


 Loading...
I N S T A L L A T I O N / O P E R A T I O N
KBD960/KBR960 Series
Desktop Intelligent
Keyboard
C1519M-E (6/06)

Contents
Regulatory Notices . . . . . . . . . . . . . . . . . . . . . . . . . . . . . . . . . . . . . . . . . . . . . . . . . . . . . . . . . . . . . . . . . . . . . . . . . . . . . . . . . . . . . . . . . . . . . . . . . . . .6
Important Safeguards and Warnings . . . . . . . . . . . . . . . . . . . . . . . . . . . . . . . . . . . . . . . . . . . . . . . . . . . . . . . . . . . . . . . . . . . . . . . . . . . . . . . . . . . . . .7
Description . . . . . . . . . . . . . . . . . . . . . . . . . . . . . . . . . . . . . . . . . . . . . . . . . . . . . . . . . . . . . . . . . . . . . . . . . . . . . . . . . . . . . . . . . . . . . . . . . . . . . . . . . .8
Models . . . . . . . . . . . . . . . . . . . . . . . . . . . . . . . . . . . . . . . . . . . . . . . . . . . . . . . . . . . . . . . . . . . . . . . . . . . . . . . . . . . . . . . . . . . . . . . . . . . . . . . . .8
Reading This Manual . . . . . . . . . . . . . . . . . . . . . . . . . . . . . . . . . . . . . . . . . . . . . . . . . . . . . . . . . . . . . . . . . . . . . . . . . . . . . . . . . . . . . . . . . . . . . .8
Keyboard Layout . . . . . . . . . . . . . . . . . . . . . . . . . . . . . . . . . . . . . . . . . . . . . . . . . . . . . . . . . . . . . . . . . . . . . . . . . . . . . . . . . . . . . . . . . . . . . . . . .9
LCD Display . . . . . . . . . . . . . . . . . . . . . . . . . . . . . . . . . . . . . . . . . . . . . . . . . . . . . . . . . . . . . . . . . . . . . . . . . . . . . . . . . . . . . . . . . . . . . . . . .9
Icon Keys . . . . . . . . . . . . . . . . . . . . . . . . . . . . . . . . . . . . . . . . . . . . . . . . . . . . . . . . . . . . . . . . . . . . . . . . . . . . . . . . . . . . . . . . . . . . . . . . . . .9
Keypad . . . . . . . . . . . . . . . . . . . . . . . . . . . . . . . . . . . . . . . . . . . . . . . . . . . . . . . . . . . . . . . . . . . . . . . . . . . . . . . . . . . . . . . . . . . . . . . . . . . .9
Function Keys . . . . . . . . . . . . . . . . . . . . . . . . . . . . . . . . . . . . . . . . . . . . . . . . . . . . . . . . . . . . . . . . . . . . . . . . . . . . . . . . . . . . . . . . . . . . . . .9
Control Keys . . . . . . . . . . . . . . . . . . . . . . . . . . . . . . . . . . . . . . . . . . . . . . . . . . . . . . . . . . . . . . . . . . . . . . . . . . . . . . . . . . . . . . . . . . . . . . .10
Lens Keys . . . . . . . . . . . . . . . . . . . . . . . . . . . . . . . . . . . . . . . . . . . . . . . . . . . . . . . . . . . . . . . . . . . . . . . . . . . . . . . . . . . . . . . . . . . . . . . . .10
Joystick . . . . . . . . . . . . . . . . . . . . . . . . . . . . . . . . . . . . . . . . . . . . . . . . . . . . . . . . . . . . . . . . . . . . . . . . . . . . . . . . . . . . . . . . . . . . . . . . . . .10
Turbo Key . . . . . . . . . . . . . . . . . . . . . . . . . . . . . . . . . . . . . . . . . . . . . . . . . . . . . . . . . . . . . . . . . . . . . . . . . . . . . . . . . . . . . . . . . . . . . . . . .10
Escape Key . . . . . . . . . . . . . . . . . . . . . . . . . . . . . . . . . . . . . . . . . . . . . . . . . . . . . . . . . . . . . . . . . . . . . . . . . . . . . . . . . . . . . . . . . . . . . . . .10
Installation . . . . . . . . . . . . . . . . . . . . . . . . . . . . . . . . . . . . . . . . . . . . . . . . . . . . . . . . . . . . . . . . . . . . . . . . . . . . . . . . . . . . . . . . . . . . . . . . . . . . . . . . .11
Connecting to the CM6800 . . . . . . . . . . . . . . . . . . . . . . . . . . . . . . . . . . . . . . . . . . . . . . . . . . . . . . . . . . . . . . . . . . . . . . . . . . . . . . . . . . . . . . . .11
Setup Mode . . . . . . . . . . . . . . . . . . . . . . . . . . . . . . . . . . . . . . . . . . . . . . . . . . . . . . . . . . . . . . . . . . . . . . . . . . . . . . . . . . . . . . . . . . . . . . . . . . . .12
Activating Setup Mode . . . . . . . . . . . . . . . . . . . . . . . . . . . . . . . . . . . . . . . . . . . . . . . . . . . . . . . . . . . . . . . . . . . . . . . . . . . . . . . . . . . . . . .12
Calibrating the Joystick . . . . . . . . . . . . . . . . . . . . . . . . . . . . . . . . . . . . . . . . . . . . . . . . . . . . . . . . . . . . . . . . . . . . . . . . . . . . . . . . . . . . . .13
Restoring Factory Default Settings . . . . . . . . . . . . . . . . . . . . . . . . . . . . . . . . . . . . . . . . . . . . . . . . . . . . . . . . . . . . . . . . . . . . . . . . . . . . . .13
Creating a Setup Pin . . . . . . . . . . . . . . . . . . . . . . . . . . . . . . . . . . . . . . . . . . . . . . . . . . . . . . . . . . . . . . . . . . . . . . . . . . . . . . . . . . . . . . . . .13
Creating a Define Pin . . . . . . . . . . . . . . . . . . . . . . . . . . . . . . . . . . . . . . . . . . . . . . . . . . . . . . . . . . . . . . . . . . . . . . . . . . . . . . . . . . . . . . . .14
Adjusting the Display Brightness . . . . . . . . . . . . . . . . . . . . . . . . . . . . . . . . . . . . . . . . . . . . . . . . . . . . . . . . . . . . . . . . . . . . . . . . . . . . . . .14
Configuring the COM Ports . . . . . . . . . . . . . . . . . . . . . . . . . . . . . . . . . . . . . . . . . . . . . . . . . . . . . . . . . . . . . . . . . . . . . . . . . . . . . . . . . . . .15
Configuring the Function Keys . . . . . . . . . . . . . . . . . . . . . . . . . . . . . . . . . . . . . . . . . . . . . . . . . . . . . . . . . . . . . . . . . . . . . . . . . . . . . . . . .16
Exiting Setup Mode . . . . . . . . . . . . . . . . . . . . . . . . . . . . . . . . . . . . . . . . . . . . . . . . . . . . . . . . . . . . . . . . . . . . . . . . . . . . . . . . . . . . . . . . .16
Operation . . . . . . . . . . . . . . . . . . . . . . . . . . . . . . . . . . . . . . . . . . . . . . . . . . . . . . . . . . . . . . . . . . . . . . . . . . . . . . . . . . . . . . . . . . . . . . . . . . . . . . . . . . |
17 |
Logging On . . . . . . . . . . . . . . . . . . . . . . . . . . . . . . . . . . . . . . . . . . . . . . . . . . . . . . . . . . . . . . . . . . . . . . . . . . . . . . . . . . . . . . . . . . . . . . . . . . . . . |
17 |
Logging Off . . . . . . . . . . . . . . . . . . . . . . . . . . . . . . . . . . . . . . . . . . . . . . . . . . . . . . . . . . . . . . . . . . . . . . . . . . . . . . . . . . . . . . . . . . . . . . . . . . . . . |
17 |
Accessing the KBD960 Menus . . . . . . . . . . . . . . . . . . . . . . . . . . . . . . . . . . . . . . . . . . . . . . . . . . . . . . . . . . . . . . . . . . . . . . . . . . . . . . . . . . . . . |
18 |
Sending/Receiving Keyboard Setups . . . . . . . . . . . . . . . . . . . . . . . . . . . . . . . . . . . . . . . . . . . . . . . . . . . . . . . . . . . . . . . . . . . . . . . . . . . . |
29 |
Accessing the CM6800 Main Programming Menu . . . . . . . . . . . . . . . . . . . . . . . . . . . . . . . . . . . . . . . . . . . . . . . . . . . . . . . . . . . . . . . . . . . . . . |
30 |
Diagnostic Mode . . . . . . . . . . . . . . . . . . . . . . . . . . . . . . . . . . . . . . . . . . . . . . . . . . . . . . . . . . . . . . . . . . . . . . . . . . . . . . . . . . . . . . . . . . . . . . . . |
30 |
Testing the Display . . . . . . . . . . . . . . . . . . . . . . . . . . . . . . . . . . . . . . . . . . . . . . . . . . . . . . . . . . . . . . . . . . . . . . . . . . . . . . . . . . . . . . . . . . |
31 |
Testing the Keyboard . . . . . . . . . . . . . . . . . . . . . . . . . . . . . . . . . . . . . . . . . . . . . . . . . . . . . . . . . . . . . . . . . . . . . . . . . . . . . . . . . . . . . . . . |
31 |
Testing the Serial Ports . . . . . . . . . . . . . . . . . . . . . . . . . . . . . . . . . . . . . . . . . . . . . . . . . . . . . . . . . . . . . . . . . . . . . . . . . . . . . . . . . . . . . . |
32 |
Testing the Dip Switches . . . . . . . . . . . . . . . . . . . . . . . . . . . . . . . . . . . . . . . . . . . . . . . . . . . . . . . . . . . . . . . . . . . . . . . . . . . . . . . . . . . . . |
32 |
Selecting Monitors . . . . . . . . . . . . . . . . . . . . . . . . . . . . . . . . . . . . . . . . . . . . . . . . . . . . . . . . . . . . . . . . . . . . . . . . . . . . . . . . . . . . . . . . . . . . . . |
32 |
Main Menu 1 . . . . . . . . . . . . . . . . . . . . . . . . . . . . . . . . . . . . . . . . . . . . . . . . . . . . . . . . . . . . . . . . . . . . . . . . . . . . . . . . . . . . . . . . . . . . . . |
32 |
Monitor Menu . . . . . . . . . . . . . . . . . . . . . . . . . . . . . . . . . . . . . . . . . . . . . . . . . . . . . . . . . . . . . . . . . . . . . . . . . . . . . . . . . . . . . . . . . . . . . . |
32 |
Function Key . . . . . . . . . . . . . . . . . . . . . . . . . . . . . . . . . . . . . . . . . . . . . . . . . . . . . . . . . . . . . . . . . . . . . . . . . . . . . . . . . . . . . . . . . . . . . . . |
33 |
Selecting Cameras . . . . . . . . . . . . . . . . . . . . . . . . . . . . . . . . . . . . . . . . . . . . . . . . . . . . . . . . . . . . . . . . . . . . . . . . . . . . . . . . . . . . . . . . . . . . . . . |
33 |
Main Menu 1 . . . . . . . . . . . . . . . . . . . . . . . . . . . . . . . . . . . . . . . . . . . . . . . . . . . . . . . . . . . . . . . . . . . . . . . . . . . . . . . . . . . . . . . . . . . . . . |
33 |
Camera Menu . . . . . . . . . . . . . . . . . . . . . . . . . . . . . . . . . . . . . . . . . . . . . . . . . . . . . . . . . . . . . . . . . . . . . . . . . . . . . . . . . . . . . . . . . . . . . . |
33 |
Function Key . . . . . . . . . . . . . . . . . . . . . . . . . . . . . . . . . . . . . . . . . . . . . . . . . . . . . . . . . . . . . . . . . . . . . . . . . . . . . . . . . . . . . . . . . . . . . . . |
33 |
Operating PTZ Cameras . . . . . . . . . . . . . . . . . . . . . . . . . . . . . . . . . . . . . . . . . . . . . . . . . . . . . . . . . . . . . . . . . . . . . . . . . . . . . . . . . . . . . . . . . . . |
33 |
Advanced Operation . . . . . . . . . . . . . . . . . . . . . . . . . . . . . . . . . . . . . . . . . . . . . . . . . . . . . . . . . . . . . . . . . . . . . . . . . . . . . . . . . . . . . . . . . . . . . . . . . .34
Presets . . . . . . . . . . . . . . . . . . . . . . . . . . . . . . . . . . . . . . . . . . . . . . . . . . . . . . . . . . . . . . . . . . . . . . . . . . . . . . . . . . . . . . . . . . . . . . . . . . . . . . . .34
Creating Presets . . . . . . . . . . . . . . . . . . . . . . . . . . . . . . . . . . . . . . . . . . . . . . . . . . . . . . . . . . . . . . . . . . . . . . . . . . . . . . . . . . . . . . . . . . . .34
Recalling Presets . . . . . . . . . . . . . . . . . . . . . . . . . . . . . . . . . . . . . . . . . . . . . . . . . . . . . . . . . . . . . . . . . . . . . . . . . . . . . . . . . . . . . . . . . . .34
Deleting Presets . . . . . . . . . . . . . . . . . . . . . . . . . . . . . . . . . . . . . . . . . . . . . . . . . . . . . . . . . . . . . . . . . . . . . . . . . . . . . . . . . . . . . . . . . . . .34
Patterns . . . . . . . . . . . . . . . . . . . . . . . . . . . . . . . . . . . . . . . . . . . . . . . . . . . . . . . . . . . . . . . . . . . . . . . . . . . . . . . . . . . . . . . . . . . . . . . . . . . . . . .35
Creating Patterns . . . . . . . . . . . . . . . . . . . . . . . . . . . . . . . . . . . . . . . . . . . . . . . . . . . . . . . . . . . . . . . . . . . . . . . . . . . . . . . . . . . . . . . . . . .35
C1519M-E (6/06) |
3 |
Pattern Length . . . . . . . . . . . . . . . . . . . . . . . . . . . . . . . . . . . . . . . . . . . . . . . . . . . . . . . . . . . . . . . . . . . . . . . . . . . . . . . . . . . . . . . . . . . . . .36 Starting Patterns . . . . . . . . . . . . . . . . . . . . . . . . . . . . . . . . . . . . . . . . . . . . . . . . . . . . . . . . . . . . . . . . . . . . . . . . . . . . . . . . . . . . . . . . . . . .36 Stopping Patterns . . . . . . . . . . . . . . . . . . . . . . . . . . . . . . . . . . . . . . . . . . . . . . . . . . . . . . . . . . . . . . . . . . . . . . . . . . . . . . . . . . . . . . . . . . .36 Zones . . . . . . . . . . . . . . . . . . . . . . . . . . . . . . . . . . . . . . . . . . . . . . . . . . . . . . . . . . . . . . . . . . . . . . . . . . . . . . . . . . . . . . . . . . . . . . . . . . . . . . . . .37 Rules to Follow When Creating Zones . . . . . . . . . . . . . . . . . . . . . . . . . . . . . . . . . . . . . . . . . . . . . . . . . . . . . . . . . . . . . . . . . . . . . . . . . . .37 Creating Zones . . . . . . . . . . . . . . . . . . . . . . . . . . . . . . . . . . . . . . . . . . . . . . . . . . . . . . . . . . . . . . . . . . . . . . . . . . . . . . . . . . . . . . . . . . . . .37 Partial Zone Overlap . . . . . . . . . . . . . . . . . . . . . . . . . . . . . . . . . . . . . . . . . . . . . . . . . . . . . . . . . . . . . . . . . . . . . . . . . . . . . . . . . . . . . . . . .38 Embedded Zones . . . . . . . . . . . . . . . . . . . . . . . . . . . . . . . . . . . . . . . . . . . . . . . . . . . . . . . . . . . . . . . . . . . . . . . . . . . . . . . . . . . . . . . . . . . .39 Turning Zones On and Off . . . . . . . . . . . . . . . . . . . . . . . . . . . . . . . . . . . . . . . . . . . . . . . . . . . . . . . . . . . . . . . . . . . . . . . . . . . . . . . . . . . . .39 Erasing Zones . . . . . . . . . . . . . . . . . . . . . . . . . . . . . . . . . . . . . . . . . . . . . . . . . . . . . . . . . . . . . . . . . . . . . . . . . . . . . . . . . . . . . . . . . . . . . .39 Macros . . . . . . . . . . . . . . . . . . . . . . . . . . . . . . . . . . . . . . . . . . . . . . . . . . . . . . . . . . . . . . . . . . . . . . . . . . . . . . . . . . . . . . . . . . . . . . . . . . . . . . . .40 Starting Macros . . . . . . . . . . . . . . . . . . . . . . . . . . . . . . . . . . . . . . . . . . . . . . . . . . . . . . . . . . . . . . . . . . . . . . . . . . . . . . . . . . . . . . . . . . . .40 Stopping Macros . . . . . . . . . . . . . . . . . . . . . . . . . . . . . . . . . . . . . . . . . . . . . . . . . . . . . . . . . . . . . . . . . . . . . . . . . . . . . . . . . . . . . . . . . . . .40 Pausing Macros . . . . . . . . . . . . . . . . . . . . . . . . . . . . . . . . . . . . . . . . . . . . . . . . . . . . . . . . . . . . . . . . . . . . . . . . . . . . . . . . . . . . . . . . . . . .41 Sequence . . . . . . . . . . . . . . . . . . . . . . . . . . . . . . . . . . . . . . . . . . . . . . . . . . . . . . . . . . . . . . . . . . . . . . . . . . . . . . . . . . . . . . . . . . . . . . . . . . . . . .41 Starting Sequences . . . . . . . . . . . . . . . . . . . . . . . . . . . . . . . . . . . . . . . . . . . . . . . . . . . . . . . . . . . . . . . . . . . . . . . . . . . . . . . . . . . . . . . . . .41 Stopping Sequences . . . . . . . . . . . . . . . . . . . . . . . . . . . . . . . . . . . . . . . . . . . . . . . . . . . . . . . . . . . . . . . . . . . . . . . . . . . . . . . . . . . . . . . . .41 Pausing Sequences . . . . . . . . . . . . . . . . . . . . . . . . . . . . . . . . . . . . . . . . . . . . . . . . . . . . . . . . . . . . . . . . . . . . . . . . . . . . . . . . . . . . . . . . . .42 Operating Relays . . . . . . . . . . . . . . . . . . . . . . . . . . . . . . . . . . . . . . . . . . . . . . . . . . . . . . . . . . . . . . . . . . . . . . . . . . . . . . . . . . . . . . . . . . . . . . . .42 Activating Relays Using F12 . . . . . . . . . . . . . . . . . . . . . . . . . . . . . . . . . . . . . . . . . . . . . . . . . . . . . . . . . . . . . . . . . . . . . . . . . . . . . . . . . . .42 Activating Relays from the GPI Menus . . . . . . . . . . . . . . . . . . . . . . . . . . . . . . . . . . . . . . . . . . . . . . . . . . . . . . . . . . . . . . . . . . . . . . . . . . .42 Multiplexer Control . . . . . . . . . . . . . . . . . . . . . . . . . . . . . . . . . . . . . . . . . . . . . . . . . . . . . . . . . . . . . . . . . . . . . . . . . . . . . . . . . . . . . . . . . . . . . .44 Video Loss . . . . . . . . . . . . . . . . . . . . . . . . . . . . . . . . . . . . . . . . . . . . . . . . . . . . . . . . . . . . . . . . . . . . . . . . . . . . . . . . . . . . . . . . . . . . . . . . . . . . .45 Alarms . . . . . . . . . . . . . . . . . . . . . . . . . . . . . . . . . . . . . . . . . . . . . . . . . . . . . . . . . . . . . . . . . . . . . . . . . . . . . . . . . . . . . . . . . . . . . . . . . . . . . . . .45 Resetting Triggered Alarms . . . . . . . . . . . . . . . . . . . . . . . . . . . . . . . . . . . . . . . . . . . . . . . . . . . . . . . . . . . . . . . . . . . . . . . . . . . . . . . . . . .45
Appendix . . . . . . . . . . . . . . . . . . . . . . . . . . . . . . . . . . . . . . . . . . . . . . . . . . . . . . . . . . . . . . . . . . . . . . . . . . . . . . . . . . . . . . . . . . . . . . . . . . . . . . . . . . .46
Specifications . . . . . . . . . . . . . . . . . . . . . . . . . . . . . . . . . . . . . . . . . . . . . . . . . . . . . . . . . . . . . . . . . . . . . . . . . . . . . . . . . . . . . . . . . . . . . . . . . . . . . . .50
List of Tables
A Function Key Defaults . . . . . . . . . . . . . . . . . . . . . . . . . . . . . . . . . . . . . . . . . . . . . . . . . . . . . . . . . . . . . . . . . . . . . . . . . . . . . . . . . . . . . . . . . .16
B Main Menu 1 . . . . . . . . . . . . . . . . . . . . . . . . . . . . . . . . . . . . . . . . . . . . . . . . . . . . . . . . . . . . . . . . . . . . . . . . . . . . . . . . . . . . . . . . . . . . . . . . .18
C Main Menu 2 . . . . . . . . . . . . . . . . . . . . . . . . . . . . . . . . . . . . . . . . . . . . . . . . . . . . . . . . . . . . . . . . . . . . . . . . . . . . . . . . . . . . . . . . . . . . . . . . .19
D Monitor Menu . . . . . . . . . . . . . . . . . . . . . . . . . . . . . . . . . . . . . . . . . . . . . . . . . . . . . . . . . . . . . . . . . . . . . . . . . . . . . . . . . . . . . . . . . . . . . . . .19
E Camera Menu 1 . . . . . . . . . . . . . . . . . . . . . . . . . . . . . . . . . . . . . . . . . . . . . . . . . . . . . . . . . . . . . . . . . . . . . . . . . . . . . . . . . . . . . . . . . . . . . . .20
F Camera Menu 2 . . . . . . . . . . . . . . . . . . . . . . . . . . . . . . . . . . . . . . . . . . . . . . . . . . . . . . . . . . . . . . . . . . . . . . . . . . . . . . . . . . . . . . . . . . . . . . .20
G MUX Menu 1 . . . . . . . . . . . . . . . . . . . . . . . . . . . . . . . . . . . . . . . . . . . . . . . . . . . . . . . . . . . . . . . . . . . . . . . . . . . . . . . . . . . . . . . . . . . . . . . . .21
H MUX Menu 2 . . . . . . . . . . . . . . . . . . . . . . . . . . . . . . . . . . . . . . . . . . . . . . . . . . . . . . . . . . . . . . . . . . . . . . . . . . . . . . . . . . . . . . . . . . . . . . . . .22
I Alarm Menu . . . . . . . . . . . . . . . . . . . . . . . . . . . . . . . . . . . . . . . . . . . . . . . . . . . . . . . . . . . . . . . . . . . . . . . . . . . . . . . . . . . . . . . . . . . . . . . . . .22
J GPI Menu 1 . . . . . . . . . . . . . . . . . . . . . . . . . . . . . . . . . . . . . . . . . . . . . . . . . . . . . . . . . . . . . . . . . . . . . . . . . . . . . . . . . . . . . . . . . . . . . . . . . . .23
K GPI Menu 2 . . . . . . . . . . . . . . . . . . . . . . . . . . . . . . . . . . . . . . . . . . . . . . . . . . . . . . . . . . . . . . . . . . . . . . . . . . . . . . . . . . . . . . . . . . . . . . . . . . .24
L Preset Menu . . . . . . . . . . . . . . . . . . . . . . . . . . . . . . . . . . . . . . . . . . . . . . . . . . . . . . . . . . . . . . . . . . . . . . . . . . . . . . . . . . . . . . . . . . . . . . . . . .24
M Macro Menu . . . . . . . . . . . . . . . . . . . . . . . . . . . . . . . . . . . . . . . . . . . . . . . . . . . . . . . . . . . . . . . . . . . . . . . . . . . . . . . . . . . . . . . . . . . . . . . . . .25
N Sequence Menu . . . . . . . . . . . . . . . . . . . . . . . . . . . . . . . . . . . . . . . . . . . . . . . . . . . . . . . . . . . . . . . . . . . . . . . . . . . . . . . . . . . . . . . . . . . . . . .25
O Define Menu 1 . . . . . . . . . . . . . . . . . . . . . . . . . . . . . . . . . . . . . . . . . . . . . . . . . . . . . . . . . . . . . . . . . . . . . . . . . . . . . . . . . . . . . . . . . . . . . . . .26
P Define Menu 2 . . . . . . . . . . . . . . . . . . . . . . . . . . . . . . . . . . . . . . . . . . . . . . . . . . . . . . . . . . . . . . . . . . . . . . . . . . . . . . . . . . . . . . . . . . . . . . . .26
Q Define Preset Menu . . . . . . . . . . . . . . . . . . . . . . . . . . . . . . . . . . . . . . . . . . . . . . . . . . . . . . . . . . . . . . . . . . . . . . . . . . . . . . . . . . . . . . . . . . . .27
R Define Zone Menu . . . . . . . . . . . . . . . . . . . . . . . . . . . . . . . . . . . . . . . . . . . . . . . . . . . . . . . . . . . . . . . . . . . . . . . . . . . . . . . . . . . . . . . . . . . . .27
S Setup LCD Menu . . . . . . . . . . . . . . . . . . . . . . . . . . . . . . . . . . . . . . . . . . . . . . . . . . . . . . . . . . . . . . . . . . . . . . . . . . . . . . . . . . . . . . . . . . . . . .28
T Programming Menu . . . . . . . . . . . . . . . . . . . . . . . . . . . . . . . . . . . . . . . . . . . . . . . . . . . . . . . . . . . . . . . . . . . . . . . . . . . . . . . . . . . . . . . . . . . .28
U Database Menu . . . . . . . . . . . . . . . . . . . . . . . . . . . . . . . . . . . . . . . . . . . . . . . . . . . . . . . . . . . . . . . . . . . . . . . . . . . . . . . . . . . . . . . . . . . . . . .29
V Esprit Programming Menu . . . . . . . . . . . . . . . . . . . . . . . . . . . . . . . . . . . . . . . . . . . . . . . . . . . . . . . . . . . . . . . . . . . . . . . . . . . . . . . . . . . . . . .36
W Relay Unit . . . . . . . . . . . . . . . . . . . . . . . . . . . . . . . . . . . . . . . . . . . . . . . . . . . . . . . . . . . . . . . . . . . . . . . . . . . . . . . . . . . . . . . . . . . . . . . . . . . .43
X Relay Unit 2 . . . . . . . . . . . . . . . . . . . . . . . . . . . . . . . . . . . . . . . . . . . . . . . . . . . . . . . . . . . . . . . . . . . . . . . . . . . . . . . . . . . . . . . . . . . . . . . . . .43
Y Triggered Alarm Functions . . . . . . . . . . . . . . . . . . . . . . . . . . . . . . . . . . . . . . . . . . . . . . . . . . . . . . . . . . . . . . . . . . . . . . . . . . . . . . . . . . . . . . .45
4 |
C1519M-E (6/06) |
List of Illustrations |
|
|
1 |
KBD960/KBR960. . . . . . . . . . . . . . . . . . . . . . . . . . . . . . . . . . . . . . . . . . . . . . . . . . . . . . . . . . . . . . . . . . . . . . . . . . . . . . . . . . . . . . . . . . . . . . . |
.9 |
2 |
Connecting to the CM6800 . . . . . . . . . . . . . . . . . . . . . . . . . . . . . . . . . . . . . . . . . . . . . . . . . . . . . . . . . . . . . . . . . . . . . . . . . . . . . . . . . . . . . . |
11 |
3 |
Enter Setup PIN . . . . . . . . . . . . . . . . . . . . . . . . . . . . . . . . . . . . . . . . . . . . . . . . . . . . . . . . . . . . . . . . . . . . . . . . . . . . . . . . . . . . . . . . . . . . . . . |
12 |
4 |
Setup Mode . . . . . . . . . . . . . . . . . . . . . . . . . . . . . . . . . . . . . . . . . . . . . . . . . . . . . . . . . . . . . . . . . . . . . . . . . . . . . . . . . . . . . . . . . . . . . . . . . . |
12 |
5 |
Joystick Setup . . . . . . . . . . . . . . . . . . . . . . . . . . . . . . . . . . . . . . . . . . . . . . . . . . . . . . . . . . . . . . . . . . . . . . . . . . . . . . . . . . . . . . . . . . . . . . . . |
13 |
6 |
Advance Setup 2 . . . . . . . . . . . . . . . . . . . . . . . . . . . . . . . . . . . . . . . . . . . . . . . . . . . . . . . . . . . . . . . . . . . . . . . . . . . . . . . . . . . . . . . . . . . . . . |
13 |
7 |
LCD Brightness Setup. . . . . . . . . . . . . . . . . . . . . . . . . . . . . . . . . . . . . . . . . . . . . . . . . . . . . . . . . . . . . . . . . . . . . . . . . . . . . . . . . . . . . . . . . . . |
14 |
8 |
Advance Setup 1 . . . . . . . . . . . . . . . . . . . . . . . . . . . . . . . . . . . . . . . . . . . . . . . . . . . . . . . . . . . . . . . . . . . . . . . . . . . . . . . . . . . . . . . . . . . . . . |
15 |
9 |
Key Define Mode . . . . . . . . . . . . . . . . . . . . . . . . . . . . . . . . . . . . . . . . . . . . . . . . . . . . . . . . . . . . . . . . . . . . . . . . . . . . . . . . . . . . . . . . . . . . . . |
16 |
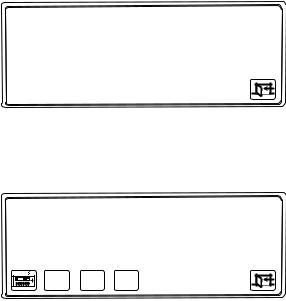
10 |
Logon Screen . . . . . . . . . . . . . . . . . . . . . . . . . . . . . . . . . . . . . . . . . . . . . . . . . . . . . . . . . . . . . . . . . . . . . . . . . . . . . . . . . . . . . . . . . . . . . . . . . |
17 |
11 |
Logoff Screen . . . . . . . . . . . . . . . . . . . . . . . . . . . . . . . . . . . . . . . . . . . . . . . . . . . . . . . . . . . . . . . . . . . . . . . . . . . . . . . . . . . . . . . . . . . . . . . . . |
17 |
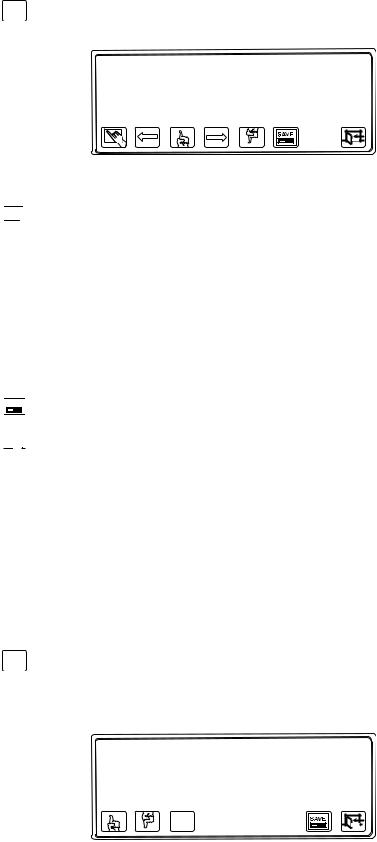
12 |
Main Menu 1 . . . . . . . . . . . . . . . . . . . . . . . . . . . . . . . . . . . . . . . . . . . . . . . . . . . . . . . . . . . . . . . . . . . . . . . . . . . . . . . . . . . . . . . . . . . . . . . . . |
18 |
13 |
Main Menu 2 . . . . . . . . . . . . . . . . . . . . . . . . . . . . . . . . . . . . . . . . . . . . . . . . . . . . . . . . . . . . . . . . . . . . . . . . . . . . . . . . . . . . . . . . . . . . . . . . . |
18 |
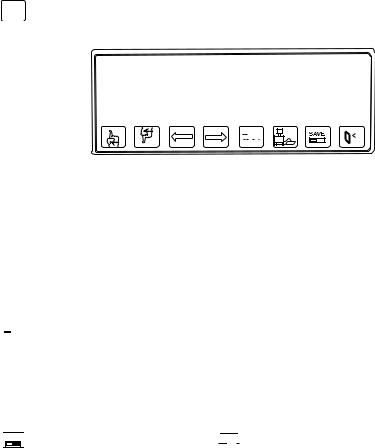
14 |
Monitor Menu . . . . . . . . . . . . . . . . . . . . . . . . . . . . . . . . . . . . . . . . . . . . . . . . . . . . . . . . . . . . . . . . . . . . . . . . . . . . . . . . . . . . . . . . . . . . . . . . |
19 |
15 |
Camera Menu 1 . . . . . . . . . . . . . . . . . . . . . . . . . . . . . . . . . . . . . . . . . . . . . . . . . . . . . . . . . . . . . . . . . . . . . . . . . . . . . . . . . . . . . . . . . . . . . . . |
19 |
16 |
Camera Menu 2 . . . . . . . . . . . . . . . . . . . . . . . . . . . . . . . . . . . . . . . . . . . . . . . . . . . . . . . . . . . . . . . . . . . . . . . . . . . . . . . . . . . . . . . . . . . . . . . |
20 |
17 |
MUX Menu 1 . . . . . . . . . . . . . . . . . . . . . . . . . . . . . . . . . . . . . . . . . . . . . . . . . . . . . . . . . . . . . . . . . . . . . . . . . . . . . . . . . . . . . . . . . . . . . . . . . |
21 |
18 |
MUX Menu 2 . . . . . . . . . . . . . . . . . . . . . . . . . . . . . . . . . . . . . . . . . . . . . . . . . . . . . . . . . . . . . . . . . . . . . . . . . . . . . . . . . . . . . . . . . . . . . . . . . |
21 |
19 |
Alarm Menu . . . . . . . . . . . . . . . . . . . . . . . . . . . . . . . . . . . . . . . . . . . . . . . . . . . . . . . . . . . . . . . . . . . . . . . . . . . . . . . . . . . . . . . . . . . . . . . . . . |
22 |
20 |
GPI Menu 1 . . . . . . . . . . . . . . . . . . . . . . . . . . . . . . . . . . . . . . . . . . . . . . . . . . . . . . . . . . . . . . . . . . . . . . . . . . . . . . . . . . . . . . . . . . . . . . . . . . . |
22 |
21 |
GPI Menu 2 . . . . . . . . . . . . . . . . . . . . . . . . . . . . . . . . . . . . . . . . . . . . . . . . . . . . . . . . . . . . . . . . . . . . . . . . . . . . . . . . . . . . . . . . . . . . . . . . . . . |
23 |
22 |
Preset Menu . . . . . . . . . . . . . . . . . . . . . . . . . . . . . . . . . . . . . . . . . . . . . . . . . . . . . . . . . . . . . . . . . . . . . . . . . . . . . . . . . . . . . . . . . . . . . . . . . . |
24 |
23 |
Macro Menu . . . . . . . . . . . . . . . . . . . . . . . . . . . . . . . . . . . . . . . . . . . . . . . . . . . . . . . . . . . . . . . . . . . . . . . . . . . . . . . . . . . . . . . . . . . . . . . . . . |
24 |
24 |
Sequence Menu . . . . . . . . . . . . . . . . . . . . . . . . . . . . . . . . . . . . . . . . . . . . . . . . . . . . . . . . . . . . . . . . . . . . . . . . . . . . . . . . . . . . . . . . . . . . . . . |
25 |
25 |
Define Menu 1 . . . . . . . . . . . . . . . . . . . . . . . . . . . . . . . . . . . . . . . . . . . . . . . . . . . . . . . . . . . . . . . . . . . . . . . . . . . . . . . . . . . . . . . . . . . . . . . . |
26 |
26 |
Define Menu 2 . . . . . . . . . . . . . . . . . . . . . . . . . . . . . . . . . . . . . . . . . . . . . . . . . . . . . . . . . . . . . . . . . . . . . . . . . . . . . . . . . . . . . . . . . . . . . . . . |
26 |
27 |
Define Preset Menu . . . . . . . . . . . . . . . . . . . . . . . . . . . . . . . . . . . . . . . . . . . . . . . . . . . . . . . . . . . . . . . . . . . . . . . . . . . . . . . . . . . . . . . . . . . . |
27 |
28 |
Define Zone Menu . . . . . . . . . . . . . . . . . . . . . . . . . . . . . . . . . . . . . . . . . . . . . . . . . . . . . . . . . . . . . . . . . . . . . . . . . . . . . . . . . . . . . . . . . . . . . |
27 |
29 |
Setup LCD Menu . . . . . . . . . . . . . . . . . . . . . . . . . . . . . . . . . . . . . . . . . . . . . . . . . . . . . . . . . . . . . . . . . . . . . . . . . . . . . . . . . . . . . . . . . . . . . . |
27 |
30 |
Programming Menu . . . . . . . . . . . . . . . . . . . . . . . . . . . . . . . . . . . . . . . . . . . . . . . . . . . . . . . . . . . . . . . . . . . . . . . . . . . . . . . . . . . . . . . . . . . . |
28 |
31 |
Database Menu . . . . . . . . . . . . . . . . . . . . . . . . . . . . . . . . . . . . . . . . . . . . . . . . . . . . . . . . . . . . . . . . . . . . . . . . . . . . . . . . . . . . . . . . . . . . . . . |
28 |
32 |
Password Screen . . . . . . . . . . . . . . . . . . . . . . . . . . . . . . . . . . . . . . . . . . . . . . . . . . . . . . . . . . . . . . . . . . . . . . . . . . . . . . . . . . . . . . . . . . . . . . |
30 |
33 |
Main Programming Menu . . . . . . . . . . . . . . . . . . . . . . . . . . . . . . . . . . . . . . . . . . . . . . . . . . . . . . . . . . . . . . . . . . . . . . . . . . . . . . . . . . . . . . . |
30 |
34 |
Diagnostic Mode Menu . . . . . . . . . . . . . . . . . . . . . . . . . . . . . . . . . . . . . . . . . . . . . . . . . . . . . . . . . . . . . . . . . . . . . . . . . . . . . . . . . . . . . . . . . |
30 |
35 |
LCD Test . . . . . . . . . . . . . . . . . . . . . . . . . . . . . . . . . . . . . . . . . . . . . . . . . . . . . . . . . . . . . . . . . . . . . . . . . . . . . . . . . . . . . . . . . . . . . . . . . . . . . |
31 |
36 |
Keyboard Test . . . . . . . . . . . . . . . . . . . . . . . . . . . . . . . . . . . . . . . . . . . . . . . . . . . . . . . . . . . . . . . . . . . . . . . . . . . . . . . . . . . . . . . . . . . . . . . . . |
31 |
37 |
SIO Test . . . . . . . . . . . . . . . . . . . . . . . . . . . . . . . . . . . . . . . . . . . . . . . . . . . . . . . . . . . . . . . . . . . . . . . . . . . . . . . . . . . . . . . . . . . . . . . . . . . . . |
32 |
38 |
DIP Switch Test . . . . . . . . . . . . . . . . . . . . . . . . . . . . . . . . . . . . . . . . . . . . . . . . . . . . . . . . . . . . . . . . . . . . . . . . . . . . . . . . . . . . . . . . . . . . . . . |
32 |
39 |
Pattern Definitions . . . . . . . . . . . . . . . . . . . . . . . . . . . . . . . . . . . . . . . . . . . . . . . . . . . . . . . . . . . . . . . . . . . . . . . . . . . . . . . . . . . . . . . . . . . . . |
35 |
40 |
Basic Zone Creation . . . . . . . . . . . . . . . . . . . . . . . . . . . . . . . . . . . . . . . . . . . . . . . . . . . . . . . . . . . . . . . . . . . . . . . . . . . . . . . . . . . . . . . . . . . . |
38 |
41 |
Partial Zone Overlap . . . . . . . . . . . . . . . . . . . . . . . . . . . . . . . . . . . . . . . . . . . . . . . . . . . . . . . . . . . . . . . . . . . . . . . . . . . . . . . . . . . . . . . . . . . . |
38 |
42 |
Embedded Zones . . . . . . . . . . . . . . . . . . . . . . . . . . . . . . . . . . . . . . . . . . . . . . . . . . . . . . . . . . . . . . . . . . . . . . . . . . . . . . . . . . . . . . . . . . . . . . |
39 |
43 |
MUX Control Menu . . . . . . . . . . . . . . . . . . . . . . . . . . . . . . . . . . . . . . . . . . . . . . . . . . . . . . . . . . . . . . . . . . . . . . . . . . . . . . . . . . . . . . . . . . . . |
44 |
44 |
Icons Legend. . . . . . . . . . . . . . . . . . . . . . . . . . . . . . . . . . . . . . . . . . . . . . . . . . . . . . . . . . . . . . . . . . . . . . . . . . . . . . . . . . . . . . . . . . . . . . . . . . |
46 |
45 |
Setup Mode Menu Tree (DIP Switch 2 ON) . . . . . . . . . . . . . . . . . . . . . . . . . . . . . . . . . . . . . . . . . . . . . . . . . . . . . . . . . . . . . . . . . . . . . . . . . . |
47 |
46 |
Diagnostic Mode Menu Tree (DIP Switch 1 ON) . . . . . . . . . . . . . . . . . . . . . . . . . . . . . . . . . . . . . . . . . . . . . . . . . . . . . . . . . . . . . . . . . . . . . . |
48 |
47 |
Operation Mode Menu Tree (DIP Switch 2 OFF) . . . . . . . . . . . . . . . . . . . . . . . . . . . . . . . . . . . . . . . . . . . . . . . . . . . . . . . . . . . . . . . . . . . . . . |
49 |
C1519M-E (6/06) |
5 |

Regulatory Notices
This device complies with Part 15 of the FCC Rules. Operation is subject to the following two conditions: (1) this device may not cause harmful interference, and (2) this device must accept any interference received, including interference that may cause undesired operation.
RADIO AND TELEVISION INTERFERENCE
This equipment has been tested and found to comply with the limits of a Class B digital device, pursuant to Part 15 of the FCC Rules. These limits are designed to provide reasonable protection against harmful interference in a residential installation. This equipment generates, uses, and can radiate radio frequency energy and, if not installed and used in accordance with the instructions, may cause harmful interference to radio communications. However there is no guarantee that the interference will not occur in a particular installation. If this equipment does cause harmful interference to radio or television reception, which can be determined by turning the equipment off and on, the user is encouraged to try to correct the interference by one or more of the following measures:
•Reorient or relocate the receiving antenna.
•Increase the separation between the equipment and the receiver.
•Connect the equipment into an outlet on a circuit different from that to which the receiver is connected.
•Consult the dealer or an experienced radio/TV technician for help.
You may also find helpful the following booklet, prepared by the FCC: “How to Identify and Resolve Radio-TV Interference Problems.” This booklet is available from the U.S. Government Printing Office, Washington D.C. 20402.
Changes and modifications not expressly approved by the manufacturer or registrant of this equipment can void your authority to operate this equipment under Federal Communications Commission’s rules.
In order to maintain compliance with FCC regulations, shielded cables must be used with this equipment. Operation with non-approved equipment or unshielded cables is likely to result in interference to radio and television reception.
This Class B digital apparatus complies with Canadian ICES-003.
Cet appareil numérique de la classe B est conforme à la norme NMB-003 du Canada.
6 |
C1519M-E (6/06) |

Important Safeguards and Warnings
1.Read, keep, and follow these instructions.
2.Heed all warnings.
3.There are no user-serviceable parts inside this unit. Only authorized service personnel may open the unit.
4.Installation and servicing should only be done by qualified service personnel and conform to all local codes.
5.WARNING: To reduce the risk of fire or electric shock, do not expose this unit to rain or moisture if this unit is designed for indoor use only.
6.Unless this unit is specifically marked as a NEMA Type 3, 3R, 3S, 4, 4X, 6, or 6P enclosure, it is designed for indoor use only and it must not be installed where exposed to rain or moisture.
7.Do not expose this unit to dripping or splashing. Do not place objects filled with liquids, such as vases, on this unit.
8.Do not block any ventilation openings. Install in accordance with the manufacturer’s instructions.
9.The installation method and materials should be capable of supporting four times the weight of the unit and equipment.
10.Do not install near any heat source.
11.Only use attachments/accessories specified by the manufacturer.
12.Clean only with dry cloth.
13.Do not defeat the safety purpose of the polarized or grounding-type plug.
14.Protect the power cord from being walked on or pinched, particularly at plugs, convenience receptacles, and the point where they exit from the unit.
15.Unplug this unit during lightning storms or when unused for long periods of time.
16.A CCC-approved power cord must be used to power this equipment when used in China.
This symbol indicates that dangerous voltage constituting a risk of electric shock is present within this unit.
This symbol indicates that there are important operating and maintenance instructions in the literature accompanying this unit.
CAUTION:
RISK OF ELECTRIC SHOCK.
DO NOT OPEN.
Please thoroughly familiarize yourself with the information in this manual prior to installation and operation.
FOR QUALIFIED SERVICE PERSONNEL ONLY
1.Use only replacement parts recommended by Pelco.
2.After replacement/repair of this unit’s electrical components, conduct a resistance measurement between line and exposed parts to verify the exposed parts have not been connected to line circuitry.
C1519M-E (6/06) |
7 |

Description
The KBD960/KBR960 Keyboard includes Pelco’s proprietary M protocol, allowing it to be used with all M devices, such as Pelco’s latest matrix switch – the CM6800. You can program the keyboard, and you can create and execute macros. You have access to effective monitoring procedures for any CCTV application.
You can assign simple or complex functions to many of the keys. This allows you to configure the keyboard to suit a specific monitoring environment. Some of the keyboard features include the following:
•User-friendly, icon-driven design
•Select and monitor any connected camera or video input
•Control pan and tilt functions for cameras and configured receivers
•Control camera iris (zoom and focus) for configured equipment
•Control camera auxiliary functions for configured equipment
•Control peripheral devices, such as video printers, frame stores, and video multiplexers
•Select macros to execute complex procedures
•Store and recall camera presets for equipment with preset capabilities
•Download function key configurations to and from other keyboards
MODELS
KBD960-US |
Programmable keyboard; 100-240 VAC, 50/60 Hz; comes with US-320-C5 power cord |
KBD960-UK |
Same as KBD960-US except for use in the United Kingdom with UK-320-C5 power cord |
KBD960-AU |
Same as KBD960-US except for use in Australia with AU-320-C5 power cord |
KBD960-EU |
Same as KBD960-US except for use in Europe with EU-320-C5 power cord |
KBR960-US |
Same as KBD960-US plus rack mountable |
KBR960-UK |
Same as KBD960-UK plus rack mountable |
KBR960-AU |
Same as KBD960-AU plus rack mountable |
KBR960-EU |
Same as KBD960-EU plus rack mountable |
READING THIS MANUAL
Each icon key corresponds to an icon on the LCD display. Each icon represents a function.
You will be instructed to “Select [icon]” when reading this manual. Press the icon key that corresponds to the icon on the LCD.
The functions of the KBR960 are the same as the KBD960. The only difference is that the KBR960 models can be mounted onto a rack. Any reference in this manual to the KBD960 also applies to the KBR960 models.
You will read references to the CM6800. However, the M protocol allows this keyboard to be used with other M devices.
8 |
C1519M-E (6/06) |
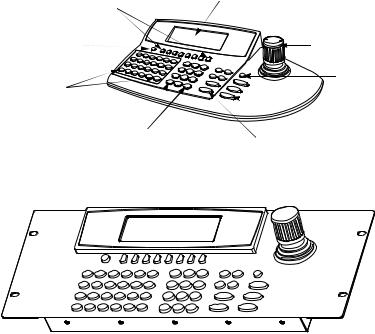
KEYBOARD LAYOUT
The KBD960 keyboard consists of the following:
LCD Display
Icon Keys |
|
|
|
|
|
||
|
|
|
|
Keypad |
|
|
|
Function Keys |
|
|
|
|
|
|
|
Control Keys |
|
|
|
Lens Keys |
|
|
|
|
|
|
|
Joystick |
|
|
|
|
|
|
|
Turbo Key |
|
|
|
|
|
||
|
|
|
|
Escape Key |
|
|
00891 |
|
|
KBD960 |
KBR960
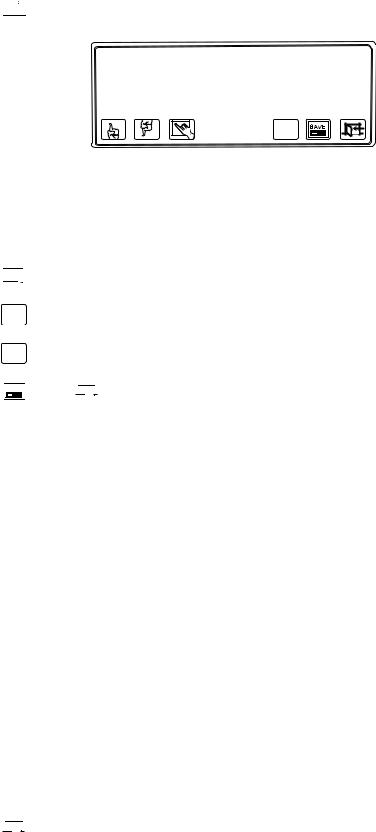
Figure 1. KBD960/KBR960
LCD DISPLAY
The LCD is a four-line display. Each line displays different information.
Line 1 Displays the video output (which is typically a monitor) and the video input source (which is typically a camera). Line 2 Displays the last number entered and the icon of the current menu.
Line 3 Displays alarm messages and other prompts.
Line 4 Displays the icons for the icon keys.
ICON KEYS
These eight blue keys correspond to the icons directly above on the LCD display. These icons change depending on the mode you are in.
KEYPAD
The keyboard has a standard numeric keypad with two additional keys for selecting cameras and monitors.
FUNCTION KEYS
The 24 function keys (F1-F24) can be programmed according to your application and the type of CCTV installation.
Refer to the Installation section for an explanation on how to program these keys. The supplied blank labels and punched LEXAN® decal overlay should be used.
C1519M-E (6/06) |
9 |

CONTROL KEYS
Step backward through available camera selections
Step forward through available camera selections
Select and execute macros
Rcl: Recall previous selections
Alt: Reserved for future use
Prst: Recall preset
Lock: Reserved for future use
LENS KEYS
You can use these keys to control cameras equipped with motorized zoom lenses and motorized pan and tilt units. These keys are sometimes used to activate other functions. For example, the Open/Close key is also used when creating preset labels.
Zoom in/out
 Focus near/far
Open/close the iris
JOYSTICK
The proportional joystick allows variable speed control. It gives you full control over the pan and tilt movements, from minimum to maximum speed. You should calibrate the joystick before setting up anything else.
TURBO KEY
Pressing this key while moving the joystick switches pan motors into high-speed mode on equipment that is capable of panning.
ESCAPE KEY
This key exits you from the mode you are in.
10 |
C1519M-E (6/06) |

Installation
The following items are supplied:
•KBD960/KBR960 keyboard
•KBD-PS-1 universal power supply
•Two 25 ft (7.6 m) straight RJ-45 cables
•10 blank labels and 10 punched LEXAN decal overlays
•One power cord (either US-320-C5, UK-320-C5, AU-320-C5, EU-320-C5)
CONNECTING TO THE CM6800
NOTE: Communication to the keyboards is RS-485. Pelco recommends using four-conductor, shielded, 18-gauge twisted pairs, such as Belden 9418, or a similar cable that meets or exceeds the basic requirements for EIA RS-485 applications.
1.Set all DIP switches OFF. The DIP switches are located on the bottom of the keyboard.
2.Connect the RJ-45 straight cable from COM 1 of the keyboard to the power supply. See Figure 2.
3.Connect the other RJ-45 straight cable from the power supply to COM 3 of the CM6800.
4.Plug in the power supply.
VOLUME |
|
|
8 |
COM 1 |
DIP SWITCHES |
RESET |
|
BUTTON |
|
|
RS-485 SERIAL PORT |
Main port used for power into keyboard, and for communication link to Pelco 6800. These I/O lines are connected to 8-pin RJ socket JP 1 as shown below. Incoming DC is also brought in via this COM port.
JP1 Pin |
Function |
JP1 Pin |
Function |
|
|
|
|
|
|
1 |
RS-485 |
Tx+ |
5 |
GND (0 VDC IN) |
|
|
|
|
|
2 |
RS-485 |
Tx- |
6 |
|
|
|
|
|
|
3 |
|
|
7 |
RS-485 Rx- |
|
|
|
|
|
4 |
+12 VDC IN |
8 |
RS-485 R+ |
|
|
|
|
|
|
16
1
2
31 |
32 |
3 |
|
3 |
4 |
|
4 |
|
6 |
7 |
8 |
VIDEO OUTPUTS 
|
|
|
|
|
ALARM |
|
||
COM |
1 |
2 |
3 |
4 |
5 |
6 |
7 |
8 |
5 |
|
|
|
|
|
|
|
|
|
|
CONTROL |
|
|||
6 |
PTZ |
|
|
|
|
|
|
|
A T |
T |
R |
R |
T |
T |
R R B |
|
+ |
- |
- |
+ |
+ |
- |
- + |
7 |
OUT |
|
|
|
|
|
|
|
|
|
|
|
|
|
|
|
|
|
|
|
|
|
F |
8 |
|
1 |
|
|
2 |
|
3 |
|
|
|
|
|
|||
|
|
|
COM 1 |
|
|
|
|
|
|
|
|
|
|
|
120/230~ |
|
|
|
|
|
|
|
50/60 HZ |
|
|
|
|
|
|
|
25 WATTS |
COM 3 DEFAULT SETTINGS: M, RS-485, 19200 BAUD, NO PARITY, 8 DATA BITS,
1 STOP BIT
STRAIGHT CABLE (SUPPLIED)
RS-485
CM6800 COM 3 |
|
KBD960 |
UNIVERSAL POWER SUPPLY |
||
RJ-45 PIN-OUTS |
RJ-45 PIN-OUTS |
||||
|
|||||
1 |
Rx+ |
1 |
Tx+ |
|
|
2 |
Rx- |
2 |
Tx- |
|
|
3 |
NC |
3 |
|
|
|
4 |
NC |
4 |
|
|
|
5 |
GROUND |
5 |
|
|
|
6 |
NC |
6 |
|
STRAIGHT CABLE |
|
7 |
Tx- |
7 |
Rx- |
||
(SUPPLIED) |
|||||
8 |
Tx+ |
8 |
Rx+ |
||
|
|||||
Figure 2. Connecting to the CM6800
C1519M-E (6/06) |
11 |
SETUP MODE
You can configure the KBD960 in the Setup Mode. You can do the following:
•Create a Personal Identification Number (PIN) for entering the Setup Mode.
•Create a PIN that provides access to features on the Define Menu.
•Calibrate the joystick.
•Adjust the display brightness.
•Set the data transmission speeds for the keyboard’s three COM ports.
•Define the function keys.
•Select a host port.
The default setup PIN is 1234. You can change it in the Setup Mode.
ACTIVATING SETUP MODE
1. Set DIP Switch 2 ON. “ENTER SETUP PIN” appears.
ENTER SETUP PIN
00895
Figure 3. Enter Setup PIN
2. Enter your PIN number (the default number is 1234) and “SETUP MODE” appears.
SETUP MODE vX.XX
JSTK LCD ADV
00896
Figure 4. Setup Mode
12 |
C1519M-E (6/06) |
CALIBRATING THE JOYSTICK
1. Select JSTK from Setup Mode. “JOYSTICK SETUP” appears on the LCD.
JOYSTICK SETUP
xxx
xxx (xxx, xxx) xxx xxx
00897
Figure 5. Joystick Setup
2.Select  with the joystick in the center default position.
3.Move the joystick completely to the left and select  .
.
4.Move the joystick completely to the right and select  .
.
5.Move the joystick completely down and select  .
.
6.Move the joystick completely up and select  .
.
7.Select  to save the joystick configuration.
8.Select  to return to the Setup Menu.
RESTORING FACTORY DEFAULT SETTINGS
1.Set DIP switches 1, 2, and 8 ON and recycle power.
2.Re-calibrate the joystick if using a keyboard version before 1.20.
For version 1.20 and later keyboards, the joystick is automatically calibrated during a factory default initialization.
CREATING A SETUP PIN
The factory settings for the KBD960 include the default setup PIN 1234. Follow these steps to change the default PIN:
1. Select ADV from Setup Mode.
2. Select  and/or
  to locate Advance Setup 2.
|
Advance Setup 2 |
Setup Pin |
**** |
Confirm |
**** |
Define Pin |
**** |
Confirm |
**** |
|
DEF |
|
NUM |
Figure 6. Advance Setup 2 |
|
00898 |
|
C1519M-E (6/06) |
13 |

3. |
Select |
|
and/or |
to choose Setup PIN. |
|
|
|
||
4. |
Select |
DEF |
, enter a four-digit PIN, and select |
DEF |
once again. |
|
|
||
|
|
NUM |
|
|
|
NUM |
|
|
|
5. |
Advance the cursor to the confirm row, select |
DEF , re-enter your PIN, and select |
DEF |
once again. |
|||||
|
|
|
|
|
NUM |
|
NUM |
|
|
|
The menu indicates “OK” if confirmed. |
|
|
|
|
|
|||
6. |
Select |
|
to save your PIN. |
|
|
|
|
|
|
CREATING A DEFINE PIN
You also need a PIN to access the extended keyboard functions that are available in the Define Menu. The default define PIN is also 1234. Follow these steps to change it (refer to Figure 6):
1. Select ADV from Setup Mode.
2.Select  and/or
  to locate Advance Setup 2.
3.Select  and/or
  to choose Define PIN.
4. |
Select |
DEF |
, enter a four-digit PIN, and select |
DEF |
once again. |
|
|
||||
|
|
NUM |
|
|
NUM |
|
|
|
|||
5. |
Advance the cursor to the confirm row, select |
DEF , re-enter your PIN, and select |
DEF |
once again. |
|||||||
|
|
|
|
|
|
|
NUM |
|
NUM |
|
|
|
The menu indicates “OK” if confirmed. |
|
|
|
|
|
|||||
6. |
Select |
|
|
|
|
to save your PIN. |
|
|
|
|
|
|
|
|
|
|
|
|
|
|
|||
|
|
|
|
|
|
|
|
|
|
|
|
ADJUSTING THE DISPLAY BRIGHTNESS
1. Select LCD from Setup Mode.
LCD BRIGHTNESS SETUP
00899
Figure 7. LCD Brightness Setup
2.Select  to make the display brighter or
  to make the display dimmer.
3.Select  and then
  .
.
You can also adjust the display brightness by selecting LCD from the Define Menu. Refer to the Operation section of this manual.
14 |
C1519M-E (6/06) |
CONFIGURING THE COM PORTS
1. Select ADV from Setup Mode and scroll to the Advance Setup 1 screen.
|
Advance Setup 1 |
|
|
|
|
||||||||||||||||
COM1 |
None (Host) |
|
|
|
|
||||||||||||||||
COM2 |
None |
|
|
|
|
||||||||||||||||
COM3 |
None |
|
|
|
|
||||||||||||||||
Local Address |
1 |
|
|
|
|
|
|
|
|
|
|
|
|
|
|
|
|
|
|
|
|
|
|
|
|
|
|
|
|
|
|
|
|
|
|
|
|
|
|
|
|
|
|
00900
Figure 8. Advance Setup 1
2.Select  and/or
  to navigate to the COM 1 row.
3.Select  and/or
  to assign a baud rate.
4.Select  to set parity for the communications port.
5.Select  to set the Host.
6.Select  and/or
  to navigate to the Local Address row.
7.Select  and/or
  to assign an address.
8.Select  to save your configuration and then select
  to return to the Setup Mode.
Default Settings
•COM 1 - 19200 baud, No Parity, Set as HOST
•Address -1
NOTES:
•COM 2 is functional, but only COM 1 is optimized for the protocol. COM 3 is not used for normal operation.
•Pelco recommends that you reserve addresses 1-8 for the KBD960/KBR960 keyboards. In System 6800, you should not use an address higher than 8.
C1519M-E (6/06) |
15 |
CONFIGURING THE FUNCTION KEYS
1. Select  from Setup Mode to switch to the key define mode.
NOT DEFINED |
KEY DEFINE |
NUMx |
|
ESC |
PLEASE ENTER A KEY |
BKSPACE |
|
ENTER |
|
DEFINE |
|
|
DEF |
|
NUM |
00901
Figure 9. Key Define Mode
2.Press a function key you want to configure. If the key is already defined, its assigned function is shown. If not, “Def = NOT DEFINED” appears on the LCD screen.
3.Select  and/or
  to scroll through the list of available functions.
4.Select  to choose a function.
5. Select NUMDEF and enter the define number.
6.Select NUMDEF .
7.Select  and then
  .
.
NOTES:
•Refer to Table A for the factory default settings.
•Many of the functions do not require that you enter a define number. In those cases, skip steps 5 and 6.
Table A. Function Key Defaults
Function Key |
Default Action |
Function Key |
Default Action |
F1 |
Camera Auxilliary 1 |
F13 |
Multiplexer |
|
|
|
|
F2 |
Camera Auxilliary 2 |
F14 |
Alarm Menu |
|
|
|
|
F3 |
Camera Auxilliary 3 |
F15 |
Macro Menu |
|
|
|
|
F4 |
Camera Auxilliary 4 |
F16 |
Sequence Menu |
|
|
|
|
F5 |
Camera Auxilliary 5 |
F17 |
GPI Menu |
|
|
|
|
F6 |
Camera Auxilliary 6 |
F18 |
Define Menu |
|
|
|
|
F7 |
Camera Auxilliary 7 |
F19 |
Menu Forward |
|
|
|
|
F8 |
Camera Auxilliary 8 |
F20 |
Menu Backward |
|
|
|
|
F9 |
Camera Pattern 1 |
F21 |
Backspace |
|
|
|
|
F10 |
Camera Pattern 2 |
F22 |
Enter |
|
|
|
|
F11 |
Camera Pattern 3 |
F23 |
Clear |
|
|
|
|
F12 |
External Relay 1 |
F24 |
--- |
|
|
|
|
NOTE: In the GPI Menu, F1-F8 are associated with the external relays in the current GPI.
EXITING SETUP MODE
1.Select  .
.
2.Set DIP switch 2 OFF.
16 |
C1519M-E (6/06) |
Loading...