

Page 1

0
+
VIAGGIO
SWITCHABLE
EN Instructions for use
사용지침
KO
Page 2
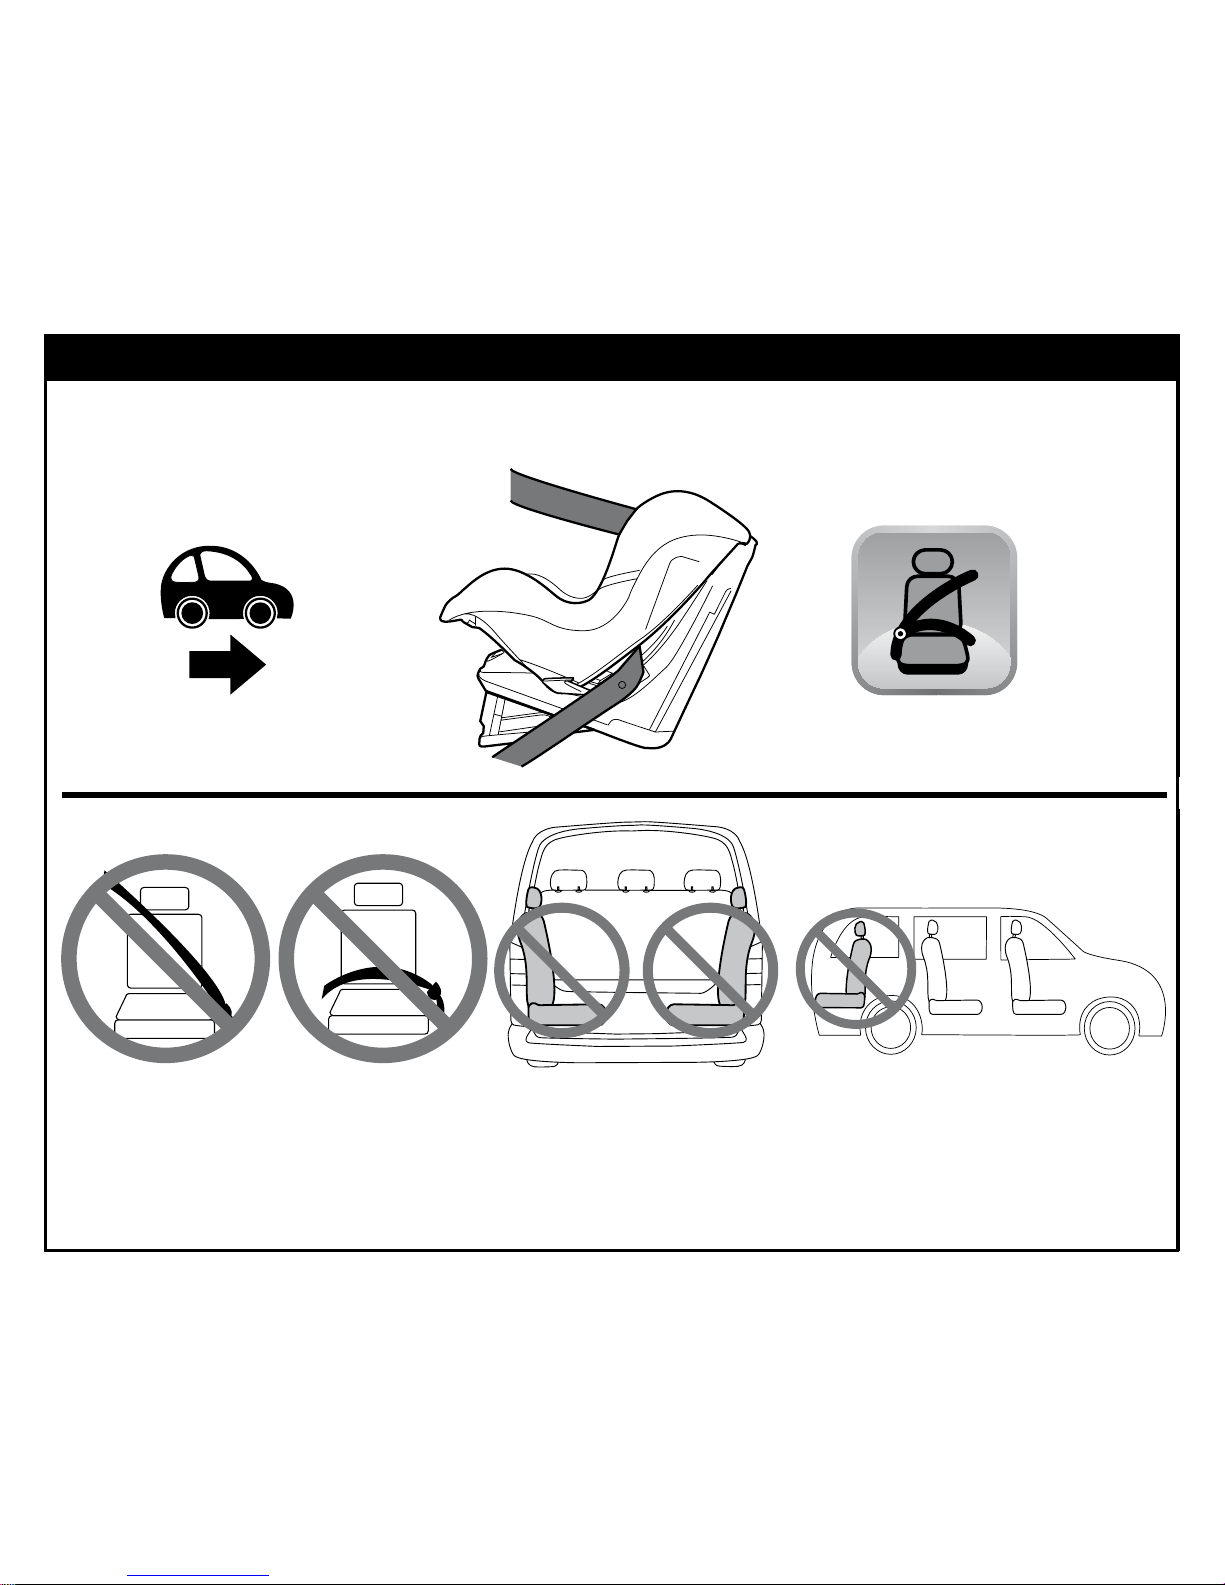
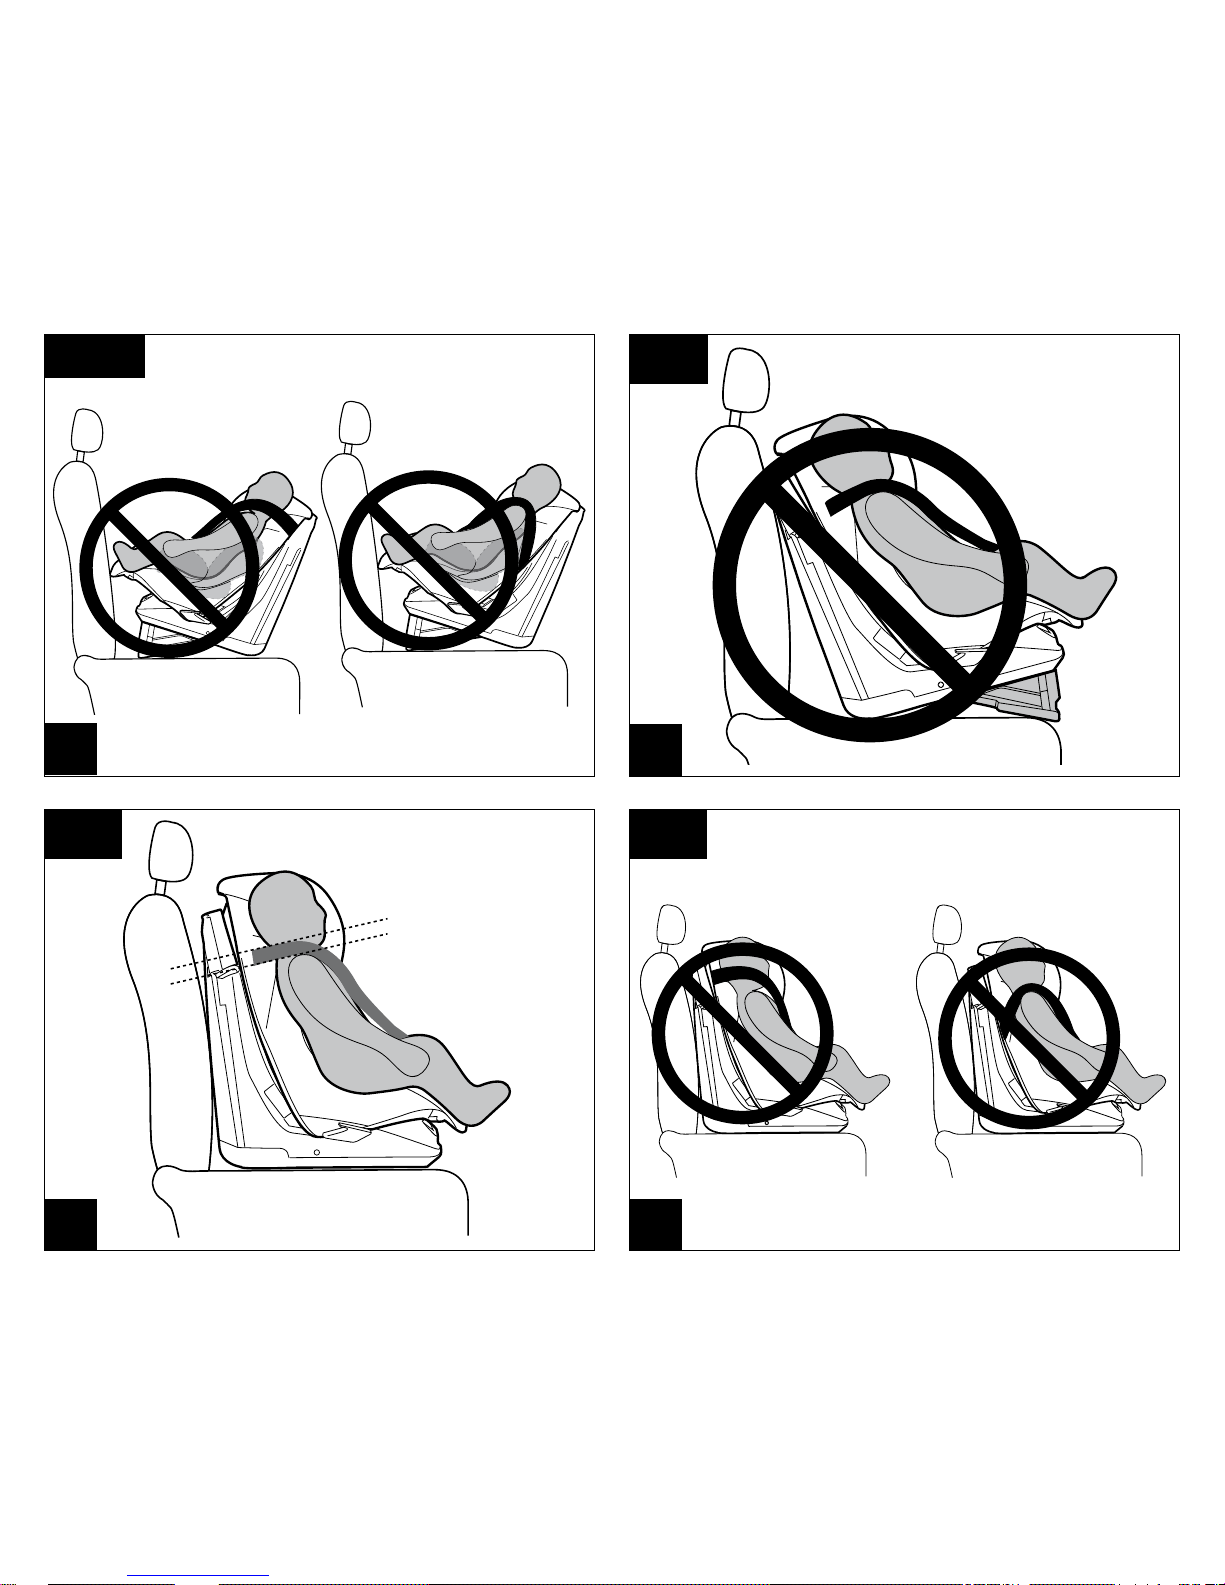
OK
NONO
NONO
NO
UNIVERSAL CATEGORY 0-13 Kg Group 0+ BELTED
EN• "Viaggio 0+1 Switchable" is fastened to the vehicle in a rear-facing position using the vehicle’s seatbelt when
used as a Group 0+ car seat (from 0 to 13 Kg).
KR•
신생아부터 13kg 까지는 자동차 벨트를 이용하여 반드시 뒤보기 장착을 해야 합니다.
Page 3
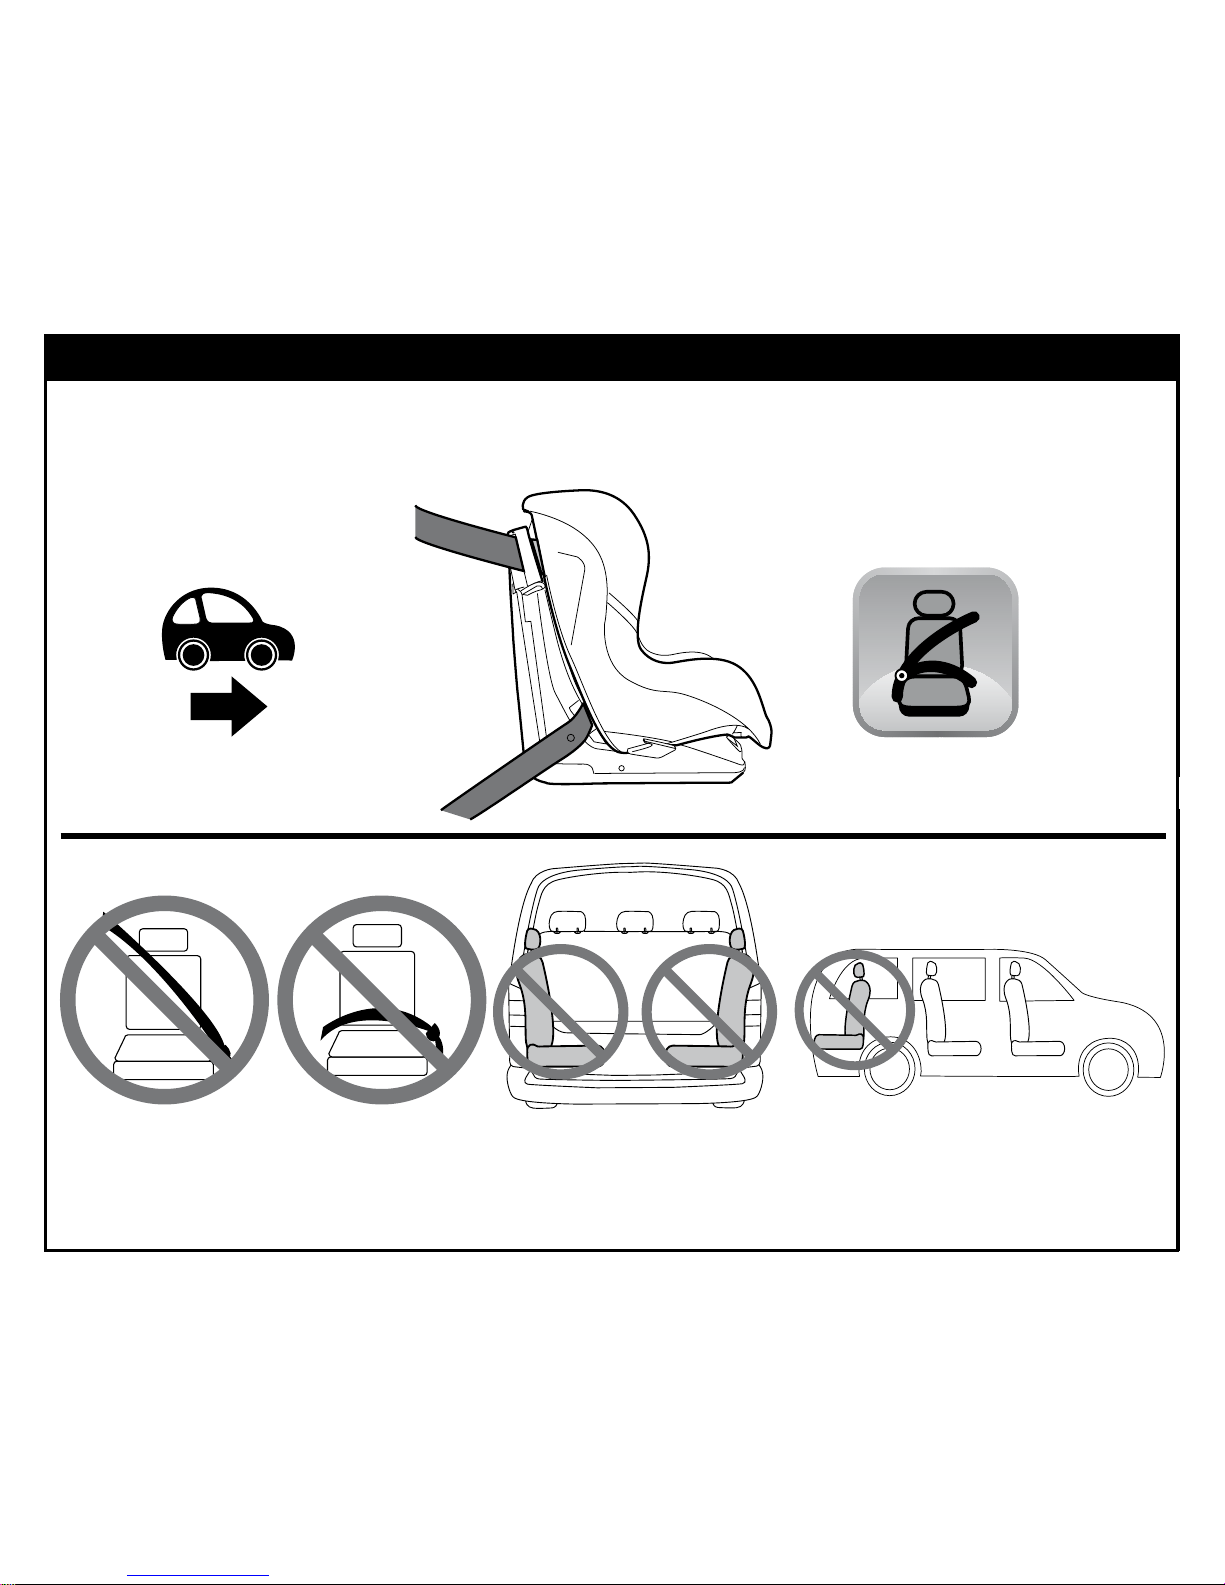
NONO
NONO
NO
OK
UNIVERSAL CATEGORY 9-18 Kg Group 1 BELTED
EN• "Viaggio 0+1 Switchable" is fastened to the vehicle in a forward-facing position using the vehicle’s seatbelt when
used as a Group 1 car seat (from 9 to 18 Kg).
KR•
9~18 kg 아기는 자동차 시트 벨트를 이용하여 반드시 전방장착을 해야 합니다.
Page 4
B
A
B
C
D
1
2
43
B
A
C
gr. 0+
Page 5
A
B
A
B
5
6
87
gr. 1
Page 6
A
B
A
B
9
11 12
10
Page 7
C
15 16
A
C
C
B
13 14
Page 8
A
B
A
18
20
19
17
Page 9
gr. 0+
1
1
2
3
4
5
6
7
2
3
4
5
6
7
NONO
21
23
OK
22
24
gr. 0+
gr. 0+
Page 10
OK
NO
NONO
27
gr. 1
gr. 1
gr. 1
26
25
28
NONO
gr. 0+
Page 11

A
B
30
32
31
29
gr. 1
Page 12
F
E
B
AA
35 36
33
34
C
D
Page 13

37
39 40
38
Page 14

43 44
41
42
Page 15

45
47
46
48
0409
Page 16

16
3
1
2
4
Viaggio 0+1 Switchable
1) BSAZUS00*
2) BRIZUS00*
3) MUCI0082N
4) BSPDUO00*
EN• Spare parts available in different colours to be
specified when ordering.
KO•
색상별로 구입가능한 부품.(색상선택은 구매 전
전화 주세요) 1 :시트커버 2:보조쿠션 3: 벨트세트
4:어깨벨트 패드
EN_English
Thank you for choosing a Peg-Perego
product.
Product characteristics
Features of the product
Car seat, Group 0+, “Universal”
category with vehicle seatbelt
• Type-approved under European standard ECE R44/04,
for children of weight up to 13 kg (from birth to
approximately 1 year).
• Suitable for installation on most, but not all vehicle
seats.
• The car seat can be correctly installed if the vehicle's
use and maintenance manual indicates compatibility
with "Universal" Groups 0+ restraint systems.
• This car seat is classed as “Universal” in compliance with
stricter type approval criteria than previous models that
do not have type approval labels.
• The car seat can only be used in type approved
vehicles, fitted with static or inertia-reel three-point
seatbelts, approved under regulation UN/ECE no. 16 or
equivalent standards.
• It must not be used with two-point or lap seatbelts.
Car seat, Group 1, “Universal” category
with vehicle seatbelt
• Type approved under European standard ECE R44/04,
for children of weight from 9 to 18 kg (9 months to 4
years approx).
• Suitable for installation on most, but not all vehicle
seats.
• The car seat can be correctly installed if the vehicle's
use and maintenance manual indicates compatibility
with "Universal" Group 1 restraint systems.
• This car seat is classed as “Universal” in compliance with
Page 17

17
from the seat in the case of an accident.
• Ensure that the vehicle’s three-point seatbelt fixing
the car seat is always taut and not twisted. It should
be replaced in the case of heavy stress as a result of an
accident.
• Never leave your child unattended in the car seat:
watch him/her even when s/he is sleeping.
• Never remove the child from the car seat when the
vehicle is in motion.
• Make sure that the car seat is not blocked by a mobile
part of the vehicle seat or by a door.
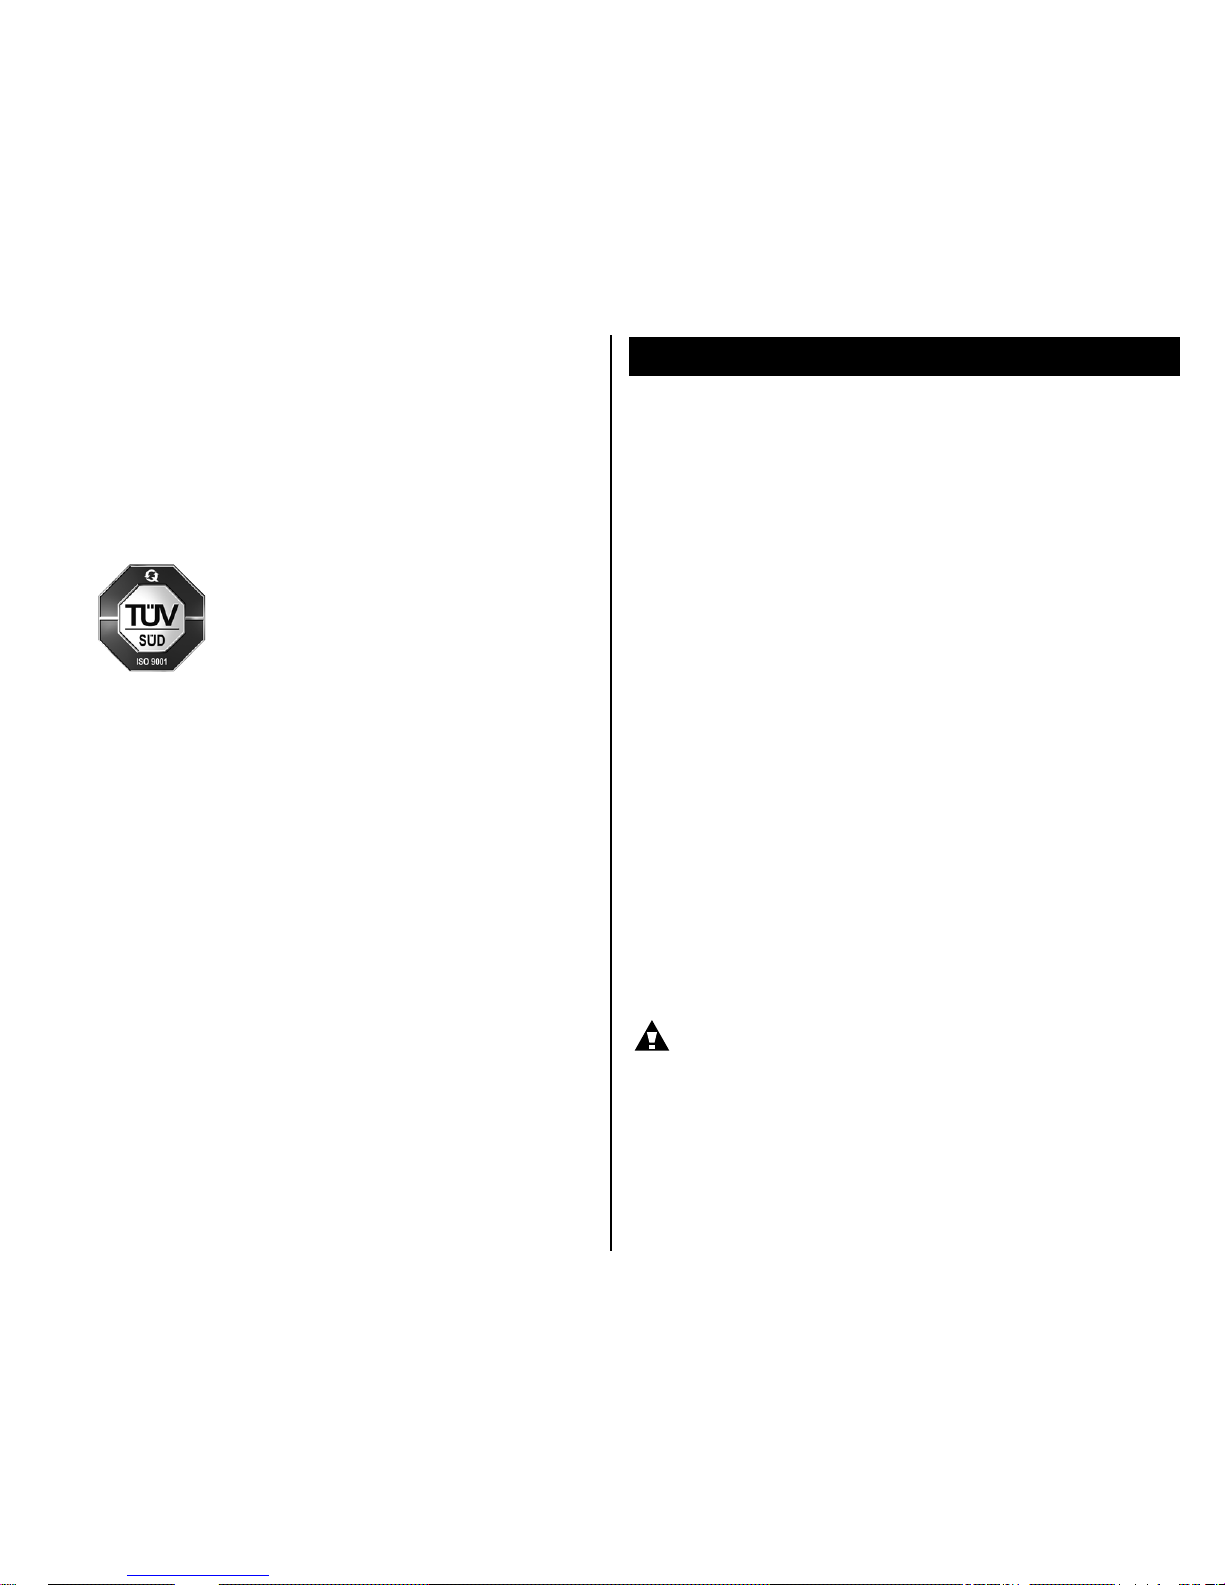
• Adjust the height and tension of the shoulder straps,
ensuring that they are as snug to the child’s body as
possible without constricting him/her too much. Check
that the harness is not twisted and that the child does
not release it.
• This car seat is not intended for prolonged periods of
sleeping.
• Do not leave the car seat in the vehicle when exposed
to the sun. Some parts might heat up and be harmful
to the delicate skin of your child. Check the seat is not
too hot before seating your child.
• Do not use the car seat without its fabric cover; this
must not be replaced with one not approved by the
manufacturer since it is an integral part of the car seat
and the safety system.
• If in doubt, contact the manufacturer or retailer of the
car seat.
• Do not remove the adhesive and stitched labels since
this might make the product not compliant with legal
requirements.
• Do not use the car seat if it has signs of breakage or
missing parts, if it is second-hand or if it has been
subjected to heavy impacts in an accident, because it
might have suffered extremely dangerous structural
damage.
• Do not alter the product.
• For any repairs, replacement parts and information
about the product, contact the after-sales assistance
stricter type approval criteria than previous models that
do not have type approval labels.
IMPORTANT
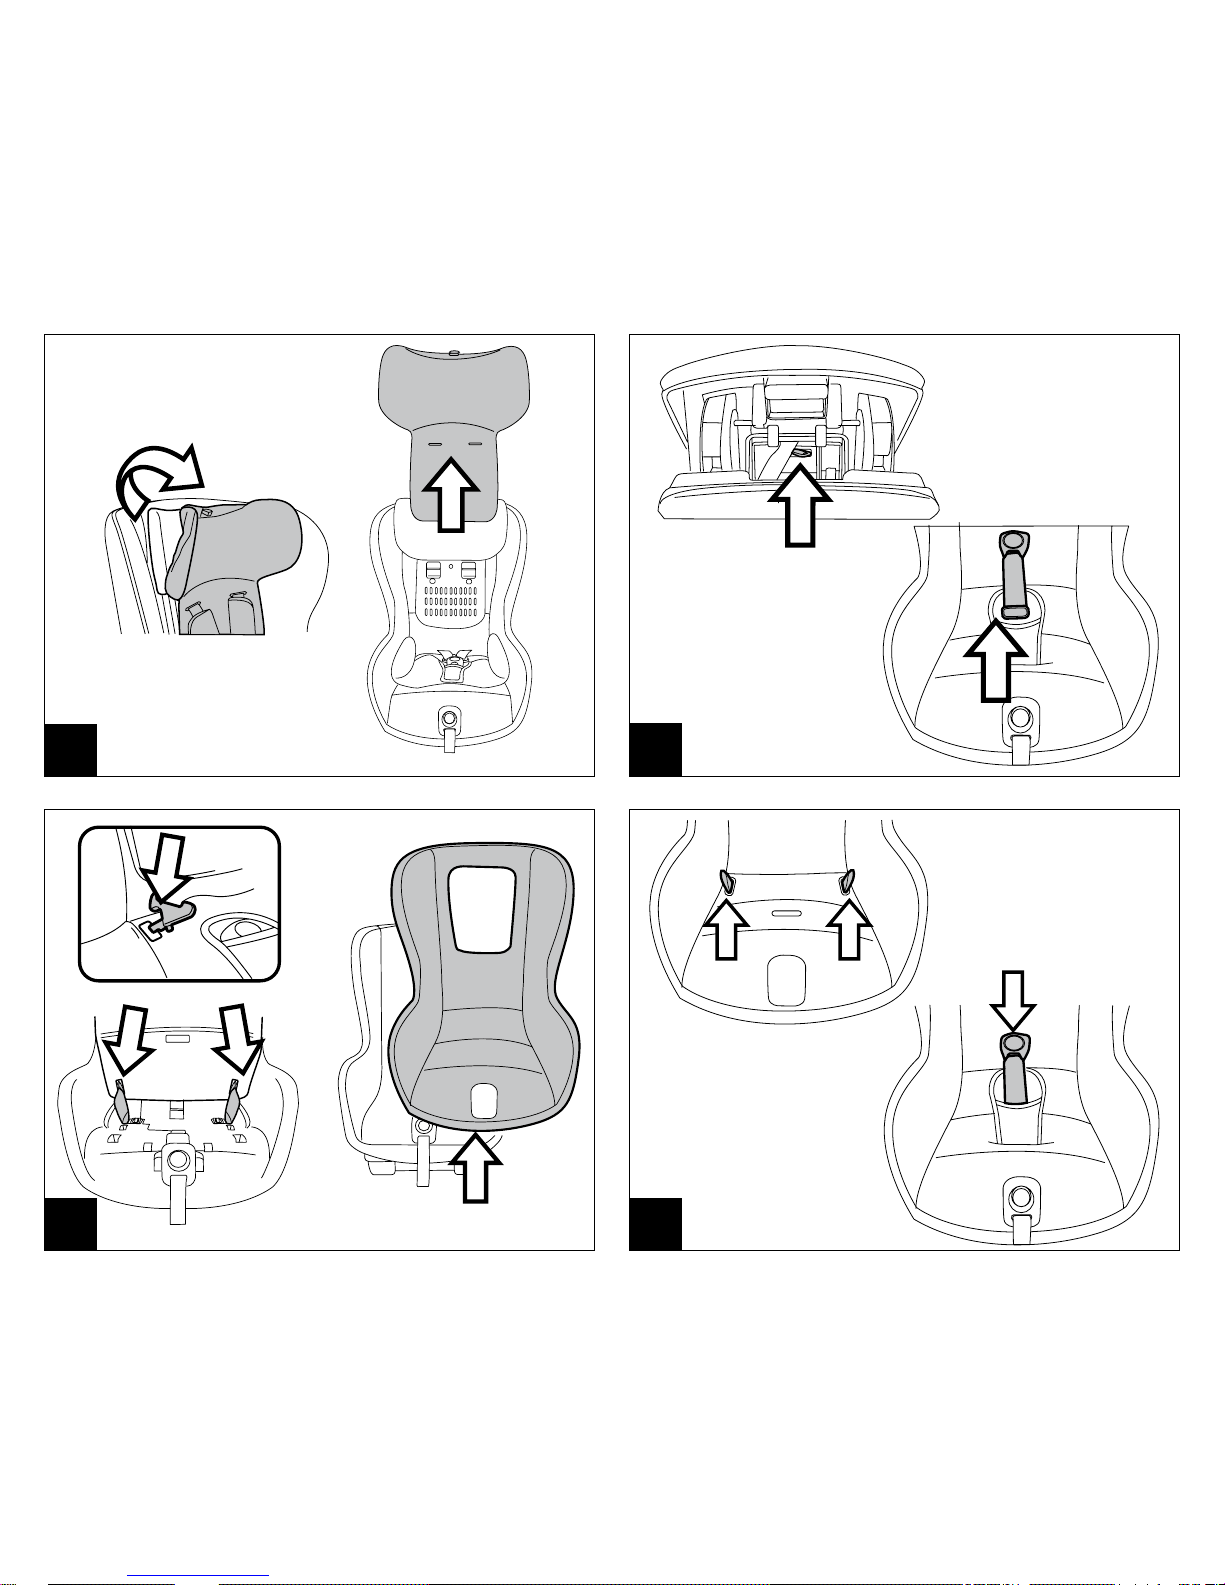
• "Viaggio 0+1 Switchable" must be installed in a
rear-facing position when used as a Group 0+ car
seat and in a forward-facing position when used as
a Group 1 car seat.
• Do not install “Viaggio 0+1 Switchable” on rear- or
sideways-facing vehicle seats.
• When used as a Group 0+ car seat on the vehicle’s
front seat, the front airbag must be disabled.
• When used as a Group 1 car seat on the vehicle’s
front seat, the car seat should be positioned as far
as possible from the dashboard.
• This item has a progressive serial number.
• If you experience any difficulty fitting “Viaggio
0+1 Switchable”, lift up or remove the vehicle’s
headrests.
WARNING
• Read the instructions carefully before use and keep
them in the folder provided for future reference.
Failure to closely follow the car seat installation
instructions will put your child at risk.
• “Viaggio 0+1 Switchable” must be assembled and
installed by adults.
• The car seat must be assembled and installed when the
child is not seated in it.
• When travelling in the vehicle, never hold your child in
your arms or allow him/her to sit on the vehicle seats.
In the event of sudden braking, even at low speeds, the
child might easily be flung forward.
• Do not insert fingers into the mechanisms.
• When travelling take special care to make sure that
luggage or other objects do not injure the child sitting
in the car seat in the case of an accident.
• Do not use installation methods other than those
indicated; this would result in the risk of detachment
Page 18

18
service. Contact information is provided on the last
page of this manual.
• The car seat must always be secured in the vehicle,
even when the child is not sitting in it; in the event of
sudden braking, it could injure the passengers.
•
Do not use this car seat if more than seven years have
elapsed from the date of production indicated on the
structure; the natural aging of the materials may mean the
car seat is no longer compliant with safety standards.
• Do not use accessories that have not been approved by
the manufacturer or by the competent authorities.
Instructions for use
UNIVERSAL CATEGORY - Belted
Group 0+
Fastening with seatbelts
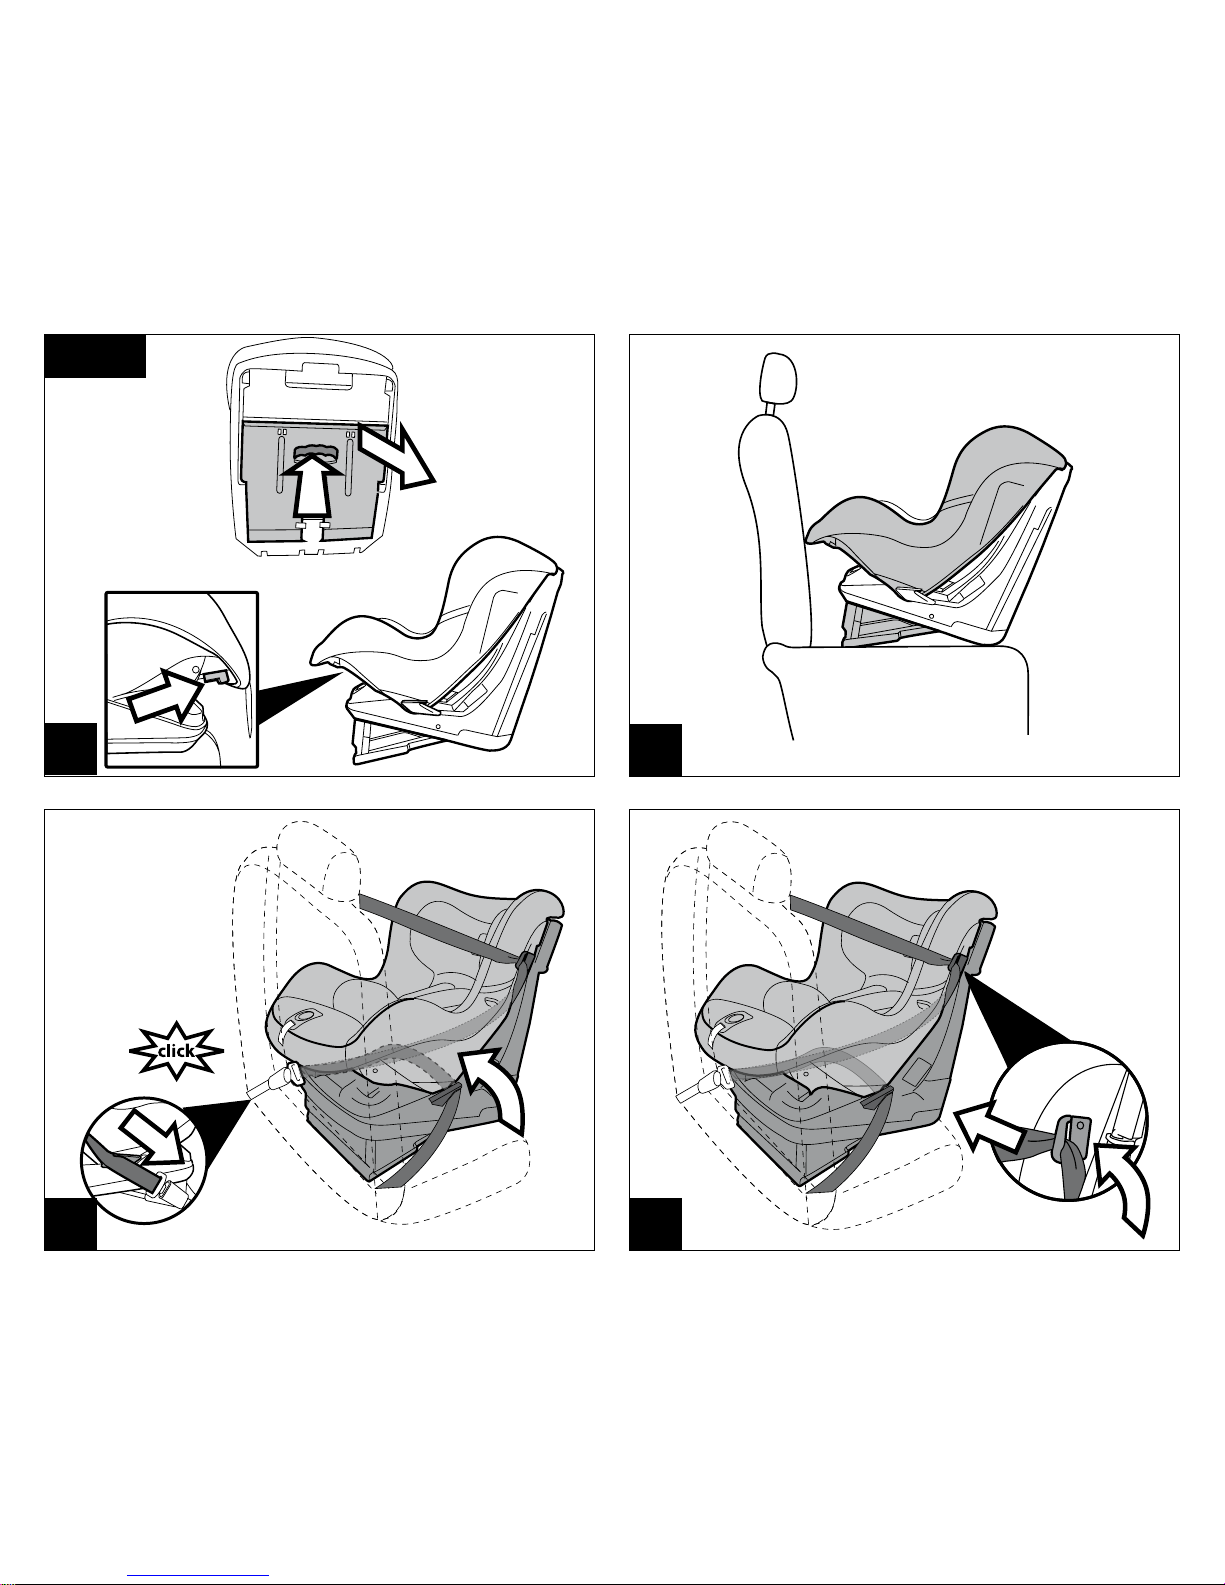
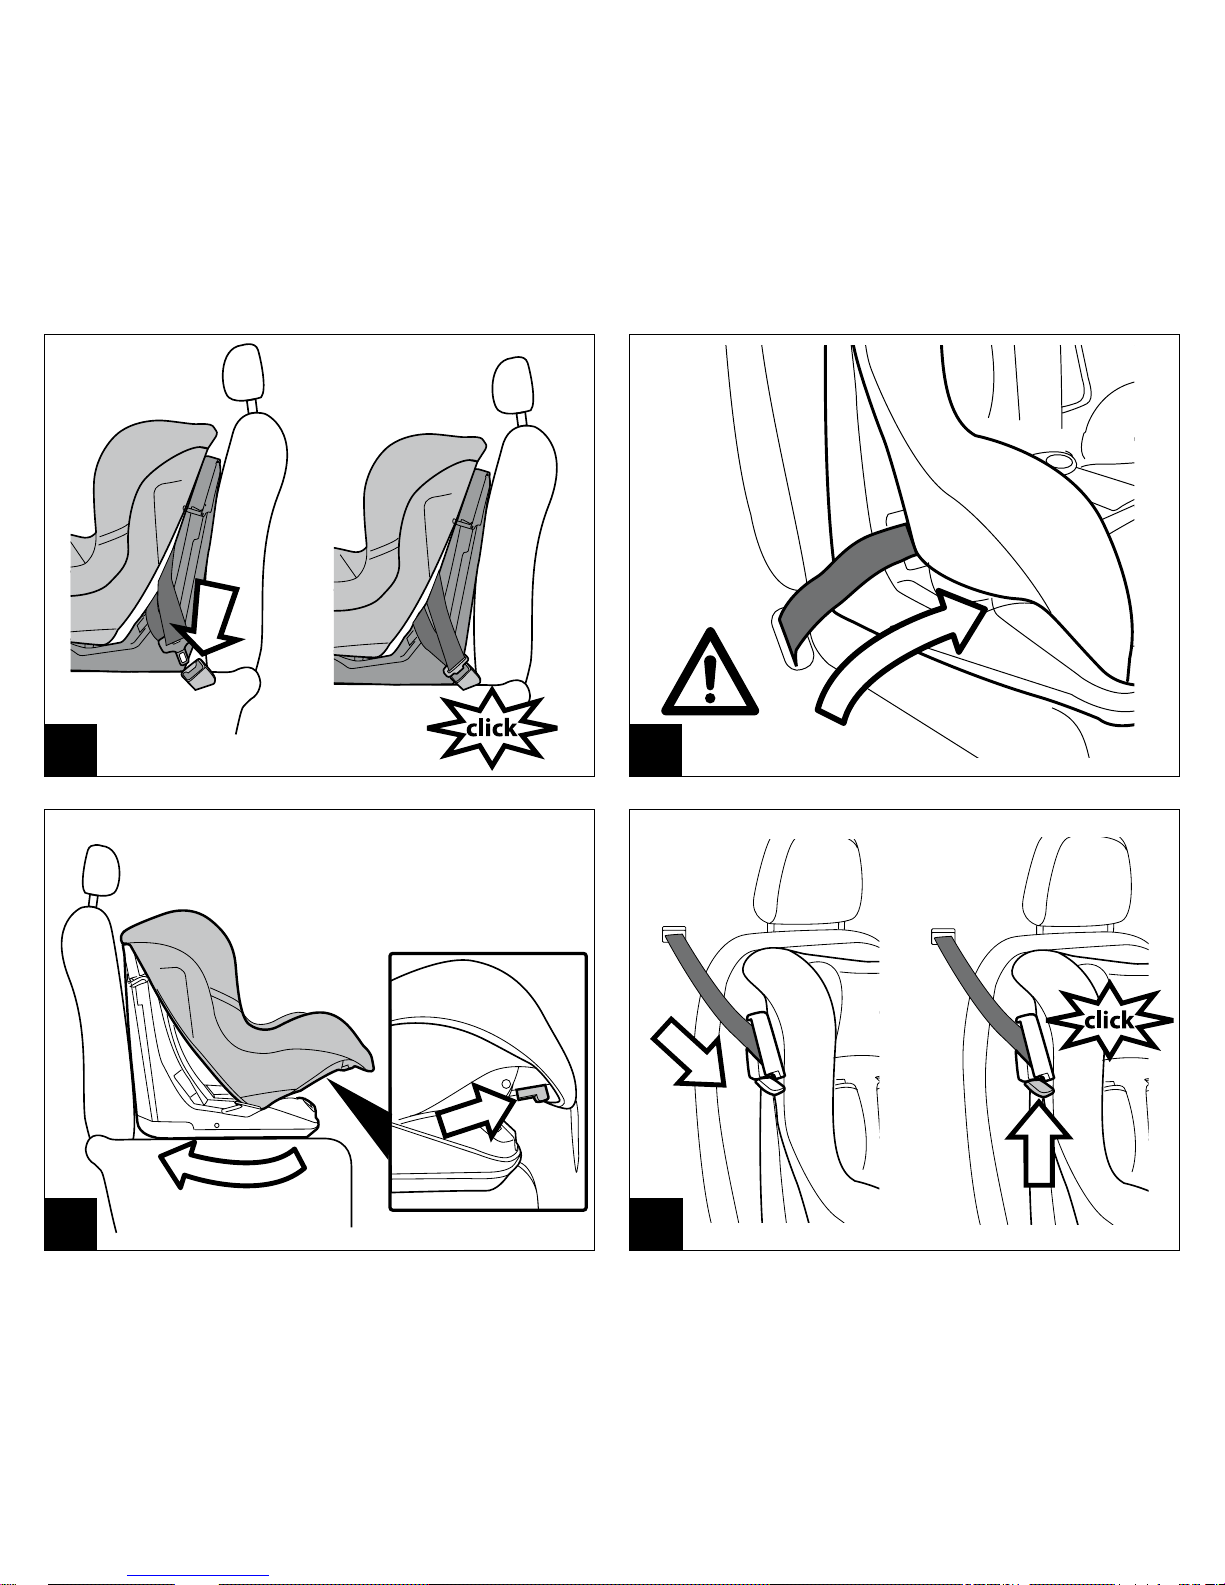
1• IMPORTANT: For the correct use of the
“Viaggio 0+1 Switchable” car seat in Group 0+
mode, it is necessary to:
- Extract from under the seat the casing that enables
the car seat to be reclined.
To extract it, press the handle and pull it towards
you, extracting the base (arrows A and B).
- Use the lever (arrow C) to recline the seat to its
highest position.
2• “Viaggio 0+1 Switchable” car seat correctly installed to
be used as a Group 0+ car seat.
3•
Install the “Viaggio 0+1 Switchable” car seat on the
vehicle’s seat so that it is rear-facing, as shown in the figure.
Pass the vehicle seatbelt between the frame and body
of the car seat following these steps:
- slip the belt into the light blue belt guides first (arrow A);
- fasten the belt, ensuring that it clicks into place (arrow B);
4• Pass the seatbelt through the upper light blue belt slot
(arrow C).
IMPORTANT: Take hold of the seatbelt and pull
it firmly, so as to ensure that the “Viaggio 0+1
Switchable” fits as close as possible to the vehicle
seat (arrow D).
Instructions for use
UNIVERSAL CATEGORY - Belted
Group 1
Fastening with seatbelts
5•
IMPORTANT: For the correct use of the “Viaggio 0+1
Switchable” car seat in Group 1 mode, it is necessary
to:
- Reposition the casing within the base of the car seat.
Press the lever and push inwards, as indicated in
the figure.
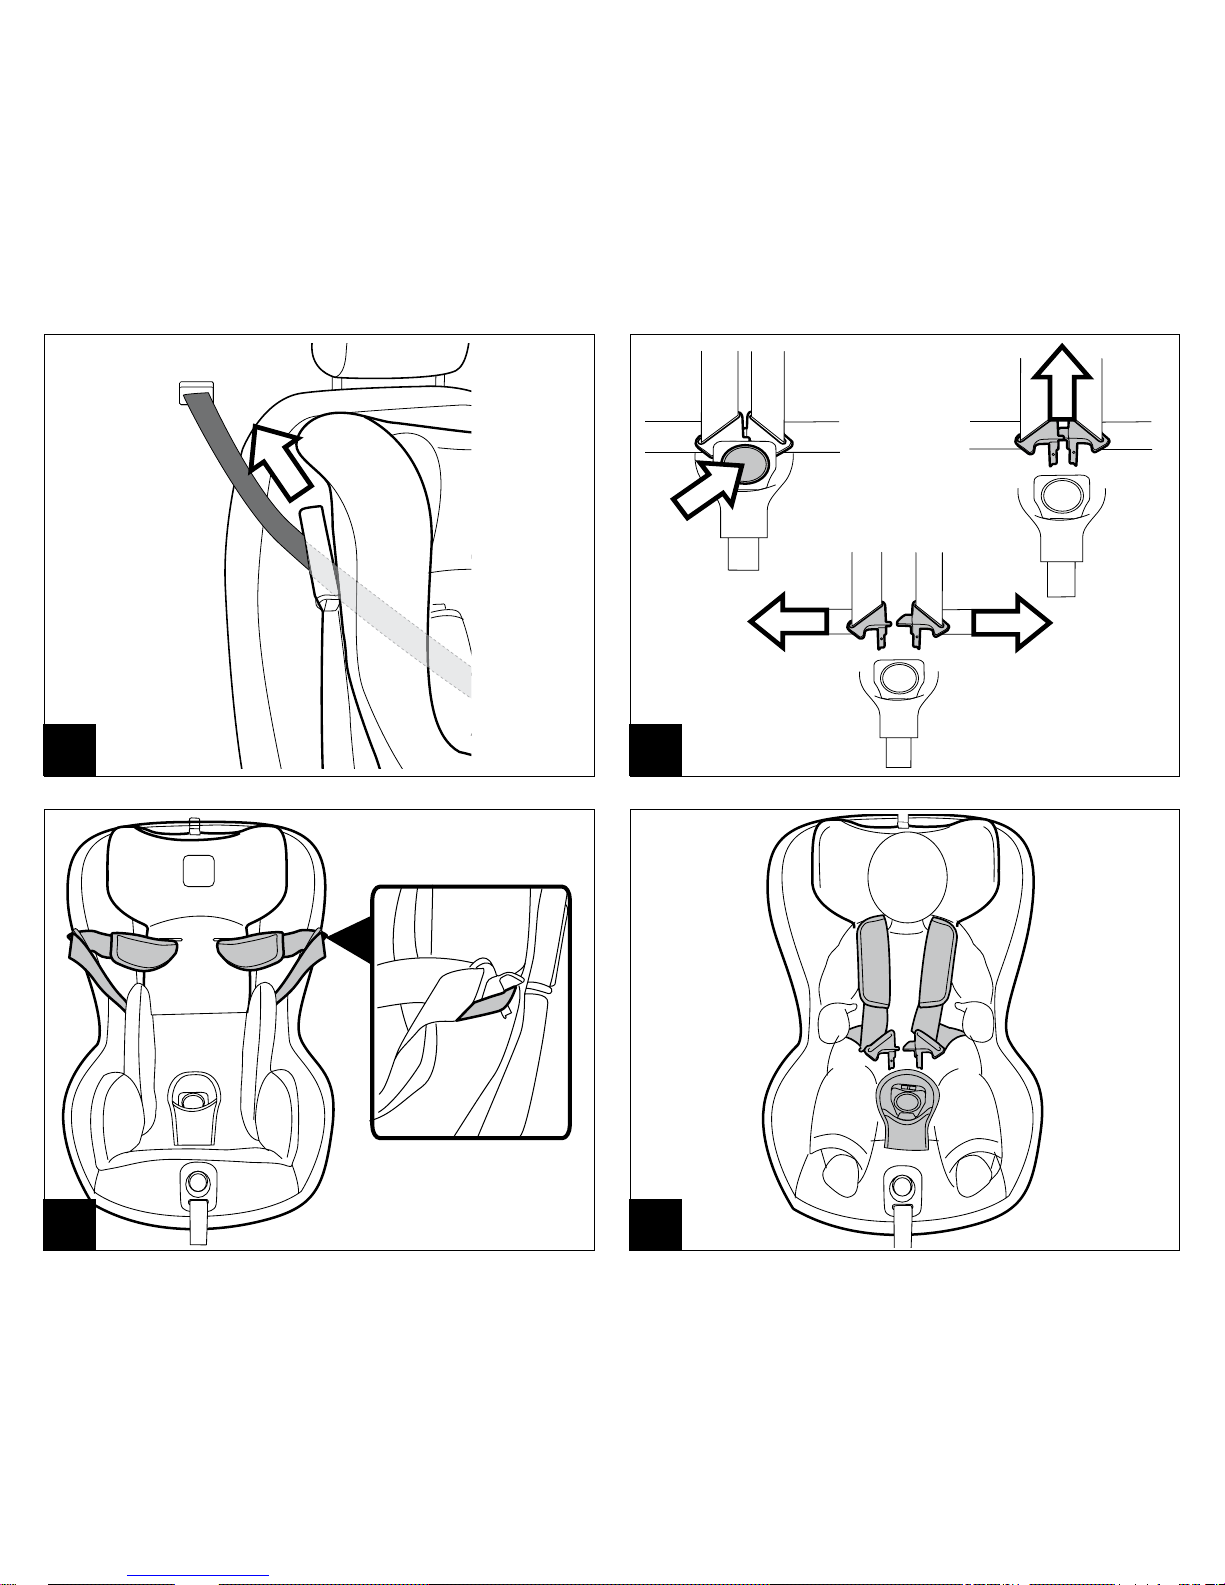
6•
Install the “Viaggio 0+1 Switchable” car seat on the vehicle’s
seat so that it is front-facing, as shown in the figure.
7• To make it easier to pass the vehicle’s seatbelts
through the back of the car seat, it is necessary to
recline the car seat to its lowest position by operating
the lever, as shown in the figure.
8• Pass the vehicle seatbelt between the frame and body
of the car seat.
9• The waist strap must pass through the lower guides,
marked in red; fasten the belt, ensuring that it clicks
into place.
10• Tighten the waist strap, ensuring it has passed through
the lower guides, marked in red.
11• Bring the car seat back into the upright position by
pulling the handle below the seat (Fig. A) and pushing
the car seat as shown in the figure (Fig. B).
12• To complete the installation process, use the Steady
Fix device: open the clip and pass the diagonal strap
through it, ensuring that it is taut and not twisted (Fig.
A). Close the safety tab (Fig. B).
13•
IMPORTANT: Take hold of the seatbelt and pull
it firmly upwards, so as to ensure that the “Viaggio
0+1 Switchable” fits as close as possible to the
vehicle seat (Fig. C).
Once installed, the car seat may be reclined to the
desired position (See Point 6).
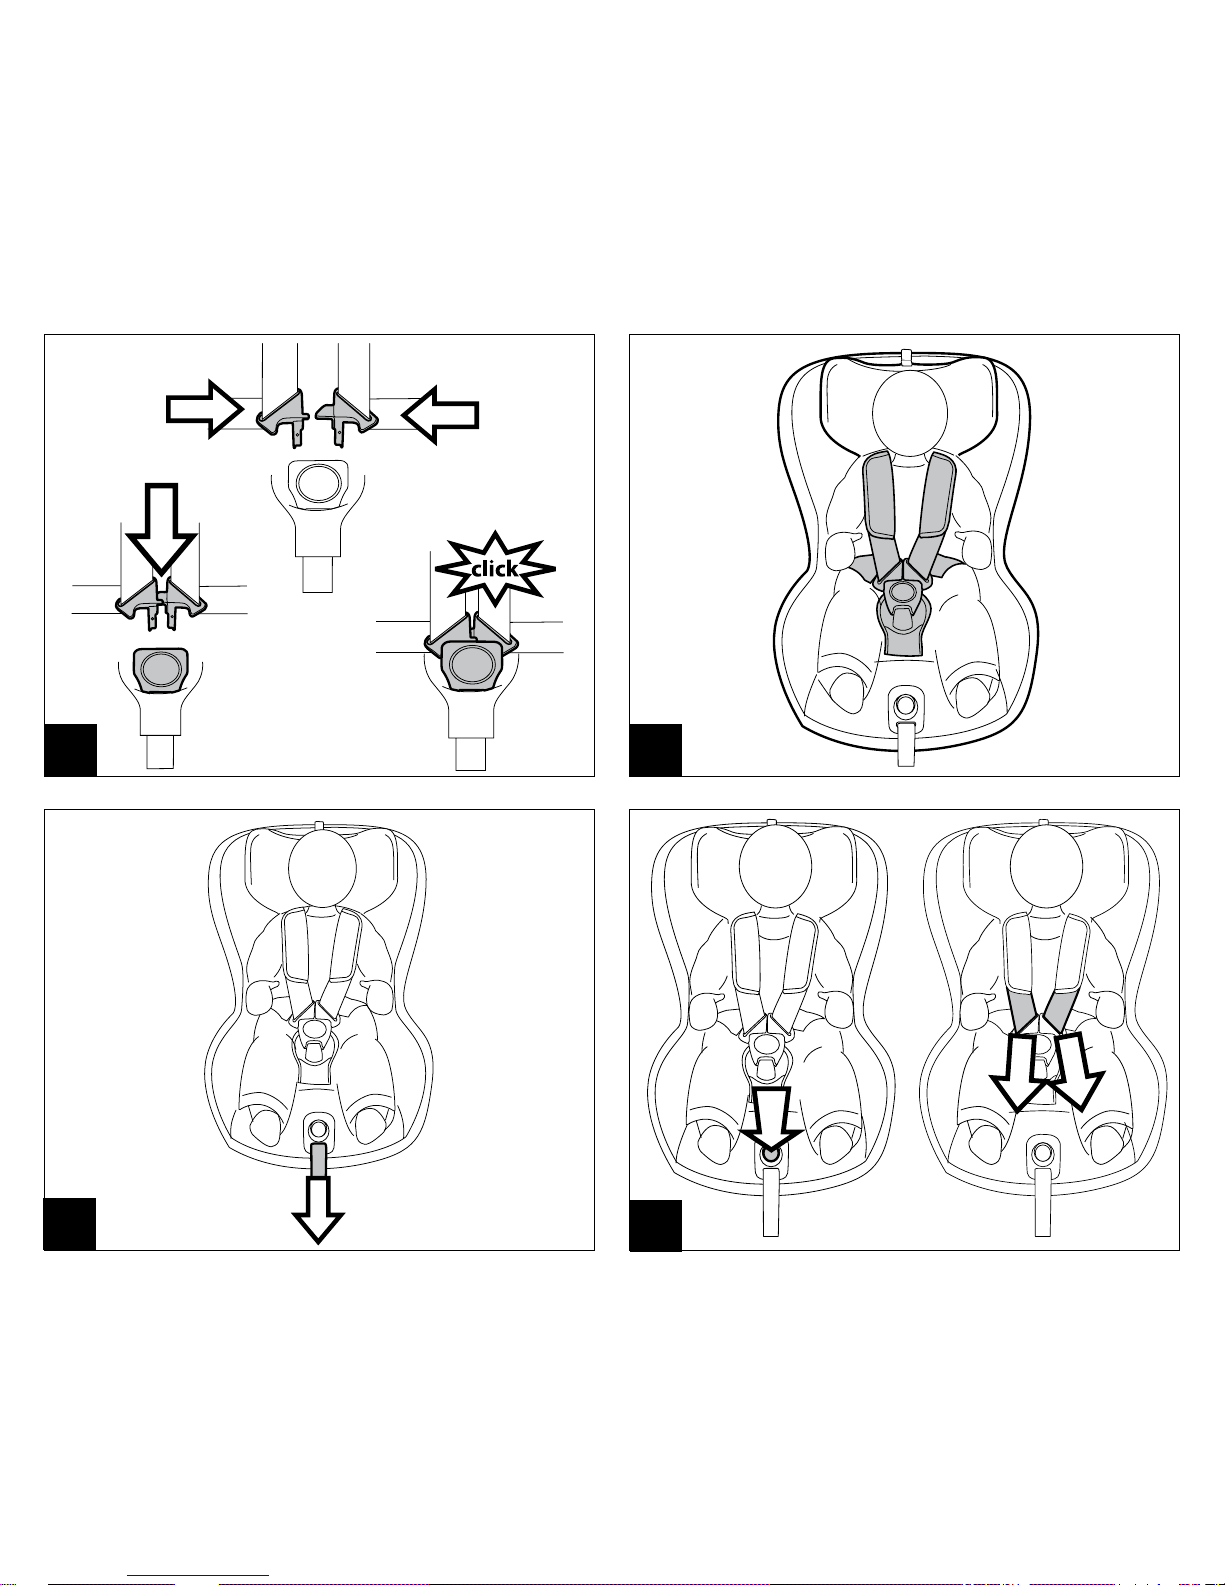
How to secure your child in the
“Viaggio 0+1 Switchable” car seat
14• Before placing the child in the car seat, release the
Page 19

19
down to the desired position.
When you have finished, try moving the headrest
to check it is properly locked into place.
23• WARNING: Do not use the car seat in Group 0+ mode
without first extracting the casing, as shown in point 1
A-B (Fig.A).
WARNING: Do not use the car seat in Group 0+ mode
without first reclining the backrest, as shown in point
1C (Fig.B).
24• Use in Group 0+ mode: To determine the best
shoulder strap position, bear in mind that the child’s
shoulders must be just above the shoulder strap guides.
25•
IMPORTANT: The straps must not be too high or
too low with respect to the child’s shoulders.
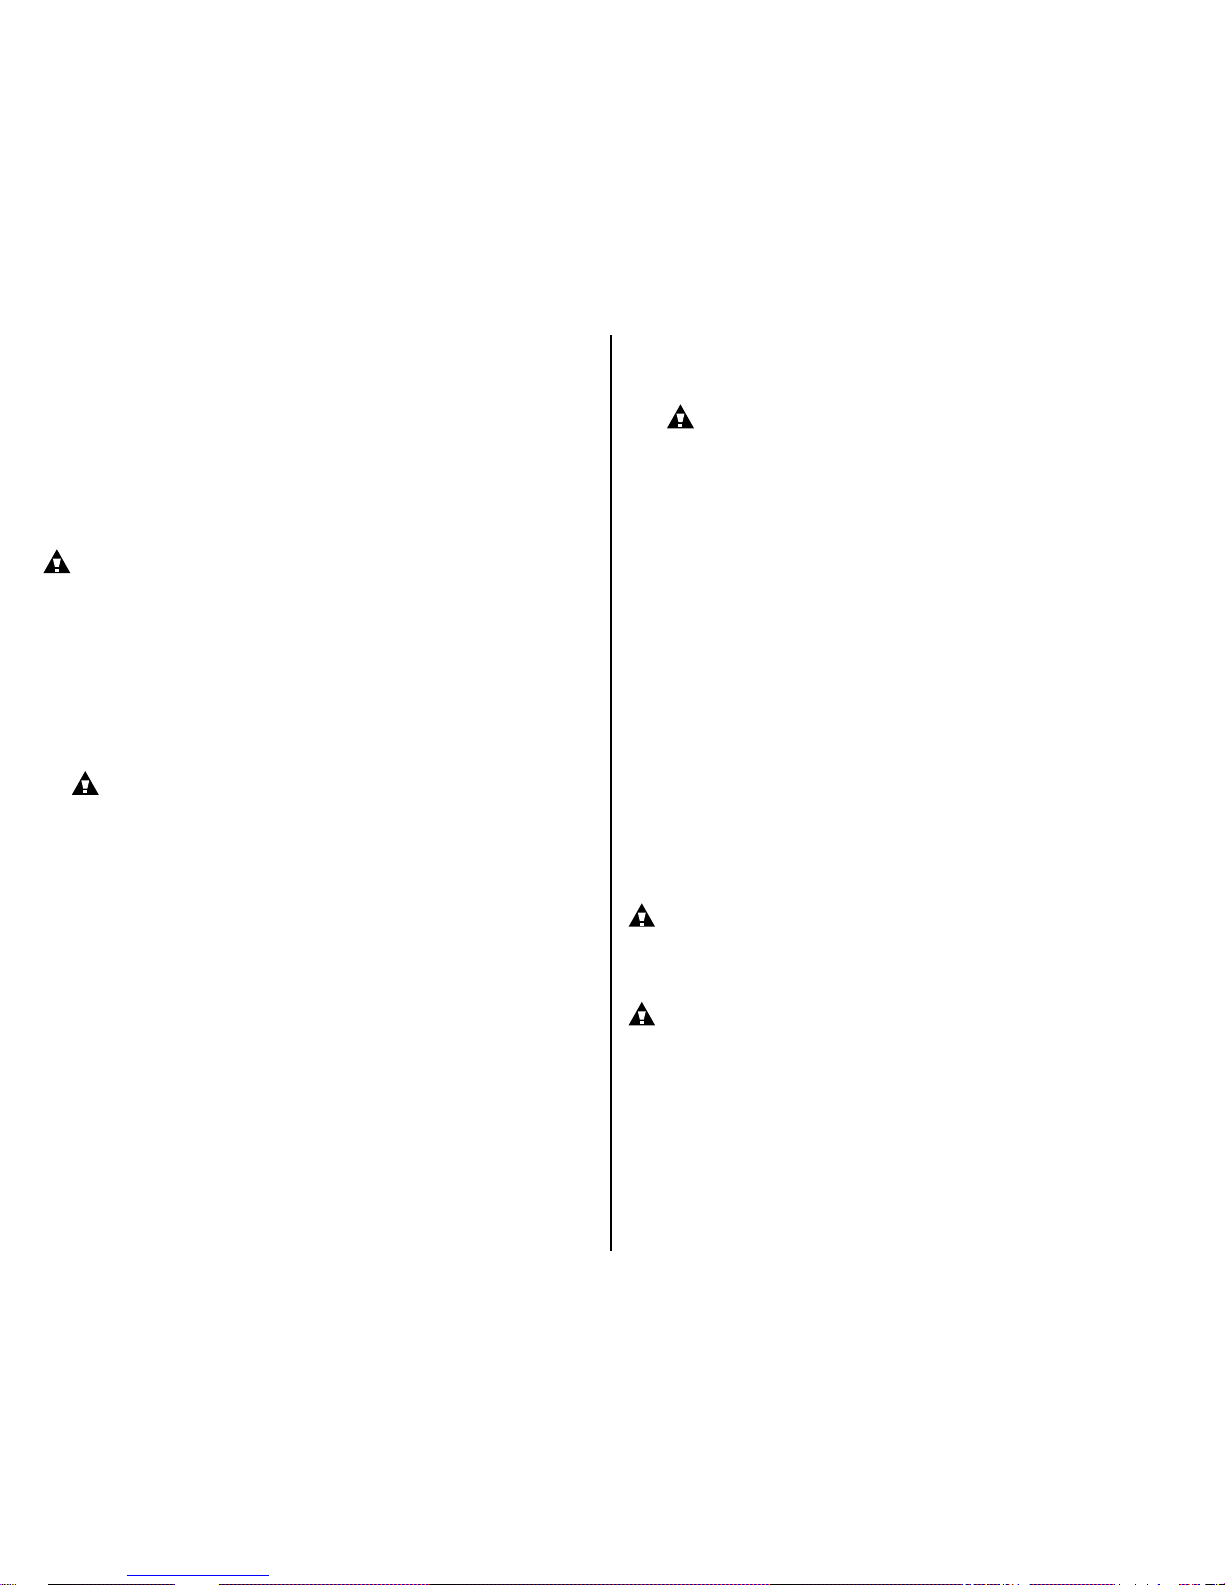
26• WARNING: Do not use the car seat in Group 1 mode
with the casing extracted.
27• Use in Group 1 mode: To determine the best shoulder
strap position, bear in mind that the child’s shoulders
must be just below the shoulder strap guides.
28•
IMPORTANT: The straps must not be too high or
too low with respect to the child’s shoulders.
29•
IMPORTANT: The “Viaggio 0+1 Switchable” car seat
can be reclined into 5 different positions only when it
is used in Group 1 mode.
To recline the car seat, press the lever under the
seat (Fig.A) and pull to adjust the seat to the desired
position (Fig.B).
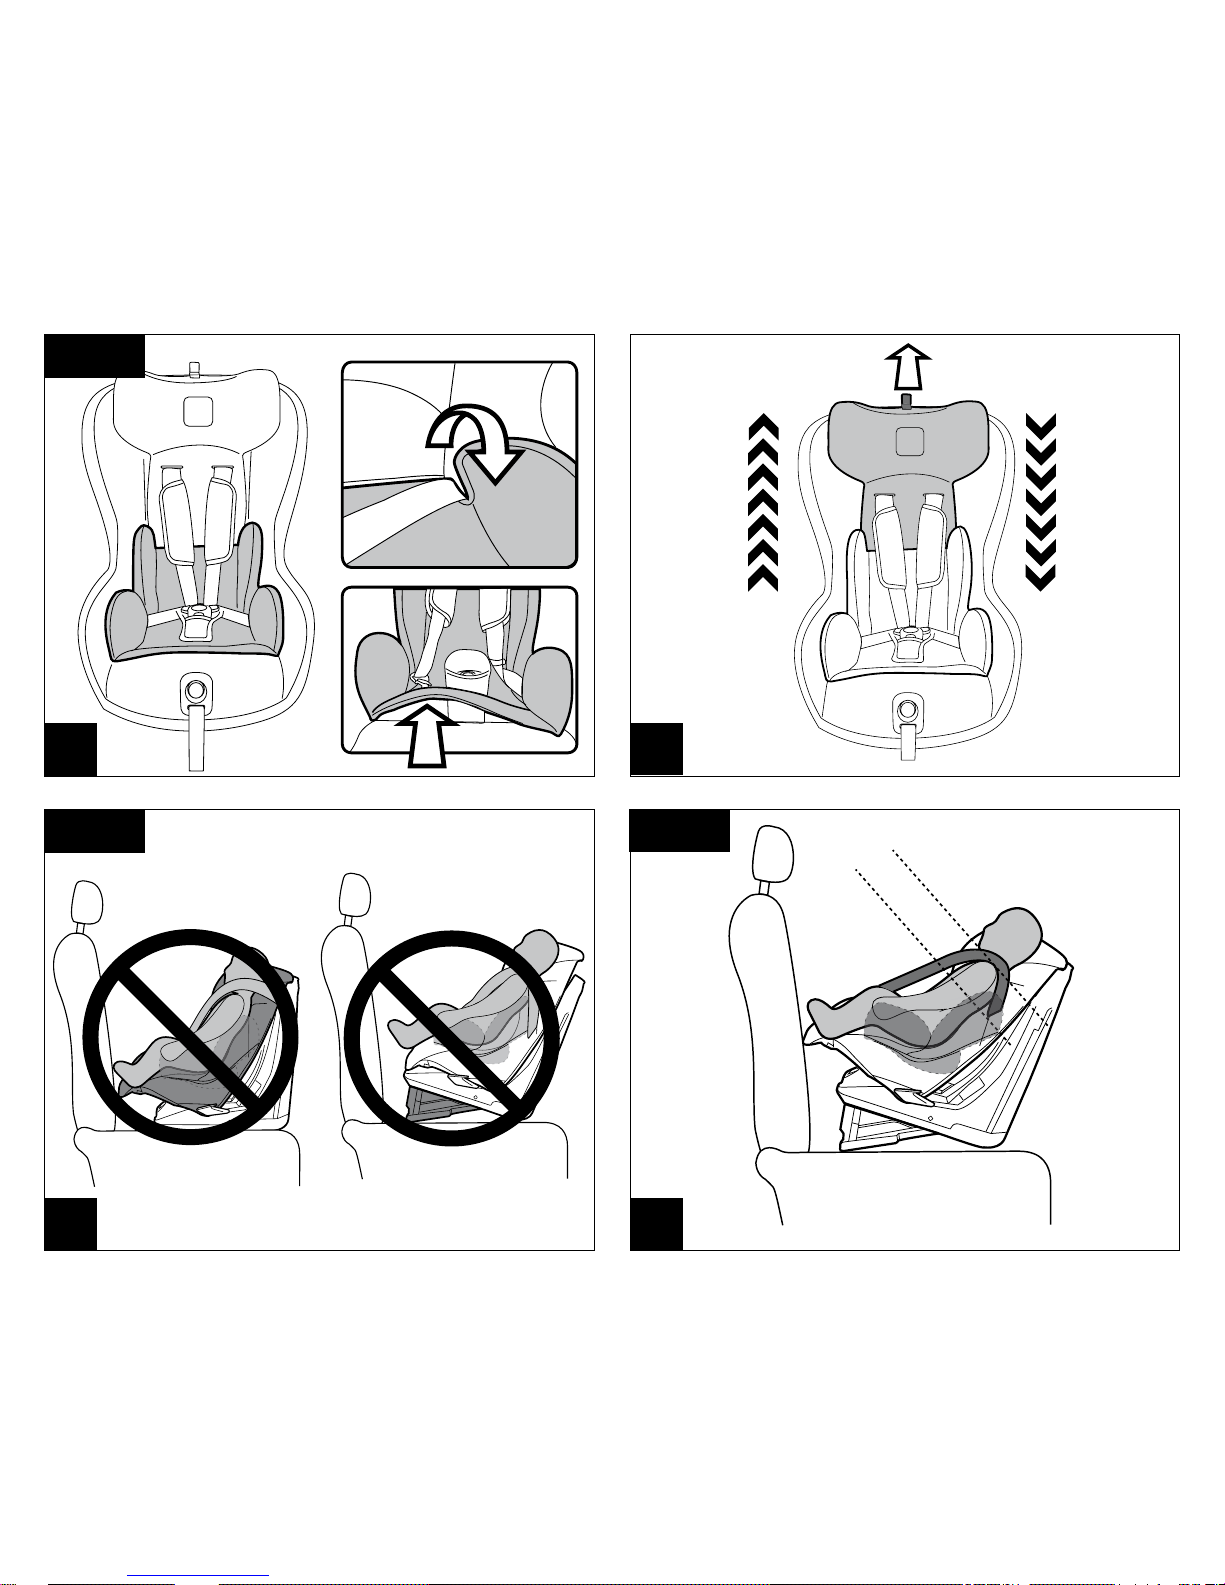
How to remove the soft cover
To remove the soft cover of the “Viaggio 0+1
Switchable” car seat:
• Remove the booster cushion, where present (point 20).
• Unfasten the harness (point 13).
• Open the rear panel.
30• Unfasten the straps from the rear latch plate.
31• Unfasten the straps on the rear and slip them out from
the front.
32• Unfasten the shoulder pads from the rear and slip
them off the straps from the front.
33• Slip off the adjuster strap (Fig. C) and then remove the
headrest cover from above (Fig. D).
34• Release the crotch strap from below the body (Fig. E) and
harness by pushing the red button on the crotch strap
buckle.
15• Lift the harness and attach the buckles to the elastic
bands on the sides.
16•
Place the child in the car seat and arrange the harness over
the child’s shoulders and waist, as shown in the figure.
17• Lock the harness by overlapping the tongues and
inserting them into the buckle of the crotch strap until
they click into place.
18• The child is now sitting correctly with the harness
fastened properly.
19• Finally, tighten the shoulder straps until they are snug
to the child’s body by pulling the central adjustment
strap towards you, as shown in the figure, taking care
not to over-tighten the straps.
IMPORTANT: Leave minimal slack (the space of
a finger) between the strap and the child's chest.
20• To slacken the straps, press the button at the centre
of the car seat and at the same time pull the straps
towards you.
IMPORTANT: Take hold of the straps under the
shoulder pads and pull, as shown in the figure.
21• The car seat has a booster cushion which is only
suitable for small babies. When the child is older,
remove the booster cushion.
• To remove the booster cushion, unfasten the seatbelts,
slide them off the booster cushion and slide the crotch
strap out through the slot in the booster cushion.
IMPORTANT: The booster cushion must be
removed when the “Viaggio 0+1 Switchable” is
used as a Group 1 car seat.
How to adjust the height of the
headrest
The headrest must be adjusted to match the child’s
height. There are 7 positions.
22• To change from a lower position to a higher one: pull
the tongue in the upper central part of the headrest
upwards. The headrest will move at the same time.
To change from a higher position to a lower one: pull
the tongue in the upper central part of the headrest
upwards and, at the same time, push the headrest
Page 20

20
slide the strap out through the crotch strap cover (Fig. F).
35• Slip the strap out through the opening in the soft cover
and remove the soft cover, as shown in the figure.
Soft cover maintenance
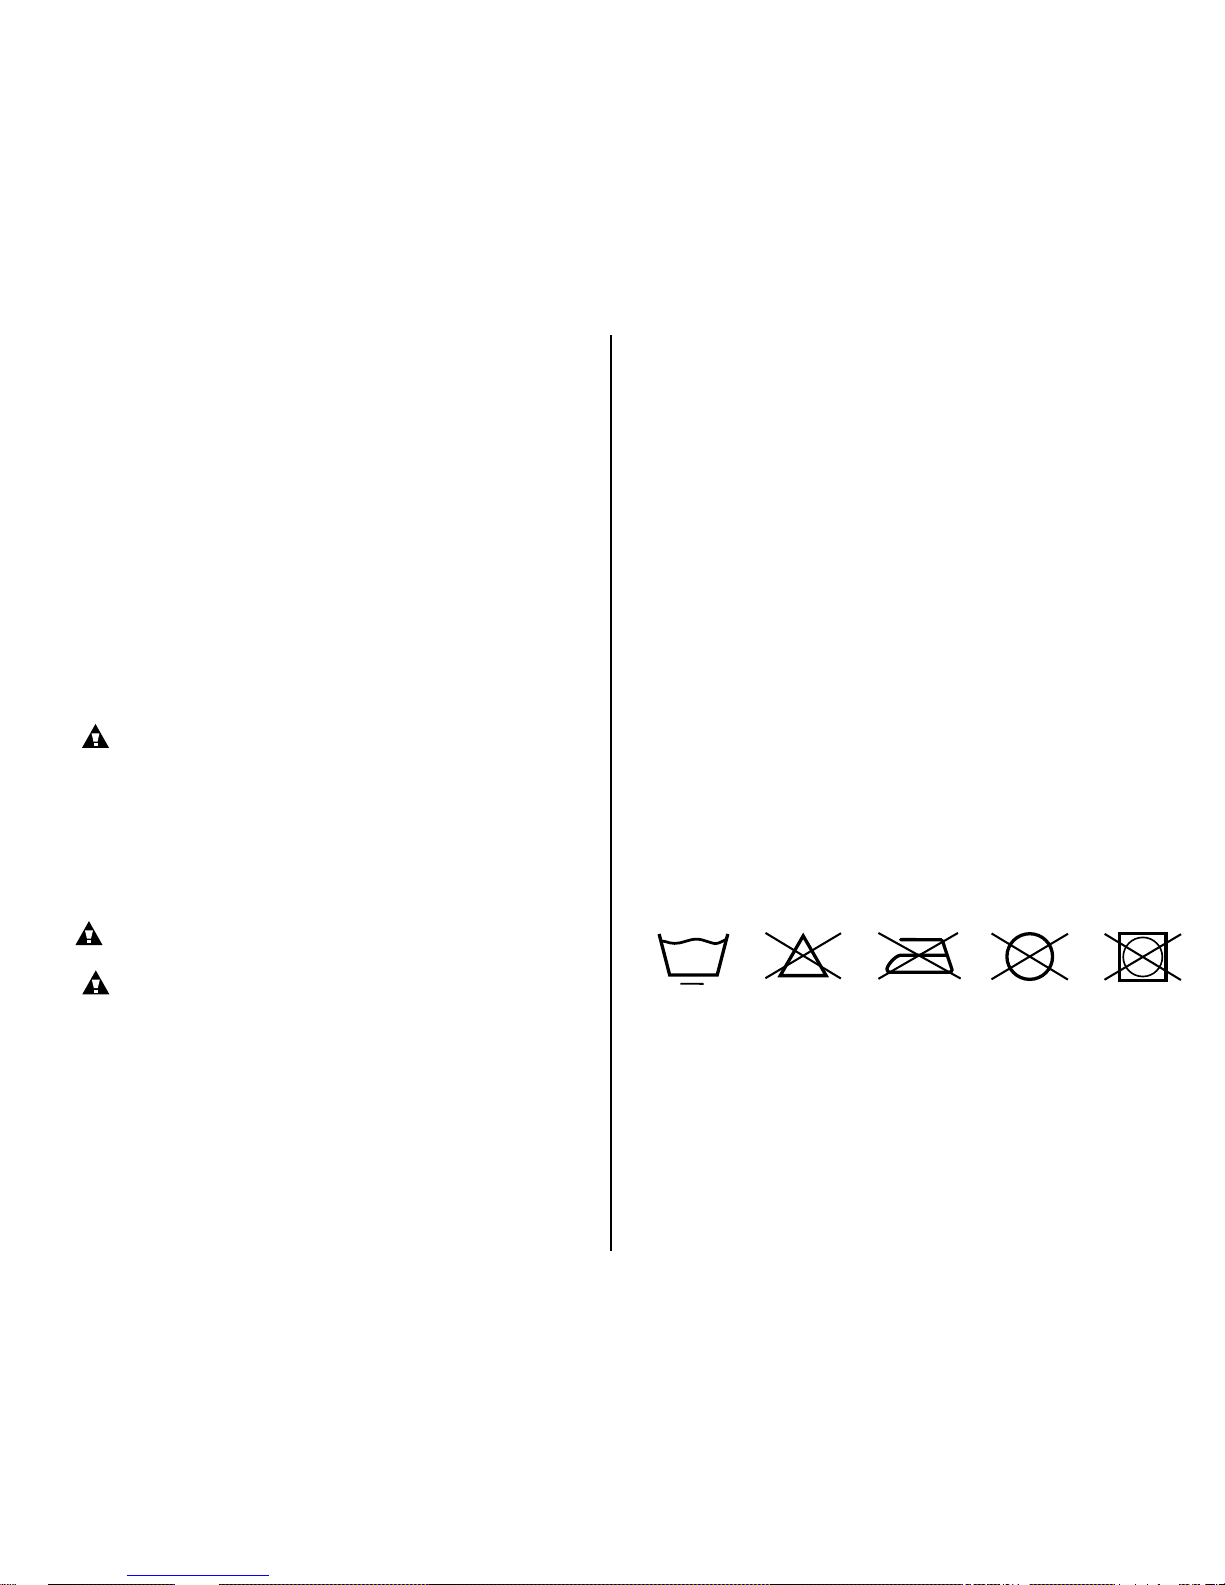
Brush the fabric parts to remove dust.
• Before placing the soft cover in the washing machine,
slide the foam rubber cushion out of the booster seat
from the rear.
• Machine wash at a maximum of 30°C with a delicate
wash setting and short spin cycle.
• Do not use chlorine bleach.
• Do not iron.
• Do not dry clean.
• Do not remove stains with solvents.
• Do not tumble dry.
30
°
How to replace the soft cover of the
“Viaggio 0+1 Switchable” car seat
To replace the soft cover of the “Viaggio 0+1
Switchable” car seat:
36• From below, slip the straps back in through the
opening in the fabric (Fig. A).
• Reinsert the crotch strap into the soft cover (Fig. B).
37• Fasten the crotch strap back onto the body.
38• Fasten the tongue to the crotch strap opening.
39• Put the soft cover in place, starting at the seat and moving
upwards, paying attention to the sides of the backrest.
40• Slip the soft cover over the headrest, ensuring the red
tongue passes through the opening in the fabric.
41• Insert the straps through the soft cover, starting with
the buckles.
42• Lengthen the straps and insert them through the body
of the car seat (the straps in the upper hole and the
buckles in the lower one).
43• Fasten them correctly on the rear, as shown in the figure.
• Fasten the harness at the front (point 17).
IMPORTANT: The straps must not be twisted.
44• ATTENTION: The central adjustment strap must pass
between the body and the plastic shield, as shown.
45• Open the rear panel and fasten the straps onto the rear
latch plate.
• Fasten the straps from the front (point 16).
• For infants and for use in Group 0+ mode, reposition
the booster cushion.
Serial numbers
46• The following information can be found under the
seat of the “Viaggio 0+1 Switchable”: product name,
production date and serial number.
47• The type approval label can be found behind the
backrest of the “Viaggio 0+1 Switchable”.
48• Harness production date.
In the event of problems with the product, these
details will be of use to customers.
Product cleaning
• This product requires minimal maintenance. Cleaning
and maintenance must only be carried out by adults.
• It is advisable to keep all the moving parts clean.
• Clean the plastic parts periodically with a damp cloth.
Do not use solvents or similar substances.
• Brush the fabric parts to remove dust.
• Do not clean the polystyrene shock absorbing device
with solvents or other similar products.
• Protect the product from atmospheric agents:
humidity, rain or snow. Extended exposure to sunshine
can cause colour changes in many materials.
• Store the product in a dry environment.
How to read the type approval label
• This paragraph explains how to interpret the type
approval label (orange label).
• This car seat is type approved for one type of
installation in vehicles: attachment system with
static or inertia-reel three-point seatbelts (the term
UNIVERSAL indicates compatibility of the car seat with
vehicles fitted with this type of seatbelt).
• The top of the label displays the trademark of the
manufacturing company and the name of the product.
• The letter E in a circle indicates the European type
approval mark and the number indicates the country
Page 21
21
that issued the type approval (1: Germany, 2: France, 3:
Italy, 4: Netherlands, 11: Great Britain, 24: Ireland).
• Type approval number: if it starts with 04, this indicates
the fourth amendment (the one currently in force) of
Regulation R44.
• Reference standard: UN/ECE R44/04.
• Production serial number: on issue of type approval,
each car seat is personalised with its own number.
PEG-PEREGO S.p.A.
Peg-Perego S.p.A. is an ISO 9001 certified
company. This certification is a guarantee
for customers and consumers of the
transparency and trustworthiness of the
company's procedures and working
methods. Peg Perego can make changes
at any time to the models described in this publication
for technical or commercial reasons. Peg Perego is at
the disposal of its customers and consumers to ensure
that all their demands and queries are fully satisfied. It
is a key part of our policy to ensure we are always
aware of our customers' views and requirements. We
would therefore be very grateful if, after using a Peg
Perego product, you take the time to fill in our
CUSTOMER SATISFACTION QUESTIONNAIRE, making a
note of any comments or suggestions you might have.
You can find the questionnaire on the Peg Perego
website: www.pegperego.com
Peg-Perego after-sales service
If any parts of the item get lost or damaged, only
use genuine Peg Perego spare parts. For any repairs,
replacements, information on the products and sales of
genuine spare parts and accessories, contact the Peg
Perego Assistance Service and state the serial number
of the product, if present.
tel. 0039/039/60.88.213
fax 0039/039/33.09.992
e-mail assistenza@pegperego.it
website www.pegperego.com
KO_Korean
뻬그뻬레고 카시트를 구입해 주셔서 감사합니다.
Group 0+(0~13kg)
• 유럽 안전 기준 ECE R44/04을 합격한 신생아부터
13kg(약 12개월)까지 사용가능 합니다.
•거의 모든 자동차 시트에 장착 가능합니다.
• 본 카시트는 자동차의 유지 관리 설명서가 법용 그룹
0+시스템과 호환성을 나타낸다면
자동차에 올바르게 정착될 수 있습니다.
• 인증라벨이 없는 이전 모델보다 보다 엄중한 인증 기
준을 획득 함으로서 “유니버셜”로
분류 되었습니다.
• UN/ECE No. 16 이나 그에 준하는 기준을 획득한 자동
조절식 3점식 시트 벨트로만 장착 가능합니다.
• 2점식이나 허리 벨트로 장착 하면 안됩니다.
Group 1 “Universal” with vehicle seatbelt
• 유럽안전기준 ECE R44/04을 합격한 애기 몸무게
9~18kg(약 9개월~4세)에 사용가능 합니다.
• 거의 모든 자동차에 장착 가능합니다.
• 사용설명서에서 설명되어 있는 것처럼 그룹1(9~18kg)
시스템에도 적합하게 거의 모든 자동차에
알맞게 장착 가능 합니다.
• 인증라벨이 없는 이전 모델보다 보다 엄중한 인증 기
준을 획득 함으로서 “유니버셜”로분류 되었습니다.
IMPORTANT (꼭 읽어 보세요 !!! )
• 본 카시트는 그룹0+(0~13kg)에서 사용할 시에는 뒤
보기(후방)장착을 하시고 그룹1 (9~18kg)에서는 필히
전방 장착을 하셔야 합니다.
• 앞 좌석에 에어벡이 있을 경우 절대로 후방(뒤보기)장
착을 하지 마세요.
• 앞 좌석에 전방 장착을 할 때에는 가능한 한 대쉬보드
에서 멀리 장착하세요.
• 이 제품은 제품 일련 번호가 있습니다.
Page 22

22
• 만약 이 제품을 장착하는데 어려움이 있다면 자동차
의자의 머리 받침대를 올리거나 제거해주세요.
WARNING (경고)
• 제품을 사용하기 전에 설명서를 필히 읽으시고 향후
참조를 위해서 제공된 서류철에 보관하세요.
제품 설명서에 면밀하게 따르지 않으면 고객님의 아기
를 위험에 빠트릴 수 있습니다.
• 이 제품은 필히 어른에 의해서 조립되고 장착 되어야
합니다.
• 아기가 카시트에 없을 때 조립하고 장착하세요.
• 여행 중일 때 절대로 고객님 애기를 안거나 자동차 의
자에 앉게 하지 마세요. 비록 자동차가 천천히 주행 중
이라도 급 브레이크일 경우에 아기는 쉽게 앞쪽으로 튕
길 수 있습니다.
• 제품 구조물에 손가락을 넣지 마세요.
• 운행 중일 때 짐이나 다른 물건이 애기를 다치지 않도
록 각별한 신경을 써 주세요.
• 설명서 이외 다른 방법으로 설치하시면 사고일 경우
카시트가 자동차 시트에서 분리될 수 있습니다.
• 3점식 시트 벨트는 항상 단단하게 고정하고 꼬이지 않
게 확인 하세요. 특히 3점식 벨트는 사고 이후 심한 충
격이 있었던 경우에는 교체 해주세요.
• 고객님의 아기가 수면 중이더라도 필히 카시트에서 떼
어 놓지 마세요.
• 자동차 운행 중일 때에는 아기를 카시트에서 떼어 놓
지 마세요.
• 자동차 문이나 자동차 시트에서 움직일 수 있는 부품
에 의해 방해 받지 않도록 하세요.
• 어깨 끈의 높이와 장력을 적절히 조절하여 아기 몸이
편하게 꼭 확인 하세요. 벨트가 꼬이거나 느슨하게 하
지 않도록 확인하세요.
• 카시트는 아기의 수면을 연장하기 위함으로 사용되
면 안됩니다.
• 카시트가 햇빛에 노출될 때는 카시트를 자동차에 두지
마세요. 몇몇 부분이 열기로 뜨거워지거나 고객님 아
기의 민감한 피부에 해가 될 수 있습니다. 아기를 시트
에 앉히기 전에 시트가 너무 뜨거운지 체크 해주세요.
• 카시트 시트커버는 제품 안전 시스템에 아주 필수적인
제품이기 때문에 허가 받지 않은 제조자의 제품으로 대
체 사용하면 안됩니다.
• 만약 의심스럽다면 카시트 판매처 및 제조자와 연락
을 취하세요.
• 제품에 부착된 부착물과 라벨을 떼어내지 마세요. 부
착물과 라벨을 참조 하지 않고 사용하면 제품 안전 기
준에 적합하지 않게 사용 될 수 있습니다.
• 카시트의 파손이나 부품 분실이 있을 때는 사용하지
마시고 혹시 중고 부품이나 이전 사고 때 심한 결함이
예상되는 부품이 계속 사용되고 있다면 아주 위험한 구
조적인 결함을 초래 할 있으니 절대 사용 하시 마시길
바랍니다.
• 어떤 수리나 제품 부품 교체에 대해서는 마지막 페이
지에 있는 고객센터에 연락 하세요.
• 카시트는 애기가 사용하지 않더라도 급브레이크 경
우 승객이 다칠 염려가 있으니 꼭 안전하게 장착 해놓
으세요.
• 제품상에 나와있는 제조일로부터 7년이 경과했다면
사용하지 마세요.오랜 세월로 인해 제품 안전 기준에
더 이상 적합 하지 않을 수도 있습니다.
• 제조자에 의해 허가 받지 않은 액세서리는 사용하지
마세요.
Instructions for use
UNIVERSIAL CATEGORY –Belted
Group 0+
Fastening with seatbelts
Group 0+ 안전벨트로 장착하는 방법 (그림 1~4번 설
명 입니다.)
1.
카시트 바닥에 있는 각도 조절 추가 장치 핸들을
눌러서 앞쪽으로 당기면 화살표 A 와 B처럼 베이스를
당겨 뽑아 낼 수 있습니다.
C (각도 조절 레버)를 최대한 당겨 최대한 각도를 눕
혀 사용하세요.
2. 그룹0+의 용도로서 올바르게 장착된 그림입니다.
Page 23
23
3. 그림과 같이 뒤보기로 장착합니다. 자동차 시트 벨트
를 카시트의 프레임과 본체 사이를 그림에서와 같이 단
계별로 통과시킵니다.
- 먼저 벨트를 연한 블루 색의 벨트가이드(A) 속으로 들
어가게 합니다.
- 벨트를 단단히 조인 후 B속으로 찰깍 소리 나게 끼
웁니다.
4. 시트벨트를 위쪽의 연한 블루 색의 벨트 홈(C)을 통
과 시킵니다.
중요함 : 시트벨트를 꼭 잡고 확실하게 D 처럼 당긴
후 자동차 시트에 최대한 밀접하게 설치 한다.
Instructions for use
UNIVERSAL CATEGORY - Belted
Group 1
Fastening with seatbelts
안전 벨트로 장착 하는 방법 (그림 5~13번 설명 입니
다.)
5.
Group 0+ 에서 Group 1 모드로 올바르게 사용
하기 위해서는 먼저 카시트 바닥의 각도 추가 조절장
치의 레버(A)를 당겨서 그림 B와 같이 안쪽으로 밀어
넣는다.
6. 그림에서와 같이 앞보기(전방) 장착 합니다.
7. 자동차의 시트 벨트를 카시트 뒤쪽으로 보다 쉽게 통
과시키기 위해서 카시의 등받이 각도 조절 레버(A)를
당겨서 B처럼 각도를 최대한 눕혀줍니다.
8. 자동차 시트벨트를 그림처럼 카시트의 프레임과 본
체 사이를 통과시킨다.
9. 허리 벨트는 아래 부분 빨간색의 가이드를 통과한 후
벨트를 당겨서 자동차의 시트 버클에 딸깍 소리 나게 끼
우고 확인하세요.
10. 허리벨트를 단단하게 당겨서 빨간색 가이드 클립
틈을 지나가게 끔 확인하세요.
11. 카시트 하단에 있는 등받이 각도 조절 레버(A)를 당
기고 프레임을 B처럼 밀면서 카시트가 똑바로 위치 하
게끔 하세요.
12. 빨간색 플라스틱의 steady fix device(확실한 고정
장치)를 오픈 후 A처럼 사선 방향의 벨트를 통과시킨
후 B 처럼 벨트가 꼬이지 않고 팽팽하게 당긴 후 고정장
치를 딸깍 소리 나게 눌러줍니다.
13.
시트벨트를 꼭 잡고 완전히 위쪽으로 당겨서 카
시트를 자동차시트에 최대한 밀접하게, 정확하게 설치
하세요.
How to secure your child in the “Viaggio
0+1 Switchable” car seat
고객님의 유아를 안전하게 탑승시키는 방법(그림
14~21번 설명)
14. 유아를 카시트에 앉히기 전에 가랭이 벨트 버클의
빨간색 버튼을 눌러서 고정벨트를 분리 하세요.
15. 고정 벨트를 위로 올려서 양쪽에 있는 고무밴드에
부착 하세요.
16. 유아를 카시트에 앉힌 후 고정벨트를 아기의 어깨
와 허리 위로 정리 해 놓으세요.
17. A 처럼 클립 두 개를 겹쳐서 B처럼 버클을 딸깍 소
리 나게 체결하세요.
18. 고정벨트가 적절하게 조여진 상태에서 바르게 앉아
있는 아기 모습입니다.
19. 마지막으로 중앙 조절 벨트를 당기면서 아기 체형
에 맞게끔 어깨 벨트를 장착하세요.
아기의 어깨와 벨트 사이에 최소한 손가락 공간만큼
느슨함을 남겨 두세요.
20. 벨트를 느슨하게 하기 위해 카시트의 중앙 버튼을
누르면서 벨트를 앞쪽으로 당기세요.
어깨벨트 패드 아래 부분을 잡고 당기세요.
21. 보조쿠션은 아주 작은 아기에만 사용하시고 아기가
크면 꼭 분리 해주세요.
• 분리를 하기 위해 시트벨트를 느슨하게 한 뒤 분리하
고 보조쿠션 중앙에 있는 홈에서 가랭이 벨트를 분리
합니다.
•보조쿠션은 Group 1 으로 사용하기 이전에 반드시 분
리 하여야 합니다.
How to adjust the height of the headrest
Page 24
24
머리받침대(headrest)
조절 방법 (그림 22 ~29번 설명) 머리 받침대는 아기 높
이에 맞게끔 조절(7단계) 해야 합니다.
22. 아래쪽에서 위로 올리기 위해서는 받침대 중앙에
있는 끝부분을 잡고 위쪽으로당겨 올린다. 에서 위쪽에
서 아래쪽으로 움직일 때는 머리받침대 중앙 끝을 위로
당기면서 받침대를 중앙부분을 눌러서 아래쪽 원하는
위치만큼 내려주면 된다.
마지막엔 반드시 머리받침대를 움직이면서 원하는 위
치에 적절하게 잠겨있는지를 꼭 확인 해야 한다.
23. 경고 : Group 0+ 모드로 사용시에는 반드시 등받이
각도를 최대한 눕히고 카시트 바닥에 있는 각도 추가 조
절 장치를 확장시켜서 뒤보기(후방)장착 사용하세요.
24. Group 0+ 모드 사용시 : 최적의 어깨벨트위치를 결
정하기 위해서 아기의 어깨는 반드시 어깨벨트 가이드
보다 위에 있어야 함을 명심하세요
25.
벨트는 아기의 어깨를 고려해서 너무 높거나 낮
아서는 안됩니다..
26. 경고 : 전방장착(Group 1)에서는 각도추가조절장치
를 사용해서는 안됩니다. (카시트 바닥의 구조물을 당
겨 확장시켜 사용해서는 안됩니다.)
27. Group 1 모드 사용시 : 최적의 어깨벨트위치를 결
정하기 위해서 아기의 어깨는 반드시 어깨벨트가이드
보다 낮아야 합니다.
28.
벨트는 아기 어깨를 고려해 너무 높거나 낮으면
안됩니다.
29.
본 카시트는 Group 1 모드 사용시에만 5단계로
등받이 조절이 됩니다.
등받이 조절을 위해서 조절 레버(A)를 눌러 B(앞)쪽으
로 당겨 원하는 위치로 조절 하면 됩니다.
How to remove the soft cover
시트 커버 분리 방법(그림 30~ 35번 그림 설명) 시트
커버를 분리 하기 위해서 먼저 보조쿠션을 제거하고(
그림20), 벨트를 느슨하게 한후.(그림 13.) 뒤쪽 패널을
오픈합니다.
30. 뒤쪽 래치(빗장)판에서 벨트를 느슨하게 합니다.
31. 뒤쪽에서 벨트를 느슨하게 한 후 앞쪽에서 벨트를
당겨냅니다.
32. 어깨패드를 뒤쪽에서 느슨하게 하고 앞쪽에서 벨트
를 당겨 분리시킵니다.
33. C처럼 조절 벨트를 소르르 풀어 내리고 머리받침대
커브를 D처럼 위로 분리합니다.
34. 가랭이 벨트를 E처럼 카시트 몸체 아래로부터 분
리한 후 F처럼 벨트를 가랭이 벨트 커버를 통해서 소
르르 빼냅니다.
35. 시트 커버를 소르르 열고 벨트를 소르르 빼내면서
시트 커버를 분리합니다.
Soft cover maintenance 시트커버 유지관리
직물 부분의 때를 제거하기 위해 솔질 합니다.
시트 커버를 세탁기에 넣기 전에 뒤쪽 보조시트로부터
스펀지 고무를 소르르 빼내세요.
세탁기 수온은 30°C, 낮은 회전 등 민감한 세탁 설정
을 하세요.
락스 같은 염소계 표백제를 사용하지 마세요.
다리미를 사용하지 마세요.
드라이크리닝 하지 마세요.
용제로 얼룩을 제거하지 마세요.
회전식 건조기에서 말리지 마세요.
30
°
How to replace the soft cover of the
“Viaggio 0+1 Switchable” car seat
카시트 시트커버 교체 방법(그림 36~45번 설명)
36. 직물 홈을 벌리면서 벨트를 뒤쪽에서부터 소르르
빼어냅니다..(A);
가랭이 벨트를 커버안쪽으로 다시 집어넣으세요.(B)
37. 가랭이 벨트를 프레임 본체 뒤쪽으로 당깁니다..
38. 끝부분을 가랭이벨트 통로 쪽으로 당겨 고정시킵
니다..
39. 뒤 받침대의 양쪽을 주의하면서 시트커버를 시트부
Page 25
25
터 위쪽으로 옮겨가면서 끼워 넣으세요.
40. 빨간색 끝 부분을 시트 구멍으로 통과시키면서 시
트커버를 머리받침대 위로 놓으세요.
41. 벨트를 버클부터 먼저 시트커버를 통해 집어 넣습
니다.
42. 벨트를 길게 하여 카시트 본체를 통해 집어 넣습니
다.(벨트는 위쪽 구멍, 버클은 아래 구멍입니다.)
43. 벨트를 뒤쪽에 정확하게 고정 될 수 있도록 앞쪽에
서 벨트를 당깁니다.
단 벨트가 꼬이면 안됩니다.
44.주의 : 중앙 조절 벨트는 카시트 본체와 플라스틱 보
호판 사이를 통과 해야 합니다.
45. 뒤 덮개를 열어서 뒤 빗장 판 위로 벨트를 단단히 당
겨 고정시킵니다.
- 앞쪽에서부터 벨트를 당겨 고정하세요.(16번 그림 참
조)
- 신생아와 Group 0+ 모드를 위하여 보조 쿠션을 재배
치 하세요.
Serial numbers 제품 일련 번호
46. 시트 아래에는 제품명, 생산일자 와 일련번호가 표
시되어 있습니다.
47. 뒤쪽에는 제품 인증 라벨이 붙어 있습니다.
48. 고정 벨트 생산 날짜. 제품 이상 있을 경우 이 상세
번호가 고객님에게 유용 하게 사용 될 것입니다..
Product cleaning 제품 세척
• 제품 최소 유지 관리가 필요합니다. 세척과 유지관리
는 반드시 성인이 해야 합니다.
• 움직일 수 있는 모든 부품은 항상 깨끗하게 유지하세
요.
• 플라스틱 부분은 주기적으로 젖은 천으로 닦아 주세
요.
• 솔벤트나 유사물질은 사용하지 마세요.
• 직물은 때를 제거하기 위해 솔질 하세요.
• 습도,비 와 눈 같은 대기요인으로부터 제품을 보호하
세요.
• 장기간 햇빛노출은 여러 부분의 변색을 초래 합니다.
• 제품을 건조한 곳에 보관하세요.
How to read the type approval label
제품인증라벨 읽는 방법
• 이 단락은 인증라벨(오렌지 라벨)을 어떻게 해석하는
지 설명합니다.
• 본 카시트는 고정식 또는 자동 조절식 3점 벨트 시스템
이 장착된 자동차에 장착하기 위한 제품으로 인증 받았
습니다. (유니버셜은 자동차 벨트로 장착되어 지는 호
환성 있는 카시트를 의미합니다.)
• 라벨 제일 위쪽은 제조회사와 제품이름의 상표를 표
시합니다.
• 원안에 있는 E 는 유렵 인증 마크를, 숫자는 인증 받은
나라를 표시합니다. (1:독일, 2:프랑스, 3:이태리, 4:네
델란드, 11:영국, 24:아일랜드).
• 인증번호형태 : 4로 시작하면 R44기준에 의한 4번째
개정(최근에 실시한)을 나타냅니다.
• 참조 기준(표준) UN/ECE R44/04
• 제품일련번호 : 각 카시트는 자기만의 고유번호가 주
어지며 부여받은 인증형태를 나타 냅니다.
PEG-PEREGO S.p.A.
뻬그뻬레고는 ISO9001가 인증한 회
사입니다. 이 인증은 고객들과 소비자
들에게 회사 일의 진행과 방법을 신뢰
할 수 있음과 투명성을 보장 합니다.
뻬그뻬레고는 기술과 통상의 이유로
여기 서술된 모델을 언제든지 바꿀 수 있습니다. 뻬그
뻬레고는 고객들과 소비자들의 요구와 질문에 완전히
만족되도록 고객 편에 서겠습니다. 우리는 고객님의 견
해와 요구를 항상 인지함이 중요합니다. 제품을 사용하
시면서 어떤 의견과 표현을 할 수 있는 고객만족설문조
사에 응해주신다면 매우 감사하겠습니다.
www.pegperego.com 홈페이지에서 설문조사를 찾을
수 있습니다.
Page 26

26
Peg-Perego after-sales service
뻬그뻬레고 A/S 부품이 분실되었거나 손상 되었을 때
는 반드시 뻬그뻬레고 정품 부품을 사용하세요. 어떠한
수리나 교체 시, 정품 부품과 액세서리 구입에 대해서
는 제품에 있는 뻬그뻬레고 고객센타에 연락 하세요.
Tel : 1566-9323
Email : good@pegperego.co.kr
website : www.pegperego.co.kr
Page 27

27
Page 28
PEG PEREGO S.p.A. VIA DE GASPERI 50 20862 ARCORE MB ITALIA
tel. 0039•039•60881 - fax 0039•039•615869-616454
Servizio Post Vendita/After Sale: tel. 0039•039•6088213 - fax: 0039•039•3309992
www.pegperego.com
FIKR1201I165 - 10/12/2012
All of the intellectual property rights for the contents of this instruction manual belong to PEG
PEREGO S.p.A. and are protected by the laws in force.
800-147414
0
+
VIAGGIO
SWITCHABLE
 Loading...