

Page 1

seat pop-up
U.S.A./CANADA
EN Instructions for use
ES Instrucciones de uso
FR Notice d’emploi
Page 2
3
2
1
Page 3
6
5
4
Page 4
8
7
9
Page 5
12
11
10
NO
OK
Page 6
14
15
13
OK
Page 7

16
Page 8

2
5
6
1
3
4
7
8
10
9
Seat Pop-Up
1) BCAS PU0 0*
2) IRBELV0008
3) BSASPUNA*
4) BCOSPU00*
5) MUCI5P22N
6) BSPSPU00*
7) CFRPPR00--NER
8) ITSE03NAN
9) SAPI7549N
10) A SPI0211L31N
EN Spare parts available in different colours to be specified when ordering.
ES Repuestos disponibles en otros colores que se especificarán en el pedido.
FR Pièces de rechange disponibles en plusieurs couleurs à spécifier dans la demande.
Page 9

- 9 -
EN_English
Thank you for choosing a Peg-Pérego product.
WARNING
_ CAREFULLY READ INSTRUCTIONS
AND KEEP FOR FUTURE USE.
_ THE CHILD’S SAFETY COULD BE PUT
AT RISK IF THE INSTRUCTIONS ARE
NOT FOLLOWED.
_ THIS PRODUCT IS DESIGNED FOR
CHILDREN WHOSE MAXIMUM
WEIGHT IS 50 POUNDS (22.7 KG)
AND WHOSE MAXIMUM HEIGHT IS
43 INCHES (110 CM). ANY POACH OR
POCKET PROVIDED WITH THIS UNIT
IS DESIGNED TO CARRY A MAXIMUM
WEIGHT OF 0.44 POUNDS (0.2 KG).
_ FAILURE TO FOLLOW
MANUFACTURER’S SPECIFICATIONS
OR USE OF ACCESSORIES OTHER
THAN THOSE APPROVED BY THE
MANUFACTURER MAY CAUSE THE
UNIT TO BECOME UNSTABLE.
_
WARNING: AVOID
SERIOUS INJURY FROM FALLING OR
SLIDING OUT. ALWAYS USE COMPLETE 5
POINT SEAT BELT.
_
WARNING: NEVER
LEAVE YOUR CHILD UNATTENDED.
_ TO AVOID SERIOUS INJURY, WHEN
MAKING ADJUSTMENTS ENSURE
THE CHILD’S BODY IS CLEAR OF ALL
MOVING PARTS.
_ ALL OPERATING AND ASSEMBLY
PROCEDURES SHOULD BE
PERFORMED BY AN ADULT.
_ DO NOT LIFT THE STROLLER BY
GRIPPING THE FRONT BAR. THE
FRONT BAR IS NOT DESIGNED TO
WITH STAND LOADS.
_ ENSURE THAT THE STROLLER IS
OPENED CORRECTLY AND LOCKED IN
POSITION OF USE.
_ DO NOT USE THE PRODUCT IF IT HAS
BROKEN OR MISSING PARTS.
_ DO NOT USE NEAR FIRE OR EXPOSED
FLAME.
_
WARNING: KEEP
CHILDREN AWAY WHILE OPENING
AND CLOSING TO AVOID TRAPPING
OR INJURY
_
WARNING:
DO
NOT ADD ANY MATTRESS ARE NOT
APPROVED BY THE MANUFACTURER.
_ WARNING: DO
NOT MAKE ANY ALTERATIONS OR
MODIFICATIONS TO THE STROLLER
WITH PRODUCTS NOT SUPPLIED BY
THE MANUFACTURER AS THIS MAY
CAUSE INSTABILITY OR STRUCTURAL
DEMAGE NOT COVERED UNDER
WARRANTY.
NOTICE
THIS ARTICLE MEETS OR EXCEEDS
ALL REQUIREMENTS COVERED IN
ASTM F833 STANDARD AND LATEST
REVISIONS.
PRODUCT CHARACTERISTICS
_ The item is numbered progressively.
_ The Seat Pop-Up is a reversible seat: it can
turn to face mum or to face outwards.
PRODUCT COMPONENTS
Check all packaging contents and contact
the Customer Help Service if you have a
complaint.
Seat Pop-Up (for Book 51S, Book Scout):
_ hood, foot muff, rain canopy, front bar.
Seat Pop-Up:
_ hood, front bar.
INSTRUCTIONS
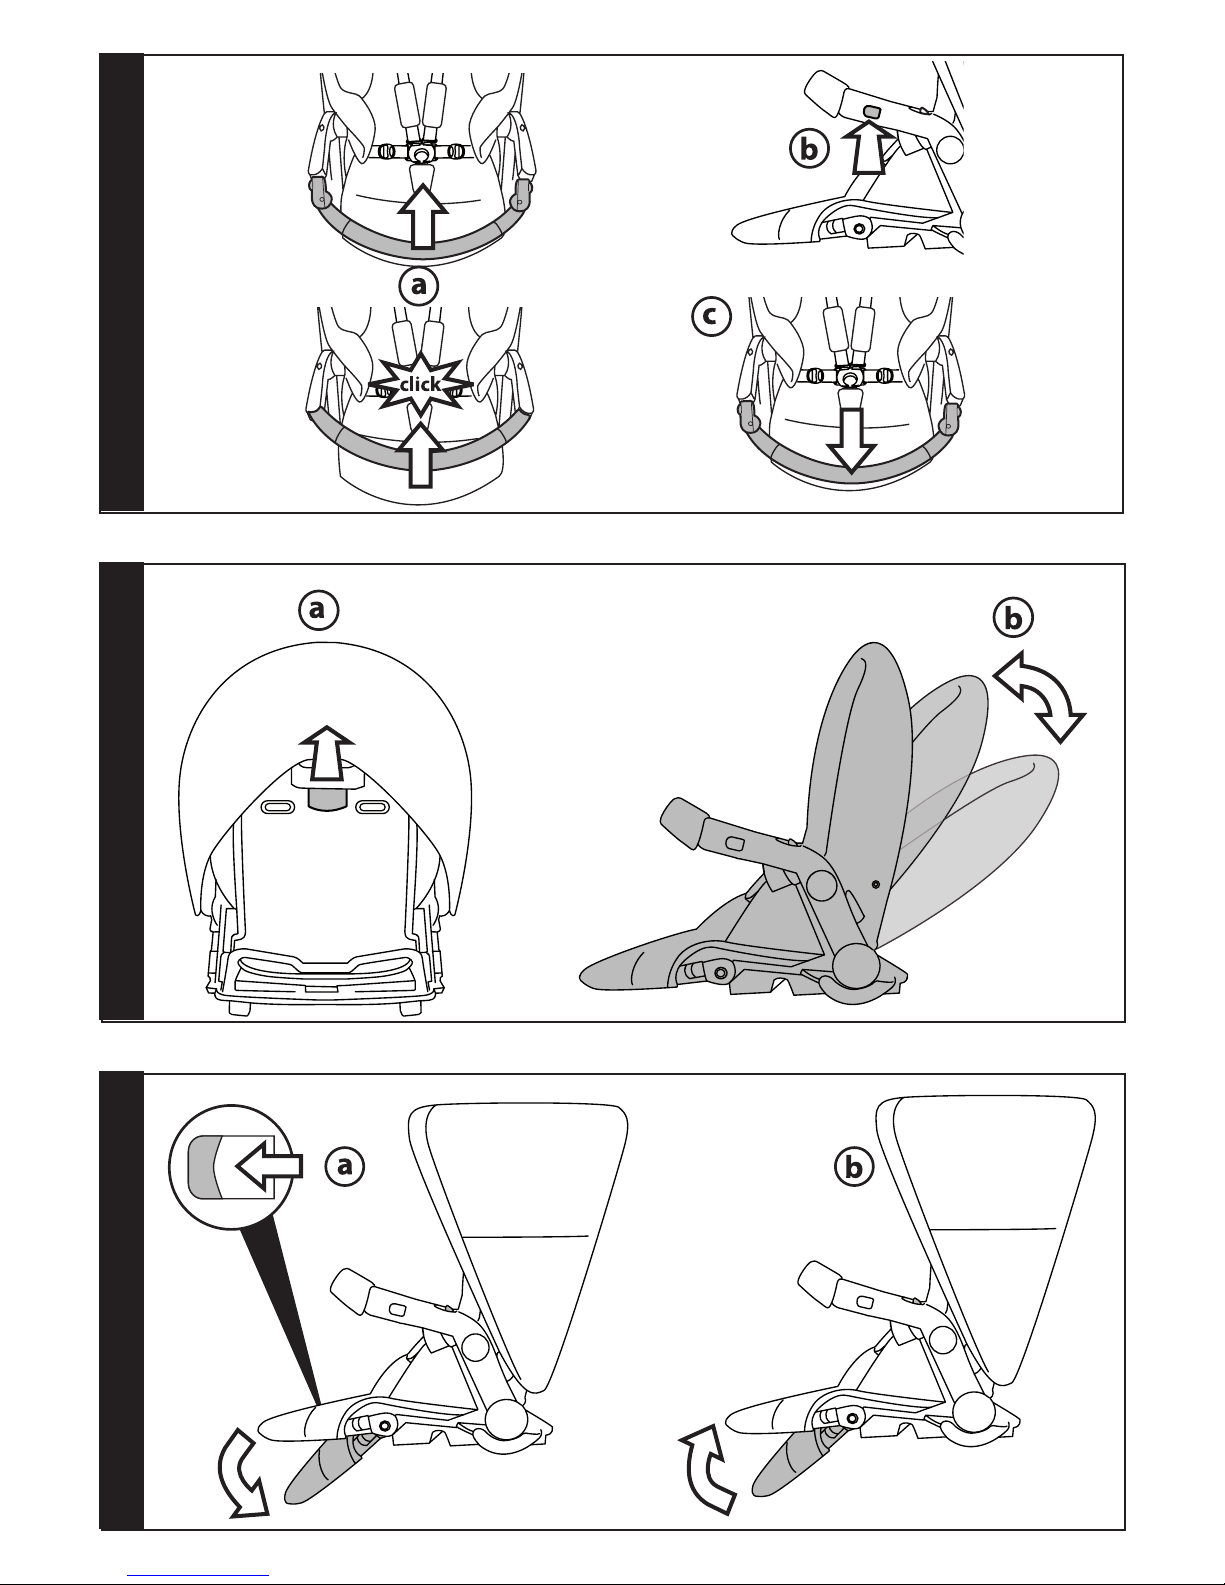
1 FRONT BAR: To attach the front bar, slide
the attachments into the armrests and push
towards the seat until they lock into place
(fig_a). To remove the front bar, press the two
buttons (fig_b) and pull out (fig_c). Open the
front bar on one side only, to facilitate the
child's entry and exit.
2 BACKREST: to adjust the backrest, lift the
handle (fig_a) and recline it to the desired
position (fig_b).The backrest can be adjusted
into different positions.
3 FOOTREST: before adjusting the foot rest,
ensure its cover is accurately fitted; if it isn’t,
Page 10

- 10 -
fit it accordingly. To lower the footrest push
the two levers downwards and then push
the footrest downwards (fig_a); to raise the
footrest lift it upwards (fig_b).
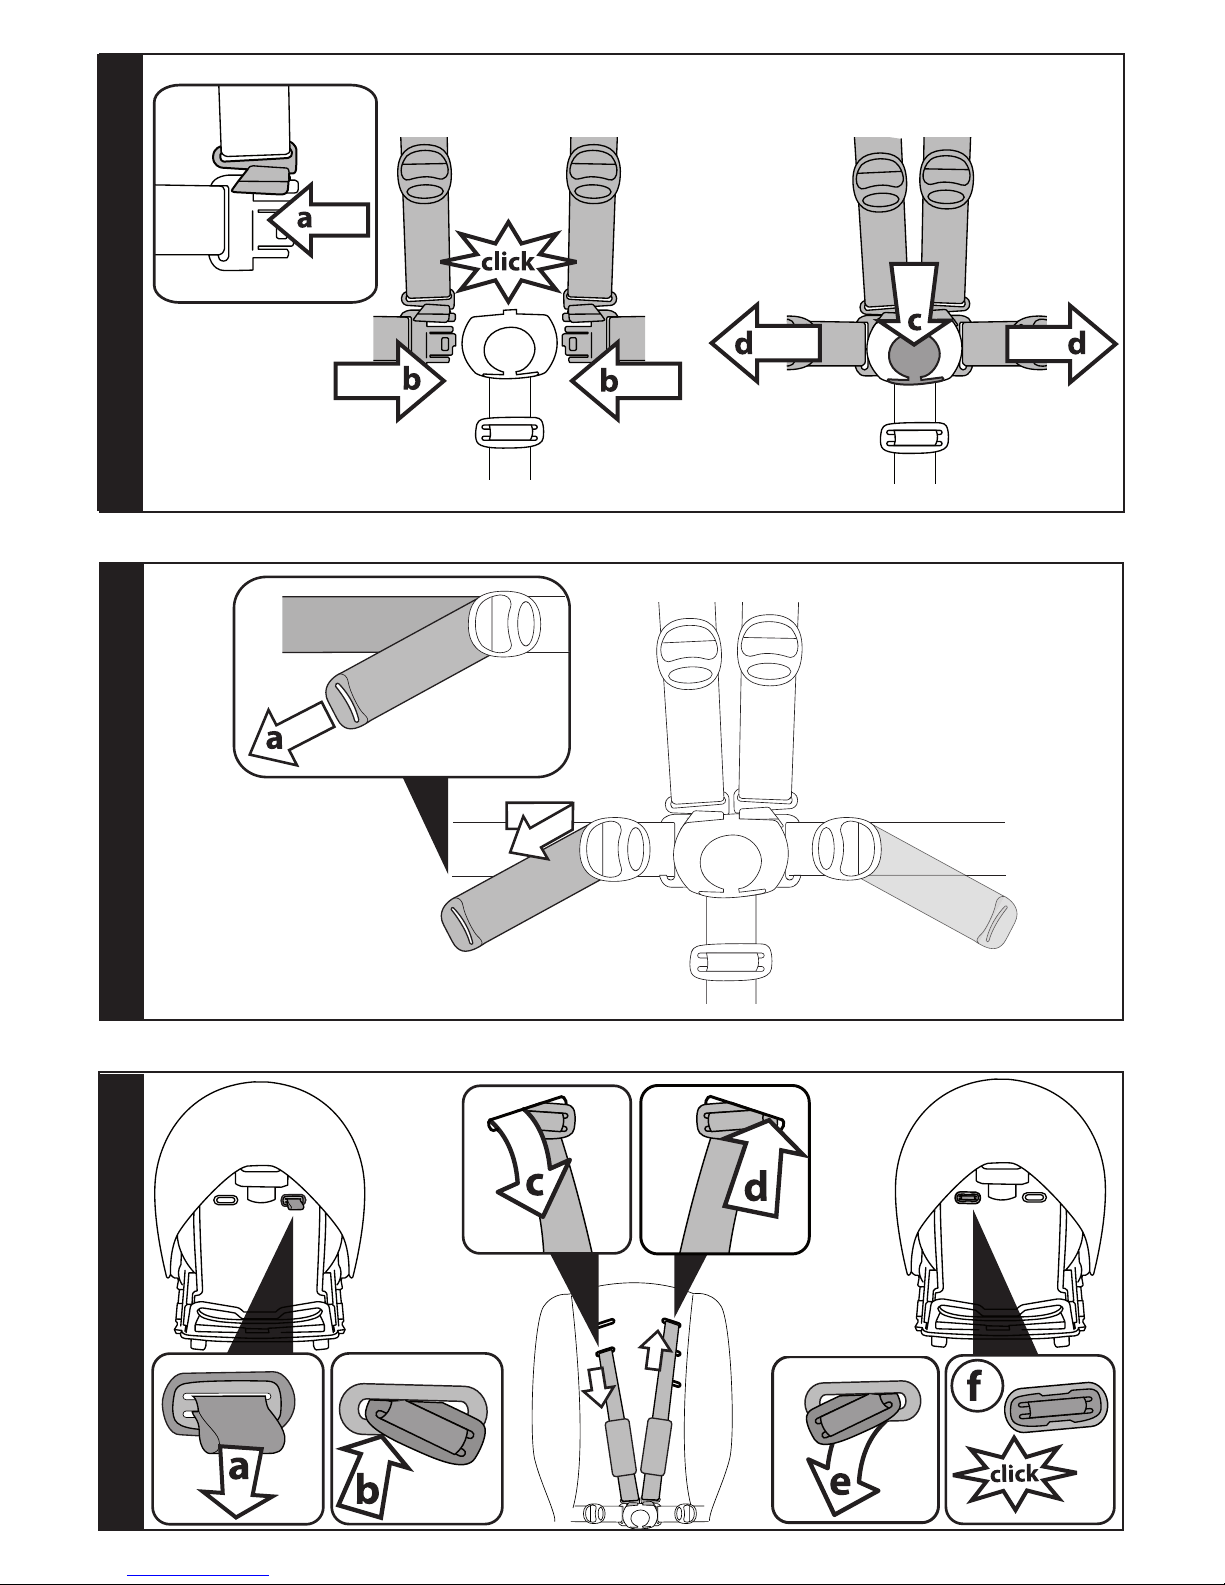
4 FIVE POINT SAFETY HARNESS: To fasten it,
push the two waist strap buckles (with the
shoulder straps attached – arrow_a) into
the leg divider until they click into place
(arrow_b). To unfasten it, press the round
button in the centre of the buckle (arrow_c)
and pull the waist straps out (arrow_d).
5 To tighten the waist strap, pull on both sides
in the direction of the arrow (arrow_a). To
loosen it, move it in the opposite direction.
6 To adjust the height of the safety harnesses,
release the two buckles on the rear of the
backrest.
Pull the shoulder straps towards you (arrow_a)
until the buckles are released and insert them
in the backrest loops (arrow_b). Remove the
shoulder straps from the sack (arrow_c) and
insert them in the most appropriate loop
(arrow_d), then re-attach the two buckles on
the rear of the backrest (arrow_e) The buckles
are securely attached when a click is heard
(fig_f).
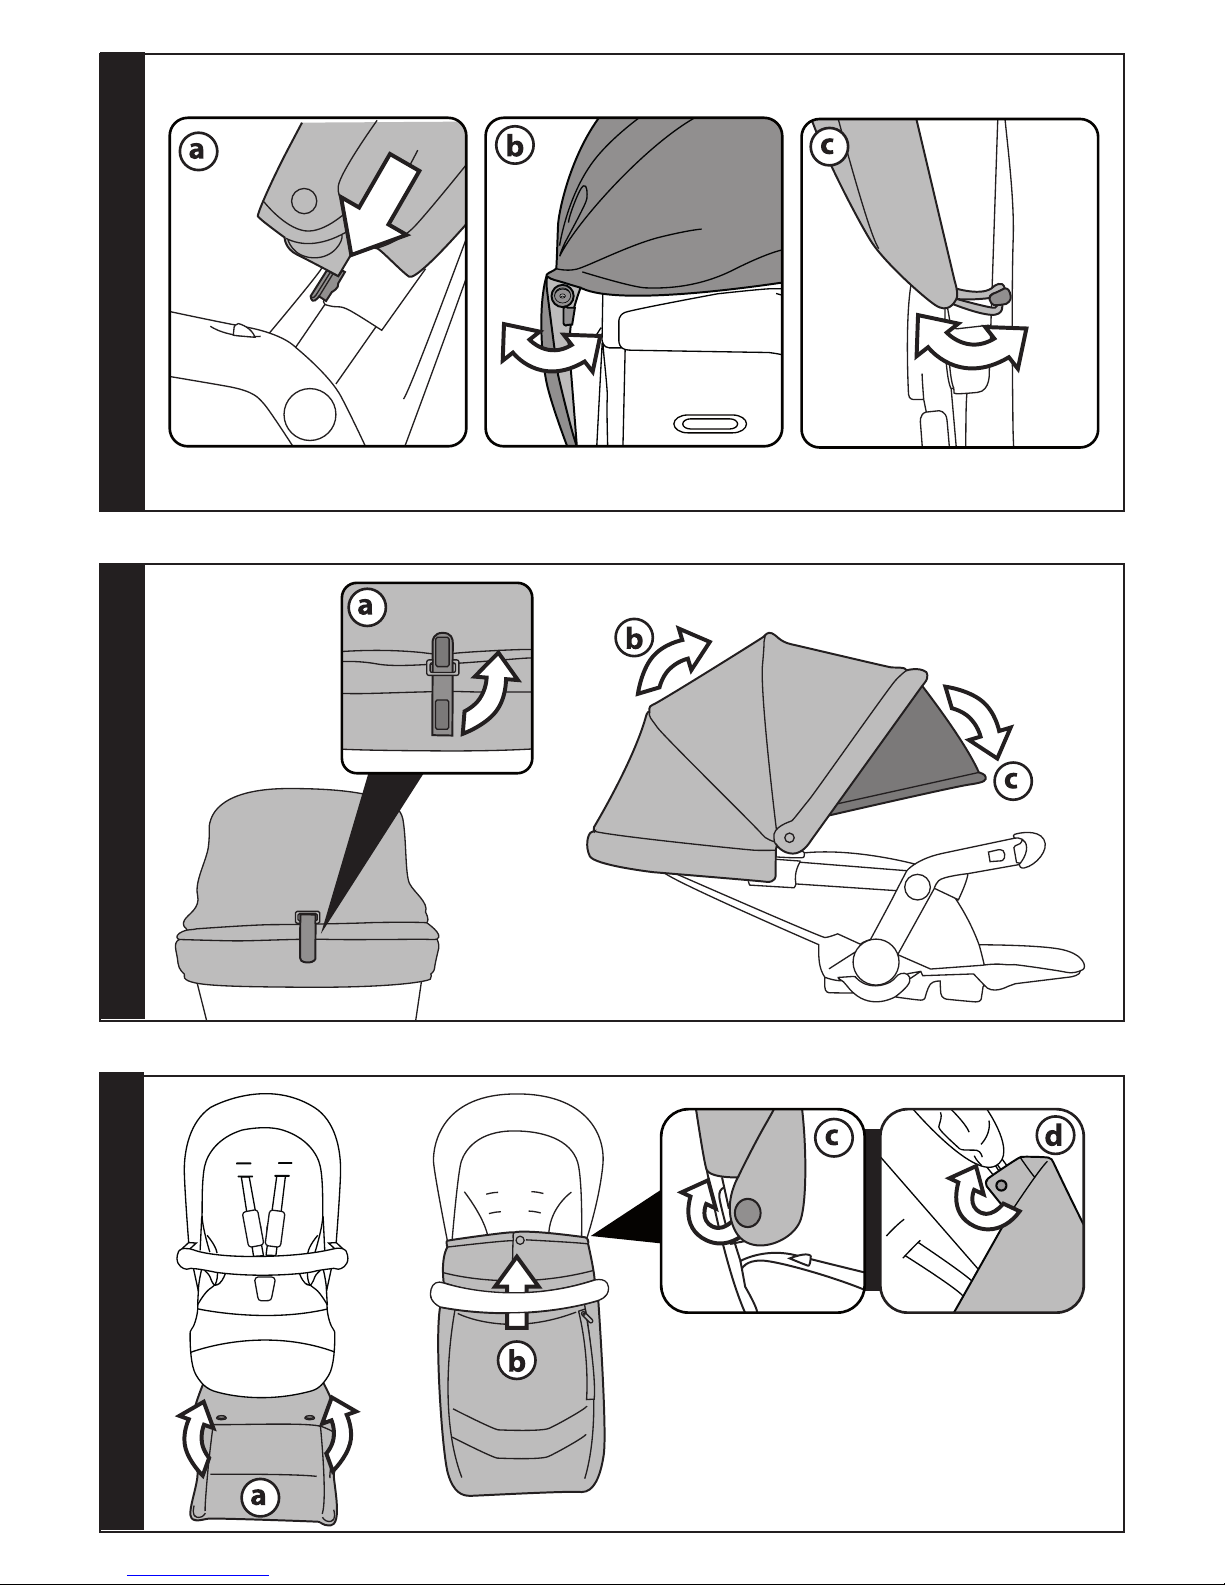
7 HOOD: slide the hood's attachments into the
seat's attachments (fig_a), button the top part
of the hood on both sides of the seat (fig_b),
and finally fasten the sides with the elastics
(fig_c). The hood includes a slot from which
you can hang the child's favourite toy.
To remove the hood: pull out the attachments
and unbutton.
8 To extend the hood, unfasten the Velcro strap
on the rear (fig_a) and let the hood open
completely (fig_b). The hood comes with an
additional sun visor that can be pulled out at
the front (fig_c).
9 FOOT MUFF: Lift the leg rest, slide on the foot
muff and button it below (fig_a); then, slide
the foot muff under the front bar (fig_b).
Unbutton the hood's inside button on both
sides (fig_c) and button up the foot muff
(fig_d).
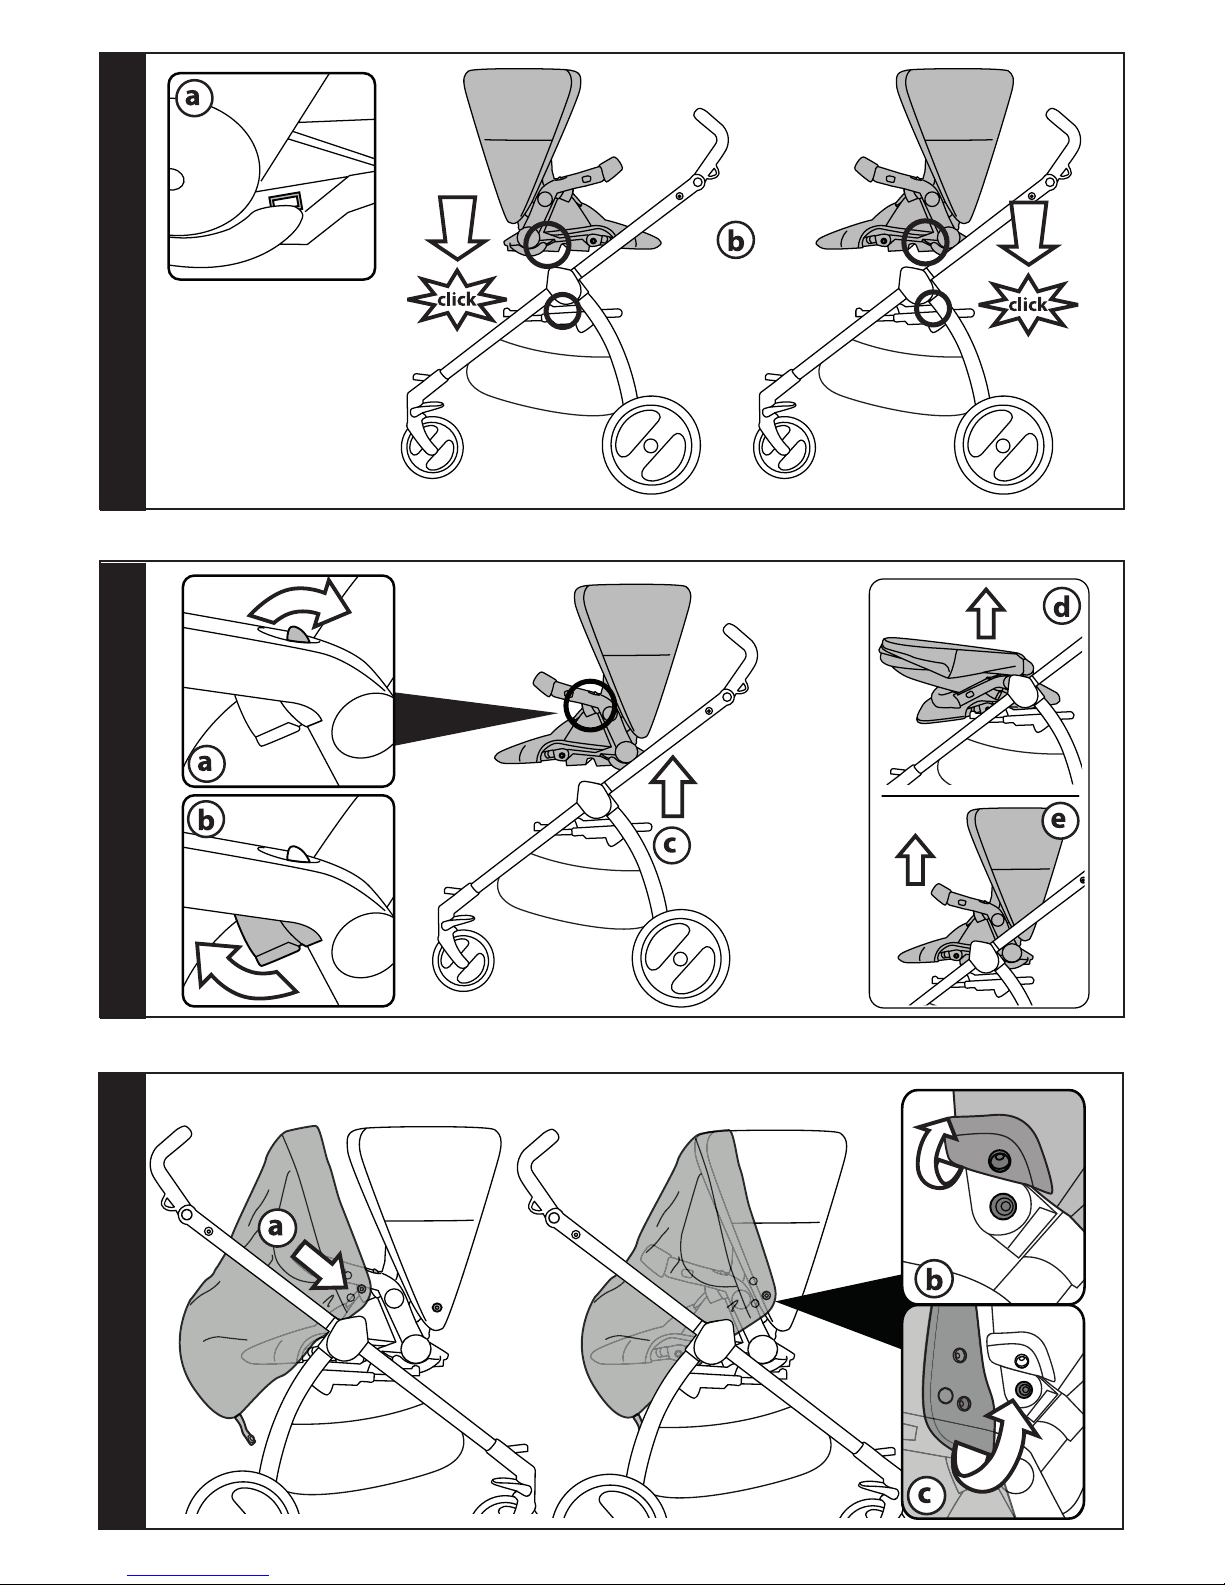
10 FASTENING THE SEAT TO THE CARRIAGE: Seat
Pop-Up can be secured to the carriage either
facing mom or the street. Place it centrally
on the carriage alongside the symbols (fig_a)
and press downwards with both hands
until it clicks into place (fig_b). To ensure it
is properly secured, grab the seat from the
front bar and pull upwards.
11 RELEASING THE SEAT FROM THE CARRIAGE:
Press the two buttons on the armrests of
the seat (fig_a) and then the two levers
underneath (fig_b); pull up the seat (fig_c)
until it releases. If the backrest is fully
reclined forward (in the closed position,
facing the world), the seat cannot be released
from the chassis (fig_d). In this case, lift
the backrest to the position of use before
releasing the seat from the chassis (fig_e).
12 RAIN COVER: Place the rain canopy over the
seat (fig_a), unbutton the hood's external
button, (fig_b) and secure the rain canopy
(fig_c).
13 Fasten the rain cover by hooking the elastics
to the side buttons on the foot rest of Seat
Pop-Up (fig_a). Rain cover fastened properly
(fig_b).
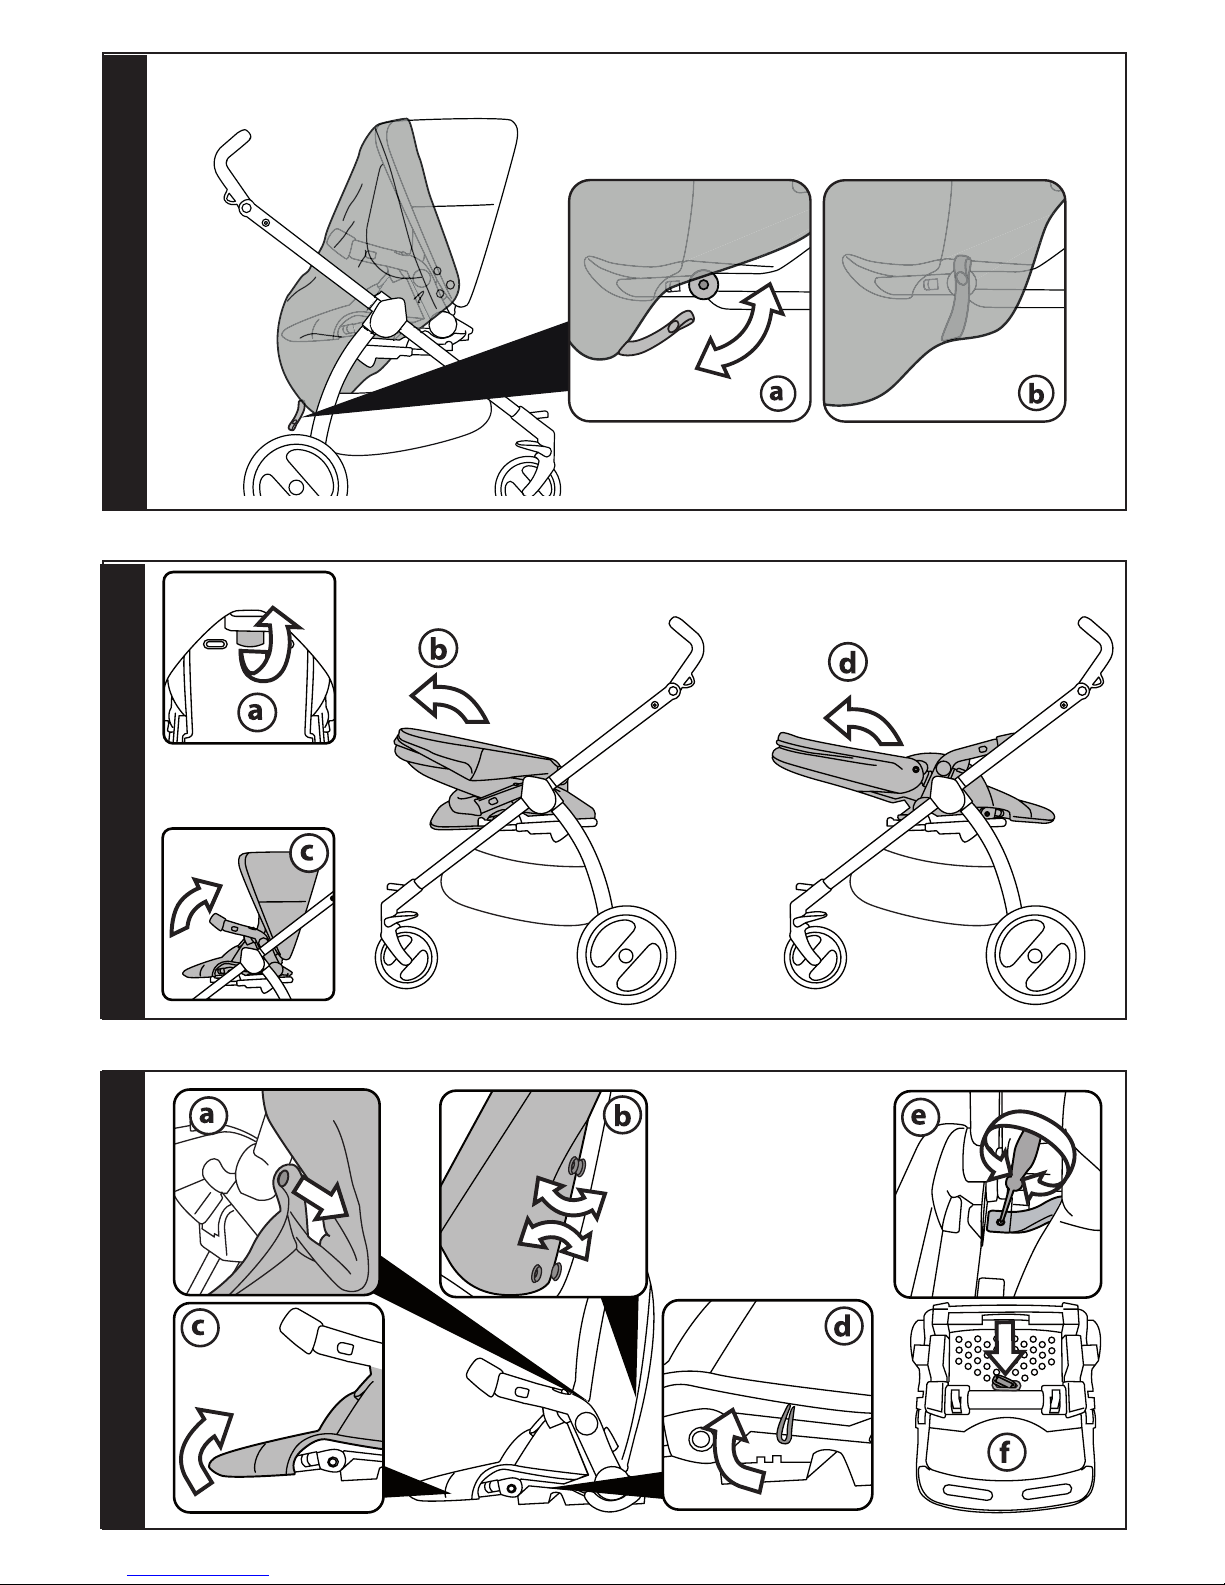
14 CLOSING THE STROLLER: To close the stroller
with the seat facing the street, press the
backrest adjustment handle (fig_a) and lower
the backrest fully forward (fig_b). To open it,
lift the backrest to the position of use, until
it locks into place (fig_c). To close the stroller
with the seat facing mom, fully recline the
backrest (fig_d).
15 REMOVING THE COVER: unbutton the cover
along the armrests (fig_a) and the backrest
(fig_b), remove the cover from the footrest
(fig_c), unfasten the side elastics (fig_d),
unscrew (fig_e) and remove the harness on
both sides, and finally remove the crotch
strap from above, pushing from under the
seat (fig_f).
SERIAL NUMBERS
16 Seat Pop-Up reports information as at the
date of manufacture of the product.
_ Product name, date of manufacture and serial
number of the seat.
This information is required for any
complaints.
THE ORIGINAL ACCESSORY
PEG PEREGO
Peg Perego accessories are designed as a
useful, practical means of simplifying the
lives of parents. Discover all your product’s
accessories on www.pegperego.com
CLEANING AND MAINTENANCE
PRODUCT MAINTENANCE: protect from the
weather: water, rain, or snow; prolonged and
continuous exposure to bright sunlight may
give rise to colour changes of various different
materials; store this product in a dry place.
CLEANING THE RAIN CANOPY: wash with
a sponge and soapy water; do not use
detergents.
CLEANING FABRIC PARTS: Brush the fabric
parts to remove dust.
• When washing, closely follow the instructions
stated on the label sewn into the cover.
• Do not use chlorine bleach.
• Do not iron.
• Do not dry clean.
• Do not remove stains with solvents.
• Do not tumble dry.
Page 11

- 11 -
PEG-PÉREGO S.p.A.
Peg Pérego can make changes at any time to
the models described in this publication for
technical or commercial reasons.
PEG-PÉREGO
AFTER-SALES SERVICE
If any parts of the item get lost or damaged,
only use genuine Peg Pérego spare parts.
For any repairs, replacements, information
on the products and sales of genuine spare
parts and accessories, contact the Peg
Pérego Assistance Service and state the serial
number of the product, if present.
USA
tel. 800.671.1701
fax 260.471.6332
call us toll free 1.800.671.1701
website www.pegperego.com
CANADA
tel. 905.839.3371
fax 905.839.9542
call us toll free 1.800.661.5050
website www.pegperego.com
ES_Español
Le agradecemos haber elegido un producto
Peg-Pérego.
ADVERTENCIA
_ IMPORTANTE: LEER ATENTAMENTE
ESTAS INSTRUCCIONES Y
CONSERVARLAS PARA UNA FUTURA
UTILIZACIÓN.
_ SI NO SE SIGUEN ESTAS
INSTRUCCIONES, SE PODRÍA
ARRIESGAR LA SEGURIDAD DEL
NIÑO.
_ DISEÑADO PARA UN NIÑO CON
UN PESO MÁXIMO DE 20 KG Y
UNA ALTURA MÁXIMA DE 110 CM.
LOS POSIBLES PORTABEBIDAS QUE
VAN CON ESTE PRODUCTO ESTÁN
CONCEBIDOS PARA SOPORTAR EL
PESO MÁXIMO ESPECIFICADO EN
EL PORTABEBIDAS EN CUESTIÓN.
CUALQUIER BOLSA ENTREGADA
JUNTO AL PRODUCTO ESTÁ
REALIZADA PARA SOPORTAR UN
PESO MÁXIMO DE 0,2 KG.
_ SI NO SE RESPETAN LAS
INDICACIONES ESPECIFICADAS O SI
SE USAN ACCESORIOS DIFERENTES
DE LOS HOMOLOGADOS POR EL
FABRICANTE, EL PRODUCTO PUEDE
SER INESTABLE.
_ ADVERTENCIA:
PARA EVITAR LESIONES GRAVES POR
CAÍDAS O SI ESCAPA EL NIÑO DE
LA SILLA DE PASEO, USAR SIEMPRE
UN CINTURÓN DE SEGURIDAD DE 5
PUNTOS COMPLETO.
_ ADVERTENCIA:
NO DEJAR NUNCA AL NIÑO SIN
VIGILANCIA.
_ PARA EVITAR LESIONES GRAVES,
ASEGURARSE DE QUE EL NIÑO NO
PUEDA MOVERSE PELIGROSAMENTE
MIENTRAS SE REGULA EL PRODUCTO.
_ TODAS LAS OPERACIONES DE
ENSAMBLAJE DEBE REALIZARLAS
SOLO UN ADULTO.
_ NO LEVANTAR LA SILLA DE PASEO
Page 12

- 12 -
COGIÉNDOLA POR LA BARRA FRONTAL.
LA BARRA FRONTAL NO HA SIDO
CONCEBIDA PARA SOPORTAR PESOS.
_ ASEGURARSE DE QUE LA
SILLA DE PASEO ESTÉ ABIERTA
CORRECTAMENTE Y BLOQUEADA EN
LA POSICIÓN CORRECTA PARA SU
UTILIZACIÓN.
_ NO UTILIZAR EL PRODUCTO SI
PRESENTA PARTES DAÑADAS O SI
FALTA ALGUNA PARTE.
_ NO USAR EN PRESENCIA DE LLAMAS
O FUENTES DE CALOR.
_ ADVERTENCIA:
DURANTE LAS OPERACIONES DE
APERTURA Y CIERRE, COMPRUEBE
QUE EL NIÑO ESTÉ SUFICIENTEMENTE
ALEJADO, PARA EVITAR QUE QUEDE
ATRAPADO O HERIDO
_ ADVERTENCIA:
NO AÑADIR UN COLCHÓN NO
APROBADO POR EL FABRICANTE.
_ ADVERTENCIA:
NO ALTERE NI MODIFIQUE EL
COCHECITO CON PRODUCTOS NO
PROVISTOS POR EL FABRICANTE,
YA QUE PODRÍAN PROVOCAR
INESTABILIDAD O DAÑOS
ESTRUCTURALES NO CUBIERTOS POR
LA GARANTÍA.
AVISO
ESTE PRODUCTO CUMPLE O NEBASA
CON TODOS LOS REQUISITOS
ESTABLECIDOS POR LA NORMA ASTM
F833 Y ULTERIORES REVISIONES.
CARACTERÍSTICAS DEL
ARTÍCULO
_ Este artículo posee una numeración
consecutiva.
_ Seat Pop-Up es un asiento reversible: hacia
atrás o hacia delante.
COMPONENTES DEL
ARTÍCULO
Comprobar el contenido del embalaje y,
en caso de reclamación, contactar con el
Servicio de Atención al Cliente.
Seat Pop-Up (para Book 51S, Book Scout):
_ capota, cubrepiés y protector de lluvia, barra
frontal.
Seat Pop-Up:
_ capota, barra frontal.
INSTRUCCIONES DE USO
1 BARRA FRONTAL: Para enganchar la barra
frontal, acompañar los ganchos en los brazos
de la silla y empujar hacia la silla hasta el
encastre (fig_a). Para sacar la barra frontal,
pulsar las dos teclas (fig_b) y extraer (fig_c).
Abrir la barra frontal sólo de un lado para
facilitar la entrada y la salida del niño.
2 RESPALDO: para regular el respaldo, alce
la manilla (fig_a) y reclínelo en la posición
deseada (fig_b). El respaldo se puede regular
en distintas posiciones
3 REPOSAPIÉS: antes de regular el reposapiés,
compruebe que el saco correspondiente
esté calzado en sus soportes, y cálcelo si no
lo está. Para bajarlo, empujar hacia abajo las
dos palancas (fig. a). Para alzarlo, empujar el
reposapiés hacia arriba (fig. b).
4 CINTURÓN DE SEGURIDAD DE 5 PUNTOS:
Para engancharlo, introducir las dos hebillas
del cinturón ventral (con los tirantes
enganchados como muestra la flecha_a) en
la tira entrepiernas hasta oír el clic (flecha_b).
Para desengancharlo, pulsar el botón
redondo colocado en el centro de la hebilla
(flecha_c) y tirar hacia afuera del cinturón
ventral (flecha_d).
5 Para ajustar la correa de la cintura, tirar
de ambos lados en el sentido de la flecha
(flecha_a); para aflojarla, deslizarla en sentido
contrario.
6 Para regular la altura de los cinturones de
seguridad es necesario desenganchar en
la parte posterior del respaldo de las dos
hebillas.
Tire hacia sí los tirantes (flecha_a) hasta
desenganchar las hebillas y pasarlas por las
ranuras del respaldo (flecha_b). Saque los
tirantes del saco (flecha_c) y páselos por la
ranura más adecuada (flecha_d), finalmente
vuelva a enganchar las dos hebillas detrás del
respaldo (flecha_e). Un clic determina que se
han enganchado correctamente las hebillas
(fig_f).
7 CAPOTA: introduzca los enganches de la capota
en los enganches de la silla (fig_a), abotónela
en la parte superior a ambos lados del asiento
(fig_b) y, por último, fíjela lateralmente con los
elásticos (fig_c). La capota cuenta con un ojal
para colgar el juguete preferido.
Para desmontar la capota: extraiga los
enganches y desabotone.
8 Para ampliar la capota, desprenda el velcro
presente en la parte trasera (fig_a) hasta que
Page 13

- 13 -
se abra totalmente (fig_b). La capota cuenta
con una sección parasol adicional. Para abrirla,
llévela hacia delante (fig_c)
9 CUBREPIÉS: Alce el reposapiernas, calce el
cubrepiés y abotónelo abajo (fig_a); haga
pasar el cubrepiés por debajo de la barra
frontal (fig_b). Desenganche el botón interior
de la capota presente sobre ambos lados
(fig_c) y abotone el cubrepiés.
10 ENGANCHE DE LA SILLA EN EL CARRITO: Seat
Pop-Up se puede enganchar en el carrito
orientada hacia la mamá o hacia la calle.
Colocarla en posición central en el carrito
en coincidencia con los símbolos (fig_a) y
presionar hacia abajo con ambas manos
hasta el encastre (fig_b). Para asegurar el
enganche correcto, sujetar la silla por la barra
frontal y tirar hacia arriba.
11 DESENGANCHE DE LA SILLA DEL CARRITO:
pulsar las dos teclas situadas en los brazos
de la silla (fig_a) y luego las dos palancas
situadas debajo (fig_b) tirando de la silla
hacia arriba (fig_c) hasta el desenganche. Si
el respaldo está completamente replegado
hacia delante (en la posición de cierre “con
vista al mundo”), no es posible desenganchar
la silla del chasis (fig_d). Entonces, lleve el
respaldo hacia atrás hasta la posición de uso,
y desenganche la silla del chasis (fig_e).
12 BURBUJA PARA LA LLUVIA: coloque la burbuja
para la lluvia sobre la silla de paseo (fig_a),
desenganche el botón exterior de la capota
(fig_b) y fije la burbuja (fig_c).
13 fijar el paralluvia enganchando el elástico en
el botón lateral del reposapiés de Seat PopUp (fig_a). Paralluvia fijado (fig_b).
14 CIERRE: para cerrar sobre el carrito la silla
orientada hacia la calle, presionar el tirador
de regulación del respaldo (fig_a) y girarlo
completamente hacia delante (fig_b). Para
abrirlo, lleve el respaldo hacia atrás (hasta
que haga clic), en la posición de uso (fig_c).
Para cerrar la silla de paseo orientada hacia
la mamá, reclinar completamente el respaldo
(fig_d).
15 EXTRACCIÓN DEL TAPIZADO: desabroche
el tapizado en la parte lateral de los
repozabrazos (fig_a) y del respaldo (fig_b),
extraiga el tapizado del reposapiés (fig_c),
desenganche los elásticos laterales (fig_d),
destornille la correa a ambos lados (fig_e)
y extraiga las correas; por último, extraiga
desde arriba (empujando desde abajo de la
silla) la correa de la entrepierna (fig_f).
NÚMEROS DE SERIE
16 Seat Pop-Up incluye información relativa a la
fecha de producción del mismo.
_ Nombre del producto, fecha de producción y
numeración de serie del asiento (fig_a) y del
cochecito (fig_b).
Estas informaciones son indispensables en
caso de reclamación.
THE ORIGINAL ACCESSORY
PEG PEREGO
Los accesorios Peg Perego han sido
concebidos como una ayuda útil y práctica
destinada a simplificar la vida de padres y
madres. Descubra todos los accesorios para
su producto Peg Perego en www.pegperego.
com
LIMPIEZA Y MANTENIMIENTO
MANTENIMIENTO DEL PRODUCTO: proteger
contra agentes atmosféricos (agua, lluvia o
nieve). Una exposición contínua y prolongada
al sol podría causar cambios de color de
muchos materiales. Conservar este producto
en un lugar seco.
LIMPIEZA DEL PROTECTOR DE LLUVIA: lavar
con una esponja con agua y jabón, sin usar
detergentes.
LIMPIEZA DE LAS PARTES DE TEJIDO:
Cepillar las partes de tejido para protegerlas
del polvo.
• Para el lavado atenerse a la etiqueta cosida a
la bolsa del producto.
• No utilizar lejía a base de cloro.
• No planchar.
• No lavar en seco.
• No eliminar las manchas con disolventes.
• No secar en secadoras con tambor rotativo.
PEG-PÉREGO S.p.A
Peg-Pérego podrá aportar en cualquier
momento modificaciones a los modelos
que se describen en el presente manual por
razones técnicas o comerciales.
SERVICIO DE ASISTENCIA
PEG-PÉREGO
En caso de que se pierdan o se dañen partes
del producto, utilizar sólo repuestos originales
Peg-Pérego. Para eventuales reparaciones,
sustituciones, informaciones sobre los
productos, venta de recambios originales y
accesorios, póngase en contacto con el Servicio
de Asistencia Peg Perego indicando, si está
presente, el número de serie del producto.
USA
tel. 800.671.1701
fax 260.471.6332
call us toll free 1.800.671.1701
website www.pegperego.com
Page 14

- 14 -
FR_Français
Merci d’avoir choisi un produit Peg-Pérego.
AVERTISSEMENT
_ LIRE CES INSTRUCTIONS AVEC
ATTENTION ET LES CONSERVER
POUR TOUTE RÉFÉRENCE FUTURE.
_ LA SÉCURITÉ DE VOTRE ENFANT
POURRAIT ÊTRE MENACÉE SI CES
INSTRUCTIONS NE SONT PAS
RESPECTÉES.
_ CE PRODUIT A ETE CONÇU POUR
DES ENFANTS DONT LE POIDS
N’EXCEDE PAS 20 KG (45 LIVRES) ET
LA TAILLE NE DEPASSE PAS 110 CM
(43 POUCES). LES POCHETTES OU
SACS FOURNIS AVEC CE PRODUIT
ONT ETE CONÇUS POUR SUPPORTER
DES CHARGES MAXIMALES DE 0,2 KG
(0,44 LIVRES).
_ LE DEFAUT D’OBSERVATION DES
SPECIFICATIONS DU FABRICANT
OU L’EMPLOI D’ACCESSOIRES NON
APPROUVES PAR LE FABRICANT PEUT
AFFECTER LA STABILITE DU PRODUIT.
_
AVERTISSEMENT
:
POUR ÉVITER DE GRAVES BLESSURES
SUITE À LA CHUTE OU AU GLISSEMENT
DE L’ENFANT DU PRODUIT, TOUJOURS
UTILISER UNE CEINTURE DE SÉCURITÉ
À 5 POINTS COMPLÈTE.
_
AVERTISSEMENT
:
NE JAMAIS LAISSER L’ENFANT SANS
SURVEILLANCE.
_ POUR ÉVITER DE GRAVES BLESSURES
LORS DU RÉGLAGE DU PRODUIT,
S’ASSURER QUE LES MEMBRES DE
L’ENFANT NE SONT PAS EN CONTACT
AVEC DES PIÈCES EN MOUVEMENT.
_ L’ENSEMBLE DES PROCÉDURES DE
MONTAGE ET D’UTILISATION DOIT
ÊTRE EFFECTUÉ PAR UN ADULTE
_ NE PAS SOULEVER LA POUSSETTE
PAR LA BARRE FRONTALE. ELLE N’A
PAS ÉTÉ CONÇUE POUR SUPPORTER
DES CHARGES.
_ S’ASSURER QUE LA POUSSETTE
EST CORRECTEMENT OUVERTE
EST BLOQUÉE DANS LA POSITION
CONVENANT À SON UTILISATION.
_ NE PAS UTILISER LE PRODUIT SI DES
PIÈCES SONT MANQUANTES OU
CASSÉES.
_ NE PAS UTILISER PRÈS DU FEU OU
D’UNE FLAMME DIRECTE.
_
AVERTISSEMENT:
PENDANT LES OPÉRATIONS
D’OUVERTURE ET DE FERMETURE
VEILLER À CE QUE L’ENFANT SOIT
ÉLOIGNÉ POUR ÉVITER TOUT RISQUE
DE COINCEMENT OU DE BLESSURE
_
AVERTISSEMENT
:
NE PAS AJOUTER DE MATELAS QUI
NE SOIT PAS APPROUVÉ PAR LE
FABRICANT.
_
AVERTISSEMENT
:
NE PAS ALTÉRER OU MODIFIER LA
POUSSETTE AVEC DES PRODUITS
FOURNIS PAR LE FABRICANT CAR
CELA POURRAIT RENDRE LE PRODUIT
INSTABLE OU PROVOQUER DES
DOMMAGES STRUCTURELS NON
COUVERTS PAR LA GARANTIE.
REMARQUE
CET ARTICLE REMPLIT LES
CONDITIONS REQUISES PAR LA
NORME ASTM F833 ET RÉVISIONS
RÉCENTES OU SATISFAIT À DES
CONDITIONS PLUS SÉVÈRES.
CARACTÉRISTIQUES DE
L’ARTICLE
_ Cet article fait l’objet d’une numérotation
progressive.
_ Seat Pop-Up est un siège réversible : face à
maman ou face au monde.
COMPOSANTS DE L’ARTICLE
Vérifier le contenu de l’emballage et, pour
toute réclamation, contacter le Service
d’assistance.
Seat Pop-Up (pour Book 51S, Book Scout):
_ capote, tablier, habillage pluie, barre frontale.
Page 15

- 15 -
Seat Pop-Up:
_ capote, barre frontale.
INSTRUCTIONS D’UTILISATION
1 BARRE FRONTALE : Pour accrocher la barre
frontale, accompagner les attaches dans les
accoudoirs, pousser le siège jusqu'au déclic
d'enclenchement (fig_a). Pour retirer la
barre frontale, appuyer sur les deux boutons
(fig_b) et l'extraire (fig_c). Ouvrir la barre
frontale d'un côté uniquement pour faciliter
l'installation et le retrait de l'enfant.
2 DOSSIER : pour régler le dossier soulever la
poignée (fig_a) et l'incliner dans la position
souhaitée (fig_b). Le dossier est réglable dans
plusieurs positions.
3 REPOSE-PIEDS: avant de régler le repose-
pieds, vérifier que la housse du repose-pieds
soit enfilée sur les supports correspondants,
dans le cas contraire, l'enfiler. Pour abaisser
le repose-pieds, déplacer vers le bas les deux
petits leviers et baisser le repose-pieds. vers le
bas (fig. a); pour le relever, le pousser vers le
haut (fig. b).
4 CEINTURE DE SÉCURITÉ À 5 POINTS : pour
l’accrocher, enclencher les deux boucles
de la ceinture ventrale (bretelles attachées,
flèche_a) dans la sangle d’entrejambes
jusqu’au déclic (flèche_b). Pour la décrocher,
appuyer sur le bouton rond situé au centre
de la boucle (flèche_c) et tirer la ceinture
ventrale vers l’extérieur (flèche_d).
5 Pour serrer la ceinture ventrale, tirer des
deux côtés dans le sens indiqué par la flèche
(flèche_a) ; pour la desserrer, procéder à
l’opération contraire.
6 Pour régler la hauteur des ceintures de
sécurité, il faut décrocher les deux clips à
l’arrière du dossier.
Tirer vers soi les bretelles (flèche_a) jusqu’à
décrocher les clips et les enfiler dans les
boutonnières du dossier (flèche_b). Enlever
les bretelles de la housse (flèche_c) et les
enfiler dans la boutonnière la plus adaptée
(flèche_d), enfin accrocher de nouveau les
deux clips derrière le dossier (flèche_e).
L’accrochage correct des clips est déterminé
par le déclic (fig_f).
7 CAPOTE: enfiler les fixations de la capote sur
les fixations du siège (fig_a), la boutonner
au niveau de la partie supérieure des deux
côtés de l’assise (fig_b), pour finir la fixer
latéralement avec les élastiques (fig_c). La
capote est dotée d'un œillet auquel suspendre
son jouet préféré.
Pour enlever la capote : décrocher les fixations
et déboutonner.
8 Pour déployer la capote, détacher le velcro
situé à l’arrière (fig_a) jusqu’à ce qu’elle soit
entièrement ouverte (fig_b). La capote est
dotée d’un pan pare-soleil supplémentaire,
pour l’ouvrir le tirer vers l’avant (fig_c).
9 TABLIER: relever le repose-pieds, enfiler le
tablier et le boutonner dessous (fig_a) puis
faire passer le tablier sous la barre frontale
(fig_b). Déboutonner le bouton à l’intérieur de
la capote des deux côtés (fig_c) et boutonner
le tablier (fig_d).
10 MONTAGE DU SIÈGE SUR LE CHARIOT : Seat
Pop-Up peut être monté sur le chariot tourné
vers la maman ou vers la route. Le placer au
centre du chariot au niveau des symboles
(fig_a) et appuyer vers le bas avec les deux
mains jusqu'au déclic d'enclenchement
(fig_b). Pour vérifier qu'il est bien accroché,
saisir le siège par la barre frontale et tirer vers
le haut.
11 MONTAGE DU SIÈGE DU CHARIOT : appuyer
sur les deux boutons situés sur les accoudoirs
du siège (fig_a), puis sur les deux leviers
situés en-dessous (fig_b) en tirant le siège ver
le haut (fig_c) jusqu'à ce qu'il se décroche.
Si le dossier est incliné complètement vers
l'avant (en position fermée face au monde),
il n'est pas possible décrocher le siège du
chariot (fig_d). Faire donc tourner le dossier
vers l'arrière jusqu'à la position d'utiliser, puis
le décrocher du chariot (fig_e).
12 HABILLAGE PLUIE: positionner l’habillage
pluie sur le siège (fig_a), déboutonner le
bouton à l’extérieur de la capote (fig_b) puis
fixer l’habillage pluie (fig_c).
13 fixer l'habillage pluie en accrochant
l'élastique au bouton sur le côté du reposepied de Seat Pop-Up (fig_a). Habillage pluie
en place (fig_b).
14 FERMETURE : pour fermer le siège sur le
chariot version face au monde, appuyer sur
la poignée de réglage du dossier (fig_a) et
la tourner complètement vers l'avant (fig_b).
Pour l'ouvrir, tourner le dossier vers l'arrière
(jusqu'au déclic), dans la position d'utilisation
(fig_c). Pour fermer la poussette avec le siège
face à maman, incliner complètement le
dossier (fig_d).
15 DÉHOUSSAGE : déboutonner la housse sur le
côté des accoudoirs (fig_a) et sur le dossier
(fig_b), enlever la housse du marchepied
(fig_c), détacher les élastiques sur les côtés
(fig_d), dévisser la sangle des deux côtés
(fig_e) et retirer les sangles, puis retirer par le
haut (en poussant par le dessous du siège), la
sangle d'entre-jambe (fig_f).
NUMÉROS DE SÉRIE
16 Seat Pop-Up reporte les informations
relatives à sa date de production.
_ Nom du produit, date de production et
numéro de série du siège.
Ces informations sont indispensables en cas
de réclamation.
Page 16

- 16 -
THE ORIGINAL ACCESSORY
PEG PEREGO
Les accessoires Peg Perego ont été conçus
en tant que support utile et pratique pour
simplifier la vie des parents. Découvrez tous
les accessoires consacrés à votre produit Peg
Perego sur le site www.pegperego.com
NETTOYAGE ET ENTRETIEN
ENTRETIEN DE L’ARTICLE: protéger l’article
des agents atmosphériques (eau, pluie ou
neige); une exposition continue et prolongée
au soleil pourrait entraîner un changement
de couleur de nombreux matériaux; ranger
cet article dans un lieu sec.
NETTOYAGE DE L’HABILLAGE PLUIE: utiliser
une éponge et de l’eau savonneuse; ne pas
utiliser de détergents.
NETTOYAGE DES ÉLÉMENTS EN TISSU:
Brosser les éléments en tissu pour éliminer la
poussière.
•
Pour le lavage, suivre les instructions figurant
sur l’étiquette cousue sur la sacoche du produit.
• ne pas blanchir au chlore ;
• ne pas repasser ;
• ne pas laver à sec ;
• ne pas utiliser de solvants pour enlever les
taches ;
• ne pas sécher dans un sèche-linge à tambour
rotatif.
PEG-PÉREGO S.p.A.
Peg-Pérego se réserve le droit de procéder
à tout moment à des modifications sur les
modèles décrits dans cet ouvrage, pour des
raisons de nature technique ou commerciale.
SERVICE D’ASSISTANCE
PEG-PÉREGO
En cas de perte de pièces ou de rupture de
l'une d'elles, utiliser exclusivement des pièces
de rechange originales Peg-Pérego. Pour
toute réparation, remplacement, informations
sur les produits, vente de pièces détachées
d’origine et accessoires, contactez le service
après-vente Peg Pérego en indiquant, si
présent, le numéro de série du produit.
CANADA
tél. 905.839.3371
fax 905.839.9542
call us toll free 1.800.661.5050
site Internet www.pegperego.com
Page 17

- 17 -
Declaration of
conformity
Product name
SEGGIOLINO POP UP
Product reference number
IS02*
IS03*
ISPV*
Reference Standards (origin)
EN 1888:2012
EN 71-3
European Directive 2005/84/CE
(Phtalates Directive)
European Directive 2002/61/CE
(Azocolourants)
ASTM F833-11
16 CFR 1500 & 1501, 15 USC 1278a
& 2057c
Declaration of conformity
PegPerego S.p.A. declares under
its sole responsibility that the
article to which this declaration
relates has undergone internal
testing and has been approved,
in accordance with regulations
in force, by external, indepen-
dent testing laboratories.
Date and place of issue
Arcore, January 2017
PegPerego S.p.A.
via De Gasperi, 50
20862 Arcore (MB), ITALY
EN_English ES_Español
declaración de
conformidad
Denominación del producto
SEGGIOLINO POP UP
Código de identicación del
producto
IS02*
IS03*
ISPV*
Normativas de referencia
(origen)
EN 1888:2012
EN 71-3
European Directive 2005/84/CE
(Phtalates Directive)
European Directive 2002/61/CE
(Azocolourants)
ASTM F833-11
16 CFR 1500 & 1501, 15 USC 1278a
& 2057c
Declaración de conformidad
PegPerego S.p.A. declara bajo
su responsabilidad que el
artículo en objeto ha sido
sometido a pruebas de ensayo
internas y ha sido homologado
según las normativas vigentes
en laboratorios exteriores e
independientes.
Fecha y lugar de expedición
Arcore,
enero de
2017
PegPerego S.p.A.
Via De Gasperi, 50
20862 Arcore (MB), ITALY
FR_Français
Declaration du
conformitè
Denomination du produit
SEGGIOLINO POP UP
Identication du produit
IS02*
IS03*
ISPV*
Standard du referiment (origin)
EN 1888:2012
EN 71-3
European Directive 2005/84/CE
(Phtalates Directive)
European Directive 2002/61/CE
(Azocolourants)
ASTM F833-11
16 CFR 1500 & 1501, 15 USC 1278a
& 2057c
Declaration du conformitè
PegPerego S.p.A. déclare, sous
sa propre responsabilité, que
l’article en question a été
soumis à des tests d’essais
internes et homologué selon
les normes en vigueur par des
laboratoires extérieurs et
indépendants.
Date et lieu du publication
Arcore, janvier 2017
PegPerego S.p.A.
Via De Gasperi, 50
20862 Arcore (MB), ITALY
Page 18

seat pop-up
FINA1701I201
24/01/2017
PEG PEREGO S.p.A.
VIA DE GASPERI 50 20862 ARCORE MB ITALIA
tel. 0039 039 60881 fax 0039 039 615869/616454
Servizio Post Vendita - After Sale:
tel. 0039 039 6088213 fax: 0039 039 3309992
PEG PEREGO U.S.A. Inc.
3625 INDEPENDENCE DRIVE FORT WAYNE INDIANA 46808
phone 260 482 8191 fax 260 484 2940
Call us toll free: 1 800 671 1701
PEG PEREGO CANADA Inc.
585 GRANITE COURT PICKERING ONTARIO CANADA L1W3K1
phone 905 839 3371 fax 905 839 9542
Call us toll free: 1 800 661 5050
www.pegperego.com
WARNING
AVOID SERIOUS INJURY FROM FALLING OR SLIDING OUT.
ALWAYS USE COMPLETE 5 POINT SEAT BELT.
ADVERTENCIA
EVITE LESIÓNES DE CAIDAS O DESLIZAMIENTOS HACIA FUERA.
SIEMPRE UTILIZE EL CINTURON COMPLETO DE 5 PUNTOS.
AVERTISSEMENT
EVITER UNE BLESSURE SÉRIEUSE DUE À UNE CHUTE OU À UN GLISSEMENT.
TOUJOURS UTILISER LA CEINTURE DE SÉCURITÉ À 5 POINTS COMPLÈTE.
Conforms to
ASTM F833
Safety Standards
 Loading...