

Page 1
sdraietta melodia
IT Istruzioni d’uso
EN Instructions for use
FR Noti ce d’empl oi
DE Gebrauchsanleitung
ES Instrucciones de uso
PT Instruções para uso
NL Gebruiksaanwijzing
DK Brugsanvisning
FI Käyttöohjeet
CZ Návod na použití
SK Návod na použitie
HU Használati útmutató
SL Navodila za uporab
RU Инструкции по пользованию
TR Kullanim klavuzu
EL Οδηγίες χρήσεως
Page 2
1
2
3
1
3
2
Page 3
4
5
6
1
1
2
2
2
Page 4
7
8
9
Page 5

10
11
12
Page 6
13
14
15
A
Page 7
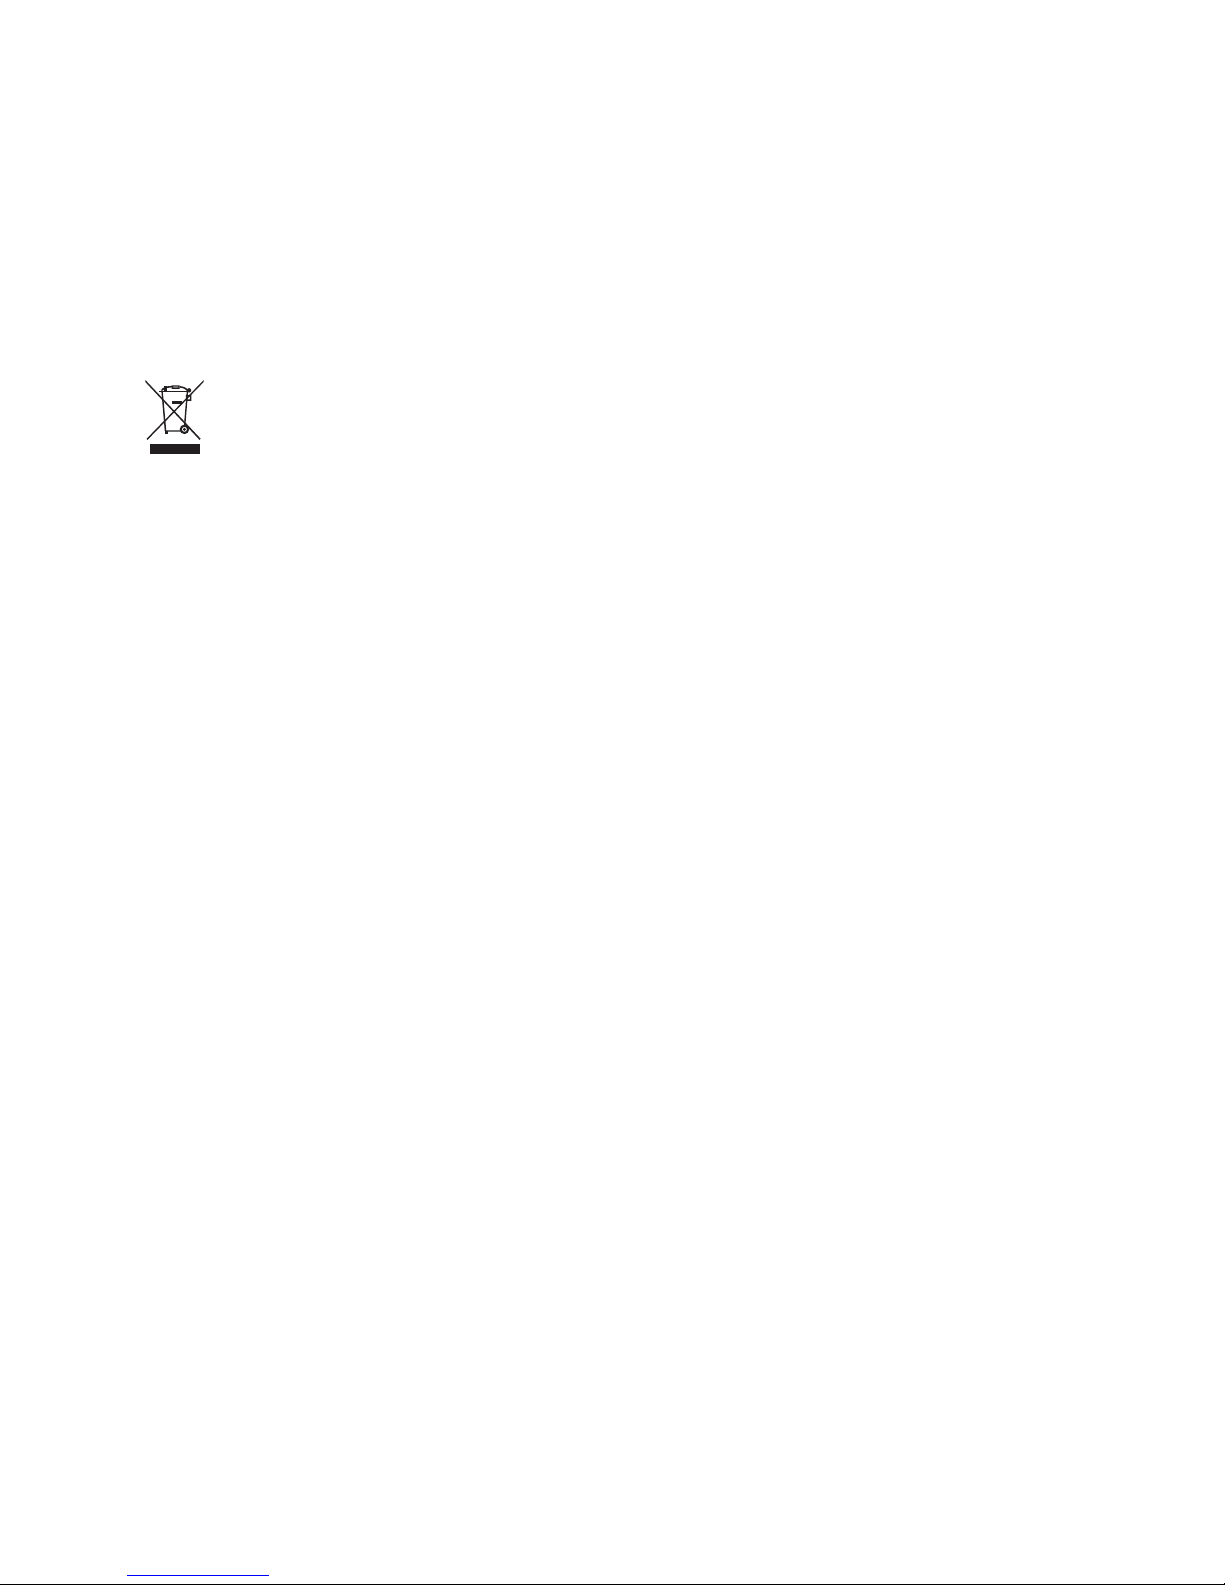
1
6
5
4
3
2
IT• Ricambi disponibili in piú colori da specificare nella richiesta.
EN• Spare parts available in different colours to be specified when ordering.
FR• Pièces de rechange disponibles en plusieurs couleurs à spécifier dans la demande.
DE• Ersatzteile in mehr Farben vorhanden, die in der Anfrage spezifiziert werden müssen.
ES• Repuestos disponibles en otros colores que se especificarán en el pedido.
PT• Peças de reposição disponíveis em cores alternativas a serem especificadas no pedido.
NL• Reserveonderdelen verkrijgbaar in meerdere kleuren, bij bestelling te specificeren.
DK• Reservedele kan leveres i flere farver som bør specificeres ved bestillingen.
FI• Varaosia saatavana eri värisinä: ilmoita väri tilauksessa.
CZ• U náhradních dílů, které jsou k dispozici ve více barvách, je nutné na objednávce specifikovat příslušnou barvu.
SK• Pri náhradných dieloch, ktoré sú k dispozícii vo viacerých farbách, je potrebné pri objednávke špecifikovať želanú farbu.
HU• A tartalék alkatrészek különböző színekben elérhetők, melyeket rendeléskor kell kiválasztani.
SL• Rezervni deli so na voljo v več barvah, ki jih je treba navesti pri naročilu.
RU• Запчасти имеются различных цветов, необходимый указать в запросе.
TR• Siparişte belirtilen değişik renklerdeki yedek parçalari mevcuttur.
EL• Ανταλλακτικά διαθέσιμα σε διάφορα χρώματα. Προσδιορίστε όταν παραγγείλετε.
Sdraietta Melodia
1 ITSDME00NL65
2 ARPI0453L65N
3 BAPMEL00•
4 BRIMEL00•
5 BSAMEL00•
6 ASPI0090GR
Page 8
- 8 -
IT_Italiano
Grazie per aver acquistato un prodotto Peg-Pérego.
AVVERTENZA
_ IMPORTANTE: LEGGERE ATTENTAMENTE QUESTE ISTRUZIONI E
CONSERVARLE PER UN FUTURO UTILIZZO. LA SICUREZZA DEL BAMBINO
POTREBBE ESSERE MESSA A RISCHIO SE NON SI ESEGUONO QUESTE
ISTRUZIONI.
_ QUESTA SDRAIETTA È PROGETTATA PER UN BAMBINO AVENTE PESO MASSIMO 9
KG.
_ NON UTILIZZARE LA SDRAIETTA QUANDO IL BAMBINO E' IN GRADO DI STARE
SEDUTO DA SOLO.
_ NON LASCIARE MAI INCUSTODITO IL VOSTRO BAMBINO NELLA SDRAIETTA.
_ QUESTA SDRAIETTA NON E’ PROGETTATA PER UN PROLUNGATO PERIODO
DI SONNO. LA SDRAIETTA NON SOSTITUISCE IL LETTINO, SE IL BAMBINO HA
BISOGNO DI DORMIRE È IMPORTANTE METTERLO IN UN LETTINO ADATTO.
_ UTILIZZATE SEMPRE LE CINTURE DI SICUREZZA.
_ QUESTA SDRAIETTA NON È UN SEGGIOLINO AUTO: NON UTILIZZARE MAI PER IL
TRASPORTO DI UN BAMBINO IN UN VEICOLO A MOTORE.
_ PERICOLO DI STRANGOLAMENTO: NON LASCIARE MAI IL BAMBINO NELLA
SDRAIETTA QUANDO LE CINTURE SONO ALLENTATE O SGANCIATE.
_ PERICOLO DI CADUTA: E' PERICOLOSO UTILIZZARE LA SDRAIETTA SU UNA
SUPERFICIE ELEVATA.
_ PERICOLO DI SOFFOCAMENTO: LA SDRAIETTA PUÒ RIBALTARSI SU SUPERFICI
MORBIDE E SOFFOCARE IL BAMBINO; NON METTERE MAI LA SDRAIETTA SU
LETTI, DIVANI O ALTRE SUPERFICI MORBIDE.
_ PRIMA DELL'USO ASSICURARSI CHE TUTTI I MECCANISMI DI AGGANCIO SIANO
INGAGGIATI CORRETTAMENTE.
_ NON UTILIZZARE IL PRODOTTO SE PRESENTA PARTI MANCANTI O ROTTURE.
_ EVITARE DI INTRODURRE LE DITA NEI MECCANISMI.
_ PRESTARE ATTENZIONE ALLA PRESENZA DEL BAMBINO QUANDO SI
EFFETTUANO OPERAZIONI DI REGOLAZIONE DEI MECCANISMI (MANIGLIONE,
SCHIENALE, PARASOLE).
_ NON UTILIZZARE MAI LA BARRA GIOCO E IL PARASOLE PER IL TRASPORTO.
_ POTREBBE ESSERE PERICOLOSO UTILIZZARE ACCESSORI NON APPROVATI DAL
COSTRUTTORE.
_ LE OPERAZIONI DI ASSEMBLAGGIO, PREPARAZIONE DELL’ARTICOLO, DI PULIZIA
E MANUTENZIONE DEVONO ESSERE EFFETTUATE SOLO DA ADULTI.
_ LE OPERAZIONI DI ACCENSIONE E SPEGNIMENTO DELLA MUSICA DELLA
SDRAIETTA, DEVONO ESSERE EFFETTUATE DA UN ADULTO.
_ SE LA MUSICA DELLA SDRAIETTA VIENE LASCIATA INATTIVA PER UN PERIODO
LUNGO, SI RACCOMANDA DI RIMUOVERE LE PILE DALL'APPOSITO VANO PILE .
_ DEVONO ESSERE UTILIZZATE SOLO PILE DELLO STESSO TIPO O EQUIVALENTI A
QUELLE RACCOMANDATE.
_ LE PILE DEVONO ESSERE INSERITE RISPETTANDO LA CORRETTA POLARITA’.
_ NON UTILIZZARE PILE NUOVE ED USATE CONTEMPORANEAMENTE.
_ LE PILE SCARICHE DEVONO ESSERE RIMOSSE DAL PRODOTTO.
_ NON CORTOCIRCUITARE I MORSETTI DI ALIMENTAZIONE.
_ LE PILE RICARICABILI DEVONO ESSERE RIMOSSE DAL PRODOTTO PER ESSERE
Page 9
- 9 -
RICARICATE.
_ LE PILE RICARICABILI DEVONO ESSERE RICARICATE SOLO SOTTO LA
SUPERVISIONE DI UN ADULTO.
DIRETTIVA RAEE (solo EU)
_ Questo prodotto costituisce alla fine della sua vita un rifiuto classificato RAEE e pertanto non deve essere
smaltito come rifiuto urbano, bensì deve essere soggetto a raccolta differenziata;
_ Consegnare il rifiuto nelle apposite, preposte isole ecologiche;
_ La presenza di sostanze pericolose contenute nelle componenti elettriche di questo prodotto costituiscono
fonte di potenziale pericolo per la salute umana e per l’ ambiente se i prodotti non vengono correttamente
smaltiti;
_ Il bidone barrato indica che il prodotto deve essere assoggettato a raccolta differenziata.
ISTRUZIONI D'USO
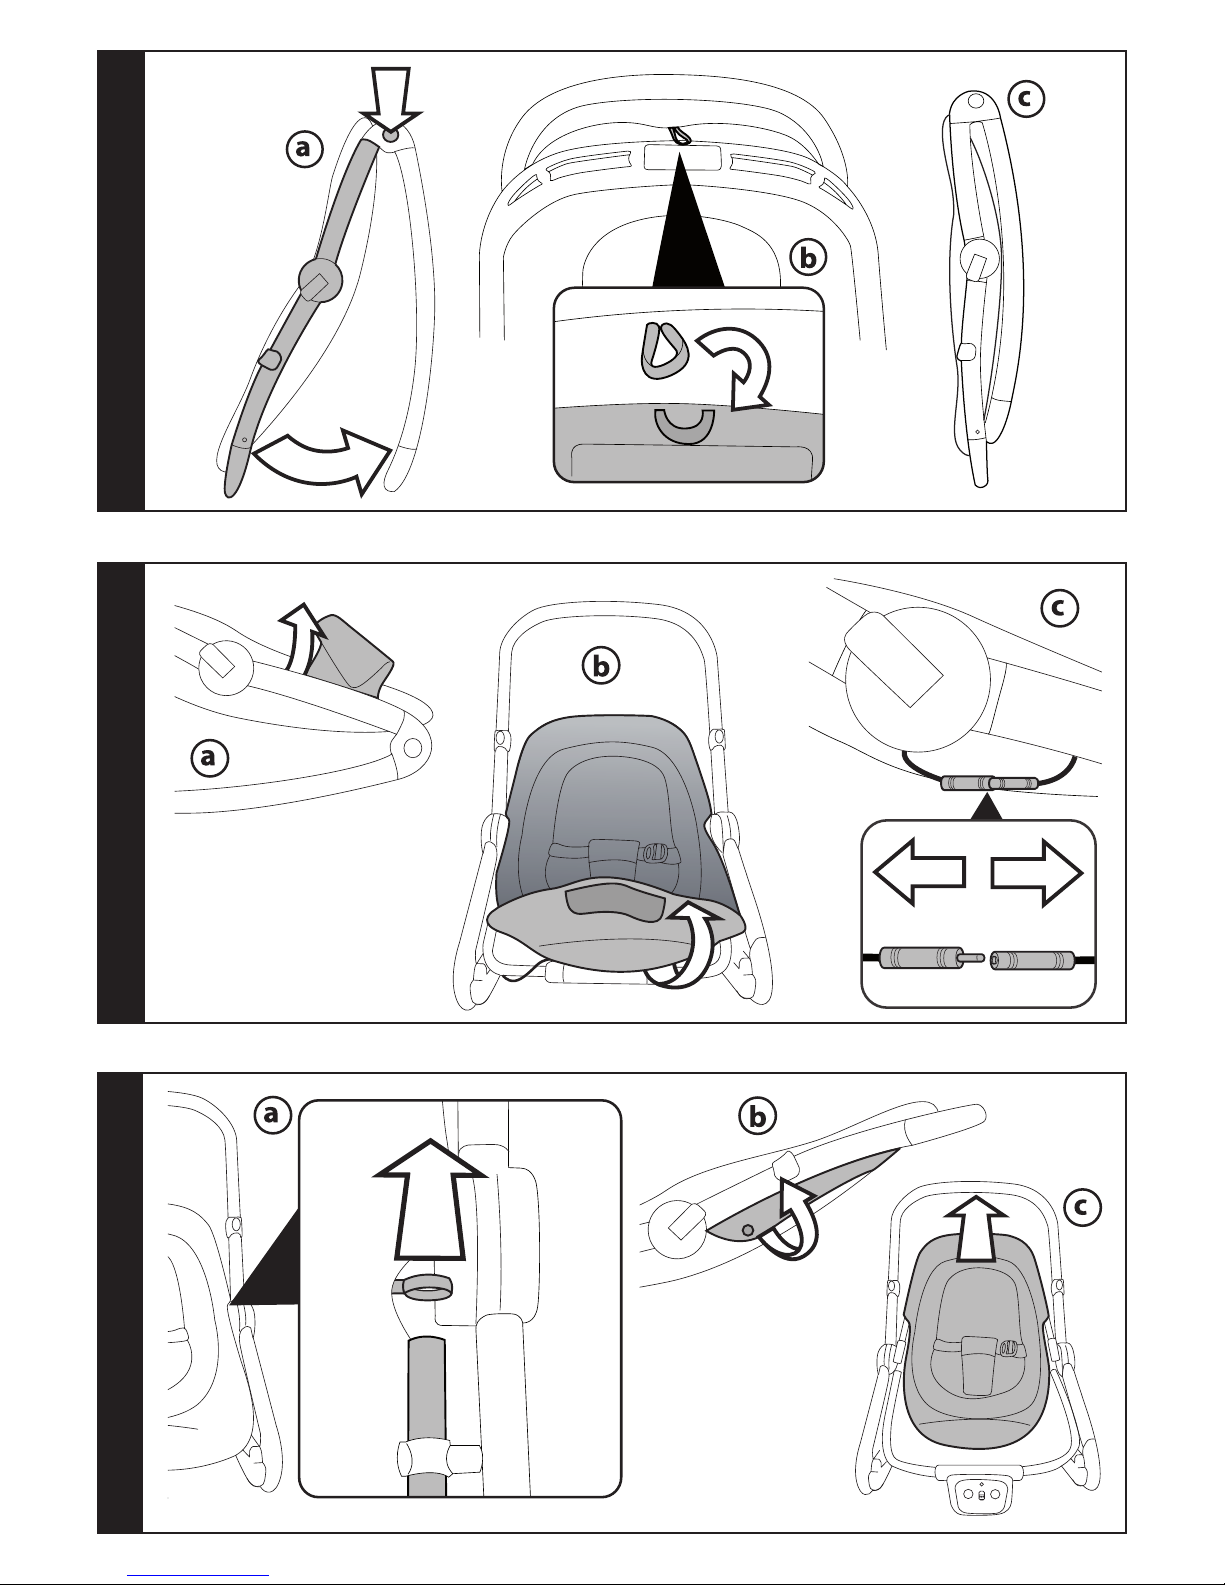
1 APERTURA: per aprire la sdraietta ruotare in avanti i tubi fino al click (fig_a) e sganciare il parasole dal maniglione (fig_b).
2 ASSEMBLAGGIO DELLA SDRAIETTA: per montare il maniglione portare lo schienale in posizione verticale
(vedi punto 4). Infilare il maniglione nei tubi (fig_a) e avvitare con un cacciavite, assicurandosi che la vite
con cavità a stella sia posizionata esternamente al maniglione (fig_b). Serrare con forza e controllare
periodicamente il fissaggio.
3 REGOLAZIONE MANIGLIONE: Il maniglione è regolabile in 3 posizioni. Spingere nel senso delle frecce le due
leve (fig_a) e contemporeneamente ruotare il maniglione fino alla posizione desiderata (fig_b).
La posizione per il trasporto è la numero 1.
4 REGOLAZIONE SCHIENALE: lo schienale è regolabile in 3 posizioni. Ruotare esternamente la leva 1 (che
rimarrà in posizione aperta), (fig_a), ruotare esternamente la leva 2 e contemporaneamente regolare lo
schienale (fig_b). Una volta scelta la posizione, ricordarsi riportare la leva 1 in posizione chiusa.
5 REGOLAZIONE PEDANETTA: la pedanetta è regolabile in due posizioni, per alzarla tirare verso l’esterno, da
entrambi i lati, le due levette e contemporaneamente spingere verso l’alto le linguette (fig_a). Pedanetta
alzata (fig_b).
6 CINTURA DI SICUREZZA: infilare il cinturino nello spartigambe e poi agganciare fino al click (fig_a). Per sganciare
la cintura, premere ai lati della fibbia e contemporaneamente tirare verso l’esterno, il cinturino girovita (fig_b).
7 CAVALLETTO: la base della sdraietta può essere dondabile (fig_a) o stabile. Per rendere la sdraietta stabile
ruotare verso l'esterno il cavalletto stabilizzatore (fig_b).
8 PARASOLE: la sdraietta è dotata di parasole regolabile in più posizioni che si aggancia al maniglione a
qualsiasi altezza.
9 BARRA GIOCHI: agganciare la barra giochi (fig_a). La barra giochi può essere appllicata ai tubi anteriori
(fig_b) o al maniglione (fig_c) a seconda della posizione dello schienale.
10 La barra giochi può essere sganciata da un solo lato e ruotare verso l'esterno (fig_a). Per azionare il verso
della mucca, premere le zampine (fig_b).
11 MODU LO SONO RO: le pile NON sono incluse nella confezione. Per attivare il modulo sonoro sono
necessarie 2 pile stilo tipo “AA” da 1,5 Volt.
Con un cacciavite svitare il coperchio del vano pile (fig_a) ed inserire le pile (fig_b). Una volta effettuata
l’operazione, riavvitare il coperchio del vano. Il modulo sonoro ha 2 regolazioni di volume e 8 musiche
(fig_c).
A: Per accendere il modulo sonoro e per regolare il volume spostare il tasto verso l'alto.
B: 4 musiche per il gioco.
C: 4 musiche per la relax.
Per cambiare le musiche premere sui relativi tasti.
12 RIDUTTORE: la sdraietta è fornita di un cuscino riduttore per il neonato, da togliere quando il bambino è più
grande. Per togliere il cuscino riduttore, sfilare il cinturino spartigambe.
13 CHIUSURA: per chiudere la sdraietta (fig_a), regolare il maniglione e lo schienale nella posizione più bassa,
premere contemporaneamente da entrambi i lati il tasto A e ruotare come in figura i tubi. Quando la
sdraietta è chiusa, prima di trasportarla, allacciare l'elastico al gancetto (fig_b). La sdraietta chiusa rimane
davvero compatta e occupa pochissimo spazio (fig_c).
14 SFODERABILITA': per sfoderare la sdraietta staccare il velcro (fig_a), sfilare anteriormente la sacca dal modulo
sonoro (fig_b), scollegare il connettore del modulo sonoro, staccando i due spinotti (fig_c),
Page 10
- 10 -
15 sfilare lateralmente l'asola della sacca dai tubi (fig_a), sbottonare il retro dello schienale (fig_b) e sfilare
dall'alto la sacca (fig_c). Importante: nel rivestire la sdraietta, ricordarsi di infilare l'asola nei tubi.
PULIZIA E MANUTENZIONE
MANUTENZIONE DELL'ARTICOLO: proteggere da agenti atmosferici: acqua, pioggia o neve; l’esposizione
continua e prolungata al sole potrebbe causare cambiamenti di colore in molti materiali; conservare questo
articolo in un posto asciutto.
PULIZIA DEL TELAIO: periodicamente pulire le parti in plastica con un panno umido senza utilizzare solventi
o altri prodotti simili; mantenere asciutte tutte le parti in metallo per prevenire la ruggine; mantenere pulite
tutte le parti in movimento (meccanismi di regolazione, meccanismi di aggancio) da polvere o sabbia e se
occorre, lubrificarle con olio leggero.
PULIZIA DELLE PARTI IN TESSUTO: spazzolare le parti in tessuto per allontanare la polvere e lavare a mano a
una temperatura massima di 30° non torcere; non candeggiare al cloro; non stirare; non lavare a secco; non
smacchiare con solventi e non asciugare a mezzo di asciugabiancheria a tamburo rotativo.
PEG-PÉREGO S.p.A.
Peg-Pérego S.p.A. è certificata ISO 9001. La certificazione offre ai clienti e ai consumatori la
garanzia di una trasparenza e fiducia nel modo di lavorare dell'impresa.
Peg Pérego potrà apportare in qualunque momento modifiche ai modelli descritti in questa
pubblicazione, per ragioni di natura tecnica o commerciale.
Peg Pérego è a disposizione dei suoi Consumatori per soddisfare al meglio ogni loro
esigenza. Per questo, conoscere il parere dei ns. Clienti, è per noi estremamente importante
e prezioso. Le saremo quindi molto grati se, dopo aver utilizzato un ns. prodotto, vorrà
compilare il QUESTIONARIO SODDISFAZIONE CONSUMATORE, segnalando eventuali
osservazioni o suggerimenti, che troverà nel nostro sito internet: www.pegperego.com
SERVIZIO ASSISTENZA PEG-PÉREGO
Se fortuitamente parti del modello vengono perse o danneggiate, usare solo pezzi di ricambio originali
Peg Pérego. Per eventuali riparazioni, sostituzioni, informazioni sui prodotti, la vendita di ricambi originali e
accessori, contatta il Servizio Assistenza Peg Pérego:
tel. 0039/039/60.88.213 numero verde: 800/147.414 (contattabile da rete fissa)
fax 0039/039/33.09.992
e-mail assistenza@pegperego.it sito internet www.pegperego.com
DICHIARAZIONE DI CONFORMITA'
Denominazione del prodotto
Sdraietta Melodia
Codice identificativo del prodotto
IMSDME00---- IMSDMEFR---- IMSDMESP----
Normative di riferimento (origine)
EN12790:2008
EN71-1 EN71-2 EN71-3 EN71-9
EN62115 EN55014 (EMC)
European Directive 2002/96/CE (WEEE Directive)
European Directive 2002/95/CE (RoHS Directive)
Dichiarazione di conformità
La PegPerego S.p.A. dichiara sotto la propria responsabilità che l’ articolo in oggetto è stato sottoposto a
test di collaudo interni e omologato secondo le normative vigenti presso laboratori esterni ed indipendenti.
Data e luogo di rilascio
Arcore, 11 settembre 2007
Page 11

- 11 -
EN_English
Thank you for choosing a Peg-Pérego product.
WARNING
_ IMPORTANT: READ THE INSTRUCTIONS CAREFULLY BEFORE USE AND KEEP
THEM FOR FUTURE REFERENCE. THE CHILD MAY BE HURT IF YOU DO NOT
FOLLOW THESE INSTRUCTIONS.
_ THIS RECLINED CRADLE IS DESIGNED FOR CHILDREN UP TO A MAXIMUM
WEIGHT OF 9 KG.
_ DO NOT USE THE RECLINED CRADLE SDRAIETTA WHEN THE CHILD IS ABLE TO
SIT UNAIDED.
_ NEVER LEAVE CHILD UNATTENDED IN THE RECLINED CRADLE.
_ THIS RECLINED CRADLE IS NOT INTENDED FOR PROLONGED PERIODS OF
SLEEPING. IF THE CHILD NEEDS TO SLEEP, IT IS IMPORTANT TO PUT IT IN A
SUITABLE COT.
_ ALWAYS USE THE SAFETY BELTS.
_ THIS RECLINED CRADLE IS NOT A CHILD CAR SEAT: NEVER USE IT FOR
TRANSPORTING A CHILD IN A MOTOR VEHICLE.
_ DANGER OF STRANGULATION: LEAVE CHILDREN IN THE RECLINED CRADLE
WHEN THE SAFETY BELTS ARE LOOSENED OR NOT FASTENED.
_ RISK OF FALLING: IT IS DANGEROUS TO USE THE RECLINED CRADLE ON A RAISED
SURFACE.
_ DANGER OF SUFFOCATION: THE RECLINED CRADLE CAN OVERTURN ON SOFT
SURFACES AND SUFFOCATE THE CHILD. NEVER PUT THE RECLINED CRADLEON
BEDS, SOFAS OR OTHER SOFT SURFACES.
_ BEFORE USE CHECK THAT ALL OF THE ATTACHMENT MECHANISMS ARE
CORRECTLY ENGAGED.
_ DO NOT USE THE PRODUCT IF THERE ARE MISSING OR BROKEN PARTS.
_ AVOID INSERTING FINGERS INTO THE MECHANISMS.
_ BE CAREFUL NOT TO HURT THE CHILD WHEN ADJUSTING THE MECHANISMS
(HANDLE, BACKREST, SUN CANOPY).
_ NEVER USE THE PLAY BAR AND THE SUN CANOPY TO CARRY THE ITEM.
_ IT MAY BE DANGEROUS TO USE ACCESSORIES NOT APPROVED BY THE
MANUFACTURER.
_ THE RECLINED CRADLE MUSIC SYSTEM MUST BE SWITCHED ON AND OFF BY AN
ADULT.
_ IF THE RECLINED CRADLE MUSIC SYSTEM IS GOING TO BE LEFT UNUSED FOR
AN EXTENDED PERIOD, IT IS ADVISABLE TO REMOVE THE BATTERIES FROM THE
BATTERY COMPARTMENT.
_ ONLY USE BATTERIES OF THE SAME OR EQUIVALENT TYPE AS THOSE
RECOMMENDED.
_ INSERT THE BATTERIES WITH THE CORRECT POLARITY.
_ DO NOT COMBINE USED AND NEW BATTERIES TOGETHER.
_ DISCHARGED BATTERIES MUST BE REMOVED FROM THE PRODUCT.
_ DO NOT SHORT CIRCUIT THE POWER SUPPLY TERMINALS.
_ RECHARGEABLE BATTERIES MUST BE REMOVED FROM THE PRODUCT BEFORE
RECHARGING.
_ RECHARGEABLE BATTERIES MUST BE RECHARGED UNDER ADULT SUPERVISION.
Page 12

- 12 -
_ NOTICE: THIS ARTICLE MEETS OR EXCEEDS ALL REQUIREMENTS COVERED IN
ASTM F2050 STANDARD AND LATEST REVISIONS.
WEEE DIRECTIVE (EU only)
_ At the end of its useful life, this product is classed as Waste Electrical and Electronic Equipment (WEEE) and
must therefore not be disposed of as urban waste but instead must be taken to a designated separated
waste collection facility.
_ Take the refuse to the relevant designated collection facility.
_ The presence of dangerous substances contained in the electrical components of this product represents
a potential source of danger for human health and for the environment if the product is not correctly
disposed of.
_ The barred dustbin indicates that the product must be subject to sorted waste collection.
INSTRUCTIONS
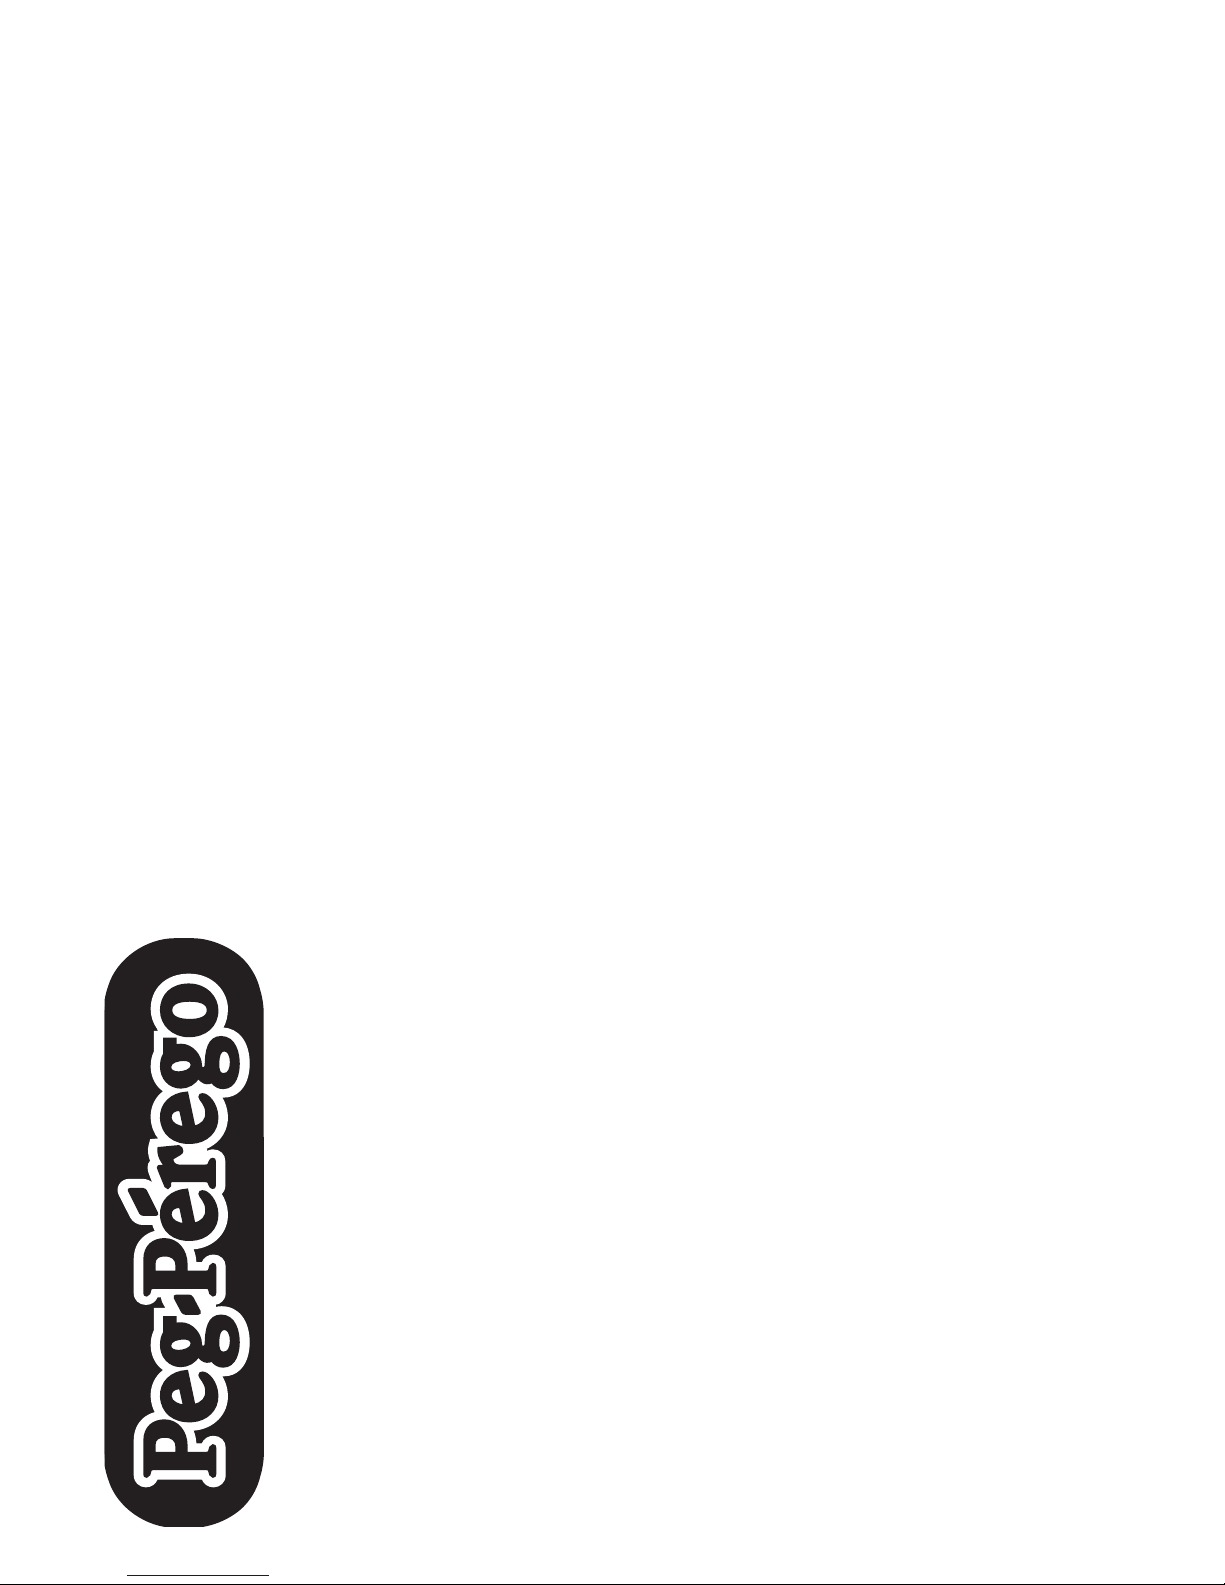
1 OPENING: to open the baby rocker, rotate the frame bars forwards until they click (fig_a) and release the sun
canopy from the handle (fig_b).
2 ASSEMBLING THE BABY ROCKER: to fit the handle, move the backrest into the vertical position (see point 4).
Slot the handle into the tubes (fig_a) and fasten it in place with a screwdriver, ensuring that the crosshead
screw is on the outside of the handle (fig_b). Tighten well and periodically check that it is fixed properly.
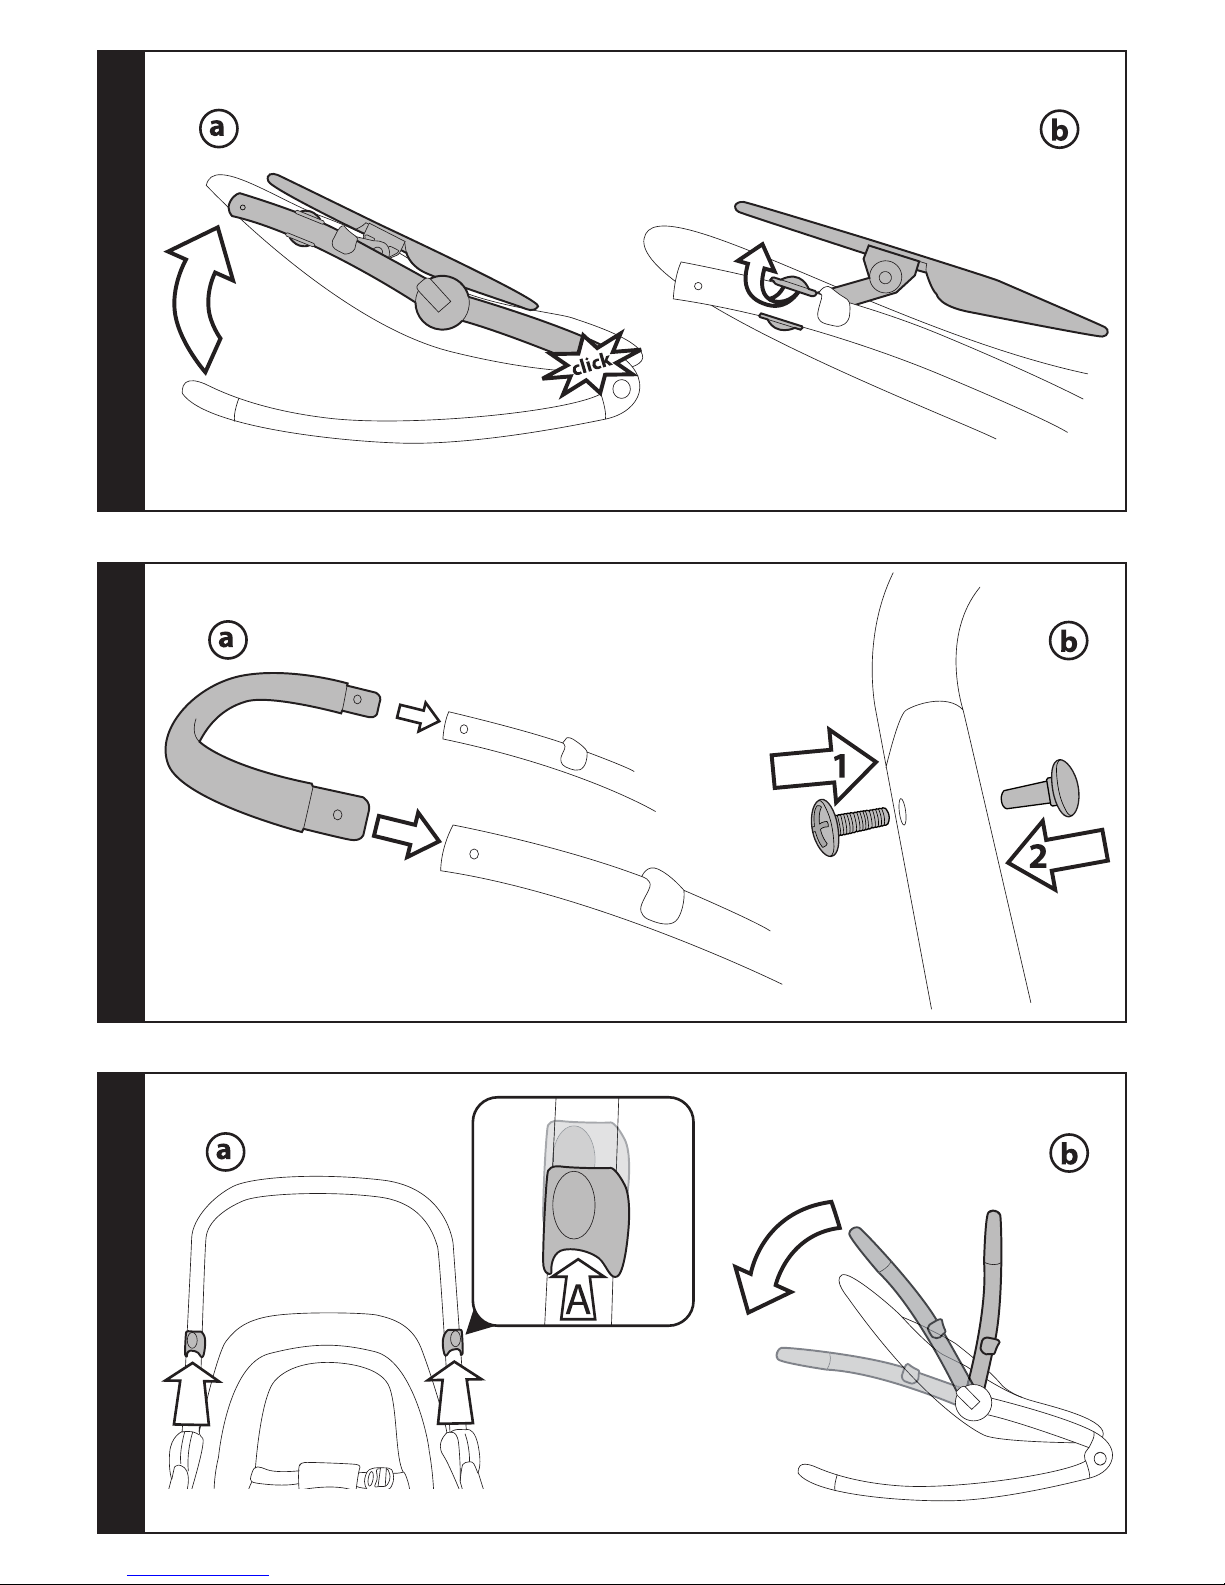
3 ADJUSTING THE HANDLE: the handle can be set in 3 different positions. Push the two levers (fig_a) in the
direction of the arrows and at the same time rotate the handle into the required position (fig_b).
The transport position is number 1.
4 ADJUSTING THE BACKREST: The backrest can be set in 3 different positions. Rotate lever 1 outwards (leaving
it in the open position) (fig_a), rotate lever 2 outwards and at the same time adjust the backrest (fig_b).
Once in the selected position, remember to close lever 1 again.
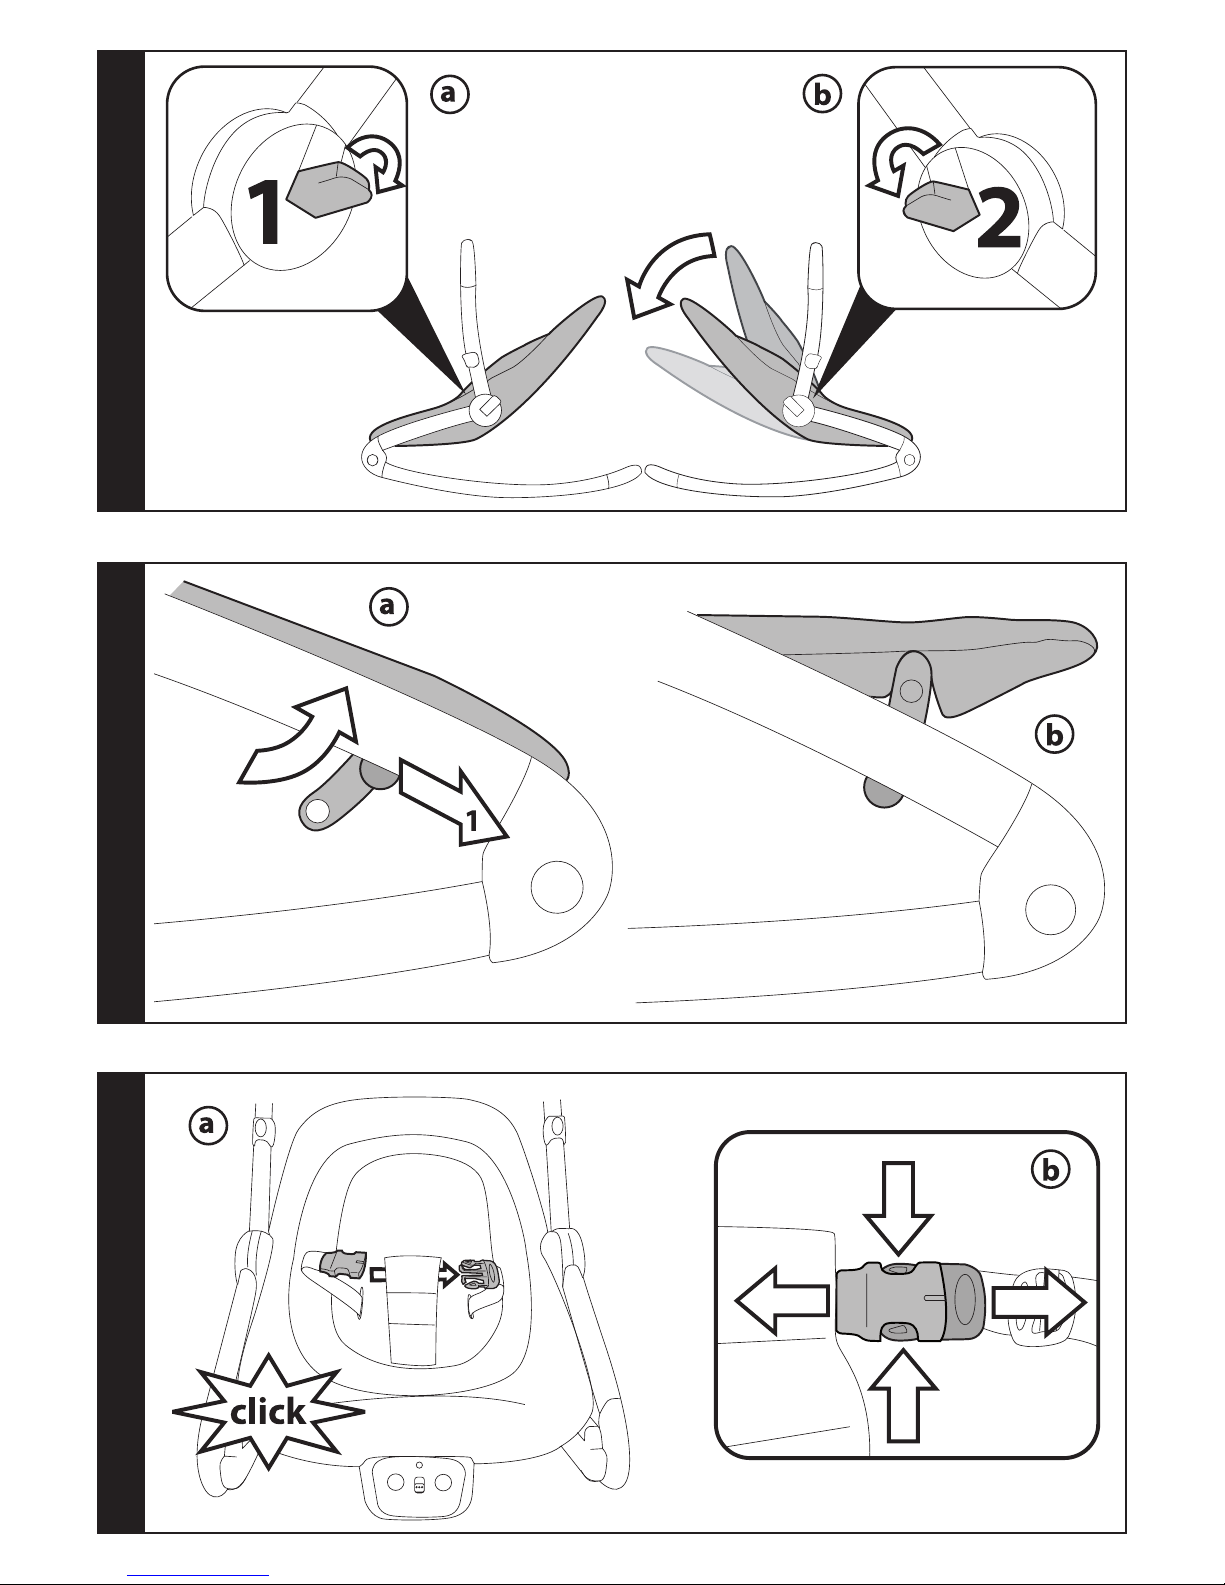
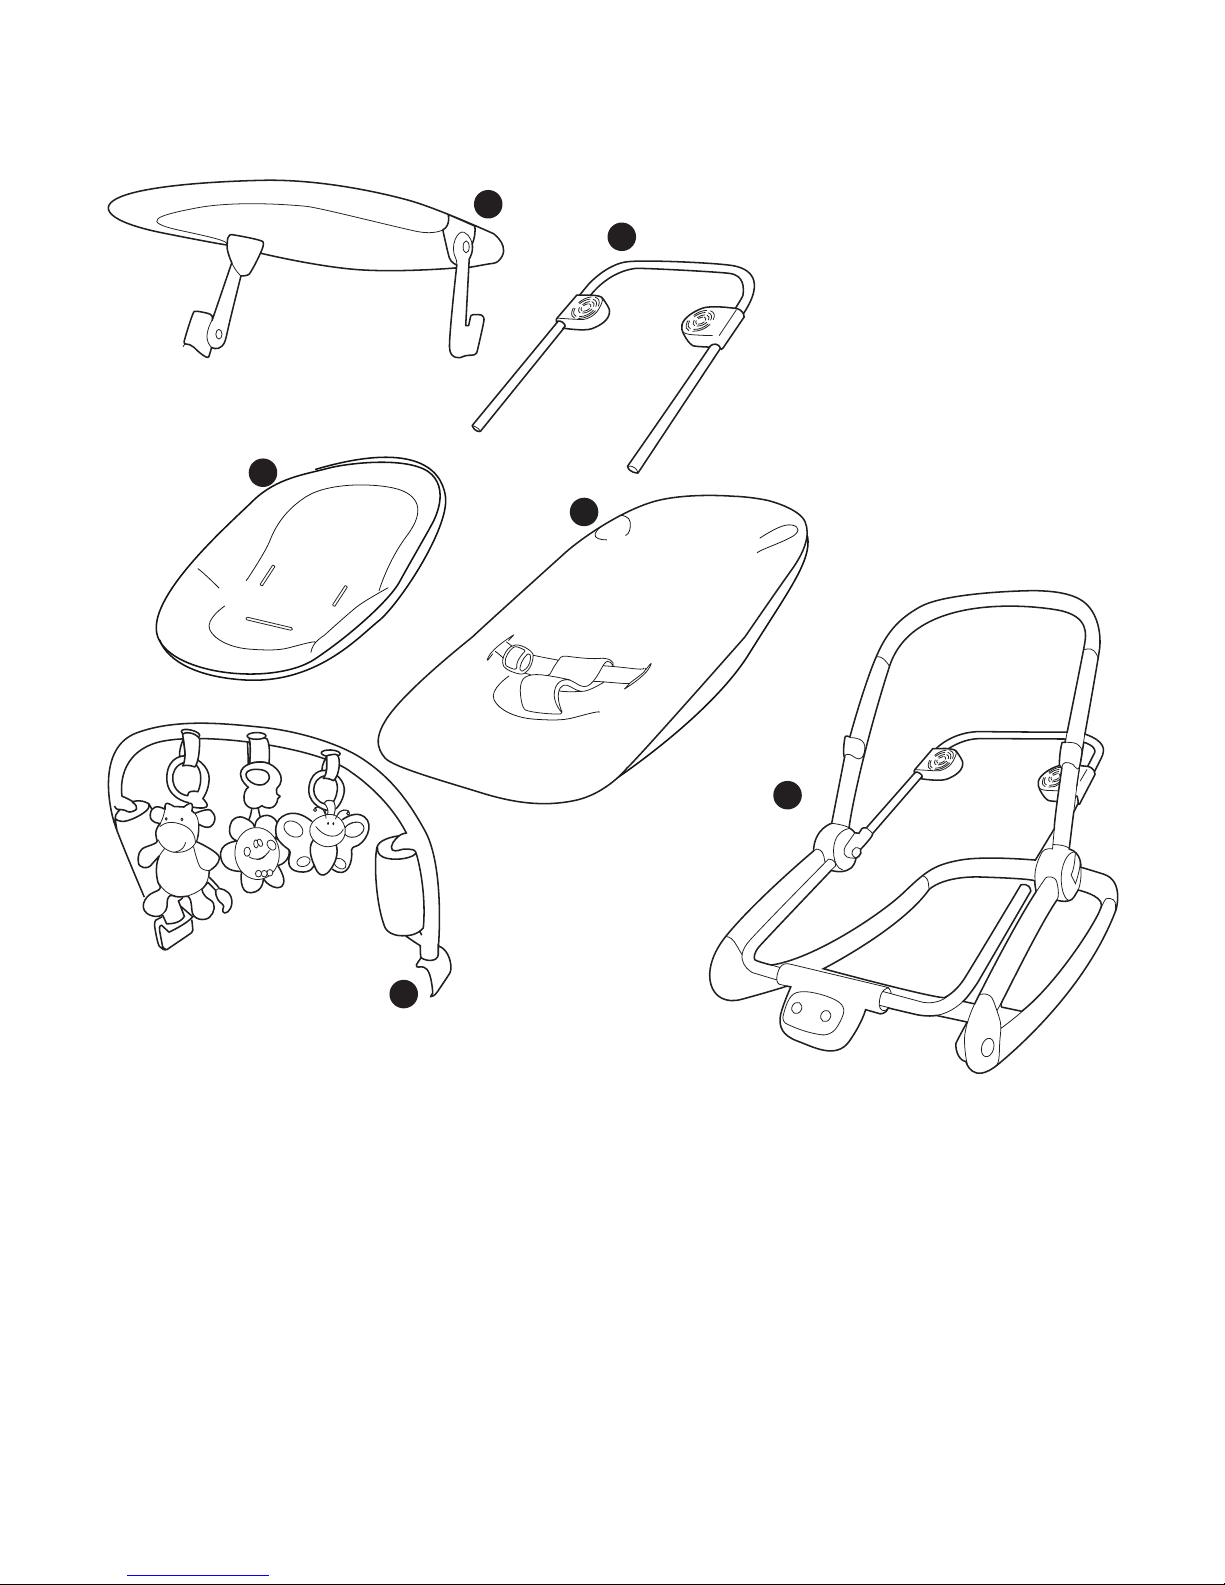
5 ADJUSTING THE REAR LEDGE: the rear ledge can be set at two different heights. To raise it, pull the two
levers outwards from both sides and at the same time push the tabs upwards (fig_a). Rear ledge raised
(fig_b).
6 SAFETY BELT: thread the safety belt through the crotch strap and engage the buckle until it clicks (fig_a). To
release the safety belt, press the two sides of the buckle and simultaneously pull the waist strap outwards
(fig_b).
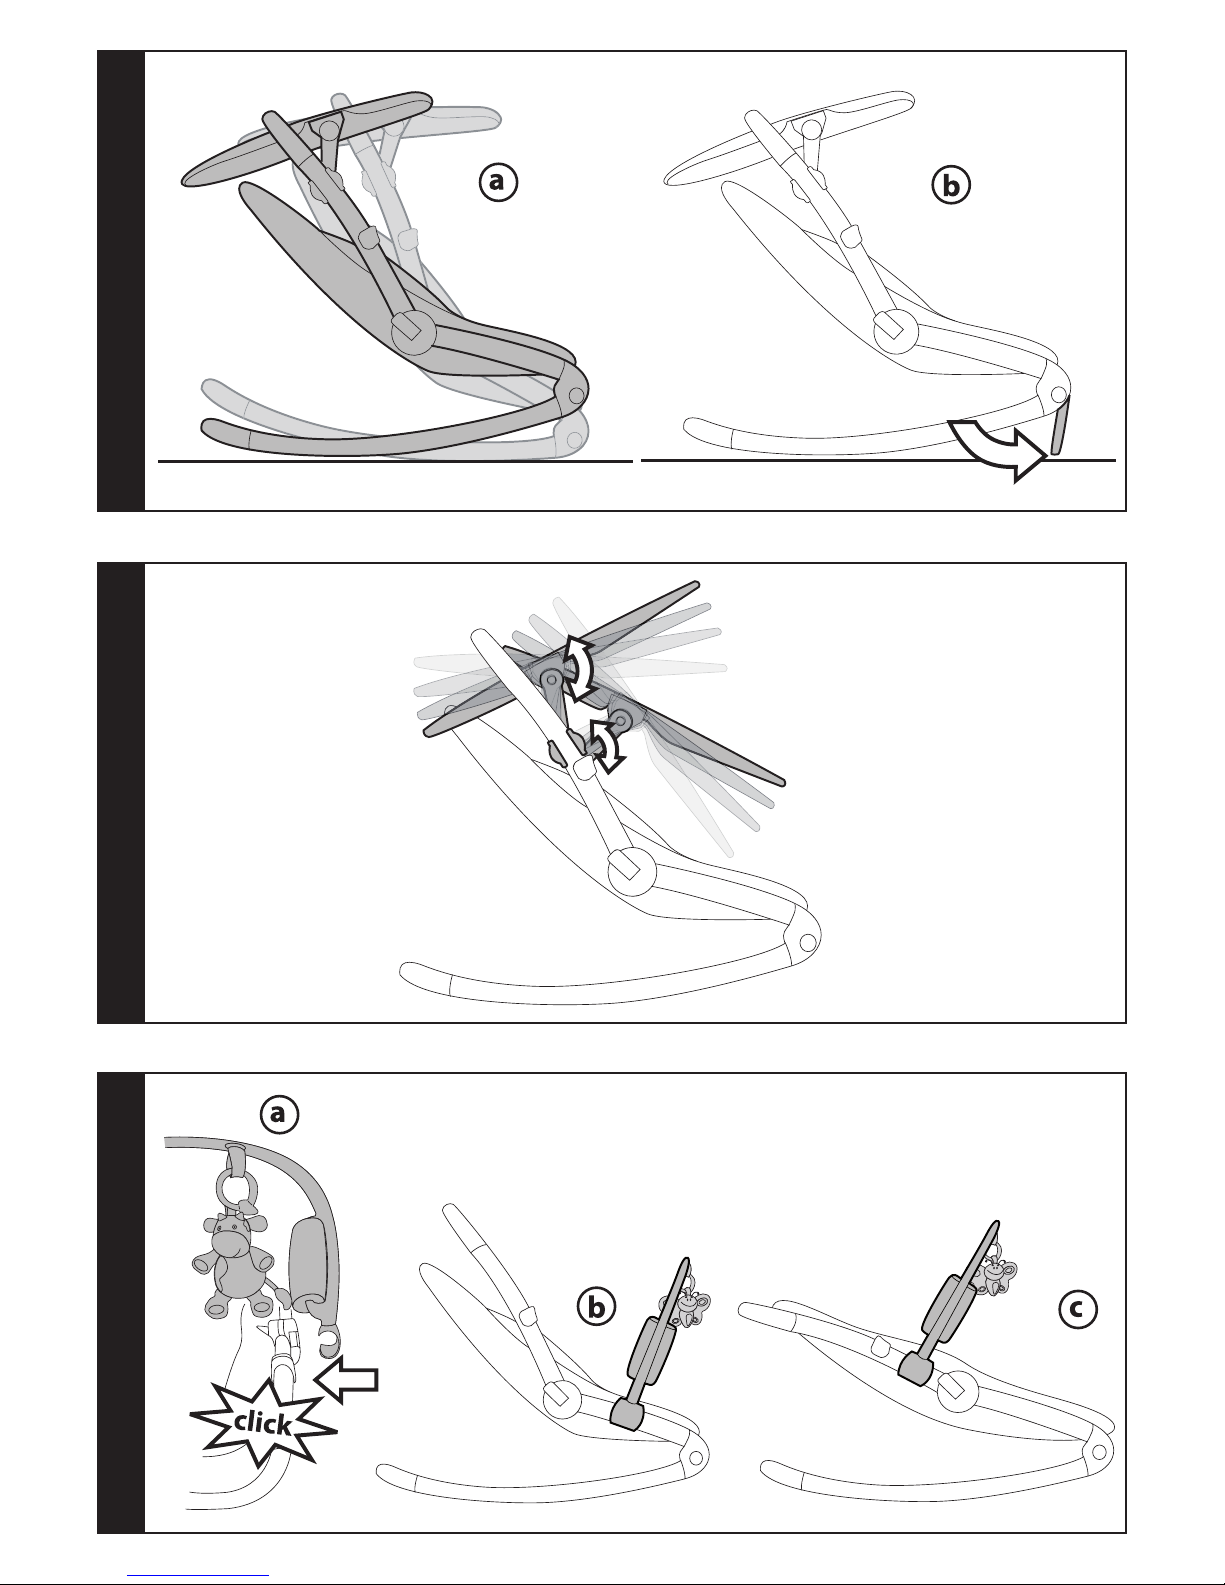
7 STAND: the base of the baby rocker can be rocking (fig_a) or stable. To stop it from rocking, rotate the
stabilizer stand outwards (fig_b).
8 SUN CANOPY: the baby rocker has a sun canopy that can be placed in different positions. It attaches to the
handle at any height.
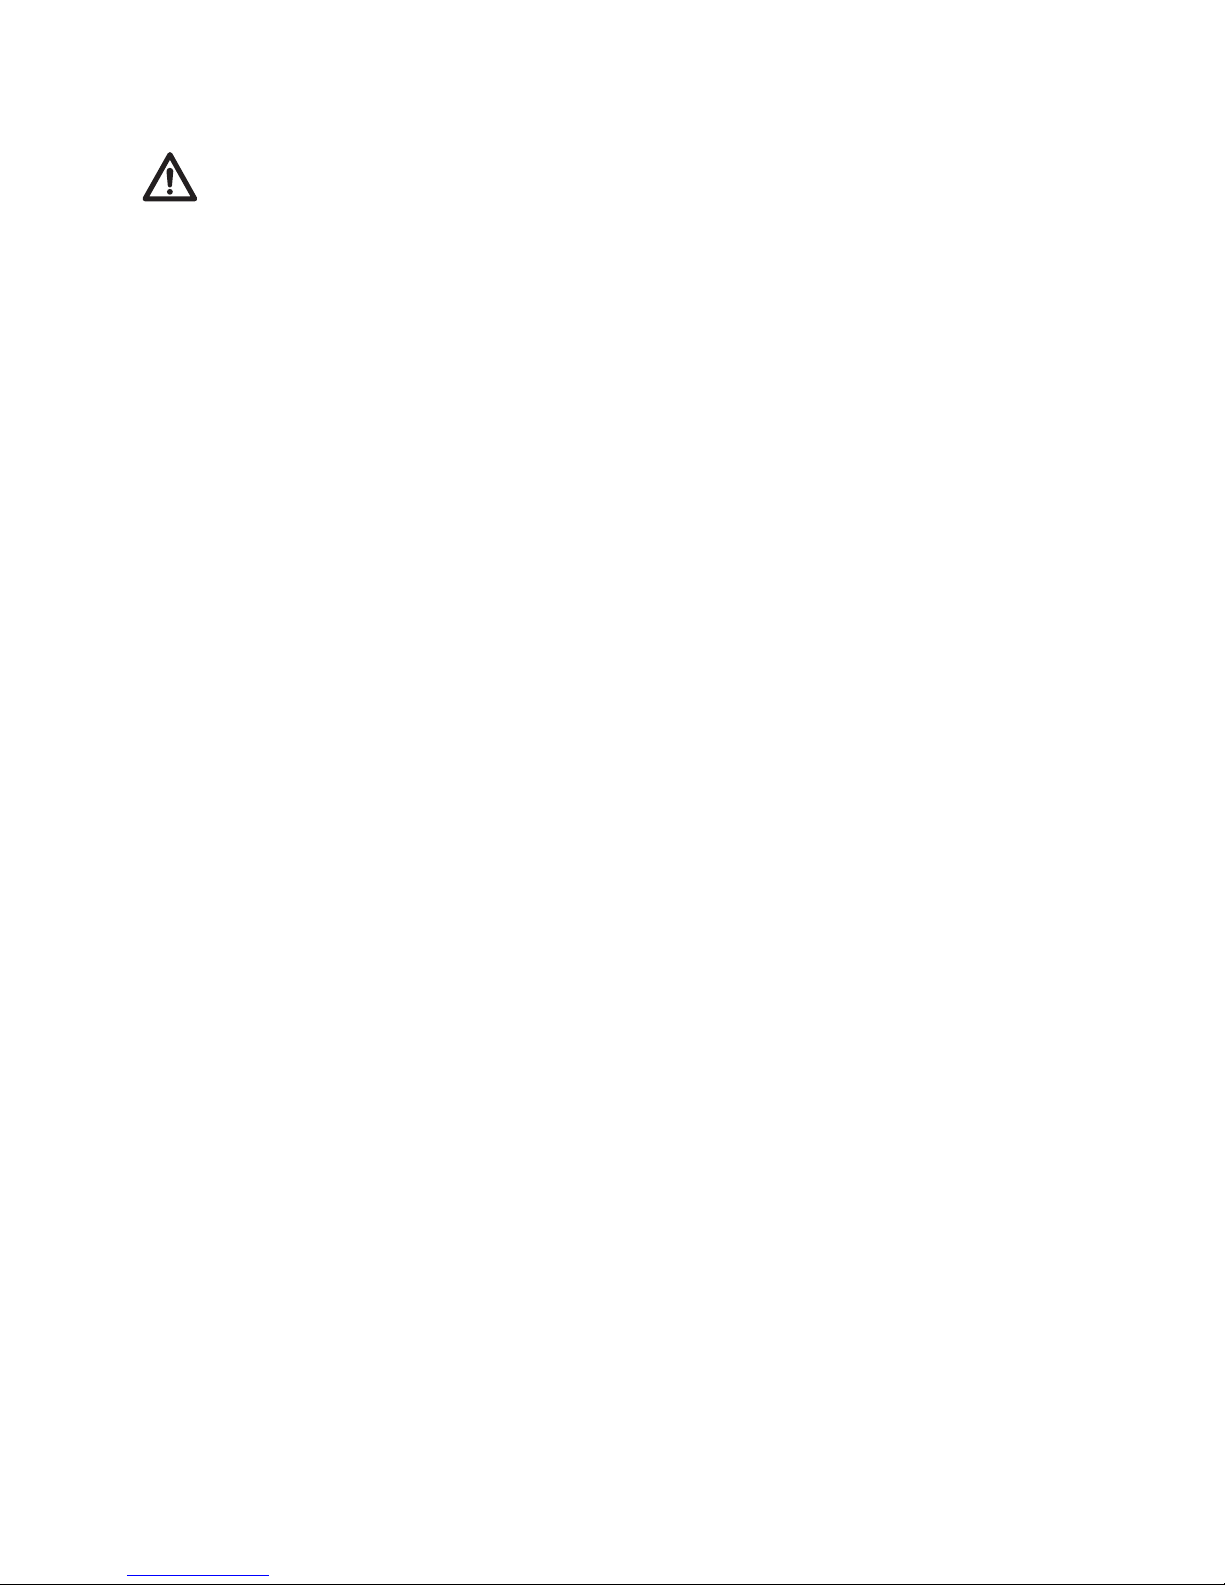
9 PLAY BAR: attach the play bar (fig_a). It can be fitted to the front of the frame (fig_b) or to the handle (fig_c),
depending on the position of the backrest.
10 The play bar can be detached on one side only, and rotated externally. To make the cow moo, press its
hooves (fig_b).
11 SOUND MODULE: batteries are NOT included. The sound module requires 2 “penlight” type AA 1.5V
batteries. Use a screwdriver to unscrew the battery compartment cover (fig_a), insert the batteries. (fig_b),
and then screw the cover back on. The sound module has 2 volume settings and 8 music options (fig_c).
A: To switch on the sound module and to adjust the volume, move the button upwards.
B: 4 playful tunes.
C: 4 soothing tunes.
To change the music, push the relevant buttons.
12 BOOSTER CUSHION: the baby rocker comes with a booster cushion for newborn infants which can be
removed when the child gets bigger. To remove the booster, unthread the crotch strap.
13 CLOSING: to close the baby rocker (fig_a), put the handle and the back rest in the lowest position, press
button A on both sides at the same time and pull together as in the figure. Before moving the closed baby
rocker, put the elastic loop around the fastener (fig_b). When closed, the baby rocker is extremely compact
and takes up very little space (fig_c).
14 REMOVING COVERS: to remove the cover of the baby rocker, detach the Velcro (fig_a), slip off the sound
module cover by moving it towards the front (fig_b), then disconnect the sound module connector by
detaching the two jacks (fig_c).
15 Slip the cover side loop off the frame tubes (fig_a), unbutton the back of the backrest (fig_b) and slide the
Page 13
- 13 -
cover upwards (fig_c). Important: when re-covering the baby rocker remember to insert the loop onto the
tubular frame.
CLEANING AND MAINTENANCE
PRODUCT MAINTENANCE: protect from the weather: water, rain, or snow; prolonged and continuous
exposure to bright sunlight may give rise to colour changes of various different materials; store this product
in a dry place.
CLEANING THE CHASSIS: periodically clean all plastic parts with a damp cloth. Do not use solvent or similar
cleaning products; keep all metal parts dry to prevent rusting; keep moving parts clean (adjustment
mechanisms, locking mechanisms) and free of dust and sand and, if necessary, lubricate with light machine
oil.
CLEANING FABRIC PARTS: brush fabric parts to remove dust and wash by hand at a maximum temperature
of 30°C; do not wring; do not use chlorine bleach, do not iron; do not dry clean; do not apply solvent-based
stain removers and do not dry in a tumble dryer.
PEG-PÉREGO S.p.A.
Peg-Pérego S.p.A. is an ISO 9001 certified company. This certification is a guarantee for
customers and consumers of the transparency and trustworthiness of the company's
procedures and working methods.
Peg Pérego can make changes at any time to the models described in this publication for
technical or commercial reasons.
Peg Pérego is at the disposal of its customers and consumers to ensure that all their demands and queries
are fully satisfied. It is a key part of our policy to ensure we are always aware of our customers' views and
requirements. We would therefore be very grateful if, after using a Peg Pérego product, you take the time to
fill in our CUSTOMER SATISFACTION QUESTIONNAIRE, making a note of any comments or suggestions you
might have. You can find the questionnaire on the Peg Pérego website: www.pegperego.com
PEG-PÉREGO AFTER-SALES SERVICE
If any parts of your Peg Pérego product should be accidentally mislaid or damaged, use exclusively genuine
original Peg Pérego replacements. For any repairs, replacements, product information, and orders for
genuine original replacement parts and accessories, contact Peg Pérego After-Sales Service:
tel. 0039/039/60.88.213 fax 0039/039/33.09.992
e-mail assistenza@pegperego.it website www.pegperego.com
DECLARATION OF CONFORMITY
Product name
Sdraietta melodia
Product reference number
IMSDME00---- IMSDMEFR---- IMSDMESP----
Reference Standards (origin)
EN12790:2008
EN71-1 EN71-2 EN71-3 EN71-9
EN62115 EN55014 (EMC)
European Directive 2002/96/CE (WEEE Directive)
European Directive 2002/95/CE (RoHS Directive)
Declaration of conformity
PegPerego S.p.A. declares under its sole responsibility that the article to which this declaration relates has
undergone internal testing and has been approved, in accordance with regulations in force, by external,
independent testing laboratories.
Date and place of issue
Arcore, 11th September 2007
Page 14

- 14 -
FR_Français
Merci d’avoir choisi un produit Peg-Pérego.
AVERTISSEMENT
_ IMPORTANT: LIRE CES INSTRUCTIONS AVEC ATTENTION ET LES CONSERVER
POUR TOUTE RÉFÉRENCE FUTURE. LA SÉCURITÉ DE L’ENFANT POURRAIT ÊTRE
MENACÉE SI CES INSTRUCTIONS NE SONT PAS SUIVIES.
_ NON RECOMANDÉ POUR LES ENFANTS QUI PEUVENT S' ASSEOIR TOUT SEULS
(ÀGÉS ENVIRON 9 MOIS; JUSQU' À 9 KG)
_ NE JAMAIS LAISSER L’ENFANT SANS SURVEILLANCE DANS LE TRANSAT.
_ CE TRANSAT N’A PAS ÉTÉ CONÇU POUR ÊTRE UTILISÉ POUR UN SOMMEIL
PROLONGÉ. SI L’ENFANT A ENVIE DE DORMIR, IL EST IMPORTANT DE LE
COUCHER DANS UN LIT APPROPRIÉ.
_ TOUJOURS UTILISER LES CEINTURES DE SÉCURITÉ.
_ POUR ÉVITER TOUT RISQUE DE CHUTE, VOTRE ENFANT DOIT TOUJOURS ÊTRE
ATTACHÉ.
_ CE TRANSAT N’EST PAS UN SIÈGE-AUTO: NE JAMAIS UTILISER POUR LE
TRANSPORT D’UN ENFANT DANS UN VÉHICULE À MOTEUR.
_ DANGER D’ÉTRANGLEMENT: NE JAMAIS LAISSER L’ENFANT DANS LE TRANSAT
QUAND LES CEINTURES SONT DESSERRÉES OU DÉTACHÉES.
_ DANGER DE CHUTE : IL EST DANGEREUX D’UTILISER LE TRANSAT SUR UNE
SURFACE SITUÉE EN HAUTEUR.
_ DANGER D’ÉTOUFFEMENT: LE TRANSAT PEUT SE RENVERSER SUR DES SURFACES
MOLLES ET ÉTOUFFER L’ENFANT; NE JAMAIS METTRE LE TRANSAT SUR UN LIT,
UN DIVAN OU DES SURFACES MOLLES.
_ AVANT L’UTILISATION, S’ASSURER QUE TOUS LES MÉCANISMES DE FIXATION
SONT CORRECTEMENT ENCLENCHÉS.
_ NE PAS UTILISER LE PRODUIT SI DES PIÈCES SONT MANQUANTES OU CASSÉES
_ ÉVITER DE METTRE LES DOIGTS DANS LES MÉCANISMES.
_ PRÊTER ATTENTION À LA POSITION DE L’ENFANT LORS DES OPÉRATIONS DE
RÉGLAGE DES MÉCANISMES (POIGNÉE, DOSSIER, PARE-SOLEIL).
_ NE JAMAIS UTILISER LA BARRE DE JEUX ET LE PARE-SOLEIL POUR TRANSPORTER
L’ARTICLE.
_ L’UTILISATION D’ACCESSOIRES N’AYANT PAS ÉTÉ APPROUVÉS PAR LE FABRICANT
PEUT ÊTRE DANGEREUSE.
_ SEULS LES ADULTES PEUVENT ALLUMER OU ÉTEINDRE LA MUSIQUE DU
TRANSAT .
_ SI LA MUSIQUE DU TRANSAT RESTE ÉTEINTE TRÈS LONGTEMPS, IL EST
RECOMMANDÉ DE RETIRER LES PILES DE LEUR COMPARTIMENT.
_ SEULES LES PILES D’UN TYPE IDENTIQUE OU ÉQUIVALENT À CELLES
RECOMMANDÉES DOIVENT ÊTRE UTILISÉES.
_ BIEN RESPECTER LA POLARITÉ EN INSÉRANT LES BATTERIES.
_ NE PAS UTILISER DES PILES NEUVES ET USAGÉES EN MÊME TEMPS.
_ LES PILES DÉCHARGÉES DOIVENT ÉTRE RETIRÉES DU PRODUIT.
_ NE PAS COURT-CIRCUITER LES BORNES D’ALIMENTATION
_ LES PILES RECHARGEABLES DOIVENT ÊTRE RETIRÉES DE LEUR COMPARTIMENT
POUR ÊTRE RECHARGÉES.
_ LES PILES RECHARGEABLES DOIVENT ÊTRE RECHARGÉES SEULEMENT SOUS LA
SUPERVISION D’UN ADULTE.
Page 15

- 15 -
_ REMARQUE : CET ARTICLE REMPLIT LES CONDITIONS REQUISES PAR LA NORME ASTM
F2050 ET RÉVISIONS RÉCENTES OU SATISFAIT À DES CONDITIONS PLUS SÉVÈRES.
_ CONFORME AUX EXIGENCES DE SECURITE.
DIRECTIVE DEEE (seulement pour l’UE)
_ Ce produit au terme de son cycle de vie est un déchet classé DEEE, par conséquent il ne doit pas être
considéré comme un déchet municipal et doit être éliminé par tri sélectif;
_ Il doit être déposé dans les points de collecte publics spécialement conçus ;
_ La présence de substances dangereuses contenues dans les parties électriques de ce produit constitue une
source potentielle de danger pour la santé des personnes et pour l’environnement, si les produits ne sont
pas correctement éliminés ;
_ La poubelle sur roues barrée d’une croix indique que le produit doit être éliminé par la collecte sélective.
INSTRUCTIONS D’UTILISATION
1 OUVERTURE : Pour ouvrir le transat, tourner les montants vers l’avant jusqu’au déclic et démonter le pare-
soleil de la poignée (fig_b).
2 MONTAGE DU TRANSAT : Pour monter la poignée, mettre le dossier en position verticale (v. point 4). Enfiler
le guidon dans les tubes (fig_a) et visser avec un tournevis en vérifiant que la vis Phillips se trouve du côté
extérieur du guidon (fig_b). Serrer à fond et contrôler régulièrement la fixation.
3 RÉGLAGE DE LA POIGNÉE : La poignée peut être inclinée en 3 positions. Pousser dans le sens des flèches les
deux leviers (fig_a) et, simultanément, tourner la poignée jusqu’à la position désirée (fig_b).
La position de transport correspond à la position numéro 1.
4 RÉGLAGE DU DOSSIER : Le dossier est réglable en 3 positions. Tourner vers l’extérieur le levier 1 (qui restera
en position ouverte) (fig_a). Tourner vers l’extérieur le levier 2 et régler le dossier en même temps (fig_b).
Une fois la position choisie, ne pas oublier de mettre le levier 1 en position fermée.
5 RÉGLAGE DU MARCHEPIED : Le marchepied se règle en deux positions: pour le relever, tirer vers l’extérieur
de part et d’autre les deux petits leviers et, en même temps, pousser les languettes vers le haut (fig_a).
Marchepied relevé (fig_b).
6 HARNAIS DE SÉCURITÉ : Faire passer la sangle à travers l’entrejambes et unir les deux embouts jusqu’à
entendre le clic d’enclenchement (fig_a). Pour décrocher la ceinture, appuyer sur les côtés de la boucle et,
dans le même temps, tirer vers l’extérieur la sangle ventrale (fig_b).
7 SUPPORT : La base du transat possède une position fixe et une position à bascule (fig_a). Pour mettre le
transat en position fixe, tourner vers l’extérieur le support de stabilisation (fig_b).
8 PARE-SOLEIL : Le transat est équipé d’un pare-soleil, réglable en plusieurs positions, qui s’enclenche dans la
poignée à n’importe quelle hauteur.
9 BARRE DE JEUX : Accrocher la barre de jeux (fig_a). La barre de jeux peut se fixer aux montants avant (fig_b)
ou à la poignée (fig_c) en fonction de la position du dossier.
10 La barre de jeux peut être fixée d’un seul côté et être tournée vers l’extérieur (fig_a). La vache en peluche
émet des sons. Pour les actionner, appuyer sur ses pattes (fig_b).
11 UNITÉ SONORE : Les piles NE SONT PAS incluses avec le produit. Pour actionner l’unité sonore, 2 piles type
AA de 1,5 volt sont nécessaires.
Dévisser à l’aide d’un tournevis le couvercle du compartiment des piles (fig_a) et insérer les piles (fig_b).
Après avoir effectué l’opération, revisser le couvercle du compartiment. L’unité sonore dispose de deux
niveaux de réglage de volume et de 8 musiques (fig_c).
A : Pour allumer l’unité sonore et régler le volume, déplacer le curseur vers le haut.
B : 4 musiques pour le jeu.
C : 4 musiques pour la détente.
Pour changer de musique, appuyer sur les touches correspondantes.
12 RÉDUCTEUR : Le transat est équipé d’un coussin réducteur pour le nouveau né, qui doit être retiré lorsque
l’enfant est plus grand. Pour retirer le coussin réducteur, faire ressortir la sangle d’entrejambe.
13 PLIAGE : pour refermer le transat (fig_a), régler la poignée et le dossier sur la position la plus basse, appuyer
simultanément des deux côtés sur le bouton A et faire tourner les montants comme indiqué sur la figure.
Lorsque le transat est fermé, accrocher l’élastique au petit crochet (fig_b) avant de le transporter. Une fois
refermé, le transat est très compact et occupe un espace très limité (fig_c).
14 POUR RETIRER LA HOUSSE : Pour retirer la housse du transat, défaire le velcro (fig_a), séparer la housse de l’unité
sonore en la faisant glisser (fig_b) et défaire le connecteur de l’unité sonore en débranchant les deux fiches (fig_c).
Page 16
- 16 -
15 Faire ressortir l’anneau de la housse des tubes sur les côtés (fig_a), déboutonner l’arrière du dossier (fig_b)
et faire glisser la housse par le haut (fig_c). Important : au moment de remonter la housse sur le transat, se
rappeler de faire passer les montants dans l’anneau.
NETTOYAGE ET ENTRETIEN
ENTRETIEN DE L’ARTICLE: protéger l’article des agents atmosphériques (eau, pluie ou neige); une exposition
continue et prolongée au soleil pourrait entraîner un changement de couleur de nombreux matériaux;
ranger cet article dans un lieu sec.
NETTOYAGE DU CHÂSSIS: nettoyer régulièrement les pièces en plastique à l’aide d’un linge humide; ne
pas utiliser de solvants ou autres produits similaires. Veiller à ce que toutes les pièces métalliques restent
sèches pour prévenir la formation de rouille. Maintenir le bon état de propreté de toutes les pièces mobiles
(mécanismes de réglage, mécanismes de fixation, etc.) en enlevant poussière ou sable; graisser avec une
huile légère si nécessaire.
NETTOYAGE DES ÉLÉMENTS EN TISSU : brosser les éléments en tissu pour enlever la poussière et laver à la
main à une température maximale de 30° ; ne pas tordre ; ne pas utiliser d’eau de javel ; ne pas repasser ; ne
pas laver à sec ; ne pas détacher à l’aide de solvants ; ne pas sécher dans un sèche-linge à tambour rotatif.
PEG-PÉREGO S.p.A.
Peg-Pérego S.p.A. est certifiée ISO 9001. La certification offre à la clientèle une garantie de
transparence et représente un gage de confiance dans la façon de travailler de l’entreprise.
Peg-Pérego se réserve le droit de procéder à tout moment à des modifications sur les
modèles décrits dans cet ouvrage, pour des raisons de nature technique ou commerciale.
Peg-Pérego est à la disposition de sa clientèle pour satisfaire au mieux chacune de ses
exigences. En cela, il est très important et précieux pour nous de connaître l’opinion
de notre clientèle. Nous vous saurions donc gré, après avoir utilisé un de nos produits,
de remplir le QUESTIONNAIRE DE SATISFACTION CLIENT, en nous faisant part de toute
observation ou suggestion éventuelle. Vous trouverez ce questionnaire sur notre site
Internet, à l'adresse www.pegperego.com
SERVICE D’ASSISTANCE PEG-PÉREGO
En cas de perte de pièces ou de rupture de l'une d'elles, utiliser exclusivement des pièces de rechange
originales Peg-Pérego. Pour les réparations, les remplacements, les demandes d'informations relatives aux
produits et l’achat de pièces de rechange originales et d’accessoires, contacter le service d'assistance Peg-
Pérego:
tél. 0039/039/60.88.213 fax 0039/039/33.09.992
e-mail assistenza@pegperego.it site Internet www.pegperego.com
DECLARATION DU CONFORMITÈ
Denomination du produit
Sdraietta Melodia
Identification du produit
IMSDME00---- IMSDMEFR---- IMSDMESP----
Standard du referiment (origin)
EN12790:2008
EN71-1 EN71-2 EN71-3 EN71-9
EN62115 EN55014 (EMC)
European Directive 2002/96/CE (WEEE Directive)
European Directive 2002/95/CE (RoHS Directive)
Declaration du conformitè
PegPerego S.p.A. déclare, sous sa propre responsabilité, que l’article en question a été soumis à des tests
d’essais internes et homologué selon les normes en vigueur par des laboratoires extérieurs et indépendants.
Date et lieu du publication
Arcore, le 11 septembre 2007
Page 17

- 17 -
DE_Deutsch
Vielen Dank, dass Sie sich für ein Peg-Pérego Produkt entschieden haben.
WARNUNG
_ WICHTIG: DIESE ANWEISUNGEN SORGFÄLTIG LESEN UND DANACH
AUFBEWAHREN. DIE SICHERHEIT DES KINDES KÖNNTE BEI NICHTBEACHTUNG
DER ANWEISUNGEN GEFÄHRDET WERDEN.
_ DIESE BABYWIPPE IST FÜR KINDER MIT EINEM HÖCHSTGEWICHT VON 9 KG
ZUGELASSEN.
_ DIE BABYWIPPE NICHT VERWENDEN, WENN DAS KIND ALLEIN SITZEN KANN.
_ NIEMALS DAS KIND UNBEAUFSICHTIGT IN DER BABYWIPPE LASSEN.
_ DIESE BABYWIPPE IST NICHT FÜR EINEN LÄNGEREN SCHLAF GEDACHT. DIE
BABYWIPPE ERSETZT NICHT DAS KINDERBETT. HET LIGSTOELTJE IS GEEN
VERVANGEND BEDJE; ALS HET KIND MOET SLAPEN, MOET HET IN EEN ECHT BED
LIGGEN.
_ IMMER DIE SICHERHEITSGURTE ANLEGEN.
_ DIESE BABYWIPPE IST KEIN AUTOSITZ: NIEMALS FÜR DEN TRANSPORT EINES
KINDES IN EINEM KRAFTFAHRZEUG VERWENDEN.
_ ERWÜRGUNGSGEFAHR: NIEMALS DAS KIND BEI LOCKEREN ODER
AUSGEHÄNGTEN GURTEN IN DER BABYWIPPE LASSEN.
_ STURZGEFAHR: DAS VERWENDEN DES STUHLS AUF EINER ERHÖHTEN EBENE IST
GERÄHRLICH.
_ ERSTICKUNGSGEFAHR: DIE BABYWIPPE KANN AUF WEICHEN UNTERLAGEN
UMKIPPEN UND DAS KIND ERSTICKEN; DIE BABYWIPPE NIEMALS AUF BETTEN,
SOFAS ODER ANDERE WEICHE UNTERLAGEN STELLEN.
_ VOR GEBRAUCH SICHERSTELLEN, DASS ALLE SCHNAPPVORRICHTUNGEN
KORREKT BEFESTIGT SIND.
_ PRODUKT NICHT VERWENDEN, WENN TEILE FEHLEN ODER KAPUTT SIND.
_ NICHT DIE FINGER IN DIE MECHANISMEN HALTEN.
_ BEI EINSTELLUNGEN AN DEN MECHANISMEN (GRIFF, RÜCKENTEIL,
SONNENDACH) AUF DAS KIND ACHTGEBEN.
_ VERWENDEN SIE DIE MENÜLEISTE DER SPIELE UND DEN SONNENSCHIRM
NIEMALS BEIM TRANSPORT.
_ ES KÖNNTE GEFÄHRLICH SEIN, VOM HERSTELLER NICHT GENEHMIGTES
ZUBEHÖR ZU VERWENDEN.
_ NUR ERWACHSENE DIE MUSIK IN DER BABYWIPPE AN- UND AUSSCHALTEN
LASSEN.
_ WIRD DIE MUSIK DER BABYWIPPE FÜR EINEN LÄNGEREN ZEITRAUM NICHT
EINGESCHALTET, EMPFIEHLT ES SICH, DIE BATTERIEN AUS DEM BATTERIENFACH
ZU ENTFERNEN.
_ ES DÜRFEN NUR BATTERIEN DES GLEICHEN ODER EINES GLEICHWERTIGEN TYPS
DER EMPFOHLENEN VERWENDET WERDEN.
_ BEIM EINLEGEN DER BATTERIEN AUF DIE KORREKTE POLARITÄT ACHTEN.
_ NICHT NEUE UND GEBRAUCHTE BATTERIEN ZUR GLEICHEN ZEIT VERWENDEN.
_ LEERE BATTERIEN MÜSSEN AUS DEM PRODUKT ENTFERNT WERDEN.
_ DIE ANSCHLUSSKLEMMEN NICHT KURZSCHLIEßEN.
_ WIEDERAUFLADBARE BATTERIEN MÜSSEN ZUM AUFLADEN AUS DEM PRODUKT
HERAUSGENOMMEN WERDEN.
_ WIEDERAUFLADBARE BATTERIEN DÜRFEN NUR UNTER AUFSICHT EINES
Page 18
- 18 -
ERWACHSENEN AUFGELADEN WERDEN.
RICHTLINIE WEEE (nur EU)
_ Das ausgediente Produkt ist als Schrott gemäß der EU-Richtlinie WEEE klassifiziert und darf daher nicht in
den Hausmüll gegeben werden, sondern muss getrennt gesammelt werden;
_ Verpackungsmaterial und ausgedientes Gerät in die dafür vorgesehenen Sammelstellen bringen;
_ In den elektrischen Komponenten des Produktes enthaltene Substanzen sind eine mögliche Gefahrenquelle
für Gesundheit und Umwelt, wenn das Produkt nicht korrekt entsorgt wird;
_ Eine durchgestrichene Tonne bedeutet, dass das Produkt getrennt gesammelt werden muss.
GERAUCHSANWEISUNG
1 ÖFFNUNG: Zum Öffnen der Babywippe die Stangen bis zum Klick nach vorne drehen (Abb. a) und das
Sonnendach vom Griff lösen (Abb. b).
2 ZUSAMMENBAU DER BABYWIPPE: Zum Anbringen des Griffes die Rückenlehne in die Vertikale stellen
(siehe Punkt 4). Den Griff in die Rohre des Gestells einstecken (Abb_a) und mit einem Schraubendreher
die Schrauben festziehen. Dabei darauf achten, dass sich die Kreuzschlitzschrauben an der Außenseite des
Griffes befinden (Abb_b). Unter Kraftanwendung schließen und die Befestigung regelmäßig überprüfen.
3 EINSTELLUNG GRIFF: Der Griff ist in drei Positionen verstellbar. Die beiden Hebel (Abb. a) in Pfeilrichtung
schieben und gleichzeitig den Griff bis zur gewünschten Position klappen (Abb. b).
Die Transportposition ist Position Nummer 1.
4 EINSTELLUNG RÜCKENLEHNE: Die Rückenlehne ist in 3 Höhen verstellbar. Hebel 1 nach außen klappen
(dieser bleibt offen), (Abb. a), Hebel 2 nach außen klappen und gleichzeitig die Rückenlehne einstellen (Abb.
b). Wenn die gewünschte Position eingestellt ist, Hebel 1 wieder zuklappen.
5 EINSTELLUNG DER FUSSSTÜTZE: Die Fußstütze ist in zwei verschiedene Positionen verstellbar; zum
Hochstellen die zwei Hebel beidseitig nach außen hin ziehen und gleichzeitig die Laschen (Abb. a) nach
oben drücken. Fußstütze in hochgestellter Position (Abb. b).
6 SICHERHEITSGURT: Den Gurt durch die Beinspreizlasche ziehen und dann anhängen, bis ein Klick zu hören
ist (Abb. a). Zum Aushängen des Gurts die Schnalle seitlich andrücken und gleichzeitig den Taillengurt nach
außen ziehen (Abb. b).
7 STÜTZELEMENT: Das Unterteil der Babywippe kann als Wippe (Abb. a) oder mit Standfunktion eingestellt werden.
Zum Einstellen der Babywippe mit Standfunktion das stabilisierende Stützelement nach außen klappen (Abb. b).
8 SONNENDACH: Die Babywippe ist mit einem in mehreren Positionen verstellbaren Sonnendach
ausgestattet, das sich in jeder Höhe am Griff anbringen lässt.
9 SPIELEKETTE: Die Spielekette anbringen (Abb. a). Die Spielekette kann je nach Position der Rückenlehne auf
die Vorderstangen (Abb. b) oder auf den Griff (Abb. c) gesteckt werden.
10 Die Spielekette kann auf nur einer Seite von der Stange gelöst und nach außen gedreht werden (Abb. a).
Zum Abspielen der Melodie in der Kuh auf die Füße drücken (Abb. b).
11 T O NM O D UL : Die Batterien sind NICHT inbegriffen. Zum Aktivieren des Tonmoduls sind zwei 1,5
Volt Batterien vom Typ „AA“ nötig. Mit einem Schraubenzieher den Deckel des Batteriefachs (Abb.
a) aufschrauben und die Batterien einlegen (Abb. b). Danach den Deckel des Batteriefachs wieder
anschrauben. Das Tonmodul lässt sich in 2 Lautstärken und 8 Melodien einstellen (Abb. c).
A: Zum Einschalten des Tonmoduls und zum Regeln der Lautstärke die Regeltaste nach oben schieben.
B:4 Spielmelodien.
C:4 Schlafmelodien.
Zur Änderung der Melodie die jeweilige Taste bedienen.
12 LIEGEFLÄCHE: Die Babywippe ist mit einer Sitzschale für Neugeborene ausgestattet, die entfernt werden
muss, wenn das Kind größer ist. Zum Herausnehmen der Sitzschale den Beinspreizgurt herausziehen.
13 SCHLIESSEN: Zum Schließen des Liegestuhls (Abb_a), den Hebel und die Rückenlehne in die niedrigste
Position bringen, gleichzeitig die Taste A auf beiden Seiten drücken und die Schläuche, wie in der Abbildung
dargestellt, drehen. Wenn der Liegestuhl geschlossen ist, das Gummiband an das Häckchen vor dem
Transport knüpfen (Abb_b). Die geschlossene Babywippe ist wirklich kompakt und braucht nur sehr wenig
Platz (Abb. c).
14 WASCHBARKEIT DES BEZUGS: Zum Abziehen des Bezugs von der Babywippe, den Klettverschluss öffnen
(Abb. a), den Beutel vorderseitig vom Tonmodul abziehen (Abb. b), den Steckverbinder des Tonmoduls
abziehen, indem die zwei Steckerstifte herausgezogen werden (Abb. c).
15 Die Beutelöse seitlich aus den Stangen herausziehen (Abb. a), die Rückseite der Rückenlehne aufknöpfen
(Abb. b) und den Beutel von oben herausziehen (Abb. c): Wichtig: Beim neuerlichen Beziehen der
Page 19

- 19 -
Babywippe nicht vergessen, die Öse durch die Stangen zu ziehen.
REINIGUNG UND PFLEGE
REINIGUNG DES ARTIKELS: vor Witterungseinflüssen schützen: Wasser, Regen oder Schnee; eine längere
Bestrahlung durch die Sonne kann zu Farbänderungen der verschiedenen Materialien führen; diesen Artikel
an einem trockenen Ort aufbewahren.
REINIGUNG DES GESTELLS: die Kunststoffteile regelmäßig mit einem feuchten Lappen reinigen – keine
Lösungsmittel oder ähnliche Produkte verwenden; sämtliche Metallteile trocken halten, um einem eventuellen
Rosten vorzubeugen; alle beweglichen Teile (Einstellungsmechanismen, Befestigungsmechanismen) von
Staub oder Sand unbedingt sauber halten und, wenn nötig, mit Leichtöl schmieren.
REINIGEN DER STOFFTEILE: die Stoffteile abbürsten, um den Staub zu entfernen und per Hand bei einer
Höchsttemperatur von 30° waschen; nicht auswringen; nicht mit Bleichmittel behandeln; nicht bügeln; nicht
chemisch Reinigen; die Flecken nicht mit Hilfe von Lösungsmitteln entfernen und nicht in einem Trockner
mit Drehtrommel trocknen.
PEG-PÉREGO S.p.A.
Peg-Pérego S.p.A. ist gemäß ISO 9001 zertifiziert. Die Zertifizierung garantiert den Kunden
und Verbrauchern Transparenz und ermöglicht das Vertrauen in die Arbeitsweise des
Unternehmens.
Peg Pérego kann zu jedem beliebigen Zeitpunkt Änderungen an den in dieser
Veröffentlichung beschriebenen Modellen sowohl aus technischen, als auch aus
kommerziellen Gründen vornehmen.
Peg Pérego steht den Verbrauchern zur Verfügung, um deren Anforderungen auf das Bestmöglichste
gerecht zu werden. Demnach ist es ausgesprochen wichtig und wertvoll für uns, über die Meinung unserer
Kunden Bescheid zu wissen. Wir bitten Sie daher, das FORMULAR ÜBER DIE KONSUMENTENZUFRIEDENHEIT
auszufüllen, nachdem Sie unsere Produkte ausprobiert haben. Das Formular ist unter folgender
Internetadresse abrufbar: www.pegperego.com
KUNDENDIENST PEG-PÉREGO
Bei Verlust oder Beschädigung ausschließlich Originalersatzteile von Peg Pérego verwenden. Für eventuelle
Reparaturen, Produktinformationen, den Austausch diverser Teile bzw. den Kauf von Originalersatzteilen
oder Zubehörteilen wenden Sie sich bitte an den Kundendienst Peg Pérego:
Tel. 0039/039/60.88.213 Fax 0039/039/33.09.992
E-Mail assistenza@pegperego.it Webseite www.pegperego.com
KONFORMITÄTSERKLÄRUNG
Bezeichnung des Produktes
Sdraietta Melodia
Kennzeichnungscode des Produktes
IMSDME00---- IMSDMEFR---- IMSDMESP----
Bezugsbestimmungen (Ursprung)
EN12790:2008
EN71-1 EN71-2 EN71-3 EN71-9
EN62115 EN55014 (EMC)
European Directive 2002/96/CE (WEEE Directive)
European Directive 2002/95/CE (RoHS Directive)
Konformitätserklärung
Die Firma PegPerego S.p.A. erklärt auf ihre Verantwortung, dass der betreffende Artikel internen
Abnahmetests unterzogen sowie gemäß den gültigen Bestimmungen von externen und unabhängigen
Labors zugelassen wurde.
Datum und Ort der Ausstellung
Arcore, den 11. September 2007
Page 20

- 20 -
ES_Español
Le agradecemos haber elegido un producto Peg-Pérego.
ADVERTENCIA
_ IMPORTANTE: LÉASE ATENTAMENTE ESTAS INSTRUCCIONES Y CONSÉRVELAS
PARA FUTURAS CONSULTAS. LA SEGURIDAD DEL NIÑO PODRÍA ESTAR EN
PELIGRO SI NO SE LEEN DICHAS INSTRUCCIONES.
_ ESTA HAMACA SE HA DISEÑADO PARA UN NIÑO DE UN PESO MÁXIMO DE 9 KG.
_ NO UTILIZAR LA HAMACA CUANDO EL NIÑO YA PUEDE SENTARSE POR SÍ SOLO.
_ NO DEJAR NUNCA A SU HIJO SIN VIGILANCIA EN LA HAMACA.
_ ESTA HAMACA NO SE HA DISEÑADO PARA UN PERIODO PROLONGADO DE
SUEÑO. LA HAMACA NO SUSTITUYE A LA CUNA; SI EL NIÑO NECESITA DORMIR
ES IMPORTANTE PONERLO EN UNA CUNA ADECUADA.
_ UTILIZAR SIEMPRE EL CINTURÓN DE SEGURIDAD.
_ ESTA HAMACA NO ES UNA SILLA DE AUTO, POR TANTO NO UTILIZAR NUNCA EN
UN VEHÍCULO DE MOTOR PARA TRANSPORTAR A UN NIÑO.
_ PELIGRO DE ESTRANGULACIÓN EL NIÑO PUEDE ESTRANGULARSE SI LAS
CORREAS ESTÁN AFLOJADAS, POR TANTO NO DEJAR NUNCA AL NIÑO EN LA
HAMACA SI LAS CORREAS ESTÁN AFLOJADAS O DESENGANCHADAS.
_ PELIGRO DE CAÍDA: ES PELIGROSO UTILIZAR LA HAMACA SOBRE UNA
SUPERFICIE ELEVADA.
_ PELIGRO DE ASFIXIA: LA HAMACA PUEDE VOLCARSE ESTANDO SOBRE
SUPERFICIES BLANDAS Y AHOGAR AL NIÑO. NO COLOCAR NUNCA LA HAMACA
SOBRE CAMAS, SOFÁS U OTRAS SUPERFICIES BLANDAS.
_ ANTES DE SU UTILIZACIÓN, CERCIORARSE DE QUE TODOS LOS DISPOSITIVOS DE
ENGANCHE ESTÉN CORRECTAMENTE ENGANCHADOS.
_ NO UTILIZAR EL PRODUCTO SI PRESENTA RUPTURAS O FALTAN PIEZAS.
_ EVITAR INTRODUCIR LOS DEDOS EN LOS DISPOSITIVOS.
_ PRESTAR ATENCIÓN A LA PRESENCIA DEL NIÑO CUANDO SE EFECTÚEN
OPERACIONES DE REGULACIÓN DE LOS DISPOSITIVOS (ASA, RESPALDO,
PARASOL).
_ NO UTILIZAR NUNCA LA BARRA DE JUEGOS Y EL PARASOL PARA EL
TRANSPORTE.
_ PUEDE SER PELIGROSO UTILIZAR ACCESORIOS NO APROBADOS POR EL
FABRICANTE.
_ SÓLO LOS ADULTOS DEBEN ENCENDER Y APAGAR LA MÚSICA.
_ SI LA MÚSICA DE LA HAMACA PERMANECE APAGADA POR MUCHO TIEMPO, SE
ACONSEJA QUITAR LAS PILAS DE SU COMPARTIMENTO.
_ SÓLO DEBEN UTILIZARSE PILAS DEL MISMO TIPO O PILAS EQUIVALENTES A LAS
AUTORIZADAS.
_ LAS PILAS DEBEN COLOCARSE RESPETANDO LA CORRECTA POLARIDAD.
_ NO MEZCLAR PILAS USADAS CON PILAS NUEVAS.
_ LOS ACUMULADORES DEBEN QUITARSE DEL PRODUCTO.
_ NO CORTOCIRCUITAR LOS BORNES DE ALIMENTACIÓN.
_ LOS ACUMULADORES DEBEN QUITARSE DEL PRODUCTO PARA RECARGARLOS.
_ SÓLO LOS ADULTOS PUEDEN RECARGAR LOS ACUMULADORES.
_ AVISO: ESTE PRODUCTO CUMPLE SUFICIENTEMENTE CON TODOS LOS
REQUISITOS ESTABLECIDOS POR LA NORMA ASTM F2050 Y ULTERIORES
Page 21

- 21 -
REVISIONES.
DIRECTIVA RAEE (sólo UE)
_ Este producto constituye al final de su vida útil un residuo RAEE, por lo que no debe eliminarse como los
residuos urbanos y debe procederse a su recogida selectiva;
_ Depositar el residuo en los establecimientos correspondientes;
_ Las sustancias peligrosas presentes en los componentes eléctricos de este producto constituyen fuentes
de peligro potenciales para la salud humana y para el medio ambiente si dicho producto no se desecha de
modo adecuado;
_ El contenedor de basura tachado indica que el producto está sujeto a la recogida selectiva.
INSTRUCCIONES DE USO
1 APERTURA: para abrir la hamaca, girar hacia delante los montantes hasta oír un “clic” (fig_a) y desenganchar
el parasol del asa (fig_b).
2 MONTAJE DE LA HAMACA: para montar el asa, colocar el respaldo en posición vertical (ver punto 4).
Introducir el manillar en los tubos (fig_a) y atornillar con un atornillador el tornillo con ranura a forma
de cruz asegurándose de que esté colocado por fuera del manillar (fig_b). Fijar fuertemente y controlar
periódicamente la fijación.
3 REGULACIÓN DEL ASA: el asa se regula en 3 posiciones. Presionar las dos palanquitas hacia el sentido de las
flechas (fig_a) y al mismo tiempo girar el asa hasta colocarla en la posición deseada (fig_b).
La posición para el transporte es la número 1.
4 REGULACIÓN DEL RESPALDO: el respaldo se regula en 3 posiciones. Girar hacia el exterior la palanca 1
(quedando en posición de apertura), (fig_a), girar hacia el exterior la palanca 2 y al mismo tiempo regular el
respaldo (fig_b).
Una vez elegida la posición, recordar dejar la palanquita 1 en posición cerrada.
5 REGULACIÓN DEL PATÍN: el patín se regula en dos posiciones, para alzarlo tirar hacia el exterior de las dos
palanquitas a ambos lados y simultáneamente empujar hacia arriba las lengüetas (fig_a). Patín alzado (fig_
b).
6 CINTURÓN DE SEGURIDAD: meter la correa por la tira entrepiernas y engancharla hasta oír un “clic” (fig_a).
Para desenganchar la correa, pulsar a los lados de la hebilla y simultáneamente tirar hacia fuera el cinturón
ventral (fig_b).
7 SOPORTE: la base de la hamaca puede balancearse (fig_a) o quedar inmóvil. Para mantener inmóvil la
hamaca, girar hacia el exterior el soporte estabilizador (fig_b).
8 PARASOL: la hamaca se compone de parasol regulable en diversas posiciones que se engancha al asa en
diferentes alturas.
9 BARRA DE JUGUETES: enganchar la barra de juguetes (fig_a). La barra de juguetes puede engancharse a los
montantes delanteros (fig_b) o al asa (fig_c) según la posición del respaldo.
10 La barra de juguetes puede engancharse a un solo lado y girarse hacia el exterior (fig_a). Para activar el
mugido de la vaca, presionar sobre las patas (fig_b).
11 UNIDAD SONORA: las pilas no están incluidas. Para activar la unidad sonora se requieren 2 pilas alcalinas
tipo AA de 1,5 V. Con un destornillador, desatornillar la tapa del compartimento de las pilas (fig_a) e
introducirlas (fig_b). Una vez finalizada esta operación, volver a atornillar la tapa del compartimento.
La unidad sonora tiene 2 intensidades de volumen y 8 melodías (fig_c).
A: Para encender la unidad sonora y regular el volumen, mover el cursor hacia arriba.
B: 4 melodías para el juego.
C: 4 melodías para la relajación.
Para cambiar de melodía, presionar sobre las diferentes teclas.
12 REDUCTOR: la hamaca se entrega con un cojín reductor para el recién nacido que deberá quitarse cuando
crezca el niño. Para quitar el cojín reductor, sacar la correa por la tira entrepiernas.
13 CIERRE: para cerrar la hamaca (fig_a), regular el asa y el respaldo en la posición más baja, pulsar a la vez
a ambos lados el botón A y girar los montantes como muestra la figura. Cuando la hamaca está cerrada,
enganchar el elástico al gancho (fig_b) antes de transportarla. La hamaca cerrada es muy compacta y ocupa
poco espacio (fig_c)
14 DESENFUNDABLE: para desenfundar la hamaca quitar el velcro (fig_a), quitar antes el forro del módulo
sonoro (fig_b), desconectar el módulo sonoro quitando las dos clavijas (fig_c).
15 Quitar el forro de la ranura de los montantes (fig_a), desbotonar la parte trasera del respaldo (fig_b) y sacar
Page 22

- 22 -
desde arriba el forro (fig_c). Importante: para revestir la hamaca, recordar de meter el forro en la ranura de
los montantes.
LIMPIEZA Y MANTENIMIENTO
MANTENIMIENTO DEL PRODUCTO: proteger contra agentes atmosféricos (agua, lluvia o nieve). Una
exposición contínua y prolongada al sol podría causar cambios de color de muchos materiales. Conservar
este producto en un lugar seco.
LIMPIEZA DEL CHASIS: Limpiar periódicamente las partes de plástico con un paño húmedo sin usar solventes
u otros productos similares. Mantener secas todas las partes de metal para prevenir la oxidación. Mantener
limpias todas las partes móviles (dispositivo de regulación, de enganche...) quitando el polvo o la arena y, en
caso necessario, engrasarlas con aceites ligeros.
LIMPIEZA DE LAS PARTES DE TEJIDO: cepillar las partes de tejido quitando el polvo y lavar a mano a una
temperatura máxima de 30º. No torcer, no usar lejía, no planchar, no lavar en seco, no usar solventes y no
secar utilizando secadoras de tambor rotativo.
PEG-PÉREGO S.p.A
Peg-Pérego S.p.A posee la certificación de la Norma ISO 9001. La certificación ofrece a los
clientes y a los consumidores la garantía de transparencia y de confianza en cuanto a los
procedimientos de trabajo de la empresa.
Peg-Pérego podrá aportar en cualquier momento modificaciones a los modelos que se
describen en el presente manual por razones técnicas o comerciales.
Peg-Pérego está a disposición de sus consumidores para responder satisfactoriamente a sus exigencias.
De ahí que sea fundamental y extremamente importante conocer la opinión de nuestros Clientes. Les
agradeceríamos por tanto que tras utilizar uno de nuestros productos rellenase, indicando eventuales
observaciones o sugerencias, el CUESTIONARIO DE SATISFACCIÓN DEL CONSUMIDOR que se halla en nuestra
página Web www.pegperego.com
SERVICIO DE ASISTENCIA PEG-PÉREGO
En caso de que se pierdan o se dañen partes del producto, utilizar sólo repuestos originales Peg-Pérego.
Para eventuales reparaciones, cambios e informaciones sobre los productos, así como la venta de recambios
originales y accesorios, contactar el Servicio de Asistencia Peg-Pérego:
tel. 0039/039/60.88.213 fax 0039/039/33.09.992
e-mail assistenza@pegperego.it sito internet www.pegperego.com
DECLARACIÓN DE CONFORMIDAD
Denominación del producto
Sdraietta Melodia
Código de identificación del producto
IMSDME00---- IMSDMEFR---- IMSDMESP----
Normativas de referencia (origen)
EN12790:2008
EN71-1 EN71-2 EN71-3 EN71-9
EN62115 EN55014 (EMC)
European Directive 2002/96/CE (WEEE Directive)
European Directive 2002/95/CE (RoHS Directive)
Declaración de conformidad
PegPerego S.p.A. declara bajo su responsabilidad que el artículo en objeto ha sido sometido a pruebas
de ensayo internas y ha sido homologado según las normativas vigentes en laboratorios exteriores e
independientes.
Fecha y lugar de expedición
Arcore, 11 de septiembre de 2007
Page 23

- 23 -
PT_Português
Obrigado por ter escolhido um produto Peg-Pérego.
ADVERTÊNCIA
_ IMPORTANTE: LEIA ATENTAMENTE ESTAS INSTRUÇÕES E CONSERVE-AS PARA
UMA FUTURA UTILIZAÇÃO. A SEGURANÇA DA CRIANÇA PODE VIR A SER
COLOCADA EM RISCO SE ESTAS INSTRUÇÕES NÃO FOREM EFECTUADAS.
_ ESTA ESPREGUIÇADEIRA FOI PROJECTADA PARA UMA CRIANÇA COM PESO
MÁXIMO DE 9 Kg.
_ NÃO UTILIZE A ESPREGUIÇADEIRA, QUANDO A CRIANÇA FOR CAPAZ DE FICAR
SENTADA SOZINHA.
_ NÃO DEIXE JAMAIS SUA CRIANÇA SOZINHA NA ESPREGUIÇADEIRA.
_ ESTA ESPREGUIÇADEIRA NÃO FOI PROJECTA PARA SER USADA DURANTE UM
SONO PROLONGADO. A ESPREGIÇADEIRA NÃO SUBSTITUI A CAMINHA, SE A
CRIANÇA PRECISAR DORMIR É IMPORTANTE COLOCÁ-LA NUMA CAMINHA
ADEQUADA.
_ UTILIZE SEMPRE OS CINTOS DE SEGURANÇA.
_ ESTA ESPREGUIÇADEIRA NÃO É UMA CADEIRA PARA AUTOMÓVEL: NÃO UTILIZE
JAMAIS PARA TRANSPORTAR UMA CRIANÇA NUM VEÍCULO A MOTOR.
_ PERIGO DE ESTRANGULAMENTO: NÃO DEIXE JAMAIS A CRIANÇA NA
ESPREGUIÇADEIRA QUANDO OS CINTOS ESTIVEREM FROUXOS OU SOLTOS.
_ PERIGO DE QUEDA: É PERIGOSO UTILIZAR A ESPREGUIÇADEIRA SOBRE UMA
SUPERFÍCIE ELEVADA.
_ PERIGO DE SUFOCAMENTO: A ESPREGUIÇADEIRA PODE VIRAR SOBRE MACIAS
E SUFOCAR A CRIANÇA; NÃO COLOQUE JAMAIS A ESPREGUIÇADEIRA SOBRE
CAMAS, SOFÁS OU OUTRAS SUPERFÍCIES MACIAS.
_ ANTES DE USAR, CERTIFIQUE-SE QUE TODOS OS MECANISMOS DE ENCAIXE
ESTEJAM PRESOS CORRECTAMENTE.
_ NÃO UTILIZE O PRODUTO SE APRESENTAR DEFEITOS OU SE FALTEM PEÇAS.
_ EVITE INTRODUZIR OS DEDOS NOS MECANISMOS.
_ PRESTE ATENÇÃO À PRESENÇA DA CRIANÇA QUANDO EFECTUAR OPERAÇÕES
DE REGULAÇÃO DOS MECANISMOS (MANILHA, ENCOSTO, PÁRA-SOL).
_ NÃO USE JAMAIS A BARRA DE JOGO E O PÁRA SOL PARA O TRANSPORTE.
_ PODERIA SER PERIGOSO UTILIZAR ACESSÓRIOS NÃO APROVADOS PELO
FABRICANTE.
_ AS OPERAÇÕES DE LIGAR E DESLIGAR A MUSICA DA ESPREGUIÇADEIRA, DEVEM
SER EFECTUADAS POR UM ADULTO;
_ SE A MUSICA DA ESPREGUIÇADEIRA FOR DEIXADA INACTIVA POR UM LONGO
PERÍODO, RECOMENDA-SE A REMOÇÃO DAS PILHAS DO RELATIVO VÃO DAS
PILHAS.
_ DEVEM SER UTILIZADAS SOMENTE PILHAS DO MESMO TIPO OU EQUIVALENTES
ÀQUELAS RECOMENDADAS.
_ AS PILHAS DEVEM SER INTRODUZIDAS COM A POLARIDADE CORRECTA.
_ NÃO UTILIZE PILHAS NOVAS E USADAS SIMULTANEAMENTE.
_ AS PILHAS DESCARREGADAS DEVEM SER REMOVIDAS DO PRODUTO.
_ EVITE CURTO CIRCUITOS NOS TERMINAIS DE ALIMENTAÇÃO.
_ AS PILHAS RECARREGÁVEIS DEVEM SER REMOVIDAS DO PRODUTO PARA QUE
SEJAM RECARREGADAS.
Page 24

- 24 -
_ AS PILHAS RECARREGÁVEIS DEVEM SER RECARREGADAS SOMENTE SOB A
SUPERVISÃO DE UM ADULTO.
DIRECTIVA REEE (somente UE)
_ Este produto constitui ao fim de sua vida útil, um resíduo classificado RAEE e portanto não deve ser
eliminado como resíduo urbano, mas sim deve ser sujeito a colecta diferenciada;
_ Entregue este resíduo nas apropriadas e relativas ilhas ecológicas;
_ A presença de substâncias perigosas contidas nos componentes eléctricos deste produto constitui fonte
de potencial perigo para a saúde humana e para o ambiente se os produtos não foram correctamente
eliminados;
_ O desenho do latão de lixo barrado indica que o produto deve ser sujeito a colecta diferenciada.
INSTRUÇÕES DE USO
1 ABERTURA: para abrir a espreguiçadeira gire os tubos para a frente até ouvir um clique (fig_a) e solte o pára-
sol da pega (fig_b).
2 MONTAGEM DA ESPREGUIÇADEIRA: para montar a pega, coloque o encosto na posição vertical (veja p.f.
o ponto 4). Insira a pega nos tubos (fig_a) e aparafuse com uma chave de fendas, assegurando-se de
que o parafuso estrela fica posicionado do lado externo da pega (fig_b). Aperte com força e controle,
periodicamente, a fixação.
3 REGULAÇÃO DA PEGA: a pega é regulável em 3 posições. Empurre as duas patilhas (fig_a) no sentido das
setas e, ao mesmo tempo, gire a pega até à posição desejada (fig_b).
A posição de transporte é a número 1.
4 REGULAÇÃO DO ENCOSTO: o encosto é regulável em 3 posições. Gire externamente a patilha 1 (que ficará
na posição aberta), (fig_a), gire externamente a patilha 2 e, ao mesmo tempo, regule o encosto (fig_b). Uma
vez escolhida a posição, lembre-se de recolocar a patilha 1 na posição fechada.
5 REGULAÇÃO DO REPOUSA-PÉS: o repousa-pés é regulável em duas posições, para o elevar puxe para
fora, de ambos os lados, as duas patilhas e contemporaneamente empurre para cima as linguetas (fig_a).
Repousa-pés levantado (fig_b).
6 CINTO DE SEGURANÇA: insira o cinto no separador de entre-pernas e depois aperte até ouvir um clique (fig_
a). Para desapertar o cinto, prema dos lados do arnês e, ao mesmo tempo, puxe para fora o cinto da cintura
(fig_b).
7 CAVALETE: a base da espreguiçadeira pode balançar (fig_a) ou ficar estável. Para tornar a espreguiçadeira
estável gire para fora o cavalete estabilizador (fig_b).
8 PÁRA-SOL: a espreguiçadeira possui um pára-sol regulável em várias posições que se prende à pega, em
qualquer altura.
9 BARRA DE JOGOS: prenda a barra de jogos (fig_a). A barra de jogos pode ser aplicada nos tubos dianteiros
(fig_b) ou na pega (fig_c) de acordo com a posição do encosto.
10 A barra de jogos pode ser solta apenas de um lado e girada para fora (fig_a). Para accionar o som do mugido
da vaca, pressione as patas (fig_b).
11 MÓDU LO SONO RO: as pilhas não estão incluídas no produto. Para activar o módulo sonoro são necessárias
2 pilhas tipo “AA” de 1,5 Volt. Com uma chave de fendas desaperte o parafuso da tampa do compartimento
das pilhas (fig_a) e introduza-as (fig_b). Uma vez efectuada esta operação, aparafuse de novo o parafuso da
tampa do compartimento. O módulo sonoro possui 2 regulações de volume e 8 músicas (fig_c).
A: Para ligar o módulo sonoro e para regular o volume, desloque a tecla para cima.
B: 4 músicas para brincar.
C: 4 músicas para relaxar.
Para mudar de música, prima as respectivas teclas.
12 REDUTOR: a espreguiçadeira é fornecida com uma almofada redutora para o recém-nascido, a ser retirada
quando a criança for maior. Para retirar a almofada redutora, retire o cinto separador de entre-pernas.
13 FECHO: para fechar a espreguiçadeira (fig_a), coloque a pega e o encosto na posição mais baixa, prema
contemporaneamente de ambos os lados o botão A e gire os tubos como ilustrado na figura. Quando a
espreguiçadeira está fechada, antes de a transportar, prenda o elástico no gancho (fig_b). A espreguiçadeira
fechada é verdadeiramente compacta e ocupa pouquíssimo espaço (fig_c).
14 REMOÇÃO DA FORRA: para remover a forra da espreguiçadeira abra o velcro (fig_a), desenfie a parte da
dianteira da forra do módulo sonoro (fig_b), desligue o conector do módulo sonoro, desligando as duas
fichas (fig_c).
Page 25

- 25 -
15 desenfie lateralmente a argola da forra dos tubos (fig_a), desabotoe a parte de trás do encosto (fig_b) e
remova a forra por cima (fig_c). Importante: ao revestir a espreguiçadeira, recorde-se de enfiar a argola nos
tubos.
LIMPEZA E MANUTENÇÃO
MANUTENÇÃO DO ARTICO: Protesa dos agentes atmosféricos: Água, chuva ou neve; a exposição contínua e
prolongada ao sol pode causar alterações de cor em muitos materiais, conserve este artigo num sítio seco.
LIMPEZA DO CHASSIS: Limpe periodicamente as partes em plástico com um pano húmido sem usar
solventes ou outros produtos similares; mantenha todas as partes em metal bem secas para prevenir
ferrugem; mantenha todas as parte em movimento (mecanismos de regulação, mecanismos de encaixe ...)
limpas de poeiras ou areia e se necessário, lubrifique com um óleo leve.
LIMPEZA DAS PARTES EM TECIDO: Escove as partes em tecido para retirar poeiras e lave à mão a uma
temperatura máxima de 30°, não torça, não use alvejante ou cloro, não passe a ferro, não lave a seco, não
use tira-manchas com solventes e não seque por meio de máquinas de secar com tambor giratório.
PEG-PÉREGO S.p.A.
Peg-Pérego S.p.A é certificada ISO 9001. A certificação oferece aos clientes e aos
consumidores a garantia de transparência e confiança no que se refere ao modo com que a
empresa trabalha.
Peg Pérego poderá realizar em qualquer momento alterações nos modelos descritos nesta
publicação, por motivos técnicos ou comerciais.
Peg Perego está à disposição dos seus Consumadores para satisfazer ao máximo suas exigências. Portanto,
conhecer a opinião de nossos Clientes, é para nós extremamente importante e precioso. Ficaremos
muito agradecidos se depois de ter utilizado um nosso produto, quiser preencher o QUESTIONÁRIO DE
SATISFAÇÃO DO CONSUMADOR, a indicar eventuais observações ou sugestões, que encontrará em nosso
site Internet: www.pegperego.com
SERVIÇO DE ASSISTÊNCIA PEG-PÉREGO
Se casualmente partes do modelo forem perdidas ou danificadas, use somente peças sobressalentes
originais Peg-Pérego. Para eventuais reparos, substituições, informações sobre o produto, venda de
sobressalentes originais e acessórios, contacte o Serviço de Assistência Peg-Pérego:
tel. 0039/039/60.88.213 fax 0039/039/33.09.992
e-mail assistenza@pegperego.it sito internet www.pegperego.com
DECLARAÇÃO DE CONFORMIDADE
Denominação do produto
Sdraietta Melodia
Código de identificação do produto
IMSDME00---- IMSDMEFR---- IMSDMESP----
Normas de referência (origem)
EN12790:2008
EN71-1 EN71-2 EN71-3 EN71-9
EN62115 EN55014 (EMC)
Directiva Europeia 2002/96/CE (Directiva WEEE)
Directiva Europeia 2002/95/CE (Directiva RoHS)
Declaração de conformidade
A PegPerego S.p.A. declara sob sua responsabilidade que o artigo em questão foi submetido a testes
de inspecção internos e homologado segundo as normativas em vigor em laboratórios externos e
independentes.
Data e local de emissão
Arcore, 11 de Setembro de 2007
Page 26

- 26 -
NL_Nederlands
Wij danken u voor de keuze van een Peg-Pérego product.
WAARSCHUWING
_ BELANGRIJK: LEES DEZE INSTRUCTIES AANDACHTIG EN BEWAAR ZE
VOOR TOEKOMSTIG GEBRUIK. HET KIND KAN GEVAAR LOPEN ALS U DEZE
INSTRUCTIES NIET OPVOLGT.
_ DIT LIGSTOELTJE IS BEDOELD VOOR KINDEREN MET EEN MAXIMUM GEWICHT
VAN 9 KG.
_ LEG HET KIND NIET IN HET LIGSTOELTJE ALS HET ALLEEN RECHTOP KAN ZITTEN.
_ LAAT HET KIND NOOIT ONBEWAAKT IN HET LIGSTOELTJE LIGGEN.
_ DIT LIGSTOELTJE IS NIET BEDOELD OM KINDEREN ER EEN LANGE TIJD IN TE
LATEN SLAPEN. HET LIGSTOELTJE IS GEEN VERVANGEND BEDJE; ALS HET KIND
MOET SLAPEN, MOET HET IN EEN ECHT BED LIGGEN.
_ MAAK DE VEILIGHEIDSGORDELS ALTIJD VAST.
_ DIT LIGSTOELTJE IS GEEN AUTOSTOELTJE: GEBRUIK HET NOOIT OM EEN KIND TE
VERVOEREN IN EEN MOTORVOERTUIG.
_ GEVAAR VOOR WURGEN: LAAT HET KIND NOOIT IN HET STOELTJE LIGGEN ALS
DE GORDELS TE LOS ZITTEN OF NIET ZIJN VASTGEMAAKT.
_ GEVAAR VOOR VALLEN: HET IS GEVAARLIJK OM HET LIGSTOELTJE ERGENS OP TE
ZETTEN.
_ GEVAAR VOOR STIKKEN: HET LIGSTOELTJE KAN OMKANTELEN OP EEN ZACHTE
ONDERGROND WAAROP HET KAN STIKKEN; ZET HET NOOIT OP EEN BED, DIVAN
OF ANDERE ZACHTE ONDERGRONDEN.
_ VOORDAT U HET KIND IN HET STOELTJE LEGT, CONTROLEERT U OF ALLE
SLUITINGEN GOED VAST ZITTEN.
_ GEBRUIK HET PRODUCT NIET ALS ER DELEN ONTBREKEN OF STUK ZIJN.
_ STEEK UW VINGERS NIET IN OF TUSSEN MECHANISMEN.
_ PAS OP HET KIND ALS U MECHANISMEN AFSTELT TERWIJL HET IN HET STOELTJE
LIG (HANDVAT, RUGGEDEELTE, ZONNEKAP).
_ •VERVOER HET STOELTJE NOOIT MET DE STANG MET SPEELTJES OF DE
ZONNEKAP.
_ HET KAN GEVAARLIJK ZIJN ACCESSOIRES TE GEBRUIKEN DIE NIET ZIJN
GOEDGEKEURD DOOR DE FABRIKANT.
_ ALLEEN VOLWASSENEN MOGEN DE MUZIEKSPELER OP HET STOELTJE AAN EN
UIT ZETTEN.
_ ALS U DE MUZIEKSPELER EEN LANGE TIJD NIET WENST AAN TE ZETTEN, HAAL
DAN DE BATTERIJEN UIT DE BATTERIJRUIMTE.
_ GEBRUIK ALLEEN BATTERIJEN VAN HET AANBEVOLEN TYPE.
_ STEEK DE BATTERIJEN IN DE GOEDE RICHTING IN DE BATTERIJRUIMTE.
_ GEBRUIK GEEN GEBRUIKTE EN NIEUWE BATTERIJEN SAMEN.
_ LEGE BATTERIJEN MOETEN UIT HET PRODUCT WORDEN GEHAALD.
_ GEEN STROOMCONTACTEN KORTSLUITEN
_ OPLAADBARE BATTERIJEN MOETEN UIT HET PRODUCT WORDEN GEHAALD ALS
U DEZE WENST OP TE LADEN.
_ OPLAADBARE BATTERIJEN MOGEN ALLEEN ONDER TOEZICHT VAN EEN
VOLWASSENE WORDEN OPGELADEN.
Page 27

- 27 -
RICHTLIJN WEEE (alleen EU)
_ Aan het einde van de levensduur wordt dit product als AEEA-afval beschouwd dat dus moet worden
gescheiden van stedelijk afval;
_ Breng het afval van dit product naar een daarvoor bestemd afvalverzamelpunt;
_ De gevaarlijke stoffen in de elektrische componenten van dit product vormen een bron van gevaar voor de
gezondheid van de mens en voor het milieu als het afval ervan niet op de goede manier wordt verwerkt;
_ De doorkruiste afvalbak op het product betekent dat het moet worden gescheiden van ander afval.
GEBRUIKSAANWIJZINGEN
1 OPENKLAPPEN: om het ligstoeltje te openen, draait u de buizen naar voor totdat u ze hoort klikken (afb_a)
en maakt u de zonnekap los van de draagarm (afb_b).
2 HET STOELTJE IN ELKAAR ZETTEN: zet het ruggedeelte recht (zie punt 4) om het handvat te monteren.
Steek de handgreep in de buizen (fig_a) en draai aan met een kruiskopschroevendraaier. Zorg ervoor
dat de kruiskopschroef aan de buitenkant van de handgreep zit (fig_b). Draai de schroeven stevig aan en
controleer regelmatig of ze nog vast zitten.
3 DE DRAAGARM VERSTELLEN: U kunt de draagarm in 3 standen zetten. Druk de twee hendels (afb_a) in de
richting van de pijlen en draai tegelijkertijd de draagarm in de gewenste stand (afb_b).
De vervoerstand is de stand 1.
4 DE RUGSTEUN VERSTELLEN: U kunt de rugsteun in 3 standen zetten. Draai de hendel 1 naar buiten (zodat
deze open blijft staan), (afb_a), draai de hendel 2 naar buiten en verstel tegelijkertijd de rugsteun (afb_b).
Als u het ruggedeelte in de gewenste stand hebt gezet, mag u niet vergeten de hendel 1 te sluiten.
5 DE VOETSTEUN VERSTELLEN: u kunt de voetsteun in twee standen zetten. Om de steun hoger te zetten,
trekt u aan beide kanten de twee hendeltjes naar buiten en drukt u tegelijkertijd de lipjes naar boven (afb_
a). Voetsteun naar boven (afb_b).
6 VEILIGHEIDSGORDEL: haal het gordeltje door het beenstuk en zet het vast tot het klikt (afb_a). Om de gordel
los te maken, drukt u op de zijkanten van de gesp en trekt u tegelijkertijd het buikgordeltje eruit (afb_b).
7 STANDAARD: u kunt het onderstel van het ligstoeltje vastzetten of als wiegje gebruiken (afb_a). Om het
stoeltje vast te zetten, draait u de standaard naar buiten (afb_b).
8 ZONNEKAP: op het stoeltje zit een zonnekap die in diverse standen kan worden gezet en op elke hoogte
aan de draagarm kan worden vastgemaakt.
9 STANG MET SPEELTJES: maak de speelstang vast (afb_a). U kunt de stang met speeltjes vastmaken aan de
voorste buizen (afb_b) of aan de draagarm (afb_c), afhankelijk van de stand van de rugsteun.
10 De stang met speeltjes kan alleen aan één kant worden losgemaakt en naar buiten worden gedraaid (afb_a).
Druk op de poten (afb_b) van de koe om hem te laten loeien.
11 MUZIEKSPELER: er zitten GEEN batterijen in de verpakking. Om de muziekspeler aan te zetten, hebt u twee
2 AA-batterijen van 1,5 Volt nodig. Draai met een schroevendraaier het klepje op de batterijruimte (afb_a)
open en steek de batterijen (afb_b) erin. Schroef het batterijklepje weer vast na afloop. U kunt het volume
van de muziek op 2 standen zetten en 8 muziekjes kiezen (afb_c).
A : Verschuif de toets naar boven om de muziek aan te zetten en het volume te regelen.
B : 4 speelmuziekjes.
C : 4 slaapliedjes.
Druk op de toetsen om een ander muziekje te kiezen.
12 AANPASSING: bij het stoeltje hoort een verloopkussen voor pasgeboren baby’s dat u eruit haalt als het kind
groter wordt. Haal het beenstuk eruit als u het kussen uit het stoeltje wilt halen.
13 INKLAPPEN: om het ligstoeltje in te klappen (afb_a), zet u de draagarm en de rugsteun in de laagste stand en
drukt u tegelijkertijd op beide zijkanten op de knop A waarbij u de buizen draait zoals op de afbeelding. Als
het ligstoeltje ingeklapt is, maakt u eerst de sluitband vast (afb_b) voordat u het vervoert. Als het ligstoeltje
ingeklapt is, is het klein en neemt het heel weinig ruimte in (afb_c).
14 DE HOES: maak het klittenband los (afb_a) om de hoes van het stoeltje te halen. Trek de zak vooraan over de
muziekspeler (afb_b), maak de twee aansluitpinnen van de speler los (afb_c),
15 haal de opening in de zijkanten van de zak over de buizen (afb_a), knoop de achterkant van de rug los (afb_
b) en trek de zak naar boven van het stoeltje af (afb_c). Belangrijk: vergeet niet deze opening over de buizen
te halen als u de hoes weer op het stoeltje doet.
ONDERHOUD EN REINIGEN
HET ARTIKEL ONDERHOUDEN: bescherm het tegen weer en wind: water, regen of sneeuw; een langdurige
Page 28

- 28 -
en continue blootstelling aan zonnestralen kan vele materialen doen verkleuren; bewaar het op een droge
en beschutte plaats.
HET FRAME REINIGEN: reinig regelmatig de plastic delen met een vochtige doek, zonder verdunners
of andere dergelijke producten; houd de metalen delen droog zodat ze niet kunnen roesten; houd alle
bewegende delen schoon (stelmechanismen, sluitmechanismen, wielen...), zorg dat er geen stof of zand op
blijft zitten en smeer ze indien nodig met een lichte olie.
DE DELEN IN STOF REINIGEN: borstel de delen in stof zodat er geen stof meer op zit en was ze met de hand
in water dat niet warmer is dan 30°. Wring ze niet uit, bleek ze niet en strijk ze niet; laat ze niet stomen;
ontvlek ze niet met verdunners en laat ze niet drogen in een droogtrommel.
PEG-PÉREGO S.p.A.
Peg-Pérego S.p.A. is houder van het ISO-certificaat 9001. Dit certificaat biedt aan onze
klanten en gebruikers van onze producten een waarborg voor een transparante werkwijze
en dus vertrouwen.
Peg Pérego kan op elk ogenblik de in deze documenten beschreven modellen wijzigen om
technische of commerciële redenen.
Peg Pérego wenst zo veel en zo goed mogelijk tegemoet te komen aan de wensen van onze klanten. De
mening van onze klanten kennen, is dus heel belangrijk voor ons. Wij verzoeken u daarom vriendelijk
een ogenblikje tijd te nemen om onze VRAGENLIJST TEVREDEN KLANTEN in te vullen als u één van onze
producten gebruikt en ons uw eventuele opmerkingen of suggesties stuurt. U vindt de vragenlijst op het
adres: www.pegperego.com
TECHNISCHE SERVICE PEG-PÉREGO
Als delen van het model in uw bezit toevallig beschadigd of verloren raken, vervang deze dan alleen door
originele onderdelen van Peg Pérego. Neem voor eventuele reparaties, vervangingen, informatie over het
product, verkoop van originele onderdelen en accessoires contact op met de Technische service van Peg
Pérego:
tel. 0039/039/60.88.213 fax 0039/039/33.09.992
e-mail assistenza@pegperego.it site internet www.pegperego.com
VERKLARING VAN OVEREENSTEMMING
Naam van het product
Sdraietta Melodia
Identificatiecode van het product
IMSDME00---- IMSDMEFR---- IMSDMESP----
Referentieregelgeving (herkomst):
EN12790:2008
EN71-1 EN71-2 EN71-3 EN71-9
EN62115 EN55014 (EMC)
Europese richtlijn 2002/96/CE (AEEA-richtlijn)
Europese richtlijn 2002/95/CE (RoHS-richtlijn)
Conformiteitsverklaring
PegPerego S.p.A. verklaart onder eigen verantwoordelijkheid dat dit product is onderworpen aan interne
kwaliteitscontroles en is goedgekeurd volgens de geldende normen in externe en onafhankelijke testcentra.
Datum en plaats van afgifte
Arcore, 11 september 2007
Page 29

- 29 -
DK_Dansk
Tak for dit valg af et produkt fra Peg-Pérego.
PAS PÅ!
_ VIGTIGT: LÆS DENNE BRUGSANVISNING GRUNDIGT OG GEM DEN TIL
FREMTIDIG BRUG. BARNETS SIKKERHED KAN BLIVE UDSAT FOR RISIKO, HVIS
DENNE BRUGSANVISNING IKKE FØLGES.
_ DENNE SKRÅSTOL ER BEREGNET TIL ET BARN MED EN MAKS. VÆGT PÅ 9 KG
_ BRUG IKKE HVILESTOLEN, NÅR BARNET ER I STAND TIL AT SIDDE OP ALENE.
_ LAD ALDRIG BARNET SIDDE UDEN OPSYN I SKRÅSTOLEN.
_ DENNE SKRÅSTOL ER IKKE BEREGNET TIL EN LÆNGEREVARENDE SØVNPERIODE.
HVIS BARNET HAR BEHOV FOR AT SOVE, BØR DU LÆGGE DET I EN RIGTIG
BARNESENG.
_ BRUG ALTID SIKKERHEDSSELERNE.
_ DENNE SKRÅSTOL ER IKKE EN AUTO-STOL: BRUG ALDRIG SKRÅSTOLEN TIL
TRANSPORT AF BARNET I ET MOTORKØRETØJ.
_ KVÆLNINGSFARE: LAD ALDRIG BARNET SIDDE UDEN OPSYN I SKRÅSTOLEN, HVIS
SIKKERHEDSSELERNE ER LØSE ELLER IKKE ER SPÆNDTE.
_ FARE FOR AT FALDE NED: DET ER FARLIGT AT ANVENDE HVILESTOLEN PÅ EN
HØJTLIGGENDE OVERFLADE.
_ KVÆLNINGSFARE: SKRÅSTOLEN KAN VÆLTE PÅ BLØDE OVERFLADER OG KVÆLE
BARNET. STIL ALDRIG SKRÅSTOLEN PÅ SENGE, SOFAER ELLER ANDET MED BLØD
OVERFLADE.
_ SØRG FOR, AT ALLE TILKOBLINGSMEKANISMERNE ER AKTIVERET KORREKT FØR
BRUGEN.
_ BRUG IKKE PRODUKTET I TILFÆLDE AF MANGLENDE ELLER DEFEKTE DELE.
_ UNDGÅ AT ANBRINGE FINGRENE INDE I MEKANISMERNE.
_ PAS PÅ BARNET, NÅR DET SIDDER I STOLEN VED JUSTERING AF MEKANISMERNE
(HÅNDTAG, RYGLÆN, PARASOL).
_ BRUG ALDRIG LEGETØJSSTANGEN ELLER SOLSKÆRMEN TIL AT BÆRE MED.
_ DET KAN VÆRE FARLIGT AT ANVENDE TILBEHØR, SOM IKKE ER GODKENDT AF
PRODUCENTEN.
_ TÆNDING OG SLUKNING AF SKRÅSTOLENS MUSIK UDFØRES AF EN VOSKEN.
_ HVIS SKRÅSTOLENS MUSIK IKKE BENYTTES I EN LÆNGEREVARENDE PERIODE,
ANBEFALES DET AT FJERNE BATTERIERNE FRA BATTERIRUMMET.
_ DER MÅ KUN BENYTTES BATTERIER AF SAMME TYPE ELLER SOM SVARER TIL DE
ANBEFALEDE BATTERIER.
_ BATTERIERNE SKAL SÆTTES I I OVERENSSTMMELSE MED DEN KORREKTE
POLARITET.
_ BENYT IKKE NYE OG BRUGTE BATTERIER SAMTIDIGT.
_ OPBRUGTE BATTERIER SKAL FJERNES FRA PRODUKTET.
_ KORTSLUT IKKE FORSYNINGSKLEMMERNE.
_ DE GENOPLADELIGE BATTERIER SKAL TAGES UD AF PRODUKTET FOR AT BLIVE
GENOPLADET.
_ DE GENOPLADELIGE BATTERIER MÅ KUN GENOPLADES UNDER OPSYN FRA EN
VOKSEN.
Page 30

- 30 -
WEEE-direktiv (kun EU)
_ Dette produkt udgør ved dets afsluttede levetid WEEE-klassificeret affald og må derfor ikke kasseres som
husholdningsaffald men skal kasseres med separat indsamlede fraktioner.
_ Aflevér affaldet i særlige økologiske indsamlinger.
_ Forekomsten af farlige stoffer i dette produkts elektriske komponenter udgør en kilde til mulig fare for det
menneskelige helbred og for miljøet, hvis produkterne ikke bortskaffes korrekt.
_ Den afkrydsede beholder angiver, at produktet skal kasseres ned separat indsamlede fraktioner.
BRUGSANVISNING
1 ÅBNING: Skråstolen åbnes ved at dreje rørene fremad, indtil de klikker fast (fig_a), og løsne parasollen fra
håndtaget (fig_b).
2 SAMLING AF SKRÅSTOLEN: Håndtaget monteres ved at rette ryglænet op i lodret stilling (se punkt 4). Stik
håndtaget ind i rørene (fig_a) og skru det fast med en skruetrækker; sørg for at stjerneskruen er anbragt på
håndtagets yderside (fig_b). Stram hårdt til og kontroller regelmæssigt fastspændingen.
3 INDSTILLING AF HÅNDTAGET: Håndtages kan reguleres i 3 indstillinger. Skub de to greb (fig_a) i pilens
retning samtidigt med at håndtaget drejes til den ønskede indstilling (fig_b).
Transportpositionen er nummer 1.
4 INDSTILLING AF RYGLÆNET: Ryglænet kan reguleres i 3 indstillinger. Drej grebet 1 udad (hvor det forbliver
i åben indstilling) (fig_a), drej grebet 2 udad samtidigt med at ryglænet indstilles (fig_b). Når den ønskede
indstilling er valgt, skal du huske at flytte grebet 1 til lukket indstilling.
5 INDSTILLING AF BENSTØTTEN: Benstøtten kan reguleres i to indstillinger; for at løfte den trækkes de to greb
udad i begge sider, samtidig med at tapperne (fig_a) skubbes opad. Hævet benstøtte (fig_b).
6 SIKKERHEDSSELE: Stik selen ind gennem skridtremmen og hægt den fast, til den klikker (fig_a). For at løsne
sikkerhedsselen trykkes på begge sider af spændet, mens den lille rem om livet samtidigt trækkes udad
(fig_b).
7 STATIV: Skråstolens underdel kan indstilles til at vippe (fig_a) eller stabilt. For at indstille skråstolen stabilt
skal stativets stabiliseringsanordning drejes udad (fig_b).
8 PARASOL: Skråstolen er udstyret med en parasol, der kan reguleres i flere indstillinger; den kan hægtes på
håndtaget i den ønskede højde.
9 LEGETØJSSTANG: Hægt legetøjsstangen på (fig_a). Legetøjsstangen kan hægtes på de forreste rør (fig_b)
eller på håndtaget (fig_c), afhængigt af, hvilken indstilling ryglænet er i.
10 Legetøjsstangen kan løsnes i den ene side og drejes udad (fig_a). For at aktivere koens brølen trykker du på
klovene (fig_b).
11 LYD M ODUL : Der medfølger IKKE batterier i pakken. For at kunne aktivere lydmodulet er det nødvendigt
at indsætte 2 batterier af typen ”AA” på 1,5 Volt. Brug en skruetrækker til at løsne låget på batterirummet
(fig_a) for at sætte batterier i (fig_b). Når dette er udført, skrues låget igen på batterirummet. Lydmodulets
lydstyrke har 2 indstillinger og der er 8 melodier (fig_c).
A: Lydmodulet tændes og justeres i lydstyrke ved at flytte knappen opad.
B: Der er 4 melodier til leg.
C: Der er 4 melodier til hvile.
Melodierne skifter, når du trykker på de respektive taster.
12 INDSATS: Skråstolen er udstyret med en reduktionspude til nyfødte; denne skal tages bort, når barnet er lidt
større. Reduktionspuden fjernes ved at trække skridtremmen ud.
13 LUKNING: skråstolen lukkes (fig_a) ved at indstille håndtaget og ryglænet i den nederste indstilling, tryk
samtidigt på knappen A på begge sider og drej rørene som vist på figuren. Når skråstolen er lukket, skal
elastikken (fig_b) hægtes på krogen, før den transporteres. Den lukkede skråstol er helt kompakt og optager
meget lidt plads (fig_c).
14 SÅDAN TAGES BEKLÆDNINGEN AF: For at tage beklædningen af skråstolen løsnes velcrobåndet (fig_a), træk
posen ud foran fra lydmodulet (fig_b), tag tilslutningen til lydmodulet ud ved at trække de to små stik ud
(fig_c).
15 Træk øjet på posen sidelæns væk fra rørene (fig_a), åbn knapperne på bagsiden af ryglænet (fig_b) og træk
posen af ved at trække den opad (fig_c). Vigtigt: Når beklædningen igen skal sættes på skråstolen, skal du
huske at sætte øjet rundt om rørene.
RENGØRING OG VEDLIGEHOLDELSE
VEDLIGEHOLDELSE AF PRODUKTET: Beskyt produktet mod vejrforholdene: vand, regn eller sne; mange
Page 31

- 31 -
materialer vil skifte farve, såfremt de udsættes for sollys i længere tid; opbevar produktet på et tørt sted.
RENGØRING AF STELLET: Rengør delene i plastik regelmæssigt med en fugtig klud og brug ikke
opløsningsmidler eller lignende produkter; hold alle metaldele tørre for at forhindre rustdannelser; hold
de bevægelige dele (justeringsmekanismer, påhægtningsmekanismer, hjul...) rene og fri for støv eller sand;
smør med en let olie efter behov.
RENGØRING AF DELE I STOF: Børst stofdelene for at fjerne støv og vask dem i hånden ved en højeste
temperatur på 30º; må ikke vrides; må ikke klorbleges; må ikke stryges; må ikke kemisk renses; fjern ikke
pletter med opløsningsmidler og tør ikke stofdelene i en tromletørremaskine.
PEG-PÉREGO S.p.A.
Peg Pérego S.p.A. er ISO 9001 certificeret. Certificeringen yder kunder og forbrugere garanti
for gennemskuelighed og tillid til måden firmaet arbejder på.
Peg-Pérego forbeholder sig retten til på ethvert tidspunkt at foretage ændringer af de heri
beskrevne modeller af tekniske eller forretningsmæssige grunde.
Peg-Pérego er til forbrugernes disposition med henblik på at opfylde deres behov på
bedste måde. Det er derfor yderst vigtigt og værdifuldt for os at høre, hvad vores kunder
mener. Vi vil derfor være dig taknemmelige, hvis du efter anvendelsen af et af vores
produkter udfylder SPØRGESKEMAET VEDR. KUNDETILFREDSHED, som du finder på vores
internetside, hvor du kan anføre bemærkninger eller forslag: www.pegperego.com
SERVICEAFDELINGEN PEG-PÉREGO
Skulle det ske, at dele af modellen mistes eller beskadiges, må der kun anvendes originale Peg-Pérego
reservedele. For eventuelle reparationer, udskiftninger, produktoplysninger, salg af originale reservedele og
tilbehør bedes du kontakte Serviceafdelingen hos Peg Pérego:
Tlf.: 0039/039/60.88.213 fax 0039/039/33.09.992
e-mail assistenza@pegperego.it Internetside www.pegperego.com
KONFORMITETSERKLÆRING
Produktnavn
Sdraietta Melodia
Produktets identifikationskode
IMSDME00---- IMSDMEFR---- IMSDMESP----
Referencenorm (oprindelse)
EN12790:2008
EN71-1 EN71-2 EN71-9
EN62115 EN55014 (EMC)
Europæisk direktiv 2002/96/EU (WEEE-direktivet)
Europæisk direktiv 2002/95/EU (RoHS-direktivet)
Konformitetserklæring
Firmaet PegPerego S.p.A. erklærer under eget ansvar, at det omhandlede produkt har undergået
afprøvningstests i virksomheden og at det er typegodkendt i overensstemmelse med gældende standarder
af eksterne og uafhængige laboratorier.
Dato og udstedelsessted
Arcore, 11. september 2007
Page 32

- 32 -
FI_Suomi
Kiitos, kun olet valinnut Peg-Pérego-tuotteen.
HUOMAA
_ TÄRKEÄÄ: LUE OHJEET HUOLELLISESTI LÄPI JA SÄILYTÄ NE MYÖHEMPÄÄ
TARVETTA VARTEN. LAPSEN TURVALLISUUS SAATTAA VAARANTUA, JOS
NÄITÄ KÄYTTÖOHJEITA EI NOUDATETA.
_ TÄMÄ SITTERI ON SUUNNITELTU ENINTÄÄN 9 KG:N PAINOISELLE LAPSELLE.
_ SITTERIN KÄYTTÖ ON LOPETETTAVA, KUN LAPSI ON OPPINUT ISTUMAAN OMIN
AVUIN.
_ ÄLÄ KOSKAAN JÄTÄ LASTA SITTERIIN ILMAN VALVONTAA.
_ SITTERIÄ EI OLE SUUNNITELTU PITKÄKESTOISTA NUKKUMISTA VARTEN. SITTERI EI
KORVAA LAPSEN SÄNKYÄ: ON TÄRKEÄÄ ASETTAA LAPSI MAKUULLE, JOS HÄNTÄ
NUKUTTAA.
_ KIINNITÄ LAPSI AINA SITTERIIN TURVAVÖILLÄ.
_ TÄMÄ SITTERI EI OLE TURVAISTUIN: ÄLÄ KOSKAAN KÄYTÄ SITÄ LAPSEN
KULJETTAMISEEN MOOTTORIAJONEUVOSSA.
_ KURISTUMISVAARA: ÄLÄ KOSKAAN JÄTÄ LASTA SITTERIIN, JOS HIHNAT OVAT
LÖYSÄLLÄ TAI AUKI.
_ PUTOAMISVAARA: ON VAARALLISTA LASKEA SITTERI LATTIAPINTAA
KORKEAMMALLE TASOLLE.
_ TUKEHTUMISVAARA: JOS SITTERI SIJOITETAAN PEHMEÄLLE ALUSTALLE, SE VOI
KAATUA JA LAPSI VOI TUKEHTUA. ÄLÄ KOSKAAN LASKE SITTERIÄ SÄNGYLLE,
SOHVALLE TAI MUULLE PEHMEÄLLE ALUSTALLE.
_ VARMISTA ENNEN KÄYTTÖÄ, ETTÄ KAIKKI KIINNITYSMEKANISMIT ON LUKITTU
OIKEIN.
_ ÄLÄ KÄYTÄ TUOTETTA, JOS SIITÄ PUUTTUU OSIA TAI JOKIN OSA ON RIKKI.
_ VARO TYÖNTÄMÄSTÄ SORMIASI MEKANISMEIHIN.
_ PIDÄ LASTA TARKASTI SILMÄLLÄ, JOS SÄÄDÄT MEKANISMEJA (KANTOKAHVA,
SELKÄNOJA, AURINKOLIPPA) HÄNEN LÄSNÄ OLLESSAAN.
_ ÄLÄ KOSKAAN KULJETA TUOTETTA KANTAMALLA SITÄ LELUKAARESTA TAI
AURINKOLIPASTA.
_ MUIDEN KUIN VALMISTAJAN HYVÄKSYMIEN LISÄVARUSTEIDEN KÄYTTÖ
SAATTAA OLLA VAARALLISTA.
_ SITTERIN MUSIIKKITOIMINNON SAA KÄYNNISTÄÄ JA SAMMUTTAA VAIN
AIKUINEN.
_ JOS SITTERIN MUSIIKKITOIMINTOA EI KÄYTETÄ PITKÄÄN AIKAAN, LAITTEESTA
ON POISTETTAVA PARISTOT.
_ KÄYTÄ AINOASTAAN SUOSITELTUJA TAI TYYPILTÄÄN VASTAAVIA PARISTOJA.
_ ASENNA PARISTOT OIKEIN PÄIN (HUOMIOI PLUS- JA MIINUSNAVAT).
_ ÄLÄ KÄYTÄ UUSIA JA KÄYTETTYJÄ PARISTOJA SEKAISIN.
_ TYHJENTYNEET PARISTOT ON POISTETTAVA LAITTEESTA.
_ ÄLÄ AIHEUTA OIKOSULKUA LIITINTEN VÄLILLE.
_ LADATTAVAT PARISTOT ON POISTETTAVA LAITTEESTA LATAUSTA VARTEN.
_ LADATTAVAT PARISTOT SAA LADATA AINOASTAAN AIKUISEN VALVONNASSA.
WEEE-DIREKTIIVI (vain EU)
_ Kun tätä tuotetta ei enää käytetä, siitä tulee WEEE-direktiivissä tarkoitettua sähkö- ja
elektroniikkalaiteromua. Sitä ei siis saa hävittää kotitalousjätteen mukana, vaan se on toimitettava
Page 33

- 33 -
erilliskeräykseen.
_ Toimita jäte asianmukaiseen sähkölaiteromun vastaanottopisteeseen.
_ Tuotteen sähköosien sisältämät vaaralliset aineet saattavat aiheuttaa ympäristölle ja ihmisten terveydelle
vaaraa, ellei tuotteista niiden käytöstäpoiston jälkeen huolehdita asianmukaisesti.
_ Roska-astian yli vedetty rasti tarkoittaa, että tuote on toimitettava erilliskeräykseen.
KÄYTTÖOHJEET
1 AVAAMINEN: Avaa sitteri kääntämällä putkia eteenpäin, kunnes kuulet naksahduksen (kuva_a). Vapauta
aurinkolippa kantokahvasta (kuva_b).
2 SITTERIN KOKOAMINEN: Ennen kantokahvan kiinnitystä nosta selkänoja pystyasentoon (ks. kohta 4). Työnnä
kahva putkiin (kuva_a) ja kiristä ruuvit ruuvitaltalla. Varmista, että ristikantaruuvi tulee kahvan ulkopuolelle
(kuva_b). Kiristä tiukasti ja tarkista kiinnitykset säännöllisin väliajoin.
3 KANTOKAHVAN SÄÄTÄMINEN: Kantokahva voidaan säätää kolmeen eri asentoon: Työnnä vipuja nuolten
suuntaan (kuva_a) ja käännä kahva haluttuun asentoon (kuva_b).
Kuljetusasento on asento numero 1.
4 SELKÄNOJAN SÄÄTÄMINEN: Selkänoja voidaan säätää kolmeen eri asentoon. Käännä ulospäin vipua 1
(joka jää auki) (kuva_a) ja vipua 2 ja säädä samanaikaisesti selkänojan asentoa (kuva_b). Kun olet säätänyt
selkänojan haluamaasi asentoon, muista painaa vipu 1 kiinni.
5 JALKATUEN SÄÄTÄMINEN: Jalkatukea voidaan säätää korkeussuunnassa kahteen asentoon. Kun haluat
nostaa sitä ylöspäin, vedä vipuja ulospäin molemmilta puolilta ja työnnä jalkatukea samanaikaisesti ylöspäin
(kuva_a). Jalkatuki yläasennossa (kuva_b).
6 TURVAVYÖ: Pujota vyö jalkojen välistä kulkevan osan läpi ja naksauta solki kiinni (kuva_a). Kun haluat avata
vyön, paina solkea reunoilta ja vedä samanaikaisesti vyötärön ympäri kulkevaa vyötä ulospäin (kuva_b).
7 TUKIJALKA: Sitteri voi joko keinua jalaksillaan (kuva_a) tai se voidaan lukita liikkumattomaksi. Jos et halua,
että sitteri keinuu, käännä tukijalka ulos (kuva_b).
8 AURINKOSUOJA: Sitterissä on aurinkolippa, joka voidaan säätää eri asentoihin. Lippa voidaan kiinnittää
kantokahvaan mille tahansa korkeudelle.
9 LELUKAARI: kiinnitä lelukaari paikalleen (kuva_a). Lelukaari voidaan kiinnittää joko jalasputkien yläosaan
(kuva_b) tai kantokahvaan (kuva_c) selkänojan asennosta riippuen.
10 Lelukaari on haluttaessa mahdollista irrottaa vain toiselta puolelta ja kääntää sitten ulospäin (kuva_a).
Lehmä alkaa soida, kun sitä painetaan jaloista (kuva_b).
11 MUSIIKKIMODUULI: Paristot EIVÄT sisälly pakkaukseen. Musiikkimoduuliin tarvitaan kaksi 1,5 voltin AA-
sormiparistoa. Avaa paristokotelon kannen ruuvit ruuvimeisselillä (kuva_a) ja aseta paristot paikalleen
(kuva_b). Sulje sitten paristokotelon kansi ruuveilla. Musiikkimoduulissa on 2 eri äänenvoimakkuutta ja 8
melodiaa (kuva_c).
A: Käynnistä musiikkimoduuli ja säädä äänenvoimakkuutta työntämällä kytkintä ylöspäin.
B: 4 leikkimelodiaa.
C: 4 rauhoittavaa melodiaa.
Voit vaihtaa melodiaa painamalla näppäintä.
12 VASTASYNTYNEEN TYYNY: Sitterin mukana toimitetaan tyyny, jolla sitteriä pienennetään vastasyntyneelle
sopivaksi. Lapsen kasvaessa tyyny täytyy ottaa pois. Tyyny poistetaan vetämällä turvavyön jalkojen välistä
kulkeva osa tyynyn läpi.
13 KOKOONTAITTAMINEN: sitteri taitetaan kokoon (kuva_a) laskemalla kantokahva ja selkänoja alimpaan
asentoonsa, painamalla painiketta A yhtä aikaa molemmilta puolilta ja kiertämällä putkia sitten kuvassa
esitetyllä tavalla. Ennen kuljettamista sulje kokoontaitettu sitteri kiinnittämällä kuminauha koukkuun (kuva_
b). Kokoontaitettuna sitteri vie erittäin vähän tilaa (kuva_c).
14 VERHOILUN IRROTTAMINEN: Kun haluat irrottaa sitterin kankaan, avaa tarrakiinnitys (kuva_a), vedä
kangaspussi etukautta irti musiikkimoduulista (kuva_b) ja avaa sitten musiikkimoduulin liitin vetämällä sen
osat erilleen toisistaan (kuva_c).
15 vedä verhoilukankaan rengas irti putkista (kuva_a), avaa selkänojan takana olevat napit (kuva_b) ja vedä
kangas irti yläkautta (kuva_c). Tärkeää: kun kiinnität verhoilua takaisin sitteriin, muista pujottaa rengas
putkiin kiinni.
PUHDISTUS JA HUOLTO
TUOTTEEN HUOLTO: Suojaa tuote sateelta, lumelta ja vedeltä. Jatkuva altistuminen auringonvalolle saattaa
muuttaa monien materiaalien väriä. Säilytä tuote kuivassa paikassa.
Page 34

- 34 -
RUNGON PUHDISTUS: Puhdista muoviosat säännöllisesti kostealla kankaalla. Älä käytä liuotteita tai
muita vastaavia tuotteita. Pidä tuotteen metalliosat kuivina, jotta ne eivät ruostu. Pidä kaikki liikkuvat
osat (säätömekanismit, kiinnitysmekanismit, pyörät jne.) puhtaina ja poista niistä sora ja hiekka. Voitele
tarvittaessa kevytöljyllä.
KANGASOSIEN PUHDISTUS: Pöly harjataan kangasosista ja kangas pestään käsin enintään 30-asteisessa
vedessä. Ei saa vääntää kuivaksi. Ei kloorivalkaisua, ei silitystä, ei kuivapesua, ei tahranpoistoa liuotteilla, ei
rumpukuivausta.
PEG-PÉREGO S.p.A.
Peg Pérego S.p.A. on ISO 9001 -sertifioitu yhtiö. Sertifiointi on asiakkaille ja kuluttajille tae
siitä, että yritys toimii läpinäkyvästi ja luotettavasti.
Peg Pérego voi koska tahansa tehdä tässä julkaisussa kuvattuihin malleihin teknisistä tai
kaupallisista syistä muutoksia.
Peg Pérego haluaa palvella asiakkaitaan ja vastata parhaansa mukaan kaikkiin
heidän tarpeisiinsa. Siksi asiakkaidemme mielipiteet ovat meille erittäin tärkeitä ja
arvokkaita. Olisimmekin hyvin kiitollisia, jos haluaisit tuotettamme käytettyäsi täyttää
KULUTTAJAN TYYTYVÄISYYSKYSELYN ja kertoa siinä mahdollisista huomautuksistasi ja
parannusehdotuksistasi. Kyselyn löydät Internet-sivuiltamme: www.pegperego.com
PEG-PÉREGO-ASIAKASPALVELU
Jos osia tuotteesta katoaa tai vaurioituu, vaihda niiden tilalle ainoastaan alkuperäisiä Peg Pérego -varaosia.
Ota yhteys Peg Pérego -asiakaspalveluun korjauksiin, vaihtoihin, tuotetietoihin ja alkuperäisten varaosien ja
lisävarusteiden tilaamiseen liittyvissä asioissa.
puh. +39 039 60 88 213 fax +39 039 33 09 992
s-posti assistenza@pegperego.it Internet-sivu www.pegperego.com
VAATIMUSTENMUKAISUUSTODISTUS
Tuotenimi
Sdraietta Melodia
Tuotteen tunnistuskoodi
IMSDME00---- IMSDMEFR---- IMSDMESP----
Viitenormit (alkuperä)
EN12790:2008
EN71-1 EN71-2 EN71-3 EN71-9
EN62115 EN55014 (EMC)
European Directive 2002/96/CE (WEEE Directive)
European Directive 2002/95/CE (RoHs Directive)
Vaatimustenmukaisuustodistus
PegPerego S.p.A. vakuuttaa omalla vastuullaan, että mainittu tuote on käynyt läpi sisäiset koestukset
ja että se on tyyppihyväksytty voimassa olevien normien mukaisesti ulkopuolisissa, riippumattomissa
laboratorioissa.
Todistuksen antamisen päivämäärä ja paikka
Arcore, 11. syyskuuta 2007
Page 35

- 35 -
CZ_Čeština
Děkujeme, že jste si vybrali ýrobek Peg-Pérego.
UPOZORNĚNÍ
_ DŮLEŽITÉ: PŘEČTĚTE SI TENTO NÁVOD A UCHOVEJTE JEJ PRO POZDĚJŠÍ
POUŽITÍ. POKUD SE JÍM NEBUDETE ŘÍDIT, MŮŽETE OHROZIT BEZPEČÍ DÍTĚTE.
_ TATO LEHAČKA JE ZKONSTRUOVÁNA PRO DÍTE S HMOTNOSTÍ MAX. 9 KG.
_ NEPOUŽÍVEJTE LŮŽKO, JESTLIŽE JE DÍTĚ SCHOPNÉ SAMO SEDĚT.
_ NIKDY NENECHÁVEJTE VAŠE DÍTE V LEHAČCE BEZ DOZORU.
_ LEHAČKA NENÍ ZKONSTRUOVÁNA PRO DELŠÍ SPÁNEK A NENAHRAZUJE
POSTÝLKU. TOTO LŮŽKO NENAHRAZUJE POSTÝLKU. JESTLIŽE DÍTĚ POTŘEBUJE
SPÁT, ULOŽTE HO DO POSTÝLKY.
_ POUŽÍVEJTE VŽDY BEZPEČNOSTNÍ PÁSY.
_ LEHAČKU NENÍ VHODNÉ POUŽÍVAT JAKO AUTOSEDAČKU. NEPOUŽÍVEJTE JI
NIKDY PRO TRANSPORT DÍTETE V MOTOROVÉM VOZIDLE.
_ NEBEZPEČÍ UŠKRCENÍ – NENECHÁVAJTE DÍTE V LEHAČCE, POKUD JSOU
BEZPEČNOSTNÍ PÁSY POVOLENY NEBO ODPOJENY.
_ NEBEZPEČÍ PÁDU: JE NEBEZPEČNÉ POKLÁDAT LEHAČKU NA VYVÝŠENÉ PLOCHY.
_ NEBEZPEČÍ UDUŠENÍ - LEHAČKA SE MŮŽE NA MĚKKÝCH PLOCHÁCH
PŘEVRHNOUT A ZPŮSOBIT TÍM UDUŠENÍ DÍTETE; NEPOKLÁDEJTE NIKDY
LEHAČKU NA POSTELE, POHOVKY NEBO NA JINÉ MĚKKÉ PREDMETY.
_ PŘED POUŽITÍM SE PRESVĚČTE JSOU-LI VŠECHNY PRVKY, KTERÉ SLOUŽÍ K
PŘIPOUTÁNÍ DÍTETE SPRÁVNĚ NASTAVENÉ.
_ NEPOUŽÍVEJTE VÝROBEK, POKUD JSOU NEKTERÉ JEHO ČÁSTI NEKOMPLETNÍ
NEBO NEFUNGUJÍCI.
_ ZABRÁŇTE VNIKNUTÍ PRSTŮ DO MECHANISMŮ.
_ DÁVEJTE POZOR NA DÍTE V LEHAČCE, POKUD SEŘIZUJETE JEJÍ MECHANISMY
(DRŽADLA, OPĚRADLA, CLONÍTKO).
_ NIKDY NEPOUŽÍVEJTE DRŽÁK NA ZAVĚŠENÍ HRAČEK A SLUNEČNÍK K PŘENÁŠENÍ
LEHAČKY.
_ POUŽÍTÍ DOPLŇKŮ LEHAČKY, KTERÉ NEJSOU SCHVÁLENY VÝROBCEM, MŮŽE BÝT
NEBEZPEČNÉ.
_ ZAPNUTÍ A VYPNUTÍ HUDEBNÍHO MECHANISMU LEHAČKY MŮŽE PROVÉST
JENOM DOSPĚLÁ OSOBA.
_ NEMÍNITE-LI DELŠÍ DOBU POUŽÍVAT HUDEBNÍ MECHANISMUS LEHAČKY,
DOPORUČUJEME VYJMUTÍ BATERII Z PŘIHRÁDKY, VE KTERÉ JSOU ULOŽENY.
_ POUŽÍVEJTE JENOM BATERIE STEJNÉHO TYPU NEBO ROVNOCENNÉ S TĚMI,
KTERÉ JSOU DOPORUČENY!
_ BATERIE MUSÍ BÝT VLOŽENY DOVNITŘ SPRÁVNOU POLARITOU.
_ NEKOMBINUJTE STARÉ A NOVÉ BATERIE!
_ VYBITÉ BATERIE MUSÍ BYT Z VÝROBKU ODSTRANĚNY.
_ NAPÁJECÍ SVORKY NEZKRATUJTE!
_ DOBÍJECÍ BATERIE MUSÍ BÝT ODSTRANĚNY PO VYBITÍ Z VÝROBKU A POTOM
OPĚTOVNĚ DOBITY.
_ DOBÍJECÍ BATERIE MOHOU BÝT DOBITY JEN POD DOHLEDEM DOSPĚLÉ OSOBY.
NAŘÍZENÍ OEEZ (JEN EU)
_ Tento výrobek se stane po ukončení své životnosti odpadem klasifikovaným podle OEEZ, a jako takový
nesmí být zlikvidován jako komunální odpad, nýbrž jako odpad separovaný.
Page 36

- 36 -
_ Odpad odevzdejte na ktomuto účelu vytvořených ekologických ostrovech.
_ Obsah nebezpečních materiálů v elektrických součástech výrobku představuje potenciální zdroj nebezpečí
pro lidské zdraví a pro životní prostředí, pokud nebude vhodným způsobem zlikvidován.
_ Přeškrtnutý sběrný kontajner znamená, že výrobek je předmětem separovaného odpadu.
NÁVOD NA POUŽITÍ
1 ROZLOŽENÍ LEHÁTKA: Pro rozložení lehátka přesuňte směrem dopředu trubky, dokud neuslyšíte cvaknutí
(obr_a), a uvolněte sluneční stříšku z madla (obr_b).
2 MONTÁŽ LEHÁTKA: Pro montáž madla přesuňte zádovou opěrku do svislé polohy (viz bod 4). Zasuňte
rukojeť do trubek kočárku (obr_a), vsuňte šroub s křížovou drážkou do otvoru na vnější straně rukojeti (obr_
b) a zašroubujte ho pomocí šroubováku. Řádně utáhněte a pravidelně kontrolujte upevnění madla.
3 NASTAVENÍ MADLA: Madlo je nastavitelné do 3 poloh. Zatlačte na obě páčky (obr_a) ve směru šipek a
současně přesuňte madlo do zvolené polohy (obr_b).
Přepravní poloha je označená číslem 1.
4 NASTAVENÍ ZÁDOVÉ OPĚRKY: Zádová opěrka je nastavitelná do 3 poloh. Otočte směrem ven páčku 1
(zůstane v otevřené poloze), (obr_a), otočte směrem ven páčku 2 a současně přesuňte zádovou opěrku (obr_
b) do zvolené polohy. Po nastavení zvolené polohy nezapomeňte páčku 1 přesunout do zavřené polohy.
5 NASTAVENÍ NÁŠLAPNÉ PLOŠINY: Našlápnou plošinu můžete nastavit do dvou poloh. Jestliže chcete plošinu
přesunout do horní polohy, zatáhněte z obou stran za obě páčky směrem ven a současně zatlačte na jazýčky
směrem nahoru (obr_a). Nášlapná plošina v horní poloze (obr._b).
6 BEZPEČNOSTNÍ PÁS: Zasuňte pás do přezky pásu na nohy a připněte ho tak, abyste uslyšeli cvaknutí (obr_a).
Pro uvolnění pásu stiskněte z obou stran na přezku a současně vytáhněte směrem ven břišní pás (obr_b).
7 STOJAN: Základna lehátka se může houpat (obr_a) anebo být fixní. Pro zafixování lehátka přesuňte směrem
ven fixovací základnu (obr_b).
8 SLUNEČNÍ STŘÍŠKA: Lehátko má sluneční stříšku, kterou je možné nastavit do více poloh tak, že ji připnete k
madlu v různých výškách.
9 HRAZDIČKA S HRAČKAMI: Připněte hrazdičku s hračkami (obr_a). Hrazdičku je možné uchytit k předním
trubkám (obr_b) nebo k madlu (obr_c) podle polohy zádové opěrky.
10 Hrazdičku je možné uvolnit pouze na jedné straně a otočit směrem ven (obr_a). Jestliže chcete, aby kráva
začala bučet, zmáčkněte na její nohy (obr_b).
11 ZVUKOVÝ MODUL: Baterie NEJSOU součástí výrobku. Pro spuštění zvukového modulu potřebujete 2 tužkové
baterie typu AA 1,5 Volt. Pomocí šroubováku sejměte kryt přihrádky na baterie (obr_a) a vložte do ní baterie
(obr_b). Poté opět namontujte kryt. Zvukový modul má 2 polohy pro nastavení hlasitosti a 8 melodií (obr_c).
A: Pro zapnutí zvukového modulu a nastavení hlasitosti přesuňte tlačítko směrem nahoru.
B: 4 melodie pro hru.
C: 4 melodie pro uklidnění.
Pro změnu melodie stiskněte příslušné tlačítko.
12 REDUKČNÍ POLŠTÁŘEK: Lehátko je dodané s redukčním polštářkem pro novorozence, který můžete sejmout,
až vaše dítě povyroste. Pro sejmutí redukčního polštářku stáhněte pásek na nohy.
13 SLOŽENÍ LEHÁTKA: před zavřením lehátka (obr_a), nastavte ruční ovladač a opěrku do nejnižší polohy,
stiskněte současně z obou stran tlačítko A a trubky rámu otočte tak, jak je uvedené na obrázku. Před
přepravou musí byť lehátko zložené a gumové poutko musí byť zavěšené na háčku (obr_b). Zavřené lehátko
je velmi kompaktní a zabírá velmi málo místa (obr_c).
14 SNÍMATELNOST POTAHŮ: Pro sejmutí potahů lehátka odepněte suchý zip (obr_a), stáhněte z přední strany
potah ze zvukového modulu (obr_b) a odpojte konektor zvukového modulu tak, že uvolníte oba kolíky
(obr_c).
15 Stáhněte potah z bočních tyčí (obr_a), odepněte knoflíky na zadní straně zádové opěrky (obr_b) a stáhněte
potah shora (obr_c). Důležité upozornění: Při opětovném navlékání potahu nezapomeňte navléct potah na
tyče.
ČIŠTĚNÍ A ÚDRŽBA
ÚDRŽBA: Chraňte výrobek před atmosférickými vlivy (voda, déšť nebo sníh); nepřetržité a dlouhodobé
vystavení slunečnímu záření může způsobit změnu barvy mnoha materiálů; uchovávejte výrobek na suchém
místě.
ČIŠTĚNÍ PODVOZKU: Pravidelně čistěte umělohmotné části vlhkým hadrem bez použití rozpouštědel nebo
jiných podobných prostředků; kovové části vždy dobře vysušte, aby nedošlo k jejich zrezivění; udržujte
veškeré pohyblivé části výrobku čisté (regulační mechanismy, úchytné mechanismy, kola...) a pravidelně z
Page 37

- 37 -
nich odstraňujte prach a písek; v případě potřeby je promažte lehkým olejem.
ČIŠTĚNÍ TEXTILNÍCH ČÁSTÍ: Textilní části pravidelně kartáčujte, aby se na nich neusazoval prach, a perte je v
ruce při max. teplotě 30°; neždímejte; nebělte chlórem; nežehlete; nečistěte chemicky; neodstraňujte skvrny
pomocí rozpouštědel a nesušte v sušičce s otočným bubnem.
PEG-PÉREGO S.p.A.
Společnost Peg-Pérego S.p.A. je certifikovaná podle ISO 9001. Tato certifikace zaručuje
klientům a spotřebitelům transparentnost a spolehlivost ohledně pracovních postupů
společnosti.
Společnost Peg Pérego si vyhrazuje právo provést jakékoliv změny a úpravy na modelech
popsaných v této publikaci, jestliže si to vyžádají technické nebo obchodní důvody.
Společnost Peg Pérego je k dispozici svým zákazníkům, aby co nejlépe uspokojila veškeré jejich potřeby a
požadavky. Z tohoto důvodu je pro společnost velmi užitečné a cenné se seznámit s názory svých zákazníků.
Budeme vám proto velmi vděční, když po použití našeho výrobku vyplníte DOTAZNÍK O SPOKOJENOSTI
ZÁKAZNÍKŮ, který naleznete na našich internetových stránkách www.pegperego.com, a seznámíte nás s
vašimi případnými připomínkami a podněty.
SERVISNÍ SLUŽBA PEG-PÉREGO
V případě ztráty anebo poškození některých částí výrobku použijte pouze originální díly Peg Pérego.
Pro případné opravy, výměny, informace o výrobcích a prodej originálních náhradních dílů a doplňků
kontaktujte Servisní službu společnosti Peg-Pérego:
tel. 0039/039/60.88.213 fax 0039/039/33.09.992
e-mail assistenza@pegperego.it internetové stránky www.pegperego.com
PROHLÁŠENÍ O SOULADU S PŘEDPISY
Název výrobku
Sdraietta Melodia
Identifikační kód výrobku
IMSDME00---- IMSDMEFR---- IMSDMESP----
Příslušná nařízení (původní)
EN12790:2008
EN71-1 EN71-2 EN71-3 EN71-9
EN62115 EN55014 (EMC)
Evropská směrnice 2002/96/ES (WEEE Directive)
Evropská směrnice 2002/95/ES (RoHS Directive)
Prohlášení o souladu s předpisy
Společnost PegPerego S.p.A. prohlašuje na svou vlastní odpovědnost, že tento výrobek byl podroben
interním schvalovacím testům a byl homologován podle platných nařízení v externích a nezávislých
laboratořích.
Datum a místo vydání
Arcore, 11. září 2007
Page 38

- 38 -
SK_Slovenčina
Ďakujeme, že ste si vybrali výrobok Peg-Pérego.
OPOZORILO
_ DÔLEŽITÉ: PREČÍTAJTE SI DÔKLADNE TIETO INŠTRUKCIE A USCHOVAJTE
SI JE PRE POUŽITIE V BUDÚCNOSTI. BEZPEČNOSŤ DIEŤAŤA BY MOHLA BYŤ
OHROZENÁ V PRÍPADE, ŽE TIETO INŠTRUKCIE NIE SÚ DODRŽANÉ.
_ TOTO LEHÁTKO JE SKONŠTRUOVANÉ PRE DIEŤA DO HMOTNOSTI 9 KG.
_ NEPOUŽÍVAJTE LÔŽKO AK JE DIEŤA SCHOPNÉ SAMO SEDIEŤ.
_ NENECHÁVAJTE NIKDY VAŠE DIEŤA V LEHÁTKU BEZ DOZORU.
_ LEHÁTKO NIE JE SKONŠTRUOVANÉ NA PRE DLHŠÍ SPÁNOK A NENAHRÁDZA
POSTIEĽKU. TOTO LÔŽKO NENAHRÁDZA POSTIEĽKU. AK MÁ DIEŤA POTREBU
SPAŤ, ULOŽTE HO DO POSTIEĽKY.
_ POUŽÍVAJTE VŽDY BEZPEČNOSTNÉ PASY.
_ LEHÁTKO NIE JE VHODNÉ POUŽÍVAŤ AKO AUTOSEDAČKU. NEPOUŽÍVAJTE HO
NIKDY PRE TRANSPORT DIEŤAŤA V MOTOROVOM VOZIDLE.
_ NEBEZPEČIE UŠKRTENIA – NENECHÁVAJTE DIEŤA V LEHÁTKU, POKIAĽ SÚ
BEZPEČNOSTNÉ PÁSY POVOLENÉ ALEBO ODPOJENÉ.
_ NEBEZPEČENSTVO PÁDU: JE NEBEZPEČNÉ UKLADAŤ LEHÁTKO NA VYVÝŠENÚ
PLOCHU!
_ NEBEZPEČIE UDUSENIA - LEHÁTKO SA MÔŽE NA MÄKKÝCH PLOCHÁCH
PREVRHNÚŤ A SPÔSOBIŤ TAK UDUSENIE DIEŤAŤA; NEUKLADAJTE NIKDY
LEHÁTKO NA POSTELE, POHOVKY ALEBO NA INÉ MÄKKÉ PREDMETY.
_ PRED POUŽITÍM SA PRESVEDČTE ČI SÚ VŠETKY PRVKY, KTORÉ SLÚŽIA NA
PRIPÚTANIE DIEŤAŤA SPRÁVNE NASTAVENÉ.
_ NEPOUŽÍVAJTE VÝROBOK, POKIAĽ SÚ NIEKTORÉ JEHO ČASTI NEKOMPLETNÉ
ALEBO NEFUNKČNÉ.
_ ZABRÁŇTE VNIKNUTIU PRSTOV DO MECHANIZMOV.
_ DÁVAJTE POZOR NA DIEŤA V LEHÁTKU, POKIAĽ NA ŇOM NASTAVUJETE
MECHANIZMY (DRŽADLÁ, OPERADLÁ, CLONÍTKO).
_ NIKDY NEPOUŽÍVAJTE DRŽADLO NA ZAVESENIE HRAČIEK A SLNEČNÍK NA
PRENÁŠANIE LEHÁTKA.
_ POUŽÍVANIE DOPLNKOV LEHÁTKA, KTORÉ NIE SÚ SCHVÁLENÉ VÝROBCOM MÔŽE
BYŤ NEBEZPEČNÉ.
_ ZAPNUTIE A VYPNUTIE HUDOBNÉHO MECHANIZMU LEHÁTKA MÔŽE VYKONAŤ
LEN DOSPELÁ OSOBA.
_ AK NEMIENITE NA DLHŠIU DOBU POUŽÍVAŤ HUDOBNÝ MECHANIZMUS
LEHÁTKA, ODPORÚČAME VYBRAŤ BATÉRIE Z PRIEČINKA, V KTOROM SÚ
ULOŽENÉ.
_ POUŽÍVAJTE LEN BATÉRIE ROVNAKÉHO TYPU ALEBO ROVNOCENNÉ S TÝMI,
KTORÉ SÚ ODPORÚČANÉ!
_ BATÉRIE MAJÚ BYŤ VLOŽENÉ DOVNÚTRA SPRÁVNOU POLARITOU.
_ NEKOMBINUJTE STARÉ A NOVÉ BATÉRIE!
_ VYBITÉ BATÉRIE MUSIA BYŤ Z VÝROBKU ODSTRÁNENÉ.
_ NAPÁJACIE SVORKY NESKRATUJTE!
_ DOBÍJATEĽNÉ BATÉRIE MUSIA BYŤ PO VYBITÍ VYBRATÉ Z VÝROBKU A ZNOVU
DOBITÉ.
_ DOBÍJATEĽNÉ BATÉRIE MÔŽU BYŤ DOBITÉ LEN POD DOZOROM DOSPELEJ
OSOBY.
Page 39

- 39 -
NARIADENIE OEEZ (LEN EÚ)
_ Tento výrobok sa stane po skončení svojej životnosti odpadom klasifikovaným podľa OEEZ, a ako taký
nesmie byť zlikvidovaný ako komunálny odpad, ale ako odpad separovaný.
_ Odpad odovzdajte v nato určených ekologických ostrovoch.
_ Obsah nebezpečných materiálov v elektrických súčastiach výrobku predstavuje potenciálny zdroj
nebezpečia pre ľudské zdravie a pre životné prostredie, pokiaľ nebude vhodným spôsobom zlikvidovaný.
_ Preškrtnutý zberný kontajner znamená, že výrobok je predmetom separovaného odpadu.
NÁVOD NA POUŽITIE
1 ROZLOŽENIE: pre rozloženie lehátka presuňte tyčky smerom dopredu, pokiaľ nebudete počuť cvaknutie
(obr_a) a uvoľnite slnečník z rukoväte (obr_b).
2 MONTÁŽ LEHÁTKA: pre montáž prednej rukoväte presuňte chrbtovú opierku do zvislej polohy (viď bod 4).
Vsuňte rukoväť do rúrok (obr_a) a zaskrutkujte ju skrutkovačom, pričom sa uistite, že skrutka s krížovým
zárezom je umiestnená na vonkajšej strane rukoväte (obr_b). Všetko poriadne upnite a spojenia pravidelne
kontrolujte
3 NASTAVENIE PREDNEJ RUKOVÄTE: Prednú rukoväť môžete nastaviť do troch polôh. Zatlačte obidve páčky
(obr_a) v smere šípok a súčasne otočte prednú rukoväť do želanej polohy (obr_b).
Prepravná poloha je označená číslom 1.
4 NASTAVENIE CHRBTOVEJ OPIERKY: chrbtovú opierku môžete nastaviť do 3 (troch) polôh. Otočte smerom von
páčku 1, ktorá zostane v otvorenej polohe (obr_a), otočte smerom von páčku 2 a súčasne nastavte chrbtovú
opierku (obr_b). Po zvolení želanej polohy nezabudnite vrátiť páčku 1 do uzavretej polohy.
5 NASTAVENIE NÁŠLAPNEJ PLOŠINY: nášlapnú plošinu možete nastaviť do dvoch polôh. Ak ju chcete presunúť
do hornej polohy presuňte smerom von z oboch strán obidve páčky a súčasne potiahnite jazýčky smerom
nahor (obr_a). Nášlapná plošina v hornej polohe (obr_b).
6 BEZPEČNOSTNÝ PÁS: zasuňte pás do pásu na nohy a pripnite ho, pokiaľ nebudete počuť cvaknutie (obr_a).
Pre odopnutie bezpečnostného pásu stlačte obe strany pracky a súčasne potiahnite smerom von brušný pás
(obr_b).
7 STOJAN: základňa lehátka može plniť funkciu húpania (obr_a) alebo môže byť pevná. Pre uvedenie lehátka
do pevnej polohy otočte smerom von stabilizačný stojan (obr_b).
8 SLNEČNÍK: lehátko je vybavené slnečníkom, nastaviteľným vo viacerých polohách, ktorý môžete pripevniť k
prednej rukoväti v ľubovolnej výške.
9 HRACÍ OBLÚK: pripnite hrací oblúk podľa obrázku (obr_a). Hrací oblúk môžete pripevniť na predné tyčky
(obr_b) alebo na prednú rukoväť (obr_c) podľa polohy chrbtovej opierky.
10 Hrací oblúk môžete odopnúť len z jednej strany a otáčať smerom von (obr_a). Pre aktiváciu zvuku kravičky,
stlačte nožičky kravičky (obr_b).
11 ZVUKOVÝ MODUL: Batérie NIE SÚ súčasťou balenia výrobku. Pre aktiváciu zvukového modulu potrebujete
dve 1,5- voltové tužkové batérie typu “AA”. Pomocou skrutkovača uvoľnite príklop priečinka na batérie (obr_
a) a vložte batérie dovnútra (obr_b). Po vykonaní operácie príklop opätovne priskrutkujte. Zvukový modul
má 2 nastavenia hlasitosti a 8 melódií (obr_c).
A: Pre zapnutie zvukového modulu a reguláciu hlasitosti presuňte vypínač do hornej polohy.
B: 4 melódie na hranie.
C: 4 melódie pre relax.
Pre výber požadovanej melódie stlačte prislušné tlačidlá.
12 REDUKTOR PRE NOVORODENCOV: lehátko je vybavené redukčným matracom pre novorodencov, ktorý
môžete vybrať, keď dieťa vyrastie. Pre odobratie redukčného matraca vyvlečte pás na nohy.
13 ZLOŽENIE LEHÁTKA: pri zatváraní ležadla (obr_a), nastavte ručný ovládač aj opierku do najnižšej polohy,
stlačte súčasne z obidvoch strán tlačidlo A a trubice rámu otočte tak, ako je uvedené na obrázku. Pred
prepravou musí byť ležadlo zložené a gumové pútko musí byť pripnuté na háčik (obr_b). Správne zložené
lehátko ostane v celku kompaktné a zaberá minimálny priestor (obr_c).
14 ZVLIEKNUTIE POŤAHOV: pre zvlieknutie poťahu lehátka odopnite suchý zips (obr_a), v prednej časti vyvlečte
poťah zo zvukového modulu (obr_b) a odpojte konektor zvukového modulu tak, že odpojíte obidva kolíky
(obr_c).
15 stiahnite poťah z bočných tyčí (obr_a), odopnite gombíky na zadnej strane chrbtovej opierky (obr_b) a
vyvlečte poťah zhora (obr_c). Dôležité upozornenie: pri opätovnom navliekaní poťahu nezabudnite navliecť
poťah na tyče.
Page 40

- 40 -
ČISTENIE A ÚDRŽBA
ÚDRŽBA VÝROBKU: chráňte výrobok pred atmosférickými vplyvmi: voda, dážď alebo sneh; nepretržité a
dlhodobé vystavenie slnečnému žiareniu môže spôsobiť zmenu farby mnohých materiálov; uchovávajte
výrobok na suchom mieste.
ČISTENIE PODVOZKU: pravidelne čistite umelohmotné časti vlhkou handričkou; nepoužívajte rozpúšťadlá
alebo podobné prostriedky; kovové časti výrobku vysušte, aby nedošlo k ich zhrdzaveniu; udržiavajte
v čistom stave všetky mobilné časti výrobku (regulačné mechanizmy, úchytné mechanizmy, kolesá...),
odstraňujte z nich prach a piesok a v prípade potreby ich namažte ľahkým olejom.
ČISTENIE TEXTILNÝCH ČASTÍ: textilné časti výrobku pravidelne vykefujte, čím odstránite prach a perte
v rukách pri maximálnej teplote 30°; nežmýkajte; nepoužívajte prostriedky obsahujúce chlór; nežehlite;
nečistite chemicky; na odstraňovanie škvŕn nepoužívajte rozpúšťadlá a nesušte v sušičke s otáčajúcim sa
bubnom.
PEG-PÉREGO S.p.A.
Spoločnosť Peg-Pérego S.p.A. je certifikovaná podľa ISO 9001. Tento certifikát zaručuje
zákazníkom a spotrebiteľom transparentnosť a spoľahlivosť vzhľadom na pracovné postupy
spoločnosti.
Spoločnosť Peg Pérego môže kedykoľvek vykonať zmeny a úpravy na modeloch, ktoré sú
popísané v tejto publikácii, ak si to budú vyžadovať technické alebo obchodné podmienky.
Spoločnosť Peg Pérego je vždy k dispozícii svojim spotrebiteľom, aby čo najlepšie uspokojila všetky ich
potreby a požiadavky. Z tohto dôvodu je pre spoločnosť veľmi dôležité a cenné oboznámiť sa s názormi
našich zákazníkov. Preto vám budeme veľmi vďační, keď po použití nášho výrobku vyplníte DOTAZNÍK PRE
ZISTENIE SPOKOJNOSTI ZÁKAZNÍKOV, ktorý nájdete na nasledujúcej internetovej adrese: www.pegperego.
com. Prosíme vás o uvedenie prípadných postrehov a doporučení.
ASISTENČNÁ SLUŽBA SPOLOČNOSTI PEG-PÉREGO
Ak dôjde k náhodnej strate alebo poškodeniu niektorých častí výrobku, použite len originálne náhradné
diely Peg Pérego. Pre prípadné opravy, výmeny, informácie o výrobkoch, predaj náhradných dielov a
doplnkov kontaktujte Asistenčnú službu Peg Pérego:
tel. 0039/039/60.88.213 fax 0039/039/33.09.992
e-mail assistenza@pegperego.it internetová stránka www.pegperego.com
PROHLÁŠENÍ O SOULADU S PŘEDPISY
Název výrobku
Sdraietta Melodia
Identifikační kód výrobku
IMSDME00---- IMSDMEFR---- IMSDMESP----
Příslušná nařízení (původní)
EN12790:2008
EN71-1 EN71-2 EN71-3 EN71-9
EN62115 EN55014 (EMC)
Evropská směrnice 2002/96/ES (WEEE Directive)
Evropská směrnice 2002/95/ES (RoHS Directive)
Prohlášení o souladu s předpisy
Společnost PegPerego S.p.A. prohlašuje na svou vlastní odpovědnost, že tento výrobek byl podroben
interním schvalovacím testům a byl homologován podle platných nařízení v externích a nezávislých
laboratořích.
Datum a místo vydání
Arcore, 11. září 2007
Page 41

- 41 -
HU_Magyar
Köszönjük, hogy a Peg-Pérego termékét választották.
FIGYELMEZTETÉS
_ FONTOS: FIGYELMESEN OLVASSÁK EL AZ ALÁBBI UTASÍTÁSOKAT ÉS
AZOKAT ŐRIZZÉK MEG A KÉSŐBBI ALKALMAZÁS CÉLJÁBÓL. A GYERMEK
BIZTONSÁGÁT VESZÉLYEZTETHETIK AZZAL, HA NEM TARTJÁK BE EZEKET AZ
UTASÍTÁSOKAT.
_ EZT A PIHENŐSZÉKET MAX. 9 KG SÚLYÚ GYERMEK SZÁMÁRA TERVEZTÉK.
_ NE HASZNÁLJA A PIHENŐSZÉKET, AMIKOR A GYERMEK KÉPES EGYEDÜL ÜLVE
MARADNI.
_ SOHA NE HAGYJÁK ŐRIZETLENÜL A GYERMEKÜKET A PIHENŐSZÉKBEN.
_ EZT A PIHENŐSZÉKET NEM HOSSZANTARTÓ ALVÁSHOZ TERVEZTÉK. A
PIHENŐSZÉK NEM HELYETTESÍTI A KISÁGYAT, HA A GYERMEKNEK ALVÁSRA VAN
SZÜKSÉGE, AKKOR FONTOS AZ, HOGY EGY MEGFELELŐ KISÁGYBA HELYEZZÉK.
_ MINDIG HASZNÁLJÁK A BIZTONSÁGI ÖVET.
_ EZ A PIHENŐSZÉK NEM AUTÓS GYEREKÜLÉS: SOHA NE HASZNÁLJÁK A
GYERMEK MOTOROS JÁRMŰBEN TÖRTÉNŐ SZÁLLÍTÁSÁHOZ.
_ FULLADÁS VESZÉLYE: SOHA NE HAGYJÁK A GYERMEKÜKET A PIHENŐSZÉKBEN,
AMIKOR AZ ÖV MEGLAZULT VAGY KI VAN KAPCSOLVA.
_ LEESÉS VESZÉLYE: A SDRAIETTA PIHENŐSZÉK MAGAS FELÜLETEN VALÓ
HASZNÁLATA VESZÉLYES.
_ FULLADÁS VESZÉLYE: A PIHENŐSZÉK PUHA FELÜLETEKEN FELBORULHAT ÉS
A GYERMEK FULLADÁSÁT OKOZHATJA; SOHA NE TEGYÉK A PIHENŐSZÉKET
ÁGYRA, DÍVÁNYRA VAGY MÁS PUHA FELÜLETRE.
_ A HASZNÁLAT ELŐTT GYŐZŐDJENEK MEG ARRÓL, HOGY MINDEN RÖGZÍTŐ
SZERKEZET HELYESEN BE VAN KAPCSOLVA.
_ NE HASZNÁLJÁK A TERMÉKET, HA EGYES RÉSZEI HIÁNYOZNAK VAGY AZON
TÖRÉST ÉSZLELNEK.
_ NE TEGYÉK AZ UJJAIKAT A SZERKEZETEKBE.
_ FIGYELJENEK ODA A JELENLÉVŐ GYERMEKRE AKKOR, AMIKOR A SZERKEZETEKET
BEÁLLÍTÓ MŰVELETEKET (FOGANTYÚ, HÁTTÁMLA, NAPELLENZŐ) VÉGZIK.
_ SOHA NE A JÁTÉKHÍDNÁL ÉS A NAPELLENZŐNÉL MEGFOGVA SZÁLLÍTSÁK.
_ A GYÁRTÓ ÁLTAL JÓVÁ NEM HAGYOTT TARTOZÉKOK HASZNÁLATA VESZÉLYES
LEHET.
_ A PIHENŐSZÉK ZENÉJÉNEK BEKAPCSOLÁSI ÉS KIKAPCSOLÁSI MŰVELETEIT
FELNŐTT HAJTHATJA VÉGRE.
_ HA A PIHENŐSZÉK ZENÉJE HOSSZABB IDŐSZAKON KERESZTÜL NINCS
BEKAPCSOLVA, AKKOR AZ ELEMEK ELTÁVOLÍTÁSA JAVASOLT AZ ADOTT
ELEMTARTÓBÓL.
_ KIZÁRÓLAG UGYANAZON TÍPUSÚ VAGY A JAVASOLT ELEMEKKEL EGYENÉRTÉKŰ
ELEMEKET SZABAD FELHASZNÁLNI.
_ AZ ELEMEKET A HELYES POLARITÁS FIGYELEMBEVÉTELÉVEL KELL BEHELYEZNI.
_ NE ALKALMAZZANAK EGYIDEJŰLEG ÚJ ÉS HASZNÁLT ELEMEKET.
_ A LEMERÜLT ELEMEKET EL KELL TÁVOLÍTANI A TERMÉKBŐL.
_ NE OKOZZANAK RÖVIDZÁRLATOT A TÁPKAPCSOKNÁL.
_ AZ UTÁNTÖLTHETŐ ELEMEKET EL KELL TÁVOLÍTANI A TERMÉKBŐL AZ
ÚJRATÖLTÉS CÉLJÁBÓL.
Page 42

- 42 -
_ AZ UTÁNTÖLTHETŐ ELEMEKET CSAK FELNŐTT FELÜGYELETE MELLETT SZABAD
ÚJRATÖLTENI.
HEEB IRÁNYELV (csak EU)
_ Ez a termék az élettartama végén egy HEEB minősítésű hulladékot képez, ezért háztartási hulladékként nem
kezelhető, hanem szelektív hulladékként kell feldolgozni;
_ Helyezzék a hulladékot a szelektív hulladékgyűjtő szigetek megfelelő edényeibe;
_ A jelen termék elektromos alkatrészeinek tartalmát képező, veszélyes anyagok potenciális veszélyforrást
jelentenek az ember egészségére és a környezetre, ha a terméket nem helyesen kezelik;
_ Az áthúzott hulladéktároló jel azt mutatja, hogy a terméknek szelektív hulladékgyűjtés tárgyát kell képeznie.
HASZNÁLATI UTASÍTÁS
1 SZÉTNYITÁS: a pihenőszék szétnyitásához forgassák előre a csöveket kattanásig (a_ábra) és kapcsolják le a
napellenzőt a fogantyúról (b_ábra).
2 A PIHENŐSZÉK ÖSSZEÁLLÍTÁSA: a fogantyú felszereléséhez vigyék a háttámlát függőleges pozícióba (lásd 4.
pont). Illessze a kart a csövekbe (a. ábra), és csavarozza be csavarhúzóval, ellenőrizze, hogy a csillagcsavar a
karon kívülről legyen becsavarozva (b. ábra). Erősen szorítsák meg és rendszeresen ellenőrizzék a rögzítést.
3 A FOGANTYÚ SZABÁLYOZÁSA: A fogantyú 3 pozícióba állítható. Tolják a két emeltyűt a nyilak irányába
(a_ábra) és ezzel egyidejűleg forgassák a fogantyút a kívánt pozícióba (b_ábra).
Az 1. számú a szállítási pozíció.
4 HÁTTÁMLA SZABÁLYOZÁSA: a háttámla 3 pozícióba állítható. Forgassák el kívül az 1-es kart (amely nyitott
pozícióban marad), (a_ábra), forgassák el kívül a 2-es kart és ezzel egyidejűleg állítsák be a háttámlát (b_
ábra). A pozíció kiválasztása után ne felejtsék el visszaállítani az 1-es kart a zárt pozícióba.
5 A LÁBTARTÓ BEÁLLÍTÁSA: a lábtartó két pozícióba állítható, a felemeléséhez mindkét oldalon húzzák a kültér
felé a két kis kart és ezzel egyidejűleg nyomják felfelé a nyelvecskéket (a_ábra). Felemelt lábtartó (b_ábra).
6 BIZTONSÁGI ÖV: fűzzék be a szíjat a lábválasztóba majd csatolják be kattanásig (a_ábra). Az öv
kikapcsolásához nyomják be a csat oldalait és ezzel egyidejűleg húzzák a derékövet a kültér irányába (b_
ábra).
7 TÁMASZTÓLÁB: a pihenőszék talpa lehet ringatható (a_ábra) vagy stabil. A pihenőszék stabillá tételéhez
forgassák a kültér felé a stabilizáló támasztólábat (b_ábra).
8 NAPELLENZŐ: a pihenőszék több pozícióba állítható napellenzővel van felszerelve, amely bármilyen
magasságban a fogantyúra kapcsolható.
9 JÁTÉKHÍD: akasszák be a játékhidat (a_ábra). A játékhíd az első csövekre (b_ábra) vagy a fogantyúra (c_ábra)
illeszthető a háttámla pozíciójának függvényében.
10 A játékhíd leakasztható csak az egyik oldalon és a kültér felé forgatható (a_ábra). A tehén hangjának
működtetéséhez nyomják meg a lábacskáit (b_ábra).
11 HANGM ODUL : az elemeket a csomag NEM tartalmazza. A hangmodul aktiválásához 2 “AA” típusú, 1,5
Voltos ceruzaelem szükséges. Csavarozzák ki egy csavarhúzóval az elemtartó fedelet (a_ábra) és helyezzék
be az elemeket (b_ábra). A művelet elvégzése után csavarozzák vissza a tartó fedelét. A hangmodul 2
hangerősség fokozattal és 8 dallammal rendelkezik (c_ábra).
A: A hangmodul bekapcsolásához és a hangerősség szabályozásához tolják felfelé a gombot.
B: 4 dallam a játékhoz.
C: 4 dallam a pihenéshez.
A dallamok felcseréléséhez nyomják meg a megfelelő gombokat.
12 SZŰKÍTŐ: a pihenőszék egy szűkítő párnával van ellátva az újszülött számára, amelyet ki kell venni akkor,
amikor a gyermek már nagyobb. A szűkítő párna kivételéhez fűzzék ki a lábválasztó szíjat.
13 ÖSSZECSUKÁS: a pihenőszék összecsukásához (a_ábra) állítsák a fogantyút és a háttámlát a legalacsonyabb
pozícióba, egyidejűleg mindkét oldalon nyomják be az A gombot és forgassák el a csöveket az ábra szerint.
Amikor a pihenőszék össze van csukva, a szállítás előtt akasszák a gumiszalagot az akasztóra (b_ábra). Az
összecsukott pihenőszék igazán kisméretű és nagyon kevés helyet foglal (c_ábra).
14 HUZAT LEVÉTELE: a pihenőszék huzatának levételéhez válasszák le a tépőzárat (a_ábra), elöl húzzák
le a zsákot a hangmodulról (b_ábra), a két kis dugó szétválasztásával csatlakoztassák ki a hangmodul
konnektorát (c_ábra).
15 húzzák le oldalt a zsákon lévő lyukat a csövekről (a_ábra), gombolják le a háttámla hátulját (b_ábra) és
felülről húzzák le a zsákot (c_ábra). Fontos: a pihenőszék huzatának visszahúzásánál ne felejtsék el ráfűzni a
lyukat a csövekre.
Page 43

- 43 -
TISZTÍTÁS ÉS KARBANTARTÁS
A TERMÉK KARBANTARTÁSA: védjék meg az időjárási viszontagságoktól: víztől, esőtől vagy hótól; a
napsütésnek való folytonos és hosszadalmas kitétel sok alapanyagban színváltozást okozhat; száraz helyen
tárolják a terméket.
A VÁZ TISZTÍTÁSA: egy nedves törlőruhával, oldószerek vagy egyéb hasonló termékek alkalmazása nélkül,
rendszeresen tisztítsák meg a műanyagból készült részeket; tartsanak szárazon minden fémből készült részt
a rozsdásodás megelőzése céljából; tisztítsák le a port vagy a homokot minden mozgó részről (szabályozó
mechanizmusok, összekapcsoló mechanizmusok, kerekek…) és szükség esetén könnyű olajjal kenjék be.
A SZÖVETRÉSZEK TISZTÍTÁSA:A SZÖVETRÉSZEK TISZTÍTÁSA: keféljék le a szövetrészeket a por eltávolításához
és legfeljebb 30°-os hőmérsékleten, kézzel mossák ki; ne facsarják; ne fehérítsék klórral; ne vasalják;
ne végezzenek száraz tisztítást; ne távolítsák el a foltokat oldószerekkel és ne szárítsák forgódobos
ruhaszárítógépben.
PEG-PÉREGO S.p.A.
A Peg-Pérego Rt. ISO 9001 tanúsítánnyal rendelkezik. A tanúsítvány a vállalati
munkamódszer rendszerezettségének és az abban való bizalomnak a garanciáját kínálja az
ügyfeleknek és a fogyasztóknak.
A Peg Pérego az ebben a kiadványban ismertetett modelleknél műszaki vagy kereskedelmi
jellegű okokból kifolyólag bármikor végrehajthat módosításokat.
A Peg Pérego a Fogyasztói rendelkezésére áll minden igényük legjobb kielégítése céljából. Ehhez az
Ügyfeleink véleményének megismerése számunkra rendkívül fontos és értékes. Ezért nagyon hálásak
lennénk, ha a termékünk használatbavétele után kitöltenék a FOGYASZTÓI ÉRTÉKELÉSI KÉRDŐÍVET és abban
feltüntetnék az esetleges észrevételeiket vagy ötleteiket; a kérdőívet az alábbi internetes weboldalunkon
találják meg: www.pegperego.com
PEG-PÉREGO VEVŐSZOLGÁLAT
Ha a modell részei véletlenül elvesznek vagy megsérülnek, akkor csak eredeti Peg Pérego cserealkatrészeket
használjanak! Az esetleges javítások, cserék, a termékekkel kapcsolatos információk valamint az eredeti
alkatrészek és tartozékok értékesítése ügyében vegyék fel a kapcsolatot a Peg Pérego Vevőszolgálatával:
tel. 0039/039/60.88.213 fax 0039/039/33.09.992
e-mail assistenza@pegperego.it internetes weboldal www.pegperego.com
MEGFELELŐSÉGI NYILATKOZAT
A termék megnevezése
Sdraietta Melodia
A termék azonosító kódja
IMSDME00---- IMSDMEFR---- IMSDMESP----
Vonatkozó szabványok (eredet)
EN12790:2008
EN71-1 EN71-2 EN71-3 EN71-9
EN62115 EN55014 (EMC)
2002/96/EK sz. európai irányelv (WEEE irányelv)
2002/95/EK sz. európai irányelv (RoHS irányelv)
Megfelelőségi nyilatkozat
A PegPerego S.p.A. felelőssége teljes tudatában kijelenti, hogy a tárgy szerinti cikket belső üzemi teszteknek
vetették alá, és azok tanúsítása az érvényes szabványok szerint külső független laboratóriumokban történt.
A nyilatkozat kiadásának helye és ideje
Arcore, 2007 szeptember 11.
Page 44

- 44 -
SL_Slovenščina
Hvala, ker ste izbrali izdelek Peg-Pérego.
OPOZORILO
_ POMEMBNO: NATANČNO PREBERITE TA NAVODILA IN JIH SHRANITE ZA
PRIHODNJO UPORABO. NEUPOŠTEVANJE TEH NAVODIL LAHKO OGROZI
VARNOST OTROKA.
_ TA LEŽALNIK JE NAMENJEN OTROKOM Z NAJVEČJO DOVOLJENO TEŽO 9 KG.
_ LEŽALNIKA NE UPORABLJAJTE, KO OTROK ZNA ŽE SAM SEDETI.
_ OTROKA V LEŽALNIKU NIKOLI NE PUSTITE BREZ NADZORA.
_ LEŽALNIK NI NAMENJEN ZA DALJŠA OBDOBJA OTROKOVEGA SPANJA. LEŽALNIK
NE ZAMENJUJE POSTELJICE. ČE ŽELI OTROK SPATI, JE ZELO POMEMBNO, DA GA
ZA TO POLEŽETE V PRIMERNO POSTELJICO.
_ VEDNO UPORABLJAJTE VARNOSTNE PASOVE.
_ TA LEŽALNIK NI AVTOSEDEŽ: NIKOLI GA NE UPORABLJAJTE ZA PREVAŽANJE
OTROKA V MOTORNEM VOZILU.
_ NEVARNOST ZADAVLJENJA: OTROKA NIKOLI NE PUŠČAJTE V LEŽALNIKU, KO SO
VARNOSTNI PASOVI ZRAHLJANI ALI ODPETI.
_ NEVARNOST PADCA: LEŽALNIK SDRAIETTA JE NEVARNO UPORABLJATI NA
DVIGNJENI POVRŠINI.
_ NEVARNOST ZADUŠITVE: LEŽALNIK SE LAHKO NA MEHKIH POVRŠINAH
PREKUCNE IN OTROKA ZADUŠI; LEŽALNIKA NIKOLI NE POSTAVLJAJTE NA
POSTELJE, KAVČE ALI DRUGE MEHKE POVRŠINE.
_ PRED UPORABO SE PREPRIČAJTE, DA SO VSI MEHANIZMI ZA PRIPENJANJE
PRAVILNO PRIPETI.
_ NE UPORABLJAJTE IZDELKA, ČE NEKATERI NJEGOVI DELI MANJKAJO ALI SO
POŠKODOVANI.
_ V MEHANIZME NE VTIKAJTE PRSTOV.
_ PAZITE NA OTROKA, KO PRILAGAJATE MEHANIZME (ROČAJI, HRBTNI NASLON,
SENČNIK).
_ NIKOLI NE UPORABLJAJTE IGRALNE PREČKE IN SENČNIKA ZA PRENAŠANJE
_ UPORABLJANJE DODATNE OPREME, KI JE NI ODOBRIL PROIZVAJALEC, BI LAHKO
BILO NEVARNO.
_ GLASBO MORA NA LEŽALNIKU VEDNO VKLJUČITI IN IZKLJUČITI ODRASLA OSEBA.
_ ČE GLASBENE FUNKCIJE LEŽALNIKA DLJE ČASA NE BOSTE UPORABLJALI, VAM
SVETUJEMO, DA ODSTRANITE BATERIJE IZ USTREZNEGA LEŽIŠČA ZA BATERIJE.
_ UPORABLJATI SMETE LE PRIPOROČENE ALI NJIM ENAKOVREDNE BATERIJE.
_ BATERIJE MORATE VSTAVITI TAKO, DA UPOŠTEVATE NJIHOVO POLARITETO’.
_ NOVIH IN RABLJENIH BATERIJ NE SMETE UPORABLJATI HKRATI.
_ PRAZNE BATERIJE MORATE VZETI IZ IZDELKA.
_ PAZITE, DA NAPAJALNIH KRTAČK NE BOSTE SPRAVILI V KRATEK STIK.
_ AKUMULATORJE MORATE VZETI IZ IZDELKA, DA BI JIH LAHKO NAPOLNILI.
_ AKUMULATORJI SE MORAJO POLNITI POD NAZDOROM ODRASLE OSEBE.
DIREKTIVE OEEO (samo za EU)
_ Ta izdelek je na koncu svoje življenjske dobe odpadek razreda OEEO, zato ga ne smete zavreči kot
gospodinjski odpadek, ampak je predmet ločenega zbiranja odpadkov;
_ Odpadek odložite na ustreznem vnaprej pripravljenem ekološkem otoku;
_ Prisotnost nevarnih snovi v električnih delih tega izdelka predstavljajo vir morebitne nevarnosti za človeško
življenje in za okolje, če izdelka ne zavržete na pravilen način;
Page 45

- 45 -
_ Prekrižan smetnjak je oznaka, ki sporoča, da je treba izdelek zavreči kot predmet ločenega zbiranja
odpadkov.
NAVODILA ZA UPORABO
1 ODPIRANJE: da bi ležalnik odprli, cevi zavrtite naprej, dokler ne kliknejo (risba_a), in odpnite senčnik z ročaja
(risba_b).
2 SESTAVLJANJE LEŽALNIKA: da bi namestili ročaj, postavite hrbtni naslon v navpični položaj (glej točko 4).
Ročaj vstavite v cevi (risba a) in ga privijte z izvijačem. Pazite, da bo vijak z zvezdasto glavo postavljen na
zunanjo stran ročaja (risba b). Tesno privijte in pritrditev redno pregledujte.
3 URAVNAVANJE ROČAJA: Ročaj si lahko prilagodite v tri položaje. V smeri puščic zavrtite vzvoda (risba_a) in
sočasno zavrtite ročaj v želeni položaj (risba_b).
Pravilen položaj za transport je položaj številka 1.
4 URAVNAVANJE HRBTNEGA NASLONA: hrbtni naslon je nastavljiv v tri položaje. Na zunanji strani zavrtite
vzvod 1 (ki bo ostal v odprtem položaju), (risba_a); nato na zunanji strani zavrtite vzvod 2 in sočasno
nastavite hrbtni naslon (risba_b). Ko izberete položaj, ne pozabite prestaviti vzvoda 1 v zaprti položaj.
5 URAVNAVANJE PODNOŽNIKA: A• Podnožnik je mogoče uravnati v dva položaja; da bi ga dvignili, povlecite
oba jezička ob straneh navzven in sočasno potisnite jezička navzgor (risba_a). Dvignjen podnožnik (risba_b).
6 VARNOSTNI PAS: vstavite pas v mednožni jermenček in spnite, dokler ne klikne (risba_a). Da bi odpeli pas,
pritisnite ob straneh sponke in sočasno jermenček okoli pasu potegnite navzven (risba_b).
7 STOJALO: podstavek ležalnika se lahko guga (risba_a) ali stoji pri miru. Da bi bil ležalnik pri miru, zavrtite
stojalce za stabilizacijo (risba_b) navzven.
8 SENČNIK: ležalnik je opremljen z nastavljivim senčnikom in ga je mogoče pripeti na ročaj na kateri koli višini.
9 NOSILEC ZA IGRAČKE: pripnite nosilec za igračke (risba_a). Nosilec je mogoče pripeti na sprednje cevi (risba_
b) ali na ročaj (risba_c), odvisno od položaja hrbtnega naslona.
10 Nosilec za igračke je mogoče odpeti z ene same strani in ga zavrteti navzven (risba_a). Da bi sprožili
oglašanje krave, pritisnite noge (risba_b).
11 ZVOČNI MODUL: baterije NISO priložene v embalaži. Da bi aktivirali zvočni modul, sta potrebni 2 1,5-voltni
bateriji tipa “AA”. Z izvijačem odvijte pokrovček prostorčka (risba_a) za baterije (risba_b) in ju vstavite. Ko
boste to naredili, spet privijte pokrov odprtine. Zvočni modul je mogoče nastaviti na dve stopnji glasnosti in
vključuje 8 glasbenih motivov (risba_c).
A: Da bi prižgali zvočni modul in nastavili glasnost, tipko potisnite navzgor.
B: 4 glasbeni motivi za igranje.
C: 4 glasbeni motivi za sprostitev.
Da bi zamenjali glasbeni motiv, pritisnite ustrezne tipke.
12 BLAZINICA ZA ZMANJŠANJE: Ležalnik ima tudi zmanjševalno blazinico za novorojenčka, ki jo morate
odstraniti, ko je otrok večji. Da bi odstranili zmanjševalno blazinico, izvlecite mednožni jermenček.
13 ZAPIRANJE: da bi zaprli ležalnik (risba_a), uravnajte ročaj v najnižji položaj hrbtnega naslona in sočasno
na obeh straneh pritisnite gumb A, nato pa zavrtite cevi ogrodja, kot prikazuje risba. Ko je ležalnik zaprt,
pripnite elastiko na zanko (risba_b), preden ga prenašate. Zaprt ležalnik je res majhen in zavzame zelo malo
prostora (risba_c).
14 SNEMLJIVOST PREVLEK: da bi sneli prevleke, odpnite ježke (risba_a), od zgoraj snemite vrečo z zvočnega
modula (risba_b) in odklopite priključek zvočnega modula, tako da izvlečete oba vtiča (risba_c).
15 Od strani snemite režo vreče s cevi (risba_a), odpnite zadnji del hrbtnega naslona (risba_b) in od zgoraj
snemite vrečo (risba_c). Pomembno: ko ležalnik oblačite, ne pozabite natakniti reže na cevi.
ČIŠČENJE IN VZDRŽEVANJE
VZDRŽEVANJE IZDELKA: zaščitite pred atmosferskimi vplivi: vodo, dežjem ali snegom; daljše izpostavljanje
soncu lahko povzroči spremembo barve veliko materialov; izdelek vedno spravljajte na suhem mestu.
ČIŠČENJE OGRODJA: plastične dele redno brišite z vlažno krpo. Ne uporabljajte topil ali drugih podobnih
izdelkov; pazite, da bodo vsi kovinski deli suhi, da bi preprečili rjo; pazite, da premični deli (mehanizmi za
uravnavanje, mehanizmi za pripenjanje, kolesa ...) ne bodo prašni in, če je to potrebno, jih podmažite z
lahkim oljem.
ČIŠČENJE DELOV IZ BLAGA: blago skrtačite, da z njega odstranite prah in ga operite na roke pri največ 30°; ne
ožemajte; ne uporabljajte klorovega belila; ne likajte; ne uporabljajte kemičnega čiščenja; ne čistite s topili in
ne uporabljajte sušilca za perilo z vrtljivim bobnom.
Page 46

- 46 -
PEG-PÉREGO S.p.A.
Peg Pérego S.p.A. ima certifikat ISO 9001. Certifikat za stranke in uporabnike pomeni
garancijo transparentnosti in zaupanja v delo podjetja.
Peg Perego se lahko kadarkoli odloči, da bo spremenil modele, objavljene v katalogu, najsi
bo to zaradi tehničnih ali podjetniških razlogov.
Peg Pérego je vedno na voljo svojim strankam, da v kar največji meri izpolni njihove
potrebe. Zato je za nas zelo pomembno, da poznamo mnenje svojih strank. Hvaležni
vam bomo, če si boste, ko boste uporabili naš izdelek, vzeli čas in izpolnili VPRAŠALNIK O
ZADOVOLJSTVU STRANK, ki ga boste našli na naših spletnih straneh, na naslovu: www.
pegperego.com
CENTER ZA POMOČ UPORABNIKOM
Če izgubite ali poškodujete sestavni del izdelka, uporabite izključno originalne rezervne dele Peg Pérego.
Za morebitna popravila, zamenjave, podatke o izdelkih, prodajo originalnih rezervnih delov in dodatkov,
stopite v stik s centrom za pomoč uporabnikom Peg Pérego:
tel. 0039/039/6088213 faks 0039/039/3309992
e-pošta assistenza@pegperego.it spletna stran www.pegperego.com
IZJAVA O SKLADNOSTI
Naziv izdelka
Sdraietta Melodia
Identifikacijska koda izdelka
IMSDME00---- IMSDMEFR---- IMSDMESP----
Zakonska podlaga (izvirniki)
EN12790:2008
EN71-1 EN71-2 EN71-3 EN71-9
EN62115 EN55014 (EMC)
Evropska direktiva 2002/96/EC (Direktiva WEEE) Evropska direktiva 2002/95/EC (Direktiva RoHS)
Izjava o skladnosti
PegPerego S.p.A. (d.d.) na lastno odgovornost izjavlja, da je bil izdelek podvržen notranjim kolavdacijskim
preizkusom in da je homologiran v skladu z veljavnimi predpisi v zunanjih, neodvisnih laboratorijih.
Datum in kraj izdaje
Arcore, 11. september 2007
Page 47

- 47 -
RU_Pусский
Благодарим вас за то, что вы выбрали продукцию компании Peg-Pеrego.
ПРЕДУПРЕЖДЕНИЕ
_ ВАЖНО: ВНИМАТЕЛЬНО ПРОЧИТАЙТЕ ДАННЫЕ ИНСТРУКЦИИ И ХРАНИТЕ,
ЧТОБЫ В ДАЛЬНЕЙШЕМ ИХ МОЖНО БЫЛО ИСПОЛЬЗОВАТЬ ДЛЯ
КОНСУЛЬТАЦИИ. РЕБЁНОК МОЖЕТ ПОДВЕРГАТЬСЯ ОПАСНОСТИ, ЕСЛИ ВЫ
НЕ БУДЕТЕ СЛЕДОВАТЬ ДАННЫМ ИНСТРУКЦИЯМ.
_ ЭТОТ ШЕЗЛОНГ РАЗРАБОТАН ДЛЯ РЕБЕНКА ВЕСОМ 9 КГ МАКСИМУМ.
_ НЕ ИСПОЛЬЗУЙТЕ ШЕЗЛОНГ, КОГДА РЕБЕНОК МОЖЕТ СИДЕТЬ АМОСТОЯТЕЛЬНО.
_ НИКОГДА НЕ ОСТАВЛЯЙТЕ РЕБЕНКА, НАХОДЯЩЕГОСЯ НА ШЕЗЛОНГЕ, БЕЗ
ПРИСМОТРА .
_ ДАННЫЙ ДЕТСКИЙ ШЕЗЛОНГ НЕ ПРЕДНАЗНАЧЕН ДЛЯ ДОЛГОГО
НАХОЖДЕНИЯ В НЕМ РЕБЕНКА ВО ВРЕМЯ СНА. ШЕЗЛОНГ НЕ ЗАМЕНЯЕТ
КРОВАТКУ: ЕСЛИ РЕБЕНКУ НАДО ПОСПАТЬ, ТО НЕОБХОДИМО УЛОЖИТЬ ЕГО
В ПОДХОДЯЩУЮ КРОВАТКУ.
_ ВСЕГДА ИСПОЛЬЗУЙТЕ РЕМНИ БЕЗОПАСНОСТИ.
_ ЭТО ШЕЗЛОНГ, А НЕ АВТОМОБИЛЬНОЕ КРЕСЛО. НИ В КОЕМ СЛУЧАЕ НЕ
ИСПОЛЬЗУЙТЕ ЕГО ДЛЯ ПЕРЕВОЗКИ РЕБЕНКА В АВТОМОБИЛЕ.
_ ОПАСНОСТЬ УДУШЕНИЯ: НИ В КОЕМ СЛУЧАЕ НЕ ОСТАВЛЯЙТЕ РЕБЕНКА НА
ШЕЗЛОНГЕ, ЕСЛИ РЕМНИ ОСЛАБЛЕНЫ ИЛИ РАССТЕГНУТЫ.
_ ОПАСНОСТЬ ПАДЕНИЯ: ИСПОЛЬЗОВАНИЕ ШЕЗЛОНГА НА ВЫСОКОЙ
ПОВЕРХНОСТИ МОЖЕТ БЫТЬ ОПАСНЫМ.
_ ОПАСНОСТЬ УДУШЕНИЯ: НА МЯГКИХ ПОВЕРХНОСТЯХ ШЕЗЛОНГ МОЖЕТ
ОПРОКИНУТЬСЯ И УДУШИТЬ РЕБЕНКА. НИКОГДА НЕ СТАВЬТЕ ШЕЗЛОНГ НА
КРОВАТИ, ДИВАНЫ И ДРУГИЕ МЯГКИЕ ПОВЕРХНОСТИ.
_ ПЕРЕД ИСПОЛЬЗОВАНИЕМ УБЕДИТЕСЬ, ЧТО ВСЕ МЕХАНИЗМЫ КРЕПЛЕНИЯ
ПРАВИЛЬНО ЗАЦЕПЛЕНЫ.
_ НЕ ПОЛЬЗУЙТЕСЬ ИЗДЕЛИЕМ ПРИ ОБНАРУЖЕНИИ В НЕМ НЕДОСТАЮЩИХ
ЧАСТЕЙ ИЛИ ПОЛОМОК.
_ НЕ ДОПУСКАЙТЕ ПОПАДАНИЯ ПАЛЬЦЕВ В МЕХАНИЗМЫ.
_ ПРИ ВЫПОЛНЕНИИ РЕГУЛИРОВКИ МЕХАНИЗМОВ (РУЧКА, СПИНКА,
СОЛНЦЕЗАЩИТНАЯ КРЫША) БУДЬТЕ ОЧЕНЬ ВНИМАТЕЛЬНЫ, ЕСЛИ В
ШЕЗЛОНГЕ СИДИТ РЕБЕНОК.
_ ДЛЯ ПЕРЕНОСА НИ В КОЕМ СЛУЧАЕ НЕ ПОЛЬЗУЙТЕСЬ ДУГОЙ ДЛЯ ИГРУШЕК
И СОЛНЦЕЗАЩИТНОЙ КРЫШЕЙ
_ ИСПОЛЬЗОВАНИЕ ПРИНАДЛЕЖНОСТЕЙ, НЕ ОДОБРЕННЫХ ИЗГОТОВИТЕЛЕМ,
МОЖЕТ БЫТЬ ОПАСНЫМ.
_ ВКЛЮЧЕНИЕ И ВЫКЛЮЧЕНИЕ МУЗЫКИ ШЕЗЛОНГА ДОЛЖЕН ВЫПОЛНЯТЬ
ВЗРОСЛЫЙ.
_ ЕСЛИ МУЗЫКА ШЕЗЛОНГА БУДЕТ ДОЛГО БЕЗДЕЙСТВОВАТЬ, ТО
РЕКОМЕНДУЕТСЯ ВЫНУТЬ БАТАРЕЙКИ ИЗ СООТВЕТСТВУЮЩЕГО ОТСЕКА.
_ НЕОБХОДИМО ИСПОЛЬЗОВАТЬ БАТАРЕЙКИ ОДНОГО И ТОГО ЖЕ ТИПА, ИЛИ
ЭКВИВАЛЕНТНЫЕ РЕКОМЕНДОВАННЫМ.
_ БАТАРЕЙКИ НЕОБХОДИМО ВСТАВЛЯТЬ С СОБЛЮДЕНИЕМ ПРАВИЛЬНОЙ
ПОЛЯРНОСТИ.
_ НЕ ИСПОЛЬЗУЙТЕ ОДНОВРЕМЕННО НОВЫЕ И СТАРЫЕ БАТАРЕЙКИ.
_ РАЗРЯЖЕННЫЕ БАТАРЕЙКИ НЕОБХОДИМО ВЫНУТЬ ИЗ ИЗДЕЛИЯ.
_ НЕ ВЫЗЫВАТЬ КОРОТКОЕ ЗАМЫКАНИЕ ПИТАЮЩИХ КЛЕММ.
Page 48

- 48 -
_ ПЕРЕЗАРЯЖАЕМЫЕ БАТАРЕЙКИ НЕОБХОДИМО ВЫНИМАТЬ ИЗ ИЗДЕЛИЯ ДЛЯ
ПЕРЕЗАРЯДКИ.
_ ПЕРЕЗАРЯЖАЕМЫЕ БАТАРЕЙКИ НЕОБХОДИМО ПЕРЕЗАРЯЖАТЬ
ИСКЛЮЧИТЕЛЬНО ПОД НАДЗОРОМ ВЗРОСЛОГО.
ИНСТРУКЦИЯ ПО ЭКСПЛУАТАЦИИ
1 РАСКЛАДЫВАНИЕ: Для раскладывания шезлонга сместите вперед трубы до щелчка (рис_a) и
отсоедините солнцезащитную крышу от ручки (рис_b).
2 СБОРКА ШЕЗЛОНГА: Для установки ручки переведите спинку в вертикальное положение (смотри пункт
4). Проденьте рукоятку в трубы (рис_a) и завинтите с помощью отвертки, убедившись, что винты со
крестообразным углублением вставлены в рукоятку снаружи (рис_b). Туго затяните и периодически
проверяйте затяжку.
3 РЕГУЛИРОВКА РУЧКИ: Ручка регулируется в 3 положениях.
Сместите в направление, указанное стрелкой, два рычага (рис_а) и одновременно переведите ручку в
необходимое вам положение (рис_b). Транспортное положение - это положение № 1.
4 РЕГУЛИРОВКА СПИНКИ: Спинка регулируется в 3 положениях. Сместите наружу рычаг 1 (который
останется в открытом положении) (рис_а), сместите наружу рычаг 2 и одновременно отрегулируйте
спинку (рис_b). Выбрав необходимое положение, не забудьте перевести рычаг 1 в закрытое
положение.
5 РЕГУЛИРОВКА ПОДНОЖКИ: подножка регулируется в двух положениях: для подъема сместите
наружу с двух сторон два рычажка, и одновременно с этим сместите вверх язычки (рис_а). Поднятая
подножка ((рис_b).
6 РЕМЕНЬ БЕЗОПАСНОСТИ: пропустите ремень в центральный ремешок и застегните до щелчка (рис_a).
Для расстегивания ремня нажмите пряжку сбоку и одновременно сместите наружу поясничный
ремешок (рис_b).
7 ПОДСТАВКА: основание шезлонга может качаться (рис_а) или стоять ровно. Чтобы шезлонг стоял
ровно, сместите наружу подставку-стабилизатор (рис_b).
8 СОЛНЦЕЗАЩИТНАЯ КРЫША: шезлонг имеет солнцезащитную крышу, которая регулируется в
нескольких положениях и прикрепляется к ручке на любой высоте.
9 ДУГА ДЛЯ ИГРУШЕК: Установите дугу для игрушек (рис_а). Дугу для игрушек можно установить на
передние трубы (рис_b) или на ручку (рис_с) в зависимости от положения спинки.
10 Дугу для игрушек можно отсоединять только с одной стороны и поворачивать наружу (рис_а). Для
включения мычания коровки нажмите на лапы (рис_b).
11 ЗВУКОВОЙ МОДУЛЬ: батарейки НЕ включены в упаковку. Для работы звукового модуля нужны 2
батарейки типа “AA” 1,5 Вольт. Отвинтите отверткой крышку отсека (рис_а) и установите батарейки (рис_
b). Выполнив эту операцию, привинтите на место крышку отсека. Звуковой модуль имеет 2 регулировки
громкости и 8 мелодий (рис_с).
A: Для включения звукового модуля и для регулировки громкости сместите кнопку вверх.
B: 4 мелодии для игры.
C: 4 мелодии для отдыха.
Для переключения мелодий нажимайте соответствующие кнопки.
12 ВСТАВКА-РЕДУКТОР: в комплект поставки шезлонга входит вставка-редуктор для маленьких детей,
которую следует снимать, когда ребенок подрастет. Для удаления вставки-редуктора снимите
центральный ремешок.
13 СКЛАДЫВАНИЕ: для складывания шезлонга (рис_а) отрегулируйте ручку и спинку в самое низкое
положение, нажмите одновременно с двух сторон кнопку А, и поверните трубы так, как показано
на рисунке. Когда шезлонг сложен, перед его переносом, пристегните резинку к крючку (рис_b).
Сложенный шезлонг очень компактен и занимает очень мало места (рис_с).
14 СНЯТИЕ ОБИВКИ: для снятия обивки шезлонга отсоедините липучку (рис_a), снимите с передней
стороны обивку со звукового модуля (рис_b), отсоедините разъем звукового модуля, сняв два
штеккера (рис_c),
15 снимите сбоку петлю обивки с труб (рис_a), расстегните верхнюю часть спинки (рис_b) и удалите
обивку сверху (рис_c). Важно: когда устанавливается обивка на место, не забудьте надеть петлю на
трубы.
ЧИСТКА И УХОД
УХОД ЗА ИЗДЕЛИЕМ: защитите изделие от атмосферных осадков - снега или дождя. Постоянная и
продолжительная подверженность солнечным лучам может вызвать цветовые изменения многих
материалов. Храните это изделие в сухом месте.
ЧИСТКА ШАССИ: периодически очищайте пластмассовые детали влажной тряпкой, без
использования растворителей и сходных веществ. Держите металлические части изделия сухими,
Page 49

- 49 -
чтобы предотвратить образование ржавчины. Поддерживайте чистоту всех движущихся деталей
(регулировочные и соединительные детали), удаляя пыль и песок. При необходимости, смажьте их
легким маслом.
ЧИСТКА ТКАНЫХ ЧАСТЕЙ: чистите щеткой тканые части, чтобы удалить пыль. Стирайте вручную при
макс. температуре 30°, не выкручивать; не отбеливать хлором; не гладить; не чистить в химчистке; не
обрабатывать растворителями и не сушить при помощи барабанных сушильных машин.
PEG-PEREGO S.p.A.
Peg-Perego S.p.A. сертифицирована по ISO 9001. Сертификация гарантирует заказчикам
и потребителям, что компания работает, соблюдая принципы гласности и доверия.
Компания Peg-Perego имеет право вносить в любой момент изменения в модели,
описанные в настоящем издании, по причинам технического или коммерческого
характера.
Peg-Perego находится к услугам своих клиентов для полного удовлетворения всех их требований.
Поэтому, для нас очень важно знать мнение наших клиентов. Поэтому, мы будем вам признательны,
если после использования нашего изделия вы заполните АНКЕТУ ОБ УДОВЛЕТВОРЕННОСТИ
ПОТРЕБИТЕЛЯ, которую можно найти на нашем сайте в Интернете, высказывая свои замечания или
рекомендации. www.pegperego.com
СЛУЖБА ОБСЛУЖИВАНИЯ PEG-PEREGO
В случае утери или повреждения частей изделия, используйте только фирменные запасные части
Peg-Perego. Для выполнения ремонта, замены деталей, получения справок об изделии, продажи
фирменных запчастей и принадлежностей вы можете обращаться в службу обслуживания Peg-Perego:
тел.: 0039/039/60.88.213 факс 0039/039/33.09.992
e-mail assistenza@pegperego.it сайт в интернете: www.pegperego.com
ДЕКЛАРАЦИЯ СООТВЕТСТВИЯ
Название изделия
Sdraietta Melodia
Идентификационный код изделия
IMSDME00---- IMSDMEFR---- IMSDMESP----
Нормативно-справочные документы (исходные)
EN12790:2008 EN71-1 EN71-2 EN71-3 EN71-9
EN62115 EN55014 (EMC)
Европейская директива 2002/96/CE (Директива об использовании старых электроприборов и
электронного оборудования WEEE)
Европейская директива 2002/95/CE (Директива об ограничении опасных веществ RoHS)
Декларация соответствия
Компания PegPerego S.p.A. с полной ответственностью заявляет, что указанное изделие прошло
внутризаводские испытания и было утверждено в соответствии с действующими нормами в
независимых лабораториях третьих сторон.
Дата и место выдачи
Arcore, 11 сентября 2007 г.
Page 50

- 50 -
TR_Türkçe
Bir Peg-Pérego ürününü tercih ettiğiniz için size teşekkür ederiz.
UYARI
_ ÖNEMLİ: BU TALIMATLARI DIKKATLICE OKUYUNUZ VE ILERIDE DE ISTIFADE
EDEBILMEK AMACIYLA MUHAFAZA EDINIZ. BU TALIMATLARA UYULMAMASI
HALINDE ÇOCUĞUN GÜVENLIĞI TEHLIKEYE GIREBILIR.
_ BU ŞEZLONG 9 KG. DEN AĞIR OLMAYAN ÇOCUKLAR İÇİN TASARLANMIŞTIR.
_ BEBEK OTURMA AŞAMASINA GELDİĞİNDE ŞEZLONGU KULLANMAYINIZ.
_ ŞEZLONGDA ÇOCUĞUNUZU HİÇBİR ZAMAN TEK BAŞINA BIRAKMAYINIZ.
_ SÖZ KONUSU ŞEZLONG UZUN SÜRELİ UYKU İÇİN TASARLANMAMIŞTIR. ŞEZLONG
YATAK YERINE KULLANILAMAZ. ÇOCUĞUN UYKUSU GELDIĞINDE, ONU UYGUN
BIR YATAĞA YATIRMANIZ GEREKMEKTEDIR.
_ HER ZAMAN İÇİN EMNİYET KEMERLERİNİ KULLANINIZ.
_ BU ŞEZLONG ARABA KOLTUĞU DEĞİLDİR : HİÇBİR ZAMAN İÇİN BEBEĞİN
MOTORLU ARAÇTA TAŞINMASI AMACIYLA KULLANILMAMALIDIR.
_ BOĞULMA TEHLİKESİ: KEMERLER AÇIK VEYAHUT DA GEVŞEK VAZİYETTEYKEN
BEBEĞİ KOLTUKTA BIRAKMAYINIZ.
_ DÜŞME TEHLİKESİ: ŞEZLONGU EĞİMLİ DÜZEY ÜZERİNDE KULLANMAK
TEHLİKELİDİR
_ BOĞULMA TEHLİKESİ : ŞEZLONG YUMUŞAK ZEMİNLERE KONULMASI HALİNDE
DEVRİLEBİLİR VE BEBEĞİN BOĞULMASI SONUCU DOĞABİLİ
R, KOLTUĞU HİÇBİR
ZAMAN İÇİN YATAK, DİVAN VE DİĞER YUMUŞAK ZEMİNLERE YERLEŞTİRMEYİNİZ.
_ ÜRÜNÜ KULLANMADAN EVVEL TÜM BAĞLANTI AKSAMLARININ TAM OLARAK
TAKILDIĞINDAN EMİN OLUNUZ.
_ KIRIK YA DA EKSİK PARÇALI ÜRÜNLERİKULLANMAYIN..
_ PARMAKLARINIZI MEKANİZMALAR ARASINA SOKMAYINIZ.
_ MEKANİZMALARIN AYAR İŞLEMLERİ (TUTACAK, SIRTLIK, GÜNEŞLİK) YAPILIRKEN
ÇOCUĞUN KONUMUNA DİKKAT EDİNİZ.
_ OYUN ÇUBUĞUNU VE GÜNEŞ KORUYUCUYU TAŞIMA AMAÇLI ASLA
KULLANMAYINIZ.
_ ÜRETİCİ TARAFINDAN ONAYLANMAMIŞ OLAN AKSESUARLARIN KULLANIMI
TEHLİKELİ OLABİLİR.
_ ŞEZLONGUN MÜZİK DÜZENEĞİNİN AÇILMA VE KAPATILMA İŞLEMLERİNİN
YETİŞKİN BİR KİŞİ TARAFINDAN YAPILMASI GEREKMEKTEDİR.
_ ŞEZLONGUN MÜZİK SİSTEMİNİN UZUN SÜREL
İ KULLANILMAMASININ
ÖNGÖRÜLMESİ HALİNDE PİLLERİN PİL YUVASINDAN ÇIKARTILMASI TAVSİYE
OLUNUR.
_ YALNIZCA TAVSİYE EDİLEN VEYAHUT DA BNUNA EŞDEĞER TÜRDE PİL
KULLANILMASI GEREKMEKTEDİR.
_ PİLLERİN YERLEŞTİRİLMESİ ESNASINDA DOĞRU KUTUPLARA GELMESİNE DİKKAT
EDİNİZ.
_ ESKİ VE YENİ PİLLERİ KARIŞIK OLARAK BİRLİKTE KULLANMAYINIZ.
_ ESKİ VE BOŞ PİLLERİN PİL YUVASINDAN ÇIKARTILMASI GEREKİR.
_ GİRİŞ BAĞLANTILARINDA KISA DEVRE OLMASINA MAHAL VERMEYİNİZ.
_ ŞAR EDİLEBİLİR PİLLERİN PİL YUVASINDAN ÇIKARTILARAK ŞARJ EDİLMESİ
GEREKİR.
Page 51

- 51 -
_ ŞAR EDİLEBİLİR PİLLERİN YALNIZCA VE KESİNLİKLE YETİŞKİN BİR KİŞİNİN
DENETİMİNDE ŞARJ EDİLMESİ GEREKİR.
KULLANIM KILAVUZU
1 AÇILMASI : Beşikli mama koltuğunu açmak için boru mekanizmasını “klik” sesini duyana kadar öne doğru
çeviriniz (şekil_a) ve güneşliği, şekilde gösterildiği gibi, tutacaktan çıkartınız (şekil_b).
2 BEŞİKLİ MAMA KOLTUĞUNUN MONTAJI: Tutacağı monte edebilmek için sırtlığı dik konuma getiriniz (4ncü
noktaya bakınız). Boru kulpu yerine takınız (şekil_a) ve yıldız başlı vidaları kulpun dış tarafından takmak
suretiyle (şekil_b) vidaları sıkarak kulpu yerine sabitleyiniz. Vidaları kuvvetlice sıkıştırınız ve periyodik olarak
kontrol ediniz.
3 TUTACAK AYARI : Tutacak ayarı 3 değişik şekilde yapılabilir. İki kolu (şekil_a) ok istikametinde itiniz ve
eşzamanlı olarak da tutacağı arzu edilen konuma gelene kadar çeviriniz (şekil_b).
Taşımak için gerekli konum 1 dir.
4 SIRTLIK AYARI : Sırtlık ayarı 3 değişik şekilde yapılabilir. 1 numaralı kolu dışa doğru çeviriniz (açık konumda
kalacaktır), (şekil_a), 2 numaralı kolu dışa doğru çeviriniz ve eşzamanlı olarak da s
ırtlığı ayarlayınız (şekil_b).
Arzulanan konumun seçimini müteakıben 1 numaralı kolu kapalı konuma getirmeyi unutmayınız.
5 BASAMAĞIN AYARLANMASI : Basamak iki değişik konumda ayarlanabilir, kaldırmak için her iki tarafından
tutarak iki adet kolu dışa doğru çekiniz ve eşzamanlı olarak da iki dilciği (şekil_a) yukarı doğru itiniz. Yüksek
konumlu basamak (şekil_b).
6 EMNİYET KEMERİ : Kemeri bacak arası bandından geçiriniz ve “klik” sesini duyacak şekilde takınız (şekil_a).
Kemeri çözmek için kemer tokasının yan taraflarına bastırınız ve eşzamanlı olarak da bel kemerini dışarı
doğru çekiniz (şekil_b).
7 TAŞIYICI AYAK : Şezlongun mesnedi sallanabilir (şekil_a) veyahut da sabit olabilir. Şezlongu sabit hale
getirmek için tespit mekanizmasını dışa doğru çeviriniz (şekil_b).
8 GÜNEŞLİK : Şezlong tutacağa takılabilen ve arzulanan konumda ayarlanabilen bir güneşlikle donatılmıştır.
9 OYUN ÇUBUĞU : Oyun çubuğunu yerine takınız (şekil_a). Oyun çubuğu, sırtlığın konumuna göre ön boru
aksamına (şekil_b) takı
labileceği gibi, tutacağa (şekil_c) da tespit edilebilir.
10 Oyuncak çubuğu tek taraftan çıkartılmak suretiyle dışarı istikamette döndürülebilir (şekil_a). İnek sesini
dinleyebilmek için, hayvanın ayaklarına basınız (şekil_b).
11 SESLİ MODÜL : Piller ambalaja DAHİL DEĞİLDİR. Sesli modu devreye sokabilmek için 2 adet “AA” tipi 1,5
Volt pil gerekmektedir. Bir tornavida yardımı ile pil haznesinin kapağını açınız (şekil_a) ve pilleri yerleştiriniz
(şekil_b). İşlemi bitirince, tornavidayla kapağı sıkıştırınız. Sesli modülde 2 ses ayarı ve 8 farklı melodi
bulunmaktadır (şekil_c).
A : Ses modülüne erişim ve ses seviyesinin ayarı için düğmeyi yukarı istikamette konumlandırınız.
B : Oyun için 4 müzik.
C : Relax için 4 müzik.
Müzikleri değiştirmek için ilgili düğmelere basınız.
12 REDÜKTÖR : Şezlong yeni doğmuş bebekler için redüktör görevini gören bir minderle birlikte sunulur, bebek
büyüyünce minder kaldırılır. Redüktör minderi çıkartmak için bacak arası bandını çıkartınız.
13 KAPATILMASI: Şezlongu kapatmak için (şekil_a), kolu ve sırtlığı en alt seviyede konumlandırarak ayarlayınız,
eşzamanlı olarak da A düğmesine her iki tarafından da bastırınız ve taşıyıcı boru aksamını, şekilde
gösterildiği gibi, döndürünüz. Şezlong kapalı konumdayken, taşıma öncesinde, lastiği kancaya bağlayınız
(şekil_b). Kapanmış vaziyetteki şezlong gerçekten de çok az yer tutar ve tümüyle kompakt olarak kalır (şekil_
c).
14 ÇIKARTILABİLİR KILIF : Şezlongun kılıfını çıkartabilmek için yapışkan bandı kaldırınız (şekil_a), torbayı sesli
modülden çekerek sıyırınız (şekil_b), iki adet soketi yerinden sökmek suretiyle (şekil_c) sesli modülün
bağlantısını çıkartınız.
1 5 Torbanın iliğini taş
ıyıcı boru aksamından yanlamasına sıyırınız (şekil_a), sırtlığın arkasında yer alan düğmeyi
açınız (şekil_b) ve kılıfı yukarıdan çekerek sıyırınız (şekil_c). Önemli : Şezlong kılıfını tekrar takarken iliklerini
borulara takmayı ihmal etmeyiniz.
TEMİZLİK VE BAKIM
ÜRÜNÜN BAKIMI ; atmosferik etkenlerden koruyunuz : bu ürünün, su, yağmur, kar gibi atmosferik
etkenlerden muhafaza edilmesi gerekir; uzun süreli güneşe maruz kalınması halinde bazı aksamda renk
değişimleri görülebilir; söz konusu ürünü kuru bir mekanda muhafaza ediniz.
ŞASE TEMİZLİĞİ : plastik aksamları periyodik olarak nemli biz bezle, herhangi b,ir solvent veyahut da benzeri
mamul kullanmaksızın temizleyiniz; metal kısımların paslanmaya karşı korunabilmesi için kuru muhafaza
Page 52

- 52 -
edilmesi gerekmektedir; tüm müteharrik aksamın (ayar mekanizmaları, kancalama mekanizmaları, vs.) temiz
olmasını sağlayınız, toz ve kum gibi maddelerle kaplanmasına mahal vermeyiniz, gerektiği takdirle ince yağ
ile yağlayınız.
KUMAŞ KISIMLARIN TEMİZLİĞİ : kumaş zeminlerin tozdan arındırılması amacıyla fırça kullanınız ve azami 30°
derece ısıdaki suda yıkayınız; sıkmayınız; klorlu maddeler ile kaynatmayınız; ütülemeyiniz; kuru temizleme
yapmayınız, leke çıkartıcı solventler kullanmayınız, döner santrifüjlü tambur kurutucularda kurutmayınız.
PEG-PÉREGO S.p.A.
Peg-Pérego S.p.A. ISO 9001 sertifikasına haizdir. Söz konusu sertifikalandırma, Kullanıcılara,
Şirketin şeffaf ve güvenilir çalışmaları konusunda garanti sunmaktadır.
Peg Prego, bu belgede belirtilen ürün özellikleri üzerinde, teknik ve ticari gereksinimlere
istinaden, arzuladığı zaman değişiklik yapabilme hakkını saklı tutar.
Peg Prego, gereksinimlerine en iyi şekilde verebilmek için tüm Müşterilerinin emrine amadedir. Bu nedenle
de Müşterilerimizin fikir ve görüşlerini almak bizler için gayet önemlidir. Ürünümüzü kullandıktan sonra,
aşağıda belirtilen internet sitemizde bulabileceğiniz “Müşteri Memnuniyet Formunu” doldurmak suretiyle
muhtemel görüş ve önerilerinizi bizlere bildirebilirseniz Sizlere müteşekkir oluruz : www.pegperego.com
PEG-PÉREGO TEKNİK BAKIM SERVİSİ
Ürünün herhangi bir aksam veyahut da parçasının kaybolması veyahut da hasarlanması halinde, kesinlikle ve
yalnızca orijinal Peg Perego yedek parçalarını kullanınız. Muhtemel tamirat, parça değişimi ve ürün hakkında
bilgi temini veyahut da yedek parça satın alımı için satış sonrası Teknik Bakım Servisine müracaat ediniz.
Tel. 0039/039/60.88.213 Fax 0039/039/33.09.992
e-mail assistenza@pegperego.it İnternet sitesi www.pegperego.com
UYGUNLUK BEYANI
Ürün adı
Sdraietta Melodia
Ürün tanımlama kodu
IMSDME00---- IMSDMEFR---- IMSDMESP----
Referans düzenlemeler (esas)
EN12790:2008
EN71-1 EN71-2 EN71-3 EN71-9
EN62115 EN55014 (EMC)
Avrupa Direktifi 2002/96/CE (WEEE Direktifi)
Avrupa Direktifi 2002/95/CE (RoHS Direktifi)
Uygunluk beyanı
Peg Perego S.p.A., söz konusu ürünün şirket bünyesinde gerekli testlere ve yürürlükteki yasal
düzenlemelerin öngördüğü bağımsız laboratuar testlerine tabi tutulduğunu, kendi sorumluluğu altında,
beyan etmektedir.
Veriliş yeri ve tarihi
Arcore, 11 Eylül 2007
Page 53

- 53 -
ΕL_Eλληνικά
Σας ευχαριστούμε που επιλέξατε ένα προϊόν Peg-Pérego.
ΠΡΟΕΙΔΟΠΟΙΗΣΗ
_ ΣΗΜΑΝΤΙΚΟ: ΔΙΑΒΑΣΤΕ ΠΡΟΣΕΚΤΙΚΑ ΤΙΣ ΟΔΗΓΊΕΣ ΑΥΤΈΣ ΚΑΙ ΔΙΑΤΗΡΗΣΤΕ
ΤΙΣ ΓΙΑ ΜΕΛΛΟΝΤΙΚΉ ΧΡΗΣΗ. Η ΑΣΦΑΛΕΙΑ ΤΟΥ ΠΑΙΔΙΟΥ ΘΑ ΜΠΟΡΟΥΣΕ ΝΑ
ΤΕΘΕΙ ΣΕ ΚΙΝΔΥΝΟ, ΕΑΝ ΔΕΝ ΑΚΟΛΟΥΘΗΣΕΤΕ ΤΙΣ ΟΔΗΓΙΕΣ ΑΥΤΕΣ.
_ ΤΟ ΡΗΛΑΞ ΑΥΤΟ ΕΧΕΙ ΣΧΕΔΙΑΣΤΕΙ ΓΙΑ ΕΝΑ ΠΑΙΔΙ ΜΕ ΑΝΩΤΕΡΟ ΒΑΡΟΣ 9 KG.
_ ΜΗΝ ΧΡΗΣΙΜΟΠΟΙΕΙΤΕ ΤΟ ΡΙΛΑΞ ΟΤΑΝ ΤΟ ΠΑΙΔΙ ΜΠΟΡΕΙ ΝΑ ΚΑΘΕΤΑΙ ΜΟΝΟ ΤΟΥ.
_ ΜΗΝ ΑΦΗΝΕΤΕ ΠΟΤΕ ΤΟ ΠΑΙΔΙ ΣΑΣ ΧΩΡΙΣ ΕΠΙΒΛΕΨΗ ΜΕΣΑ ΣΤΟ ΡΗΛΑΞ.
_ ΤΟ ΡΗΛΑΞ ΑΥΤΟ ΔΕΝ ΕΧΕΙ ΚΑΤΑΣΚΕΥΑΣΤΕΙ ΓΙΑ ΠΑΡΑΤΕΤΑΜΕΝΗ ΠΕΡΙΟΔΟ
ΥΠΝΟΥ. ΤΟ ΡΗΛΑΞ ΔΕΝ ΑΝΤΙΚΑΘΙΣΤΑ ΤΟ ΚΡΕΒΑΤΑΚΙ, ΕΑΝ ΤΟ ΠΑΙΔΙ ΧΡΕΙΑΖΕΤΑΙ
ΝΑ ΚΟΙΜΗΘΕΙ ΕΙΝΑΙ ΣΗΜΑΝΤΙΚΟ ΝΑ ΤΟ ΒΑΛΕΤΕ ΝΑ ΞΑΠΛΩΣΕΙ ΣΕ ΕΝΑ
ΚΑΤΑΛΛΗΛΟ ΚΡΕΒΑΤΑΚΙ.
_ ΧΡΗΣΙΜΟΠΟΙΕΙΤΕ ΠΑΝΤΑ ΤΙΣ ΖΩΝΕΣ ΑΣΦΑΛΕΙΑΣ.
_ ΤΟ ΡΗΛΑΞ ΑΥΤΟ ΔΕΝ ΕΙΝΑΙ ΚΑΘΙΣΜΑ ΑΥΤΟΚΙΝΗΤΟΥ: ΜΗΝ ΤΟ ΧΡΗΣΙΜΟΠΟΙΕΙΤΕ
ΠΟΤΕ ΓΙΑ ΤΗ ΜΕΤΑΦΟΡΑ ΕΝΟΣ ΠΑΙΔΙΟΥ ΜΕΣΑ ΣΕ ΜΗΧΑΝΟΚΙΝΗΤΟ ΟΧΗΜΑ.
_ ΚΙΝΔΥΝΟΣ ΠΝΙΓΜΟΥ: ΜΗΝ ΑΦΗΝΕΤΕ ΠΟΤΕ ΤΟ ΠΑΙΔΙ ΜΕΣΑ ΣΤΟ ΡΗΛΑΞ ΟΤΑΝ
ΟΙ ΖΩΝΕΣ ΕΙΝΑΙ ΧΑΛΑΡΕΣ Ή ΛΥΜΕΝΕΣ.
_ ΚΙΝΔΥΝΟΣ ΠΤΩΣΗΣ: ΕΙΝΑΙ ΕΠΙΚΙΝΔΥΝΗ Η ΧΡΗΣΗ ΤΟΥ ΡΗΛΑΞ ΕΠΑΝΩ ΣΕ
ΑΝΥΨΩΜΕΝΗ ΕΠΙΦΑΝΕΙΑ.
_ ΚΙΝΔΥΝΟΣ ΑΣΦΥΞΙΑΣ: ΤΟ ΡΗΛΑΞ ΜΠΟΡΕΙ ΝΑ ΑΝΑΤΡΑΠΕΙ ΕΠΑΝΩ ΣΕ ΜΑΛΑΚΕΣ
ΕΠΙΦΑΝΕΙΕΣ ΚΑΙ ΝΑ ΠΝΙΞΕΙ ΤΟ ΠΑΙΔΙ· ΜΗΝ ΤΟΠΟΘΕΤΕΙΤΕ ΠΟΤΕ ΤΟ ΡΗΛΑΞ
ΕΠΑΝΩ ΣΕ ΚΡΕΒΑΤΙΑ, ΚΑΝΑΠΕΔΕΣ Ή ΣΕ ΑΛΛΕΣ ΜΑΛΑΚΕΣ ΕΠΙΦΑΝΕΙΕΣ.
_ ΠΡΙΝ ΑΠΟ ΤΗ ΧΡΗΣΗ ΒΕΒΑΙΩΘΕΙΤΕ ΟΤΙ ΟΛΟΙ ΟΙ ΜΗΧΑΝΙΣΜΟΙ ΣΥΝΔΕΣΗΣ ΕΙΝΑΙ
ΣΥΝΔΕΜΕΝΟΙ ΣΩΣΤΑ.
_ ΜΗΝ ΧΡΗΣΙΜΟΠΟΙΕΙΤΕ ΤΟ ΠΡΟΪΟΝ ΕΑΝ ΠΑΡΟΥΣΙΑΖΕΙ ΡΩΓΜΕΣ Ή ΤΜΗΜΑΤΑ
ΠΟΥ ΛΕΙΠΟΥΝ.
_ ΜΗΝ ΕΙΣΑΓΕΤΕ ΤΑ ΔΑΧΤΥΛΑ ΜΕΣΑ ΣΤΟΥΣ ΜΗΧΑΝΙΣΜΟΥΣ.
_ ΠΡΟΣΕΧΕΤΕ ΙΔΙΑΙΤΕΡΑ ΟΤΑΝ ΕΚΤΕΛΕΙΤΕ ΕΡΓΑΣΙΕΣ ΡΥΘΜΙΣΗΣ ΤΩΝ
ΜΗΧΑΝΙΣΜΩΝ (ΧΕΙΡΟΛΑΒΗ, ΠΛΑΤΗ, ΤΕΝΤΑ ΗΛΙΟΥ) ΠΑΡΟΥΣΙΑ ΤΟΥ ΠΑΙΔΙΟΥ
_ ΜΗΝ ΧΡΗΣΙΜΟΠΟΙΕΙΤΕ ΠΟΤΕ ΤΗ ΜΠΑΡΑ ΠΑΙΧΝΙΔΙ ΚΑΙ ΤΗΝ ΤΕΝΤΑ ΗΛΙΟΥ ΓΙΑ ΤΗ ΜΕΤΑΦΟΡΑ.
_ ΜΠΟΡΕΙ ΝΑ ΕΙΝΑΙ ΕΠΙΚΙΝΔΥΝΗ Η ΧΡΗΣΗ ΕΞΑΡΤΗΜΑΤΩΝ ΠΟΥ ΔΕΝ ΕΧΟΥΝ ΤΗΝ
ΕΓΚΡΙΣΗ ΤΟΥ ΚΑΤΑΣΚΕΥΑΣΤΗ.
_ ΟΙ ΔΙΑΔΙΚΑΣΙΕΣ ΕΝΕΡΓΟΠΟΙΗΣΗΣ ΚΑΙ ΑΠΕΝΕΡΓΟΠΟΙΗΣΗΣ ΤΗΣ ΜΟΥΣΙΚΗΣ ΤΟΥ
ΡΗΛΑΞ, ΠΡΕΠΕΙ ΝΑ ΕΚΤΕΛΟΥΝΤΑΙ ΑΠΟ ΕΝΗΛΙΚΕΣ.
_ ΕΑΝ Η ΜΟΥΣΙΚΗ ΤΟΥ ΡΗΛΑΞ ΔΕΝ ΧΡΗΣΙΜΟΠΟΙΗΘΕΙ ΓΙΑ ΜΕΓΑΛΟ ΧΡΟΝΙΚΟ
ΔΙΑΣΤΗΜΑ, ΣΥΝΙΣΤΟΥΜΕ ΝΑ ΑΦΑΙΡΕΣΕΤΕ ΤΙΣ ΜΠΑΤΑΡΙΕΣ ΑΠΟ ΤΗΝ ΕΙΔΙΚΗ
ΘΗΚΗ ΜΠΑΤΑΡΙΩΝ.
_ ΠΡΕΠΕΙ ΝΑ ΧΡΗΣΙΜΟΠΟΙΟΥΝΤΑΙ ΜΟΝΟ ΜΠΑΤΑΡΙΕΣ ΤΟΥ ΙΔΙΟΥ ΤΥΠΟΥ Ή
ΙΣΟΔΥΝΑΜΕΣ ΜΕ ΑΥΤΕΣ ΠΟΥ ΣΥΝΙΣΤΩΝΤΑΙ.
_ ΟΙ ΜΠΑΤΑΡΙΕΣ ΠΡΕΠΕΙ ΝΑ ΤΟΠΟΘΕΤΟΥΝΤΑΙ ΣΥΜΦΩΝΑ ΜΕ ΤΗ ΣΩΣΤΗ ΠΟΛΙΚΟΤΗΤΑ.
_ ΜΗ ΧΡΗΣΙΜΟΠΟΙΕΙΤΕ ΚΑΙΝΟΥΡΓΙΕΣ ΚΑΙ ΜΕΤΑΧΕΙΡΙΣΜΕΝΕΣ ΜΠΑΤΑΡΙΕΣ ΣΥΓΧΡΟΝΩΣ.
_ ΟΙ ΑΠΟΦΟΡΤΙΣΜΕΝΕΣ ΜΠΑΤΑΡΙΕΣ ΠΡΕΠΕΙ ΝΑ ΑΦΑΙΡΟΥΝΤΑΙ ΑΠΟ ΤΟ ΠΡΟΪΟΝ.
_ ΜΗ ΒΡΑΧΥΚΥΚΛΩΝΕΤΕ ΤΟΥΣ ΑΚΡΟΔΕΚΤΕΣ ΤΡΟΦΟΔΟΣΙΑΣ.
_ ΟΙ ΕΠΑΝΑΦΟΡΤΙΖΟΜΕΝΕΣ ΜΠΑΤΑΡΙΕΣ ΠΡΕΠΕΙ ΝΑ ΑΦΑΙΡΟΥΝΤΑΙ ΑΠΟ ΤΟ
ΠΡΟΪΟΝ ΓΙΑ ΝΑ ΕΠΑΝΑΦΟΡΤΙΣΤΟΥΝ.
_ ΟΙ ΕΠΑΝΑΦΟΡΤΙΖΟΜΕΝΕΣ ΜΠΑΤΑΡΙΕΣ ΠΡΕΠΕΙ ΝΑ ΕΠΑΝΑΦΟΡΤΙΖΟΝΤΑΙ ΜΟΝΟ
Page 54

- 54 -
ΜΕ ΤΗΝ ΕΠΙΒΛΕΨΗ ΕΝΗΛΙΚΩΝ.
ΟΔΗΓΙΑ ΑΗΗΣ (μόνο ΕΕ)
_ Το προϊόν αυτό στο τέλος της ζωής του αποτελεί απόβλητο το οποίο ανήκει στην κατηγορία ΑΗΗΣ
(Απόβλητα Ηλεκτρονικών και Ηλεκτρικών Συσκευών) και ως εκ τούτου δεν πρέπει να διατεθεί ως αστικό
απόβλητο, αλλά πρέπει να υπόκειται σε διαφοροποιημένη συλλογή·
_ Παραδώστε το απόβλητο στις ειδικές, αρμόδιες οικολογικές περιοχές·
_ Η παρουσία επικίνδυνων ουσιών που περιέχονται στα ηλεκτρικά μέρη του προϊόντος αυτού αποτελούν
πηγή πιθανού κινδύνου για την ανθρώπινη υγεία και για το περιβάλλον, εάν τα προϊόντα δεν διατεθούν ως
απόβλητα με το σωστό τρόπο·
_ Ο διαγραμμένος κάδος δείχνει ότι το προϊόν πρέπει να υποβληθεί σε διαφοροποιημένη συλλογή απορριμμάτων.
ΟΔΗΓΙΕΣ ΧΡΗΣΗΣ
1 ΑΝΟΙΓΜΑ: για να ανοίξετε το ρηλάξ γυρίστε μπροστά τους σωλήνες μέχρι να ακουστεί το κλικ (εικ_a) και
αποσυνδέστε την τέντα ήλιου από τη χειρολαβή (εικ_b).
2 ΣΥΝΑΡΜΟΛΟΓΗΣΗ ΤΟΥ ΡΗΛΑΞ: για να τοποθετήσετε τη χειρολαβή βάλτε την πλάτη σε κάθετη θέση (βλέπε
σημείο 4). Περάστε τη λαβή μέσα στους σωλήνες (εικ_a) και βιδώστε με ένα κατσαβίδι, ελέγχοντας ότι η
βίδα με την σταυρωτή κοιλότητα είναι τοποθετημένη στην εξωτερική πλευρά της λαβής (εικ_b). Σφίξτε με
δύναμη και ελέγχετε περιοδικά τη στερέωση.
3 ΡΥΘΜΙΣΗ ΧΕΙΡΟΛΑΒΗΣ: Η χειρολαβή ρυθμίζεται σε 3 θέσεις. Σπρώξτε προς τη φορά των τόξων τους δύο
μοχλούς (εικ_a) και τα
υτόχρονα γυρίστε τη χειρολαβή μέχρι τη θέση που επιθυμείτε (εικ_b).
Η θέση για τη μεταφορά είναι ο αριθμός 1.
4 ΡΥΘΜΙΣΗ ΠΛΑΤΗΣ: η πλάτη ρυθμίζεται σε 3 θέσεις. Γυρίστε εξωτερικά το μοχλό 1 (που θα παραμείνει σε
ανοιχτή θέση), (εικ_a), γυρίστε εξωτερικά το μοχλό 2 και ταυτόχρονα ρυθμίστε την πλάτη (εικ_b). Αφού
επιλέξετε τη θέση, θυμηθείτε να θέσετε και πάλι το μοχλό 1 στην κλειστή θέση.
5 ΡΥΘΜΙΣΗ ΠΛΑΤΦΟΡΜΑΣ: Η πλατφόρμα ρυθμίζεται σε δύο θέσεις, για να τη σηκώσετε τραβήξτε προς τα έξω,
και από τις δύο πλευρές, τους δύο μοχλούς και συγχρόνως σπρώξτε προς τα πάνω τις γλωσσίτσες (εικ_a).
Πλατφόρμα σηκωμένη (εικ_b).
6 ΖΩΝΗ ΑΣΦΑΛΕΙΑΣ: περάστε τη ζωνίτσα στο διαχωριστικό για τα πόδια και στη συνέχεια προσδέστε μέχρι να
ακου
στεί το κλικ (εικ_a). Για να αποσυνδέσετε τη ζώνη, πατήστε στα πλαϊνά της αγκράφας και ταυτόχρονα
τραβήξτε προς τα έξω τη ζωνίτσα που περιβάλλει τη μέση (εικ_b).
7 ΒΑΣΗ ΣΤΑΘΕΡΟΠΟΙΗΣΗΣ: βάση του ρηλάξ μπορεί να είναι λικνιζόμενη (εικ_a) ή σταθερή. Για να κάνετε το
ρηλάξ σταθερό γυρίστε προς τα έξω την ενσωματωμένη βάση-καβαλέτο (εικ_b).
8 ΤΕΝΤΑ ΗΛΙΟΥ: το ρηλάξ διαθέτει τέντα ήλιου ρυθμιζόμενη σε πολλές θέσεις η οποία συνδέεται στη
χειρολαβή σε οποιοδήποτε ύψος.
9 ΜΠΑΡΑ ΠΑΙΧΝΙΔΙΩΝ: συνδέστε τη μπάρα παιχνιδιών (εικ_a). Η μπάρα παιχνιδιών μπορεί να εφαρμοστεί
στους μπροστινούς σωλήνες (εικ_b) ή στη χειρολαβή (εικ_c) ανάλογα με τη θέση της πλάτης.
10 Η μπάρα παιχνιδιών μπορεί να αποσυνδεθεί από τη μία μόνο πλε
υρά και να γυρίσει προς τα έξω (εικ_a). Για
να ενεργοποιήσετε τη φωνή της αγελάδας, πατήστε τα ποδαράκια (εικ_b).
11 ΗΧΗΤΙΚΗ ΜΟΝΑΔΑ: Οι μπαταρίες ΔΕΝ περιλαμβάνονται στη συσκευασία. Για να ενεργοποιήσετε την
ηχητική μονάδα χρειάζονται 2 μπαταρίες τύπου “AA” 1,5 Volt. Με ένα κατσαβίδι ξεβιδώστε το καπάκι
της θήκης μπαταριών (εικ_a) και τοποθετήστε τις μπαταρίες (εικ_b). Αφού πραγματοποιηθεί η ενέργεια,
ξαναβιδώστε το καπάκι της θήκης. Η ηχητική μονάδα έχει 2 ρυθμίσεις έντασης και 8 μουσικές (εικ_c).
A: Για να ενεργοποιήσετε την ηχητική μονάδα και για να ρυθμίσετε την ένταση τοποθετήστε το κουμπί προς τα πάνω.
B: 4 μελωδίες για το παιχνίδι.
C: 4 μελωδίες για τη χαλάρωση.
Για να αλλάξετε τις μελωδίες πατήστε τα σχετικά κουμπιά.
12 ΜΕΙΩΤΗΡΑΣ: το ρηλάξ παρέχεται με ένα μαξιλαράκι μειωτήρα για νεογέννητα, που αφαιρείται όταν το παιδί
γίνει πιο μεγάλο. Για να αφαιρέσετε το μαξιλάρι μειωτήρα, βγάλτε τη ζωνίτσα του διαχωριστικού για τα πόδια.
13 ΚΛΕΙΣΙΜΟ: για να κλείσετε το ριλάξ (εικ_a), ρυθμίστε τη χειρολαβή και την πλάτη στην πιο χαμηλή θέση,
πατήστε ταυτόχρονα και από τις δύο πλευρές το κουμπί A και γυρίστε τους σωλήνες όπως φαίνεται στην
εικόνα. Όταν το ριλάξ είναι κλειστό, πριν να το μεταφέρετε, προσδέστε το λάστιχο στο άγκιστρο (εικ_b). Το
ρηλάξ κλειστό είναι πράγματι συμπαγές και καταλαμβάνει πολύ λίγο χώρο (εικ_c).
14 ΔΥΝΑΤΟΤΗΤΑ ΑΦΑΙΡΕΣΗΣ ΤΗΣ ΕΠΕΝΔΥΣΗΣ: για να αφαιρέσετε την επένδυση του ρηλάξ ξεκολλήστε το
velcrο (εικ_a), τραβήξτε μπροστά το σάκο από την ηχητική μονάδα (εικ_b), αποσυνδέστε τον ακροδέτη της
ηχητικής μονάδας, βγάζοντας τα δύο βύσματα (εικ_c).
15 βγάλτε πλευρικά το άνοιγμα του σάκου από τους σωλήνες (εικ_a), ξεκουμπώστε το πίσω μέρος της πλάτης
Page 55

- 55 -
(εικ_b) και αφαιρέστε από επάνω το σάκο (εικ_c). Σημαντικό: τοποθετώντας την επένδυση στο ρηλάξ,
θυμηθείτε να περάσετε το άνοιγμα στους σωλήνες.
ΚΑΘΑΡΙΣΜΟΣ ΚΑΙ ΣΥΝΤΗΡΗΣΗ
ΣΥΝΤΗΡΗΣΗ ΤΟΥ ΠΡΟΪΟΝΤΟΣ: προστατέψτε το από τους ατμοσφαιρικούς παράγοντες: νερό, βροχή ή χιόνι·
η συνεχής και παρατεταμένη έκθεση στον ήλιο θα μπορούσε να προκαλέσει αλλαγές στο χρώμα πολλών
υλικών· φυλάξτε το προϊόν αυτό σε ξηρό χώρο.
ΚΑΘΑΡΙΣΜΟΣ ΤΟΥ ΣΚΕΛΕΤΟΥ: Περιοδικά καθαρίζετε τα πλαστικά μέρη με ένα υγρό πανί χωρίς να
χρησιμοποιείτε διαλυτικά ή άλλα παρόμοια προϊόντα· κρατήστε στεγνά όλα τα μεταλλικά μέρη για να μη
σκουριάσουν· κρατήστε καθαρά όλα τα κινούμενα μέρη (μηχανισμοί ρύθμισης, μηχανισμοί σύνδεσης,
τροχοί…) από σκόνη ή άμμο και εάν χρειαστεί, λιπάνετέ τα με ελαφρύ λάδι.
ΚΑΘΑΡΙΣΜΟΣ ΤΩΝ ΥΦΑ
ΣΜΑΤΙΝΩΝ ΜΕΡΩΝ: βουρτσίστε τα μέρη από ύφασμα για να απομακρύνετε τη σκόνη
και πλύνετε στο χέρι σε θερμοκρασία 30° το ανώτερο· μην τα στύβετε· μην λευκαίνετε με χλώριο· μην τα
σιδερώνετε· μην κάνετε στεγνό καθάρισμα· μην αφαιρείτε τους λεκέδες με διαλυτικά και μην στεγνώνετε σε
στεγνωτήριο με περιστροφικό κύλινδρο.
PEG-PÉREGO S.p.A.
Η Peg-Pérego S.p.A. διαθέτει πιστοποίηση ΙSO 9001. Η πιστοποίηση παρέχει στους πελάτες
και τους καταναλωτές την εγγύηση διαφάνειας και εμπιστοσύνης στον τρόπο με τον οποίο
εργάζεται η εταιρία.
Η Peg-Pérego θα μπορεί να επιφέρει ανά πάσα στιγμή τροποποιήσεις στα μοντέλα που
περιγράφονται στην παρούσα δημοσίευση, για λόγους τεχνικής ή εμπορικής φύσης.
Η Peg-Pérego είναι στη διάθεση των Καταναλωτών της για να ικανοποιήσει όσο το δυνατόν καλύτερα
όλες τις απαιτήσεις τους. Για το λόγο αυτό, για μας είναι εξαιρετικά σημαντικό και πολύτιμο να γνωρίζουμε
τη γνώμη των Πελατών μας. Θα σας είμαστε λοιπόν ευγνώμονες εάν, αφού χρησιμοποιήσετε ένα προϊόν
μας, συμπληρώσετε το ΕΡΩΤΗΜΑΤΟΛΟΓΙΟ ΙΚΑΝΟΠΟΙΗΣΗΣ ΚΑΤΑΝΑΛΩΤΗ, επισημαίνοντας ενδεχόμενες
παρατηρήσεις ή υποδείξεις, που
θα βρείτε στην ιστοσελίδα μας στο διαδίκτυο. www.pegperego.com
ΥΠΗΡΕΣΙΑ ΥΠΟΣΤΗΡΙΞΗΣ PEG-PÉREGO
Εάν τυχόν χαθούν ή καταστραφούν μέρη του μοντέλου, χρησιμοποιήστε μόνον γνήσια ανταλλακτικά Peg-
Pérego. Για τυχόν επισκευές, αντικαταστάσεις, πληροφορίες σχετικά με τα προϊόντα, την πώληση γνήσιων
ανταλλακτικών και εξαρτημάτων, επικοινωνήστε με την Υπηρεσία Υποστήριξης Peg-Pérego:
τηλ. 0039/039/60.88.213 fax 0039/039/33.09.992
e-mail assistenza@pegperego.it ιστοσελίδα internet www.pegperego.com
ΔΉΛΩΣΗ ΣΥΜΜΌΡΦΩΣΗΣ
Ονομασία του προϊόντος
Ριλαξ Μελωδια
Κωδικός προσδιορισμού του προϊόντος
IMSDME00---- IMSDMEFR---- IMSDMESP----
Κανονισμοί αναφοράς (προέλευση)
EN12790:2008
EN71-1 EN71-2 EN71-3 EN71-9
EN62115 EN55014 (EMC)
European Directive 2002/96/ΕΚ (WEEE Directive)
European Directive 2002/95/ΕΚ (RoHS Directive)
Δήλωση συμμόρφωσης
Η PegPerego S.p.A. δηλώνει υπεύθυνα ότι το συγκεκριμένο προϊόν έχει υποβληθεί σε τεστ έγκρισης εντός
του εργοστασίου και έχει εγκριθεί σύμφωνα με τους ισχύοντες κανονισμούς σε εξωτερικά και ανεξάρτητα
εργαστήρια.
Ημερομηνία και τόπος έκδοσης
Arcore, 11 Σεπτεμβρίου 2007
Page 56

Peg-Pérego S.p.A. via De Gasperi 50, 20043 Arcore MI, ITALY
ΠΑΙΔΙΚΑ ΕΙΔΗ ΒΡΕΦΑΝΑΠΤΥΞΗΣ ΚΑΙ ΠΑΙΧΝΙΔΙΑ ΕΓΓΥΗΣΗ
Η PEG – PEREGO εγγυάται για τυχόν εργοστασιακά ελαττώματα των προιόντων της για διάστημα
έξι μηνών από την ημερομηνία αγοράς. Η προσκόμιση της ανάλογης ταμειακής απόδειξης αγοράς
είναι απαραίτητη. Εξαιρούνται της εγγύγησης οι επαναφορτιζόμενες μπαταρίες και οι μετασχηματιστές παιχνιδιών. (βλ. αναλυτικές οδηγίες χρήσεως παιχνιδιών).
Η παρούσα εγγύηση ισχύει μόνον εφ’ όσον το προιόν χρησιμοποιείται σωστά και βάσει των
οδηγιών χρήσεως. Ο κατασκευαστής και οι εντεταλμένοι συνεργάτες του διατηρούν το δικαίωμα
τεχνικού ελέγχου.
Ο κατασκευαστής δεν μπορεί να θεωρηθεί υπεύθυνος εφ’ όσον:
_ Δεν τηρηθούν οι ανάλογες οδηγίες χρήσεως του κάθε προιόντος.
_ Καταστραφεί τυχαία το προιόν ή προκληθούν βλάβες από κακή χρήση αυτού.
_ Υπάρξει τεχνική παρέμβαση ξένου προς την εταιρεία μας τεχνικού, πράγμα το οποίο
απαγορεύεται και αποτελεί κίνδυνο για την ασφάλεια του
παιδιού.
_ Φυσιολογική φθορά του προιόντος.
Διατηρείτε την εγγύηση και τις οδηγίες χρήσεως και για μελλοντική χρήση.
ΕΓΓΥΗΣΗ
ΟΝΟΜΑΤΕΠΩΝΥΜΟ ΑΓΟΡΑΣΤΟ:________________________________________________
ΔΙΕΥΘΥΝΣΗ: ________________________________________________________________
ΤΗΛΕΦΩΝΟ: ________________________________________________________________
ΕΙΔΟΣ ΠΡΟΙΟΝΤΟΣ: __________________________________________________________
ΚΩΔΙΚΟΣ ΠΡΟΙΟΝΤΟΣ: _______________________________________________________
ΗΜΕΡΟΜΗΝΙΑ ΑΓΟΡΑΣ
ΣΦΡΑΓΙΔΑ ΚΑΤΑΣΤΗΜΑΤΟ
ΠΡΟΣΟΧΉ: Η εγγύηση ισχύει μονο εφ’ όσον εχει συμπληρωθεί και σφραγισθεί από τον πωλητή η
ημερομηνία αγοράς. Ζητείστε το από το κατάστημα τη στιγμή της αγοράς. Αν χαθεί ή καταστραφεί
το απόκομμα της εγγύησης δεν μπορεί να αντικατασταθεί.
&
Page 57

- 57 -
Page 58

- 58 -
Page 59

- 59 -
Page 60

PEG PEREGO S.p.A.
VIA DE GASPERI 50 20043 ARCORE MI ITALIA
tel. 0039 039 60881 fax 0039 039 615869/616454
Servizio Post Vendita - After Sale:
tel. 0039 039 6088213 fax: 0039 039 3309992
PEG PEREGO U.S.A. Inc.
3625 INDEPENDENCE DRIVE FORT WAYNE INDIANA 46808
phone 260 482 8191 fax 260 484 2940
Call us toll free: 1 800 671 1701
PEG PEREGO CANADA Inc.
585 GRANITE COURT PICKERING ONTARIO CANADA L1W3K1
phone 905 839 3371 fax 905 839 9542
Call us toll free: 1 800 661 5050
www.pegperego.com
sdraietta melodia
FI000902I92
11/3/2009
 Loading...