

Peg-Perego Primo Viaggio SIP Convertible, Primo Viaggio SIP 5.65 Convertible Instructions For Use Manual
Page 1

CA
Instructions for use EN
FICA1202I141
WARNING:
Do not install or use this child restraint
until you read and understand all
instructions in this manual. To avoid
serious injuries to your child, follow
the instructions carefully and be sure
to buckle your child using the 5-point
harness.
Weight limits in
rear-facing mode:
2.3 - 20.4 kg (5 - 45 lbs)
Maximum height:
119 cm (47 inches)
Weight limits in
forward-facing mode:
10 - 30 kg (22 - 65 lbs)
Maximum height:
125 cm (49 inches)
65
Page 2

- 2 -
© 2012 Peg Perego. All rights reserved.
Table of Contents
Introduction...............................................................................................................................................3
Warning............................................................................................................................................... 5
Safety information ................................................................................................................................. 7
Registration form ................................................................................................................................... 8
Your child restraint ...............................................................................................................................10
Installing your child restraint in a vehicle.................................................................................... 11
Vehicle classes compatibility ..................................................................................11
Vehicle seatbelts design and compatibility .........................................................11
Non compatible vehicle seat designs ................................................................... 17
Weight and dimension range .................................................................................. 18
Proper levelling of child restraint in rear facing mode.................................... 19
Use of top tether strap ............................................................................................... 20
1 - Rear facing mode using Latch System ........................................................... 24
2 - Rear facing mode using lap/shoulder belt (Type II)................................... 27
3 - Rear facing mode using lap belt (Type I) ...................................................... 29
1 - Forward facing mode using Latch System ................................................... 31
2 - Forward facing mode using lap/shoulder belt (Type II) .......................... 34
3 - Forward facing mode using lap belt (Type I) ............................................... 36
Installing your child restraint in an aircraft ................................................................................. 38
Securing your child in Primo Viaggio SIP Convertible ........................................................... 40
Securing your child in Primo Viaggio SIP Convertible (Crotch strap adjustment)........ 45
Cleaning and maintenance .............................................................................................................. 47
Replacement Parts............................................................................................................................... 52
Page 3
- 3 -
Thank you for choosing a PegPerego Primo
Viaggio SIP Convertible. As with any other
PegPerego product, your Convertible has
been designed and certied by a dedicated
team of engineers inside Peg Perego
Research and Development Department.
Your Convertible has been manufactured
and assembled in a Peg Perego plant under
certied quality procedures and using high
quality materials from certied suppliers.
As with every child restraint, Primo Viaggio
Convertible is used with a child inside a
vehicle, travelling fast on highways or slow
in the chaotic trac of today’s cities. This
means that you need to use this car seat
as a concerned parent, driving carefully
when you have a child on board but also,
before this, taking your time to explore the
child restraint, knowing all the features it
has, the dierent possible uses, the proper
and best installations. Go through this
manual entirely, keeping your new child
restraint in sight, checking every point and
understanding it. Install the child restraint in
your vehicle taking the necessary time and
making tting trials before using it with your
child. Once you have read the manual, store
it again in its proper pocket. This will ensure
that everybody looking after your child and
using this seat will be able to look for help in
this manual.
Introduction
Page 4

- 4 -
Should you see any malfunctioning feature,
after taking the necessary familiarization or
if you see broken parts, do not hesitate to
call Peg Perego Canada customer service at
1-800-661-5050 (toll free) for information
about repairs or spare parts. Now that
you know your new Primo Viaggio SIP
Convertible, you are ready to enjoy safe and
happy journeys with your family and your
children.
Introduction
Page 5

- 5 -
• Do not install or use this child restraint until
you read and understand all the instructions
in this manual and the labels on the product.
To avoid serious injuries to your child,
follow the instructions carefully. Keep the
instruction manual in the dedicated pocket
for future reference.
• Your child could be seriously injured if you
do not follow instructions and warning labels
correctly.
• This car seat meets or exceeds all applicable
Canada Motor Vehicle Safety Standard 213 ,
213.1 requirements for use in motor vehicles
and aircraft.
• Always restrain your child with the 5-point
integral harness provided with the product.
Be sure that the buckle is correctly latched.
Snugly adjust the belt around the child's
body making sure that the belt lies at with
no slack. Use the chest clip to be sure that the
belts are in the correct position.
• Primo Viaggio SIP Convertible can be used
in two main modes: rear facing, when child
sitting in the restraint looks at the back of the
vehicle; forward facing when child sitting in
the restraint looks at the front of the vehicle.
• Use Primo Viaggio SIP Convertible in rear
facing mode with children weighing 2,3 - 20,4
kg (5 - 45 lbs) and having a maximum height
of 119 cm (47 inches); in forward facing mode
with children weighing in the range 10 - 30
kg (22 - 65 lbs) and having a maximum height
of 125 cm (49 inches).
• Keep your child in rearward facing mode as
long as possible: NEVER use Primo Viaggio
Convertible in forward facing mode if baby
weighs less than 10 kg (22 lbs).
• Primo Viaggio SIP Convertible can be
secured to your vehicle by means of lap or
lap/shoulder belts available in your vehicle.
However, not all available models of seatbelts
are approved for use with this product. Refer
to the dedicated section in this manual for
further details.
• Primo Viaggio SIP Convertible can be secured
to your vehicle by means of lower universal
anchorage system (LUAS) in conjunction with
a top tether, both provided with this product.
Refer to the dedicated section in this manual
for installation details and check your vehicle
Warning
Page 6
- 6 -
owner’s manual for further details.
• When using Primo Viaggio Convertible in rear
facing mode, never place it in vehicle seats
equipped with an active air bag. Death or
serious injuries can occur if an air bag hits the
unit. Check your vehicle owner's manual for
child restraint and vehicle seat compatibility.
• This child restraint is designed to be installed
on front facing vehicle seats only. Never use
on seats looking sideways or rearward facing.
Do not use in cars with door-mounted or
motorized shoulder belts. Read your vehicle
owner’s manual for additional information.
• According to accident statistics, children
are safer when properly restrained in the rear
seating positions.
• When the child restraint is installed on the
vehicle seat, check that vehicle belts or LUAS
and top tether straps are snugly tted around
the child restraint structure and that there is no
slack. An incorrectly fastened child restraint may
result in an additional excursion or deceleration
on your child in case of an accident.
• Complete and send in the registration form
provided with this product right away. In
case of accident: if this car seat is involved
in a car accident, it may be no longer safe
for use. You may need to get a new unit. Call
customer service @ 1-800-661-5050 for help.
• Seat covers and pads provided with this
product are part of the product and the
certication program. The use of non
approved covers or other accessories are not
recommended .
• EPS components (white soft foam located
below the upholstered covers) are integrated in
the product as safety related parts and should
never be removed or severely damaged.
• EPP component (black soft part located
behind the shell) is integrated in the product
as safety related part and should never be
removed.
• Secure this child restraint in the car even
when not occupied. This child restraint is a
heavy object that could cause severe damage
to other occupants in case of an accident.
• Do not lift this child restraint by harnesses
to avoid unnecessary wear or stress on the
webbing. Lift it by the hard structure.
• Keep ngers away from moving parts.
Warning
Page 7

- 7 -
Safety information
• Use only with children who weigh between
2.3 and 30 kg (5 and 65 lbs).
• When placing your child in the seat, make
sure that bulky jackets or covers are removed.
This will ensure that the harness is used
correctly.
• Do not leave your child unattended in the
car, even for a short period. He/she could get
tangled in the straps and be seriously injured
or could move or tip the child restraint.
• Do not leave the child restraint under direct
sunlight for a prolonged time. The seat may
become very hot and burn your child’s skin.
• When not in use, store the product, away
from light, moisture, excessive heat or cold.
• Be sure the child restraint is properly levelled.
If the seat reclines too much, your child can
be injured or ejected from the seat. If the seat
is too upright, it can cause your child to have
breathing problems, which could lead to
injury or death.
• Do not place this child restraint on
countertops, tables or soft surfaces. Do not
use this unit after seven (7) years from the
date of production labelled on the seat.
• Do not try to remove or add parts unless
where explained in this manual; do not try
to repair this product. In case of damage or
defective components, call customer service
@ 1-800-661-5050 for help.
• Do not leave loose objects, bags or luggage
in the vehicle interior. In case of an accident
they could suddenly move causing the
occupants to be injured.
Page 8
- 8 -
Registration form
Important! Child restraints could be recalled
for safety reasons. You must register this
restraint to be reached in a recall. Send your
name, address and the restraint's model
number and manufacturing date to:
Peg Perego Canada, Inc.
585 Granite Court
Pickering Ontario Canada L1W3K1
Or call 1-800-661-5050 (toll free)
For recall information, call Transport
Canada’s Road Safety Information Centre at
1-800-333-0371.
Registration form is attached to the product
cover. Detach the form, ll in and mail to
PegPerego. No stamp is needed. We have
already paid for it. Should the registration form
be missing, please call Customer Service @
1-800-661-5050 for a replacement form.
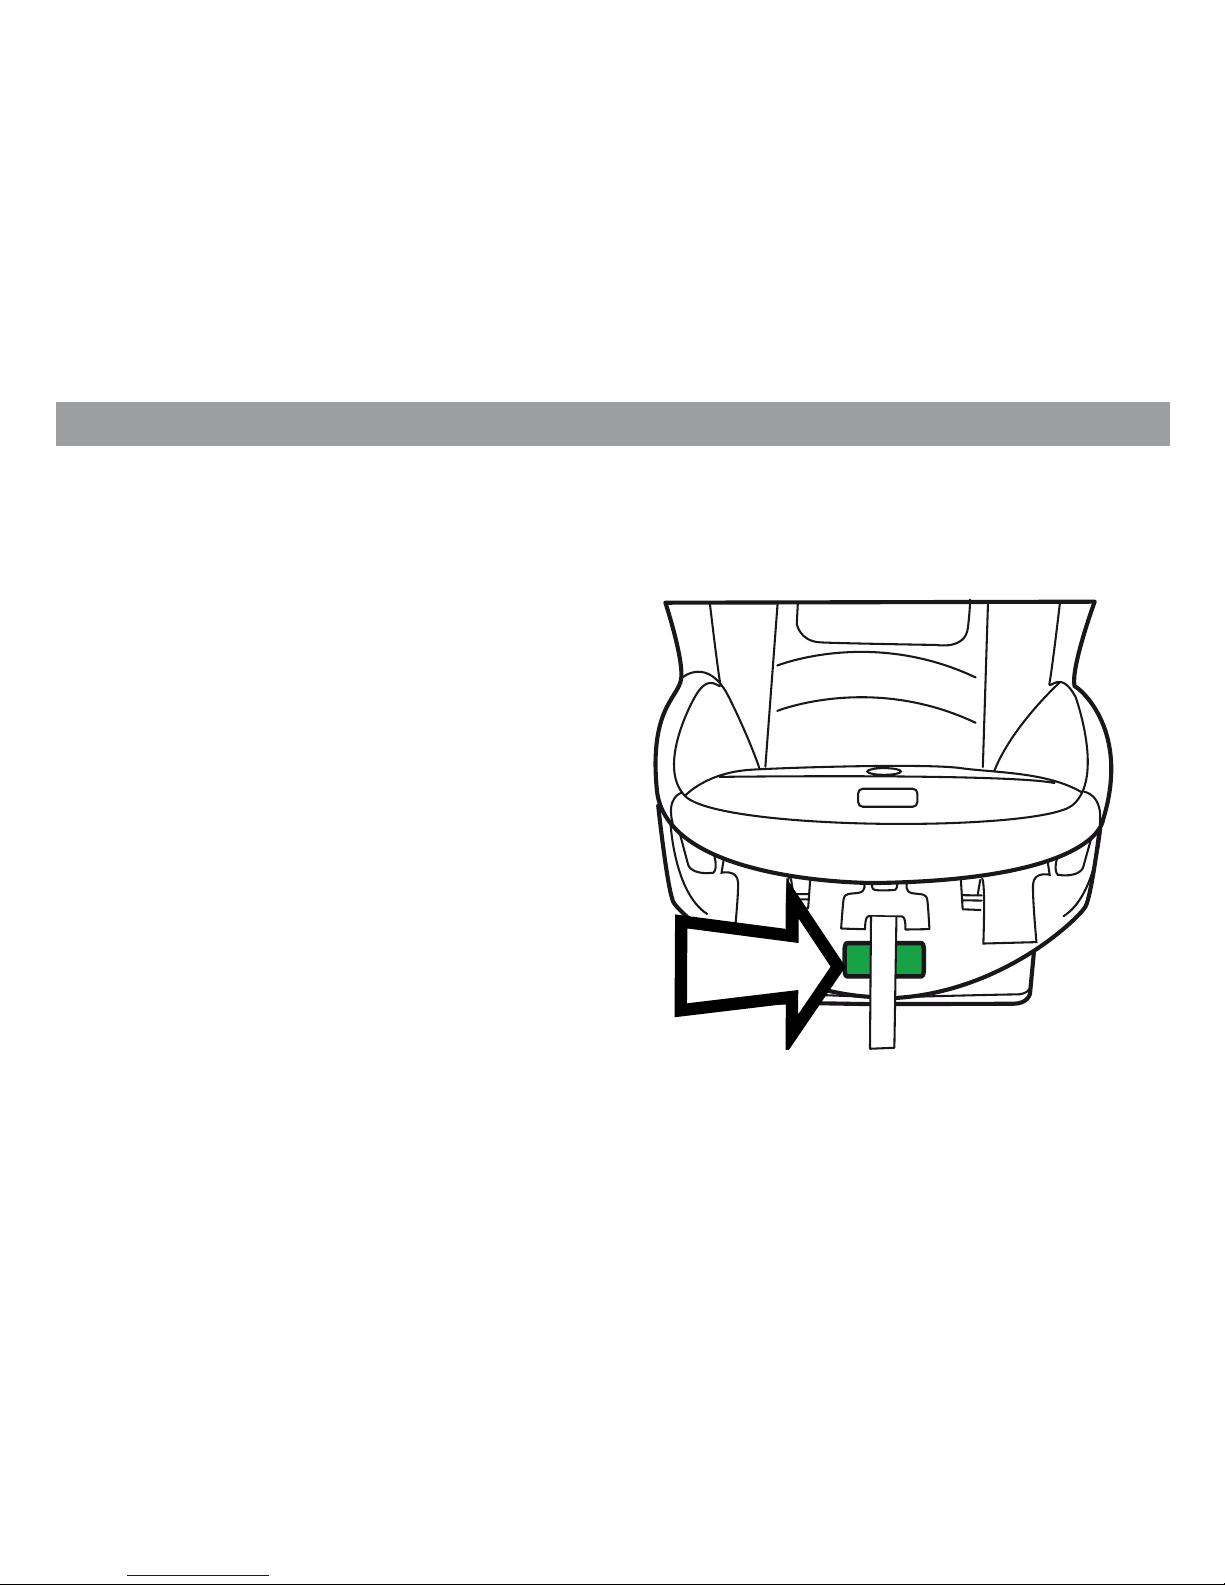
Model number, model name, date of
manufacturing, etc. are indelibly printed on a
label located in the picture shown here.
Page 9
- 9 -
Registration form
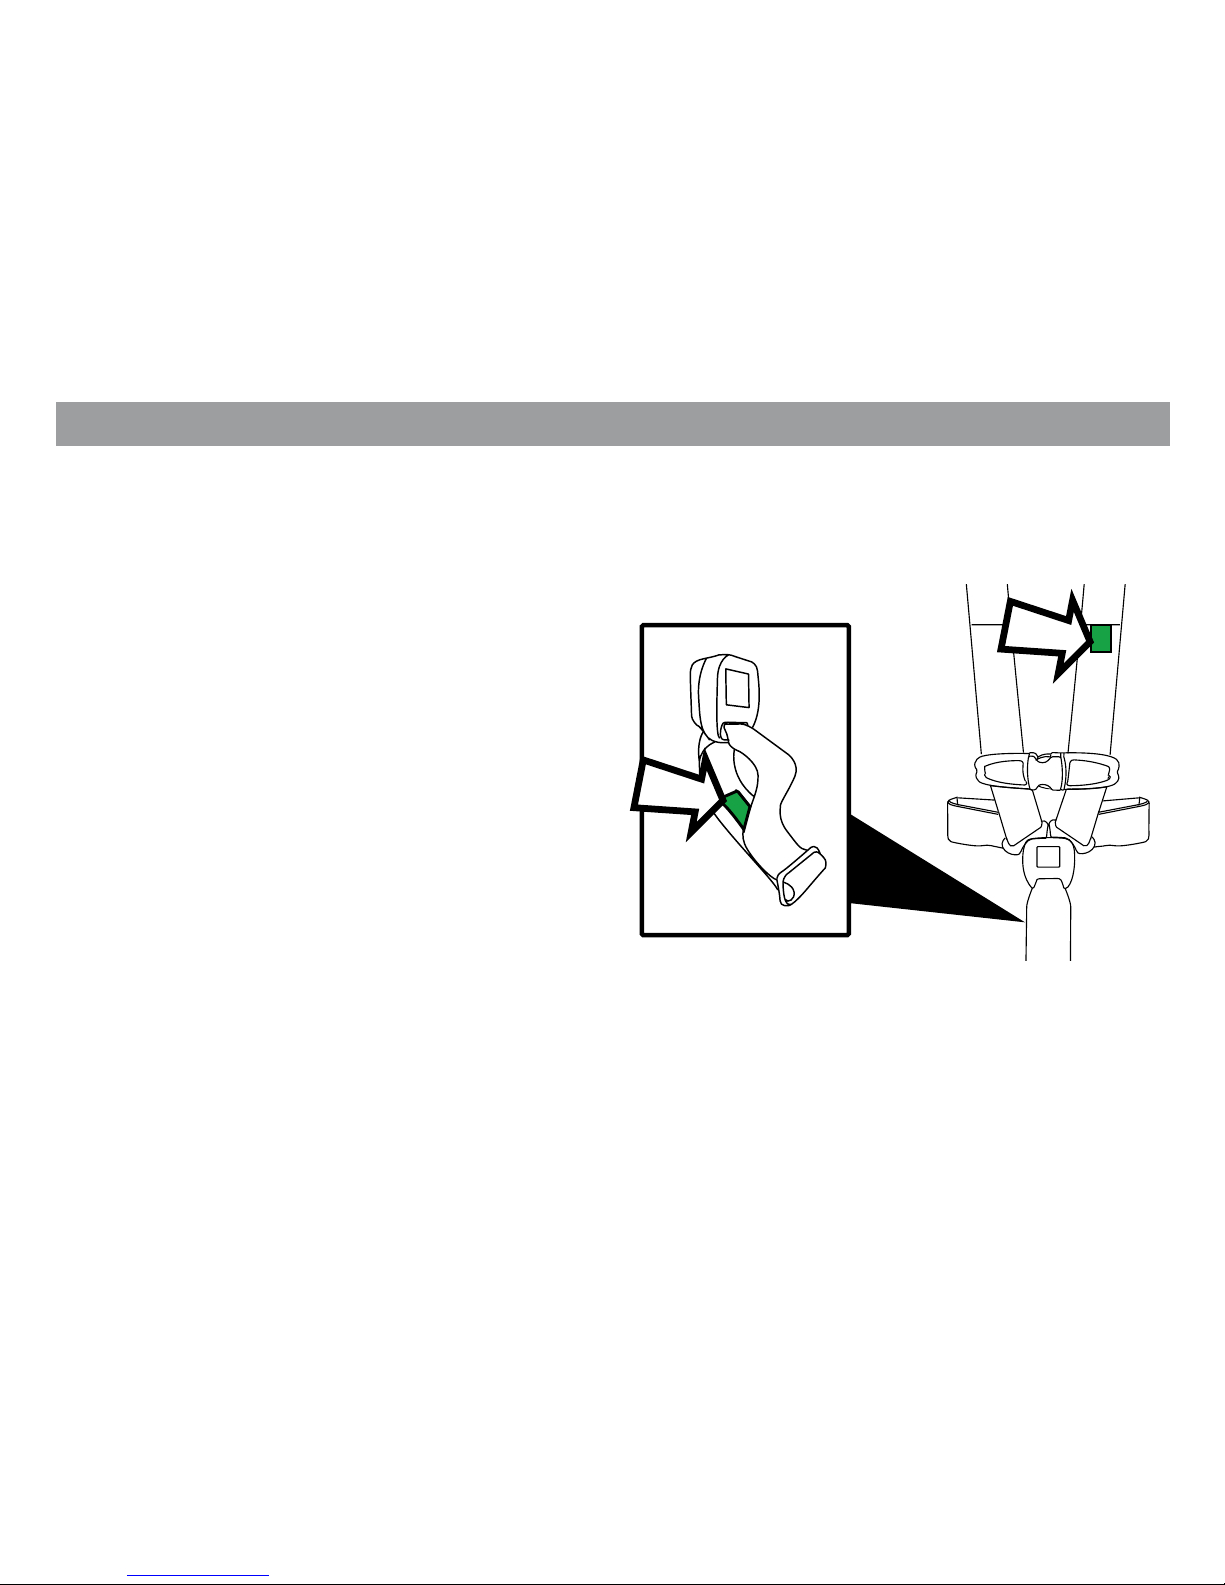
Harness serial number is also indelibly printed
on the buckle and the webbing and could
provide useful information in case of accident
or defects. See picture below for location
explanation.
Page 10
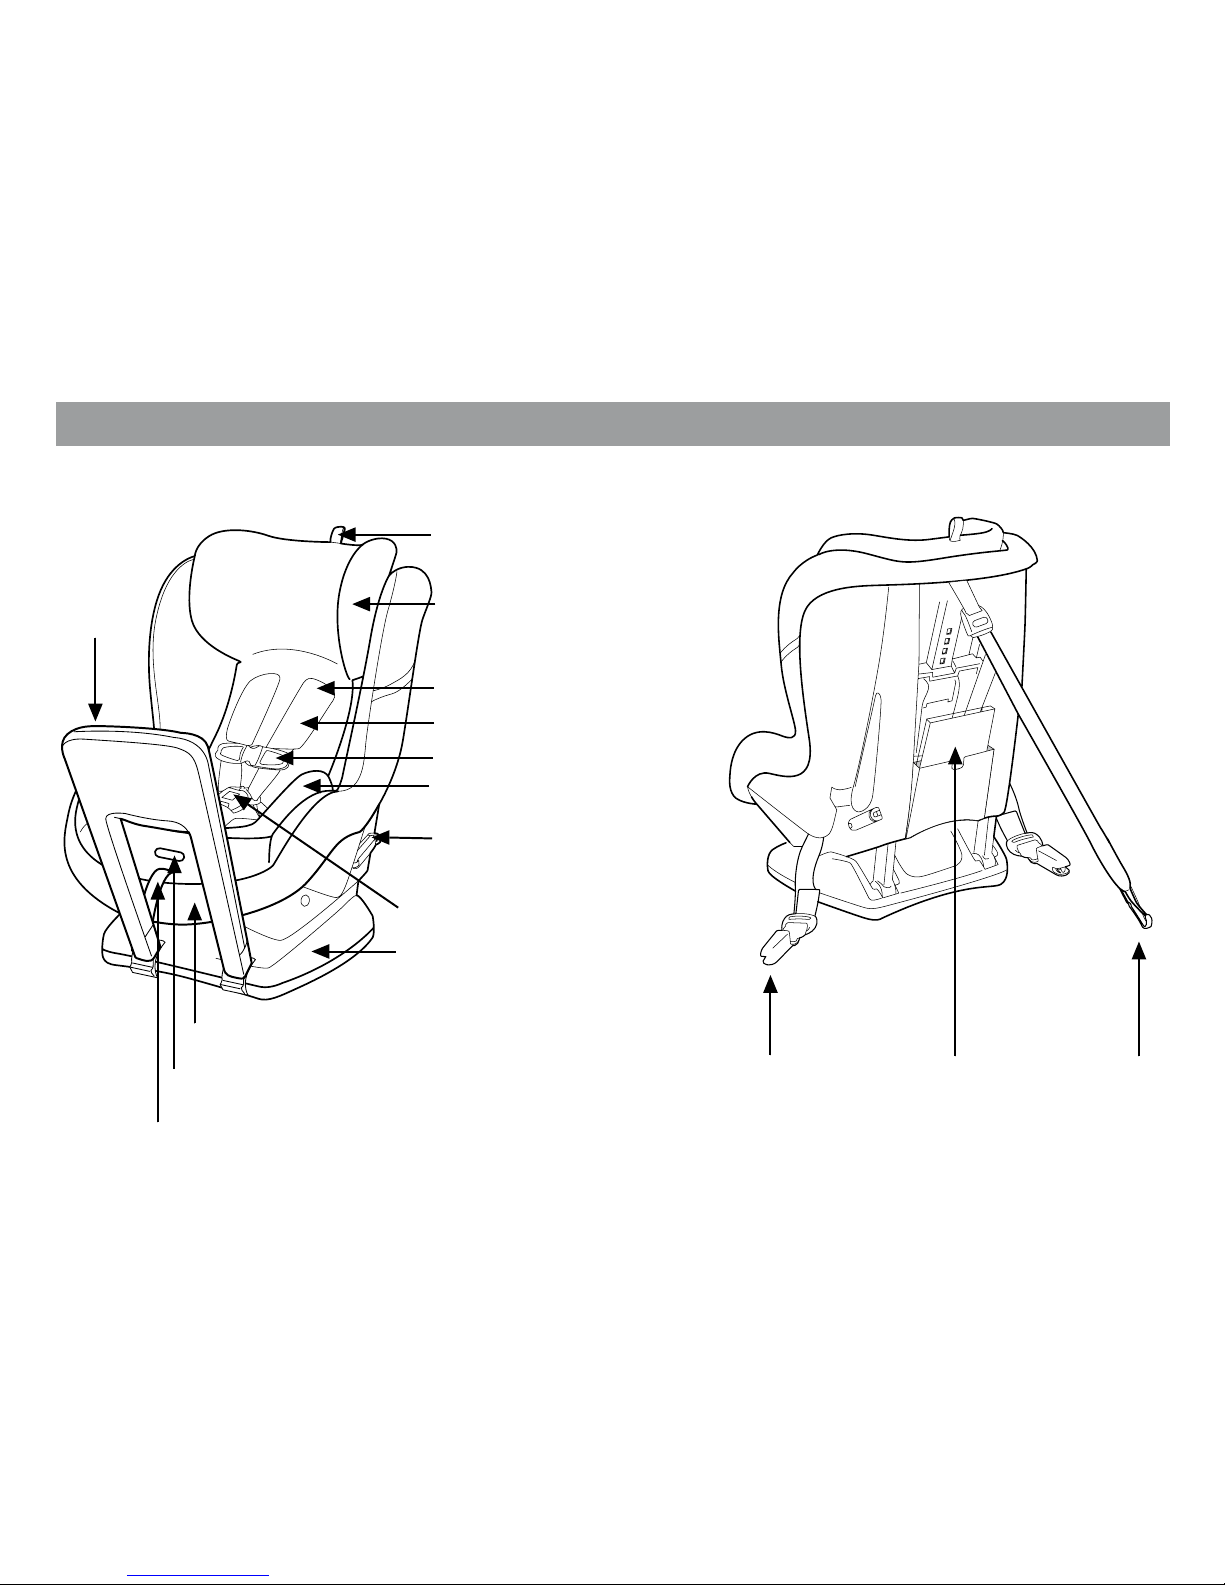
- 10 -
Locko clip
Headpad adjustment strap
5 point harness
Shoulder pads
Chest clip
Buckle
Harness release button
EPS padded head panel
Base
Latch
connector
Instruction
manual pocket
Top tether
strap
Recline handle
Adjuster strap
Newborn ller cushion
Rebound
Bar
Your child restraint
Page 11

- 11 -
Vehicle classes compatibility
Primo Viaggio SIP Convertible is designed to be installed on the following vehicle classes:
.
multi-purpose passenger vehicle . passenger car
Primo Viaggio SIP Convertible shall not be installed on the following vehicle classes:
.
buses
.
motorcycles
.
three - wheeled vehicle
.
trucks
Primo Viaggio SIP Convertible is designed to be installed with vehicle belts commonly fitted on
most of the available cars. However, in the market there are several different types of vehicles
manufactured in different periods. As a result, there are many different vehicle belt designs.
Unfortunately, some may be unsuitable for a safe installation of Primo Viaggio SIP Convertible.
Please read carefully the list below and in case of problems or doubts, double check your vehicle
owner’s manual or call Peg Perego Customer Service @ 1-800-661-5050 for additional help.
Vehicle seatbelts design and compatibility
Page 12
- 12 -
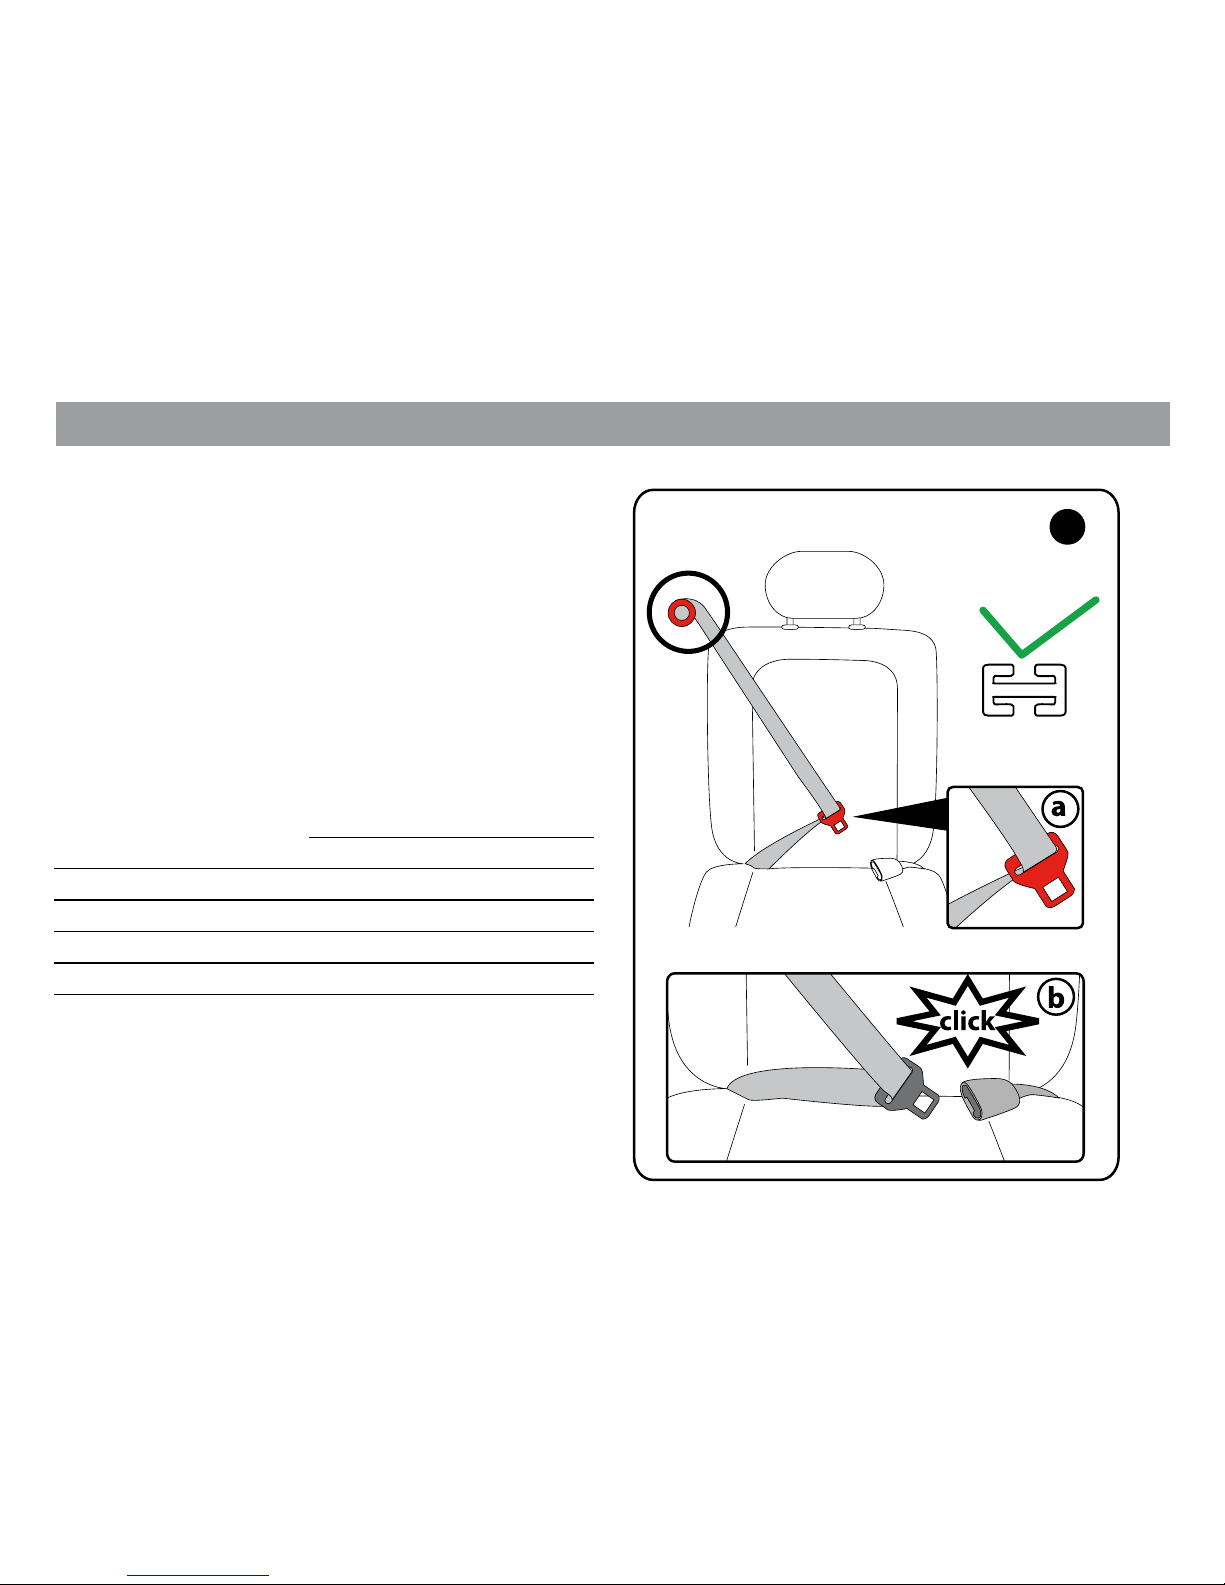
Vehicle seatbelts design and compatibility
1. Lap/shoulder belt (3-point) with
Automatic Locking Retractor (ALR) and
free sliding latch plate. This type of seat
belt has a latch plate that moves freely along
the belt. To activate ALR retractor for child
restraint installation, some vehicle models
may require to pull the belt all the way out;
some other vehicle models may require to
pull the belt for a certain length (check vehicle
owner’s manual for details). Tighten the belt
around the seat feeding the belt back into the
retractor. The belt will not extend unless you
unbuckle the belt and repeat the operation
from the beginning. With these belts, use of a
locking clip is not required.
Important Note: The lock o clips located on the
side of the Convertible seat are used to enhance
the stability during normal use. The lock os are
not designed to replace an automatic locking
retractor or a locking latch plate. The vehicle
belt must be properly tightened to secure the
Convertible seat to the vehicle.
ALR
1
Page 13
- 13 -
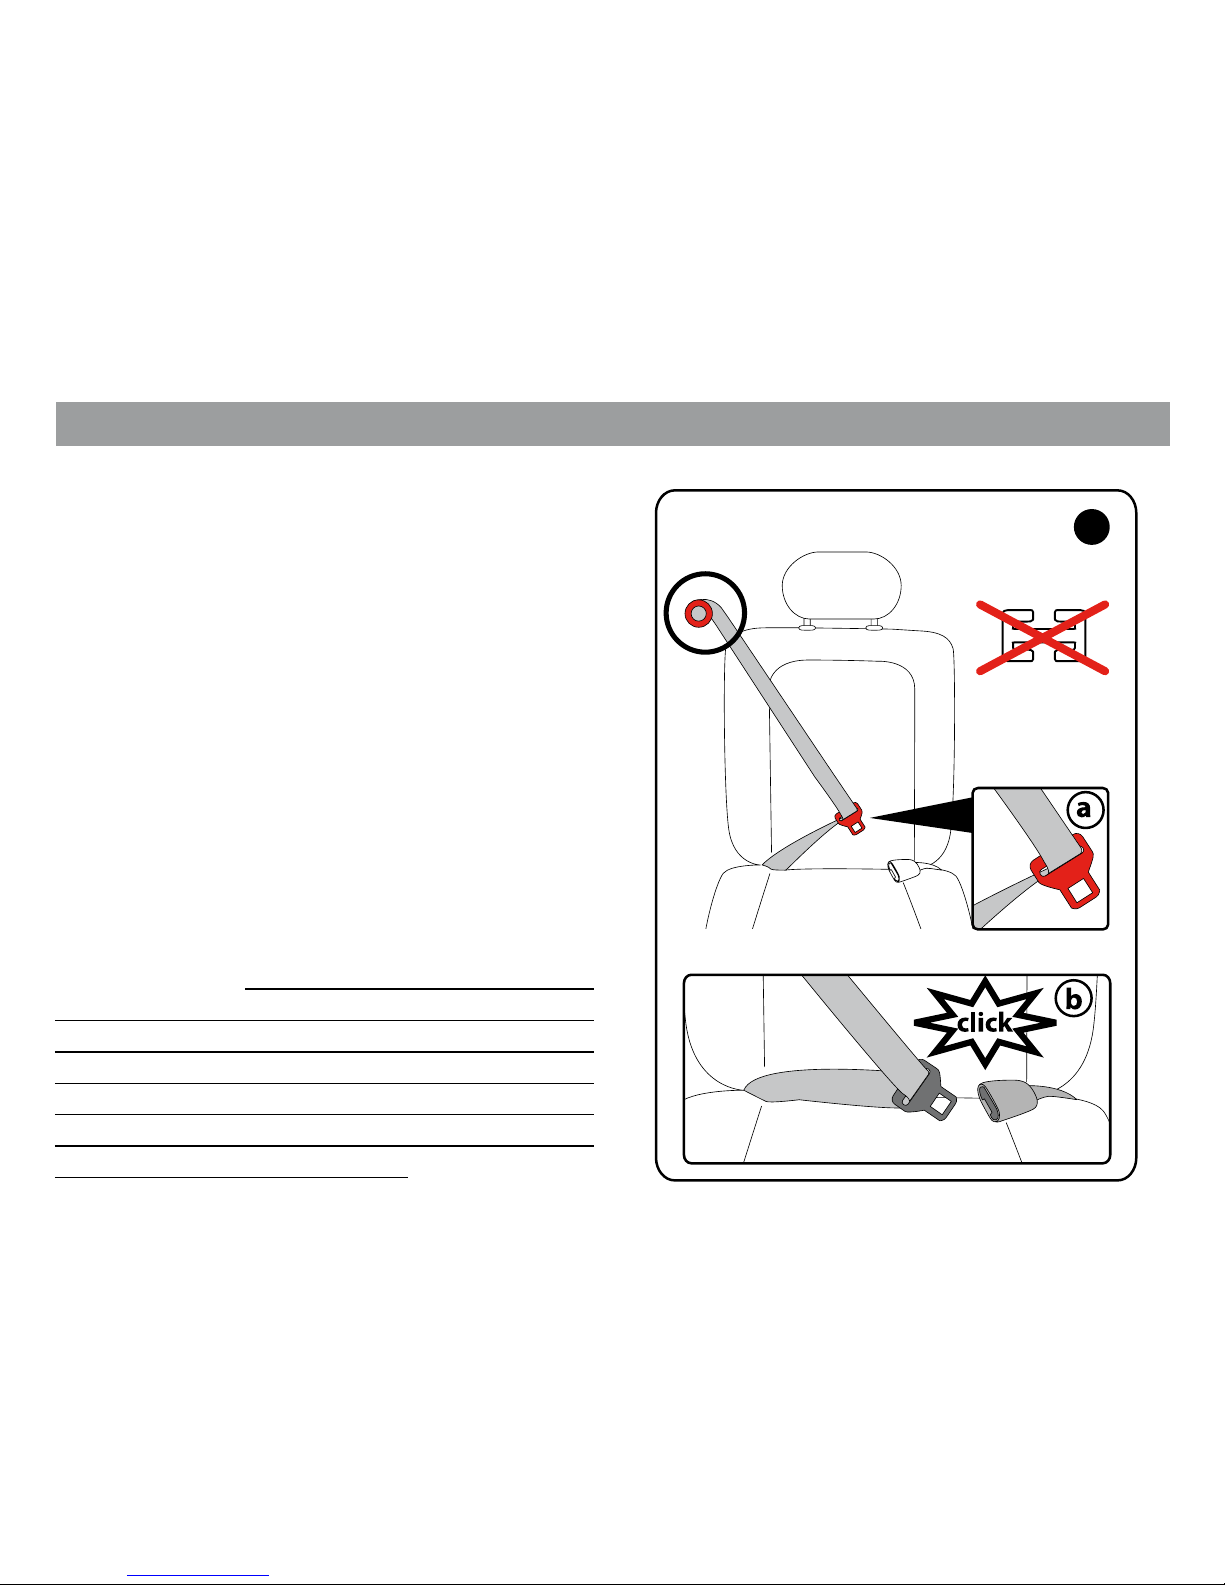
Vehicle seatbelts design and compatibility
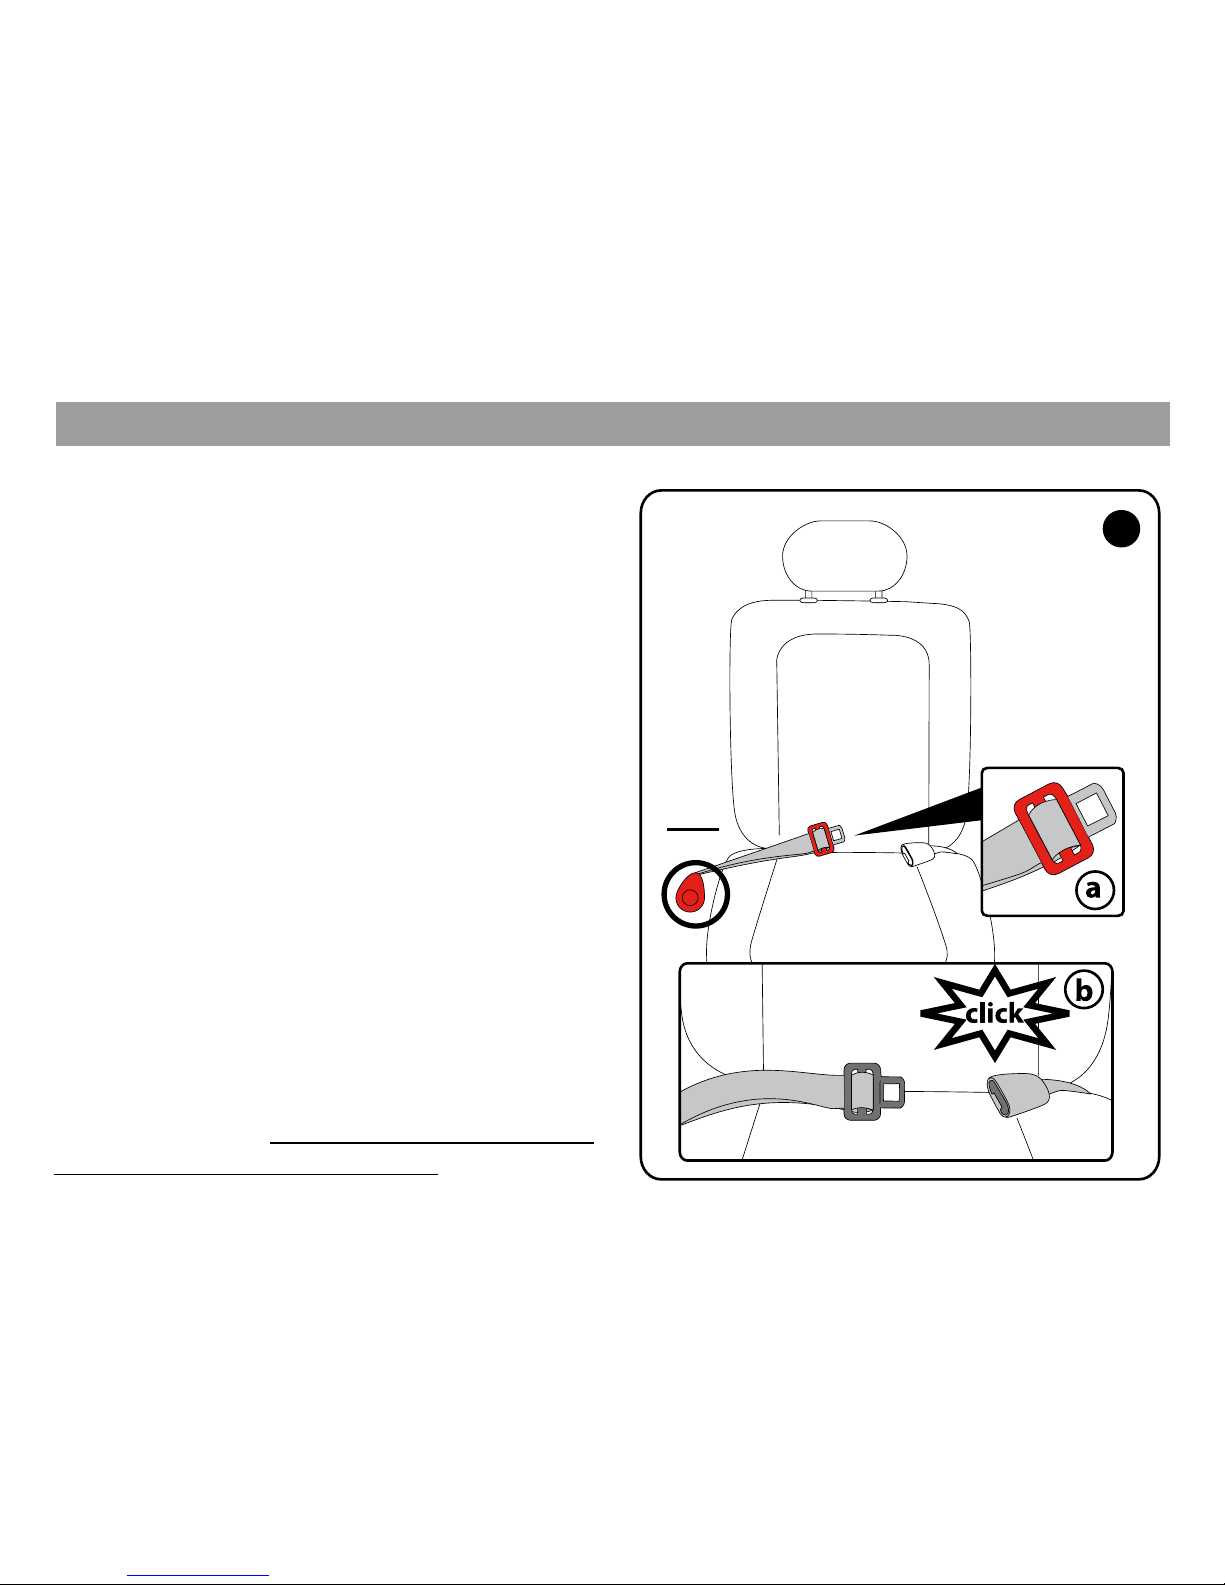
2. Lap/shoulder belt (3-point) with
Emergency Locking Retractor (ELR) and
with a locking latch plate. This type of belt
can be adjusted by pulling/releasing the strap
at the latch plate adjuster. Please refer to your
vehicle owner’s manual for details.
2
ELR
Page 14
- 14 -
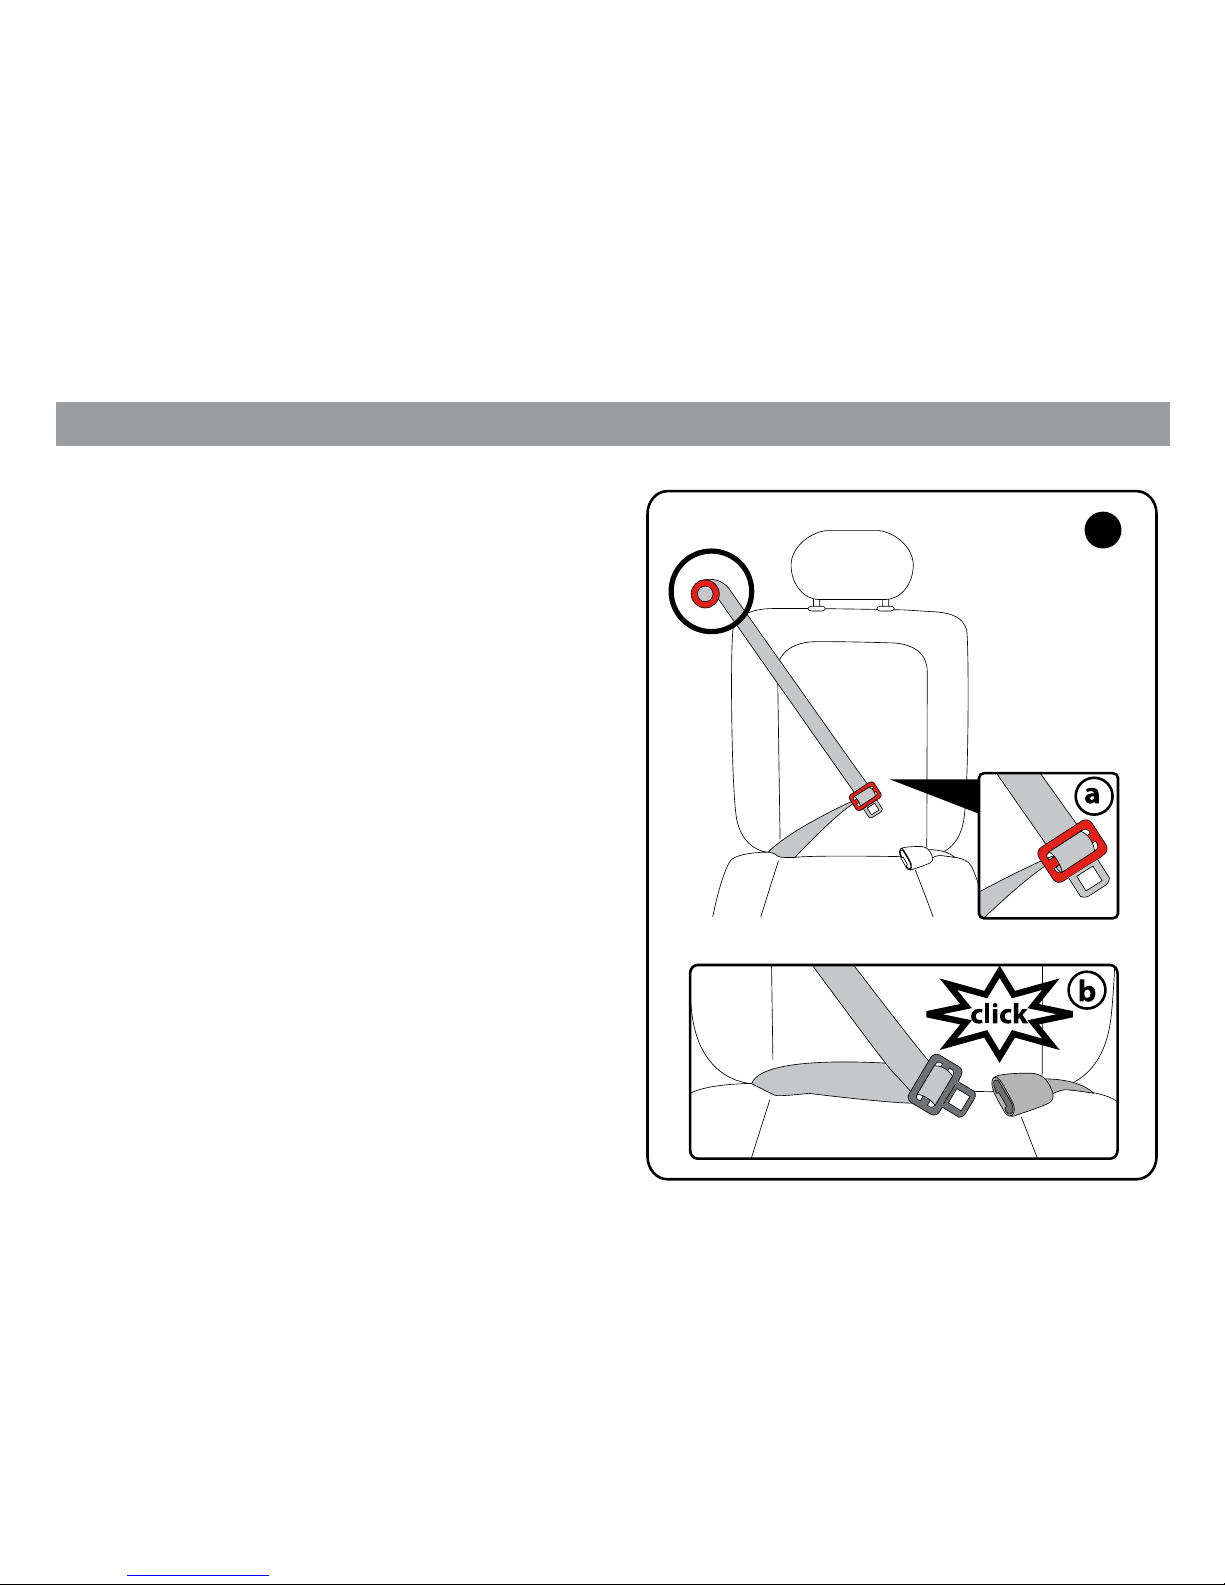
Vehicle seatbelts design and compatibility
ELR
3
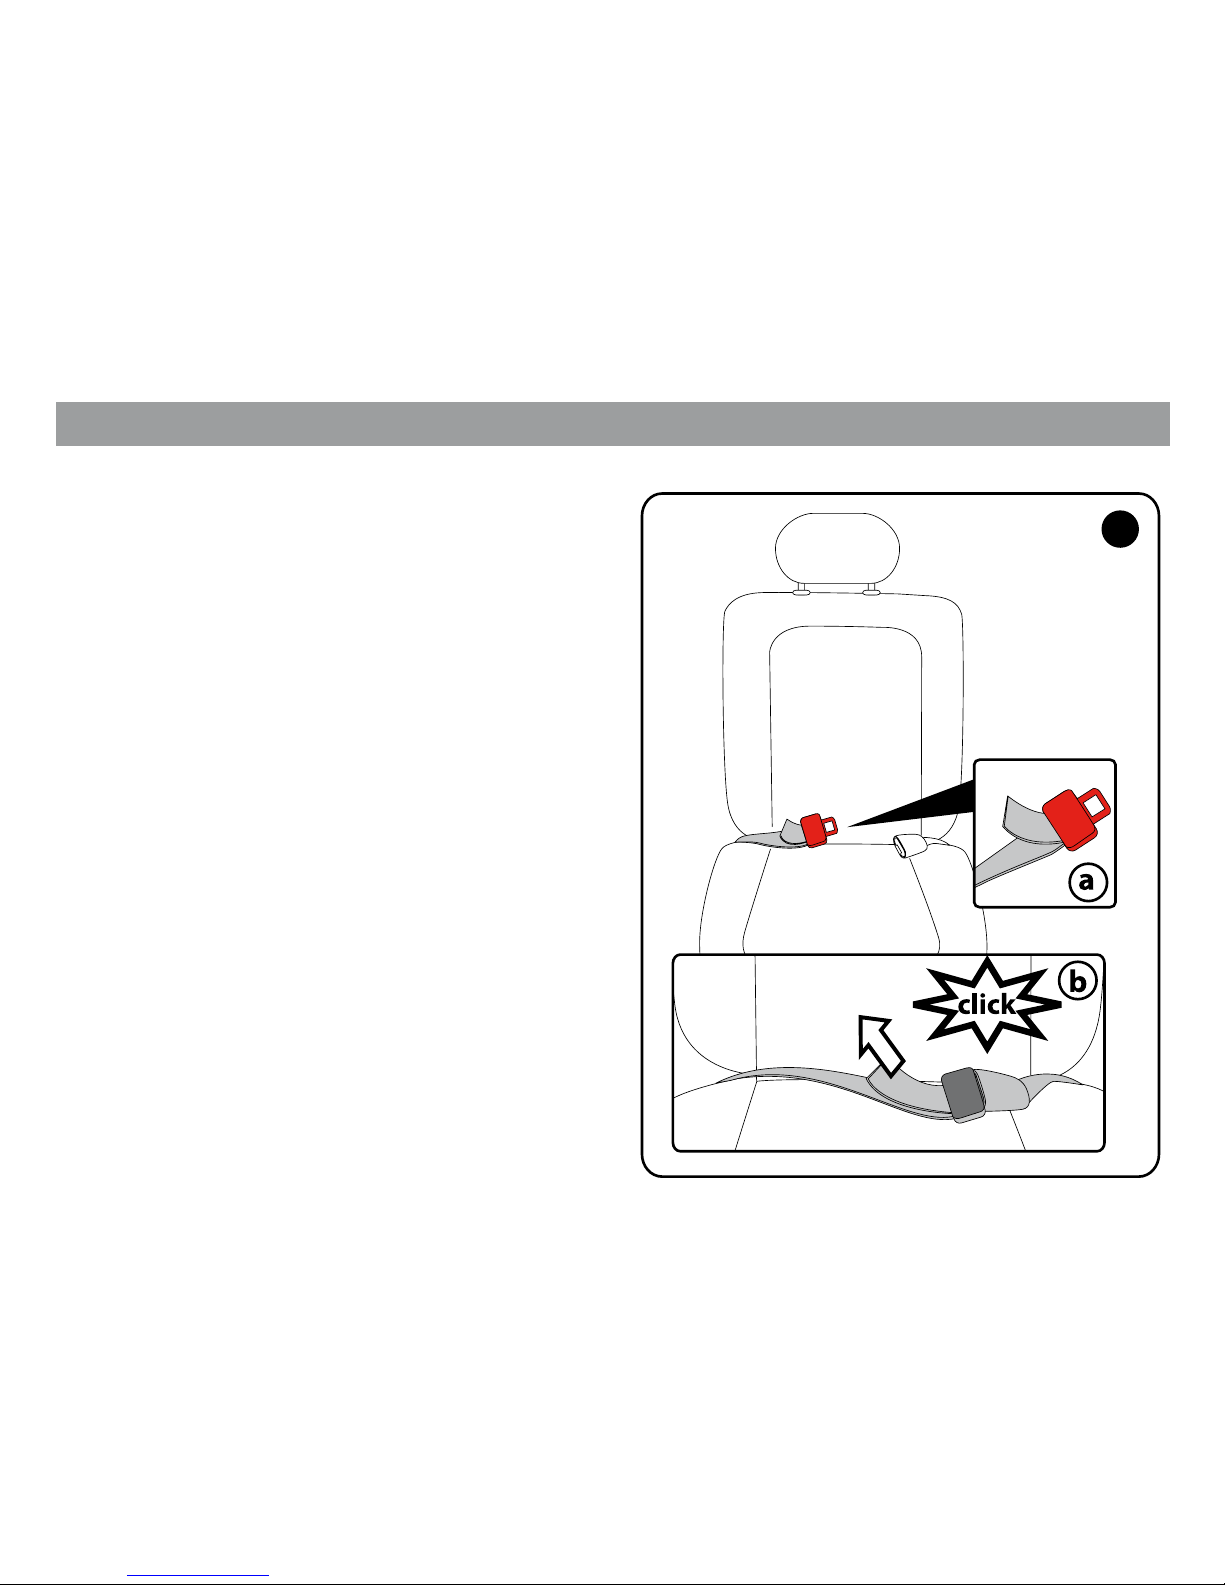
3. Lap/shoulder belt (3-point) with
Emergency Locking Retractor (ELR) and
free sliding latch plate. This type of seat belt
has a latch plate that moves freely along the
belt; it will only lock in an emergency (sudden
stop or crash) so you must use a Locking Clip
to secure this type of belt. To obtain a locking
clip and instructions for installation, call Peg
Perego customer service at 1-800-661-5050.
Important note: The lock o clips located on
the side of the Convertible seat are used to
enhance the stability during normal use. They
are not designed to replace a locking clip. A
locking clip must be used to properly secure
the seat with a belt as described above.
Page 15
- 15 -
4. Lap belt (2-point) with Automatic
Locking Retractor (ALR). This type of seat
belt has a latch plate that is sewn to the end
of the belt. To activate ALR retractor for child
seats installation, some vehicle models may
require to pull the belt all the way through;
some other vehicle models may require
to pull the belt for a certain length (check
vehicle owner’s manual for details). Tighten
the belt around the seat feeding the belt back
into the retractor. The belt will not extend
unless you unbuckle the belt and repeat the
operation from the beginning. With these
belts, use of a locking clip is not required.
5. Lap belt (2-point) with Emergency
Locking Retractor (ELR). This type of seat
belt has a latch plate sewn at the end of the
belt; it will only lock in an emergency (sudden
stop or crash).
Important note: DO NOT USE Primo Viaggio
SIP Convertible with these belts.
ELR
ALR
4/5
Vehicle seatbelts design and compatibility
Page 16
- 16 -
6. Lap belt (2-point) with a locking latch
plate. This type of belt can be adjusted by
pulling/releasing the strap at the latch plate
adjuster.
Some vehicles may have seatbelts with
large rigid buckles. These designs may cause
the installation to be troublesome and aect
stability of the child restraint during
normal use. Also, it may cause slack in the
belt that may result in poor performance
in case of a sudden stop or crash.
In this situation, try another seating position
in the vehicle or consult your vehicle owner’s
manual.
Please consult a certied child restraint
passenger safety technician for other
installation options.
6
Vehicle seatbelts design and compatibility
Page 17
- 17 -
Vehicle seatbelts design and compatibility
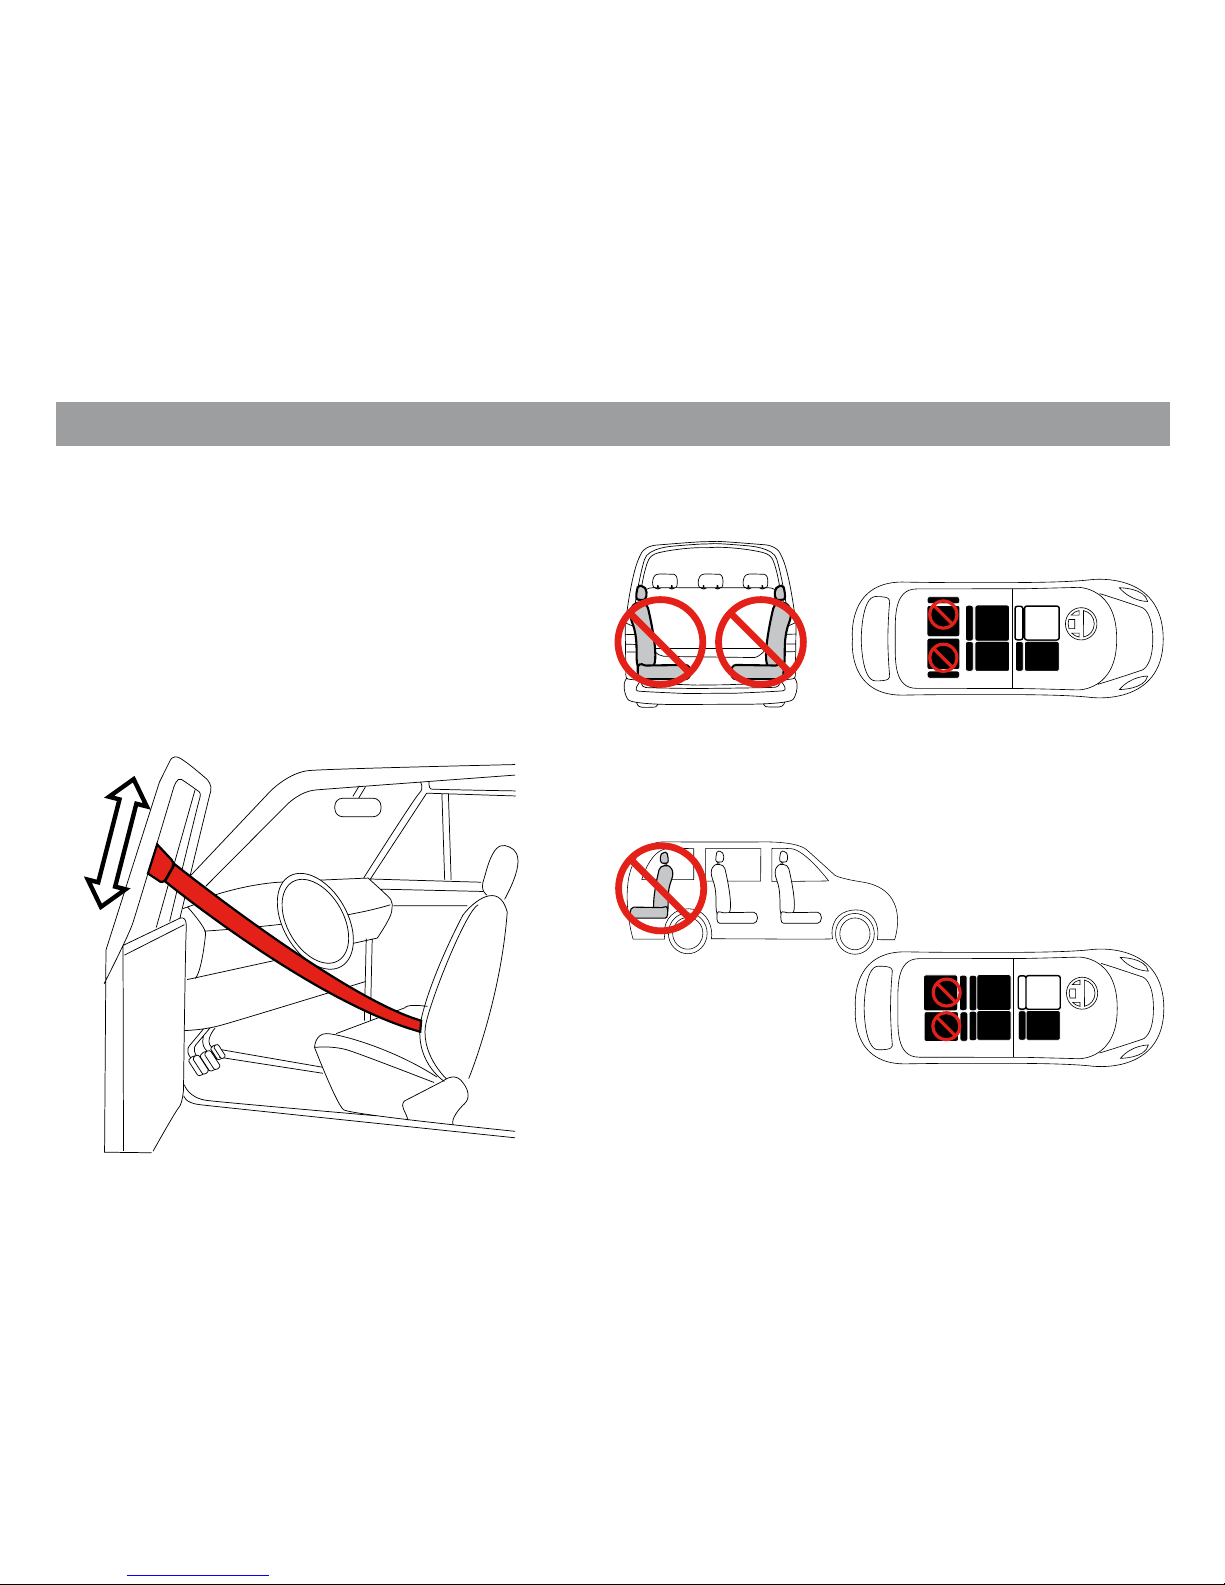
NON COMPATIBLE VEHICLE SEAT DESIGNS
WARNING: do not use Primo Viaggio SIP
Convertible with the following vehicle
belt design:
1. Lap/motorized shoulder belts.
Belts mounted on the door
2. Side facing seats
3. Rear facing seats or seats that rotate in
dierent positions
For your child’s safety, always read your
vehicle owner’s manual for further
information.
NO
NO
NO
NO
Page 18
- 18 -
Installing your child restraint in the vehicle
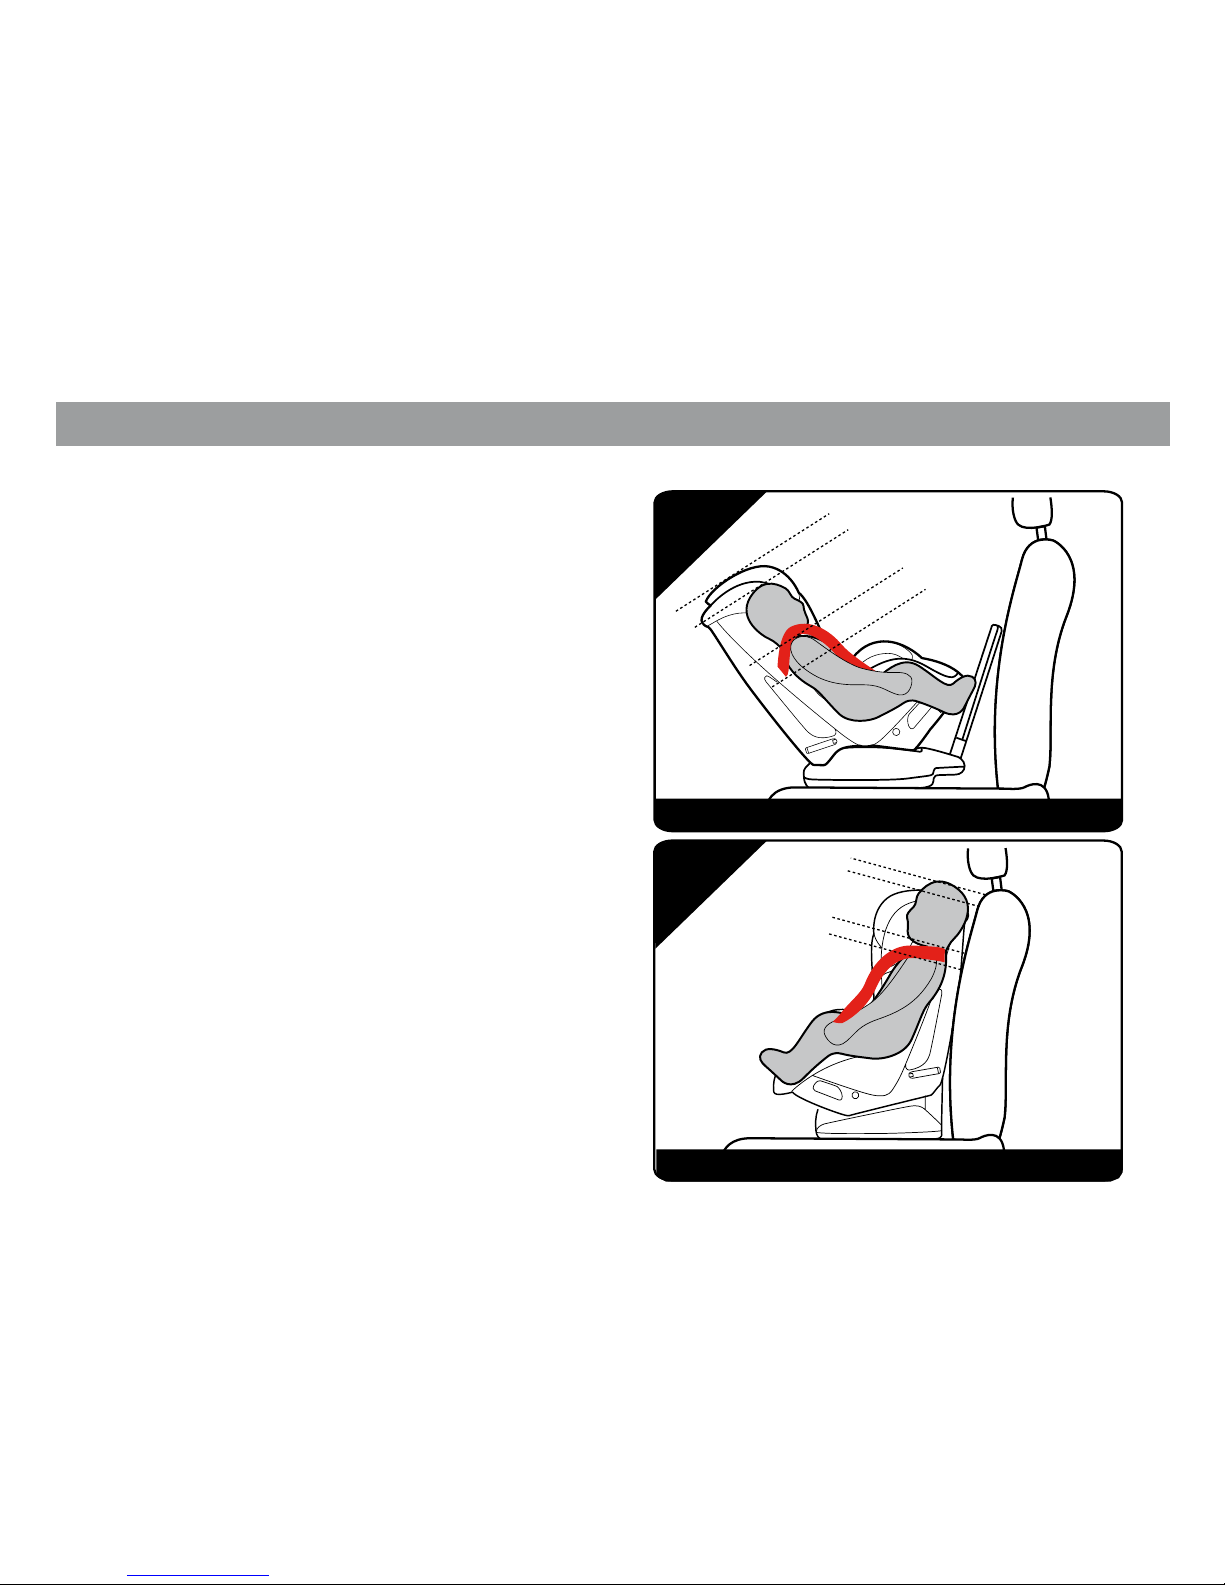
WEIGHT AND DIMENSION RANGE
REAR FACING MODE
•
Use rear facing with children who weigh
between 2.3 and 20.4 kg (5 - 45 lbs);
and whose maximum height is 119 cm (47 inches)
.
• Use rear facing if head is at least one inch
below headrest edge.
• The correct shoulder position is when
shoulder straps are located at or just below
shoulder level, as shown in the picture.
Note: The lower 7 head panel positions can be
used in the rear facing mode. Positions 8, 9 and 10
should only be used in the forward facing mode.
Refer to page 42 for head panel adjustment.
FORWARD FACING MODE
• Use forward facing with children who weigh
between 10 and 30 kg (22 - 65
lbs
); and whose
maximum height is 125 cm (49 inches).
• Use forward facing if head is no more than
one inch above headrest edge.
• The correct shoulder position is when straps
slot are located at or just above shoulder level,
as shown in the picture.
RF
REAR FACING
1’’
FF
FORWARD FACING
1’’
Page 19
- 19 -
Installing your child restraint in the vehicle
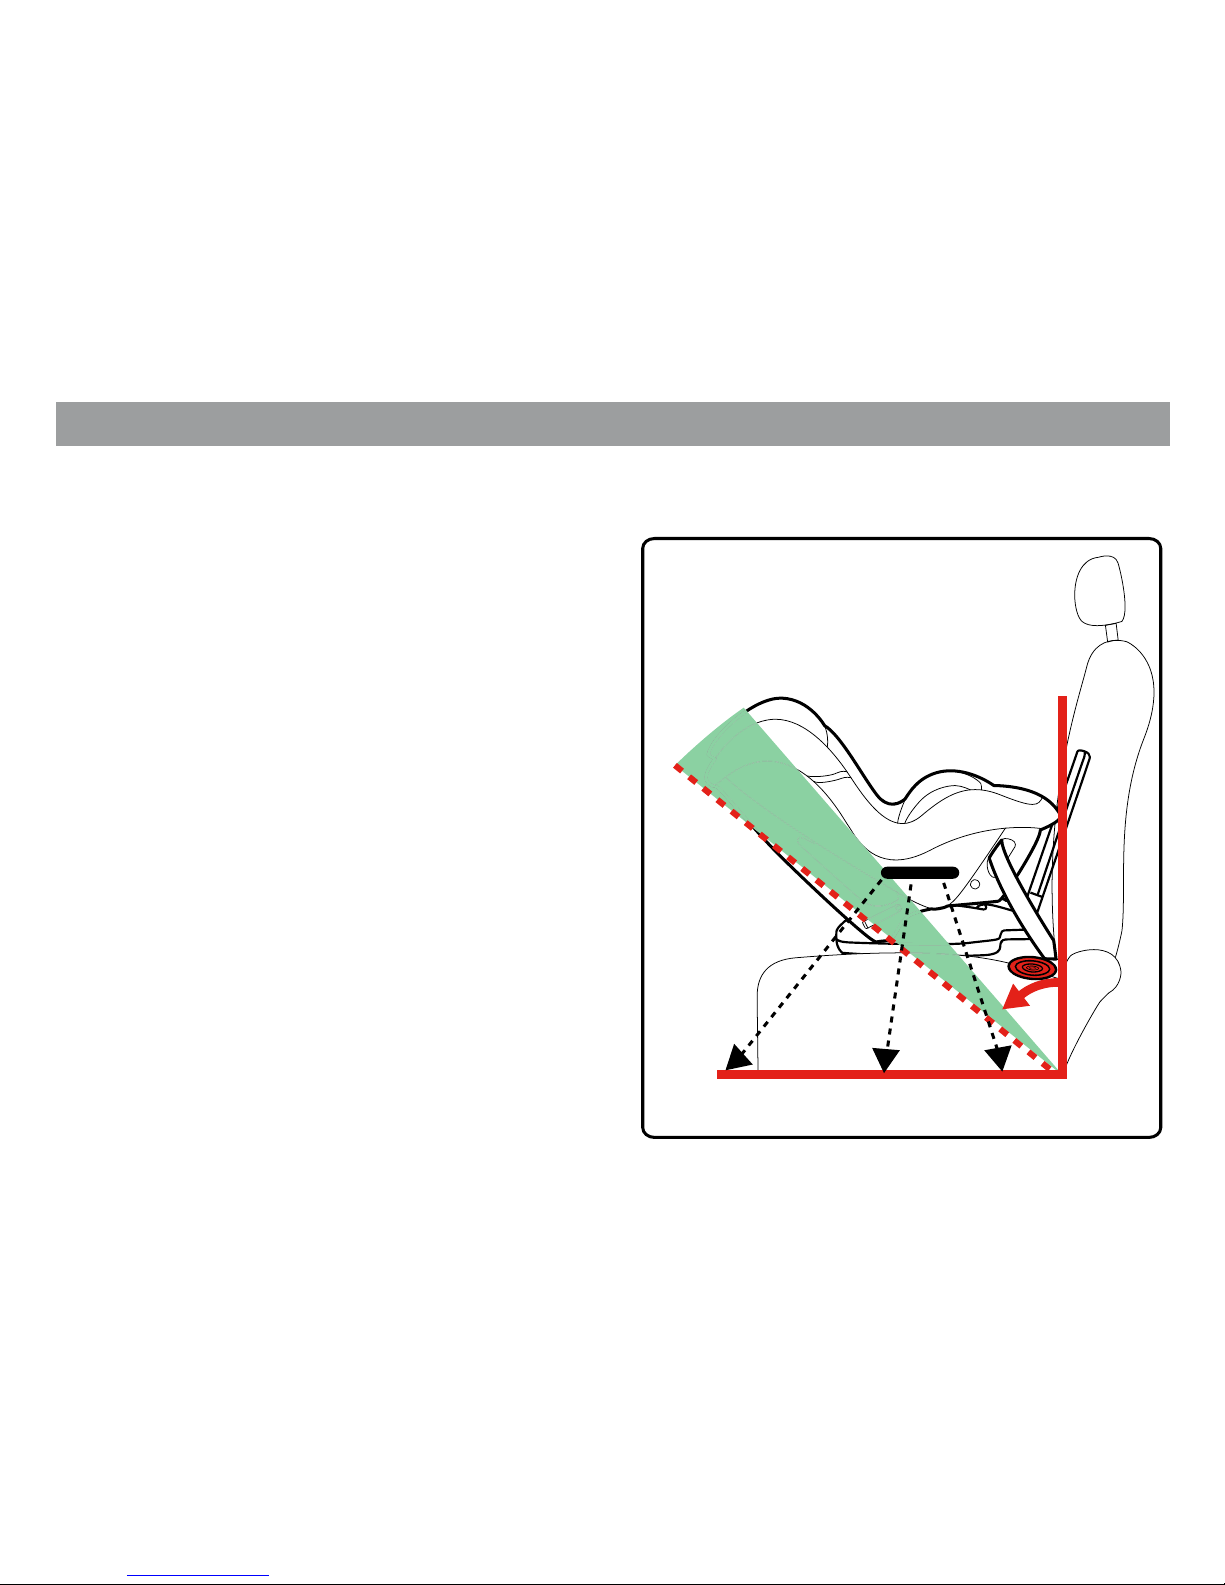
PROPER LEVELLING OF CHILD
RESTRAINT IN REAR FACING MODE
When properly installed according to the
following sections, the child restraint used
in rear facing mode should have a backrest
angle of 35° - 45° from vertical. If it is not
possible to reach such angle, use a pool noodle
or a rolled towel to further recline the seat.
Use the line drawn on the product as a
reference. When the line is horizontal, the
backrest angle will be at 45° with vertical.
NOTE: make sure that the angle
does not exceed 45° with vertical.
Important! Newborn infants should be
properly reclined. If the seat reclines too
much, your infant can be ejected from the
seat in an accident. If too upright, it can cause
breathing problems.
45°-35°
HORIZONTAL LINE
GROUND REFERENCE
Page 20
- 20 -
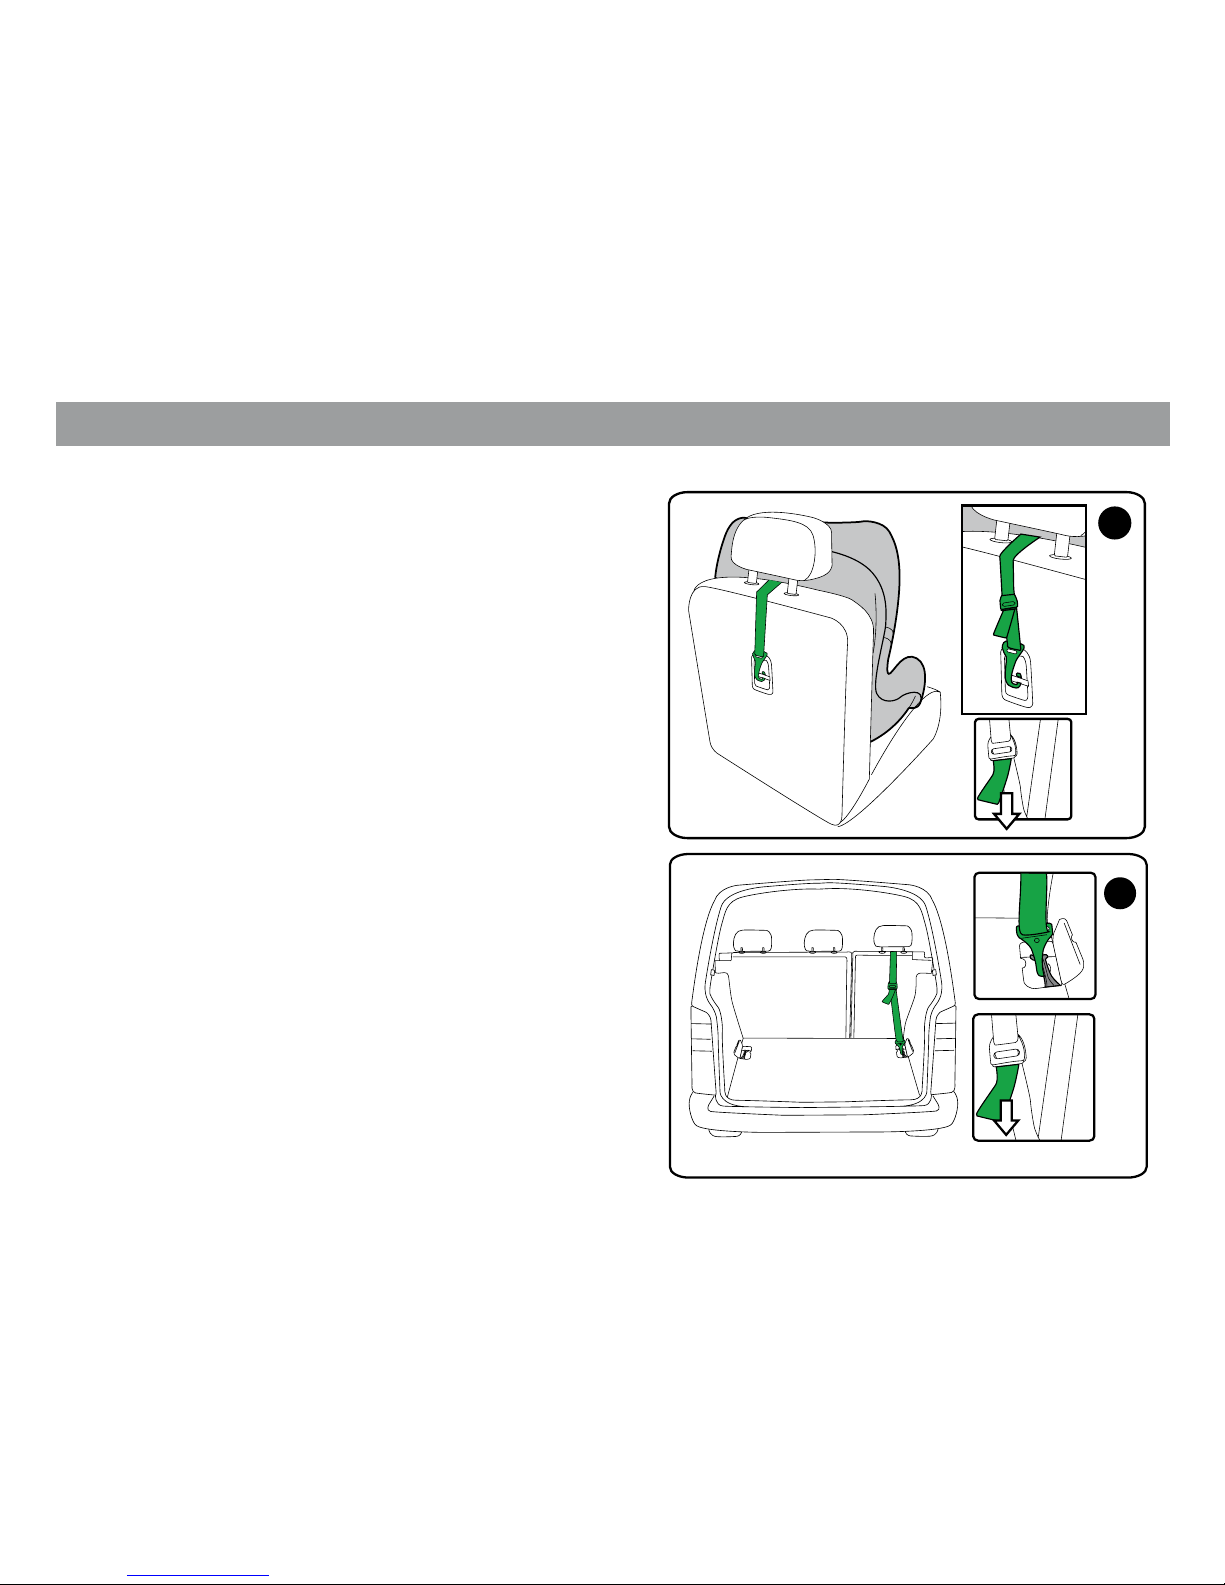
Installing your child restraint in the vehicle
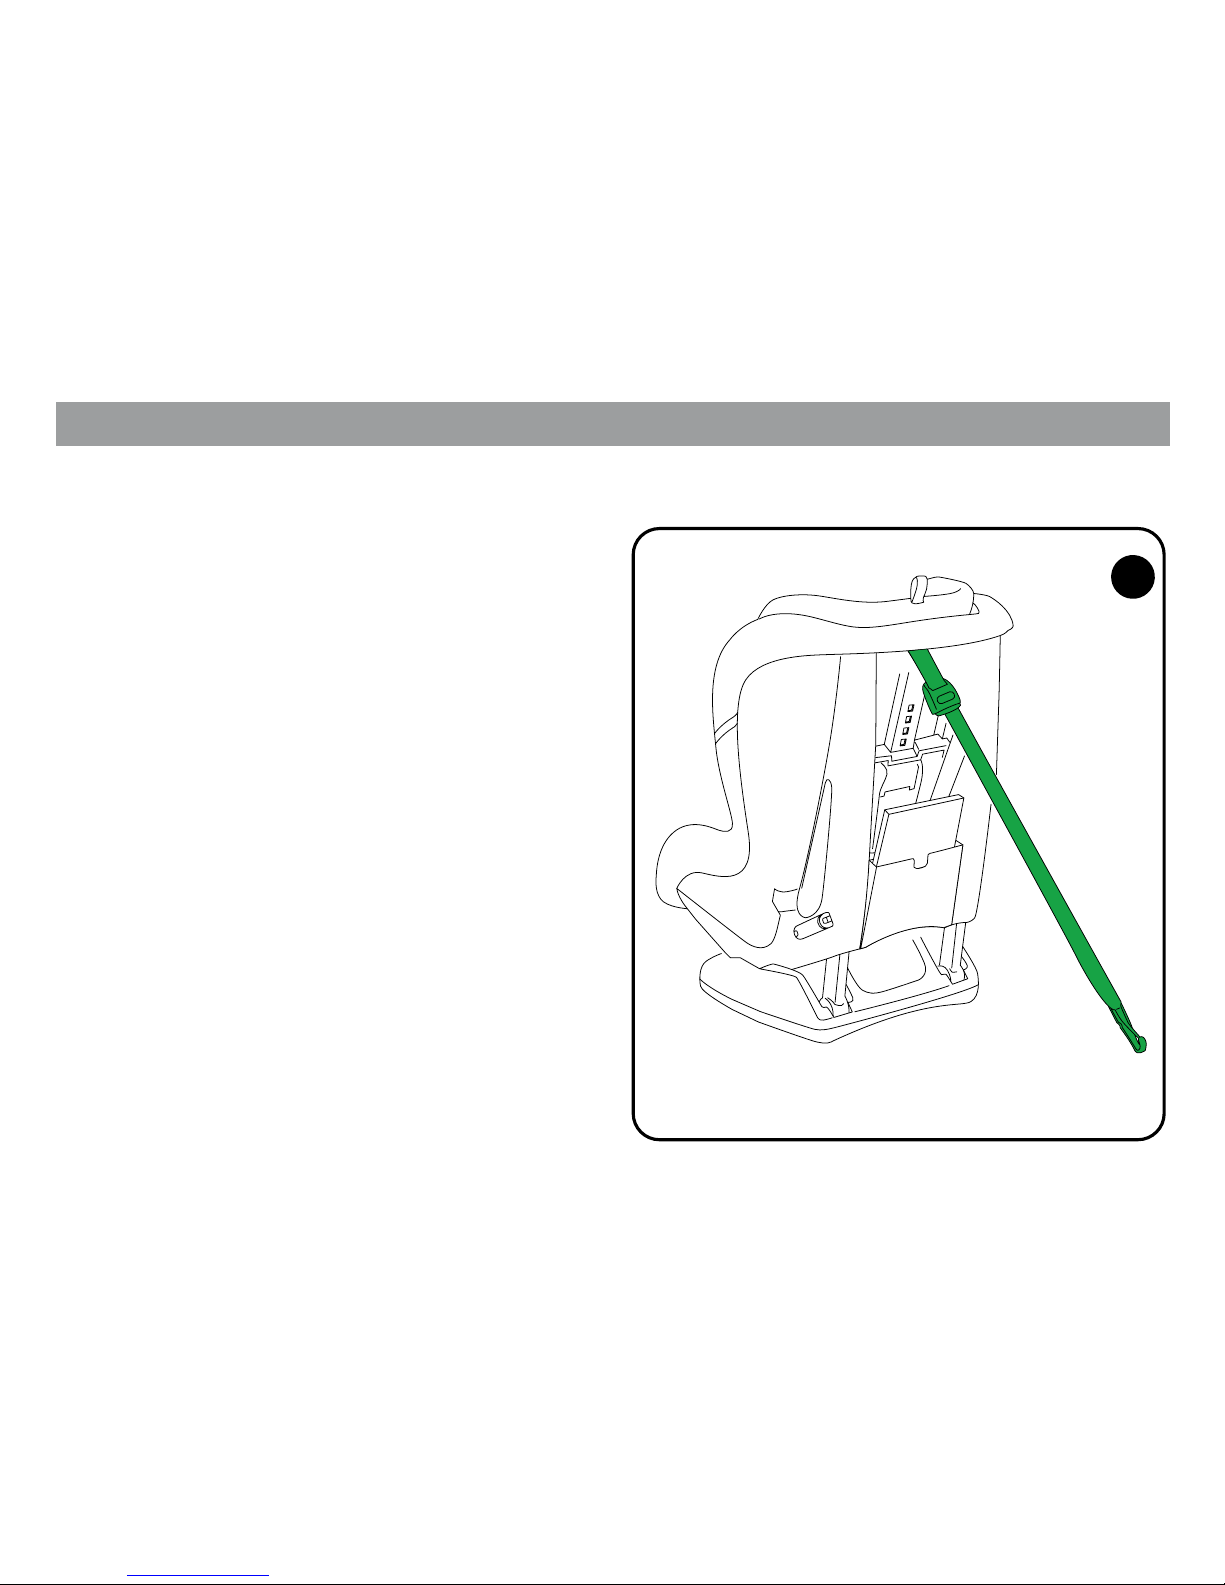
USE OF TOP TETHER STRAP
1. The top tether is a strap attached at the
top of the Primo Viaggio SIP Convertible
shell equipped with a hook and an adjuster.
When used in forward facing mode,
your Primo Viaggio SIP Convertible
is certied for use with a top
tether in conjunction with a lap, lap and
shoulder belt or lower anchors (LUAS).
The top tether has to be connected to a
suitable tether attachment points in the
vehicle. To locate the proper point on the
vehicle, please refer to your vehicle owner’s
manual.
Do not attach the Primo Viaggio Tether to
vehicle anchorage points not designed as
child restraint tether anchorage points, as
this may result in a failure during a crash.
Always use Top Tether in Forward Facing
mode.
1
Page 21
- 21 -
Installing your child restraint in the vehicle
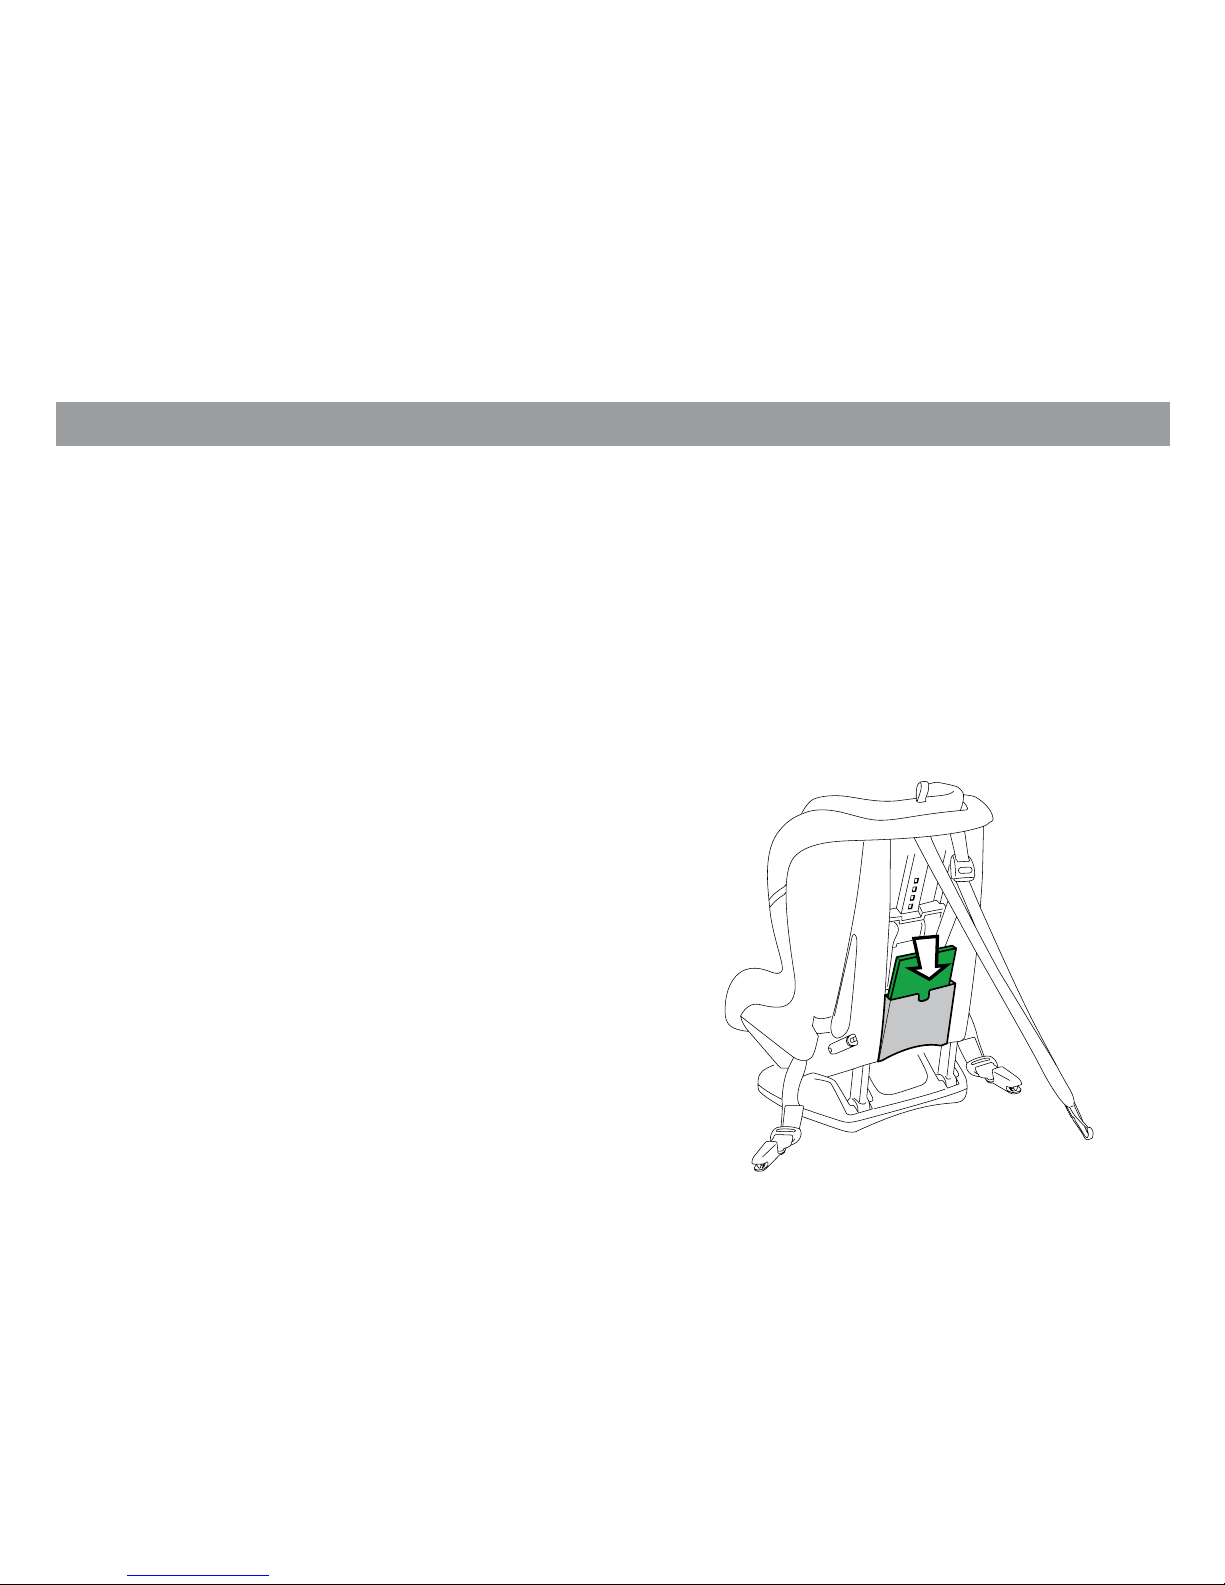
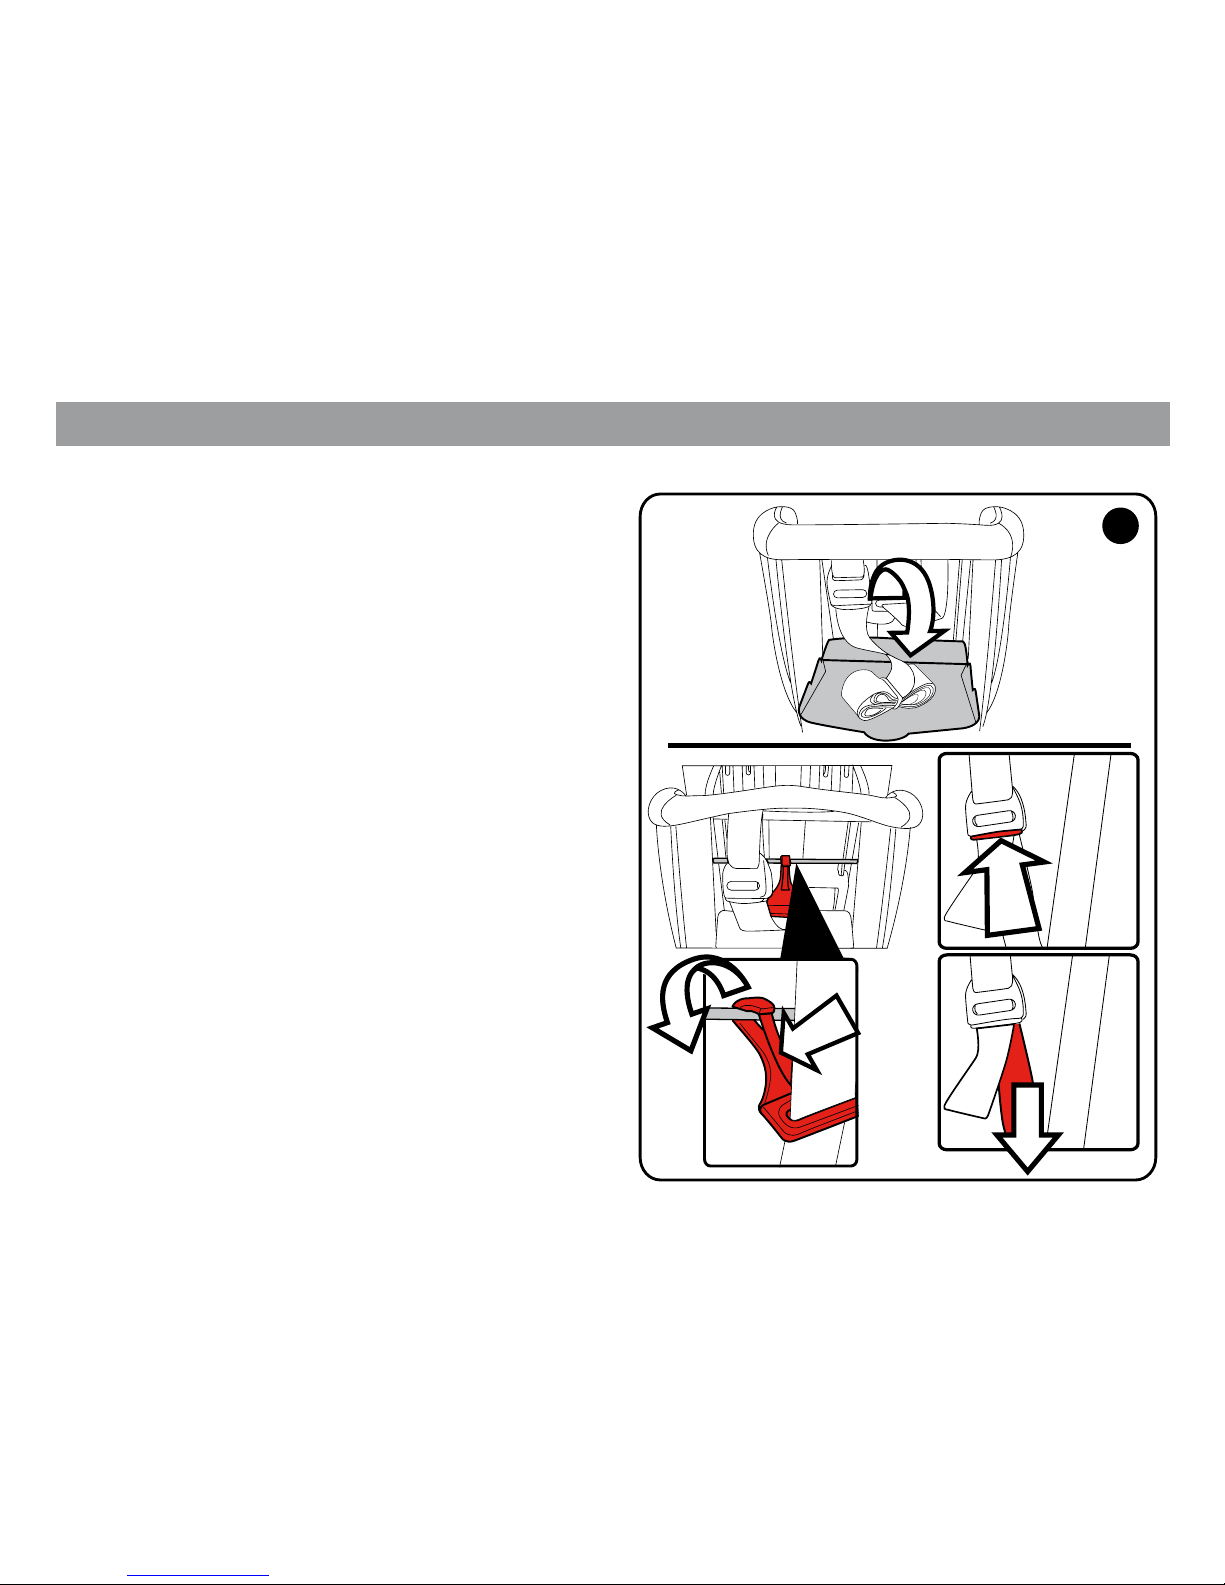
2. To use top tether, open the plastic pouch,
detach the hook from its rear attachment
pressing on adjuster button in order to
lengthen the strap to the required length.
When not in use, keep the tether attached to
the shell, in order to prevent injury hazard to
your child or other occupant due to a metal
part free to move inside the vehicle interior.
2
B
A
Page 22
- 22 -
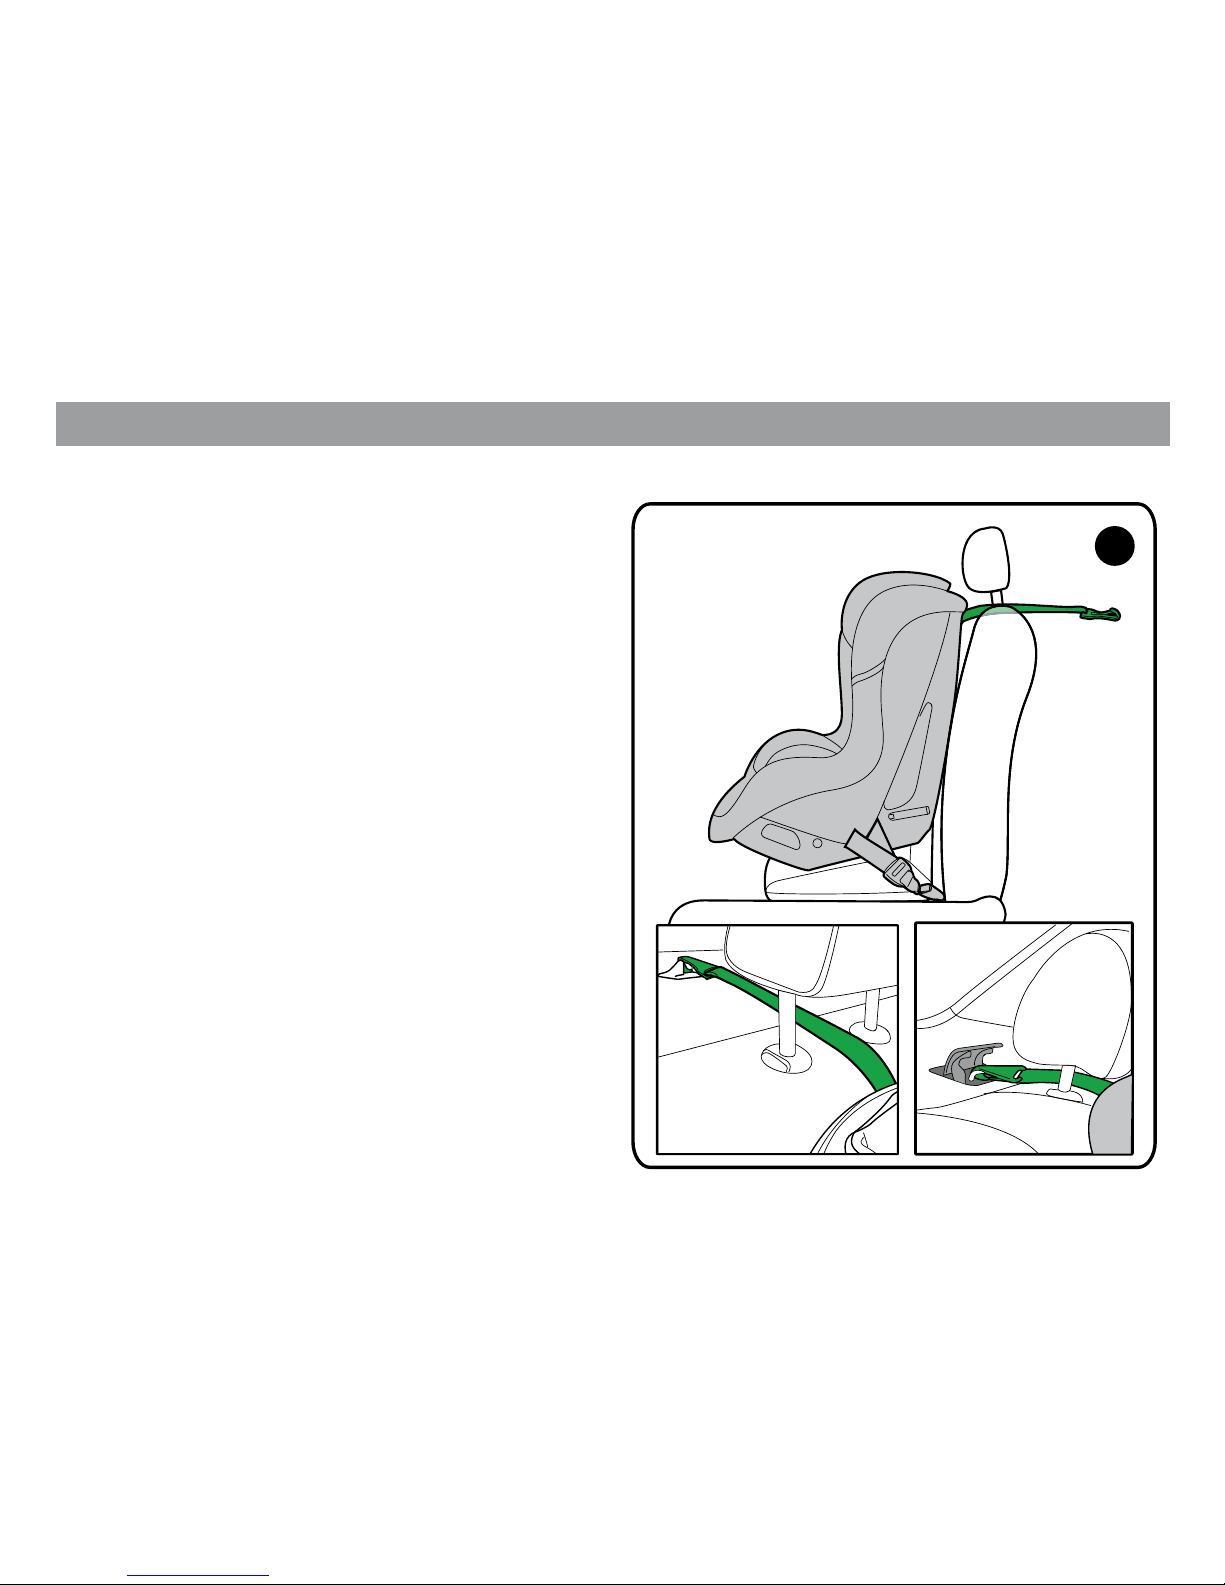
3. The tether is used to prevent excessive
rotation in an impact in forward facing mode,
thus reducing the risk for the child to impact
objects in front of him.
Attach the tether hook to the designated
tether anchor and pull the free strap until the
tether is fully tensioned and free of any slack.
Picture shows the tether anchor located on
the rear shelf.
Installing your child restraint in the vehicle
3
Page 23
- 23 -
4. Attach the tether to the designated tether
anchor and pull the free strap until the tether
is fully tensioned and free of any slack. Picture
shows the tether anchor located on the back
of the seat.
5. Another common location is the vehicle
trunk.
Installing your child restraint in the vehicle
4
5
Page 24
- 24 -
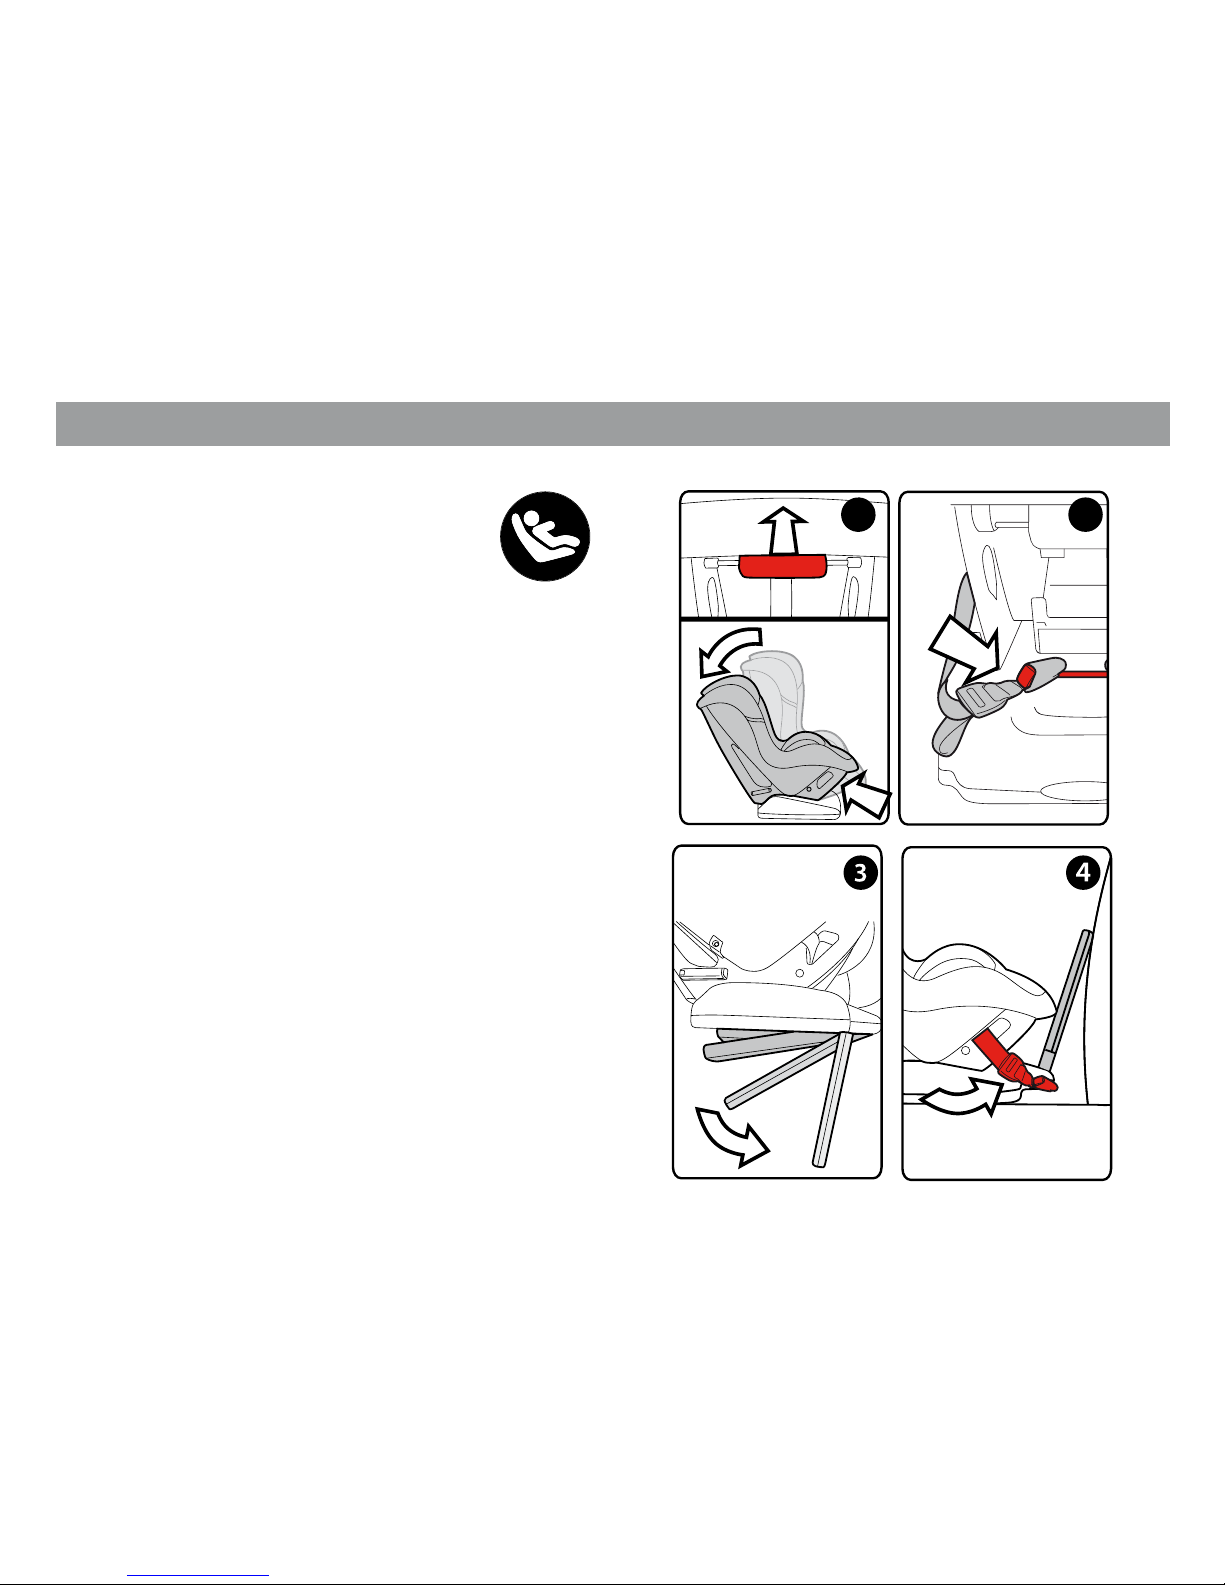
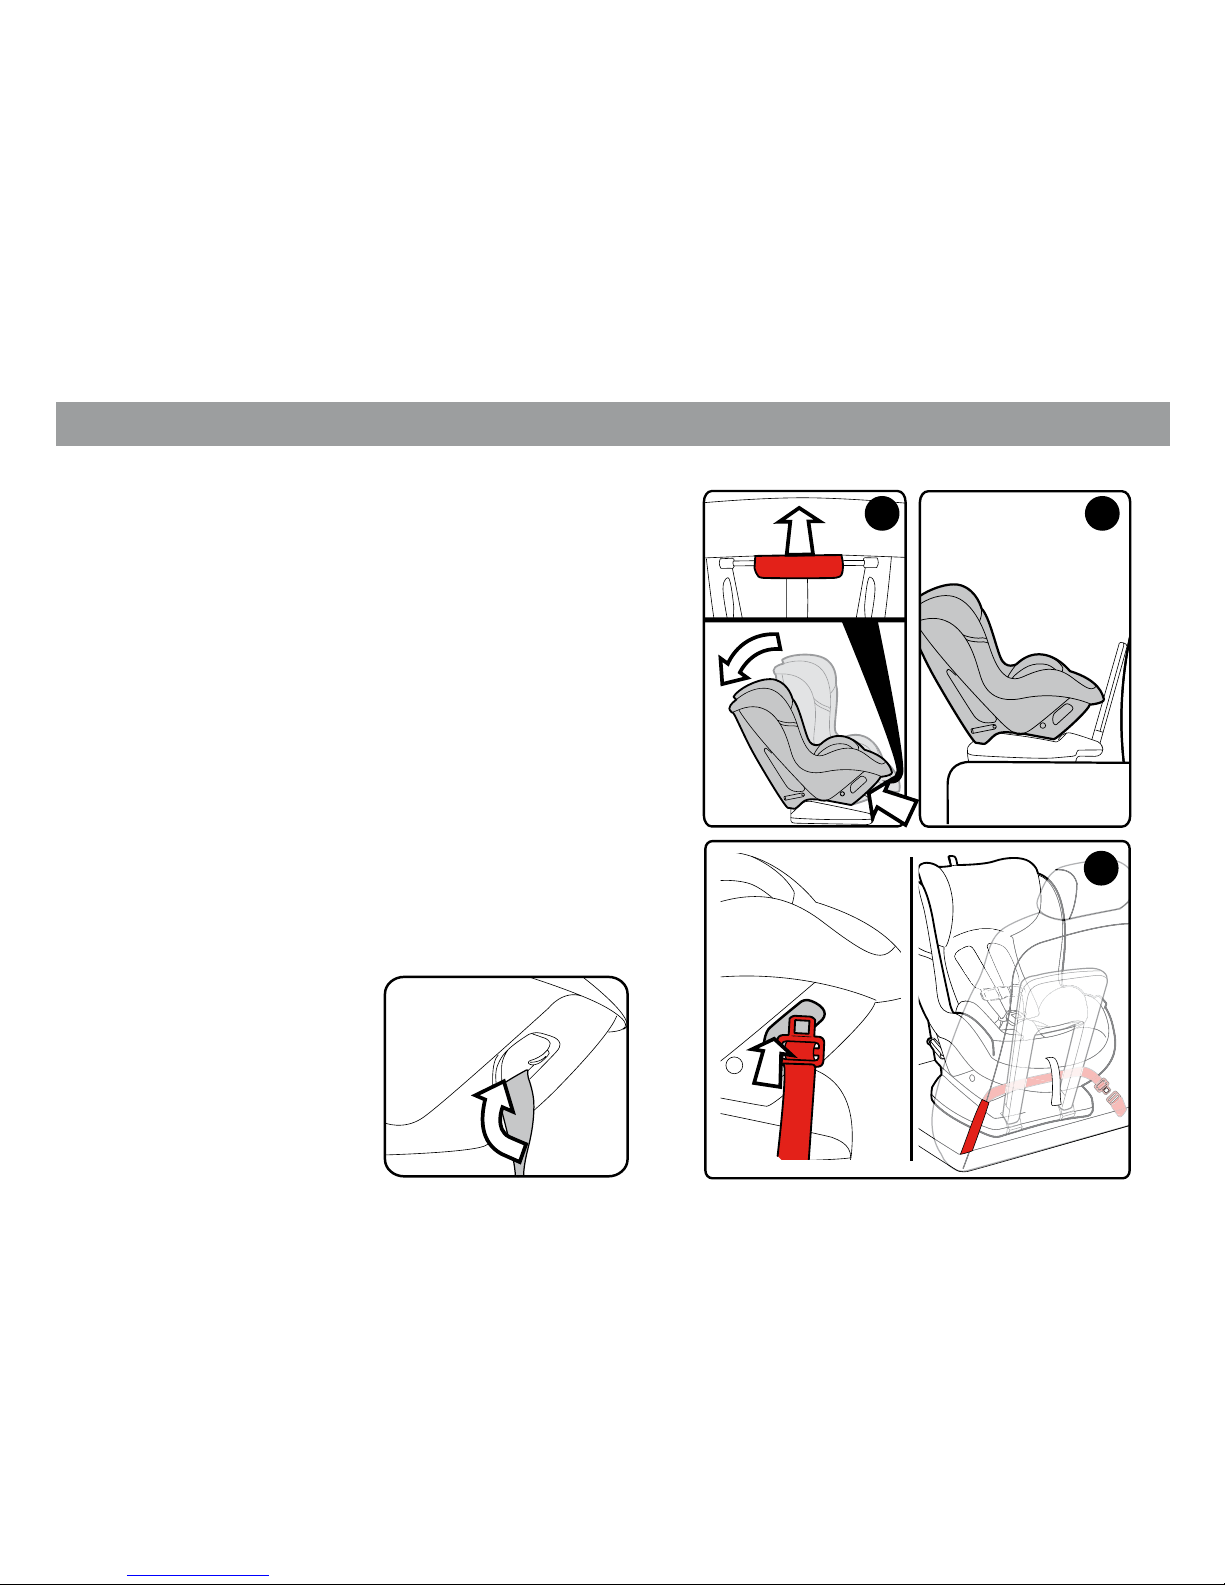
Installing your child restraint in the vehicle
REAR FACING MODE USING
LUAS STRAPS
1. Recline the child restraint to the rearfacing
position as shown in the picture. To recline
the child restraint, pull the handle located
below the front edge of the shell (A)as shown
in detail. An audible "click" is heard when
the seat is properly locked into position.
2. Disconnect the latch straps from the
storage bar by pushing on the red button
and pulling the straps at the same time.
3. Disengage the rebound bar under the
seat and rotate it until it clicks in position as
shown in picture.
4. Slide the straps toward the front of the
child restraint. Check that the straps are not
reversed. Lean the reclined seat, unoccupied,
on the selected vehicle seat in the rearfacing
mode making sure that the front part of the
seat touches the vehicle seat backrest.
1
A
A
B
2
Page 25
- 25 -
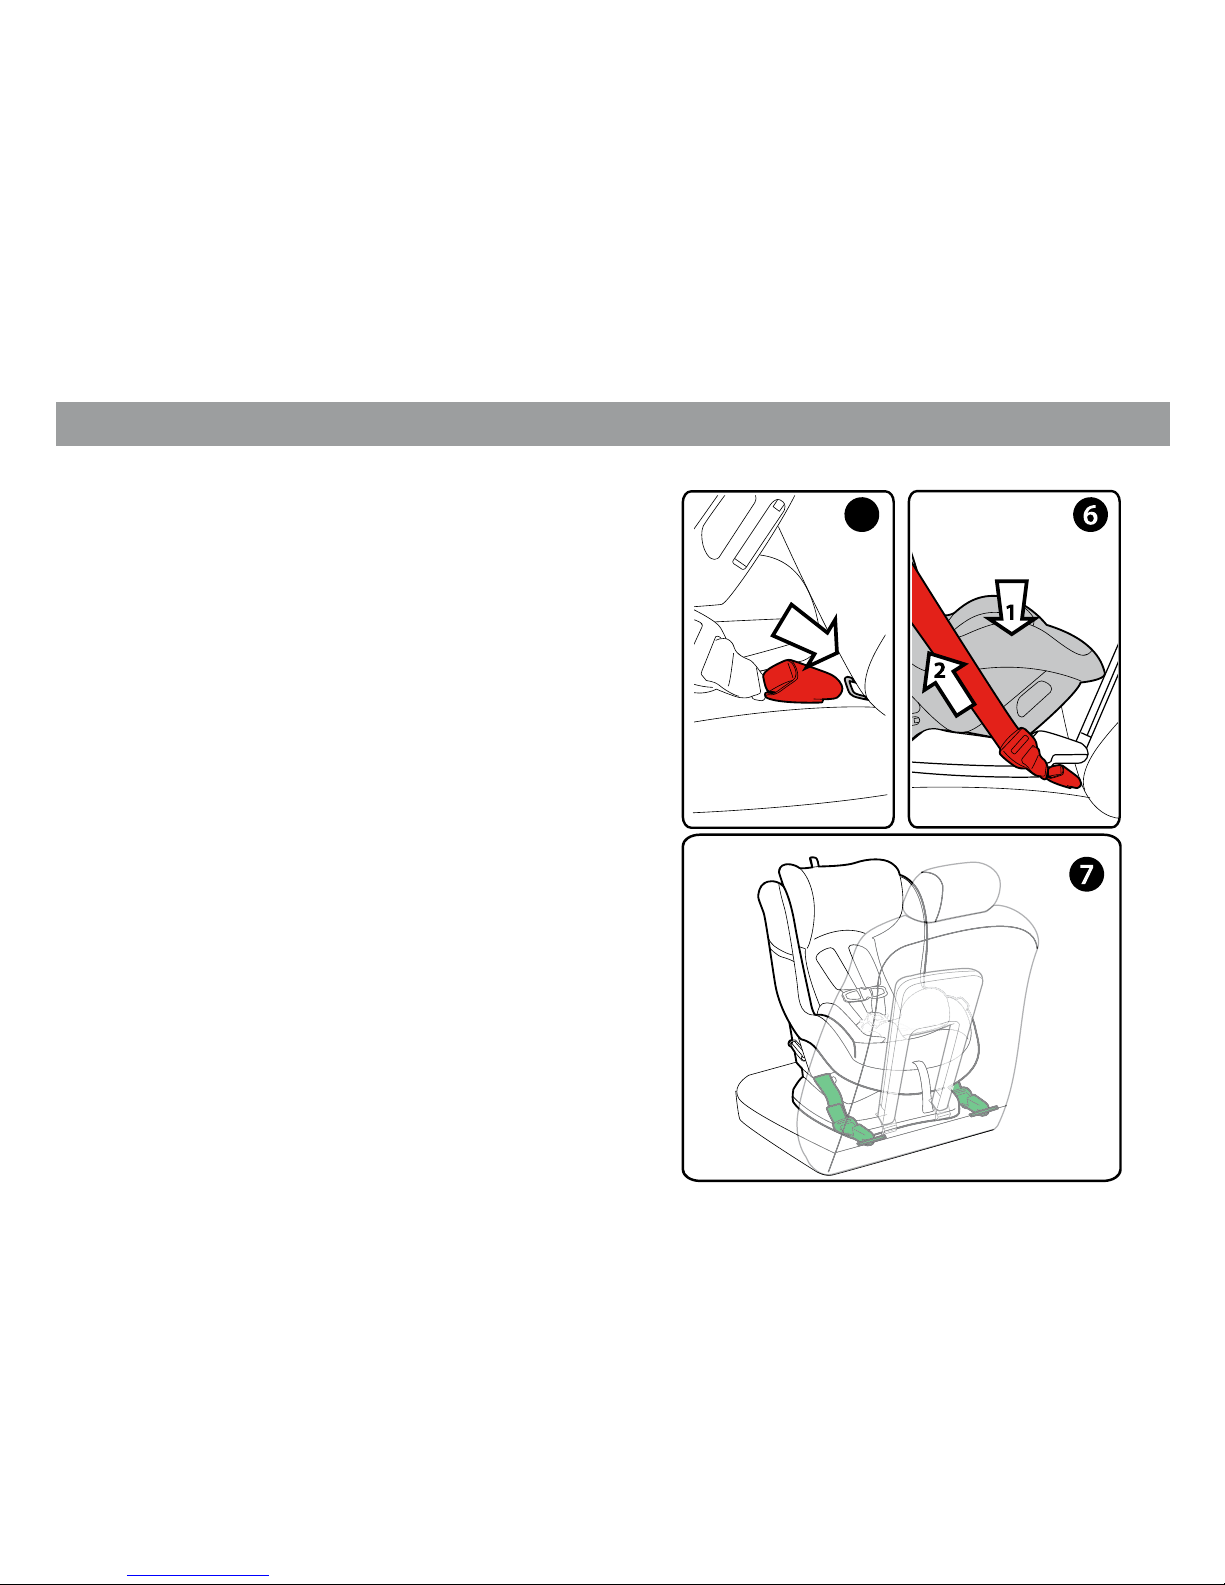
Installing your child restraint in the vehicle
5. Attach the lower connectors to the lower
anchors of your vehicle located at the joint
line between seat and backrest. Check your
vehicle owner’s manual to learn what is the
best place for your child restraint. When
the LUAS straps are connected to the lower
anchors, an audible click will be heard. If
this is not the case, repeat the operation
and double check that the latch is attached
and working by trying to pull the lower
connector away from the lower anchor.
6. Push down the child restraint (1) into
the seat with your own body weight and
at the same time pull the strap ends in
order to tighten the latch straps (2). Check
that the connectors are evenly tightened
and that the seat is not leaning sideways.
7. Picture shows the correct strap path
when the seat is attached using the
LUAS connectors. Make sure the seat is
properly leveled as explained on page 19.
Verify that the child restraint is secure. A
secure child restraint will not move more
than 2.5 cm (1 inch) near the latch anchors.
5
Page 26

- 26 -
Installing your child restraint in the vehicle
IMPORTANT NOTE
: Unless where
specied dierently, lower anchors (LUAS)
may be used for a child whose weight is less
than 18 kg (40 lbs). However most car lower
anchors can withstand much greater forces.
Please, check your vehicle owner’s manual
or contact the vehicle manufacturer in order
to determine what the weight limit is for
the use of lower anchors. When the weight
of occupant is beyond these limits, vehicle
seatbelt must be used to install the child
restraint properly and securely.
Page 27
- 27 -
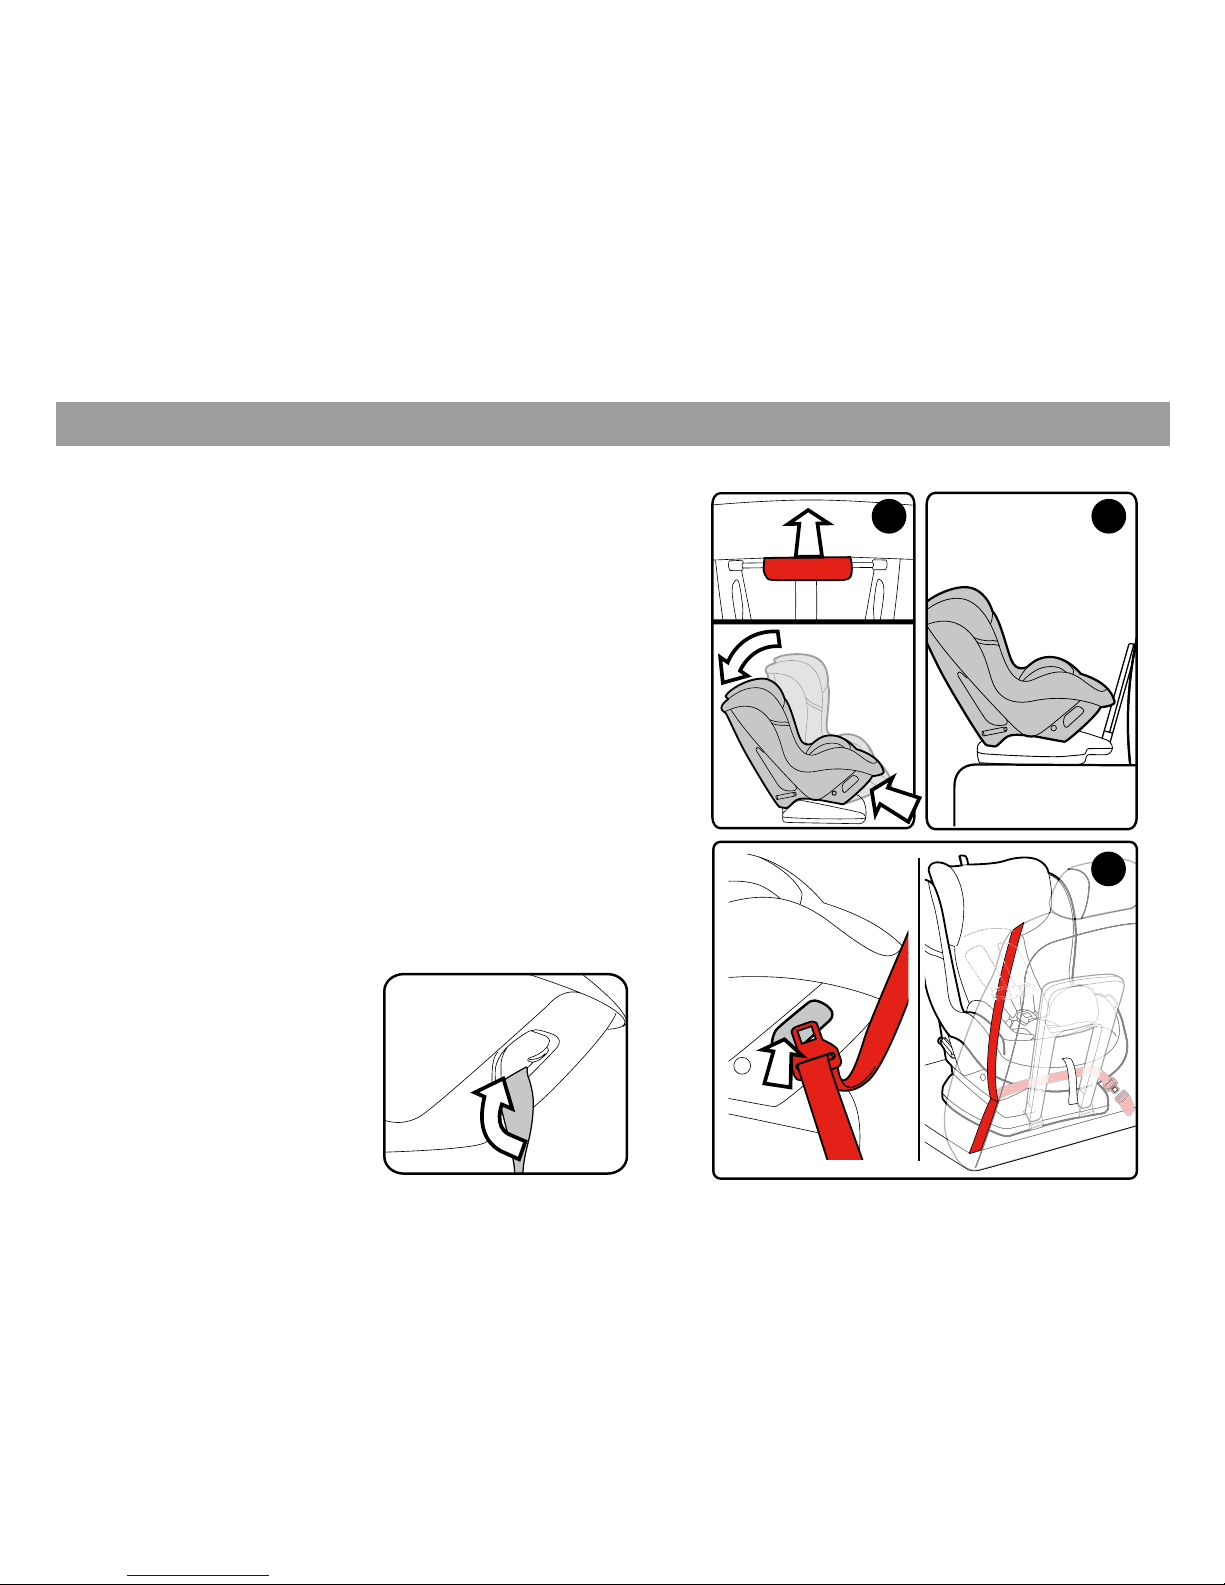
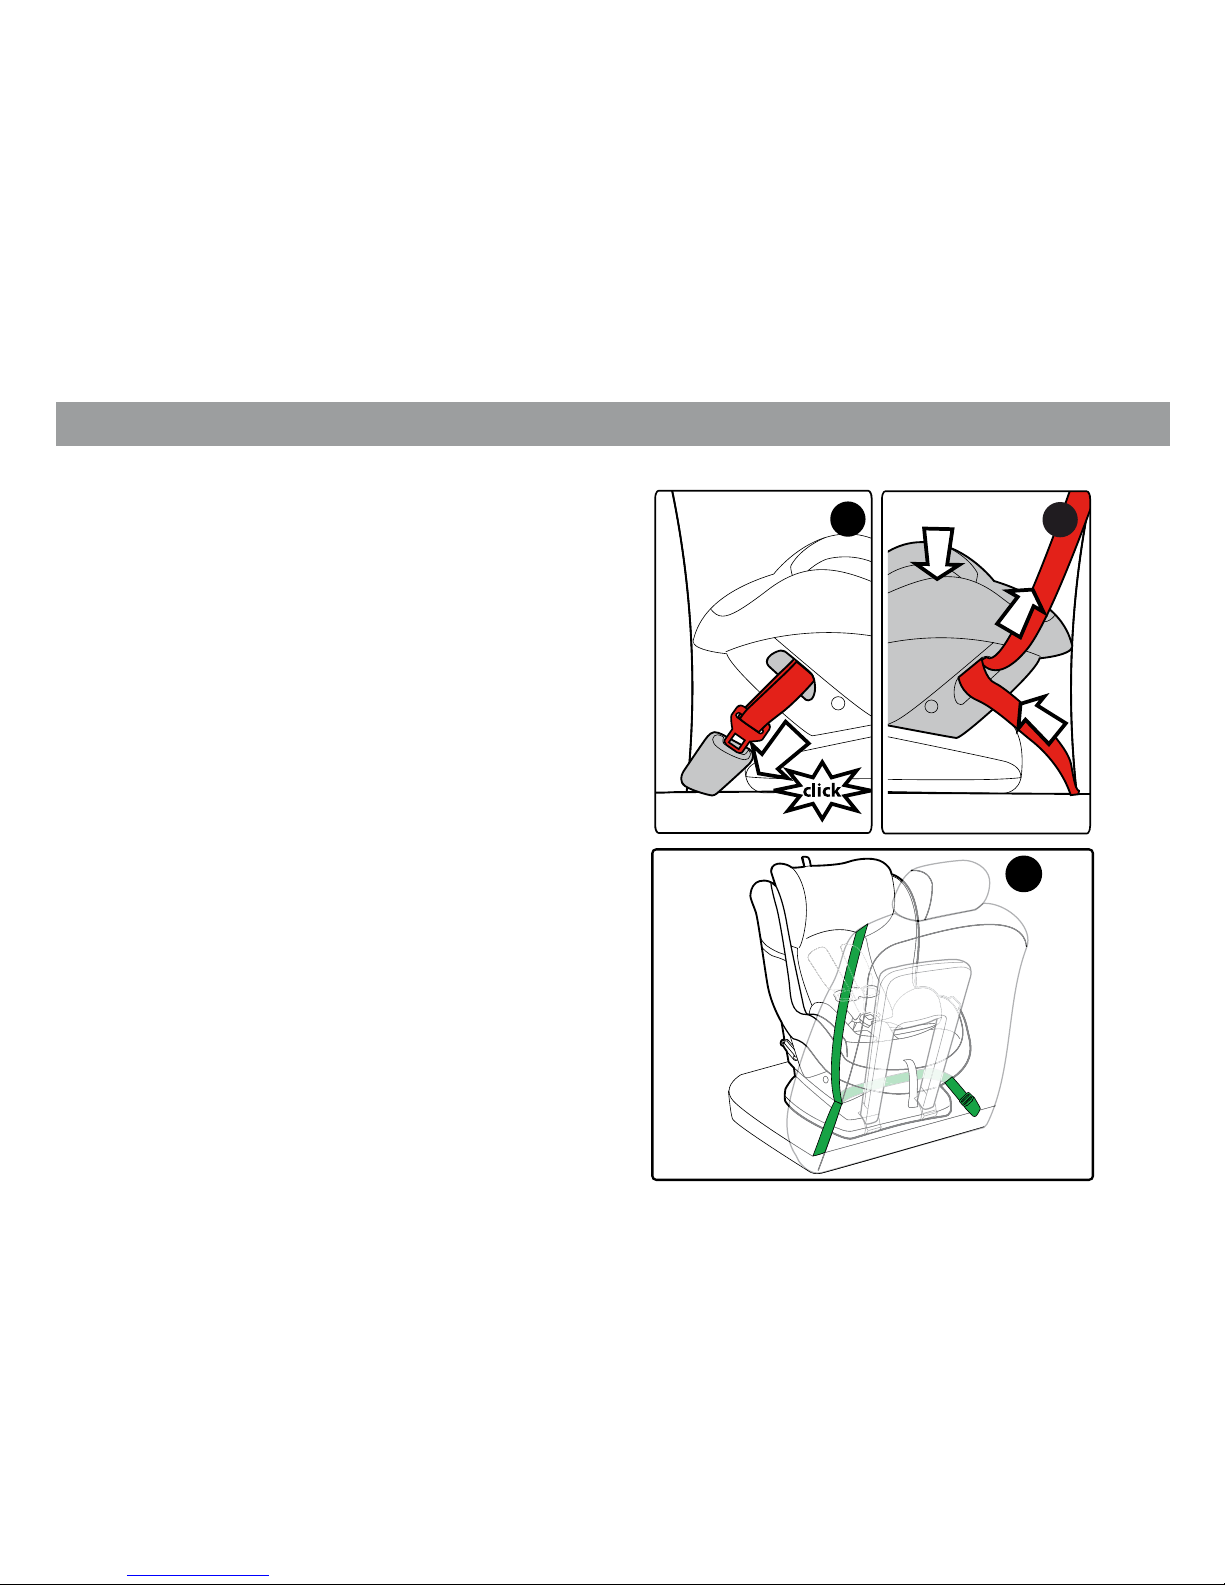
Installing your child restraint in the vehicle
REAR FACING MODE USING LAP/
SHOULDER BELT (TYPE II)
1. Recline the child restraint to the rearfacing
position as shown in the picture. To recline
the child restraint, pull the handle located
below the front edge of the shell (A) as shown
in detail. An audible "click" is heard when the
seat is properly locked into position.
2. Disengage the rebound bar under the seat
and rotate it until it clicks in position as shown
at page 24. Lean the reclined child restraint,
unoccupied, on the selected vehicle seat.
3. Pull the vehicle belt at full available length
and thread both the lap and shoulder portion
of the belt through the openings under the
seat area as shown in
the picture.
IMPORTANT: check inside
the shell openings; verify
that the waist position of
the belt is placed as shown
in the picture.
3
21
A
A
B
Page 28
- 28 -
Installing your child restraint in the vehicle
4. Buckle the vehicle belt and check under the
seat that the adjuster strap is not entangled
with the vehicle seat belt.
5. Push the child restraint rmly into the
vehicle seat and pull the vehicle belt in order
to eliminate any slack. Follow the procedure
shown in the picture making sure that while
the child restraint is pushed down (A), the lap
portion of the belt is pulled from the xed
point toward the buckle (B). Then pull the
diagonal portion of the belt upwards (C).
6. The picture shows the correct belt path
when the child restraint is attachd to the
vehicle using a lap/shoulder belt.
Make sure the child restraint is properly
leveled as explained on page 19.
Verify that the child restraint is secure. A
secure child restraint will not move more than
2.5 cm (1 inch) near the latch anchors.
4
5
A
B
C
6
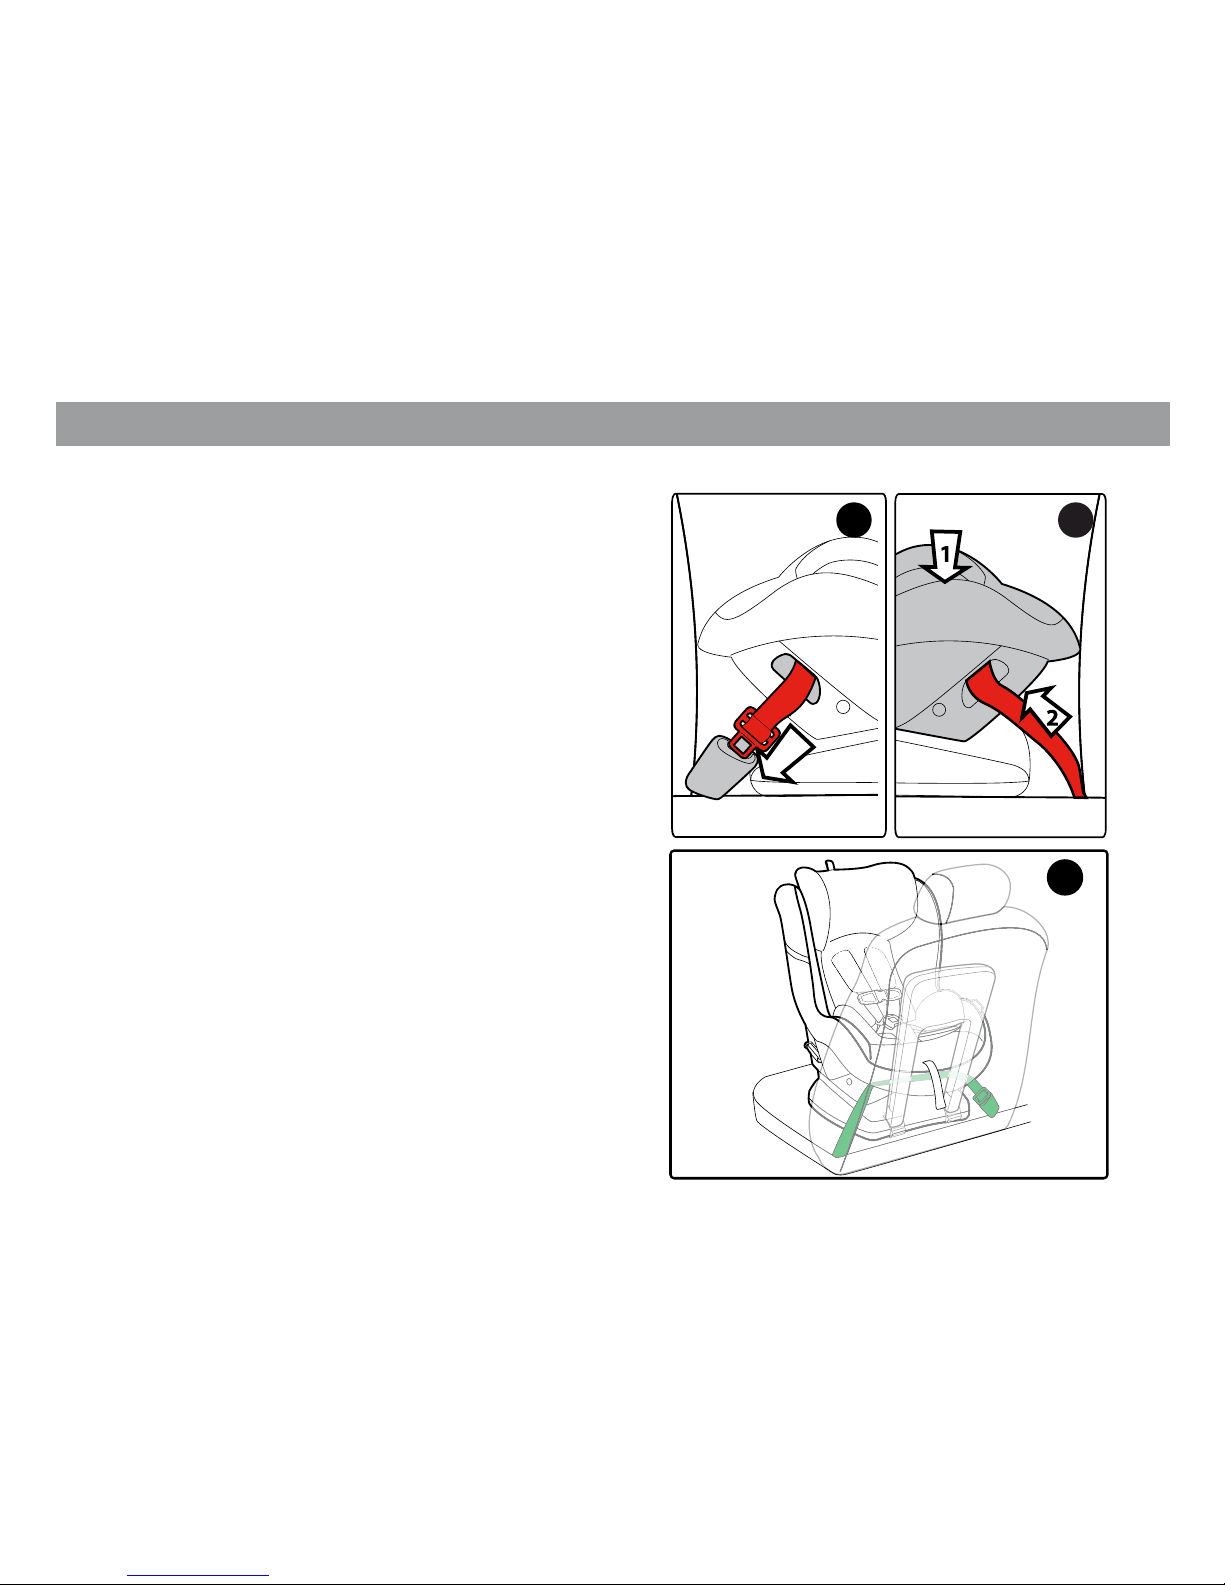
Page 29
- 29 -
REAR FACING MODE USING LAP
BELT (TYPE I)
1. Recline the child restraint to the rearfacing
position as shown in the picture. To recline
the seat, pull the handle located below the
front edge of the shell (A) as shown in detail.
An audible "click" is heard when the seat is
properly locked into position.
2. Disengage the rebound bar under the seat
and rotate it until it clicks in position as shown
at page 19. Lean the reclined child restraint,
unoccupied, on the selected vehicle seat.
3. Pull the vehicle belt at full available length
and thread through the openings under the
seat area as shown in the picture.
IMPORTANT: check inside
the shell openings;
verify that the belt is
placed as shown
in the picture.
Installing your child restraint in the vehicle
21
3
A
A
B
Page 30
- 30 -
4. Under the seat that the adjuster strap is
not entangled with the vehicle seatbelt.
5. Push the seat rmly into the vehicle seat
(1) and pull the vehicle belt (2) in order
to tighten the seat, eliminating any slack.
6. The picture shows the correct belt path
when the seat is attachd to the vehicle using
a lap belt .
Once the installation is completed check that
the seat is properly levelled following the
section on page 19.
Verify that the child restraint is secure. A
secure child restraint will not move more than
2.5 cm (1 inch) near the latch anchors.
Installing your child restraint in the vehicle
4
5
1
6
Page 31

- 31 -
Installing your child restraint in the vehicle
Important! Remove newborn ller cushion in
forward facing mode (see page 46).
Important! Do not use rebound bar in forward
facing mode.
FORWARD FACING MODE
USING LUAS STRAPS
1. Recline the child restraint pulling the
handle located below the front edge of the
shell (A) as shown in detail. This will make
access to the latch storage area easier.
2. Disconnect the latch straps from the
storage bar by pushing on the red button
and pulling the straps at the same time.
3. Pull the handle and move the child restraint
to the upright position. You should hear a "click"
when locked in the upright position. Lean the
child restraint on the vehicle seat making
sure that the lock o clips are closed.
Take the LUAS strap from front to rear
sliding the straps along their tubing.
1
A
A
B
3
2
Page 32

- 32 -
4. Attach the lower connectors to the lower
anchors of your vehicle located at the joint
line between seat and backrest. Check your
vehicle owner’s manual to learn what is
the best place for your car . When the LUAS
straps are connected to the lower anchors, an
audible click will be heard. If this is not the
case, repeat the operation and double check
that the latch is attached and working by
trying to pull the lower connector away from
the lower anchor.
5. Push down the child restraint (A) into the
seat with your own body weight and at the
same time pull the strap ends (B) in order
to tighten the latch straps. Check that the
connectors are evenly tightened and that the
seat is not leaning sideways.
6. Attach TOP TETHER strap to your vehicle
following instructions at page 20.
Verify that the child restraint is secure. A
secure child restraint will not move more
than 2.5 cm (1 inch) near the seat belt anchors.
Installing your child restraint in the vehicle
54
6
A
B
Page 33

- 33 -
IMPORTANT NOTE: Unless where
specied dierently, lower anchors (LUAS)
may be used for a child whose weight is less
than 18 kg (40 lbs). However most vehicle
lower anchors can withstand much greater
forces. Please, check your vehicle owner’s
manual or contact the vehicle manufacturer
in order to determine what the weight limit
is for the use of lower anchors. When the
weight of the child is beyond these limits, the
vehicle seatbelt must be used to install the
child restraint properly and securely.
Installing your child restraint in the vehicle
Page 34

- 34 -
Installing your child restraint in the vehicle
WARNING: Do not use lockoff clips in
forward facing mode for children whose
weight is less than 11 kg (25lbs).
Important! Remove newborn ller cushion
in forward facing mode (see page 46).
Important! Do not use rebound
bar in forward facing mode.
FORWARD FACING MODE USING LAP/
SHOULDER BELT (TYPE II)
1. Make sure that the backrest is in the upright
position or adjust it using the handle below
the front edge of the shell (A).
2. Lean the upright child restraint,
unoccupied, on the selected vehicle seat.
Make sure that the LUAS straps are stored in
their proper location (page 31 - picture2) and
that the rear openings in the structure are
free and ready for use. Open the lock o clips
on both sides as shown in the picture.
3. Pull the vehicle belt at full available
length and thread both the lap and shoulder
portions of the belt through the openings in
the structure behind the child restraint.
4. Buckle the vehicle belt and check that the
vehicle belts are both threaded through
the openings, free of any entanglement.
4
3
A
A
B
1 2
Page 35

- 35 -
Installing your child restraint in the vehicle
5. Push the child restraint rmly into the
vehicle seat and pull the vehicle belt in order
to tighten the child restraint, eliminating
any slack. Follow the procedure shown in
the picture making sure that while the seat
is pushed down (A), the lap portion of the
belt is pulled from the xed point toward the
buckle (B). Then pull the diagonal portion of
the belt (C).
6. Make sure that only the lap portion of the
belt passes through the opened locko clips
and then close them on both sides following
the procedure shown in picture (D and E).
7. Attach TOP TETHER strap to your
vehicle following instructions at page 20.
Picture shows the correct belt pattern
when the child restraint is installed
in the forward facing mode using a
lap and shoulder belt and top tether.
Verify that the child restraint is secure. A
secure child restraint will not move more
than 2.5 cm (1 inch) near the seat belt anchor.
5
6
7
A
B
C
D
E
Page 36

- 36 -
Installing your child restraint in the vehicle
Important! Remove newborn ller cushion in
forward facing mode (see page 46).
Important! Do not use rebound bar in forward
facing mode.
FORWARD FACING MODE USING
LAP BELT (TYPE I)
1. Before installing the child restraint in the
vehicle, make sure that the backrest is in the
upright position or adjust it using the handle
located below the front edge of the shell (A)
as shown in detail.
2. Lean the upright child restraint, unoccupied,
on the selected vehicle seat. Make sure that
the LUAS straps are stored in their proper
location (page 31 - picture2) and that the rear
openings in the structure are free and ready
for use. Open the lock-o clips, as shown in
the picture .
3. Pull the vehicle belt at full available length
and thread the belt through the openings
in the structure behind the child restraint as
shown in the picture.
4. Buckle the vehicle belt and check that the
vehicle belt is free of any entanglement.
4
2
3
A
A
B
1
Page 37

- 37 -
5. Push the child restraint rmly into the
vehicle seat (A) and pull the vehicle belt (B)
in order to tighten the seat, eliminating any
slack.
6. Make sure that the belt passes through
the opened locko clips and then close
them on both sides following the procedure
shown in picture (C and D).
7. Attach TOP TETHER strap to your vehicle
following instructions at page 20.
Picture shows the correct belt pattern when
the product is installed in the forward facing
mode using a lap belt and top tether.
Verify that the child restraint is secure. A
secure child restraint will not move more
than 2.5 cm (1 inch) near the seat belt
anchors.
5
7
6
A
D
C
B
Installing your child restraint in the vehicle
Page 38

- 38 -
Installing your child restraint in an aircraft
This child restraint is certied for use in an
aircraft. Most airlines should allow the use of
a restraint which is labelled for use according
to FAA regulations.
However, due to the size and weight of
the Primo Viaggio SIP Convertible, it is
recommended that airline is contacted for
further information prior to booking or ight.
Aircraft seatbelts are waist only type (Type I
belt).
1. Installation in rear facing mode: please refer
to the section on page 29 for proper belt t.
IMPORTANT: Do not use rebound bar; keep
rebound bar under the seat base.
1
Page 39

- 39 -
Installing your child restraint in an aircraft
2. Installation in forward facing mode:
please refer to page 36 for proper belt t.
Use of locko clips is not required.
After installation make sure that the child
restraint is properly levelled and safely rm
on the aircraft seat. Should you need further
help, please contact aircraft crew.
2
Page 40

- 40 -
Securing your child into the child restraint
1. This child restraint uses a 5 point harness
system to secure your child. Before placing
your child in the seat, push the release button
(A) and pull the shoulder straps (B) as shown
in the picture.
2. Open the buckle by pushing on the
red button (C) as shown in the picture.
Open the chest clip following the procedure
shown in the picture (A and B).
3. Insert the buckle tongues into the side
bands and pull the crotch portion of the
harness assembly in forward position, to
make room for your child. Make sure that the
seating area is free of any harness or other
objects.
A
A
B
2
1
A
B
B
D
C
3
Page 41

- 41 -
Securing your child into the child restraint
4. Put your child in the child restraint with his/
her bottom and back at against the child
restraint.
Bring the two shoulder straps over your
child’s shoulders. Make sure that the straps
are not twisted behind the backrest or over
your child’s chest.
Check that the harness is at the right shoulder
height.
When the child restraint is used in rear
facing mode, the correct shoulder position
is when the shoulder straps are located at
or just below shoulder level, as shown in the
picture.
5. When the child restraint is used in forward
facing mode, the correct shoulder position
is when the shoulder straps are located at
or just above shoulder level, as shown in the
picture.
4
RF
REAR FACING
5
FF
FORWARD FACING
Page 42

- 42 -
Securing your child into the child restraint
6. To adjust the shoulder strap level,
from bottom to top, pull the arrow strap
located on top of headrest until the panel is
disengaged and able to move. Once the
desired position is reached, make sure that
the panel is properly latched.
To adjust the shoulder strap level from top to
bottom pull the arrow strap with one hand
and push the panel down with the other
hand at the same time. Check that the panel
is properly latched.
Note: The lower 7 head panel positions can
be used in the rear facing mode. Positions 8,
9 and 10 should only be used in the forward
facing mode.
7. Insert both latch plates into the buckle
until you hear them click. Pull on the straps
to make sure that both plates are latched
securely.
10
9
8
7
6
5
4
3
2
1
10
9
8
7
6
5
4
3
2
1
6
7
Page 43

- 43 -
Securing your child into the child restraint
8. The harness is equipped with a chest
clip. This device is used in order to
guarantee that the shoulder harness is
positioned correctly on the shoulder,
preventing the risk of the straps falling down
the shoulder in an accident.
To close the chest clip push the two parts
together as shown.
9. To tighten the harness, pull the adjuster
strap at the bottom of the child restraint until
strap is snug. Make sure you leave one nger
width between the harness and your child’s
collar bone.
8
9
Page 44

- 44 -
10. When the harness is tightened, check that
the chest clip is at arm pit level. If necessary
remove the shoulder pads (attached with
Velcro) as they are not considered as safety
features.
Important! A snug strap should not allow
any slack. It lies in a relatively straight line
without sagging. It does not press on the
child’s flesh or push the child’s body into an
unnatural position.
11. To loosen the harness, press and hold
the harness adjuster button inside the slot
located at your child’s feet and pull the top
harness as shown in the picture.
To undo the latch plates, press the red button
and pull the latches up.
10
11
1
22
Securing your child into the child restraint
Page 45

- 45 -
CROTCH STRAP ADJUSTMENT
12. Your Primo Viaggio SIP Convertible is
equipped with a repositionable crotch strap.
The child restraint is assembled with the
crotch located in the forward position (A).
However, for children up to 10 kg (22 lbs),
the crotch strap must be relocated in the rear
position (B).
To change position, lift the upholstery so that
the crotch attachment is visible (g.1).
Remove the crotch metal plate from above
(g.2).
Insert the metal plate from above in position
B, then turn the strap below the shell so that
the metal plate is pulled out and locked in
position A (g.3)
Pull the buckle through the buckle pad and
through the seat upholstery.
Securing your child into the child restraint
A
B
12
B
1
2
3
Page 46

- 46 -
13. To complete the operation, put the soft
cover on the crotch in the new position by
sliding the buckle through the openings in
the upholstery and in the croch protection
14. Important! The seat is supplied
with a specically designed ller
cushion for smaller children. This
cushion must be used in rear facing
mode only; this cushion must be
used for children up to 10 kg (22 lbs).
14
13
Securing your child into the child restraint
Page 47

- 47 -
Cleaning and maintenance
1. Pull the head panel all the way up. Detach
shoulder belts from rear metal plate in the back
of the child restraint. Turn it around and pull
the straps from the openings at shoulder level.
1
Your child restraint requires a minimum of cleaning and maintenance. Do not clean with harsh
products or solvents. Keep moving parts clean. In case, clean plastic parts with a damp cloth.
Do not use water with harness and latching mechanisms. Protect it from extreme cold, water,
rain and sun exposure. Prolonged exposures to these elements can change the colors in the
material but also change their mechanical properties. Store it in a dry area if not used for long
periods. Warning! Do not use or purchase the child restraint 7 years after the production date
labelled on the seat or shell. The upholstery is likely to be removed and cleaned frequently.
Follow the procedure below to remove the fabric and reassemble it properly. Check the child
restraint features before disassembly and make sure that the same features are still working
once it is set up for use again. Extra care is required when removing padding to avoid breaking
the white EPS panels on the product.
Page 48

- 48 -
2. Remove head panel padding following
the procedure (1, then 2). Take care of the
soft white EPS insert.
3.
Undo the lower part of upholstery and
remove it from the crotch strap. The crotch
portion of the harness does not need to be
removed.
4. Pull the bottom part of the upholstery
upward making sure that the shoulder
belts are let through the side openings.
2
1
2
3
3
4
Cleaning and maintenance
Page 49

- 49 -
5. Check that the adjuster is free of food
particles or debris that could prevent correct
functioning.
6. Remove the padding from bottom to top
making sure that the side impact wings white
EPS are not bent or broken in the process.
5
6
1
2
3
Cleaning and maintenance
Page 50

- 50 -
7. To reassemble the upholstery, start from
the head panel opening as shown in the
sequence. Then put the head panel cover on.
Pull shoulder straps up through slots in the
bottom of the upholstery. Pull crotch strap
through hole in upholstery. Push shoulder
straps through head pad.
8. Properly connect shoulder straps. Make
sure that the harness is reconnected properly
to the rear plate. The central adjuster strap
must pass behind the plastic shield as shown.
7
3
2
1
8
Cleaning and maintenance
Page 51

- 51 -
Cleaning and maintenance
PADDING CLEANING INSTRUCTIONS
Machine wash, max temperature 30°C (86°F).
30
°
Page 52

- 52 -
Replacement Parts
4
3
1 2
1) BSACOB*
2) BRICOB*
3) MUCI0076GR
4) BAKCOB*
NOTE: Spare parts available in different
colors* to be specified when ordering.
Page 53

- 52 -
Pièces détachées
4
3
1 2
1) BSACOB*
2) BRICOB*
3) MUCI0076GR
4) BAKCOB*
REMARQUE: Des pièces détachées sont
disponibles en différentes couleurs * à
indiquer dans la commande.
Page 54

- 51 -
Nettoyage et entretien
ENTRETIEN DU REMBOURRAGE
Laver en machine, température maximale 30°C
(86°F).
30
°
Page 55

- 50 -
7. Pour remonter le capitonnage procédez
à partir de l’ouverture du panneau de tête
comme le montre la séquence. Puis remettez
en place le revêtement du panneau de tête.
Tirez les sangles d’épaule vers le haut à
travers les fentes au bas du capitonnage.
Tirez la sangle d’entrejambe à travers le trou
du capitonnage. Poussez les sangles d’épaule
à travers le capitonnage de tête.
8. Raccordez correctement les sangles
d’épaule. Vériez si le harnais est correctement
xé sur la plaque arrière. La sangle centrale
de réglage doit passer derrière l'écran en
plastique de la façon illustrée.
7
3
2
1
8
Nettoyage et entretien
Page 56

- 49 -
5. Vériez l’absence de restes de nourriture
ou d'autres débris sur le dispositif de réglage,
susceptibles de l’empêcher de fonctionner
correctement.
6. Retirez les rembourrages de bas en haut
en veillant à ne pas plier, ni casser les ailettes
latérales de protection en EPS blanc
5
6
1
2
3
Nettoyage et entretien
Page 57

- 48 -
2. Retirez le rembourrage du panneau de
tête en suivant la procédure (1 puis 2). faites
attention à l’insert souple en EPS blanc.
3. Défaites le bas du capitonnage et retirez-
le de la sangle d’entrejambe. La portion
d’entrejambe du harnais n’a pas besoin
d’être retirée.
4. Tirez le bas du capitonnage vers le haut
en vériant si les sangles d’épaule passent à
travers les ouvertures.
2
1
2
3
3
4
Nettoyage et entretien
Page 58

- 47 -
Nettoyage et entretien
1. Tirez toute la mole panneau de tête vers
le haut. Détachez les sangles d’épaule de
la plaque métallique au dos du siège auto.
Retournez-le et tirez les sangles à travers
les ouvertures au niveau des épaules.
1
Votre siège auto ne demande que très peu de nettoyage et d'entretien. Ne le nettoyez pas
avec un produit agressif, ni avec un solvant. Nettoyez les parties mobiles. Nettoyez au besoin
les parties en plastique avec un chion humide. N’utilisez pas d’eau sur les mécanismes du
harnais et de fermeture. Ne l’exposez ni au froid extrême, ni à l'eau, ni à la pluie, ni au soleil.
L’exposition prolongée à ces éléments risque non seulement de décolorer les matériaux
mais aussi de modier leurs propriétés mécaniques. Rangez-le au sec si vous ne l'utilisez
pas pendant longtemps. Avertissement! N’utilisez ni n’achetez un siège auto plus de 7 ans
après sa date de fabrication gravée sur le siège ou la coque. Le capitonnage peut être retiré
et nettoyé fréquemment. Procédez de la façon indiquée ci-dessous pour retirer et remonter
correctement le capitonnage. Vériez les éléments du siège auto avant de le démonter et
assurez-vous de leur bon fonctionnement après
le remontage. Faites très attention quand vous
retirer les rembourrages an de ne pas casser la
mousse blanche EPS du siège.
Page 59

- 46 -
13. Pour nir, placez le revêtement souple
sur la sangle dans la nouvelle position
en faisant glisser la bouche à travers
les ouvertures du capitonnage et la
protection de l’entrejambe.
14. Important! Le siège est vendu avec
un coussin spécial pour les enfants
plus petits. Ce coussin ne doit être
utilisé qu’en mode face vers l’arrière;
ce coussin doit être utilisé avec les
enfants de moins de 10 kg (22 livres).
14
13
Attacher votre enfant dans le siège auto
Page 60

- 45 -
RÉGLAGE DE LA SANGLE D’ENTREJAMBE
12. Votre Convertible Primo Viaggio
est équipé d’une sangle d’entrejambe
repositionnable. Le siège auto est monté avec
la patte d'entrejambe en position en avant
(A). Cependant, la sangle d'entrejambe doit
être mise en position en arrière (B) pour les
enfants pesant moins de 10 kg (22 livres).
Pour la déplacer, soulevez le capitonnage de
façon à voir le point de xation de l’entrejambe
(g.1). Retirez la plaque métallique de
l’entrejambe par le dessus (g.2). Enlez
la plaque métallique par le dessus dans
la position B, puis repliez la sangle sous la
coque de façon à ce que la plaque métallique
ressorte et immobilisez-la en place A (g. 3).
Tirez la boucle à travers la patte de la boucle
et à travers le capitonnage du siège.
Attacher votre enfant dans le siège auto
A
B
12
B
1
2
3
Page 61

- 44 -
10. Lorsque le harnais est serré, vériez si
la pince de poitrine se trouve au niveau de
l'aisselle. Au besoin, retirez les rembourrages
d’épaule (xés avec du Velcro) car ce ne sont
pas des dispositifs de sécurité.
Important! Si la sangle est ajustée elle doit
être bien tendue. Elle est pratiquement droite
et bien tendue. Elle n'exerce pas de pression
sur la peau de l'enfant et ne pousse pas le corps
de celui-ci dans une position non-naturelle.
11. Pour desserrer le harnais, appuyez sans
le lâcher sur la touche de réglage du harnais
dans la fente située au pied de votre enfant
et tirez sur le haut du harnais de la façon
illustrée par la gure.
Pour défaire les plaques de verrouillages,
appuyez sur la touche rouge et tirez les
attaches vers le haut.
10
11
1
22
Attacher votre enfant dans le siège auto
Page 62

- 43 -
Attacher votre enfant dans le siège auto
8. Le harnais est muni d’une pince de poitrine.
Ce dispositif sert à garantir que le harnais
d’épaule est correctement placé sur l’épaule,
et à éviter que les sangles ne tombent des
épaules en cas d’accident.
Pour fermer la pince de poitrine poussez les
deux parties l’une vers l’autre.
9. Pour serrer le harnais, tirez sur la sangle de
réglage au bas du siège auto jusqu’à ce que
la sangle soit ajustée étroitement. Laissez
l’espace d’un doigt entre le harnais et la
clavicule de votre enfant.
8
9
Page 63

- 42 -
Attacher votre enfant dans le siège auto
6. Pour régler le niveau de la sangle d'épaule,
de bas en haut, tirez la sangle avec la èche
placée en haut de l’appui-tête jusqu’à ce que
le panneau se libère et puisse bouger. Lorsque
vous avez atteint la position voulue, vériez si
le panneau est correctement attaché. Pour
régler le niveau de la sangle d’épaule de haut
en bas tirez sur la sangle avec la èche d’une
main tout en poussant le panneau vers le bas
de l’autre. Vériez si le panneau est
correctement attaché.
Note: Les 7 positions les plus basses de l'ap-
puie-tête peuvent être utilisées en mode face
à l'arrière. Les positions 8, 9 et 10 doivent être
utilisées uniquement en mode face à l'avant.
7. Enlez les deux plaques de verrouillage
dans la bouche jusqu’au déclic. Tirez sur les
sangles pour vérier si les deux plaques sont
solidement verrouillées.
10
9
8
7
6
5
4
3
2
1
10
9
8
7
6
5
4
3
2
1
6
7
Page 64

- 41 -
Attacher votre enfant dans le siège auto
4. Installez votre enfant dans le siège auto
avec le bas de son dos appuyé contre le siège.
Faites passer les deux sangles d’épaule par
dessus les épaules de votre enfant. Vériez si
les sangles ne sont pas entortillées derrière le
dossier ou sur la poitrine de votre enfant.
Vériez si le harnais se trouve à la bonne
hauteur d’épaule.
Si vous utilisez le siège pour enfant en mode
face à l’arrière, la position d'épaule correcte
est celle où les sangles d'épaule se trouvent
au niveau ou juste au-dessous du niveau des
épaules, comme le montre la gure.
5. Si vous utilisez le siège pour enfant en mode
face à l’avant, la position d'épaule correcte
est celle où les sangles d'épaule se trouvent
au niveau ou juste au-dessus du niveau des
épaules, comme le montre la gure.
4
FACE À L’ARRIÈRE
5
MODE FACE À L’AVANT
Page 65

- 40 -
Attacher votre enfant dans le siège auto
1. Ce siège auto utilise un harnais à 5 points
d’ancrage pour garantir la sécurité de votre
enfant. Avant d'installer votre enfant sur le
siège, appuyez sur la touche d'ouverture (A)
et tirez sur les sangles d’épaule (B) de la façon
illustrée par la gure.
2. Ouvrez la boucle en appuyant sur le bouton
rouge (C) de la façon illustrée par la gure.
Ouvrez la pince de poitrine en procédant de
la façon illustrée par la gure (A et B).
3. Enlez les languettes de la boucle dans
les bandes latérales et tirez la portion
d’entrejambe du harnais vers l'avant pour
laisser de la place à votre enfant. Vériez si la
surface de l'assise n'est encombrée ni par le
harnais ni par d’autres objets.
A
A
B
2
1
A
B
B
D
C
3
Page 66

- 39 -
Installation du siège-auto de votre enfant dans un avion
2. Installation en mode à vers l’avant : veuillez
consulter la page 36 pour xer correctement
la ceinture.
Les attaches de verrouillage ne sont pas
nécessaires.
Après l’installation, vériez si le siège auto
est bien à niveau et solidement xé sur
le siège de l'avion. Si vous avez besoin
d’aide, demandez au personnel de l'avion.
2
Page 67

- 38 -
Installation du siège-auto de votre enfant dans un avion
Ce siège auto est homologué pour l’usage
en avion. La plupart des lignes aériennes
acceptant les sièges auto estampillés
conformes aux règlements FAA.
Cependant, en raison du poids et de la
dimension du Convertible Primo Viaggio SIP,
nous vous recommandons de demander de
plus amples informations à votre compagnie
aérienne au moment de votre réservation.
Les ceintures de sécurité des avions ne sont
que du type corps (Ceinture du type I).
1. Installation en mode face à l’arrière: veuillez
consulter le chapitre de la page 29 pour xer
correctement la ceinture.
IMPORTANT: N’utilisez pas la barre anti-
rebond, que vous rangerez sous la base du
siège.
1
Page 68

- 37 -
5. Poussez avec force le siège auto sur le
siège du véhicule (A) et tirez sur la ceinture du
véhicule (B) pour serrer le siège et la tendre
parfaitement A.
6. Veillez à ce que la ceinture passe à travers
les attaches de verrouillage ouvertes puis
refermez-les des deux côtés de la façon
illustrée par la gure (C et D).
7. Fixez la sangle de FIXATION SUPÉRIEURE
sur votre véhicule en procédant de la façon
indiquée à la page 20.
La gure montre la position correcte de la
sangle lorsque le siège auto est installé en
mode face vers l’avant avec une sangle de
cuisse et une Fixation supérieure.
Vériez si le siège auto est solidement xé.
Si le siège auto est correctement xé il ne se
déplace pas de plus de 2,5 cm (1 pouce) au
niveau des ancrages du siège.
5
7
6
A
D
C
B
Installation de votre siège auto sur votre véhicule
Page 69

- 36 -
Installation de votre siège auto sur votre véhicule
Important! Retirez le coussin pour nouveau-
né en mode face à l’avant (cf. page 46).
Important! N’utilisez pas la barre anti-rebond
en mode face à l’avant.
MODE FACE À L’AVANT AVEC UNE SANGLE
DE CUISSE (TYPE I)
1. Avant d'installer le siège auto sur le
véhicule, vériez si le dossier est en position
verticale ou réglez-le à l’aide du levier placé
sous le bord antérieur de la coque (A) comme
l’illustre la gure. A
2. Couchez le siège auto qui est en position
verticale, sans occupant, sur le siège du
véhicule choisi. Vériez si les sangles du LUAS
se trouvent dans leur logement (page 31 -
gure 2) et si les ouvertures à l'arrière de la
structure sont libres et prêtes à l'usage. Ouvrez
les attaches de verrouillage de la façon illustrée
par la gure.
3. Tirez toute la longueur disponible de la
ceinture du véhicule et faites-la passer à travers
les ouvertures prévues dans la structure derrière
le siège de la façon illustrée par la gure.
4. Bouclez la ceinture de sécurité du véhicule
et vériez si elle n'est pas coincée.
4
2
3
A
A
B
1
Page 70

- 35 -
Installation de votre siège auto sur votre véhicule
5. Poussez le siège auto avec force
contre le siège du véhicule et tirez sur la
ceinture de sécurité du véhicule de façon
à serrer étroitement le siège auto. Suivez
la procédure illustrée par la gure en
poussant complètement le siège auto vers
le bas (A) et en tirant la portion de sangle
du point xe vers la boucle (B). Tirez ensuite
sur la portion diagonale de la ceinture (C).
6. Veillez à ce que seule la portion de cuisse
passe à travers les attaches de verrouillage
ouvertes puis refermez-les des deux côtés
de la façon illustrée par la gure (D et E).
7. Fixez la sangle de FIXATION SUPÉRIEURE
sur votre véhicule en procédant
de la façon indiquée à la page 20.
La gure montre la position correcte de la
sangle lorsque le siège auto est installé en
mode face vers l’avant avec une sangle de
cuisse/épaule et une Fixation supérieure.
Vériez si le siège auto est solidement xé.
Si le siège auto est correctement xé il ne se
déplace pas de plus de 2,5 cm (1 pouce) au
niveau des ancrages de la ceinture du siège.
5
6
7
A
B
C
D
E
Page 71

- 34 -
Installation de votre siège auto sur votre véhicule
Attention : ne pas utiliser les barrettes
de verrouillage en mode face à l’avant si
l’enfant pèse moins de 11kg (25 livres).
Important! Retirez le coussin pour nouveau-
né en mode face à l’avant (cf. page 46).
Important! N’utilisez pas la barre
anti-rebond en mode face à l’avant.
MODE FACE À L’AVANT AVEC UNE
SANGLE DE CUISSE/ÉPAULE (TYPE II)
1. Vériez si le dossier est en position verticale
ou réglez-le à l’aide du levier placé sous le
bord antérieur de la coque (A).
2. Couchez le siège auto qui est en position
verticale, sans occupant, sur le siège du
véhicule choisi. Vériez si les sangles du
LUAS se trouvent dans leur logement (page
31 - gure 2) et si les ouvertures à l'arrière
de la structure sont libres et prêtes à l'usage.
Ouvrez les attaches de verrouillage des deux
côtés de la façon illustrée par la gure.
3.
Tirez toute la longueur disponible de la
ceinture du véhicule et faites passer les portions
de cuisse et d’épaule de la ceinture à travers les
ouvertures de la structure au dos du siège auto.
4. Bouclez la ceinture de sécurité du véhicule
et vériez si les deux sangles du véhicules
sont passées à travers les ouvertures et ne
sont ni coincées, ni emmêlées.
4
3
A
A
B
1 2
Page 72

- 33 -
REMARQUE IMPORTANTE :
A moins d’une indication contraire, vous
pouvez utiliser les ancrages inférieurs
(LUAS) si l’enfant pèse moins de 18 kg
(40 livres). Cependant la plupart des
ancrages inférieurs supportent des forces
plus importantes. Veuillez vérifier dans
le manuel de votre voiture ou demander
à un fabricant automobile de façon à
connaître la limite de poids des ancrages
inférieurs. Lorsque le poids de l'occupant
dépasse ces limites, vous devez utiliser
une ceinture de sécurité pour installer le
siège auto de façon correcte et sûre.
Installation de votre siège auto sur votre véhicule
Page 73

- 32 -
4. Fixez le connecteur inférieur sur les
ancrages inférieurs de votre véhicule situés à
la ligne de jonction entre le siège et le dossier.
Vériez dans le manuel de votre voiture quel
est le meilleur endroit où installer votre
siège auto. Lorsque les sangles du système
d’ancrage universel (LUAS) sont xées sur les
points d’ancrage inférieurs, vous entendez
un déclic. Si ce n’est pas le cas, répétez
l’opération et vériez si l’attache est présente
et fonctionne en tirant sur le connecteur
inférieur hors du point d’ancrage inférieur.
5. Poussez le siège auto (A) vers le bas dans le
siège avec tout le poids de votre corps tout en
tirant sur les extrémités des sangles (B) an de
serrer les sangles de fermeture. Vériez si les
connecteurs sont serrés de façon identique
et si le siège n'est pas penché sur le côté.
6. Fixez la sangle de FIXATION SUPÉRIEURE
sur votre véhicule en procédant de la façon
indiquée à la page 20.
Vériez si le siège auto est solidement xé.
Si le siège auto est correctement xé il ne se
déplace pas de plus de 2,5 cm (1 pouce) au
niveau des ancrages du siège.
Installation de votre siège auto sur votre véhicule
54
6
A
B
Page 74

- 31 -
Installation de votre siège auto sur votre véhicule
Important! Retirez le coussin pour nouveau-
né en mode face à l’avant (cf. page 46).
Important! N’utilisez pas la barre anti-rebond
en mode face à l’avant.
MODE FACE À L’AVANT AVEC
SANGLE LUAS
1. Inclinez le siège auto en tirant sur le levier
placé sous le bord antérieur de la coque (A) de
la façon illustrée. Cela vous permet d’accéder
plus facilement au logement de l’attache.
2. Libérez les sangles d’attache de la barre de
rangement en appuyant sur le bouton rouge
tout en tirant sur les sangles. Tirez sur la poignée
et amenez le siège auto en position verticale.
Lorsque le siège est verrouillé en position
verticale vous entendez un déclic. Inclinez le
siège auto sur le siège du véhicule en vériant
si les dispositifs de verrouillage sont fermés.
Amenez la ceinture du LUAS d’avant en arrière
en faisant glisser les sangles dans leurs tubes.
3. Fixez le connecteur inférieur sur les
ancrages inférieurs de votre véhicule situés à
la ligne de jonction entre le siège et le dossier.
Vériez dans le manuel de votre voiture
quel est le meilleur endroit où installer votre
siège auto. Lorsque les sangles du système
d’ancrage universel (LUAS) sont xées sur les
points d’ancrage inférieurs, vous entendez
un déclic. Si ce n’est pas le cas, répétez
l’opération et vériez si l’attache est présente
et fonctionne en tirant sur le connecteur
inférieur hors du point d’ancrage inférieur.
1
A
A
B
3
2
Page 75

- 30 -
4. Vériez sous le siège si la sangle de réglage
n’est pas emmêlée avec la ceinture de sécurité
du véhicule
5. Poussez avec force le siège auto sur le
siège du véhicule (1) et tirez sur la ceinture du
véhicule (2) pour serrer le siège et la tendre
parfaitement.
6. La gure illustre le parcours correct de la
ceinture lorsque le siège auto est xé sur le
véhicule à l’aide de la sangle de cuisse.
Au terme de l’installation vériez si le siège
est bien à niveau en procédant de la façon
indiquée à la page 19.
Vériez si le siège auto est solidement xé.
Si le siège auto est correctement xé il ne se
déplace pas de plus de 2,5 cm (1 pouce) au
niveau des ancrages arrière.
Installation de votre siège auto sur votre véhicule
4
5
1
6
Page 76

- 29 -
MODE FACE À L’ARRIÈRE AVEC A
SANGLE DE CUISSE (TYPE I)
1. Inclinez le siège auto en position face à
l’arrière de la façon illustrée par la figure.
Pour incliner le siège auto, tirez sur le levier
placé sous le bord antérieur de la coque
(A) de la façon illustrée. Vous entendez un
déclic lorsque le siège est correctement
verrouillé en place.
2. Dégagez la barre anti-rebond sous le
siège et faites-la pivoter jusqu’à ce qu’un
déclic signale qu'elle est en place, de la
façon illustrée à la page 19. Couchez le
siège auto incliné, sans occupant, sur le
siège du véhicule choisi.
3. Tirez toute la longueur disponible de
la ceinture du véhicule et faites-la passer
à travers les ouvertures prévues sous le
siège de la façon illustré
e par la figure.
IMPORTANT: vérifiez dans
les ouvertures de la coque;
vérifiez si la sangle est
placée de la façon illustrée
par la figure.
Installation de votre siège auto sur votre véhicule
21
3
A
A
B
Page 77

- 28 -
Installation de votre siège auto sur votre véhicule
4. Bouclez la ceinture de sécurité du
véhicule et vériez sous le siège si la sangle
d’ajustement n'est pas emmêlée avec la
ceinture de sécurité du véhicule.
5. Poussez avec force le siège auto sur le siège
du véhicule et tirez sur la ceinture de sécurité
du véhicule an de la tendre parfaitement.
Suivez la procédure illustrée par la gure en
poussant complètement le siège auto vers le
bas (A) et en tirant la portion de cuisses de la
ceinture du point xe vers la bouche (B). Tirez
ensuite la portion diagonale de la ceinture
vers le haut (C).
6. La gure illustre le parcours correct de
la ceinture lorsque le siège auto est xé sur
le véhicule à l’aide d’une sangle de cuisse/
épaule. Vériez si le siège est correctement
mis à niveau, de la façon expliqué à la page 19.
Vériez si le siège auto est solidement xé.
Si le siège auto est correctement xé il ne se
déplace pas de plus de 2,5 cm (1 pouce) au
niveau des ancrages arrière.
4
5
A
B
C
6
Page 78

- 27 -
Installation de votre siège auto sur votre véhicule
MODE FACE VERS L’ARRIÈRE AVEC
SANGLE DE CUISSE/D’ÉPAULE (TYPE II)
1. Inclinez le siège auto en position face vers
l’arrière de la façon illustrée par la gure. Pour
incliner le siège auto, tirez sur le levier B placé
sous le bord antérieur de la coque (A) de la
façon illustrée. Vous entendez un déclic lorsque
le siège est correctement verrouillé en place.
2. Dégagez la barre anti-rebond sous le siège et
faites-la pivoter jusqu’à ce qu’un déclic signale
qu'elle est en place, de la façon illustrée à la
page 24. Couchez le siège auto incliné, sans
occupant, sur le siège du véhicule choisi.
3.
Tirez toute la longueur disponible de la
ceinture de sécurité du véhicule et faites passer
la partie cuisse et la partie épaule de la ceinture à
travers les ouvertures prévues sous le siège de la
façon illustrée par la gure.
IMPORTANT: vériez dans
les ouvertures de la coque
si la position de la sangle
de corps est celle indiquée
sur la gure.
3
21
A
A
B
Page 79

- 26 -
Installation de votre siège auto sur votre véhicule
REMARQUE IMPORTANTE : A moins
d’une indication contraire, vous
pouvez utiliser les points d’ancrage
inférieurs (LUAS) si l’enfant pèse
moins de 18 kg (40 livres). Cependant
la plupart des points d’ancrage
inférieurs supportent des forces plus
importantes. Veuillez vérifier dans le
manuel de votre voiture ou demander
à un fabricant automobile de façon
à connaître la limite de poids des
ancrages inférieurs. Lorsque le poids
de l'occupant dépasse ces limites,
vous devez utiliser une ceinture de
sécurité pour installer le siège auto
de façon correcte et sûre.
Page 80

- 25 -
Installation de votre siège auto sur votre véhicule
5. Fixez les raccords inférieurs sur les points
d’ancrage inférieurs de votre véhicule situés à
la ligne de jonction entre le siège et le dossier.
Vériez dans le manuel de votre voiture quel
est le meilleur endroit où installer votre siège
auto. Lorsque les sangles du système d’ancrage
universel (LUAS) sont xées sur les points
d’ancrage inférieurs, vous entendez un déclic.
Si ce n’est pas le cas, répétez l’opération et
vériez si l’attache est présente et fonctionne
en tirant sur le connecteur inférieur hors du
point d’ancrage inférieur.
6. Poussez vers le bas le siège auto (1) sur le
siège avec tout le poids de votre corps tout en
tirant sur les extrémités de la sangle de façon
à serrer les sangles d'attache (2). Vériez si les
connecteurs sont serrés de façon identique et
si le siège n'est pas penché sur le côté.
7. La gure montre le parcours correct de
la sangle lorsque le siège est xé à l’aide
des connecteurs LUAS. Vériez si le siège
est correctement mis à niveau, de la façon
expliqué à la page 19. Vériez si le siège
auto est solidement xé. Si le siège auto est
correctement xé il ne se déplace pas de plus
de 2,5 cm (1 pouce) au niveau des ancrages
arrière.
5
Page 81

- 24 -
Installation de votre siège auto sur votre véhicule
MODE FACE À L’ARRIÈRE
AVEC SANGLE LUAS
1.
Inclinez le siège auto en position face vers
l’arrière de la façon illustrée par la gure. Pour
incliner le siège auto, tirez sur le levier placé
sous le bord antérieur de la coque (A) de la
façon illustrée. Vous entendez un déclic lorsque
le siège est correctement verrouillé en place.
2. Libérez les sangles d’attache de la barre de
rangement en appuyant sur le bouton rouge
tout en tirant sur les sangles.
3.
Dégagez la barre anti-rebond sous le siège et
faites-la pivoter jusqu’à ce qu’un déclic signale
qu'elle est en place, comme le montre la gure.
4. Faites glisser les sangles vers l’avant du
siège auto. Vériez si les sangles ne sont
pas inversées. Couchez le siège incliné, sans
occupant, sur le siège du véhicule choisi en
mode face vers l’arrière en veillant à ce que
l’avant du siège touche le dossier du siège du
véhicule.
1
A
A
B
2
Page 82

- 23 -
4. Fixez le crochet de xation sur le point
d’ancrage prévu à cet eet et tirez pour
libérer la sangle jusqu’à ce que la xation soit
complètement tendue et sans mou. La gure
illustre le point d’ancrage de la xation au dos
du siège.
5. Un autre emplacement courant est le core
de la voiture.
Installation de votre siège auto sur votre véhicule
4
5
Page 83

- 22 -
3. La xation est conçue pour éviter toute
rotation excessive en cas de choc en mode
face vers l’avant et donc pour éviter que
l’enfant ne soit heurté par des objets placés
devant lui.
Fixez le crochet de xation sur le point
d’ancrage prévu à cet eet et tirez la
sangle libre jusqu’à ce que la xation soit
complètement tendue et bien tendue. La
gure illustre le point d’ancrage de la xation
sur le plat arrière.
Installation de votre siège auto sur votre véhicule
3
Page 84

- 21 -
Installation de votre siège auto sur votre véhicule
2. Pour utiliser la xation, ouvrez l’étui en
plastique, libérez le crochet de sa xation à
l’arrière en appuyant sur la touche de l’ajusteur
pour allonger la sangle à la longueur voulue.
Si vous ne l’utilisez pas, laissez la xation
accrochée à la coque, an d'éviter qu'une
pièce métallique ne blesse votre enfant
ou un autre passager en se déplaçant
librement à l’intérieur du véhicule.
2
B
A
Page 85

- 20 -
Installation de votre siège auto sur votre véhicule
UTILISATION DE LA SANGLE DE
FIXATION SUPÉRIEURE
1. La xation supérieure est une sangle
xée en haut de la coque du Convertible
Primo Viaggio SIP, munie d’un crochet et
d’un ajusteur. Utilisé en mode face vers
l’avant votre Convertible Primo Viaggio
SIP est certié s'il est associé à une xation
supérieure et à une sangle de cuisses,
une sangle de cuisses et d’épaules ou
un système d’ancrage universel (LUAS).
La xation supérieure doit en outre être xée
sur des points attache adéquats sur le véhicule.
Pour trouver ces points sur le véhicule,
veuillez consulter le manuel de votre voiture.
Ne xez pas la xation supérieure de
Primo Viaggio sur les points d’ancrage
du véhicule qui ne sont pas destinés à
ancrer un siège auto car ils risquent de
ne pas être ecaces en cas d’accident.
Toujours utiliser Top Tether face à l'avant.
1
Page 86

- 19 -
Installation de votre siège auto sur votre véhicule
MISE À NIVEAU CORRECTE DU SIÈGE
AUTO EN MODE FACE À L’ARRIÈRE
Lorsque le siège auto est correctement installé,
conformément aux indications suivantes, en
mode face vers l’arrière le dossier doit être
incliné de 35° à 45°. Si vous n’arrivez pas à
obtenir cette inclinaison, servez-vous d’une
barre en mousse ou d’une serviette enroulée
pour incliner ultérieurement le siège. Prenez
comme référence la ligne tracée sur le
produit. Si la ligne est horizontale, le dossier
est incliné à 45°. REMARQUE: faites attention
à ne pas incliner le siège de plus de 45°.
Important! Les nouveau-nés doivent être
correctement inclinés. Si le siège est trop
incliné, votre enfant risque d’être projeté
hors du siège en cas d’accident. S’il ne l'est
pas assez, votre enfant risque d'avoir des
problèmes respiratoires.
45°-35°
LIGNE HORIZONTALE
RÉFÉRENCE AU SOL
Page 87

- 18 -
Installation de votre siège auto sur votre véhicule
PLAGE DE POIDS ET DE DIMENSIONS
MODE FACE À L’ARRIÈRE
• Utilisez le mode face vers l’arrière avec les
enfants pesant entre 2,3 et 20,4 kg (5-45 livres)
et qu’il hauteur maxi 119 cm (47 pouces);
• Utilisez le mode face vers l’arrière si la tête
se trouve un pouce au moins au-dessous de
l’appui-tête.
• La position correcte des épaules est celle
où les sangles d’épaule se trouvent au niveau
ou juste au-dessous du niveau des épaules,
comme le montre la gure.
Note: Les 7 positions les plus basses de
l'appuie-tête peuvent être utilisées en mode
face à l'arrière. Les positions 8, 9 et 10 doivent
être utilisées uniquement en mode face à
l'avant. Voir page 42 pour plus de détails sur
les ajustements possibles de l'appuie-tête.
MODE FACE À L’AVANT
• Utilisez le mode face vers l’avant avec les
enfants pesant entre 10 et 30 kg (22-65 livres)
et qu’il hauteur maxi 125 cm (49 pouces).
• Utilisez le mode face vers l’avant si la tête ne
dépasse pas de plus d’un pouce du bord de
l'appui-tête.
• La position correcte des épaules est celle
où les sangles d’épaule se trouvent au niveau
ou juste au-dessus du niveau des épaules,
comme le montre la gure.
FACE À L’ARRIÈRE
1’’
MODE FACE À L’AVANT
1’’
Page 88

- 17 -
Concept et compatibilité des ceintures de sécurité
FORMES DE CEINTURE DE SÉCURITÉ NON
COMPATIBLES
AVERTISSEMENT: n’utilisez pas le Con-
vertible Primo Viaggio avec les formes
de ceinture de sécurité suivantes:
1. Sangles d’épaule/cuisses motorisées.
Sangles montées dans la portière
2. Sièges orientés latéralement
3. Sièges orientés vers l’arrière ou sièges qui
pivotent dans diérentes positions
Pour garantir la sécurité de votre enfant, lisez
toujours le manuel de votre véhicule pour en
savoir davantage.
NO
NO
NO
NO
Page 89

- 16 -
6. Sangle de cuisses (2 points) avec plaque
de fermeture.
Ce type de ceinture peut-être réglé en tirant/
libérant la sangle au niveau de l’ajusteur de la
plaque de fermeture.
Certains véhicules ont des ceintures de
sécurité munies de grosses boucles rigides.
Elles risquent de causer des problèmes
d'installation et de nuire à la stabilité du siège
auto pendant l'usage normal. Elles peuvent
aussi empêcher de bien serrer la sangle et
nuire au bon fonctionnement du siège en
cas d'arrêt brusque ou d'accident. Dans ce
cas, essayez une autre position assise sur
le véhicule ou consultez le manuel de votre
voiture.
Veuillez consulter un technicien certié
spécialisé dans la sécurité des sièges auto
pour connaître les autres possibilités de
montage.
6
Concept et compatibilité des ceintures de sécurité
Page 90

- 15 -
4. Sangle de cuisses (2 points) avec
Rétracteur autobloquant (ALR). Ce type de
ceinture de sécurité a une plaque de fermeture
cousue à l'extrémité de la ceinture. Sur certains
véhicules il faut tirer complètement sur la
sangle pour activer le rétracteur autobloquant
(ALR) avant de monter le siège auto, sur
d’autres modèles il sut de tirer une certaine
longueur de sangle (vériez sur le manuel du
véhicule pour en savoir davantage). Serrez la
sangle autour du siège en renvoyant la sangle
dans le rétracteur. La sangle ne s’allongera pas
à moins de déboucler la sangle et de répéter
l’opération depuis le début. Aucune attache de
verrouillage n’est nécessaire avec ces sangles.
5. Sangle de cuisses (2 points) avec
Rétracteur à blocage d'urgence (ELR).
Ce type de ceinture de sécurit a une plaque de
fermeture cousue à l’extrémité de la ceinture;
elle ne se bloque qu'en cas d'urgence (arrêt
brusque ou accident).
Remarque importante: N’UTILISEZ PAS le
Convertible Primo Viaggio SIP avec ce type
de ceinture.
ELR
ALR
4/5
Concept et compatibilité des ceintures de sécurité
Page 91

- 14 -
Concept et compatibilité des ceintures de sécurité
ELR
3
3. Sangle d’épaule/de cuisses (3 points)
avec Rétracteur à blocage d’urgence
(ALR) et plaque de fermeture coulissante.
Ce type de ceinture de sécurité a une
plaque de fermeture qui coulisse librement
sur la ceinture; elle ne se bloque qu'en cas
d'urgence (arrêt brusque ou accident) et
vous devez donc utiliser une attache de
verrouillage pour xer cette ceinture. Pour
vous procurer une attache de verrouillage
et des instructions de montage, appelez le
service client Peg Perego au 1-800-661-5050.
Remarque importante: Les dispositifs de
verrouillage placés sur le côté du siège
Convertible servent à accroître la stabilité
pendant l’usage normal. Ils ne remplacent
pas l’attache de verrouillage. Vous devez
utiliser une attache de verrouillage pour xer
solidement le siège avec une ceinture de ce type.
Page 92

- 13 -
Concept et compatibilité des ceintures de sécurité
2. Sangle d’épaule/de cuisses (3 points)
avec Rétracteur à blocage d’urgence (ELR)
et plaque de fermeture.
Ce type de ceinture peut-être réglé en tirant/
libérant la sangle au niveau de l’ajusteur de
la plaque de fermeture. Veuillez consulter
le manuel de votre véhicule pour en savoir
davantage.
2
ELR
Page 93

- 12 -
Concept et compatibilité des ceintures de sécurité
1. Sangle d’épaule/de cuisses (3 points)
avec Rétracteur autobloquant (ALR) et
plaque de fermeture coulissante. Ce type
de ceinture a une plaque de fermeture qui
coulisse librement le long de la sangle Sur
certains véhicules il faut tirer complètement
sur la sangle pour activer le rétracteur
autobloquant (ALR) avant de monter le siège
auto, sur d’autres modèles il sut de tirer
une certaine longueur de sangle (vériez
sur le manuel du véhicule pour en savoir
davantage). Serrez la sangle autour du siège
en renvoyant la sangle dans le rétracteur. La
sangle ne s’allongera pas à moins de déboucler
la sangle et de répéter l’opération depuis le
début. Aucune attache de verrouillage n’est
nécessaire avec ces sangles.
Remarque importante: Les dispositifs de
verrouillage placés au dos du siège Convertible
servent à accroître la stabilité pendant l’usage
normal. Les dispositifs de verrouillage ne
remplacent pas le rétracteur autobloquant
ni la plaque de fermeture. La ceinture du
véhicule doit être correctement serrée pour
xer solidement le Convertible sur le véhicule.
ALR
1
Page 94

- 11 -
Compatibilité catégories de véhicules
Primo Viaggio SIP Convertible est conçu pour être installé dans les catégories suivantes de
véhicules :
. véhicule de tourisme à usages multiples
. voiture
Primo Viaggio SIP Convertible ne doit pas être installé dans les catégories suivantes de véhicules:
. car
. moto
. véhicule à trois roues
. camion
Primo Viaggio SIP Convertible est conçu pour être installé avec les ceintures de sécurité classiques
montées sur la plupart des voitures. Cependant on trouve sur le marché de nombreux types de
véhicules fabriqués à des époques différentes. Il existe donc de nombreux types de ceintures
de sécurité. Certaines ceintures ne permettent pas d’installer de façon sûre le Convertible
Primo Viaggio SIP. Veuillez lire attentivement la liste ci-dessous et en cas de problèmes ou de
doutes, vérifiez aussi sur le manuel de votre voiture ou appelez le Service client Peg Perego au
1-800-661-5050 pour en savoir davantage.
Concept et compatibilité des ceintures de sécurité
Page 95

- 10 -
Attache de verrouillage
Sangle de réglage
du rembourrage de tête
Harnais à 5 points d’ancrage
Epaulières
Pince de poitrine
Boucle
Bouton de déverrouillage du harnais
Protection de tête
rembourrée d’EPS
Base
Raccord
Latch
Poche du manuel
d’instruction
Sangle
supérieure
de xation
Levier d’inclinaison
Sangle de réglage
Coussin nouveau-né
Barre anti
rebond
Le siège auto
Page 96

- 9 -
Formulaire d’enregistrement
Le numéro de série de la ceinture, lui aussi
gravé de façon indélébile sur la boucle et les
sangles, peut fournir des informations utiles en
cas d’accident ou de défaut.
La gure ci-dessous explique ou le trouver.
Page 97

- 8 -
Formulaire d’enregistrement
Important! Les sièges auto peuvent-être
rappelés en usine pour des raisons de
sécurité. Vous devez enregistrer ce siège auto
de façon à pouvoir être joint dans ce cas.
Communiquez votre nom, votre adresse et
le numéro de série du siège auto ainsi que sa
date de fabrication à :
Peg Perego Canada, Inc.
585 Granite Court
Pickering Ontario Canada L1W3K1
Ou appelez le 1-800-661-5050 (appel
gratuit)
Pour en savoir davantage sur le rappel en
usine, appelez le Centre d’information sur la
sécurité routière des transports du Canada au
1-800-333-0371.
Le formulaire d’enregistrement est joint au
produit. Détachez le formulaire, remplissez-
le et retournez-le à Peg Perego. Inutile de le
timbrer. Nous avons payé le port. Si vous ne
trouvez pas le formulaire d’enregistrement
veuillez appeler le Service client au 1-800-
661-5050 pour en recevoir un.
Le numéro de série, le nom du modèle, la
date de fabrication, etc.. sont gravés de façon
indélébile sur l'étiquette illustrée ci-après.
Page 98

- 7 -
Consignes de sécurité
• Ne l’utilisez qu’avec des enfants pesant
entre 2,3 et 30 kg (5 et 65 livres).
• Lorsque vous installez votre enfant sur ce
siège, assurez-vous de lui ôter toute veste ou
couverture encombrante.
Cela vous permettra d’utiliser correctement
la ceinture.
• Ne laissez pas votre enfant seul dans la
voiture, même pendant peu de temps. Il
pourrait s’emmêler dans les sangles et se
blesser grièvement ou bien déplacer ou
renverser le siège auto.
• Ne laissez pas le siège auto exposé à la
lumière solaire directe pendant une période
de temps prolongée. Le fauteuil risque de
devenir très chaud et de brûler la peau de
votre enfant.
• Lorsque vous ne l’utilisez pas rangez le
produit à l’abri de la lumière, de l’humidité et
des températures extrêmes.
• Vériez si le siège auto est bien à niveau.
Si le siège est trop incliné votre enfant risque
d’être blessé ou éjecté du siège. Si le siège
est trop droit, il peut causer des problèmes
respiratoires à votre enfant, qui peuvent
provoquer de graves blessures ou même la
mort.
• Ne placez pas ce siège auto sur un comptoir,
une table ou une surface molle. N’utilisez pas
cet article au-delà de 7 (sept) ans après sa
date de production, marquée sur le siège.
• Ne tentez pas de retirer ni d’ajouter des
parties à moins que ce manuel n’explique
comment le faire ; ne tentez pas de réparer ce
produit. Si ce produit est endommagé ou que
ses composants sont défectueux, appelez le
service après-vente au 1-800-661-5050 .
• Ne laissez pas d'objet, ni de sac, ni de valise
à l'intérieur du véhicule. En cas d’accident ils
risquent de se déplacer à l’improviste et de
blesser les passagers.
Page 99

- 6 -
Viaggio en mode à l'arrière, ne le placez jamais
sur des sièges de voiture équipés d'airbag actif.
En heurtant le siège auto l’airbag peut provoquer
de graves blessures ou la mort. Vériez la
compatibilité entre le siège auto et le siège de
votre véhicule dans le manuel de votre véhicule.
• Ce siège auto est conçu pour être installé
uniquement sur les sièges du véhicule
orientés vers l’avant. Ne l’utilisez jamais sur les
sièges orientés latéralement ou à l’arrière. Ne
l’utilisez pas sur des voitures ayant des sangles
d'épaule motorisées montées sur les portières.
Veuillez lire le manuel de votre véhicule pour
en savoir davantage.
•
Les statistiques révèlent qu'en cas d’accident
les enfants courent moins de risques s'ils sont
correctement attachés sur les banquettes
l'arrière du véhicule.
•
Lorsque le siège auto est installé sur le siège
du véhicule, vériez si les sangles du véhicule
ou le LUAS et les sangles de xation supérieure
sont étroitement xées autour de la structure
du siège auto et si elles sont bien tendues. Si
le siège auto n'est pas xé correctement en
cas d'accident votre enfant risque de subir une
excursion ou une décélération supplémentaire.
• Remplissez et retournez immédiatement le
formulaire qui accompagne ce produit. En
cas d’accident: si ce siège auto est impliqué
dans un accident de voiture, il risque de ne
plus être sûr. Vous devrez peut-être acheter
un nouveau siège auto. Appelez le service
client au numéro 1-800-661.5050.
• Les housses et les rembourrages fournis avec
ce produit font partie intégrante du produit
et du programme de certication. Nous vous
déconseillons vivement d’utiliser une housse
ou tout autre accessoire non homologué.
• Les composants EPS (mousse blanche placée
sous les housses du capitonnage) font partie
intégrante du produit car il s’agit de pièces
nécessaires à la sécurité qui ne devraient jamais
être retirées ni gravement endommagées.
• Le composant EPP (partie souple noire
placée derrière la coque) fait partie intégrante
du produit car il s’agit d’une pièce nécessaire
à la sécurité qui ne devrait jamais être retirée.
• Attachez le siège auto sur la voiture même
s’il n’est pas occupé. Ce siège auto est un
objet lourd qui pourrait blesser grièvement
les autres passagers en cas d’accident.
• Ne soulevez pas ce siège auto par la ceinture
an d’éviter d’user ou de forcer sur les sangles.
Soulevez-le par la partie dure.
• Attention à ne pas coincer vos doigts dans
les parties mobiles.
Avertissement
Page 100

- 5 -
•
N’installez ni n’utilisez ce siège-auto avant
d’avoir lu et compris toutes les instructions de ce
manuel et des étiquettes placées sur le produit
Pour éviter le risque de blesser grièvement votre
enfant, suivez scrupuleusement les instructions.
Conservez le manuel d’instruction dans son étui
an de pouvoir le consulter par la suite.
• Votre enfant risque d’être grièvement
blessé si vous ne suivez pas correctement ces
instructions et celles des étiquettes.
• Ce siège auto est conforme ou supérieur à
toutes les prescriptions 213.1 de la norme
213 sur la Sécurité à bord des véhicules à
moteurs du Canada applicables aux véhicules
à moteur et aux avions.
• Attachez toujours votre enfant avec le harnais
intégral à 5 points fourni avec le produit. Veillez
à ce que la boucle soit correctement fermée.
Ajustez bien la sangle autour du corps de
l’enfant en veillant à ce qu’elle soit bien plate et
tendue. Utilisez la pince de poitrine pour vous
assurer que les sangles sont bien en place.
•
Le siège auto Convertible Primo Viaggio SIP
peut être utilisé essentiellement de deux façons
: face à l’arrière, lorsque l'enfant assis dans le
siège auto regarde vers l'arrière du véhicule;
face à l’avant lorsque l'enfant assis dans le siège
auto regarde vers l’avant du véhicule.
•
Utilisez le siège auto Convertible Primo Viaggio
SIP en mode face à l’arrière si l'enfant pèse entre
2,3 et 20,4 kg (5-45 livres) et qu’il hauteur maxi 119
cm (47 pouces); en mode face à l’avant si l'enfant
pèse entre 10 et 30 kg (22-65 livres) et qu’il hauteur
maxi 125 cm (49 pouces).
•
Asseyez votre enfant en mode face à l’arrière
le plus longtemps possible: N’utilisez JAMAIS le
siège auto Convertible Primo Viaggio
en mode face à l’avant si le bébé pèse moins
de 10 kg (22 livres).
•
Le siège Convertible Primo Viaggio SIP peut
être xé sur votre véhicule à l’aide des sangles de
bassin/d'épaule de votre véhicule. Cependant,
tous les modèles de ceintures de sécurité ne
sont pas homologués pour être utilisés avec ce
produit. Consultez le chapitre concerné de ce
manuel pour en savoir davantage.
•
Le siège Convertible Primo Viaggio SIP peut être
xé sur votre véhicule avec un système d'ancrage
universel inférieur (LUAS) et un crochet supérieur,
tous deux fournis avec ce produit. Consultez le
chapitre concerné de ce manuel pour en savoir
davantage sur l'installation et consultez aussi le
manuel de votre véhicule.
•
Si vous utilisez le siège Convertible Primo
Avertissement
 Loading...