

Page 1

Istructions for use EN
USA
PRIMO VIAGGIO SIP 30•30
Side Impact Protection
O W N E R ’ S M A N U A L
(LF)
WARNING:
Do not install or use this infant restraint
until you read and understand all
instructions in this manual. To avoid
serious injuries to your baby, follow
the instructions carefully and be sure
to buckle your baby using the 5-point
harness.
Child Requirements:
Weight limits: 30 pounds (13,5 kg)
Maximum height: 30 inches (76 cm)
FIUS1301I154
Page 2

Table of Contents
3 Before You Start
4 Customer Service
4 Registration Form
5 Safety
7 Safety Rules
8 Your Car Seat
9 Your Car Seat Base
10 Travel System
11 Serial Numbers
12 Installation Instructions
13 Installing the Base
14 How to Install the Base Using the
17 How to install the Base Using your
19 Installing the Base with Different
21 How to Install the Locking Clip
22 Different Types of Vehicle Seat Belts
LATCH SYSTEM
VEHICLE SEAT BELT
Types of Seat Belts
© 2013 Peg Perego. All rights reserved.
2
23 Installing the Car Seat on the Base
25
27 Installing the Seat with Different
28 How to Buckle Your Baby into the
33 How to Raise or Lower the Shoulder
35 Using the Car Seat Outside the
38 How to Use the Car Seat on Aircraft
39 How to Use the Car Seat on Aircraft
41 Cleaning and Maintenance
42 How to Wash the Chair Padding-
44 How to Wash the Chair Padding-
46 Replacement Parts
Installing the Car Seat without the Base
Types of Seat Belts
Car Seat
Straps
Vehicle
without the Base
with the Base
Cover removal
Refitting
Page 3

Before You Start
1 Please read this manual carefully. Keep this manual in the plastic pocket on the
base of the infant car seat.
2 Review car seat parts and read through instructions. Also read the labels. Read and
understand all instructions before using this car seat.
3 Fill in and return the registration form (see page 4).
4 All assembly must be performed by an adult.
5 Do not use the car seat if damaged or parts are missing.
6 Use only the parts or accessories that come with the unit. Do not modify or
repair any part.
7 Remember: this car seat is to be installed rear facing only.
8 Peg Perego has the right to make changes to the product at any time without
notice.
3
Page 4

Customer Service
Registration Form
Call Peg Perego USA customer service
at 1-800-671-1701 (toll free) for
information about repairs or spare
parts. If any part is missing or damaged,
replace with Peg Perego parts only. See
page 46 for a list of replacement parts.
If you want more than one base, you
can purchase it from your local dealer,
or you can call 1-800-671-1701
(toll free), or you can go to
www.pegperego.com.
4
Important! Child restraints could be
recalled for safety reasons. You must
register this restraint to be reached
in a recall. Send your name, address
and the restraint’s model number and
manufacturing date to:
Peg Perego U.S.A., Inc.
3625 Independence Drive
Fort Wayne, IN 46808
Or call 1-800-671-1701 (toll free)
Or register online at
www.carseat-registration.pegperego.com
For recall information, call the U.S.
Government’s Vehicle Safety Hotline at
1-888-327-4236
(TTY: 1-800-424-9153).
Or go to http://www.NHTSA.gov
Page 5
Safety
Warning
• This car seat meets or exceeds all
applicable Federal Motor Vehicle
Safety Standard 213 requirements for
use in motor vehicles and aircraft.
• Your child could be seriously injured
if you do not follow instructions and
warning labels correctly.
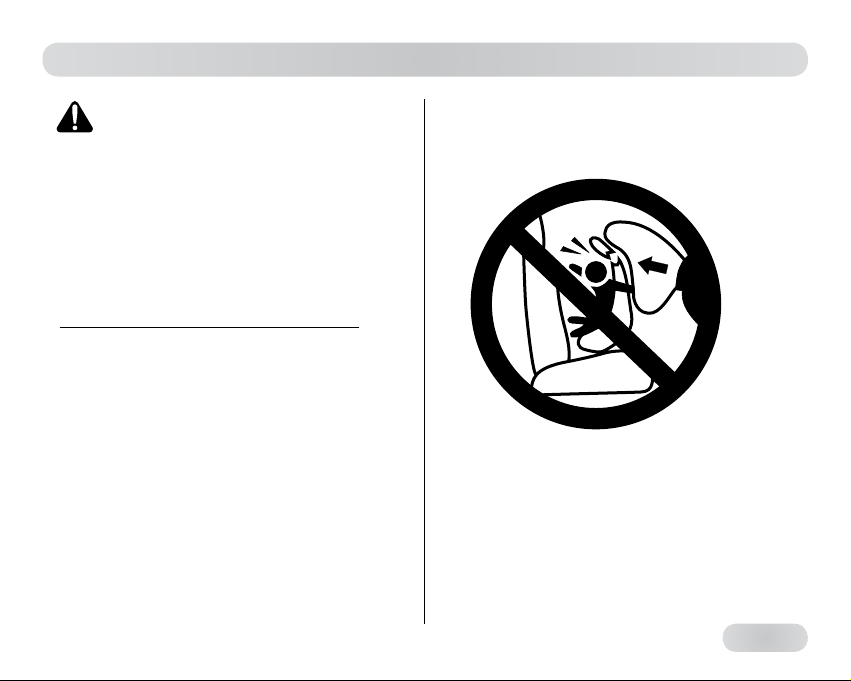
• Use this car seat rear facing only. This
seat is not designed to face forward.
Serious injury or death can occur in an
accident if you install the seat facing
forward.
• Never use in a vehicle seat with an
active air bag. Read your vehicle
manual for instructions on how to
turn off the air bag.
• If your vehicle has air bags, do not
install this car seat on a seat with
an active air bags. Death or serious
injuries can occur if an air bag hits
the unit (read your vehicle owner’s
manual for instructions on where
to install an infant car seat in your
vehicle).
• This car seat is certified for use with
or without base. Use of the base is
highly recommended for ease of
proper installation. Install this car seat
without the base only if needed.
• Never install the car seat in the front
vehicle seat unless instructed by your
5
Page 6

vehicle manual. According to accident
statistics, children are safer when
properly restrained in the rear seating
positions than in the front seating
positions.
• Install this car seat on front facing
seats only. Do not use on rear facing
or side facing seats or in cars with
door-mounted or motorized shoulder
belts.
If you use a lap belt or lap/shoulder
•
belt to install the base, you must use a
seat belt that locks in place. If it does
not lock in place, use the locking clip.
The seat belt must lock into place for
the car seat to be properly secured.
Be sure the car seat or car seat base
•
are properly secured using a vehicle
seat belt or LATCH as shown in this
manual.
Always buckle your baby into the car
•
seat with the harness. Be sure to latch
buckles correctly.
When lifting the seat out of the base,
•
be sure you first secure the handle
6
into the carrying position.
Keep fingers away from moving parts.
•
Use only approved parts. Use of
•
unapproved parts can affect the safety
of the car seat and cause serious
injury or death in an accident.
Complete and send in the registration
•
form right away.
Always store the manual with car seat.
•
Keep it in the pocket on front of base.
In case of accident: if this car seat
•
is involved in a car accident, it may
be no longer safe to use. You may
need to get a new unit. Call customer
service at 1-800-671-1701 (toll free)
for more information.
Do not use Primo Viaggio Sip 30•30
•
with bases manufactured before July
2006.
Page 7

Safety Rules
Use only with children who weigh
•
between 5 and 30 pounds (2.3 and
13,5 kg) and whose height is 30 inches
(76 cm) or less. If your baby was born
with low birth weight, ask your doctor
for special instructions on using an
infant car seat.
Use this car seat in vehicles with
•
standard lap or lap/shoulder belts
or universal lower anchors. If your
vehicle has lower anchors, use those
to secure the car seat instead of the
standard seat belt. Read your vehicle
manual to locate the lower anchors.
Be sure the car seat is properly
•
leveled. If the seat reclines too much,
your baby can be injured or ejected
from the seat. If the seat is too
upright, it can cause your baby to
have breathing problems, which could
lead to injury or death.
Do not place car seat on countertop,
•
table, or soft surfaces.
Never leave your baby alone in the
•
car seat. He/she could get tangled in
the straps and be seriously injured or
could move or tip the seat.
Do not leave the car seat or base
•
unsecured in the vehicle, even if not
occupied. A loose car seat can injure
other passengers in a crash.
Do not use this unit after seven (7)
•
years from the date of production
labeled on the seat.
Do not hang toys on handle of seat.
•
7
Page 8
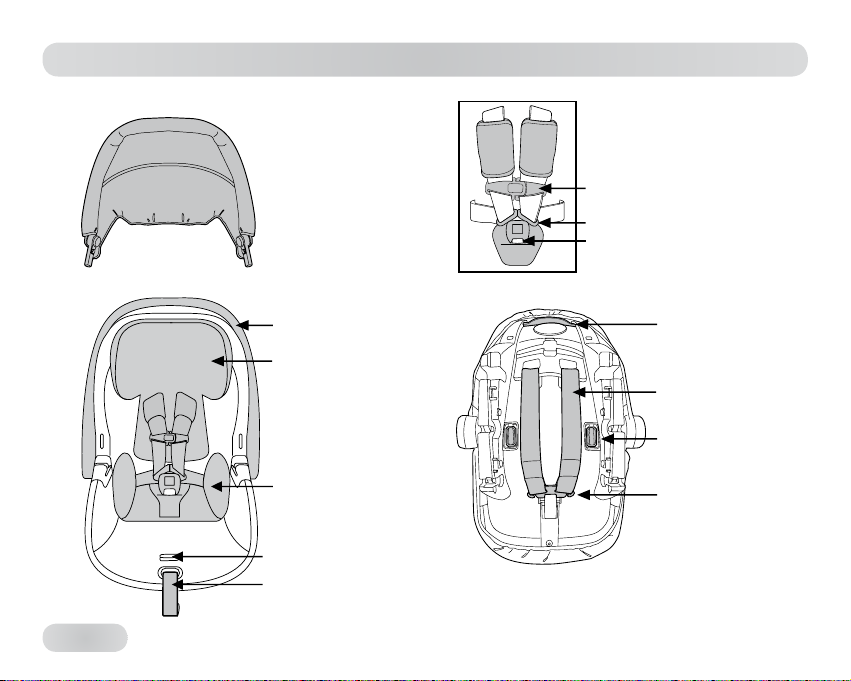
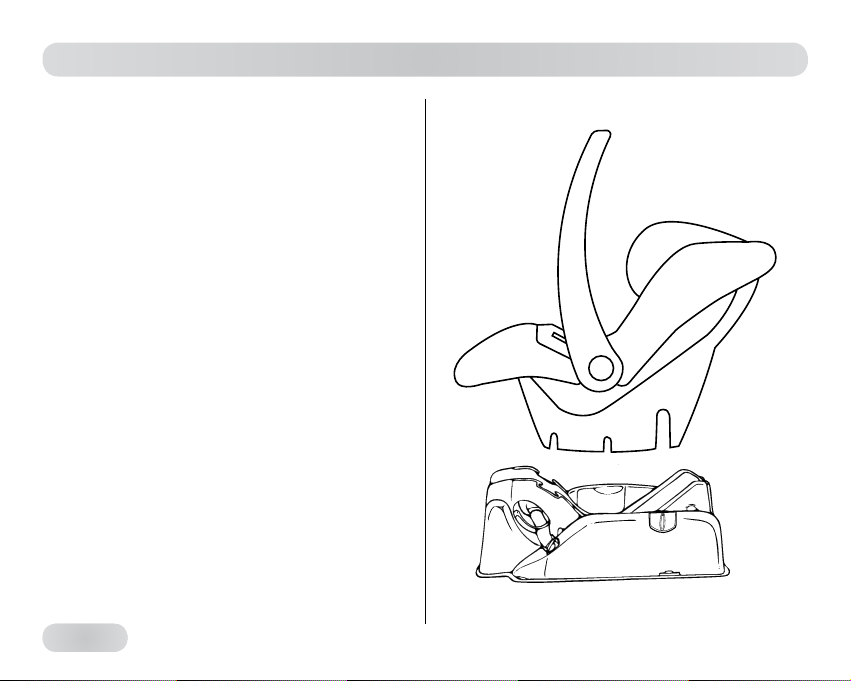
Your Car Seat
8
HOOD
FRONT
Seat handle
Side Impact
Head protection
Seat pad for infant
Harness adjuster button
Harness adjuster strap
5-POINT
HARNESS SYSTEM
Chest harness clip
Harness latch plate
Harness buckle
BACK
Release lever
Harness strap
Anchor buckles
Slide adjuster
Energy absorbing Expanded Polystyrene (EPS) foam
lined shell and headrest for added impact protection.
Page 9
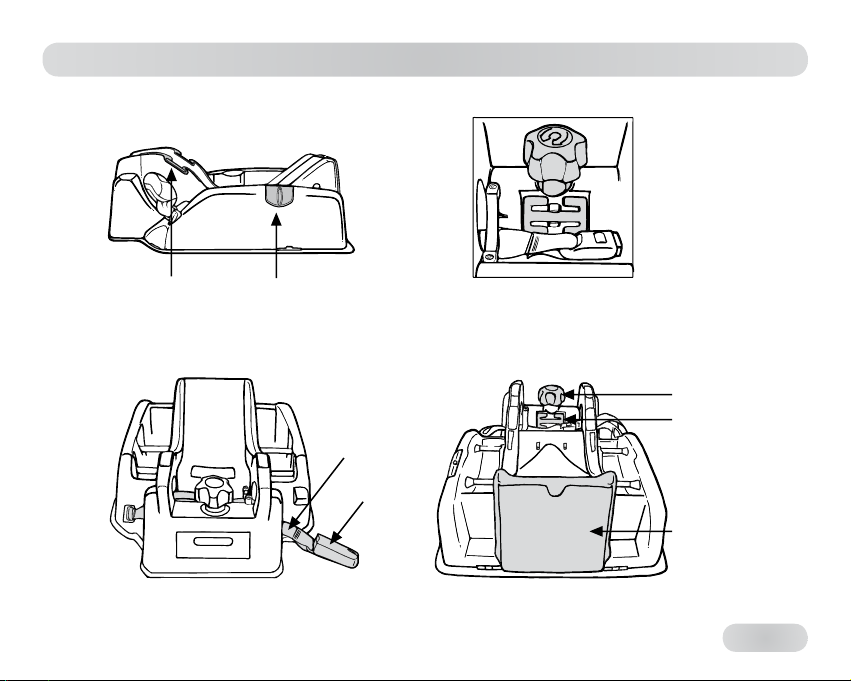
Your Car Seat Base
SIDE
Belt slots with
anti-slip rubber pads
FRONT
Level indicator
Latch strap
Anchor
latches
BACK
LOCKING CLIP
STORAGE
Level knob
Locking clip
Owner's Manual
book pocket
9
Page 10
Seat
10
Base
Travel System
Duette SW
Triplette SW
Aria Twin 6040
Si
Pliko Mini
Vela easy drive
Pliko Four
Switch Four
Uno
GT3
Skate
Book
Book Plus
Page 11

Serial Numbers
The following information can be found
under the front of the seat of the Primo
Viaggio Sip 30•30 : product name,
production date and serial number.
Buckle production date.
Harness production date.
In the event of problems with the
product, these details will be of use to
customers.
⇠
11
Page 12
Installation Instructions
Peg Perego Primo Viaggio Sip 30•30
is certified for use with or without
the base. Use of the base is highly
recommended because it makes
installation easier and therefore safer.
⇠ 12
Page 13
Installing the Base
When using Primo Viaggio Sip 30•30 with its base, first you install the base,
and then you install the car seat on the base.
Important! Read your vehicle manual for instructions on where to best install an
infant car seat in your vehicle.
There are two ways to install the base:
I USING THE LATCH
SYSTEM. If your car has
“universal lower anchors”,
you can install the infant
car seat using the LATCH
system instructions on page
14. The anchor is a bar located where
the seat back meets the seat bottom
(slide your hand down between the
seat back and seat bottom to locate
this bar).
Important! Also read your vehicle
manual for locating lower anchors
and instructions on using the LATCH
system.
II USING THE STANDARD LAP BELT/
SHOULDER STRAP. If your car does
not have universal lower anchors,
install the infant car seat using the
instructions for lap belt/shoulder
straps on page 17.
⇠ 13
Page 14
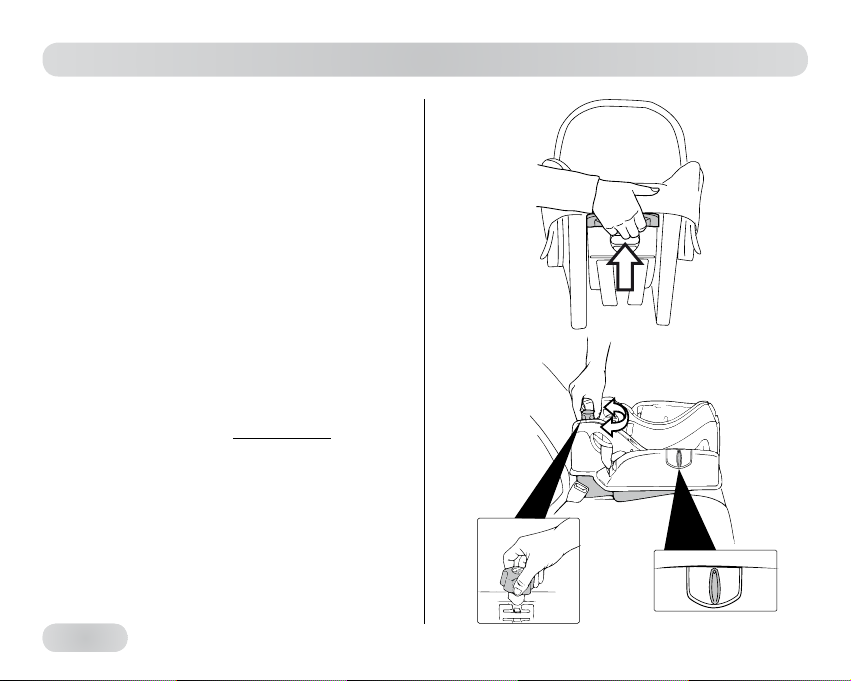
I - How to Install the Base Using the LATCH SYSTEM
Install the base with your vehicle parked
on level ground.
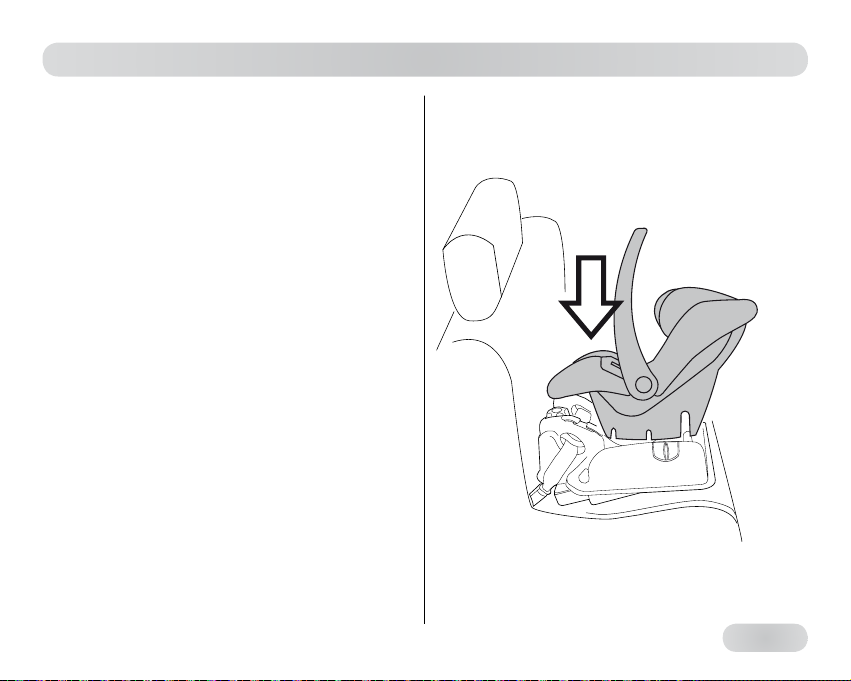
1• Take the car seat off the base by
moving the handle to the upright
position. Place your hand on the top
of the seat back and pull up on the
handle with your fingers.
Note: Pulling near the center of the
handle provides the easiest release.
2• Position the base rear facing in the
back seat of your vehicle. Check the
level indicator on the side of the
base to make sure that the pointer
is in the green area. If it is not, turn
the knob left or right until it is in the
correct position.
⇠ 14
Page 15

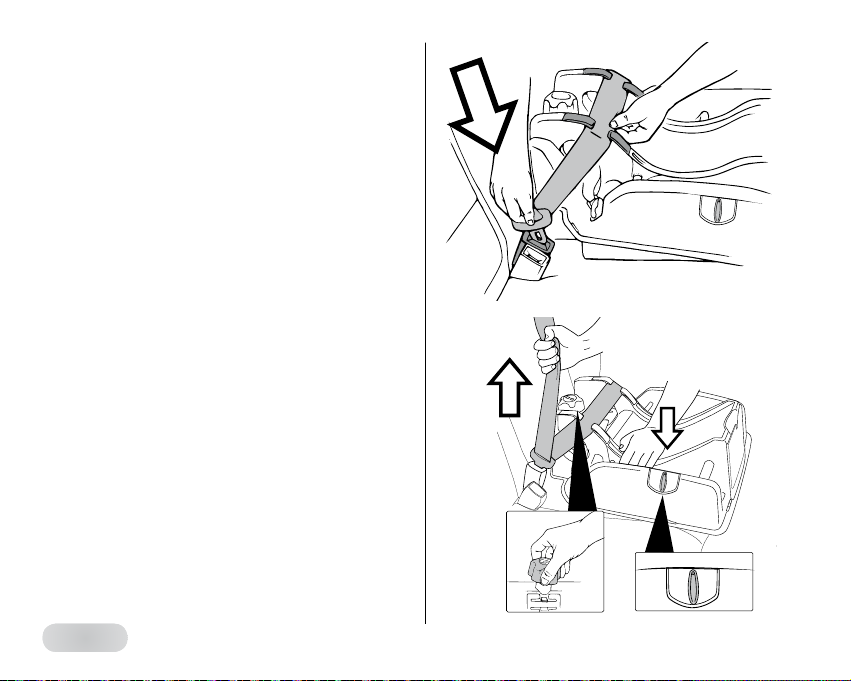
3• Remove the two anchor latches from
their housings. The latches are on
the sides of the base. First loosen
the latch strap by pressing on the
gray button and pulling the strap as
shown. Then press the red button
on top of the latch and pull the latch
out of its housing. Repeat on other
side.
4• Push each latch onto the anchor bar
located between your vehicle seat
back and seat bottom. Press until
you hear the click.
PUSH
A
B
PUSH
A
B
⇠ 15
Page 16
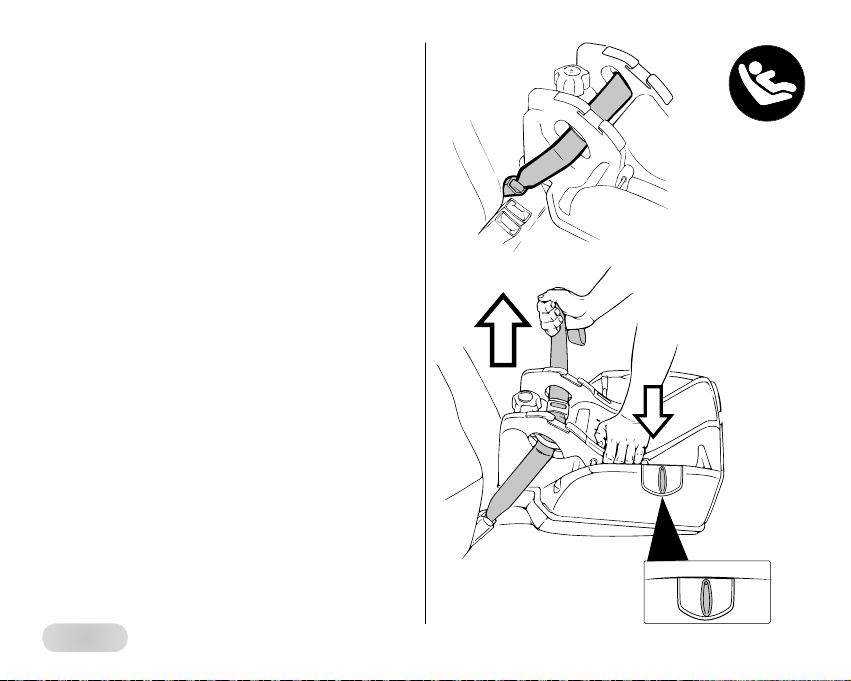
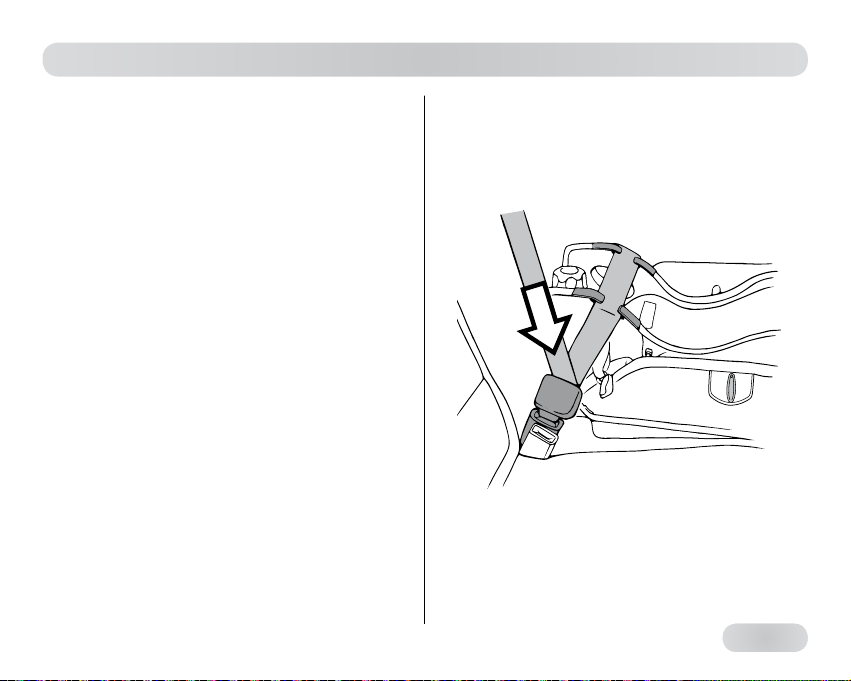
5• Make sure that the latch strap is
threaded flat against the base.
6• Tighten the base against the seat
by pulling the free end of the latch
strap. Press down on the base with
your body weight and tighten
further. Check the level indicator. If
the pointer has moved outside of the
green area, turn the knob until the
pointer is back within the green area.
You may need to loosen the strap
slightly to do this. Push and pull on
the base. If you can move it more
than 2,5 cm (1 inch), tighten the belt
further.
• Now that you have installed the
base, go to page 23.
⇠ 16
Page 17

II - How to Install the Base Using Your VEHICLE SEAT BELT
Important! Not all seat belts work
the same way. To make sure that the
infant car seat is properly installed
using your seat belts, read your vehicle
owner’s manual. It will suggest proper
placement of an infant car seat in your
particular vehicle.
Park your vehicle on level ground.
1• Take the car seat off the base by
moving the handle to the upright
position. Place your hand on the top
of the seat back and pull up on the
handle with your fingers.
Note: Pulling near the center of the
handle provides the easiest release.
2• Position the base rear facing in the
back seat of your vehicle. Check the
level indicator on the side of the
base to make sure that the pointer
is in the green area. If it is not, turn
the knob left or right until it is in the
correct position.
⇠ 17
Page 18
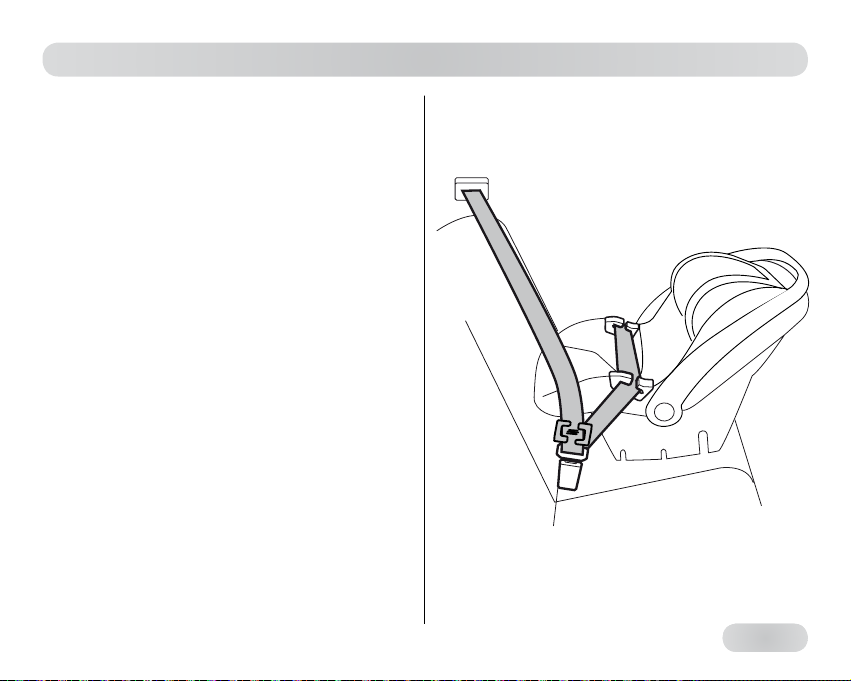
3• Thread the lap belt through the slots
on the base and lock the latch plate
into the buckle as shown.
4• Pull the strap to tighten the seat
belt. Press down on the base with
your body weight and pull the strap
tighter. Then push and pull on the
base. If you can move the base more
than 2,5 cm (1 inch), tighten the belt
further. Once the base is tight, check
the level indicator. If the pointer has
moved outside of the green area,
turn the knob until the pointer is
back within the green area. You may
need to loosen the strap slightly to
do this.
Warning! If you cannot get the belt
tight enough, refer to your vehicle
manual for instructions on how to
secure the base using the type of seat
belt in your vehicle. Your baby is not
safe riding in a loose car seat.
⇠ 18
Page 19
Installing the Base with Different Types of Seat Belts
Primo Viaggio Sip 30•30 is designed for
use with lap or lap/shoulder seat belts.
Four of the most common types are listed
below. Please read your vehicle manual
for instructions on installing an infant car
seat using your vehicle seat belts.
I Lap/Shoulder belt with
Switchable Locking Retractor
If your vehicle has Switchable
Locking Retractor lap/shoulder belts,
pull the shoulder strap all the way
out, let it retract several inches, then
pull it out again. It should lock in
place to properly secure the base.
II Lap/Shoulder belt with
Emergency Locking Retractor
(ELR) and free sliding latch plate
This type of seat belt will only lock in
an emergency, so you must use the
locking clip (stored on infant seat
base) to properly secure this type of
seat belt (see page 21).
⇠ 19
Page 20
III Lap/shoulder belt with a locking
latch plate
If you have a lap/shoulder belt with
a locking latch plate and the belt
comes loose after buckling, unbuckle
it, flip it over, and re-buckle. This will
usually keep the seat belt locked
in place. If not, read your vehicle
manual for specific instructions.
IV Different Types of Lap Belts
Lap belts with Emergency Locking
Retractors (ELR), Automatic Locking
Retractors (ALR), and Switching
Locking Retractors (SLR) look as shown.
Consult your vehicle owner's manual
to determine which style you have.
belts with locking latch plates look as
shown.
Lap
V Lap belt only with an Emergency
Locking Retractor
If you have a lap belt (without shoulder
strap) that locks only in an emergency
(ELR), do not use it to secure the Primo
Viaggio Sip 30•30 car seat. Please
consult a certified Child Passenger Safety
Technician for other installation options.
To find a technician in your area, go to:
http://www.nhtsa.dot.gov/people/
injury/childps/contacts/index.cfm, or
call 1-888-327-4236.
⇠ 20
Page 21

How to Install the Locking Clip
13 mm
1/2 inch
To install the locking clip, hold the
shoulder strap and lap belt together
just above the buckle. Unbuckle the
belt while holding the straps. Hook
the locking clip around both straps as
shown.
Leave 1/2 inch space between the clip
and latch. Re-buckle the belt.
B
PUSH
A
⇠ 21
Page 22
Different Types of Vehicle Seat Belts
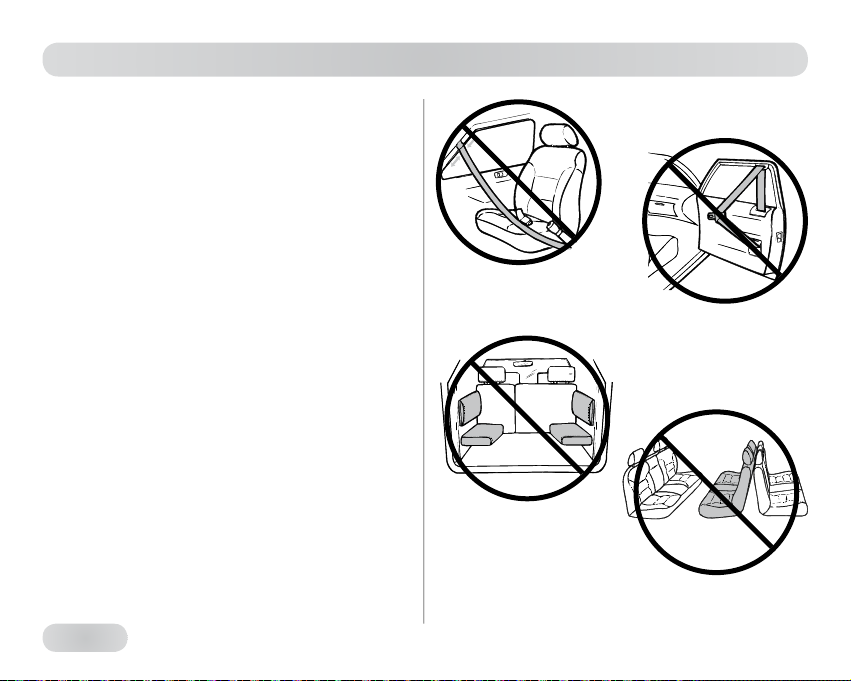
Important! Do not install this car seat
on seats with:
A Lap/motorized shoulder belts.
B Belts mounted on the door.
C Side-facing seats.
D Rear-facing seats or seats that rotate.
For your child’s safety, always read
your vehicle manual for instructions on
installing child car seats.
22
A
B
C
D
Page 23
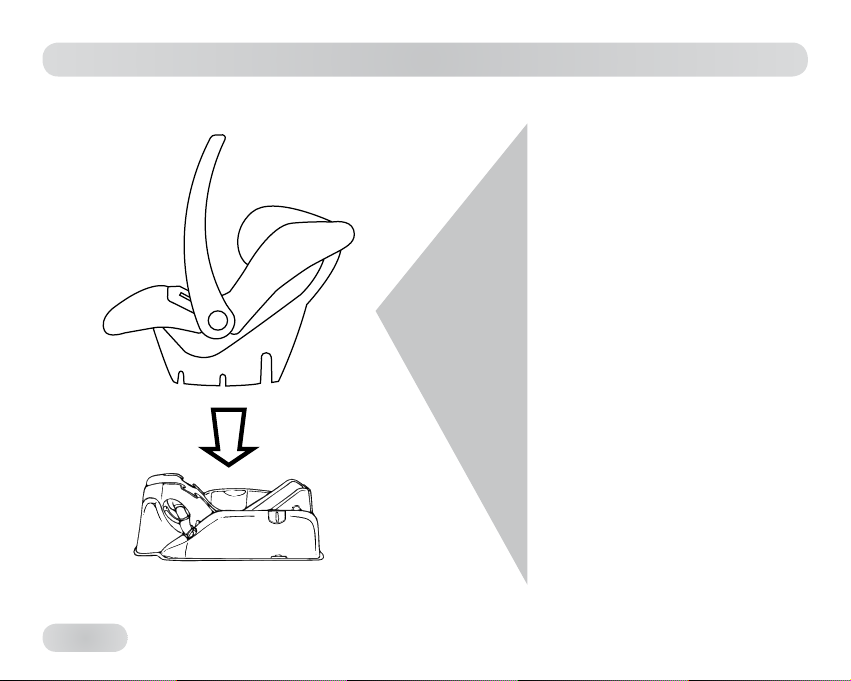
Installing the Car Seat on the Base
Now that you have installed the base in
your vehicle, you are ready to install the
car seat on the base.
1• Holding the car seat by the handle,
press it rear facing on the base
until you hear the click. You will not
be able to move the car seat if it
is properly locked in place. Check
to make sure the base is still level.
If not, remove the car seat and
properly adjust the base.
Important! Newborn infants should be
properly reclined. If the seat reclines too
much, your baby can be ejected from
the seat in an accident. If too upright, it
can cause breathing problems.
23
Page 24
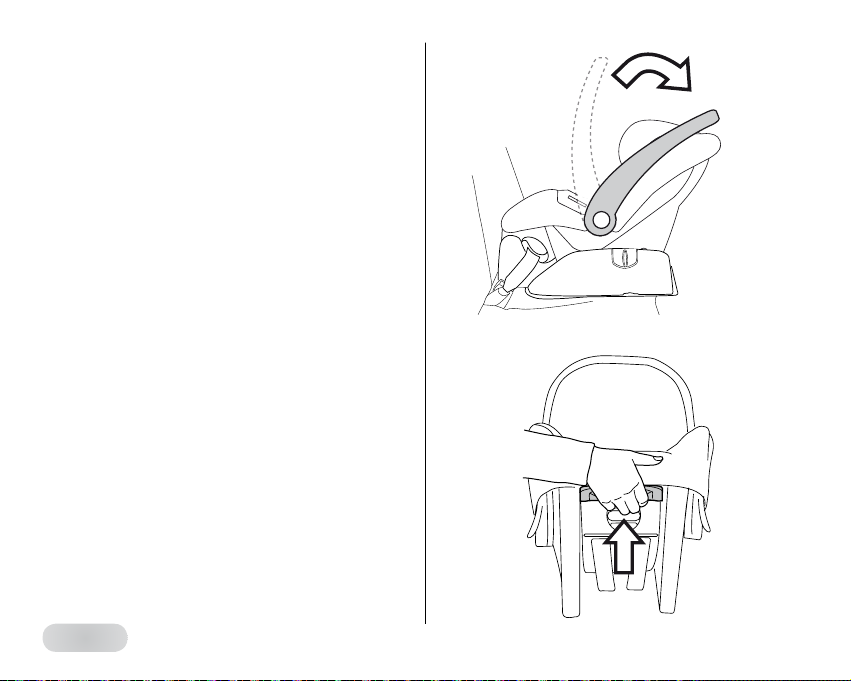
2• Adjust the handle so it rests at the
top edge of the car seat as shown.
Any other position may injure your
baby in an accident.
To rotate the handlebar, press each
of the round buttons (located on
each side of the handle where it
attaches to the seat) and rotate it to
the position required.
3• To remove the car seat, move the
handle to the upright position. Place
your hand on the top of the seat
back and pull up on the handle with
your fingers.
Note: Pulling near the center of the
handle provides the easiest release.
24
Page 25
Installing the Car Seat without the Base
Important! The base is designed to
avoid consumer misuse by reducing
the number of times the seat must be
anchored to your vehicle. Please, use
and install Primo Viaggio Sip 30•30
without the base only if needed.
Park the vehicle on level ground.
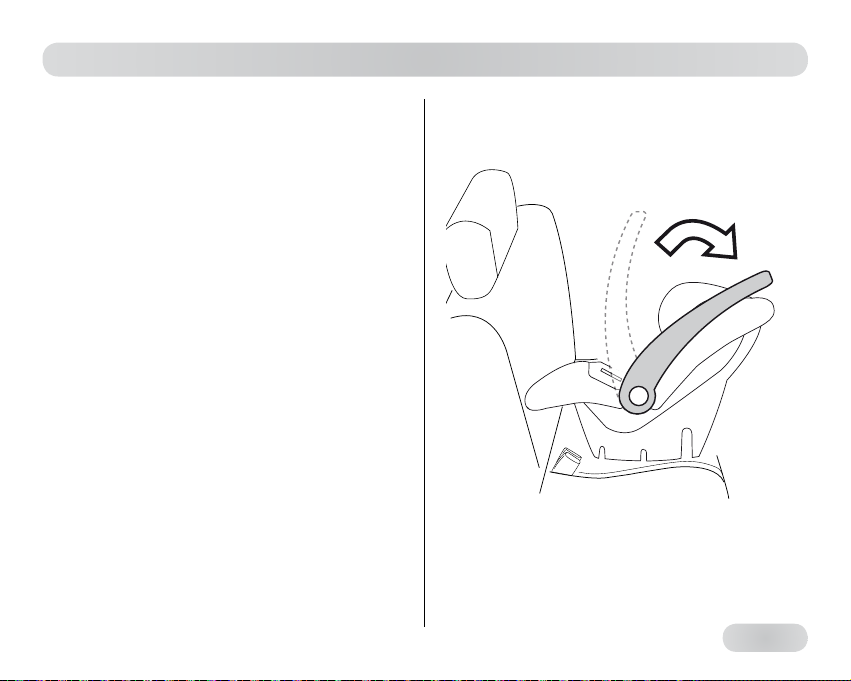
1• Position the restraint on the seat,
so your baby is facing the rear of
the vehicle. Adjust the handle so it
rests at the top edge of the car seat
as shown. Any other position may
injure your baby in an accident. To
move the handle, press the gray
buttons on the sides of the handle at
the same time and push the handle.
Important! The seat must be parallel
to the ground. If necessary, use rolled
towels or pool noodles under the seat
at vehicle seat crease, so the red line on
the side of the seat is parallel with the
ground.
25
Page 26
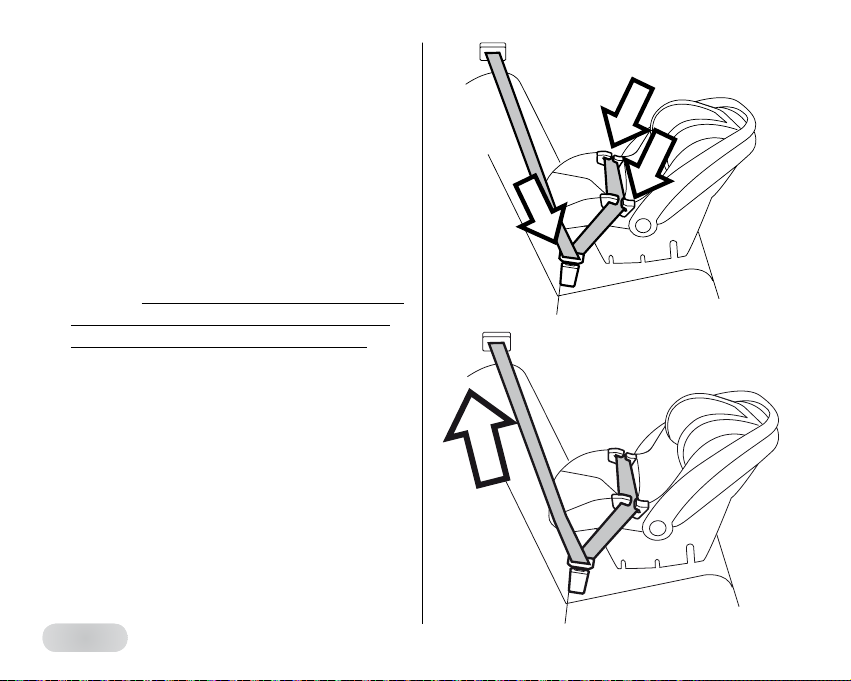
2• Adjust the restraint on the seat.
Check the red line to see that the
base is level with the ground. Thread
the lap belt through the slots on the
seat and lock the latch plate into the
buckle as shown.
3• Pull the strap to tighten the seat
belt. Press down on the seat with
your body weight and pull the strap
tighter. Once the seat is tight, check
that the red line on the side of the
car seat is level with the ground.
Warning! If you cannot get the belt
tight enough, refer to your vehicle
manual for instructions on how to
secure the seat using the type of seat
belt in your vehicle. Your baby is not
safe riding in a loose car seat.
⇠ 26
Page 27
Installing the Seat with Different Types of Seat Belts
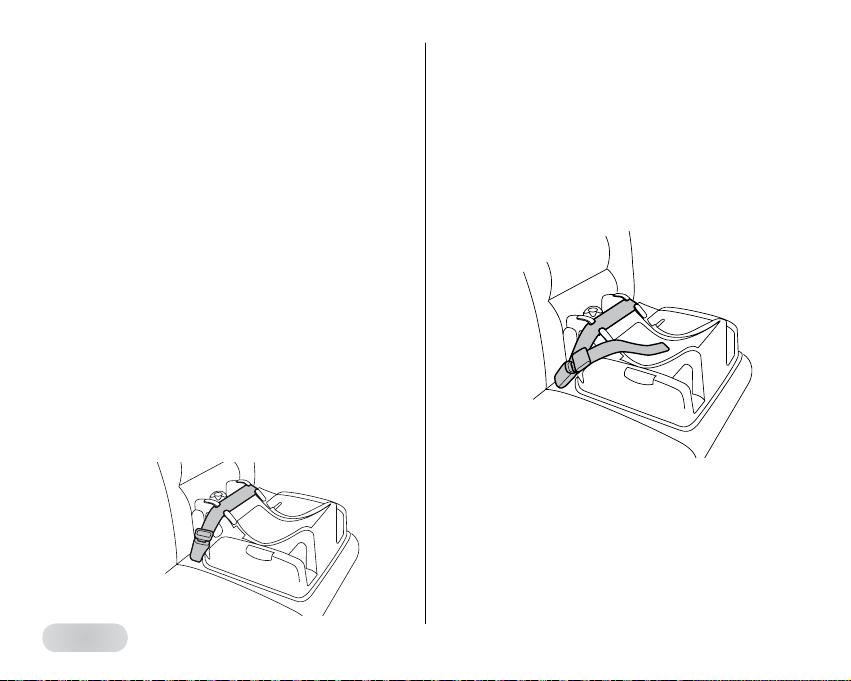
Installation of Primo Viaggio Sip 30•30
without base follows the same rules as
with base regarding the availability of
different types of vehicle seat belts.
Important! For different types of seat
belts, please refer to page 19 and 20.
Should your vehicle belt need a
locking clip, please refer to page 21 for
installation details. Illustration in this
page shows the completed installation.
Primo Viaggio Sip 30•30 should not be
installed on seat types shown on
page 22.
⇠ 27
Page 28
How to Buckle Your Baby into the Car Seat
This restraint uses a 5-point harness
system to secure your baby into the car
seat. See illustration on page 8.
1• Push the red buckle button to
release the harness. Press and hold
the harness adjuster button while
pulling the shoulder straps out
undo the chest clip (point 5). Lay the
shoulder straps to the side to make
room for your baby.
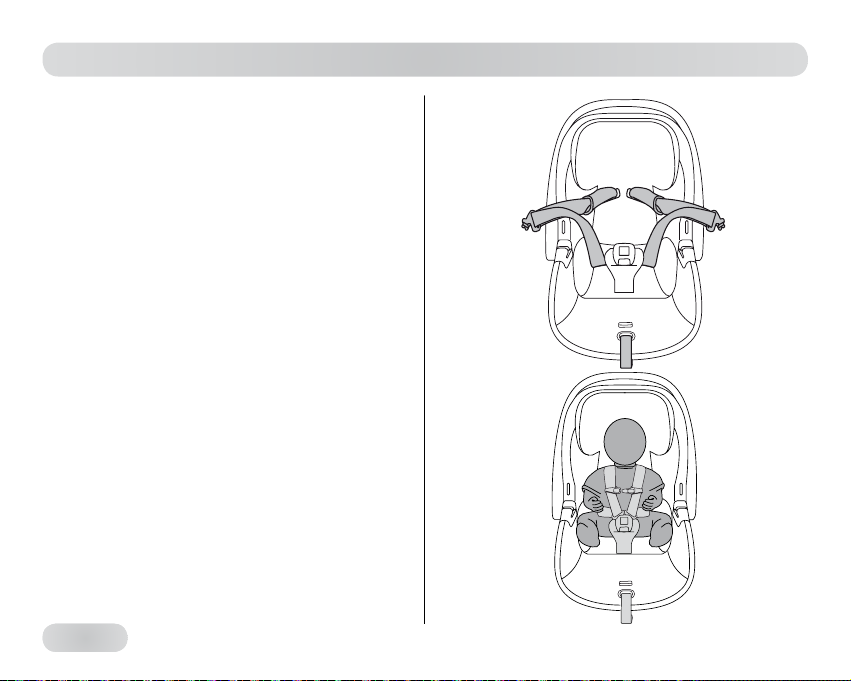
2• Put your baby in the car seat with
their bottom and back flat against
the child restraint. Bring the two
shoulder straps over your baby’s
shoulders. Make sure the straps are
not twisted behind the backrest or
over your baby’s chest.
⇠ 28
Page 29

3• Insert both latch plates into the
buckle until you hear them click. Pull
on straps to make sure that both
plates are latched securely. (Note:
You may need to adjust the shoulder
height. See How to Raise or Lower
the Shoulder Straps on page 33).
4• Latch the two chest clips together.
⇠ 29
Page 30

5• To undo the chest clip, press the
button on the clip and pull apart as
shown.
6• To undo the latch plates, press the
red button and pull the latches up.
⇠ 30
A
B
PUSH
B
A
PUSH
Page 31

7• Adjust the chest clip to the arm pit
level. To tighten the harness, pull the
adjuster strap at the bottom of seat
until strap is snug. Make sure you
leave one finger width between the
harness and your baby’s collar bone.
Tuck the loose end of the adjuster
strap under the seat padding.
8• To loosen the harness, press and
hold the harness adjuster button
inside the slot located at your baby’s
feet, and pull the top harness as
shown.
B
A
⇠ 31
Page 32

Important! A snug strap should not
allow any slack. It lies in a relatively
straight line without sagging. It does
not press on the child’s flesh or push
the child’s body into an unnatural
position.
⇠ 32
Page 33

How to Raise or Lower the Shoulder Straps
Primo Viaggio Sip 30•30 is fitted
with a new and innovative feature
to make strap adjustment easy and
safe. Removing the shoulder strap
and threading through the slots is not
required anymore.
1• To raise or lower the harness strap,
push the button on top of the
back plate and at the same time
pull or push the plate to adjust at
the desired position. There are 5
positions to choose from.
B
A
⇠ 33
Page 34

2• The correct position is when the
1 inch min
shoulder strap slot is located just
below shoulder level, as shown.
Important! T
his restraint is designed for
infants up to 76 cm (30 inches) in length.
The top of the infant head should not
exceed the top of the seat back.
Important! Make sure that the chest
harness and all straps are flat and not
twisted on the back or the front of the
car seat.
Important! The seat is supplied with a
filler cushion for new-born babies. This
can be removed when the child grows.
Even when using the cushion make
sure the shoulder straps are positioned
correctly.
⇠ 34
5
4
3
2
1
Page 35

Using the Car Seat Outside the Vehicle
This unit can be used as an infant seat.
The special shell shape is designed for
rocking your baby.
The hood provides shade for your baby.
1• To rock your baby, move the handle
into the up position as shown. To
prevent rocking, lock the handle
behind the backrest.
⇠ 35
Page 36

2• To attach the hood, push the hood
latch into the slot on the seat shell
as shown. To open the hood, pull the
frame until it clicks open.
3• To adjust the hood position, simply
push into the desired position.
4• To remove the hood, push the
buttons and remove the latches from
the seat shell.
B
Warning! The hood must not be used
to lift the safety seat because it might
detach.
⇠ 36
A
A
Page 37

5• Carrying handle for Base.
Warning! Do not use with the seat
attached to the base.
Warning! Do not use as a means of
transporting child.
⇠ 37
Page 38

How to Use the Car Seat on Aircraft without Base
This unit is certified for aircraft use.
1• Position the restraint on the seat,
adjust the handle so it rests at the
top edge of the car seat as shown.
Any other position may injure your
baby in an accident. To move the
handle, press the gray buttons on
the sides of the handle at the same
time and push the handle.
2• Adjust the restraint on the seat.
Check the red line to see that the
base is level with the ground. Thread
the lap belt through the slots on the
seat and lock the latch plate into the
buckle as shown.
3• Pull the strap to tighten the seat
belt. Press down on the seat with
your body weight and pull the strap
tighter. Once the seat is tight, check
that the red line on the side of the
car seat is level with the ground.
38
Important! Follow the harness
instructions beginning with “How to
Buckle Your Baby into the Car Seat”
(on page 28) to safely secure your baby.
Page 39

How to Use the Car Seat on Aircraft with Base
This unit is certified for aircraft use.
1• Buckle the base to the aircraft seat
using the lap belt as shown. A
secondary belt path can also be used
as shown in Fig. B.
2• Position the base rear facing in
the aircraft seat. Check the level
indicator on the side of the base
to make sure that the ball is in the
green area. If it is not, turn the knob
left or right until it is in the correct
position.
3• Thread the lap belt through the slots
on the base and lock the latch plate
into the buckle.
4• Pull the seat belt strap to tighten the
base down. Press your body weight
down on the seat to tighten the belt
further. Check the level and adjust if
needed. Push and pull on the base. If
you can move it more than one inch,
A
B
⇠ 39
Page 40

tighten the belt further. Position the
car seat rear facing over the base.
Press the seat into the base until you
hear the click. Make sure the seat is
correctly locked in place.
Important! Follow the harness
instructions beginning with “How to
Buckle Your Baby into the Car Seat” (on
page 28) to safely secure your baby.
⇠ 40
Page 41

Cleaning and Maintenance
This unit needs minimal maintenance.
Keep all moving parts clean. Lubricate with light oil, if necessary on moving parts.
•
Clean the plastic parts often with a damp cloth. Do not use solvents or harsh
•
products.
Brush the fabric parts to remove dust.
•
Protect the product against snow, water, and rain. Constant exposure to sunlight
•
can change the colors in the material. Sun can also make the seat very hot. Be
sure it is cool before putting your baby in the seat.
Excessive exposure to the sun for long periods of time can make the plastic
•
brittle.
Store product in a dry area.
•
Warning! Do not use or purchase the car seat 7 (seven) years after the production
date labelled on the seat or shell.
⇠ 41
Page 42

How to Wash the Chair Padding - Cover removal
1•
Remove the hood.
• Remove the filler cushion.
• Press the red button on the crotch
strap buckle to release the harness.
• remove the shoulder straps from the
slide adjuster on the back of the seat.
• open the chest clip.
• from the front, remove the straps
from the backrest.
2• Slide on the headrest cover from the
bottom first and then, carefully, from
the two side tabs.
BE CAREFUL NOT TO BREAK THE WHITE
POLYSTYRENE (EPS) PARTS.
⇠ 42
Page 43

3• Remove the four installation tabs of
),
y clean, do not use
;
the padding from the edge of the car
seat.
• Remove the two covers of the lateral
guides for the belt of the car.
4• Slip the side belts out through the
slots in the cover; finally, also slip the
central strap out through the hole in
the cover.
• remove the padding in sequence, as
shown.
Padding cleaning instructions
• hand wash at max 86 F (30 C
do not wring;
• do not iron;
• do not bleach with chlorine;
• do not dr
solvent based stain removers
• do not tumble dry.
C
B
A
⇠
43
Page 44

How to Wash the Chair Padding - Refitting
1•
Slide the padding on in sequence, as
shown:
- slide the sack on from the top
- first put the lateral tabs of the
headrest carefully
_ then slide it into the bottom of the
headrest.
• Insert the side belts upwards into the
slots in the cover.
• Slip the strap through the opening
in the cover and insert it into the leg
divider.
2• Insert the four installation tabs of the
padding from the edge of the car
seat.
• Place the two covers of the lateral
guides for the belt of the car with
the slots facing the inside of the car
seat and make sure that it is attached
correctly.
A
B
C
⇠
44
Page 45

3• To slide on the headrest cover from
the two lateral tabs and slide on the
bottom.
IMPORTANT: the strap must not be
4•
twisted.
• Insert the straps in the backrest, from
the front .
• Attach the shoulder straps with
Velcro.
• Insert the safety belts into the slide
adjuster on the back of the seat.
⇠ 45
Page 46

Replacement Parts
7
46
1
4
6
3
9
1) BSAKAP*
2) SPST6850GL
3) SPST6341DNF
4) SPST6341SNF
5) BSPKAP*
6) BCAASI*
7) MUCI0081GR
8) BRIASI*
9) ASPI0151GLNF
10) IAKADJUSNF
2
5
8
NOTE: Spare parts
available in different
colors* to be specified
10
when ordering.
NOTE: A Tether is not
a component of a rear
facing only car seat.
Page 47

47
Page 48

Page 49

Page 50

47
Page 51

atrás.
de auto orientada hacia
un componente de silla
NOTA: Un Tether no es
de repuesto.
colores* de las piezas
pedido especifique los
NOTA: Cuando haga su
10) IAKADJUSNF
9) ASPI0151GLNF
8) BRIASI*
7) MUCI0081GR
6) BCAASI*
5) BSPKAP*
4) SPST6341SNF
3) SPST6341DNF
2) SPST6850GL
1) BSAKAP*
46
10
8
7
5
2
9
3
6
4
1
Piezas de repuesto
Page 52

45
respaldo.
en el seguro del lado posterior del
• Poner los cinturones de seguridad
con velcro.
• Enganchar las cintas de los hombros
como se muestra en la figura.
• Colocar los cinturones en el respaldo,
estar torcido.
4•
IMPORTANTE: El cinturón no debe
parte inferior.
aletas laterales y finalmente calzar la
reposacabeza comenzar por las dos
3• Para calzar el revestimiento del
Page 53

44
correctamente.
de que estén enganchadas
de la sillita para coche y asegurarse
las ranuras orientadas hacia el interior
laterales del cinturón del coche con
• Colocar las dos tapas de las guías
de coche.
del acolchado en el borde de la sillita
2• Colocar las cuatro aletas de fijación
de las piernas.
del saco e insertarla en el separador
• Hacer pasar la correa por la abertura
abajo hacia arriba por la ranura del saco.
• Hacer pasar los cinturones laterales de
C
inferior del reposacabeza.
- luego hacerlo pasar por la parte
del reposacabeza con cuidado;
- introducir primero las aletas laterales
B
- calzar desde arriba el saco;
se muestra en la figura:
1•
A
Calzar el acolchado en secuencia, como
Cómo lavar el acolchado de la silla - Enfundar
Page 54

43
• Laver à la main uniquement,
• No centrifugar
• No limpiar en seco;
• No poner en lejía;
• No planchar;
température maximale 30°C.
A
Mantenimiento del acolchado
B
como se muestra en la figura.
C
• Extraer el acolchado en secuencia,
correa central por la ranura del saco.
saco; por último, extraer también la
haciéndolos pasar por las ranuras del
4•
Extraer los cinturones laterales
laterales del cinturón del coche.
• Quitar las dos tapas de las guías
coche.
acolchado del borde de la sillita de
3•
Sacar las cuatro aletas de fijación del
Page 55

42
POLIESTIRENO (EPS).
ROMPER LAS PIEZAS BLANCAS DE
PRESTE ATENCIÓN PARA NO
dos aletas laterales.
inferior y luego, con cuidado, de las
reposacabeza, primero por la parte
2•
Sacar el revestimiento del
delante.
• Sacar los cinturones del respaldo por
• Quitar las cintas de los hombros.
silla.
deslizante del lado posterior de la
• Sacar los tirantes del seguro
cinturón de seguridad.
entrepiernas para desabrochar el
• Pulsar el botón rojo de la hebilla
• Sacar el cojín de relleno.
1•Retire la capota.
Cómo lavar el acolchado de la silla - Desenfundable
Page 56

41
más desde la fecha de producción etiquetada en la silla o en el armazón.
Advertencia! No utilice ni compre una silla de auto si han pasado 7 (siete) años o
• Guarde el producto en un lugar seco.
plástico.
• La exposición al sol durante períodos prolongados puede resquebrajar el
de colocar a su bebé en la silla, asegúrese de que la silla no esté caliente.
solar puede cambiar los colores del material. El sol puede recalentar la silla. Antes
• Proteja el producto de la nieve, el agua y la lluvia. La exposición constante a la luz
• Cepille las partes de tela para eliminar el polvo.
solventes ni productos fuertes.
• Limpie las partes plásticas con frecuencia utilizando un paño húmedo. No utilice
aceite liviano si es necesario.
• Mantenga limpias todas las partes móviles. Lubrique las partes móviles con un
Esta unidad requiere un mantenimiento mínimo.
Limpieza y mantenimiento
Page 57

40
lugar.
esté correctamente bloqueada en su
enganche. Asegúrese de que la silla
silla sobre la base hasta oír el clic del
hacia atrás sobre la base. Empuje la
Coloque la silla de auto orientada
pulgada, apriete el cinturón aún más.
base. Si se desplaza más de una
es necesario. Empuje y tire de la
más. Controle el nivel y ajústelo si
a su bebé correctamente.
la silla de auto» (página 28) para sujetar
arnés sobre «Cómo sujetar a su bebé en
Importante! Siga las instrucciones del
Page 58

39
B
A
asiento para apretar el cinturón aún
presión con su cuerpo sobre el
apretar la base hacia abajo. Haga
4• Tire de la correa del cinturón para
placa del seguro en la hebilla.
las ranuras de la base y bloquee la
3• Haga pasar el cinturón de cadera por
esté en la posición correcta.
la izquierda o la derecha hasta que
En caso contrario, gire el pomo hacia
de que la bola esté en el área verde.
costado de la base para asegurarse
Controle el indicador de nivel al
atrás en el asiento del avión.
2• Coloque la base orientada hacia
cinturón como indica la figura B.
utilizarse un paso secundario para el
como muestra la figura. Puede
utilizando el cinturón de cadera
1• Abroche la base al asiento del avión
en aviones.
Esta unidad está certificada para el uso
Uso de la silla de auto en el avión con la base
Page 59

38
a su bebé correctamente.
la silla de auto» (página 28) para sujetar
arnés sobre «Cómo sujetar a su bebé en
Importante! Siga las instrucciones del
paralela al suelo.
línea roja al costado de la silla quede
ajustada la silla, compruebe que la
apretar la correa aún más. Una vez
silla con el peso de su cuerpo para
cinturón de seguridad. Presione la
3• Tire de la correa para apretar el
hebilla como indica la figura.
y bloquee la placa del seguro en la
de cadera por las ranuras de la silla
la línea roja. Haga pasar el cinturón
esté paralela al suelo observando
el asiento. Compruebe que la base
2• Ajuste el dispositivo de retención en
botones grises laterales y empújela.
el asa, pulse simultáneamente los
bebé en un accidente. Para mover
posición puede provocar heridas al
indica la figura. Cualquier otra
superior de la silla de auto como
modo que descanse sobre el borde
sobre el asiento y ajuste el asa de
1• Coloque el dispositivo de retención
en aviones.
Esta unidad está certificada para el uso
Uso de la silla de auto en el avión sin la base
Page 60

37
para transportar al niño.
Advertencia! No la utilice como medio
acoplada a la base.
Advertencia! No la utilice con la silla
5• Asa de transporte para la base.
Page 61

36
puede soltarse.
usarse para levantar la silla ya que
Importante: la capota no tiene que
A
A
silla.
botones y quite los seguros de la
B
4• Para quitar la capota, pulse los
deseada.
simplemente empújela a la posición
3• Para ajustar la posición de la capota,
hasta que se abra con un clic.
abrir la capota, tire del armazón
la silla como indica la figura. Para
seguro de la capota en la ranura de
2• Para montar la capota, empuje el
Page 62

35
respaldo.
balanceo, bloquee el asa detrás del
como indica la figura. Para impedir el
1• Para acunar a su bebé, levante el asa
La capota hace sombra.
caparazón para acunar al bebé.
para niños. Está diseñada con forma de
Esta unidad puede utilizarse como silla
Uso de la silla de auto fuera del vehículo
Page 63

34
reductor.
de las correas incluso cuando se use el
niño. Asegurarse de la correcta posición
nacido que puede quitarse al crecer el
con un cojín reductor para el recién
Importante! La silla de auto se entrega
de la silla de auto.
planos y no retorcidos detrás o delante
pectoral y todas las correas queden
Importante! Asegúrese de que el arnés
el respaldo de la silla.
cabeza del niño no debería sobrepasar
1
2
3
4
5
1 pulgada 2.54 centímetros
de hasta 30 pulgadas de estatura. La
retención está diseñado para niños
Importante! Este dispositivo de
del hombro como indica la figura.
queda precisamente debajo del nivel
que la ranura de la correa de hombro
2• La posición correcta es aquella en la
Page 64

33
para elegir.
posición deseada. Hay 5 posiciones
empuje la placa para ajustarla en la
posterior y al mismo tiempo tire o
arnés, pulse el botón de la placa
1• Para levantar o bajar la correa del
A
B
hombro y hacerla pasar por las ranuras.
Ya no es necesario quitar la correa de
ajuste de las correas sea fácil y seguro.
una prestación innovadora para que el
Primo Viaggio Sip 30•30 está dotada de
Cómo levantar o bajar las correas de hombro
Page 65

32
natural.
cuerpo a una posición que no sea
presión sobre el bebé ni empujar el
recta sin ceder, pero sin tampoco hacer
sino mantener una línea relativamente
debería permitir ningún aflojamiento
Importante! Una correa ceñida no
Page 66

31
A
del arnés como indica la figura.
B
ubicada a los pies de su bebé y tire
ajuste del arnés dentro de la ranura
mantenga pulsado el botón de
8• Para aflojar el arnés, pulse y
silla.
ajuste debajo del acolchado de la
el extremo suelto de la correa de
el arnés y la clavícula del bebé. Meta
de dejar un dedo de distancia entre
hasta que quede ceñida. Asegúrese
correa de ajuste del fondo de la silla
axila. Para apretar el arnés, tire de la
7• Ajuste el clip pectoral al nivel de la
Page 67

30
EMPUJAR
A
B
hacia arriba.
seguro, pulse el botón rojo y tire
6• Para desabrochar las placas del
EMPUJAR
B
A
indica la figura.
pulsar el botón del clip y tirar como
5• Para desabrochar el clip pectoral,
Page 68

29
4• Abroche los dos clips pectorales.
Tirantes en la página 33).
Consultar Cómo Subir o Bajar los
deba ajustar la altura del hombro.
enganchadas. (Nota: Puede que
ambas placas estén correctamente
las correas para asegurarse de que
en la hebilla hasta oír el clic. Tirar de
3• Introducir ambas placas de cierre
Page 69

28
del bebé.
detrás del respaldo o sobre el pecho
que las correas no estén retorcidas
hombros del bebé. Asegúrese de
dos correas de hombro sobre los
al dispositivo de sujeción. Lleve las
con la cadera y la espalda pegadas
2• Coloque a su bebé en la silla de auto
costado para dar lugar a su bebé.
5). Coloque las correas de hombro al
desabrochar el clip pectoral (punto
tira de las correas de hombro
botón de ajuste del arnés mientras
abrir el arnés. Mantenga pulsado el
1• Pulse el botón rojo de la hebilla para
ilustración en la página 8.
sujetar al bebé en la silla de auto. Vea la
un sistema de arnés de 5 puntos para
Este dispositivo de retención aplica
Cómo sujetar a su bebé en la silla de auto
Page 70

27
página 22.
instalarse en los tipos de asiento de la
Primo Viaggio Sip 30•30 no debería
instalación completa.
que figura en esta página muestra una
instrucciones de instalación. El ejemplo
de bloqueo, ver página 21 para las
Si el cinturón necesita una presilla
cinturón, consulte las páginas 19 y 20.
Importante! Para otros tipos de
diferentes cinturones de seguridad.
en función de la disponibilidad de los
instala del mismo modo que con base
Primo Viaggio Sip 30•30 sin base se
de cinturones de seguridad
Instalación de la silla con diferentes tipos
Page 71

26
paralela al suelo.
línea roja al costado de la silla quede
ajustada la silla, compruebe que la
apretar la correa aún más. Una vez
silla con el peso de su cuerpo para
cinturón de seguridad. Presione la
hebilla como indica la figura.
y bloquee la placa del seguro en la
de cadera por las ranuras de la silla
la línea roja. Haga pasar el cinturón
esté paralela al suelo observando
el asiento. Compruebe que la base
auto floja.
Su bebé no estará a salvo en una silla de
cinturón de seguridad de su vehículo.
cómo asegurar la silla utilizando el tipo de
de instrucciones de su vehículo para saber
cinturón lo suficiente, consulte el manual
Advertencia! Si no puede apretar el
3• Tire de la correa para apretar el
2• Ajuste el dispositivo de retención en
Page 72

25
paralela al suelo.
la línea roja al costado de la silla quede
del asiento del vehículo, de modo que
debajo de la silla, donde está el pliegue
toalla enrollada o un tubo de goma
al suelo. Si es necesario, coloque una
Importante! La silla debe estar paralela
botones grises laterales y empújela.
mover el asa, pulse simultáneamente los
heridas al bebé en un accidente. Para
Cualquier otra posición puede provocar
la silla de auto como indica la figura.
descansar sobre el borde superior de
orientado hacia atrás. El asa debe
sobre el asiento de modo que quede
1•
Coloque el dispositivo de retención
Aparque el vehículo sobre un terreno llano.
30•30 sin la base sólo en caso de necesidad.
utiliza. Utilice e instale Primo Viaggio Sip
fijar la silla en el vehículo cada vez que se
evitar el uso erróneo, ya que evita tener que
La base está diseñada para
Importante!
Instalación de la silla de auto sin la base
Page 73

24
la palanca.
facilidad si se tira cerca del centro de
Nota: La silla se quitará con más
los dedos.
del respaldo y tirar de la palanca con
Situar la mano en la parte superior
la palanca en posición vertical.
3• Para quitar la silla de coche, colocar
posición deseada.
colocándolo simultáneamente en la
los botones redondos del asa
Para mover el asa presione
bebé en un accidente.
posición puede provocar heridas al
como indica la figura. Cualquier otra
borde superior de la silla de auto
2• El asa debe descansar sobre el
Page 74

23
dificultades para respirar.
erguida, su bebé podría tener
accidente. Si la silla está demasiado
o ser expulsado de la silla en un
reclinada, su bebé podría lastimarse
correctamente. Si la silla está demasiado
deberían estar reclinados
Importante! Los recién nacidos
y ajuste la base adecuadamente.
De lo contrario, quite la silla de auto
esté todavía nivelada correctamente.
moverla. Compruebe que la base
bloqueada, no debería ser posible
oír el clic. Si la silla de auto está bien
presionándola sobre la base hasta
asa, móntela orientada hacia atrás
1• Sosteniendo la silla de auto por el
sobre la base.
vehículo, puede instalar la silla de auto
Ahora que la base está instalada en su
Instalación de la silla de auto sobre la base
Page 75

B
D
C
A
22
auto para niños.
instrucciones de instalación de sillas de
lea en el manual de su vehículo las
Para la seguridad de su niño, siempre
giratorios.
D Asientos orientados hacia atrás o
costados.
C Asientos orientados hacia los
B Cinturones montados en la puerta.
motorizados.
A Cinturones de cadera/hombro
auto en asientos con:
Importante! No instale esta silla de
Diferentes tipos de cinturones de seguridad
Page 76

media pulgada
media pulgada
21
seguro. Abroche de nuevo el cinturón.
Deje media pulgada entre el clip y el
correas como indica la figura.
A
el clip de bloqueo en torno a ambas
sosteniendo las correas. Enganche
EMPUJAR
B
la hebilla. Desabroche el cinturón
cinturón de cadera juntos, sobre
sostenga la correa de hombro y el
Para instalar el clip de bloqueo,
Cómo instalar el clip de bloqueo
Page 77

20
o llame al 1-888-327-4236.
injury/childps/ contacts/index.cfm
http://www.nhtsa.dot. gov/people/
Para conseguir un técnico en su zona visite
indique las opciones de instalación.
pasajeros infantiles certificado para que le
Consulte con un técnico de seguridad de
la silla de auto Primo Viaggio Sip 30•30 .
de emergencia, no lo utilice para asegurar
de hombro) que se bloquea sólo en caso
Si tiene un cinturón de cadera (sin correa
retractor de bloqueo de emergencia
V
Cinturón de cadera sólo con
en la figura.
cierre con agarre tal y como se muestra
Cinturones abdominales con placas de
el tipo de cinturón del que dispone.
el manual de su vehículo para saber
como se muestra en la figura. Consultar
Retractores de Bloqueo de Posición tal y
Retractores de Bloqueo Automático y
Retractores de Bloqueo de Emergencia,
Cinturones abdominales dotados de
Abdominales
IV Tipos Diferentes de Cinturones
en el manual de su vehículo.
Si no, lea instrucciones más específicas
cinturón debería quedar bloqueado.
vuelva a abrocharlo. De este modo el
abrocharlo, desabróchelo, inviértalo y
el cinturón queda suelto después de
con placa de seguro con bloqueo y
Si tiene un cinturón de cadera/hombro
placa de seguro con bloqueo
III Cinturón de cadera/hombro con
adecuadamente (página 21).
de la silla) para poder asegurarlo
clip de bloqueo (guardado en la base
Page 78

19
por lo que será necesario utilizar el
se bloquea sólo en una emergencia,
Este tipo de cinturón de seguridad
emergencia y placa de seguro libre
con retractor de bloqueo de
II
Cinturón de cadera/hombro
asegurar la base adecuadamente.
a tirar. Debería quedar bloqueada para
retraiga varias pulgadas y luego vuelva
de hombro hasta el tope, deje que se
bloqueo conmutable, tire de la correa
cadera/hombro con retractor de
retractor de bloqueo conmutable
I Cinturón de cadera/hombro con
seguridad del vehículo.
para niños utilizando los cinturones de
para saber cómo instalar una silla de auto
el manual de instrucciones de su vehículo
listan cuatro de los tipos más comunes. Lea
cadera o de hombro. A continuación se
utilizarse con cinturones de seguridad de
Primo Viaggio Sip 30•30 está diseñada para
cinturones de seguridad
Instalación de la base con diferentes tipos de
Page 79

18
estará a salvo en una silla de auto floja.
seguridad de su vehículo. Su bebé no
la base utilizando el cinturón de
vehículo para saber cómo asegurar
el manual de instrucciones de su
el cinturón lo suficiente, consulte
Advertencia! Si no puede apretar
aflojar la correa ligeramente.
área . Para ello puede ser necesario
indicador vuelva a estar dentro del
verde, gire el pomo hasta que el
nivel. Si se hubiese salido del área
apretada, controle el indicador de
cinturón aún más. Con la base bien
más de una pulgada, apriete el
tire de la base. Si la base se desplaza
apretar la correa aún más. Empuje y
base con el peso de su cuerpo para
cinturón de seguridad. Presione la
seguro en la hebilla como indica la figura.
ranuras de la base y bloquee la placa del
en la posición correcta.
izquierda o la derecha hasta que esté
4• Tire de la correa para apretar el
3• Haga pasar el cinturón de cadera por las
Page 80

17
contrario, gire el pomo hacia la
encuentra en el área verde. En caso
situado en el lateral de la base, se
Controle que el indicador de nivel,
sobre el asiento trasero del vehículo.
2• Coloque la base orientada hacia atrás
la palanca.
facilidad si se tira cerca del centro de
Nota: La silla se quitará con más
palanca con los dedos.
superior del respaldo y tirar de la
vertical. Situar la mano en la parte
colocando la palanca en posición
1• Quitar la silla de coche de la base
el vehículo sobre un terreno llano.
correctamente en su vehículo. Aparque
indicará cómo montar la silla de auto
el manual de su vehículo. El manual le
con los cinturones de seguridad, lea
de auto para niños esté bien instalada
manera. Para asegurarse de que la silla
de seguridad funcionan de la misma
Importante! No todos los cinturones
CINTURONES DE SEGURIDAD DEL VEHÍCULO
II - Cómo instalar la base utilizando los
Page 81

16
página 23.
pulgada, apriete el cinturón aún más.
la base. Si se desplaza más de una
correa ligeramente. Empuje y tire de
ello puede ser necesario aflojar la
vuelva a estar dentro del área. Para
gire el pomo hasta que el indicador
Si se hubiese salido del área verde,
más. Controle el indicador de nivel.
el peso de su cuerpo para apretarla
de seguridad. Empuje la base con
tirando del extremo libre de la correa
contra la base.
seguro esté colocada planamente
• Una vez instalada la base, vaya a la
6• Apriete la base contra el asiento
5• Asegúrese de que la correa del
Page 82

15
Presione hasta oír el clic.
el fondo del asiento de su vehículo.
anclaje ubicada entre el respaldo y
4• Empuje cada seguro en la barra de
B
operación del otro lado.
A
EMPUJAR
seguro de su alojamiento. Repita la
rojo sobre el seguro y quite el
como indica la figura. Pulse el botón
el botón gris y tirando de la correa
A
afloje la correa del seguro pulsando
a los costados de la base. Primero
B
EMPUJAR
sus alojamientos. Los seguros están
3• Quite los dos seguros de anclaje de
Page 83

14
esté en la posición correcta.
la izquierda o la derecha hasta que
En caso contrario, gire el pomo hacia
base, se encuentra en el área verde.
de nivel, situado en el lateral de la
vehículo. Controle que el indicador
atrás sobre el asiento trasero del
2• Coloque la base orientada hacia
la palanca.
facilidad si se tira cerca del centro de
Nota: La silla se quitará con más
palanca con los dedos.
superior del respaldo y tirar de la
vertical. Situar la mano en la parte
colocando la palanca en posición
1• Quitar la silla de coche de la base
sobre un terreno llano.
Instale la base con el vehículo aparcado
de seguro LATCH SYSTEM
I - Cómo instalar la base utilizando el sistema
Page 84

13
vehículo para localizar los anclajes
Importante! Lea el manual de su
localizar esta barra).
respaldo y el fondo del asiento para
página 17.
cadera o la correa de hombro en la
instrucciones de uso del cinturón de
auto para niños siguiendo las
universales, instale la silla de
vehículo no tiene anclajes inferiores
DE HOMBRO ESTÁNDAR.Si su
DE CADERA O LA CORREA
II CON EL CINTURÓN
del sistema de seguro LATCH SYSTEM.
inferiores y lea las instrucciones de uso
asiento (deslice la mano entre el
entre el respaldo y el fondo del
ubicada en la línea de intersección
página 14. El anclaje es una barra
seguro; vea las instrucciones en la
niños utilizando el sistema de
instalar la silla de auto para
universales», puede
«anclajes inferiores
Si su vehículo tiene
seguro LATCH SYSTEM.
I CON EL sistema de
Hay dos maneras de instalar la base:
parte del vehículo se puede instalar mejor una silla de auto para niños.
Importante! Lea el manual de instrucciones de su vehículo para saber en qué
la base y luego la silla de auto sobre la base.
Para utilizar Primo Viaggio Sip 30•30 con la base, primero hay que instalar
Instalación de la base
Page 85

12
tanto, segura.
la instalación resulte más fácil y, por lo
Se recomienda utilizar la base para que
certificada para utilizarse con o sin base.
Peg Perego Primo Viaggio Sip 30•30 está
Instrucciones de instalación
Page 86

11
presente anomalías.
consumidor en caso de que el producto
Estos elementos son de utilidad para el
Fecha de fabricación del arnés.
de la hebilla.
Fecha de fabricación
fabricación y número de serie.
Nombre del producto, fecha de
asiento las siguientes informaciones:
debajo de la parte delantera de su
Primo Viaggio Sip 30•30 contiene
Números de Serie
Page 87

10
Silla
Book Plus
Book
Skate
GT3
Uno
Switch Four
Pliko Four
Vela easy drive
Pliko Mini
Si
Aria Twin 6040
Triplette SW
Duette SW
Base
Sistema de Viaje
Page 88

9
usuario
manual del
Bolsillo para
Clip de bloqueo
Pomo de nivel
de anclaje
Seguros
Correa de seguro
POSTERIOR
FRONTAL
de nivel
Indicador
DE BLOQUEO
DEPÓSITO DE CLIP
LATERAL
antideslizante
cinturón con goma
Ranuras para
Base de la silla de auto
Page 89

SISTEMA DE ARNÉS
zas para una mayor protección contra el impacto.
expandido (EPS) que absorbe energía, con reposacabeEstructura revestida en espuma de poliestireno
8
Correa de ajuste del arnés
Botón de ajuste del arnés
Regulador deslizante
Hebillas de anclaje
Correa del arnés
Palanca de apertura
Hebilla del arnés
Placa de seguro del arnés
Clip de arnés pectoral
DE 5 PUNTOS
POSTERIOR
Almohadillas para el niño.
contra impacto lateral
Protección de cabeza
Asa de la silla
FRONTAL
CAPOTA
Silla de auto
Page 90

7
heridas o muerte.
de respiración que podrían causarle
su bebé podría tener dificultades
Si la silla está demasiado erguida,
lastimarse o ser expulsado de la silla.
silla.
• No cuelgue juguetes en el asa de la
etiquetada en la silla.
(7) años desde la fecha de producción
• No utilice esta unidad pasados siete
pasajeros en caso de accidente.
suelta puede causar heridas a los
estén ocupadas. Una silla de auto
sueltas en el vehículo, aunque no
• No deje la silla de auto ni la base
moverse y tumbar la silla.
las correas y sufrir heridas graves, o
silla de auto. Podría enredarse con
• Nunca deje a su bebé solo en la
blandas.
encimeras, mesas o superficies
• No coloque la silla de auto sobre
demasiado reclinada, su bebé podría
nivelada correctamente. Si la silla está
• Asegúrese de que la silla de auto esté
localizar los anclajes inferiores.
Lea el manual de su vehículo para
de utilizar el cinturón de seguridad.
para asegurar la silla de auto en vez
tiene anclajes inferiores, utilícelos
inferiores universales. Si su vehículo
hombro estándar o con anclajes
con cinturones de cadera o de
• Utilice esta silla de auto en vehículos
sobre cómo utilizar una silla de auto.
al médico instrucciones especiales
Si su bebé tiene muy poco peso, pida
hasta 30 pulgadas (76 cm) de estatura.
5 a 30 libras (2,3 a 13,5 kg) de peso y
• Utilice el dispositivo sólo con niños de
Reglas de seguridad
Page 91

6
de 2006.
que hayan sido fabricadas antes de Julio
• No usar Primo Viaggio Sip 30•30 con bases
para más información.
servicio al cliente 1-800-671-1701 (gratuito)
adquirir una nueva unidad. Llame al
segura para el uso. Podría ser necesario
sufre un accidente, podría dejar de ser
• En caso de accidente: si esta silla de auto
de la base.
de auto. Guárdelo en el bolsillo frontal
• Conserve el manual junto con la silla
formulario de registro.
• Complete y envíe inmediatamente el
caso de accidente.
auto y causar graves heridas o muerte en
comprometer la seguridad de la silla de
El uso de piezas no aprobadas puede
• Utilice únicamente piezas aprobadas.
• No acerque los dedos a las piezas móviles.
coloque el asa en posición de transporte.
• Antes de levantar la silla de la base,
hebillas se abrochen correctamente.
utilizando el arnés. Asegúrese de que las
• Sujete a su bebé en la silla de auto
muestra este manual.
un seguro LATCH SYSTEM como el que
utilizando un cinturón de seguridad o
de la silla de auto quede bien asegurada
• Cerciórese de que la silla de auto o la base
esté bien asegurada.
quedar bloqueado para que la silla de auto
bloqueo. El cinturón de seguridad debe
su lugar. Si no se bloquea, utilice el clip de
cinturón de seguridad para bloquearlo en
hombro para instalar la base, utilice un
• Si utiliza un cinturón de cadera o de
montados en las puertas.
cinturones de hombro motorizados o
o hacia los costados, ni en vehículos con
utilice en asientos orientados hacia atrás
asientos orientados hacia delante. No la
• Instale esta silla de auto únicamente en
que en el asiento delantero.
asiento trasero, se encuentran más a salvo
niños están sujetados correctamente en el
accidentes automovilísticos, cuando los
su vehículo. Según las estadísticas de
sean las instrucciones del manual de
Page 92

5
delantero del vehículo salvo que tales
• Nunca instale la silla de auto en el asiento
base sólo en caso de necesidad.
correcta. Instale esta silla de auto sin la
utilizar la base para facilitar la instalación
utilizarse con o sin base. Se recomienda
• Esta silla de auto está certificada para
saber dónde instalar la silla de auto).
manual de instrucciones de su vehículo para
en caso de impacto contra la unidad (lea el
airbag puede causar graves heridas o muerte
el airbag desactivado. La activación de un
esta silla de auto en un asiento que tenga
•
Si su vehículo dispone de airbags, instalar
desactivar el airbag.
de instrucciones de su vehículo para
vehículo con airbag activo. Lea el manual
• Nunca utilice esta silla en un asiento de
instala orientada hacia delante.
graves heridas o muerte si la silla se
delante. Un accidente podría causar
está diseñada para orientarse hacia
orientada hacia atrás. Esta silla no
• Utilice esta silla de auto únicamente
instrucciones y etiquetas de advertencia.
en caso de incumplimiento de las
• Su niño podría sufrir graves heridas
uso en vehículos de motor y aviones.
de Seguridad de Vehículos 213 para el
todos los requisitos de la Norma Federal
• Esta silla de auto es conforme o supera
Advertencia
Seguridad
Page 93

4
O visitar el sitio http://www.NHTSA.gov
(TTY: 1-800-424-9153).
1-888-327-4236
Auto del gobierno estadounidense
llame al número gratuito de Seguridad
Para información sobre actualizaciones
www.carseat-registration.pegperego.com
O regístrate online en
O llame al 1-800-671-1701(gratuito)
Fort Wayne, IN 46808
3625 Independence Drive
Peg Perego U.S.A., Inc.
retención y la fecha de fabricación a:
dirección, el modelo de dispositivo de
que le llamen. Envíe su nombre, su
dispositivo de retención para permitir
motivos de seguridad. Registre este
reclamados para actualizaciones por
retención para niños pueden ser
Importante! Los dispositivos de
www.pegperego.com.
(gratuito) o visitando
local, o llamando al 1-800-671-1701
adquirirla a través de su revendedor
Si desea tener más de una base, puede
listan las piezas de repuesto.
pieza Peg Perego. En la página 46 se
ser reemplazada únicamente con una
alguna pieza falta o está dañada, debe
reparaciones o piezas de repuesto. Si
si desea obtener información sobre
Perego USA, 1-800-671-1701 (gratuito)
Llame al servicio al cliente de Peg
Formulario de registro
Servicio al cliente
Page 94

3
momento sin aviso previo.
8 Peg Perego se reserva el derecho de aportar cambios al producto en cualquier
7 Recuerde: esta silla de auto debe instalarse únicamente orientada hacia atrás.
modifique ni repare ninguna pieza.
6 Utilice sólo las piezas o accesorios que se suministran con la unidad. No
5 No utilice la silla de auto si falta o si está dañada alguna pieza.
4 El ensamblaje debe ser llevado a cabo por un adulto.
3 Rellene y envíe el formulario de registro (página 4).
esta silla de auto.
también las etiquetas. Lea y entienda todas las instrucciones antes de utilizar
2 Revise una a una las piezas de la silla de auto y lea las instrucciones. Lea
la base de la silla de auto.
1 Lea este manual atentamente. Conserve este manual en el bolsillo plástico de
Antes de empezar
Page 95

46 Piezas de repuesto
Enfundar
44 Cómo lavar el acolchado de la silla-
Desenfundable
42 Cómo lavar el acolchado de la silla 41 Limpieza y mantenimiento
base
39 Uso de la silla de auto en el avión con la
base
38 Uso de la silla de auto en el avión sin la
35 Uso de la silla de auto fuera del vehículo
hombro
33 Cómo levantar o bajar las correas de
auto
28 Cómo sujetar a su bebé en la silla de
de cinturones de seguridad
27 Instalación de la silla con diferentes tipos
25 Instalación de la silla de auto sin la base
base
23 Instalación de la silla de auto sobre la
2
© 2013 Peg Perego. Todos los derechos reservados.
seguridad
22 Diferentes tipos de cinturones de
21 Cómo instalar el clip de bloqueo
de cinturones de seguridad
19 Instalación de la base con diferentes tipos
VEHÍCULO
CINTURONES DE SEGURIDAD DEL
17 Cómo instalar la base utilizando los
sistema de seguro LATCH SYSTEM
14 Cómo instalar la base utilizando el
13 Instalación de la base
12 Instrucciones de instalación
11 Números de Serie
10 Sistema de Viaje
9 Base de la silla de auto
8 Silla de auto
7 Reglas de seguridad
5 Seguridad
4 Formulario de registro
4 Servicio al cliente
3 Antes de empezar
Tabla de contenidos
Page 96

(LF)
USA
FIUS1301I154
arnés de 5 puntos.
y asegúrese de sujetar a su bebé con el
bebé, siga las instrucciones atentamente
manual. Para evitar heridas graves a su
entender todas las instrucciones de este
Estatura máxima: 30 pulgadas (76 cm)
Límites de peso: 30 libras (13,5 kg)
Requisitos para el niño:
M A N U A L D E L U S U A R I O
retención para niños sin antes leer y
No instale ni utilice este dispositivo de
ADVERTENCIA:
Side Impact Protection
PRIMO VIAGGIO SIP 30•30
Instrucciones de uso ES
 Loading...