

Page 1

Instructions for use EN
USA
FIUS1402I141
WARNING:
Do not install or use this child restraint
until you read and understand all
instructions in this manual. To avoid
serious injuries to your child, follow
the instructions carefully and be sure
to buckle your child using the 5-point
harness.
Weight limits in
rear-facing mode with vehicle belt:
5-45 lbs (2.3 - 20.4 kg)
Weight limits in rear-facing
mode with LATCH:
5-40 lbs (2.3 - 18.2 kg)
maximum height:
47 inches (119 cm)
Weight limits in
forward-facing mode with
vehicle belt:
22-65 lbs (10 - 30 kg)
Weight limits in
forward-facing mode with
LATCH:
22-45 lbs (10 - 20.4 kg)
maximum height:
49 inches (125 cm)
Page 2

Table of Contents
Introduction page 4
Warning page 5
Safety features page 8
Registration form page 10
Your child restraint page 12
Installing your child restraint in a vehicle:
• Vehicle attachment design and compatibility page 13
• Latch System page 14
• Vehicle Seatbelt page 15
• Non compatible vehicle belt designs page 22
• Top Tether page 23
• Weight and dimension range page 26
• Proper levelling of child restraint in rear facing mode page 27
Installing your child restraint in a vehicle - Rear Facing mode:
• REAR FACING mode using Latch System page 28
• REAR FACING mode using lap/shoulder belt (Type II) page 30
• Use of a locking clip page 32
• REAR FACING mode using lap belt (Type I) page 33
• Using the tether in Rear Facing mode page 36
© 2014 Peg Perego. All rights reserved.
- 2 -
Page 3

Table of Contents
Installing your child restraint in a vehicle - Forward Facing mode:
• FORWARD FACING mode using Latch System page 38
• FORWARD FACING mode using lap/shoulder belt (Type II) page 40
• FORWARD FACING mode using lap belt (Type I) page 42
• Using the Tether in Forward Facing mode page 44
Installing your child restraint in an aircraft page 45
Securing your child into the child restraint page 47
• Harness use and adjustment page 47
• Crotch strap adjustment page 52
• Infant ller cushion page 53
Cleaning and maintenance page 54
How to tell if the seat has been in a crash page 59
Replacement Parts page 62
- 3 -
Page 4
Introduction
Thank you for choosing a Peg Perego Primo Viaggio Convertible. As with any other PegPerego
product, your Convertible has been designed and certied by a dedicated team of engineers
inside Peg Perego Research and Development Department. Your Convertible has been
manufactured and assembled in a Peg Perego plant under certied quality procedures and
using high quality materials from certied suppliers. As with every child restraint, Primo
Viaggio Convertible is used with a child inside a vehicle, travelling fast on highways or slow in
the chaotic trac of today’s cities. This means that you need to use this car seat as a concerned
parent, driving carefully when you have a child on board but also, before this, taking your
time to explore the child restraint, knowing all the features it has, the dierent possible uses,
the proper and best installations. Go through this manual entirely, keeping your new child
restraint in sight, checking every point and understanding it. Install the child restraint in your
vehicle taking the necessary time and making tting trials before using it with your child. Once
you have read the manual, store it again in its proper pocket. This will ensure that everybody
looking after your child and using this seat will be able to look for help in this manual.
Should you see any malfunctioning feature,
after taking the necessary familiarization or if
you see broken parts, do not hesitate to call Peg
Perego Customer Service @ 1-800-671-1701
for help. Now that you know your new Primo
Viaggio Convertible, you are ready to enjoy safe
and happy journeys with your family and your
children.
- 4 -
Page 5
Warning
• When using the Primo Viaggio Convertible in
rear facing mode, never place it in vehicle seats
equipped with an active air bag. Death or
serious injuries can occur if an air bag hits the
unit. Check your vehicle owner's manual for
child restraint and vehicle seat compatibility.
• According to accident statistics, children
are safer when properly restrained in the rear
seating positions.
• Do not install or use this child restraint until
you read and understand all the instructions
in this manual and the labels on the product.
To avoid serious injuries to your child,
follow the instructions carefully. Keep the
instruction manual in the dedicated pocket
for future reference.
•
Your child could be seriously injured if you do not
follow instructions and warning labels correctly.
• This child restraint meets or exceeds all
applicable Federal Motor Vehicle Safety
Standard 213 requirements for use in motor
vehicles and aircraft.
• Always restrain your child with the 5-point
integral harness provided with the product.
Be sure that the buckle is correctly latched.
Snugly adjust the belt around the child's
body making sure that the belt lies at with
no slack. Use the chest clip to be sure that the
belts are in the correct position.
• Primo Viaggio Convertible can be used in
two main modes: rear facing, when the child
sitting in the restraint looks at the back of the
vehicle; forward facing when the child sitting
in the restraint looks at the front of the vehicle.
• Use Primo Viaggio Convertible in rear
facing mode with vehicle belt with children
weighing 5 – 45 lbs (2.3 – 20.4 kg) and with
latch with children weighing 5-40 lbs (2.3-
18.2 kg); in forward facing mode with vehicle
belt with children weighing in the range
22 – 65 lbs (10 – 30 kg) and with latch with
children weighing 22-45 lbs (10-20.4 kg) and
having a maximum height of 49 inches (125
cm).
• Keep your child in rearward facing mode as
long as possible: NEVER use Primo Viaggio
Convertible in forward facing mode if baby
weighs less than 22 lbs (10 kg).
• Primo Viaggio Convertible can be secured to
your vehicle by means of lap or lap/shoulder
belts available in your vehicle. However, not
all available models of seatbelts are approved
for use with this product. Refer to the dedicated
section in this manual for further details.
- 5 -
Page 6

Warning
• Primo Viaggio Convertible can be secured
to your vehicle by means of lower universal
anchorage system (LATCH) in conjunction
with a top tether, both provided with this
product. Refer to the dedicated section in this
manual for installation details and check your
vehicle owner’s manual for further details.
• When securing the child seat into the
vehicle, make sure that the seat belt or LATCH
stay locked and tight during normal driving.
Refer to the dedicated sections in this manual
for further details.
• This child restraint is designed to be installed
on front facing vehicle seats only. Never use
on seats looking sideways or rearward facing.
Do not use in cars with door-mounted or
motorized shoulder belts. Read your vehicle
owner’s manual for additional information.
• When the child restraint is installed on the
vehicle seat, check that vehicle belts or LATCH
and top tether straps are snugly tted around
the child restraint structure and that there is no
slack. An incorrectly fastened child restraint may
result in an additional excursion or deceleration
on your child in case of an accident.
• Complete and send in the registration form
- 6 -
provided with this product right away. In
case of an accident: if this car seat is involved
in a car accident, it may be no longer safe
for use. You may need to get a new unit. Call
customer service @ 1-800-671-1701 for help.
• Seat covers and pads provided with this product
are part of the product and the certication
program. The use of non approved covers or
other accessories is not recommended.
• EPS components (white soft foam located
below the upholstered covers) are integrated in
the product as safety related parts and should
never be removed or severely damaged.
• EPP component (black soft part located behind
the shell) is integrated in the product as safety
related part and should never be removed.
• Secure this child restraint in the car even
when not occupied. This child restraint is a
heavy object that could cause severe damage
to other occupants in case of an accident.
• Do not lift this child restraint by harnesses
to avoid unnecessary wear or stress on the
webbing. Lift it by the hard structure.
• Keep ngers away from moving parts.
WARNING: Do not use the lower anchors of
the child restraint anchorage system (LATCH
Page 7
Warning
system) to attach this child restraint when
restraining a child weighing more than 40
pounds (18.2 Kg) with the internal harnesses
of the child restraint.
• The harness should t snugly against the
child’s body. Bulky jackets should be removed
and placed on backwards over the child after
the harness is tted.
• Use only with children who weigh between
5 and 65 lbs (2.3 and 30 kg).
• Do not leave your child unattended in the
car, even for a short period. He/she could get
tangled in the straps and be seriously injured
or could move or tip the child restraint.
• Do not leave the child restraint under direct
sunlight for a prolonged time. The seat may
become very hot and burn your child’s skin.
• When not in use, store the product, away
from light, moisture, excessive heat or cold.
• Be sure the child restraint is properly levelled.
If the seat reclines too much, your child can
be injured or ejected from the seat. If the seat
is too upright, it can cause your child to have
breathing problems, which could lead to
injury or death.
• Do not place this child restraint on
countertops, tables or soft surfaces. Do not
use this unit after seven (7) years from the
date of production labelled on the seat.
• Do not try to remove or add parts unless
where explained in this manual; do not try
to repair this product. In case of damage or
defective components, call customer service
@ 1-800-671-1701 for help.
• Do not leave loose objects, bags or luggage
in the vehicle interior. In case of an accident
they could suddenly move causing the
occupants to be injured.
- 7 -
Page 8
Safety features
Primo Viaggio Convertible is equipped with safety features specically designed to protect your
child in the event of a crash. In case of a severe crash, there are parts of your seat designed to bend
or deform. These parts will absorb the crash energy so it is not transferred to your child. Please refer
to section "How to tell if your seat has been in a crash" on page 59, for additional information.
EPS: the side of the head wings, the side and the
bottom of the shell are covered with a thick layer
of low density Expanded Poly Styrene which
absorb energy and reduce crash forces. They
also provide thermal insulation and give extra
comfort when used for long periods of time.
STEEL PLATE: the back of the seat is reinforced
with a steel plate that supports the spine, neck and
head under the high loads developed in a crash.
SAFE: (Shock Absorbing Foam Element) is an
Expanded Poly Propylene (EPP) block located at
the bottom of the shell between the hard surface
and the harness web. It is designed to deform
during a crash in order to reduce compression
loads on the occupant shoulders and chest.
- 8 -
Page 9
Safety features
PIVOT PINS: the base of the seat is hinged on
steel pins that travel into plastic walls during
a crash.
REAR ROD: a steel rod in the back of the seat
takes compression loads in a crash when the
product is used in rearfacing mode.
TETHER BAR: the tether strap that is located
on the top of the seat is attached to a bar that
bends during a crash.
- 9 -
Page 10
Registration form
Important! Child restraints could be recalled
for safety reasons. You must register this
restraint to be reached in a recall. Send your
name, address and the restraint's model
number and manufacturing date to:
Peg Perego U.S.A., Inc.
3625 Independence Drive
Fort Wayne, IN 46808
Or call 1-800-671-1701 (toll free)
Or register online at
www.carseat-registration.pegperego.com
For recall information, call the U.S.
Government’s Vehicle Safety Hotline at
1-888-327-4236 (TTY: 1-800-424-9153)
Or go to http://www.NHTSA.gov
The registration form is attached to the
product cover. Detach the form, ll in and mail
to PegPerego. No stamp is needed. We have
already paid for it. Should the registration form
be missing, please call Customer Service @
1-800-671-1701 for a replacement form.
- 10 -
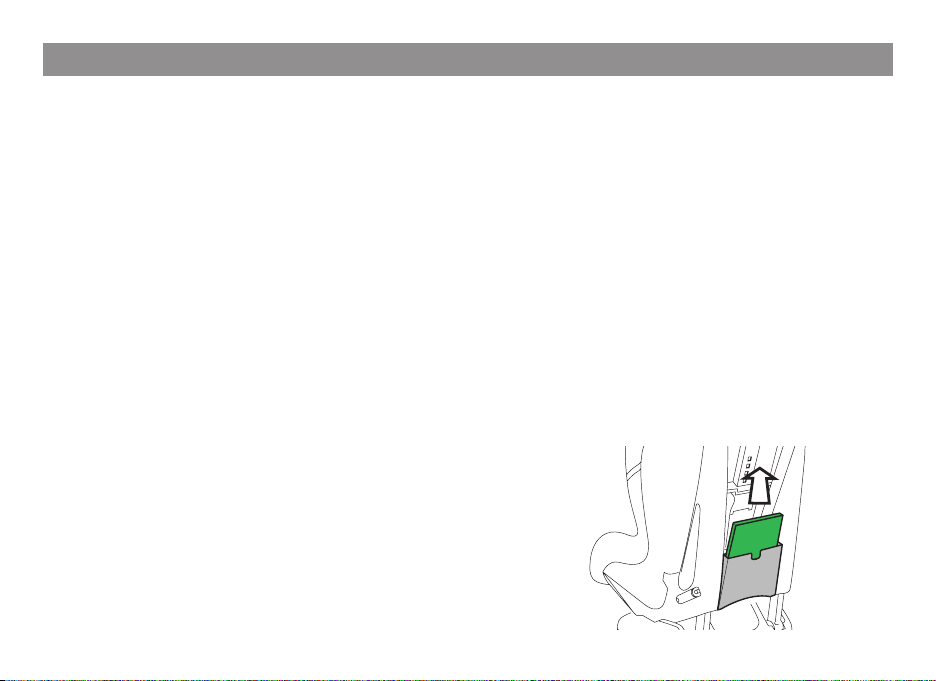
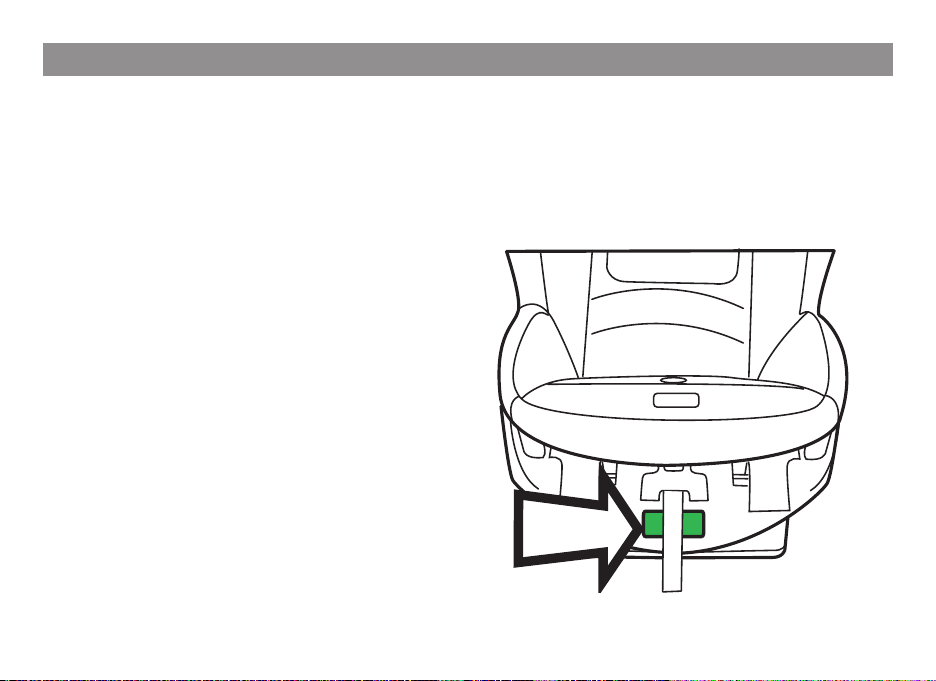
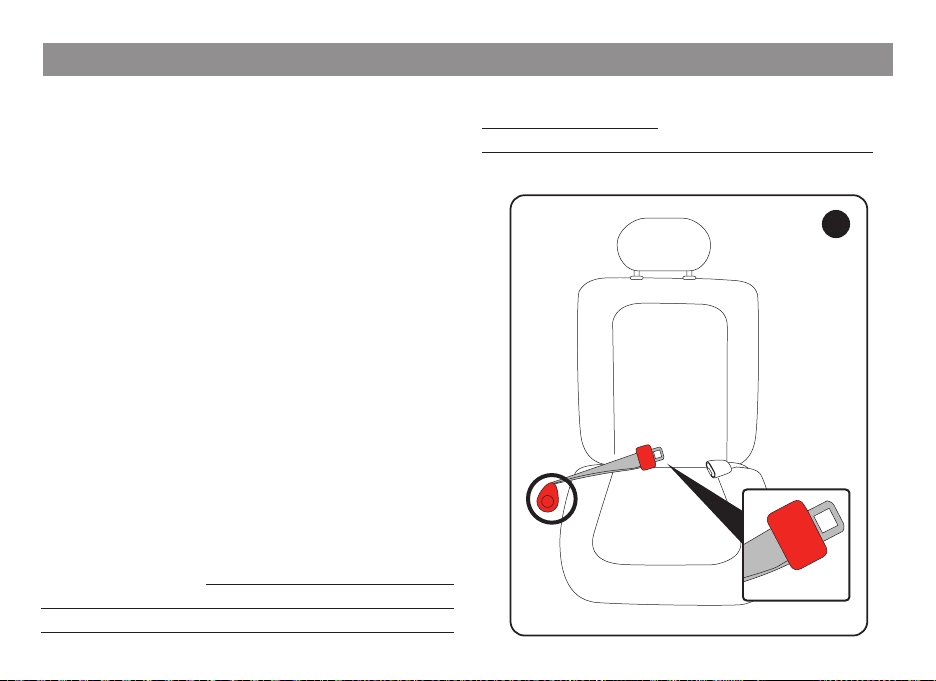
Model number, model name, date of
manufacturing, etc. are indelibly printed on a
label located in the picture shown here.
Page 11
Registration form
Harness serial number is also indelibly printed
on the buckle and the webbing and could
provide useful information in case of accident
or defects. See picture below for location
explanation.
- 11 -
Page 12
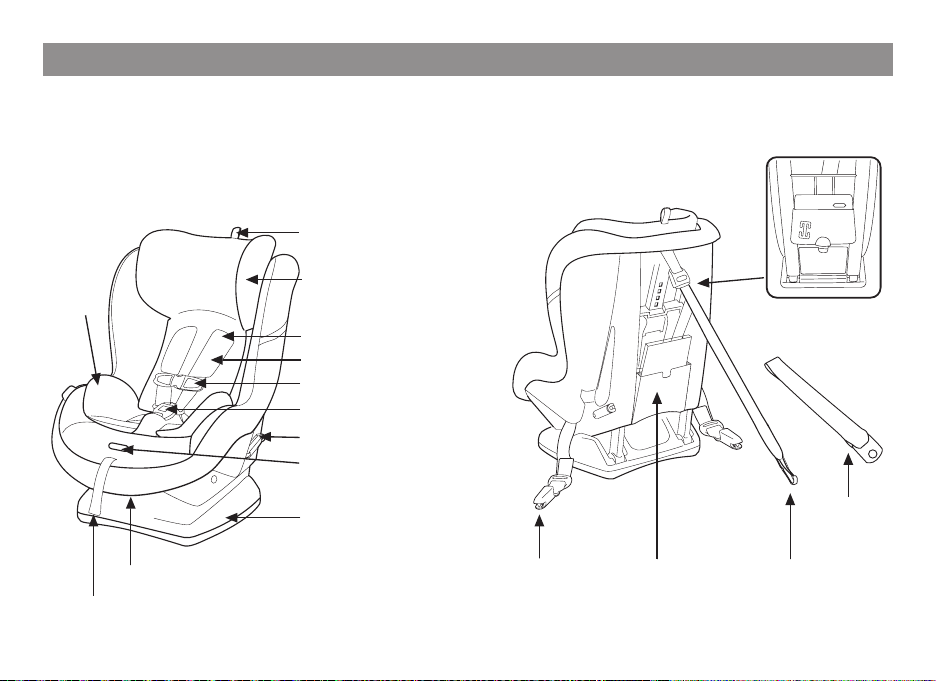
Your child restraint
Headpad adjustment strap
Newborn
ller
cushion
Recline handle
Adjuster strap
EPS padded head panel
5 point harness
Shoulder pads
Chest clip
Buckle
Locko clip
Harness release button
Base
- 12 -
Latch
connector
Instruction
manual pocket
Top tether
strap
Locking clip
storage
Rear facing
tether strap
extension
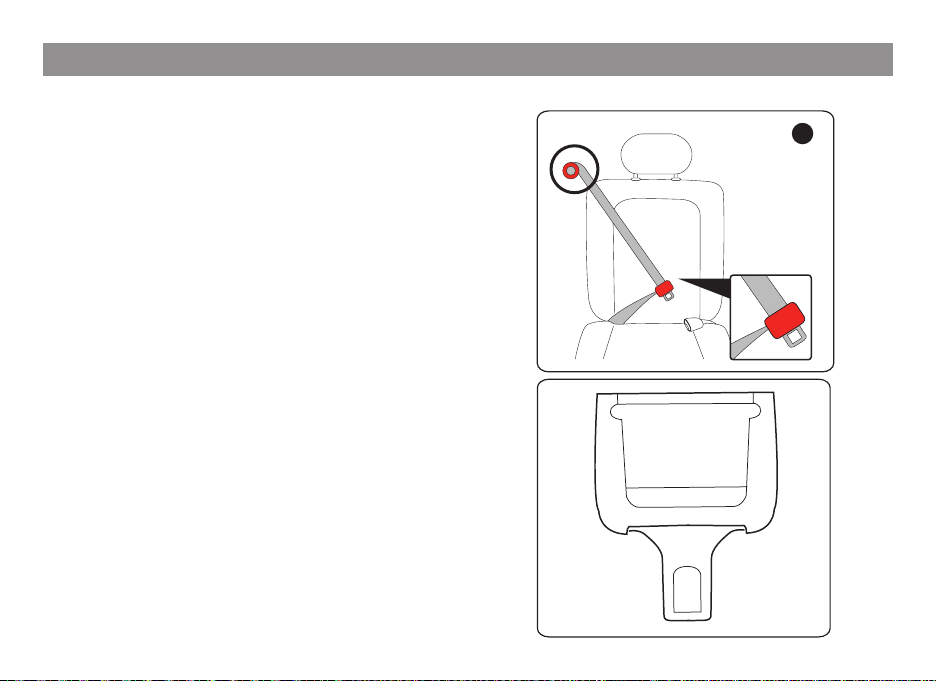
Page 13
Installing your child restraint in the vehicle
VEHICLE ATTACHMENT DESIGNS
AND COMPATIBILITY
Primo Viaggio Convertible
to be installed in a vehicle in Rear Facing
mode (RF) or in Forward Facing mode (FF).
It can be installed using:
1) Latch System
2) Vehicle Seatbelts
3) Additionally your seat is equipped with a
Top Tether to be attached to a suitable Top
Tether anchorage point. PegPerego always
recommends use of a Top Tether to increase
safety and stability of the child seat.
Details are described in the following pages.
Peg Perego recommends that caregivers
have their car seat installation checked by a
certied child passenger safety technician.
These technicians are trained for this specic
purpose and are available in your area. To
locate a technician go to the website at
http://www.nhtsa.gov/cps/cpstting/index.cfm
is designed
RF
REAR FACING
FF
FORWARD FACING
- 13 -
Page 14

Installing your child restraint in the vehicle
1) LATCH SYSTEM:
Primo Viaggio Convertible is equipped with latch connectors. They are
located at each side of the child seat that attach to anchors located at the junction of the seat
and backrest in your vehicle. There are two anchors for each seating position and they are
spaced by about 11" (28 cm).
They may be visible or slightly recessed into the vehicle uphostery and can be protected by
plastic or fabric shields. The LATCH anchor can be located by this symbol:
Check your Vehicle Owner's Manual to nd the
LATCH anchor locations in your vehicle.
Important! The maximum weight limit for latch
is 40 pounds when Primo Viaggio Convertible
11”
is used rear facing and 45 pounds when used
forward facing.
- 14 -
Page 15
Installing your child restraint in the vehicle
2) VEHICLE SEATBELTS: this child seat is designed to be installed with vehicle belts. There are
many dierent vehicle belt designs. Unfortunately, some may be unsuitable for a safe installation
of
Primo Viaggio Convertible
Check your vehicle owner’s manual or call Peg Perego Customer Service @ 1-800-671-1701 for
additional help.
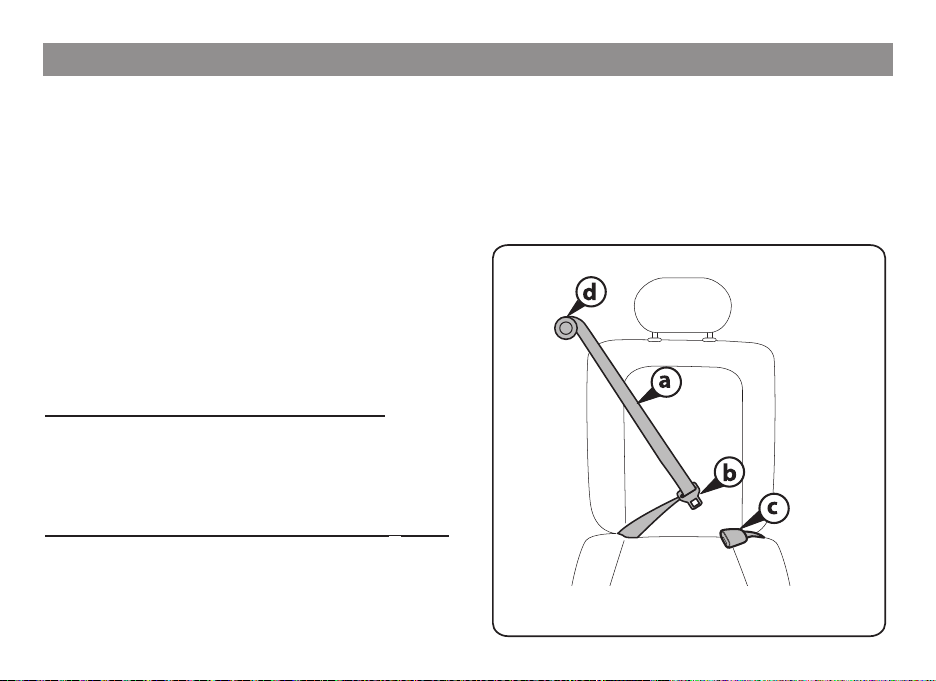
The most common vehicle belt is composed
of a web strap (a), a latch plate (b), a buckle
(c) and a retractor (d). A retractor is a
spring loaded device that rolls the seatbelt
automatically when not in use.
Common retractors are:
Emergency Locking Retractor (ELR) allows
the occupant to have free movement while
buckled up, but in an emergency situation
or crash the retractor instantly locks securing
the occupant.
Switchable Locking Retractor (ELR —> ALR)
Switches from Emergency Locking Retractor
(ELR) to an Automatic Locking Retractor (ALR).
This allows the user to lock the retractor at a
set position (also called child restraint mode)
. Please read carefully the pages below.
- 15 -
Page 16
Installing your child restraint in the vehicle
used for securing child seats. ALR mode is
activated by extending the retractor all the
way out until a "click" is heard, next let the seat
belt (webbing) retract into the retractor to the
desired length and stop the belt at that point.
The retractor locks and will not let the belt
lengthen at that point (only retract).
To cancel ALR mode and return the retractor to
the ELR mode, just let the retractor retract the
webbing all the way back into the retractor.
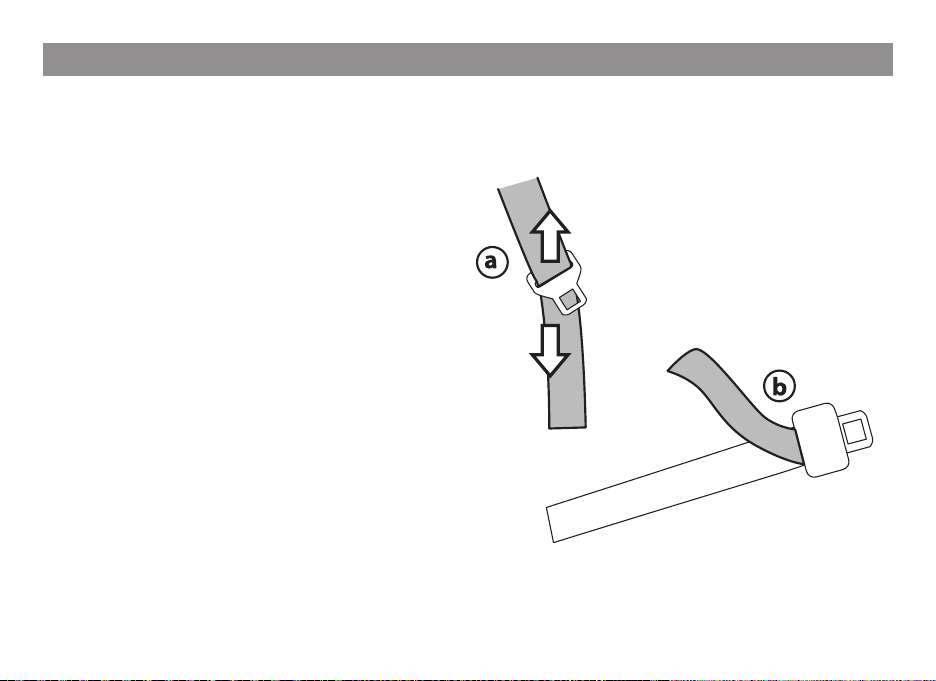
A latch plate can be a sliding latch plate (a) or
a locking latch plate (b). A sliding latch plate is
available on lap/shoulder belt only and moves
freely along the strap. A Locking latch plate
has a mechanism to lock the movement of the
plate on the strap.
- 16 -
Page 17
Installing your child restraint in the vehicle
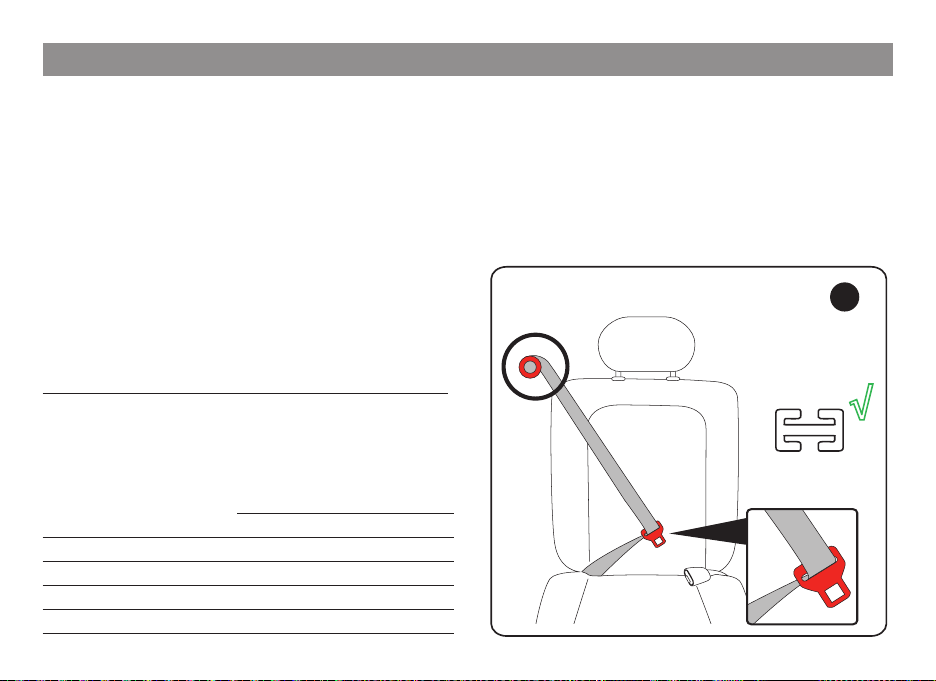
2.1 Lap/shoulder belt (3-point) with
Switchable Locking Retractor (ELR —>
ALR) and free sliding latch plate.
of seat belt has a latch plate that moves freely
along the belt. To activate the ALR mode, pull
the belt all the way out. Some vehicles may
require another activation method (check
vehicle owner’s manual for details). Once
activated, the belt will not extend unless
allowed to retract all the way.
Rear facing installation can be done using
the ALR or a locking clip. In some vehicles,
the shoulder strap can tend to tilt the seat
sideways when tightened. In this case, a
locking clip may provide a better installation.
The use of a locking clip is explained on page
32.
Forward facing installation should be done
with the ALR and the lock o clips located on
the sides of the seat.
Mode detailed installation instructions begin
on page 28.
This type
Important Note:
on the side of the Convertible seat are used to
enhance the stability during normal use. The lock
os are not designed to replace an automatic
locking retractor or a locking latch plate. The
vehicle belt must be properly tightened to secure
the Convertible seat to the vehicle.
ELR ALR
The lock o clips located
1
FF
RF
√
- 17 -
Page 18
Installing your child restraint in the vehicle
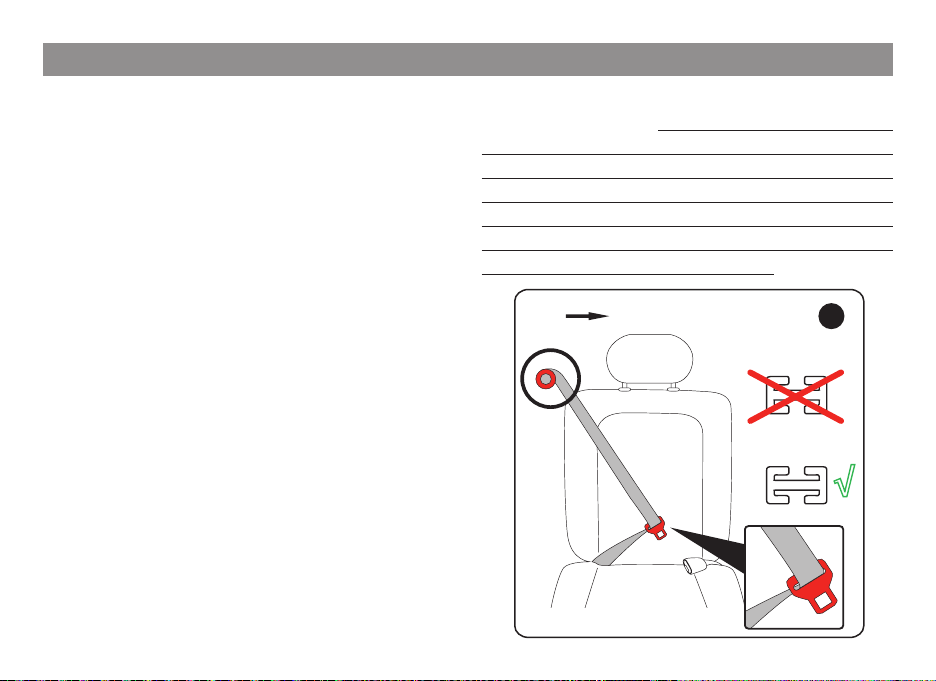
2.2 Lap/shoulder belt (3-point) with
Emergency Locking Retractor (ELR) and
with a locking latch plate. This type of belt
can be adjusted by pulling/releasing the strap
at the latch plate adjuster. Please refer to your
vehicle owner’s manual for details.
Note: Some locking latch plates need to
have the web positioned at the correct angle
for proper locking. Make sure the latch plate
properly locks when installing the car seat
with a locking latch plate.
Note: some vehicles are equipped with
switchable latch plate that can switch from a
sliding type to a locking type. In this specic
case, make sure that the latch plate is in a
locking mode.
- 18 -
ELR
2
Page 19
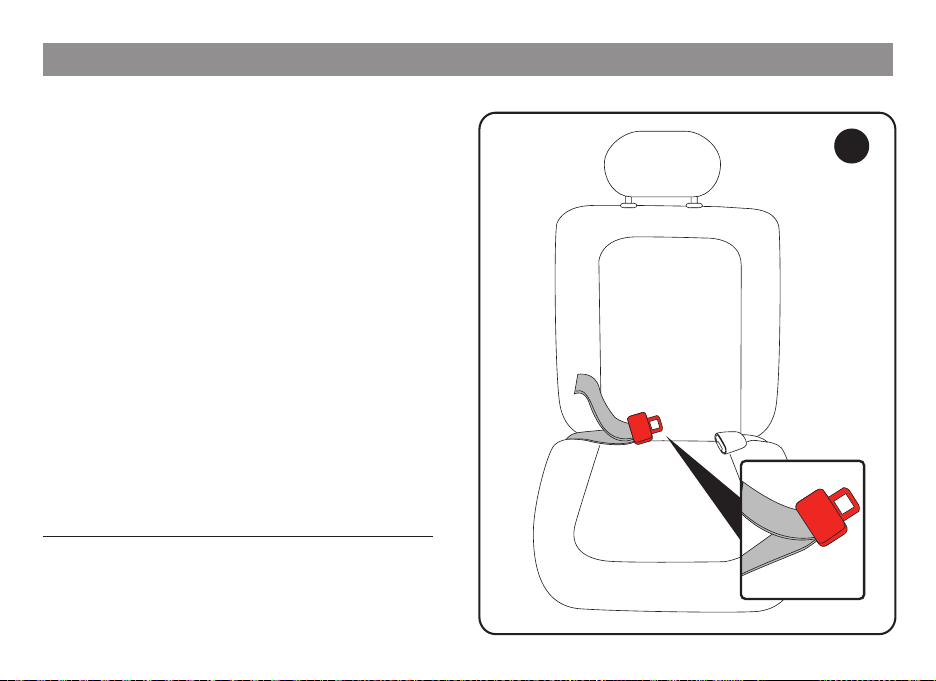
Installing your child restraint in the vehicle
2.3 Lap/shoulder belt (3-point) with
Emergency Locking Retractor (ELR) and
free sliding latch plate. This type of seat belt
has a latch plate that moves freely along the
belt; it will only lock in an emergency (sudden
stop or crash) so you must use a Locking
Clip to secure this type of belt. Refer to
page 32 for the proper use of a locking clip.
If additional help is needed, consult with a
Child Passenger Safety Technician (CPST).
To locate a technician go to the website at
http://www.nhtsa.gov/cps/cpstting/index.cfm
Important note: The lock o clips located on
the side of the Convertible seat are used to
enhance the stability during normal use. They
are not designed to replace a locking clip. A
locking clip must be used to properly secure
the seat with a belt as described above.
- 19 -
ELR
3
√
Page 20
Installing your child restraint in the vehicle
2.4 Lap belt (2-point) with a locking latch
plate. This type of belt can be adjusted by
pulling/releasing the strap tail at the latch
plate.
Some vehicles may have seatbelts with
large rigid buckles. These designs may cause
the installation to be troublesome and aect
stability of the child restraint during
normal use. Also, it may cause slack in the
belt that may result in poor performance
in case of a sudden stop or crash.
In this situation, try another seating position
in the vehicle or consult your vehicle owner’s
manual.
Please consult a certied child passenger
safety technician for other installation options
(www.nhtsa.gov/cps/cpstting/index.cfm).
4
- 20 -
Page 21
Installing your child restraint in the vehicle
2.5 Lap belt (2-point) with Switchable
Locking Retractor (ELR --> ALR). This type
of seat belt has a latch plate that is sewn to
the end of the belt. To activate ALR retractor
for child seats installation, some vehicle
models may require to pull the belt all the
way through; some other vehicle models may
require to pull the belt for a certain length
(check vehicle owner’s manual for details).
Tighten the belt around the seat feeding the
belt back into the retractor. The belt will not
extend unless you unbuckle the belt and
repeat the operation from the beginning.
2.6 Lap belt (2-point) with Emergency
Locking Retractor (ELR). This type of seat
belt has a latch plate sewn at the end of the
belt; it will only lock in an emergency (sudden
stop or crash).
Important note: DO NOT USE Primo Viaggio
Convertible with this belt or consult a certied
child passenger safety technician for other
installation options
(www.nhtsa.gov/cps/cpstting/index.cfm).
5/6
ELR -->ALR
- 21 -
Page 22
Installing your child restraint in the vehicle
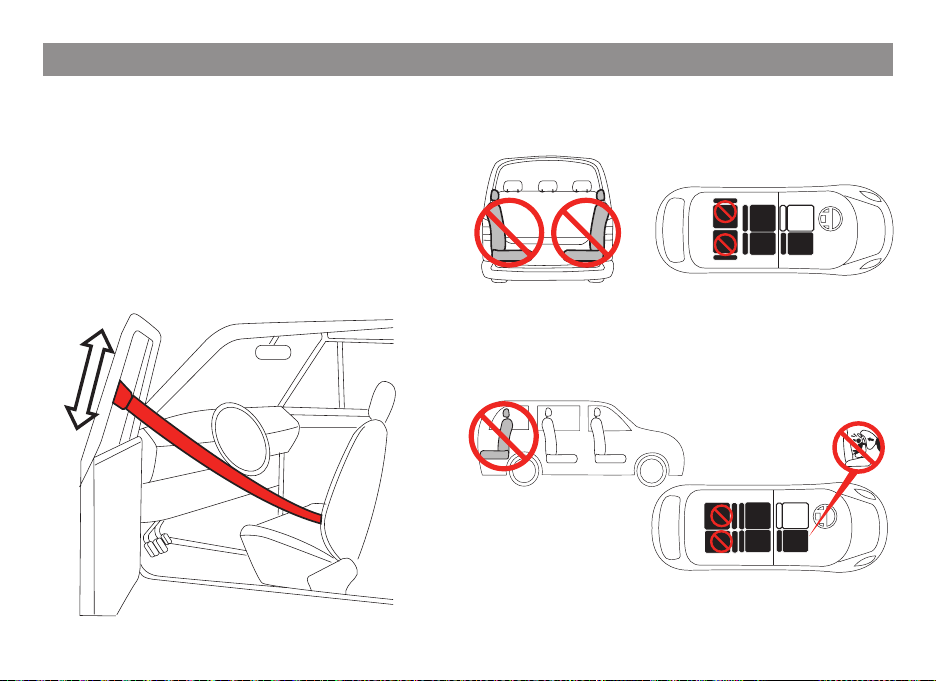
2.7 NON COMPATIBLE VEHICLE BELT
DESIGNS
WARNING: do not use Primo Viaggio
Convertible with the following vehicle
belt design:
1. Lap/motorized shoulder belts.
Belts mounted on the door
- 22 -
2. Side facing seats
NO
NO
3. Rear facing seats
4. Rotating seat unless tray can be locked in
forward facing direction.
NO
NO
NEVER INSTALL
REAR-FACING IN
FRONT OF AN
ACTIVE AIRBAG
For your child’s safety, always read your vehicle
owner’s manual for further information.
Page 23
Installing your child restraint in the vehicle
3)
TOP TETHER: The top tether is an
additional strap attached at the top of the
Primo Viaggio Convertible shell equipped
with a hook and an adjuster.
Peg Perego always recommends the use
of the top tether. It is a device designed to
increase stability in normal use and improve
safety in an accident.
The top tether has to be connected to a
suitable tether attachment points in the
vehicle.
Do not attach the Primo Viaggio Convertible
Tether to vehicle anchorage points not
designed as child restraint tether anchorage
points, as this may result in a failure during
a crash.
Important! maximum weight for top tether
use is 65 lbs (30 kg).
- 23 -
Page 24
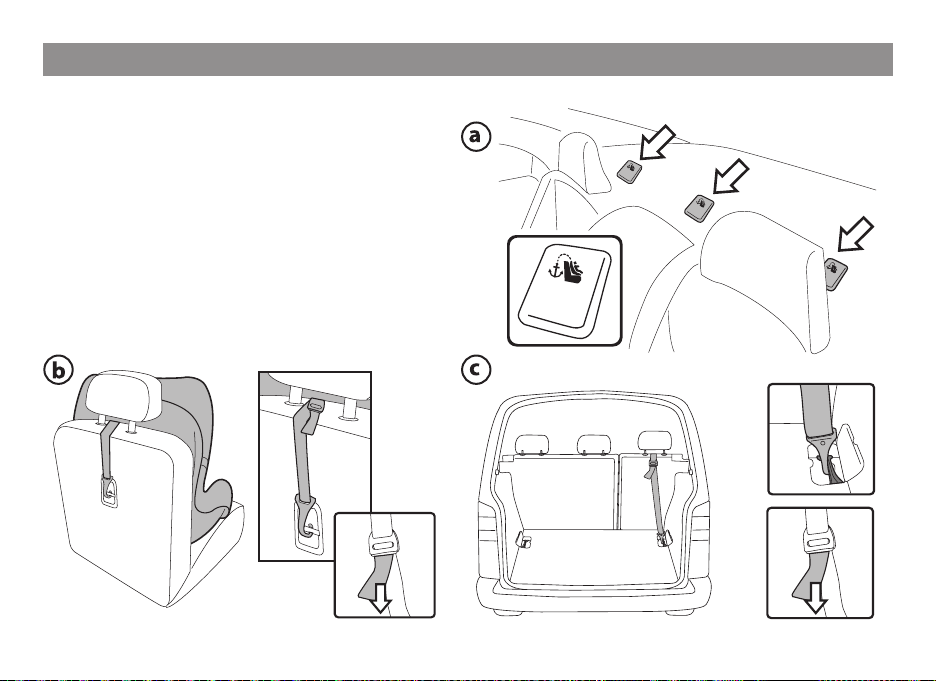
Installing your child restraint in the vehicle
Common locations for top tether
attachments are: the rear shelf in sedan type
vehicle (a), the back of the seat backrest in
minivans (b), the rear compartment in SUVs
and other vehicles (c).
To locate the proper points, please refer to
your vehicle owner's manual.
- 24 -
Page 25
Installing your child restraint in the vehicle
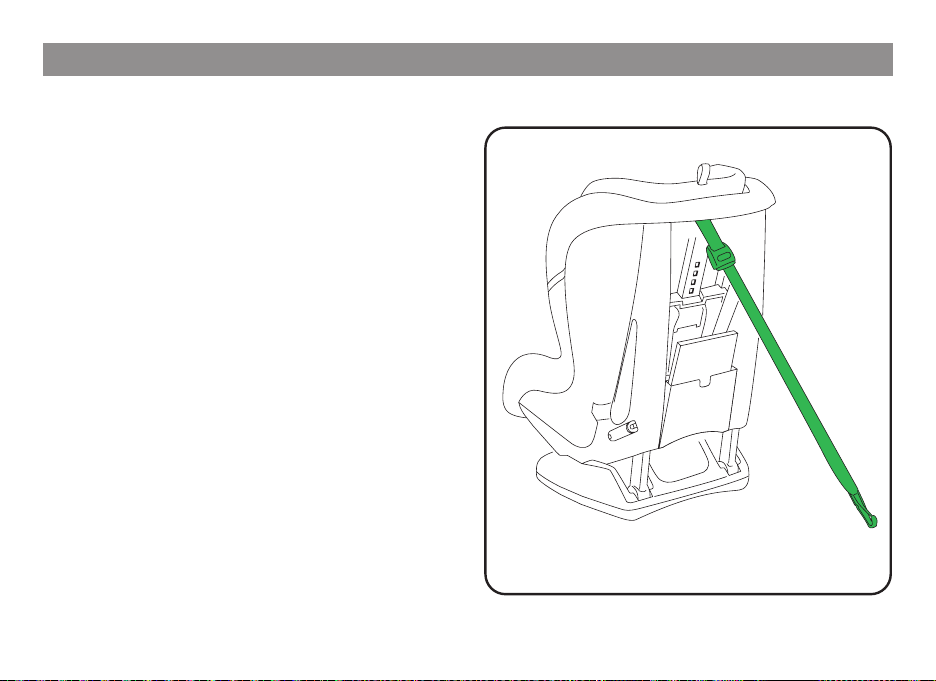
To use the tether, open the plastic pouch,
detach the hook from its rear attachment.
Press on the adjuster button in order to
lengthen the strap to the required length.
When not in use, keep the tether attached
in the plastic pouch. A free hanging metal
hook could cause injury during a crash.
A
B
- 25 -
Page 26
Installing your child restraint in the vehicle
WEIGHT AND DIMENSION RANGE
REAR FACING MODE
• Use rear facing with vehicle belt with
children who weigh 5 – 45 lbs (2.3 – 20.4 kg)
and with latch with children who weigh 5-40
lbs (2.3-18.2 kg);
• Use rear facing if head is at least one inch
below headrest edge.
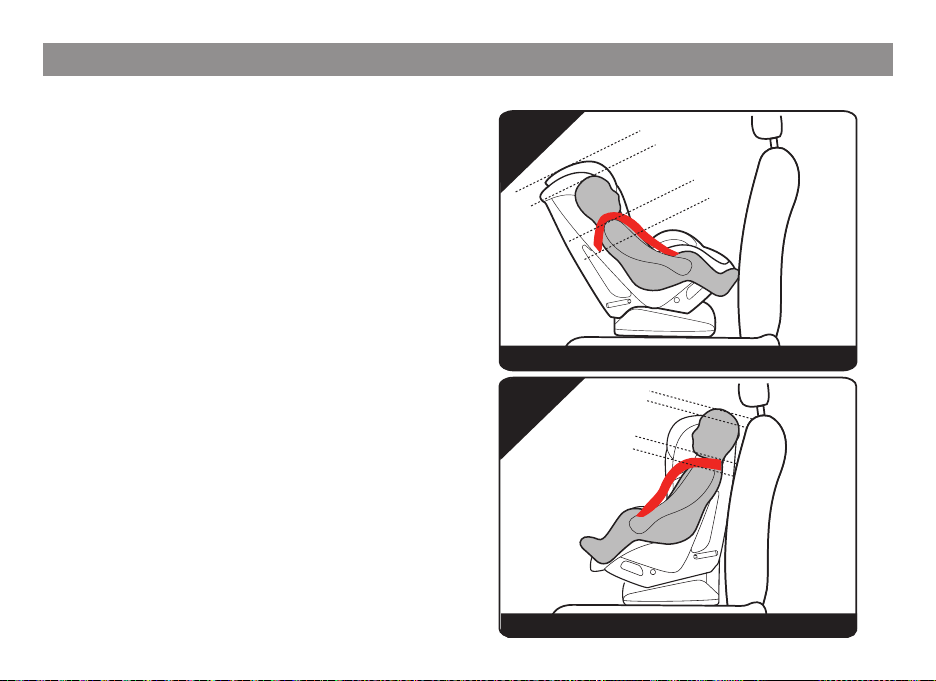
• The correct shoulder position is when
shoulder straps are located at or just below
shoulder level, as shown in the picture.
Note: The lower 7 head panel positions can be
used in the rear facing mode. Positions 8, 9 and 10
should only be used in the forward facing mode.
Refer to page 49 for head panel adjustment.
FORWARD FACING MODE
• Use forward facing with vehicle belt with
children who weigh between 22 and 65
pounds (10 and 30 kg) and with latch with
children who weigh 22-45 lbs (10-20.4 kg) .
• Use forward facing if head is no more than
one inch above headrest edge.
• The correct shoulder position is when strap
slots are located at or just above shoulder
level, as shown in the picture.
- 26 -
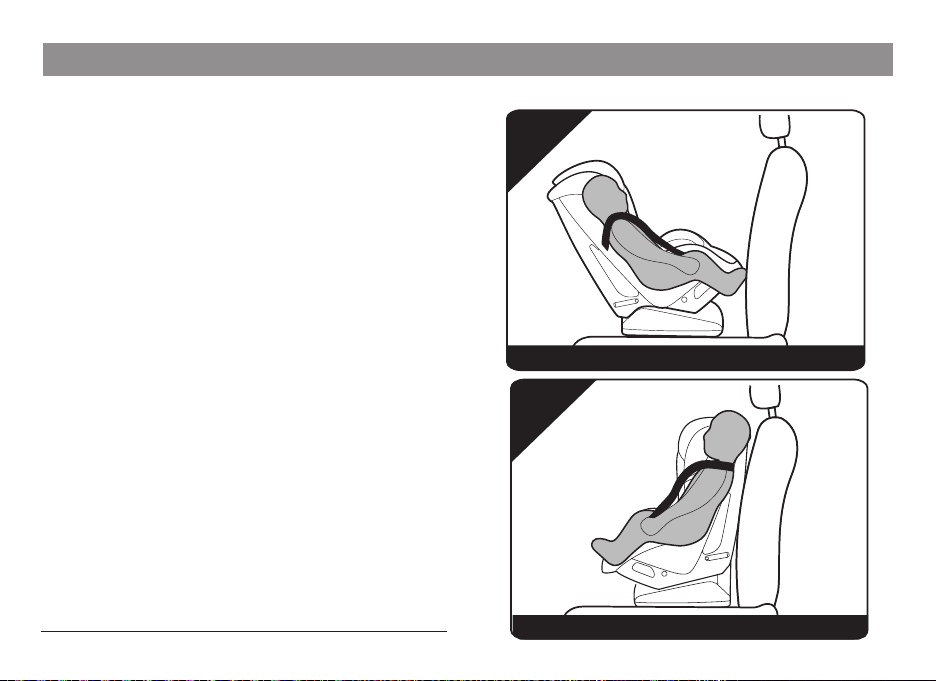
RF
FF
1’’
REAR FACING
1’’
FORWARD FACING
Page 27
Installing your child restraint in the vehicle
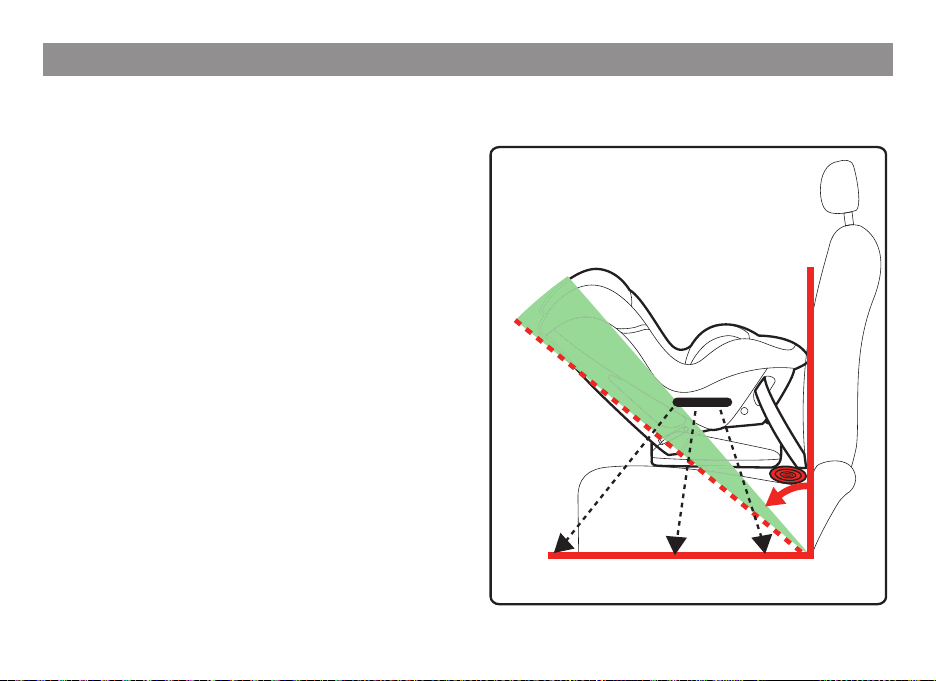
45°-35°
PROPER LEVELLING OF CHILD
RESTRAINT IN REAR FACING MODE
When properly installed according to the
following sections, the child restraint used
in rear facing mode should have a backrest
angle of 35° - 45° from vertical. If it is not
possible to reach such angle, use a pool noodle
or a rolled towel to further recline the seat.
Use the line drawn on the product as a
reference. When the line is horizontal, the
backrest angle will be at 45° with vertical.
NOTE: make sure that the angle
does not exceed 45° with vertical.
Important! Newborn infants should be
properly reclined. If the seat reclines too
much, your infant can be ejected from the
seat in an accident. If too upright, it can cause
breathing problems.
GROUND REFERENCE
HORIZONTAL LINE
- 27 -
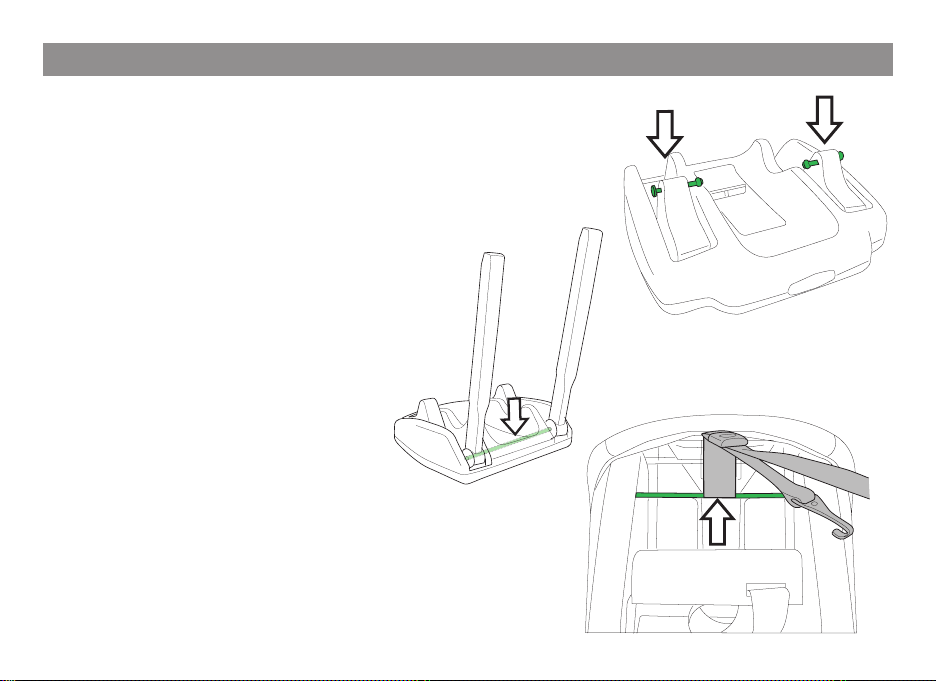
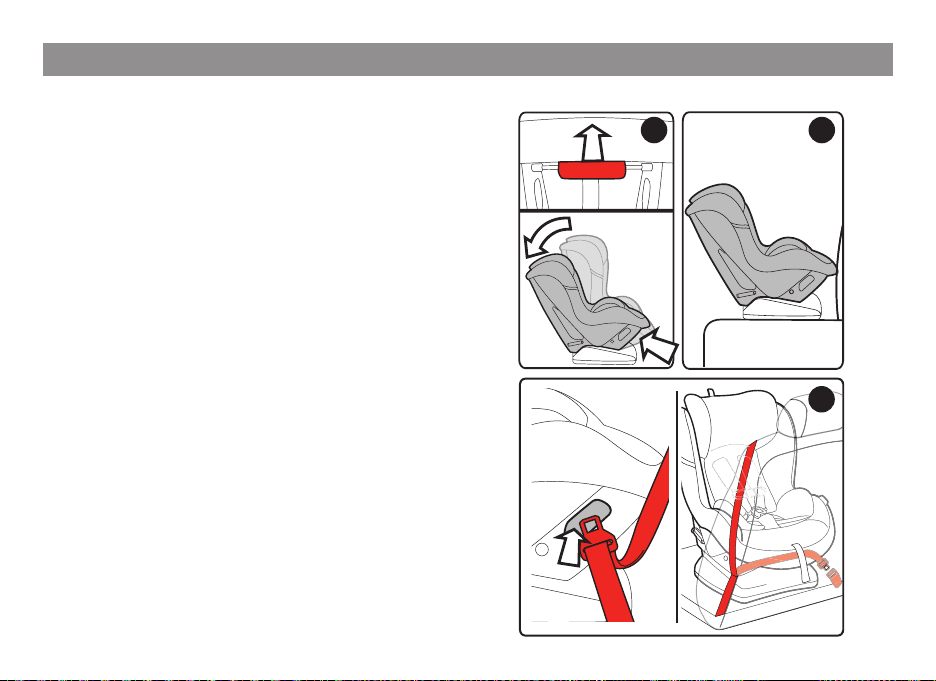
Page 28
Installing your child restraint in the vehicle - Rear Facing mode
REAR FACING MODE USING
LATCH SYSTEM
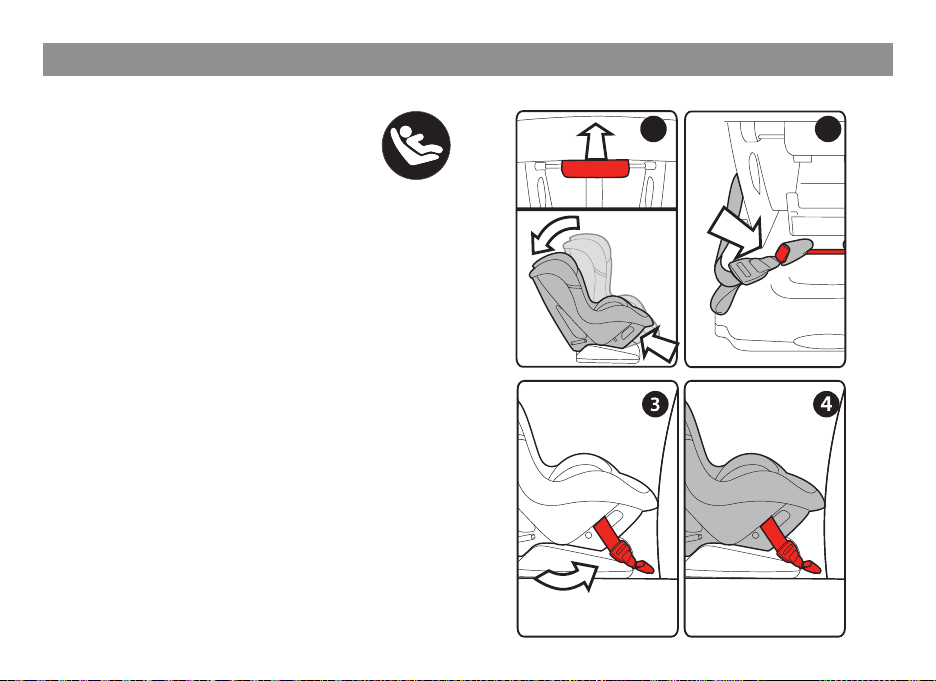
1. Recline the child restraint to the rearfacing
position as shown in the picture. To recline
the child restraint, pull the handle located
below the front edge of the shell (A)as shown
in detail. An audible "click" is heard when
the seat is properly locked into position.
Note: for easier adjustment, lift the back of the
seat slightly with your free hand to remove
some weight from the mechanism.
2. Disconnect the latch straps from the
storage bar by pushing on the red button
and pulling the straps at the same time.
3.
Slide the straps toward the front of the child
restraint. Check that the straps are not reversed.
4. Lean the reclined seat, unoccupied, on
the selected vehicle seat in the rearfacing
mode making sure that the front part of
the seat touches the vehicle seat backrest.
- 28 -
1
A
B
A
2
Page 29
Installing your child restraint in the vehicle - Rear Facing mode
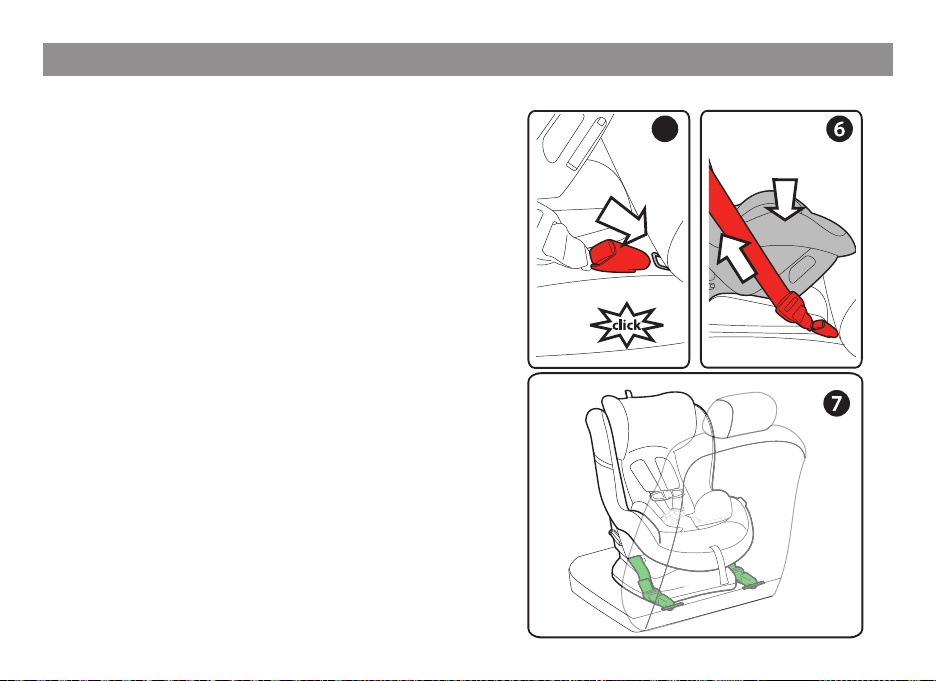
5. Attach the lower connectors to the lower
anchors of your vehicle located at the joint
line between seat and backrest. Check your
vehicle owner’s manual to learn what is the
best place for your child restraint. When the
LATCH straps are connected to the lower
anchors, an audible click will be heard. If
this is not the case, repeat the operation
and double check that the latch is attached
and working by trying to pull the lower
connector away from the lower anchor.
6. Push down the child restraint (A) into
the seat with your own body weight and
at the same time pull the strap ends in
order to tighten the latch straps (B). Check
that the connectors are evenly tightened
and that the seat is not leaning sideways.
7. Picture shows the correct strap path
when the seat is attached using the
LATCH connectors. Make sure the seat is
properly leveled as explained on page 27.
Verify that the child restraint is secure.
A secure child restraint will not move
more than 1 inch near the latch anchors.
5
A
B
- 29 -
Page 30
Installing your child restraint in the vehicle - Rear Facing mode
REAR FACING MODE USING LAP/
SHOULDER BELT (TYPE II)
1. Recline the child restraint to the rearfacing
position as shown in the picture. To recline
the child restraint, pull the handle located
below the front edge of the shell (A) as shown
in detail. An audible "click" is heard when the
seat is properly locked into position.
Note: for easier adjustment, lift the back of the
seat slightly with your free hand to remove
some weight from the mechanism.
2. Lean the reclined child restraint,
unoccupied, on the selected vehicle seat.
3. Pull the vehicle belt at full available length
and thread both the lap and shoulder portion
of the belt through the openings under the
seat area as shown in the picture.
Note: for easier threading, turn the seat at a 45
degree angle, thread the latch plate throught
the rst opening, reach under the front of the
seat and thread through the second opening.
- 30 -
A
B
A
21
3
Page 31

Installing your child restraint in the vehicle - Rear Facing mode
IMPORTANT: check inside the shell openings;
verify that the waist portion of the belt is
placed as shown in the picture.
4. Buckle the vehicle belt and check under the
seat that the adjuster strap is not entangled
with the vehicle seat belt.
4
A
5
5. Push the child restraint rmly into the
vehicle seat and pull the vehicle belt in order
to eliminate any slack. Follow the procedure
shown in the picture making sure that while
the child restraint is pushed down (A), the lap
portion of the belt is pulled from the xed
point toward the buckle (B). Then pull the
diagonal portion of the belt upwards (C).
C
B
- 31 -
Page 32

Installing your child restraint in the vehicle - Rear Facing mode
6. The picture shows the correct belt path
when the child restraint is attachd to the
vehicle using a lap/shoulder belt.
Make sure the child restraint is properly
leveled as explained on page 27.
Verify that the child restraint is secure. A
secure child restraint will not move more than
1 inch near the seat belt anchors.
USE OF A LOCKING CLIP
If the lap/shoulder belt in your vehicle
requires a locking clip according to page 19,
Primo Viaggio Convertible is provided with
one in the tether compartment (page 12).
To install the locking clip, hold the shoulder
strap and lap belt together just above the
buckle. Unbuckle the belt while holding the
straps. Hook the locking clip around both
straps as shown.
Leave 1/2 inch space between the clip and
latch. Re-buckle the belt.
- 32 -
13 mm
6
1/2 inch
Page 33

Installing your child restraint in the vehicle - Rear Facing mode
REAR FACING MODE USING LAP
BELT (TYPE I)
1. Recline the child restraint to the rearfacing
position as shown in the picture. To recline
the seat, pull the handle located below the
front edge of the shell (A) as shown in detail.
An audible "click" is heard when the seat is
properly locked into position.
Note: for easier adjustment, lift the back of the
seat slightly with your free hand to remove
some weight from the mechanism.
2. Lean the reclined child restraint,
unoccupied, on the selected vehicle seat.
3. Pull the vehicle belt at full available length
and thread through the openings under the
seat area as shown in the picture.
Note: for easier threading, turn the seat at a 45
degree angle, thread the latch plate throught
the rst opening, reach under the front of the
seat and thread through the second opening.
- 33 -
A
B
A
21
3
Page 34

Installing your child restraint in the vehicle - Rear Facing mode
IMPORTANT: check inside the shell openings;
verify that the belt is placed as shown in the
picture.
- 34 -
Page 35

Installing your child restraint in the vehicle - Rear Facing mode
4. Buckle the vehicle belt and check that it is
threaded below the adjuster strap and not
entangled with it.
5. Push the seat rmly into the vehicle seat
(A) and pull the vehicle belt (B) in order
to tighten the seat, eliminating any slack.
6. The picture shows the correct belt path
when the seat is attached to the vehicle using
a lap belt .
Once the installation is completed check that
the seat is properly levelled following the
section on page 27.
Verify that the child restraint is secure. A
secure child restraint will not move more than
1 inch near the seat belt anchors.
- 35 -
4
A
5
B
6
Page 36

Installing your child restraint in the vehicle - Rear Facing mode
USING THE TETHER IN REAR
FACING MODE
Peg Perego always recommends using
the rear facing tether if the vehicle has the
proper anchor point. The tether can prevent
excessive rotation in rear facing mode in
both frontal and rear end crashes. Install the
rear facing tether as follows.
1. Remove the tether hook and the tether
strap from the rear pouch (page 25).
- 36 -
Page 37

Installing your child restraint in the vehicle - Rear Facing mode
2. Attach the rear facing strap to the vehicle
front seat rail. If your vehicle has a plastic
seat rail cover, you may want to remove it to
gain better access to the seat rail. Wrap the
strap around the rail then thread the metal
plate through the loop so it points upward as
shown.
3. Attach the child restraint tether hook to
the plate and pull the free end of the tether
strap until it is free.
Note: Too much tension in the tether strap will
change the seat back angle. After removing
the slack from the tether, check to see thet
the seat back angle is correct.
If your vehicle has designated anchors for a
tether strap used in rear facing mode, do not
use the additional rear facing tether strap.
- 37 -
Page 38

Installing your child restraint in the vehicle - Forward Facing mode
Important! Remove newborn ller cushion in
forward facing mode (see page 53).
FORWARD FACING
MODE USING LATCH SYSTEM
1. Recline the child restraint pulling the
handle located below the front edge of the
shell (A) as shown in detail. This will make
access to the latch storage area easier.
2. Disconnect the latch straps from the
storage bar by pushing on the red button
and pulling the straps at the same time.
3. Pull the handle and move the child restraint
to the upright position. You should hear a "click"
when locked in the upright position. Lean the
child restraint on the vehicle seat making
sure that the lock o clips are closed.
Take the LATCH strap from front to rear
sliding the straps along their tubing.
- 38 -
A
B
1
A
2
3
Page 39

Installing your child restraint in the vehicle - Forward Facing mode
4. Attach the lower connectors to the lower
anchors of your vehicle located at the joint
line between seat and backrest. Check your
vehicle owner’s manual to learn what is the
best place for your car . When the LATCH
straps are connected to the lower anchors, an
audible click will be heard. If this is not the
case, repeat the operation and double check
that the latch is attached and working by
trying to pull the lower connector away from
the lower anchor.
5. Push down the child restraint (A) into the
seat with your own body weight and at the
same time pull the strap ends (B) in order
to tighten the latch straps. Check that the
connectors are evenly tightened and that the
seat is not leaning sideways.
6. Picture shows the correct strap path when
the child restraint is attached to the vehicle
using the LATCH connectors.
Verify that the child restraint is secure. A
secure child restraint will not move more
than 1 inch near the LATCH anchors.
A
54
B
6
- 39 -
Page 40

Installing your child restraint in the vehicle - Forward Facing mode
Important! Remove newborn ller cushion
in forward facing mode (see page 53).
FORWARD FACING MODE USING
LAP/SHOULDER BELT (TYPE II)
1. Before installing the child restraint, make
sure that the backrest is in the upright position
or adjust it using the handle below the front
edge of the shell (A) as shown in detail.
2. Lean the upright child restraint,
unoccupied, on the selected vehicle seat.
Make sure that the LATCH straps are stored
in their proper location (page 38 - picture2)
and that the rear openings in the structure
are free and ready for use. Open the lock o
clips on both sides as shown in the picture.
3. Pull the vehicle belt at full available
length and thread both the lap and
shoulder portions of the belt through
the openings in the structure behind the
child restraint as shown in the picture.
4. Buckle the vehicle belt and check that
the vehicle belts are both threaded through
the openings, free of any entanglement.
- 40 -
1 2
A
B
A
3
4
Page 41

Installing your child restraint in the vehicle - Forward Facing mode
5
5. Push the child restraint rmly into
the vehicle seat and pull the vehicle belt
eliminating any slack. While pushing the
seat down (A), pull the lap portion of the belt
from the xed point toward the buckle (B).
Then pull the diagonal portion of the belt (C).
6. Close the locko clip following the
procedure shown in picture (D and E).
Make sure that only the lap portion of the
belt passes through the opened locko
clip on the side where the shoulder
strap goes up to the retractor (picture 6).
7. Open the locko clip on the buckle side.
Make sure that both the lap and shoulder
belts go through the locko near the buckle.
Close the locko clip following the procedure
shown in picture 6 (D and E).
Verify that the child restraint is secure. A
secure child restraint will not move more
than 1 inch near the seat belt anchor.
Important Note:
The lock o clips located
on the side of the Convertible seat are used to
enhance the stability during normal use. The lock
os are not designed to replace an automatic
locking retractor or a locking latch plate.
- 41 -
6
A
7
C
E
D
B
Page 42

Installing your child restraint in the vehicle - Forward Facing mode
Important! Remove newborn ller cushion in
forward facing mode (see page 53).
FORWARD FACING MODE USING
LAP BELT (TYPE I)
1. Before installing the child restraint in the
vehicle, make sure that the backrest is in the
upright position or adjust it using the handle
located below the front edge of the shell (A)
as shown in detail.
2. Lean the upright child restraint, unoccupied,
on the selected vehicle seat. Make sure that
the LATCH straps are stored in their proper
location (page 38 - picture2) and that the rear
openings in the structure are free and ready
for use. Open the lock-o clips, as shown in
the picture .
3. Pull the vehicle belt at full available length
and thread the belt through the openings
in the structure behind the child restraint as
shown in the picture.
4. Buckle the vehicle belt and check that the
vehicle belt is free of any entanglement.
- 42 -
1
A
B
A
3
2
4
Page 43

5
Installing your child restraint in the vehicle - Forward Facing mode
5. Push the child restraint rmly into the
vehicle seat (A) and pull the vehicle belt (B)
in order to tighten the seat, eliminating any
slack.
6. Make sure that the belt passes through
the opened locko clips and then close
them on both sides following the procedure
shown in picture (C and D).
7. Picture shows the correct belt pattern
when the product is installed in the forward
facing mode using a lap belt.
Verify that the child restraint is secure. A
secure child restraint will not move more than
1 inch near the seat belt anchors.
Important Note:
The lock o clips located
on the side of the Convertible seat are used to
enhance the stability during normal use. The lock
os are not designed to replace an automatic
locking retractor or a locking latch plate.
6
A
D
C
B
7
- 43 -
Page 44

Installing your child restraint in the vehicle - Forward Facing mode
USING THE TETHER IN FORWARD FACING
MODE
Peg Perego always recommends the use of
the top tether.
The tether prevents excessive rotation of the
seat in a crash. It reduces the risk for the child
to impact objects in front of him.
Remove the tether hook from the rear pouch
(page 25).
Attach the tether hook to the designated
tether anchor and pull the free strap until the
tether is fully tensioned and free of any slack.
Pictures show the tether anchor located on
the rear shelf.
Alternative tether locations are illustrated at
page 24.
- 44 -
Page 45

Installing your child restraint in an aircraft
This child restraint is certied for use in an
aircraft. Most airlines should allow the use of
a restraint which is labelled for use according
to FAA regulations.
However, due to the size and weight
of the Primo Viaggio Convertible, it is
recommended that airline is contacted for
further information prior to booking or ight.
Aircraft seatbelts are waist only type (Type I
belt).
1. Installation in rear facing mode: please refer
to the section on page 33 for proper belt t.
1
- 45 -
Page 46

Installing your child restraint in an aircraft
2. Installation in forward facing mode:
please refer to page 35 for proper belt t.
Use of locko clips is not required.
After installation make sure that the child
restraint is properly levelled and safely
secured on the aircraft seat. Should you need
further help, please contact aircraft crew.
2
- 46 -
Page 47

Securing your child into the child restraint
HARNESS USE AND ADJUSTMENT
1. This child restraint uses a 5 point harness
system to secure your child. Before placing
your child in the seat, push the release button
(A) and pull the shoulder straps (B) as shown
in the picture.
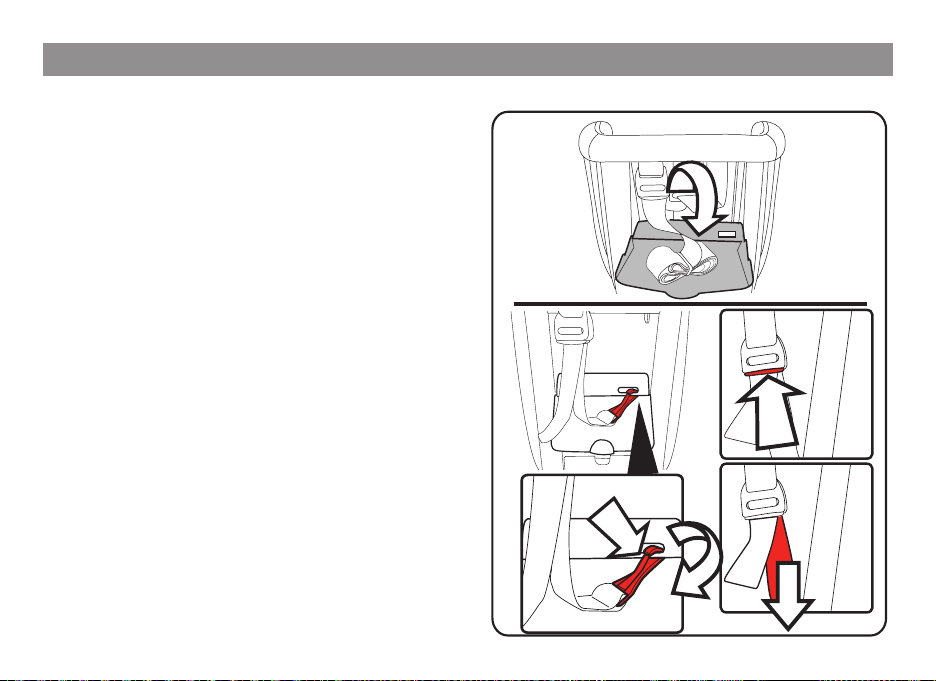
2. Open the buckle by pushing on the
red button (C) and pulling the latch plates up
(D) as shown in the picture.
Open the chest clip following the procedure
shown in the picture (A and B).
3. Insert the buckle tongues into the side
bands and pull the crotch portion of the
harness assembly in forward position, to
make room for your child. Make sure that the
seating area is free of any harness or other
objects.
- 47 -
1
A
A
B
B
A
D
C
2
B
3
Page 48

Securing your child into the child restraint
4. Put your child in the child restraint with his/
her bottom and back at against the child
restraint.
Bring the two shoulder straps over your
child’s shoulders. Make sure that the straps
are not twisted behind the backrest or over
your child’s chest.
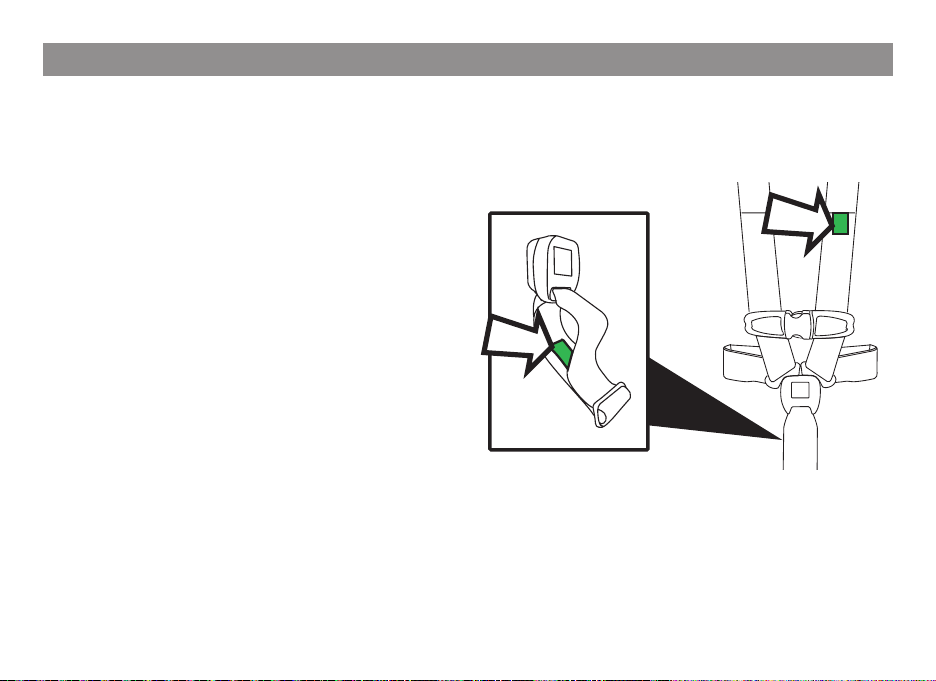
Check that the harness is at the right shoulder
height.
When the child restraint is used in rear
facing mode, the correct shoulder position
is when the shoulder straps are located at
or just below shoulder level, as shown in the
picture.
5. When the child restraint is used in forward
facing mode, the correct shoulder position
is when the shoulder straps are located at
or just above shoulder level, as shown in the
picture.
- 48 -
RF
FF
4
REAR FACING
5
FORWARD FACING
Page 49

Securing your child into the child restraint
6. To adjust the shoulder strap level,
from bottom to top, pull the ring located on
top of headrest until the panel is disengaged
and able to move. Once the desired position is
reached, make sure that the panel is properly
latched.
To adjust the shoulder strap level from top to
bottom pull the ring with one hand and push
the panel down with the other hand at the
same time. Check that the panel is properly
latched.
Note: The lower 7 head panel positions can
be used in the rear facing mode. Positions 8,
9 and 10 should only be used in the forward
facing mode.
Check maximum rear facing head panel
height behind the seat (detail in picture 6).
7. Insert both latch plates into the buckle
until you hear them click. Pull on the straps
to make sure that both plates are latched
securely.
- 49 -
10
9
8
7
6
5
4
3
2
1
6
7
Page 50

Securing your child into the child restraint
8. The harness is equipped with a chest clip.
This device is used in order to guarantee that
the shoulder harness is positioned correctly
on the shoulder, preventing the risk of
the straps falling down the shoulder in an
accident.
To close the chest clip push the two parts
together as shown.
9. To tighten the harness, pull the adjuster
strap at the bottom of the child restraint until
strap is snug. Make sure you leave one nger
width between the harness and your child’s
collar bone.
- 50 -
8
9
Page 51

Securing your child into the child restraint
10. When the harness is tightened, check that
the chest clip is at arm pit level. If necessary
remove the shoulder pads (attached with
Velcro) as they are not considered as safety
features.
Important! A snug strap should not allow
any slack. It lies in a relatively straight line
without sagging. It does not press on the
child’s flesh or push the child’s body into an
unnatural position.
11. To loosen the harness, press and hold
the harness adjuster button inside the slot
located at your child’s feet (1) and pull the top
harness (2) as shown in the picture.
To undo the latch plates, press the red button
and pull the latches up.
10
11
22
1
- 51 -
Page 52

Securing your child into the child restraint
CROTCH STRAP ADJUSTMENT
12. Your Primo Viaggio Convertible is
equipped with a repositionable crotch strap.
The child restraint is assembled with the
crotch located in the forward position (A).
The crotch strap can be repositioned to
position (B) which may be more suitable for
smaller infants.
To change position, lift the upholstery so that
the crotch attachment is visible (g.1).
Pull the buckle through the buckle pad and
through the seat upholstery.
Remove the crotch metal plate from above
(g.2).
Insert the metal plate from above in position
B, then turn the strap below the shell so that
the metal plate is pulled out and locked in
position A (g.3)
Pull the buckle back through the seat
upholstery and through the buckle pad.
- 52 -
12
A
1
2
B
B
3
Page 53

Securing your child into the child restraint
13. To complete the operation, put the soft
cover on the crotch in the new position by
sliding the buckle through the openings in
the upholstery and in the croch protection
INFANT FILLER CUSHION
14. Primo Viaggio Convertible is
supplied with a specically designed
ller cushion for smaller infants. The
cushion can help provide better harness
t and keep the head properly positioned
between the side wings of the head pad.
Important note: the infant ller cushion
is designed for use in rear facing mode
only. It must be removed when the seat is
used in the forward facing mode.
13
14
- 53 -
Page 54

Cleaning and maintenance
Your child restraint requires a minimum of cleaning and maintenance. Do not clean with harsh
products or solvents. Keep moving parts clean. In case, clean plastic parts with a damp cloth.
Do not use water with harness and latching mechanisms. Protect it from extreme cold, water,
rain and sun exposure. Prolonged exposures to these elements can change the colors in the
material but also change their mechanical properties. Store it in a dry area if not used for long
periods. Warning! Do not use or purchase the child restraint 7 years after the production date
labelled on the seat or shell. The upholstery is likely to be removed and cleaned frequently.
Follow the procedure below to remove the fabric and reassemble it properly. Check the child
restraint features before disassembly and make sure that the same features are still working
once it is set up for use again. Extra care is required when removing padding to avoid breaking
the white EPS panels on the product.
1
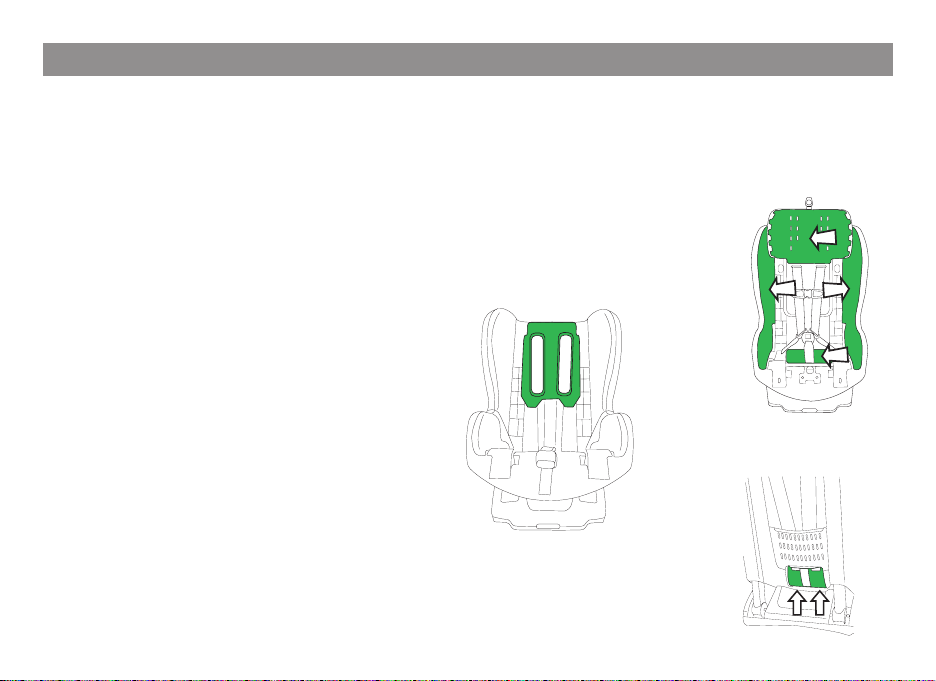
1. Pull the head panel all the way up. Detach
shoulder belts from rear metal plate in the back
of the child restraint. Turn it around and pull
the straps from the openings at shoulder level.
- 54 -
Page 55

Cleaning and maintenance
2. Remove head panel padding following
the procedure (1, then 2). Take care of the
soft white EPS insert.
2
2
3
1
3.
Undo the lower part of upholstery and
remove it from the crotch strap. The crotch
portion of the harness does not need to be
removed.
4. Pull the bottom part of the upholstery
upward making sure that the shoulder
belts are let through the side openings.
- 55 -
3
4
Page 56

Cleaning and maintenance
5. Check that the adjuster is free of food
particles or debris that could prevent correct
functioning.
6. Remove the padding from bottom to top
making sure that the side impact wings white
EPS are not bent or broken in the process.
- 56 -
5
3
1
2
6
Page 57

Cleaning and maintenance
7. To reassemble the upholstery, start from
the head panel opening as shown in the
sequence. Then put the head panel cover on.
Pull shoulder straps up through slots in the
bottom of the upholstery. Pull crotch strap
through hole in upholstery. Push shoulder
straps through head pad.
8. Properly connect shoulder straps. Make
sure that the harness is reconnected properly
to the rear plate. The central adjuster strap
must pass behind the plastic shield as shown.
- 57 -
1
2
3
7
8
Page 58

Cleaning and maintenance
MAINTENANCE OF THE PADDING
Brush the fabric parts to remove dust.
• Machine wash at a maximum of 90 F (30°C) with a delicate wash setting and short spin cycle.
• Do not use chlorine bleach.
• Do not iron.
• Do not dry clean.
• Do not remove stains with solvents.
• Do not tumble dry.
°
30
- 58 -
Page 59

How to tell if the seat has been in a crash
The Primo Viaggio Convertible can withstand minor crashes without any damage. If the child
restraint has been in a crash, you must determine if it is suitable for further use. First review
the ve guidelines listed below and then refer to the next section titled "clear signs the child
restraint has been in a crash".
What denes a minor crash?A minor crash is one in which ALL of the following apply:
• The vehicle was able to be driven away from the crash site.
• The vehicle door nearest to the car seat was not damaged.
• None of the passengers in the vehicle sustained any injuries in the crash.
• The vehicle air bags did not deploy during the crash.
• There is no visible damage to the car seat.
If any one of these ve statements apply, the seat may be damaged and should not be used.
If these statements do not apply, refer to the next section to check for hidden damage.
Clear signs the child restraint has been in a crash.
Peg Perego does not recommend purchasing used seats for which there is no known history.
A child restraint can be damaged in a vehicle crash, and may not be suitable for further use
after a vehicle crash.
The Primo Viaggio Convertible has energy absorbing features that reduce forces on the child
passenger during a vehicle crash. These features can only absorb energy one time. If any of
these features show damage as shown below, the entire seat must be replaced.
- 59 -
Page 60

How to tell if the seat has been in a crash
1. Tether Bar: The tether bar is located on the
back of the seat shell near the top (open the
tether plastic storage pouch if so equipped).
The tether bar will bend during a crash.
The tether bar should be straight (green
illustration). If the bar is bent (red illustration),
the seat has been in a crash and should be
replaced.
2. Rear Bar: The rear bar runs through
the rear of the base. The rear bar will bend
during a crash. The bar should be straight
(green illustration). If the rear bar is bent (red
illustration), the seat has been in a crash and
should be replaced.
- 60 -
Page 61

How to tell if the seat has been in a crash
3. Pivot Bolts: The pivot bolts are located
on each side of the seat. The pivot bolts will
move closer to the base during a crash. There
should be about 1 inch of space between the
pivot bolt and the top of the base (green
illustration). If the pivot bolt is located at or
near the top of the base (red illustration),
the seat has been in a crash and should be
replaced.
4. SAFE Device: The Shock Absorbing Foam
Element (SAFE) device is located on the
bottom rear part of the shell above the base.
The SAFE device will deform during a crash.
The SAFE device should be straight from side
to side (green). If the SAFE device has a crease
or cracks in it (red), the seat has been in a
crash and should be replaced.
1”
- 61 -
Page 62

1 2
Replacement Parts
1) BSACOB*
2) BRICOB*
3) MUCI0076GR
4) BAKCOB*
3
NOTE: Spare parts available in different
colors* to be specified when ordering.
- 62 -
4
Page 63

- 63 -
Page 64

Page 65

- 64 -
Page 66

los colores* de las piezas de repuesto.
NOTA: cuando haga su pedido especifique
- 63 -
4) BAKCOB*
3) MUCI0076GR
2) BRICOB*
1) BSACOB*
4
3
1 2
Piezas de repuesto
Page 67

- 62 -
un accidente y se debe reemplazar.
deformado o tiene grietas (rojo), la silla sufrió
debe estar recto de lado a lado (verde). Si está
deforma durante un impacto. Este dispositivo
carcasa, sobre la base. El dispositivo SAFE se
se encuentra en la parte inferior trasera de la
espuma amortiguadora de impactos (SAFE)
4. Dispositivo SAFE: el elemento de
1”
reemplazar.
en rojo), la silla sufrió un accidente y se debe
cerca de la parte superior de la base (ilustrado
(ilustrado en verde). Si el perno está en o
entre el perno y la parte superior de la base
aproximadamente una pulgada de espacio
a la base durante un accidente. Debe haber
cada lado de la silla. Estos pernos se acercan
3. Pernos: los pernos se encuentran de
Cómo saber si la silla estuvo involucrada en un accidente
Page 68

- 61 -
accidente y se debe reemplazar.
doblada (ilustrada en rojo), la silla sufrió un
derecha (ilustrada en verde). Si la barra está
esta barra se dobla. Esta barra debe estar
parte trasera de la base. Durante un accidente,
2. Barra trasera: la barra trasera pasa por la
silla sufrió un accidente y se debe reemplazar.
Si la barra está doblada (ilustrada en rojo), la
barra debe estar derecha (ilustrada en verde).
accidente, la barra de enganche se dobla. Esta
del enganche, si está instalado). Durante un
el estuche de almacenamiento de plástico
del asiento, cerca de la parte superior (abra
se encuentra en la parte trasera de la carcasa
1. Barra de enganche: la barra de enganche
Cómo saber si la silla estuvo involucrada en un accidente
Page 69

- 60 -
indica a continuación, es necesario reemplazar la silla completa.
absorber la energía una vez. Si una de estas características presenta algún daño como se
fuerzas sobre el niño que la ocupa durante un accidente. Estas características sólo pueden
Primo Viaggio Convertible tiene características de absorción de energía que reducen las
posible que no sea apropiada para seguir siendo utilizada después de un accidente.
historia. Una silla de auto puede haberse dañado durante un accidente automovilístico y es
Peg Perego no aconseja la compra de sillas de auto usadas, puesto que no se conoce su
Signos claros de que la silla de auto estuvo involucrada en un accidente.
comprobar la presencia de daños ocultos.
y no se debe utilizar. Si estas situaciones no se cumplen, consulte la siguiente sección para
Si una de estas cinco situaciones no se cumple, es posible que la silla de auto esté dañada
. No hay daños visibles en la silla de auto.
. Los airbags del vehículo no se desplegaron durante el choque.
. Ninguno de los pasajeros del vehículo sufrió heridas en el accidente.
. La puerta del vehículo más cercana a la silla de auto no sufrió ningún daño.
. El vehículo pudo ser conducido fuera del lugar del accidente.
que se cumplen TODAS las siguientes situaciones:
¿Qué caracteriza a un accidente menor? Un accidente de menor importancia es aquél en el
accidente”.
consulte la sección titulada “signos claros de que la silla de auto estuvo involucrada en un
seguir siendo utilizada. Primero, revise las cinco directrices que guran a continuación y luego
silla de auto se vio involucrada en un accidente, es necesario determinar si es apropiada para
Primo Viaggio Convertible puede soportar accidentes menores sin sufrir ningún daño. Si la
Cómo saber si la silla estuvo involucrada en un accidente
Page 70

- 59 -
30
°
. No secar en secadoras con tambor rotativo.
. No quitar las manchas con solventes.
. No limpiar en seco.
. No planchar.
. No utilizar blanqueadores con cloro.
ciclo de centrifugado corto.
. Lavar en lavadora a una temperatura máxima de 90ºF (30ºC) con acción mecánica delicada y
Cepillar las partes de tejido para eliminar el polvo.
MANTENIMIENTO DE LA GUATA
Limpieza y mantenimiento
Page 71

- 58 -
de la carcasa de plástico, como se muestra.
La correa de ajuste central debe pasar detrás
conectado correctamente en la placa trasera.
los hombros. Asegúrese de que el arnés esté
8. Conecte adecuadamente las correas de
8
3
hombros por el tapizado de la cabeza.
apertura de la funda. Ponga las correas de los
Saque la correa de la entrepierna por la
ranuras en la parte inferior de la funda.
Saque las correas de los hombros por las
ponga la cubierta del panel de la cabeza.
como se muestra en la secuencia. Luego,
7
2
1
funda, comience por el panel de la cabeza
7. Cuando tenga que volver a ensamblar la
Limpieza y mantenimiento
Page 72

- 57 -
2
1
la operación.
de impacto lateral no se doble ni se rompa en
asegurándose de que el EPS blanco de las alas
6
3
6. Saque la guata de abajo hacia arriba,
puedan impedir su correcto funcionamiento.
5
no tenga restos de comida ni residuos que
5. Compruebe que el dispositivo de ajuste
Limpieza y mantenimiento
Page 73

- 56 -
laterales.
de los hombros salgan por las aperturas
arriba, asegurándose de que las correas
4. Tire de la parte inferior de la funda hacia
ser extraída.
parte de la entrepierna del arnés no necesita
4
3
3
1
2
extráigala de la correa de la entrepierna. La
3. Saque la parte inferior de la funda y
blanco.
2). Tenga cuidado con el elemento de EPS
2
siguiendo el procedimiento (1, luego el
2. Extraiga la guata del panel de la cabeza
Limpieza y mantenimiento
Page 74

- 55 -
desde las aperturas a la altura de los hombros.
auto. Gire el producto y tire de las correas
metal trasera en la parte trasera de la silla de
Suelte las correas del hombro de la placa de
1. Tire del panel de la cabeza hacia arriba.
1
cuando extrae la guata, para evitar romper
funcionando una vez que el producto esté instalado de nuevo. Debe tener especial cuidado
características de la silla de auto antes de desmontarla y asegúrese de que las mismas sigan
el procedimiento a continuación para extraer la funda y volver a colocarla. Compruebe las
etiqueta del asiento o la carcasa. La funda puede extraerse y limpiarse periódicamente. Siga
No use ni compre la silla de auto 7 años después de la fecha de fabricación marcada en la
Guarde el producto en una zona seca si no lo usa durante largos periodos. ¡Advertencia!
estos elementos puede cambiar los colores del material y modicar sus propiedades mecánicas.
producto del frío extremo, el agua, la lluvia y la exposición solar. La exposición prolongada a
un paño húmedo. No utilice agua en el arnés ni en los mecanismos de enganche. Proteja el
irritantes o disolventes. Mantenga limpias las partes móviles. Limpie las partes plásticas con
Este producto requiere un mínimo de limpieza y mantenimiento. No limpie la silla con productos
Limpieza y mantenimiento
los paneles blancos de EPS del producto.
Page 75

13
14
- 54 -
hacia delante.
retirarse cuando la silla se utiliza orientada
con la silla orientada hacia atrás. Éste debe
está diseñado exclusivamente para el uso
Nota importante: el cojín adaptador
aletas laterales del panel para la cabeza.
cabeza correctamente ubicada entre las
mejor ajuste de las correas y mantener la
Este cojín puede ayudar a obtener un
diseñado para los niños más pequeños.
con un cojín adaptador expresamente
14. Primo Viaggio Convertible se entrega
COJÍN PARA RECIÉN NACIDOS
de la entrepierna.
las aperturas de la funda y en la protección
nueva posición deslizando la hebilla por
la cubierta blanda en la entrepierna de la
13. Para completar la operación, ponga
Asegurar a su bebé a la silla de auto
Page 76

- 53 -
asiento y de su propia almohadilla.
Empuje la hebilla a través de la funda del
coloque en posición A (g. 3)
carcasa para que la placa de metal salga y se
posición B, y tire de la correa debajo de la
3
B
2
Inserte la placa de metal desde arriba en la
(g. 2).
Extraiga la placa de metal de la entrepierna
a través de la funda del asiento.
Empuje la hebilla a través de su almohadilla y
(g. 1).
1
para dejar a la vista el acople de la entrepierna
Para cambiar la posición, levante la funda
pequeños.
resultar más apropiada para los niños más
puede colocar en la posición (B), que podría
delante (A). La correa de la entrepierna se
B
A
con la entrepierna en la posición hacia
reposicionable. El producto está ensamblado
equipado con una correa de entrepierna
12. Su Primo Viaggio Convertible está
12
ENTREPIERNA
AJUSTE DE LA CORREA DE LA
Asegurar a su bebé a la silla de auto
Page 77

- 52 -
11
10
1
22
rojo y saque los enganches por arriba.
Para abrir los pasadores, presione el botón
muestra en la imagen.
bebé (1) y tire del arnés superior (2) como se
dentro de la ranura ubicada a los pies de su
botón del dispositivo de ajuste del mismo
11. Para aojar el arnés, presione y sujete el
posición no natural.
su hijo ni pone el cuerpo del bebé en una
sin combaduras. No presiona el cuerpo de
correa sin holguras. Descansa en línea recta,
¡Importante! Una correa ajustada es una
consideran elementos de seguridad.
de los hombros (con Velcro), ya que no se
axila. Si es necesario, quite las almohadillas
que el clip pectoral esté a la altura de la
10. Cuando el arnés está ajustado, compruebe
Asegurar a su bebé a la silla de auto
Page 78

- 51 -
entre el arnés y la clavícula de su bebé.
que esté apretado. Deje el ancho de un dedo
ajuste en la parte inferior del asiento hasta
9. Para tensar el arnés, tire de la correa de
9
dos partes, como se muestra.
Para cerrar el clip pectoral, presione juntas las
accidente.
de que las correas caigan del hombro en un
ubicado sobre el hombro, evitando el riesgo
el arnés del hombro esté correctamente
8
Este dispositivo se utiliza para garantizar que
8. El arnés está equipado con un clip pectoral.
Asegurar a su bebé a la silla de auto
Page 79

- 50 -
correctamente conectados.
asegurarse de que ambos anclajes estén
hasta oír un clic. Tire de las correas para
7. Introduzca ambos pasadores en la hebilla
asiento (el detalle se ve en la gura 6).
cabeza en la orientación hacia atrás detrás del
Controle la altura máxima del panel de la
deben utilizar en orientación hacia delante.
7
hacia atrás. Las posiciones 8, 9 y 10 sólo se
inferiores se pueden utilizar en la orientación
Nota: las 7 posiciones del panel de la cabeza
panel esté acoplado correctamente.
la otra al mismo tiempo. Compruebe que el
una mano y empuje el panel hacia abajo con
de arriba hacia abajo, tire de la anilla con
Para ajustar el nivel de la correa del hombro
1
2
3
4
5
6
7
6
8
9
10
acoplado.
asegúrese de que el panel esté correctamente
Una vez que obtenga la posición deseada,
que el panel se desacople y se pueda mover.
en la parte superior del reposacabezas hasta
de abajo hacia arriba, tire de la anilla situada
6. Para ajustar el nivel de la correa del hombro,
Asegurar a su bebé a la silla de auto
Page 80

- 49 -
ORIENTACIÓN HACIA ADELANTE
hombros, como se muestra en la ilustración.
cinturones está en o sobre el nivel de los
de los hombros es cuando la ranura de los
orientación hacia delante, la posición correcta
5. Cuando la silla de auto se utiliza con
5
ilustración.
del nivel del hombro, como se muestra en la
ORIENTACIÓN HACIA ATRÁS
ranura de los cinturones está en o por debajo
posición correcta de los hombros es cuando la
auto se utiliza con orientación hacia atrás, la
correcta de los hombros. Cuando la silla de
Compruebe que el arnés esté a la altura
respaldo ni sobre el pecho del bebé.
las correas no queden retorcidas detrás del
los hombros de su bebé. Asegúrese de que
auto. Lleve las dos correas de los hombros a
4
espalda y la espalda bien pegadas a la silla de
4. Coloque al bebé en la silla de auto con la
Asegurar a su bebé a la silla de auto
Page 81

- 48 -
asiento esté libre de correas y otros objetos.
hacer sitio a su bebé. Asegúrese de que el
entrepierna del arnés hacia delante para
las bandas laterales y tire de la parte de la
3. Inserte las lengüetas de la hebilla en
3
(A y B).
procedimiento que se muestra en la imagen
C
Abra el clip pectoral siguiendo el
como se muestra en la imagen.
(C) y tirando hacia arriba los pasadores (D)
D
B
A
A
2
A
B
B
1
2. Abra la hebilla presionando el botón rojo
hombros (B) como se muestra en la imagen.
botón (A) de apertura y tire de la correa de los
de colocar al bebé en la silla, presione el
de 5 puntos para asegurar a su bebé. Antes
1. Esta silla de auto utiliza un sistema de arnés
USO Y AJUSTE DE LAS CORREAS
Asegurar a su bebé a la silla de auto
Page 82

- 47 -
con el personal de cabina.
asiento del avión. Si necesita ayuda, contacte
esté nivelada adecuadamente y segura en
Tras la instalación, asegúrese de que la silla
No es necesario usar clips de bloqueo.
2
correcta instalación.
por favor consulte la página 36 para la
2. Instalación con orientación hacia delante:
Instalación de la silla en un avión
Page 83

1
- 46 -
instalación.
favor consulte la página 34 para la correcta
1. Instalación con orientación hacia atrás: por
(Tipo I).
Los cinturones de los aviones son de cadera
volar.
información antes de reservar su vuelo o de
contactar con la compañía aérea para obtener
Primo Viaggio Convertible, recomendamos
Sin embargo, debido al tamaño y peso de
las normas FAA.
auto autorizada para el uso de acuerdo con
deberían permitir el empleo de una silla de
en un avión. La mayoría de aerolíneas
Esta silla de auto está certicada para utilizarla
Instalación de la silla en un avión
Page 84

- 45 -
ilustran en la página 25.
Las posiciones alternativas del enganche se
en la bandeja trasera del vehículo.
muestran el anclaje del enganche presente
tenso y carezca de holguras. Las guras
que el enganche quede completamente
correspondiente y tire de la correa libre hasta
Coloque el gancho del enganche en el anclaje
trasero (página 26).
Retire el gancho del enganche del estuche
encuentran delante de él.
que el niño golpee contra los objetos que se
un accidente. Además, reduce el riesgo de
excesiva de la silla como consecuencia de
enganche superior. Éste impide una rotación
Peg Perego siempre recomienda el uso del
HACIA DELANTE
USO DEL ENGANCHE EN LA ORIENTACIÓN
Instalación de su silla de auto en un vehículo – Orientación hacia adelante
Page 85

- 44 -
5
automático ni un pasador de bloqueo.
para reemplazar un retractor de bloqueo
uso normal. Los bloqueos no están diseñados
utilizan para mejorar la estabilidad durante el
situados del lado de la silla Convertible se
Nota importante: los clips de bloqueo
anclajes del cinturón de seguridad.
no se moverá más de una pulgada de los
Verique que la silla esté ja. Una silla ja
7
cinturón de cadera.
con orientación hacia delante usando un
B
C
D
cinturón cuando el producto está instalado
7. La imagen muestra el patrón correcto del
procedimiento mostrado en la imagen (C y D).
luego ciérrelos de ambos lados siguiendo el
través de los clips de bloqueo abiertos, y
6. Asegúrese de que el cinturón pase a
A
6
para asegurar la silla, eliminando holguras.
asiento del vehículo (A) y tire el cinturón (B)
5. Empuje la silla rmemente contra el
Instalación de su silla de auto en un vehículo – Orientación hacia adelante
Page 86

- 43 -
compruebe que el mismo no tenga enredos.
4. Cierre el cinturón del vehículo y
auto como se muestra en la imagen.
en la estructura detrás de la silla de
e introdúzcalo a través de las aperturas
3. Extraiga todo el cinturón del vehículo
bloqueo como se muestra en la imagen.
libres y listas para usar. Abra los clips de
aperturas traseras de la estructura estén
en su sitio (página 39 – imagen 2) y que las
4
3
A
de que las correas LATCH estén guardadas
asiento seleccionado del vehículo. Asegúrese
2. Apoye la silla vertical, sin ocupar, en el
borde frontal de la carcasa (A), como se muestra.
ajústelo usando la manija ubicada debajo del
asegúrese de que el respaldo esté vertical o
1. Antes de instalar la silla en el vehículo,
SEGURIDAD DE CADERA (TIPO I)
B
USANDO EL CINTURÓN DE
ORIENTACIÓN HACIA DELANTE
2
1
A
(consultar la página 54).
delante, elimine el cojín para recién nacidos
¡Importante! Con la orientación hacia
Instalación de su silla de auto en un vehículo – Orientación hacia adelante
Page 87

- 42 -
5
automático ni un pasador de bloqueo.
para reemplazar un retractor de bloqueo
uso normal. Los bloqueos no están diseñados
utilizan para mejorar la estabilidad durante el
situados del lado de la silla Convertible se
Nota importante: los clips de bloqueo
del cinturón de seguridad.
se moverá más de una pulgada del anclaje
Verique que la silla esté ja. Una silla ja no
el procedimiento indicado en la gura 6 (D y E).
la hebilla. Cierre los clips de bloqueo siguiendo
como la diagonal, pasen por el bloqueo cerca de
7
Compruebe que, tanto la correa abdominal
7. Abra los clips del bloqueo en la hebilla.
sube hasta el retractor (gura 6).
abiertos del lado donde la correa diagonal
cinturón pase a través de los clips de bloqueo
D
B
E
Asegúrese de que sólo la parte abdominal del
procedimiento indicado en la gura (D y E).
6. Cierre los clips de bloqueo siguiendo el
diagonal del cinturón (C).
hacia la hebilla (B). Luego, tire de la parte
C
A
abdominal del cinturón desde el punto jo
empuja hacia abajo la silla (A), tire de la parte
seguridad para eliminar holguras. Mientras
6
el asiento del vehículo y tire del cinturón de
5. Empuje la silla de auto rmemente contra
Instalación de su silla de auto en un vehículo – Orientación hacia adelante
Page 88

- 41 -
que esté insertado en las aperturas, sin enredos.
4. Cierre el cinturón del vehículo y compruebe
silla de auto, como se muestra en la imagen.
de las aperturas en la estructura detrás de la
abdominal y la diagonal del cinturón a través
extraerlo por completo e introduzca la parte
3. Tire del cinturón de seguridad hasta
ambos lados como se muestra en la imagen.
y listas para usar. Abra los clips de bloqueo de
aperturas traseras de la estructura estén libres
4
3
A
en su sitio (página 39 – imagen 2) y que las
de que las correas LATCH estén guardadas
asiento seleccionado del vehículo. Asegúrese
2. Apoye la silla vertical, sin ocupar, en el
frontal de la carcasa (A), como se muestra.
usando la manija ubicada debajo del borde
que el respaldo esté vertical o ajústelo
1. Antes de instalar la silla, asegúrese de
B
ABDOMINAL/ DIAGONAL (TIPO II)
USANDO EL CINTURÓN DE SEGURIDAD
ORIENTACIÓN HACIA DELANTE
A
1 2
nacidos (consultar la página 54).
adelante, elimine el cojín para recién
¡Importante! Con la orientación hacia
Instalación de su silla de auto en un vehículo – Orientación hacia adelante
Page 89

6
B
A
54
- 40 -
anclajes LATCH.
no se moverá más de una pulgada de los
Verique que la silla esté ja. Una silla ja
en el vehículo usando los conectores LATCH.
las correas cuando el asiento está instalado
6. La imagen muestra el recorrido correcto de
no esté inclinada hacia los lados.
estén tensados uniformemente y que la silla
las correas. Compruebe que los conectores
tiempo, tire de los extremos (B) para tensar
con el peso de su cuerpo y, al mismo
5. Empuje el dispositivo (A) hacia el asiento
el conector inferior del anclaje inferior.
conectadas y funcionen intentando separar
comprobar que las correas LATCH estén
Si no es así, repita la operación y vuelva a
en los anclajes inferiores se oirá un “clic”.
Cuando las correas LATCH estén conectadas
para su silla de auto.
vehículo para saber cuál es el mejor lugar
Consulte el manual de instrucciones de su
la línea de unión entre el asiento y el respaldo.
anclajes inferiores de su vehículo, ubicados en
4. Conecte los conectores inferiores en los
Instalación de su silla de auto en un vehículo – Orientación hacia adelante
Page 90

- 39 -
correas por su conducto.
LATCH de adelante hacia atrás deslizando las
de bloqueo estén cerrados. Tome la correa
del vehículo asegurándose de que los clips
vertical. Apoye la silla de auto en el asiento
"clic" cuando esté colocado en posición
hasta una posición vertical. Debería oír un
Tire de la manija y mueva la silla de auto
3
3.
tirando de las correas al mismo tiempo.
almacenamiento presionando el botón rojo y
Desconecte las correas de la barra de
A
2.
enganche.
fácil llegar a la zona de almacenamiento del
(A) como se muestra. Esto hará que sea más
ubicada debajo del borde frontal de la carcasa
Recline el dispositivo tirando de la manija
B
1.
USANDO EL SISTEMA LATCH
ORIENTACIÓN HACIA DELANTE
2
1
A
página 54).
quite el cojín para recién nacidos (consultar la
¡Importante! Con la orientación hacia delante,
Instalación de su silla de auto en un vehículo – Orientación hacia adelante
Page 91

- 38 -
orientación hacia atrás.
utilice la correa de enganche adicional para la
del enganche en la orientación hacia atrás, no
Si su vehículo tiene los anclajes para la correa
correcto.
controle que el ángulo del respaldo sea el
Después de eliminar la holgura del enganche,
enganche modica el ángulo del respaldo.
Nota: una tensión excesiva de la correa del
del enganche hasta que quede libre.
pasador y tire del extremo libre de la correa
3. Fije el gancho del enganche de la silla en el
dirigido hacia arriba como se ve en la gura.
pasador por la lazada, de manera que quede
correa alrededor del riel y luego introduzca el
para lograr un mejor acceso al mismo. Pase la
de plástico del riel del asiento, debe retirarla
vehículo. Si su automóvil tiene una cubierta
atrás en el riel del asiento delantero del
2. Conecte la correa de orientación hacia
Instalación de su silla de auto en un vehículo – Orientación hacia atrás
Page 92

- 37 -
del estuche trasero (página 26).
1. Retire el gancho y la correa del enganche
manera.
la orientación hacia atrás de la siguiente
en los traseros. Instale el enganche para
atrás, tanto en los impactos frontales como
una rotación excesiva en la orientación hacia
punto de anclaje. El enganche puede impedir
cuando el vehículo tiene el correspondiente
enganche para la orientación hacia atrás
Peg Perego siempre recomienda utilizar el
ORIENTACIÓN HACIA ATRÁS
USO DEL ENGANCHE EN LA
Instalación de su silla de auto en un vehículo – Orientación hacia atrás
Page 93

- 36 -
anclajes del cinturón de seguridad.
no se moverá más de una pulgada de los
Verique que la silla esté ja. Una silla ja
correctamente, según se indica en la página 28.
6
compruebe que el asiento esté nivelado
Una vez que la instalación esté completa,
en el vehículo usando el cinturón de cadera.
del cinturón cuando el asiento está instalado
6. La imagen muestra el recorrido correcto
B
eliminando holguras.
(B) para asegurar la silla lo máximo posible,
asiento del vehículo (A) y tire del cinturón
5. Empuje la silla rmemente contra el
debajo de la correa de ajuste y sin enredos.
5
A
4
que las partes del cinturón estén insertadas
4. Cierre el cinturón del vehículo y compruebe
Instalación de su silla de auto en un vehículo – Orientación hacia atrás
Page 94

- 35 -
imagen.
cinturón esté colocado como se muestra en la
aperturas de la estructura; compruebe que el
IMPORTANTE: controle el interior de las
Instalación de su silla de auto en un vehículo – Orientación hacia atrás
Page 95

3
A
21
- 34 -
segunda apertura.
delantera del asiento e introdúzcalo en la
apertura, hágalo pasar hacia la parte
introduzca el pasador en la primera
hacia delante el asiento a 45 grados,
Nota: para facilitar la introducción, lleve
imagen.
la zona del asiento, como se muestra en la
introdúzcalo a través de las aperturas bajo
3. Extraiga todo el cinturón del vehículo e
asiento seleccionado del vehículo.
2. Apoye la silla reclinada, sin ocupar, en el
el mecanismo.
su mano libre, para reducir el peso sobre
ligeramente la parte trasera de la silla con
Nota: para facilitar el ajuste, alce
colocada en su posición.
un "clic" cuando la silla esté correctamente
de la carcasa (A), como se muestra. Se oirá
B
la manija ubicada debajo del borde frontal
la imagen. Para reclinar el asiento, tire de
orientada hacia atrás como se muestra en
1. Recline la silla de auto en la posición
DE SEGURIDAD DE CADERA (TIPO I)
A
EL CINTURÓN
ORIENTACIÓN HACIA ATRÁS USANDO
Instalación de su silla de auto en un vehículo – Orientación hacia atrás
Page 96

- 33 -
y la correa. Abroche nuevamente el cinturón.
gura. Deje un espacio de ½ pulgada entre el clip
en torno a las dos correas como se muestra en la
sujeta las correas. Enganche el clip de bloqueo
1/2 inch
13 mm
de la hebilla. Desabroche el cinturón mientras
cinturón abdominal y el diagonal justo por encima
Para instalar el clip de bloqueo, sujete juntos el
Primo Viaggio Convertible (página 13).
un compartimento presente en el enganche de
se explica en la página 20, éste se encuentra en
del vehículo requiere un clip de bloqueo según
Si el cinturón de seguridad abdominal/diagonal
USO DE UN CLIP DE BLOQUEO
del cinturón de seguridad.
se moverá más de una pulgada de los anclajes
Verique que la silla esté ja. Una silla ja no
nivelada como se describe en la pág. 28.
diagonal. Asegúrese de que la silla esté totalmente
6
en el vehículo usando el cinturón abdominal/
cinturón cuando la silla de auto está instalada
6.
La imagen muestra el recorrido correcto del
Instalación de su silla de auto en un vehículo – Orientación hacia atrás
Page 97

- 32 -
cinturón (C).
cierre (B). Luego, saque la parte diagonal del
del cinturón salga desde el punto jo hacia el
B
se empuja hacia abajo (A), la parte de la cadera
imagen, asegurándose de que mientras la silla
holguras. Siga el procedimiento mostrado en la
del vehículo y tire el cinturón para eliminar
C
5. Empuje la silla rmemente contra el asiento
vehículo.
esté enredada con el cinturón de seguridad del
5
A
4
debajo del asiento que la correa de ajuste no
4. Cierre el cinturón del vehículo y compruebe
como se muestra en la imagen.
parte de la cadera del cinturón se encuentre
aperturas de la estructura; compruebe que la
IMPORTANTE: controle el interior de las
Instalación de su silla de auto en un vehículo – Orientación hacia atrás
Page 98

3
A
21
- 31 -
introdúzcalo en la segunda apertura.
pasar hacia la parte delantera del asiento e
el pasador en la primera apertura, hágalo
delante el asiento a 45 grados, introduzca
Nota: para facilitar la introducción, lleve hacia
muestra en la imagen.
aperturas debajo del área del asiento como se
y del hombro del cinturón a través de las
por completo e introduzca la parte de la cadera
3.
Tire del cinturón de seguridad hasta extraerlo
asiento seleccionado del vehículo.
2.
Apoye la silla reclinada, sin ocupar, en el
reducir el peso sobre el mecanismo.
parte trasera de la silla con su mano libre, para
Nota: para facilitar el ajuste, alce ligeramente la
correctamente colocada en su posición.
se muestra. Se oirá un "clic" cuando la silla esté
B
debajo del borde frontal de la carcasa (A) como
reclinar el dispositivo, tire de la manija ubicada
hacia atrás como se muestra en la imagen. Para
1.
Recline la silla de auto en la posición orientada
ABDOMINAL/ DIAGONAL (TIPO II)
A
EL CINTURÓN DE SEGURIDAD
ORIENTACIÓN HACIA ATRÁS USANDO
Instalación de su silla de auto en un vehículo – Orientación hacia atrás
Page 99

- 30 -
pulgada de los anclajes de la correa.
silla ja no se moverá más de una
Verique que la silla esté ja. Una
correctamente como se explica en la página 28.
Asegúrese de que la silla esté nivelada
en el vehículo usando los conectores LATCH.
las correas cuando el asiento está instalado
7. La imagen muestra el recorrido correcto de
que la silla no esté inclinada hacia los lados.
conectores estén tensados uniformemente y
tensar las correas (B). Compruebe que los
mismo tiempo, tire de los extremos para
asiento con el peso de su cuerpo y, al
6. Empuje la silla de auto (A) sobre el
inferiores de los anclajes inferiores.
funcionen intentando separar los conectores
que las correas LATCH estén conectadas y
así, repita la operación y vuelva a comprobar
B
anclajes inferiores se oye un “clic”. Si no es
las correas LATCH están conectadas a los
es el mejor lugar para su silla de auto. Cuando
A
instrucciones de su vehículo para saber cuál
asiento y el respaldo. Consulte el manual de
ubicados en la línea de unión entre el
5
los 5 anclajes inferiores de su vehículo
5. Asegure los conectores inferiores en
Instalación de su silla de auto en un vehículo – Orientación hacia atrás
Page 100

- 29 -
el respaldo del asiento del vehículo.
de que la parte frontal de la silla toque
orientación hacia atrás, asegurándose
en el asiendo del auto seleccionado en
4. Apoye la silla reclinada, sin ocupar,
que las correas no estén al revés.
delantera de la silla. Compruebe
3. Deslice las correas hacia la parte
y tirando de las correas al mismo tiempo.
almacenamiento presionando el botón rojo
2. Desconecte las correas de la barra de
para reducir el peso sobre el mecanismo.
parte trasera de la silla con su mano libre,
A
facilitar el ajuste, alce ligeramente la
colocada en su posición. Nota: para
un "clic" cuando la silla esté correctamente
de la carcasa (A), como se muestra. Se oirá
manija ubicada debajo del borde frontal
B
la imagen. Para reclinar la silla, tire de la
orientada hacia atrás como se muestra en
1. Recline la silla de auto en la posición
2
A
1
ORIENTACIÓN HACIA ATRÁS
Instalación de su silla de auto en un vehículo – Orientación hacia atrás
USANDO EL SISTEMA LATCH
 Loading...