

Page 1

U.S.A./CANADA/AUSTRALIA
EN Instructions for use
ES Instrucciones de uso
FR Notice d’emploi
RU Инструкция по пользованию
prima pappa best
Page 2
1
2
3
Page 3
4
5
6
Page 4
7
8
9
Page 5
10
11
12
Page 6
13
14
15
Page 7

16
EN Spare parts available in different colours to be specified when ordering.
ES Repuestos disponibles en otros colores que se especificarán en el pedido.
FR Pièces de rechange disponibles en plusieurs couleurs à spécifier dans la demande.
RU Запчасти имеются различных цветов, их необходимо указать в запросе.
Page 8

Prima Pappa Best
19
11
16
5
9
3
6
4
7
2
18
17
1
15
14
13
7
1 SPST6215BM
2 TMPPBE00--RETE
3 SPST5025JJD•
SPST5025JJS•
4 SPST5024DBM
SPST5024SBM
5 SPST5459GR
12
10
6 SPST5458BM
7 SPST5728•
8 SAPI5934TBM
9 SPST5942K•
10 SPST5942J•
11 SAPU5730•
12 SAPI5934BM
8
13 SAPI5171BMGR
14 SPST6218•
15 SPST6219BM
16 EMPPBENA•
17 SAPU5298JJBM•
18 SPST5298XBMPEG
19 MUCI5P18•
Page 9

EN_English
Thank you for choosing a Peg-Pérego product.
WARNING
_ IMPORTANT: READ THESE
INSTRUCTIONS CAREFULLY
AND KEEP THEM FOR FUTURE
REFERENCE. FAILURE TO FOLLOW
THESE INSTRUCTIONS COULD PUT
THE CHILD’S SAFETY AT RISK.
_ ALL ASSEMBLY AND OPERATING
PROCEDURES SHOULD BE
PERFORMED BY AN ADULT; DO NOT
USE THE PRODUCT IF IT HAS BROKEN
OR MISSING PARTS.
_ PREVENT SERIOUS INJURY OR DEATH
FROM FALLS OR SLIDING OUT;
ALWAYS USE COMPLETE 5 POINT
SEATBELT; THE CHILD SHOULD BE
SECURED IN THE HIGH CHAIR AT ALL
TIMES, EITHER IN THE RECLINED OR
IN THE UPRIGHT POSITION.
_ ALWAYS USE THE CROTCH STRAP.
_ NEVER LEAVE THE CHILD
UNATTENDED; ALWAYS KEEP CHILD
IN VIEW WHILE IN THE HIGHCHAIR.
_ TRAY AND ACCESSORY TRAYS ARE
NOT DESIGNED TO SUPPORT THE
CHILD’S WEIGHT; TRAY IS NOT
DESIGNED TO HOLD THE CHILD IN
THE CHAIR.
_ ALWAYS USE THE HIGHCHAIR ON A
FLAT, HORIZONTAL SURFACE.
_ IT IS RECOMMENDED THAT THE HIGH
CHAIR BE USED IN THE UPRIGHT
POSITION ONLY BY CHILDREN
CAPABLE OF SITTING UPRIGHT.
_ BE CAREFUL OF WHERE YOU PLACE
THE PRODUCT. AVOID PLACING THE
CHILD NEAR SAFETY HAZARDS SUCH
AS ELECTRICAL CORDS, SOURCES OF
HEAT, OR FLAMES.
_ DO NOT PUT FINGERS IN THE
MECHANISM. MAKE SURE YOUR
CHILD’S ARMS AND LEGS ARE CLEAR
OF THE MOVING PARTS DURING
ADJUSTMENT.
_ USING ACCESSORIES THAT
HAVE NOT BEEN APPROVED BY
THE MANUFACTURER MAY BE
HAZARDOUS.
_ DO NOT USE THE PRODUCT NEAR
STAIRS OR STEPS.
_ BE CAREFUL NOT TO PLACE THE
PRODUCT NEAR SOURCES OF HEAT
OR FLAMES, SUCH AS GAS STOVES,
ELECTRIC HEATERS, ETC.
_ MAKE SURE THE BELT IS ATTACHED
PROPERLY.
_ DO NOT USE THE HIGH CHAIR
UNLESS ALL OF THE PARTS ARE
PROPERLY FITTED AND ADJUSTED.
NOTICE:
_ THIS ARTICLE MEETS OR EXCEEDS
ALL REQUIREMENTS COVERED IN
ASTM F404 STANDARD AND LATEST
REVISIONS.
INSTRUCTIONS
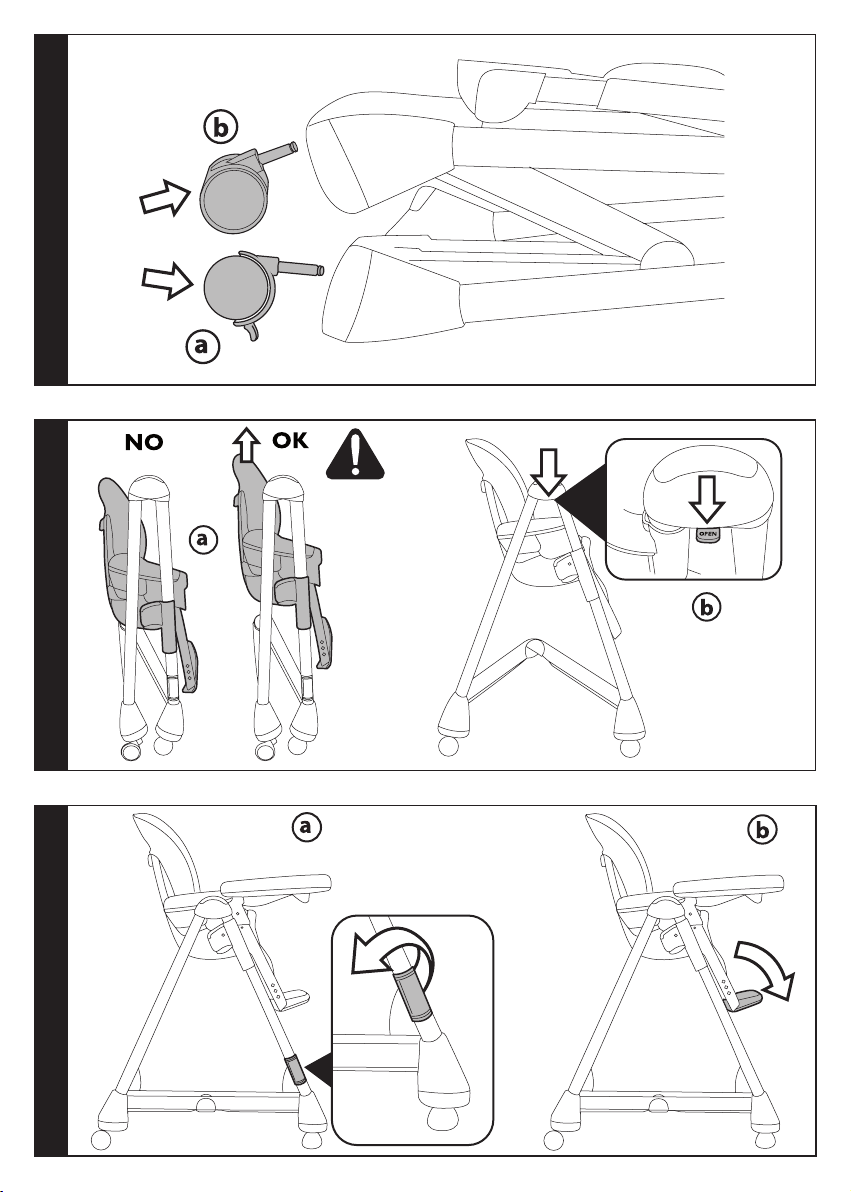
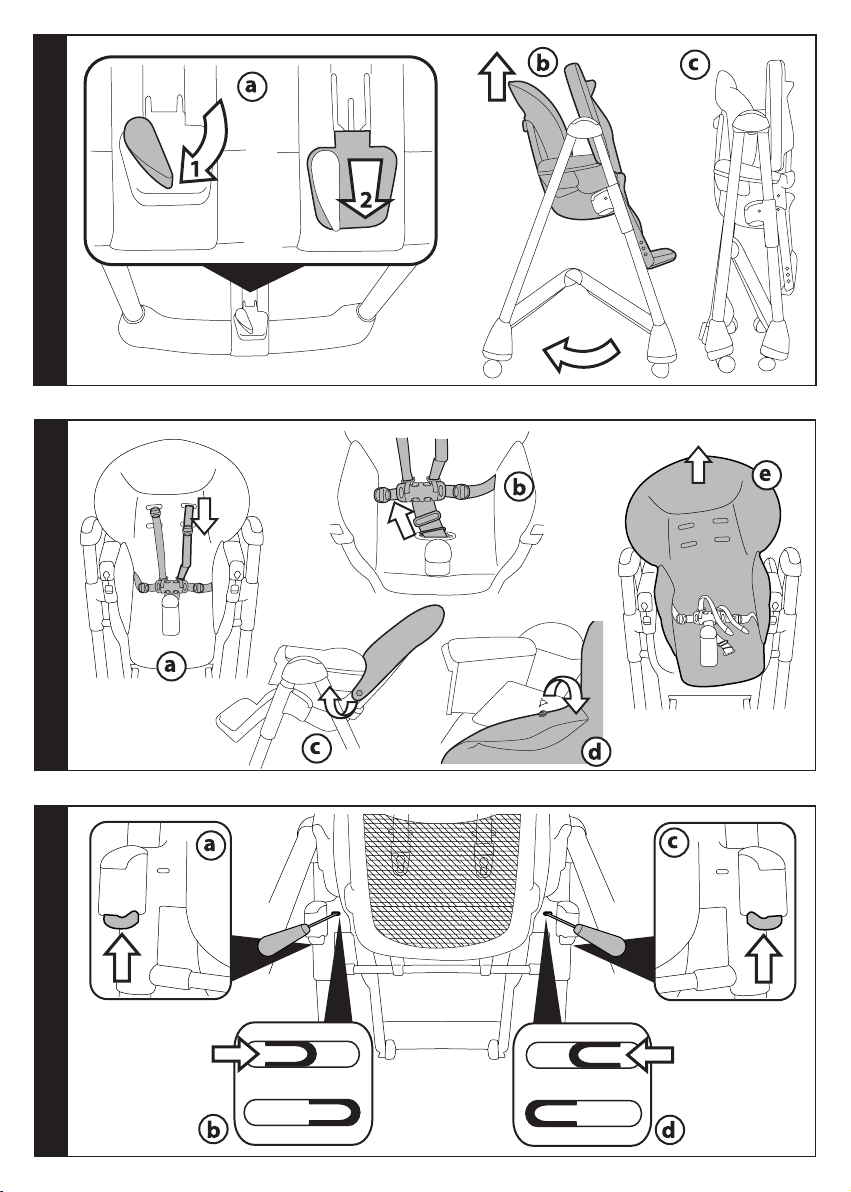
1 FITTING THE WHEELS: fit the two wheels
with brakes on the rear of the high chair
(fig_a) and the other two on the front (fig_c),
pushing in the direction of the arrows.
2 OPENING: when it is removed from the
packaging, the high chair is not in the correct
position for use (packing position). For use,
raise it up until it engages with a click at one
of the seven chair heights (fig_a). To open
the high chair, push the red side levers down
(fig_b) and push the back supports outwards.
3 Before using the high chair, remove the
spacers (fig_a) and lower the footrest (fig_b).
4 ADJUSTABLE FOOTREST: to adjust the
footrest, push the buttons on the sides (fig_a)
and move it to the required position (fig_b).
5 BRAKE: the rear wheels of the high chair are
fitted with brakes. To apply the brakes, lower
the levers on the rear wheels. To release them,
raise the levers. It is recommended that you
apply the brakes before carrying out any
procedures involving the high chair.
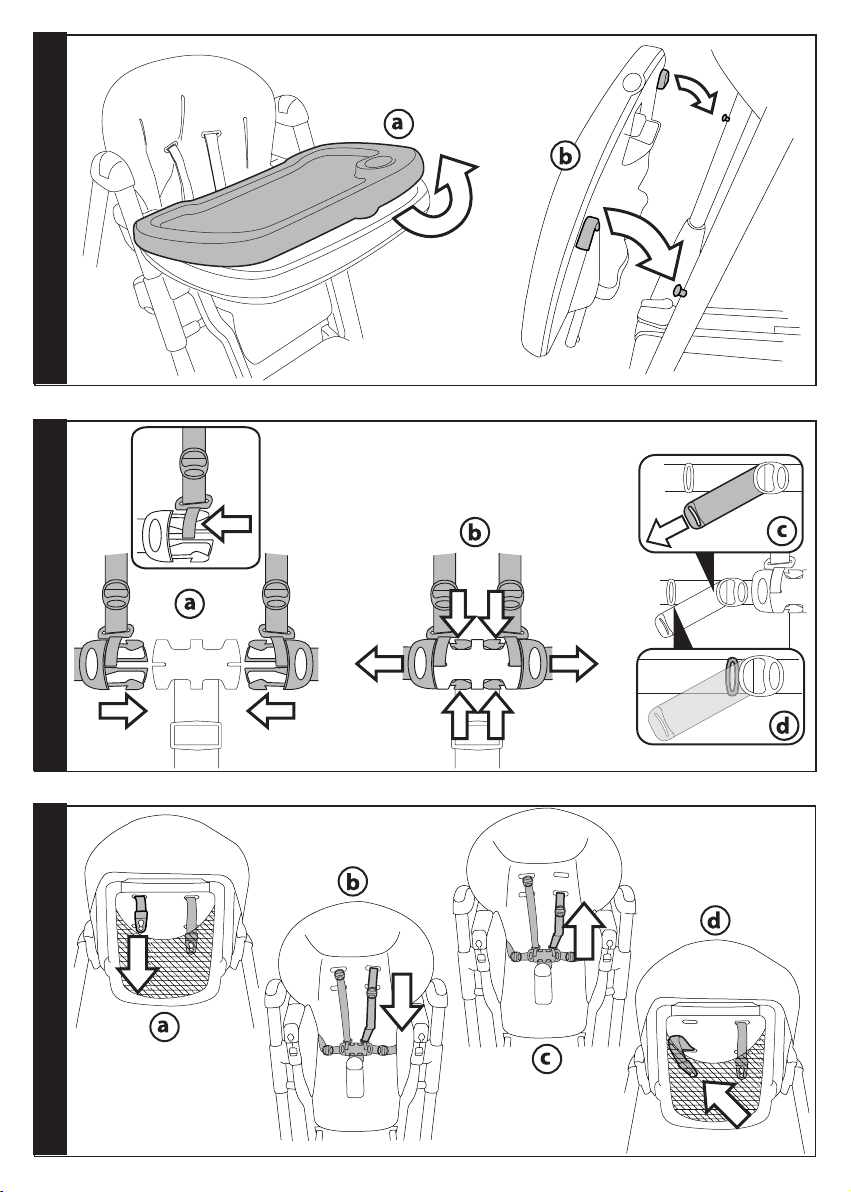
6 TRAY: to fit the tray, pull the lever underneath
it towards you (fig_a) while at the same time
inserting it onto the armrests, and push down
fully (fig_b). The tray is extendible to three
positions (fig_c). The third position (indicated
with red markings) should not be used and is
only for reclosing the tray.
_ To extend the tray, pull the lever under it
and pull the tray towards you into the first
position, repeating the operation to move it
into the second position.
_ To remove the tray, pull the lever and at the
same time push the tray towards yourself
until it disengages.
- 9 -
Page 10

7 The high chair has a double tray. The top
tray can easily be washed in a dishwasher.
To remove it, detach it from the lower tray
and lift it up (fig_a). To fix the tray on the rear
supports of the high chair, align and engage
it with the attachments provided (fig_b).
When the high chair is closed, the tray cannot
be attached to the rear supports.
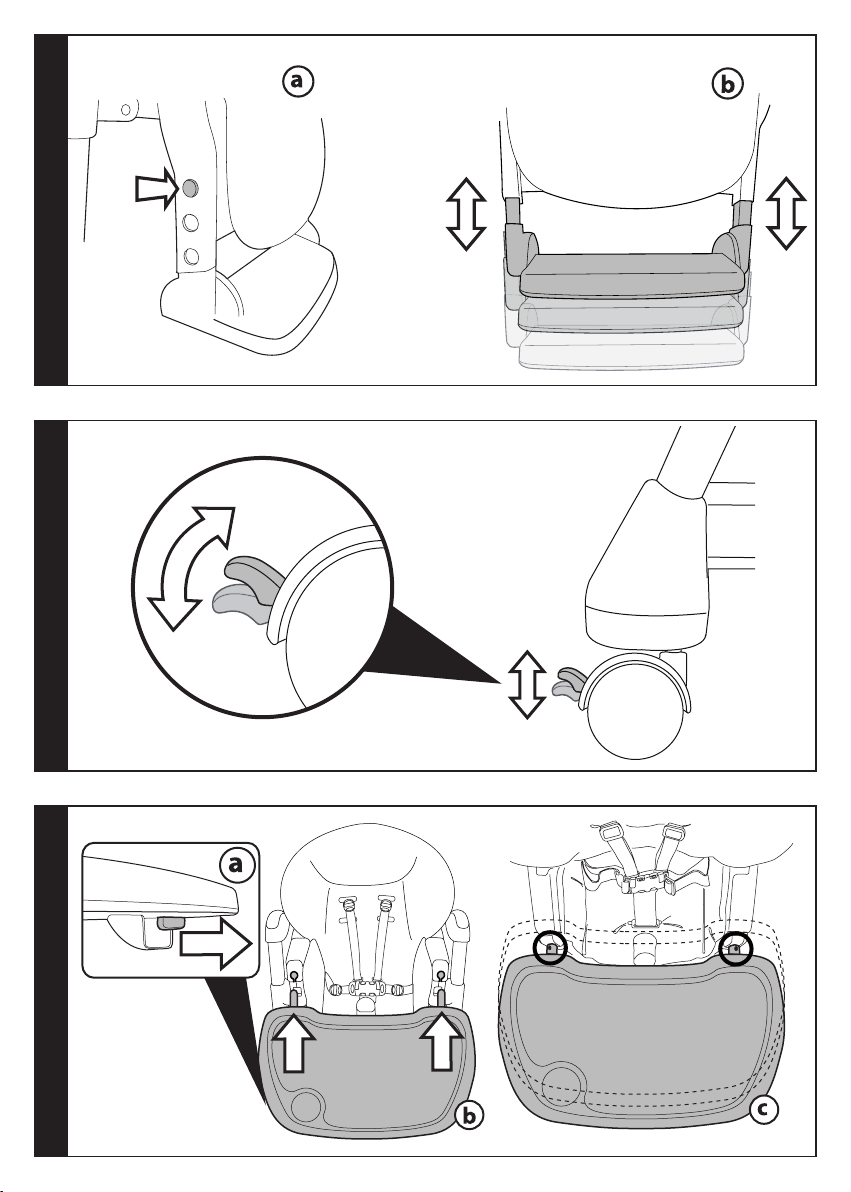
8 FIVE POINT SAFETY HARNESS: to close it, insert
the two waist strap buckles (with attached
shoulder straps) into the crotch strap until they
click into position (fig_a). To release it, press
the two sides of the buckles and at the same
time pull the waist strap outwards (fig_b). To
tighten the waist strap pull from both sides in
the direction of the arrow (fig_c), to loosen do
the opposite. The waist strap can be tightened
up to the safety stop (fig_d).
9 The shoulder straps can be adjusted to two
different heights. Unfasten the safety belt
from behind the backrest by pushing the
buckle downwards (fig_a) and unthread the
strap from the cover (fig_b). Insert the strap
buckle into the other slot in the backrest
(fig_c) and reattach the buckle, pulling the
strap until it clicks into position (fig_d).
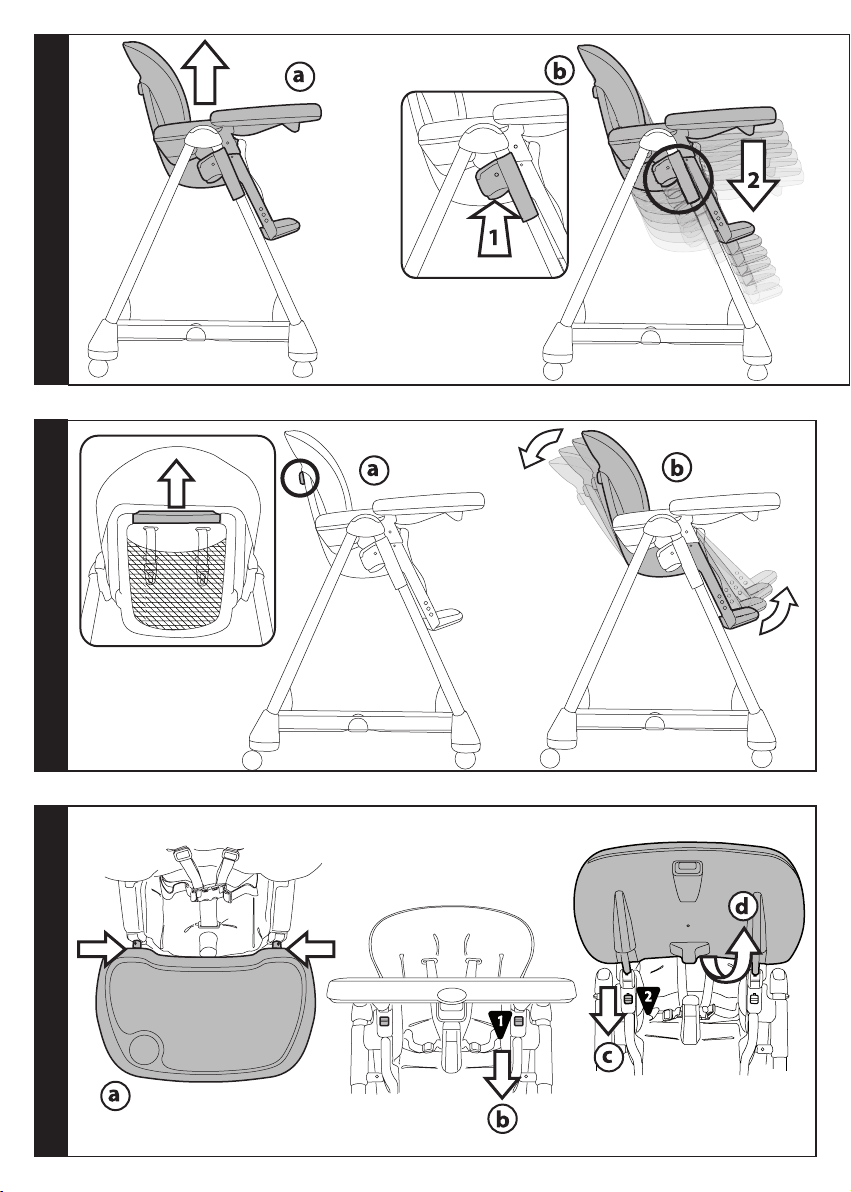
10 ADJUSTING HEIGHT: the high chair can be
set at 7 different heights. To raise it, take hold
below the tray and pull upwards (fig_a). To
lower it, press the two side buttons at the
same time and move to the required height
(fig_b). This can also be carried out with the
child in the high chair.
11 RECLINING BACKREST. The high chair can be
reclined in four positions: for eating, playing,
resting, or sleep. To adjust it, raise the handle
behind the backrest (fig_a) and lock in the
required position (fig_b). This can also be
carried out with the child in the high chair.
12 CLOSING AND REOPENING THE TRAY: to close
the tray, pull it to the third position indicated
with the red markings (fig_a), push down
button 1 (fig_b), push down button 2 (fig_c),
and at the same time rotate the tray upwards
until it locks (fig_d). To reopen the tray, push
down button 2, rotate the tray downwards
and set it in the first or second position.
13 FOLDING: before folding up the high chair,
close the tray, move the backrest to the upright
position, lower the seat to the lowest position,
and close the footrest. To fold up the high chair,
release the safety device by turning it in the
direction of the arrow and then press the pedal
(fig_a). At the same time take hold of the seat
and fold it by pulling it upwards (fig_b). The
high chair is freestanding when folded up.
14 REMOVING THE COVERS: to remove the high
chair covers, unthread the harness straps
from the backrest (fig_a) and from the seat
(fig_b). Fully recline the seat to unbutton the
covers from the sides of the backrest (fig_c),
unbutton from the inside of the armrests, and
slide the cover upwards to remove it.
15 PACKING POSITION: in order to return the high
chair to its “packing position” (for transport
purposes, or to put it back into its box), proceed
as follows (a small screwdriver is required).
Remove the tray, move the backrest into the
upright position, lower the seat to the lowest
position, and close the footrest. Press the side
button (fig_a), at the same time inserting the
screwdriver into the slot, and push towards the
right (fig_b). Repeat the same operation on
the other side (fig_c), pushing the screwdriver
towards the left (fig_d) and lower the seat to
the bottom (the non-usable position). Then fold
up the high chair and put it into its box.
SERIAL NUMBERS
16 The information about the date of production
of PRIMA PAPPA BEST is indicated under the
seat.
_ Product name, date of manufacture and serial
number of the product.
This information is essential in the event of
any complaints.
CLEANING AND MAINTENANCE
PRODUCT MAINTENANCE: protect from the
weather: water, rain, or snow; prolonged
and continuous exposure to bright sunlight
may give rise to colour changes of various
different materials; store this product in a dry
place.
CLEANING THE CHASSIS: periodically clean all
plastic parts with a damp cloth. Do not use
solvent or similar cleaning products; keep
all metal parts dry to prevent rusting; keep
moving parts clean (adjustment mechanisms,
locking mechanisms, wheels, ...) and free of
dust and sand and, if necessary, lubricate with
light machine oil.
CLEANING THE SACK: Wash with a damp cloth
and neutral detergent. Do not wring. Do not
use chlorine bleach. Do not iron. Do not dry
clean. Do not use solvents for stain removal.
Do not spin dry.
PEG-PÉREGO S.p.A.
Peg Pérego can make changes at any time to
the models described in this publication for
technical or commercial reasons.
PEG-PÉREGO AFTER-SALES
SERVICE
If any parts of your Peg Pérego product
should be accidentally mislaid or damaged,
use exclusively genuine original Peg Pérego
replacements. For any repairs, replacements,
- 10 -
Page 11

product information, and orders for genuine
original replacement parts and accessories,
contact Peg Pérego After-Sales Service:
CANADA
tel. 905.839.3371 fax 905.839.9542
call us toll free 1.800.661.5050 website www.
pegperego.com
USA
tel. 800.671.1701 fax 260.471.6332
call us toll free 1.800.671.1701 website www.
pegperego.com
ES_Español
Le agradecemos haber elegido un producto
Peg-Pérego.
ADVERTENCIA
_ IMPORTANTE: LEER ATENTAMENTE
ESTAS INSTRUCCIONES Y
CONSERVARLAS PARA UNA FUTURA
UTILIZACIÓN. SI NO SE SIGUEN
ESTAS INSTRUCCIONES, SE PODRÍA
ARRIESGAR LA SEGURIDAD DEL
NIÑO.
_ LAS OPERACIONES DE MONTAJE Y
DE REGULACIÓN DEL PRODUCTO
TIENEN QUE SER REALIZADAS
POR UN ADULTO; NO UTILIZAR EL
PRODUCTO SI EL MONTAJE NO
HA SIDO COMPLETADO Y SI EL
PRODUCTO PRESENTA ROTURAS O
FALTAN PIEZAS.
_ PREVENIR HERIDAS SERIAS O LA
MUERTE DEL NIÑO CAUSADAS POR
LA CAÍDA O EL RESBALAMIENTO
DEL MISMO; UTILIZAR SIEMPRE
LOS CINTURONES DE SEGURIDAD
DE CINCO PUNTOS; UTILIZAR LOS
CINTURONES TANTO EN POSICIÓN
RECLINADA COMO EN POSICIÓN
ERECTA.
_ UTILIZAR SIEMPRE LA TIRA
ENTREPIERNAS.
_ NO DEJAR NUNCA AL NIÑO SIN
VIGILANCIA; NO PERDER NUNCA DE
VISTA AL NIÑO.
_ LA BANDEJA Y SUS ACCESORIOS
NO HAN SIDO CONCEBIDOS
PARA SOPORTAR EL PESO DEL
NIÑO; LA BANDEJA NO HA SIDO
DISEÑADA PARA SUJETAR AL NIÑO
EN EL ASIENTO Y NO SIRVE COMO
CINTURÓN DE SEGURIDAD.
_ ASEGURARSE DE QUE EL PRODUCTO
ESTÉ SOBRE UNA SUPERFICIE
HORIZONTAL.
_ UTILIZAR EL PRODUCTO EN
POSICIÓN ERECTA SOLO CUANDO EL
NIÑO SEA CAPAZ DE ESTAR SENTADO
SOLO.
_ PONER EL PRODUCTO DE MANERA
- 11 -
Page 12

QUE EL NIÑO ESTÉ LEJOS DE
POSIBLES PELIGROS COMO CABLES
ELÉCTRICOS, FUENTES DE CALOR O
LLAMAS.
_ NO INTRODUCIR LOS DEDOS EN
LOS MECANISMOS Y PRESTAR
ATENCIÓN A LA POSICIÓN DE LAS
EXTREMIDADES DEL NIÑO DURANTE
LAS OPERACIONES DE REGULACIÓN.
_ PUEDE SER PELIGROSO UTILIZAR
ACCESORIOS NO HOMOLOGADOS
POR EL FABRICANTE.
_ NO UTILIZAR EL PRODUCTO CERCA
DE ESCALERAS O ESCALONES.
_ PRESTAR ATENCIÓN A NO PONER EL
PRODUCTO CERCA DE FUENTES DE
CALOR O FUEGO COMO HORNILLOS
DE GAS, ESTUFAS ELÉCTRICAS, ETC.
_ ASEGURARSE DE QUE SE FIJE
CORRECTAMENTE EL CHASIS.
_ USAR LA SILLA ALTA ÚNICAMENTE
SI TODOS LOS ELEMENTOS SE HAN
FIJADO Y AJUSTADO DE MODO
ADECUADO.
AVISO:
_ ESTE PRODUCTO CUMPLE
SUFICIENTEMENTE CON TODOS LOS
REQUISITOS ESTABLECIDOS POR LA
NORMA ASTM F404 Y ULTERIORES
REVISIONES.
INSTRUCCIONES DE USO
1 MONTAJE DE LAS RUEDAS: encajar las dos
ruedas con freno en la parte trasera de la
trona (fig_a) y las otras dos ruedas en la parte
delantera (fig_b), presionando en el sentido
de la flecha.
2 APERTURA: cuando se quita el embalaje, la
silla está en una posición incorrecta para ser
utilizada (posición embalaje). Para utilizarla,
levantarla hasta oír un clic, poniéndola en
una de las siete alturas de la trona (fig_a).
Para abrir la trona, empujar hacia abajo las
palanquitas rojas laterales (fig_b), haciendo
presión en los bastidores posteriores.
3 Antes de utilizar la trona, quitar los
separadores (fig_a) y bajar el peldaño
reposapies (fig_b).
4 REPOSAPIÉS REGULABLE: para regular el
reposapiés, pulsar los botones laterales (fig_a)
y bloquearlo en la posición deseada (fig_b).
5 FRENO: las ruedas posteriores de la trona
están dotadas de freno. Para frenar, bajar
las palanquitas colocadas sobre las ruedas
posteriores y para desbloquearlas, levantar
las palanquitas. Se recomienda frenar la trona
antes de realizar cualquier operación.
6 BANDEJA: para poner la bandeja, tirar hacia
sí de la palanca que se halla bajo la misma
(fig_a) y al mismo tiempo introducirla en los
brazos encajándola completamente (fig_b).
La bandeja se extiende en tres posiciones
(fig_c), la tercera posición (identificada con
referencias rojas) no tiene que utilizarse pues
sirve para volver a cerrar la bandeja.
_ Para alargar la bandeja, tirar de la palanquita
que está debajo de la misma y tirar de la
bandeja hacia sí hasta la primera posición.
Repetir la operación para poner la bandeja en
la segunda posición.
_ Para extraer la bandeja, tirar de la palanquita
y al mismo tiempo empujar hacia sí de la
bandeja hasta extraerla.
7 La trona está equipada de una bandeja doble,
la superior es fácil de lavar en el lavavajillas.
Para quitarla, hay que desengancharla de
la bandeja inferior levantándola (fig_a).
Para volver a colocar la bandeja sobre los
bastidores posteriores de la trona, alinearla
con respecto a los enganches y encajarla (fig_
b). La bandeja no puede quedar enganchada
a los bastidores posteriores cuando la trona
esté plegada.
8 ARNÉS DE SEGURIDAD DE 5 PUNTOS: para
engancharlo, introducir las dos hebillas
de la correa de la cintura (con los tirantes
enganchados) a la tira entrepiernas hasta oír
un clic (fig_a). Para desengancharlo, presionar
a los lados de la hebilla y al mismo tiempo
tirar hacia fuera la correa de la cintura (fig_b).
Para apretar la correa de la cintura, tirar de
ambos lados en el sentido que indica la
flecha (fig_c). Y para aflojarla, hacer lo mismo
pero en sentido contrario. La correa de la
cintura puede apretarse hasta la arandela de
retención (fig_d).
9 La altura de las correas del arnés puede
regularse en dos posiciones: desenganchar
el arnés por detrás del respaldo, empujando
la hebilla hacia abajo (fig_a), y sacarlo de la
funda (fig_b). Después, meter la hebilla del
arnés en la otra ranura del respaldo (fig_c)
y enganchar la hebilla, tirando del cinturón
hasta oir el clic de enganche (fig_d).
10 REGULACIÓN DE LA ALTURA: la silla se regula
en 7 posiciones. Para levantar la silla, asir
la bandeja desde abajo y tirar hacia arriba
(fig_a). Para bajar la silla, presionar al mismo
tiempo los dos botones laterales y detenerse
en la posición deseada (fig_b). Estas
operaciones pueden ser realizadas también
con el niño en la trona.
11 RESPALDO RECLINABLE: la silla puede
reclinarse en cuatro posiciones: comer, jugar,
- 12 -
Page 13

descansar o dormir. Para regularla, subir el
asa que está detrás del respaldo (fig_a) y
bloquearlo en la posición deseada (fig_b).
Esta operación puede ser realizada también
con el niño en la trona.
12 CERRAR Y VOLVER A ABRIR LA BANDEJA: para
cerrar la bandeja, alargarla hasta la tercera
posición identificada con las referencias rojas
(fig_a), pulsar el botón número 1 (fig_b),
pulsar el botón número 2 (fig_c) y al mismo
tiempo girar la bandeja hacia arriba hasta
bloquearla (fig_d). Para volver a abrir la
bandeja hay que pulsar el botón número 2,
girar hacia abajo la bandeja y colocarla en la
primera o en la segunda posición.
13 CIERRE: Antes de cerrar la trona, hay que
volver a cerrar la bandeja, colocar el respaldo
en posición erguida, bajar la silla hasta la
última posición y volver a cerrar el peldaño
reposapiés. Para cerrar la trona, desbloquear
el dispositivo de seguridad girándolo en
el sentido de la flecha y sucesivamente
presionar el pedal (fig_a). Asir al mismo
tiempo la trona y cerrarla tirando hacia arriba
(fig_b). Cuando la trona está cerrada se
sostiene en pie por sí sola.
14 QUITAR LA FUNDA: para quitar la funda de
la silla, sacar el arnés del respaldo (fig_a) y
del asiento (fig_b). Reclinar completamente
la silla para desabrochar externamente la
funda por los lados del respaldo (fig_c),
desbotonarla internamente por los brazos y,
por último, sacar la funda desde arriba.
15 POSICIÓN DE EMBALAJE: para volver a
colocar la trona en la “posición embalaje”
(para transportarlas o volver a meterla en la
caja), hay que quitar la bandeja, colocar el
respaldo en posición erguida, bajar la silla
hasta la última posición y volver a cerrar el
peldaño reposapiés. Usar un destornillador
pequeño, presionar el botón lateral (fig_a) y
al mismo tiempo introducir el destornillador
en la ranura empujando hacia la derecha
(fig_b). Repetir la misma operación (fig_c),
empujando el destornillador hacia la
izquierda (fig_d) y bajar completamente la
silla (en la posición no utilizable). Entonces,
volver a cerrar la trona y guardarla en su caja.
nieve). Una exposición contínua y prolongada
al sol podría causar cambios de color de
muchos materiales. Conservar este producto
en un lugar seco.
LIMPIEZA DEL CHASIS: Limpiar
periódicamente las partes de plástico con
un paño húmedo sin usar solventes u otros
productos similares. Mantener secas todas las
partes de metal para prevenir la oxidación.
Mantener limpias todas las partes móviles
(dispositivo de regulación, de enganche,
ruedas...) quitando el polvo o la arena y, en
caso necessario, engrasarlas con aceites
ligeros.
LIMPIEZA DEL FORRO: lavar con un paño
húmedo y detergente neutro. No torcer, no
utilizar lejía, no planchar, no lavar en seco, no
eliminar las manchas con disolventes y no
secar en secadora con tambor rotativo.
PEG-PÉREGO S.p.A
Peg-Pérego podrá aportar en cualquier
momento modificaciones a los modelos
que se describen en el presente manual por
razones técnicas o comerciales.
SERVICIO DE ASISTENCIA
PEG-PÉREGO
En caso de que se pierdan o se dañen
partes del producto, utilizar sólo repuestos
originales Peg-Pérego. Para eventuales
reparaciones, cambios e informaciones sobre
los productos, así como la venta de recambios
originales y accesorios, contactar el Servicio
de Asistencia Peg-Pérego:
CANADA
tel. 905.839.3371 fax 905.839.9542
call us toll free 1.800.661.5050 website www.
pegperego.com
NÚMEROS DE SERIE
16 PRIMA PAPPA BEST, incluye debajo del
asiento informaciones relativas a la fecha de
producción del mismo.
_ Nombre, fecha de producción y numeración
en serie del producto.
Estas informaciones son indispensables en
caso de reclamación.
LIMPIEZA Y MANTENIMIENTO
MANTENIMIENTO DEL PRODUCTO: proteger
contra agentes atmosféricos (agua, lluvia o
- 13 -
Page 14

FR_Français
Merci d’avoir choisi un produit Peg-Pérego.
_ IMPORTANT: LIRE CES
_ LES OPÉRATIONS DE MONTAGE
_ EMPÊCHER DE GRAVES BLESSURES
_ UTILISER SYSTEMATIQUEMENT
_ NE JAMAIS LAISSER L’ENFANT SANS
_ LE PLATEAU ET SES ACCESSOIRES
_ S’ASSURER QUE LE PRODUIT EST
_ N’UTILISER LE PRODUIT EN POSITION
_ INSTALLER LE PRODUIT DE MANIÈRE
AVERTISSEMENT
INSTRUCTIONS AVEC ATTENTION
ET LES CONSERVER POUR TOUTE
RÉFÉRENCE FUTURE. LA SÉCURITÉ
DE VOTRE ENFANT POURRAIT ÊTRE
MENACÉE SI CES INSTRUCTIONS NE
SONT PAS RESPECTÉES.
ET DE RÉGLAGE DU PRODUIT
DOIVENT ÊTRE EFFECTUÉES PAR
UN ADULTE; NE PAS UTILISER LE
PRODUIT SI LE MONTAGE N’EST PAS
CONVENABLEMENT TERMINÉ ET SI
LE PRODUIT PRÉSENTE DES PIÈCES
CASSÉES OU MANQUANTES.
OU LA MORT DE L’ENFANT
DUES À SA CHUTE OU À SON
GLISSEMENT: TOUJOURS UTILISER
LES CEINTURES DE SÉCURITÉ À CINQ
POINTS; UTILISER LES CEINTURES
EN POSITION INCLINÉE ET À LA
VERTICALE.
L'ENTREJAMBE
SURVEILLANCE; TOUJOURS GARDER
L’ENFANT EN VUE.
N’ONT PAS ÉTÉ CONÇUS POUR
SUPPORTER LE POIDS DE L’ENFANT;
LE PLATEAU N’A PAS ÉTÉ CONÇU
POUR MAINTENIR L’ENFANT EN
POSITION ASSISE ET NE REMPLACE
PAS LA SANGLE DE SÉCURITÉ.
INSTALLÉ SUR UNE SURFACE
HORIZONTALE.
VERTICALE QUE SI L’ENFANT EST
CAPABLE DE RESTER ASSIS TOUT
SEUL.
À CE QUE L’ENFANT NE PUISSE ÊTRE
MIS EN DANGER PAR DES CÂBLES
ÉLECTRIQUES, DES SOURCES DE
CHALEUR OU DES FLAMMES.
_ NE PAS METTRE LES DOIGTS
DANS LES MÉCANISMES ET FAIRE
ATTENTION À LA POSITION DES
MEMBRES DE L’ENFANT AU COURS
DES OPÉRATIONS DE RÉGLAGE.
_ L’UTILISATION D’ACCESSOIRES
N’AYANT PAS ÉTÉ APPROUVÉS PAR LE
FABRICANT PEUT ÊTRE DANGEREUSE.
_ NE PAS UTILISER LE PRODUIT
À PROXIMITÉ DE MARCHES OU
D’ESCALIERS.
_ FAIRE ATTENTION À NE PAS
POSITIONNER LE PRODUIT À
PROXIMITÉ DE SOURCES DE CHALEUR
OU DE FEUX COMME LES POÊLES À
GAZ, LES RADIATEURS ÉLECTRIQUES,
ETC.
_ NE PAS UTILISER LA CHAISE HAUTE
SI TOUS LES ÉLÉMENTS NE SONT
PAS FIXÉS ET RÉGLÉS DE MANIÊRE
APPROPRIÉE.
REMARQUE:
_ CET ARTICLE REMPLIT LES
CONDITIONS REQUISES PAR LA
NORME ASTM F404 ET RÉVISIONS
RÉCENTES OU SATISFAIT À DES
CONDITIONS PLUS SÉVÈRES.
_ CONFORME AUX EXIGENCES DE
SECURITE.
INSTRUCTIONS D’UTILISATION
1 MONTAGE DES ROUES : appliquer les deux
roues avec frein à l’arrière de la chaise haute
(fig_a) et les deux autres à l’avant (fig_b) en
faisant pression dans le sens indiqué par la
flèche.
2 OUVERTURE : une fois sorti de son emballage,
le siège est dans une position inadaptée à
son utilisation (position emballage). Pour
l’utiliser, soulever le siège jusqu’au déclic et
l’enclencher dans une des sept positions de
réglage de la hauteur de la chaise haute (fig_
a). Pour ouvrir la chaise haute, pousser vers
le bas les languettes rouges situées sur les
côtés (fig_b) en faisant levier sur les montants
arrière.
3 Enlever les pièces d’écartement avant
d’utiliser la chaise haute (fig_a) et abaisser la
pédale repose-pieds (fig_b).
4 REPOSE-PIED RÉGLABLE : pour régler le
repose-pied, appuyer sur les boutons latéraux
- 14 -
Page 15

(fig_a) et le régler dans la position souhaitée
(fig_b).
5 FREIN : les roues arrière de la chaise haute
sont munies d’un frein. Pour bloquer les
roues, abaisser les petits leviers placés sur les
roues arrière ; pour les débloquer, procéder à
l’opération contraire. Avant toute opération
sur la chaise haute, il est conseillé de
l’immobiliser à l’aide des freins.
6 PLATEAU : pour appliquer le plateau, tirer
vers soi le levier situé sous le plateau (fig_a)
tout en enfilant à fond ce dernier dans les
accoudoirs (fig_b). Le plateau peut être
allongé en trois positions (fig_c) ; ne pas
utiliser la troisième position (indiquée par les
repères rouge), qui sert à refermer le plateau.
_ Pour allonger le plateau, tirer vers soi le levier
situé sous le plateau et ce dernier jusqu’en
première position. Répéter l’opération pour
l’amener en deuxième position.
_ Pour extraire le plateau, tirer vers soi le levier
et, dans le même temps, tirer vers soi le
plateau jusqu’à l’extraire.
7 La chaise haute est dotée d’un double
plateau, dont celui du haut peut être
facilement lavé au lave-vaisselle. Pour
le démonter, le décrocher du plateau
inférieur en le soulevant (fig_a). Pour
replacer le plateau sur les montants à
l’arrière de la chaise haute, le positionner en
correspondance des fixations et l’accrocher
(fig_b). Lorsque la chaise haute est repliée, il
n’est pas possible d’accrocher le plateau aux
montants arrière.
8 CEINTURE DE SÉCURITÉ À CINQ POINTS :
pour accrocher la ceinture, insérer jusqu’au
déclic les deux boucles de la ceinture ventrale
(avec les bretelles attachées) dans la sangle
d’entrejambes (fig_a). Pour décrocher la
ceinture, enfoncer les côtés de la boucle tout
en tirant la ceinture ventrale vers l’extérieur
(fig_b). Pour serrer la ceinture ventrale, tirer
des deux côtés dans le sens indiqué par la
flèche (fig_c). Pour la desserrer, procéder à
l’opération contraire. La ceinture ventrale
peut être serrée jusqu’à la butée de sécurité
(fig_d).
9 Les bretelles de la ceinture peuvent être
réglées en hauteur en deux positions :
détacher la ceinture à l’arrière du dossier en
tirant la boucle vers le bas (fig_a) et retirer la
ceinture par la housse (fig_b). Enfiler ensuite
la boucle de la ceinture dans l’autre fente
du dossier (fig_c) et accrocher la boucle
a l’ergot en tirant la ceinture jusqu’au clic
d’enclenchement (fig_d).
10 RÉGLAGE DE LA HAUTEUR : la hauteur du
siège est réglable en 7 positions. Pour relever
le siège, empoigner le plateau et tirer le siège
vers le haut (fig_a). Pour abaisser le siège,
appuyer simultanément sur les deux boutons
latéraux et s’arrêter sur la position souhaitée
(fig_b). Ces opérations peuvent également
être effectuées alors que l’enfant est assis
dans la chaise haute.
11 SIÈGE INCLINABLE : le siège peut être incliné
en quatre positions : repas, jeu, détente et
sieste. Pour régler l’inclinaison du siège,
relever la poignée située derrière le dossier
(fig_a) et bloquer le siège dans la position
souhaitée (fig_b). Cette opération peut
également être effectuée alors que l’enfant
est assis dans la chaise haute.
12 FERMETURE ET RÉOUVERTURE DU PLATEAU:
pour refermer le plateau, l’amener en
troisième position, indiquée par les repères
rouges (fig_a). Abaisser le bouton numéro
1 (fig_b), puis le bouton numéro 2 (fig_c),
tout en relevant le plateau jusqu’à ce qu’il
se bloque (fig_d). Pour rouvrir le plateau,
abaisser le bouton numéro 2, abaisser le
plateau et l’amener en première ou deuxième
position.
13 FERMETURE : avant de fermer la chaise
haute, il convient de refermer le plateau, de
redresser le dossier, d’abaisser complètement
le siège et de refermer la pédale reposepieds. Débloquer le dispositif de sécurité en
le faisant pivoter dans le sens indiqué par
la flèche, puis appuyer sur la pédale (fig_a).
Dans le même temps, se saisir de la chaise
haute et la refermer en tirant vers le haut (fig_
b). Lorsqu’elle est refermée, la chaise haute
tient debout toute seule.
14 POUR ENLEVER LA HOUSSE : pour enlever
la housse de la chaise haute, retirer les
ceintures du dossier (fig_a) et de l’assise
(fig_b). Abaisser complètement le siège
pour déboutonner de l’extérieur la housse
des côtés du dossier (fig_c), déboutonner
l’intérieur des accoudoirs et retirer la housse
par le haut.
15 POSITION D’EMBALLAGE : pour remettre la
chaise haute en position d’emballage (afin
de la transporter ou de la remettre dans
son carton), il convient de démonter le
plateau, de redresser le dossier, d’abaisser
complètement le siège et de refermer la
pédale repose-pieds. Se munir d’un petit
tournevis. Appuyer sur le bouton latéral
(fig_a) tout en enfilant le tournevis dans
la fente et en le poussant vers la droite
(fig_b). Répéter cette opération (fig_c) en
poussant le tournevis vers la gauche (fig_d) et
abaisser complètement le siège (en position
d’emballage). Refermer la chaise haute et la
mettre dans son carton.
NÚMEROS DE SERIE
16 PRIMA PAPPA BEST, incluye debajo del
asiento informaciones relativas a la fecha de
producción del mismo.
- 15 -
Page 16

_ Nombre, fecha de producción y numeración
en serie del producto.
Estas informaciones son indispensables en
caso de reclamación.
NETTOYAGE ET ENTRETIEN
ENTRETIEN DE L’ARTICLE: protéger l’article des
agents atmosphériques (eau, pluie ou neige);
une exposition continue et prolongée au
soleil pourrait entraîner un changement de
couleur de nombreux matériaux; ranger cet
article dans un lieu sec.
NETTOYAGE DU CHÂSSIS: nettoyer
régulièrement les pièces en plastique à
l’aide d’un linge humide; ne pas utiliser de
solvants ou autres produits similaires. Veiller
à ce que toutes les pièces métalliques restent
sèches pour prévenir la formation de rouille.
Maintenir le bon état de propreté de toutes
les pièces mobiles (mécanismes de réglage,
mécanismes de fixation, roues, etc.) en
enlevant poussière ou sable; graisser avec
une huile légère si nécessaire.
NETTOYAGE DES ÉLÉMENTS EN TISSU :
nettoyer à l’aide d’un linge humide et d’un
détergent neutre ; ne pas tordre ; ne pas
utiliser de javel ; ne pas repasser ; ne pas laver
à sec ; ne pas détacher à l’aide de solvants ;
ne pas sécher dans un sèche-linge à tambour
rotatif.
PEG-PÉREGO S.p.A.
Peg-Pérego se réserve le droit de procéder
à tout moment à des modifications sur les
modèles décrits dans cet ouvrage, pour des
raisons de nature technique ou commerciale.
SERVICE D’ASSISTANCE PEG-
PÉREGO
En cas de perte de pièces ou de rupture de
l'une d'elles, utiliser exclusivement des pièces
de rechange originales Peg-Pérego. Pour les
réparations, les remplacements, les demandes
d'informations relatives aux produits et
l’achat de pièces de rechange originales et
d’accessoires, contacter le service d'assistance
Peg-Pérego:
CANADA
tél. 905.839.3371 fax 905.839.9542
call us toll free 1.800.661.5050 site Internet
www.pegperego.com
RU_Pусский
Благодарим вас за то, что вы выбрали
продукцию компании Peg-Pеrego.
РЕДУПРЕЖДЕНИЕ
_ ВАЖНО:
СОХРАНИТЕ
ИНСТРУКЦИЮ
ДЛЯ БУДУЩЕГО
ИСПОЛЬЗОВАНИЯ.
_ Внимательно прочтите настоящую
инструкцию. Ее невыполнение
может поставить под угрозу
безопасность ребенка.
_ Операции по сборке и регулировке
изделия должны выполнять
только взрослые; не используйте
изделие, если сборка неправильно
завершена, а также если изделие
обнаруживает поломки или
недостающие детали.
_ Операции по чистке и уходу должны
выполнять только взрослые.
_ Не допускайте падение или
сползание ребенка; всегда
используйте ремни безопасности
с пятью точками крепления;
используйте ремни как в
опущенном, так и в стоящем
положении спинки.
_ удостоверьтесь, что ремень был
правильно застёгнут.
_ Никогда не оставляйте вашего
ребенка без присмотра; не
упускайте его из вида.
_ Не пользуйтесь изделием,
пока ребенок не умеет сидеть
самостоятельно.
_ Лоток и его принадлежности не
предназначены для выдерживания
веса ребенка; лоток не
предназначен для удерживания
ребенка на сидении, и он не
- 16 -
Page 17

заменяет ремень безопасности.
_ Убедитесь, что изделие стоит на
горизонтальной поверхности.
_ Установите изделие так, чтобы
держать ребенка вдали от таких
источников опасности, как
электрические кабели, источники
тепла или огонь.
_ Избегайте попадания пальцев в
механизмы, и обратите внимание
на положение конечностей
ребенка при выполнении операций
по регулировке.
_ Использование принадлежностей,
не одобренных изготовителем,
может быть опасным.
_ Не пользуйтесь изделием вблизи
лестниц или ступенек.
_ Не используйте детский стульчик
для кормления, если все
элементы не были соответственно
закреплены и отрегулированы.
_ Обратите внимание на то, чтобы
не ставить изделие вблизи таких
источников тепла или огня, как
газовые плиты, электрические
нагреватели и т.Д.
ИНСТРУКЦИЯ
1 УСТАНОВКА КОЛЕС: установите для колеса
с тормозами на заднюю часть структуры
(рис. А) а остальные два на переднюю часть
структуры (рис. С), следуя указаниям стрелок.
2 РАССКЛАДЫВАНИЕ: после того, как
вы достали стул из коробки, изделии
находится в неправильном положении
(в собранном положении). Для
использования, поднимите сидение вверх,
переводя его в одно из семи положений по
высоте стульчика (рис. А). Чтобы открыть
стул, опустите красные боковые рычажки
вниз (рис. B), опираясь на задние стойки.
3 Перед использованием стула снимите
упаковку (рис. А) и опустите опору для ног
(рис. B).
4 РЕГУЛИРУЕМАЯ ОПОРА ДЛЯ НОГ: чтобы
отрегулировать опору для ног, нажмите
на боковые кнопки и, удерживая их,
привидете опору в нужное положение.
5 ТОРМОЗ: задние колеса стульчика
оснащены тормозами. Чтобы поставить
колеса на тормоз, опустите рычажки колес
вниз. Чтобы снять с тормоза, поднимите
рычажки. Рекомендуется всегда ставить
стул на тормоз, прежде чем проводить с
ним любые операции.
6 ЛОТОК: для установки лотка потяните к
себе рычаг, расположенный под лотком,
и одновременно с этим вставьте в него
подлокотники, смещая его до упора
(рис. B). Лоток имеет три положения,
при чем третье положение не следует
использовать, так как оно предназначено
для складывания лотка.
- Для выдвижения лотка сместите
расположенный под ним рычаг и лоток до
первого положения, после чего повторите
эту операцию для того, чтобы перевести
лоток во второе положение.
- Для снятия лотка сместите рычаг и
одновременно с этим потяните лоток на
себя вплоть до его извлечения.
7 Стульчик имеет двойной лоток. Верхний
лоток легко моется в посудомоечной
машине. Чтобы отсоединить его поднимите
его вверх, как показано на рисунке (рис.
А). Чтобы закрепить лоток на опоре стула
используйте специальные крепления.
Когда стульчик находится в сложенном
положении лоток невозможно закрепить
на опоре стула.
8 ПЯТИТОЧЕЧНЫЙ РЕМЕНЬ БЕЗОПАСНОСТИ:
чтобы застегнуть ремень вставьте застежки
(с уже прикрепленными лямками) в
центральную пряжку до щелчка (рис. А).
Для расстегивания ремешка нажмите
боковые части пряжки и одновременно
сместите брюшной ремешок (рис. B). Чтобы
затянуть брюшной ремешок тяните его в
обе стороны по направлению стрелок (рис.
С), чтобы ослабить проделайте операцию
наоборот. Брюшной ремень может быть
затянуть до безопасного предела (рис. D).
9 Лямки ремешка можно отрегулировать по
высоте в двух положениях. Отсоедините
ремешок с задней стороны спинки, смещая
пряжку вниз (рис. А). Снимите ремешок
с обивки (рис. B). Пропустите пряжку
ремня через другую щель спинки (рис. С)
и зацепите пряжку за стопор, потянув за
ремешок вплоть до щелчка (рис. D).
10 РЕГУЛИРОВКА ПО ВЫСОТЕ: стульчик имеет
7 положений по высоте. Для подъема
сидения возьмите лоток снизу и сместите
его вверх (рис. А). Чтобы опустить сидение
нажмите на две боковые кнопки и
переместите его в нужное вам положение
(рис. B). Данную операцию можно
проделовать и с ребенком и без него.
11 ОПУСКАЕМОЕ СИДЕНИЕ: сидение опускается
в четырех положениях: для еды, для игры,
для отдыха и для сна. Для его регулировки
поднимите рукоятку, находящуюся сзади
спинки (рис. А) и заблокируйте ее в
необходимом положении (рис. B). Данную
операцию можно проделывать, даже когда
- 17 -
Page 18

ребеное сидит на стульчике.
12 СКЛАДЫВАНИЕ И РАСКЛАДЫВАНИЕ ЛОТКА:
чтобы сложить лоток, выдвиньте его в третье
положение, помеченное красными метками
(рис. А), опустите кнопку, помеченную цифрой
1 (рис. B), опустите кнопку помеченную
цифрой 2 (рис. С), и одновременно с этим
поднимите лоток до его блокировки
в верхнем положении (рис. D). Для
раскладывания лотка необходимо опустить
кнопку, помеченную цифрой 2, опустить лоток
и перевести его в 1 или 2 положение.
13 СКЛАДЫВАНИЕ СТУЛА: перед складыванием
стула сложите лоток, переведите спинку в
вертикальное положение, опустите сидение
до самого низкого положения, закройте
подножку. Разблокируйте предохранительное
устройство, поворачивая его в направлении
стрелок, после чего нажмите на педаль (рис.
А). Одновременно с этим возьмитесь за стул
и смещайте его вверх (рис. B). В сложенном
состоянии стул устойчив в вертикальном
положении.
14 СНЯТИЕ ОБИВКИ: для снятия обивки вытяните
ремень с сидения (рис. А) и со спинки стула
(рис. B). Опустите сидение до конца для
расстегивания обивки с боков спинки (рис.
С), расстегните кнопки подлокотников, после
чего снимите обивку сверху.
15 УПАКОВОЧНОЕ ПОЛОЖЕНИЕ: чтобы снова
привести стул в “упаковочное положение”
(для его перевозки, или чтобы убрать его в
коробку), необходимо снять лоток, перевести
спинку в вертикальное положение, опустить
сидение в последнее положение, закрыть
подножку.Возьмите небольшую отвертку.
Нажмите боковую кнопку (рис. А) и,
одновременно с этим, вставьте отвертку в
щель, нажимая вправо (рис. B). Повторите
такую же операцию с другой стороны (рис.
С), смещая отвертку влево (рис. D), и опустите
сидение до упора (в положение, в котором
его нельзя использовать). После этого
сложите стул и уберите его в коробку.
СЕРИЙНЫЕ НОМЕРА
16 Информация о дате производства PRIMA
PAPPA BEST указана под сиденьем.
_ Название продукта, дата производства и
серийный номер продукта.
Эту информацию необходимо сообщать при
любом обращении в службу поддержки.
ЧИСТКА И УХОД
УХОД ЗА ИЗДЕЛИЕМ: защитите изделие
от атмосферных осадков: воды, снега или
дождя. Постоянная и продолжительная
подверженность солнечным лучам может
вызвать цветовые изменения многих
материалов. Храните изделие в сухом месте.
ЧИСТКА ШАССИ: периодически очицайте
пластмассовые части влажной тряпкой. Не
пользуйтесь растворителями или сходными
с ними веществами. Вытирайте насухо
металлические части, чтобы предотвратить
образование ржавчины. Очищайте
также подвижные части (регулируемые
механизмы, закрывающиеся механизмы,
колеса и т.д.) от грязи и песка и, при
необходимости, смазывайте их легким
машинным маслом.
ЧИСТКА ОБИВКИ: Мойте влажной тряпкой
или нейтральным моющим средством. Не
выжимайте. Не используйте отбеливатель.
Не гладьте. Не используйте сушку. Не
используйте растворитель для выведения
пятен. Не скручивайте сухую обивку.
PEG-PEREGO S.p.A.
Peg-Perego S.p.A.
сертифицирована по ISO 9001.
Сертификация гарантирует
заказчикам и потребителям, что
компания работает, соблюдая
принципы гласности и доверия.
Компания Peg-Perego имеет право
вносить в любой момент изменения
в модели, описанные в настоящем
издании, по причинам технического или
коммерческого характера.
Peg-Perego находится к услугам своих
клиентов для полного удовлетворения
всех их требований. Поэтому, для нас очень
важно знать мнение наших клиентов.
Поэтому, мы будем вам признательны,
если после использования нашего
изделия вы заполните АНКЕТУ ОБ
УДОВЛЕТВОРЕННОСТИ ПОТРЕБИТЕЛЯ,
которую можно найти на нашем сайте в
Интернете, высказывая свои замечания или
рекомендации. www.pegperego.com
СЛУЖБА ОБСЛУЖИВАНИЯ
PEG-PEREGO
В случае утери или повреждения
частей изделия, используйте только
фирменные запасные части Peg-Perego.
Для выполнения ремонта, замены деталей,
получения справок об изделии, продажи
фирменных запчастей и принадлежностей
вы можете обращаться в службу
обслуживания Peg-Perego:
тел.: 0039/039/60.88.213 факс
0039/039/33.09.992
e-mail assistenza@pegperego.it сайт в
интернете: www.pegperego.com
- 18 -
Page 19

- 19 -
Page 20

PEG PEREGO S.p.A.
VIA DE GASPERI 50 20043 ARCORE MI ITALIA
tel. 0039 039 60881 fax 0039 039 615869/616454
Servizio Post Vendita - After Sale:
tel. 0039 039 6088213 fax: 0039 039 3309992
PEG PEREGO U.S.A. Inc.
3625 INDEPENDENCE DRIVE FORT WAYNE INDIANA 46808
phone 260 482 8191 fax 260 484 2940
Call us toll free: 800 671 1701
PEG PEREGO CANADA Inc.
585 GRANITE COURT PICKERING ONTARIO CANADA L1W3K1
phone 905 839 3371 fax 905 839 9542
Call us toll free: 800 661 5050
www.pegperego.com
WARNING
AVOID SERIOUS INJURY FROM FALLING OR SLIDING OUT.
ALWAYS USE COMPLETE 5 POINT SEAT BELT.
ADVERTENCIA
EVITE LESIÓNES DE CAIDAS O DESLIZAMIENTOS HACIA FUERA.
SIEMPRE UTILIZE EL CINTURON COMPLETO DE 5 PUNTOS.
Conforms to
ASTM F833
Safety Standards
AVERTISSEMENT
EVITER UNE BLESSURE SÉRIEUSE DUE À UNE CHUTE OU À UN GLISSEMENT.
TOUJOURS UTILISER LA CEINTURE DE SÉCURITÉ À 5 POINTS COMPLÈTE..
FINA1001I88
prima pappa best
24/11/2010
 Loading...