

Paxar 7410, 9850 User Manual
Paxar
Monarch
Printers
9825
9850
9855
9860
TC9850ENOI Rev. AD 3/03 ©2001 Paxar Americas, Inc. All rights reserved.

Each product and program carries a respective written warranty, the only
warranty on which the customer can rely. Paxar reserves the right to make
changes in the product and the programs and their availability at any time and
without notice. Although Paxar has made every effort to provide complete and
accurate information in this manual, Paxar shall not be liable for any omissions
or inaccuracies. Any update will be incorporated in a later edition of this
manual.
©2001 Paxar Americas, Inc. All rights reserved. No part of this publication
may be reproduced, transmitted, stored in a retrieval system, or translated into
any language in any form by any means, without the written permission of
Paxar Americas, Inc.
Trademarks
7410, 9800, 9825, 9850, 9855, 9860, and PaxarNet are trademarks of Paxar Americas, Inc.
Monarch is a registered trademark of Monarch Marking Systems, Inc.
Paxar is a trademark of Paxar Corporation.
Centronics is a registered tradmark of Centronics Data Computer Corporation.
Microsoft and MS-DOS are registered trademarks of Microsoft Corporation.
Windows and NT are registered trademarks of Microsoft in the U.S. and other countries.
Hewlett-Packard is a registered trademark of Hewlett-Packard Company.
HP Jet Admin, HP JetDirect, and HP Web Jet Admin are trademarks of Hewlett-Packard Company.
Novell and NetWare are registered trademarks of Novell, Inc., in the United States and other countries.
Other products are trademarks or registered trademarks of their respective holders and should be noted as
such.
Paxar Corporation
170 Monarch Lane
Miamisburg, OH 45342

Regulatory Compliance
Paxar RF products are designed to be compliant with the rules and regulations in the locations
into which they are sold and will be labeled as required. The majority of Paxar RF devices are
type approved and do not require the user to obtain license or authorization before using the
equipment. Any changes or modifications to Paxar equipment not expressly approved by Paxar
could void the user authority to operate the equipment.
FCC RF Exposure Guidelines
To comply with FCC exposure requirements, antennas that are mounted externally at remote
locations or operating near users at stand-alone desktop of similar configurations must operate
with a minimum separation distance of 20 cm from all persons.
Declaration of Conformity for RF Exposure:
The radio module has been evaluated under FCC Bulletin OET 65C and found compliant to the
requirements as set forth in CFR 47 Sections 2.1091, 2.1093, and 15.247 (b) (4) addressing RF
Exposure from radio frequency devices.
Radio Frequency Interference Requirements
This device complies with Part 15 of the FCC Rules. Operation is subject to the following two
conditions: 1) this device may not cause harmful interference, and 2) this device must accept any
interference that may cause undesired operations.
CAUTION:
The Part 15 radio device operates on a non-interference basis with other devices operating at this
frequency when using the listed antenna.
Collocation Statement:
This device must not be collocated with any other antenna or transmitters.

Radio Frequency Interference Requirements - Canada
This device complies with RSS 210 of Industry & Science Canada. Operation is subject to the
following two conditions: (1) this device may not cause harmful interference and (2) this device
must accept any interference received, including interference that may cause undesired
operation.
This Class A digital apparatus meets the requirements of the Canadian Interference-Causing
Equipment Regulations.
Cet appareil numérique de la Classe A especte toutes les exigencies du Reglement sur le
Materiél Brouilleur du Canada.
European Economic Area
The European variant is intended for use throughout the European Economic Area, however
authorization for use restricted as follows:
European standards dictate maximums radiated transmit power of 100 mW EIRP and frequency
range 2.400 –2.4835 GHz.
France, the equipment is to be restricted to the 2.4465 – 2.4835 GHz frequency range.
Belgium outside, the equipment is to be restricted to the 2.460 – 2.4835 GHz frequency range.
Operation in Italy requires a user license.

TABLE OF CONTENTS
Installing the Print Server Hardware................................................... 1-1
System Requirements........................................................................ 1-1
Network Protocols Supported ............................................................. 1-2
Checking the Print Server Hardware ................................................... 1-3
Verifying Successful Installation......................................................... 1-3
Verifying Successful Installation......................................................... 1-4
Sample Test Page .......................................................................... 1-6
Configuring the 802.11b and IP Settings............................................. 2-1
Configuring the Print Server............................................................... 2-1
Before You Begin .............................................................................. 2-1
Installing the Software....................................................................... 2-2
Management Methods ......................................................................... 3-1
WP-Admin Utility............................................................................... 3-1
XAdmin32 Utility ............................................................................... 3-1
Web Browser .................................................................................... 3-1
PaxarNet Console ............................................................................. 3-2
HP JetAdmin Utility ........................................................................... 3-2
HP Web JetAdmin Utility.................................................................... 3-3
Microsoft Windows Network Configuration...................................... 3-3
Installing ExtendNet Connect ............................................................. 3-3
Additional Windows Configuration Methods ......................................... 3-4
UNIX Network Configuration .............................................................. 3-4
Berkeley UNIX Host Configuration ...................................................... 3-5
Sun Solaris Configuration ............................................................... 3-6
i

HP/UX Configuration ......................................................................... 3-8
IBM AIX Configuration ....................................................................... 3-9
Configuration on Other Systems......................................................... 3-9
Troubleshooting ................................................................................. 4-1
General Troubleshooting Information .................................................. 4-1
Troubleshooting Wireless Configuration Problems ............................... 4-4
Troubleshooting Network Configuration............................................... 4-5
Wireless Server Configuration Screen Fields....................................... 4-5
Loading the Firmware ........................................................................ 4-9
Software Versions ............................................................................. 4-9
Technical Support - Where to Get Help ............................................. 4-10
Telnet Console Commands................................................................. A-1
General Commands........................................................................... A-3
802.11b Wireless Commands ............................................................. A-7
TCP/IP Commands ............................................................................ A-8
SNMP Commands ........................................................................... A-10
ii

INSTALLING THE PRINT
1
SERVER HARDWARE
The Paxar Monarch 7410 Print Server lets you communicate with
Paxar Monarch printers on an 802.11b wireless network. You can use
the print server in ad-hoc (peer-to-peer) or infrastructure (access point)
wireless mode. The print server operates at speeds of up to 11 Mbps on any
IEEE 802.11b wireless compatible network.
The Paxar Monarch 985x printers can be used on
the Paxar Monarch 9876 Mobile Printing Station for
portable wireless communication.
In addition, the wireless print server includes a unique dual-mode built-in
wired Ethernet connection. What does this mean? No more production
slowdowns in poor coverage areas; when the RF net is down; or when RF
traffic is heavy. Simply move the printer and/or mobile printing station to the
nearest Ethernet jack, plug it in, and the print server automatically switches
to wired Ethernet mode! Unplug the Ethernet cable and it automatically
switches back to RF!
Follow the instructions in this manual to configure the wireless print server
for your printer. For more information and software downloads, see Chapter
4, “Troubleshooting.”
System Requirements
To use the print server for printing from a wireless network, you need an
802.11b wireless network. The wireless network consists of either of the
following:
♦ An 802.11b wireless enabled PC printing straight to the printer (Ad-Hoc
or Peer-to-Peer Mode).
♦ An 802.11b wireless Access point allowing wireless and wired Ethernet
enabled computers to print to the print server (Infrastructure Mode).
Installing the Print Server Hardware 1-1

To configure and print, you need the following:
1. The MAC address from the label of the print server (for example:
004017023F96).
2. The following information from your wireless network administrator:
♦ Wireless Mode (Infrastructure or Ad-Hoc)
♦ The SSID (service set identifier) for your wireless network.
♦ If you are using TCP/IP (recommended for Windows
Networks) and are not connected to a DHCP server (for
obtaining an IP Address automatically), you need a unique
IP Address for the wireless print server (for example:
192.168.1.14) and a subnet mask. If the print server is not
on the same IP subnet as the computers you are printing
from, you need a subnet mask. A router (default gateway)
address is optional.
Network Protocols Supported
♦ TCP/IP:
LPD/LPR
Raw TCP/IP (port 9100 or any chosen port)
NetBIOS over IP (with SMB)
♦ TELNET
♦ WINS
♦ DHCP
1-2 Installing the Print Server Hardware
Checking the Print Server Hardware
The print server comes preinstalled and tested in your printer. Do not plug
any cables into the parallel port when using the print server. A printer with
this print server cannot use the parallel port. However, the serial port is still
active.
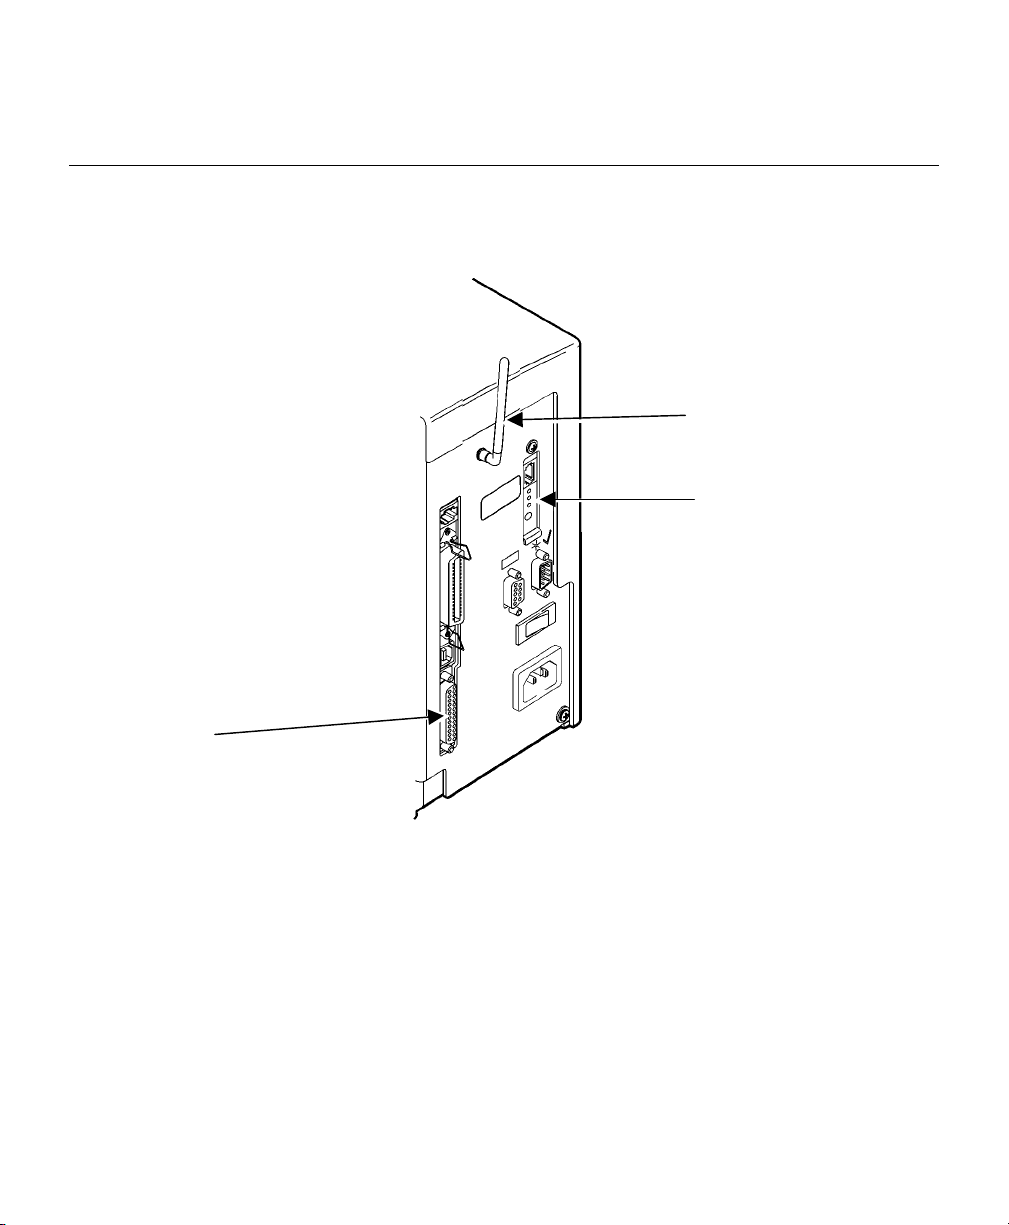
Antenna
Test/Reset Button
Serial
Port
985x Plastic Cover Printer
Installing the Print Server Hardware 1-3
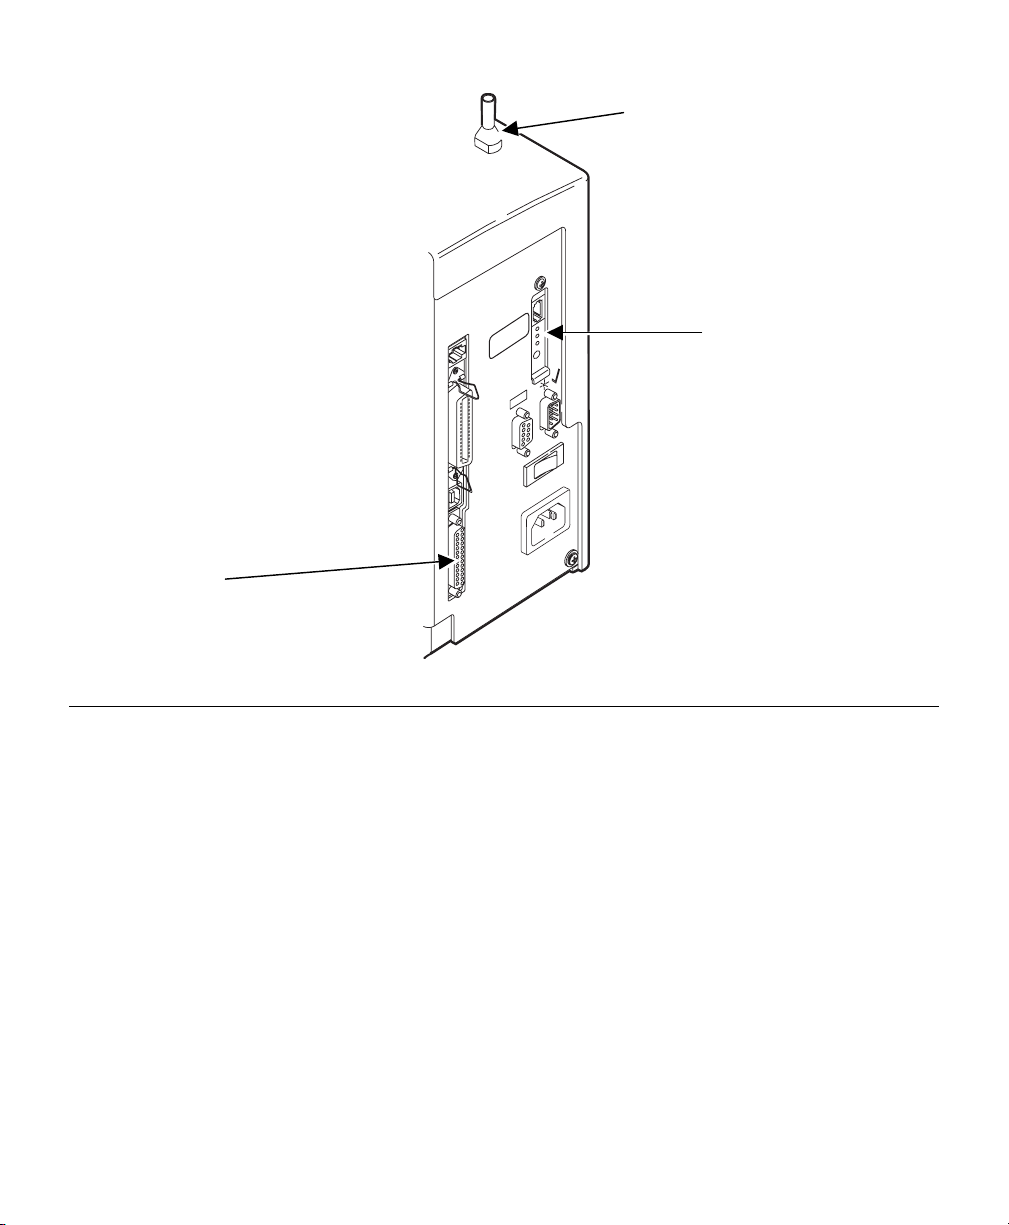
Antenna
Test/Reset Button
Serial
Port
9860 Printer
Verifying Successful Installation
When the print server is turned on, it goes through the following startup
sequence:
♦ It runs through a set of power-up diagnostics for a few seconds. The
green light comes on when the unit is turned on, then the green light
turns off. The yellow light comes on solid when an Ethernet link (wired)
is established. The red light comes on solid when a wireless link is
established. The green light blinks during network activity.
1-4 Installing the Print Server Hardware

Test/Reset Button Press this button down for less than 5 seconds to
print a test page on the printer. The test page
shows the current wireless and network settings of
the print server. See “Sample Test Page” for more
information. If the test page does not print, see
Chapter 4, “Troubleshooting.”
Press this button down for more than 5 seconds
while turned on to reset the print server to its
factory default parameters.
LED Status Indicators The green light comes on when the unit is turned
on, then the green light turns off. The yellow light
comes on solid when an Ethernet link (wired) is
established. The red light comes on solid when a
wireless link is established. The green light blinks
during network activity.
Antenna A rugged 802.11b compatible antenna, mounted on
the back of plastic-cover printers or on the top of
metal-cover printers.
Installing the Print Server Hardware 1-5
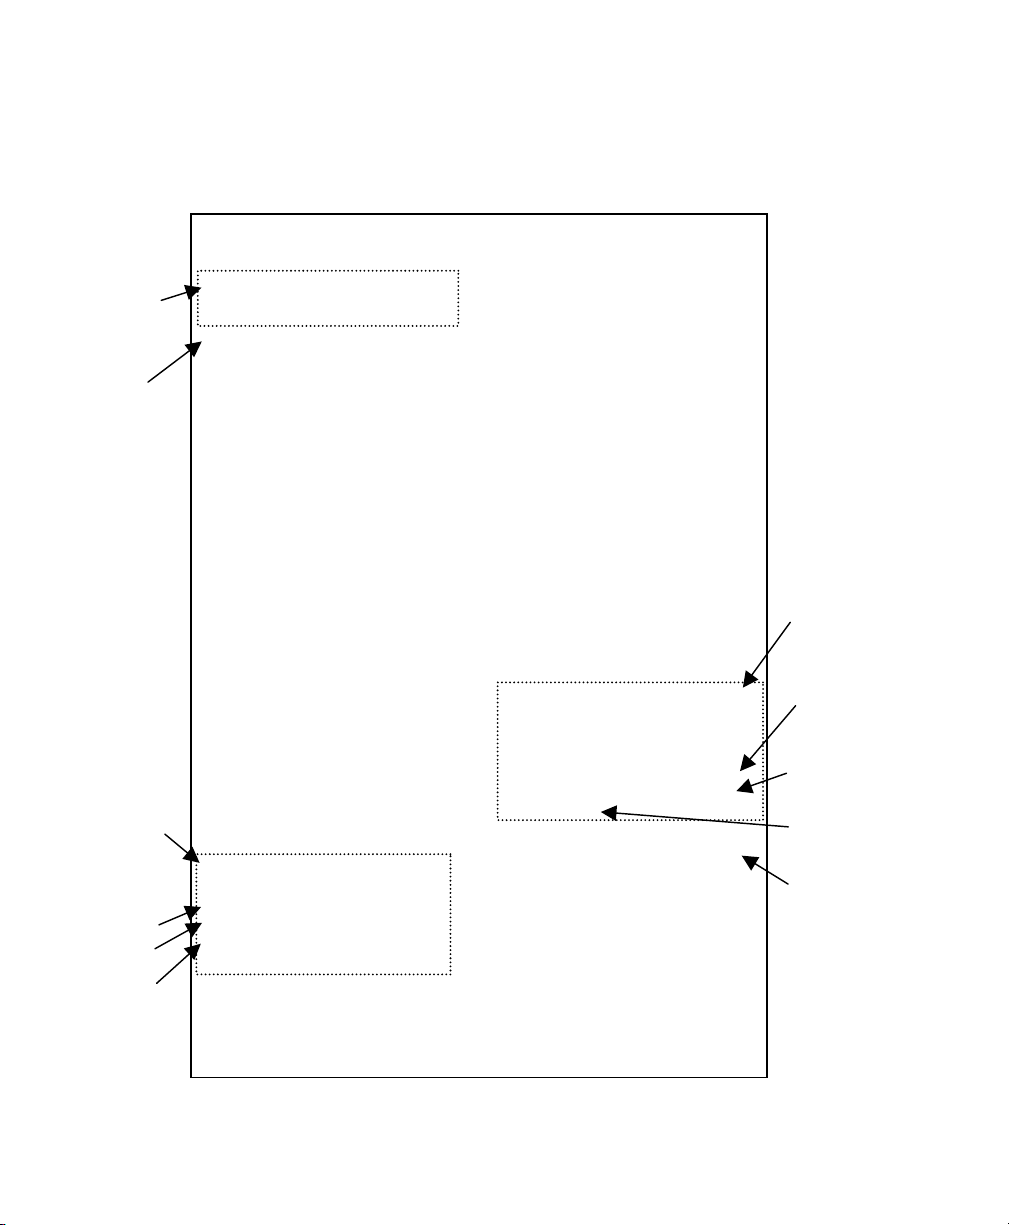
Sample Test Page
The test page is best displayed using 4” wide by 6” long labels. If the label
is too small, some information may print outside the label edges.
PAXAR
------------------ PaxarNet Print Server Status -------------
Firmware
versions
MAC
address
TCP/IP
settings
Set
method
should
match
defined
Method
Transmit packet fail 0
PaxarNet Network Adapter-PLUS
FW Ver. CLM -3.99 (2003.02.19) Netware Retries: 0
Boot Ver. 7.3 Frame type Network Count
Ethernet: 00-40-17-0d-20-77 EN_11 00000302 9609
Node name: MON_002077 EN_802.2 Unknown 2931
EN_802.3 00000302 109314
EN_SNAP Unknown 3142
Active Services:
MON_002077_P1 AppleTalk Name:
BINARY_P1 MON_002077_P1_AT
TEXT_P1 AppleTalk Zone:
POSTSCRIPT_P1
PCL_P1
NetBIOS Computer Name:
MON_002077_S1 MON_002077
BINARY_S1 NetBIOS Domain:
TEXT_S1 MSBG_ENG
POSTSCRIPT_S1 Primary WINS server
PCL_S1 0.0.0.0
Secondary WINS server
0.0.0.0.
TCP/IP Enabled
Netware Enabled WiFi Channel: 11
AppleTalk Enabled WiFi SSID: abc123
POP3 Disabled WiFi Mode: INFRASTRUCTURE
DLC Enabled WiFi Speed: 11
NetBIOS/IP Enabled WiFi WEP: DISABLED
NetBEUI Enabled WiFi Signal Quality: 75%
LAT Disabled Actual SSID:
Banyan Disabled
Wired/Wireless: WIRED
IP address 10.1.88.155
Subnet mask 255.255.0.0 NETWORK STATISTICS
IP Gateway 10.1.110.254 Packets Received 428129
(set manually) Bytes Received 093759
Boot method STATIC Bad Packets Received 0
Boot tries 3 Receiver error mask 0000
Receiver overruns 79
Netware Status: No server enabled Packets Transmitted 2807
Mode: Queue Server Bytes Transmitted 257578
Server Name: Packet Collisions 22
WiFi settings
Security
setting
Should be at
least 60%
Actual SSID
should match
WiFi SSID
How print
server is
communicating
1-6 Installing the Print Server Hardware

CONFIGURING THE 802.11B
2
AND IP SETTINGS
Configuring the Print Server
There are three basic steps required to configure print server:
1. Configuring the 802.11b settings for wireless usage. To operate on an
802.11b network, you must set the wireless (ad-hoc or infrastructure),
SSID, channel, data rate and WEP encryption. All nodes of a wireless
network need to have the same settings in order to communicate with
each other.
2. Configuring the IP address settings. You need to set the IP address,
subnet mask, and router address if you are using TCP/IP, NetBIOS IP,
or if you want to use the Web Browser management utility.
3. Configuring the print server for operation with the network operating
systems. Configure the print server to print using one or more network
operating systems (for example, Windows NT/2000, NetWare, etc.).
Before You Begin
Make sure that you have properly configured your computer for
communication on a wireless network. If you are connecting to the device
through an access point, make sure your computer is in infrastructure mode
and it is associated with the access point. If you are connecting directly to
the device without an access point, you should be in ad-hoc mode. See the
documentation for your wireless adapter for instructions.
NOTE: If your wireless adapter includes an option for 802.11 Ad-hoc, you
must select it if you want to use the printer in ad-hoc mode. If it
doesn’t include this option, select Ad-hoc Computer-to-Computer, or
whatever mode your adapter uses to communicate on a wireless
network without an access point.
Configuring the 802.11b and IP Settings 2-1

If you are using WEP (Wired Equivalent Privacy) encryption on your wireless
network, you will need to temporarily disable WEP on your PC in order to
configure the print server. If you are using an access point with WEP
enabled and it does not allow non-wep clients to communicate with other
non-wep clients, then you will also need to temporarily change the wireless
mode of your computer to Ad-hoc (802.11) mode.
NOTE: If no computers on your network can be set to Ad-hoc mode, you
need to temporarily disable WEP on your access point. When you
are done configuring the print server, you can re-enable WEP on
your computer and change the wireless mode back if necessary.
♦ If you are using TCP/IP, note your computer’s IP address. The print
server needs to be on the same IP segment as the other nodes on your
network in order to communicate.
♦ If you are using infrastructure mode, make sure you have a good signal
between your computer and the access point. Most wireless adapters
have a utility that shows the wireless signal strength. See your wireless
adapter’s documentation for details.
♦ If you are using a home gateway or router, you should configure the print
server from a PC on the same network segment that you want the print
server to be on.
Installing the Software
The following operating systems are supported: Microsoft Windows 95,
98, ME, NT 4, 2000, and XP.
Follow these steps to install the WP-Admin software and configure the print
server.
1. Insert the Wireless Configuration CD-ROM into your PC.
2. Click on Install PaxarNet Utilities, then click on Install PaxarNet
Configuration Utilities and Printing Software.
NOTE: If you are using Windows and don’t have the Java Runtime installed
on your system, you will be prompted to install it, click Continue.
3. Follow the on-screen instructions for installing the utility. When WPAdmin starts, you will see the WP-Admin Wireless Server Search screen.
2-2 Configuring the 802.11b and IP Settings

4. Click START to begin searching for print servers. WP-Admin gets the
information from the print server(s) and lists the Server Name and
Ethernet Address (which should correspond with the label on the back of
the print server). It might take a minute or two for the print server to
show up, especially if you have a large wireless network. The default
name of the print server is XCD_xxxxxx, where xxxxxx is the last six
digits of the Ethernet (MAC) address (for example, XCD_08B2C7).
NOTE: If you do not see the print server in the list, hold down the button for
more than 5 seconds to reset it to factory defaults and try the search
again. If you still do not see it, see Chapter 4, “Troubleshooting.”
5. When you see the print server you want to configure in the list, highlight
it and click Configure. If you are using DHCP, wait until the print server
gets an IP Address from the DHCP server and is updated on the search
screen before configuring (the IP address changes from the default
10.1.85.1 to a new value).
NOTE: If the wireless signal is less than 50% on the search screen, printing
performance could be affected. To improve the signal strength, try
moving the print server closer to the computer or access point and
away from other radio devices such as Bluetooth wireless devices,
microwave ovens, or 2.4 gigahertz cordless phones.
6. You will be prompted for the configuration password (the default
password is access), type in the password and click OK to continue.
The Wireless Server Configuration screen comes up.
NOTE: If you are having trouble configuring a print server, click Cancel to
get back to the Search screen, click Clear to clear the list of print
servers, and start again from step 4 above.
7. The settings of the print server you selected in the Wireless Server
Search screen will be displayed. Many of the fields are automatically
configured to match the network being used, so you probably do NOT
need to change the Wireless Mode, RF Channel, SSID, and Data Rate
settings unless you want to want to change the print server to a different
wireless network.
Configuring the 802.11b and IP Settings 2-3
 Loading...