

Page 1
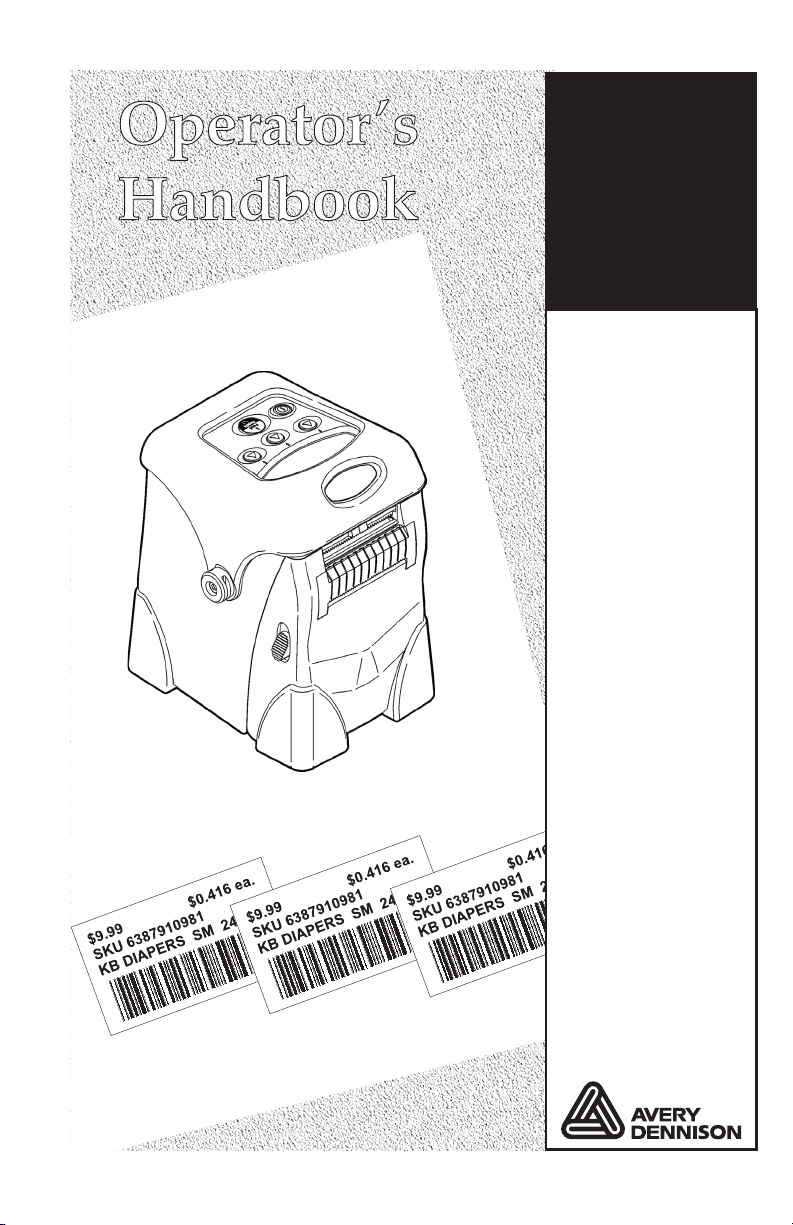
Monarch
®
Sierra Sport™ 2
9460™ Printer
TC9460OH Rev. AG 12/07 ©2004 Paxar Americas, Inc. a subsidiary of Avery Dennison Corp.
All rights reserved.
Page 2

Each product and program carries a respective written warranty, the
only warranty on which the customer can rely. Paxar reserves the
right to make changes in the product, the programs, and their
availability at any time and without notice. Although Paxar has made
every effort to provide complete and accurate information in this
manual, Paxar shall not be liable for any omissions or inaccuracies.
Any update will be incorporated in a later edition of this manual.
©2004 Paxar Americas, Inc. a subsidiary of Avery Dennison Corp.
All rights reserved. No part of this publication may be reproduced,
transmitted, stored in a retrieval system, or translated into any
language in any form by any means, without the prior written
permission of Paxar Americas, Inc.
WARNING
This equipment has been tested and found to comply with the limits
for a Class A digital device, pursuant to Part 15 of the FCC Rules.
These limits are designed to provide reasonable protection against
harmful interference when the equipment is operated in a commercial
environment. This equipment generates, uses, and can radiate radio
frequency energy and, if not installed and used in accordance with
the instruction manual, may cause harmful interference t o radio
communications. Operation of this equipment in a residential area is
likely to cause harmful interference in which case the user will be
required to correct the interference at his own expense.
RF Operation is subject to t he following two conditions: (1) this
device may not cause interference, and (2) this device must accept
any interference including interference that may cause undesired
operation of the device.
CANADIAN D.O.C. WARNING
This digital apparatus does not exceed the Class A limits for radio
noise emissions from digital apparatus set out in the Radio
Interference Regulations of the Canadian Department of
Communications.
Le présent appareil numérique n’émet pas de bruits radioélectriques
dépassant les limites applicables aux appareils numériques de la
classe A prescrites dans le Réglement sur le brouillage
radioélectrique édicte par le ministère des Communications du
Canada.
Trademarks
9460, 9462, 9463, 9465, Monarch®, MPCL, and Sierra Sport 2 are trademarks of
Paxar Americas, Inc.
Paxar® is a trademark of Paxar Corporation.
Avery Dennison® is a trademark of Avery Dennison Corporation.
Bluetooth® is a trademark of Bluetooth SIG, Inc.
Adobe and Acrobat are registered trademarks of Adobe Systems Incorporated.
Avery Dennison Printer Systems Division
170 Monarch Lane
Miamisburg, Ohio 45342
Page 3

TABLE OF CONTENTS
GETTING STARTED ..........................................................1-1
Introduction................................................................. 1-1
Audience .................................................................... 1-1
Documentation ............................................................1-1
Printer Utilities ............................................................ 1-2
Unpacking the Printer................................................... 1-2
Powering the Printer ....................................................1-3
Installing the Battery.................................................... 1-3
Battery and Safety Information................................... 1-5
Connecting the Communications Cable ..........................1-7
Using the Display and Buttons ......................................1-9
Printing....................................................................... 1-9
LOADING SUPPLIES......................................................... 2-1
Loading for Non-Peel Mode........................................... 2-1
Tearing the Supplies................................................. 2-3
Loading for Peel Mode .................................................2-4
CARE & MAINTENANCE.................................................... 3-1
Cleaning ..................................................................... 3-1
Clearing Label Jams ....................................................3-4
TROUBLESHOOTING ........................................................ 4-1
Common Errors ...........................................................4-2
SPECIFICATIONS .............................................................A-1
Printer Specifications ...................................................A-1
Supply Specifications...................................................A-2
Cable Pin-outs.............................................................A-3
i
Page 4

ACCESSORIES ................................................................ B-1
Single Station Battery Charger ..................................... B-2
Four Station Battery Charger........................................ B-2
AC Power Adapter....................................................... B-2
Carrying Accessories................................................... B-2
PRINTER OPTIONS .......................................................... C-1
Linerless .................................................................... C-1
Bluetooth.................................................................... C-1
ii
Page 5

GETTING STARTED
The Monarch® Sierra Sport2™ 9460TM printer is a
portable, thermal-direct printer that prints on tags,
labels, or receipt paper.
1
Introduction
This chapter includes information about
♦ documentation.
♦ printer utilities.
♦ unpacking the printer.
♦ installing the battery and battery information.
♦ connecting the communications cable.
♦ using the LCD screen and buttons.
Audience
The Operator's Handbook is for the person who prints
and applies labels.
Additional Documentation
The online version of the Programmer's Manual, the
RCL Programmer's Manual, and the System
Administrator's Guide are available on our Web site
(www.paxar.com).
Note: Information in this document supercedes
information in previous versions. Check our
Web site for the latest documentation and
release information.
Getting Started 1-1
Page 6

Printer Utilities
The Monarch® MPCLTM Toolbox utilities are also
available on our Web site (www.paxar.com) and are
free to download. This group of development utilities
helps you configure the printer, customize fonts, and
download files.
Unpacking the Printer
After you unpack the printer, you may have
(depending on your order):
♦ a 9460 printer
♦ one or more batteries
♦ an AC power adapter (supply) or none
♦ a hip/shoulder/hand strap or none
♦ a cable
Note: Look through all of the packaging material for
items. Keep all packaging material in case
you need to move or return the printer.
If any items are missing, contact Paxar at the number
listed on the back of this manual for replacement
items.
About the Printer’s Power
There are two ways to power the printer:
♦ Using a battery. See "Installing the Battery" for
more information.
♦ Using the optional AC power adapter. For more
information about the AC power adapter, refer to
the 9463
AC power adapter.
1-2 Getting Started
TM
Operating Instructions included with the
Page 7
Installing the Battery
The battery can be installed with or without supplies
loaded.
Note: Make sure the battery is charged before
using it.
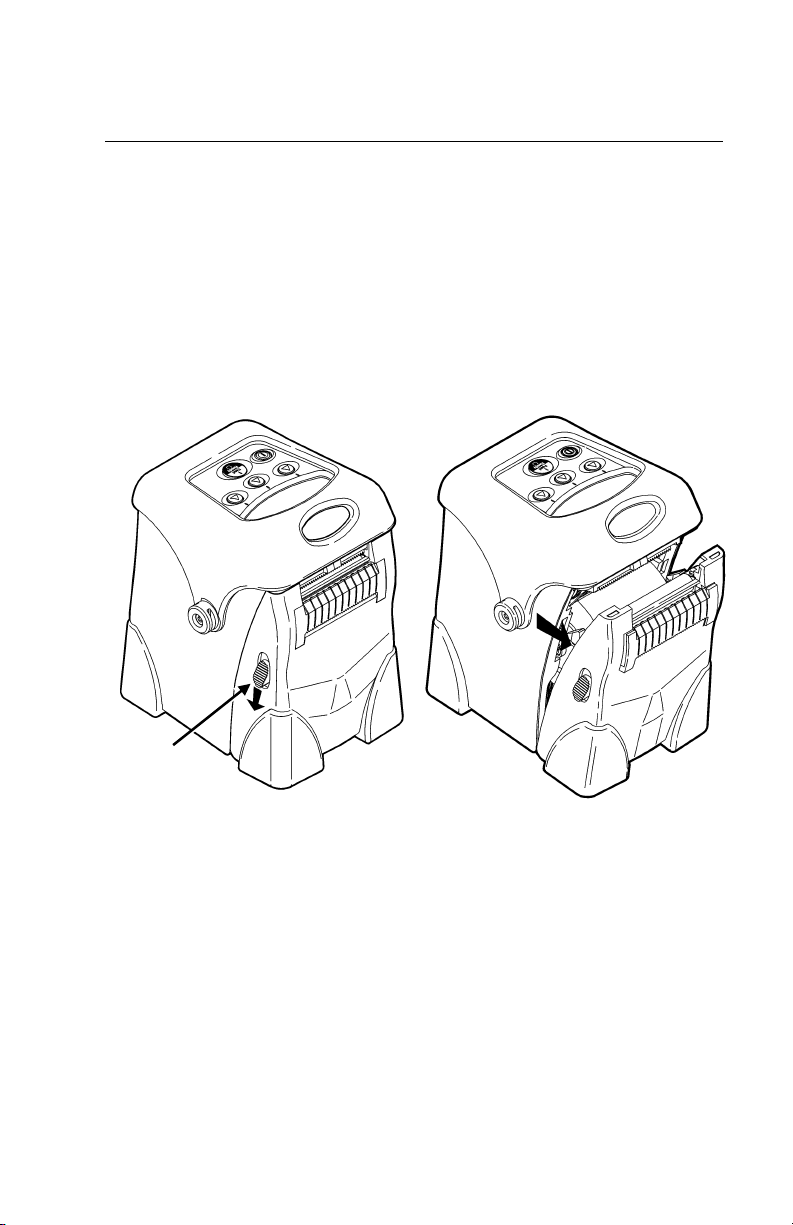
1. Turn off the printer if you are changing batteries.
2. Open the supply door by pushing down on the
release buttons located on both sides of the
printer. The supply door should swing open.
Release
Button
3. Insert the connector end of the battery into the
printer.
Getting Started 1-3
Page 8
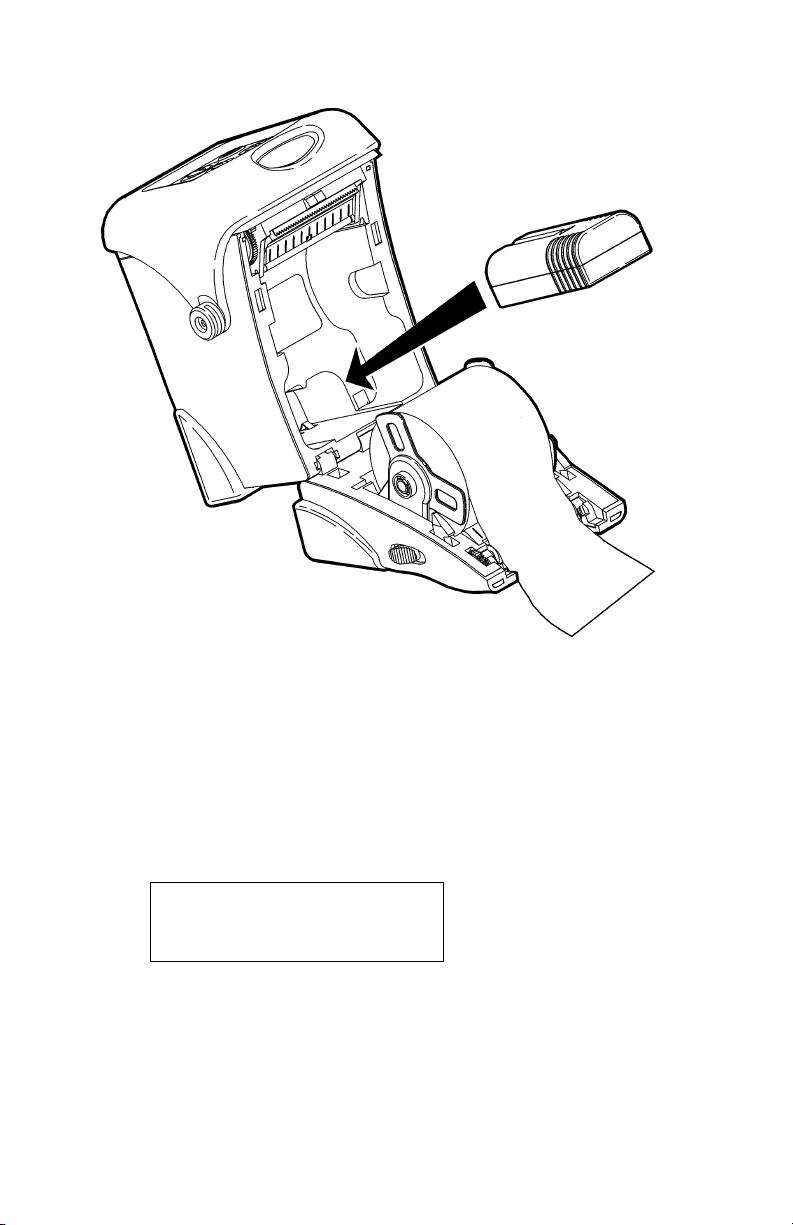
4. Close the supply door until the release buttons
click into place.
5. Turn on the printer by pressing and holding P
until the LCD screen comes on (about two
seconds).
The display flashes printer version
information, battery charging status, and then
you will see:
Ready
p
1-4 Getting Started
Page 9

Battery and Safety Information
♦ You must charge a battery before using it. For
optimal battery life, charge the battery within three
months of receipt.
WARNING
TM
Use only Monarch chargers (Monarch® 9462
Single Station Charger or the Monarch® 9465
Four Station Charger) designed for lithium-ion
batteries when charging.
The battery might explode if placed
on a different charger.
♦ Take the battery out of the printer when storing the
printer for a month or longer.
♦ The optimal battery storage temperature is 50°F -
73°F (10°C - 23°C). For more information about
storage temperatures, see Appendix A,
“Specifications.” The battery may lose its charge
capacity permanently if stored at temperatures less
than 32°F (0°C) or greater than 104°F (40°C). For
longest life, the battery should be stored in a cool,
dry place.
TM
♦ The recommended temperature for charging is
68°F - 77°F (20°C - 25°C)
♦ Charging time is approximately 1 to 3 hours.
♦ Recycling Information - Do not throw in trash.
Recycle to your local regulations. The
Rechargeable Battery Recycling Corporation
(RBRC®) is a non-profit organization created to
promote recycling of rechargeable batteries. For
more information about how to recycle batteries in
your area, visit www.rbrc.org. Batteries can also
be returned postage-paid to: ERC; 200 Monarch
Lane Door #39; Miamisburg, OH 45342.
Getting Started 1-5
Page 10

CAUTION
Do Not disassemble, short-circuit, heat above
80°C, or incinerate the battery. It may explode.
♦ The battery should be charged immediately for
either long-term storage or after the battery has
been exhausted from a printing session. Frequent
charging will actually prolong battery life and has
no negative effects such as memory issues.
♦ Do not let the battery get battery wet or come into
contact with metal objects.
♦ Do not use a battery with a cracked case.
♦ It is normal for battery capacity to decrease up to
20% over the first 300 cycles of use.
♦ The printer uses battery power even when the
printer is not printing. Remove the printer's battery
and place on a charger when the printer is not in
use.
♦ Many factors affect your battery's performance,
including the quantity of labels printed, intervals of
batches printed, percentage of black per label, and
power management.
1-6 Getting Started
Page 11
Connecting the Communications Cable
9-pin and 25-pin serial communication cables are
available. For best results, use only Monarch®
cables. See Appendix B, "Accessories" for part
number information.
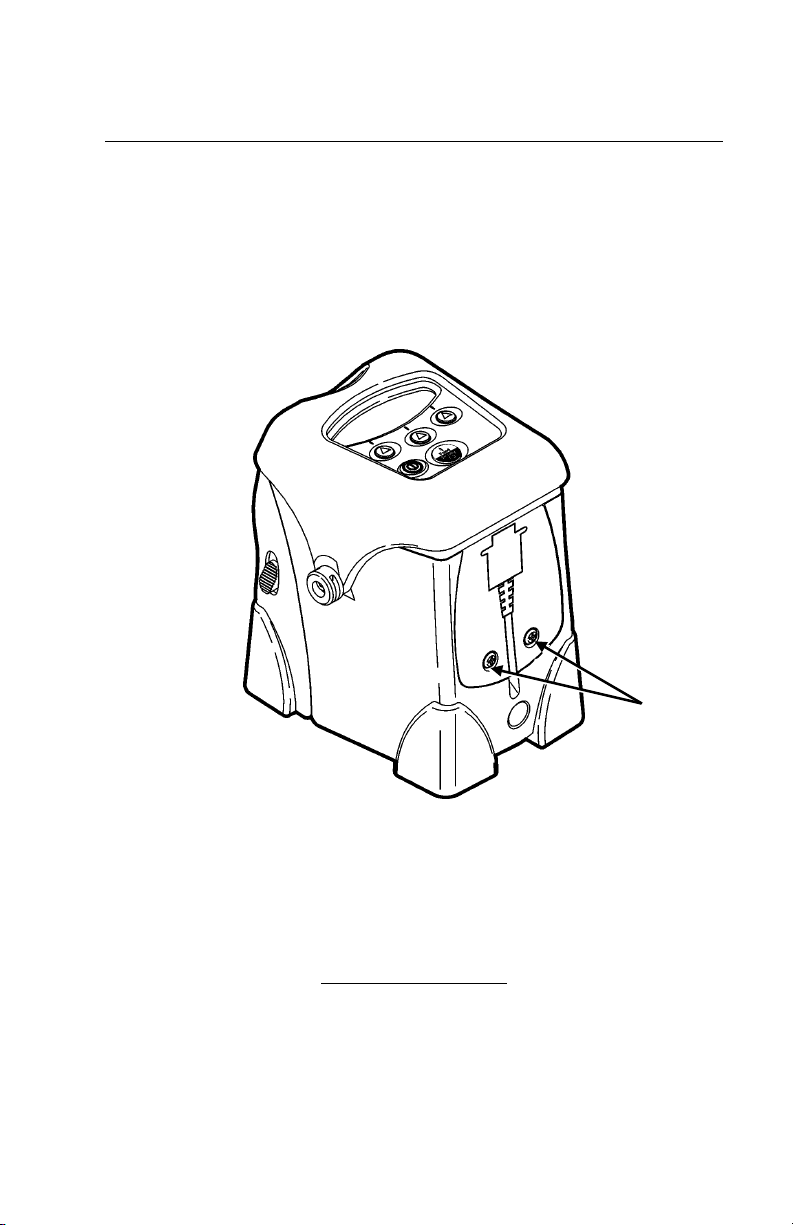
1. Open the hinged cable door by loosening the two
screws and lifting up on the door.
Screws
CAUTION
Do not use sharp objects around the printhead or
touch the printhead with your fingers.
Both may damage the printhead and require a
service charge.
Getting Started 1-7
Page 12
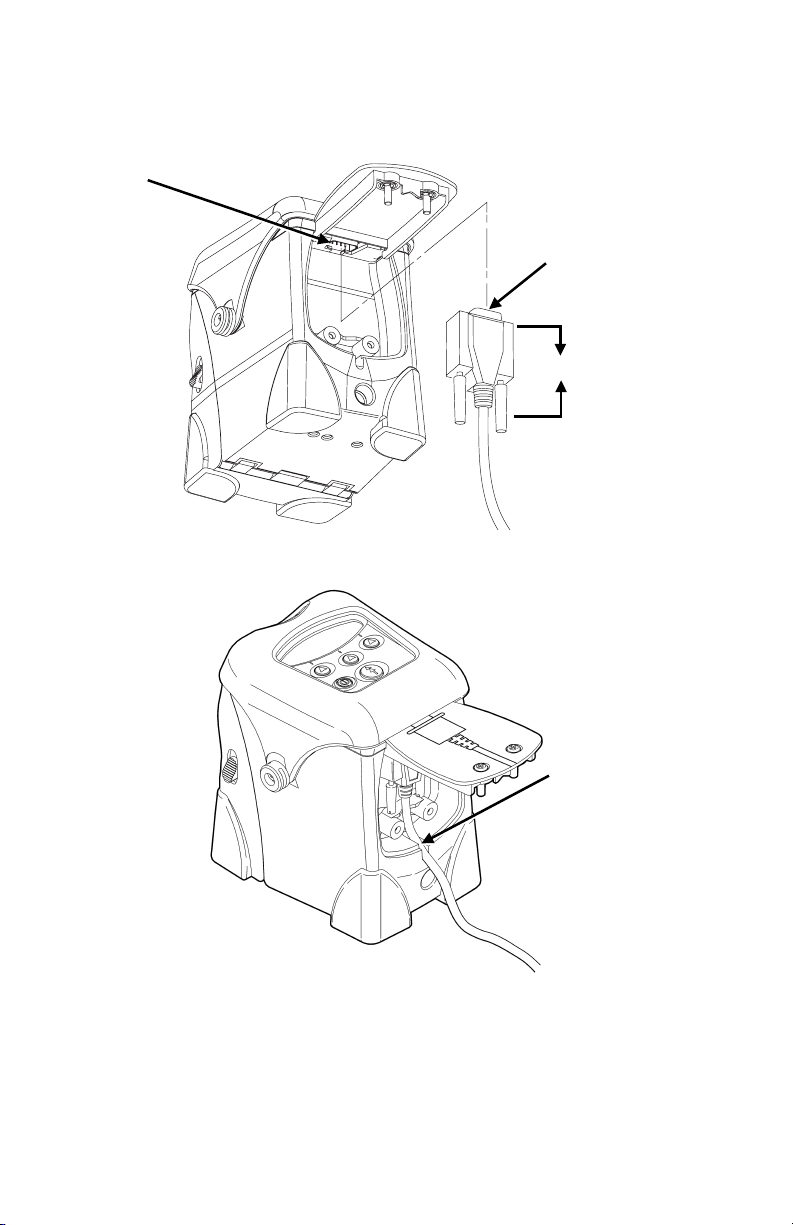
2. Plug the DB9 connector into the DB9 port.
y
DB9 Port
DB9
Connector
2.5”
3. Place the cable in the cable cavity.
Cable in Cable
Cavit
4. Close the hinged cable door and tighten the
screws.
To connect the optional AC power adapter, refer to the
9463 Operating Instructions included with it.
1-8 Getting Started
Page 13
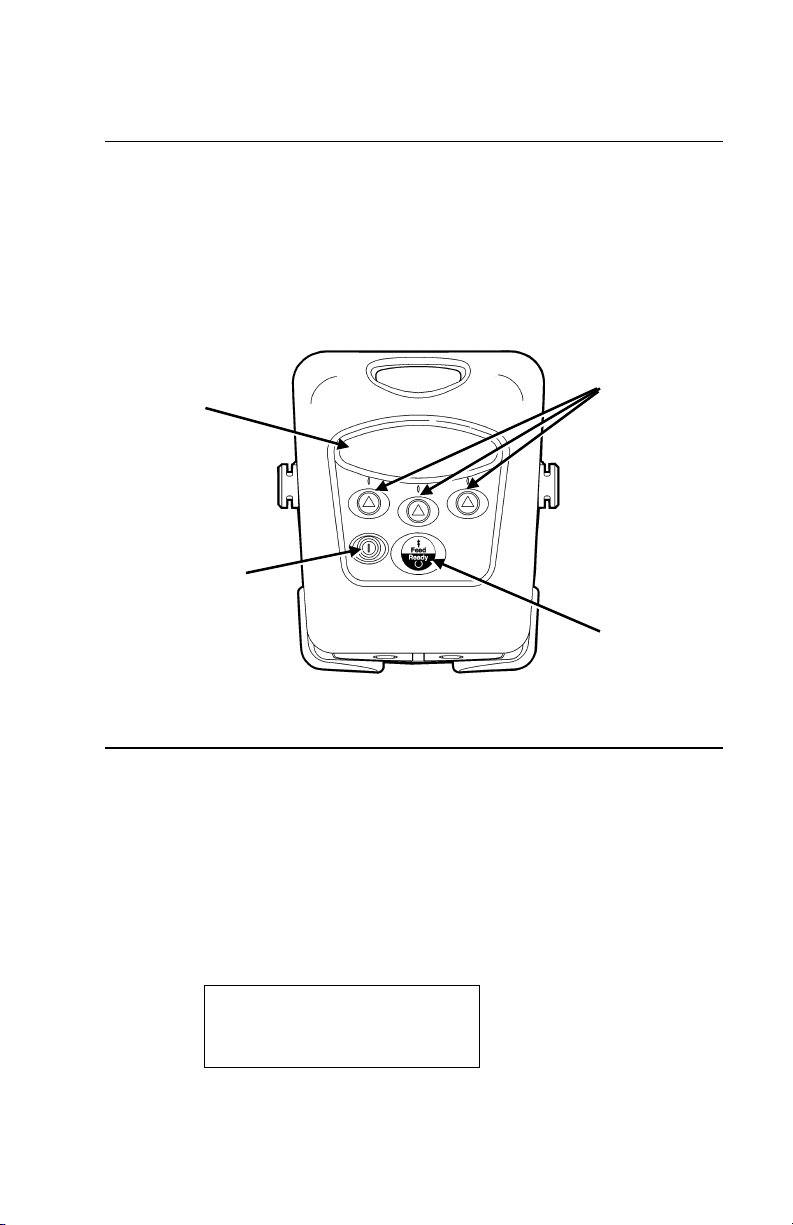
Using the Display and Buttons
P Turns the printer on and off.
F Advances the supply or returns the display to
the next higher menu.
A Three buttons for selecting options on the
display.
Navigation
Display
On/Off Button
Buttons
Feed/Ready
Button
Printing
The host sends online packets containing print jobs to
the printer.
1. Turn on the printer by pressing and holding P
until the display appears.
The display flashes printer version
information, battery charging status, and then
you will see:
Ready
p
Getting Started 1-9
Page 14

2. Download a format and a batch.
For information on creating packets and
downloading print jobs refer to the online
version of the Programmer's Manual available
on our Web site.
The printer prints either a strip of supplies or
one at a time (on-demand mode).
3. Remove the printed supplies.
1-10 Getting Started
Page 15
LOADING SUPPLIES
This chapter describes how to load supply for
♦ non-peel mode (prints on continuous strip of
supply).
♦ peel mode (prints and separates the label from the
liner).
Loading tips:
♦ Whenever you open and close the supply door,
press F to calibrate the supply under the
printhead.
♦ The printer may be on or off when loading
supplies.
2
Loading for Non-Peel Mode
Use these instructions to load labels, tags, receipt
paper, and linerless labels (supply without a liner). To
print linerless labels, the printer needs to be setup
with the linerless platen roller.
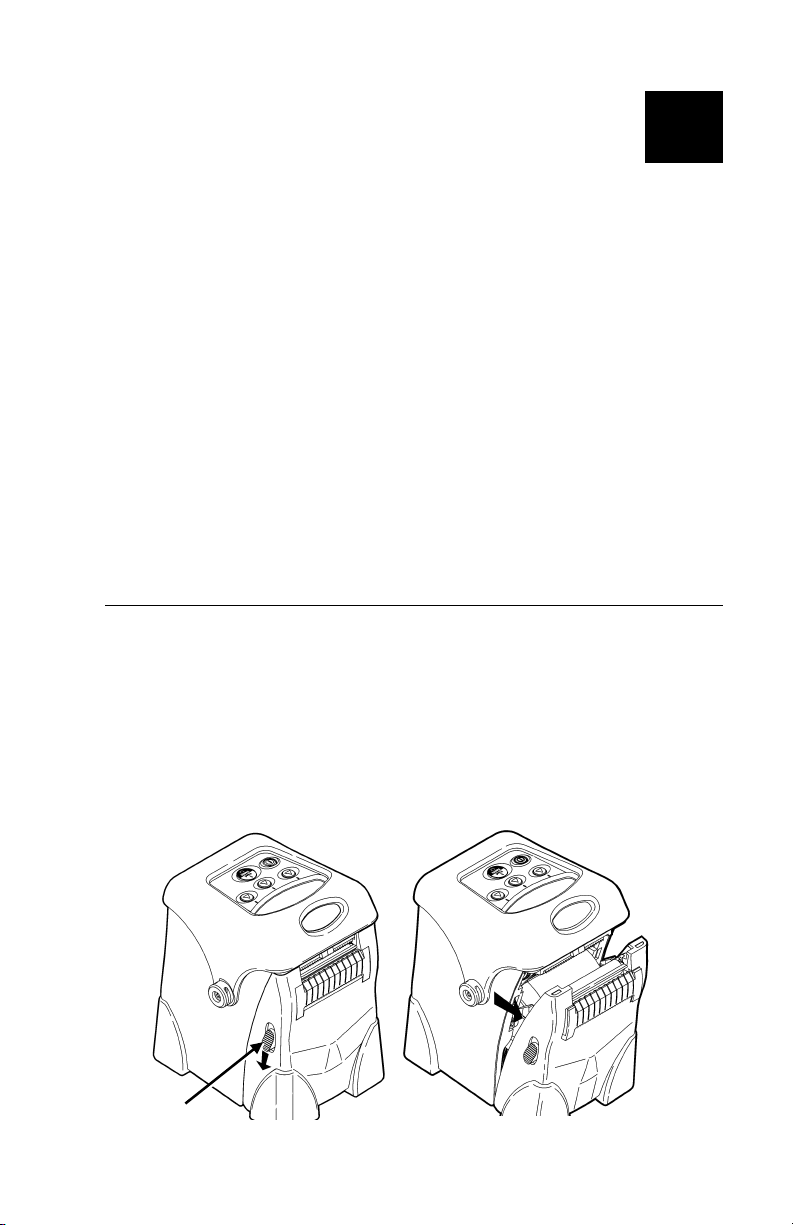
1. Open the supply door by pushing down on the
release buttons on both sides of the printer. The
supply door should swing open.
Release
Button
Loading Supplies 2-1
Page 16
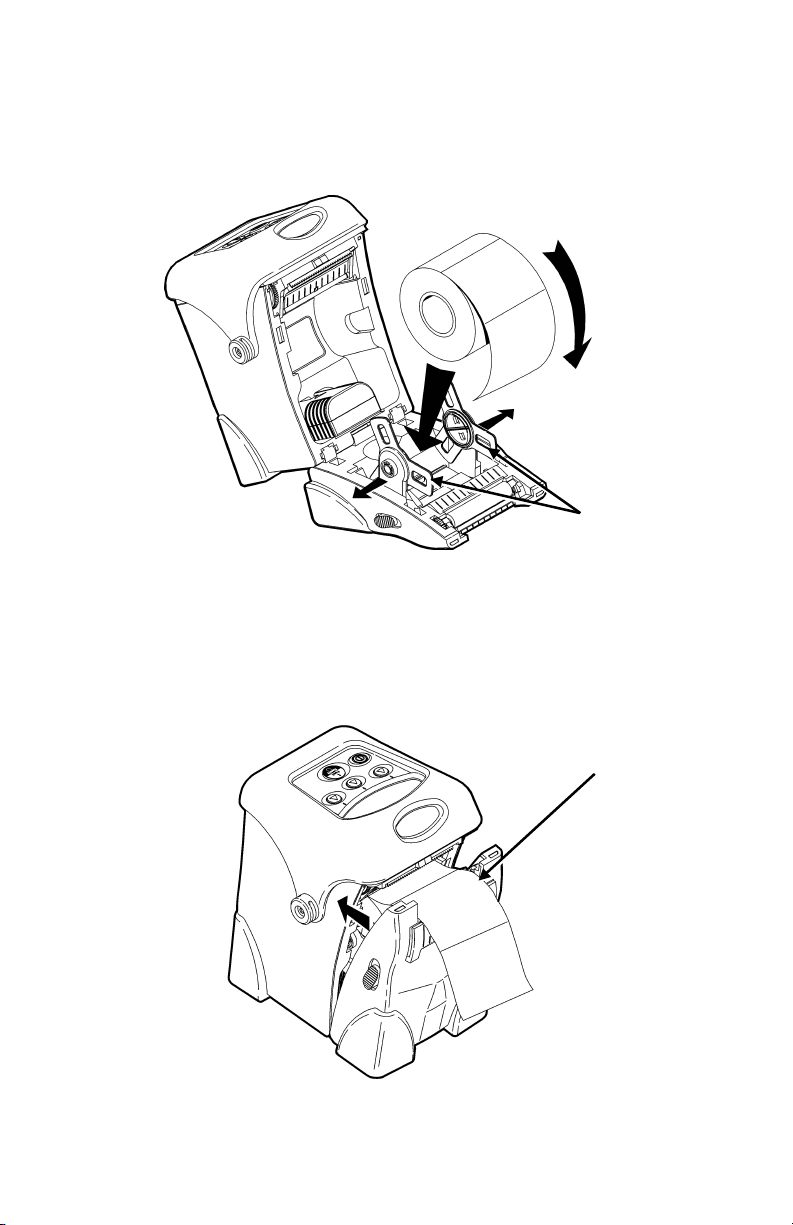
2. Remove the tape from a new roll of supply.
3. Push apart the supply holder tabs to widen the
supply holders. Insert a roll of supplies.
Supply Holder
Tabs
Note: The supply should unwind as shown, with the
loose end of the supply feeding through the
exit chute.
4. Pull out enough supply to lay across the exit chute
and raise the supply door back to the upright
position.
2-2 Loading Supplies
Exit Chute
Page 17
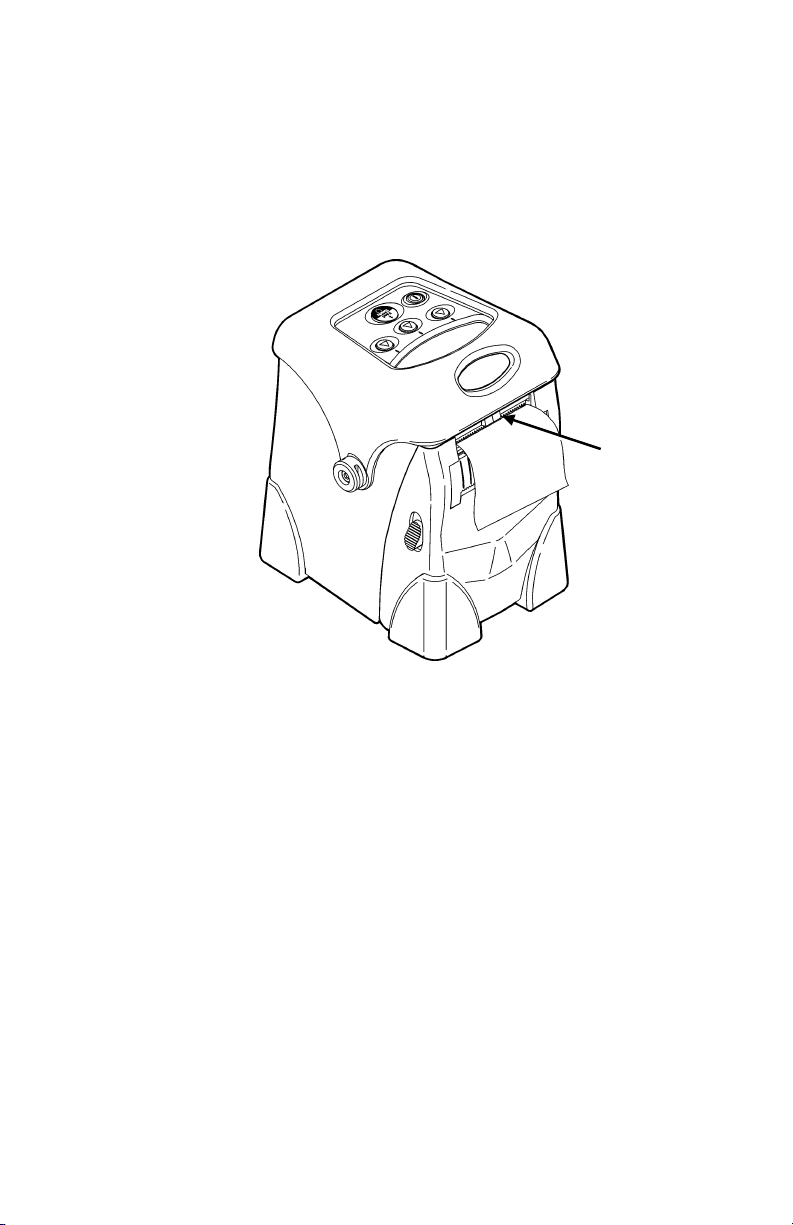
5. Close the supply door until the release buttons
click into place.
6. Press F to calibrate the supply under the
printhead. If you receive a supply error, see
Chapter 4, "Troubleshooting" for more information.
Tear Edge
Tearing the Supplies
Tear the supply from the right or left using the tear
edge as a guide.
Note: Do not pull straight up on the supply. You
may lose registration.
Loading Supplies 2-3
Page 18
Loading for Peel Mode
You need label supply with a liner to use these
instructions.
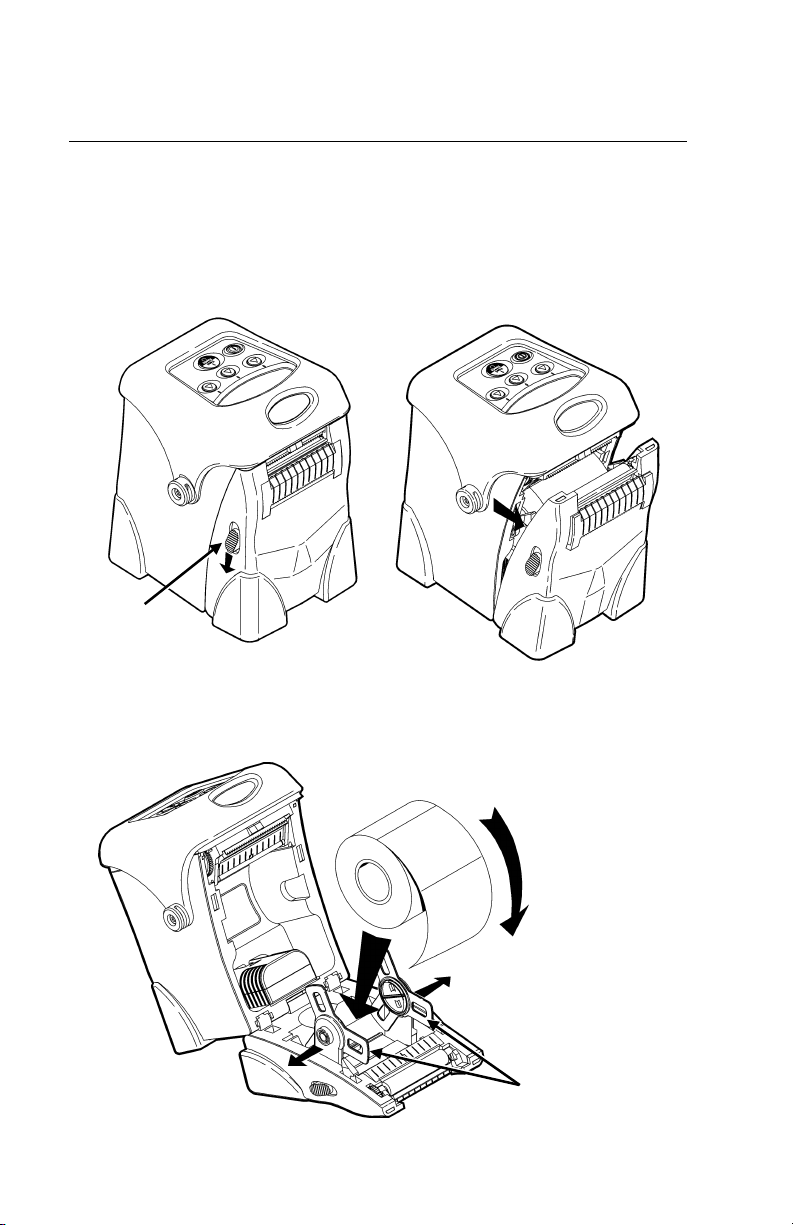
1. Open the supply door by pushing down on the
release buttons located on both sides of the
printer. The supply door should swing open.
Release
Button
2. Remove the tape from a new roll of supply.
3. Push the supply holder tabs apart to widen the
supply holders. Insert a roll of supplies.
2-4 Loading Supplies
Supply Holder
Tabs
Page 19
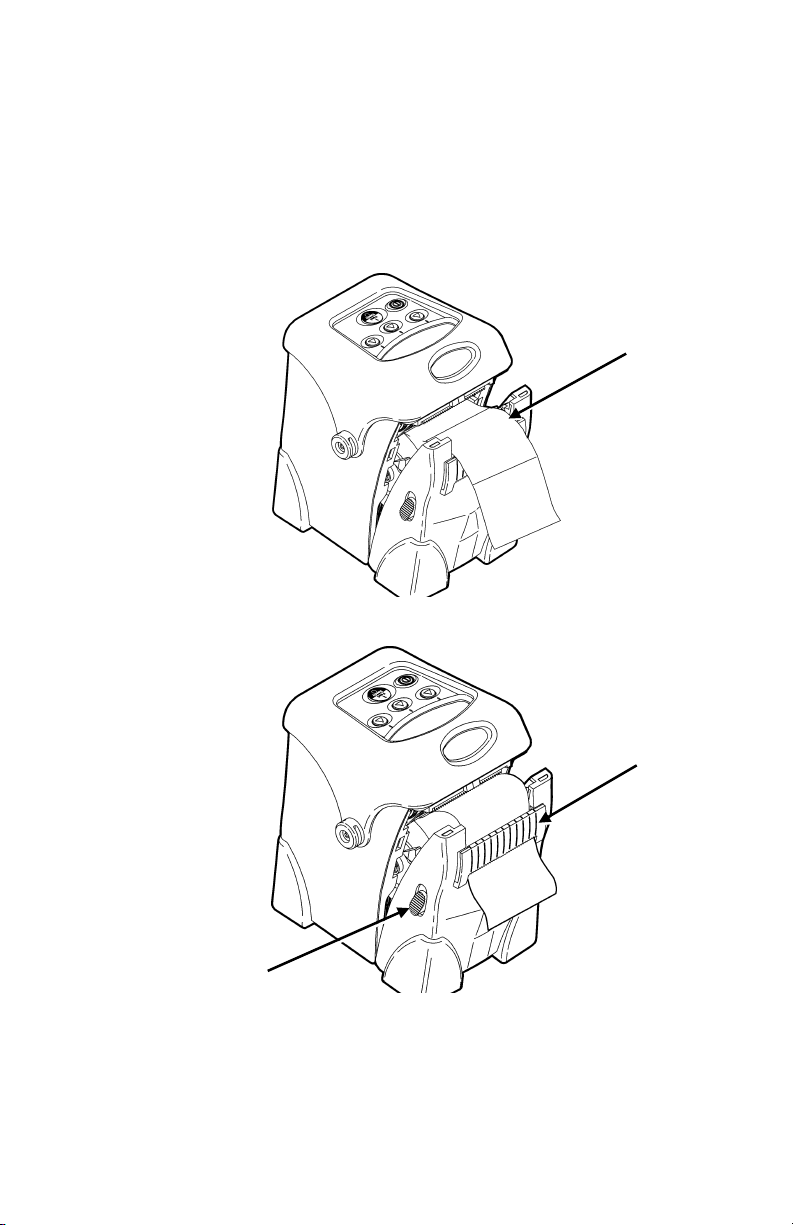
Note: The supply should unwind as shown with the
loose end of the supply feeding through the
exit chute.
4. Pull out enough supply to lay across the exit chute
and raise the supply door back to the upright
position.
Exit Chute
5. Remove a couple of labels from the liner. Feed
the supply under the peel bar.
Peel Bar
Release
Button
Note: The peel bar should be open. If not, push up
on the release buttons located on both sides
of the printer.
Loading Supplies 2-5
Page 20
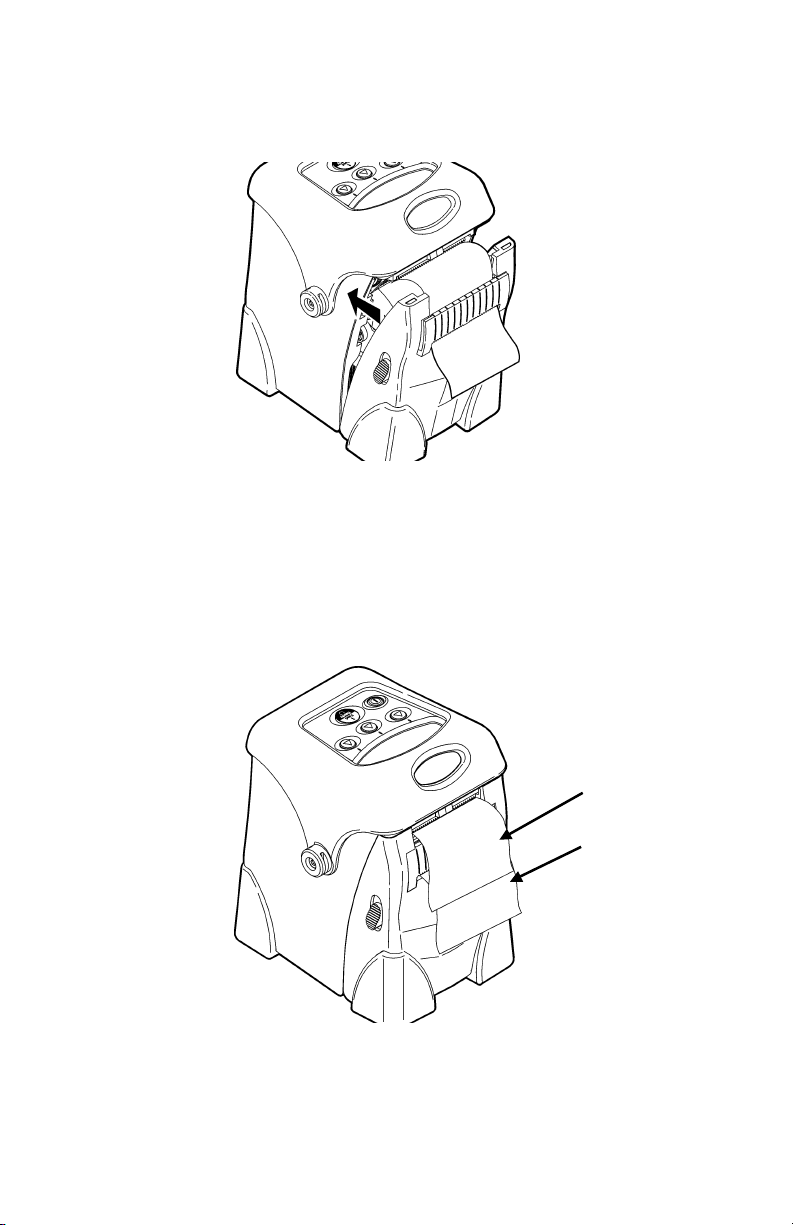
6. Close the supply door until the release buttons
click into place.
Note: The peel bar closes when the supply door
clicks into place.
7. Lightly tug on the liner to remove the slack.
8. Press F once or twice to advance the labels and
to calibrate the supply under the printhead. If you
receive a supply error, see Chapter 4,
"Troubleshooting" for more information.
The liner separates from the label.
2-6 Loading Supplies
Label
Liner
Page 21

CARE &
3
MAINTENANCE
This chapter explains how to
♦ clean the printhead, platen roller, and the supply
sensors.
♦ clear label jams.
CAUTION
Do not use sharp objects to clean the printhead
or touch the printhead with your fingers.
Both may damage the printhead and require a
service charge.
Cleaning
Your printing rate and frequency determines how often
you must clean the printer.
You may need to clean the printhead and platen roller
♦ after using seven to ten (7-10) rolls of supplies.
♦ in extreme temperatures,
humid conditions or a dirty
environment.
♦ when you see voids in the
print.
♦ after a label jam.
You may have to clean the supply sensors more often
if you receive supply error messages frequently.
Care & Maintenance 3-1
Page 22
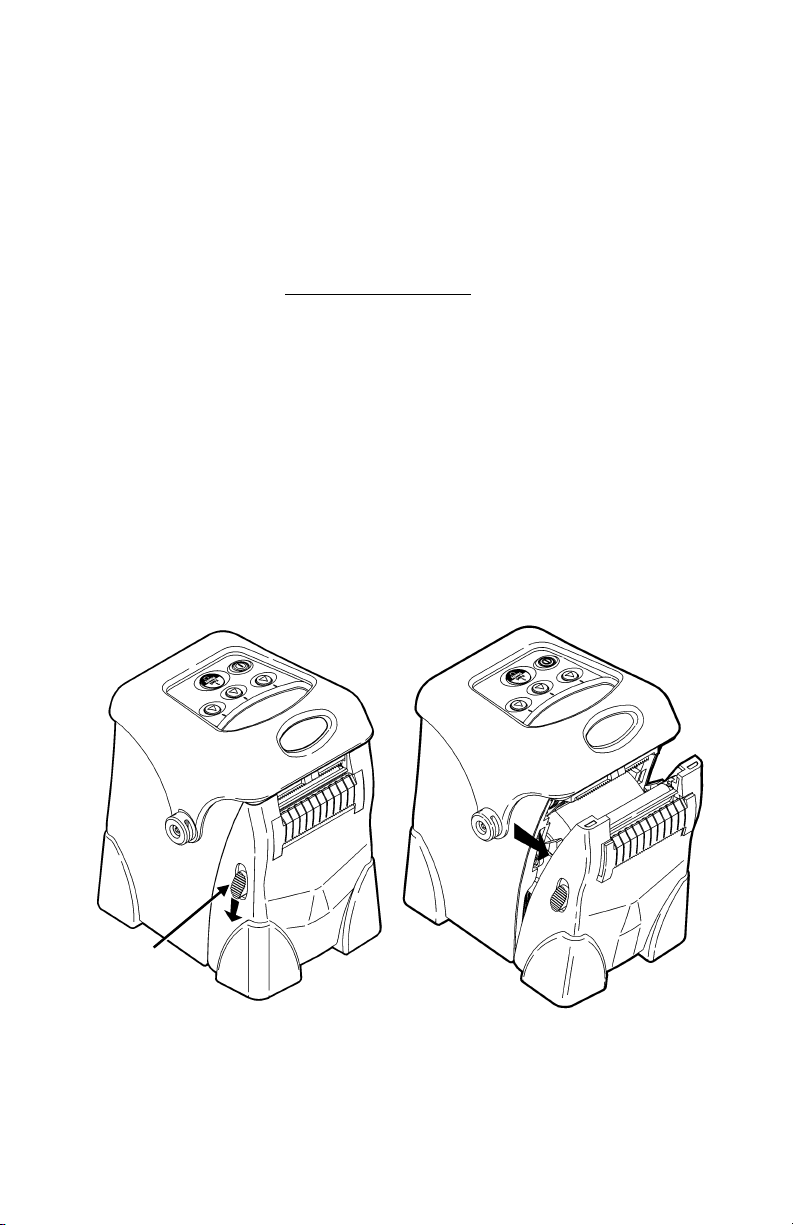
Use any of the following items to clean the printhead:
♦ A soft cloth moistened with isopropyl alcohol.
CAUTION
Use isopropyl alcohol on the interior
areas only, never on the exterior.
♦ A Monarch Cleaning Pen (part number 114226).
To clean the printhead, platen roller, and supply
sensors:
1. Turn off the printer by pressing and holding P
until the display is blank.
Note: Do not use sharp objects to remove adhesive
or label particles from the printhead area.
2. Push down on the release buttons on both sides of
the printer to open the supply door. The supply
door should swing open.
Release
Button
3. Lay the printer on its back.
3-2 Care & Maintenance
Page 23
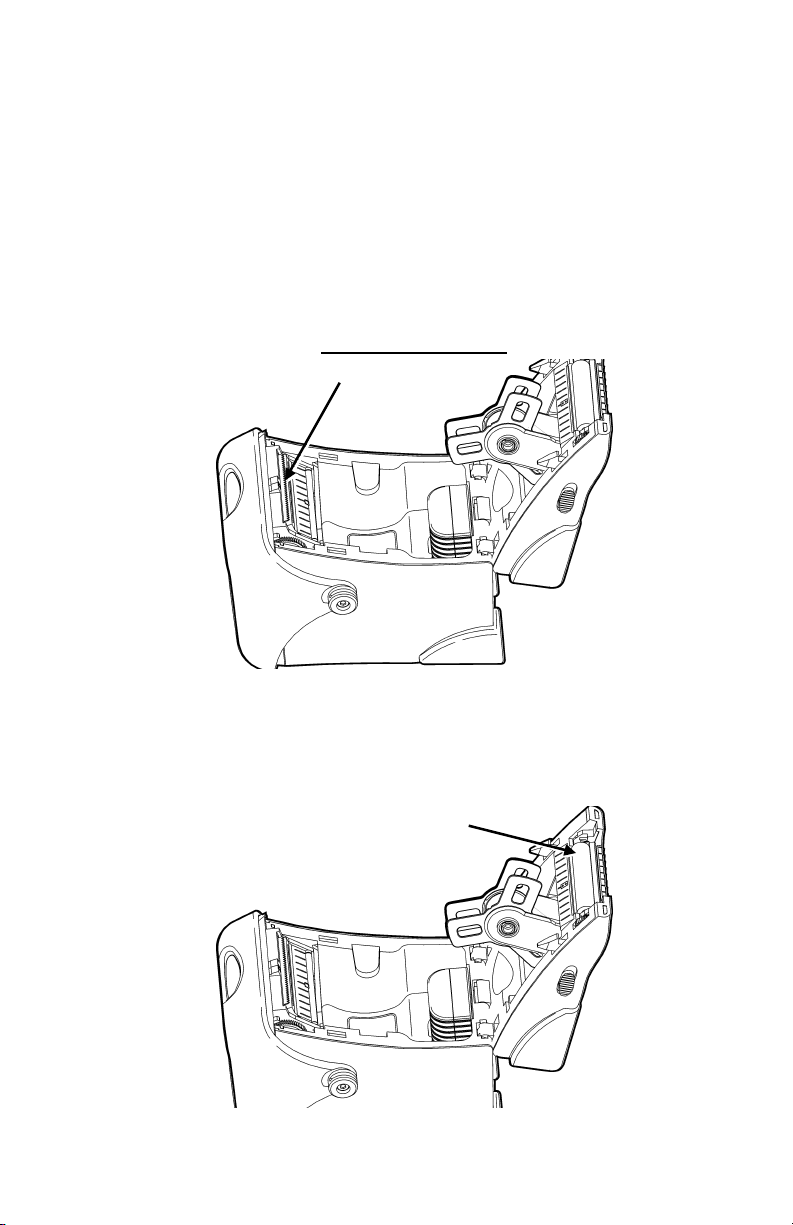
4. Clean the printhead with a clean soft cloth
moistened with isopropyl alcohol, a cleaning pen,
or a small brush.
CAUTION
The printhead is sensitive to static electricity,
which can damage the printhead or reduce its
life. Ground yourself by touching some metal
before cleaning the printhead.
Printhead
5. Clean the platen roller with a clean soft cloth
moistened with isopropyl alcohol or a cleaning
pen.
6. Turn the platen roller with your finger to clean the
entire surface.
Platen Roller
Care & Maintenance 3-3
Page 24
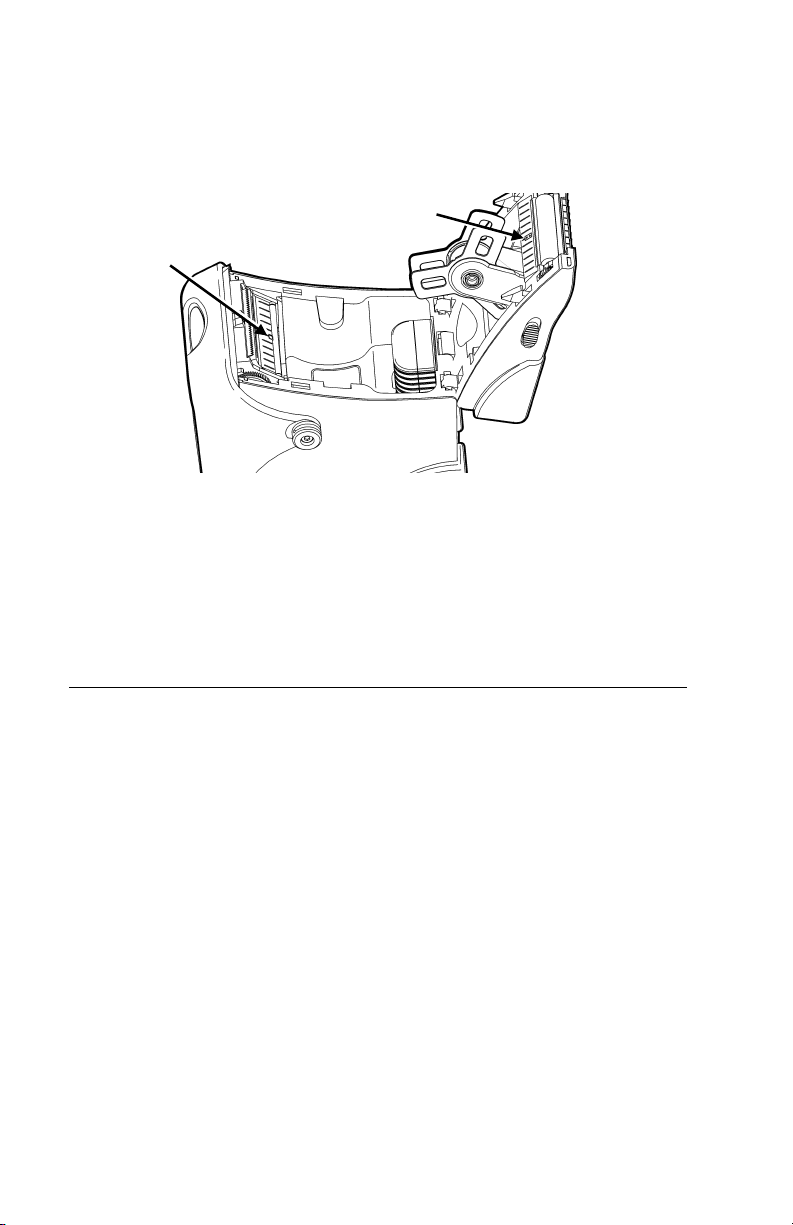
7. Clean the on-demand and black mark sensor with
a clean soft cloth or cotton swab moistened with
isopropyl alcohol or a cleaning pen.
Black Mark
Sensor
On-Demand
Sensor
8. Reload the supply.
9. Close the supply door until the release buttons
click into place.
10. Turn on the printer by pressing and holding P
until the display appears.
Clearing Label Jams
When you are printing and jam occurs, a supply error
message appears. To clear the jam:
1. Turn off the printer by pressing and holding P
until the display is blank.
2. Push down on the release buttons on both sides of
the printer to open the supply door. The supply
door should swing open.
3. If necessary, remove the roll of supplies.
4. Remove the jammed supplies and reload the
supply.
5. Close the supply door.
6. Turn on the printer by pressing and holding P
until the display appears.
3-4 Care & Maintenance
Page 25

TROUBLESHOOTING
This chapter lists some of the common printer
problems and their possible solutions. If these
solutions do not work, call Service.
Problem Solution
4
Printer will
not feed.
Printer will
not print.
Print has
voids or is
too light.
Printer turns
off while
printing
and/or the
display goes
blank.
Make sure the battery is fully charged.
Make sure the supply cover is completely
closed.
Make sure the supply is loaded properly.
Run the printer diagnostic tests. Refer to
the System Administrator's Guide for
more information.
Make sure the battery is fully charged.
Make sure the supply cover is completely
closed.
Clean the printhead.
Run the printhead diagnostics tests.
Refer to the System Administrator's Guide
for more information.
Make sure the battery is fully charged.
Make sure the supply cover is completely
closed.
Make sure the supply is loaded properly.
Clean the printhead.
Run the printhead diagnostics tests.
Refer to the System Administrator's Guide
for more information.
Recharge the battery.
Resend the format.
The maximum black to white print ratio for
each label/tag is 30%. Check your format
for unnecessary thick horizontal lines.
Troubleshooting 4-1
Page 26

Problem Solution
Supply does
not calibrate
properly.
Check the on-demand, black mark, die
cut, or non-indexed sensors. Refer to the
System Administrator's Guide for more
information. You may need a new sensor.
Common Errors
The following is a list of common printer errors you
may receive. If you receive a message not listed
here, see your System Administrator or call the
Service at the number listed on the back of this
manual.
Error Description
025
Invalid Length
101
Invalid/Missing
409
Memory Full
410
Parity
411
Framing
413
Overrun
611
Error Loading
612
Invalid Data
613
Invalid Data
4-2 Troubleshooting
String length is outside the range 0 to
2710.
The format referenced by batch is not
in memory.
The printer memory is full. Delete
unnecessary formats or graphics from
memory.
Parity mismatch. Check your parity
settings at the printer and at the host.
Framing error (baud rate mismatch).
Check your baud rate settings at the
printer and at the host.
Online receive queue is full. Check for
a flow control problem.
Font, bar code, or density in the batch
does not fit the format.
The data in this line of the batch is
missing or does not match the format.
Reference point off supply.
Page 27

Error Description
614
Invalid Data
703
Check Supply
704
Check Supply
750
Hot Head
751
Check Supply
752
Check Supply
753
Check Supply
756
Load Supplies
Portion of field off supply or there may
be an invalid character in the packet.
The printer sensed a calibration of
different-sized black marks. Make sure
the correct supply is loaded.
Printer has not sensed a supply mark
within the specified number of inches
or is out of supplies. Check the supply
tracking, supply marks, black mark
sensor position, and supply roll for
binding. Press A under x to clear the
error. Change supply.
Printhead is overheated. Press A
under x to clear the error. Turn off the
printer to let the printhead cool. If
error persists, call Service.
Printer did not sense a black mark
when expected. For errors 751-753,
Check the supply tracking, supply
marks, black mark sensor position, and
supply roll for binding. Press A under
x to clear the error and try to continue
printing the batch. Change supply.
Printer sensed a mark in the wrong
place. Press A under x to clear the
error.
Printer sensed a mark that is too long.
Press A under x to clear the error.
Load supplies. Press A under x to
clear the error.
Troubleshooting 4-3
Page 28

Error Description
757
Load Supplies
758
Check Supply
762
Low Battery
763
Remove Label
765
Check
Printhead
768
Check
Printhead
791
Error Pending
Load supplies (supply length mismatch),
because the calibrated supply length
differs by plus or minus .25 inches from
the format. Press A under x to clear the
error.
Either the supply is not seen or the ondemand sensor is broken. Press A
under x to clear the error. Check for a
label jam, clear the supply path, or
reload supplies. This error may occur if
you remove a label too quickly in ondemand mode. The printer does not
recalibrate after this error.
Recharge the battery. Press A under x
to clear the error.
Waiting to dispense label. Press A
under x to clear the error.
The printhead has less than four bad
dots. The printer can shift bar code
fields to avoid bad dots. Press A under
x to clear the error and continue printing.
Printhead has more than 10 bad dots or
is not connected. Connect the printhead.
Press A under x to clear the error.
The printer has an error pending. Turn
off the printer. Wait 15 seconds and turn
it back on. Resend the packets.
If you see a System Error Vector ## on the display,
call Service for instructions. If you need to return the
printer to Paxar, use the original packaging (box and
packing material).
4-4 Troubleshooting
Page 29

SPECIFICATIONS
This appendix includes information about printer
specifications and cable pin-outs.
A
Printer Specifications
Height: 5.8" (147 mm)
Width: 3.6" (91 mm)
Depth: 4.8" (122 mm)
Weight without 1.61 lb. (.73 kg)
Battery or Supplies:
Weight with 1.84 lb. (.84 kg)
Battery:
Shipping Weight 3.1 lbs. (1.4 kg) depends on
(no supplies): options shipped with printer
Display: Graphical LCD with backlight
Printhead: 1.89" (48 mm)
203 dpi (8 dots per mm)
Memory: 512K RAM
1 MB (expandable to 2MB)
Flash
Power: 7.4V Lithium Ion battery
Battery Life: 5000" (127 m) of 25% black
supplies
Specifications A-1
Page 30

Operating Limits 40° to 104°F (5° to 40° C)
(Printer): Storage 40° to 140° F (5° to
60° C)
Storage Limits -4° to 95°F (-20° to 35° C)
(Battery): within one year
-4° to 104°F (-20° to 40° C)
within six months
-4° to 113°F (-20° to 45° C)
within one month
-4° to 122°F (-20° to 50° C)
within one week
Relative Humidity 45% to 85%
(Battery):
Printing Method: Thermal Direct
Recommended 33% Duty Cycle (5 minutes
Duty Cycle: out of 15 minutes time
intervals). On-demand or
intermittent printing has no
restrictions.
A-2 Specifications
Page 31

Supply Specifications
Supply Types: Labels (standard or linerless),
tags or receipt paper
Supply Widths: 0.5" (13 mm) minimum
2.0" (51 mm) maximum
Tag/Receipt Paper Width -
0.5" (13 mm) to 2.05" (52 mm)
Supply Lengths: 0.375" (9.5 mm) minimum
12.0" (305 mm) maximum
Max. Print Area: 1.89" (48 mm) x 12" (305 mm)
Cable Pin-outs
ANSI/EIA-232-D
Contact # Circuit Description
6 CC DSR (Data Set Ready)
1 - Reserved - Do not connect.
4 CD DTR (Data Terminal Ready)
5 AB Signal Ground
2 BB Received Data (RXD)
3 BA Transmitted Data (TXD)
8 CB Clear to Send (CTS)
7 CA Request to Send (RTS)
9 - No connect
Specifications A-3
Page 32

A-4 Specifications
Page 33

ACCESSORIES
B
This appendix lists the accessories that work with your
printer and briefly describes them.
Use these part numbers when ordering an item.
Call Paxar at the number listed on the back of this
manual to order parts or supplies.
Accessory Items Part Number
Single Station Battery
Charger
Four Station Battery
Charger
Spare Battery 12009502
AC Power Supply M09463
Communication Cable DB9 to 9-pin
Communication Cable DB9 to 25-pin
Standard Platen Roller 119951
Linerless Platen Roller 119952
Hip Strap 120417
Shoulder Strap 119998
Hand Strap 120277
Clip 120296
Cleaning Pen 11997208
Operator's Handbook
Programmer's Manual
System Administrator's
Guide
M09462
M09465
12665914
12029315
TC9460OH
TC9460PM
TC9460SA
Accessories B-1
Page 34

Single Station Battery Charger
The Monarch® 9462™ Single Station Battery Charger
is designed for the Monarch® 9460™ portable printer.
It can charge one battery at a time. For more
information about the battery, see Chapter 1, "Getting
Started." For more information about the Single
Station Battery Charger, refer to 9462 Operating
Instructions included with the charger.
Four Station Battery Charger
The Monarch® 9465™ Four Station Battery Charger is
designed for the Monarch® 9460™ portable printer.
It can charge the individual batteries or the printer
with a battery installed. Full charging of a battery
takes between 1.5 hours and 3 hours. For more
information about the Four Station Charger, refer to
the 9465 Operating Instructions included with the
charger.
AC Power Adapter
The Monarch® 9463™ AC Power Adapter is designed
for the Monarch® 9460™ portable printer. For more
information about the AC power adapter, refer to 9463
Operating Instructions included with the AC power
adapter.
Carrying Accessories
The following carrying accessories are available:
Hip Strap and Clip, Shoulder Strap, and Hand Strap.
Refer to your Operating Instructions provided with
each strap for more information.
B-2 Accessories
Page 35

PRINTER OPTIONS
This appendix lists the options that may be installed in
your printer.
♦ Linerless
♦ Bluetooth®
C
Linerless
The printer is configured to use supplies without the
backing paper. A linerless platen roller needs to be
installed. If it is not installed, refer to the Operating
Instructions (TC9460ACPROI) included with the platen
roller.
Bluetooth
Bluetooth wireless technology provides a low power
consuming method to communicate between devices.
It has a maximum range of 30 feet (10m). Our
Bluetooth device connects to your printer’s serial port
and conforms to V2.0 of the Bluetooth specification.
The printer defaults to receiving unencrypted data for
the Bluetooth device. See the System Administrator’s
Guide for more information about Bluetooth.
Printer Options C-1
Page 36

C-2 Printer Options
Page 37

Page 38

 Loading...