

Page 1

SMERIGLIATRICE
ANGOLARE RICARICABILE PWSA 18 A1
SMERIGLIATRICE ANGOLARE
RICARICABILE
Traduzione delle istruzioni d’uso originali
AKKU-WINKELSCHLEIFER
Originalbetriebsanleitung
IAN 104454
CORDLESS ANGLE GRINDER
Translation of the original instructions
Page 2

Prima di leggere aprire la pagina con le immagini e prendere confidenza con le diverse funzioni
dell’apparecchio.
Before reading, unfold the page containing the illustrations and familiarise yourself with all functions of the
device.
Klappen Sie vor dem Lesen die Seite mit den Abbildungen aus und machen Sie sich anschließend mit allen
Funktionen des Gerätes vertraut.
IT / MT Traduzione delle istruzioni d’uso originali Pagina
GB / MT Translation of the original instructions Page
DE / AT / CH Originalbetriebsanleitung Seite
4
28
51
Page 3
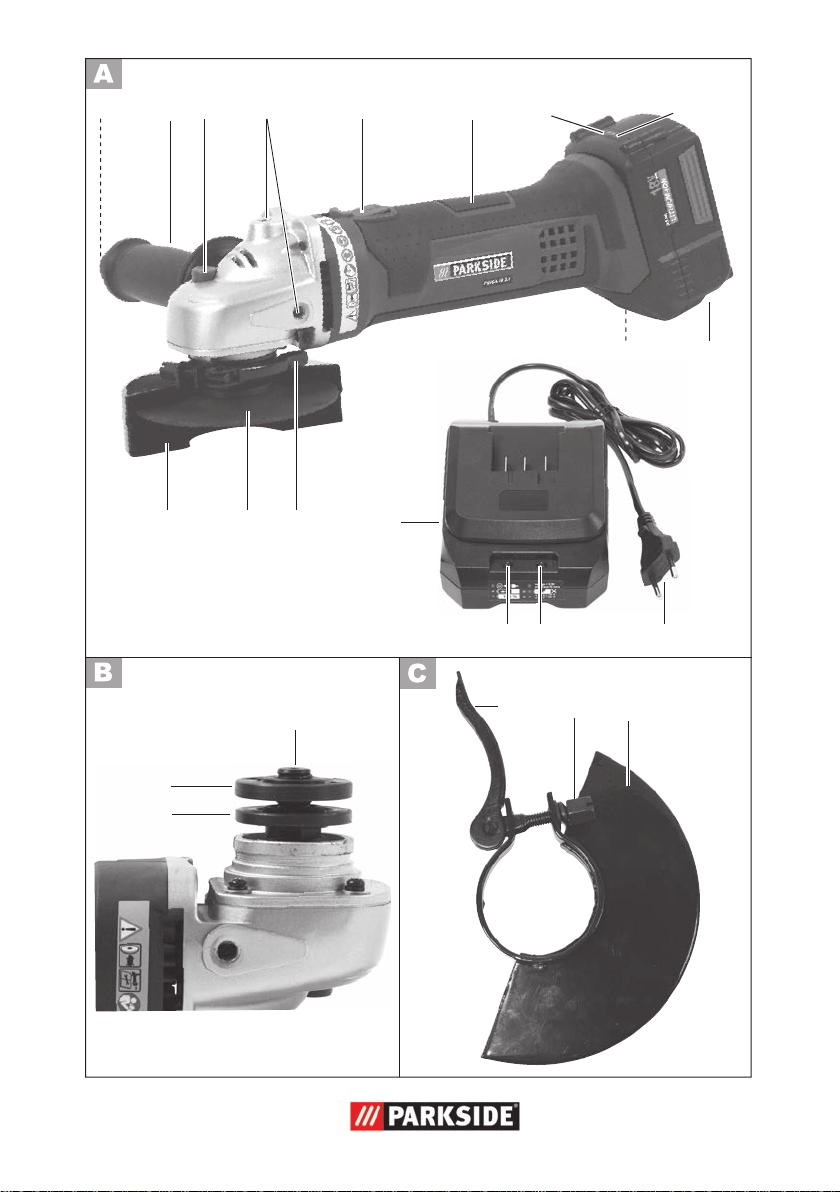
1
2
3 4 8
5
6
7
19
18
10
16 15 1417
13
20
15 17
21
9
1112
Page 4

IT MT
Contenuto
Introduzione ................................ 4
Utilizzo ........................................4
Descrizione generale .................... 5
Contenuto della confezione ...............5
Descrizione del funzionamento ..........5
Sommario .......................................5
Dati tecnici ...................................6
Norme di sicurezza ......................7
Simboli e pittogrammi ......................7
Indicazioni di sicurezza generali per
utensili elettrici .................................8
Ulteriori avvertenze di sicurezza ......14
Carica ........................................ 18
Rimozione/inserimento batteria .......19
Ricarica della batteria ....................19
Batterie consumate .........................19
Controllo dello stato di carica della
batteria .........................................19
Avvertenze per la lavorazione ...19
Montaggio ................................. 20
Montaggio dell‘impugnatura
addizionale ...................................20
Montaggio / regolazione della calotta
protettiva ......................................20
Montaggio / sostituzione della mola 21
Azionamento .............................21
Accensione e spegnimento ..............22
Pulizia e manutenzione .............. 22
Pulizia ..........................................23
Conservazione ...........................23
Smaltimento/Tutela dell’ambiente . 23
Garanzia ...................................24
Servizio di riparazione ............... 25
Service-Center ............................ 25
Importatore ...............................25
Pezzi di ricambio / Accessori ...... 26
Ricerca di guasti .........................27
Dichiarazione di conformità CE ...75
Introduzione
Congratulazioni per l’acquisto del Suo
nuovo apparecchio. Ha scelto un prodotto
altamente pregiato. Le istruzioni per l’uso
costituiscono parte integrante di questo
prodotto. Questo apparecchio è stato
sottoposto a un controllo di qualità durante
la produzione e quindi sottoposto a un
controllo nale. Quindi è garantito il funzionamento del vostro apparecchio.
Contengono indicazioni importanti
per la sicurezza, l’uso e lo smaltimento. Prima dell’uso del prodotto,
si raccomanda di familiarizzare con
tutte le indicazioni di comando e di sicurezza. Usare il prodotto solo come
descritto e per i campi d’impiego
specicati. Conservare le istruzioni in
un luogo sicuro e consegnare la documentazione in caso di cessione del
prodotto a terzi.
Utilizzo
La smerigliatrice angolare è un apparecchio che serve a tagliare, sgrossare e
spazzolare metallo, calcestruzzo e piastrelle senza l’uso dell’acqua. L‘apparecchio
non è concepito per qualsiasi altro tipo di
utilizzo (ad esempio la levigatura con utensili non adeguati, la levigatura con liquidi
refrigeranti, la levigatura o il taglio di
materiali nocivi come l‘amianto). È adatto
all‘uso nell‘ambito di piccoli lavori di riparazione domestici. Non è stato concepito
per l‘impiego aziendale prolungato.
L‘apparecchio è destinato all‘utilizzo da parte
di adulti. I giovani sopra i 16 anni possono
impiegarlo solo sotto sorveglianza.
Il produttore non si fa carico di eventuali
danni causati da un uso improprio o da un
azionamento errato.
4
Page 5
IT MT
Descrizione generale
Le immagini si trovano sulla parte
anteriore dell’apertura ribaltabile.
Contenuto della confezione
Rimuovere l’apparecchio dalla confezione e
controllare se è completo. Smaltire il materiale di imballaggio secondo le disposizioni.
- Apparecchio
- Caricabatteria
- Accumulatore
- Impugnatura addizionale
- Calotta protettiva
- Chiave per ghiere
- Mola da taglio
- Traduzione delle istruzioni per l’uso in
originale
Descrizione del funzionamento
La smerigliatrice angolare è destinata al taglio, allo sgrossamento e alla spazzolatura
del metallo. Per i singoli impieghi sono previste mole speciali. Prestare attenzione alle
indicazioni del produttore delle mole.
La seguente descrizione illustra il funzionamento dei componenti.
La batteria in dotazione è utilizzabile
anche per la sega a gattuccio a batteria
PSSA 18 A1 e per l’avvitatore ad impulsi a
batteria PDSSA 18 A1.
gnimento
6 Impugnatura
7 Tasto di attivazione Indicazione
carica
8 Indicatore dello stato di carica
della batteria
9 Accumulatore
10 Tasto di sblocco batteria
(non a vista)
11 Spina di alimentazione carica-
batteria
12 LED verde
13 LED rosso
14 Caricabatteria
15 Leva di bloccaggio / Impugnatu-
ra addizionale
16 Mola da taglio
17 Calotta protettiva
18 Flangia
19 Dado di bloccaggio
20 Mandrino
21 Dado di regolazione
Sommario
1 Chiave per ghiere con custodia
(non a vista)
2 Impugnatura addizionale
3 Tasto di arresto del mandrino
4 Filettatura per l‘impugnatura ad-
dizionale
5 Interruttore di accensione / spe-
5
Page 6
IT MT
Dati tecnici
Smerigliatrice angolare PWSA 18 A1:
Tensione del motore
................................................. 18 V
Vitesse nominale (n).................8000 min
Misure mole da taglio/dischi per sgrossa-
tura ........................... Ø 115 x 22,2 mm
Spessore mole da taglio/dischi per sgros-
satura ...................................max. 6 mm
Filettatura del mandrino portamola .... M14
Lunghezza della lettatura del mandrino
portamola ...........................max. 14 mm
Tipo di protezione ............................IPX0
Livello di pressione sonora
(L
) ................... 81,6 dB(A); KpA= 3 dB
pA
Livello di potenza sonora (L
misurata .............92,6 dB(A); K
garantito ............................... 96 dB(A)
Vibrazione (a
)
h
Impugnatura ...... 3,043 m/s
Impugnatura addizionale
......................... 5,024 m/s
Accumulatore (Li-Ion) .. PAP18 -2.6A1
Numero di celle batteria .................. 10
Tensione nominale .................... 18 V
Capacità .................................2,6 Ah
Tempo di ricarica ......................ca. 1 h
Caricabatteria ..........JLH-H260-18G
Assorbimento nominale ............... 70 W
Tensione di entrata/Input
....................... 220-240 V~, 50-60 Hz
Tensione d uscita/Output
.............................. 18 V
Classe di protezione .....................
Tipo di protezione ........................ IPX0
I valori di vibrazione rappresentano i valori
massimi che sono stati determinati con la
mola da taglio. I valori di vibrazione effettiva possono variare a seconda degli accessori usati. I valori di vibrazione subiscono
)
wA
wA
2
K= 1,5 m/s
2
K= 1,5 m/s
2600 mA
= 3 dB
II
ancora la gestione per l’utente.
Mola da taglio (Contenuto della
confezione):
Velocità in posizione di folle n
-1
................................... max.13300 min
0
Velocità della mola ............ max. 80 m/s*
Diametro esterno ................. Ø 115 mm
Foro .................................Ø 22,2 mm
Spessore .................................2,4 mm
*
La mola da levigatura deve sopportare una
velocità di rotazione pari a 80 m/s
I valori relativi alla rumorosità e alle vibrazioni sono stati determinati in base alle
norme e alle disposizioni indicate nella
dichiarazione di conformità.
Nel corso del perfezionamento dell‘apparecchio ci si riserva il diritto di effettuare
modiche tecniche ed estetiche senza
2
preavviso. Tutte le misure, le indicazione e i
dati sul presente apparecchio sono pertan-
2
to indicativi. Di conseguenza le eventuali
rivendicazioni presentate sulla base delle
presenti istruzioni d‘uso possono essere
rese nulle.
Il valore sulle vibrazioni emesse indicato è
stato misurato seguendo una procedura di
controllo regolata da norme e può essere
utilizzato per il confronto di un utensile elettrico con un altro.
Il valore sulle vibrazioni emesse indicato
può anche essere impiegato per un calcolo
approssimativo della sospensione.
Avvertenza:
Durante l‘impiego dell‘utensile
elettrico, il valore sulle vibrazioni
può scostarsi dal valore indicato,
in base al modo in cui esso viene
utilizzato.
Sussiste la necessità di stabilire
misure di sicurezza per la tutela
-1
6
Page 7
IT MT
dell‘utilizzatore che si basino su un
calcolo approssimativo delle condizioni d‘uso effettive (che includono
tutti i fattori del ciclo d‘impiego, fra
cui ad esempio i tempi di riposo
dell‘utensile elettrico e quelli di esercizio senza carico).
Norme di sicurezza
Attenzione!
Durante l’uso di utensili elettrici osservarle seguenti misure di sicurezza di
base ai ni della protezione contro
scosse elettriche e rischi di lesioni e
incendi.
Simboli e pittogrammi
Simboli graci sull’apparecchio:
Attenzione!
Pericolo di lesioni a causa di utensi-
li rotanti! Tenere lontane le mani
Attenzione! Pericolo di scossa elet-
trica! Prima di qualsiasi operazione
sull’apparecchio, staccare la spina
di rete
Classe di protezione II
Le apparecchiature non si devono
smaltire insieme ai riuti domestici
Altri simboli sulla
mola da taglio:
Non adatto per la rettica laterale
Non adatto per la levigatura ad
acqua
Non utilizzare mole difettose
Adatto all‘impiego sul metallo
Indossare scarpe di sicurezza
Simboli sull’ accumulatore:
Non gettare l’accu-
mulatore nei riuti,
nel fuoco o in acqua.
Non esporre l‘apparecchio a forti
irradiazioni solari per periodi prolungati e non posizionarli su corpi
riscaldanti (max. 45°C).
Leggere le istruzioni per l’uso!
Indossare dispositivi di protezione
l’udito
Indossare dispositivi di protezione
per gli occhi
Indossare una protezione per le vie
respiratorie
Pericolo di ferite da taglio!
Indossare guanti a prova di taglio
Introdurre le batterie nei contenitori
adibiti alla raccolta di batterie consumate, dove vengono consegnate
a un centro di riciclaggio.
Simboli sull’apparecchiatura
carica-batterie:
Attenzione!
Antecedentemente alla prima mes-
sa in esercizio leggere attentamente le istruzioni per l’uso.
7
Page 8
IT MT
Il carica-batterie può essere utiliz-
zato per la ricarica, all’interno di
locali
T2,5A
Minifusibile
Classe di protezione II
Le apparecchiature non si devono
smaltire insieme ai riuti domestici.
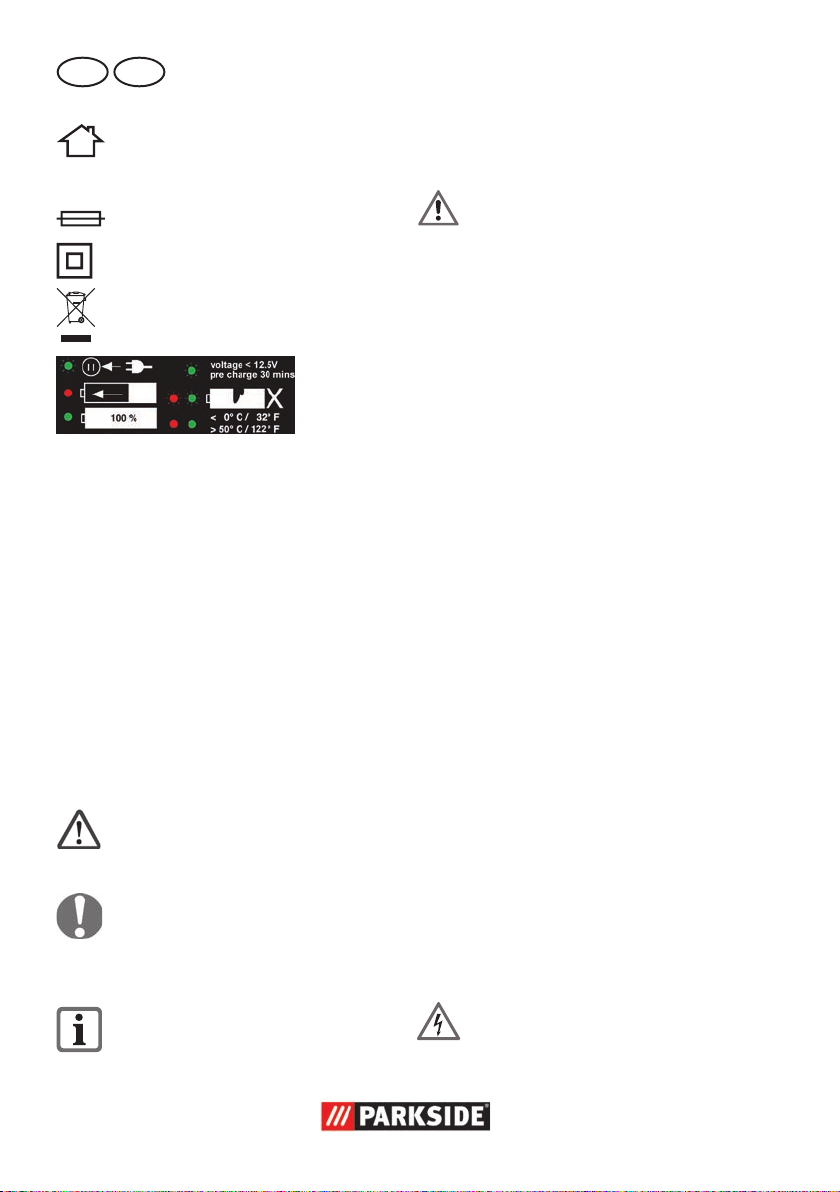
LED verde lampeggiante senza batteria
caricabatteria pronto
LED verde acceso batteria caricata
LED rosso acceso batteria in caricat
LED verde lampeggiante con batteria
La batteria deve essere precaricata per 30
min prima dell’inizio del processo di ricarica
LED rosso e verde lampeggianti
Batteria difettosa
LED rosso e verde accesi
Batteria eccessivamente fredda o eccessivamente calda. Impossibile caricare la
batteria
Simboli nelle istruzioni
Simboli dei pericoli con appo-
site indicazioni per prevenire
danni a persone o cose.
Simboli dei divieti (al posto del
punto esclamativo, viene spiegato il
divieto) con indicazioni relative alla
prevenzione di danni.
Indicazioni di sicurezza
generali per utensili elettrici
ATTENZIONE! Leggere tutte le
indicazioni di sicurezza e le
istruzioni. La mancata osservanza
delle indicazioni di sicurezza e delle
istruzioni possono provocare scosse
elettriche, incendi e/o lesioni gravi.
Conservare tutte le indicazioni di
sicurezza e le istruzioni per una consultazione futura.
Il termine usato nelle indicazioni di sicurezza „Utensile elettrico“ si riferisce a utensili
elettrici azionati con tensione di rete (con
cavo di rete) e a utensili elettrici azionati con
accumulatori (senza cavo di rete).
1) SICUREZZA SUL POSTO DI LAVORO:
a) Tenere la zona di lavoro pulita e
ben illuminata. Disordine o zone di
lavoro non sufcientemente illuminate
possono causare infortuni.
b) Non lavorare con l‘utensile elet-
trico in un ambiente a rischio di
esplosioni, nel quale sono presenti
liquidi, gas o polveri inammabili.
Utensili elettrici generano scintille che pos-
sono inammare la polvere o i vapori.
c) Tenere bambini e altre persone
lontane durante l‘uso dell‘utensile.
In caso di distrazioni si può perdere il
controllo dell‘apparecchio.
2) SICUREZZA ELETTRICA:
Simboli di avvertenza con informa-
zioni relative ad un migliore trattamento dell’apparecchio.
8
Attenzione: in questo modo evitate
incidenti e lesioni a causa di scosse
elettriche:
Page 9

IT MT
a) La spina di allacciamento dell‘u-
tensile elettrico deve essere adatto
alla presa. La spina non deve
essere modicata in alcun modo.
Non usare un adattatore insieme
a utensili elettrici collegati a massa. Spine non modicate riducono il
rischio di scosse elettriche.
b) Evitare il contatto del corpo con
superci collegate a massa, come
anche da tubi, termosifoni, fornelli
e frigoriferi. Aumento del pericolo di
scosse elettriche, quando il corpo è collegato a massa.
c) Tenere gli utensili elettrici lontani
dalla pioggia e dall‘umidità. L‘in-
ltrazione di acqua nell‘utensile elettrico
aumenta il pericolo di scosse elettriche.
d) Non usare il cavo per trasporta-
re, appendere l‘utensile elettrico
o per staccare la spina dalla
presa. Tenere il cavo lontano
da calore, olio, spigoli vivi o
componenti in movimento. Cavi
danneggiati o attorcigliati aumentano il
rischio di una scossa elettrica.
e) Quando si lavora con un utensile
elettrico all‘aperto, usare solo prolunghe adatte anche per l‘esterno.
L‘uso di una prolunga adatta per l‘esterno
riduce il rischio di scosse elettriche.
f) Se non è possibile evitare l‘uso
dell‘utensile elettrico in un ambiente umido, usare un interruttore di sicurezza per correnti
di guasto con una corrente di
accensione di 30 mA o meno.
L‘impiego di un interruttore di sicurezza
per correnti di guasto riduce il rischio
di scosse elettriche.
3) SICUREZZA DELLE PERSONE:
Attenzione: in questo modo si evitano
incidenti e ferite:
a) Prestare attenzione ai propri mo-
vimenti e lavorare con l‘utensile
elettrico usando raziocinio. Non
usare un utensile elettrico, quando
si è stanchi o si è sotto effetto di
droghe, alcol o farmaci. Un attimo
di disattenzione durante l‘uso dell‘utensile
elettrico può causare lesioni gravi.
b) Indossare un‘attrezzatura di sicu-
rezza personale e sempre occhiali
protettivi.. Indossando un‘attrezzatura
di sicurezza personale, come maschera
antipolvere, scarpe di sicurezza antiscivolo, casco o protezione dell‘udito a
seconda dell‘impiego dell‘utensile elettrico
si riduce il pericolo di lesioni.
c) Evitare la messa in esercizio incu-
stodita. Assicurarsi che l‘utensile
elettrico sia spento, prima di allacciarlo all‘alimentazione elettrica
e/o all‘accumulatore, di sollevarlo
o trasportarlo. Se durante il trasporto
dell‘utensile elettrico si tiene il dito sull‘interruttore oppure si allaccia l‘apparecchio
all‘alimentazione elettrica in condizioni
accese, possono vericarsi infortuni.
d) Rimuovere gli strumenti di re-
golazione o i cacciaviti, prima di
accendere l‘utensile elettrico. Un
utensile o un cacciavite che si trova in un
componente rotante dell‘apparecchio,
può provocare lesioni.
e) Evitare una postura anormale.
Garantire una posizione stabile e
mantenere l‘equilibrio in ogni momento. In questo modo l‘utensile elettrico
può essere controllato meglio in situazioni
impreviste.
f) Indossare abbigliamento adegua-
9
Page 10

IT MT
to. Non indossare abiti larghi o
gioielli. Tenere i capelli, l‘abbigliamento e i guanti lontani dalle parti in movimento. Capi di abbigliamen-
to larghi, gioielli o capelli lunghi possono
essere catturati dalle parti in movimento.
g) Se è possibile montare apparecchi
aspirapolvere o di raccolta della
polvere, assicurarsi che questi siano collegati e vengano utilizzati
in modo corretto. Il ricorso all‘aspi-
rapolvere può ridurre i danni dovuti alla
polvere.
4) USO E TRATTAMENTO DELL‘UTENSILE ELETTRICO:
a) Non sovraccaricare l‘apparecchio.
Usare l‘utensile elettrico destinato
al tipo di lavoro da svolgere. Con
l‘utensile elettrico adatto si lavora in
modo migliore e più sicuro nel campo di
potenza specicato.
b) Non usare utensili elettrici con l‘in-
terruttore difettoso. Un utensile elettri-
co che non può essere acceso o spento è
pericoloso e deve essere riparato.
c) Staccare la spina dalla presa e/o
rimuovere l‘accumulatore, prima
di eseguire le regolazioni dell‘apparecchio, di sostituire gli accessori o di deporre l‘apparecchio.
Questa misura previene l‘avviamento
involontario dell‘utensile elettrico.
d) Conservare gli utensili elettri-
ci non usati fuori dalla portata
di bambini. Non lasciare usare
l‘apparecchio a persone che non
hanno familiarizzato con lo stesso
o che non hanno letto le istruzioni.
Utensili elettrici sono pericolosi se usati da
persone inesperte.
e) Trattare gli utensili elettrici con
cura. Controllare se le parti in
movimento funzionano perfettamente e non si inceppano, se sono
presenti parti spezzate o danneggiate che possono compromettere
il funzionamento dell‘utensile
elettrico. Fare riparare le parti
danneggiate prima dell‘impiego
dell‘apparecchio. Le cause di molti
infortuni risiedono in una scarsa manutenzione degli utensili elettrici.
f) Tenere gli utensili da taglio ap-
puntiti e puliti. Utensili da taglio curati
con bordi taglienti appuntiti si inceppano
meno facilmente e sono più facili da maneggiare.
g) Usare l‘utensile elettrico, gli acces-
sori e i ricambi ecc. conformemente alle istruzioni. A tale proposito
tenere in considerazione le condizioni di lavoro e l‘attività da svolgere. L‘uso di utensili elettrici per scopi
diversi da quelli previsti può generare
situazioni pericolose.
5) TRATTAMENTO E USO ACCURATO
DI APPARECCHI A BATTERIA
a) Ricaricare le batterie solo con
caricabatteria consigliati dal produttore. Un caricabatteria adatto per
un determinato tipo di batterie è a rischio di incendio se viene usato con altri
tipi di batteria.
b) Usare solo batterie previste per
gli elettrodomestici. L‘uso di altre
batterie può causare lesioni e pericolo
di incendio.
c) Tenere la batteria non usata
lontana da graffe, monete, chiavi, chiodi, viti o altri oggetti di
minuteria metallici che possono
causare un cavallottamento dei
contatti. Un corto circuito tra i contatti
della batteria può causare ustioni o in-
10
Page 11

IT MT
cendi.
d) In caso di un‘applicazione non
corretta possono vericarsi fuoriuscite di liquidi dalla batteria.
Evitare il contatto. In caso di
contatto involontario, sciacquare
con acqua. Se il liquido viene a
contatto con gli occhi, consultare
anche un medico. Fuoriuscite di liqui-
do della batteria può causare irritazioni
della pelle o ustioni.
6) ASSISTENZA TECNICA:
Fare riparare l‘utensile elettrico da
personale specializzato qualicato
e solo con ricambi originali. In questo modo si garantisce il mantenimento
della sicurezza dell‘utensile elettrico.
7) INFORMAZIONI DI SICUREZZA
SPECIFICHE PER L’APPARECCHIO
SENZA FILO
a) Assicurarsi che l‘apparecchio sia
spento prima di inserire la batteria. L‘inserimento di una batteria in
un elettrodomestico acceso può causare
infortuni.
b) Caricare le batterie solo in am-
bienti interni, il caricabatteria
non adatto per l‘uso esterno. Peri-
colo di schock elettrico!
c) Per ridurre il rischio di scosse
elettriche, staccare la spina del
caricabatteria dalla presa, prima
di pulirlo.
d) Non esporre l‘apparecchio a forti
irradiazioni solari per periodi
prolungati e non posizionarli su
corpi riscaldanti. Il calore danneggia
la batteria e genera pericolo di esplosioni.
e) Lasciare raffreddare una batteria
surriscaldata prima di ricaricarla.
f) Non aprire la batteria e preve-
nire eventuali danneggiamenti
meccanici della batteria. Pericolo di
corto circuito e di fuoriuscita di vapori
che irritano le vie respiratorie. Assicu-
rare sufciente aerazione e in caso di
disturbi consultare anche un medico.
g) Non usare batterie non ricari-
cabili. L’apparecchio potrebbe venire
danneggiato.
8)
Utilizzo corretto del caricabatterie
a) Questo apparecchio può essere usato
da bambini a partire da 8 anni come
anche da persone con capacità siche,
sensoriali o mentali ridotte o senza esperienze e conoscenze, se sono sorvegliati
o istruiti sull’uso sicuro dell’apparecchio
e comprendono i pericoli che ne scaturiscono. I bambini non devono giocare
con l’apparecchio. La pulizia e la manutenzione da parte dell’utilizzatore
non devono essere eseguite da bambini
senza sorveglianza.
b) Bambini devono essere sorvegliati per
assicurarsi che non giochino con l’apparecchio.
c) Per ricaricare la batteria usare
esclusivamente il caricabatteria fornito. Pericolo di incendio e di
esplosione.
d) Controllare prima di ogni uso
il caribatteria, il cavo e la spina e fare effettuare eventuali
riparazioni solo da personale
specializzato qualicato e solo
con ricambi originali. Non usare
un caricabatterie difettoso e non
aprirlo autonomamente. In questo
modo si garantisce il mantenimento della sicurezza dell‘apparecchio.
11
Page 12
IT MT
e) Prestare attenzione che la ten-
sione di rete corrisponda ai dati
della targhetta sul caricabatteria.
Pericolo di scosse elettriche.
f) Staccare il caricabatteria dalla
rete, prima di chiudere o aprire
i collegamenti con la batteria/
l‘elettrodomestico/l‘apparecchio.
Così si assicura che l’accumulatore e il
caricabatteria non vengano danneggiati.
g) Tenere il caricabatteria pulito
e lontano dall‘umidità e dalla
pioggia. Non usare mai il caricabatteria all‘aperto. A causa di inl-
trazioni di sporcizia e di acqua aumenta
il rischio di scosse elettriche.
h) Il caricabatteria deve essere azio-
nato solo con le batterie originali. Ricaricare altre batterie può causare
lesioni e pericoli di incendio.
i) Prevenire danneggiamenti mec-
canici del caricabatteria. Possono
portare a corto circuiti interni.
j) Il caricabatteria non deve essere
azionato su una supercie inammabile (p. es. carta, tessuti).
Pericolo di incendio a causa del surriscaldamento generato durante il caricamento.
k) Nel caso in cui la conduttura di collega-
mento di caricabatteria venga danneggiata, deve essere sostituita da parte del
produttore o dal servizio di assistenza
cliente dello stesso oppure da una perso-
na qualicata, al ne di evitare pericoli.
l) La batteria del vostro apparecchio viene
fornito solo parzialmente precaricato e
deve essere caricato per la prima volta
completamente prima dell’uso. Inserire la
batteria nell’attacco e collegare il caricabatteria alla rete elettrica.
m) Staccare la spina quando la batteria è
completamente carica e staccare il caricabatteria dall’apparecchio
n) Non lasciare caricare la batteria perma-
nentemente. In questo modo si rischia
di danneggiare le celle. Annotazione:
continue ricariche brevi possono causare
danneggiamenti alle celle. Caricare solo
quando l’apparecchio funziona troppo
lentamente.
o) Non usare batterie non ricaricabili. L’ap-
parecchio potrebbe venire danneggiato.
9) RISCHI RESIDUI
Anche se questo utensile elettrico viene
usato conformemente alle disposizioni,
rimangono sempre rischi residui. I seguenti
pericoli possono vericarsi in relazione alla
tipologia costruttiva e al tipo di esecuzione
di questo elettrodomestico:
a) Lesioni da taglio
b) Danni all‘udito, qualora non venga in-
dossata un‘adeguata protezione dell‘udito.
c) Danni alla salute risultanti dalle oscil-
lazioni mano-braccio, quando l‘apparecchio viene usato per un periodo
prolungato o non viene condotto o
manutenuto conformemente alle disposizioni.
Avvertenza! Questo utensile elet-
trico genera un campo magnetico
durante il funzionamento. In determinate condizioni questo campo
può compromettere gli impianti
medici attivi o passivi. Per ridurre
il pericolo di lesioni gravi o letali, consigliamo alle persone con
impianti medici di consultare il
medico e il produttore dell’impianto
medico prima di azionare la macchina.
12
Page 13

IT MT
Avvertenze di sicurezza per
tutti gli impieghi
Avvertenze di sicurezza comuni per
levigatura, levigatura con disco
abrasivo, impiego di spazzole metalliche e taglio con mola:
• Il presente utensile elettrico è
destinato all‘uso per levigatura,
levigatura con disco abrasivo,
ricorso a spazzole metalliche e
taglio con mola. Attenersi a tutte
le avvertenze di sicurezza, le indicazioni, le illustrazioni e i dati
allegati all‘apparecchio. Qualora
non si osservino le seguenti indicazioni,
sussiste il rischio di scosse elettriche,
incendi e/o lesioni gravi.
• Il presente utensile elettrico non è
destinato alla lucidatura. Gli impieg-
hi non previsti per il presente utensile elettrico potrebbero causare danni e lesioni.
• Il presente utensile elettrico non
è adatto per l’uso con spazzole
a tazza. Gli impieghi non previsti per
il presente utensile elettrico potrebbero
causare danni e lesioni.
• Questo utensile elettrico non è
adatto per mole a tazza, a gambo e a cono. Gli impieghi non previsti
per il presente utensile elettrico potrebbero causare danni e lesioni.
• Non utilizzare alcun accessorio
non previsto e raccomandato dal
produttore specicamente per il
presente utensile elettrico. Il fatto
che l‘accessorio possa essere montato
sull‘utensile elettrico non ne garantisce
un uso sicuro.
• Il numero di giri ammesso per
gli utensili ad inserto deve avere un valore almeno analogo al
numero di giri massimo indicato
sull‘utensile elettrico. Gli accessori
con numero di giri maggiore rispetto a
quello ammesso potrebbe danneggiarsi
ed essere proiettato.
• Il diametro esterno e lo spessore
degli utensili ad inserto devono
corrispondere alle misure dell‘utensile elettrico. Gli utensili ad inserto
misurati in modo errato non possono esse-
re lubricati o controllati sufcientemente.
• Gli utensili con inserto lettato
devono adattarsi perfettamente
alla lettatura del mandrino di
levigatura. Nel caso di utensili
ad inserto montati per mezzo di
ange, il diametro del foro su di
essi deve adattarsi al diametro di
inserimento nella angia. Gli uten-
sili ad inserto non ssati correttamente
all‘utensile elettrico girano in modo
non uniforme, vibrano notevolmente e
possono portare alla perdita di controllo
sull‘utensile.
• Non utilizzare utensili ad inserto danneggiati. Prima di ogni
utilizzo vericare l‘assenza di
scheggiature o crepe sugli utensili ad inserto, di crepe o usura sul
platorello e di li staccati o rotti
sulle spazzole metalliche. In caso
di caduta dell‘utensile elettrico o
degli utensili ad inserto, vericare l‘assenza di danni o utilizzare
un utensile ad inserto non danneggiato. Se l‘utensile ad inserto
è stato controllato e utilizzato,
assicurarsi di sostare e di far sostare le eventuali persone che si
trovano nelle vicinanze al di fuori
del piano degli utensili ad inserto
rotanti e lasciare l‘apparecchio
acceso per 1 min. al numero di
giri massimo. Di solito gli utensili ad
inserto danneggiati si rompono durante
13
Page 14

IT MT
il periodo di prova.
• Indossare il proprio equipaggiamento protettivo personale. In
base all‘impiego utilizzare una
maschera di protezione per il viso,
una protezione per gli occhi o gli
occhiali protettivi. Se necessario,
indossare una mascherina antipolvere, i paraorecchi, i guanti
protettivi o un grembiule speciale
che protegga dai residui della levigatura e del materiale in lavorazione. Proteggere gli occhi da eventuali
corpi estranei proiettati in diversi impieghi. Le mascherine antipolvere e quelle di
protezione delle vie respiratorie servono
a ltrare la polvere prodotta durante l‘utilizzo dell‘apparecchio. Una lunga esposizione a forti rumori può provocare anche
la perdita dell‘udito.
• Assicurarsi che le altre persone si trovino a una distanza di
sicurezza dalla zona di lavoro.
Chiunque entri nella zona di lavoro deve indossare il proprio
equipaggiamento protettivo
personale. Frammenti del materiale in
lavorazione o pezzi di utensili ad inserto possono essere proiettati e provocare
lesioni anche al di fuori della zona di
lavoro vera e propria.
• Durante l‘esecuzione di lavori in
cui l‘utensile ad inserto può entrare a contatto con cavi elettrici
nascosti o con il proprio cavo di
alimentazione, afferrare l‘uten-
sile elettrico solo dalle superci
isolate previste per l‘impugnatura. Il contatto con un cavo con tensione
può condurre la corrente anche sui
componenti metallici dell‘apparecchio e
provocare una scossa elettrica.
• Tenere il cavo di alimentazione
lontano dagli utensili ad inserto
in movimento. Se si perde il controllo
sull‘apparecchio, è possibile che il cavo
di alimentazione si tranci in due parti o
che si inciampi su di esso e che le mani
o le braccia vengano a contatto con gli
utensili ad inserto in movimento.
• Non riposare mai l‘utensile elettrico prima che gli utensili ad
inserto si siano fermate completamente. Gli utensili ad inserto in
movimento potrebbero venire a contatto
con la supercie di appoggio facendo
perdere il controllo sull‘utensile elettrico.
• Non far funzionare l‘utensile
elettrico durante il suo trasporto. In caso di contatto fortuito con
l‘apparecchio, gli indumenti possono
essere tagliati dall‘utensile ad inserto in
movimento, che potrebbe inlzarsi nel
proprio corpo.
• Pulire a cadenza regolare le fessure di aerazione per la ventilazione dell‘utensile elettrico. La ven-
tola del motorino immette polvere nella
scatola. Un ingente accumulo di polvere
metallica potrebbe provocare pericoli di
carattere elettrico.
• Non utilizzare l‘utensile elettrico
nelle vicinanze di materiali in-
ammabili. Le scintille possono far
incendiare tali materiali.
• Non utilizzare utensili ad inserto
che richiedono refrigeranti liquidi.
L‘uso di acqua o di altri refrigeranti liquidi
può provocare una scossa elettrica.
Ulteriori avvertenze di
sicurezza
• Collegare l‘apparecchio solo a una presa protetta da interruttore differenziale
(interruttore FI) con corrente di guasto
nominale non superiore a 30 mA.
• Tenere il cavo di alimentazione e l‘e-
14
Page 15

IT MT
ventuale prolunga lontani dalla mola.
In caso di danni o di tranciamenti
disinserire immediatamente la spina di
alimentazione dalla presa di corrente.
Non toccare la conduttura prima di
averla scollegata dalla rete elettrica.
Sussiste il pericolo di scossa elettrica.
• La sostituzione della spina o del cavo
di alimentazione deve essere eseguita
esclusivamente dal costruttore dell‘utensile elettrico o dal rispettivo centro
assistenza, al ne di evitare l‘insorgere
di pericoli.
• Utilizzare solo mole il cui numero di
giri indicato corrisponde almeno a
quello riportato sulla targa identicativa
dell‘apparecchio.
• Sottoporre la mola a un‘ispezione visiva prima dell‘utilizzo. Non usare mole
danneggiate o deformate. Sostituire la
mola quando usurata.
• Assicurarsi che le scintille provocate
dalla levigatura non costituiscano un
pericolo, ad esempio che non colpiscano persone o incendino sostanze
inammabili.
• Durante la levigatura, la spazzolatura e
la troncatura usare sempre gli occhiali
protettivi, i guanti di sicurezza, un dispositivo di protezione delle vie respiratorie e le protezioni acustiche.
• Non tenere mai le dita fra la mola e il
parascintille, ovvero in prossimità della
calotta protettiva. Pericolo di schiacciamento!
• Le parti rotanti dell‘apparecchio non
possono essere coperte per non comprometterne il funzionamento. Pertanto,
si raccomanda di procedere con attenzione e di tenere il pezzo da lavorare
ben saldo, in modo da evitare che
scivoli e che le mani entrino conseguentemente in contatto con la mola.
• Durante la levigatura il pezzo si surri-
scalda. Non afferrarlo dal lato di lavorazione, lasciarlo raffreddare. Pericolo
di ustione! Non usare refrigeranti o
sostanze simili.
• Non usare l‘apparecchio in caso di
stanchezza o dopo l‘assunzione di
alcol o di medicinali. Interrompere sempre il lavoro a tempo debito.
• Spegnare l’apparecchio ed estrarre la
batteria dall’apparecchio prima di eseguire lavori all’apparecchio.
RISCHI RESIDUI
Anche se questo utensile elettrico viene
usato conformemente alle disposizioni,
rimangono sempre rischi residui. I seguenti
pericoli possono vericarsi in relazione
alla tipologia costruttiva e al tipo di esecuzione di questo elettrodomestico:
a) Lesioni da taglio
b) Danni all‘udito, qualora non venga
indossata un‘adeguata protezione
dell‘udito.
c) Danni alla salute risultanti dalle oscil-
lazioni mano-braccio, quando l‘apparecchio viene usato per un periodo
prolungato o non viene condotto o
manutenuto conformemente alle disposizioni.
d) Danni alla salute,derivanti dalle vibra-
zioni della mano e del braccio, qualora
l‘apparecchio venga utilizzato per un
periodo di tempo prolungato o il suo
uso e la sua manutenzione non siano
effettuati in modo conforme.
Avvertenza! Questo utensile elettri-
co genera un campo magnetico durante il funzionamento. In determinate condizioni questo campo può
compromettere gli impianti medici
attivi o passivi. Per ridurre il pericolo di lesioni gravi o letali, consiglia-
15
Page 16

IT MT
mo alle persone con impianti medici
di consultare il medico e il produttore dell‘impianto medico prima di
azionare la macchina.
Contraccolpo
Il contraccolpo è la reazione improvvisa a
un utensile ad inserto, come ad esempio
una mola da levigatura, un platorello, una
spazzola metallica, ecc. che rimane incastrato o si blocca durante il movimento.
L‘incastro o il bloccaggio comportano un
arresto repentino dell‘utensile ad inserto
in movimento. Di conseguenza un utensile
elettrico incontrollato subisce un‘accelerazione agente nella direzione opposta a
quella di rotazione dell‘utensile ad inserto
nel punto del bloccaggio. Se ad esempio
una mola da levigatura si aggancia o si
blocca nel pezzo da lavorare, il bordo
della mola che si inserisce nel pezzo
può impigliarsi causando la rottura della
mola o un contraccolpo. La mola si muove
quindi in direzione dell‘utilizzatore o nella
direzione opposta in base alla direzione
di rotazione della mola stessa nel punto
del bloccaggio. Di conseguenza le mole
possono anche rompersi. Il contraccolpo è
la conseguenza di un uso errato o imperfetto dell‘utensile elettrico. Esso può essere
evitato ricorrendo a misure preventive adeguate, come descritto di seguito.
a) Tenere saldamente l‘utensile elettrico
e portare il corpo e le braccia in una po-
sizione dalla quale è possibile contrastare
le forze esercitate dal contraccolpo. Utilizzare sempre l‘impugnatura supplementare, se presente, per avere il massimo controllo possibile sulle forze esercitate dal
contraccolpo o sui momenti di reazione
all‘avviamento. L‘utilizzatore può control-
lare le forze esercitate dal contraccolpo e
le forze di reazione ricorrendo a misure
preventive adeguate.
b) Le mole a gomito vanno preassemblate
in modo tale che la supercie abrasiva
non sporga rispetto al bordo della calotta protettiva. Le mole non montate a
regola d‘arte che sporgono rispetto al
bordo della calotta protettiva non pos-
sono essere sufcientemente schermate.
c) Non portare mai la mano nelle vicinan-
ze degli utensili ad inserto in movimento. In caso di contraccolpo, l‘utensile ad
inserto potrebbe muoversi sulla mano.
d) Non portare il proprio corpo nella zona
che l‘utensile elettrico può raggiungere
in caso di contraccolpo. Il contraccolpo
spinge l‘utensile elettrico nella direzione opposta a quella del movimento
della mola nel punto del bloccaggio.
e) Lavorare con particolare cautela nelle
zone in cui sono presenti angoli, spigoli
vivi ecc. Evitare che gli utensili ad inserto si ritraggano dal pezzo da lavorare
e si incastrino. L‘utensile ad inserto in
rotazione tende ad incastrarsi quando
si ritrae e in corrispondenza di angoli e
spigoli vivi. Ciò provoca la perdita del
controllo o un contraccolpo.
f) Non utilizzare plateau o lame da sega
dentate. Tali utensili ad inserto provocano spesso un contraccolpo o la perdita
di controllo sull‘utensile elettrico.
Avvertenze di sicurezza speciali
per la levigatura e il taglio con
mola
a) Utilizzare esclusivamente gli attrezzi
per la levigatura ammessi per il presente utensile elettrico e la calotta protettiva prevista per tali attrezzi. Gli attrezzi
per la levigatura non previsti per il
presente utensile elettrico non possono
essere lubricati a sufcienza e non
16
Page 17

IT MT
sono sicuri.
b) La calotta protettiva deve essere appli-
cata in modo sicuro all‘utensile elettrico
e regolata in modo tale da assicurare la
massima sicurezza, ossia così che la più
piccola parte possibile dell‘attrezzo per
la levigatura sia rivolto apertamente
verso l‘utilizzatore. La calotta protetti-
va deve proteggere l‘utilizzatore dai
frammenti e dal contatto fortuito con gli
attrezzi per la levigatura.
c) Gli attrezzi per la levigatura devono
essere utilizzati solo per gli impieghi
raccomandati. Ad esempio: Non levi-
gare mai con la supercie laterale delle
mole da taglio. Le mole da taglio sono
destinate all‘eliminazione di materiale
mediante il bordo. L‘azione delle forze
laterali su questi attrezzi per la levigatura possono provocarne la rottura.
d) Utilizzare sempre ange di ssaggio
non danneggiate e aventi dimensioni e
forma corrette per la mola da levigatura selezionata. Le ange adeguate
sostengono la mola da levigatura riducendo così il rischio di una rottura della
mola stessa. Le ange per le mole da
taglio possono differire dalle ange per
altre mole da levigatura.
e) Non utilizzare mole da levigatura usu-
rate di utensili elettrici più grandi. Le
mole da levigatura per utensili elettrici
più grandi non sono idonei per il numero di giri più elevato degli utensili elettrici più piccoli e potrebbero rompersi.
Ulteriori avvertenze di sicurezza
speciali per il taglio con mola
a) Evitare il bloccaggio della mola da
taglio e pressioni eccessive su di essa.
Non eseguire tagli troppo profondi.
Un sovraccarico della mola da taglio
aumenta la sollecitazione su di essa
e la probabilità di inceppamento o di
bloccaggio e di conseguenza anche la
possibilità di un contraccolpo o della
rottura dell‘attrezzo da levigatura.
b) Evitare la zona davanti e dietro la mola
da taglio in movimento. Se la mola da
taglio viene spostata nella direzione
opposta al proprio corpo all‘interno
del pezzo da lavorare, in caso di contraccolpo l‘utensile elettrico può essere
proiettato direttamente sull‘utilizzatore
insieme alla mola in movimento.
c) Qualora la mola da taglio si incastri o
si interrompa il lavoro, spegnere l‘apparecchio e tenerlo fermo no all‘arresto del movimento della mola. Non
tentare mai di estrarre la mola da taglio ancora in movimento dal pezzo da
lavorare, poiché in caso contrario sussiste il rischio di contraccolpo. Vericare
ed eliminare la causa dell‘incastro.
d) Non riaccendere l‘utensile elettrico, n-
ché si trova nel pezzo da lavorare. Lasciare raggiungere alla mola da taglio
il suo numero di giri nominale, prima di
proseguire con cautela con il taglio. In
caso contrario la mola può incastrarsi,
fuoriuscire dal pezzo da lavorare o
provocare un contraccolpo.
e) Puntellare le piastre o i pezzi da lavora-
re per evitare il rischio di contraccolpo
provocato da una mola da taglio incastrata. I pezzi da lavorare di grandi
dimensioni possono imbarcarsi a causa
del loro stesso peso. Il pezzo da lavorare deve essere puntellato da entrambi
i lati della mola, sia vicino alla mola
stessa che nei bordi.
f) Lavorare con particolare cautela per i „ta-
gli a tuffo“ effettuati in pareti già esistenti o
in altre zone non ben visibili. Inlandosi nel
pezzo da lavorare, la mola da taglio può
provocare un contraccolpo dovuto a tagli
nelle tubazioni del gas o dell‘acqua, nei
17
Page 18

IT MT
cavi elettrici o in altri oggetti.
Avvertenze di sicurezza supplementari per i dischi abrasivi
Avvertenze di sicurezza speciali per i dischi abrasivi:
• Non utilizzare fogli abrasivi sovradimensionati, ma attenersi
alle indicazioni del produttore
riguardo alle loro dimensioni. I
fogli abrasivi che sporgono dal platorello possono provocare lesioni e causare
il bloccaggio, la rottura dei fogli o un
contraccolpo.
Avvertenze di sicurezza supplementari per la lavorazione con
spazzole metalliche
Avvertenze di sicurezza speciali per la lavorazione con spazzole metalliche:
• Tenere presente che le spazzole
metalliche perdono frammenti di
metallo anche durante l‘utilizzo
comune. Non sovraccaricare i li
metallici esercitando una pressione eccessiva. I frammenti di metallo
proiettati possono penetrare molto facilmente negli indumenti sottili e/o nella
pelle.
• Se viene raccomandato l‘uso di
una calotta protettiva, evitare
che essa venga a contatto con la
spazzola metallica. Le spazzole a
disco e a tazza possono subire un aumento del diametro a causa della pressione effettuata su di esse e delle forze
centrifughe.
Carica
Non esporre la batteria a con-
dizioni estreme come calore e
colpi. Pericolo di lesioni a causa di fuoriuscita di soluzione
elettrolitica! In caso di contatto
con gli occhi, sciacquare le
parti interessate con acqua o
un neutralizzatore e consultare un medico.
Caricare la batteria solo in ambien-
ti asciutti.
La supercie esterna della batteria
deve essere pulita e asciutta, prima
di collegare il caricabatteria.
Pericolo di lesioni a causa di scosse
elettriche.
Caricare solo con il caricabatteria
originale fornito. Prestare attenzione
che l’apparecchio non venga caricato per più di 1 ore interrottamente. La
batteria e l’apparecchio potrebbero
venire danneggiati e, in caso di carica prolungata, consumano inutilmente energia. In caso di sovraccarico
decade il diritto di garanzia.
Assicurarsi che la tensione dell‘ali-
mentazione corrisponda con quella
indicata nella targhetta identicativa dell‘apparecchio.
• Caricare la batteria prima del primo uso.
Non caricare la batteria per più volte
consecutive brevemente.
• Caricare la batteria, quando l’apparecchio lavora troppo lentamente.
• Un tempo d’esercizio notevolmente ridotto nonostante la ricarica indica che la
batteria è consumata e che deve essere
sostituita. Usare solo batterie di ricambio
18
Page 19

IT MT
originali, reperibile tramite il servizio
clienti.
• Osservare in ogni caso le indicazioni di
sicurezza rispettivamente valide come anche le disposizioni e indicazioni relative
alla tutela dell‘ambiente.
• Difetti che risultano da un uso improprio,
non rientrano nella garanzia.
Rimozione/inserimento
batteria
1. Per estrarre la batteria (9) dall’apparecchio, premere il tasto di
sblocco (10) posto sulla batteria ed
estrarre la batteria.
2. Per inserire la batteria (9) spingere
la batteria nell’apparecchio lungo
la guida di scorrimento La batteria
scatta in posizione in modo udibile.
Ricarica della batteria
1. Eventualmente rimuovere la bat-
teria (9) dall’apparecchio.
2. Inserire la batteria (9) nel vano di
carica del caricabatteria
3. Collegare il caricabatteria a una
presa.
4. Dopo la carica completa stacca-
re il caricabatteria dalla rete.
5. Staccare la batteria dal carica-
batteria (9).
LED verde lampeggiante senza batteria
caricabatteria pronto
LED verde acceso batteria caricata
LED rosso acceso batteria in caricat
LED verde lampeggiante con batteria
La batteria deve essere precaricata per 30
min prima dell’inizio del processo di ricarica
LED rosso e verde lampeggianti
Batteria difettosa
LED rosso e verde accesi
Batteria eccessivamente fredda o eccessivamente calda. Impossibile caricare la
batteria
Batterie consumate
• Una riduzione notevole della durata di
funzionamento nonostante la ricarica indica che la batteria è consumata e deve
essere sostituita. Usare solo un pacchetto
batteria di ricambio originale, reperibile
attraverso il centro di assistenza clienti.
• Osservare in ogni caso le indicazioni di sicurezza valide come anche le disposizioni
e indicazioni relative alla tutela dell’ambiente (vedi “Pulizia e manutenzione“).
Controllo dello stato di
carica della batteria
L’indicatore dello stato di carica (8) segnala lo stato di carica della batteria (9).
Premere il tasto PRESS sulla batteria.
Lo stato di carica della batteria viene visualizzato mediante accensione dell’apposita spia a LED.
rosso-giallo-verde =
Abatteria completamente carica
rosso-giallo =
batteria carica per ca. la metà
rosso =
la batteria deve essere caricata
Avvertenze per la
lavorazione
Rettica:
Non utilizzare mai mole da
taglio per la rettica !
Esercitare una pressione moderata sul
19
Page 20
IT MT
pezzo da lavorare. Muovere l‘apparecchio
avanti e indietro in modo uniforme.
Nel caso di un angolo di lavorazione compreso fra 30° e 40°, il migliore risultato si
ottiene con la lavorazione tramite rettica.
Taglio con mola :
Non utilizzare mai mole da
rettica per il taglio !
Utilizzare solo mole da taglio o da levigatura
collaudate e rinforzate con materiale broso.
Di norma lavorare con avanzamento ridotto. Esercitare una pressione moderata sul
pezzo da lavorare.
Lavorare sempre con il movimento di controrotazione. In questo modo l‘apparecchio
non fuoriesce in modo incontrollato dal
pezzo da lavorare.
Taglio della pietra:
• Per tagliare la pietra è opportuno utilizzare una mola da taglio diamantata. In
ogni caso prestare attenzione all’idoneità e al contrassegno della mola da
taglio per l’utilizzo specico.
• Nel tagliare la pietra assicurarsi della
presenza di una sufciente aspirazione
delle polveri.
• Indossare una maschera antipolvere.
• Utilizzare l’apparecchio solo per taglio
a secco/molatura a secco.
Indicazioni sulla statica:
Prima di iniziare i lavori, consultare l’ingegnere, l’architetto o il direttore dei lavori
incaricato.
Montaggio
Attenzione! Pericolo di
lesioni!
- Assicurarsi di disporre di uno
spazio sufciente allo svolgimento del lavoro e di non compromettere la sicurezza di altre
persone.
- Prima della messa in funzione
montare correttamente tutte le
coperture e i dispositivi di protezione.
- Estrarre la spina prima di regolare l‘apparecchio
Montaggio dell‘impugnatura
addizionale
L‘apparecchio può essere uti-
lizzato solo con l‘impugnatura montata.
Avvitare l‘impugnatura addizionale (2) all‘ap-
posita lettatura (4) sull‘apparecchio agendo
verso sinistra, verso destra o verso l‘alto in
base alla procedura di lavorazione.
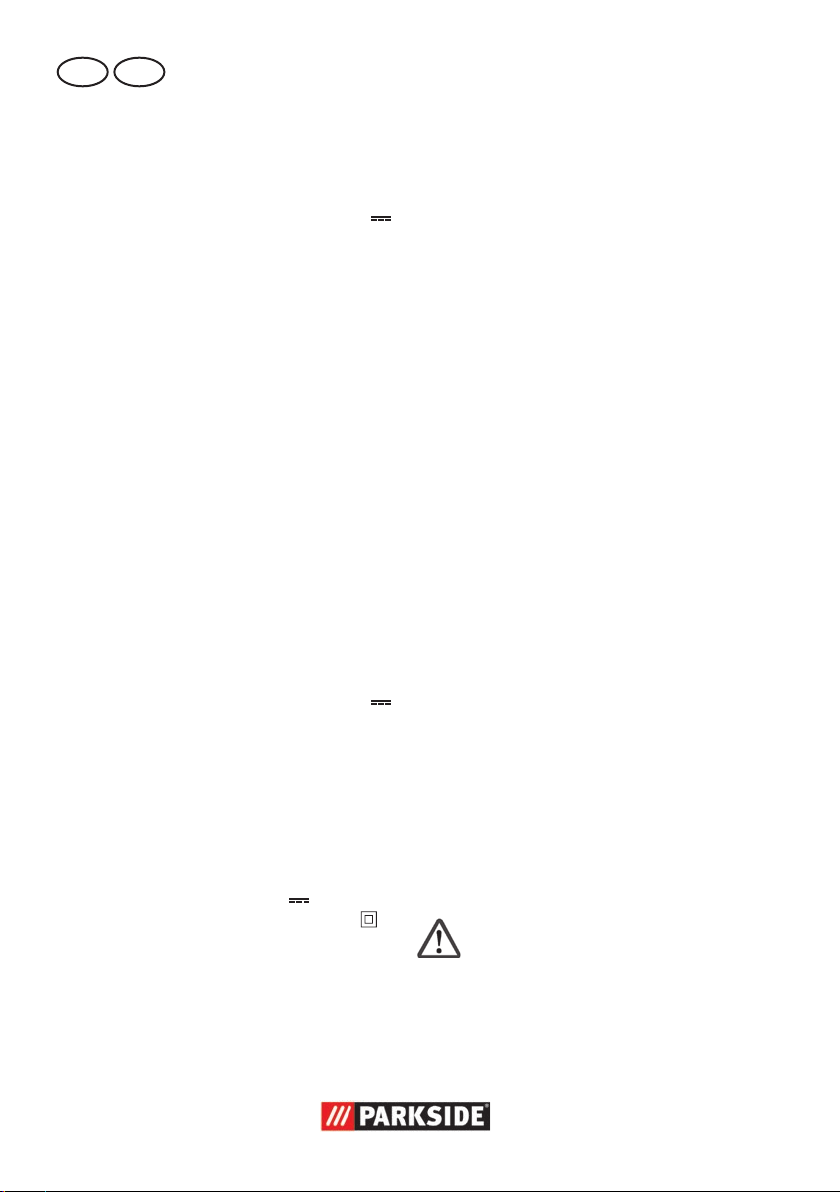
Montaggio / regolazione
della calotta protettiva
Regolare la calotta protettiva in modo tale
che le scintille o le parti distaccate non
possano raggiungere l’utilizzatore o le persone circostanti.
Le fessure nelle pareti portanti sono soggette alla norma DIN 1053 Parte 1 o alle
disposizioni speciche del Paese. Tali prescrizioni vanno assolutamente rispettate.
20
La calotta protettiva deve essere regolata
inoltre in modo che le scintille non possano
incendiare le parti inammabili, ad esempio che si trovano nelle vicinanze.
Page 21
IT MT
L‘apparecchio può essere
utilizzato solo con la calotta
protettiva montata.
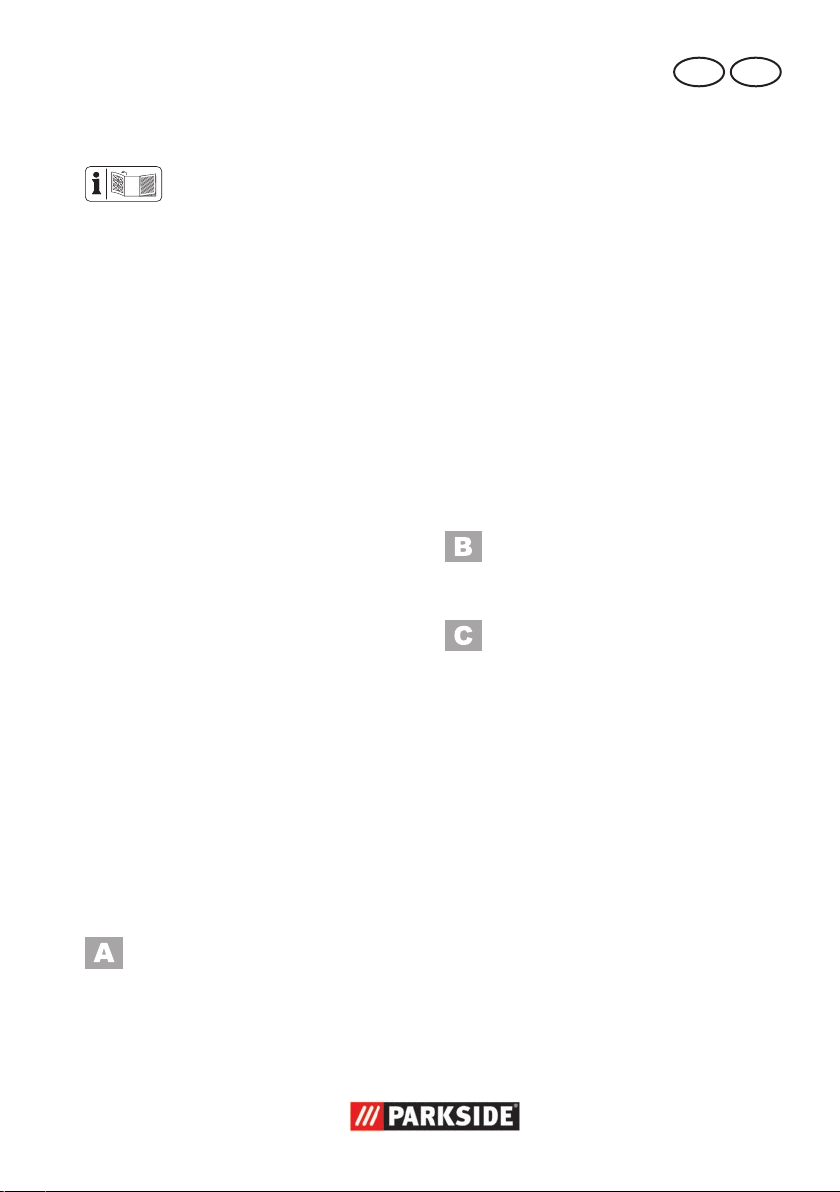
1. Aprire la leva di bloccaggio
(15).
2. Applicare la calotta protettiva (17)
nei fori per il posizionamento.
3. Ruotare la calotta protettiva (17)
portandola in posizione di lavoro. La parte chiusa della calotta
protettiva deve essere sempre
orientata verso l‘utilizzatore.
4. Chiudere nuovamente la leva di
bloccaggio (15). La calotta protettiva non deve più girare.
Se necessario, la forza di bloccaggio può essere regolata dal dado di regolazione (
21).
Montaggio / sostituzione
della mola
1. Premere il tasto di arresto del
mandrino (3).
2. Allentare i dadi di bloccaggio
(
3. Posizionare la mola desiderata
4. Applicare nuovamente i dadi di
5. Premere il tasto di arresto del
19) con la chiave di bloccag-
gio (1).
sulla angia (
sulla mola deve essere orientata
verso l‘apparecchio.
bloccaggio (
(
20). La parte piatta dei dadi
di bloccaggio deve essere orientata verso l‘utensile ad inserto.
mandrino (3) e serrare nuovamente a fondo i dadi di bloccaggio (19) con la chiave di
bloccaggio (1).
18). La scritta
19) sul mandrino
Azionamento
Attenzione! Pericolo di
lesioni!
- Prima di intraprendere qualsiasi intervento sull‘apparecchio
estrarre la spina di alimentazione.
- Utilizzare solo mole da levigatura e accessori raccomandati
dal produttore. L‘utilizzo di altri
utensili ad inserto e di altri accessori può provocare il rischio
di lesioni per l‘utilizzatore.
- Usare solo utensili di levigatura
che riportano informazioni sul
costruttore, il tipo di collegamento, le dimensioni e il numero di
giri per cui è omologato.
- Utilizzare solo mole il cui numero di giri indicato corrisponde
almeno a quello riportato sulla
targa identicativa dell‘apparecchio.
- Non utilizzare mole da levigatura che presentano rotture, crepe
o altri danni.
- Non utilizzare mai l‘apparecchio
senza dispositivi di protezione.
- Puntellare le piastre o i pezzi da
lavorare per ridurre il rischio di
contraccolpo provocato da una
mola da taglio incastrata. I pezzi
da lavorare di grandi dimensioni
possono imbarcarsi a causa del
loro stesso peso. Il pezzo da lavorare deve essere puntellato da entrambi i lati della mola, sia vicino
alla mola stessa che nei bordi
Tenere le mani a distanza
dalla mola durante il funzionamento dell‘apparecchio.
Pericolo di lesioni.
21
Page 22
IT MT
Indicazioni per la sostitu-
zione:
• Non usare mai l‘apparecchio
senza i dispositivi di protezione.
• Assicurarsi che il numero di giri
indicato sulla mola sia uguale o
maggiore al numero di giri nominale a vuoto dell‘apparecchio.
• Assicurarsi che le dimensioni della
mola siano adatte all‘apparecchio.
• Utilizzare solamente mole in perfetto stato (test acustico: colpendo con un martello in plastica si
ascolta un suono nitido).
• Non ingrandire il foro della
mola se troppo piccolo.
• Non usare una bussola di riduzione separata o un adattatore
per adattare le mole dotate di un
foro troppo grande.
• Non utilizzare lame da sega.
• Per il serraggio degli utensili di
levigatura usare solamente le
ange di ssaggio in dotazione. Gli spessori fra la angia e
l‘utensile devono essere in materiale elastico, come gomma,
cartone morbido ecc.
• Dopo avere sostituito la mola,
rimontare completamente l‘apparecchio.
Accensione e spegnimento
1. Per accenderlo premere l‘interruttore
on/off (5).
2. Per spegnere, rilasciare l‘interruttore di
accensione/spegnimento. L‘apparecchio si spegne.
Dopo l‘accensione attendere nché l‘apparecchio ha raggiunto la velocità massima.
Solo allora procedere con la lavorazione.
La mola continua a girare
dopo lo spegnimento dell‘apparecchio. Pericolo di lesioni.
Ciclo di prova:
Prima del primo utilizzo e dopo ogni sostituzione della mola, effettuare un ciclo di
prova a vuoto. Spegnere immediatamente
l‘apparecchio se la mola non gira in modo
uniforme e si percepiscono vibrazioni o
rumori anomali.
Pulizia e manutenzione
Lasciare eseguire i lavori di ripara-
zione e di manutenzione non descritti nelle presenti istruzioni d’uso
dal nostro centro di assistenza tecnica. Usare solo ricambi originali.
Spegnare l’apparecchio ed estrarre
la batteria dall’apparecchio prima
di eseguire lavori all’apparecchio.
Durante la sostituzione della mola
indossare i guanti protettivi, in modo
da evitare di ferirsi tagliandosi.
Il dado della mola non deve essere
stretto eccessivamente per evitare
che la mola e il dado si rompano.
22
Spegnare l’apparecchio ed estrarre
la batteria dall’apparecchio prima
di eseguire lavori all’apparecchio.
Eseguire i seguenti lavori di pulizia e manutenzione regolarmente. In questo modo
può essere garantito un utilizzo duraturo ed
afdabile.
Prima di ogni utilizzo vericare l‘assenza
di difetti visibili all‘apparecchio, quali componenti non ssati o danneggiati, e il corretto posizionamento delle viti e degli altri
Page 23
IT MT
componenti. Controllare in particolare la
mola da levigatura. Sostituire i componenti
danneggiati.
Pulizia
Non utilizzare detergenti o solventi.
Le sostanze chimiche possono aggredire i componenti in materiale
sintetico dell‘apparecchio. Non pulire mai l‘apparecchio sotto l‘acqua
corrente.
• Pulire a fondo l‘apparecchio dopo ogni
utilizzo.
• Pulire le aperture di aerazione e la supercie dell‘apparecchio con una spaz-
zola morbida, un pennello o un panno.
Conservazione
• Conservare l’apparecchio in un luogo
asciutto e privo di polvere, lontano dalla portata dei bambini.
• Durante l’immagazzinamento evitare
condizioni di freddo o caldo estreme, in
modo tale da non ridurre la prestazione
della batteria.
• Prima di un periodo di stoccaggio prolungato, rimuovere la batteria dall’apparecchio e ricaricarla completamente.
• Le mole di levigatura devono essere
conservate asciutte e poste di taglio e
non vanno accatastate.
Le apparecchiature non si devono
smaltire insieme ai riuti domestici.
Non smaltire le batterie insieme ai ri-
uti domestici, nel fuoco (pericolo di esplosione) o nell‘acqua. Batterie danneggiate possono nuocere all‘ambiente
e alla vostra salute, se fuoriescono
vapori o liquidi velenosi.
• Consegnare l’apparecchio ad un centro
di riciclaggio. Le parti in plastica e in
metallo possono essere suddivise per
tipo per poi essere portate al centro di
riciclaggio. Domandare a tal proposito
il nostro centro assistenza.
• Smaltire le batterie nello stato scarico.
Raccomandiamo di coprire i poli con
un nastro adesivo per garantire una
protezione contro un corto circuito.
Non aprire la batteria.
• Smaltire la batteria secondo le disposizioni locali. Introdurre le batterie
nei contenitori adibiti alla raccolta di
batterie consumate, dove vengono
consegnate a un centro di riciclaggio.
A tale proposito chiedere informazioni
ai centri di raccolta riuti o al nostro
centro di assistenza.
• Lo smaltimento degli apparecchio difettosi consegnati viene effettuato gratuitamente.
Smaltimento/Tutela
dell’ambiente
Estrarre la batteria dall‘apparecchio e introdurre l‘apparecchio, la batteria, gli accessori e l‘imballaggio nei contenitori adibiti alla
raccolta differenziata.
23
Page 24

IT MT
Garanzia
Gentile cliente,
Su questo apparecchio Le viene concessa
una garanzia di 3 anni a partire dalla
data di acquisto.
In caso di difetti di questo prodotto può
avanzare diritti legali nei confronti del
venditore del prodotto. Tali diritti legali non
vengono limitati dalla nostra garanzia qui
di seguito rappresentata.
Condizioni di garanzia
Il termine di garanzia inizia con la data di
acquisto. La preghiamo di conservare in
un luogo sicuro lo scontrino scale originale. Questo documento viene richiesto come
prova d’acquisto.
Qualora subentrasse un difetto di materiale
o di fabbricazione entro tre anni a partire
dalla data di acquisto di questo prodotto,
il prodotto verrà riparato o sostituito – a
nostra discrezione - gratuitamente da noi.
Questa prestazione di garanzia presuppone che venga presentato entro il termine di
tre anni l’apparecchio difettoso e la prova
d’acquisto (scontrino scale) e descritto
brevemente per iscritto in che cosa consiste
il difetto e quando si è vericato.
Se il difetto è coperto dalla nostra garanzia, riceverà il prodotto riparato oppure
un prodotto nuovo. Con la riparazione o
la sostituzione del prodotto non inizia un
nuovo periodo di garanzia.
Tempo di garanzia e diritti legali
per vizi della cosa
Il periodo di garanzia non viene prolungato. Questo vale anche per parti sostituite
e riparate. Difetti e vizi presenti già al momento dell’acquisto devono essere segnalati
immediatamente dopo la rimozione dall’imballaggio. Riparazioni che accorrono dopo
il periodo di garanzia sono a pagamento.
Volume di garanzia
L’apparecchio è stato prodotto accuratamente secondo severe direttive di qualità
e controllato con coscienza prima della
consegna.
La prestazione di garanzia vale per difetti
di materiale o di fabbricazione. Questa
garanzia non si estende ai componenti
del prodotto che sono soggetti a normale
usura e che quindi possono essere visti
come parti di usura (p. es. mole abrasivo,
nastro abrasivo, angie per ghiere) oppure
per danneggiamenti delle parti fragili (p.
es. interruttori, accumulatori o elementi di
vetro).
Questa garanzia decade se il prodotto è
stato danneggiato, non usato correttamente o non manutenuto. Per un uso corretto
del prodotto devono essere osservate tutte
le indicazioni riportate nelle istruzioni per
l’uso. Destinazioni d’uso e azioni sconsigliate nelle istruzioni d’uso o dalle quali
si viene avvertiti, sono tassativamente da
evitare.
Il prodotto è destinato esclusivamente all’uso commerciale. In caso di uso improprio,
esercizio della forza e interventi non effettuati dalla nostra liale di assistenza tecnica autorizzata, decade la garanzia.
Svolgimento in caso di garanzia
Per garantire una rapida elaborazione della Sua pratica, La preghiamo di seguire le
seguenti indicazioni:
• per tutte le richieste tenere a portata
di mano lo scontrino scale e il codice
articolo (IAN 104454) come prova
d’acquisto.
• I codici articolo sono riportati sulla targhetta del tipo.
• Nel caso in cui si dovessero vericare
difetti funzionali o altri vizi, La preghiamo di contattare telefonicamente o per
24
Page 25

IT MT
e-mail. Riceverà ulteriori informazioni
sullo svolgimento del Suo reclamo.
• Un prodotto rilevato come difettoso può
essere inviato con porto franco all’indirizzo di assistenza comunicato, previa
consultazione del nostro servizio di
assistenza tecnica, allegando la prova
d‘acquisto (scontrini scali) e l’indicazione, in che cosa consiste il difetto e
quando si è vericato. Per evitare problemi di accettazione e costi aggiuntivi,
usare tassativamente solo l’indirizzo
che Le è stato comunicato. Assicurarsi
che la spedizione non avvenga in porto assegnato, con merce ingombrante,
corriere espresso o altro carico speciale. Spedire l’apparecchio inclusi tutti gli
accessori forniti insieme al momento
dell’acquisto e garantire un imballaggio
di trasporto sufcientemente sicuro.
Servizio di riparazione
Riparazioni non soggette alla garanzia
possono essere effettuate dietro fattura dal-
la nostra liale di assistenza tecnica previo
preventivo gratuito da parte della stessa.
Possiamo lavorare solo apparecchi che
vengono spediti sufcientemente imballati
e affrancati.
Attenzione: Spedire l’apparecchio alla
nostra liale in condizioni pulite e con l’indicazione del difetto.
Apparecchi spediti in porto assegnato con merce ingombrante, corriere espresso
o altro carico speciale - non vengono
accettati.
Lo smaltimento degli apparecchi difettosi
spediti viene effettuato da noi gratuitamente.
Service-Center
Assistenza Italia
IT
Tel.: 02 36003201
E-Mail: grizzly@lidl.it
IAN 104454
Assistenza Malta
MT
Tel.: 80062230
E-Mail: grizzly@lidl.com.mt
IAN 104454
Importatore
Non dimenticare che il seguente indirizzo
non è un indirizzo di assistenza tecnica.
Contattare prima di tutto il centro di assistenza tecnica sopra nominato.
Grizzly Tools GmbH & Co. KG
Stockstädter Straße 20
63762 Großostheim
Germania
www.grizzly-service.eu
25
Page 26

IT MT
Pezzi di ricambio / Accessori
È possibile ordinare pezzi di ricambio e accessori all’indirizzo
www.grizzly-service.eu
Se non si dispone di una connessione Internet, contattare telefonicamente il centro di
assistenza (vedere “Service-Center” a pag. 25). Tenere a portata di mano i numeri
d’ordine riportati in basso.
Pos. Denominazione ........................................................ Cod. art.
1 Chiave per ghiere .............................................................. 91104101
2 Impugnatura addizionale ....................................................91104100
9 Accumulatore 18V / 2,6 Ah ................................................ 80001162
14 Caricabatteria ...................................................................80001086
16 Mola da taglio ................................................................... 30211060
17 Calotta protettiva................................................................91104104
18 Flangia ............................................................................ 91104102
19 Dado di bloccaggio ...........................................................91104103
Mole abrasivo ...................................................................30211070
Accumulatore 18V / 1,5 Ah ................................................ 80001161
Consigliamo di utilizzare la batteria solo con l’apposito caricabatterie.
26
Page 27

Ricerca di guasti
Spegnare l’apparecchio ed estrarre la batteria dall’apparecchio prima di eseguire
lavori all’apparecchio.
Problema Possibile causa Soluzione
IT MT
L‘apparecchio non
si accende
Gli utensili di
levigatura non si
muovono anche se
il motore gira
Il motore rallenta e
si ferma
La mola ruota in
modo irregolare,
si odono rumori
inconsueti
Interruttore di accensione /
spegnimento (
Motore difettoso
Dado della mola da levigatura
allentata
Il pezzo da lavorare, residui
dello stesso o degli utensili di
levigatura bloccano l‘azionamento
Il pezzo sovraccarica l‘apparecchio
Dado della mola da levigatura
allentata
Mola da levigatura difettosa Sostituire la mola
5) difettoso
Riparazione al centro assistenza
Stringere il dado della mola (si
veda „Sostituzione della mola“)
Rimuovere le cause di blocco
Ridurre la pressione sull‘utensile
di levigatura
Il pezzo da lavorare non è adatto
Stringere il dado della mola (si
veda „Sostituzione della mola“)
27
Page 28

GB MT
Content
Introduction ............................... 28
Intended purpose ....................... 28
General description .................... 29
Extent of the delivery ......................29
Description of function ....................29
Overview ......................................29
Technical data ............................ 29
Notes on safety..........................30
Symbols and icons .........................31
General Safety Directions for Power
Tools ............................................32
Additional safety instructions ...........37
RESIDUAL RISKS ............................38
Charging the battery .................. 41
Removing / inserting the battery ......41
Recharging the battery....................41
Used batteries ...............................42
Checking the battery charge level ....42
Practical tips .............................. 42
Assembly ................................... 42
Mount additional handgrip .............43
Assemble/set protective hood ..........43
Installing/changing disc .................43
Operation .................................. 43
Turning on and off ..........................44
Cleaning .......................................45
Storage ......................................45
Disposal and protection of the envi-
ronment .....................................45
Replacement parts/Accessories .. 46
Troubleshooting ......................... 47
Guarantee .................................48
Repair Service ............................ 49
Service-Center ............................ 49
Importer ....................................49
Translation of the original
EC declaration of conformity ......76
Introduction
Congratulations on the purchase of your
new device. With it, you have chosen a
high quality product.
During production, this equipment has
been checked for quality and subjected to
a nal inspection. The functionality of your
equipment is therefore guaranteed.
The operating instructions constitute
part of this product. They contain
important information on safety,
use and disposal. Before using the
product, familiarise yourself with
all of the operating and safety instructions. Use the product only as
described and for the applications
specied. Keep this manual safely
and in the event that the product
is passed on, hand over all documents to the third party.
Intended purpose
The angle grinder is a tool for cutting,
scrubbing and brushing metal, concrete or
tiles without using water.
The device is not intended for any other
types of applications (e.g. grinding with
unsuitable grinding tools, grinding with a
coolant solution, grinding or cutting hazardous materials such as asbestos).
The device is intended to be used by do-ityourselfers. It was not designed for heavy
commercial use.
The tool is to be used by adults. Children
under the age of 16 may not use the tool
except under supervision.
The manufacturer is not liable for damages
caused by an improper use or incorrect
operation of this device.
28
Page 29

GB MT
General description
See the front fold-out page for
illustrations.
Extent of the delivery
Carefully unpack the appliance and check
that it is complete. Dispose of the packaging material correctly.
- Device
- Battery-charger
- Battery
- Additional handle
- Protective hood
- Chuck key
- Cutting disc
- Translation of the original instructions
for use
Description of function
The angle grinder is made for cutting,
scrubbing or brushing metal. There is a
special disc for each of the separate applications. Please refer to the information
from the disc manufacturer.
Please refer to the descriptions below for
information about the operating devices.
The battery included in the scope of delivery can also be used for the cordless reciprocating saw PSSA 18 A1 and the cordless
drill driver PDSSA 18 A1.
Overview
1 Chuck key with storage facility
(not visible)
2 Additional handle
3 Spindle stop button
4 Threads for additional handgrip
5 On/off switch
6 Handgrip
7 Activation button battery Indicator
8 Battery Indicator
9 Battery
10 Battery release button
(not visible)
11 Power plug of charger
12 Green LED
13 Red LED
14 Charger
15 Tightening lever for protective
hood
16 Cutting disc
17 Protective hood
18 Mounting ange
19 Clamping nut
20 Mounting spindle
21 Adjustment nut
Technical data
Angle Grinder PWSA 18 A1:
Rated input voltage
................................................. 18 V
Measurement idling speed (n) ...8000 min
Dimensions of the cutting/roughing discs
................................. Ø 115 x 22,2 mm
Thickness of the cutting/roughing discs
............................................max. 6 mm
Grinding spindle thread ................... M14
Thread length of the grinding spindle
..........................................max. 14 mm
Protection category...........................IPX0
Sound pressure level
(L
) ................... 81,6 dB(A); KpA= 3 dB
pA
Sound power level (L
measured ...........92,6 dB(A); K
guaranteed ...........................96 dB(A)
Vibration values (a
Main handgrip ... 3,043 m/s
Additional handle 5,024 m/s2 K= 1,5 m/s
)
wA
)
h
= 3 dB
wA
2
K= 1,5 m/s
-1
2
2
29
Page 30

GB MT
Battery (Li-Ion) ........... PAP18-2.6A1
Number of battery cells................. ..10
Nominal voltage ...................... 18 V
Capacity ..................................2,6 Ah
Charging time ..........................ca. 1 h
Recharger ................JLH-H260-18G
Nominal consumption ................. 70 W
Uptake voltage/Input
....................... 220-240 V~, 50-60 Hz
Voltage output/Output
.............................. 18 V
Protection class ............................
2600 mA
II
Protection category ...................... IPX0
The vibration values represent maximum
values which have been determined with
the supplied cutting disc. The actual vibration values may vary depending on the
used accessories. The vibration values are
still affected by the handling of the user’s.
Cutting disc (extent of delivery):
Idling speed n
0
................................... max.13300 min
Disc speed ....................... max. 80 m/s*
Outer diameter ................... Ø 115 mm
Bore hole .......................... Ø 22,2 mm
Thickness ................................2,4 mm
*
The grinding disc must keep a rotational
speed of 80 m/s
Noise and vibration values have been
determined according to the standards and
regulations mentioned in the declaration of
conformity.
Technical and optical changes may be
undertaken in the course of further development without notice. All dimensions,
references and information in this instruction manual are therefore not guaranteed.
Legal claims made on the basis of the
instruction manual can therefore not be
considered as valid.
The stated vibration emission value was
measured in accordance with a standard
testing procedure and may be used to compare one power tool to another.
The stated vibration emission value may
also be used for a preliminary exposure
assessment.
Warning:
The vibration emission value whilst
actually using the electrical tool may
vary from the given values independently of the type and way in which
the electric tool is used.
Safety measures for the protection of
the operator are to be determined
that are based on an estimate of the
actual exposure under the real operating conditions (for this, all parts of
the operating cycle are to be taken
into account, for example, times in
which the electric tool is turned off,
and those during which it is turned
-1
on but running without a load).
Notes on safety
Caution! When using power tools,
observe the following basic safety
measures for the prevention of electric shocks and the risk of injury and
re.
Please read all these instructions before using this electric tool and please
keep the safety instructions.
30
Page 31

GB MT
Symbols and icons
Symbols on the device:
Warning!
Risk of injury from the rotating tool!
Keep hands away
Warning! Electric shock hazard.
Always unplug the device before
working on it
Read the manual!
Wear ear protection
Wear eye protection
Wear breathing protection
Risk of cuts!
Wear cut-resistant gloves
Electrical machines do not belong
with domestic waste
Other symbols on the
cutting disc:
Do not use for side grinding
Do not use for wet grinding
Symbols on the battery:
Do not dispose of
batteries in house-
hold waste, re or
water.
Do not subject the battery to strong
sunlight over long periods and
do not leave it on a heater (max.
45°C).
Take batteries to an old battery
collection point where they will
be recycled in an environmentally
friendly manner.
Symbols on the recharger:
Warning!
Before using for the rst time, care-
fully read through the user manual
The recharger is for indoor use
only.
T2,5A
Miniature fuse
Protection class II
Electrical appliances must not be dis-
posed of with the domestic waste.
Do not use defective discs
Suitable for metal
Wear safety shoes
Green LED ashes up without battery
Charger ready
Green LED lights up
Battery such alleged charged
Red LED lights up Battery charging
31
Page 32
GB MT
Green LED ashes with battery:
Battery has to be charged in advance for
30 minutes before charging starts
Red and green LED ashes Battery defect
Red and green LED lights up
Battery too cold or too warm. Battery cannot be charged
Symbols in the manual
Warning symbols with in-
formation on damage and
injury prevention.
Instruction symbols (the instruction is
explained at the place of the exclamation mark) with information on
preventing damage.
Help symbols with information on
improving tool handling.
General Safety Directions for
Power Tools
WARNING! READ ALL SAFETY
DIRECTIONS AND INSTRUCTIONS. Omissions in the compliance
with safety directions and instructions
can cause electrical shock, re and/
or severe injuries.
Retain all safety directions and instructions for future use.
The term „power tool“ in the warnings refers
to your mains-operated (corded) power tool
or battery-operated (cordless) power tool).
1) Work area safety :
a) Keep work area clean and well
lit. Cluttered or dark areas invite acci-
dents.
b) Do not operate power tools in
explosive atmospheres, such as
in the presence of ammable
Iiquids, gases or dust. Power tools
create sparks which may ignite the dust or
fumes.
c) Keep children and bystanders
away while operating a power
tool. Distractions can cause you to lose
control.
2) Electrical safety :
CAUTION! The following states how
to avoid accidents and injuries due to
electric shock:
a) Power tool plugs must match the
outlet. Never modify the plug in
any way. Do not use any adapter
plugs with earthed (grounded)
power tools. Unmodied plugs and
matching outlets will reduce risk of electric
shock
b) Avoid body contact with earthed
or grounded surfaces, such as
pipes, radiators, ranges and refrigerators. There is an increased risk
of electric shock if your body is earthed or
grounded.
c) Do not expose power tools to rain
or wet conditions. Water entering a
power tool will increase the risk of electric
shock.
d) Do not abuse the cord. Never use
the cord for carrying, pulling or
unplugging the power tool. Keep
cord away from heat, oil, sharp
edges or moving parts. Damaged or
entangled cords increase the risk of electric shock.
e) When operating a power tool out-
doors, use an extension cord suitable for outdoor use. Use of a cord
suitable for outdoor use reduces the risk of
32
Page 33
GB MT
electric shock.
f) If operating a power tool in a
damp location is unavoidable, use
a residual current device (RCD)
protected supply. Use of an RCD
reduces the risk of electric shock. Use a
circuit breaker with a current limit of
30 mA or less.
3) Personal safety:
CAUTION! The following states how
to avoid accidents and injuries:
a) Stay alert, watch what you are
doing and use common sense
when operating a power tool. Do
not use a power tool while you
are tired or under the inuence of
drugs, alcohol or medication. A moment of inattention white operating power
tools may result in serious personal injury.
b) Use personal protective equip-
ment. Always wear eye protection. Protective equipment such as dust
mask, non-skid safety shoes, hard hat, or
hearing protection used for appropriate
conditions will reduce personal injuries.
c) Prevent unintentional starting.
Ensure the switch is in the off-position before connecting to power
source and/or battery pack, picking up or carrying the tool. Carry-
ing power tools with your nger on the
switch or energising power tools that have
the switch on invites accidents.
d) Remove any adjusting key or
wrench before turning the power
tool on. A wrench or a key left attached
to a rotating part of the power tool may
result in personal injury.
e) Do not overreach. Keep proper
footing and balance at all times.
This enables better control of the power
tool in unexpected situations.
f) Dress properly. Do not wear loose
clothing or jewellery. Keep your
hair, clothing and gloves away
from moving parts. Loose clothes,
jewellery or long hair can be caught in
moving parts.
g) If devices are provided for the
connection of dust extraction and
collection facilities, ensure these
are connected and properly used.
Use of dust collection can reduce dustrelated hazards.
4) Power tool use and care :
a) Do not force the power tool. Use
the correct power tool for your
application. The correct power tool will
do the job better and safer at the rate for
which it was designed.
b) Do not use the power tool if the
switch does not turn it on and off.
Any power tool that cannot be controlled
with the switch is dangerous and must be
repaired.
c) Disconnect the plug from the
power source and/or the battery
pack from the power tool before
making any adjust -ments, changing accessories, or storing power
tools. Such preventive safety measures
reduce the risk of starting the power tool
accidentaIly.
d) Store idle power tools out of the
reach of children and do not allow persons unfamiliar with the
power tool or these instructions to
operate the power tool. Power tools
are dangerous in the hands of untrained
users.
e) Maintain power tools. Check for
misalignment or binding of moving parts, breakage of parts and
any other condition that may af-
33
Page 34

GB MT
fect the power tool’s operation.
If damaged, have the power tool
repaired before use. Many accidents
are caused by poorly maintained power
tools.
f) Keep cutting tools sharp and
clean. Properly maintained cutting tools
with sharp cutting edges are less Iikely to
bind and are easier to control.
g) Use the power tool, accessories
and tool bits etc. in accordance
with these instructions, taking into
account the working conditions
and the work to be performed.
Use of the power tool for operations different from those intended could result in
a hazardous situation.
5) CAREFUL HANDLING AND USE OF
BATTERY DEVICES
a) Charge the batteries only in charg-
ers that are recommended by the
manufacturer. Risk of re if a charger
that is suitable for a specic type of battery is used with other batteries.
b) In the power tools, use only the
batteries designed for the purpose. The use of other batteries may
result in injuries and risk of re.
c) Keep the unused battery away
from paper clips, coins, keys,
nails, screws and other small
metal objects, which could cause
bridging of the contacts. A short
circuit between the battery contacts may
cause burns or re.
d) If used incorrectly, liquid may leak
from the battery. Avoid contact
with this. In the event of accidental
contact, rinse off with water. If the
liquid gets into eyes, seek medical
assistance. Leaking battery uid may
cause skin irritations or burns.
6) SERVICE
Have your power tool serviced by
a qualied repair person using
only identical replacement parts.
This will ensure that the safety of the power
tool is maintained.
7) SPECIAL SAFETY DIRECTIONS FOR
BATTERY-OPERATED TOOLS
a) Ensure that the device is switched
off before inserting the battery.
Inserting a battery into a power tool that is
switched on may result in accidents.
b) Recharge the batteries indoors
only because the battery charger
is designed for indoor use only.
c) To reduce the electric shock haz-
ard, unplug the battery charger
from the mains before cleaning
the charger.
d) Do not subject the battery to
strong sunlight over long periods
and do not leave it on a heater.
Heat damages the battery and there is a
risk of explosion.
e) Allow a hot battery to cool before
charging.
f) Do not open up the battery and
avoid mechanical damage to the
battery. Risk of short circuit and fumes
may be emitted that irritate the respiratory
tract. Ensure fresh air and seek medical assistance in the event of discomfort.
g) Do not use non-rechargeable bat-
teries!
8) CORRECT HANDLING OF THE BATTERY CHARGER
a) This device can be used by children
aged 8 and over and by people with
reduced physical, sensory or mental
34
Page 35

GB MT
capacities or with a lack of experience
or knowledge, if they are supervised or
have been instructed regarding safe use
of the device and understand the resulting risks. Children are not permitted to
play with the device. Cleaning and user
maintenance are not to be undertaken
by children without supervision.
b) Children should be supervised to ensure
that they do not play with the appliance.
c) To charge the battery, use only the
charger supplied.
Risk of re and explosion. This ensures that
the safety of the device is maintained.
d) Before each use, check the charg-
er, cable and plug and have them
repaired by qualied professionals and only with original parts.
Do not use a defective charger and do not
open it up yourself. This ensures that the
safety of the device is maintained.
e) Connect the charger only to a
socket with an earth. Ensure that
the mains voltage matches the
specications on the charger rating plate. Risk of electric shock.
f) Disconnect the charger from the
mains before closing or opening
connection to the battery / power
tool / device.
g) Keep the charger clean and away
from wet and rain. Do not use the
charger outdoors. Dirt and the entry of
water increase the risk of electric shock.
h) Operate the charger only with
the appropriate original batteries.
Charging other batteries may result in inju-
ries and risk of re.
i) Avoid mechanical damage to the
charger. This can result in internal short
circuits.
j) Do not operate the charger on a
combustible surface (e.g. paper,
textiles). Risk of re due to heating dur-
ing charging.
k) If the power cable for this equipment is
damaged, it must be replaced by the
manufacturer, a customer service agent of
the same or a similarly qualied person in
order to prevent hazards.
l) The battery of the appliance is not fully
charged at the time of delivery. It therefore
needs to be fully recharged before you use
it for the rst time. For the rst recharge
cycle we recommend that you charge the
battery for about 1 hour. Slot the battery
into the base and plug the battery charger
into a mains outlet.
m) When the battery is fully charged, unplug
the charger from the mains and from the
appliance. Charging time is approx. 1
hour.
n) Do not charge the battery continuously
since this may damage the battery cells.
Note: Repeatedly charging small capacities may damage the battery cells.
Recharge the battery only if the appliance
is becoming slow.
o) Do not use the charger to charge non-
rechargeable batteries.
9) RESIDUAL RISKS
Even if properly operating and handling this
electric tool, some residual risks will remain.
Due to its construction and build, this electric
tool may present the following hazards:
a) Cuts
b) Ear damage if working without ear protec-
tion.
c) Damage to your health caused by swing-
ing your hands and arms when operating
the appliance for longer periods of time or
if the unit is not held or maintained properly.
Warning! During operation, this elec-
tric tool generates an electromagnetic
35
Page 36

GB MT
eld which, under certain circumstances, may impair the functionality of
active or passive medical implants. To
reduce the risk of serious or lethal injuries, we recommend that persons with
medical implants consult their doctor
and the manufacturer of their medical
implant before operating the machine.
Safety instructions for all applications
Common safety instructions for
grinding, sanding, working with
wire brushes and cutting grinders:
• This electric tool is to be used as
a grinder, sander, wire brush
and cutting grinder. Follow all
safety instructions, directives, illustrations and facts which you
receive with the device. If you do
not follow these instructions, an electri-
cal shock, re and/or serious injury
may occur.
• This electric tool is not suitable
for cup brushes. Using the electric
tool in ways for which it is not intended
may cause hazards and injuries.
• This electric tool is not suitable
for cup wheels, mounted points
or grinding cones. Using the electric
tool in ways for which it is not intended
may cause hazards and injuries.
• This electric tool is not suitable
for polishing. Using the electric tool
in ways for which it is not intended may
cause hazards and injuries.
• Do not use any accessories that
are not specically intended and
recommended for this electric
tool by the manufacturer. Simply
because an accessory can be attached
to your electric tool does not guarantee
safe operation.
• The allowable rotation speed of
the attachment tools must be at
least as high as the highest rotation speed indicated on the electric tool. Accessories that run faster
than the allowable speed can break
and y apart.
• The outside diameter and thickness of the attachment tool must
correspond to the dimensions
indicated for your electric tool.
Attachment tools which are wrongly
dimensioned cannot be sufciently
shielded or controlled.
• Attachment tools with threaded
attachment must t the thread-
ing of the grinding spindle exactly. For attachment tools which
are mounted through a ange,
the diameter of the hole in the
attachment tool must t the
mounting diameter of the ange.
Attachment tools which cannot be precisely attached to the electric tool turn
unevenly, vibrate very strongly and can
ultimately lead to a loss of control.
• Never use damaged attachment
tools. Check attachment tools
such as grinding discs for chipping or cracks, grinding plates
for cracks, wear or strong abrasion and wire brushes for loose
or broken wires before using
them. If the electric tool or the
attachment tool falls off, check
whether it is damaged or, use
an undamaged attachment tool.
If you have checked the attachment tool and attached it,
keep yourself and any nearby
persons beyond the level of the
rotating attachment tool and allow the device to run for 1 min.
36
Page 37

GB MT
at the highest rotational speed.
Damaged tools usually break during this
test period.
• Wear personal safety equipment. Depending on the application, use full face shields, eye
protection or safety goggles.
In so far as it is appropriate,
wear dust masks, ear protection, gloves or special aprons
which keep small grinding and
material particles away from
you. Eyes should be protected from the
foreign matter which can be caused to
y during the various applications. Dust
or breathing masks should lter the dust
that is created during operation. If you
are exposed to loud noise for a long
time, you may suffer hearing loss.
• Ensure that other people are at
a safe distance to your working area. Anyone who enters
the working area should wear
personal protective equipment.
Broken bits from the piece being worked
or broken attachment tools can y away
and cause injuries even beyond the direct working area.
• Hold the electric tool only by
the insulated gripping surfaces
when performing work in which
the cutting tool may come into
contact with hidden wiring or its
own cord. Contact with a live wire
can also cause a charge in metal parts
of the device and result in an electric
shock.
• Keep the cord away from the rotating attachment tool. If you lose
control of the device, the power cord
can become separated or caught and
your hand or arm may be pulled into
the rotating attachment tool.
• Never put the electric tool down
before the attachment tool has
come to a full stop. The rotating
attachment tool can come into contact
with the surface upon which it is set,
whereby you could lose control of the
electric tool.
• Never allow the electric tool to
run whilst you are carrying it.
Your clothing may accidentally come
into contact with the rotating attachment
tool and get caught and the attachment
tool could drill into your body.
• Clean the ventilation slots of
your electric tool routinely. The
motor air pulls dust into the housing
and, should too much metallic dust collect, could cause electrical hazards.
• Never use the electric tool near
ammable material. Sparks could
ignite this material.
• Do not use attachment tools
which require liquid coolant.
Using water or another liquid coolant
could lead to electrical shock.
Additional safety instructions
• Connect the appliance only to a power
socket with a residual current circuit
breaker of rated residual current no
more than 30 mA.
• Keep power cords and extension cords
away from the disc. If they are damaged or cut through, immediately pull
the plug from the outlet. Do not touch
the cable before it has been disconnected from the power supply.
Risk of electric shock!
• The replacement of the plug or the connection line must always be executed
by the manufacturer of the electric tool
or his/her customer service in order to
avoid any hazards.
• Only use grinding discs where the in-
37
Page 38

GB MT
dicated rotational speed is at least as
high as what has been specied on the
name plate of the device.
• Carry out a visual inspection of the
grinding disc before use. Do not use
any damaged or deformed grinding
discs. Replace any damaged or worn
grinding discs.
• Make sure that the sparks produced by
grinding do not present a danger, e.g.
reach people or ignite ammable substances.
• Always wear safety goggles, safety
gloves, respiratory protection and ear
protection when grinding, brushing and
cutting.
• Never keep the ngers between the
grinding disc and spark protection or in
close proximity to the protective hoods.
There is a risk of crushing.
• The rotating parts of the device cannot
be covered due to functional reasons.
Therefore, proceed cautiously and hold
the workpiece rmly in order to avoid
slipping which could cause your hands to
come into contact with the grinding disc.
• The workpiece gets hot during grinding. Do not touch the machined area,
allow it to cool down. There is a risk of
burning. Do not use coolants or the like.
• If you are tired or have consumed alcohol or tablets, do not work with the
device. Always have a break on time.
• Turn off the appliance and, before doing any servicing, remove the battery.
RESIDUAL RISKS
Even if properly operating and handling this
electric tool, some residual risks will remain.
Due to its construction and build, this electric
tool may present the following hazards:
a) Cuts
b) Ear damage if working without ear pro-
38
tection.
c) Damage to your health caused by swing-
ing your hands and arms when operating the appliance for longer periods of
time or if the unit is not held or maintained properly.
d) Health injuries which result from swing-
ing hand and arm, in the event that the
device is used over a longer period
of time or is not used and maintained
properly.
Warning! During operation, this elec-
tric tool generates an electromagnetic
eld which, under certain circumstances, may impair the functionality
of active or passive medical implants.
To reduce the risk of serious or lethal
injuries, we recommend that persons
with medical implants consult their
doctor and the manufacturer of their
medical implant before operating the
machine.
Kickback
Kickback is the sudden reaction from a chopping or blocked grinder attachment such as a
grinding disc, grinding plate, wire brush etc.
Chopping or blocking leads to sudden stopping of the rotating attachment. This causes
an uncontrolled electric tool to accelerate in a
direction counter to the rotational direction of
the attachment tool. If, for example, a grinding disc cuts into the workpiece or blocks it,
the edge of the grinding disc that digs into
the workpiece can get caught and, through
that, break off the grinding disc or cause a
kickback. The grinding disc then moves towards or away from the operator, depending
on the direction of rotation of the disc at the
blocked spot. Here, the grinding discs can
also break. A kickback is caused by wrongly
or incorrectly operating the electric tool. It can
be avoided by suitable cautionary measures,
Page 39

GB MT
such as described below.
a) Hold the electric tool very
rmly and bring your body and your
arm into a position in which you can
resist the kickback force. Always use
the supplemental handle if available to
give you the best control over kickback
force or reaction time during acceleration. The operator can master the
kickback and reaction force through
suitable precautions.
b) Never bring your hands near a
rotating attachment tool. The at-
tachment tool can run over your hand
in the kickback.
c) Keep your body away from the
area in which the electric tool
would move during a kickback.
The kickback drives the electric tool in
the counter-direction to the rotation of
the grinding disc at the blocked spot.
d) Work particularly cautiously in
corner areas or where there are
sharp corners etc. Prevent the at-
tachment tools from recoiling from the
workpiece and jamming. The rotating
attachment tool tends to jam when near
corners, sharp edges or when it recoils
from such. This causes a loss of control
or kickback.
e) Do not use chain or toothed
saw blades. Such attachment tools
frequently cause a kickback or loss of
control over the electric tool.
Special safety instructions for
grinding and cutting
a) Use only grinders which have
been approved for your electric
tool and the protective hood intended for these grinders. Grind-
ers which are not intended for the elec-
tric tool may not be sufciently shielded
and are unsafe.
b) Depressed centre grinding
wheels must be pre-mounted in
such a way that their grinding
surface does not protrude over
the level of the edge of the protective cover. An incorrectly mounted
grinding wheel which protrudes beyond
the level of the edge of the protective
cover cannot be adequately shielded.
c) The protective hood must be
securely attached to the electric tool and adjusted so that
the greatest level of safety is
reached, i.e., the smallest possible
amount of the grinder is exposed to the
operator. The protective hood should
protect the operator from broken bits
and accidental contact with the grinder.
d) Grinders may only be used for
the recommended attachment
options. For example: Never grind
with the side surface of a cutting disc.
Cutting discs are for cutting material
using the edge of the disc. Pushing
sideways on these grinders can break
them.
e) Always use undamaged clamp-
ing anges of the correct size
and shape for the grinding disc
you selected. Suitable anges sup-
port the grinding disc and thus reduce
the danger of the grinding disc break-
ing. Flanges for cutting discs can be
distinguished from anges for other
grinding discs.
f) Do not use worn grinding discs
for larger electric tools. Grinding
discs for larger electric tools are not
set up for the higher rotation speeds of
39
Page 40

GB MT
smaller electric tools and can break.
Other special safety instructions for
cutting grinding
a) Avoid blocking the cutting disc
or pressing down too hard. Do
not make any excessively deep cuts.
Overloading the cutting disc increases
wear and its tendency to tilt or block
and, with that, to kickback or break the
grinder.
b) Avoid the area in front of and
behind the rotating cutting disc.
When you move the cutting disc by
itself in the workpiece, in the event that
the electric tool kicks back with the rotating disc, it can spin directly towards
you.
c) If the cutting disc jams, or you
interrupt your work, switch the
device off and hold it until the
disc has come to a full stop.
Never try to pull the cutting disc out of
the cut while it is still running, because
it can kick back. Identify and correct
the cause of the jamming.
d) Do not switch the electric tool
on again as long as it is in the
workpiece. Allow the cutting disc
to rst reach its full rotational speed
before you carefully resume with the
cutting. Otherwise, the disc may catch,
spring away from the workpiece or
cause a kickback.
e) Support plates or workpieces
to reduce the risk of kickback
from a jammed cutting disc. Large
workpieces may bend under their own
weight. The workpiece must be supported on both sides of the disc, near
the cutting disc as well as also at the
edge.
f) Be particularly careful for pocket
cuts in existing walls or other
areas where you cannot see
what is there. The cutting disc may
cause a kickback when it cuts into gas
or water lines, electrical lines or other
hidden objects.
Additional safety instructions for
sanding
Special safety instructions for sanding:
• Do not use overly large sandpaper sheets; follow the manufacturer‘s information for sandpaper sizes. Sandpaper sheets which
extend beyond the sanding plate can
cause injuries and can block, tear the
sandpaper, or cause kickback.
Additional safety instructions for
working with wire brushes
Special safety instructions for working with
wire brushes:
• Be aware that the wire brushes
also lose wire pieces during
typical use. Do not overload
the wires by pressing down too
hard. Flying wire pieces can very eas-
ily penetrate thin clothing and/or your
skin.
• If a protective hood is recommended, do not allow the wire
brushes and the protective hood
to touch each other. The diameter of
plate and cup brushes can enlarge if too
much pressure and centrifugal force is
exerted.
40
Page 41
GB MT
Charging the battery
Do not expose the battery to
extreme conditions such as
heat or impact. Risk of injury
from escaping electrolytic solution! After eye/skin contact,
rinse the affected areas with
water or a neutraliser and
consult a doctor.
Charge the battery in a dry room
only.
Prior to attaching the charger, check
that the battery‘s outer surface is
clean and dry.
There is a risk of injury due to elec-
tric shock.
Only use the original charger from
the package to charge the battery.
Mind not to charge the appliance
for more than 1 hours at a time. If
you do, the battery and the appliance may be damaged and longer
charging times would be a waste
of energy. Excessive charging will
void the warranty.
Make sure that the power supply
voltage matches the voltage rating
indicated on the device‘s type plate.
• Charge the battery before the rst time
of use. Do not briey charge the battery
several time in a row.
• Recharge the battery when you notice
that the appliance is becoming slower.
• If a fully recharged battery lasts for considerably shorter operating times, the battery is used up and needs to be replaced.
Only use an OEM spare battery available
from our Customer Service.
• Always take heed of the applicable safety
instructions as well as the environmental
protection regulations and information.
• The warranty excludes all defects
caused by improper handling.
Removing / inserting the
battery
1. To remove the battery (9) from
the appliance, press the release
button 10) on the battery and
pull out the battery.
2. To insert the battery (9), place it
on the guide track and push it
back into the appliance. It will
audibly snap in.
Recharging the battery
1. Remove the battery (9) from the
appliance.
2. Insert the battery (9) in the charg-
ing compartment of the battery
charger.
3. Plug the battery charger into a
mains outlet.
4. When the battery (9) is fully
recharged unplug the battery
charger from the mains.
5. Pull the battery (9) out of the bat-
tery charger.
Green LED ashes up without battery
Charger ready
Green LED lights up
Battery such alleged charged
Red LED lights up Battery charging
Green LED ashes with battery:
Battery has to be charged in advance for
30 minutes before charging starts
Red and green LED ashes Battery defect
Red and green LED lights up
Battery too cold or too warm. Battery cannot be charged
41
Page 42

GB MT
Used batteries
• If a fully recharged battery lasts for
considerably shorter operating times,
the battery is used up and needs to be
replaced. Only use an OEM battery
pack replacement available from our
Customer Service.
• Always take heed of the applicable safety
instructions as well as the environmental
protection regulations and information
(see “Cleaning and Maintenance”).
Checking the battery charge
level
The battery’s (9) charge level is indicated
by the charge state indicator (8).
Press the activation button battery indicator
on the battery.
The LEDs indicate the battery’s charge
level.
red-yellow-green =Battery fully charged
red and yellow =Battery half charged
red =Battery needs to be charged
Practical tips
Scrubbing wheels:
Never use a cutting wheel for
scrubbing !
Exert only moderate pressure on the workpiece. Move the device evenly back and
forth.
Cutting disc:
Never use a scrubbing wheel
for cutting !
Only certied, bre-reinforced cutting or
grinding discs may be used.
In general, work with small scrubs. Exert
only moderate pressure on the workpiece.
Always work in the counter-direction. This
ensures that the device is not pushed out of
the cut through lack of control.
Cutting of stone materials:
• It is best to use a diamond cutting disc
to cut stone materials. Make sure in any
case that the cutting disc is suitable and
labelled for your application.
• When cutting stone materials, ensure
that the dust extraction is sufcient.
• Wear a dust protection mask.
• The device may only be used for dry
cutting/dry grinding.
Information on building statics:
Slits in structural walls are subject to the
standard DIN 1053 Part 1 or country-
specic regulations. These regulations must
be observed without fail. Before beginning work you should ask the structural
engineer, architect or relevant construction
supervisor for advice.
Assembly
A working angle of 30° to 40° achieves
the best results for scrub grinding.
42
Caution! Risk of injury!
- Ensure that you have sufcient
space in which to work, and that
you do not endanger other people.
Page 43
GB MT
- All hoods and protective devices
must be assembled properly before commissioning.
- Disconnect the mains plug before changing the setting on the
device
Mount additional handgrip
The device must only be op-
erated with the handgrip
mounted.
Screw the additional handgrip (2), depending on the type of work, to the left,
right or above the device using the threading for the handgrip (4).
Assemble/set protective
hood
Adjust the protective cover such that any
sparks or detached parts cannot hit either
the user or any bystanders.
The protective cover must also be positioned such that the sparks cannot ignite
combustible parts, including those in the
surroundings.
The device must only be
operated with the protective
hood mounted.
1. Open the tightening lever
(15).
2. Place the protective hood (17)
on the positioning holes.
3. Turn the protective hood (17) into
the working position. The closed
side of the protective hood must
always face the operator.
4. Close the tightening lever
(15) again. The protective hood
should not be able to be turned
any more.
If needed, the tension on the adjustment
nut (
21) can be set.
Installing/changing disc
1. Press the spindle stop button (3).
2. Release the clamping nut
(
(1).
3. Set the desired disc onto the
4. Set the clamping nut (
5. Press the spindle stop button (3)
19) with the chuck key
mounting ange (
on the disc should always face
the device.
the mounting spindlel (
again. The at side of the clamping nut must face the attachment tool.
and pull the clamping nut (19)
tight again using the chuck key
(1).
18). label
19) on
20)
Operation
Caution! Risk of injury!
- Always remove the mains plug
before working on the tool.
- Only use grinding discs and accessories recommended by the
manufacturer. Using other attachment tools and other accessories
can represent a risk of injury for
you.
- Only use grinding tools which
bear information about the
manufacturer, type of binding,
dimension and permitted number
of revolutions.
- Only use grinding discs where
the printed rotational speed is at
43
Page 44

GB MT
least as high as what has been
specied on the name plate of
the device.
- Do not use any broken, cracked,
or otherwise damaged grinding
discs.
- Never operate the device without protective equipment.
- Support plates or workpieces to
reduce the risk of kickback from
a jammed cutting disc. Large
workpieces may bend under
their own weight. The workpiece
must be supported on both sides
of the disc, near the cutting disc
as well as at the edge.
Keep your hands away from
the disc when the device is in
operation. Risk of injury.
Information on replace-
ment:
• Never operate the device without
protective equipment.
• Ensure that the rotation speed
stated on the grinding disc is the
same or higher than the nominal
rotation speed of the device.
• Ensure that the grinding disc
dimensions match those of the
device.
• Only use awless grinding discs
(ringing test: when you strike the
grinding disc with a plastic hammer, it results in a clear sound).
• Never re-drill a locating hole
which is too small to make it
larger.
• Never use separate bushings or
adapters in order to make grinding discs with a hole that is too
large t the device.
• Do not use any saw blades.
• To clamp the grinding tools
only use the clamping ange
provided. The pads between the
clamping ange and the grinding tools must be made of elastic
materials e.g., rubber, soft cardboard etc.
• Always reassemble the device
completely after replacing the
grinding disc.
Turn off the appliance and, before
doing any servicing, remove the
battery.
Wear protective gloves when chang-
ing the grinding discs in order to
avoid cutting damages.
The grinding disc nut must not be
screwed too tightly in order to
avoid breaking the disc and nut.
Turning on and off
1. Press the on switch to start the device.
Press the on/off switch (5).
2. To turn it off, release the on-off button.
The device turns off.
After switching on the device, wait until the
device has reached its max. speed. Only
then should you start with the work.
The disc still runs even after
the device has been switched
off. Risk of injury.
Trial run:
Always carry out a trial run before carry-
ing out your rst grinding procedure and
after every disc replacement. Switch the
device off immediately if the grinding disc
is not rotating smoothly, if considerable
44
Page 45

GB MT
vibration occurs or if you hear abnormal
noises.
Cleaning and servicing
Contact our Service Centre about
repairs and servicing not described
in this manual. Only use OEM
parts. Risk of injury!
Turn off the appliance and, before
doing any servicing, remove the
battery.
Perform the following cleaning and maintenance work regularly. This guarantees reliable use for a long time.
Always check the device before using it for
obvious deciencies such as loose, worn
or damaged parts, correct the positioning of screws or other parts. Examine the
grinding disc in particular. Exchange the
damaged parts.
Cleaning
Do not use any cleaning agent or
solvent. Chemical substances can
etch the plastic parts of the device.
Never clean the device under running water.
• Thoroughly clean the device after every
use.
• Clean the ventilation openings and the
surface of the device with a soft brush
or cloth.
Storage
• Store the appliance in a dry place well
out of reach of children.
• In order to keep the battery well
charged, avoid exposing the appliance
to extreme heat or cold in storage.
• Remove the battery before storing the
unit for longer periods of time.
• Grinding discs must be dry and stored
upright and should never be stacked.
Disposal and protection
of the environment
Remove the battery from the device and
take the device, battery, accessories and
packaging for environmentally friendly
recycling.
Machines do not belong with domes-
tic waste.
Do not dispose of batteries in
household waste, re (risk of explosion) or water. Damaged batteries
may damage the environment and
your health if toxic fumes or liquids
leak out.
• Return the unit to a recycling centre.
The plastics and metals in the unit can
be sorted and appropriately recycled.
Ask our Service Centre for details.
• Dispose of batteries in discharged condition. We recommend covering the pole
with adhesive tape to prevent a short
circuit. Do not open up the battery.
• Dispose of batteries in accordance with
the local regulations. Take batteries to an
old battery collection point where they
will be recycled in an environmentally
friendly manner. For information about
this, ask your local waste management
company or our service centre.
• Defective units returned to us will be
disposed of for free.
45
Page 46

GB MT
Replacement parts/Accessories
Spare parts and accessories can be obtained at
www.grizzly-service.eu
If you do not have internet access, please contact the Service Centre via telephone
(see “Service-Center” page 49). Please have the order number mentioned below ready.
Pos. Description .......................................................... Product No.
1 Chuck key ......................................................................... 91104101
2 Additional handgrip ...........................................................91104100
9 Battery 18V / 2,6 Ah .........................................................80001162
14 Charger ............................................................................ 80001086
16 Cutting disc .......................................................................30211060
17 Protective hood .................................................................. 91104104
18 Mounting ange ................................................................ 91104102
19 Clamping nut ..................................................................... 91104103
Grinding wheel ..................................................................30211070
Battery 18V / 1,5 Ah ......................................................... 80001161
We recommend using the battery only with the battery charger supplied.
46
Page 47

Troubleshooting
Turn off the appliance and, before doing any servicing, remove the battery.
Problems Possible Cause Error correction
GB MT
Device doesn‘t start
Grinding tools do
not move although
the engine is running
Engine is slower
and stops
Grinding disc does
not rotate smoothly,
abnormal noises
can be heard
On/off switch (
defective
Engine faulty
Grinding disc nut (
loose
Workpiece, remaining workpieces or remaining grinding
tools block drive
Device is overloaded through
workpiece
Grinding disc nut (
loose
Grinding disc is defective Change grinding disc
5) may be
19) is
19 is
Repair by Customer Care
Tighten grinding disc nut (
19) (see „Changing the grinding
disc“)
Remove blockages
Reduce pressure on grinding tool
Workpiece unsuitable
Tighten grinding disc nut (
19 (see „Changing the grinding
disc“)
47
Page 48

GB MT
Guarantee
Dear Customer,
This equipment is provided with a 3-year
guarantee from the date of purchase.
In case of defects, you have statutory rights
against the seller of the product. These
statutory rights are not restricted by our
guarantee presented below.
Terms of Guarantee
The term of the guarantee begins on the
date of purchase. Please retain the original
receipt. This document is required as proof
of purchase.
If a material or manufacturing defect
occurs within three years of the date of
purchase of this product, we will repair or
replace – at our choice – the product for
you free of charge. This guarantee requires
the defective equipment and proof of purchase to be presented within the three-year
period with a brief written description of
what constitutes the defect and when it occurred.
If the defect is covered by our guarantee,
you will receive either the repaired product
or a new product. No new guarantee period begins on repair or replacement of the
product.
Guarantee Period and Statutory
Claims for Defects
The guarantee period is not extended by
the guarantee service. This also applies for
replaced or repaired parts. Any damages
and defects already present at the time of
purchase must be reported immediately after unpacking. Repairs arising after expiry
of the guarantee period are chargeable.
Guarantee Cover
The equipment has been carefully pro-
duced in accordance with strict quality
guidelines and conscientiously checked
prior to delivery.
The guarantee applies for all material and
manufacturing defects. This guarantee
does not extend to cover product parts that
are subject to normal wear and may therefore be considered as wearing parts (e.g.
grinding wheels, grinding belts, clamping
ange) or to cover damage to breakable
parts (e.g. switches, batteries, or parts
made of glass).
This guarantee shall be invalid if the product has been damaged, used incorrectly or
not maintained. Precise adherence to all of
the instructions specied in the operating
manual is required for proper use of the
product. Intended uses and actions against
which the operating manual advises or
warns must be categorically avoided.
The product is designed only for private
and not commercial use. The guarantee
will be invalidated in case of misuse or
improper handling, use of force, or interventions not undertaken by our authorised
service branch.
Processing in Case of Guarantee
To ensure efcient handling of your query,
please follow the directions below:
• Please have the receipt and item number (IAN 104454) ready as proof of
purchase for all enquiries.
• Please nd the item number on the rating plate.
• Should functional errors or other defects occur, please initially contact the
service department specied below by
telephone or by e-mail. You will then
receive further information on the processing of your complaint.
• After consultation with our customer
48
Page 49

GB MT
service, a product recorded as defective
can be sent postage paid to the service
address communicated to you, with the
proof of purchase (receipt) and specication of what constitutes the defect and
when it occurred. In order to avoid acceptance problems and additional costs,
please be sure to use only the address
communicated to you. Ensure that the
consignment is not sent carriage forward
or by bulky goods, express or other special freight. Please send the equipment
inc. all accessories supplied at the time
of purchase and ensure adequate, safe
transport packaging.
Repair Service
For a charge, repairs not covered by
the guarantee can be carried out by
our service branch, which will be happy to
issue a cost estimate for you.
We can handle only equipment that has
been sent with adequate packaging and
postage.
Attention: Please send your equipment to
our service branch in clean condition and
with an indication of the defect.
Equipment sent carriage forward or by
bulky goods, express or other special
freight will not be accepted.
We will dispose of your defective devices
free of charge when you send them to us.
Assistenza Malta
MT
Tel.: 80062230
E-Mail: grizzly@lidl.com.mt
IAN 104454
Importer
Please note that the following address is
not a service address. Please initially con-
tact the service centre specied above.
Grizzly Tools GmbH & Co. KG
Stockstädter Straße 20
63762 Großostheim
Germany
www.grizzly-service.eu
Service-Center
Service Great Britain
GB
Tel.: 0871 5000 720
(£ 0.10/Min.)
E-Mail: grizzly@lidl.co.uk
IAN 104454
49
Page 50

GB MT
50
Page 51

DE AT CH
Inhalt
Einleitung ...................................51
Bestimmungsgemäße Verwendung 51
Allgemeine Beschreibung ........... 52
Lieferumfang..................................52
Funktionsbeschreibung ....................52
Übersicht ......................................52
Technische Daten ........................ 52
Sicherheitshinweise ....................54
Symbole und Bildzeichen ................54
Allgemeine Sicherheitshinweise für
Elektrowerkzeuge ...........................55
Sicherheitshinweise für alle
Anwendungen ...............................60
Weiterführende Sicherheitshinweise .62
Weitere Sicherheitshinweise für alle
Anwendungen ...............................63
Ladevorgang .............................65
Akku entnehmen / einsetzen ...........66
Akku auaden ...............................66
Verbrauchte Akkus .........................66
Ladezustand des Akkus ..................66
prüfen...........................................66
Arbeitshinweise .........................67
Montage .................................... 67
Zusatzgriff montieren ......................67
Schutzhaube montieren/einstellen ....67
Scheibe montieren/wechseln ...........68
Bedienung .................................68
Ein- und Ausschalten .......................69
Reinigung und Wartung ............. 69
Reinigung .....................................70
Lagerung ...................................70
Entsorgung/ Umweltschutz.........70
Garantie .................................... 71
Reparatur-Service ...................... 72
Service-Center ............................ 72
Importeur ..................................72
Ersatzteile/Zubehör ...................73
Fehlersuche ................................ 74
Original EG-Konformitäts-
erklärung ..................................77
Einleitung
Herzlichen Glückwunsch zum Kauf Ihres
neuen Gerätes. Sie haben sich damit für
ein hochwertiges Gerät entschieden.
Dieses Gerät wurde während der Produktion auf Qualität geprüft und einer Endkontrolle unterzogen. Die Funktionsfähigkeit
Ihres Gerätes ist somit sichergestellt.
Die Betriebsanleitung ist Bestandteil
dieses Gerätes. Sie enthält wichtige
Hinweise für Sicherheit, Gebrauch
und Entsorgung. Machen Sie sich
vor der Benutzung des Gerätes mit
allen Bedien- und Sicherheitshinweisen vertraut. Benutzen Sie das
Gerät nur wie beschrieben und für
die angegebenen Einsatzbereiche.
Bewahren Sie die Betriebsanleitung
gut auf und händigen Sie alle Unterlagen bei Weitergabe des Gerätes
an Dritte mit aus.
Bestimmungsgemäße
Verwendung
Der Winkelschleifer ist ein Gerät zum Trennen, Schruppen und Bürsten von Metall,
Beton oder Fliesen ohne Verwendung von
Wasser.
Für alle anderen Anwendungsarten (z.B.
Schleifen mit nicht geeigneten Schleifwerk-
zeugen, Schleifen mit einer Kühlüssigkeit,
Schleifen oder Trennen gesundheitsgefährdender Materialien wie Asbest) ist das
Gerät nicht vorgesehen.
Das Gerät ist für den Einsatz im Heimwerkerbereich bestimmt. Es wurde nicht für
den gewerblichen Dauereinsatz konzipiert.
Das Gerät ist zum Gebrauch durch Erwachsene bestimmt. Jugendliche über
16Jahre dürfen das Gerät nur unter Aufsicht benutzen.
51
Page 52

DE AT CH
Der Hersteller haftet nicht für Schäden, die
durch bestimmungswidrigen Gebrauch
oder falsche Bedienung verursacht wurden.
Allgemeine
Beschreibung
Die Abbildung der wichtigsten
Funktionsteile nden Sie auf der
vorderen Ausklappseite.
Lieferumfang
Packen Sie das Gerät aus und kontrollieren
Sie, ob es vollständig ist. Entsorgen Sie das
Verpackungsmaterial ordnungsgemäß.
- Gerät
- Ladegerät
- Akku
- Zusatzgriff
- Schutzhaube
- Spannschlüssel
- Trennscheibe
- Originalbetriebsanleitung
Funktionsbeschreibung
Übersicht
1 Spannschlüssel mit
Aufbewahrung (nicht sichtbar)
2 Zusatzgriff
3 Spindel-Arretiertaste
4 Gewinde für Zusatzgriff
5 Ein-/Ausschalter
6 Handgriff
7 Taste für Ladezustandsanzeige
8 Akku-Ladezustandsanzeige
9 Akku
10 Entriegelungstaste Akku
(nicht sichtbar)
11 Netzstecker Ladegerät
12 Grüne LED
13 Rote LED
14 Ladegerät
15 Spannhebel für Schutzhaube
16 Trennscheibe
17 Schutzhaube
18 Aufnahmeansch
19 Spannmutter
20 Aufnahmespindel
21 Justiermutter
Der Winkelschleifer ist zum Trennen,
Schruppen oder Bürsten von Metall geeignet. Für die einzelne Anwendung sind
jeweils spezielle Scheiben vorgesehen.
Beachten Sie die Angaben der Scheibenhersteller.
Die Funktion der Bedienteile entnehmen Sie
bitte den nachfolgenden Beschreibungen.
Der im Lieferumfang enthaltene Akku ist
auch für die Akku Säbelsäge PSSA 18 A1
und den Akku-Drehschlagschrauber
PDSSA 18 A1 verwendbar.
52
Technische Daten
Winkelschleifer PWSA 18 A1:
Motorspannung
................................................. 18 V
Bemessungsdrehzahl (n) ...........8000 min
Abmessungen Trenn-/Schruppscheiben
................................. Ø 115 x 22,2 mm
Stärke Trenn-/Schruppscheiben max. 6 mm
Schleifspindelgewinde ..................... M14
Gewindelänge der Schleifspindel
..........................................max. 14 mm
Schutzart.........................................IPX0
Schalldruckpegel
(L
) ................... 81,6 dB(A); KpA= 3 dB
pA
Schallleistungspegel (L
)
wA
-1
Page 53

DE AT CH
gemessen ...........92,6 dB(A); KwA= 3 dB
garantiert ..............................96 dB(A)
Schwingungswert (a
Hauptgriff .......... 3,043 m/s
)
h
2
K= 1,5 m/s
Zusatzgriff .......... 5,024 m/s2 K= 1,5 m/s
Akku (Li-Ion) .............. PAP18-2.6A1
Anzahl der Batteriezellen ................. 10
Nennspannung ........................ 18 V
Kapazität ................................. 2,6 Ah
Ladezeit ...................................ca. 1 h
Ladegerät ................JLH-H260-18G
Nennaufnahme .......................... 70 W
Eingangsspannung/Input
....................... 220-240 V~, 50-60 Hz
Ausgangsspannung/Output
.............................. 18 V
Schutzklasse ................................
2600 mA
II
Schutzart .................................... IPX0
Es handelt sich bei den Schwingungswerten
um Maximalwerte, die mit der mitgelieferten Trennscheibe ermittelt wurden. Die
tatsächlichen Schwingungswerte können
abhängig von dem eingesetzten Zubehör
variieren.
Die Schwingungswerte werden weiterhin
durch die Handhabung des Anwenders
beeinusst.
Trennscheibe (aus Lieferumfang):
Leerlaufgeschwindigkeit n
................................... max.13300 min
0
-1
Scheibengeschwindigkeit ... max. 80 m/s*
Außendurchmesser .............. Ø 115 mm
Bohrung ............................ Ø 22,2 mm
Dicke ......................................2,4 mm
*
Die Schleifscheibe muss einer Umlaufge-
schwindigkeit von 80 m/s standhalten.
genannten Normen und Bestimmungen
ermittelt.
Technische und optische Veränderungen
2
können im Zuge der Weiterentwicklung
2
ohne Ankündigung vorgenommen werden.
Alle Maße, Hinweise und Angaben dieser
sind deshalb ohne Gewähr. Rechtsansprüche, die aufgrund der Betriebsanleitung
gestellt werden, können daher nicht geltend
gemacht werden.
Der angegebene Schwingungsemissionswert ist nach einem genormten Prüfverfahren gemessen worden und kann zum
Vergleich eines Elektrowerkzeugs mit einem
anderen verwendet werden.
Der angegebene Schwingungsemissionswert kann auch zu einer einleitenden
Einschätzung der Aussetzung verwendet
werden.
Warnung:
Der Schwingungsemissionswert
kann sich während der tatsächlichen Benutzung des Elektrowerkzeugs von dem Angabewert unterscheiden, abhängig von der Art und
Weise, in der das Elektrowerkzeug
verwendet wird.
Es besteht die Notwendigkeit, Sicherheitsmaßnahmen zum Schutz
des Bedieners festzulegen, die auf
einer Abschätzung der Aussetzung
während der tatsächlichen Benutzungsbedingungen beruhen (hierbei
sind alle Anteile des Betriebszyklus
zu berücksichtigen, beispielsweise
Zeiten, in denen das Elektrowerkzeug abgeschaltet ist, und solche,
in denen es zwar eingeschaltet ist,
aber ohne Belastung läuft).
Lärm- und Vibrationswerte wurden entsprechend den in der Konformitätserklärung
53
Page 54

DE AT CH
Sicherheitshinweise
ACHTUNG!
Beim Gebrauch von Elektrowerkzeugen sind zum Schutz gegen
elektrischen Schlag, Verletzungs- und
Brandgefahr folgende grundsätzliche
Sicherheitsmaßnahmen zu beachten.
Lesen Sie alle diese Hinweise, bevor
Sie dieses Elektrowerkzeug benutzen,
und bewahren Sie die Sicherheitshinweise gut auf.
Symbole und Bildzeichen
Bildzeichen auf dem Gerät:
Achtung!
Verletzungsgefahr durch sich dre-
hendes Werkzeug! Halten Sie Ihre
Hände fern
Gefahr durch elektrischen Schlag!
Ziehen Sie vor Wartungs- und Reparaturarbeiten den Netzstecker
aus der Steckdose
Betriebsanleitung lesen!
Weitere Bildzeichen auf der
Trennscheibe:
Nicht zulässig für Seitenschleifen
Nicht zulässig für Nassschleifen
Keine defekte Scheiben verwenden
Eignung für Metall
Sicherheitsschuhe tragen
Bildzeichen auf dem Akku:
Werfen Sie den Akku
nicht in den Hausmüll,
ins Feuer oder ins
Wasser.
Setzen Sie den Akku nicht über längere Zeit starker Sonneneinstrahlung
aus und legen Sie ihn nicht auf Heizkörpern ab (max. 45°C).
Geben Sie Akkus an einer Altbat-
teriesammelstelle ab, wo sie einer
umweltgerechten Wiederverwertung
zugeführt werden.
Tragen Sie Gehörschutz
Tragen Sie Augenschutz
Tragen Sie einen Atemschutz
Gefahr durch Schnittverletzungen!
Tragen Sie schnittsichere Handschuhe
Elektrogeräte gehören nicht in den
Hausmüll
54
Bildzeichen auf dem Ladegerät:
Achtung!
Lesen Sie die Bedienungsanleitung
aufmerksam durch.
Das Ladegerät ist nur zur Verwen-
dung in Räumen geeignet.
T2,5A
Gerätesicherung
Schutzklasse II
Page 55
DE AT CH
Elektrogeräte gehören nicht in den
Hausmüll.
Grüne LED blinkt ohne Akku
Ladegerät betriebsbereit
Grüne LED leuchtet Akku ist geladen
Rote LED leuchtet Akku lädt
Grüne LED blinkt mit Akku
Akku muss 30 min vorgeladen werden ,
bevor der Ladevorgang beginnt
Rote und grüne LED blinkt Akku defekt
Rote und grüne LED leuchtet
Akku zu kalt oder zu warm. Akku kann
nicht geladen werden
Symbole in der Betriebsanleitung:
Gefahrenzeichen mit Anga-
ben zur Verhütung von Personen- oder Sachschäden.
Gebotszeichen (anstelle des Ausru-
fungszeichens ist das Gebot erläutert) mit Angaben zur Verhütung von
Schäden.
Bewahren Sie alle Sicherheitshinweise und Anweisungen für die Zukunft
auf.
Der in den Sicherheitshinweisen verwendete
Begriff ,,Elektrowerkzeug” bezieht sich auf
netzbetriebene Elektrowerkzeuge (mit Netzkabel) und auf akkubetriebene Elektrowerkzeuge (ohne Netzkabel).
1) Arbeitsplatzsicherheit:
a) Halten Sie Ihren Arbeitsbereich
sauber und gut beleuchtet. Unord-
nung oder unbeleuchtete Arbeitsbereiche können zu Unfällen führen.
b) Arbeiten Sie mit dem Elektrowerk-
zeug nicht in explosionsgefährdeter Umgebung, in der sich brennbare Flüssigkeiten, Gase oder
Stäube benden. Elektrowerkzeuge
erzeugen Funken, die den Staub oder die
Dämpfe entzünden können.
c) Halten Sie Kinder und andere
Personen während der Benutzung
des Elektrowerkzeuges fern.
Bei Ablenkung können Sie die Kontrolle
über das Gerät verlieren.
2) Elektrische Sicherheit:
Hinweiszeichen mit Informationen zum
besseren Umgang mit dem Gerät.
Allgemeine
Sicherheitshinweise für
Elektrowerkzeuge
WARNUNG! Lesen Sie alle Si-
cherheitshinweise und Anweisungen. Versäumnisse bei der Ein-
haltung der Sicherheitshinweise und
Anweisungen können elektrischen
Schlag, Brand und/oder schwere
Verletzungen verursachen.
Vorsicht: So vermeiden Sie Unfälle
und Verletzungen durch elektrischen
Schlag:
a) Der Anschlussstecker des Elektro-
werkzeuges muss in die Steckdo-
se passen. Der Stecker darf in keiner Weise verändert werden. Verwenden Sie keine Adapterstecker
gemeinsam mit schutzgeerdeten
Elektrowerkzeugen. Unveränderte
Stecker und passende Steckdosen verringern das Risiko eines elektrischen Schlages.
55
Page 56

DE AT CH
b) Vermeiden Sie Körperkontakt mit
geerdeten Oberächen wie von
Rohren, Heizungen, Herden und
Kühlschränken. Es besteht ein erhöhtes
Risiko durch elektrischen Schlag, wenn Ihr
Körper geerdet ist.
c) Halten Sie das Elektrowerkzeug
von Regen oder Nässe fern. Das
Eindringen von Wasser in ein Elektrowerkzeug erhöht das Risiko eines elektrischen
Schlages.
d) Zweckentfremden Sie das Kabel
nicht, um das Elektrowerkzeug
zu tragen, aufzuhängen oder um
den Stecker aus der Steckdose zu
ziehen. Halten Sie das Kabel fern
von Hitze, Öl, scharfen Kanten
oder sich bewegenden Geräteteilen. Beschädigte oder verwickelte Kabel
erhöhen das Risiko eines elektrischen
Schlages.
e) Wenn Sie mit dem Elektrowerk-
zeug im Freien arbeiten, verwenden Sie nur Verlängerungskabel,
die auch für den Außenbereich
geeignet sind. Die Anwendung eines
für den Außenbereich geeigneten Verlängerungskabels verringert das Risiko eines
elektrischen Schlages.
f) Wenn der Betrieb des Elektro-
werkzeuges in feuchter Umgebung nicht vermeidbar ist,
verwenden Sie einen Fehlerstromschutzschalter. Der Einsatz eines
Fehlerstromschutzschalters vermindert das
Risiko eines elektrischen Schlages. Benutzen Sie einen Fehlerstromschutzschalter
mit einem Auslösestrom von 30 mA oder
weniger.
3) Sicherheit von Personen:
Vorsicht: So vermeiden Sie Unfälle
und Verletzungen:
a) Seien Sie aufmerksam, achten Sie
darauf, was Sie tun, und gehen
Sie mit Vernunft an die Arbeit mit
dem Elektrowerkzeug. Benutzen
Sie das Elektrowerkzeug nicht,
wenn Sie müde sind oder unter
Einuss von Drogen, Alkohol oder
Medikamenten stehen. Ein Moment
der Unachtsamkeit beim Gebrauch des
Elektrowerkzeugs kann zu ernsthaften Verletzungen führen.
b) Tragen Sie persönliche Schut-
zausrüstung und immer eine
Schutzbrille. Das Tragen persönlicher
Schutzausrüstung, wie Staubmaske,
rutschfeste Sicherheitsschuhe, Schutzhelm
oder Gehörschutz je nach Art und Einsatz
des Elektrowerkzeugs, verringert das Risiko von Verletzungen.
c) Vermeiden Sie eine unbeabsichtig-
te Inbetriebnahme. Vergewissern
Sie sich, dass das Elektrowerkzeug ausgeschaltet ist, bevor Sie
es an die Stromversorgung und/
oder den Akku anschließen, es
aufnehmen oder tragen. Wenn Sie
beim Tragen des Elektrowerkzeugs den
Finger am Schalter haben oder das Gerät
eingeschaltet an die Stromversorgung anschließen, kann dies zu Unfällen führen.
d) Entfernen Sie Einstellwerkzeuge
oder Schraubenschlüssel, bevor
Sie das Elektrowerkzeug einschalten. Ein Werkzeug oder Schlüssel, der
sich in einem drehenden Geräteteil bendet, kann zu Verletzungen führen.
e) Vermeiden Sie eine abnormale
Körperhaltung. Sorgen Sie für
einen sicheren Stand und halten
Sie jederzeit das Gleichgewicht.
Dadurch können Sie das Elektrowerkzeug in unerwarteten Situationen besser kontrollieren.
f) Tragen Sie geeignete Kleidung.
56
Page 57

DE AT CH
Tragen Sie keine weite Kleidung
oder Schmuck. Halten Sie Haare,
Kleidung und Handschuhe fern
von sich bewegenden Teilen. Locke-
re Kleidung, Schmuck oder lange Haare
können von sich bewegenden Teilen erfasst werden.
g) Wenn Staubabsaug- und -auf-
fangeinrichtungen montiert werden können, vergewissern Sie
sich, dass diese angeschlossen
sind und richtig verwendet werden. Verwendung einer Staubabsaugung
kann Gefährdungen durch Staub verringern.
4) Verwendung und Behandlung des
Elektrowerkzeuges:
a) Überlasten Sie das Gerät nicht.
Verwenden Sie für Ihre Arbeit das
dafür bestimmte Elektrowerkzeug. Mit dem passenden Elektrowerk-
zeug arbeiten Sie besser und sicherer im
angegebenen Leistungsbereich.
b) Benutzen Sie kein Elektrowerk-
zeug, dessen Schalter defekt ist.
Ein Elektrowerkzeug, das sich nicht mehr
ein- oder ausschalten lässt, ist gefährlich
und muss repariert werden.
c) Ziehen Sie den Stecker aus der
Steckdose und/oder entfernen
Sie den Akku, bevor Sie Geräteeinstellungen vornehmen, Zubehörteile wechseln oder das Gerät
weglegen. Diese Vorsichtsmaßnahme
verhindert den unbeabsichtigten Start des
Elektrowerkzeugs.
d) Bewahren Sie das unbenutzte
Elektrowerkzeug außerhalb der
Reichweite von Kindern auf.
Lassen Sie Personen das Gerät
nicht benutzen, die mit diesem
nicht vertraut sind oder diese An-
weisungen nicht gelesen haben.
Elektrowerkzeuge sind gefährlich, wenn
sie von unerfahrenen Personen benutzt
werden.
e) Pegen Sie das Elektrowerkzeug
mit Sorgfalt. Kontrollieren Sie,
ob bewegliche Teile einwandfrei
funktionieren und nicht klemmen,
ob Teile gebrochen oder so beschädigt sind, dass die Funktion
des Gerätes beeinträchtigt ist.
Lassen Sie beschädigte Teile vor
dem Einsatz des Gerätes reparieren. Viele Unfälle haben ihre Ursache in
schlecht gewarteten Elektrowerkzeugen.
f) Halten Sie Schneidwerkzeuge
scharf und sauber. Sorgfältig ge-
pegte Schneidwerkzeuge mit scharfen
Schneidkanten verklemmen sich weniger
und sind leichter zu führen.
g) Verwenden Sie das Elektrowerk-
zeug, Zubehör, Einsatzwerkzeuge
usw. entsprechend diesen Anweisungen. Berücksichtigen Sie dabei
die Arbeitsbedingungen und die
auszuführende Tätigkeit. Der Ge-
brauch des Elektrowerkzeuges für andere
als die vorgesehenen Anwendungen kann
zu gefährlichen Situationen führen.
5) Verwendung und Behandlung
des Akkuwerkzeugs
a) Laden Sie die Akkus nur in Lade-
geräten auf, die vom Hersteller
empfohlen werden. Für ein Lade-
gerät, das für eine bestimmte Art von
Akkus geeignet ist, besteht Brandgefahr,
wenn es mit anderen Akkus verwendet
wird.
b) Verwenden Sie nur die dafür
vorgesehenen Akkus in den Elektrowerkzeugen. Der Gebrauch von
anderen Akkus kann zu Verletzungen
57
Page 58

DE AT CH
und Brandgefahr führen.
c) Halten Sie den nicht benutzten
Akku fern von Büroklammern,
Münzen, Schlüsseln, Nägeln,
Schrauben oder anderen kleinen
Metallgegenständen, die eine
Überbrückung der Kontakte verursachen könnten. Ein Kurzschluss
zwischen den Akkukontakten kann
Verbrennungen oder Feuer zur Folge
haben.
d) Bei falscher Anwendung kann
Flüssigkeit aus dem Akku austreten. Vermeiden Sie den Kontakt
damit. Bei zufälligem Kontakt
mit Wasser abspülen. Wenn die
Flüssigkeit in die Augen kommt,
nehmen Sie zusätzlich ärztliche
Hilfe in Anspruch. Austretende
Akkuüssigkeit kann zu Hautreizungen
oder Verbrennungen führen.
6) SERVICE
Lassen Sie lhr Elektrowerkzeug
nur von qualiziertem Fachpersonal und nur mit OriginalErsatzteilen reparieren. Damit wird
sichergestellt, dass die Sicherheit des
Gerätes erhalten bleibt.
7) Spezielle Sicherheitshinweise für
Akkugeräte
a) Stellen Sie sicher, dass das Gerät
ausgeschaltet ist, bevor Sie den
Akku einsetzen. Das Einsetzen eines
Akkus in ein Elektrowerkzeug, das eingeschaltet ist, kann zu Unfällen führen.
b) Laden Sie Ihre Batterien nur im
Innenbereich auf, weil das Ladegerät nur dafür bestimmt ist.
c) Um das Risiko eines elektrischen
Schlags zu reduzieren, ziehen Sie
den Stecker des Ladegeräts aus
der Steckdose heraus, bevor Sie
es reinigen.
d) Setzen Sie den Akku nicht über
längere Zeit starker Sonneneinstrahlung aus und legen Sie ihn
nicht auf Heizkörpern ab. Hitze
schadet dem Akku und es besteht Explosionsgefahr.
e) Lassen Sie einen erwärmten
Akku vor dem Laden abkühlen.
f) Öffnen Sie den Akku nicht und
vermeiden Sie eine mechanische
Beschädigung des Akkus. Es be-
steht die Gefahr eines Kurzschlusses und
es können Dämpfe austreten, die die
Atemwege reizen. Sorgen Sie für Frischluft und nehmen Sie bei Beschwerden
zusätzlich ärztliche Hilfe in Anspruch.
g) Verwenden Sie keine nicht wie-
derauadbaren Batterien!
8) RICHTIGER UMGANG MIT DEM
AKKULADEGERÄT
a) Dieses Gerät kann von Kindern ab 8
Jahren und darüber sowie von Personen
mit verringerten physischen, sensorischen oder mentalen Fähigkeiten oder
Mangel an Erfahrung und Wissen
benutzt werden, wenn sie beaufsichtigt
oder bezüglich des sicheren Gebrauchs
des Gerätes unterwiesen wurden und
die daraus resultierenden Gefahren
verstehen. Kinder dürfen nicht mit dem
Gerät spielen. Reinigung und BenutzerWartung dürfen nicht von Kindern ohne
Beaufsichtigung durchgeführt werden.
b) Kinder sollten beaufsichtigt werden, um
sicherzustellen, dass sie nicht mit dem
Gerät spielen.
c) Verwenden Sie zum Laden des
Akkus ausschließlich das mitgelieferte Ladegerät. Es besteht Brand-
58
Page 59

DE AT CH
und Explosionsgefahr.
d) Überprüfen Sie vor jeder Benut-
zung Ladegerät, Kabel und Stecker und lassen Sie es von qua-
liziertem Fachpersonal und nur
mit Original-Ersatzteilen reparieren. Benutzen Sie ein defektes
Ladegerät nicht und öffnen Sie es
nicht selbst. Damit wird sichergestellt,
dass die Sicherheit des Gerätes erhalten
bleibt.
e) Achten Sie darauf, dass die Netz-
spannung mit den Angaben des
Typenschildes auf dem Ladegerät
übereinstimmt. Es besteht die Gefahr
eines elektrischen Schlags.
f) Trennen Sie das Ladegerät vom
Netz, bevor Verbindungen zum
Elektrowerkzeug geschlossen
oder geöffnet werden.
g) Halten Sie das Ladegerät sauber
und fern von Nässe und Regen.
Benutzen Sie das Ladegerät niemals im Freien. Durch Verschmutzung
und das Eindringen von Wasser erhöhen sich das Risiko eines elektrischen
Schlags.
h) Das Ladegerät darf nur mit den
zugehörigen Original-Akkus betrieben werden. Das Laden von an-
deren Akkus kann zu Verletzungen und
Brandgefahr führen.
i) Vermeiden Sie mechanische Be-
schädigungen des Ladegerätes.
Sie können zu inneren Kurzschlüssen
führen.
j) Das Ladegerät darf nicht auf
brennbarem Untergrund (z.B. Papier, Textilien) betrieben werden.
Es besteht Brandgefahr wegen der beim
Laden auftretenden Erwärmung.
k) Wenn die Anschlussleitung dieses Ge-
rätes beschädigt wird, muss sie durch
den Hersteller oder seinen Kundendienst
oder eine ähnlich qualizierte Person
ersetzt werden, um Gefährdungen zu
vermeiden.
l) Der Akku Ihrers Gerätes wird nur teil-
weise vorgeladen geliefert und muss vor
Gebrauch zum ersten Mal richtig aufgeladen werden. Stecken Sie den Akku
in den Sockel ein und schließen Sie das
Ladegerät ans Stromnetz an.
m) Ziehen Sie den Netzstecker wenn der
Akku voll aufgeladen ist und trennen Sie
das Ladegerät vom Gerät.
n) Lassen Sie Ihre Akku nicht kontinuierlich
auaden. Das kann die Akkuzellen
beschädigen. Anmerkung: Ständiges
Nachladen kleiner Kapazitäten kann die
Akkuzellen beschädigen. Nur nachladen, wenn das Gerät zu langsam läuft.
o) Laden Sie in dem Ladegerät keine nicht-
auadbaren Batterien auf.
9) RESTRISIKEN
Auch wenn Sie dieses Elektrowerkzeug
vorschriftsmäßig bedienen, bleiben immer
Restrisiken bestehen. Folgende Gefahren
können im Zusammenhang mit der Bauweise und Ausführung dieses Elektrowerkzeugs
auftreten:
a) Schnittverletzungen
b) Gehörschäden, falls kein geeigneter Ge-
hörschutz getragen wird.
c) Gesundheitsschäden, die aus Hand-
Arm-Schwingungen resultieren, falls das
Gerät über einen längeren Zeitraum verwendet wird oder nicht ordnungsgemäß
geführt und gewartet wird.
Warnung! Dieses Elektrowerkzeug
erzeugt während des Betriebs ein
elektromagnetisches Feld. Dieses
Feld kann unter bestimmten Umständen aktive oder passive medizinische Implantate beeinträchtigen.
59
Page 60

DE AT CH
Um die Gefahr von ernsthaften
oder tödlichen Verletzungen zu
verringern, empfehlen wir Personen
mit medizinischen Implantaten ihren
Arzt und den Hersteller des medizinischen Implantats zu konsultieren,
bevor die Maschine bedient wird.
Sicherheitshinweise für alle
Anwendungen
Gemeinsame Sicherheitshinweise
zum Schleifen, Sandpapierschleifen, Arbeiten mit Drahtbürsten und
Trennschleifen:
• Dieses Elektrowerkzeug ist zu
verwenden als Schleifer, Sandpapierschleifer, Drahtbürste und
Trennschleifmaschine. Beachten
Sie alle Sicherheitshinweise, Anweisungen, Darstellungen und
Daten, die Sie mit dem Gerät
erhalten. Wenn Sie die folgenden
Anweisungen nicht beachten, kann es
zu elektrischem Schlag, Feuer und/oder
schweren Verletzungen kommen.
• Dieses Elektrowerkzeug ist nicht
für Topfbürsten geeignet. Verwen-
dungen, für die das Elektrowerkzeug
nicht vorgesehen ist, können Gefährdungen und Verletzungen verursachen.
• Dieses Elektrowerkzeug ist nicht
für Schleiftöpfe, Schleifstifte oder
-konusse geeignet. Verwendungen,
für die das Elektrowerkzeug nicht vorgesehen ist, können Gefährdungen und
Verletzungen verursachen.
• Dieses Elektrowerkzeug ist nicht
zum Polieren geeignet. Verwendun-
gen, für die das Elektrowerkzeug nicht
vorgesehen ist, können Gefährdungen
und Verletzungen verursachen.
• Verwenden Sie kein Zubehör,
das vom Hersteller nicht speziell
für dieses Elektrowerkzeug vorgesehen und empfohlen wurde.
Nur weil Sie das Zubehör an Ihrem
Elektrowerkzeug befestigen können, garantiert das keine sichere Verwendung.
• Die zulässige Drehzahl des Einsatzwerkzeugs muss mindestens
so hoch sein wie die auf dem
Elektrowerkzeug angegebene
Höchstdrehzahl. Zubehör, das sich
schneller als zulässig dreht, kann zerbre-
chen und umheriegen.
• Außendurchmesser und Dicke
des Einsatzwerkzeugs müssen
den Maßangaben Ihres Elektrowerkzeuges entsprechen. Falsch
bemessene Einsatzwerkzeuge können
nicht ausreichend abgeschirmt oder kontrolliert werden.
• Einsatzwerkzeuge mit Gewindeeinsatz müssen genau auf das
Gewinde der Schleifspindel passen. Bei Einsatzwerkzeugen, die
mittels Flansch montiert werden,
muss der Lochdurchmesser des
Einsatzwerkzeuges zum Aufnahmedurchmesser des Flansches
passen. Einsatzwerkzeuge, die nicht
genau am Elektrowerkzeug befestigt
werden, drehen sich ungleichmäßig,
vibrieren sehr stark und können zum
Verlust der Kontrolle führen.
• Verwenden Sie keine beschädigten Einsatzwerkzeuge. Kontrollieren Sie vor jeder Verwendung
Einsatzwerkzeuge wie Schleifscheiben auf Absplitterungen
und Risse, Schleifteller auf Risse,
Verschleiß oder starke Abnutzung, Drahtbürsten auf lose
oder gebrochene Drähte. Wenn
das Elektrowerkzeug oder das
Einsatzwerkzeug herunterfällt,
60
Page 61

DE AT CH
überprüfen Sie, ob es beschädigt
ist oder verwenden Sie ein unbeschädigtes Einsatzwerkzeug.
Wenn Sie das Einsatzwerkzeug
kontrolliert und eingesetzt haben, halten Sie und in der Nähe
bendliche Personen sich außerhalb der Ebene des rotierenden
Einsatzwerkzeugs auf und lassen
Sie das Gerät 1 Minute lang mit
Höchstdrehzahl laufen. Beschädig-
te Einsatzwerkzeuge brechen meist in
dieser Testzeit.
• Tragen Sie persönliche Schutzausrüstung. Verwenden Sie je nach
Anwendung Vollgesichtsschutz,
Augenschutz oder Schutzbrille. Soweit angemessen, tragen
Sie Staubmaske, Gehörschutz,
Schutzhandschuhe oder Spezialschürze, die kleine Schleif- und
Materialpartikel von Ihnen fernhalten. Die Augen sollen vor herumie-
genden Fremdkörpern geschützt werden,
die bei verschiedenen Anwendungen
entstehen. Staub- oder Atemschutzmaske
müssen den bei der Anwendung entste-
henden Staub ltern. Wenn Sie lange
lautem Lärm ausgesetzt sind, können Sie
einen Hörverlust erleiden.
• Achten Sie bei anderen Personen
auf sicheren Abstand zu Ihrem
Arbeitsbereich. Jeder, der den
Arbeitsbereich betritt, muss persönliche Schutzausrüstung tragen. Bruchstücke des Werkstücks oder
gebrochener Einsatzwerkzeuge können
wegiegen und Verletzungen auch
außerhalb des direkten Arbeitsbereichs
verursachen.
• Halten Sie das Elektrowerkzeug
nur an den isolierten Griffächen, wenn Sie Arbeiten ausführen, bei denen das Einsatzwerk-
zeug verborgene Stromleitungen
oder das eigene Netzkabel
treffen kann. Der Kontakt mit einer
spannungsführenden Leitung kann auch
metallene Geräteteile unter Spannung
setzen und zu einem elektrischen Schlag
führen.
• Halten Sie das Netzkabel von
sich drehenden Einsatzwerkzeugen fern. Wenn Sie die Kontrolle über
das Gerät verlieren, kann das Netzkabel
durchtrennt oder erfasst werden und Ihre
Hand oder Ihr Arm in das sich drehende
Einsatzwerkzeug geraten.
• Legen Sie das Elektrowerkzeug
niemals ab, bevor das Einsatzwerkzeug völlig zum Stillstand
gekommen ist. Das sich drehende
Einsatzwerkzeug kann in Kontakt mit
der Ablageäche geraten, wodurch Sie
die Kontrolle über das Elektrowerkzeug
verlieren können.
• Lassen Sie das Elektrowerkzeug
nicht laufen, während Sie es
tragen. Ihre Kleidung kann durch zu-
fälligen Kontakt mit dem sich drehenden
Einsatzwerkzeug erfasst werden und das
Einsatzwerkzeug sich in Ihren Körper
bohren.
• Reinigen Sie regelmäßig die
Lüftungsschlitze Ihres Elektrowerkzeugs. Das Motorgebläse zieht
Staub in das Gehäuse, und eine starke
Ansammlung von Metallstaub kann
elektrische Gefahren verursachen.
• Verwenden Sie das Elektrowerkzeug nicht in der Nähe brennbarer Materialien. Funken können diese
Materialien entzünden.
• Verwenden Sie keine Einsatz-
werkzeuge, die üssige Kühlmittel
erfordern. Die Verwendung von Was-
ser oder anderen üssigen Kühlmitteln
kann zu einem elektrischen Schlag führen.
61
Page 62
DE AT CH
Weiterführende
Sicherheitshinweise
• Schließen Sie das Gerät nur an eine
Steckdose mit Fehlerstrom-Schutzeinrichtung (FI-Schalter) mit einem Bemessungs-
fehlerstrom von nicht mehr als 30mA an.
• Halten Sie Netzkabel und Verlänge-
rungskabel von der Scheibe fern. Ziehen
Sie bei Beschädigung oder Durchschneiden sofort den Netzstecker aus
der Steckdose. Berühren Sie die Leitung
nicht, bevor sie vom Netz getrennt ist.
Es besteht Gefahr durch elektrischen
Schlag.
• Der Austausch des Steckers oder der
Anschlussleitung ist immer vom Hersteller
des Elektrowerkzeugs oder seinem Kundendienst auszuführen, um Gefährdungen zu vermeiden.
• Verwenden Sie nur Schleifscheiben, deren aufgedruckte Drehzahl mindestens
so hoch ist wie die auf dem Typenschild
des Gerätes angegebene.
• Unterziehen Sie die Schleifscheibe vor
dem Gebrauch einer Sichtprüfung. Verwenden Sie keine beschädigten oder
verformten Schleifscheiben. Wechseln
Sie eine abgenutzte Schleifscheibe aus.
• Achten Sie darauf, dass beim Schleifen entstehende Funken keine Gefahr
hervorrufen, z. B. Personen treffen oder
entammbare Substanzen entzünden.
• Tragen Sie beim Schleifen, Bürsten und
Trennen stets eine Schutzbrille, Sicherheitshandschuhe, einen Atemschutz und
einen Gehörschutz.
• Halten Sie nie die Finger zwischen
Schleifscheibe und Funkenschutz oder in
die Nähe der Schutzhauben. Es besteht
Gefahr durch Quetschen.
• Die rotierenden Teile des Gerätes können
aus funktionellen Gründen nicht abgedeckt werden. Gehen Sie daher mit Bedacht
vor und sichern Sie das Werkstück gut,
um ein Verrutschen zu vermeiden, wodurch Ihre Hände mit der Schleifscheibe in
Berührung kommen könnten.
• Das Werkstück wird beim Schleifen
heiß. Nicht an der bearbeiteten Stelle
anfassen, lassen Sie es abkühlen. Es
besteht Verbrennungsgefahr. Verwenden
Sie kein Kühlmittel oder ähnliches.
• Arbeiten Sie mit dem Gerät nicht, wenn
Sie müde sind oder nach der Einnahme
von Alkohol oder Tabletten. Legen Sie
immer rechtzeitig eine Arbeitspause ein.
• Schalten Sie das Gerät aus und nehmen
Sie vor allen Arbeiten den Akku aus
dem Gerät.
Restrisiken
Auch wenn Sie dieses Elektrowerkzeug vorschriftsmäßig bedienen, bleiben immer Restrisiken bestehen. Folgende Gefahren können im
Zusammenhang mit der Bauweise und Ausführung dieses Elektrowerkzeugs auftreten:
a) Lungenschäden, falls kein geeigneter
Atemschutz getragen wird.
b) Gehörschäden, falls kein geeigneter
Gehörschutz getragen wird.
c) Gesundheitsschäden durch
- Berührung der Schleifwerkzeuge im
nicht abgedeckten Bereich;
- Herausschleudern von Teilen aus
Werkstücken oder beschädigten
Schleifscheiben.
d) Gesundheitsschäden, die aus Hand-
Arm-Schwingungen resultieren, falls das
Gerät über einen längeren Zeitraum verwendet wird oder nicht ordnungsgemäß
geführt und gewartet wird.
Warnung! Dieses Elektrowerkzeug
erzeugt während des Betriebs ein
elektromagnetisches Feld. Dieses
Feld kann unter bestimmten Umstän-
62
Page 63

DE AT CH
den aktive oder passive medizinische Implantate beeinträchtigen.
Um die Gefahr von ernsthaften oder
tödlichen Verletzungen zu verringern, empfehlen wir Personen mit
medizinischen Implantaten ihren
Arzt und den Hersteller des medizinischen Implantats zu konsultieren,
bevor die Maschine bedient wird.
Weitere Sicherheitshinweise
für alle Anwendungen
Rückschlag und entsprechende
Sicherheitshinweise
Rückschlag ist die plötzliche Reaktion infolge
eines hakenden oder blockierten drehenden
Einsatzwerkzeuges, wie Schleifscheibe,
Schleifteller, Drahtbürste usw. Verhaken oder
Blockieren führen zu einem abrupten Stopp
des rotierenden Einsatzwerkzeugs. Dadurch
wird ein unkontrolliertes Elektrowerkzeug gegen die Drehrichtung des Einsatzwerkzeugs
an die Blockierstelle beschleunigt. Wenn z.B.
eine Schleifscheibe im Werkstück hakt oder
blockiert, kann sich die Kante der Schleifscheibe, die in das Werkstück eintaucht,
verfangen und dadurch die Schleifscheibe
ausbrechen oder einen Rückschlag verursachen. Die Schleifscheibe bewegt sich dann
auf die Bedienperson zu oder von ihr weg,
je nach Drehrichtung der Scheibe an der
Blockierstelle. Hierbei können Schleifscheiben
auch brechen. Ein Rückschlag ist die Folge
eines falschen oder fehlerhaften Gebrauchs
des Elektrowerkzeugs. Er kann durch geeignete Vorsichtsmaßnahmen, wie nachfolgend
beschrieben, verhindert werden.
a) Halten Sie das Elektrowerkzeug gut
fest und bringen Sie Ihren Körper und
Ihre Arme in eine Position, in der Sie
die Rückschlagkräfte abfangen können.
Verwenden Sie immer den Zusatzgriff,
falls vorhanden, um die größtmögliche
Kontrolle über Rückschlagkräfte oder
Reaktionsmomente beim Hochlauf zu
haben. Die Bedienperson kann durch
geeignete Vorsichtsmaßnahmen die
Rückschlag- und Reaktionskräfte beherrschen.
b) Bringen Sie Ihre Hand nie in die Nähe
sich drehender Einsatzwerkzeuge. Das
Einsatzwerkzeug kann sich beim Rückschlag über Ihre Hand bewegen.
c) Meiden Sie mit Ihrem Körper den Be-
reich, in den das Elektrowerkzeug bei
einem Rückschlag bewegt wird. Der
Rückschlag treibt das Elektrowerkzeug
in die Richtung entgegengesetzt zur
Bewegung der Schleifscheibe an der
Blockierstelle.
d) Arbeiten Sie besonders vorsichtig im
Bereich von Ecken, scharfen Kanten
usw. Verhindern Sie, dass Einsatzwerkzeuge vom Werkstück zurückprallen
und verklemmen. Das rotierende Einsatzwerkzeug neigt bei Ecken, scharfen
Kanten oder wenn es abprallt dazu,
sich zu verklemmen. Dies verursacht
einen Kontrollverlust oder Rückschlag.
e) Verwenden Sie kein Ketten- oder ge-
zähntes Sägeblatt. Solche Einsatzwerkzeuge verursachen häug einen Rückschlag oder den Verlust der Kontrolle
über das Elektrowerkzeug.
Besondere Sicherheitshinweise
zum Schleifen und Trennschleifen
a) Verwenden Sie ausschließlich die für Ihr
Elektrowerkzeug zugelassenen Schleifkörper und die für diese Schleifkörper
vorgesehene Schutzhaube. Schleifkörper,
die nicht für das Elektrowerkzeug vorgesehen sind, können nicht ausreichend
abgeschirmt werden und sind unsicher.
63
Page 64

DE AT CH
b) Gekröpfte Schleifscheiben müssen
so vormontiert werden, dass ihre
Schleifäche nicht über der Ebene des
Schutzhaubenrandes hervorsteht. Eine
unsachgemäß montierte Schleifscheibe,
die über die Ebene des Schutzhaubenrandes hinausragt, kann nicht ausreichend abgeschirmt werden.
c) Die Schutzhaube muss sicher am Elek-
trowerkzeug angebracht und für ein
Höchstmaß an Sicherheit so eingestellt
sein, das der kleinstmögliche Teil des
Schleifkörpers offen zum Bediener
zeigt. Die Schutzhaube hilft, die
Bedienperson vor Bruchstücken,
zufälligem Kontakt mit dem Schleif körper sowie Funken, die Kleidung
entzünden könnten, zu schützen.
d) Schleifkörper dürfen nur für die emp-
fohlenen Einsatzmöglichkeiten verwendet werden. Zum Beispiel: Schleifen Sie
nie mit der Seitenäche einer Trennscheibe. Trennscheiben sind zum Ma-
terialabtrag mit der Kante der Scheibe
bestimmt. Seitliche Krafteinwirkung auf
diese Schleifkörper kann sie zerbrechen.
e) Verwenden Sie immer unbeschädigte
Spannansche in der richtigen Größe
und Form für die von Ihnen gewählte
Schleifscheibe. Geeignete Flansche
stützen die Schleifscheibe und ver ringern so die Gefahr eines Schleif-
scheibenbruchs. Flansche für Trennscheiben können sich von den
Flanschen für andere Schleifscheiben
unterscheiden.
f) Verwenden Sie keine abgenutzten Schleif-
scheiben von größeren Elektrowerkzeugen. Schleifscheiben für größere Elekt-
rowerkzeuge sind nicht für die höheren
Drehzahlen von kleineren Elektrowerkzeugen ausgelegt und können brechen.
Weitere besondere Sicherheitshinweise zum Trennschleifen
a) Vermeiden Sie ein Blockieren der
Trennscheibe oder zu hohen Anpressdruck. Führen Sie keine übermäßig
tiefen Schnitte aus. Eine Überlastung
der Trennscheibe erhöht deren Beanspruchung und die Anfälligkeit zum
Verkanten oder Blockieren und damit
die Möglichkeit eines Rückschlags oder
Schleifkörperbruchs.
b) Meiden Sie den Bereich vor und hinter
der rotierenden Trennscheibe. Wenn
Sie die Trennscheibe im Werkstück von
sich wegbewegen, kann im Falle eines
Rückschlags das Elektrowerkzeug mit
der sich drehenden Scheibe direkt auf
Sie zugeschleudert werden.
c) Falls die Trennscheibe verklemmt oder
Sie die Arbeit unterbrechen, schalten
Sie das Gerät aus und halten Sie es
ruhig, bis die Scheibe zum Stillstand gekommen ist. Versuchen Sie nie, die noch
laufende Trennscheibe aus dem Schnitt
zu ziehen, sonst kann ein Rückschlag
erfolgen. Ermitteln und beheben Sie die
Ursache für das Verklemmen.
d) Schalten Sie das Elektrowerkzeug nicht
wieder ein, solange es sich im Werkstück
bendet. Lassen Sie die Trennscheibe erst
ihre volle Drehzahl erreichen, bevor Sie
den Schnitt vorsichtig fortsetzen. Andern-
falls kann die Scheibe verhaken, aus dem
Werkstück springen oder einen Rückschlag verursachen.
e) Stützen Sie Platten oder Werkstücke ab,
um das Risiko eines Rückschlags durch
eine eingeklemmte Trennscheibe zu
vermindern. Große Werkstücke können
sich unter ihrem eigenen Gewicht durchbiegen. Das Werkstück muss auf beiden
Seiten der Scheibe abgestützt werden,
und zwar sowohl in der Nähe der Trenn-
64
Page 65

DE AT CH
scheibe als auch an der Kante.
f) Seien Sie besonders vorsichtig bei „Tauch-
schnitten“ in bestehende Wände oder
andere nicht einsehbare Bereiche. Die
eintauchende Trennscheibe kann beim
Schneiden in Gas- oder Wasserleitungen,
elektrische Leitungen oder andere Objekte
einen Rückschlag verursachen.
Zusätzliche Sicherheitshinweise
zum Sandpapierschleifen
Besondere Sicherheitshinweise zum Sandpapierschleifen:
• Benutzen Sie keine überdimensionierten Schleifblätter, sondern
befolgen Sie die Herstellerangaben zur Schleifblattgröße.
Schleifblätter, die über den Schleifteller
hinausragen, können Verletzungen verursachen sowie zum blockieren, Zerreißen
der Schleifblätter oder zum Rückschlag
führen.
Zusätzliche Sicherheitshinweise
zum Arbeiten mit Drahtbürsten
Besondere Sicherheitshinweise zum Arbeiten mit Drahtbürsten:
• Beachten Sie, dass die Drahtbürste auch während des
üblichen Gebrauchs Drahtstücke
verliert. Überlasten Sie die
Drähte nicht durch zu hohen
Anpressdruck. Wegiegende Draht-
stücke können sehr leicht durch dünne
Kleidung und/oder die Haut dringen.
• Wird eine Schutzhaube empfohlen, verhindern Sie, dass sich
Schutzhaube und Drahtbürste
berühren können. Teller- und Topf-
bürsten können durch Anpressdruck und
Zentrifugalkräfte ihren Durchmesser vergrössern.
Ladevorgang
Setzen Sie den Akku nicht
extremen Bedingungen wie
Wärme und Stoß aus. Es besteht Verletzungsgefahr durch
auslaufende Elektrolytlösung!
Spülen Sie bei Augen-HautKontakt die betroffenen Stellen mit Wasser oder Neutralisator und suchen Sie einen
Arzt auf.
Laden Sie den Akku nur in trocke-
nen Räumen auf.
Die Außenäche des Akkus muss
sauber und trocken sein, bevor Sie
das Ladegerät anschließen.
Es besteht die Gefahr von Verlet-
zungen durch Stromschlag.
Laden Sie nur mit beiliegendem
Original-Ladegerät auf. Achten
Sie darauf, dass das Gerät nicht
länger als 1 Stunden ununterbrochen aufgeladen wird. Der Akku
und das Gerät könnten beschädigt
werden und bei längerer Ladezeit
verbrauchen Sie unnötig Energie.
Bei Überladung erlischt der Garantieanspruch.
Achten Sie darauf, dass die Span-
nung des Netzanschlusses mit
dem Typenschild am Gerät übereinstimmt.
• Laden Sie den Akku vor dem ersten Gebrauch auf. Den Akku nicht mehrmals
hintereinander kurz auaden.
• Laden Sie den Akku nach, wenn das Ge-
65
Page 66

DE AT CH
rät zu langsam läuft.
• Eine wesentlich verkürzte Betriebszeit
trotz Auadung zeigt an, dass der Akku
verbraucht ist und ersetzt werden muss.
Verwenden Sie nur einen Original-Ersatzakku, den Sie über den Kundendienst
beziehen können.
• Beachten Sie in jedem Falle die jeweils
gültigen Sicherheitshinweise sowie Bestimmungen und Hinweise zum Umweltschutz.
• Defekte, die aus unsachgemäßer Handhabung resultieren, unterliegen nicht der
Garantie.
Akku entnehmen / einsetzen
1. Zum Herausnehmen des Akkus
(9) aus dem Gerät drücken Sie
die Entriegelungstaste (10) am
Akku und ziehen den Akku heraus.
2. Zum Einsetzen des Akkus (9)
schieben Sie den Akku entlang
der Führungsschiene in das Gerät.
Er rastet hörbar ein.
Akku auaden
Grüne LED blinkt ohne Akku
Ladegerät betriebsbereit
Grüne LED leuchtet Akku ist geladen
Rote LED leuchtet Akku lädt
Grüne LED blinkt mit Akku
Akku muss 30 min vorgeladen werden ,
bevor der Ladevorgang beginnt
Rote und grüne LED blinkt Akku defekt
Rote und grüne LED leuchtet
Akku zu kalt oder zu warm. Akku kann
nicht geladen werden
Verbrauchte Akkus
• Eine wesentlich verkürzte Betriebszeit
trotz Auadung zeigt an, dass der Akku
verbraucht ist und ersetzt werden muss.
Verwenden Sie nur einen Ersatz-Akku,
den Sie über den Kundendienst beziehen können.
• Beachten Sie in jedem Falle die jeweils
gültigen Sicherheitshinweise sowie
Bestimmungen und Hinweise zum Umweltschutz (siehe „Entsorgung/Umweltschutz“).
Ladezustand des Akkus
prüfen
1. Nehmen Sie den Akku (9) aus
dem Gerät.
2. Schieben Sie den Akku (9) auf
das Ladegerät auf.
3.
4. Nach erfolgtem Ladevorgang tren-
5. Ziehen Sie den Akku (9) vom La-
Schließen Sie das Ladegerät an
eine Steckdose an.
nen Sie das Ladegerät vom Netz.
degerät ab.
66
Die Ladezustandsanzeige (8) signalisiert
den Ladezustand des Akkus (9).
Drücken Sie den Aktivierungsknopf der Ladezustandsanzeige (7).
Der Ladezustand des Akkus wird durch Aufleuchten der entsprechenden LED-Leuchte
angezeigt.
rot-gelb-grün = Akku vollgeladen
rot-gelb = Akku ca. zur Hälfte geladen
rot = Akku muss geladen werden
Page 67
DE AT CH
Arbeitshinweise
Schruppschleifen:
Verwenden Sie niemals
Trennscheiben zum
Schruppen !
Üben Sie nur mäßigen Druck auf das
Werkstück aus. Bewegen Sie das Gerät
gleichmäßig hin und her.
Bei einem Arbeitswinkel von 30° bis 40°
erzielen Sie beim Schruppschleifen das
beste Ergebnis.
Trennschleifen:
Verwenden Sie niemals
Schruppscheiben zum
Trennen !
Es dürfen nur geprüfte, faserstoffverstärkte
Trenn- oder Schleifscheiben verwendet werden.
Arbeiten Sie grundsätzlich mit geringem
Vorschub. Üben Sie nur mäßigen Druck
auf das Werkstück aus.
Arbeiten Sie stets im Gegenlauf. So wird
das Gerät nicht unkontrolliert aus dem
Schnitt gedrückt.
Trennen von Steinwerkstoffen:
• Verwenden Sie zum Trennen von Steinwerkstoffen am Besten einen DiamantTrennscheibe. Achten Sie in jedem Fall
auf die Eignung und Kennzeichnung
der Trennscheibe für Ihre Anwendung.
• Sorgen Sie beim Trennen von Steinwerkstoffen für eine ausreichende
Staubabsaugung.
• Tragen Sie eine Staubschutzmaske.
• Das Gerät darf nur für Trockenschnitt/
Trockenschliff verwendet werden.
Hinweise zur Statik:
Schlitze in tragenden Wänden unterliegen
der Norm DIN 1053 Teil 1 oder länderspezischen Festlegungen. Diese Vorschriften sind unbedingt einzuhalten. Ziehen Sie
vor Arbeitsbeginn den verantwortlichen
Statiker, Architekten oder die zuständige
Bauleitung zu Rate.
Montage
Achtung! Verletzungsgefahr!
- Achten Sie darauf, zum Arbeiten
genügend Platz zu haben und
andere Personen nicht zu gefährden.
- Vor Inbetriebnahme müssen alle
Abdeckungen und Schutzvorrichtungen ordnungsgemäß montiert
sein.
- Ziehen Sie den Netzstecker, bevor Sie Einstellungen am Gerät
vornehmen.
Zusatzgriff montieren
Das Gerät darf nur mit mon-
tiertem Zusatzgriff betrieben
werden.
Schrauben Sie den Zusatzgriff (2) je nach
Arbeitsweise am Gewinde für den Zusatzgriff (4) links, rechts oder oben am Gerät
ein.
Schutzhaube montieren/
einstellen
Stellen Sie die Schutzhaube so ein, dass
ein Funkenug oder abgelöste Teile weder
67
Page 68

DE AT CH
den Anwender noch umstehende Personen
treffen können.
Die Stellung der Schutzhaube hat eben-
falls so zu erfolgen, dass der Funkenug
brennbare Teile, auch umliegend, nicht
entzündet.
Das Gerät darf nur mit mon-
tierter Schutzhaube betrieben
werden.
1. Öffnen Sie den Spannhebel
(15).
2. Setzen Sie die Schutzhaube (17)
an den Positionierungslücken
auf.
3. Drehen Sie die Schutzhaube (17)
in Arbeitsposition. Die geschlossene Seite der Schutzhaube muss
stets zum Bediener zeigen.
4. Schließen Sie den Spannhebel
(15) wieder. Die Schutzhaube darf
sich nicht mehr drehen lassen.
Falls erforderlich, kann die Spannkraft an der
Justiermutter (
21) nachgestellt werden.
Scheibe montieren/wechseln
1. Drücken Sie die Spindel-Arretiertaste (3).
2. Lösen Sie die Spannmutter
(
(1).
3. Setzen Sie die gewünschte
4. Setzen Sie die Spannmutter
(
19) mit dem Spannschlüssel
Scheibe auf den Aufnahme-
ansch (
der Scheibe zeigt grundsätzlich
zum Gerät.
19) wieder auf die Aufnahmespindel (
Seite der Spannmutter zeigt grund-
18). Die Beschriftung
20) auf. Die ache
sätzlich zum Einsatzwerkzeug.
5. Drücken Sie die SpindelArretiertaste (3) und ziehen Sie
die Spannmutter (19) mit dem
Spannschlüssel (1) wieder fest.
Bedienung
Achtung! Verletzungsgefahr!
- Ziehen Sie vor allen Arbeiten an
dem Gerät den Netzstecker.
- Verwenden Sie nur vom Hersteller empfohlene Schleifscheiben
und Zubehörteile. Der Gebrauch
anderer Einsatzwerkzeuge und
anderen Zubehörs kann eine Verletzungsgefahr für Sie bedeuten.
- Verwenden Sie nur Schleifwerkzeuge, die Angaben tragen
über Hersteller, Art der Bindung,
Abmessung und zulässige Umdrehungszahl.
- Verwenden Sie nur Schleifscheiben, deren aufgedruckte
Drehzahl mindestens so hoch ist
wie die auf dem Typenschild des
Gerätes angegebene Drehzahl.
- Verwenden Sie keine abgebrochenen, gesprungenen oder anderweitig beschädigten Schleifscheiben.
- Betreiben Sie das Gerät niemals
ohne Schutzeinrichtungen.
- Stützen Sie Platten oder Werkstücke ab, um das Risiko eines
Rückschlags durch eine eingeklemmte Trennscheibe zu
vermindern. Große Werkstücke
können sich unter ihrem eigenen Gewicht durchbiegen. Das
Werkstück muss auf beiden
Seiten der Scheibe abgestützt
werden, und zwar sowohl in der
Nähe der Trennscheibe als auch
an der Kante
68
Page 69

DE AT CH
Halten Sie Ihre Hände von
der Scheibe fern, wenn das
Gerät in Betrieb ist. Es besteht Verletzungsgefahr.
Hinweise zum Wechseln:
• Betreiben Sie das Gerät niemals
ohne Schutzeinrichtungen.
• Vergewissern Sie sich, dass die
auf der Schleifscheibe angegebene Drehzahl gleich oder
größer als die Bemessungs-Leerlaufdrehzahl des Gerätes ist.
• Vergewissern Sie sich, dass die
Maße der Schleifscheibe zum
Gerät passen.
• Benutzen Sie nur einwandfreie
Schleifscheiben (Klangprobe: sie
haben beim Anschlagen mit Plastikhammer einen klaren Klang).
• Bohren Sie eine zu kleine Aufnahmebohrung der Schleifscheibe nicht nachträglich auf.
• Verwenden Sie keine getrennten
Reduzierbuchsen oder Adapter,
um Schleifscheiben mit großem
Loch passend zu machen.
• Verwenden Sie keine Sägeblätter.
• Zum Aufspannen der Schleif-
werkzeuge dürfen nur die mitgelieferten Spannansche verwendet werden. Die Zwischenlagen
zwischen Spannansch und
Schleifwerkzeuge müssen aus
elastischen Stoffen z.B. Gummi,
weicher Pappe usw., bestehen.
• Montieren Sie das Gerät nach
dem Schleifscheibenwechsel wieder vollständig.
Schalten Sie das Gerät aus und
nehmen Sie vor allen Arbeiten den
Akku aus dem Gerät.
Tragen Sie beim Schleifscheiben-
wechsel Schutzhandschuhe, um
Schnittverletzungen zu vermeiden.
Die Schleifscheiben-Mutter darf
nicht zu fest angezogen werden,
um ein Brechen von Scheibe und
Mutter zu vermeiden.
Ein- und Ausschalten
1. Zum Einschalten drücken Sie den Ein-/
Ausschalter (5).
2. Zum Ausschalten lassen Sie den Ein-/
Ausschalter los. Das Gerät schaltet ab.
Warten Sie nach dem Einschalten ab, bis das
Gerät seine max. Drehzahl erreicht hat. Beginnen Sie erst dann mit dem Arbeiten.
Die Scheibe läuft nach, nach-
dem das Gerät abgeschaltet
wurde. Es besteht Verletzungsgefahr.
Probelauf:
Führen Sie vor dem ersten Arbeiten und nach
jedem Scheibenwechsel einen Probelauf
ohne Belastung durch. Schalten Sie das
Gerät sofort aus, wenn die Schleifscheibe unrund läuft, beträchtliche Schwingungen auftreten oder abnorme Geräusche zu hören sind.
Reinigung und Wartung
Lassen Sie Instandsetzungsarbeiten
und Wartungsarbeiten, die nicht in
dieser Anleitung beschrieben sind,
von unserem Service-Center durchführen. Verwenden Sie nur Originalteile.
Schalten Sie das Gerät aus und neh-
men Sie vor allen Arbeiten den Akku
aus dem Gerät.
69
Page 70
DE AT CH
Führen Sie folgende Reinigungs- und Wartungsarbeiten regelmäßig durch. Dadurch
ist eine lange und zuverlässige Nutzung
gewährleistet.
Kontrollieren Sie das Gerät vor jedem Gebrauch auf offensichtliche Mängel wie lose,
abgenutzte oder beschädigte Teile, korrekten
Sitz von Schrauben oder anderer Teile.
Prüfen Sie insbesondere die Schleifscheibe.
Tauschen Sie beschädigte Teile aus.
Reinigung
Verwenden Sie keine Reinigungs- bzw.
Lösungsmittel. Chemische Substanzen
können die Kunststoffteile des Gerätes
angreifen. Reinigen Sie das Gerät nie-
mals unter ießendem Wasser.
• Reinigen Sie das Gerät nach jedem Ge-
brauch gründlich.
• Reinigen Sie die Lüftungsöffnungen und
die Oberäche des Gerätes mit einer
weichen Bürste, einem Pinsel oder einem Tuch.
Lagerung
• Bewahren Sie das Gerät an einem trockenen und staubgeschützten Ort auf, und
außerhalb der Reichweite von Kindern.
• Vermeiden Sie während der Lagerung
extreme Kälte oder Hitze, damit der
Akku nicht an Leistung verliert.
• Nehmen Sie den Akku vor einer längeren Lagerung aus dem Gerät und laden
Sie ihn vollständig auf.
• Schleifscheiben müssen trocken und
hochkant aufbewahrt werden und dürfen nicht gestapelt werden.
Entsorgung/
Umweltschutz
Nehmen Sie den Akku aus dem Gerät
und führen Sie Gerät, Akku, Zubehör und
Verpackung einer umweltgerechten Wiederverwertung zu.
Elektrische Geräte gehören nicht in
den Hausmüll.
Werfen Sie den Akku nicht in den
Hausmüll, ins Feuer (Explosionsgefahr) oder ins Wasser. Beschädigte
Akkus können der Umwelt und ihrer
Gesundheit schaden, wenn giftige
Dämpfe oder Flüssigkeiten austreten.
• Geben Sie das Gerät und das Ladegerät an einer Verwertungsstelle ab. Die
verwendeten Kunststoff- und Metallteile
können sortenrein getrennt werden
und so einer Wiederverwertung zugeführt werden. Fragen Sie hierzu unser
Service-Center.
• Entsorgen Sie Akkus im entladenen
Zustand. Wir empfehlen die Pole mit
einem Klebestreifen zum Schutz vor
einem Kurzschluss abzudecken. Öffnen
Sie den Akku nicht.
• Entsorgen Sie Akkus nach den lokalen
Vorschriften. Geben Sie Akkus an einer
Altbatteriesammelstelle ab, wo sie einer
umweltgerechten Wiederverwertung
zugeführt werden. Fragen Sie hierzu
Ihren lokalen Müllentsorger oder unser
Service-Center.
• Die Entsorgung Ihrer defekten eingesendeten Geräte führen wir kostenlos durch.
70
Page 71

DE AT CH
Garantie
Sehr geehrte Kundin, sehr geehrter Kunde,
Sie erhalten auf dieses Gerät 3 Jahre Garantie ab Kaufdatum.
Im Falle von Mängeln dieses Gerätes
stehen Ihnen gegen den Verkäufer des
Gerätes gesetzliche Rechte zu. Diese
gesetzlichen Rechte werden durch unsere
im Folgenden dargestellte Garantie nicht
eingeschränkt.
Garantiebedingungen
Die Garantiefrist beginnt mit dem Kaufdatum. Bitte bewahren Sie den Original Kassenbon gut auf. Diese Unterlage wird als
Nachweis für den Kauf benötigt.
Tritt innerhalb von drei Jahren ab dem Kaufdatum dieses Gerätes ein Material- oder
Fabrikationsfehler auf, wird das Gerät von
uns – nach unserer Wahl – für Sie kostenlos
repariert oder ersetzt. Diese Garantieleistung setzt voraus, dass innerhalb der DreiJahres-Frist das defekte Gerät und der Kaufbeleg (Kassenbon) vorgelegt und schriftlich
kurz beschrieben wird, worin der Mangel
besteht und wann er aufgetreten ist.
Wenn der Defekt von unserer Garantie
gedeckt ist, erhalten Sie das reparierte oder
ein neues Gerät zurück. Mit Reparatur oder
Austausch des Gerätes beginnt kein neuer
Garantiezeitraum.
Garantiezeit und gesetzliche
Mängelansprüche
Die Garantiezeit wird durch die Gewährleistung nicht verlängert. Dies gilt auch für
ersetzte und reparierte Teile. Eventuell schon
beim Kauf vorhandene Schäden und Mängel
müssen sofort nach dem Auspacken gemeldet
werden. Nach Ablauf der Garantiezeit anfal-
lende Reparaturen sind kostenpichtig.
Garantieumfang
Das Gerät wurde nach strengen Qualitätsrichtlinien sorgfältig produziert und vor
Anlieferung gewissenhaft geprüft.
Die Garantieleistung gilt für Material- oder
Fabrikationsfehler. Diese Garantie erstreckt
sich nicht auf Geräteteile, die normaler Abnutzung ausgesetzt sind und daher als Verschleißteile angesehen werden können (z.B.
Schleifscheibe, Schleifband, Spannansche)
oder für Beschädigungen an zerbrechlichen
Teilen (z.B. Schalter, Akkus oder die aus
Glas gefertigt sind).
Diese Garantie verfällt, wenn das Gerät
beschädigt, nicht sachgemäß benutzt oder
nicht gewartet wurde. Für eine sachgemäße
Benutzung des Gerätes sind alle in der Betriebsanleitung aufgeführten Anweisungen
genau einzuhalten. Verwendungszwecke
und Handlungen, von denen in der Betriebsanleitung abgeraten oder vor denen gewarnt
wird, sind unbedingt zu vermeiden.
Das Gerät ist lediglich für den privaten
und nicht für den gewerblichen Gebrauch
bestimmt. Bei missbräuchlicher und unsachgemäßer Behandlung, Gewaltanwendung
und bei Eingriffen, die nicht von unserer
autorisierten Service-Niederlassung vorgenommen wurden, erlischt die Garantie.
Abwicklung im Garantiefall
Um eine schnelle Bearbeitung Ihres Anliegens zu gewährleisten, folgen Sie bitte den
folgenden Hinweisen:
• Bitte halten Sie für alle Anfragen den
Kassenbon und die Identikationsnummer (IAN104454) als Nachweis für
den Kauf bereit.
• Die Artikelnummer entnehmen Sie bitte
dem Typenschild.
• Sollten Funktionsfehler oder sonstige
Mängel auftreten kontaktieren Sie
zunächst die nachfolgend benannte
71
Page 72

DE AT CH
Serviceabteilung telefonisch oder per
E-Mail. Sie erhalten dann weitere In-
formationen über die Abwicklung Ihrer
Reklamation.
• Ein als defekt erfasstes Gerät können
Sie, nach Rücksprache mit unserem
Kundenservice, unter Beifügung des
Kaufbelegs (Kassenbons) und der
Angabe, worin der Mangel besteht
und wann er aufgetreten ist, für Sie
portofrei an die Ihnen mitgeteilte
Service-Anschrift übersenden. Um Annahmeprobleme und Zusatzkosten zu
vermeiden, benutzen Sie unbedingt nur
die Adresse, die Ihnen mitgeteilt wird.
Stellen Sie sicher, dass der Versand
nicht unfrei, per Sperrgut, Express oder
sonstiger Sonderfracht erfolgt. Senden
Sie das Gerät bitte inkl. aller beim Kauf
mitgelieferten Zubehörteile ein und
sorgen Sie für eine ausreichend sichere
Transportverpackung.
Reparatur-Service
Sie können Reparaturen, die nicht der Garantie unterliegen, gegen Berechnung von
unserer Service-Niederlassung durchführen
lassen. Sie erstellt Ihnen gerne einen Kostenvoranschlag.
Wir können nur Geräte bearbeiten, die
ausreichend verpackt und frankiert eingesandt wurden.
Achtung: Bitte senden Sie Ihr Gerät gereinigt und mit Hinweis auf den Defekt an
unsere Service-Niederlassung.
Nicht angenommen werden unfrei - per
Sperrgut, Express oder mit sonstiger Sonderfracht - eingeschickte Geräte.
Die Entsorgung Ihrer defekten eingesendeten Geräte führen wir kostenlos durch.
Service-Center
Service Deutschland
DE
Tel.: 0800 54 35 111
E-Mail: grizzly@lidl.de
IAN 104454
Service Österreich
AT
Tel.: 0820 201 222
(0,15 EUR/Min.)
E-Mail: grizzly@lidl.at
IAN 104454
Service Schweiz
CH
Tel.: 0842 665566
(0,08 CHF/Min.,
Mobilfunk max. 0,40 CHF/Min.)
E-Mail: grizzly@lidl.ch
IAN 104454
Importeur
Bitte beachten Sie, dass die folgende
Anschrift keine Serviceanschrift ist. Kontaktieren Sie zunächst das oben genannte
Service-Center.
Grizzly Tools GmbH & Co. KG
Stockstädter Straße 20
63762 Großostheim
Deutschland
www.grizzly-service.eu
72
Page 73

DE AT CH
Ersatzteile/Zubehör
Ersatzteile und Zubehör erhalten Sie unter
www.grizzly-service.eu
Sollten Sie kein Internet haben, so wenden Sie sich bitte telefonisch an das ServiceCenter (siehe „Service-Center“ Seite 72). Halten Sie die unten genannten Bestellnummern
bereit.
Pos. Bezeichnung .......................................................... Artikel-Nr.
1 Spannschlüssel ................................................................... 91104101
2 Zusatzgriff .........................................................................91104100
9 Akku 18V / 2,6 Ah ............................................................80001162
14 Ladegerät .......................................................................... 80001086
16 Trennscheibe ...................................................................... 30211060
17 Schutzhaube ...................................................................... 91104104
18 Aufnahmeansch ...............................................................91104102
19 Spannmutter ...................................................................... 91104103
Schleifscheibe ....................................................................30211070
Akku 18V / 1,5 Ah ............................................................80001161
Wir empfehlen, den Akku nur mit dem dazugehörigen Ladegerät zu verwenden.
73
Page 74

DE AT CH
Fehlersuche
Schalten Sie das Gerät aus und nehmen Sie vor allen Arbeiten den Akku aus dem
Gerät.
Problem Mögliche Ursache Fehlerbehebung
Gerät startet nicht
Schleifwerkzeug
bewegen sich
nicht, obwohl Motor läuft
Motor wird langsamer und bleibt
stehen
Schleifscheibe läuft
unrund, abnorme
Geräusche sind zu
hören
Ein-/Ausschalter (
Motor defekt
Spannmutter (
Werkstück, Werkstückreste
oder Reste der Schleifwerkzeuge blockieren Antrieb
Gerät wird durch Werkstück
überlastet
Spannutter (
Schleifscheibe defekt Schleifscheibe wechseln
5) defekt
19) locker
19) locker
Reparatur durch Kundendienst
Spannmutter (
(siehe „Schleifscheibe wechseln“)
Blockaden entfernen
Druck auf Schleifwerkzeug verringern
Werkstück ungeeignet
Spannmutter (
(siehe „Schleifscheibe wechseln“)
19) anziehen
19) anziehen
74
Page 75

IT MT
Traduzione della dichiarazione
di conformità CE originale
Con la presente dichiariamo che
Smerigliatrice angolare ricaricabile serie
PWSA 18 A1
Numero di serie 201502000001 - 201503040000
corrisponde alle seguenti direttive UE in materia nella rispettiva versione valida:
2006/42/EC • 2004/108/EC • 2006/95/EC • 2011/65/EU*
Per garantire la conformità sono state applicate le seguenti norme armonizzate e anche
le norme e disposizioni nazionali che seguono:
EN 60745-1/A11:2010 • EN 60745-2-3/A2:2013
EN 60335-1:2012 • EN 62233:2008 • EN 60335-2-29/A2:2010
EN 55014-1/A2:2011 • EN 55014-2/A2:2008
EN 61000-3-2/A2:2009 • EN 61000-3-3:2013
Il produttore è il solo responsabile della stesura della presente dichiarazione
di conformità (15)**:
Grizzly Tools GmbH & Co. KG
Stockstädter Straße 20
63762 Großostheim
Germany
25.03.2015
Volker Lappas
Responsabile documentazione tecnica
*L’oggetto descritto sopra è conforme alle prescrizioni della Direttiva 2011/65/EU del Parlamento
Europeo e del Consiglio dell’8 giugno 2011 sulla restrizione dell’uso di determinate sostanze
pericolose nelle apparecchiature elettriche ed elettroniche
** Le ultime due cifre dell’anno nel quale è stato apportato il marchio CE.
75
Page 76

GB
MT
Translation of the original EC
declaration of conformity
We hereby conrm that the
Cordless Angle Grinder
Design Series PWSA 18 A1
Serial Number
201502000001 - 201503040000
conforms with the following applicable relevant version of the EU guidelines :
2006/42/EC • 2004/108/EC • 2006/95/EC • 2011/65/EU*
In order to guarantee consistency, the following harmonised standards as well as national
standards and stipulations have been applied:
EN 60745-1/A11:2010 • EN 60745-2-3/A2:2013
EN 60335-1:2012 • EN 62233:2008 • EN 60335-2-29/A2:2010
EN 55014-1/A2:2011 • EN 55014-2/A2:2008
EN 61000-3-2/A2:2009 • EN 61000-3-3:2013
This declaration of conformity (15)** is issued under the sole responsibility of the
manufacturer:
Grizzly Tools GmbH & Co. KG
Stockstädter Straße 20
63762 Großostheim
Germany
25.03.2015
*The object of the declaration described above satises the provisions of Directive 2011/65/EU
of the European Parliament and the Council of 8 June 2011 on limiting the use of certain harmful
substances in electrical and electronic appliances.
**The last two digits of the year in which the CE marking was afxed.
Volker Lappas
Documentation Representative
76
Page 77

DE
AT
CH
Hiermit bestätigen wir, dass der
Akku-Winkelschleifer
Baureihe PWSA 18 A1
Seriennummer 201502000001 - 201503040000
folgenden einschlägigen EU-Richtlinien in ihrer jeweils gültigen Fassung entspricht:
2006/42/EG • 2004/108/EG • 2006/95/EG • 2011/65/EU*
Um die Übereinstimmung zu gewährleisten, wurden folgende harmonisierte Normen
sowie nationale Normen und Bestimmungen angewendet:
EN 60745-1/A11:2010 • EN 60745-2-3/A2:2013
EN 60335-1:2012 • EN 62233:2008 • EN 60335-2-29/A2:2010
EN 55014-1/A2:2011 • EN 55014-2/A2:2008
EN 61000-3-2/A2:2009 • EN 61000-3-3:2013
Die alleinige Verantwortung für die Ausstellung dieser Konformitätserklärung
(15) ** trägt der Hersteller:
EG Konformitätserklärung
Original
Grizzly Tools GmbH & Co. KG
Stockstädter Straße 20
63762 Großostheim
Germany
25.03.2015
(Dokumentationsbevollmächtigter)
* Der oben beschriebene Gegenstand der Erklärung erfüllt die Vorschriften der Richtlinie 2011/65/
EU des Europäischen Parlaments und des Rates vom 8. Juni 2011 zur Beschränkung der Verwendung bestimmter gefährlicher Stoffe in Elektro- und Elektronikgeräten.
** Die beiden letzten Ziffern des Jahres, in dem die CE-Kennzeichnung angebracht wurde.
Volker Lappas
77
Page 78

GRIZZLY TOOLS GMBH & CO. KG
Stockstädter Straße 20
D-63762 Großostheim
Versione delle informazioni
Last Information Update · Stand
der Informationen: 02 / 2015
Ident.-No.: 72037304022015-IT
IAN 104454
 Loading...