

Parkside PSH 3 A1 Installation, Operating And Safety Information, Translation Of The Original Instructions
Page 1
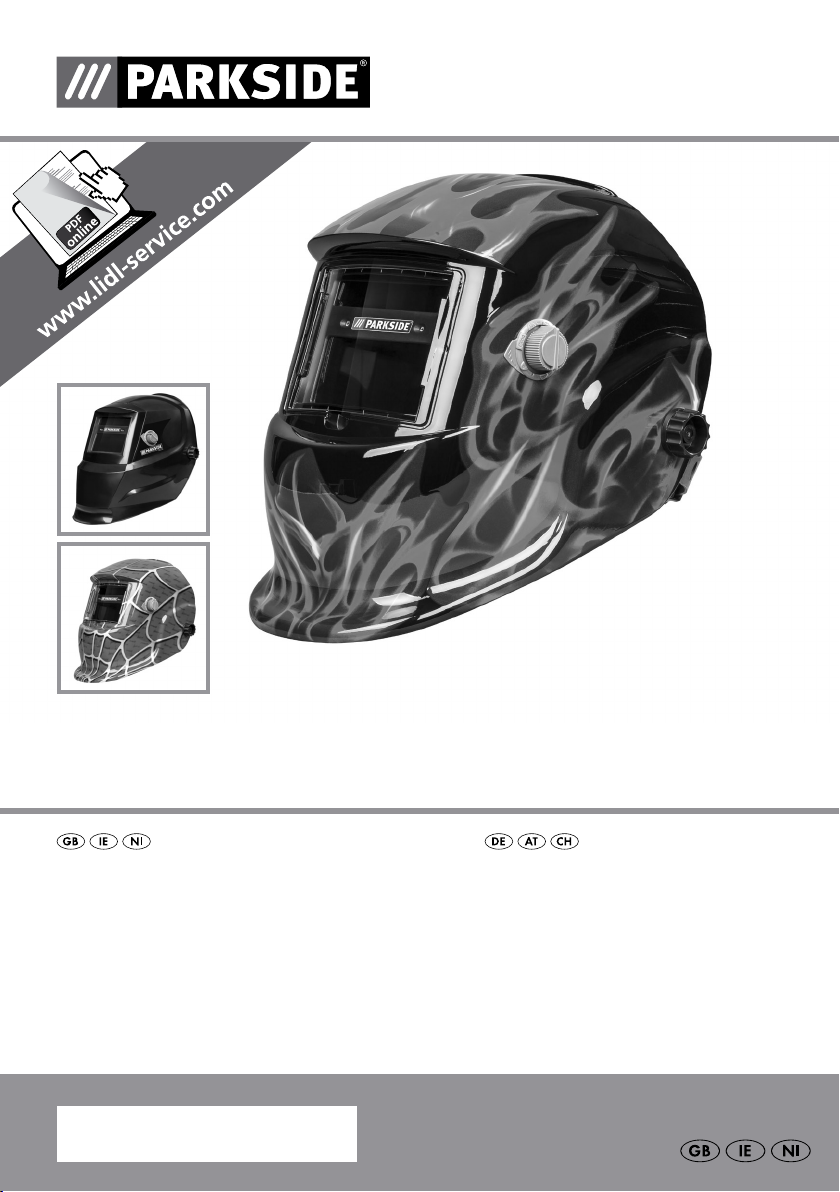
AUTO-DARKENING WELDING HELMET PSH 3 A1
AUTO-DARKENING WELDING HELMET
Installation, operating and safety information
Translation of the original instructions
IAN 281392
AUTOMA TIK -SCHWEISSHELM
Montage-, Bedienungs- und Sicherheitshinweise
Originalbetriebsanleitung
Page 2

Before reading, unfold the page containing the illustrations and familiarise yourself with all functions of the
device.
Klappen Sie vor dem Lesen die Seite mit den Abbildungen aus und machen Sie sich anschließend mit allen
Funktionen des Gerätes vertraut.
GB / IE / NI Installation, operating and safety information Page 5
DE / AT / CH Montage-, Bedienungs- und Sicherheitshinweise Seite 13
Page 3
2
3 4 51
8
9
A B
7 6
Page 4

Table of contents
List of pictograms used ........................................................................................................ Page 6
Introduction ................................................................................................................................... Page 6
Intended use ........................................................................................................................................ Page 6
Parts Description .................................................................................................................................. Page 6
Technical Data ....................................................................................................................................Page 6
Scope of delivery ................................................................................................................................ Page 7
Safety instructions ................................................................................................................... Page 7
Initial use ......................................................................................................................................... Page 8
Cleaning and Maintenance .............................................................................................. Page 9
Environmental instructions and disposal information .............................. Page 9
Troubleshooting ........................................................................................................................Page 9
Warranty and service information ...........................................................................Page 10
Warranty terms .........................................................................................................................Page 10
Extent of warranty ............................................................................................................................... Page 10
Processing of warranty claims ............................................................................................................ Page 11
Service ............................................................................................................................................... Page 11
Label meanings .......................................................................................................................... Page 11
EU Conformity Declaration ............................................................................................... Page 12
5 GB/IE/NI
Page 5
List of pictograms used
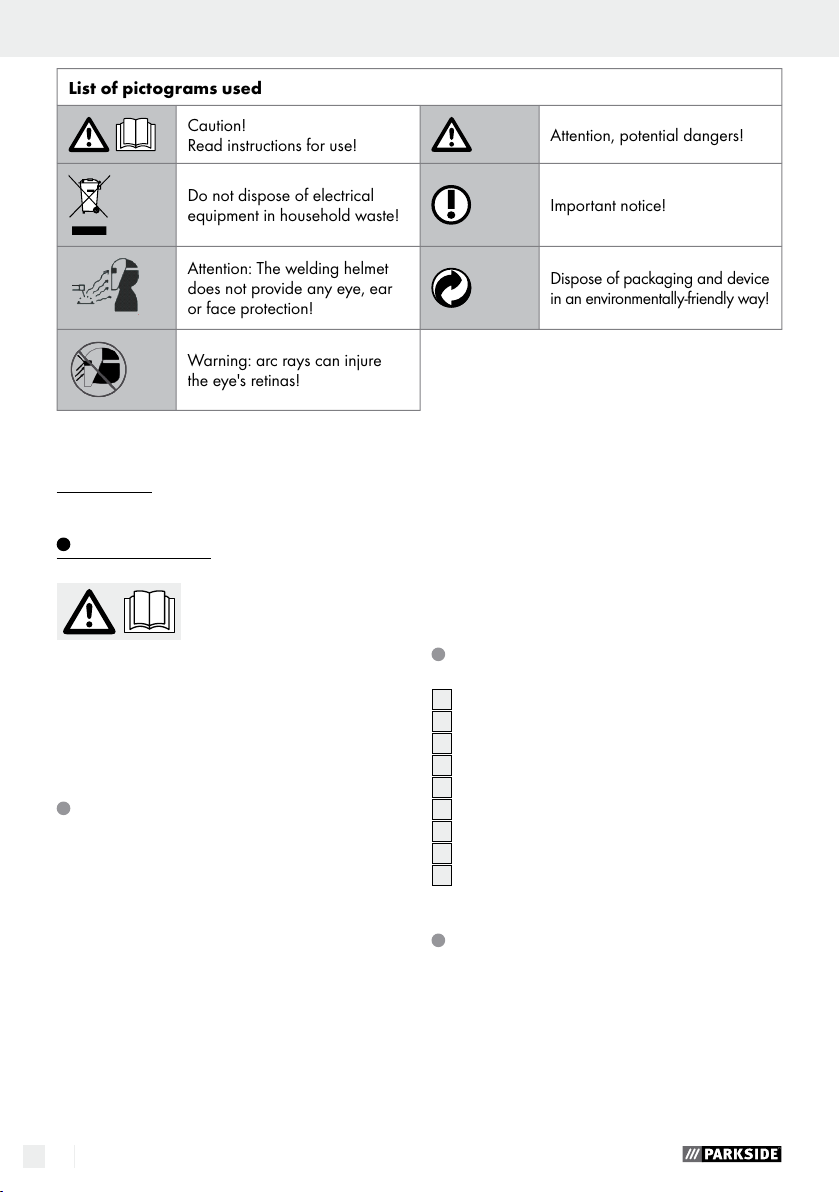
Caution!
Read instructions for use!
Attention, potential dangers!
Do not dispose of electrical
equipment in household waste!
Important notice!
Attention: The welding helmet
does not provide any eye, ear
or face protection!
Dispose of packaging and device
in an environmentally-friendly way!
Warning: arc rays can injure
the eye's retinas!
Auto-Darkening Welding Helmet
PSH 3 A2
Introduction
Congratulations! You have
chosen a high-quality product
from our company. Familiarise
yourself with the product before using it for the first
time. In addition, please carefully refer to the instructions for use and the safety instructions below.
KEEP OUT OF THE REACH OF CHILDREN!
Intended use
This welding helmet protects the eyes and face from
sparks, splashes and UV rays while welding and
automatically adapts to the lighting conditions. It
ensures an immediate, sensor-controlled darkening
upon arc ignition as well as automatic illumination
at the end of the welding procedure (including a
short delay to protect against afterglow). This welding helmet provides a freely adjustable DIN protection
level with a lateral adjustment wheel and is also adjustable for flying sparks during grinding work. Only
use the product as described and for its indicated
purpose. Keep these instructions in a safe place.
When passing this product on to others, please also
6 GB/IE/NI
include all the documents. Any use other than the
intended is prohibited and potentially dangerous.
Damages resulting from noncompliance or misuse
are not covered by the warranty and are not inclu
ded
in the manufacturer‘s liability. This device has been
designed for household use and may not be used
for commercial or industrial purposes.
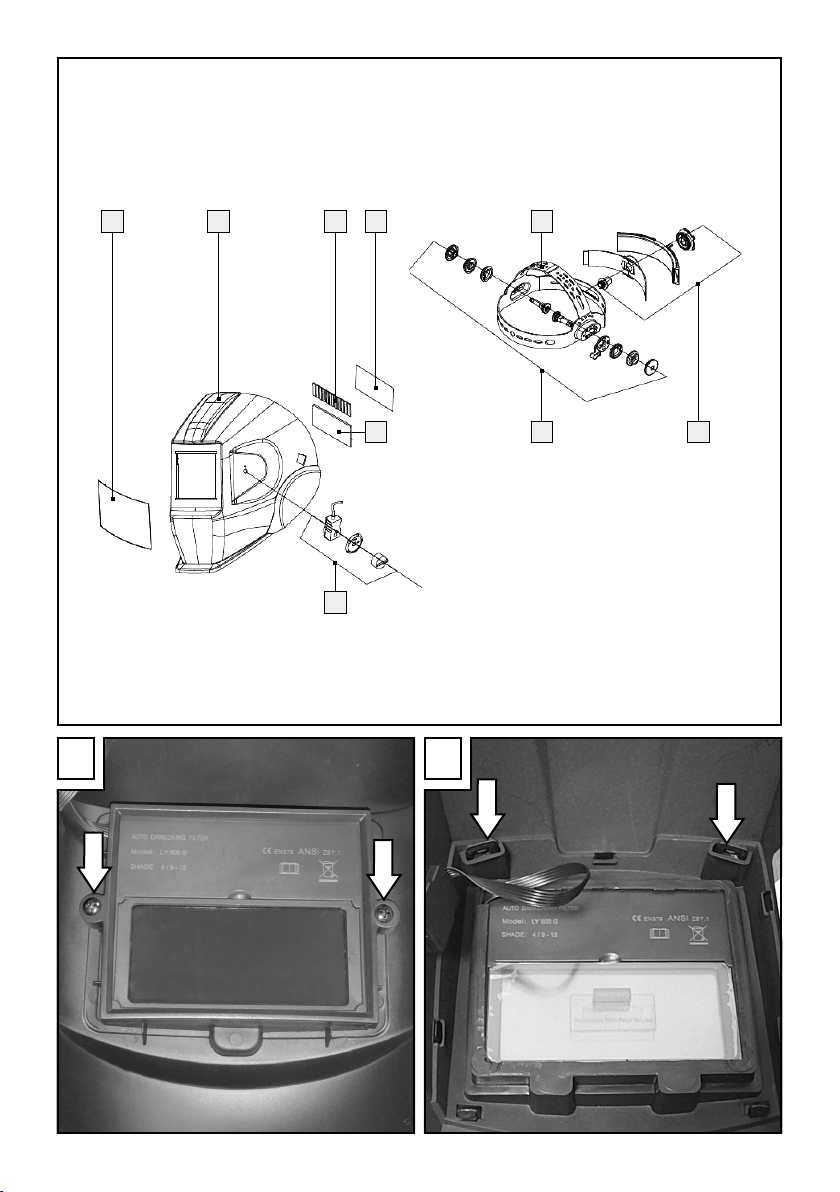
Parts Description
1
Viewing pane
2
Helmet casing
3
Solar cell
4
Rear pane
5
Headband
6
Adjustable headband button
7
Adjustable headband buttons
8
UV filter
9
Darkening regulator
Technical Data
Filter cartridge size: 110 x 90 x 9 mm
Field of vision: 9.2 x 4.2 cm
Bright state: DIN 4
Dark state: DIN 9–DIN 13
Switching times
Bright to dark: 0.23∼ 0.72 ms
Dark to bright: 0.15∼ 0.45 s
Page 6

Introduction / Safety instructions
Switch on / off: Fully automatic
Energy supply: Solar cell
UV / IR protection: DIN 16
Operating temperature: -5 °C to +55 °C
Storage temperature: -20 °C to +70 °C
Welding procedures: MMA, MIG, MAG, TIG,
plasma cutting and
plasma welding
Maximum service life: approx. 6 years
Scope of delivery
1 Auto-Darkening Welding Helmet
1 Set of instructions for use
Safety instructions
Please carefully read the instructions
for use and follow the specified notices. Familiarise yourself with the
equipment, its proper use and the
safety notices using these instructions
for use. All technical data about this
welding helmet is on the label, pleas
e
learn about this product‘s technical
facts.
This device may be used by chil-
dren aged 16 years and up, as
well as by persons with reduced
physical, sensory or mental cap
acities, or lacking experience and /
or knowledge, so long as they
are supervised or instructed in
the safe use of the device and
understand the associated risks.
Do not allow children to play
with the product. Cleaning and
user maintenance should not be
performed by children without
supervision.
The welding helmet with automatic
darkening is not suitable for laser
and gas welding.
Never place the welding helmet
on hot surfaces.
Never open the welding helmet.
Never carry out repairs on or
modifications to the welding helmet. These may only be carried
out by trained experts.
Please ensure that you have set
the automatic darkening before
each welding procedure.
The safety visor should not be
opened. It protects the filter from
dirt and damage.
If the filter does not automatically
darken, then immediately end the
welding procedure and contact
the manufacturer.
Only use the welding helmet in
temperatures between -5 °C and
+55 °C. The filter‘s reaction time
will slow down if this temperature
has not been reached or is exceeded.
Clean the filter, the surface of
the helmet and the solar cells
regularly.
7 GB/IE/NI
Page 7
Replace the protective visor if
scratches or damages appear.
The welding helmet does not pro-
vide protection against impact.
Frequent use, cleaning or storage
can mean that the service life is
less than 6 years. Replace the
welding helmet immediately if
the viewing panel gets scratched
or the viewing panel is visibly
damaged in any other way.
ATTENTION! Materials that
come into contact with the wearer‘s
skin
may cause allergic reactions in
peo
ple with sensitive skin.
ATTENTION! Eye protection
can represent a hazard for the
wearer if it is worn over normal corrective glasses due to the impact
from high-speed particles.
ATTENTION! If protection
against high-speed particles at
extreme temperatures is required,
the eye protection chosen must be
labelled with the letter T directly after the letter for the impact intensity,
i. e. FT, BT or AT. If the letter for the
impact intensity is not followed by
the letter T, the eye protection may
only be used against high-speed
particles at room temperature.
Initial use
Note: Only use the welding helmet with the rear
pane mounted
Note: Keep the UV filter‘s sensors
clear.
Check that the welding helmet and the protective
screen are intact before each use. If the protective
screen has scratches, cracks or irregularities, it must
be replaced before use, as serious injuries may occur otherwise.
Remove the protective film from the inside and
the outside of the visor.
Put on the welding helmet with the help of the
headband
to make the welding helmet tighter and the adjustment button
When adjusting, ensure that your head is placed
as far into the helmet as possible and that it sits
as close as possible to your face.
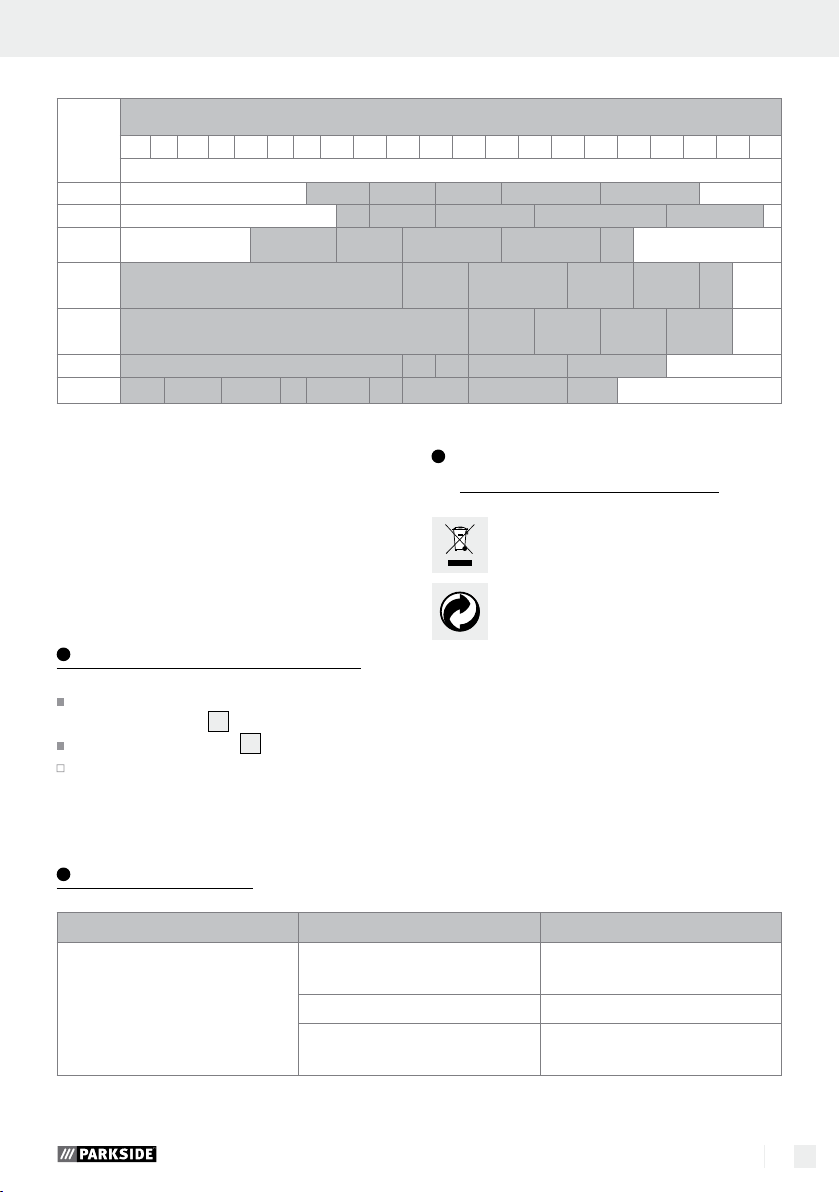
Set the appropriate darkening shade before the
welding procedure (see the following table).
The darkening shade may be manually adjusted
from 9 to 13 by twisting the darkening regulator
ATTENTION! The darkening regulator 9 has
the setting position “grind“. If the darkening
regulator
darkening is deactivated.
Only use this setting when you do not wish to
use the welding helmet for welding. The auto-
matic darkening is then no longer active.
Check the light density before each use.
Test procedure: Bring the viewing panel closer
to an external light source with a value of more
than 40 W and examine whether or not the
screen darkens or illuminates.
To change the UV filter / solar cells, push in both
tabs and pull the front frame outward. Fig. B
(Item no. 2000) or loosen the two screws as
shown in Fig. A (Item no. 2001, 2002).
4
.
5
. Press the adjustment buttons 6
7
, to fix the welding helmet.
9
on the outside of the helmet.
9
is set to this position the automatic
8
clean and
8 GB/IE/NI
Page 8
… / Cleaning and Maintenance / Environmental instructions / Troubleshooting
Table for setting the darkening shades
Arc current (ampere)
1.5 6 10 15 30 40 60 70 100 125 150 175 200 225 250 300 350 400 450 500 600
SMAW
MAG
TIG /
GTAW
MIG
(heavy)
MIG
(light)
PAC
PAW
4 5 6 7 8 9 10 11 12
8 9 10 11 12 13 14
8 9 10 11 12 13 14
8 9 10 11 12 13
9 10 11 12 13 14
9 10 11 12 13
SMAW: welding with coated electrodes
MIG (heavy): MIG welding heavy metals
MIG (light): MIG welding light metals and alloys
TIG / GTAW: welding with inert gases
MAG: welding with metal active gas
PAC: plasma cutting
PAW: plasma welding
Cleaning and Maintenance
Do not use any harsh cleaning agents to clean
the helmet casing
Never bring the UV filter 8 into contact with wate
Clean the product with a soft, dry cloth, with a
cloth dampened with pure alcohol or with a
cloth dampened with disinfectant.
2
.
10 11 12 13 14
Environmental instructions
and disposal information
Don‘t waste, recycle!
The device, accessories and packaging
should be recycled in an environmentally friendly manner.
Do not throw the auto-darkening welding helmet
into household rubbish, fire or water. If possible,
non-operational equipment should be recycled.
Contact your local retailer for information.
r.
Troubleshooting
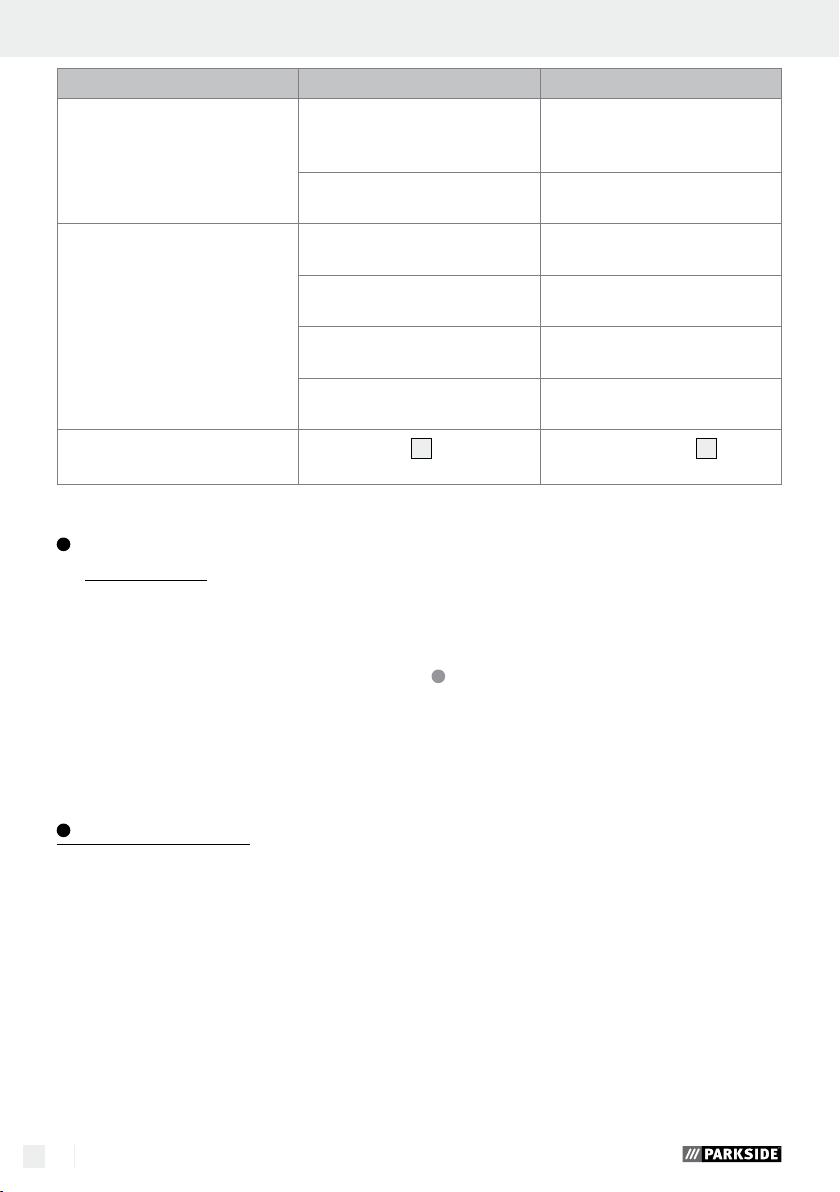
Error Cause Solution
The filter does not darken in a
normal way or flickers.
The protector does not darken in
Clean the protector or replace it.
a normal way or flickers.
The arc sensor is not clear. Clean the arc sensor's surface.
The welding current is too low. Set the sensitivity to the maximum
degree.
9 GB/IE/NI
Page 9
Troubleshooting / Warranty and service information / Warranty terms
Error Cause Solution
The reaction is slow. The ambient temperature is too
low / high.
The sensitivity is too low. Set the sensitivity to a higher
The visibility is poor. The protector / the protective
screen is dirty.
The protective film on the protec-
tive screen was not removed.
The ambient light is not sufficient. Apply more light to your work
The wrong darkening shade has
been set.
The welding helmet slips.
The headband
on incorrectly.
5
has been put
Only use the welding helmet in
temperatures between -5 °C and
+55 °C.
setting.
Clean the protector and the pro-
tective screen.
Remove the protective film.
surroundings.
Reset the darkening shade.
Put on the headband 5 again
tighter.
Warranty and service
information
Creative Marketing Consulting GmbH
warranty
Dear customer, the warranty for this device is 3 years
from the date of purchase. In the event of product
defects, you have legal rights against the retailer of
this product. Your statutory rights are not limited in
any way by our warranty detailed below.
Warranty terms
The warranty period begins on the date of purchase.
Please keep the original receipt in a safe place.
This document is required as your proof of purchase.
Should this device show any fault in materials or
manufacture within 3 years from the date of purchase, it will be repaired or replaced - at our choice
- by us free of charge. This warranty is conditional
on the defective device and the receipt of purchase
being presented within the 3 year warranty period,
and that there is a brief written description of the
nature of the defect and of the date it arose.
If the defect is covered by our warranty, you will
receive the product which has been repaired or a
new product. A repair or exchange of the device
does not begin a new warranty period.
Extent of warranty
The appliance has been manufactured to strict
quality guidelines and meticulously examined before delivery.
The warranty applies to defects in material or manufacture. This warranty does not apply to product
parts subject to normal wear and tear and which
can therefore be considered as wear items, or to
damage to fragile parts, e.g. switches, storage batteries or glass parts.
This warranty becomes void if the device has been
damaged or improperly used or maintained. All instructions provided in the instructions for use must be
followed strictly to constitute proper use of the product. Purposes and practices which the operating instructions warn of or advise against must be avoided
without fail.
10 GB/IE/NI
Page 10
Warranty terms / Service / Label meaningsTroubleshooting / Warranty and service information / Warranty terms
This product is intended for private, non-commercial
use only. Any incorrect or improper use of the device,
use of force and changes not performed by our authorized service branch will void the warranty.
Processing of warranty claims
Please follow the instructions below to ensure your
claim is processed quickly:
When inquiring about your product please have
your receipt and product number (e.g. IAN) ready
as your proof of purchase.
The product number can be found on the type plate,
an engraving, the cover page of your instructions
(bottom left) or the decal at the back or bottom.
In the event of malfunctions or other defects, please
first contact the service department below by phone
or e-mail.
A product recorded as defective, along with the
proof of purchase (sales receipt) and a description
of the defect and when it occurred, can then be returned free of charge to you to the service address
provided.
Note: On www.lidl-service.com you can
download this as well as many other
manuals, product videos and software.
Service
Only use original accessory parts:
Viewing pane 114.5 mm x 89.5 mm
Rear pane 103.8 mm x 47.3 mm.
How to contact us:
GB, IE
Phone: 0-808-189-0652
(£ 0,10 / Min.)
Registered office: Germany
IAN 281392
Please note that the following address is not a service
address.
Please first contact the service point named above.
Address:
C. M. C. GmbH
Katharina-Loth-Str. 15
DE-66386 St. Ingbert
GERMANY
Label meanings
Safety viewing panels approved according to DIN EN 166: CMC 1 F CE
(Legend: CMC = manufacturer code, 1 = optical
class, F = low power shock, CE = CE symbol)
ADF approved according to DIN EN 379:
(Legend: 4 = bright state, 9–13 = dark state, CMC =
manufacturer code , number 1 = optical class,
number 2 = scattered light grade, number 3 = homogeneity class, number 4 = angle dependency class,
379 = test standard, CE = CE symbol)
Welding helmet case
Manufacturer identification .................CMC GmbH
Number of the standard ......................EN 175
Area(s) of application (if required) .........S, F, B
Mass in grams (if required)
Description of
scope
of application
Mechanical strength
Mechanical strength
Mechanical strength
Symbol
S
-F
-B
Protection
type
increased
strength
Low energy
impact
Medium
energy
impact
11 GB/IE/NI
Page 11

Label meanings / EU Conformity Declaration Inhaltsverzeichnis
If the symbols F, B and A are not obtained
for the viewing panel as well as the supporting body, the entire eye protection
device is to be conferred with a lower
rating.
Certification body:
DIN CERTCO Gesellschaft für
Konformitätsbewertung mbH
Alboinstrasse 56
12103 Berlin
Notified body number 0196
EU Conformity Declaration
We,
C. M. C. GmbH
Responsible for documentation: Andre Scheer
Katharina-Loth-Str. 15
DE-66386 St. Ingbert
GERMANY
declare in our sole responsibility the product
Auto-Darkening Welding Helmet
Series number: 2000 / 2001 / 2002
Year of manufacture: 2017 / 15
IAN: 281392
Model: PSH 3 A2
meets the basic safety requirements of European
Directives
EC Electromagnetic Compatibility Directive
2014 / 30 / EU
RoHS Directive
2011 / 65 / EU
Personal Protective Equipment Directive
89 / 686 / EEC
12 GB/IE/NI
and its amendments.
The conformity assessment is based on the following
harmonised standards:
EN 379:2009-07
EN 175:1997-08
EN 166:2002-04
St. Ingbert, 31.01.2017
p.p. Andre Scheer
- Quality Control Manager -
Page 12

Legende der verwendeten Piktogramme ........................................................... Seite 14
Einleitung ......................................................................................................................................... Seite 14
Bestimmungsgemäße Verwendung .................................................................................................... Seite 14
Teilebeschreibung ............................................................................................................................... Seite 14
Technische Daten ................................................................................................................................ Seite 15
Lieferumfang ........................................................................................................................................ Seite 15
Sicherheitshinweise ................................................................................................................ Seite 15
Inbetriebnahme ......................................................................................................................... Seite 16
Reinigung und Wartung ..................................................................................................... Seite 17
Umwelthinweise und Entsorgungsangaben ..................................................... Seite 18
Fehlerbehebung ........................................................................................................................Seite 18
Hinweise zu Garantie und Serviceabwicklung ..............................................Seite 19
Garantiebedingungen .........................................................................................................Seite 19
Garantieumfang .................................................................................................................................. Seite 19
Abwicklung im Garantiefall ................................................................................................................ Seite 19
Service ............................................................................................................................................... Seite 20
Bedeutung der Kennzeichnung .................................................................................... Seite 20
EG-Konformitätserklärung ............................................................................................... Seite 20
13 DE/AT/CH
Page 13
Legende der verwendeten Piktogramme / Einleitung
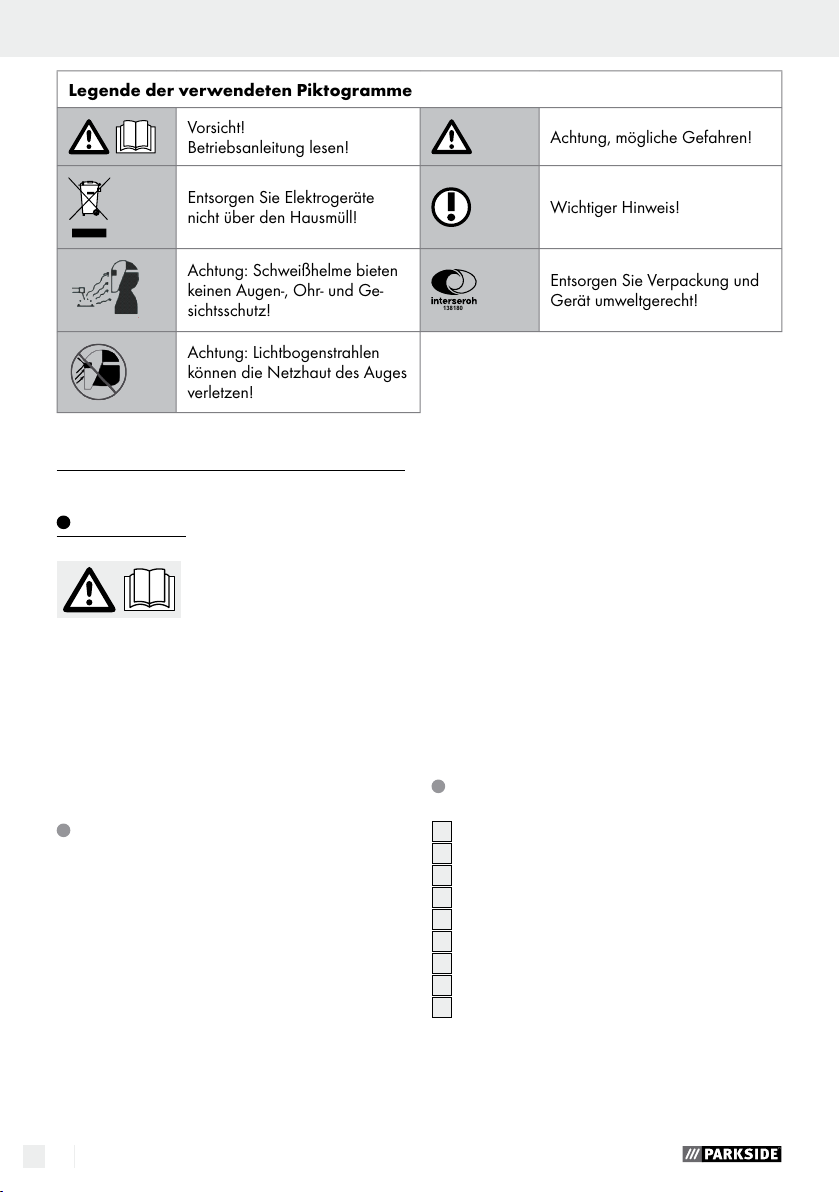
Legende der verwendeten Piktogramme
Vorsicht!
Betriebsanleitung lesen!
Achtung, mögliche Gefahren!
Entsorgen Sie Elektrogeräte
nicht über den Hausmüll!
Wichtiger Hinweis!
Achtung: Schweißhelme bieten
keinen Augen-, Ohr- und Ge-
sichtsschutz!
138180
Entsorgen Sie Verpackung und
Gerät umweltgerecht!
Achtung: Lichtbogenstrahlen
können die Netzhaut des Auges
verletzen!
Automatik-Schweißhelm PSH 3 A2
Einleitung
Herzlichen Glückwunsch! Sie
haben sich für ein hochwertiges
Gerät aus unserem Haus entschieden. Machen Sie sich vor der ersten Inbetriebnahme mit dem Produkt vertraut. Lesen Sie hierzu
aufmerksam die nachfolgende Bedienungsanleitung
und die Sicherheitshinweise.
NICHT IN DIE HÄNDE VON KINDERN
KOMMEN LASSEN!
Bestimmungsgemäße
Verwendung
Dieser Schweißhelm schützt beim Schweißen Augen
und Gesicht vor Funken, Spritzern und UV-Strahlung
und passt sich automatisch an die Lichtverhältnisse
an. Er sorgt für eine sofortige, sensorgesteuerte Abdunkelung bei Zündung des Lichtbogens sowie ein
selbsttätiges Wiederaufhellen bei Beendigung des
Schweißvorgangs (inklusive kurzer Verzögerung zum
Schutz vor Nachglühen). Der Schweißhelm verfügt
über eine stufenlos einstellbare DIN-Schutzstufe mit
seitlichem Stellrad und ist auch auf Funkenflug bei
14 DE/AT/CH
Schleifarbeiten einstellbar. Benutzen Sie das Produkt
nur wie beschrieben und für die angegebenen Einsatzbereiche. Bewahren Sie diese Anleitung gut auf.
Händigen Sie alle Unterlagen bei Weitergabe des
Produkts an Dritte ebenfalls mit aus. Jegliche Anwendung, die von der bestimmungsgemäßen Verwend
abweicht, ist untersagt und potentiell gefährlich.
Schäden durch Nichtbeachtung oder Fehlanwendung werden nicht von der Garantie abgedeckt und
fallen nicht in den Haftungsbereich des Herstellers.
Das Gerät wurde für den Hausgebrauch konzipiert
und darf nicht kommerziell oder industriell genutzt
werden.
Teilebeschreibung
1
Vorsatzscheibe
2
Helmgehäuse
3
Solarzelle
4
Hinterlegscheibe
5
6
7
8
9
Kopfband
Einstelltaste Kopfband
Einstelltasten Kopfband
UV-Filter
Verdunklungsregler
ung
Page 14
Einleitung / Sicherheitshinweise
Technische Daten
Filterkassettengröße: 110 x 90 x 9 mm
Sichtfeld: 9,2 x 4,2 cm
Heller Zustand: DIN 4
Dunkler Zustand: DIN 9–DIN 13
Schaltzeiten
Hell zu dunkel: 0,23∼ 0,72 ms
Dunkel zu hell: 0,15∼ 0,45 s
Ein- / ausschalten: Vollautomatik
Energiezufuhr: Solarzelle
UV- / IR-Schutz: DIN 16
Betriebstemperatur: -5 °C bis + 55 °C
Lagertemperatur: -20 °C bis + 70 °C
Schweißvorgänge: MMA, MIG, MAG, TIG,
Plasmaschneiden und
Plasmaschweißen
Maximale Lebensdauer: ca. 6 Jahre
Lieferumfang
1 Automatik-Schweißhelm
1 Bedienungsanleitung
Sicherheitshinweise
Bitte lesen Sie die Gebrauchsanweisung sorgfältig durch und beachten
Sie die beschriebenen Hinweise.
Machen Sie sich anhand dieser Gebrauchsanweisung mit dem Gerät,
dessen richtigem Gebrauch sowie
den Sicherheitshinweisen vertraut. Auf
dem Typenschild stehen alle technischen Daten von diesem Schweißhelm, bitte informieren Sie sich über
die technischen Gegebenheiten
dieses Produkts.
Dieses Gerät kann von Kindern
ab 16 Jahren und darüber sowie
von Personen mit verringerten
physischen, sensorischen oder
mentalen Fähigkeiten oder Mangel an Erfahrung und Wissen
benutzt werden, wenn sie beaufsichtigt oder bezüglich des siche
Gebrauchs des Gerätes unterwiesen wurden und die daraus
resultierenden Gefahren versteh
Kinder dürfen nicht mit dem Gerät spielen. Reinigung und Benutzerwartung dürfen nicht von
Kindern ohne Beaufsichtigung
durchgeführt werden.
Der Schweißhelm mit automa-
tischer Verdunkelung ist nicht
geeignet für Laser- und Autogenschweißen.
Legen Sie den Schweißhelm nie-
mals auf heiße Oberflächen.
Öffnen Sie den Schweißhelm auf
keinen Fall. Nehmen Sie keine Reparaturen oder Veränderungen
am Schweißhelm vor. Dies darf
nur von geschultem Fachpersonal
durchgeführt werden.
Achten Sie darauf, dass Sie die
automatische Verdunkelung vor
jedem Schweißvorgang eingestellt haben.
Das Sicherheitsvisier darf nicht
geöffnet werden. Es schützt den
ren
en.
15 DE/AT/CH
Page 15
Sicherheitshinweise / Inbetriebnahme
Filter vor Schmutz und Beschädigungen.
Wenn der Filter nicht automatisch
verdunkelt, beenden Sie sofort
den Schweißvorgang und kontaktieren Sie den Hersteller.
Verwenden Sie den Schweißhelm
nur bei Temperaturen zwischen
-5 °C und + 55 °C. Die Reaktionszeit des Filters wird sich verlangsamen, sollte diese Temperatur
unter- / überschritten werden.
Reinigen Sie den Filter, die Hel-
moberfläche und die Solarzellen
regelmäßig.
Ersetzen Sie das Schutzvisier, falls
dieses Kratzer oder Beschädigungen aufweist.
Der Schweißhelm schützt nicht
gegen Aufprall.
Gebrauch, Reinigung und Lage-
rung kann die Lebensdauer von
ca. 6 Jahren reduzieren.
Bei zerkratzter Sichtscheibe oder
anderen sichtbaren Schäden die
Sichtscheibe bzw. den Schweißhelm sofort austauschen.
ACHTUNG! Augenschutzge-
räte können gegen Teilchen hoher
Geschwindigkeit durch das Übertragen von Stößen für den Träger eine
Gefährdung darstellen, wenn sie
über üblichen Korrektionsbrillen
getragen werden.
ACHTUNG! Falls ein Schutz ge-
gen Teilchen hoher Geschwindigkeit bei extremen Temperaturen
erforderlich ist, muss das gewählte
Augenschutzgerät mit dem Buchstaben T direkt nach dem Buchstaben
für die Aufprallintensität gekennzeichnet sein, d. h. FT, BT oder AT.
Wenn dem Buchstaben für die Aufprallintensität nicht der Buchstabe T
folgt, darf das Augenschutzgerät
nur bei Raumtemperatur gegen Teilchen hoher Geschwindigkeit verwendet werden.
Inbetriebnahme
Hinweis: Verwenden Sie den Schweißhelm nur mit
der eingebauten Hinterlegscheibe
Hinweis: Halten Sie die Sensoren des UV-Filters
sauber und klar.
4
.
8
ACHTUNG! Werkstoffe, die in
Kontakt mit der Haut des Trägers
kommen, können bei empfindlichen
Personen allergische Reaktionen
hervorrufen.
16 DE/AT/CH
Prüfen Sie vor jeder Inbetriebnahme, ob der
Schweißhelm sowie die Schutzscheibe intakt sind.
Sollte die Schutzscheibe Kratzer, Risse oder Unebenheiten aufweisen, muss diese vor der Verwendung
unbedingt ausgetauscht werden, da es sonst zu
schweren Verletzungen kommen kann.
Page 16
Inbetriebnahme / Reinigung und WartungSicherheitshinweise / Inbetriebnahme
Entfernen Sie die Schutzfolie von der Innen-
und Außenseite des Visiers.
Stellen Sie den Schweißhelm mit Hilfe des
Kopfbandes
sten
und die Einstelltaste
5
ein. Drücken Sie die Einstellta-
6
, um den Schweißhelm festzumachen
7
, um den Schweißhelm
zu arretieren. Achten Sie bei der Einstellung
darauf, dass der Schweißhelm so tief wie möglich auf dem Kopf und so nah wie möglich an
Ihrem Gesicht sitzt.
S
tellen Sie vor dem Schweißvorgang die passe
nde
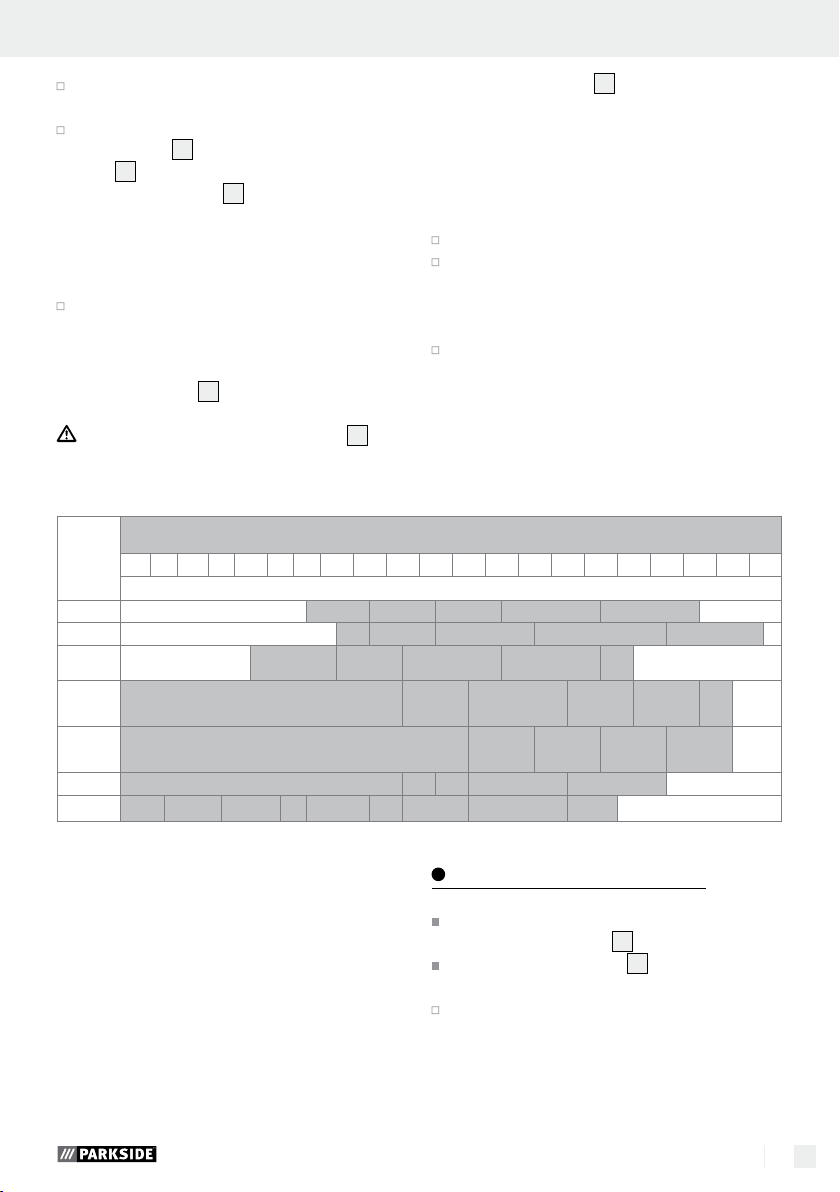
Verdunklungsstufe ein (siehe nachfolgende Tabelle). Die Verdunklungsstufe lässt sich manuell
von 9 bis 13 einstellen, indem Sie an dem Verdunklungsregler
9
an der Helmaußenseite
drehen.
ACHTUNG! Der Verdunklungsregler 9 hat
die Einstellposition „Grind“. Wenn der
Tabelle zur Einstellung der Verdunklungsstufen
Lichtbogenstrom (Ampere)
1,5 6 10 15 30 40 60 70 100 125 150 175 200 225 250 300 350 400 450 500 600
SMAW
MAG
TIG /
GTAW
MIG
(schwer)
MIG
(leicht)
PAC
PAW
4 5 6 7 8 9 10 11 12
8 9 10 11 12 13 14
8 9 10 11 12 13 14
8 9 10 11 12 13
9 10 11 12 13 14
10 11 12 13 14
9 10 11 12 13
Verdunklungsregler
9
auf diese Position gestellt ist, wird die automatische Verdunklung deaktiviert.
Verwenden Sie diese Einstellung nur, wenn Sie
den Schweißhelm nicht zum Schweißen nutzen
möchten. Die automatische Verdunklung ist
dann nicht aktiv.
P
rüfen Sie vor jeder Verwendung die Lichtdichthe
Testvorgang durchführen: Nähern Sie sich einer
externen Lichtquelle mit mehr als 40 W der
Sichtscheibe und überprüfen Sie, ob sich die
Scheibe verdunkelt bzw. erhellt.
Um den UV-Filter / die Solarzelle zu wechseln,
drücken Sie auf die beiden Rastnasen und ziehen
den vorderen Rahmen nach außen weg. Abb.
B (Art.-Nr. 2000) oder lösen Sie die beiden
Schrauben wie in Abb. A (Art.-Nr. 2001, 2002).
it.
SMAW: Schweißen mit Mantelelektroden
MIG (schwer):
MIG Schweißen von Schwermetallen
MIG (leicht): MIG Schweißen von Leichtmetallen
und Legierungen
TIG / GTAW: Inertgasschweißen
MAG: Schweißen mit Metall-Aktivgas
PAC: Plasmaschneiden
PAW: Plasmaschweißen
Reinigung und Wartung
Verwenden Sie keine ätzenden Reinigungsmittel,
um das Helmgehäuse
Bringen Sie den UV-Filter 8 niemals mit Wasser
in Verbindung.
Reinigen Sie das Produkt mit einem weichen und
trockenen Tuch, mit einem mit reinem Alkohol
angefeuchteten Tuch oder mit einem mit Desinfektionsmittel angefeuchteten Tuch.
2
zu reinigen.
17 DE/AT/CH
Page 17
Umwelthinweise und Entsorgungsangaben / Fehlerbehebung
Umwelthinweise und
Entsorgungsangaben
Werfen Sie den Automatik-Schweißhelm nicht in
den Hausmüll, ins Feuer oder ins Wasser. Wenn
möglich, sollten nicht mehr funktionstüchtige Geräte
Rohstoffrückgewinnung statt
Müllentsorgung!
recycelt werden. Fragen Sie Ihren lokalen Händler
um Hilfe.
Gerät, Zubehör und Verpackung sollten
einer umweltgerechten Wiederverwertung
138180
zugeführt werden.
Fehlerbehebung
Fehler Ursache Lösung
Der Filter verdunkelt sich nicht
regelmäßig bzw. flackert.
Die Reaktion ist verlangsamt. Die Umgebungstemperatur ist zu
Die Sicht ist schlecht. Der Protektor / die Schutzscheibe
Der Schweißhelm verrutscht.
Der Protektor ist verschmutzt
oder defekt.
Reinigen Sie den Protektor oder
ersetzen Sie ihn.
Der Lichtbogensensor ist nicht klar. Reinigen Sie die Oberfläche des
Lichtbogensensors.
Der Schweißstrom ist zu gering. Stellen Sie die Empfindlichkeit
auf die max. Stufe ein.
Benutzen Sie den Schweißhelm
gering / hoch.
nur bei Temperaturen zwischen
-5 °C und +55 °C.
Die Empfindlichkeit ist zu gering. Stellen Sie die Empfindlichkeit
höher ein.
Reinigen Sie den Protektor und
ist verschmutzt.
Die Schutzfolie auf der Schutz-
die Schutzscheibe.
Entfernen Sie die Schutzfolie.
scheibe wurde nicht entfernt.
Das Umgebungslicht ist nicht
ausreichend.
Die falsche Verdunklungsstufe ist
eingestellt.
Das Kopfband
5
ist falsch
eingestellt.
Stellen Sie mehr Licht an Ihrer
Arbeitsumgebung ein.
Stellen Sie die Verdunklungsstufe
erneut ein.
Stellen Sie das Kopfband 5 erneut und enger ein.
18 DE/AT/CH
Page 18

Hinweise zu Garantie und Serviceabwicklung / Garantiebedingungen
Hinweise zu Garantie und
Serviceabwicklung
Garantie der Creative Marketing
Consulting GmbH
Sehr geehrte Kundin, sehr geehrter Kunde, Sie
erhalten auf dieses Gerät 3 Jahre Garantie ab
Kaufdatum. Im Falle von Mängeln dieses Produkts
stehen Ihnen gegen den Verkäufer des Produkts
gesetzliche Rechte zu. Diese gesetzlichen Rechte
werden durch unsere im Folgenden dargestellte
Garantie nicht eingeschränkt.
Garantiebedingungen
Die Garantiefrist beginnt mit dem Kaufdatum. Bitte
bewahren Sie den Original-Kassenbon gut auf.
Diese Unterlage wird als Nachweis für den Kauf
benötigt.
Tritt innerhalb von drei Jahren ab dem Kaufdatum
dieses Produkts ein Material- oder Fabrikationsfehler
auf, wird das Produkt von uns – nach unserer Wahl
– für Sie kostenlos repariert oder ersetzt. Diese
Garantieleistung setzt voraus, dass innerhalb der
Drei-Jahres-Frist das defekte Gerät und der Kaufbeleg
(Kassenbon) vorgelegt und schriftlich kurz beschrieben
wird, worin der Mangel besteht und wann er aufgetreten ist.
Wenn der Defekt von unserer Garantie gedeckt ist,
erhalten Sie das reparierte oder ein neues Produkt
zurück. Mit Reparatur oder Austausch des Produkts
beginnt kein neuer Garantiezeitraum.
Garantieumfang
Das Gerät wurde nach strengen Qualitätsrichtlinien
sorgfältig produziert und vor Anlieferung gewissenhaft geprüft.
Die Garantieleistung gilt für Material- oder Fabrikationsfehler. Diese Garantie erstreckt sich nicht auf
Produktteile, die normaler Abnutzung ausgesetzt sind
und daher als Verschleißteile angesehen werden
können oder für Beschädigungen an zerbrechlichen
Teilen, z.B. Schalter, Akkus oder solchen, die aus
Glas gefertigt sind.
Diese Garantie verfällt, wenn das Produkt beschädigt,
nicht sachgemäß benutzt oder gewartet wurde. Für
eine sachgemäße Benutzung des Produkts sind alle
in der Bedienungsanleitung aufgeführten Anweisungen genau einzuhalten. Verwendungszwecke
und Handlungen, von denen in der Bedienungsanleitung abgeraten oder vor denen gewarnt wird,
sind unbedingt zu vermeiden.
Das Produkt ist lediglich für den privaten und nicht
für den gewerblichen Gebrauch bestimmt. Bei missbräuchlicher und unsachgemäßer Behandlung,
Gewaltanwendung und bei Eingriffen, die nicht von
unserer autorisierten Service-Niederlassung vorgenommen wurden, erlischt die Garantie.
Abwicklung im Garantiefall
Um eine schnelle Bearbeitung Ihres Anliegens zu
gewährleisten, folgen Sie bitte den folgenden
Hinweisen:
Bitte halten Sie für alle Anfragen den Kassenbon
und die Artikelnummer (z.B. IAN) als Nachweis für
den Kauf bereit.
Die Artikelnummer entnehmen Sie bitte dem Typenschild, einer Gravur, dem Titelblatt Ihrer Anleitung
(unten links) oder dem Aufkleber auf der Rückoder Unterseite.
Sollten Funktionsfehler oder sonstige Mängel auftreten, kontaktieren Sie zunächst die nachfolgend
benannte Serviceabteilung telefonisch oder per
E-Mail.
Ein als defekt erfasstes Produkt können Sie dann
unter Beifügung des Kaufbelegs (Kassenbon) und
der Angabe, worin der Mangel besteht und wann
er aufgetreten ist, für Sie portofrei an die Ihnen mitgeteilte Service Anschrift übersenden.
Hinweis:
Auf www.lidl-service.com können Sie
diese und viele weitere Handbücher, Produktvideos und Software herunterladen.
19 DE/AT/CH
Page 19
Service / Bedeutung der Kennzeichnung / EG-Konformitätserklärung
Service
Verwenden Sie nur Originalzubehörteile:
Vorsatzscheibe 114,5 mm x 89,5 mm
Hinterlegscheibe 103,8 mm x 47,3 mm.
So erreichen Sie uns:
DE, AT, CH
Telefon: +49 (0) 6894 9989751
(Normal-Tarif dt. Festnetz)
Sitz: Deutschland
IAN 281392
Bitte beachten Sie, dass die folgende Anschrift
keine Serviceanschrift ist.
Kontaktieren Sie zunächst die oben benannte
Servicestelle.
Adresse:
C. M. C. GmbH
Katharina-Loth-Str. 15
DE-66386 St. Ingbert
DEUTSCHLAND
Bedeutung der Kennzeichnung
Schweißhelmschale
Identifizierung des Herstellers ..............CMC GmbH
Die Nummer der vorliegenden Norm ..EN 175
Anwendungsbereich(e) (gegebenenfalls)
Masse in Gramm (gegebenenfalls)
Symbol Schutzart
S
-F
-B
Zertifizierungsstelle:
DIN CERTCO Gesellschaft für
Konformitätsbewertung mbH
Alboinstrasse 56
12103 Berlin
Notified body number 0196
erhöhte
Festigkeit
Aufprall mit
niedriger
Energie
Aufprall mit
mittlerer
Energie
Wenn die Symbole F, B und A nicht sowohl für die Sichtscheibe als auch den
Tragkörper gelten, ist dem vollständigen
Augenschutzgerät der niedrigere Grad
zuzuerkennen.
Mechanische
Festigkeit
Mechanische
Festigkeit
Mechanische
Festigkeit
..S, F, B
Beschreibung des
Anwendungs-
bereichs
Sicherheitssichtscheiben geprüft nach
DIN EN 166: CMC 1 F CE
(Erklärung: CMC = Herstellerkürzel, 1 = optische
Klasse, F = Stoß mit niedriger Energie, CE =
CE-Zeichen)
ADF geprüft nach DIN EN 379:
(Erklärung: 4 = Hellzustand, 9–13 = Dunkelzustände
CMC = Herstellerkürzel, Ziffer 1 = optische Klasse,
Ziffer 2 = Streulichtklasse, Ziffer 3 = Homogenitätsklasse, Ziffer 4 = Winkelabhängigkeitsklasse, 379 =
Prüfnorm,CE = CE-Zeichen)
20 DE/AT/CH
EG-Konformitätserklärung
Wir, die
C. M. C. GmbH
Dokumentenverantwortlicher: Andre Scheer
Katharina-Loth-Str. 15
DE-66386 St. Ingbert
DEUTSCHLAND
,
erklären in alleiniger Verantwortung, dass das Produkt
Automatik-Schweißhelm
Page 20
Seriennummer: 2000 / 2001 / 2002
Herstellungsjahr: 2017 / 15
IAN: 281392
Modell:
PSH 3 A2
den wesentlichen Schutzanforderungen genügt,
die in den Europäischen Richtlinien
EG-Richtlinie Elektromagnetische
Verträglichkeit
2014 / 30 / EU
RoHS Richtlinie
2011 / 65 / EU
Persönliche Schutzausrüstung-Richtlinie
89 / 686 / EWG
und deren Änderungen festgelegt sind.
Für die Konformitätsbewertung wurden folgende
harmonisierte Normen herangezogen:
EN 379:2009-07
EN 175:1997-08
EN 166:2002-04
EG-Konformitätserklärung
St. Ingbert, 31.01.2017
i. A. Andre Scheer
- Leiter Qualitätssicherung -
21 DE/AT/CH
Page 21

22
Page 22

23
Page 23

24
Page 24

C. M. C. GmbH
Katharina-Loth-Str. 15
DE-66386 St. Ingbert
GERMANY
Last Information Update · Stand
der Informationen: 01 / 2017
Ident.-No.: PSH3A2012017-GB/IE/NI
IAN 281392
 Loading...