

Panasonic WJ-ND400K, WJ-ND400K/G Setup Instructions

Network Disk Recorder
Setup Instructions
Model Nos. WJ-ND400K
WJ-ND400K/G
1
2
3
4
5
6
7
8
9
Before attempting to connect or operate this product,
please read these instructions carefully and save this manual for future use.

Preface
Contents
Preface
Preface.............................................................................................................................................................. 5
About these Operating Instructions................................................................................................................... 5
System Requirements for a PC ........................................................................................................................ 6
Trademarks and Registered Trademarks ......................................................................................................... 6
Restrictions when operating MPEG-4 images .....................................................................7
Initial configurations
Getting started ........................................................................................................................8
Setup procedure ............................................................................................................................................... 8
Setup menu list ................................................................................................................................................. 9
Network settings...................................................................................................................11
Recorder network settings .............................................................................................................................. 11
PC network settings ........................................................................................................................................ 13
About operating windows ....................................................................................................15
Display and close the operating window......................................................................................................... 15
Names and functions of components.............................................................................................................. 17
Top page.................................................................................................................................................... 17
[Control] button .......................................................................................................................................... 18
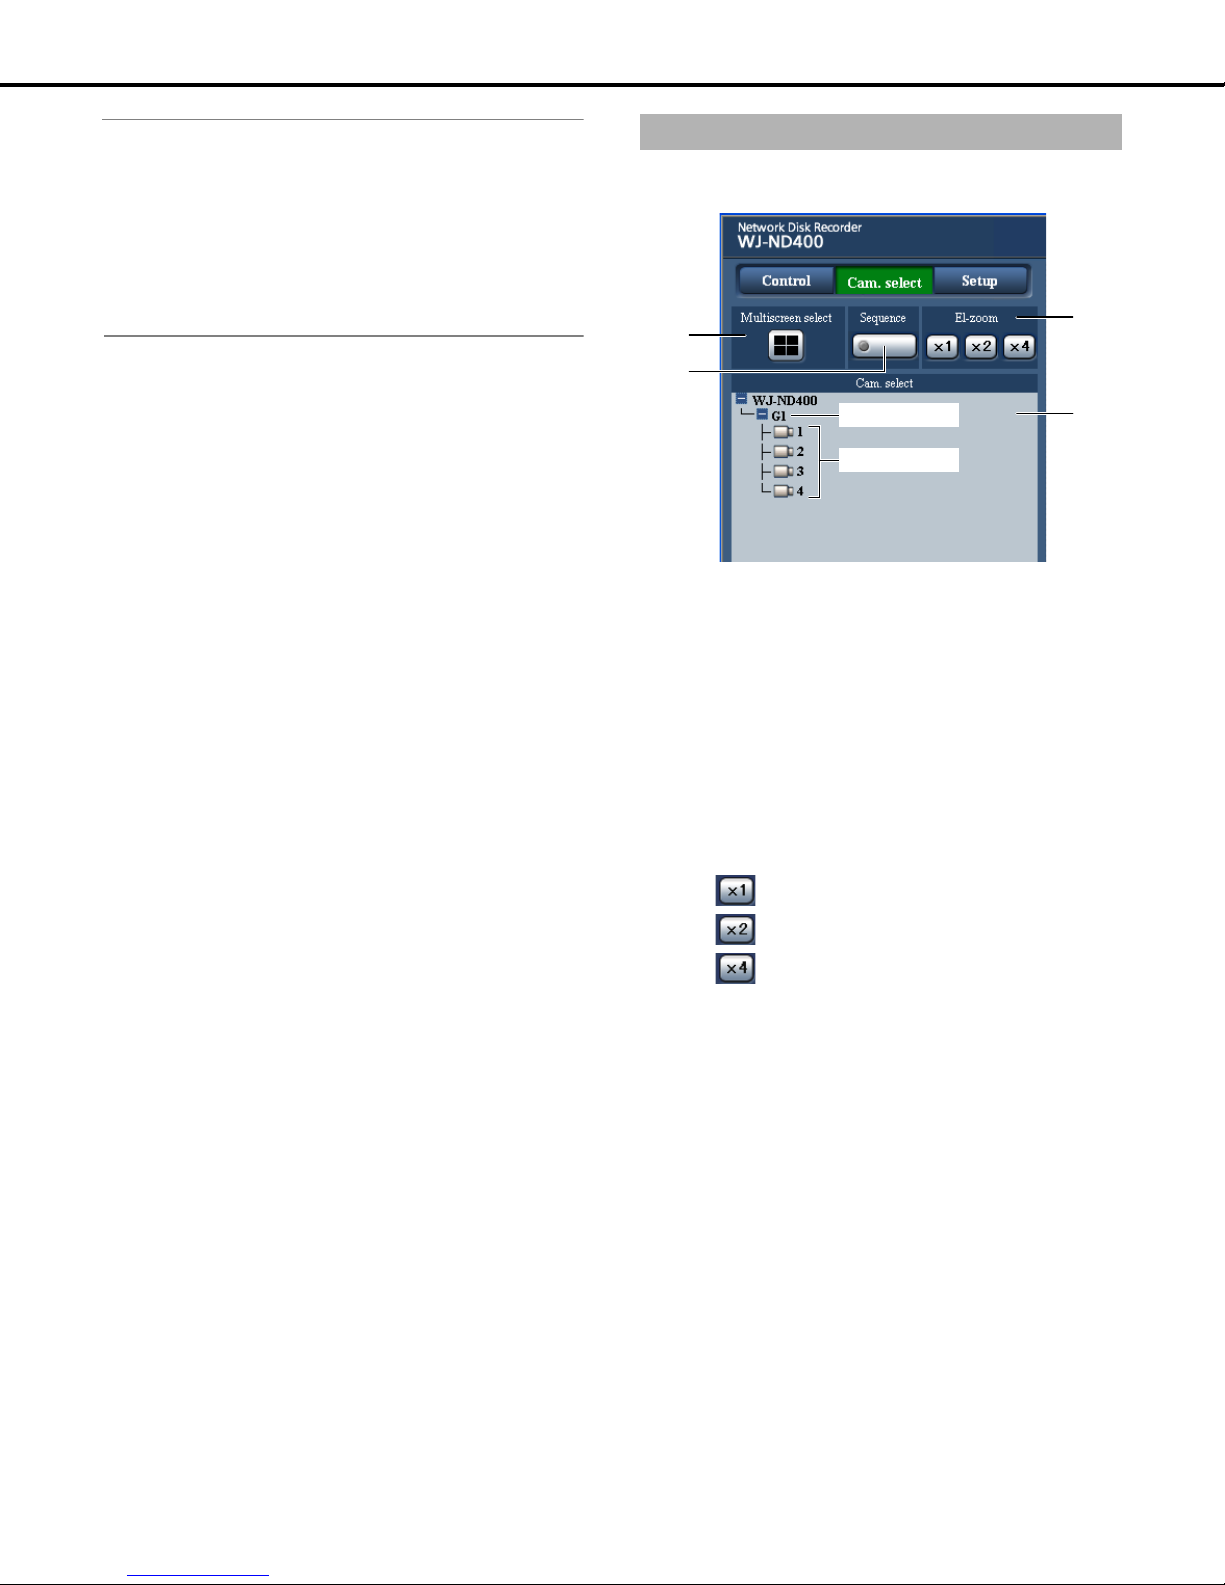
[Cam. select] button................................................................................................................................... 19
[Setup] button ............................................................................................................................................ 20
Status display area .................................................................................................................................... 21
Playback point operation area ................................................................................................................... 22
[HDD] tab ................................................................................................................................................... 22
[CAM] tab................................................................................................................................................... 24
Basic operations ............................................................................................................................................. 25
Setup
Quick settings .......................................................................................................................26
Settings........................................................................................................................................................... 26
Language, and time & date settings .......................................................................................................... 26
Network setup............................................................................................................................................ 27
Camera registration ................................................................................................................................... 28
Program settings........................................................................................................................................ 30
Basics ....................................................................................................................................31
Basics ............................................................................................................................................................. 31
Time & date..................................................................................................................................................... 32
Emergency recording...........................................................................................................34
Emergency recording...................................................................................................................................... 34
About the [Measurement] button ............................................................................................................... 36
About SD memory recording...................................................................................................................... 36
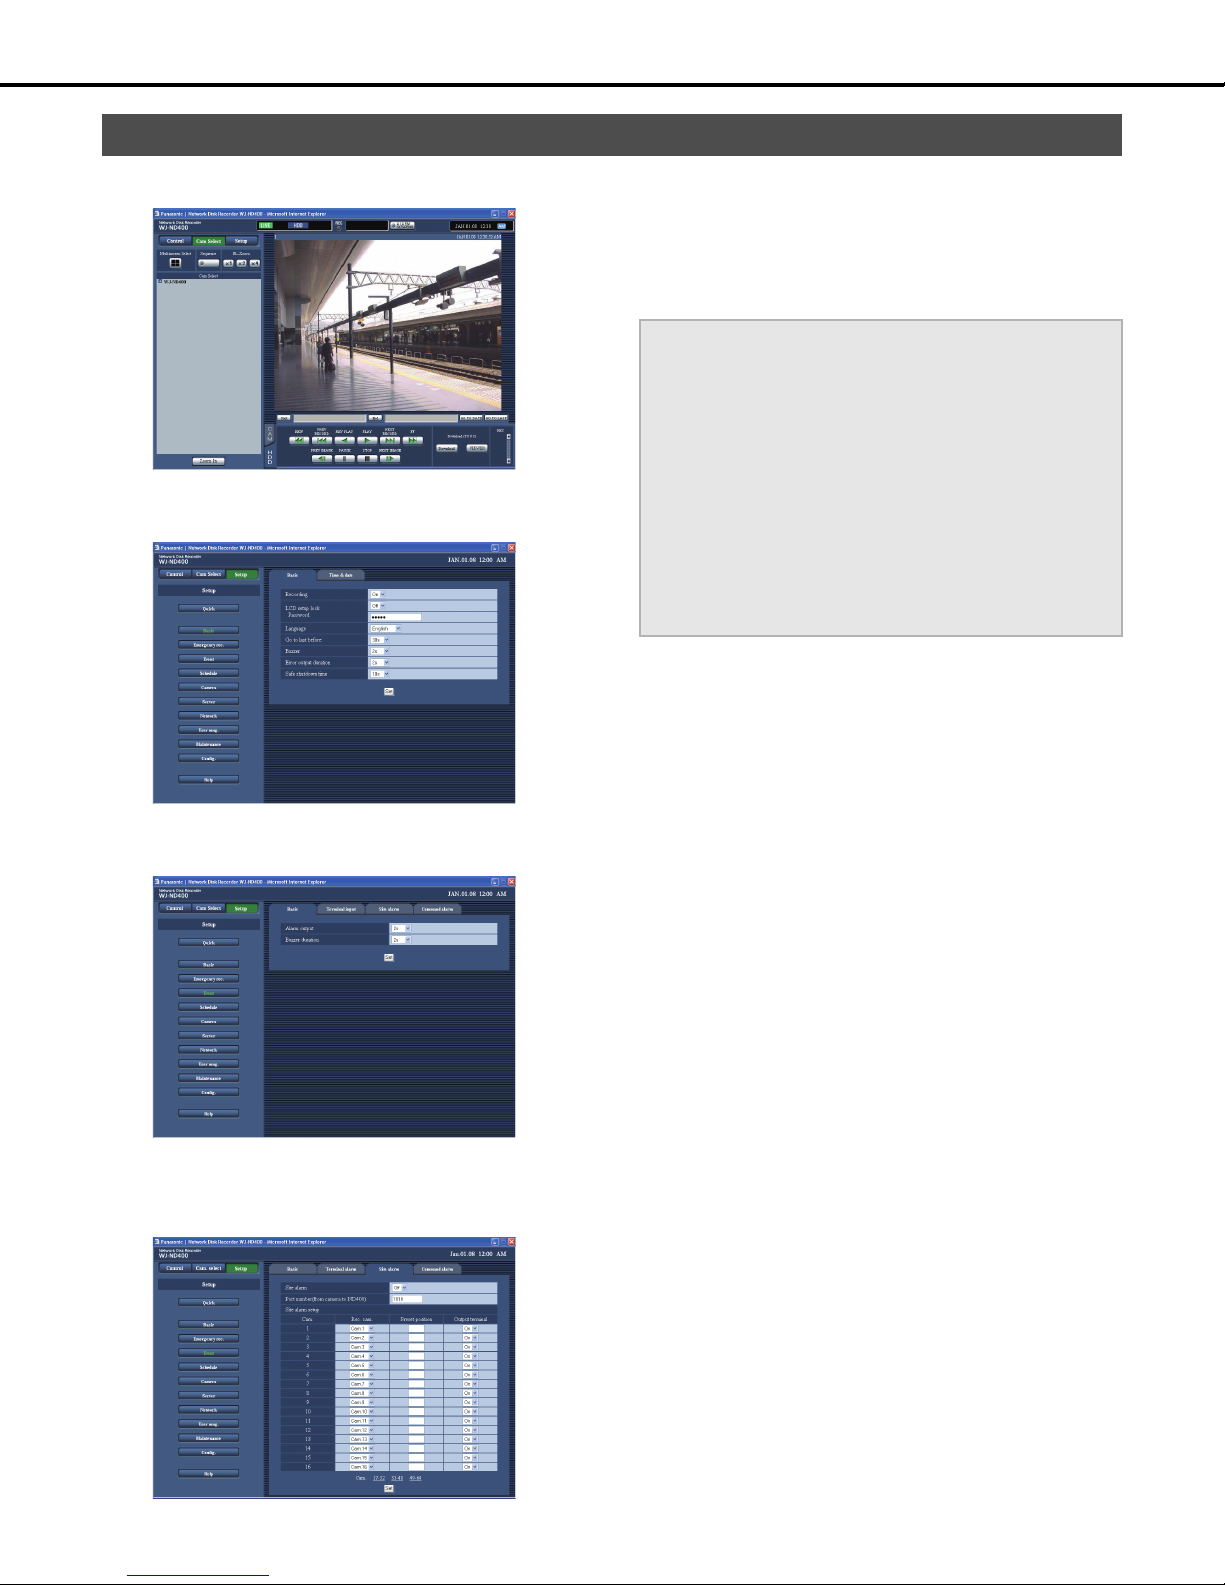
Event ......................................................................................................................................37
Event functions ............................................................................................................................................... 37
Basics ............................................................................................................................................................. 38
Terminal alarm ................................................................................................................................................ 39
2

Contents
Site alarm........................................................................................................................................................ 40
Command alarm ............................................................................................................................................. 41
Schedules..............................................................................................................................42
Program .......................................................................................................................................................... 42
About the [Measurement] button ............................................................................................................... 45
Time table ....................................................................................................................................................... 46
About externally controlled recording......................................................................................................... 47
Special days.................................................................................................................................................... 47
Camera...................................................................................................................................48
NW camera..................................................................................................................................................... 48
Automatically detecting and registering cameras ...................................................................................... 48
Switch cameras (4-screen display setting) ................................................................................................ 50
Checking and changing a camera (Manually setting) ................................................................................ 50
Group.............................................................................................................................................................. 52
Sequence........................................................................................................................................................ 53
Server.....................................................................................................................................55
NTP................................................................................................................................................................. 55
FTP ................................................................................................................................................................. 56
Mail ................................................................................................................................................................. 58
Proxy............................................................................................................................................................... 60
Network..................................................................................................................................61
Basics ............................................................................................................................................................. 61
DDNS.............................................................................................................................................................. 65
SNMP.............................................................................................................................................................. 66
Panasonic alarm protocol ............................................................................................................................... 67
User management.................................................................................................................68
Basics ............................................................................................................................................................. 68
Administrator................................................................................................................................................... 69
Users............................................................................................................................................................... 70
Editing user information ............................................................................................................................. 71
Deleting user information........................................................................................................................... 71
Hosts............................................................................................................................................................... 72
Editing host information ............................................................................................................................. 73
Deleting host information ........................................................................................................................... 73
User level........................................................................................................................................................ 74
Maintenance ..........................................................................................................................76
Recorder information ...................................................................................................................................... 76
Disk information .............................................................................................................................................. 77
Network information........................................................................................................................................ 79
Disk ................................................................................................................................................................. 80
Deleting image data from a disk ................................................................................................................ 81
Settings management ..................................................................................................................................... 82
Disk management
Configuring disks .................................................................................................................83
HDD space management................................................................................................................................ 83
Disk partition information ................................................................................................................................ 84
3

Contents
Formatting disks...................................................................................................................86
Format............................................................................................................................................................. 86
Pre-event recording area formatting ............................................................................................................... 88
Attachments
About mail notification .........................................................................................................90
Alarm mail notification..................................................................................................................................... 90
Warning mail notification................................................................................................................................. 90
Troubleshooting....................................................................................................................93
Problems......................................................................................................................................................... 93
Message display ............................................................................................................................................. 96
Glossary.................................................................................................................................97
Words used in the manual .............................................................................................................................. 97
Index.....................................................................................................................................100
4

Preface
The Network Disk Recorder (WJ-ND400) is for recording images and audio from network surveillance cameras to a hard disk (hereafter HDD). It
is possible to connect up to 64 cameras over a network.
Also, it is possible to access and operate the recorder via a network from the web browser on a computer (hereafter PC). A maximum of 16 PCs
can be connected (via a network).
• The network settings for the PC need to be done to do settings and operations from the PC. A web browser must also be installed.
About these Operating Instructions
There are four manuals, they include the Installation Guide, Setup Instructions (PDF file), Operating Instructions (PDF file), and the Quick
Reference Guide.
• Installation Guide : How to configure required settings and connect the equipment.
• Setup Instructions (PDF file) : How to configure required settings and connect the equipment to perform operations
from a PC over a network.
• Operating Instructions (PDF file) : How to perform operations from a PC.
• Quick Reference Guide : Basic settings and frequently used functions.
®
Reader is required to refer to the “Operating Instructions” and the “Setup Instructions” on the provided CD-ROM. When the Adobe
Adobe
Reader is not installed on the PC, download the latest Adobe® Reader from the Adobe web site and install it.
In this manual and on the screen, the ND400 and the recorder are shown as WJ-ND400.
Refer to the "readme.txt" file on the CD-ROM bundled with the recorder for information about the versions and types of separately available
software and cameras supported.
®
The following abbreviations are used in this document.
Microsoft
Microsoft
®
Windows Vista® Business (32-bit) is called Windows Vista®.
®
Windows® XP Professional SP2, and Microsoft® Windows® XP Home Edition SP2 are called Windows® XP.
5

System Requirements for a PC
It is recommended to operate this unit using a PC that meets the following system requirements.
• OS : Microsoft® Windows Vista® Business (32-bit)
®
:Microsoft
Windows ® XP Professional SP2
:Microsoft® Windows ® XP Home Edition SP2
• OS Language : English, French, Spanish, German, Italian, Russian, Chinese
®
•CPU :Pentium
4 3.0 GHz or faster
• Memory : 1 GB or more (512 MB or more is required when using Microsoft
• Monitor : Resolution: 1 024 x 768 pixels or more
Color: 24-bit True color or better
• Network interface : 10/100/1 000 Mbps Ethernet port x1
®
• Web Browser : Windows
:Microsoft
Internet Explorer® 7.0
®
Internet Explorer® 6.0 SP2
• Audio interface : Sound card (when using the audio function)
• Other : CD-ROM drive: It is necessary to refer to the operating instructions and use the software on the provided
CD-ROM.
®
9.0c or later
®
Reader®: It is necessary to refer to the operating instructions on the provided CD-ROM.
*Microsoft
:DirectX
: Adobe
®
Internet Explorer® 6.0 SP2 is required when using Microsoft® Windows® XP Professional SP2 or Microsoft® Windows® XP Home
Edition SP2.
Important:
• When using a PC that does not meet the above requirements, displaying of images may become slow or the web browser may become
inoperable.
• Audio may not be heard if a sound card is not installed on a PC. Audio may be interrupted depending on the network environment.
• Refer to "Notes on Vista
Windows Vista®.
®
" (PDF) for further information about system requirements for a PC and precautions when using Microsoft
*
*
®
Windows® XP.)
*
®
Trademarks and Registered Trademarks
• Adobe and Reader are either registered trademarks or trademarks of Adobe Systems Incorporated in the United States and/or other countries.
• Microsoft, Windows, Windows Vista, Internet Explorer, ActiveX, DirectX are either a registered trademark or trademark of Microsoft
Corporation in the United States and/or other countries.
• Intel and Pentium are trademarks or registered trademarks of Intel Corporation and its subsidiaries in the USA and other countries.
• Other names of companies and products contained in these operating instructions may be trademarks or registered trademarks of their
respective owners.
6

Restrictions when operating MPEG-4 images
There are following restrictions when "MPEG-4" is selected for the
image compression method on the setup menu. ("NW camera"
under "Camera")
1. When displaying live images
(1) Black screen may be displayed for the first few seconds (*)
when the following operations are performed while displaying
live images.
⋅ When MPEG-4 live images are displayed (by switching
camera channel, etc.)
⋅ When MPEG-4 image is enlarged (or when enlarged
MPEG-4 image is resized to the original size)
(2) It may take several seconds (*) for refresh interval of MPEG-4
image when displaying images on a 4-screen.
Example: When "3 seconds" is selected for the refresh
interval on the camera, MPEG-4 image will be
refreshed in 3 seconds intervals.
2. When displaying images sequentially
When "MPEG-4" is selected for the image compression method of
the camera selected for a camera channel on the setup menu, the
respective sequence step will be skipped.
3. When playing recorded images
(1) Displayed playback time may be fast for several seconds (*)
when the following operations are performed while playing
recorded images
⋅ When MPEG-4 recorded images are played (by changing
camera channel, etc.)
⋅ When MPEG-4 image is enlarged (or when enlarged
MPEG-4 image is resized to the original size)
(When operating to zoom in/out a paused MPEG-4
recorded image, image of several seconds later than the
displayed image may be enlarged.)
⋅ When the [PLAY] button is clicked again while playing
MPEG-4 image
⋅ When the first frame is displayed by clicking the [NEXT
IMAGE] button during pausing
(2) Playback may be performed in several seconds intervals (*)
when the following operations are performed while playing
MPEG-4 image. Refer to the Operating Instructions (PDF file)
for further information.
⋅ Reverse playback ([REV P LAY])
⋅ Fast playback/fast reverse playback ([FF] / [REW])
⋅ Reverse frame playback ([PREV IMAGE])
Example: When "3 seconds" is selected for the refresh
interval on the camera, MPEG-4 image will be
played in 3 seconds intervals.
(3) When two records are played sequentially, the last few frames
of the former record and the first few frames of the next record
may be displayed overlapped.
(4) When playing MPEG-4 image by designating time and date,
playback may start from a point several seconds before or
after the designated time and date or from the first frame of
the next record.
4. When recording images
(1) Time and date displayed on the recording event list (actual
start time of recordings) may not exactly indicate the actual
time of recording trigger (event occurrence time, start time of
the schedule recording, etc.), and also the recording duration
may be shortened for seconds worth two times of the refresh
interval set on the camera.
Example: When the set recording duration and the set
refresh interval of the camera are 10 seconds and
1 second respectively
10 - (1 x 2) = 8 (sec)
The minimum actual recording duration is 8
seconds.
(2) When pre-event recording is set to be performed, pre-event
recording duration may be longer than the set duration.
Example: Depending on the size of the image data, pre-
recording duration may be around 10 seconds
even when setting 5 seconds for the pre-event
recording duration.
5. When copying images
Copying may start from a point several seconds (*) later than the
designated start time when copying MPEG-4 images. To copy the
desired images for sure, designate start time several seconds earlier
than the time when the desired images are recorded, and set time
range for copying longer than the refresh interval set on the camera.
6. When downloading recorded images
Download of recorded images may start from a point several
seconds (*) earlier than the designated start time. Set time range for
download longer than the refresh interval set on the camera.
7. When transmitting images recorded at an event
occurrence to the FTP server
Duration of images to be transmitted to the FTP server, which are
recorded at an event occurrence, may not be exactly the same as
the duration set for "Duration-Pre" and "Duration-Post". Set
"Duration-Pre" and "Duration-Post" longer than the refresh interval
set on the camera.
8. Other
MPEG-4 images will not be attached to alarm mails.
Even when images are to be transmitted to the FTP server
periodically, MPEG-4 images will not be transmitted.
* Time (seconds) differs depending on the refresh interval set on
the camera (0.2 - 5 seconds). To shorten time lag, set the refresh
interval on the camera shorter. Refer to the operating instructions
of the camera for how to configure the refresh interval.
7
Initial configurations
Getting started
Setup procedure
The procedure to start operations is shown below.
1 Rack Mounting
2 Connections
3 Power On
4 Installing HDDs
5 Recorder Network
Settings
Mount the recorder into the rack (refer to the Installation Guide).
Go to step 2 if you are not using a rack.
Connect the recorder to the various devices (refer to the Installation
Guide).
Turn on the recorder (refer to the Installation Guide).
When using extension units, turn on all extension units before turning on
the recorder.
Install the HDDs in the recorder (refer to the Installation Guide).
Unformatted HDDs inserted into the recorder are automatically initialized.
Also, set the HDD operation mode as necessary.
Set the network for the recorder using the buttons on the front panel
(page 11).
6 PC Network Settings
7 Initialize HDDs
8 Camera Network Settings
9 Settings
10 Start Operations
When necessary
Replace HDDs
This section explains how to change PC network settings to match the
settings of the recorder (page 13).
To change HDD area management, display disk configuration and
initialize the HDD from the setup menu on the recorder as needed
(page 86).
Open the NW camera setup menu from the PC and do the network
settings (page 48).
Set up functions necessary for operation (page 9).
You can change or format HDDs while the recorder is [ON] (refer to the
Installation Guide).
8

Getting started
Setup menu list
You must pre-configure settings from the setup menu when using the recorder. To display the setup menu, click the [Setup] button.
Setting item Description Page
Quick
Setup Display a menu with the minimum settings necessary to use the recorder. page 26
Basic
Basic Set the basic operations for the recorder. page 31
Time & date Set the time and date. page 32
Emergency rec.
Emergency rec. Set the emergency recording duration, rate, audio, etc. page 34
Event
Basic Set the basic setting for alarm action. page 38
Terminal input Set the alarm action when an event occurs. page 39
Site alarm Set the alarm action when a Site alarm occurs. page 40
Command alarm Set the alarm action when a Command alarm occurs. page 41
Schedule
Time table Configure time table settings to schedule operations for each day of the
week, and assign each time table to a program.
Program Create a recording operation program. You can create up to 8 programs.
Set recording operations in each program, including the recording rate and
audio recording, for each camera channel.
Special days Assign separate time tables for each day of the week for special days. page 47
Camera
NW camera Configure camera network settings, including the camera address and port
number.
Group Set the group title of a camera. page 52
Sequence Set camera sequence operations. page 53
Server
NTP Configure settings, such as the NTP server address, for time adjustment
FTP Set the FTP server. Configure to periodically send images from a camera
Mail Set to send e-mails to registered addresses when an event or an error
Proxy Set the proxy server.
Network
Basic Configure the basic settings for the network. Configure network configuration
DDNS Set the DDNS server.
SNMP Set the SNMP server.
Panasonic alarm
protocol
based on the NTP server.
connected to the recorder to a specified FTP server.
occurs.
Set On or Off for the proxy server and set the server address.
settings like the IP address, default gateway and DNS server.
Set On or Off for the DDNS server and set user names.
Configure these settings when connecting to an SNMP manager and check
the status of the recorder.
Set to send a message to registered addresses when an event or an error
occurs using our original communication method.
page 46
page 42
page 48
page 55
page 56
page 58
page 60
page 61
page 65
page 66
page 67
9

Getting started
Setting item Description Page
User mng.
Basic Set whether user and host authentication should be performed. page 68
Administrator Edit registered administrator information such as the administrator name,
User Edit or delete registered user information and register uses who can operate
Host Edit or delete registered host information and register PCs (hosts) that can
User level Set the functions available at each user level. page 74
Maintenance
Product information Display the version of the software and hardware, the MAC address, serial
Disk information Displays information about recording, the disk operational mode, disk space
Network information Display network information such as the camera address set on the recorder
Disk Set operations for when the HDD is full and perform deletion of data stored
Settings
management
Config.
Disk information Displays information about recording, the disk operational mode, disk space
Format Format the HDD and assign Event recording areas and Copy areas to the
page 69
password, and start monitor.
page 70
the recorder.
You can also set the operation level, user name, and password.
page 72
access the camera over a network.
You can also set the operation level and the IP address of the PC.
page 76
number, and the internal temperature of the recorder.
page 77
capacity, and the recording area.
page 79
and the line speed of the recorder.
page 80
on the HDD.
Save, load and initialize the content of the setup menu on the recorder. page 82
page 84
capacity, and the recording area.
page 86
HDD.
10

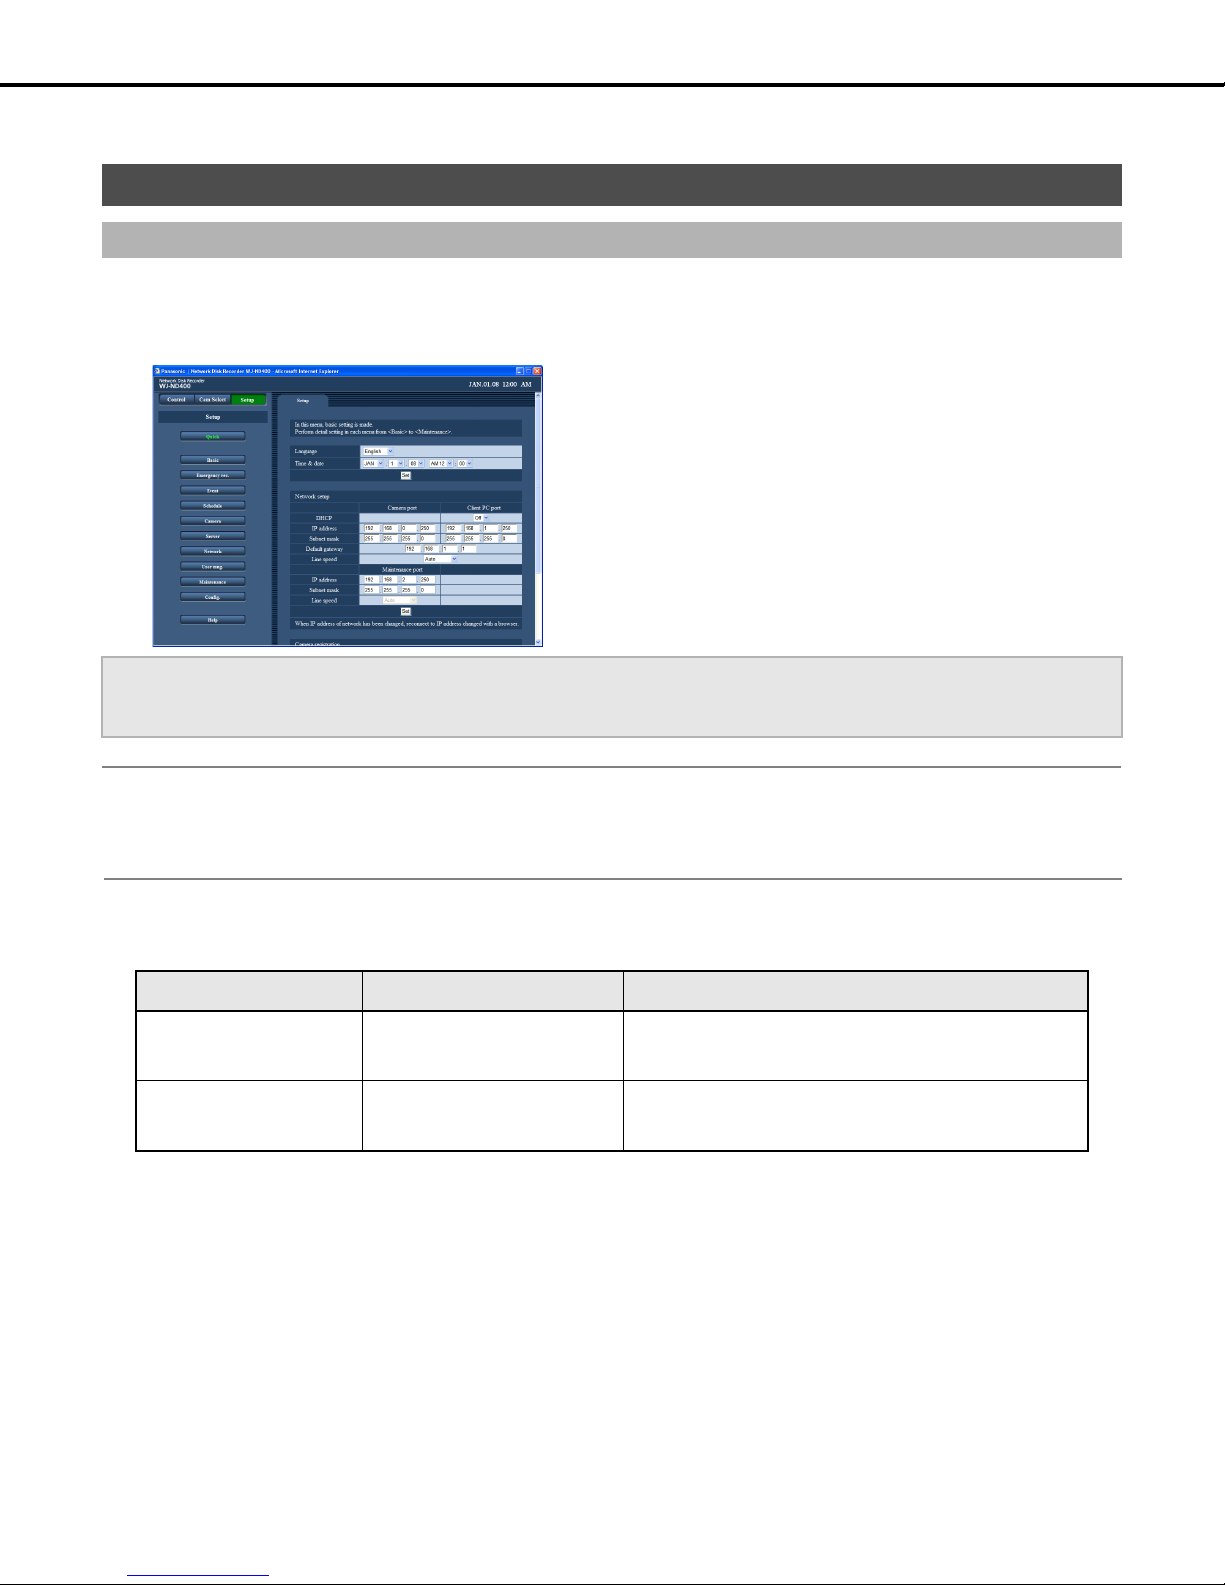
Network settings
Recorder network settings
This section explains how to configure recorder network settings.
The following are the settings for ports to be used.
Set the parameters using the button on the front panel. Setting parameters are displayed on the LCD.
Setting item Description
DHCP Specifies whether a DHCP server is used. Select [On] for this setting to obtain the IP address,
subnet mask, and default gateway from a DHCP server.
IP address When DHCP is [Off], specify the IP address.
Subnet mask When DHCP is [Off], specify the IP address.
Default gateway When DHCP is [Off], specify the default gateway subnet mask.
HTTP port Specify the HTTP port number to be used. Normally this setting is 80.
The following shows the factory default network settings.
Setting item Camera port Client PC port Maintenance port
DHCP − Off −
IP address 192.168.0.250 192.168.1.250 192.168.2.250
Subnet mask 255.255.255.0 255.255.255.0 255.255.255.0
Default gateway − 192.168.1.1 −
HTTP port − 80 −
Important:
• Always configure the network settings for the ports using different subnet mask areas. Using the same subnet mask area may result in
improper network communication.
Note:
• Settings are not required when the PC network environment is as shown below. You can configure recorder settings and perform operations
from a web browser after connecting.
IP address : 192.168.1.2 to 249, 192.168.1.251 to 254
Subnet mask : 255.255.255.0
Gateway : 192.168.1.1
In an environment with other settings than those shown above, you will need to configure the network settings of the recorder or PC.
• For camera network settings, call up the Camera setup menu. Refer to "NW camera (page 48)" for details about the settings.
11
Network settings
The following is the procedure for configuring network settings.
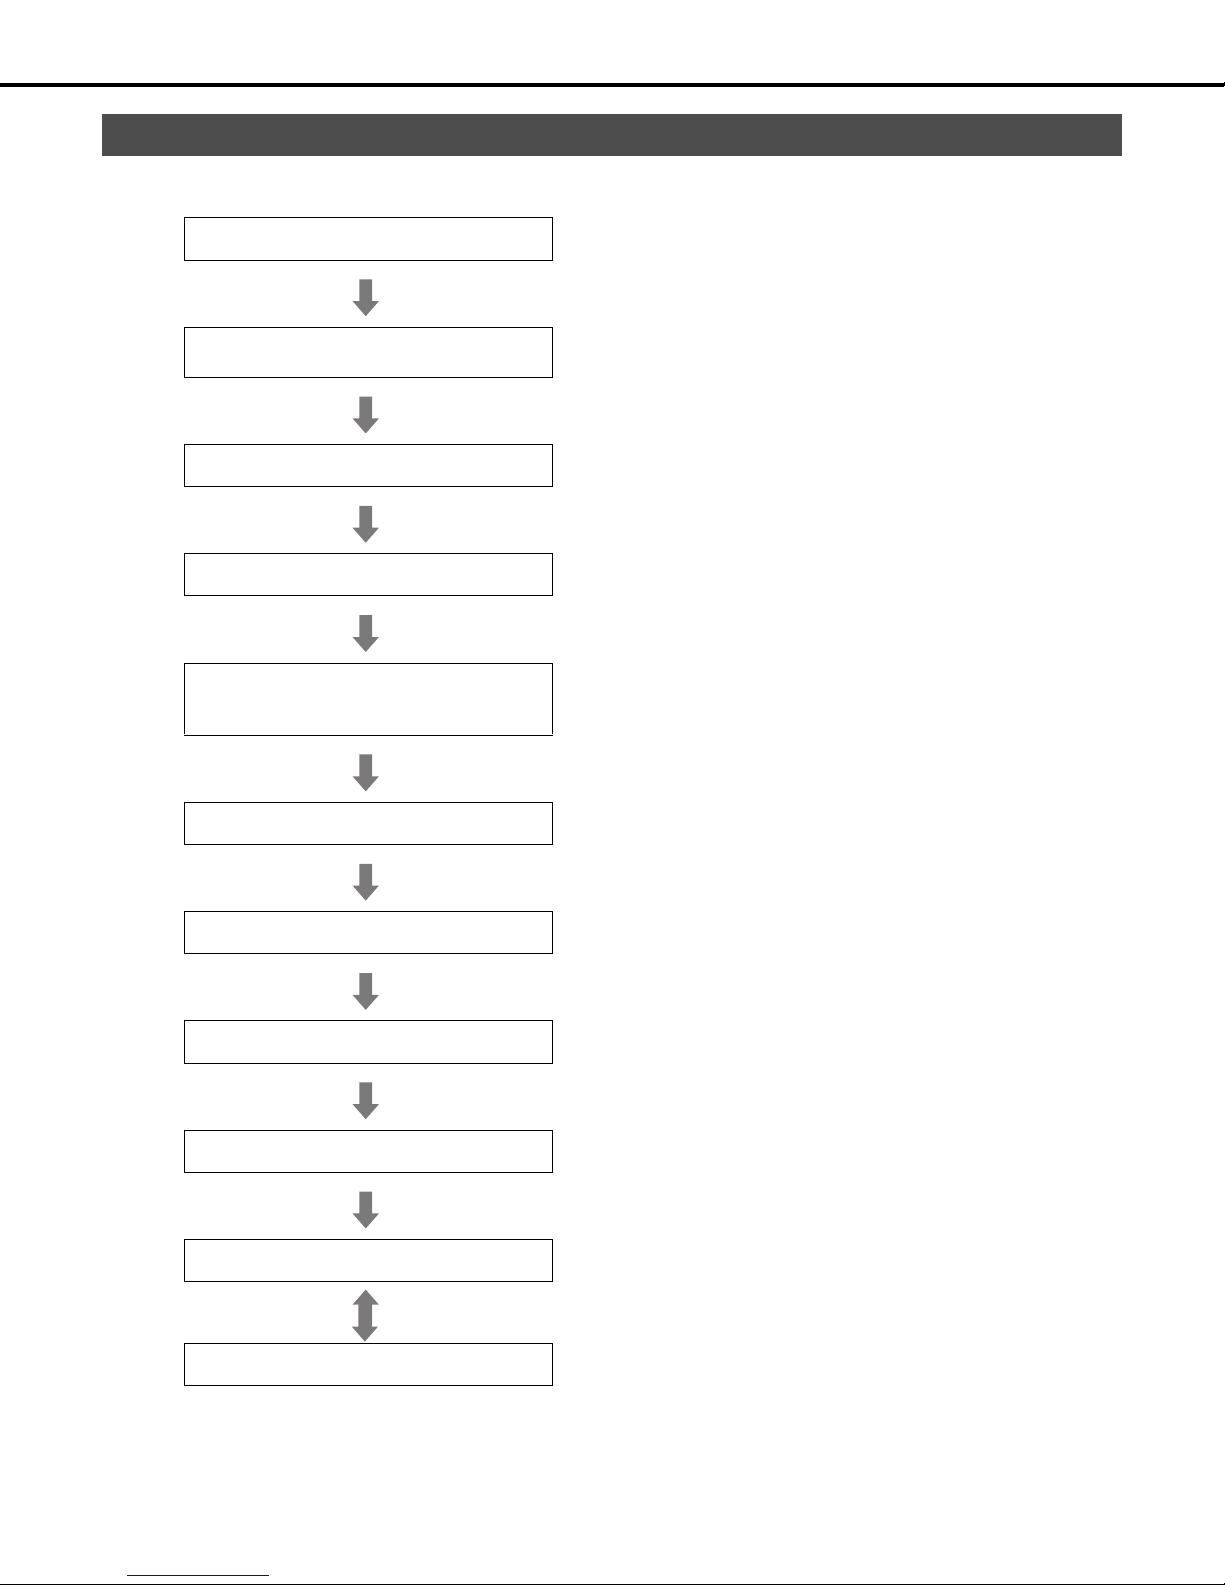
1 Make sure that the Date display screen (standby screen)
is displayed on the LCD.
If display is different, press the [ESC] button to display the
standby screen.
2 Use the arrow buttons (up or down) to display the IP
address settings screen.
3 Press the [SET] button.
This will display the [PT#1 IP ADDR] setting screen.
4 Use the arrow buttons (left or right) to display the
network port setting screen.
• PT#1 : Camera port
•PT#2 :Client PC port
• PT#3 : Maintenance port
8 Press the [ESC] button to move the cursor to ">" and
check the settings.
9 To configure the setting of another item, use the arrow
buttons (up or down) to change the screen.
10 Repeat steps 5 through 8 to configure the settings for
each item.
5 Use the arrow buttons (up or down) to display the screen
of the item you want to set.
• DHCP
• IP address
• Subnet mask
• Default gateway
•HTTP port
Note:
• You can only set the DHCP, the gateway, and the HTTP port to
PT#2.
6 After confirming that the cursor is [>], press the [SET]
button.
The cursor moves to the number area.
• The cursor is shown as an underscore (_).
7 Use the arrow buttons to change the setting.
• To move the cursor : Arrow buttons (left or right)
• To input a value : Arrow buttons (up or down)
12
Network settings
PC network settings
This section explains how to match the PC network settings to the settings of the recorder. In order to access the recorder, the IP address of the
PC must be set to the same subnet mask area as the recorder client PC port.
The examples in this manual are presented using the basic settings of Windows XP. If you are using an operating system other than Windows
XP, refer to the user documentation of the operating system you are using.
Example:
If you are using the recorder's initial default settings (IP address: 192.168.1.250), set the IP address of the PC to; 192.168.1.XXX, where XXX is
any value except 250 (which is used by the recorder) from 2 to 254.
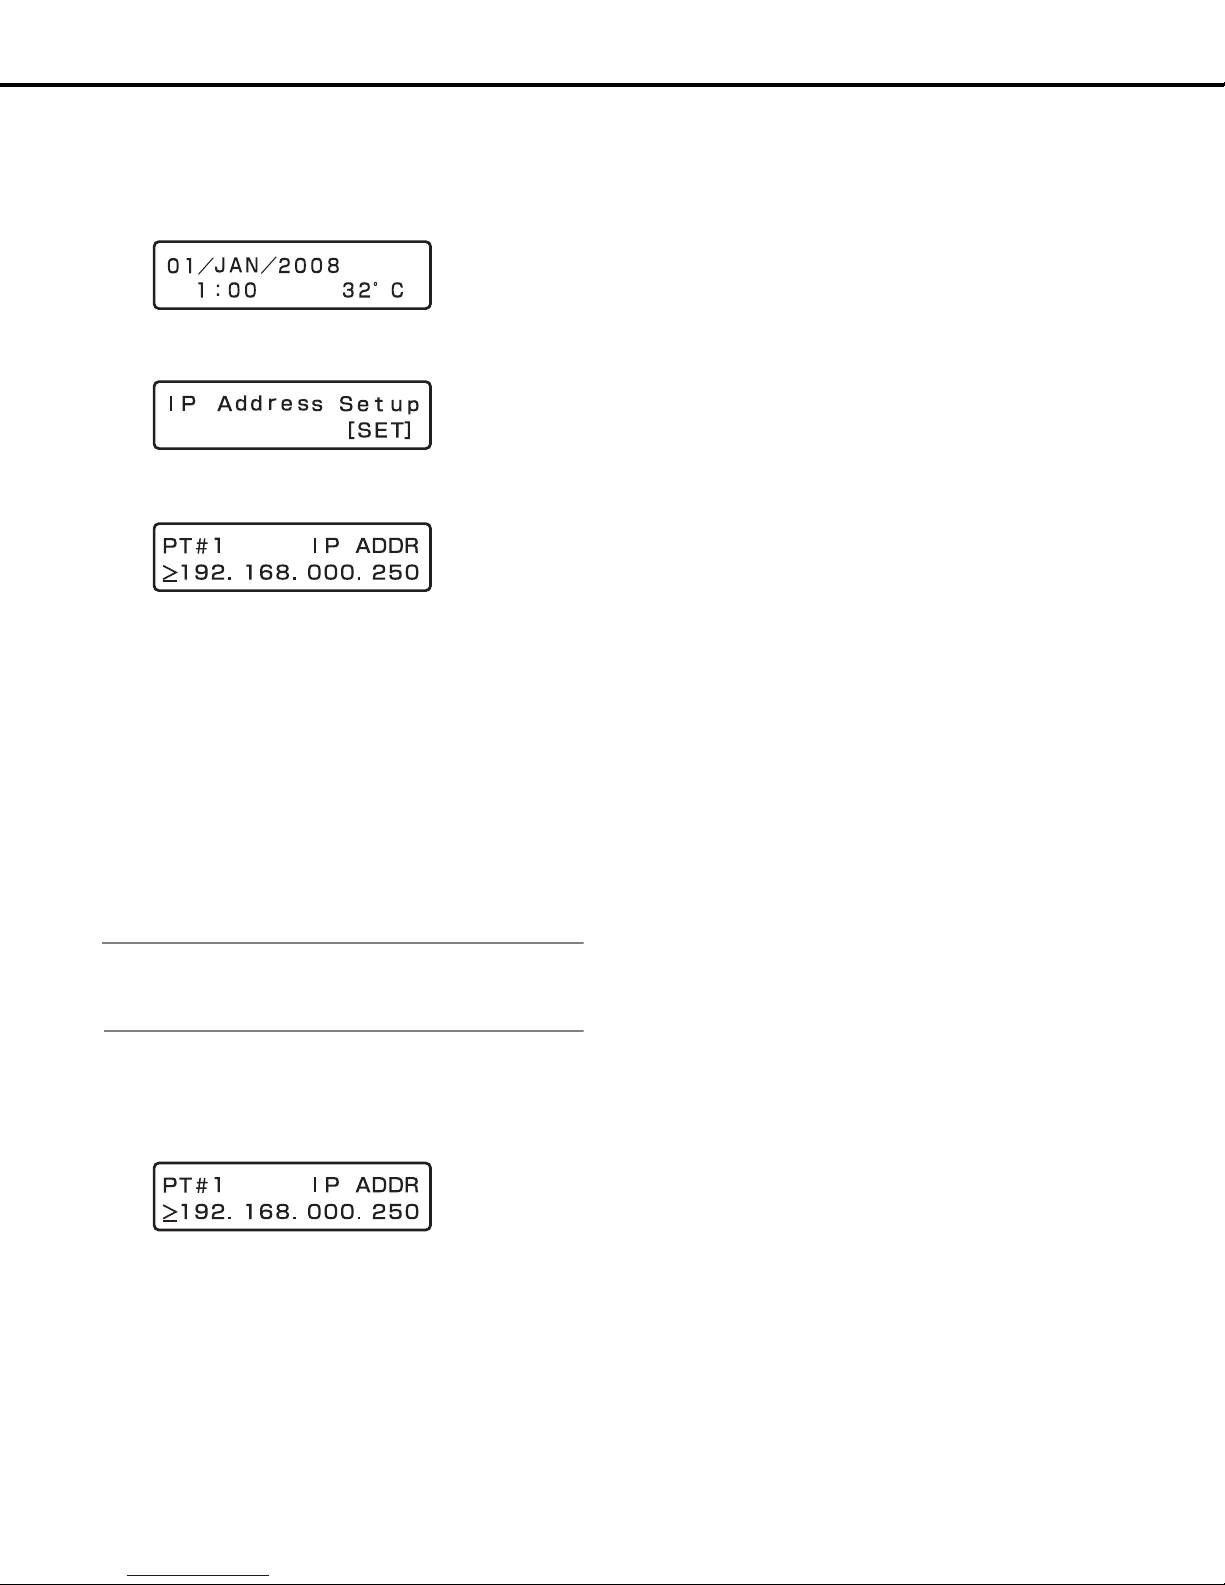
1 Log in to the PC as an administrator.
2 Click [Start] and then select [Control Panel].
3 Click [Network and Internet Connections].
This will display the [Network and Internet Connections]
window.
5 Double click [Local Area Connection].
This will display the [Local Area Connection Status] window.
6 Click [Properties].
This will display the [Local Area Connection Properties]
window.
4 Click [Network Connections].
This will display the [Network Connections] window.
13
Network settings
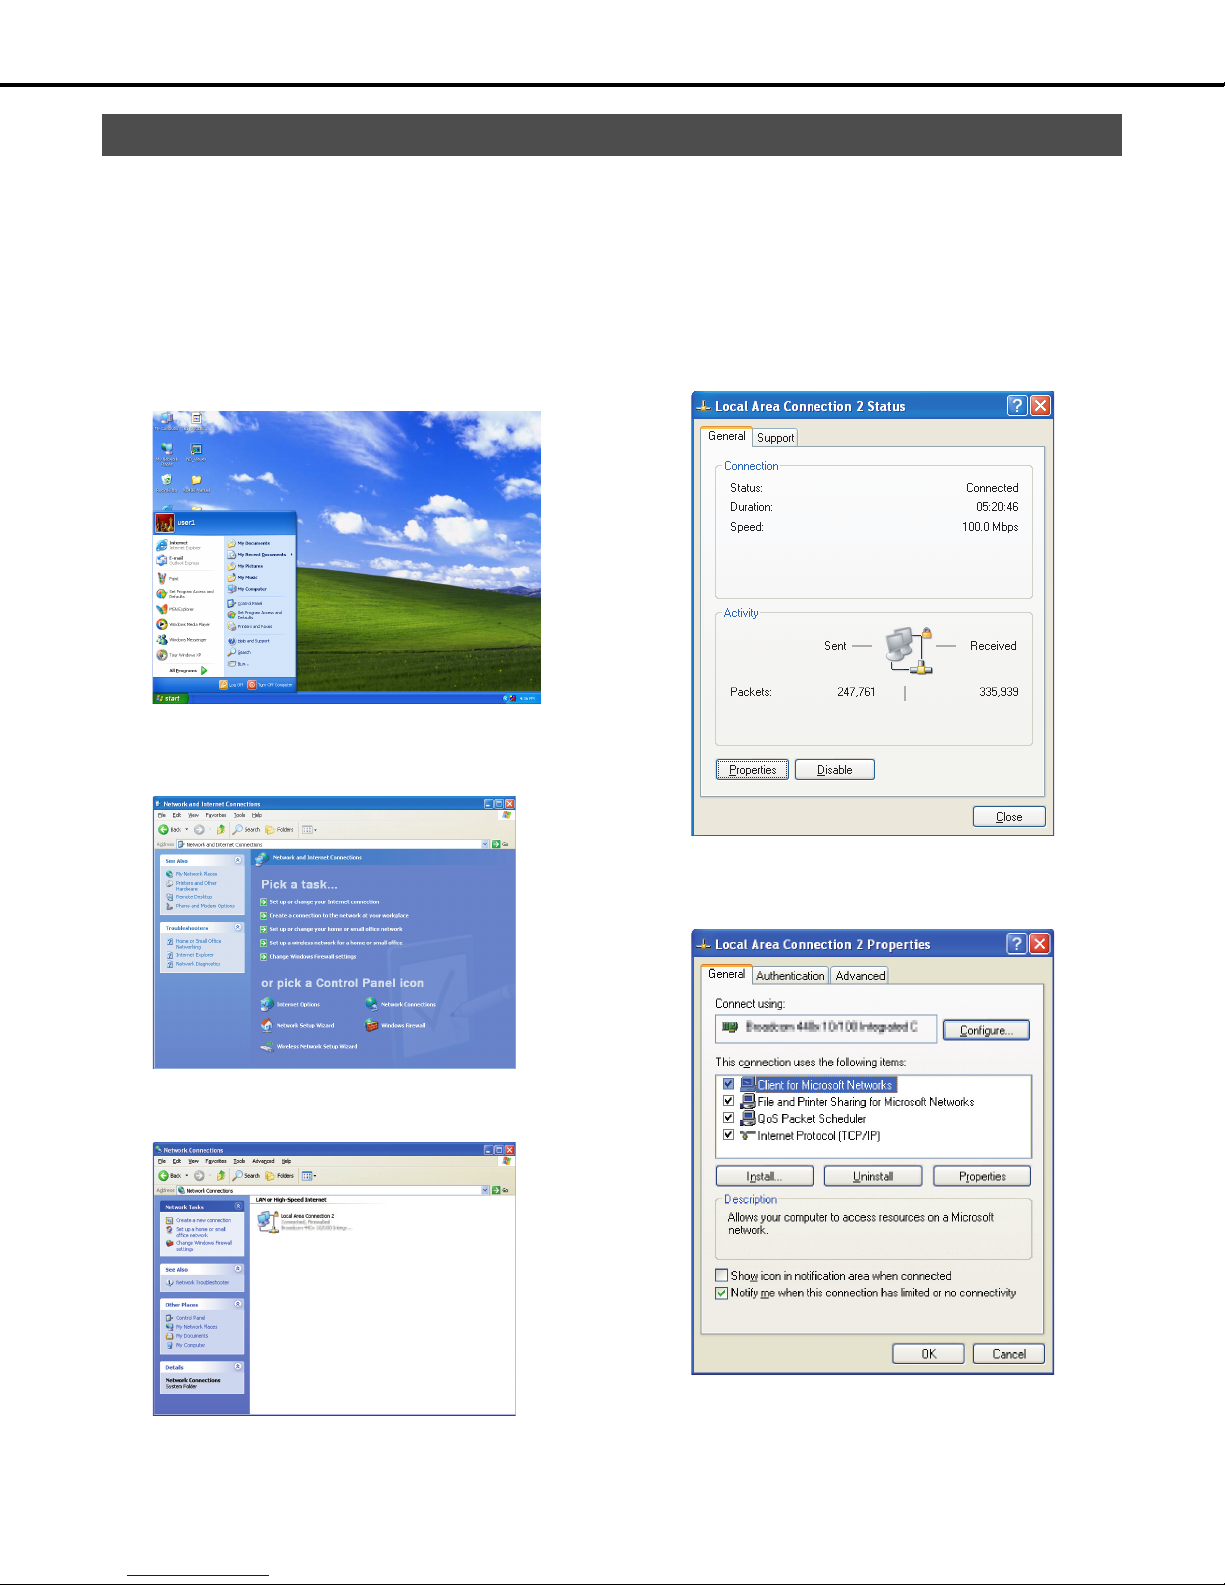
7 Click [Internet Protocol (TCP/IP)] and then click
[Properties].
This will display the [Internet Protocol (TCP/IP) Properties]
window.
8 Click [Use the following IP address] and then configure
the IP address and subnet mask.
• For the IP address, set the same subnet mask area as the
recorder.
• Depending on the network configuration, the default
gateway setting is required. For details about settings,
refer to your network administrator.
9 Click the [OK] button to close the window.
14
About operating windows
Display and close the operating window
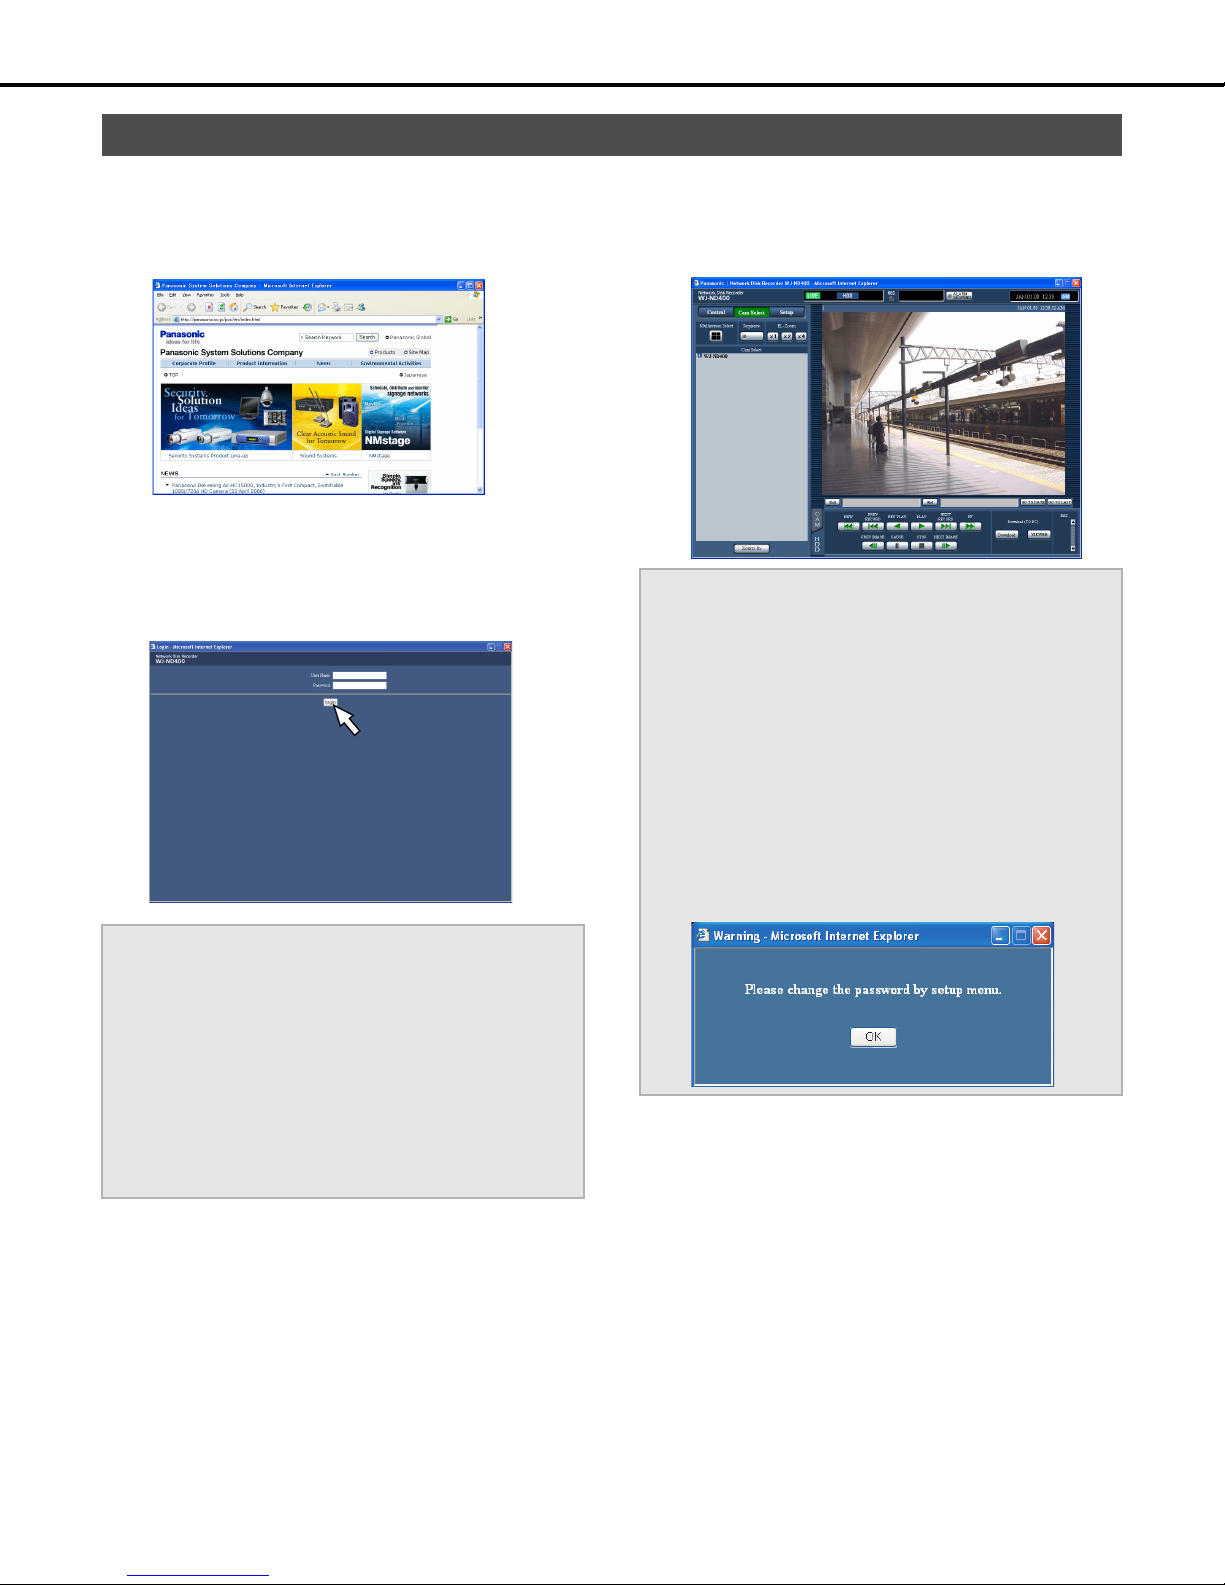
Operate the recorder from a web browser on a PC.
1 Start the PC.
2 Launch the web browser.
3 Enter the URL or IP address set for the recorder into the
address box and press the [Enter] key.
The authentication window is displayed.
• If [User authentication] is [Off], the authentication window
does not open (page 68).
4 Enter a "User name" and "Password" that is registered
with the recorder, and click the [Login] button.
The top page is displayed.
Important:
• Refer to your system administrator for the user name and
password set for you.
Refer to "Users (page 70)" for information about user
registration.
• The default user name and password settings are shown
below.
User name: ADMIN
Password: 12345
• To ensure security, change the ADMIN password before
starting operations. Also, change the password periodically.
Refer to page 70 for information about changing passwords.
• When the unit is being operated without changing the default
administrator name and password, the pop-up window saying
that it is recommended to change the password will be
displayed.
Important:
• Refer to your system administrator for the IP address settings.
• If the [Host authentication] is [On] (page 72), only PCs that
have an IP address that is registered with the recorder can
connect to the recorder.
For more information, contact your system administrator.
• Do not enter "0" on the front of the IP address when inputting
it.
Example:
OK: 192.168.0.50
NG: 192.168.0.050
• Refer to page 96 if a message appears in the information bar.
15
About operating windows
5 Click the buttons and tabs to set up operations.
Important:
• Refer to page 96 if a message appears in the information bar.
Note:
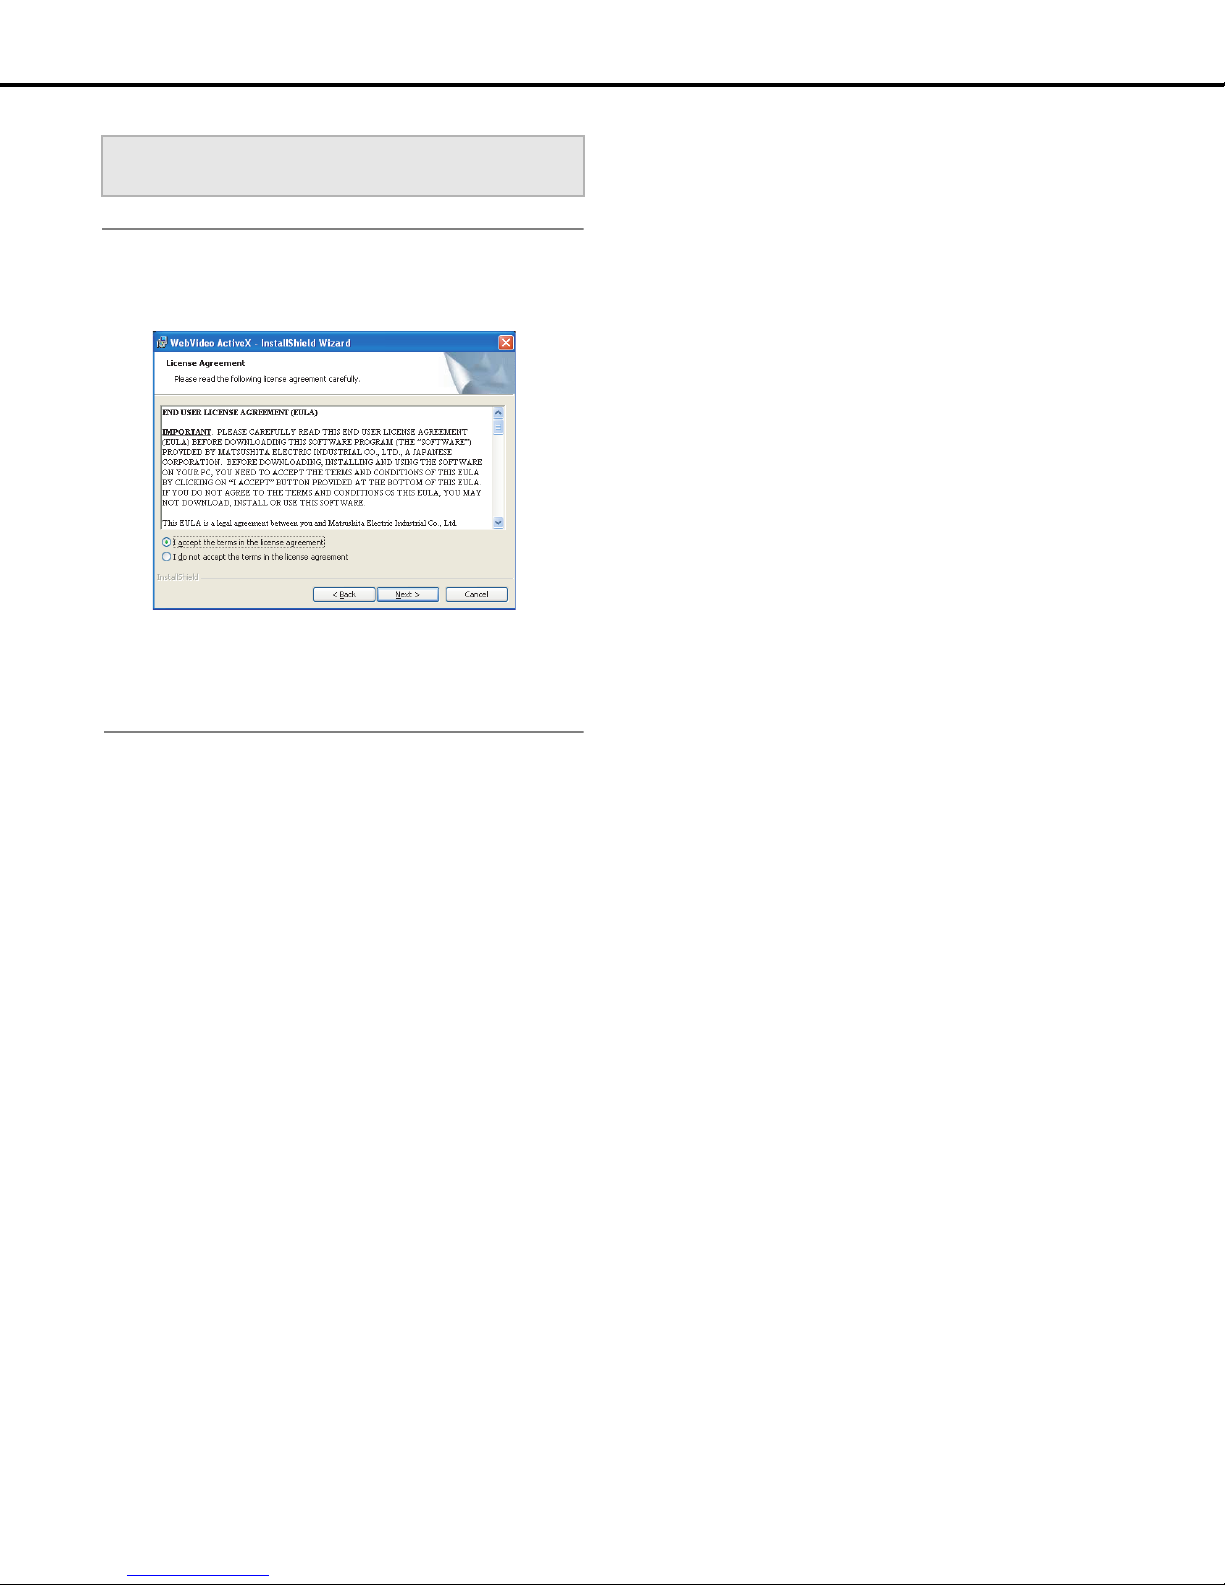
• The first time the recorder's top page is displayed on a PC the
wizard for installing ActiveX, which must be installed to view
images, is displayed. Follow the on-screen instructions.
• If WJ-ND200/WJ-ND300 ActiveX is already installed, delete
WebVideo ActiveX using Add or Remove Programs and then
install WJ-ND400 ActiveX.
• When the install wizard is displayed again even after
completing the installation of the ActiveX, restart the PC.
6 Close the web browser after operations and settings are
finished.
Follow the on-screen instructions for setting and ending
functions.
16
Names and functions of components
Top page
(2) (3) (4) (5)
(1)
About operating windows
(6)
(9)
(8)
(1) [Control] button (page 18)
Performs operations such as searching for recorded images.
You can also perform the functions of the camera picture
switcher such as changing the display of camera live pictures
to multiscreen or sequential display.
(2) [Cam. select] button (page 19)
The switcher functions such as switching camera channels
are operable on this page.
(3) [Setup] button (page 20)
Sets up the recorder.
(4) Status display area (page 21)
Displays the recorder's status, such as the recording and
playback status.
(5) Current time display area
Displays the current time.
(6) Image display
Displays live and recorded images. Displays the camera title
in the upper left and the date/time in the upper right (current
for live, recorded for recorded images). Click the camera title
when viewing multiscreen to view the clicked image on a
single screen.
(7)
(8) [HDD] tab (page 22)
Controls recorded images, such as playing images or
downloading to save to a PC.
(9) [CAM] tab (page 24)
Controls the cameras' zoom, focus, and automatic functions.
(7) Playback point operation area (page 22)
Specify the playback position or skip to the latest images.
17
About operating windows
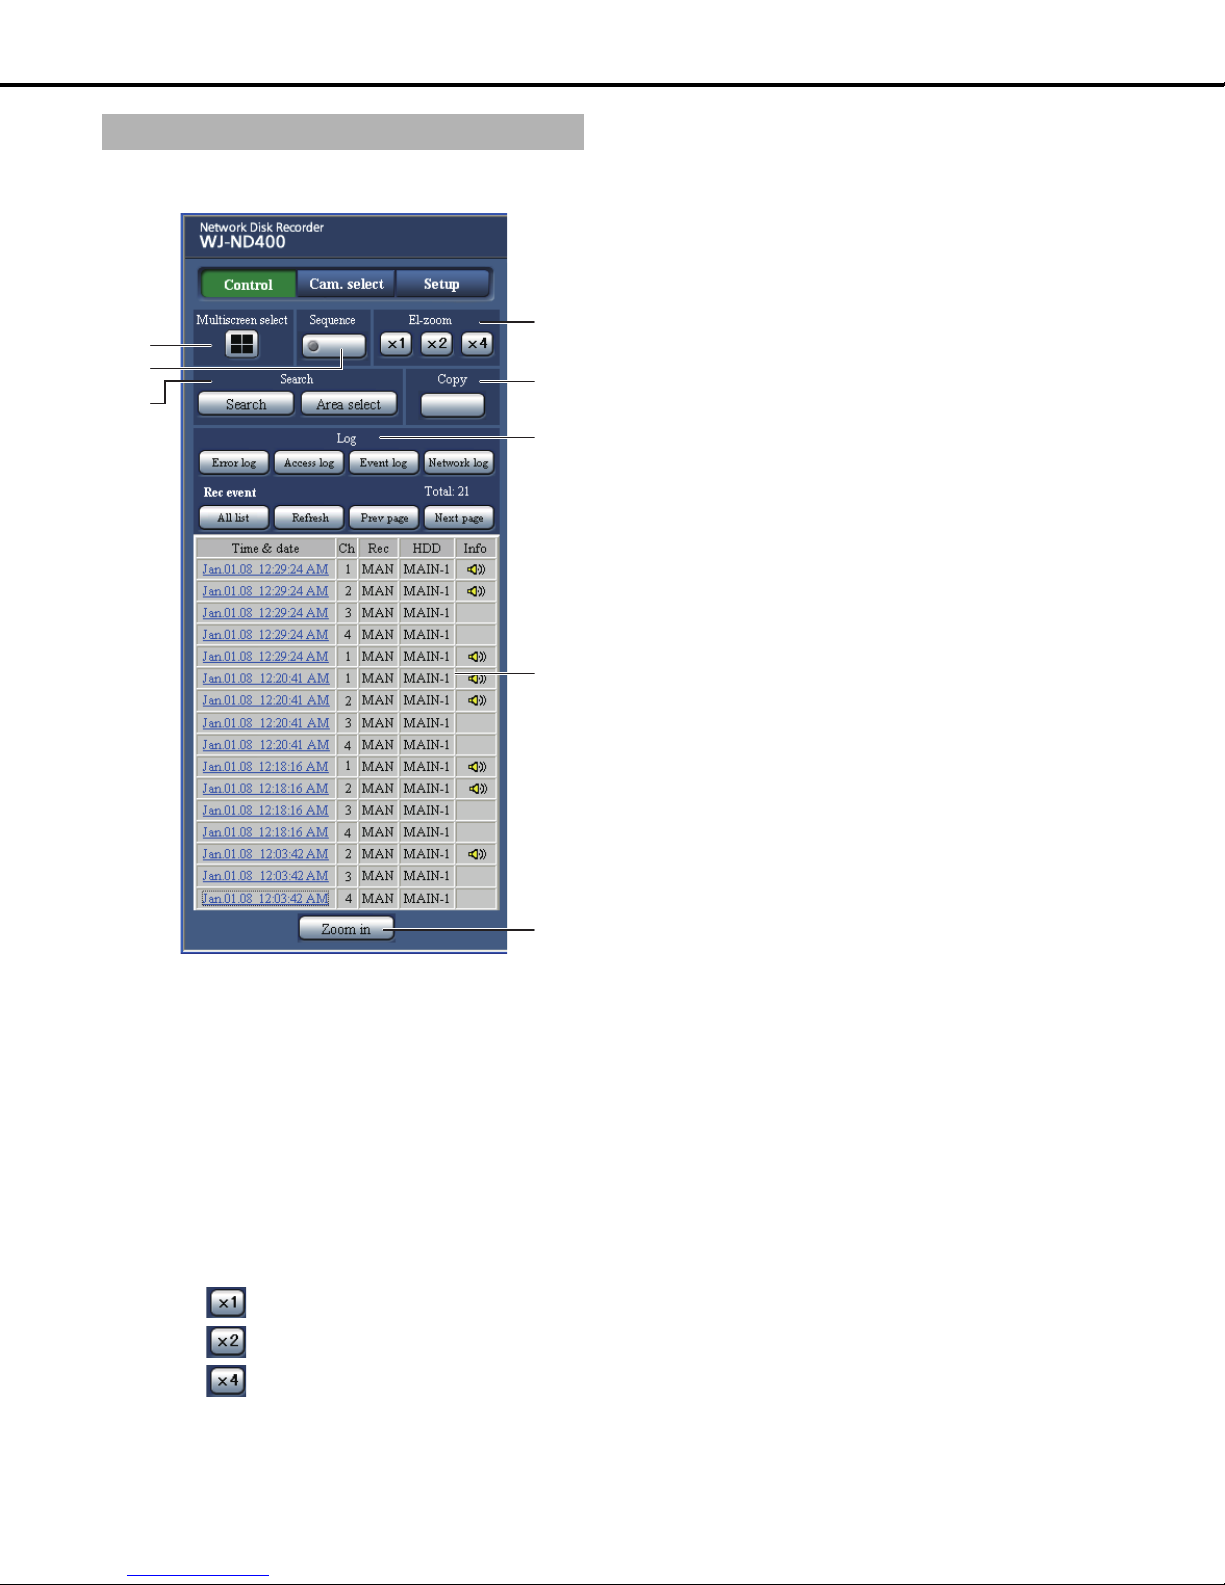
[Control] button
The following operation panel appears when you click the [Control]
button.
(3)
(1)
(2)
(4)
(5)
(6)
(7)
(4) [Search] box
[Search] button
Searches for recorded images. The search results are shown
on the rec event list window. (refer to the Operating
Instructions (PDF file))
[Area select] button
Selects disk to play or search. (refer to the Operating
Instructions (PDF file))
(5) [Copy] box
Copies recorded images into the copy area of the HDD.
(6) [Log] box
The history is shown on the rec event list window.
[Error log] button
Displays a log of the errors that occur.
[Access log] button
Displays the log in/log out time and date, the user name or
IP address.
[Event log] button
Displays the event log (when it occurred and a description).
[Network log] button
Displays a log of the problems that occur on the network.
(1) [Multiscreen select] box
Displays multiple images from up to 4 cameras at the same
time. Switches between the four screens with each clicking
the button following the preset camera combination
(page 50).
(2) [Sequence] box
Switches the camera images automatically in a preset
sequence. The button indicator lights green during sequence
(page 53).
(3) [El-zoom] box
Displays the camera image at the magnification of the button
clicked.
:1x
:2x
:4x
(8)
(7) Rec event list
Number of events
Displays the total number of events in a list. If there are more
than 10 000 events, [>10000] is displayed.
[All list] button
Removes any conditions and all rec events are listed.
[Refresh] button
Updates the display to the most recent status.
[Prev page] button
Displays the previous page of the list.
[Next page] button
Displays the next page of the list.
[Time & date]
Displays the time and date.
[Ch]
Displays the channel of the recorded data.
[Rec]
Displays the recording mode (refer to the Operating
Instructions (PDF file)).
[HDD]
Displays the number of the disk where data is stored.
[Info]
An icon is displayed on the image when audio is available.
(8) [Zoom in] button
Enlarges the display of live and recorded images.
18
About operating windows
Note:
• The rec event list is displayed when the [Refresh] button is
pressed, or when searching or when selecting an area.
Refer to the Operating Instructions (PDF file) for information
about searching and selecting an area.
• The [All list] button is disabled during playback. Stop playback
and then do the search operation.
• When there are many cameras, the recording start time may
vary for each channel.
[Cam. select] button
The following operation panel appears when you click the [Cam.
select] button.
(1)
(2)
Group title
Camera title
(1) [Multiscreen select] box
Displays multiple images from up to 4 cameras at the same
time. Switches between the four screens by each clicking the
button following the preset camera combination (page 50).
(2) [Sequence] box
Switches the camera images automatically in a preset
sequence. The button indicator lights green during sequence
(page 53).
(3)
(4)
(3) [El-zoom] box
Displays the camera image at the magnification of the button
clicked.
:1x
:2x
:4x
(4) [Cam. select] box
Displays the group titles of the cameras connected to the
recorder when clicking [WJ-ND400]. Refer to page 52 for
information about group settings.
Displays the cameras the belong to that group when clicking
a group title. Displays the image of camera when clicking a
camera title on 1-screen.
19
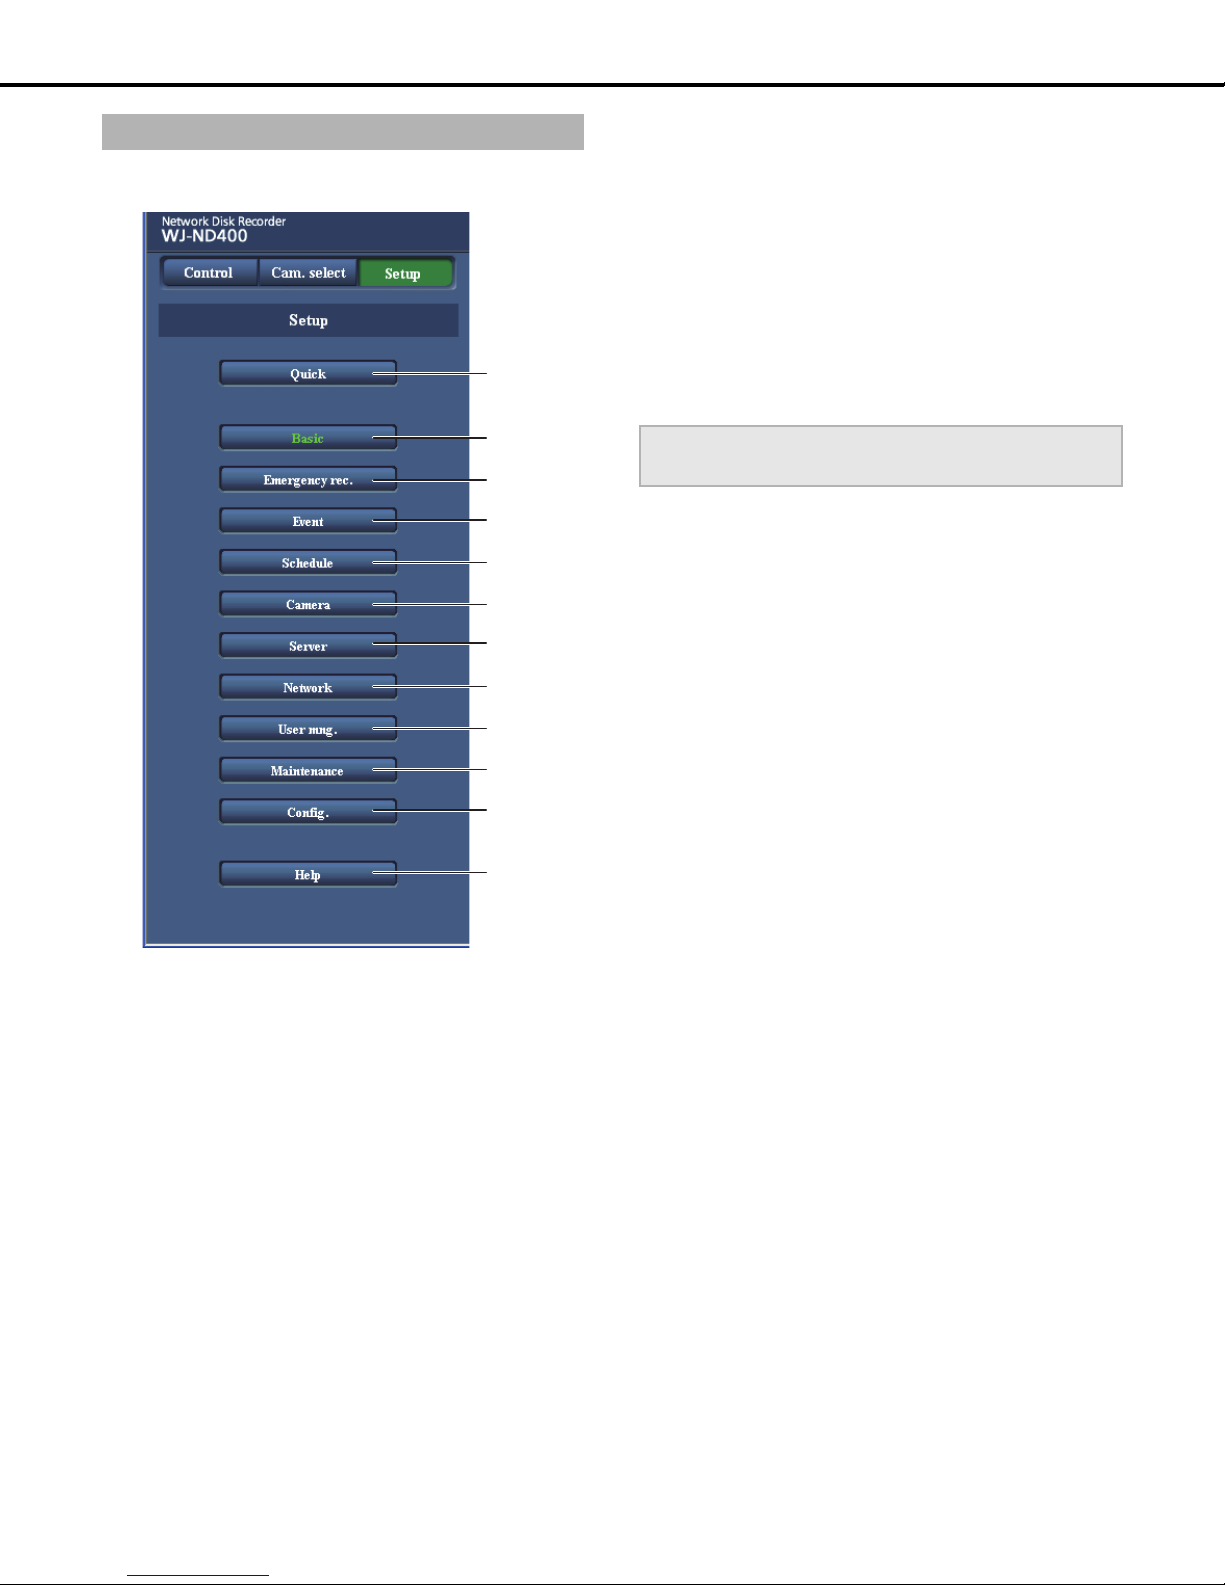
About operating windows
[Setup] button
The following operation panel appears when you click the [Setup]
button.
(1)
(2)
(3)
(4)
(5)
(6)
(7)
(8)
(7) [Server] button
Displays a menu for setting the server.
(8) [Network] button
Displays a menu for setting the network.
(9) [User mng.] button
Displays a menu for setting authentication.
(10) [Maintenance] button
Displays a menu for setting HDDs.
(11) [Config.] button
Displays a menu for disk information and formatting disks.
Important:
• When settings are activated, all logged in users log out.
(12) [Help] button
Displays the Help window.
(1) [Quick] button
Displays a menu with the minimum settings necessary to
operate the recorder.
(2) [Basic] button
Displays a menu for system and date/time settings
necessary for basic operations of the recorder.
(3) [Emergency rec.] button
Displays a menu for emergency recording settings.
(4) [Event] button
Displays a menu for setting the operations for the occurrence
of each type of event (site alarm, terminal alarm, command
alarm).
(9)
(10)
(11)
(12)
(5) [Schedule] button
Displays a menu for setting recording/event action for
specified days and times.
(6) [Camera] button
Displays a menu for setting the network, group, and
sequence of cameras.
20
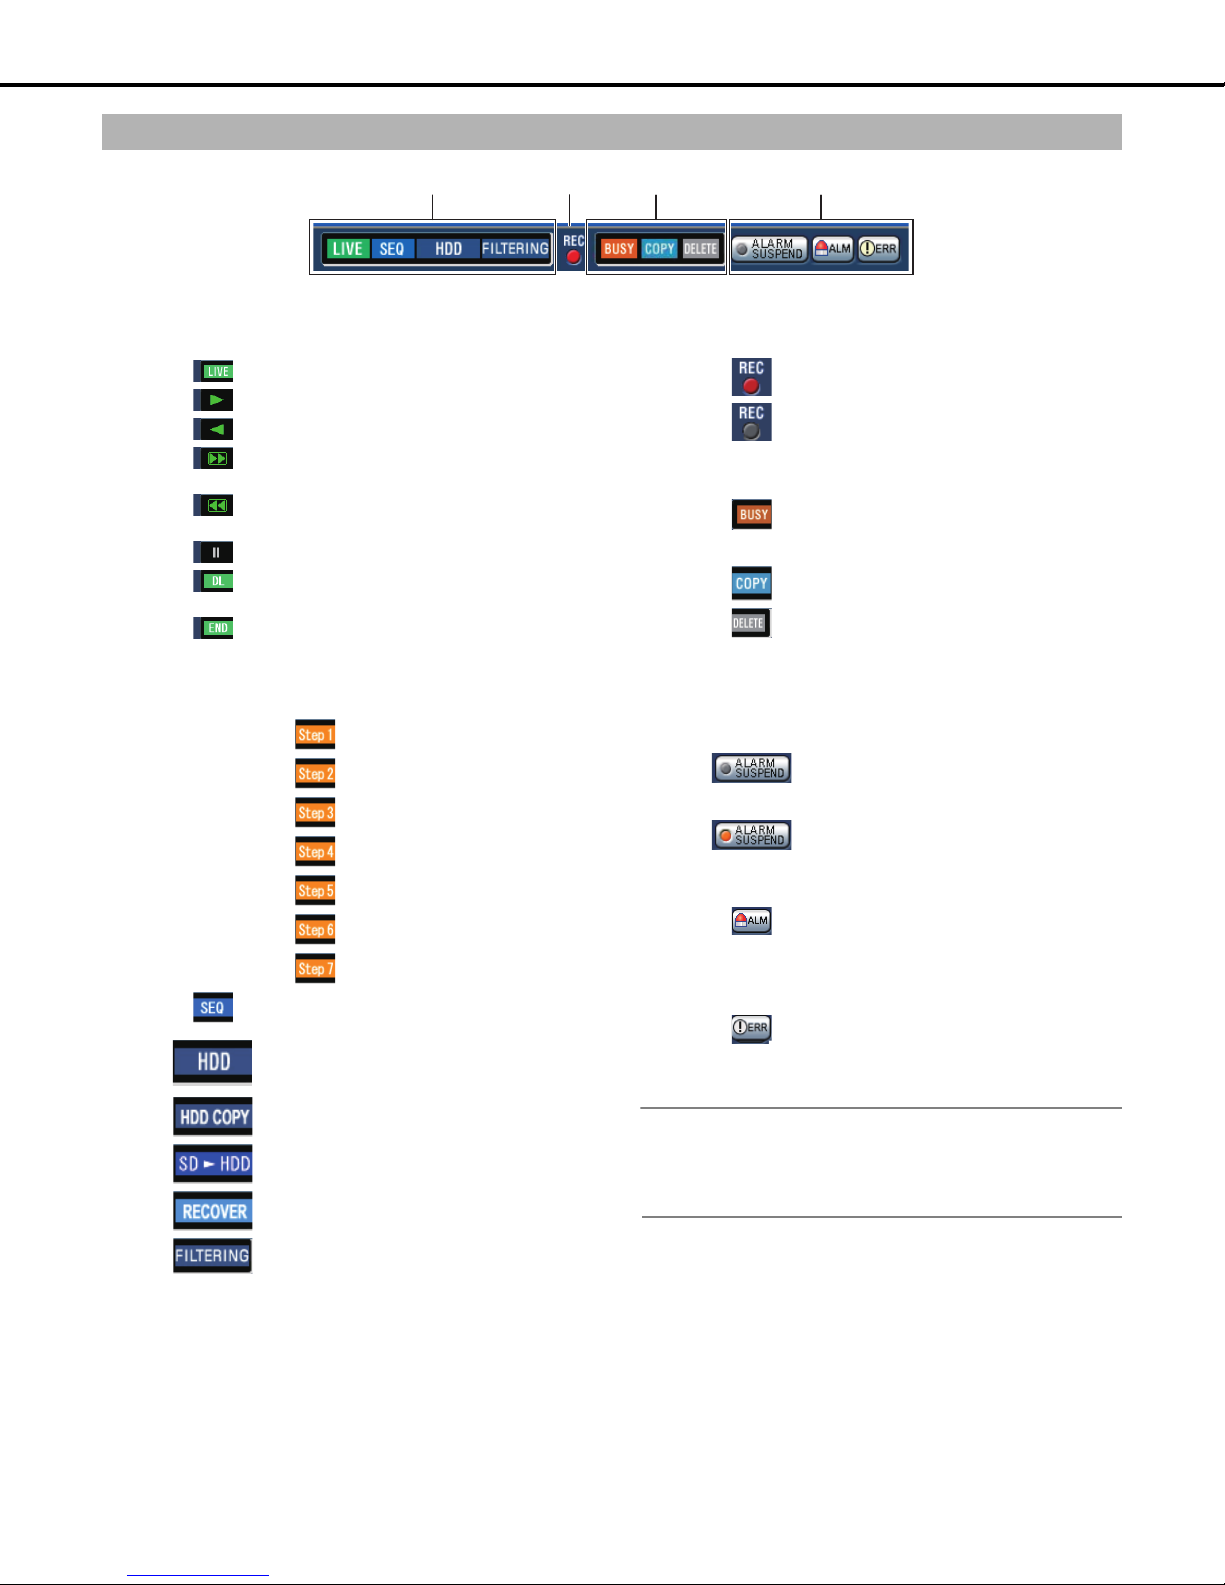
Status display area
About operating windows
(1) (3) (4)(2)
(1) Displays the status of live and playback
images.
: Live images are being displayed.
: Recorded images are being played back.
: Images are being played back reversely.
: Images are being played back at fast
forward.
: Images are being played back reversely at
fast forward.
: Playback is paused.
: Recorded images and audio are being
downloaded.
: Recorded images and audio have been
downloaded.
[Step 1] to [Step 7]
: The playback speed is displayed.
:1x
:Approx. 4x
:Approx. 8x
:Approx. 16x
:Approx. 32x
:Approx. 48x
:Approx. 96x
: The sequence is being activated.
: Normal recording area or event recording
area of the HDD on the recorder is
selected.
: HDD copy area is selected.
: SD memory data is currently being
obtained.
: RAID is being recovered.
(2) [REC] indicator
Displays the recording status.
: Recording is being performed.
: Recording is not being performed.
(3) Display the following statuses.
: Camera cannot be operated because a
user with a higher priority is using the
camera.
: Copying is being performed.
: Image data is being deleted.
(4) Information about the events and errors is
displayed.
"Alarm suspend [ALARM SUSPEND]" button
: Clicking this button to temporarily disable
alarm detection. (refer to the Operating
Instructions (PDF file))
: This indication will be displayed while an
alarm is being suspended.
"Alarm [ALM]" button
: Displays when an event occurs. Clicking
this button clears the alarm action. (refer
to the Operating Instructions (PDF file))
"Error [ERR]" button
: An error has occurred. Clicking this button
clears the error occurrence. Refer to the
Operating Instructions (PDF file) for further
information about errors.
Note:
• Emergency recording does not stop even if you click the "Alarm
[ALM]" button while recording. However, recording does stop if
the recording time is set to [Continue] for emergency recording.
: Rec event list is filtered. For details on
filtering of recording event searches, refer
to the Operating Instructions (PDF File).
21
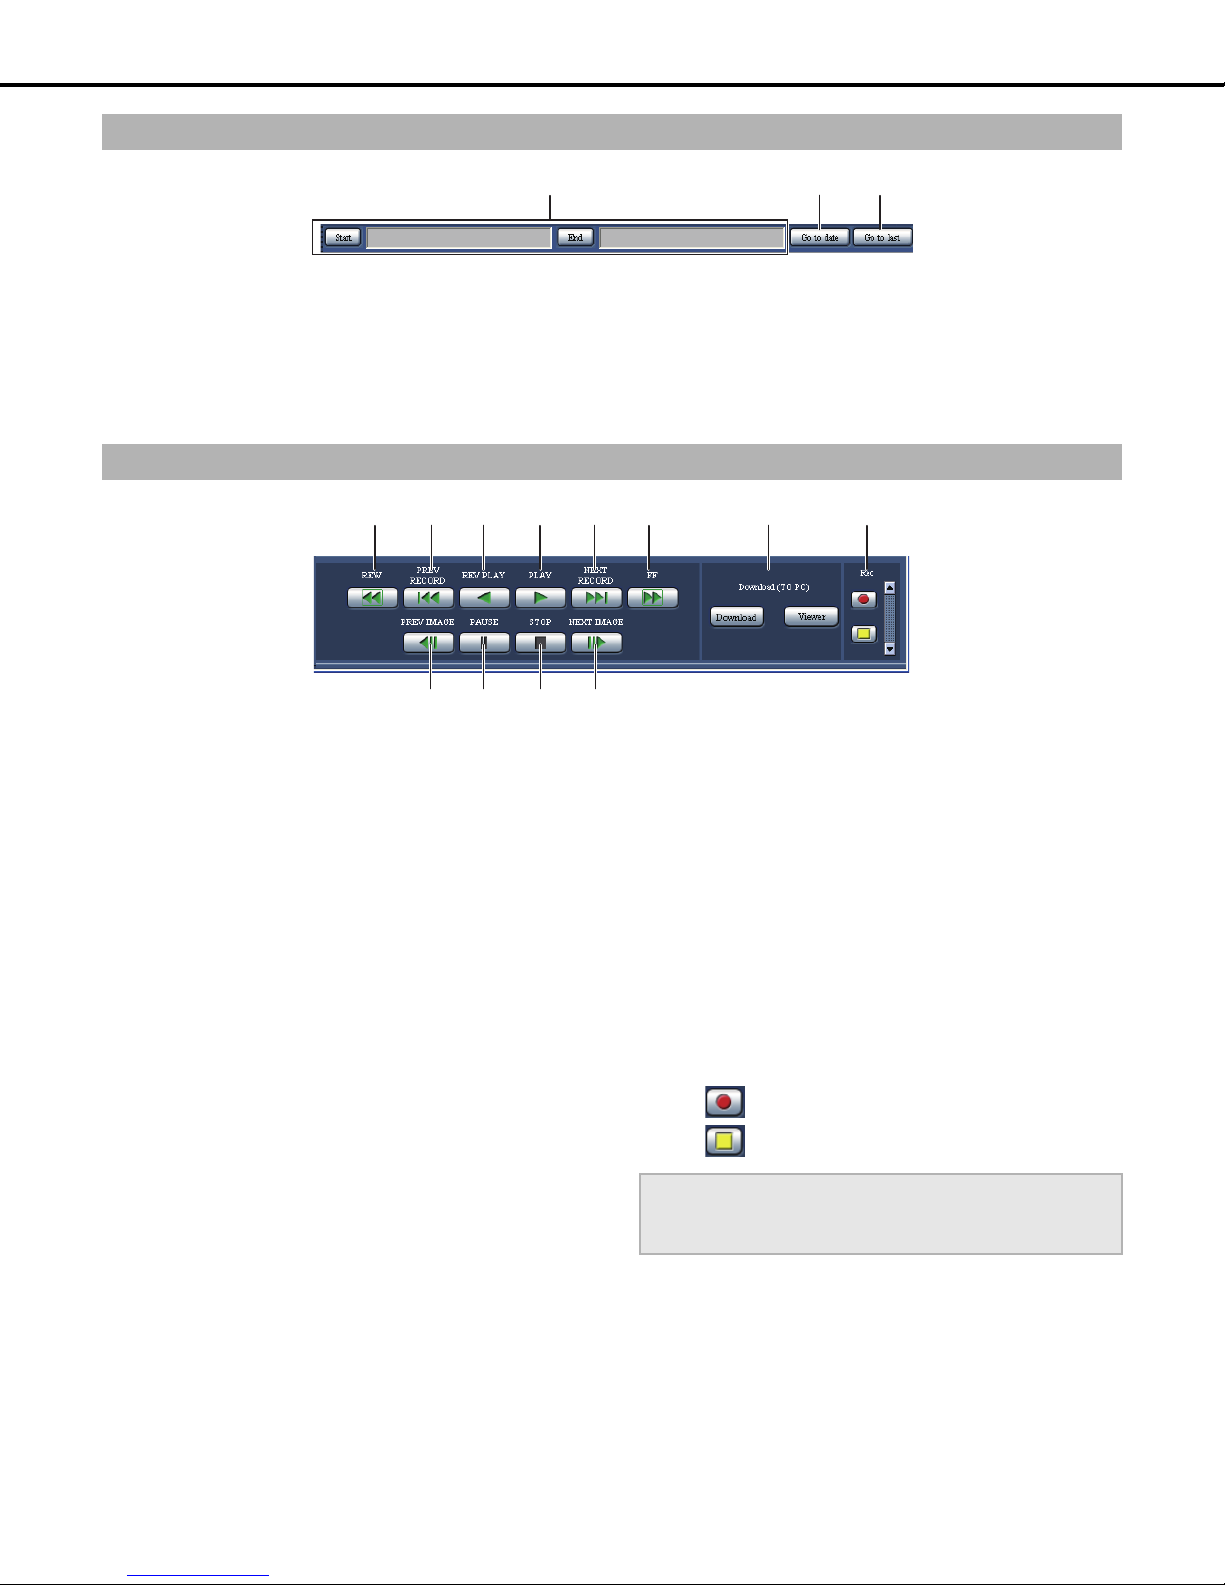
About operating windows
Playback point operation area
(1) (2) (3)
(1) Displays the time and date for the download
start point/ending point.
[Start] : Set the time and date to start the image
to be downloaded.
[End] : Set the time and date to end the image to
be downloaded.
[HDD] tab
(1)
(2) (3) (4) (5) (6) (11) (12)
(7) (8) (9) (10)
(1) [REW] button
Plays recorded images reversely at high speed.
Each time the button is clicked, the reverse speed changes
Step 2 (4x) > Step 3 (8x) > Step 4 (16x) > Step 5 (32x) > Step
6 (48x) > Step 7 (96x).
(2) [PREV RECORD] button
Skips backward to play back recorded images.
(3) [REV PLAY] button
Plays recorded images in reverse.
(4) [PLAY] button
Plays recorded images.
(5) [NEXT RECORD] button
Skips forward to play back recorded images.
(2) [Go to date] button
Used to playback images from a specified time and date.
(3) [Go to last] button
Skips to the latest recorded image on the displayed camera
channel and starts playback.
(10) [NEXT IMAGE] button
Clicking during playback or pause plays back one frame at a
time forward and then pauses.
(11) [Download (TO PC)] box
Downloads the image being played to the PC.
[Download] : Images and audio can be downloaded.
[Viewer] : Downloads viewer software for playing back
downloaded images.
(12) [Rec] box
Click [Up] button to display the [Recording] and [Recording
stop] buttons.
Click [Down] button to hide the [Recording] and [Recording
stop] buttons.
[Recording] button : Starts recording manually.
(6) [FF] button
Plays recorded images at high speed.
Each time the button is clicked, the speed changes Step 2
(4x) > Step 3 (8x) > Step 4 (16x) > Step 5 (32x) > Step 6
(48x) > Step 7 (96x).
(7) [PREV IMAGE] button
Clicking during playback or pause plays back one frame at a
time reversely, and then pauses.
(8) [PAUSE] button
Clicking during playback pauses playback.
Clicking during pause restarts playback.
(9) [STOP] button
Stops playback and displays live images from the camera.
22
[Recording stop]
button
Important:
• When displaying the [Recording] or [Recording stop] buttons,
click and hold [Up] button until displayed.
: Stops recording manually.

Note:
• The operations are as follows when the image for playback is
an MPEG-4 image.
Date/Time Search : Playback may start a few seconds
before or after the specified time.
Reverse Playback : Not all recorded images are
displayed. Reverse playback is
performed at the refresh rate set
for the camera at the time of
recording.
Playback During
Playback
Single Frame Reverse : Not all recorded images are
Fast Forward/Fast
Reverse
Downloading Images
During Playback
: Performing the playback
operations again during playback
skips ahead a few seconds.
displayed. Single frame reverse is
performed at the refresh rate set
for the camera at the time of
recording.
: Not all recorded images are
displayed. Fast forward and fast
reverse are performed at the
refresh rate set for the camera at
the time of recording.
: Image may be saved including a
few seconds before the starting
time and date and a few seconds
after the ending time and date.
About operating windows
23

About operating windows
[CAM] tab
The camera can be controlled (pan/tilt, zoom, focus, brightness, preset, auto mode) when the live image is from a camera that can pan and tilt.
Some camera operations cannot be done depending on the type of camera connected.
(1) (3) (4) (5)
(2)
(1) [Zoom] box
Click [-] or [+] to adjust the zoom. Click [x1] to return the
zoom to normal.
(2) [Focus] box
Click [Near] or [Far] to adjust the image focus.
Click [Auto] to adjust the focus automatically (auto focus).
(3) [Auto mode] box
Select the camera's auto mode function. Click [V] and select
an auto mode function (auto track, auto pan, preset
sequence, sort, patrol), and then click [Start]. Click [Stop] to
turn off the auto mode function.
(4) Control pad/buttons
Click the buttons on the control pad to move the camera to
the direction of the button (pan/tilt). Also, click in the control
pad to adjust the horizontal/vertical position (pan/tilt) of the
image. The pan/tilt movement increases if a clicked point
gets farther from the center point of the control pad.
(5) [Brightness] box
Click [-] (Dark) or [+] (Bright) to adjust the lens iris
(brightness).
Click [Reset] to reset the brightness.
(6)
(6) [Preset] box
[Go] button
The camera moves to the pre-registered preset position.
Click [V], select a preset number ([Home], 1 to 256), and then
click [Go]. To perform the preset operation, register the
camera's preset positions in advance.
[Set] button
Register preset positions that specify the direction of the
camera. Move the camera to the direction to register, click
[V], select a preset number (1 to 256), and then click [Set]
([Home] cannot be registered.).
24
Basic operations
About operating windows
1 Display the top page and access th e recorder.
2 Click the [Setup] button.
The Setup menu button is displayed.
5 Configure the settings for each item.
6 Click the [Set] button after configuring the settings.
The settings are reflected on the recorder.
• The changes are canceled if you move to another page
without clicking the [Set] button.
Important:
• Activating the settings forcibly logs out any other users
currently logged in to the recorder.
• Changing the user management settings forcibly logs out all
users.
• Recording may not be possible for about four seconds
immediately after the settings are saved.
• The setup menu can be used by only one user. The setup
menu does not open if another user is using it.
• If you click on the [x] to close the web browser while moving to
the setup menu, the setup menu cannot be accessed for
about 90 seconds. If you click on the setup menu button, a
message appears indicating another user is configuring
settings.
3 Click the setup menu button to configure.
The sub menu tab of the selected setup menu is displayed.
4 Click the sub menu tab to configure.
The settings for the selected sub menu on the window is
displayed.
25
Setup
Quick settings
Configure the language, time & date, network setup, camera registration, and the minimum required settings to operate the recorder.
Settings
Language, and time & date settings
This section explains how to configure settings for the display language, and the current time and date.
1 Click the [Quick] button on the setup menu.
This will display the setting window.
2 Configure the settings for each item.
Refer to “Quick settings 1” table for details about the settings.
3 Under [Time & date], click the [Set] button.
Important:
• For around 4 seconds after changing the time and date, for example, when switching to summer time or when setting the time and date, the
live image display will turn black and recording may not be possible.
Note:
• If there is no camera set up, the [Quick] window appears.
• There is one item for language and Time & date, one item for network settings, one item for Camera registration, and one item for Program
setup. When you make the settings, click the [Set] button and apply the settings to the recorder.
Quick settings 1
Item Settings Description
Language Japanese / English♦ / Français /
Español / Deutsch / Italiano /
Russian / Chinese / Custom
Time & date 08 to 34 (Year) / Jan to Dec
(Month) / 1 to 31 (Day) / 0 to 23
(hour) / 0 to 59 (minute)
♦Initial default
Specifies the language used in browser screens.
• Contact your dealer for further information about the
customized language (Custom).
For setting the current time and date.
Configure the setting as year / month / day / hour / minute
26
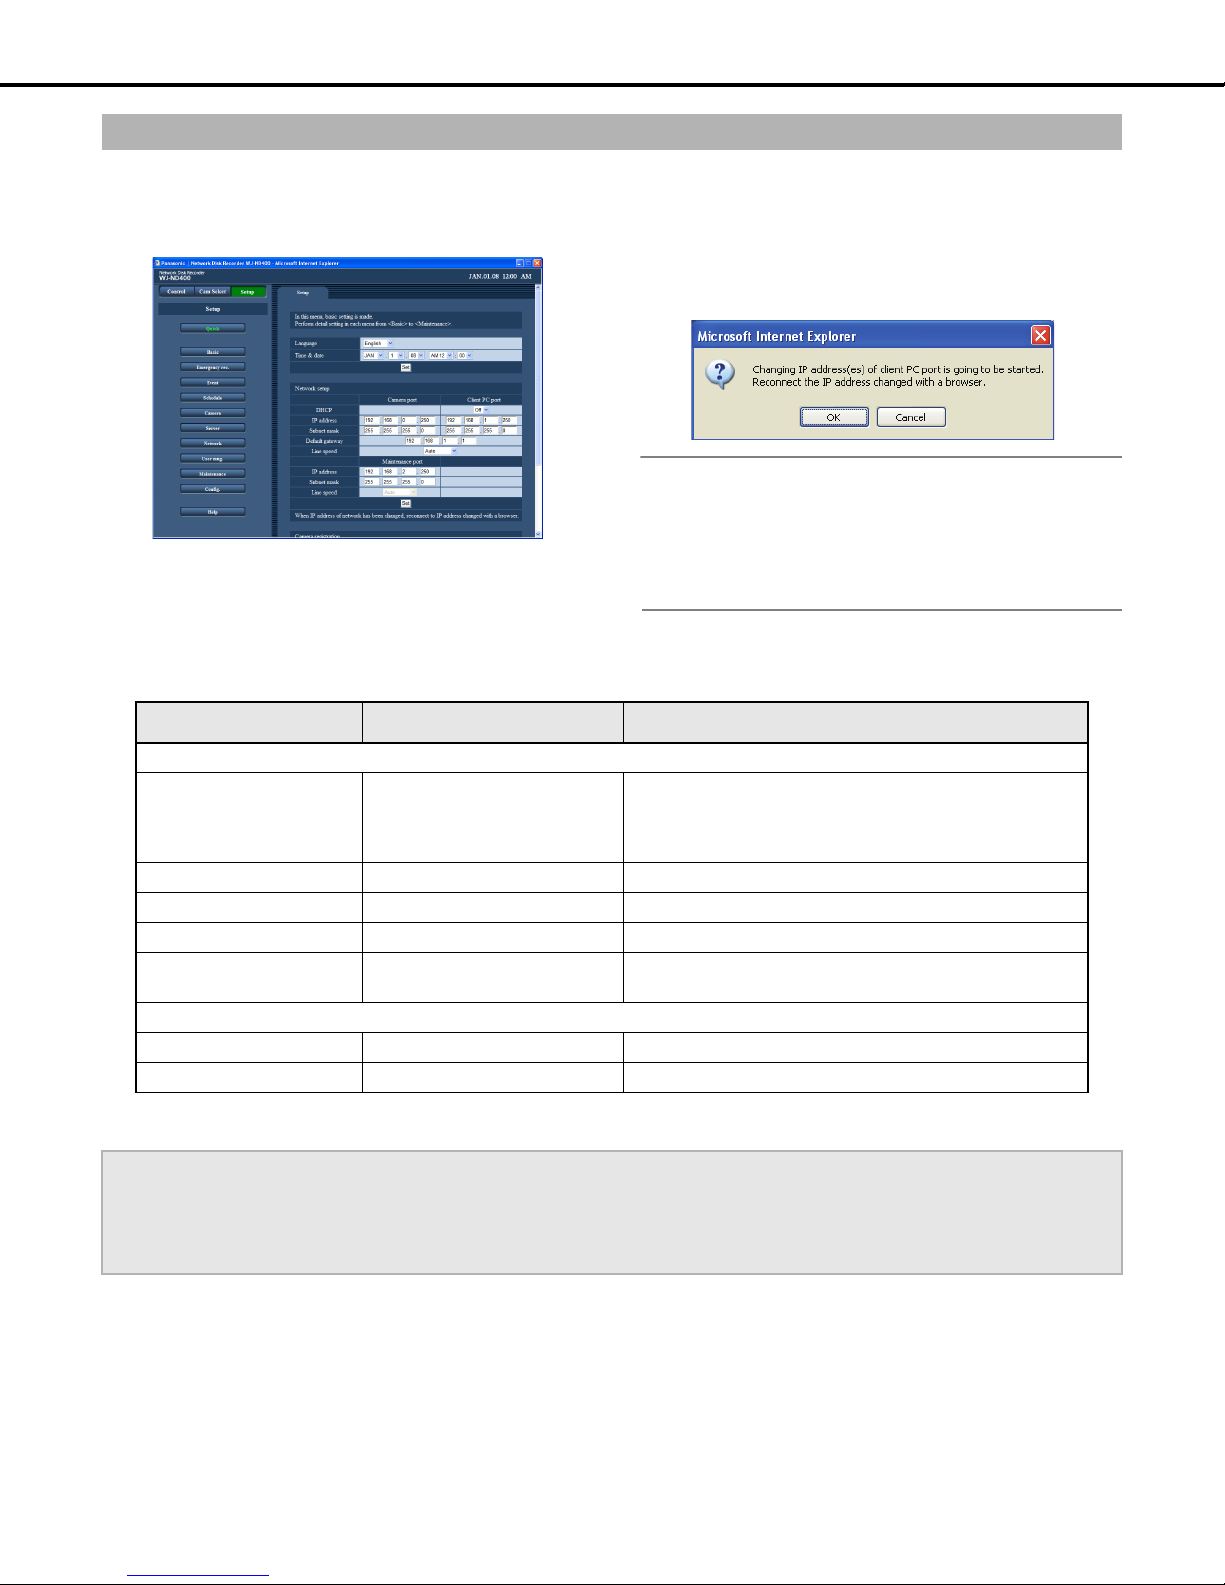
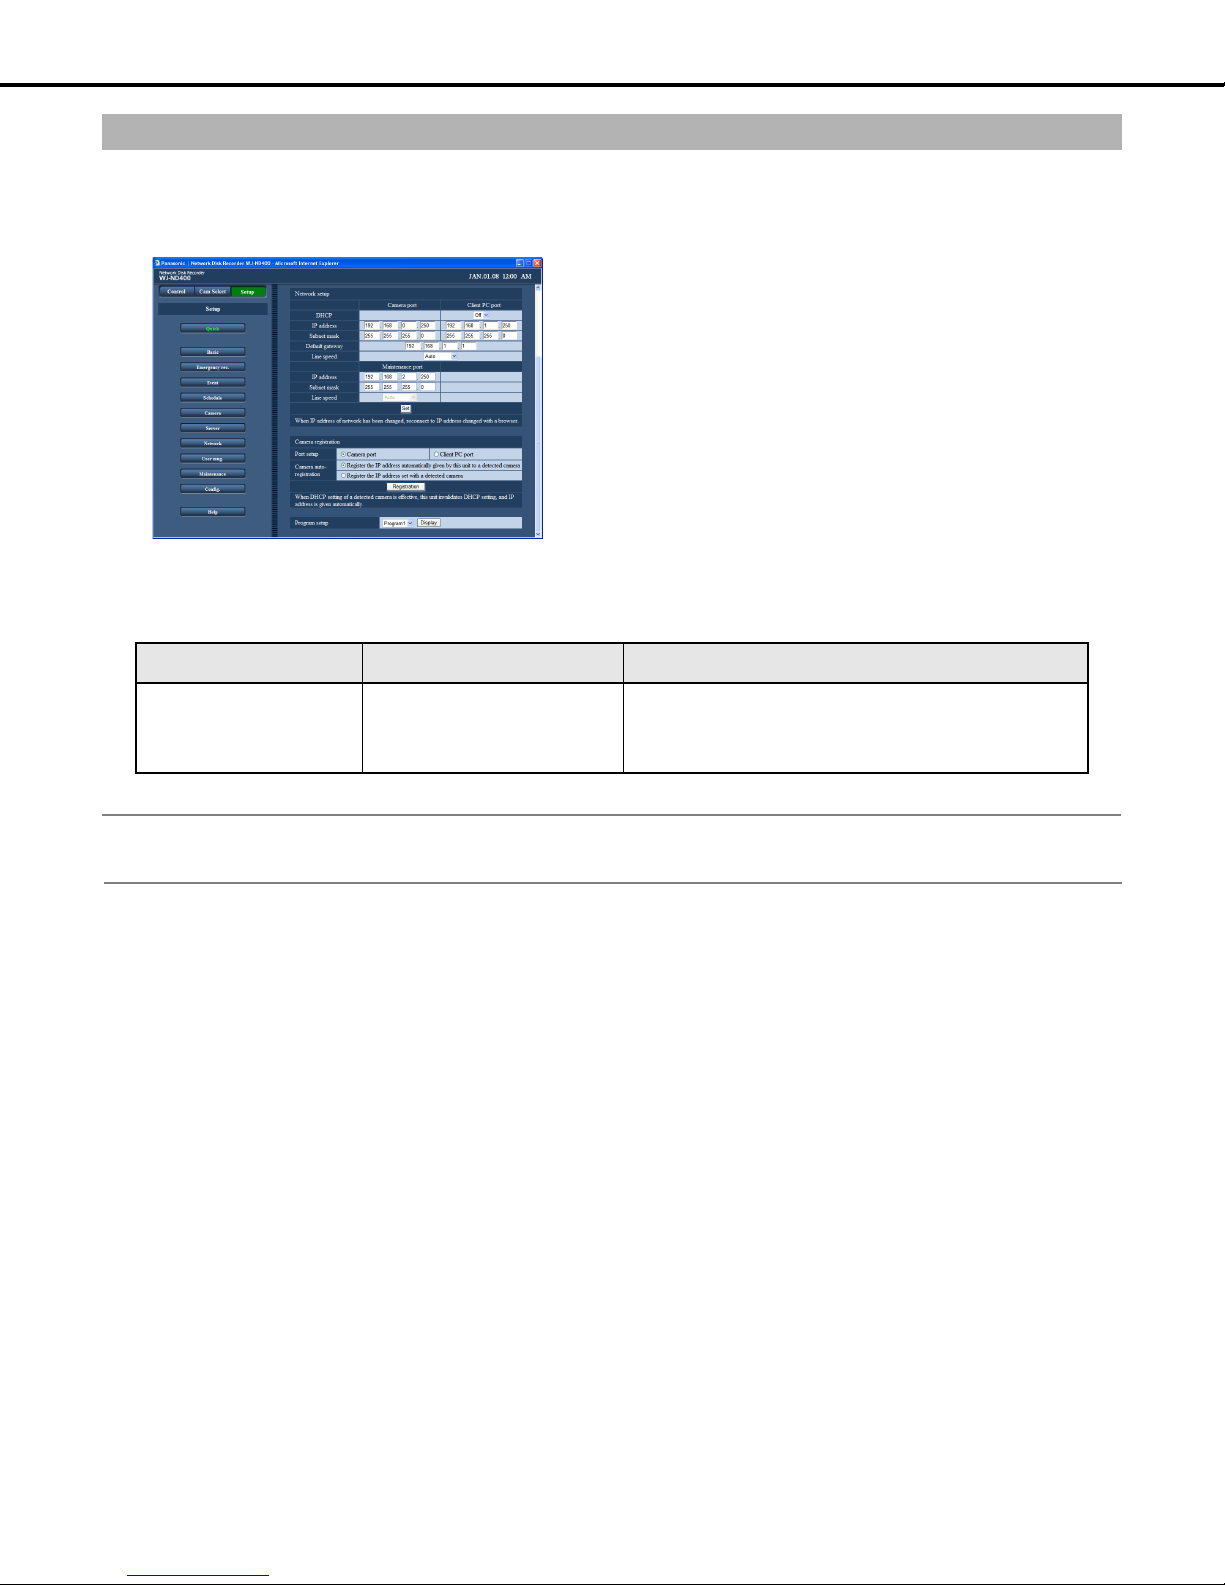
Network setup
This section explains how to configure recorder network settings.
Quick settings
1 Click the [Quick] button on the setup menu.
This will display the setting window.
3 Under the "Network setup" item, click the [Set] button
When you change the Client PC port IP address, the
"Change IP Address" window will appear. Click [OK] to
complete the process.
Note:
• Changing the "Client PC port" IP address causes all connected
users to be forcibly logged out. Reconnect with the new IP
address.
2 Configure the settin gs for each item.
Refer to “Quick settings 2” table for details about the settings.
• The recorder reboots after changing the line speed settings and
pressing [Set].
Quick settings 2
Item Settings Description
Network setup- Camera port/Client PC port
DHCP Off♦ / On Specifies whether a DHCP server is used.
Select [On] to obtain the IP address, subnet mask, and default
gateway from a DHCP server. Select [Off] to enter these
addresses manually.
IP address Address input
Subnet mask Address input
Default gateway Address input
Line speed Auto♦ / 1000M-Full / 100M-Full /
100M-Half / 10M-Full / 10M-Half
Network setup - Maintenance port
IP address Address input
Subnet mask Address input
♦Initial default
*1 Refer to "Recorder network settings (page 11)" for information on initial default settings.
*1
*1
*1
*1
*1
When [DHCP] is [Off], specify the IP address here.
When [DHCP] is [Off], specify the subnet mask here.
When [DHCP] is [Off], specify the default gateway here.
Specifies the data line speed.
Specifies the IP address.
Specifies the subnet mask.
Important:
• A different subnet should be set for each port.
• When DHCP is set to [On] and "SD memory rec." is set, an error may occur in the process of startup of the unit when a request to write onto
the SD memory card is made. This occurs when the response from the DHCP server is slow. Once the address has been obtained from the
DHCP server, the error is resolved.
27
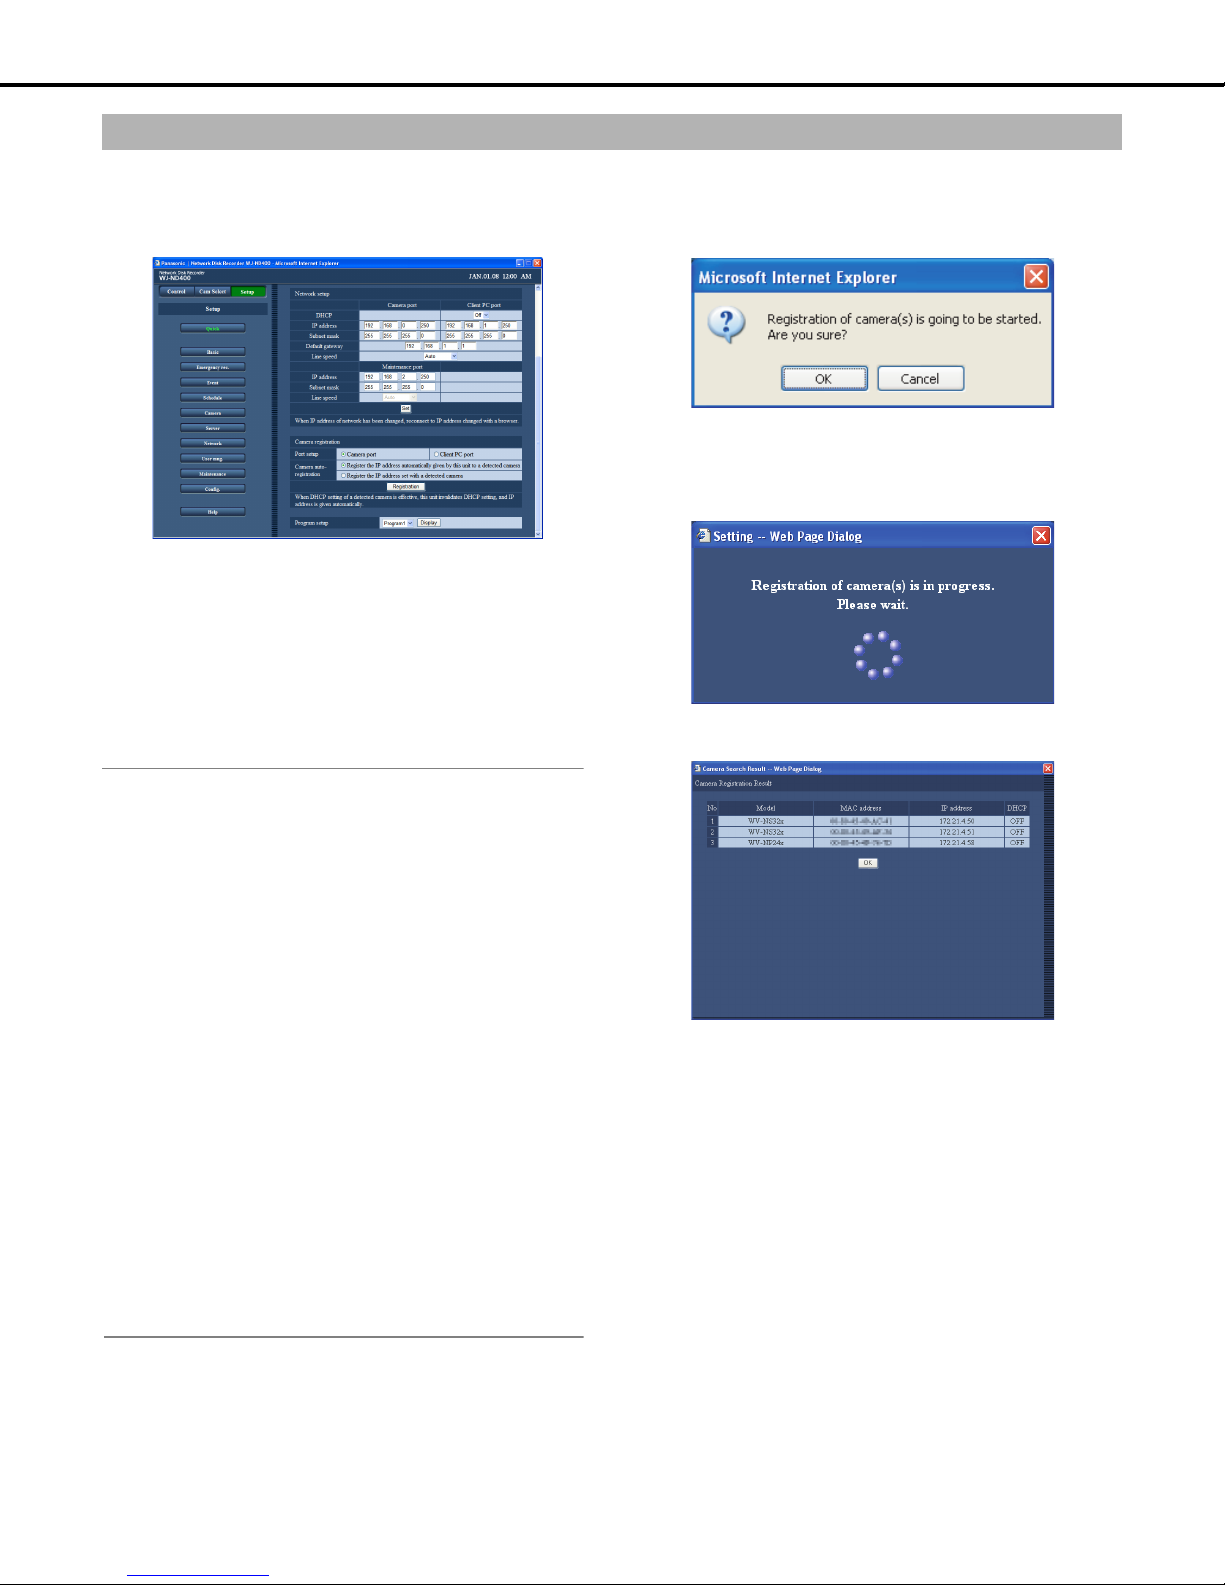
Quick settings
Camera registration
This section explains how to register a camera on the recorder. The recorder supports registration of up to 64 cameras.
1 Click the [Quick] button on the setup menu.
This will display the setup window.
2 Select the network port for detecting cameras from the
following.
[Camera port] / [Client PC port]
3 Use the Camera auto-registration item to specify
whether to assign an IP address to the detected camera.
[Register the IP address automatically given by this unit to a
detected camera]
[Register the IP address set with a detected camera]
Note:
• After executing [Register the IP address automatically given by
this unit to a detected camera], the recorder will automatically
detect blank IP addresses for setting, but depending on the
network environment, the IP address may be already used for
the other network device (when the Windows XP firewall
function is being used, for example). If the same IP address is
used by another device, check the IP address setting and
change it manually.
• When [Register the IP address automatically given by this unit
to a detected camera] is executed and [On] is selected for the
DHCP setting of the detected camera, the recorder will change
the DHCP setting to [Off] and provide an IP address
automatically.
• Only when the DHCP setting of the recorder is [Off] are IP
addresses automatically provided.
• In the case of IP auto addressing, set the subnet mask of the
network port to 255.255.255.0.
• When automatically assigning IP addresses, make sure the
octets of the port selected in step 2 match the gateway.
Depending on the camera, IP addresses cannot be assigned if
it is not set.
• Registering an IP address to a camera automatically sets the
camera's HTTP port number to 80. Also, the camera's subnet
mask and default gateway are set to the same values as the
recorder's network port subnet mask and default gateway.
4 Click the [Registration] button.
This will display a camera registration confirmation message.
5 Click the [OK] button.
This will detect the camera and perform registration.
The "Setting" dialog box appears while registration is in
progress.
A "Camera Registration Result" window will appear after
registration is complete.
6 Check the registration results.
• Up to 64 cameras can be registered.
• Only newly registered cameras appear in the "Camera
registration result" window. If there are more than 64
cameras on the same network, only 64 will be displayed.
• If multiple cameras have the same IP address, the IP
address and MAC address will be displayed in red. In this
case, change the IP address for one of the cameras and
make sure that the same IP address is not used for two
cameras or more.
28
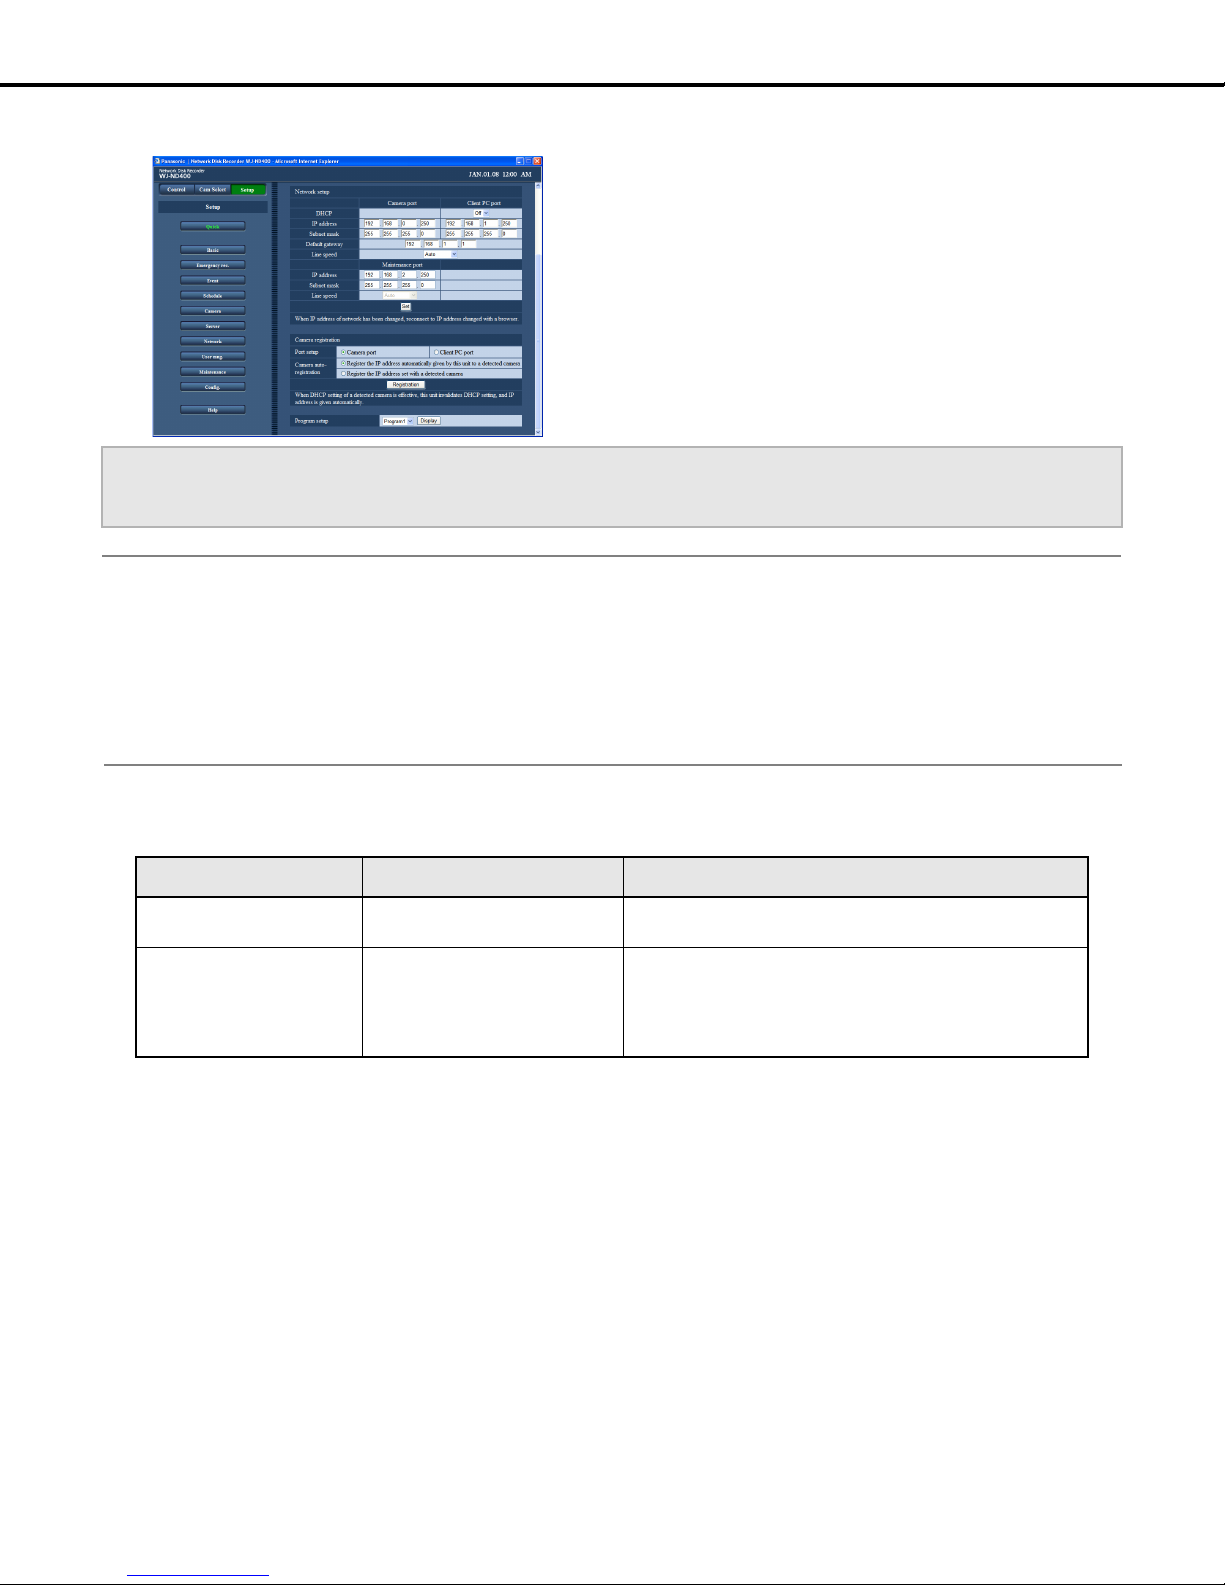
Quick settings
7 Click the [OK] button.
This completes registration.
Important:
• Execute [Register the IP address automatically given by this unit to a detected camera] to automatically provide IP addresses to all
detected cameras. Note that some cameras may already be operating.
Note:
• When a camera you want to register is not detected or when you want to change the settings of a camera, refer to "NW camera (page 48)".
• Registering a camera forcibly logs out any other users currently logged in to the recorder.
• All recording is disabled while auto camera registration is in progress.
• Camera auto-registration is unavailable for cameras on a different subnet accessed through a router.
• For improved security, some camera models whose settings have been changed from initial defaults are detected for the only first 20
minutes after power is turned on. For details refer to the operating instructions for the camera.
• The compression format of registered cameras is set automatically to JPEG or M-JPEG.
Quick settings 3
Item Settings Description
Port setup Camera port♦ / Client PC port Select the network port to which the camera being registered is
connected.
Camera auto-registration Register the IP address
automatically given by this unit to
a detected camera♦
/ Register the IP address set with
a detected camera
♦Initial default
Specifies the IP address given to the detected camera by the
recorder.
• When [On] is selected for [DHCP] for the recorder [Network
setup], no IP address can be given to the camera.
29
Quick settings
Program settings
Use the following procedure to select the recording program that determines the live image rate, recording rate, and other operations.
1 Click the [Quick] button on the setup menu.
This will display the setting window.
2 Configure the settings for each item.
Refer to “Quick settings 4” table for details about the settings.
3 Click the [Set] button.
Quick settings 4
Item Settings Description
Program setup Program1♦ to Program8 Selects the recording program.
To check the details of the selected program, click the [Display]
button.
• Refer to "Program (page 42)" for details about programs.
♦Initial default
Note:
• Performing [Camera registration] sets both the live video rate and manual record rate of [Program1] to [Program8] to "1 ips".
30
 Loading...