

Page 1

Quad Unit
WJ-MS424
Before attempting to connect or operate this product, please read these instructions completely
ENGLISH
FRANÇAIS
Page 2
CONTENTS
PREFACE .................................................................................................................................................................................. 1
FEATURES ................................................................................................................................................................................ 1
PRECAUTIONS ......................................................................................................................................................................... 1
MAJOR OPERATING CONTROLS AND THEIR FUNCTIONS ................................................................................................... 2
RACK MOUNTING .................................................................................................................................................................... 4
SETTING UP THE MENUS ........................................................................................................................................................ 5
SYSTEM CONNECTIONS ....................................................................................................................................................... 11
SPECIFICATIONS ................................................................................................................................................................... 15
STANDARD ACCESSORIES ................................................................................................................................................... 15
Warning:
This equipment generates and uses radio frequency energy and if not installed and used properly, i.e., in strict
accordance with the instruction manual, may cause harmful
interference to radio communications. It has been tested
and found to comply with the limits for a Class A computing
device pursuant to Subpart J of Part 15 of FCC Rules,
which are designed to provide reasonable protection
against such interference when operated in a commercial
environment.
WARNING:
TO PREVENT FIRE OR ELECTRIC SHOCK HAZARD, DO NOT EXPOSE THIS APPLIANCE TO RAIN OR MOIS
TURE.
The lightning flash with arrowhead symbol, within an equilateral triangle, is
intended to alert the user to the presence of uninsulated "dangerous voltage"
within the product's enclosure that may
be of sufficient magnitude to constitute a
risk of electric shock to persons.
The exclamation point within an equilateral triangle is intended to alert the user
to the presence of important operating
and maintenance (servicing) instructions
in the literature accompanying the appliance.
The serial number of this product may be found on the bottom of the unit.
You should note the serial number of this unit in the space
provided and retain this book as a permanent record of your
purchase to aid identification in the event of theft.
Model No. WJ-MS424
Serial No.
CAUTION:
TO REDUCE THE RISK OF ELECTRIC SHOCK, DO
NOT REMOVE COVER (OR BACK). NO USER SERVICEABLE PARTS INSIDE.
REFER SERVICING TO QUALIFIED SERVICE PERSONNEL.
CAUTION
RISK OF ELECTRIC SHOCK
DO NOT OPEN
SA 1965
SA 1966
For U.S.A
CAUTION:
Before attempting to connect or operate this product,
please read the label on the bottom.
Page 3

-1-
The Panasonic WJ-MS424 Quad Unit is ideal for CCTV
applications where multiple surveillance cameras are
required. Most 2 : 1 interlace cameras available today,
either color or black and white, are compatible with the
WJ-MS424. Up to four cameras may be connected to
PREF ACE
1. Compatible with Most 2 : 1 Interlace cameras
Advanced digital processing technology allows
connection of most 2 : 1 interlace cameras available
today without the requirement for synchronization of
the four video inputs.
The system may be added to existing security systems and makes possible displays in black and
white or full color.
2. Alphanumeric Character Generator
Title insertion of up to 8 characters in each of the
four windows is possible. This promotes easy identification of the separate camera locations.
3. Alarm with Built-in Buzzer
This system can be combined with alarm sensors
and switches as well as time-lapse VCRs through
the alarm output and reset signal connectors.
Upon receiving an alarm signal, a full-sized picture
of the site is displayed. By setting the “CAM TITLE
ON” and “ALARM TITLE ON” modes from the TITLE
menu, “ALARM” and the window title will appear
intermittently in the picture.
The Automatic alarm reset time is adjustable from 1
to 30 sec.,1, 2, 3, 4, 5 min. or Off.
FEATURES
PRECAUTIONS
• Do not attempt to disassemble the unit. In order to
prevent electrical shock, do not remove screws or
covers. There are no user-serviceable parts inside.
• Do not abuse the unit. Avoid striking, shaking etc. It
could be damaged by improper handling or storage.
• Do not use strong or abrasive detergents when
cleaning the unit body.
• Do not expose the unit to water or moisture, and do
not operate it in wet or humid areas.
• Do not use the unit in an extreme environment
where high temperature or high humidity exists.
• Handle the unit with care.
• Take immediate action if ever the unit does become
wet. Tune the power off and refer servicing to qualified service personnel. Moisture can damage the
unit and also create a danger of electric shock.
• Use the unit under conditions where temperature is
within –10°C to +50°C (14°F to 122°F), and humidity
is below 90%. When installing the unit in the rack, it
is recommended to install the fan.
• The input power source is 120 V AC, 60 Hz.
• Refer all installation work to qualified service personnel or system installers.
4.Quad Picture Borderlines
A white borderline can be inserted in the quad pictures by setting “BORDER ON” from the Setup
Menu.
5. Two kinds of Video Output Connectors
The Quad system offers two kinds of video output
connectors :
(a) VIDEO OUT : Quad or full-size single picture
can be selected with the front panel switches.
(b) VCR OUT : A quad display is always supplied,
regardless of the setting of the front panel
switches.
6. A back-up memory inside maintains preset title
character information.
7. Video Loss Checking Function
If the video signal is lost due to a disconnected
cable or other reasons, an alarm buzzer beeps and
a caution message is displayed on the monitor
screen.
the system, and if desired, the monitor can be divided
into 4 windows for simultaneous display of the four different images.
Simple front panel switch operation allows quick selection between quad and single camera display modes.
ENGLISH
Page 4
-2-
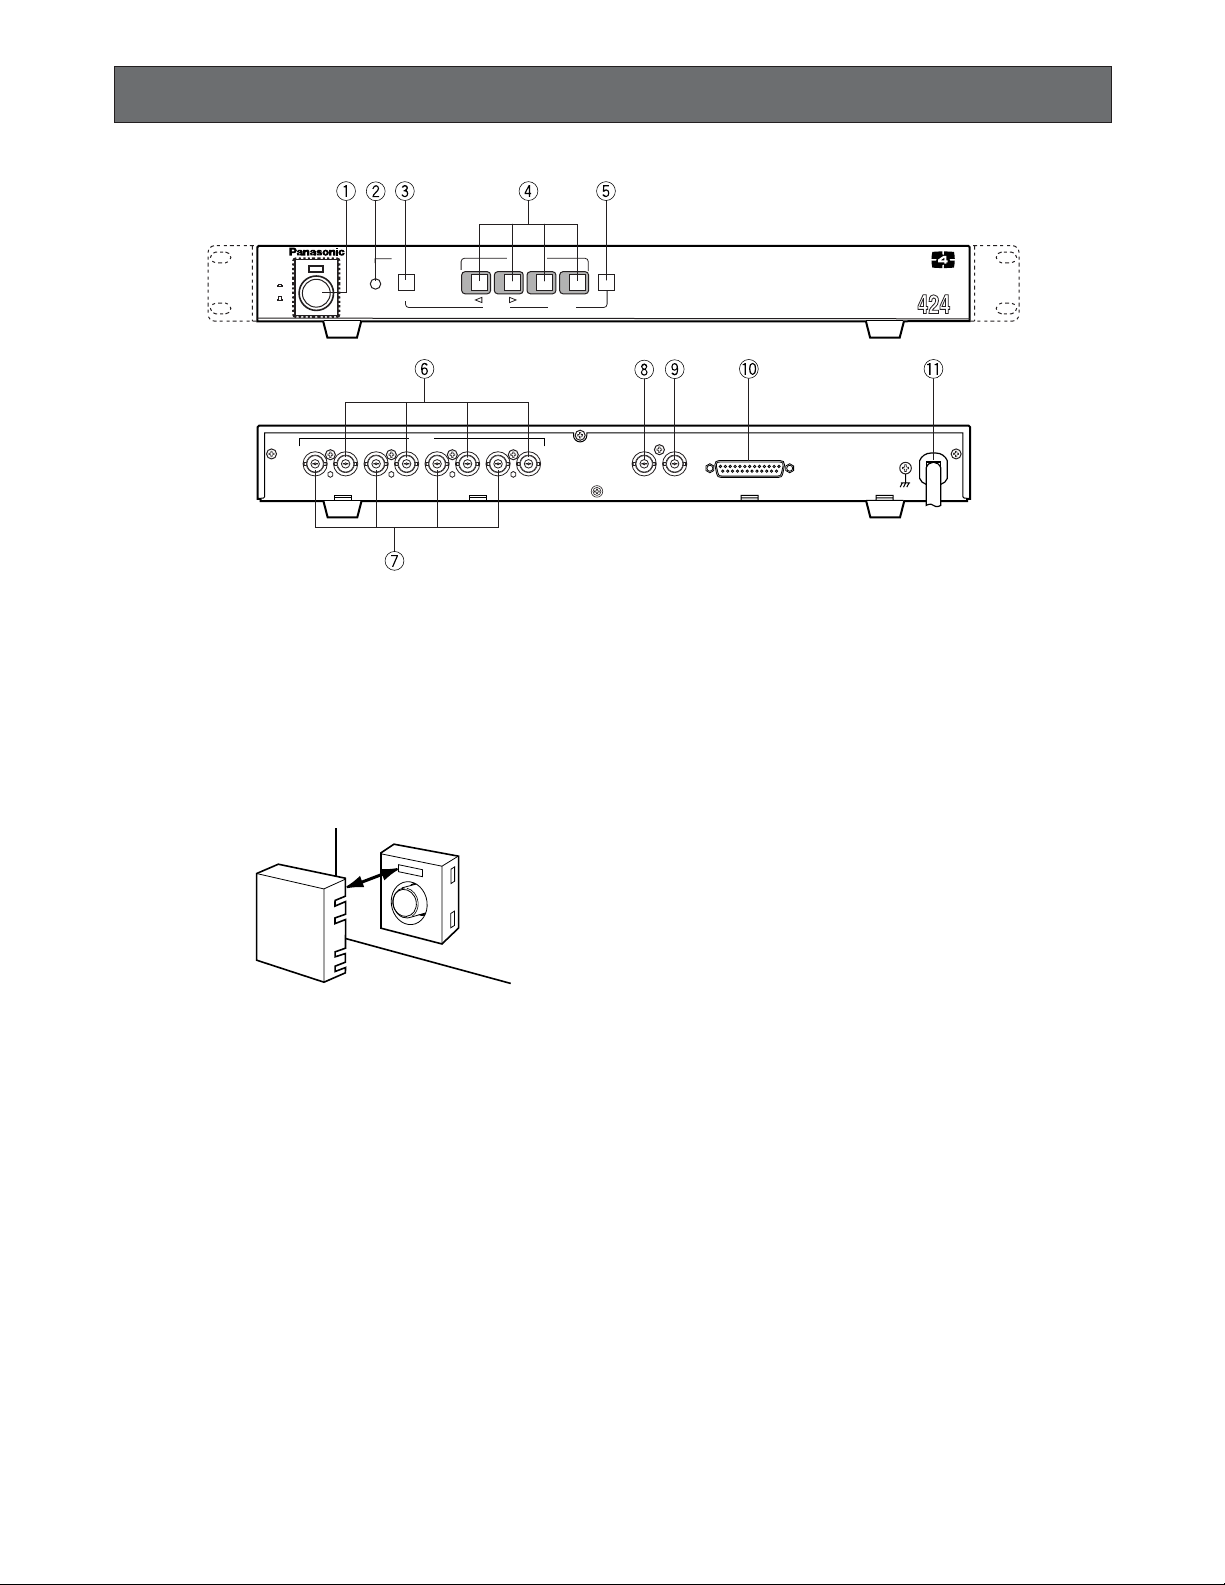
1. Power ON/OFF Switch (POWER)
This switch turns the power of this switch on or off.
The POWER indicator lights when the power of this
unit is on.
Switch Protector (Standard Accessory)
To prevent that the power of this unit is turned off accidentally, install the supplied switch protector as shown
below.
• QUAD button
When QUAD is selected for VIDEO OUT on the
SYSTEM SETUP menu, this button works as the
QUAD button.
Pressing this button displays the quad picture on
the monitor screen.
• SEQ button
When SEQ is selected for VIDEO OUT on the SYSTEM SETUP menu, this button works as the SEQ
button.
Pressing this button displays the pictures on the
monitor screen in the sequential order and with the
dwell time set on the SEQ SETUP menu.
• ESC button
When the setup menu (SYSTEM SETUP, SEQ
SETUP, TITLE SETUP, TITLE SET, or TITLE POSI) is
displayed on the monitor screen, this button works
as the ESC button.
Pressing this button returns the current setup menu to
the previous setup menu.
4. VIDEO SELECT (1, 2, 3, 4)/CURSOR
(4, 5)/SELECT (–, +) Buttons
These buttons select the video signal or move the
cursor on the setup menus.
• VIDEO SELECT(1, 2, 3, 4) buttons
When the setup menu is not displayed, these button
work as VIDEO SELECT button.
Pressing one of these buttons selects a channel to
be displayed in single picture mode.
• CURSOR (4, 5)/SELECT(–, +) buttons
When the setup menu is displayed, these buttons
work as CURSOR (4, 5)/SELECT (–, +) buttons.
Pressing these buttons moves the cursor or select s
a mode or a parameter.
MAJOR OPERATING CONTROLS AND THEIR FUNCTIONS
VCR
OUT
1
VIDEO
OUT
ALARM/REMOTE
INOUT
2
VIDEO
INOUT
3
INOUT
4
INOUT
SIGNAL GND
ON
POWER
ALARM
MENU
ESC
ALARM RESET
QUAD/SEQ
OFF
POWER
PROTECTION
1 2 3 4
VIDEO SELECT
CURSOR SELECT
–
+
Quad System WJ-MS
SWITCH
PROTECTOR
2. Alarm LED (ALARM)
This LED flashes while the alarm signal is received.
It changes to steady light when the alarm is reset
automatically.
To turn the flashing LED off, press the ALARM
RESET/QUAD/SEQ button.
3. Alarm Reset/Quad/Sequence/Escape Button
(ALARM RESET/QUAD/SEQ/ESC)
This button has different functions in different
modes, as described below.
• ALARM RESET button
When an alarm signal is received, this button works
as the ALARM RESET button.
Pressing this button in an alarm situation cancels
the alarm mode with the following results:
1. The alarm LED stops flashing.
2. The alarm output is stopped.
3. The alarm buzzer stops beeping.
4. The video loss caution message on the monitor
screen disappears and the screen returns to
the camera picture.
Page 5
-3-
4 button: This button moves the cursor to the left or
selects an item on the setup menus.
5 button: This button moves the cursor to the right
or selects an item on the setup menus.
– button: This button selects a character or a para-
meter on the setup menus.
+ button: This button selects a character or a para-
meter on the setup menus.
5. Menu Button (MENU)
Pressing this button for approx. 2 seconds displays
the setup menus. Pressing it again for approx. 1
second cancels the display of the setup menus.
6. Video input Connector (VIDEO IN 1, 2, 3, 4)
These connectors receive a composite video signal.
They are automatically terminated.
Notes:
• The input signals must meet the EIA B/W
video signal standard, if the video inputs of this
unit are to be synchronized.
• If the input signals have a high jitter content,
as in the case of a VCR playback picture, it
may not be possible to synchronize this unit.
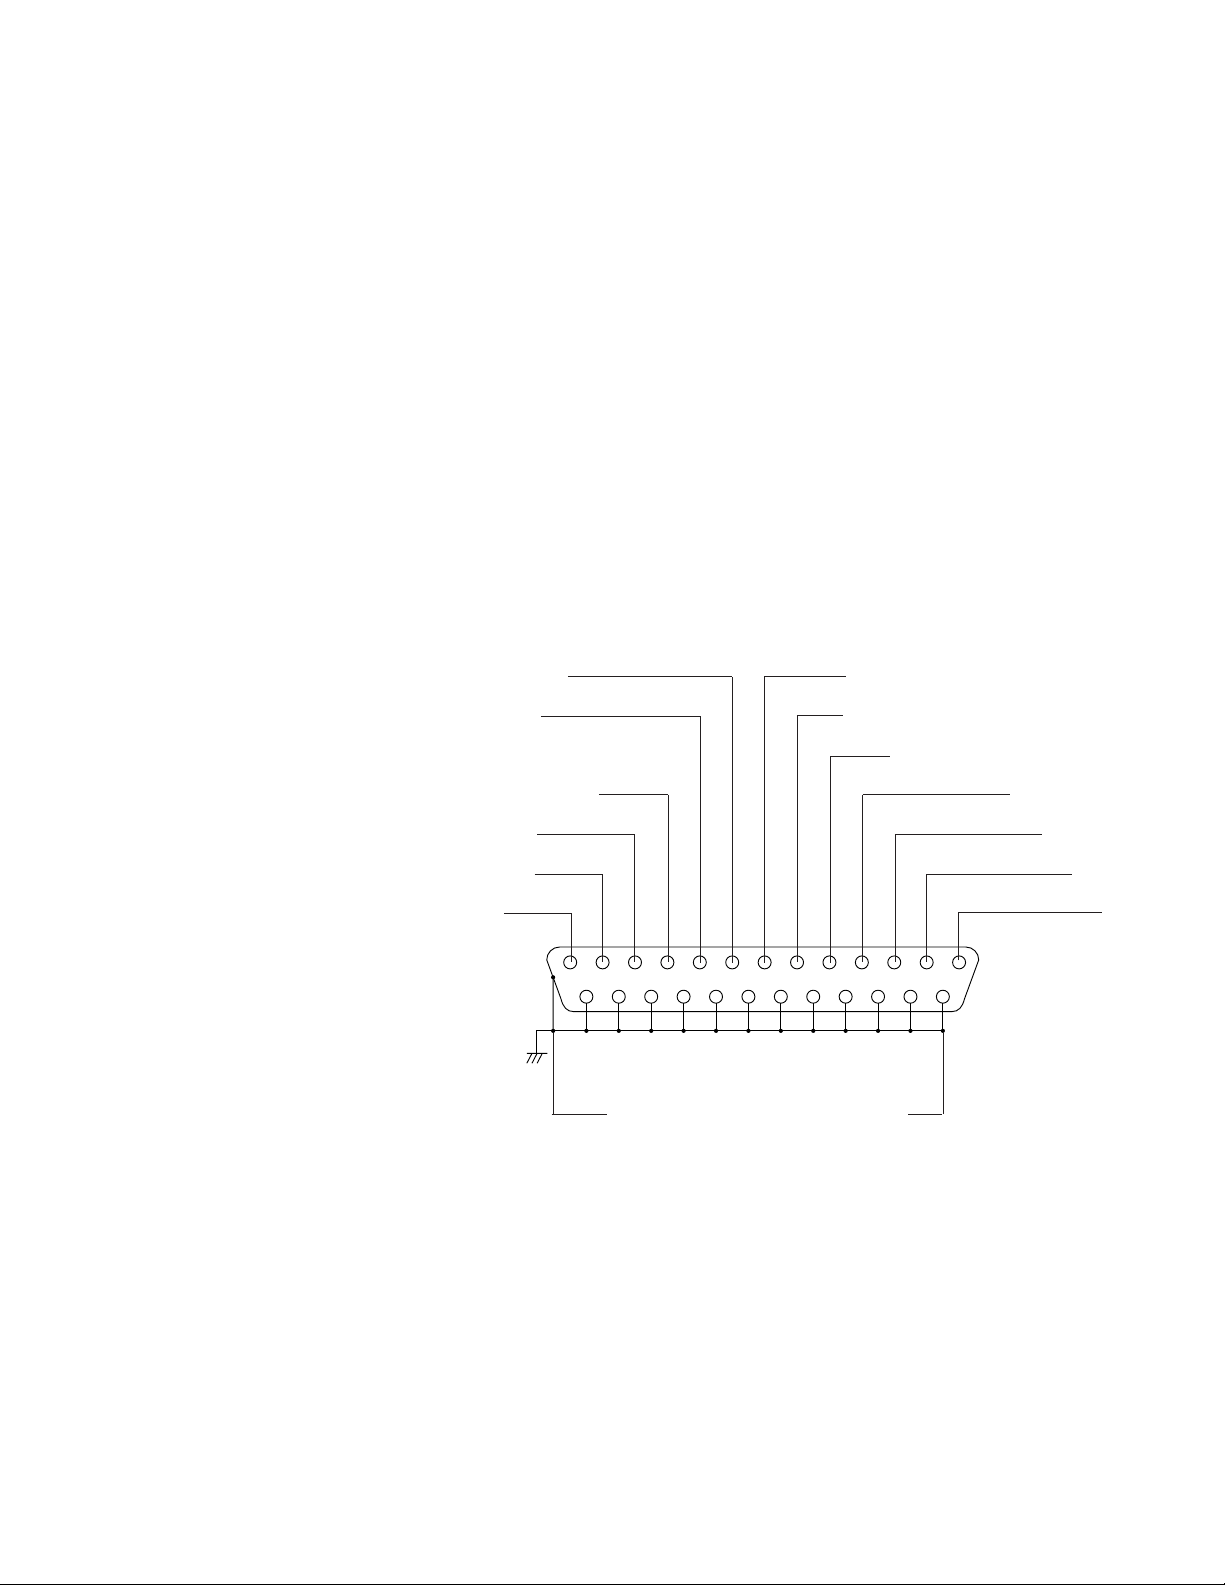
Not Used
Not Used
ALARM OUT
Not Used
ALARM RESET OUT
ALARM RECOVER IN QUAD/SEQ
Menu
Selector
REMOTE/ALARM 4
REMOTE/ALARM 3
REMOTE/ALARM 2
REMOTE/ALARM 1
GND
Pin-14 to 25 are connected to Ground
7. Video Output Connectors
(VIDEO OUT 1, 2, 3, 4)
The video input signals connected to the VIDEO IN
connector are looped through to these connectors.
Connectors a coaxial cable to these connectors
cancels the termination.
8. VCR Output Connector (VCR OUT)
The video signal for the quad picture mode is
always provided at this connector. By connecting it
to the VIDEO IN connector of the time lapse VCR,
you can record the quad picture.
9. Video Output Connector (VIDEO OUT)
The video signal selected by the QUAD/SEQ button
(quad picture) or the VIDEO SELECT button (single
picture) is output from this connector.
10. Alarm/Remote Control Connector
(ALARM/REMOTE)
This connector accepts the alarm signal from associated alarm sensor units and the remote control
signal from the external equipment.
Notes:
• The pins #6 Menu and #7 QUAD/SEQ are operable only when pin #5 Selector is grounded.
• See Specifications for allowable electric capacity of each pin.
11. Power Cord
13251224112310229218207196185174163152141
Page 6

-4-
To install the WJ-MS424 Quad Unit in an EIA 19-inch
rack, use the rack mounting brackets (provided) and
eight screws (provided, M3x10).
1. Turn off the power of the unit.
2. Remove the four screws fixing the rubber legs, and
remove the four rubber legs from the unit.
RACK MOUNTING
Remove four rubber legs.
3. Attach the rack mounting brackets on both sides
and fix them with eight screws (provided).
Eight screws (Provided)
4. Install the unit in the rack with four screws (to be
procured locally).
Cautions:
1. Leave one space free both above and below the
unit, or install a cooling fan in the rack.
2. If the rack is subject to vibrations, secure the rear of
the unit to the rack using additional rack mounting
brackets (to be procured locally).
EIA 19”
rack
Fix the rack mounting brackets
Page 7

-5-
Before the Settings
1. Confirm that the cameras and peripherals are connected correctly and firmly.
2. Turn on the power of this unit and connected
peripherals.
1. Displaying the Menus
Press the MENU button for 2 seconds or more.
The MAIN menu appears.
You can setup the following items:
• SYSTEM SETUP
• ALARM BUZZER
• ALARM OUT
• ALARM AUTO RESET
• SEQ SETUP
• TITLE SETUP
See the following pages for details about the functions and settings.
2. How to Operate the Menus
To select the desired item, press the CURSOR (4,
5) buttons. Each time you press a button, the cur-
sor moves to the next (5) or previous (4) item.
SETTING UP THE MENUS
1 2
To select the desired parameter of the selected
item, press the SELECT (–, +) buttons.
3 4
–
+
Note:
Some items have a setting menu (The
“*”
mark
indicates that a setting menu exists, for example, SYSTEM SETUP.), press the SELECT (–, +)
buttons to select ON for its parameter. The setting menu of the selected item appears.
Precaution:
Entering the setup menu is not possible while
the ALARM LED is flashing. Make sure the
alarm mode is canceled. To cancel the alarm
mode, press the ALARM RESET button.
All Reset Operation
All reset allows you to reset all setup menu items to
the factory settings if you are unsure about the correct settings.
Proceed as follows:
1. Turn the power of this unit off.
2. Keep holding down the CURSOR button (5),
the SELECT button (+), and the MENU button
simultaneously, and press the POWER button.
The buzzer beeps when all settings are reset to
the factory settings.
ALARM
ALARM RESET
QUAD/SEQ
ESC
VIDEO SELECT
1 2 3 4
CURSOR SELECT
–
MENU
+
** MAIN **
SYSTEM SETUP
ALARM BUZZER 2SEC
ALARM OUT 2SEC
ALARM AUTO RESET OFF
SEQ SETUP
TITLE SETUP
*
*
*
Page 8

-6-
3-1-1. Border (BORDER)
This parameter lets you set the appearance of the borders that divide the screen.
1. Move the cursor to BORDER.
2. Select ON or OFF.
ON: The borders appear when QUAD is selected
for VIDEO OUT.
OFF: The borders do not appear.
ALARM
MENU
ESC
ALARM RESET
QUAD/SEQ
1 2 3 4
VIDEO SELECT
CURSOR SELECT
–
+
or
** SYSTEM SETUP **
BORDER ON
VIDEO OUT QUAD
AUTO SKIP OFF
VIDEO LOSS ON
Borderline (white)
e
ALARM
MENU
ESC
ALARM RESET
QUAD/SEQ
1 2 3 4
VIDEO SELECT
CURSOR SELECT
–
+
or
** SYSTEM SETUP **
BORDER ON
VIDEO OUT QUAD
AUTO SKIP OFF
VIDEO LOSS ON
3-1-2. Quad/Sequence (VIDEO OUT)
This parameter lets you select the quad picture or
sequential single picture for display on the monitor
screen.
1. Move the cursor to VIDEO OUT.
2. Select QUAD or SEQ.
QUAD: The quad picture appears on the monitor
that is connected to the VIDEO OUT connector.
SEQ: The single picture appears sequentially in
the order to set on the of SEQUENCE SETUP
submenu of the MAIN menu.
** SYSTEM SETUP **
BORDER ON
VIDEO OUT QUAD
AUTO SKIP OFF
VIDEO LOSS ON
3. Setup Menu Description
3-1. SYSTEM SETUP
The SYSTEM menu lets you set the following
items:
• BORDER
• VIDEO OUT
• AUTO SKIP
• VIDEO LOSS
1. Move the cursor to SYSTEM SETUP.
2. Press one of the SELECT buttons (– or +). The SYSTEM SETUP menu appears on the monitor screen.
Note: To return to the MAIN menu, press the ESC
button.
ALARM
MENU
ESC
ALARM RESET
QUAD/SEQ
1 2 3 4
VIDEO SELECT
CURSOR SELECT
–
+
** SYSTEM SETUP **
BORDER ON
VIDEO OUT QUAD
AUTO SKIP OFF
VIDEO LOSS ON
or
Page 9

-7-
1
2
3
4
1
3
4
d
3-1-3. Auto Channel Skipping (AUTO SKIP)
Setting
This parameter lets you set automatic skipping of channels to which no camera is connected.
1. Move the cursor to AUTO SKIP.
2. Select ON or OFF.
ON: Channels to which no camera is connected are
skipped when SEQ is selected.
OFF: No channels are skipped.
3-2. ALARM BUZZER
This parameter lets you adjust the buzzer time between
1 and 30 seconds and 1 and 5 minutes.
1. Move the cursor to ALARM BUZZER.
2. Select the buzzer time.
OFF: The alarm buzzer does not beep when an
alarm signal is received.
1-30 SEC, 1-5 MIN: The buzzer keeps on beeping
for the duration you set.
EXT: The alarm buzzer keeps on beeping until an
operation is performed from an external equipment such as a time lapse VCR.
3-1-4. Video Loss Checking
(VIDEO LOSS)
This parameter lets you activate a function that checks
whether the video signal is being supplied to the VIDEO
INPUT connector.
1. Move the cursor to VIDEO LOSS.
2. Select ON or OFF.
OFF: The video loss alarm is ignored.
ON: When video loss alarm is received, the picture
switches to the quad format. The message
“CHXX LOSS” appears on the monitor screen
and the alarm buzzer starts beeping.
** SYSTEM SETUP **
BORDER ON
VIDEO OUT QUAD
AUTO SKIP OFF
VIDEO LOSS OFF
** SYSTEM SETUP **
BORDER ON
VIDEO OUT QUAD
AUTO SKIP OFF
VIDEO LOSS ON
** SYSTEM SETUP **
BORDER ON
VIDEO OUT QUAD
AUTO SKIP ON
VIDEO LOSS ON
** MAIN **
SYSTEM SETUP
ALARM BUZZER 2SEC
ALARM OUT 2SEC
ALARM AUTO RESET OFF
SEQ SETUP
TITLE SETUP
OFF 1SEC 2SEC
1MIN
*
*
*
......
5MIN EXT
......
30SEC
Page 10

-8-
3-3. ALARM OUT
This parameter lets you adjust the duration the alarm
signal is output between 1 and 30 seconds and 1 and 5
minutes.
1. Move the cursor to ALARM OUT.
2. Select the duration the alarm signal is output.
1-30 SEC, 1-5 MIN: The alarm signal is output for
the duration you set.
3-4. ALARM AUTO RESET
This parameter lets you set the time until the unit recovers after receiving the alarm signal.
1. Move the cursor to ALARM AUTO RESET.
2. Select the recover time.
OFF: The alarm condition is maintained until the
ALARM RESET button on the front panel is
pressed or the alarm recover signal from the
time lapse VCR is supplied to the ALARM/
REMOTE connector.
1-30 SEC, 1-5 MIN: The alarm condition is main-
tained for the length of the recover time you set.
3-5. SEQ SETUP
This parameter lets you set the sequential order and
dwell time for camera switching.
1. Move the cursor to SEQ SETUP.
2. Press one of the SELECT buttons (– or +). The
SEQUENCE menu appears on the monitor screen,
and “1 CH” starts blinking.
3. Press the SELECT buttons (–, +) to select the channel. The channel changes as below:
<Channel>
4. Press the CURSOR buttons (4 or 5) so that “SEC”
starts blinking.
The cursor moves in the SEQ SETUP menu as
shown below:
1CH 2CH 3CH
4CH QUAD OFF
<Display time>
5. Select the dwell time by pressing the SELECT buttons
(–, +). The dwell time changes as below:
1SEC 2SEC 3SEC • • • • 30SEC
** MAIN**
SYSTEM SETUP
ALARM BUZZER 2SEC
ALARM OUT 2SEC
ALARM AUTO RESET OFF
SEQ SETUP
TITLE SETUP
*
*
*
ALARM
** MAIN **
SYSTEM SETUP
ALARM BUZZER 2SEC
ALARM OUT 2SEC
ALARM AUTO RESET OFF
SEQ SETUP
TITLE SETUP
ALARM RESET
QUAD/SEQ
ESC
1 2 3 4
CURSOR SELECT
*
*
VIDEO SELECT
*
MENU
+
–
or
1SEC
......
30SEC 1MIN
......
5MIN
** MAIN **
SYSTEM SETUP
ALARM BUZZER 2SEC
ALARM OUT 2SEC
ALARM AUTO RESET OFF
SEQ SETUP
TITLE SETUP
OFF 1SEC
*
*
*
......
30SEC 1MIN
......
5MIN
** SEQ SETUP **
1: 1CH 2SEC
2: 2CH 2SEC
3: 3CH 2SEC
4: 4CH 2SEC
5: OFF
6: OFF
7: OFF
8: OFF
** SEQUENCE **
1: 1CH 2SEC
2: 2CH 2SEC
3: 3CH 2SEC
4: 4CH 2SEC
5: OFF
6: OFF
7: OFF
8: OFF
: Cursor Move
Page 11

-9-
6. Repeat steps 3 to 5 to determine the sequential order
and dwell time.
7. Press the ESC button to return to the MAIN menu.
3-6. TITLE SETUP
A title consisting of up to 8 alphanumeric characters
can be displayed on the monitor.
1. Move the cursor to TITLE SETUP.
2. Press one of the SELECT buttons (– or +). The
TITLE SETUP menu appears on the monitor screen.
or
ALARM
MENU
ESC
ALARM RESET
QUAD/SEQ
1 2 3 4
VIDEO SELECT
CURSOR SELECT
–
+
** TITLE SETUP **
CAM TITLE ON
TITLE SET
*
TITLE POSI
*
ALARM TITLE ON
** MAIN **
SYSTEM SETUP
*
ALARM BUZZER 2SEC
ALARM OUT 2SEC
ALARM AUTO RESET OFF
SEQ SETUP
*
TITLE SETUP
*
You can set the following items:
• CAM TITLE
• TITLE SET
• TITLE POSI
• ALARM TITLE
Note: To return to the MAIN menu, press the ESC
button.
3-6-1. CAM TITLE
This parameter lets you decide whether or not to have
the title displayed.
1. Move the cursor to the CAM TITLE parameter.
2. Select ON or OFF.
ON: Title display.
OFF: No title display.
3-6-2. TITLE SET
This parameter lets you edit a displayed title.
1. Move the cursor to TITLE SET.
2. Press one of the SELECT buttons (– or +). The
EDITTING menu appears on the monitor screen
and “1” starts blinking.
3. Move the cursor to the channel number whose title
is to be edited by pressing the CURSOR buttons (4
or 5).
4. Select a character by pressing the SELECT buttons
(– or +).
5. After selecting the first character, press the CURSOR button(5). Then select the second character.
6. Repeat steps 3 to 5 above to complete the title.
7. Repeat steps 3 to 6 to edit the other channels.
8. Press the ESC button to return to the previous
menu.
ABCDEFGH
** TITLE SETUP **
CAM TITLE ON
TITLE SET
TITLE POSI
ALARM TITLE ON
*
*
** TITLE SETUP **
CAM TITLE ON
ALARM
1....... 2.......
3....... 4.......
TITLE SET
TITLE POSI
ALARM TITLE ON
TITLE EDIT ON
ALARM RESET
QUAD/SEQ
ESC
*
VIDEO SELECT
1 2 3 4
CURSOR SELECT
or
*
MENU
+
–
ABCDEFGHIJKLM
NOPQRSTUVWXYZ
0123456789
←→=?'"#&()*+,
-./:;E(blank)
Page 12

-10-
To erase a specific character
1. Select a character to be erased.
2. Select “•” (blank mark) to erase the character.
To erase the title of a specific channel
1. Move the cursor to the channel number whose title
is to be erased.
2. Press the SELECT buttons (– and +) simultaneously.
3-6-3. TITLE POSI
This parameter lets you select the position on the monitor screen where you want the title to be displayed.
1. Move the cursor to TITLE POSI.
2. Press one of the SELECT buttons (– or +). The
TITLE POSITION menu appears with the title of the
channel 1 on the monitor screen.
3. Select the position where the title is to be displayed
by pressing the CURSOR buttons (
4 or 5).
4. Press the ESC button to return to the previous
menu.
Note: All channel titles will be displayed in the
same position. You cannot specify a different
position for each title.
3-6-4. ALARM TITLE
This parameter lets you decide whether or not to have
the word”ALARM” displayed when the unit receives the
alarm signal.
1. Move the cursor to ALARM TITLE .
2. Select ON or OFF.
ON: “ALARM” is displayed
OFF: “ALARM” is not displayed.
** TITLE SETUP **
CAM TITLE ON
TITLE SET
*
TITLE POSI
*
ALARM TITLE ON
ALARM
** TITLE SETUP **
CAM TITLE ON
TITLE SET
TITLE POSI
ALARM TITLE OFF
*
*
1.......
Page 13

-11-
SYSTEM 1
The input video signals for this unit are not synchronized.
Notes :
• When pressing the ALARM RESET/QUAD/SEQ/ECS button or the VIDEO SELECT/CURSOR/SELECT buttons, the picture on the video monitor may roll briefly at the time of switching.
• The video signal to be recorded by the VCR should be supplied from the VCR OUT connector of this unit and not from
the VIDEO OUT/ESC connector of this unit, unless VCR servo control disturbances are allowable when setting the
ALARM RESET/ QUAD/SEQ/ECS button or the VIDEO SELECT/CURSOR/SELECT buttons.
Connections
• Connect the VIDEO IN connectors of this unit to the video output connectors of the cameras.
• Connect the VCR OUT connector of this unit to the video input connector of the time lapse VCR for recording.
• Connect the VIDEO OUT connector of this unit to the video input connector of the video monitor.
SYSTEM CONNECTIONS
VIDEO
VIDEO
VIDEO
VIDEO
WJ-MS424
VIDEO
4
3
INOUT
2
INOUT
1
INOUT
INOUT
Monitor
VCR
VIDEO
OUT
ALARM/REMOTE
OUT
SIGNAL GND
Monitor
VCR
Page 14

-12-
SYSTEM 2
The input video signals for this unit are synchronized, and synchronization noise or disturbances in the video output signal
will not occur when the quad or single picture mode is selected.
Connections
• Connect the VIDEO IN connectors of this unit to the video output connectors of the cameras.
• Connect the VCR OUT connector of this unit to the video input connector of the video distribution amplifier (V.D.A).
• Connect the output of the video distribution amplifier (V.D.A.) to the video input connector of the time lapse VCR and to
the gen-lock input connectors of the cameras.
• Connect the VIDEO OUT connector of this unit to the video input connector of the monitor.
GENLOCK
VIDEO
GENLOCK GENLOCK
GENLOCK
VIDEO
VIDEO
VIDEO
WJ-MS424
VIDEO
4
3
INOUT
2
INOUT
1
INOUT
INOUT
VCR
VIDEO
OUT
ALARM/REMOTE
OUT
SIGNAL GND
VDA
Monitor
Monitor
VCR
Page 15

-13-
SYSTEM 3
A system consisting of this Quad Unit and the specified cameras should include the WV-PS104C Camera Drive Unit.
Note: When pressing the ALARM RESET/QUAD/SEQ/ESC button or the VIDEO SELECT/CURSOR/SELECT buttons, the pic-
ture on the video monitor may roll briefly at the time of switching.
Connections
• Connect the VIDEO IN connectors of this unit to the video output connectors of the WV-PS104C Camera Drive Unit.
• Connect the VIDEO OUT connector of this unit to the video input connector of the monitor.
• Connect the VCR OUT connector of this unit to the video input connector of the time lapse VCR.
• Connect the video output connectors of the cameras to the camera input connectors of the WV-PS104C Camera Drive
Unit.
VIDEO
WV-PS104C
CAMERA
IN
4ch
VIDEO
OUT
AUDIO
OUT
4
INOUT
CAMERA
IN
3ch
VIDEO
OUT
AUDIO
OUT
CAMERA
IN
2ch
VIDEO
OUT
AUDIO
OUT
CAMERA
IN
1ch
VIDEO
OUT
AUDIO
OUT
VD/SYNC
IN
(4Vp-p 75Ω)
VD/SYNC
OUT
CAUTION
WJ-MS424
VIDEO
3
2
INOUT
1
INOUT
INOUT
VCR
VIDEO
OUT
ALARM/REMOTE
OUT
SIGNAL GND
Monitor
Monitor
VCR
Page 16

-14-
SYSTEM 4
Connections
• Connect the VIDEO IN connectors of this unit to the video output connectors of the cameras.
• Connect the VCR OUT connector of this unit to the input connector of the time lapse VCR.
• Connect the VIDEO OUT connector of this unit to the input connector of the monitor.
• Connect the wires of the alarm sensors to the alarm input pins of ALARM/REMOTE connector.
• Connect the ALARM OUTPUT pin of the ALARM/REMOTE connector of this unit to the alarm input terminal of the time
lapse VCR.
• Connect the recover output (alarm reset output) of the time lapse VCR to the ALARM RECOVER IN pin of the ALARM
/REMOTE connector of this unit.
• Connect the ALARM RESET OUT pin of the ALARM/REMOTE connector of this unit to the alarm reset in terminal of the
time lapse VCR.
Sensor
Sensor
Sensor
4
INOUT
3
VIDEO
INOUT
Monitor
Sensor
WJ-MS424
VCR
VIDEO
1
2
INOUT
INOUT
OUT
ALARM/REMOTE
OUT
SIGNAL GND
Monitor
VCR
Page 17

-15-
Video Input : 2:1 interlace, composite 1V [p-p] 75 Ω, auto termination or loop-through, black and white or
color video signal x 4 (Each video signal should be synchronized vertically for vertical interval
switching. Does not have to be synchronized in case vertical interval switching is not
required.)
Video Output : Video Output x 1, composite, 1V [p-p] 75 Ω, color or black and white video signal with com-
posite sync and burst signal.
Title : Up to 8 characters per window
Alarm Input : One per 4 video inputs (max. DC 12V and a make-contact for ground)
Alarm Output : One (max. DC 24V, 100mA, open collector circuit)
Alarm Time : Adjustable approx. 1s to 30s, 1, 2, 3, 4, 5 min. or EXT
Recover Input : One (max. DC 12V and a make-contact for ground)
Auto Reset Time : Adjustable approx. 1s to 30s, 1, 2, 3, 4, 5 min. or OFF
Ambient Operating Temperature : −10˚C to +50˚C (14˚F to 122˚F)
Power Source and
Power Consumption: AC 120V, 60Hz, 13W
Dimensions : 420 (W) x 44 (H) x 350 (D) mm
[16-1/2” (W) x 1-3/4” (H) x 13-3/4” (D)]
Weight : 3.6 kg (7.9 lbs.)
Weight and Dimensions shown above are approximate.
Specifications are subject to change without notice.
SPECIFICATIONS
STANDARD ACCESSORIES
Rack Mounting Brackets ................................................1 set
Rack Mounting Bracket Fixing Screws ..........................8 pcs
Switch Protector .............................................................1 pc
Page 18

Video Imaging Systems Company
A Division of Panasonic Broadcast & Television Systems Company
A Unit of Matsushita Electric Corporation of America
Executive Office: One Panasonic Way 4H-2, Secaucus, New Jersey 07094
Regional Offices:
Northeast: One Panasonic Way, Secaucus, NJ 07094 (201) 348-7303
Southeast: 1225 Northbrook Parkway, Suite 1-160, Suwanee, GA 30024 (770) 338-6838
Midwest: 1707 North Randall Road, Elgin, IL 60123 (847) 468-5211
Southwest: 8105 Beltsline Road, Suite 100, Irving, TX 75063 (927) 915-1334
Western: 6550 Katella Ave., Cypress, CA 90630 (714) 373-7840
PANASONIC CANADA INC.
5770 Ambler Drive, Mississauga, Ontario, L4W 2T3 Canada (905)624-5010
PANASONIC SALES COMPANY
DIVISION OF MATSUSHITA ELECTRIC OF PUERTO RICO, INC.
San Gabriel Industrial Park, 65th Infantry Ave. KM. 9.5 Carolina, P.R. 00630 (809)750-4300
N0398-2052 YWV8QA4907CN Printed in Japan
N 30 Imprimé au Japon
 Loading...