

Page 1
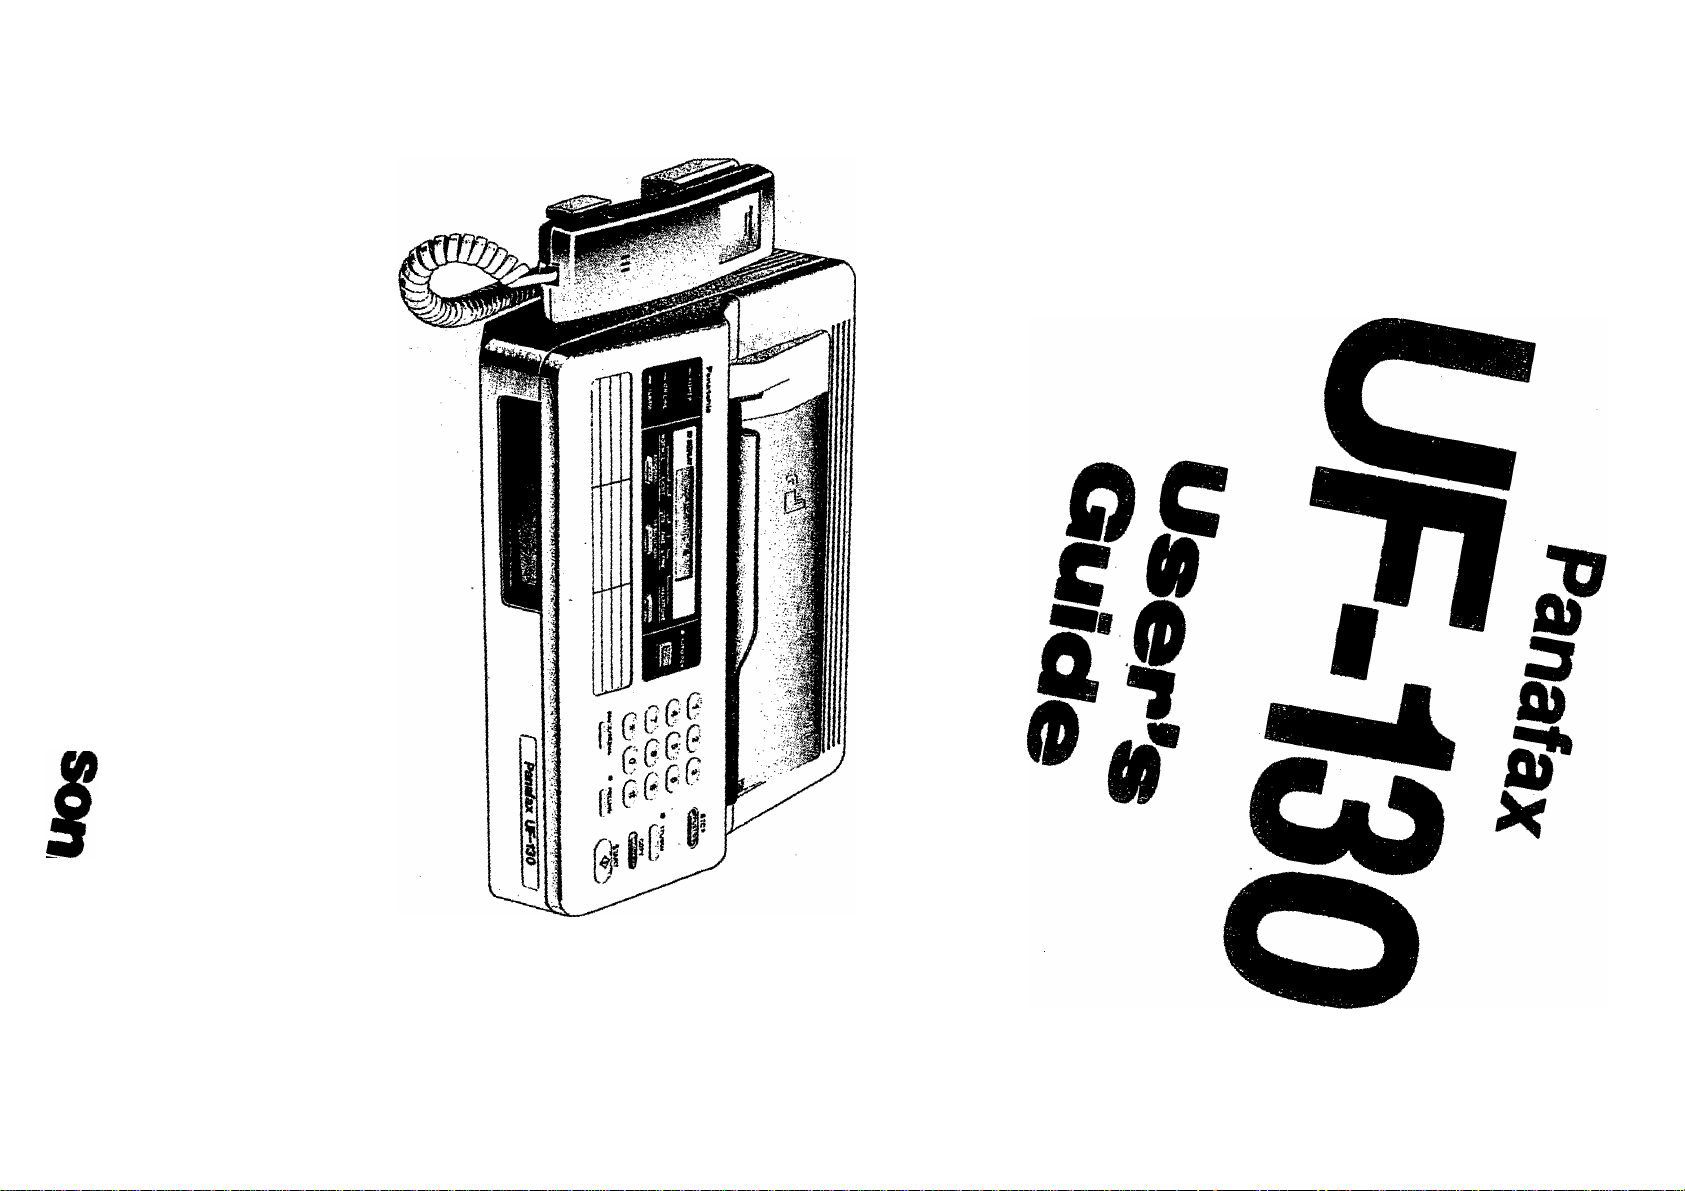
s
Page 2

INTRODUCTION
The UF-130 is an amazingly compact facsimile machine in the low-end user range
of the Panafax family of G3/G2 compatible, desktop facsimile machines. It features
One-Touch speed dialing and other functions designed to make sending faxes easi
er, faster and more economical.
Anyone can learn how to use the most frequently used functions with a few minutes
of simple practice. However, because the UF-130 is capable of performing many differ
ent functions, users may not need to learn every one of them.
This User’s Guide will help you to use your UF-130 quickly and easily. The Contents
shows where to find information on every feature. Although we recommend that you
at least review each section briefly, you may need to read only the sections that con
cern the feature(s) you are interested in.
Page 3

CONTENTS
INTRODUCTION
1. GETTING TO KNOW YOUR UF-130
— External View
— Control Panel.............................................................................
— Function Keys......................................................................................................
2. INSTALLING YOUR MACHINE................................................................................. 9
“ Caution..................................................................................................................... 9
— Unpacking.............................................................................................................. 10
— Battery Switch..................................................................................................... 11
“ Installing the Handset and Cradle.................................................................................12
Power Switch....................................................................................................... 13
— Loading Recording Paper....................................................................................... 14
— RAM Initialization......................................................................................................16
— Setting the Dialing Method (Tone or Pulse)
— Final Installation Test.............................................................................................. 18
— Lightning Precautions............................................................................................. 19
3. SETTING UP YOUR MACHINE.................................................................................. 20
USER PARAMETERS ............................................................................................. 20
— How to Set the Date and Time..................................................................................20
— How to Set Your ID Number.....................................................................................21
ONE-TOUCH DIALING NUMBERS............................................................................. 23
— Storing One-Touch Dialing Numbers
— Filling Out the Station Directory Sheet........................................................................26
FAX PARAMETERS .................................................................................................. 28
— Changing Fax Parameter Settings
— Parameter Table.................................................................................................. 31
USING MUTE AND ADJUSTING VOLUMES
— Using Mute..............................................................................................................31
— Setting the Ringer Volume
— Setting the Speaker Volume.....................................................................................31
4. SENDING DOCUMENTS ........................................................................................... 32
LOADING DOCUMENTS............................................................................................ 32
— Documents You Can Send
— Documents You Cannot Send...................................................................................32
— How to Use the Carrier Sheet
— How to Load a Document.........................................................................................33
— How to Release the Document
.........................................................
.............
...........................................
...........................................................................
................................................. 5
..............................
................................................................
.........................................................................
....
.......................................................................30
................................................................
...................................................
............................................32
....................................
....
............................................................................
...............................................32
........................
5
6
. 8
17
23
31
31
33
Page 4

BASIC TRANSMISSION SETTINGS.............................................................................
— Resolution ............................................................................................................ 34
— Original (Contrast)....................................................................................................36
— Halftone................................................................................................................. 37
— Automatic Transmission Journal (XMT Journal)
MAKING A COPY.........................................................................................................39
DIALING TECHNIQUES .............................................
— Direct Dialing (On-Hook Dialing)................................................................................40
Off-Hook Dialing.................................................................................................. 43
— One-Touch Dialing................................................................................................. 44
— Redialing.................................................................................................................46
— What to Do When You Hear a Voice through the Speaker
5. RECEIVING DOCUMENTS ........................................................................................ 48
AUTOMATIC RECEPTION ......................................................................................... 48
MANUAL RECEPTION ................................................................................................48
— How to Set Manual Reception..................................................................................48
— What to Do When Your Telephone Rings..................................................................49
DOTTED LINE PAGE SEPARATOR
POLLING ...................................................................................................................
— How to Set the Polling Password
— How to Poll..............................................................................................................52
6. USING THE MACHINE’S TELEPHONE........................................................................53
— Making a Regular Call
— Making Voice Contact after Sending/Receiving
— Answering a Voice Contact Request.........................................................................54
7. PRINTOUT REPORT AND LISTS
— One-Touch Dialing Number List
— Fax Parameter List................................................................................................ 57
— Transmission Journal Printout................................................................................. 59
8. PROBLEM SOLVING AND DAILY CARE
— Information Codes....................................................................................................60
— Clearing a Recording Paper Jam
-- Reloading a Recording Paper
-- Clearing a Document Jam
— Cleaning the Feed and Head Rollers....................................................................... 66
— Cleaning the Thermal Head......................................................................................67
9. SPECIFICATIONS .......................................................................................................68
.............................................................................................
.........................................................................................
............................................................................50
..............................................................................
..............
............
............................................................................. 63
....................................................................................
....................................................................55
.....................................................................
.........................................................
.....
............................................40
.........................................
.........................................................
..................................................................55
34
38
47
51
51
53
54
60
64
65
Page 5
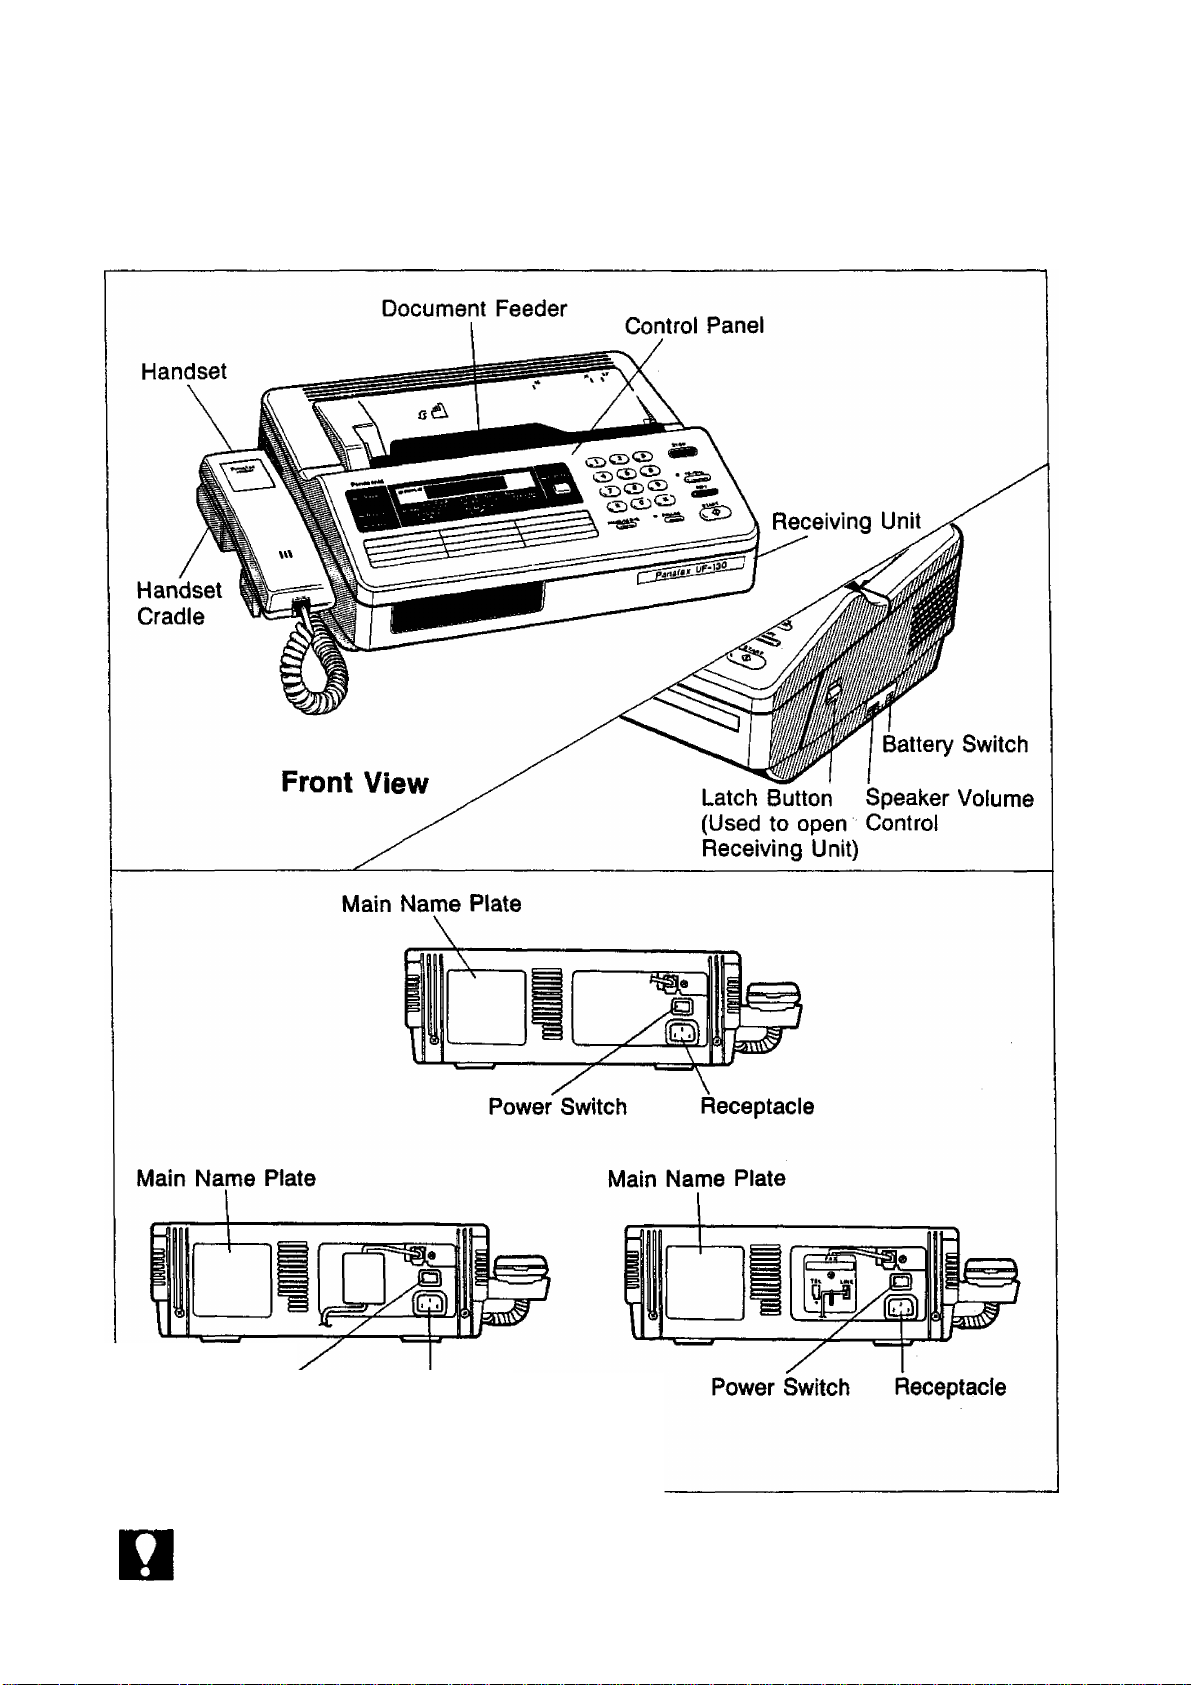
GETTING TO KNOW YOUR
UF-130
External View
1
NOT€
Power Switch Receptacle
Rear View
Rear view varies depending on the country.
Page 6
Control Panel
ALARM Lamp
Lights when a document becomes jammed, a
communication error occurs, or recording paper
runs out.
ON LINE Lamp
Lights when communication begins.
POWER Lamp
Lights when the power is ON.
Panasonic
POWER
ON LINE
' ALARM
NORMAL
ORIGINAL
LIGHT
HALF TONE
Provides ON and OFF settings for halftone
documents. The cursor on the display indicates
Half Tone «ON.
AUTO RCV
Used to set/reset automatic reception.
Lights when automatic reception is set.
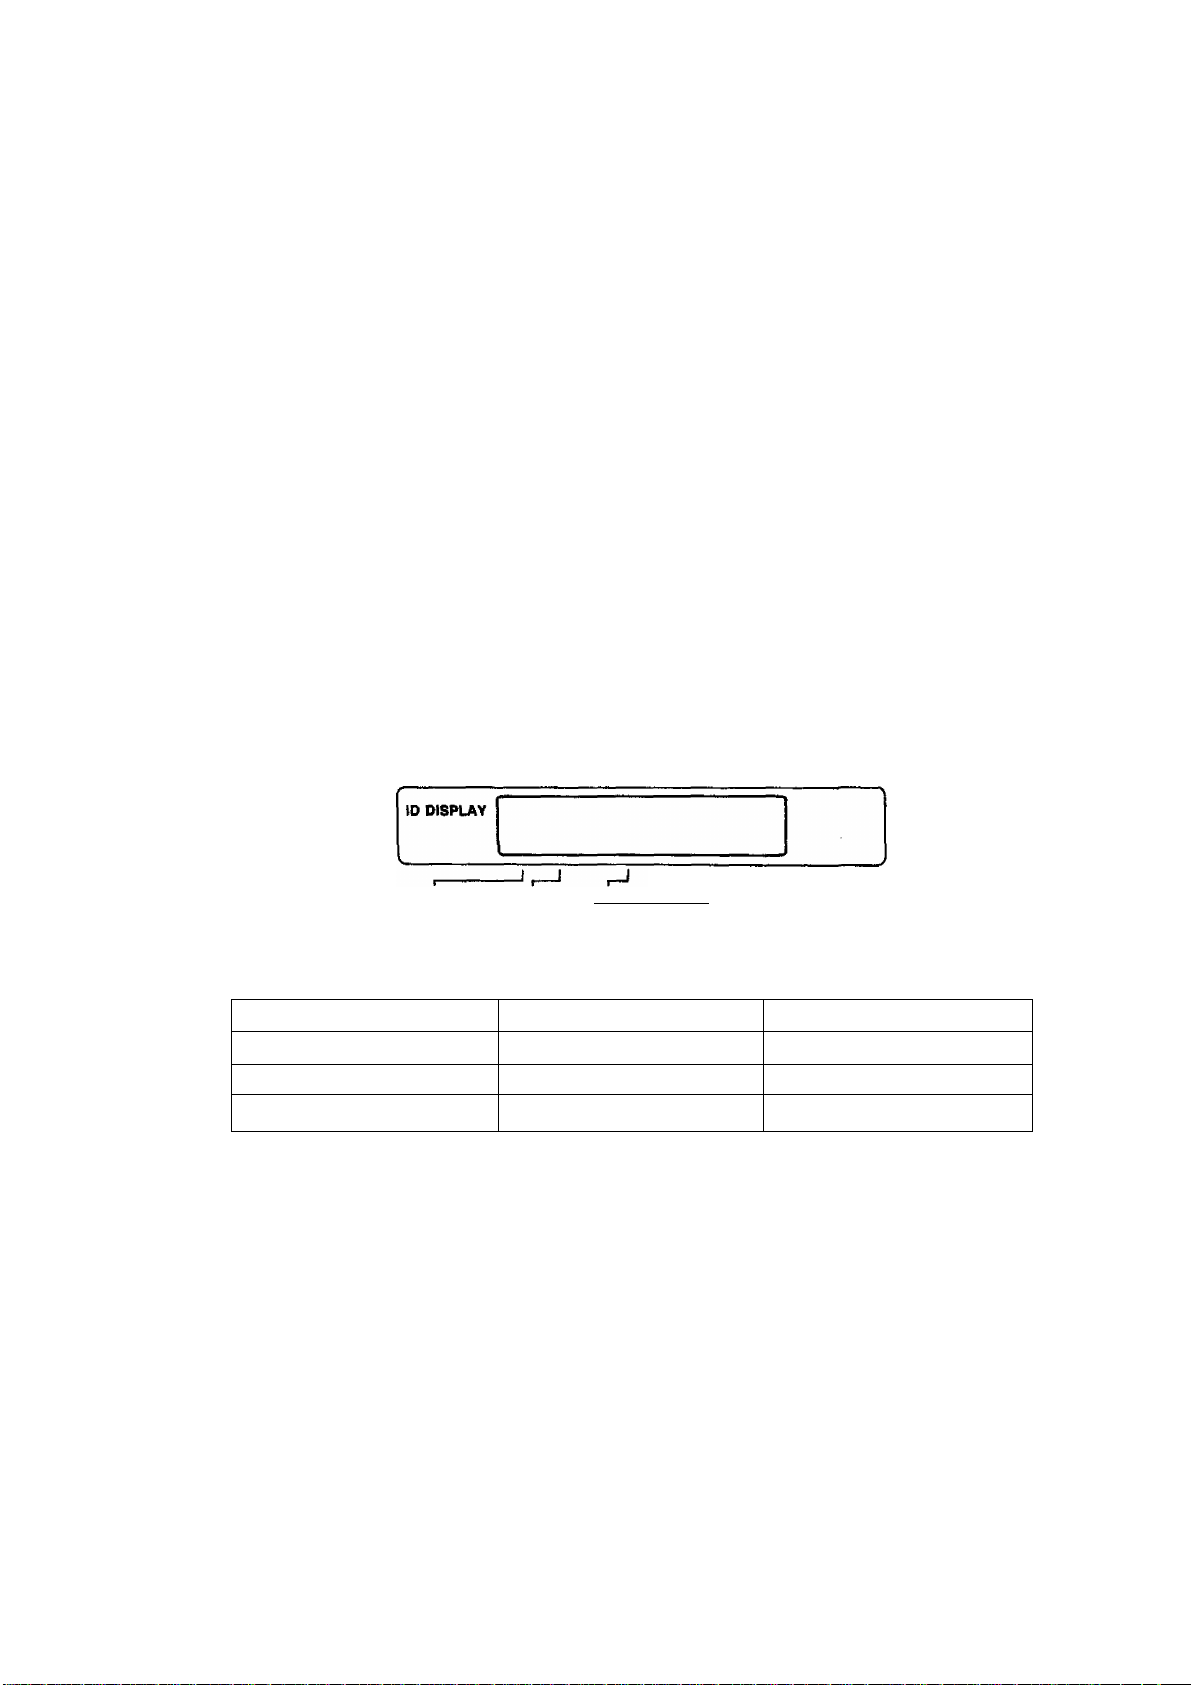
DISPLAY
Shows Date and Time, or the current operation
If the other station has an ID, ◄ mark lights up
and the display shows the ID number.
• AUTO RCV
STD FINE S-FINE
RESOLUTION
I l-n
HALF TONE
C>ZD
ORIGINAL
Used to set Normal or Light. The cursor
|30sition indicates the current setting.
Also used to move the cursor to the left.
RESOLUTION
Used to set Normal, Fine, or Super-Fine.
The cursor position indicates the current set
ting. Also used to move the cursor to the right.
---------
j
Page 7
1
recording or dialing a telephone number.
Page 8

Function Keys
Your machine uses two keys (* and #) to set various functions, as shown in the
chart belows.
— Setting One-Touch Dialing
(page 23)
USER PARAMETERS
STANDBY
—Setting Date & Time
Setting ID Number
Setting Polling Password
— Resetting Fax Parameters
(page 28)
STAAT
Printing One-Touch Dialing
Number List (page 55)
(page 20) [
I
(page 21) I
I
(page 51) !
START
•Printing Fax Parameter List
(page 57)
8
Page 9
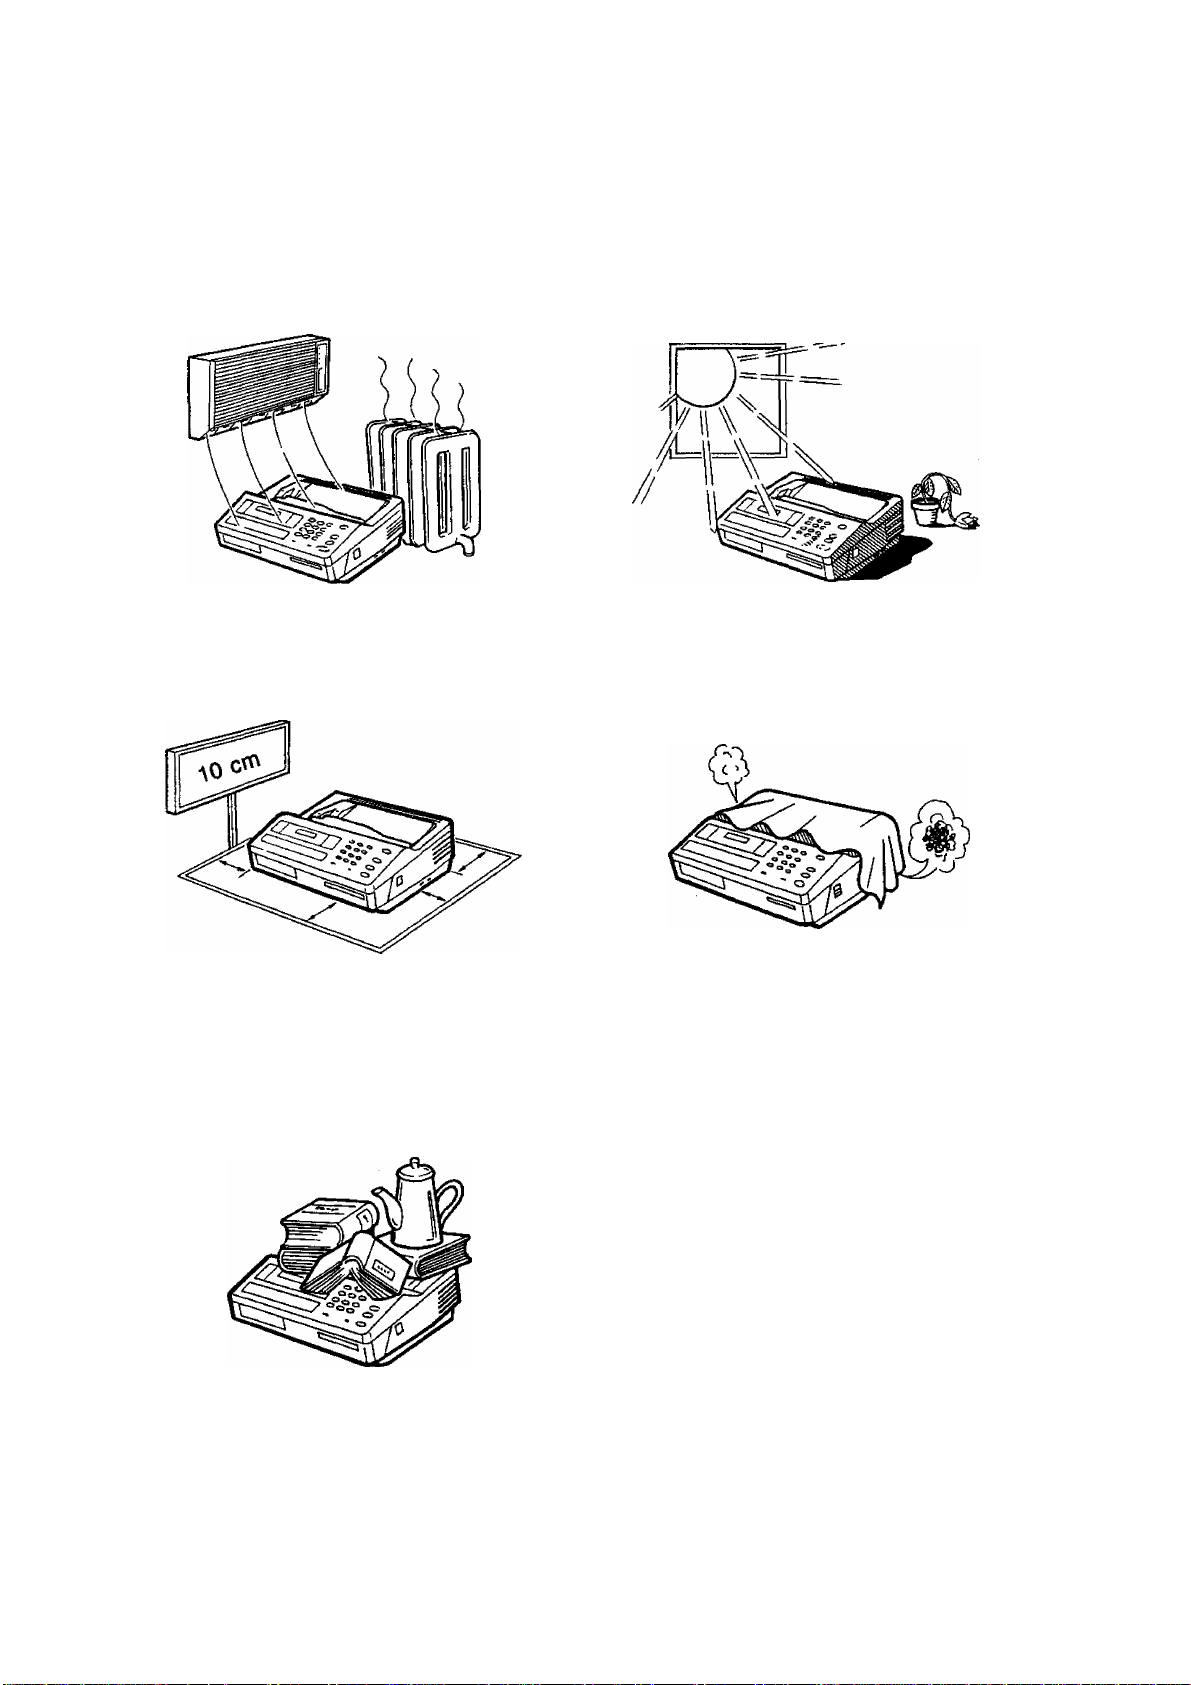
Caution
INSTALLING YOUR MACHINE
1. Do not install the machine near
heating or air conditioning units.
3. Install the machine on a flat place,
and leave at least 10 cm of space
between the machine and other
objects.
2. Avoid exposure to direct sunlight.
4. Do not block the ventilation
openings.
5. Do not place heavy objects, or spill
liquids on the machine.
Page 10
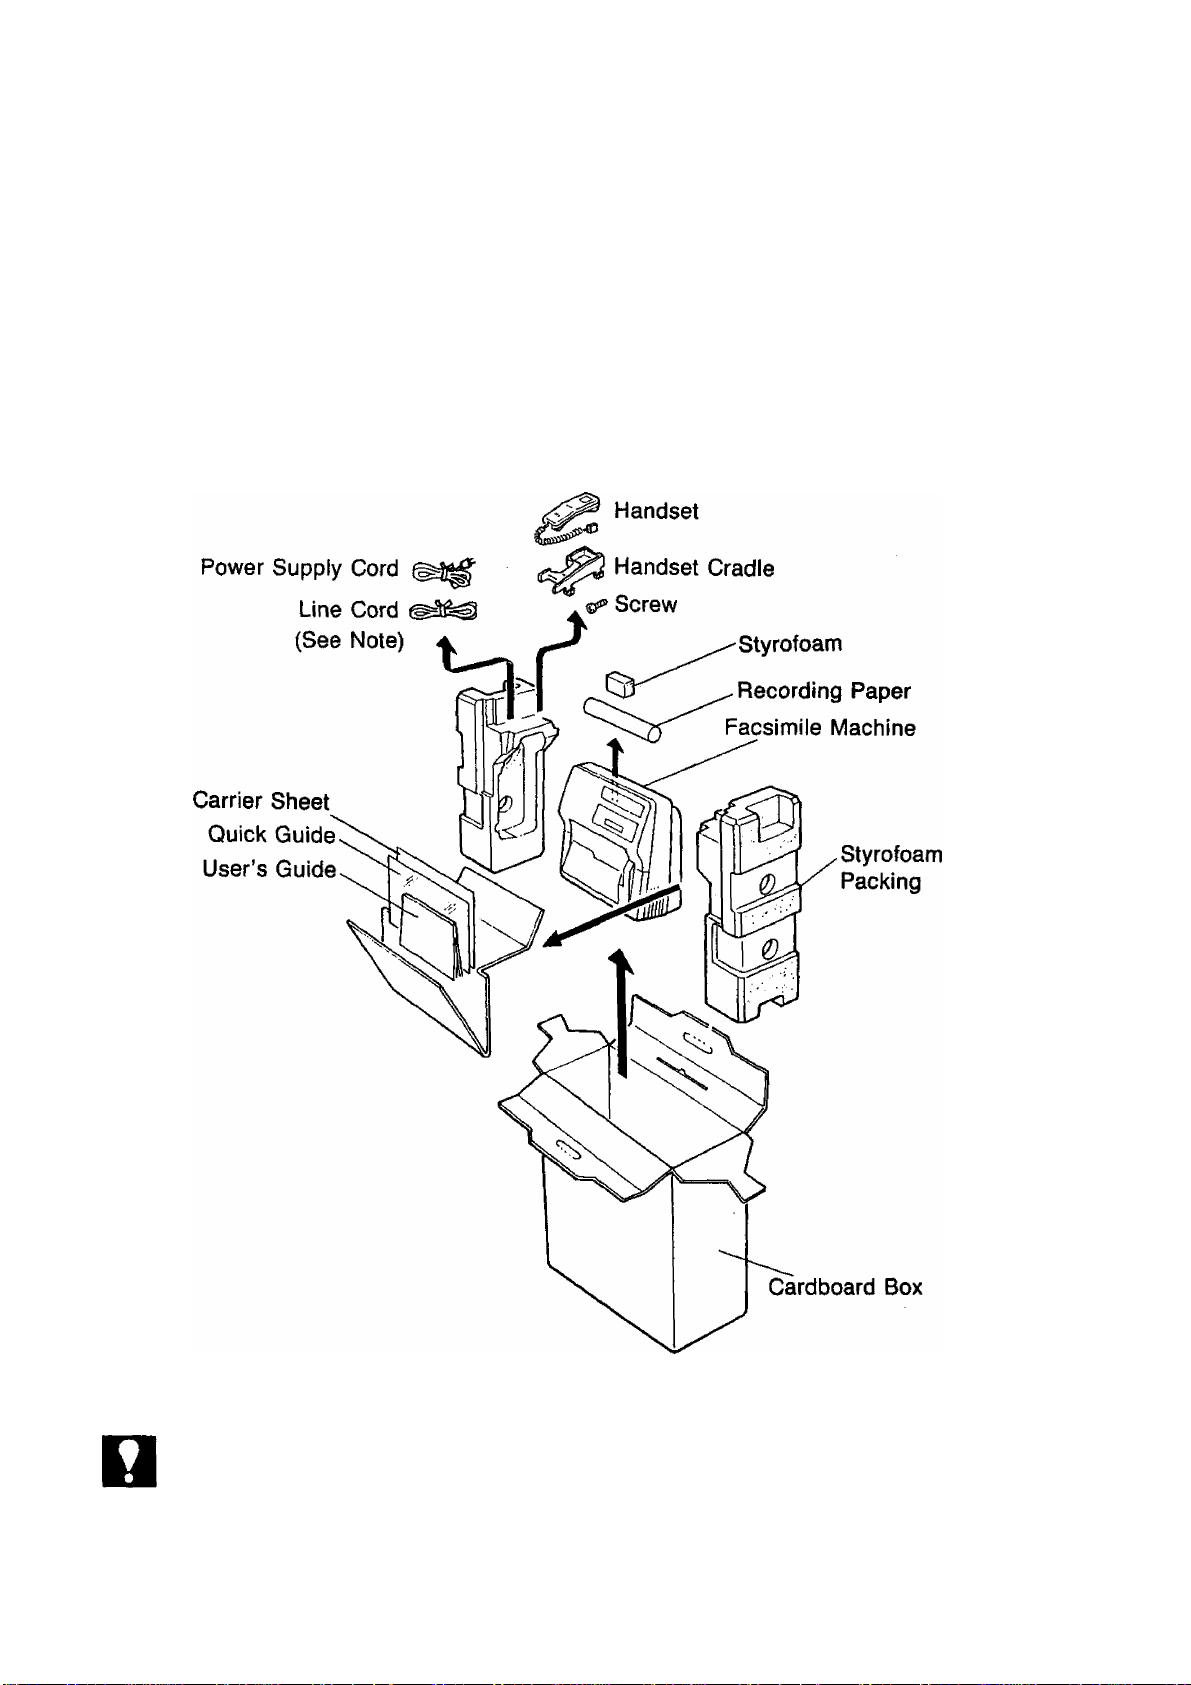
Unpacking
1. Unpack the cardboard box referring to the illustration shown below.
2. Remove protective styrofoam packing from the facsimile machine.
3. Inspect the unit for any shipping damage.
4. Check that you have all accessories illustrated below.
NOT€
10
When you purchased the machine, the line cord had been connected to the machine.
Page 11

Battery Switch
The machine is equipped with a battery pack which backs up the RAM data (clock,
date, abbreviated dialing numbers, etc.) stored in your machine for up to 10 days
when fully charged. Be sure to turn the Battery Switch ON when the machine is in
stalled and leave it ON at all times. If it is not turned ON, all information which is
programmed will be lost when the AC power is turned OFF, or power failure occurs.
Use a pointed object (such as a pen) to slide the battery switch located on the right
side cover to the “ON” position. See the figure below.
NOT€
Remember to keep the power ON at all times.
11
Page 12
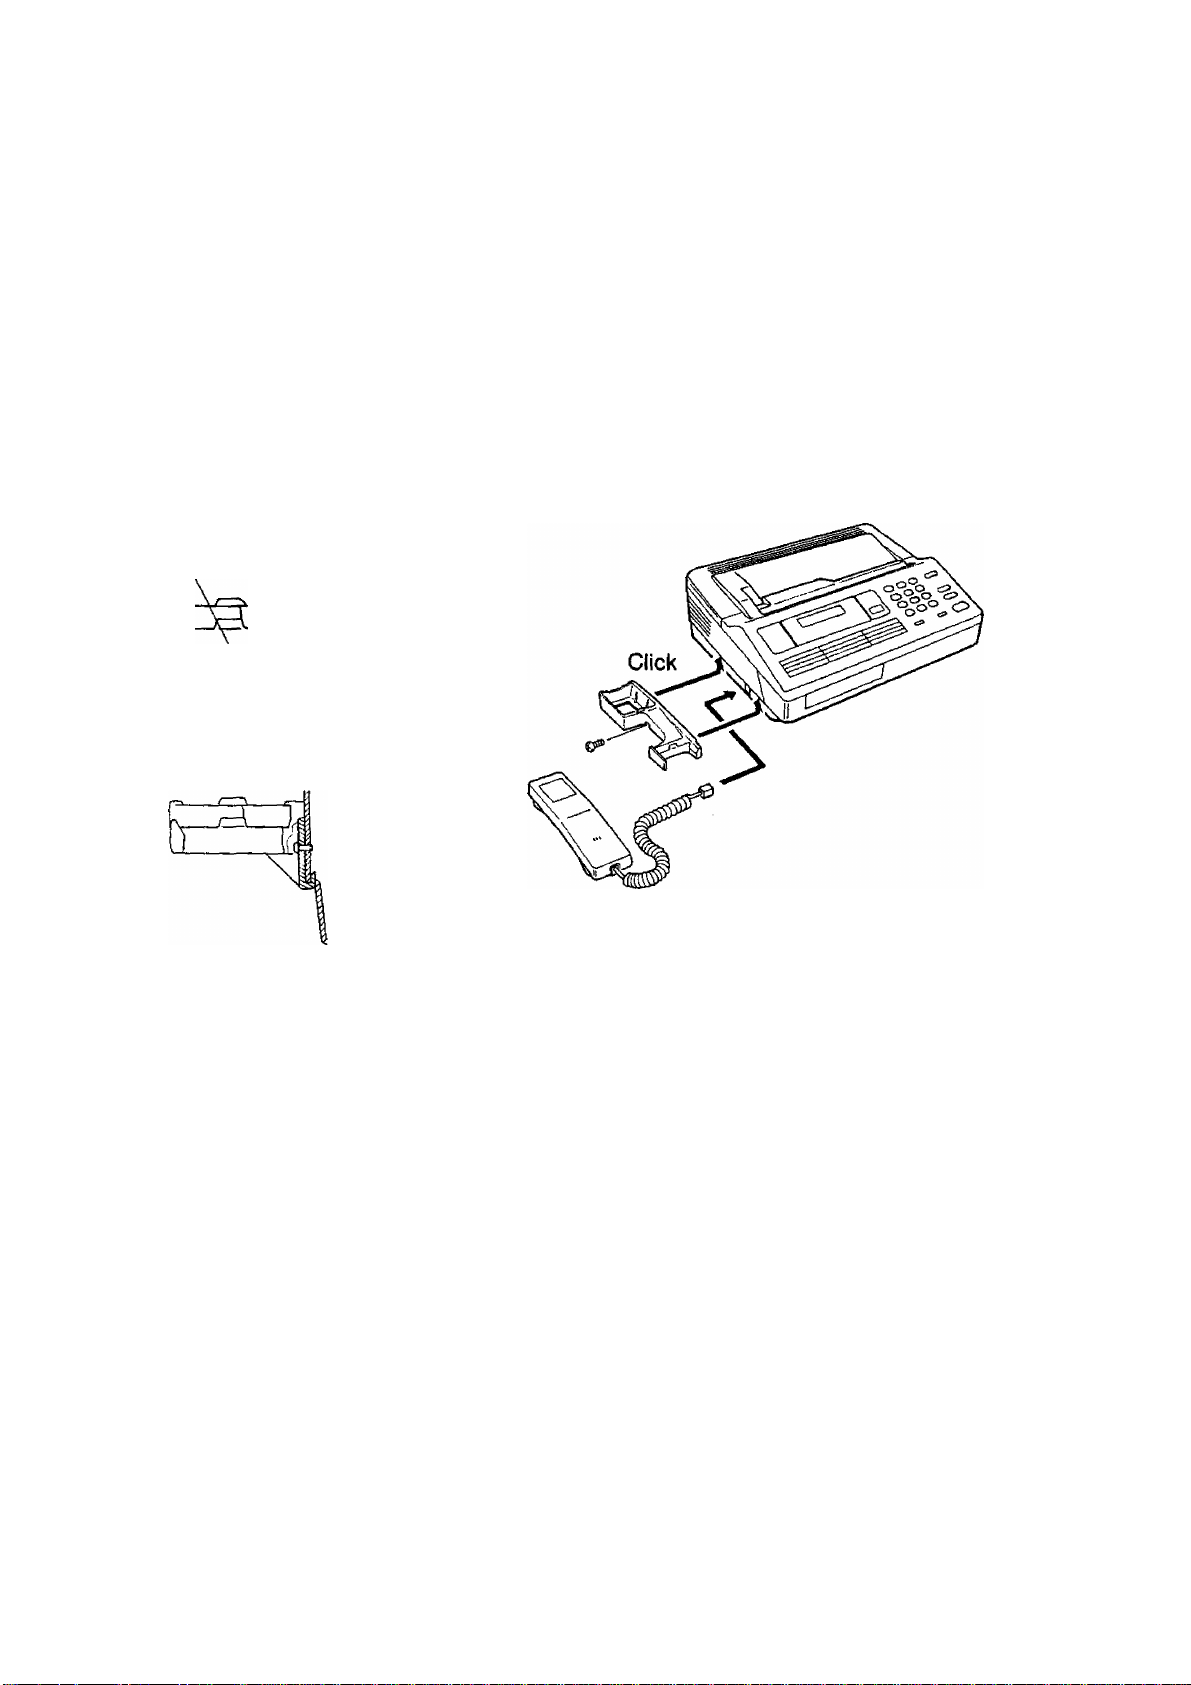
Installing the Handset and Cradle
(1) Plug the telephone handset into the jack on the left side of the machine.
(2) To attach the telephone cradle to the machine,
• Insert the two projections on the cradle into the slots provided on the left side
of the machine.
• Insert the screw into the center of the cradle and secure it to the cover with
a Phillips screwdriver.
Before installing
Side Cover
Cradle
Screw
After installing
12
Page 13

Power Switch
The power switch is located on the rear panel of the machine as shown below.
Turn the power switch to the “ I ” position to turn on the power. The power lamp
on the control panel should light up.
Your machine uses little power, and you should keep it ON at alt times. If you turn
the machine OFF for too long, the contents of the memory (such as the ID number
you registered) will be lost. (Note that the power supply to the memory is backed
up by the battery to preserve the memory contents in case of a short power failure.)
13
Page 14
Loading Recording Paper
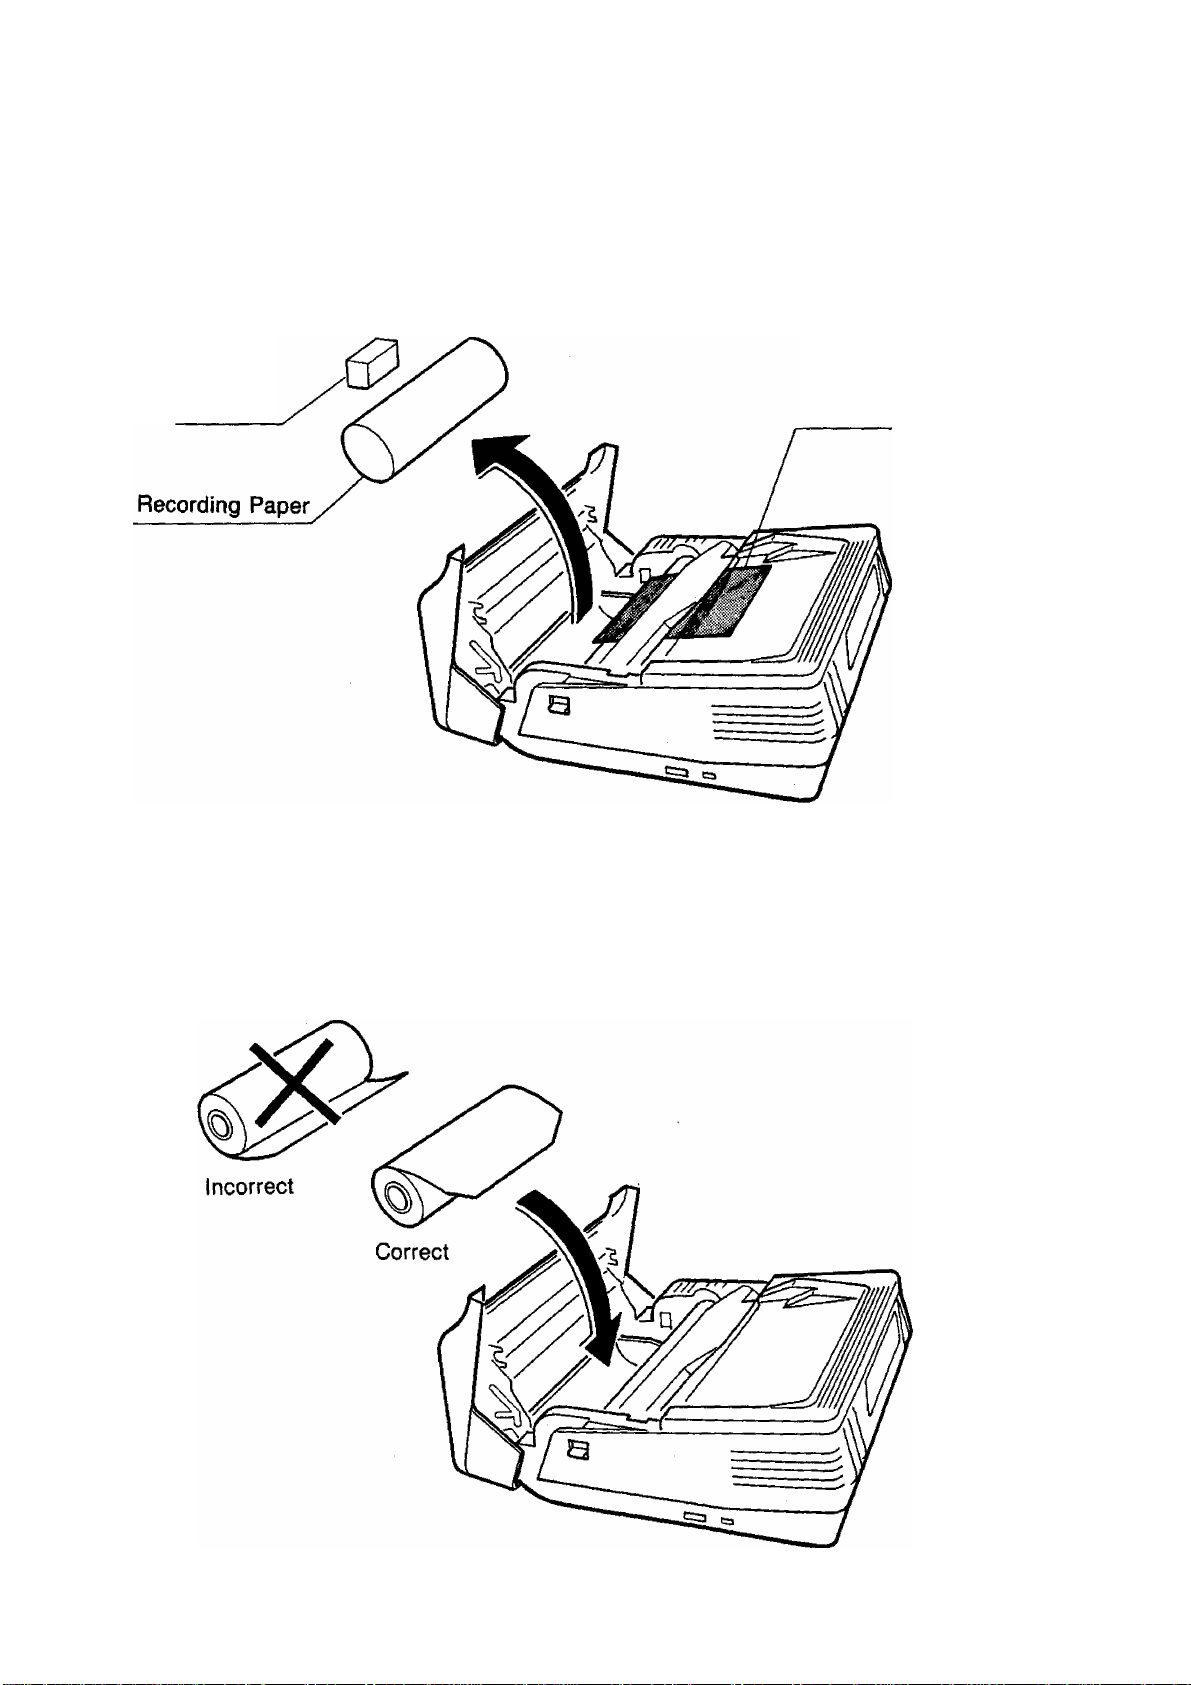
(1) Press the latch button on the right side cover and open the Receiving Unit.
Remove the styrofoam, the Head Protective Sheet, and recording paper.
Styrofoam
(2) Remove the wrapper,and set the recording paper into the unit and feed the paper
to the Document Feeder cover. Make sure that the recording paper is correctly
loaded as shown in the figure below. If it is loaded incorrectly, the received docu
ment will not be printed.
Head Protective Sheet
14
Page 15

Close the Receiving Unit carefully by pressing both ends of the unit. When the
cover locks in the right position, you will hear a “click” sound.
(4) Then, tear off the recording paper projecting from the unit by hand. The machine
is now loaded to receive faxes.
15
Page 16

RAM Initialization
When you first unpack and install your machine, it is not yet ready to be programmed
with information such as your ID Number, clock, etc. (See also Section 3.
SETTING UP YOUR MACHINE).
To prepare the machine for programming, you must perform the following RAM
(Random Access Memory) initialization procedure.
four times and
RAM data is initialized and default values
are stored.
STOP
To return to standby,
8888888888888888
01-01-1950 12:00
16
Page 17

Setting the Dialing Method (Tone or Pulse)
Your machine can operate with either one of two dialing methods (Tone or Pulse),
depending on the type of telephone line you are connected to. Your machine is preset
at the factory for Pulse (Rotary) Dialing. If your machine requires Tone Dialing, set
to Tone Dialing using the following procedure.
1
Enter the Fax Parameter number.
To return the dialing method to Pulse
Dialing,
To store the new setting,
START
07
07
07
[2] 2
[2] 1
121 2
NOT€
To return to standby, press I STOP
The number on the left corner of the display indicates a Fax Parameter. The num
ber inside the brackets is the standard setting and the number blinking on the right
corner is the current setting.
17
Page 18

Final Installation Test
After installing your machine, it is advisable to make a copy or send a fax by direct
dialing to check if the machine is working properly.
1 Place a document face down on the
Document Feeder correctly.
copy
2q
p
(For more details, see page 39.)
TCL/DIAL
2b
i and enter a full number.
Ex: [Sill® m mil] a
(For more details, see page 40.)
01-01-1950 12:00
01-01-1950 12:00
5551234_
18
Page 19
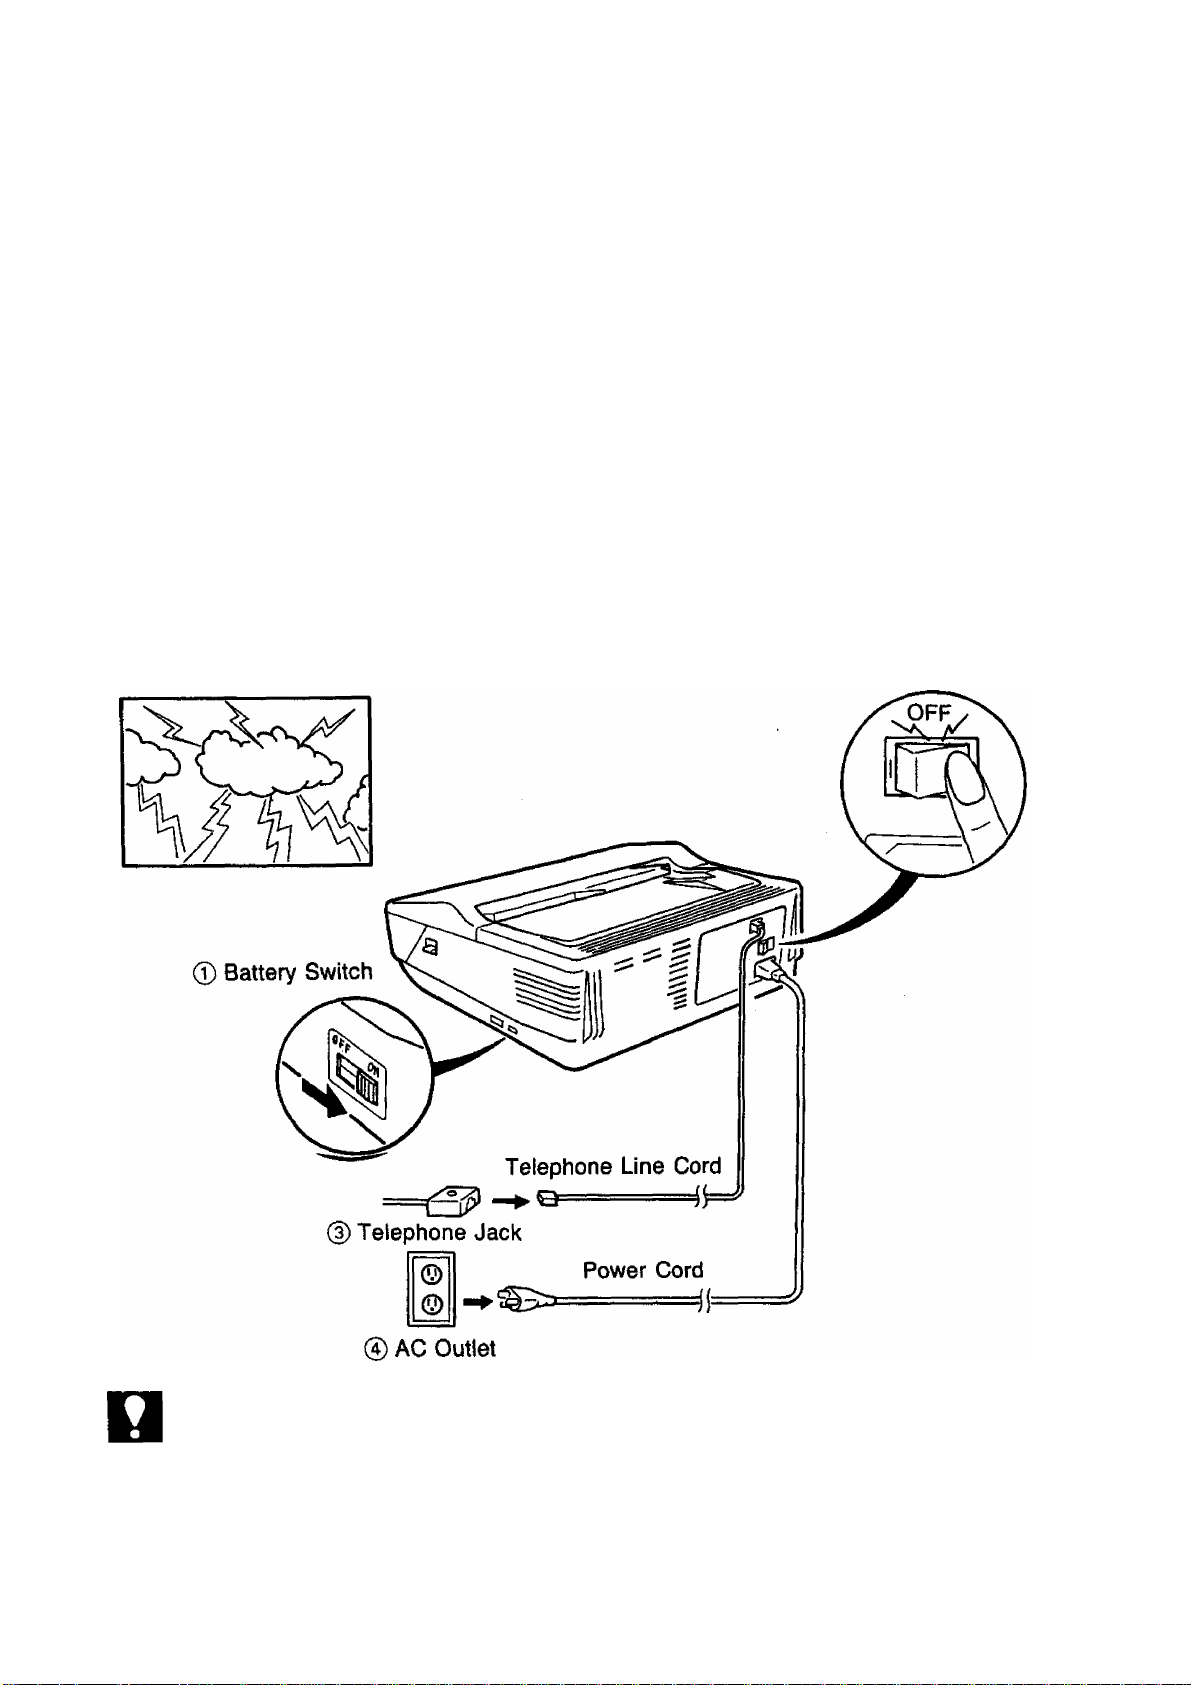
Lightning Precautions
To minimize the possibility of lightning damage, a surge protector is built into your
machine. Sometimes though this is not enough to protect the machine completely
when a strong lightning surge comes through the telephone line or AC power line.
To further protect the equipment when you know that a thunderstorm is coming, we
recommend that you;
(1) Make sure that the battery switch is ON.
(2) Turn off the power switch.
(3) Unplug the telephone line cord from the telephone jack.
(4) Unplug the power cord from the AC outlet.
(D Power Switch
NOT€
1. If the battery switch is not turned ON, all memory information (i.e., clock, telephone
numbers, ID. etc.) wilt be erased immediately.
2. The battery can back up the memory up to 10 days when fully charged. As soon as
the thunderstorm is over, plug in the AC cord and telephone line cord, and then turn
on the power switch.
3. The line connecting method, the type of telephone line cord and Power Cord vary
depending on the country.
19
Page 20

SETTING UP YOUR MACHINE
USER PARAMETERS
How to Set the Date and Time
The built-in timer helps you to know when you sent or received a document. It is
printed out on the head of each received page. In standby mode when the machine
Is in an idle state, it shows the current date and time on the display.
To set the date and time,
Enter the new day (two digits), month (two
digits), year (four digits), and 24-hour
clock (four digits).
15 Jan., 1989 15:00
1
0
If you make a mistake, move the cursor
to the incorrect number by pressing [3
or [>], then reenter the correct number
over it.
10111111119 8 9 1 5
5
0
START
01-01-1950 12:00
15-01-1989 15:00
NOT€
20
To set the date and time,
Blinking number indicates the entering point.
15-01-1989 15:00
Page 21

How to Set Your ID Number
When you transmit a document, your ID will appear on the other machine’s display.
When you receive a document, the sender’s ID will appear on your machine’s dis
play. We suggest you use your facsimile telephone number as your ID, but you may
use any number up to 20 digits long.
To set the ID number,
Enter the ID number using the keypad.
You may use |TEL/DIALlto enter a space
between the numbers to make it easier
to see.
Ex:
2
ШШШШ
TEUDIAL
l2j
2
1
3
TEUDIAL
2
4
1 212 1111234.
NOT€
If you make a mistake, move the cursor
to the incorrect number by pressing
or [3, then reenter the correct number
over it. If you press 1 STOP I, you have to
start from Step 1 again.
If the ID number is over 15 digits long and
you just entered 16th digit, the display
clears and then shows only from the 17th
digit on. To look at the first part of the ID
number, press repeatedly.
START
To set the ID number,
15-01-1989 15:00
To enter “ + press [PAUSE/REDIAL , “h” is displayed for it.
21
Page 22

To change the ID number,
1 212 1111234
Now you can set a new ID number. Fol
low the same procedure as in Step 3 in
the setting mode (see page 21).
22
Page 23

ONE-TOUCH DIALING NUMBERS
Storing One-Touch Dialing Numbers
To simplify dialing, your machine offers up to 10 One-Touch dialing numbers. In
stead of dialing long numbers each time you send a document, you can assign a
one-digit code number to each of the number you dial most often and store them
in the machine's memory.
To set One-Touch dialing numbers.
To assign a One-Touch dialing number
to a one-digit code number, press one of
the keypad (0-9).
Ex:
Enter the facsimile telephone number (up
to 36 digits, including pauses, spaces,
and slashes).
If you need a special number to access
an outside line, input the number first
and then a pause by pressing
PAUSE/REDIAL
full number,
pause.
You can insert a space by pressing
TEL/DIAL in the telephone number to
make it easier to read. The space does
not effect the dialing.
before you enter the
A is displayed for a
23
Page 24

If you have Pulse Dialing (Rotary) service
and you need to change it to Tone Dialing
in the middle of a long number, press
copy] to make the change. A ‘V”
is displayed for the change.
TEL/DIAL 1 t 1
To set the number,
start
T\ 1
iT 3
X
4
1 9-212 1112345-
15-01-1989 15:00
NOT€
24
If you make a mistake, move the cursor to the incorrect number by pressing | < |
or ¡3, and then enter the correct number over it.
Page 25

To change a One-Touch Dialing number,
Press the one-digit code number you wish
to reset (0 - 9).
Ex:
Now you can set a new One-Touch Dial
ing number. Foilow the same procedure
as in Step 3 in the setting mode (see page
23).
1 9-212 1111234
25
Page 26

Filling out the Station Directory Sheet
Use a pencil or a bail-point pen to fill in the station directory sheet with station names
corresponding to the One-Touch number keys. The station directory sheet is held
in place in the machine by a transparent plastic cover sheet.
To remove the station directory sheet,
(1) Push the transparent plastic cover sheet to the left or right until it is bent enough
to take out.
(2) Remove the transparent plastic cover sheet together with the station directory
sheet.
NOTC
26
If you use a pen to fill in the station directory sheet, be sure the ink is dry. If you use
a pencil, remove any excess lead before replacing the station directory sheet.
Page 27

To replace the sheets,
(1) Set the station directory sheet into its proper position.
(2) Place the transparent plastic cover sheet over the station directory sheet and
insert the projections provided by bending the sheet. (See the figure below.)
27
Page 28

FAX PARAMETERS
Your machine has a variety of adjustable Fax Parameters which control the follow
ing functions. These Fax Parameters are preset for you in standard settings {see
Fax Parameter Table). Usually you do not need to change the settings. However,
you may wish to change some of them to suit your own circumstances. Once you
reset the standard position, it will be effective until you change it again. Some of
the settings, such as Resolution or Original (Contrast), can also be changed tem
porarily by pressing the particular key.
Changing Fax Parameter Settings
1
4
28
Enter a Fax Parameter number (always
two^its) from the Parameter table.
0 1 for Resolution.
The number inside the brackets is the
standard setting and the number blinking
on the right corner is the current setting.
Enter the new setting.
Ex:
01
01
[1] 1
Ml 2
Page 29

To store the new setting,
START
llllllllllll
Return to Step 3 to change the next
parameter, or return to standby by
pressing [STOP
15-01-1989 15:00
NOT€
1. If you entered a wrong number in Step 4, reenter the correct number over it.
2. If necessary, print out a Fax Parameter List to confirm the current setting before chang
ing. To print it out, see page 57.
29
Page 30

Parameter Table
Parameter
number
01
02
06
07
10
19
Parameter
Resolution
Original
(Contrast)
Printout
Heading
Dialing
Method
Key Tone
(Beep)
Automatic
Transmission
Journal Printout
Setting
Number
1
2
3
1
2 Light
1
2
3
1
2
1
2
1
2
Inside copy area
Outside copy area
Setting
Standard
Fine
Super Fine
Normal
Not printed
Tone
Pulse
Soft
Loud
OFF
ON
Standard
Setting
о
о
о
О
о
о
ноте
25
Half Tone
Contrast
1
2
Copy with Standard Contrast
Copy with Lighter Contrast
о
When you set Half Tone and select 2 in Fax Parameter 25, the called station receives
the document with lighter Contrast. Changing the Half Tone Contrast setting does not
effect the Original setting.
30
Page 31

USING MUTE AND ADJUSTING VOLUMES
Using Mute
When you are using the fax machine’s built-in tele
phone, you can temporarily turn off the microphone
in the handset. Press | o—o | on the handset. As
iong as you hold down this button, your caller can
not hear you.
Setting the Ringer Voiume
You can adjust the RINGER VOLUME so the fax
machine rings at a comfortable level when it receives
a call. Move the ringer control on the handset to the
level desired, either normal or reduced.
Mute Button
Setting the Speaker Volume
When the fax machine is making a call, you hear
the dial tone, the dialing signals, and the ringing or
busy signal through the built-in speaker. Rotate the
SPEAKER VOLUME control on the right side of the
unit to adjust the volume to a comfortable level. You
also hear the called person’s voice through the
speaker If the called station is set to manual recep
tion. In this case you can talk with the called person by lifting the handset and pressing
(see page 47).
NOT€
STOP
Your handset may have a different type of Mute Button and Ringer Volume from the
ones shown above. That is, they may appear as follows;
Mute Button I MUTE I
speaker Volume
Ringer Volume
VOLUME
LOW o o HIGH
31
Page 32

SENDING DOCUMENTS
LOADING DOCUMENTS
Documents You Can Send
In general, your machine will send any document printed on A4 size paper.
Documents You Cannot Send
You must never try to send documents that are;
• Wet
• Covered with wet ink or paste
• Wrinkled, curled or folded
• Too thin (e.g. onionskin, airmail paper, pages from some magazines, etc.)
• Too thick (e.g. card, etc.)
• Chemically processed (e.g. pressure-sensitive paper, carbon-coated paper, etc.)
• Coated (e.g. glossy paper, etc.)
• Smaller than 148 mm (W) x 73 mm (L)
• Longer than 1000 mm
• Made of cloth or metal
To transmit these kinds of documents, make a photocopy first, and then transmit
the copy instead.
How to Use the Carrier Sheet
If you send documents wrinkled, curled, folded, too thin, or smaller than 148 mm
(W) X 73 mm (L), you can send them using the Carrier Sheet. Put them in the Carri
er Sheet, and then place the carrier on the Document Feeder with the sealed edge first.
NOT€
32
1. Document thickness : 0.06 to 0.15 mm
2. You cannot load the Carrier Sheet and the other documents together on the Docu
ment Feeder.
Page 33

How to Load a Document
First, make sure that your document is free of staples and paper clips, and is not
torn, greased, or covered by any foreign objects.
Insert the document face down along the Document Feeder Guide until it starts feeding
in and stops.
If you wish to send more than one document, insert the next document when the
machine is beeping. If the beeping stops before Inserting the next document, the
telephone line will be disconnected.
How to Release the Document
Once you set a document on the Document Feeder, you can release the document
by pressing I STOP 1. The machine starts feeding the document and ejects it out of
the machine. Do not try to pull it out by force because the document may be damaged.
33
Page 34

BASIC TRANSMISSION SETTINGS
You can temporarily change several settings, such as Resolution and Original
(Contrast), when you send a document. Choose one of the most appropriate settings
for the transmission before or after you set the document on the Document Feeder.
You can also change these settings during transmission, but the change will not be
come effective until the machine starts transmitting the next page.
Resolution
Your machine is preset to Standard resolution, which is suitabie for an ordinary
document.
1
The current setting of Resolution is indicated by on the display.
-^^powen
ID DISPLAY
15-01-1989 15:00
_______=___________
M ON LINE
» ALARM
NORMAL
ORIGINAL
LIGHT
r-* I 1—1
STD FINE S-FINE
RESOLUTION
HALF TONE
CZD
- O AUTO RCV
/ I
If the document is very detailed or you want to send it much clearer, press
RESOLUTION and select Fine resolution.
N I
-o^POWER
" ON LINE
ALARM
L
ID DISPLAY
NORMAL
ORIGINAL
C5D
15-01-1989 15:00
^ I L-.
LIGHT
STD FINE S-FINE
RESOLUTION
HALF TONE
CZZ)
-O AUTO RCV
^1^
34
Page 35

If the document is extremely detailed or you want to send it with the clearest reproduction, select S-FINE, which stands for Super Fine resolution.
1/
POWER
/1 ^
ON LINE
M ALARM
ID DISPLAY
15-01-1989 15:00
NORMAL LIGHT
ORIGINAL
I—
J 1 *—
STD FINE S-FINE
RESOLUTION
-¿"auto rcv
^ 1 \
I
HALF TONE
C
_3
To return to the Standard setting, press RESOLUTION again.
After choosing the appropriate resolution setting, proceed to the next trans
mission setting or begin dialing.
NOT€
1. If you set Fine or Super-Fine resolution, the document will take longer to send than
with Standard resolution.
2. When transmission ends, the setting returns to the standard setting. If you frequently
use a different setting from the preset setting, change the standard setting (see Fax
Parameters, page 28).
3. To make a trial copy before sending, press [COPY
35
Page 36

Original (Contrast)
Your machine is preset to NORMAL contrast which is suitable tor an ortjinary document.
1
The standard setting of Contrast is indicated by on the display.
I
-c^^pOWER
ID DISPLAY
15-01-1989 15:00
ON LINE
M ALARM
NORMAL LIGHT
ORIGINAL
STD FINE S-FINE
I 1-,
RESOLUTION
HALF TONE
-CD'^AUTO RCV
^ ^
When you send a document which has light contrast, press ORIGINAL and select LIGHT.
\ I /
^;c=4fOWER
— ON LINE
ALARM
-
------------------ID DISPLAY
NORMAL
ORIGINAL
G
15-01-1989 15:00
_l
LIGHT
)
r-i 1 Ln
STD FINE S-FINE
RESOLUTION
CSD
---------------
HALF TONE
,
Э
S ' /■
-O AUTO RCV
^ I ^
NOTC
36
To return to NORMAL, press ORIGINAL again.
After choosing the appropriate contrast setting, proceed to the next trans
mission setting or begin dialing.
1. When transmission ends, the setting returns to the standard setting. If you frequently
use a different setting from the preset setting, change the standard setting (see Fax
Parameters, page 28).
2. To make a trial copy before sending, press | COPY |.
Page 37

Halftone
The Halftone setting is useful when you send photographs or illustrations with gray
tones. The Halftone function is preset to OFF in your machine.
1
The standard setting of Halftone is indicated by When It is turned on,
it will appear on the display.
cp^POWER
« ON LINE
M ALARM
To set Halftone to ON,
XI /
^a^POWER
ID DISPLAY
NORMAL
ORIGINAL
C^D
ID DISPLAY
15-01-1989 15:00
r-J 1 1—,
LIGHT
HALF TONE
STD FINE S-FINE
RESOLUTION
. lights up on the display.
15-01-1989 15:00
-------
1
HALF TONE
D
-^O'^AUTO RCV
- O AUTO HCV
^ 1 S
NOT€
« ON LINE
M ALARM
NORMAL
LIGHT
ORIGINAL
C^D
r-l I L-,
STD FINE S-FINE
RESOLUTION
HALF TONE
c
3
In this case, Resolution is automatically set to FINE, and Contrast is set to
NORMAL The settings are fixed during the communication.
To set Halftone to OFF, press I HALF TON^ again.
After choosing the appropriate halftone setting, proceed to the next trans
mission setting or begin dialing.
When you use the Halftone function, it takes much longer to send a document since
more picture information must be sent to the other machine to make the finest copy.
37
Page 38

Automatic Transmission Journal (XMT Journal)
Transmission Journal (XMT Journal) is a report which tells you whether the docu
ment is sent successfully or not. It is printed out automatically after each transmis
sion when the Transmission Journal is set to ON. The Automatic Tansmission Journal
is, however, preset to OFF in your machine. If you wish to turn ON the setting, follow
the procedure below.
and
4
Enter the Fax Parameter number.
EU]
To turn on the Transmission Journal,
To turn off the Transmission Journal,
START
19
19
19
[1] 1
[11 2
[11 1
NOT€
38
To store the new setting,
STOP
To return to standby.
15-01-1989 15:00
1. The Transmission Journal setting does not return to the standard setting postilion until
you change it again.
2. The number inside the brackets is the standard setting and the number blinking is
the current setting.
3. A sample Transmission Journal is shown in page 59.
Page 39

MAKING A COPY
Before you send a document, you can make a copy of it on the machine so that you
can see what it will probably look like to the person who receives it.
1
Place a document face down on the
Document Feeder correctly.
If necessary, adjust 1 RESOLUTION!.
ORIGINAL I. and I HALF TONE
(review pages 34 - 37).
15-01-1989 15:00
15-01-1989 15:00
NOTC
The machine begins making a copy.
1. To stop the copy process, press STOP
2. To make copies of more than one page, add additional pages while you hear the
machine beeping.
3. When making a copy, the machine will automatically select Fine Resolution, unless
you change the setting.
39
Page 40

DIALING TECHNIQUES
This section expiains four ways of sending documents to a station. To review how
to enter One-Touch dialing numbers, see page 23.
Direct Dialing (On<Hook Dialing)
Direct Dialing does not need any settings in advance. You can use your machine
right away by using Direct Dialing. It is as easy as using a telephone set.
1
Place a document face down on the
Document Feeder correctly.
Dial the number from the keypad.
Ex; [IKIlillEiliaa
15-01-1989 15:00
5551234_
40
If you need a special access number to
get an outside line, dial it first and then
press I PAUSE I to enter a pause before
dialing the full number. A hyphen is
displayed for a pause.
Ex: FqI [pause irTliyifsIlTliTliyii^
9-5551234_
Page 41

Your machine will dial the number. If the line is free, your documents will be sent
and the ON LINE lamp lights up.
If the other station has an ID, and the ID will appear on the display.
When transmission ends, the display shows the number of pages sent (e.g., 05).
-<=p.^POWER
:>L-
ON LINE
[N-
ALARM
ID DISPLAY
NORMAL LIGHT
ORIGINAL
CHZ)
I—* I *—I
STD FINE S-FINE
RESOLUTION
05
HALF TONE
CZD
-'¿'auto rcv
^ I N
41
Page 42

If the line is busy, your machine will redial the number for you up to twice with threeminute intervals.
■Ч I /
^cp^POWER
ID DISPLAY
5551234.
~0 AUTO RCV
•— ON LINE
M ALARM
NORMAL LIGHT
ORIGINAL
c
r-J I
STD FINE S-FINE
RESOLUTION
CHD
HALF TONE
CUD
If no contact is made, the ALARM lamp will light up and the display shows an infor
mation code (e.g., 630 which means no contact was made).
N I
POWER
— ON LINE
N I /
—
ALARM
/ I \
ID DISPLAY
NORMAL LIGHT
ORIGINAL
n-i I
STD FINE S-FINE
RESOLUTION
630
-о AUTO RCV
HALF TONE
CUD
In this case, you can start another round of automatic dialing by pressing
PAUSE/REDIALI (see page 46).
ноте
42
If you hear a voice speaking through the speaker, lift the handset and press ISTOP
to talk with the other party (see page 47).
Page 43

Off-Hook Dialing
1
Place a document face down on the
15-01-1989 15:00
Document Feeder correctly.
Dial the number from the keypad.
Ex; [5][5][5][I]|I][3][I]
5551234.
NOTC
If the line is free and the other machine answers, you will hear a long “beep”
sound.
START
The ON LINE lump lights up. Then hang up the handset. If the other station
has an ID, it will appear on the display.
N I /
-^ciplfOWER
^ I
ON LINE
«« ALARM
ID DISPLAY
NORMAL LIGHT
ORIGINAL
CSD
212 5551234
r-J I 1-,
STD RNE S-FINE
RESOLUTION
CED
HALF TONE
\ t /
'O AUTO RCV
If the line is busy, you must hang up and try again later by dialing the same number
or pressing [FaUSE/REDIAL | (see page 46).
43
Page 44

One-Touch Dialing
1
Place a document face down on the
15-01-1989 15:00
Document Feeder correctly.
Press a One-digit code number.
5551234
Ex: 3
The full number (e.g. 555 1234) will be
dialed and shown on the display.
5551234_
If the number dialed answers, the ON LINE lamp lights up and document trans
mission will start.
N ^
-j= POWER
LINE
ALARM
I
^Fj^POWER
xj/
-¿fc=^ON LINE
» ALARM
ID DISPLAY
-^O^AUTO RCV
^ l '■
-J
NORMAL
ORIGINAL
LIGHT STD FINE S-FINE
RESOLUTION
C>D
HALF TONE
CUD
If the other station has an ID, and the ID will appear on the display.
'
ID DISPLAY
212 5551234
"... —
_________
si/
- O AUTO RCV
^
1
NORMAL UGHT STD
ORIGINAL
FINE S-FINE
RESOLUTION
HALF TONE
44
Page 45

When transmission ends, the display will show the number of pages sent.
POWER
/ I
”^=(bN LINE
ALARM
ID DISPLAY
NORMAL LIGHT
ORIGINAL
C^D
STD FINE S-FINE
RESOLUTION
05
-------
1
HALF TONE
-O AUTO RCV
If the line is busy, the machine will wait three minutes and then automatically
redial the same number up to twice with three-minute intervals.
^crjzTpOWER
•i*> ON LINE
■w ALARM
ID DISPLAY
NORMAL LIGHT
ORIGINAL
555 1234
(—11*—. *-
STD FINE S-RNE
RESOLUTION
-O AUTO RCV
HALF TONE
NOT€
If no contact is made, the ALARM lamp will light up and the display will show
an information code (e.g., 630 which means no contact was made).
's I
-c^^POWER
ON LINE
^ 1 ^
ALARM
ID DISPLAY
NORMAL LIGHT
ORIGINAL
CHD
L-=_
,-1 I U
STD FINE S-FINE
RESOLUTION
630
HALF TONE
CZ=D
-O AUTO RCV
^ I
In this case, you can start another round of automatic dialing by pressing
PAUSE/REDIAL (see page 46).
If you hear a voice speaking through the speaker, lift the handset and press ISTOP
to talk with the other party (see page 47).
45
Page 46

Redialing
If the number you dialed is busy or there is no answer, the machine will wait three
minutes and then automatically redial the number for you up to twice.
If no contact is made, the ALARM lamp will light up and the display will show an
information code (e.g., 630 which means no contact was made).
N. I /
-c^^POWER
ID DISPLAY
630
/ I N
AUTO ncv
^ ON LINE
X !
ALARM
NORMAL
ORIGINAL
CSZ)
LIGHT
r-i 1 L-,
STD FINE S-FINE
RESOLUTION
cs
HALF TONE
In this case, you can redial the last number by simply pressing PAUSE/REDIAL
The machine will redial the last number a total of three times.
You can use Redial if you dialed the last number using one of the following:
• One-Touch Dialing
• Direct dialing from the machine keypad (ON-Hook or OFF-Hook)
• Redialing
Even after you made contact and succeeded in sending your documents, you can
still use I PAUSE/REDIAL I to contact the same number again
NOT€
46
1. You cannot use this Redialing feature when you used the telephone set connected
to your machine.
2, If you hear a voice speaking through the speaker, lift the handset and press {STOP
to talk with the other party (see page 47).
Page 47

What to Do When You Hear a Voice through the Speaker
1
If the other person’s fax machine is set
for manual reception, you Nvill hear a voice
through the speaker when you try to send
documents.
Lift the handset.
Tell the other person to prepare for
reception.
6
START
When you hear a beep,
^^a^POWER
ID DISPLAY
5551234
ON UNE
^ ALARM
NORMAL LIGHT
ORIGINAL
r-l I
STD FINE S-FINE
RESOLUTION
c
The ON LINE lamp lights up and transmission begins.
Hang up the handset.
HALF TONE
N I /*
-O AUTO RCV
I''
47
Page 48

RECEIVING DOCUMENTS
AUTOMATIC RECEPTION
When your machine is preset to receive documents automatically, you do not need
to answer the telephone when it rings. Your machine will soon begin receiving.
MANUAL RECEPTION
How to Set Manual Reception
If there is only one telephone line in your office and you wish to use the telephone
line for both Fax and Voice Communications, you may set the machine to Manual
Reception.
To set Manual Reception,
• AUTO RCV
1
The lamp goes off, which means that
Manual Reception is set now.
To set Automatic Reception again,
-O-AUTO RCV
I
The lamp lights up, which means that Au
tomatic Reception is set now.
48
Page 49

What to Do When Your Telephone Rings
1
Lift the handset.
If you hear a beep... beep... beep sound,
it means someone wants to send a fax,
or, if the caller answers and says he/she
wants to send a fax, then remove any
document placed on the Document
Feeder, and
Your machine will start receiving a document and the ON LINE lamp will light
up.
~N I ^
tf^^power
ON LINE
^ I -s
» ALARM
ID DISPLAY
NORMAL
ORIGINAL
C^Z)
LIGHT
r-J I 1—,
STD FINE S-FINE
RESOLUTION
--------------
\
HALF TONE
c )
• AUTO RCV
Hang up the handset. If the other station has an ID, and the ID will
appear on the display.
^ck'pOWER
9^<pN LINE
ALARM
ID DISPLAY
NORMAL LIGHT
ORIGINAL
415 1111234
r-J I L-,
STD FINE S-FINE
RESOLUTION
• AUTO RCV
HALF TONE
CZI3
49
Page 50

DOTTED LINE PAGE SEPARATOR
The machine prints out all received pages on one continuous strip of paper; it does
not cut the pages for you. However, the edge of the plastic cover over the slit where
the paper comes out is sharp so that you can tear the received strip of pages off
neatly. Moreover, to help you separate individual pages, the machine automatically
prints a dotted line across the strip at the end of each received page. Use this “dot
ted line page separator" as a guide when cutting the strip.
Dotted Line Page Separator
50
Page 51

POLLING
Polling means calling another station and requesting the transmission of documents
to you. In this case, the other station must know in advance that you will call, and
must have a document set on the Document Feeder. You also need to record a poll
ing password, shared by the other station, to ensure security.
How to Set The Polling Password
NOT€
Enter a four-digit password.
Ex:[|][8]aH
START
15-01-1989 15:00
To store the password,
9876
1. Polling might not function with all fax machines. We suggest you attempt a trial poll
ing before you actually poll for important documents.
2. You cannot have other stations poll a document set on your machine.
3. If you make a mistake in Step 3, use the or key to move the cursor to the
incorrect number, and then enter the new number over it. To erase the password,
press
TEL/DIAL
4. If a password is not set in the other station, you can still poll the other station even
though only your machine has a password.
51
Page 52

How to Poll
To poll a document from the other station, follow the procedure below.
1 Make sure there is no document on the
Document Feeder.
The lamp lights up, which means that
polling is set now.
Dial by pressing a one-digit code number,
or
TEL/DtAL and a full number.
15-01-1989 15:00
Ex; [7]
if the other station is ready to be polled
and the line is free, your machine will start
receiving a document.
312 5551234
52
Page 53

USING THE MACHINE’S
TELEPHONE____________________
Making a Regular Call
You can use the handset on your machine to make regular calls. To do so, lift the
handset and dial a full number just as you would using an ordinary telephone.
1
Lift the handset.
Dial the telephone number on the keypad.
Ex: E [2 [U E E E E S [3] H
2131111234.
NOT€
You cannot use One-Touch Dialing.
53
Page 54

Making Voice Contact after Sending/Receiving
You may want to talk to the other person over the telephone after sending or receiv
ing documents. To do so, perform Step 1 while the machine is still sending or receiving.
1
When sending or receiving is over and the other party replies the Voice Con
tact request, you will hear a beep-beep-beep sound coming through the
speaker.
4
-^;^POWER
ID DISPLAY
212 1111234
LINE
ALARM
NORMAL
ORIGINAL
CSD
LIGHT
STD FINE S-FINE
RESOLUTION
HALF TONE
CUD
When the TEL/DIAL lamp starts blinking, lift the handset.
( , the lamp lights up.
Talk.
-\3^AUTO RCV
Answering a Voice Contact Request
When you hear a beep-beep-beep sound coming through the speaker, it means you
are receiving a voice contact request. Reply by following the above procedure from
Step 2.
54
Page 55

PRINTOUT REPORT AND LISTS
One-Touch Dialing Number List
After or before you enter any new setting of One-Touch dialing number, you can con
firm the current settings by printing out the One-Touch Dialing Number list.
To print out the list,
1
Make sure no document is on the Docu
ment Feeder.
The machine starts printing out the list.
55
Page 56

Sample One-Touch Dialing Number List
UF-130
(3)
ONE TOUCH NO.
1
2
3
H
5
6
7
8
9
0
POLLING PASSWORD = 9876
(6)
HEADER
TOME/PULSE s 2 f2] (1:T0NE 2:PUL.SE)
XMT JOURNAL = 2 (13 (1:0FF 2:0N)
KEY TONE (BEEP) *1(1] (1:S0FT 2:L0UD)
(7)(8)
s 1 [1] (1:INSIDE 2:OUTSIDE 3:H0NE)
-LIST-
(^)
TELEPHONE NO.
312
111123^1
1115
1111234
60U
1111234
Oil
41 1111234
Oil
44 1111234
Oil
65 1111234
1111234
213
Oil
81 3 1111234
1111234
907
on
61 2 1111234
(5)
DATE 15-01-1989
(1)
TIME 15:00 «***
(2)
-PANASONIC-
Printout Explanation
(1) Printout date : Day-Month-Year
(2) Printout time : Hour: Minute
(3) One-Touch number
(4) Telephone number
(5) Polling password : Four digits
(6) Fax parameter
(7) Current setting
(8) Standard setting
(9) ID number
-1 212 1111234-
(9)
66
Page 57

Fax Parameter List
After or before you enter the new setting of Fax Parameter, you can confirm the cur
rent settings by printing out a Fax Parameter List.
To print the list,
1
Make sure no document is on the
Document Feeder.
The machine starts printing out the list.
57
Page 58

Sample Fax Parameter List
UF-130
-FAX PAHAMETERS-
(3)
PARAMETER
NUMBER
CURRENT STANDARD
SETTING
01
02 1
03
OM
05
06 1
07
08
09
10 1
11
12
13
1M
15
16
17
18
19
20
21
22
23
24
25
26
27
28
29
30
DATE 15-01-1989 »»*«» TIME 15:00 »»»*
(4)
1
- -
- -
-
2
-
-
- -
-
-
- -
- >
- -
-
- -
- -
- _
- -
-
-
1
-
- -
-
•
-
(1) (2)
(5)
SETTING
1
1
-
1
2.
-
-
1
-
-
1
-
1
—
-
-PANASOKIC-
Fax Parameter List Explanation
(1) Printout date : Day-Month-Year
(2) Printout time : Hour; Minute
(3) Parameter number
(4) Current setting
(5) Standard setting
(6) ID number
58
(6)
-1 212 111123'1-
Page 59

Transmission Journal Printout
When the Fax Parameter of Transmission Journal is set to ON, a Transmission Jour
nal is printed out automatically after each transmission.
Sample Transmission Journal Printout
(3)
COM
OK
(H) (5)
PAGES
02
DURATION
00:01'37
-PANASONIC-
(6) (7)
X/R IDENTIFICATION
XMT T 213
1111231*
Transmission Journal Printout Explanation
(1) Printout date
(2) Printout time
(3) Communication result
(4) Number of pages transmitted
(5) Duration of communication
(6) Type of communication
(7) Remote station identification
(8) Communication date
(9) Communication start time
(10) Diagnostic
(11) ID number
Day-Month-Year
Hour: Minute
“OK’* indicates that the transmission was
successful.
The two-digit number is the number of pages
successfully transmitted.
An asterisk “ * ’’ indicates that the quality of
some received copies was poor.
Hours : Minutes : Seconds
“XMT” means Transmission.
“T” and the following number indicates the
telephone number the machine dialed. The
number without “T” indicates the ID of the
called station.
Day-Month
Hour: Minute
For service personnel only
(1)
15-01-1989
(B)
DATE
15-01
-1 212 nil23M-
(9)
TIME
15:110
(11)
(2)
^ TIME 15:111
(10)
DIAGNOSTIC
8112*180081000
NOT€
To set Transmission Journal on, see page 38.
59
Page 60

PROBLEM SOLVING AND DAILY CARE
_________________________
Information Codes
When something unusual occurs, the display may show one of the information codes
below. These will help you fix the problem.
Information
code
010 No recording paper.
020
030 Document misfeeding.
Thermal Recording Head
temperature is too high.
Meaning
Reload recording paper
(see page 64).
Open the receiving unit for a
few minutes to permit
cooling.
1. Reload the document
properly (see page 33).
2. Remove document jam
(see page 65).
Action
031
060
210
212
433
452
500
599
637
400
464
Document paper is too long
or jammed.
Document length exceeds
1 meter.
Door is open.
Internal error
During initial handshake,
receiving station did not
respond or communication
error occurred. and try again.
Remove jammed document
from the Document Feeder
(see page 65).
Close the Transmission
Guide Unit and Receiving
Unit.
Retry the communication.
1. Check with the other
party.
2. Reload the document
60
402
404
405
During initial handshake,
communication failure again.
occurred.
Reload the document and try
Page 61

Information
code
Meaning
Action
403
407
468 receiving station for the again.
469
408
409
411
414 match.
412
415
416
417
418
419
490
No polling capability at the
other side.
No confirmation from the
previous page sent.
Other side confirmation of
previous page is illegible. transmit again.
Polling password does not Check polling password.
No data from the transmit
ting side.
Polling function is incom
patible.
Received data has too many
errors.
Ask other side to set
“POLLED = ON”.
Wait a few minutes and send
Wait a few minutes and
Check with the other party.
Check with the other party.
Check with the other party.
8
420
422
427
429
413
431
434
435
459
493
494
Machine went into receiving
mode, but no command from
the transmitting side.
Interface is incompatible.
Communication error
occurred while receiving.
1. Other side misdialed.
2. Check with the other
party.
Check with the other party.
Check with the other party.
61
Page 62

Information
code
Meaning Action
451
495
465 Group 2 transmission mode
466
467
468
469
474
478
479
480
481
485
442
443 occurred while transmitting.
444
445
446
Telephone line disconnected. Check with the other party.
error.
Group 2 reception mode
error.
Communication error
1. Reload the document
and try again.
2. Check with the other
party.
Check with the other party.
1. Reload the document
and try again.
2. Check with the other
party.
630
Redial was not successful
due to a busy line or no
response from the called
station.
Reload the document and try
again.
62
Page 63

Clearing a Recording Paper Jam
If the recording paper becomes jammed in the machine, you can remove the jammed
recording paper by following the steps below.
1. Open the Receiving Unit (Control Panel) by
depressing the latch button.
2. Remove the jammed recording paper and
feed the paper to the Document Feeder.
8
Z. Close the Receiving Unit carefully by press
ing both ends gently until you hear the cover
lock into position.
4. Tear the recording paper projecting from
the unit by hand. Remove this cut paper.
63
Page 64

Reloading a Recording Paper
Your facsimile machine uses a roll of special recording paper. You can easily load
paper yourself by following the steps below.
1, Open the Receiving Unit (Control Panel) by
depressing the latch button.
2. If there is the used roil inside, lift it out and
set a new roll in its place. Be sure the direc
tion of the roll is as shown below.
3. Close the Receiving Unit carefully by press
ing both ends gently until you hear the
cover lock into position.
4, Tear the recording paper projecting from
the unit by hand. Remove this cut paper.
4
a
u
u
64
Page 65

Clearing a Document Jam
If a document becomes jammed in the machine, the display will show the informa
tion code 031.
To clear the jam,
1. Open the Receiving Unit by depressing the
latch button on the right side panel, and
swing the Receiving Unit forward.
£. Unlock the Document Feed Unit by gently
pressing outward the two black tabs locat
ed at the right and left ends of the unit.
When the Document Feed Unit springs
open, raise it to release the jammed paper.
8
3. Remove the jammed paper.
4. Relock the Document Feed Unit into place
by pressing down on it gently. Then gently
close the Receiving Unit with both hands.
65
Page 66

Cleaning the Feed and Head Rollers
The transmitting feed roller and head roller in your machine will gradually accumu
late dust and black, sootlike particles in the course of regular use. You should there
fore clean these rollers using the following procedure approximately once every three
months.
1. Open the Receiving Unit by depressing the
latch button on the right side panel, and
swing the Receiving Unit forward.
2« Unlock the Document Feed Unit by gently
pressing outward the two black tabs locat
ed at the right and left ends of the unit.
When you see the Document Feed Unit
open, raise it up gently.
3. Wipe the Transmitting Feed Roller (white
roller) gently with a soft, clean cloth soaked
with ethyl alcohol, while rotating the roller
slowly towards the front of the machine with
your fingers.
4, Clean the Head Roller (black roller) in the
same way, only rotate the roller towards the
back of the machine as you wipe it.
Head Roller
Transmittimg
Feed Roller
66
Page 67

Cleaning the Thermal Head
The thermal head in your machine needs to be cleaned periodically to ensure clear
receive copy. How often depends on how much you use your machine. However,
we recommend that you clean the thermal head whenever you clean the feed roller
and head roller.
To clean the thermal head,
1. Open the Receiving Unit by depressing the
latch button on the right side panel, and
swing the Receiving Unit forward.
2. Wipe the surface of the thermal head unit
gently with a soft cloth or gauze soaked
with ethyl alcohol. Be sure to use a clean
cloth since the thermal head unit can be
easily scratched.
Thermal Head Unit
8
67
Page 68

SPECIFICATIONS
Compatibility
Scanning method
Document size
Document thickness
Effective scanning width
Recording paper size
Effective recording width
Resoiution
CCITT Group 3
Group 2
Horizontal: Flat bed scanning with contact type
image sensor
Vertical: Intermittent scanning (G3) and steady
scanning (G2) by stepper motor.
Normal: 210mm x 297mm
MAX. : 218mm X 1000mm
MIN. : 148mm x 73mm
0.06mm to 0.15mm
G3: 208mm
G2: 205mm
210mm X 30m
G3: 208mm
G2: 205mm
Horizontal: G3
Vertical : G3
8 pels/mm
G2
3.85 pels/mm
3.85 lines/mm (STANDARD)
7.7 lines/mm (FINE)
15.4 lines/mm (SUPER FINE)
G2
3.85 lines/mm
Coding scheme
Modem
Power suppiy
Power consumption
MH, and MR with MWS
G3: V.29, V.27ter with fall back function, and V.21
G2: AM-PM-VSB
100V version: AC 110V to 120V, 50/60 Hz,
Single Phase
200V version: AC 200V to 240V, 50/60 Hz,
Single Phase
Standby: Approx. 10W
Transmission: Approx. 25W
Reception: Approx. 40W
Copy:
Max.:
Approx. 50W
Approx. 150W
68
Page 69

Dimensions
118mm (H) X 330mm (W) x 300mm (D)
(excluding projections)
Weight
Operating environment
Approx. 5.8 kg
(excluding recording paper, power cord)
Temperature:
Relative humidity:
5 to 35°C (41 to 95®F)
20 to 80%
69
Page 70

Facsimile Number Directory
Name Name
Page 71

Facsimile Number Directory
Name Name
Page 72

Facsímile Number Di
Name Name
 Loading...