

Page 1

Essaa USER’S guide
Panafax
'N>->.\''
UF-127
M
®
Page 2
^ IMPORTANT INFORMATION
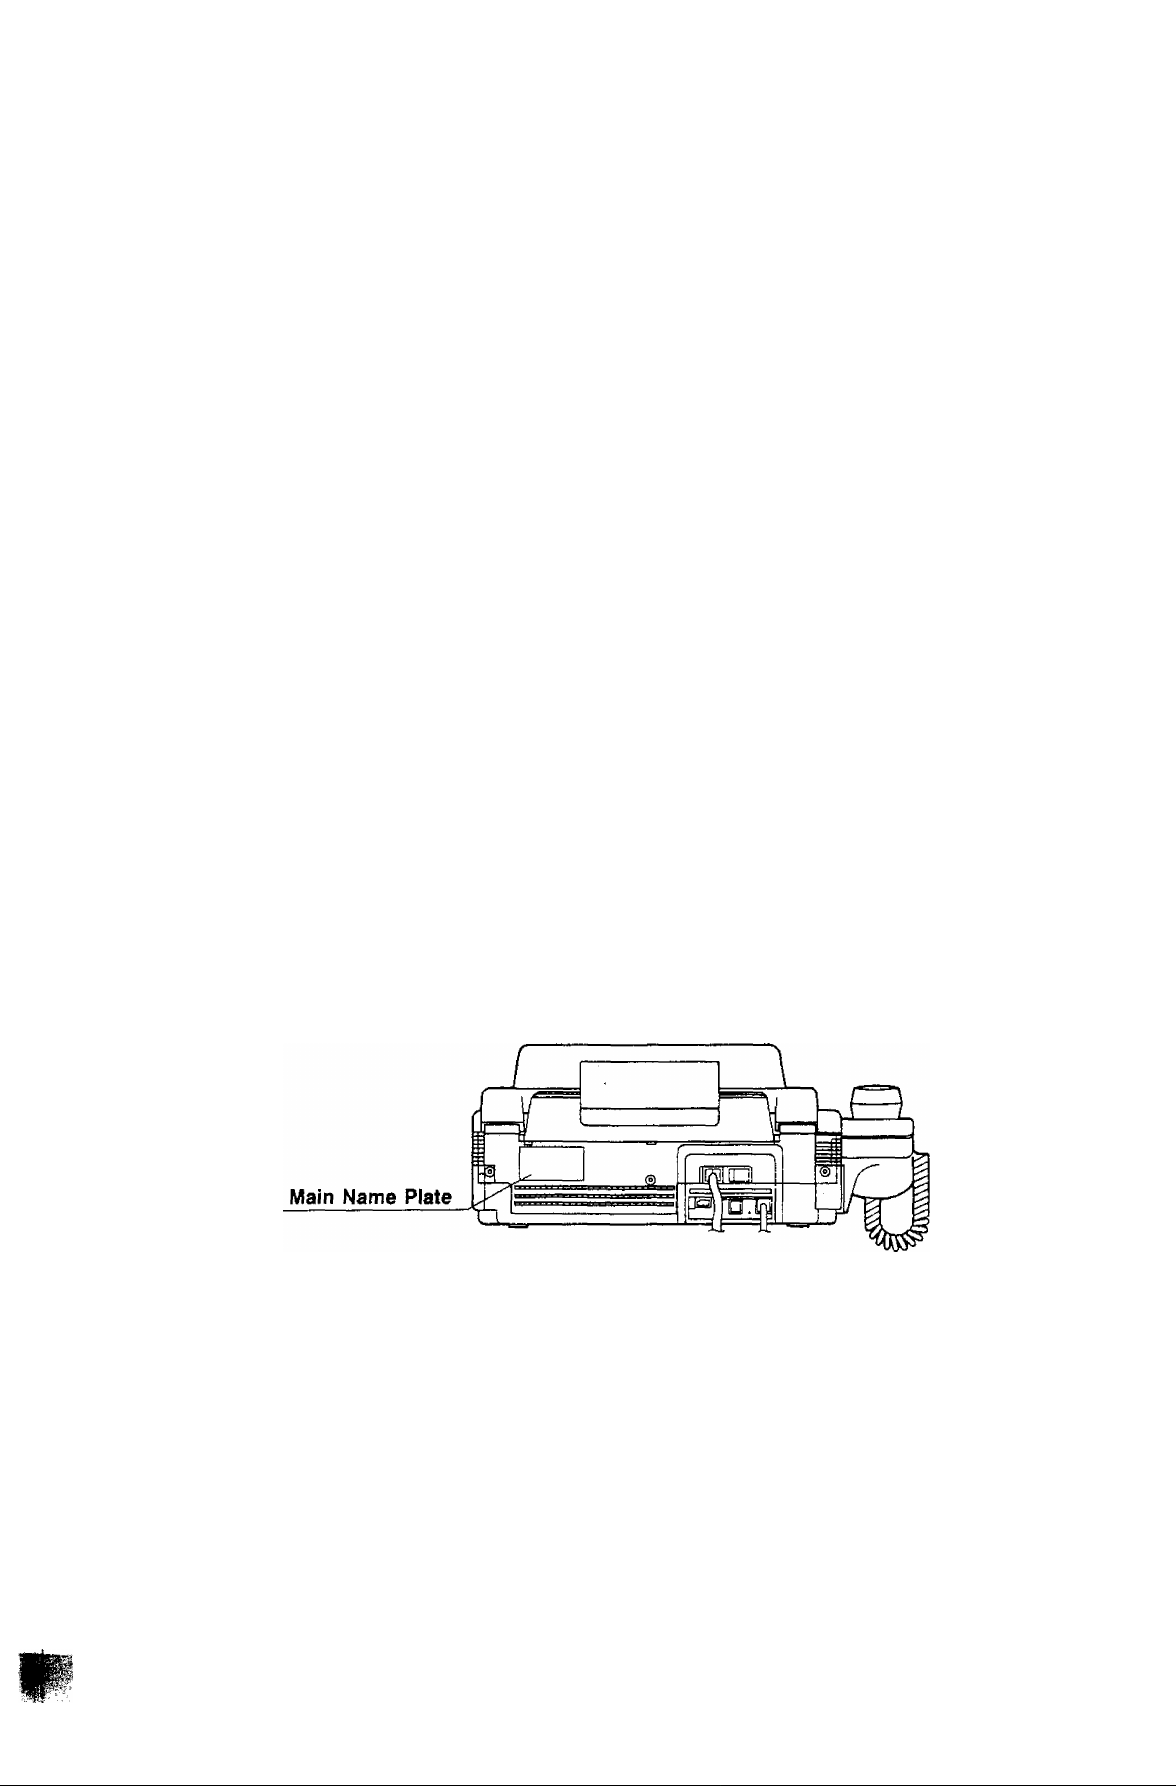
When requesting information, supplies, or service aiways refer to the modei and serial number
of your machine. The model and serial number’s piate (Main Name Piate) is iocated on the
rear of the machine.
For your convenience, space is provided below to record the information you may need in the
future.
MODEL NO. UF-127M
Date of Purchase
Deaier
Address
Teiephone Number
( )
Suppiies Telephone Number
( )
Service Teiephone Number
( )
SERiAL NO.
© 1991 by Matsushita Graphic Communication Systems, inc.
Aii rights reserved.
Printed in Singapore.
The contents of this User’s Guide are subject to change without notice.
Page 3

INTRODUCTION
The UF-127M is an amazingly compact facsimile machine in the low-end user range of the Panafax
family of G3 compatible, desktop facsimile machines. It features Auto speed dialing and other functions
designed to make sending faxes easier, faster and more economical. The UF-127M is one of the
models in the Panafax line of fax machines that is equipped with the TAM l/F feature. It enables
you to connect a Teiephone Answering Machine (TAM) to the UF-127M and automatically switch
incoming calls to either the Fax or Telephone Answering Machine.
Anyone can learn how to use the most frequently used functions with a few minutes of simple practice.
However, because the UF-127M is capable of performing many different functions, users may not
need to learn every one of them.
This User’s Guide will help you to use your UF-127M quickly and easily. The Contents show where
to find information on every feature. Although we recommend that you at least review each section
briefly, you may need to read only the sections that concern the feature(s) you are interested in.
Page 4

CONTENTS
INTRODUCTION
1. GETTING TO KNOW YOUR FACSIMILE
— External View ......................................................................................................................... 3
— Control Panel .......................................................................................................................... 4
— Set Key .................................................................................................................................... 5
2. INSTALLING YOUR FACSIMILE
— Caution .................................................................................................................................. 6
— Unpacking ................................................................................................................................ 7
— Installing the Recording Paper Tray and Document Tray......................................................... 8
— installing Stacker.................................................................................................................... 8
— Connecting the Handset Cable and Telephone Line
— Connecting the Power Suppiy Cord ........................................................................................ 9
— Installing/Replacing Recording Paper.................................................................................... 10
— Setting the Dialing Method {Tone or Pulse)........................................................................... 12
— Final Installation Test ............................................................................................................ 13
— Lightning Precautions ............................................................................................................ 13
3. SETTING UP YOUR MACHINE
USER PARAMETERS ............................................................................................................... 14
— How to Set the Date and Time............................................................................................... 14
— How to Set Your ID Number
— How to Set Your LOGO ....................................................................................................... 17
ABBREVIATED/ONE-TOUCH DIALING NUMBERS .................................................................. 19
— Entering Abbreviated/One-Touch Dialing Numbers................................................................ 19
— Filling out the Station Directory Sheet ....................................................................................23
FAX PARAMETERS
— Changing Fax Parameter Settings
(Header Print Position, Dialing Method, etc.)..........................................................................24
— Fax Parameter Table ............................................................................................................ 25
ADJUSTING VOLUMES
— Setting the Ringer Volume .................................................................................................... 26
— Setting the Monitor Volume ....................................................................................................26
4. SENDING DOCUMENTS
LOADING DOCUMENTS ......................................................................................................... 27
— Documents You Can Send...................................................................................................... 27
— Documents You Cannot Send ............................................................................................... 27
— How to Use Carrier Sheet ......................................................................................................27
~ How to Load a Document.........................................................................................................28
TRANSMISSION SETTINGS
— Resolution ............................................................................................................................. 29
— Original (Contrast) ................................................................................................................ 30
— Halftone .................................................................................................................................31
— Error Correction Mode (ECM) .............................................................................................. 32
— Automatic Transmission Journal (XMT Journal).....................................................................33
MAKING A COPY ...................................................................................................................... 34
— Single Copies ........................................................................................................................ 34
— Multiple Copies (Using the Memory)
DIALING TECHNIQUES ........................................................................................................... 36
— Direct Dialing (On-Hook Dialing).............................................................................................36
— Off-Hook Dialing .................................................................................................................... 38
— Abbreviated/One-Touch Dialing ............................................................................................ 39
— Redialing ............................................................................................................................... 41
..................................................................................................
.........
.............................................................................35
............................................................... 9
15
^ 1
Page 5
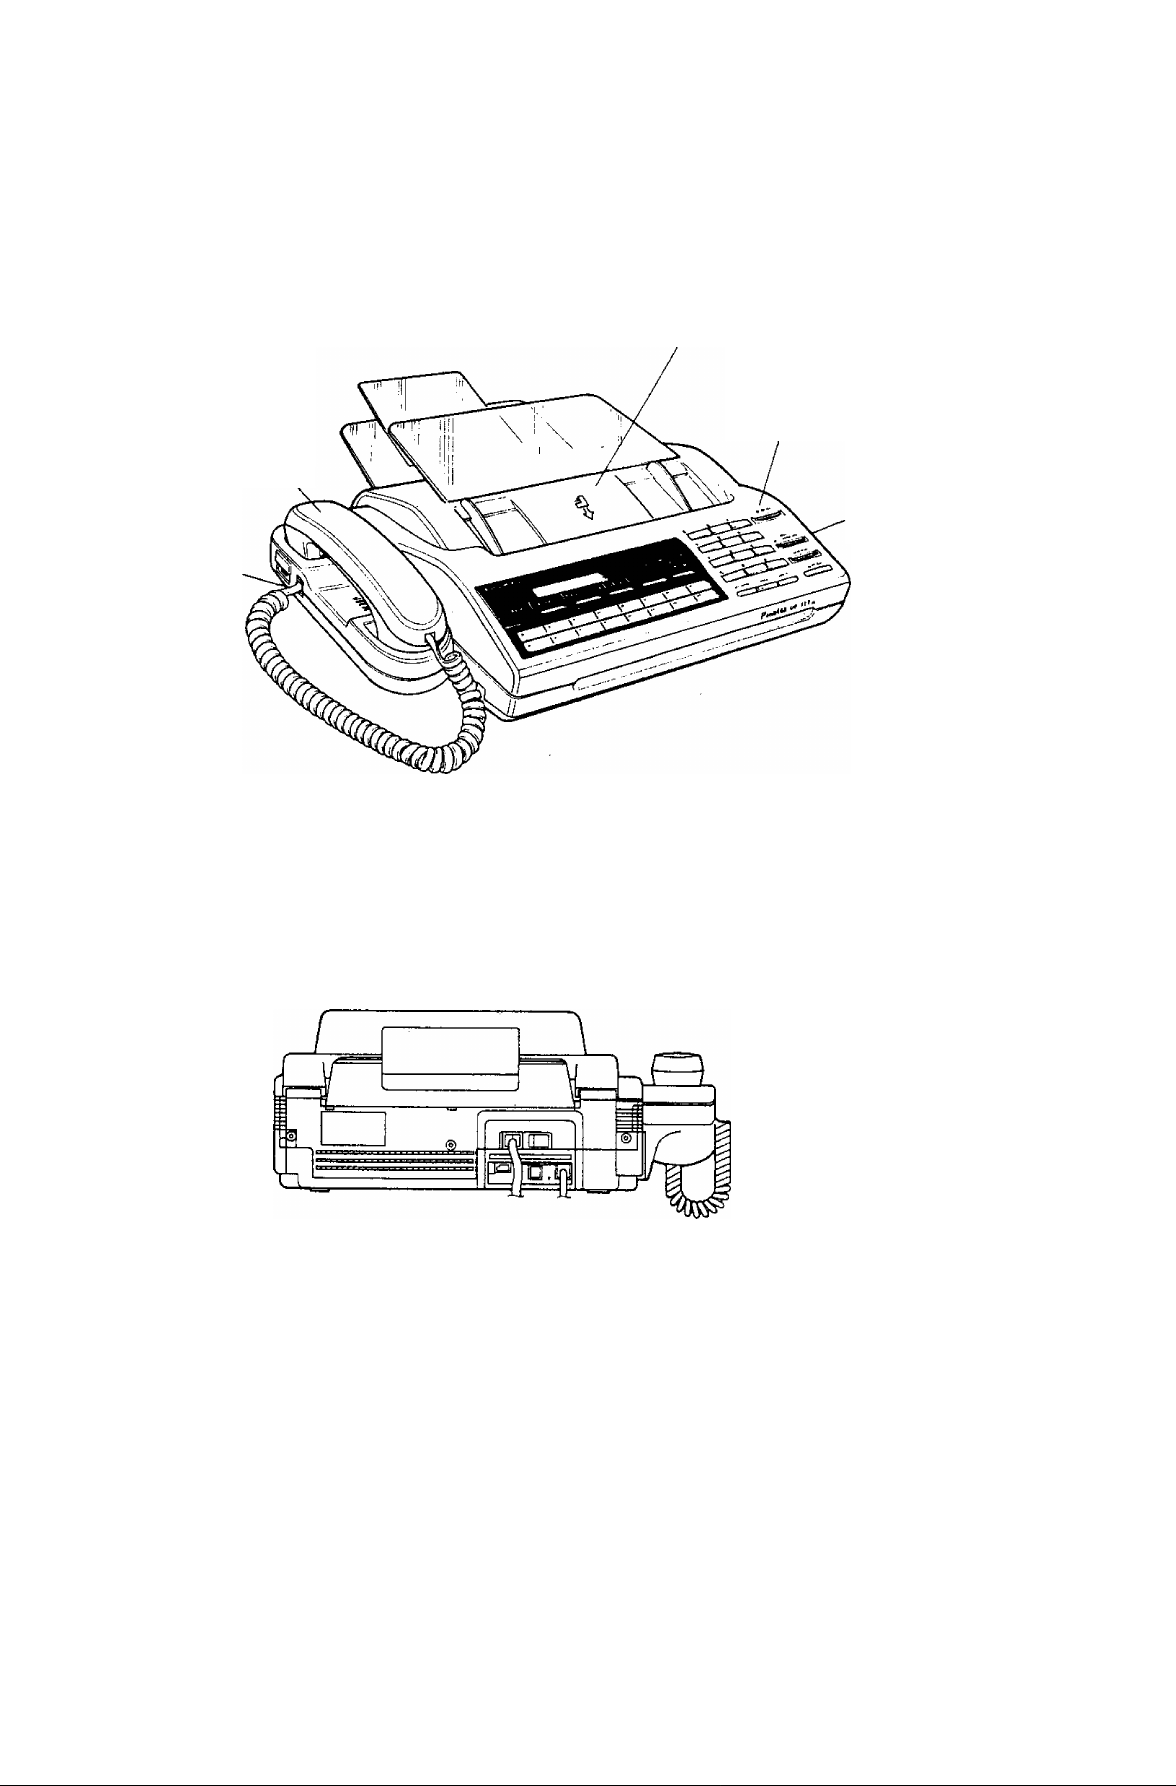
GETTING TO KNOW YOUR FACSIMILE
External View
ADF (Automatic Document Feeder)
Control Panel
Handset
Handset
Cradle
Receiving Unit
Front View
Rear View
Page 6

MEMORY TRANSMISSION .................................................................................................... 42
— Memory Transmission to Single Station
— Multistation Transmission ..................................................................................................... 44
— What to Do When You Hear a Voice through the Speaker
5.
RECEIVING DOCUMENTS
RECEPTION MODES ............................................................................................................... 46
Telephone Mode ...................................................................................................................... 46
Fax Mode ................................................................................................................................... 46
AUTO Mode .............................................................................................................................. 46
— How to Set Fax Mode ............................................................................................................ 47
— How to Set Telephone Mode..................................................................................................47
— How to Set AUTOMATIC Mode .............................................................................................48
SUBSTITUTE RECEPTION (MEMORY RECEPTION) ............................................................. 49
POLLING
6.
— How to Set the Polling Password ..........................................................................................50
— How to Poll.............................................................................................................................51
7.
USING THE MACHINE’S TELEPHONE
— Making a Regular Call............................................................................................................52
— Making Voice Contact after Sending/Receiving ....................................................................52
— Answering a Voice Contact Request..................................................................................... 52
PRINT OUT REPORTS AND LISTS
8.
— 32 Transaction Journal ..........................................................................................................53
— Transmission Journal (XMT Journal)..................................................................................... 53
— Abbreviated/One-Touch Dialing Number List ................................................................. 56
— Fax Parameter List
— Character Code Table........................................................................................................... 58
— Memory Transmission Journal (COMM. JOURNAL) .............................................................59
— Power Failure Report ............................................................................................................ 60
PROBLEM SOLVING AND DAILY CARE
9.
— Information Codes ................................................................................................................ 61
— Installing Recording Paper ................................................................................................. 62
— Clearing a Recording Paper Jam ......................................................................................... 63
— Clearing a Document Jam .....................................................................................................64
— Cleaning the Head Roller and Scanning Roller......................................................................65
— Cleaning the Thermal Head and Image Sensor
— Refilling the Verification Stamp ............................................................................................. 67
— Changing the Document Feed Tension .................................................................................67
10.
APPENDIX I
A. TAM INTERFACE ............................................................................................................... 68
— Installing Your TAM (Telephone Answering Machine)
— Setting up Your Machine for TAM Connection
— Receiving Document with Your TAM Connected ..................................................................69
B. TROUBLESHOOTING WITH A TELEPHONE ANSWERING MACHINE (TAM)
CONNECTED ....................................................................................................................... 70
11.
APPENDIX II
CHARACTER CODE TABLE .................................................................................................... 71
12.
SPECIFICATIONS ................................................................................................................... 72
..........................................
...............................................................................43
....................................................
.......................................................................57
....................................................................
..........................................................
......................................................................
45
66
68
68
Page 7

Control Panel
DISPLAY
Shows Date and Time, Dialing Number or ID.
POWER Lamp
Lights when the power is ON.
ORIGINAL
Used to set Normal or Light. Also serves as
an arrow key ( < ), together with
RESOLUTION ( > ), to move the cursor over
recorded numbers and character codes.
RESOLUTION
Used to set Normal, Fine, or Super-Fine. Also
used as an arrow key ( > ), together with
ORIGINAL ( < ), to move the cursor over
recorded numbers and character codes.
Panasonic
ID DISPLAY
= POWER 11 NORMAL LIGHT |( STO PINE S-PINE |t HALF TONE (i
01
6»
ORIQINAL RESOLUTION
< CURSOR >
02
10
' 02
i
11
1 04
12
Of
I"
j at
u
^ ON LINE
o ALARM
= MEMORY f
1 OT
1
15
STOP
Used to cancel operations. When it is pressed,
the machine will return to standby.
TEL/DIAL (SPACE)
Used for Direct Dialing and to enter a space
when recording telephone numbers.
COPY/LIST
Used to make document copies and print out
various lists.
START
Used to start or set operations.
* TONE
Used to indicate a change to DTMF (Tone
Dialing) when dialing.
2
_ _ _ _ _ _ _ _
5
8
3
_ _ _ _ _
6
9
i 1
0
TONE
tt SET
__ _ _ _ _ __1_ _
1
o TELEPHONE
«P FAX
AUTO
= fAXjTELEPNONE
! 08 1
1
rz^T
4
1 1 1
7
1 1
■X"
L 1
!
PAUEE/REDIAL abbr • ROLLING
i- i
1
SPACE
TEUDIAL
0> START
ON LINE Lamp
Lights when communication begins. Blinks
when you place a document in the ADF unit,
correctly.
ALARM Lamp
Lights when a document becomes jammed,
a communication error occurs or recording
paper runs out.
HALF TONE
Provides ON and OFF settings for halftone
documents.
MEMORY
Used for memory transmission, multistation
and multi-copy. The MEMORY lamp lights up
when it is pressed.
FAX/TELEPHONE
Used to switch FAX Mode, TEL Mode, AUTO
Mode.
One-Touch Keys (<>1--16)
Used for One-Touch Dialing.
# SET
Used to set Character Codes.
PAUSE/REDIAL
Used to start Redialing, or to enter a pause
when recording or dialing a telephone
number.
ABBR
Used to start Abbreviated Dialing.
POLLING
Used to start polling.
The POLLING lamp lights up when it is
pressed.
Page 8
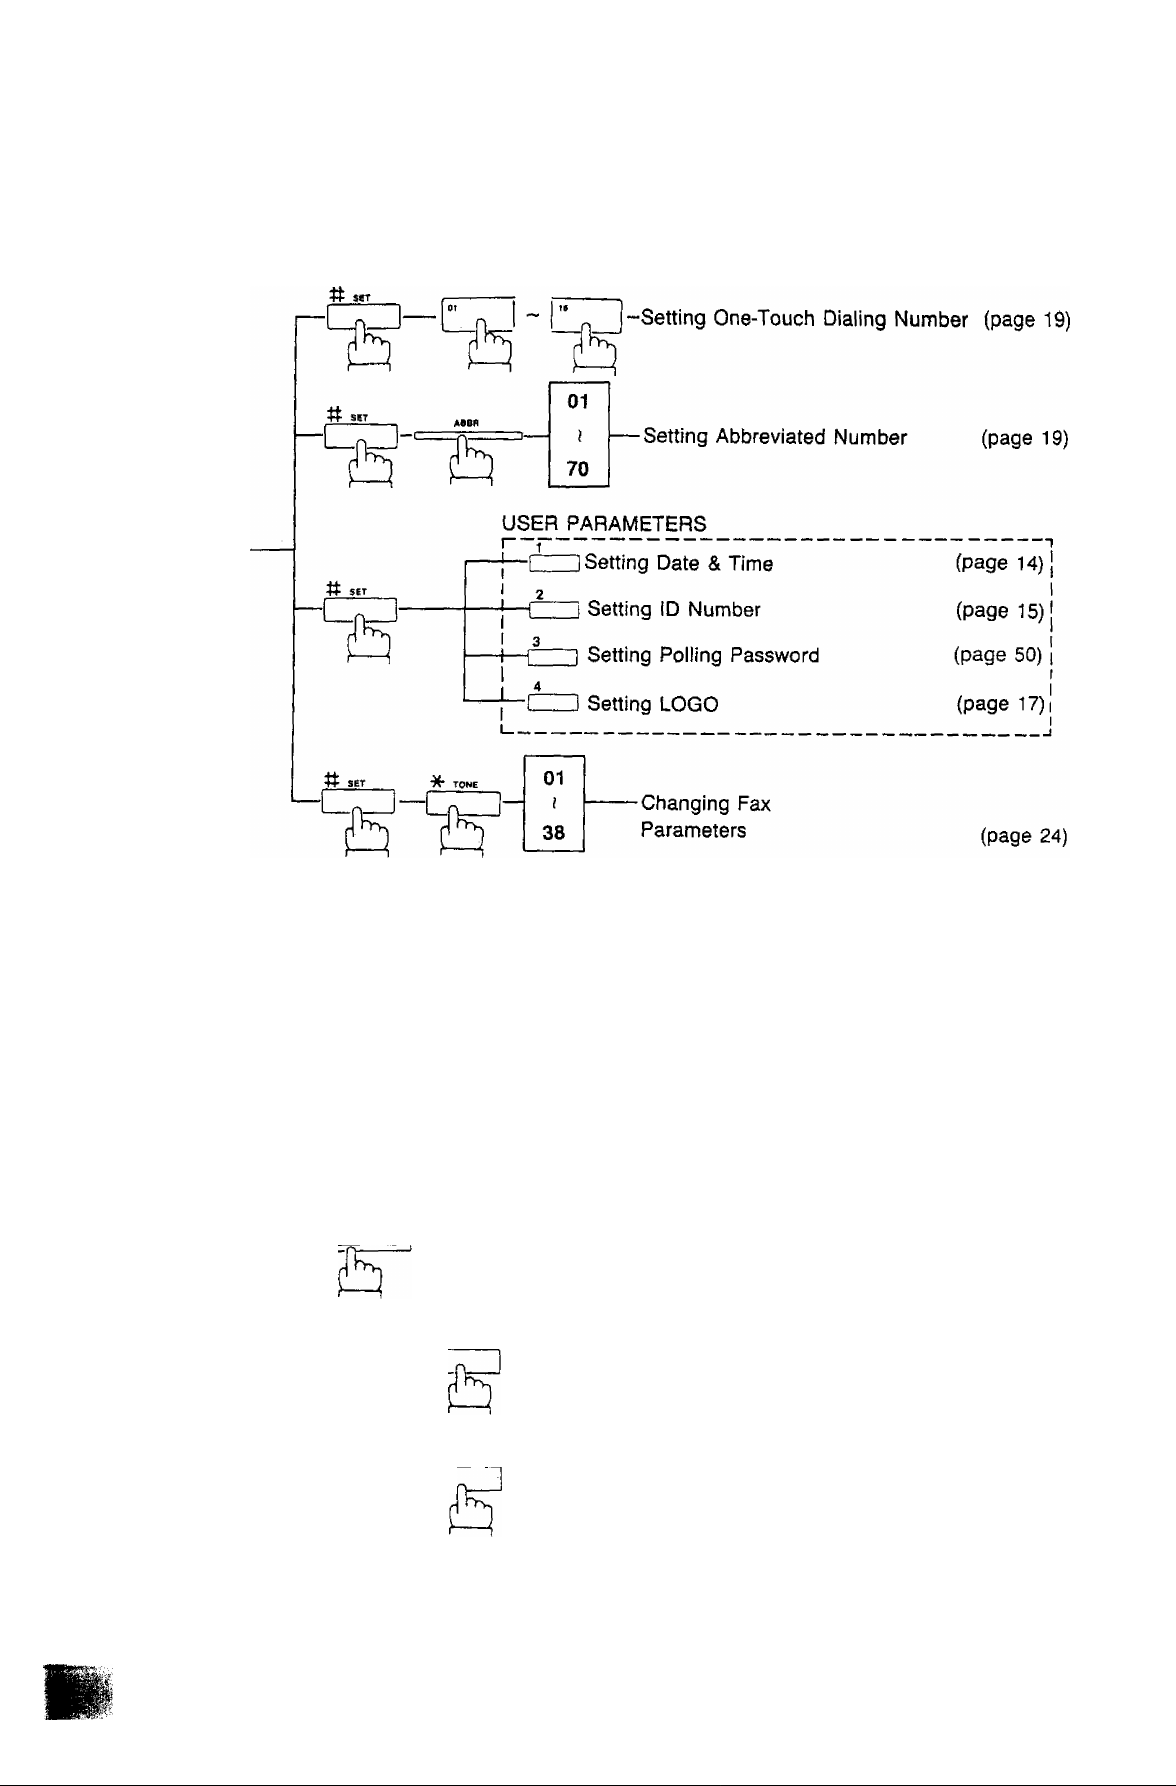
Set Key
Your machine uses the # key to set various functions, as shown in the chart below.
STANDBY
Printouts
In addition to making copies, the COPY/LIST key can be used to print out various Lists and Journals.
COPY/UST <I> STAflT
Printing One-Touch/Abbreviated
Number List (page 56)
COPY/UST ^ ^ START
■C
- Printing Fax Parameter List
(page 57)
H__^
STANDBY-
'"No Document\
>on the ADF ' /
COPY/LIST
1
-CXD-[
<I> START
-Printing Transmission
Journal (XMT Journal)
(page 53)
n
COPY/UST
COPY/UST
'-C
START
-Printing 32 Transaction Journal (page 53)
START
-Printing Character Code Table (page 58)
Page 9
INSTALLING YOUR FACSIMILE
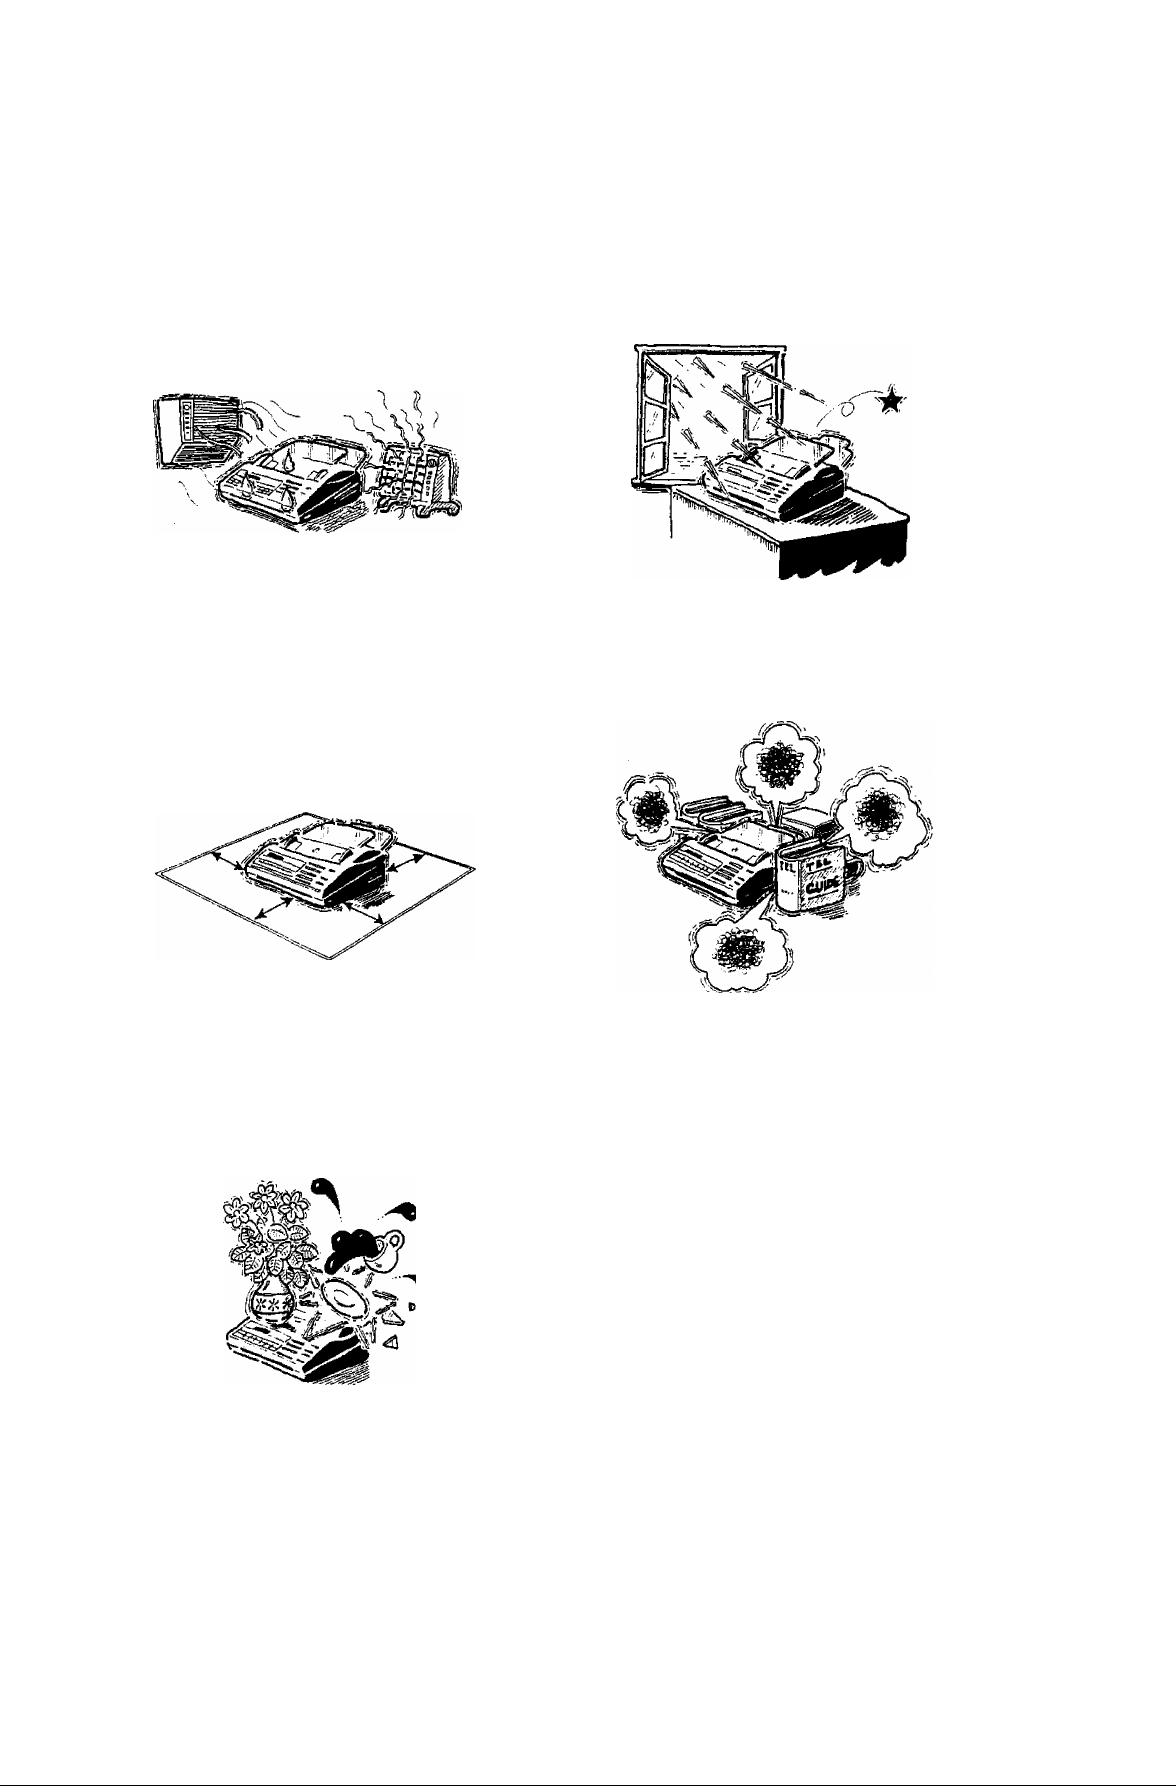
Caution
1. Do not install the machine near heating or
air conditioning units.
3. Install the machine on a flat surface, leave
at least 10 cm of space between the
machine and other objects.
2. Avoid exposure to direct sunlight.
4. Do not block the ventilation openings.
5. Do not place heavy objects or spill liquids
on the machine.
Page 10
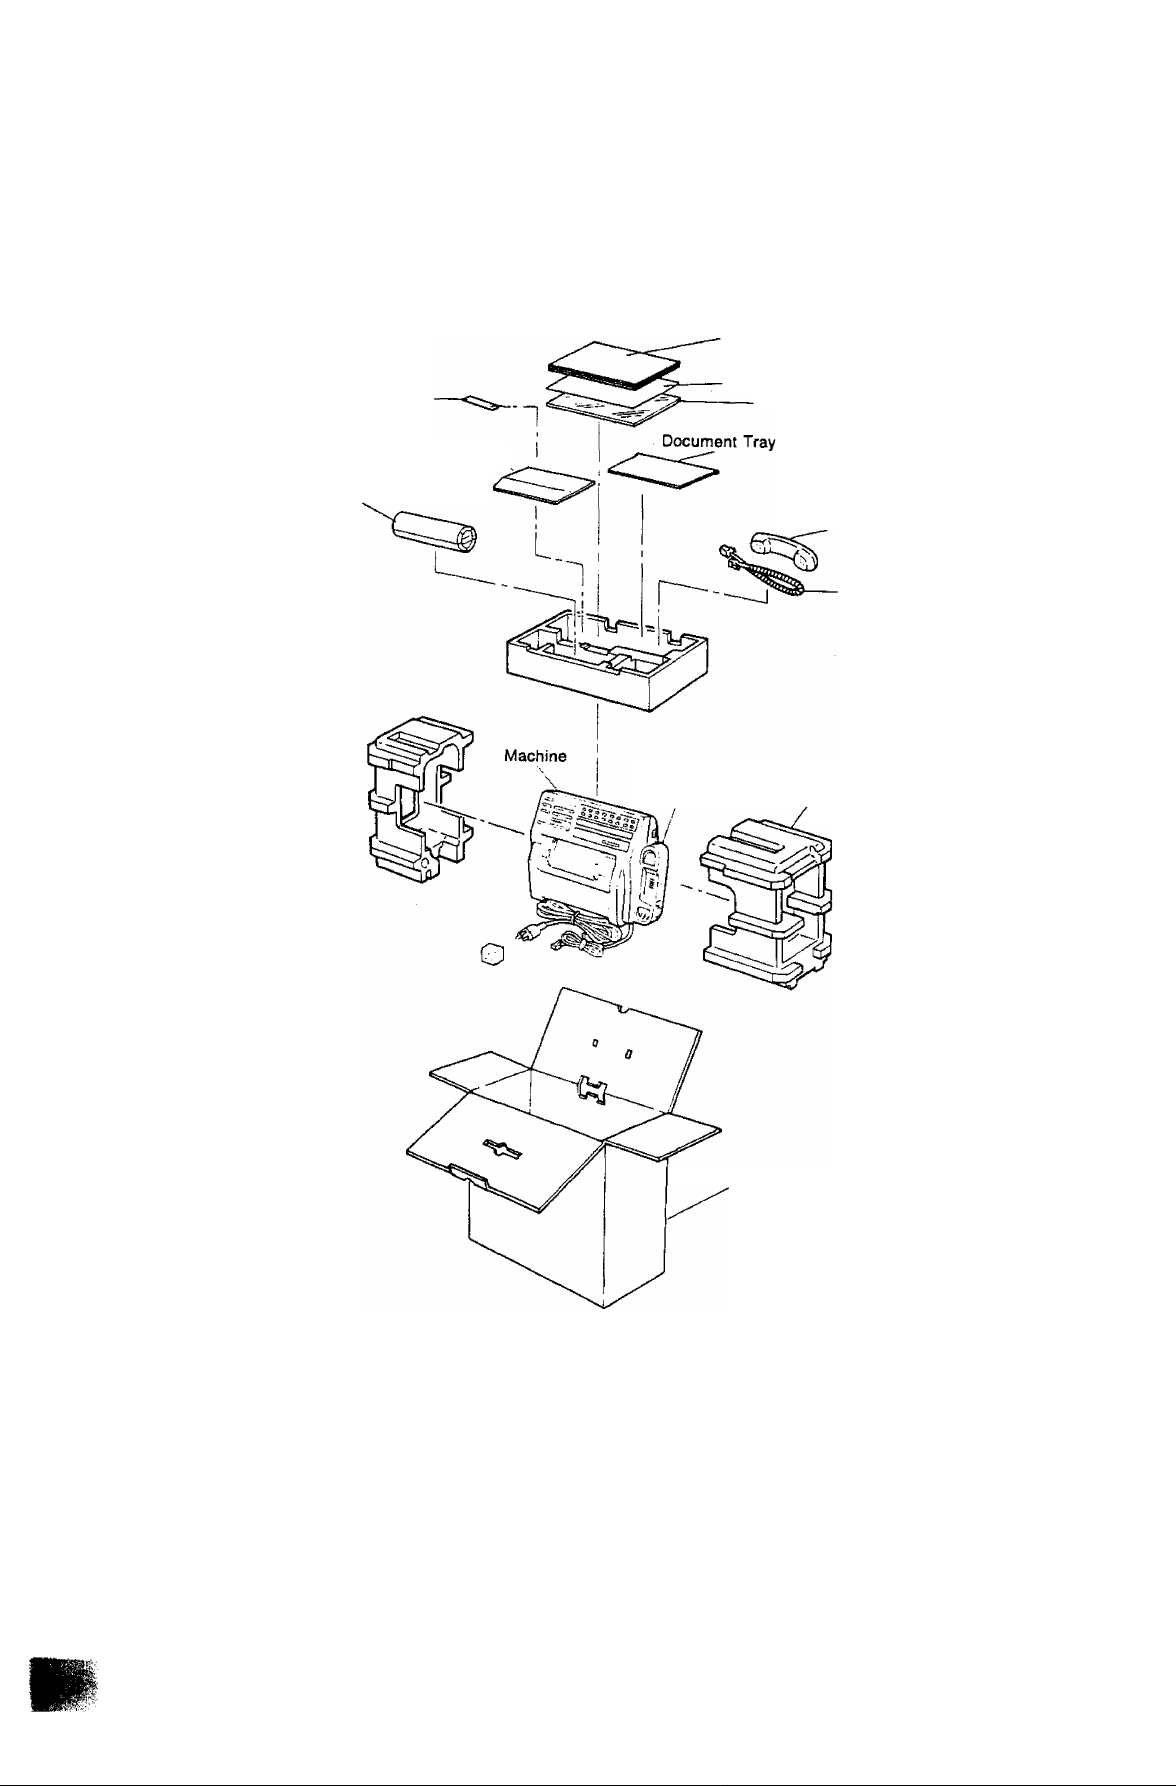
Unpacking
Unpack the carton referring to the illustration shown below.
Inspect the machine and accessories for any shipping damage.
User’s Guide
Stacker
Recording Paper Tray
Recording Paper
Quick Guide
Carrier Sheet
Handset
Handset Cord
Handset Cradle Styrofoam Packing
Cardboard Box
~ To the User
---------------------------------------------------------------------------------------------------------------
This machine is supplied with a 30 meter roll of thermal recording paper.
The machine is capable of using up to a 50 meter roll of high sensitive type thermal recording
paper.
To insure the continued reliability and quality of the thermal print head, please use only the original
manufacturer’s thermal recording paper.
NOTC
1. Do not lift your machine by the Handset Cradle.
2. The types of the telephone cord and power supply cord vary depending on the country.
-
Page 11
Installing the Recording Paper Tray and Document Tray
Recording Paper Tray
(1) Install the Recording Paper Tray by inserting it into the tray guide on the rear of the machine
until it locks into position.
(2) Open the Auxiliary Tray.
Recording Paper Tray Auxiliary Tray
Document Tray
Bend the Document Tray slightly and insert both of the tabs on the Tray into the notches on the
machine.
instailing Stacker
(1) Remove the backing paper on the Stacker.
(2) Stick it on the rear as shown below.
Page 12
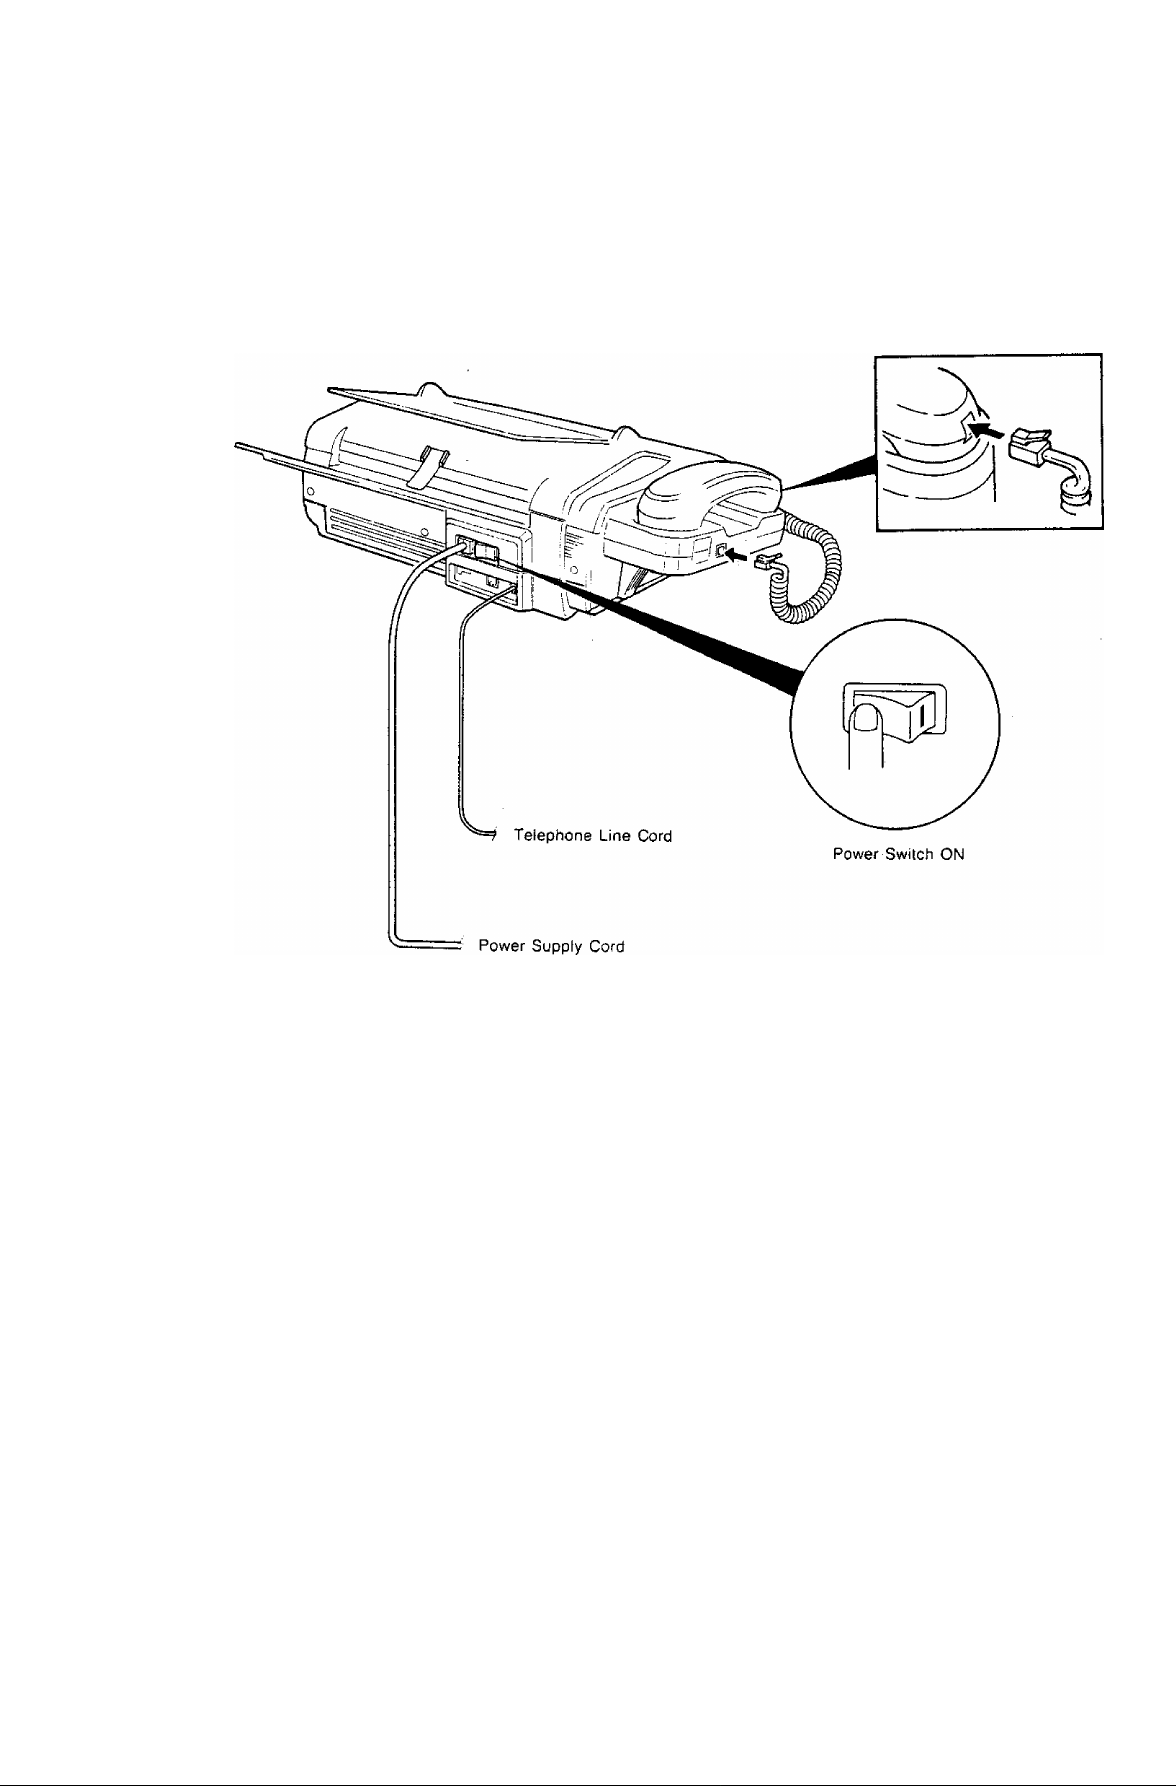
Connecting the Handset Cable and Telephone Line
(1) Plug the Handset Cable into the Handset Socket and into the socket on the cradle.
(2) Plug the telephone line cord into the telephone jack supplied by the telephone company.
Connecting the Power Supply Cord
Plug the power supply cord into an ordinary AC outlet. Turn the power switch to the “ I ” position
to turn on the power. The power lamp on the control panel should light up.
Your machine uses little power and you should keep it ON at all times. If you turn the machine OFF
for too long, the contents of the memory (such as ID number, LOGO you registered) will be lost.
In case of a power failure the memory is backed up by a built-in battery for up to 7 days when it
is fully charged.
WARNING: This apparatus must be properly grounded.
NOT€
1. If you wish to use a telephone set other than the one supplied with the machine, connect it to the "TEL” jack on
the back of the machine with a telephone line cord.
2. The built-in rechargeable battery requires 48 hours to be fully charged.
3. The line connecting method, the type of telephone line cord and power supply cord vary depending on the country.
Page 13
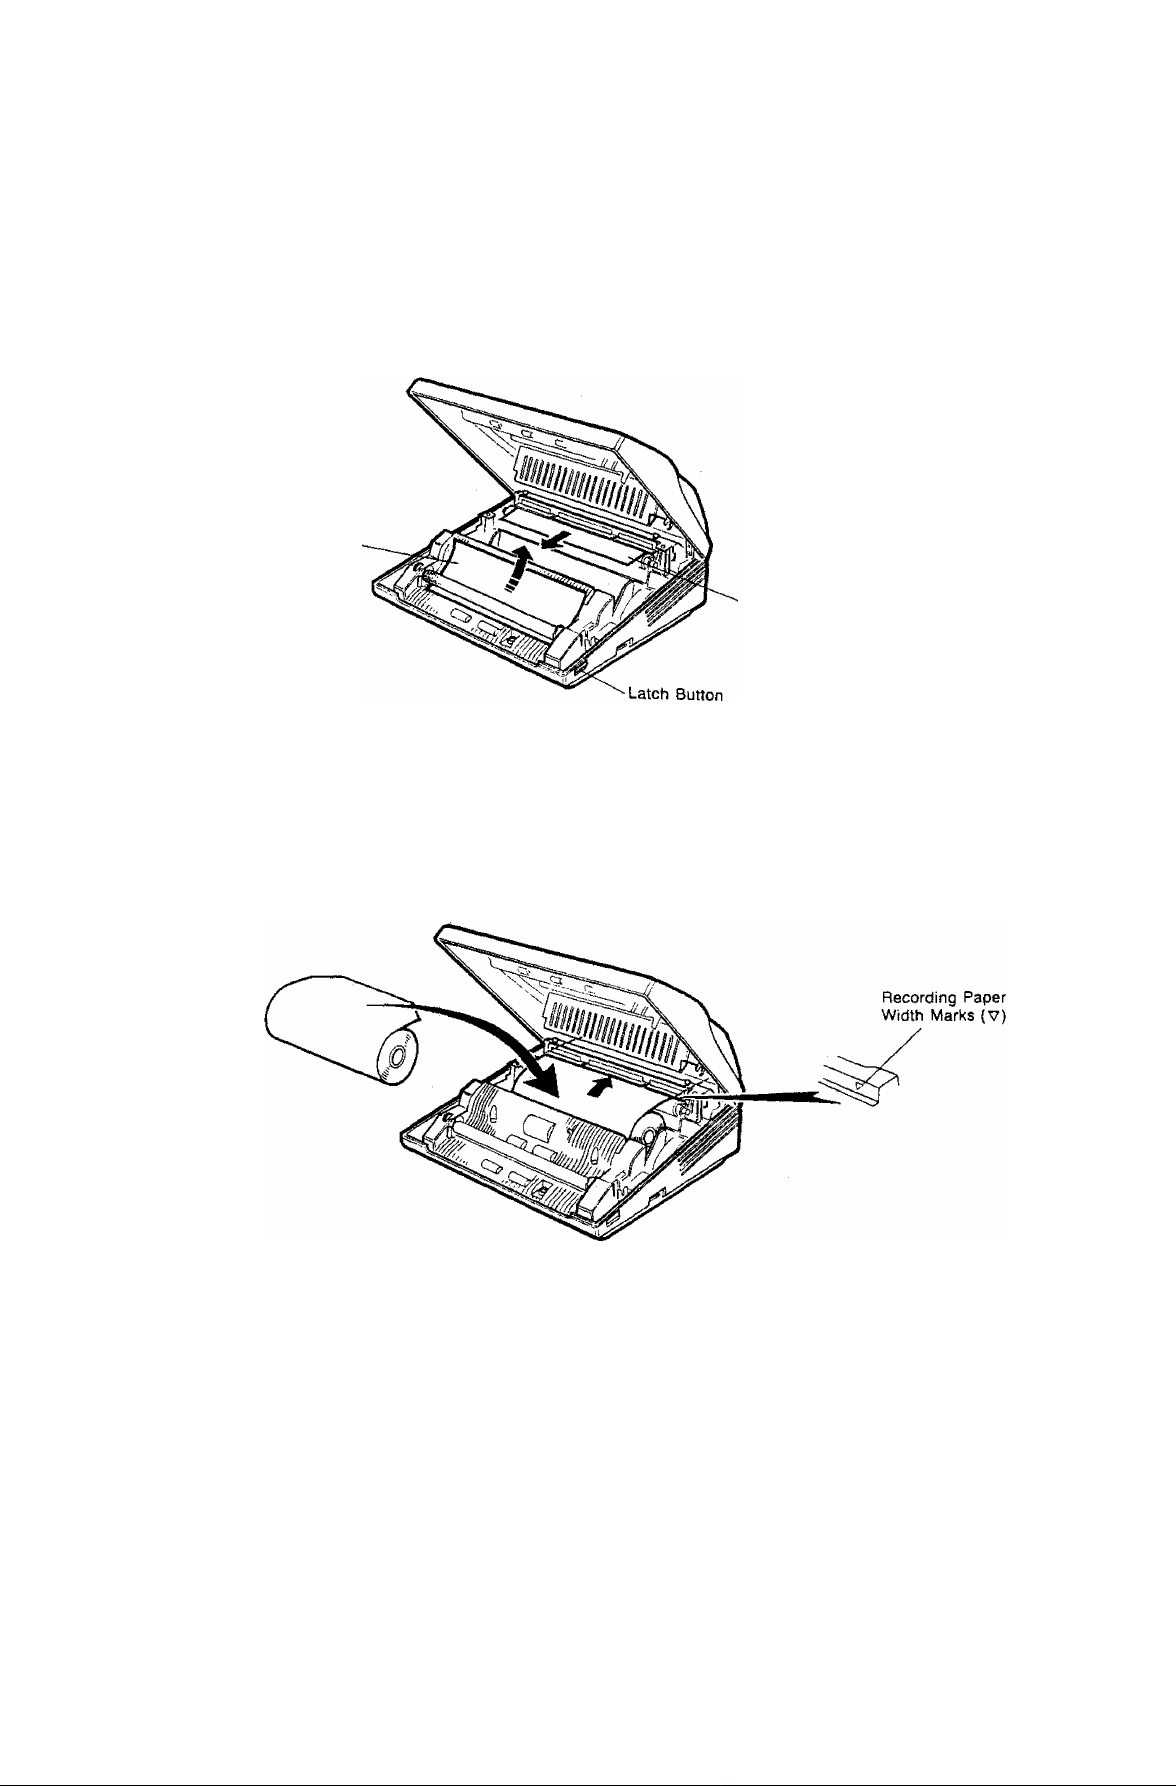
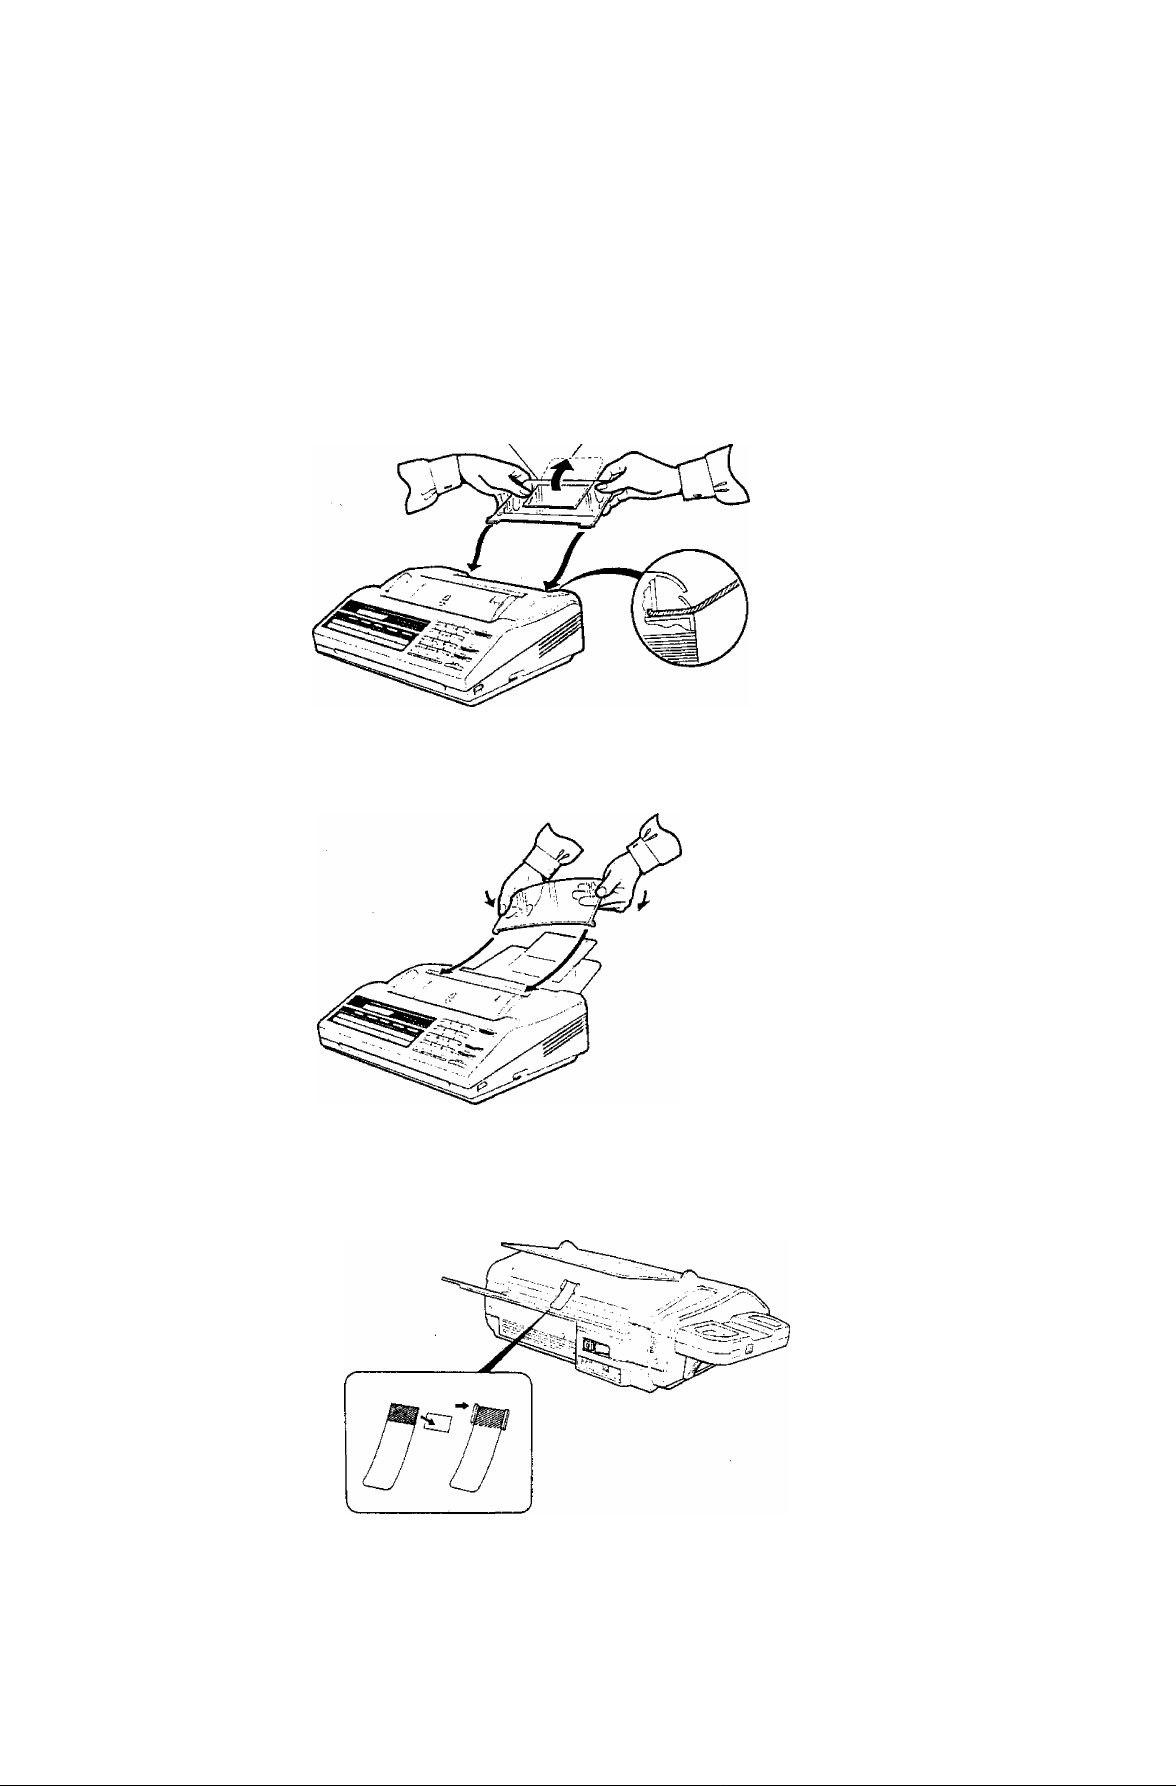
Installing/Replacmg Recording Paper
(T) Press the latch button down on the right side of the cover and open the Receiving Unit.
Remove the ADF Protective Sheet by pulling it up toward the rear of the machine.
Remove the Thermal Head Protective Sheet by pulling it toward the front of the machine.
ADF Protective Sheet
Thermal Head Protective Sheet
(2) Set the recording paper into the unit and feed the leading edge of the paper between the guide
plates of the cutter unit until it projects out of the unit. Make sure that the recording paper is
set correctly as shown in the figure below. If it is set incorrectly, the machine will not reproduce
images.
NOT€
The top guide plate has marks indicating the width of the recording paper. When setting the recording paper, be sure
to align the paper with the marks (V).
10
Page 14
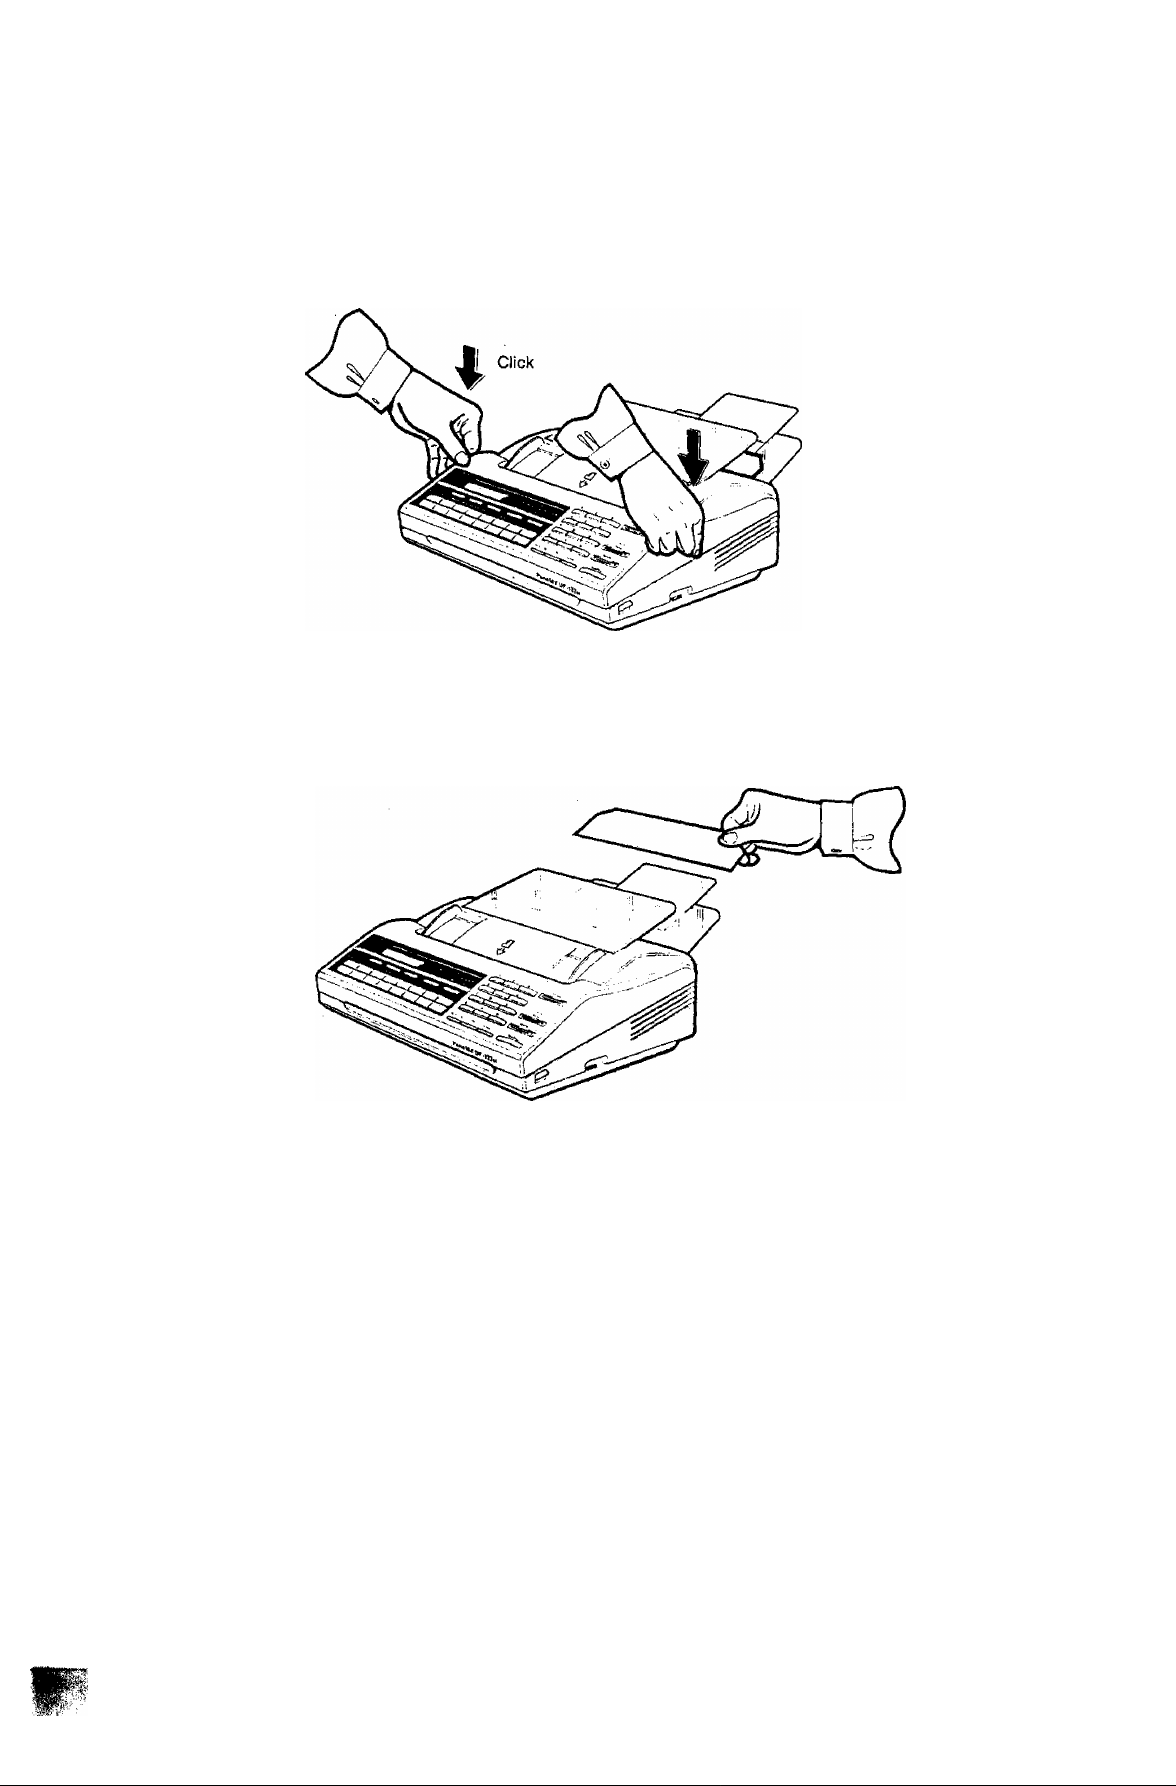
(3) Close the Receiving Unit carefully by pressing both corners down until the cover locks into position
' (you will hear a “click” sound).
(4) The recording paper projecting from the unit will be cut automatically. Remove this cut paper.
11
Page 15

Setting the Dialing Method (Tone or Pulse)
Your machine can operate with either of two dialing methods (Tone or Pulse), depending on the type
of telephone line you are connected to. Your machine is preset at the factory for Pulse Dialing. If
your telephone line requires Tone Dialing, set to Tone Dialing using the following procedure.
tt SET
1
n
■X" TOME
2
Lj^J
3
Enter the Fax Parameter number.
EE
To set Tone Dialing,
I—aJ
—
—
07 [1] 2
07
-
[1] 1
.................
'— Blinking
Blinking
To return the dialing method to Pulse Dialing,
07
To store the new setting,
<p START
To return to standby, press [STOP
01 -01 -1900 12:00
NOTC
The number on the left of the display indicates the Fax Parameter number. The number inside the brackets is the
standard setting value and the number blinking on the right is the current setting.
[1] 2
Blinking
12
Page 16
Final Installation Test
After installing your machine, it is advisable to make a copy or send a fax by direct dialing to check
if the machine is working properly.
1
Place the document face down on the ADF.
Adjust the right and left Document Guides.
01-01-1900 12:00
2a
(For more details, see page 34.)
SPACE
• TEU/DIAL
and enter a full number.
Ex: (BEiamiTiiiKi]
(For more details, see page 36.)
Lightning Precautions
To minimize the possibility of lightning
damage, a surge protector is built into
your machine. Sometimes though this is
not enough to protect the machine
completely when a strong lightning surge
comes through the telephone line or AC
power line.
To further protect the equipment when
you know that a thunderstorm is coming,
we recommend that you;
01 -01 -1900 12:00
5551234.
Thunderstorm
\Va '|i
3 il
(1) Unplug the telephone line cord from
the phone jack.
(2) Unplug the power supply cord from
the AC outlet.
ноте
1. The built-in battery can back up the memory up to 7 days when fully charged. As soon as the thunderstorm is over,
plug in the power supply cord and telephone tine cord.
2, The types of the telephone line cord and power supply cord vary depending on the country.
13
Page 17

SETTING UP YOUR MACHINE
USER PARAMETERS
Beforo setting or changing any of the foiiowing User Parameters, make sure that the handset is on
the cradle (On-Hook).
How to Set the Date and Time . . . > »u«
The built-in timer helps you to know when you sent or received a document. ^ ® thTdisolav
top ol osoh received page. In the standby mode, the current date and time are shown on the display.
To set the date and time,
1
c
and
Enter the new day (two digits), month (two digits),
year (four digits), 24-hour clock (four digits).
Ex: 15, Oct. 1991 15:00
m E m m m [I] [a m m [s E E
If you make a mistake, move the cursor to the incorrect number by pressing [<2
11 ORIGINAL I ) or r>l( { resolution] ), then reenter the correct number over it.
rj> START
To set the date and time,
01-01-1900 12:00
15-10-1991 15:00
15-10-1991 15:00
NOTC
î^ilinking number indicates the entering point.
14
Page 18

How to Set Your ID Number
When you transmit a document, your ID will appear on the other machine’s display. When you receive
a document, the sender’s ID will appear on your machine’s display. We suggest you use your facsi
mile telephone number as your ID, but you may use any number up to 20 digits long.
To set the ID number,
4*
dZI]
and
Enter the ID number using the keypad. You may
2
use I SPACE I to enter a space between the
numbers to make it easier to read.
Ex: rniSPACEli2imr2l
1 212 1111234
i SPACE iiTifTirniTiryiryiiTi
If you make a mistake, move the cursor to the incorrect number by pressing
( [ORIGINAL I) or f> i ( I RESOLUTION I) , then reenter the correct number over
it. If you press i STOP \, you will have to start from Step 1 again.
If the ID number is over 15 digits long and you just entered a 16th digit, the display
clears and then shows only from the 17th digit on. To look at the first part of the
ID number, press [<"! fi ORIGINAL h repeatedly.
<t> START
To set the ID number.
15-10-1991 15:00
NOT€
To enter " + press | PAUSE I. The display will show " H”, but do not worry, this is correct.
15
Page 19

Changing the Ю number,
n S.T
and
Now you can set a new ID number. Move the
cursor to the number you wish to change by
pressing [<] f lORIGINALl^ or [>]
MREBbLUTiONl).
If any unnecessary digits remain after entering the new number, erase them by
entering a space with the [SPACE I key.
Ex: Change the ID number
Ш ШШ2] ШШШШ1Х1Ш13] entered in page 15 to
Г"
1 212 1111234_
Ш ШШЭ] шшшшиш.
Press [<] ^ I ORIGINAL n 9 times to move the
cursor to left digit.
Enter [T].
Press I > I (I RESOLUTION h 7 times to move
the cursor to last digit.
Press the I SPACE I key to erase it.
1 212 1111234
----------------
1 213 1111234
1 213 1111234
Blinking
Biinking
To set the new ID number,
Ф START
L
1 213 111123
16
Page 20

How to Set Your LOGO
The LOGO helps identify you to someone who receives your document. To set your LOGO {25
characters max.), enter a two-digit numeric code corresponding to the Character Code Table
(see Appendix II).
4
and
Input
Enter each letter, number and/or symbol of your
LOGO using the key pad to enter each two-digit
code.
Ex: for Panafax HQ
E [5] [Z] S] S] E a [IIE B] [H
1 # Il4il5ll # II4II0II # II6II3II # j
0_ ; --
Area
f7i fii nz rn fyi r#i iTi ai r#i
0000000 oo_
• Symbol *‘o” appears when you enter a
two-digit code for each character.
• Symbol appears on the Input Area when
you enter a space using the [SPACE I key.
You can use the 1 SPACE 1 key to enter a space instead of entering (T] [2] .
If more than 13 characters are entered, the first
13 characters will scroll off the display.
<t> START
To set the LOGO.
The machine prints out the LOGO you entered
for your confirmation and returns to standby
15-10-1991 15:00
after completing the printout.
NOT«
1. When you want to see your entered character codes, move the cursor to the character you wrant to see by using
the [ < I or 1 > I key. The code corresponding to the character will appear on the input area.
2. You can print out the Character Code Table (see page 58) shown in Appendix II,
17
Page 21

Changing the LOGO,
tt set
c
and
0000000 00
u
____________________
Blinking
Now you can set a new LOGO. Move the cursor
to the character you wish to change by pressing
(I ORIGIN^) or f i RESOLUTT^ L
Ex; Change the LOGO “Panafax HQ” entered in page 17 to ‘‘Panasonic
HQ”.
Press i > i (IRRESOLUTION i) 4 times to move
the cursor to the 5th character.
0000000 00 ;45
_
________^___________
Enter sonic HQ.
E [1] [ill II] S] SII] 5] CI]
0000000 00 00
iSEsaiEraaiiici]
mm 53 in EE
If any unnecessary characters remain after
entering new LOGO, erase them by entering a
space with the I SPACE!.
:25
Blinking
To set the new LOGO,
J> START
The machine prints out the new LOGO you
entered for your confirmation and returns to
standby after compieting the printout.
18
Page 22

ABBREVIATED/ONE-TOUCH DIALING NUMBERS
Entering Abbreviated/One-Touch Dialing Numbers
Abbreviated Dialing and One-Touch Dialing are two fast ways of dialing. To use these dialing methods,
you must first record the full numbers, using the following procedure. You can enter 70 abbreviated
numbers (01 to 70). Note that the numbers (01 to 16) are automatically assigned to the One-Touch keys.
To store an Abbreviated number;
2o
and enter a two-digit code number on the keypad
(01 - 70).
Ex; [2][Ц
To store a One-Touch number;
2b Press One-Touch key (01 - 16).
Ex: One-Touch key Ms |
Enter the facsimile telephone number (up to 36
digits, including pauses and spaces).
If you make a mistake, move the cursor to the incorrect number by pressing [<I|
( ! ORiGINAL i ) or ( I RESOLUTION I ), and then enter the correct number over it.
Ex: islIPAUSE ir^lTimrSPA^
[- 1
[20]
[16]
2019-212 111234
If more than 12 digits are entered, the first
12 digits will scroll off the display.
20]
[20]
NOT€
1- if you require a special number to access an outside line, input the number first and then a pause by pressing
I PAUSE I before you enter the full number. A is displayed for a pause.
2. You can insert a space by pressing (SPACE | in the telephone number to make it easier to read. The space does
not effect the dialing.
3. When you press Щ and ¡^, "L” is displayed for and “J” for
4. If you have Pulse Dialing (Rotary) service and you need to change it to Tone Dialing in the middle of a long number,
press [ *~i to make the change. A ‘V’’ is displayed for the change.
19
Page 23

<J> START
To set the number,
Enter receiving station name (up to 15 letters)
using the Character Code Table (see Appendix
II).
Ex; NEW YORK OFFICE
nmiSPACEl
[UfflESiiiEEiacaiii
mrFii sPACEiinmnnmiTninm
[S ffl Q] IB B B] B B [33 B] B
d> START
L
To set the name,
Repeat Step 2a/2b to 6 to record more numbers, or return to standby by pressing
ISTOPl.
20
Page 24

Changing an Abbfeviated/One-Touch number,
it SET
To change an ABBR number;
2o
h
Press the two-digit code number you wish to
change (01 * 70) (see Step 2a/2b in page 19).
Ex: [H SJ
The last 12 digits will appear on the display.
Move the cursor by pressing r<l to see any additional digits entered.
To change a One-Touch number;
2b Press One-Touch key (01 - 16).
Ex: One-Touch key hi
The last 12 digits will appear on the display,
Move the cursor by pressing h< ; to see any additional digits entered.
Move the cursor to the number you wish to
change by pressing [3 (¡ORIGINAL I) or [3
tlRESOLUTl^l.
t_ i
20J212 1112345
[16]212 1112345_
□
If any unnecessary digits remain, erase them by entering a space with the! SPACE
key.
Ex: Change the abbreviated number
[S-EiTlS] iT^, ITl IT! [T1 [Tl [4l r^i entered in page 19 to
[9]-[i][i][i;i amsmmm
Press [<] (I ORIGINAL I) 7 times to move the
cursor to left digit.
Enter f4l rri rn rn rn .
Press ! SPACE! key to erase the 5.
21
Page 25

To set the new telephone number,
4
START
• Go to Step 5 when you wish to change the
station name.
• Press I STOP I to return to standby.
Changing the station name,
Move the cursor to the character you wish to
change by pressing CU ( [ ORIGINAIT] ) or
M RESOLUTION
I ) .
Ex: Change the station name “NEW YORK
OFFICE” entered in page 20 to “NEW
YORK HQ”.
Press I > I (I RESOLUTION 1^ 9 times to move
the cursor to the 10th character.
Enter HQ.
[T]l7][Z][I][l]CZ]
Press
1
SPACE
characters (FICE).
To set the new station name,
START
I
4 times to erase unnecessary
000 0000 000
Blinking
000 0000 c
000 0000 0000 : 15
-
5000 :24
-----
Blinking
___I
^
------
:23
.
Blinking
-
^ , and return to standby by pressing
-----
i ISTOPI.
2P
Page 26

FUling out the Station Directory Sheet
Use a pencil or a bail-point pen to fiii in the station directory sheet with station names corresponding
to the One-Touch keys. The station directory sheet is held in place in the machine by a transparent
plastic cover sheet.
To remove the station directory sheet,
(1) Push the transparent plastic cover sheet downward until it is bent enough to take out.
(2) Remove the transparent plastic cover sheet together with the station directory sheet.
Transparent Plastic Cover Sheet
To replace the sheets,
(1) Set the station directory sheet into its proper position.
(2) Place the transparent plastic cover sheet over the station directory sheet and insert the projections
while bending the sheet.
NOT€
tf you use a pen to fill in the station directory sheet, be sure the ink is dry. If you use a pencil, remove any excess
lead before replacing the station directory sheet.
23
Page 27

FAX PARAMETERS
Your machine has a variety of adjustable Fax Parameters. These Fax Parameters are preset for you
in standard settings (see Fax Parameter Table on page 25). Usually you do not need to change the
settings. However, you may wish to change some of them to suit your own circumstances. Once
you reset the standard setting, it will be effective until you change it again. Some of the settings,
such as Resolution or Contrast, can also be changed temporarily by pressing the particular key on
the Control Panel before a transmission starts. After the transmission ends, these parameters return
to their preset settings.
Changing Fax Parameter Settings (Header Print Position, Dialing Method, etc.)
___
and
Enter a Fax Parameter number (always two
digits) from the Parameter table.
Ex: Eirrifor Resolution.
The number inside the brackets is the standard setting and the number blinking
on the right is the current setting.
Enter the new setting.
Ex: [2]
4
To store the new setting,
<t> START
n
01
01
L
Return to Step 2 to change the next parameter,
or return to standby by pressing [STOP I.
15-10-1991 15:00
m 1
'—Blinking
[1] 2
Blinking
NOT€
1. if you entered a wrong number in Step 3, reenter the correct number over it.
2, If necessary, print out a Fax Parameter List to confirm the current setting before changing. To print it out. see page 57,
24
Page 28

Fax Parameter Table
Parameter
Number
01
02
Parameter
Resolution
Original (Contrast)
03 Stamp
05
Journal Print
06 Header Print
07 Dialing Method
13
XMT in no paper
(See note 1)
Setting
Number
1*
2 Fine
3
Super Fine
r
2
1
2* On
1
2*
Automatic Print
1 * inside
2 Outside
3 None
1 Tone
2* Pulse
1*
2
Not Allowed
Setting
Standard
Normal
Light
Off
Off
Allowed
Comments
Setting home position of the
Resolution mode.
Setting home position of the
Original contrast mode.
Setting home position of the
Stamp function Off/On.
Selecting whether or not the
machine prints the journal
automatically after every 32
transactions.
Selecting printing position of the
header.
Inside; inside document the area.
Outside: outside the document area.
None: header is not printed.
Selecting whether the machine
dials by Tone or Pulse (rotary)
method.
Selecting whether or not the
machine is allowed to transmit
document when no recording
paper is installed.
15
17
18
19
ECM (Error
Correction Mode)
Substitute Reception
Stamp at
MEM.XMT
XMT Journal
32 Initial Operator Call
37 TAM
38
Silent Detection
(TAM 1/F]
1
2*
Off
On
1 invalid
2' Valid
1 •
Off
2 On
1 *
2
1
Off
Automatic Print
Off
2* On
1 *
2
1
2"
None
Connected
Off
On
Selecting whether or not the
machine performs ECM function
if the line is poor.
Selecting whether or not the
machine receives to memo-ry
when recording paper runs out.
Selecting whether or not the
machine stamps the original
document when storing into
memory.
Selecting whether or not the
machine prints a transmission
journal automatically after each
transmission.
Selecting whether or not the
machine sounds operator call
when no fax signal is received in •
the fax mode.
Selecting whether or not a tele
phone answering device is
connected to the unit.
Selecting whether or not the
machine will switch to fax com
munication when a silent pause
longer than 3 seconds occurs in
the TAM/FAX mode.
NOT€
1, When parameter No. 13 is set to 1, you can still send document when your machine has no more recording paper,
or a mechanical error has occurred which affects receiving. Some transactions, however, may not be recorded on
the Journal when either situations occur.
2. Setting Number marked with an asterisk {') indicates factory standard setting.
Page 29

ADJUSTING VOLUMES
Setting the Ringer Volume
You can adjust the RINGER VOLUME so the fax machine rings at a comfortable level when it receives
a call. Move the ringer control on the handset cradle to the desired level, either high, low or off.
Ringer Volume
Setting the Monitor Volume
When the fax machine is making a call, you hear the dial tone, the dialing signals, and the ringing
or busy signal through the built-in speaker. Rotate the MONITOR VOLUME control on the right side
of the unit to adjust the volume to a comfortable level. You also hear the called person's voice through
the speaker if the called station is set to manual reception. In this case you can talk with the called
person by lifting the handset (see page 45).
26
Mònitor Volume
Page 30

H SENDING DOCUMENTS
LOADING DOCUMENTS
Documents You Can Send
In general, your machine will send any document from A4‘Size to A5-size paper.
Documents You Cannot Send
You must never try to send documents that are;
• Wet
• Covered with wet ink or paste
• Wrinkled, curled or folded
• Too thin (e.g. onionskin, airmail paper, pages from some magazines, etc.)
• Too thick (e.g. card, etc.)
• Chemically processed (e.g. pressure-sensitive paper, carbon-coated paper, etc.)
• Coated (e.g. glossy paper, etc.)
• Smaller than 148 mm (W) x 73 mm (L)
• Longer than 1000 mm
• Made of cloth or metal
To send these kinds of documents, make a photocopy first and then send the copies instead.
How to Use Carrier Sheet
If you send documents wrinkled, curled, folded, too thin, or smaller than 148 mm (W) x 73 mm (L),
you can send them using the Carrier Sheet. Put them in the Carrier Sheet, and then place the carrier
in the ADF with the sealed edge first.
NOT€
Document thickness ; Single sheet 0.06 to 0.15 mm
В
Multi-sheet 0.08 to 0.13 mm
27
Page 31

How to Load a Document
First, make sure that your document is free of staples
and paper clips, and is not torn, greased, or covered
by any foreign objects.
Place the document face down on the Automatic
Document Feeder (ADF) with the top edge going into
the machine until it stops. Adjust the sliding document
guides to ensure that the document is centered on the
ADF.
If you are sending two or more pages, make sure that
the bottom sheet enters first. You can also stack
up to 10 sheets on the ADF at one time. If you want
to send more pages, you can place them on top of the
last page on the ADF once transmission has started,
as long as you do not have more than 10 sheets on
the ADF at any one time.
When you set a document on the ADF, you can now
make basic transmission settings, or begin the dialing
procedure.
Face down
Document Guide
INCORRECT
The ON LINE lamp will blink when you set the
document on the ADF correctly.
28
Page 32

TRANSMISSION SETTINGS
You can temporarily change several settings, such as Resolution and Original (Contrast), before you
send a document. Choose the most appropriate settings for the transmission before or after you set
the document on the ADF. You can also change these settings during transmission, but the change
will not become effective until the machine starts transmitting the next page.
You can confirm whether each page was transmitted successfully or not by setting Verification Stamp
to “ON’' (see pages 24-25). Verification Stamp is stamped at the bottom of each successfully
transmitted page with a small pink®nnark.
Resolution
Your machine Is preset to Standard resolution, which is suitable for an ordinary document.
1
The current setting of Resolution is indicated by on the display.
15-10-1991 15:00
r-J 1
STD FINE S-F!NE
If the document is very detailed, press I RESOLUTION I and select Fine resolution.
RESOLUTION
15-10-1991 15:00
r-J I L,
STD FINE S-FINE
If the document is extremely detailed, select S-FINE, which stands for Super Fine
resolution.
SESOLUTtON
15-10-1991 15:00
r-i I 1-^
STD FINE S-FINE
To return to the Standard setting position, press I RESOLUTION I again.
After choosing the appropriate resolution setting, proceed to the next transmission
setting or begin dialing.
NOTC
1. If you set Fine or Super-Fine resolution, the document will take longer to send than with Standard resolution.
2. When transmission ends, the setting returns to the standard setting. If you frequently use a different setting from
the preset setting, change the standard setting (see Fax Parameters, pages 24 - 25).
3. To make a trial copy before sending, press [COPY [.
29
Page 33

How to Load a Document
First, make sure that your document is free of staples
and paper clips, and is not torn, greased, or covered
by any foreign objects.
Place the document face down on the Automatic
Document Feeder (ADF) with the top edge going into
the machine until it stops. Adjust the sliding document
guides to ensure that the document is centered on the
ADF.
If you are sending two or more pages, make sure that
the bottom sheet enters first. You can also stack
up to 10 sheets on the ADF at one time. If you want
to send more pages, you can place them on top of the
last page on the ADF once transmission has started,
as tong as you do not have more than 10 sheets on
the ADF at any one time.
When you set a document on the ADF, you can now
make basic transmission settings, or begin the dialing
procedure.
Face down
Document Guide
INCORRECT
The ON LINE lamp will blink when you set the
document on the ADF correctly.
28
Page 34

TRANSMISSION SETTINGS
You can temporarily change several settings, such as Resolution and Original (Contrast), before you
send a document. Choose the most appropriate settings for the transmission before or after you set
the document on the ADF. You can also change these settings during transmission, but the change
will not become effective until the machine starts transmitting the next page.
You can confirm whether each page was transmitted successfully or not by setting Verification Stamp
to “ON" (see pages 24-25). Verification Stamp is stamped at the bottom of each successfully
transmitted page with a small plnk®mark.
Resolution
Your machine is preset to Standard resolution, which is suitable for an ordinary document.
1
The current setting of Resolution is indicated by on the display.
15-10-1991 15:00
r-J 1 >
STD FINE S-FiNE
If the document is very detailed, press I RESOLUTION I and select Fine resolution.
RESOLUTION
15-10-1991 15:00
r-J I
STD FINE S-FlNE
If the document is extremely detailed, select S-FINE, which stands for Super Fine
resolution.
RESOLUTION
15-10-1991 15:00
^ I
STD FINE S-FINE
To return to the Standard setting position, press I RESOLUTION i again.
After choosing the appropriate resolution setting, proceed to the next transmission
setting or begin dialing.
NOT€
1. If you set Fine or Super-Fine resolution, the document wilt take longer to send than with Standard resolution.
2. When transmission ends, the setting returns to the standard setting. If you frequently use a different setting from
the preset setting, change the standard setting (see Fax Parameters, pages 24 - 25).
3. To make a trial copy before sending, press | COPY I.
29
Page 35

Original (Contrast)
Your machine is preset to NORMAL contrast which is suitable for an ordinary document.
1
The standard setting of Contrast is indicated by on the display.
15-10-1991 15:00
1 "'
NORMAL
2
When you send a document which has light contrast. Dress 1 ORIGINAL t and select
LIGHT.
NORMAL LIGHT
To return to NORMAL, press IORIGINAH again.
After choosing the appropriate contrast setting, proceed to the next transmission
setting or begin diaiing.
—'r-l
LIGHT
15-10-1991 15:00
—
J ^
ноте
1. When transmission ends, the setting returns to the standard setting. If you frequently use a different sotting from
the preset setting, change the standard setting {see Fax Parameters, pages 24 - 25).
2. To make a trial copy before sending, press fCOPY |.
Page 36

Halftone
The Halftone setting is useful when you send photographs or illustrations with gray tones. The Halftone
function is preset to OFF in your machine.
1 The standard setting of Halftone is indicated by When it is turned on, it will
appear on the display.
15-10-1991 15:00
I
HALF TONE
To set Halftone to ON,
2
Resolution is automatically set to FINE and Contrast is set to NORMAL. The settings are
fixed during the communication.
HALF TONE
15-10-1991 15:00
—
1_______
HALF TONE
“1
15-10-1991 15:00
r-J r-J
NORMAL LIGHT STD FINE S-FINE
ORIGINAL
RESOLUTION
To set Halftone to OFF, press I HALF TON^ again.
After choosing the appropriate Halftone setting, proceed to the next transmission
setting or begin dialing.
HALF TONE
NOTE
When you use the Halftone function, it takes longer to send a document since more picture information must be sent
to the other machine to make a detailed copy.
31
Page 37

Error Correction Mode (ECM)
ECM mode provides error free copy when your fax machine is connected with a receiving fax machine
which has ECM mode capability and your ECM mode is set to ON. The transmission time required
in the ECM mode is the same as the normal G3 mode in most cases.
Your machine is preset to ECM = ON. If the telephone line is poor, then the transmission will take
longer because the machine will have to retransmit the lines that have errors. In the case where
the transmission time is more important than the quality of the received copy, you may set your fax
machine to ECM = OFF. This will inhibit the ECM mode for the transmission regardless of the capa
bility of the receiving machine. To set ECM - OFF,
i— minL-T
and
Blinking
Enter the Fax Parameter number.
Q][I]
To set ECM = OFF.
1
c
To return to ECM = ON,
2
CZI]
4
To store the new setting, ; J
To return to standby,
'
------
<:> START
© STOP
n
15
15
15
j .
'— Blinking
15-10-1991 15:00
[2] 2
^—-Blinking
[2] 1
"^Blinking
[2] 2
Blinking
32
Page 38

Automatic Transmission Journal (XMT Journai)
Transmission Journai (XMT Journal) is a report which tells you whether the document is sent suc
cessfully or not. It is printed out automatically after each transmission when the Transmission Journal
is set to ON. The Automatic Tansmission Journal is, however, preset to OFF in your machine. If you
wish to turn ON the setting, follow the procedure below.
1
tr minimi
and
Slinking
Enter the Fax Parameter number.
mii]
To turn on the Transmission Journal,
To turn off the Transmission Journal,
1
Ф START
I ]
To store the new setting
fng, )—{
@ STOP
19
19
19
Blinking
15-10-1991 15:00
[1] 1
[1] 2
[1] 1
■H
'—Blinking
"^“Blinking
^—-Blinking
Hi:
To return to standby,
NOTC
1. The Transmission Journal setting does not return to the standard setting position until you change it again.
2. The number inside the brackets is the standard setting and the number blinking is the current setting.
3. A sample Transmission Journal is shown on page 54,
33
Page 39

MAKING A COPY
Before you send a document, you can make a copy of it on the machine so that you can see what
it will probably look like to the person who receives it.
Single Copies
Place the document face down on the ADF.
1
Adjust right and left Document Guides.
When making a copy, the machine will
automatically select Fine Resolution, unless you
change the setting. If necessary, adjust
i RESOLUTION i , iORIGINALl , and
I
HALF TONE i (review pages 29 - 31).
15-10-1991 15:00
COPY/LIST
The machine begins making a copy.
To stop the copy process, press [ STOP
15-10-1991 15:00
Page 40

Multiple Copies (Using the Memory)
If you want to make two or more copies of a document, use the following procedure.
Place a document face down on the ADF.
Adjust left and right Document Guides.
If necessary, adjust I RESOLUTION I ,
2
i
ORIGINAin, and I HALF TONE I (review pages
29 - 31).
COPY/UST
Enter the number of copies.
j Ex; mm
15-10-1991 15:00
15-10-1991 15:00
01
t
03
t
Blinking
Blinking
<J> START
00-03
The machine begins storing the document, then
prints out copies.
01 -03
♦
03-03
MOT<
When you make multiple copies of a single-page document or multi-page document, copies are made page by page.
Page 41

DIALING TECHNIQUES
This section explains four ways of sending documents. To review how to enter Abbreviated dialing
numbers, see page 19.
Direct Dialing (On-Hook Dialing)
Direct Dialing does not require any advanced settings. You can use your machine right away, it is
as easy as using a telephone set.
1
Place the document face down on the ADF.
Adjust right and left Document Guides.
SPACE
2
TEL/DIAL
15-10-1991 15:00
, the lamp lights up.
Dial the number from the keypad.
5551234
Ex: [IlisIEillEaii]
If you need a special access number to get an outside line, dial it first and then
press I PAIisE i to enter a pause before dialing the full number. A hyphen is
displayed for a pause.
Ex: illiMUSEir^r^fsirnr^flllJl
9-5551234
36
Page 42

Your machine will dial the number. If the line is free, your documents will be sent and the ON LINE
lamp lights up.
5551234_
■■ ON LINE
(: lamp ON)
if the other station has an ID, and the ID will appear on the display.
ID DISPLAY
212 5551234
ON LINE
When transmission ends, the display shows the number of pages sent (e.g., 05).
ON LINE
05
: lamp OFF)
If the line is busy, your machine will redial the number for you up to twice with three-minute intervals.
5551234
( : lamp flashes)
ON LINE
If no contact is made, the ALARM lamp will light up and the display shows an information code (e.g.,
630 which means no contact was made).
630
You can start another round of automatic dialing by pressing I REDIAL I (see page 41).
NOTC
If you hear a voice through the speaker, lift the handset and talk with the other party (see page 45).
ON LINE
ALARM
37
Page 43

Off-Hook Dialing
1
Place the document face down on the ADF.
Adjust right and left Document Guides.
2
Lift the handset^^^^^T^
3
Dial the number from the keypad.
Ex: II]Eli][Till]Sill]
% XJ
4 If the line is free and the other machine answers,
you will hear a long “beep” sound.
<t> START
15-10-1991 15:00
5551234_
The ON LINE lamp will light up, replace the handset. display
if the other station has an ID, it will appear on the
display.
NOT<
If the line is busy, you must replace and try again later by dialing the same number or by pressing | REDIAL i
(See page 41).
212 5551234
Page 44

Abbreviated/One-Touch Dialing
1
Place the document face down on the ADF.
Adjust right and left Document Guides.
15-10-1991 15:00
2o To dial using ABBR. key,
and enter a two-digit number from the
keypad.
3
____
Ex;
1 n
[ -1
[03]
5551234
&
2b To dial using One-Touch key,
5551234_
The full number (e.g. 555 1234) will be dialed
and shown on the display.
If the number dialed answers, the ON LINE lamp lights up and document transmission will start.
5551234_
If the other station has an ID, and the ID will appear on the display.
^Blinking
ON LINE
ID DISPLAY
212 5551234 ON LINE
When transmission ends, the display will show the number of pages sent.
10 DISPLAY
05
If the line is busy, the machine will wait three minutes and then automatically redial
the same number up to twice with three-minute intervals.
03
39
5551234 ON LINE
lE^
Blinking
ON LINE
Page 45

If no contact is made, the ALARM lamp will light up and the display will show an information
code (e.g., 630 which means no contact was made).
630
> ALARM
You can start another round of automatic dialing by pressing 1 REDIAL I (see page 41).
ON LINE
NOTC
If you hear a voice through the speaker, lift the handset and talk with the other party {see page 45).
i:
40
Page 46

Redialing
If the number you dialed is busy or there is no answer, the machine will wait three minutes and then
automatically redial the number for you up to twice.
If no contact is made, the ALARM lamp will light up and the display will show an information code
(e.g., 630 which means no contact was made).
630
You can redial the last number by simply pressing I REDIAL I . The machine will redial the last
number a total of three times.
You can use Redial if you dialed the last number using one of the following:
One-Touch Dialing
Abbreviated Dialing
Direct dialing from the machine keypad (ON-Hook or OFF-Hook)
Redialing
ALARM
Even after you made contact and succeeded in sending your documents, you can still use I REDIAL
to contact the same number again.
ноте
1. You cannot use this Redialing feature if you are dialing by an external telephone connected to the rear panel of
the machine.
2. If you hear a voice through the speaker, lift the handset and talk with the other party (see page 45).
41
Page 47

MEMORY TRANSMISStON
The memory function allows you to perform easily many different tasks. If you wish, you can store
your documents into memory and then have the machine transmit the stored documents. After trans
mission is completed, the stored documents are erased automatically.
The advantages of memory transmission are:
1. The same document can also be transmitted to multiple stations.
2. If communications fail when transmitting from the memory, your machine wilt retransmit the remaining unsuccessful page(s) automatically.
NOT€
В
1. When you use memory transmission, a Memory Transmission Journal (COMM, JOURNAL) is printed out
automatically after transmission. This report lets you verify if transmission was successful or not (see page 59),
2, If a memory overflow condition occurs while storing document(s) into the memory, the machine will start transmitting
those pages which are successfully stored. If you wish to cancel this transmission, press f^OP \ and confirm
on the display (see Specifications, page 72 for the Image Memory Capacity).
870
3, The percentage of memory used is shown by " a " mark at the left corner of the display and the two-digit code
at the right corner indicates the number of pages storing into the memory.
02
(Each - represents 10% memory used.)
4. INFO. CODE = 633 will be displayed if there is no answer at the receiving side after the last automatic redial.
The document stored for this transmission will be erased from the memory automatically and the Memory
Transmission Journal (COMM. JOURNAL) will be printed out stating the transmission is “INC” (Incomplete).
633
5. If a power failure occurs, the document information stored in the machine's memory will be lost. In this case the
Power Failure Report will be printed out automatically after the Power is turned ON again. The report is not print
ed out if there were no documents stored in the memory.
42
Page 48

Memory Transmission to Single Station
If you have a number of pages to send to a single station, you may be able to save time by using
mdmory transmission. Instead of waiting for your transmission to be completed, you can store the
document in your machine’s memory first and then have it transmitted to the station automatically.
By doing this, if the line is busy, the machine will redial later without you being there and send the
stored documents.
Place a document face down on the ADF.
Adjust left and right Document Guides.
2
Dial by pressing a One-Touch key, iABBR land
two digits, or Itel/DIALI and a full number.
Ex; One-Touch key
Ф START
4
Your machine will print out the following list to
confirm the number you want to send to.
'------------------------------
15-10-1991
15-10-1991
01 1
■■ - —" —
15:00
15:00
5551234
After printing out, your machine will feed the
document to store into the memory.
Dialing begins automatically.
When transmission ends the machine will print
out a Memory Transmission Journal {COMM.
JOURNAL) (see page 59) and the document in
the memory will be erased automatically.
The machine returns to standby.
ноте
[01
15-10-1991 15:00
5551234
D if you press I STOP ¡while the machine is still dialing or sending a document, the transmission will be canceled and
the documents stored in the memory will be erased automatically.
43
01
05
Page 49

Multistation Transmission
Using the built-in memory you can send a document sequentially to more than one station at one
time. This saves you the trouble of sending the same document to each station one after another.
Place a document face down on the ADF.
T
Adjust left and right Document Guides.
Dial by pressing a One-Touch key, i ABBR land
two digits, I TEL/DIAG and a full number.
Ex: iABBRir5]r7l
fABB^ [Tirol
START
c
Your machine will print out the following list to
confirm the numbers you want to send to.
■
15-10-1991
■
15-10-1991 15:00
[57]
[20
5327890
53167890
15:00
After printing out, your machine will feed the
document to store into the memory.
Dialing begins automatically.
[57]
When transmission ends the machine will print
out a Memory Transmission Journal (GOMM.
JOURNAL) (see page 59) and the document in
the memory will be erased automatically.
The machine returns to standby.
NOT€
1. You can enter up to three Direct dialings by pressing |TEL/DIALl and a full number.
2, If you press I STOP j white the machine is still dialing or sending the document, the multistation transmission will
be canceled and the document stored in the memory will be erased automatically.
44
15-10-1991 15:00
01
05
5327890
Page 50

What to Do When You Hear a Voice through the Speaker
If the other person's fax machine is set for
manual reception, you will hear a voice through
the speaker when you try to send documents.
Lift the handset.
Tell the other person to prepare for reception.
<t> START
c
When you hear a beep,
The ON LINE lamp lights up and transmission begins.
If the other station has an ID, “and the ID will appear on the display.
ID DISPLAY
Replace the handset.
5551234
ON LINE
45
Page 51

RECEIVING DOCUMENTS
RECEPTION MODES
When your machine receives documents, you can select one of three modes o f Reception as shown
below.
Your machine is preset to the Fax Mode. You can select another mode of Reception by pressing
the 1FAX/TELEPHONEI key.
Telephone Mode (TEL)
When your machine is set to this mode, your machine is ready for voice communication only.
You must manually press [ START I and then hang up the handset to receive document.
Fax Mode (FAX)
When your machine is set to this mode, your machine will begin to receive documents automatically
after it rings 2 times.
AUTO Mode (AUTOMATIC)
This mode is useful when you want to use the telephone line for both Fax and Voice communication
(for example when there is only one telephone line in your office).
Either of the following two modes can be selected by changing the TAM parameter shown in the
Fax Parameter Table (see pages 24 - 25).
(1) TEL/FAX Reception
This mode is selected by setting the TAM Parameter to “None” (Not connected) and your machine
then automatically switches to document reception or voice communication by monitoring the
line for a fax signal.
(2) TAM/FAX Reception
You should select this mode when you connect a TAM (Telephone Answering Machine)
to the facsimile.
This mode is'selected by setting the TAM Parameter to “Connected”. The function of this mode
is described in Appendix I (see page 68).
NOTC
1. Depending on the PBX conditions at the moment the fax machine is called, the number of rings can differ from
the setting number.
2. Depending on the model of Telephone Answering Machine (TAM) that is connected. The TAM/FAX Reception mode
may not work satisfactory.
46
Page 52

How to Set Fax Mode
Your machine is preset to the FAX mode. The FAX/TELEPHONE lamp is ON when your
machine is set to this mode.
FAX/TELEPHONE
If the FAX/TELEPHONE lamp is not ON, press the I FAX/TELEPHONE I key, and confirm that
the FAX/TELEPHONE lamp is ON.
How to Set Telephone Mode
1
Press the I FAX/TELEPHONE I key and confirm that the FAX/TELEPHONE lamp goes off. This
indicates that the machine is now set for Voice Communication.
FAX/TELEPHONE
When your telephone rings;
Lift the handset.
Talk.
When you want to receive documents after talking, press i START I when you are ready and
then replace the handset.
47
Page 53

How to Set AUTOMATIC Mode
TEL/FAX Reception
You must set the TAM parameter to “None” (Not connected) before setting this mode (see pages
24 - 25).
Press the i FAX/TELEPHONÉ I key and confirm that the FAX/TELEPHONE lamp flashes. This
indicates that the machine is now set for AUTOMATIC Reception.
i ^ MX/TELETHON e
7^
When the other party sends a document;
2a Your machine begins to receive the document.
2b When you will hear a beep-beep sound coming through the speaker;
tf you do not lift the Handset
Your machine will begin to receive a document after a few seconds if it detects a Fax signal.
If you lift the Handset
Talk with other party and press ( START I to receive document or replace the Handset
if you do not wish to receive document.
ШУ.
Page 54

SUBSTITUTE RECEPTION
(MEMORY RECEPTION)
If the recording paper runs out in the middle of a page during reception, the machine wiil stop recording
and automatically start receiving into its image data memory. Stored documents are automatically
printed out from the top of the page that resulted in an incomplete recording when a new roll of record
ing paper is loaded.
When the machine finishes the memory recep
tion and there is no recording paper, an infor
mation code appears on the display.
Open the Receiving Unit and replace the record
ing paper (see page 62).
Close the Receiving Unit.
After loading new recording paper, the record
ing paper projecting from the unit will be cut
automatically and the machine will start printing
out the document stored in the memory, which
will be erased when printing is completed.
The machine will return to standby.
010
15-10-1991 15:00
NOT€
1. You can replace the recording paper while stored documents are m the machine’s memory.
2. When the memory overflows, the machine wilf stop receiving and release the communication line. The document(s)
stored in the memory up to that moment will be printed out automatically.
3. If a power failure occurs, the document information stored in the machine’s memory will be lost. In this case the
Power Failure Report {see page 60) will be printed out automatically after the Power is turned ON again. The report
is not printed out if there were no documents stored in the memory.
49
Page 55

1
POLLING
Polling rneans calling another station and requesting the transmission of documents to you. The other
station must know in advance that you will call, and must have a document set on the ADF. You
can also record a polling password, shared by the other station, to ensure security.
How to Set the Polling Password
3
and
Enter a four-digit password. Ex; [9]|l][I][i]
To store the password, ^ start
ь
-
3
3
15-10-1991 15 :
Blinking
9876
^Blinking
00
ноте
1. Polling might not function with all fax machines. We suggest you attempt a trial polling before you actually poll
for important documents.
2. You cannot have other stations poll a document set on your machine.
3. If you make a mistake in Step 2, use the| < jor| > ¡key to move the cursor to the incorrect number, and then enter
the new number over it. To erase the password, press I TEL/DIALl.
4. If a password is not set in the other station, you can stilt poll the other station even though only your machine has
a password.
50
Page 56

How to Poll
To poll a document from the other station, follow the procedure below.
1
Make sure there is no document on the ADF.
The lamp lights up, which means that polling is set now.
1
3a
Polling password appears when it has been
previously set (see page 50).
Press I START I key.
Polling password setting message appears if it
3b
has not been previously set.
Enter a four-digit temporary password.
Ex: Enter [T] E [1] [4] and press I START I.
15-10-1991 15:00
9876
TT
Blinking
■Slinking
1234
Dial by pressing IABBR i and enter two-digit
code number, One-Touch key or I TEL/DIALl
and a full number.
Ex; One-Touch key !
1
[07] 312 5551234
312 5551234
If the other station is ready to be polled and the line is free, your machine will start receiving
a document.
Page 57

B
USING THE MACHINE’S TELEPHONE
Making a Regular Call
You can use the handset on your machine to make regular calls. To do so, lift the handset and dial
a full number just as you would using an ordinary telephone.
1
Lift the handset.
Dial the telephone number on the keypad.
Ex: [2][i][I][i][T]|T][T][I][I][4]
2131111234
Making Voice Contact after Sending/Receiving
You may want to talk to the other person over the telephone after sending or receiving documents.
To do so, perform Step 1 while the machine is still sending or receiving.
SPACE
1
TEL/DIAL
, the lamp lights up.
When sending or receiving is over and the other party replies with a Voice Contact request,
you will hear a beep-beep-beep sound coming through the speaker.
When the TEL/DIAL iamp starts blinking, lift the handset.
The TEL/DIAL lamp goes off.
ID DISPLAY
212 111 1234
Answering a Voice Contact Request
When you hear a beep-beep-beep sound coming through the speaker, it means you are receiving
a voice contact request. Reply by following the above procedure from Step 3. If no one answers
the request, a “VOICE CONTACT REQUESTED” message will be printed out on the Transmission
Journal {see page 54).
52
Page 58

PRINT OUT REPORTS AND LISTS
To help you maintain records of the documents you send and receive, as well as lists of the Abbreviated
Dialing numbers and Fax Parameters you record, the UF-127M can print out the following reports
and lists.
32 Transaction Journal
The “Journal” is a record of the last 32 transactions {a transaction is performed each time you send
or receive a document). You can print it out manually in the following way;
Make sure no document is on the ADF.
COPV/LIST
and
START
The machine starts printing out a Journal.
Transmission Journal (XMT Journal)
A Transmission Journal is printed out automatically after each transmission if you set the Fax
Parameter of Transmission Journal to ON in advance (see page 33). If necessary, it can also be
obtained manually by the following procedure;
Make sure no document is on the ADF.
COPY/LIST
and
START
The machine begins printing out a Transmission Journal (see page 54 for a sample Journal
printout).
1
CTD
NOT€
UF-127M is preset at the factory to permit you to send documents even when there is no recording paper in the machine,
or when a mechanical error that affects receiving (e.g. an overheated recording head) has occurred. With this setting,
however, some transactions might not be recorded on the Journal. To change the setting (and ensure a complete
Journal printout), see pages 24 - 25.
53
Page 59

Sample 32 Transaction Journal
' ■ (1) (2)
************************ -JOURNAL- *************** DATE 15-10-1991 **** TIME 12:311 ********
(3)
NO. COM
01
02
0 3
04 OK 02 00:01 '07
05
06
07
32
OK 02 00:01 '06
S-OK
OK
OK 05/05(P.01)
407
OK
OK 05
(5)
PAGES(START) DURATION
00
01
02/05(P.01)
03/05(P .03)
(6) (7)
00:00 '20
00:03 '20
00:02'з8
00:01'09
00:00'46
00:02 '52 XMT T
X/R
XMT
XMT
RCV
XMT
XMT
XMT
XMT
IDENTIFICATION
T 517
T 91
T
(8)
2 34 56
5 16 1 11 12 34
673 542
2 37 1 79 26
0466
2 3
1689
9 1 3 74 1 77 17 1 5- 10
41 395 1819
516 П1 123Д 15-10 12:32
(9)
DATE
1 5- 10
15-10
15-10
15-10
1 5- 10
15-10
(10)
TIME
10:44
10:45
10:47
10:53
10:57 840480AC7800
11:04
11:07 840480ЛС7800
(12)
-UF-127M Singapore
03)
(11)
DIAGNOSTIC
840480AC7800
A40480AC7800
010220200000
840480AC7800
050280AC7SOO
8401180AC7300
_ -)(«««<<«««»
Sample Transaction Journal (XMT Journal)
************************ -JOURNAL- *************** DATE 15-10-1991 **** TIMS 12;3H ********
(3) (H) (5) (6) (7)
NO. COM PAGES(START) DURATION X/R
11 OK
01 00:00'5A X.MT T
(8) (9) (10) (11)
IDENTIFICATION DATE TIME DIAGNOSTIC
8l 425 1П 1234 15-10 12:34
(14),
VOICE CONTACT REQUESTED.
-UF-127M Singapore
(0 (2)
(12)
(13)
C0048C2:7920
_ **********
54
Page 60

Journal Printout Explanation
(1) Printout date
(2) Printout time
(3) Communication number
(4) Communication result
(5) Number of pages transmitted
or received
(6) Duration of communication
(7) Type of communication
(8) Remote station identification
(9) Communication date
(10) Communication start time
(11) Diagnostic
(12) Own LOGO
(13) Own ID number
(14) Call back message
Day-Month-Year
Hour : Minute
01 ~32 (Does not always begin with 01 when printed out
manually).
“OK" indicates that the transmission was successful.
“S-OK” indicates that i STOP I was pressed during
communication.
Three-digit information code (see page 61) appears when
a problem occurs.
XX (from the ADF) or
XX/YY (from the memory)
XX; Indicates the number of pages successfully
transmitted.
YY: Indicates the total number of pages stored in
memory.
P.(ZZ): Indicates the first page number transmitted from
memory.
Example:
PAGE (START)
02/05 (P.01) Two pages of five were sent successfully but
three pages of five were not sent.
03/05 (P.03) Documents remained in memory were sent
from page number three (P.03) and were
sent three pages.
Hours : Minutes : Seconds
“XMT" means Transmission
“RCV" means Reception
“T" indicates direct dialing or One-Touch/Abbreviated
dialing with no recorded station name.
Day-Month
Hour : Minute
For service personnel only
Up to 25 characters
Up to 20 digits
Appears when voice contact was requested
(see page 52).
55
Page 61

Abbreviated/One-Touch Dialing Number List
Before or after you enter any new setting of Abbreviated dialing numbers, you can confimn the cur
rent settings by printing out the Abbreviated Number list.
To print out the list,
Make sure no document is on the ADF.
COPY/LIST
<t> START
and
The machine starts printing out the list.
Sample Abbreviated Number List
O) (2) (3)
«***»****«»»#»»** -ONE-TOUCH/ABBR.NOS.- ********* DATE 15-10-1991 TIME 15:00 ***** p.t
. (U)
A33R.no.
[01]
[02]
[03]
[09]
[17]
[22]
[
2 8
]
[33]
[67]
(5)
ST.ATION NAME
New York 212 111
Chicago
Detroit
Minneapolis
St. Louis
Denver
Seat tle
San Francisco
Los Angeles
(6)
TELEPHONE NO
3 12
313
6 12
319
303
206 111 1239
915
213
1239
m
1239
111
1239
m
1239
111
1239
111 1239
111
1239
111 1239
(7) (8)
MO. OF STATIONS = 09 POLLING PASSWORD = 987Ô
-UF-127M Singapore
_1 212 1111239
(9)
(.10)
Printout Explanation
(1) Printout date
(2) Printout time
(3) Page number
(4) One-Touch/Abbreviated number
(5) Station name
(6) Telephone number
(7) Number of recorded ABBR and
One-Touch numbers
(8) Polling password
(9) Own LOGO
(10) Own ID number
Day-Month-Year
Hour: Minute
[01] to [16]: One-Touch Dialing numbers
[17] to [70]: ABBR. Dialing numbers
Up to 15 characters
Up to 36 digits
Up to 70 stations
4 digits
Up to 25 characters
Up to 20 digits
_ ■*»»****#»*
56
Page 62

Fax Parameter List
Before or after you enter the new setting of a Fax Parameter, you can confirm the current settings
by printing out a Fax Parameter List.
To print the list,
Make sure no document is on the ADF.
COPY/LIST ^
T5“ “ n
2
Ф START
The machine starts printing out the list.
Sample Fax Parameter List
_pAX PARAMETERS- DATE 15-10-1991 TIME 12:3^ »«»»»»*»
PARAMETER NO. & PARAMETER
(3)
01
02
03
05
06
07
13
15
17
1 8
19
32
37
38
(iO
RESOLUTION
ORIGINAL
STAMP
JOURNAL PRINT
HEADER PRINT
DIALLING METHOD
XMT IN N0 PAPER
ECM
SUBSTITUTE RCV
STAMP at MEM. XMT
XMT JOURNAL
INITIAL OPR. CALL (1;0ff
TAM
SILENT DET.fTAM I/F]
(5)
(1iStandard
(1: Normal
(1:0ff
(l;0ff
(1 :Inside
C1:Tone
(1;Allowed 2:Not allowed)
(1:0ff
(1:Invalid
(1:0ff
(1:0ff 2:Automatic Print)
(1:None 2:Connected)
(1iOff
2:Fine 3:S.Fine)
2:Light)
2;0n)
2:Automatic Print)
2:0utside 3:None)
2:Pulse)
2;0n)
2:Valid)
2:On)
2: On)
2;0n)
O) (2)
(6)
CURRENT
SETTING
1 1
1
1 2
2
1
1 2
1
2
2
1
1
1 2
1
2
i7)
STANDARD
SETTING
1
2
1
1
2
2
1
1
1
2
-UF-127M Singapore
»»»»»»»*»»*»»*«*»***»*«*«»»»**»«»*»»»**«»»«»»«»«*»»»»»*»* _i 212 111 1234
Fax Parameter List
(1) Printout date
(2) Printout time
(3) Parameter number
(4) Parameter
(5) Parameter setting
(6) Current setting
(7) Standard setting
(8) Own LOGO
(9) Own ID number
Explanation
Day-Month-Year
Hour; Minute
01 - 38
Function
Setting number detaiis
See page 25.
See page 25.
Up to 25 characters
Up to 20 digits
57
(8)
(9)
Page 63

Character Code Table
To' print out a copy of the Character Code Table, which is used to record your Logo, etc.,
Make sure no document is on the ADF.
COPY/LIST
3
and
<t> START
2
The machine starts printing out the list.
Character Code table
CHR.
(CODE)
CHR. N
(CODE)
CHR.
(CODE)
CHR.
A B
(10)
(23)
A
(36)
a
(11)
0
{2k)
A 0
(37)
b
(12)
(25)
(38)
c
(CODE) (UO) (Ul) ik2)
CHR. n
(CODE)
(53)
CHR. a
(CODE) (66)
CHR. 0
(CODE) (00) (01)
CHR.
(CODE)
CHR.
(CODE)
(SP)
(72)
+
(85)
0
i5k)
a
(67)
1
*
(73)
1
(86)
P
(55)
6
(68)
2
(02)
(7i+) (75)
rt
(87)
CODE
-CHR.
C
D E F
(13)
P
Q
(26)
ilk)
R
(27)
TABLE-
(15)
S
(28)
DATE 15
G
(16)
T
(29)
-10-1991 **** * TIME
H
(17)
U
(30)
I
(18)
V
(31)
J
(19)
W
(32)
12:34
K L
(20) (21)
X
(33)
Y
(3I+)
M
(22)
Z
(35)
u
(39)
(51)
(6U)
(
(83)
[ ]
(96)
1
m
(52)
y
z
(65)
*
)
(8k)
*
(97)
d
(1+3)
q
(56)
e
(UU)
r s
(57)
ii e
(69)
(03)
(TO)
li
3
(OU)
>
(76)
%
$
(88)
(89)
f
(1+5)
(58)
e
(71)
5.
(05)
(77)
< =
(90)
g
(1+6)
t
(59)
6
(06)
/
5
(78)
(91)
h i
(1+7)
u
(60)
7
(07)
'#
(79)
>
(92)
(1+8)
V
(61)
8
(08)
& -
(80)
9
(93)
j
(1+9)
w
(62)
9
(09)
(81)
a
(91+)
k
(50)
X
(63)
(82)
(95)
CHR.
(CODE) (98)
(99)
-UF-127M Singapore
♦»**»**#*««♦**«**«»»***##«**««#«**«««»**«*««**#«**«*«*** 212 111123U
58
Page 64

Memory Transmission Journal (COMM. JOURNAL)
A Memory Transmission Journal is printed out automatically when you use Memory Transmission
(Multistation Transmission).
Sample Memory Transmission Journal
-COMM. JOURNAL- ***»^(«» DATE 15-10-1991 **** TIME 12:34 ****»*)nt
(1) (2)
MODE = TRANSMISSION
C6)
N0 .
01
02
0 3
04
0 5
06
(7)
COM
OK
OK
OK
INC
OK
OK
(8)
ABBR.NO.
(01 ]
(02]
(15]
( 16]
[27]
(9)
STATION NAME/
TELEPHONE NO.
London
Geneva
San Francisco
Vancouver
New York H. Q.
555
1 23 4
Memory Transmission Journal
(1) Printout date
(2) Printout time
(3) Type of communication
(4) Memory Transmission start date
and time
(5) Memory Transmission end date
and time
(6) Communication number
(7) Communication results
(8) Abbreviated number or
One-Touch number
(9) Station name and/or telephone
number recorded in the machine
(10) N-umber of pages transmitted
(11) Own LOGO
(12) Own ID number
(3)
(4)
START = 15-10 12;ii0
(10)
PAGES
0 5/ 05
0 5/ 05
0 5/ 05
0 1/ 05
05/05
05/05
END = 15-10 12:45
(5)
(11)
-UF-127M Singapore
_ 1 212 1 1 1 1234
(12)
_ ** * ** ** * **
Printout Explanation
Day-Month-Year
HounMinute
Memory transmission
Day-Month Hour: Minute
Day-Month Hour: Minute
Up to 73 stations (70 ABBR. and 3 direct dialing)
“OK” indicates that the transmission was successful.
“INC” indicates that the transmission was incomplete.
Up to 15 characters
XX/YY
XX: Indicates the number of pages successfully
transmitted.
YY: Indicates the total number of pages stored in
memory.
Up to 25 characters
Up to 20 digits
59
Page 65

Power Failure Report
If a power failure occurs, the document information stored in the machine’s memory will be lost, in
this case a Power Failure Report wifi be printed out automatically after the Power is turned ON again.
The report is not printed out if there were no documents stored in the memory.
«»»««»»«««««««««ft«««««««««» failure rep.- **** DATE 15-10-1991 **** TIME 14:19 »»»*»*»
POWER FAILURE OCCURRED
(1) (2)
C3)
FROM *** 15-10-1991 13:45 *****
(4)
TO ***
1 5-1 0- 19 9 1
14:19
(5)
-UF-127M Singapore
»**»»**«*»»»*»**»»It*»»#»*212 111 1234
(6)
Power Failure Report Explanation
{1} Printout date
(2) Printout time
(3) Power failure date and time
(4) Power return date and time
(5) Own LOGO
(6) Own ID number
Day-Month-Year
HourMinute
Day-Month-Year Hour : Minute
Day-Month-Year Hour : Minute
Up to 25 characters
Up to 20 digits
fin
Page 66

a
problem solving and daily care
Information Codes
Whisn something unusual occurs, the display may show one of the information codes beigw. These
will help you fix the problem.
Information
code
001/002/
003/004
010
020
030
031
039
060
400
402/404/405
Meaning
Recording paper jam.
No recording paper.
Thermal Recording Head temperature is
too high.
Document misfeeding.
Document paper is too long or jammed.
Document length exceeds 1 meter.
STOP key was pressed while sending/
copying documents and more than one
page remains on the ADF.
Cover is opened.
During initial handshake, receiving station
did not respond or communication error
occurred.
During initial handshake, communication
failure occurred.
Action
Remove jammed paper {see page 63).
Reload recording paper (see page 62). |
Cpen the Receiving Unit for a few minuter
to permit cooling.
1. Reload the document properly
(see page 28).
2. Remove document jam (see page 64),
3. Adjust ADF (see page 67),
Remove jammed document from the ADF
(see page 64).
Remove the documents on the ADF (press
I STOP I when a document has already
entered the ADF). Reload the document
and try again.
Close the Receiving Unit.
1. Check with the other party.
2. Reload the document and try again.
Reload the document and try again.
403 No polling capability at the other side.
407
408/409
411/414
412
415
416/417/418/
419/490
420/421 Machine went into receiving mode, but no
422
434/459/
493/494
451/495
540/541/542/
534/544
630/633
No confirmation from the receiving station
for the previous page sent.
Other side confirmation of previous page is
illegible.
Polling password does not match.
No data from the transmitting side.
Polling function is incompatible.
Received data has too many errors.
command from the transmitting side.
Interface is incompatible.
Communication error occurred while
receiving.
Telephone line disconnected.
Communication error occurred, while
transmitting.
Redial was not successful due to a busy
line or no response from the called station.
Ask other side to set “PCLLED = ON”.
Wait a few minutes and transmit again.
Wait a few minutes and transmit again.
Check polling password.
Check with the other party.
Inform the other party that your machine
does not have the polling transmission
feature.
Check with the other party.
1. Other side misdialed.
2. Check with the other party.
Check with the other party.
Check with the other party.
Check with the other party.
1. Reload the document and try again.
2. Check with the other party.
Reload the document and try again.
870
Memory overflow occurred while storing
documents into memory.
61
1. When substitute reception is used,
reload recording paper.
2. Transmit documents without storing into
memory.
Page 67

Installing Recording Paper
Your facsimile machine uses a roll of special recording pap>er. You can easily install paper yourself
by following the steps below.
Receiving Unit
1, Open the Receiving Unit by pressing down the latch
button on the right side panel and swinging the
Receiving Unit backward.
2. If there is a used roil inside, lift it out and set a new
roll in its place. Be sure the direction of the roll is
as shown.
3, Close the Receiving Unit carefully by pressing both
ends gently until the cover locks into position {you
will hear a “click” sound).
4, The recording paper projecting from the unit will be
cut automatically. Remove this cut paper.
62
Page 68

Clearing a Recording Paper Jam
If the recording paper becomes jammed in the machine, you can remove the jammed recording paper
by following the steps below.
1. Open the Receiving Unit by pressing down the latch
button on the right side panel and swinging the
Receiving Unit backward.
2. Remove the jammed recording paper and reset it
(see Step 2 on page 62).
3. Close the Receiving Unit carefully by pressing both
ends gently until the cover locks into position (you
will hear a “click” sound).
4. The recording paper projecting from the unit wiil be
cut automatically. Remove this cut paper.
63
Page 69

Clearing a Document Jam
If a.document becomes jammed in the machine, the display will show the information code 031.
To clear the jam,
1. Open the Receiving Unit by pressing down the latch
button on the right side panel and swinging the
Receiving Unit backward.
2. Lift the Scanning Roller and remove the jammed
paper.
3. Close the Receiving Unit by pressing down on it
gently. The recording paper projecting from the unit
will be cut automatically. Remove this cut paper.
Scanning Roller
c--:
64
Page 70

Cleaning the Head Roller and Scanning Roller
The head roller in your machine will gradually accumulate dust in the course of regular use. You
should therefore clean the roller periodically using the following procedure.
1. Open the Receiving Unit by pressing down the latch
button on the right side panel and swinging the
Receiving Unit backward. Remove the recording
paper.
2. Wipe the Head Roller (black) gently with a soft,
clean cloth soaked with ethyl alcohol, while rotat
ing the roller slowly towards the back or front of the
machine with your fingers.
Receiving Unit
Head Roller
3, Wipe the Scanning Roller (white) with a soft clean
cloth with ethyl alcohol, while rotating the roller slow
ly towards the back or front of the machine with your
fingers.
4. Reset the recording paper correctly (see page 62),
then close the Receiving Unit by pressing down on
it gently. The recording paper projecting from the
unit will be cut automatically. Remove this cut
paper.
65
Page 71

Cleaning the Thermal Head and Image Sensor
The Thermal Head and Image Sensor in your machine needs to be cleaned periodically to ensure
clear received and transmitted copy. How often depends on how much you use your machine.
However, we recommend that you clean the Thermal Head and Image Sensor whenever you clean
the Head Roller.
1. Open the Receiving Unit by pressing down the latch
button on the right side panel and swinging the
Receiving Unit backward.
2. Wipe the surface of the Thermal Head Unit gently
with a soft cloth or gauze soaked with ethyl alcohol.
Be sure to use a clean cloth since the Thermal Head
Unit can be easily scratched.
Receiving Unit
Latch Button
To clean the Image Sensor,
3. Lift the Scanning Roller. Wipe the glass surface of
the image Sensor Unit gently with a soft cloth or
gauze soaked with ethyl alcohol. Be sure to use a
clean cloth since the Image Sensor Unit can be
easily scratched.
Image Sensor
66
Page 72

Refilling the Verification Stamp
The Verification Stamp Unit contains ink. When the stamp appears faded or hard to see, refill the
stamp unit with ink.
1. Open the Receiving Unit by pressing down the latch
button on the right side panel and swinging the
Receiving Unit backward.
2. Refill the stamp unit by placing one drop of Ink into
the refill hole.
Latch Button 0
Receiving Unit
Changing the Document Feed Tension
If misfeeding of documents happens frequently, we suggest you adjust the ADF following the proce
dure below.
Ip"
67
Page 73

APPENDIX I
A. TAM INTERFACE
Your ÜF-127M is equipped with a unique feature called TAM (Telephone Answering Machine) inter
face which enables it to automatically switch a single telephone line either to FAX or TAM. You can
connect most TAMs in the market to your machine and use your existing telephone line very effi
ciently. For the operation of your TAM, please refer to the User’s Guide of the TAM.
Installing Your TAM
For the connecting with your TAM, please ask your service personnel.
Setting up Your Machine for TAM Connection
You will need to set a Fax Parameter and the AUTO RECEIVE mode before you use the UF-127M
with a TAM,
Setting Fax Parameter
1
2
4
5
SÉT
^ ^ and
Enter Fax Parameter number.
3 7
L_n_J
)- and ^
This parameter was set to "None” (Not
connected) as the standard setting. Enter 2 to
activate the TAM interface feature.
2
^—{
To store the new setting,
<t> START
To return to standby,
S STOP
¥r TONE
'S’
____
37
37
15-10-1991 15:00
[1] 2
m 1
1
Blinking
^^linking
■ ^ .
h
68
Page 74

Setting AUTO RECEIVE Mode
To change to the TAM/FAX mode, press the I FAX/TELEPHONEI key until the lamp flashes.
■-FAX/TELEPHONE
Receiving Document with Your TAM Connected
When your TAM receives a call from the remote station, it sends an OGM (Outgoing Message) to
the remote station. At the same time, your fax machine will continue to monitor for a fax signal.
(1) When a remote station sends a document;
Your machine begins to receive a document after the TAM gives an OGM.
Remote
UF-127M
and TAM
Dialing
OGM
П Q
(TAM)
(2) When a remote station’s operator wants to talk;
The TAM gives an OGM then records an ICM (Incoming Message).
Remote
UF-127M
and TAM
Dialing
OGM
Q__D
(TAM)
Record ICM
Q D
(TAM)
Sample of OGM
“This is Smith. Sorry I am unable to take your call.
Please leave your message after the beep tone. This telephone is connected to a FAX
machine, if you want to send a FAX message, please send message now. FAX will
answer automatically. Thanks for calling.”
69
Page 75

в. TROUBLESHOOTING WITH A TELEPHONE ANSWERING
MACHINE (TAM) CONNECTED
AUTO MODE
Problem
1) Cannot utilize the remote turn-on feature of
the telephone answering machine. The fax
machine always answers after the 8th ring.
2) Fax machine will not start up when the TAM
is set to give only an outgoing message
{OGM).
3) A beep sound is recorded as Incoming
Message (ICM).
4) Fax machine starts up in the middle of the
Outgoing Message (OGM).
5) Cannot record any Incoming Message (ICM).
The fax machine always starts up at the end
of the OGM and before the tape advances to
the end of last ICM.
6) Cannot receive from machine that does not
send a beep tone (CNG) after dialing.
Solution
This feature is not compatible. The fax machine
is designed to answer after 8 rings if the TAM
does not answer.
TAM with outgoing message (OGM) only is not
compatible. The fax machine will work with a TAM
that will record Incoming Message (ICM).
Speak a little slower between each word while
recording OGM.
Make sure the OGM does not have silent pause
longer than 3 seconds.
If your TAM uses a single cassette tape to give
OGM and to record ICM, set Silent Detection
Function to “OFF” (see pages 24 - 25).
Set Silent Detection Function to “ON” (see pages
24 - 25).
7) Cannot retrieve message from the answering
machine remotely, the fax machine always
starts up after the command code is inputted.
FAX MODE
1) Fax machine will not start to receive with TAM
in auto-answer mode.
After the command code is inputted, press a digit
on the telephone keypad approx, every 2 seconds
until you start hearing your message. Select a
digit that does not correspond to any of the remote
functions of your Answering Machine. Refer to
your Answering Machine's Operation Guide.
Increase the No. of ringing detection on the TAM.
70
Page 76

APPENDIX II
CHARACTER CODE TABLE
GHR.
CODE
CHR.
CODE
CHR.
CODE
GHR.
CODE
CHR.
CODE
CHR.
CODE
CHR.
CODE
CHR.
CODE
CHR.
CODE
CHR.
CODE
A
10 11
N
23
A
36A37
a
40
n
53 54
à
66
0
00
(SP)
72
+
85!861P87
98
B C
0 P
24
b
41 42
0
à
67
1 2
01 02
73
99
D
12 13
Q
25
38Ù39
55 56
68
74
26
Ó
c
P
Ò
d
43 44
q
u è
69 70 71
3 4
03
75 76 77
$
88
E
14 15 16
R
27
e
r s
57
04
%
89
F G H
S
28 29
f
45 46 47
58 59
é
5
05
90
06 07
78
<
91
1
J K
17
T
30
g
t
60
6
/
79
92
U
h i
u
7
#
>
18 19
V
W X
31
48 49
61
08
80 81
93 94
32
V w X
62
8
09
&
?
20 21
33 34
1
50
63 64
9
82)83
95]96 97
k
(
[
L
M
22
Y
1
51 52
y
Z
35
m
z
65
>tc
84
NOTC
To enter a space, input character code 72 or press the j SPACE | key on the control panel.
71
Page 77

SPECIFICATIONS
Compatibinty
Scanning method
Document size
Document thickness
Effective scanning width
Recording paper size
Effective recording width
Resolution
Coding scheme
Modem
ADF capacity
Image memory capacity
Power supply
Power consumption
Dimensions
Weight
Operating environment
CCITT Group 3
Horizontal
Vertical
Normal
MAX.
MIN.
Single sheet
Multi sheet
208mm
210mm X 50m with 25.4mm core
208mm
Horizontal : 8 pels/mm
Vertical : STANDARD : 3,85 lines/mm
MH, and MR with MWS
V.29, V.27ter with fall back function, and V.21
(9600, 7200, 4800, 2400 bps)
Built-in, up to 10 sheets
Approx. 7 pages
(Based on CCITT Test Chart No.1 using STD resolution)
AC 200V to 240V, 50/60 Hz. Single Phase
(AC 110V to 120V, 50/60 Hz, Single Phase)
Standby ; Approx. 11W(7W)
Transmission : Approx. 18W (15W)
Reception : Approx. 32W (32W)
Copy : Approx. 32W (32W)
Max. : Approx. 90W (93W)
121 mm (H) x330 mm (W) x293 mm (D)
(excluding projections)
Approx. 5 kg (excluding recording paper)
Temperature : 5 to 35°C (41 to 95°F)
Relative humidity : 20 to 80%
Flat bed scanning with Contact type Image Sensor
Intermittent scanning by stepper motor.
210mm X 297mm
218mm x 1000mm
148mm X 73mm
0.06mm to 0.15mm
0.08mm to 0.13mm
FINE : 7.7 lines/mm
SUPER FINE; 15.4 lines/mm
72
Page 78

Facsimile Number Directory
Name Number
Page 79

Facsimile Number Directory
Name Number
Page 80

ш
W---
■lit.-■■■'
 Loading...