

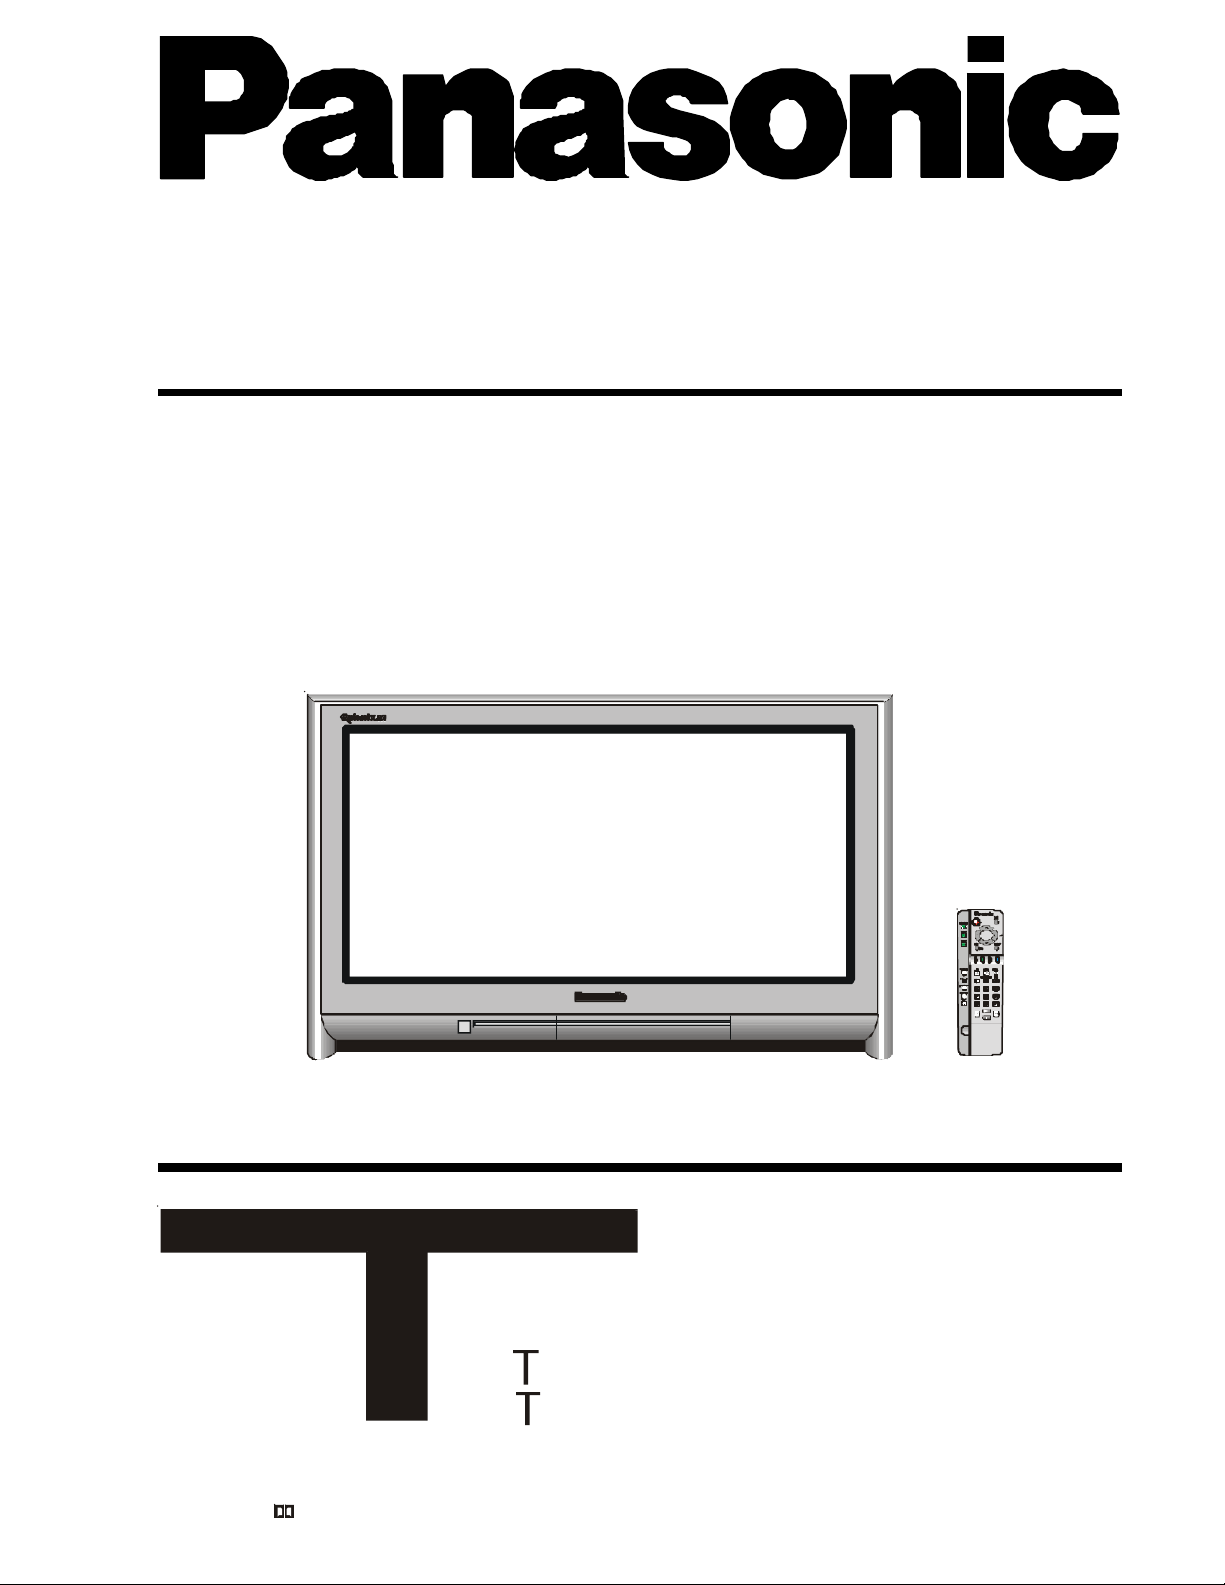
Widescreen
Stereo Colour Television
With Teletext
Operating Instructions
TX-86PW200A
TX-76PW200A
Panasonic
Operating Instructions
Please read these operating instructions
[tau]
FLA
DIGI AL
Dolby and the symbol are trademarks of Dolby Laboratories.
Manufactured under licence from Dolby Laboratories. TQB4A0162
completely before operating this set and
retain the booklet for future reference.

Panasonic
and the Environment
Reduce, reuse, recycle
Dear Panasonic Customer,
Welcome to the Panasonic family. We hope that you will have many years of enjoyment from your
new Colour Television.
Thank you for choosing to buy this Panasonic Colour Television. It was assembled at our Panasonic
Television factory in Penrith, Australia under an internationally accredited quality and environmental system.
You can therefore be assured that you have purchased a quality product incorporating features to reduce
environmental impacts.
As part of our commitment to conserving natural resources we provide the following
information about the reuse, recycling and disposal of your packaging.
Cardboard
Cardboard comprises up to 75% of the packaging in your Panasonic TV and all of
our cartons are manufactured with optimum levels of recycled fibre.
1. Reuse
Cartons can be readily folded and packed flat for storage and made up when required for later use.
2. Recycling
If you, or someone else has no further use for the carton, it can be flattened or cut up
and placed into the recycle bin or service provided by your local council (applicable
for most parts of Australia).
By recycling the cardboard you are benefiting the environment by reducing
waste to landfill and reducing the dependence on virgin forest timbers for paper fibre.
Plastics
Panasonic is reducing the number of different plastics used in both the Television and its packaging.
Unfortunately you are unable to include the type of plastic used in Television packaging in the curbside-
recycling program. Polystyrene foam and other plastic will need to be placed in your general waste bin.
About Panasonic
Panasonic Australia and Panasonic AVC Networks Australia Pty Ltd are signatories to the National
Packaging Covenant. The Covenant is an agreement between Governments and member
companies aimed at reducing the amount of waste going to landfill through Reducing, Reusing and
Recycling. Panasonic and Panasonic AVC Networks Australia Pty Ltd contribute to the industry
transitional funding arrangements to support curbside recycling in Australia.
Important Information
This television lets you to prove ownership by letting you enter personal identification into it. The “Owner ID”
function allows you to enter a security code and address information so that in the unfortunate event of theft
it will help the Police to determine the owner. Details of setting the Owner ID are on page 23.
As a further security precaution, please retain your proof of purchase along with these operating instructions.
Space has been made available on page 40 of this instruction book for recording the Serial Number. The
Serial Number can be found on the back cover of the set and on the packing carton.
Note: Do not record your PIN in this book.
Programme Location Numbers
This television comes to you “factory tuned” to all the major capital city broadcast stations. Adjustments to
the tuning should not be necessary. However, if you have to make adjustments, please read these
instructions carefully first. Throughout this booklet “Programme Location Numbers” are referred to. These
are memory locations into which you can tune television broadcast stations. Any television station can be
tuned into any Programme Location Number.
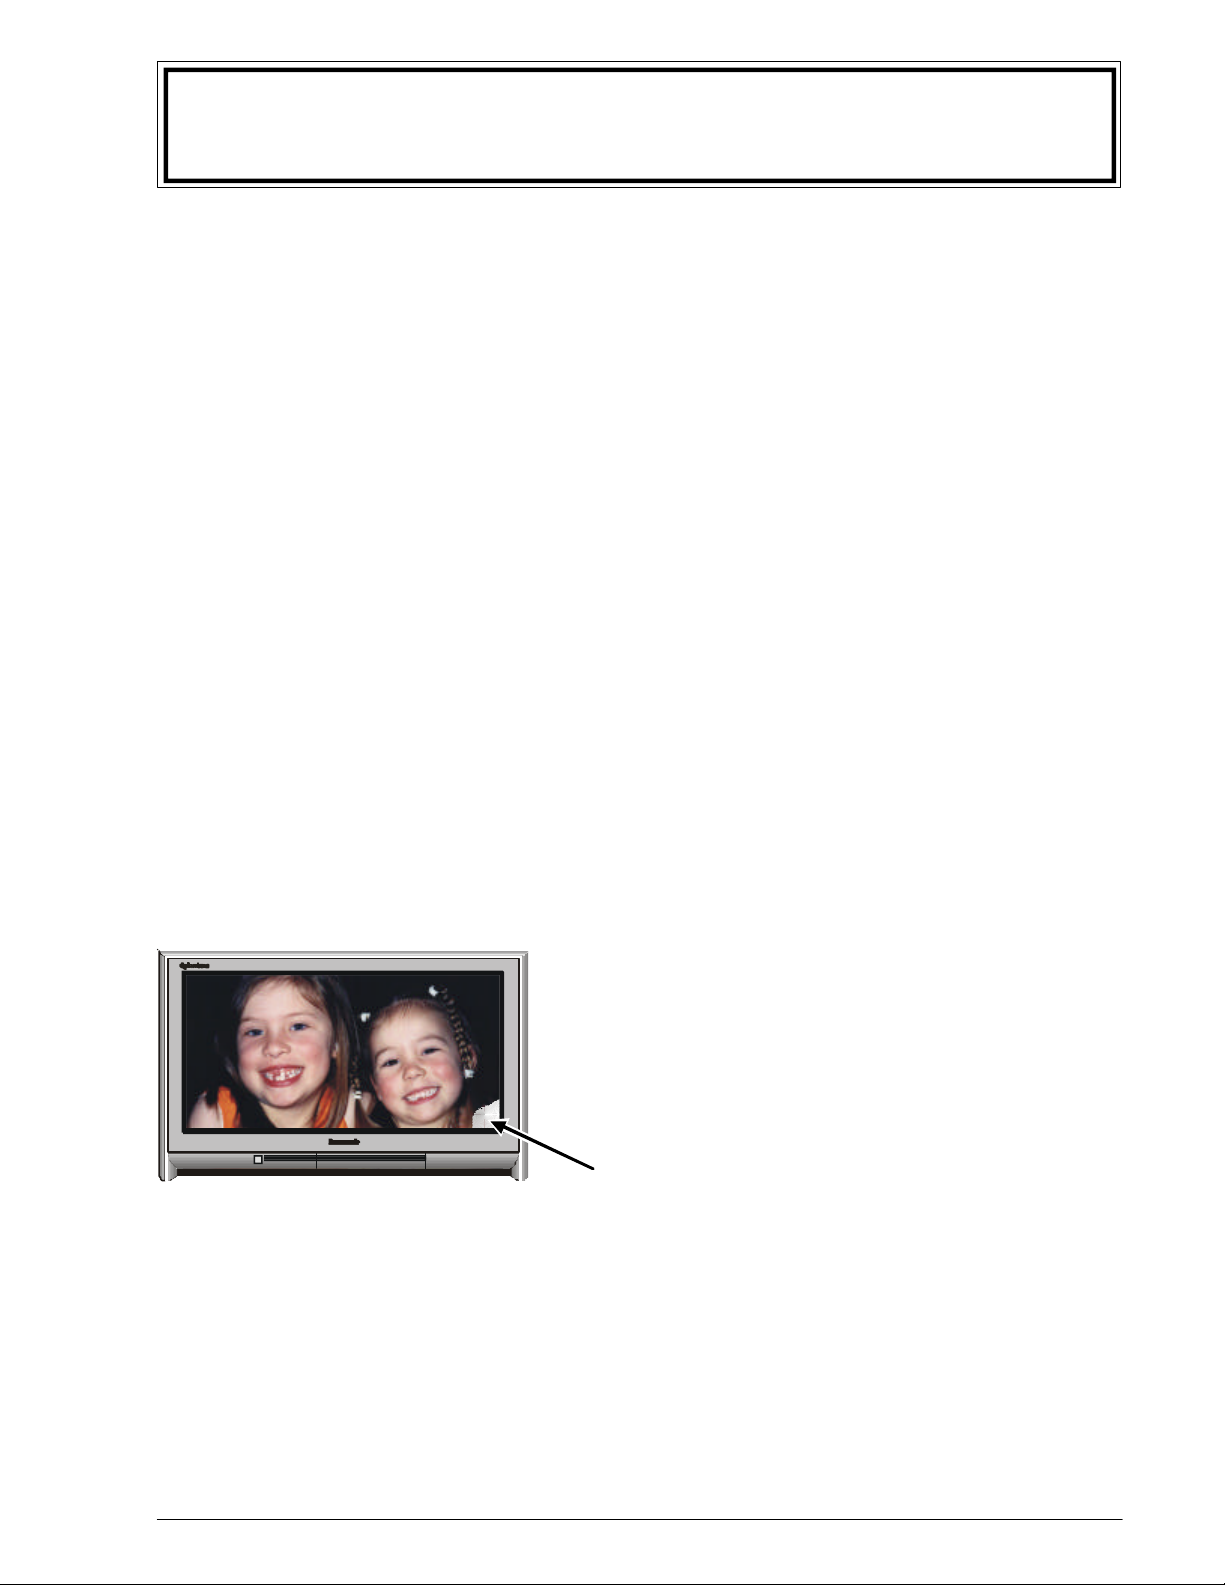
Picture Quality
All televisions are affected by Magnetic Interference.
Magnetic interference may come from such things as
unshielded motors, moving the TV while it is switched ON,
turning off a vacuum cleaner too close to the TV, lightning
strikes nearby or many other things.
The interference shows up as coloured patches which
appear while the TV is switched ON.
Panasonic
A typical result may look like the picture shown.
∗ Your Panasonic Television is designed to overcome this with the inclusion of a demagnetising
(degaussing) function.
∗ To activate this feature, simply switch your Television OFF, or into Standby for 30 minutes and then
switch it back ON.
∗ If the television is to be left unattended for extended periods (several days or more), turn the power off
to the unit. DO NOT leave in Standby mode.
∗ This will ensure that you enjoy the picture clarity as it was meant to be.
∗ Refer to page 22 for operating instructions for the GEOMAGNETIC feature.
CONTENTS
Getting started ..................................................................................................................................... 6
Battery Installation and Replacement .................................................................................................. 7
Control Panel and Remote Control ...................................................................................................... 8
Front Panel Buttons ............................................................................................................................ 9
STR. ................................................................................................................................. 9
F ....................................................................................................................................... 9
-/\/ ..................................................................................................................................... 9
+//\ .................................................................................................................................... 9
TV/AV ............................................................................................................................... 9
Remote Control Buttons.............................................................................................................10 ~ 13
STANDBY ....................................................................................................................... 10
PICTURE ........................................................................................................................ 10
SOUND........................................................................................................................... 10
SET UP ........................................................................................................................... 10
STEREO / MONO / BILINGUAL* ....................................................................................... 10
100Hz / PROGRE ............................................................................................................ 10
SURROUND .................................................................................................................... 10
ASPECT ......................................................................................................................... 10
MULTI PIP ....................................................................................................................... 10
RECALL ........................................................................................................................... 11
N NORMALISATION.............................................................................................................11
STR ................................................................................................................................. 11
? HELP .............................................................................................................................. 12
SOUND MUTE ................................................................................................................ 12
PROGRAMME NUMBER UP AND DOWN ......................................................................... 12
VOLUME DOWN AND UP ................................................................................................ 12
TV / AV ............................................................................................................................ 12
COLOURED BUTTONS ................................................................................................... 12
STILL .............................................................................................................................. 12
CH SEARCH ................................................................................................................... 13
0 ~ 9 DIRECT PROGRAMME NUMBER SELECTION ................................................................ 13
- / - - TWO DIGIT PROGRAMME NUMBER SELECTION ........................................................... 13
Using the On Screen Displays .......................................................................................................... 14
Picture Menu Operation..............................................................................................................15 ~ 16
Menu............................................................................................................................... 15
Contrast, Brightness, Colour, Sharpness, NTSC-Tint .......................................................... 15
Colour Temperature ......................................................................................................... 16
P-NR (Picture Noise Reduction) ........................................................................................ 16
Scan mode ...................................................................................................................... 16
Sound Menu Operation...............................................................................................................17 ~ 18
Menu............................................................................................................................... 17
Volume, Bass, Treble, Balance, Headphone Volume Subwoofer .......................................... 17
Dolby Virtual .................................................................................................................... 18
Set Up Menu Operation ..............................................................................................................19 ~ 21
Teletext ........................................................................................................................... 19
Off timer .......................................................................................................................... 19
Wake up timer ................................................................................................................. 19
CH colour set ................................................................................................................... 20
Child lock ........................................................................................................................ 20
Blue back ........................................................................................................................ 20
3D-COMB ....................................................................................................................... 20
Text Select....................................................................................................................... 20
Tuning menu .................................................................................................................... 20
Geomagnetic ................................................................................................................... 21
Owner I.D. ....................................................................................................................... 21
VCR / GAME ................................................................................................................... 21
Colour system .................................................................................................................. 21
CONTENTS
Geomagnetic correction .....................................................................................................................22
Owner ID ........................................................................................................................................ 23
Aspect Control ................................................................................................................................... 24
Teletext Operation ...................................................................................................................... 25 ~ 27
F.P. (Favourite Page) .........................................................................................................26
SET UP ............................................................................................................................26
TV/TEXT ..........................................................................................................................26
STR (Store) ...................................................................................................................... 26
PAGE NUMBERS UP AND DOWN .................................................................................... 26
SUB-PAGE NUMBERS DOWN AND UP ............................................................................ 26
COLOURED BUTTONS .................................................................................................... 26
INDEX.............................................................................................................................26
HOLD .............................................................................................................................. 26
0 ~ 9 PAGE NUMBER BUTTONS ...............................................................................................27
REVEAL ...........................................................................................................................27
F/T/B (Full / Top / Bottom)..................................................................................................27
Display Cancel ..................................................................................................................27
TIME TEXT ...................................................................................................................... 27
Tuning Menu .............................................................................................................................. 28 ~ 32
Sys Select ........................................................................................................................ 28
Auto tuning .......................................................................................................................29
Manual tuning ...................................................................................................................30
Tuning the Television to a VCR .......................................................................................... 30
Fine tuning ....................................................................................................................... 31
Skip ................................................................................................................................. 32
Remote Control VCR/DVD Operation .......................................................................................... 33 ~ 35
Remote Control VCR/DVD Buttons ........................................................................................................ 34
REWIND / REVIEW .......................................................................................................... 34
STOP...............................................................................................................................34
POWER BUTTON ............................................................................................................ 34
RECORD .........................................................................................................................34
PAUSE.............................................................................................................................34
PLAY ............................................................................................................................... 34
FAST FORWARD / CUE ....................................................................................................34
VCR/DVD .........................................................................................................................34
\/ /\ PROGRAMME NUMBER DOWN AND UP / PROGRAMME SKIP ........................................ 34
Manufacturers’ Code Settings ............................................................................................ 35
Connecting Equipment to the TV ............................................................................................... 36 ~ 38
Front Panel Connections .......................................................................................................................36
Headphones ..................................................................................................................... 36
AV Equipment .................................................................................................................. 36
Rear Panel Connections ............................................................................................................... 37 ~ 39
Connecting a DVD player or Set Top Box to the AV Input ......................................................37
Connecting S-Video Equipment to the AV Input ................................................................... 37
Connecting a Standard VCR to the AV Input ........................................................................ 38
Monitor Out ...................................................................................................................... 38
Customer Information ................................................................................................................ 39 ~ 43
Warnings and Cautions .........................................................................................................................39
Cleaning the Television ......................................................................................................................... 40
Cleaning the Remote Control ................................................................................................................ 40
Customer’s Record .............................................................................................................................. 40
Frequently Asked Questions .................................................................................................................. 41
Troubleshooting ................................................................................................................................... 42
Specifications ....................................................................................................................................... 43
Getting Started
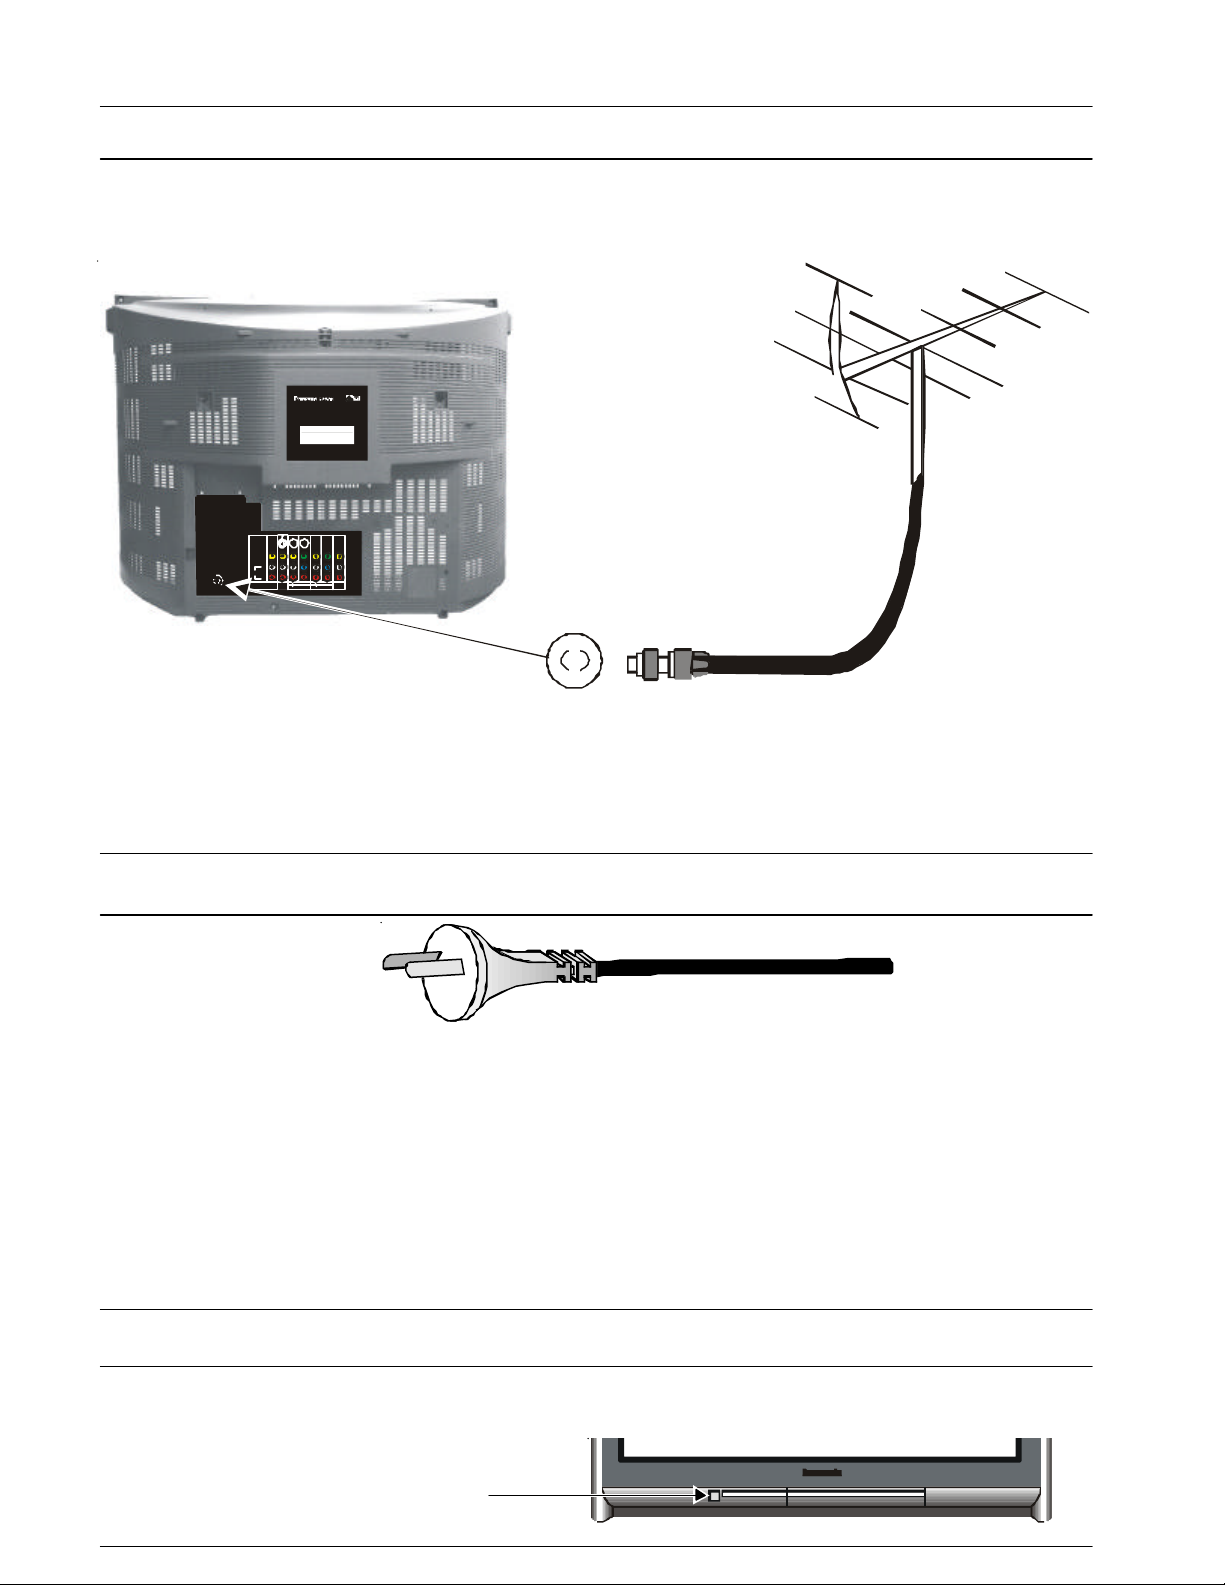
Connect the Aerial
The RF (Aerial) Input impedance of this television is 75Ω. If your aerial lead is 300Ω ribbon (two wires
separated by a flat plastic strip) you will require a 300Ω/75Ω Balun (not supplied) in order to connect your
aerial to the television.
Panasonic AVC Networks Australia Pty. Ltd.
Distributed in Australia by Panasonic Australia Pty. Ltd.
Distributed in New Zealand by Panasonic NZ. Ltd. Auckland New Zealand
MODEL TX-86PW200A
CHASSIS GP1E
220 ~ 240V 50Hz 179W
WARNING - DANGEROUS VOLTAGE INSIDE.
DO NOT REMOVE THIS COVER.
NO USER SERVICEABLE PARTS INSIDE.
REFER SERVICING TO QUALIFIED TECHNICIAN.
PART No. TBM4A0154
S-VIDEO
Y
VIDEO
AUDIO
R
MONITOR OUT
Y
P
MONOMONO
P
MONO
B
L
B
R
P
R
P
COMPONENT
COMPONENT
AV5 INAV2 IN
AV4 IN
AV1 IN
Note:
For your safety any external aerial should be installed by a reputable qualified installer and should comply
with Australian Standard AS1417.1.
In New Zealand the installation should comply with International Standard IEC597-1.1.
Connect the Power Plug
The televisions are designed for the Australian Standard Mains Voltage of 240V 50Hz and the New Zealand
Standard Mains Voltage of 230V 50Hz.
NOTE:
If the television is not going to be used for an extended period, remove the power plug from the wall outlet.
Turn on the Television
Push the Power Switch to turn the television ON.
Sit back and enjoy your new Panasonic television.
Power Switch
Panasonic
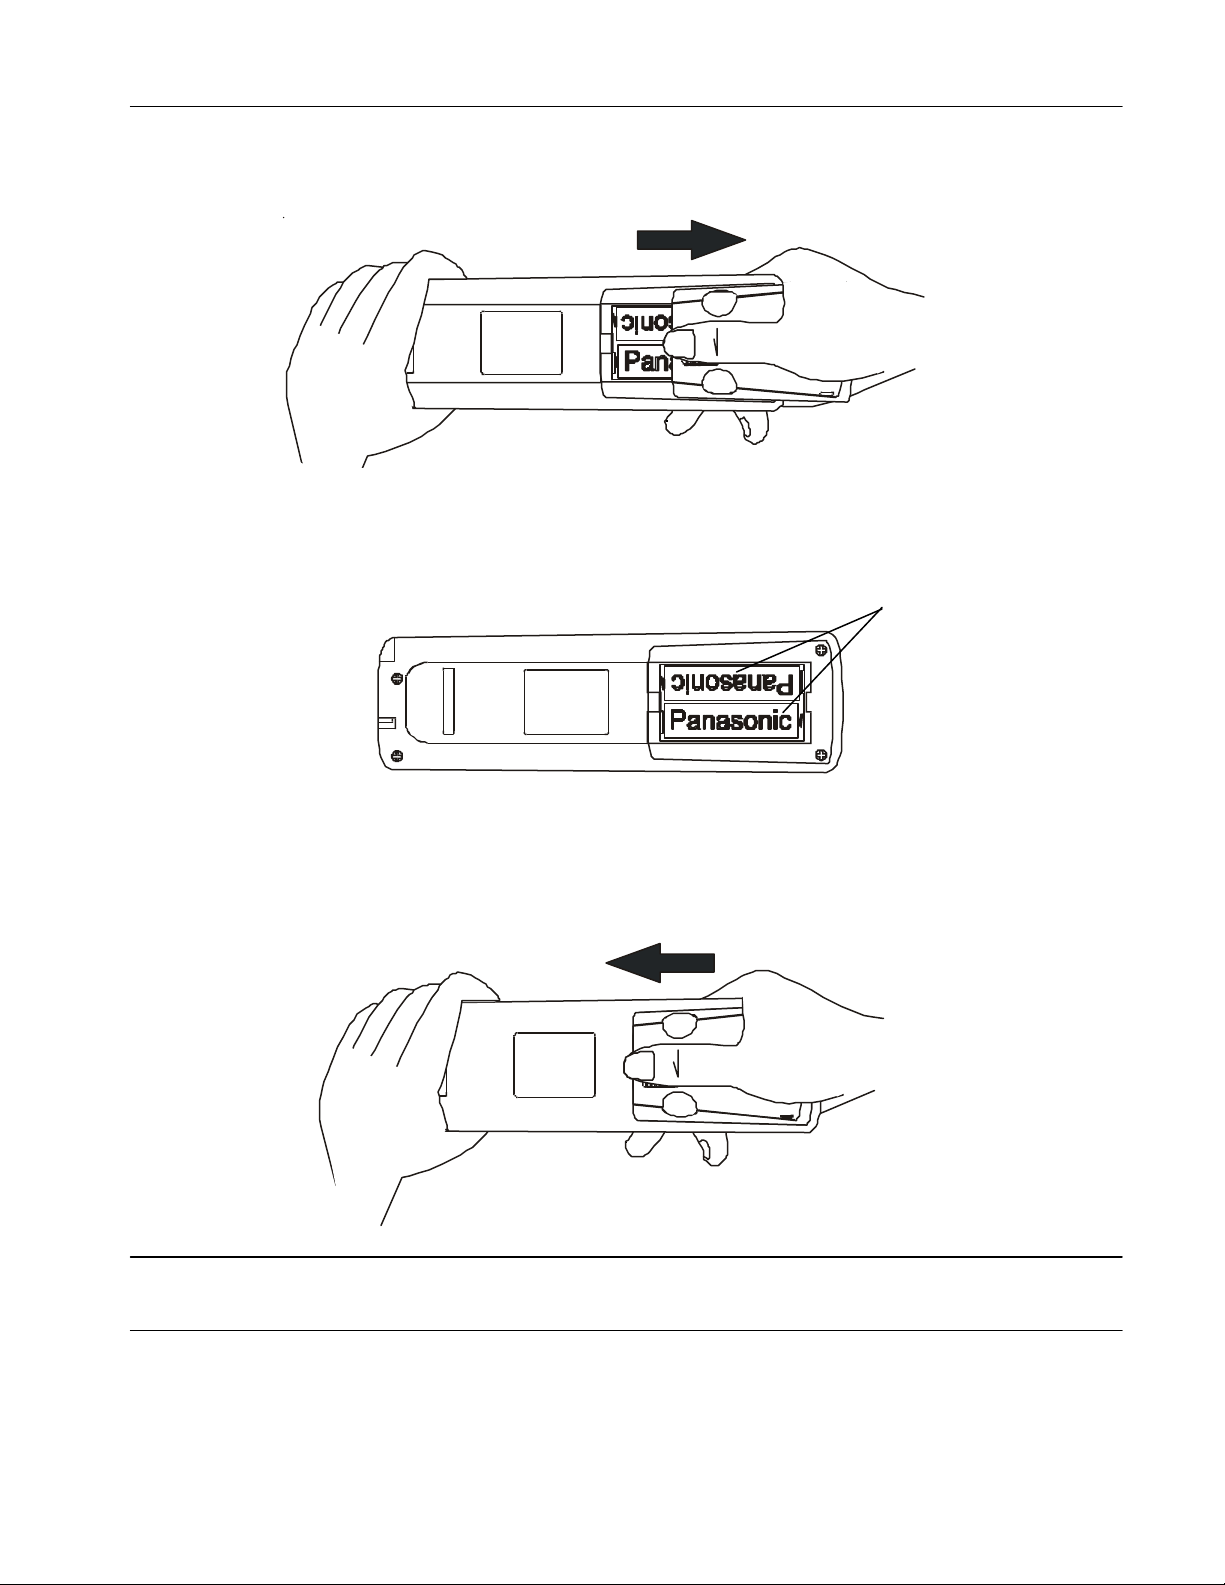
Battery Installation and Replacement
Open Battery Cover
Place your thumb on the battery cover triangle. Apply a slight downward pressure with the thumb and slide the
cover back. This allows the cover to be removed.
Insert Batteries
Insert the batteries ensuring the correct polarity. The polarity is identified by the “ + “ symbol on the battery and
the “ + “ and “ - “ symbols on the battery compartment. The springs inside the battery compartment connect to
the negative terminal of the battery.
Two “AA” size batteries
Replace Battery Cover
Fit the battery cover and slide it forward until it “clicks” into place.
Battery Precautions
∗ Do Not use rechargeable batteries. Differences in size and performance may cause incorrect operation.
∗ Do Not mix battery types (Alkaline with zinc-carbon etc.)
∗ Do Not mix old and new batteries. Replace both batteries at the same time.
∗ Do Not attempt to recharge batteries.
∗ Do Not short circuit batteries.
∗ Do Not disassemble batteries.
∗ Do Not heat or burn batteries.
L/MONO R
S-VIDEO VIDEO
Remote Control Operation is possible for
manufacturers. After completion of setting,
execute the various operations by selecting
Manufacturer settings
1 Select the switch of the unit to be set
VCR DVD
2 While pressing the VCR/DVD button,
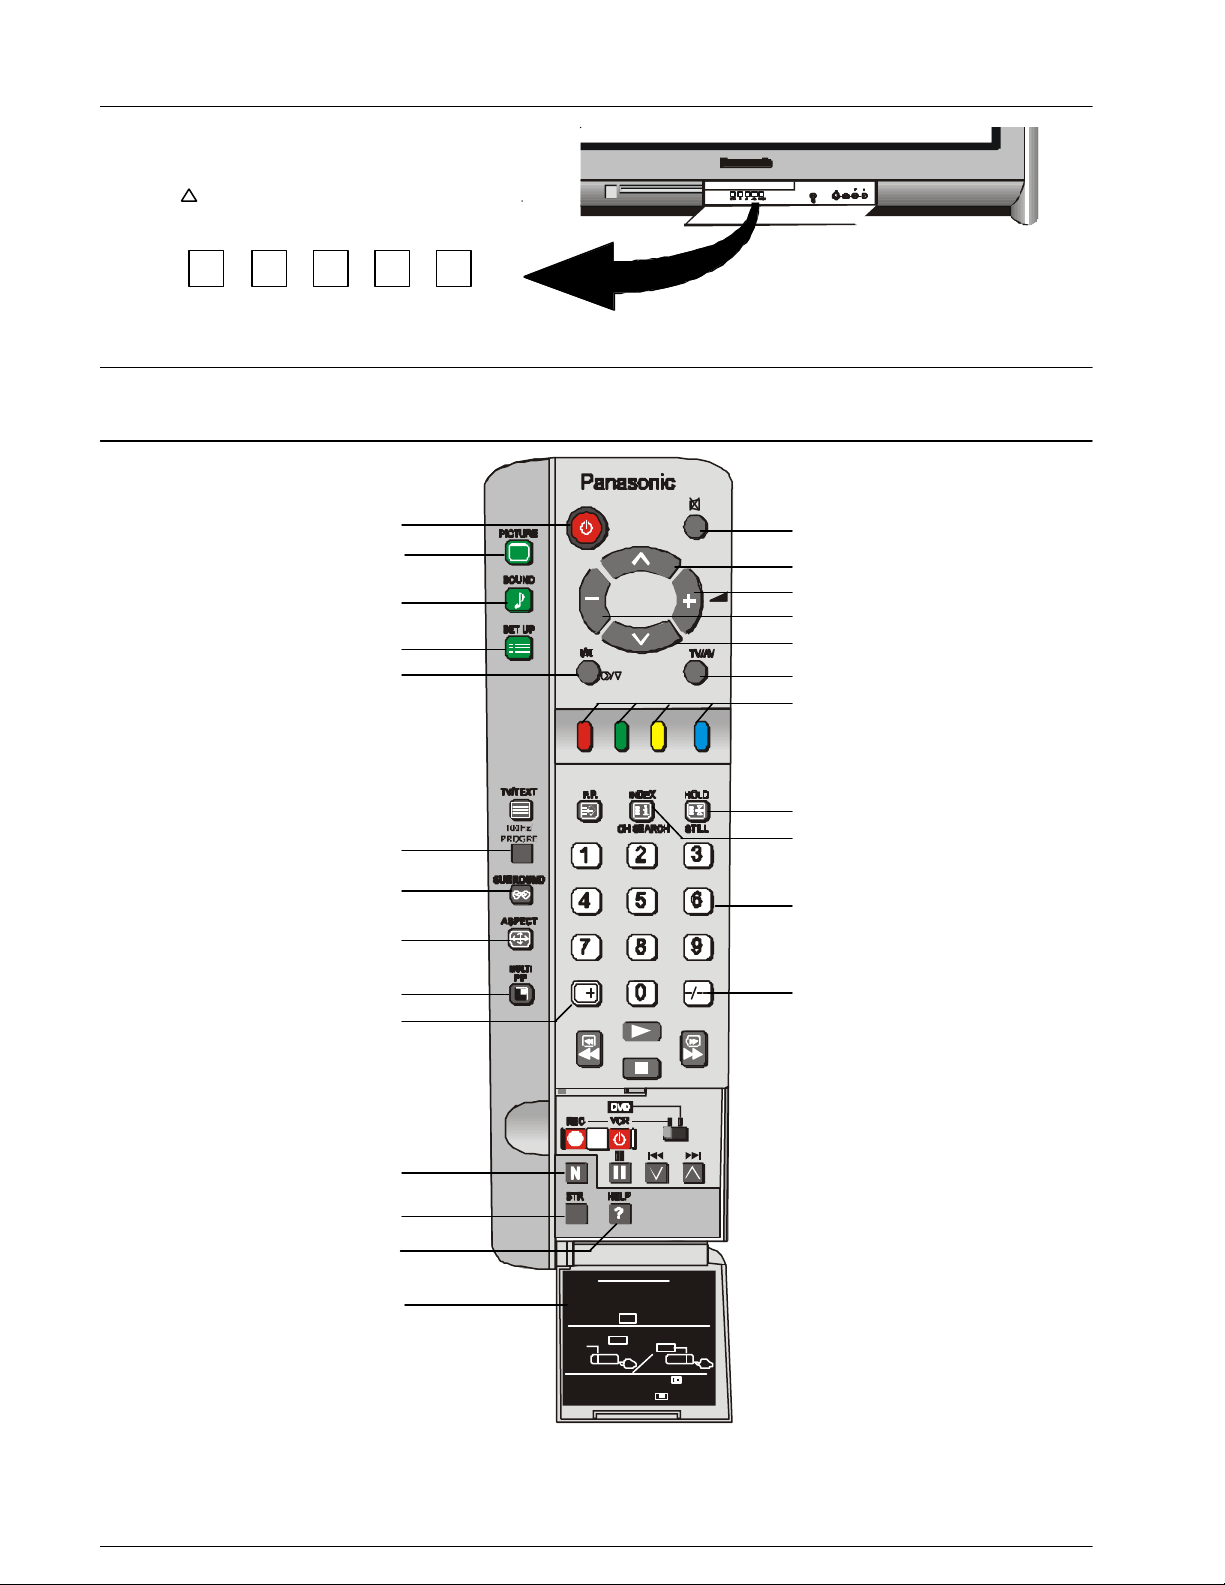
Control Panel Buttons
Open the control panel door to gain access to the
Television Controls Push the door at the point
marked to open.
Push again to close.
STR F -/\/ +//\ TV/AV
Remote Control Buttons
Stand By
Picture
Sound
Set Up
Stereo / Mono / *Bilingual
Panasonic
AV3 IN
AUDIO
Mute
Programme Number Up
Volume Up
Volume Down
Programme Number Down
TV / AV / RGB
Coloured Buttons. Used for
Aspect Functions, AV Selection
Teletext Functions
100Hz / Progressive Scan
Surround
Aspect
Multi Picture in Picture
Recall
Normalisation
Store
Help
Door
the VCR’s and DVD’s of the various
the VCR or the DVD switch.
(VCR or DVD )
key in the manufacturer code setting.
Then press the VCR/DVD button.
Still
Channel Search
Direct Programme Numbers
Two Digit Programme
Numbers
For details of TELETEXT Operation remote control operation, please refer to page 25.
For details of VCR and DVD player remote control operation, please refer to page 33.
* Bilingual broadcasting is not currently available in Australia or New Zealand.
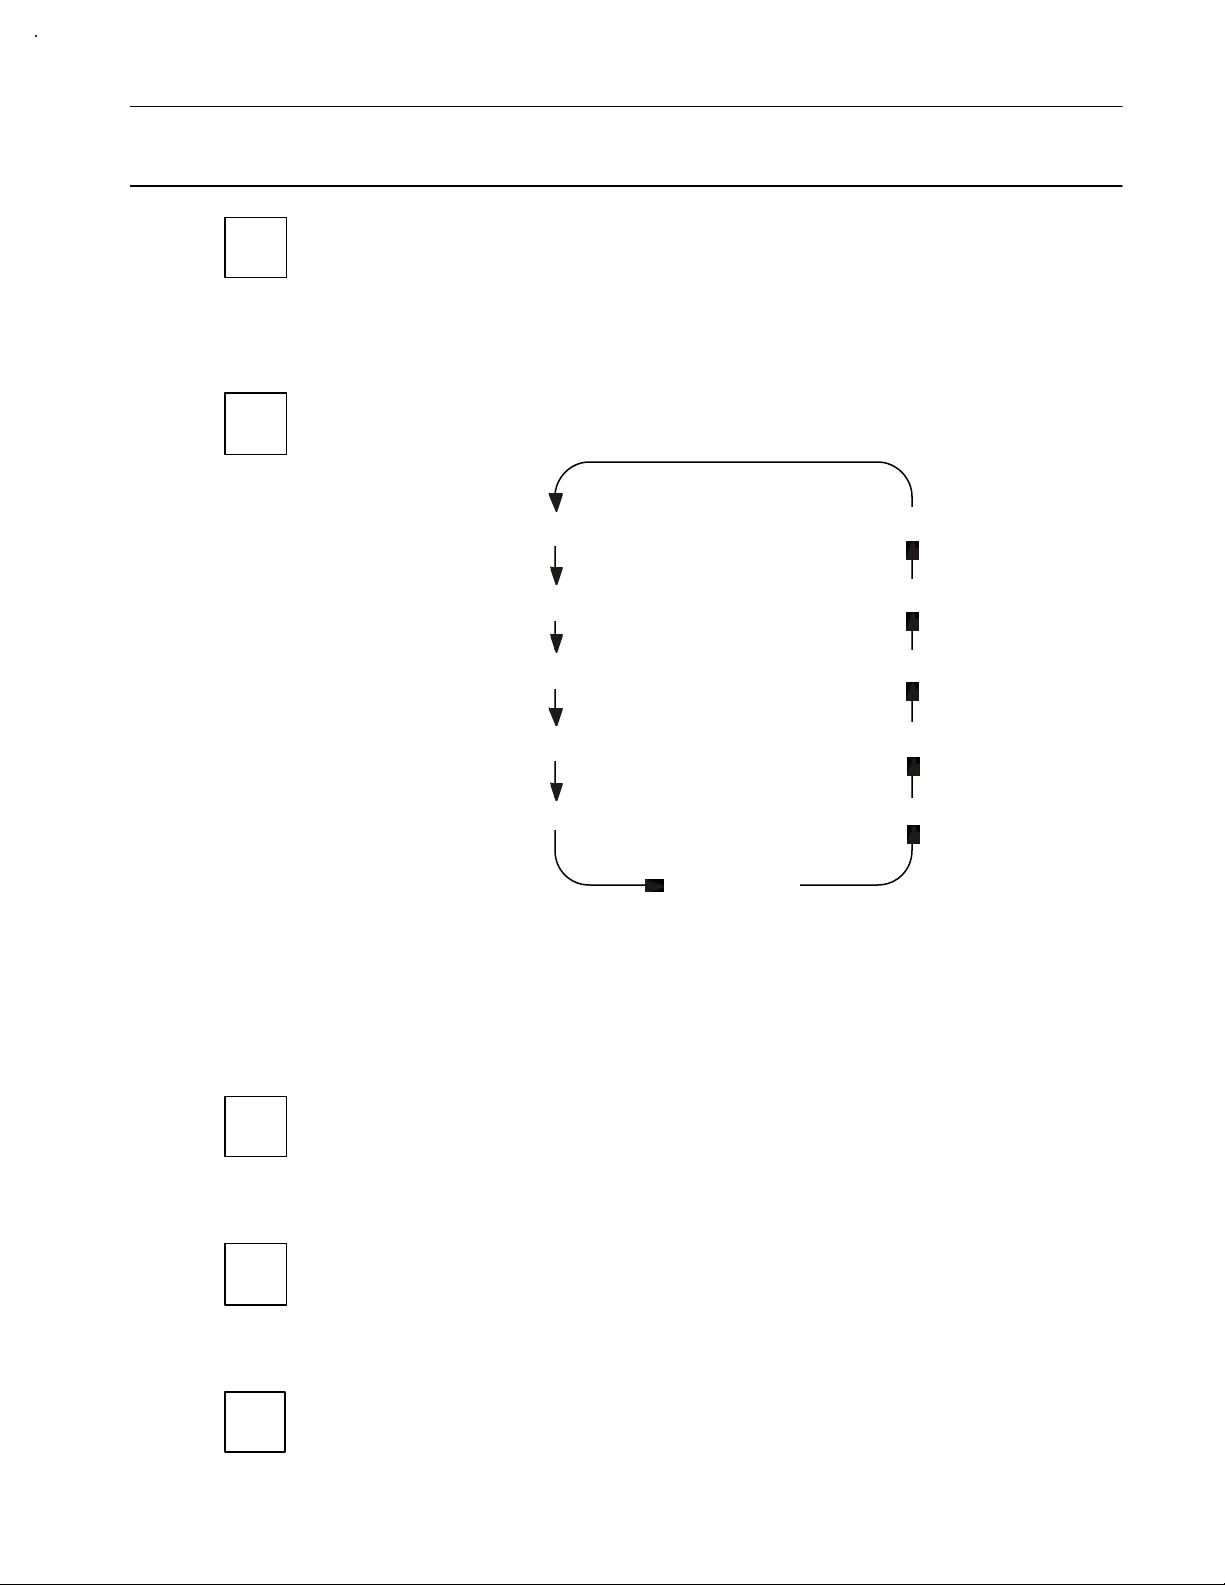
Television Control Panel Buttons
BUTTON WHAT IT DOES
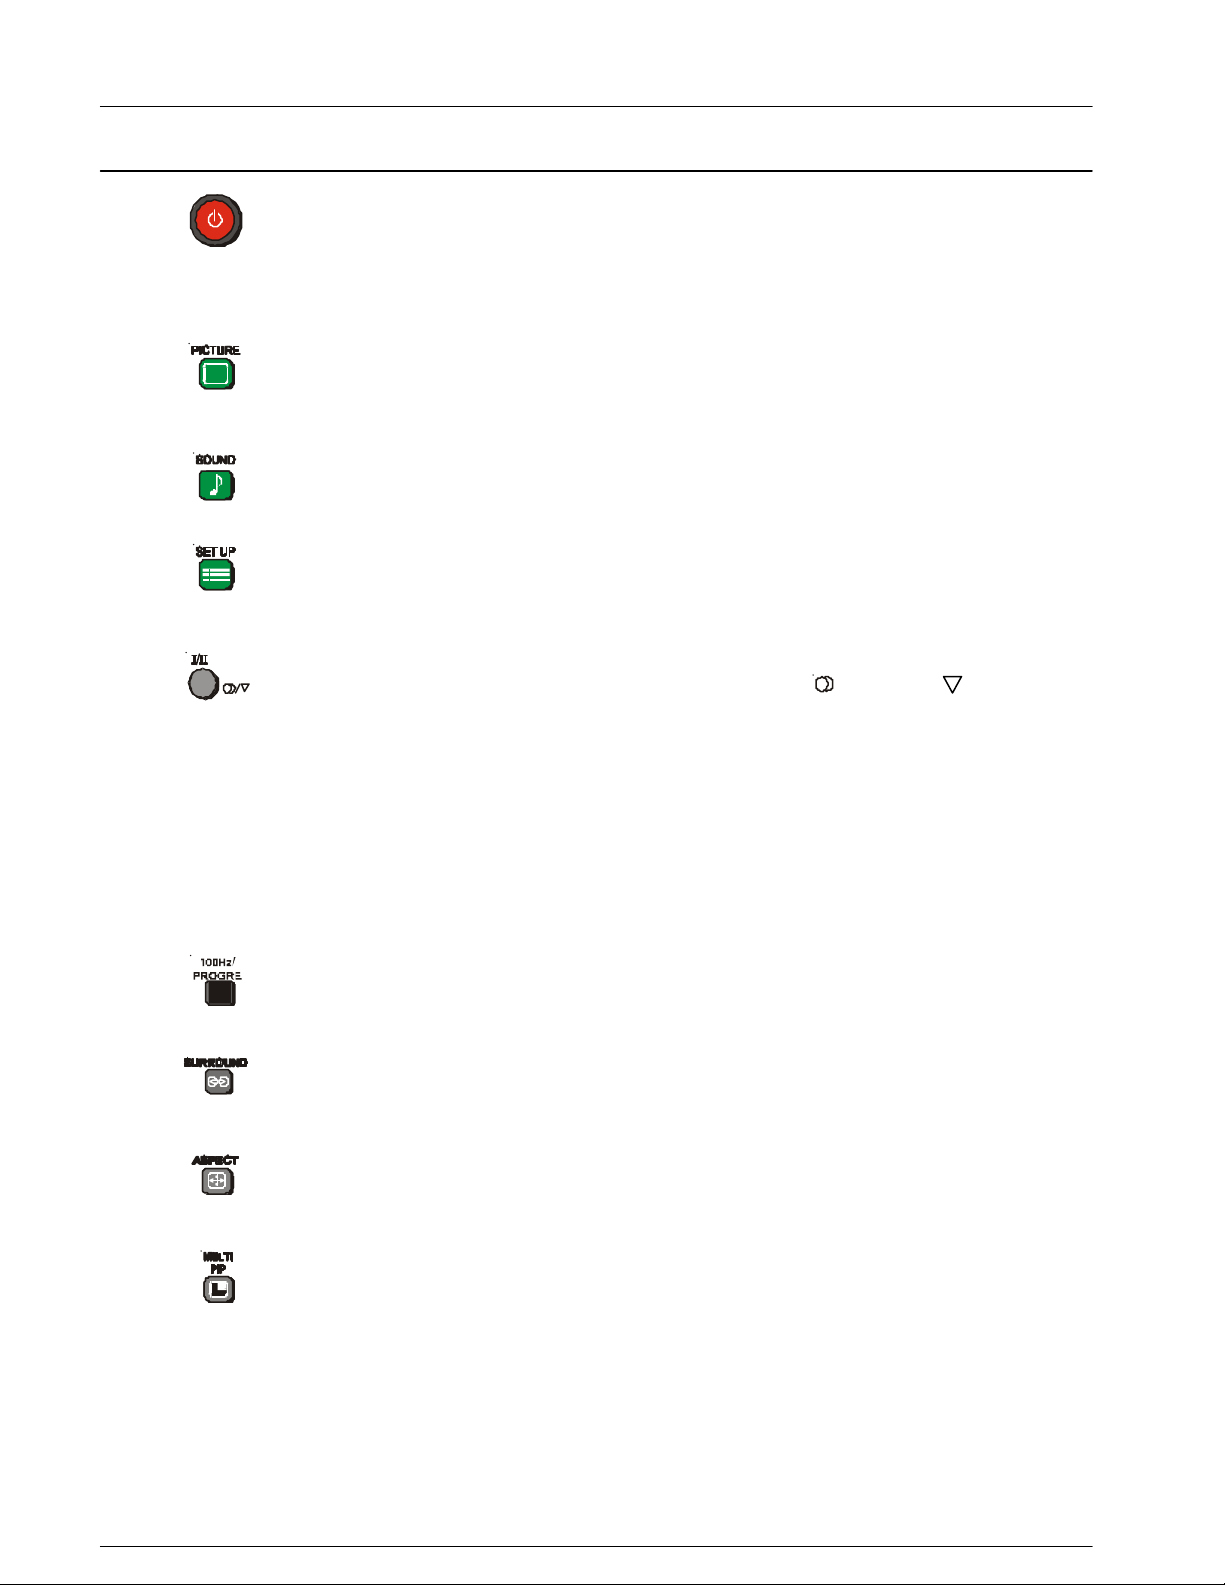
STR
This button is used to store tuning information and other function settings. It is
STR
F
also used to start the menu demonstration.
F
The F button is used to select the on screen display functions. Press the button to
select the following functions sequentially.
Volume Geomagnetic
Contrast Tuning mode
-/\/
Brightness Balance
Colour Treble
Sharpness Bass
NTSC-Tint
Notes:
NTSC-Tint: Only in AV Mode when receiving NTSC signals.
Tuning mode: Not displayed when in AV mode.
- / \/
This button is used to select the next lower programme number.
It is also used with the F button to adjust function settings.
+ / /\
This button is used to select the next higher programme number.
It is also used with the F button to adjust function settings.
+//\
TV / AV
This button is used to switch between the TV mode and the five AV modes.
TV/AV
Please refer to drawing on Page 8 for location of Remote Control Buttons.
Remote Control Television Operation
BUTTON WHAT IT DOES
STANDBY
The remote control button is used to turn the television into Standby mode. When
the television is in Stand-By it is possible to turn it back on by pressing this remote
control Power Button, the Programme Number UP or DOWN Button (front panel
or remote control) or any of the direct Programme Number Buttons.
PICTURE
This button is used to select the picture menu. Please refer to page 15 for detailed
operating instructions.
SOUND
This button is used to select the sound menu. Please refer to page 17 for detailed
operating instructions.
SET UP
This button is used to select the set up menu. Please refer to page 19 for detailed
operating instructions.
STEREO / MONO
Pushing the button changes the mode from Stereo ( ) to Mono ( ) and back
again. Normally the television will detect whether the broadcast signal is Mono or
Stereo and will set the mode accordingly. If the Stereo signal is weak or if the
receiving conditions are not the best, it is recommended that the Mono mode be
manually selected.
BILINGUAL *
This system allows two languages to be transmitted for one broadcast. Switching
between the Main ( I ) and Sub ( II ) positions selects the desired language.
* Note: Bilingual sound is not currently available in Australia or New Zealand.
100Hz / PROGRE
This button allows you to change the Picture refresh setting between 75/883i,
100Hz and Progressive. Please refer to Scan mode on page 16.
SURROUND
This button switches the Dolby Virtual surround on and off. Please refer to page
18.
ASPECT
This button is used to move through the different aspect options of AUTO, 16:9,
14:9, Just, 4:3, Zoom 1, Zoom 2, Zoom 3. Please refer to page 24.
MULTI PIP
This option allows you to watch:
* a television picture and an AV picture at the same time, or
* two AV pictures at the same time.
Pressing this button will access the Picture in Picture options. You can choose
between normal, PIP (Picture In Picture), PAP (Picture And Picture) and POP
(Picture Out Of Picture).
The Multipip function does not operate when you are using a Progressive signal.
If you are already in Multipip mode and you select an AV input with a Progressive
signal the message “progressive input” will be displayed.
Please refer to drawing on Page 8 for location of Remote Control Buttons.
Remote Control Television Operation
POP PAP CHANGE
AV1
PIP POP CHANGE
AV1
BUTTON WHAT IT DOES
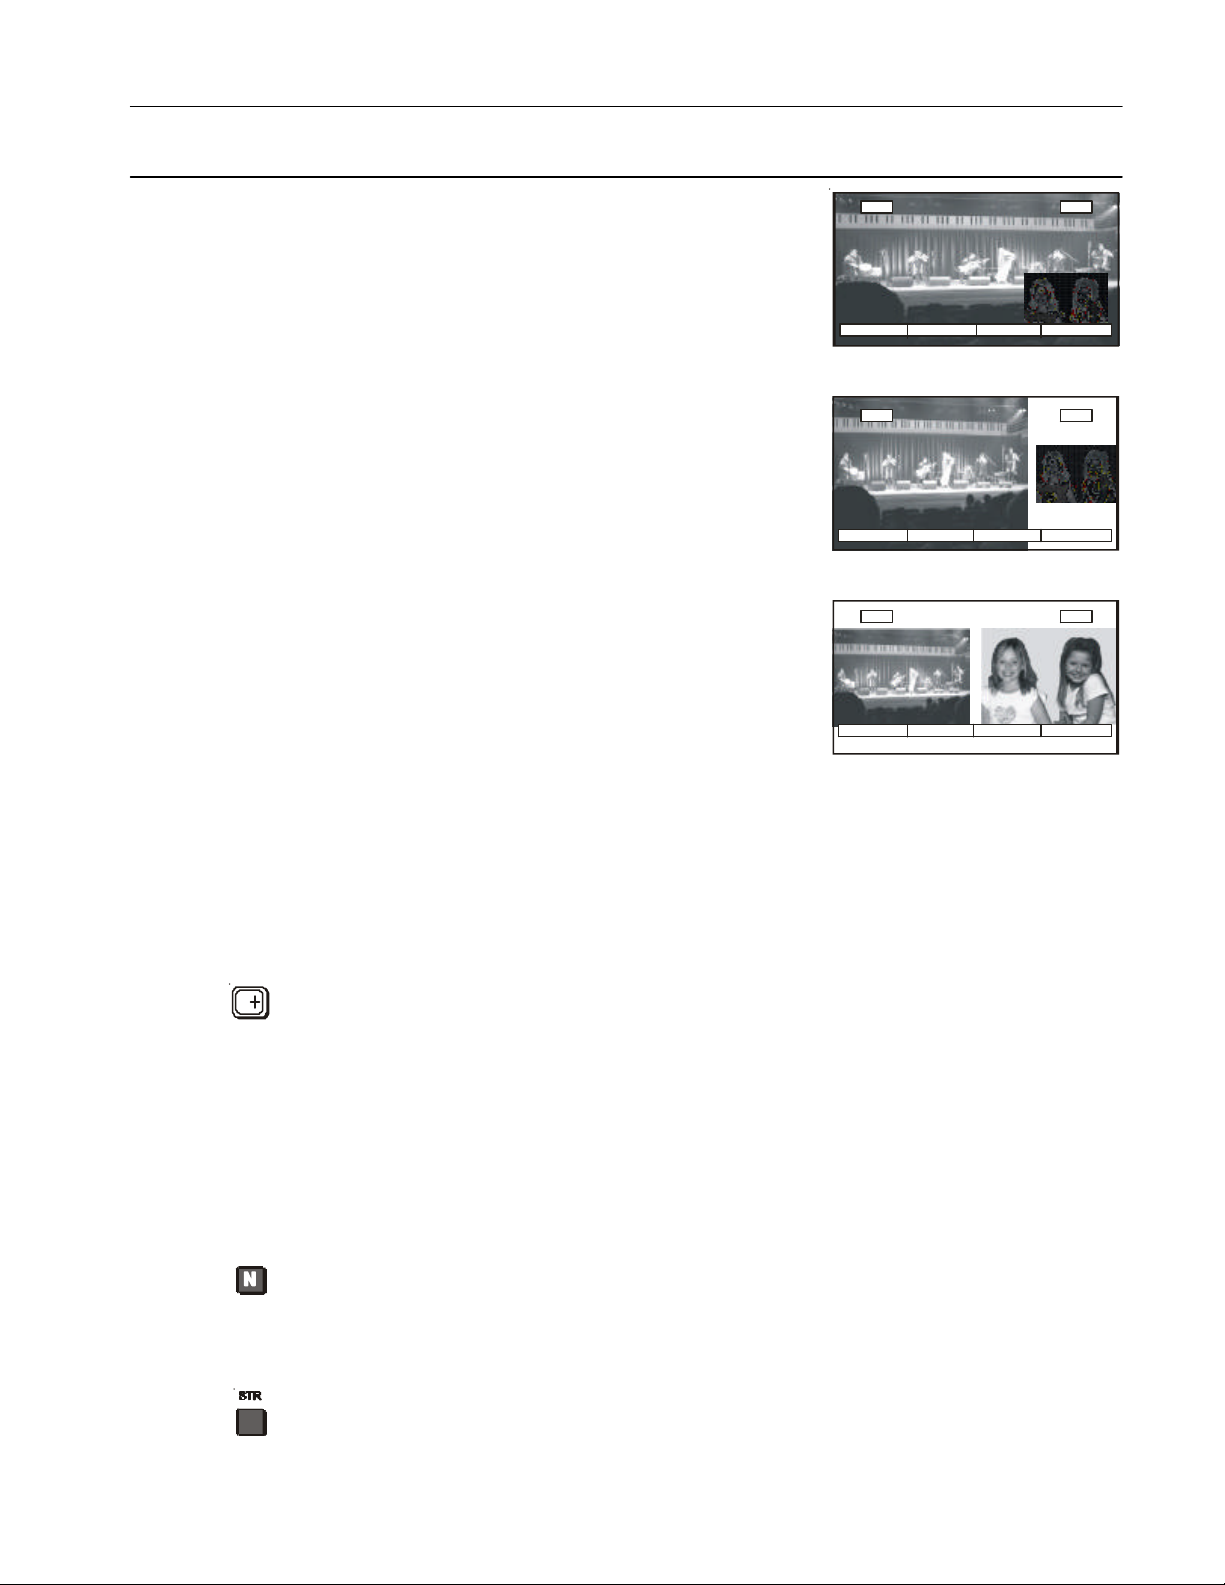
PIP (Picture In Picture) Mode
Allows a small picture to be viewed inside the
main picture.
Pressing the Red button will switch to the PIP.
The Yellow button will switch to the PAP mode.
The Blue button swaps the position of the two
pictures.
POP (Picture Out Of Picture) Mode
Allows two pictures to be viewed at the same
time. The pictures will be shown side by side.
The main picture is larger
Pressing the Red button will switch to the PAP.
The Yellow button will switch to the PIP mode.
The Blue button swaps the position of the two
pictures.
PAP (Picture And Picture) Mode
Allows two equal sized pictures to be viewed at
the same time. The pictures will be shown side
by side.
Pressing the Red button will switch to the PIP.
The Yellow button will switch to the POP mode.
The Blue button swaps the position of the two
pictures.
28 AV1
28
PAP PIP CHANGE
28
Changing channels in MULTIPIP mode
When the On-Screen display (coloured boxes) is ON, the sub picture can be
changed. Use the normal TV/AV button to switch between each of the 5 AV inputs
and the RF input.
When the On-Screen display (coloured boxes) is OFF, the main picture can be
changed. Use the normal programme or AV select buttons.
RECALL
Pressing this button will display all current active functions. The functions that can
be displayed include AV Number, Programme Number, Colour system, Sound
Option, Picture Option, Stereo or Mono and Off-Timer setting. Pressing the button
again cancels the recall function and removes the text being displayed on the
screen.
If the button is not pressed within about 2 seconds it automatically switches to
display the Programme Number or the AV Number and the Off-Timer setting.
Pressing the button again cancels the recall function and removes the text being
displayed on the screen.
NORMALISATION
The Normalisation Button is used to reset the television to factory set levels.
Colour, Sharpness, Contrast, Brightness, Treble, Bass and Balance will be reset.
The button will only operate if the menu is displayed on the screen.
STR
The STR (Store) button is used with a number of features to store settings after
adjustments have been made or options have been set. It is also used in
TELETEXT and tuning functions.
Please refer to drawing on Page 8 for location of Remote Control Buttons.
Remote Control Television Operation
BUTTON WHAT IT DOES
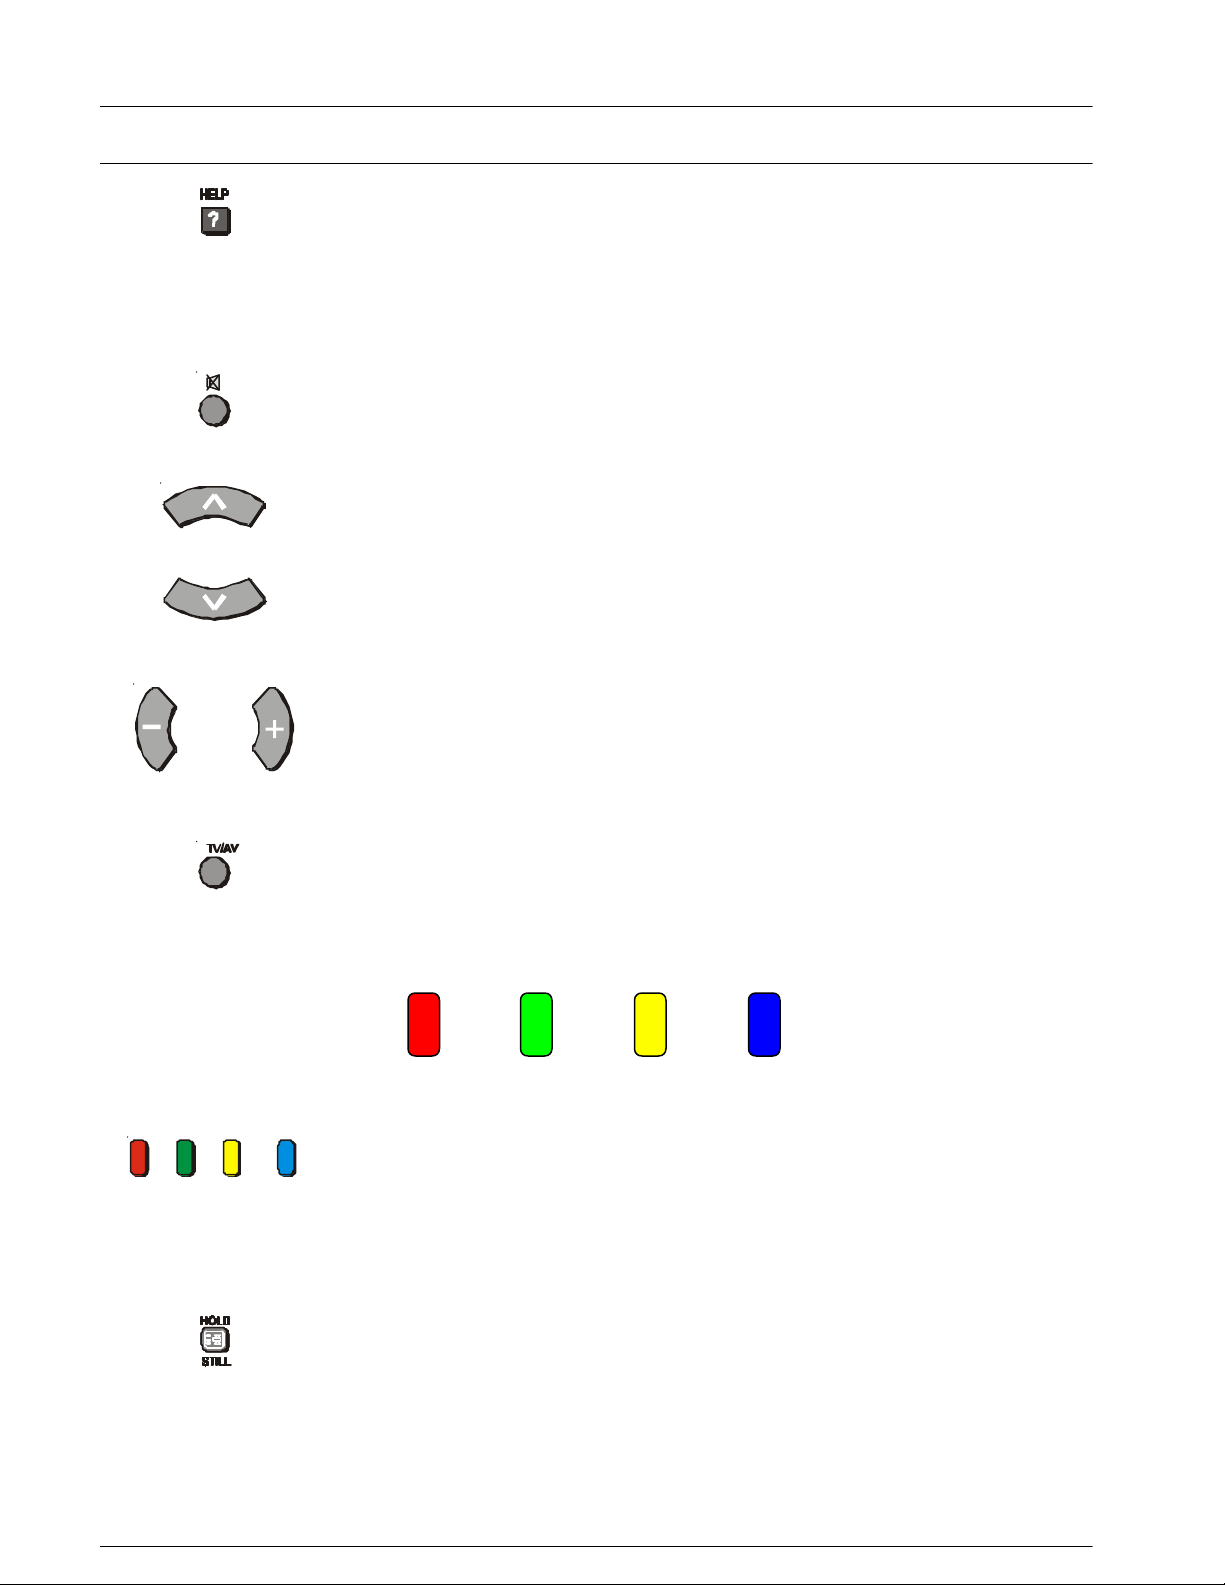
HELP
Pressing this button displays on screen instructions on how to adjust various
settings and how to connect external equipment. Press the HELP button and
select one of the options. Please refer to page 14.
SOUND MUTE
Pressing this button reduces the sound from the television to nil. Pressing the
button again returns the sound to the original setting. Pressing the Volume
Up ( + ) or Down ( - ) will also restore the volume level setting.
PROGRAMME NUMBER UP AND DOWN
Pressing this button selects the next higher ( /\ ) or lower ( \/ ) Programme
Number in sequence. Programme Numbers which have been “Skipped” (See
page 32) will be bypassed when this button is used.
VOLUME DOWN AND UP
This button is used to increase ( + ) or decrease ( - ) the volume output level from
the television. The volume control has a range from 0 to 100.
TV / AV
Pressing the TV/AV Button will cycle between TV, the current AV Input and back
to TV. While the AV indicator is still on screen the different AV inputs can be
selected using the coloured buttons.
RED GREEN YELLOW BLUE
AV1 AV2 AV3 AV4 / AV5
COLOURED BUTTONS
These buttons are used for:
- selecting different aspect ratios
- selecting different AV inputs
- teletext functions
STILL
Press this button to freeze the picture on the screen. Press it again to return to
normal viewing.
If Multi Pip has been selected, pressing the Still button once will freeze the main
picture while the sub picture remains normal. Pressing the Still button again will
freeze the sub picture while the main picture returns to normal. Pressing the Still
button for a third time will return both pictures to normal.
Please refer to drawing on Page 8 for location of Remote Control Buttons.

Remote Control Television Operation
BUTTON WHAT IT DOES
CH SEARCH
This option is used to show freeze frames of the programmes being broadcast on
all the stored channels. The images are displayed clockwise around the edge of
the screen starting from the top left corner. The current programme is displayed in
the centre of the screen. When the display gets back to the top left corner it will
overwrite the first picture with the next one in series.
The display will continue to change until either the button is pressed to pause
or is pressed to exit the feature.
The Red button is used to select each programme in turn. The green button is
used to swap the main display between the current programme and the one
selected by the red button. The Blue button returns to normal viewing.
RED GREEN YELLOW BLUE
1
2
3
4
5
6
SELECT OK EXIT
SELECT OK EXIT
Notes: Skipped channels are not shown.
When all the programmed channels have been displayed, the television
will restart the display starting from the top left corner.
DIRECT PROGRAMME NUMBER SELECTION
Single Digit Programme Numbers (0 to 9) can be accessed directly by pressing
the corresponding number on the Remote Control Transmitter.
TWO DIGIT PROGRAMME NUMBER SELECTION
To directly access Programme Numbers 10 to 99, press the “- / - -” Button followed
by the two digits required. For example, to select Programme Number 12:
The On-Screen display will be as shown:
_ _ 1_ 12
Please refer to drawing on Page 8 for location of Remote Control Buttons.
Using The On Screen Displays
P-NR Auto
Scan mode 75 / 833i
P-NR Auto
Scan mode 75 / 833i
Off timer Off
Wake up timer Off
Blue back On
Geomagnetic
Tuning menu
Owner ID
3D-COMB On
Ch colour set
Dolby Virtual On
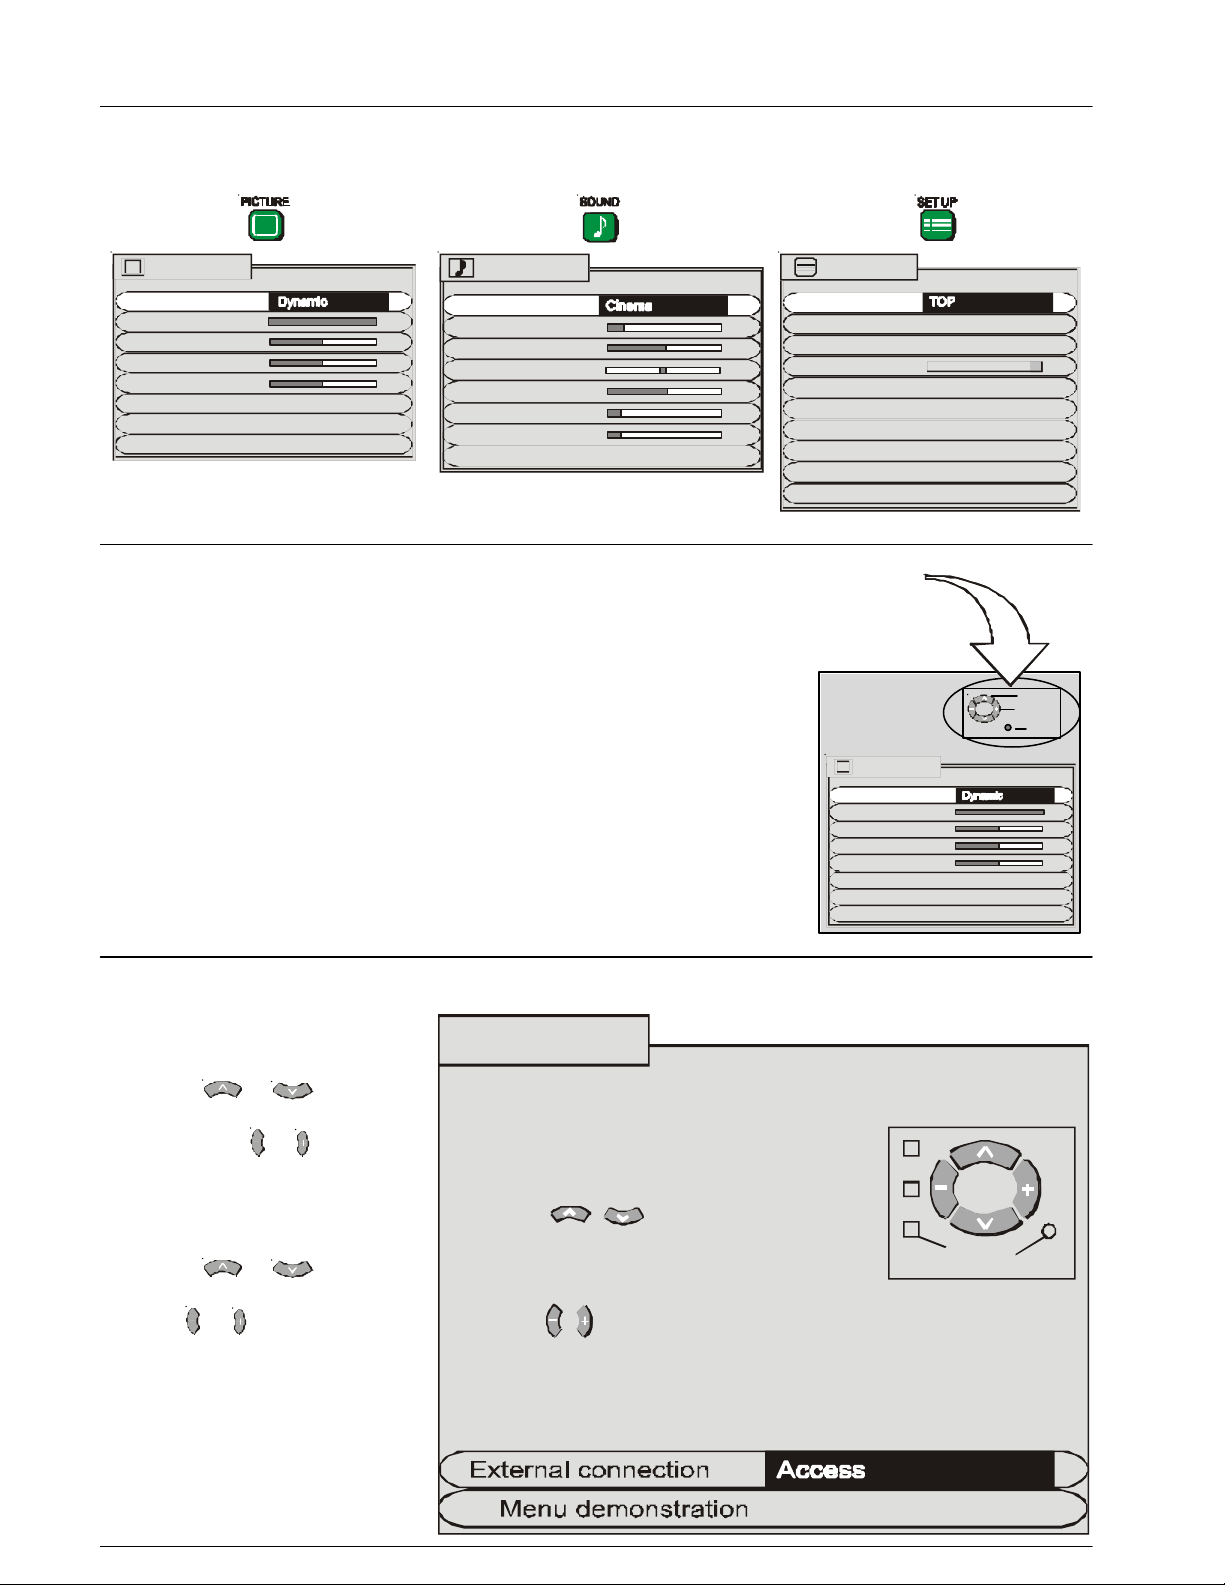
Many features available on this TV can be accessed via the On Screen Display menu
system. Use the remote control to access and adjust features as required.
Picture menu
Menu
Contrast
Brightness
Colour
Sharpness
Colour Temperature Standard
Sound menu
Menu
Volume
Bass
Balance
Treble
Headphone Volume
Subwoofer
An on screen help box is displayed whenever a menu is displayed on
the TV. This help box indicates which keys on the remote control are
used to navigate the menu shown. See above for descriptions of button
functions.
Note:
The help box is not shown in the menu pictures in this manual due to
space limitations.
Setup menu
Teletext
Child lock Off
ON SCREEN HELP
Instruction box
Picture menu
Menu
Contrast
Brightness
Colour
Sharpness
Colour Temperature Standard
SELECT
CHANGE
TV/AV EXIT
Pressing the HELP (?) button displays on screen instructions on how to adjust various settings and how to
connect external equipment.
Help menu
External connection
Press the or button to
HOW TO USE THE HELP MENUS
select the External connection
option. Use the or button to
view information on how to
Press the MENU keys to
open or close the menus
connect external equipment.
Use the keys on the
Menu demo
Press the or button to
select the Menu demo option.
Use the or button to view the
demonstration.
remote to move between
MENU
menu options
Use the keys to adjust the chosen option or
to adjust the chosen menu
TV/AV
Press the TV/AV key to
go back to watching TV
 Loading...