

Panasonic TX-76DT30A User Manual
®
®
TX-76DT30A
Wide Screen Stereo Colour Television with
Integrated Decoder
[ tau ]
FLA
DIGI AL
Operating Instructions
Please read these operating instructions
completely before operating this set and reta in
the booklet for future reference.
TQB4A0158P
Trade Mark of the DVB Digital Video Broadcasting Project (1991 to 1996)
Registration number 2716
Panasonic
and the Environment
Reduce, Reuse, Recycle
Dear Panasonic Customer,
Welcome to the Panasonic family. We hope that you will have many years of enjoyment from
your new Colour Television.
Thank you for choosing to buy this Panasonic Colour Television. It was assembled at our Panasonic
Television factory in Penrith, Australia under an inter nationally accredited quality and environmental
system. You can therefore be assured that you have purchased a quality product incorporating features
to reduce environmental impacts.
As part of our commitment to conserving natural resources we provide the following information about the
reuse, recycling and disposal of your packaging.
Cardboard
Cardboard comprises up to 75% of the packaging in your Panasonic TV and all of
our cartons are manufactured with optimum levels of recycled fibre.
1. Reuse
Cartons can be readily folded and packed flat for storage and made up when required for later
use.
2. Recycling
If you, or someone else has no further use for the carton, it can be flattened or cut up and placed
into the recycle bin or service provided by your local council (applicable for most parts of
Australia).
By recycling the cardboard you are benefiting the environment by reducing
waste to landfill and reducing the dependence on virgin forest timbers for
paper fibre.
Plastics
Panasonic is reducing the number of different plastics used in both the Television and its packaging.
Unfortunately you are unable to include the type of plastic used in Television packaging in the curbside -
recycling program. Polystyrene foam and other plastic will need to be placed in your general waste bin.
About Panasonic
Panasonic Australia and Panasonic AVC Networks Australia Pty Ltd are signatories to the
National Packaging Covenant. The Covenant is an agreement between Governments and
member companies aimed at reducing the amount of waste going to landfill through Reducing,
Reusing and Recycling. Panasonic and Panasonic AVC Networks Australia Pty Ltd contribute
to the industry transitional funding arrangements to support curbside recycling in Australia.
2
Important Information
®
®
Warning
This television weighs 57kg. Most of the weight is at the front of the television. Although the television has
been tilt tested and meets current Australian and International Standards, we recommend that great care
be taken when positioning the television.
* Do not allow the front of the set to overhang the stand or cabinet.
* Make sure that the stand or cabinet is flat and does not lean forward.
* Do not allow anyone to climb or sit on the television.
* Do not place any heavy weights on the television.
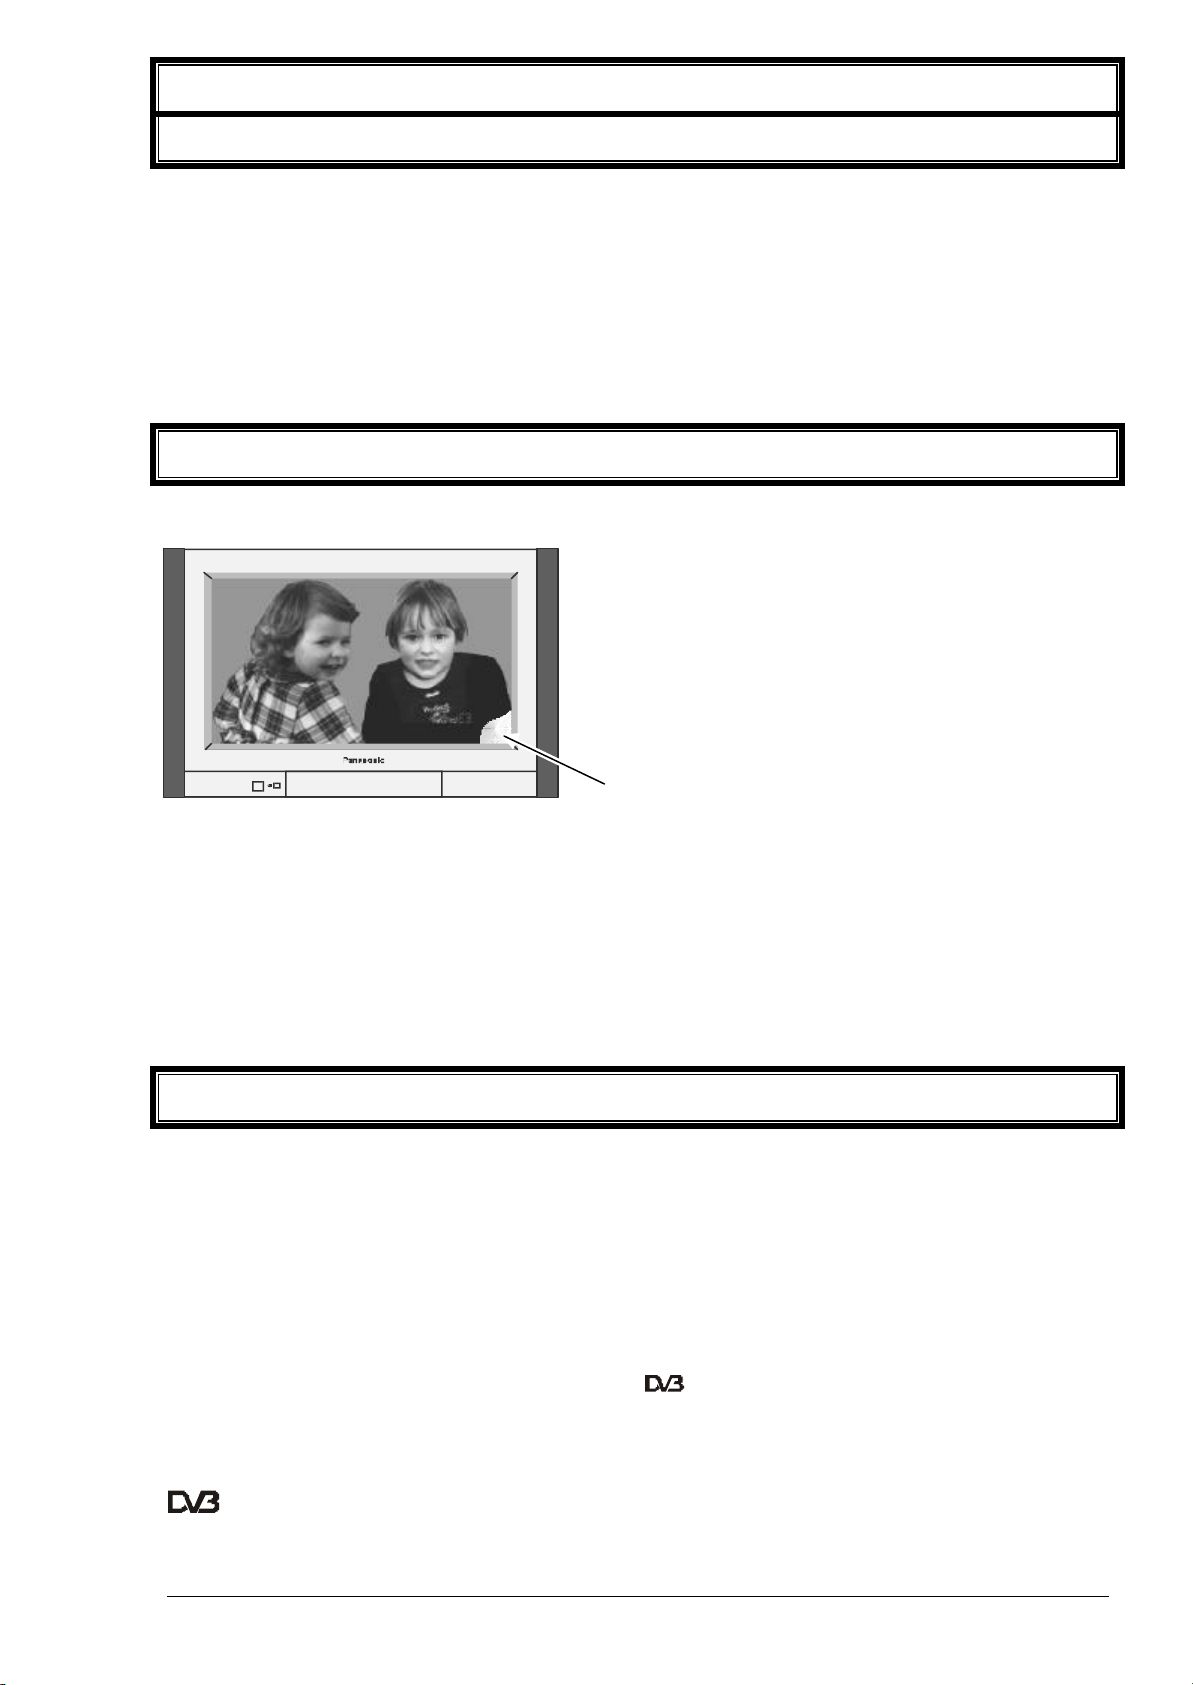
Picture Quality
All televisions are affected by Magnetic Interference.
Magnetic interference may come from such things as
unshielded motors, moving the TV while it is switched
ON, turning off a vacuum cleaner too close to the TV,
lightning strikes nearby or many other things.
The interference shows up as coloured patches that
appear while the TV is switched ON.
A typical result may look like the picture shown.
? ? Your Panasonic Television is designed to overcome this with the inclusion of a demagnetising
(degaussing) function.
? ? To activate this feature, simply switch your Television OFF with the Power On/Off Switch (not with
the remote control) for 30 minutes and then switch it back ON.
? ? If the television is to be left unattended for extended periods (several days or more), turn the power
off to the unit. DO NOT leave in Standby mode.
? ? This will ensure that you enjoy the picture clarity as it was meant to be.
Refer to page 31 for operating instructions for the GEOMAGNETIC feature.
Analogue and Digital television - what are they?
Analogue transmission is the system that has been used for many years for broadcasting television
programmes. With continuous impro vements in technology it is now possible to transmit programmes in a
digital format, allowing clearer pictures, more stations and other services to be displayed on screen.
Digital television is provided in three different ways; it can be sent along a cable connection direct to your
house, broadcast from a satellite, or broadcast using traditional land based (terrestrial) transmitters. The
first two options require you to have an extra 'set top box' decoder and in the case of satellite, a receiving
dish mounted outdoors.
While allowing you to receive traditional analogue transmissions in the usual way, this television can also
receive terrestrial digital services using an integrated (Digital Video Broadcasting) decoder. This
allows you to enjoy the new era of digital terrestrial television without the need for a 'set top box' or
satellite dish – a good roof mounted antenna is all you should need.
Trade Mark of the DVB Digital Video Broadcasting Project (1991 to 1996).
Registration number 2716
3

Contents
Getting Started......................................................................................................................... 5 ~ 9
Television Control Panel.............................................................................................................. 10
POWER, STR, F, - / \/, + / /\, TV/AV............................................................................ 10
Remote Control ................................................................................................................... 11 ~ 13
SETUP ..................................................................................................................... 12
MUTE....................................................................................................................... 12
PICTURE ................................................................................................................. 12
GUIDE...................................................................................................................... 12
HELP ....................................................................................................................... 12
VOLUME UP ............................................................................................................ 12
OK ........................................................................................................................... 12
VOLUME DOWN....................................................................................................... 12
TEXT........................................................................................................................ 12
COLOURED BUTTONS ............................................................................................ 12
N.............................................................................................................................. 12
AMBIENCE............................................................................................................... 12
DIRECT TV RECORD............................................................................................... 12
ASPECT ...................................................................................................................12
STANDBY ................................................................................................................ 13
SOUND .................................................................................................................... 13
TV/AV ...................................................................................................................... 13
INFORMATION......................................................................................................... 13
PROGRAMME NUMBER UP ..................................................................................... 13
POSITION BUTTONS ............................................................................................... 13
PROGRAMME NUMBER DOWN............................................................................... 13
STTL........................................................................................................................ 13
EXIT......................................................................................................................... 13
PROGRAMME NUMBERS ........................................................................................ 13
DIRECT CHANNEL ...................................................................................................13
STILL....................................................................................................................... 13
Picture Menu ................................................................................................................................ 14
Sound Menu ................................................................................................................................ 15
Aspect Control ............................................................................................................................. 16
Setup Menu ................................................................................................................................ 17
Guide ................................................................................................................................ 18
DVB Timer Programming.............................................................................................................. 19
DVB Setup Menu........................................................................................................................... 21
Favourites Setup .......................................................................................................................... 22
System Update ............................................................................................................................. 23
Tuning Menu ................................................................................................................................ 24
Auto setup ................................................................................................................ 25
Analogue manual tuning............................................................................................26
Q-Link Download .......................................................................................................28
Shipping condition.....................................................................................................30
Owner ID .................................................................................................................. 31
Geomagnetic Correction .............................................................................................................. 32
Teletext Operation ................................................................................................................ 33 ~ 35
Connecting Equipment to the TV.......................................................................................... 36 ~ 43
VCR Installation ........................................................................................................36
Remote Control VCR / DVD Operation ....................................................................... 37
Front Panel Connections ........................................................................................... 38
Connectors ............................................................................................................... 39
Rear Panel Connections .................................................................................... 40 ~ 42
Common Interface Module......................................................................................... 42
PC Connection and Modem ....................................................................................... 43
Customer Information........................................................................................................... 44 ~ 47
Frequently Asked Question........................................................................................ 44
Warnings and Cautions .............................................................................................45
Troubleshooting........................................................................................................ 46
Specifications............................................................................................................ 47
4
Getting Started
SERIALAV1
AV2
AV4MODE
M
AUDIO OUT
RF CABLE
Use AV2
SERIALAV1
AV2
AV4MODE
M
AUDIO OUT
RF CABLE
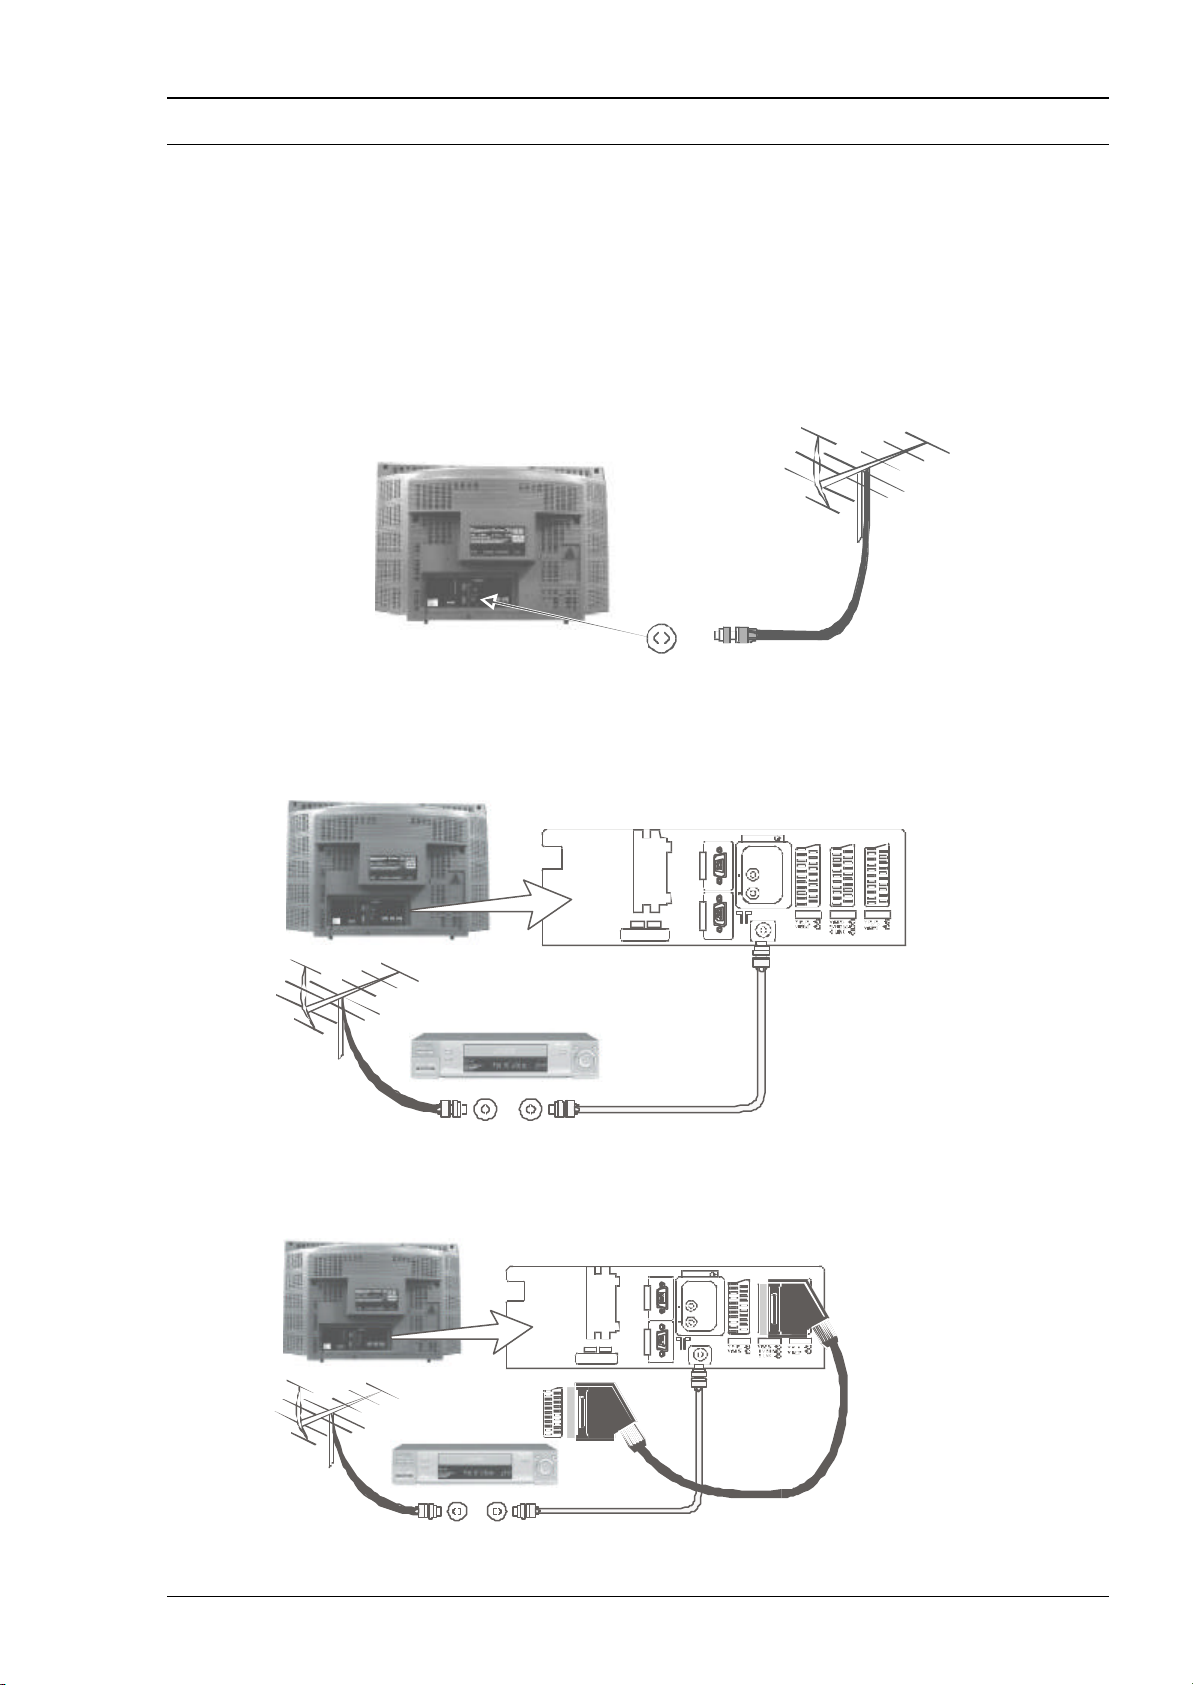
Connecting the Aerial
For your safety any external aerial should be installed by a reputable qualified installer and should comply
with Australian Standard AS1417.1. The RF (Aerial) Input impedance of this television is 75? . If your
aerial lead is 300? ribbon (two wires separated by a flat plastic sheet) you will require a 300? /75? Balun
in order to connect your aerial to the television.
If you are just using the television with no other equipment (VCR, DVD Player, Set Top Box etc) then
connect the aerial as per step 1. If you are connecting VCR then connect the aerial as shown in step 2. If
your VCR is Q-Link compatible then go to step 3.
Step 1 - Using the television on its own.
RF-IN Terminal 75? Co-Axial
Cable
Step 2 - Using the television with a Standard VCR.
VCR
RF OUT
RF IN
Step 3 - Using the television with a Q-Link compatible VCR.
VCR
RF OUTRF IN
(Not Supplied)
Refer to pages 38 to 41 for S-VHS VCR, DVD and other Audio / Video connections.
CI 1
TO ACCESS COMMON
INTERFACE SLOTS PLEASE
REMOVE COVER
INTERFACE SLOTS PLEASE
CI 2
CI 1
CI 2
TO ACCESS COMMON
REMOVE COVER
(Not Supplied)
Socket
Scart - Scart
Cable
(Not Supplied)
5
Getting Started
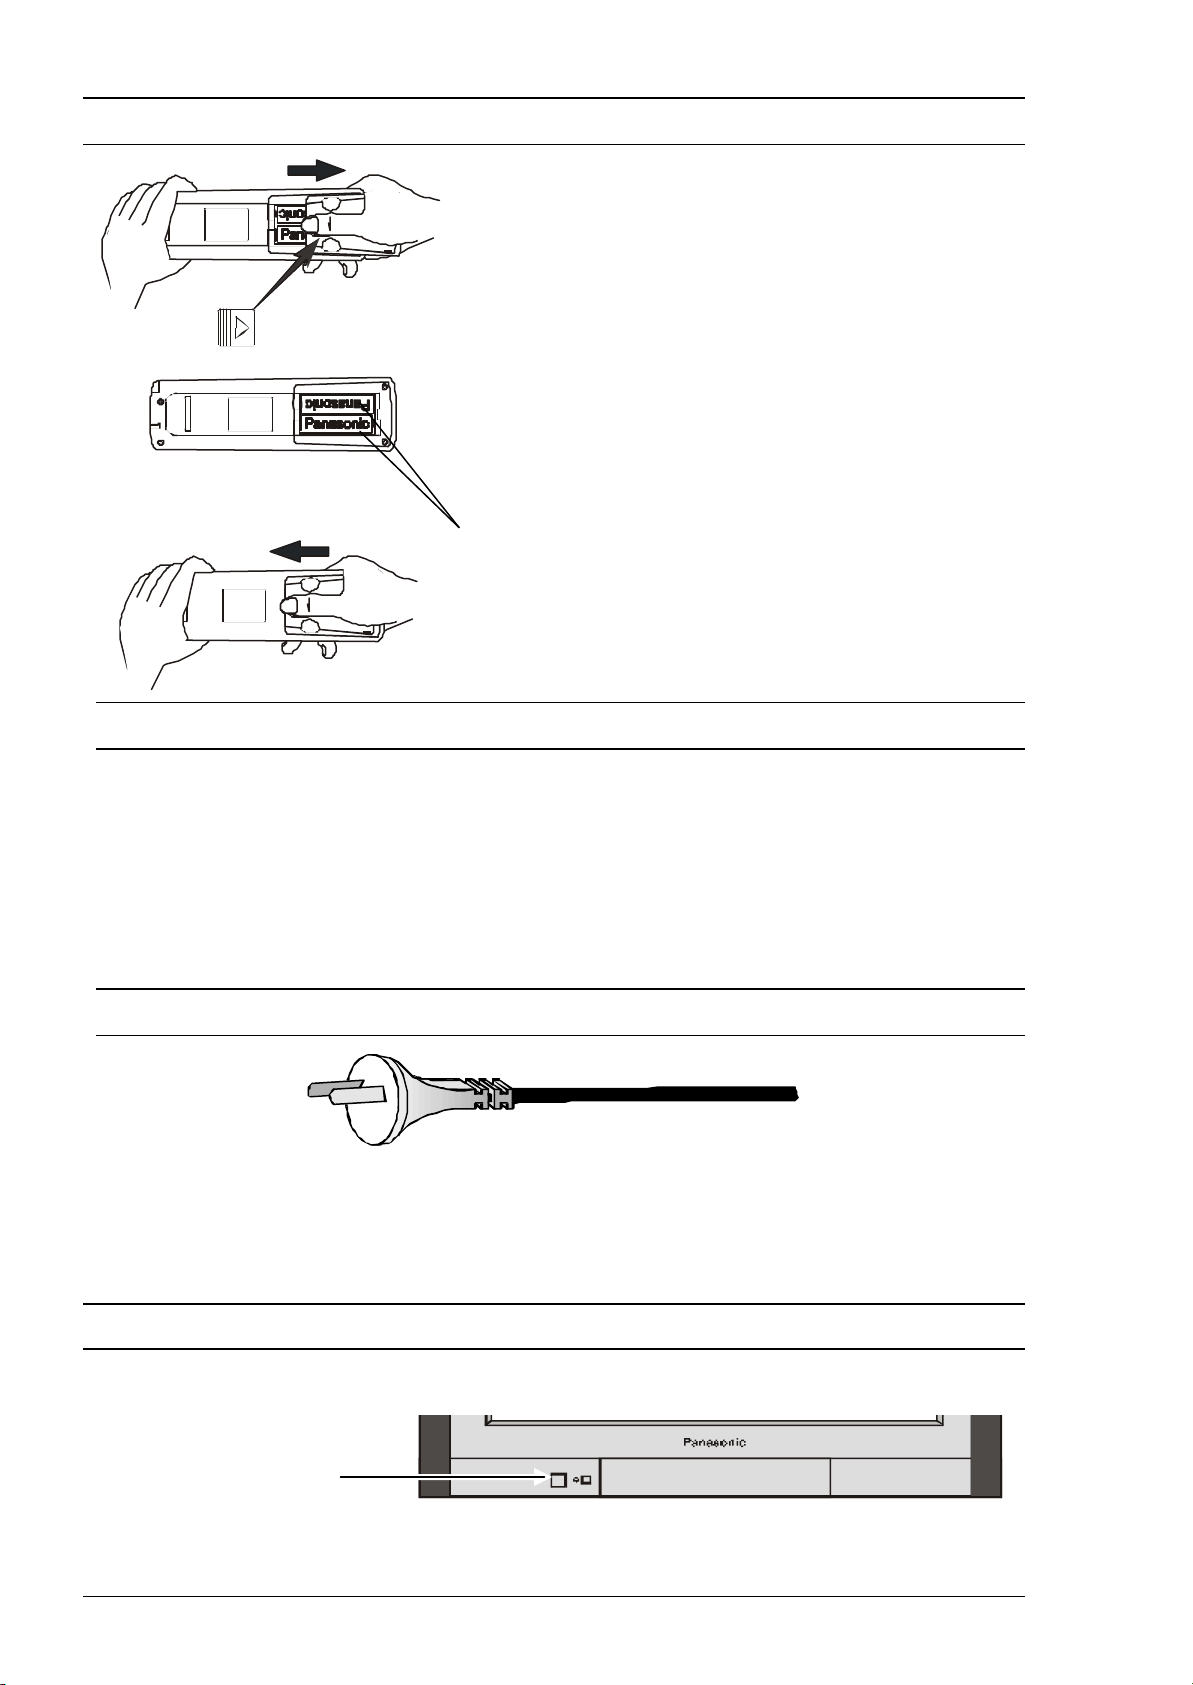
Battery Replacement and Installation
Place your thumb on triangle on the battery cover. Apply a
slight downward pressure with the thumb and slide the cover
back. This allows the cover to be removed.
Insert the batteries ensuring the correct polarity. The polarity is
identified by the “ + “ and “ – “ symbols on the battery and the “
+ “ and “– “ symbols on the battery compartment. The springs
inside the battery compartment connect to the negative
terminal of the battery.
Two “AA” size batteries
Fit the battery cover and slide it forward until it “clicks” into
place.
Battery Precautions
? Do Not use rechargeable batteries. Differences in size and performance may cause
incorrect operation.
? Do Not mix battery types (Alkaline with zinc -carbon etc.)
? Do Not mix old and new batteries. Replace both batteries at the same time.
? Do Not attempt to recharge batteries.
? Do Not short circuit batteries.
? Do Not disassemble batteries.
? Do Not heat or burn batteries.
Connect the Power Plug
This television is designed for the Australi an Standard Mains Voltage of 240V 50Hz.
NOTE:
If the television is not going to be used for an extended period, remove the power plug from the wall
outlet.
Turn on the Television
Push the Power Switch to turn the television ON. Sit back and enjoy your new Panasonic television.
Power Switch
If the television is not going to be used for a while, turn it off with the power switch. This will reduce the
amount of electricity used, reduce greenhouse emissions and save you money.
6
Getting Started
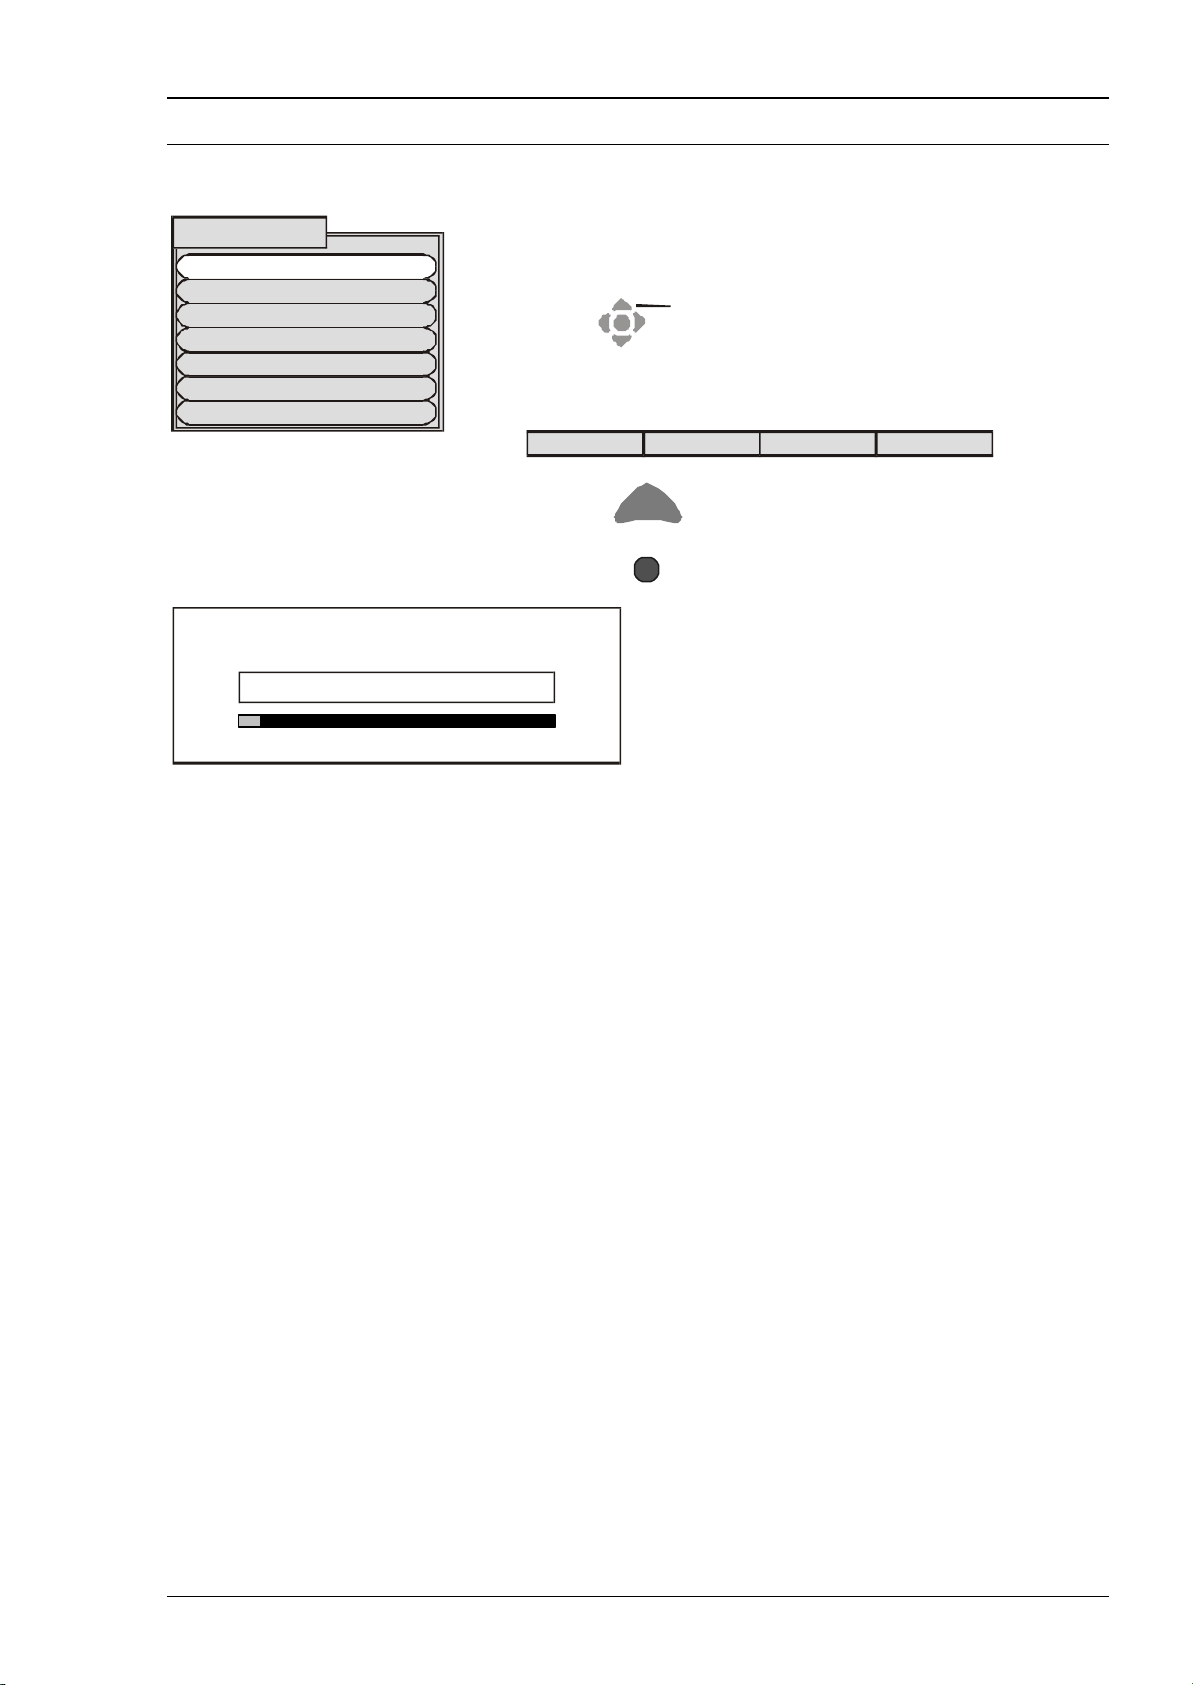
Start ATP Exit
Northern Territory
State / Territory
Auto Setup
Unless your dealer has already programmed your television then Auto Setup will begin.
State / Territory
New South Wales / ACT
Victoria
Queensland
South Australia
Western Australia
Tasmania
Select the state or territory in which you live.
Press the Red button to start the Auto Setup.
The television will search for the digital and analogue stations simultaneously.
TV stations will be located, sorted into order and stored ready for use.
Stations are sorted into the following order:
DVB Stations sorted by their logical channel number
Analogue Stations sorted into channel order.
The programme order depends on the TV signal, the broadcasting system and reception conditions.
If a "Q-Link", "NEXTVIEWLINK" or compatible VCR has been connected to the AV2 socket before
starting the Auto Setup, programme information will be downloaded to the VCR.
Only the analogue programme positions will be downloaded to the VCR, in the correct order.
Not all VCRs support this download of programme information, some may require to be started manually.
Refer to your VCR operating instruction book.
If a VCR other than those described above has been connected, then there will be no download
operation.
The TV is now ready for use:
Notes:
If the VCR has not accepted download data from the TV, you may need to select the Download option
from the VCR's menu system.
Refer to your VCR operating instruction book.
If Q-Link is not operating correctly, check the following:
? The Scart cable is connected to the TV's AV2 Scarf socket.
? The Scart cable is connected to the VCR's compatible (Q-Link, NEXTVIEWLINK or similar
? The Scart cable is a "fully wired" type.
For further information on Q-Link and connecting equipment, see pages 5, 28 and 29.
AUTO SETUP IN PROGRESS
SEARCHING : PLEASE WAIT
Stored CH02
00 75:02 44
technology) Scart socket.
7
Getting Started
Colour Balance Normal
Select
Access
PICTURE
SOUND
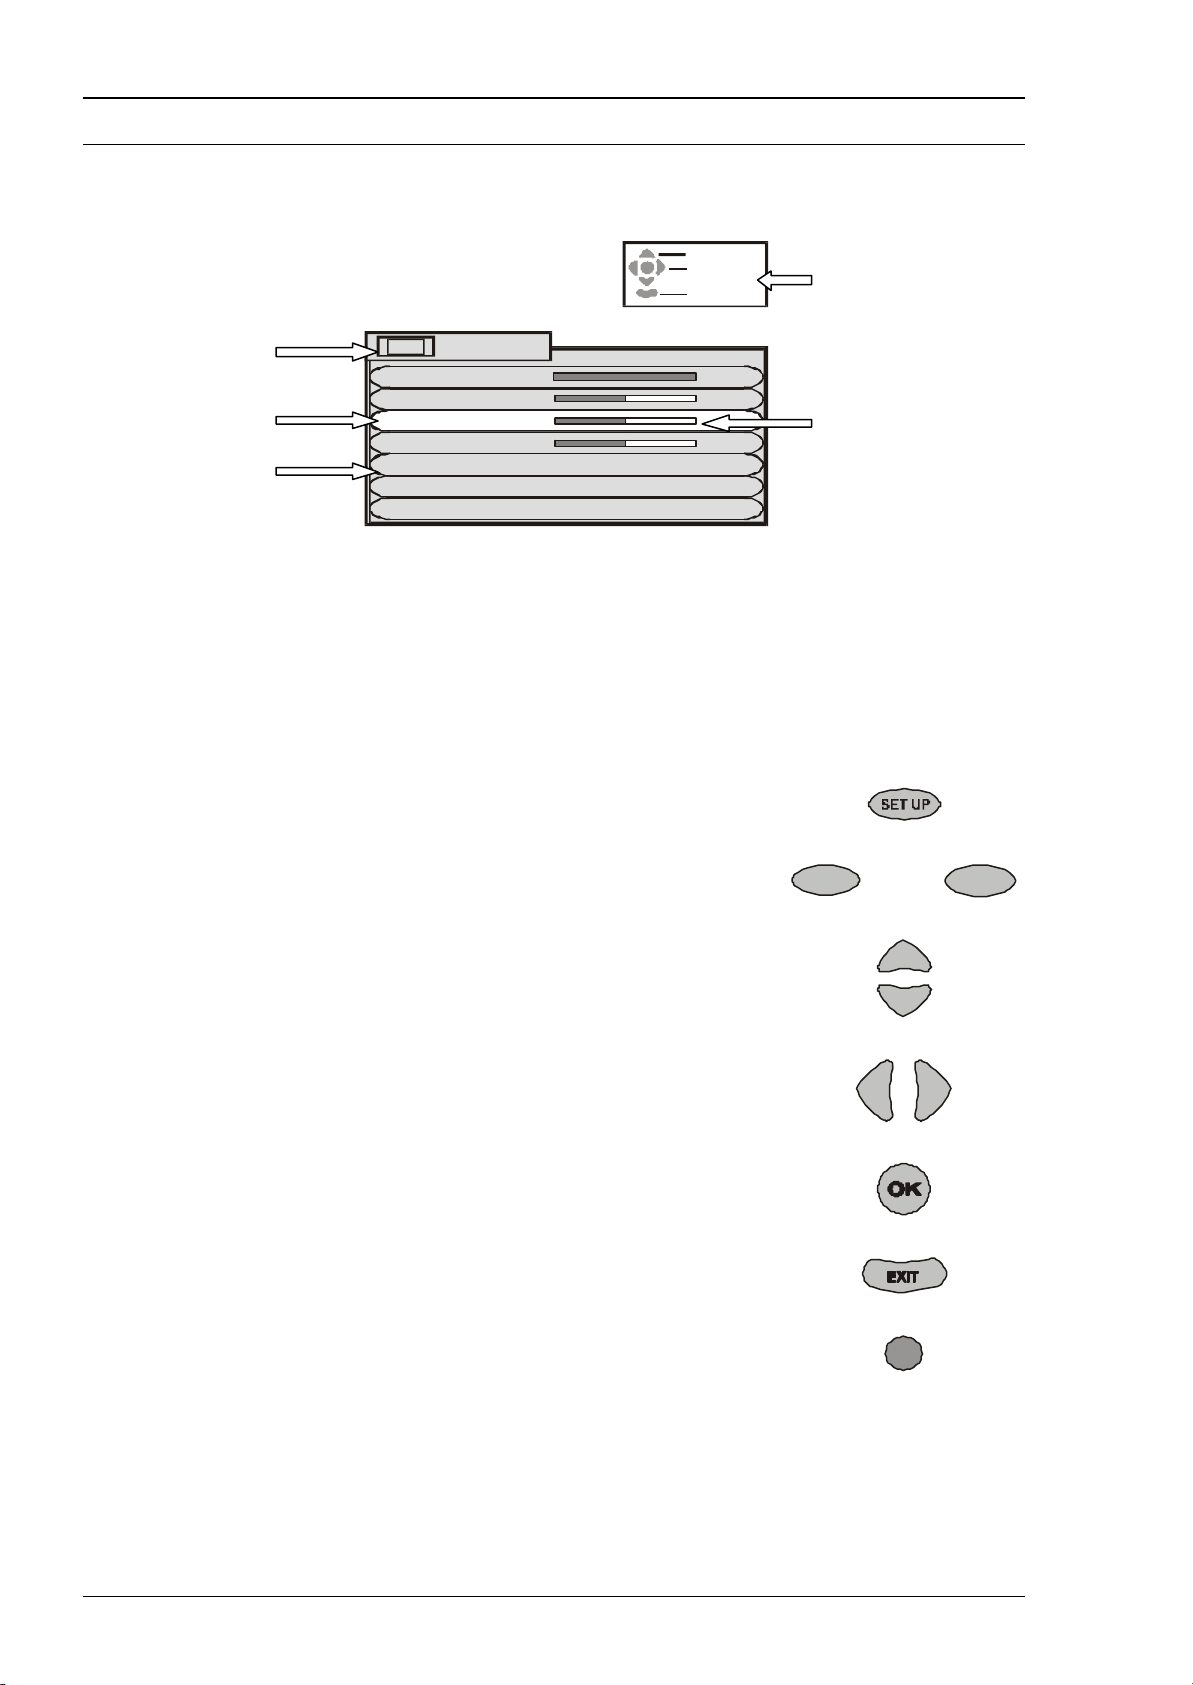
Using the On -Screen Displays
This TV has a comprehensive system of On-Screen Display (OSD) menus to access adjustments and
options.
Instructions
Main Title
Selection bar Indicator for options
Sub-menus
Picture menu
Contrast
Brightness
Colour
Sharpness
P-NR Off
AI On
Some selections, for example, Contrast, Brightness, Colour and Sharpness will allow you to increase or
decrease their level.
Some selections, for example, Off timer, allow a change of setting to be made.
Some selections, for example Tuning menu, will lead to a further menu.
The PICTURE, SOUND and SET UP buttons are used to open the main
menus and also to return to the previous menu.
The up and down cursor buttons are used to move the cursor up and down
the menus.
The left and right cursor buttons are used to access menus, adjust levels or
to select from a range of options.
The OK button is used to store settings after adjustments have been made or
options have been set for example Picture and Sound settings.
The EXIT button is used to exit the menu system and return to the normal
viewing screen.
The HELP button will run a demonstration of the menus available. During
normal viewing, with no OSDs displayed, press the HELP button and select
one of the options.
Exit
HELP
8
Getting Started
3 SBS DIGITAL 1 08:25
3 SBS DIGITAL 1 08:25
3 SBS DIGITAL 1 08:25
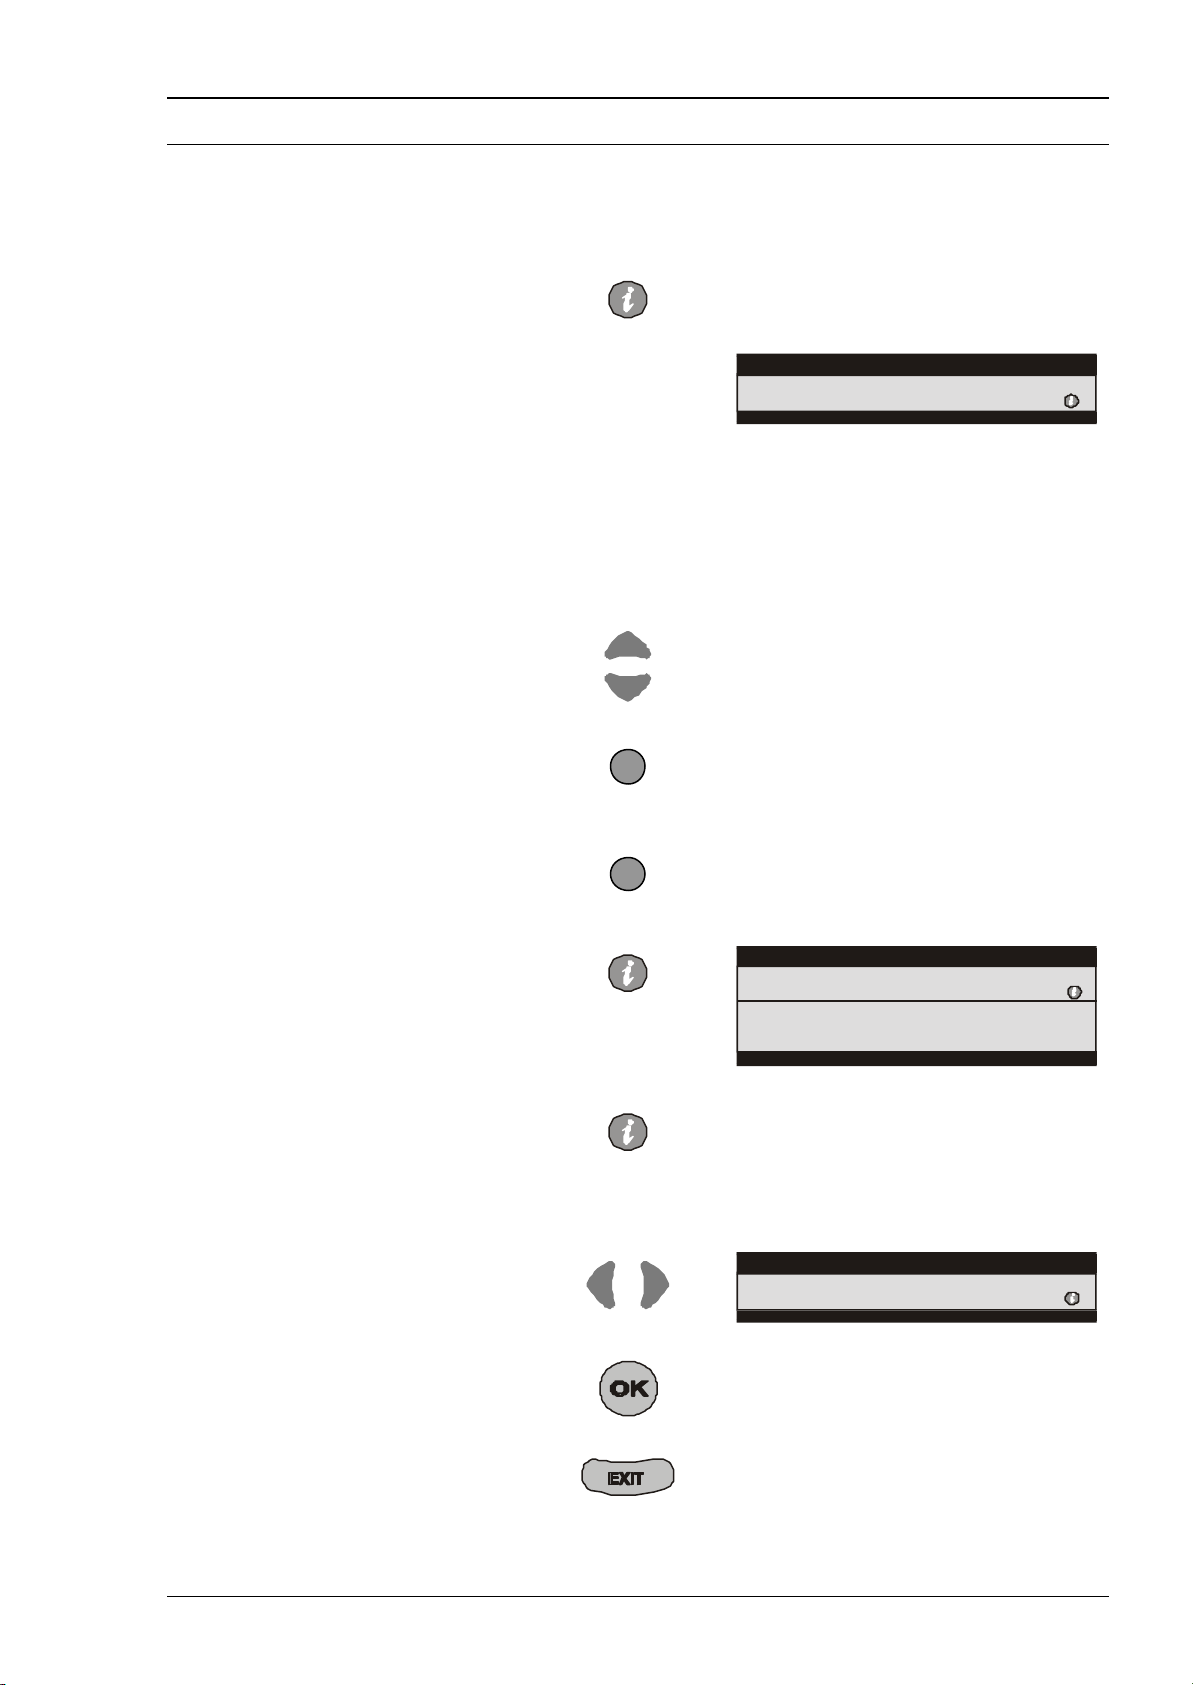
Information Banner
The Information banner provides access to information on current and upcoming programmes and easy
switching between all channels or just those in your Favourites list.
Note: This feature only applies to digital channels.
Press the Information button.
An information banner will appear with
details of the current programme being
broadcast.
These details may include the channel
number and programme position, the title
and duration of the current or next
programme, details of transmitted support
services (for example text, multi audio, and
subtitles) and the current time.
You can set how long the information
banner stays on screen. See page 21.
Use the cursor up and down buttons to scroll
through the programme list.
If you have set favourite channels and
want to scroll through only those channels,
press the Blue button.
To step through your favourite channels
press the Blue button repeatedly.
Further information on the individual
programmes shown can be displayed by
pressing the Information button.
To return to the normal Information banner
view press the Information button once
more.
For information on the upcoming (next)
programme on any Individual channel, press
the Left or Right cursor button.
To select any programme listed In the
Information banner press the OK button.
You can press the Exit button at any time
to return to normal viewing mode.
Ta Nea Ton Ennea
08:00 - 08:59 <Now> For info press
Ta Nea Ton Ennea
08:00 - 08:59 <Now> Exit info :
News via satellite from ERT Athens. In Greek. No
subtitles.
Le Journal
08:59 - 09:29 <Next> For info press
9
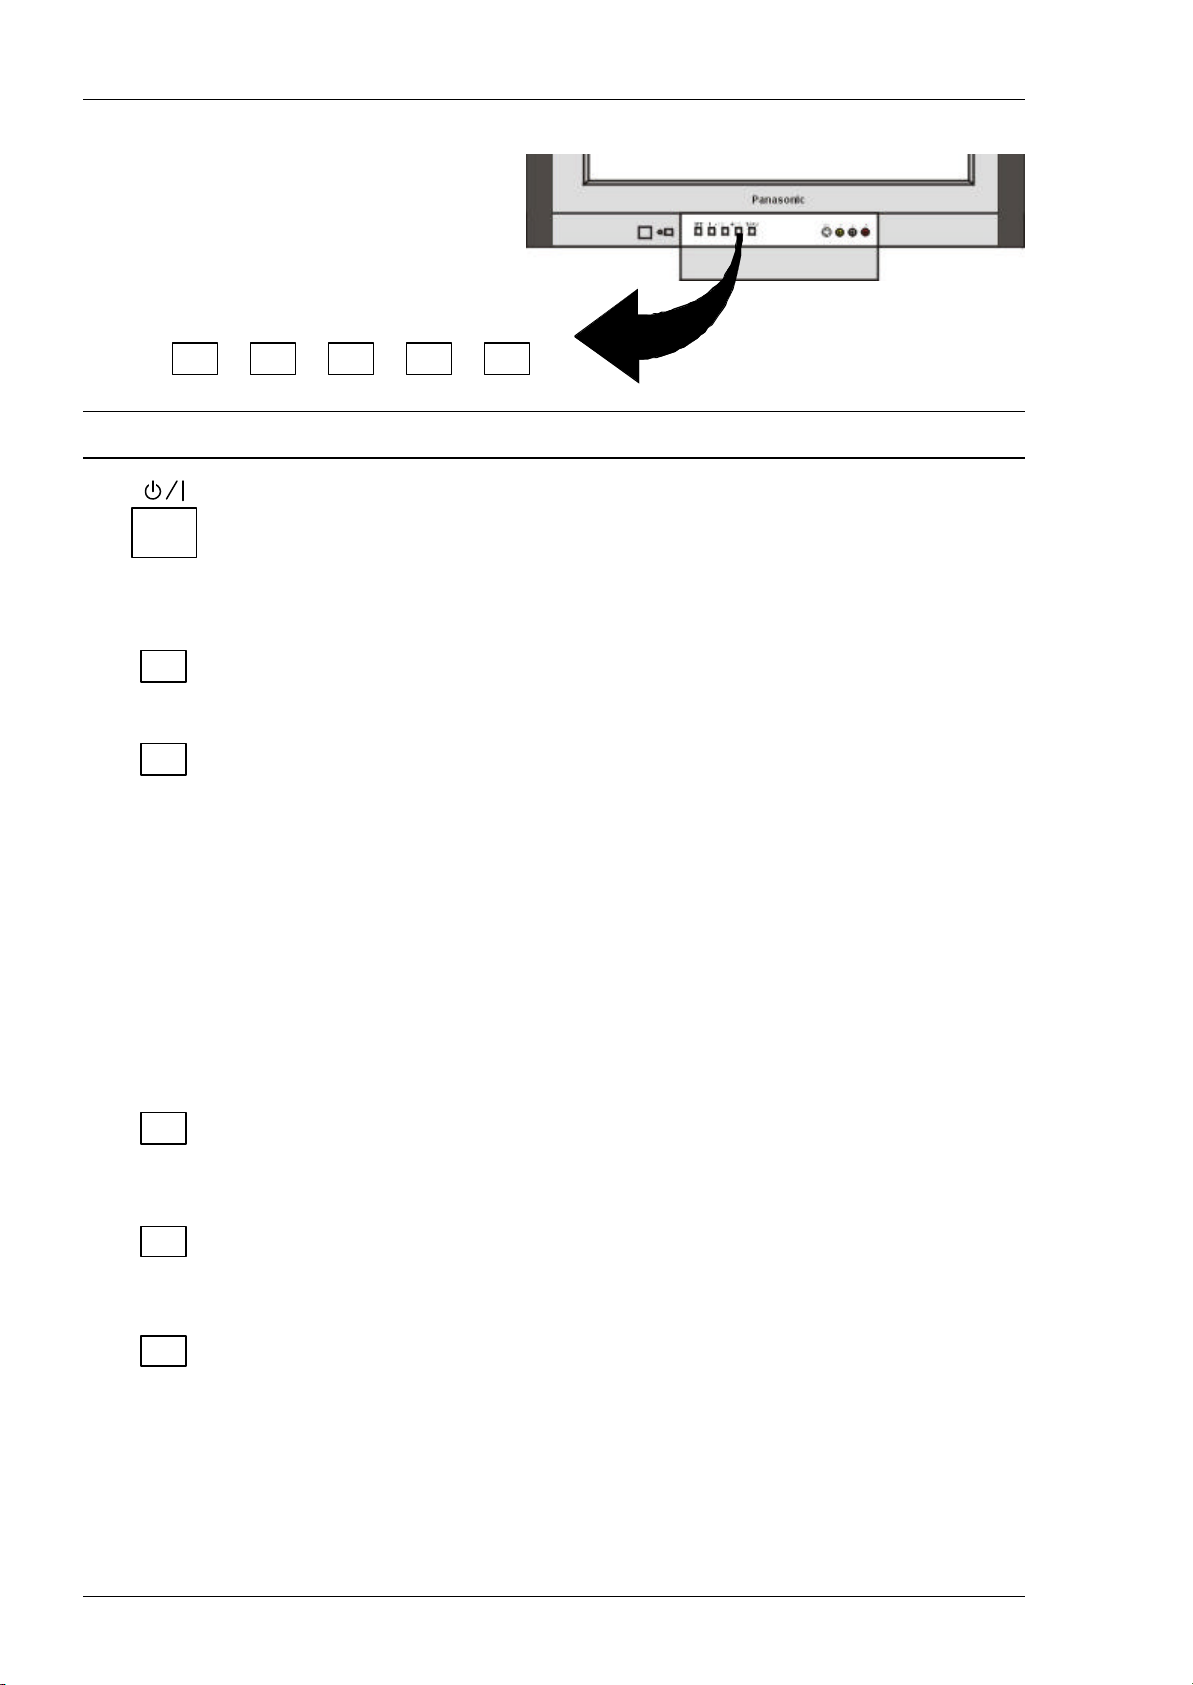
Television Control Panel Buttons
STR
F -
/ \/
-
/ \/ TV/AV
Open the front panel door to gain access to the Television Controls push the door at the point marked
with a triangle
Push again to close
STR F - / \/ + / /\ TV/AV
BUTTON WHAT IT DOES
POWER
This button is used to turn the television on and off.
.
STR (Store)
This button is used to store tuning information and other function settings.
F (Function Select)
The F button is used to select the on screen display functions. Push the
button to select the following functions sequentially:
Volume, Contrast, Brightness, Colour, Sha rpness, Tint, Bass, Treble,
Balance, Tuning and Geomagnetic Correction.
Notes:
Tint: Only displayed when receiving NTSC signals.
Tuning: Not displayed when the TV is showing a DVB station or when in
AV mode.
For manual tuning of analogue stations please refer to page 26 or 27.
For Geomagnetic Correction instructions please refer to page 32.
- / \/
This button is used to select the next lower programme number. It is also
used with the F button to adjust function settings.
+ / /\
This button is used to select the next higher programme number. It is also
used with the F button to adjust function settings.
TV / AV
This button is used to switch between the TV mode and the four AV modes.
Note:
When the television is in Stand -By it is possible to turn it back on by pressing the Programme Number UP
or DOWN Button.
10
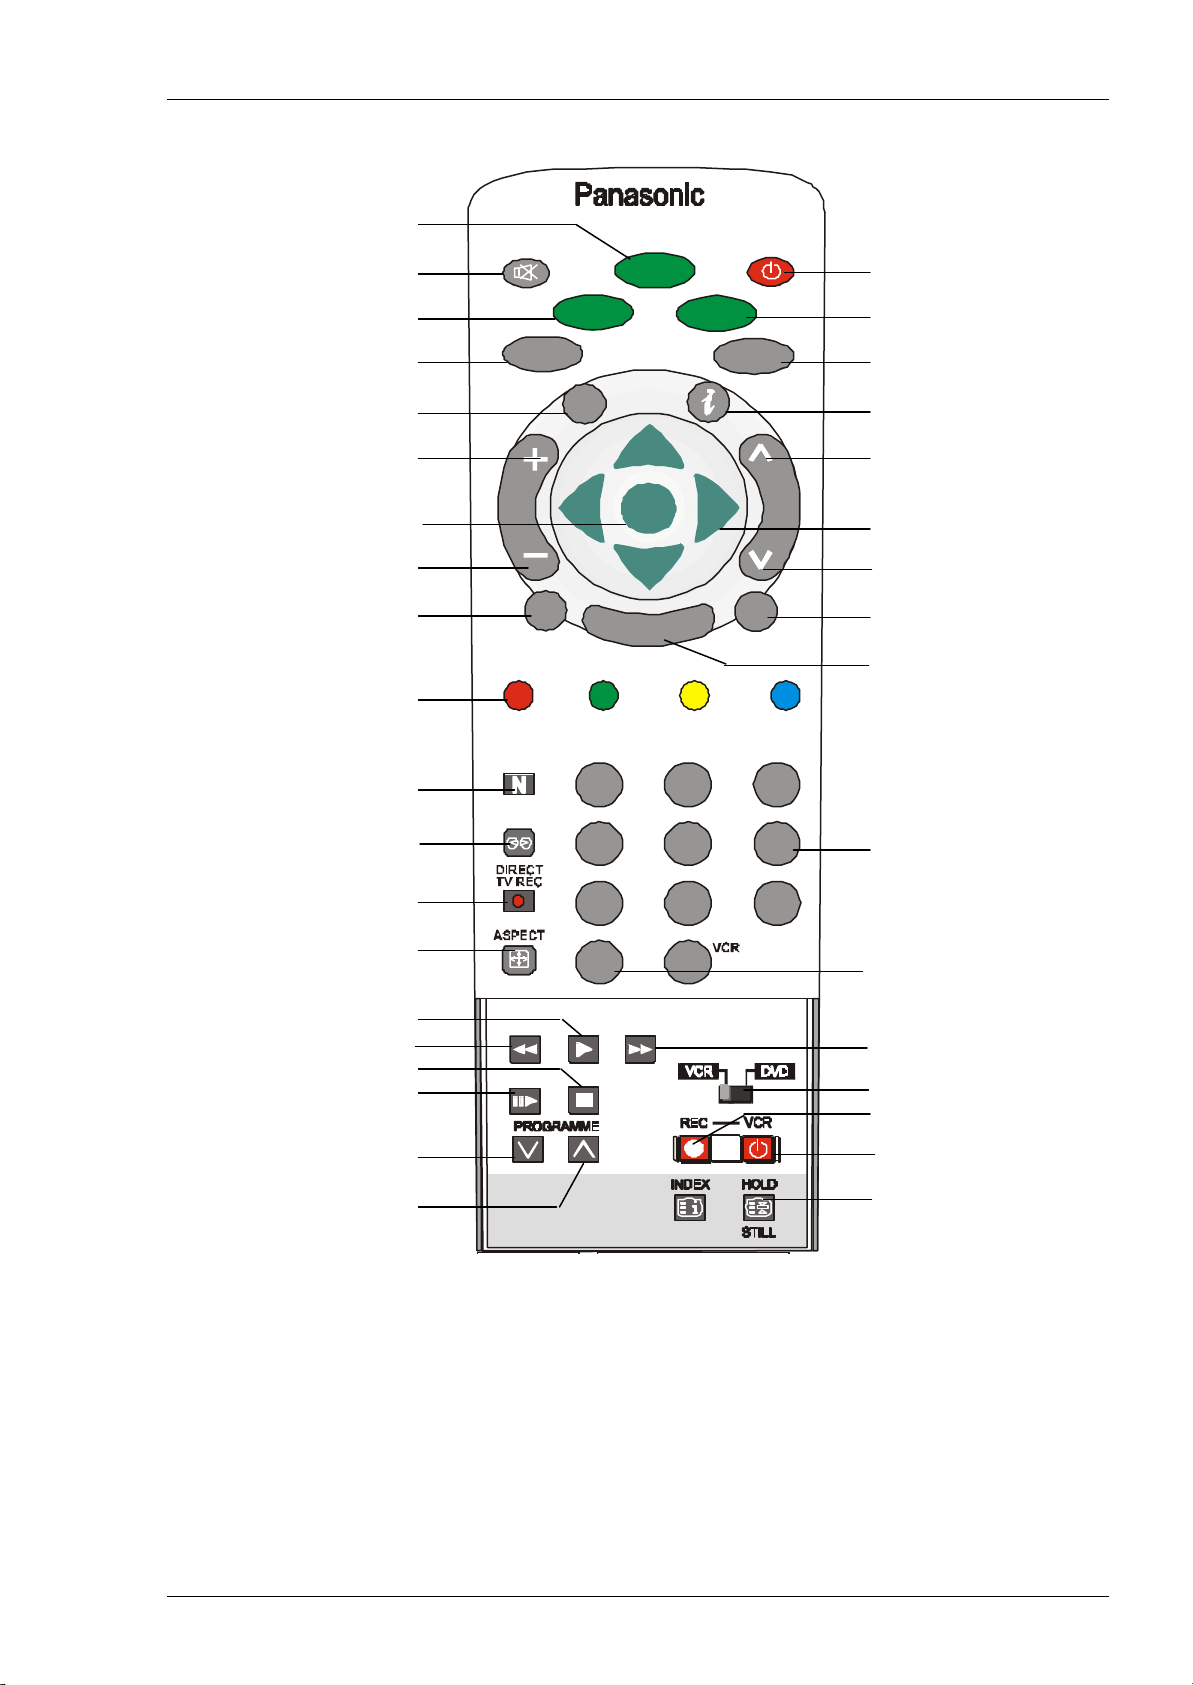
Television Remote Control Buttons
2580369
TV/AV
SOUND
TEXT
STTL
OK
EXIT
SET UP
SOUND MUTE STANDBY
PICTURE SOUND
GUIDE TV / AV
HELP INFORMATION
VOLUME UP PROGRAMME NUMBER
UP
OK POSITION BUTTONS
VOLUME DOWN PROGRAMME NUMBER
PICTURE
GUIDE
HELP
DOWN
TEXT SUBTITLES
EXIT
COLOUR CODED
BUTTONS
N
AMBIENCE PROGRAMME
NUMBERS
DIRECT TV
RECORD
ASPECT
DIRECT CHANNEL
NUMBER
PLAY
REWIND / REVIEW .FAST FORWARD / CUE
STOP
STILL ADVANCE VCR / DVD SWITCH
RECORD
PROGRAMME DOWN STANDBY
PROGRAMME UP STILL
For details of Teletext remote control operation, please refer to page 33.
For details of VCR remote control operation, please refer to page 37.
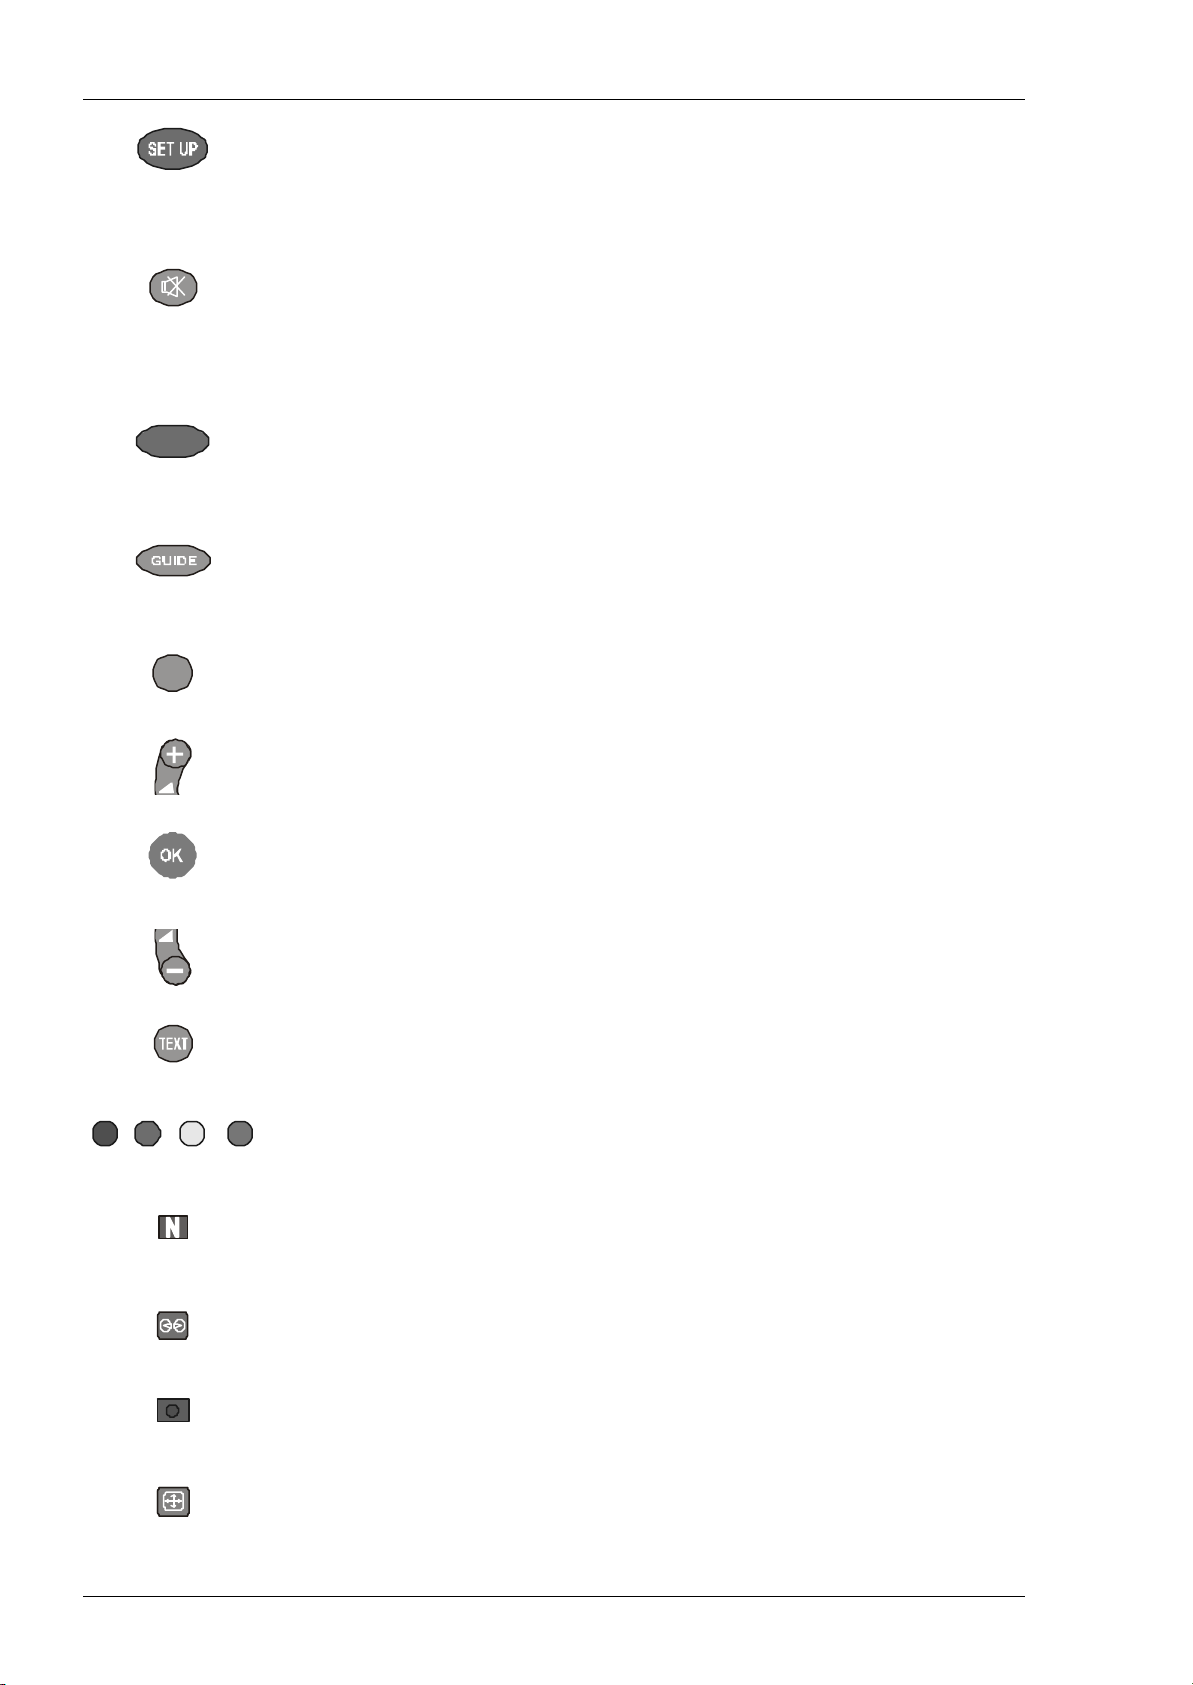
SET UP
1
4
7
C
11
Television Remote Control Buttons
PICTURE
SET UP
This button is used to access advanced features such as Timer Programming, Off
Timer, DVB Tuner Lock, DVB Setup, Teletext, Flicker Reduction, Geomagnetic,
AV2 Out, Tuning Menu and Volume Correction (AV only). Please refer to page 18.
MUTE
Pressing this button reduces the sound from the television to nil. Pressing the
button again returns the sound to the original setting. Pressing either + (Volume
Up) or - (Volume Down) will also restore the volume level setting. “Mute” will be
displayed on the screen.
PICTURE
This button allows you to change Contrast, Brightness, Colour, Sharpness and
Colour Balance. It also allows you to control P-NR and AI. Please refer to page 14.
GUIDE
The GUIDE Button displays the current television guide for all digital channels
available in your area. Please refer to page 18.
HELP
Provides a demonstration of On Screen Display menus.
VOLUME UP
Used to increase the volume level.
OK
The OK Button is used to confirm selections and choices.
VOLUME DOWN
Used to decrease the volume level.
TEXT
This button is used to switch between TV and Teletext Modes.
COLOURED BUTTONS
These buttons are used for teletext functions and AV selection.
N
The N Button will recall settings stored with OK.
AMBIENCE
Used to turn the Ambience On or Off.
DIRECT TV RECORD
Allows immediate recording of the programme currently on the screen.
ASPECT
This button is used to move through the different aspect ratios. The aspect options
HELP
are Panasonic Auto, 16:9, 14:9, 4:3, Zoom1, Zoom2 and Zoom3. Please refer to
page 16.
12
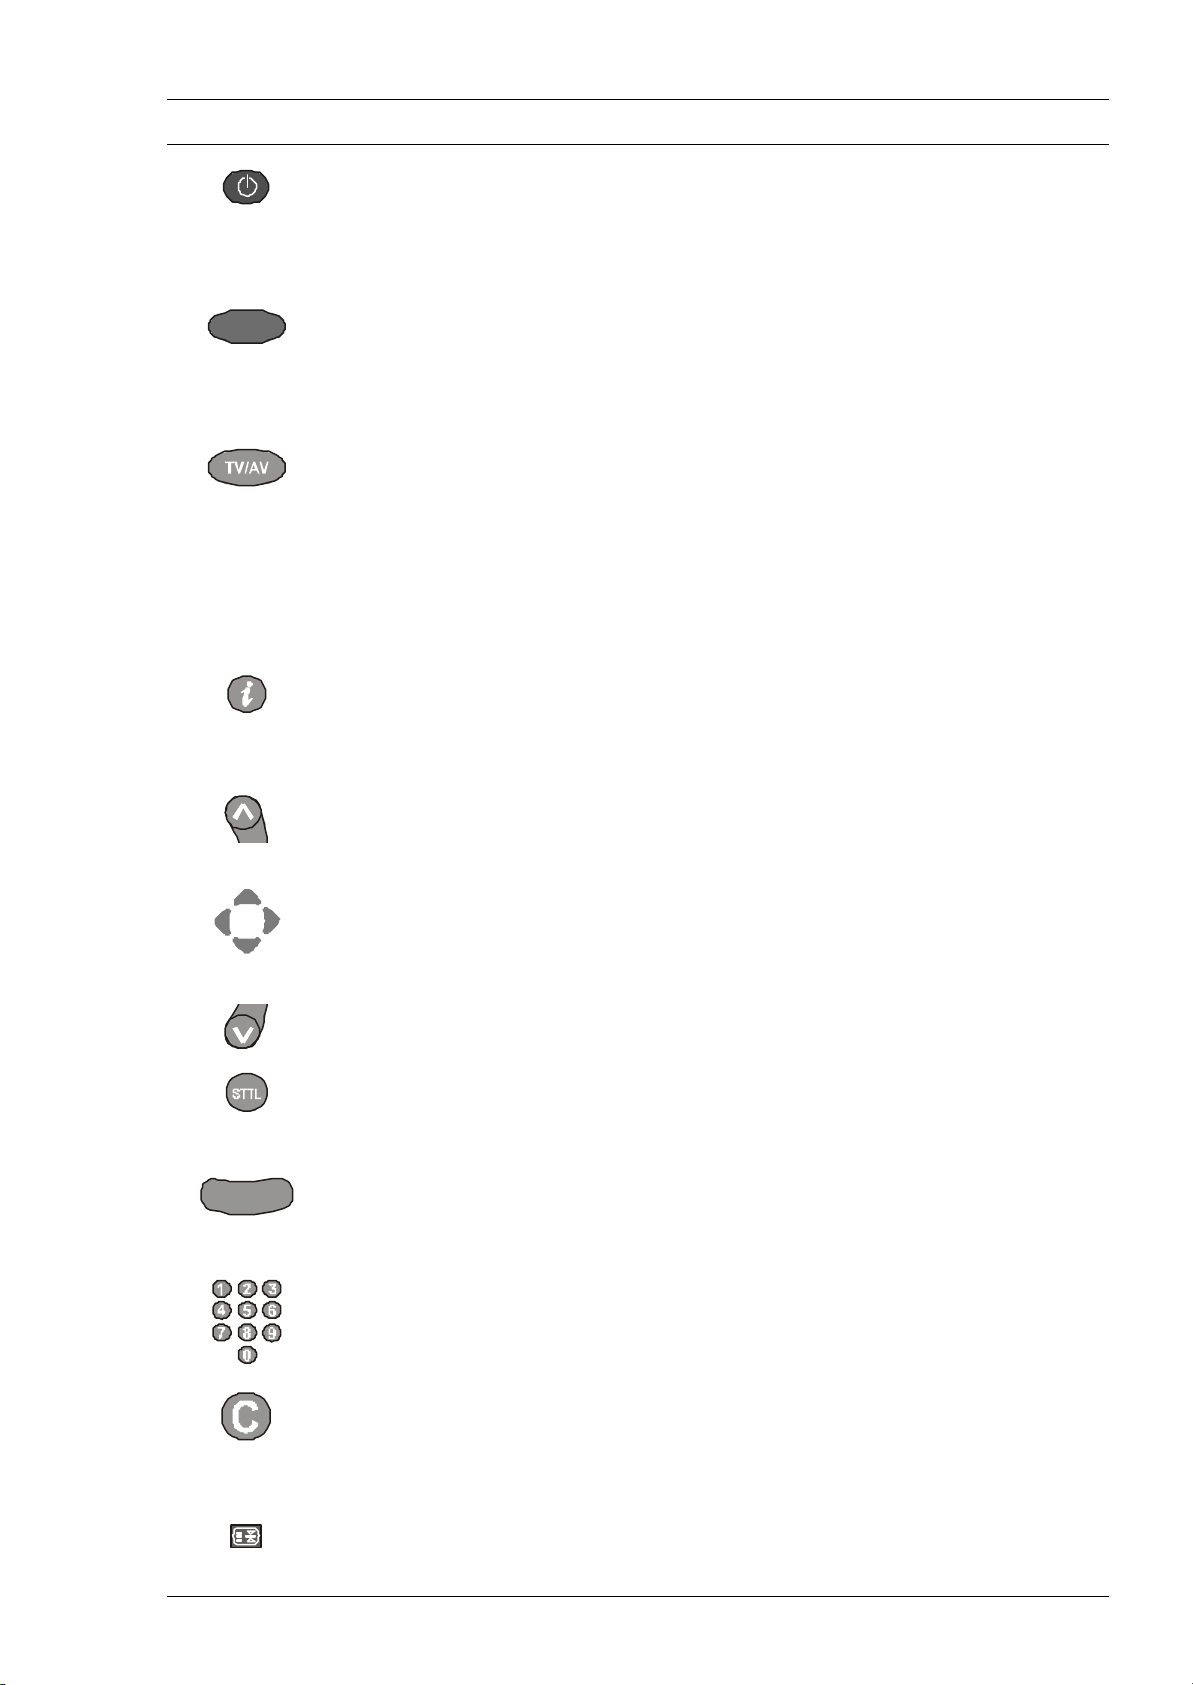
Remote Control Televisi on Operation
SOUND
BUTTON WHAT IT DOES
STAND-BY
The remote control button is used to turn the television into Stand-by mode. When
the television is in Stand-By it is possible to turn it back on by pressing this remote
control Power Button, the Programme Number UP Button, the Programme Number
DOWN Button or any of the direct Programme Number Buttons.
SOUND
This button allows you to change Bass, Treble, Balance, and Headphone Volume
levels. It also allows you to select different sound modes and turn the Ambience On
or Off. Please refer to page 15.
TV/AV
This button is used to switch between the normal broadcast television stations or
the AV (Audio/Video) inputs.
Press the TV/AV button then press the appropriate coloured remote control button
(whilst the options remain on screen). Each AV input has two options. Press the
appropriate coloured button again to select the alternate option.
You can adjust the volume level for each AV input individually to compensate for
different output levels from the audio sources. Please refer to page 17 for Volume
correction adjustment.
INFORMATION
This button is used to show the status information for the current Programme
position.
PROGRAMME NUMBER UP
Pressing this button selects the next higher Programme Number in sequence.
POSITION / CURSOR BUTTONS
These buttons are used with the Menu buttons to select and change features of the
television.
PROGRAMME NUMBER DOWN
Pressing this button selects the next lower Programme Number in sequence.
STTL (Subtitles)
Displays subtitles (if available). Pressing this button is the same as accessing
teletext and selecting page 801. Please refer to page 33 for further information.
EXIT
EXIT
Used to close the on screen menus.
PROGRAMME NUMBERS
Programme Numbers can be accessed directly by pressing the corresponding
number(s) on the Remote Control Transmitter.
DIRECT CHANNEL SELECTION
To directly access analogue Programme Numbers, press the C Button followed by
the two digits required (e.g. C02, C28 etc).
STILL
STILL
Used to freeze the picture currently on the screen. Press again for normal viewing.
13
Picture Menu Operation
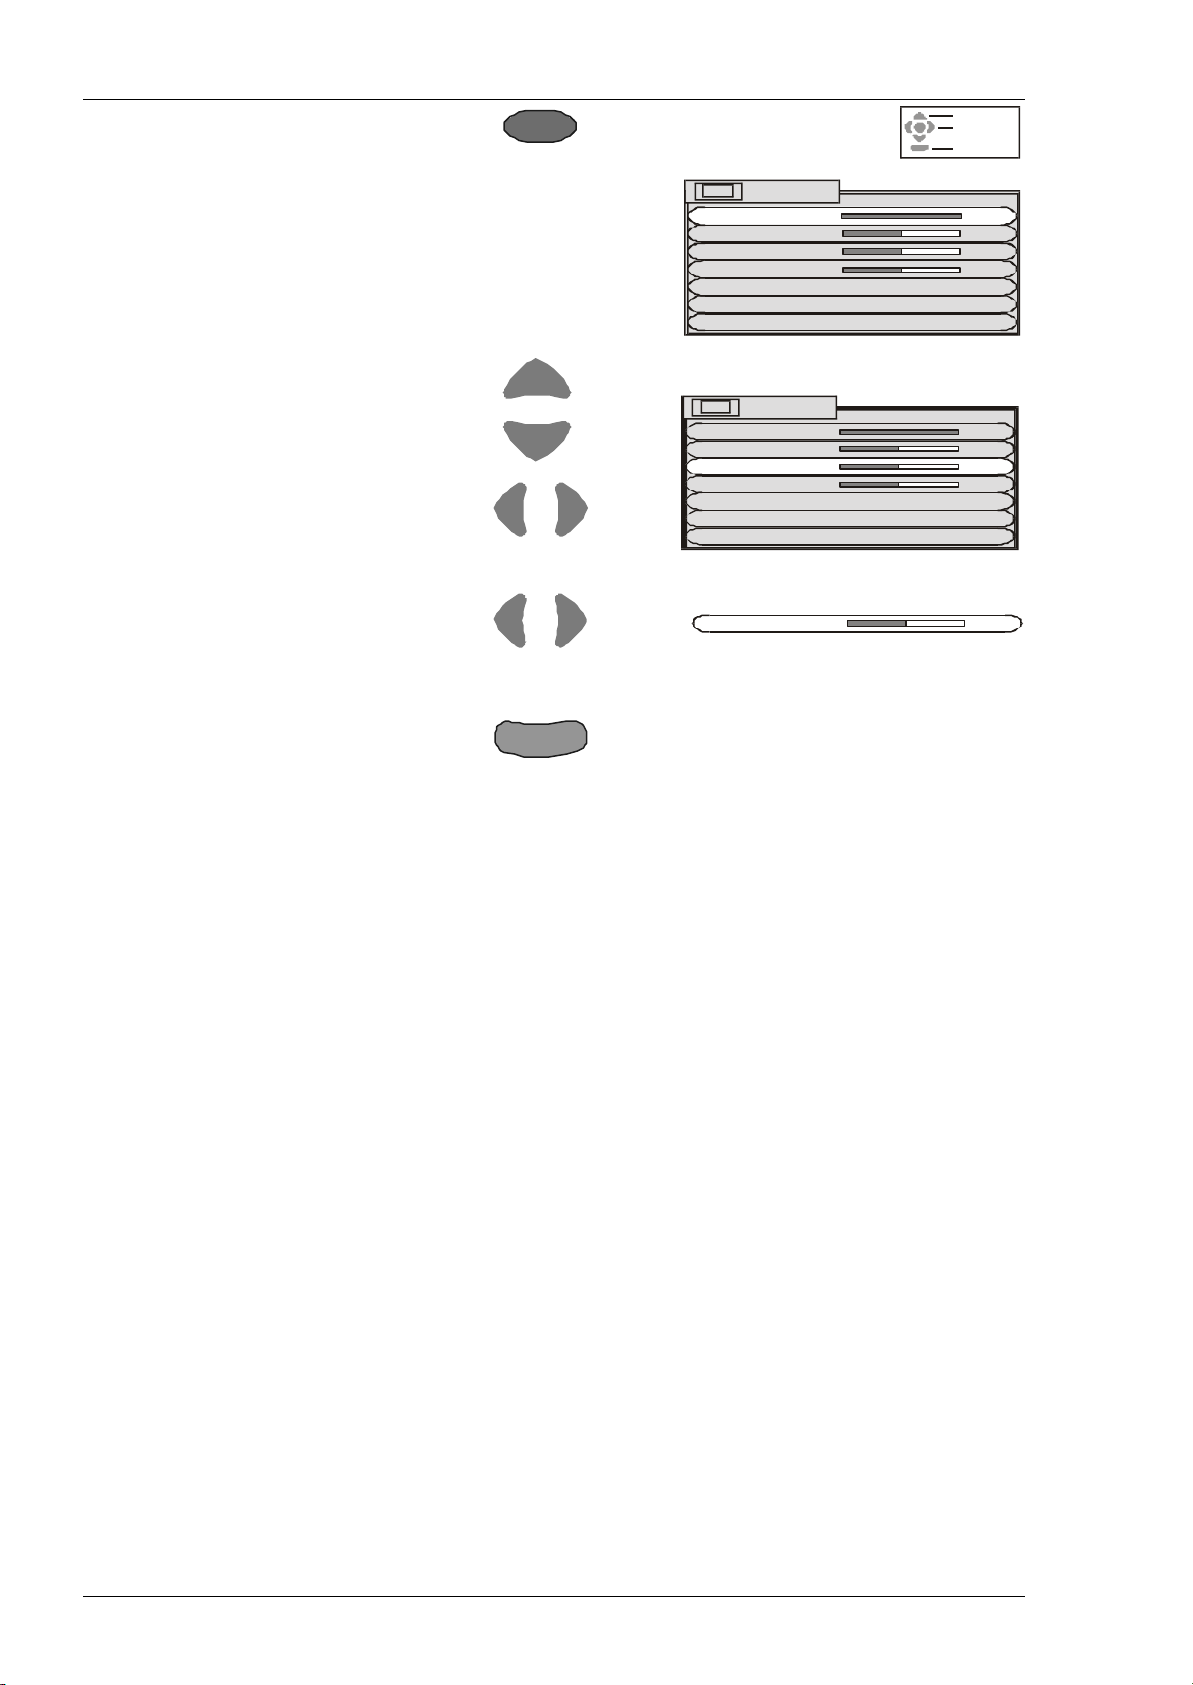
PICTURE
Colour
Press the PICTURE Button.
Move to your choice.
Select the option to change.
Change settings or choose another menu.
Press EXIT to leave the Picture menu.
Contrast
Brightness
Colour
Sharpness
Tint
Colour balance
P-NR
AI
The Contrast, Brightness, Colour and Sharpness levels can be adjusted to suit
your own preferences.
The Tint adjustment will only appear as a menu item if you have an NTSC
signal source connected to the TV. You will be able to adjust the picture hue.
The Colour balance setting allows you to set the overall colour tone of the
picture. You can switch between Cool, Normal and Warm.
P-NR will automatically reduce unwanted picture noise.
Al automatically analyses the incoming picture and processes it to give
improved contrast and optimum depth of field.
EXIT
Select
Access
Exit
Picture menu
Contrast
Brightness
Colour
Sharpness
Colour Balance Normal
P-NR Off
AI On
Picture menu
Contrast
Brightness
Colour
Sharpness
Colour Balance Normal
P-NR Off
AI On
14
Sound Menu Operation
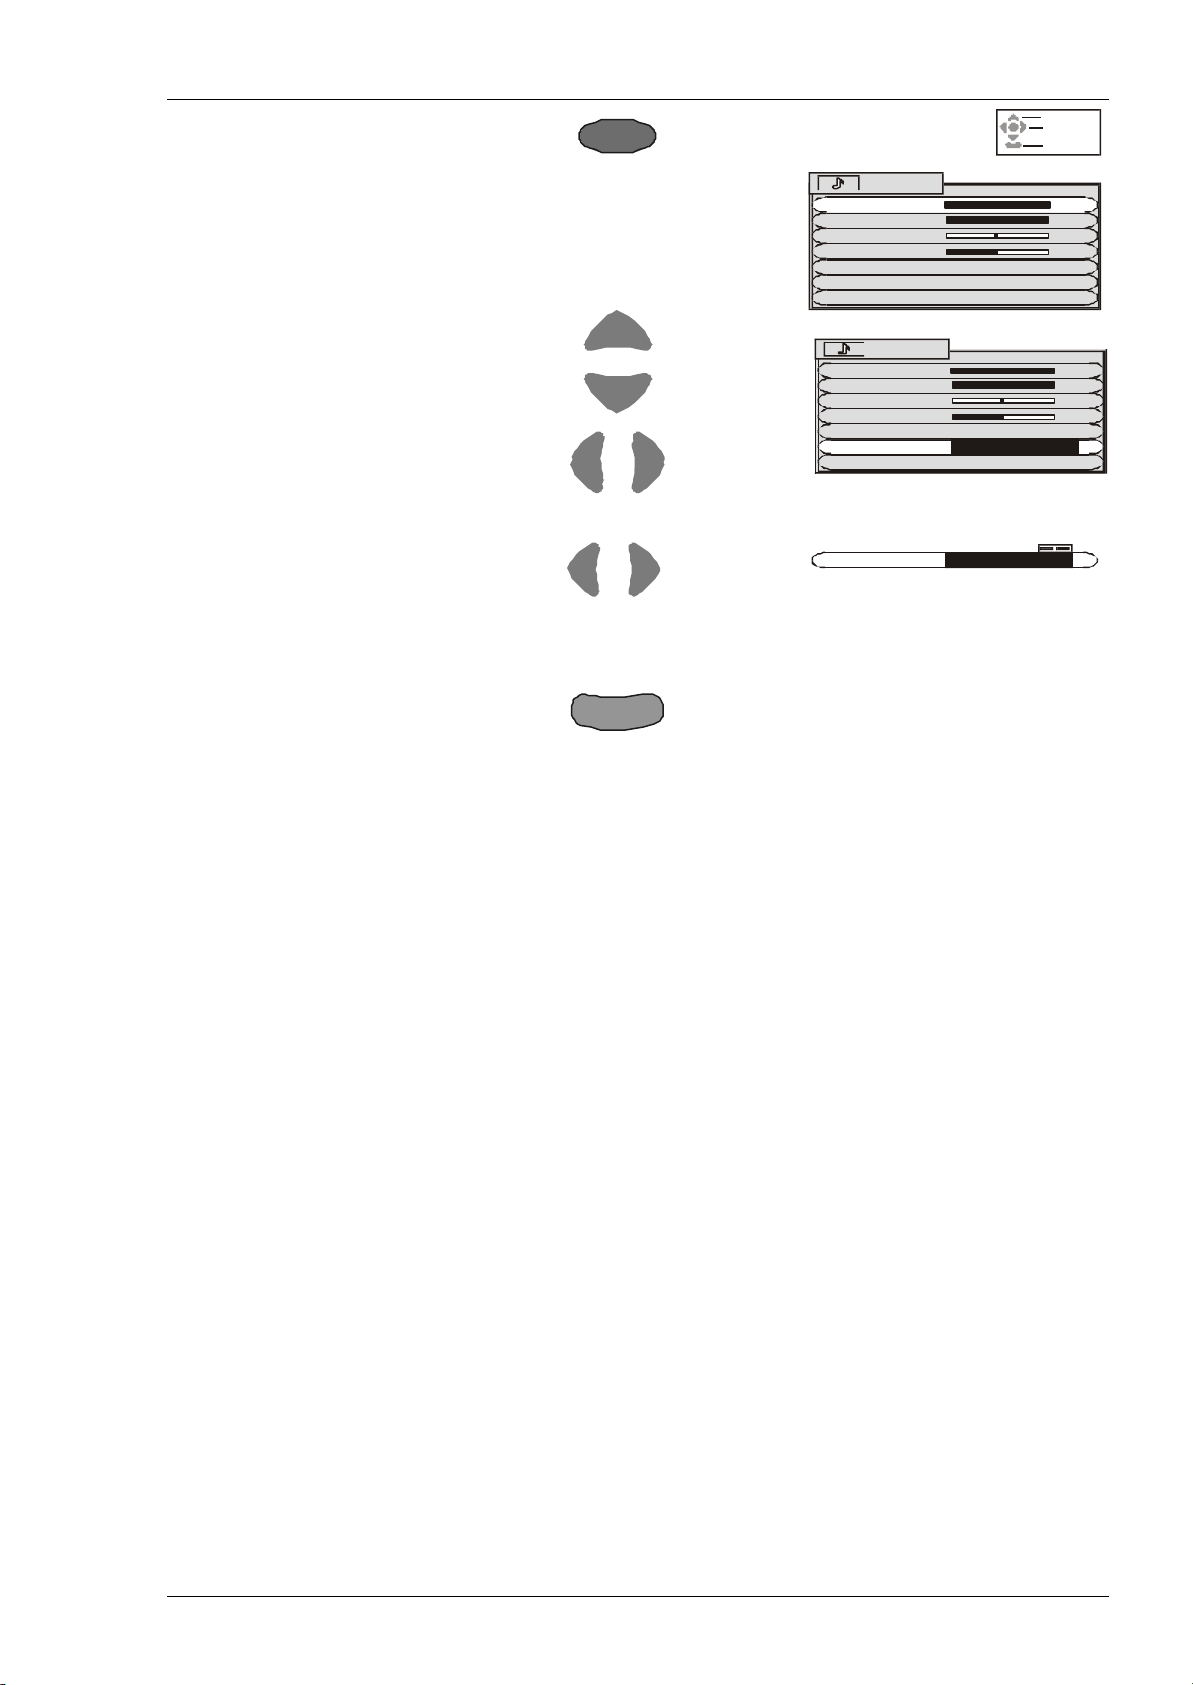
SOUND
Mode
Mode
Press the SOUND Button.
Move to your choice.
Select the option to change.
Change settings or choose another menu.
Press EXIT to leave the Picture menu.
Bass
Treble
Balance
Headphone
volume
MPX
Multi audio
Mode
Ambience
Bass adjustment will emphasise the lower, deeper frequencies and can be
increased or decreased.
Treble adjustment will emphasise the sharper, higher frequencies and can be
increased or decreased.
Balance affects the levels of sound between the left and right speakers.
Adjustment can be made so that the level from the speakers will suit your
listening position.
The headphone volume can be adjusted independently of the TV speakers so
that everyone can enjoy listening at their own comfort level.
(Not available with DVB programmes).
Switch between Stereo and Mono.
If reception deteriorates it is advisable to switch to Mono.
Multi audio, which will only appear when a DVB programme is selected, allows
you to select an alternative sound track. The number of options available
depends on each broadcast.
The sound can be improved during Music or Speech mode by selecting the
appropriate function.
Ambience provides a dynamic enhancer to simulate improved spatial effects.
EXIT
Sound menu
Bass
Treble
Balance
Headphone volume
Multi audio Eng
Mode Music
Ambience On
Sound menu
Bass
Treble
Balance
Headphone volume
Multi audio Eng
Ambience On
Music
Speech
Select
Access
Exit
15
 Loading...