

Page 1
Operating Instructions
86-inch model
75-inch model
65-inch model
55-inch model
50-inch model
43-inch model
Functional Manual
UHD LCD TV
Model No. TH-86CQ1U
TH-75CQ1U
TH-65CQ1U
TH-55CQ1U
TH-50CQ1U
TH-43CQ1U
This manual is common to all the models regardless of suffixes of the
*
model number.
English
TP0719TS1079 -PB
Please read these instructions before operating your set
and retain them for future reference.
*Actual resolution: 3840 × 2160p
Manufactured under license from Dolby Laboratories.
Dolby, Dolby Audio and the double-D symbol are trademarks of Dolby
Laboratories.
DPQP1285ZB/X1
Page 2

Dear Panasonic Customer
Welcome to the Panasonic family of customers. We hope that
you will have many years of enjoyment from your new UHD
LCD TV.
To obtain maximum benefit from your set, please read these
Instructions before making any adjustments, and retain them
for future reference.
Retain your purchase receipt also, and note down the model
number and serial number of your set in the space provided
on the rear cover of these instructions.
Visit our Panasonic Web Site
https://panasonic.net/cns/prodisplays/
Table of Contents
Before use
●
Illustrations and screens in this Operating Instructions
are images for illustration purposes, and may be
different from the actual ones.
●
Descriptive illustrations in this Operating Instructions
are created mainly based on the 55-inch model.
Important Safety Instructions ..........................4
FCC STATEMENT ..............................................5
Important Safety Notice ................................... 6
Safety Precautions ........................................... 8
Precautions for use ........................................ 10
Accessories ....................................................12
Accessories Supply ·········································· 12
Remote Control Batteries ·································· 13
Kensington security ....................................... 14
Connections .................................................... 14
Video equipment connection ······························ 17
Before connecting ············································ 18
HDMI 1 and HDMI 2 terminals connection ············· 18
PC IN terminal connection ································· 19
RS232 terminal connection ································ 20
AUDIO OUT terminal connection ························· 22
Antenna connection ·········································· 22
USB terminal connection ··································· 23
Identifying Controls ........................................24
Display ·························································· 24
Remote Control Transmitter ······························· 25
Basic Controls ................................................ 26
Selecting the input signal ··································· 27
DISPLAY ························································28
Volume Adjustment ··········································28
ASPECT Controls ........................................... 29
On-Screen Menu Displays ............................. 30
Picture Adjustments ....................................... 32
Audio Adjustment ........................................... 34
TV Adjustment ................................................35
Setup menu ..................................................... 36
Language ······················································· 36
Network settings ·············································· 37
English
2
Page 3

Parental control ··············································· 38
Closed caption ················································ 40
HDMI-CEC control ··········································· 40
EDID select ···················································· 40
Position ························································· 41
No signal power off ·········································· 41
Power save mode ············································ 41
Button lock ····················································· 42
RC control lock ················································ 42
Front indicator light ··········································· 42
Auto play ························································ 43
Information ····················································· 43
All reset ························································· 43
Using Network Function ................................ 44
Necessary environment for computers to be connected
Example of network connection ·························· 44
Settings to connect to a LAN ······························ 45
Command-based control ··································· 45
Using “USB media file playback function”
Play file ·························································· 47
Auto playback ················································· 47
Operations during play ······································ 48
Playing the pictures ·········································· 49
Playing the music / video ··································· 50
···
... 46
Using HDMI-CEC function .............................51
Connection ····················································· 51
Setting ··························································· 51
Preset Signals ................................................. 52
Troubleshooting .............................................54
Specifications ................................................. 56
44
English
3
Page 4
CAUTION
86-inch model
86-inch model
RISK OF ELECTRIC SHOCK
DO NOT OPEN
WARNING: To reduce the risk of electric shock,
do not remove cover or back.
No user-serviceable parts inside. Refer servicing
to qualified service personnel.
The lightning flash with arrow-head within a
triangle is intended to tell the user that parts
inside the product are a risk of electric shock
to persons.
The exclamation point within a triangle
is intended to tell the user that important
operating and servicing instructions are in the
papers with the appliance.
WARNING :
To prevent damage which may result in fire or
shock hazard, do not expose this apparatus to
rain or moisture.
Do not place containers with water (flower vase,
cups, cosmetics, etc.) above the set.
(including on shelves above, etc.)
WARNING :
1) To prevent electric shock, do not remove cover. No
user serviceable parts inside. Refer servicing to
qualified service personnel.
2)
Do not remove the grounding pin on the power
plug. This apparatus is equipped with a three pin
grounding-type power plug. This plug will only fit
a grounding-type power outlet. This is a safety
feature. If you are unable to insert the plug into the
outlet, contact an electrician.
Do not defeat the purpose of the grounding plug.
Important Safety Instructions
1) Read these instructions.
2) Keep these instructions.
3) Heed all warnings.
4) Follow all instructions.
5) Do not use this apparatus near water.
6) Clean only with dry cloth.
7) Do not block any ventilation openings. Install in
accordance with the manufacturer’s instructions.
8) Do not install near any heat sources such as
radiators, heat registers, stoves, or other apparatus
(including amplifiers) that produce heat.
9) Do not defeat the safety purpose of the polarized or
grounding-type plug. A polarized plug has two blades
with one wider than the other. A grounding type plug
has two blades and a third grounding prong. The
wide blade or the third prong are provided for your
safety. If the provided plug does not fit into your
outlet, consult an electrician for replacement of the
obsolete outlet.
10) Protect the power cord from being walked on
or pinched particularly at plugs, convenience
receptacles, and the point where they exit from the
apparatus.
11) Only use attachments / accessories specified by the
manufacturer.
12) Use only with the cart, stand, tripod,
bracket, or table specified by the
manufacturer, or sold with the apparatus.
When a cart is used, use caution when
moving the cart / apparatus combination
to avoid injury from tip-over.
13) Unplug this apparatus during lightning storms or
when unused for long periods of time.
14) Refer all servicing to qualified service personnel.
Servicing is required when the apparatus has been
damaged in any way, such as power-supply cord or
plug is damaged, liquid has been spilled or objects
have fallen into the apparatus, the apparatus has
been exposed to rain or moisture, does not operate
normally, or has been dropped.
15)
To prevent electric shock, ensure the grounding pin
on the AC cord power plug is securely connected.
16) If an outside antenna is connected to the receiver,
confirm that the antenna system is grounded to
protect against voltage surges and built up static
charges. Section 810 of the National Electrical
Code, ANSI/NFPA 70-1984, provides information
with respect to proper grounding of the mast and
supporting structure, grounding of the lead-in wire
to an antenna discharge unit, size of grounding
connectors, location of antenna discharge
unit, connection to grounding electrodes, and
requirements for the grounding electrode.
English
4
Page 5
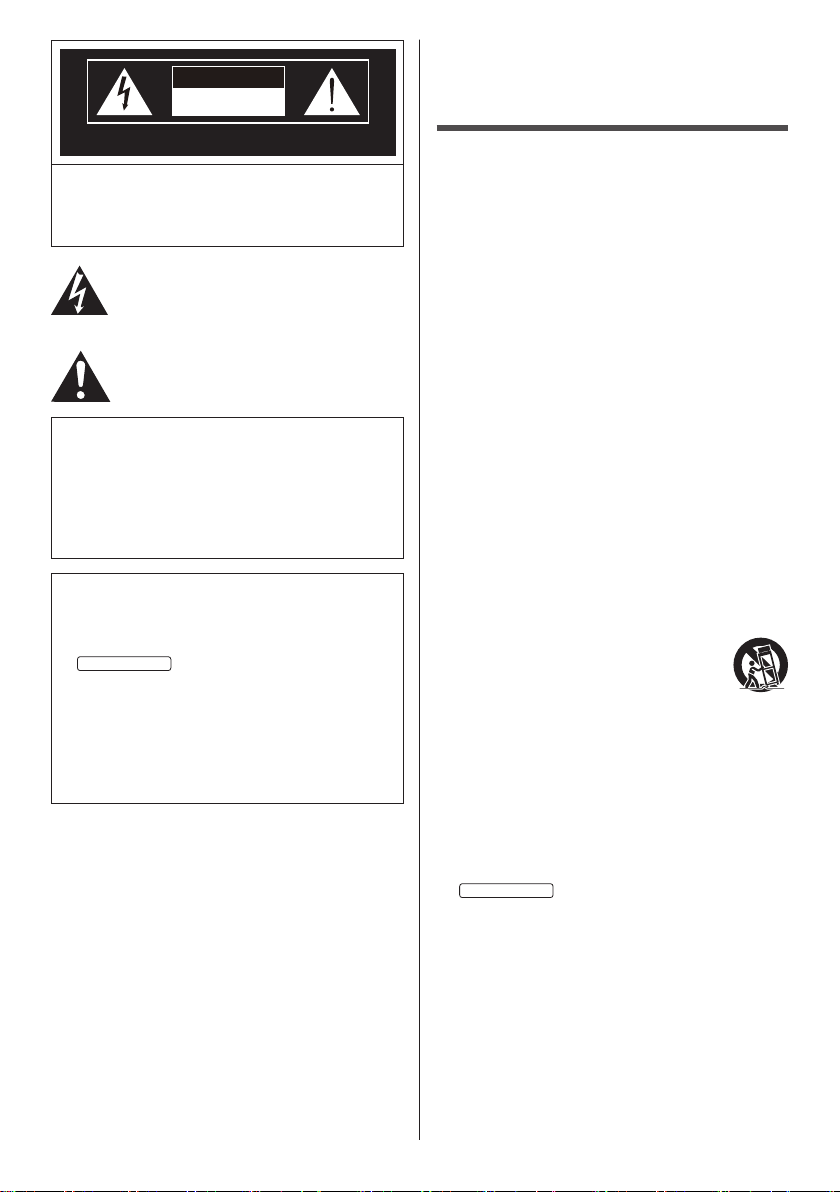
The cable distribution system should be grounded
GROUNDING
(NEC ART 250, PART H)
(earthed) in accordance with ANS/NFPA 70. the
National Electrical Code (NEC), in particular Section
820.93, Grounding of Outer Conductive Shield of a
Coaxial Cable.
EXAMPLE OF ANTENNA GROUNDING AS PER
(NEC) NATIONAL ELECTRICAL CODE
ANTENNA LEAD IN WIRE
GROUND CLAMP
ELECTRIC
SERVICE
EQUIPMENT
Lightning — For added protection for this television
•
ANTENNA
DISCHARGE UNIT
(NEC SECTION 810-20)
GROUNDING
CONDUCTORS
(NEC SECTION 810-21)
GROUND CLAMPS
POWER SERVICE
ELECTRODE SYSTEM
equipment during a lightning storm, or when it is
left unattended and unused for long periods of
time, unplug it from the wall outlet and disconnect
the antenna. This will prevent damage to the
equipment due to lightning and power-line surges.
Power Lines — An outside antenna system should
•
not be located in the vicinity of overhead power
lines or other electric light or power circuits, or
where it can fall into such power lines or circuits.
When installing an outside antenna system,
extreme care should be taken to keep from
touching such power lines or circuits as contact
with them might be fatal.
17) An outside antenna system should not be located in
the vicinity of overhead, power lines, other electric
light, power circuits, or where it can fall into such
power lines or circuits. When installing an outside
antenna system, extreme care should be taken to
keep from touching such power lines or circuits as
contact with them might be fatal.
FCC STATEMENT
This equipment has been tested and found to comply
with the limits for a class B digital device, pursuant to
part 15 of the FCC Rules. These limits are designed
to provide reasonable protection against harmful
interference in a residential installation.
This equipment generates, uses and can radiate radio
frequency energy and, if not installed and used in
accordance with the instructions, may cause harmful
interference to radio communications. However, there
is no guarantee that interference will not occur in a
particular installation. If this equipment does cause
harmful interference to radio or television reception,
which can be determined by turning the equipment
off and on, the user is encouraged to try to correct the
interference by one or more of the following measures:
Reorient or relocate the receiving antenna.
•
Increase the separation between the equipment and
•
receiver.
Connect the equipment into an outlet on a circuit
•
different from that to which the receiver is connected.
Consult the dealer or an experienced radio/TV
•
technician for help.
FCC CAUTION:
To assure continued compliance, follow the attached
installation instructions and use only the provided
power supply cord. Any changes or modifications
not expressly approved by Panasonic Corp. of North
America could void the user’s authority to operate
this device.
Supplier’s Declaration of Conformity
Model No.
TH-86CQ1U, TH-75CQ1U, TH-65CQ1U,
TH-55CQ1U, TH-50CQ1U, TH-43CQ1U
Responsible Party:
Panasonic Corporation of North America
Two Riverfront Plaza, Newark, New Jersey
07102-5490
Contact Source:
Panasonic System Solutions Company of North
America
1-877-655-2357
General Contact:
http://shop.panasonic.com/support
This device complies with Part 15 of the FCC Rules and
all applicable IC RSS standards. Operation is subject
to the following two conditions: (1) This device may not
cause harmful interference, and (2) this device must
accept any interference received, including interference
that may cause undesired operation.
English
5
Page 6
To maintain compliance with EMC regulations, use
86-inch model
86-inch model
shielded cables to connect to the following terminals:
HDMI input terminal, D-sub input terminal and RS232C input terminal.
Important Safety Notice
CANADIAN NOTICE:
This Class B digital apparatus complies with
Canadian ICES-003.
WARNING:
Not for use in a computer room as defined in the
•
Standard for the Protection of Electronic Computer/
Data Processing Equipment, ANSI/NFPA 75.
For permanently connected equipment, a readily
•
accessible disconnect device shall be incorporated
in the building installation wiring.
For pluggable equipment, the socket-outlet shall
•
be installed near the equipment and shall be easily
accessible.
Note:
Image retention may occur. If you display a still
picture for an extended period, the image might
remain on the screen. However, it will disappear when
a general moving picture is displayed for a while.
Trademark Credits
Microsoft, Windows, Internet Explorer and Microsoft
•
Edge are the registered trademarks or trademarks
of Microsoft Corporation in the United States and/or
other countries.
Mac, macOS and Safari are the trademarks of
•
Apple Inc. registered in the United States and other
countries.
HDMI, High-Definition Multimedia Interface and the
•
HDMI Logo are trademarks or registered trademarks
of HDMI Licensing Administrator, Inc. in the United
States and other countries.
Manufactured under license from Dolby Laboratories.
•
Dolby, Dolby Audio and the double-D symbol are
trademarks of Dolby Laboratories.
Even if no special notation has been made of company
or product trademarks, these trademarks have been fully
respected.
WARNING
1) To prevent damage which may result in fire or
shock hazard, do not expose this appliance to
dripping or splashing.
Do not place containers with water (flower vase,
cups, cosmetics, etc.) above the set. (including on
shelves above, etc.)
No naked flame sources, such as lighted candles,
should be placed on / above the set.
2) To prevent electric shock, do not remove cover. No
user serviceable parts inside. Refer servicing to
qualified service personnel.
3)
Do not remove the earthing pin on the power
plug. This apparatus is equipped with a three pin
earthing-type power plug. This plug will only fit an
earthing-type power outlet. This is a safety feature.
If you are unable to insert the plug into the outlet,
contact an electrician.
Do not defeat the purpose of the earthing plug.
4)
To prevent electric shock, ensure the earthing pin
on the AC cord power plug is securely connected.
CAUTION
This appliance is intended for use in environments
which are relatively free of electromagnetic fields.
Using this appliance near sources of strong
electromagnetic fields or where electrical noise may
overlap with the input signals could cause the picture
and sound to wobble or cause interference such as
noise to appear.
To avoid the possibility of harm to this appliance, keep
it away from sources of strong electromagnetic fields.
English
6
Page 7

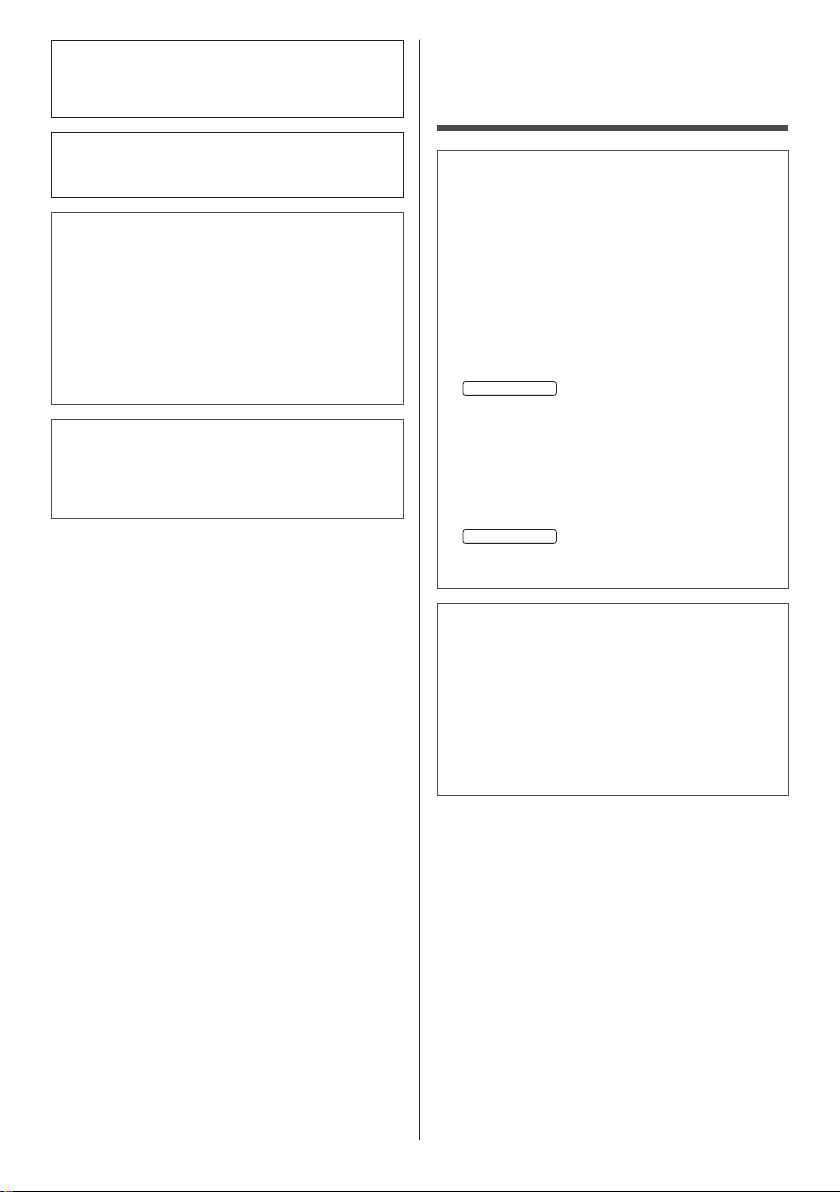
WARNING
Stability Hazard
A TV set may fall, causing serious personal injury or
death. Many injuries, particularly to children, can be
avoided by taking simple precautions such as:
ALWAYS use cabinets or stands or mounting
•
methods recommended by the manufacturer of the
TV set.
ALWAYS use furniture that can safely support the
•
TV set.
ALWAYS ensure the TV set is not overhanging the
•
edge of the supporting furniture.
ALWAYS educate children about the dangers of
•
climbing on furniture to reach the TV set or its
controls.
ALWAYS route cords and cables connected to
•
your TV so they cannot be tripped over, pulled or
grabbed.
NEVER place a TV set in an unstable location.
•
NEVER place the TV set on tall furniture (for
•
example, cupboards or bookcases) without
anchoring both the furniture and the TV to a
suitable support.
NEVER place the TV set on cloth or other
•
materials that may be located between the TV set
and supporting furniture.
NEVER place items that might tempt children to
•
climb, such as toys and remote controls, on the top
of the TV or furniture on which the TV is placed.
If the existing TV set is going to be retained and
relocated, the same considerations as above should
be applied.
The cable distribution system should be grounded
(earthed) in accordance with ANSI/NFPA 70. the
National Electrical Code (NEC), in
particular Section 820.93, Grounding of Outer
Conductive Shield of a Coaxial Cable.
This equipment is not suitable for use in locations
where children are likely to be present.
English
7
Page 8
Safety Precautions
86-inch model
75-inch model
65-inch model
55-inch model
50-inch model
43-inch model
86-inch model
WARNING
■ Setup
When installing the wall hanging bracket, read the
operating instructions supplied with it carefully and install
properly.
We are not responsible for any product damage, etc.
caused by failures in the installation environment for
the pedestal or wall hanging bracket even during the
warranty period.
Small parts can present choking hazard if accidentally
swallowed. Keep small parts away from young children.
Discard unneeded small parts and other objects,
including packaging materials and plastic bags/sheets to
prevent them from being played with by young children,
creating the potential risk of suffocation.
Do not place the TV on sloped or unstable surfaces,
and ensure that the TV does not hang over the edge
of the base.
The TV may fall off or tip over.
•
Install this unit at a location with minimal vibration
and which can support the weight of the unit.
Dropping or falling of the unit may cause injury or
•
malfunction.
Caution - For use only with UL Listed Wall Mount
Bracket with minimum weight/load, please refer to
the Specifications. (see page 57)
If installed in different directions, heat is generated
•
and it may cause fire or damage to the TV.
Cautions for Wall or Pedestal Installation
The installation should be performed by an installation
•
professional. Installing the TV incorrectly may lead to
an accident that results in death or serious injury.
When installing on a wall, the specified wall hanging
•
bracket or a wall hanging bracket that conforms to
VESA standards must be used.
Some wall hanging brackets cannot be used due
•
to the structure of the product. Check the product
drawing before using.
: VESA 600 × 400
: VESA 400 × 400
: VESA 400 × 200
: VESA 400 × 200
: VESA 400 × 200
: VESA 200 × 200
(see page 10)
Before installation, be sure to check if the mounting
•
location has enough strength to support the weight of
the TV and the wall hanging bracket for anti drop.
If you terminate the use of the product, ask a
•
professional to remove it promptly.
When mounting the TV on the wall, prevent the
•
mounting screws and power cable from contacting
metal objects inside the wall. An electric shock may
occur if they contact metal objects inside the wall.
■ When using the LCD TV
The TV is designed to operate on 110 - 127 V ,
50/60 Hz.
If problems or malfunction occur, stop using
immediately.
If problems occur, unplug the power supply plug.
Smoke or an abnormal odour come out from the unit.
•
No picture appears or no sound is heard,
•
occasionally.
Liquid such as water or foreign objects got inside the
•
unit.
The unit has deformed or broken parts.
•
If you continue to use the unit in this condition, it
could result in fire or electric shock.
Unplug the power supply plug from the wall outlet,
•
and then contact the dealer for repairs.
To cut off the power supply to this TV completely, you
•
need to unplug the power supply plug from the wall
outlet.
Repairing the unit yourself is dangerous, and shall
•
never be done.
To enable to unplug the power supply plug
•
immediately, use the wall outlet which you can reach
easily.
Do not touch the unit directly by hand when it is
damaged.
Electric shock could occur.
•
Do not stick any foreign objects into the TV.
Do not insert any metal or flammable objects into the
•
ventilations holes or drop them onto the TV, as doing
so can cause fire or electric shock.
Do not remove the cover (cabinet) or modify it.
High voltages which can cause fire or electric shocks
•
are present inside the TV. For any inspection,
adjustment and repair work, please contact your local
Panasonic dealer.
Ensure that the mains plug is easily accessible.
The mains plug shall be connected to a mains
socket outlet with a protective earthing connection.
Do not use any power supply cord other than that
provided with this unit.
Doing so may cause short-circuit, generates heat,
•
etc., which could cause electric shock or fire.
Do not use the supplied power supply cord with any
other devices.
Doing so may cause short-circuit, generates heat,
•
etc., which could cause electric shock or fire.
English
8
Page 9
Clean the power supply plug regularly to prevent it
86-inch model
75-inch model
65-inch model
55-inch model
50-inch model
43-inch model
becoming dusty.
If there is a build up of dust on the plug, the resultant
•
humidity may cause short-circuit, which could cause
electric shock or fire. Unplug the power supply plug
from the wall outlet and wipe it with a dry cloth.
Do not handle the power supply plug with wet
hands.
Doing so may cause electric shocks.
•
Securely insert the power supply plug (socket outlet
side) and the power supply connector (main unit
side) as far as it will go.
If the plug is not fully inserted, heat may be generated
•
which could cause fire. If the plug is damaged or the
wall socket is loose, they shall not be used.
Do not do anything that may damage the power
supply cord or the power supply plug.
Do not damage the cable, make any modifications
•
to it, place heavy objects on top of it, heat it, place it
near any hot objects, twist it, bend it excessively or
pull it. To do so may cause fire and electric shock. If
the power cable is damaged, have it repaired at your
local Panasonic dealer.
Do not touch the power supply cord or the plug
directly by hand when they are damaged.
Doing so may cause electric shock or fire due to
•
short-circuit.
Keep the supplied AAA batteries out of reach of
children. If accidentally swallowed, it will be harmful
to the body.
Please contact a doctor immediately in case you
•
doubt that the child may have swallowed it.
To prevent the spread of fire, keep
candles or other open flames away from
this product at all times.
CAUTION
Do not place any objects on top of the TV.
Ventilation should not be impeded by covering
the ventilation openings with items such as
newspapers, table cloths and curtains.
Doing so may cause the TV to overheat, which can
•
cause fire or damage to the TV.
For sufficient ventilation, see page 10.
Do not place the TV where it may be affected by salt
or corrosive gas.
Doing so may cause the TV to fall due to corrosion,
•
and it may result in injury. Also, the unit may
malfunction.
The following number of people are required to carry
or unpack this unit.
: 4 or more
If this is not observed, the unit may drop, resulting in
•
injury.
: 2 or more
When disconnecting the power supply cord, always
pull on the plug (socket outlet side) / the connector
(main unit side).
Pulling the cord may damage the cord, and it may
•
cause electric shock or fire due to short-circuit.
Be sure to disconnect all cables before moving the
TV.
If the TV is moved while some of the cables are still
•
connected, the cables may become damaged, and
fire or electric shock could result.
Disconnect the power supply plug from the wall
socket as a safety precaution before carrying out
any cleaning.
Electric shocks can result if this is not done.
•
Do not step on, or hang from the TV or the Pedestal.
They might tip over, or might be broken and it may
•
result in injury. Pay special attention to the children.
Do not reverse the polarity (+ and -) of the battery
when inserting.
Mishandling the battery may cause its explosion
•
or leakage, resulting in fire, injury or damage to
surrounding properties.
Insert the battery correctly as instructed.
•
(see page 13)
Do not use batteries with the outer cover peeling
away or removed.
Mishandling the batteries may cause the batteries
•
to short circuit, resulting in fire, injury or damage to
surrounding properties.
Remove the batteries from the remote control
transmitter when not using for a long period of time.
The battery may leak, heat, ignite or burst, resulting in
•
fire or damage to surrounding properties.
Remove exhausted batteries from the remote control
immediately.
Leaving the batteries unattended in it may cause
•
battery leakage, heat or burst.
Do not burn or breakup batteries.
Batteries must not be exposed to excessive heat such
•
as sunshine, fire or the like.
Do not turn the TV upside down.
Do not position the unit with its liquid crystal panel
facing upright.
English
9
Page 10
Precautions for use
Cautions when installing
Do not set up the TV outdoors.
The TV is designed for indoor use.
•
Install this unit at a location which can support the
weight of the unit.
Dropping or falling of the unit may cause injury.
•
Environmental temperature to use this unit
When using the unit where it is below 1 400 m
•
(4 593 ft) above sea level: 0 °C to 40 °C (32 °F to
104 °F)
When using the unit at high altitudes (1 400 m
•
(4 593 ft) and higher and below 2 800 m (9 186 ft)
above sea level): 0 °C to 35 °C (32 °F to 95 °F)
Do not install the unit where it is 2 800 m (9 186 ft)
and higher above sea level.
Failure to do so may shorten the life of the internal
•
parts and result in malfunctions.
We are not responsible for any product damage, etc.
caused by failures in the installation environment
even during the warranty period.
Transport only in upright position!
Transporting the unit with its liquid crystal panel
•
facing upright or downward may cause damage to the
internal circuitry.
Do not grab the liquid crystal panel.
Do not forcibly press the liquid crystal panel, or push
•
it with a pointed object. Applying a strong force to
the liquid crystal panel will cause unevenness of the
screen display, resulting in malfunction.
Do not install the product to a place where the
product is exposed to direct sunlight.
If the unit is exposed to direct sunlight even indoors,
•
the temperature rise of the liquid crystal panel may
cause malfunction.
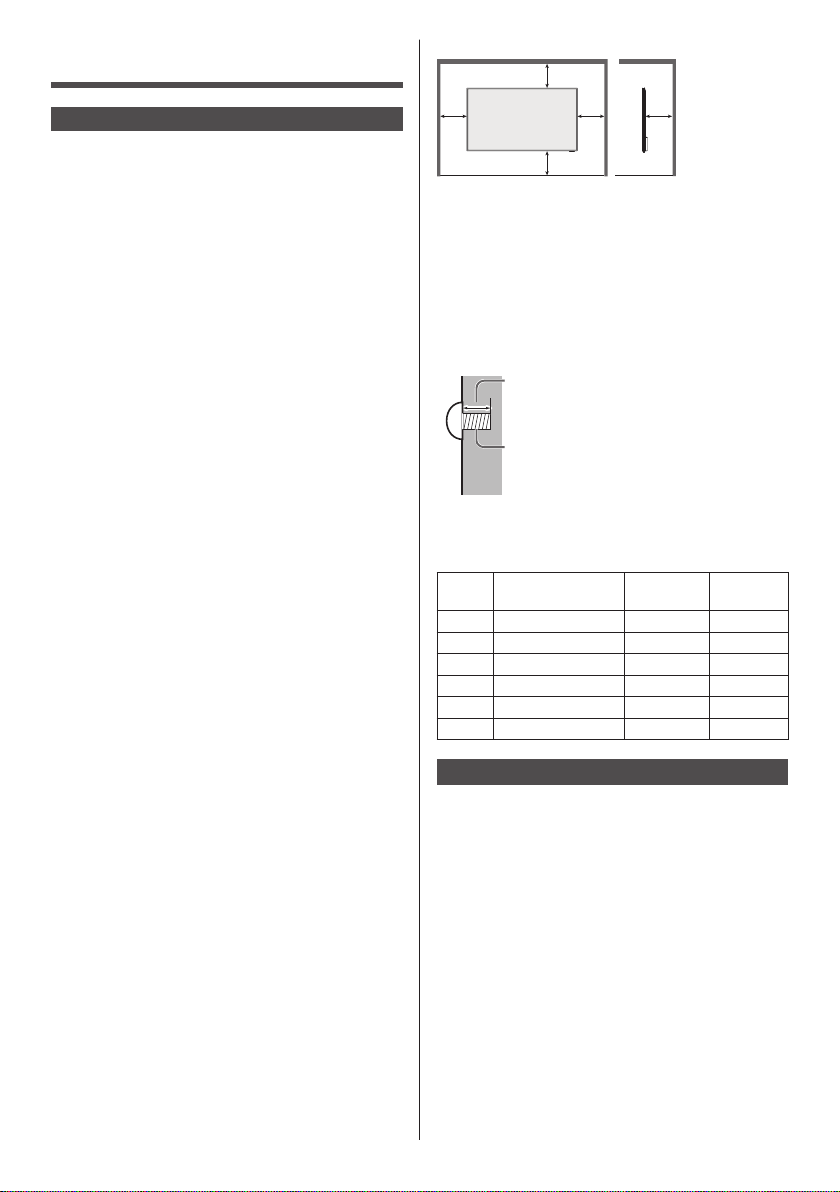
Required space for ventilation
When using the pedestal, leave a space of 10 cm
•
(3 15/16”) or more at the top, left and right, and 5 cm
31/32”) or more at the rear, and also keep the space
(1
between the bottom of the TV and the table surface.
If using some other setting-up method (wall-hanging,
•
etc.), follow the manual of it. (If there is no specific
indication of installation dimension in the installation
manual, leave a space of 10 cm (3 15/16”) or more at
the top, bottom, left and right, and 5 cm (1 31/32”) or
more at the rear.)
Minimum distance:
a
a: 10 cm
a
Operation of this unit is guaranteed up to an ambient
•
temperature of 40 °C (104 °F). When installing the
unit in a case or chassis, be sure to provide adequate
ventilation with a cooling fan or ventilation hole so
that the surrounding temperature (inside the case or
chassis) including the temperature of the front surface
of the liquid crystal panel can be kept at 40 °C
(104 °F) or less.
About the screws used when using a wall hanging
bracket that conforms to VESA standards
Depth of screw hole
Screw for fixing the TV onto the wall-hanging
bracket (not supplied with the TV)
●
(View from the side)
Inch
model
Screw pitch for
installation
86 600 mm × 400 mm 18 mm M8 (4)
75 400 mm × 400 mm 18 mm M8 (4)
65 400 mm × 200 mm 17 mm M6 (4)
55 400 mm × 200 mm 17 mm M6 (4)
50 400 mm × 200 mm 17 mm M6 (4)
43 200 mm × 200 mm 14 mm M6 (4)
a
b
Make sure that all screws are securely
tightened.
b
(3
b: 5 cm
(1
Depth of
screw hole
15/16”)
31/32”)
Screw
(quantity)
Note for connection
Removing and inserting the power cord and
connection cables
When the unit has been installed on the wall, if the
•
power cord and connection cables are difficult to
remove and insert, make connections first before
installation. Be careful not to allow the cables to be
entangled. After installation is completed, insert the
power plug to the outlet.
10
English
Page 11
When using
Red, blue or green dots on the screen are a liquid
crystal panel-specific phenomenon. This is not a
malfunction.
Although the liquid crystal display is manufactured
•
with high-precision technology, always-lighting dots or
non-lighting dots may appear on the screen. This is
not a malfunction.
Inch model Dot omission ratio
*
86, 75 0.00007% or less
65, 55, 50, 43 0.00005% or less
*
Calculated in sub-pixel units according to the
ISO09241-307 standard.
Depending on the temperature or humidity
conditions, uneven brightness may be observed.
This is not a malfunction.
This unevenness will disappear while applying current
•
continuously. If not, consult the distributor.
If the TV is not going to be used for any prolonged
length of time, unplug the power supply plug from
the wall outlet.
Picture noise may occur if you connect / disconnect
the cables connected to the input terminals you
are currently not watching, or if you turn the power
of the video equipment on / off, but it is not a
malfunction.
Notes on Using Wired LAN
When setting up the TV at a place, where electric
statistic occurs often, take a sufficient antistatic
measure before start using.
When the TV is used at a location, where static
•
electricity occurs often, such as on a carpet, a wired
LAN communication is disconnected more often.
In that case, remove static electricity and the noise
source that may cause problems with an antistatic
mat, and re-connect the wired LAN.
In rare cases, the LAN connection is disabled due
•
to static electricity or noise. In that case, turn off the
power of the TV and the connected devices once and
then re-turn on the power.
The TV may not work properly due to strong radio
wave from the broadcast station or the radio.
If there is any facility or equipment, which outputs
•
strong radio wave, near the installation location, set
up the TV at a location sufficiently far from the source
of the radio wave. Or, wrap the LAN cable connected
to the LAN terminal by using a piece of metal foil or a
metal pipe, of which is grounded at both ends.
Request Regarding Security
When using this unit, take safety measures against
the following incidents.
Personal information being leaked via this unit
•
Unauthorized operation of this unit by a malicious
•
third party
Interfering or stopping of this unit by a malicious third
•
party
Take sufficient security measures.
Set a password for the LAN control and restrict the
•
users who can log in.
Make your password difficult to guess as much as
•
possible.
Change your password periodically.
•
Panasonic Corporation or its affiliate companies will
•
never ask for your password directly. Do not divulge
your password in case you receive such inquiries.
The connecting network must be secured by a
•
firewall, etc.
When disposing the product, initialize the data before
•
disposing.
Cleaning and maintenance
First, remove the mains plug from the mains socket.
Gently wipe the surface of the liquid crystal panel or
cabinet by using a soft cloth to remove dirt.
To remove stubborn dirt or fingerprints on the surface
•
of the liquid crystal panel, dampen a cloth with diluted
neutral detergent (1 part detergent to 100 parts
water), wring out the cloth firmly, and then wipe away
the dirt. Finally, wipe away all the moisture with a dry
cloth.
If water droplets get inside the unit, operating
•
problems may result.
Note
●
The surface of the liquid crystal panel is specially
treated. Do not use a hard cloth or rub the surface
too hard, otherwise this may cause scratches on the
surface.
Usage of a chemical cloth
Do not use a chemical cloth for the liquid crystal panel
•
surface.
Follow the instructions for the chemical cloth to use it
•
for the cabinet.
Avoid contact with volatile substances such as
insect sprays, solvents and thinner.
This may cause damage to the cabinet or cause
•
peeling of the paint. Furthermore, do not leave it in
contact with a rubber or PVC substance for a long
time.
Disposal
When disposing the product, ask your local
authority or dealer about the correct methods of
disposal.
English
11
Page 12
Accessories
Accessories Supply
Check that you have the accessories and items shown.
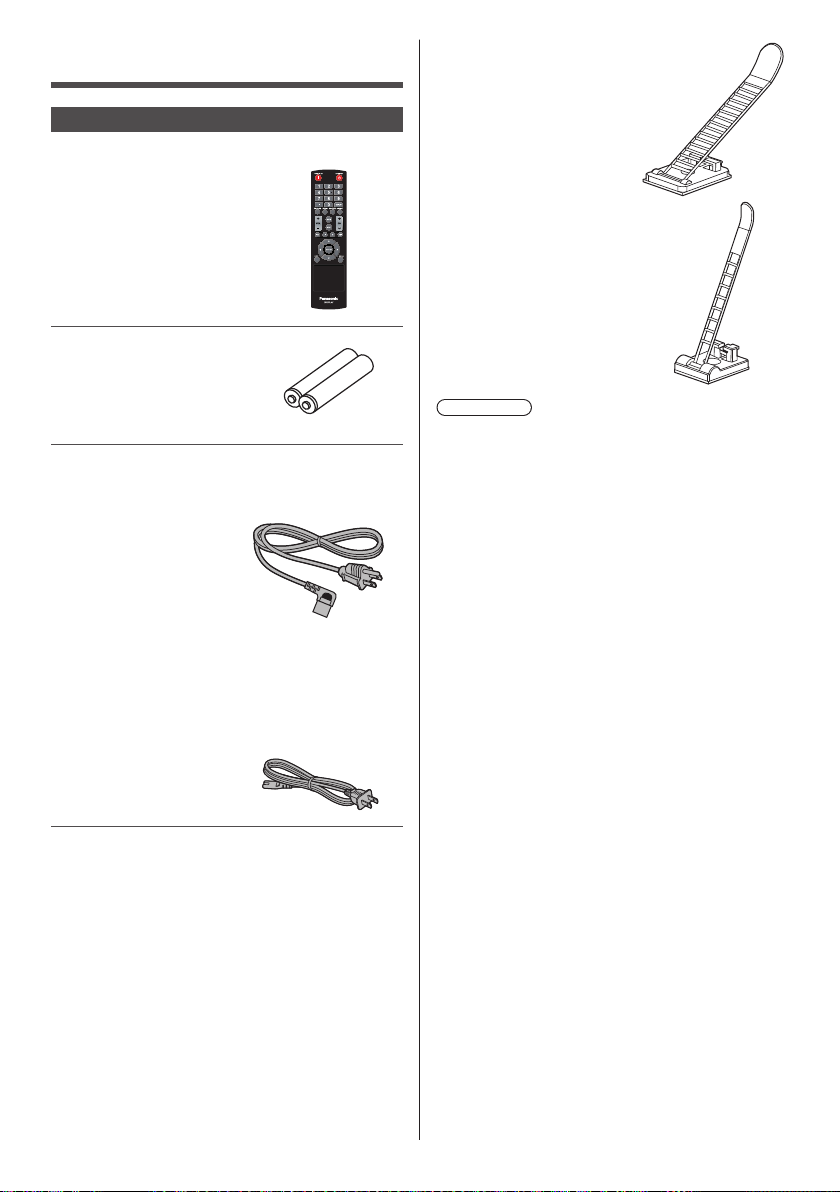
Remote Control Transmitter
× 1
●
DPVF2598ZA/X1
Batteries for the Remote
Control Transmitter × 2
(AAA type)
Power supply cord
TH-86CQ1U
(Approx. 3 m)
●
DPVF2714ZA/X1
Clamper (large) × 2
●
DPVF1654ZA
Clamper (small) × 1
●
DPVF1653ZA
Attention
●
Store small parts in an appropriate manner, and keep
them away from young children.
●
The part numbers of accessories are subject to
change without notice. (The actual part number may
differ from the ones shown above.)
●
In case you lost accessories, please purchase them
from your dealer. (Available from the customer
service)
●
Dispose the packaging materials appropriately after
taking out the items.
TH-75CQ1U
TH-65CQ1U
TH-55CQ1U
TH-50CQ1U
TH-43CQ1U
(Approx. 1.8 m)
12
●
TZSH3042
English
Page 13

Remote Control Batteries
Open the battery cover.
Insert batteries and close
the battery cover.
(Insert starting from the
side.)
AAA type
Note
●
Incorrect installation of the batteries can cause
battery leakage and corrosion that will damage the
remote control.
●
Disposal of batteries should be done in an
environment-friendly manner.
Take the following precautions.
1. Batteries shall always be replaced as a pair.
2. Do not combine a used battery with a new one.
3. Do not mix battery types (example; manganese
dioxide battery and alkaline battery etc.).
4. Do not attempt to charge, disassemble or burn used
batteries.
5. Do not burn or breakup batteries.
Moreover, batteries must not be exposed to excessive
heat such as sunshine, fire or the like.
English
13
Page 14
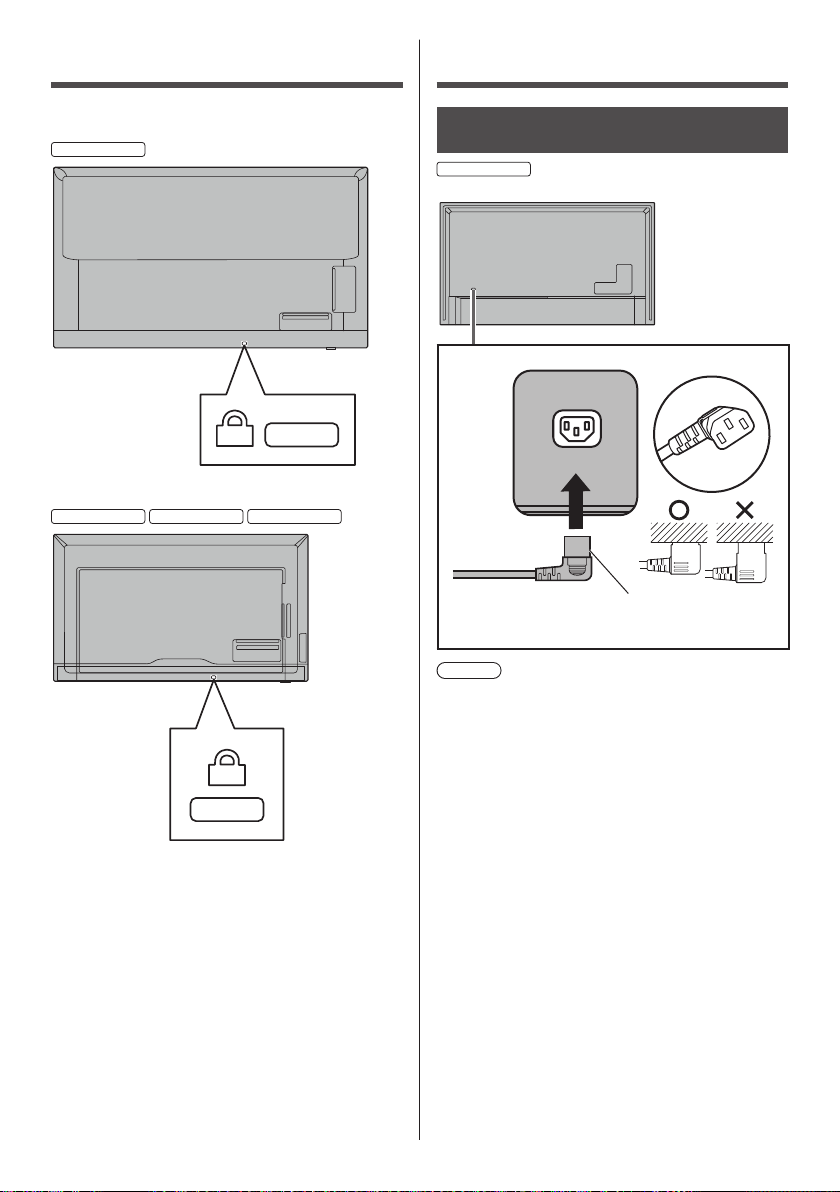
Kensington security
65-inch model
55-inch model
50-inch model
43-inch model
86-inch model
Connections
The security slot of this unit is compatible with the
Kensington security slot.
AC cord connection and fixing / Cable fixing
Back of the unit
AC cord fixing
AC cord (supplied)
Plug the connector into the TV unit.
Note
●
When disconnecting the AC cord, be absolutely sure
to disconnect the AC cord plug at the socket outlet
first.
●
The supplied AC cord is for this unit exclusive use. Do
not use this for other purposes.
English
14
Page 15
75-inch model
65-inch model
55-inch model
50-inch model
43-inch model
75-inch model
50-inch model
65-inch model
43-inch model
55-inch model
86-inch model
75-inch model
65-inch model
55-inch model
50-inch model
43-inch model
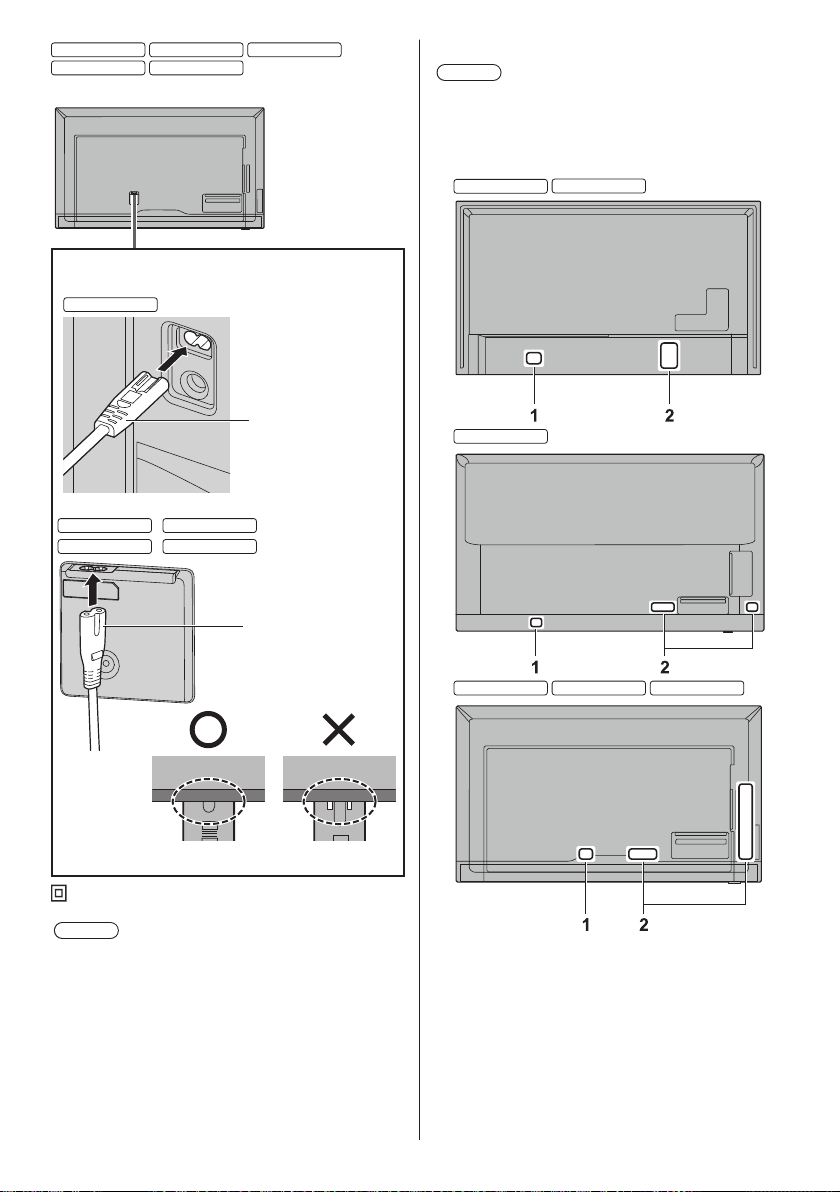
Back of the unit
Insert the AC cord securely all the way seated on
the back side of the unit.
AC cord
(supplied)
AC cord
(supplied)
Cable fixing
Note
●
3 clampers are supplied with this unit. Fix the cables
at 3 locations using the holes for clampers as shown
below.
If you need more clampers, purchase them from your
dealer. (Available from the customer service)
Insert the plug until the line is hidden.
Class II equipment
Note
●
When disconnecting the AC cord, be absolutely sure
to disconnect the AC cord plug at the socket outlet
first.
●
The supplied AC cord is for this unit exclusive use.
Do not use this for other purposes.
1 For AC cord: clamper (small)
2 For signal cable: clamper (large) x 2
English
15
Page 16
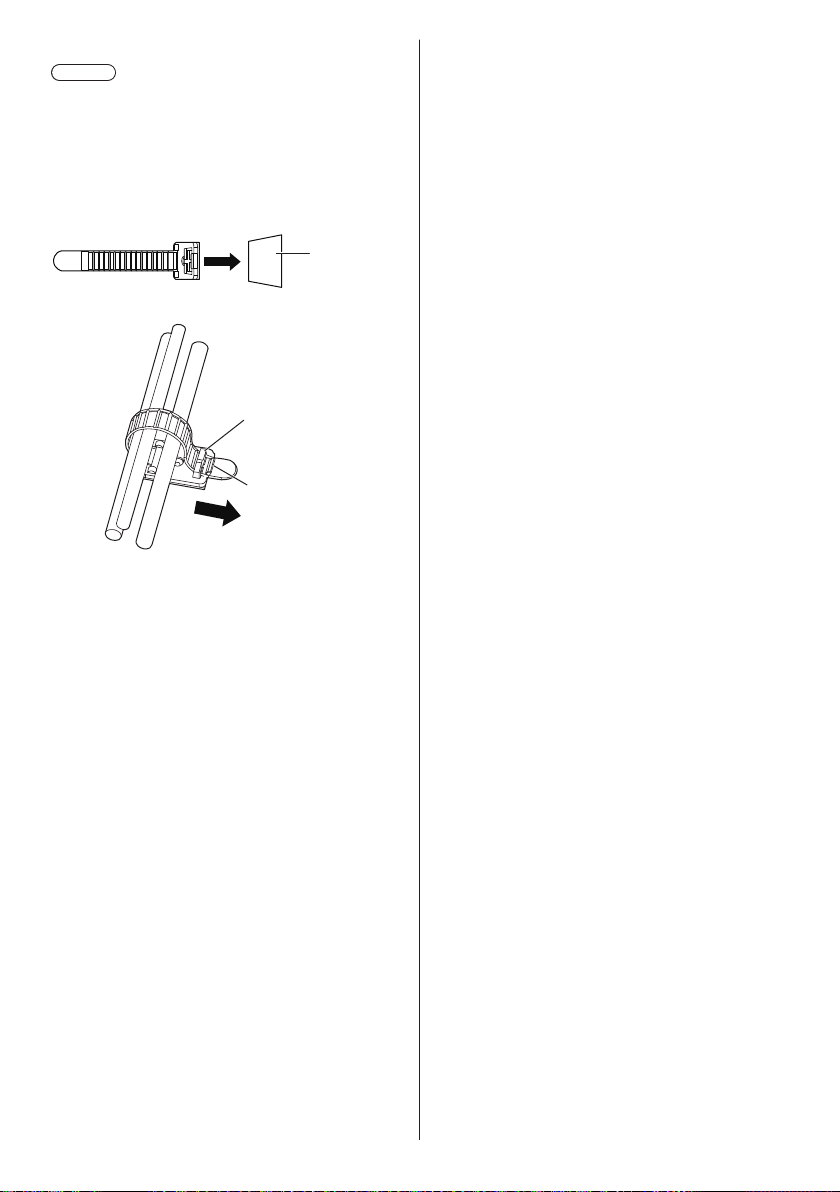
1. Attach the clamper
Note
●
Wipe off dirt, such as dust, water and oil on the
attachment surface, and affix the clamper on the
attachment surface by pushing it firmly.
●
Once the clamper is affixed, it cannot be reused. Be
sure to confirm the attaching position before affixing
it.
Remove the tape at the back, and affix the clamper on
the flat surface.
Attachment
surface
2. Bundle the cables
hooks
knob
To loosen:
Remove the band from the knob, and pull out the band
tip.
16
English
Page 17
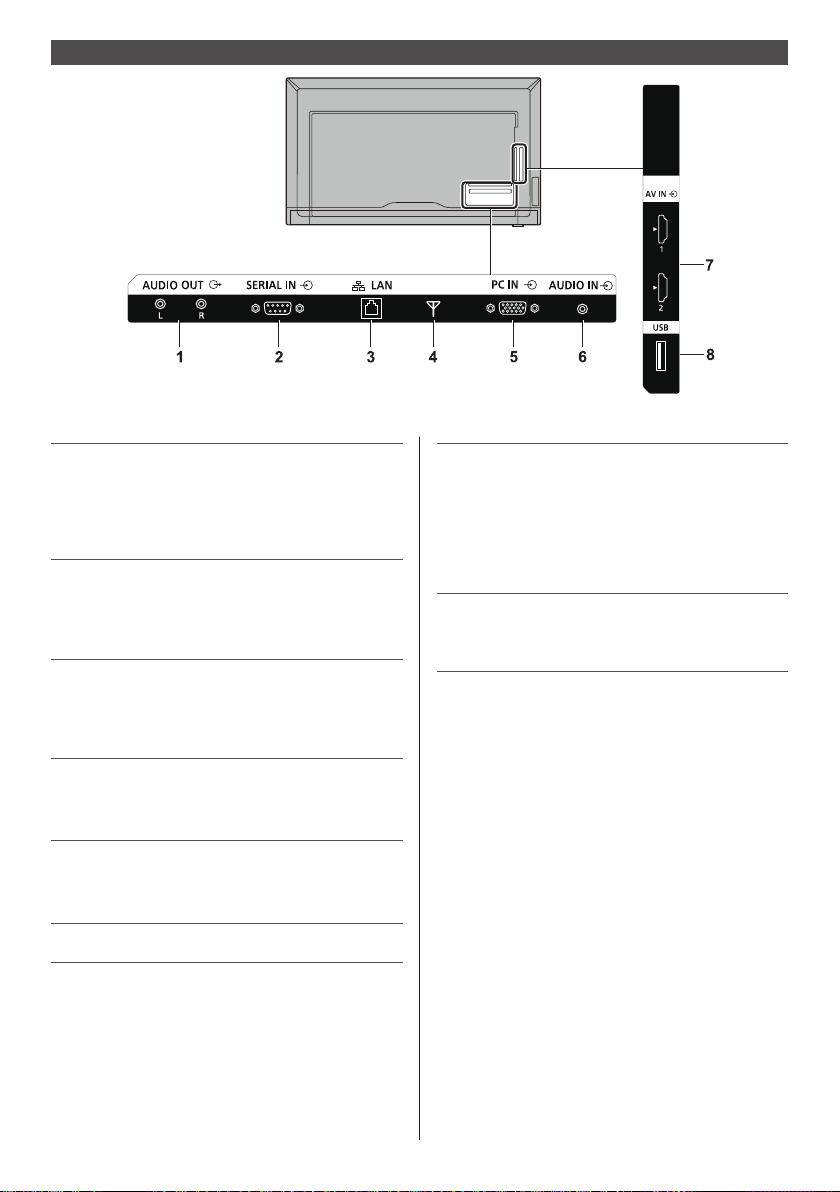
Video equipment connection
ANTENNA/
CABLE IN
HDMI
5V DC 0.5A
1 AUDIO OUT: Analogue Audio Output
Terminal
Connect to audio equipment with
analogue audio input terminal.
(see page 22)
2 SERIAL IN: SERIAL Input Terminal
Control the TV by connecting
to PC.
(see page 20)
3 LAN: LAN Terminal
Control the TV by connecting to
Network.
(see page 44)
4 ANTENNA/
CABLE IN:
Antenna Terminal
Connect to antenna cable
(see page 22)
5 PC IN: PC Input Terminal
Connect to video terminal of PC.
(see page 19)
6 AUDIO IN: Audio Input Terminal
7 HDMI 1, HDMI 2: HDMI Input Terminal
Connect to video equipment such
as VCR or DVD player, etc.
●
Use a commercially available
HDMI cable (conforming to the
HDMI standard) that supports
4K
8 USB: USB Terminal
Connect the USB memory device
to the USB port.
English
17
Page 18

Before connecting
●
Before connecting cables, carefully read the operating
instructions for the external device to be connected.
●
Turn off the power of all devices before connecting
cables.
●
Take note of the following points before connecting
the cables. Failure to do so may result in
malfunctions.
When connecting a cable to the unit or a device
•
connected to the unit itself, touch any nearby
metallic objects to eliminate static electricity from
your body before performing work.
Do not use unnecessarily long cables to connect
•
a device to the unit or to the unit body. The
longer the cable, the more susceptible to noise it
becomes. Since using a cable while it is wound
makes it act like an antenna, it is more susceptible
to noise.
When connecting cables, insert them straight into
•
the connecting terminal of the connecting device
so that the ground is connected first.
●
Acquire any cable necessary to connect the external
device to the system that is neither supplied with the
device nor available as an option.
●
If the outer shape of the plug of a connection cable is
large, it may come in contact with the periphery such
as a back cover or the plug of an adjacent connection
cable. Use a connection cable with the suitable plug
size for the terminal alignment.
●
When connecting the LAN cable with plug cover, be
aware that the cover may come in contact with the
back cover and it may be difficult to disconnect.
●
Some PC models are not compatible with the unit.
●
Use cable compensator when you connect devices to
the unit using long cables. Otherwise the image may
not be displayed properly.
●
Refer to “Preset Signals” (see page 52) for the types
of video signals that can be displayed with the unit.
HDMI 1 and HDMI 2 terminals connection
Note
●
Video equipment and HDMI cable shown are not
supplied with this unit.
●
Connect the equipment complying with the HDMI
standard.
●
Some HDMI equipment may not be able to display
picture.
●
This TV does not support VIERA LINK.
HDMI cable (commercially available)
Video Cassette Recorder
DVD Player
PC
HDMI
18
English
Page 19

Pin assignments and signal names for HDMI
Terminal
PC IN terminal connection
Pin No. Signal name
T.M.D.S Data2 +
T.M.D.S Data2 Shield
T.M.D.S Data2 -
T.M.D.S Data1 +
T.M.D.S Data1 Shield
T.M.D.S Data1 -
T.M.D.S Data0 +
T.M.D.S Data0 Shield
T.M.D.S Data0 -
T.M.D.S Clock +
T.M.D.S Clock Shield
T.M.D.S Clock -
CEC
SCL
SDA
DDC/CEC Ground
+5V DC
Hot Plug Detect
(Female)
Mini D-sub 15p cable (commercially available)
Conversion adapter (if necessary) (commercially
available)
Stereo mini plug (M3) cable (commercially available)
PC
The type of computer signal that can be connected
●
With regard to the typical PC input signals that
are described in “Preset Signals” (see page 52),
adjustment values such as for the standard picture
positions and sizes have already been stored in this
unit.
(Computer signals which can be input are those with
a horizontal scanning frequency of 31 to 83 kHz and
vertical scanning frequency of 56 to 76 Hz.)
●
If signals outside the range of supported frequencies
are input, normal images cannot be displayed. Note
that some images may not be correctly displayed
even if signals are within the range.
●
If the PC screen is not displayed, check if the image
signal of the PC meets “Preset Signals” (see page
52), and then change the settings. For power-saving
purpose, image output may be OFF on a notebook
computer. In this case, it may be set to ON with
function key operation etc. of the computer. (Refer to
the manual of the computer.)
(Male)
Connect a cable
which matches
the audio output
terminal on the
computer.
(commercially
available)
English
19
Page 20

Note
●
Additional computer, cables and conversion adapter
shown are not supplied with this set.
●
If the computer being connected is not DDC2Bcompatible, you will need to make setting changes to
the computer at the time of connection.
●
When connecting a computer equipped with a
D-sub15 pin terminal or a Mac, use a commercially
sold conversion adapter as necessary.
There is no need to use an adapter for computers
*
with DOS/V compatible Mini D-sub 15P terminal.
●
Do not set the horizontal and vertical scanning
frequencies for PC signals which are above or below
the specified frequency range.
●
For audio, the AUDIO IN terminal can be used.
Pin assignments and signal names for PC Input
Terminal (Mini D-sub 15P)
45
10
15 14 13 12 11
Pin No. Signal Name
Red video signal input
Green video signal input
Blue video signal input
NC (not connected)
GND
GND for red video signal
GND for green video signal
GND for blue video signal
+5 V DC
GND (Ground)
NC (not connected)
DDC data
Hsync Signal input
Vsync Signal input
DDC Clock
1
2
67839
RS232 terminal connection
The RS232 terminal conforms to the RS-232C interface
specification, so that the TV can be controlled by a
computer which is connected to this terminal.
Note
●
Additional computer and cables shown are not
supplied with this set.
(Male)
(Female)
D-sub 9p
RS-232C Straight cable (commercially available)
PC
Note
●
Select the RS-232C straight cable for communication
used for connecting RS232 terminal and computer
according to the computer you are using.
20
English
Page 21

Pin assignments and signal names for SERIAL
Terminal
1 3 4 52
6 7 8 9
Pin No. Signal Name
NC (not connected)
Transmitted data
Received data
NC (not connected)
GND (Ground)
NC (not connected)
NC (not connected)
NC (not connected)
NC (not connected)
These signal names are those of computer
specifications.
Communication parameters
Signal level: RS-232C compliant
Synchronization method: Asynchronous
Baud rate: 9 600 bps
Parity: None
Character length: 8 bits
Stop bit: 1 bit
Flow control: None
Basic format for control data
The transmission of control data starts with a STX
signal, followed by the command, the parameters,
and lastly an ETX signal in that order. If there are no
parameters, the colon “:” does not need to be sent.
STX C1 C2 C3 P1 P2 P3 P4: P5 ETX
Start
3-character command
Colon
End
Parameter(s)
(3 bytes)
Command
Command Parameter Control details
PON (None) Power ON
POF (None) Power OFF
AVL *** VOLUME 000 - 100
AMT
IMS
STV
DAM
0 Audio MUTE OFF
1 Audio MUTE ON
(None) Input select (toggle)
TV1
HM1 HDMI 1 input (HDMI1)
HM2 HDMI 2 input (HDMI2)
PC1 PC IN input (PC)
UD1 USB input (USB)
CUP TV Channel Up
CDN TV Channel Down
FULL Full
NORM Normal
NATV Native
ZOOM Zoom
ANTENNA/CABLE IN
input (TV)
Note
●
If an incorrect command is sent, this unit will reply an
“ER401” command to the computer.
●
If communication has not been established for
reasons such as a bad connection between the
computer and TV, nothing is returned (not even
ER401).
●
“ER401” may be returned when a command cannot
be received correctly due to interference from the
surrounding environment.
Please ensure that the system or software resends
the command if this occurs.
Communication interval
After getting the feedback, then you can continue the
following commands.
Suggest setting a timeout for the command response.
(specify 10 seconds or longer)
If multiple commands are transmitted, be sure to wait
for the response for the first command to come from
this unit before sending the next command.
●
When sending a command which does not require
parameter, a colon (:) is not needed.
●
Consult your local Panasonic dealer for detail
instructions on command usage.
For mode details, visit the following web site.
http://panasonic.net/cns/prodisplays/
English
21
Page 22

AUDIO OUT terminal connection
ANTENNA/
CABLE IN
Note
●
Audio equipment and the cable shown are not
supplied with this set.
Antenna connection
Back of the TV
VHF/UHF Antenna
ANTENNA/
CABLE IN
or
Cable TV
line-in
Stereo audio cable (commercially available)
Audio equipment
Note
●
To output sound from AUDIO OUT terminal of the
unit, be sure to set [Audio output] or [Speaker] in the
[Audio] menu. (see page 34)
VHF/UHF Antenna
●
NTSC (National Television System Committee):
Analog television system
●
ATSC (Advanced Television System Committee):
Digital TV Standards include digital high-definition
television (HDTV), standard-definition television
(SDTV), data broadcasting, multi-channel surround
sound audio and interactive television.
Cable
●
You need to subscribe to a cable TV service to enjoy
viewing their programming.
●
You can enjoy high-definition programming by
subscribing to a high-definition cable service.
22
English
Page 23

USB terminal connection
1 3 42
Connect a USB memory device to the USB port.
Note
●
Do not connect a USB device other than a USB
memory device.
●
Turn off the power of the TV when removing a USB
memory device.
●
If the power is turned off or the USB memory device
is removed while accessing data in the USB memory
device, the stored data may be destroyed. The
access indicator of the USB memory device blinks
during data access.
■ Supported USB memory device
File System FAT16/32
Capacity Up to 32GB
(maximum file size 4 GB)
Note
●
Do not use a USB memory device with a security
function or a write protection function.
●
Use a USB memory device with a shape that can
be inserted in the USB port. Some USB memory
devices with special shapes cannot be inserted. Do
not forcibly insert a USB memory device. This may
damage the connector and cause failure.
HDMI
5V DC 0.5A
Pin assignments and signal names for USB Terminal
Pin No. Signal name
+5 V DC
DATA -
DATA +
GND (Ground)
Power of up to 5V/0.5A can be supplied to an external
device when the picture is displayed.
Note
●
If the direct connection to this unit is not possible due
to the size of a stick PC, etc. use a commercially sold
extension cable.
●
Depending on the type of a USB memory device,
it may come in contact with the periphery such as
a back cover, and cannot be attached. Use a USB
memory device connectable to this unit.
●
When connecting the USB memory device, confirm
the orientation of the plug to prevent damage to the
terminal.
●
When removing the USB memory device, note the
following.
When the access indicator of the connected USB
•
memory device is blinking, it shows the TV is
loading the data. Do not remove the USB memory
device while blinking.
Depending on the USB memory device, the access
•
indicator may remain blinking even when it is not
being accessed, or the device is not equipped
with an access indicator function, etc. In this case,
remove the USB memory device after confirming
the following or .
Switch the input to an input other than [USB],
and confirm that the functions that access USB
memory device are finished.
Turn the unit off.
Do not frequently repeat connecting/disconnecting
•
the USB memory device. Wait at least 5 seconds
after connection, and then remove the USB
memory device. Before reconnection, wait at least
5 seconds. A certain length of time is required so
that the TV can recognise that the USB memory
device is switched for connection or disconnection.
If the power of this unit is turned off or the USB
•
memory device is removed accidentally while
accessing data, the data may not be accessed
next time the USB memory device is used.
In such a case, turn the power of the main unit off
and on.
English
23
Page 24

Identifying Controls
65-inch model
55-inch model
50-inch model
43-inch model
86-inch model
75-inch model
86-inch model
75-inch model
65-inch model
55-inch model
50-inch model
43-inch model
Display
1 Power LED
The Power Indicator will light.
When the power of the unit is ON
(Power button (
●
Picture is displayed: Green
●
When the unit enters the standby mode: Red
2 Remote control sensor
(Unit): ON)
1 External input / output terminal
Connects to video equipment, PC, etc. (see page 17)
2 Power button (
Turns the power On / Off.
3 INPUT (Unit)
Selects the connected device. (see page 27)
Configures the item on menu screen.
4 MENU (Unit)
Displays the menu screen. (see page 30)
5 ˄ (Unit) / ˅ (Unit)
When TV input, changes the channel.
Selects the setting item on menu screen. (see page
30)
6 + (Unit) / - (Unit)
Adjusts the volume. (see page 28)
On the main screen, switches settings or adjusts
settings level. (see page 30)
) (Unit)
English
24
Note
●
To output sound from the built-in speakers of the
unit, be sure to set [Speaker] in the [Audio] menu.
(see page 34)
Page 25

Remote Control Transmitter
8 ENTER / Cursor buttons ( )
●
Used to operate the menu screens. (see page 30)
9 EXIT
●
Turns off the menu screens. (see page 30)
10
DISPLAY
●
Displays information of displayed channel or
signal.
11
ASPECT
●
Change aspect ratio. (see page 29)
12
FAVORITE
●
Displays registered favorite channel list.
13
MUTE
●
Sound mute on / off. (see page 28)
14
CH ˄ / ˅
●
Changes channel.
15
INPUT
●
Switches input to display on the screen.
(see page 27)
16
MENU
●
Press to open the OSD menu. (see page 30)
Note
●
In this manual, buttons of the remote control and the
unit are indicated as < >.
(Example: <INPUT>.)
The operation is mainly explained indicating the
remote control buttons but you can also operate with
the buttons on the unit when there are the same
buttons.
1 POWER ON button ( )
●
Turns the power on (Picture is displayed) when the
TV is turned off (Standby condition).
2 STANDBY button (
●
Turns the power off (Standby condition) when the
TV is turned on.
3 Numeric buttons (0 - 9) / ∙
●
Changes channel. You can also use the button
when you enter numeric or dot.
●
Input numbers in LAN settings.
4 PICTURE
●
Adjust Picture mode. (see page 32)
5 AUDIO
●
Changed MTS or audio language. (see page 34)
6 VOL + / VOL -
●
Adjusts sound volume level. (see page 28)
7 Navigation keys (
●
Used in the USB menu and HDMI CEC function.
)
, , ►, )
English
25
Page 26

Basic Controls
86-inch model
75-inch model
65-inch model
55-inch model
50-inch model
43-inch model
86-inch model
75-inch model
65-inch model
55-inch model
50-inch model
43-inch model
<Power button (
(Back of the unit)
Operate pointing the remote control directly at the unit’s
Remote Control Sensor.
) (Unit)>
AC cord
(supplied)
AC socket outlet
Remote Control Sensor /
Power Indicator
Note
●
Do not put an obstacle between the remote control
sensor of the main unit and the remote control.
●
Operate the remote control in front of the remote
control sensor or from the area where the sensor can
be seen.
●
When directly aiming the remote control at the remote
control sensor of the main unit, the distance from
the front of remote control sensor should be approx.
7 m or less. Depending on the angle, the operation
distance may be shorter.
●
Do not subject the remote control sensor of the main
unit to the direct sunlight or strong fluorescent light.
Connect the AC cord plug to the TV.
1
(see page 14)
Connect the plug to the socket outlet.
2
Note
●
When disconnecting the AC cord, be absolutely
sure to disconnect the AC cord plug at the
socket outlet first.
●
The settings may not be saved if the power plug
is disconnected immediately after changing
settings with on-screen menu. Disconnect the
power plug after a enough period of time. Or,
disconnect the power plug after turning the
power off with the remote control, RS-232C
control or LAN control.
Press the <Power button ( )> on the
3
unit to turn the power of the unit on.
●
Power Indicator: Green (Picture is displayed.)
●
When the power of the unit is on, the power
indicator lights up and remote control operation is
possible.
●
When the power indicator is lit, it is not necessary
to press the <Power button (
unit. Operate the remote control so that the power
indicator turns green (picture is displayed).
) (Unit)> on the
English
26
Page 27

■ To turn the power ON/OFF with the remote
control
To turn the power on
●
When the power of the unit is on (Power Indicator red), press <POWER ON button (
will be displayed.
●
Power Indicator: Green (Picture is displayed.)
To turn the power off (Standby condition)
●
When the power of the unit is on (Power Indicator green), press <STANDBY button (
will be turned off.
●
Power Indicator: Red (standby)
Note
●
After the power plug is disconnected, the power
indicator may remain lit for a while. This is not a
malfunction.
●
Press the <Power button (
turn the unit off, when the power of the unit is turned
on or in standby mode.
)> then the picture
)>, then the power
) (Unit)> on the unit to
■ When the Unit is turned on for the first time
Following screen will be displayed.
Important:
Please read carefully.
This product’s power save mode has been set to enable (low power mode)
before shipping. (To reduce power consumption in standby mode)
During power standby at low power mode settings:
- LAN function cannot be used.
Are you sure you want to use low power mode?
Please select “YES“ if you agree with this condition.
Yes No
Selecting the input signal
Select the signals input to the unit.
Press <INPUT> or <INPUT (Unit)>.
Unit
Input
TV
HDMI1
HDMI2
PC
USB
■ Power save mode
When this TV is turned on for the first time after being
shipped from the factory, the power save mode setting
screen will be displayed.
[Yes ]:TheTV᾿sconsumptioninstandbymodeis
reduced. However, the startup time from standby
mode becomes longer.
[No]: It is reduced that startup time from standby
mode. However, more power will be consumed in
standby mode.
Even after being set, you can change the “Power save
mode”. (see page 41)
ENTER
Move Select
[TV]: Antenna terminal
[HDMI1]: HDMI 1 terminal, HDMI input
[HDMI2]: HDMI 2 terminal, HDMI input
[PC]: PC Input Terminal
[USB]: USB terminal, USB input
English
27
Page 28
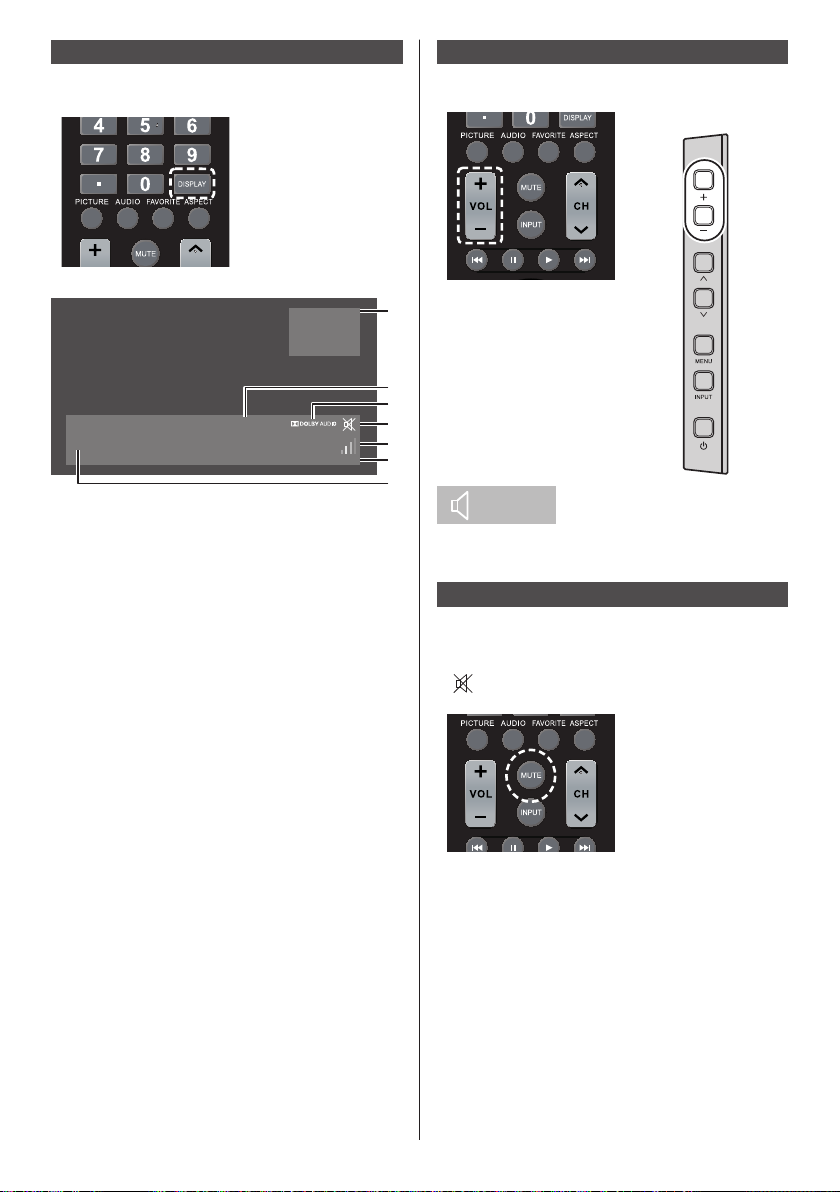
DISPLAY
1
2
7
3
4
5
6
It is possible to check the channel information.
Press <DISPLAY>.
Current setting status will be displayed.
Digital
8.1
KUHT-HD
Volume Adjustment
Press <VOL +> <VOL -> or <+ (Unit)> <- (Unit)> to
adjust volume.
Unit
1080i
Why Quilts Matter: History, Art & Politics
Description Bring History Alive Explore the quilt’s unique ability to preserve our own
family histories and the history of America.
9:00PM-09:30PM
1 Signal type / Channel position and name /
Signal resolution
2 Program start / Finish time
3 Dolby Digital audio track
4 Sound mute on
5 Signal strength
6 Rating (Parental control)
7 Program name and program introduction
●
When there is no video signal to the selected input,
[No signal] is displayed for about 60 seconds at the
end.
TV-G
6
●
The current sound volume level is memorised even if
the power is turned off.
Sound mute On / Off
It is useful when you want to mute the sound temporarily,
for example, when answering the phone or door.
Press <MUTE>.
●
appears on the screen and the sound is muted.
Press again to reactivate the sound.
●
It is also reactivated when the power is turned on / off
or the volume level is changed.
28
English
Page 29

ASPECT Controls
Press <ASPECT> to move through the aspect
options:
[Normal] → [Zoom] → [Full] → [Native]
Note
●
The aspect mode is memorised separately for each
input terminal.
■ List of Aspect Modes
Aspect
mode
Picture
Normal
Pictures are displayed with the aspect ratio of
input signals.
Description
Enlarged screen
Note
●
[Native] cannot be used for video signals exceeding
the resolution of 3 840 x 2 160 and for the interlace
signal.
[Zoom] cannot be used with PC input.
●
Using this TV’s screen-size switching function to
compress or expand the screen for commercial
or public viewing in establishments like cafes or
hotels may infringe on the rights of the creators, as
protected by Copyright Law, so please be careful.
●
The appearance of the original video may change if
you select a screen size with a different aspect ratio
than the original image (e.g. TV broadcast or video
input from external equipment).
●
When 4:3 video is viewed with the whole screen using
the screen-size switching function of this TV, the edge
of the video may be lost or appear distorted. If you
wish to respect the creator’s intentions, set the screen
size to [Normal].
●
When playing commercial software, parts of the
image (like subtitles) may be cropped. In this case
select the optimal screen size using the screen-size
switching function of this TV. With some software,
there may be noise or distortion at the edges of
the screen. This is due to the characteristics of the
software, and is not a malfunction.
●
Depending on the original video size, black bands
may remain at the edges of the screen.
Letterbox pictures with a 16:9 aspect ratio are
Zoom
enlarged vertically and horizontally to fill the
screen. The top and bottom edges as well
as the left and right edges of the pictures are
cut off.
Full
Pictures are displayed filling the screen.
Native
According the input signals to display the
picture. Refer to “Preset Signals” (see page
52) for the applicable input signal that can be
displayed.
English
29
Page 30

On-Screen Menu Displays
Display the menu screen.
1
Remote Control
Unit
Set.
3
Press to set.
Press to set.
Press to select.
Select the item.
2
(Example: [Picture] menu)
Picture
Picture mode
Advanced
Backlight
Brightness
Contrast
Color
Tint
Sharpness
Press to select.
Press to select.
SetupAudio TV
Exit from the menu.
4
Press to exit the
menu.
Press <MENU> to return to the previous screen.
Alternatively, press the button selected in step 1 to
exit from the menu.
Press
Note
●
When changing the settings of the TV, picture or
sound disturbance may occur temporarily. This is not
a malfunction.
Move
To display the submenu, press <ENTER>.
English
30
ENTER
Select Return Exit
MENU EXIT
Page 31

Menu display list
●
Menu that cannot be adjusted is greyed out.
Adjustable menu changes depending on signal, input
and menu setting.
●
The menu will differ depending on the input mode.
(Example: TV input)
[Picture] menu
(see page 32)
Picture
Picture mode
Advanced
Backlight
Brightness
Contrast
Color
Tint
Sharpness
Move
ENTER
Select Return Exit
MENU
SetupAudio TV
EXIT
[Audio] menu
(see page 34)
AudioPicture SetupTV
Sound mode
Balance
Bass
Treble
Speaker
Surround
Audio output
Visual impaired
Menu speech
Move
ENTER
MENU EXIT
Select Return Exit
[Setup] menu
(see page 36‒43)
Picture
Language
Network settings
Parental control
Closed caption
HDMI-CEC control
EDID select
Position
No signal power off
Power save mode
Move
Position
No signal power off
Power save mode
Button lock
RC control lock
Front indicator light
Auto play
Information
All reset
Move
ENTER
Picture
ENTER
SetupAudio TV
MENU EXIT
Select Return Exit
SetupAudio TV
All settings except for
Parental control are initialized.
Yes
No
MENU EXIT
Select Return Exit
[TV] menu
(see page 35)
CH search
CH memory
Favorite CH
MTS/SAP
Audio language
Move
AudioPicture SetupTV
ENTER
MENU EXIT
Select Return Exit
English
31
Page 32

Picture Adjustments
86-inch model
75-inch model
65-inch model
Press <MENU> to display the [Picture]
1
menu.
Picture
Picture mode
Advanced
Backlight
Brightness
Contrast
Color
Tint
Sharpness
Move
Select the item to adjust with < >.
2
●
Menu that cannot be adjusted is greyed out.
Adjust with < >.
3
Press <EXIT> to exit from adjust
4
ENTER
Select Return Exit
Dynamic
Graphic
Sports
Cinema
Standard
Custom
MENU EXIT
mode.
■ To return to the previous screen
Press <MENU>.
[Picture mode] This menu switches to easy-to-
Note
●
[Dynamic]/[Sports]/[Cinema] cannot be selected for
the PC input or RGB signal with HDMI input.
see pictures suitable to the picture
source or environment where this
unit is used.
[Dynamic]:
Improves contrast and sharpness
for viewing in a bright room.
[Graphic]:
Suitable for PC input.
[Sports]:
Suitable for sports matches.
[Cinema]:
Improves the performance
of contrast, black and colour
reproduction for watching movies in
a darkened room.
[Standard]:
For viewing in standard (evening
lighting) environments.
[Custom]:
Adjusts the manually by using the
equaliser to suit your favourite
picture quality.
SetupAudio TV
[Advanced]
Selects advanced video settings.
[Aspect ratio]:
Changes the screen size.
(see page 29)
[Overscan]:
Sets the scan mode used for video
input.
[Dynamic backlight control]:
Optimizes the backlight brightness
to enhance contrast and reduce
total power consumption.
[Color temperature]:
Adjusts colour tone. ([10700K],
[9300K], [6500K] and [Native])
Note
●
Emphasizes red when the
numerical value of [Color
temperature] is small, and
emphasizes blue when it is big.
●
[Native] is a colour tone of the
panel element.
[Noise reduction]:
Sets to reduce the video noise.
[Dynamic contrast]:
Automatically adjusts the contrast by
determining the changes in the use
of colours for images that constantly
change, such as motion pictures.
●
The adjustment operation may
not be smooth depending on the
image. In this case select [Off].
[Cinema reality]:
Attempts to reproduce a more
natural interpretation of sources
such as movie pictures, which are
recorded by 24 frames per second.
●
The function only affects 480i,
576i, 1080i 50Hz and 1080i 60Hz
signal during HDMI input.
[Motion smoother]:
Selects smooth levels of fast motion
scenes. (only for
)
[Backlight] Selects the proper brightness and
density for the room.
Less ↔ More
[Brightness] Adjusts the entire brightness of the
video signals.
Less ↔ More
[Contrast] Adjusts for easier viewing of dark
pictures.
Less ↔ More
[Color] Adjusts colour saturation.
Less ↔ More
English
32
Page 33

[Tint] Adjusts hue of skin colour.
Reddish ↔ Greenish
[Sharpness] Adjusts picture sharpness.
Less ↔ More
English
33
Page 34

Audio Adjustment
Press <MENU> and < > to display
1
the [Audio] menu.
AudioPicture SetupTV
Sound mode
Balance
Bass
Treble
Speaker
Surround
Audio output
Visual impaired
Menu speech
Move
Select the item to adjust with < >.
2
●
Menu that cannot be adjusted is greyed out.
Adjust with < >.
3
Press <EXIT> to exit from adjust
4
ENTER
Select Return Exit
mode.
■ To return to the previous screen
Press <MENU>.
[Sound mode] Selects your favourite sound mode.
[Standard]:
Provides the suitable sound
quality for all types of scenes.
[Theatre]:
Sets up and get the sound
through your Home Theatre
systems.
[Music]:
Improves sound quality for
watching music videos, etc.
[Sports]:
Improves sound quality for
watching sports program, etc.
[Custom]:
Adjusts the sounds manually by
using the equaliser to suit your
favourite sound quality.
[Balance] Adjusts left and right volumes.
[Bass] Adjusts low pitch sounds.
[Treble] Adjusts high pitch sounds.
[Speaker] Internal speakers.
[Enable]:
Internal speakers enable.
[Disable]:
Internal speakers disable.
Standard
Theatre
Music
Sports
Custom
MENU EXIT
[Surround] [Off]:
Normal sound
[On]:
Surround sound
[Audio output] Sets the volume of sound output
from the audio output terminals.
[Fixed]:
Fixes the sounds.
[Variable]:
Adjusts the volume by using the
VOL button.
[Visual impaired] Select to turn On/Off support
methods for visual impaired.
(Only available for digital channels)
[Menu speech] Enable speech function for OSD
menu and certain operations.
Note
●
[Bass] and [Treble] settings are memorised separately
for [Standard], [Theatre], [Music] and [Sports] in
[Sound mode].
34
English
Page 35

TV Adjustment
Press <MENU> and < > to display
1
the [TV] menu.
AudioPicture SetupTV
CH search
CH memory
Favorite CH
MTS/SAP
Audio language
Cable
Air
Move
Select the item to adjust with < >.
2
●
Unadjustable items are greyed out.
Adjustable items differ depending on the signal,
input and the display mode.
Adjust with < >.
3
Press <EXIT> to exit from adjust
4
ENTER
MENU EXIT
Select Return Exit
mode.
■ To return to the previous screen
Press <MENU>.
[CH search] Automatically searches for the
[CH memory] Selects the channels to skip.
[Favorite CH] Creates a list of favourite channels.
[MTS/SAP] Selects audio type for the program.
[Audio language] Selects language options in digital
receivable channels.
channels.
●
Only available for digital TV
programs.
English
35
Page 36

Setup menu
Press <MENU> and < > to display
1
the [Setup] menu.
Picture
Language
Network settings
Parental control
Closed caption
HDMI-CEC control
EDID select
Position
No signal power off
Power save mode
Picture
ENTER
Select Return Exit
ENTER
Select Return Exit
Move
Position
No signal power off
Power save mode
Button lock
RC control lock
Front indicator light
Auto play
Information
All reset
Move
Select the item to set with < >.
2
●
Menu that cannot be adjusted is greyed out.
Adjustable menu changes depending on signal
input and menu setting.
Set with < >.
3
Press <EXIT> to exit from adjust
4
mode.
English
Français
Español
MENU EXIT
All settings except for
Parental control are initialized.
Yes
No
MENU EXIT
[Closed caption] Adjusts the Closed Caption
settings.
[HDMI-CEC control] Sets for HDMI-CEC function.
[EDID select] EDID select settings change
how the content displayed is
processed and decoded.
SetupAudio TV
[Position] Adjusts the position for PC input.
[No signal power off] Sets whether or not the TV
power off when there is no input
signal for more than 10 minutes.
[Power save mode] Reduces power consumption in
standby mode.
[Button lock] Limits operation of the buttons
on the unit.
[RC control lock] Limits operation of the remote
control buttons.
[Front indicator light] Specifies whether to light the
SetupAudio TV
[Auto play] Sets the type of file to be
power LED.
automatically played from a USB
memory device.
[Information] Displays the serial number and
software version of this unit.
[All reset] Resets all the settings to the
factory default settings.
Language
Select your preferred language.
Selectable languages
English
Français
Español
■ To return to the previous screen
Press <MENU>.
[Language] Changes language for on-screen
[Network settings] Set the communication channel
[Parental control]
English
36
displays.
supported by the application
software accordingly.
You can lock specified channels
or shows to prevent children
from watching objectionable
content.
(see page 38)
●
The factory preset password
is a 4-digit number “0000”.
Note
●
Make a note of your password
in case you forget it.
(If you have forgotten your
password, consult your local
dealer.)
Page 37

Network settings
Selects the method with which to control the TV from the
computer.
[Network settings] submenu will be displayed.
Picture
SERIAL IN/LAN select
LAN setup
Audio
TV
SERIAL IN
LAN
Setup
[Network information]
Picture
DHCP
IP address
Subnet mask
Gateway
MAC address
Use
000 . 000 . 000 . 000
000 . 000 . 000 . 000
000 . 000 . 000 . 000
SetupAudio TV
Move
ENTER
Select
MENU EXIT
Return Exit
■ [SERIAL IN/LAN select]
RS-232C or LAN function is enable. To control the TV
via RS-232C, set [SERIAL IN/LAN select] to [SERIAL
IN].
Note
●
You cannot use RS-232C and LAN control
simultaneously.
■ [LAN setup]
Controls via LAN using the LAN terminal.
Picture
SERIAL IN/LAN select
LAN setup
Move
Picture
Network information
DHCP
IP address
Subnet mask
Gateway
Set
Move
ENTER
ENTER
Select
Select
SERIAL IN
LAN
MENU EXIT
Return Exit
Use
000 . 000 . 000 . 000
000 . 000 . 000 . 000
000 . 000 . 000 . 000
MENU EXIT
Return Exit
SetupAudio TV
SetupAudio TV
MENU
EXIT
Return Exit
[DHCP], [IP address], [Subnet mask], [Gateway]
Press < > to set [Use] / [No Use] of [DHCP].
When [No Use] is selected, IP address and other
settings can be set manually.
[DHCP]:
[Use]: Use Dynamic IP address.
[No Use]: Use Static IP address, Subnet mask,
and Gateway.
[IP address]:
Enter IP address when [DHCP] is [No Use].
[Subnet mask]:
Enter Subnet mask when [DHCP] is [No Use].
[Gateway]:
Enter Gateway address when [DHCP] is [No Use].
Note
●
When [DHCP] is set to [Use], others will be
displayed in grey.
Entering numbers
Picture
Network information
DHCP
IP address
Subnet mask
Gateway
Set
Move
ENTER
Select
Use
000 . 000 . 000 . 000
000 . 000 . 000 . 000
000 . 000 . 000 . 000
MENU EXIT
Return Exit
SetupAudio TV
1. Select the address and press <ENTER>.
2. Select digits with the cursor buttons <
/ >
and<∙>.
3. Change numbers with the cursor buttons
/ > and the numeric buttons <0 - 9>.
<
4. Press <ENTER>.
English
37
Page 38

Select [Set] and press <ENTER>.
Save the current network Setup.
Note
●
To use a DHCP server, make sure the DHCP
server is started.
●
Contact your network administrator for details on
[IP address], [Subnet mask] and [Gateway].
●
Shipping condition
[DHCP]: Use
[MAC address]
Displays the MAC address of this unit.
Parental control
Setstofilterprogramsnotsuitableforchildren᾽sviewing.
[Parental control] - submenu screen
Picture
Picture
No rating
US
Canada
RRT5
Reset RRT5
Setting secret No.
Reset
Move
ENTER
Input secret No.
_
Select
MENU EXIT
Return Exit
Block
No block
MENU EXIT
Return Exit
SetupAudio TV
SetupAudio TV
■ [No rating]
Blocks programs without rating.
■ [US]
It has two rating systems for reviewing content:
Movie ratings and TV Parental Guidelines.
Movie ratings are used for original movies rated by
Motion Picture Association of America (MPAA) as
watched on cable TV and not edited for television.
TheV-CHIP can also be set to block MPAA-rated
movies.
The TV Parental Guidelines work in conjunction with
the V-CHIP to help parents screen out inappropriate
television shows from their children.
[MPAA]: (Voluntary movie rating system)
Sets parental control on movie ratings.
None Do not set parental controls.
G General audiences. All ages admitted.
PG Parental guidance suggested. Some
material may not be suitable for
children.
PG-13 Parents strongly cautioned. Some
material may be inappropriate for
children under 13.
R Restricted. Under 17 requires
accompanying parent or adult guardian
(age varies in some jurisdictions).
NC-17 No one 17 and under admitted.
X It is an older rating that is unified with
NC-17 but may be encoded in the data
of older movies.
[TV guidelines]:
1. Suggested age
None Do not set parental controls.
TV-Y All children.
TV-Y7 Directed to older children.
TV-G General audience.
TV-PG Parental Guidance suggested.
TV-14 Parents strongly cautioned.
TV-MA Mature audience only.
2. Content
All All contents.
FV Fantasy violence.
L Adult language.
S Sexual situation.
V Violence
D Sexually suggestive dialog.
Rating
Suggested age
All FV L S V D
TV-Y Ye s No No No No No
TV-Y7 Yes Ye s No No No No
TV-G Ye s No No No No No
TV-PG Ye s No Yes Yes Ye s Yes
TV-14 Ye s No Ye s Ye s Ye s Yes
TV-MA Yes No Ye s Yes Ye s No
Content
38
English
Page 39

■ [Canada]
The TV rating systems in Canada are based on the
Canadian Radio-Television and Telecommunications
Commission (CRTC) policy on violence in television
programming.
While violence is the most important content element
to be rated, the structure developed takes into
consideration other program content like language,
nudity, sexuality and mature themes.
When setting the V-CHIP on the Canadian system you
can choose either the Canadian English ratings or the
Canadian French ratings.
[Can.English ratings]:
Sets parental control on Can.English ratings.
E
(Exempt)
C
(Children)
C8+
(Children
over 8
years old)
G
(General)
PG
(Parental
Guidance)
14+
(Over 14
years)
18+
(Adults)
Includes news, sports,
documentaries and other information
programming; talk shows, music
videos, and variety programming.
Intended for younger children under
the age of 8 years. Pays careful
attention to themes that could
threaten their sense of security and
well-being.
Contains no portrayal of violence
as the preferred, acceptable, or
only way to resolve conflict; nor
encourage children to imitate
dangerous acts which they may see
on the screen.
Considered acceptable for all age
groups. Appropriate viewing for
the entire family, contains very
little violence, physical, verbal or
emotional.
Intended for a general audience,
but may not be suitable for
younger children (under the age
of 8) because it could contain
controversial themes or issues.
Could contain themes where
violence is one of the dominant
elements of the storyline, but it must
be integral to the development of plot
or character. Language usage could
be profane and nudity present within
the context of the theme.
Intended for viewers 18 years and
older and might contain depictions
of violence, which while related to
the development of plot, character
or themes, are intended for adult
viewing. Could contain graphic
language and portrayals of sex and
nudity.
[Can.French ratings]:
Sets parental control on Can.French ratings.
E (Exempt) Exempt programming.
G
(General)
8ans+
(General
but inadvisable
for young
children)
13ans+
(Over 13
years)
16ans+
(Over 16
years)
18ans+
(Over 18
years)
All ages and children, contains
minimal direct violence, but may
be integrated into the plot in a
humorous or unrealistic manner.
May be viewed by a wide public
audience, but could contain scenes
disturbing to children under 8
who cannot distinguish between
imaginary and real situations.
Recommended for viewing with
parent.
Could contain scenes of frequent
violent scenes and therefore
recommended for viewing with
parent.
Could contain frequent violent
scenes and intense violence.
Only for adult viewing. Could contain
frequent violent scenes and extreme
violence.
■ [RRT5]
Sets the RRT5(Rating Region Table 5) setting.
■ [Reset RRT5]
Resets the RRT5 setting.
■ [Setting secret No.]
It allows to use a secret number to protect certain
settings from being accidentally changed. “0000” is
set as the default value.
Note
●
Make a note of your password in case you forget it.
(If you have forgotten your password, consult your
local dealer.)
■ [Reset]
Returns to the factory preset values.
English
39
Page 40

Closed caption
The television include a built-in decoder that is capable
of providing a text display of the audio.
The program being viewed must be transmitting the
Closed caption (CC) information.
[Closed caption] - submenu screen
Picture
Caption display
Analog CC
Digital CC
Caption setup
Move
CC off
CC on
CC on when mute
ENTER
MENU EXIT
Select Return Exit
SetupAudio TV
Note
●
It is only available for TV and AV input.
■ [Caption display]
[CC off]: To disable Closed caption.
[CC on]: To display Closed captions.
[CC on when mute]: To display Closed captions
when the audio is muted.
■ [Analog CC]
[CC1 - CC4]: Information related to pictures.
[Text1 - Text4]: Textual information.
■ [Digital CC]
The Digital Closed caption menu lets you configure
the way you choose to view the digital captioning.
■ [Caption setup]
[Style]: Text style.
[Size]: Text size.
[Font]: Text font.
[Text color]: Color of text.
[Background color]: Color of text box.
Note
●
It is only available for Digital TV.
HDMI-CEC control
Set for HDMI-CEC function.
For details of HDMI-CEC function, refer to “Using HDMICEC function”. (see page 51)
[HDMI-CEC control] - submenu screen
Picture
Language
Network settings
Parental control
Closed caption
HDMI-CEC control
EDID select
Position
No signal power off
Power save mode
Move
On
Off
ENTER
MENU EXIT
Select Return Exit
SetupAudio TV
■ [On]
When set to [On], the TV will automatically switch
to the appropriate HDMI input whenever an HDMI
connected equipment is initially turned on and the
Play mode is selected.
■ [Off]
Disables HDMI-CEC control.
Note
●
The HDMI CEC feature of connected HDMI CECcompatible device must be turned on.
EDID select
The menu is displayed in HDMI1 and HDMI2 inputs.
EDID data of each terminal is switched.
[EDID select] - submenu screen
Picture
Language
Network settings
Parental control
Closed caption
HDMI-CEC control
EDID select
Position
No signal power off
Power save mode
Move
4K/60p
4K/30p
ENTER
MENU
Select Return Exit
SetupAudio TV
EXIT
40
English
■ [4K/60p]
Sets EDID compatible with 4K video signals (Max.
4096 x 2160 dots, Max. vertical operation frequency
60 Hz).
■ [4K/30p]
Sets EDID compatible with 4K video signals (Max.
4096 x 2160 dots, Max. vertical operation frequency
30 Hz).
Note
●
It is only available for HDMI source.
Page 41

Position
Adjusts the position.
[Position] - submenu screen
Note
●
In some cases, noise appears outside the area
picture is displayed, but it is not a malfunction.
●
It is only available for PC input.
Picture SetupAudio
Language
Network settings
Parental control
Closed caption
HDMI-CEC control
EDID select
Position
No signal power off
Power save mode
Move
Auto setup
H-position
V-position
Dot clock
Clock phase
Reset
Move Select Return Exit
ENTER
Picture
ENTER
MENU EXIT
Select Return Exit
SetupAudio
MENU EXIT
■ [Clock phase]
Adjusts sampling clock for applicable video.
Useful when small characters appear with low
contrast and/or there are flickers at corners.
When using the adjustment pattern, make
adjustments so that no horizontal stripe noise
appears in it.
●
It should be made only after [Dot clock] has been
correctly set.
■ [Reset]
Resets the values of [Position] items to the factory
default settings.
Note
●
In some cases, noise appears outside the area
picture is displayed, but it is not a malfunction.
●
It is only available for PC input.
●
In the case that [Auto setup] cannot work well, [Auto
setup] may work well to execute [Reset] before [Auto
setup].
No signal power off
When this function is set to [Enable], the power is turned
off (standby) automatically when there is no signal of the
TV for 10 minutes.
Starting from 1 minute- before the turn off, the
remaining time will be displayed.
No signal 33 Sec.
■ [Auto setup]
Sets the operational mode of the automatic position
adjustment.
Note
●
[Auto setup] may not work when a cropped or dark
image is input. In such case, switch to a bright
image with borders and other objects are clearly
shown, and then try [Auto setup] again.
■ [H-position]
Adjusts the horizontal position of the image.
■ [V-position]
Adjusts the vertical position of the image.
■ [Dot clock]
Periodic striped pattern interference (noise) may
occur when a striped pattern is displayed. If this
happens, adjust so that any such noise is minimized.
Power save mode
■ [Off]
It is reduced that startup time from standby mode.
However, more power will be consumed in standby
mode.
■ [On]
TheTV᾿sconsumptioninstandbymodeisreduced.
However, the startup time from standby mode
becomes longer.
Note
●
If set to [On] , certain serial commands and LAN
control cannot be used in standby mode.
English
41
Page 42

Button lock
55-inch model
50-inch model
43-inch model
55-inch model
50-inch model
43-inch model
55-inch model
50-inch model
43-inch model
Disables the TV buttons.
[Button lock] - submenu screen
Picture
Network settings
Parental control
Closed caption
HDMI-CEC control
EDID select
Position
No signal power off
Power save mode
Button lock
Move
ENTER
Select Return Exit
Unlocked
Lock all
Lock except volume
Lock except power
MENU EXIT
RC control lock
Disables the remote control buttons.
[RC control lock] - submenu screen
SetupAudio TV
Picture
Parental control
Closed caption
HDMI-CEC control
EDID select
Position
No signal power off
Power save mode
Button lock
RC control lock
Move
Unlocked
Lock all
Lock except volume
Lock except power
ENTER
MENU EXIT
Select Return Exit
SetupAudio TV
■ [Unlocked] / [Locked]
[Unlocked]: (55/50/43 inch model)
All the buttons on main unit can be used.
[Unlocked]: (86/75/65 inch model)
The button on main unit can be used.
[Locked]: (86/75/65 inch model)
The button on main unit cannot be used.
■ [Lock all]
(only for
)
All the buttons on main unit can not be used.
■ [Lock except volume]
(only for
)
Disabling all button operations on main unit except
< + > and < - >.
■ [Lock except power]
(only for
)
Disabling all button operations on main unit except
<Power button ( )>.
Note
●
Press <PLAY (
to disable [Button lock]. Before the “L” disappears,
pressing the following sequence cursor buttons
< >
●
You can also disconnect the power cord and then
reconnecting the power cord while pressing the
<Power button (
)> until “L” appears in the screen
) (Unit)> on the TV.
■ [Unlocked]
All the buttons on your remote control can be used.
■ [Lock all]
All the buttons on your remote control can not be
used.
■ [Lock except volume]
Disabling all button operations on your remote control
except <VOL +> and <VOL ->.
■ [Lock except power]
Disabling all button operations on your remote control
except <POWER ON button ( )> / <STANDBY
button( )>.
Note
●
Press <PLAY (
disable [RC control lock]. Before the “L” disappears,
pressing the following sequence cursor buttons
< >
●
You can also disconnect the power cord and then
reconnecting the power cord while pressing the
<Power button (
Front indicator light
Enables / Disables the power LED.
[Front indicator light] - submenu screen
Picture
Closed caption
HDMI-CEC control
EDID select
Position
No signal power off
Power save mode
Button lock
RC control lock
Front indicator light
Move Select Return Exit
)> until “L” appears in the screen to
) (Unit)> on the TV.
SetupAudio TV
On
Off
ENTER
MENU EXIT
English
42
Page 43

Auto play
Sets the type of file to be automatically played from a
USB memory device.
[Auto play] - submenu screen
Picture
Disable
HDMI-CEC control
EDID select
Position
No signal power off
Power save mode
Button lock
RC control lock
Front indicator light
Auto play
Move Select Return Exit
ENTER
Photo
Video
MENU EXIT
SetupAudio TV
■ [Disable]
Disables the Auto playback function.
■ [Photo]
Photos in a USB memory device can be played
automatically. (*.jpg file only)
■ [Video]
Video in a USB memory device can be played
automatically. (*.mp4 file only)
Note
●
Photos and video cannot be played automatically at
the same time. (see page 47)
Information
Displays the display information.
[Information] - submenu screen
Picture
EDID select
Position
No signal power off
Power save mode
Button lock
RC control lock
Front indicator light
Auto play
Information
Move
Model
TH-50CQ1U
Version
V0.07(MAIN)/V0.03(LAN)
Serial number
NA
MENU EXIT
Return Exit
SetupAudio TV
All reset
It is possible to reset the data to the factory settings.
Picture
Position
No signal power off
Power save mode
Button lock
RC control lock
Front indicator light
Auto play
Information
All reset
Move
Parental control are initialized.
ENTER
MENU
Select Return Exit
SetupAudio TV
All settings except for
Yes
No
EXIT
English
43
Page 44

Using Network Function
This unit has a network function and you can control the
TV connected to the network using your computer.
Necessary environment for computers to be connected
First of all, confirm your computer whether it has a wired
LAN.
Before connecting the TV to the computer, be sure to
check the following settings.
Check 1: About LAN cable
●
Connect the cable properly.
●
Use LAN cable that is compatible with category 5e
or above.
Check 2: Wired LAN settings
Computer with a built-in wired LAN function
●
Switch on the wired LAN.
Computer without a built-in wired LAN function
●
Check that your wired LAN adapter is recognized
properly and it is switched on.
●
Install the wired LAN adapter driver beforehand.
For details on how to install the driver, refer to the
instructions accompanying the wired LAN adapter.
Example of network connection
Note
●
When [Power save mode] is set to [On], the control is
disabled in the standby mode.
●
To use the network function, set each item in
[Network settings] and make sure to select [LAN].
(see page 37)
●
You cannot use RS-232C and LAN control
simultaneously.
■ LAN Terminal connection
TV (Back of the unit)
PC
LAN terminal
LAN cable (commercially available)
Hub or broadband router
Note
●
For LAN cable, use shielded cable, otherwise picture
noise may be caused.
●
Make sure the broadband router or hub supports
10BASE-T / 100BASE-TX / 1000BASE-T.
●
Touching the LAN Terminal with a statically charged
hand (body) may cause damage to the device due to
its discharge.
Do not touch the LAN Terminal or the metal part of
the LAN cable.
●
For instructions on connection, consult your network
administrator.
44
English
Page 45

Settings to connect to a LAN
[Important]
The network environment when controlling via LAN
is required to be physically isolated from the outside
network or not illegally connected / controlled by
unknown equipment with the Firewall.
Set the TV’s IP address and subnet mask to match the
settings of your LAN.
These settings can be made on either the TV or a
computer connected to the TV.
The settings depend on the configuration of your LAN.
For instructions on connection, consult your network
administrator.
To set on the TV
Set [SERIAL IN/LAN select] of [Network settings] on the
[Setup] menu to [LAN], and then set the [LAN setup]
options. (see page 37)
After setting each item, select [Set] and press
<ENTER>.
■ Network information
Displays LAN setting information. (see page 37)
Command-based control
You can control the TV using serial commands (see
page 21) via terminal software and other appropriate
applications.
Read the manual for the terminal software for detailed
instructions.
Supported commands
Commands used in the serial control are supported.
(see page 21)
●
Default user name and password are as follows:
User name: dispadmin
Password: @Panasonic
If you change user name and password, please use the
command below by serial line.
Command Parameter Control details
SSU:UNM *...* LAN control user name
SSU:UPW *...* LAN control password
(Max 16 Parameters)
Range of parameters:
[space] 0 1 2 3 4 5 6 7 8 9 A B C
D E F G H I J K L M N O P Q R S
T U V W X Y Z _ a b c d e f g h i j
k l m n o p q r s t u v w x y z - @
(Max 16 Parameters)
Range of parameters:
[space] 0 1 2 3 4 5 6 7 8 9 A B C
D E F G H I J K L M N O P Q R S
T U V W X Y Z _ a b c d e f g h i j
k l m n o p q r s t u v w x y z - @
Connect the computer to the TV.
1
1. Specify the IP address and data port number
(10101) and connect the computer to the TV.
When connection has been established
successfully, [Login:] is returned as response.
2. Send the user name.
●
Send [user name] + [
●
If the user name is not set, send [
●
When the transmission is successful, [
Password:] is returned as response.
3. Send the password.
●
Send [password] + [
●
If the password is not set, send [
●
When the transmission is successful, [OK
is returned as response.
Send commands to control the TV.
2
The commands used are the same as those for
RS-232C. Refer to the communication procedure
(see page 21) for operation.
Usable commands are provided in the serial
command table (see page 21).
Disconnect the connection with the
3
].
].
].
].
TV and quit the function.
●
Send [BYE
When the transmission is successful, [goodbye] is
returned and the connection is disconnected.
Note
●
The TV automatically will disconnect one minute after
receiving the last data without [BYE] command.
●
Repeating the procedure in 1 to 3 every time you
send / receive a command or a group of commands
is recommended for shortening the time for which the
port is open .
]
]
English
45
Page 46

Using “USB media file playback function”
It allows you to enjoy photo, music or video recorded
on a USB memory device. You can also play Music file
during Photo file display.
For information on USB memory device, see page 23.
■ Supported formats
Theunit᾿sMediaPlayersupportstheformatsbelow.
Save immediately below root in USB memory.
Still pictures
Extension Format Limitation
jpg/
jpeg
Motion pictures
Extension Video Audio
mp4 H.264/
ts MPEG2/
JPEG Maximum 15 360 x 8 640
Codec/Profile Resolution Codec
Main Profile
and High
Profile @
Level4.0
MP @ HL
H.264/
Main Profile
and High
Profile @
Level4.0
(supports baseline only)
YUV, RGB
1920x1080
@ 30.0
Bit rate:
Maximum
20Mbps
1920x1080
@ 30.0
Bit rate:
Maximum
20Mbps
MP3
(MPEG-1 Layer2,
MPEG-1 Layer3,
MPEG-2 Layer3)
AC3,
LPCM,
ADPCM,
AAC,
DD+,
HE-AAC
Music files
Extension Audio codec
mp3 MP3
Audio
Codec Sampling rates Bit Rates
MP3 MEPG-1 Layer2 16KHz ~ 48KHz 8Kbps ~ 384Kbps
MEPG-1 Layer3 16KHz ~ 48KHz 8Kbps ~ 320Kbps
MEPG-2 Layer3 16KHz ~ 48KHz 8Kbps ~ 320Kbps
AC3 32KHz, 44.1KHz,
LPCM 8KHz ~ 48KHz 64Kbps ~ 1.5Mbps
ADPCM 8KHz ~ 48KHz 384Kbps
DD+ 32KHz, 44.1KHz,
AAC 8KHz ~ 48KHz
HE-AAC 8KHz ~ 48KHz
(MPEG-1 Layer2, MPEG-1 Layer3,
MPEG-2 Layer3)
48KHz
48KHz
32Kbps ~ 640Kbps
32Kbps ~ 6Mbps
Note
●
In some cases it may not be possible to play the
above files.
●
A maximum of 32 alphanumeric characters can be
used for folder name and file name.
●
Do not use a file that is over 4 GB.
mpg MPEG1/
avi MPEG2/
English
46
Main Profile
MPEG2/
Main Profile
MP @ HL
H.264
JPEG 640x480 @
1920x1080
@ 30.0
Bit rate:
Maximum
20Mbps
1920x1080
@ 30.0
Bit rate:
Maximum
20Mbps
30.0
Bit rate:
Maximum
10Mbps
Page 47

Play file
Note
●
Files are displayed/played according to the order you
copy them to a USB memory device. Copy files to a
USB memory device according to the order you want
to play.
●
You can have photo or video files play automatically
when a USB memory device is connected or the
power is turned on. (see page 47)
■ Select the type of file to be played
1. Insert the USB memory device for Media Player
to the USB terminal on the side of the TV.
Note
●
Depending on the type of a USB memory device,
it may come in contact with the periphery such as
a back cover, and cannot be attached. Use a USB
memory device connectable to this unit.
USB terminal
USB memory
2. Change INPUT to [USB].
3. Select the type of file to be played with the
cursor buttons <
/ >, and press <ENTER>.
■ Playing files
1. Displays the file to be played.
Select the folder with the cursor buttons <
> and press <ENTER> to show the files in
the folder.
2. Select the file you want to play, and press
<ENTER>.
The file is selected.
Multiple files can be selected. You can also select
files in different folders.
3.
Press <PLAY (
The selected files are played.
)>.
■ To stop playing
Press <EXIT>.
Auto playback
Photos or video in a USB memory device can be played
automatically. (MAX 30 files)
■ Preparations
Prepare the files. Name the file to be played “001030” such as “001.jpg” - “030.jpg”.
1. Creates a folder named “AUTO_PLAYBACK”
in the root folder of a USB memory device and
copy the files to be automatically played to the
folder.
Select the type of file.
1. Press <MENU>, and select [Setup] with the
cursor buttons <
with the cursor buttons < / > and press
<ENTER>.
2. Select the type of file with the cursor buttons
/ > and press <ENTER>.
<
/ >, select [Auto play]
■ Auto playback of files
Connect a USB memory device (see page 23) and
turn on the TV power.
Auto play starts.
You can connect a USB memory device (see page
23) after turning on the TV power.
Auto play starts.
Note
●
Photos and video cannot be played automatically at
the same time.
●
Auto play repeatedly plays all photo or video files in
the “AUTO_PLAYBACK” folder.
●
During auto playback, only the button operations of
<VOL +> / <VOL -> and <EXIT> are enabled.
■ To stop auto playing
Press <EXIT>.
Note
●
The played screen size is [Normal].
●
If you press <PLAY (
the files in the folder will be played.
●
Select [Return] folder to return to the root folder,
select [Up folder] folder to return to the next higher
folder.
●
The volume can be adjusted with the <VOL +> /
<VOL -> and <MUTE> on the remote control.
●
For operations during play, see page 48.
)> without selecting a file, all
English
47
Page 48

Operations during play
When playing is started, the operation bar is displayed
in the bottom of the screen and you can perform the
steps below. If the operation bar is not displayed, press
<MENU> to display it.
Item Description
PLAY/PAUSE To play the file.
To pause the file.
FB To play fast backward.
(Audio and Video only)
FF To play fast forward.
(Audio and Video only)
Previous To go to previous file.
Next To go to next file.
STOP To stop the playing file.
Item Description
Repeat none
Repeat 1
Repeat all
Set A
Set B
None
Random On
Random Off
Music On
Music Off
Interval To select the slideshow time.
Playlist To show the playlist.
Info. To show the file information.
Rotate
(Clockwise)
Rotate
(CounterClockwise)
Repeat none -
After starting playing the files selected
in the menu, each file in the same
folder is played once in order until the
last one.
Also, if you start playing several files
checked in the menu, they are played
once.
Repeat 1 -
The one file selected or checked in the
menu is repeatedly played.
Repeat all -
To play and repeat files in the playlist.
Set the interval to play and repeat.
Set A -
Set the start point of the interval.
Set B -
Set the end point of the interval.
(Audio and Video only)
Random On -
To play and repeat all files in random.
Random Off -
To play and repeat all files in order.
When selected [Music On], the photo
and music files in the same folder are
synchronized.
(Photo only)
(Photo only)
To rotate the file 90 degrees
clockwise.
(Photo only)
To rotate the file 90 degrees Anticlockwise.
(Photo only)
Zoom in To zoom in the file.
(Photo only)
Zoom out To zoom to the file.
(Photo only)
Move To select view area in zoomed
Dynamic
Graphic
Sports
Cinema
Standard
viewing.
(Photo only)
To select the video settings.
(Video only)
48
English
Page 49

Playing the pictures
No device
Photo Music Video
Select a file in the same manner in the file list view.
1
Press < > to select the file
you want to play.
: To play the selected file
: Selected the file.
ENTER
: To return the media type select page.
EXIT
Return
ENTER Select ExitEXIT
Play
Press <ENTER>
2
The picture will be displayed on the full screen.
[Repeat all]
[Repeat none]
[Repeat 1]
Repeat all -
All the files in the same folder are
repeatedly played.
Repeat none -
After starting playing the files
selected in the menu, each file in
the same folder is played once in
order until the last one.
Repeat 1 -
The one file selected or checked in
the menu is repeatedly played.
[Random On]
[Random Off]
[Music Off]
[Music On]
[Interval]
[Playlist]
[Info.]
[Rotate]
(Clockwise)
[Rotate]
(Counter-
Select to play images in the folder
randomly.
Setting to [Music On], the photo
and music files in the same folder
are played at the same time.
Select Slideshow time.
Show Playlist.
Show the file information.
Rotate the image 90 degrees
clockwise temporarily.
Rotate the image 90 degrees Anticlockwise temporarily.
Clockwise)
[Zoom in]
[Zoom out]
[Move]
To zoom-in the image.
To zoom-out the image.
Select view area in zoomed.
2. Information window
Press <DISPLAY> to show the information window
PLAY Previous Next STOP Repeat all Random Off Music Off Interval
1. Operation bar
Press <MENU> to display operation bar on the
bottom of screen
Then press the cursor buttons <
/ > to perform
the following operations.
[PLAY/PAUSE]
To play the image slideshow.
To pause the playing image.
[Previous]
[Next]
[STOP]
To go to previous image.
To go to next image.
To stop the playing image
slideshow.
English
49
Page 50

Playing the music / video
No device
Photo Music Video
Select the file you want to play in
1
the same manner as “Playing the
pictures”. (see page 49)
: To play the selected file
ENTER
: Selected the file.
: To return the media type select page.
EXIT
Return
ENTER Select ExitEXIT
Play
Press <ENTER>
2
The video will be displayed on the full screen.
Note
●
The music icon is displayed on the screen for music
playback.
[FB]
To play the file fast backward.
FB2X / FB4X / FB8X / FB16X
[FF]
To play the file fast forward.
FF2X / FF4X / FF8X / FF16X
[Previous]
To go to previous the file. When
playing video, press once to play
from the beginning.
[Next]
[STOP]
[Repeat all]
[Repeat none]
[Repeat 1]
To go to next file.
To stop the playing file.
Repeat all -
All the files in the same folder are
repeatedly played.
Repeat none -
After starting playing the files
selected in the menu, each file in
the same folder is played once in
order until the last one.
Repeat 1 -
The one file selected or checked in
the menu is repeatedly played.
[Random On]
[Random Off]
[Set A]
[Set B]
[None]
Select to play images in the folder
randomly.
Set A -
Set the interval of the start point.
Set B - Set the interval of the end
point.
[Playlist]
[Info.]
[Dynamic]
[Graphic]
Show Playlist.
Show the file information.
Select video settings.
(Video only)
[Sports]
[Cinema]
[Standard]
You can also adjust the file by using the navigation
, ,►, > and the cursor buttons < /
keys <
> on the remote control. (see page 48)
PLAY FB FF Previous Next STOP Repeat all Set A
1. Operation bar
Press <MENU> to display operation bar on the
bottom of screen
Then press the cursor buttons <
the following operations.
[PLAY/PAUSE]
To play the music / video.
To pause the playing image.
English
50
2. Information window
Press <DISPLAY> to show the information window
/ > to perform
Page 51

Using HDMI-CEC function
The HDMI-CEC function enables the remote control
of this unit alone to operate the basics of HDMI-CEC
compatible devices by the interlocking control between
this unit and such devices. Also, this function enables
the remote control (or main unit’s buttons) of a HDMICEC compatible device alone to turn on/off this unit and
switch input.
Connection
Connect the HDMI-CEC compatible device to HDMI 1 or
HDMI 2 terminal.
HDMI
HDMI cable (commercially available)
DVD Recorder / DVD Player, Blu-ray Recorder /
Blu-ray Player
Setting
Make the setting on the connected device (HDMICEC compatible device) so this function can
operate.
Set [HDMI-CEC control] to [On]. (see page 40)
Turn on all the devices, and turn this unit off and on.
Then check if images can be seen correctly with
HDMI1 or HDMI2 input.
English
51
Page 52

Preset Signals
This unit can display the video signals shown in the table below.
●
The contents of HDMI signal in the Plug and Play-supported signal column are as follows.
1: 4K/60p, 2: 4K/30p
Corresponding
signal
Resolution (Dot)
480/60i 720 (1 440) x 480i
576/50i 720 (1 440) x 576i
Scanning frequency
Horizontal
(kHz)
1
*
15.73 59.94 27.00 H ○ ○
1
*
15.63 50.00 27.00 H ○ ○
Vertical
(Hz)
Dot clock
frequency
(MHz)
Format
480/60p 720 x 480 31.47 59.94 27.00 H ○ ○
576/50p 720 x 576 31.25 50.00 27.00 H ○ ○
720/60p 1 280 x 720 45.00 60.00 74.25 H ○ ○
720/50p 1 280 x 720 37.50 50.00 74.25 H ○ ○
1080/60i 1 920 x 1 080i 33.75 60.00 74.25 H ○ ○
1080/50i 1 920 x 1 080i 28.13 50.00 74.25 H ○ ○
1080/24p 1 920 x 1 080 27.00 24.00 74.25 H ○ ○
1080/25p 1 920 x 1 080 28.13 25.00 74.25 H ○ ○
1080/30p 1 920 x 1 080 33.75 30.00 74.25 H ○ ○
1080/60p 1 920 x 1 080 67.50 60.00 148.50 H ○ ○
1080/50p 1 920 x 1 080 56.25 50.00 148.50 H ○ ○
3840 x 2160/24p 3 840 x 2 160 54.00 24.00 297.00 H ○ ○
3840 x 2160/25p 3 840 x 2 160 56.25 25.00 297.00 H ○ ○
3840 x 2160/30p 3 840 x 2 160 67.50 30.00 297.00 H ○ ○
3840 x 2160/60p 3 840 x 2 160 135.00 60.00 594.00 H ○
3840 x 2160/50p 3 840 x 2 160 112.50 50.00 594.00 H ○
4096 x 2160/24p 4 096 x 2 160 54.00 24.00 297.00 H ○ ○
4096 x 2160/25p 4 096 x 2 160 56.25 25.00 297.00 H ○ ○
4096 x 2160/30p 4 096 x 2 160 67.50 30.00 297.00 H ○ ○
4096 x 2160/60p 4 096 x 2 160 135.00 60.00 594.00 H ○
4096 x 2160/50p 4 096 x 2 160 112.50 50.00 594.00 H ○
640 x 480/60 640 x 480 31.47 59.94 25.18 R/H ○ ○ ○
800 x 600/60 800 x 600 37.88 60.32 40.00 R/H ○ ○ ○
1024 x 768/60 1 024 x 768 48.36 60.00 65.00 R/H ○ ○ ○
1280 x 720/60 1 280 x 720 45.00 60.00 74.25 R/H ○ ○ ○
1280 x 800/60 1 280 x 800 49.70 59.81 83.50 R/H ○ ○ ○
1280 x 960/60 1 280 x 960 60.00 60.00 108.00 R/H ○ ○ ○
1280 x 1024/60 1 280 x 1 024 63.98 60.02 108.00 R/H ○ ○ ○
1280 x 1024/75 1 280 x 1 024 79.98 75.02 135.00 R/H ○ ○ ○
1360 x 768/60 1 360 x 768 47.71 60.02 85.50 H
1400 x 1050/60 1 400 x 1 050 65.32 59.98 121.75 H ○ ○
1440 x 900/60 1 440 x 900 55.94 59.89 106.50 R/H ○ ○ ○
1600 x 900/60 1 600 x 900
*
60.00 60.00 108.00 R/H ○ ○ ○
3
1600 x 1200/60 1 600 x 1 200 75.00 60.00 162.00 R/H ○ ○ ○
1680 x 1050/60 1 680 x 1 050 65.29 59.95 146.25 R/H ○ ○ ○
1920 x 1080/60 1 920 x 1 080 67.50 60.00 148.50 R/H ○ ○ ○
1920 x 1200/60 1 920 x 1 200
*
74.04 59.95 154.00 R/H ○ ○ ○
3
720 x 400/70 720 x 400 31.50 70.00 28.30 R/H ○ ○ ○
Plug and Play-supported
2
*
HDMI
signal
4
*
1 2
○
PC
52
English
Page 53

*
1: Pixel-Repetition signal (dot clock frequency 27.0 MHz) only
*
2: Signals to represent formats are as follows.
R : D-sub RGB (PC IN)
H : HDMI (HDMI 1, HDMI 2)
*
3: Based on VESA CVT-RB (Reduced Blanking) standard
*
4:Signalswith○inthePlugandPlay-supportedsignalcolumnaretheoneswritteninEDID(ExtendedDisplay
Identification Data) of this unit.
Forsignalswithout○inthePlugandPlay-supportedsignalcolumn,resolutionsmaynotbeselectedonthePC
side even if this unit supports those signals.
Note
●
An auto detected signal format may be differently displayed from the actual input signal.
●
[ i ] shown after the number of dots of resolution means the interlace signal.
English
53
Page 54

Troubleshooting
Before you call for service, determine the symptoms and make a few simple checks as shown below.
Symptoms Check
Picture Sound
Electrical Appliances
Cars / Motorcycles
Fluorescent light
Interference Noisy Sound
Volume
(Check whether the mute function has been activated on the remote
control.)
Normal Picture No Sound
No Picture No Sound
No Picture Normal Sound
No Colour Normal Sound
A display error such as “no picture”
occurs, or remote control operation is
suddenly disabled.
The screen turns off automatically.
No remote control operations can be
performed.
Unstable video
There are areas at the top and bottom
of the screen where picture is not
displayed.
Parts of the unit become hot.
The video from the HDMI input
terminal is abnormal.
The video from D-Sub input terminal
is abnormal.
Make sure the volume is not set to minimum.
Not plugged into AC outlet
Not switched on
Picture and Brightness/Volume setting
(Check by pressing the POWER ON (
If a signal with a non-applicable colour system format, or frequency is
input, only the input terminal indication is displayed.
Colour controls set at minimum level (see page 32)
Load noises from outside may be interfering with normal operation. Turn off
the power and turn it on after waiting at least 5 seconds, and then check
the operation.
Check the settings of [No signal power off] may be set to [Enable]. (see
page 41)
Are the batteries inserted with polarity (+,-) aligned? (see page 13)
Are the batteries exhausted?
Point the remote control unit toward the TV’s remote control sensor. (see
page 24)
Check whether the option other than [Unlocked] is selected in [RC control
lock]. (see page 42)
The signal may be incompatible.
Try the automatic screen adjustment when PC is in use.
When using a video software program (such as a cinema size program)
with a screen wider than one in the 16:9 mode, blank areas separate from
the images are formed at the top and bottom of the screen.
Even when the temperature of parts of the front, top and rear panels has
risen, these temperature rises will not pose any problems in terms of
performance or quality.
Check the HDMI cable support 4K, and whether compliant of HDMI
standard.
Check the input signal compatible with this TV. (see page 52 - 53)
To set [EDID select] to [4K/30p] when the connected device does not
support 4K.
Check the PC setting correct.
Check the input signal compatible with this TV. (see page 52 - 53)
) button or STANDBY ( ) button.)
54
English
Page 55

Symptoms Check
The Serial commands is
uncontrollable.
The LAN is uncontrollable.
LCD TV panel
Symptoms Check
It takes a while for the picture to
appear.
The edges of the images flicker.
There may be always-lighting dots
or non-lighting dots appear on the
screen.
Image retention appears
This TV uses special image processing. Hence a slight time lag may occur between image and audio, depending on
the type of input signal. However, this is not a malfunction.
Check that [SERIAL IN/LAN select] is selected [SERIAL IN]. (see page 37)
Check whether the connection has been made properly.
(see page 20)
Check that [SERIAL IN/LAN select] is selected [LAN]. (see page 37)
Check that the connection has been made properly.
(see page 44)
Check that [LAN setup] is set properly.
(see page 37)
The unit digitally processes the various signals in order to reproduce
esthetically pleasing images. As such, it sometimes takes a few moments
for the picture to appear when the power has been turned on, when the
input has been switched.
Due to the characteristics of the system used to drive the liquid crystal
panel, the edges may appear to flicker in the fast-moving parts of the
images: This is normal and not indicative of malfunctioning.
This is a characteristic of liquid crystal panels and is not a problem.
Image retention may occur. If you display a still picture for an extended
period, the image might remain on the screen. However, it will disappear
when a general moving picture is displayed for a while. This is not
considered as malfunction.
English
55
Page 56

Specifications
86-inch model
75-inch model
65-inch model
55-inch model
50-inch model
43-inch model
86-inch model
75-inch model
65-inch model
55-inch model
50-inch model
43-inch model
86-inch model
75-inch model
65-inch model
55-inch model
50-inch model
43-inch model
86-inch model
75-inch model
65-inch model
55-inch model
50-inch model
43-inch model
86-inch model
75-inch model
65-inch model
55-inch model
50-inch model
43-inch model
Model No.
: TH-86CQ1U
: TH-75CQ1U
: TH-65CQ1U
: TH-55CQ1U
: TH-50CQ1U
: TH-43CQ1U
Power Consumption
Screen size
1 895.0 mm (W) × 1 065.9 mm (H) × 2 174.2 mm
(diagonal) / 74.60” (W) × 41.96” (H) × 85.60” (diagonal)
1 649.6 mm (W) × 927.9 mm (H) × 1 892.7 mm
(diagonal) / 64.94” (W) × 36.53” (H) × 74.51” (diagonal)
1 428.4 mm (W) × 803.5 mm (H) × 1 638.9 mm
(diagonal) / 56.23” (W) × 31.63” (H) × 64.52” (diagonal)
1 209.6 mm (W) × 680.4 mm (H) × 1 387.8 mm
(diagonal) / 47.62” (W) × 26.78” (H) × 54.63” (diagonal)
340 W
274 W
136 W
128 W
120 W
106 W
Stand-by condition
0.5 W
LCD TV panel
86-inch IPS panel (Edge LED backlight), 16:9 aspect
ratio
75-inch IPS panel (Direct LED backlight), 16:9 aspect
ratio
65-inch VA panel (Direct LED backlight), 16:9 aspect
ratio
55-inch VA panel (Direct LED backlight), 16:9 aspect
ratio
50-inch VA panel (Direct LED backlight), 16:9 aspect
ratio
43-inch VA panel (Direct LED backlight), 16:9 aspect
ratio
1 095.8 mm (W) × 616.4 mm (H) × 1 257.3 mm
(diagonal) / 43.14” (W) × 24.26” (H) × 49.50” (diagonal)
941.1 mm (W) × 529.4 mm (H) × 1 079.8 mm
(diagonal) / 37.05” (W) × 20.84” (H) × 42.51” (diagonal)
No. of pixels
8 294 400
(3 840 (Horizontal) × 2 160 (Vertical))
Dimensions (W × H × D)
1 929 mm × 1 103 mm (excluding Remote Control
Sensor: 1 100 mm) × 80 mm /
75.92” × 43.41” (excluding Remote Control Sensor:
43.28”) × 3.13”
1 684 mm × 969 mm (excluding Remote Control
Sensor: 966 mm) × 94 mm /
66.30” × 38.14” (excluding Remote Control Sensor:
38.01”) × 3.70”
1 463 mm × 847 mm (excluding Remote Control
Sensor: 843 mm) × 97 mm /
57.57” × 33.32” (excluding Remote Control Sensor:
33.17”) × 3.81”
1 240 mm × 718 mm (excluding Remote Control
Sensor: 713 mm) × 80 mm /
48.79” × 28.25” (excluding Remote Control Sensor:
28.05”) × 3.12”
1 124 mm × 653 mm (excluding Remote Control
Sensor: 647 mm) × 77 mm /
44.24” × 25.70” (excluding Remote Control Sensor:
25.47”) × 3.04”
969 mm × 566 mm (excluding Remote Control
Sensor: 560 mm) × 77 mm /
38.12” × 22.26” (excluding Remote Control Sensor:
22.03”) × 3.03”
English
56
Page 57

Mass
86-inch model
75-inch model
65-inch model
55-inch model
50-inch model
43-inch model
Approx. 50.0 / 111 lbs net
LAN
Communication method:
RJ45, 10BASE-T / 100BASE-TX / 1000BASE-T
Approx. 34.0 / 75 lbs net
Approx. 24.0 / 53 lbs net
Approx. 15.0 / 34 lbs net
Approx. 13.0 / 29 lbs net
Approx. 9.0 / 20 lbs net
Power source
110 - 127 V , 50/60 Hz
Operating condition
Temperature
0°C‒40°C(32°F‒104°F)
Humidity
20%‒80%(nocondensation)
Storing condition
Temperature
-20°C‒60°C(-4°F‒140°F)
Humidity
20%‒80%(nocondensation)
Connection terminals
HDMI 1
HDMI 2
TYPE A Connector
Audio signal:
Linear PCM (sampling frequencies: 48 kHz,
44.1 kHz, 32 kHz)
2
*
× 2
USB
USB connector × 1, TYPE A
DC 5V / 0.5 A
Sound
Speakers
132mm×25mm×1/φ70mm×1×2pieces
Audio Output
20 W [10 W + 10 W] (10 % THD)
Remote Control Transmitter
Power source
DC 3 V (battery (AAA type) × 2)
Operating range
Approx. 7 m (22.9 ft)
1
*
(when operated directly in front of remote control
sensor)
Mass
Approx. 91
/ 3.21 oz (including batteries)
Dimensions (W × H × D)
”
48 mm × 190 mm × 27 mm / 1.89
*
1: Environmental temperature to use this unit at high
× 7.48” × 1.06
altitudes (1 400 m (4 593 ft) and higher and below
2 800 m (9 186 ft) above sea level): 0 °C to 35 °C
(32 °F to 95 °F)
*
2: VIERA LINK is not supported.
Note
●
Design and specifications are subject to change
without notice. Mass and dimensions shown are
approximate.
”
AUDIO IN
PC IN
AUDIO OUT
SERIAL IN
Stereo mini jack (M3) × 1, 0.5 Vrms
Mini D-sub 15 Pin (Compatible with DDC2B) × 1
RCA jack, 0.5 Vrms
Output:Variable(-∞‒0dB)
(1 kHz 0 dB input, 10 kΩ load)
External Control Terminal
D-sub 9 Pin × 1:
RS-232C compatible
English
57
Page 58

Notice (U.S.A. only)
Web Site: https://panasonic.net/cns/prodisplays/
© Panasonic Corporation 2019
Disposal may be regulated in your community due to environmental considerations. For disposal or
recycling information, please visit Panasonic website:
http://www.panasonic.com/environmental
or call 1-888-769-0149.
Customer’s Record
The model number and serial number of this product may be found on its rear panel. You should note this serial
number in the space provided below and retain this book, plus your purchase receipt, as a permanent record of
your purchase to aid in identification in the event of theft or loss, and for Warranty Service purposes.
Model Number Serial Number
For TH-86CQ1U, TH-75CQ1U, TH-65CQ1U, TH-55CQ1U, TH-50CQ1U, TH-43CQ1U
Panasonic System Solutions Company of North America
Unit of Panasonic Corporation of North America
Executive Office :
Two Riverfront Plaza, Newark, New Jersey 07102
Panasonic Canada Inc.
5770 Ambler Drive
Mississauga, Ontario
L4W 2T3
English
 Loading...