

Page 1
SU-G700
Stereo Integrated Amplifier Operating Instructions
Stereo-Vollverstärker Bedienungsanleitung
Amplificateur intégré Mode d’emploi
Amplificatore stereo integrato Istruzioni per l’uso
Geïntegreerde Stereo Versterker Gebruiksaanwijzing
Page 2

Page 3

Music is borderless and timeless, touching people’s
hearts across cultures and generations.
Each day the discovery of a truly emotive experience
from an unencountered sound awaits.
Let us take you on your journey to rediscover music.
03
Page 4

04
Page 5

Delivering the Ultimate Emotive Musical
Experience to All
At Technics we understand that the listening experience is not
purely about technology but the magical and emotional relationship
between people and music.
We want people to experience music as it was originally intended
and enable them to feel the emotional impact that enthuses and
delights them.
Through delivering this experience we want to support the
development and enjoyment of the world’s many musical cultures.
This is our philosophy.
With a combination of our love of music and the vast high-
end audio experience of the Technics team, we stand committed
to building a brand that provides the ultimate emotive musical
experience by music lovers, for music lovers.
Director
Michiko Ogawa
05
Page 6

Thank you for purchasing this product.
Please read these instructions carefully before using this product, and save this manual for future use.
• About descriptions in these operating instructions
- Pages to be referred to are indicated as “ ○○”.
- The illustrations shown may differ from your unit.
For the United Kingdom and Ireland customer
Sales and Support Information
Customer Communications Centre
• For customers within the UK: 0333 222 8777
• For customers within Ireland: 01 447 5229
• Monday–Friday 9:00 am – 5:00 pm, (Excluding public holidays).
• For further support on your product, please visit our website: www.technics.com/uk/
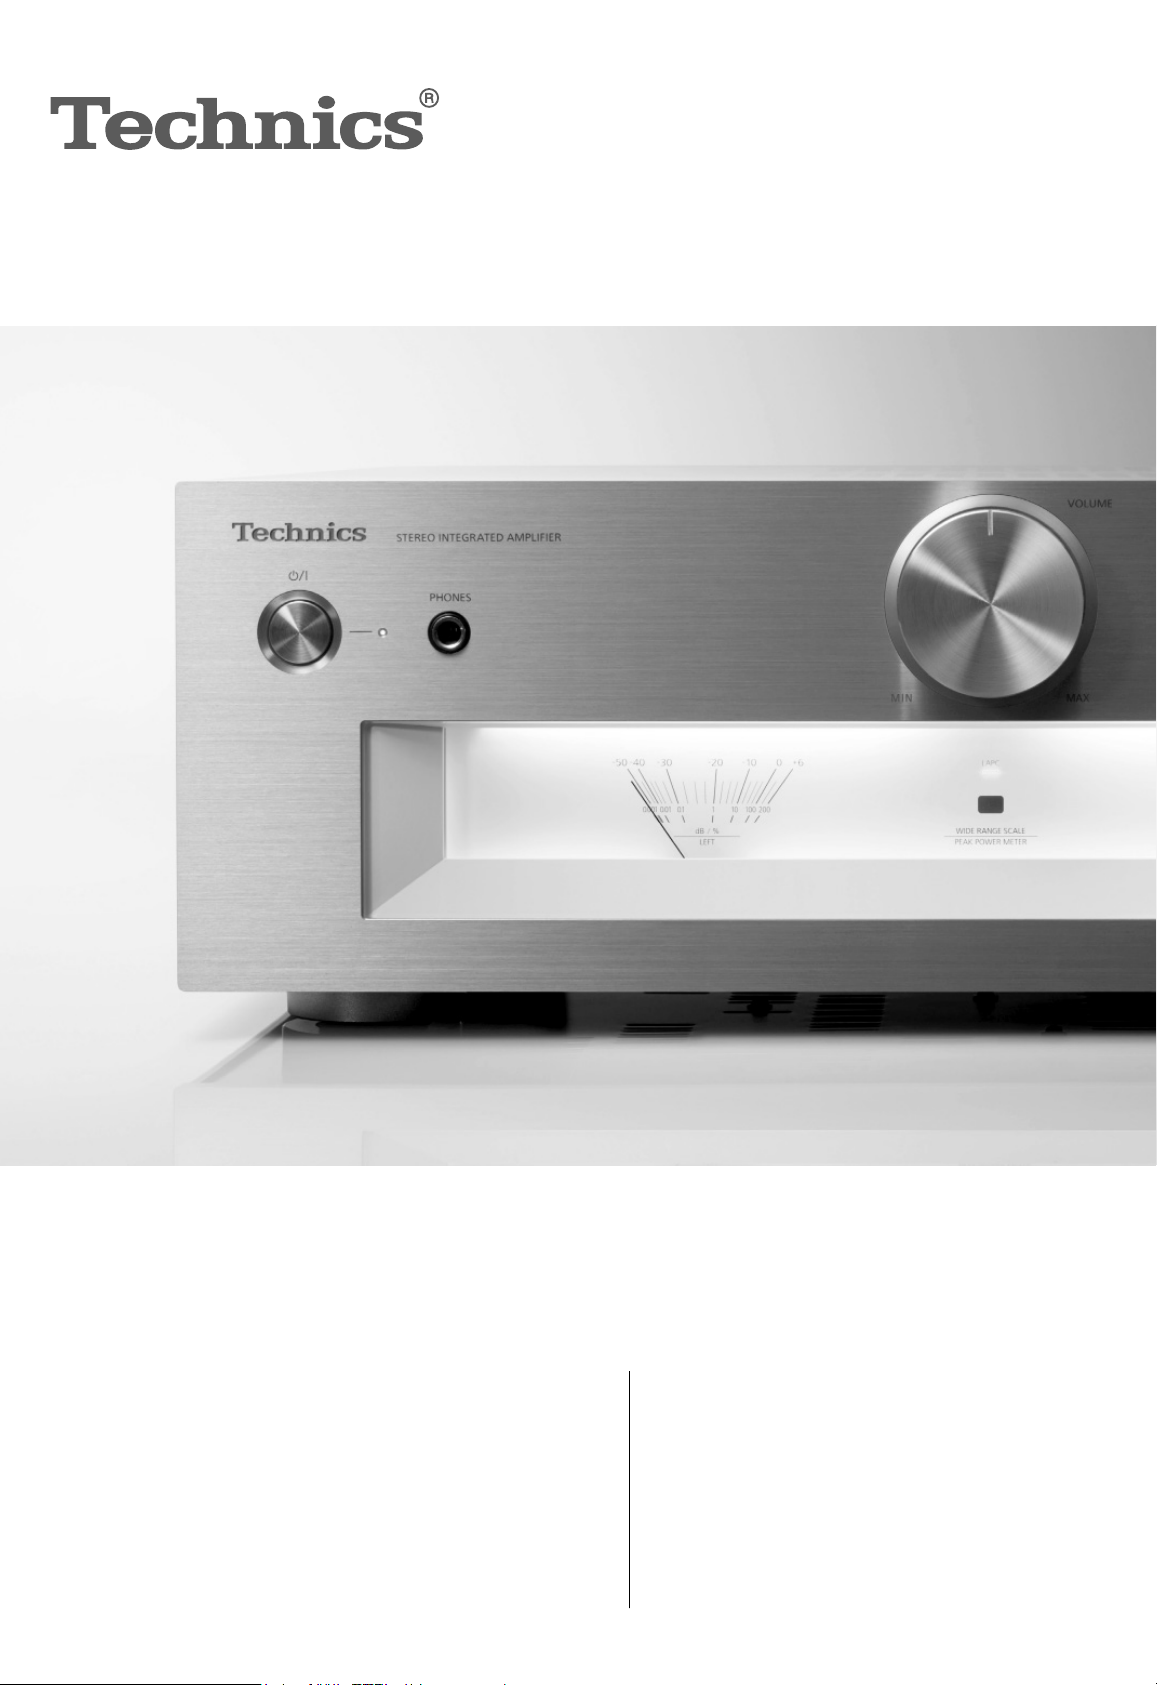
Features
High-Quality Audio Technologies
Employed including JENO Engine
and LAPC
The JENO Engine transmits and processes audio
signals in full digital and with minimal jitter from
the input stage to the power stage. The LAPC
conducts speaker load adaptive phase calibration
to achieve ideal gain and phase characteristics
for any type of speaker. Also, a unique, highprecision PWM conversion circuit is used for
PWM conversion, which is important for sound
quality.
Three-section Configuration
High Rigidity Aluminum Cabinet
The high-rigidity metal double chassis features
a steel-plate inner chassis and a steel-plate
outer chassis to reduce vibration and noise that
degrade the purity of sound.
In integrated amplifiers, there are a variety of
circuits such as circuits handling the microsignals of input, circuits handling large current,
etc. SU-G700 uses a three-section construction
with partitions installed between the circuit
blocks according to the signal level handled. This
eliminates interference between circuit blocks,
thus achieving clear sound quality.
(06)
06
Page 7
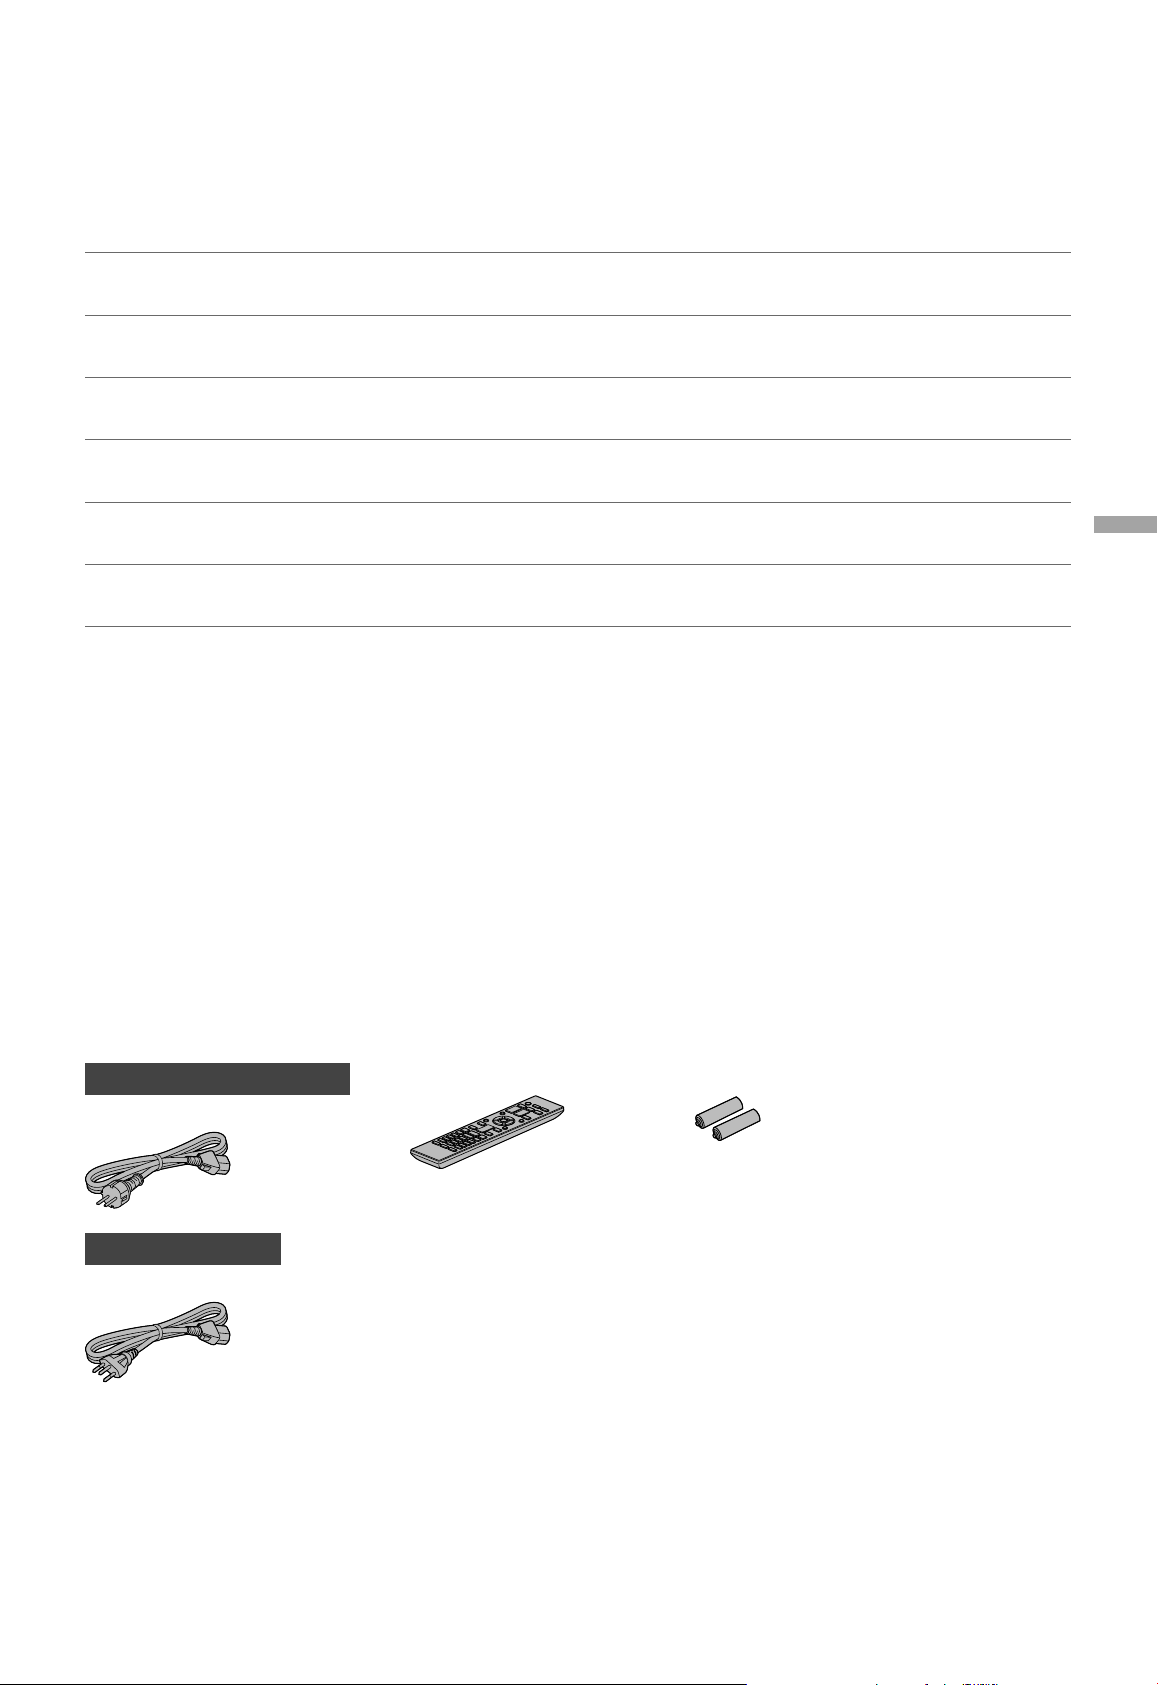
Table of contents
Safety precautions 08
Control reference guide 10
Connections 14
Operations 16
Settings 24
Troubleshooting 30
Others 33
Please carefully read the “Safety precautions” of this
manual before use.
This unit, Remote control
Speaker connection, AC mains lead connection
Playing back connected devices
Other settings, Using output correction function
(LAPC)
Before requesting service, read the troubleshooting.
Specifications, etc.
English
Accessories
AC mains lead (2)
Except for Switzerland
K2CM3YY00041
For Switzerland
K2CS3YY00033
• Product numbers provided in these operating instructions are correct as of February 2017.
• These may be subject to change.
• Do not use AC mains lead with other equipment.
Remote control (1)
N2QAYA000143
Batteries for remote control (2)
(07)
07
Page 8

Safety precautions
Warning
Unit
• To reduce the risk of fire, electric shock or
product damage,
- Do not expose this unit to rain, moisture,
dripping or splashing.
- Do not place objects filled with liquids, such
as vases, on this unit.
- Use only the recommended accessories.
- Do not remove covers.
- Do not repair this unit by yourself. Refer
servicing to qualified service personnel.
- Do not let metal objects fall inside this unit.
- Do not place heavy items on this unit.
AC mains lead
• To reduce the risk of fire, electric shock or
product damage,
- Ensure that the power supply voltage
corresponds to the voltage printed on this
unit.
- Insert the mains plug fully into the socket
outlet.
- Do not pull, bend, or place heavy items on the
lead.
- Do not handle the plug with wet hands.
- Hold onto the mains plug body when
disconnecting the plug.
- Do not use a damaged mains plug or socket
outlet.
• The mains plug is the disconnecting device.
Install this unit so that the mains plug can be
unplugged from the socket outlet immediately.
• Ensure the earth pin on the mains plug is
securely connected to prevent electrical shock.
- An apparatus with CLASS I construction shall
be connected to a mains socket outlet with a
protective earth connection.
Caution
Unit
• Do not place sources of naked flames, such as
lighted candles, on this unit.
• This unit may receive radio interference caused
by mobile telephones during use. If such
interference occurs, please increase separation
between this unit and the mobile telephone.
• This unit is intended for use in moderate and
tropical climates.
• Do not put any objects on this unit. This unit
becomes hot while it is on.
• Do not touch the top surface of this unit. This
unit becomes hot while it is on.
Placement
• Place this unit on an even surface.
• To reduce the risk of fire, electric shock or
product damage,
- Do not install or place this unit in a bookcase,
built-in cabinet or in another confined space.
Ensure this unit is well ventilated.
- Do not obstruct this unit’s ventilation
openings with newspapers, tablecloths,
curtains, and similar items.
- Do not expose this unit to direct sunlight, high
temperatures, high humidity, and excessive
vibration.
• Ensure that the placement location is sturdy
enough to accommodate the weight of this unit
( 34).
• Do not lift or carry this unit by holding the
knobs. Doing so may cause this unit to fall,
resulting in personal injury or malfunction of
this unit.
08
(08)
Page 9
Battery
• Danger of explosion if battery is incorrectly
replaced. Replace only with the type
recommended by the manufacturer.
• Mishandling of batteries can cause electrolyte
leakage and may cause a fire.
- Remove the battery if you do not intend to
use the remote control for a long period of
time. Store in a cool, dark place.
- Do not heat or expose to flame.
- Do not leave the battery(ies) in a car exposed
to direct sunlight for a long period of time
with doors and windows closed.
- Do not take apart or short circuit.
- Do not recharge alkaline or manganese
batteries.
- Do not use batteries if the covering has been
peeled off.
- Do not mix old and new batteries or different
types at the same time.
• When disposing of the batteries, please contact
your local authorities or dealer and ask for the
correct method of disposal.
Installation
Turn off all equipment before connection and
read the appropriate operating instructions.
For the United Kingdom and Ireland
customer
Caution for AC Mains Lead
(For the AC mains plug of three pins)
For your safety, please read the following text
carefully.
This appliance is supplied with a moulded three
pin mains plug for your safety and convenience.
A 10-ampere fuse is fitted in this plug.
Should the fuse need to be replaced please
ensure that the replacement fuse has a rating of
10-ampere and that it is approved by ASTA or
BSI to BS1362.
Check for the ASTA mark
or the BSI mark
on the body of the fuse.
If the plug contains a removable fuse cover you
must ensure that it is refitted when the fuse is
replaced.
If you lose the fuse cover the plug must not be
used until a replacement cover is obtained.
A replacement fuse cover can be purchased from
your local dealer.
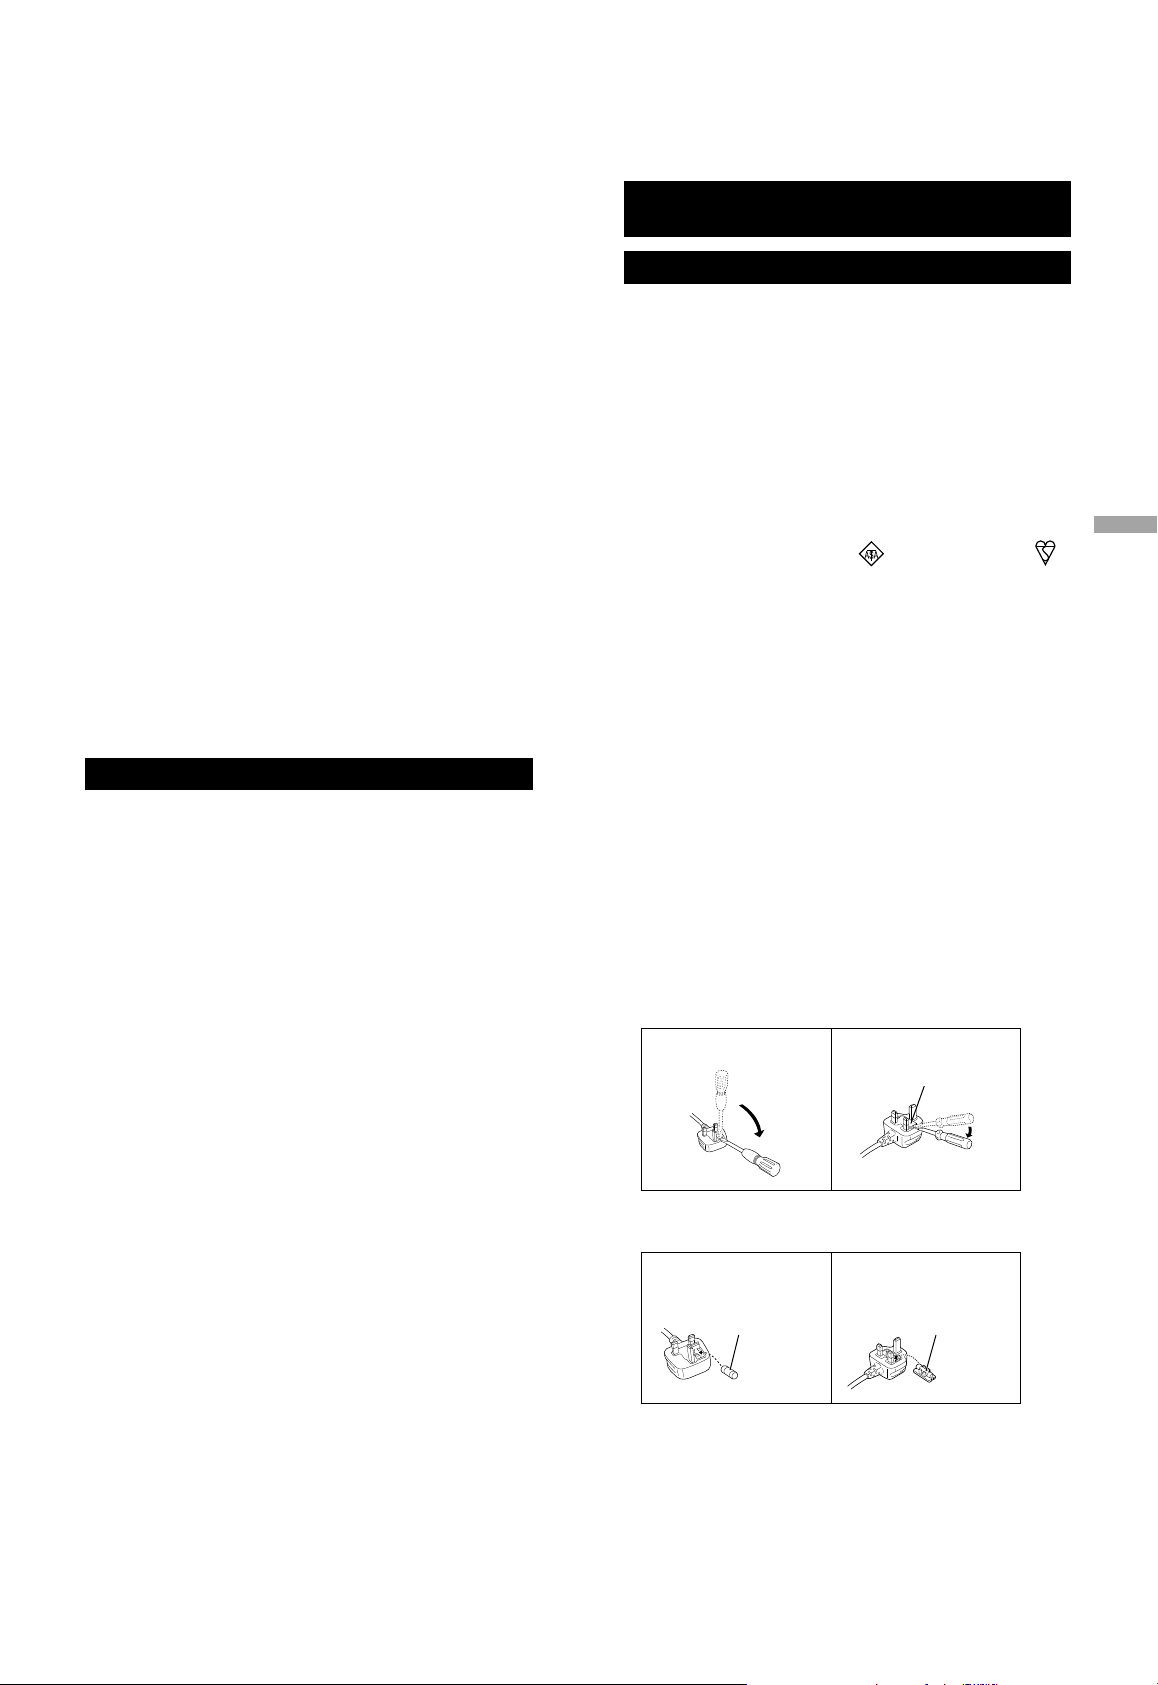
Before use
Remove the connector cover.
How to replace the fuse
The location of the fuse differ according to
the type of AC mains plug (figures A and B).
Confirm the AC mains plug fitted and follow the
instructions below.
Illustrations may differ from actual AC mains
plug.
1. Open the fuse cover with a screwdriver.
Figure A Figure B
Fuse cover
English
2. Replace the fuse and close or attach the fuse
cover.
Figure A Figure B
Fuse
(10 ampere)
Fuse
(10 ampere)
Safety precautions
(09)
09
Page 10
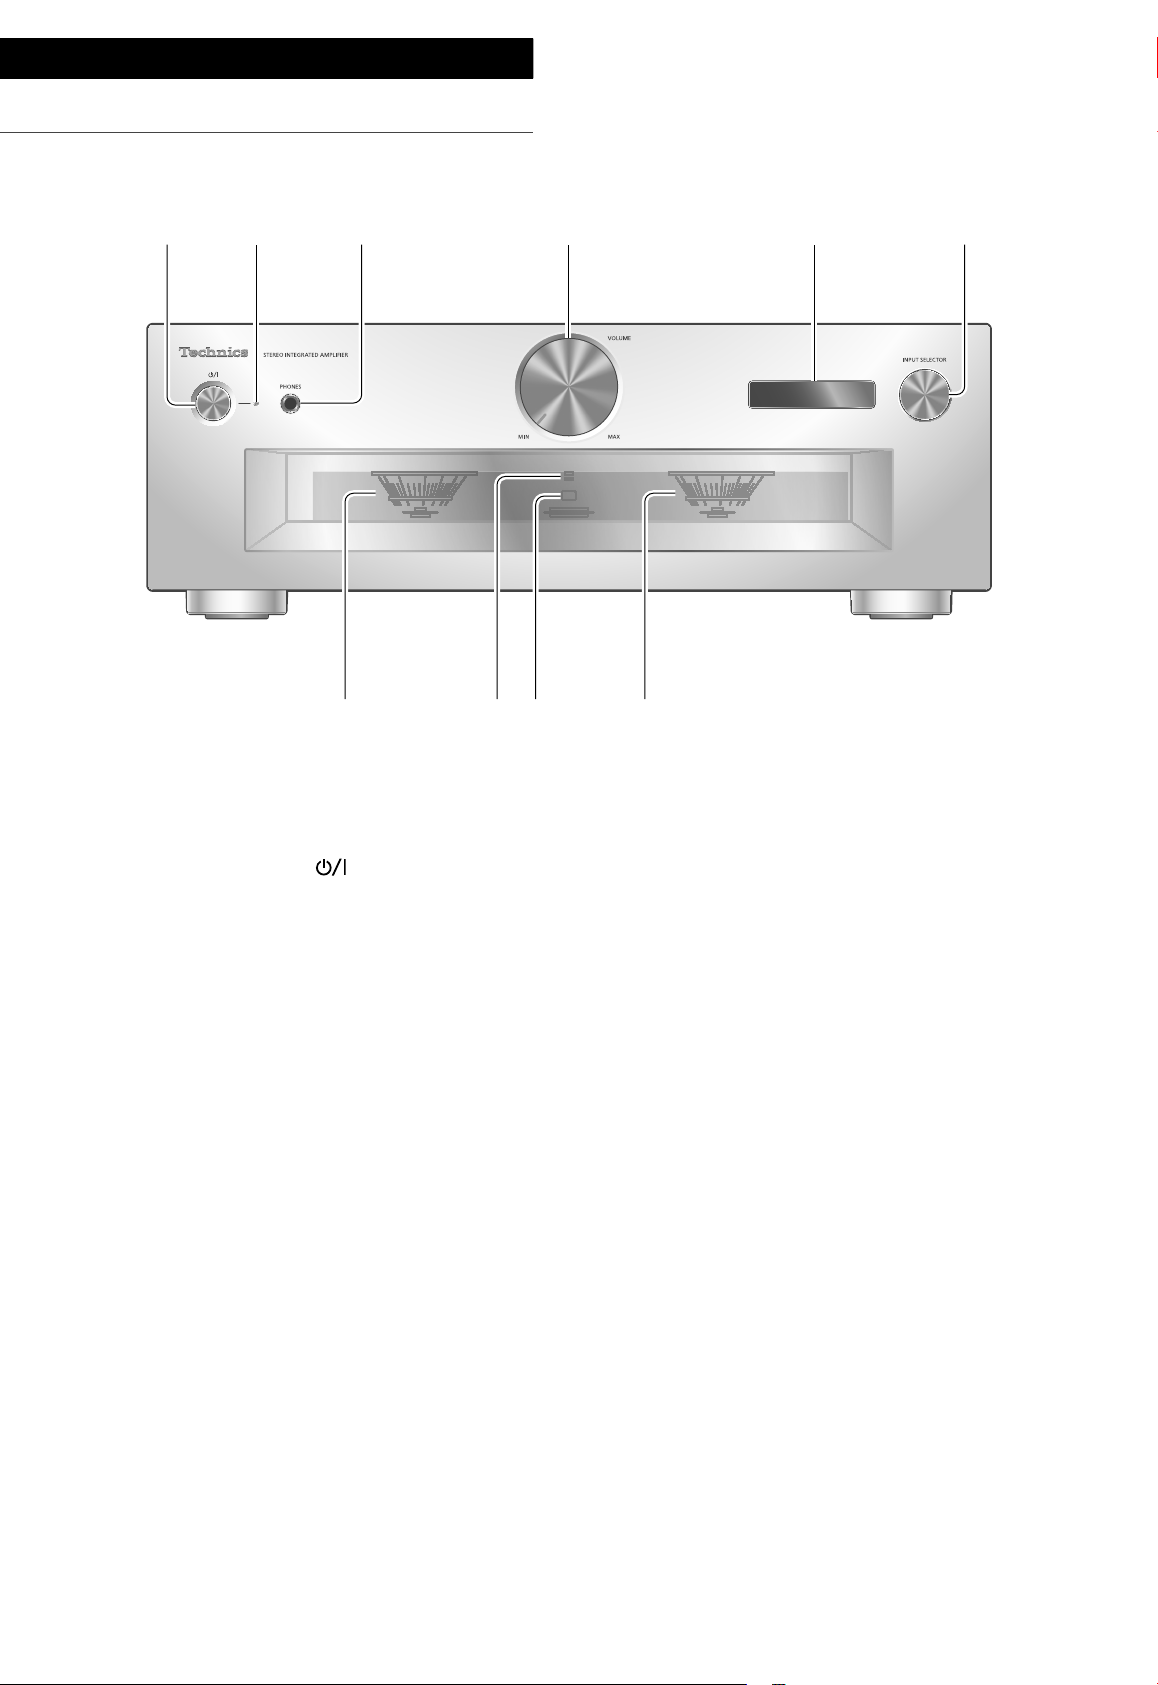
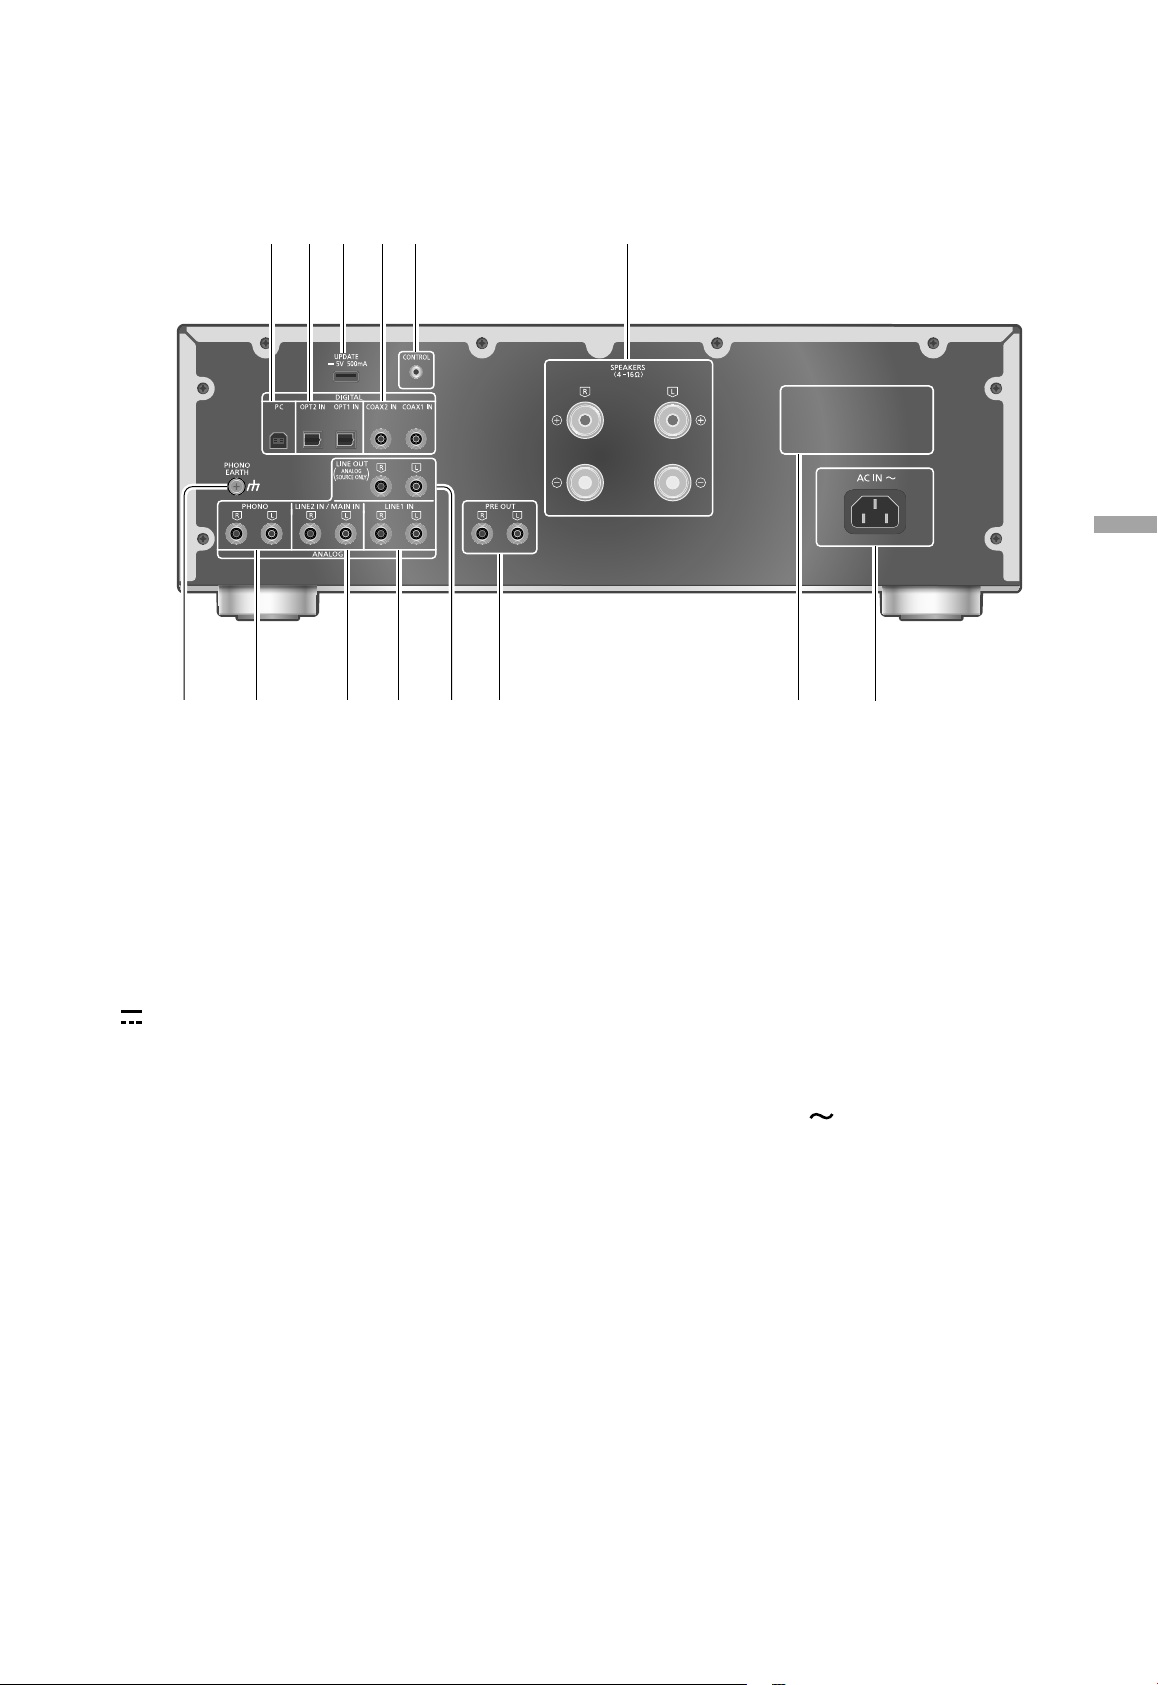
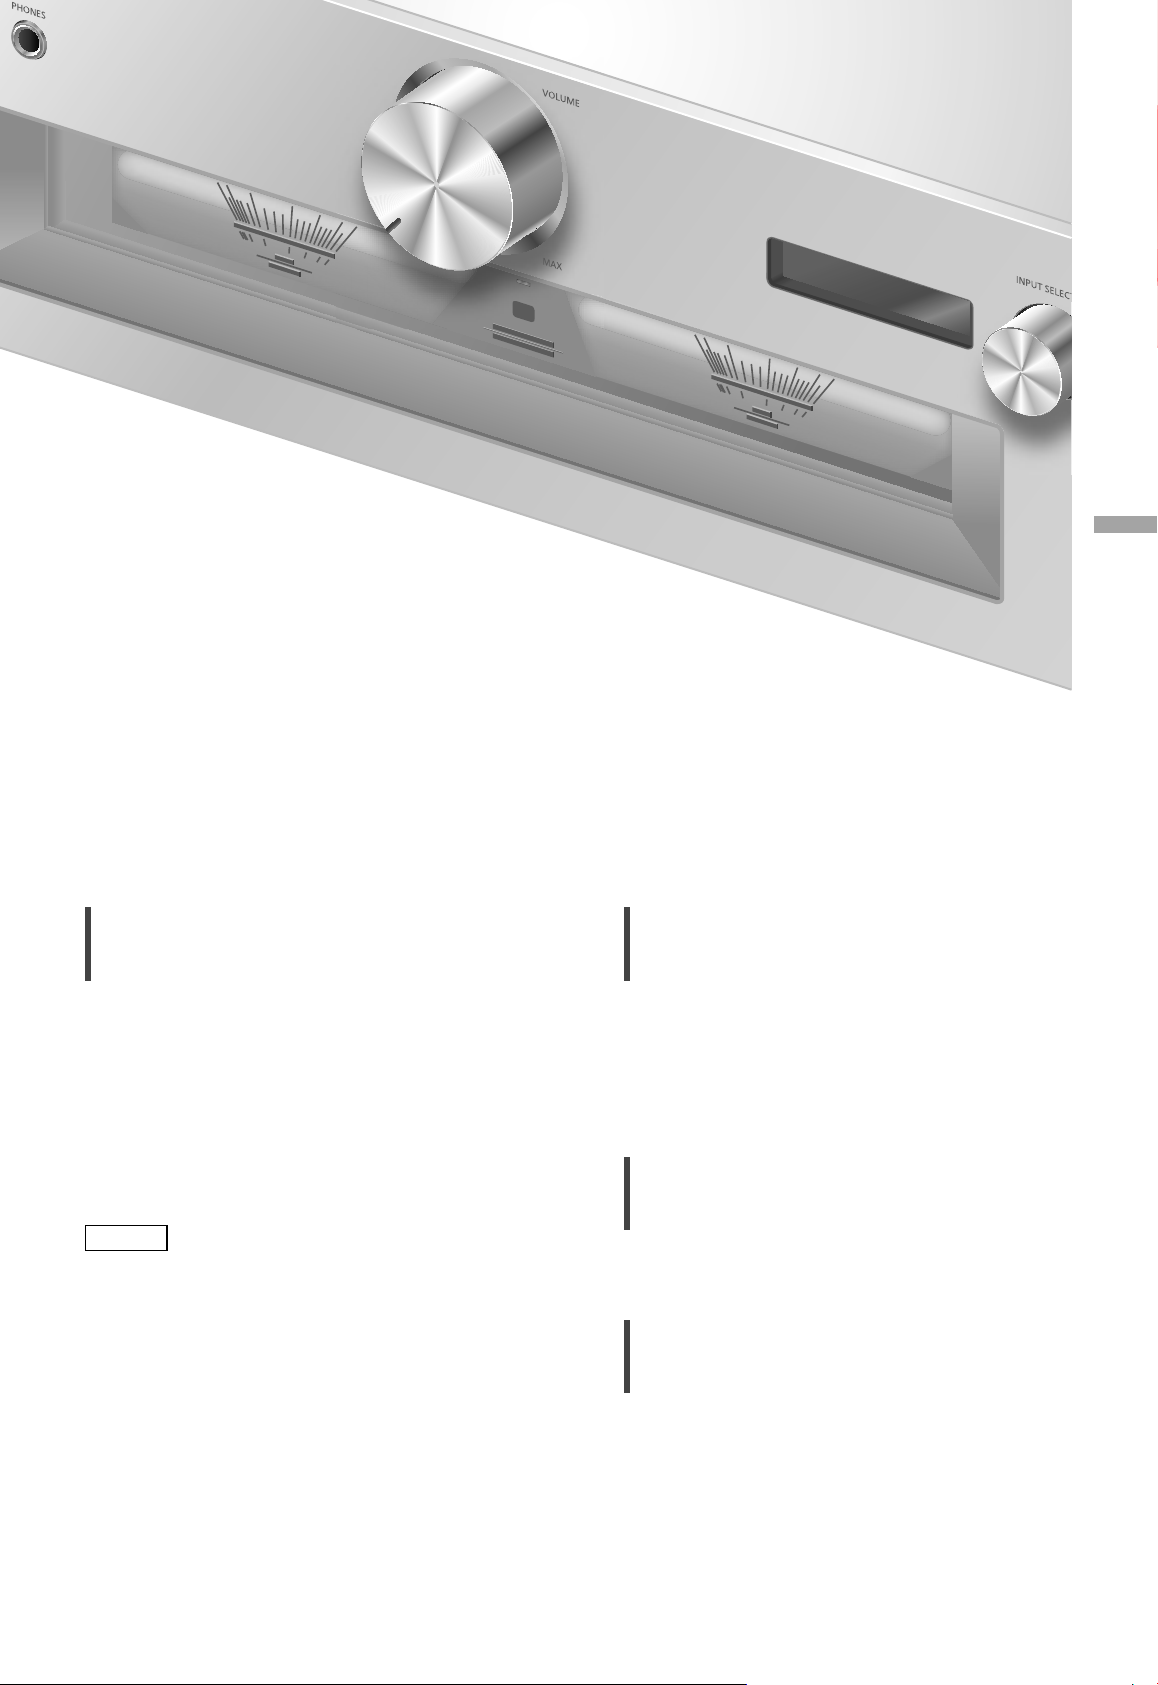
Control reference guide
This unit
01 Standby/on button ( )
• Press to switch the unit from on to standby
mode or vice versa. In standby mode, the
unit is still consuming a small amount of
power.
02 Power indicator
• Blue: The unit is on.
• Off: The unit is in standby mode.
03 Headphones jack
• When a plug is connected, the speakers and
PRE OUT terminals do not output sound.
( 22)
• Sound is not output from headphones jack
while “MAIN IN” is selected as input source
of this unit. ( 20)
• Excessive sound pressure from earphones
and headphones can cause hearing loss.
• Listening at full volume for long periods may
damage the user’s ears.
06 Input selector knob
• Turn this knob clockwise or anticlockwise to
switch the input source.
07 Peak power meter
• Display the output level. 100 % is the rated
output ( 34).
• Peak power meter does not work while the
light is turned off.
08 LAPC indicator ( 26)
09 Remote control signal sensor
• Reception distance: Within approx. 7 m
directly in front
• Reception angle: Approx. 30° left and right
04 Volume knob
• -- (min), 1 to 100 (max)
• To display the volume, set “VOLUME
Display” to “On”. ( 25)
05 Display
• Information such as input source, etc. is
displayed. ( 32)
(10)
10
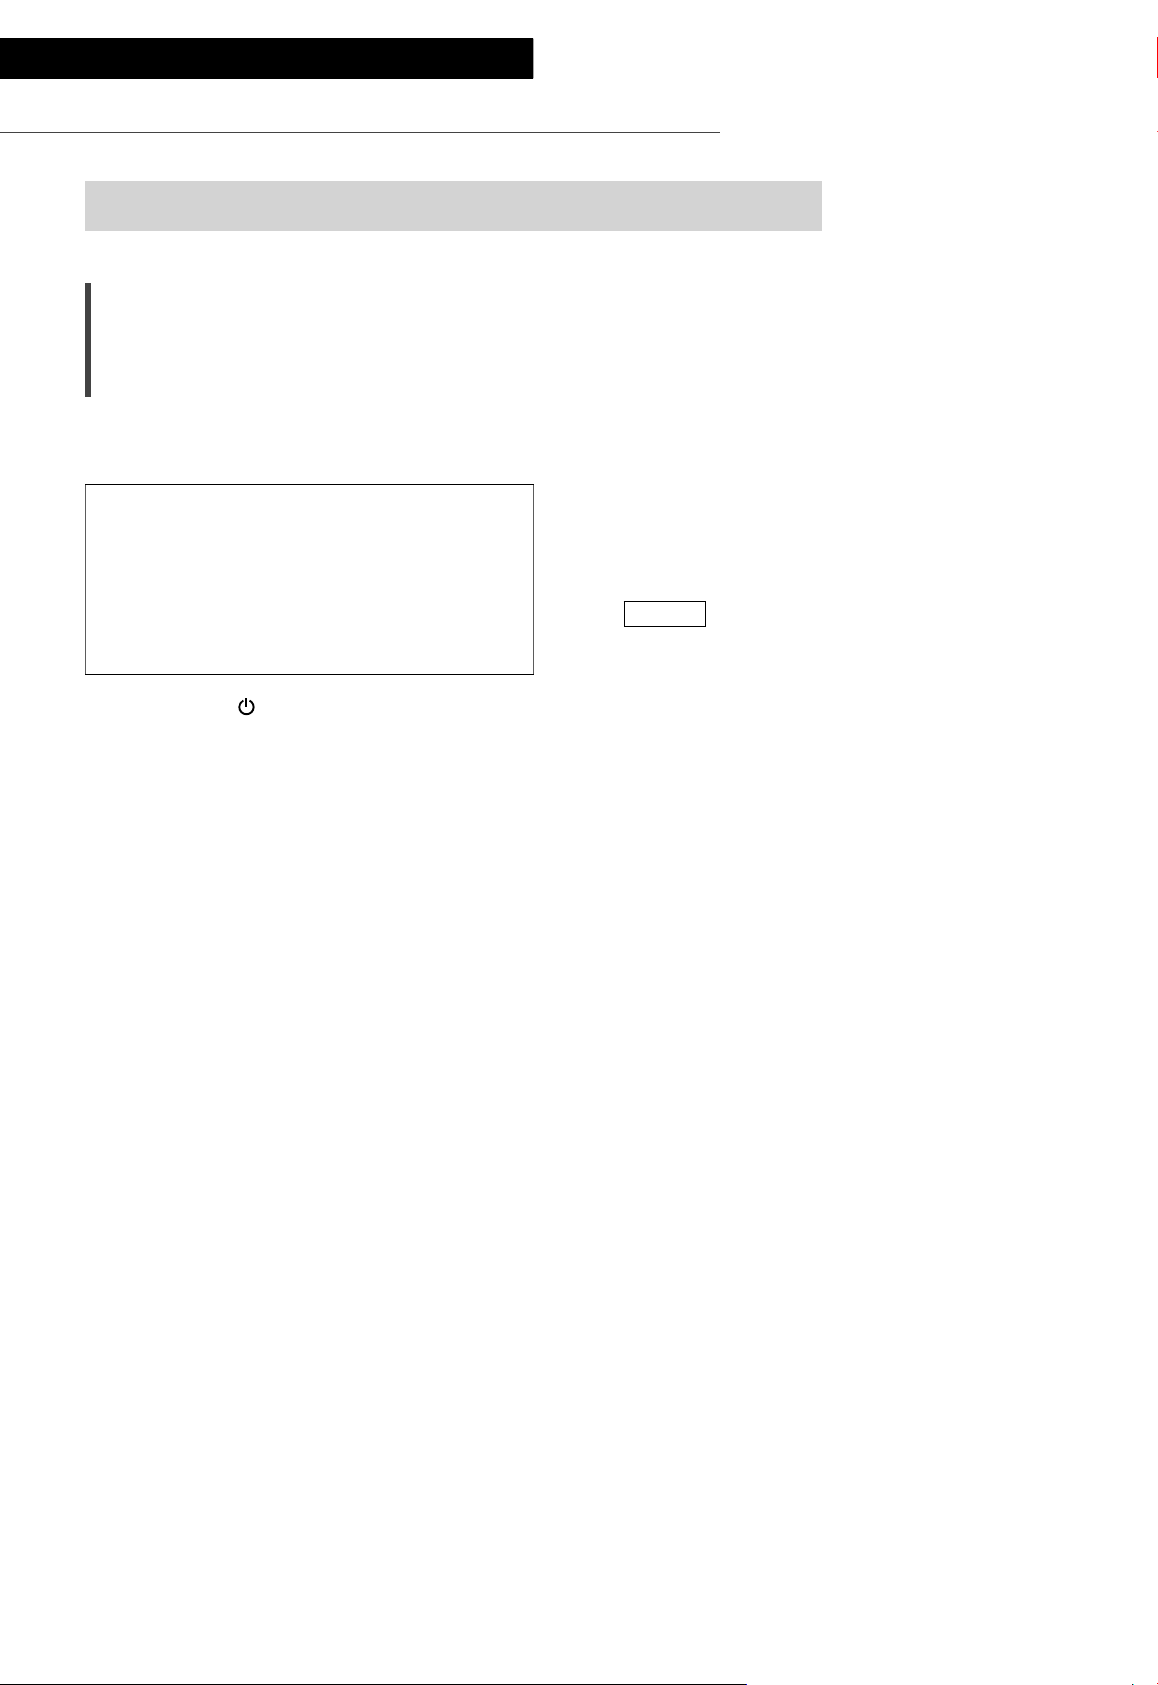
Page 11
English
10 USB-B terminal
• For connecting to a PC, etc. ( 17)
11 Optical digital input terminal
(OPT1 IN/OPT2 IN) ( 16)
12 UPDATE terminal (USB-A)
( DC 5 V 500 mA) ( 27)
13 Coaxial digital input terminals
(COAX1 IN/COAX2 IN) ( 16)
14 System terminal (CONTROL) ( 28)
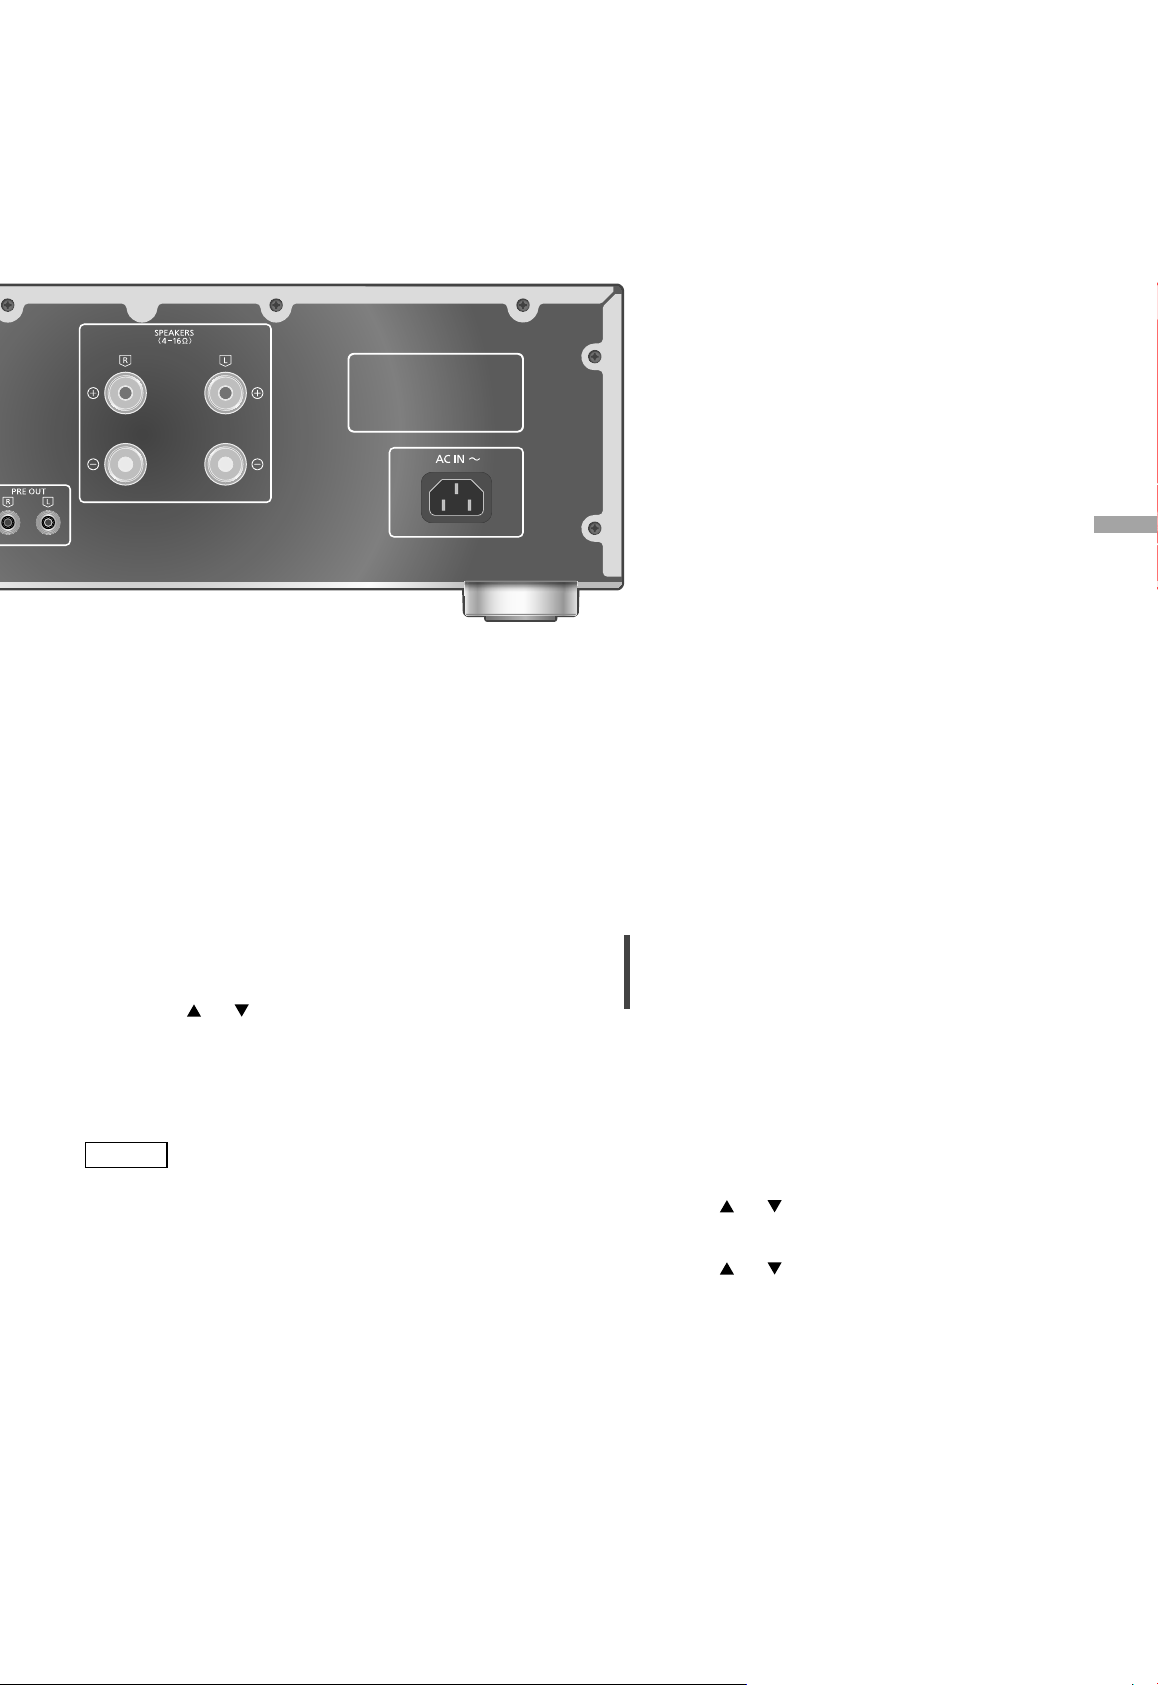
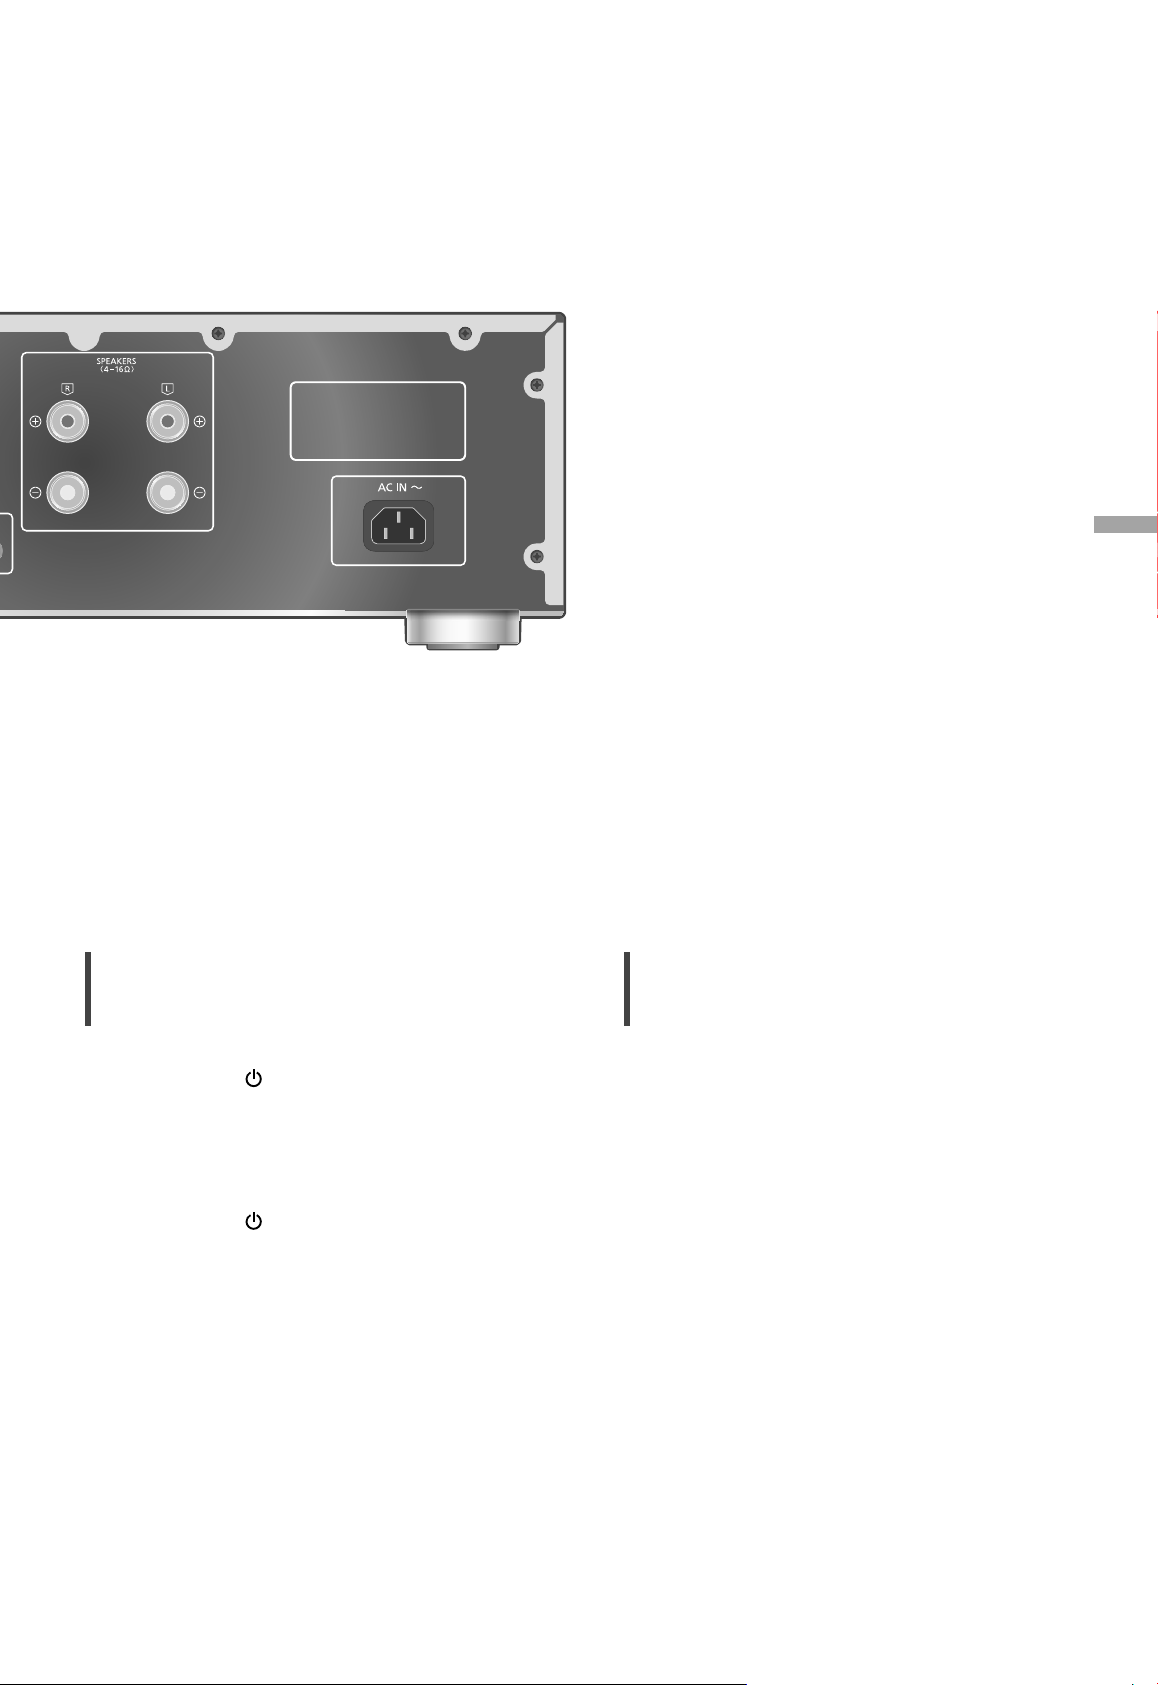
15 Speaker output terminals ( 14)
16 PHONO EARTH terminal ( 18)
• For connecting the ground wire of a
turntable.
17 Analogue audio input terminals (PHONO)
( 18)
• MM cartridges are supported.
19 Analogue audio input terminals (LINE1 IN)
( 19)
20 Analogue audio output terminals
(LINE OUT) ( 23)
21 Analogue audio output terminals
(PRE OUT) ( 22)
22 Product identification marking
• The model number is indicated.
23 AC IN terminal (
) ( 15)
18 Analogue audio input terminals
(LINE2 IN/MAIN IN)
• These input terminals are combined with
LINE2 and MAIN IN. Switch the function
according to the connected equipment.
( 19, 20)
Control reference guide
(11)
11
Page 12
Control reference guide
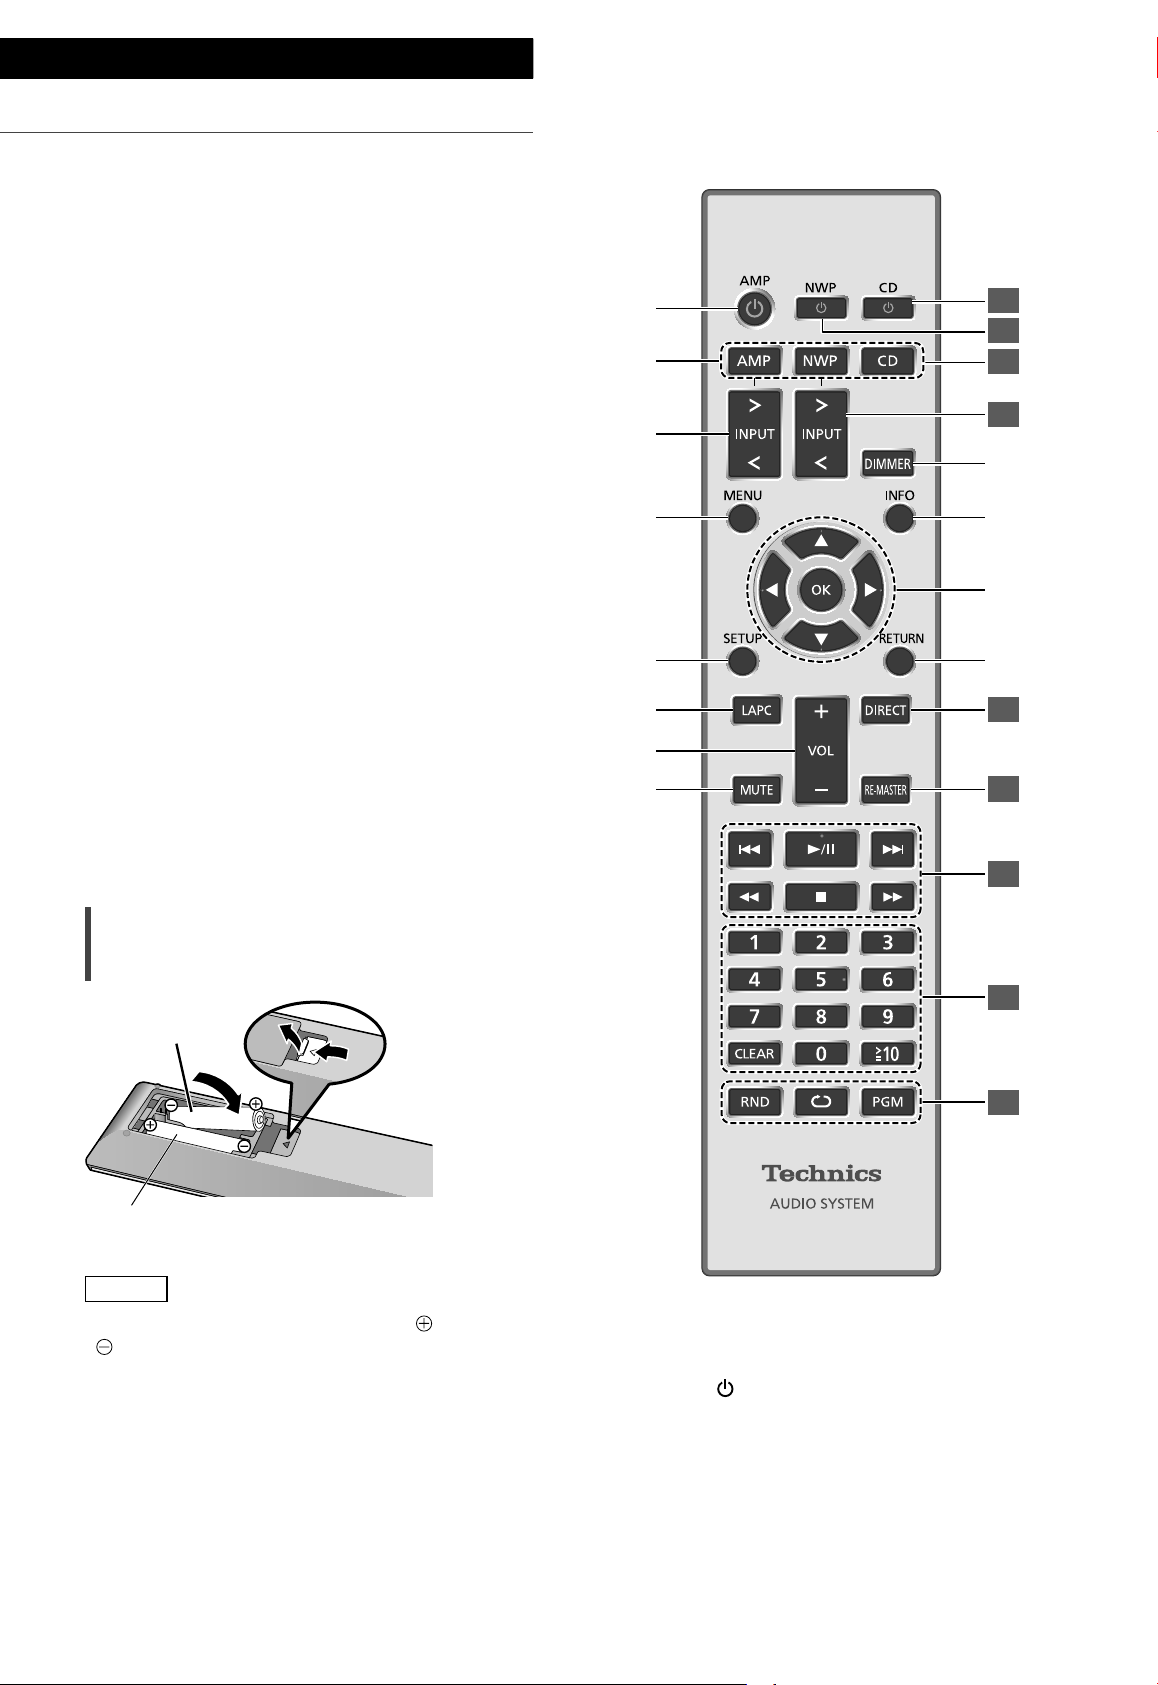
Remote control
Using the remote control
2
1
R03/LR03, AAA
(Alkaline or manganese batteries)
Note
• Insert the battery so the terminals (
) match those in the remote control.
• Point it at the remote control signal sensor on
this unit. ( 10)
• Keep the batteries out of reach of children to
prevent swallowing.
(12)
12
and
01 [AMP
• Press to switch the unit from on to standby
mode or vice versa. In standby mode, the
unit is still consuming a small amount of
power.
02 [AMP]/[NWP]/[CD]:
Select the device to be operated
]: Standby/on button
Page 13

03 [>INPUT<]: Switch the input source
( 16, 17, 18, 19, 20)
04 [MENU]: Enter menu ( 18, 19, 20, 21)
05 [SETUP]: Enter setup menu ( 24)
06 [LAPC]: Measure the output signal of the
amplifier when speakers are connected,
and correct its output ( 26)
07 [+VOL-]: Adjust the volume
• Volume range: -- (min), 1 to 100 (max)
08 [MUTE]: Mute the sound
• Press [MUTE] again to cancel. “MUTE” is
also cancelled when you adjust the volume
with this unit or when you turn the unit to
standby.
09 [DIMMER]: Adjust the brightness of the
peak power meter light, display, etc.
• When the display is turned off, it will
light up for a few seconds only when you
operate this unit. Before the display turns
off, “Display Off” will be displayed for a few
seconds.
• Press repeatedly to switch the brightness.
• Peak power meter does not work while the
light is turned off.
10 [INFO]: View content information
• Press this button to display sampling
frequency and other information. (The
information varies depending on the input
source.)
11 [
], [ ], [ ], [ ]/[OK]: Selection/OK
12 [RETURN]: Return to the previous display
: Press [AMP] first to operate this unit. (The
*
remote control may work for other Technics
devices and may not for this unit when
pressing [NWP] or [CD].)
*
*
*
*
■ Buttons that work for Technics devices
supporting system control function
The remote control of this unit also works for
Technics devices supporting system control
function (Network Audio Player, Compact Disc
Player, etc.). For information on the operations of
the devices, please also refer to their operating
instructions.
[ ] Standby/on switch for the Compact
01
Disc Player
[ ] Standby/on switch for the Network
02
Audio Player
Select the device to be operated
03
Select the input source of the Network
04
Audio Player
Turn on/off Direct mode
05
Turn on/off Re-master
06
Playback control buttons
07
Numeric buttons, etc.
08
Playback control buttons
09
English
Remote control mode
When other equipment responds to the supplied
remote control, change the remote control
mode.
• The factory default is “Mode 1”.
1 Press [AMP].
2 Press [SETUP].
3 Press [
], [ ] repeatedly to select
“Remote Control” and then press
[OK].
• The current remote control mode of this unit
is displayed for a few seconds.
4 When “Set Mode 1/2” is displayed,
change the remote control mode of
the remote control.
To set “Mode 1”:
Press and hold [OK] and [1] for at least 4
*
seconds.
To set “Mode 2”:
Press and hold [OK] and [2] for at least 4
seconds.
5 Point the remote control at this unit,
and press and hold [OK] for at least 4
seconds.
• When the remote control mode is changed,
the new mode will appear on the display for
a few seconds.
■ When “Remote 1” or “Remote 2” is
displayed
When “Remote 1” or “Remote 2” is displayed,
the remote control modes of this unit and
remote control are different. Perform step 3
above.
Control reference guide
(13)
13
Page 14
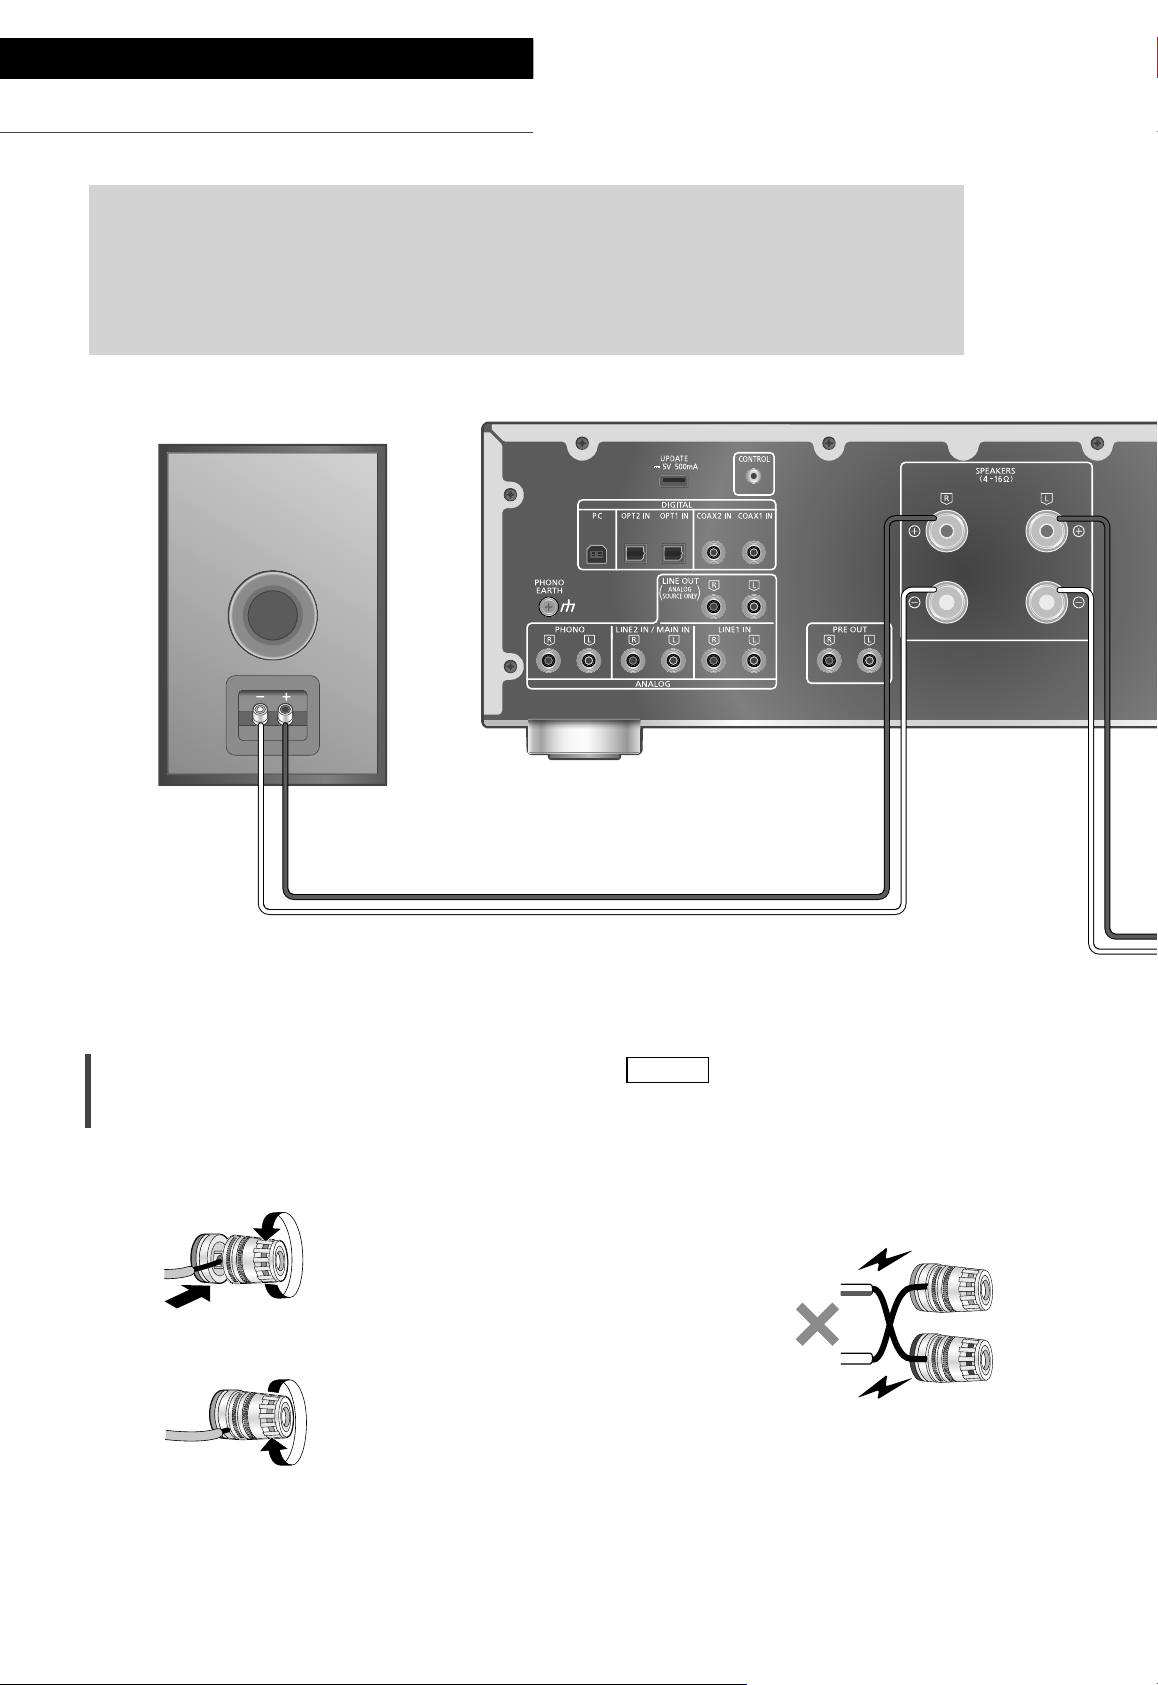
Connections
Speakers/AC mains lead
• Use only the supplied AC mains lead.
• Do not connect the AC mains lead until all other connections are complete.
• Insert the plugs of the cables to be connected all the way in.
• Do not bend cables at sharp angles.
• To optimise the audio output, you can measure the amplifier output signal and correct its
output when it is connected to the speakers. ( 26)
Speaker cable (not supplied)
Speaker connection
1 Turn the knobs to loosen them, and
insert the core wires into the holes.
2 Tighten the knobs.
Note
• When the connections are completed, pull the
speaker cables lightly to check that they are
connected firmly.
• Be careful not to cross (short-circuit) or reverse
the polarity of the speaker wires as doing so
may damage the amplifier.
DO NOT
• Wire the polarity (+/-) of the terminals correctly.
Not doing so may adversely affect stereo
effects or cause malfunction.
• For details, refer to the operating instructions of
the speakers.
14
(14)
Page 15
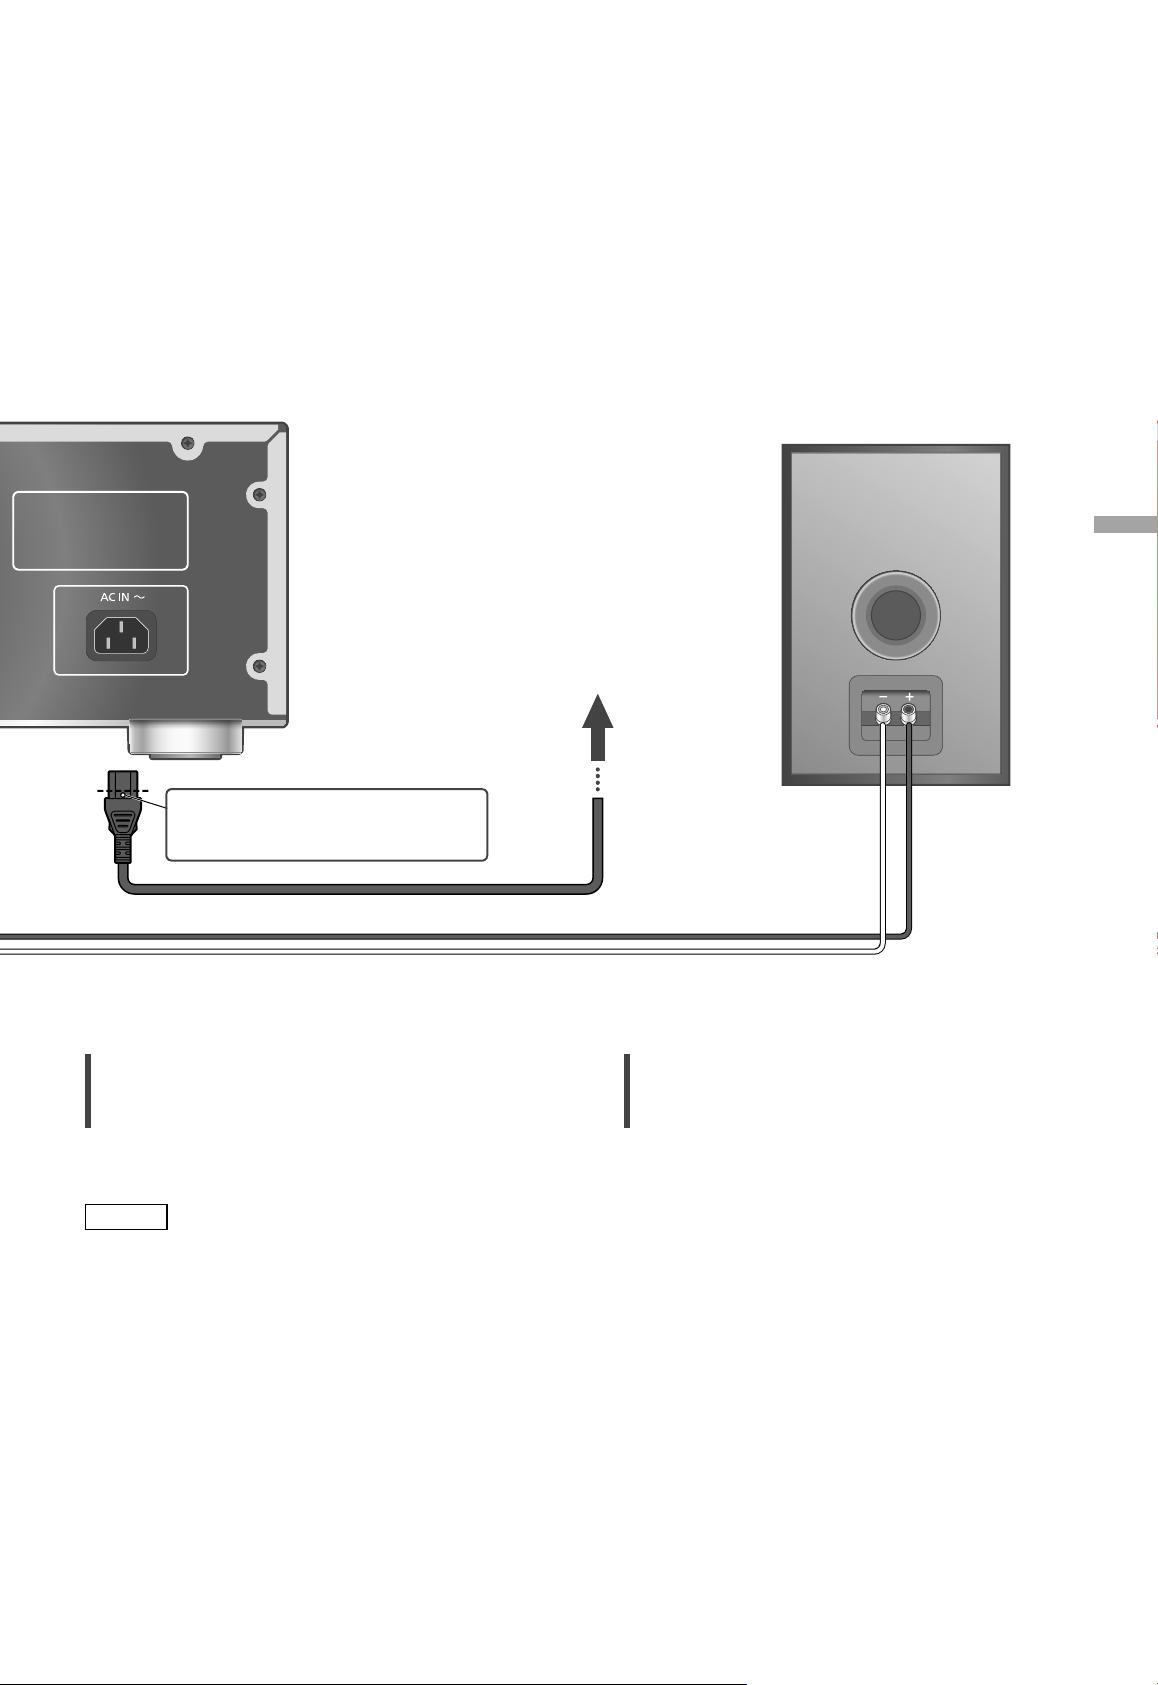
Insert the AC mains lead up to a
point just before the round hole.
AC mains lead (supplied)
Speaker cable (not supplied)
English
To a household
mains socket
AC mains lead connection
Connect only after all other connections are
completed.
Note
• This unit consumes a small amount of AC power
( 34) even when the unit is in standby mode.
Remove the plug from the main electrical outlet
if you will not be using the unit for an extended
period of time. Place the unit so the plug can be
easily removed.
Speaker output correction (LAPC)
You can make the optimum adjustment
according to your own speakers. ( 26)
Connections
(15)
15
Page 16
Operations
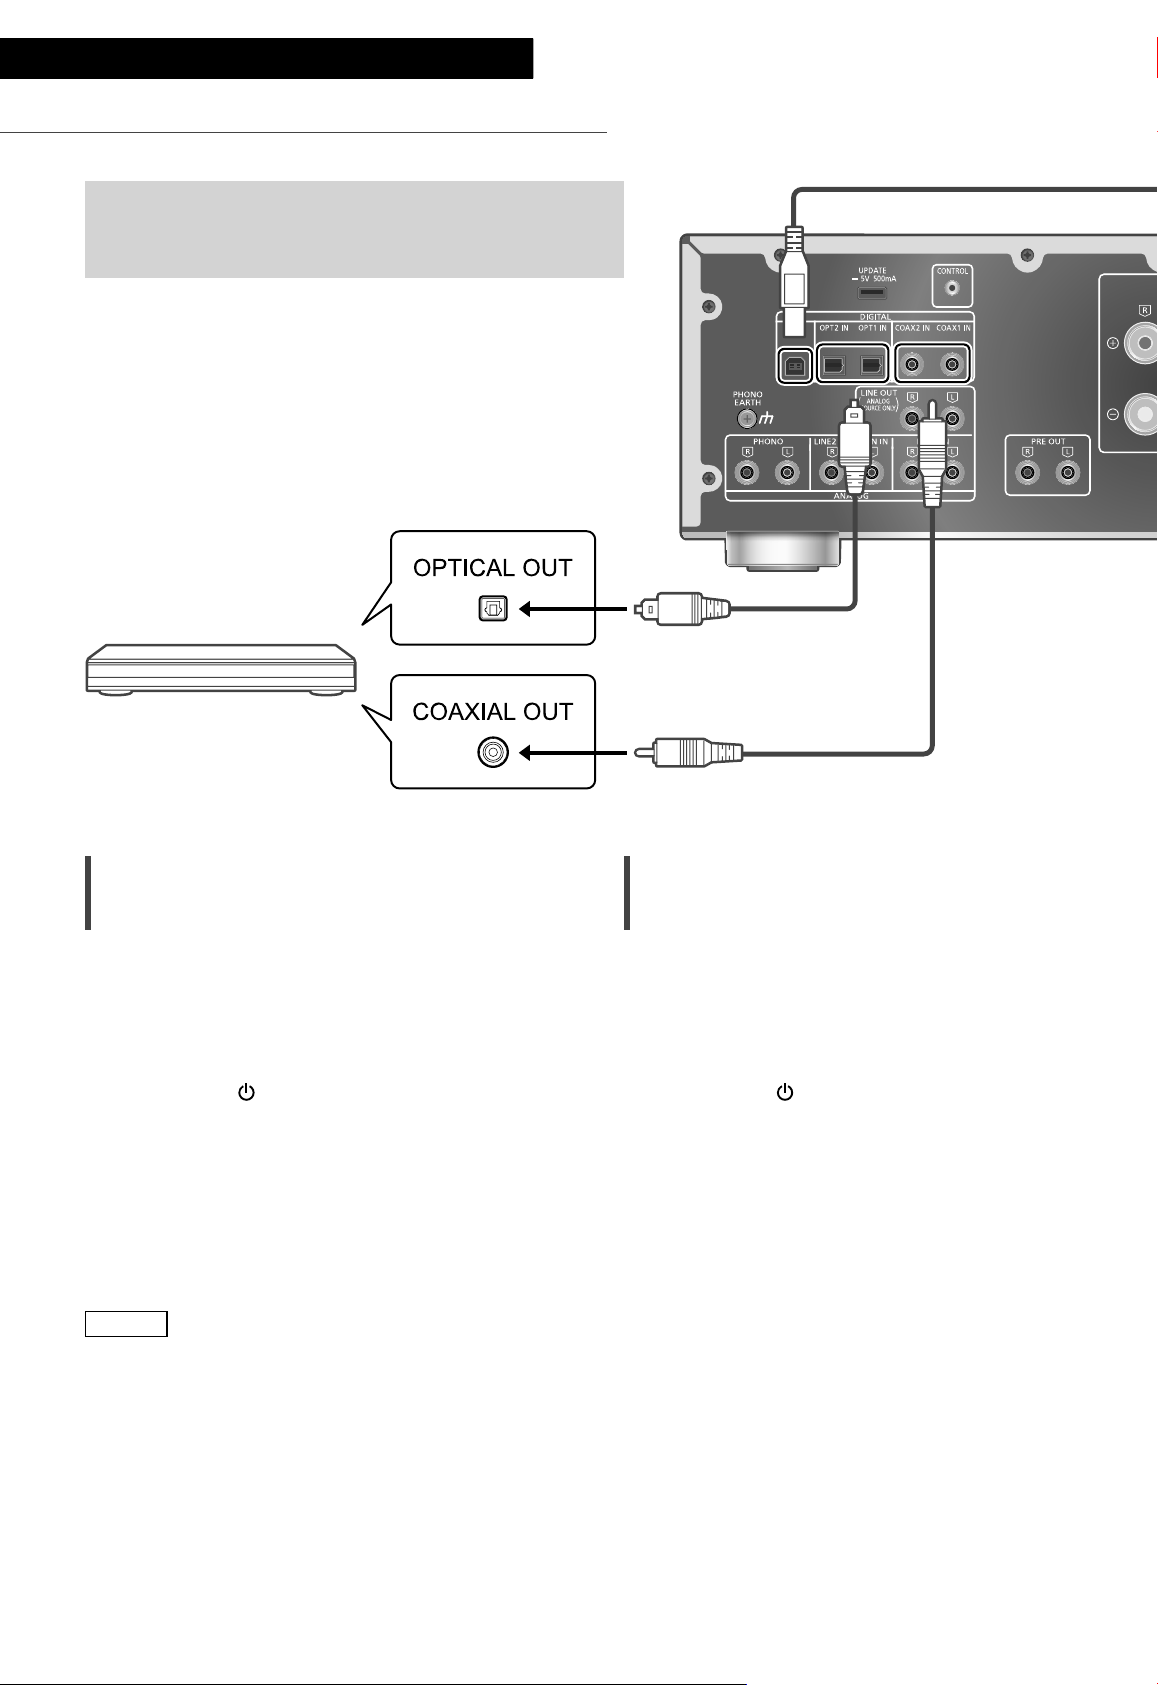
Using digital audio output device
You can connect the CD player, etc. with coaxial digital
cable (not supplied)/optical digital audio cable (not
supplied) to this unit and play back music.
Optical digital audio cable
(not supplied)
CD player, etc.
Using coaxial digital cable
1 Disconnect the AC mains lead.
2 Connect this unit and a CD player, etc.
3 Connect the AC mains lead to this unit.
( 15)
4 Press [AMP
5 Press [>INPUT<] repeatedly to select
“COAX1” or “COAX2”.
• You can also select the input source by
turning the input selector knob on the unit.
6 Start playback on the connected
device.
] to turn this unit on.
Coaxial digital cable
(not supplied)
Using optical digital audio cable
1 Disconnect the AC mains lead.
2 Connect this unit and a CD player, etc.
3 Connect the AC mains lead to this unit.
( 15)
4 Press [AMP
5 Press [>INPUT<] repeatedly to select
“OPT1” or “OPT2”.
• You can also select the input source by
turning the input selector knob on the unit.
6 Start playback on the connected
device.
] to turn this unit on.
Note
• The digital audio input terminals of this unit can
only detect the following linear PCM signals.
For details, refer to the operating instructions of
the connected device.
- Sampling frequency:
Coaxial digital input
32/44.1/48/88.2/96/176.4/192 kHz
Optical digital input
32/44.1/48/88.2/96 kHz
- Number of quantisation bits:
16/24 bit
(16)
16
Page 17

USB 2.0 cable
(not supplied)
Using PC, etc.
You can connect the PC, etc. or another device with
USB 2.0 cable (not supplied) to this unit and play back
music.
PC, etc.
English
■ Preparation
Connecting to a PC
• Before connecting to a PC, follow the steps
below.
• Refer to the following for the recommend OS
versions for your PC (as of February 2017):
- Windows 7, Windows 8, Windows 8.1,
Windows 10
- OS X 10.7, 10.8, 10.9, 10.10, 10.11,
macOS 10.12
Download and install the dedicated USB driver
to the PC. (Only for Windows OS)
• Download and install the driver from the
website below.
www.technics.com/support/
Download and install the dedicated app
“Technics Audio Player” (free of charge) on
your PC.
• Download and install the app from the
website below.
www.technics.com/support/
Using USB 2.0 cable
1 Disconnect the AC mains lead.
Audio device with USB-DAC output
terminal such as ST-G30, etc.
2 Connect this unit and a PC, etc.
3 Connect the AC mains lead to this unit.
( 15)
4 Press [AMP
] to turn this unit on.
5 Press [>INPUT<] repeatedly to select
“PC”.
• You can also select the input source by
turning the input selector knob on the unit.
6 Start playback using the dedicated
app “Technics Audio Player” on the
connected PC.
Note
• When connecting an audio device with USB-
DAC output terminal such as ST-G30, etc., refer
to the operating instructions of the connected
device.
• About supported format, refer to “Format
support”. ( 35)
• Windows is a trademark or a registered
trademark of Microsoft Corporation in the
United States and other countries.
• Mac and OS X are trademarks of Apple Inc.,
registered in the U.S. and other countries.
• macOS is a trademark of Apple Inc.
Operations
(17)
17
Page 18
Operations
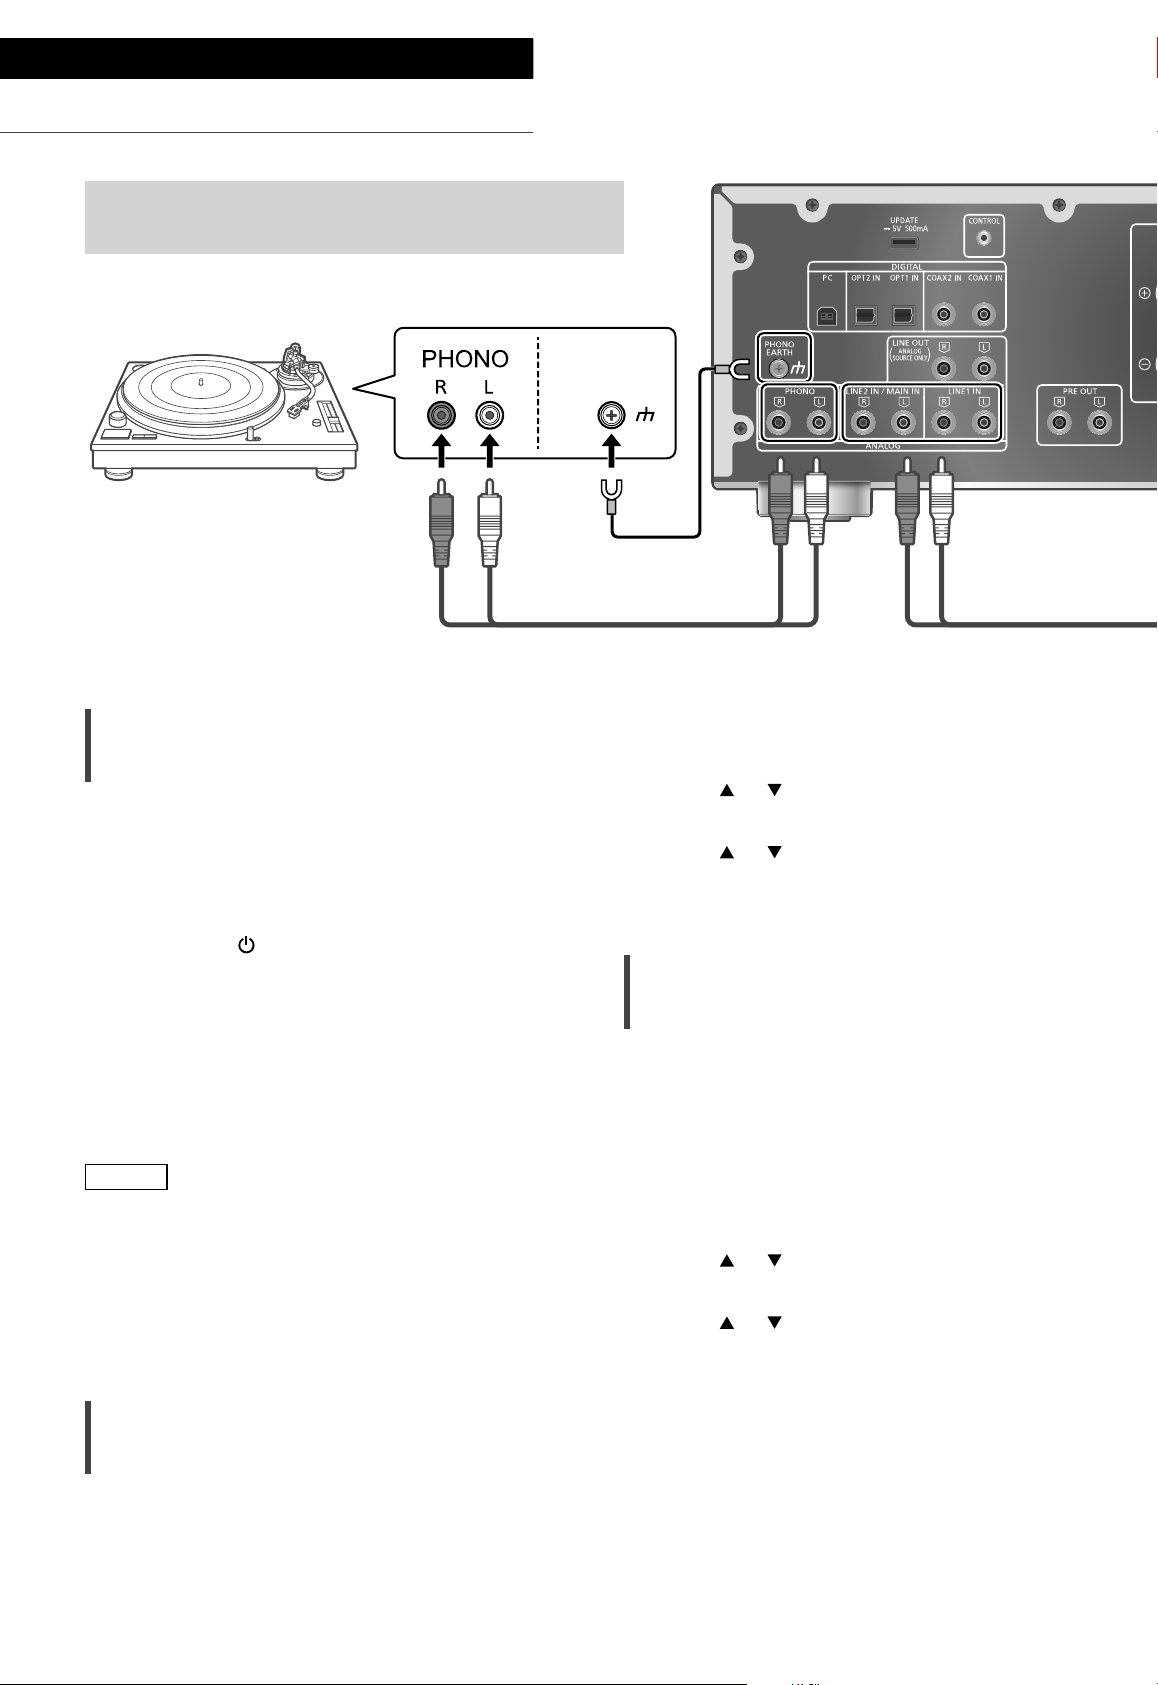
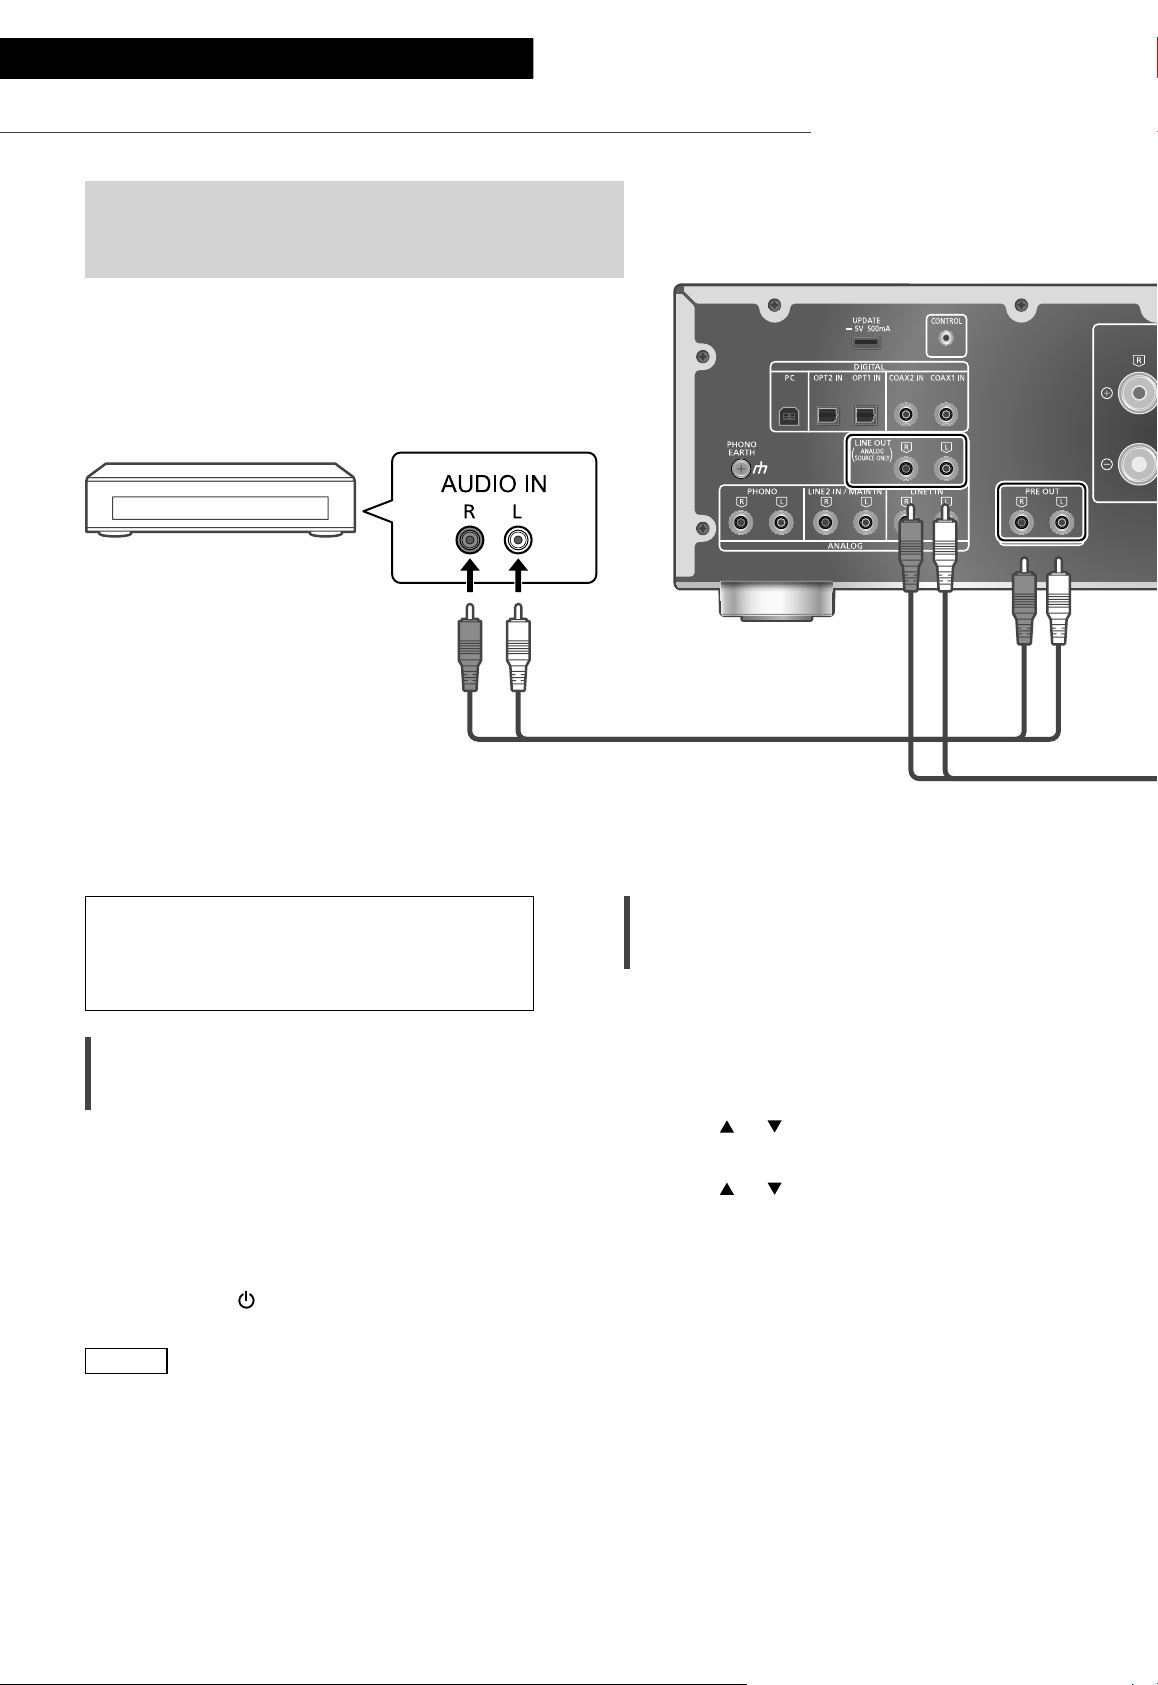
Using turntable (PHONO)
You can connect the turntable with PHONO cable (not
supplied) to this unit and play back music.
PHONO
EARTH
Turntable
PHONO earth lead
(not supplied)
PHONO cable (not supplied)
Using PHONO cable
1 Disconnect the AC mains lead.
2 Connect this unit and a turntable.
3 Connect the AC mains lead to this unit.
( 15)
4 Press [AMP
5 Press [>INPUT<] repeatedly to select
“PHONO”.
• You can also select the input source by
turning the input selector knob on the unit.
6 Start playback on the connected
turntable.
Note
• When connecting a turntable with a built-in
PHONO equalizer, connect the PHONO cable to
the analogue audio input terminals (LINE1 IN or
LINE2 IN) of this unit. ( 19)
• When connecting a turntable with a PHONO
earth lead, connect the PHONO earth lead to
the PHONO EARTH terminal of this unit.
] to turn this unit on.
1 Press [AMP].
2 Press [MENU].
3 Press [
], [ ] repeatedly to select
“Attenuator” and then press [OK].
4 Press [
], [ ] to select “On(-3dB)”/
”On(-6dB)”/”On(-10dB)” and then
press [OK].
Reducing low frequency noise
Reduces the low frequency noise caused by the
warpage of record.
• The factory default is “Off”.
• You can also set this menu while “LINE1” or
“LINE2” is selected as input source of this unit.
1 Press [AMP].
2 Press [MENU].
3 Press [
“Subsonic Filter” and then press [OK].
4 Press [
press [OK].
], [ ] repeatedly to select
], [ ] to select “On” and then
Minimising sound distortion
If sound distortion occurs when using the
analogue audio input terminals, setting the
attenuator to “On(-3dB)”/”On(-6dB)”/”On(-10dB)”
may improve the sound quality.
• The factory default is “Off”.
(18)
18
Page 19
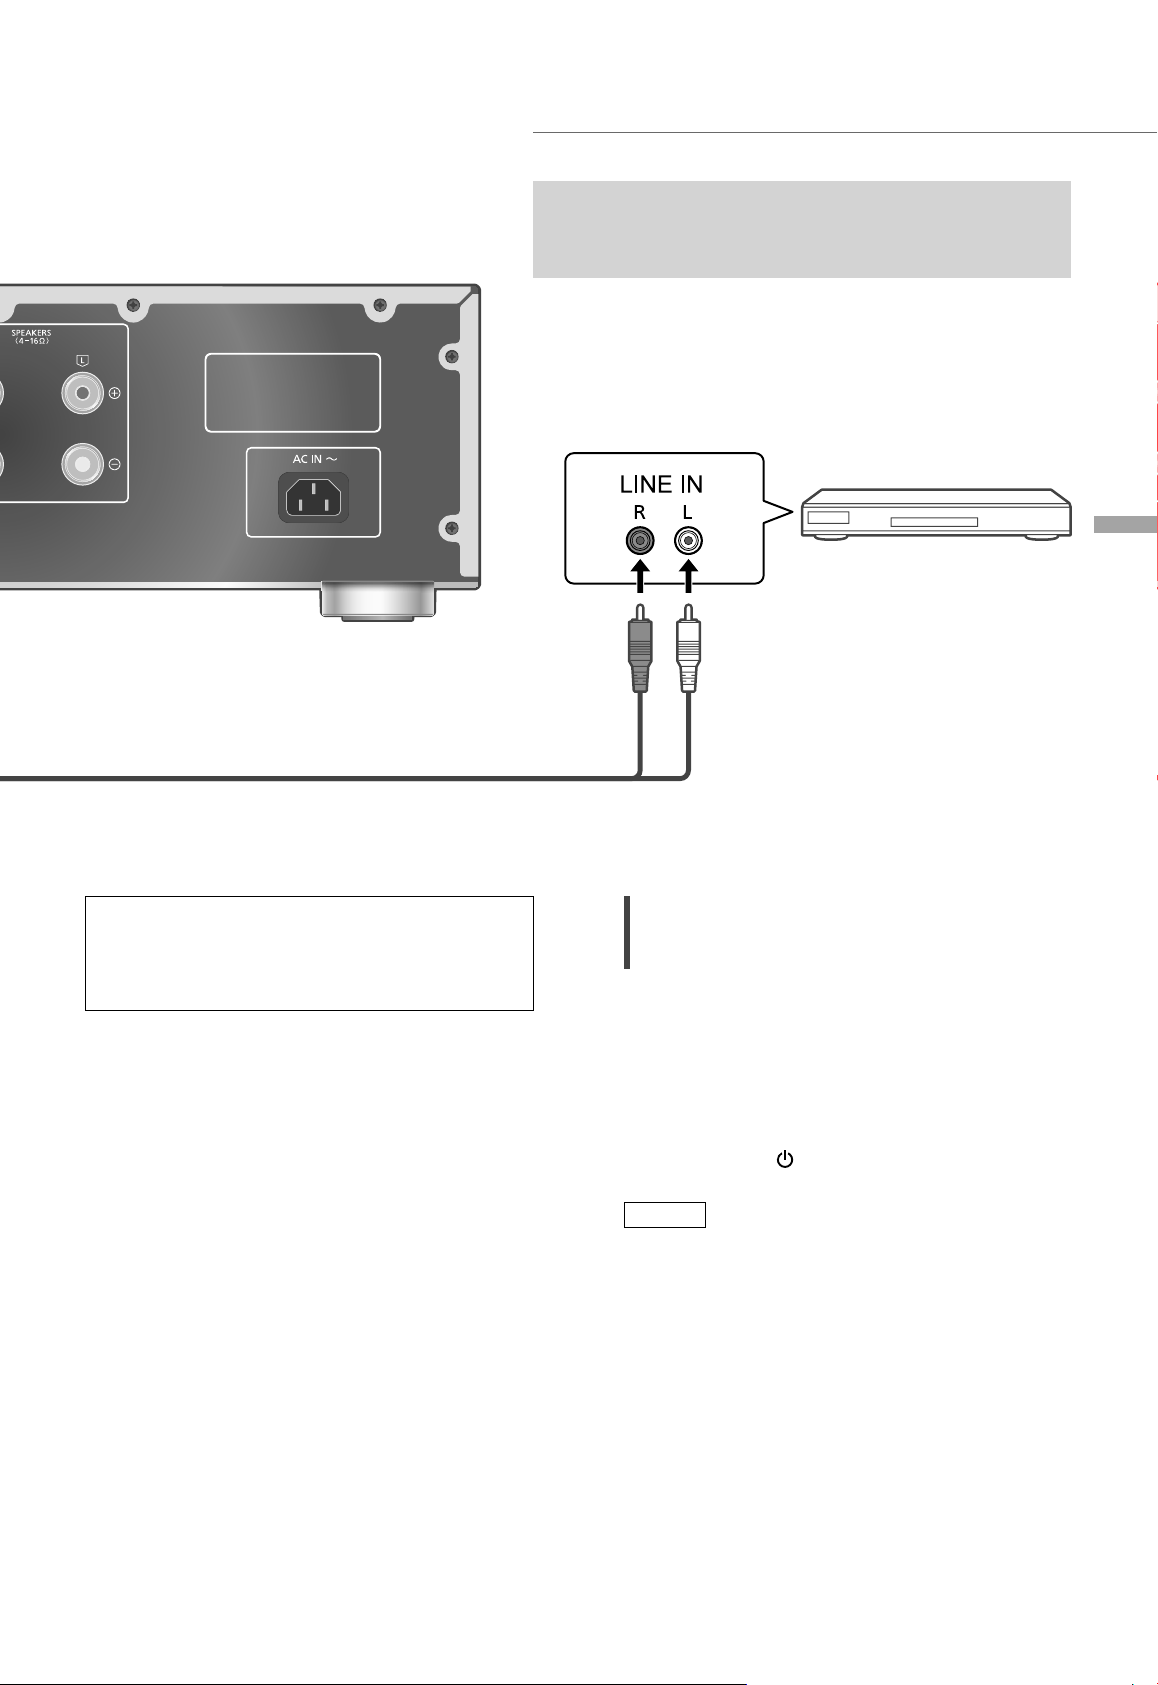
Using analogue audio output device (LINE1/LINE2)
Analogue audio cable (not supplied)
You can connect the Blu-ray Disc player, etc. with
analogue audio cable (not supplied) to this unit and
play back music.
Blu-ray Disc player, etc.
English
Using analogue audio cable
1 Disconnect the AC mains lead.
2 Connect this unit and a Blu-ray Disc
player, etc.
3 Connect the AC mains lead to this unit.
( 15)
4 Press [AMP
] to turn this unit on.
5 Press [>INPUT<] repeatedly to select
“LINE1” or “LINE2”.
• You can also select the input source by
turning the input selector knob on the unit.
• Set to “LINE2” (see below) when “MAIN IN”
is displayed as input source of this unit.
6 Start playback on the connected
device.
When connecting to “LINE2”
3 Press [MENU].
4 Press [
], [ ] repeatedly to select
“Input Mode” and then press [OK].
5 Press [
], [ ] repeatedly to select
“LINE2” and then press [OK].
6 Confirm the displayed message and
press [OK].
• The volume level set after switching to
“LINE2” is displayed. Confirm and adjust the
volume before pressing [OK].
7 Press [ ], [ ] to select “Yes” and then
press [OK].
Minimising sound distortion
If sound distortion occurs when using the
analogue audio input terminals, setting the
attenuator to “On” may improve the sound
quality.
• The factory default is “Off”.
Analogue audio input terminals (LINE2 IN/MAIN
IN) have both LINE2 and MAIN IN functions.
When connecting an analogue audio output
device, switch the input setting of this unit to
“LINE2”.
• The factory default is “LINE2”.
1 Press [AMP].
2 Press [>INPUT<] repeatedly to select
“MAIN IN”.
1 Press [AMP].
2 Press [MENU].
3 Press [
], [ ] repeatedly to select
“Attenuator” and then press [OK].
4 Press [
], [ ] to select “On” and then
press [OK].
Operations
(19)
19
Page 20
Operations
Using this unit as power amplifier
You can connect the AV receiver, control amplifier, etc. with
analogue audio cable (not supplied) to this unit and use this unit
as power amplifier.
AV receiver, control
amplifier, etc.
Set the volume of the AV receiver,
control amplifier, etc. to minimum before
connecting.
While using this unit as power amplifier,
the volume adjustment with this unit is
disabled. Adjust the volume little by little
with the connected device.
Do not input the audio signal from PRE
OUT/LINE OUT terminals to the MAIN IN
terminals of this unit. Doing so may cause
malfunction.
Analogue audio cable
(not supplied)
Using analogue audio cable
1 Disconnect the AC mains lead.
2 Connect this unit and AV receiver,
control amplifier, etc. after minimising
the volume of the device.
3 Connect the AC mains lead to this
unit. ( 15)
4 Press [AMP
5 Press [>INPUT<] repeatedly to select
“LINE2”.
• You can also select the input source by
turning the input selector knob on the unit.
6 Press [AMP].
] to turn this unit on.
20
(20)
7 Press [MENU].
8 Press [
], [ ] repeatedly to select
“Input Mode” and then press [OK].
9 Press [
], [ ] to select “MAIN IN” and
press [OK].
Page 21
10 Confirm the displayed message and
press [OK].
English
Minimising sound distortion
11 Press [
], [ ] to select “Yes” and then
press [OK].
12 Start playback on the connected
device.
Note
• It is not possible to adjust the volume with this
unit.
• Sound is not output from headphones jack and
PRE OUT terminals.
• Select “LINE2” when not using this unit as
power amplifier. ( 19)
• When the input source is switched to “LINE2”
or other source from “MAIN IN” and the current
volume level is higher than previous level, the
volume is automatically adjusted.
If sound distortion occurs, setting the attenuator
to “On” may improve the sound quality.
• The factory default is “Off”.
1 Press [AMP].
2 Press [MENU].
3 Press [
], [ ] repeatedly to select
“Attenuator” and then press [OK].
4 Press [
], [ ] to select “On” and then
press [OK].
Operations
(21)
21
Page 22
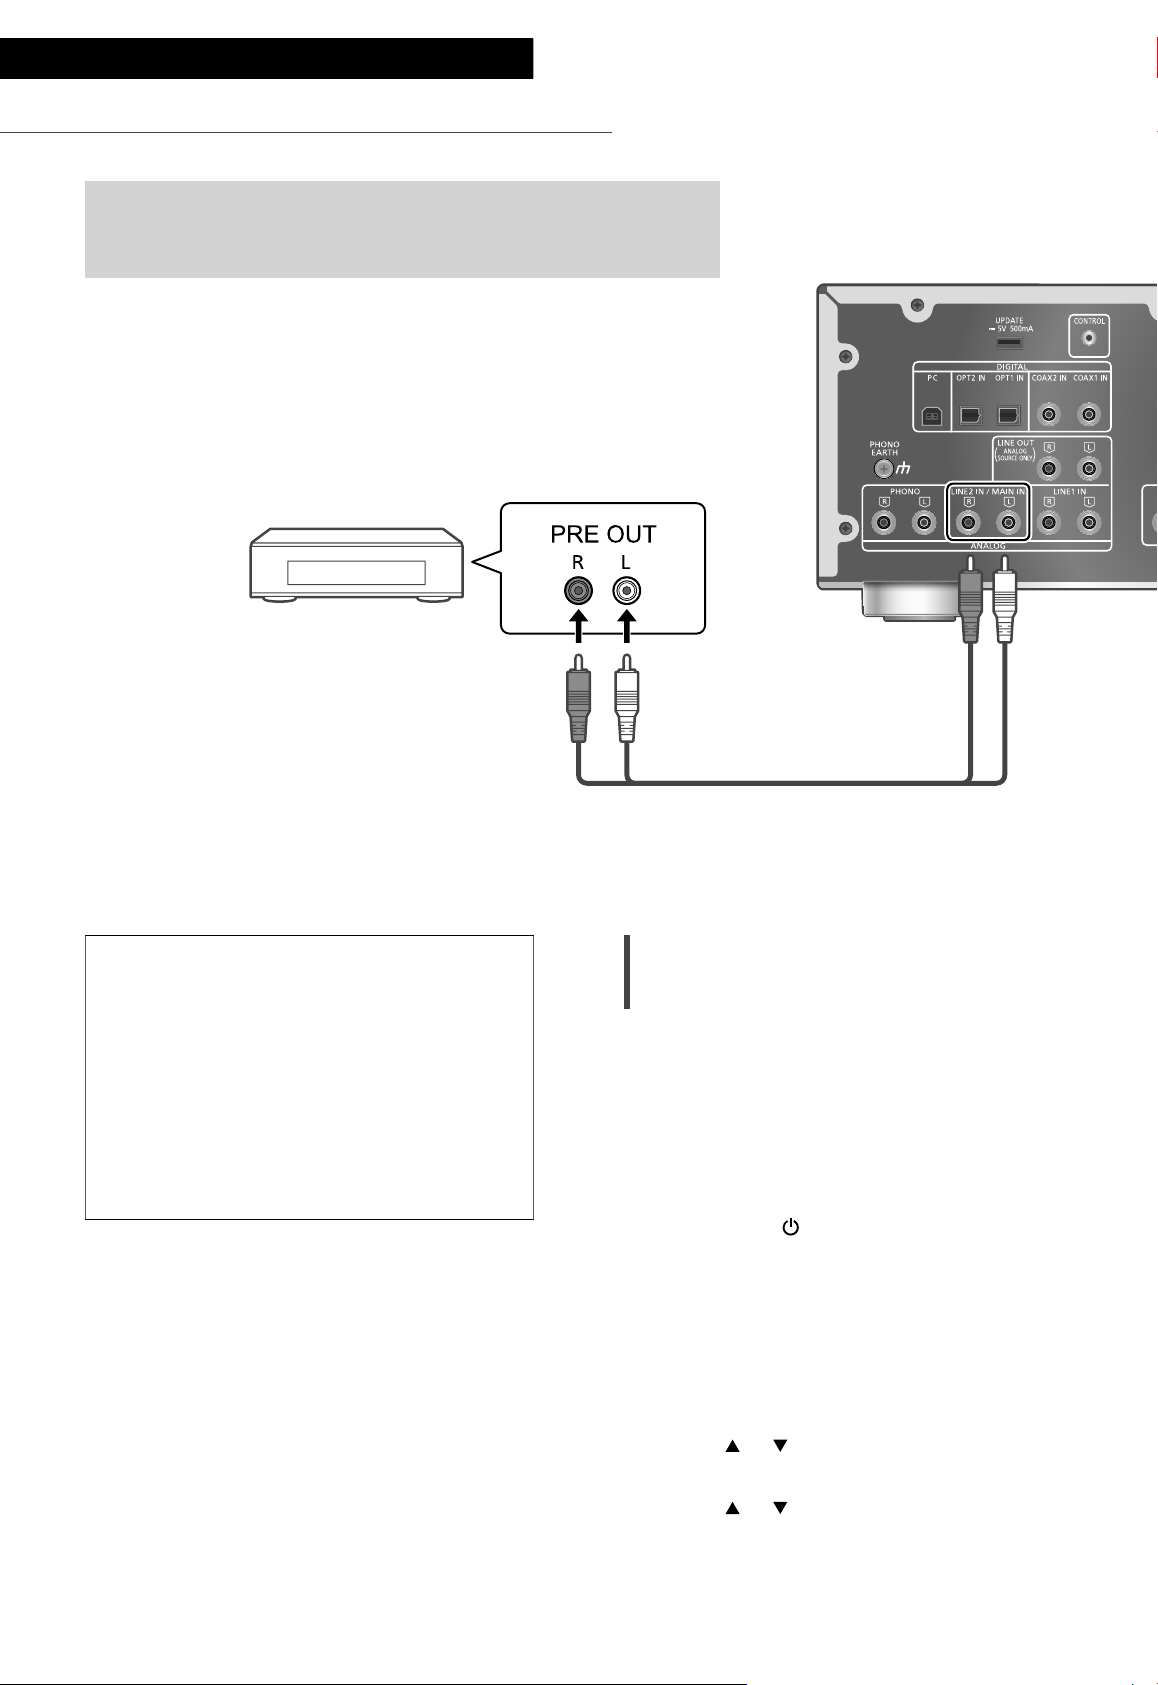
Operations
Connecting a power amplifier, subwoofer, etc.
You can connect the power amplifier, subwoofer, etc.
with analogue audio cable (not supplied) to output the
analogue audio signals.
Power amplifier,
Subwoofer, etc.
Do not input the audio signal from PRE
OUT/LINE OUT terminals to the analogue
audio input terminals of this unit. Doing so
may cause malfunction.
Using analogue audio cable
1 Disconnect the AC mains lead.
2 Connect this unit and a power
amplifier, subwoofer, etc.
3 Connect the AC mains lead to this unit.
( 15)
4 Press [AMP
Note
• For details, refer to the operating instructions of
the connected device.
• Sound is not output from PRE OUT terminals
while “MAIN IN” is selected as input source of
this unit.
] to turn this unit on.
Analogue audio cable
(not supplied)
Setting the audio output (PRE OUT)
You can set the audio output of the speaker
output terminals and PRE OUT terminals.
1 Press [AMP].
2 Press [SETUP].
3 Press [
“PRE OUT” and then press [OK].
4 Press [
setting and then press [OK].
• The factory default is “On”.
• Not available when “MAIN IN” is selected as
input source of this unit.
On:
Sound is output from the speaker output
terminals and PRE OUT terminals.
On (Speaker:Off):
Sound is not output from the speaker output
terminals. Sound is output from PRE OUT
terminals.
Off:
Sound is not output from PRE OUT terminals.
Sound is output from the speaker output
terminals.
], [ ] repeatedly to select
], [ ] to select the output
22
(22)
Page 23
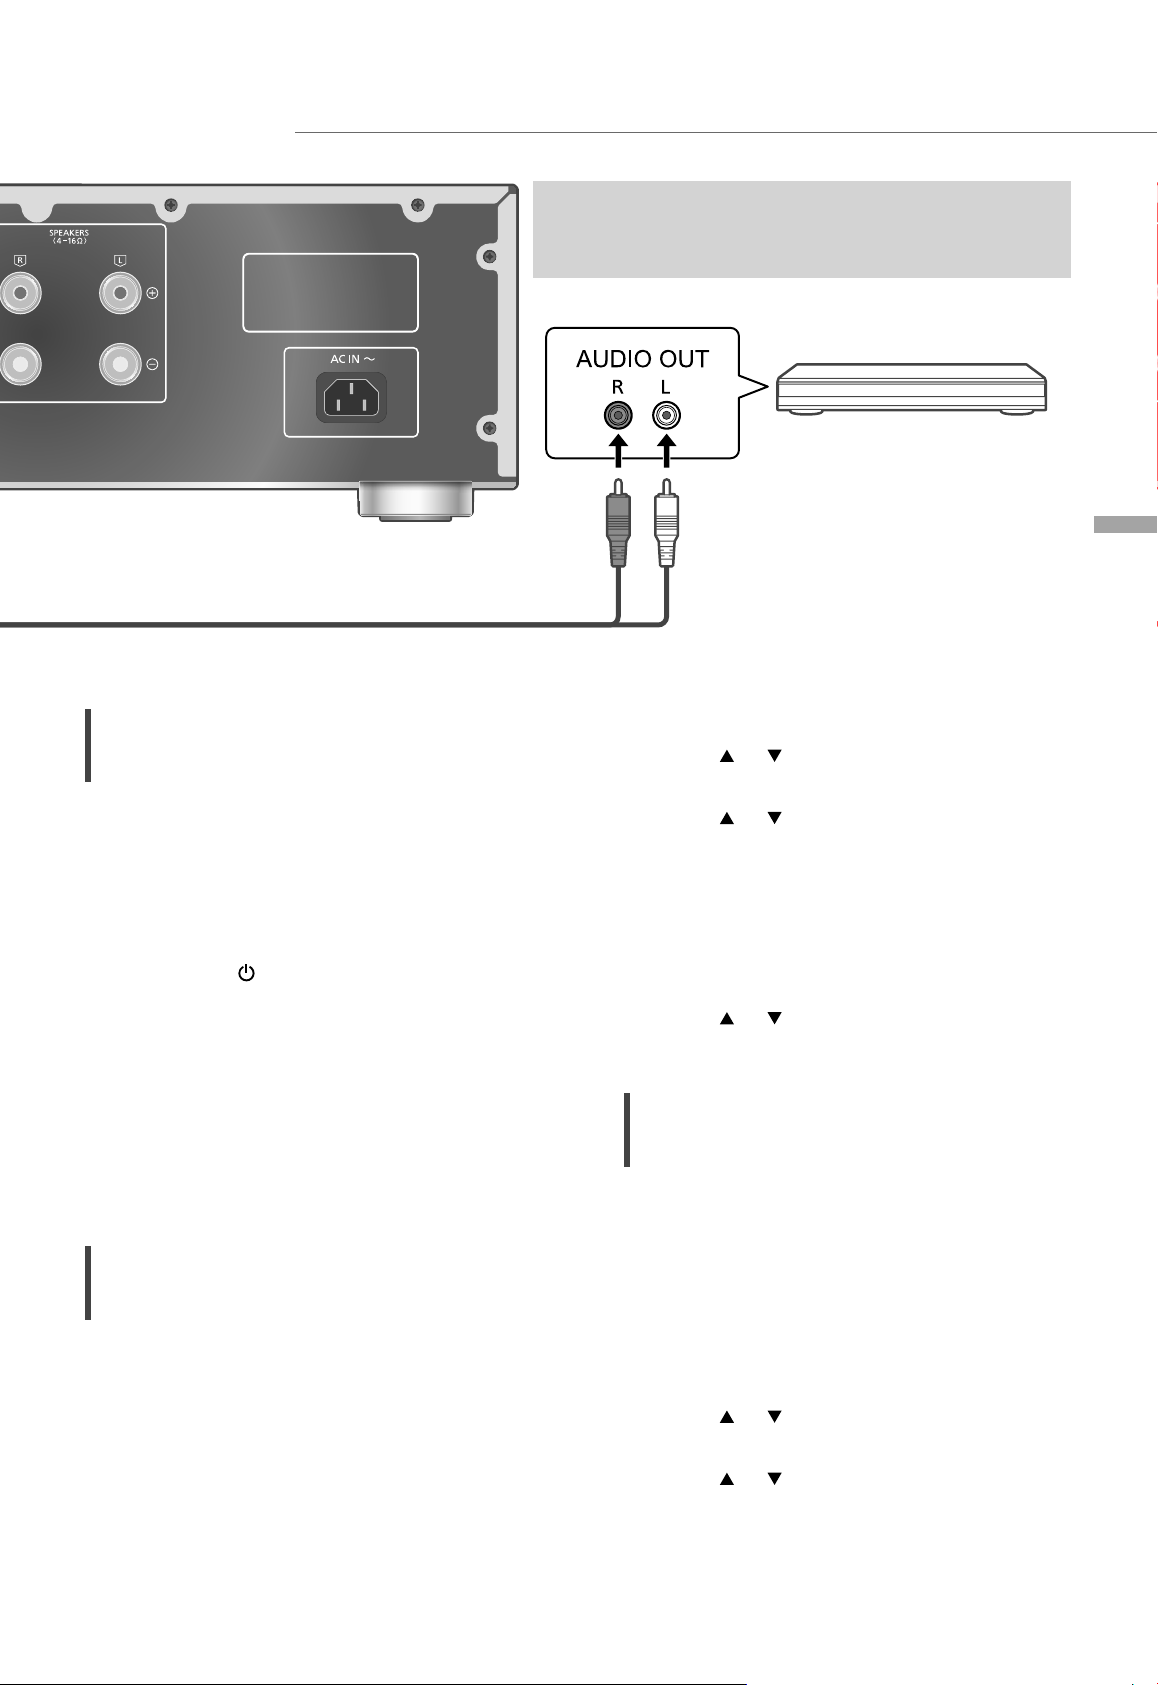
Using analogue audio input device
You can connect the CD recorder, etc. with analogue
audio cable (not supplied) to output analogue audio
signals from this unit (LINE1/LINE2/PHONO).
CD recorder, etc.
English
Analogue audio cable
(not supplied)
Do not input the audio signal from PRE
OUT/LINE OUT terminals to the analogue
audio input terminals of this unit. Doing so
may cause malfunction.
Using analogue audio cable
1 Disconnect the AC mains lead.
2 Connect this unit and a CD recorder,
etc.
3 Connect the AC mains lead to this unit.
( 15)
4 Press [AMP
Note
• When a digital audio signal (COAX1/COAX2/
OPT1/OPT2/PC) is selected as input source
of this unit, analogue audio signal (LINE1) is
output.
• The choppy audio occurs in output audio signal
when switching the input source.
] to turn this unit on.
Operations
(23)
23
Page 24
Settings
Sound adjustment, Other settings
The sound effects and other settings can be set up.
1 Press [AMP].
2 Press [SETUP].
3 Press [
], [ ] repeatedly to
select the menu and then
press [OK].
4 Press [
], [ ], [ ], [ ] to select
a desired item or value, and
press [OK].
Adjusting BASS/MID/TREBLE
“Tone Control”
You can adjust the tone of this unit. Each tonal
range (BASS/MID/TREBLE) can be adjusted.
• To enable this function, select “On
(adjustment)”.
• Each level can be adjusted between “-10” and
“+10”.
• “TONE” is displayed after setting.
• While connecting Technics device supporting
system control function (Network Audio
Player, etc.) to this unit, sound setting on the
connected device may have a priority over this
unit. Adjust the sound with the connected
device.
• Not available when using this unit as power
amplifier ( 20). Adjust the sound with the AV
receiver, control amplifier, etc.
Adjusting the volume attenuator
“VOLUME Attenuator”
Set to “On (-20dB)” for the attenuator to ease
the volume adjustment at a low volume.
• The factory default is “Off”.
• ”ATT” is displayed after setting.
• Not available when using this unit as power
amplifier ( 20). Adjust the sound with the AV
receiver, control amplifier, etc.
24
(24)
Page 25
English
Auto off function
“AUTO OFF”
This unit is designed to conserve its power
consumption and save energy. The unit has been
left unused for about 20 minutes and will enter
standby mode within a minute. Press any button
to cancel it.
• The factory default is “On”. To disable this
function, select “Off”.
• “AUTO OFF” is displayed 3 minutes before this
unit is turned off.
Note
• The setting is stored even if the power is turned
off and on.
Displaying the volume status
“VOLUME Display”
The volume status is displayed when adjusting
the volume.
• The factory default is “Off”.
• Not available when “MAIN IN” is selected as
input source of this unit.
Checking the model name
“Model No.”
The model name is displayed.
Checking the firmware version
“F/W Version”
The version of the installed firmware is displayed.
Settings
(25)
25
Page 26
Settings
Using output correction function (LAPC)
You can make the optimum adjustment according to your own speakers.
Measuring the output signal of the
amplifier and correcting its output
(LAPC)
■ Preparation
• Disconnect the headphones.
Test tone emitted during measurement
To ensure the measurement accuracy,
the speakers output a test tone at regular
intervals. (For approximately 3 minutes)
It is not possible to change the volume of the
audio being output while the measurement is
in progress.
1 Press [AMP ] to turn this unit on.
2 Press and hold [LAPC] until “Please
Wait” is displayed.
“LAPC Measuring” is displayed and this unit
will start measuring the output signal of the
amplifier. Check that a test tone is output from
both the left and right speakers.
When the measurement is complete, amplifier
output correction will be automatically turned
on.
• If you press [LAPC] while the measurement is
in progress, it will be cancelled.
• If you connect headphones during amplifier
signal measurement or amplifier output
correction, it will be cancelled.
■ Turning on/off the output correction
function
Press [LAPC] to select “On”/“Off”.
• LAPC indicator lights and “LAPC On” is
displayed while the output correction function
is in progress.
Note
• Measurement is not available for the audio
output signal from PRE OUT terminals of this
unit. ( 22)
• Depending on the type of the connected
speakers, the effect of the output correction
function may be minimal.
• The corrected output remains in effect until you
measure the output signal again. When you use
other speakers, redo the measurement.
26
(26)
Page 27
Firmware updates
Firmware updates
“F/W Update”
Occasionally, Panasonic may release updated
firmware for this unit that may add or improve
the way a feature operates. These updates are
available free of charge.
• For the update information, refer to the
following website.
www.technics.com/support/firmware/
Downloading takes approx. 3 minutes.
Do not disconnect the AC mains lead or
turn this unit to standby while updating.
Do not disconnect the USB flash memory
while updating.
• The progress is displayed as “Updating
while updating. (“
Note
• During the update process, no other operations
can be performed.
• If there are no updates, “Firmware is Up To
Date” is displayed. (No need to update it.)
• Updating the firmware may reset the settings
of this unit.
” stands for a number.)
%”
■ Preparation
• Download the latest firmware on the USB flash
memory. For details, refer to the following
website.
www.technics.com/support/firmware/
1 Connect the USB flash memory with
new firmware.
2 Press [AMP].
3 Press [SETUP].
4 Press [
“F/W Update” and then press [OK].
], [ ] repeatedly to select
English
5 Press [
], [ ] to select “Yes” and then
press [OK].
• The progress is displayed as “Updating %”
while updating. (“ ” stands for a number.)
• When the update has finished successfully,
“Success” is displayed.
6 Disconnect the AC mains lead and USB
flash memory, and reconnect it after 3
minutes.
Note
• Downloading may take longer depending on
the USB flash memory.
• Use a USB flash memory with FAT16 or FAT32
format.
• UPDATE terminal is used only for firmware
updating. Do not connect any USB device
other than the USB flash memory for firmware
updating.
• No USB device can be charged from the
UPDATE terminal of this unit.
Settings
(27)
27
Page 28
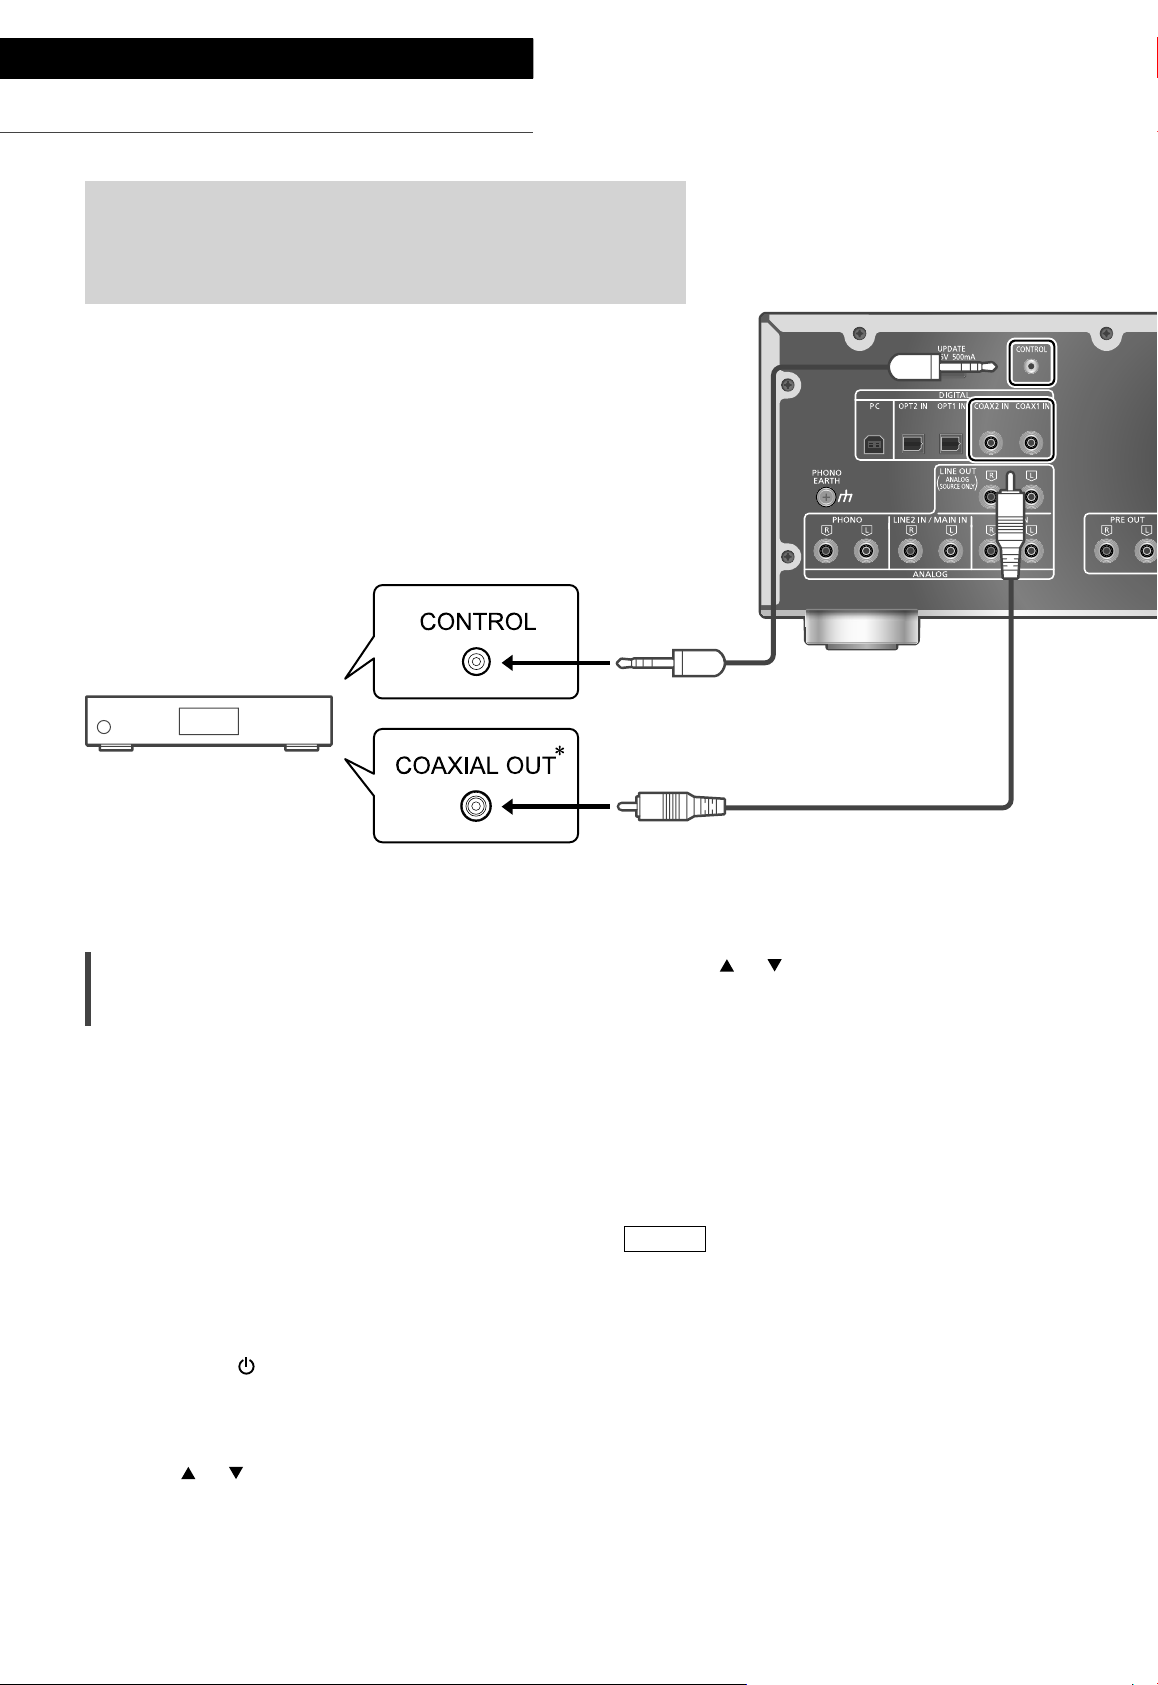
Settings
System control connection
You can operate this unit and Technics devices supporting
system control function (Network Audio Player, Compact Disc
Player, etc.) simultaneously with ease on the remote control.
For details, refer to the operating instructions of each device.
Network Audio Player, etc.
Using system connection cable and
audio cable
1 Disconnect the AC mains lead.
2 Connect this unit and Technics device
supporting system control function
(Network Audio Player, etc.).
• Use both of the system connection cable and
the audio cables when connecting this unit
and the device.
• Use the system connection cable supplied
with the connected device.
3 Connect the AC mains lead to this unit.
( 15)
4
Press [AMP
5 Press [AMP].
6 Press [SETUP].
7 Press [
“System Control” and then press [OK].
] to turn this unit on.
], [ ] repeatedly to select
System connection cable
Coaxial digital cable
(not supplied)
*
8 Press [ ], [ ] to select the input
source for the device which is
connected at step 2, and press [OK].
• Select “Off” to disable the system control
function.
: The illustration shows the example when
*
connecting with coax digital cable. Connect
the device with proper cable/terminal
supporting the device.
Note
• When using the system control function by
connecting the Technics device to the LINE2 IN
terminal of this unit, select “LINE2” ( 19) for
the input setting of the analogue audio input
terminals (LINE2 IN/MAIN IN) of this unit.
• When using this unit as power amplifier ( 20),
the system control function for the Technics
device connected to the MAIN IN terminals is
disabled.
28
(28)
Page 29
English
Switching this unit and the
connected device
• If you point the remote control at this unit
and press [AMP
connected device are in standby mode, this
unit and the device of the selected input source
which is set with “System Control” will be
turned on simultaneously.
• If you point the remote control at this unit
and press [AMP
connected device are turned on, this unit and
the connected device will enter standby mode.
• You can also switch this unit and the connected
device by pressing the standby/on button on
this unit.
] when this unit and the
] when this unit and the
Switching this unit’s input source
automatically
When you perform an operation such as
playback on the connected device, the input
source of this unit will be automatically switched
to the source which is set with “System Control”.
Settings
(29)
29
Page 30

Troubleshooting
Before requesting service, make the following checks. If you are uncertain about some of the check
points, or if the solutions indicated in the following guide do not resolve the issue, then consult your
dealer for instructions.
Heat buildup of this unit
This unit becomes warm while in use. This is not
a malfunction.
Do you have the latest firmware
installed?
Panasonic is constantly improving the unit’s
firmware to ensure that our customers are
enjoying the latest technology. ( 27)
To restore all settings to the factory
defaults
When the following situations occur, reset the
memory:
• There is no response when buttons are pressed.
• You want to clear and reset the memory
contents.
1 Press [AMP].
2 Press [SETUP].
3 Press [
“Initialization” and then press [OK].
• A confirmation screen appears. Select “Yes”
in the following steps to restore all the
settings to defaults.
4 Press [ ], [ ] to select “Yes” and then
press [OK].
5 Press [
press [OK] again.
], [ ] repeatedly to select
], [ ] to select “Yes” and then
General
The unit does not work.
Operations are not done properly.
• One of the unit’s safety devices may have been
activated.
Press [ ] on the unit to switch the unit to
standby.
• If the unit does not switch to standby,
disconnect the AC mains lead, wait for at
least 3 minutes, then reconnect it.
Press [ ] on the unit to switch on. If the unit
still cannot be operated, consult the dealer.
A “humming” sound can be heard during
playback.
• An AC mains lead of another device or
fluorescent light is near the cables. Turn off
other appliances, or keep them away from the
cables of this unit.
• A strong magnetic field near a TV or other
device may adversely affect the audio quality.
Keep this unit away from such a location.
• The speakers may output noise when a device
nearby is emitting powerful radio waves, such
as when a mobile phone is on a call.
No sound.
• Check the volume of this unit and the
connected device.
• Check connections to speakers and other
equipment.
• Connect speakers and measure the output
signal of the amplifier. ( 26)
• Check the impedance of the connected
speakers.
• Check to see if the correct input source is
selected.
• Insert the plugs of the cables to be connected
all the way in.
• Confirm the sound output setting. (Sound is
not output from the speakers connected to the
speaker output terminals of this unit while “PRE
OUT” is set to “On (Speaker:Off)”.) ( 22)
• Playback of multi-channel content is not
supported.
• The digital audio input terminals of this unit can
only detect linear PCM signals. For details, refer
to the operating instructions of the device.
30
(30)
Page 31

Sound is distorted.
• Setting “Attenuator” to “On” according to the
analogue audio input may minimise the sound
distortion. ( 18, 19, 21)
• Setting the attenuator is not available for the
output audio signal from LINE OUT terminal.
The volume is automatically changed.
• When the input source is switched to “LINE2”
or other source from “MAIN IN” and the current
volume level is higher than previous level, the
volume is automatically adjusted. (Volume knob
automatically turns.) ( 20)
The unit turns to standby mode
automatically.
• Is the auto off function turned on? ( 25)
• This unit incorporates a protection circuit
to prevent damage caused by heat buildup.
When you use this unit at a high volume
level for a long period of time, it may turn
off automatically. Wait for this unit to cool
down before turning on this unit again. (For
approximately 3 minutes)
The settings are reset to the factory defaults.
• Updating the firmware may reset the settings.
The peak power meter does not operate.
• In the following cases, this meter does not
operate:
- When the headphones are connected.
- When the peak power meter light is turned
off by pressing [DIMMER].
- When this unit is muted by pressing [MUTE].
- When “PRE OUT” is set to “On (Speaker:Off)”
( 22)
The system control function is not working.
• Use the system connection cable supplied with
the connected device.
• Connect the system connection cable to the
system terminals (CONTROL). ( 28)
• Check the connection of system connection
cable, audio cable and the input source which is
set with “System Control”. ( 28)
• Connect Technics device supporting system
control function (Network Audio Player,
Compact Disc Player, etc.) to this unit. For
details, refer to the following website.
www.technics.com/support/
PC
The PC does not recognise this unit.
• Check your operating environment. ( 17)
• Restart the PC, turn this unit to standby and on,
and then reconnect the USB cable.
• Use another USB port of the connected PC.
• Install the dedicated USB driver if using a PC
with Windows. ( 17)
Remote control
The remote control does not work properly.
• The batteries are depleted or inserted
incorrectly. ( 12)
• To avoid interference, please do not put any
objects in front of signal sensor. ( 10)
• If the remote control mode of the remote
control differs from that of this unit, match the
mode of the remote control to the mode of this
unit. ( 13)
English
Trouble shooting
(31)
31
Page 32

Troubleshooting
Messages
ATTENTION : MAX Output Setting
• While using this unit as power amplifier, the
volume adjustment with this unit is disabled.
• Adjust the volume little by little with the
connected device. ( 20)
AUTO OFF
• The unit has been left unused for about
20 minutes and will shut down within a minute.
Press any button to cancel it. ( 25)
Connect USB Device
• The firmware download has failed.
• Download the latest firmware on the USB flash
memory and try again. ( 27)
Disconnect PHONES
• When the headphones are connected,
measuring the output signal of the amplifier
(LAPC) will not start.
• Disconnect the headphones.
• If you connect headphones during amplifier
signal measurement or amplifier output
correction, it will be cancelled. ( 26)
” (“ ” stands for a number.)
“F
• An abnormality has occurred. (If this unit
detects an abnormality, the protection circuit
is activated, and the power may be turned off
automatically.)
- Is the volume extremely high? Or is this unit
placed in an extremely hot place?
Wait a few seconds and then turn the unit
on again. (The protection circuit will be
deactivated.)
Load Fail
• The firmware cannot be found on the USB flash
memory.
• Download the latest firmware on the USB flash
memory and try again. ( 27)
No Device
• USB flash memory with new firmware is not
connected.
Connect the USB flash memory with new
firmware. ( 27)
Not Measured
• Measuring the output signal for the output
correction function (LAPC) has not been done
yet.
• Measure the output signal. ( 26)
Not Valid
• The function you have tried to use is not
available with the current settings. Check the
steps and settings.
PHONES Connected
• The headphones are connected.
• Sound is not output from headphones jack and
speaker output terminals when the headphones
are connected and “MAIN IN” is selected as
input source of this unit. ( 20)
“Remote
• The remote control and this unit are using
different modes.
Change the mode on the remote control. ( 13)
Signal Overflow
• The sound from the analogue audio input
terminals in use is distorted. Select ”Attenuator”
according to the selected analogue audio input,
and change the setting of the attenuator to
“On”. ( 19)
Unlocked
• “COAX1”, “COAX2”, “OPT1”, “OPT2” or “PC” is
selected, but no device is connected. Check the
connection with the device. ( 16, 17)
• The sampling frequency components, etc. of
the audio signals are not input correctly.
- About supported format, refer to “Format
support”. ( 35)
USB Over Current Error
USB device is drawing too much power.
• Disconnect the USB device and connect it
again. ( 27)
• Turn the unit to standby and on again.
VOLUME
• When the input source is switched to “LINE2”
or other source from “MAIN IN”, the volume
level after switching the input source is
displayed.
• Confirm and adjust the volume before pressing
[OK].
” (“ ” stands for a number.)
OK (“ ” stands for a number.)
32
(32)
Page 33

Others
Unit care
• Pull out the AC mains lead from the outlet
before maintenance. Clean this unit with a soft
cloth.
• When dirt is heavy, wring a wet cloth tightly to
wipe the dirt, and then wipe it with a soft cloth.
• Do not use solvents including benzine, thinner,
alcohol, kitchen detergent, a chemical wiper,
etc. This might cause the exterior case to be
deformed or the coating to come off.
To dispose or transfer this unit
• This unit may contain private information.
Before disposing of or transferring this unit,
perform the following to delete the data,
including personal or secret information.
• “To restore all settings to the factory defaults”
( 30)
English
Disposal of Old Equipment and Batteries
Only for European Union and countries with recycling systems
These symbols on the products, packaging, and/or accompanying documents mean that used
electrical and electronic products and batteries must not be mixed with general household
waste.
For proper treatment, recovery and recycling of old products and used batteries, please take
them to applicable collection points in accordance with your national legislation.
By disposing of them correctly, you will help to save valuable resources and prevent any
potential negative effects on human health and the environment.
For more information about collection and recycling, please contact your local municipality.
Penalties may be applicable for incorrect disposal of this waste, in accordance with national
legislation.
Note for the battery symbol (bottom symbol):
This symbol might be used in combination with a chemical symbol. In this case it complies with
the requirement set by the Directive for the chemical involved.
Troubleshooting / Others
(33)
33
Page 34

Others
Specifications
■ GENERAL
Power supply
Power
consumption
Power
consumption in
standby mode
Dimensions
(W×H×D)
Mass Approx. 12.3 kg
Operating
temperature range
Operating humidity
range
■ AMPLIFIER SECTION
Output power
Load impedance 4 - 16
Frequency
response
PHONO (MM)
LINE
DIGITAL
Input sensitivity/
Input impedance
PHONO (MM) 2.5 mV / 47 k
LINE 200 mV / 22 k
AC 220 V to 240 V,
50/60 Hz
85 W
Approx. 0.3 W
430 mm × 148 mm ×
428 mm
0 °C to 40 °C
35 % to 80 % RH
(no condensation)
70 W + 70 W
(1 kHz, T.H.D. 0.5 %, 8 ,
20 kHz LPF)
140 W + 140 W
(1 kHz, T.H.D. 0.5 %, 4 ,
20 kHz LPF)
20 Hz to 20 kHz
(RIAA DEVIATION ±1 dB,
8 )
5 Hz to 80 kHz
(-3 dB, 8 )
5 Hz to 90 kHz
(-3 dB, 8 )
■ TERMINALS SECTION
Headphones Jack
PC
Analogue input
LINE IN ×2 Pin jack
PHONO (MM) Pin jack
Digital input
OPT IN ×2 Optical terminal
COAX IN ×2 Pin jack
Format support LPCM
Analogue output
LINE OUT Pin jack
PRE OUT Pin jack
System port
System control 3.5 mm, Jack
Stereo, 6.3 mm
0.75 mW, 32
REAR USB
Type B Connector
■ FORMAT SECTION
USB-B
USB 2.0 high-speed
USB Standard
DSD control mode
USB Audio Class 2.0,
Asynchronous mode
ASIO Native mode,
DoP mode
34
(34)
Page 35

■ Format support
This unit supports the following formats.
• Playback of all formats supported by this unit is not guaranteed.
• Playback of a format not supported by this unit may cause choppy audio or noise. In such cases, check to
see if this unit supports the format.
• File information (sampling frequency, etc.) shown by this unit and playback software may differ from each
other.
PC (USB-B)
File format Sampling frequency
PCM 32/44.1/48/88.2/96/176.4/192/352.8/384 kHz 16/24/32 bit
DSD 2.8 MHz/5.6 MHz/11.2 MHz
: If you download and install the dedicated app, you can play back files in wide-ranging formats. ( 17)
*
For details, refer to the operating instructions of the app.
Note
• Specifications are subject to change without notice.
• Mass and dimensions are approximate.
• DSD is a trademark of Sony Corporation.
*
Bit rate / Number of
quantisation bits
English
Others
(35)
35
Page 36

Wir möchten Ihnen dafür danken, dass Sie sich für dieses Gerät entschieden haben.
Bitte lesen Sie diese Anleitung vor der Inbetriebnahme dieses Produkts aufmerksam durch, und bewahren
Sie dieses Handbuch für spätere Bezugnahme griffbereit auf.
• Hinweise zu Beschreibungen in dieser Bedienungsanleitung
- Seitenverweise werden dargestellt als “ ○○”.
- Die gezeigten Abbildungen können sich von Ihrem Gerät unterscheiden.
Merkmale
Hochwertige Audiotechnologie wird
verwendet, inklusive JENO Engine
und LAPC
Die JENO Engine überträgt und verarbeitet
volldigitale Audiosignale mit minimalem Jitter
von der Eingangs- bis zur Leistungsstufe. Die
LAPC führt eine Adaptiv-Phasen-Kalibrierung
der Lautsprecherauslastung durch, um ideale
Verstärkung und Phaseneigenschaften für jeden
Lautsprechertyp zu erreichen. Zudem wird für die
PWM-Wandlung eine einzigartige hochpräzise
PWM-Wandlerschaltung verwendet, die wichtig
für die Klangqualität ist.
Dreiteilige Konfiguration
Bei integrierten Verstärkern gibt es eine Vielzahl
von Schaltungen, z. B. Schaltungen für die
Handhabung von Eingangs-Mikrosignalen,
von großen Stromflüssen usw. Der SU-G700
verwendet eine dreiteilige Konstruktion mit
Partitionen zwischen den Schaltungsblöcken
je nach dem verarbeiteten Signalpegel.
Dies vermeidet Interferenzen zwischen
Schaltungsblöcken und sorgt so für eine klare
Klangqualität.
Hochsteifes Aluminiumgehäuse
Das hochsteife Doppelchassis aus Metall verfügt
über ein Innen- und ein Außengehäuse aus
Stahlplatten. Dies verringert Vibrationen und
Störgeräusche, die die Reinheit des Klangs
verschlechtern würden.
06
(36)
Page 37

Inhaltsverzeichnis
Sicherheitsvorkehrungen
08
Lesen Sie vor der Verwendung die
“Sicherheitsvorkehrungen” in diesem Handbuch
sorgfältig durch.
Benutzung der Bedienelemente 10
Anschlüsse 14
Bedienung 16
Einstellungen 24
Fehlerbehebung 30
Sonstige 33
Dieses Gerät, Fernbedienung
Lautsprecherverbindung, Netzkabelverbindung
Wiedergabe über angeschlossene Geräte
Sonstige Einstellungen, Verwendung der
Ausgangskorrekturfunktion (LAPC)
Bevor Sie den Kundendienst anfordern, lesen Sie
die Fehlerbehebung.
Technische Daten usw.
Deutsch
Zubehör
Netzkabel (2)
Außer für die Schweiz
K2CM3YY00041
Für die Schweiz
K2CS3YY00033
• Produktnummern, die Sie in dieser Bedienungsanleitung finden, entsprechen dem Stand Februar 2017.
• Änderungen vorbehalten.
• Verwenden Sie das Netzkabel nicht mit anderen Geräten.
Fernbedienung (1)
N2QAYA000143
Batterien für Fernbedienung (2)
(37)
07
Page 38

Sicherheitsvorkehrungen
Warnung
Gerät
• Zur Reduzierung der Gefahr von Brand,
elektrischem Schlag und Beschädigung:
- Setzen Sie dieses Gerät weder Regen, noch
Feuchtigkeit, Tropfen oder Spritzern aus.
- Stellen Sie keine mit Flüssigkeiten gefüllten
Gefäße, wie Vasen, auf dieses Gerät.
- Ausschliesslich das empfohlene Zubehör
verwenden.
- Entfernen Sie die Abdeckungen nicht.
- Reparieren Sie dieses Gerät nicht selbst.
Wenden Sie sich zur Wartung an qualifiziertes
Kundendienstpersonal.
- Lassen Sie keine Gegenstände aus Metall in
dieses Gerät fallen.
- Stellen Sie keine schweren Gegenstände auf
dieses Gerät.
Netzkabel
• Zur Reduzierung der Gefahr von Brand,
elektrischem Schlag und Beschädigung:
- Gewährleisten Sie, dass die Spannung der
Stromversorgung dem auf diesem Gerät
angegebenen Wert entspricht.
- Stecken Sie den Netzstecker vollständig in die
Steckdose ein.
- Ziehen Sie nicht an der Leitung, knicken
Sie sie nicht und stellen Sie keine schweren
Gegenstände darauf.
- Fassen Sie den Stecker nicht mit nassen
Händen an.
- Fassen Sie den Stecker beim Herausziehen an
seinem Korpus an.
- Verwenden Sie keinen Netzstecker und keine
Steckdose, die beschädigt sind.
• Der Netzstecker ist das trennende Gerät.
Installieren Sie dieses Gerät so, dass der
Netzstecker sofort aus der Steckdose gezogen
werden kann.
• Stellen Sie sicher, dass der Erdungsstift sicher
mit dem Netzstecker verbunden ist, um einen
elektrischen Schlag zu vermeiden.
- Ein Gerät mit CLASS I-Konstruktion wird an
eine Netzsteckdose mit Schutzleiteranschluss
angeschlossen.
Achtung
Gerät
• Stellen Sie keine Quellen offener Flammen, z.B.
brennende Kerzen, auf das Gerät.
• Dieses Gerät kann beim Betrieb
Hochfrequenzstörungen auffangen, die durch
die Benutzung von Mobiltelefonen verursacht
werden. Sollte eine solche Störung festgestellt
werden, sollte das Handy in größerer
Entfernung zu diesem Gerät betrieben werden.
• Dieses Gerät ist für den Betrieb in Ländern mit
moderatem und tropischem Klima bestimmt.
• Legen Sie keine Gegenstände auf dieses Gerät.
Dieses Gerät wird heiß, wenn es an ist.
• Berühren Sie nicht die Oberseite dieses Geräts.
Dieses Gerät wird heiß, wenn es eingeschaltet
ist.
Aufstellung
• Stellen Sie dieses Gerät auf eine ebene
Oberfläche.
• Zur Reduzierung der Gefahr von Brand,
elektrischem Schlag und Beschädigung:
- Installieren oder positionieren Sie dieses Gerät
nicht in einem Bücherregal, Einbauschrank
oder einem sonstigen engen Raum. Stellen Sie
eine gute Belüftung des Geräts sicher.
- Achten Sie darauf, die Entlüftungsschlitze des
Geräts nicht durch Gegenstände aus Papier
oder Stoff zu blockieren, z.B. Zeitungen,
Tischdecken und Vorhänge.
- Setzen Sie dieses Gerät keinem direkten
Sonnenlicht, hohen Temperaturen,
starker Feuchtigkeit und übermäßigen
Erschütterungen aus.
• Stellen Sie sicher, dass der Aufstellungsort stabil
genug ist, um das Gewicht dieses Geräts zu
tragen ( 34).
• Heben oder tragen Sie dieses Gerät nicht,
indem Sie es an den Knöpfen halten. Das
Gerät könnte herunterfallen und einen
Personenschaden oder eine Fehlfunktion dieses
Geräts verursachen.
08
(38)
Page 39

Batterie
• Explosionsgefahr bei falschem Anbringen der
Batterie. Ersetzen Sie die Batterie nur durch den
vom Hersteller empfohlenen Typ.
• Der Missbrauch der Batterien kann zu einem
Auslaufen von Elektrolyt und einem Brand
führen.
- Entfernen Sie die Batterien, wenn Sie die
Fernbedienung über längere Zeit nicht
benutzen. Bewahren Sie sie an einem kühlen,
dunklen Ort auf.
- Niemals starker Hitze oder offenem Feuer
aussetzen.
- Lassen Sie die Batterie(n) nie längere
Zeit in einem Auto mit geschlossenen
Türen und Fenstern zurück, das direkter
Sonneneinstrahlung ausgesetzt ist.
- Nehmen Sie die Batterien nicht auseinander,
und schließen Sie sie nicht kurz.
- Laden Sie Alkali- oder Manganbatterien nicht
wieder auf.
- Verwenden Sie keine Batterien mit teilweise
abgelöstem Mantel.
- Verwenden Sie keine alten und neuen
Batterien oder verschiedene Typen
gleichzeitig.
• Wenden Sie sich zur Entsorgung der Batterien
an die lokalen Behörden oder erfragen Sie die
richtige Vorgehensweise zur Entsorgung.
Installation
Schalten Sie das gesamte Gerät vor dem
Anschließen aus und lesen Sie die entsprechende
Betriebsanleitung.
Deutsch
Sicherheitsvorkehrungen
(39)
09
Page 40

Benutzung der Bedienelemente
Dieses Gerät
01 Standby-/Ein-Taste ( )
• Drücken Sie diese Taste, um vom Standby-
Modus auf “ein” zu wechseln oder
umgekehrt. Auch im Standby-Modus
verbraucht das Gerät Energie.
02 Leistungsanzeige
• Blau: Das Gerät ist an.
• Aus: Das Gerät befindet sich im Standby-
Modus.
03 Kopfhörerbuchse
• Wenn ein Stecker eingesetzt ist, geben
die Lautsprecher und PRE OUT-Anschlüsse
keinen Sound aus. ( 22)
• Solange “MAIN IN” als Eingangsquelle dieses
Geräts ausgewählt ist, wird kein Sound über
die Kopfhörerbuchse ausgegeben. ( 20)
• Zu hohe Lautstärke von Ohr- oder
Kopfhörern kann zu Gehörverlust führen.
• Das Hören bei voller Lautstärke und über
einen längeren Zeitraum kann das Gehör des
Benutzers zerstören.
05 Display
• Informationen wie Eingangsquelle usw.
werden angezeigt. ( 32)
06 Eingangswahlschalter
• Drehen Sie diesen Knopf im Uhrzeigersinn
oder gegen den Uhrzeigersinn, um die
Eingabequelle umzuschalten.
07 Spitzenleistungsmesser
• Anzeige des Ausgangspegels. 100 % zeigt
die Ausgangsleistung ( 34).
• Der Spitzenleistungsmesser funktioniert
nicht, wenn das Licht ausgeschaltet ist.
08 LAPC-Anzeige ( 26)
09 Fernbedienungs-Signalsensor
• Abstand: Max. 7 m direkt von der
Vorderseite
• Winkel: Ca. 30° links und rechts
04 Lautstärkeregler
• -- (min), 1 bis 100 (max)
• Stellen Sie zur Anzeige der Lautstärke
“VOLUME Display” auf “On”. ( 25)
(40)
10
Page 41

10 USB-Anschluss B
• Zum Anschluss an einen PC usw. ( 17)
11 Optischer digitaler Eingangsanschluss
(OPT1 IN/OPT2 IN) ( 16)
12 UPDATE-Anschluss (USB-A)
( DC 5 V 500 mA) ( 27)
13 Koaxiale digitale Eingangsanschlüsse
(COAX1 IN/COAX2 IN) ( 16)
14 Systemanschluss (CONTROL) ( 28)
15 Ausgangsanschluss für Lautsprecher
( 14)
16 PHONO EARTH-Anschluss ( 18)
• Zum Anschluss des Erdungskabels eines
Plattenspielers.
19 Analoge Audioeingangsanschlüsse
(LINE1 IN) ( 19)
20 Analoge Audioausgangsanschlüsse
(LINE OUT) ( 23)
21 Analoge Audioausgangsanschlüsse
(PRE OUT) ( 22)
22 Produktkennzeichnung
• Es wird die Modellnummer angegeben.
23 Netzkabel-Anschluss (
) ( 15)
Deutsch
17 Analoge Audioeingangsanschlüsse
(PHONO) ( 18)
• MM-Tonabnehmer werden unterstützt.
18 Analoge Audioeingangsanschlüsse
(LINE2 IN/MAIN IN)
• Diese Eingangsanschlüsse sind kombiniert
mit LINE2 und MAIN IN. Wechseln Sie die
Funktion je nach den angeschlossenen
Geräten. ( 19, 20)
Benutzung der Bedienelemente
(41)
11
Page 42

Benutzung der Bedienelemente
Fernbedienung
Verwendung der Fernbedienung
2
1
R03/LR03, AAA
(Alkali- oder Manganbatterien)
Hinweis
• Legen Sie die Batterie so ein, dass die Pole
und ) mit denen in der Fernsteuerung
(
übereinstimmen.
• Auf den Fernbedienungs-Signalsensor an
diesem Gerät richten. ( 10)
• Bewahren Sie die Batterien außerhalb
der Reichweite von Kindern auf, um ein
Verschlucken zu verhindern.
(42)
12
01 [AMP
• Drücken Sie diese Taste, um vom Standby-
Modus auf “ein” zu wechseln oder
umgekehrt. Auch im Standby-Modus
verbraucht das Gerät Energie.
02 [AMP]/[NWP]/[CD]:
Auswahl des zu bedienenden Geräts
]: Standby-/Ein-Taste
Page 43

03 [>INPUT<]: Umschalten der Eingangsquelle
( 16, 17, 18, 19, 20)
04 [MENU]: Öffnen des Menüs
( 18, 19, 20, 21)
05 [SETUP]: Öffnen des Einrichtungsmenüs
06 [LAPC]: Ausgangssignals des Verstärkers
07 [+VOL-]: Anpassen der Lautstärke
08 [MUTE]: Stummschalten des Tons
*
( 24)
messen und Ausgabe korrigieren ( 26)
• -- (min), 1 bis 100 (max)
• Drücken Sie erneut [MUTE], um
abzubrechen. “MUTE” wird auch durch
Anpassen der Lautstärke durch dieses Gerät
oder durch Versetzen des Geräts in den
Standby-Modus abgebrochen.
*
[ ] Standby-/Ein-Schalter für den
02
Netzwerk-Audio-Player
Auswählen des zu bedienenden Geräts
03
Auswählen der Eingangsquelle für den
04
Netzwerk-Audio-Player
Ein-/Ausschalten des Direktmodus
05
Ein-/Ausschalten des Re-Masters
06
Steuertasten für grundlegende
07
Wiedergabefunktionen
Zifferntasten usw.
08
Steuertasten für grundlegende
09
Wiedergabefunktionen
Fernbedienungscode
09 [DIMMER]: Einstellen der Leuchte für den
Spitzenleistungsmesser, der Anzeige usw.
• Wenn das Display ausgeschaltet ist, leuchtet
es nur dann auf, wenn Sie dieses Gerät
bedienen. Bevor das Display sich wieder
ausschaltet, wird “Display Off” einige
Sekunden lang angezeigt.
• Drücken Sie die Taste mehrfach, um die
Helligkeit anzupassen.
• Der Spitzenleistungsmesser funktioniert
nicht, wenn das Licht ausgeschaltet ist.
10 [INFO]: Anzeigen von Informationen
• Drücken Sie diese Taste, um die
Abtastfrequenz und andere Informationen
anzuzeigen. (Die Information variiert je nach
Eingangsquelle.)
11 [
], [ ], [ ], [ ]/[OK]: Auswahl/OK
12 [RETURN]: Zurückkehren zur vorherigen
Anzeige
: Drücken Sie zunächst [AMP], um dieses Gerät
*
einzuschalten. (Die Fernbedienung kann für
ein anderes Technics-Gerät funktionieren und
nicht für dieses Gerät, wenn Sie [NWP] oder
[CD] drücken.)
*
*
*
■ Tasten für die Systemsteuerfunktion für
Technics-Geräte
Die Fernbedienung für dieses Gerät kann auch
für die Systemsteuerfunktion für TechnicsGeräte (Netzwerk-Audio-Player, CD-Player
usw.) verwendet werden. Informationen zur
Bedienung der Geräte finden Sie auch in deren
Bedienungsanleitungen.
[ ] Standby-/Ein-Schalter für den CD-Player
01
Wenn ein anderes Gerät auf die mitgelieferte
Fernbedienung reagiert, ändern Sie den
Fernbedienungscode.
• Die Werkseinstellung lautet “Mode 1”.
1 Drücken Sie [AMP].
2 Drücken Sie [SETUP].
3 Drücken Sie [
], [ ] wiederholt, um
“Remote Control” auszuwählen, und
drücken Sie danach [OK].
• Der aktuelle Fernbediencode dieses Geräts
wird einige Sekunden lang angezeigt.
4 Wenn “Set Mode 1/2” angezeigt wird,
konfigurieren Sie den Fernbediencode
der Fernbedienung.
Um “Mode 1” einzustellen:
Halten Sie [OK] und [1] mindestens
4 Sekunden lang gedrückt.
Um “Mode 2” einzustellen:
Halten Sie [OK] und [2] mindestens
4 Sekunden lang gedrückt.
5 Zeigen Sie mit der Fernbedienung
auf dieses Gerät und halten Sie [OK]
mindestens 4 Sekunden lang gedrückt.
• Wenn der Code der Fernbedienung geändert
wird, wird der neue Code einige Sekunden
lang auf dem Display angezeigt.
■ Wenn “Remote 1” oder “Remote 2”
angezeigt wird
Wenn “Remote 1” oder “Remote 2” angezeigt
wird, verwenden dieses Gerät und die
Fernbedienung unterschiedliche Codes. Führen
Sie Schritt 3 oben durch.
Benutzung der Bedienelemente
(43)
Deutsch
13
Page 44

Anschlüsse
Lautsprecher/Netzkabel
• Verwenden Sie ausschließlich das mitgelieferte Netzkabel.
• Verbinden Sie das Netzkabel erst, wenn alle anderen Verbindungen hergestellt wurden.
• Stecken Sie die Stecker der zu verbindenden Kabel vollständig ein.
• Knicken Sie Kabel nicht in spitzen Winkeln.
• Wenn der Verstärker an die Lautsprecher angeschlossen ist, können Sie sein Ausgangssignal
messen und korrigieren, um die Audioausgabe zu optimieren. ( 26)
Lautsprecherkabel (nicht mitgeliefert)
Lautsprecheranschluss
1 Drehen Sie die Knöpfe, um sie zu
lösen, und führen Sie die Kerndrähte
in die Löcher ein.
2 Ziehen Sie die Knöpfe fest.
Hinweis
Wenn die Verbindungen hergestellt wurden,
•
ziehen Sie leicht an den Lautsprecherkabeln, um
sicherzustellen, dass diese fest verbunden sind.
• Achten Sie darauf, die Polarität der
Lautsprecherdrähte nicht zu überkreuzen
(Kurzschluss) oder umzukehren, da dies zur
Beschädigung des Verstärkers führen kann.
FALSCH
• Verdrahten Sie die Polarität (+/-) der Anschlüsse
richtig. Andernfalls können die Stereo-Effekte
beeinträchtigt werden oder es kann zu
Fehlfunktionen kommen.
• Detaillierte Informationen finden Sie in der
Bedienungsanleitung der Lautsprecher.
14
(44)
Page 45

Führen Sie das Netzkabel bis zu
einem Punkt unmittelbar vor der
runden Öffnung ein.
Netzkabel (mitgeliefert)
Lautsprecherkabel (nicht mitgeliefert)
An eine
Netzsteckdose
Deutsch
Netzkabelanschluss
Erst anschließen, wenn alle anderen Kabel
bereits angeschlossen sind.
Hinweis
• Dieses Gerät verbraucht kleine Mengen an
Wechselstrom ( 34), auch wenn es sich
im Standby-Modus befindet. Ziehen Sie den
Stecker aus der Steckdose, wenn das Gerät über
einen längeren Zeitraum nicht verwendet wird.
Positionieren Sie das Gerät so, dass der Stecker
leicht gezogen werden kann.
Anpassung des
Lautsprecherausgangs (LAPC)
Sie können die Einstellungen anhand Ihrer
eigenen Lautsprecher optimieren. ( 26)
Anschlüsse
(45)
15
Page 46

Bedienung
Verwendung eines digitalen Audio-Ausgangsgeräts
Sie können den CD-Player usw. mit einem KoaxialDigitalkabel (nicht mitgeliefert) bzw. einem
Lichtwellenleiter-Digitalkabel (nicht mitgeliefert) an
dieses Gerät anschließen und so Musik wiedergeben.
Lichtwellenleiter-Digitalkabel
(nicht mitgeliefert)
CD-Player, usw.
Verwendung eines koaxialen
Digitalkabels
1 Ziehen Sie das Netzkabel.
2 Verbinden Sie dieses Gerät und einen
CD-Player usw.
3 Schließen Sie das Netzkabel an dieses
Gerät an. ( 15)
4 Drücken Sie [AMP
einzuschalten.
5 Drücken Sie wiederholt [>INPUT<], um
“COAX1” oder “COAX2” auszuwählen.
•
Sie können die Eingangsquelle auch durch Drehen
des Eingangswahlschalters am Gerät wählen.
6 Starten Sie die Wiedergabe auf dem
angeschlossenen Gerät.
Hinweis
], um dieses Gerät
Koaxial-Digitalkabel (nicht mitgeliefert)
Verwendung eines LichtwellenleiterDigitalkabels
1 Ziehen Sie das Netzkabel.
2 Verbinden Sie dieses Gerät und einen
CD-Player usw.
3 Schließen Sie das Netzkabel an dieses
Gerät an. ( 15)
4 Drücken Sie [AMP
einzuschalten.
5 Drücken Sie wiederholt [>INPUT<], um
“OPT1” oder “OPT2” auszuwählen.
• Sie können die Eingangsquelle auch durch
Drehen des Eingangswahlschalters am Gerät
wählen.
6 Starten Sie die Wiedergabe auf dem
angeschlossenen Gerät.
], um dieses Gerät
16
Die digitalen Audio-Eingangsanschlüsse an diesem Gerät
•
können nur lineare PCM-Signale erkennen. Weitere
Details finden Sie in der Bedienungsanleitung des Geräts.
- Abtastrate:
Koaxialer digitaler Eingang
32/44,1/48/88,2/96/176,4/192 kHz
Optischer digitaler Eingang
32/44,1/48/88,2/96 kHz
- Anzahl der Quantisierungsbits:
16/24 Bit
(46)
Page 47

USB 2.0-Kabel
(nicht mitgeliefert)
Verwendung des PC usw.
Sie können den PC usw. mit einem USB-2.0-Kabel
(nicht mitgeliefert) an dieses Gerät anschließen und so
Musik wiedergeben.
PC usw.
■ Vorbereitung
Verbindung mit einem PC
• Bevor Sie eine Verbindung zu einem PC
herstellen, folgen Sie den Schritten unten.
• Empfohlene Betriebssystem-Versionen für Ihren
PC (Stand: Februar 2017) finden Sie hier:
- Windows 7, Windows 8, Windows 8.1,
Windows 10
- OS X 10.7, 10.8, 10.9, 10.10, 10.11, macOS 10.12
Laden Sie den speziellen USB-Treiber auf den
PC herunter und installieren Sie ihn. (Nur bei
einem Windows-Betriebssystem)
• Laden Sie den Treiber von der folgenden
Website herunter und installieren Sie ihn.
www.technics.com/support/
Laden Sie die spezielle App “Technics Audio
Player” (kostenlos) auf den PC herunter und
installieren Sie sie.
• Laden Sie die App von der folgenden Website
herunter und installieren Sie diese.
www.technics.com/support/
Verwendung eines USB-2.0-Kabels
1 Ziehen Sie das Netzkabel.
2 Verbinden Sie dieses Gerät und einen
PC usw.
Audiogerät mit USB-DAC-
Ausgangsanschluss, z. B. ST-G30.
3 Schließen Sie das Netzkabel an dieses
Gerät an. ( 15)
4 Drücken Sie [AMP
], um dieses Gerät
einzuschalten.
5 Drücken Sie wiederholt [>INPUT<], um
“PC” auszuwählen.
• Sie können die Eingangsquelle auch durch
Drehen des Eingangswahlschalters am Gerät
wählen.
6 Starten Sie die Wiedergabe auf dem
angeschlossenen PC mit der dafür
vorgesehenen App “Technics Audio
Player”.
Hinweis
Beziehen Sie sich bezüglich des Verbindens eines
•
Audiogeräts mit USB-DAC-Ausgangsanschluss,
z. B. das ST-G30, auf die Bedienungsanleitung
des angeschlossenen Geräts.
• Informationen zum unterstützten Format finden
Sie unter “Formatunterstützung”. ( 35)
• Windows ist ein eingetragenes Warenzeichen
von Microsoft Corporation in den USA und
anderen Ländern.
• Mac und OS X sind Warenzeichen von Apple
Inc., die in den USA und in anderen Ländern
eingetragen sind.
• macOS ist eine Marke von Apple Inc.
Deutsch
Bedienung
(47)
17
Page 48

Bedienung
Verwendung eines Plattenspielers (PHONO)
Sie können den Plattenspieler mit einem PHONO-Kabel
(nicht mitgeliefert) an dieses Gerät anschließen und so
Musik wiedergeben.
PHONO
EARTH
Plattenspieler
PHONO-Masseleitung
(nicht mitgeliefert)
PHONO-Kabel (nicht mitgeliefert)
Verwendung eines PHONO-Kabels
1 Ziehen Sie das Netzkabel.
2 Verbinden Sie dieses Gerät und einen
Plattenspieler.
3 Schließen Sie das Netzkabel an dieses
Gerät an. ( 15)
4 Drücken Sie [AMP
einzuschalten.
5 Drücken Sie wiederholt [>INPUT<], um
“PHONO” auszuwählen.
•
Sie können die Eingangsquelle auch durch Drehen
des Eingangswahlschalters am Gerät wählen.
6 Starten Sie die Wiedergabe auf dem
angeschlossenen Plattenspieler.
Hinweis
• Zum Anschluss eines Plattenspielers
mit integriertem PHONO-Equalizer
verbinden Sie sein Kabel mit den analogen
Audioeingangsanschlüssen (LINE1 IN oder
LINE2 IN) dieses Geräts. ( 19)
• Zum Anschluss eines Plattenspielers mit
PHONO-Masseleitung verbinden Sie die
PHONO-Masseleitung mit dem PHONO EARTHAnschluss dieses Geräts.
], um dieses Gerät
Klangverzerrungen minimieren
Sollte es während der Nutzung der analogen
Audioeingangsanschlüsse zu Klangverzerrungen
kommen, stellen Sie das Dämpfungselement auf
“On(-3dB)”/“On(-6dB)”/“On(-10dB)”.
• Die Werkseinstellung lautet “Off”.
1 Drücken Sie [AMP].
2 Drücken Sie [MENU].
Drücken Sie [ ], [ ] wiederholt, um “Attenuator”
3
auszuwählen, und drücken Sie danach [OK].
4 Drücken Sie [ ], [ ], um “On(-3dB)”/
“On(-6dB)”/“On(-10dB)” auszuwählen,
und drücken Sie danach [OK].
Verringerung von geringem
Rauschen
Verringert geringes Rauschen bei verzogenen Schallplatten.
• Die Werkseinstellung lautet “Off”.
• Sie können dieses Menü auch einstellen,
während “LINE1” oder “LINE2” als
Eingangsquelle des Geräts ausgewählt ist.
1 Drücken Sie [AMP].
2 Drücken Sie [MENU].
18
(48)
Drücken Sie [ ], [ ] wiederholt, um “Subsonic
3
Filter” auszuwählen, und drücken Sie danach [OK].
4 Drücken Sie [ ], [ ] zur Auswahl von
“On” und drücken Sie danach [OK].
Page 49

Verwendung eines analogen Audioausgangsgeräts (LINE1/LINE2)
Sie können den Blu-ray Disc-Player usw. mit einem
analogen Audiokabel (nicht mitgeliefert) an dieses
Gerät anschließen und so Musik wiedergeben.
Blu-ray Disc-Player, usw.
Analoges Audiokabel (nicht mitgeliefert)
Verwendung eines analogen
Audiokabels
1 Ziehen Sie das Netzkabel.
2 Verbinden Sie dieses Gerät und einen
Blu-ray Disc-Player usw.
3 Schließen Sie das Netzkabel an dieses
Gerät an. ( 15)
4 Drücken Sie [AMP
einzuschalten.
5 Drücken Sie wiederholt [>INPUT<], um
“LINE1” oder “LINE2” auszuwählen.
•
Sie können die Eingangsquelle auch durch Drehen
des Eingangswahlschalters am Gerät wählen.
• Stellen Sie auf “LINE2” (siehe unten), wenn
“MAIN IN” als Eingangsquelle dieses Geräts
ausgewählt ist.
6 Starten Sie die Wiedergabe auf dem
angeschlossenen Gerät.
], um dieses Gerät
3 Drücken Sie [MENU].
4 Drücken Sie [
], [ ] wiederholt, um
“Input Mode” auszuwählen, und
drücken Sie danach [OK].
Drücken Sie [ ], [ ] wiederholt, um “LINE2”
5
auszuwählen, und drücken Sie danach [OK].
6 Bestätigen Sie die Meldung und
drücken Sie [OK].
• Die Lautstärke nach dem Wechsel zu “LINE2”
wird angezeigt. Bestätigen und verstellen Sie
die Lautstärke, bevor Sie [OK] drücken.
7 Drücken Sie [ ], [ ] zur Auswahl von
“Yes” und drücken Sie danach [OK].
Klangverzerrungen minimieren
Sollte es während der Nutzung der analogen
Audioeingangsanschlüsse zu Klangverzerrungen
kommen, stellen Sie das Dämpfungselement auf “On”.
• Die werkseitige Standardeinstellung ist “Off”.
Deutsch
Beim Verbinden mit “LINE2”
Analoge Audioeingangsanschlüsse (LINE2 IN/
MAIN IN) sind kombiniert mit LINE2 und MAIN
IN. Wechseln Sie die Funktion je nach den
angeschlossenen Geräten.
• Die Werkseinstellung lautet “LINE2”.
1 Drücken Sie [AMP].
2 Drücken Sie wiederholt [>INPUT<], um
“MAIN IN” auszuwählen.
1 Drücken Sie [AMP].
2 Drücken Sie [MENU].
3 Drücken Sie [
], [ ] wiederholt,
um “Attenuator” auszuwählen, und
drücken Sie danach [OK].
4 Drücken Sie [
], [ ] zur Auswahl von
“On” und drücken Sie danach [OK].
Bedienung
(49)
19
Page 50

Bedienung
Verwendung dieses Geräts als Endstufe
Sie können den AV-Empfänger, Regelverstärker usw. mit einem
analogen Audiokabel (nicht mitgeliefert) an dieses Gerät
anschließen und dieses Gerät als Endstufe verwenden.
AV-Empfänger,
Regelverstärker usw.
Stellen Sie die Lautstärke des
AV-Empfängers, Regelverstärkers usw. auf
ein Minimum, bevor Sie sie anschließen.
Während der Verwendung dieses Geräts
als Endstufe ist die Lautstärkeregelung
mit diesem Gerät deaktiviert. Verstellen
Sie die Lautstärke nach und nach mit dem
angeschlossenen Gerät.
Leiten Sie das Audiosignal der PRE OUT/
LINE OUT-Anschlüsse nicht in die MAIN INAnschlüsse des Geräts. Dies könnte eine
Störung zur Folge haben.
Analoges Audiokabel
(nicht mitgeliefert)
Verwendung eines analogen
Audiokabels
1 Ziehen Sie das Netzkabel.
2 Stellen Sie die Verbindung zwischen
diesem Gerät und dem AV-Empfänger,
Regelverstärker usw. erst her,
nachdem Sie die Lautstärke des
Geräts verringert haben.
3 Schließen Sie das Netzkabel an dieses
Gerät an. ( 15)
4 Drücken Sie [AMP
einzuschalten.
5 Drücken Sie wiederholt [>INPUT<], um
“LINE2” auszuwählen.
• Sie können die Eingangsquelle auch durch
Drehen des Eingangswahlschalters am Gerät
wählen.
], um dieses Gerät
20
(50)
6 Drücken Sie [AMP].
7 Drücken Sie [MENU].
8 Drücken Sie [
], [ ] wiederholt, um
“Input Mode” auszuwählen, und
drücken Sie danach [OK].
Page 51

9 Drücken Sie [ ], [ ], um “MAIN IN”
auszuwählen, und drücken Sie danach
[OK].
Deutsch
Klangverzerrungen minimieren
10 Bestätigen Sie die Meldung und
drücken Sie [OK].
11 Drücken Sie [
], [ ] zur Auswahl von
“Yes” und drücken Sie danach [OK].
12 Starten Sie die Wiedergabe auf dem
angeschlossenen Gerät.
Hinweis
• Die Lautstärke kann nicht mithilfe dieses Geräts
verstellt werden.
• Es wird kein Klang über die Kopfhörerbuchse
und die PRE OUT-Anschlüsse ausgegeben.
• Wählen Sie “LINE2”, wenn Sie dieses Gerät
nicht als Endstufe verwenden. ( 19)
• Wenn die Lautstärke beim Wechsel der
Eingangsquelle zu “LINE2” oder einer anderen
Quelle über “MAIN IN” höher als die vorherige
Stufe ist, wird sie automatisch angepasst.
Wenn Klangverzerrungen auftreten, kann ein
Einstellen des Dämpfungselements auf “On” für
Abhilfe sorgen.
• Die Werkseinstellung lautet “Off”.
1 Drücken Sie [AMP].
2 Drücken Sie [MENU].
3 Drücken Sie [
], [ ] wiederholt,
um “Attenuator” auszuwählen, und
drücken Sie danach [OK].
4 Drücken Sie [
], [ ] zur Auswahl von
“On” und drücken Sie danach [OK].
Bedienung
(51)
21
Page 52

Bedienung
Anschließen einer Endstufe, eines Subwoofers usw.
Sie können eine Endstufe, einen Subwoofers usw.
mit einem analogen Audiokabel (nicht mitgeliefert)
anschließen, um die analogen Audiosignale
auszugeben.
Endstufe, Subwoofer usw.
Leiten Sie das Audiosignal der PRE OUT/
LINE OUT-Anschlüsse nicht in die analogen
Audioeingang-Anschlüsse des Geräts. Dies
könnte eine Störung zur Folge haben.
Verwendung eines analogen
Audiokabels
1 Ziehen Sie das Netzkabel.
2 Verbinden Sie dieses Gerät und eine
Endstufe, einen Subwoofer usw.
3 Schließen Sie das Netzkabel an dieses
Gerät an. ( 15)
4 Drücken Sie [AMP
einzuschalten.
], um dieses Gerät
Analoges Audiokabel
(nicht mitgeliefert)
Einstellen des Audioausgangs
(PRE OUT)
Sie können den Audioausgang der LautsprecherAusgangsanschlüsse und PRE OUT-Anschlüsse
einstellen.
1 Drücken Sie [AMP].
2 Drücken Sie [SETUP].
3 Drücken Sie [
“PRE OUT” auszuwählen, und drücken
Sie danach [OK].
Drücken Sie [ ], [ ], um den Ausgang
4
auszuwählen, und drücken Sie danach [OK].
• Die Werkseinstellung lautet “On”.
• Nicht verfügbar, wenn “MAIN IN” als
Eingangsquelle dieses Geräts ausgewählt ist.
], [ ] wiederholt, um
Hinweis
• Weitere Details finden Sie in der
Bedienungsanleitung des angeschlossenen
Geräts.
• Solange “MAIN IN” als Eingangsquelle dieses
Geräts ausgewählt ist, wird kein Sound über die
PRE OUT-Ausgänge ausgegeben.
(52)
22
On:
Klangausgabe über die Ausgangsanschlüsse der
Lautsprecher und die PRE OUT-Anschlüsse.
On (Speaker:Off):
Es wird kein Sound über die Ausgangsanschlüsse
der Lautsprecher ausgegeben. Die SoundAusgabe erfolgt über die PRE OUT-Anschlüsse.
Off:
Es wird kein Sound über die PRE OUTAnschlüsse ausgegeben. Es wird Sound über
die Ausgangsanschlüsse der Lautsprecher
ausgegeben.
Page 53

Verwendung eines analogen Audio-Eingangsgeräts
Sie können den CD-Rekorder usw. mit einem analogen
Audiokabel (nicht mitgeliefert) anschließen, um analoge
Audiosignale von diesem Gerät auszugeben (LINE1/
LINE2/PHONO).
CD-Rekorder usw.
Analoges Audiokabel
(nicht mitgeliefert)
Leiten Sie das Audiosignal der PRE OUT/
LINE OUT-Anschlüsse nicht in die analogen
Audioeingang-Anschlüsse des Geräts. Dies
könnte eine Störung zur Folge haben.
Verwendung eines analogen
Audiokabels
1 Ziehen Sie das Netzkabel.
2 Verbinden Sie dieses Gerät und einen
CD-Rekorder usw.
3 Schließen Sie das Netzkabel an dieses
Gerät an. ( 15)
4 Drücken Sie [AMP
einzuschalten.
Hinweis
• Wenn ein digitales Audiosignal (COAX1/
COAX2/OPT1/OPT2/PC) als Eingangsquelle für
dieses Gerät ausgewählt ist, wird ein analoges
Audiosignal (LINE1) ausgegeben.
• Beim Wechsel der Eingangsquelle kann es zu
abgehacktem Audio im Ausgangs-Audiosignal
kommen.
], um dieses Gerät
Deutsch
Bedienung
(53)
23
Page 54

Einstellungen
Klangeinstellung, Sonstige Einstellungen
Die Klangeffekte und anderen Einstellungen können konfiguriert werden.
1 Drücken Sie [AMP].
2 Drücken Sie [SETUP].
3 Drücken Sie [
], [ ]
wiederholt, um das Menü
auszuwählen, und drücken Sie
danach [OK].
4 Drücken Sie zum Einstellen
], [ ], [ ], [ ] und drücken
[
Sie danach [OK].
Einstellung von BASS/MID/TREBLE
“Tone Control”
Sie können den Ton dieses Geräts einstellen.
Jeder Tonbereich (BASS/MID/TREBLE) kann
eingestellt werden.
• Um diese Funktion zu aktivieren, wählen Sie
“On (adjustment)”.
• Jeder Pegel kann zwischen “-10” und “+10”
eingestellt werden.
• “TONE” wird nach der Einstellung angezeigt.
• Beim Verbinden der Systemsteuerfunktion für
Technics-Geräte (Netzwerk-Audio-Player usw.)
mit diesem Gerät hat die Sound-Einstellung
auf dem verbundenen Gerät möglicherweise
Priorität vor diesem Gerät. Verstellen Sie den
Sound mit dem angeschlossenen Gerät.
• Nicht verfügbar, wenn Sie dieses Gerät als
Endstufe verwenden ( 20).
Verstellen Sie den Sound mit dem
AV-Empfänger, Regelverstärker usw.
Einstellung des LautstärkeDämpfungselements
“VOLUME Attenuator”
Stellen Sie das Dämpfungselement auf
“On (-20dB)”, damit es die Lautstärkeanpassung
bei geringer Lautstärke abgleicht.
• Die Werkseinstellung lautet “Off”.
• “ATT” wird nach der Einstellung angezeigt.
• Nicht verfügbar, wenn Sie dieses Gerät als
Endstufe verwenden ( 20).
Verstellen Sie den Sound mit dem
AV-Empfänger, Regelverstärker usw.
24
(54)
Page 55
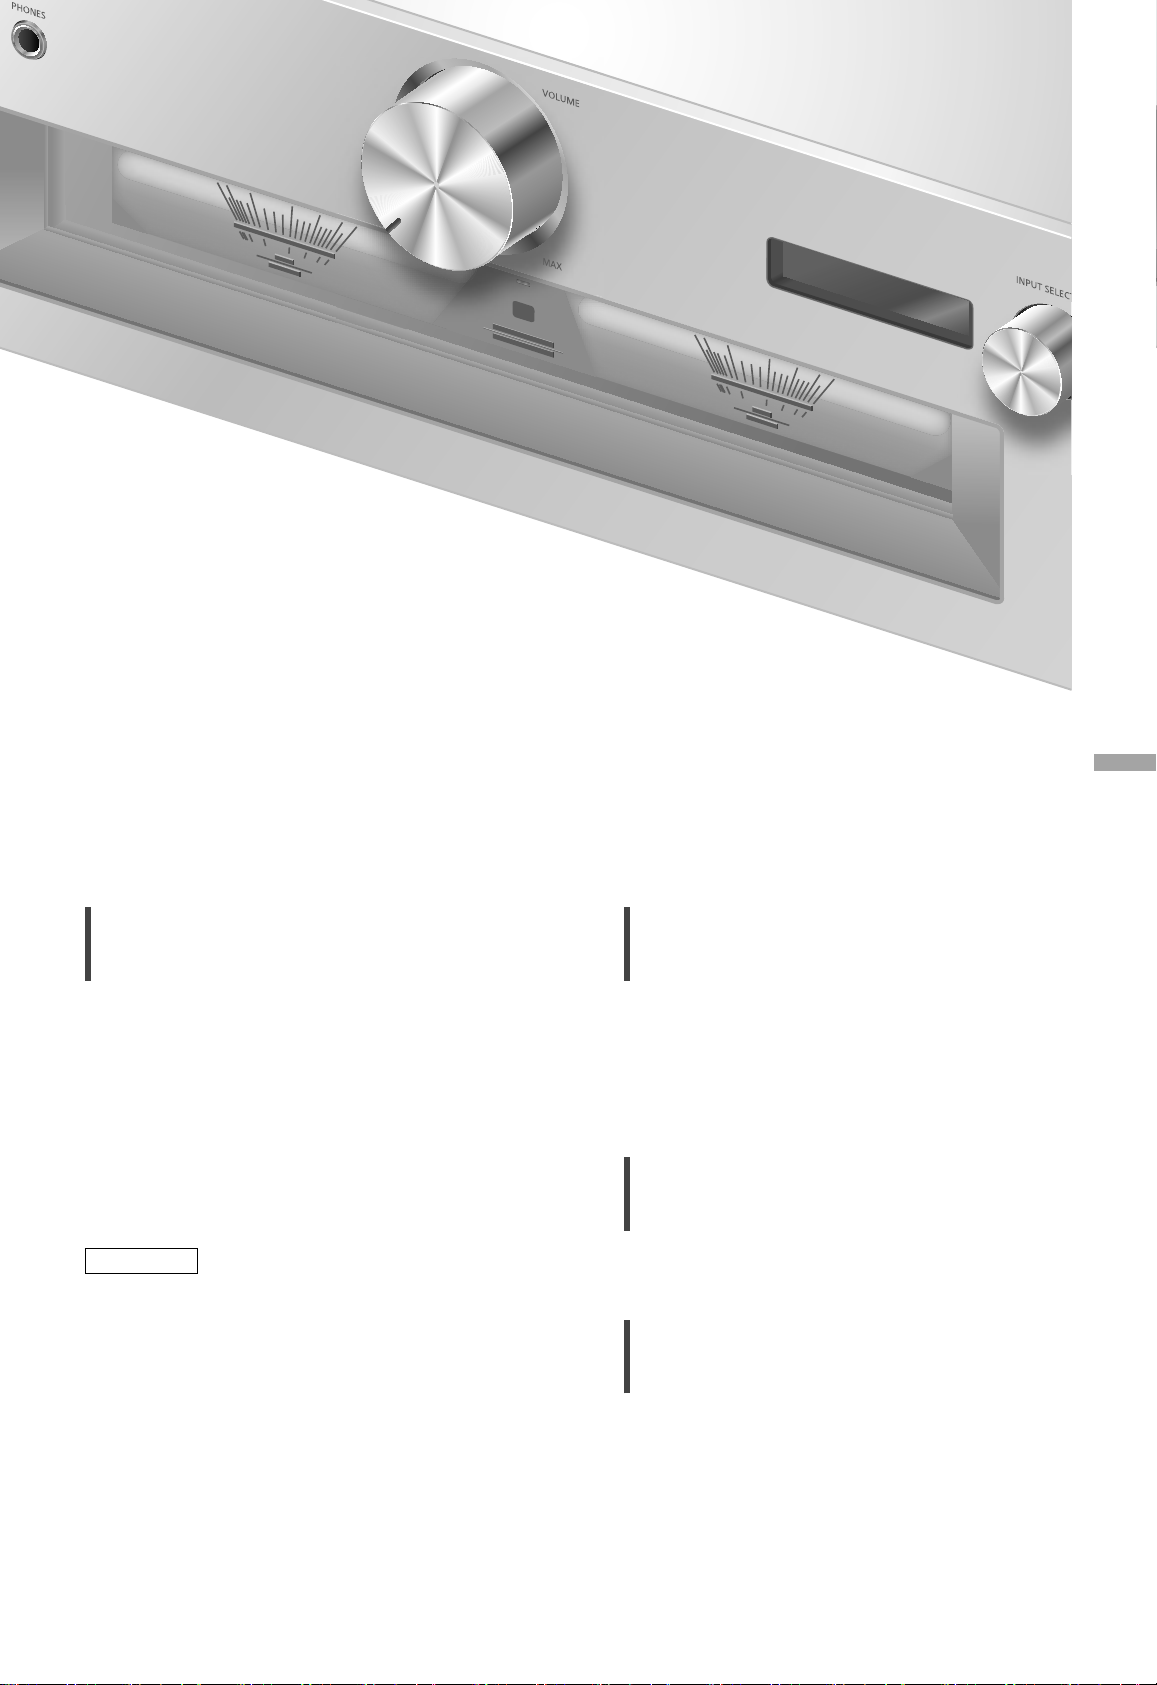
Deutsch
Auto-Aus-Funktion
“AUTO OFF”
Dieses Gerät ist darauf ausgelegt, den
Stromverbrauch zu reduzieren und Energie
einzusparen. Das Gerät wurde ca. 20 Minuten
lang nicht betrieben und wechselt in einer
Minute in den Standby-Modus. Drücken Sie eine
beliebige Taste, um dies zu verhindern.
• Die Werkseinstellung lautet “On”. Um diese
Funktion zu deaktivieren, wählen Sie “Off”.
• “AUTO OFF” wird angezeigt, bevor das Gerät in
3 Minuten ausgeschaltet wird.
Hinweis
Die Auto-Aus-Funktion ist aktiv, bis sie ausgeschaltet
•
wird, auch dann, wenn dieses Gerät in den StandbyModus versetzt und eingeschaltet wird.
Anzeigen des Lautstärkestatus
“VOLUME Display”
Beim Einstellen der Lautstärke wird der
Lautstärkestatus angezeigt.
• Die Werkseinstellung lautet “Off”.
• Nicht verfügbar, wenn “MAIN IN” als
Eingangsquelle dieses Geräts ausgewählt ist.
Überprüfen der Modellbezeichnung
“Model No.”
Die Bezeichnung des Modells wird angezeigt.
Überprüfen der Firmware-Version
“F/W Version”
Die Version der installierten Firmware wird
angezeigt.
Einstellungen
(55)
25
Page 56
Einstellungen
Verwendung der Ausgangskorrekturfunktion (LAPC)
Sie können die Einstellungen anhand Ihrer eigenen Lautsprecher optimieren.
Ausgangssignal des Verstärkers
messen und Ausgabe korrigieren
(LAPC)
■ Vorbereitung
• Lösen Sie die Kopfhörer.
Während der Messung ausgegebener
Test ton
Um die Messgenauigkeit zu gewährleisten,
geben die Lautsprecher in regelmäßigen
Abständen einen Testton aus
(für ca. 3 Minuten).
Die Ausgabelautstärke kann nicht geändert
werden, während die Messung durchgeführt
wird.
1 Drücken Sie [AMP ], um dieses Gerät
einzuschalten.
2 Halten Sie [LAPC] gedrückt, bis
“Please Wait” angezeigt wird.
“LAPC Measuring” wird angezeigt und
dieses Gerät misst das Ausgangssignal des
Verstärkers. Stellen Sie sicher, dass der linke
sowie der rechte Lautsprecher einen Testton
ausgeben.
Wenn die Messung abgeschlossen wurde,
wird die Verstärkerausgabe-Korrektur
automatisch eingeschaltet.
• Wenn Sie [LAPC] drücken, während die
Messung läuft, wird diese abgebrochen.
• Wenn Sie während der Messung des
Verstärkersignals oder der Korrektur
der Verstärkerausgabe einen Kopfhörer
anschließen, wird der Vorgang abgebrochen.
■ Ein-/Ausschalten der Ausgangskorrektur-
Funktion
Drücken Sie [LAPC] zur Auswahl von
“On”/“Off”.
• Die Betriebsanzeigen LAPC und
“LAPC On” leuchten, während die
Ausgangskorrekturfunktion aktiv ist.
Hinweis
• Es ist keine Messung verfügbar für das Audio-
Ausgabesignal der PRE OUT-Anschlüsse dieses
Geräts. ( 22)
• Je nach Typ der angeschlossenen Lautsprecher
kann die Auswirkung der AusgabekorrekturFunktion minimal sein.
• Die korrigierte Ausgabe bleibt bestehen,
bis Sie das Ausgangssignal erneut messen.
Wiederholen Sie die Messung, wenn Sie andere
Lautsprecher anschließen.
26
(56)
Page 57

Firmware-Updates
Firmware-Updates
“F/W Update”
Panasonic kann gelegentlich eine aktualisierte
Firmware für dieses Gerät ausgeben, die neue
Funktionen hinzufügen oder die Weise, in der
eine Funktion arbeitet, verbessern könnte.
Diese Aktualisierungen stehen kostenlos zur
Verfügung.
• Informationen über die Aktualisierung finden
Sie auf der folgenden Website.
www.technics.com/support/firmware/
Das Herunterladen dauert ca. 3 Minuten.
Ziehen Sie während der Aktualisierung
nicht das Netzkabel und versetzen Sie das
Gerät nicht in den Standby-Modus.
Trennen Sie den USB-Flash-Speicher
während der Aktualisierung nicht vom
Gerät.
• Der Vorgang wird als “Updating
angezeigt, während die Aktualisierung
erfolgt. (“ ” steht für eine Zahl.)
Hinweis
• Während des Update-Prozesses können keine
anderen Vorgänge ausgeführt werden.
• Wenn keine Updates zur Verfügung stehen,
wird “Firmware is Up To Date” angezeigt.
(Muss nicht aktualisiert werden.)
• Die Einstellungen können durch eine
Aktualisierung der Firmware zurückgesetzt
werden.
%”
■ Vorbereitung
• Laden Sie die neueste Version der Firmware
herunter und speichern Sie sie auf dem USBFlash-Speicher. Weitere Details finden Sie auf
der folgenden Website.
www.technics.com/support/firmware/
1 Verbinden Sie den USB-Flash-Speicher
mit der neuen Firmware.
2 Drücken Sie [AMP].
3 Drücken Sie [SETUP].
4 Drücken Sie [
“F/W Update” auszuwählen, und
drücken Sie danach [OK].
5 Drücken Sie [
“Yes” und drücken Sie danach [OK].
• Der Vorgang wird als “Updating %”
angezeigt, während die Aktualisierung
erfolgt. (“ ” steht für eine Zahl.)
• Nachdem das Update erfolgreich beendet
wurde, wird “Success” angezeigt.
], [ ] wiederholt, um
], [ ] zur Auswahl von
Deutsch
6 Stecken Sie das Netzkabel und den
USB-Flash-Speicher aus und stecken
Sie beide nach 3 Minuten wieder ein.
Hinweis
• Das Herunterladen könnte je nach USB-Flash-
Speicher länger dauern.
• Verwenden Sie einen USB-Flash-Speicher mit
FAT16- oder FAT32-Format.
• Der UPDATE-Anschluss dient nur für Firmware-
Aktualisierungen. Schließen Sie für die
Aktualisierung der Firmware keine anderen
USB-Geräte als USB-Flash-Speicher an.
• Über den UPDATE-Anschluss dieses Geräts
können keine USB-Geräte aufgeladen werden.
Einstellungen
(57)
27
Page 58

Einstellungen
Systemsteuerverbindung
Sie können dieses Gerät und die Systemsteuerfunktion für
Technics-Geräte (Netzwerk-Audio-Player, CD-Player usw.)
gleichzeitig mit der Fernbedienung bedienen.
Weitere Details finden Sie in der Bedienungsanleitung des
Geräts.
Systemverbindungskabel
Netzwerk-Audio-Player usw.
Verwendung des
Systemverbindungs- und
Audiokabels
1 Ziehen Sie das Netzkabel.
2 Verbinden Sie dieses Gerät mit der
Systemsteuerfunktion für TechnicsGeräte (Netzwerk-Audio-Player usw.).
• Verwenden Sie das Systemverbindungskabel
und das Audiokabel, wenn Sie die Geräte
verbinden.
• Verwenden Sie das Systemverbindungskabel,
das mit dem angeschlossenen Gerät
mitgeliefert wurde.
3 Schließen Sie das Netzkabel an dieses
Gerät an. ( 15)
4
Drücken Sie [AMP
einzuschalten.
5 Drücken Sie [AMP].
6 Drücken Sie [SETUP].
(58)
28
], um dieses Gerät
Koaxiales Digitalkabel
(nicht mitgeliefert)
*
7 Drücken Sie [ ], [ ] wiederholt, um
“System Control” auszuwählen, und
drücken Sie danach [OK].
8 Drücken Sie [
], [ ], um die
Eingangsquelle für das in Schritt 2
angeschlossene Gerät zu wählen, und
drücken Sie danach [OK].
• Wählen Sie “Off”, um die
Systemsteuerfunktion zu deaktivieren.
: Die Abbildung zeigt die Verbindung mit einem
*
Koaxial-Digitalkabel als Beispiel. Verwenden
Sie das/den zum Gerät passende/n Kabel/
Anschluss.
Hinweis
• Wählen Sie “LINE2” ( 19) als
Eingangsmodus-Einstellung dieses Geräts,
um die Systemsteuerfunktion für TechnicsGeräte zu verwenden, die an die analogen
Eingangsanschlüsse (LINE2 IN/MAIN IN)
angeschlossen sind.
• Wenn “MAIN IN” ( 20) als Eingangsquelle
dieses Geräts ausgewählt ist, ist die
Systemsteuerfunktion für Technics-Geräte an
den analogen Eingangsanschlüssen (LINE2 IN/
MAIN IN) deaktiviert.
Page 59

Deutsch
Einschalten dieses und des
angeschlossenen Geräts
• Wenn Sie die Fernbedienung auf dieses Gerät
richten und die Taste [AMP
sich dieses und das angeschlossene Gerät im
Standby-Modus befinden, werden dieses Gerät
und das auf “System Control” gestellte Gerät an
der ausgewählten Eingangsquelle gleichzeitig
eingeschaltet.
• Wenn Sie die Fernbedienung auf dieses Gerät
richten und die Taste [AMP ] drücken,
wenn dieses und das angeschlossene Gerät
eingeschaltet sind, wechseln dieses und das
angeschlossene Gerät in den Standby-Modus.
• Sie können auch zwischen diesem und dem
angeschlossenen Gerät wechseln, indem Sie die
Standby-/Ein-Taste an diesem Gerät drücken.
] drücken, wenn
Automatisches Wechseln der
Eingangsquelle für dieses Gerät
Wenn Sie eine Aktion, z. B. Wiedergabe, auf
dem angeschlossenen Gerät ausführen, wechselt
die Eingangsquelle dieses Geräts automatisch
zu der Quelle, die mit der “System Control”
eingestellt wird.
Einstellungen
(59)
29
Page 60

Fehlerbehebung
Vor dem Kundendienstruf kontrollieren Sie Folgendes. Wenn Sie bei einigen Kontrollpunkten Zweifel
haben oder die in Ihrer Betriebsanleitung aufgeführten Angaben Ihr Problem nicht lösen können,
wenden Sie sich an Ihren Händler.
Wärmeentwicklung dieses Geräts
Bei hoher Lautstärke wird dieses Gerät warm.
Dies ist keine Störung.
Haben Sie die neueste Firmware
installiert?
Panasonic verbessert ständig die Firmware
des Geräts, um zu gewährleisten, dass unsere
Kunden in den Genuss der modernsten
Technologie kommen. ( 27)
So setzen Sie alle Einstellungen
auf die werksseitigen
Standardeinstellungen zurück.
Setzen Sie den Speicher in den folgenden Fällen
zurück:
• Bei Drücken der Tasten erfolgt keine Reaktion.
• Sie möchten den Speicherinhalt löschen und
zurücksetzen.
1 Drücken Sie [AMP].
2 Drücken Sie [SETUP].
3 Drücken Sie [
“Initialization” auszuwählen, und
drücken Sie danach [OK].
• Alle Einstellungen werden auf die
werksseitigen Standardeinstellungen
zurückgesetzt. Die Speicherelemente müssen
erneut eingestellt werden.
], [ ] wiederholt, um
Allgemeines
Das Gerät funktioniert nicht.
Das Gerät wurde nicht ordnungsgemäß
bedient.
• Evtl. wurde eine der Sicherheitsvorrichtungen
des Geräts aktiviert.
Drücken Sie auf dem Gerät die Taste [ ], um
es in den Standby-Modus zu versetzen.
• Wenn das Gerät nicht zum Standby-Modus
wechselt, ziehen Sie das Netzkabel, warten
Sie mindestens 3 Minuten und schließen Sie
es dann erneut an.
Drücken Sie zum Einschalten des Geräts die
Taste [
betrieben werden kann, wenden Sie sich an
einen Fachhändler.
Während der Wiedergabe ist ein
“IBrummton” zu hören.
• Ein Netzkabel oder eine Leuchtstoffröhre
befindet sich in der Nähe der Kabel. Halten Sie
andere Elektrogeräte und Kabel von den Kabeln
dieses Geräts fern.
• Ein starkes Magnetfeld in der Nähe eines TV-
Geräts oder eines anderen Geräts kann die
Audioqualität beeinträchtigen. Halten Sie dieses
Gerät von solchen Geräten fern.
• Die Lautsprecher können Rauschen ausgeben,
wenn ein Gerät in der Nähe starke Radiowellen
ausgibt, wie beispielsweise wenn auf einem
Mobiltelefon ein Anruf aktiv ist.
]. Wenn das Gerät immer noch nicht
4 Drücken Sie [ ], [ ], um “Yes”
auszuwählen, und drücken Sie danach
[OK].
5 Drücken Sie [
], [ ], um “Yes”
auszuwählen, und drücken Sie danach
erneut [OK].
(60)
30
Page 61

Kein Ton.
• Überprüfen Sie die Lautstärke des Geräts.
• Überprüfen Sie die Anschlüsse der Lautsprecher
und anderen Geräte.
• Schließen Sie die Lautsprecher an und messen
Sie das Ausgangssignal des Verstärkers. ( 26)
• Überprüfen Sie die Impedanz der
angeschlossenen Lautsprecher.
• Überprüfen Sie, ob die korrekte Eingabequelle
ausgewählt ist.
• Setzen Sie die Stecker der zu verbindenden
Kabel vollständig ein.
• Bestätigen Sie die Einstellung der Sound-
Ausgabe. (Wenn “PRE OUT” auf “On
(Speaker:Off)” gestellt ist, wird kein Sound
über die Lautsprecher an den LautsprecherAusgangsanschlüssen ausgegeben.) ( 22)
• Die Wiedergabe von Mehrkanal-Inhalten wird
nicht unterstützt.
• Die digitalen Audio-Eingangsanschlüsse an
diesem Gerät können nur lineare PCM-Signale
erkennen. Weitere Details finden Sie in der
Bedienungsanleitung des Geräts.
Der Klang ist verzerrt.
• Wenn Sie “Attenuator” auf “On” stellen, kann
dies je nach dem analogen Audioeingang die
Verzerrung minimieren. ( 18, 19, 21)
• Das Einstellen des Dämpfungselements ist nicht
verfügbar für das Ausgangs-Audiosignal vom
LINE OUT-Anschluss.
Die Lautstärke wird automatisch geändert.
• Wenn die Lautstärke beim Wechsel der
Eingangsquelle zu “LINE2” oder einer anderen
Quelle über “MAIN IN” höher als die vorherige
Stufe ist, wird sie automatisch angepasst. (Der
Lautstärkeregler dreht sich automatisch.) ( 20)
Das Gerät wechselt automatisch in den
Standby-Modus.
• Ist die Auto-Aus-Funktion aktiviert? ( 25)
• Dieses Gerät ist mit einer Schutzschaltung
ausgestattet, um Schäden durch Hitzebildung
vorzubeugen. Bei langer Verwendung des
Geräts mit hoher Lautstärke schaltet es sich
möglicherweise automatisch aus. Warten Sie,
bis sich das Gerät abgekühlt hat, bevor Sie es
erneut einschalten. (Etwa 3 Minuten lang)
Die Einstellungen werden auf die
werksseitigen Standardeinstellungen
zurückgesetzt.
• Die Einstellungen können durch eine
Aktualisierung der Firmware zurückgesetzt
werden.
Der Spitzenleistungsmesser funktioniert nicht.
• In den folgenden Fällen funktioniert dieser
Messer nicht:
- Wenn der Kopfhörer angeschlossen ist.
- Wenn das Spitzenleistungsmesser-Licht durch
Drücken von [DIMMER] ausgeschaltet wird.
- Wenn dieses Gerät durch Drücken von
[MUTE] stummgeschaltet wurde.
- Wenn “PRE OUT” auf “On (Speaker:Off)”
( 22) eingestellt ist.
Die Systemsteuerfunktion funktioniert nicht.
• Verwenden Sie das Systemverbindungskabel,
das mit dem angeschlossenen Gerät
mitgeliefert wurde.
• Verbinden Sie das Systemverbindungskabel mit
den Systemanschlüssen (CONTROL). ( 28)
• Überprüfen Sie die Verbindung des
Systemverbindungskabels, Audiokabels und
der Eingangsquelle, die mit “System Control”
eingestellt wird. ( 28)
• Verbinden Sie die Systemsteuerfunktion für
Technics-Geräte (Netzwerk-Audio-Player, CDPlayer usw.) mit diesem Gerät. Weitere Details
finden Sie auf der folgenden Website.
www.technics.com/support/
PC
Der PC erkennt dieses Gerät nicht.
• Überprüfen Sie Ihre Betriebsumgebung. ( 17)
Starten Sie den PC neu, versetzen Sie dieses
•
Gerät in den Standby-Modus und schalten Sie es
ein, dann stecken Sie das USB-Kabel wieder ein.
• Verwenden Sie einen anderen USB-Anschluss
am verbundenen PC.
• Installieren Sie den speziellen USB-Treiber, wenn
Sie einen PC mit Windows verwenden. ( 17)
Fernbedienung
Die Fernbedienung funktioniert nicht richtig.
• Die Batterien sind leer oder falsch eingesteckt.
( 12)
• Um Interferenzen zu vermeiden, stellen Sie
keine Objekte vor den Signalsensor. ( 10)
• Ändern Sie den Fernbedienungscode, wenn
andere Geräte auf diese Fernbedienung
reagieren. ( 13)
Deutsch
Fehlerbehebung
(61)
31
Page 62

Fehlerbehebung
Meldungen
ATTENTION : MAX Output Setting
• Während der Verwendung dieses Geräts als
Endstufe ist die Lautstärkeregelung mit diesem
Gerät deaktiviert.
• Verstellen Sie die Lautstärke nach und nach mit
dem angeschlossenen Gerät. ( 20)
AUTO OFF
• Das Gerät war seit 20 Minuten außer Betrieb
und wird sich innerhalb einer Minute
abschalten. Drücken Sie zum Abbrechen eine
beliebige Taste. ( 25)
Connect USB Device
• Der Firmware-Download ist fehlgeschlagen.
• Laden Sie die neueste Version der Firmware
herunter, speichern Sie sie auf dem USB-FlashSpeicher und versuchen Sie es erneut. ( 27)
Disconnect PHONES
• Wenn ein Kopfhörer angeschlossen ist, wird
die Messung des Verstärker-Ausgangssignals
(LAPC) nicht gestartet.
• Lösen Sie die Kopfhörer.
• Wenn Sie während der Messung des
Verstärkersignals oder der Korrektur
der Verstärkerausgabe einen Kopfhörer
anschließen, wird der Vorgang abgebrochen.
( 26)
” (“ ” steht für eine Zahl.)
“F
• Es liegt ein Problem mit diesem Gerät vor.
- Ist die Lautstärke extrem hoch?
Verringern Sie in diesem Fall die Lautstärke.
- Befindet sich dieses Gerät an einem
besonders warmen Ort?
In diesem Fall bringen Sie das Gerät an
einen kühleren Ort, warten eine Weile und
versuchen dann, es wieder einzuschalten.
Wenn das Problem weiterhin besteht, notieren
Sie die angezeigte Nummer, trennen das
Netzkabel ab und wenden sich an Ihren Händler.
Load Fail
• Die Firmware auf dem USB-Flash-Speicher kann
nicht gefunden werden.
• Laden Sie die neueste Version der Firmware
herunter, speichern Sie sie auf dem USB-FlashSpeicher und versuchen Sie es erneut. ( 27)
No Device
• USB-Flash-Speicher mit neuer Firmware ist nicht
angeschlossen.
Verbinden Sie den USB-Flash-Speicher mit der
neuen Firmware. ( 27)
Not Measured
• Die Messung des Ausgangssignals für die
Ausgangskorrekturfunktion (LAPC) wurde noch
nicht durchgeführt.
• Messen Sie das Ausgangssignal. ( 26)
Not Valid
• Die Funktion, die Sie verwenden möchten,
ist mit den derzeitigen Einstellungen nicht
verfügbar. Überprüfen Sie die Schritte und
Einstellungen.
PHONES Connected
• Der Kopfhörer ist angeschlossen.
• Der Sound wird nicht über die Kopfhörerbuchse
und die Lautsprecher-Ausgangsanschlüsse
ausgegeben, wenn der Kopfhörer
angeschlossen und “MAIN IN” als Eingabequelle
dieses Geräts ausgewählt ist. ( 20)
“Remote
• Die Fernbedienung und das Gerät verwenden
unterschiedliche Codes.
Ändern Sie den Code an der Fernbedienung. ( 13)
Signal Overflow
• Der Klang über die verwendeten analogen
Audioeingänge ist verzerrt. Wählen Sie
entsprechend den ausgewählten analogen
Audioeingang “Attenuator” aus und ändern
Sie die Einstellung des Dämpfungselements zu
“On”. ( 19)
Unlocked
• “COAX1”, “COAX2”, “OPT1”, “OPT2” oder
“PC” ist ausgewählt, aber es ist kein Gerät
angeschlossen. Überprüfen Sie die Verbindung
mit dem Gerät. ( 16, 17)
• Die Abtastratenkomponenten, usw. der
Audiosignale werden nicht korrekt eingegeben.
- Informationen zum unterstützten Format
finden Sie unter “Formatunterstützung”.
( 35)
USB Over Current Error
Das USB-Gerät nimmt zu viel Strom auf.
• Trennen Sie das USB-Gerät und schließen Sie es
wieder an. ( 27)
• Versetzen Sie das Gerät in den Standby-Modus
und schalten Sie es dann wieder ein.
VOLUME
• Wenn die Eingangsquelle zu “LINE2” oder einer
anderen Quelle über “MAIN IN” gewechselt
wird, wird die Lautstärke nach dem Umschalten
der Eingangsquelle angezeigt.
• Bestätigen und verstellen Sie die Lautstärke,
bevor Sie [OK] drücken.
” (“ ” steht für eine Zahl.)
OK (“ ” steht für eine Zahl.)
32
(62)
Page 63

Sonstige
Gerätepflege
• Stecken Sie vor der Wartung das Netzkabel
aus der Netzsteckdose aus. Reinigen Sie dieses
Gerät mit einem weichen Tuch.
• Wenn der Schmutz hartnäckig ist, wringen Sie
ein nasses Tuch gründlich aus, um den Schmutz
abzuwischen, und trocknen Sie es mit einem
weichen Tuch ab.
• Verwenden Sie keine Lösungsmittel wie Benzin,
Verdünner, Alkohol, Haushaltsreiniger, einen
chemischen Wischer usw. Diese könnten dazu
führen, dass sich das äußere Gehäuse verformt
oder die Beschichtung abblättert.
Entsorgung oder Weitergabe dieses
Geräts
• Dieses Gerät kann private Angaben enthalten.
Führen Sie vor der Entsorgung oder Weitergabe
des Geräts Folgendes durch, um die Daten,
einschließlich persönlicher und geheimer
Angaben, zu löschen.
• “So setzen Sie alle Einstellungen auf die
werksseitigen Standardeinstellungen zurück.”
( 30)
Entsorgung von Altgeräten und Batterien
Nur für die Europäische Union und Länder mit Recyclingsystemen
Dieses Symbol, auf den Produkten, der Verpackung und/oder den Begleitdokumenten,
bedeutet, dass gebrauchte elektrische und elektronische Produkte sowie Batterien nicht in den
allgemeinen Hausmüll gegeben werden dürfen.
Bitte führen Sie alte Produkte und verbrauchte Batterien zur Behandlung, Aufarbeitung bzw.
zum Recycling gemäß den gesetzlichen Bestimmungen den zuständigen Sammelpunkten zu.
Indem Sie diese Produkte und Batterien ordnungsgemäß entsorgen, helfen Sie dabei,
wertvolle Ressourcen zu schützen und eventuelle negative Auswirkungen auf die menschliche
Gesundheit und die Umwelt zu vermeiden.
Für mehr Informationen zu Sammlung und Recycling, wenden Sie sich bitte an Ihren örtlichen
Abfallentsorgungsdienstleister.
Gemäß Landesvorschriften können wegen nicht ordnungsgemäßer Entsorgung dieses Abfalls
Strafgelder verhängt werden.
Deutsch
Hinweis für das Batteriesymbol (Symbol unten):
Dieses Symbol kann in Kombination mit einem chemischen Symbol abgebildet sein. In diesem
Fall erfolgt dieses auf Grund der Anforderungen derjenigen Richtlinien, die für die betreffende
Chemikalie erlassen wurden.
Fehlerbehebung / Sonstige
(63)
33
Page 64

Sonstige
Technische Daten
■ ALLGEMEIN
Spannungsversorgung
Stromverbrauch 85 W
Stromverbrauch im
Standby-Modus
Abmessungen
(B×H×T)
Gewicht Ca. 12,3 kg
Betriebstemperaturbereich
Betriebsfeuchtigkeitsbereich
■ ABSCHNITT VERSTÄRKER
Ausgangsleistung
Lastimpedanz 4 bis 16
Frequenzantwort
PHONO (MM)
LINE
DIGITAL
Eingangsempfindlichkeit/
Eingangsimpedanz
PHONO (MM) 2,5 mV / 47 k
LINE 200 mV / 22 k
220 V bis 240 V
Wechselstrom, 50/60 Hz
Ca. 0,3 W
430 mm × 148 mm ×
428 mm
0 °C bis 40 °C
35 % bis 80 % Rel.
Feuchte
(keine Kondensbildung)
70 W + 70 W
(1 kHz, T.H.D. 0,5 %, 8 ,
20 kHz LPF)
140 W + 140 W
(1 kHz, T.H.D. 0,5 %, 4 ,
20 kHz LPF)
20 Hz bis 20 kHz
(RIAA DEVIATION ±1 dB,
8 )
5 Hz bis 80 kHz
(-3 dB, 8 )
5 Hz bis 90 kHz
(-3 dB, 8 )
■ ABSCHNITT ANSCHLÜSSE
Kopfhöreranschluss
PC
Analogeingang
LINE IN ×2 Klinkenbuchse
PHONO (MM) Klinkenbuchse
Digitaleingang
OPT IN ×2 Optischer Anschluss
COAX IN ×2 Klinkenbuchse
Formatunterstützung
Analoger Ausgang
LINE OUT Klinkenbuchse
PRE OUT Klinkenbuchse
Systemanschluss
Systemsteuerung 3,5 mm, Buchse
Stereo, 6,3 mm
0,75 mW, 32
USB-Anschluss
Typ B HINTEN
LPCM
■ ABSCHNITT FORMAT
USB-B
USB 2.0 High-speed
USB-Standard
DSD-Steuermodus
USB-Audio-Klasse 2.0,
Asynchronmodus
Nativer ASIO-Modus,
DoP-Modus
34
(64)
Page 65

■ Formatunterstützung
Dieses Gerät unterstützt die folgenden Formate.
• Die Wiedergabe aller Formate, die von diesem Gerät unterstützt werden, kann nicht garantiert werden.
• Die Wiedergabe eines Formats, das von diesem Gerät nicht unterstützt wird, kann zu abgehacktem Audio
oder zu Rauschen führen. Überprüfen Sie in solchen Fällen, ob dieses Gerät das Format unterstützt.
• Die von diesem Gerät und von der Wiedergabe-Software angezeigten Dateiinformationen (Abtastfrequenz,
usw.) können sich voneinander unterscheiden.
PC (USB-B)
Dateiformat Abtastrate
PCM 32/44,1/48/88,2/96/176,4/192/352,8/384 kHz 16/24/32 Bit
DSD 2,8 MHz/5,6 MHz/11,2 MHz
: Wenn Sie die spezielle App herunterladen und installieren, können Sie Dateien in vielen verschiedenen
*
Formaten wiedergeben. ( 17)
Detaillierte Informationen finden Sie in der Bedienungsanleitung der App.
Hinweis
• Die technischen Daten können ohne Benachrichtigung geändert werden.
• Gewicht und Maße sind ungefähre Werte.
• DSD ist eine Marke der Sony Corporation.
*
Bitrate /
Anzahl der Quantisierungsbits
Deutsch
Sonstige
(65)
35
Page 66

Merci d’avoir porté votre choix sur cet appareil.
Veuillez lire attentivement les présentes instructions avant d’utiliser ce produit, et conserver ce manuel pour
utilisation ultérieure.
• A propos des descriptions dans ce mode d’emploi
- Les pages à consulter sont désignées par le signe “ ○○”.
- Les illustrations montrées peuvent être différentes de votre appareil.
Caractéristiques
Utilisation de technologies audio
de haute qualité incluant le circuit
numérique JENO et LAPC
Le moteur JENO transmet et traite les signaux
audio totalement en numérique et avec une
instabilité minimale, depuis l’étage d’entrée
jusqu’à l’étage de puissance. Le LAPC dirige
l’étalonnage de la phase adaptative de la charge
du haut-parleur afin d’obtenir un gain et des
spécifications de phase idéaux pour tout type de
haut-parleur. En outre, un circuit de conversion
PWM unique, de haute précision, est utilisé pour
la conversion PWM, importante pour la qualité
du son.
Configuration à trois sections
Les amplificateurs intégrés comprennent
différents circuits, par exemple des circuits
traitant les micro-signaux d’entrée, des circuits
traitant un courant élevé, etc. Le SU-G700
possède une conception à trois sections avec
des partitions installées entre les blocs de circuits
selon le niveau de signal traité. Cela élimine les
interférences entre les blocs de circuits et offre
donc une qualité claire de son.
Pièces d’enceinte de haute qualité
Le double châssis métallique haute rigidité
présente un châssis intérieur en acier et un
châssis extérieur en acier pour réduire les
vibrations et le bruit, qui détériorent la pureté du
son.
06
(66)
Page 67

Table des matières
Consignes de sécurité 08
Guide de référence de la commande
10
Connexions 14
Commandes 16
Paramètres 24
Guide de dépannage 30
Autres 33
Veuillez lire attentivement les “Consignes de
sécurité” de ce manuel avant utilisation.
Cet appareil, Télécommande
Connexion de l’enceinte, connexion du câble
d’alimentation secteur
Lecture d’appareils connectés
Autres réglages, Utilisation de la fonction de
correction de sortie (LAPC)
Avant de faire appel à l’assistance, lisez la
section Dépannage.
Caractéristiques, etc.
Accessoires
Cordon d’alimentation secteur (2)
Sauf pour la Suisse
K2CM3YY00041
Pour la Suisse
K2CS3YY00033
• Les numéros de produit fournis dans ces instructions d’utilisation sont exacts à partir de février 2017.
• Sous réserve de modifications.
• N’utilisez pas de cordon d’alimentation avec d’autres appareils.
Télécommande (1)
N2QAYA000143
Piles pour la télécommande (2)
Français
(67)
07
Page 68

Consignes de sécurité
Avertissement
Appareil
• Pour réduire les risques d’incendie,
d’électrocution ou de dommages au produit,
- N’exposez pas cet appareil à la
pluie, l’humidité, l’égouttement ou
l’éclaboussement.
- Ne placez pas d’objets remplis d’eau, tels que
des vases, sur l’appareil.
- Utiliser exclusivement les accessoires
préconisés.
- Ne retirez pas les caches.
- Ne réparez pas l’appareil vous-même. Confiez
l’entretien a un personnel qualifié.
- Ne laissez pas d’objets métalliques tomber
dans cet appareil.
- Ne pas placer d’objets lourds sur cet appareil.
Cordon d’alimentation secteur
• Pour réduire les risques d’incendie,
d’électrocution ou de dommages au produit,
- Assurez-vous que la tension d’alimentation
électrique correspond à la tension inscrite sur
l’appareil.
- Branchez la prise secteur dans la prise
électrique.
- Ne pas tirer, plier ou placer des objets lourds
sur le cordon.
- Ne manipulez pas la prise avec les mains
mouillées.
- Tenez le corps de la prise secteur en la
débranchant.
- N’utilisez pas de prise secteur ni de prise de
courant endommagée.
• La fiche secteur est le dispositif de
déconnexion.
Installez cet appareil de sorte que la fiche
secteur puisse être débranchée immédiatement
de la prise de courant.
• Assurez-vous que la broche de terre de la prise
secteur est connectée de manière sécurisée
pour éviter tout risque d’électrocution.
- Un appareil de construction de CLASSE I doit
être raccordé à une prise secteur équipée
d’une protection par mise à la terre.
Attention
Appareil
• Ne placez pas de sources de flammes vives
telles que des bougies allumées sur cet appareil.
• Cet appareil peut être perturbé par des
interférences causées par des téléphones
mobiles pendant l’utilisation. En présence de
telles interférences, éloignez le téléphone
mobile de cet appareil.
• Cette unité est destinée aux climats tempérés et
tropicaux.
• Ne posez aucun objet sur cet appareil. Cet
appareil chauffe lorsqu’il est en marche.
• Ne touchez pas la surface supérieure de cette
unité. Cette unité chauffe lorsqu’elle est en
marche.
Emplacement
• Placez cet appareil sur une surface plane.
• Pour réduire les risques d’incendie,
d’électrocution ou de dommages au produit,
- N’installez pas et ne placez pas cet appareil
dans une bibliothèque, un placard ni dans
aucun autre espace réduit. Assurez-vous que
l’appareil est bien ventilé.
- Ne bouchez pas les ouvertures d’aération
de cet appareil avec des journaux, nappes,
rideaux ou objets similaires.
N’exposez pas cet appareil directement aux
rayons du soleil, à des températures élevées, à une
humidité élevée ni à des vibrations excessives.
• Assurez-vous que l’emplacement est assez
solide pour supporter le poids de cet appareil
( 34).
• Ne pas soulever ou transporter cet appareil
en le tenant par les boutons. L’unité pourrait
sinon chuter et provoquer des blessures ou son
dysfonctionnement.
08
(68)
Page 69

Pile
Il y a un danger d’explosion si la pile n’est pas
•
correctement remplacée. Remplacez uniquement
par le type recommandé par le fabricant.
•
Manipuler de façon incorrecte les piles peut causer
une fuite d’électrolyte ainsi qu’un incendie.
- Retirez la batterie si vous n’avez pas l’intention
d’utiliser la télécommande pendant un long
moment. Rangez-la dans un endroit frais et
sombre.
- Ne chauffez pas et n’exposez pas les piles à
une flamme.
- Ne laissez pas la (les) pile(s) dans un véhicule
exposé directement aux rayons du soleil
pendant un long moment avec fenêtres et
portières fermées.
- Ne pas démonter ou court-circuiter les piles.
- Ne rechargez pas des piles alcalines ou au
manganèse.
- Ne pas utiliser des piles dont le revêtement a
été enlevé.
- Ne mélangez pas les anciennes piles avec les
piles neuves ou différents types de piles.
• Pour jeter les piles, veuillez contacter les
autorités locales ou votre revendeur afin de
connaître la procédure d’élimination à suivre.
Installation
Eteignez tous les appareils avant le branchement
et lisez le mode d’emploi approprié.
Français
Consignes de sécurité
(69)
09
Page 70

Guide de référence de la commande
Cet appareil
01 Bouton Veille/Marche ( )
• Appuyez pour faire passer l’unité de la
marche à l’état de veille, ou inversement.
Même en veille, cette unité consomme une
petite quantité de courant.
02 Voyant d’alimentation
• Bleu : L’unité est allumée.
• Éteint : L’appareil est en mode de veille.
03 Prise pour casque
• Lorsqu’une fiche est branchée, les enceintes
et les bornes PRE OUT n’émettent pas de
son. ( 22)
• Le son ne sort pas de la prise du casque si
“MAIN IN” est sélectionné comme source
d’entrée de cet appareil. ( 20)
• Une pression acoustique excessive provenant
des écouteurs ou d’un casque peut entraîner
une perte de l’ouïe.
• Une écoute prolongée au volume maximal
peut endommager les oreilles de l’utilisateur.
06 Sélecteur d’entrée
• Tournez ce bouton dans le sens horaire ou
antihoraire pour changer la source d’entrée.
07 Compteur de puissance de crête
• Pour afficher le niveau de sortie. 100 %
représente la puissance de sortie ( 34).
• Le compteur de puissance de crête ne
fonctionne pas lorsque l’éclairage est éteint.
08 Indicateur LAPC ( 26)
09 Capteur du signal de la télécommande
• Distance : Environ dans un rayon de 7 m
directement vers l’avant
• Angle : Environ 30° à gauche et à droite
04 Bouton du volume
• -- (min), 1 à 100 (max)
• Pour afficher le volume, réglez “VOLUME
Display” sur “On”. ( 25)
05 Affichage
• Des informations comme la source d’entrée,
etc., s’affichent. ( 32)
(70)
10
Page 71

10 Borne USB-B
• Pour raccorder un ordinateur, etc. ( 17)
11 Bornes d’entrée optique numérique
(OPT1 IN/OPT2 IN) ( 16)
12 Borne UPDATE (USB-A)
5 V c.c. 500 mA) ( 27)
(
13 Bornes d’entrée numérique coaxiale
(COAX1 IN/COAX2 IN) ( 16)
14 Borne du système (CONTROL) ( 28)
15 Bornes de sortie des enceintes ( 14)
16 Prise PHONO EARTH ( 18)
• Pour le branchement du fil de terre d’une
platine.
17 Bornes d’entrée audio analogique
(PHONO) ( 18)
• Prise en charge des cartouches MM.
19 Bornes d’entrée audio analogique
(LINE1 IN) ( 19)
20 Bornes de sortie audio analogique
(LINE OUT) ( 23)
21 Bornes de sortie audio analogique
(PRE OUT) ( 22)
22 Marquage d’identification du produit
• Le numéro de modèle est indiqué.
23 Prise AC IN (
) ( 15)
Français
18 Bornes d’entrée audio analogique
(LINE2 IN/MAIN IN)
• Ces bornes d’entrée sont combinées à LINE2
et à MAIN IN. Pour commuter la fonction
selon l’équipement connecté. ( 19, 20)
Guide de référence de la commande
(71)
11
Page 72

Guide de référence de la commande
Télécommande
Utiliser la télécommande
2
1
R03/LR03, AAA
(Piles alcalines ou au manganèse)
Remarque
• Insérez la pile de façon à ce que ses pôles (
) correspondent à ceux de la télécommande.
• Pointez-la vers la cellule de réception du signal
de commande à distance sur cette unité. ( 10)
• Gardez les piles hors de portée des enfants
pour éviter qu’ils les avalent.
(72)
12
et
01 [AMP
• Appuyez pour faire passer l’unité de la
marche à l’état de veille, ou inversement.
Même en veille, cette unité consomme une
petite quantité de courant.
02 [AMP]/[NWP]/[CD] : Pour sélectionner le
périphérique à utiliser
03 [>INPUT<] : Pour changer la source
d’entrée ( 16, 17, 18, 19, 20)
] : Bouton Veille/Marche
Page 73

04 [MENU] : Pour accéder au menu
( 18, 19, 20, 21)
05 [SETUP] : Pour accéder au menu de
configuration ( 24)
06 [LAPC] : Mesure le signal de sortie de
l’amplificateur et corrige sa sortie ( 26)
07 [+VOL-] : Règle le volume
• -- (min), 1 à 100 (max)
08 [MUTE] : Option muet
• Appuyez de nouveau sur [MUTE] pour
annuler. “MUTE” est également annulé
lorsque vous réglez le volume avec cet
appareil ou mettez l’appareil en veille.
09 [DIMMER] : Pour régler la luminosité de
l’éclairage du compteur de puissance de
crête, de l’écran, etc.
• Lorsque l’écran est éteint, il ne s’allume que
lorsque vous faites fonctionner cette unité.
Avant que l’écran ne s’éteigne à nouveau,
“Display Off” est affiché pendant quelques
secondes.
• Appuyez plusieurs fois pour changer la
luminosité.
• Le compteur de puissance de crête ne
fonctionne pas lorsque l’éclairage est éteint.
10 [INFO] : Pour afficher les informations du
contenu
• Appuyez sur ce bouton pour afficher la
fréquence d’échantillonnage et d’autres
informations. (Les informations varient en
fonction de la source d’entrée).
11 [
12 [RETURN] : Pour retourner à l’affichage
précédent
: Commencez par appuyer sur [AMP] pour
*
utiliser cette unité. (Lorsque vous appuyez sur
[NWP] ou sur [CD], la télécommande peut
fonctionner pour d’autres appareils Technics
et pas pour cette unité.)
*
], [ ], [ ], [ ]/[OK] : Sélection/OK
*
*
*
*
■ Boutons fonctionnant pour des dispositifs
Technics prenant en charge la fonction de
contrôle du système
La télécommande de cet appareil fonctionne
également pour les dispositifs Technics prenant
en charge la fonction de contrôle du système
(lecteur audio réseau, lecteur de disque
compact, etc.). Pour plus d’informations sur
le fonctionnement des dispositifs, veuillez
également vous reporter à leurs instructions
d’utilisation.
[ ] Commutateur Veille/Marche pour le
02
lecteur audio réseau
Pour sélectionner le périphérique à utiliser
03
Pour sélectionner la source d’entrée du
04
lecteur audio réseau
Active/désactive le mode Direct
05
Active/désactive Re-master
06
Touches de contrôle de base de la lecture
07
Touches numériques, etc.
08
Touches de contrôle de base de la lecture
09
Code de la télécommande
Si un autre équipement répond à la
télécommande fournie, changez le code de la
télécommande.
• Le mode d’usine par défaut est “Mode 1”.
1 Appuyez sur [AMP].
2 Appuyez sur [SETUP].
3 Appuyez sur [
], [ ] de façon répétée
pour choisir “Remote Control” puis
appuyez sur [OK].
• Le code actuel de la télécommande de
cet appareil est affiché pendant quelques
secondes.
4 Lorsque “Set Mode 1/2” est
affiché, paramétrez le code de la
télécommande.
Pour paramétrer le “Mode 1” :
Maintenez enfoncé [OK] et [1] pendant au
moins 4 secondes.
Pour paramétrer le “Mode 2” :
Maintenez enfoncé [OK] et [2] pendant au
moins 4 secondes.
5 Pointez la télécommande vers cette
unité et maintenez enfoncé [OK]
pendant au moins 4 secondes.
• Lorsque le code de la télécommande est
changé, le nouveau code est indiqué sur
l’afficheur pendant quelques secondes.
■ Lorsque “Remote 1” ou “Remote 2” est
affiché
Lorsque “Remote 1” ou “Remote 2” est affiché,
les codes de télécommande de cette unité et
de la télécommande sont différents. Effectuez
l’étape 3 ci-dessus.
Français
[ ] Commutateur Veille/Marche pour le
01
lecteur de disque compact
Guide de référence de la commande
(73)
13
Page 74

Connexions
Enceintes/cordon d’alimentation secteur
• N’utilisez que le cordon d’alimentation secteur fourni.
• Ne branchez pas le cordon d’alimentation secteur avant que les autres raccordements soient
effectués.
• Insérez les connecteurs des câbles à raccorder complètement.
• Ne pliez pas les câbles trop abruptement.
• Afin d’optimiser la sortie audio, vous pouvez évaluer le signal de sortie de l’amplificateur et
corriger sa sortie lorsqu’il est connecté aux enceintes. ( 26)
Câble d’enceinte (non fourni)
Connexion de l’enceinte
1 Tournez les boutons pour les desserrer
et insérez les fils conducteurs dans les
trous.
2 Serrez les boutons.
Remarque
• Une fois les raccordements effectués, tirez
légèrement sur les câbles d’enceinte pour
vérifier qu’ils sont solidement branchés.
• Faites attention de ne pas croiser (court-circuit)
ou inverser la polarité des fils de l’enceinte car
cela peut endommager l’amplificateur.
A NE PAS FAIRE
• Branchez correctement la polarité (+/-) des
prises. Si non, cela pourrait nuire aux effets
stéréo ou causer un dysfonctionnement.
• Pour avoir plus de détails, consultez le mode
d’emploi des enceintes.
14
(74)
Page 75

Insérez le cordon d’alimentation au
point situé juste avant le trou rond.
Cordon d’alimentation secteur (fourni)
Vers une prise
secteur
Câble d’enceinte (non fourni)
Connexion du câble d’alimentation
secteur
À raccorder uniquement une fois tous les
autres branchements effectués.
Remarque
• Cette unité consomme une petite quantité de
courant alternatif ( 34) même lorsqu’elle est
en veille. Retirez la prise du secteur lorsque
vous n’utilisez pas l’unité pendant une longue
période. Positionnez l’unité pour pouvoir
facilement débrancher la prise.
Français
Correction de sortie d’enceinte
(LAPC)
Vous pouvez effectuer un réglage optimal en
fonction de vos propres enceintes. ( 26)
Connexions
(75)
15
Page 76

Commandes
Utilisation d’un périphérique de sortie audio numérique
Vous pouvez raccorder le lecteur de CD, etc. avec un
câble numérique coaxial (non fourni)/un câble audio
numérique optique (non fourni) à cet appareil et
écouter de la musique.
Câble audio numérique
optique (non fourni)
Lecteur CD, etc.
Utilisation d’un câble numérique
coaxial
1
Débranchez le cordon d’alimentation secteur.
2
Raccordez cet appareil et un lecteur CD, etc.
3 Branchez le cordon d’alimentation
secteur à cette unité. ( 15)
4 Appuyez sur [AMP
appareil en marche.
Appuyez plusieurs fois sur [>INPUT<] pour
5
sélectionner “COAX1” ou “COAX2”.
•
Vous pouvez également sélectionner la source d’entrée
en tournant la molette de sélection d’entrée sur l’unité.
6
Démarrez la lecture sur l’appareil connecté.
Remarque
Les bornes d’entrée audio numérique de cette unité ne
•
peuvent détecter que les signaux PCM linéaires. Pour plus
de détails, référez-vous au mode d’emploi du périphérique.
- Fréquence d’échantillonnage :
Entrée numérique coaxiale
32/44,1/48/88,2/96/176,4/192 kHz
Entrée numérique optique
32/44,1/48/88,2/96 kHz
- Nombre de bits de quantification :
16/24 bits
] pour mettre cet
Câble numérique coaxial
(non fourni)
Utilisation d’un câble audio
numérique optique
1 Débranchez le cordon d’alimentation
secteur.
2 Raccordez cet appareil et un lecteur
CD, etc.
3 Branchez le cordon d’alimentation
secteur à cette unité. ( 15)
4 Appuyez sur [AMP
appareil en marche.
5 Appuyez plusieurs fois sur [>INPUT<]
pour sélectionner “OPT1” ou “OPT2”.
• Vous pouvez également sélectionner la
source d’entrée en tournant la molette de
sélection d’entrée sur l’unité.
6 Démarrez la lecture sur l’appareil
connecté.
] pour mettre cet
16
(76)
Page 77

Câble USB 2.0
(non fourni)
Utilisation d’un ordinateur, etc.
Vous pouvez raccorder un PC, etc. ou un autre
dispositif avec un câble USB 2.0 (non fourni) à cet
appareil et écouter de la musique.
PC, etc.
■ Préparation
Pour raccorder un ordinateur
• Avant de raccorder un ordinateur, suivez les
étapes suivantes.
• Reportez-vous à ce qui suit concernant les
versions OS recommandées pour votre PC (à
partir de février 2017) :
- Windows 7, Windows 8, Windows 8.1,
Windows 10
- OS X 10.7, 10.8, 10.9, 10.10, 10.11,
macOS 10.12
Téléchargez et installez le pilote USB dédié sur
l’ordinateur. (Uniquement pour Windows OS)
• Téléchargez et installez le pilote dédié à partir
du site ci-dessous.
www.technics.com/support/
Téléchargez et installez l’application dédiée
“Technics Audio Player” (gratuite) sur votre
ordinateur.
• Téléchargez et installez l’appli dédiée à partir
du site ci-dessous.
www.technics.com/support/
Utilisation d’un câble USB 2.0
1 Débranchez le cordon d’alimentation
secteur.
Périphérique audio avec borne de
sortie USB-DAC tel qu’un ST-G30, etc.
Raccordez cet appareil et un ordinateur, etc.
2
3 Branchez le cordon d’alimentation
secteur à cette unité. ( 15)
4 Appuyez sur [AMP
] pour mettre cet
appareil en marche.
5 Appuyez plusieurs fois sur [>INPUT<]
pour sélectionner “PC”.
• Vous pouvez également sélectionner la
source d’entrée en tournant la molette de
sélection d’entrée sur l’unité.
6 Lancez la lecture en utilisant
l’application dédiée “Technics Audio
Player” sur l’ordinateur connecté.
Remarque
• Lorsque vous connectez un périphérique audio
avec une borne de sortie USB-DAC tel qu’un
ST-G30, etc., reportez-vous aux instructions
d’utilisation du périphérique.
• Concernant les formats compatibles, référez-
vous à “Formats pris en charge”. ( 35)
• Windows est une marque ou une marque
déposée de Microsoft Corporation aux ÉtatsUnis et dans d’autres pays.
• Mac et OS X sont des marques de commerce de
Apple Inc., enregistrées aux Etats-Unis et dans
d’autres pays.
macOS est une marque commerciale d’Apple Inc.
•
Commandes
(77)
Français
17
Page 78

Commandes
Utilisation d’une platine (PHONO)
Vous pouvez raccorder une platine avec un câble
PHONO (non fourni) à cet appareil et écouter de la
musique.
PHONO
EARTH
Platine
Câble de terre PHONO
(non fourni)
Câble PHONO (non fourni)
Utilisation d’un câble PHONO
1 Débranchez le cordon d’alimentation
secteur.
2 Raccordez cet appareil et une platine.
3 Branchez le cordon d’alimentation
secteur à cette unité. ( 15)
4 Appuyez sur [AMP
appareil en marche.
5 Appuyez plusieurs fois sur [>INPUT<]
pour sélectionner “PHONO”.
• Vous pouvez également sélectionner la
source d’entrée en tournant la molette de
sélection d’entrée sur l’unité.
6 Démarrez la lecture sur la platine
connectée.
Remarque
• Lorsque vous connectez une platine avec un
égaliseur PHONO intégré, raccordez son câble
aux bornes d’entrée audio analogique (LINE1 IN
ou LINE2 IN) de cet appareil. ( 19)
• Lorsque vous connectez une platine avec un
câble de terre PHONO, raccordez le câble de
terre PHONO à la borne PHONO EARTH de cet
appareil.
] pour mettre cet
Réduction de la distorsion sonore
Si une distorsion sonore se produit lors de l’utilisation
des bornes d’entrée audio analogique, régler
l’atténuateur sur “On(-3dB)”/“On(-6dB)”/“On(-10dB)”
peut apporter une amélioration.
• Le réglage d’usine par défaut est “Off”.
1 Appuyez sur [AMP].
2 Appuyez sur [MENU].
Appuyez sur [ ], [ ] de façon répétée pour
3
choisir “Attenuator” puis appuyez sur [OK].
4 Appuyez sur [ ], [ ] pour sélectionner
“On(-3dB)”/“On(-6dB)”/“On(-10dB)”
puis appuyez sur [OK].
Réduction du bruit faible
Réduit le bruit faible causé par la déformation
d’un enregistrement.
• Le réglage d’usine par défaut est “Off”.
Vous pouvez régler ce menu lorsque la source d’entrée
•
“LINE1” ou “LINE2” est sélectionnée pour cette unité.
1 Appuyez sur [AMP].
2 Appuyez sur [MENU].
18
(78)
3 Appuyez sur [
], [ ] de façon répétée
pour choisir “Subsonic Filter” puis
appuyez sur [OK].
4 Appuyez sur [
], [ ] pour choisir “On”
puis appuyez sur [OK].
Page 79

Utilisation d’un périphérique de sortie audio analogique (LINE1/LINE2)
Vous pouvez raccorder un lecteur de disque Blu-ray,
etc. avec un câble audio analogique (non fourni) à
cet appareil et écouter de la musique.
Lecteur de Blu-ray Disc, etc.
Câble audio analogique (non fourni)
Utilisation d’un câble audio
analogique
1 Débranchez le cordon d’alimentation
secteur.
2 Raccordez cet appareil et un lecteur de
disque Blu-ray, etc.
3 Branchez le cordon d’alimentation
secteur à cette unité. ( 15)
4 Appuyez sur [AMP
] pour mettre cet
appareil en marche.
5 Appuyez plusieurs fois sur [>INPUT<]
pour sélectionner “LINE1” ou “LINE2”.
• Vous pouvez également sélectionner la
source d’entrée en tournant la molette de
sélection d’entrée sur l’unité.
• Réglez-la sur “LINE2” (voir ci-dessous)
quand “MAIN IN” est affiché comme source
d’entrée de cette unité.
6 Démarrez la lecture sur l’appareil
connecté.
Lors d’une connexion à “LINE2”
2 Appuyez plusieurs fois sur [>INPUT<]
pour sélectionner “MAIN IN”.
3 Appuyez sur [MENU].
4 Appuyez sur [
], [ ] de façon répétée
pour choisir “Input Mode” puis
appuyez sur [OK].
5 Appuyez sur [
], [ ] de façon répétée
pour choisir “LINE2” puis appuyez sur
[OK].
Confirmez le message et appuyez sur [OK].
6
• Le niveau de volume après avoir commuté
sur “LINE2” s’affiche. Vérifiez et ajustez le
volume avant d’appuyer sur [OK].
7 Appuyez sur [ ], [ ] pour choisir
“Yes” puis appuyez sur [OK].
Réduction de la distorsion sonore
Si une distorsion sonore se produit lors de l’utilisation
des bornes d’entrée audio analogique, régler
l’atténuateur sur “On” peut apporter une amélioration.
• Le réglage d’usine par défaut est “Off”.
1 Appuyez sur [AMP].
Français
Les bornes d’entrée audio analogique
(LINE2 IN/MAIN IN) sont combinées avec LINE2
et MAIN IN. Pour commuter la fonction selon
l’équipement connecté.
• Le réglage d’usine par défaut est “LINE2”.
1 Appuyez sur [AMP].
2 Appuyez sur [MENU].
3 Appuyez sur [
], [ ] de façon répétée
pour choisir “Attenuator” puis
appuyez sur [OK].
4 Appuyez sur [
], [ ] pour choisir “On”
puis appuyez sur [OK].
Commandes
(79)
19
Page 80

Commandes
Utilisation de cet appareil comme amplificateur de puissance
Vous pouvez raccorder le récepteur AV, l’amplificateur de
commande, etc. avec un câble audio analogique (non fourni)
à cette unité et utiliser cette unité comme amplificateur de
puissance.
Récepteur audiovisuel,
amplificateur de
commande, etc.
Réglez le volume du récepteur audiovisuel,
de l’amplificateur de commande, etc. au
minimum avant le raccordement.
Si vous utilisez cet appareil comme
amplificateur de volume, le réglage du
volume avec cet appareil est désactivé.
Réglez le volume graduellement avec le
périphérique raccordé.
Ne raccordez pas le signal audio provenant
des bornes PRE OUT/LINE OUT aux bornes
MAIN IN de cet appareil. Cela pourrait
provoquer un dysfonctionnement.
Câble audio analogique
(non fourni)
Utilisation d’un câble audio
analogique
1 Débranchez le cordon d’alimentation
secteur.
2 Raccordez cet appareil et un récepteur
audiovisuel, un amplificateur de
commande, etc. après avoir réduit le
volume du périphérique.
3 Branchez le cordon d’alimentation
secteur à cette unité. ( 15)
4 Appuyez sur [AMP
appareil en marche.
5 Appuyez plusieurs fois sur [>INPUT<]
pour sélectionner “LINE2”.
• Vous pouvez également sélectionner la
source d’entrée en tournant la molette de
sélection d’entrée sur l’unité.
] pour mettre cet
20
6 Appuyez sur [AMP].
7 Appuyez sur [MENU].
(80)
Page 81

8 Appuyez sur [ ], [ ] de façon répétée
pour choisir “Input Mode” puis
appuyez sur [OK].
9 Appuyez sur [
], [ ] pour
sélectionner “MAIN IN” puis appuyez
sur [OK].
10 Confirmez le message et appuyez sur
[OK].
11 Appuyez sur [
], [ ] pour choisir
“Yes” puis appuyez sur [OK].
12 Démarrez la lecture sur l’appareil
connecté.
Remarque
• Il n’est pas possible de régler le volume avec cet
appareil.
• Aucun son ne provient de la prise du casque ni
de la borne PRE OUT.
• Sélectionnez “LINE2” quand vous n’utilisez pas
cet appareil comme amplificateur de puissance.
( 19)
• Lorsque la source d’entrée est commutée de
“MAIN IN” à “LINE2” ou une autre source et
que le niveau de volume actuel est supérieur
au niveau précédent, le volume est ajusté
automatiquement.
Réduction de la distorsion sonore
Si une distorsion sonore se produit, régler
l’atténuateur sur “On” peut apporter une
amélioration.
• Le réglage d’usine par défaut est “Off”.
1 Appuyez sur [AMP].
2 Appuyez sur [MENU].
3 Appuyez sur [
pour choisir “Attenuator” puis
appuyez sur [OK].
4 Appuyez sur [
puis appuyez sur [OK].
], [ ] de façon répétée
], [ ] pour choisir “On”
Français
Commandes
(81)
21
Page 82

Commandes
Raccordement d’un amplificateur de puissance, d’un caisson de basse, etc.
Vous pouvez raccorder un amplificateur de puissance,
un caisson de basse, etc. avec un câble audio
analogique (non fourni) pour émettre des signaux
audio analogiques.
Amplificateur de
puissance, caisson de
basse, etc.
Ne raccordez pas le signal audio provenant
des bornes PRE OUT/LINE OUT aux
bornes d’entrée audio analogique de
cet appareil. Cela pourrait provoquer un
dysfonctionnement.
Utilisation d’un câble audio
analogique
1 Débranchez le cordon d’alimentation
secteur.
2 Raccordez cet appareil et un
amplificateur de puissance, un caisson
de basse, etc.
3 Branchez le cordon d’alimentation
secteur à cette unité. ( 15)
Câble audio analogique
(non fourni)
Réglage de la sortie audio
(PRE OUT)
Vous pouvez régler la sortie audio des bornes de
sortie des enceintes et des bornes PRE OUT.
1 Appuyez sur [AMP].
2 Appuyez sur [SETUP].
3 Appuyez sur [
pour choisir “PRE OUT” puis appuyez
sur [OK].
4 Appuyez sur [
la sortie, puis appuyer sur [OK].
• Le réglage d’usine par défaut est “On”.
• Non disponible quand “MAIN IN” est
sélectionné comme source d’entrée de cet
appareil.
], [ ] de façon répétée
], [ ] pour sélectionner
4 Appuyez sur [AMP
] pour mettre cet
appareil en marche.
Remarque
• Pour plus de détails, référez-vous au mode
d’emploi du périphérique connecté.
• Le son ne sort pas des bornes PRE OUT quand
“MAIN IN” est sélectionné comme source
d’entrée de cet appareil.
(82)
22
On :
Le son sort des bornes de sortie d’enceinte et des
bornes PRE OUT.
On (Speaker:Off) :
Le son ne sort pas des bornes de sortie
d’enceinte. Le son sort des bornes PRE OUT.
Off :
Aucun son ne provient des bornes PRE OUT.
Le son sort des bornes de sortie d’enceinte.
Page 83

Utilisation d’un périphérique d’entrée audio analogique
Vous pouvez raccorder un graveur de CD, etc. avec un
câble audio analogique (non fourni) pour émettre des
signaux audio analogiques à partir cet appareil (LINE1/
LINE2/PHONO).
Graveur de CD, etc.
Câble audio analogique
(non fourni)
Ne raccordez pas le signal audio provenant
des bornes PRE OUT/LINE OUT aux
bornes d’entrée audio analogique de
cet appareil. Cela pourrait provoquer un
dysfonctionnement.
Utilisation d’un câble audio
analogique
1 Débranchez le cordon d’alimentation
secteur.
2 Raccordez cet appareil et un graveur
de CD, etc.
3 Branchez le cordon d’alimentation
secteur à cette unité. ( 15)
4 Appuyez sur [AMP
appareil en marche.
Remarque
• Quand un signal audio numérique (COAX1/
COAX2/OPT1/OPT2/PC) est sélectionné
comme source d’entrée de cet appareil, un
signal audio analogique (LINE1) est émis.
• Le son du signal audio de sortie peut être
saccadé lorsque vous commutez la source
d’entrée.
] pour mettre cet
Français
Commandes
(83)
23
Page 84
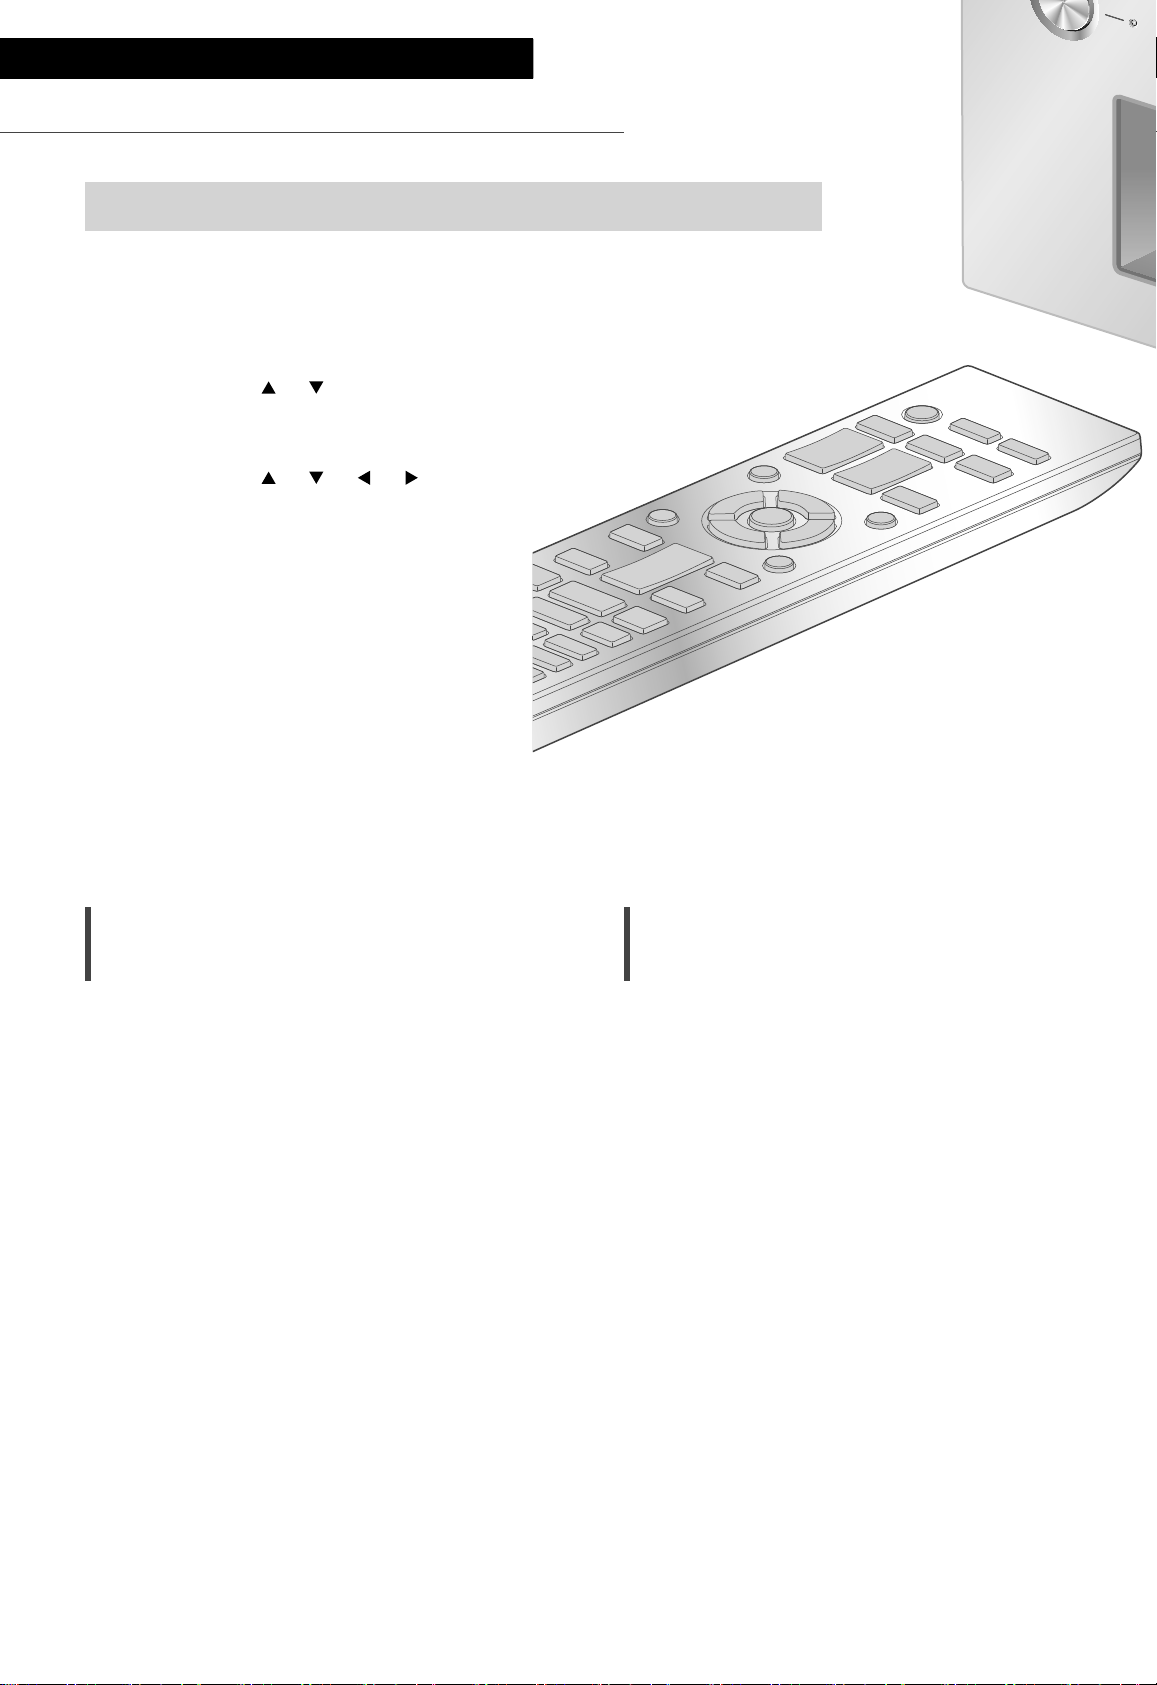
Paramètres
Réglage du son, autres paramètres
Les effets sonores et les autres paramètres peuvent être réglés.
1 Appuyez sur [AMP].
2 Appuyez sur [SETUP].
3 Appuyez sur [
], [ ] de façon
répétée pour choisir le menu
puis appuyez sur [OK].
4 Appuyez sur [
], [ ], [ ], [ ]
pour configurer et appuyez sur
[OK].
Réglage des BASS/MID/TREBLE
“Tone Control”
Vous pouvez régler la tonalité de cette unité.
Chaque plage de tonalité (BASS/MID/TREBLE)
peut être réglée.
• Pour activer cette fonction, choisissez “On
(adjustment)”.
• Chaque niveau peut être réglé entre “-10” et
“+10”.
• “TONE” est affiché après les réglages.
• Lorsque vous raccordez un appareil Technics
prenant en charge la fonction de contrôle du
système (lecteur audio réseau, etc.) à cette
unité, le réglage du son sur l’appareil connecté
peut avoir priorité sur celui de cette unité.
Réglez le volume avec le périphérique raccordé.
• Indisponible quand vous n’utilisez pas cette
unité comme amplificateur de puissance ( 20).
Réglez le son avec le récepteur AV,
l’amplificateur de commande, etc.
Réglage de l’atténuateur de volume
“VOLUME Attenuator”
Réglez l’atténuateur sur “On (-20dB)” pour
faciliter le réglage du volume à un niveau faible.
• Le réglage d’usine par défaut est “Off”.
• “ATT” s’affiche après le réglage.
• Indisponible quand vous n’utilisez pas cette
unité comme amplificateur de puissance ( 20).
Réglez le son avec le récepteur AV,
l’amplificateur de commande, etc.
24
(84)
Page 85

Fonction Extinction Auto
Affichage de l’état du volume
“AUTO OFF”
Cet appareil est conçu pour conserver et
économiser son énergie. L’appareil n’a pas été
utilisé pendant environ 20 minutes et passera en
mode veille au bout d’une minute. Appuyez sur
n’importe quelle touche pour l’annuler.
• Le réglage d’usine par défaut est “On”. Pour
désactiver cette fonction, choisissez “Off”.
• “AUTO OFF” s’affiche avant que cet appareil soit
mis hors tension après 3 minutes.
Remarque
• La fonction d’arrêt automatique marche sauf si
vous la désactivez, même si vous mettez cette
unité en veille puis en marche.
“VOLUME Display”
L’état du volume s’affiche lors du réglage du
volume.
• Le réglage d’usine par défaut est “Off”.
• Non disponible quand “MAIN IN” est
sélectionné comme source d’entrée de cet
appareil.
Vérification du nom de modèle
“Model No.”
Le nom du modèle s’affiche.
Vérification de la version du
micrologiciel
“F/W Version”
La version du micrologiciel installé est affichée.
Français
Paramètres
(85)
25
Page 86

Paramètres
Utilisation de la fonction de correction de sortie (LAPC)
Vous pouvez effectuer un réglage optimal en fonction de vos propres
enceintes.
Mesure du signal de sortie de
l’amplificateur et correction de sa
sortie (LAPC)
■ Préparation
• Débranchez le casque.
Test de tonalité émis durant la mesure
Afin d’assurer la précision de la mesure, les
enceintes émettent une sonnerie de test
à intervalles réguliers. (Pendant environ
3 minutes)
Il n’est pas possible de changer le volume du
son qui est en train d’être reproduit pendant
que la mesure est en cours.
1 Appuyez sur [AMP ] pour mettre cet
appareil en marche.
2 Appuyez longuement sur [LAPC]
jusqu’à ce que “Please Wait” s’affiche.
“LAPC Measuring” s’affiche et cette unité
commence à mesurer le signal émis par
l’amplificateur. Vérifiez qu’une sonnerie de test
est émise depuis les deux enceintes (gauche et
droite).
Une fois la mesure achevée, la correction
de sortie de l’amplificateur s’active
automatiquement.
• Si vous appuyez sur [LAPC] en cours de
mesure, elle sera annulée.
• Si vous branchez le casque pendant la
mesure du signal de l’amplificateur ou la
correction de la sortie de l’amplificateur,
cette opération sera annulée.
■ Marche/Arrêt de la fonction de correction
de sortie
Appuyez sur [LAPC] pour sélectionner
“On”/“Off”.
• L’indicateur LAPC s’allume et “LAPC On”
s’affiche quand la fonction de correction de
sortie est en cours.
Remarque
• La mesure n’est pas disponible pour le signal
audio de sortie des bornes PRE OUT de cette
unité. ( 22)
• En fonction du type d’enceinte raccordée, l’effet
de la fonction de correction de sortie peut être
minimal.
• La sortie corrigée reste effective jusqu’à ce que
vous mesuriez le signal de sortie à nouveau.
Lorsque vous utilisez d’autres enceintes,
effectuez la mesure à nouveau.
26
(86)
Page 87

Mises à jour du microprogramme
Mises à jour du microprogramme
“F/W Update”
A l’occasion, Panasonic édite un micrologiciel
actualisé de cet appareil qui peut ajouter ou
améliorer la manière de fonctionner d’un
accessoire. Ces mises à jour sont disponibles
gratuitement.
• Pour des informations sur la mise à jour, référez-
vous au site Internet suivant.
www.technics.com/support/firmware/
Le téléchargement nécessite environ
3 minutes.
Ne débranchez pas le cordon
d’alimentation secteur et ne mettez pas
cette unité en veille pendant la mise à jour.
Ne déconnectez pas la clé USB pendant la
mise à jour.
• La progression est affichée en tant que
“Updating
(“
” représente un nombre.)
Remarque
• Pendant le traitement de la mise à jour, aucune
autre opération ne peut être effectuée.
• S’il n’y a aucune mise à jour, “Firmware is Up To
Date” s’affiche. (Mise à jour non nécessaire.)
• La mise à niveau du micrologiciel peut
réinitialiser les paramètres.
%” pendant la mise à jour.
■ Préparation
• Téléchargez le micrologiciel le plus récent sur
une clé USB. Pour plus de détails, référez-vous
au site Internet suivant.
www.technics.com/support/firmware/
1 Connectez la clé USB avec le nouveau
micrologiciel.
2 Appuyez sur [AMP].
3 Appuyez sur [SETUP].
4 Appuyez sur [
pour choisir “F/W Update” puis
appuyez sur [OK].
5 Appuyez sur [
“Yes” puis appuyez sur [OK].
• La progression est affichée en tant que
“Updating %” pendant la mise à jour.
(“ ” représente un nombre.)
• Si la mise à jour s’est effectuée avec succès,
“Success” s’affiche.
], [ ] de façon répétée
], [ ] pour choisir
Français
6 Déconnectez le cordon d’alimentation
secteur et la clé USB et reconnectez-les
après 3 minutes.
Remarque
• Le téléchargement peut être plus long en
fonction de la clé USB.
• Utilisez une clé USB au format FAT16 ou FAT32.
• La borne UPDATE n’est utilisée que pour la mise
à jour du micrologiciel. Ne raccordez pas d’autre
dispositif USB qu’une clé USB pour la mise à
jour du micrologiciel.
• Aucun dispositif USB ne peut être chargé avec
la borne UPDATE de cette unité.
Paramètres
(87)
27
Page 88

Paramètres
Branchement du contrôle de système
Vous pouvez commander cet appareil et un dispositif Technics
prenant en charge la fonction de contrôle du système (lecteur
audio réseau, lecteur de disque compact, etc.) simultanément
et simplement au moyen de la télécommande.
Pour plus de détails, référez-vous au mode d’emploi du
périphérique.
Lecteur audio réseau, etc.
Utilisation d’un câble de
raccordement du système et d’un
câble audio
1 Débranchez le cordon d’alimentation
secteur.
2 Raccordez cet appareil et un dispositif
Technics prenant en charge la fonction
de contrôle du système (lecteur audio
réseau, etc.).
• Utilisez le câble de raccordement du système
et les câbles audio lorsque vous raccordez cet
appareil et le dispositif.
• Utilisez le câble de raccordement du système
fourni avec le dispositif connecté.
3 Branchez le cordon d’alimentation
secteur à cette unité. ( 15)
4
Appuyez sur [AMP
appareil en marche.
5 Appuyez sur [AMP].
6 Appuyez sur [SETUP].
(88)
28
] pour mettre cet
Câble de raccordement
du système
Câble numérique coaxial
(non fourni)
*
7 Appuyez sur [ ], [ ] de façon répétée
pour choisir “System Control” puis
appuyez sur [OK].
8 Appuyez sur[
], [ ] pour sélectionner
la source d’entrée du dispositif qui est
raccordé à l’étape 2 et appuyez sur
[OK].
• Sélectionnez “Off” pour désactiver la
fonction de contrôle du système.
: L’illustration montre un exemple de
*
raccordement avec un câble numérique
coaxial. Raccordez le dispositif avec le câble/la
borne adapté(e).
Remarque
• Sélectionnez “LINE2” ( 19) comme mode
d’entrée pour cette unité afin d’utiliser
la fonction de commande de système de
l’appareil Technics raccordé aux bornes d’entrée
analogique (LINE2 IN/MAIN IN).
• Quand “MAIN IN” ( 20) est sélectionné
comme source d’entrée de cette unité,
la fonction de commande de système de
l’appareil Technics raccordé aux bornes d’entrée
analogique (LINE2 IN/MAIN IN) est désactivée.
Page 89

Commutation de cet appareil et du
dispositif connecté
Commuter automatiquement la
source d’entrée de cet appareil
Français
• Si vous pointez la télécommande vers cette
unité et appuyez sur [AMP
et l’appareil connecté sont en mode de veille,
cette unité et l’appareil de la source d’entrée
sélectionnée, réglée avec “System Control”,
sont mis en marche simultanément.
• Si vous dirigez la télécommande vers cet
appareil et si vous appuyez sur [AMP
cet appareil et le dispositif connecté sont en
marche, cet appareil et le dispositif connecté
passent simultanément en mode de veille.
• Vous pouvez également commuter cette unité
et l’appareil raccordé en appuyant sur le bouton
Veille/Marche de cette unité.
] quand cette unité
] quand
Lorsque vous effectuez une opération comme
la lecture sur le dispositif connecté, la source
d’entrée de cet appareil sera automatiquement
commutée sur la source réglée avec “System
Control”.
Paramètres
(89)
29
Page 90

Guide de dépannage
Avant de contacter l’assistance, effectuez les contrôles suivants. Si vous avez des doutes sur certains
points, ou si les solutions fournies dans le guide suivant ne permettent pas de trouver une solution,
contactez votre revendeur pour connaitre la marche à suivre.
Accumulation de chaleur de cet
Général
appareil
Cette unité chauffe lorsque le volume est élevé. Il
ne s’agit pas d’un dysfonctionnement.
Le dernier micrologiciel est-il
installé?
Panasonic améliore de façon constante le
firmware de l’appareil afin de s’assurer que ses
clients bénéficient d’une technologie de pointe.
( 27)
Pour remettre tous les paramètres
sur leurs réglages d’usine par défaut
Si une des situations suivantes se produit,
réinitialisez la mémoire :
• Aucune réponse lorsque les touches sont
actionnées.
• Si vous désirez effacer et réinitialiser le contenu
de la mémoire.
1 Appuyez sur [AMP].
2 Appuyez sur [SETUP].
3 Appuyez sur [
pour choisir “Initialization” puis
appuyez sur [OK].
• Tous les paramètres sont à nouveau
réglés sur les paramètres par défaut. Il est
nécessaire de régler à nouveau les mémoires.
4 Appuyez sur [ ], [ ] pour choisir
“Yes” puis appuyez sur [OK].
5 Appuyez sur [
puis appuyez à nouveau sur [OK].
], [ ] de façon répétée
] [ ] pour choisir “Yes”
L’unité ne fonctionne pas.
Les opérations ne sont pas effectuées de
manière correcte.
• L’un des appareils de sécurité de l’unité est
peut-être activé.
Appuyez sur [ ] sur l’unité pour la mettre en
veille.
• Si l’unité ne se met pas en veille,
déconnectez le cordon d’alimentation
secteur, attendez au moins 3 minutes, puis
rebranchez-le.
Appuyez sur [ ] sur l’unité pour la mettre en
marche. Si l’unité ne fonctionne toujours pas,
consultez le concessionnaire.
Un son de “bourdonnement” peut être émis
au cours de la lecture.
• Un cordon d’alimentation secteur ou une
lumière fluorescente se trouve près des câbles.
Conservez les autres appareils et cordons loin
des câbles de cet appareil.
• Un champ fortement magnétique situé près
d’un téléviseur ou d’un autre appareil peut nuire
à la qualité sonore. Gardez cet appareil loin de
ce genre de périphériques.
• Les enceintes peuvent émettre un bruit si un
périphérique proche émet des ondes radio
puissantes, comme lorsqu’un téléphone mobile
reçoit un appel.
Pas de son.
• Vérifiez le volume de cette unité.
• Contrôlez les connexions aux enceintes et
autres appareils.
• Raccordez les enceintes et mesurez le signal de
sortie de l’amplificateur. ( 26)
• Vérifiez l’impédance des enceintes raccordées.
• Vérifiez pour voir si la source d’entrée correcte
est sélectionnée.
• Insérez les connecteurs des câbles à raccorder
complètement.
• Confirmez les paramètres de sortie du son. (Le
son ne sort pas des enceintes raccordées aux
bornes de sortie d’enceinte si “PRE OUT” est
réglé sur “On (Speaker:Off)”.) ( 22)
• La lecture d’un contenu multicanal n’est pas
prise en charge.
• Les bornes d’entrée audio numérique de cette
unité ne peuvent détecter que les signaux PCM
linéaires. Pour plus de détails, référez-vous au
mode d’emploi du périphérique.
30
(90)
Page 91

Le son est déformé.
• Paramétrer “Attenuator” sur “On” en fonction
de l’entrée audio analogique peut réduire la
distorsion du son. ( 18, 19, 21)
• Le paramétrage de l’atténuateur n’est pas
disponible pour le signal audio de sortie de la
borne LINE OUT.
Le volume change automatiquement.
• Lorsque la source d’entrée est commutée de
“MAIN IN” à “LINE2” ou une autre source et
que le niveau de volume actuel est supérieur
au niveau précédent, le volume est ajusté
automatiquement. (Le bouton de volume
tourne automatiquement.) ( 20)
Cette unité se met automatiquement en
veille.
• Est-ce que la fonction d’arrêt automatique est
active? ( 25)
• Cette unité inclut un circuit de protection
contre les dommages causés par l’accumulation
de chaleur. Lorsque vous utilisez cette unité
à un niveau de volume élevé pendant une
période prolongée, elle peut s’éteindre
automatiquement. Attendez que l’unité
refroidisse avant de la rallumer. (Pendant
environ 3 minutes)
Les paramètres sont réinitialisés sur les
paramètres usine par défaut.
• La mise à niveau du micrologiciel peut
réinitialiser les paramètres.
Le compteur de puissance de crête ne
fonctionne pas.
• Dans les cas suivants, ce compteur ne
fonctionne pas :
- Quand le casque est branché.
- Quand l’éclairage du compteur de puissance
de crête a été éteint en appuyant sur
[DIMMER].
- Quand cet appareil est mis en sourdine en
appuyant sur [MUTE].
- Quand “PRE OUT” est paramétré sur “On
(Speaker:Off)” ( 22)
La fonction de contrôle du système ne
fonctionne pas.
• Utilisez le câble de raccordement du système
fourni avec le dispositif connecté.
• Branchez le câble de raccordement du système
dans les bornes du système (CONTROL). ( 28)
• Vérifiez le branchement du câble de
raccordement du système, du câble audio et de
la source d’entrée réglée avec “System Control”.
( 28)
• Raccordez un appareil Technics prenant en
charge la fonction de contrôle du système
(lecteur audio réseau, lecteur de disque
compact, etc.) à cette unité. Pour plus de
détails, référez-vous au site Internet suivant.
www.technics.com/support/
PC
L’ordinateur ne reconnait pas cet appareil.
• Vérifiez l’environnement d’exploitation. ( 17)
• Redémarrez l’ordinateur, mettez en veille puis
en marche cette unité, puis rebranchez le câble
USB.
• Utilisez un autre port USB de l’ordinateur.
• Installez le pilote USB dédié si vous utilisez un
ordinateur avec Windows. ( 17)
Télécommande
La télécommande ne fonctionne pas
correctement.
• Les batteries sont déchargées ou mal insérées.
( 12)
• Pour éviter les interférences, veillez à ne placer
aucun objet devant le capteur de signal. ( 10)
• Changez le code de la télécommande si aucun
appareil ne réagit à cette télécommande.
( 13)
Français
Guide de dépannage
(91)
31
Page 92

Guide de dépannage
Messages
ATTENTION : MAX Output Setting
• Si vous utilisez cet appareil comme amplificateur
de volume, le réglage du volume avec cet
appareil est désactivé.
• Réglez le volume graduellement avec le
périphérique raccordé. ( 20)
AUTO OFF
• Cette unité est restée inactive pendant environ
20 minutes et elle va s’éteindre dans la minute
qui suit. Appuyez sur n’importe quel bouton
pour annuler. ( 25)
Connect USB Device
• Le téléchargement du firmware a échoué.
• Téléchargez le micrologiciel le plus récent sur la
clé USB et essayez à nouveau. ( 27)
Disconnect PHONES
• Quand le casque est raccordé, la mesure du
signal de sortie de l’amplificateur (LAPC) ne
démarre pas.
• Débranchez le casque.
• Si vous branchez le casque pendant la mesure
du signal de l’amplificateur ou la correction de
la sortie de l’amplificateur, cette opération sera
annulée. ( 26)
” (“ ” représente un nombre.)
“F
• Il y a un problème avec cet appareil.
- Est-ce que le volume est extrêmement élevé?
Si oui, baissez le volume.
- Est-ce que cet appareil se trouve dans un
endroit extrêmement chaud?
Si oui, mettez cet appareil dans un endroit
plus frais et attendez quelques instants puis
essayez de le remettre en marche.
Si le problème persiste, notez le numéro affiché,
débranchez le cordon d’alimentation secteur et
consultez votre revendeur.
Load Fail
• Le micrologiciel présent sur la clé USB ne peut
pas être trouvé.
• Téléchargez le micrologiciel le plus récent sur la
clé USB et essayez à nouveau. ( 27)
No Device
• Une clé USB avec un nouveau micrologiciel n’est
pas connectée.
Connectez la clé USB avec le nouveau
micrologiciel. ( 27)
Not Measured
• La mesure du signal de sortie pour la fonction
de correction de sortie (LAPC) n’a pas encore
été effectuée.
• Mesurez le signal de sortie. ( 26)
Not Valid
• La fonction que vous avez essayé d’utiliser n’est
pas disponible avec la configuration actuelle.
Vérifiez les étapes et les paramètres.
PHONES Connected
• Le casque est branché
• Le son ne provient pas de la prise du casque
et des bornes de sorties des enceintes quand
le casque est raccordé et que “MAIN IN” est
sélectionné comme source d’entrée de cette
unité. ( 20)
“Remote
• La télécommande et cet appareil utilisent des
codes différents.
Changez le code de la télécommande. ( 13)
Signal Overflow
• Le son provenant des bornes d’entrée audio
analogique en cours d’utilisation présente une
distorsion. Sélectionnez “Attenuator” selon
l’entrée audio analogique sélectionnée, et
modifiez le réglage de l’atténuateur sur “On”.
( 19)
Unlocked
• “COAX1”, “COAX2”, “OPT1”, “OPT2” ou “PC”
est sélectionné, mais aucun périphérique n’est
connecté. Vérifiez le branchement avec le
périphérique. ( 16, 17)
• Les composants d’échantillonnage de la
fréquence, etc. des signaux audio n’entrent pas
correctement.
- Concernant les formats compatibles, référez-
vous à “Formats pris en charge”. ( 35)
USB Over Current Error
La consommation de puissance du dispositif USB
est trop élevée.
• Débranchez le dispositif USB et rebranchez-le.
( 27)
• Mettez l’unité en veille et rallumez-la.
VOLUME
• Quand vous commutez la source d’entrée de
“MAIN IN” à “LINE2” ou une autre source,
le niveau de volume après avoir commuté la
source d’entrée s’affiche.
• Vérifiez et ajustez le volume avant d’appuyer sur
[OK].
” (“ ” représente un nombre.)
OK (“ ” représente un nombre.)
32
(92)
Page 93

Autres
Entretien de l’appareil
• Débranchez le cordon d’alimentation secteur de
la prise avant l’entretien. Nettoyez cet appareil à
l’aide d’un chiffon doux.
• Si la saleté est importante, utilisez un chiffon
mouillé bien essoré pour nettoyer la saleté, puis
essuyez-le à l’aide d’un chiffon doux.
• N’utilisez pas de solvants, y compris essence,
diluant, alcool, liquide vaisselle, lingette
chimique, etc. Cela peut déformer le boîtier
externe ou décoller le revêtement.
Pour éliminer ou transférer cette
unité
• Cette unité peut contenir des informations
privées. Avant d’éliminer ou de transférer
cette unité, effectuez les actions suivantes
pour supprimer les données, notamment les
informations personnelles ou secrètes.
• “Pour remettre tous les paramètres sur leurs
réglages d’usine par défaut” ( 30)
L’élimination des équipements et des batteries usagés
Applicable uniquement dans les pays membres de l’Union européenne et les pays disposant de
systèmes de recyclage.
Apposé sur le produit lui-même, sur son emballage, ou figurant dans la documentation qui
l’accompagne, ce pictogramme indique que les piles, appareils électriques et électroniques
usagés, doivent être séparées des ordures ménagères.
Afin de permettre le traitement, la valorisation et le recyclage adéquats des piles et des
appareils usagés, veuillez les porter à l’un des points de collecte prévus, conformément à la
législation nationale en vigueur.
En les éliminant conformément à la réglementation en vigueur, vous contribuez à éviter le
gaspillage de ressources précieuses ainsi qu’à protéger la santé humaine et l’environnement.
Pour de plus amples renseignements sur la collecte et le recyclage, veuillez vous renseigner
auprès des collectivités locales.
Le non-respect de la réglementation relative à l’élimination des déchets est passible d’une
peine d’amende.
Note relative au pictogramme à apposer sur les piles (pictogramme du bas) :
Si ce pictogramme est combiné avec un symbole chimique, il répond également aux exigences
posées par la Directive relative au produit chimique concerné.
Guide de dépannage / Autres
(93)
Français
33
Page 94

Autres
Caractéristiques
■ GÉNÉRALITÉS
Alimentation
électrique
Consommation
électrique
Consommation
électrique en mode
de veille
Dimensions
(L×H×P)
Poids Environ 12,3 kg
Plage de
température en
fonctionnement
Plage d’humidité
de fonctionnement
■ SECTION AMPLIFICATEUR
Puissance de sortie
Impédance de
charge
Réponse de
fréquence
PHONO (MM)
LINE
DIGITAL
Sensibilité
d’entrée/
Impédance
d’entrée
PHONO (MM) 2,5 mV / 47 k
LINE 200 mV / 22 k
220 V à 240 V CA,
50/60 Hz
85 W
Environ 0,3 W
430 mm × 148 mm ×
428 mm
0 °C à 40 °C
35 % à 80 % HR
(sans condensation)
70 W + 70 W
(1 kHz, T.H.D. 0,5 %, 8 ,
20 kHz LPF)
140 W + 140 W
(1 kHz, T.H.D. 0,5 %, 4 ,
20 kHz LPF)
4 à 16
20 Hz à 20 kHz
(RIAA DEVIATION ±1 dB,
8 )
5 Hz à 80 kHz
(-3 dB, 8 )
5 Hz à 90 kHz
(-3 dB, 8 )
■ SECTION CONNECTEUR
Prise écouteurs/
casque
PC Prise USB ARRIÈRE Type B
Entrée analogique
LINE IN ×2 Prise jack
PHONO (MM) Prise jack
Entrée numérique
OPT IN ×2 Prise optique
COAX IN ×2 Prise jack
Format pris en
charge
Sortie analogique
LINE OUT Prise jack
PRE OUT Prise jack
Port du système
Contrôle du
système
Stereo, 6,3 mm
0,75 mW, 32
LPCM
3,5 mm, Prise
■ SECTION FORMAT
USB-B
USB 2.0 haut débit
Norme USB
Mode contrôle
DSD
USB Audio Class 2.0,
Mode asynchrone
Mode ASIO Native,
Mode DoP
34
(94)
Page 95

■ Formats pris en charge
Cet appareil prend en charge les formats suivants.
• La lecture de tous les formats pris en charge par cet appareil n’est pas garantie.
• La lecture d’un format qui n’est pas pris en charge par cet appareil peut entraîner un son saccadé ou du
bruit. Dans ce cas, vérifier si cet appareil prend en charge le format.
• Les informations du fichier (fréquence d’échantillonnage, etc.) affichées par cet appareil et par le logiciel de
lecture peuvent être différentes.
fichiers
*
Fréquence d’échantillonnage
Débit / nombre de bits de
quantification
PC (USB-B)
Formats des
PCM 32/44,1/48/88,2/96/176,4/192/352,8/384 kHz 16/24/32 bits
DSD 2,8 MHz/5,6 MHz/11,2 MHz
: Si vous téléchargez et installez l’application dédiée, vous pouvez lire des fichiers de grands formats. ( 17)
*
Pour avoir plus de détails, consultez le mode d’emploi de l’application.
Remarque
• Les caractéristiques techniques sont sujettes à des modifications sans préavis.
• Le poids et les dimensions sont approximatifs.
• DSD est une marque commerciale de Sony Corporation.
Français
Autres
(95)
35
Page 96

La ringraziamo dell’acquisto di questo prodotto.
Leggere attentamente queste istruzioni prima di utilizzare il presente prodotto, e conservare questo manuale
per usi futuri.
• Descrizioni contenute in queste istruzioni per l’uso
- I riferimenti alle pagine sono indicati con “ ○○”.
- L’aspetto dell’unità mostrata nelle illustrazioni potrebbe apparire diverso da quello dell’unità in dotazione.
Caratteristiche
Tecnologie audio di alta qualità
inclusi JENO Engine e LAPC
JENO Engine trasmette ed elabora i segnali
audio in modalità completamente digitale e
jitter ridotto dallo stadio di ingresso a quello di
potenza. L’unità LAPC effettua la calibrazione
della fase adattiva del carico dell’altoparlante,
per ottenere caratteristiche di guadagno e fase
ottimali per qualsiasi tipo di altoparlante. Inoltre,
per la conversione PWM, si impiega un circuito
di conversione PWM di elevata precisione, senza
eguali, aspetto questo rilevante per la qualità del
suono.
Configurazione a tre sezioni
Telaio in alluminio ad elevata rigidità
Il doppio chassis in metallo ad elevata rigidità
prevede un telaio in lastra d’acciaio sia interno
che esterno per ridurre le vibrazioni e il rumore
che rovinano la purezza del suono.
Gli amplificatori integrati contengono numerosi
circuiti con cui, ad esempio, gestire i microsegnali
in ingresso, le correnti elevate, ecc. SU-G700
impiega una configurazione a tre sezioni che
prevede la presenza di partizioni installate tra
i blocchi di circuiti, in funzione del livello del
segnale da controllare. Ciò permette di eliminare
l’interfaccia tra i blocchi di circuiti e di ottenere,
quindi, un suono chiaro e di alta qualità.
(96)
06
Page 97

Indice
Precauzioni per la sicurezza 08
Guida di riferimento e controllo
10
Connessioni 14
Operazioni 16
Impostazioni 24
Risoluzione dei problemi 30
Altre operazioni 33
Si prega di leggere attentamente le “Precauzioni
per la sicurezza” di questo manuale prima dell’uso.
L’uni tà, Tel eco mand o
Collegamento altoparlanti, Collegamento cavo di
alimentazione CA
Riproduzione dei dispositivi connessi
Altre impostazioni, Utilizzo della funzione di
correzione dell’uscita (LAPC)
Prima di richiedere assistenza, leggere la risoluzione
dei problemi.
Specifiche, ecc.
Accessori
Cavo di alimentazione CA (2)
Tranne per la Svizzera
K2CM3YY00041
Per la Svizzera
K2CS3YY00033
• I codici prodotto forniti in queste istruzioni per l’uso sono corretti e aggiornati a febbraio 2017.
• Possono essere soggetti a modifiche.
• Non utilizzare il cavo di alimentazione CA con altri apparecchi.
Telecomando (1)
N2QAYA000143
Batterie per il telecomando (2)
Italiano
(97)
07
Page 98

Precauzioni per la sicurezza
Attenzione
Unità
• Per ridurre il rischio d’incendio, folgorazioni o
danni all’unità,
- Non esporre questa unità alla pioggia,
umidità, gocciolamenti o spruzzi.
- Non posare oggetti contenenti liquidi, come
un vaso di fiori, su questa unità.
- Utilizzare solo gli accessori consigliati.
- Non rimuovere le coperture.
- Non riparare quest’unità da soli. Per qualsiasi
riparazione rivolgersi a un tecnico qualificato.
- Non introdurre oggetti metallici all’interno di
questa unità.
- Non appoggiare oggetti pesanti su questa
unità.
Cavo di alimentazione CA
• Per ridurre il rischio d’incendio, folgorazioni o
danni all’unità,
- Accertarsi che la tensione di alimentazione
corrisponda a quella indicata su questa unità.
- Inserire fino in fondo la spina del cavo di
alimentazione nella presa.
- Non tirare, piegare, o appoggiare oggetti
pesanti sul cavo di alimentazione.
- Non maneggiare la spina con le mani bagnate.
- Tenere la spina del cavo di alimentazione tra
le dita quando la si scollega.
- Non utilizzare una spina o una presa di rete
danneggiate.
• La spina del cavo di alimentazione è il
dispositivo per scollegare.
Installare l’unità in modo che la spina del
cavo di alimentazione possa essere scollegata
immediatamente dalla presa di corrente.
• Assicurarsi che lo spinotto di terra sulla spina
di alimentazione sia correttamente collegato al
fine di evitare il rischio di folgorazione.
- Un dispositivo di CLASSE I deve essere
collegato a una presa di rete provvista di un
polo protettivo di collegamento a terra.
Avvertenza
Unità
• Non mettere sull’unità sorgenti di fiamme nude,
come candele accese.
• Durante l’uso, questa unità potrebbe essere
soggetta all’interferenza radio causata
dal cellulare. Se si dovesse verificare tale
interferenza, aumentare la distanza tra questa
unità e il cellulare.
• Questa unità è progettata per l’uso nei paesi
con clima mite e tropicale.
• Non posizionare oggetti sull’unità. Questa unità
diventa calda quando è accesa.
• Non toccare la superficie superiore di questa
unità. Questa unità diventa calda quando è
accesa.
Collocazione
• Collocare questa unità su una superficie piana.
• Per ridurre il rischio d’incendio, folgorazioni o
danni all’unità,
- Per mantenere una buona ventilazione, non
installare o sistemare questa unità in uno
scaffale dei libri, armadietto incorporato od
altro spazio ristretto.
- Non ostruire le aperture di ventilazione di
questa unità con giornali, tovaglie, tende ed
altri oggetti simili.
- Non esporre questa unità alla luce diretta
del sole, a temperature elevate, a eccessiva
umidità e a forti vibrazioni.
• Accertarsi di posizionare l’unità su un supporto
sufficientemente robusto da sopportare il suo
peso ( 34).
• Non sollevare né trasportare l’unità dalle
manopole. Diversamente, potrebbe
cadere, provocando lesioni personali o il
malfunzionamento della stessa.
08
(98)
Page 99

Batteria
• Se la batteria viene sostituita in modo non
corretto esiste il rischio che esploda. Sostituirla
esclusivamente con una del tipo consigliato dal
produttore.
• L’uso scorretto delle batterie può causare
perdite di elettrolito e causare incendi.
- Rimuovere la batteria se si prevede di non
utilizzare il telecomando per lungo tempo.
Conservarla in un luogo fresco e al riparo dalla
luce.
- Non riscaldare o esporre a fiamme le batterie.
- Non lasciare la batteria/le batterie per lungo
tempo all’interno dell’auto, esposte alla luce
solare diretta e con le porte e i finestrini
chiusi.
- Non aprire o mettere in corto le batterie.
- Non ricaricare batterie alcaline o al
manganese.
- Non usare batterie la cui guaina non è intatta.
- Non utilizzare batterie nuove e vecchie o
batterie di tipi diversi insieme.
• Quando si smaltiscono le batterie, contattare
le autorità locali o il rivenditore e chiedere
informazioni sul metodo corretto di
smaltimento.
Installazione
Prima di effettuare il collegamento, spegnere
tutti gli apparecchi e leggere le relative istruzioni
per l’uso.
Precauzioni per la sicurezza
(99)
Italiano
09
Page 100

Guida di riferimento e controllo
L’u ni tà
01 Pulsante di standby/accensione ( )
• Premere per portare l’unità dalla modalità di
accensione a quella di standby e viceversa.
In modalità standby, l’unità continua a
consumare una quantità ridotta di energia.
02 Indicatore di alimentazione
• Blu: L’unità è accesa.
• Spento: L’unità è in modalità standby.
03 Presa cuffie
• Quando si collega uno spinotto, gli
altoparlanti e i terminali PRE OUT non
emettono alcun suono. ( 22)
• Quando “MAIN IN” è selezionato come
sorgente di ingresso dell’unità, la presa delle
cuffie non trasmette il suono. ( 20)
• Un’eccessiva pressione sonora dagli
auricolari e dalle cuffie può causare la
perdita dell’udito.
• L’ascolto a volume massimo per lunghi
periodi potrebbe danneggiare l’udito
dell’utente.
05 Display
• Sono visualizzate informazioni quali, ad
esempio, la sorgente di ingresso. ( 32)
06 Manopola del selettore ingresso
• Ruotare questa manopola in senso orario
o antiorario per commutare la sorgente di
ingresso.
07 Peak power meter
• Visualizza il livello di uscita. 100%
corrisponde alla potenza in uscita ( 34).
• Il peak power meter non funziona quando è
spenta la luce.
08 Indicatore LAPC ( 26)
09 Sensore del segnale del telecomando
• Distanza: Fino a 7 m circa, direttamente di
fronte
• Angolo: Circa 30° a sinistra e a destra
04 Manopola volume
• -- (min), da 1 a 100 (max)
• Per visualizzare il volume, impostare
“VOLUME Display” su “On”. ( 25)
(100)
10
 Loading...