


Operating Instructions
Network Audio Control Player
Bedienungsanleitung
Mode d’emploi
Istruzioni per l’uso
Instrucciones de funcionamiento
Betjeningsvejledning
Gebruiksaanwijzing
Bruksanvisning
Käyttöohjeet
Netzwerkaudio-Vorstufe
Préamplificateur lecteur réseau
Network Audio Control Player
Reproductor Audio en Red con Pre-amplificador
Netværkslydkontrolafspiller
Netwerk Audio Speler
Nätverksspelare med Intergrerat Försteg
Verkkoaudion ohjauslaite
SU-R1

Music is borderless and timeless,
touching people’s hearts across cultures and generations.
Each day the discovery of a truly emotive experience
from an unencountered sound awaits.
Let us take you on your journey to rediscover music.
Thank you for purchasing this product.
Please read these instructions carefully before using this product, and save this manual for future use.
Sales and Support Information
Customer Communications Centre
≥For customers within the UK: 0844 844 3899
≥For customers within Ireland: 01 289 8333
≥Monday–Friday 9:00 am – 5:00 pm, (Excluding public holidays).
≥For further support on your product, please visit our website: www.panasonic.co.uk
Direct Sales at Panasonic UK
≥
Order accessory and consumable items for your product with ease and confidence by phoning our Customer Communications Centre
Monday–Friday 9:00 am – 5:00 pm, (Excluding public holidays).
≥Or go on line through our Internet Accessory ordering application at www.pas-europe.com.
≥Most major credit and debit cards accepted.
≥All enquiries transactions and distribution facilities are provided directly by Panasonic UK.
≥It couldn’t be simpler!
≥Also available through our Internet is direct shopping for a wide range of finished products. Take a browse on our website for
further details.
∫ Features of this unit
This unit offers the following features:
Technics Digital Link
Technics has minimised the length of the signal path by enclosing the network audio player and input selector, which handle very
weak signals, into the same chassis, and reduced noise entering weak signals as much as possible by using a separate chassis
for the power amplifier, which handles high frequencies and large currents. In addition, Technics’s newly developed signal
transmission interface minimises the degradation of time accuracy and amplitude accuracy that occurs when signals are
transmitted between the network control player and the power amplifier, achieving an ideal amplifier configuration.
Digital Noise Isolation Architecture
Since most digital content storage media are intended for use with PCs, they are not designed with consideration for low noise,
which is critical to pure audio reproduction. To overcome this challenge, this unit employs a thorough measure against jitter and
outstanding noise blocking technology for each of its interfaces, delivering clear and stable sound.
Separated Analogue/Digital Power Supply
A dedicated low-noise R-core transformer with excellent regulation characteristics is provided individually for analogue and for
digital circuit, achieving high quality sound reproduction.
∫ Recommended devices
We recommend using Technics devices (optional) for superior audio quality.
Product name Model number
Stereo Power Amplifier SE-R1
Speaker System SB-R1*
* This product is set to be released in February 2015. (For European Countries)
(4)
4
Safety precautions
Figure A Figure B
Fuse cover
Figure A Figure B
Fuse
(10 ampere)
Fuse
(10 ampere)
WAR NING
Unit
≥ To reduce the risk of fire, electric shock or product damage,
– Do not expose this unit to rain, moisture, dripping or splashing.
– Do not place objects filled with liquids, such as vases, on this unit.
– Use only the recommended accessories.
– Do not remove covers.
– Do not repair this unit by yourself. Refer servicing to qualified service personnel.
– Do not let metal objects fall inside this unit.
– Do not place heavy items on this unit.
AC mains lead
≥ To reduce the risk of fire, electric shock or product damage,
– Ensure that the power supply voltage corresponds to the voltage printed
on this unit.
– Insert the mains plug fully into the socket outlet.
– Do not pull, bend, or place heavy items on the lead.
– Do not handle the plug with wet hands.
– Hold onto the mains plug body when disconnecting the plug.
– Do not use a damaged mains plug or socket outlet.
≥ The mains plug is the disconnecting device.
Install this unit so that the mains plug can be unplugged from the socket
outlet immediately.
CAUTION
Unit
≥ Do not place sources of naked flames, such as lighted candles, on this unit.
≥ This unit may receive radio interference caused by mobile telephones
during use. If such interference occurs, please increase separation between
this unit and the mobile telephone.
≥ This unit is intended for use in tropical climates.
Placement
≥ Place this unit on an even surface.
≥ To reduce the risk of fire, electric shock or product damage,
– Do not install or place this unit in a bookcase, built-in cabinet or in another
confined space. Ensure this unit is well ventilated.
– Do not obstruct this unit’s ventilation openings with newspapers,
tablecloths, curtains, and similar items.
– Do not expose this unit to direct sunlight, high temperatures, high
humidity, and excessive vibration.
≥ Do not lift or carry this unit by holding any of its knobs. Doing so may cause
this unit to fall, resulting in personal injury or malfunction of this unit.
Battery
≥ Danger of explosion if battery is incorrectly replaced. Replace only with the
type recommended by the manufacturer.
≥
Mishandling of batteries can cause electrolyte leakage and may cause a fire.
– Remove the battery if you do not intend to use the remote control for a
long period of time. Store in a cool, dark place.
– Do not heat or expose to flame.
– Do not leave the battery(ies) in a car exposed to direct sunlight for a long
period of time with doors and windows closed.
– Do not take apart or short circuit.
– Do not recharge alkaline or manganese batteries.
– Do not use batteries if the covering has been peeled off.
≥ When disposing of the batteries, please contact your local authorities or
dealer and ask for the correct method of disposal.
NORSK
ADVARSEL
Produkt
≥ For å redusere faren for brann, elektrisk støt eller skade på apparatet:
– Utsett ikke produktet for regn, fukt, drypping eller sprut.
– Ikke plasser objekter som er fylt med væske, som vaser, på apparatet.
– Bruk kun anbefalt tilbehør.
– Fjern ikke deksler.
– Reparer ikke denne enheten selv, overlat service til kvalifisert servicepersonell.
Vekselstrømnett
≥ Nettstøpselet er trukket ut fra denne enheten.
Installer denne enheten slik at nettstøpselet umiddelbart kan trekkes fra
stikkontakten.
FORSIKTIG
Produkt
≥ Plasser ikke åpen ild, slik som levende lys, oppå apparatet.
≥ Denne enheten er beregnet for bruk i tropiske klimaer.
Plassering
≥ For å redusere faren for brann, elektrisk støt eller skade på apparatet:
– Ikke plasser apparatet i en bokhylle, et innebygget kabinett eller et annet
lukket sted. Pass på at produktet er godt ventilert.
– Apparatets ventilasjonsåpninger må ikke dekkes til med aviser, duker,
gardiner eller lignende.
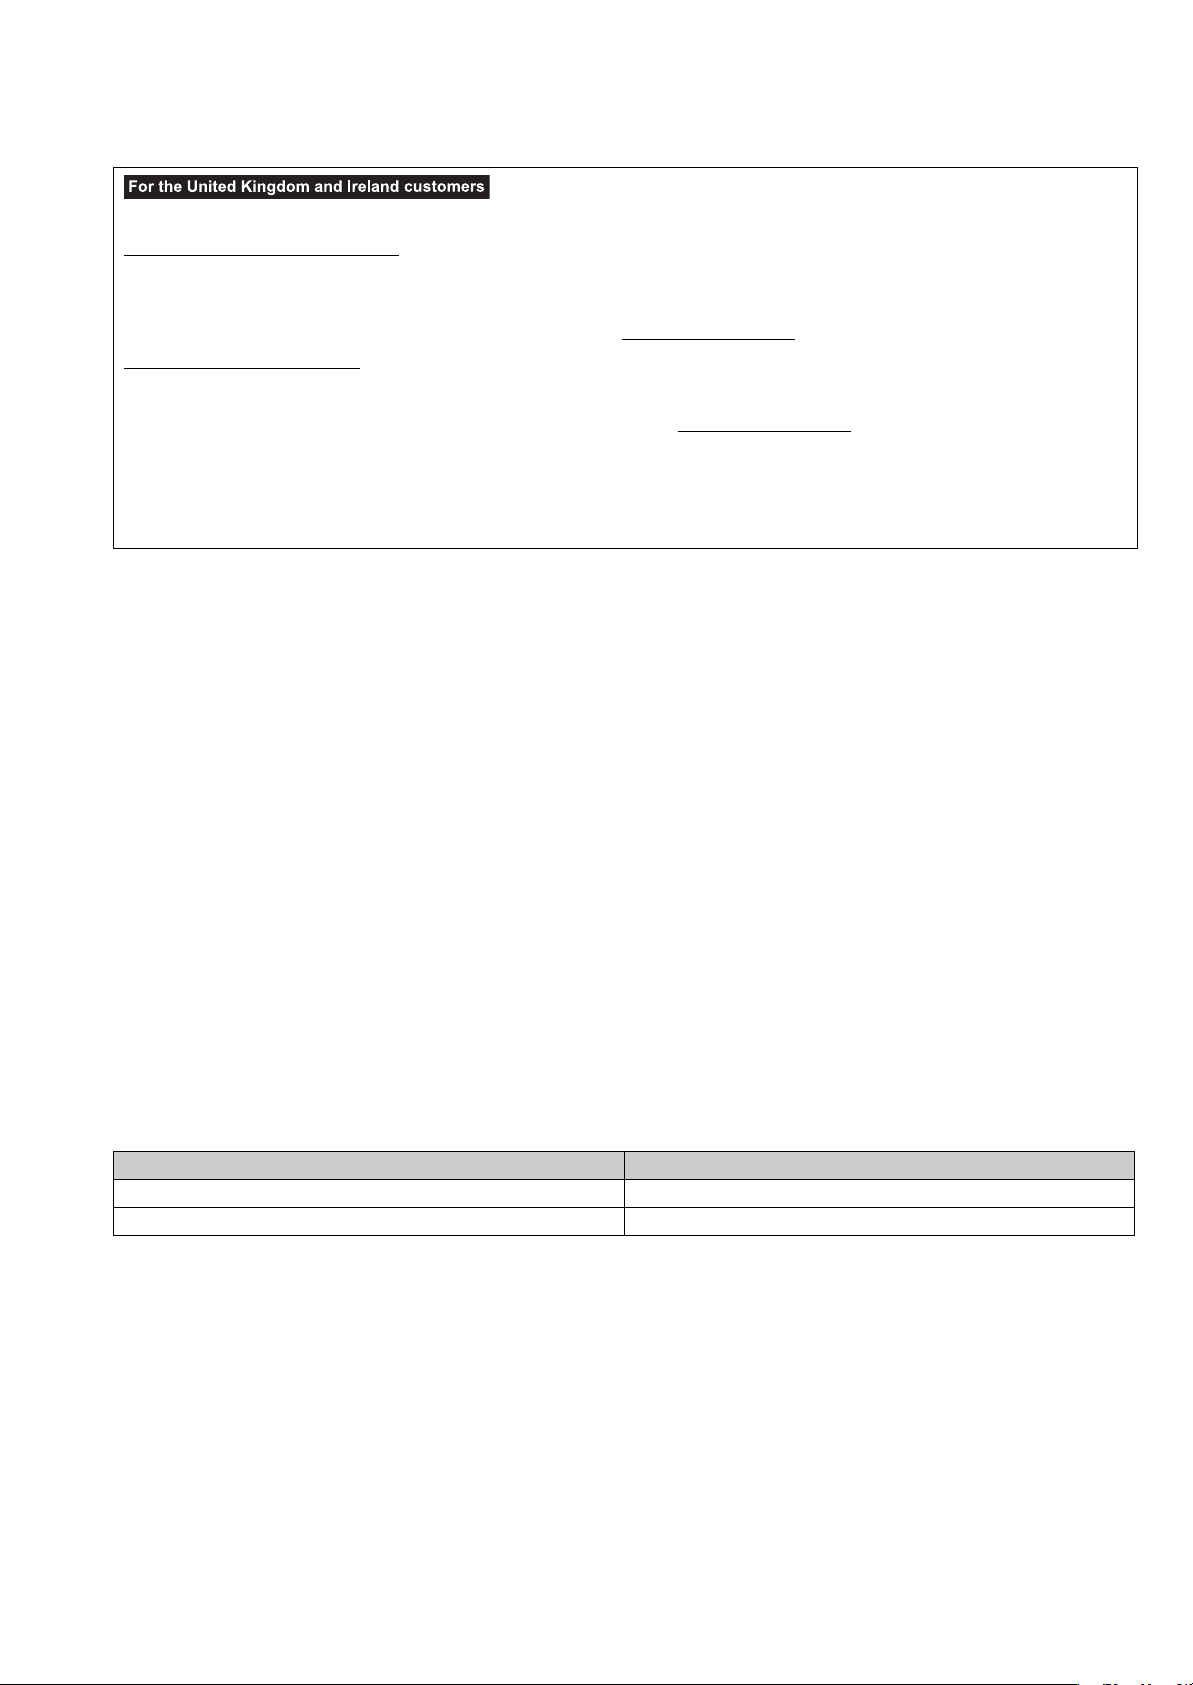
Caution for AC Mains Lead
(For the AC mains plug of three pins)
For your safety, please read the following text carefully.
This appliance is supplied with a moulded three pin mains plug for your safety
and convenience.
A 10-ampere fuse is fitted in this plug.
Should the fuse need to be replaced please ensure that the replacement fuse
has a rating of 10-ampere and that it is approved by ASTA or BSI to BS1362.
Check for the ASTA mark Ï or the BSI mark Ì on the body of the fuse.
If the plug contains a removable fuse cover you must ensure that it is refitted
when the fuse is replaced.
If you lose the fuse cover the plug must not be used until a replacement cover
is obtained.
A replacement fuse cover can be purchased from your local dealer.
Before use
Remove the connector cover.
How to replace the fuse
The location of the fuse differ according to the type of AC mains plug (figures A
and B). Confirm the AC mains plug fitted and follow the instructions below.
Illustrations may differ from actual AC mains plug.
1. Open the fuse cover with a screwdriver.
2. Replace the fuse and close or attach the fuse cover.
Disposal of Old Equipment and Batteries
Only for European Union and countries with recycling
systems
These symbols on the products, packaging, and/or
accompanying documents mean that used electrical and
electronic products and batteries must not be mixed with
general household waste.
For proper treatment, recovery and recycling of old
products and used batteries, please take them to
applicable collection points in accordance with your
national legislation.
By disposing of them correctly, you will help to save
valuable resources and prevent any potential negative
effects on human health and the environment.
For more information about collection and recycling,
please contact your local municipality.
Penalties may be applicable for incorrect disposal of this
waste, in accordance with national legislation.
Note for the battery symbol (bottom symbol):
This symbol might be used in combination with a
chemical symbol. In this case it complies with the
requirement set by the Directive for the chemical
involved.
(5)
English
5
Table of contents
2
1
R03/LR03, AAA
(Alkaline or manganese batteries)
Safety precautions ............................................................5
Accessories ....................................................................... 6
Unit care .............................................................................6
Control reference guide....................................................7
Getting started...................................................................9
Basic operations .............................................................13
Network settings .............................................................14
Playing back music files on the DLNA server ..............15
About descriptions in these operating instructions
≥Pages to be referred to are indicated as “@ ±±”.
≥The illustrations shown may differ from your unit.
≥Unless otherwise indicated, operations are described using the remote control.
Using iPhone/iPad/iPod ..................................................16
Using AirPlay ...................................................................17
Using USB device............................................................17
Using PC, etc. ..................................................................19
Sound adjustment ...........................................................20
Others ...............................................................................21
Troubleshooting ..............................................................23
Specifications ..................................................................26
Accessories
∏ 1 Remote control
(N2QAYA000095)
∏ 1 AC mains lead
(K2CT2YY00109)
∏ 2 Batteries for remote
control
∏ 1 AC mains lead
Except for Switzerland
(K2CQ2YY00132)
∏ 1 AC mains lead
For Switzerland
(K2CS2YY00001)
≥ Product numbers provided in these operating instructions are correct as of November 2014. These may be subject to change.
≥ Do not use AC mains lead with other equipment.
≥ In Saudi Arabia, please use the moulded three pin mains plug.
∫ Using the remote control
Insert the battery so the terminals (i and j)
match those in the remote control.
Point it at the remote control signal sensor on this
unit. (> 7)
≥Keep the batteries out of reach of children to
prevent swallowing.
Unit care
Pull out the AC mains lead from the outlet before maintenance. Clean this unit with a soft cloth.
≥ When dirt is heavy, wring a wet cloth tightly to wipe the dirt, and then wipe it with a soft cloth.
≥ Do not use solvents including benzine, thinner, alcohol, kitchen detergent, a chemical wiper, etc. This might cause the exterior case to be
deformed or the coating to come off.
(6)
6
Control reference guide
This unit
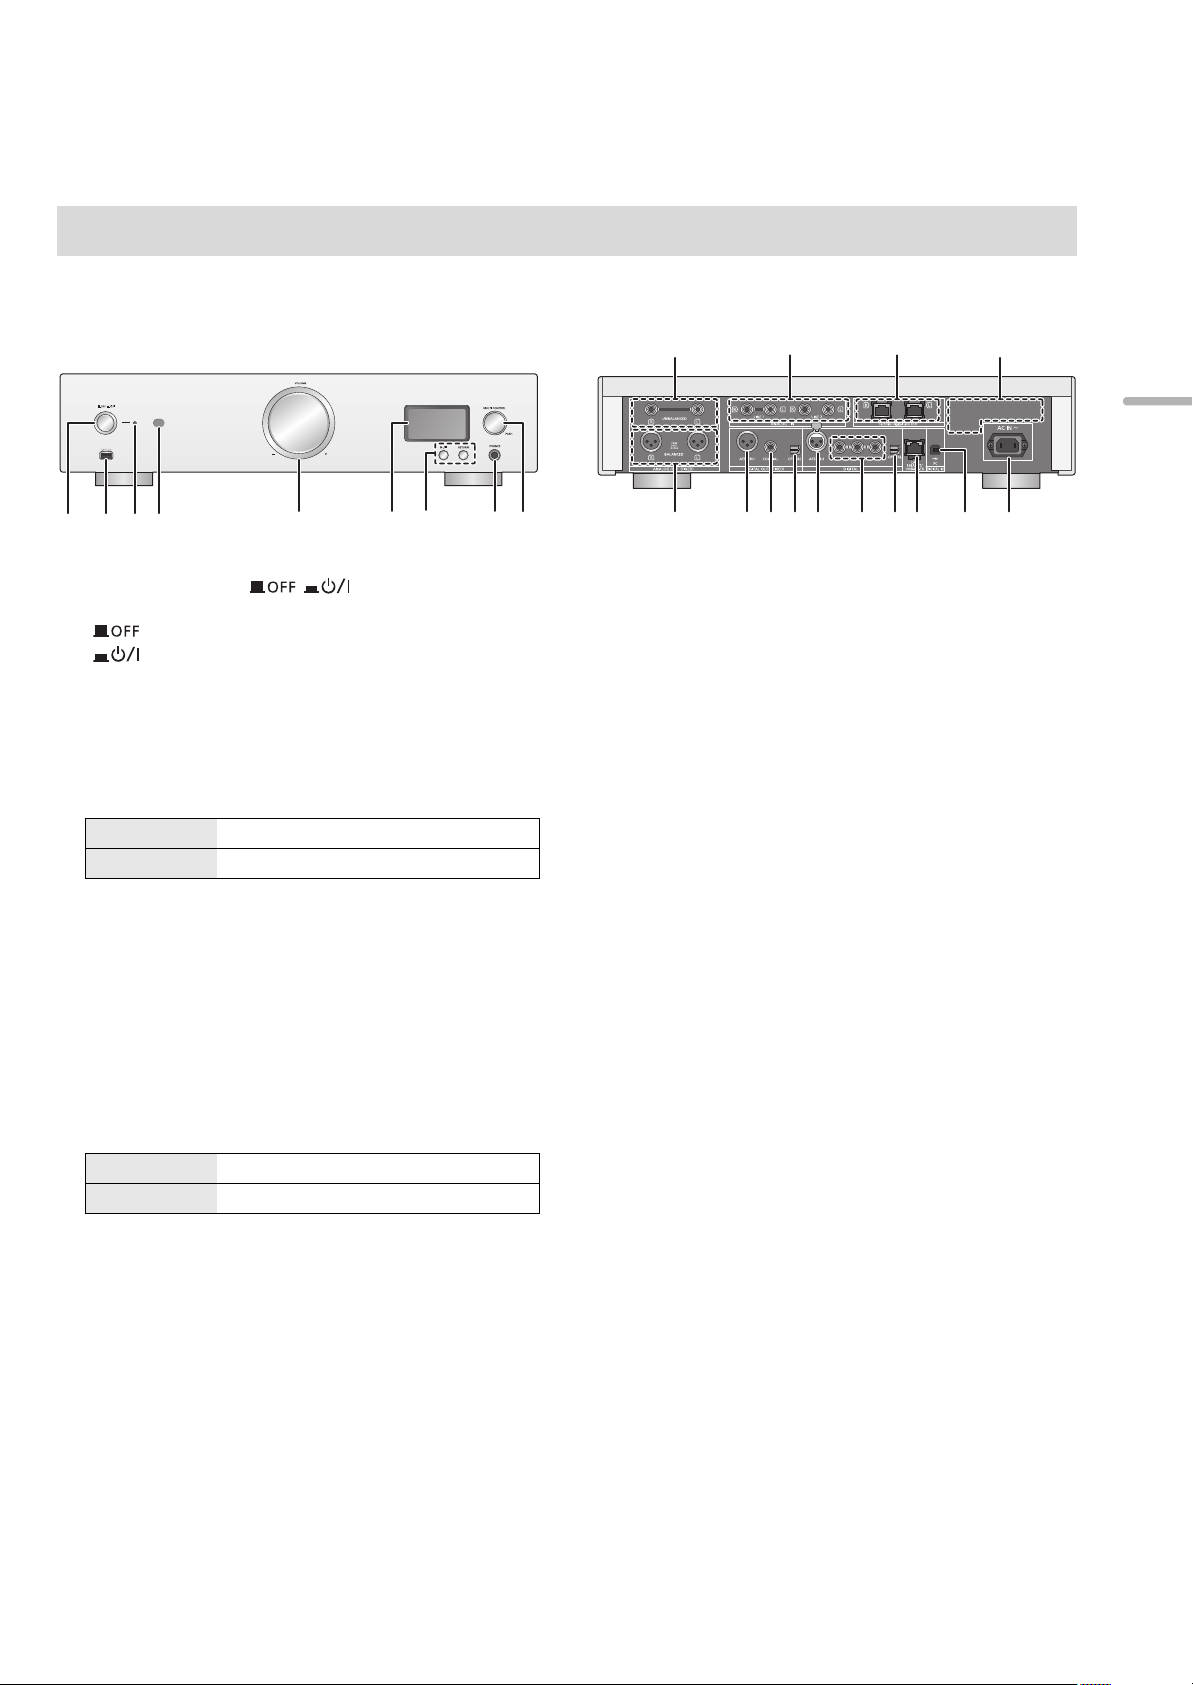
∫ Front
1 Unit on/off button [ ]
Use this button to turn the unit on and off.
[ ] (off): The unit is off.
[ ] (on): The unit is on.
≥ The unit is still using a small amount of power in off mode. Off
mode uses less power. (> 26)
2
Port for iPhone/iPad/iPod and USB devices (> 16, 17)
3 Power indicator
The colour of the indicator changes according to the
status of this unit.
Blue The unit is on.
Red The unit is in standby mode.
4 Remote control signal sensor
Distance: Within approx. 7 m directly in front
Angle: Approx. 30o left and right
5 Volume knob
Adjust the volume of the headphones or the SE-R1. (>13)
≥ It is not possible to adjust the volume of devices connected to
the analogue or digital audio output terminals.
≥ The speed at which the volume is adjusted varies depending
on how fast you turn the knob.
6 Display
7 Basic control buttons
1/; Play/Pause
RETURN Return to the previous display
≥ Press and hold [RETURN] on the unit to display the HOME
menu. (> 13)
8 Headphones jack
For connecting a headphone plug.
≥ Excessive sound pressure from earphones and headphones
can cause hearing loss.
≥ Listening at full volume for long periods may damage the
user’s ears.
9 Multi-control knob (> 13)
≥Turn this knob clockwise and anticlockwise to switch
the input source, scroll through items, and skip during
playback.
≥To set an item, press the knob; to enter the menu
screen, press and hold it.
∫ Rear
: Analogue audio output terminals [UNBALANCED]
(> 10)
; Analogue audio input terminals [LINE1]/[LINE2]
(> 10)
< System terminal [Technics Digital Link OUT] (> 9)
= Product identification marking
The model number is indicated.
> Analogue audio output terminal [BALANCED] (> 10)
? Digital audio output terminal [AES/EBU] (> 11)
@ Digital audio output terminal [COAXIAL] (> 11)
A Digital audio output terminal [OPTICAL] (> 11)
B Digital audio input terminal [AES/EBU] (> 11 )
C Digital audio input terminals
[COAXIAL1]/[COAXIAL2]/[COAXIAL3] (> 11)
D Digital audio input terminal [
E LAN port [LAN] (> 14)
F Digital audio input terminal [PC] (> 19)
For connecting to a PC, etc.
G AC IN terminal [AC IN T] (> 12)
OPTICAL
] (> 11)
English
(7)
7
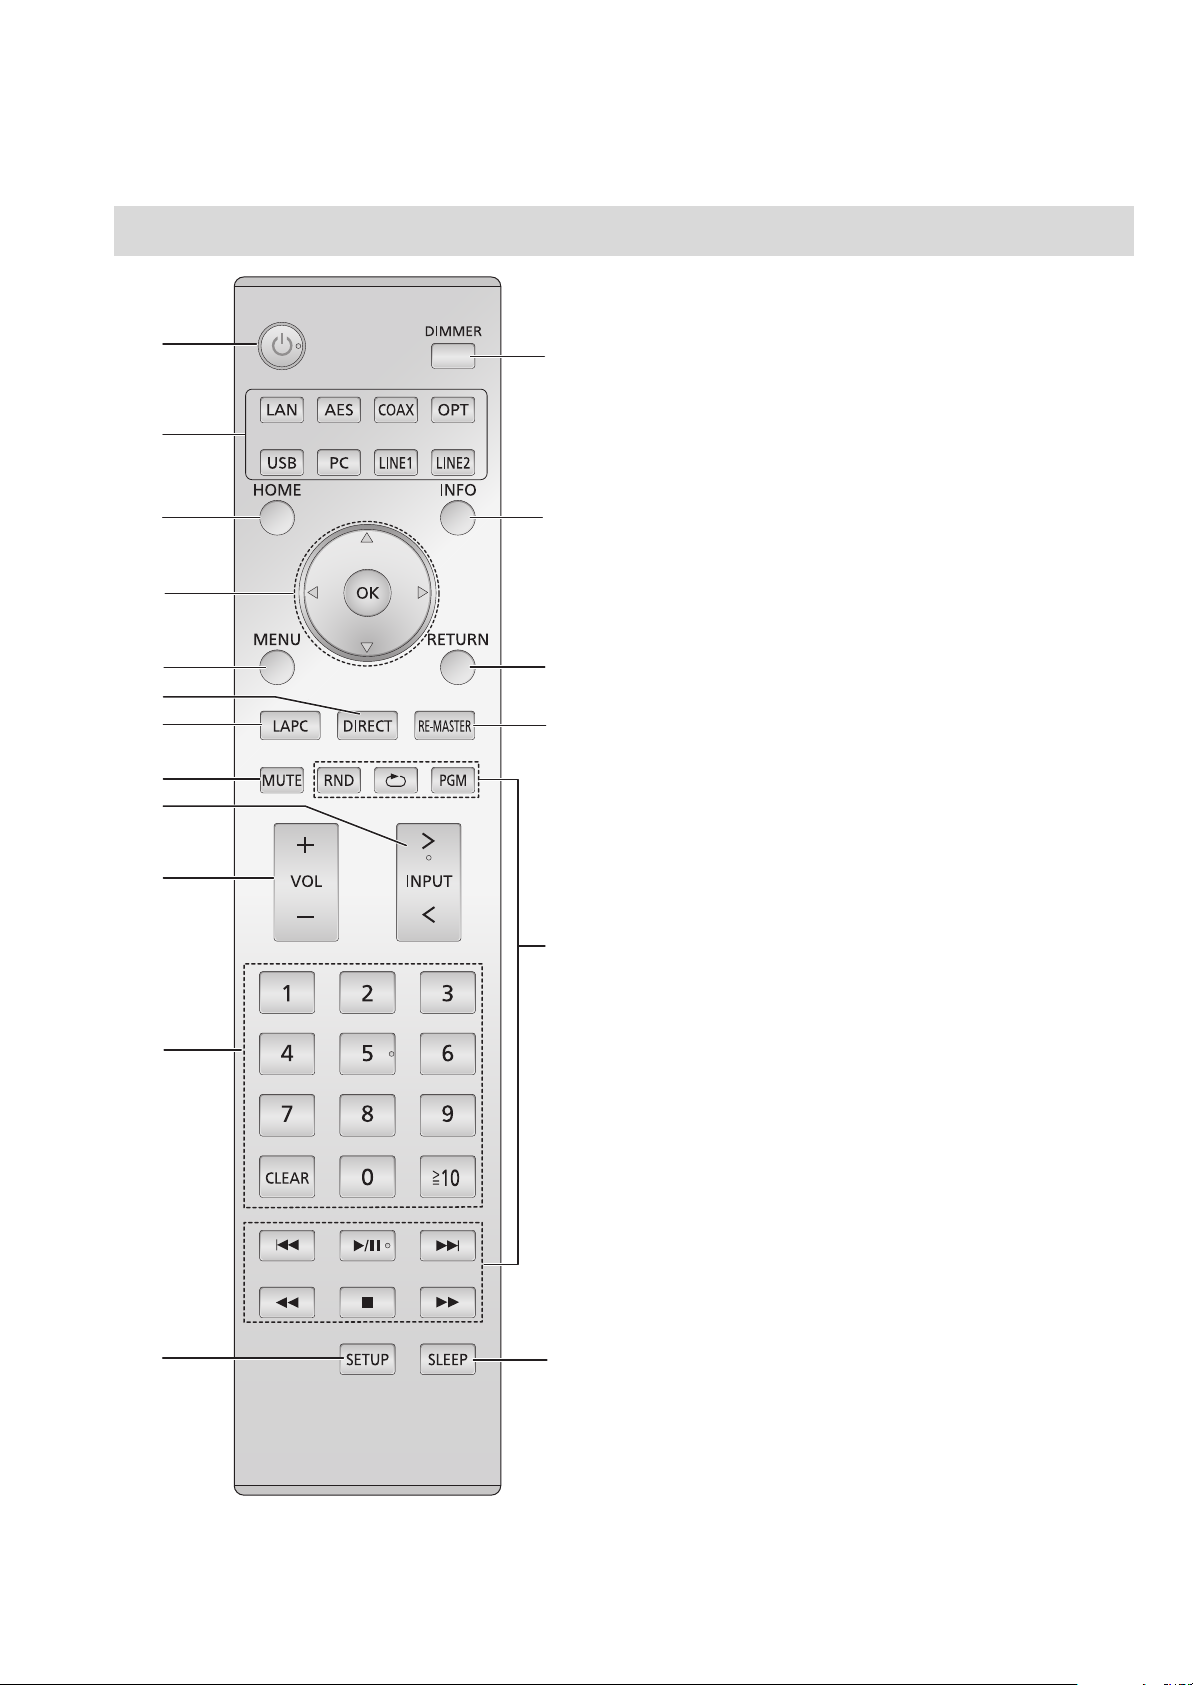
LAPC
㻌
RE- MASTER
㻌
AES
㻌
COAX
㻌
LINE1
㻌
OPT
㻌
USB
㻌
PC
㻌
LAN
㻌
PGM
㻌
RAND
㻌
LINE2
㻌
Remote control
MENU
DIRECT
1 [Í]: Standby/on switch
Press to switch the unit from on to standby mode or vice versa.
In standby mode, the unit is still consuming a small amount of
power.
≥ The remote control do not operate when the power indicator is
off.
2 Select the input source
3 [HOME]: Display HOME menu
4 [3, 4, 2, 1]/[OK]: Selection/OK
5 [MENU]: Enter menu (> 21)
6 [DIRECT]: Turn on/off Direct mode (> 20)
7 [LAPC]: Measure the characteristics of the amplifier
and correct its output (> 12)
8 [MUTE]: Mute the sound of the headphones or the
SE-R1 (> 13)
9 [N INPUT O]: Select the input source
: [r VOL s]: Adjust the volume of the headphones or
the SE-R1 (> 13)
≥ It is not possible to adjust the volume of devices connected to
the analogue or digital audio output terminals.
; Numeric buttons, etc.
≥ To select a 2-digit number
Example:
16: [S10] > [1] > [6]
≥ To select a 4-digit number
Example:
1234: [S10] > [S10] > [S10] > [1] > [2] > [3] > [4]
≥ [CLEAR]: Clear the entered value.
< [SETUP]: Enter setup menu (> 14, 20, 21, 22, 23)
= [DIMMER]: Adjust the brightness of the display, etc.
(> 13)
> [INFO]: View content information
Press this button to display the track, artist, and album names,
file type, sampling frequency, and other information.
? [RETURN]: Return to the previous display
@ [RE-MASTER]: Turn on/off Re-master (> 20)
A Basic playback control buttons
B [SLEEP]: Set the sleep timer (> 21)
(8)
8
Getting started
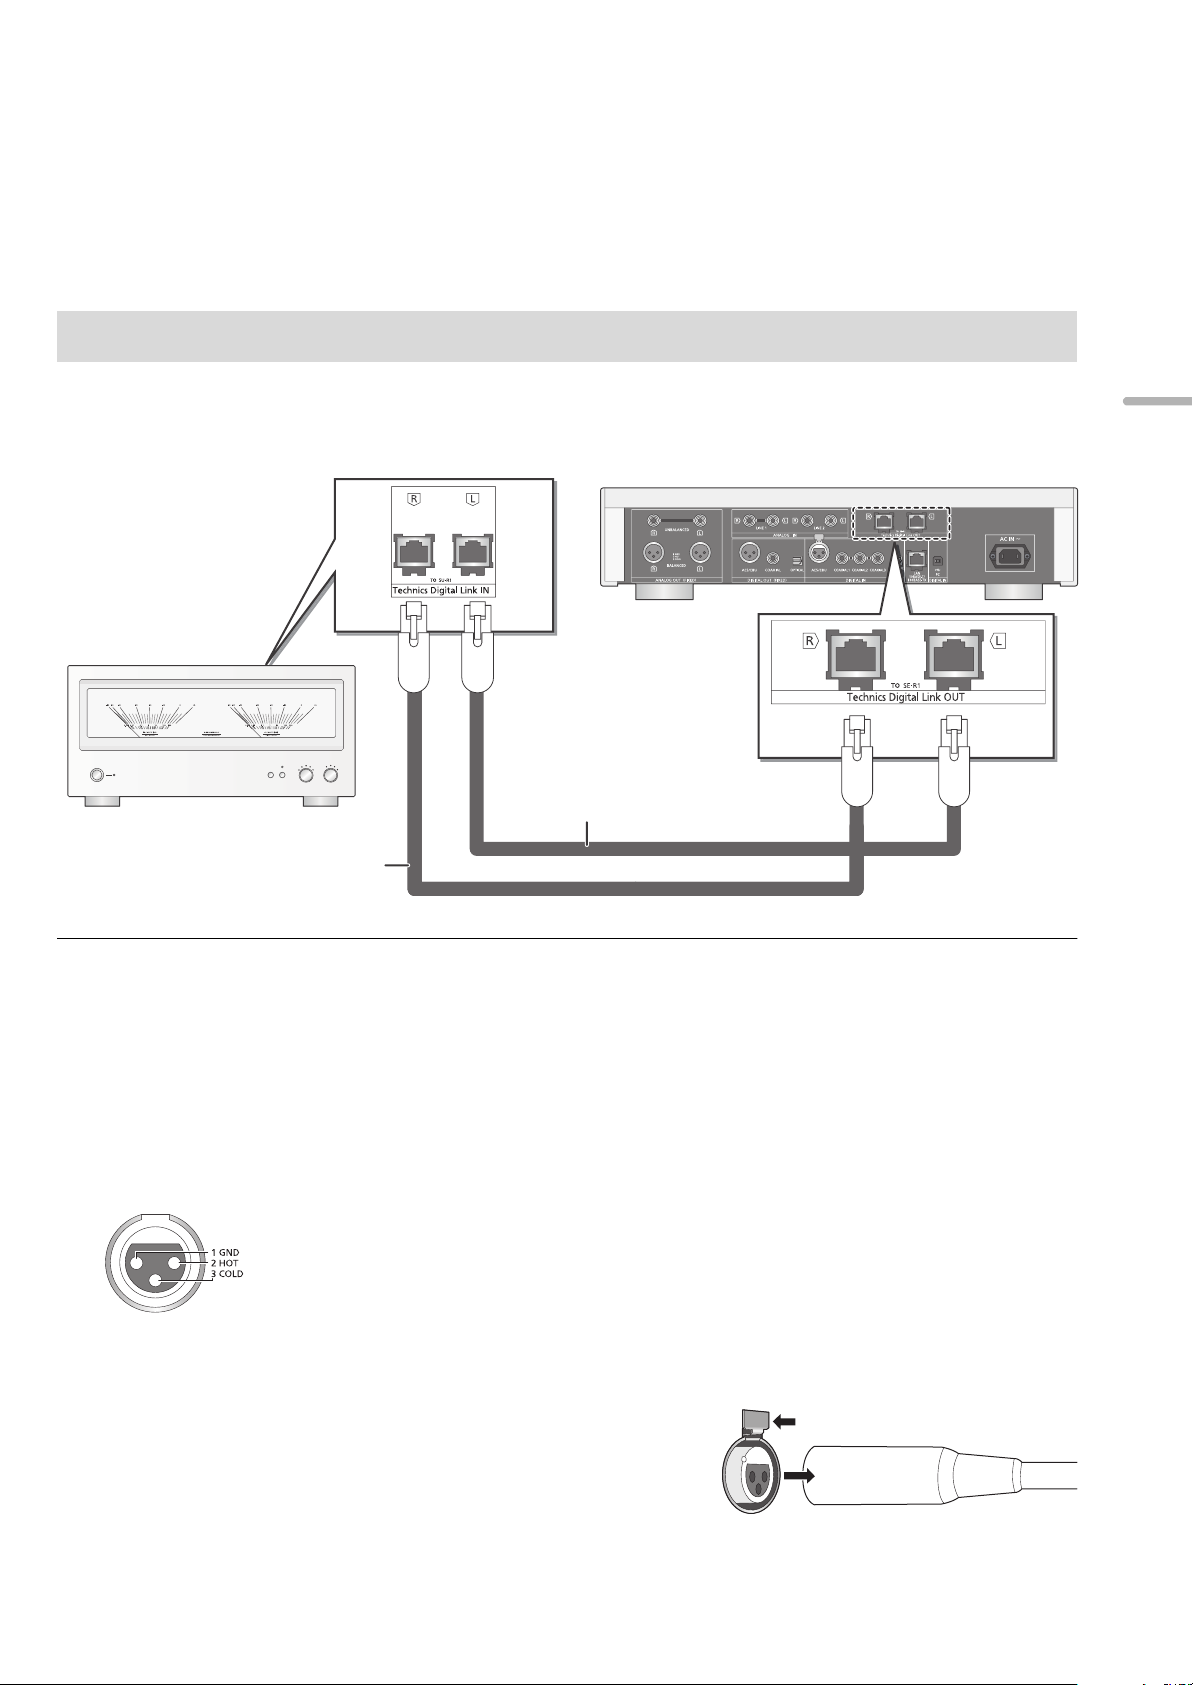
SE-R1
This unit
(rear)
Cable for system control
(not supplied)
Cable for system control
(not supplied)
≥Turn off all equipment before connection and read the appropriate operating instructions.
≥Do not connect the AC mains lead until all other connections are complete.
≥Insert the plugs of the cables to be connected all the way in.
≥Do not bend cables at sharp angles.
System control connection to an SE-R1
≥You can output digital audio signals from this unit and play back music.
≥You can operate this unit and the SE-R1 simultaneously with ease on the remote control. (> 23)
English
≥ Use category 7 or above straight LAN cables (STP) when connecting to peripheral devices.
≥ We recommend using cables with a length of 3 m or less.
≥ The system terminal and the LAN port are identical in shape. Be careful not to mistakenly connect either of the cables for system control
connected to the system terminal of the SE-R1 to the LAN port.
≥ Do not connect an SE-R1 in any other way than described above.
∫ Polarity of the balanced audio terminals
Insert the cable pins so that their polarities match the polarities of the holes.
∫ To disconnect the balanced cables
Pull out the cables while pressing [PUSH] at the top of the terminals.
(9)
9
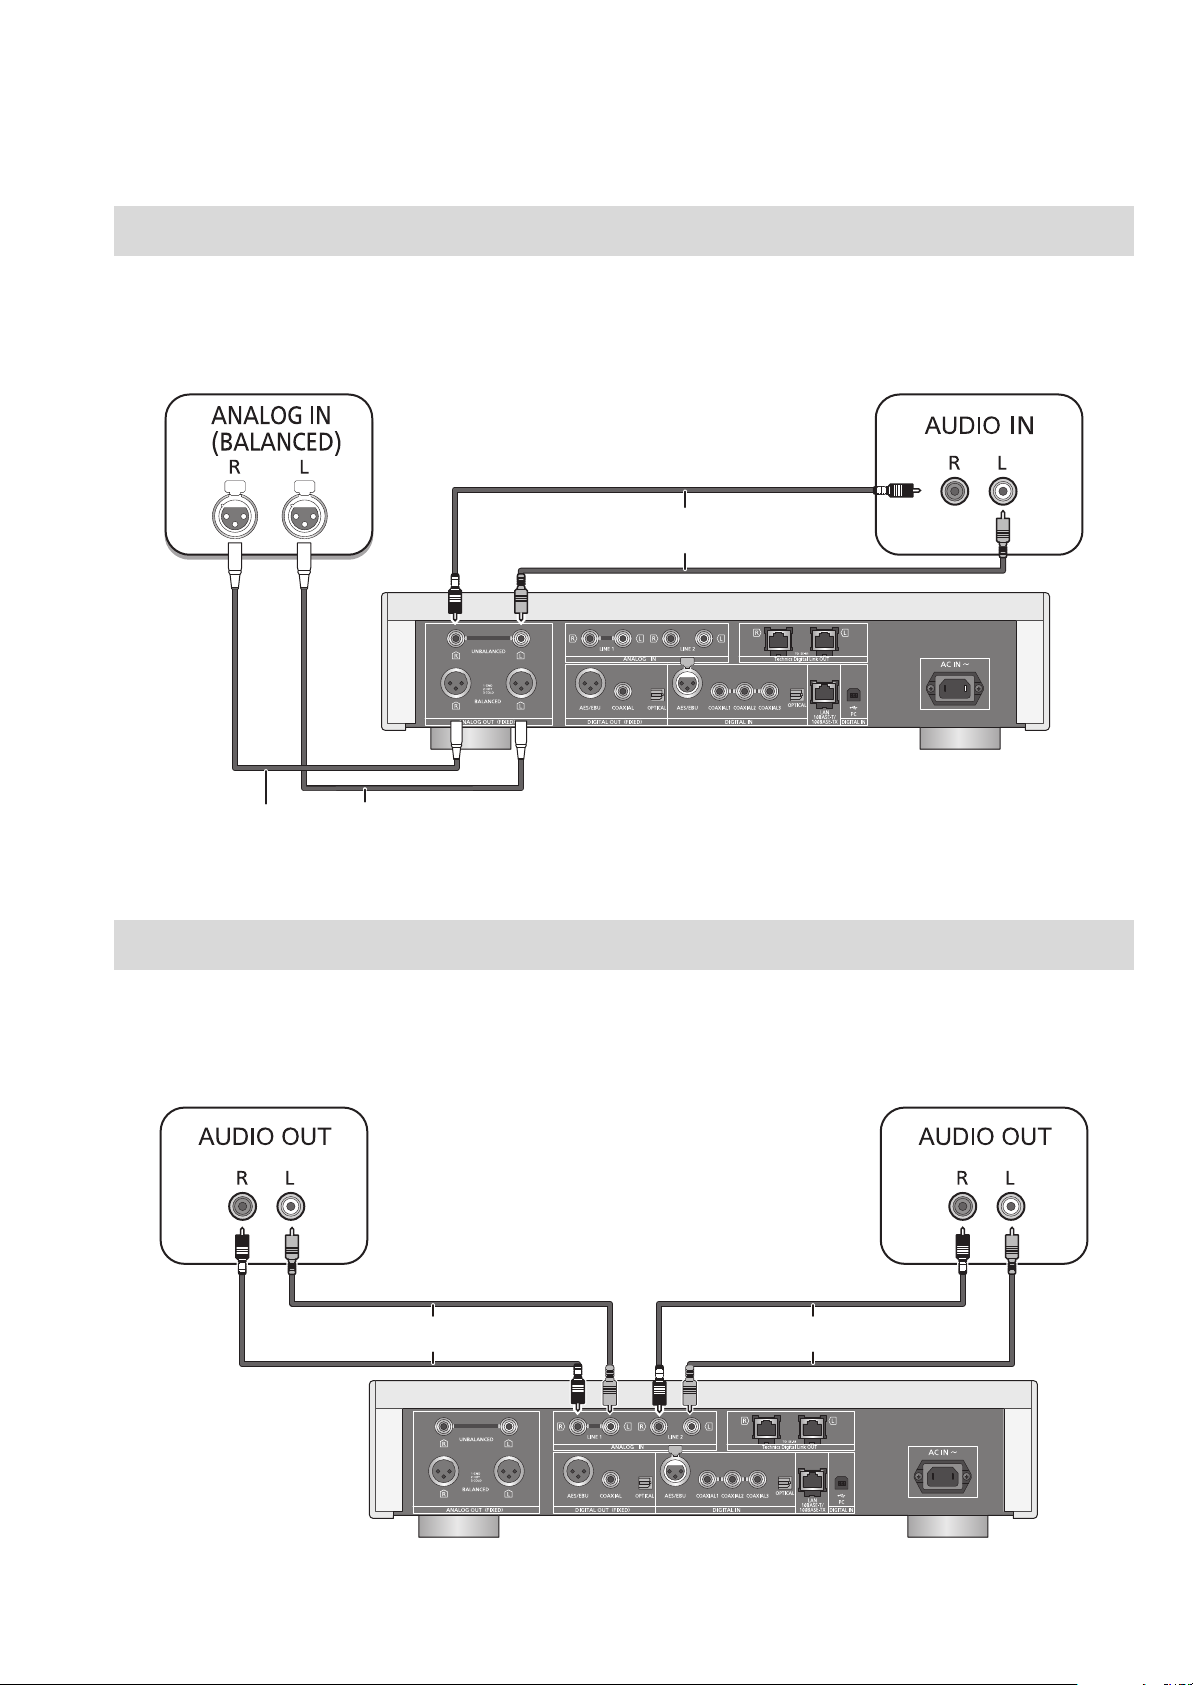
Connecting to analogue audio input devices
This unit
(rear)
XLR cable* (not supplied)
Audio cable (not supplied)
This unit
(rear)
Audio cable (not supplied) Audio cable (not supplied)
You can output analogue audio signals from this unit and play back music.
e.g.,
Pre-amplifier with balanced input terminals Pre-amplifier with unbalanced input terminals
* We recommend using cables with a length of 3 m or less.
Connecting to analogue audio output devices
You can input analogue audio signals to this unit and play back music.
e.g.,
Player, etc. Player, etc.
(10)
10
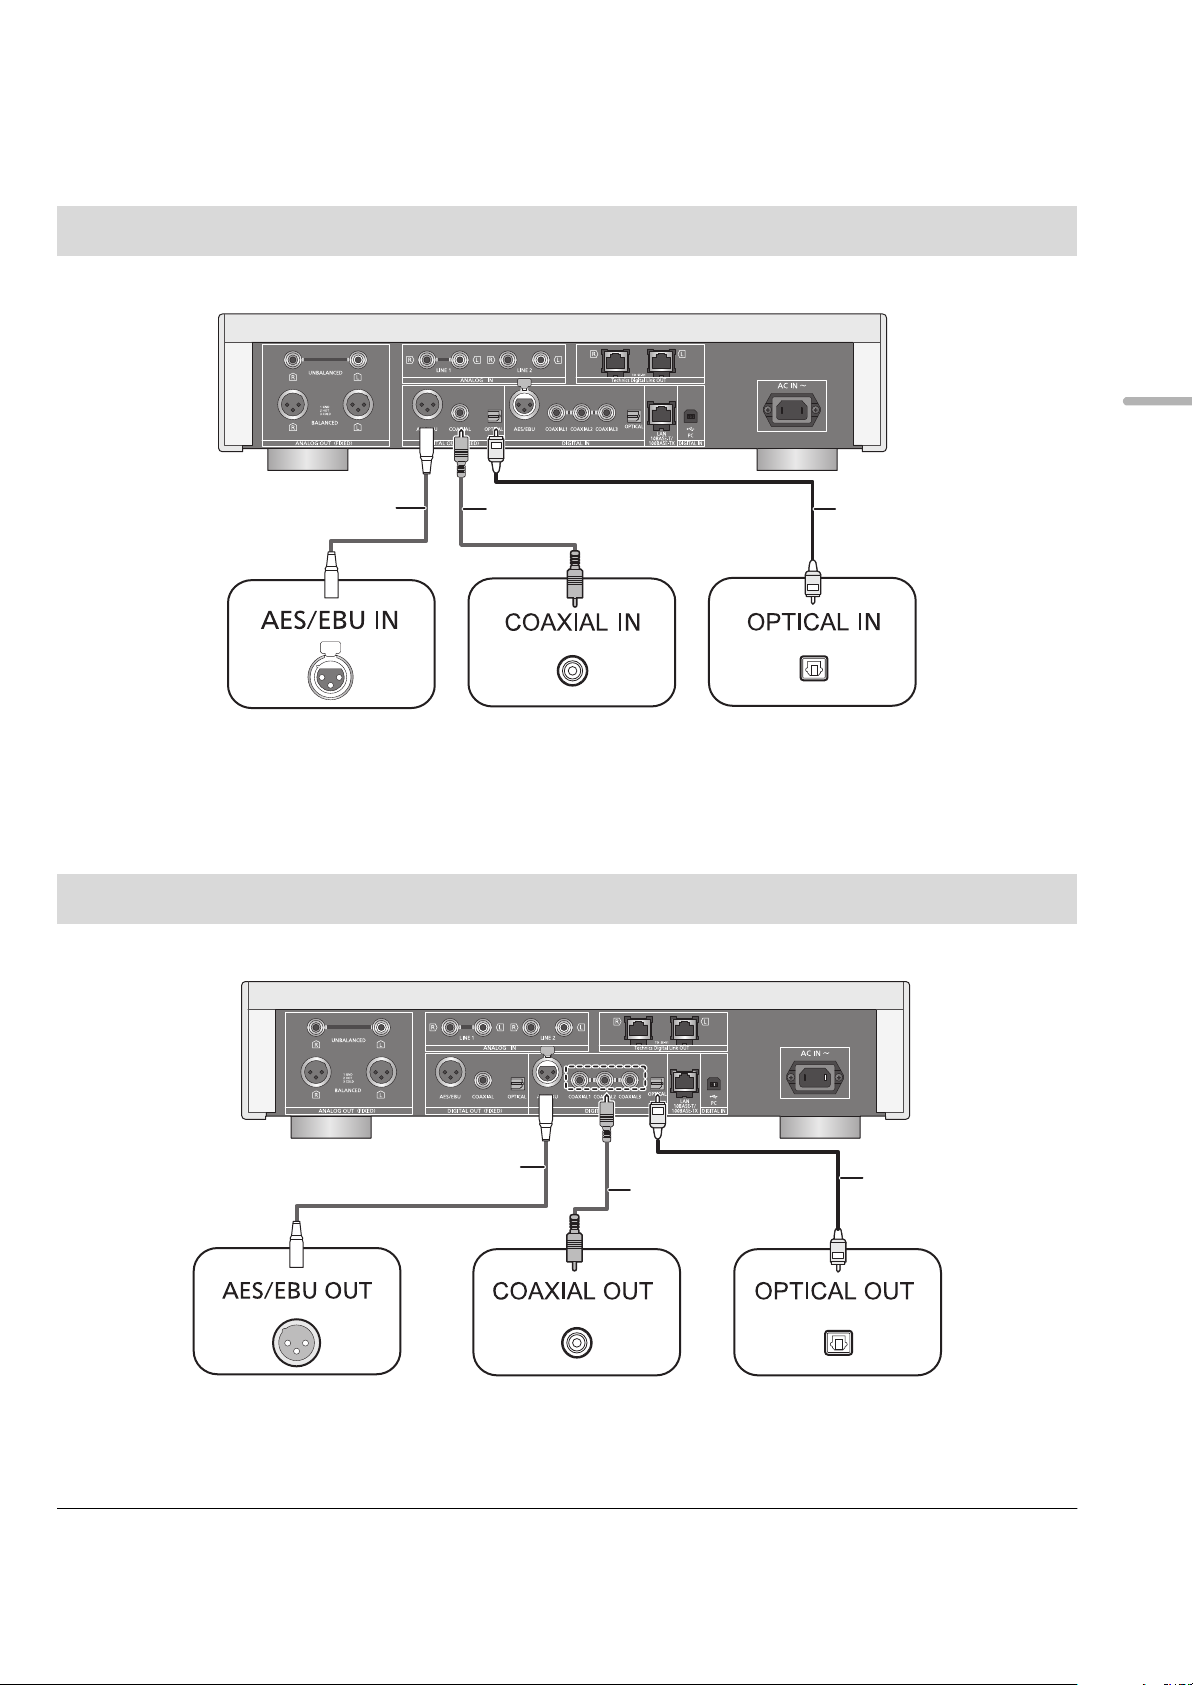
Connecting to digital audio input devices
This unit
(rear)
AES/EBU cable*
(not supplied)
Coaxial digital cable
(not supplied)
e.g.,
Optical digital audio cable
(not supplied)
This unit
(rear)
AES/EBU cable*
(not supplied)
Coaxial digital cable
(not supplied)
e.g.,
Optical digital audio
cable
(not supplied)
You can output digital audio signals from this unit and play back music.
English
Device that supports
AES/EBU input
(pre-amplifier, etc.)
* We recommend using cables with a length of 3 m or less.
Connecting to digital audio output devices
You can input digital audio signals to this unit and play back music.
Device that supports
coaxial digital input
(pre-amplifier, etc.)
Device that supports
optical digital input
(pre-amplifier, etc.)
Device that supports
AES/EBU output
(player, etc.)
* We recommend using cables with a length of 3 m or less.
Device that supports
coaxial digital output
(player, etc.)
Device that supports
optical digital output
(player, etc.)
≥ The digital audio input terminals of this unit can only detect linear PCM signals. For details, refer to the operating instructions of the device.
(11)
11
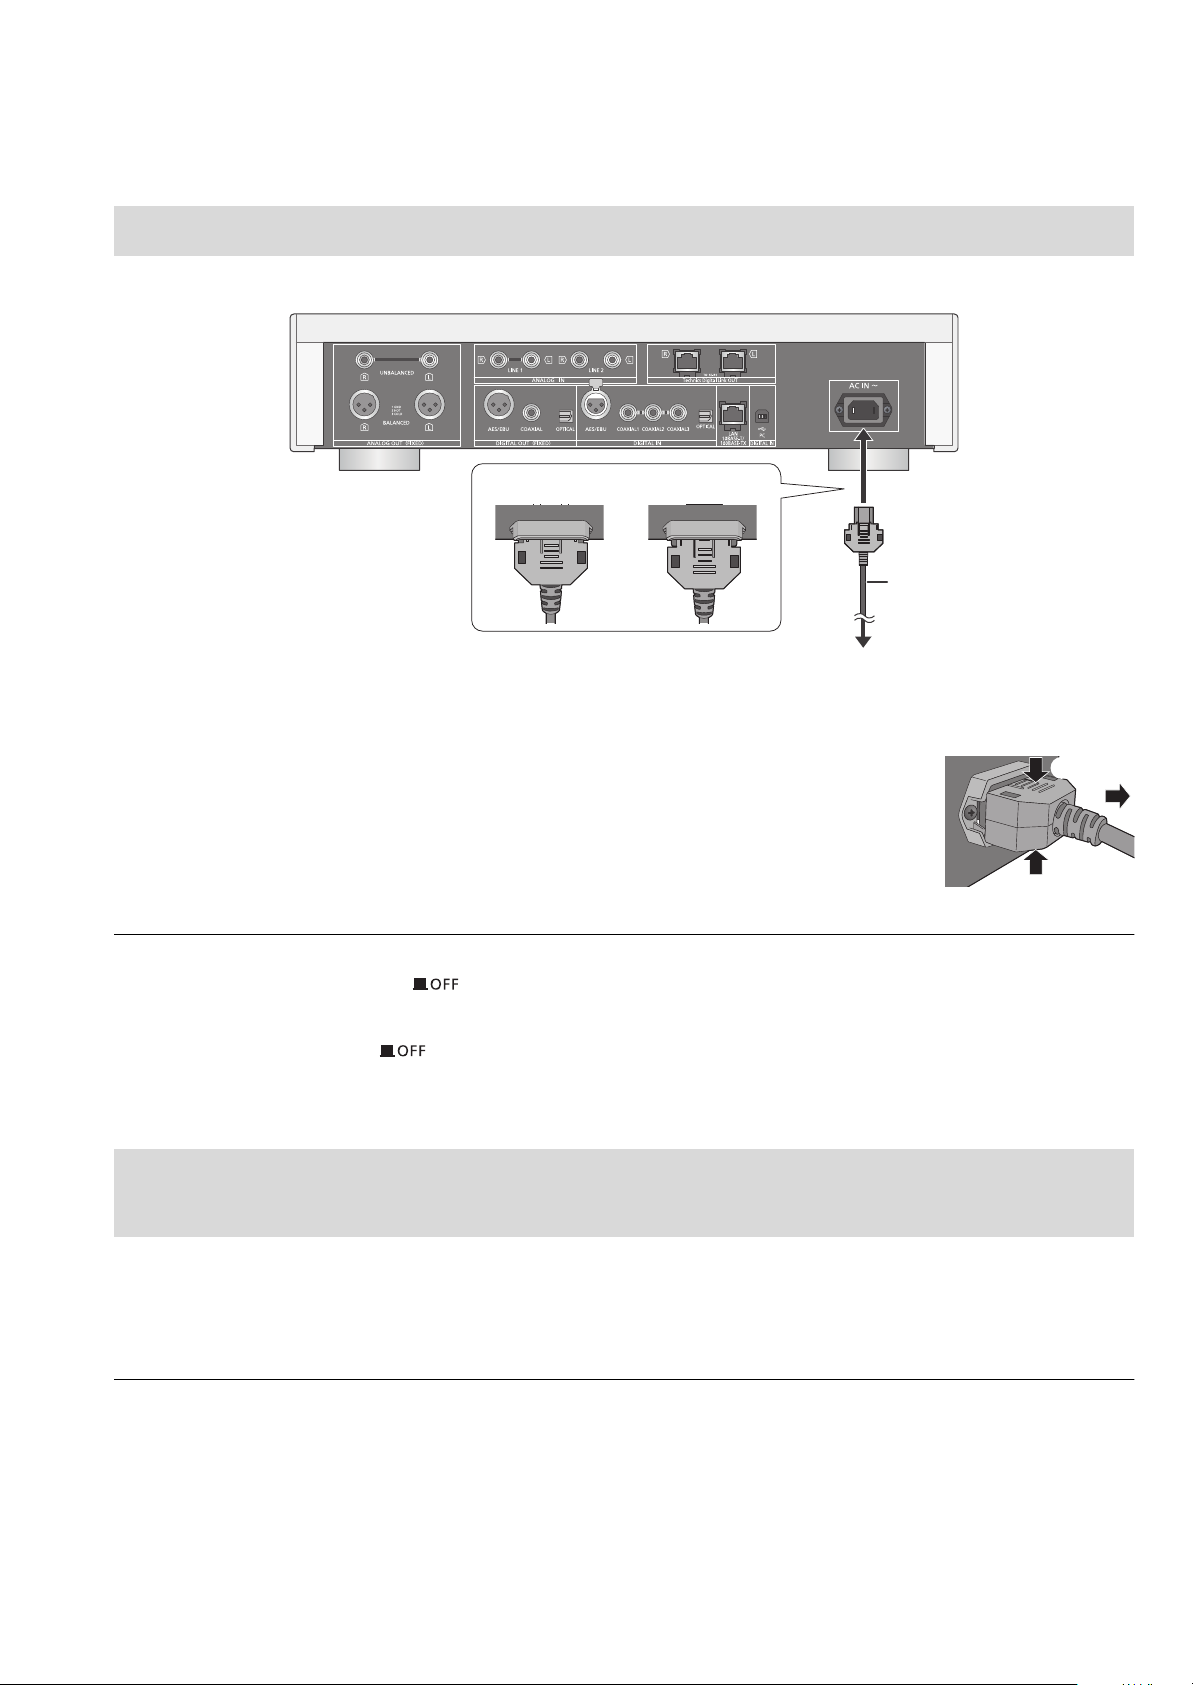
AC mains lead connection
TENTATIVE
AC mains lead
(supplied)
To a household mains socket
This unit
(rear)
DO DO NOT
Connect only after all other connections are completed.
∫ To disconnect the AC mains lead from this unit
Pull out the AC mains lead while pressing the top and bottom sides of the connector.
≥ Although the AC power switch is in the [ ] position, the unit is not completely disconnected from the mains. Remove the plug from the
main electrical outlet if you will not be using the unit for an extended period of time. Place the unit so the plug can be easily removed.
NORSK
≥ Selv om hovedbryteren er i stilling [ ], er ikke enheten koblet fra strømnettet. Koble kontakten fra strømuttaket hvis du ikke skal bruke
enheten på en stund. Plasser enheten slik at det er lett å dra ut kontakten.
Measuring the characteristics of the amplifier and correcting its
output
If the SE-R1 is connected to this unit via the system control function, you can operate using the remote control of this unit.
Press and hold [LAPC] until the LAPC indicator on the SE-R1 starts to blink.
≥The SE-R1 will start measuring the characteristics of the amplifier if it is connected to the speakers.
≥ For information on the operations of the SE-R1, please also refer to its operating instructions.
12
(12)
Basic operations
Preparation
≥Prepare the music that you want to play back.
≥Turn on the connected device (amplifier, etc.) and lower its
volume.
1 Press the unit on/off button to the [ ]
position.
≥The power indicator lights up in blue.
2 Press any of the input source buttons. (> 8)
LAN
AES
COAX
OPT
USB
PC
LINE1/LINE2
Connects this unit to a network and
plays back music over it. (> 15)
Plays back music from digital audio
output devices.
≥ Press [COAX] to select
“COAX1”/“COAX2”/“COAX3”.
Plays back music stored on a USB
device or an iPhone/iPad/iPod.
(> 16, 17, 18)
Plays back music stored on a PC,
etc. (> 19)
Plays back music from analogue
audio output devices.
Adjusting the volume of the
headphones or the SE-R1
Connect this unit and the SE-R1 with cables for system
control. (> 23)
∫ Adjusting the volume
Press [r VOL s].
≥ -- dB (min), -99.0 dB to 0 dB (max)
≥ When adjusting the volume of the SE-R1, set the input selector
knob on the SE-R1 to [DIGITAL].
∫ Muting the sound
Press [MUTE].
≥ “ ” is displayed.
≥ Press again to cancel. “ ” is also cancelled when the volume is
adjusted or the unit is turned off.
Display brightness
The brightness of this unit’s display and the power indicator
can be changed.
Press [DIMMER] repeatedly.
English
3 Press [3, 4] to select an item and then
press [OK].
≥If there are any other items, repeat this step.
4 Start play.
∫ Using the multi-control knob
1 Press and hold [RETURN] on the unit to display the
HOME menu.
2 Turn the multi-control knob clockwise and anticlockwise
to select an input source, and then press the knob.
3 Turn the multi-control knob clockwise and anticlockwise
to select an item, and then press the knob.
4 Start play.
≥ When the display is turned off, it will light up only when you
operate this unit.
Before the display turns off again, “Display Off” will be displayed
for a few seconds.
Operations using the
dedicated app “Technics
Music App”
If you install the dedicated app “Technics Music App” (free of
charge) on your tablet/smartphone, you can control this unit
and the SE-R1 using a wide variety of functions.
For details, visit:
www.technics.com/support/
(13)
13
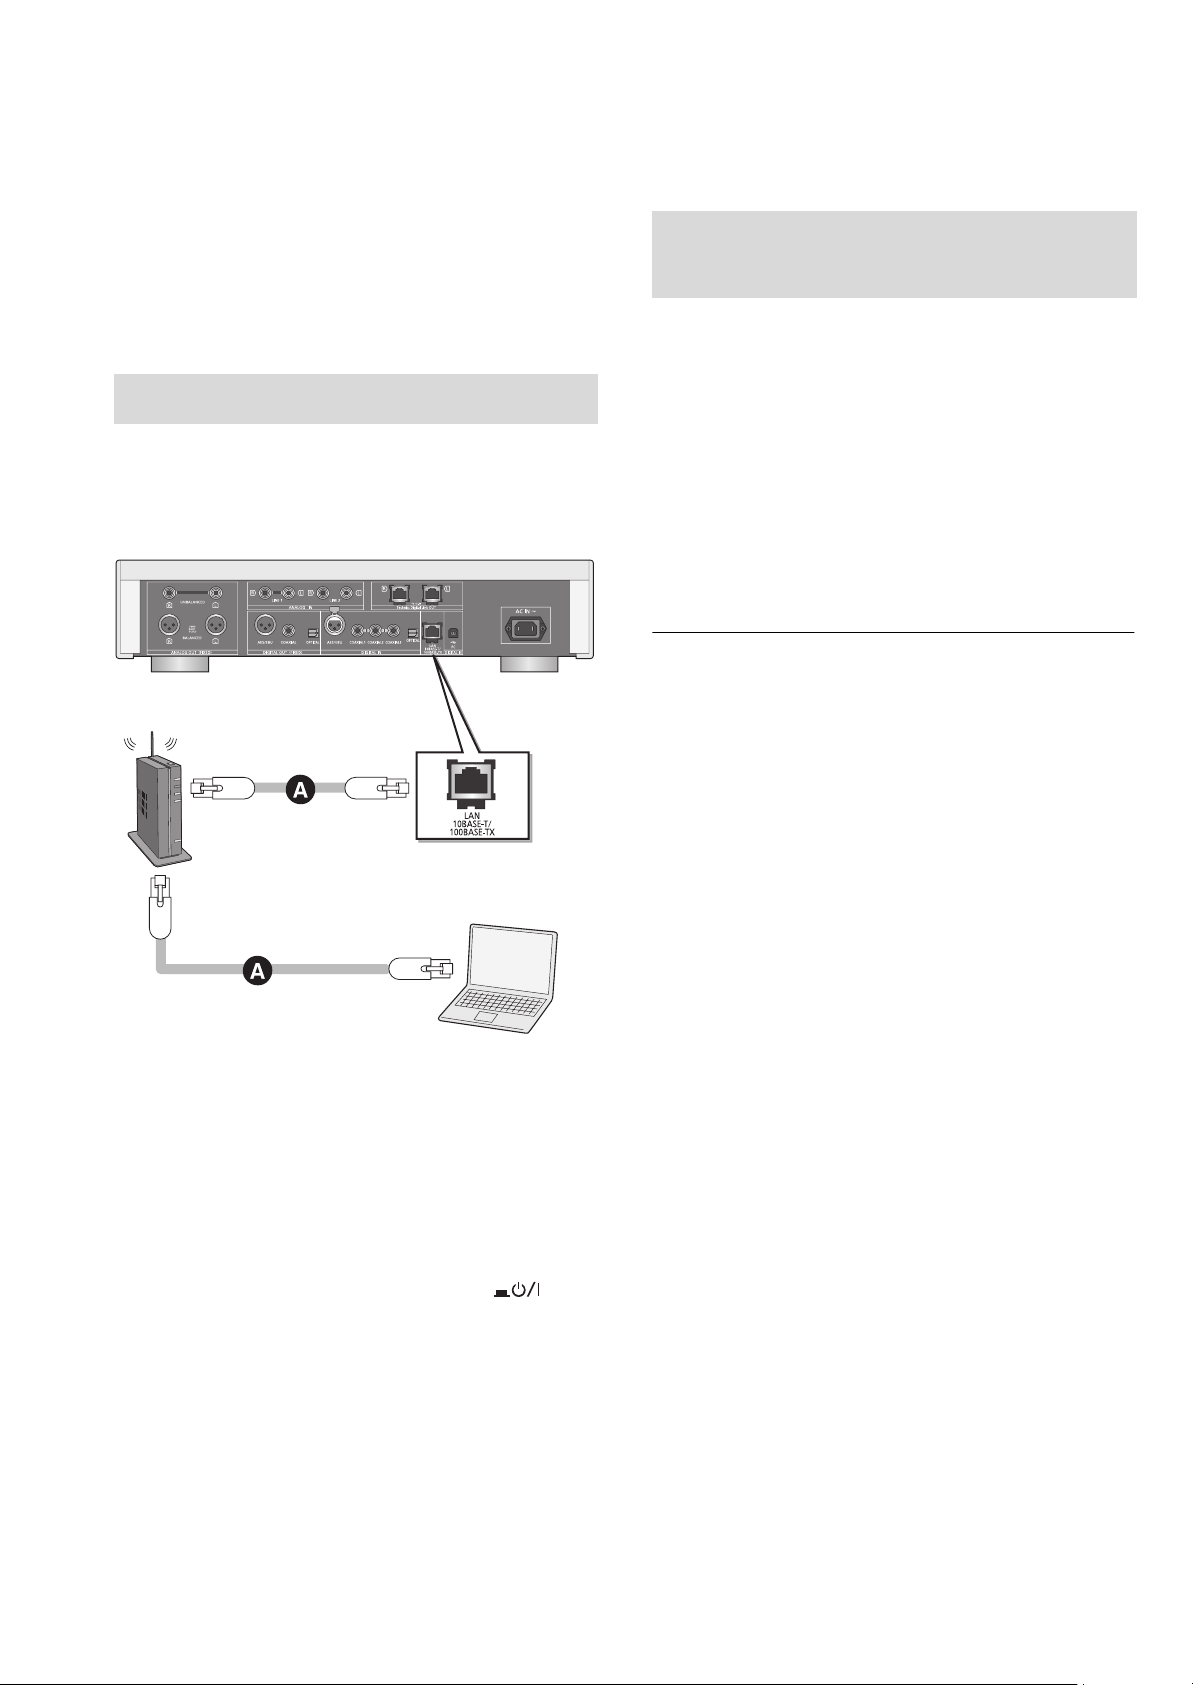
Network settings
This unit
(rear)
PC, etc.
Broadband router, etc.
You can stream music from an iOS device
(iPhone/iPad/iPod), an Android™ device or a PC
(Mac/Windows) to this unit by using the AirPlay or DLNA
feature. (> 15, 17)
To use these features, this unit must join the same network
as the AirPlay compatible device or the DLNA compatible
device.
Wired LAN connection
Normally, just connecting a LAN cable will complete the
setup.
To make network-related
settings
You can change this unit’s name on the network (Friendly
Name), and use specific IP address, subnet mask, default
gateway, primary DNS, etc.
≥ Do not play back music while changing these settings.
1 Press [SETUP].
2 Press [3, 4] repeatedly to select “Network” and then
press [OK].
3 Select and input the details.
4 Press [OK] to apply the settings.
5 Press [RETURN] repeatedly to exit the settings.
6 Press [Í] to turn the unit to standby mode.
≥ Wait until “Please Wait” disappears.
7 Perform “Wired LAN connection”. (> left)
≥ Use category 7 or above straight LAN cables (STP) when
connecting to peripheral devices.
≥ The LAN port and the system terminal are identical in shape. Be
careful not to mistakenly connect the LAN cable connected to
another device, such as a broadband router, to the system
terminal.
≥ Inserting any cable other than a LAN cable in the LAN port can
damage the unit.
≥ If you change the network settings immediately after turning on
this unit, it may take some time until the changes are applied.
A: LAN cable (not supplied)
1 Disconnect the AC mains lead.
2 Connect this unit to a broadband router, etc.
using a LAN cable.
3 Connect the AC mains lead to this unit, and
press the unit on/off button to the [ ]
position. (> 12)
(14)
14
Playing back music files on the DLNA server
You can share music files stored in the DLNA Certified media
server (PC, smartphone, etc.) connected to your home
network, and enjoy the contents with this unit.
≥ About supported format, refer to “File format” (@ 28)
Preparation
≥Complete the network settings. (> 14)
≥Connect the device to be used to the same network as this
unit.
≥Add the contents and folder to the libraries of the Windows
®
Media
player 11 or 12, or a smartphone, etc.
– Playlist of Windows Media® player can play back only the
contents that are stored in the libraries.
– To use Windows Media
configure it in advance.
®
Player for streaming, you need to
Playing back content stored
on the DLNA server by
controlling it from this unit
You can play back music stored on the DLNA server on this
unit (DMP—Digital Media Player) by controlling the DLNA
server with this unit.
1 Press [LAN].
≥The server selection screen will be displayed.
∫ Random repeat playback
Press [RND].
Each time you press the button:
On
Off Turns off random repeat mode.
All tracks in a folder are repeated
randomly.
≥ “RND `” is displayed.
∫ Repeat playback
Press [`].
Each time you press the button:
1-Track
All
Off Turns off repeat mode.
Only plays the selected track.
≥ “1 `” is displayed.
All tracks in a folder are repeated.
≥ “`” is displayed.
Playing back content stored
on the DLNA server by
English
2 Press [3, 4] to select a DLNA server on the
network, and then press [OK].
≥The folder/content selection screen will be displayed.
≥Folders/content may be displayed in different order
from the order on the server, depending on its
specifications.
3 Press [3, 4] to select an item and then
press [OK].
≥If there are any other items, repeat this step.
Operations on the remote control
Stop Press [∫].
Pause
Skip
Search
Press [1/;].
≥ Press again to restart play.
Press [:] or [9] to skip track.
≥ If you press either of these buttons during
pause, playback will restart.
During play or pause, press and hold
[6] or [5].
controlling it from a DMC
By controlling a DMC (Digital Media Controller) compatible
device, you can play back music stored on the DLNA server
on this unit (DMR—Digital Media Renderer).
1 Press the unit on/off button to the [ ]
position.
2 Operate the DMC compatible device and
connect to this unit.
≥The device name of this unit will be displayed as
“Technics SU-R1 _ _ _ _ _ _”*
≥For details on how to use DMC compatible devices,
refer to the operating instructions of the devices or the
software.
≥ You cannot use random repeat playback in combination with other
playback modes.
≥ When you operate DMC, playback of other audio sources will stop
and DLNA output will have priority.
≥ Depending on the contents and the connected equipment,
operations or playback may not be possible.
*1 “ _ ” stands for a digit that is unique to each set.
*2 The device name can be changed from “To make network-
related settings”. (> 14)
1, 2
.
(15)
15
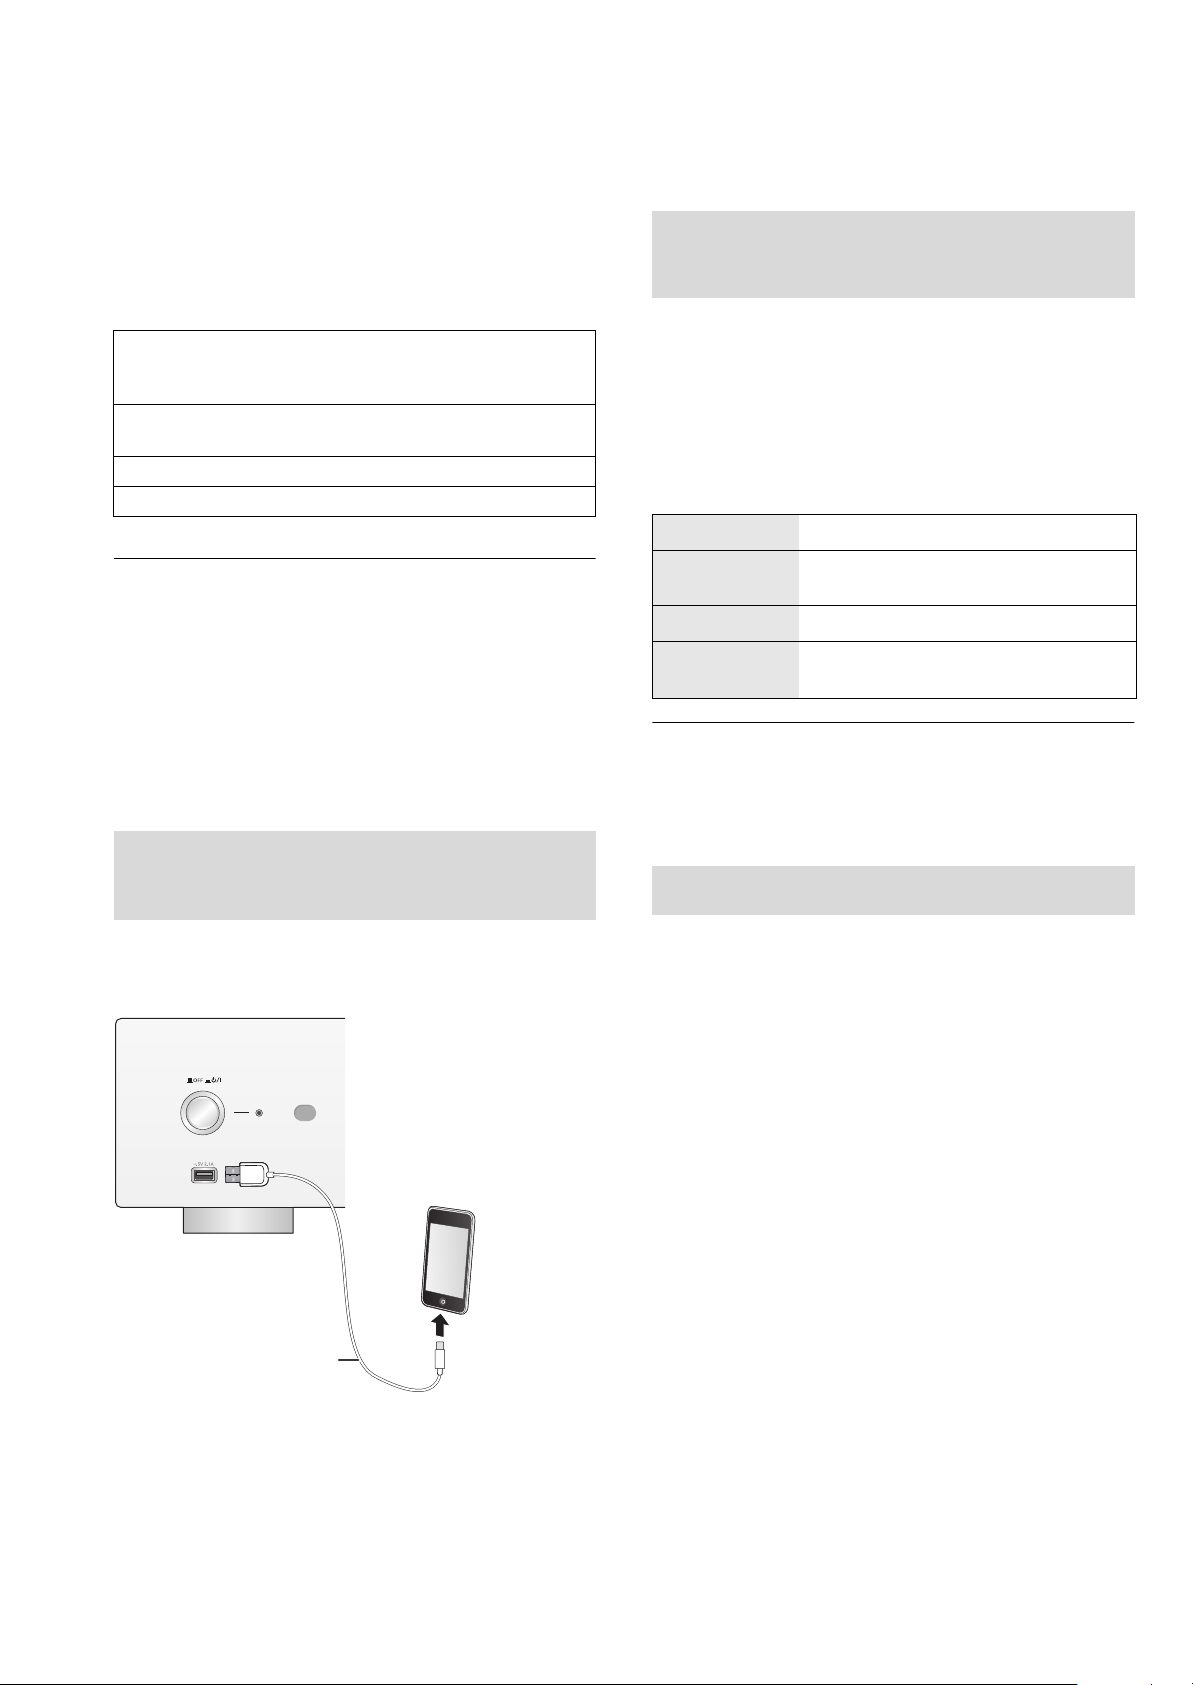
Using iPhone/iPad/iPod
USB cable
(not supplied)
e.g.,
This unit
(front)
iPhone, etc.
Connect your iPhone/iPad/iPod, and you can play back
music stored on iPhone/iPad/iPod or charge
iPhone/iPad/iPod.
∫ Compatible iPhone/iPad/iPod
Listening to music stored on
an iPhone/iPad/iPod
iPhone 6 Plus / iPhone 6 / iPhone 5s / iPhone 5c /
iPhone 5 / iPhone 4s / iPhone 4 / iPhone 3GS /
iPhone 3G
iPad Air / iPad (3rd and 4th generation) / iPad 2 / iPad /
iPad mini with Retina display / iPad mini
iPod touch (2nd through 5th generation)
iPod nano (3rd through 7th generation)
(as of September 2014)
≥ Compatibility depends on the software version. Update your
iPhone/iPad/iPod to the latest software before using it with this
unit.
≥ Please be aware that Panasonic accepts no responsibility for the
loss of data and/or information.
≥ Do not connect the following models to the port:
– iPod classic, iPod [4th (colour display), and 5th (video)
generation], iPod nano (1st generation)
Unexpected behaviour may occur.
≥ Operation results may vary depending on the iPhone/iPad/iPod
models.
Connecting an
iPhone/iPad/iPod
1 Connect iPhone/iPad/iPod to the unit.
2 Press [USB].
3 Start play.
Operations on the remote control
Stop Press [∫].
Pause
Skip Press [:] or [9] to skip track.
Search
Press [1/;].
≥ Press again to restart play.
During play or pause, press and hold
[6] or [5].
≥ It may be necessary to select the album, artist, etc. on the
iPhone/iPad/iPod.
≥ Depending on the iOS version, this function may not be available.
Charging an iPhone/iPad/iPod
When connecting an iPhone/iPad/iPod, use the dedicated
USB cable (not supplied).
During unit on, charging starts when an iPhone/iPad/iPod is
connected to this unit.
≥ Charging is not possible when this unit is turned off.
≥ Make sure the unit is turned on when you start charging.
– When charging an iPhone/iPad/iPod whose battery is depleted,
do not turn this unit to standby mode until the iPhone/iPad/iPod
becomes operational.
≥ Check the iPhone/iPad/iPod to see if the battery is fully charged.
Once fully charged, remove the iPhone/iPad/iPod.
≥ Charging stops when the battery is fully charged. The battery will
deplete naturally.
16
(16)

Using AirPlay
e.g.,
This unit
(front)
USB device
Using USB device
AirPlay works with iPhone, iPad, and iPod touch with iOS
4.3.3 or later, Mac with OS X Mountain Lion or later, and PC
with iTunes 10.2.2 or later.
Listening to music with AirPlay
Preparation
≥Complete the network settings. (> 14)
≥Connect the iOS device or PC to the same network as this
unit.
1 [iOS_device] : Start the “Music” (or iPod) app.
[PC] : Start “iTunes”.
2 Select “Technics SU-R1 _ _ _ _ _ _”*
the AirPlay icon.
≥Check the volume settings before starting the playback.
(When AirPlay is used for the first time, the volume may
be output at the maximum setting.)
3 Start play.
≥The playback will start with a slight delay.
1, 2
from
You can play back music stored on a USB device.
≥ This unit does not guarantee connection with all USB devices.
≥ FAT16 and FAT32 file systems are supported.
≥ This unit supports USB 2.0 high speed.
≥ USB devices may not be recognised by this unit when connected
using the following:
– a USB hub
– a USB extension cable
≥ It is not possible to use USB card reader/writers.
≥ This unit cannot record music to a USB device.
≥ About supported format, refer to “File format” (@ 28)
Listening to music stored on a
USB device
1 Connect a USB device to the unit.
English
Operations on the remote control
Stop Press [∫].
Pause
Skip Press [:] or [9] to skip track.
Press [1/;].
≥ Press again to restart play.
≥ Playback of other audio sources will stop and AirPlay output will
have priority.
≥ Volume changes on the iOS device or iTunes will be applied to this
unit. (Refer to the iTunes Help for the required settings in iTunes.)
≥ With some iOS and iTunes versions, it may not be possible to
restart the AirPlay playback if the selector is changed or the unit is
turned off, during the AirPlay playback.
In this case, select a different device from the AirPlay icon of the
Music app or iTunes and then re-select this unit as the output
speakers.
≥ AirPlay will not work when playing back videos on iTunes.
*1 “ _ ” stands for a digit that is unique to each set.
*2 The device name can be changed from “To make network-
related settings”. (> 14)
2 Press [USB].
3 Press [3, 4] to select an item and then
press [OK].
≥If there are any other items, repeat this step.
Operations on the remote control
Stop Press [∫].
Pause
Skip
Search
Press [1/;].
≥ Press again to restart play.
Press [:] or [9] to skip track.
≥ If you press either of these buttons during
pause, playback will restart.
During play or pause, press and hold
[6] or [5].
≥ This operation may not be available for
some formats.
(17)
17
∫ Random repeat playback
Press [RND].
Each time you press the button:
On
Off Turns off random repeat mode.
All tracks in a folder are repeated
randomly.
≥ “RND `” is displayed.
∫ Repeat playback
Press [`].
Each time you press the button:
1-Track
All
Off Turns off repeat mode.
Only plays the selected track.
≥ “1 `” is displayed.
All tracks in a folder are repeated.
≥ “`” is displayed.
Programme playback
This function allows you to programme up to 24 tracks.
Preparation
≥It is not possible to programme tracks by moving folders.
Move all the tracks you want to programme to a single
folder in advance.
1 Press [PGM] in the stop mode.
≥“Program Mode” screen will be displayed.
2 Press [OK] to display the programming
screen.
3 Press [3, 4] to select the desired track.
4 Press [OK].
≥Do steps 3 through 4 again to programme other tracks.
≥ You cannot use random repeat playback in combination with other
playback modes.
≥ You can use repeat playback in combination with programme
playback.
5 Press [1/;] to start playback.
≥To return to the “Program Mode” screen, press [∫].
Operations on the remote control
Stop
Check the
programmed
order
Add tracks Do steps 3 through 4 in the stop mode.
Clear the last
track
Cancel
programme
mode
≥ Programmed content is maintained as long as the input source is
set to “USB”.
≥ The programme memory will be cleared:
– When the USB device is disconnected.
– When the unit is turned to standby or off mode.
≥ You can use programme playback in combination with repeat
playback.
Press [∫].
≥ Programmed content is maintained.
Press [2, 1] in the stop mode.
≥ To return to the “Program Mode” screen,
press [RETURN].
Press [CLEAR] in the stop mode.
≥ It is not possible to select and clear the
desired programmed track.
1 Press [PGM] in the stop mode.
≥ “Program Clear” is shown.
2 Press [3, 4] to select “Yes” and
then press [OK].
≥ The programme memory will be
cleared.
18
(18)
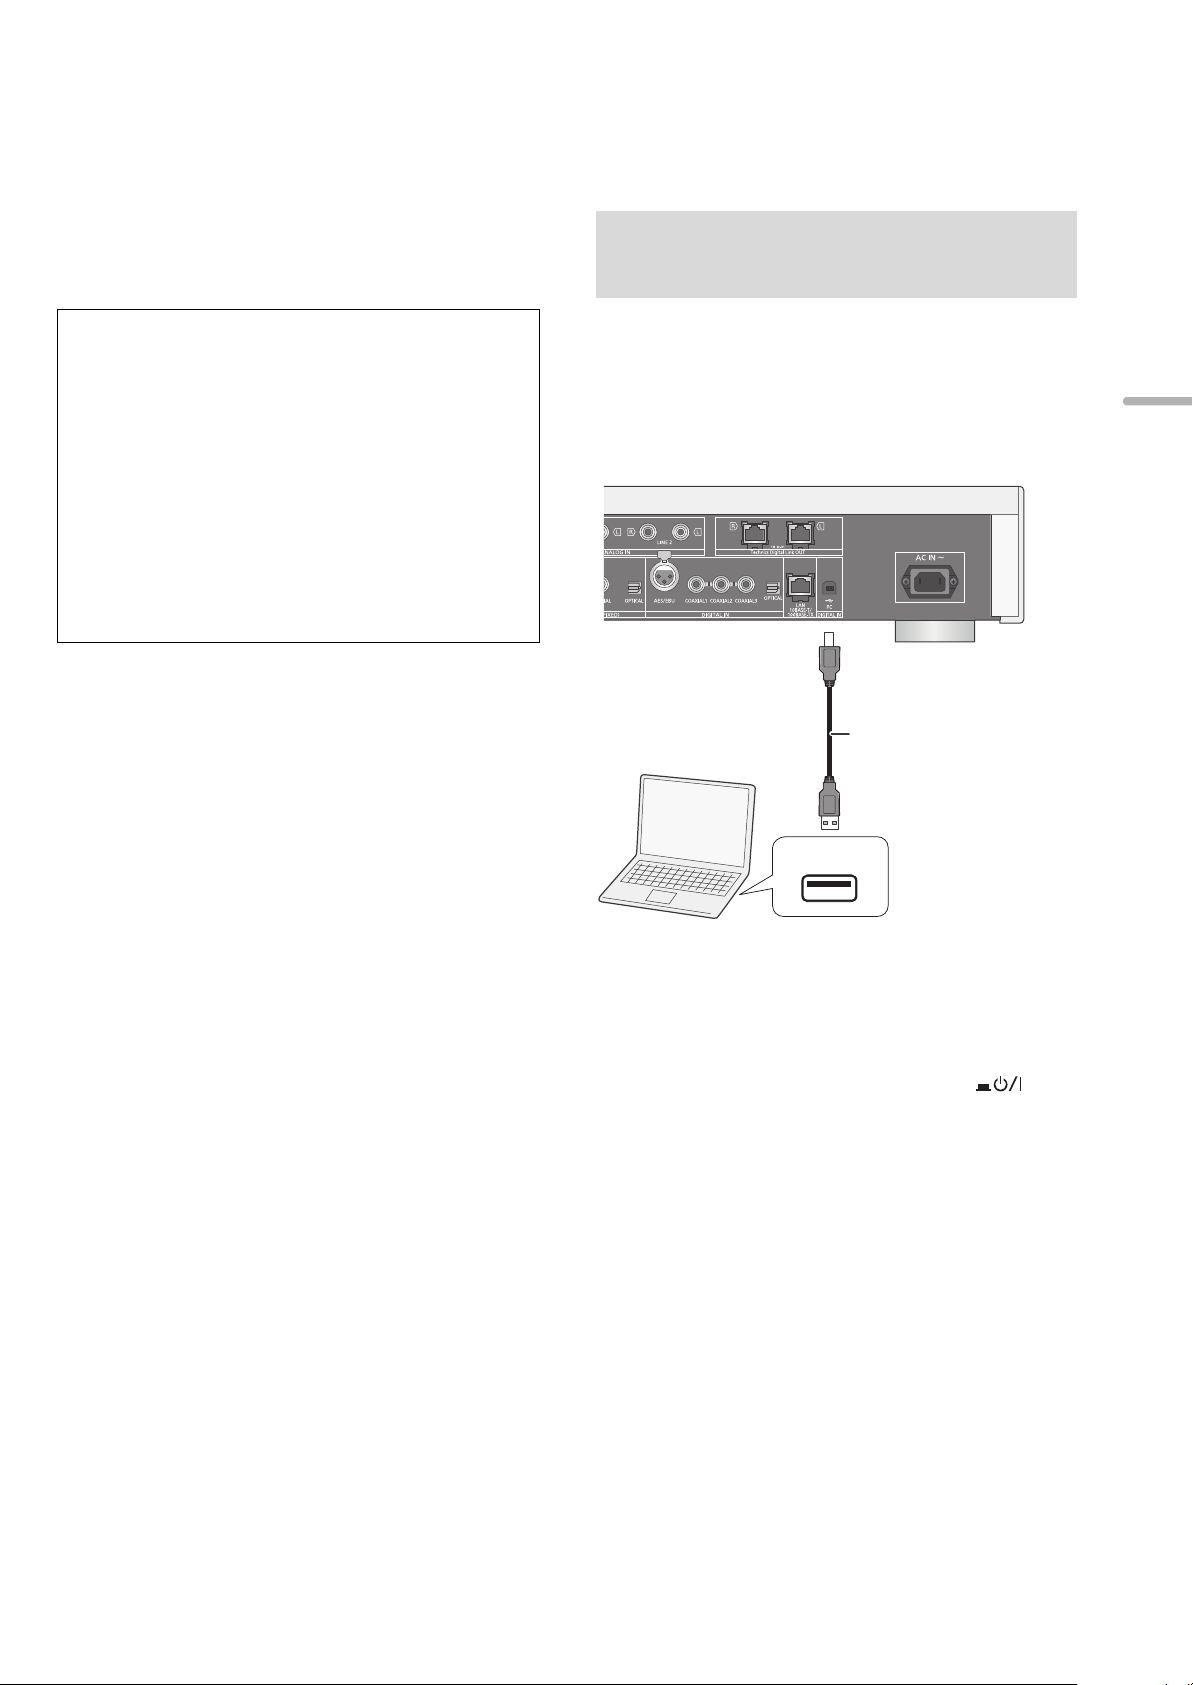
Using PC, etc.
USB
TENTATIVE
USB 2.0 cable
(not supplied)
This unit
(rear)
e.g.,
PC, etc.
Type A
Typ e B
You can connect the digital audio input terminal [PC] and a
PC, etc. with a USB cable and play back music on the PC,
etc. with this unit.
≥ About supported format, refer to “File format” (@ 28)
Connecting to a PC
Before connecting to a PC, follow the steps below.
≥ Refer to the following for the recommend OS versions for your
PC:
– Windows Vista, Windows 7, Windows 8, Windows 8.1
– OS X 10.7, 10.8, 10.9, 10.10
1 Download and install the dedicated driver to the PC.
(Only for Windows OS)
Download and install the driver from the website below.
www.technics.com/support/
2 Download and install the dedicated app “Technics
Audio Player” (free of charge) on your PC. (Common
to both Windows OS and OS X)
Download and install the app from the website below.
www.technics.com/support/
(as of November 2014)
Listening to audio from a PC,
etc.
1 Disconnect the AC mains lead.
English
2 Connect this unit and a PC, etc.
3 Connect the AC mains lead to this unit, and
press the unit on/off button to the [ ]
position. (> 12)
4 Press [PC].
5 Operate the device to be used for playback.
(19)
19

Sound adjustment
The following sound effects can be added to the audio output.
Listening to more naturalsounding audio (Re-master)
Re-mastering expands the playback band and achieves a
higher bit depth to reproduce natural and expansive sound
close to original music.
≥ The factory default is “Off”.
Press [RE-MASTER] to select “On”/“Off”.
Direct mode
This unit can transmit input signals without passing them
through its digital signal processor (DSP), via the shortest
possible path. This enables faithful and high quality
reproduction of original sound.
≥ The factory default is “Off”.
Press [DIRECT] to select “On”/“Off”.
Setting the sampling
Minimising audio distortion
If audio distortion occurs when using the analogue audio
input terminals, set the attenuator to “On”.
≥ The factory default is “Off”.
1 Press [SETUP].
2 Press [3, 4] repeatedly to select
“Attenuator” and then press [OK].
3 Press [3, 4] to select “LINE1” or “LINE2”.
4 Press [2, 1] to select “On” and then press
[OK].
Disabling audio output
Disabling the audio output of unused terminals minimises
noise and allows playback in higher audio quality.
≥ The factory default is “On”.
frequency
You can set an upper limit on the output sampling frequency
range. Please note that the range that can be processed
differs depending on the amplifier or D/A converter. For
details, refer to the operating instructions of the connected
device.
≥ The factory default is “32kHz-192kHz”.
Preparation
≥Set “Digital Output” to “On”.
1 Press [SETUP].
2 Press [3, 4] repeatedly to select “D.Output
fs” and then press [OK].
3 Press [3, 4] to select an item and then
press [OK].
≥You can select a sampling frequency of 96 kHz or
192 kHz.
1 Press [SETUP].
To disable the digital audio output:
Press [3, 4] repeatedly to select “Digital Output” and
then press [OK].
To disable the analogue audio output:
Press [3, 4] repeatedly to select “Analog Output” and
then press [OK].
To disable the system terminal output (SE-R1):
Press [3, 4] repeatedly to select “Digital Link” and then
press [OK].
2 Press [3, 4] to select “Off” and then press
[OK].
≥To enable the output again, select “On”.
≥ Depending on the music source that you play back, the applied
setting may be less effective.
≥ Depending on the music source that you play back, it may not be
possible to achieve the desired audio quality and sound field
effect. In such cases, turn off this function.
≥ Both Re-master and Direct mode cannot be set to “On”.
≥ When “Digital Output”, “Analog Output” or “Digital Link” is set to
“Off”, no sound will be output.
≥ When a headphone plug is connected, even if “Analog Output” is
set to “Off”, it is not possible to disable the analogue audio output.
≥ It may take some time to output audio when you have adjusted the
audio quality.
20
(20)

Others
Sleep timer
The sleep timer can turn the unit off after a set time.
Press [SLEEP].
Each time you press the button:
“30 minutes” "# “60 minutes” "# “90 minutes” "# “120 minutes”
^"""""""""""""" “Off” !"""""""""""""n
≥ You can also set the sleep timer by selecting “SLEEP” using the
menu screen.
Auto off function
This unit is designed to conserve its power consumption and
save energy. The unit will turn to standby mode automatically
if there is no sound and it is not being used for approximately
20 minutes.
≥ The factory default is “On”.
To cancel this function
Network standby
This unit can turn on automatically from standby mode when
this unit is selected as the AirPlay/DLNA player.
≥ The factory default is “Off”.
1 Press [SETUP].
2 Press [3, 4] repeatedly to select
“Network Standby” and then press [OK].
3 Press [3, 4] to select “On” and then press
[OK].
≥ If this function is set to “On” the standby power consumption will
increase.
English
1 Press [SETUP].
2 Press [3, 4] repeatedly to select
“AUTO OFF” and then press [OK].
3 Press [3, 4] to select “Off” and then press
[OK].
≥To enable the output again, select “On”.
≥ The auto off function works unless you turn it off, even if you turn
off and on this unit.
≥ If “Network Standby” is set to “On”, this function will also be set to
“On”. To change the setting, set “Network Standby” to “Off”. (> 21)
(21)
21

Firmware updates
Remote control code
Occasionally, Panasonic may release updated firmware for
this unit that may add or improve the way a feature operates.
These updates are available free of charge.
Preparation
≥Connect this unit to the network. (> 14)
– Make sure that the network is connected to the Internet.
1 Press [SETUP].
2 Press [3, 4] repeatedly to select “F/W
Update” and then press [OK].
3 Press [3, 4] to select “Yes” and then press
[OK].
Do not disconnect the AC mains lead or press the unit
on/off button to the [ ] position while one of the
following messages is displayed.
“Linking” or “Updating”
≥ During the update process, no other operations can be
performed.
≥When the update has finished successfully, “Success” is
displayed.
When other equipment responds to the supplied remote
control, change the remote control code.
≥ The factory default is “Mode 1”.
Point the remote control at this unit, and press
and hold [OK] and the numeric button for at least
4 seconds.
≥When the remote control code is changed, the new code
will appear on the display for a few seconds.
[OK] + [1] Set the code to “Mode 1”
[OK] + [2] Set the code to “Mode 2”
Changing the character
encoding
You can change the character encoding of track names,
artist names and other information when they are not
displayed as they should be.
≥ The factory default is “Type 1( 日本 )”.
1 Press [SETUP].
4 Disconnect the AC mains lead and
reconnect it after 3 minutes.
≥ If there are no updates, “No Need” is displayed after step 3.
≥ Downloading will require several minutes. It may take longer or
may not work properly depending on the connection environment.
∫ Checking the firmware version
1 Press [SETUP].
2 Press [3, 4] repeatedly to select “F/W Version” and
then press [OK].
≥ Press [OK] to exit.
2 Press [3, 4] repeatedly to select “E Asian
Character” and then press [OK].
3 Press [3, 4] to select
“Type 1( 日本 )”/“Type 2( 简体字 )” and then
press [OK].
Type 1( 日本 )
Type 2( 简体字 )
Priority is given to Japanese.
Priority is given to Chinese
(Simplified).
22
(22)
Using the system control
function
You can operate this unit and the SE-R1 simultaneously with
ease on the remote control.
Preparation
1 Connect this unit and the SE-R1 with cables for system
control. (> 9)
2 Set the input selector knob on the SE-R1 to [DIGITAL].
3 Press the unit on/off button on this unit and the SE-R1 to
the [ ] position.
4 If “Digital Link” is set to “Off”, change the setting to “On”.
Troubleshooting
Before requesting service, make the following checks. If you
are uncertain about some of the check points, or if the
solutions indicated in the following guide does not resolve
the issue, then consult your dealer for instructions.
Heat buildup of this unit.
≥This unit becomes warm when used for a long time. This is
not a malfunction.
Do you have the latest firmware installed?
≥Panasonic is constantly improving the unit’s firmware to
ensure that our customers are enjoying the latest
technology. (> 22)
English
∫ Switching this unit and the SE-R1 to
on/standby simultaneously
≥If you point the remote control at this unit and press [Í]
when this unit and the SE-R1 are in standby mode, this unit
and the SE-R1 will be turned on simultaneously.
≥If you point the remote control at this unit and press [Í]
when this unit and the SE-R1 are turned on, this unit and
the SE-R1 will simultaneously enter standby mode.
∫ Measuring the characteristics of the
amplifier and correcting its output
You can operate using the remote control of this unit.
∫ Adjusting Bass/Middle/Treble
You can adjust the tone of the SE-R1 with this unit. Each
tonal range (Bass/Middle/Treble) can be adjusted.
1 Press [SETUP].
2 Press [3, 4] repeatedly to select “Tone Control” and
then press [OK].
3 Press [3, 4] to select “On (adjustment)” and then press
[OK].
4 Press [3, 4] to select “BASS” (Bass), “MID” (Middle) or
“TREBLE” (Treble).
5 Press [2, 1] to adjust the level and then press [OK].
≥ Each level can be adjusted between “s10” and “r10”.
≥ For information on the operations of the SE-R1, please also refer
to its operating instructions.
To return all settings to the factory defaults
When the following situations occur, reset the memory:
≥ There is no response when buttons are pressed.
≥ You want to clear and reset the memory contents.
1 Press [SETUP].
2 Press [3, 4] repeatedly to select “Initialization” and
then press [OK].
3 Press [3, 4] to select “Yes” and then press [OK].
4 Press [3, 4] to select “Yes” and then press [OK]
again.
General
A “humming” sound can be heard during
playback.
≥An AC mains lead or fluorescent light is near the cables.
Keep other appliances and cords away from the cables of
this unit.
No sound.
≥Check the volume of the connected device (amplifier, etc.).
≥Check to see if the cable connections to the input and
output terminals are incorrect. If this is the case, turn off
this unit and reconnect the cables correctly.
≥Check to see if the correct input source is selected.
≥Insert the plugs of the cables to be connected all the way
in.
≥When “Digital Output”, “Analog Output” or “Digital Link” is
set to “Off”, no sound will be output. Change the setting of
the output terminal to be used to “On”. (> 20)
≥Playback of multi-channel content is not supported.
≥The digital audio input terminals of this unit can only detect
linear PCM signals. For details, refer to the operating
instructions of the device.
(23)
23
The sound is interrupted.
≥Depending on your environment, the audio may be
interrupted during playback. Check the operating
instructions of the connected device and the connection to
the device.
Playback does not start.
≥Depending on your environment or connected devices, it
may take some time.
The system control function is not working.
≥Connect the cables to the matching LR terminals on this
unit and the SE-R1.
iPhone/iPad/iPod
Cannot operate.
≥Select “USB” as the input source.
≥Check that the iPhone/iPad/iPod is connected properly.
≥Connect the iPhone/iPad/iPod again or try to restart the
iPhone/iPad/iPod.
≥The battery of the iPhone/iPad/iPod is depleted. Charge
the iPhone/iPad/iPod, and then operate again.
iPhone/iPad/iPod does not charge.
≥Make sure the unit is turned on when you start charging.
– When charging an iPhone/iPad/iPod whose battery is depleted,
do not turn this unit to standby mode until the iPhone/iPad/iPod
becomes operational.
The unit turns off automatically.
≥Is the auto off function turned on? (> 21)
AirPlay/DLNA
Cannot connect to the network.
≥Confirm the network connection and settings. (> 14)
Cannot connect to the unit.
≥Make sure that the multicast function on the wireless router
is enabled.
≥Make sure that the device and the unit are connected to
the same network. (> 14)
≥Reconnect the compatible device to the network and then
connect to this unit again.
≥Set “Network Standby” to “Off” (> 21), turn this unit off and
on, and then connect to this unit again.
Playback does not start.
The sound is interrupted.
≥Simultaneous use with other 2.4 GHz devices, such as
microwaves, cordless telephones, etc., may result in
connection interruptions.
Increase the distance between the wireless router and
these devices.
≥If several wireless devices are simultaneously using the
same wireless network as this unit, try turning off the other
devices or reducing their wireless network usage.
≥If the playback stops, check the playback status on the
device.
USB
The USB drive or its contents cannot be read.
≥The USB drive format or its contents is/are not compatible
with the unit. (> 28)
No response when [1/;] is pressed.
≥Disconnect the USB device and then reconnect it.
Alternatively, turn the unit off and on again.
Slow operation of the USB flash drive.
≥Large file size or high memory USB flash drive takes longer
time to read.
PC
The PC does not recognise this unit.
≥Check your operating environment. (> 19)
≥Restart the PC, turn off and on this unit, and then
reconnect the USB cable.
≥Use another USB port of the connected PC.
≥Install the dedicated driver if using a PC with Windows.
Cannot find music files stored on the PC.
≥When you play back music files over a network, those that
are not registered to its network server are not displayed.
For details, refer to the operating instructions for your
server.
24
(24)
Remote control
The remote control does not work properly.
≥To avoid interference, please do not put any objects in front
of signal sensor. (> 7)
≥Change the remote control code if other products react to
this remote control. (> 22)
Messages
The following messages or service numbers may appear
on the unit’s display.
“AUTO OFF”
≥The unit has been left unused for about 20 minutes and will
shut down within a minute. Press any button to cancel it.
“Checking Connection”
≥The unit is checking the connected iPhone/iPad/iPod or a
USB device.
“Download Error”
≥The firmware download has failed. Press any button to exit.
Please try again later.
≥The server cannot be found. Press any button to exit. Make
sure that the network is connected to the Internet.
“Empty”
≥The selected folder is empty. Move tracks into the folder
and retry the operation.
≥The server is not found on the network. Check to see if the
server is connected to the same network as this unit, and
retry the connection to this unit. (> 15, 17)
“Error”
≥Incorrect operation is performed. Read the instructions and
try again.
“F” (“ ” stands for a number.)
≥There is a problem with this unit.
– Is the volume extremely high?
If so, lower the volume.
– Is this unit placed in an extremely hot place?
If so, move this unit to a cooler place and wait a few moments
and then try to turn it on again.
If the problem persists, write down the displayed number,
disconnect the AC mains lead and consult your dealer.
“No Network Connection”
≥This unit is not connected to the network.
Check the network connection. (> 14)
“Not Conditional”
≥The function you have tried to use is not available with the
current settings. Check the steps and settings.
“Over Flow”
≥The audio from the analogue audio input terminal in use is
distorted. Select “Attenuator”, and change the setting for
the analogue audio input terminal in use to “On”. (> 20)
“PGM Full”
≥The number of programmed tracks is more than 24.
“Please Wait”
≥This is displayed, for example, when this unit is turned
on/off. (For up to 1 minute and 30 seconds)
“Remote ” (“ ” stands for a number.)
≥The remote control and this unit are using different codes.
Change the code on the remote control.
– When “Remote 1” is displayed, press and hold [OK] and [1] for
at least 4 seconds.
– When “Remote 2” is displayed, press and hold [OK] and [2] for
at least 4 seconds.
“Searching”
≥The unit is checking the DLNA server on the network.
“Unlocked”
≥“PC”, “AES”, “COAX1”, “COAX2”, “COAX3” or “OPT” is
selected, but no device is connected. Check the
connection with the device. (> 10, 11)
≥Audio signals, such as sampling frequency components,
are not input correctly.
– About supported format, refer to “File format” (@ 28)
“USB Over Current Error”
≥The iPhone/iPad/iPod or USB device is drawing too much
power. Disconnect the iPhone/iPad/iPod or USB device
and turn the unit off and on again.
“Hub Device Not Supported”
“Unrecognizable Device”
“Unsupported”
“Unsupported USB Device”
≥You have connected an iPhone/iPad/iPod or USB device
that is not supported.
– If the iPhone/iPad/iPod is compatible, turn it on and connect it
correctly.
≥The format of the file on the iPhone/iPad/iPod or USB
device is not supported.
– About supported format, refer to “File format” (@ 28)
English
(25)
25

Specifications
∫ GENERAL
Power supply AC 220 V to 240 V, 50/60 Hz
Power consumption 60 W
Power consumption in standby mode*
(When “Network Standby” is off) Approx. 0.3 W
(When “Network Standby” is on) Approx. 5.6 W
Power consumption in off mode Approx. 0.3 W
Dimensions (WkHkD) 480 mmk120 mmk391 mm
Mass Approx. 17 kg
Operating temperature range 0 oC to r40 oC
Operating humidity range 35 % to 80 % RH (no condensation)
∫ TERMINALS SECTION
Analogue input
LINE input k2 Pin jack
Digital input
AES/EBU digital input 3 pin XLR
Coaxial digital input k3 Pin jack
Optical digital input Optical terminal
USB
Front USB Type A connector
Support memory capacity 2TB (max)
Maximum number of folders (albums) 800
Maximum number of files (songs) 8000
File system FAT1 6, FAT3 2
USB port power DC OUT 5 V 2.1 A (max)
PC
Rear USB Type B connector
Analogue output
BALANCED 3 pin XLR
UNBALANCED Pin jack
Digital output
Technics Digital Link
AES/EBU digital output 3 pin XLR
Coaxial digital output Pin jack
Optical digital output Optical terminal
Headphones jack Stereo, ‰6.3 mm
Ethernet interface
LAN 10 Base-T/100 Base-TX
26
(26)

∫ FORMAT SECTION
USB-A
USB Standard USB 2.0 high-speed
USB Mass Storage class
PC (USB-B)
USB Standard USB 2.0 high-speed
USB Audio Class specification USB Audio Class 2.0, Asynchronous mode
DSD control mode ASIO Native mode, DoP mode
DSD64/DSD128 playback
∫ ANALOGUE OUTPUT SECTION
Channel 2ch
Output level
BALANCED 2.3 Vrms
UNBALANCED 2.3 Vrms
Headphone 180 mWr180 mW (32 ≠)
Frequency response
BALANCED 2 Hz to 90 kHz (s3dB)
UNBALANCED 2 Hz to 90 kHz (s3dB)
THD+N
BALANCED 0.0008 % (1 kHz, 0 dB)
UNBALANCED 0.0008 % (1 kHz, 0 dB)
S/N
BALANCED 118 dB (IHF-A)
UNBALANCED 115 dB (IHF-A)
Dynamic range
BALANCED 118 dB (IHF-A)
UNBALANCED 115 dB (IHF-A)
English
≥ Specifications are subject to change without notice.
≥ Mass and dimensions are approximate.
* When the iPhone/iPad/iPod is not charging
(27)
27
∫ File format
This unit supports the following file formats.
≥This unit does not support the playback of copy-protected music files.
≥Playback of all files in formats supported by this unit is not guaranteed.
≥Playback of a file in a format not supported by this unit may cause choppy audio or noise. In such cases, check to see if this unit
supports the file format.
≥This unit does not support VBR (Variable Bit Rate) playback.
≥Some of the connected devices (servers) may be capable of converting files in formats not supported by this unit and output
them. For details, refer to the operating instructions for your server.
≥File information (sampling frequency, etc.) shown by this unit and playback software may differ from each other.
USB-A
File format Extension Sampling frequency
MP3 .mp3 32/44.1/48 kHz 16 kbps to 320 kbps
AAC .m4a/.aac 32/44.1/48/88.2/96 kHz 16 kbps to 320 kbps
WMA .wma 32/44.1/48 kHz 16 kbps to 320 kbps
WAV .wav 32/44.1/48/88.2/96/176.4/192 kHz 16/24 bit
FLAC .flac 32/44.1/48/88.2/96/176.4/192 kHz 16/24 bit
AIFF .aiff 32/44.1/48/88.2/96/176.4/192 kHz 16/24 bit
ALAC .m4a 32/44.1/48/88.2/96 kHz 16/24 bit
DSD .dff/.dsf 2.8224/5.6448 MHz
PC (USB-B)*
1
File format Extension Sampling frequency
PCM 32/44.1/48/88.2/96/176.4/192/352.8/384 kHz 16/24/32 bit
DSD .dff/.dsf 2.8224/5.6448 MHz
LAN (DLNA)*
2
File format Extension Sampling frequency
MP3 .mp3 32/44.1/48 kHz 16 kbps to 320 kbps
AAC .m4a/.aac 32/44.1/48/88.2/96 kHz 16 kbps to 320 kbps
WMA .wma 32/44.1/48 kHz 16 kbps to 320 kbps
WAV .wav 32/44.1/48/88.2/96/176.4/192 kHz 16/24 bit
FLAC .flac 32/44.1/48/88.2/96/176.4/192 kHz 16/24 bit
AIFF .aiff 32/44.1/48/88.2/96/176.4/192 kHz 16/24 bit
ALAC .m4a 32/44.1/48/88.2/96 kHz 16/24 bit
DSD .dff/.dsf 2.8224/5.6448 MHz
*1 If you download and install the dedicated app, you can play back files in wide-ranging formats. (> 19)
For details, refer to the operating instructions of the app.
*2 Whether or not each music file can be played back over your network is determined by the network server even if the format of the file is listed
above. For example, if you are using Windows Media
added to the library of Windows Media
®
Player 11.
®
Player 11, not all music files on the PC are playable. You can play back only those
Number of quantisation bits
Number of quantisation bits
Number of quantisation bits
Bit rate
Bit rate
Bit rate
28
(28)
“Made for iPod”, “Made for iPhone”, and “Made for iPad” mean that an
electronic accessory has been designed to connect specifically to iPod,
iPhone, or iPad, respectively, and has been certified by the developer to
meet Apple performance standards.
Apple is not responsible for the operation of this device or its compliance
with safety and regulatory standards.
Please note that the use of this accessory with iPod, iPhone, or iPad may
affect wireless performance.
AirPlay, iPad, iPhone, iPod, iPod nano, iPod touch, and Retina are
trademarks of Apple Inc., registered in the U.S. and other countries.
iPad Air and iPad mini are trademarks of Apple Inc.
Mac and OS X are trademarks of Apple Inc., registered in the U.S. and
other countries.
Android is a trademark of Google Inc.
DLNA, the DLNA Logo and DLNA CERTIFIED are trademarks, service
marks, or certification marks of the Digital Living Network Alliance.
“Direct Stream Digital”, DSD and their logos are trademarks of Sony
Corporation.
MPEG Layer-3 audio coding technology licensed from Fraunhofer IIS and
Thomson.
Windows and Windows Vista are either registered trademarks or
trademarks of Microsoft Corporation in the United States and/or other
countries.
Windows Media and the Windows logo are trademarks or registered
trademarks of Microsoft Corporation in the United States and/or other
countries.
This product is protected by certain intellectual property rights of Microsoft
Corporation and third parties. Use or distribution of such technology outside
of this product is prohibited without a license from Microsoft or an
authorized Microsoft subsidiary and third parties.
FLAC Decoder
Copyright (C) 2000, 2001, 2002, 2003, 2004, 2005, 2006, 2007, 2008,
2009 Josh Coalson
Redistribution and use in source and binary forms, with or without
modification, are permitted provided that the following conditions are met:
– Redistributions of source code must retain the above copyright notice,
this list of conditions and the following disclaimer.
– Redistributions in binary form must reproduce the above copyright
notice, this list of conditions and the following disclaimer in the
documentation and/or other materials provided with the distribution.
– Neither the name of the Xiph.org Foundation nor the names of its
contributors may be used to endorse or promote products derived from
this software without specific prior written permission.
THIS SOFTWARE IS PROVIDED BY THE COPYRIGHT HOLDERS AND
CONTRIBUTORS “AS IS” AND ANY EXPRESS OR IMPLIED
WARRANTIES, INCLUDING, BUT NOT LIMITED TO, THE IMPLIED
WARRANTIES OF MERCHANTABILITY AND FITNESS FOR A
PARTICULAR PURPOSE ARE DISCLAIMED. IN NO EVENT SHALL THE
FOUNDATION OR CONTRIBUTORS BE LIABLE FOR ANY DIRECT,
INDIRECT, INCIDENTAL, SPECIAL, EXEMPLARY, OR CONSEQUENTIAL
DAMAGES (INCLUDING, BUT NOT LIMITED TO, PROCUREMENT OF
SUBSTITUTE GOODS OR SERVICES; LOSS OF USE, DATA, OR
PROFITS; OR BUSINESS INTERRUPTION) HOWEVER CAUSED AND
ON ANY THEORY OF LIABILITY, WHETHER IN CONTRACT, STRICT
LIABILITY, OR TORT (INCLUDING NEGLIGENCE OR OTHERWISE)
ARISING IN ANY WAY OUT OF THE USE OF THIS SOFTWARE, EVEN IF
ADVISED OF THE POSSIBILITY OF SUCH DAMAGE.
English
(29)
29

Wir möchten Ihnen dafür danken, dass Sie sich für dieses Gerät entschieden haben.
Bitte lesen Sie diese Anleitung vor der Inbetriebnahme dieses Produkts aufmerksam durch, und bewahren Sie dieses Handbuch
für spätere Bezugnahme griffbereit auf.
∫ Funktionen dieses Geräts
Dieses Gerät bietet folgende Funktionen:
Technics Digital Link
Technics hat die Länge des Signalpfads minimiert, indem der Netzwerk-Audio-Player und der Eingangswähler, die sehr
schwache Signale verarbeiten, in das gleiche Gehäuse gesetzt wurden, und das in schwache Signale gelangende Rauschen so
weit wie möglich reduziert, indem ein separates Gehäuse für den Leistungsverstärker verwendet wird, das hohe Frequenzen und
Ströme verarbeitet. Darüber hinaus minimiert Technics' neu entwickelte Signalübertragungsschnittstelle den Abbau der
Zeitgenauigkeit und Amplitudengenauigkeit, die auftreten, wenn Signale zwischen dem Netzwerk-Control-Player und dem
Leistungsverstärker übertragen werden. Dadurch wird eine ideale Verstärkerkonfiguration erzielt.
Digital Noise Isolation-Architektur
Da die meisten Speichermedien für digitale Inhalte zur Nutzung mit PCs ausgelegt sind, werden diese nicht unter
Berücksichtigung eines niedrigen Rauschens konzipiert, was für eine reine Audiowiedergabe entscheidend ist. Um diese
Herausforderung zu überwinden, nutzt dieses Gerät eine eingehende Maßnahme gegen Jitter sowie eine hervorragende
Technologie zur Rauschunterdrückung für jede einzelne Schnittstelle, um einen klaren und stabilen Klang zu gewährleisten.
Getrennte Analog-/Digital-Stromversorgung
Ein spezieller rauscharmer R-Core-Transformator mit hervorragenden Regeleigenschaften wird individuell für Analog- und
Digitalschaltungen bereitgestellt, um eine hohe Klangqualität zu erzielen.
∫ Empfohlene Geräte
Wir empfehlen die Verwendung von Technics-Geräten (Sonderzubehör) für eine überragende Audioqualität.
Produktname Modellnummer
Stereo-Endstufe SE-R1
Lautsprecheranlage SB-R1*
* Dieses Produkt wird im Februar 2015 veröffentlicht. (Für Europäische Länder)
(30)
4

Vorsichtsmaßnahmen
WARNUNG
Gerät
≥ Zur Reduzierung der Gefahr von Brand, elektrischem Schlag und
Beschädigung:
– Setzen Sie dieses Gerät weder Regen, noch Feuchtigkeit, Tropfen oder
Spritzern aus.
– Stellen Sie keine mit Flüssigkeiten gefüllten Gefäße, wie Vasen, auf
dieses Gerät.
– Ausschliesslich das empfohlene Zubehör verwenden.
– Entfernen Sie die Abdeckungen nicht.
– Reparieren Sie dieses Gerät nicht selbst. Wenden Sie sich zur Wartung
an qualifiziertes Kundendienstpersonal.
– Lassen Sie keine Gegenstände aus Metall in dieses Gerät fallen.
– Stellen Sie keine schweren Gegenstände auf dieses Gerät.
Netzkabel
≥ Zur Reduzierung der Gefahr von Brand, elektrischem Schlag und
Beschädigung:
– Gewährleisten Sie, dass die Spannung der Stromversorgung dem auf
diesem Gerät angegebenen Wert entspricht.
– Fügen Sie den Netzstecker vollständig in die Steckdose ein.
– Ziehen Sie nicht an der Leitung, knicken Sie sie nicht und stellen Sie
keine schweren Gegenstände darauf.
– Fassen Sie den Stecker nicht mit nassen Händen an.
– Fassen Sie den Stecker beim Herausziehen an seinem Korpus an.
– Verwenden Sie keinen Netzstecker und keine Steckdose, die beschädigt
sind.
≥ Der Netzstecker ist das trennende Gerät.
Installieren Sie dieses Gerät so, dass der Netzstecker sofort aus der
Wandsteckdose gezogen werden kann.
ACHTUNG
Gerät
≥ Stellen Sie keine Quellen offener Flammen, z.B. brennende Kerzen, auf das
Gerät.
≥ Dieses Gerät kann beim Betrieb Hochfrequenzstörungen auffangen, die
durch die Benutzung von Mobiltelefonen verursacht werden. Sollte eine
solche Störung festgestellt werden, sollte das Handy in größerer Entfernung
zu diesem Gerät betrieben werden.
≥ Dieses Gerät ist für den Betrieb in Ländern mit tropischem Klima bestimmt.
Aufstellung
≥ Stellen Sie dieses Gerät auf eine ebene Oberfläche.
≥ Zur Reduzierung der Gefahr von Brand, elektrischem Schlag und
Beschädigung:
– Installieren oder positionieren Sie dieses Gerät nicht in einem
Bücherregal, Einbauschrank oder einem sonstigen engen Raum. Stellen
Sie eine gute Belüftung des Gerätes sicher.
– Achten Sie darauf, die Entlüftungsschlitze des Gerätes nicht durch
Gegenstände aus Papier oder Stoff zu blockieren, z.B. Zeitungen,
Tischdecken und Vorhänge.
– Setzen Sie dieses Gerät keinem direkten Sonnenlicht, hohen
Temperaturen, starker Feuchtigkeit und übermäßigen Erschütterungen
aus.
≥ Heben oder tragen Sie dieses Gerät nicht, indem Sie es an einem seiner
Knöpfe festhalten. Dies kann dazu führen, dass dieses Gerät herunterfällt,
was Verletzungen oder Fehlfunktionen dieses Geräts zur Folge haben kann.
Batterie
≥ Explosionsgefahr bei falschem Anbringen der Batterie. Ersetzen Sie die
Batterie nur durch den vom Hersteller empfohlenen Typ.
≥ Der Missbrauch der Batterien kann zu einem Auslaufen von Elektrolyt und
einem Brand führen.
– Entfernen Sie die Batterien, wenn Sie die Fernbedienung über längere
Zeit nicht benutzen. Bewahren Sie sie an einem kühlen, dunklen Ort auf.
– Niemals starker Hitze oder offenem Feuer aussetzen.
– Lassen Sie die Batterie(n) nie längere Zeit in einem Auto mit
geschlossenen Türen und Fenstern zurück, das direkter
Sonneneinstrahlung ausgesetzt ist.
– Nehmen Sie die Batterien nicht auseinander, und schließen Sie sie nicht
kurz.
– Laden Sie Alkali- oder Manganbatterien nicht wieder auf.
– Verwenden Sie keine Batterien mit teilweise abgelöstem Mantel.
≥ Wenden Sie sich zur Entsorgung der Batterien an die lokalen Behörden
oder erfragen Sie die richtige Vorgehensweise zur Entsorgung.
Entsorgung von Altgeräten und Batterien
Nur für die Europäische Union und Länder mit
Recyclingsystemen
Dieses Symbol, auf den Produkten, der Verpackung
und/oder den Begleitdokumenten, bedeutet, dass
gebrauchte elektrische und elektronische Produkte sowie
Batterien nicht in den allgemeinen Hausmüll gegeben
werden dürfen.
Bitte führen Sie alte Produkte und verbrauchte Batterien
zur Behandlung, Aufarbeitung bzw. zum Recycling
gemäß den gesetzlichen Bestimmungen den
zuständigen Sammelpunkten zu.
Indem Sie diese Produkte und Batterien ordnungsgemäß
entsorgen, helfen Sie dabei, wertvolle Ressourcen zu
schützen und eventuelle negative Auswirkungen auf die
menschliche Gesundheit und die Umwelt zu vermeiden.
Für mehr Informationen zu Sammlung und Recycling,
wenden Sie sich bitte an Ihren örtlichen
Abfallentsorgungsdienstleister.
Gemäß Landesvorschriften können wegen nicht
ordnungsgemäßer Entsorgung dieses Abfalls Strafgelder
verhängt werden.
Hinweis für das Batteriesymbol (Symbol
unten):
Dieses Symbol kann in Kombination mit einem chemischen Symbol
abgebildet sein. In diesem Fall erfolgt dieses auf Grund der Anforderungen
derjenigen Richtlinien, die für die betreffende Chemikalie erlassen wurden.
Deutsch
(31)
5

Inhaltsverzeichnis
2
1
R03/LR03, AAA
(Alkali- oder Manganbatterien)
Vorsichtsmaßnahmen .......................................................5
Zubehör..............................................................................6
Gerätepflege.......................................................................6
Benutzung der Bedienelemente.......................................7
Inbetriebnahme..................................................................9
Basisbetrieb.....................................................................13
Netzwerkeinstellungen ...................................................14
Abspielen von Musikdateien auf dem DLNA-Server .... 15
Hinweise zu Beschreibungen in dieser Bedienungsanleitung
≥Seitenverweise werden dargestellt als “@ ±±”.
≥Die gezeigten Abbildungen können sich von Ihrem Gerät unterscheiden.
≥Wenn nicht anders angegeben, werden die Bedienvorgänge unter Verwendung der Fernbedienung beschrieben.
Verwenden der iPhone/iPad/iPod...................................16
Verwenden der AirPlay....................................................17
Verwendung des USB-Geräts.........................................17
Verwendung des PC etc..................................................19
Sound-Anpassung...........................................................20
Sonstige ...........................................................................21
Fehlerbehebung...............................................................23
Technische Daten ............................................................26
Zubehör
∏ 1 Netzkabel
Außer für die Schweiz
∏ 1 Netzkabel
Für die Schweiz
∏ 1 Fernbedienung
(N2QAYA000095)
∏ 2 Batterien für
Fernbedienung
≥ Stand der in dieser Bedienungsanleitung aufgeführten Produktnummern ist November 2014. Änderungen vorbehalten.
≥ Verwenden Sie das Netzkabel nicht mit anderen Geräten.
∫ Verwendung der Fernbedienung
Legen Sie die Batterie so ein, dass die Pole
(i und j) mit denen in der Fernsteuerung
übereinstimmen.
Auf den Fernbedienungs-Signalsensor an
diesem Gerät richten. (> 7)
≥Bewahren Sie die Batterien außerhalb der
Reichweite von Kindern auf, um ein
Verschlucken zu verhindern.
Gerätepflege
Stecken Sie vor der Wartung das Netzkabel aus der Netzsteckdose aus. Reinigen Sie dieses Gerät mit einem weichen Tuch.
≥ Wenn der Schmutz hartnäckig ist, wringen Sie ein nasses Tuch gründlich aus, um den Schmutz abzuwischen und trocknen Sie es mit einem
weichen Tuch ab.
≥ Verwenden Sie keine Lösungsmittel wie Benzin, Verdünner, Alkohol, Haushaltsreiniger, einen chemischen Wischer etc. Diese könnten dazu
führen, dass sich das äußere Gehäuse verformt oder die Beschichtung abblättert.
(32)
6

Benutzung der Bedienelemente
Dieses Gerät
∫ Vorderansicht
1 Ein-/Aus-Taste des Geräts [ ]
Verwenden Sie diese Taste, um das Gerät ein- und
auszuschalten.
[ ] (aus): Das Gerät ist ausgeschaltet.
[ ] (ein): Das Gerät ist eingeschaltet.
≥
Das Gerät verbraucht auch im Aus-Modus eine geringe Menge
Strom. Der Aus-Modus verbraucht weniger Strom. (
2 Port für iPhone/iPad/iPod und USB-Geräte (> 16, 17)
3 Stromanzeige
Die Farbe der Anzeige ändert sich je nach Gerätestatus.
Blau Das Gerät ist eingeschaltet.
Rote
4 Fernbedienungs-Signalsensor
Abstand: Max. 7 m direkt von der Vorderseite
Winkel: Ca. 30o links und rechts
5 Lautstärkeregler
Passen Sie die Lautstärke der Kopfhörer oder des SE-R1
an. (> 13)
≥ Die Anpassung der Lautstärke von Geräten, die mit den
analogen oder digitalen Ausgabeanschlüssen verbunden sind,
ist nicht möglich.
≥ Die Geschwindigkeit, mit der die Lautstärke angepasst wird,
variiert je nach dem, wie schnell Sie den Knopf drehen.
6 Display
7 Grundsteuertasten
1/; Wiedergabe/Pause
RETURN
≥ Halten Sie [RETURN] an diesem Gerät gedrückt, um das
HOME-Menü anzuzeigen. (> 13)
Das Gerät befindet sich im StandbyModus.
Kehren Sie zur vorherigen Anzeige
zurück
>
26)
∫ Rückansicht
: Analoge Audioausgangsanschlüsse [UNBALANCED]
(> 10)
; Analoge Audioeingangsanschlüsse [LINE1]/[LINE2]
(> 10)
< Systemanschluss [Technics Digital Link OUT] (> 9)
= Produktkennzeichnung
Die Modellnummer ist angegeben.
> Analoger Audioausgangsanschluss [BALANCED]
(> 10)
? Digitaler Audioausgangsanschluss [AES/EBU] (> 11)
@ Digitaler Audioausgangsanschluss [COAXIAL] (> 11)
A Digitaler Audioausgangsanschluss [OPTICAL] (> 11)
B Digitaler Audioeingangsanschluss [AES/EBU] (> 11)
C Digitale Audioeingangsanschlüsse
[COAXIAL1]/[COAXIAL2]/[COAXIAL3] (> 11)
D Digitaler Audioeingangsanschluss [
E LAN-Anschluss [LAN] (> 14)
F Digitaler Audioeingangsanschluss [PC] (> 19)
Zum Anschluss an einen PC etc.
G Netzkabel-Anschluss [AC IN T] (> 12)
OPTICAL
] (> 11)
Deutsch
8 Kopfhörerbuchse
Zum Anschluss eines Kopfhörersteckers.
≥ Ein übermäßiger Schalldruckpegel von Ohr- und Kopfhörern
kann Gehörverlust verursachen.
≥ Ein Betrieb in voller Lautstärke über längere Zeit kann das
Gehör schädigen.
9 Multi-Steuerknopf (> 13)
≥Drehen Sie diesen Knopf im Uhrzeigersinn und gegen
den Uhrzeigersinn, um die Eingabequelle
umzuschalten, durch Elemente zu blättern und
während der Wiedergabe zu überspringen.
≥Um eine Option einzustellen, drücken Sie auf den
Knopf; um zum Menübildschirm zu gelangen, halten
Sie ihn gedrückt.
(33)
7

LAPC
㻌
RE- MASTER
㻌
AES
㻌
COAX
㻌
LINE1
㻌
OPT
㻌
USB
㻌
PC
㻌
LAN
㻌
PGM
㻌
RAND
㻌
LINE2
㻌
Fernbedienung
MENU
DIRECT
1 [Í]: Bereitschafts-/Ein-Schalter
Drücken Sie diese Taste, um das Gerät ein- oder in den Standby-Modus zu schalten. Auch im Stand-by-Modus verbraucht das
Gerät eine geringe Menge Strom.
≥ Die Fernbedienung funktioniert nicht, wenn die Stromanzeige
aus ist.
2 Wählen Sie die Eingangsquelle
3 [HOME]: Anzeige HOME
4 [3, 4, 2, 1]/[OK]: Auswahl/OK
5 [MENU]: Gehen Sie ins Menü (> 21)
6 [DIRECT]: Schalten Sie den Direktmodus ein/aus
(> 20)
7 [LAPC]: Messen Sie die Charakteristiken des
Verstärkers und korrigieren Sie dessen Ausgabe
(> 12)
8 [MUTE]: Stummschalten der Kopfhörer oder des
SE-R1 (> 13)
9 [N INPUT O]: Wählen Sie die Eingangsquelle
: [r VOL s]: Passen Sie die Lautstärke der Kopfhörer
oder des SE-R1 an (> 13)
≥ Die Anpassung der Lautstärke von Geräten, die mit den
analogen oder digitalen Ausgabeanschlüssen verbunden sind,
ist nicht möglich.
; Zifferntasten usw.
≥ Zur Auswahl einer 2-stelligen Nummer
Beispiel:
16: [S10] > [1] > [6]
≥ Zur Auswahl einer 4-stelligen Nummer
Beispiel:
1234: [S10] > [S10] > [S10] > [1] > [2] > [3] > [4]
≥ [CLEAR]: Löschen Sie den eingegebenen Wert.
< [SETUP]: Betreten des Setup-Menüs
(> 14, 20, 21, 22, 23)
= [DIMMER]: Passen Sie die Helligkeit des Displays
etc. an (> 13)
> [INFO]: Informationen anzeigen
Drücken Sie diese Taste, um den Titel, den Künstler- und
Albumnamen, den Dateitypen, die Abtastfrequenz, und andere
Informationen anzuzeigen.
? [RETURN]: Kehren Sie zur vorherigen Anzeige
zurück
@ [RE-MASTER]: Schalten Sie Re-Master ein/aus (> 20)
A Steuertasten für grundlegende
Wiedergabefunktionen
B [SLEEP]: Schlaf-Timer einstellen (> 21)
(34)
8

Inbetriebnahme
Dieses Gerät
(Rückseite)
SE-R1
Kabel für Systemsteuerung
(nicht mitgeliefert)
Kabel für Systemsteuerung
(nicht mitgeliefert)
≥Schalten Sie das gesamte Gerät vor dem Anschließen aus und lesen Sie die entsprechende Betriebsanleitung.
≥Verbinden Sie das Netzkabel erst, wenn alle anderen Verbindungen hergestellt wurden.
≥Setzen Sie die Stecker der zu verbindenden Kabel vollständig ein.
≥Knicken Sie Kabel nicht in spitzen Winkeln.
Systemsteuerverbindung mit einem SE-R1
≥Sie können digitale Audiosignale über dieses Gerät ausgeben und Musik wiedergeben.
≥Sie können dieses Gerät und SE-R1 gleichzeitig über die Fernbedienung bedienen. (> 23)
Deutsch
≥ Bei Anschluss von Peripheriegeräten verwenden Sie gerade LAN Kabel (STP) der Kategorie 7 oder darüber.
≥ Wir empfehlen die Nutzung von Kabeln mit einer Länge von 3 m oder kürzer.
≥ Der Systemanschluss und der LAN-Port haben dieselbe Form. Achten Sie darauf, nicht versehentlich eines der Kabel für die Systemsteuerung,
die an den Systemanschluss des SE-R1 angeschlossen sind, mit dem LAN-Port zu verbinden.
≥ Verbinden Sie ein SE-R1 nicht auf eine andere Methode als oben beschrieben.
∫ Polarität der symmetrischen Audioanschlüsse
Setzen Sie die Kabelstifte so ein, dass ihre Polaritäten denen der Löcher entsprechen.
∫ Um die symmetrischen Kabel auszustecken
Ziehen Sie die Kabel heraus, während Sie [PUSH] oben an den Anschlüssen
drücken.
(35)
9

Verbindung zu Analog-Audioeingangsgeräten
Dieses Gerät
(Rückseite)
XLR-Kabel* (nicht mitgeliefert)
Audio-Kabel (nicht mitgeliefert)
Audio-Kabel (nicht mitgeliefert)
Audio-Kabel (nicht mitgeliefert)
Dieses Gerät
(Rückseite)
Sie können analoge Audiosignale über dieses Gerät ausgeben und Musik wiedergeben.
z.B.
Vorverstärker mit symmetrischen Eingangsanschlüssen Vorverstärker mit unsymmetrischen Eingangsanschlüssen
* Wir empfehlen die Nutzung von Kabeln mit einer Länge von 3 m oder kürzer.
Verbindung zu Analog-Audioausgangsgeräten
Sie können analoge Audiosignale auf diesem Gerät eingeben und Musik wiedergeben.
z.B.
Player etc.
Player etc.
(36)
10
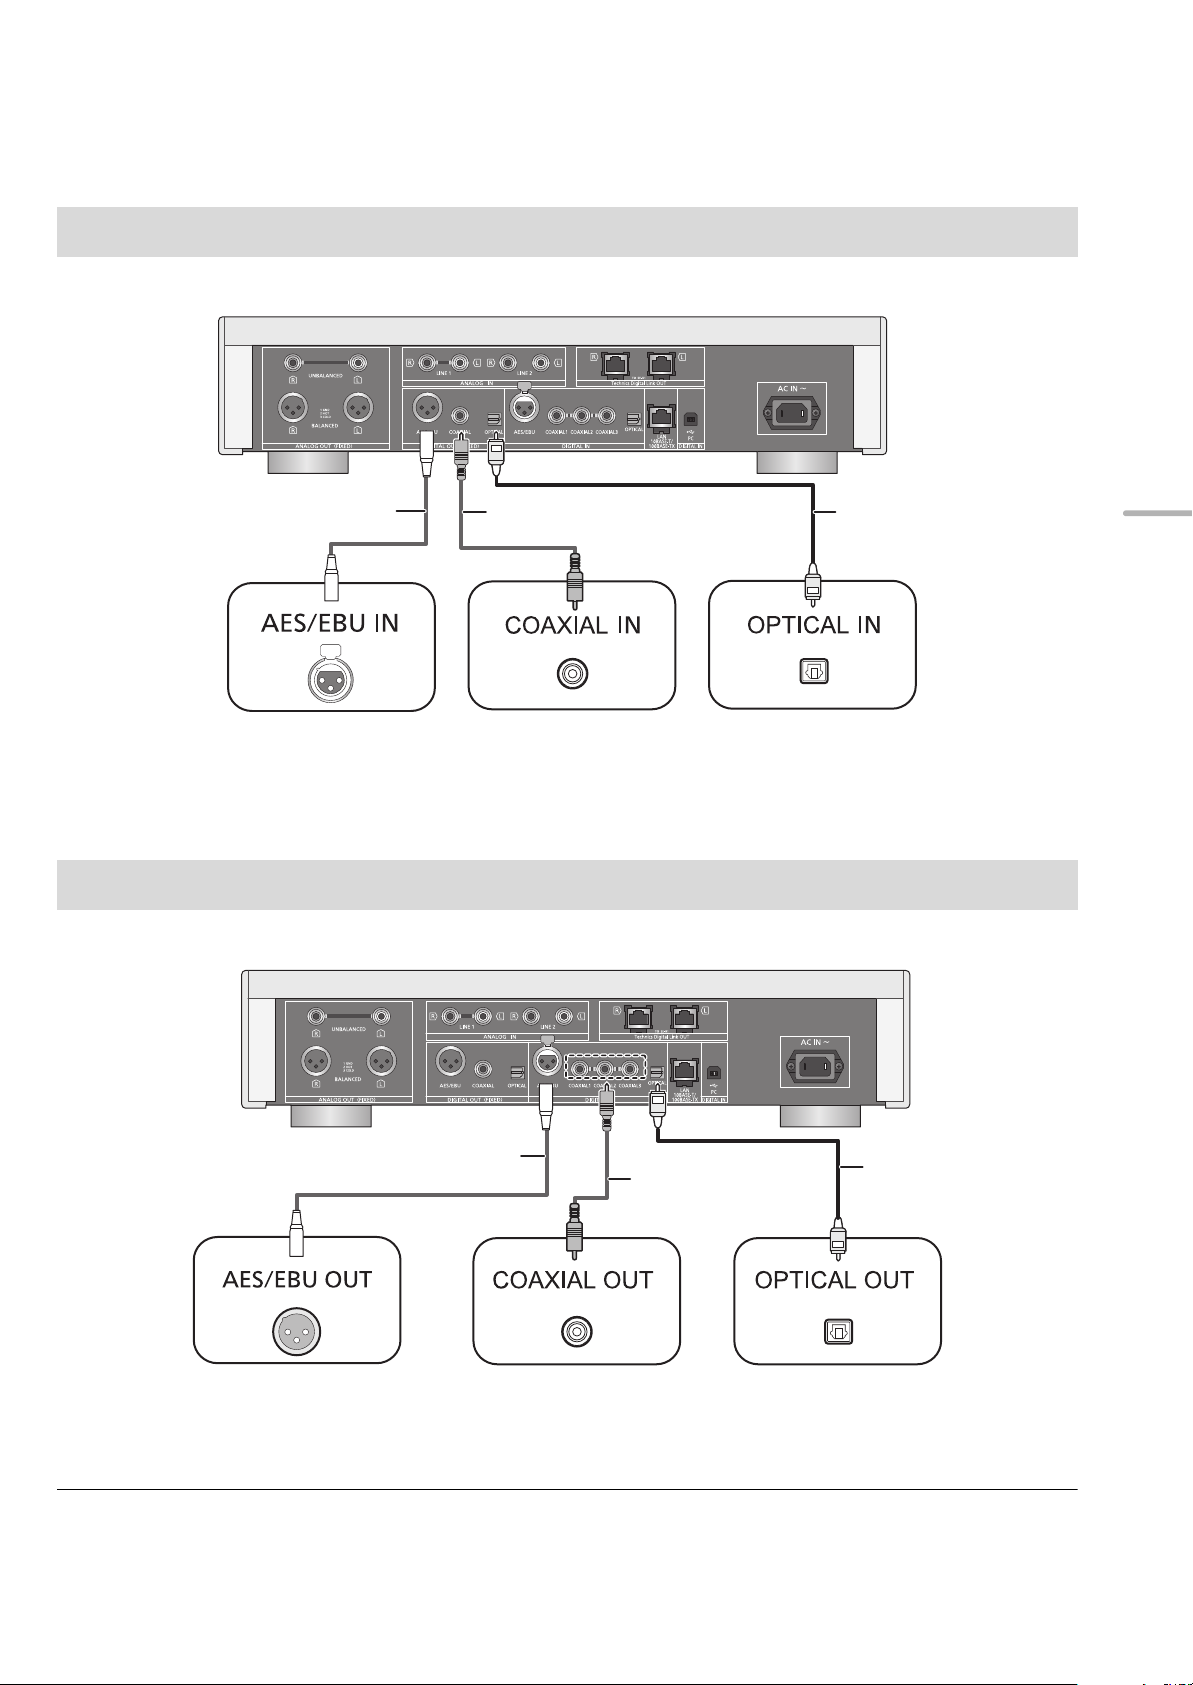
Verbindung zu Digital-Audioeingangsgeräten
Dieses Gerät
(Rückseite)
AES/EBU-Kabel*
(nicht mitgeliefert)
Koaxial-Digitalkabel
(nicht mitgeliefert)
z.B.
Optisches DigitalAudiokabel
(nicht mitgeliefert)
Dieses Gerät
(Rückseite)
AES/EBU-Kabel*
(nicht mitgeliefert)
Koaxial-Digitalkabel
(nicht mitgeliefert)
z.B.
Optisches DigitalAudiokabel
(nicht mitgeliefert)
Sie können digitale Audiosignale über dieses Gerät ausgeben und Musik wiedergeben.
Deutsch
Gerät, das den AES/EBU-
Eingang unterstützt
(Vorverstärker etc.)
* Wir empfehlen die Nutzung von Kabeln mit einer Länge von 3 m oder kürzer.
Gerät, das den koaxialen
Digitaleingang unterstützt
(Vorverstärker etc.)
Gerät, das den optischen
Digitaleingang unterstützt
(Vorverstärker etc.)
Verbindung zu Digital-Audioausgangsgeräten
Sie können analoge Audiosignale auf diesem Gerät eingeben und Musik wiedergeben.
Gerät, das den AES/EBU-
Ausgang unterstützt
(Player etc.)
* Wir empfehlen die Nutzung von Kabeln mit einer Länge von 3 m oder kürzer.
≥ Die digitalen Audioeingangsanschlüsse dieses Geräts können nur lineare PCM-Signale erkennen. Detaillierte Informationen finden Sie in der
Bedienungsanleitung des Geräts.
Gerät, das den koaxialen
Digitalausgang unterstützt
(Player etc.)
Gerät, das den optischen
Digitalausgang unterstützt
(Player etc.)
(37)
11

Netzkabelanschluss
Netzkabel (mitgeliefert)
An eine Netzsteckdose
Dieses Gerät
(Rückseite)
FALSCHRICHTIG
Erst anschließen, wenn alle anderen Kabel bereits angeschlossen sind.
TENTATIVE
∫ Um das Netzkabel von diesem Gerät zu trennen
Ziehen Sie das Netzkabel heraus, während Sie die obere und untere Seite des Steckers drücken.
≥ Obwohl sich der Netzschalter in der [ ]-Position befindet, ist das Gerät nicht vollständig vom Stromnetz getrennt. Ziehen Sie den Stecker
aus der Netzsteckdose, wenn Sie das Gerät für einen längeren Zeitraum nicht verwenden. Stellen Sie das Gerät so auf, dass der Stecker leicht
gezogen werden kann.
Wenn das SE-R1 über die Systemsteuerfunktion mit diesem Gerät verbunden ist, ist die Bedienung über die Fernbedienung
dieses Geräts möglich.
Halten Sie [LAPC] gedrückt, bis die LAPC-Anzeige am SE-R1 zu blinken beginnt.
≥Das SE-R1 beginnt mit der Messung der Charakteristiken des Verstärkers, wenn er mit Lautsprechern verbunden ist.
≥ Informationen zu den Bedienvorgängen für SE-R1 finden Sie auch in deren Bedienungsanleitungen.
Messung der Eigenschaften des Verstärkers und Korrektur dessen
Ausgabe
12
(38)
Basisbetrieb
Vorb erei tung
≥Bereiten Sie die Musik vor, die Sie wiedergeben möchten.
≥Schalten Sie das verbundene Gerät (Verstärker etc.) ein
und reduzieren Sie dessen Lautstärke.
Anpassen der Lautstärke der
Kopfhörer oder des SE-R1
1 Drücken Sie die Ein-/Aus-Taste des Geräts
auf die [ ]-Position.
≥Die Stromanzeige leuchtet blau auf.
2 Drücken Sie eine der Eingabequellen-
Tasten. (> 8)
Verbindet dieses Gerät mit einem
LAN
AES
COAX
OPT
USB
PC
LINE1/LINE2
Netzwerk und gibt über dieses Musik
wieder. (> 15)
Gibt Musik von DigitalAudioausgangsgeräten wieder.
≥ Drücken Sie [COAX] zur Auswahl von
“COAX1”/“COAX2”/“COAX3”.
Gibt auf einem USB-Gerät oder
einem iPhone/iPad/iPod
gespeicherte Musik wieder.
(> 16, 17, 18)
Gibt auf einem PC etc. gespeicherte
Musik wieder (> 19)
Gibt Musik von AnalogAudioausgangsgeräten wieder.
Verbinden Sie dieses Gerät und das SE-R1 mit Kabeln zur
Systemsteuerung. (> 23)
∫ Einstellen der Lautstärke
Drücken Sie [r VOL s].
≥ -- dB (min), -99,0 dB bis 0 dB (max)
≥ Stellen Sie den Eingangswahlknopf am SE-R1 bei Einstellung der
Lautstärke des SE-R1 auf [DIGITAL].
∫ Stummschalten des Sounds
Drücken Sie [MUTE].
≥ “ ” wird angezeigt.
≥ Drücken Sie die Taste erneut, um den Vorgang rückgängig zu
machen. “ ” wird auch rückgängig gemacht, wenn die
Lautstärke geregelt oder das Gerät ausgeschaltet wird.
Display-Helligkeit
Die Helligkeit des Gerätedisplays und die Stromanzeige
können geändert werden.
Wiederholt [DIMMER] betätigen.
Deutsch
3 Wählen Sie mit [3, 4] eine Option aus und
drücken Sie [OK].
≥Wiederholen Sie diesen Schritt, wenn weitere Optionen
vorhanden sind.
4 Starten Sie die Wiedergabe.
∫ Verwendung des Multi-Steuerknopfs
1 Halten Sie [RETURN] an diesem Gerät gedrückt, um das
HOME-Menü anzuzeigen.
2 Drehen Sie den Multi-Steuerknopf im Uhrzeigersinn und
gegen den Uhrzeigersinn, um eine Eingabequelle
auszuwählen und drücken Sie anschließend auf den
Knopf.
3 Drehen Sie den Multi-Steuerknopf im Uhrzeigersinn und
gegen den Uhrzeigersinn, um ein Element auszuwählen
und drücken Sie anschließend auf den Knopf.
4 Starten Sie die Wiedergabe.
≥ Wenn das Display ausgeschaltet wird, leuchtet es nur auf, wenn
Sie dieses Gerät bedienen.
Bevor sich das Display wieder ausschaltet, wird “Display Off” ein
paar Sekunden lang angezeigt.
Bedienung über die spezielle
App “Technics Music App”
Wenn Sie die spezielle App “Technics Music App”
(kostenlos) auf Ihrem Tablet/Smartphone installieren, können
Sie dieses Gerät und den SE-R1 mit einer Vielzahl von
Funktionen steuern.
Besuchen Sie für Details:
www.technics.com/support/
(39)
13

Netzwerkeinstellungen
Dieses Gerät
(Rückseite)
PC usw.
Breitband-Router, usw.
Sie können Musik von einem iOS-Gerät (iPhone/iPad/iPod),
einem Android™-Gerät oder einem PC (Mac/Windows) an
dieses Gerät streamen, indem Sie die AirPlay- oder DLNAFunktion verwenden. (> 15, 17)
Zur Verwendung dieser Funktionen muss sich dieses Gerät
im selben Netzwerk wie das AirPlay-kompatible Gerät oder
das DLNA-kompatible Gerät befinden.
Kabelgebundene LANVerbindung
Normalerweise wird das Setup durch die einfache
Verbindung über ein LAN-Kabel abgeschlossen.
Vornehmen der
netzwerkbezogenen
Einstellungen
Sie können den Namen dieses Geräts am Netzwerk
(Friendly Name) ändern und eine bestimmte IP-Adresse,
Subnetzmaske, einen Standard-Gateway, primären DNS etc.
verwenden.
≥ Geben Sie keine Musik wieder, während Sie diese Einstellungen
ändern.
1 Drücken Sie [SETUP].
2 Drücken Sie wiederholt [3, 4] zur Auswahl von
“Network” und drücken Sie dann [OK].
3 Nehmen Sie die Auswahl vor und geben Sie die Details
ein.
4 Drücken Sie [OK], um die Einstellungen anzuwenden.
5 Drücken Sie wiederholt [RETURN], um die Einstellungen
zu verlassen.
6 Drücken Sie [Í], um das Gerät in den Standby-Modus zu
schalten.
≥ Warten Sie, bis “Please Wait” erlischt.
7 Führen Sie “Kabelgebundene LAN-Verbindung” aus.
(> links)
A: LAN-Kabel (nicht mitgeliefert)
1 Ziehen Sie das Netzkabel.
2 Verbinden Sie dieses Gerät über ein LAN-
Kabel etc. mit einem Breitband-Router.
3 Verbinden Sie das Netzkabel mit diesem
Gerät und drücken Sie die Ein-/Aus-Taste
am Gerät auf die [ ]-Position. (> 12)
≥ Bei Anschluss von Peripheriegeräten verwenden Sie gerade LAN
Kabel (STP) der Kategorie 7 oder darüber.
≥ Der LAN-Port und der Systemanschluss haben dieselbe Form.
Achten Sie darauf, nicht versehentlich das LAN-Kabel, das an ein
anderes Gerät, wie einen Breitbandrouter, angeschlossen ist, mit
dem Systemanschluss zu verbinden.
≥ Wird ein anderes Kabel als ein LAN-Kabel in den LAN-Anschluss
eingesteckt, kann das Gerät beschädigt werden.
≥ Wenn Sie die Netzwerkeinstellungen direkt nach dem Ausschalten
dieses Geräts ändern, kann es einige Zeit dauern, bis die
Änderungen übernommen werden.
14
(40)

Abspielen von Musikdateien auf dem DLNAServer
Sie können auf einem mit Ihrem Heimnetzwerk verbundenen
DLNA-zertifizierten Medienserver (PC, Smartphone etc.)
gespeicherte Musikdateien teilen und die Inhalte über dieses
Gerät genießen.
≥ Hinweise zum unterstützten Format finden Sie unter “Dateiformat”
(@ 28).
Vorb erei tung
≥Beenden Sie die Netzwerkeinstellungen. (> 14)
≥Verbinden Sie das zu verwendende Gerät mit demselben
Netzwerk wie dieses Gerät.
≥Fügen Sie die Inhalte und den Ordner zu den Bibliotheken
des Windows Media
Smartphones etc. hinzu.
– Die Wiedergabeliste von Windows Media® Player kann nur
Inhalte wiedergeben, die in den Bibliotheken gespeichert sind.
– Um den Windows Media
müssen Sie diesen im Voraus konfigurieren.
®
Player 11 oder 12 oder eines
®
Player zum streamen zu verwenden,
Wiedergabe von auf dem
DLNA-Server gespeicherten
Inhalten durch die Steuerung
über dieses Gerät
Sie können die am DLNA-Server gespeicherte Musik auf
diesem Gerät (DMP—Digital Media Player) durch Steuerung
des DLNA-Servers über dieses Gerät wiedergeben.
1 Drücken Sie [LAN].
≥Der Bildschirm zur Serverauswahl wird angezeigt.
2 Drücken Sie [3, 4] zur Auswahl eines
DLNA-Servers im Netzwerk und drücken Sie
anschließend [OK].
≥Der Bildschirm zur Ordner-/Inhaltsauswahl wird
angezeigt.
≥Je nach den Spezifikationen werden Ordner/Inhalte
möglicherweise in einer anderen Reihenfolge als auf
dem Server angezeigt.
3 Wählen Sie mit [3, 4] eine Option aus und
drücken Sie [OK].
≥Wiederholen Sie diesen Schritt, wenn weitere Optionen
vorhanden sind.
Steuerung der Fernbedienung
∫ Zufällige wiederholte Wiedergabe
Drücken Sie [RND].
Jedes Mal, wenn Sie die Taste drücken:
Alle Tracks in einem Ordner werden
On
Off
wiederholt wiedergegeben.
≥ “RND `” wird angezeigt.
Schaltet den
Zufallswiederholungsmodus aus.
∫ Wiederholte Wiedergabe
Drücken Sie [`].
Jedes Mal, wenn Sie die Taste drücken:
1-Track
All
Off Schaltet den Wiederholungsmodus aus.
Nur der gewählte Titel wird abgespielt.
≥ “1 `” wird angezeigt.
Alle Tracks in einem Ordner werden
wiederholt.
≥ “`” wird angezeigt.
Wiedergabe von auf dem
DLNA-Server gespeicherten
Inhalten durch die Steuerung
über einen DMC
Durch Steuerung eines DMC (Digital Media Controller)
kompatiblen Geräts können Sie die am DLNA-Server
gespeicherte Musik auf diesem Gerät (DMR—Digital Media
Renderer) wiedergeben.
1 Drücken Sie die Ein-/Aus-Taste des Geräts
auf die [ ]-Position.
2 Bedienen Sie das DMC-kompatible Gerät
und schließen Sie es an dieses Gerät an.
≥Der Gerätename dieses Geräts wird als “Technics SU-
R1 _ _ _ _ _ _”*
≥Wegen Details hinsichtlich der Benutzung von DMC-
kompatiblen Geräten siehe Bedienungsanleitung der
Geräte oder der Software.
1, 2
angezeigt.
Deutsch
Stopp Drücken Sie [∫].
Pause
Überspringen
Suchlauf
Drücken Sie [1/;].
≥ Drücken Sie erneut, um die Wiedergabe
fortzusetzen.
Drücken Sie [:] oder [9], um
einen Titel zu überspringen.
≥
Wenn Sie während der Pause eine dieser Tasten
drücken, wird die Wiedergabe neu gestartet.
Während Wiedergabe oder Pause [6]
5
oder [
] drücken und gedrückt halten.
≥ Sie können die zufällige wiederholte Wiedergabe nicht in
Kombination mit anderen Wiedergabemodi nutzen.
≥ Die Wiedergabe anderer Audioquellen stoppt und die DLNA-
Ausgabe hat Vorrang, wenn Sie DMC bedienen.
≥ Je nach den Inhalten und dem angeschlossenen Gerät ist die
Bedienung oder Wiedergabe unter Umständen nicht möglich.
*1 “ _ ” steht für eine Ziffer, die einzigartig für jedes Set ist.
*2 Der Gerätename kann von “Vornehmen der netzwerkbezogenen
Einstellungen” geändert werden. (> 14)
(41)
15

Verwenden der iPhone/iPad/iPod
USB-Kabel
(nicht mitgeliefert)
z.B.
Dieses Gerät
(Vorderseite)
iPhone, usw.
Schließen Sie Ihren/Ihr iPhone/iPad/iPod an, um Musik
wiederzugeben, die auf dem iPhone/iPad/iPod gespeichert
ist, oder um den/das iPhone/iPad/iPod zu laden.
∫ Kompatibler/s iPhone/iPad/iPod
iPhone 6 Plus / iPhone 6 / iPhone 5s / iPhone 5c /
iPhone 5 / iPhone 4s / iPhone 4 / iPhone 3GS /
iPhone 3G
iPad Air / iPad (3. und 4. Generation) / iPad 2 / iPad /
iPad mini mit Retina-Display / iPad mini
iPod touch (2. bis 5. Generation)
iPod nano (3. bis 7. Generation)
(Stand: September 2014)
Anhören von auf einem
iPhone/iPad/iPod
gespeicherten Musik
1 Verbinden Sie den/das iPhone/iPad/iPod mit
dem Gerät.
2 Drücken Sie [USB].
3 Starten Sie die Wiedergabe.
≥ Die Kompatibilität hängt von der Software-Version ab.
Aktualisieren Sie Ihren/Ihr iPhone/iPad/iPod auf die aktuelle
Software-Version, bevor Sie es mit diesem Gerät verwenden.
≥ Bitte beachten Sie, dass Panasonic keine Verantwortung für den
Verlust von Daten und/oder Informationen übernimmt.
≥ Die folgenden Modelle nicht an den Port anschließen:
– iPod classic, iPod [4. (Farb-Display) und 5. (Video) Generation],
iPod nano (1. Generation)
Es kann unerwartetes Verhalten auftreten.
≥ Die Ergebnisse der Bedienvorgänge können je nach
iPhone/iPad/iPod-Modell variieren.
Anschluss eines
iPhone/iPad/iPod
Verwenden Sie zum Anschluss an ein iPhone/iPad/iPod das
entsprechende USB-Kabel (nicht mitgeliefert).
Steuerung der Fernbedienung
Stopp Drücken Sie [∫].
Pause
Überspringen
Suchlauf
Drücken Sie [1/;].
≥ Drücken Sie erneut, um die Wiedergabe
fortzusetzen.
Drücken Sie [:] oder [9], um
einen Titel zu überspringen.
Während Wiedergabe oder Pause
[6] oder [5] drücken und gedrückt
halten.
≥ Es kann erforderlich sein, das Album, den Künstler etc. auf dem
iPhone/iPad/iPod auszuwählen.
≥ Je nach iOS-Version steht diese Funktion möglicherweise nicht
zur Verfügung.
Aufladen eines
iPhone/iPad/iPod
Wenn dieses Gerät eingeschaltet ist, beginnt der
Ladevorgang, sobald ein iPhone/iPad/iPod an dieses Gerät
angeschlossen wird.
≥ Das Aufladen ist nicht möglich, wenn dieses Gerät ausgeschaltet
ist.
≥ Stellen Sie sicher, dass das Gerät eingeschaltet ist, wenn Sie den
Ladevorgang beginnen.
– Beim Aufladen eines iPhone/iPad/iPod, dessen Akku entladen
ist, schalten Sie dieses Gerät nicht in den Standby-Modus, bis
das iPhone/iPad/iPod wieder betriebsbereit ist.
≥ Überprüfen Sie am iPhone/iPad/iPod, ob der Akku vollständig
geladen ist. Entfernen Sie nach vollständiger Aufladung das/den
iPhone/iPad/iPod.
≥ Der Aufladevorgang endet, sobald der Akku vollständig
aufgeladen ist. Der Akku entleert sich mit der Zeit.
16
(42)
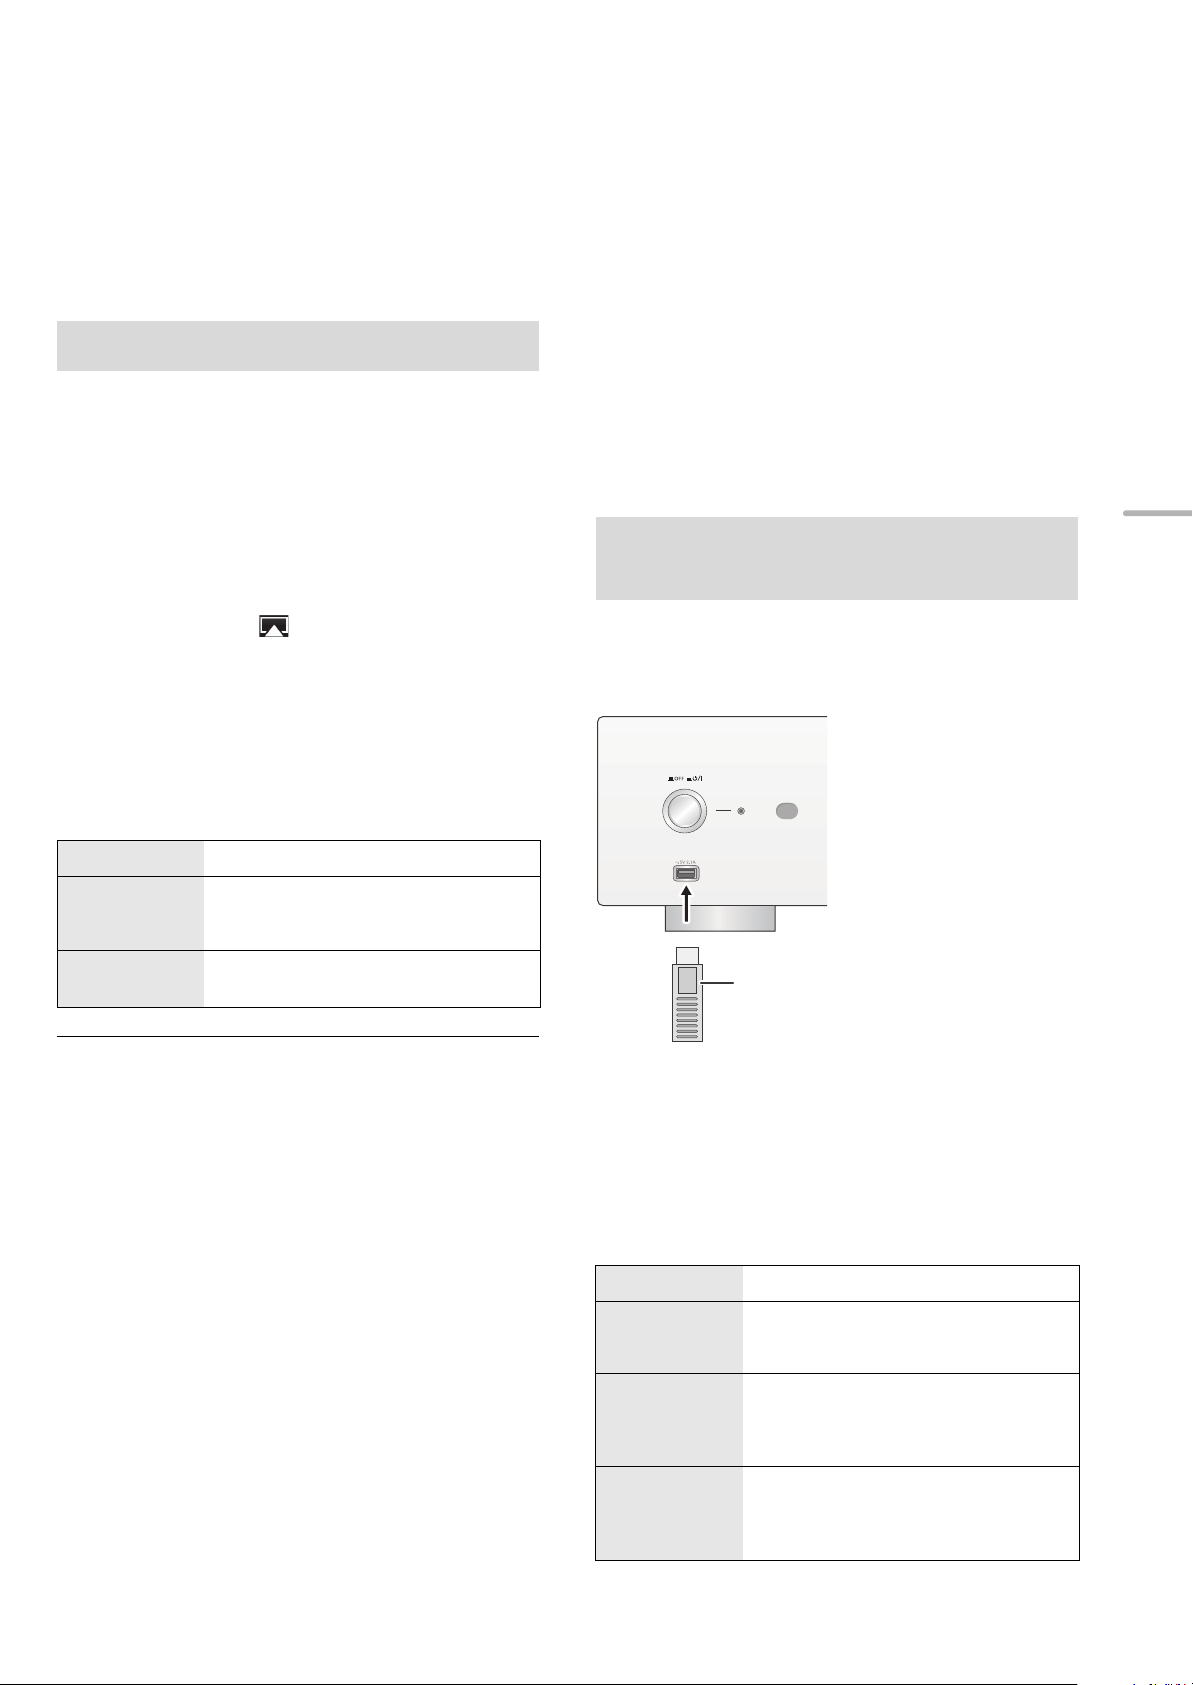
Verwenden der
z.B.
Dieses Gerät
(Vorderseite)
USB-Gerät
Verwendung des
AirPlay
AirPlay funktioniert mit iPhone, iPad und iPod touch mit iOS
4.3.3 oder später, Mac mit OS X Mountain Lion oder später
und PC mit iTunes 10.2.2 oder später.
Musik hören mit AirPlay
Vorb erei tung
≥Beenden Sie die Netzwerkeinstellungen. (> 14)
≥Verbinden Sie das iOS-Gerät oder den PC mit demselben
Netzwerk wie dieses Gerät.
1 [iOS_device] : Starten Sie die “Music”- (oder
iPod-) App.
[PC] : Starten Sie “iTunes”.
2
Wählen Sie
“Technics SU-R1 _ _ _ _ _ _”*
aus dem AirPlay Symbol.
≥Überprüfen Sie die Lautstärke-Einstellungen, bevor Sie
mit der Wiedergabe beginnen. (Wird AirPlay das erste
Mal verwendet, wird die Lautstärke unter Umständen
mit maximaler Einstellung ausgegeben.)
3 Starten Sie die Wiedergabe.
≥Die Wiedergabe startet mit einer leichten Verzögerung.
1, 2
USB-Geräts
Sie können auf einem USB-Gerät gespeicherte Musik
wiedergeben.
≥
Dieses Gerät gewährleistet nicht den Anschluss an alle USB-Geräte.
≥ FAT16 und FAT32 Dateisysteme werden unterstützt.
≥ Dieses Gerät unterstützt USB 2.0 Highspeed.
≥ USB-Geräte können von diesem Gerät nicht erkannt werden,
wenn angeschlossen an:
– einen USB-Hub
– ein USB-Verlängerungskabel
≥ Es können keine USB-Kartenlesegeräte verwendet werden.
≥ Von diesem Gerät kann keine Musik auf ein USB-Gerät
aufgenommen werden.
≥ Hinweise zum unterstützten Format finden Sie unter “Dateiformat”
(@ 28).
Auf einem USB-Gerät
gespeicherte Musik anhören
1 Verbinden Sie ein USB-Gerät mit diesem
Gerät.
Deutsch
Steuerung der Fernbedienung
Stopp Drücken Sie [∫].
Pause
Überspringen
Drücken Sie [1/;].
≥ Drücken Sie erneut, um die Wiedergabe
fortzusetzen.
Drücken Sie [:] oder [9], um
einen Titel zu überspringen.
≥ Die Wiedergabe anderer Audioquellen stoppt und die AirPlay-
Ausgabe hat Vorrang.
≥ Lautstärkeänderungen am iOS-Gerät oder in iTunes wirken sich
auf das Gerät aus. (Unter iTunes Help finden Sie Informationen zu
den erforderlichen Einstellungen in iTunes.)
≥ Mit einigen iOS- und iTunes-Versionen ist es unter Umständen
nicht möglich, die AirPlay-Wiedergabe erneut zu starten, wenn die
Auswahl geändert wird oder das Gerät während der AirPlayWiedergabe ausgeschaltet wird.
Wählen Sie in diesem Fall ein anderes Gerät über das AirPlaySymbol der Musik-App oder iTunes und wählen Sie dieses Gerät
dann erneut als Ausgabelautsprecher aus.
≥ AirPlay funktioniert nicht, wenn Videos in iTunes wiedergegeben
werden.
*1 “ _ ” steht für eine Ziffer, die einzigartig für jedes Set ist.
*2 Der Gerätename kann von “Vornehmen der netzwerkbezogenen
Einstellungen” geändert werden. (> 14)
2 Drücken Sie [USB].
3 Wählen Sie mit [3, 4] eine Option aus und
drücken Sie [OK].
≥Wiederholen Sie diesen Schritt, wenn weitere Optionen
vorhanden sind.
Steuerung der Fernbedienung
Stopp Drücken Sie [∫].
Pause
Überspringen
Drücken Sie [1/;].
≥ Drücken Sie erneut, um die Wiedergabe
fortzusetzen.
Drücken Sie [:] oder [9], um
einen Titel zu überspringen.
≥
Wenn Sie während der Pause eine dieser Tasten
drücken, wird die Wiedergabe neu gestartet.
Suchlauf
Während Wiedergabe oder Pause [6]
5
oder [
≥ Dieser Betrieb kann für einige Formate
nicht möglich sein.
] drücken und gedrückt halten.
(43)
17
∫ Zufällige wiederholte Wiedergabe
Programmwiedergabe
Drücken Sie [RND].
Jedes Mal, wenn Sie die Taste drücken:
Alle Tracks in einem Ordner werden
On
Off
wiederholt wiedergegeben.
≥ “RND `” wird angezeigt.
Schaltet den
Zufallswiederholungsmodus aus.
∫ Wiederholte Wiedergabe
Drücken Sie [`].
Jedes Mal, wenn Sie die Taste drücken:
1-Track
All
Off Schaltet den Wiederholungsmodus aus.
Nur der gewählte Titel wird abgespielt.
≥ “1 `” wird angezeigt.
Alle Tracks in einem Ordner werden
wiederholt.
≥ “`” wird angezeigt.
≥ Sie können die zufällige wiederholte Wiedergabe nicht in
Kombination mit anderen Wiedergabemodi nutzen.
≥ Sie können die wiederholte Wiedergabe in Kombination mit der
Programmwiedergabe nutzen.
Mit dieser Funktion können Sie bis zu 24 Titel programmieren.
Vorbereitung
≥Tracks können nicht durch Verschieben von Ordnern
programmiert werden. Verschieben Sie im Voraus alle zu
programmierenden Tracks in einen einzelnen Ordner.
1 Drücken Sie [PGM] im Stop-Modus.
≥“Program Mode”-Bildschirm wird angezeigt.
2 Drücken Sie [OK], um den
Programmierbildschirm anzuzeigen.
3 Drücken Sie [3, 4], um den gewünschten
Track auszuwählen.
4 Drücken Sie [OK].
≥Wiederholen Sie die Schritte 3 bis 4, um weitere Titel
zu programmieren.
5 Drücken Sie [1/;], um mit der Wiedergabe
zu beginnen.
≥Um zum “Program Mode”-Bildschirm zurückzukehren,
drücken Sie [∫].
Steuerung der Fernbedienung
Stopp
Überprüfen des
programmierten
Ordners
Hinzufügen
von Tracks
Abbrechen
des
ProgrammModus
Letzten Titel
löschen
Drücken Sie [∫].
≥ Der programmierte Inhalt wird beibehalten.
Drücken Sie [2, 1] im Stopp-Modus.
≥ Um zum “Program Mode”-Bildschirm
zurückzukehren, drücken Sie [RETURN].
Führen Sie die Schritte 3 bis 4 im StopModus durch.
Drücken Sie [CLEAR] im Stopp-Modus.
≥ Es ist nicht möglich, den gewünschten
programmierten Track auszuwählen und
zu löschen.
1 Drücken Sie [PGM] im Stopp-
Modus.
≥ “Program Clear” wird angezeigt.
2 Drücken Sie [3, 4] zur Auswahl
von “Yes” und drücken Sie dann
[OK].
≥ Der Programmspeicher wird geleert.
≥ Der programmierte Inhalt wird beibehalten, so lange die
Eingabequelle auf “USB” gestellt ist.
≥ Der Programmspeicher wird geleert:
– Wenn das USB-Gerät ausgesteckt wird.
– Wenn das Gerät in den Standby- oder Aus-Modus geschaltet
wird.
≥ Sie können die Programmwiedergabe in Kombination mit der
wiederholten Wiedergabe nutzen.
18
(44)

Verwendung des PC etc.
USB
TENTATIVE
USB 2.0-Kabel
(nicht mitgeliefert)
Dieses Gerät
(Rückseite)
z.B.
PC usw.
Typ A
Typ B
Sie können den digitalen Audioeingangsanschluss [PC] und
einen PC etc. über ein USB-Kabel miteinander verbinden
und Musik auf dem PC etc. mit diesem Gerät wiedergeben.
≥ Hinweise zum unterstützten Format finden Sie unter “Dateiformat”
(@ 28).
Anhören von Audio über einen
PC etc.
Verbindung mit einem PC
Bevor Sie eine Verbindung zu einem PC herstellen, folgen
Sie den Schritten unten.
≥ Beziehen Sie sich für die empfohlenen
Betriebssystemversionen für Ihren PC auf Folgendes:
– Windows Vista, Windows 7, Windows 8, Windows 8.1
– OS X 10.7, 10.8, 10.9, 10.10
1 Laden Sie den speziellen Treiber auf den PC herunter
und installieren Sie ihn. (Nur bei einem WindowsBetriebssystem)
Laden Sie den Treiber von der folgenden Website herunter
und installieren Sie ihn.
www.technics.com/support/
2 Laden Sie die spezielle App “Technics Audio Player”
(kostenlos) auf den PC herunter und installieren Sie
sie. (Gilt für das Windows-Betriebssystem und OS X)
Laden Sie die App von der folgenden Website herunter und
installieren Sie diese.
www.technics.com/support/
(Stand: November 2014)
1 Ziehen Sie das Netzkabel.
2 Verbinden Sie dieses Gerät und einen PC
etc.
Deutsch
3 Verbinden Sie das Netzkabel mit diesem
Gerät und drücken Sie die Ein-/Aus-Taste
am Gerät auf die [ ]-Position. (> 12)
4 Drücken Sie [PC].
5 Bedienen Sie das zur Wiedergabe zu
verwendende Gerät.
(45)
19

Sound-Anpassung
Die folgenden Soundeffekte können zum Audio-Ausgang hinzugefügt werden.
Anhören von natürlicher
klingendem Sound (Re-Master)
Durch das Re-Mastering erweitert sich das Wiedergabeband
und es wird eine höhere Bit-Tiefe erzielt, um einen
originalgetreuen natürlichen und raumfüllenden Klang zu
erzeugen.
≥ Die werkseitige Standardeinstellung ist “Off”.
Drücken Sie [RE-MASTER] zur Auswahl von
“On”/“Off”.
Direktmodus
Dieses Gerät kann Eingangssignale über den kürzesten
Pfad übertragen, ohne diese durch den digitalen
Signalprozessor (DSP) zu leiten. Dies ermöglicht eine
originalgetreue und hochqualitative Sound-Wiedergabe.
≥ Die werkseitige Standardeinstellung ist “Off”.
Drücken Sie [DIRECT] zur Auswahl von
“On”/“Off”.
Tonverzerrung minimieren
Tritt bei Verwendung der analogen
Audioeingangsanschlüsse eine Audio-Verzerrung auf,
stellen Sie den Attenuator auf “On”.
≥ Die werkseitige Standardeinstellung ist “Off”.
1 Drücken Sie [SETUP].
2 Drücken Sie wiederholt [3, 4] zur Auswahl
von “Attenuator” und drücken Sie dann [OK].
3 Drücken Sie [3, 4] um “LINE1” oder
“LINE2” zu wählen.
4 Drücken Sie [2, 1] zur Auswahl von “On”
und drücken Sie dann [OK].
Deaktivierung des
Audioausgangs
Durch die Deaktivierung des Audioausgangs von
ungenutzten Anschlüssen wird das Rauschen minimiert und
die Wiedergabe in höherer Audioqualität ermöglicht.
≥ Die werkseitige Standardeinstellung ist “On”.
Einstellen der Abtastfrequenz
Sie können eine Obergrenze für den Abtastfrequenzbereich
einstellen. Bitte beachten Sie, dass der Bereich, der
verarbeitet werden kann, vom Verstärker oder D/A-Wandler
abhängt. Detaillierte Informationen finden Sie in der
Bedienungsanleitung des angeschlossenen Geräts.
≥ Die werkseitige Standardeinstellung ist “32kHz-192kHz”.
Vorbereitung
≥Stellen Sie “Digital Output” auf “On”.
1 Drücken Sie [SETUP].
2 Drücken Sie wiederholt [3, 4] zur Auswahl
von “D.Output fs” und drücken Sie dann
[OK].
3 Wählen Sie mit [3, 4] eine Option aus und
drücken Sie [OK].
≥Sie können eine Abtastfrequenz von 96 kHz oder
192 kHz auswählen.
1 Drücken Sie [SETUP].
Um den digitalen Audioausgang zu deaktivieren:
Drücken Sie wiederholt [3, 4] zur Auswahl von “Digital
Output” und drücken Sie dann [OK].
Um den analogen Audioausgang zu deaktivieren:
Drücken Sie wiederholt [3, 4] zur Auswahl von “Analog
Output” und drücken Sie dann [OK].
So deaktivieren Sie den digitalen Audioausgang
(SE-R1):
Drücken Sie wiederholt [3, 4] zur Auswahl von “Digital
Link” und drücken Sie dann [OK].
2 Drücken Sie [3, 4] zur Auswahl von “Off”
und drücken Sie dann [OK].
≥
Um den Ausgang wieder zu aktivieren, wählen Sie “On”.
≥ Je nach der wiedergegebenen Musikquelle, kann die angewandte
Einstellung weniger wirksam sein.
≥ Je nach der wiedergegebenen Musikquelle können die
gewünschte Audioqualität und der gewünschte Klangfeldeffekt
möglicherweise nicht erzielt werden. Schalten Sie diese Funktion
in solchen Fällen aus.
≥ Weder der Re-Master- als auch der Direktmodus können auf “On”
gestellt werden.
≥ Wenn “Digital Output”, “Analog Output” oder “Digital Link” auf “Off”
gestellt ist, wird kein Sound ausgegeben.
≥ Wenn ein Kopfhörerstecker angeschlossen wird, ist es nicht
möglich, den analogen Tonausgang zu deaktivieren, auch wenn
“Analog Output” auf “Off” eingestellt ist.
≥ Es kann einige Zeit dauern, bis Audio ausgegeben wird, wenn Sie
die Audioqualität eingestellt haben.
20
(46)

Sonstige
Einschlaf-Zeitschaltuhr
Mit der Einschlaf-Zeitschaltuhr schaltet sich das Gerät nach
einer voreingestellten Zeit ab.
Drücken Sie [SLEEP].
Jedes Mal, wenn Sie die Taste drücken:
“30 minutes” "# “60 minutes” "# “90 minutes” "# “120 minutes”
^"""""""""""""" “Off” !"""""""""""""n
≥ Sie können den Sleep-Timer auch mithilfe von “SLEEP” im
Menübildschirm einstellen.
Auto-OFF-Funktion
Dieses Gerät ist darauf ausgelegt, den Stromverbrauch zu
reduzieren und Energie einzusparen. Das Gerät wird
automatisch in den Standby-Modus geschaltet, wenn kein
Sound vorhanden ist und wenn es ca. 20 Minuten lang nicht
verwendet wird.
≥ Die werkseitige Standardeinstellung ist “On”.
Abbruch dieser Funktion
Netzwerk-Standby
Dieses Gerät kann sich automatisch aus dem StandbyModus einschalten, wenn dieses Gerät als AirPlay/DLNAPlayer ausgewählt ist.
≥ Die werkseitige Standardeinstellung ist “Off”.
1 Drücken Sie [SETUP].
2 Drücken Sie wiederholt [3, 4] zur Auswahl
von “Network Standby” und anschließend
[OK].
3 Drücken Sie [3, 4] zur Auswahl von “On”
und drücken Sie dann [OK].
≥ Wenn diese Funktion auf “On” gestellt ist, erhöht sich der
Stromverbrauch im Standby-Modus.
Deutsch
1 Drücken Sie [SETUP].
2
Drücken Sie wiederholt [3,4] zur Auswahl
von “AUTO OFF” und drücken Sie dann [OK].
3 Drücken Sie [3, 4] zur Auswahl von “Off”
und drücken Sie dann [OK].
≥
Um den Ausgang wieder zu aktivieren, wählen Sie “On”.
≥ Die Auto-Aus-Funktion ist aktiv, bis sie ausgeschaltet wird, auch
dann, wenn dieses Gerät ein- und ausgeschaltet wird.
≥ Wenn “Network Standby” auf “On” eingestellt wird, wird auch diese
Funktion auf “On” eingestellt. Zum Ändern der Einstellung, stellen
Sie “Network Standby” auf “Off”. (> 21)
(47)
21
Firmware-Update
Fernbedienungscode
Panasonic könnte gelegentlich eine aktualisierte Firmware
für dieses Gerät ausgeben, die die Weise, in der eine
Funktion arbeitet, hinzufügen oder verbessern könnte. Diese
Aktualisierungen stehen kostenlos zur Verfügung.
Vorbereitung
≥Verbinden Sie dieses Gerät mit dem Netzwerk. (> 14)
– Stellen Sie sicher, dass das Netzwerk mit dem Internet
verbunden ist.
1 Drücken Sie [SETUP].
2 Drücken Sie wiederholt [3, 4] zur Auswahl
von “F/W Update” und drücken Sie dann
[OK].
3 Drücken Sie [3, 4] zur Auswahl von “Yes”
und drücken Sie dann [OK].
Stecken Sie das Netzkabel nicht aus oder drücken Sie
nicht die Ein-/Aus-Taste des Geräts auf die [ ]-
Position, während eine der folgenden Meldungen
angezeigt wird.
“Linking” oder “Updating”
≥ Während des Update-Prozesses können keine anderen
Vorgänge ausgeführt werden.
≥Nachdem das Update erfolgreich beendet wurde, wird
“Success” angezeigt.
Wenn ein anderes Gerät auf die mitgelieferte Fernbedienung
reagiert, ändern Sie den Fernbedienungscode.
≥ Die werkseitige Standardeinstellung ist “Mode 1”.
Richten Sie die Fernbedienung auf dieses Gerät
und halten Sie [OK] sowie die Zifferntaste
mindestens 4 Sekunden lang gedrückt.
≥Wenn der Code der Fernbedienung geändert wird, wird der
neue Code einige Sekunden lang auf dem Display
angezeigt.
[OK] + [1] Stellen Sie den Code auf “Mode 1”
[OK] + [2] Stellen Sie den Code auf “Mode 2”
Ändern der Zeichenkodierung
Sie können die Zeichenkodierung von Titelnamen,
Künstlernamen und anderen Informationen ändern, wenn
diese nicht wie erwartet angezeigt werden.
≥ Die werkseitige Standardeinstellung ist “Type 1( 日本 )”.
1 Drücken Sie [SETUP].
2 Drücken Sie wiederholt [3, 4] zur Auswahl
von “E Asian Character” und drücken Sie
dann [OK].
4 Stecken Sie das Netzkabel aus und stecken
Sie es nach 3 Minuten wieder ein.
≥ Wenn keine Updates zur Verfügung stehen, wird “No Need” nach
Schritt 3 angezeigt.
≥ Das Herunterladen dauert einige Minuten. Es könnte je nach
Verbindungsumgebung länger dauern oder nicht richtig
funktionieren.
∫ Überprüfung der Firmware-Version
1 Drücken Sie [SETUP].
2 Drücken Sie wiederholt [3, 4] zur Auswahl von “F/W
Version” und drücken Sie dann [OK].
≥ Drücken Sie [OK] zum Beenden.
3 Drücken Sie [3, 4] zur Auswahl von
“Type 1(日本)”/“Type 2(简体字)” und drücken
Sie dann [OK].
Type 1 ( 日本 )
Type 2 ( 简体字 )
Japanisch hat Priorität.
Chinesisch (vereinfacht) hat
Priorität.
22
(48)

Verwendung der
Systemsteuerfunktion
Fehlerbehebung
Vor dem Kundendienstruf kontrollieren Sie Folgendes. Wenn
Sie bei einigen Kontrollpunkten Zweifel haben oder die in
Ihrer Betriebsanleitung aufgeführten Angaben Ihr Problem
nicht lösen können, wenden Sie sich an Ihren Händler.
Sie können dieses Gerät und SE-R1 gleichzeitig über die
Fernbedienung bedienen.
Vorb erei tung
1 Verbinden Sie dieses Gerät und das SE-R1 mit Kabeln
zur Systemsteuerung. (> 9)
2 Stellen Sie den Eingangswahlknopf am SE-R1 auf
[DIGITAL].
3 Drücken Sie die Ein-/Aus-Taste des Geräts und SE-R1
auf die [ ]-Position.
4 Wenn “Digital Link” auf “Off” eingestellt ist, ändern Sie die
Einstellung auf “On”.
∫ Gleichzeitiges Schalten dieses Geräts und
SE-R1 auf ein/Standby
≥Wenn Sie die Fernbedienung auf dieses Gerät richten und
[Í] drücken, während sich dieses Gerät und das SE-R1 im
Standby-Modus befinden, werden dieses Gerät und das
SE-R1 gleichzeitig eingeschaltet.
≥Wenn Sie die Fernbedienung auf dieses Gerät richten und
[Í] drücken, während dieses Gerät und SE-R1
eingeschaltet sind, werden dieses Gerät und SE-R1
gleichzeitig in den Standby-Modus geschaltet.
∫ Messung der Eigenschaften des
Verstärkers und Korrektur dessen
Ausgabe
Die Bedienung ist über die Fernbedienung dieses Geräts möglich.
∫ Einstellen von Bass/Mitte/Höhe
Sie können den Klang des SE-R1 mit diesem Gerät anpassen.
Jeder Tonbereich (Bass/Mitte/Höhe) kann eingestellt werden.
1 Drücken Sie [SETUP].
2 Drücken Sie wiederholt [3, 4] zur Auswahl von “Tone
Control” und drücken Sie dann [OK].
3 Drücken Sie [3, 4] zur Auswahl von “On (adjustment)”
und drücken Sie dann [OK].
4 Drücken Sie [3, 4] zur Auswahl von “BASS” (Bass),
“MID” (Mitte) oder “TREBLE” (Höhe).
5 Drücken Sie [2, 1], um die Stufe auszuwählen, und
dann [OK].
≥ Jeder Pegel kann zwischen “s10” und “r10” eingestellt
werden.
Wärmeentwicklung dieses Geräts.
≥Dieses Gerät wird warm, wenn es für eine längere Zeit
verwendet wird. Dies ist kein Grund zur Beunruhigung.
Haben Sie die neueste Firmware installiert?
≥Panasonic verbessert ständig die Firmware des Gerätes,
um zu gewährleisten, dass unsere Kunden in den Genuss
der modernsten Technologie kommen. (> 22)
So setzen Sie alle Einstellungen auf die werksseitigen
Standardeinstellungen zurück.
Setzen Sie den Speicher in den folgenden Fällen zurück:
≥ Bei Drücken der Tasten erfolgt keine Reaktion.
≥ Sie möchten den Speicherinhalt löschen und zurücksetzen.
1 Drücken Sie [SETUP].
2 Drücken Sie wiederholt [3, 4] zur Auswahl von
“Initialization” und drücken Sie dann [OK].
3 Drücken Sie [3, 4] zur Auswahl von “Yes” und
drücken Sie dann [OK].
4 Drücken Sie [3, 4] zur Auswahl von “Yes” und
drücken Sie anschließend erneut [OK].
Allgemeines
Während der Wiedergabe ist ein Brummton zu hören.
≥Ein Netzkabel oder eine Leuchtstoffröhre befindet sich in
der Nähe der Kabel. Halten Sie andere Elektrogeräte und
Kabel von den Kabeln dieses Geräts fern.
Kein Ton.
≥Überprüfen Sie die Lautstärke des angeschlossenen
Geräts (Verstärker etc.).
≥Prüfen Sie, ob die Kabelverbindungen mit den Eingangs-
und Ausgangsanschlüssen fehlerhaft sind. Wenn dies der
Fall ist, schalten Sie dieses Gerät aus und verbinden Sie
die Kabel richtig.
≥
Überprüfen Sie, ob die korrekte Eingabequelle ausgewählt ist.
≥Setzen Sie die Stecker der zu verbindenden Kabel
vollständig ein.
≥Wenn “Digital Output”, “Analog Output” oder “Digital Link”
auf “Off” gestellt ist, wird kein Sound ausgegeben. Ändern
Sie die Einstellung des zu verwendenden
Ausgangsanschlusses auf “On”. (> 20)
≥Die Wiedergabe von Mehrkanal-Inhalten wird nicht
unterstützt.
≥Die digitalen Audioeingangsanschlüsse dieses Geräts
können nur lineare PCM-Signale erkennen. Detaillierte
Informationen finden Sie in der Bedienungsanleitung des
Geräts.
Deutsch
≥ Informationen zu den Bedienvorgängen für SE-R1 finden Sie auch
in deren Bedienungsanleitungen.
(49)
23

Der Sound wird unterbrochen.
≥Je nach Ihrer Umgebung kann Audio während der
Wiedergabe unterbrochen werden. Überprüfen Sie die
Bedienungsanleitung des angeschlossenen Geräts sowie
die Verbindung zum Gerät.
Die Wiedergabe startet nicht.
≥Je nach Ihrer Umgebung oder Ihren angeschlossenen
Geräten kann dies einige Zeit dauern.
iPhone/iPad/iPod
Bedienung nicht möglich.
≥Wählen Sie “USB” als Eingabequelle.
≥Vergewissern Sie sich, dass der/das iPhone/iPad/iPod
korrekt angeschlossen ist.
≥Schließen Sie den/das iPhone/iPad/iPod wieder an oder
versuchen Sie das/den iPhone/iPad/iPod.erneut zu starten
≥Der Akku des iPhone/iPad/iPod ist leer. Laden Sie den/das
iPhone/iPad/iPod auf und nehmen Sie ihn/es wieder in
Betrieb.
Die Systemsteuerfunktion funktioniert nicht.
≥Verbinden Sie die Kabel mit den entsprechenden
LR-Anschlüssen an diesem Gerät und dem SE-R1.
Das Gerät wird automatisch ausgeschaltet.
≥Ist die Auto-Aus-Funktion aktiviert? (> 21)
AirPlay/DLNA
Verbindung zum Netzwerk kann nicht hergestellt
werden.
≥Überprüfen Sie die Netzwerkverbindung und die
Einstellungen. (> 14)
Verbindung zum Gerät kann nicht hergestellt werden.
≥Stellen Sie sicher, dass die Multicast-Funktion im Wireless-
Router aktiviert ist.
≥Stellen Sie sicher, dass das Gerät und dieses Gerät mit
demselben Netzwerk verbunden sind. (> 14)
≥Verbinden Sie das kompatible Gerät erneut mit dem
Netzwerk und verbinden Sie sich wieder mit diesem Gerät.
≥Stellen Sie “Network Standby” auf “Off” (> 21), schalten
Sie dieses Gerät aus und wieder ein und stellen Sie
anschließend wieder eine Verbindung zu diesem Gerät
her.
Die Wiedergabe startet nicht.
Der Sound wird unterbrochen.
≥Das gleichzeitige Verwenden von anderen 2,4 GHz-
Geräten, wie Mikrowellen, schnurlosen Telefonen, etc.,
kann zu Verbindungsunterbrechungen führen.
Erhöhen Sie die Entfernung zwischen dem drahtlosen
Router und diesen Geräten.
≥Wenn mehrere Wireless-Geräte gleichzeitig das gleiche
Wireless-Netz nutzen, wie auch dieses Gerät, versuchen
Sie, die anderen Geräte auszuschalten oder deren Zugriff
auf das Wireless-Netz einzuschränken.
≥Wenn die Wiedergabe anhält, überprüfen Sie den
Wiedergabestatus am Gerät.
Der/Das iPhone/iPad/iPod wird nicht aufgeladen.
≥Stellen Sie sicher, dass das Gerät eingeschaltet ist, wenn
Sie den Ladevorgang beginnen.
– Beim Aufladen eines iPhone/iPad/iPod, dessen Akku entladen
ist, schalten Sie dieses Gerät nicht in den Standby-Modus, bis
das iPhone/iPad/iPod wieder betriebsbereit ist.
USB
Das USB-Laufwerk oder dessen Inhalt kann nicht
gelesen werden.
≥Das USB-Laufwerkformat oder dessen Inhalt ist nicht mit
dem Gerät kompatibel. (> 28)
Keine Reaktion, wenn [1/;] gedrückt wird.
≥Trennen Sie das USB-Gerät und schließen Sie es wieder
an. Oder schalten Sie das Gerät aus und wieder ein.
Langsamer Betrieb des USB-Sticks.
≥Große Dateien oder USB-Sticks beanspruchen eine
längere Lesezeit.
PC
Der PC erkennt dieses Gerät nicht.
≥Überprüfen Sie Ihre Betriebsumgebung. (> 19)
≥Starten Sie den PC neu, schalten Sie dieses Gerät aus und
wieder ein und stecken Sie das USB-Kabel anschließend
wieder ein.
≥Verwenden Sie einen anderen USB-Anschluss am
verbundenen PC.
≥Installieren Sie den speziellen Treiber, wenn Sie einen PC
mit Windows verwenden.
Es können keine am PC gespeicherten
Musikdateien gefunden werden.
≥Bei der Wiedergabe von Musikdateien über ein Netzwerk,
werden die Dateien, die nicht auf dem Server-Netzwerk
registriert sind nicht angezeigt. Detaillierte Informationen
finden Sie in der Bedienungsanleitung Ihres Servers.
24
(50)

Platte
Die Fernbedienung funktioniert nicht richtig.
≥Um Interferenzen zu vermeiden, stellen Sie keine Objekte
vor den Signalsensor. (> 7)
≥Ändern Sie den Fernbedienungscode, wenn andere
Geräte auf diese Fernbedienung reagieren. (> 22)
Meldungen
Die folgenden Meldungen oder Servicenummern
erscheinen unter Umständen auf dem Display des Gerätes.
“AUTO OFF”
≥Das Gerät wurde ca. 20 Minuten lang nicht benutzt und
wird innerhalb einer Minute heruntergefahren. Drücken Sie
eine beliebige Taste, um dies zu verhindern.
“Checking Connection”
≥Das Gerät überprüft den angeschlossenen/das
angeschlossene iPhone/iPad/iPod oder USB-Gerät.
“Download Error”
≥Der Firmware-Download ist fehlgeschlagen. Drücken Sie
zum Beenden eine beliebige Taste. Bitte versuchen Sie es
später erneut.
≥Der Server kann nicht gefunden werden. Drücken Sie zum
Beenden eine beliebige Taste. Stellen Sie sicher, dass das
Drahtlosnetzwerk mit dem Internet verbunden ist.
“Empty”
≥Der gewählte Ordner ist leer. Verschieben Sie Titel in den
Ordner und versuchen Sie, den Vorgang erneut
auszuführen.
≥Der Server wird im Netzwerk nicht gefunden. Überprüfen
Sie, ob der Server mit demselben Netzwerk wie dieses
Gerät verbunden ist und versuchen Sie erneut, eine
Verbindung zu diesem Gerät herzustellen. (> 15, 17)
“Error”
≥Die Bedienung ist inkorrekt. Lesen Sie die Anleitung durch
und versuchen Sie es erneut.
“F” (“ ” steht für eine Zahl.)
≥Es liegt ein Problem mit diesem Gerät vor.
– Ist die Lautstärke extrem hoch?
Verringern Sie in diesem Fall die Lautstärke.
– Befindet sich dieses Gerät an einem besonders warmen Ort?
In diesem Fall bringen Sie das Gerät an einen kühleren Ort,
warten eine Weile und versuchen dann, es wieder
einzuschalten.
Wenn das Problem weiterhin besteht, notieren Sie die
angezeigte Nummer, trennen das Netzkabel ab und
wenden sich an Ihren Händler.
“No Network Connection”
≥Dieses Gerät hat keine Verbindung mit dem Netzwerk.
Überprüfen Sie die Netzwerkverbindung. (> 14)
“Not Conditional”
≥Die Funktion, die Sie verwenden möchten, ist mit den
derzeitigen Einstellungen nicht verfügbar. Überprüfen Sie
die Schritte und Einstellungen.
“Over Flow”
≥
Der Ton vom verwendeten analogen
Toneingangsanschluss ist verzerrt. Wählen Sie “Attenuator”
und ändern Sie die Einstellung für den verwendeten
analogen Toneingangsanschluss auf “On”. (
>
20)
“PGM Full”
≥Die Anzahl der programmierten Titel ist mehr als 24.
“Please Wait”
≥
Dies wird beispielsweise angezeigt, wenn dieses Gerät ein/ausgeschaltet ist. (Für bis zu 1 Minute und 30 Sekunden)
“Remote ” (“ ” steht für eine Zahl.)
≥Die Fernbedienung und das Gerät verwenden
unterschiedliche Codes. Ändern Sie den Code an der
Fernbedienung.
– Wenn “Remote 1” angezeigt wird, drücken und halten Sie [OK]
und [1] für mindestens 4 Sekunden.
– Wenn “Remote 2” angezeigt wird, drücken und halten Sie [OK]
und [2] für mindestens 4 Sekunden.
“Searching”
≥Das Gerät überprüft den DLNA-Server im Netzwerk.
“Unlocked”
≥“PC”, “AES”, “COAX1”, “COAX2”, “COAX3” oder “OPT” ist
ausgewählt, aber es ist kein Gerät angeschlossen.
Überprüfen Sie die Verbindung mit dem Gerät. (> 10, 11)
≥Audiosignale, wie Abtastfrequenz-Komponenten, werden
nicht richtig eingegeben.
– Hinweise zum unterstützten Format finden Sie unter
“Dateiformat” (@ 28).
“USB Over Current Error”
≥Der/Das iPhone/iPad/iPod oder das USB-Gerät nimmt zu
viel Strom auf. Trennen Sie den/das iPhone/iPad/iPod bzw.
das USB-Gerät ab und schalten Sie das Gerät ein und
wieder aus.
“Hub Device Not Supported”
“Unrecognizable Device”
“Unsupported”
“Unsupported USB Device”
≥Sie haben einen/ein iPhone/iPad/iPod oder ein USB-Gerät
angeschlossen, das nicht unterstützt wird.
– Ist der/das iPhone/iPad/iPod kompatibel, dieses einschalten und
korrekt anschließen.
≥Das Dateiformat auf dem iPhone/iPad/iPod oder USB-
Gerät wird nicht unterstützt.
– Hinweise zum unterstützten Format finden Sie unter
“Dateiformat” (@ 28).
Deutsch
(51)
25

Technische Daten
∫ ALLGEMEIN
Spannungsversorgung AC 220 V bis 240 V, 50/60 Hz
Leistungsaufnahme 60 W
Stromverbrauch im Standby-Modus*
(Wenn “Network Standby” ausgeschaltet ist) Ca. 0,3 W
(Wenn “Network Standby” eingeschaltet ist) Ca. 5,6 W
Stromverbrauch in ausgeschaltetem Zustand Ca. 0,3 W
Abmessungen (BkHkT) 480 mmk120 mmk391 mm
Gewicht Ca. 17 kg
Betriebstemperaturbereich 0 oC bis r40 oC
Betriebsfeuchtigkeitsbereich 35 % bis 80 % Rel. Feuchte (keine Kondensbildung)
∫ ANSCHLUSS-TEIL
Analogeingang
LINE-Eingang k2 Klinkenbuchse
Digitaleingang
AES/EBU-Digitaleingang 3-Pin XLR
Koaxial-Digitaleingang k3 Klinkenbuchse
Optischer Digitaleingang Optischer Anschluss
USB
Vorderer USB-Port Typ A Anschluss
Supportspeicher-Kapazität 2 TB (max.)
Maximale Anzahl an Ordnern (Alben) 800
Maximale Anzahl an Dateien (Lieder) 8000
Dateiensystem FAT16, FAT32
USB-Anschlussleistung DC OUT 5 V 2,1 A (max.)
PC
Hinterer USB-Port Typ B Anschluss
Analogausgang
BALANCED 3-Pin XLR
UNBALANCED Klinkenbuchse
Digitalausgang
Technics Digital Link
AES/EBU-Digitalausgang 3-Pin XLR
Koaxiale Digitalausgabe Klinkenbuchse
Optischer Digitalausgang Optischer Anschluss
Kopfhörerbuchse Stereo, ‰6,3 mm
Ethernet Interface
LAN 10 Base-T/100 Base-TX
(52)
26

∫ FORMAT-ABSCHNITT
USB-A
USB Standard USB 2.0 High-Speed
USB-Massenspeicher-Klasse
PC (USB-B)
USB Standard USB 2.0 High-Speed
USB-Audio-Klassenspezifikation USB-Audio-Klasse 2.0, Asynchronmodus
DSD-Steuermodus Nativer ASIO-Modus, DoP-Modus
DSD64/DSD128-Wiedergabe
∫ ANALOGAUSGANG-ABSCHNITT
Kanal 2ch
Ausgangspegel
BALANCED 2,3 Vrms
UNBALANCED 2,3 Vrms
Kopfhörer 180 mWr180 mW (32 ≠)
Frequenzantwort
BALANCED 2 Hz bis 90 kHz (s3dB)
UNBALANCED 2 Hz bis 90 kHz (s3dB)
THD+N
Deutsch
BALANCED 0,0008 % (1 kHz, 0 dB)
UNBALANCED 0,0008 % (1 kHz, 0 dB)
S/R
BALANCED 118 dB ( I H F -A)
UNBALANCED 115 dB ( I H F -A)
Dynamikumfang
BALANCED 118 dB ( I H F -A)
UNBALANCED 115 dB ( I H F -A)
≥ Änderungen der technischen Daten bleiben ohne vorherige Ankündigung vorbehalten.
≥ Die Gewichtsangaben und Abmessungen sind ungefähre Werte.
* Wenn das iPhone/iPad/iPod nicht aufgeladen wird
(53)
27

∫ Dateiformat
Dieses Gerät unterstützt die folgenden Dateiformate.
≥Dieses Gerät unterstützt nicht die Wiedergabe von kopiergeschützten Musikdateien.
≥Die Wiedergabe aller Dateien in Formaten, die von diesem Gerät unterstützt werden, kann nicht garantiert werden.
≥Die Wiedergabe einer Datei in einem Format, das von diesem Gerät nicht unterstützt wird, kann zu abgehacktem Audio oder zu
Rauschen führen. Überprüfen Sie in solchen Fällen, ob dieses Gerät das Dateiformat unterstützt.
≥Dieses Gerät unterstützt nicht die Wiedergabe von VBR (Variable Bitrate).
≥Einige der angeschlossenen Geräte (Server) sind möglicherweise in der Lage, Dateien in Formate zu konvertieren, die von
diesem Gerät nicht unterstützt werden, und diese auszugeben. Detaillierte Informationen finden Sie in der Bedienungsanleitung
Ihres Servers.
≥Die von diesem Gerät und von der Wiedergabe-Software angezeigten Dateiinformationen (Abtastfrequenz, etc.) können sich
voneinander unterscheiden.
USB-A
Dateiformat Erweiterung Abtastrate
MP3 .mp3 32/44,1/48 kHz 16 kbps bis 320 kbps
AAC .m4a/.aac 32/44,1/48/88,2/96 kHz 16 kbps bis 320 kbps
WMA .wma 32/44,1/48 kHz 16 kbps bis 320 kbps
WAV .wav 32/44,1/48/88,2/96/176,4/192 kHz 16/24 bit
FLAC .flac 32/44,1/48/88,2/96/176,4/192 kHz 16/24 bit
AIFF .aiff 32/44,1/48/88,2/96/176,4/192 kHz 16/24 bit
ALAC .m4a 32/44,1/48/88,2/96 kHz 16/24 bit
DSD .dff/.dsf 2,8224/5,6448 MHz
Anzahl der Quantisierungsbits
Bitrate
PC (USB-B)*
Dateiformat Erweiterung Abtastrate
PCM 32/44,1/48/88,2/96/176,4/192/352,8/384 kHz 16/24/32 bit
DSD .dff/.dsf 2,8224/5,6448 MHz
LAN (DLNA)*
Dateiformat Erweiterung Abtastrate
MP3 .mp3 32/44,1/48 kHz 16 kbps bis 320 kbps
AAC .m4a/.aac 32/44,1/48/88,2/96 kHz 16 kbps bis 320 kbps
WMA .wma 32/44,1/48 kHz 16 kbps bis 320 kbps
WAV .wav 32/44,1/48/88,2/96/176,4/192 kHz 16/24 bit
FLAC .flac 32/44,1/48/88,2/96/176,4/192 kHz 16/24 bit
AIFF .aiff 32/44,1/48/88,2/96/176,4/192 kHz 16/24 bit
ALAC .m4a 32/44,1/48/88,2/96 kHz 16/24 bit
DSD .dff/.dsf 2,8224/5,6448 MHz
*1 Wenn Sie die spezielle App herunterladen und installieren, können Sie Dateien in vielen verschiedenen Formaten wiedergeben. (> 19)
Detaillierte Informationen finden Sie in der Bedienungsanleitung des App.
*2 Ob jede Musikdatei über Ihr Netzwerk wiedergegeben werden kann, wird durch den Netzwerk-Server bestimmt, auch wenn das Dateiformat
oben aufgelistet ist. Wenn Sie beispielsweise Windows Media
können nur diejenigen wiedergeben, die zur Bibliothek von Windows Media
1
Bitrate
Anzahl der Quantisierungsbits
2
Bitrate
Anzahl der Quantisierungsbits
®
Player 11 verwenden, sind nicht alle Musikdateien auf dem PC abspielbar. Sie
®
Player 11 hinzugefügt wurden.
28
(54)

“Made for iPod”, “Made for iPhone” und “Made for iPad” bedeutet, dass ein
elektronisches Zubehörteil speziell für den Anschluss an einen iPod,
iPhone bzw. ein iPad, entworfen wurde, und vom Entwickler zertifiziert
wurde, dass es den Leistungsstandards von Apple entspricht.
Apple ist nicht für die Funktionsfähigkeit dieses Geräts, oder für die
Einhaltung von Sicherheits- und Regulierungsstandards, verantwortlich.
Bitte beachten Sie, dass die Verwendung dieses Zubehörs mit einem iPod,
iPhone oder iPad die drahtlose Leistung beeinträchtigen kann.
AirPlay, iPad, iPhone, iPod, iPod nano, iPod touch und Retina sind
Warenzeichen von Apple Inc., die in den USA und in anderen Ländern
eingetragen sind.
iPad Air und iPad mini sind Markenzeichen von Apple Inc.
Mac und OS X sind Warenzeichen von Apple Inc., die in den USA und in
anderen Ländern eingetragen sind.
Android ist eine Marke von Google Inc.
DLNA, the DLNA Logo and DLNA CERTIFIED are trademarks, service
marks, or certification marks of the Digital Living Network Alliance.
“Direct Stream Digital”, DSD und ihre Logos sind Markenzeichen von Sony
Corporation.
Die MPEG Layer-3 Audio-Codiertechnologie wurde von Fraunhofer IIS und
Thomson lizensiert.
Windows und Windows Vista sind eingetragene Warenzeichen oder
Warenzeichen von Microsoft Corporation in den USA und/oder anderen
Ländern.
Windows Media und das Windows-Logo sind Markenzeichen oder
eingetragene Markenzeichen der Microsoft Corporation in den Vereinigten
Staaten und/oder anderen Ländern.
Dieses Produkt unterliegt dem Schutz durch bestimmte Rechte an
geistigem Eigentum von Microsoft Corporation und Dritten. Nutzung oder
Verteilung einer derartigen Technologie außerhalb dieses Produkts ohne
Erteilung einer entsprechenden Lizenz durch Microsoft, ein autorisiertes
Microsoft-Tochterunternehmen oder autorisierte Dritte ist verboten.
FLAC Decoder
Copyright (C) 2000, 2001, 2002, 2003, 2004, 2005, 2006, 2007, 2008,
2009 Josh Coalson
Redistribution and use in source and binary forms, with or without
modification, are permitted provided that the following conditions are met:
– Redistributions of source code must retain the above copyright notice,
this list of conditions and the following disclaimer.
– Redistributions in binary form must reproduce the above copyright
notice, this list of conditions and the following disclaimer in the
documentation and/or other materials provided with the distribution.
– Neither the name of the Xiph.org Foundation nor the names of its
contributors may be used to endorse or promote products derived from
this software without specific prior written permission.
THIS SOFTWARE IS PROVIDED BY THE COPYRIGHT HOLDERS AND
CONTRIBUTORS “AS IS” AND ANY EXPRESS OR IMPLIED
WARRANTIES, INCLUDING, BUT NOT LIMITED TO, THE IMPLIED
WARRANTIES OF MERCHANTABILITY AND FITNESS FOR A
PARTICULAR PURPOSE ARE DISCLAIMED. IN NO EVENT SHALL THE
FOUNDATION OR CONTRIBUTORS BE LIABLE FOR ANY DIRECT,
INDIRECT, INCIDENTAL, SPECIAL, EXEMPLARY, OR CONSEQUENTIAL
DAMAGES (INCLUDING, BUT NOT LIMITED TO, PROCUREMENT OF
SUBSTITUTE GOODS OR SERVICES; LOSS OF USE, DATA, OR
PROFITS; OR BUSINESS INTERRUPTION) HOWEVER CAUSED AND
ON ANY THEORY OF LIABILITY, WHETHER IN CONTRACT, STRICT
LIABILITY, OR TORT (INCLUDING NEGLIGENCE OR OTHERWISE)
ARISING IN ANY WAY OUT OF THE USE OF THIS SOFTWARE, EVEN IF
ADVISED OF THE POSSIBILITY OF SUCH DAMAGE.
Deutsch
(55)
29

Merci d’avoir porté votre choix sur cet appareil.
Veuillez lire attentivement les présentes instructions avant d’utiliser ce produit, et conserver ce manuel pour utilisation ultérieure.
∫ Caractéristiques de cet appareil
Cet appareil offre les caractéristiques suivantes :
Technics Digital Link
Technics a raccourci la longueur du trajet du signal en plaçant le lecteur audio en réseau et le sélecteur d'entrée, qui traitent des
signaux très faibles, dans le même châssis, et a réduit autant que possible les parasites des signaux faibles en utilisant un
châssis séparé pour l'amplificateur de puissance, qui gère les fréquences élevées et les courants forts. De plus, Technics a
développé une nouvelle interface de transmission de signal qui réduit la dégradation de la précision de l'heure et de la précision
de l'amplitude qui surviennent lorsque les signaux sont retransmis entre le lecteur de contrôle réseau et l'amplificateur de
puissance, effectuant ainsi une configuration d'amplificateur idéale.
Digital Noise Isolation Architecture (Architecture d'isolation des bruits numériques)
Puisque la plupart des supports de stockage de contenu numérique sont destinés à être utilisés avec des ordinateurs, ils n'ont
pas été conçus en tenant compte des faibles bruits, ce qui est essentiel à la reproduction d'un son pur. Pour surmonter ce défi,
cet appareil utilise une mesure efficace contre les instabilités et une technologie de blocage de bruit exceptionnelle pour chacune
de ses interfaces, afin de reproduire un son clair et stable.
Alimentation Analogique/Numérique Séparée
Un transformateur R-core dédié à faible bruit avec d'excellentes caractéristiques de régulation est fourni individuellement pour le
circuit analogique et numérique, afin de reproduire un son de haute qualité.
∫ Dispositifs recommandés
Nous vous recommandons l'utilisation de dispositifs Technics (en option) pour une qualité sonore supérieure.
Nom du produit Numéro du modèle
Amplificateur de puissance SE-R1
Enceintes acoustiques SB-R1*
* Ce produit devrait sortir en février 2015. (Pour les pays européens)
(56)
4

Consignes de sécurité
AVERTISSEMENT
Appareil
≥ Pour réduire les risques d’incendie, d’électrocution ou de dommages au
produit,
– N’exposez pas cet appareil à la pluie, l’humidité, l’égouttement ou
l’éclaboussement.
– Ne placez pas d’objets remplis d’eau, tels que des vases, sur l’appareil.
– Utiliser exclusivement les accessoires préconises.
– Ne retirez pas les caches.
– Ne réparez pas l’appareil vous-même. Confiez l’entretien a un personnel
qualifié.
– Ne laissez pas d’objets métalliques tomber dans cet appareil.
– Ne pas placer d’objets lourds sur cet appareil.
Cordon d’alimentation secteur
≥ Pour réduire les risques d’incendie, d’électrocution ou de dommages au
produit,
– Assurez-vous que la puissance du voltage fourni correspond au voltage
inscrit sur l’appareil.
– Branchez la prise secteur dans la prise électrique.
– Ne pas tirer, plier ou placer des objets lourds sur le cordon.
– Ne manipulez pas la prise avec les mains mouillées.
– Tenez le corps de la prise secteur en la débranchant.
– N’utilisez pas de prise secteur ni de prise de courant endommagée.
≥ La fiche secteur est le dispositif de déconnexion.
Installez cet appareil de sorte que la fiche secteur puisse être débranchée
immédiatement de la prise de courant.
ATTENTION
Appareil
≥ Ne placez pas de sources de flammes vives telles que bougies allumées sur
cet appareil.
≥ Cet appareil peut être perturbé par des interférences causées par des
téléphones mobiles pendant l’utilisation. En présence de telles
interférences, éloignez le téléphone mobile de cet appareil.
≥ Cet appareil est destiné à être utilisé sous des climats tropicaux.
Emplacement
≥ Placez cet appareil sur une surface plane.
≥ Pour réduire les risques d’incendie, d’électrocution ou de dommages au
produit,
– N’installez pas et ne placez pas cet appareil dans une bibliothèque, un
placard ni dans aucun autre espace réduit. Assurez-vous que l’appareil
est bien ventilé.
– Ne bouchez pas les ouvertures d’aération de cet appareil avec des
journaux, nappes, rideaux ou objets similaires.
– N’exposez pas cet appareil directement aux rayons du soleil, à des
températures élevées, à une humidité élevée ni à des vibrations
excessives.
≥ Ne soulevez pas et ne transportez pas cet appareil en le tenant par l'un de
ses boutons. Cela pourrait faire tomber l'appareil, causant des blessures ou
un dysfonctionnement de celui-ci.
Pile
≥ Il y a un danger d’explosion si la pile n’est pas correctement remplacée.
Remplacez uniquement par le type recommandé par le fabricant.
≥ Manipuler de façon incorrecte les piles peut causer une fuite d’électrolyte
ainsi qu’un incendie.
– Retirez la batterie si vous n’avez pas l’intention d’utiliser la télécommande
pendant un long moment. Rangez-la dans un endroit frais et sombre.
– Ne chauffez pas et n’exposez pas les piles à une flamme.
– Ne laissez pas la (les) pile(s) dans un véhicule exposé directement aux
rayons du soleil pendant un long moment avec fenêtres et portières
fermées.
– Ne pas démonter ou court-circuiter les piles.
– Ne rechargez pas des piles alcalines ou au manganèse.
– Ne pas utiliser des piles dont le revêtement a été enlevé.
≥ Pour jeter les piles, veuillez contacter les autorités locales ou votre
revendeur afin de connaître la procédure d’élimination à suivre.
L’élimination des équipements et des batteries usages
Applicable uniquement dans les pays membres de l’Union
européenne et les pays disposant de systèmes de recyclage
Apposé sur le produit lui-même, sur son emballage, ou
figurant dans la documentation qui l’accompagne, ce
pictogramme indique que les piles, appareils électriques
et électroniques usagés, doivent être séparées des
ordures ménagères.
Afin de permettre le traitement, la valorisation et le
recyclage adéquats des piles et des appareils usagés,
veuillez les porter à l’un des points de collecte prévus,
conformément à la législation nationale en vigueur.
En les éliminant conformément à la réglementation en
vigueur, vous contribuez à éviter le gaspillage de
ressources précieuses ainsi qu’à protéger la santé
humaine et l’environnement.
Pour de plus amples renseignements sur la collecte et le
recyclage, veuillez vous renseigner auprès des
collectivités locales.
Le non-respect de la réglementation relative à
l’élimination des déchets est passible d’une peine
d’amende.
Note relative au pictogramme à apposer sur
les piles (pictogramme du bas) :
Si ce pictogramme est combiné avec un symbole
chimique, il répond également aux exigences posées par
la Directive relative au produit chimique concerné.
Français
(57)
5

Table des matières
2
1
R03/LR03, AAA
(Piles alcalines ou au manganèse)
Consignes de sécurité......................................................5
Accessoires .......................................................................6
Entretien de l’appareil.......................................................6
Guide de référence de la commande...............................7
Préparatifs..........................................................................9
Commandes de base ......................................................13
Configuration réseau ......................................................14
Lecture des fichiers musicaux sur le serveur DLNA ...15
A propos des descriptions dans ce mode d’emploi
≥Les pages à consulter sont désignées par le signe “@ ±±”.
≥Les illustrations montrées peuvent être différentes de votre appareil.
≥Sauf indication contraire, les opérations sont décrites en utilisant la télécommande.
Utilisation iPhone/iPad/iPod...........................................16
Utilisation AirPlay............................................................17
Utilisation du périphérique USB ....................................17
Utilisation d'un ordinateur, etc. ......................................19
Réglage du son................................................................20
Autres ...............................................................................21
Guide de dépannage .......................................................23
Caractéristiques ..............................................................26
Accessoires
∏ 1 Cordons d’alimentation
secteur
Sauf pour la Suisse
∏ 1 Cordons d’alimentation
secteur
Pour la Suisse
∏ 1 Télécommande
(N2QAYA000095)
∏ 2 Piles pour la
télécommande
≥ Les références des produits fournies dans ce mode d'emploi sont correctes à compter de novembre 2014. Sous réserve de modifications.
≥ N’utilisez pas de cordon d’alimentation avec d’autres appareils.
∫ Utiliser la télécommande
Insérez la pile de façon à ce que ses pôles (i et j)
correspondent à ceux de la télécommande.
Pointez-le vers la cellule de réception du signal
de commande à distance sur cet appareil. (> 7)
≥Gardez les piles hors de portée des enfants
pour éviter qu’ils les avalent.
Entretien de l’appareil
Débranchez le cordon d'alimentation secteur de la prise avant l'entretien. Nettoyez cet appareil à l'aide d'un chiffon doux.
≥ Si la saleté est importante, utilisez un chiffon mouillé bien essoré pour nettoyer la saleté, puis essuyez-le à l’aide un chiffon doux.
≥ N'utilisez pas de solvants, y compris essence, diluant, alcool, liquide vaisselle, lingette chimique, etc. Cela peut déformer le boitier externe ou
décoller le revêtement.
(58)
6
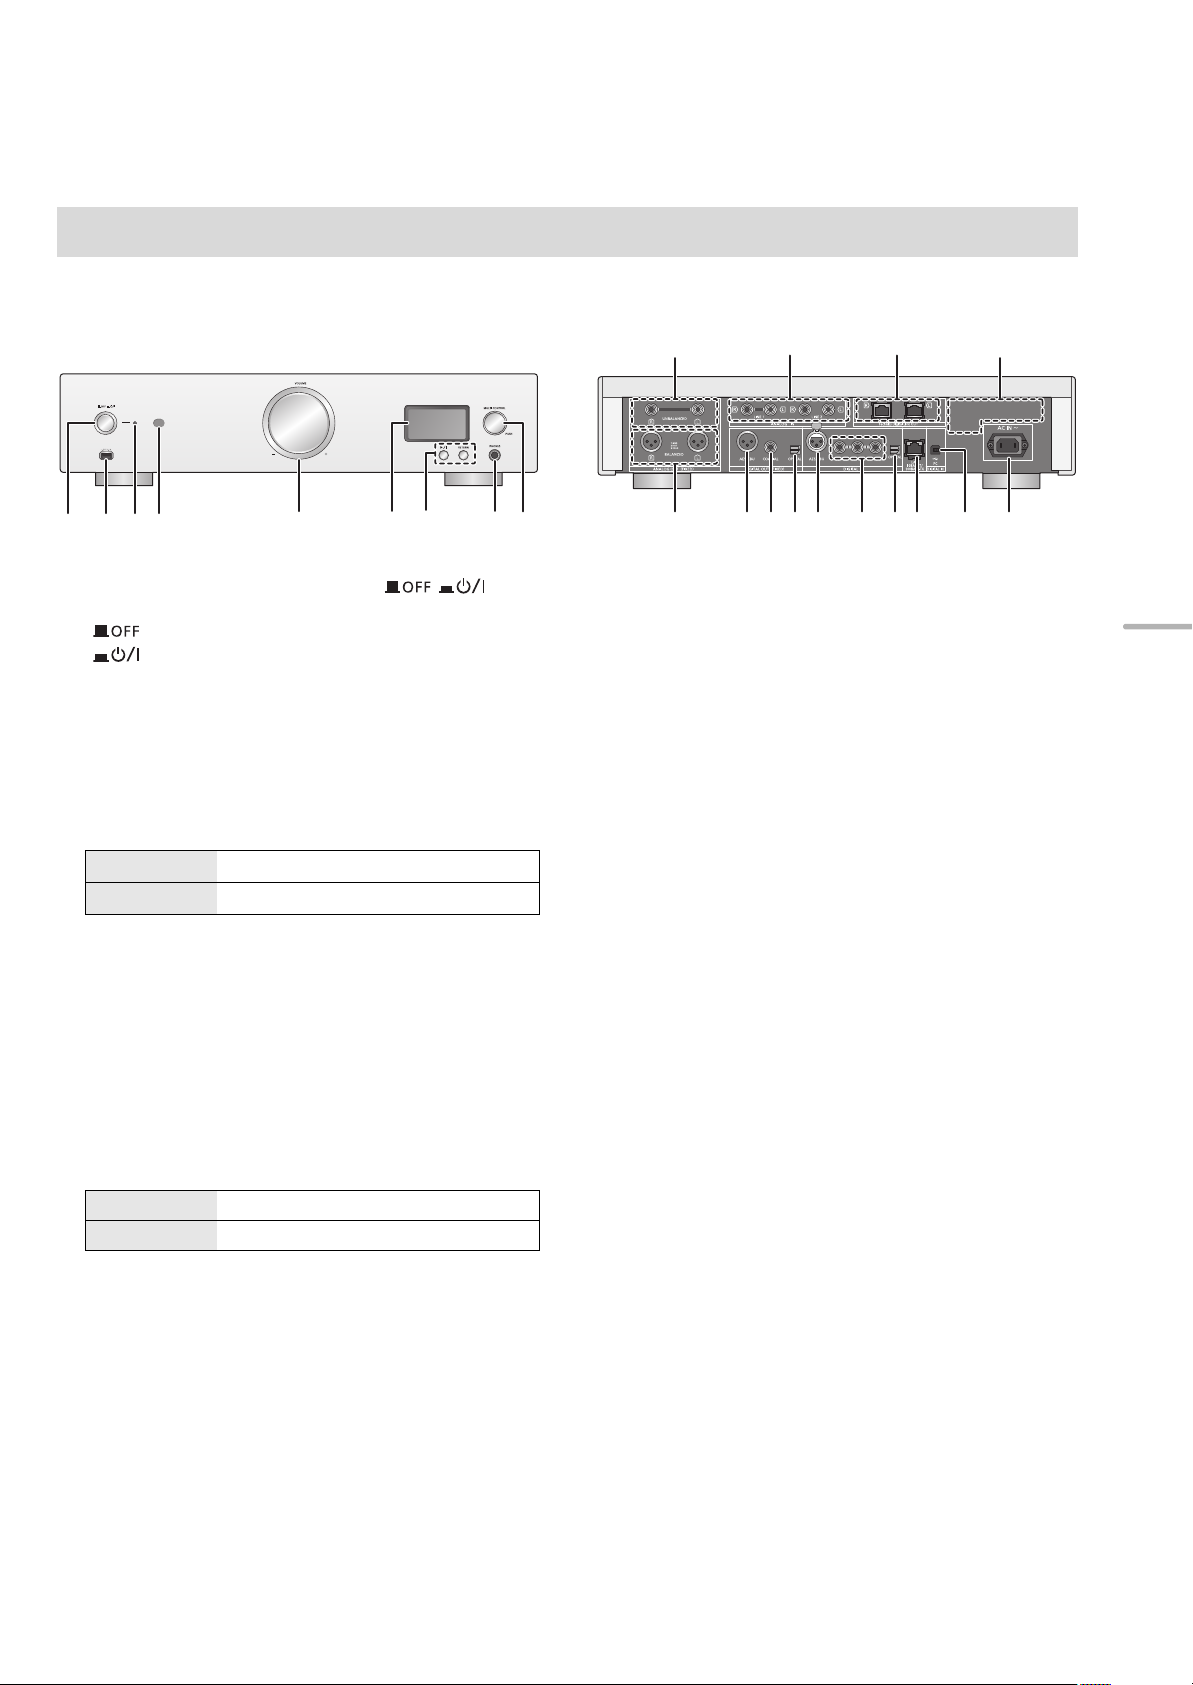
Guide de référence de la commande
Cet appareil
∫ Avant
1 Touche marche/arrêt de l'appareil [ ]
Utilisez cette touche pour allumer et éteindre l'appareil.
[ ] (arrêt) : L'appareil est éteint.
[ ] (marche) : L'appareil est en marche.
≥ L'appareil utilise continuellement une petite quantité
d'électricité en mode arrêt. Le mode arrêt utilise moins
d'électricité. (> 26)
2 Port pour iPhone/iPad/iPod et périphériques USB
(> 16, 17)
3 Indicateur d'alimentation
La couleur de l'indicateur change en fonction de l'état de
cet appareil.
Bleu L'appareil est en marche.
Rouge L'appareil est en mode veille.
4 Capteur du signal de la télécommande
Distance: Environ dans un rayon de 7 m directement vers
l’avant
Angle: Environ 30o à gauche et à droite
5 Bouton du volume
Réglez le volume du casque ou du SE-R1. (> 13)
≥ Il n'est pas possible de régler le volume des périphériques
branchés aux sorties audio analogiques ou numériques.
≥ La vitesse à laquelle le volume change dépend de la rapidité
avec laquelle vous tournez le bouton.
6 Affichage
7 Touches de contrôle de base
1/; Lecture/Pause
RETURN Retourne sur l'affichage précédent
≥ Appuyez quelques instants [RETURN] sur l'appareil pour
afficher le menu HOME. (> 13)
8 Prise pour casque
Pour brancher le connecteur du casque.
≥ Une pression excessive du son provenant des écouteurs et
hautparleurs peut entraîner une perte de l’ouïe.
≥ A pleine puissance, l’écoute prolongée du baladeur peut
endommager l’oreille de l’utilisateur.
9 Bouton de commande multiple (> 13)
≥Tournez ce bouton dans le sens horaire et antihoraire
pour changer la source d'entrée, faire défiler les options
et sauter des passages durant la lecture.
≥Pour sélectionner une option, appuyez sur le bouton;
pour entrer dans l'écran de menu, appuyez quelques
instants.
∫ Arrière
: Sorties audio analogiques [UNBALANCED] (> 10)
; Entrées audio analogiques [LINE1]/[LINE2] (> 10)
< Prise système [Technics Digital Link OUT] (> 9)
= Marquage d'identification du produit
Le numéro du modèle est indiqué.
> Sortie audio analogique [BALANCED] (> 10)
? Sortie audio numérique [AES/EBU] (> 11)
@ Sortie audio numérique [COAXIAL] (> 11)
A Sortie audio numérique [OPTICAL] (> 11)
B Entrée audio numérique [AES/EBU] (> 11)
C Entrées audio numériques
[COAXIAL1]/[COAXIAL2]/[COAXIAL3] (> 11)
D Entrée audio numérique [
E Port LAN [LAN] (> 14)
F Entrée audio numérique [PC] (> 19)
Pour raccorder un ordinateur, etc.
G Prise AC IN [AC IN T] (> 12)
OPTICAL
] (> 11)
Français
(59)
7

LAPC
㻌
RE- MASTER
㻌
AES
㻌
COAX
㻌
LINE1
㻌
OPT
㻌
USB
㻌
PC
㻌
LAN
㻌
PGM
㻌
RAND
㻌
LINE2
㻌
Télécommande
MENU
DIRECT
1 [Í]: Commutateur veille/marche
Appuyez sur le commutateur de l’appareil à partir de mode
marche vers le mode veille et vice et versa.
En mode veille, l’appareil consomme une petite quantité
d’énergie.
≥ La télécommande ne fonctionne pas lorsque l'interrupteur
d'alimentation est sur arrêt.
2 Sélectionne la source d’entrée
3 [HOME]: Affichez le menu de HOME
4 [3, 4, 2, 1]/[OK]: Sélection/OK
5 [MENU]: Entre dans le menu (> 21)
6 [DIRECT]: Active/désactive le mode Direct (> 20)
7 [LAPC]: Mesure des caractéristiques de
l'amplificateur et corrige sa sortie (> 12)
8 [MUTE]: Mettez en sourdine le son du casque ou de
SE-R1 (> 13)
9 [N INPUT O]: Sélectionne la source d’entrée
: [r VOL s]: Réglez le volume du casque ou du SE-R1
(> 13)
≥ Il n'est pas possible de régler le volume des périphériques
branchés aux sorties audio analogiques ou numériques.
; Touches numériques, etc.
≥ Pour sélectionner un numéro à 2 chiffres
Exemple:
16: [S10] > [1] > [6]
≥ Pour sélectionner un nombre à 4 chiffres
Exemple :
1234: [S10] > [S10] > [S10] > [1] > [2] > [3] > [4]
≥ [CLEAR]: Efface la valeur entrée.
< [SETUP]: Entre dans le menu Configuration
(> 14, 20, 21, 22, 23)
= [DIMMER]: Réglez la luminosité de l'écran
d'affichage, etc. (> 13)
> [INFO]: Afficher les informations le contenu
Appuyez sur ce bouton pour afficher les noms de la piste, de
l'artiste et de l'album ainsi que le type de fichier, la fréquence
d'échantillonnage, et d'autres informations.
? [RETURN]: Retourne sur l'affichage précédent
@ [RE-MASTER]: Active/désactive Re-master (> 20)
A Touches de contrôle de base de la lecture
B [SLEEP]: règle le retardateur de veille (> 21)
(60)
8

Préparatifs
SE-R1
Cet appareil
(Derrière)
Câble du contrôle de
système
(non fourni)
Câble du contrôle de système
(non fourni)
≥Eteignez tous les appareils avant le branchement et lisez le mode d'emploi approprié.
≥Ne branchez pas le cordon d'alimentation secteur avant que les autres raccordements soient effectués.
≥Insérez les connecteurs des câbles à raccorder complètement.
≥Ne pliez pas les câbles trop abruptement.
Branchement du contrôle de système au SE-R1
≥Vous pouvez reproduire les signaux audio numériques de cet appareil et écouter de la musique.
≥Vous pouvez commander cet appareil et le modèle SE-R1 simultanément avec facilité en utilisant la télécommande. (> 23)
Français
≥ Utilisez des câbles LAN droits de catégorie 7 ou supérieure (STP) pour connecter les appareils périphériques.
≥ Nous vous conseillons d'utiliser des câbles mesurant 3 m au maximum.
≥ La prise du système et le port LAN ont des formes identiques. Faites attention de ne pas brancher l'un des câbles du contrôle de système
connecté à la prise système du SE-R1 au port LAN par erreur.
≥ Ne branchez pas le SE-R1 d'une autre manière que celle décrite ci-dessus.
∫ Polarité des prises audio synchronisées
Introduisez les broches du câble de manière à ce que leur polarité corresponde à celle des trous.
∫ Pour débrancher les câbles synchronisés
Tirez les câbles tout en appuyant sur [PUSH] situé au-dessus des prises.
(61)
9

Branchement aux dispositifs d'entrée audio analogique
Cet appareil
(Derrière)
Câble XLR* (non fourni)
Câble audio (non fourni)
Cet appareil
(Derrière)
Câble audio (non fourni) Câble audio (non fourni)
Vous pouvez reproduire les signaux audio analogiques de cet appareil et écouter de la musique.
ex:
Préamplificateur avec entrées symétriques Préamplificateur avec entrées asymétriques
* Nous vous conseillons d'utiliser des câbles mesurant 3 m au maximum.
Branchement aux dispositifs de sortie audio analogiques
Vous pouvez faire entrer les signaux audio analogiques vers cet appareil et écouter de la musique.
ex:
Lecteur, etc. Lecteur, etc.
(62)
10

Branchement aux dispositifs d'entrée audio numérique
Cet appareil
(Derrière)
Câble AES/EBU*
(non fourni)
Câble numérique coaxial
(non fourni)
ex:
Câble audio numérique
optique
(non fourni)
Cet appareil
(Derrière)
Câble AES/EBU*
(non fourni)
Câble numérique
coaxial
(non fourni)
ex:
Câble audio numérique
optique
(non fourni)
Vous pouvez reproduire les signaux audio numériques de cet appareil et écouter de la musique.
Français
Appareil prenant en charge
l'entrée AES/EBU
(préamplificateur, etc.)
* Nous vous conseillons d'utiliser des câbles mesurant 3 m au maximum.
Appareil prenant en charge
l'entrée numérique coaxiale
(préamplificateur, etc.)
Appareil prenant en charge
Branchement aux dispositifs de sortie audio numérique
Vous pouvez faire entrer les signaux audio analogiques vers cet appareil et écouter de la musique.
l'entrée optonumérique
(préamplificateur, etc.)
Appareil prenant en charge la
sortie AES/EBU
(lecteur, etc.)
* Nous vous conseillons d'utiliser des câbles mesurant 3 m au maximum.
≥ L'entrée audio numérique de cet appareil peut uniquement détecter les signaux PCM linéaires. Pour plus de détails, consultez le mode d’emploi
du dispositif.
Appareil prenant en charge
la sortie numérique coaxiale
(lecteur, etc.)
Appareil prenant en charge
la sortie optonumérique
(lecteur, etc.)
(63)
11

Connexion du câble d’alimentation secteur
Cordon d’alimentation
secteur (fourni)
Vers une prise secteur
Cet appareil
(Derrière)
A FAIRE
A NE PAS FAIRE
À raccorder une fois tous les autres branchements effectués.
TENTATIVE
∫ Pour débrancher le cordon d'alimentation secteur de cet appareil.
Tirez le cordon d'alimentation secteur tout en appuyant sur le haut et le bas du connecteur.
≥ Bien que l'interrupteur d'alimentation se trouve sur la position [ ], l'appareil n'est pas complètement débranché du secteur. Débranchez la
fiche de la prise électrique murale si vous ne devez plus utiliser l'appareil durant une période prolongée. Placez l'appareil de manière à ce que
la fiche puisse être facilement débranchée.
Mesure des caractéristiques de l'amplificateur et correction de sa
sortie
Si le SE-R1 est raccordé à cet appareil via la fonction de contrôle du système, vous pouvez l'actionner en utilisant la
télécommande de cet appareil.
Appuyez sur [LAPC] jusqu'à ce que l'indicateur LAPC du SE-R1 commence à clignoter.
≥Le SE-R1 démarrera en mesurant les caractéristiques de l'amplificateur s'il est raccordé aux enceintes.
≥ Pour avoir des informations sur les modèles SE-R1, veuillez consulter leur mode d'emploi.
12
(64)

Commandes de base
Préparation
≥Préparez la musique que vous désirez écouter.
≥Mettez en marche le périphérique raccordé (amplificateur,
etc.) et baissez son volume.
Réglage du volume du casque
ou du SE-R1
1 Mettez la touche marche/arrêt de l'appareil
sur la position [ ].
≥L’indicateur d'alimentation est bleu.
2 Appuyez sur n'importe quelle touche de la
source d'entrée. (> 8)
Connecte cet appareil à un réseau et
LAN
AES
COAX
OPT
USB
PC
LINE1/LINE2
lit la musique qui y est diffusée.
(> 15)
Lit la musique à partir des dispositifs
de sortie audio numériques.
≥ Appuyez sur [COAX] pour sélectionner
“COAX1”/“COAX2”/“COAX3”.
Lit la musique stockée sur un
périphérique USB ou un
iPhone/iPad/iPod. (> 16, 17, 18)
Lit la musique stockée sur un
ordinateur, etc. (> 19)
Lit la musique à partir des dispositifs
de sortie audio analogiques.
3 Appuyez sur [3, 4] pour sélectionner un
élément puis appuyez sur [OK].
≥S’il y a d’autres éléments, répétez cette étape.
Branchez cet appareil et le SE-R1 à l'aide des câbles du
contrôle de système. (> 23)
∫ Réglage du volume
Appuyez sur [r VOL s].
≥ -- dB (min), -99,0 dB à 0 dB (max)
≥ Pour régler le volume du SE-R1, paramétrez le sélecteur d'entrée
du SE-R1 sur [DIGITAL].
∫ Coupure du son
Appuyez sur [MUTE].
≥ “ ” s’affiche.
≥ Appuyez de nouveau pour annuler. “ ” est également annulé
si le volume est ajusté ou si l’appareil est éteint.
Luminosité de l’afficheur
La luminosité de l'afficheur de cet appareil et de l'indicateur
d'alimentation peut être changée.
Appuyez plusieurs fois sur [DIMMER].
≥ Si l'afficheur est éteint, il ne s'allumera que lorsque vous
actionnerez cet appareil.
Avant que l'afficheur s'éteigne à nouveau, “Display Off” s'affichera
pendant quelques secondes.
Français
4 Démarrez la lecture.
∫ Utilisation du bouton de commande
multiple
1 Appuyez quelques instants [RETURN] sur l'appareil pour
afficher le menu HOME.
2 Tournez le bouton de commande multiple dans le sens
horaire et antihoraire pour sélectionner une source
d'entrée, puis appuyez sur le bouton.
3 Tournez le bouton de commande multiple dans le sens
horaire et antihoraire pour sélectionner une option, puis
appuyez sur le bouton.
4 Démarrez la lecture.
Commandes utilisant l'appli
dédiée “Technics Music App”
Si vous installez l'appli dédiée “Technics Music App”
(gratuite) sur votre smartphone/tablette, vous pouvez
actionner cet appareil et le SE-R1 en utilisant une grande
variété de fonctions.
Pour avoir des détails, visitez :
www.technics.com/support/
(65)
13
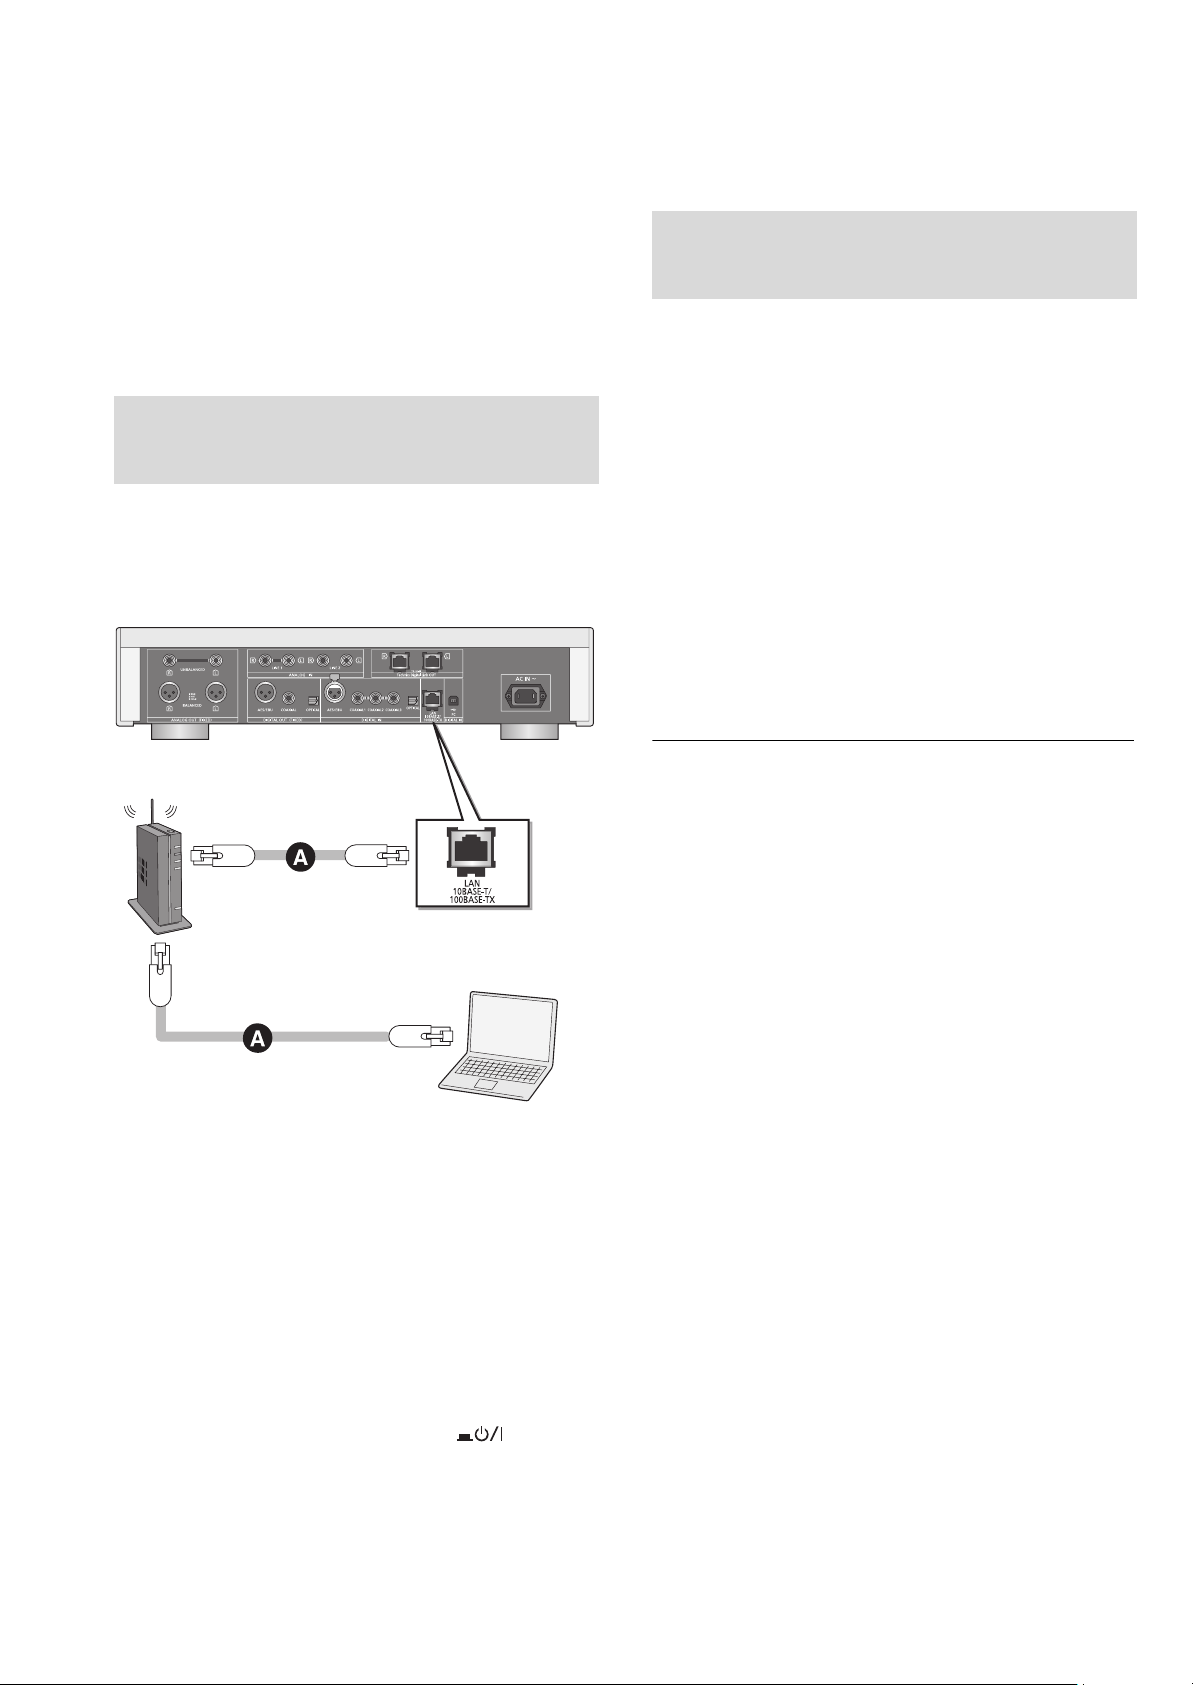
Configuration réseau
Cet appareil
(Derrière)
PC , etc.
Routeur de bande large
passante, etc.
Vous pouvez diffuser en streaming la musique d'un
périphérique iOS (iPhone/iPad/iPod), d'un périphérique
Android™ ou d'un ordinateur (Mac/Windows) vers cet
appareil en utilisant la fonctionnalité AirPlay ou DLNA.
(> 15, 17)
Pour utiliser ces fonctionnalités, cet appareil doit être
connecté au même réseau que le périphérique compatible
AirPlay ou le périphérique compatible DLNA.
Raccordement du réseau local
filaire
Normalement, le simple raccordement d'un câble réseau
terminera la configuration.
Pour définir les paramètres
liés au réseau
Vous pouvez changer le nom de cet appareil sur le réseau
(Friendly Name) et utiliser une adresse IP, un masque de
sous-réseau, une passerelle par défaut, un DNS primaire,
etc. spécifiques.
≥ N'écoutez pas de musique pendant le changement de ces
paramètres.
1 Appuyez sur [SETUP].
2 Appuyez plusieurs fois sur [3, 4] pour sélectionner
“Network” puis appuyez sur [OK].
3 Sélectionnez et saisissez les détails.
4 Appuyez sur [OK] pour appliquer les paramètres.
5 Appuyez plusieurs fois sur [RETURN] pour quitter les
paramètres.
6 Appuyez sur [Í] pour passer l'appareil en mode de
veille.
≥ Attendez jusqu’à ce que “Please Wait” disparaisse.
7 Effectuez “Raccordement du réseau local filaire”.
(> gauche)
A: Câble réseau (LAN) (non fourni)
1 Débrancher le cordon d’alimentation
secteur.
2 Raccordez cet appareil à un routeur à haut
débit, etc. via un câble réseau.
3 Branchez le cordon d’alimentation secteur à
cet appareil et mettez la touche marche/arrêt
de cet appareil sur la position [ ]. (> 12)
≥ Utilisez des câbles LAN droits de catégorie 7 ou supérieure (STP)
pour connecter les appareils périphériques.
≥ Le port LAN et la prise du système ont des formes identiques.
Faites attention de ne pas brancher le câble réseau raccordé à un
autre appareil, comme un routeur à haut débit, à la prise du
système par erreur.
≥ L’introduction d’un tout autre câble que le câble réseau dans le
port LAN peut endommager l’appareil.
≥ Si vous changez les paramètres réseau immédiatement après
avoir mis en marche cet appareil, cela peut prendre du temps
avant que les changements soient appliqués.
14
(66)

Lecture des fichiers musicaux sur le serveur
DLNA
Vous pouvez partager les fichiers musicaux stockés sur le
serveur de média certifié DLNA (Ordinateur, smartphone,
etc.) connecté à votre réseau domestique, et bénéficier du
contenu à l'aide de cet appareil.
≥ A propos du format supporté, consultez “Formats des fichiers”
(@ 28)
Préparation
≥Terminez la configuration réseau. (> 14)
≥Connectez le périphérique à utiliser au même réseau que
cet appareil.
≥Ajoutez le contenu et le dossier aux bibliothèques du
lecteur Windows Media
– La liste de lecture de lecteur Windows Media® peut lire
uniquement les contenus enregistrés dans ces bibliothèques.
– Pour utiliser le lecteur Windows Media
(streaming), vous devez le configurer à l'avance.
®
11 ou 12 ou d'un smartphone, etc.
®
pour la diffusion en flux
Lecture du contenu stocké sur
le serveur DLNA en le
contrôlant de cet appareil
Vous pouvez écouter la musique stockée sur le serveur
DLNA avec cet appareil (DMP—Digital Media Player pour
Lecteur de support numérique) en contrôlant le serveur
DLNA à l'aide de cet appareil.
∫ Répétition aléatoire de la lecture
Appuyez sur [RND].
Chaque fois que vous appuyez sur la touche:
On
Off
Toutes les pistes du dossier sont
répétées aléatoirement.
≥ “RND `” s’affiche.
Désactive le mode de répétition aléatoire.
∫ Répétition de la lecture
Appuyez sur [`].
Chaque fois que vous appuyez sur la touche:
1-Track
All
Off Désactive le mode répétition.
Ne joue que la piste sélectionnée.
≥ “1 `” s’affiche.
Toutes les pistes du dossier sont répétées.
≥ “`” s’affiche.
Lecture du contenu stocké sur
le serveur DLNA en le
contrôlant à partir d'un DMC
Français
1 Appuyez sur [LAN].
≥L'écran de sélection du serveur s'affichera.
2 Appuyez sur [3, 4] pour sélectionner un
serveur DLNA sur le réseau puis appuyez
sur [OK].
≥L'écran de sélection du contenu/dossier s'affichera.
≥Les dossiers/contenus peuvent être affichés dans un
ordre différent de celui du serveur, en fonction de ses
caractéristiques.
3 Appuyez sur [3, 4] pour sélectionner un
élément puis appuyez sur [OK].
≥S’il y a d’autres éléments, répétez cette étape.
Actions sur la télécommande
Arrêt Appuyez sur [∫].
Pause
Saut
Rechercher
Appuyez sur [1/;].
≥ Appuyez de nouveau pour redémarrer la
lecture.
Appuyez sur [:] ou [9] pour
sauter une piste.
Si vous appuyez sur l'une de ces touches
≥
durant la pause, la lecture redémarrera.
Durant la lecture ou la pause, appuyez
et maintenez [6] ou [5].
En contrôlant un périphérique compatible DMC (Digital
Media Controller pour Contrôleur de support numérique),
vous pouvez écouter la musique stockée sur le serveur
DLNA avec cet appareil (DMR—Digital Media Renderer pour
Restituteur de support numérique).
1 Mettez la touche marche/arrêt de l'appareil
sur la position [ ].
2 Actionnez le dispositif compatible DMC et
connectez-vous à cet appareil.
≥Le nom de dispositif de cet appareil s'affichera ainsi
“Technics SU-R1 _ _ _ _ _ _”*
≥Pour plus de détails sur la manière d'utiliser les
dispositifs compatibles DMC, consultez le mode
d'emploi des dispositifs ou du logiciel.
≥ Vous ne pouvez pas utiliser la répétition de lecture aléatoire avec
d'autres modes de lecture.
≥ Lorsque vous utilisez un DMC, la lecture des autres sources audio
s'arrêtera et la diffusion DLNA aura la priorité.
≥ Selon les contenus et l’équipement connecté, les commandes ou
la lecture peuvent être impossibles.
*1 “ _ ” symbolise une entrée unique pour chaque paramètre.
*2 Le nom du périphérique peut être changé à partir de “Pour
définir les paramètres liés au réseau”. (> 14)
1, 2
.
(67)
15

Utilisation iPhone/iPad/iPod
Câble USB
(non fourni)
ex:
Cet appareil
(avant)
iPhone, etc.
Branchez votre iPhone/iPad/iPod, vous pourrez écouter la
musique stockée sur l' iPhone/iPad/iPod ou charger l'
iPhone/iPad/iPod.
∫ Compatible iPhone/iPad/iPod
Écoute de la musique stockée
sur un iPhone/iPad/iPod
iPhone 6 Plus / iPhone 6 / iPhone 5s / iPhone 5c /
iPhone 5 / iPhone 4s / iPhone 4 / iPhone 3GS /
iPhone 3G
iPad Air / iPad (3e et 4e génération) / iPad 2 / iPad /
iPad mini avec écran Retina / iPad mini
iPod touch (de la 2e à la 5e génération)
iPod nano (de la 3e à la 7e génération)
(à compter de septembre 2014)
≥ La compatibilité dépend de la version du logiciel. Mettez à jour
votre iPhone/iPad/iPod avec le dernier logiciel avant de l’utiliser
avec cet appareil.
≥ Veuillez prendre note que Panasonic n’accepte aucune
responsabilité pour la perte de données et/ou d’information.
≥ Ne connectez pas les modèles suivants au port :
– iPod classic, iPod [4e (afficheur en couleur), et 5e (vidéo)
génération] iPod nano (1re génération)
Un comportement inattendu peut se produire.
≥ Les résultats de l'opération peuvent être différents en fonction du
modèle de l'iPhone/iPad/iPod.
Raccordement d'un
iPhone/iPad/iPod
1 Branchez l' iPhone/iPad/iPod à l'appareil.
2 Appuyez sur [USB].
3 Démarrez la lecture.
Actions sur la télécommande
Arrêt Appuyez sur [∫].
Pause
Saut
Rechercher
≥ Il pourrait être nécessaire de sélectionner l’album, l’artiste, etc. sur
l’iPhone/iPad/iPod.
≥ En fonction de la version du iOS, cette fonctionnalité pourrait ne
pas être disponible.
Appuyez sur [1/;].
≥ Appuyez de nouveau pour redémarrer la
lecture.
Appuyez sur [:] ou [9] pour
sauter une piste.
Durant la lecture ou la pause, appuyez
et maintenez [6] ou [5].
Pour connecter un iPhone/iPad/iPod, utilisez le câble USB
dédié (non fourni).
Chargement d'un
iPhone/iPad/iPod
Avec l'appareil en marche, le chargement démarre lorsqu'un
iPhone/iPad/iPod est raccordé à cet appareil.
≥ Le chargement n'est pas possible si cet appareil est éteint.
≥ Assurez-vous que l'appareil est en marche lorsque vous démarrez
le chargement.
– Lorsque vous chargez un iPhone/iPad/iPod dont la batterie est
complètement épuisée, ne mettez pas cet appareil en mode
veille avant que l'iPhone/iPad/iPod soit opérationnel.
≥ Vérifiez l'iPhone/iPad/iPod pour voir si la batterie est
complètement chargée. Une fois complètement chargée, retirez
l'iPhone/iPad/iPod.
≥ Le chargement s’arrête lorsque la pile est complètement chargée.
La pile se videra naturellement.
16
(68)
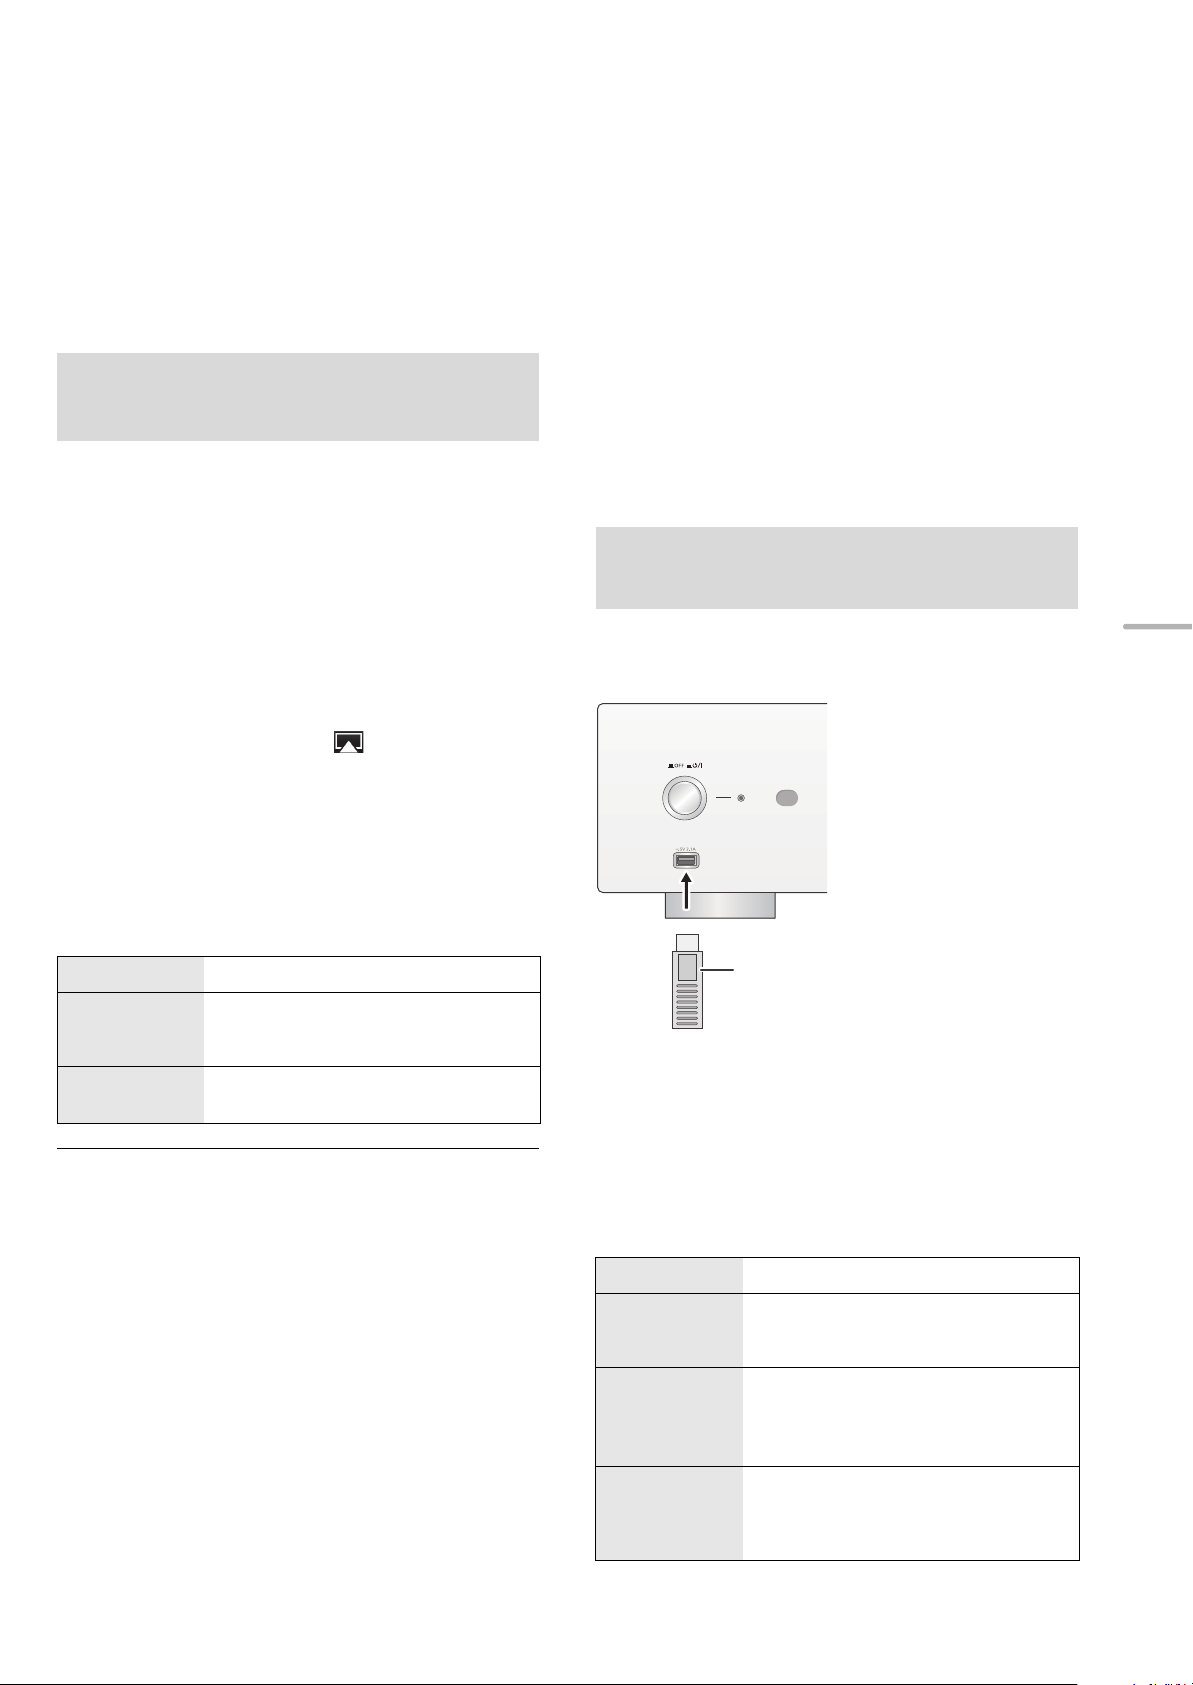
Utilisation AirPlay
ex:
Cet appareil
(avant)
Périphérique USB
Utilisation du
périphérique USB
AirPlay fonctionne sur iPhone, iPad, et iPod touch avec iOS
4.3.3 ou ultérieur, sur Mac avec OS X Mountain Lion ou
ultérieur, et sur PC avec iTunes 10.2.2 ou ultérieur.
Écoute de la musique avec
AirPlay
Préparation
≥Terminez la configuration réseau. (> 14)
≥Connectez le périphérique iOS ou le PC sur le même
réseau que cet appareil.
1 [iOS_device] : Démarrez l’application “Music” (ou
iPod).
[PC] : Démarrez “iTunes”.
2
Sélectionnez “Technics SU-R1 _ _ _ _ _ _”*
à partir de l'icône AirPlay .
≥
Contrôlez la configuration du volume avant de démarrer
la lecture. (Lorsque AirPlay est utilisé pour la première
fois, le volume peut être réglé sur le maximum.)
1, 2
Vous pouvez écouter la musique stockée sur un
périphérique USB.
≥
Cet appareil ne garantit pas la connexion avec tous les dispositifs USB.
≥ Les systèmes de fichiers FAT16 et FAT32 sont pris en charge.
≥ Cet appareil prend en charge l’USB 2.0 Full Speed.
≥ Les dispositifs USB peuvent ne pas être reconnus par cet appareil
s'ils sont connectés en utilisant les choses suivantes:
– un concentrateur (hub) USB
– un câble d'extension USB
Il est également possible d'utiliser des lecteurs/graveurs de carte USB.
≥
≥ Cet appareil ne peut pas enregistrer de musique sur un
périphérique USB.
A propos du format supporté, consultez “Formats des fichiers” (@28)
≥
Écoute de la musique stockée
sur un périphérique USB
1
Branchez un périphérique USB à cet appareil.
Français
3 Démarrez la lecture.
≥La lecture démarrera avec un léger retard.
Actions sur la télécommande
Arrêt Appuyez sur [∫].
Pause
Saut
≥ La lecture des autres sources audio s’arrêtera et la diffusion
AirPlay aura la priorité.
≥ Le changement de volume sur le dispositif iOS ou iTunes sera
appliqué à cet appareil. (Consultez l’iTunes Help pour connaître
les paramètres nécessaires dans iTunes.)
≥ Avec certaines versions iOS et iTunes, il pourrait être impossible
de redémarrer la lecture AirPlay si le sélecteur est changé ou si
l'appareil est éteint, durant la lecture AirPlay.
Dans ce cas, sélectionnez un dispositif différent à partir de l'icône
AirPlay de Music App ou iTunes puis resélectionnez cet appareil
comme sortie des enceintes.
≥ AirPlay ne fonctionnera pas en regardant des vidéos sur iTunes.
*1 “ _ ” symbolise une entrée unique pour chaque paramètre.
*2 Le nom du périphérique peut être changé à partir de “Pour
définir les paramètres liés au réseau”. (> 14)
Appuyez sur [1/;].
≥ Appuyez de nouveau pour redémarrer la
lecture.
Appuyez sur [:] ou [9] pour
sauter une piste.
2 Appuyez sur [USB].
3 Appuyez sur [3, 4] pour sélectionner un
élément puis appuyez sur [OK].
≥S’il y a d’autres éléments, répétez cette étape.
Actions sur la télécommande
Arrêt Appuyez sur [∫].
Pause
Saut
Appuyez sur [1/;].
≥ Appuyez de nouveau pour redémarrer la
lecture.
Appuyez sur [:] ou [9] pour
sauter une piste.
Si vous appuyez sur l'une de ces touches
≥
durant la pause, la lecture redémarrera.
Rechercher
Durant la lecture ou la pause, appuyez
et maintenez [6] ou [5].
≥ Cette action peut ne pas être disponible
pour certains formats.
(69)
17

∫ Répétition aléatoire de la lecture
Appuyez sur [RND].
Chaque fois que vous appuyez sur la touche:
On
Off
Toutes les pistes du dossier sont
répétées aléatoirement.
≥ “RND `” s’affiche.
Désactive le mode de répétition
aléatoire.
Lecture du programme
Cette fonction permet de programmer un maximum de 24 plages.
Préparation
≥Il n'est pas possible de programmer des pistes par
déplacement des dossiers. Déplacez toutes les pistes que
vous désirez programmer dans un seul dossier à l'avance.
∫ Répétition de la lecture
Appuyez sur [`].
Chaque fois que vous appuyez sur la touche:
1-Track
All
Off Désactive le mode répétition.
Ne joue que la piste sélectionnée.
≥ “1 `” s’affiche.
Toutes les pistes du dossier sont répétées.
≥ “`” s’affiche.
≥ Vous ne pouvez pas utiliser la répétition de lecture aléatoire avec
d'autres modes de lecture.
≥ Vous pouvez utiliser la répétition de lecture avec la programmation
de lecture.
1 Appuyez sur [PGM] en mode arrêt.
≥L'écran “Program Mode” s’affichera.
2 Appuyez sur [OK] pour afficher l'écran de
programmation.
3 Appuyez sur [3, 4] pour sélectionner la
piste désirée.
4 Appuyer sur [OK].
≥Effectuer les étapes 3 à 4 pour programmer d’autres
plages.
5 Appuyer sur [1/;] pour lancer la lecture.
≥Pour revenir sur l'écran “Program Mode”, appuyez sur
[∫].
Actions sur la télécommande
Arrêt
Vérifie l'ordre
programmé
Appuyez sur [∫].
≥ Le contenu programmé est conservé.
Appuyer sur [2, 1] en mode d’arrêt.
≥ Pour revenir sur l'écran “Program Mode”,
appuyez sur [RETURN].
18
(70)
Ajout de
pistes
Effacer la
dernière plage
Annuler le
mode de
lecture
programmée
Effectuez les étapes 3 et 4 en mode
arrêt.
Appuyer sur [CLEAR] en mode d’arrêt.
≥ Il n'est pas possible de sélectionner et
d'effacer la piste programmée désirée.
1 Appuyer sur [PGM] en mode d’arrêt.
≥ “Program Clear” s’affiche.
2 Appuyez sur [3, 4] pour
sélectionner “Yes” puis appuyez sur
[OK].
≥ La mémoire du programme sera
effacée.
≥ Le contenu programmé sera conservé aussi longtemps que la
source d'entrée est paramétrée sur “USB”.
≥ La mémoire du programme sera effacée :
– Lorsque le périphérique USB est débranché.
– Lorsque l'appareil est mis en mode veille ou en mode arrêt.
≥ Vous pouvez utiliser la programmation de lecture avec la répétition
de lecture.

Utilisation d'un ordinateur, etc.
USB
TENTATIVE
Câble USB 2.0
(non fourni)
Cet appareil
(Derrière)
ex:
PC, etc.
Type A
Type B
Vous pouvez raccorder l'entrée audio numérique [PC] et un
ordinateur, etc. à l'aide d'un câble USB et écouter la musique
présente sur l'ordinateur, etc. avec cet appareil.
≥ A propos du format supporté, consultez “Formats des fichiers”
(@ 28)
Pour écouter le son d'un
ordinateur, etc.
Pour raccorder un ordinateur
Avant de raccorder un ordinateur, suivez les étapes
suivantes.
≥ Consultez ce qui suit pour connaitre les versions
recommandées du système d'exploitation de votre ordinateur :
– Windows Vista, Windows 7, Windows 8, Windows 8.1
– OS X 10.7, 10.8, 10.9, 10.10
1 Téléchargez et installez le pilote dédié sur l'ordinateur.
(Uniquement pour Windows OS)
Téléchargez et installez le pilote dédié à partir du site cidessous.
www.technics.com/support/
2 Téléchargez et installez l'appli dédiée “Technics Audio
Player” (gratuite) sur votre ordinateur. (Commune à
Windows et à OS X)
Téléchargez et installez l'appli dédiée à partir du site cidessous.
www.technics.com/support/
(à compter de novembre 2014)
1 Débrancher le cordon d’alimentation
secteur.
2 Raccordez cet appareil et un ordinateur, etc.
Français
3 Branchez le cordon d’alimentation secteur à
cet appareil et mettez la touche marche/arrêt
de cet appareil sur la position [ ]. (> 12)
4 Appuyez sur [PC].
5 Actionnez le périphérique à utiliser pour la
lecture.
(71)
19

Réglage du son
L’effet sonore suivant peut être ajouté à la sortie audio.
Écoute d'un son plus naturel
(Remastérisation)
Le remastérisation élargit la bande de lecture et permet
d'obtenir une profondeur de bits supérieure pour reproduire
un son naturel et expansif proche de la musique originale.
≥ Le réglage d'usine par défaut est “Off”.
Appuyez sur [RE-MASTER] pour sélectionner
“On”/“Off”.
Mode direct
Cet appareil peut transmettre les signaux d'entrée sans les
faire passer à travers son processeur de signal numérique
(DSP), en passant par le plus court chemin possible. Cela
permet une reproduction fidèle et de haute qualité du son
d'origine.
≥ Le réglage d'usine par défaut est “Off”.
Appuyez sur [DIRECT] pour sélectionner
“On”/“Off”.
Minimiser la distorsion audio
S'il y a une déformation sonore lorsque vous utilisez les
entrées audio analogiques, mettez l'atténuateur sur “On”.
≥ Le réglage d'usine par défaut est “Off”.
1 Appuyez sur [SETUP].
2 Appuyez plusieurs fois sur [3, 4] pour
sélectionner “Attenuator” puis appuyez sur
[OK].
3 Appuyez sur [3, 4] pour sélectionner
“LINE1” ou “LINE2”.
4 Appuyez sur [2, 1] pour sélectionner “On”
puis appuyez sur [OK].
Sortie désactivée
Désactiver la sortie audio des prises non utilisées minimise
les parasites et permet une qualité audio plus élevée.
≥ Le réglage d'usine par défaut est “On”.
Réglage de la fréquence
d'échantillonnage
Vous pouvez définir la limite supérieure de la plage de la
fréquence d'échantillonnage de sortie. Notez que la plage qui
peut être traitée est différente en fonction de l'amplificateur
ou du convertisseur D/A. Pour avoir plus de détails, consultez
le mode d'emploi du périphérique raccordé.
≥ Le réglage d'usine par défaut est “32kHz-192kHz”.
Préparation
≥ Paramétrez “Digital Output” sur “On”.
1 Appuyez sur [SETUP].
2 Appuyez plusieurs fois sur [3, 4] pour
sélectionner “D.Output fs” puis appuyez sur
[OK].
3 Appuyez sur [3, 4] pour sélectionner un
élément puis appuyez sur [OK].
≥Vous pouvez sélectionner une fréquence
d'échantillonnage de 96 kHz ou de 192 kHz.
1 Appuyez sur [SETUP].
Pour désactiver la sortie audio numérique :
Appuyez plusieurs fois sur [3, 4] pour sélectionner
“Digital Output” puis appuyez sur [OK].
Pour désactiver la sortie audio analogique :
Appuyez plusieurs fois sur [3, 4] pour sélectionner
“Analog Output” puis appuyez sur [OK].
Pour désactiver la sortie du système (SE-R1) :
Appuyez plusieurs fois sur [3, 4] pour sélectionner
“Digital Link” puis appuyez sur [OK].
2 Appuyez sur [3, 4] pour sélectionner “Off”
puis appuyez sur [OK].
≥Pour activer de nouveau la sortie, sélectionnez “On”.
≥ Selon la source musicale que vous écoutez, le paramètre appliqué
peut être moins efficace.
≥ Selon la source musicale que vous écoutez, il peut être impossible
d'atteindre la qualité audio et l'effet de champ sonore désirés.
Dans ce cas, désactivez la fonction.
≥ Ni Remastérisation ni le mode Direct mode ne peuvent être
paramétrés sur “On”.
≥ Lorsque “Digital Output”, “Analog Output” ou “Digital Link” est sur
“Off”, aucun son n'est reproduit.
≥ Lorsque la prise d'un casque est branchée, même si “Analog
Output” est sur “Off”, il n'est pas possible de désactiver la sortie
audio analogique.
≥ Si cela prend du temps pour reproduire le son lorsque vous avez
réglé la qualité du son.
20
(72)

Autres
Minuterie d’arrêt différé
La minuterie d’arrêt différé peut éteindre l’appareil après une
durée définie.
Appuyez sur [SLEEP].
Chaque fois que vous appuyez sur la touche:
“30 minutes” "# “60 minutes” "# “90 minutes” "# “120 minutes”
^"""""""""""""" “Off” !"""""""""""""n
≥ Vous pouvez également paramétrer la minuterie d'arrêt différé en
sélectionnant “SLEEP” à l'aide de l'écran de menu.
Fonction d'arrêt automatique
Cet appareil est conçu pour conserver et économiser sa
consommation d’énergie. L’appareil passera automatiquement
en mode veille s’il n’émet aucun son et s’il n’est pas utilisé
pendant environ 20 minutes.
≥ Le réglage d'usine par défaut est “On”.
Pour annuler cette fonction
Veille réseau
Cet appareil peut être automatiquement mis en marche à
partir du mode veille lorsque celui-ci est sélectionné comme
lecteur AirPlay/DLNA.
≥ Le réglage d'usine par défaut est “Off”.
1 Appuyez sur [SETUP].
2 Appuyez plusieurs fois sur [3, 4] pour
sélectionner “Network Standby” puis
appuyez sur [OK].
3 Appuyez sur [3, 4] pour sélectionner “On”
puis appuyez sur [OK].
≥ Si cette fonction est sur “On” la consommation d’énergie de veille
augmentera.
Français
1 Appuyez sur [SETUP].
2 Appuyez plusieurs fois sur [3, 4] pour
sélectionner “AUTO OFF” puis appuyez sur
[OK].
3 Appuyez sur [3, 4] pour sélectionner “Off”
puis appuyez sur [OK].
≥Pour activer de nouveau la sortie, sélectionnez “On”.
≥ La fonction d'arrêt automatique marche sauf si vous la désactivez,
même si vous éteignez et remettez en marche cet appareil.
≥ Si “Network Standby” est sur “On”, cette fonction sera également
sur “On”. Pour changer le paramètre, paramétrez
“Network Standby” sur “Off”. (> 21)
(73)
21

Mise à jour du logiciel
Code de la télécommande
A l’occasion, Panasonic édite un micrologiciel actualisé de
cet appareil qui peut ajouter ou améliorer la manière de
fonctionner d’un accessoire. Ces mises à jour sont
disponibles gratuitement.
Préparation
≥Connectez cet appareil au réseau. (> 14)
– Assurez-vous que le réseau est connecté à internet.
1 Appuyez sur [SETUP].
2 Appuyez plusieurs fois sur [3, 4] pour
sélectionner “F/W Update” puis appuyez sur
[OK].
3 Appuyez sur [3, 4] pour sélectionner “Yes”
puis appuyez sur [OK].
Ne débranchez pas le cordon d'alimentation secteur
ou ne mettez pas la touche marche/arrêt de l'appareil
sur la position [ ] si un des messages suivants
est affiché.
“Linking” ou “Updating”
≥ Pendant le traitement de la mise à jour, aucune autre opération
ne peut être effectuée.
≥Si la mise à jour s'est effectuée avec succès, “Success”
s'affiche.
4 Débranchez le cordon d’alimentation secteur
et rebranchez-le après 3 minutes.
Si un autre équipement répond à la télécommande fournie,
changez le code de la télécommande.
≥ Le réglage d'usine par défaut est “Mode 1”.
Pointez la télécommande vers cet appareil, puis
appuyez sur [OK] et la touche numérique pendant
au moins 4 secondes.
≥Lorsque le code de la télécommande est changé, le
nouveau code est indiqué sur l'afficheur pendant quelques
secondes.
[OK] + [1] Réglez le code sur “Mode 1”
[OK] + [2] Réglez le code sur “Mode 2”
Modification de l'encodage
d'un jeu de caractères
Vous pouvez modifier l'encodage des caractères du nom de
la piste, du nom de l'artiste et des autres informations s'ils ne
sont pas affichés comme ils devraient l'être.
≥ Le réglage d'usine par défaut est “Type 1( 日本 )”.
1 Appuyez sur [SETUP].
2 Appuyez plusieurs fois sur [3, 4] pour
sélectionner “E Asian Character” puis
appuyez sur [OK].
≥ S’il n’y a aucune mise à jour, “No Need” s’affiche après l’étape 3.
≥ Le téléchargement demande plusieurs minutes. Cela pourrait
prendre plus de temps ou ne pas fonctionner correctement en
fonction de l’état de la connexion.
∫ Vérification de la version du firmware
1 Appuyez sur [SETUP].
2 Appuyez plusieurs fois sur [3, 4] pour sélectionner
“F/W Version” puis appuyez sur [OK].
≥ Appuyez sur [OK] pour quitter.
(74)
22
3 Appuyez sur [3, 4] pour sélectionner
“Type 1( 日本 )”/“Type 2( 简体字 )” puis
appuyez sur [OK].
Type 1 ( 日本 )
Type 2 ( 简体字 )
La priorité est donnée au
japonais.
La priorité est donnée au chinois
(simplifié).

Utilisation de la fonction de
contrôle du système
Vous pouvez commander cet appareil et le modèle SE-R1
simultanément avec facilité en utilisant la télécommande.
Préparation
1 Branchez cet appareil et le SE-R1 à l'aide des câbles du
contrôle de système. (> 9)
2 Mettez le sélecteur d'entrée du SE-R1 sur [DIGITAL].
3 Mettez la touche marche/arrêt de cet appareil et du
SE-R1 sur la position [ ].
4 Si “Digital Link” est sur “Off”, modifiez en mettant le
paramètre sur “On”.
∫ Passez simultanément cet appareil et le
modèle SE-R1 sur marche/veille
≥Si vous dirigez la télécommande vers cet appareil et que
vous appuyez sur [Í] lorsque cet appareil et le SE-R1 sont
en mode veille, cet appareil et le SE-R1 seront mis en
marche simultanément.
≥Si vous pointez la télécommande vers cet appareil et que
vous appuyez sur [Í] lorsque cet appareil et le modèle
SE-R1 sont en marche, cet appareil et le modèle SE-R1
passeront simultanément en mode veille.
Guide de dépannage
Avant de contacter l'assistance, effectuez les contrôles
suivants. Si vous avez des doutes sur certains points, ou si
les solutions fournies dans le guide suivant ne permettent
pas de trouver une solution, contactez votre revendeur pour
connaitre la marche à suivre.
Accumulation de chaleur de cet appareil.
≥Cet appareil chauffe lorsqu'il est utilisé pendant longtemps.
Ceci ne doit causer aucune inquiétude.
Le dernier micrologiciel est-il installé?
≥Panasonic améliore de façon constante le firmware de
l’appareil afin de s’assurer que ses clients bénéficient
d’une technologie de pointe. (> 22)
Pour remettre tous les paramètres sur leurs réglages
d’usine par défaut
Si une des situations suivantes se produit, réinitialisez la
mémoire:
≥ Aucune réponse lorsque les touches sont actionnées.
≥
Si vous désirez effacer et réinitialiser le contenu de la mémoire.
1 Appuyez sur [SETUP].
2 Appuyez plusieurs fois sur [3, 4] pour sélectionner
“Initialization” puis appuyez sur [OK].
3 Appuyez sur [3, 4] pour sélectionner “Yes” puis
appuyez sur [OK].
4 Appuyez sur [3, 4] pour sélectionner “Yes” puis
appuyez de nouveau sur [OK].
Français
∫ Mesure des caractéristiques de
l'amplificateur et correction de sa sortie
Vous pouvez commander à l'aide de la télécommande de cet
appareil.
∫ Réglage Graves/Médiums/Aigus
Vous pouvez régler la tonalité du SE-R1 avec cet appareil.
Chaque plage tonale (Grave/Médium/Aigu) peut être réglée.
1 Appuyez sur [SETUP].
2 Appuyez plusieurs fois sur [3, 4] pour sélectionner
“Tone Control” puis appuyez sur [OK].
3 Appuyez sur [3, 4] pour sélectionner “On (adjustment)”
puis appuyez sur [OK].
4 Appuyez sur [3, 4] pour sélectionner “BASS” (Graves),
“MID” (Médiums) ou “TREBLE” (Aigus).
5 Appuyez sur [2, 1] pour régler le niveau puis appuyez
sur [OK].
≥ Chaque niveau peut être réglé entre “s10” et “r10”.
≥ Pour avoir des informations sur les modèles SE-R1, veuillez
consulter leur mode d'emploi.
Général
Un son de “bourdonnement” peut être émis au
cours de la lecture.
≥Un cordon d'alimentation secteur ou une lumière
fluorescente se trouve près des câbles. Conservez les
autres appareils et cordons loin des câbles de cet appareil.
Pas de son.
≥
Vérifiez le volume du périphérique raccordé (amplificateur, etc.).
≥Vérifiez pour voir si le branchement des câbles aux prises
d'entrée et de sortie est incorrect. Si c'est le cas, éteignez
cet appareil et rebranchez correctement les câbles.
≥Vérifiez pour voir si la source d'entrée correcte est
sélectionnée.
≥Insérez les connecteurs des câbles à raccorder
complètement.
≥Lorsque “Digital Output”, “Analog Output” ou “Digital Link”
est sur “Off”, aucun son n'est reproduit. Changez le
paramètre de la sortie qui doit être utilisée pour “On”.
(> 20)
≥La lecture d'un contenu multicanal n'est pas prise en
charge.
≥L'entrée audio numérique de cet appareil peut uniquement
détecter les signaux PCM linéaires. Pour plus de détails,
consultez le mode d’emploi du dispositif.
(75)
23
Le son est coupé.
≥En fonction de votre environnement, le son peut être coupé
durant la lecture. Vérifiez le mode d'emploi du périphérique
raccordé et la connexion au périphérique.
La lecture ne démarre pas.
≥En fonction de votre environnement ou des périphériques
raccordés, cela peut prendre un certain temps.
iPhone/iPad/iPod
Utilisation impossible.
≥Choisissez “USB” comme source d'entrée.
≥Contrôlez que l'iPhone/iPad/iPod est connecté
correctement.
≥Reconnectez l'iPhone/iPad/iPod ou essayez de redémarrer
l'iPhone/iPad/iPod.
≥La batterie de l’iPhone/iPad/iPod est épuisée. Chargez
l’iPhone/iPad/iPod et faites-le de nouveau fonctionner.
La fonction de contrôle de système ne marche pas.
≥Branchez les câbles aux prises LR correspondantes de cet
appareil et du SE-R1.
L’appareil s'éteint automatiquement.
≥Est-ce que la fonction d'arrêt automatique est active ?
(> 21)
AirPlay/DLNA
Impossible de se connecter au réseau.
≥Vérifiez les paramètres et la connexion réseau. (> 14)
Impossible de se connecter à l’appareil.
≥Assurez-vous que la fonction multicast du routeur sans fil
est active.
≥Assurez-vous que le périphérique et l'appareil sont
connectés au même réseau. (> 14)
≥Rebranchez le périphérique compatible au réseau puis
raccordez-le de nouveau à cet appareil.
≥Paramétrez “Network Standby” sur “Off” (> 21), éteignez
cet appareil et remettez-le en marche, puis raccordez-le de
nouveau à cet appareil.
La lecture ne démarre pas.
Le son est coupé.
≥L'utilisation simultanée d'autres dispositifs à 2,4 GHz, tels
que les fours à micro-onde, les téléphones sans fil, etc.
peut causer des coupures de connexion.
Augmente la distance entre cet appareil et ces dispositifs.
≥Si plusieurs dispositifs sans fil sont utilisés simultanément
sur le même réseau sans fil que cet appareil, essayez
d’éteindre les autres dispositifs ou de réduire leur utilisation
du réseau sans fil.
≥Si la lecture s'arrête, vérifiez l'état de la lecture sur le
périphérique.
L’iPhone/iPad/iPod ne se charge pas.
≥Assurez-vous que l'appareil est en marche lorsque vous
démarrez le chargement.
– Lorsque vous chargez un iPhone/iPad/iPod dont la batterie est
complètement épuisée, ne mettez pas cet appareil en mode
veille avant que l'iPhone/iPad/iPod soit opérationnel.
USB
Impossible de lire la clé USB ou son contenu.
≥Le format de la clé USB ou son contenu n’est pas
compatible avec cet appareil. (> 28)
Il n’y a aucune réponse lorsque [1/;] est actionné.
≥Déconnectez le périphérique USB puis reconnectez-le.
Sinon, éteignez et rallumez l’appareil.
La clé USB à mémoire flash est lente.
≥La lecture d’un fichier volumineux ou d’une clé USB à
mémoire flash de grande capacité peut prendre du temps.
PC
L'ordinateur ne reconnait pas cet appareil.
≥Vérifiez l'environnement d'exploitation. (> 19)
≥Redémarrez l'ordinateur, éteignez et mettez en marche cet
appareil, puis rebranchez le câble USB.
≥Utilisez un autre port USB de l'ordinateur.
≥Installez le pilote dédié si vous utilisez un ordinateur avec
Windows.
Impossible de trouver des fichiers musicaux
stockés sur l'ordinateur.
≥Lorsque vous écoutez des fichiers musicaux sur un
réseau, ceux qui ne sont pas enregistrés sur leur serveur
réseau ne sont pas affichés. Pour plus de détails,
consultez le mode d'emploi de votre serveur.
24
(76)

Télécommande
La télécommande ne fonctionne pas correctement.
≥Pour éviter les interférences, veillez à ne placer aucun
objet devant le capteur de signal. (> 7)
≥Changez le code de la télécommande si aucun appareil ne
réagit à cette télécommande. (> 22)
“Not Conditional”
≥La fonction que vous avez essayé d'utiliser n'est pas
disponible avec la configuration actuelle. Vérifiez les
étapes et les paramètres.
Messages
Les messages ou codes de service suivants peuvent
apparaître sur l’afficheur de l’appareil.
“AUTO OFF”
≥L’appareil n’a pas été utilisé pendant environ 20 minutes et
s'éteindra au bout d'une minute. Appuyez sur n'importe
quelle touche pour l'annuler.
“Checking Connection”
≥L’appareil contrôle l’iPhone/iPad/iPod/USB connecté.
“Download Error”
≥Le téléchargement du firmware a échoué. Appuyez sur
n'importe quelle touche pour quitter. Veuillez réessayer
plus tard.
≥Le serveur est introuvable. Appuyez sur n’importe quelle
touche pour quitter. Assurez-vous que le réseau sans fil est
connecté à internet.
“Empty”
≥Le dossier sélectionné est vide. Déplacez les pistes dans
le dossier et réessayez.
≥Le serveur n'est pas détecté sur le réseau. Voyez si le
serveur est connecté au même réseau que cet appareil, et
réessayez de le connecter à cet appareil. (> 15, 17)
“Error”
≥Une opération incorrecte a été effectuée. Lisez les
instructions et essayez encore.
“Over Flow”
≥Le son provenant de l'entrée audio analogique en cours
d'utilisation est déformé. Sélectionnez “Attenuator”, puis
modifiez le paramètre de l'entrée audio analogique en
cours d'utilisation en le mettant sur “On”. (> 20)
“PGM Full”
≥Il y a plus de 24 pistes programmées.
Français
“Please Wait”
≥Ceci s'affiche, par exemple, lorsque cet appareil est
allumé/éteint. (Pendant 1 minute et 30 secondes max.)
“Remote ” (“ ” représente un chiffre.)
≥La télécommande et cet appareil utilisent des codes
différents. Changez le code de la télécommande.
– Lorsque “Remote 1” s'affiche, appuyez sur [OK] et [1] pendant
au moins 4 secondes.
– Lorsque “Remote 2” s'affiche, appuyez sur [OK] et [2] pendant
au moins 4 secondes.
“Searching”
≥L'appareil contrôle le serveur DLNA sur le réseau.
“Unlocked”
≥“PC”, “AES”, “COAX1”, “COAX2”, “COAX3” ou “OPT” est
sélectionné, mais aucun périphérique n'est branché.
Vérifiez le branchement avec le périphérique. (> 10, 11)
≥Les signaux audio, comme les composants de la
fréquence d'échantillonnage, n'entrent pas correctement.
– A propos du format supporté, consultez “Formats des fichiers” (@28)
“F” (“ ” représente un chiffre.)
≥Il y a un problème avec cet appareil.
– Est-ce que le volume est extrêmement élevé?
Si oui, baissez le volume.
– Est-ce que cet appareil se trouve dans un endroit extrêmement
chaud ?
Si oui, mettez cet appareil dans un endroit plus frais et attendez
quelques instants puis essayez de le remettre en marche.
Si le problème persiste, notez le numéro affiché,
débranchez le cordon d'alimentation secteur et consultez
votre revendeur.
“No Network Connection”
≥Cet appareil n'est pas connecté au réseau.
Contrôlez la connexion réseau. (> 14)
“USB Over Current Error”
≥L'iPhone/iPad/iPod ou le périphérique USB consomme
trop de courant. Débranchez l'iPhone/iPad/iPod ou le
périphérique USB puis éteignez l'appareil et rallumez-le.
“Hub Device Not Supported”
“Unrecognizable Device”
“Unsupported”
“Unsupported USB Device”
≥Vous avez branché un iPhone/iPad/iPod ou un
périphérique USB qui n'est pas pris en charge.
– Si l'iPhone/iPad/iPod est compatible, allumez-le avant de le
connecter à cet appareil.
≥Le format du fichier sur l'iPhone/iPad/iPod ou le
périphérique USB n'est pas pris en charge.
– A propos du format supporté, consultez “Formats des fichiers”
(@ 28)
(77)
25

Caractéristiques
∫ GÉNÉRALITÉS
Alimentation électrique AC 220 V à 240 V, 50/60 Hz
Consommation d’énergie 60 W
Consommation d’énergie en mode veille*
(Lorsque “Network Standby” est désactivé) Environ 0,3 W
(Lorsque “Network Standby” est activé) Environ 5,6 W
Consommation d’énergie en mode désactivé Environ 0,3 W
Dimensions (LkHkP) 480 mmk120 mmk391 mm
Masse Environ 17 kg
Plage de température en fonctionnement 0 oC à r40 oC
Plage d’humidité de fonctionnement 35 % à 80 % RH (sans condensation)
∫ SECTION CONNECTEUR
Entrée analogique
Entrée LINE k2 Prise jack
Entrée numérique
Entrée numérique AES/EBU 3 broches XLR
Entrée numérique coaxiale k3 Prise jack
Entrée optonumérique Prise optique
USB
USB avant Connecteur type A
Capacité de mémoire du support 2 TB (max)
Nombres maximum de dossiers (albums) 800
Nombres maximum de fichiers (chansons) 8000
Système de fichier FAT16, FAT32
Alimentation du port USB DCOUT 5V 2,1A (max)
PC
USB arrière Connecteur type B
Sortie analogique
BALANCED 3 broches XLR
UNBALANCED Prise jack
Sortie numérique
Technics Digital Link
Sortie numérique AES/EBU 3 broches XLR
Sortie numérique coaxiale Prise jack
Sortie optonumérique Prise optique
Prise jack du casque Stéréo, ‰6,3 mm
Interface Ethernet
LAN 10 Base-T/100 Base-TX
(78)
26

∫ SECTION FORMAT
USB-A
Le standard USB USB 2.0 haut débit
USB Classe stockage de masse
PC (USB-B)
Le standard USB USB 2.0 haut débit
Spécification de classe audio USB USB Audio Class 2.0, Mode asynchrone
Mode contrôle DSD Mode ASIO Native, Mode DoP
Lecture DSD64/DSD128
∫ SECTION SORTIE ANALOGIQUE
Canal 2 canaux
Niveau de sortie
BALANCED 2,3 Vrms
UNBALANCED 2,3 Vrms
Casque 180 mWr180 mW (32 ≠)
Réponse de fréquence
BALANCED 2 Hz à 90 kHz (s3dB)
UNBALANCED 2 Hz à 90 kHz (s3dB)
THD+N
BALANCED 0,0008 % (1 kHz, 0 dB)
UNBALANCED 0,0008 % (1 kHz, 0 dB)
S/N
BALANCED 118 dB ( I H F -A)
UNBALANCED 115 dB ( I H F -A)
Plage dynamique
BALANCED 118 dB ( I H F -A)
UNBALANCED 115 dB ( I H F -A)
Français
≥ Ces caractéristiques peuvent être soumises à des changements sans avis préalable.
≥ La masse et les dimensions sont approximatives.
* Lorsque l'iPhone/iPad/iPod ne se charge pas
(79)
27

∫ Formats des fichiers
Cet appareil prend en charge les formats de fichier suivants:
≥Cet appareil ne prend pas en charge la lecture des fichiers musicaux protégés contre la copie.
≥La lecture de tous les formats de fichier pris en charge par cet appareil n'est pas garantie.
≥La lecture d'un fichier ayant un format qui n'est pas pris en charge par cet appareil peut causer un son saccadé ou des
parasites. Dans ce cas, vérifiez pour voir si cet appareil prend en charge le format du fichier.
≥Cet appareil ne prend pas en charge la lecture VBR (Variable Bit Rate pour Taux d'échantillonnage variable).
≥Certains périphériques connectés (serveurs) peuvent être en mesure de convertir les fichiers dont le format n'est pas pris en
charge par cet appareil et de les reproduire. Pour avoir plus de détails, consultez le mode d'emploi de votre serveur.
≥Les informations du fichier (fréquence d'échantillonnage, etc.) affichées par cet appareil et par le logiciel de lecture peuvent être
différentes.
USB-A
Formats
des fichiers
MP3 .mp3 32/44,1/48 kHz 16 kbps à 320 kbps
AAC .m4a/.aac 32/44,1/48/88,2/96 kHz 16 kbps à 320 kbps
WMA .wma 32/44,1/48 kHz 16 kbps à 320 kbps
WAV .wav 32/44,1/48/88,2/96/176,4/192 kHz 16/24 bits
FLAC .flac 32/44,1/48/88,2/96/176,4/192 kHz 16/24 bits
AIFF .aiff 32/44,1/48/88,2/96/176,4/192 kHz 16/24 bits
ALAC .m4a 32/44,1/48/88,2/96 kHz 16/24 bits
DSD .dff/.dsf 2,8224/5,6448 MHz
PC (USB-B)*
1
Formats
des fichiers
PCM 32/44,1/48/88,2/96/176,4/192/352,8/384 kHz 16/24/32 bits
DSD .dff/.dsf 2,8224/5,6448 MHz
LAN (DLNA)*
2
Formats
des fichiers
MP3 .mp3 32/44,1/48 kHz 16 kbps à 320 kbps
AAC .m4a/.aac 32/44,1/48/88,2/96 kHz 16 kbps à 320 kbps
WMA .wma 32/44,1/48 kHz 16 kbps à 320 kbps
WAV .wav 32/44,1/48/88,2/96/176,4/192 kHz 16/24 bits
FLAC .flac 32/44,1/48/88,2/96/176,4/192 kHz 16/24 bits
AIFF .aiff 32/44,1/48/88,2/96/176,4/192 kHz 16/24 bits
ALAC .m4a 32/44,1/48/88,2/96 kHz 16/24 bits
DSD .dff/.dsf 2,8224/5,6448 MHz
*1 Si vous téléchargez et installez l'appli dédiée, vous pouvez lire des fichiers de grands formats. (> 19)
Pour avoir plus de détails, consultez le mode d’emploi de l'appli.
*2 La possibilité qu'a chaque fichier musical d'être lu sur votre réseau est déterminée par le serveur du réseau même si le format du fichier est
présent dans la liste ci-dessus. Par exemple, si vous utilisez Windows Media
pas lisibles. Vous ne pouvez lire que ceux qui ont été ajoutés à la bibliothèque de Windows Media
Extension Fréquence d’échantillonnage
Extension Fréquence d’échantillonnage
Extension Fréquence d’échantillonnage
®
Player 11, tous les fichiers musicaux de l'ordinateur ne sont
Nombre de bits de quantification
Nombre de bits de quantification
Nombre de bits de quantification
®
Player 11.
Débit
Débit
Débit
28
(80)

“Conçu pour iPod”, “Conçu pour iPhone” et “Conçu pour iPad” signifient
qu’un accessoire électronique a été conçu pour se connecter
spécifiquement à un iPod, un iPhone, ou un iPad, respectivement, et a été
certifié conforme par le concepteur aux normes de performance Apple.
Apple décline toute responsabilité concernant le fonctionnement de cet
appareil ou sa conformité aux normes de sécurité et de réglementation.
Veuillez noter que l’utilisation de cet accessoire avec un iPod, un iPhone ou
un iPad peut affecter la performance de la connexion sans fil.
AirPlay, iPad, iPhone, iPod, iPod nano, iPod touch, et Retina sont des
marques commerciales d’Apple Inc., enregistrées aux États-Unis et dans
les autres pays.
iPad Air et iPad mini sont des marques commerciales de Apple Inc.
Mac et OS X sont des marques de commerce de Apple Inc., enregistrées
aux Etats-Unis et dans d’autres pays.
Android est une marque commerciale de Google Inc.
DLNA, the DLNA Logo and DLNA CERTIFIED are trademarks, service
marks, or certification marks of the Digital Living Network Alliance.
“Direct Stream Digital”, DSD et leurs logos sont des marques commerciales
de Sony Corporation.
Technologie d’encodage du son MPEG Layer-3 brevetée par Fraunhofer
IIS et Thomson.
Windows et Windows Vista sont des marques déposées ou des marques
commerciales de Microsoft Corporation aux États-Unis et/ou dans d’autres
pays.
Windows Media et le logo Windows sont soit des marques de Microsoft
Corporation, soit des marques déposées de Microsoft Corporation aux
États-Unis et/ou dans d’autres pays.
Cet appareil est protégé par certains droits de propriété intellectuelle de
Microsoft Corporation et de tiers. L’utilisation ou la distribution de cette
technologie à l’extérieur de cet appareil est interdite sans une licence de
Microsoft ou d’une filiale Microsoft autorisée et des tiers.
FLAC Decoder
Copyright (C) 2000, 2001, 2002, 2003, 2004, 2005, 2006, 2007, 2008,
2009 Josh Coalson
Redistribution and use in source and binary forms, with or without
modification, are permitted provided that the following conditions are met:
– Redistributions of source code must retain the above copyright notice,
this list of conditions and the following disclaimer.
– Redistributions in binary form must reproduce the above copyright
notice, this list of conditions and the following disclaimer in the
documentation and/or other materials provided with the distribution.
– Neither the name of the Xiph.org Foundation nor the names of its
contributors may be used to endorse or promote products derived from
this software without specific prior written permission.
THIS SOFTWARE IS PROVIDED BY THE COPYRIGHT HOLDERS AND
CONTRIBUTORS “AS IS” AND ANY EXPRESS OR IMPLIED
WARRANTIES, INCLUDING, BUT NOT LIMITED TO, THE IMPLIED
WARRANTIES OF MERCHANTABILITY AND FITNESS FOR A
PARTICULAR PURPOSE ARE DISCLAIMED. IN NO EVENT SHALL THE
FOUNDATION OR CONTRIBUTORS BE LIABLE FOR ANY DIRECT,
INDIRECT, INCIDENTAL, SPECIAL, EXEMPLARY, OR CONSEQUENTIAL
DAMAGES (INCLUDING, BUT NOT LIMITED TO, PROCUREMENT OF
SUBSTITUTE GOODS OR SERVICES; LOSS OF USE, DATA, OR
PROFITS; OR BUSINESS INTERRUPTION) HOWEVER CAUSED AND
ON ANY THEORY OF LIABILITY, WHETHER IN CONTRACT, STRICT
LIABILITY, OR TORT (INCLUDING NEGLIGENCE OR OTHERWISE)
ARISING IN ANY WAY OUT OF THE USE OF THIS SOFTWARE, EVEN IF
ADVISED OF THE POSSIBILITY OF SUCH DAMAGE.
Français
(81)
29

La ringraziamo dell’acquisto di questo prodotto.
Leggere attentamente queste istruzioni prima di utilizzare il presente prodotto, e conservare questo manuale per usi futuri.
∫ Funzioni di questa unità
Questa unità offre le seguenti funzioni:
Technics Digital Link
Technics ha minimizzato il percorso del segnale unendo nello stesso chassis lo streamer ed il selettore di ingresso, che trattano
segnali molto deboli, ed ha ridotto quanto più possibile il rumore che entra nei segnali deboli usando uno chassis separato per il
finale di potenza, che gestisce alte frequenze e notevoli correnti. Inoltre, la nuova interfaccia di trasmissione dei segnali di
Technics minimizza la degradazione della precisione in termini di tempo e di ampiezza che si verifica quando i segnali vengono
trasmessi tra lo streamer ed il finale di potenza, ottenendo una configurazione ideale dell'amplificazione.
Architettura isolamento rumore digitale
Poiché la maggior parte dei supporti per la memorizzazione di contenuti digitali è pensata per l'utilizzo su PC, non è progettata in
modo da minimizzare i disturbi, un requisito essenziale per la purezza della riproduzione. Per risolvere tale problema, questa
unità utilizza un'efficace funzione anti-jitter e una straordinaria tecnologia di isolamento dei disturbi per ciascuna delle sue
interfacce, offrendo un suono chiaro e stabile.
Alimentazione separata per il circuito analogico e per quello digitale
Il circuito analogico e quello digitale sono dotati di un proprio trasformatore R-core low-noise con eccellenti caratteristiche di
regolazione; questo consente una riproduzione del suono di altissima qualità.
∫ Dispositivi consigliati
Per una migliore qualità dell'audio si consiglia di utilizzare i seguenti dispositivi Technics (opzionali).
Nome del prodotto Numero modello
Amplificatore di potenza stereo SE-R1
Cassa acustica SB-R1*
* Questo prodotto verrà messo in commercio nel febbraio 2015. (Per i paesi europei)
(82)
4

Precauzioni per la sicurezza
ATTENZIONE
Unità
≥ Per ridurre il rischio d’incendio, folgorazioni o danni all’unità,
– Non esporre questa unità alla pioggia, umidità, gocciolamenti o spruzzi.
– Non posare oggetti contenenti liquidi, come un vaso di fiori, su questa
unità.
– Utilizzare solo gli accessori consigliati.
– Non rimuovere le coperture.
– Non riparare quest’unità da soli. Per qualsiasi riparazione rivolgersi a un
tecnico qualificato.
– Non introdurre oggetti metallici all’interno di questa unità.
– Non appoggiare oggetti pesanti su questa unità.
Cavo di alimentazione CA
≥ Per ridurre il rischio d’incendio, folgorazioni o danni all’unità,
– Accertarsi che la tensione di alimentazione corrisponda a quella indicata
su questa unità.
– Inserire fino in fondo la spina del cavo di alimentazione nella presa.
– Non tirare, piegare, o appoggiare oggetti pesanti sul cavo di
alimentazione.
– Non maneggiare la spina con le mani bagnate.
– Tenere la spina del cavo di alimentazione tra le dita quando la si scollega.
– Non utilizzare una spina o una presa di rete danneggiate.
≥ La presa di rete è il dispositivo per scollegare.
Installare l’unità in modo che la presa di rete possa essere scollegata
immediatamente dalla presa di corrente.
AVVERTENZA
Unità
≥ Non mettere sull’unità sorgenti di fiamme nude, come candele accese.
≥ Durante l’uso, questa unità potrebbe essere soggetta all’interferenza radio
causata dal cellulare. Se si dovesse verificare tale interferenza, aumentare
la distanza tra questa unità e il cellulare.
≥ Questa unità è progettata per l’uso nei paesi con clima tropicale.
Collocazione
≥ Collocare questa unità su una superficie piana.
≥ Per ridurre il rischio d’incendio, folgorazioni o danni all’unità,
– Per mantenere una buona ventilazione, non installare o sistemare questa
unità in uno scaffale dei libri, armadietto incorporato od altro spazio
ristretto.
– Non ostruire le aperture di ventilazione di questa unità con giornali,
tovaglie, tende ed altri oggetti simili.
– Non esporre questa unità alla luce diretta del sole, a temperature elevate,
a eccessiva umidità e a forti vibrazioni.
≥ Non sollevare o trasportare questa unità tenendola per una manopola.
Questo potrebbe causare la caduta dell'unità e conseguenti lesioni
personali o malfunzionamento dell'unità.
Batteria
≥ Se la batteria viene sostituita in modo non corretto esiste il rischio che
esploda. Sostituirla esclusivamente con una del tipo consigliato dal
produttore.
≥ L’uso scorretto delle batterie può causare perdite di elettrolito e causare
incendi.
– Rimuovere la batteria se si prevede di non utilizzare il telecomando per
lungo tempo. Conservarla in un luogo fresco e al riparo dalla luce.
– Non riscaldare o esporre a fiamme le batterie.
– Non lasciare la batteria/le batterie per lungo tempo all’interno dell’auto,
esposte alla luce solare diretta e con le porte e i finestrini chiusi.
– Non aprire o mettere in corto le batteria.
– Non ricaricare batterie alcaline o al manganese.
– Non usare batterie la cui guaina non è intatta.
≥ Quando si smaltiscono le batterie, contattare le autorità locali o il rivenditore
e chiedere informazioni sul metodo corretto di smaltimento.
Smaltimento di vecchie apparecchiature e batterie usate
Solo per Unione Europea e Nazioni con sistemi di raccolta e
smaltimento
Questi simboli sui prodotti, sull’imballaggio e/o sulle
documentazioni o manuali accompagnanti i prodotti
indicano che i prodotti elettrici, elettronici e le batterie
usate non devono essere buttati nei rifiuti domestici
generici.
Per un trattamento adeguato, recupero e riciclaggio di
vecchi prodotti e batterie usate vi invitiamo a portarli negli
appositi punti di raccolta secondo la legislazione vigente
nel vostro paese.
Con uno smaltimento corretto, contribuirete a salvare
importanti risorse e ad evitare i potenziali effetti negativi
sulla salute umana e sull’ambiente.
Per ulteriori informazioni su raccolta e riciclaggio, vi
invitiamo a contattare il vostro comune.
Lo smaltimento non corretto di questi rifiuti potrebbe
comportare sanzioni in accordo con la legislazione
nazionale.
Note per il simbolo batterie (simbolo sotto):
Questo simbolo può essere usato in combinazione con
un simbolo chimico. In questo caso è conforme ai
requisiti indicati dalla Direttiva per il prodotto chimico in
questione.
Italiano
(83)
5

Indice
2
1
R03/LR03, AAA
(Batterie alcaline o al manganese)
Precauzioni per la sicurezza ............................................5
Accessori ...........................................................................6
Cura dell’unità ...................................................................6
Guida di riferimento e controllo.......................................7
Preparativi..........................................................................9
Operazioni di base ..........................................................13
Impostazioni di rete.........................................................14
Riproduzione di file musicali sul server DLNA.............15
Descrizioni contenute in queste istruzioni per l’uso
≥I riferimenti alle pagine sono indicati con “@ ±±”.
≥L’aspetto dell’unità mostrata nelle illustrazioni potrebbe apparire diverso da quello dell’unità in dotazione.
≥A meno di indicazioni diverse, le operazioni descritte prevedono l’utilizzo del telecomando.
Uso di iPhone/iPad/iPod .................................................16
Uso di AirPlay ..................................................................17
Utilizzo dispositivo USB .................................................17
Utilizzo PC, ecc................................................................19
Regolazione dell’audio....................................................20
Altre operazioni ...............................................................21
Risoluzione dei problemi................................................23
Specifiche.........................................................................26
Accessori
∏ 1 Cavi di alimentazione CA
Tranne per la Svizzera
∏ 1 Cavi di alimentazione CA
Per la Svizzera
∏ 1 Telecomando
(N2QAYA000095)
∏ 2 Batterie per il
telecomando
≥ I codici prodotto forniti in queste istruzioni per l'uso sono aggiornati a novembre 2014. Possono essere soggetti a modifiche.
≥ Non utilizzare il cavo di alimentazione CA con altri apparecchi.
∫ Uso del comando a distanza
Inserire la batteria in modo che i poli (i e j)
coincidano con quelli indicati sul telecomando.
Puntarlo verso il sensore del segnale del
telecomando di quest’unità. (> 7)
≥Tenere le batterie fuori della portata dei
bambini, per evitare che le possano ingerire.
Cura dell’unità
Prima di eseguire qualsiasi operazione di manutenzione rimuovere il cavo di alimentazione CA dalla presa. Pulire questa unità
con un panno morbido.
≥ Se l'unità è molto sporca, passare un panno inumidito e ben strizzato per rimuovere lo sporco, quindi un panno morbido.
≥ Non utilizzare solventi come benzina, diluenti, alcol, detergenti da cucina, panni chimici, ecc. In caso contrario l'involucro esterno potrebbe
deformarsi o il rivestimento potrebbe staccarsi.
(84)
6

Guida di riferimento e controllo
Questa unità
∫ Parte anteriore
1 Tasto accensione/spegnimento unità [ ]
Utilizzare questo pulsante per accendere e spegnere
questa unità.
[ ] (off): L'unità è spenta.
[ ] (on): L'unità è accesa.
≥ L'unità continua a consumare una minima quantità di corrente
anche quando è spenta. In modalità spegnimento i consumi
sono ridotti. (> 26)
2 Porta per iPhone/iPad/iPod e dispositivi USB
(> 16, 17)
3 Indicatore di accensione
Il colore dell'indicatore cambia in base allo stato di questa
unità.
Blu L'unità è accesa.
Rosso L'unità è in modalità standby.
4 Sensore del segnale del telecomando
Distanza: Fino a 7 m circa, direttamente di fronte
Angolo: Circa 30o a sinistra e a destra
5 Manopola volume
Regolare il volume delle cuffie o del SE-R1. (> 13)
≥ Non è possibile regolare il volume dei dispositivi collegati ai
terminali di uscita audio analogici o digitali.
≥ La velocità alla quale viene regolato il volume varia a seconda
di quanto velocemente si ruota la manopola.
6 Display
7 Tasti per il controllo di base
1/; Riproduzione/Pausa
RETURN
≥ Tenere premuto [RETURN] sull'unità per visualizzare il menu
HOME. (> 13)
8 Presa cuffie
Per collegare lo spinotto di un set di cuffie.
≥ Una pressione sonora eccessiva negli auricolari e nelle cuffie
potrebbe causare perdite dell’udito.
≥ L’ascolto a pieno volume per lunghi periodi può danneggiare
l’udito dell’utente.
9 Manopola multifunzione (> 13)
≥Ruotare questa manopola in senso orario e antiorario
per commutare la sorgente di ingresso, scorrere i
comandi e saltare in avanti/all'indietro durante la
riproduzione.
≥Per impostare un comando, premere la manopola; per
attivare la schermata dei menu, tenerla premuta.
Torna all'impostazione precedente del
display
∫ Parte posteriore
: Terminali uscita audio analogica [UNBALANCED]
(> 10)
; Terminali ingresso audio analogico [LINE1]/[LINE2]
(> 10)
< Terminale di sistema [Technics Digital Link OUT]
(> 9)
= Marcatura di identificazione del prodotto
Indica il numero del modello.
> Terminale uscita audio analogica [BALANCED]
(> 10)
? Terminale uscita audio digitale [AES/EBU] (> 11)
@ Terminale uscita audio digitale [COAXIAL] (> 11)
A Terminale uscita audio digitale [OPTICAL] (> 11)
B Terminale ingresso audio digitale [AES/EBU] (> 11)
C Terminali ingresso audio digitale
[COAXIAL1]/[COAXIAL2]/[COAXIAL3] (> 11)
D Terminale ingresso audio digitale [
E Porta LAN [LAN] (> 14)
F Terminale ingresso audio digitale [PC] (> 19)
Per il collegamento di un PC ecc.
G Terminale AC IN [AC IN T] (> 12)
OPTICAL
] (> 11)
Italiano
(85)
7

LAPC
㻌
RE- MASTER
㻌
AES
㻌
COAX
㻌
LINE1
㻌
OPT
㻌
USB
㻌
PC
㻌
LAN
㻌
PGM
㻌
RAND
㻌
LINE2
㻌
Telecomando
MENU
DIRECT
1 [Í]: Interruttore di standby/accensione
Premerlo per passare dallo stato di accensione alla
modalità standby o viceversa. In modalità standby l’unità
consuma comunque una piccola quantità di corrente.
≥ Il telecomando non funziona quando l'indicatore di accensione
è spento.
2 Selezionare la sorgente
3 [HOME]: Mostra il menu HOME
4 [3, 4, 2, 1]/[OK]: Selezione/OK
5 [MENU]: Consente di accedere al menu (> 21)
6 [DIRECT]: Attiva/disattiva la modalità Diretta (> 20)
7 [LAPC]: Misura le caratteristiche dell'amplificatore e
corregge il segnale in uscita (> 12)
8 [MUTE]: Attiva il muting delle cuffie o di SE-R1 (> 13)
9 [N INPUT O]: Selezionare la sorgente
: [r VOL s]: Regolare il volume delle cuffie o del
SE-R1 (> 13)
≥ INon è possibile regolare il volume dei dispositivi collegati ai
terminali di uscita audio analogici o digitali.
; Pulsanti numerici, ecc.
≥ Per selezionare un numero a 2 cifre
Esempio:
16: [S10] > [1] > [6]
≥ Per selezionare un numero a 4 cifre
Esempio:
1234: [S10] > [S10] > [S10] > [1] > [2] > [3] > [4]
≥ [CLEAR]: Cancellare il valore inserito.
< [SETUP]: Consente di accedere al menu Setup
(> 14, 20, 21, 22, 23)
= [DIMMER]: Regolare la luminosità del display, ecc.
(> 13)
> [INFO]: Visualizzazione le informazioni di contenuto
Premere questo pulsante per visualizzare traccia, artista, nome
album, tipo di file, frequenza di campionamento, ed altre
informazioni.
? [RETURN]: Torna all'impostazione precedente del
display
@ [RE-MASTER]: Attiva/disattiva la funzione di
Rimasterizzazione. (> 20)
A Tasti per il controllo di base della riproduzione
B [SLEEP]: Imposta il timer per la modalità Sleep
(> 21)
(86)
8

Preparativi
SE-R1
Questa unità
(Parte posteriore)
Cavo per controllo di
sistema
(non in dotazione)
Cavo per controllo di sistema
(non in dotazione)
≥Prima di effettuare il collegamento spegnere tutti gli apparecchi e leggere il relativo manuale di istruzioni.
≥Non collegare il cavo di alimentazione CA sino a che tutti gli altri collegamenti siano stati completati.
≥Inserire fino in fondo gli spinotti dei cavi da collegare.
≥Non piegare eccessivamente i cavi.
Collegamento del controllo di sistema a SE-R1
≥È possibile utilizzare questa unità per trasmettere dei segnali audio digitali e riprodurre della musica.
È possibile controllare contemporaneamente questa unità e i dispositivi SE-R1 utilizzando il telecomando, in modo facile. (>23)
≥
Italiano
≥ Utilizzare soltanto cavi LAN diretti di categoria 7 o superiore (STP) per collegarsi alle periferiche.
≥ Si raccomanda l'utilizzo di cavi di lunghezza pari a 3 m o inferiore.
≥ La forma del terminale di sistema e della porta LAN è identica. Fare attenzione a non collegare inavvertitamente i cavi per il controllo del
sistema collegati al terminale di sistema di SE-R1 alla porta LAN.
≥ Non collegare un dispositivo SE-R1 in modo diverso da quanto descritto precedentemente.
∫ Polarità dei terminali audio bilanciati
Inserire il cavo pin in modo che le polarità corrispondano alle polarità dei fori.
∫ Per scollegare i cavi bilanciati
Tirare i cavi premendo contemporaneamente [PUSH] sulla parte superiore dei
terminali.
(87)
9

Collegamento a dispositivi di ingresso audio analogici
Questa unità
(Parte posteriore)
Cavo XLR* (non in dotazione)
Cavo audio (non in dotazione)
Questa unità
(Parte posteriore)
Cavo audio (non in dotazione)
Cavo audio (non in dotazione)
È possibile utilizzare questa unità per trasmettere dei segnali audio analogici e riprodurre della musica.
es.
Pre-amplificatore con terminali di ingresso bilanciati Pre-amplificatore con terminali di ingresso non bilanciati
* Si raccomanda l'utilizzo di cavi di lunghezza pari a 3 m o inferiore.
Collegamento a dispositivi di uscita audio analogici
È possibile immettere segnali audio analogici su questa unità e riprodurre della musica.
es.
Lettore, ecc. Lettore, ecc.
(88)
10

Collegamento a dispositivi di ingresso audio digitali
Questa unità
(Parte posteriore)
Cavo AES/EBU*
(non in dotazione)
Cavo digitale coassiale
(non in dotazione)
es.
Cavo audio digitale a
fibre ottiche
(non in dotazione)
Questa unità
(Parte
posteriore)
Cavo AES/EBU*
(non in dotazione)
Cavo digitale
coassiale
(non in dotazione)
es.
Cavo audio digitale a
fibre ottiche
(non in dotazione)
È possibile utilizzare questa unità per trasmettere dei segnali audio digitali e riprodurre della musica.
Dispositivo che supporta
l'ingresso AES/EBU
(pre-amplificatore, ecc.)
* Si raccomanda l'utilizzo di cavi di lunghezza pari a 3 m o inferiore.
Dispositivo che supporta
l'ingresso digitale coassiale
(pre-amplificatore, ecc.)
Collegamento a dispositivi di uscita audio digitali
È possibile immettere segnali audio analogici su questa unità e riprodurre della musica.
Dispositivo che supporta
l'uscita AES/EBU
(lettore, ecc.)
Dispositivo che supporta
l'uscita digitale coassiale
(lettore, ecc.)
Dispositivo che supporta
l'ingresso digitale ottico
(pre-amplificatore, ecc.)
Dispositivo che supporta
l'uscita digitale ottica
(lettore, ecc.)
Italiano
* Si raccomanda l'utilizzo di cavi di lunghezza pari a 3 m o inferiore.
≥ I terminali di ingresso audio digitale di questa unità sono in grado di rilevare solo segnali PCM lineari. Per ulteriori informazioni, vedere le
istruzioni per l’uso del dispositivo.
(89)
11

Collegamento cavo di alimentazione CA
Cavo di alimentazione CA
(in dotazione)
Ad una presa di corrente
Questa unità
(Parte
posteriore)
SI NO
Collegare solo dopo che tutti gli altri collegamenti sono completati.
TENTATIVE
∫ Per scollegare il cavo di alimentazione CA da questa unità.
Tirare il cavo di alimentazione CA premendo il lato superiore e quello inferiore del connettore
≥ Anche se l'interruttore di alimentazione CA si trova nella posizione [ ] , l'unità non è completamente scollegata dalla rete. Se si prevede di
non utilizzare l'unità per un periodo prolungato, togliere la spina dalla presa di rete. Collocare l'unità in una posizione che consenta di togliere
facilmente la spina.
Rilevazione delle caratteristiche dell'amplificatore e correzione del
segnale in uscita
Se SE-R1 è collegato a questa unità tramite la funzione di controllo di sistema, è possibile controllarlo tramite il telecomando di
questa unità.
Tenere premuto [LAPC] finché l'indicatore LAPC su SE-R1 non inizia a lampeggiare.
≥L'SE-R1 inizierà a misurare le caratteristiche dell'amplificatore se è connesso con i diffusori.
≥ Per informazioni sul funzionamento dei dispositivi SE-R1, consultare le relative istruzioni per l'uso.
12
(90)

Operazioni di base
Preparazione
≥Preparare la musica che si desidera riprodurre.
≥Attivare il dispositivo collegato (amplificatore ecc.) e
ridurne il volume.
Regolazione del volume delle
cuffie o dell’SE-R1
1 Portare il pulsante di
accensione/spegnimento nella posizione
[].
≥L’indicatore di alimentazione diventa blu e si accende.
2 Premere uno dei tasti di selezione
dell'ingresso. (> 8)
Collega questa unità ad una rete e
LAN
AES
COAX
OPT
USB
PC
LINE1/LINE2
riproduce la musica disponibile in
rete. (> 15)
Riproduce musica da dispositivi di
uscita audio digitali.
≥ Premere [COAX] per selezionare
“COAX1”/“COAX2”/“COAX3”.
Riproduce la musica memorizzata su
un dispositivo USB o un
iPhone/iPad/iPod. (> 16, 17, 18)
Riproduce la musica memorizzata su
un PC, ecc. (> 19)
Riproduce musica da dispositivi di
uscita audio analogici.
3 Premere [3, 4] per selezionare una voce e
premere [OK].
≥Se vi sono altre voci, ripetere questo passaggio.
Collegare questa unità e l'SE-R1 utilizzando i cavi di
collegamento di sistema. (> 23)
∫ Regolazione del volume
Premere [r VOL s].
≥ -- dB (min), -99,0 dB a 0 dB (max)
≥ Quando si regola il volume di SE-R1, impostare la manopola di
selezione degli ingressi di SE-R1 su [DIGITAL].
∫ Silenzia il volume
Premere [MUTE].
≥ Viene visualizzato “ ”.
≥ Premere nuovamente per annullare. “ ” viene annullato anche
quando si regola il volume o si spegne l’unità.
Luminosità del display
È possibile modificare la luminosità del display di questa
unità e dell'indicatore di accensione.
Premere ripetutamente [DIMMER].
≥ Quando il display è spento, questo si illumina solo quando si
aziona questa unità.
Prima che il display si spenga di nuovo, per qualche secondo
verrà visualizzato “Display Off”.
Operazioni con utilizzo di app
Italiano
4 Avviare la riproduzione.
∫ Utilizzo della manopola multifunzione
1 Tenere premuto [RETURN] sull'unità per visualizzare il
menu HOME.
2 Ruotare la manopola multifunzione in senso orario e
antiorario per selezionare un ingresso, quindi premere la
manopola.
3 Ruotare la manopola multifunzione in senso orario e
antiorario per selezionare un comando, quindi premere la
manopola.
4 Avviare la riproduzione.
dedicata “Technics Music App”
Se si installa l'apposita app gratuita “Technics Music App” sul
proprio tablet/smartphone, è possibile controllare questa
unità e SE-R1 utilizzando un'ampia varietà di funzioni.
Per ulteriori informazioni, visitare il sito:
www.technics.com/support/
(91)
13

Impostazioni di rete
Questa unità
(Parte posteriore)
PC, ecc.
Router a banda larga, ecc.
È possibile effettuare lo streaming di musica da un
dispositivo iOS (iPhone/iPad/iPod), un dispositivo Android™
o un PC (Mac/Windows) a questa unità utilizzando la
funzione AirPlay o DLNA. (> 15, 17)
Per utilizzare queste funzioni, questa unità deve essere
collegata alla stessa rete del dispositivo compatibile con
AirPlay o con DLNA.
Connessione LAN via cavo
Normalmente è sufficiente collegare un cavo LAN per
completare l'impostazione.
Effettuare impostazioni relative alla
rete
È possibile modificare il nome di questa unità sulla rete
(Friendly Name), ed usare indirizzo IP, subnet mask,
gateway predefinito, DNS primario specifici.
≥ Non riprodurre musica mentre si stanno modificando queste
impostazioni.
1 Premere [SETUP].
2 Premere [3, 4] ripetutamente per selezionare
“Network”, quindi premere [OK].
3 Selezionare e immettere le voci.
4 Premere [OK] per applicare le impostazioni.
5 Premere ripetutamente [RETURN] per uscire dalle
impostazioni.
6 Premere [Í] per passare l'unità in modalità standby.
≥ Attendere fino alla scomparsa di “Please Wait”.
7 Eseguire “Connessione LAN via cavo”. (> a sinistra)
≥ Utilizzare soltanto cavi LAN diretti di categoria 7 o superiore (STP)
per collegarsi alle periferiche.
≥ La forma del terminale di sistema e della porta LAN è identica.
Fare attenzione a non collegare inavvertitamente il cavo LAN
collegato ad un altro dispositivo, ad esempio il router, al terminale
di sistema.
≥ L’inserimento di un cavo che non sia il cavo LAN nella porta LAN
può danneggiare l’unità.
≥ Se si modificano le impostazioni della rete immediatamente dopo
aver attivato questa unità, potrebbe essere necessario un po' di
tempo affinché tali modifiche vengano applicate.
A: Cavo LAN (non in dotazione)
1 Staccare il cavo di alimentazione CA.
2 Collegare questa unità ad un router a banda
larga utilizzando un cavo LAN.
3 Collegare il cavo di alimentazione CA a
questa unità, quindi portare il pulsante di
14
accensione/spegnimento dell'unità nella
posizione [ ]. (> 12)
(92)

Riproduzione di file musicali sul server DLNA
È possibile condividere file musicali memorizzati su un
media server certificato DLNA (PC, smartphone, ecc.)
collegato alla rete domestica, e visualizzare i contenuti con
questa unità.
≥ Riguardo al formato supportato, fare riferimento a “Formato file”
(@ 28)
Preparazione
≥Completare le impostazioni di rete. (> 14)
≥Collegare i dispositivi da utilizzare alla stessa rete come
questa unità.
≥Aggiungere i contenuti e la cartella alle librerie di Windows
®
player 11 o 12 o allo smartphone, ecc.
Media
– La playlist di Windows Media® Player è in grado di riprodurre
solo i contenuti presenti nelle librerie.
– Per utilizzare Windows Media
necessario per prima cosa configurarlo.
®
Player per lo streaming, è
Riproduzione del contenuto
memorizzato sul server DLNA
controllandolo da questa
unità.
È possibile riprodurre la musica memorizzata sul server
DLNA su questa unità (DMP—Digital Media Player)
controllando il server DLNA con questa unità.
1 Premere [LAN].
≥Verrà visualizzata la schermata di selezione del server.
∫ Riproduzione ripetuta casuale
Premere [RND].
Ogni volta che si preme il pulsante:
Tutti i brani in una cartella vengono
On
Off
ripetuti casualmente.
≥ Viene visualizzato “RND `”.
Disattiva la modalità ripetizione
casuale.
∫ Riproduzione ripetuta
Premere [`].
Ogni volta che si preme il pulsante:
1-Track
All
Off Disattiva la modalità ripetizione.
Riproduce solo il brano selezionato.
≥ Viene visualizzato “1 `”.
Tutti i brani in una cartella vengono ripetuti.
≥ Viene visualizzato “`”.
Riproduzione del contenuto
memorizzato sul server DLNA
controllandolo da un DMC
Controllando un dispositivo compatibile DMC (Digital Media
Controller), è possibile riprodurre la musica memorizzata sul
server DLNA su questa unità (DMR—Digital Media
Renderer).
Italiano
2 Premere [3, 4] per selezionare un server
DLNA sulla rete, quindi premere [OK].
≥Verrà visualizzata la schermata di selezione della
cartella/del contenuto.
≥Le cartelle/i contenuti possono essere visualizzati in
ordine diverso da quello del server, a seconda delle sue
specifiche.
3 Premere [3, 4] per selezionare una voce e
premere [OK].
≥Se vi sono altre voci, ripetere questo passaggio.
Funzioni presenti sul telecomando
Stop Premere [∫].
Pausa
Salto
Ricerca
Premere [1/;].
≥ Premere nuovamente per riavviare la
riproduzione.
Premere [:] o [9] per saltare un
brano.
≥ Se si preme uno di questi pulsanti durante
la pausa, la riproduzione riprenderà.
Durante la riproduzione o la pausa,
tenere premuto [6] o [5].
1
Portare il pulsante di accensione/spegnimento
nella posizione [ ].
2 Azionare il dispositivo compatibile con DMC
e collegarsi a questa unità.
≥Il nome di questa unità verrà visualizzato come
“Technics SU-R1 _ _ _ _ _ _”*
≥Per maggiori dettagli sull'utilizzo dei dispositivi
compatibili con DMC, consultare le istruzioni per l'uso
dei dispositivi o del software.
≥ Non è possibile usare riproduzione ripetuta casuale in
combinazione con altre modalità di riproduzione.
≥ Quando si attiva DMC, la riproduzione delle altre sorgenti audio si
interromperà e il DLNA in uscita avrà la priorità.
≥ A seconda dei contenuti e dell'apparecchio collegato, le operazioni
o la riproduzione potrebbero non essere possibili.
*1 “_ ” indica una cifra unica per ciascun apparecchio.
*2 Il nome del dispositivo può essere cambiato consultando
“Effettuare impostazioni relative alla rete”. (> 14)
1, 2
.
(93)
15

Uso di iPhone/iPad/iPod
Cavo USB
(non in dotazione)
es.
Questa unità
(fronte)
iPhone, ecc.
Collegando il proprio iPhone/iPad/iPod, è possibile
riprodurre la musica memorizzata sull'iPhone/iPad/iPod o
ricaricare l'iPhone/iPad/iPod.
∫ iPhone/iPad/iPod compatibile
iPhone 6 Plus / iPhone 6 / iPhone 5s / iPhone 5c /
iPhone 5 / iPhone 4s/ iPhone 4 / iPhone 3GS /
iPhone 3G
iPad Air / iPad (3a e 4a generazione) / iPad 2 / iPad /
iPad mini con display Retina / iPad mini
iPod touch (dalla 2a alla 5a generazione)
iPod nano (dalla 3a alla 7a generazione)
(informazioni aggiornate a settembre 2014)
Ascolto di musica
memorizzata su un
iPhone/iPad/iPod
1 Collegare l'iPhone/iPad/iPod all'unità.
2 Premere [USB].
3 Avviare la riproduzione.
Funzioni presenti sul telecomando
≥ La compatibilità dipende dalla versione del software. Aggiornare il
software dell’iPhone/iPad/iPod alla versione più recente prima di
utilizzarlo con questa unità.
≥ Panasonic non accetta alcuna responsabilità per la perdita di dati
e/o informazioni.
≥ Non collegare i seguenti modelli alla porta:
– iPod classic, iPod [4a (display a colori) e 5a (video)
generazione], iPod nano (1a generazione)
Il funzionamento potrebbe non essere quello atteso.
≥ È possibile che le operazioni siano diverse a seconda dei modelli
di iPhone/iPad/iPod.
Collegamento di un
iPhone/iPad/iPod
Quando si collega un iPhone/iPad/iPod, utilizzare l'apposito
cavo USB (non in dotazione).
Stop Premere [∫].
Pausa
Salto
Ricerca
Premere [1/;].
≥ Premere nuovamente per riavviare la
riproduzione.
Premere [:] o [9] per saltare un
brano.
Durante la riproduzione o la pausa,
tenere premuto [6] o [5].
≥ Può essere necessario selezionare l'album, l'artista, ecc.
sull'iPhone/iPad/iPod.
≥ A seconda della versione di iOS, questa funzione potrebbe non
essere disponibile.
Carica di un iPhone/iPad/iPod
Quando l'unità è accesa, la carica inizia quando si connette
un iPhone/iPad/iPod a questa unità.
≥ Non è possibile caricare il dispositivo quando questa unità è
spenta.
≥ Accertarsi che l'unità sia accesa quando si inizia la ricarica.
– Quando si ricarica un iPhone/iPad/iPod la cui batteria si è
esaurita, non mettere questa unità in standby fino a quando non
è stata ripristinata l'operatività dell'iPhone/iPad/iPod.
≥ Controllare l'iPhone/iPad/iPod per verificare se la batteria è
completamente carica. Una volta completamente carica,
rimuovere l'iPhone/iPad/iPod.
≥ Il caricamento si arresta quando la batteria è completamente
carica. La batteria si esaurisce naturalmente.
16
(94)

Uso di AirPlay
es.
Questa unità
(fronte)
Dispositivo USB
Utilizzo dispositivo
AirPlay funziona con iPhone, iPad e iPod touch con
iOS 4.3.3 o superiore, Mac con OS X Mountain Lion o
successivo e PC con iTunes 10.2.2 o superiore.
Ascolto di musica con AirPlay
Preparazione
≥Completare le impostazioni di rete. (> 14)
≥Collegare il proprio dispositivo iOS o il PC alla stessa rete
di questa unità.
1 [iOS_device] : Avviare l'applicazione “Music”
(o l'iPod)
[PC] : Avviare “iTunes”.
2 Selezionare “Technics SU-R1 _ _ _ _ _ _”*
dall'icona AirPlay .
≥
Controllare le impostazioni del volume prima di avviare
la riproduzione. (Quando si utilizza AirPlay per la prima
volta, è possibile che il volume di uscita sia al massimo.)
1, 2
USB
È possibile riprodurre la musica memorizzata su un
dispositivo USB.
≥ Non è garantito che questa unità possa essere collegata a tutti i
dispositivi USB.
≥ Sono supportati i file system FAT16 e FAT32.
≥ Questa unità supporta USB 2.0 ad alta velocità.
È possibile che i dispositivi USB non vengano riconosciuti dall'unità
≥
quando per il collegamento si utilizza:
– un hub USB
– una prolunga USB
Non è possibile usare il lettore/scrittore di schede USB.
≥
≥ L’unità non è in grado di registrare musica su un dispositivo USB.
≥
Riguardo al formato supportato, fare riferimento a “Formato file” (@28)
Ascolto di musica memorizzata
su un dispositivo USB
1
Collegare un dispositivo USB all'unità.
Italiano
3 Avviare la riproduzione.
≥
La riproduzione inizierà con un leggero ritardo.
Funzioni presenti sul telecomando
Stop Premere [∫].
Pausa
Salto
≥ La riproduzione delle altre sorgenti audio si interromperà e il
segnale AirPlay in uscita avrà la priorità.
≥ Quando si cambia il volume sul dispositivo iOS o su iTunes le
modifiche verranno applicate anche a questa unità. (Vedere
iTunes Help per informazioni sulle impostazioni necessarie in
iTunes.)
≥ Con alcune versioni di iOS e iTunes, è possibile che non si riesca
a riavviare la AirPlay riproduzione se si cambia la posizione del
selettore o se l’unità viene spenta durante la AirPlay riproduzione.
In tal caso selezionare un dispositivo diverso dall’icona AirPlay
dell’applicazione musicale o di iTunes, quindi selezionare
nuovamente questa unità come diffusore di uscita.
≥ AirPlay non funzionerà quando si riproducono dei video su iTunes.
*1 “ _ ” indica una cifra unica per ciascun apparecchio.
*2 Il nome del dispositivo può essere cambiato consultando
“Effettuare impostazioni relative alla rete”. (> 14)
Premere [1/;].
≥ Premere nuovamente per riavviare la
riproduzione.
Premere [:] o [9] per saltare un
brano.
2 Premere [USB].
3 Premere [3, 4] per selezionare una voce e
premere [OK].
≥Se vi sono altre voci, ripetere questo passaggio.
Funzioni presenti sul telecomando
Stop Premere [∫].
Pausa
Salto
Ricerca
Premere [1/;].
≥ Premere nuovamente per riavviare la
riproduzione.
Premere [:] o [9] per saltare un
brano.
≥ Se si preme uno di questi pulsanti durante
la pausa, la riproduzione riprenderà.
Durante la riproduzione o la pausa,
tenere premuto [6] o [5].
≥ Questa impostazione potrebbe non essere
disponibile per alcuni formati.
(95)
17

∫ Riproduzione ripetuta casuale
Premere [RND].
Ogni volta che si preme il pulsante:
Tutti i brani in una cartella vengono
On
Off
ripetuti casualmente.
≥ Viene visualizzato “RND `”.
Disattiva la modalità ripetizione
casuale.
∫ Riproduzione ripetuta
Premere [`].
Ogni volta che si preme il pulsante:
1-Track
All
Off Disattiva la modalità ripetizione.
Riproduce solo il brano selezionato.
≥ Viene visualizzato “1 `”.
Tutti i brani in una cartella vengono ripetuti.
≥ Viene visualizzato “`”.
≥ Non è possibile usare riproduzione ripetuta casuale in
combinazione con altre modalità di riproduzione.
≥ È possibile usare riproduzione ripetuta in combinazione con
riproduzione programma.
Riproduzione programmata
Questa funzione permette di programmare fino a 24 brani.
Preparazione
≥Non è possibile programmare i brani spostando le cartelle.
Spostare tutti i brani che si desidera programmare in una
singola cartella anticipatamente.
1 Premere [PGM] nella modalità di arresto.
≥Verrà visualizzata la schermata “Program Mode”.
2 Premere [OK] per visualizzare la schermata
di programmazione.
3 Premere [3, 4] per selezionare il brano
desiderato.
4 Premere [OK].
≥Ripetere i punti dal 3 a 4 per programmare altri brani.
5 Premere [1/;] per avviare la riproduzione.
≥Per tornare alla schermata “Program Mode”, premere
[∫].
Funzioni presenti sul telecomando
Stop
Controllare
l'ordine
programmato
Aggiunta brani
Cancellare
l’ultimo brano
Cancellare la
modalità di
programmazione
Premere [∫].
≥ Il contenuto programmato viene
mantenuto.
Premere [2, 1] nella modalità di
arresto.
≥ Per tornare alla schermata “Program
Mode”, premere [RETURN].
Effettuare i passaggi da 3 a 4 quando la
modalità di arresto è attivata.
Premere [CLEAR] nella modalità di
arresto.
≥ Non è possibile selezionare ed annullare la
traccia programmata desiderata.
1 Premere [PGM] nella modalità di
arresto.
≥ Viene visualizzato “Program Clear”.
2 Premere [3, 4] per selezionare
“Yes” e quindi premere [OK].
≥ La memoria di programma verrà
annullata.
≥ Il contenuto programmato verrà mantenuto fintanto che la
sorgente di ingresso è impostata su “USB”.
≥ La memoria di programma verrà annullata:
– Quando il dispositivo USB viene scollegato.
– Quando l’unità viene messa in modalità standby o viene spenta.
≥ È possibile usare riproduzione programma in combinazione con
riproduzione ripetuta.
18
(96)

Utilizzo PC, ecc.
USB
TENTATIVE
Cavo USB 2.0
(non in dotazione)
Questa unità
(Parte
posteriore)
es.
PC, ecc.
Tipo A
Tipo B
È possibile collegare il terminale di ingresso audio [PC] ad
un PC, ecc. con un cavo USB e riprodurre della musica
presente sul PC, ecc. con questa unità.
≥ Riguardo al formato supportato, fare riferimento a “Formato file”
(@ 28)
Connessione a un PC
Prima di effettuare il collegamento al PC, seguire i
seguenti passaggi:
≥ Ulteriori informazioni riguardanti le versioni del sistema
operativo per il vostro PC:
– Windows Vista, Windows 7, Windows 8, Windows 8.1
– OS X 10.7, 10.8, 10.9, 10.10
1 Scaricare e installare il relativo driver sul PC. (Solo per
il sistema operativo Windows)
Scaricare e installare il driver dal sito sottostante.
www.technics.com/support/
2 Scaricare ed installare la app dedicata “Technics Audio
Player” (gratuita) sul proprio PC. (Identica sia per
Windows OS che per OS X)
Scaricare e installare la app dal sito sottostante.
www.technics.com/support/
(informazioni aggiornate a novembre 2014)
Ascolto di audio da un PC, ecc.
1 Staccare il cavo di alimentazione CA.
2 Collegare questa unità a un PC, ecc.
Italiano
3 Collegare il cavo di alimentazione CA a
questa unità, quindi portare il pulsante di
accensione/spegnimento dell'unità nella
posizione [ ]. (> 12)
4 Premere [PC].
5 Avviare il dispositivo da utilizzare per la
riproduzione.
(97)
19

Regolazione dell’audio
È possibile aggiungere all’audio in uscita i seguenti effetti sonori.
Ascolto di un suono più
naturale (Rimasterizzazione)
La rimasterizzazione amplia la banda di riproduzione
raggiungendo una maggiore profondità di bit al fine di
riprodurre un suono naturale ed espansivo simile alla musica
originale.
≥ L'impostazione predefinita è “Off”.
Premere [RE-MASTER] per selezionare
“On”/“Off”.
Modalità diretta
Questa unità è in grado di trasmettere i segnali in ingresso
senza passare attraverso l'elaboratore di segnale digitale
(DSP), riducendo al minimo la distanza percorsa dai segnali
in questione. Questo consente una riproduzione fedele e di
alta qualità del suono originale.
≥ L'impostazione predefinita è “Off”.
Premere [DIRECT] per selezionare “On”/“Off”.
Impostazione della frequenza
Minimizzazione della
distorsione audio.
Se il suono risulta distorto quando si utilizzano i terminali
audio analogici, impostare l'attenuatore su “On”.
≥ L'impostazione predefinita è “Off”.
1 Premere [SETUP].
2 Premere [3, 4] ripetutamente per
selezionare “Attenuator”, quindi premere
[OK].
3 Premere [3, 4] per selezionare “LINE1” o
“LINE2”.
4 Premere [2, 1] per selezionare “On”, quindi
premere [OK].
Disabilitazione uscita audio
La disabilitazione dell'uscita audio di terminali inutilizzati
minimizza i disturbi e consente la riproduzione di un audio di
più alta qualità.
≥ L'impostazione predefinita è “On”.
di campionamento
È possibile impostare il limite superiore dell'intervallo di
frequenza di campionamento in uscita. Si prega di notare
che l'intervallo che può essere elaborato differisce a seconda
dell'amplificatore o del convertitore D/A. Si rimanda alle
Istruzioni per l'uso per quanto riguarda i dettagli sul
dispositivo collegato.
≥ L'impostazione predefinita è “32kHz-192kHz”.
Preparazione
≥Impostare “Digital Output” su “On”.
1 Premere [SETUP].
2 Premere [3, 4] ripetutamente per
selezionare “D.Output fs”, quindi premere
[OK].
3 Premere [3, 4] per selezionare una voce e
premere [OK].
≥È possibile selezionare una frequenza di
campionamento di 96 kHz o 192 kHz.
1 Premere [SETUP].
Per disabilitare l'uscita audio digitale:
Premere [3, 4] ripetutamente per selezionare “Digital
Output”, quindi premere [OK].
Per disabilitare l'uscita audio analogica:
Premere [3, 4] ripetutamente per selezionare “Analog
Output”, quindi premere [OK].
Per disabilitare l'uscita del terminale di sistema
(SE-R1):
Premere [3, 4] ripetutamente per selezionare “Digital
Link”, quindi premere [OK].
2 Premere [3, 4] per selezionare “Off”, quindi
premere [OK].
≥Per riabilitare l'uscita, selezionare “On”.
≥ A seconda della fonte audio che si riproduce, l'impostazione
applicata potrebbe avere prestazioni inferiori.
≥ A seconda della fonte audio che si riproduce, potrebbe non essere
possibile ottenere la qualità audio e l'effetto del campo sonoro
desiderati. In tali casi disattivare questa funzione.
≥ Le modalità Re-master e Direct non possono essere impostate
entrambe su “On”.
≥ Quando “Digital Output”, “Analog Output” o “Digital Link” è
impostato su “Off”, non verrà trasmesso alcun suono.
≥ Quando lo spinotto delle cuffie è collegato, anche se “Analog
Output” è impostato su “Off”, non è possibile disabilitare l'output
audio analogico.
≥ È possibile che occorra del tempo per emettere l'audio quando si è
regolata la qualità dello stesso.
20
(98)

Altre operazioni
Timer di spegnimento
automatico
Il timer di spegnimento automatico consente di spegnere
l’unità dopo un tempo impostato.
Premere [SLEEP].
Ogni volta che si preme il pulsante:
“30 minutes” "# “60 minutes” "# “90 minutes” "# “120 minutes”
^"""""""""""""" “Off” !"""""""""""""n
≥ È possibile impostare il timer di spegnimento anche selezionando
“SLEEP” usando la schermata dei menu.
Funzione di spegnimento
automatico
Questa unità è stata progettata per ridurre i consumi
energetici. Questa unità passerà automaticamente alla
modalità standby se non vengono emessi segnali audio e se
non vengono eseguite operazioni per circa 20 minuti.
≥ L'impostazione predefinita è “On”.
Standby di rete
Questa unità può accendersi automaticamente quando si
trova in standby e viene selezionata come lettore
AirPlay/DLNA.
≥ L'impostazione predefinita è “Off”.
1 Premere [SETUP].
2 Premere [3, 4] ripetutamente per
selezionare “Network Standby”, quindi
premere [OK].
3 Premere [3, 4] per selezionare “On” e
quindi premere [OK].
≥ Se questa funzione è impostata su “On” il consumo di corrente in
standby aumenterà.
Italiano
Per annullare questa funzione
1 Premere [SETUP].
2
Premere [3,4] ripetutamente per selezionare
“AUTO OFF”, quindi premere [OK].
3 Premere [3, 4] per selezionare “Off”, quindi
premere [OK].
≥Per riabilitare l'uscita, selezionare “On”.
≥ La funzione di spegnimento automatico è attiva a meno che non
venga disattivata, anche se questa unità viene spenta e riaccesa.
≥ Se “Network Standby” è impostato su “On”, anche questa funzione
verrà impostata su “On”.
“Network Standby” su “Off”. (> 21)
Per cambiare l'impostazione, impostare
(99)
21

Aggiornamento del firmware
Codice del telecomando
Talvolta, Panasonic pubblica firmware aggiornato per questa
unità che può aggiungere o migliorare alcune funzioni.
Questi aggiornamenti sono disponibili gratuitamente.
Preparazione
≥Collegare questa unità alla rete. (> 14)
– Accertarsi che la rete sia collegata a Internet.
1 Premere [SETUP].
2 Premere [3, 4] ripetutamente per
selezionare “F/W Update”, quindi premere
[OK].
3 Premere [3, 4] per selezionare “Yes” e
quindi premere [OK].
Non scollegare il cavo di alimentazione CA e non
portare il pulsante di accensione/spegnimento in
posizione [ ] mentre è visualizzato uno dei
seguenti messaggi.
“Linking” o “Updating”
≥ Mentre è in corso il processo di aggiornamento non è possibile
effettuare nessun’altra operazione.
≥Al termine dell'aggiornamento verrà visualizzata
l'indicazione “Success”.
4 Scollegare il cavo di alimentazione CA e
ricollegarlo dopo 3 minuti.
Quando altri apparecchi rispondono al telecomando in
dotazione, cambiare il codice del telecomando.
≥ L'impostazione predefinita è “Mode 1”.
Puntare il telecomando verso questa unità, quindi
tenere premuto [OK] e il pulsante numerico per
almeno 4 secondi.
≥Quando viene modificato il codice del telecomando, il
nuovo codice apparirà sul display per alcuni secondi.
[OK] + [1] Imposta il codice su “Mode 1”
[OK] + [2] Imposta il codice su “Mode 2”
Modifica della codifica dei
caratteri
È possibile modificare la codifica dei caratteri dei nomi delle
tracce, dei nomi degli artisti e di altre informazioni quando
non vengono visualizzati correttamente.
≥ L'impostazione predefinita è “Type 1( 日本 )”.
1 Premere [SETUP].
2 Premere [3, 4] ripetutamente per
selezionare “E Asian Character”, quindi
premere [OK].
≥ Se non vi sono aggiornamenti, al termine del passaggio 3 verrà
visualizzata l’indicazione “No Need”.
≥ Lo scaricamento richiederà diversi minuti. Con alcuni tipi di
connessione è possibile che la durata sia maggiore, o che
l’operazione non venga eseguita correttamente.
∫ Controllo della versione del firmware
1 Premere [SETUP].
2 Premere [3, 4] ripetutamente per selezionare “F/W
Version”, quindi premere [OK].
≥ Premere [OK] per uscire.
(100)
22
3 Premere [3, 4] per selezionare
“Type 1( 日本 )”/“Type 2( 简体字 )” e quindi
premere [OK].
Type 1 ( 日本 )
Type 2 ( 简体字 )
Viene data priorità al giapponese.
Viene data priorità al cinese
(semplificato).
 Loading...