

Page 1
Operating
Instructions
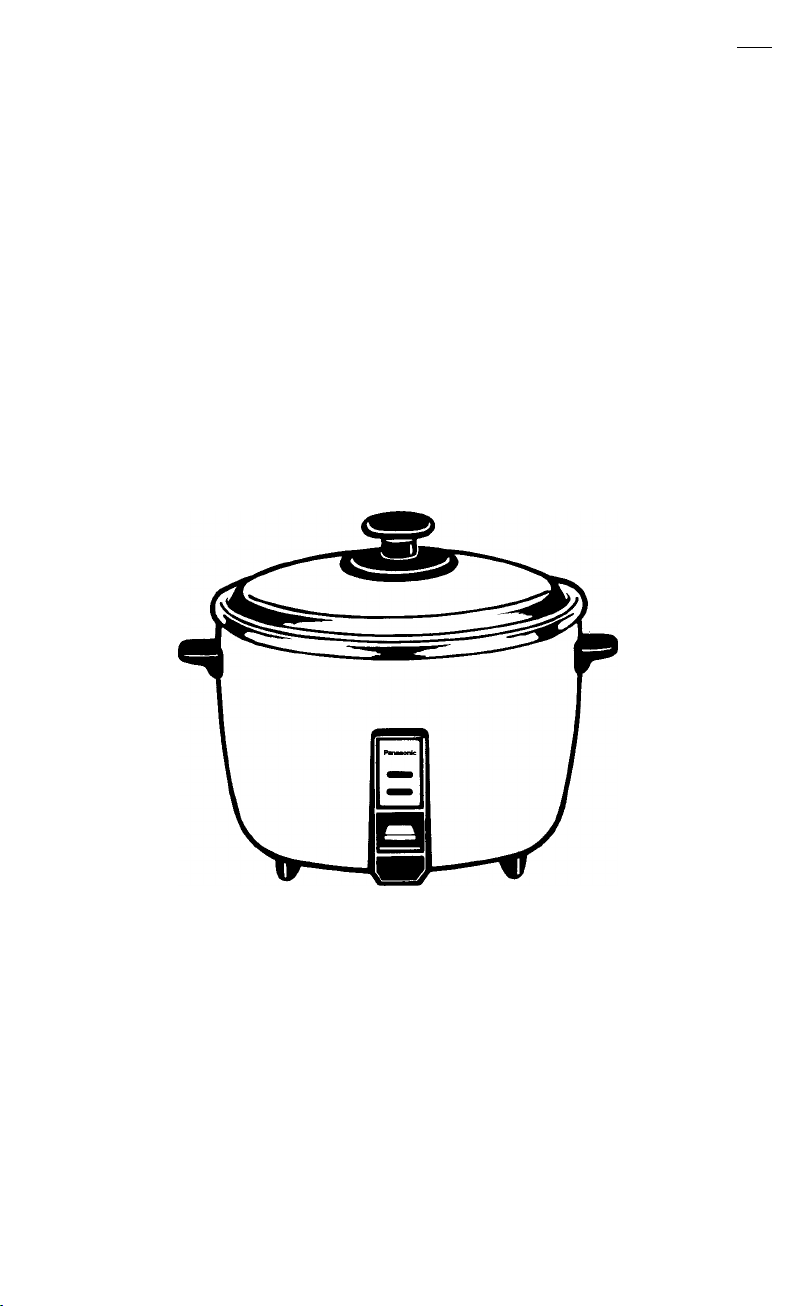
Rice Cooker
Rice Cooker/Steamer
SR-42HP/42F
(pc^
Panasonic'
Before using this cooker, please read these instructions completely. ENGLISH P3 P4
Antes de usar la marmita, lea estas instrucciones hasta el final. ESPAÑOL P7 - P8
A^g5^A|7| ítOll OI § tfOl P9-P10
Xin doc hé't nhCrng phan chi dan náy.trUÓc khi bát dau sií dung noi cdm dién. Viét ngü P11 ~P12
_ P5-P6
Page 2

IMPORTANT SAFEGUARDS
When using electrical appliances, basic safety precautions should
always be observed including the following:
1.
Read all instructions.
2.
Do not touch hot surfaces. Use handles or knobs.
3.
To protect against electrical shock, do not immerse cord, plugs, and Rice
Cooker, except lid and pan, in water or other liquid.
4.
Close supervision is necessary when any appliance is used by or near children.
5.
Unplug from outlet when not in use and before cleaning. Allow to cool
before putting on or taking off parts.
6.
Do not operate any appliance with a damaged cord or plug or after
the appliance malfunctions or has been damaged in any manner.
Return appliance to the nearest authorized service facility for
examination, repair, or adjustment.
The use of accessory attachments not recommended by the appliance
manufacturer may cause injuries.
8.
Do not use outdoors.
9.
Do not let cord hang over edge of table or counter, or touch hot surfaces.
10.
Do not place on or near a hot gas or electric burner, or in a heated oven.
11.
Extreme caution must be used when moving an appliance containing
hot oil or other hot liquids.
12.
Do not use appliance for other than intended use.
13. This product is intended for household use.
14. SAVE THESE INSTRUCTIONS NOTE
A. A short power supply cord set is provided to reduce the risk resulting from
becoming entangled in or tripping over a longer cord.
B. Longer cord set or extension cords are available and may be used if care is
exercised in their use.
C. If a longer cord set or extension cord is used,
(1) the marked electrical rating of the cord set or extension cord should be at
least as great as the electrical rating of the appliance,
(2) Jhe longer cord should be arranged so that it will not drape over the
countertop or tabletop where it can be pulled on by children or tripped
over unintentionally.
This appliance has a polarized plug: (One blade is wider than the other)
As a safety feature, this plug will fit in a polarized outlet only one way.
If the plug does not fit completely into the wall outlet, remove and try again.
If it still does not fit, contact a qualified electrician.
Do not attempt to defeat this safety feature.
Page 3
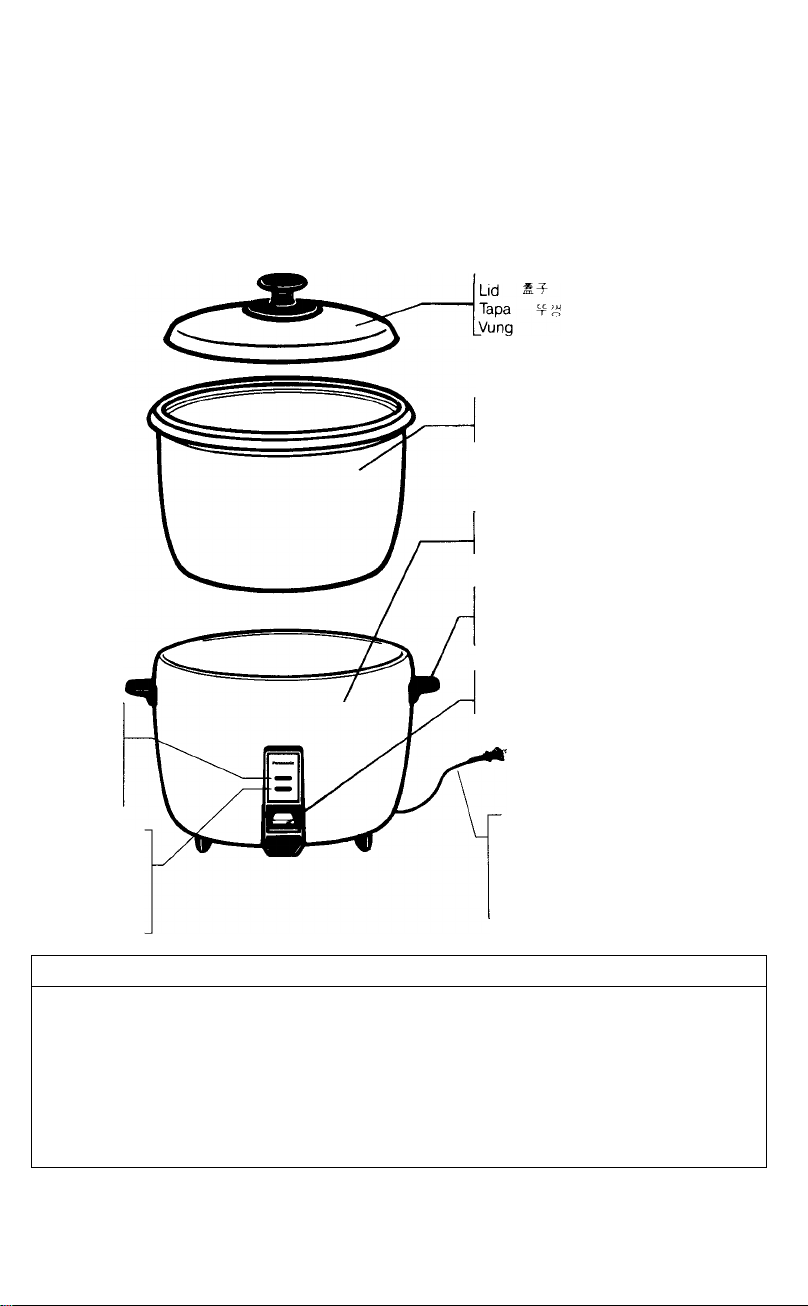
PARTS IDENTIFICATION/ IDENTIFICACION DE LAS PARTES/ TÉN GOl CÁC BÒ PHAN
Cooking Lamp
Luz de cocción
sal-S 13“
Dén náu
Keep Warm Lamp
m&m
Luz de calentamiento
asfe DS5!}| siia
GiOí Dén GiO nóng
Accessories/ №# /Accesoric^ /06 phu tùng
Pan
Recipiente
J\iói trong
Body 4; as
Cuerpo P 41
Jhán nói
Handle
Asa tSfoi
Quai cam
Switch
Interruptor ^
JSút cóng tác
AC Cord with Plug
Cable AC con enchufe
42F: Non-Stick coated
42F: Non-Stick ttW
42F: Cubierto Non-Stick
42F; Non-Stick sg
42F: Trang bang Non-Stick
^ 4|
sa ^
Day dièn xoay chieu (AC) vdi Phich càm
Measuring cup
(approx. 6 fl.oz./180 ml)
^ «+3^ (*h6a^s»/i8o*?t-)
1 1 Taza medidora
1 / (aprox. 6 fl.oz./180 ml)
Milita (2,fc6fl.oz./180ml)
CSc do (khoáng 6 fl.oz/180 ml)
-2-
Page 4
HOW TO USE
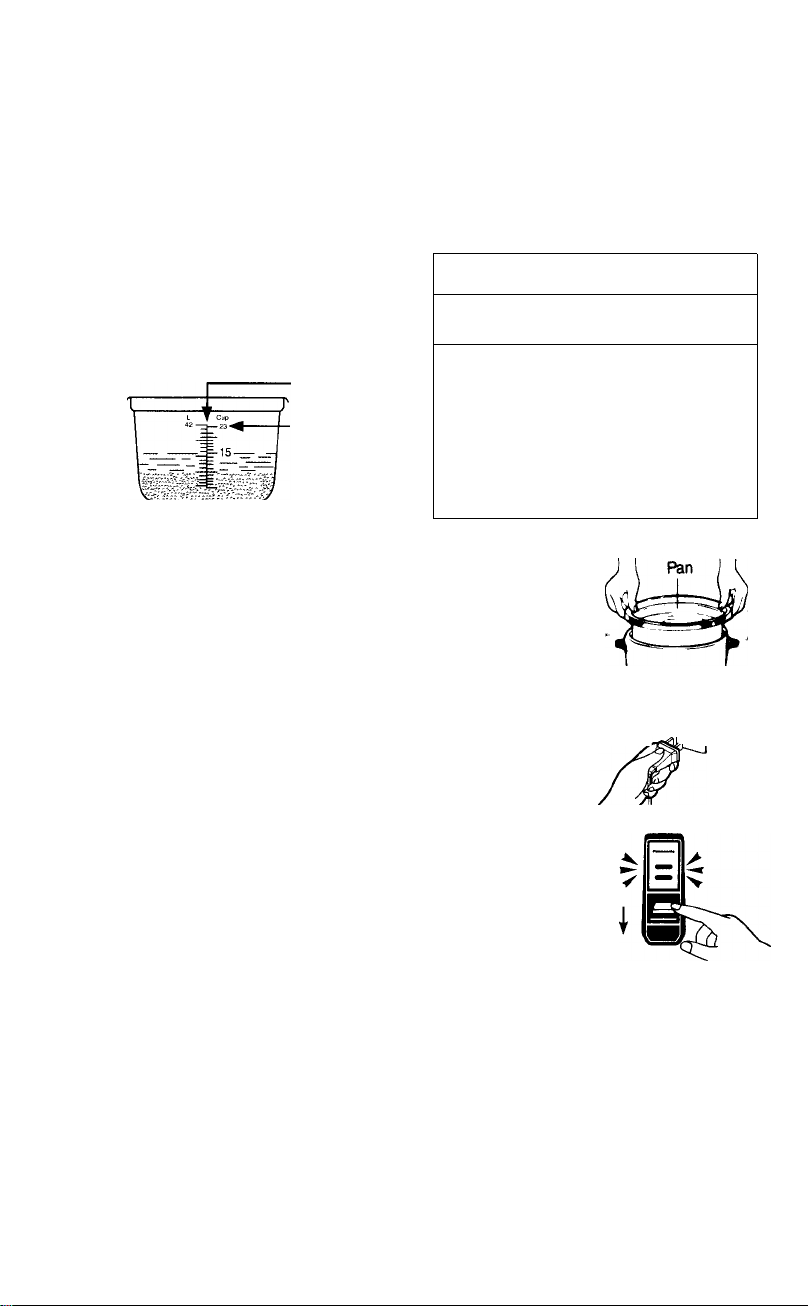
^ Measure rice with the measuring cup provided. One cup of uncooked rice makes
approximately 3 cups of cooked rice by volume. Rinse rice in a separte bowl until
water becomes relatively clear.
2 Place rinsed rice in the pan. Add water according to the following standard.
Using the markings on the pan
e.g.To cook 15 cups of rice, rinse the
rice, put it into the pan and then
Using the measuring cup
Raw rice by cup
add water to LEVEL INDICATOR 15.
LEVEL INDICATOR
MAX. LEVEL:
Do not cook more
than this amout.
23 cups
20 cups
15 cups
10 cups
5 cups
...............
...............
.............
..............
..............
Adjust water quantity to your taste.
Set the pan in the cooker. To place it correctly on the
heater, turn the pan gently to right and left. Cover with
the lid and let rice soak approximately 30 minutes.
A Plug in. Do not plug in until ready to cook. Otherwise, rice
• may be ruined.
If the pan is not in the cooker, cooking will not begin.
5 Press the switch a red " Cooking " lamp tells you cooking has
started
Water to be
added
.... 23-23V4 cups
... 2O-2OV4 cups
. . . . 15-15V4 cups
. . . . IO-IOV4 cups
.......
5-5V4 cups
©
O When rice is done, the switch will pop up and the "Cooking" lamp goes out.
7 After the switch pops up, leave the lid closed for at least 15 minutes to steam rice.
0 Unplug after use. Grasp the plug, not the cord.
—3-
Page 5
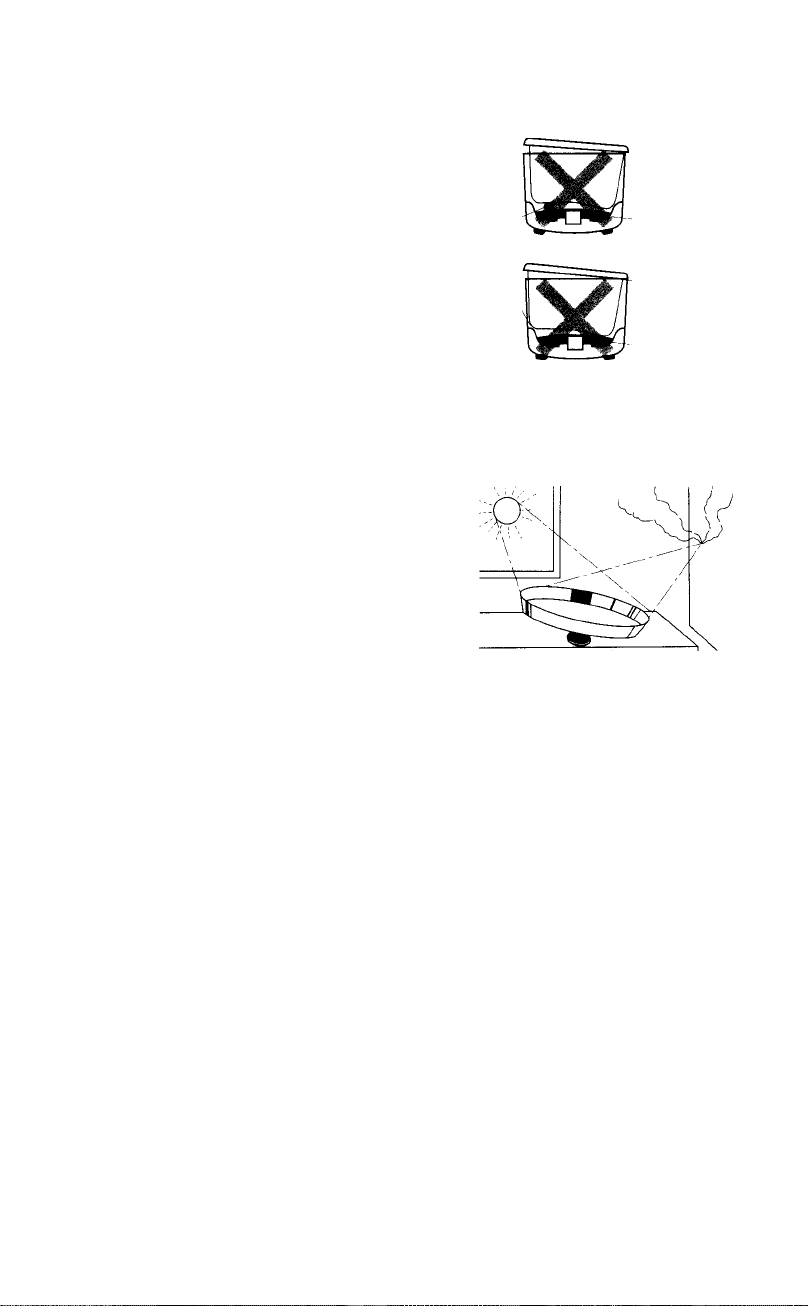
CAUTION
•Make sure that the pan is sitting properly in
1
the cooker.
If the pan is not positioned correctly, the
switch may click off too soon or the heater
may be damaged.
Foreign matter -
( WRONG )
Heater
The pan should ,,
not be caught on'
the ledge above
the heater.
-The pan should
not be caught on
the edge of the
body.
Heater
Your rice cooker has been designed
with a thermal fuse which may shut the
heater off in these cases.
•Be sure the switch is off before removing
the pan.
Replace all damaged parts immediately.
2
Do not leave the lid down-side up in places
3
subjected to direct sunlight.
If direct light is subjected to the concave side of
the lid, it may focus on furniture, walls, etc., and
damages may result.
A Do not tilt the rice-cooker on its edge or place it upside down with its power supply plug
^ connected, as this may cause damage.
5 Non-stick coated pan may discolor with age. This is normal, DO NOT use metal
utensils with non-stick coated pan (42F only)
KEEP WARM FUNCTION
•After cooking is completed, "Keep Warm" automatically functions until the cord is unplugged.
•Always unplug before taking the pan out of the cooker.
• Do not switch to "Cooking" again during "Keep Warm" function.
• Do not kee|D rice warm for more than 5 hours.
• Do not use "Keep Warm" function to reheat cold rice.
HOW TO CLEAN
1. Unplug before cleaning.
2. Soak the pan in hot water to loosen cooked-on rice.
3. Do not immerse the body in water or any other liquid. Wipe with a damp cloth.
4. Do not use abrasive cleaners or steel wool. Clean with non-metal brush or sponge.
—4—
Page 6

1
ffiiftiíWí+íÍtAftiíM. »TWffl^JpATK.
^¥*i5ffí+íWlí, A,?iWliP£i5âiAfâM
)f „
,------------ AiiîiJS
Й ^ M ■
-15^J
fi*..
№»1®АМШ», sifflgtftMînA*
îEi^î^i4«îSc п\ш-^шттттш^,
*«», шшшт. i*AüAÂ*;a=+i>iiÆÆ
S'SIJ, Ateôi"AilÂ’A*i#igÎg„
*шт-штт
?$ТГ»115Я, ÍIM“Cooking ”(*iS)fê7F®
iAôifffi
23 tí
20 tí
15
ioti
..........
...........
.............
............
5tí
...........
...........................
............................
...........................
...........................
...........................
V
'7
íoA*
23 -23'4tí
20 - 20'4tí
15- 15'.4tí
10- 10'4tí
5- 5'4tí
©
>
>
жшшт,
ítüí¥№-s , ЩЯЙВ# , “Cooking” (Ж®) ígíií
ÆP»1IÎSfitÜ{fa<]-Sît. MAft + £î>îlAT'Wnrw1i0SUffi}iÎtS:’
)жа#з1»т, [ТпТ'*Ш‘|
8
—5—
Page 7

a>
WIS
WS?
»и
»a
sin
”
a
m
»
>fo
да
Щ]>
№
■¥á
¡я 1й So ffi ;#
Л Ф М S 45
Ш S гй S Ч
да
1ш ^ йш Й Я
^Я - Я»
SS ёй ^ ® -
»®Я»ЯВ
а W æ Я IS
# ш Ш Et ä-
¥ '3 S N- ®
® Ф IS 3 ul
- a - nt
° I gB
м » э iiíií
^ Й )d]ií¡ N'
• ИйЦ:
a-M :g! -
* » Й я
if Я" я ^
Ш ì^ Й
»-&aïs
äl - s "
УЯЗ
м ìM 3
S3 "
^ ш
й>а
а ”
$
S
ж
ÎK-
-ЭФ
I
»
ж
?#
сл ^
»z
a§
3 '
li“.
so
■
3B ™
M ^
За
Ä
ifl®
я
s
Ф
tu
æ
s
a
s
a
Fit
sîï
>
li
'tÌ
ss
a
*
li
CJ
Ю
® S5t
il iS Ж
»SB
if 3)5
iSSÿis
a «if
KSW
SE ж
Ü ^ iS ж
Di i| 3
” »S
» ■>
S»*
asta
sæe
|cy
ÎTE
»
~и
3î
»
ш-
Йп 1
й
ü
Et
•
Я
3
-
m
w
a
s
s
s
a
*
3
®
#
в»э
as
Il s
ss»
«ÌB®
Etna
sss
e Й5 R
1 Ж »
«ЯЙ
- Fityÿ
sa»
S » li
s s ж
»SS
as
йи S
Di Ш|
” ЯЙ
S
F+i
Sii
о
о
7Г
Page 8

COMO USAR
4 Medir el arroz con la taza medidora incluida. Una taza de arroz crudo proporciona
* aproximadamente 3 tazas de arroz cocido. Lavar el arroz en otro recipiente hasta que el
agua se vuelva relativamente clara.
2 Introduzca el arroz lavado en el recipiente. Añada agua de acuerdo con las normas
siguientes.
Empleo de las marcas del recipiente
R ej.. Para cocinar 15 tazas de arroz, lave
éste en el recipiente y añada agua
hasta “15” de la INDICACIÓN DE
NIVEL DE AGUA.
1
--------------
INDICADOR DE NIVEL
'1 i —T
INVEL MAXIMO. No
cocer más de esta
cantidad
Ajuste la cantidad de agua a su gusto.
Introducir el recipiente en la marmita. Para asentarlo
3
correctamente sobre el hornillo, hacer girar suavemente el
recipiente a derecha e izquierda. Poner la tapa. Dejar que
el arroz se humedezca unos 30 minutos.
Enclufar. No conectar hasta que el arroz esté listo para cocer.
De otra manera puede deteriorarse.
Si el recipiente no está dentro de la marmita,
no comenzará la cocción.
Presione el interruptor. El indicador de “Cooking (cocción)
le señalará que se ha iniciado la cocción.
Empleo de la taza medidora
Arroz por tazas Agua añadida
23 tazas
...............................
20 tazas
...............................
15 tayas . . . 15-15'/4 tazas
10 tazas
5 tazas...................................5-5'/4 tazas
...............................
23-23'/4 tazas
20-20'/4 tazas
10-10'/4 tazas
0 Cuando el arroz se haya cocido, el interruptor se dispoarará. La lámpara se agagara.
Después que el interruptor se mueva hacia arriba, dejar la marmita cubierta durante
unos 15 minutos para que el arroz se sature de vapor.
Desconectar el cable después de usar la marmita. Tirar del enchufe, no del cable.
8
—7—
Page 9

PRECAUCIONES
•Asegurarse de que el recipiente está bien
asentado sobre el hornillo eléctrico de la
marmita.
Si el recipiente no está bien asentado, el
interruptor puede subir antes de lo debido o
se quede dañar el calentador u hornillo
eléctrico.
El recipiente está
atascado en el
borde sobre el
hornillo.
Su marmite para arroz se ha disenñado
con un fusible termal para que se
desactive el hornillo en casos semejantes.
• S'assurer, avant d'enlever la casserole, que
l'interrupteur est coupé.
Recambiar inmediatamente las partes dañadas.
2
No deje el lado inferior de la tapa hacia arriba en
3
lugares sujetos a la luz directa del sol.
Si la luz directa cae sobre el lado cóncavo de la
tapa, puede proyectarse sobre los muebles,
paredes, etc., y puede resultar en daños.
A Ne pas incliner l'uto-cuiseur à riz sur sa bordure ni le placer à l'envers quand sa fiche
d'alimentation est branchée car cela pourrait l'endommager.
c
MAL
3
Hornillo.
El recipiente está
apoyado en el la
borde del cuerpo
de la marmita.
Hornillo.
5 El recipiente de non-stick puede decolorarse con el tiempo. Esto es normal.
No utilice utensilios de metal con el recipente de non-stick (sólo 42F).
FUNCION EN CALIENTE
• Después de completer la cocción del arroz, la function EN CALIENTE para mantenerlo en este
estado funciona automáticamente hasta que se desenchufa el aparato.
• Desenchufar siempre antes de sacar el recipiente fuera de la marmita.
•No cambiarla COCCION DEL ARROZ durante la functión de EN CALIENTE.
• No mantener el arroz en caliente por más de 5 horas.
• No usar la functión EN CALIENTE para calendar el arroz frió.
COMO LIMPIAR LA MARMITA
1. Desenchufar antes de hecer la limpieza.
2. Enjuagar el recipiente con agua caliente para que se desprenda el arroz adherido.
3. No sumergir la marmita en el agua. Fregarla con un paño húmedo.
4. No usar detergentes abrasivos o estropajos metálicos. Limpiar con un cepillo no metálico o
con una esponja.
Page 10

Page 11

U
Z)
от
к
01:
0
Л
0IJ U
И 3
ИЯ
01
Sr 1Л
шо
^ и W
JIJ П
НС FQ ÎÎ
Й И1Ш '='
га R
□ 5J ^
” ;п 1Ш R
(И) í°
п 'ЮО —
J. — oh
rü $ ^1
*га
■lOh s s
uü Olili <0
ИЙ 5Б
м
^ ^ Л
гл
r> S r\
:< OU
OIJ
iRF Si IH
И
лиг
ш
5 ™ OUI
01(11 ?p
Í? oim
O -^Ti
^ ou
lo <r
и
-<
3
о
R
'Ю
-< ^
<в OlfU
<=| JÍ0
R
Ul- OIJ
ИЯ и
S JIJ
<0 s
1Я =
ÎI
So
'lO
P<
HC
üF ^
«.1
s™
■lo _
UH ran
p::] Wll
^ Ш
Ш 5'’
s nO
orni ^
(li JJ
Ш1 oH
fJ S
(IIJ Ш
DU ffJ
-<
üF
ни
bi JIJ
às
(И 2
Ш
<i
Kh
o
ИН
Page 12

CACH SÙ DUNG
Oong gao bang c6c do dinh kèm. Mot coc gao sé nàu thành khoàng 3 eòe cdm. Vo gao
I
trong mòt chàu ni/óc khàc cho dén khi nude trò nèn khà trong.
05 gao dà rifa xong vào nói trong. Sau dó, thèm nude vào theo mdc tiéu chuàn nhd sau:
Néu dùng Bang Mdc NiftSc khSc b vàch nSi
trong '
Thi du: Oé nàu 15 eòe gao, trUóc hét vo sach
gao, do gao vào nói trong, ròi thèm ndóc dén
vàch ‘15’ eòa Bàng Mdc Ni/óc
mOùc ch/e phaAn
^ lOOIng
MOÙC TOAl NA Xin liòang
naàu quaù móùc naey
Hày thèm bdt luong ndóc sao cho com hOp vói khàu vi riéng cùa ban.
So eòe gao
23 eòe . . .
20 eòe . . .
15 eòe . .
10 eòe . .
5 eòe.. .
Néu dùng eoe do
..........................
..........................
..........................
..........................
...............................
Oàt nói trong vào thàn nói. Oàt thàt dùng trèn dày già nhlèt
cua nói, rói xoay nhe qua ben ph^i bén trài nhù hinh vé.
Oày vung nói. Nèn ngàm gao trong nude khoàng 30 phùt.
Khi càm dién, Phai chàc chàn là o cam dién co day dàt’.
Chó càm dién cho déri khi càh dùng. Nèù khóng vày thi sé
có thè làm cho cóm hóng dùóc.
Néu nói trong chùa dùde d$t vào thàn nói thi nói cdm dién sé
khóng hoat dóng.
Àn nùt cóng tac. Oèn do sé chày bào hièu cdm dang
“Cooking” (dùde bàt) dàu nàu.
Só eòe nude phài thèm
23-23'U eòe
20-20V4 eòe
15-15V4 eòe
IO-IOV4 eòe
5-51/4 eòe
©
0 Khi cóm chiri.cài bàt sé bàt lén và dén dó sé tàt.
^ Sau khi nùt cóng tàt dà bàt lén, tiép tue dày vung it nhàt 15 phùt dé hàp cdm.
Sau khi dùng xong, rùt phit dién ra. Khi rùt, chù y càm phàn phit dién chù dùng càm
8
phàn dày dién.
-11 —
Page 13

• Xin chú ÿ xem nói náu dà ddac dàt chinh xàc
1
vào than noi hay chua.
Néu nói nà'u khóng duce dàt chinh xàc, nùt
nau se bât qué sdm, hoàc phán phát nhiêt
cüa thân nói së bi hu.
LJU Ÿ
( V.ITHE SAI ')
Bi can bài—^
vàt la
Phân phát nhiêt
Nói náu bj can
trên canh cùa
phân phát nhiêt.
Trong noi nau com cua quÿ vi, môt cáu chi
nhiêt dupe gân sân, và së ngât giòng dién
trong nhOng truàng hpp này.
• LUu y xem nùt nâ'u dâ bât lên chua, truóc khi
lâ'y nói nâ'u ra,
Thay ngay tâ't câ bp phân bj hu.
2
Xin dUng de ngCia nâp dây à cho cô ânh nâng
3
chiéu thing. Tia nâng chiëu thing vào mât lôm
cûa nâp, CÓ the phân chiê'u lai và làm chây hu
câc do dùng, tudng vâch... chung quanh.
4
WnÎS « ï“’ O“» «Sn.
Xoong trâng bàng non-stick cô thêm mât màu theo thPi gian. Dieu này là blnh thuPna khônn
5
dung dung cu nha bep bang kirn Ioai vói xoong trâng bàng non-stick (chi dói vói 42pf ^
Nôi nâ'u bi cân
trên vién cùa
thân noi.
Phân phát nhiêt
CO NANO GIÜ NÓNG
• Sau khi nà^u xong, co nàng GIÜ NÓNG sè tiép tue làm vièc cho dén khi dày dién dUPc rùt ra
. Xin luon nho phà, rùt chiù dién, trude khi lay nói nà'u ra khòi thàn noi.
• Xm dung àn NÚT NAU, khi cd nàng GIÙ NÓNG dang làm viéc.
• Xin dUng de giU ndng edm quà 5 tiéng dóng hó.
• Xin dùng dùng cd nàng GIÜ NÓNG di hàm lai edm dà nguói.
CÁCH LAU RL/A
1. Rùt chót dién ra khòi nói trude khi lau rùa.
3 ''hang hat com bám vào chúnq
Co the dung sponge, hoàc bàn chái khóng bàng kim loai. ' cnui bang kim loai.
— 12—
Page 14

SPECIFICATIONS
Model No.
SR-42HP
SR-42F
miñ
SR-42HP
SR-42F
Power
supply
120 V
AC
'1®
120«
AC
Power
consumed
1,550W
1,550H
Capacity
1.0 ~ 4.4 qts
(0.9 ~ 4.2 L)
^
m
1.0-4.41$ If
(0.9~4.2«?()
72"
Weight
mm
(5.5RÍT-)
Dimensions (HxWxD)
1175"x17"x14V2” 12.1 lbs
(30 X 43 X 37 cm) (5.5 kg)
R«(i^xl:xa)
11*/5"x17"x14
(30 X 43 X 37H3(i:)
Accessories
Measuring cup
(approx. 6 fl.oz./180 ml)
Píí№
mfí'
ESPECIFICACIONES
N.°de
modelo
SR-42HP
SR-42F
Alimen
tación
120 V
CA
Consumo
1.550W
Capacidad
1,0 - 4,4 qts
(0,9 - 4,2 L)
Dimensions _
(AlxAnXPif)
1175"x17"x14 72" : 12,1 Ibs
(30 x 43 x 37 cm) (5,5 kg)
-13—
Accesorios
Taza medidora
(aprox. 6 fl.oz./l80 mi)
Page 15

най2
SS
37| (feO| X L-)b| X äO|)
td -s
“Г
SR-42HP
SR-42F
120V I
AC I
QUI CÁCH
Kieu noi
SR-42HP
SR-42F
Nguón
diên
120 V
АС
1,550W
Luöng
cíi0n tiêu
thu
1,550W
1.0 ~ 4.4 qts
(0.9 ~ 4.2 L)
117s" X 17" X 14 '/2"
(30x43x37 cm)
11 "/5" X 17" X 147г"
(30 X 43 X 37 cm)
12,1 lbs
(5.5 kg)
(^^6fl.o2,/18 0ml)
^2-1 lbs ! Coc do
(5.5 kg) I (khoáng 6 fl.oz./180 ml)
— 14—
Page 16

Panasonic Consumer Electronic Company,
Division of Matsushita Electric Corporation of America
One Panasonic Way Secaucus, New Jersey 07094
www.panasonic.com
Printed in Thailand
SR770U657-X
MAT0310-0
 Loading...