

Page 1
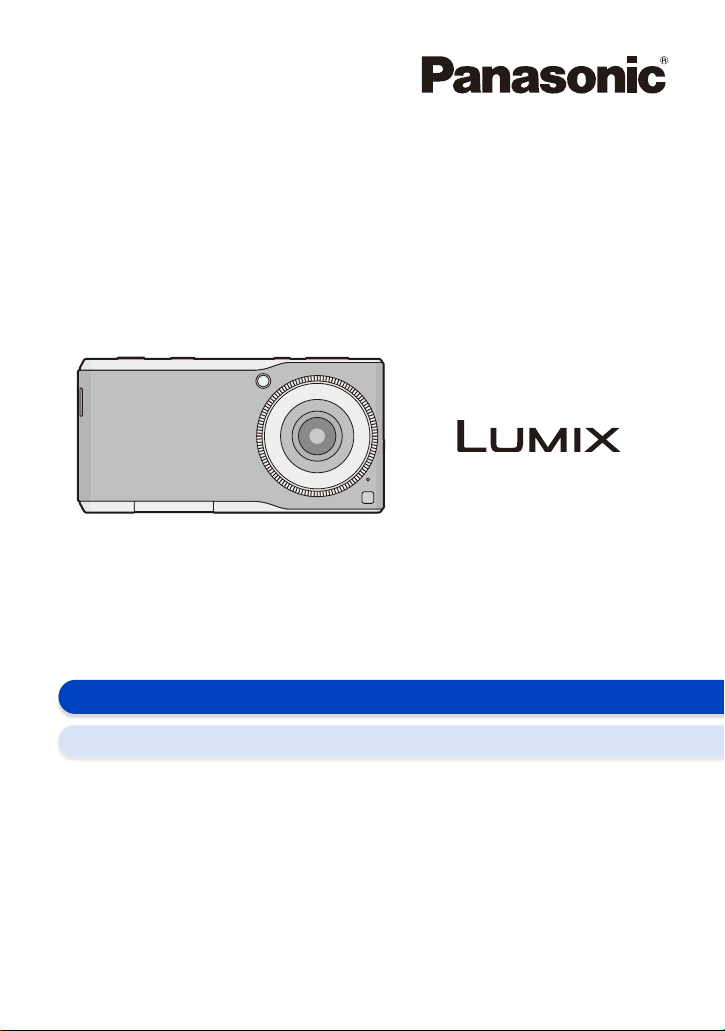
Operating Instructions
for advanced features
Digital Camera
Model No. DMC-CM1
Please read these instructions carefully before using this product, and
save this manual for future use.
Troubleshooting P183
Contents P2
SQW0019
F1014MR0
Page 2

Contents
1. Before Use
How to use this manual ......................................................................................5
Standard Accessories.........................................................................................5
Names and Functions of Main Parts...................................................................6
Stereo headset (optional)....................................................................................9
Inserting/Removing the microSIM card (optional).............................................10
About the Built-in Memory/the microSD Card (optional) ...................................11
Charging ...........................................................................................................14
Turning the unit on/off.......................................................................................16
Android™ default settings.................................................................................17
Release the lock screen ...................................................................................17
2. Basic Operation
Using the touch screen.....................................................................................18
Switching between vertical and horizontal viewing modes ...............................20
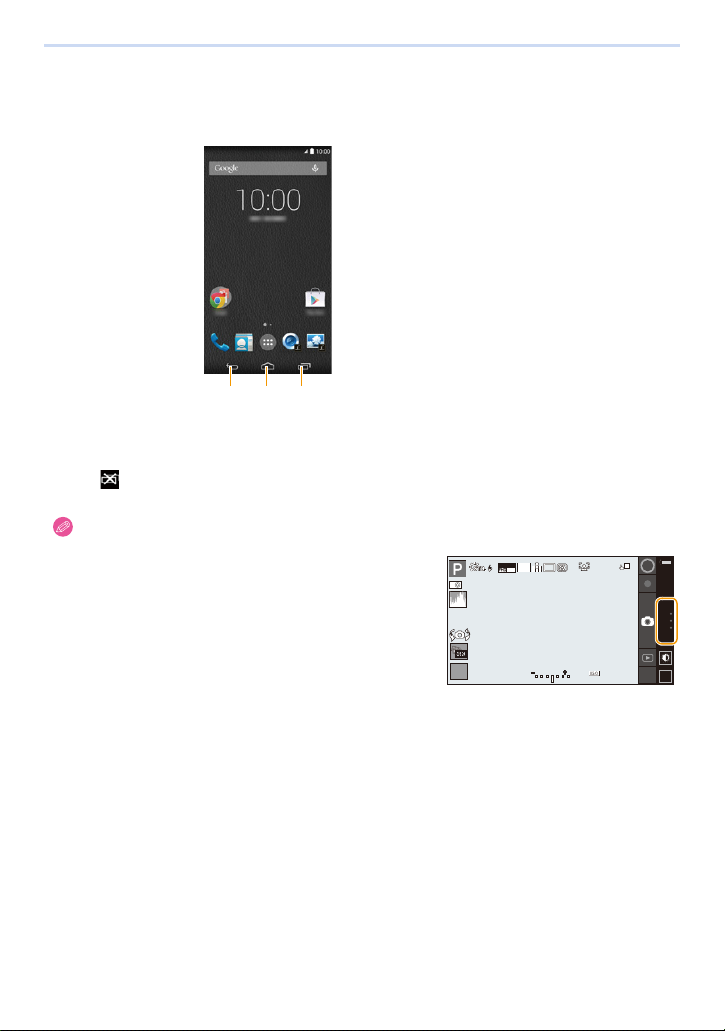
Home screen ....................................................................................................21
Status bar..........................................................................................................23
Notifications panel/Quick menu ........................................................................24
Control icons.....................................................................................................25
Using apps........................................................................................................26
Entering Text.....................................................................................................28
Basic settings....................................................................................................29
3. Connecting to networks
Connecting to mobile networks.........................................................................32
Connecting to Wi-Fi
Connecting to VPNs .........................................................................................36
Configure a portable Wi-Fi access point...........................................................37
Configure airplane mode ..................................................................................38
®
networks .........................................................................34
4. Camera
Before using the camera...................................................................................39
Recording flow..................................................................................................41
Using camera functions ....................................................................................42
Viewing Recording screens ..............................................................................43
Taking a Still picture..........................................................................................46
Recording Motion Picture .................................................................................47
Selecting the Recording Mode..........................................................................51
Zoom and Flash................................................................................................79
Operating the control ring .................................................................................84
Setting the Menu...............................................................................................91
2
Page 3

Using the [Rec] Menu .......................................................................................96
Using the [Custom] Menu ...............................................................................116
Basic camera settings ([Setup] menu)............................................................122
5. Viewer
Gallery ............................................................................................................124
6. Photo Search
Launching Photo Search ................................................................................129
7. Phone
Emergency calls .............................................................................................132
Making a call...................................................................................................132
Answering a call..............................................................................................134
Call log............................................................................................................135
Voicemail ........................................................................................................136
Caller ID information .......................................................................................137
Fixed Dialling Numbers...................................................................................137
8. People
Saving contacts ..............................................................................................138
Displaying contacts.........................................................................................139
Managing contacts..........................................................................................140
9. Email/Messaging
Email...............................................................................................................142
Gmail™...........................................................................................................145
Google Hangouts™ ........................................................................................146
10. Web browser
Launching the web browser............................................................................148
Bookmarks......................................................................................................151
11. Music
Google Play Music™ ......................................................................................152
12. Maps
Location information service...........................................................................154
Google Maps™...............................................................................................155
13. Other apps and functions
NFC ................................................................................................................156
Google Drive™ ...............................................................................................156
3
Page 4

Google Keep™ ...............................................................................................158
Calendar .........................................................................................................161
YouTube™......................................................................................................163
14. Google Play
Google Play™ Store .......................................................................................164
Deleting apps..................................................................................................165
Access permissions........................................................................................166
Installing apps from unknown sources............................................................166
15. Connecting to external devices
Bluetooth® wireless technology.......................................................................167
USB connections ............................................................................................170
Printing............................................................................................................172
16. Synchronise/Backup/Reset
Synchronise and delete accounts...................................................................173
Backup............................................................................................................174
Reset ..............................................................................................................174
17. Security
Screen lock .....................................................................................................175
SIM card lock..................................................................................................176
18. Updates
System updates ..............................................................................................177
19. Settings list
Settings list .....................................................................................................179
20. Others
Troubleshooting ..............................................................................................183
Cautions for Use.............................................................................................189
4
Page 5

1. Before Use
How to use this manual
≥ Click a cross reference in the text to jump to the corresponding page.
≥ By entering keywords in the search field at the top of the Adobe Reader screen, you can run a keyword search and
jump to the corresponding page.
≥ Operations and other details of this manual may vary depending on the Adobe Reader version you are using.
∫ About the symbols in the text
: Indicates a general notification.
: Indicates a hint for easier use, or a key point for taking pictures with the camera.
Indicates conditions that prevent a certain function from being used while taking pictures with the
:
camera.
(P¢¢): Indicates a reference page. Click to navigate to that page.
In these operating instructions, steps for setting a menu item are described as follows.
From the Home screen > [] > [].
Standard Accessories
Check that all the accessories are supplied before using this unit.
≥ The accessories and their shape will differ depending on the country or area where this unit was purchased.
For details on the accessories, refer to “Basic Operating Instructions”.
≥ microSD Memory Card, microSDHC Memory Card and microSDXC Memory Card are indicated as microSD ca rd in
the text.
≥ microSIM card and microSD card are optional.
5
Page 6
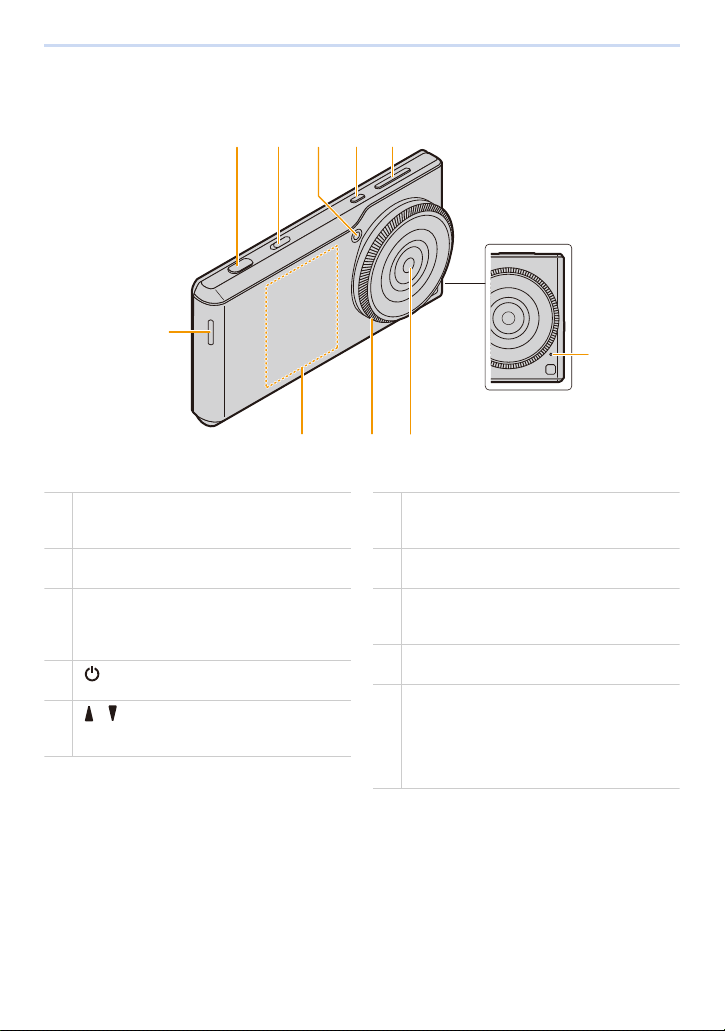
1. Before Use
1
789
2345
6
10
1
Shutter button (P46)
Press to take a picture with the camera.
Press halfway (lightly) to adjust the focus.
2
Camera selector switch (P42)
Starts or ends the camera.
3
Flash (P81)/
AF Assist Lamp (P118)
Flashes or lights up when taking a picture with the
camera.
4
[ ] button (P16)
Turns the unit on/off, or sets/releases sleep.
5
[ ]/[ ] (Volume adjustment) buttons (P30)
Adjusts the volume of incoming calls, receivers or
music.
6
Speake r (P133)
Plays the ringtone, music or the caller’s voice
when in handsfree mode.
7
NFC antenna (P156)
The NFC antenna is built-in.
8
Control ring (P84)
Assigned functions can be used by rotating the
control ring while taking pictures with the camera.
9
Outward facing camera (P39)
Take pictures or motion pictures.
10
Microphone (P40, 133)
Records audio when recording motion pictures,
and limits noise to make it easier to hear the
caller’s voice.
Picks up and transmits your voice when in
handsfree mode.
Names and Functions of Main Parts
6
Page 7

1. Before Use
12 13 1411
18 19
20
21
15
16
17
11
microUSB terminal (P14, 170)
Use this when charging or connecting external
devices.
12
Ringtone lamp/Charging lamp (P14, 180)
Flashes if there is a missed call or new email, and
lights up when charging.
13
Light sensor/Proximity sensor
Sensor to detect the surrounding brightness and
automatically adjust the brightness of the screen,
and to prevent incorrect operation of the touch
screen during a call.
Do not cover the sensor area with your hand or
paste stickers over it in order to prevent incorrect
operation of the sensor.
14
Display (P18)
Features a touch screen. Operate it by touching
directly with your fingers.
15
Earpiece
Hear the caller’s voice.
16
Earphone terminal (P9)
Connect a headset (optional).
17
Inward facing camera (P42)
Take pictures or motion pictures.
18
microSIM card slot (P10)
Insert a microSIM card.
19
microSD card slot (P11)
Insert a microSD card.
20
Nameplate
Stowable nameplate.
Contains information such as the mobile
identification number.
21
Mouthpiece/Microphone (P40, 132)
Records audio when recording motion pictures,
and picks up and transmits your voice when
talking.
7
Page 8
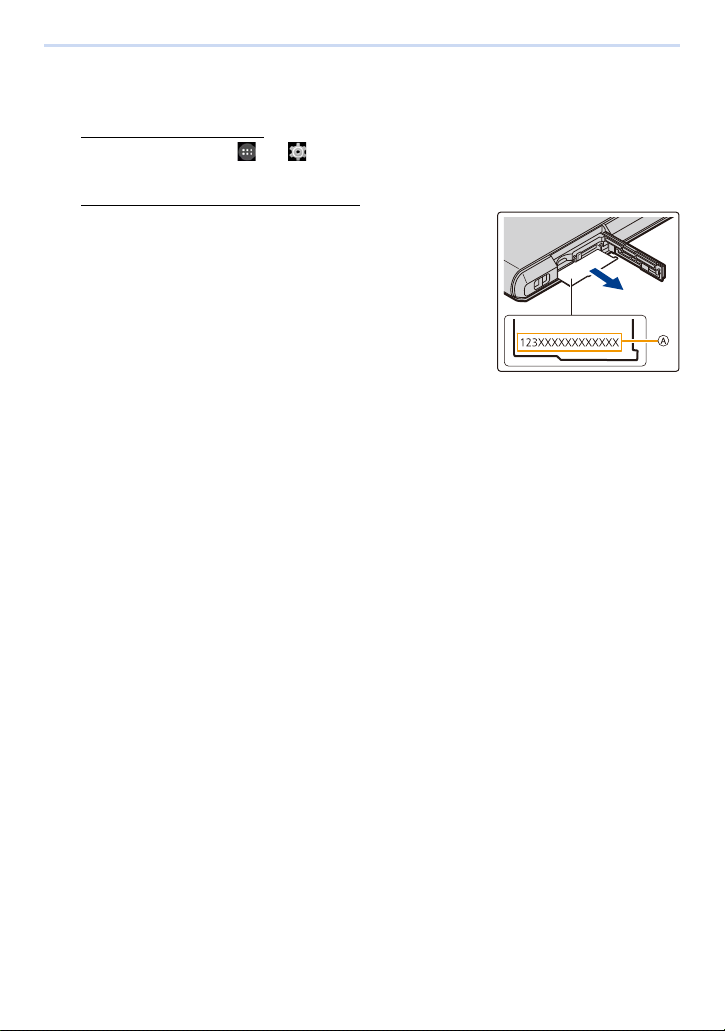
1. Before Use
∫ About the mobile identification number
This unit has a specific mobile identification number A.
The mobile identification number is verified as follows.
To verify the number on-screen:
1 From the Home screen > [ ] > [ ].
2 [About phone] > [Status] > check the [IMEI] item.
To verify the number by checking the nameplate:
1 Open the card slot cover.
2 Remove the microSIM card tray.
3 Pull the nameplate towards you.
≥ Be careful as the nameplate may be damaged if it is pulled too hard.
8
Page 9
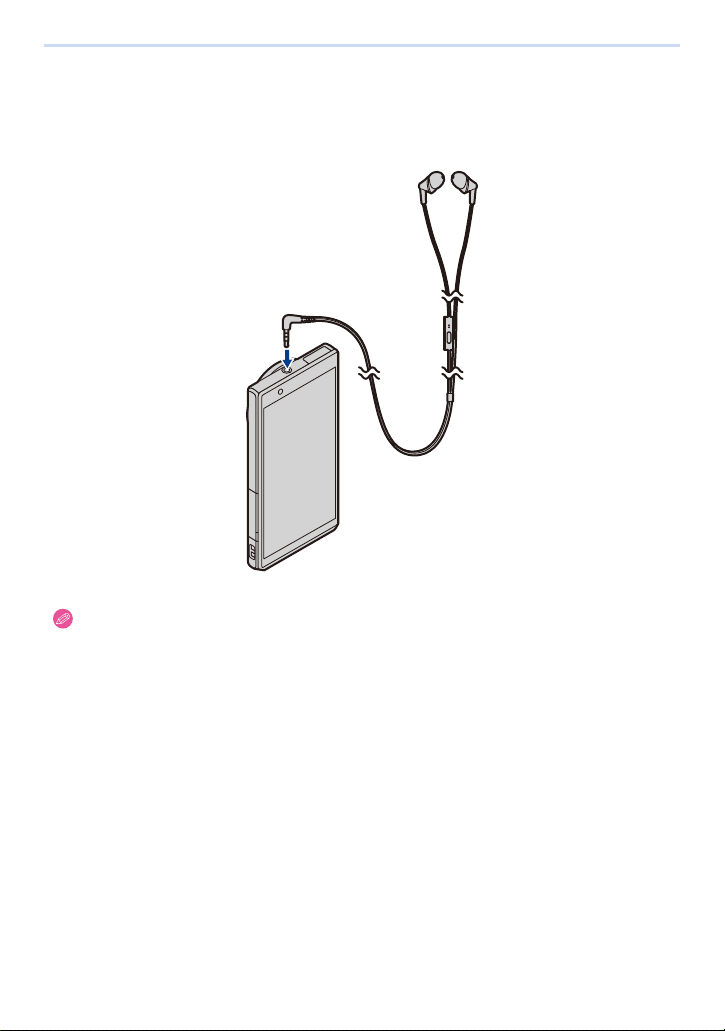
1. Before Use
Stereo headset (optional)
You can use a headset (optional) to listen to music or watch videos.
If the headset (optional) has a microphone, you can also use it to talk on the phone.
≥ Check that the headset (optional) plug is completely inserted into the earphone terminal.
9
Page 10
1. Before Use
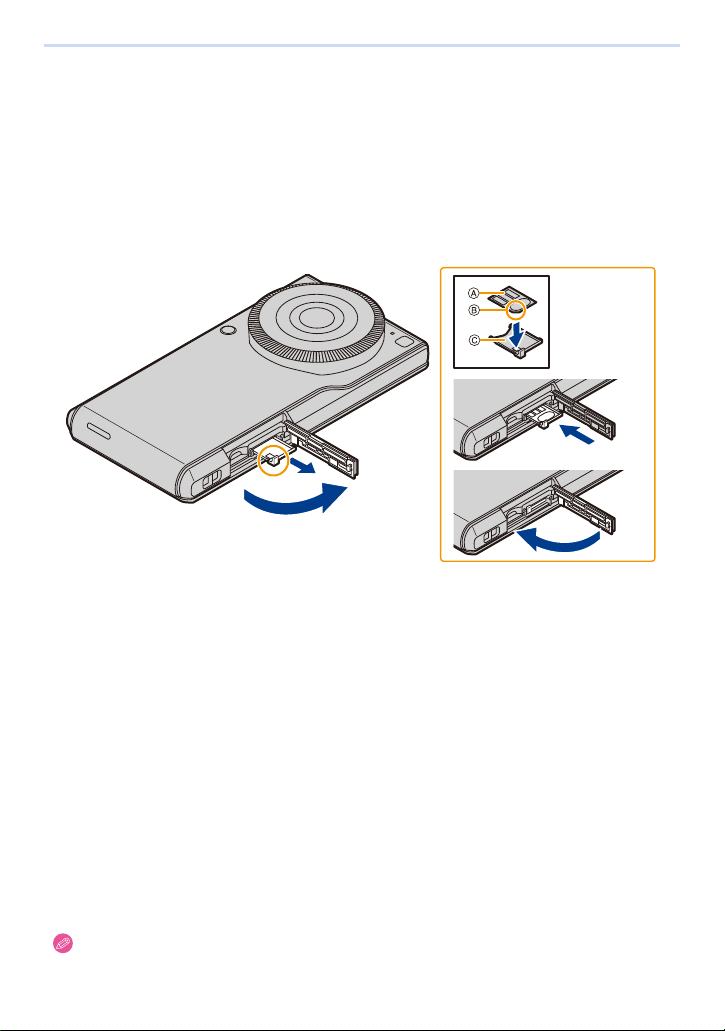
Inserting/Removing the microSIM card (optional)
A microSIM card is an integrated circuit that stores the customer’s phone number and
other information.
Calls and messages (SMS) cannot be sent or received unless the microSIM card is
inserted.
If you have inserted/removed the microSIM card, do not deliberately touch or damage the
IC terminals.
Open the card slot cover with the control ring face of this unit facing upwards.
1
Hold the hooks of the tray with your fingertips and pull it out horizontally.
2
Mount the microSIM card on the tray C with the IC face A on top.
3
≥ Take note of the notch B on the microSIM card and mount it in the correct direction.
Check the orientation of this unit and insert the tray horizontally into the slot of
4
the microSIM card.
Close the card slot cover.
5
∫ Removing the microSIM card
1 Open the card slot cover with the control ring face of this unit facing up wards.
2 Hold the hooks of the tray with your fingertips, pull it out horizontally, and remove the microSIM card.
3 Check the orientation of this unit and insert the tray horizontally into the slot of the microSIM card.
4 Close the card slot cover.
≥ Keep the microSIM Card out of reach of children to prevent swallowing.
≥ Keep the microSIM Card Tray out of reach of children to prevent swallowing.
10
Page 11

1. Before Use
About the Built-in Memory/the microSD Card (optional)
About Built-in Memory
≥ Memory size: Approx. 10 GB
≥ The access time for the built-in memory may be longer than the access time for a microSD card.
≥ You can copy the recorded pictures to a microSD card. (P126)
About microSD cards that can be used with this unit
The following microSD cards which conform to the SD standard can be used with this
unit.
(These cards are indicated as microSD card in the text.)
microSD Memory Card
(64 MB to 2 GB)
microSDHC Memory Card
(4 GB t o 32 GB )
microSDXC Memory Card
(64 GB to 128 GB)
∫ About the motion picture recording and SD speed class
According to the [Rec Quality] (P48) of a motion picture, the required microSD card differs. Use a microSD card
that meets the following rating of the SD Speed Class.
≥ SD Speed Class is the speed standard regarding continuous writing. Check via the label on the microSD card,
etc.
≥ The SD speed class represents the level of performance of microSD cards. The SD speed class does not serve
as a guarantee of performance for all operations.
≥ microSDHC Memory Cards and microSDXC Memory Cards can
be used only with their compatible devices.
≥ Check that the PC and other equipment are compatible when
using the microSDXC Memory Cards.
≥ Check the corresponding manufacturer, capacity and other latest
compatibility information from the following support site.
http://panasonic.jp/support/global/cs/dsc/
(This Site is English only.)
Note that this does not guarantee compatibility with all operations.
≥ A message prompting to format the microSD card may be
displayed when connecting the microSD card to other devices,
but do not format.
[Rec Quality] SD Speed class Label example
FHD/HD/VGA/1:1 Class 4 or higher
4K Class 10
The data on the built-in memory or the microSD card may be damaged or lost due to electromagnetic wa ves,
≥
static electricity or breakdown of this unit or the microSD card. We recommend storing important data on a PC etc.
≥ Keep the microSD Card out of reach of children to prevent swallowing.
11
Page 12

1. Before Use
Approximate number of recordable pictures and available recording
time
∫ Number of recordable pictures
≥ [9999i] is displayed if there are more than 10000 pictures remaining.
Aspect ratio [3:2], Quality [A]
[Picture Size] 8 GB 32 GB 64 GB 128 GB
L (20M) 720 2910 5790 11600
M (10M) 1310 5310 10570 21190
S (5M) 2290 9250 18020 36100
XS (2.5M) 6010 24300 48660 97480
Aspect ratio [3:2], Quality [ ]
[Picture Size] 8 GB 32 GB 64 GB 128 GB
L (20M) 220 920 1840 3690
M (10M) 260 1070 2150 4 310
S (5M) 290 1170 2350 470 0
XS (2.5M) 310 1270 2540 510 0
∫ Available recording time (when recording motion pictures)
≥ “h” is an abbreviation for hour, “m” for minute and “s” for second.
≥ The recordable time is the total time of all the motion pictures which have been recorded.
[Rec Quality] 8 GB 32 GB 64 GB 128 GB
[4K 15p] 20m58s 1h24m39s 2h49m30s 5h39m36s
[FHD 30p] 52m09s 3h30m35s 7h01m41s 14h04m49s
[HD 30p] 1h43m28s 6h57m44s 13h56m28s 27h55m49s
[VGA 30p] 4h12m27s 16h59m17s 34h01m00s 68h09m04s
[1:1 30p] 4h12m27s 16h59m17s 34h01m00s 68h09m04s
≥ The maximum continuous recordable time of a motion picture is 29 minutes and 59 seconds, which is
equivalent to a file size of approximately 4 GB.
You can check the recordable time on the screen. (With [4K 15p]/[FHD 30p], the file size becomes larger,
causing the recordable time to become shorter than 29 minutes and 59 seconds)
≥ The number of recordable pictures and the available recording time are an approximation.
(These vary depending on the recording conditions and the type of microSD card.)
≥ The number of recordable pictures and the available recording time varies depending on the subjects.
≥ The maximum available continuous recording time is displayed on the screen.
12
Page 13
1. Before Use
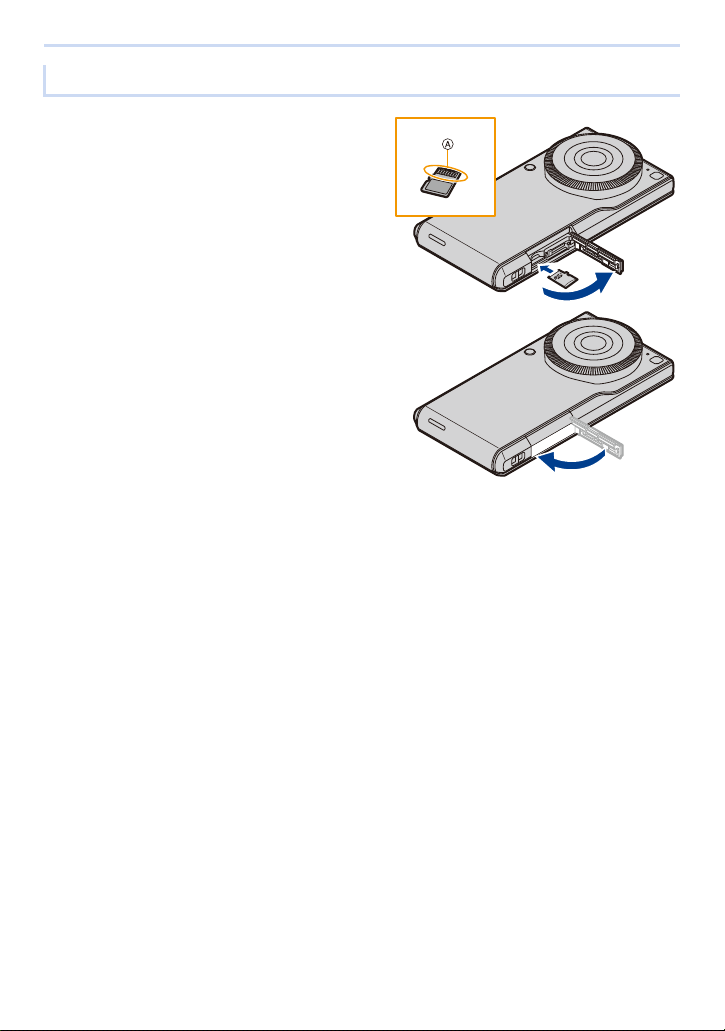
Inserting/Removing the microSD card
Open the card slot cover, ensure that
1
the connection terminal of the microSD
card is facing down, and insert it firmly
in the correct direction until it makes a
“click” sound.
A Do not touch the connection terminals of the
microSD card.
Close the card slot cover.
2
∫ Removing the microSD card
Push the microSD card in until it makes a “click” sound and then pull it out straight.
13
Page 14
1. Before Use
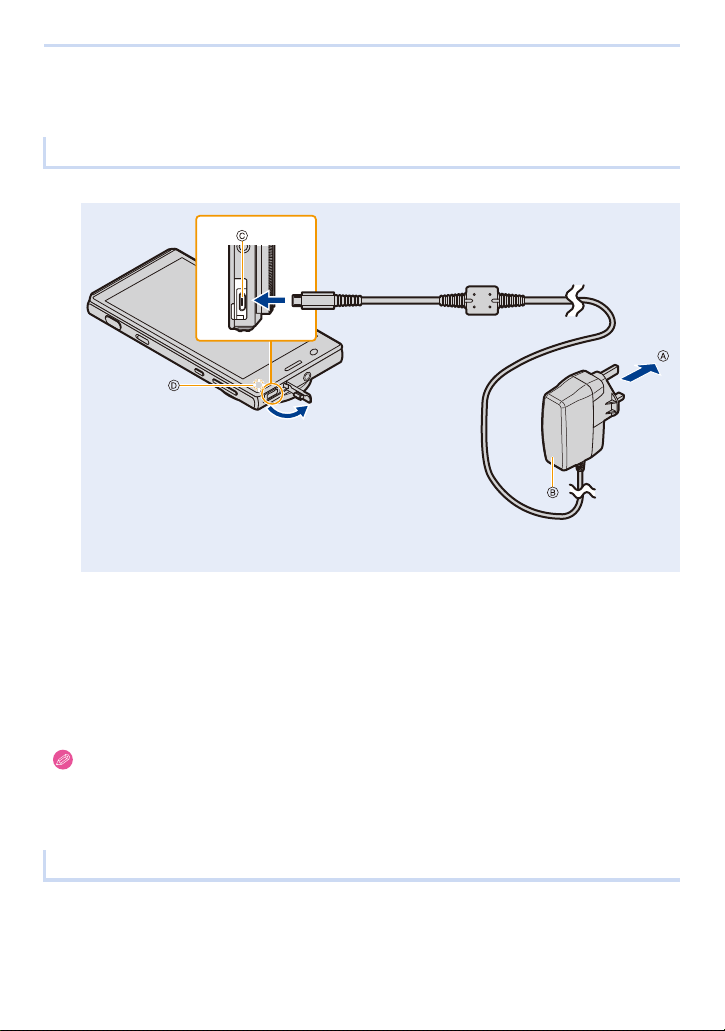
Charging
≥ The battery is not charged when this unit is shipped. Charge the battery before use.
Charge with an AC adaptor
Connect the unit and AC adaptor to charge.
A To power outlet
B AC adaptor
Open the microUSB terminal cover, check the direction of the AC adaptor cable
1
C microUSB terminal
D Charging lamp
terminal, and insert it into the microUSB terminal.
Insert the AC adaptor power plug into the power outlet.
2
∫ When charging is complete
1 Remove the AC adaptor power plug from the power outlet.
2 Remove the AC adaptor cable terminal from the unit.
≥ The unit and AC adaptor may become warm while charging, however this is not a malfunction.
≥ The shape of the AC adaptor power plug and power outlet may differ depending on each country/region.
≥ Do not use any other AC adaptors except the supplied one.
≥ Do not leave any metal items (such as clips) near the contact areas of the power plug. Otherwise, a fire
and/or electric shocks may be caused by short-circuiting or the resulting heat generated.
About the charging lamp
On: Charging.
Off: Charging has completed.
≥ When you start charging an empty battery, the charging lamp may flash. This is not a malfunction. The charging
lamp stops flashing and lights up after the battery is charged for a while.
14
Page 15

1. Before Use
Charging time
Charging time Approx. 150 min
≥ Approximate charging time when the battery is drained and the unit is turned off.
The charging time is longer if the unit is turned on during charging.
When the battery becomes low (charge notification)
If the battery level falls below 15%, a message will be displayed stating that the
battery is low to notify you to charge the unit.
If the battery becomes flat, a message will be displayed stating that the battery is flat,
and the unit will turn off.
Approximate operating time and number of recordable pictures
≥ The amount of time you can use the unit varies depending on how it used and the usage environment.
Recording still pictures (By CIPA standard in Programme AE Mode)
Number of recordable pictures Approx. 300 pictures
Recording time Approx. 150 min
Recording conditions by CIPA standard
≥ CIPA is an abbreviation of [Camera & Imaging Products Association].
≥ Temperature: 23 oC (73.4 oF)/Humidity: 50%RH when display is on.
≥ Using a Panasonic microSDHC Memory Card.
≥ Starting the camera application and recording 30 seconds after this unit is turned on.
≥ Recording once every 30 seconds using full flash every second recording.
≥ Turning this camera application off every 10 recordings and leaving it until the temperature of the unit
decreases.
The number of recordable pictures varies depending on the recording interval time. If the recording
interval time becomes longer, the number of recordable pictures decreases.
[For example, if you were to take one picture every two minutes, then the number of pictures would be
reduced to approximately one-quarter of the number of pictures given above (based upon one picture
taken every 30 seconds).]
Recording motion pictures
(Recording with picture quality set to [FHD 30p])
Recordable time Approx. 130 min
Actual recordable time Approx. 90 min
≥ The maximum continuous recordable time of a motion picture is 29 minutes and 59 seconds, which is
equivalent to a file size of approximately 4 GB.
You can check the recordable time on the screen. (With [4K 15p]/[FHD 30p], the file size becomes larger,
causing the recordable time to become shorter than 29 minutes and 59 seconds)
≥ These times are for an ambient temperature of 23 oC (73.4 oF) and a humidity of 50%RH.
Please be aware that these times are approximate.
≥ The actual recordable time is the time of recording possible with repeated start/stop of the camera function, and
start/stop of recording.
15
Page 16
1. Before Use
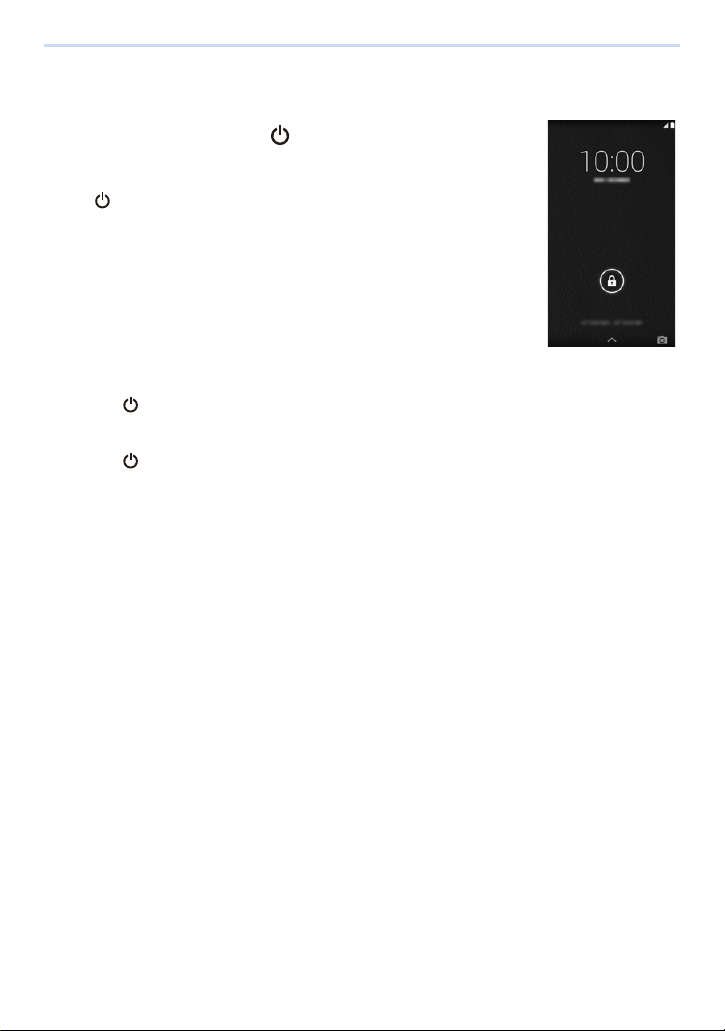
Turning the unit on/off
Turn on the unit by pressing [ ] for 2 seconds or more.
≥ The lock screen will be displayed after a short time. (P17)
≥ The default settings screen will be displayed when you turn the unit on for the first time.
(P17)
≥ Press [ ] to enter/release sleep mode, when the unit is turned on.
∫ To turn the unit off
Press [ ] for 1 second or more > [Power off] > [OK].
∫ To restart
Press [ ] for 1 second or more > [Reboot] > [OK].
16
Page 17

1. Before Use
A
Android™ default settings
The first time you turn the unit on after purchase, follow the on-screen instructions
and configure the language and Wi-Fi
Select language > [ ].
1
Follow the on-screen instructions to configure various settings.
2
After configuring various settings, read through description on diagnosis
3
information > [Disallow]/[Allow].
≥ Information concerning the condition of the terminal and information required for resolution is sent to the
manufacturing source e.g. during system update or when an error occurs. This information is used for quality
and service improvement purposes only.
Data communication charges may be incurred when sending data.
≥ The tutorial screen is displayed when the default settings are completed.
Confirm the details on the screen, and tap [OK].
≥ The unit will acquire the date and time from the network to automatically set the date and time, however they
may not be set properly depending on the environment that the unit is used in. In this case, set the date and
time manually. (P29)
®
settings.
Release the lock screen
Slide [ ] until the guide (white line on the outer
circumference) A.
≥ If the [Screen lock] settings have been changed, use the method configured to
release the lock.
17
Page 18
2. Basic Operation
Using the touch screen
The unit features a touch screen, which you can operate by touching directly with your
fingers.
≥ Peel off the sheet pasted to the touch screen when first bought before use.
≥ The touch screen is designed to be lightly touched with a finger.
Do not press the touch screen strongly with your finger or press objects with sharp tips (claws/ball point pens/pins etc.)
against it.
≥ The touch screen may not work even when touched in the following cases. Please note that they may also result in
incorrect operations.
– Operating with gloves on your hand
– Operating with your fingertips
– Operating with foreign objects on top of the operating surface
– Operating with a protective sheet, seal, etc. pasted on top
– Operating with the touch screen wet
– Operating with your fingers wet with sweat or water
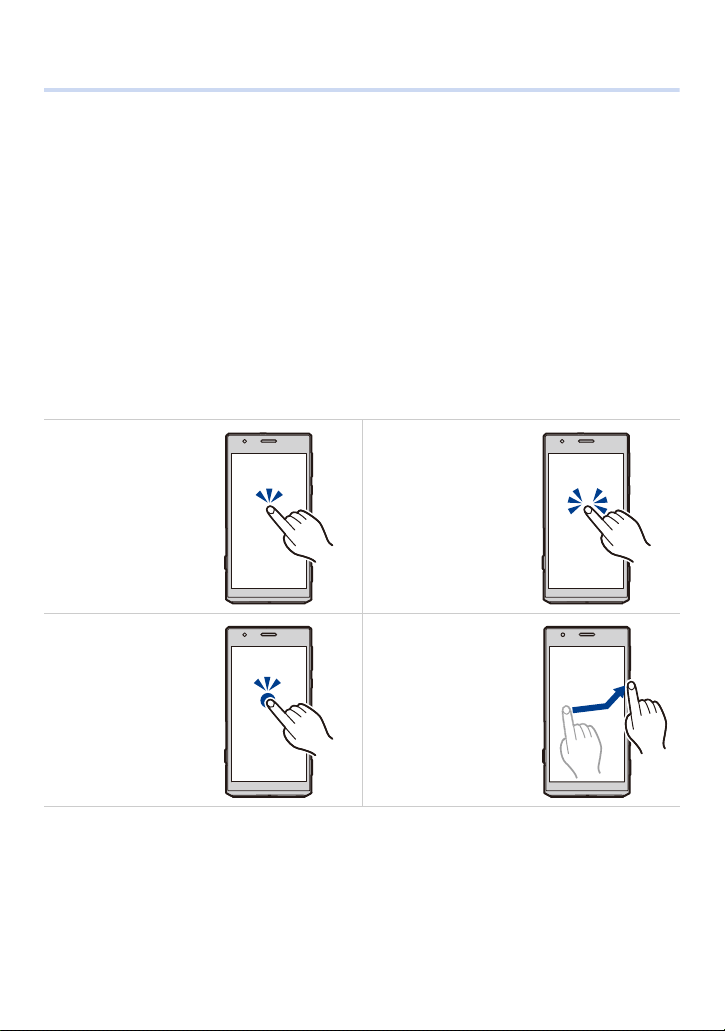
Tap pin g
Tap an item or icon to select
it.
Tapping and holding
Tap an item or icon without
releasing your finger.
Use this to display a context
menu.
Double-tapping
Tap the touch screen quickly
two times when you want to
zoom in and out of
webpages, etc.
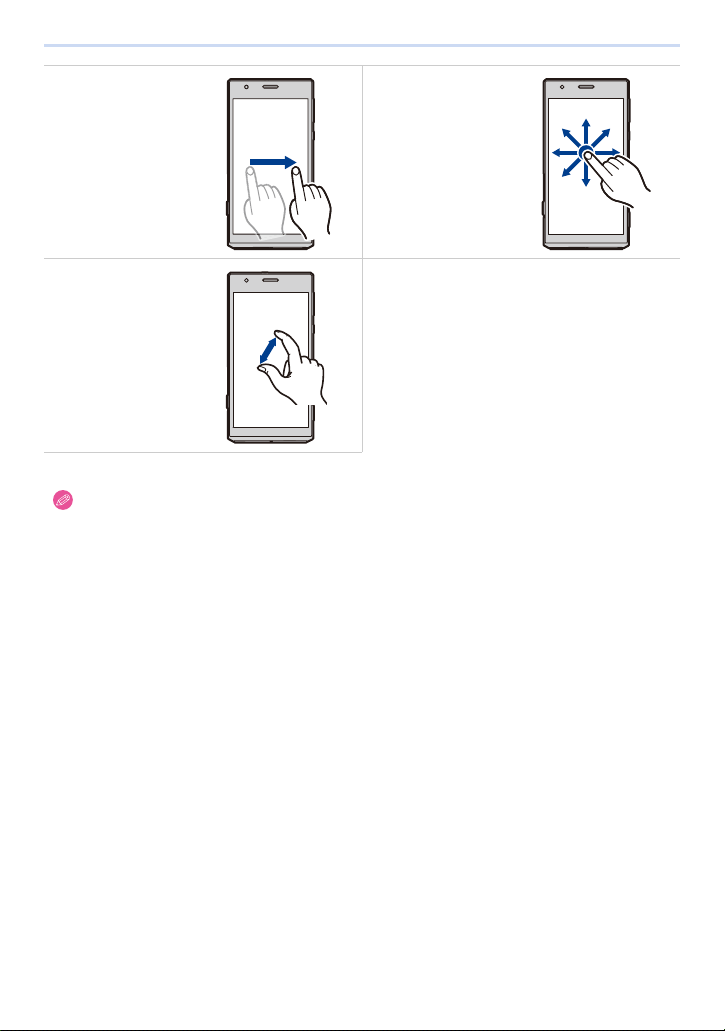
Flicking
Moving your finger quickly
across the touch screen will
move back and forth through
numerous pictures.
18
Page 19
2. Basic Operation
Dragging
Tap an item or icon without
releasing your finger and
slide it.
Scrolling
Flick/drag your finger around
the screen to display a
hidden area.
Pinching
When displaying a webpage
or picture, use two fingers to
push the screen apart and
zoom in (pinch out), or bring
them together to zoom out
(pinch in).
≥ Controls may differ or not be available depending on the app being used.
19
Page 20

2. Basic Operation
Switching between vertical and horizontal viewing modes
The unit switches the screen between vertical and horizontal viewing modes depending on
its motion sensor that can detect the unit’s direction and movement.
≥ The screen display may not switch depending on the app being used and other reasons.
20
Page 21

2. Basic Operation
1
2
3
454
Home screen
The Home screen is the main screen for launching apps.
Tapping [ ] when other screens are displayed will return to the Home screen.
1 Google Search™
2 Area for adding shortcuts, widgets or folders.
3 Displays the current page if there are numerous home screen pages.
The page can be switched by flicking in a horizontal direction.
4 Frequently used shortcuts or folders
Drag frequently used shortcuts to store them here.
5 Displays the app list. (P27)
21
Page 22

2. Basic Operation
Home screen operations
∫ Launching an app
Tap the app’s icon.
∫ Moving an item in the Home screen
1 Tap and hold an item.
2 Drag the item to the desired location.
≥ Dragging an item to the edge of the screen displays the next page.
∫ Adding a widget to the Home screen
1 Tap and hold the b ackground > [ ].
2 Tap and hold the widget you want to add.
3 Drag the item to the desired location.
∫ Adding a shortcut to the Home screen
1 Tap [ ].
2 Tap and hold the app you want to add.
3 Drag the item to the desired location.
∫ Creating a folder
1 Tap and hold an item.
2 Drag onto a nother item.
∫ Renaming a folder
1 Tap the folder shortcut.
2 Tap fo lde r n ame > Enter folder name.
≥ The name of the newly created folder is [Unnamed Folder].
∫ Deleting an item from the Home screen
1 Tap and hold an item.
2 Drag the item and drop it on [Remove].
∫ Changing the wallpaper on the Home screen
1 Tap and hold the b ackground > [ ].
2 Select the desired wallpaper.
3 Tap [Set wallpaper].
22
Page 23
2. Basic Operation
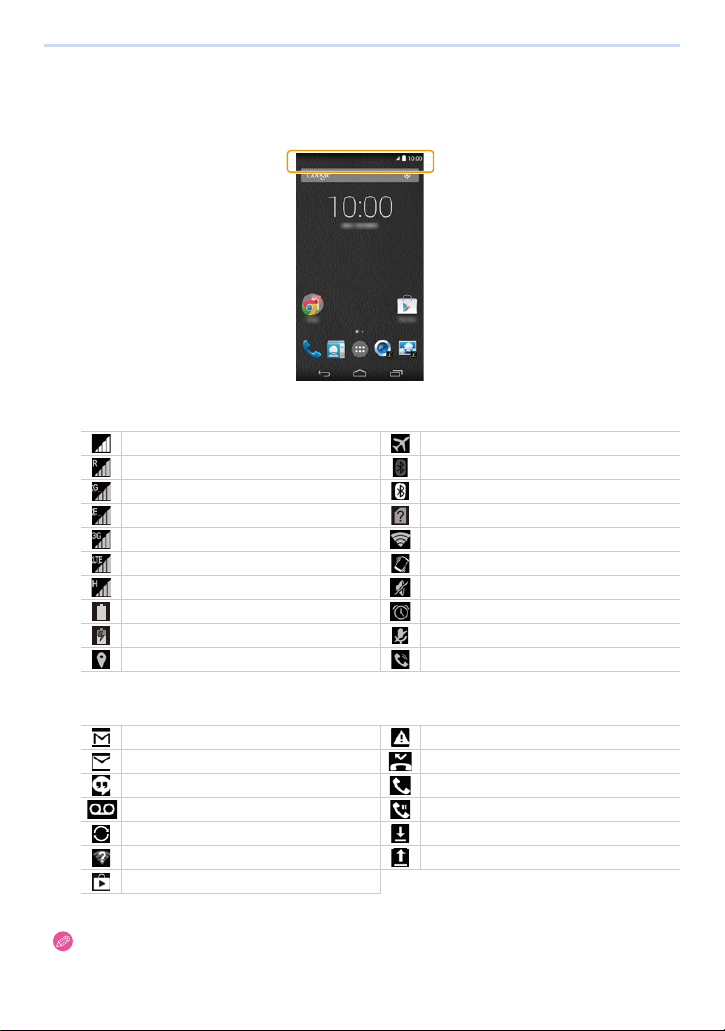
Status bar
The status bar displays icons that let you know the status of the unit, and notification icons.
Status bar
∫ List of main status icons
Network strength Airplane mode is on
Roaming Bluetooth® feature is on
GPRS network is available Bluetooth device is connected
EDGE network is available microSIM card is not inserted
3G network is available Connected to Wi-Fi network
LTE network is available Vibrate mode is on
High speed packet is available Silent mode is on
Battery level Alarm is set
Battery is charging Microphone is muted
GPS is activated Speakerphone is on
∫ List of main notification icons
New Gmail™ received Error message
New email received Missed call
New SMS message received Call in progress
New voicemail received Call is on hold
Synchronising data Downloading data
Open (unsecur ed) wireles s network is available
Notification from the Google Play™ store
≥ The status bar may fade away if there is no input for a while depending on the app being used.
Tapping the screen displays the status bar.
Uploading data
23
Page 24
2. Basic Operation
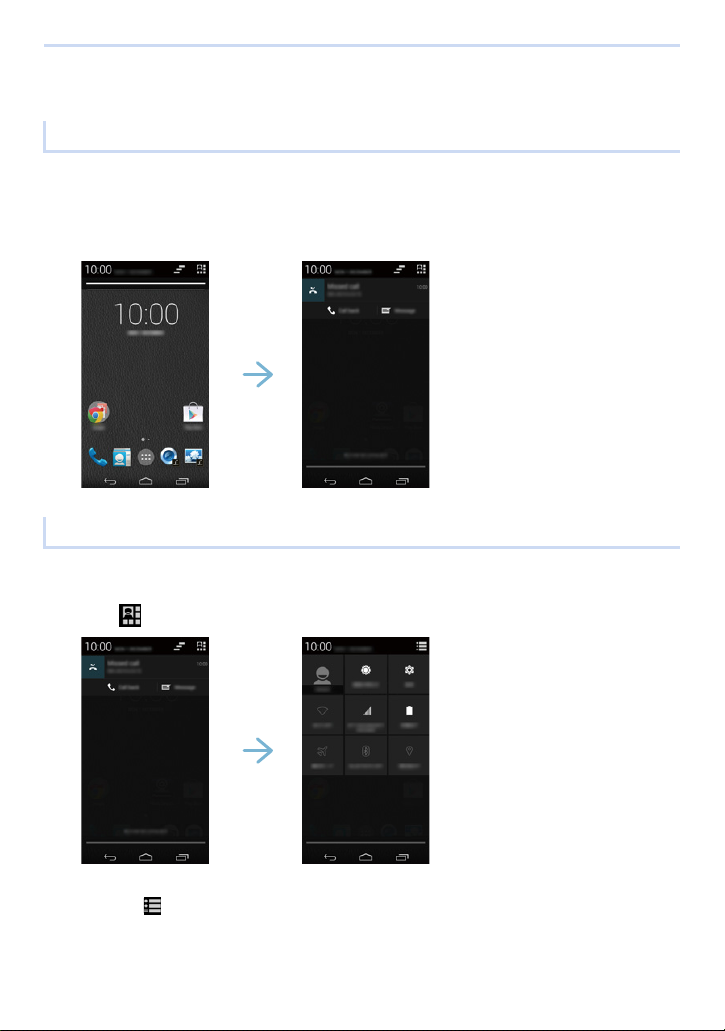
Notifications panel/Quick menu
Notifications panel
The notifications panel allows you to check notifications such as missed calls and
incoming email messages.
Drag the status bar down.
Quick menu
Various settings can be changed and profile confirmed from the quick menu.
Tap [ ] in the notifications panel screen.
1
Tap each setting.
2
≥ Tapping [ ] in the quick menu screen returns to the notifications panel screen.
24
Page 25
2. Basic Operation
123
ヮユワヶ
0500
2.8
AWB
0 33
A
HDR
OFF
DISP.DISP.
GPS
OFF
AU
TO
Control icons
Control icons are displayed at the bottom of the screen.
1 Return to the previous screen.
2 Display the Home screen.
3 Display a thumbnail of recently used apps.
Tapping a thumbnail launches that app.
≥ Tap [ ] while the thumbnail is displayed to clear the app used most recently.
≥ The control icons may fade away if there is no input for a while depending on the app being used.
Tapping the screen displays the control icons.
≥ In the camera app screen, the control icons are displayed when
flicking the right edge of the screen to the left.
05000500
MP4
3:2
p
A
30
AF
HDRHDR
GPSGPS
AFAFAF
OFFOFF
L
OFFOFF
ヮユワヶ
25
6060602.8
2.8
AU
AU
Q.
DISP.
DISP.
MENUQ.MENU
TO
TO
AWB
AWB
Page 26

2. Basic Operation
Using apps
Launching an app
From the Home screen > [ ].
1
Tap the app that you want to launch.
2
Close the app
Tap [ ] .
≥ The app may pause or remain running in the background depending on the app.
Display app options menu
Tap [ ] when the app is running.
≥ Controls may differ or the options menu may not be available depending on the app.
26
Page 27

2. Basic Operation
∫ App list
[Camera] Refer to P39 for details.
Google Calendar™ Refer to P161 for details.
[Gallery] Refer to P124 for details.
[Downloads] Display downloaded files.
Google Drive™ Refer to P156 for details.
Google Hangouts™ Refer to P146 for details.
Google Maps™ Refer to P155 for details.
[Email] Refer to P142 for details.
Google Voice Search™ Search for information on apps or webpages on the unit with your voice.
[Clock] Display the time, or use the alarm or timer.
[Photos] Display pictures or motion pictures that have been taken.
[Settings] Refer to P179 for details.
[Calculator] Use four-function calculations.
[Phone] Refer to P132 for details.
[People] Refer to P138 for details.
Google Chrome™ Refer to P148 for details.
Google Earth™ Browse satellite pictures from around the world.
[Gmail] Refer to P145 for details.
Google Search™ Search for information on apps or webpages on the unit.
Google+™
Google Settings™ Configure various Google™ services.
Google Keep™ Refer to P158 for details.
[Photo Search] Refer to P129 for details.
Google Play Games™ Play games from the Play Store.
Goole Play Newsstand™ Check news of interest from the Play Newsstand.
Google Play Store Refer to P164 for details.
Google Play Books™ Purchase e-books from the Play Store, and browse Play Books.
Google Play Music™ Refer to P152 for details.
Goole Play Movies & TV™
You Tube™ Refer to P163 for details.
[4K Pre-Burst] Refer to P50 for details.
[4K PhotoCapture] Refer to P127 for details.
≥ The app list spans multiple pages.
The page can be switched by flicking in a horizontal direction.
≥ The control method or screen displays of apps installed on the unit are subject to change without notice due to
updates.
Share updates and pictures with other users, or use [Hangouts] to chat
with them.
P
urchase videos and TV programmes from the Play Store, and browse
Play Movies.
27
Page 28
2. Basic Operation
456
8
9
1
2
3
7
Entering Text
The keyboard is displayed automatically when you tap a text entry field.
≥ The keyboard may differ, or the text and symbols that can be entered may be restricted depending on the app
used, language or selected text entry field.
Select entry method
The entry method can be selected depending on the language used.
From the Home screen > [ ] > [ ].
1
[Language & input] > [Default].
2
Select entry method to use.
3
Using the Google keyboard
1 Tap to enter text.
2 Tap to change the character case.
Double-tap to turn on the caps lock.
3 Tap to switch the type of text entered.
4 Tap to enter text.
Tap and hold to configure the input options.
5 Tap to enter a space.
6 Tap to enter text.
Tap and hold to enter symbols.
7 Tap and use voice input.
8 Delete the character before the cursor.
9 Tap to enter a line break.
Tap and hold to enter pictograms.
28
Page 29

2. Basic Operation
Basic settings
Setting the date and time
∫ Set the date, time and time zone
1 From the Home screen > [ ] > [ ].
2 Tap [Date & time].
3 To set the date and time automatically
Turn on the [Automatic date & time] and [Automatic time zone] checkboxes.
≥ This completes the setting.
To set the date and time manually
Turn off the [A utomatic date & time ] and [Au tomatic time zone] checkboxes, and proceed to the next step.
4 [Set date] > set the date > [Done].
5 [Set time] > set the time > [Done].
6 [Select time zone] > select time zone.
≥ If the date and time is not corrected automatically, set the date and time manually.
≥ If the correct time has not been set, some apps may not function properly.
∫ Switch between the 12 hour display and the 24 hour display
1 From the Home screen > [ ] > [ ].
2 [Date & time] > turn on/off the [Use 24-hour format].
29
Page 30

2. Basic Operation
Sound, vibration settings
∫ Adjust the volume
1 From the Home screen > [ ] > [ ].
2 [Sound] > [Volumes] > drag the slider for the sound to adjust left or right > [OK].
≥ The ringtone volume can also be adjusted by pressing [ ]/[ ].
∫ Change the ringtone for phone calls
1 From the Home screen > [ ] > [ ].
2 [Sound] > [Phone ringtone] > select the desired ringtone > [OK].
∫ Turn the incoming call vibration on/off
1 From the Home screen > [ ] > [ ].
2 [Sound] > turn the [Vibrate when ringing] checkbox on/off.
∫ Turn touch tones on/off
1 From the Home screen > [ ] > [ ].
2 [Sound] > turn the [Touch sounds] checkbox on/off.
≥ Touch tones will be off when the camera is operating, even if [Touch sounds] is set.
∫ Turn the touch tone vibration on/off
1 From the Home screen > [ ] > [ ].
2 [Sound] > turn the [Vibrate on touch] checkbox on/off.
∫ Set to vibration mode
Press [ ] for 1 second or more > .
≥ This can also be adjusted by pressing [ ] several times or pressing [ ] in silent mode.
≥ To cancel, press [ ] for 1 second or more and then either tap [ ] or [ ], or press [ ]/[ ].
∫ Set to silent mode
Press [ ] for 1 second or more > .
≥ This can also be adjusted by pressing [ ] several times.
≥ To cancel, press [ ] for 1 second or more and then either tap [ ] or [ ], or press [ ].
30
Page 31

2. Basic Operation
Screen settings
∫ Change display language
1 From the Home screen > [ ] > [ ].
2 [Language & input] > [Language] > select the desired language.
∫ Change screen brightness
1 From the Home screen > [ ] > [ ].
2 [Display] > [Brightness] > drag the slider left or right to adjust the brightness.
≥ Tapping [AUTO] adjusts the screen brightness automatically to suit the surrounding brightness.
≥ Increasing the screen brightness decreases the battery performance.
∫ Set how much time passes before entering sleep mode
Set how much time passes before automatically entering sleep mode when there are no operations.
1 From the Home screen > [ ] > [ ].
2 [Display] > [Sleep] > select the time.
≥ Press [ ] to enter sleep mode regardless of the set time.
Account settings
∫ Add account
Adding an account allows you to synchronise data with services such as Google.
≥ Setting up a Google account will allow apps to be downloaded from the Play Store, and backup various types of
data.
Setting up a Google account is recommended.
1 From the Home screen > [ ] > [ ].
2 [Add account] > tap the services to add.
≥ Follow the on-screen instructions and enter account information.
∫ Turn data synchronisation on/off
Synchronisation of various data can be turned on/off for each account.
1 From the Home screen > [ ] > [ ].
2 Tap the account services.
≥ You may need to tap the account again depending on the service.
3 Turn the checkbox for each type of data on/off.
31
Page 32

3. Connecting to networks
Connecting to mobile networks
2G/3G/LTE networks can be used to access email, messages and the internet.
For most mobile network operators, the connection is configured automatically when a
microSIM card is inserted.
If the connection is not configured automatically, an access point must be configured
manually.
Check with the mobile network operator with whom you signed the network contract for the
information required when setting the access points.
Configure access point
From the Home screen > [ ] > [ ].
1
[More...] > [Mobile networks] > [Access Point Names] > [ ].
2
[Name] > enter the name for the new settings > [OK].
3
[APN] > enter the access point name > [OK].
4
Enter other information as required.
5
≥ The details to enter differ depending on your mobile network operator.
[] > [Save].
6
Check the current access point
From the Home screen > [ ] > [ ].
1
[More...] > [Mobile networks] > [Access Point Names].
2
≥ If multiple access points are configured, the currently connected access point will be indicated.
32
Page 33

3. Connecting to networks
Configure mobile network details
∫ Disabling mobile network connections
Disable a 2G/3G/LTE network connection.
This can be used to avoid unintentional downloads or synchronisation.
≥ Wi-Fi network settings will not be changed.
1 From the Home screen > [ ] > [ ].
2 [More...] > [Mobile networks].
3 Turn off the [Data enabled] checkbox.
∫ Configure data roaming
When data roaming is enabled, you may be able to use another mobile network operator’s network for data
connections even if you are outside of the range of your operator’s network.
For details, contact your mobile network operator.
≥ Data roaming charges will be incurred.
Some apps may use data connections without notifying you.
1 From the Home screen > [ ] > [ ].
2 [More...] > [Mobile networks].
3 Turn the [Data roaming] checkbox on.
∫ Configure priority network type
1 From the Home screen > [ ] > [ ].
2 [More...] > [Mobile networks] > [Preferred network type] > select the item.
∫ Select mobile network operator manually
A specific mobile network operator can be selected and connected to while outside or travelling.
If a mobile network operator is selected manually, the unit will not connect to other mobile network operators even
if you move out of range of the selected mobile network operator.
1 From the Home screen > [ ] > [ ].
2 [More...] > [Mobile networks] > [Network operators].
≥ The unit will begin searching for networks. Please wait.
3 Select network.
≥ Tap [Search networks] to search for networks again.
∫ Select mobile network operator automatically
1 From the Home screen > [ ] > [ ].
2 [More...] > [Mobile networks] > [Network operators].
≥ The unit will begin searching for networks. Please wait.
3 Tap [Choose automatically].
33
Page 34

3. Connecting to networks
Connecting to Wi-Fi
This unit is compatible with Wi-Fi networks.
You can use email and the internet with wireless LAN services.
®
networks
Turning on the Wi-Fi function
From the Home screen > [ ] > [ ].
1
Turn on [Wi-Fi].
2
≥ [ ] is displayed in the status bar if connection settings have already completed.
≥ When Wi-Fi is turned on, the Wi-Fi connection will take priority even if a mobile network connection is enabled.
≥ When Wi-Fi is turned off, the unit will automatically switch to the mobile network connection.
Connecting to a Wi-Fi network
From the Home screen > [ ] > [ ].
1
Tap [W i-F i].
2
≥ A list of detected Wi-Fi networks is displayed.
Select a Wi-Fi network.
3
≥ If a Wi-Fi network that is protected with security is selected, enter the password and tap [Connect].
≥ If the desired Wi-Fi network is not displayed, add the Wi-Fi network manually. (P35)
≥ After you connect to a Wi-Fi network, the unit will automatically switch to that Wi-Fi network the next time it is
within range.
≥ Some Wi-Fi networks require you to enter a user name and password when accessing a webpage.
For details, contact the network administrator.
34
Page 35

3. Connecting to networks
∫ Adding a Wi-Fi network manually
Some Wi-Fi networks cannot be detected automatically. In this case, you need to add the Wi-Fi network manually.
For details, contact the network administrator.
1 From the Home screen > [ ] > [ ].
2 [Wi-Fi] > [ ].
3 Enter the network SSID.
4 Select the network’s security type and enter its password > [Save].
∫ Disconnecting from a connected Wi-Fi network
1 From the Home screen > [ ] > [ ].
2 [Wi-Fi] > tap the connected Wi-Fi network > [Forget].
Wi-Fi network settings
∫ Enabling Wi-Fi network notification
Configure the unit so that it notifies you when a Wi-Fi network is available.
1 From the Home screen > [ ] > [ ].
2 [Wi-Fi] > [ ] > [Advanced] > turn the [Network notification] checkbox on.
∫ Configure Wi-Fi connection settings during sleep mode
1 From the Home screen > [ ] > [ ].
2 [Wi-Fi] > [ ] > [Advanced].
3 Tap [Keep Wi-Fi on during sleep] > select the item.
35
Page 36

3. Connecting to networks
Connecting to VPNs
If your company or school uses a Virtual Private Network (VPN), you must configure your
unit so that you can use the VPN.
For details about configuring your unit, contact the network administrator.
Connecting to a VPN
From the Home screen > [ ] > [ ].
1
[More...] > [VPN].
2
Tap the VPN to connect to.
3
Enter the required information > [Connect].
4
≥ [ ] is displayed in the status bar.
Adding a VPN
From the Home screen > [ ] > [ ].
1
[More...] > [VPN] > [ ].
2
Configure each time as instructed by the network administrator > [Save].
3
Disconnecting from a VPN
Open the notifications panel > tap the notifications displayed when connected
to the VPN > [Disconnect].
36
Page 37

3. Connecting to networks
Configure a portable Wi-Fi access point
Using this unit as a portable Wi-Fi access point allows PCs with wireless LAN capabilities
to connect to the internet.
From the Home screen > [ ] > [ ].
1
[More...] > [Tethering & portable hotspot] > [Set up Wi-Fi hotspot].
2
Configure the network SSID, security and password > [Save].
3
Turn the [Portable Wi-Fi hotspot] checkbox on.
4
≥ [ ] is displayed in the status bar.
∫ Stop the portable Wi-Fi access point
1 From the Home screen > [ ] > [ ].
2 [More...] > [Tethering & portable hotspot].
3 Turn off the [Portable Wi-Fi hotspot] checkbox.
37
Page 38

3. Connecting to networks
Configure airplane mode
This turns off all wireless features of the unit to prevent interference with aircraft
equipment.
From the Home screen > [ ] > [ ].
1
[More...] > turn on the [Aeroplane mode] checkbox.
2
≥ [ ] is displayed in the status bar.
≥ This can also be configured by pressing [ ] for 1 second or more, and tapping [Aeroplane mode].
38
Page 39

4. Camera
Before using the camera
≥ Check whether the lens is stained. (P190)
≥ When starting the camera app, be careful not to interfere with the lens operation.
≥ Make sure that your fingers or hair do not cover the lens when taking pictures.
≥ Always take test shots beforehand.
Always take test shots for important pictures (such as weddings) to confirm that images and sounds are recorded
properly.
≥ Compensation cannot be provided for missed shots.
Compensation cannot be provided for missed shots if technical problems with the unit or microSD card prevent
recording.
≥ The effect of the set shutter speed is not reflected in the Recording screen (image shown in the display).
≥ The set aperture value is reflected in the Recording screen only when the shutter button is pressed halfway.
≥ There may be a slight delay between starting recording and actually recording content. When recording objects that
are moving fast, the position displayed on the screen when starting recording may differ slightly to the position being
recorded.
≥ If the temperature of the unit increases when taking pictures under high temperature conditions or taking pictures
continuously, stop recording and end the camera app.
≥ Be sure to pay special attention to the privacy, the likeness rights, etc. of the subject when you use this unit.
Use at your own risk.
39
Page 40

4. Camera
∫ Tips for taking good pictures
Hold the unit gently with both hands, keep your arms still at your side and stand with your feet slightly
apart.
≥ Do not cover the flash/AF Assist lamp A, the microphone B or the speaker C with your fingers or other
objects.
≥ Be careful not to move the unit when you press the shutter button.
If the unit moves, it may cause blurry images.
Dim areas become blur easily in particular.
∫ Problems when recording (P186)
About the indication of the applicable mode in the text
Applicable modes:
The icons indicate the modes available for a function.
≥ Black icons: Applicable modes
≥ Grey icons: Unavailable modes
and will differ depending on the Recording Modes registered under custom settings.
40
Page 41

4. Camera
Recording flow
Slide and release the camera selector switch to start up the camera. (P42)
1
≥ Home screen > [ ] also starts the camera.
Set the desired Recording Mode. (P51)
2
Start recording.
3
Taking a Still picture (P46)
1 Press the shutter button halfway to focus.
2 Press the shutter button fully (push it in
further), and take the picture.
Recording Motion Picture (P47)
1 From the Recording screen > [ ].
≥ Start recording motion pictures.
2 Tap [ ] .
≥ Stop recording motion pictures.
Tap [(] to check recorded images. (P124)
4
≥ Releasing the camera selector switch after sliding it, or pressing the shutter button returns to the Recording
screen.
Changing settings to suit the
desired situation, and start
recording
Adjusting the area to record
≥ Using the zoom ≠P79
Adjusting brightness or colour shades
≥ Operating the control ring ≠P84
Recording to suit conditions
≥ Taking Pictures using Burst Mode ≠P97
≥ Using the Self-timer ≠P100
Record without missing a picture opportunity
Using the [4K Pre-Burst] app to record is recommended. (P50)
Configuring your favourite operation environment to suit recording style
Configure this from the [Custom] menu. (P116)
Configuring the camera’s basic settings, such as changing the save
destination of images
Configure this from the [Setup] menu. (P122)
41
Page 42

4. Camera
ヮユワヶ
0500
2.8
AWB
0 33
A
HDR
OFF
DISP.DISP.
GPS
OFF
AU
TO
ヮユワヶヮユワヶ
050005000500
6060602.82.82.8
AWBAWBAWB
0 33
AFAFAF
L
3:2
MP4
30
p
AA
HDRHDRHDR
OFFOFFOFF
Q.
MENUQ.MENU
DISP.DISP.DISP.DISP.
AF
GPSGPSGPS
OFFOFFOFF
AUAU
TOTOAUTO
Using camera functions
Launching the camera
Slide and release the camera selector switch.
≥ Home screen > [ ] also starts the camera.
≥ The camera can also be started by flicking [ ] to the left on the Lock screen.
∫ To end the camera
Releasing the camera selector switch after sliding it, or using the steps below returns to the Home screen.
1 Flick the right edge of the screen to the left.
2 Tap [ ]. (P25)
05000500
MP4
3:2
p
A
L
30
AF
HDRHDR
GPSGPS
AFAFAF
OFFOFF
OFFOFF
ヮユワヶ
6060602.8
2.8
Switching the camera mode (outward facing camera/inward facing
camera)
From the Recording screen > [ ].
Only the following menus can be set in an inward facing camera.
Menu Item
[Rec]
[Motion Picture] [Rec Quality] [HD 30p]/[VGA 30p]
[Custom]
[Setup] All menu items can be set. (P122)
[Drive Mode] [Single]/[Self Timer]
[Picture Size] [HD]/[VGA]
[Silent Mode] [ON]/[OFF]
[Guide Line] [9-split]/[8-split]/[OFF]
[Auto Review] [1 sec.]/[2 sec.]/[Hold]/[OFF]
[Touch Shutter Setting] [ON]/[OFF]
42
Q.
DISP.
DISP.
AU
AU
MENUQ.MENU
TO
TO
AWB
AWB
Page 43

4. Camera
Viewing Recording screens
Switching the Information Displayed on the recording screen
From the Recording screen > [ ].
∫ About the tilt sensor display
With the tilt sensor displayed, it is easy to correct the tilt of the unit etc.
1 Tap [ ] to display the tilt sensor.
2 Check the tilt of the unit.
A Horizont al direction:
Correcting tilt to the left
B Vertical direction:
Correcting downward tilt
≥ When the tilt of the unit is little, the indicator changes to green.
≥ When recording with a vertical orientation, the display automatically switche s to a vertically orientated display.
≥ Even after correcting the tilt, there may still be an error of approximately ± 1°.
≥ Tilt sensor display may not be displayed correctly when this unit is in motion.
43
Page 44

4. Camera
ヮユワヶヮユワヶ
050005000500
6060602.82.82.8
AWBAWBAWB
0 33
AFAFAF
L
3:2
MP4
30
p
AA
HDRHDRHDR
OFFOFFOFF
AF
Q.
MENUQ.MENU
DISP.DISP.DISP.DISP.
GPSGPSGPS
OFFOFFOFF
AUAU
TOTOAUTO
1
2
3
4
5
6
7
Recording Mode (P51)
Custom settings (P62)
Storage location (P122)
0500
Number of recordable
pictures (P12)
Available recording
time¢1 (P12)
Histogram (P120)
Camera Mode (outward
facing camera/inward
facing camera) switch
(P42)
4K Pre-Burst (P50)
Menu (P91)
Photo Style (P101)
‡ ‰ Œ Flash Mode (P81)
Recording quality (P48)
Picture size/Aspect
Ratio (P103)
A› Quality (P105)
Drive Mode (P96)
Metering Mode (P109)
Focus Mode (P106, 108)
AF/AE Lock (P117, 121)
šØAF Mode (P106)
Location Logging (P122)
HDR (P 111)
Touch Settings (P121)
Silent Mode (P116)
L
3:2
MF
AEL
AFL
AF
Screen display
The display on the screen shows the operation state of the unit.
¢1 m: minute, s: second
AF
44
Page 45

4. Camera
ヮユワヶヮユワヶ
050005000500
6060602.82.82.8
AWBAWBAWB
0 33
AFAFAF
L
3:2
MP4
30
p
AA
HDRHDRHDR
OFFOFFOFF
AF
Q.
MENUQ.MENU
DISP.DISP.DISP.DISP.
GPSGPSGPS
OFFOFFOFF
AUAU
TOTOAUTO
8
9
:
;
<
=
>
?
@
A
B
C
Control ring menu (P84)
Battery indication
Start/End recording
motion picture (P47)
Picture taking (P46)
App controls (P25)
( Image playback (P124)
Switch to High
Brightness Mode (P122)
Switching display (P43)
Quick menu (P95)
Control ring operation
(P84)
Programme Shift (P57 )
2.8 Aperture value (P46)
60 Shutter speed (P 46)
Exposure compensation
value (P86)
Brightness (P56)
Manual Exposure
Assistance (P61)
ISO sensitivity (P87)
VÐîÑ
White Balance (P88)
White Balance Fine
Adjustment (P90)
Colour (P56)
AF area (P46)
WW
TT
0 33
W
T
45
Page 46

4. Camera
6060602.82.82.8
D
C
AB
Taking a Still picture
Select the Recording Mode. (P51)
1
Press the shutter button halfway to focus.
2
≥ Aperture value and shutter speed are displayed.
(Flashes in red if the correct exposure is not achieved.)
A Aperture value
B Shutter speed
Focus
Focus
indication C
AF area D Green Red
Sound Beeps 2 times —
≥ Focusing may take longer than usual in a dark environment.
Press the shutter button fully (push it in
3
further), and take the picture.
When the subject
is focused
On Blinks
When the subject
is not focused
Subjects and recording conditions which are difficult to focus
≥ Fast-moving subjects, extremely bright subjects or subjects without contrast
≥ When recording subjects through windows or near shiny objects
≥ When it is dark or when jitter occurs
≥ When this unit is too close to the subject or when taking a picture of both distant and near subjects
Taking pictures with touch operations
1 Hold your finger on [ ] and adjust the focus.
2 Release your finger to take a picture.
≥ For details on the Touch function, refer to P121.
46
Page 47

4. Camera
ヮユワヶ
0500
2.8
AWB
0 33
A
HDR
OFF
DISP.DISP.
GPS
OFF
AU
TO
1m37s
13s
A
C
B
Recording Motion Picture
Applicable modes:
Motion pictures can be recorded in the MP4 format.
Audio will be recorded in stereo.
MP4
3:2
p
A
L
From the Recording screen > [ ].
1
A Available recording time
30
05000500
B Elapsed recording time
≥ Start recor ding mot ion pictures.
≥ Recording of motion picture appropriate for each mode is
possible.
≥ The recording state indicator (red) C will flash while recording
motion pictures.
≥ You can operate the zoom even when recording motion
ヮユワヶ
6060602.8
2.8
pictures.
≥ When recording a motion picture, do not cover the microphone
with your fingers or other objects.
Tap [ ].
2
≥ Stop recording motion pictures.
≥ Still picture recording is also possible during the motion picture
recording by fully pressing the shutter button. (P49)
1m37s1m37s
≥ If zoom is used before recording a motion picture, the settings are cancelled and the angle of view will change
drastical ly.
≥ The focus is fixed at the position where the recording of the motion picture starts.
To adjust the focus while recording, tap [ ] to refocus.
≥ When recording motion pictures, the sounds of camera operations such as the control ring or button operations
may also be recorded.
≥ The available recording time displayed on the screen may not decrease regularly.
≥ Recording motion pictures shorter than 1 second may not be possible.
≥ The [Sensitivity] will be set to [AUTO] (for motion pictures) when recording motion pictures. Also, the [ISO Limit
Set] will not operate.
≥ It will be recorded in the following categories for certain Recording Modes. A motion picture recording matching
each Recording Mode will be performed for the ones not listed below.
Selected Recording Mode Recording Mode while recording motion picture
≥ Programme AE Mode
≥ Aperture-Priority AE Mode
≥ Shutter-Priority AE Mode
≥ Manual Exposure Mode
≥ [Clear Nightscape]/[Artistic Nightscape]/
[Handheld Night Shot]/[Clear Night Portrait]
(Scene Guide Mode )
Normal motion picture
Low Light Mode
AF
HDRHDR
GPSGPS
AFAFAF
OFFOFF
OFFOFF
Q.
DISP.
DISP.
AU
AU
MENUQ.MENU
TO
TO
AWB
AWB
13s13s
47
Page 48

4. Camera
B C
A
≥ Motion pictures cannot be recorded in the following cases.
– [Glistening Water]/[Glittering Illuminations] (Scene Guide Mode)
– [Miniature Effect]/[Star Filter] (Creative Control Mode)
∫ Configuring the recording quality
1 From the Recording screen > [ ] > [Motion Pict ure] > [Rec Quality].
2 Select the item.
Item Size Frame rate Bit rate
[]([4K 15p]) 3840k2160 15p 50 Mbps
[]([FHD 30p]) 1920k1080 30p 20 Mbps
[]([HD 30p]) 1280k720 30p 10 Mbps
[]([VGA 30p]) 640k480 30p 4 Mbps
[]([1:1 30p]) 640k640 30p 4 Mbps
≥ Exit the menu after it is set.
∫ About the [Motion Picture] menu
≥ [Photo Style], [Metering Mode], [i.Dynamic] and [i.Resolution] are common to both the [Rec] menu and [Motion
Picture] menu.
Changing these settings in one of these menus is reflected in other menu.
∫ About the compatibility of the recorded motion pictures
Even when a compatible device is used, recorded motion pictures may be played back with reduced picture and
sound quality, or they may not be played back.
Also, recording information may not be displayed correctly. Use this unit to playback in such case.
∫ Indication of the icon
A Format
B Size
C Frame rate
≥ What is bit rate
This is the volume of data for a definite period of time, and the quality becomes higher when the number gets
bigger. This unit is using the “VBR” recording method. “VBR” is an abbreviation for “Variable Bit Rate”, and the
bit rate (volume of data for definite period of time) is changed automatically depending on the subject to record.
Therefore, the recording time is shortened when a subject with fast movement is recorded.
48
Page 49

4. Camera
∫ Recording still pictures while recording motion pictures
Applicable modes:
Still pictures can be recorded even while recording a motion picture. (Simultaneous recording)
During motion picture recording, press the shutter button
fully to record a still picture.
≥ Tapping [ ] can also record still pictures.
49
Page 50

4. Camera
パパパ
4K Pre-Burst
Burst files are recorded 1.5 seconds before and after the moment that the shutter
clicks, and your favourite frame can be selected and the still picture captured.
From the Recording screen > [ ].
1
≥ Home screen > [ ] > [ ] also starts the app.
Taking a Still picture. (P46)
2
≥ Still pictures before and after the shutter clicks are displayed.
≥ Tap [ ] to capture the still picture from previously recorded
burst fi les.
Select frame to capture.
3
≥ Pinch out/pinch in or double tap to zoom in/zoom out of a
picture.
Tap [ ].
4
≥ Captured still pictures are stored in the “PRE-BURST” folder if
[Store in] is set to [Internal Storage].
When [Store in] is set to [microSD], the still pictures are stored
in the “PRE-BURST[SD]” folder on the microSD card.
≥ The following settings can also be configured with [4K Pre-Burst].
Menu Item
[Rec Quality] [3840k2160 15fps]/[1920k1080 30fps]
[RECORDING
SETTINGS]
[SETUP]
[Shutter Speed]
[Burst picture file] [Save]/[Do not save]
[Location Logging]/[Store in]/[Auto Backup]/[Auto OFF]/[Beep]/[Shutter]/[Note]/
[Reset]
[Auto]
[Manual]:
Operate the control ring to set the shutter
speed. (P84)
≥ Burst files recorded with the [4K Pre-Burst] app cannot be played back with other apps.
They are also excluded from automatic backup.
≥ The settings when recording a burst file are updated to the position information and save location settings of the
captured picture.
≥ Striping or flickering may appear under lighting such as fluorescent lighting and LED lighting fixtures, however
this is characteristic of MOS sensors which serve as the unit’s pickup sensor, and is not a malfunction.
Lowering the shutter speed may reduce the effect of the horizontal stripes.
50
Page 51

4. Camera
ヮユワヶ
0500
2.8
AWB
0 33
A
HDR
OFF
DISP.DISP.
GPS
OFF
AU
TO
Selecting the Recording Mode
From the Recording screen > Recording
1
Mode icon.
Select the Recording Mode.
2
Intelligent Auto Mode (P52)
The subjects are recorded using settings automatically selected by this unit.
Intelligent Auto Plus Mode (P52)
Allows you to adjust the brightness and colour hue when in Intelligent Auto Mode.
Programme AE Mo de (P57)
Records at the aperture value and shutter speed set by this unit.
Aperture-Prio rity AE Mode (P58)
The shutter speed is automatically determined by the aperture value you set.
Shutter-Priority AE Mode (P59)
The aperture value is automatically determined by the shutter speed you set.
Manual Expo sure Mode (P60)
The exposure is adjusted by the aperture value and the shutter speed which are manually adjusted.
Custom Mode (P62)
Use this mode to take pictures with previously registered settings.
Scene Guide Mode (P63)
This mode allows you to take pictures that match the scene being recorded.
Creative Control Mode (P70)
Record while checking the image effect.
Panorama Shot Mode (P77)
This mode allows you to take panorama pictures.
ヮユワヶ
05000500
MP4
3:2
p
A
L
30
6060602.8
2.8
AF
HDRHDR
GPSGPS
AFAFAF
OFFOFF
OFFOFF
Q.
DISP.
DISP.
AU
AU
MENUQ.MENU
TO
TO
AWB
AWB
51
Page 52

4. Camera
050005000500
AA
Taking Pictures using the Automatic Function
Recording Mode:
When you wish to leave settings to this unit and record without thinking about them,
use Intelligent Auto Plus Mode or Intelligent Auto Mode, which makes optimal
settings for the subject and scene.
Functions that can be set differ between Intelligent Auto Plus Mode and Intelligent Auto Mode.
(±: possible, —: not possible)
Intelligent Auto Plus Mode Intelligent Auto Mode
Setting the brightness (P56) ± —
Setting the colour tone (P56) ± —
Defocus Control (P55) ±±
Menus that can be set Refer to P54 for details. Refer to P54 for details.
Set the Recording Mode to [¦]/[ ]. (P51)
1
Align the screen with the subject.
2
≥ When the unit identifies the optimum scene, the icon of the scene concerned is
displayed in blue for 2 seconds, after which its colour changes to the usual red.
≥ If the exposure is not adequate, the aperture value and the shutter speed turn red and blink when the shutter
button is pressed halfway.
52
Page 53

4. Camera
∫ Scene Detection
When taking pictures
¦ > [i-Portrait]
[i-Scenery]
[i-Macro]
[i-Night Portrait]
[i-Night Scenery]
[i-Food]
[i-Sunset]
When recording motion pictures
¦ > [i-Portrait]
[i-Scenery]
[i-Low Light]
[i-Macro]
≥ [¦] is set if none of the scenes are applicable, and the standard settings are set.
≥ When [ ] or [ ] is selected, the unit automatically detects a person’s face, and it will adjust the focus and
exposure. (Face Detection)
≥ During AF Tracking, Scene Detection does not work until the subject is locked.
≥ Due to conditions such as the ones below, a different scene may be identified for the same subject.
– Subject conditions: When the face is bright or dark, the size, colour and shape of the subject, the
distance to the subject, the contrast of the subject, when the subject is moving
– Recording conditions: Sunset, sunrise, under low brightness conditions, when the unit is shaken, when
zoom is used
53
Page 54

4. Camera
∫ Functions that work automatically
The following functions work automatically in order for the unit to perform the most optimum settings.
≥ Scene Detection
≥ Backlight Compensation
≥ Face Detection
≥ Auto White Balance
≥ Intelligent ISO sensitivity control
≥ [Red-Eye Removal]
≥ [i.Resolution]
≥ [i.Dynamic]
≥ [AF Assist Lamp]
The Backlight Compensation
≥ When there is a backlight, the subject appears darker and the unit will automatically attempt to correct it by
increasing the brightness of the picture.
In Intelligent Auto Plus Mode or Intelligent Auto Mode, backlight compensation works automatically.
∫ Menus that can be set
Only the following menus can be set.
Intelligent Auto Plus Mode
Menu Item
[Rec]
[Motion Picture] [Photo Style]/[Rec Quality]
[Custom]
[Setup] All menu items can be set. (P122)
Menu Item
[Rec] [Drive Mode]/[Aspect Ratio]/[Picture Size]/[AF Mode]/[Focus Mode]/[Flash]
[Motion Picture] [Rec Quality]
[Custom] [Silent Mode]/[Guide Line]/[Touch Settings]
[Setup] All menu items can be set. (P122)
[Drive Mode]/[Photo Style]/[Aspect Ratio]/[Picture Size]/[Quality]/[AF Mode]/[Focus
Mode]/[Flash]/[Shutter Type]/[Color Space]
[Silent Mode]/[Peaking]/[Detect Level]/[Histogram]/[Guide Line]/[Auto Review]/[Touch
Settings]
Intelligent Auto Mode
54
Page 55

4. Camera
2.82.8
3.23.2
2.8
∫ Taking a picture with a blurred background (Defocus Control)
Recording Mode:
You can easily set the blurriness of the background while checking the screen.
Set the aperture value to a higher number when you want a sharp focus background. Set the aperture value to a
lower number when you want a soft focus background.
1 [] > [ ]. (P84)
2 Operate the control ring to set the blur.
AUTO
2.8
2.8
6060602.8
2.8
Strong defocus Weak defocus
3 Taking pictures.
≥ When recording a motion picture, the blur is adjusted automatically.
3.2
3.2
55
Page 56

4. Camera
0 33
AWBAWBAWB
∫ Recording images by changing the brightness or colour tone
Recording Mode:
This mode enables you to change the brightness and colour tone to your preferred settings from the ones set by
this unit.
Setting brightness
1 [] > [ ]. (P84)
2 Operate the control ring to adjust the brightness.
≥ Tap [ ] to return to the Recording screen.
0
0
0
0
・
・
・
・
・
・
・
・
・
・
・
・
・
・
・
・
1
1
1
1
-
-
-
-
+
+
+
+
・
・
・
・
1
1
1
1
・
・
・
・
・
・
・
・
・
・
・
・
2
2
2
2
-
-
-
-
・
・
・
・
・
・
・
・
3
3
3
3
-
-
-
-
Setting colour (Fine adjustment of the White Balance)
1 [] > [ ]. (P84)
2 Operate the control ring to adjust the colour.
≥ This will adjust the colour of the image from a reddish colour to
a bluish colour.
≥ Tap [ ] to return to the Recording screen.
≥ The set colour will return to normal (centre point) when this unit is turned off, when the camera function is
terminated, or when the Recording Mode is changed.
+
+
+
+
2
2
2
2
・
・
・
・
・
・
・
・
+
+
+
+
3
3
3
3
56
Page 57

4. Camera
1
0
0
8
0
6
0
5
0
4
0
4.0
4.5
5.0
5.6
6060605.05.05.0
AWBAWBAWB
0 33
6.3
AUAUToAUToAUTo
B
A
Taking Pictures with Your Favourite Settings (Programme AE Mode)
Recording Mode:
The unit automatically sets the shutter speed and aperture value according to the
brightness of the subject.
You can take pictures with greater freedom by changing various settings in the [Rec]
menu.
Set the Recording Mode to [ ]. (P51)
1
Press the shutter button halfway and then
2
release it to display a yellow bar under the
figures for the aperture and shutter speed.
Perform the Programme Shift by rotating the control ring while the yellow bar
3
is being displayed (for about 10 seconds).
≥ The Programme Shift indication A and Exposure meter B appear on the screen.
≥ To cancel Programme Shift, either change the Recording Mode, or rotate the control ring until the Programme
Shift display disappears.
∫ Programme Shift
In Programme AE Mode, you can change the preset aperture value and shutter speed without changing the
exposure. This is called Programme Shift.
You can make the background more blurred by decreasing the aperture value or record a moving subject more
dynamically by slowing the shutter speed when taking a picture in Programme AE Mode.
≥ Programme Shift is available in all [Sensitivity] settings except [ ].
≥ If the exposure is not adequate, the aperture value and the shutter speed turn red and blink when the shutter
button is pressed halfway.
57
Page 58

4. Camera
2.8
A
Aperture-Priority AE Mode
Recording Mode:
Set the aperture value to a higher number when you want a sharp focus background.
Set the aperture value to a lower number when you want a soft focus background.
Set the Recording Mode to [ ]. (P51)
1
Operate the control ring to set the aperture
2
value. (P84)
A Aperture Value
A
2.8
2.8
2.8
3.2
F
3.5
Aperture value:
Reduces
It becomes easier to defocus
the background.
Available Aperture Value Shutter Speed (Sec)
F2.8 to F11
≥ If the exposure is not adequate, the aperture value and the shutter speed turn red and blink when the shutter
button is pressed halfway.
Aperture value:
Increases
It becomes easier to
maintain focus as far as the
background.
60 to 1/16000 (with the [Shutter Type] set to [Auto])
58
60 to 1/2000 (with the [Shutter Type] set to
[Mechanical Shutter])
Page 59

4. Camera
A
Shutter-Priority AE Mode
Recording Mode:
When you want to take a sharp picture of a fast moving subject, set with a faster
shutter speed. When you want to create a trail effect, set to a slower shutter speed.
Set the Recording Mode to [ ]. (P51)
1
Operate the control ring to set the shutter
2
speed. (P84)
A Shutter Speed
S
60
80
50
40
606060
SS
100
Shutter speed:
Slow
It becomes easier to express
movement.
Available Shutter Speed (Sec)
60 to 1/16000 (with the [Shutter Type] set to [Auto])
60 to 1/2000 (with the [Shutter Type] set to
[Mechanical Shutter])
¢1 When [Burst] in the [Rec] menu is set to [SH], the shutter speed becomes 1/50 to 1/16000.
≥ If the exposure is not adequate, the aperture value and the shutter speed turn red and blink when the shutter
button is pressed halfway.
≥ If the shutter speed is slow, we recommend that the unit be fixed.
≥ The [Sensitivity] is automatically set to [AUTO] when you switch the Recording Mode to Shutter-Priority AE
Mode while the [Sensitivity] is set to [ ].
Shutter speed:
Fast
It becomes easier to freeze
movement.
¢1
59
Aperture Value
F2.8 to F11
Page 60

4. Camera
2.8
F
0 33
B
A
C
Manual Exposure Mode
Recording Mode:
Determine the exposure by manually setting the aperture value and the shutter
speed.
The Manual Exposure Assistance appears on the lower portion of the screen to
indicate the exposure.
Set the Recording Mode to [ ]. (P51)
1
Operate the control ring to set the aperture
2
value and shutter speed. (P84)
≥ The unit switches between aperture setting operation and
shutter speed setting operation each time [ ] is tapped.
A Aperture value
B Shutter speed
C Manual Exposure Assistance
Aperture value
M
60
50
40
2.8
2.8
606060
SS
80
100
F
SS
Reduces
It becomes easier to defocus the
background.
Shutter speed
Slow
It becomes easier to express movement.
Available Aperture Value Available Shutter Speed (Sec)
F2.8 to F11
¢1 When [Burst] in the [Rec] menu is set to [SH], the shutter speed becomes 1/50 to 1/16000.
60 to 1/16000 (with the [Shutter Type] set to [Auto])
60
Increases
It becomes easier to maintain focus as
far as the background.
Fast
It becomes easier to freeze movement.
60 to 1/2000 (with the [Shutter Type] set to
[Mechanical Shutter])
¢1
Page 61

4. Camera
++30+
30
00
−3−
3
++30+
30
00
−3−
3
++30+
30
00
−3−
3
Manual Exposure Assistance
The exposure is adequate.
Set to faster shutter speed or larger aperture value.
Set to slower shutter speed or smaller aperture value.
≥ The Manual Exposure Assistance is an approximation. We recommend checking the pictures on the playback
screen.
≥ If the exposure is not adequate, the aperture value and the shutter speed turn red and blink when the shutter
button is pressed halfway.
≥ If the shutter speed is slow, we recommend that the unit be fixed.
≥ Switching the Recording Mode to Manual Exposure Mode while the ISO sensitivity is [ ] or [AUTO] switches
the ISO sensitivity to [125].
61
Page 62

4. Camera
050005000500
AA
C1C 1C1
Registering your preferred settings (Custom Mode)
Recording Mode:
You can register the current camera function settings as custom settings.
If you then record in Custom Mode, you can use the registered settings.
≥ Initial setting of the Programme AE Mode is registered as the custom settings initially.
∫ Registering Personal Menu Settings (Registering custom settings)
Up to 2 sets of the current camera settings can be registered in [Cust.Set Mem.] to allow recording to be
performed with the same settings. ( / )
Preparations:
Set in advance the Recording Mode you wish to save and select the desired menu settings on the unit.
1 From the Recording screen > [ ] > [Custom] > [Cust.Set Mem.].
2 Tap [C1]/[C2].
≥ Confirmation screen is displayed. It is executed when [OK] is selected.
Exit the menu after it is executed.
≥ The following items are not registered as custom settings.
– [Auto Backup]/[No.Reset] ([Setup] menu)
– Camera Mode (outward facing camera/inward facing camera)
∫ Recording using registered custom set
You can easily call up the settings you have registered using [Cust.Set Mem.].
Set the Recording Mode to [ ]/[ ]. (P51)
≥ The custom set will be called up.
≥ Saving of the selected custom settings is displayed on the screen.
∫ Changing the settings
Registered content will not change even when the menu setting is changed temporarily with the Recording Mode
set to or .
To change the registered settings, overwrite the registered content using [Cust.Set Mem.] on the [Custom] menu.
62
Page 63

4. Camera
Taking Pictures that match the Scene being recorded (Scene Guide
Mode)
Recording Mode:
If you select a scene to suit the subject and recording conditions while viewing
sample pictures, the unit will set the optimal exposure, colour and focus, allowing you
to take pictures matching the scene.
Set the Recording Mode to [ ] and tap the
1
scene example. (P51)
Scroll and select the scene example (P64 to
2
P69) and then tap it.
≥ Scroll the screen to display hidden items.
≥ If you wish to change the Scene Guide Mode, you can display the selection screen by operating the control ring
in the Recording screen. (P84)
≥ The following items cannot be set in Scene Guide Mode because the unit automatically adjusts them to the
optimal setting.
– Changing the [Photo Style] effect
– [Sensitivity]
≥ If the exposure is not adequate, the aperture value and the shutter speed turn red and blink when the shutter
button is pressed halfway.
63
Page 64

4. Camera
[Clear Portrait]
The brightness of the face is adjusted and the background is defocused
to create a clear portrait.
[Silky Skin]
Brighter face and softer skin colour creates a healthy younger look.
≥ The smoothing effect is applied to the part that has a similar
tone to the complexion of a subject, as well.
≥ This mode may not be effective under insufficient lighting.
[Backlit Softness]
When backlighted, the overall screen brightness is increased. Portraits
are softened and infused with light.
[Relaxing Tone]
The warm colour tone creates an image with a relaxing mood.
64
Page 65

4. Camera
[Sweet Child's Face]
Moderate background defocusing and skin tone highlighted draws
attention to the child’s face.
[Distinct Scenery]
Saturation of sky and trees creates more distinct scenery.
[Bright Blue Sky]
On a sunny day, the overall screen brightness is increased to create a
vibrant image of the blue sky.
[Romantic Sunset Glow]
The enhanced purple tone creates a romantic image of the sky just
after sunset.
65
Page 66

4. Camera
[Vivid Sunset Glow]
Red is enhanced to create a vivid image of the sunset.
[Glistening Water]
The glisten of the water is enhanced to look brighter and slightly bluish.
≥ Display of the Recording screen will be delayed more than
usual and the screen will look as if frames are dropping.
≥ Star filter used in this mode may cause glistening effects on
the objects other than water surface.
[Clear Nightscape]
Colour saturation of the night light is increased to accentuate the
nightscape.
≥ We recommend that you fix the unit and take pictures using
the Self-timer.
≥ The shutter may remain closed after taking the picture. This is
due to signal processing and is not a malfunction.
≥ Noise may become visible when you take pictures in dark
places.
[Cool Night Sky]
Blue tones are enhanced to create a cool and sophisticated image of
the night sky after sunset.
≥ We recommend that you fix the unit and take pictures using
the Self-timer.
≥ The shutter may remain closed after taking the picture. This is
due to signal processing and is not a malfunction.
≥ Noise may become visible when you take pictures in dark
places.
66
Page 67

4. Camera
[Warm Glowing Nightscape]
The warm colour tone creates a warm image of the nightscape.
≥ We recommend that you fix the unit and take pictures using
the Self-timer.
≥ The shutter may remain closed after taking the picture. This is
due to signal processing and is not a malfunction.
≥ Noise may become visible when you take pictures in dark
places.
[Artistic Nightscape]
A slow shutter speed captures light trails that can creates an artistic
nightscape.
≥ We recommend that you fix the unit and take pictures using
the Self-timer.
≥ The shutter may remain closed after taking the picture. This is
due to signal processing and is not a malfunction.
≥ Noise may become visible when you take pictures in dark
places.
[Glittering Illuminations]
The star filter enhances pinpoints of light.
≥ We recommend that you fix the unit and take pictures using
the Self-timer.
≥ Display of the Recording screen will be delayed more than
usual and the screen will look as if frames are dropping.
≥ The shutter may remain closed after taking the picture. This is
due to signal processing and is not a malfunction.
≥ Noise may become visible when you take pictures in dark
places.
[Handheld Night Shot]
Capture multiple images and combine the data to minimise blur and
noise for hand-held shooting with night scenery.
≥ Do not move the unit during the continuous shooting after
pressing the shutter button.
≥ The angle of view will be slightly narrower.
67
Page 68

4. Camera
[Clear Night Portrait]
Fill flash and a longer exposure capture better portraits against the
nightscape.
≥ Use the flash.
≥ We recommend that you fix the unit and take pictures using
the Self-timer.
≥ When [Clear Night Portrait] is selected, keep the subject still
for about 1 second after taking the picture.
≥ When [Silent Mode] is set to [ON], the flash is not activated.
≥ The shutter may remain closed after taking the picture. This is
due to signal processing and is not a malfunction.
≥ Noise may become visible when you take pictures in dark
places.
[Appetizing Food]
The overall screen brightness is increased to make the food look
appealing.
≥ We recommend that you fix the unit and take pictures using
the Self-timer.
≥ We recommend that you do not use the flash when taking
close-up pictures.
[Cute Dessert]
The overall screen brightness is set higher to enhance the cuteness of
the dessert.
≥ We recommend that you fix the unit and take pictures using
the Self-timer.
≥ We recommend that you do not use the flash when taking
close-up pictures.
68
Page 69

4. Camera
[Freeze Animal Motion]
The faster shutter speed prevents blur and captures a clear image of
the fast moving animal.
[Clear Sports Shot]
The faster shutter speed prevents blur, for example at sporting events.
[Monochrome]
A monochrome image captures the mood of the moment.
69
Page 70

4. Camera
Taking Pictures with different image effects (Creative Control Mode)
Recording Mode:
This mode records with additional image effects.
Set the Recording Mode to [ ] and tap the
1
image effect (filter). (P51)
Select and tap the image effect (filter) (P72 to
2
P76).
≥ Scroll the screen to display hidden items.
≥ The White Balance will be fixed to [AWB] and the ISO sensitivity will be fixed to [AUTO]. In addition, the Photo
Style will be fixed to [Standard] and the Colour Space will be fixed to [sRGB].
≥ If the exposure is not adequate, the aperture value and the shutter speed turn red and blink when the shutter
button is pressed halfway.
70
Page 71

4. Camera
6060602.82.82.8
2.82.82.82.8
AUTO
3.23.23.23.2
POP
0 33
±1
∫ Taking a picture with a blurred background (Defocus Control)
You can easily set the blurriness of the background while checking the screen.
1 [] > [ ]. (P84)
2 Operate the control ring to set the blur.
≥ Tap [ ] to return to the Recording screen.
≥ This function is not available in the following case:
– [Miniature Effect] (Creative Control Mode)
∫ Setting brightness
1 Tap [ ].
2 Operate the control ring to configure settings.
≥ Tap [ ] to return to the Recording screen.
POP
・
・
・
・
・
・
・
・
3
3
3
3
-
-
-
-
±1
0
0
0
0
・
・
・
・
・
・
・
・
・
・
・
・
・
・
・
・
1
1
1
1
-
-
-
-
+
+
+
+
・
・
・
・
1
1
1
1
・
・
・
・
・
・
・
・
・
・
・
・
2
2
2
2
-
-
-
-
+
+
+
+
2
2
2
2
・
・
・
・
・
・
・
・
+
+
+
+
3
3
3
3
0
71
Page 72

4. Camera
[Expressive]
This effect emphasises the colour to make a pop art picture.
[Retro]
This effect gives a faded image.
[Old Days]
This effect adds a bright, soft and nostalgic feel to the overall image.
[High Key]
This effect adds a bright, airy and soft feel to the overall image.
≥ If you select this effect with Panorama Shot Mode, the effect
may not be apparent in places with insufficient brightness.
72
Page 73

4. Camera
[Low Key]
This effect adds a dark and relaxing feel to the overall image and
enhances bright parts.
[Sepia]
This effect creates a sepia image.
[Monochrome]
This effect creates a black and white picture.
[Dynamic Monochrome]
This effect gives a higher contrast to create an impressive black and
white picture.
[Impressive Art]
This effect gives your photo a dramatic contrast look.
≥ If you select this effect with Panorama Shot Mode, seams
between pictures may become noticeable.
73
Page 74

4. Camera
[High Dynamic]
This effect produces the optimum brightness for both dark and bright
parts.
[Cross Process]
This effect gives your photo a dramatic colour look.
[Toy Effect]
This effect reduces peripheral brightness to give the impression of a toy
camera.
[Toy Pop]
This effect creates a vivid and bright image with the look of a toy
camera.
[Bleach Bypass]
This effect gives a higher contrast and a lower saturation to create a
calm and tranquil picture.
74
Page 75

4. Camera
[Miniature Effect]
This effect blurs peripheral areas to give the impression of a diorama.
Setting the type of defocus
With [Miniature Effect] you can make the subject stand out by
intentionally creating defocused and in-focus portions.
You can set the recording orientation (defocus orientation) and
the position and size of the in-focus portion.
1 From the Recording screen > [ ].
2 Tap [ ] to set the recording orientation (def ocus
orientation).
3 Tap the in-focus area.
4 Drag [±] to change the size of the in-focus area.
≥ You can change to 3 types of size.
5 Tap [ ].
≥ Display of the Recording screen will be delayed more than
usual and the screen will look as if frames are dropping.
75
Page 76

4. Camera
[Fantasy]
This effect creates a fantastical image in a pale colour tone.
[Star Filter]
This effect transforms pin-points of light into a star effect.
≥ Display of the Recording screen will be delayed more than
usual and the screen will look as if frames are dropping.
[One Point Color]
This effect leaves one selected colour to emphasise impressiveness.
Set the colour to leave in
Set the colour to leave in by selecting a location on the screen.
1 Ta p [ ].
2 Tap the area of the colour you wish to preserve.
3 Tap [ ].
≥ Depending on the subject, the set colour may not be left in.
76
Page 77

4. Camera
A
Taking panorama pictures (Panorama Shot Mode)
Recording Mode:
Consecutive photos taken while this unit is moved are combined to form a panorama.
Set the Recording Mode to [ ]. (P51)
1
Adding an image effect
Operate the control ring to select the image effect. (P84)
≥ With the same operation as the Creative Control Mode, the same image effect as the Creative Control
Mode can be added. (P70) (excluding [Toy Effect], [Toy Pop], [Bleach Bypass], [Miniature Effect] and
[Fantasy])
≥ If no image effect is to be added, select [No Effect].
Press the shutter button halfway to focus.
2
Press the shutter button fully and move the unit in a small circle in the
3
direction of the arrow on the screen.
Recording from left to right
A Recording direction and panning (Guide)
≥ Move the unit at a constant speed.
Pictures may not be able to be recorded properly if the unit is moved too fast or slow.
Press the shutter button once again to end the still picture recording.
4
≥ Recording can also be ended by moving the unit to the end of the guide.
77
Page 78

4. Camera
≥ Move the unit towards the recording direction while taking care not to shake the unit.
(If the camera shakes too much, pictures may not be able to be recorded, or the recorded panorama picture
may become narrower (smaller) .)
≥ The zoom position is fixed to Wide.
≥ If the exposure is not adequate, the aperture value and the shutter speed turn red and blink when the shutter
button is pressed halfway.
≥ The White Balance is fixed to [AWB].
≥ When multiple pictures are combined to create a single panorama picture, the subject may appear distorted or
the connection points may be noticeable in some cases.
≥ The maximum number of pixels for recording panorama pictures is as follows.
Horizontal Resolution Vertical Resolution
Horizontal Approx. 3800 pixels Approx. 640 pixels
≥ [Shutter Type] is fixed to [AUTO].
≥ A panorama picture may not be able to be created, or the pictures may not be combined properly when
recording the following subjects or under the recording conditions below.
– Subjects with a single, uniform colour or repetitive pattern (such as the sky or a beach)
– Moving subjects (person, pet, car, waves, flowers blowing in the breeze, etc.)
– Subjects where the colour or patterns change in a short time (such as an image appearing on a display)
– Dark places
– Locations with flickering light sources such as fluorescent lights or candles
78
Page 79

4. Camera
ヮユワヶ
0500
2.8
AWB
0 33
A
HDR
OFF
DISP.DISP.
GPS
OFF
AU
TO
×
2.0×2.0
iAiA
WW
TT
A
B
Zoom and Flash
Taking Pictures with the Zoom
Applicable modes:
You can zoom-out to record landscapes etc. in wide angle (Wide) or zoom-in to make
people and objects appear closer (Tele).
(Maximum magnification: 4k)
Pinching in/pinching out the screen.
or
Operating with the control ring. (P84)
1 [] > [ ].
≥ A Zoom function is assigned to the control ring in Intelligent
Auto Plus Mode or Intelligent Auto Mode.
05000500
MP4
3:2
AFAFAF
p
A
L
30
AF
HDRHDR
GPSGPS
OFFOFF
OFFOFF
2 Operate the control ring.
ヮユワヶ
W
A Zoom magnification
B Zoom types
6060602.8
2.8
2.0
2.0
×
×
iA
iA
AU
AU
T
Q.
DISP.
DISP.
MENUQ.MENU
TO
TO
AWB
AWB
79
Page 80

4. Camera
∫ About zoom types
Use Extra Optical Zoom, Intelligent Zoom or Digital Zoom to zoom in.
Combinations of zoom types are fixed depending on the picture sizes.
[EZ] Extra Optical Zoom
[iA] Intelligent Zoom
[Digital] Digital Zoom
≥ This function is not available in the following cases:
– [Impressive Art]/[Toy Effect]/[Toy Pop]/[Miniature Effect] (Creative Control Mode)
– [Handheld Night Shot] (Scene Guide Mode)
– When [Burst] in the [Rec] menu is set to [SH]
– When [HDR] is set to [ON]
– When [Quality] is set to [ ] or [ ]
≥ Zooming cannot be performed by pinching in/pinching out in the following case.
– When [Touch Shutter] in the [Touch Settings] is set.
≥ This function works when any of the picture sizes indicated
with “EX” (P104) are selected.
Zooms in without deteriorating the image quality.
≥ You can zoom in while minimising deterioration of the image
quality.
≥ The image quality deteriorates as it is zoomed in, however
the zoom factor can be increased more.
80
Page 81

4. Camera
Taking pictures by using the flash
Applicable modes:
With the built-in flash you can take pictures in dark places or adjust the entire
contrast of a picture by illuminating a subject with a bright background.
Flash
Do not cover it with your fingers or other objects.
From the Recording screen > [ ] > [Rec] > [Flash].
The flash is automatically activated when the recording conditions
[‡] ([Auto])
[‰] ([Forced Flash On])
[] ([Always ON])
[Œ] ([Forced Flash Off]
make it necessary.
≥ The flash is [ ] to suit recording conditions while [Burst],
[Auto Bracket] or recording motion pictures. It does not turn
off until recording is complete.
The flash is activated every time regardless of the recording
conditions.
≥ The flash is temporarily [‡] while [Burst], [Auto Bracket] or
recording motion pictures.
Permanently on.
≥ The available recording range is smaller than when recording
with [‡] and [‰].
The flash is not activated in any recording conditions.
)
≥ Use this when you take pictures in places where the use of
flash is not permitted.
≥ Correcting red-eye (P113)
81
Page 82

4. Camera
∫ The available flash range (approximation)
If the distance to the subject is close when taking a picture using a flash, part of the recorded image becomes
dark because the light of flash is blocked by the lens or it becomes out of flash range. Check the distance to the
subject when taking a picture.
Wide
[AUTO] in [Sensitivity] 60 cm (2.0 feet) to 5.3 m (17 feet)
≥ This is the range when [ISO Limit Set] (P113) is set to [OFF].
≥ Recording a subject from too close, or without sufficient flash will not provide the appropriate level of exposure,
and may result in a picture that is too white or dark.
≥ If recording a subject without sufficient flash, the White Balance may not be properly adjusted.
∫ Shutter speed for each flash setting
Flash setting Shutter speed (Sec.)
‡
‰
Œ
60 to 1/16000 (with the [Shutter Type] set to [Auto])
60 to 1/2000 (with the [Shutter Type] set to [Mechanical Shutter])
82
Page 83

4. Camera
∫ Available flash settings by Recording Mode
The available flash settings depend on the Recording Mode.
(±: Available, —: Not available)
Recording Mode ‡‰ Œ
Intelligent Auto Mode ± —— ±
Intelligent Auto Plus Mode ± —— ±
Programme AE Mo de ±±±±
Aperture-Prio rity AE Mode ±±±±
Shutter-Priority AE Mode ±±±±
Manual Expo sure Mode ±±±±
Creative Control Mode — — — ±
Panorama Shot Mode — — — ±
[Clear Portrait] ±±— ±
[Silky Skin] ±±— ±
[Backlit Softness] ——— ±
[Relaxing Tone] ———±
[Sweet Child's Face] ±±— ±
[Distinct Scenery] ———±
[Bright Blue Sky] ———±
[Romantic Sunset Glow] ———±
[Vivid Sunset Glow] ———±
[Glistening Water] ———±
Scene Guide
Mode
[Clear Nightscape] —— —±
[Cool Night Sky] ——— ±
[Warm Glowing Nightscape] ———±
[Artistic Nightscape] ———±
[Glittering Illuminations] ———±
[Handheld Night Shot] ———±
[Clear Night Portrait] ±±— ±
[Appetizing Food] ±±— ±
[Cute Dessert] ±±— ±
[Freeze Animal Motion] ±±— ±
[Clear Sports Shot] ±±— ±
[Monochrome] ±±— ±
he flash setting may change if the Recording Mode is changed. Set the flash setting again if necessary.
≥ T
≥ In the following cases, the flash is fixed to [Œ].
– When [HDR] is set to [ON]
– When [Silent Mode] is set to [ON]
83
Page 84

4. Camera
××
2.02.0×2.0×2.0
iAiAiAiA
WWW
TTT
Operating the control ring
Applicable modes:
A function to suit the Recording Mode is assigned to the control ring.
∫ Rotating the control ring
Functions assigned by the control ring can be set by directly
rotating the control ring from the Recording screen. (P85)
∫ Operating the control ring bar with touch operations
Operation of the control ring bar differs depending on the configured
function.
≥ Tap the item on the control ring to configure it.
≥ Drag the slide bar on the control ring and move it to the value to
configure.
Control ring bar
84
Page 85

4. Camera
ヮユワヶ
0500
2.8
AWB
0 33
A
HDR
OFF
DISP.DISP.
GPS
OFF
AU
TO
WWW
TTT
∫ Change various settings with the control ring
1 Tap [ ] .
05000500
MP4
3:2
p
A
L
30
AF
HDRHDR
GPSGPS
AFAFAF
OFFOFF
OFFOFF
ヮユワヶ
2 Select the item.
[] Zoom (P79)
[] Defocus Control (P55)
[] Fine adjustment of the White Balance (P56)
[] Exposure Compensation (P86)
[] [Sensitivity] (P87)
[] White Balance (P88)
[] [Aperture] (P58, 60)
[] [Shutter Speed] (P59, 60)
[] Creative Control selection (P 70)
[] Scene Guide selection (P63)
≥ The items and the order they are displayed differ depending on the Recording Mode.
3 Operating the control ring. (P84)
4 Tap [ ] to close the menu.
Q.
DISP.
DISP.
6060602.8
2.8
AU
AU
MENUQ.MENU
TO
TO
AWB
AWB
85
Page 86

4. Camera
-
3
・
・
-
2
・
・
-
1
・
・
0
・
・
+
1
・
・
+
2
・
・
+
3
-
3
・
・
-
2
・
・
-
1
・
・
0
・
・
+
1
・
・
+
2
・
・
+
3
-
3
・
・
-
2
・
・
-
1
・
・
0
・
・
+
1
・
・
+
2
・
・
+
3
-
3
・
・
-
2
・
・
-
1
・
・
0
・
・
+
1
・
・
+
2
・
・
+
3
0 33
Compensating the Exposure
Applicable modes:
Use this function when you cannot achieve appropriate exposure due to the
difference in brightness between the subject and the background.
[] > [ ]. (P84)
1
Operate the control ring to configure settings.
2
Underexposed Properly exposed Overexposed
Compensate the exposure towards
positive.
≥ Select [0] to return to the original exposure.
Tap [ ].
3
86
Compensate the exposure towards
negative.
Page 87

4. Camera
125125
ISO
AUToAUTo
Setting the Light Sensitivity
Applicable modes:
This allows the sensitivity to light (ISO sensitivity) to be set. Setting to a higher figure
enables pictures to be taken even in dark places without the resulting pictures
coming out dark.
[] > [ ]. (P84)
1
Operate the control ring to configure settings.
2
AUTO
ISO
ISO
AU
AUTo
[AUTO]
[]
(Intelligent)
[L.100]¢2/[125]/[200]/[400]/[800]/
[1600]/[3200]/[6400]/[12800]/
¢2
[H.25600]
¢1 When the [ISO Limit Set] (P113) of [Rec] menu is set to anything except [OFF], it is set automatically within
the value set in [ISO Limit Set].
¢2 Only available when [Extended ISO] is set.
Tap [ ].
3
The ISO sensitivity is automatically adjusted according to the
brightness.
≥ Maximum [3200]
The unit detects movement of the subject and then automatically
sets the optimum ISO sensitivity and shutter speed to suit the
movement of the subject and brightness of the scene to minimise
the jitter of the subject.
≥ Maximum [3200]
≥ The shutter speed is not fixed when the shutter button is pressed
halfway. It is continuously changing to match the movement of the
subject until the shutter button is pressed fully.
The ISO sensitivity is fixed to various settings.
≥ When the [ISO Increments] (P114) in [Rec] menu is set to
[1/3 EV], items of ISO sensitivity that can be set will increase.
¢1
¢1
125
125
Characteristics of the ISO sensitivity
125 12800
Recording location (recommended) When it is light (outdoors) When it is dark
Shutter speed Slow Fast
Noise Less Increased
Jitter of the subject Increased Less
87
Page 88

4. Camera
AWB
≥ For the focus range of flash when [AUTO] is set, refer to P82.
≥ [ ] is not available in the following cases.
– Shutter-Priority AE Mode
– Manual Exposure Mode
≥ [AUTO] is not available in the following case.
– Manual Exposure Mode
Adjusting the White Balance
Applicable modes:
In sunlight, under incandescent lights or in other such conditions where the colour of
white takes on a reddish or bluish tinge, this item adjusts to the colour of white which
is closest to what is seen by the eye in accordance with the light source.
[] > [ ]. (P84)
1
Operate the control ring to select an item.
2
AWB
AWB
AWB
[AWB] ([Auto White Balance]) Automatic adjustment
[V] ([Daylight]) When taking pictures outdoors under a clear sky
[Ð] ([Cloudy]) When taking pictures outdoors under a cloudy sky
[î] ([Shade]) When taking pictures outdoors in the shade
[Ñ] ([Incandescent]) When taking pictures under incandescent lights
[] ([Color Temperature]) When using the preset colour temperature setting
[] ([White Set]) The manually set value is used
≥ Under fluorescent lighting, LED lighting fixture etc., the appropriate White Balance will vary depending on the
lighting type, so use [AWB] or [ ].
≥ The White Balance is only calculated for subjects within the flash range of this unit. (P82)
≥ In Scene Guide Mode, changing the scene or Recording Mode will return White Balance settings (including the
White Balance fine adjustment setting) back to [AWB].
≥ In the Scene Guide Modes listed below, White Balance is fixed to [AWB].
– [Backlit Softness]/[Relaxing Tone]/[Distinct Scenery]/[Bright Blue Sky]/[Romantic Sunset Glow]/[Vivid Sunset
Glow]/[Glistening Water]/[Clear Nightscape]/[Cool Night Sky]/[Warm Glowing Nightscape]/[Artistic
Nightscape]/[Glittering Illuminations]/[Handheld Night Shot]/[Clear Night Portrait]/[Appetizing Food]/[Cute
Dessert]
88
Page 89

4. Camera
∫ Auto White Balance
Depending on the conditions prevailing when pictures are taken, the pictures may take on a reddish or bluish
tinge. Furthermore, when a multiple number of light sources are being used or there is nothing with a colour close
to white, Auto White Balance may not function properly. In a case like this, set the White Balance to a mode other
than [AWB].
1 Auto White Balance will work within this range.
2 Blue sky
3 Cloudy sky (Rain)
4 Shade
5 Sunlight
6 White fluorescent light
7 Incandescent light bulb
8 Sunrise and sunset
9 Candlelight
KlKelvin Colour Temperature
∫ Setting the White Balance manually
Set the White Balance value. Use to match the condition when taking photographs.
1 Select [ ]. (P88)
2 Tap [ ].
3 Aim the camera at a sheet of white paper or other object so
that only the white object fills the entire screen, and tap
[].
OKOK
≥ White Balance may not be set when the subject is too bright or too dark. Set the White Balance again after
adjusting to appropriate brightness.
89
Page 90

4. Camera
K
H
L
6500
AWB
∫ Setting the colour temperature
You can set the colour temperature manually for taking natural pictures in different lighting conditions.
The colour of light is measured as a number in degrees Kelvin. As the colour temperature increases, the picture
becomes more bluish. As the colour temperature decreases, the picture becomes more reddish.
1 [] > [ ]. (P84)
2 Operate the control ring and align [ ] to the centre.
3 Tap [ ].
4 Operate the control ring to configure settings.
≥ You can set a colour temperature from [2500] to [10000].
≥ Exit the menu after it is set.
6500
6500
L
K
∫ Finely adjusting the White Balance
You can finely adjust the White Balance when you cannot acquire the desired hue by setting the White Balance.
1 [] > [ ]. (P84)
2 Tap [ ].
3 Operate the control ring to configure settings.
Left: Red (If blue is too strong.)
Right: Blue (If red is too strong.)
≥ Return the White Balance fine adjustment bar to the centre
when no adjustment to the White Balance fine adjustment is
required.
≥ Exit the menu after it is set.
AWB
AWB
H
≥ If you finely adjust the White Balance, the White Balance icon on the screen turns red or blue.
≥ The White Balance fine adjustment setting is reflected in the picture when using the flash.
≥ You can finely adjust the White Balance independently for each White Balance item.
90
Page 91

4. Camera
ヮユワヶ
0500
2.8
AWB
0 33
A
HDR
OFF
DISP.DISP.
GPS
OFF
AU
TO
Setting the Menu
Various fun and user-friendly menu options are available for you to set your unit to take
pictures the way you want.
Example: In the [Rec] menu, change [Quality] from [
From the Recording screen > [ ].
1
A] to [›]
05000500
MP4
3:2
p
A
L
30
AF
HDRHDR
GPSGPS
AFAFAF
OFFOFF
OFFOFF
Select the menu.
2
Select the menu item.
3
≥ Scroll the screen to display hidden items.
Select the setting.
4
≥ The available settings differ depending on the Recording Mode.
≥ There are functions that cannot be set or used depending on the modes or menu settings being used on this
unit due to the specifications.
∫ Close the menu
Tap [ ] repeatedly to return to the Recording screen.
≥ The menu screen can also be exited by pressing the shutter button halfway.
ヮユワヶ
6060602.8
2.8
AU
AU
Q.
MENUQ.MENU
TO
TO
AWB
AWB
[Rec] (P96)
This menu lets you set the aspect ratio, number of pixels and other aspects of the pictures you are
recording.
[Motion Picture] (P93)
This menu lets you set the [Rec Quality], and other aspects for motion picture recording.
[Custom] (P 116)
Your favourite operation environment can be configured to suit the recording style.
[Setup] (P122)
The unit can be configured for easier use, such as changing the save destination of images.
DISP.
DISP.
91
Page 92

4. Camera
Menu list
∫ [Rec]
This menu lets you set the aspect ratio, number of pixels and other aspects of the pictures you are recording.
≥ [Photo Style], [Metering Mode], [i.Dynamic] and [i.Resolution] are common to both the [Rec] menu and [Motion
Picture] menu. Changing these settings in one of these menus is reflected in other menu.
[Drive Mode] You can change what this unit will do when you press the shutter button. P96
[Photo Style]
[Aspect Ratio] Sets the aspect ratio of the image. P103
[Picture Size] Set the number of pixels. P104
[Quality] Set the compression rate at which the pictures are to be stored. P105
[AF Mode]
[Focus Mod e]
[Flash] The setting of the built-in flash can be selected. P81
[Metering Mode] Sets the light metering method for measuring brightness. P109
[i.Dynamic] (Intelligent
dynamic range control)
[i.Resolution] Records pictures with more defined outlines and sense of clarity. P110
[HDR]
[Shutter Type]
[Red-Eye Removal]
[ISO Limit Set]
[ISO Increments]
[Extended ISO] You can extend the available ISO sensitivity values. P114
[Color Space]
You can select effects to match the type of image you wish to record.
You can adjust the colour and image quality of the effects.
This allows the focusing method that suits the positions and number of
the subjects to be selected.
The focus method can be selected. P106,
Adjusts the contrast and exposure.
You can combine 3 pictures with different levels of exposure into a
single picture with rich gradation.
You can select auto shutter (either electronic or mechanical shutter)
depending on the recording conditions and shutter speed, or fix the
shutter as mechanical shutter only.
Automatically detects red-eye caused by the flash and corrects the
image data accordingly.
When the ISO sensitivity is set to [AUTO] or [ ], an optimal ISO
sensitivity is set with the selected value as an upper limit.
The ISO sensitivity settings values changes in steps of
1/3 EV or 1 EV.
Set this when you want to correct the colour reproduction of the
recorded pictures on a PC, printer etc.
P101
P106
P108
P110
P111
P112
P113
P113
P114
P115
92
Page 93

4. Camera
∫ [Motion Picture]
This menu lets you set the [Rec Quality], and other aspects for motion picture recording.
≥ [Photo Style], [Metering Mode], [i.Dynamic] and [i.Resolution] are common to both the [Rec] menu and [Motion
Picture] menu. Changing these settings in one of these menus is reflected in other menu.
– For details, refer to the explanation for the corresponding setting in the [Rec] menu.
[Rec Quality] This sets up the picture quality of motion pictures. P48
∫ [Custom]
Your favourite operation environment can be configured to suit the recording style.
[Cust.Set Mem.] Registers the current camera function settings as custom set. P62
[Silent Mode] Disables operational sounds and output of light at once. P116
[AF/AE Lock]
[AF Assist Lamp]
[Peaking] In-focus portions are highlighted when focus is being adjusted manually. P119
[Detect Level] The detection level for in-focus portions is set. P119
[Histogram] This allows you to set either to display or not display the histogram. P120
[Guide Line] This will set the pattern of guide lines displayed when taking a picture. P120
[Auto Review]
[Touch Settings]
[Touch Shutter Setting]
Sets the fixed content for focusing and exposure when the AF/AE lock is
on.
AF assist lamp will illuminate the subject when the shutter button is
pressed half-way making it easier for the unit to focus when recording in
low light conditions.
Set the length of time that the picture is displayed after taking the still
picture.
During recording, the focus and/or the brightness can be adjusted and
set at the position tapped on the display.
Sets whether to use the touch shutter or not when using an inward
facing camera.
Displayed during inward facing camera use only.
P117
P118
P120
P121
—
93
Page 94

4. Camera
∫ [Setup]
The unit can be configured for easier use, such as changing the save destination of images.
[Location Logging]
[Store in] Sets the storage location of recorded images. P122
[Auto Backup]
[Auto OFF] Sets the time until the camera function ends if there is no operation. P122
[High Brightness
Mode]
[Preview Mode] Set the frame rate of the recording screen. P122
[Beep] Sets whether to emit the beep or not. P123
[Shutter] Sets whether to emit the shutter sound or not. P123
[No.Reset] Returns the image file number to 0001. P123
[Reset] The recording or setup/custom settings are reset to the default. P123
Sets whether to append location information of the recording location to
the picture or motion picture during recording.
Sets whether to save a backup copy of the recorded image on the
Google drive or not at the end of the camera function.
Sets whether to use [High Brightness Mode] or not.
P122
P122
P122
94
Page 95

4. Camera
ヮユワヶ
0500
2.8
AWB
0 33
A
HDR
OFF
DISP.DISP.
GPS
OFF
AU
TO
Calling frequently-used menus instantly (Quick Menu)
By using the Quick Menu, some of the menu settings can be easily found.
≥ The features that can be adjusted using Quick Menu are determined by the mode or a display style the unit is
in.
From the Recording screen > [ ].
1
≥ The menu can also be called by touching the icon you wish to
change in the Recording screen.
Select the menu item.
2
Select the setting.
3
Tap [ ] to exit the menu once the setting is complete.
4
ヮユワヶ
05000500
MP4
3:2
p
A
L
30
6060602.8
2.8
AF
HDRHDR
GPSGPS
AFAFAF
OFFOFF
OFFOFF
Q.
DISP.
DISP.
AU
AU
MENUQ.MENU
TO
TO
AWB
AWB
95
Page 96

4. Camera
Using the [Rec] Menu
Select a Drive Mode
Applicable modes:
You can change what this unit will do when you press the shutter button.
From the Recording screen > [ ] > [Rec] > [Drive Mode]. (P91)
[] ([Single]) When the shutter button is pressed, only one picture is recorded.
[] ([Burst]) (P97)
[] ([Auto Bracket]) (P99)
[] ([Self Timer]) (P100)
Recordings are made in succession while the shutter button is
pressed.
Press the shutter button to take 3 pictures continuously in
accordance with the exposure compensation range.
When the shutter button is pressed, recording takes place after the
set time has elapsed.
96
Page 97

4. Camera
0500
A
Taking Pictures using Burst Mode
Applicable modes:
Pictures are taken continuously while the shutter button is pressed.
≥ A maximum of 23 pictures is taken upon pressing the shutter button once when the burst speed is set to [SH].
≥ Pictures taken with a burst speed will be recorded as a single burst group.
From the Recording screen > [ ] > [Rec] > [Drive Mode] > [Burst].
1
(P91)
Select the burst speed.
2
¢2
[SH]
(Super high
speed)
Burst speed
(pictures/second)
Live View during Burst Mode None None Available Available
¢1
¢1 Number of recordable pictures
¢2 The electronic shutter will operate.
¢3 Depending on the recording conditions, the number of frames in a burst may be reduced. (For example,
when you set [i.Resolution] of the recording menu, the number of frames in a burst may be reduced)
¢4 Pictures can be taken until the capacity of built-in memory or microSD cards becomes full, however the
burst speed will become slower halfway. The exact timing of this depends on the aspect ratio, the picture
size, the setting for the quality and the type of microSD card used.
≥ The Burst speed may become slower depending on the following settings.
– [Picture Size] (P104)/[Quality] (P105)/[Sensitivity] (P87)/[Focus Mode] (P106, 108)
≥ Refer to P105 for information about RAW files.
Focus on the subject and take a picture.
3
≥ Hold down the shutter button fully to activate the Burst Mode.
With RAW files
Without RAW files 23
¢3
50 10 5 2
—
[H]
(High speed)
Depends on the capacity of the microSD card
[M]
(Middle speed)
A
MP4
p
30
05000500
[L]
(Low speed)
3:2
L
¢4
97
Page 98

4. Camera
≥ The focus is fixed in the first picture.
≥ Exposure, White Balance and ISO sensitivity will be fixed to the settings for the first picture when [SH]/[H] is set.
≥ When [SH]/[H] is set, the recording may be brighter or darker from the second picture depending on changes in
the brightness of the subject.
≥ When set to [H]/[M]/[L], the burst speed may drop midway when the number of pictures taken continuously
increases.
≥ Since the shutter speed becomes slower in dark places, the burst speed (pictures/second) may become slower.
≥ Depending on the operating conditions, it may take time to take the next picture if you repeat the recording of
pictures.
≥ It may take time to save pictures taken in Burst Mode on the microSD card.
For continuous shooting, use of a high speed microSD card is recommended.
≥ The Burst Mode is disabled in the following cases.
– [Glistening Water]/[Glittering Illuminations]/[Handheld Night Shot] (Scene Guide Mode)
– [Miniature Effect]/[Star Filter] (Creative Control Mode)
– When recording motion pictures
– When [HDR] is set to [ON]
≥ In the following case, [SH] in Burst Mode cannot be used.
– When [Quality] is set to [ ] or [ ]
98
Page 99

4. Camera
050005000500
L
3:2
MP4
30
p
AA
Taking Pictures using Auto Bracket
Applicable modes:
In this mode, 3 pictures are automatically recorded in the selected exposure
compensation range each time the shutter button is pressed.
With Auto Bracket d1EV
1st picture 2nd picture 3rd picture
d0EV j1 EV i1 EV
From the Recording screen > [ ] > [Rec] > [Drive Mode] > [Auto
1
Bracket]. (P91)
Set the exposure compensation range.
2
Focus on the subject and take a picture.
3
≥ When taking pictures using Auto Bracket after setting the Exposure Compensation value, the pictures taken are
based on the selected Exposure Compensation value.
≥ Auto Bracket is disabled in the following cases.
– [Glistening Water]/[Glittering Illuminations]/[Handheld Night Shot] (Scene Guide Mode)
– [Miniature Effect]/[Star Filter] (Creative Control Mode)
– When recording motion pictures
– When [HDR] is set to [ON]
99
Page 100

4. Camera
Taking Pictures with the Self-timer
Applicable modes:
From the Recording screen > [ ] > [Rec] > [Drive Mode] > [Self
1
Timer]. (P91)
Select the time of the Self-timer.
2
[] ([2sec.])
[] ([10sec.]) P icture is taken 10 seconds after shutter is pressed.
Press the shutter button halfway to focus and
3
then press it fully to take the picture.
≥ Focus and exposure will be set when the shutter button is
pressed halfway.
≥ We recommend that you fix the unit when using the Self-timer for recording.
≥ Self-timer is disabled in the following case.
– When recording motion pictures
Picture is taken 2 seconds after shutter is pressed.
≥ This is convenient for preventing camera shake when the shutter
button is pressed e.g. when recording with this unit fixed.
100
 Loading...