

Panasonic DMC-LX100, SQt0375 User Manual
Basic Operating Instructions
Digital Camera
Model No. DMC-LX100
Please read these instructions carefully before using this product, and
save this manual for future use.
More detailed instructions on the operation of this
camera are contained in “Operating Instructions for
advanced features (PDF format)” in the supplied
disc. Install it on your PC to read it.
Web Site: http://www.panasonic.com
Model number suffix “EB” denotes UK model.
EB
SQT0375
M0914KZ0
Dear Customer,
We would like to take this opportunity to thank you for purchasing this Panasonic
Digital Camera. Please read these Operating Instructions carefully and keep
them handy for future reference. Please note that the actual controls and
components, menu items, etc. of your Digital Camera may look somewhat
different from those shown in the illustrations in these Operating Instructions.
Carefully observe copyright laws.
• Recording of pre-recorded tapes or discs or other published or broadcast
material for purposes other than your own private use may infringe copyright
laws. Even for the purpose of private use, recording of certain material may
be restricted.
Information for Your Safety
WARNING:
To reduce the risk of fire, electric shock or product damage,
• Do not expose this unit to rain, moisture, dripping or
splashing.
• Use only the recommended accessories.
• Do not remove covers.
• Do not repair this unit by yourself. Refer servicing to qualified
service personnel.
The socket outlet shall be installed near the equipment and shall be
easily accessible.
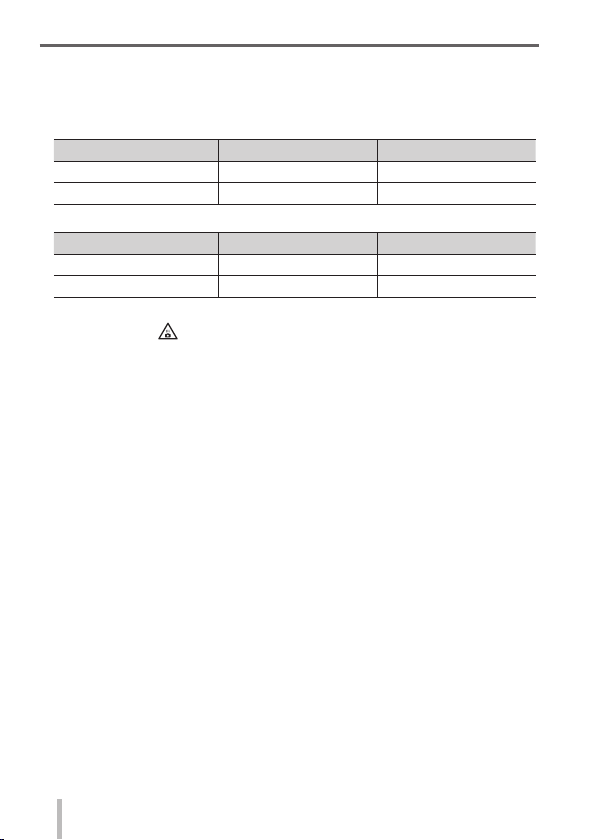
■
Product identification marking
Product Location
Digital camera Bottom
Battery charger Bottom
■
About the battery charger
CAUTION!
To reduce the risk of fire, electric shock or product damage,
• Do not install or place this unit in a bookcase, built-in cabinet or in
another confined space. Ensure this unit is well ventilated.
• The battery charger is in the standby condition when the AC power supply
cord is connected. The primary circuit is always “live” as long as the power
cord is connected to an electrical outlet.
SQT0375 (ENG)
2

■
About the battery pack
CAUTION
• Danger of explosion if battery is incorrectly replaced. Replace only
with the type recommended by the manufacturer.
• When disposing of the batteries, please contact your local
authorities or dealer and ask for the correct method of disposal.
• Do not heat or expose to flame.
• Do not leave the battery(ies) in a car exposed to direct sunlight for a
long period of time with doors and windows closed.
Warning
Risk of fire, explosion and burns. Do not disassemble, heat above
60 °C or incinerate.
■
Cautions for Use
• Do not use any other USB connection cables except the supplied one or a
genuine Panasonic USB connection cable (DMW-USBC1: optional).
• Always use a genuine Panasonic AV cable (DMW-AVC1: optional).
• Use a “High Speed HDMI micro cable” with the HDMI logo. Cables that do not
comply with the HDMI standards will not work.
“High Speed HDMI micro cable” (Type D-Type A plug, up to 2 m (6.6 feet)
long)
Keep this unit as far away as possible from electromagnetic equipment
(such as microwave ovens, TVs, video games etc.).
• If you use this unit on top of or near a TV, the pictures and/or sound on this
unit may be disrupted by electromagnetic wave radiation.
• Do not use this unit near cell phones because doing so may result in noise
adversely affecting the pictures and/or sound.
• Recorded data may be damaged, or pictures may be distorted, by strong
magnetic fields created by speakers or large motors.
• Electromagnetic wave radiation may adversely affect this unit, disturbing the
pictures and/or sound.
• If this unit is adversely affected by electromagnetic equipment and stops
functioning properly, turn this unit off and remove the battery or disconnect AC
adaptor (DMW-AC10E: optional). Then reinsert the battery or reconnect AC
adaptor and turn this unit on.
Do not use this unit near radio transmitters or high-voltage lines.
• If you record near radio transmitters or high-voltage lines, the recorded
pictures and/or sound may be adversely affected.
SQT0375 (ENG)
3
Declaration of Conformity (DoC)
Hereby, “Panasonic Corporation” declares that this product is in
compliance with the essential requirements and other relevant
provisions of Directive 1999/5/EC.
Customers can download a copy of the original DoC to our R&TTE
products from our DoC server:
http://www.doc.panasonic.de
Contact to Authorized Representative:
Panasonic Marketing Europe GmbH, Panasonic Testing Centre,
Winsbergring 15, 22525 Hamburg, Germany
This product is intended for general consumer. (Category 3)
This product on purpose to connect to access point of 2.4 GHz WLAN.
These symbols indicate separate collection
of waste electrical and electronic equipment
or waste batteries.
More detailed information is contained
in “Operating Instructions for advanced
features (PDF format)”.
SQT0375 (ENG)
4
Caution for AC Mains Lead
For your safety, please read the following text carefully.
This appliance is supplied with a moulded three pin mains plug for your safety
and convenience.
A 5-ampere fuse is fitted in this plug.
Should the fuse need to be replaced please ensure that the replacement fuse
has a rating of 5-ampere and that it is approved by ASTA or BSI to BS1362.
Check for the ASTA mark
If the plug contains a removable fuse cover you must ensure that it is refitted
when the fuse is replaced.
If you lose the fuse cover the plug must not be used until a replacement cover is
obtained.
A replacement fuse cover can be purchased from your local dealer.
■
Before use
Remove the connector cover.
■
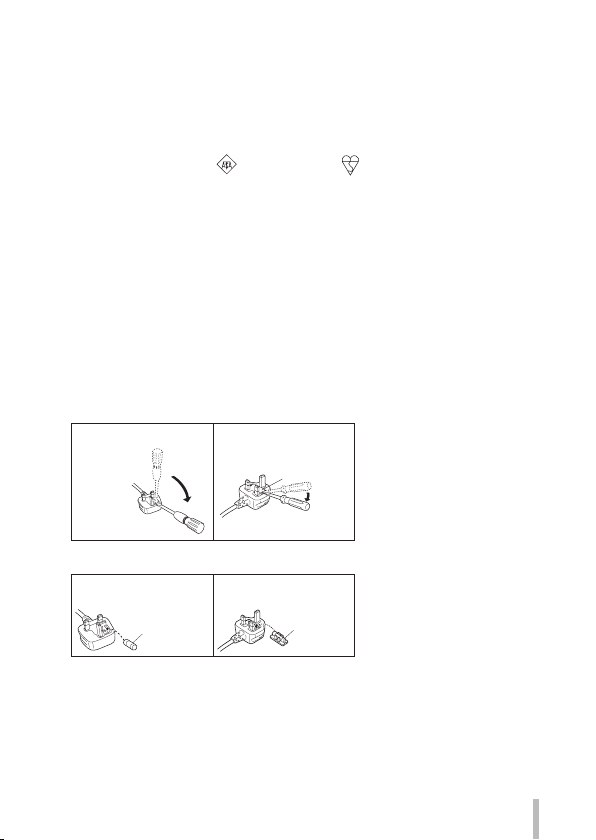
How to replace the fuse
The location of the fuse differ according to the type of AC mains plug (figures A
and B). Confirm the AC mains plug fitted and follow the instructions below.
Illustrations may differ from actual AC mains plug.
1. Open the fuse cover with a screwdriver.
Figure A Figure B
2. Replace the fuse and close or attach the fuse cover.
Figure A
Fuse
(5 ampere)
or the BSI mark on the body of the fuse.
Fuse cover
Figure B
Fuse
(5 ampere)
SQT0375 (ENG)
5

Contents
■
Information for Your Safety .........2
Preparations
■
Before use .....................................8
■
Standard accessories ..................9
■
Names and Functions of
Main Parts ...................................10
■
Preparations ................................13
Attaching the lens cap and
shoulder strap ....................................... 13
Charging the battery .............................14
Inserting and removing the battery/
the card (optional) ................................16
Formatting the card (initialisation) ........17
Recording capacity guidelines
(pictures/recording time) ....................... 17
Setting the clock ...................................19
Basics
■
Setting the menu ........................20
Calling frequently-used menus
instantly (Quick Menu) .......................... 21
Assigning frequently used functions to
the buttons (Function buttons) .............. 21
■
Changing settings using the
control ring ..................................22
Changing the settings assigned to the
control ring ............................................ 23
■
Holding the camera ....................24
■
Recording pictures using the
viewfinder ....................................24
■
Taking pictures ...........................25
■
Taking pictures with
automatic settings
[Intelligent Auto] Mode ...............26
■
Taking pictures after setting
the aperture value and
shutter speed ..............................28
Taking pictures after automatically
setting the aperture value and shutter
speed ([Program AE] Mode) ................. 29
Taking pictures by setting the aperture
value ([Aperture-Priority] Mode) ...........30
Taking pictures by setting the shutter
speed ([Shutter-Priority] Mode) ............31
Taking pictures by setting the
aperture value and shutter speed
([Manual Exposure] Mode) ...................32
SQT0375 (ENG)
6
Checking the effects of the aperture
value and shutter speed
([Preview] Mode) ..................................33
Registering a combination of settings
to be used during recording
(Custom Set) ........................................34
■
Switching the display
information on the recording
screen ..........................................35
■
Viewing your pictures ................36
■
Deleting pictures ........................36
Motion picture
■
Recording motion pictures ........ 37
Setting the format, picture size and
recording frame rate .............................38
Viewing motion pictures........................39
■
Recording 4K motion pictures
Creating a high-resolution still
picture from a 4K motion picture
[4K PHOTO] .........................................40
...40
Advanced Recording Functions
■
Taking pictures using picture
effects (Filter) ............................. 42
■
Adjusting the White Balance .....42
■
Setting the picture quality and
size ...............................................43
Changing the aspect ratio of the still
pictures ................................................. 43
Setting the picture size .........................43
Setting the compression rate of
pictures ([Quality]) ................................44
■
Taking pictures with
Auto Focus .................................. 45
■
Taking close-up pictures
(Macro recording) .......................46
■
Taking pictures with
Manual Focus ..............................46
■
Taking pictures by locking
the focus and/or exposure
[AF/AE Lock] ...............................47
■
Taking pictures with Exposure
Compensation .............................48
■
Setting the ISO Sensitivity ......... 48
■
Setting the metering mode ........49

■
Setting the Shutter Type ............50
■
Selecting a Drive Mode ..............51
Burst function .......................................52
Recording while exposure is changed
automatically [Auto Bracket] .................53
Automatically changing the aspect
ratio while taking pictures
[Aspect Bracket] ...................................53
Taking pictures with self-timer ..............54
Recording panorama pictures ..............54
■
Using Zoom ................................. 56
■
Taking pictures using the flash
(supplied) ....................................58
Attaching the flash ................................58
Changing Flash Mode ..........................59
Wi-Fi
■
Wi-Fi® Function and
NFC Function ..............................60
■
Operating the camera by
connecting it to a smartphone
Installing the smartphone/tablet app
“Panasonic Image App” ........................61
Connecting to a smartphone ................62
Taking pictures via a smartphone
(remote recording) ................................64
Playing back pictures in the camera
on a smartphone ..................................65
Saving pictures in the camera to the
smartphone ..........................................65
Sending pictures in the camera to
social networking services .................... 66
■
When sending images to
WEB service ................................ 67
Quickly sending pictures in the
camera to WEB services .....................67
■
Sending pictures to a PC with
the Wi-Fi function .......................68
■
About the symbols in the text
Indicates that the menu can be set by pressing [MENU/SET] button.
Indicates that the Wi-Fi setting can be made by pressing [Wi-Fi] button.
Configurations that can be performed in the [Custom] menu.
Tips for skilful use and points for recording.
Conditions in which a particular function cannot be used.
In this Operating Instructions, steps for setting a menu item are described as
follows:
→ [Rec] → [Quality] → [ ]
...61
Others
■
Viewing on TV screen ................71
■
Storing recorded still
pictures and motion pictures
on your PC ..................................72
About supplied software .......................72
Installing supplied software ..................73
Copying still pictures and motion
pictures ................................................. 74
■
List of monitor/viewfinder
displays .......................................75
■
Message displays .......................78
■
Menu list ......................................80
■
Q&A Troubleshooting ................87
■
Specifications .............................90
■
Digital Camera Accessory
System .........................................93
■
Reading the Operating
Instructions (PDF format) .........94
SQT0375 (ENG)
7

Preparations
Before use
■
Camera handling
Keep the camera away from excessive vibration, force, or pressure.
●
The camera is not dust resistant, splash resistant, or waterproof.
●
Avoid using the camera in places with excessive dust or sand, or where
water can come into contact with the camera.
Do not allow camera to come into contact with pesticides or volatile
●
substances (can cause surface damage or coating to peel).
■
Condensation (When the lens, the monitor or the viewfinder is fogged up)
Condensation may occur when the camera is exposed to sudden changes
●
of temperature or humidity. Avoid these conditions, which may make the
lens, the monitor or the viewfinder dirty, cause mould, or damage the
camera.
If condensation does occur, turn off the camera and wait about two hours
●
before using it. Once the camera adjusts to the surrounding temperature,
the fogging will clear naturally.
■
Caring for your camera
Before cleaning the camera, remove the battery or the DC coupler (DMW-
●
DCC11: optional), or disconnect the power plug from the outlet.
Do not press the monitor with excessive force.
●
Do not press the lens with excessive force.
●
Do not keep rubber or plastic products in contact with the camera for a long
●
period of time.
Do not use solvents such as benzine, thinner, alcohol, kitchen detergents,
●
etc., to clean the camera, since it may deteriorate the external case or the
coating may peel off.
Do not leave the camera with the lens facing the sun, as rays of light from
●
the sun may cause it to malfunction.
Do not extend the supplied cord or cable.
●
While the camera is accessing the card (for an operation such as picture
●
writing, reading, deletion, or formatting), do not turn off the camera or
remove the battery, card, AC adaptor (DMW-AC10E: optional) or DC
coupler (DMW-DCC11: optional).
The data on the card may be damaged or lost due to electromagnetic
●
waves, static electricity or breakdown of the camera or the card. We
recommend storing important data on a PC etc.
Do not format the card on your PC or other equipment. Format it on the
●
camera only to ensure proper operation.
SQT0375 (ENG)
8
Preparations
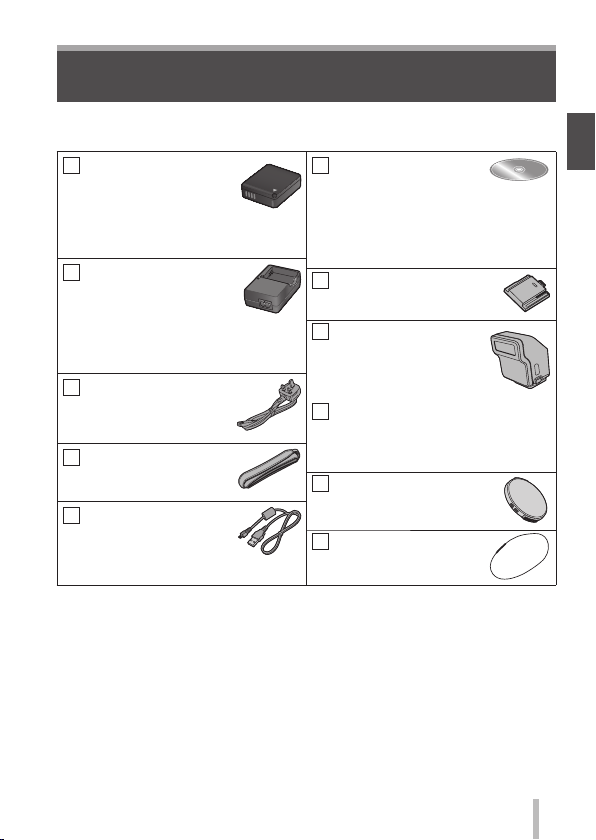
Standard accessories
Check that all the accessories are supplied before using the camera. Part
numbers are as of September 2014. These may be subject to change.
Battery pack
DMW-BLG10E
• Charge the battery
before use.
Battery pack is indicated as
battery pack or battery in the text.
Battery charger
DE-A98A
Battery charger is indicated as
battery charger or charger in the
text.
AC Mains Lead
K2CT3YY00034
Shoulder strap
VFC5137
USB connection cable
K1HY08YY0031
∗
Already attached to the camera at the time of purchase.
• Cards are optional.
• SD Memory Card, SDHC Memory Card and SDXC Memory Card are
indicated as card in the text.
• Consult the dealer or your nearest Service Centre if you lose the supplied
accessories. (You can purchase the accessories separately.)
• Please dispose of all packaging appropriately.
• Keep small parts in a safe place out of the reach of children.
• The illustrations and screens in this manual may differ from the actual product.
DVD
SFM0039
• Software:
Use it to install the software on
your PC.
• Operating Instructions for
advanced features
Hot shoe cover
VKF5259 (Black model)
SKF0043S (Silver model)
Flash
VEK0V37Z1-A
(Black model)
VEK0V37Z1-B
(Silver model)
Soft case
VFC5140
Keep the flash in the soft case
when not in use.
Lens cap
SXQ0155 (Black model)
SXQ0156 (Silver model)
Lens cap string
VFC4366
∗
∗
SQT0375 (ENG)
9
Preparations
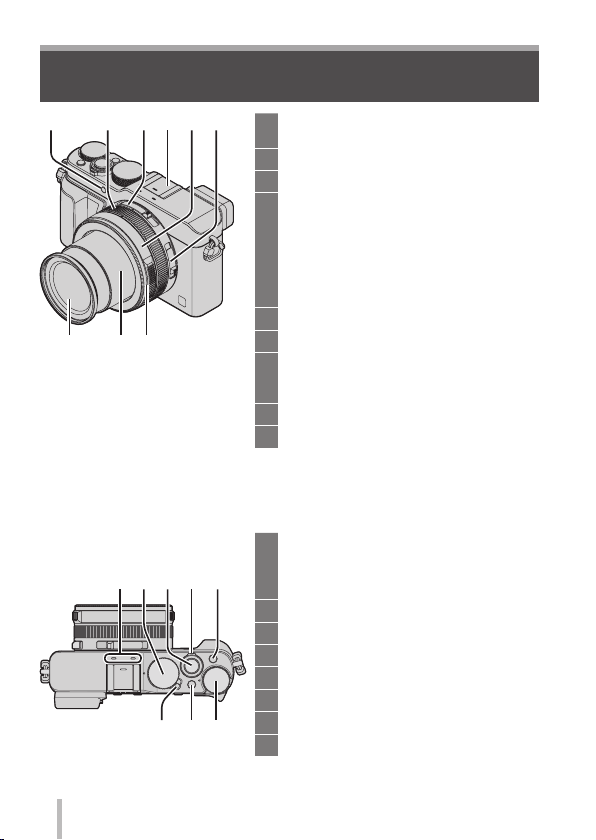
Names and Functions of Main Parts
16
2543
98
7
Self-timer indicator (→54) /
1
AF Assist Lamp
Control ring (→22)
2
Aspect ratio selector switch (→43)
3
Hot shoe (Hot shoe cover) (→58)
4
• The hot shoe cover is already
attached to the hot shoe at the time
of purchase.
• Keep the hot shoe cover out
of reach of children to prevent
swallowing.
Aperture ring (→28)
5
Focus selector switch (→45, 46)
6
Lens front ring
7
To attach the auto lens cap (optional)
(→93), remove the lens front ring.
Lens barrel
8
Lens (Filter diameter Φ43 mm)
9
(Top)
10
10 11 12 1413
SQT0375 (ENG)
1617 15
Stereo microphone
10
Be careful not to cover the microphone
with your finger. Doing so may make
sound difficult to record.
Shutter speed dial (→28)
11
Shutter button
12
Zoom lever (→56)
13
[FILTER] button (→42)
14
Exposure compensation dial (→48)
15
[iA] button (→26)
16
Camera [ON/OFF] switch
17
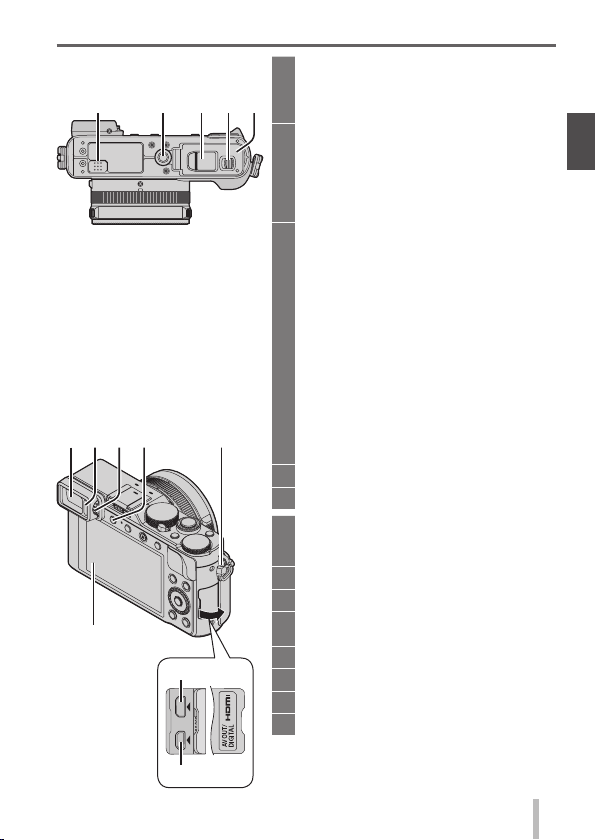
Preparations
(Bottom)
18 20 2119 22
2523 26
24
28
29
27
Speaker
18
Be careful not to cover the speaker
with your finger. Doing so may make
sound difficult to hear.
Tripod mount
19
Do not attach to a tripod with a 5.5 mm
(0.22 inch) or longer screw. Doing so
may damage this unit.
It may not be possible to attach certain
types of tripods properly.
DC coupler cover
20
• Open this cover to use an AC
adaptor (optional) and DC coupler
(optional) in place of the battery.
• Always use a genuine Panasonic
AC adaptor (DMW-AC10E:
optional).
• When using an AC adaptor, use the
AC Mains Lead supplied with the AC
adaptor.
• When using an AC adaptor
(DMW-AC10E: optional), ensure
that the Panasonic DC coupler
(DMW-DCC11: optional) and AC
adaptor are used.
Release lever (→16)
21
Card/Battery door (→16)
22
Viewfinder (LVF) (→24)
23
In this manual, “viewfinder” is used to
indicate the LVF.
Eye Sensor (→24)
24
Diopter adjustment dial (→24)
25
[LVF] button (→24) /
26
[Fn3] button (→21)
Strap eyelet (→13)
27
Monitor
28
[HDMI] socket (→71)
29
[AV OUT/DIGITAL] socket (→71, 74)
30
30
SQT0375 (ENG)
11
Preparations
27
36
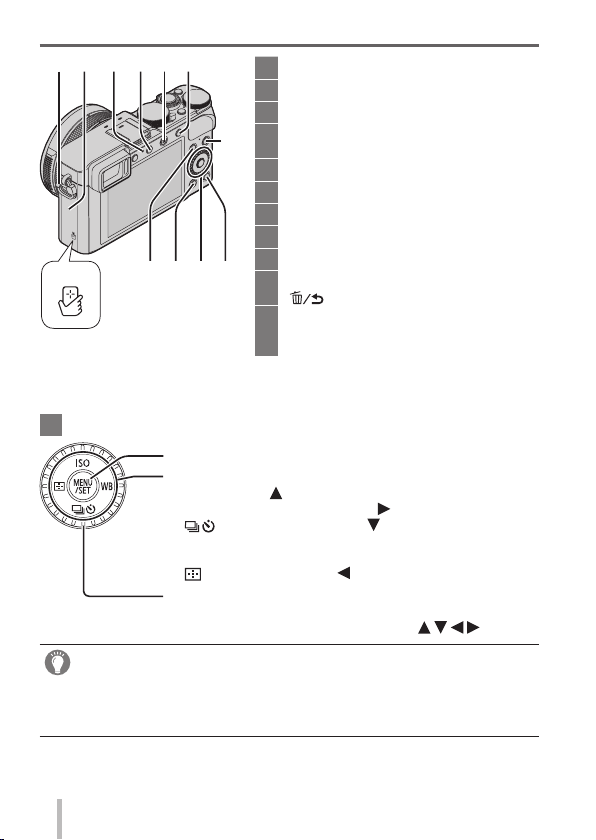
[MENU/SET] button / Cursor button / Control dial
41
In this manual, the button that is to be used is indicated by .
●
35343331 32
37384139 40
[MENU/SET] button (→20)
Cursor button
[ISO] button (
[WB] (White Balance) button (
] (Drive Mode) button ( ) (→51)
[
Single, Burst, Auto Bracket, Aspect Bracket, Self-timer,
Panorama
] (AF Mode) button ( ) (→45)
[
Control dial (→20)
Strap eyelet (→13)
27
Wi-Fi® antenna
31
Wi-Fi connection lamp (→60)
32
[Wi-Fi] button (→60) /
33
[Fn2] button (→21)
Motion picture button (→37)
34
[AF/AE LOCK] button (→47)
35
NFC antenna (→63)
36
[Q.MENU] button (→21)
37
Playback button
38
[Fn1] button (→21) /
39
40
] (Delete/Cancel) button (→36)
[
[DISP.] button (→35)
Each time this is pressed, the display
on the screen is switched.
) (→48)
) (→42)
Disabling the button and dial operation (while recording)
When the [Cursor Button Lock] is assigned to the function button, operation of
the [MENU/SET] button, cursor button, and control dial is disabled. For details,
refer to “Operating Instructions for advanced features (PDF format)”.
SQT0375 (ENG)
12

Preparations
Preparations
Attaching the lens cap and shoulder strap
Cover the lens with the lens cap to protect it when you are not taking pictures.
We recommend attaching the lens cap to the camera using the lens cap string to
prevent loss of the lens cap. We also recommend attaching the shoulder strap to
prevent the camera from being dropped.
Use the lens cap string (supplied) to attach the lens cap to
1
the camera
Make sure that the thicker portion of the string is not hanging over the
lens cap or the shoulder strap eyelet.
Attach the lens cap
2
• To attach and remove the lens cap, press the
areas shown by arrows in the illustration.
Attach the shoulder strap
3
Shoulder strap
eyelet
• Attach the other end of the shoulder strap.
SQT0375 (ENG)
13
Preparations
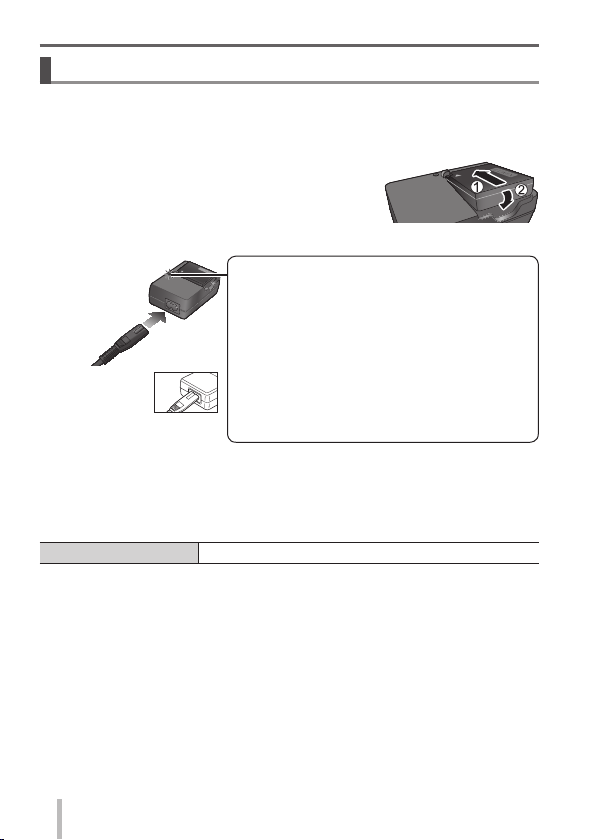
Charging the battery
The battery that can be used with this unit is DMW-BLG10E.
The battery is not charged when the camera is shipped. Charge the battery
before use.
• Use the dedicated charger and battery.
Attach the battery paying attention to the
1
direction of the battery
Connect the charger to the electrical outlet
2
Charging light ([CHARGE])
On: Charging in progress
Off: Charging complete
If light is flashing:
• Battery temperature is too high or too low. We
• The AC
mains lead
does not fit
entirely into
the AC input terminal.
A gap will remain.
• Charge the battery with the charger indoors.
Detach the battery after charging is completed
3
Charging time Approx. 190 min
• The charging time indicated above is the time required for charging in case
when the battery is completely used up. The time required for charging differs
depending on conditions of battery usage. Charging takes longer in cases
when temperatures are either high or low and when the battery has not been
used for a long period of time.
recommend charging in a location where the
ambient temperature is between 10 °C and
30 °C (50 °F to 86 °F).
• Battery/charger connector is dirty. Clean with
a dry cloth.
14
SQT0375 (ENG)
Preparations
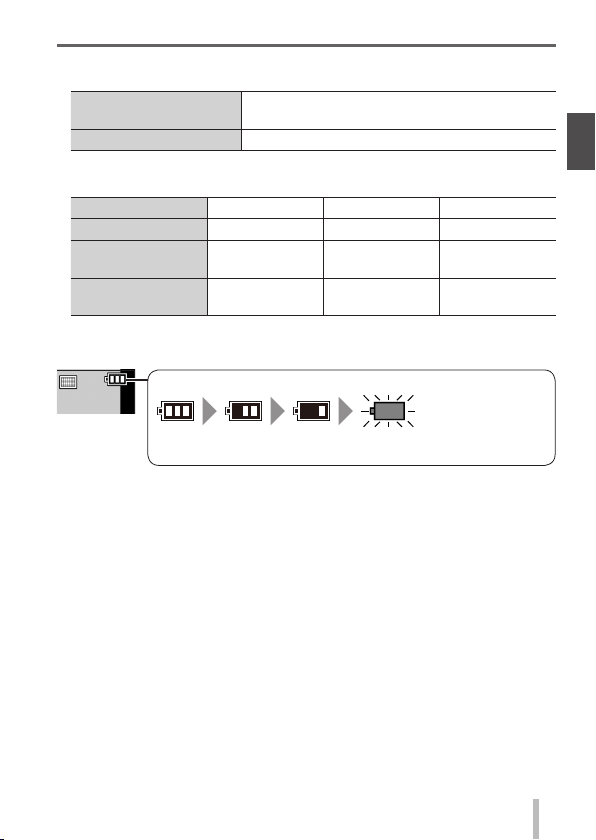
Remaining battery (only when using battery)
(flashes red)
If the battery mark flashes red, recharge or replace a fully
charged battery.
■
Guidelines for number of recordable pictures and operating time
Recording still pictures (When using monitor)
Number of recordable
pictures
Recording time Approx. 175 min (Approx. 150 min)
• The values when the flash (supplied) is used are provided in parentheses.
Recording motion pictures (When using monitor)
[Rec Format] [AVCHD] [MP4] [MP4]
[Rec Quality] [FHD/17M/50i] [FHD/20M/25p] [4K/100M/25p]
Available
recording time
Actual available
recording time
∗
The time you can actually record when repeatedly turning the camera on and
off, starting and stopping recording and using zoom.
The battery is a rechargeable lithium ion battery. If the temperature is too high
●
or too low, the operating time of the battery will become shorter.
The battery becomes warm after using and during and after charging. The
●
camera also becomes warm during use. This is not a malfunction.
Do not leave any metal items (such as clips) near the contact areas of
●
the power plug or near the batteries.
Store the battery in a cool and dry place with a relatively stable temperature.
●
(Recommended temperature: 15 °C to 25 °C (59 °F to 77 °F), Recommended
humidity: 40%RH to 60%RH)
Do not store the battery for a long time while fully charged. When storing
●
the battery for a long period of time, we recommend charging it once a year.
Remove the battery from the camera and store it again after it has completely
discharged.
∗
Approx. 350 pictures (Approx. 300 pictures)
Approx. 125 min Approx. 135 min Approx. 90 min
Approx. 60 min Approx. 65 min Approx. 45 min
SQT0375 (ENG)
15
Preparations
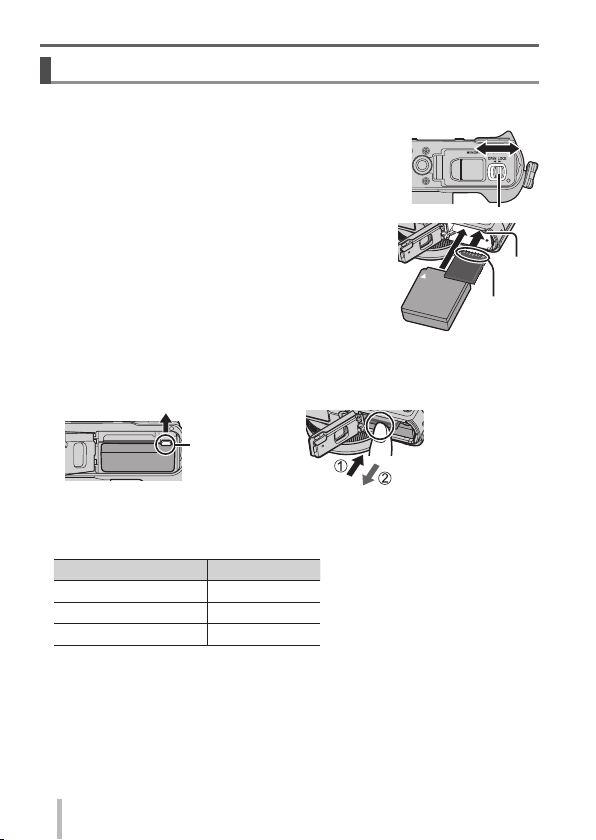
Inserting and removing the battery/the card (optional)
• Always use genuine Panasonic batteries (DMW-BLG10E).
• If you use other batteries, we cannot guarantee the quality of this product.
Slide the release lever to the [OPEN] position and
1
open the card/battery door
(Battery)
2
Insert the battery all the way firmly until a locking
sound is heard, and check that the lever is
hooked over the battery.
(Card)
Insert the card all the way firmly until it clicks.
Close the card/battery door and slide the release
3
lever to the [LOCK] position
■
To remove
• To remove battery:
Move lever in direction of arrow.
Lever
■
About the Card
The following SD standard-based cards (Panasonic brand recommended) can
be used.
Type of Card Capacity
SD Memory Cards 8 MB – 2 GB
SDHC Memory Cards 4 GB – 32 GB
SDXC Memory Cards 48 GB, 64 GB
• Keep the Memory Card out of reach of children to prevent swallowing.
• To remove card:
Press the centre of the card.
Release lever
Do not
touch the
terminal
Lever
16
SQT0375 (ENG)
Preparations
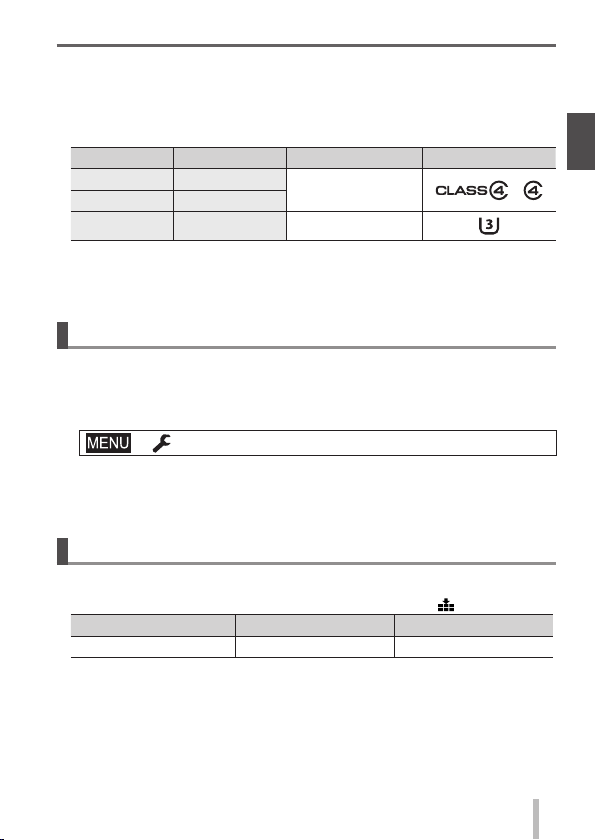
■
About the motion picture recording and speed class
According to the [Rec Format] (→38) and [Rec Quality] (→38) of a motion picture,
the required card differs. Use a card that meets the following ratings of the SD
Speed Class or UHS Speed Class. Confirm the SD speed by checking the
card label or other card related materials.
[Rec Format] [Rec Quality] Speed class Label example
[AVCHD] All
[MP4] FHD/HD/VGA
[MP4] 4K UHS Speed Class 3
• Latest information:
http://panasonic.jp/support/global/cs/dsc/
(This site is available in English only.)
Class 4 or higher
Formatting the card (initialisation)
Format the card before recording a picture with this unit. Since data cannot
be recovered after formatting, make sure to back up necessary data in
advance.
Set the menu (→20)
1
→ [Setup] → [Format]
• A confirmation screen is displayed. If you select [Yes], the operation is
executed.
Recording capacity guidelines (pictures/recording time)
■
Recording picture capacity (still pictures)
When aspect ratio is set to [4:3] and [Quality] is set to [
[Picture Size] 16 GB 64 GB
L (12.5M) 2200 8820
]
SQT0375 (ENG)
17
Preparations
■
Recording time capacity (motion pictures)
([h], [m] and [s] indicate “hour”, “minute” and “second”.)
• The recordable time is the total time of all the motion pictures which have
been recorded.
When [Rec Format] is [AVCHD]
[Rec Quality] 16 GB 64 GB
[FHD/28M/50p] 1h15m00s 5h00m00s
[FHD/17M/50i] 2h00m00s 8h15m00s
When [Rec Format] is [MP4]
[Rec Quality] 16 GB 64 GB
[4K/100M/25p] 20m00s 1h20m00s
[FHD/28M/50p] 1h15m00s 5h00m00s
If the surrounding temperature is high, or a motion picture is recorded
●
continuously, [
through to protect the camera.
[AVCHD] motion pictures:
●
Recording stops when the continuous recording time exceeds 29 minutes
and 59 seconds.
Motion pictures with their file size set to [FHD], [HD] or [VGA] in [MP4]:
●
Recording stops when the continuous recording time exceeds 29 minutes
and 59 seconds or the file size exceeds 4 GB.
• Since the file size becomes larger with [FHD], recording with [FHD] will
stop before 29 minutes 59 seconds.
Motion pictures with their file size set to [4K] in [MP4]:
●
Recording stops when the continuous recording time exceeds 15 minutes.
(You can continue recording without interruption even if the file exceeds
4 GB, but the motion picture file will be recorded and played back in
separate files.)
The maximum available continuous recording time is displayed on the
●
screen.
] is displayed and recording may be stopped halfway
18
SQT0375 (ENG)

Setting the clock
The clock is not set when the camera is shipped.
Turn the camera on
1
Press [MENU/SET]
2
Preparations
Press to select the items (year, month, day,
3
hour, minute), and press
• To cancel → Press [
To set the display order or time display format
• Select [Style] and press [MENU/SET] to display the
setting screen for display order and time display
format.
Press [MENU/SET]
4
• A confirmation screen is displayed.
Press [MENU/SET].
When [Please set the home area] is displayed,
5
press [MENU/SET]
Press to set your home area and press
6
[MENU/SET]
to set
] button.
: Home time
: Destination time
SQT0375 (ENG)
19
Basics
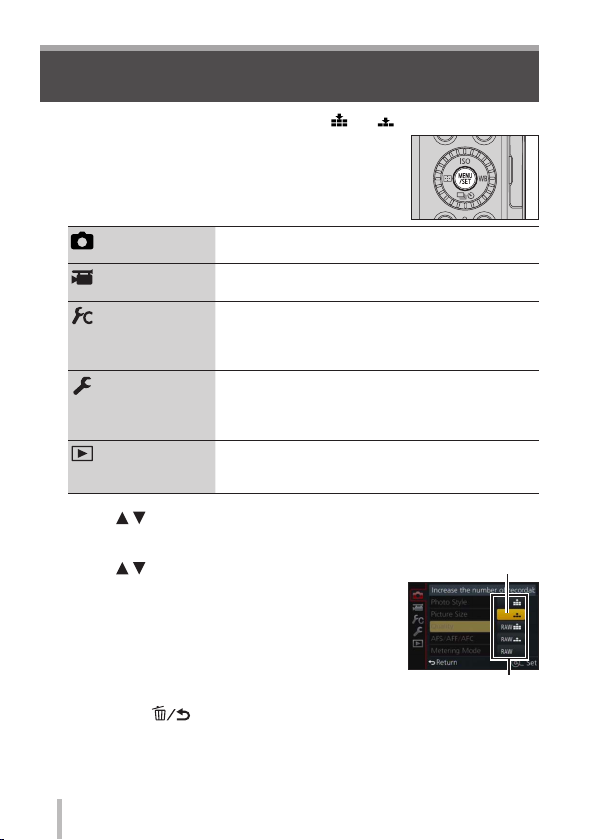
Setting the menu
Example: To change the [Quality] setting from [ ] to [ ] in the [Rec] menu
Press [MENU/SET] to bring up the menu
1
[Rec]
(→80)
[Motion Picture]
(→82)
[Custom]
(→82)
[Setup]
(→85)
[Playback]
(→86)
Press to select the menu item and press [MENU/SET]
2
• Items can also be selected by turning the control dial.
Press to select the setting and press
3
[MENU/SET]
• Items can also be selected by turning the control
dial.
Press the [ ] button repeatedly until the recording or
4
playback screen reappears
• During recording, the menu screen can also be exited by pressing the
shutter button halfway.
SQT0375 (ENG)
20
You can perform settings for picture size and the
flash.
You can select the recording format and picture
quality and other settings.
Operation of the unit, such as displaying of the
screen and button operations, can be set up
according to your preferences. Also, it is possible
to register the modified settings.
You can perform settings that make usage more
convenient, such as the changing the clock
settings and beep volume. You can also perform
Wi-Fi function-related settings.
You can specify picture protection, cropping, print
settings, and other settings for pictures you have
taken.
Selected setting
Settings
■
Switching menu type
Example: Switching to the [Setup] menu from [Rec] menu
Press
1
Press to select a menu switch icon [ ]
2
• Items can also be selected by turning the control dial.
Press [MENU/SET]
3
• Select the menu item and perform the setting.
The menu types and items that are displayed vary according to the mode.
●
The setting methods vary depending on the menu item.
●
Basics
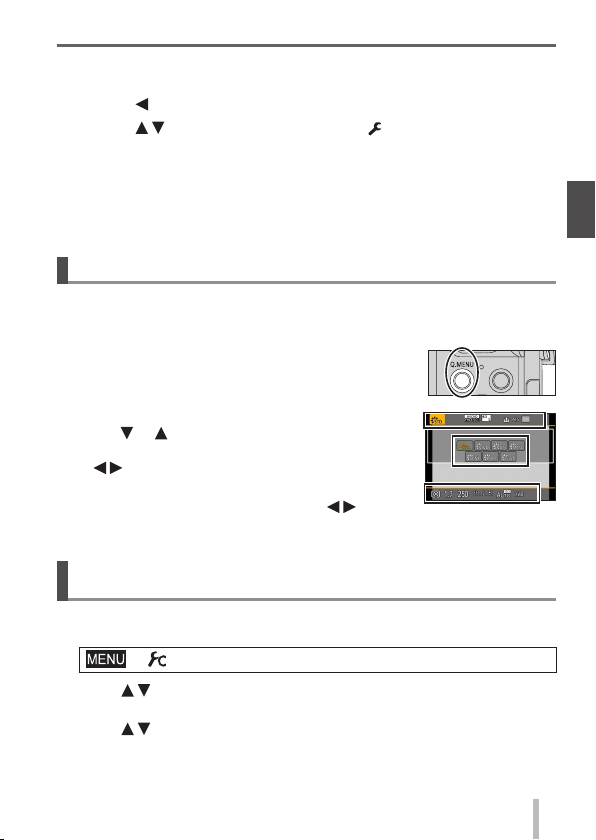
Calling frequently-used menus instantly
You can easily call some of the menu items and set them.
• The menu items and setting items that are displayed differ depending on the
recording mode and settings during recording.
Press [Q.MENU] button to display the Quick menu
1
Turn the control dial to select the menu item, and
2
3
4
or
press
• The menu item can also be selected by pressing
.
Turn the control dial to select the setting
• The setting can also be selected with
Press [Q.MENU] button to close the Quick menu
.
(Quick Menu)
Assigning frequently used functions to the buttons
(Function buttons)
You can assign frequently-used functions to particular buttons.
Set the menu
1
→ [Custom] → [Fn Button Set]
Press to select the function button you want to assign a function
2
to and press [MENU/SET]
Press to select the function you want to assign and press
3
[MENU/SET]
SQT0375 (ENG)
21
Basics
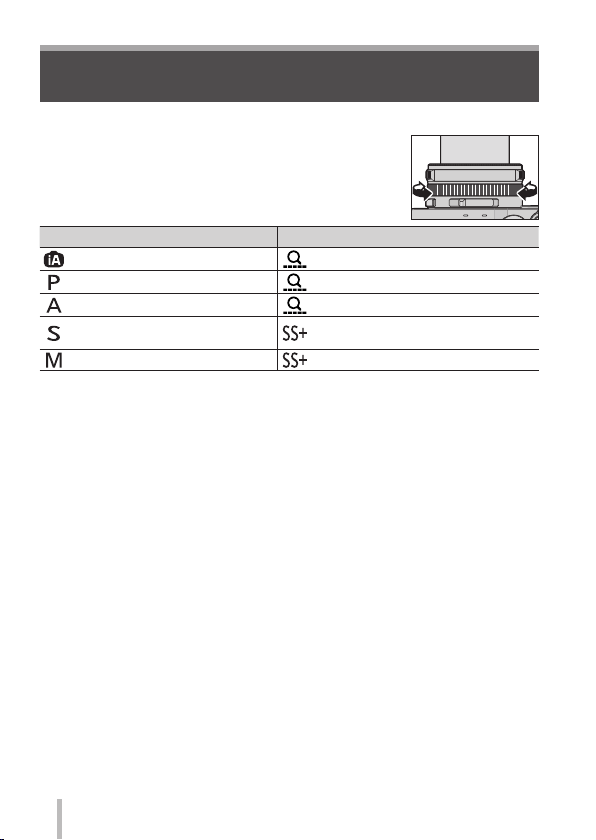
Changing settings using the control ring
You can use the control ring to change the settings of the unit.
Items that can be set by the control ring vary depending
on recording modes.
Following are the pre-assigned settings.
Recording mode Setting
[Intelligent Auto] Mode Step Zoom (→57)
[Program AE] Mode Step Zoom (→57)
[Aperture-Priority] Mode Step Zoom (→57)
[Shutter-Priority] Mode
[Manual Exposure] Mode
∗
You can use the control ring to change the following settings values, which
cannot be set using the shutter speed dial.
• Higher speed than 1/4000 seconds (electronic shutter (→50))
• Slower speed than 1 second (mechanical shutter (→50))
• Setting in 1/3 EV steps
The control ring is assigned to selecting the picture effect (Filter) when you
●
are recording a panorama picture. (→55)
When Manual Focus is set, focus adjustment is assigned to the control ring.
●
(→46)
Shutter speed adjustment∗
(→31, 32)
Shutter speed adjustment∗ (→32)
22
SQT0375 (ENG)

Basics
Changing the settings assigned to the control ring
Changes the settings assigned to the control ring.
Set the menu
1
→ [Custom] → [Control Ring]
Use to select the setting and press [MENU/SET]
2
• [DEFLT] [Normal]
•
[Step Zoom] (→57)
[White Balance] (→42)
•
• [OFF] [Not Set]
To return to the default setting, select [Normal].
●
If you do not use the control ring, select [OFF] ([Not Set]).
●
The assigned function setting applies to all the Recording Modes.
●
The function assigned to the control ring may not work in some combinations
of Recording Mode or settings used for recording (panorama picture
recording, Filter setting, etc.).
When Manual Focus is set, the control ring is fixed to the function for adjusting
●
the focus. You cannot use the settings assigned using the [Control Ring]. (→46)
[Zoom] (→56)
•
• [Sensitivity] (→48)
[Filter Select] (→42)
•
SQT0375 (ENG)
23
Basics
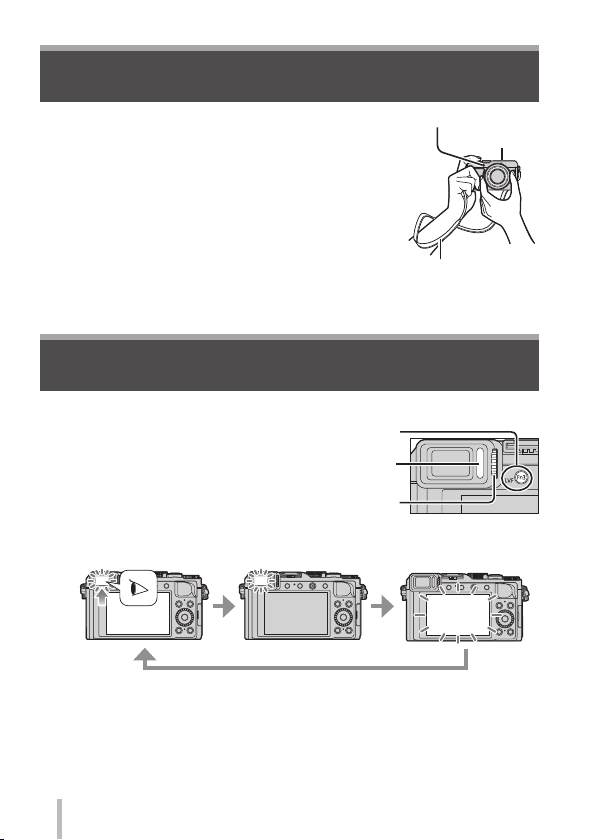
Holding the camera
• To avoid camera shake, hold it with both hands keeping
your arms close to your body while standing with your
feet slightly apart.
• Do not touch the lens.
• Do not block the microphone when recording motion
pictures.
• Do not block the AF Assist Lamp, or the flash when
you take a picture using it. Do not look at it from close
range.
• Make sure that the camera does not move at the
moment the shutter button is pressed.
We recommend using the supplied shoulder strap to avoid dropping the
●
camera.
AF Assist Lamp
Shoulder strap
Recording pictures using the viewfinder
■
Switching between the monitor and viewfinder
Press [LVF] button
1
• The display is switched as shown
below.
Diopter adjustment dial
Automatic switching
between viewfinder
and monitor
∗
For automatic switching between the viewfinder and monitor, the eye
sensor automatically switches the display to viewfinder when your eye or
an object moves close to the viewfinder.
■
About diopter adjustment
Turn the diopter adjustment dial to adjust until you are able to clearly see the
characters displayed in the viewfinder.
SQT0375 (ENG)
24
∗
Viewfinder display Monitor display
[LVF] button
Eye Sensor
Microphone
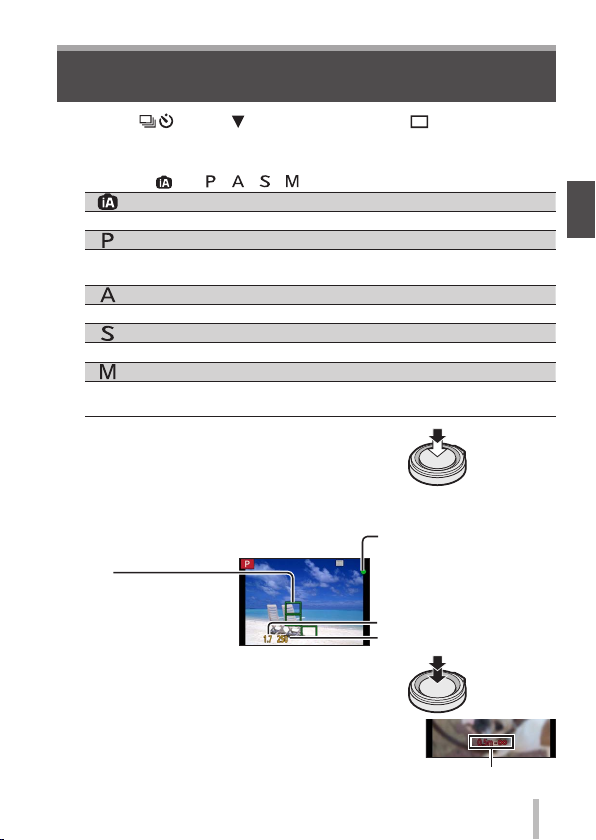
Taking pictures
• Press the [ ] button ( ) to set the drive mode to [ ] ([Single]).
Select the recording mode
1
• Each time you press the [iA] button, the recording mode will switch
between
Adjust focus according to subject
2
• The aperture value and shutter speed are
displayed. (If the aperture value and shutter
speed are shown in red and flashing, you do
not have the appropriate exposure, unless you
are using the flash.)
AF area
( When focus is aligned:
green)
Take a picture
3
and / / / .
[Intelligent Auto] Mode (→26)
Take pictures with automatic settings.
[Program AE] Mode (→29)
Record pictures with the aperture value and shutter speed settings
automatically adjusted.
[Aperture-Priority] Mode (→30)
Determine aperture, then record pictures.
[Shutter-Priority] Mode (→31)
Determine shutter speed, then record pictures.
[Manual Exposure] Mode (→32)
Determine the aperture value and shutter speed respectively, and
then record pictures.
Focus display
( When focus is aligned:
illuminated
When focus is not aligned:
flashing)
Aperture value
Shutter speed
Basics
Press
halfway
Press fully
The focus display flashes and beep sounds when focus
●
is not aligned.
Use the focus range displayed in red as a reference.
Focus range
SQT0375 (ENG)
25
Basics
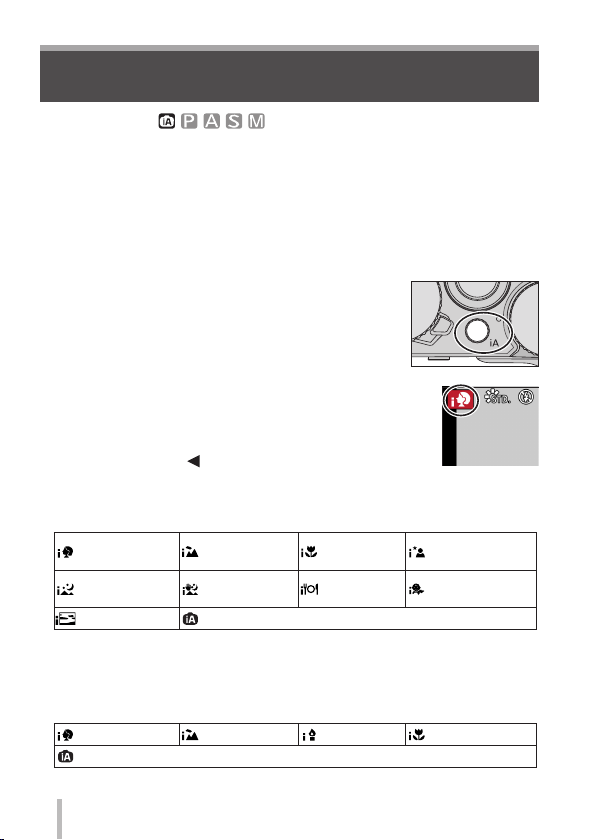
Taking pictures with automatic settings
[Intelligent Auto] Mode
Recording mode:
This mode is recommended for those who want to point and shoot as the
camera optimises settings to match the subject and recording environment.
The camera optimises the settings and the following functions are activated
automatically.
• Automatic Scene Detection / Backlight Compensation / [Face/Eye Detection] /
Auto White Balance / Intelligent ISO sensitivity control / [Red-Eye Removal] /
[i.Zoom] / [i.Resolution] / [Stabilizer] / [i.Dynamic] / [Long Shtr NR] /
[Quick AF] / [AF Assist Lamp]
Press [iA] button
1
The camera switches to [Intelligent Auto] Mode.
• When you press the [iA] button again, the recording
mode is switched to one that is set using the
aperture ring and shutter speed dial.
Point the camera at the subject
2
• When the camera identifies the optimal scene, the
icon for each scene turns blue for 2 seconds and
then changes to the normal red indication.
• When you press
halfway, AF Tracking is activated. (→45)
■
Automatic Scene Detection
When taking pictures
[i-Portrait] [i-Scenery] [i-Macro]
[i-Night
Scenery]
[i-Sunset]
1
∗
When the flash (supplied/optional) is used.
2
∗
When [iHandheld Night Shot] is [ON]. (→27)
3
∗
When children (that are registered in the camera with Face Recognition)
under 3 years old are recognised.
When recording motion pictures
[i-Portrait] [i-Scenery]
When scene does not correspond to any of the above
and press the shutter button
[i-Night
1
∗
Portrait]
[i-Handheld
Night Shot]
When scene does not correspond to any of the above
2
∗
[i-Food]
[i-Low Light]
[i-Baby]
[i-Macro]
3
∗
26
SQT0375 (ENG)
Basics
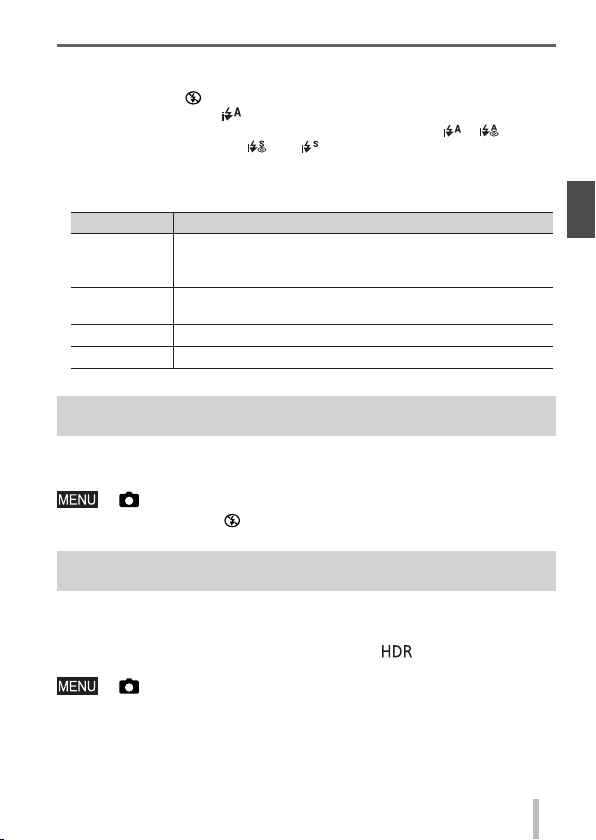
■
Flash
When the [ON/OFF] switch for the flash (supplied/optional) is set to [OFF],
the flash is set to [ ] (Forced Flash Off). When the [ON/OFF] switch is set to
[ON], the flash is set to [
When the flash is turned on, the camera automatically sets [
(Auto/Red-Eye Reduction), [
brightness.
■
Available menus
You can set only the following menus.
Menu Item
[Rec]
[Motion
Picture]
[Custom] [Silent Mode] / [Guide Line] / [Remaining Disp.]
[Setup] All menu items can be set.
[Picture Size] / [Quality] / [AFS/AFF/AFC] / [Burst Rate] /
[Self Timer] / [iHandheld Night Shot] / [iHDR] /
[Time Lapse Shot] / [Stop Motion Animation] / [Face Recog.]
[Rec Format] / [Rec Quality] / [AFS/AFF/AFC]
] (AUTO).
], [ ]
], or [ ] based on the type of subject and
Taking pictures using a handheld camera
([iHandheld Night Shot])
If a night scene is detected automatically while the unit is being handheld,
[iHandheld Night Shot] can record a still picture with less jitter and less noise
without using a tripod by combining a burst of pictures.
→ [Rec] → [iHandheld Night Shot] → [ON] / [OFF]
The flash is fixed to the [ ] (Forced Flash Off) setting.
●
Combining pictures into a single still picture with rich gradation
([iHDR])
When there is, for example, strong contrast between the background and
the subject, [iHDR] records multiple still pictures with differing exposures and
combines them to create a single still picture rich in gradation.
[iHDR] is activated when required. When activated, [
the screen.
→ [Rec] → [iHDR] → [ON] / [OFF]
] will be displayed on
SQT0375 (ENG)
27
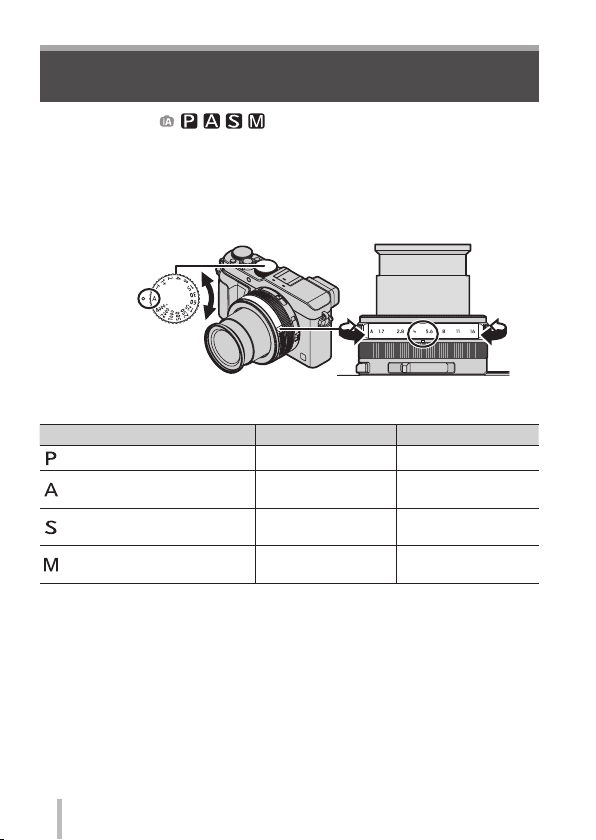
Basics
Taking pictures after setting the aperture
value and shutter speed
Recording mode:
You can set the exposure using the aperture ring and shutter speed dial settings.
Using the [Rec] menu to change settings and set up your own recording
environment.
You can also record pictures by applying picture effects. (→42)
Turn the aperture ring and shutter speed dial to set your
1
preferred recording mode
Align
with the
indicator
Set the aperture ring where it
clicks.
Recording mode Aperture ring Shutter speed dial
[Program AE] Mode (→29) [A] (AUTO) [A] (AUTO)
[Aperture-Priority] Mode (→30)
[Shutter-Priority] Mode (→31) [A] (AUTO)
[Manual Exposure] Mode (→32)
• In [Aperture-Priority] Mode, [Shutter-Priority] Mode, and [Manual Exposure]
Mode, the effect of the aperture value and shutter speed you have set is not
applied to the recording screen. To check the effect on the recording screen,
use [Preview] Mode. (→33)
The brightness of the screen may vary from the actual pictures recorded.
Check the brightness of pictures using the playback screen.
A faster shutter speed than the set shutter speed may be used when you
record a motion picture.
Your preferred
settings
Your preferred
settings
[A] (AUTO)
Your preferred
settings
Your preferred
settings
28
SQT0375 (ENG)
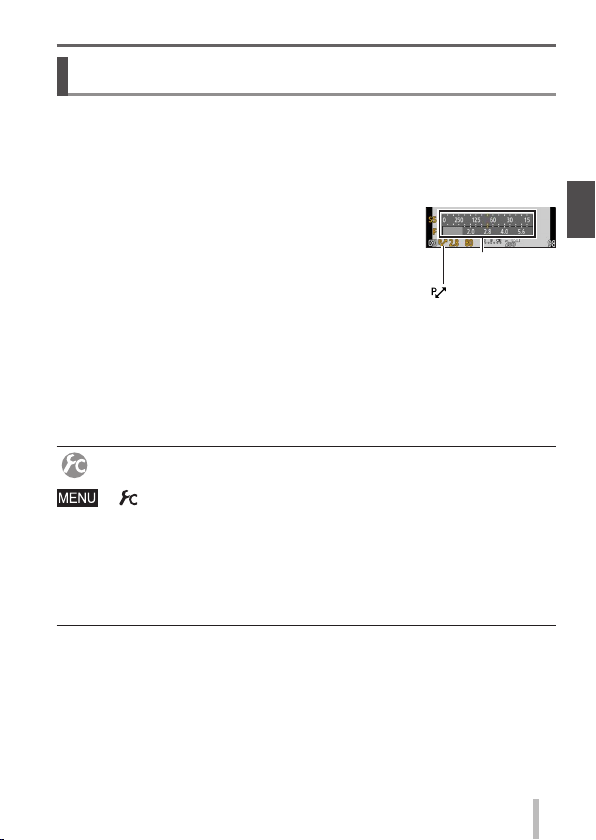
Basics
Taking pictures after automatically setting the
aperture value and shutter speed
Take pictures using automatic aperture values and shutter speed settings in
accordance with the brightness of a subject.
Turn the aperture ring to select [A] (AUTO)
1
Turn the shutter speed dial to select [A] (AUTO)
2
[Program AE] Mode is set and the recording mode icon changes to [P].
Press the shutter button halfway
3
• If the aperture value and shutter speed flash red,
you do not have the correct exposure.
While the numeric values are displayed in yellow (approximately
4
10 seconds), turn the control dial to change the values using
Programme Shift
• To cancel Programme Shift, either turn off the camera or turn the control
dial until the Programme Shift indication turns off.
• To correct the exposure, use the exposure compensation dial to adjust the
compensation value. (→48)
Enabling/disabling the exposure meter display
→ [Custom] → [Expo.Meter] → [ON] / [OFF]
When you set this function to [ON], an exposure meter is displayed during
●
Programme Shift, aperture setting, and shutter speed operation.
Proper exposure is not possible in the range indicated in red.
●
If the exposure meter is not displayed, press the [DISP.] button to switch the
●
display of the monitor.
The exposure meter will turn off if no operation is performed for approximately
●
4 seconds.
([Program AE] Mode)
Exposure
meter
[ ] Programme
Shift indication
SQT0375 (ENG)
29
 Loading...