

Page 1
Panasonic
Automatic SBreaJ iMaker
SD-BT10P
» »■
Page 2

Thank you for purchasing the Panasonic {Bread {Boke^, SD-BT10R
For optimum performance and safety, please read thes^instructions carefully.
This unit is for household use only.
Table of Contents
Important Safeguards................................................................................................................ 2
Basic Principles when Baking with Unread dBakcN
—Basic Features.......................................................................................................................................................3
—Baking Processes........................................................................................................................................... 3—4
—The Role of Ingredients in Bread Baking..............................................................................................................5—6
—Differences in Baking Results..................................................................................................................................7
Parts Identiffication.................................................................................................................... 8
Control Panel-Display/Functions................................................................................................. 9
How to Use....................................................................................................................... 10—14
—Baking basic breads and whole wheat breads using the BAKE mode
—Baking basic breads and whole wheat breads using the BAKE (RAPID) mode...........................................................12
—Baking basic breads using the BAKE (LIGHT) mode................................................................................................13
—Baking basic breads and whole wheat breads using the timer
—Making dough using the DOUGH mode..................................................................................................................14
Slicing and Storing the Bread .................................................................................................... 15
How to Clean............................................................................................................................15
Display indications for Abnormal Conditions
Before Calling for Service .................................................................................................. 17—18
Recipes............................................................................................................................ 19—29
—Basic Bake mode..........................................................................................................................................19—20
—Whole Wheat Bake mode.....................................................................................................................................21
—Basic Dough mode....................................................................................................................................... 22—28
—Whole Wheat Dough mode...................................................................................................................................29
Leakage of Bread Ingredients from the Bread Pan.......................................................................30
Specifications........................................................................................................................... 30
...................................................................
................................................................
..................................................................................
.............................................................................
3—7
10—12
16
13
Page 3

IMPORTANT SAFEGUARDS
When using electrical appliances, basic safety precautions should always be followed
including the following:
1. READ ALL INSTRUCTIONS BEFORE USE.
2. Follow all warnings and instructions marked on the product.
3. Unplug this product from wall outlet when not in use and before cleaning.
Do not immerse appliance or pan in water or other liquid.
Use a soft cloth to wipe out the inside of the pan. The cabinet may be cleaned with
a damp cloth.
4. Do not touch hot surfaces. Use oven gloves when handling hot materials, allow
metal parts to cool before cleaning.
5. Close supervision is necessary when any appliance is used near children.
6. Do not allow anything to rest on power cord. Do not plug in cord where persons may
walk or trip.
7. Do not operate any appliance with a damaged or frayed cord. Refer servicing of
appliance to an authorized service centre if unit should malfunction or be damaged
in any manner.
8. This appliance is not intended for commercial use. It is for household use only.
9. The use of attachments not recommended by manufacturer may cause damage or
injury.
10. Avoid contacting moving parts.
11. Do not use outdoors. Do not use appliance for other than intended use.
12. Do not let cord hang over edge of table or bench top, or touch hot surfaces.
13. Do not place on or near a hot gas or electric burner, or in a heated oven.
14. To disconnect, grip plug and pull from wall outlet. Never pull on cord.
15. If the supply cord of this equipment is damaged, it must be replaced by the special
cord (Part No. ADA24R107).
SAVE THESE INSTRUCTIONS
Note:
A. A short power-supply cord is provided to reduce the risk resulting from becoming
entangled in or tripping over a longer cord.
B. Extension cords are available and may be used if care is exercised in their use.
C. If extension cord is used;
(1) the marked electrical rating of the extension cord should be at least as great as the
electrical rating of the appliance,
and
(2) the longer cord should be arranged so that it will not drape over the benchtop or
tabletop where it can be pulled on by children or tripped over unintentionally.
_2 —
Page 4

Choice of bread modes
BASIC.
.For white breads with a crisp brown crust and tender interior or for a variety of
breads based on white flour. See individual recipes on R19 to P.20 and R22 to P.28
on how to bake basic white bread and a variety of other breads.
WHOLE WHEAT.
.For breads using 50% to 100% whole wheat flour.
Rich in fibre, vitamin B groups and vitamin E. See individual recipes on R21 and R29.
on how to bake a variety of whole wheat breads.
Choice of baking modes
BAKE
.......................
BAKE (LIGHT) .. .The unit mixes ingredients, kneads the dough, rises it and automatically bakes it as in
BAKE (RAPID)
DOUGH....................The unit automatically prepares dough for pizzas, dinner rolls, doughnuts etc.
—A 13 hour timer allows you to prepare everything the night before and wake up to the aroma of freshly
baked bread. The result may differ when the timer is used.
The unit automatically mixes ingredients, kneads the dough, rises it and bakes it.
the BAKE mode, but the colour of the crust will be a little lighter. (BASIC only).
(Types of ingredients in the recipes will determine the final colour of the crust.)
.The unit mixes ingredients, kneads the dough, rises it and automatically bakes it faster
than the standard BAKE mode.
(The height of bread may be lower when baked in this mode.)
—The beeper sounds eight times when baking in the BAKE modes or rising (fermentation) of dough in the
DOUGH mode is completed.
— Time required for each mode (when timer is not used) is as follows.
Bread mode
BASIC BAKE
Baking mode
BAKE (LIGHT)
BAKE (RAPID)
DOUGH 2 hours 25 minutes
4 hours
3 hours
Time
Bread mode
WHOLE WHEAT
Baking mode
BAKE 5 hours
BAKE (RAPID)
DOUGH
3 hours
3 hours 15 minutes
Bakthg Pra^^es
Steps in Baking Bread
j Manual
Conventionally made bread
I [ I Fermentatiorr j Punch j Divide j Round | Rest [ I p # I
I Measure ¡i*- ,,, ¡(Development! (Releaseof [ {Dividethe ¡(Round eacht (Restfor ¡ShapesPlacet i
\ Ingredients I i of gas in the î gas. Dough ! dough to ! portion into î further î into Pan ! tPinai ¡ oa
I } } dough) j relaxation.) ¡equal portions)! ab^l) |fermentation)! ¡fermentation)!
Automatic
Time
j Cool j Store I
j {Evaporation i {Prevention *
! of vapor) I from staling) |
* Time required for each step will depend on factors such as room temperature, humidity, your oven, type
of bread, type of ingredients, their quantity and quality.
— 3 —
Page 5

3read !2akefy
With Spread 3ial<£ty, the steps from mixing to baking are automatic for Bake modes.
For Dough modes, it is automatic from mixing to punching.
The display window will indicate the time remaining until the process selected is complete.
BASIC mode
Gas Release
Hours 0
I
-----
BAKE,
BAKE!
BAKE (LIGHT) ¡ ’*“”1 flEsr
modes
-r
I I
|ingredieots j
I I
1.
___
O.
KNEAD
Gas Release
RISE
BAKE
1
1
1
1
1
Coo!
-r-1
1 1
( Store
1 1
1
-L.. ..J
I
Houis 0
BAKE (RAPID) r 1
mode
DOUGH mode i
I ingredients I
!.
_ _ _
Hours 0
r
-----
I Measure | _
I I REST
¡ingrediems |
I I
WHOLE WHEAT mode
Ho«s 0 1 2
BAKE mode i i
1 Measure
I. , 1
Ingredients
1 1
U
____
Hours
BAKE (RAPID)
mode
I Ingredients i
I I
L
-r
1
REST
1
.i -
KNEAD
KNEAD
RISE
Gas Release
Gas Release
rl
1
1
1 Divide
1
-------L_____
---------------
L- - L
BAKE 1 Cool
1
1
Round
1 1
Gas Release
1 3 .
RISE
BAKE 1
3
1 i
1 1
Store
1
1 1
_ _ _
1
1 1 1 )
1
Rest 1 Shape
1
1 1 1
I 4 5
r
1 1 1
Cool 1 Store 1
1
1
---------L._____
1
1
1
1 1
Proof 11Bake
----------------BAKE i
1
1
T
1
j
Cool I Store
1
1
1
Cool 1 Store
1
-r
----
1
I I
I I
I
I I
I I
Gas Release
Hours
DOUGH mode ■ ■
I““" I REST
|ingtedients|
!
___!____
KNEAD
2 i 3
RISE
..
——
■■
T~~**
1---.
1
1 1 1 1 1 \
t
1 1 1
1
OMde
1
1
1
Round ( Rest 1 Shape
1 1 1
1 1 1 1 1 1
1 1
1
1 1
* Time required for each step will depend on factors such as room temperature and humidity. For Dough
mode, time will also depend on the oven you use.
For additional information, read instructions on the following pages.
Measuring of ingredients: P.7 #2.
Measuring to Baking: Refer to each recipe on P.19 to P.29.
Cooling: P.12 and P.14
Storing: P.15
— 4 —
Proof 1 Bake
1
1
(
Cool
1
1
1
1
1
Store
1
Page 6

Thé Role of Irigredients in Bread Békihg
The ingredients used in bread baking ali play an important part in the quality of the bread produced.
Below we briefly discuss the role that each ingredient plays in the bread baking process. It is important to
follow the recipes and weigh or measure carefully to ensure the correct balance of ingredients for
successful bread baking.
Basic Ingredients
FLOUR
Most bread is made from wheat flour. The quantity and quality of the gluten forming proteins in the flour
determines its suitability for good bread making.
High grade flours have a consistently higher protein content than some of the lower grades available and
these will generally give a more successful result.
If lower grade flours are used, the addition of 1 tablespoon of gluten flour will improve performance.
All flour starts off as brown flour and is milled and refined until it becomes white.
in wholemeal flour, the wheat grain has not been removed so breads made with wholemeal flour have a
coarser, more crumbly texture.
Breads made with wholemeal flour only will have a reduced volume due to the reduced availability of
gluten forming proteins. To enhance the volume in these loaves a proportion of white flour can be used and
additional gluten flour may also give improved results.
Flours milled from cereals such as oats, rice, barley and rye contain little or no gluten. Therefore these
loaves have a low rise and a dense structure.
Panasonic recommend the use of ELFIN HIGH GRADE FLOUR.
SUGAR
Sugar used in bread making comes in a variety of forms—these include white sugar, brown sugar,
molasses, treacle, honey and golden syrup.
Sugar in some form is essential in all breads as sugar provides food for yeast—it helps the yeast to begin
to ferment and then promotes continued yeast action.
Sugar also provides sweetness and aids browning during baking.
Artificial sweeteners cannot be successfully used as a substitute for sugar—they do not provide the
carbohydrates required for fermentation.
SALT
Salt is very important in bread making as it gives the bread a more even texture.
It also controls the action of the yeast by inhibiting enzyme activity, thus controlling the amount of carbon
dioxide produced. Bread with reduced salt will have a weak gluten structure and a more open texture, too
much salt inhibits fermentation.
Salt also contributes to the flavour.
FATS
The main purpose of fats in bread baking is to tenderise and soften the bread and to enhance the flavour
and richness. Although the addition of fat is not essential, breads made without fat will have less flavour
and will not keep as well.
The best flavour is achieved when butter is used—it should be softened to help mixing.
Other fats can be used. These include vegetable oil, margarine or shortening. Remember that these may
alter the flavour and texture.
— 5
Page 7

LIQUIDS
Liquids are important in bread baking, a small change in the quantity may affect the height and the texture
of the bread.
Liquid is needed to form the bread's gluten framework.
Too much wili cause the dough to collapse, too little prevents the gluten from stretching enough.
Liquid temperature is important—generally a tepid liquid—one that feels neither hot nor cold, is best.
If a recipe specifies water only—part of this may be replaced with fresh milk but remember that this will
affect the fat content of the bread.
Fresh milk is not suitable if timer is being used.
MILK AND MILK PRODUCTS
These enhance the flavour and help increase the nutritional value of the bread. The recipes included in this
book use dry milk because it is convenient to use.
If fresh milk is used, reduce the quantity of water by the same amount.
Fresh milk is not suitable if timer is being used.
YEAST
Yeast is a form of plant life—it will grow and multiply when the conditions are favourable.
In bread baking the yeast ferments the sugar and forms a gas (carbon dioxide).
This gas causes the dough to rise, the fermentation softens the gluten, and makes it elastia
Kneading then develops this softened gluten and spreads the gas cells evenly through the dough to give a
fine textured product.
When bread is baked, the initial heat increases the yeast action—the gas cells expand and the loaf rises.
The yeast is killed and the loaf cooks to have a crisp brown crust and a soft moist even crumb.
Yeast in the following forms can be used in the Ûiread i2akc^ ;
•Active Dry Yeast—yellow lid
•Surebake Yeast—red lid
Surebake is active yeast mixed with additives to enhance the action of the yeast—these additives include
wheat flour, baking fats (to strengthen the gluten and improve texture), calcium carbonate, ascorbic acid
and potassium bromate.
These additives accelerate the strengthening of the gluten. Generally when using Surebake, there will be
no need to add extra ascorbic acid. Gluten flour will only be needed when using grains with a low gluten
content such as oats, rice, barley and rye.
Surebake is added to the bread pan with all other ingredients at the beginning of the process.
Granulated yeast is also placed in the pan directly.
Yeast should be refrigerated for storage—watch use by dates! A temperature of 30—35°C provides the
best conditions for rising of yeast products.
Important
•Place yeast in bread pan before all other ingredients, this gives more consistent results.
• Do not use compressed yeast or dry yeast that requires preliminary fermentation,
•Do not dissolve yeast in warm water before use.
Other Ingredients
•When using ingredients, such as eggs, fruits and vegetables, their water amounts must be taken into
account. With fruits and vegetables, their amounts of sugar must also be taken into account.
Adjust water and sugar amounts in the recipes accordingly.
•When nuts are used, chop them finely. The loaf may be lower in volume because the nuts may cut the
gluten network in the dough.
— 6 —
Page 8

Dilf^iiip^ in Baking Jle
Baking results differ according to several factors including:
the environmental conditions, electricity fluctuation, choice of ingredients and their quantity and quality.
To avoid poor baking results, the following should be remembered.
1. Temperature
Temperature is an important factor in bread baking. The temperature of the room and the ingredients
can effect the final result.
Best results are obtained at a room temperature of 20°C, using room temperature ingredients.
2. Measurements
Accurate measurement is essential in achieving good baking results.
Weighing flour is more accurate than measuring flour in a cup.
When measuring other dried ingredients, use metric measuring cups and spoons.
Scoop the ingredients into the measuring cup then level with the back of a knife.
Do not tap the bottom of the cup to hold an increased quantity.
Liquid measurements must also be accurate, adding too much or too little water will affect the end
result.
3. Always use fresh ingredients—check use by dates and store yeast in the refrigerator and dry
ingredients in air tight containers.
4. Electrical fluctuations
will affect the height, the texture and the colour of bread. It is recommended that you use the unit where
the electricity supply is constant.
5. Using your own recipes
Always ensure that you use no more than 300 g of flour as the bread bakery is not designed to cope with
larger quantities.
Always maintain the same ratio of dry to liquid ingredients as specified in the recipes supplied.
Always use Surebake or Granular yeast—the bread bakery is not designed for use with compressed
yeast.
Not all flours and grains will result in loaves of the same volume, whole wheat loaves are generally
smaller and more dense.
6. Modifying Recipes Supplied
Use the recipes supplied as a guide to the overall quantities of dry and liquid ingredients and take care
that changes to the ingredients do not upset this ratio.
_7__
Page 9
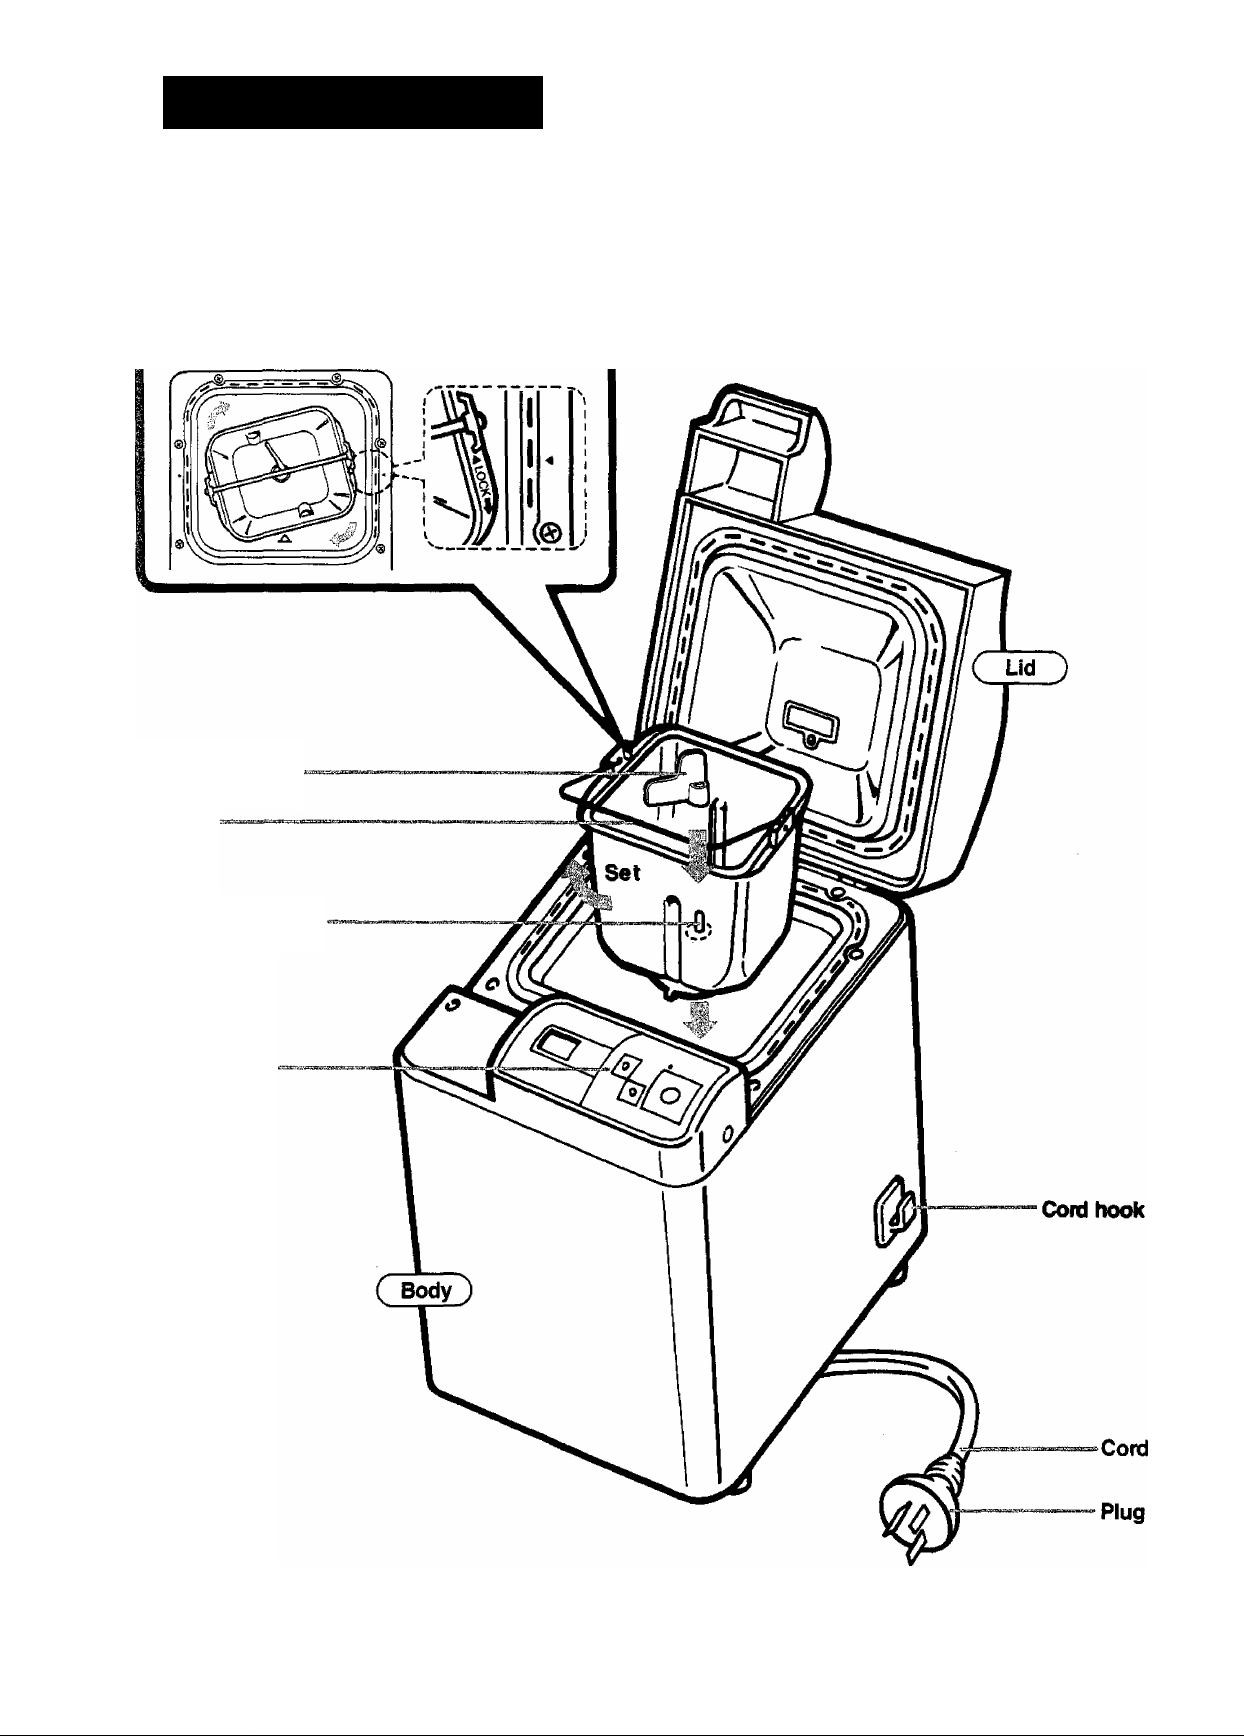
Parts Identification
Bread pan
Place the pan into the oven area and turn
clockwise as far as it will turn.
This sets the pan in position.
Turn counterclockwise to remove.
Kneading blade
Handle
Kneader mounting
shaft
Control panel
8 —
Page 10

Conllpl Paniel-Display/Functions
Be sure you understand the function of each pad before using the Olread {Bakeiy.
NOTE; The unit has a protective film overlay on the control panel to prevent scratching or marring
during shipping.
Vbu may peel this film off and discard It.
Select
Press to select the operation mode desired.
(For BAKE mode of BASIC, it is not necessary to
press this pad.)
Each time the pad is pressed, the display will
change accordingly.
Indicating light
The red light will be lit when in operation.
Display window
All modes and indications are shown here for
reference.
It will flash when the bread baking or the dough
making is completed.
It will also flash in a different frequency when
operated In abnormal conditions.
Timer
Press this pad to set the timer.
The time will advance 10 minutes each time
this pad is pressed.
(The timer setting will change rapidly if
constant pressure is applied to the pad.)
Start/Stop
Press this pad to start operation or begin
the timer.
Press this pad to stop operation or cancel the
timer setting.
(To stop operation, the pad must be pressed
and held for 1 second.)
— 9 —
Page 11

iim
ow to Use
Baking basic biaads and whole Wheat mode
Recipe examples
—
Basic: WHITE BREAD
2t(6g)
300 g
1t(3g)
1t(5g)
1T(5g)
1 t(10g)
200m£(200g) water
Remove the bread pan from the oven area.
1
Twist counter clockwise and pull up, using the handle.
Surebake yeast
white flour
sugar
salt
milk powder
butter
100¥o WHOLEMEAL BREAD
2t(6g)
300 g
IT (17 g)
1T(5g)
1T(10g) butter
1t(5g) salt
200m£ (200 g)
Surebake yeast
wholemeal flour
treacle
milk powder
water
2
5
Mount the kneading blade on the shaft.
Pour water and other liquids, if any, into the
bread pan.
Be sure that there are no
crumbs around the shaft.
The kneading blade is
designed to fit loosely on the
shaft with some loose turning.
6
Place the bread pan inside the body.
Align the bread pan with
the guide mark A on the
top of the oven area.
— Wipe off any moisture or foreign matter from the outside of the bread pan before inserting it
into the oven area.
— 10 —
Page 12

8
Twist the bread pan clockwise into its right
position.
Fold the handle down.
“Be sure the bread pan contacts the bottom of the oven area and twisted to settle into place.
If the bread pan is not placed correctly, the dough will not be kneaded properly.
Close the lid.
Plug into a 230 volt outlet.
9
10
—
ui ‘ ut
Basic breads
©smmisra. Press START pad.
BASIC
И
Rest begins.
* There will be no mixing action for approx.
30 minutes after the START pad is pressed.
(Time will be longer in hot temperatures.)
—Operation begins in the rest condition to settle the temperature of the bread pan and ingredients.
— A clicking noise may be heard during operation. This is not a malfunction.
—If the indicating light blinks and the beeper sounds, see R16.
WHOLE
WHEAT
BAKE
LIGHT
RAPID
DOUGH
Whole wheat breads
SELECT
a
фштзюр
Rest begins.
* There will be no mixing action for approx.
45 minutes after the START pad is pressed.
(Time will be longer in hot temperatures.)
BAKE
n-nni
LIGHT
RAPID
DOUGH
Press this pad to select
WHOLE WHEAT BAKE.
Press START pad.
The display will light up.
BASIC
WHOLE
WHEAT
С'ПП
Duu
BAKE
UGHT
RAPID
DOUGH
After rest, the process will proceed to knead, then to rise and finally, bake.
11
(For detailed information, see R4.)
—Each process is not shown on the display.
—The time required for each of the steps from rest to bake will vary slightly according to factors
—During operation do not remove the pan, nor unplug the power cord.
-------------------------------
BASIC
WHOLE
WHEAT
such as voltage fluctuation and room temperature.
The lid and body will be hot during baking. Do not touch them.
—11 —
tji*l <n
1 ■ u* u*
The above display is for BASIC-BAKE mode.
The time remaining until
BME
LIGHT
RAPID
.
DOUGH
the bread Is finished is
displayed in hours and
minutes. (3:59, 3:58...)
Page 13

12
The beeper will sound eight times and the indicating
light will flash when the bread is baked.
When the beeper stops, promptly press STOP pad, then open the lid and remove the bread pan
13
14
The display will go out
BASIC
WHOLEi
WHEAT
The STOP pad must be pressed before removing the bread
pan.
The bread pan wilt be very hot. Do not place It on any
plastic surges. Handle carefully.
Turn the pan upside down.
Shake the pan several times to release the
bread.
Place the bread on a wire rack to allow the
steam to escape and allow it to cool.
If the kneading blade comes out with the bread, use a heat-resistant plastic utensil to
remove it.
A metal utensil may scratch the finish of the kneading blade.
The bread and the kneading blade will be very hot.
BAKE
LIGHT
RAPID
DOUGH
when the beeper stops,
but the indicating light
will flash until the STOP
pad is pressed.
Unplug after use.
15
—Ensure that the bread bakery and pan have cooled down before the next use
(30 minutes—1 hour).
s.
Follow the same steps as In pages 10—12 except step 10. For step 10, follow the instructions beiow.
SELECT
a
asTOfwsTDP pi-ess START pad.
* There will be no mixing action for approx, 15 minutes after the START pad is pressed.
(Time will be longer in hot temperatures.)
—Operation begins in the rest condition to settle the temperature of the bread pan and ingredients.
Press this pad to select BASIC-BAKE (RAPID) or
WHOLE WHEAT-BAKE (RAPID) mode.
Rest begins.
— 12 —
The remaining time is
displayed in hours and
minutes.
The above display is for BASIC-BAKE (RAPID) mode.
Page 14

ic breads usi
This mode is for BASIC only.
Follow the same steps as in pages 10^12 except step 10.
For step 10, follow the instructions below.
SELECT
^START/STOP
Press this pad to select BASIC-BAKE (LIGHT) mode.
Press START pad.
Rest begins.
BASIC
WHOLE
WHEAT
^ w » ►
»*'*» << I p.
BAKE
LIGHT
RAPID
DOUGH
The remaining time is
displayed in hours and
minutes.
* There will be no mixing action for approx. 30 minutes after the START pad is pressed.
(Time will be longer in hot temperatures.)
—Operation begins in the rest condition to settle the temperature of the bread pan and ingredients.
Baking basic breads and whole wheat breads using the timer
The timer cannot be used for the BAKE (RAPID) mode or the DOUGH mode.
Set the amount of time in which you want
the bread to be compieted.
Example: If the present time is 9:00 pm, and you want
the bread to be finished at 6:30 am tomorrow
morning, set the timer to 9:30 (9 hours and
30 minutes), the time required until the
completion of the bread.
6:30 am flnlsn^*^ 6
(9 hours and 30 minutes) Ы-
'/ г
9:00 pm start V J ,
-------------
I \]
' ^
Follow the same steps as in pages 10^12 except step 10. For step 10, follow the instructions below.
SELEa
TIMEP
a
#STAPri7S
ft
—Operation begins in the rest condition to settle the temperature of the bread pan and ingredients.
Press this pad to select the mode (not necessary for
BASIC—BAKE mode).
Press this pad to set the amount of time in
which you want the bread to be baked.
(Time may be set for any length of time between
4 hours to 13 hours for BASIC, between
5 hours to 13 hours for WHOLE WHEAT.
See page 9 for further explanation of the timer pads.)
TOP Press START pad.
J Rest begins.
WHOLE
WHEAT
WHOLE
WHEAT
BASIC
WHOLE
WHEAT
— 13 —
^ * w ^
О ■ r< о
Э'С о
The above display is for BASIC-BAKE mode.
BAKE
LIGHT
RAPID
DOUGH
BASIC
^ w — ►
BASIC
О • D * 1
Г** Э u
The remaining time is
displayed in hours and
minutes.
BAKE
LIGHT
RAPID
DOUGH
BAKE
LIGHT
RAPID
DOUGH
Page 15

Making dough using the DOUGH mode
Recipe examples
.............
.......................
Basic: DINNER ROLLS
2t(6g)
300 g
1t(5 g)
1t(3g)
21/2 T (25 g)
155m£ (155 g)
2T(10g)
1
Surebake yeast
white flour
salt
sugar
butter
water
milk powder
beaten egg for brushing
top of rolls
See pages 10—11 for steps 1—9.
SELEa
10
a
Press to select the BASIC
DOUGH mode or the
WHOLE WHEAT DOUGH
mode.
..........
N
^
--------------------
——
Whole Wheat:
CRUSTY WHOLEMEAL ROLLS
2t(6g)
300 g
2T
2T
IT (10 g)
1 T
1T(5g)
1T(17g)
1 t (5 g)
220m£ (220 g)
1
____________
The remaining time is displayed in hours and
minutes.
BASIC mode
Surebake yeast
wholemeal flour
sesame seeds
kibbled wheat
butter
gluten flour
milk powder
treacle
salt
water
WHOLE WHEAT mode
®START/STOP Press START pad.
—Operation begins in the rest condition to settle the temperature of the bread pan and ingredients.
The beeper will sound eight times and the indicating light will flash when the dough is completed.
11
12
Press STOP pad when the beeper stops.
Remove the bread pan. ,
Close the lid.
Unplug after use. 1“«® when the beeper stops,
Follow rest of the procedure according to each recipe directions on R22—R28 (Basic) and R29
(Whole Wheat).
Rest begins.
........... ........
BASIC
WHOLE
WHEAT
BASIC
< * »
WHOLE
WHEAT
* There will be no mixing action for 30—45 minutes
after the START pad is pressed.
(Time will be longer in hot temperatures.)
................
BAKE
LIGHT
RAPID
DOUGH
c *c □
, The display will go out
BAKE
c
UGKT
RAPID
► DOUGH
i—^ \
^ ' but the indicating light
>
BASIC
WHOLE
<
WHEAT
3:
will flash until the STOP
pad is pressed.
iS
BAKE
LIGHT
RAPID
> DOUGH
13
When baking is completed, remove from the oven,
using your oven mitts and cool on a wire rack.
The timer cannot be used for this mode.
— 14 —
Page 16

Slicing and $^ring the Bread
Coot the bread on a wire rack before slicing or storing the bread.
Slicing homemade bread
Homemade bread can be cut with a bread knife.
Storing homemade bread
After cooling the bread completely at room
temperature, wrap it in a foil or a plastic bag to
preserve freshness.
To enjoy the taste of freshly baked homemade
bread, try to consume your bread as soon as
possible.
For longer storage, wrap well and store in the
Place the loaf on its side and cut with a sawing
motion.
freezer.
It is better to slice the loaf before freezing.
How to Clean
Before cleaning the unit, unplug and allow the unit to cool.
Body and Lid
Body and lid should be wiped clean with a damp cloth.
Use only mild liquid detergent.
Body
Kneader mounting shaft
Do not use cleansers, steel wool pads, or other abrasive
materials.
Do not use benzine, thinner, alcohol, etc.
Temperature sensor
Wipe gently and avoid bending the temperature sensor.
Temperature
sensor
Bread Pan and Kneading Blade
Remove them from the body of the bakery and wipe with a
soft cloth after each use.
The inside of the pan and kneading blade are coated with
a non-stick finish. Avoid using harsh cleansers or sharp
objects when cleaning.
Do not immerse in water.
— 15 —
Page 17

When the Start pad is pressed:
Display
The oven area is hot (above 40®C).
This may occur during repetitive
BASIC
WHOLS
WHEAT
BAKE
LIGHT
RAPID
DOUGH
use. You must allow the unit to cool
down before reusing.
Indicating light flashes.
Beeper sounds.
During a power failure:
Display
There has been an interruption in
BASIC
WHOLE
WHEAT
ni-r'iri
U'UU
This display appears
and operation stops.
^ - - -- -
BAKE
LIGHT
RAPID
DOUGH
the power supply {power failure,
unplugging of the power cord, or a
malfunctioning of household fuse or
breaker).
Reason
Reason
How to reset
When the unit has cooled to below
40°C, “TEMP” will disappear from
the display window and the red
indicaing light will go out.
To use again, press SELECT and
START pad.
How to reset
If the outage lasts longer than 10
seconds, the operation of the unit stops.
Remove the dough and start again
using all new ingredients.
If the interruption in the power
supply is momentary, the operation
will not be affected.
About the motor protection device
If the unit is overloaded and an excessive force is applied to the motor, the protection device will
stop the motor. After approximately 30 minutes, the motor will automatically start running again. It is
recommended to restart with fresh ingredients.
If the kneading blade is restricted by hard dough, take out the dough. The
unit will restart 30 minutes later.
Check to see if the kneader mounting shaft of the bread pan can rotate.
If it can rotate, restart the bread maker after 30 minutes. If it cannot rotate,
service will be required.
— 16 —
Page 18

Before Calling for Service
Page 19

ead
es too
jch.
Collapsed
after
over-rising.
Bread
doesn’t rise
enough.
Unleavened or not leavened enough
Top of bread
floured.
Under
browned.
Browned and
floured sides,
centre sticky
and raw.
o
o
Sides
brown but
flour coated
bottom.
^
Underbaked.
_o
o
Slices
unevenly
and is
sticky.
o
o
o
o
o
o
o
o
o
O
o
o
o
o
o
o
o
o
o
o
— 18 —
Page 20

Basic Bake mode
Recipes
The timer may be used for recipes marked with 0.
BAKE (RAPID) mode may be used for recipes marked with ©■
The timer and the BAKE (RAPID) mode may not be used at the same time.
BRAN BREAD®®
lV2t
300 g white flour
230 m£
Surebake yeast
1 T brown sugar
1 T
1 T milk powder
11
3T
butter
salt
baking bran
water 11
WHITE BREAD®®
2t
300 g white flour
11 sugar
1 T butter
1 T milk powder
11
200 mi
Surebake yeast
salt
water
HERB BREAD®®
2t
Surebake yeast
300 g white flour
1 t
sugar
1 T
butter
milk powder
1 T
11
salt
11
mixed herbs
parsley
11
caraways
230 m£
water
RYE BREAD®
2t
Surebake yeast
250 g white flour
50g
230 mi
rye fiour
1 t
sugar
1 T butter
milk powder
1 T
11
salt
water
CORN MEAL BREAD ®®
1^2t
300 g
V4 c
230 mi
Surebake yeast 2t Surebake yeast
white flour
cornmeal
milk powder
1 T
11
salt
1 T olive oil
treacle
1 T
water
— 19 —
YOGHURT BREAD®
300 g
V2C yoghurt
100 mi water
white flour
11
sugar
1 T
butter
1 T
milk powder
11 salt
2T
sesame seeds
Page 21

WALNUT BREAD®®
2t
300 g
11
1 T
1 T
30 g
230 m£
Surebake yeast
white flour
sugar
butter
milk powder
11
salt 11
walnuts-chopped 2t
water
RAISIN BREAD
2t Surebake yeast
300 g white flour
sugar
11
butter
1 T
milk powder
1 T
salt
cinnamon
c
raisins (small)
200
This bread should be baked in BAKE
(LIGHT) mode.
water
CARROT AND SPICE BREAD ® RYE ONION AND CARAWAY
2t
300 g
1 T
1 T
1 t
2t allspice
1 T
^4 c
175 m£
Surebake yeast SEED BREAD
white flour
butter
milk powder
salt
honey
grated carrot
water
2t Surebake yeast
300 g white flour
V4C
iVzt
V4 c
175 m£
rye flour
sugar
11
butter
1 T
milk powder
1 T
11 salt
caraway seeds
finely chopped onion
water
ORANGE AND RAISIN BREAD (R
2t
300 g
2t
1 T
1 T
11
3T
V3C
200 m£
Surebake yeast 2t
white flour
sugar
butter
milk powder
salt
walnuts, chopped
raisins
grated orange peel
1 T
orange juice
— 20
SPICY CHEESE BREAD ®
Surebake yeast
300 g white flour
sugar
2t
butter
1 T
milk powder
1 T
salt
11
dry mustard
11
'/4t
V2C
200 mi water
black pepper
Worcestershire sauce
1 T
finely grated cheese
Page 22

WhoJe Wheat Bake mode
100% WHOLEMEAL BREAD 0 ®
2t
Surebake yeast 2t
300 g
200 m£
wholemeal flour
1 t
1 T
11
1 T treacle
butter
milk powder
salt 50 g
water
50% WHOLEMEAL BREAD 0(g)
2t Surebake yeast
150 g wholemeal flour
150 g white flour
butter
1 T
milk powder
1 T
salt
1 t
1 T
treacle
230 m£
water
WHOLE WHEAT DATE AND NUT BREAD 0(g)
2t
Surebake yeast
300 g
V4 c
V3C dates, chopped
230 m£ water
wholemeal flour
1 T
butter
1 T
milk powder
salt
11
pecans or walnuts, chopped
WHOLE WHEAT YOGHURT BREAD (g)
21 Surebake yeast
300 g wholemeal flour
1 t sugar
1T butter
1 T milk powder
11 salt
2 T sesame seeds
V2 c yoghurt
165 m£ water
RYE AND LINSEED BREAD 0(g)
Surebake yeast
100 g
150 g
50 g
220 m£
HONEY
180 g
V4C
V4C
V4 c
V4 c
180 m£
white flour
wholemeal flour
whole rye flakes
whole linseeds
1 T
gluten
butter
1 T
1 T
milk powder
1 t
salt
1 T
treacle
water
AND GRAIN BREAD 0
2t
Surebake yeast
wholemeal flour
kibbled wheat
cornmeal
sunflower seeds
oat bran
1 T
guiten
1 T
butter
1 t
salt
2t
malt vinegar
1 T
honey
water
KIBBLED WHEAT AND
PUMPKIN KERNEL BREAD 0
iVjt Surebake yeast
250 g white flour
50 g wholemeal flour
V4 c kibbled wheat
V4 c pumpkin kernels
1T butter
11 salt
1 T honey
230 m£ water
WHOLE WHEAT PEANUT AND SESAME BREAD 0(g)
21 Surebake yeast
150 g white flour
150 g wholemeal flour
1 T brown sugar
V4 c peanut butter
1 T milk powder
11 salt
2 T sesame seeds
150 m£ water
— 21 —
MIXED GRAIN BREAD 0
2t
Surebake yeast
150 g
150 g wholemeal flour
230 m£ water
white flour
21
1 T
1 T
11
1 T
1 T milk powder
11
kibbled wheat
bran flakes
wheatgerm flakes
sugar
butter
salt
Page 23

Basic Dpugh mode
DINNER ROLLS
2t Surebake yeast
300 g white flour
11
sugar
2V2T
155 mi
1
• Make dough according to instructions on
page 14.
• Divide the dough
into 12 equal
portions. Roll each
portion into a ball.
Cover with plastic
wrap and leave to
rest for 20 minutes.
• Roll one end of the
ball on a lightly
floured surface to
make a cone.
butter
2T
milk powder
salt
1 t
water
beaten egg for brushing top of rolls
' Starting with the
wider end, roll up
the wedge loosely
towards the
narrower end.
• Place seam side
down on a greased
oven tray.
• Prove at 30~35°C
for 30—50 minutes
or until doubled in
size.
If an oven for proving
is not available, cover
with plastic wrap
and leave to rise in
a warm place of
approximately this
temperature.
• Brush rolls with
beaten egg, sprinkle
with poppy seeds
or sesame seeds if
desired.
• Roll each cone into
a wedge shape,
approximately
V2 cm thick, using
rolling pin.
* Bake in a
preheated 175°C
oven for 10—15
minutes or until
golden brown.
— 22 —
Page 24

Basic Pough mode
VIENNA LOAF
•Use dinner rolls dough recipe on page 22.
• Pat or roll the dough into an
oval, 2~3cm thick.
Fold in half lengthwise,
pinch edges together.
• Place the seam facing upwards.
• Pat the dough out from the
seam which should be
the centre of the dough.
• Repeat 3—4 times, elongating the dough each
time.
• Place seam down on a lightly greased oven
tray and leave to rise until doubled in size.
•Slash the dough diagonally with a sharp knife
if desired.
• Brush with beaten egg and sprinkle with
sesame or poppy seeds. To make a savoury
loaf, sprinkle with grated cheese and diced
onion.
•Bake in a preheated 200°C oven for 15—20
minutes.
T-T r
SWEDISH TEA RING
2t
Surebake yeast
300 g white flour
3T sugar
2T
1 t
butter
milk povwler
salt
water
2V2T
155 mi
•Make dough according to instructions on
page 14,
• Roll or pat the dough into a rectangle 40 cm x
30 cm.
21 melted butter
21 cinnamon
V2 c brown sugar
1 egg beaten, for glaze
•Brush over surface of the dough with melted
butter.
• Mix cinnamon and brown sugar and sprinkle
over butter.
• Roll up like a swiss roll starting from the long
side.
• Press edges firmly underneath.
•Join ends to make a circle, pinch edges
together and place on a greased oven tray.
• Cut nearly through to the centre of the ring at
25cm intervals, turning each section so that it
faces cut side up.
DOUGHNUTS
•Use dinner rolls dough recipe on page 22.
• Divide the dough into 12 equal portions.
Roll each portion into a ball.
• Place on a lightly floured surface. Cover with a
plastic wrap and leave to rise for 20 minutes.
• Shape each ball as desired, in a ring, twisted,
or in an oval shape. Place on a greased tray.
• Leave to rise at 30®C for 30 minutes.
• Deep fry the doughnuts until golden brown.
• Roll in a mixture of sugar and cinnamon or cool
and use other toppings as desired.
23
Page 25

Basic Dough mode
»Cover with plastic wrap and leave to rise in a
warm place (30—35°C) for 30 minutes.
® Brush with beaten egg.
• Bake in a preheated 180®C oven for 15—25
minutes or until golden brown.
•Other fillings such as dried fruit, jam,
mincemeat, nuts etc can be used.
•This tea ring can be iced with a vanilla icing if
desired.
FRUIT BRAID
Use plain white dough as in dinner rolls on page
22 or sweet white dough as in Swedish tea ring
on page 23.
•After dough is completed, roll out into a
rectangle 40cm x 30cm.
• Lift this rectangle onto a greased tray.
Lightly mark the rectangle in thirds.
Filling
1 cup of fruit mincemeat.
Glaze
1 beaten egg
•Spread the filling down the centre third of the
rectangle of dough.
•Cut the outer third into 25cm diagonal strips.
•Starting at the top end, cross left and right
strips over the filling overlapping at the centre.
•Continue until all the filling is covered and all
the strips are in place.
• Cover with plastic wrap and leave to rise in a
warm place {30—35°C) for 30 minutes.
• Brush with beaten egg,
• Bake in a preheated 180°C oven for 15—25
minutes or until golden brown.
— 24 —
Page 26

Basic Dough rpode
HOT CROSS BUNS
2t
Surebake yeast
300 g
1*/2t
V2 c
1
130 m£
• Make dough according to instructions on page
14.
•Place dough in a greased bowl. Cover with a
plastic wrap and leave to rise for 20—30
minutes.
•Shape into 8 or 10 buns depending on the
size required.
• Cover and leave to rise in a warm place
(30—35°C) for 30—50 minutes or until doubled
in size.
• Put on crosses.
• Bake in a preheated 200®C oven for 10—15
minutes or until golden brown. Brush over the
glaze.
Crosses
Vzc 2Tflour
white flour
brown sugar
2T
4T
butter
milk powder
1 T
salt
all spice or mixed spice
sultanas
egg
1 T
grated orange rind
water (warm)
oil
water to mix
Glaze
3T3Tmilk
castor sugar
Crosses
Mix flour and oil then add water to make a stiff
paste. Pipe into the shape of crosses—if a piping
bag is not available, use a small plastic bag with
a corner cut off.
FOCACCIAITALIAN SAVOURY FLAT BREAD
iVit
300 g
200 m£
•Make dough according to instructions on page
14.
• Roll or pat the dough into a rectangle 22 x 16cm.
•Dimple the top every 6cm by pressing your
finger well into the dough.
•Cover and leave to rise in a warm place
(30—35°C) for 30—50 minutes.
Combine:
2 T olive oil
V21 salt—coarse sea salt, if available
11 dried basil
11 dried rosemary
11 dried thyme
•Brush the surface of the dough with the herbed
oil.
•Bake in a preheated 200°C oven for 15—20
minutes or until golden brown.
Variations
•Add finely chopped bacon and onion to the
herbs and oiive oil and spread over bread,
do not add salt,
or
•Add bacon and onion to the dough ingredients
—make dough and then top with the herb
mixture.
1 t
1 T
1 T
11
Surebake yeast
white flour
sugar
butter
milk powder
salt
water
Glaze
Boil together until syrupy—brush over cooked
buns when they are removed from the oven.
— 25
Page 27

Basic Dough mode
FOCCACIA WITH BALSAMIC VINEGAR
AND OLIVE FILLING
• Use Foccacia dough recipe on page 25.
• Roll or pat the dough into a rectangle 25 x 40
cm.
•Spread onion and olive mixture on one half, fold
other half over—sealing edges with water,
• Cover and leave to rise in a warm place
(30—35'^) for 30—50 minutes.
• Brush surface with olive oil.
• Bake in a preheated 200°C oven for 20—25
minutes or until golden brown.
Onion Puree
3 onions, chopped
75 m£ Balsamic vinegar
11 mustard seeds
1 T brown sugar
pepper
salt
• Simmer all ingredients for one hour, cool.
Olive Mixture
3 cloves garlic, crushed
3 T olive oil
1 T rosemary, finely chopped
200 g olives, chopped
•Heat oil in saucepan, fry garlic add to onion
puree along with all other ingredients.
FOCCACIA WITH TOMATO HERB AND MOZZARELLA CHEESE
• Use Foccacia dough recipe on page 25.
•Roll or pat the dough into a rectangle 25 x 40
cm.
• Spread Tomato mixture on one half. Sprinkle with
Mozzarella cheese and fold other half over—sealing
edges with water.
•Cover and leave to rise in a warm place
(30—35°C) for 30—50 minutes.
• Brush surface with olive oil.
• Bake in a preheated 200®C oven for 20—25
minutes or until golden brown.
Tomato Herb and Mozzarella Filling
1 T olive oil
2 onions, chopped
3 large tomatoes, chopped
2 garlic cloves, crushed
2 T fresh basil, chopped or 11 dried basil
2 T tomato paste
V41 salt
black pepper, freshly ground
^/3 c grated Mozzarella cheese
•Heat olive oil in a medium sized pan, add all
ingredients except the cheese, cook stirring
occasionally until the tomato mixture reduces.
Cool to room temperature.
•Optional extras: olives, bacon, mushrooms,
chunks of salami.
— 26 —
Page 28

LIGHT WHOLEMEAL ROLLS
PIZZA BASE
1 t
1 T
1 T
1 t
1
Surebake yeast
white flour
sugar
butter
milk powder
salt
water
beaten egg for brushing top of rolls
poppy or sesame seeds to sprinkle
on top.
iVzt
250 g
50 g wholemeal flour
200 m£
• Make dough according to instructions on page
14.
•Turn the dough out into a greased bowl.
Cover and let the dough rest for 20 minutes in
the refrigerator.
• Divide the dough into 9—12 equal portions—
shape into rolls (you may need to use floured
hands) and place on a greased baking tray.
Cover and leave to rise in a warm place
(30—35®C) for 30—50 minutes or until doubled
in size.
1V2T
300 g
'/2t
'/2t
1V2T
125 mi
Pizza ingredients, cheese, ham, onion,
mushrooms etc.
• Make dough according to instructions on page
14.
•Cover and let the dough rest in the refrigerator
in a greased bowl.
•Shape dough into a circle—for a single pizza or
divide up and make individual sized pizzas.
• Leave to rest at room temperature for 10
minutes.
•Top the pizza base with your choice of toppings.
• Bake in a preheated 220°C oven for 15—20
minutes or until golden brown.
Surebake yeast
white flour
sugar
salt
olive oil
water
•Brush the tops with beaten egg, then sprinkle
with poppy or sesame seeds.
• Bake In a preheated 200°C oven for 15—20
minutes or until golden brown.
— 27 —
Page 29

Basic bough mode
BRIOCHE
1 T
Surebake yeast
280 g
80g
V2t
35 mi
• Make dough according to instructions on page
14.
•Cover and let the dough rest in the refrigerator
in a greased bowl for 20—30 minutes.
• Use a lightly floured work surface and hands
to shape brioche.
• Divide into 12 equal portions, make into bails,
divide each ball into one large and one small
ball.
• Place each large ball in a greased brioche or
muffin cup. With floured fingers, dimple the top
of each large ball. Place the small ball in each
indentation.
•Cover and leave to rise in a warm place
(30—35°C) for 30—40 minutes or until
doubled in size.
• Brush brioche with beaten egg. Bake in a
preheated 200®C oven for 10—15 minutes or
until light golden brown.
2
2t
1
white flour
eggs (size 7)
sugar
butter
salt
milk (fresh)
beaten egg for brushing top of
brioche
PITA BREAD
I'/zt
225 g
V2t
V4t
150 mi
• Make dough according to instructions on page
14.
• Use a lightly floured work surface and hands to
shape pita breads.
• Divide the dough into 6 equal portions, make
into flat oval shapes, approximately 0.5 cm
thick.
•Cover and leave to rise for 30—50 minutes.
• Lightly grease heavy pan, fry each pita until it
puffs—turn, cook until golden brown.
• Split and fill with your choice of hot or cold
fillings.
Pita Crisps
An alternative to potato or corn chips.
• Split pita breads, cut into triangles 6cm x 4cm.
• Brush with oil and bake in a preheated 120*^C
oven for 20—30 minutes until crisp.
•Glaze with salsa or guacamole.
Garlic Pita Triangles
• Spread the inside of whole split pita breads with
garlic or herb butter,
Surebake yeast
white flour
sugar
salt
water
-28-
• Heat in a preheated 180°C oven until butter
melts.
•Cut in quarters and serve as an
accompaniment to soups or pasta dishes.
Page 30

Whole Wheat Dough
mode
CRUSTY WHOLEMEAL ROLLS
Surebake yeast
2t
1 T
2T
2T
1 T
1 T
11
1 T
wholemeal flour
gluten flour
sesame seeds
kibbled wheat
butter
milk powder
salt
treacle
water
300 g
220 mi
• Make dough according to instructions on page
14.
•Turn the dough out into a greased bowl.
Cover and let the dough rest for 20 minutes in
the refrigerator.
• Divide the dough into 9—12 equal portions—
shape into rolls (you may need to use floured
hands) and place on a greased baking tray.
Cover and leave to rìse in a warm place
(30—35°C) for 30—50 minutes or until doubled
in size.
• Brush the tops with beaten egg, then sprinkle
with poppy or sesame seeds,
•Bake in a preheated 200°C oven for 15—20
minutes or until golden brown.
WHOLEMEAL AND CORNMEAL
ROLLS
2t
Surebake yeast
150 g
150 g white flour
50 g
220 m£ water
• Make dough according to instructions on page
14.
•Turn the dough out into a greased bowl.
Cover and let the dough rest for 20 minutes in
the refrigerator.
• Divide the dough into 9—12 equal portions—
shape into rolls (you may need to use floured
hands) and place on a greased baking tray.
Cover and leave to rise in a warm place
(30—35°C) for 30—50 minutes or until doubled
in size.
• Brush the tops with beaten egg, then sprinkle
with poppy or sesame seeds.
• Bake in a preheated 200°C oven for 15—20
minutes or until golden brown.
wholemeal flour
cornmeal
1 T
butter
1 T
milk powder
1 t salt
1 T treacle
— 29 —
Page 31

Bread Pan
—With extended use, a small quantity of ingredients may leak out from the outlet of the bread pan. The
bread pan is designed so that the ingredients in the kneader mounting shaft unit may be discharged to
prevent rotation stoppage.
—When the ingredients block the outlet and the kneader mounting shaft is no longer able to rotate, it is
necessary to exchange the kneader mounting shaft unit for a new one.
Consult with your authorized Panasonic Service Center for exchange of the part.
Spe^ication
Power supply
Power consumption
Capacity
Timer
Protective device
Dimensions (H x W x D)
Weight
230 V AC 50 Hz
380 W
2 cups (300 g) flour
Digital timer
(up to 13 hours)
Self-resetting motor protector
31.1 x 23.2 x 295 cm
approx. 5.6 kg
— 30 —
 Loading...