

Page 1
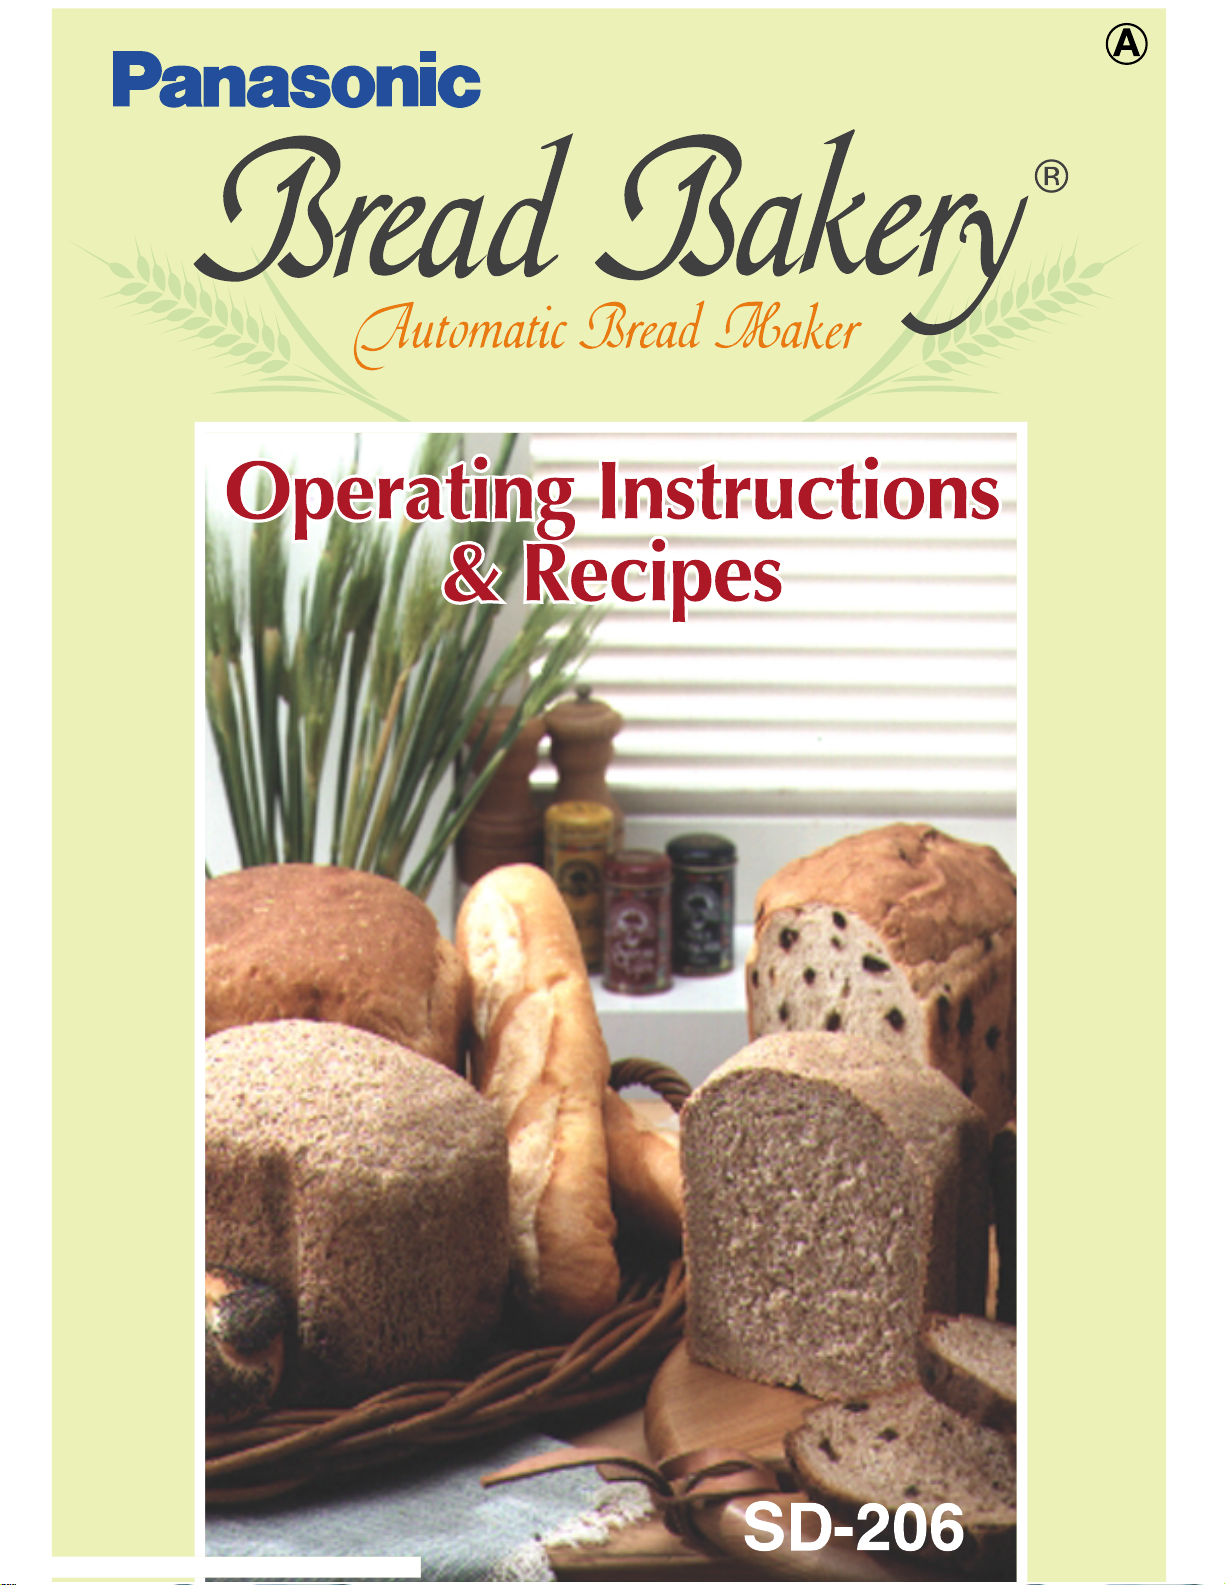
SD-206
Page 2

The has to be installed to a minimum 10-ampere (T) fuse.
If your AC outlet is not grounded, it is the personal responsibility of the customer to have it
replaced with a properly ground wall socket of 240V 50Hz.
Thank you for purchasing a
Panasonic
,SD-206.
For your own safety and convenience, please read these instructions carefully before operating.
Installation of the .
IMPORTANT: THIS UNIT HAS TO BE EARTHED FOR PERSONAL SAFETY!
¨
¨
¨
IMPORTANT SAFEGUARDS
When using electrical appliances, basic safety precautions should always be followed
including the following:
1. READ ALL INSTRUCTIONS BEFORE USE.
2. Follow all warnings and instructions marked on the product.
3. Unplug this product from wall outlet when not in use and before cleaning.
Do not immerse appliance in water or other liquid. Use a soft sponge and mild
detergent when cleaning the inside of the pan or kneading blade. The cabinet may
be cleaned with a cloth, dampened with a mild soap and water solution.
4. Do not touch hot surfaces. Use oven mitts when handling hot materials, allow metal
parts to cool before cleaning.
5. Close supervision is necessary when any appliance is used near children.
6. Do not allow anything to rest on power cord. Do not plug in cord where persons may
walk or trip.
7. Do not operate any appliance with a damaged or frayed cord. Refer servicing of
appliance to an authorised service centre if the unit should malfunction or be
damaged in any manner.
8. This appliance is not intended for commercial use. It is for household use only.
9. The use of attachments not recommended by manufacturer may cause damage or
injury.
10. Avoid contacting moving parts.
11. Do not use outdoors. Do not use appliance for other than intended use.
12. Do not let cord hang over edge of table or counter, or touch hot surfaces.
13. Do not place on or near a hot gas or electric burner, or in a heated oven.
14. To disconnect, grip plug and pull from wall outlet. Never pull on cord.
15. The unit may vibrate or move during the kneading process. Do NOT place the
unit near the edge of a countertop. Place the unit securely where movement of the
unit will not cause it to fall off the countertop.
16. If the supply cord of this equipment is damaged, it must be replaced by the special
cord (Part No. ADA24R117).
SAVE THESE INSTRUCTIONS
Note:
A. A short power-supply cord is provided to reduce the risk resulting from becoming
entangled in or tripping over a longer cord.
B. Extension cords are available and may be used if care is exercised in their use.
C. If extension cord is used:
(1) the marked electrical rating of the extension cord should be at least as great as
the electrical rating of the appliance,
and
(2) the longer cord should be arranged so that it will not drape over the countertop or
tabletop where it can be pulled on by children or tripped over unintentionally.
Page 3
Table of Contents
Basic Principles when Baking with ........................3
-Basic Features ...........................................................................3
Baking Programs.........................................................................4
Parts identification .......................................................................5
Control panel-display/functions...................................................6
How to use.............................................................................7Ð12
-To use the timer for baking loaves only
with the BAKE mode................................................................10
-Using the BAKE RAPID mode ................................................10
-Using the DOUGH mode .........................................................11
-Using the BAKE ONLY mode ...........................................11Ð12
How to clean..............................................................................12
Slicing and storing the bread ....................................................13
Leakage of bread ingredients from the bread pan...................13
Specifications............................................................................13
Display Indications for Abnormal Conditions ...........................14
Before calling for service ....................................................15Ð16
Ingredients...........................................................................17Ð18
Other Ingredients Used for Flavoured Loaves.........................19
Tips for baking whole wheat & multigrain breads ....................20
Differences in Baking Results ...................................................20
Recipes................................................................................21Ð42
Basic recipes .....................................................................21Ð26
Whole wheat recipes.........................................................27Ð29
Multigrain recipes...............................................................30Ð31
French recipes.........................................................................32
Breadmix formulas ..................................................................32
Dough recipes....................................................................33Ð41
Bake only recipes....................................................................42
¨
Page 4
Choice of bread modes
BASIC.............Forproducing loaves of bread using white or brown strong flour as the major ingredient.
WHOLE WHEAT.....Forloaves using wholemeal strong flour as the main ingredient.
MULTIGRAIN.......Forbreads with cereals/grains such as rye, etc. mainly using wholemeal strong flour.
FRENCH ..........Forloaves with crisp crust and open texture. It has crisp taste because sugar is not
included in the ingredients.
PIZZA .............Arapid dough mode for pizza, focaccia and other Italian breads.
BAKE ONLY .......Amode for baking cakes only.
Choice of baking modes
Choice of size and crust colour
BAKE............. Theunit automatically mixes ingredients, kneads the dough, rises it and bakes it.
BAKE RAPID.......Theunit mixes ingredients, kneads the dough, rises it and automatically bakes it faster
than the standard BAKE mode.
BAKE SANDWICH. . . The unit automatically makes a medium size loaf of bread with a soft crust suitable for
sandwich slices.
BAKE RAISIN.......The unit automatically makes bread as in the BAKE mode. A beeper sounds to let you
know when to add dried fruits, such as raisins. This is to prevent them from being
crushed during the kneading process.
DOUGH...........
The unit automatically prepares dough for pizzas, dinner rolls, doughnuts, croissants, etc.
DOUGH RAISIN.....Theunit automatically prepares dough as in the DOUGH mode. A beeper sounds to
let you know when to add dried fruits as in the BAKE RAISIN mode.
-
A 13-hour timer allows you to prepare everything thenight before and wake up to the aroma of freshly
baked bread. (Certain BAKE mode only). The result may differ when the timer is used.
-
The beep sounds eight times when baking in the BAKE modes or rising of dough in the DOUGH modes is
completed.
-
The beep also sounds in the BAKE RAISIN and DOUGH RAISIN modes, when the machine pauses for 1
minute during the kneading process to add the raisins, chopped dried fruits and / or nuts.
-3-
Basic Features
Basic Principles when Baking with
¨
Mode
Size / Colour
BASIC BAKE
BASIC BAKE RAPID
BASIC BAKE RAISIN
WHOLE WHEAT BAKE
WHOLE WHEAT BAKE RAPID
WHOLE WHEAT BAKE RAISIN
Size Selection
L
Ã
Ã
Ã
Ã
Ã
Ã
M
Ã
Ã
Ã
Ã
Ã
Ã
S
Ã
Ã
Ã
Ã
Ã
Ã
Crust Colour Selection
Dark
Ã
Ã
Medium
Ã
Ã
Ã
Light
Ã
Ã
Ã
The selection of size and crust colour is possible for the following modes:
If not selected, the will automatically select L size with a medium crust.
¥
Size and crust colour will be affected by the room temperature and the quality of flour and/or other ingredients.
¨
Page 5
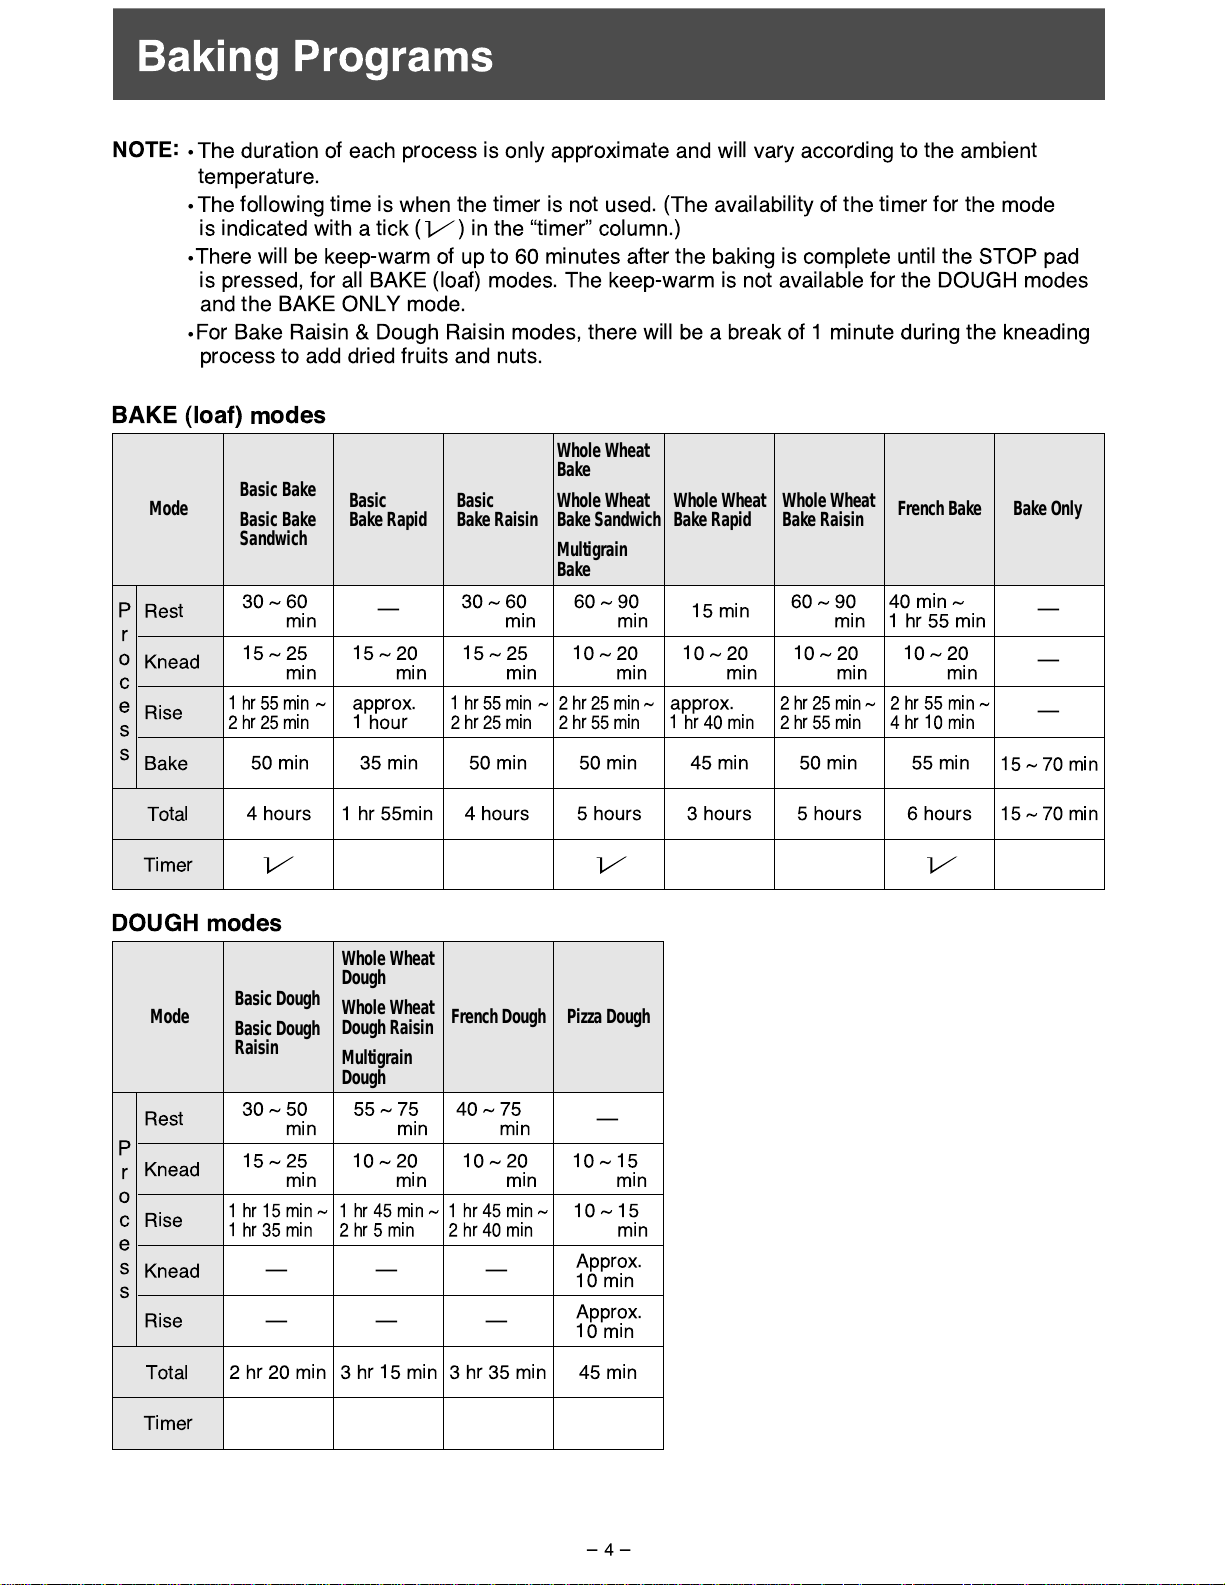
NOTE
:
¥
The duration of each process is only approximate and will vary according to the ambient
temperature.
¥
The following time is when the timer is not used. (The availability of the timer for the mode
is indicated with a tick ( ) in the ÒtimerÓ column.)
¥
There will be keep-warm of up to 60 minutes after the baking is complete until the STOP pad
is pressed, for all BAKE (loaf) modes. The keep-warm is not available for the DOUGH modes
and the BAKE ONLY mode.
¥
For Bake Raisin & Dough Raisin modes, there will be a break of 1 minute during the kneading
process to add dried fruits and nuts.
-4-
Baking Programs
BAKE (loaf) modes
DOUGH modes
Mode
Basic Bake
Basic Bake
Sandwich
Rest
30~60
min
15~25
min
30~60
min
60~90
min
60 ~ 90
min
40 min ~
1hr55min
15 min
-
50 min 50 min 50 min 50 min 55 min45 min35 min
15~70min
1hr55min ~
2hr25min
1hr55min ~
2hr25min
2hr25min~
2hr55min
2hr25min~
2hr55min
2hr55min~
4hr10min
approx.
1hr40min
approx.
1 hour
Whole Wheat
Bake
Whole Wheat
Bake Sandwich
Multigrain
Bake
Whole Wheat
Bake Rapid
Whole Wheat
Bake Raisin
French Bake Bake Only
Basic
Bake Rapid
Basic
Bake Raisin
P
r
o
c
e
s
s
Knead
Rise
Bake
-
15~20
min
15~25
min
10~20
min
10 ~ 20
min
10 ~ 20
min
10~20
min
-
-
4 hours 1 hr 55min 4 hours 5 hours 3 hours 5 hours 6 hours
15~70min
Total
Timer
Approx.
10 min
Approx.
10 min
2hr20min 3hr15min 3hr35min 45min
Whole Wheat
Dough
Whole Wheat
Dough Raisin
Multigrain
Dough
French Dough Pizza Dough
Basic Dough
Basic Dough
Raisin
Rest
30~50
min
55~75
min
15~25
min
40~75
min
-
-
1hr15min~
1hr35min
1hr45min~
2hr40min
10~15
min
1hr45min~
2hr5min
P
r
o
c
e
s
s
Knead
Rise
Knead
Rise
10~20
min
10~20
min
10~15
min
Total
Timer
-
-
-
-
-
Mode
Page 6
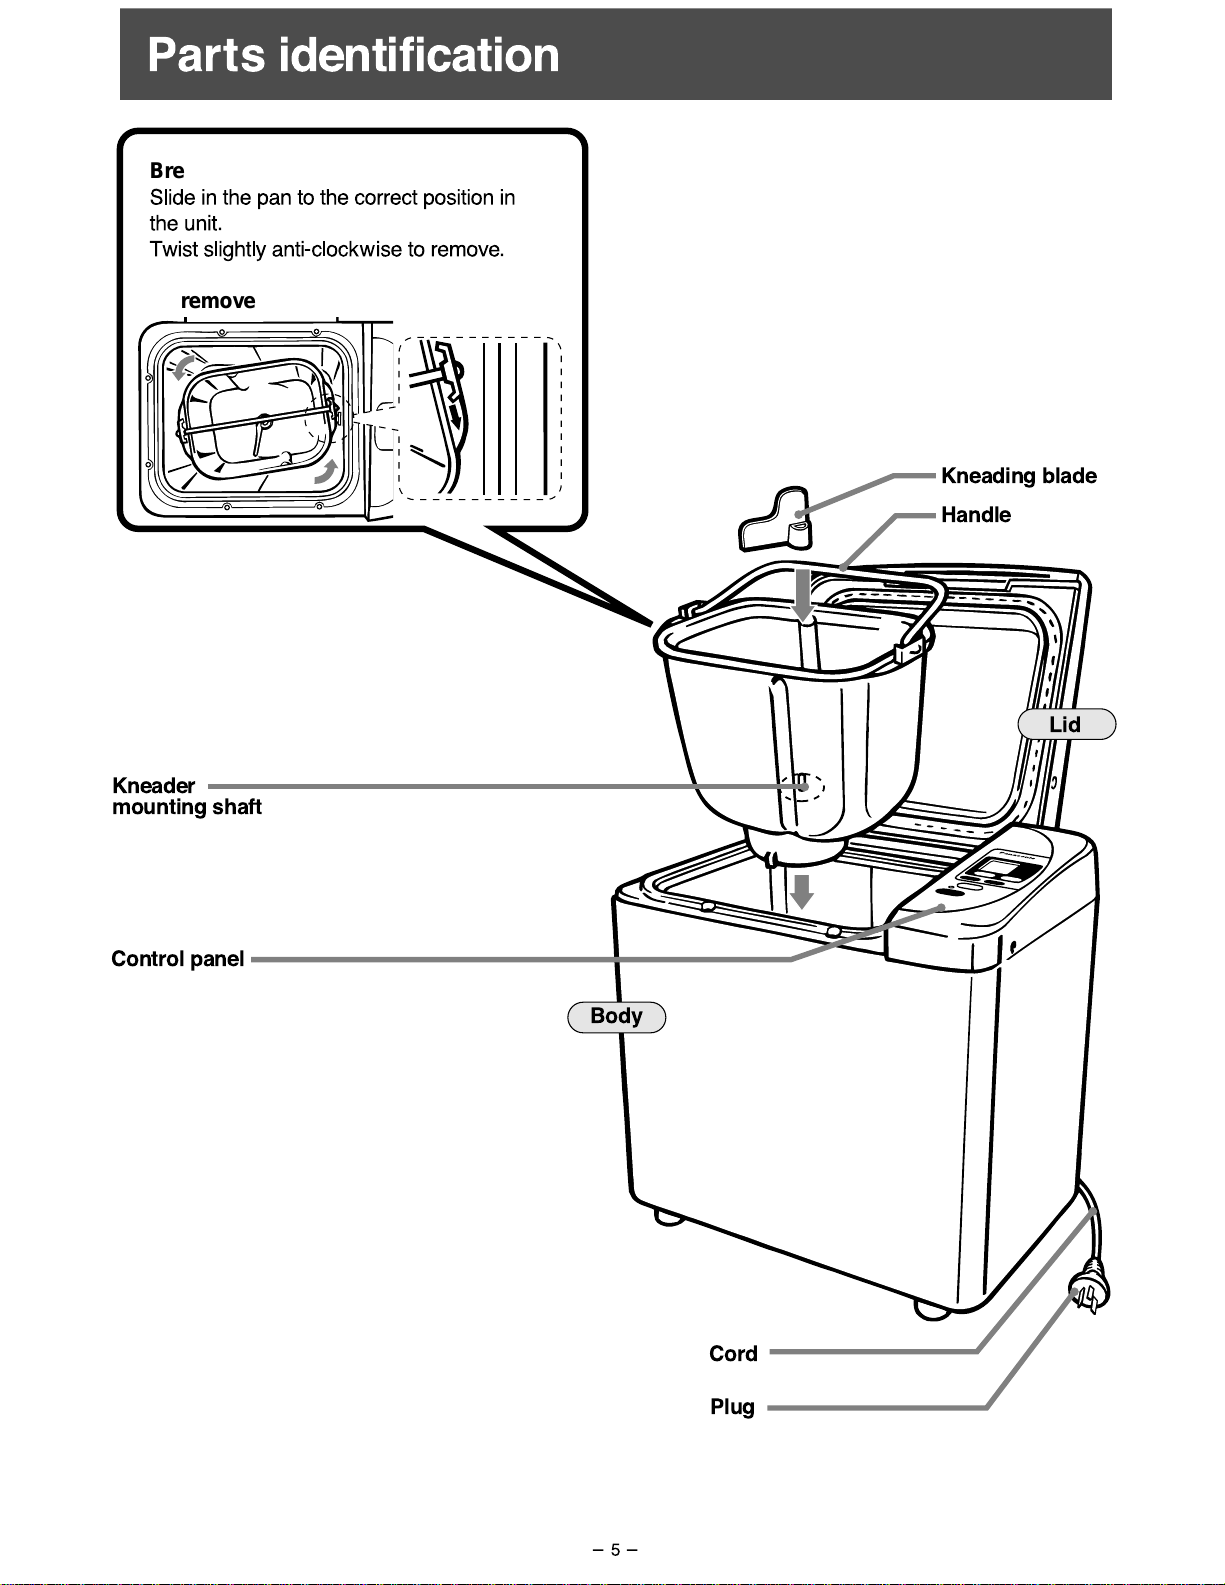
-5-
Bread pan
Slide in the pan to the correct position in
the unit.
Twist slightly anti-clockwise to remove.
To remove
Kneading blade
Handle
Control panel
Kneader
mounting shaft
Cord
Plug
Lid
Body
Parts identification
Page 7
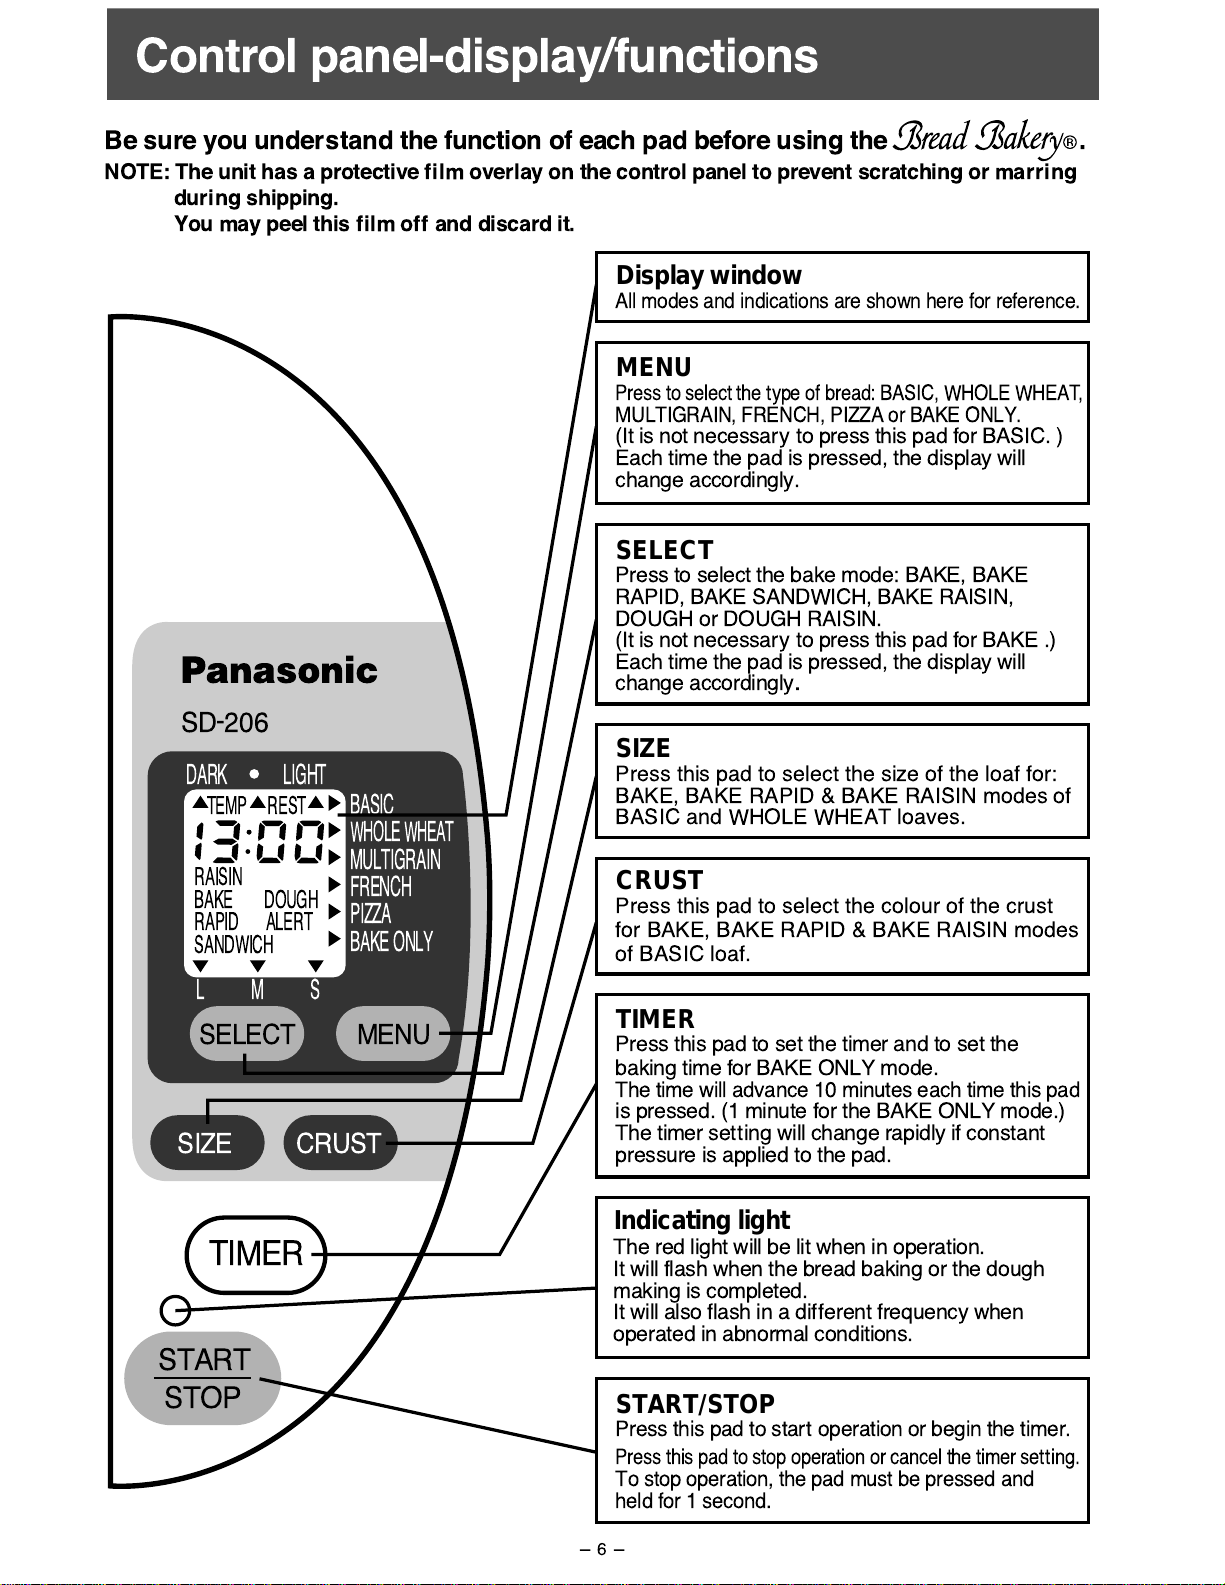
DARK LIGHT
BASIC
WHOLE WHEAT
MULTIGRAIN
FRENCH
PIZZA
BAKE ONLY
LMS
SELECT
SIZE
START
STOP
TIMER
CRUST
MENU
TEMP REST
RAISIN
BAKE DOUGH
RAPID ALERT
SANDWICH
SD-206
Be sure you understand the function of each pad before using the .
NOTE: The unit has a protective film overlay on the control panel to prevent scratching or marring
during shipping.
You may peel this film off and discard it.
Display window
All modes and indications are shown here for reference.
CRUST
Press this pad to select the colour of the crust
for BAKE, BAKE RAPID & BAKE RAISIN modes
of BASIC loaf.
SELECT
Press to select the bake mode: BAKE, BAKE
RAPID, BAKE SANDWICH, BAKE RAISIN,
DOUGH or DOUGH RAISIN.
(It is not necessary to press this pad for BAKE .)
Each time the pad is pressed, the display will
change accordingly.
SIZE
Press this pad to select the size of the loaf for:
BAKE, BAKE RAPID & BAKE RAISIN modes of
BASIC and WHOLE WHEAT loaves.
TIMER
Press this pad to set the timer and to set the
baking time for BAKE ONLY mode.
The time will advance 10 minutes each time this pad
is pressed. (1 minute for the BAKE ONLY mode.)
The timer setting will change rapidly if constant
pressure is applied to the pad.
Indicating light
The red light will be lit when in operation.
It will flash when the bread baking or the dough
making is completed.
It will also flash in a different frequency when
operated in abnormal conditions.
START/STOP
Press this pad to start operation or begin the timer.
Press this pad to stop operation or cancel the timer setting.
To stop operation, the pad must be pressed and
held for 1 second.
MENU
Press to select the type of bread: BASIC, WHOLE WHEAT,
MULTIGRAIN, FRENCH, PIZZA or BAKE ONLY.
(It is not necessary to press this pad for BASIC. )
Each time the pad is pressed, the display will
change accordingly.
¨
Control panel-display/functions
-6-
Page 8
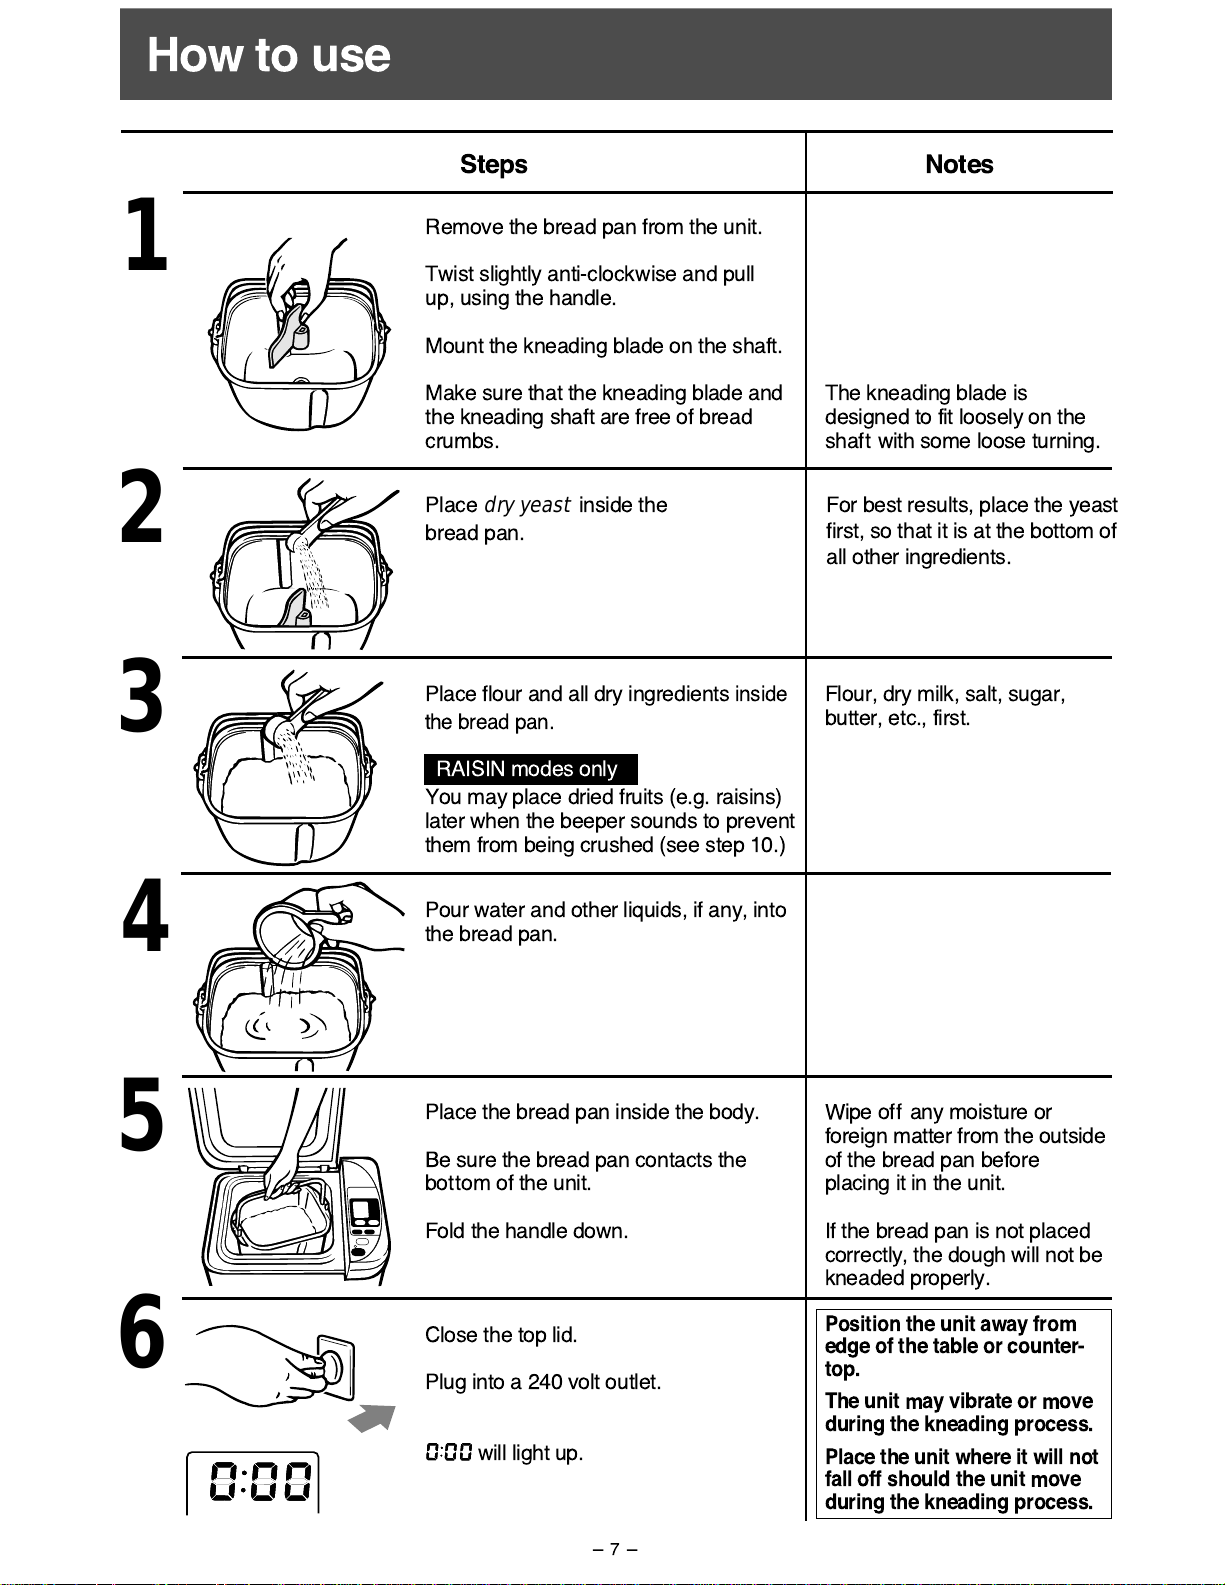
Close the top lid.
Plug into a 240 volt outlet.
will light up.
Steps Notes
Remove the bread pan from the unit.
Twist slightly anti-clockwise and pull
up, using the handle.
Mount the kneading blade on the shaft.
Make sure that the kneading blade and
the kneading shaft are free of bread
crumbs.
The kneading blade is
designed to fit loosely on the
shaft with some loose turning.
Place flour and all dry ingredients
inside
the bread pan.
RAISIN modes only
You may place dried fruits (e.g. raisins)
later when the beeper sounds to prevent
them from being crushed (see step 10.)
Flour, dry milk, salt, sugar,
butter, etc., first.
Pour water and other liquids, if any, into
the bread pan.
Place the bread pan inside the body.
Be sure the bread pan contacts the
bottom of the unit.
Fold the handle down.
Wipe off any moisture or
foreign matter from the outside
of the bread pan before
placing it in the unit.
If the bread pan is not placed
correctly, the dough will not be
kneaded properly.
1
2
3
4
5
6
Place
dry yeast
inside the
bread pan.
For best results, place the yeast
first, so that it is at the bottom of
all other ingredients.
Position the unit away from
edge of the table or counter-
top.
The unit may vibrate or move
during the kneading process.
Place the unit where it will not
fall off should the unit move
during the kneading process.
How to use
-7-
Page 9
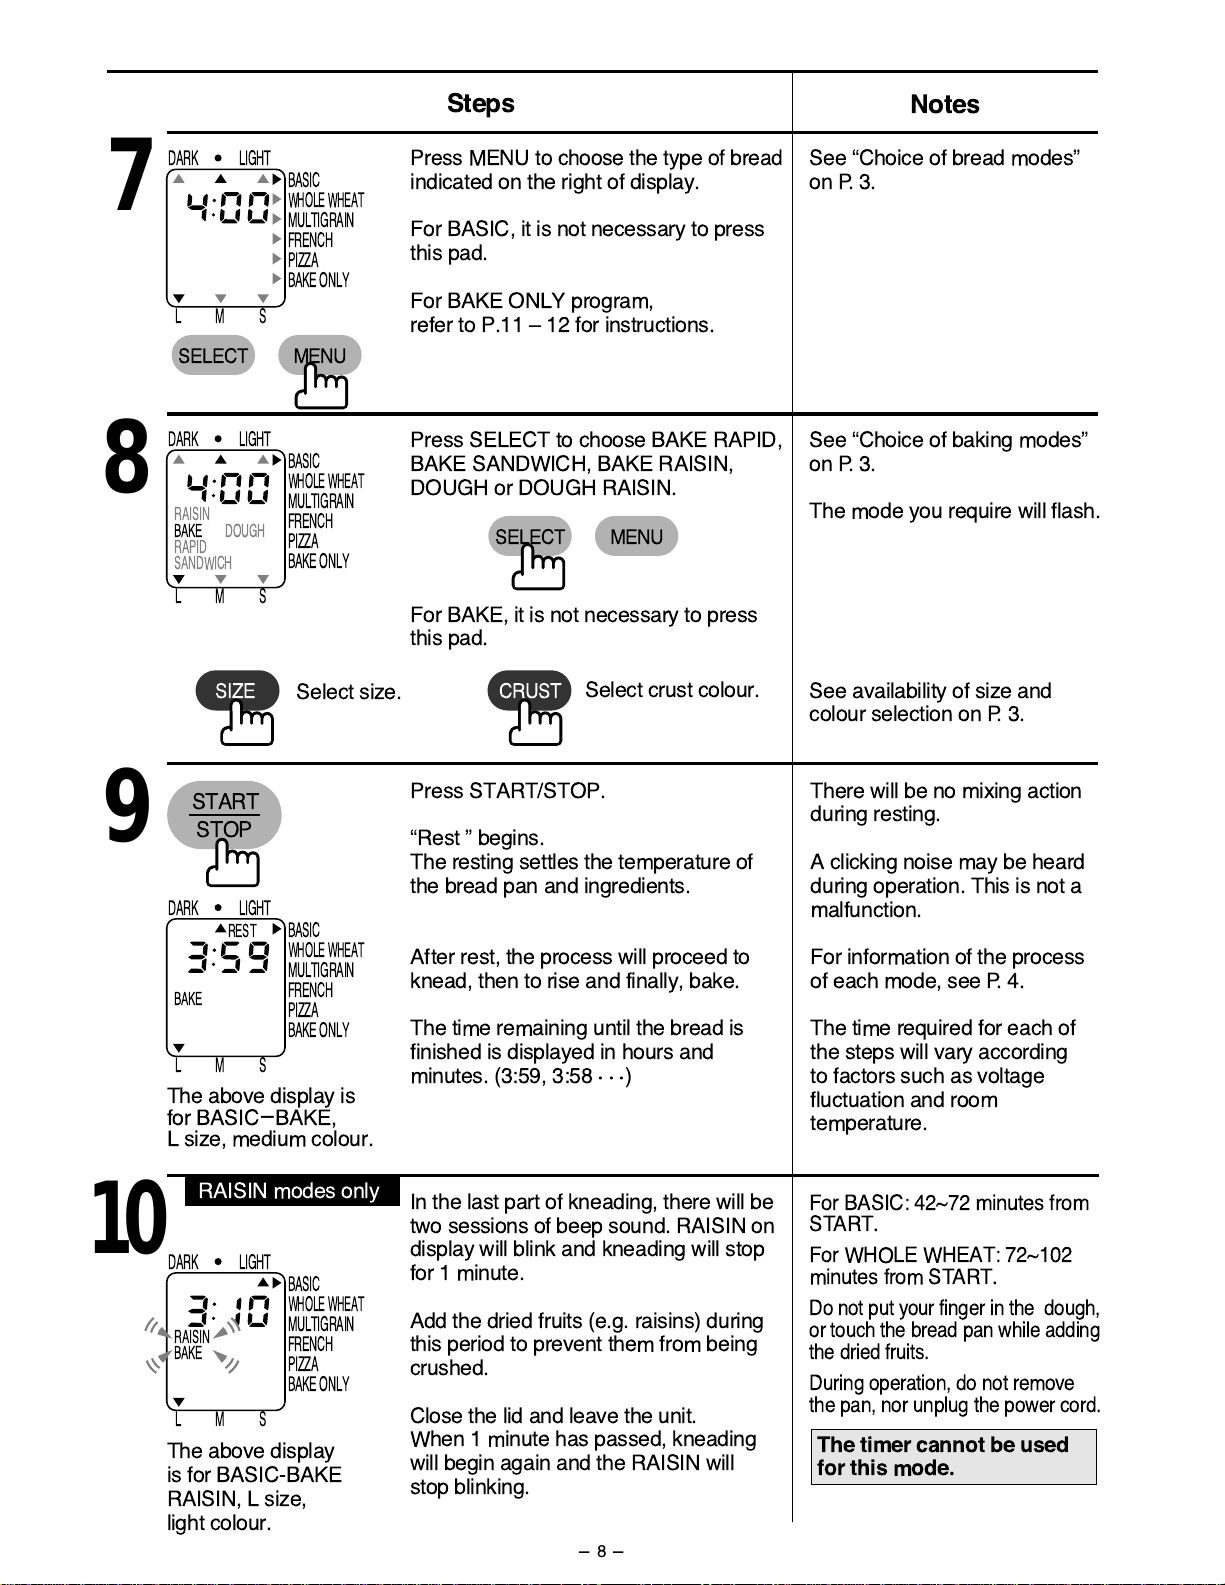
START
STOP
7
Press MENU to choose the type of bread
indicated on the right of display.
For BASIC, it is not necessary to press
this pad.
For BAKE ONLY program,
refer to P.11 Ð 12 for instructions.
See ÒChoice of bread modesÓ
on P. 3.
Press SELECT to choose BAKE RAPID,
BAKE SANDWICH, BAKE RAISIN,
DOUGH or DOUGH RAISIN.
Select size.
Select crust colour.
See ÒChoice of baking modesÓ
on P. 3.
The mode you require will flash.
See availability of size and
colour selection on P. 3.
Press START/STOP.
ÒRest Ó begins.
The resting settles the temperature of
the bread pan and ingredients.
After rest, the process will proceed to
knead, then to rise and finally, bake.
The time remaining until the bread is
finished is displayed in hours and
minutes. (3:59, 3:58
¥¥¥)
There will be no mixing action
during resting.
A clicking noise may be heard
during operation. This is not a
malfunction.
For information of the process
of each mode, see P. 4.
The time required for each of
the steps will vary according
to factors such as voltage
fluctuation and room
temperature.
The above display is
for BASIC–BAKE,
L size, medium colour.
Notes
Steps
8
9
For BASIC: 42~72 minutes from
START.
For WHOLE WHEAT: 72~102
minutes from ST ART.
Do not put your finger in the dough,
or touch the bread pan while adding
the dried fruits.
During operation, do not remove
the pan, nor unplug the power cord.
In the last part of kneading, there will be
two sessions of beep sound. RAISIN on
display will blink and kneading will stop
for 1 minute.
Add the dried fruits (e.g. raisins) during
this period to prevent them from being
crushed.
Close the lid and leave the unit.
When 1 minute has passed, kneading
will begin again and the RAISIN will
stop blinking.
10
The above display
is for BASIC-BAKE
RAISIN, L size,
light colour.
RAISIN modes only
-8-
SELECT MENU
DARK LIGHT
BASIC
WHOLE WHEAT
MULTIGRAIN
FRENCH
PIZZA
BAKE ONLY
LMS
TEMP REST
RAISIN
BAKE DOUGH
RAPID ALERT
SANDWICH
SELECT MENU
DARK LIGHT
BASIC
WHOLE WHEAT
MULTIGRAIN
FRENCH
PIZZA
BAKE ONLY
LMS
TEMP REST
RAISIN
BAKE DOUGH
RAPID ALERT
SANDWICH
DARK LIGHT
BASIC
WHOLE WHEAT
MULTIGRAIN
FRENCH
PIZZA
BAKE ONLY
LMS
TEMP REST
RAISIN
BAKE DOUGH
RAPID ALERT
SANDWICH
DARK LIGHT
BASIC
WHOLE WHEAT
MULTIGRAIN
FRENCH
PIZZA
BAKE ONLY
LMS
TEMP REST
RAISIN
BAKE DOUGH
RAPID ALERT
SANDWICH
SIZE CRUST
For BAKE, it is not necessary to press
this pad.
The timer cannot be used
for this mode.
Page 10
Steps Notes
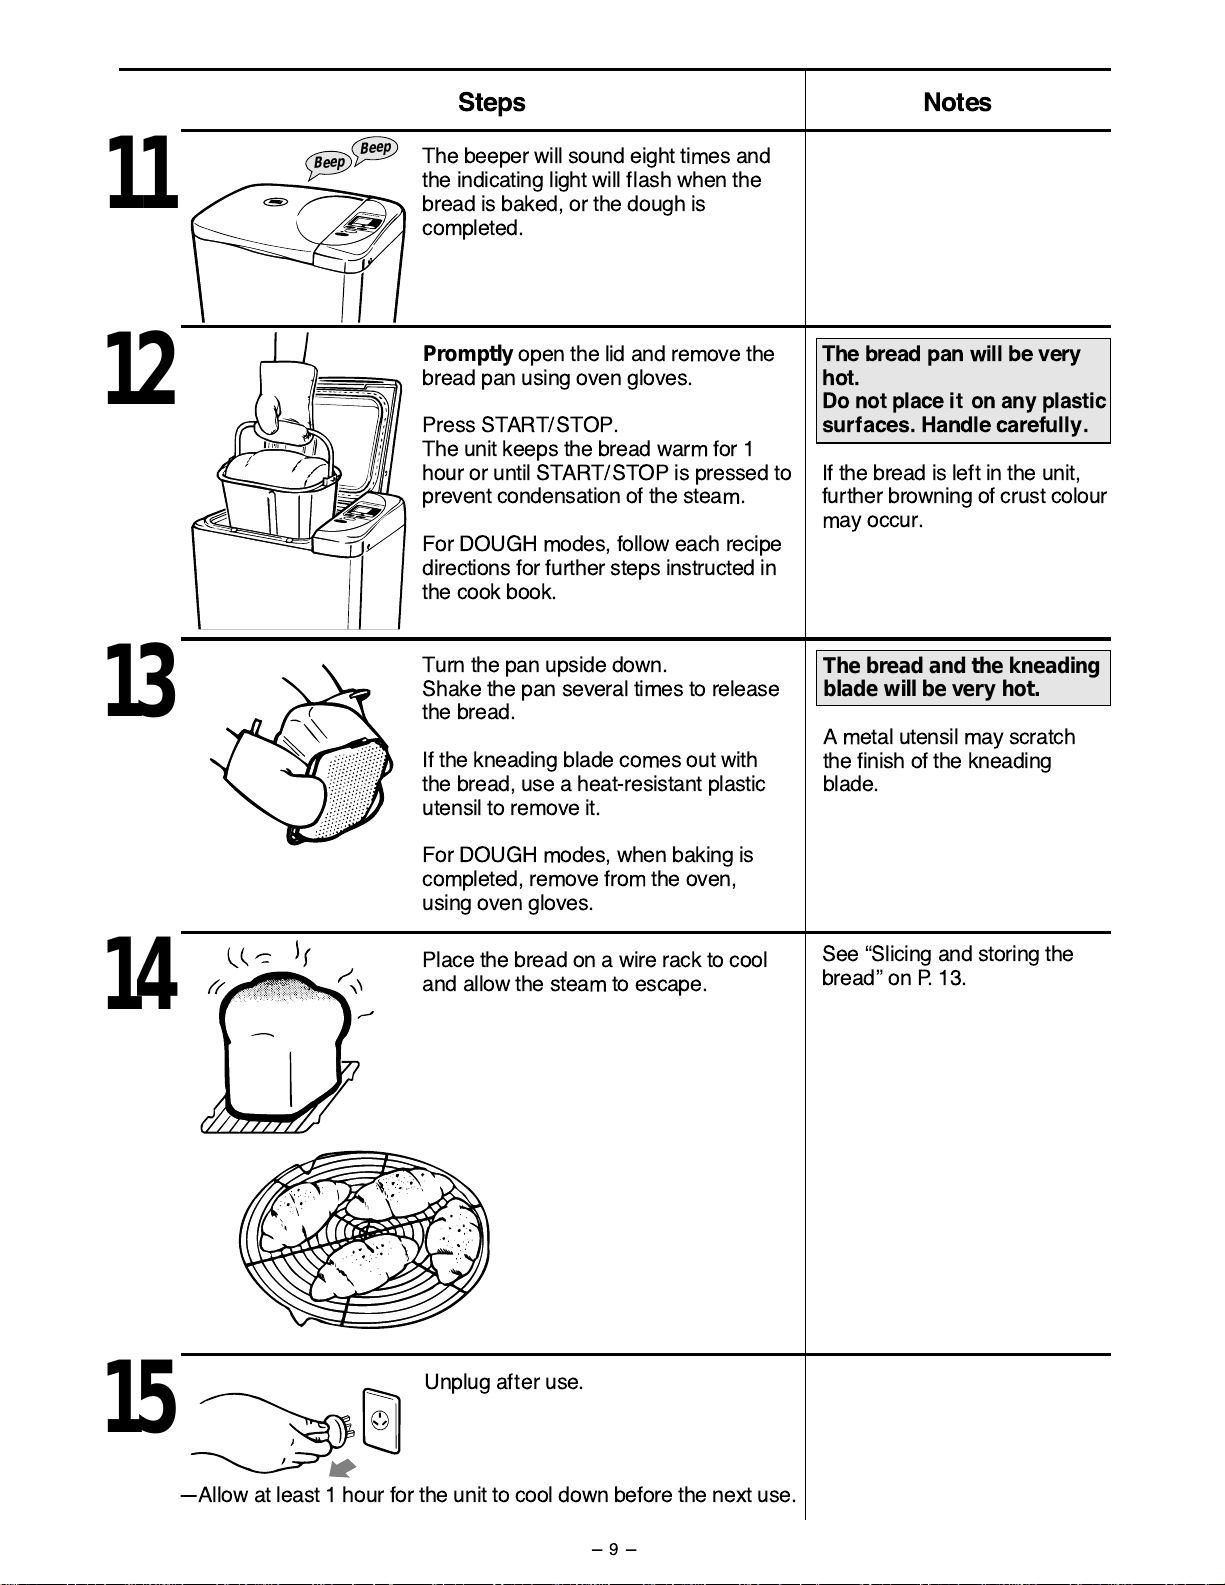
The beeper will sound eight times and
the indicating light will flash when the
bread is baked, or the dough is
completed.
Promptly
open the lid and remove the
bread pan using oven gloves.
Press START/STOP.
The unit keeps the bread warm for 1
hour or until START/STOP is pressed to
prevent condensation of the steam.
For DOUGH modes, follow each recipe
directions for further steps instructed in
the cook book.
The bread pan will be very
hot.
Do not place it on any plastic
surfaces. Handle carefully.
If the bread is left in the unit,
further browning of crust colour
may occur.
Turn the pan upside down.
Shake the pan several times to release
the bread.
If the kneading blade comes out with
the bread, use a heat-resistant plastic
utensil to remove it.
For DOUGH modes, when baking is
completed, remove from the oven,
using oven gloves.
Place the bread on a wire rack to cool
and allow the steam to escape.
See ÒSlicing and storing the
breadÓ on P. 13.
Unplug after use.
-
Allow at least 1 hour for the unit to cool down before the next use.
11
12
13
14
15
The bread and the kneading
blade will be very hot.
A metal utensil may scratch
the finish of the kneading
blade.
Beep
Beep
-9-
Page 11
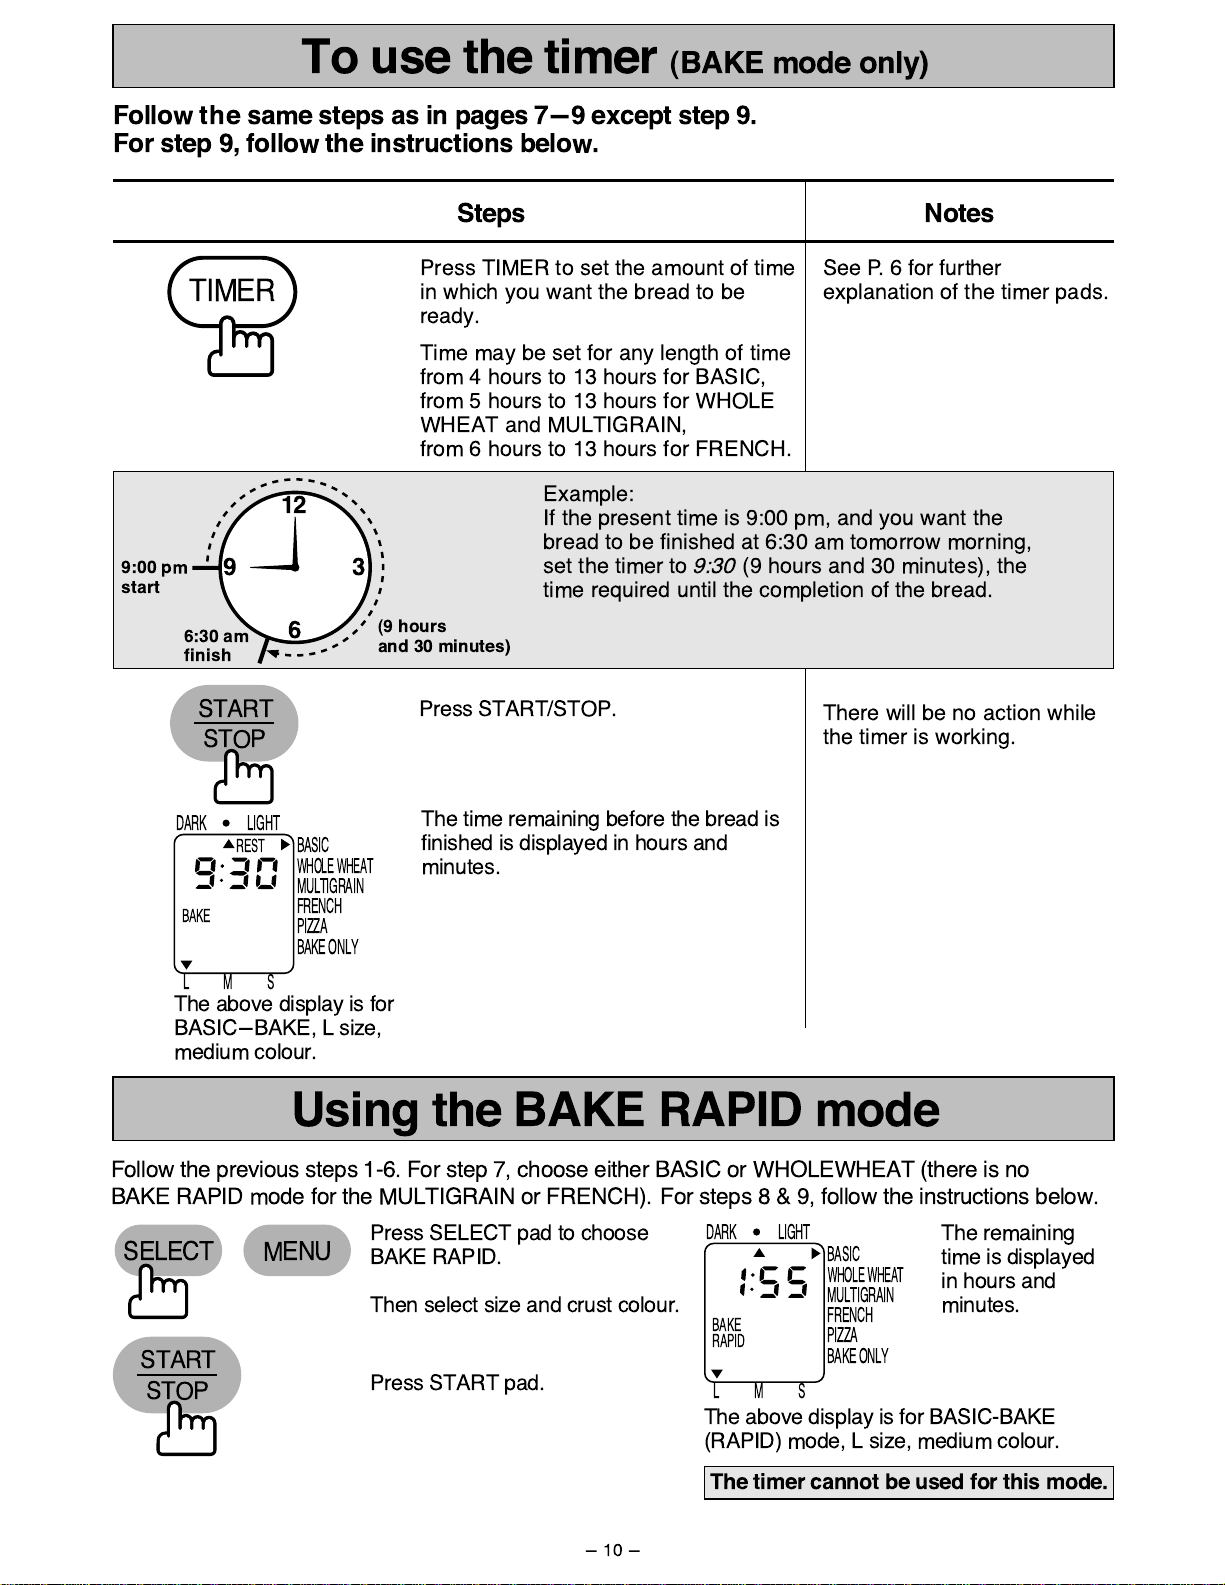
Press TIMER to set the amount of time
in which you want the bread to be
ready.
Time may be set for any length of time
from 4 hours to 13 hours for BASIC,
from 5 hours to 13 hours for WHOLE
WHEAT and MULTIGRAIN,
from 6 hours to 13 hours for FRENCH.
See P. 6 for further
explanation of the timer pads.
There will be no action while
the timer is working.
Notes
Steps
Follow the same steps as in pages 7-9 except step 9.
For step 9, follow the instructions below.
Press START/STOP.
The time remaining before the bread is
finished is displayed in hours and
minutes.
Follow the previous steps 1-6. For step 7, choose either BASIC or WHOLEWHEAT (there is no
BAKE RAPID mode for the MULTIGRAIN or FRENCH). For steps8&9,follow the instructions below.
Press SELECT pad to choose
BAKE RAPID.
Then select size and crust colour.
The remaining
time is displayed
in hours and
minutes.
The above display is for BASIC-BAKE
(RAPID) mode, L size, medium colour.
Press START pad.
The above display is for
BASIC-BAKE, L size,
medium colour.
Example:
If the present time is 9:00 pm, and you want the
bread to be finished at 6:30 am tomorrow morning,
set the timer to
(9 hours and 30 minutes), the
time required until the completion of the bread.
9:30
9:00 pm
start
6:30 am
finish
(9 hours
and 30 minutes)
12
9
6
3
Using the BAKE RAPID mode
To use the timer (BAKE mode only)
-10-
TIMER
START
STOP
START
STOP
SELECT MENU
DARK LIGHT
BASIC
WHOLE WHEAT
MULTIGRAIN
FRENCH
PIZZA
BAKE ONLY
LMS
TEMP REST
RAISIN
BAKE DOUGH
RAPID ALERT
SANDWICH
DARK LIGHT
BASIC
WHOLE WHEAT
MULTIGRAIN
FRENCH
PIZZA
BAKE ONLY
LMS
TEMP REST
RAISIN
BAKE DOUGH
RAPID ALERT
SANDWICH
The timer cannot be used for this mode.
Page 12
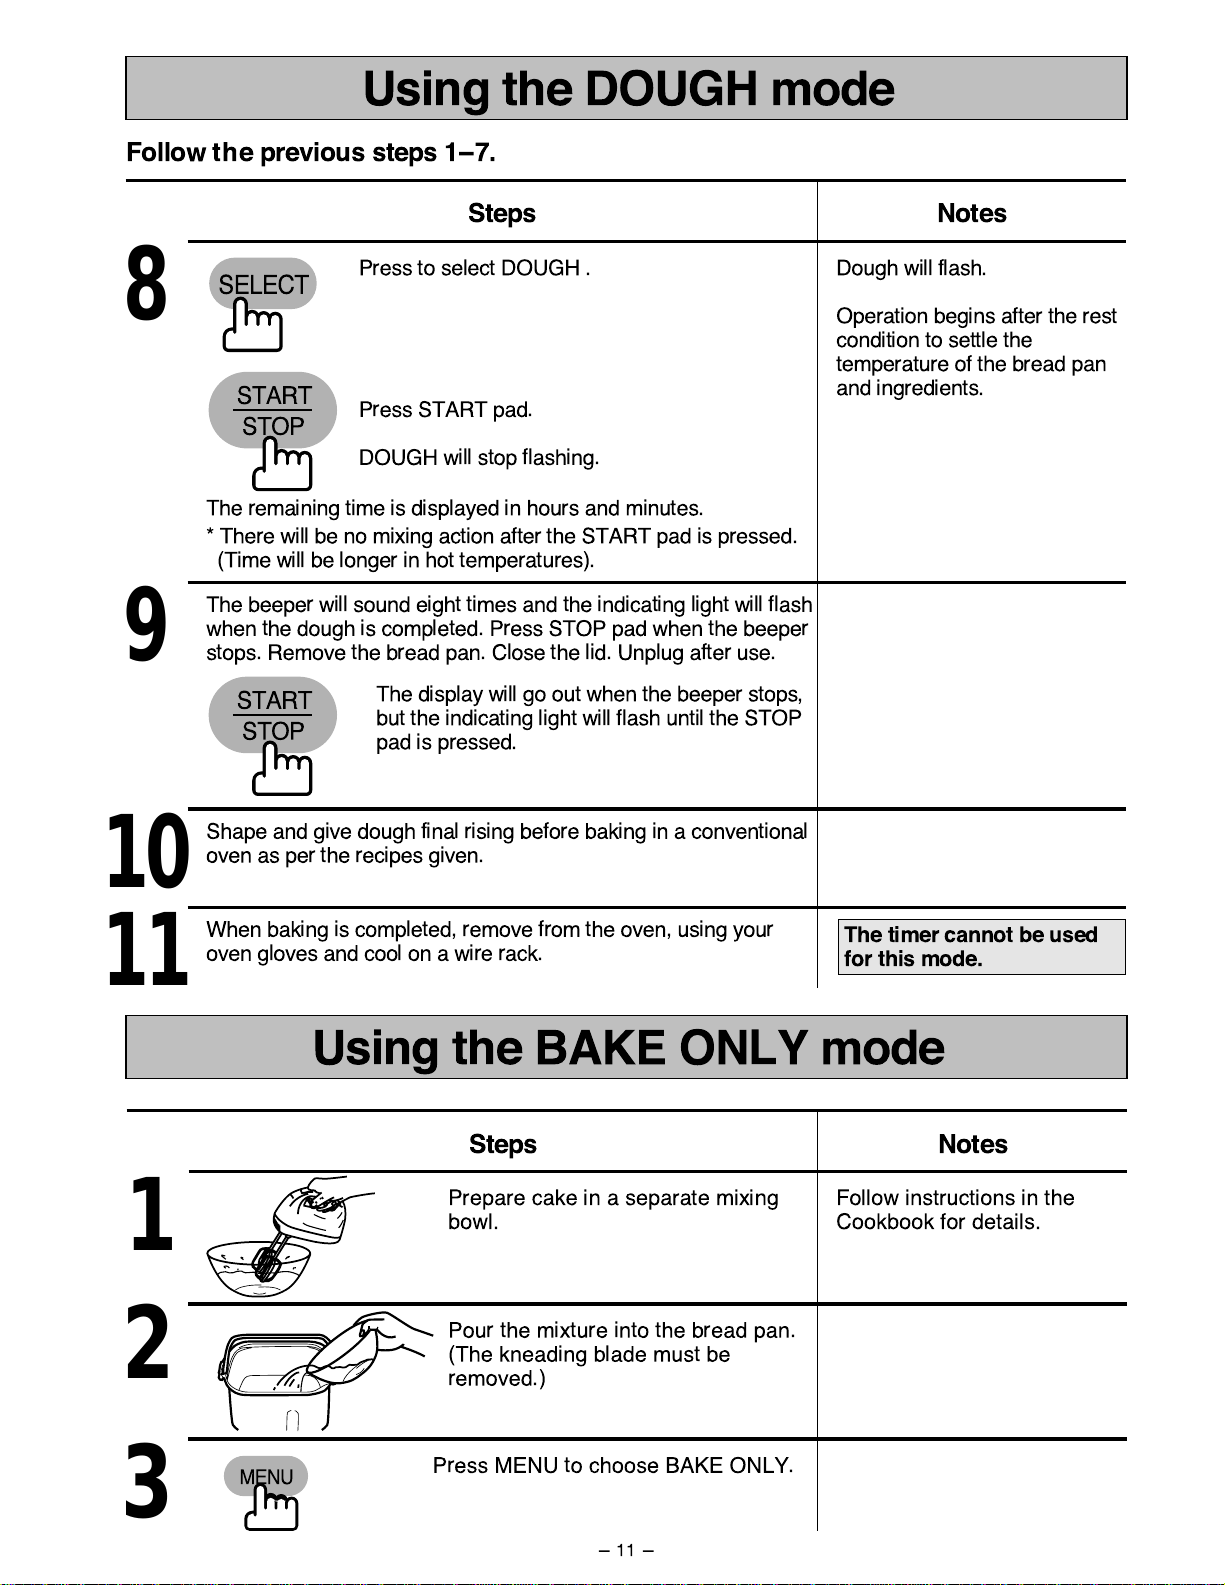
Follow the previous steps 1-7.
Using the DOUGH mode
Using the BAKE ONLY mode
-11-
Steps Notes
Press to select DOUGH .
The display will go out when the beeper stops,
but the indicating light will flash until the STOP
pad is pressed.
Dough will flash.
Operation begins after the rest
condition to settle the
temperature of the bread pan
and ingredients.
Prepare cake in a separate mixing
bowl.
Follow instructions in the
Cookbook for details.
Press START pad.
DOUGH will stop flashing.
The remaining time is displayed in hours and minutes.
The beeper will sound eight times and the indicating light will flash
when the dough is completed. Press STOP pad when the beeper
stops. Remove the bread pan. Close the lid. Unplug after use.
* There will be no mixing action after the START pad is pressed.
(Time will be longer in hot temperatures).
8
9
Shape and give dough final rising before baking in a conventional
oven as per the recipes given.
10
When baking is completed, remove from the oven, using your
oven gloves and cool on a wire rack.
11
The timer cannot be used
for this mode.
START
STOP
START
STOP
SELECT
Pour the mixture into the bread pan.
(The kneading blade must be
removed.)
Steps Notes
1
2
Press MENU to choose BAKE ONLY.
3
MENU
Page 13
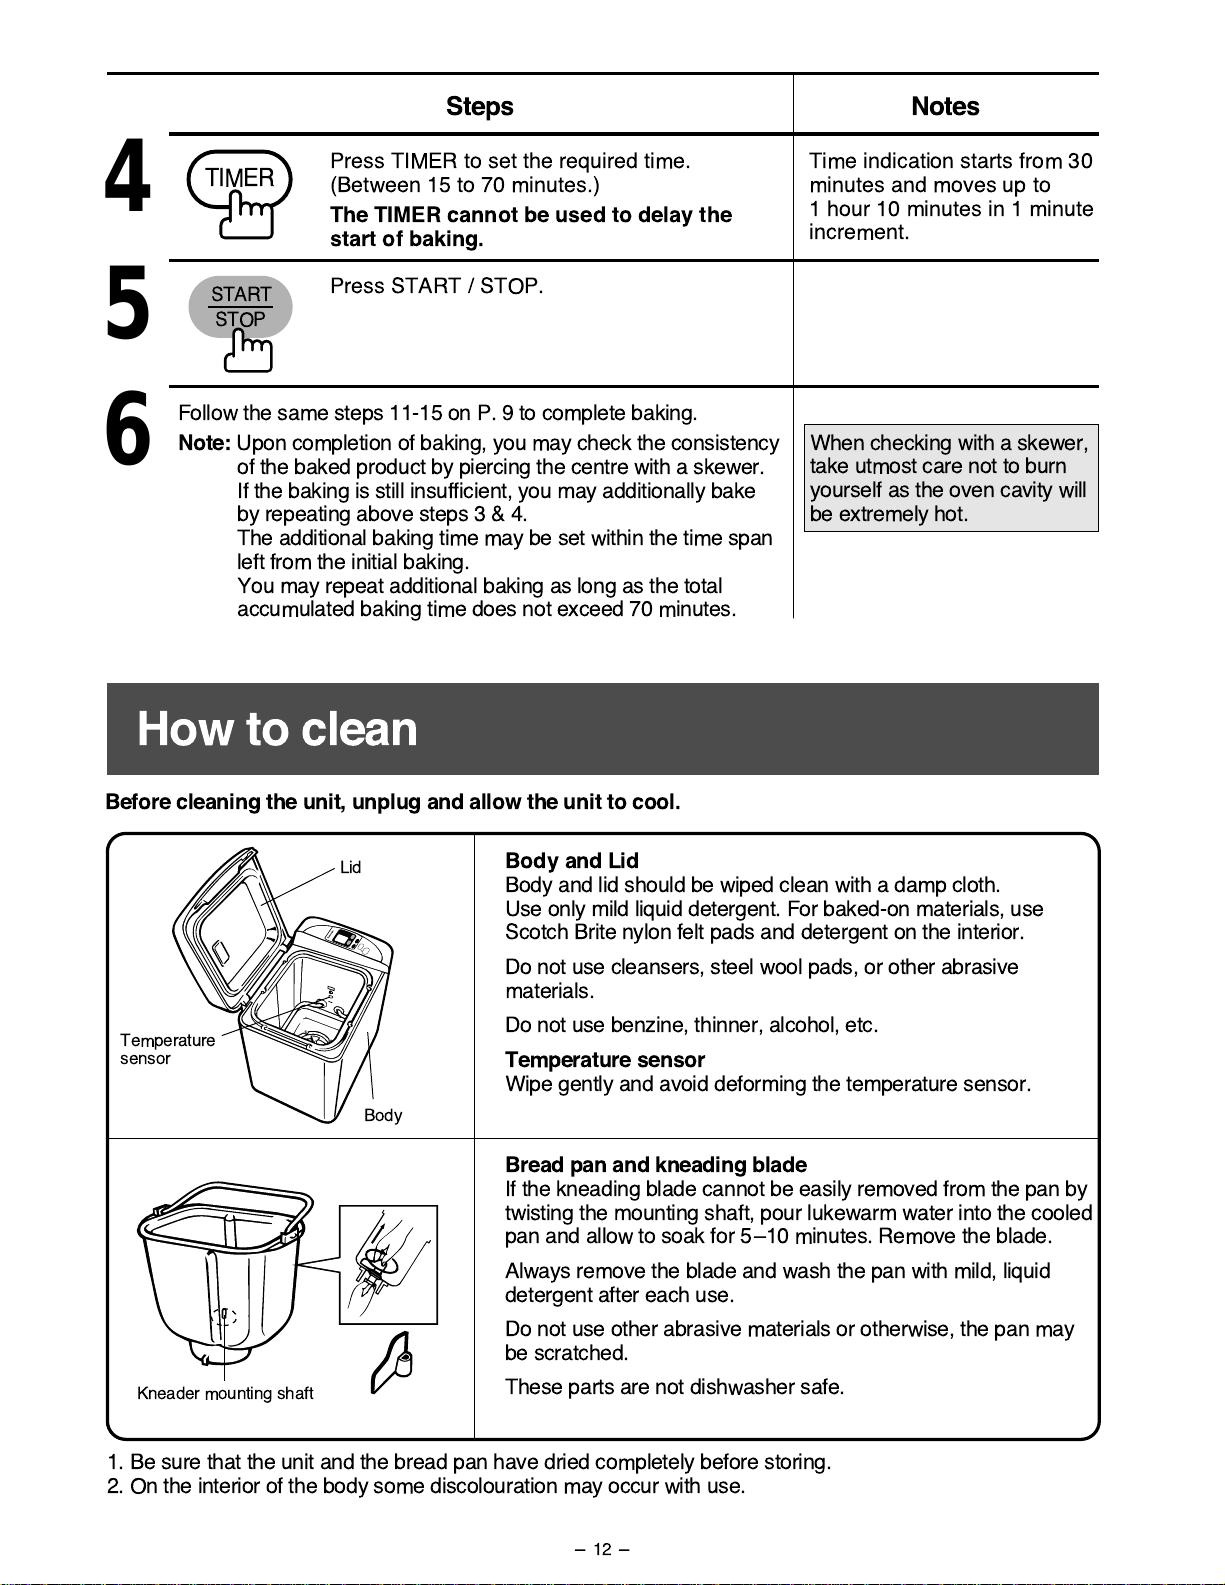
Before cleaning the unit, unplug and allow the unit to cool.
Body and Lid
Body and lid should be wiped clean with a damp cloth.
Use only mild liquid detergent. For baked-on materials, use
Scotch Brite nylon felt pads and detergent on the interior.
Do not use cleansers, steel wool pads, or other abrasive
materials.
Do not use benzine, thinner, alcohol, etc.
Temperature sensor
Wipe gently and avoid deforming the temperature sensor.
Bread pan and kneading blade
If the kneading blade cannot be easily removed from the pan by
twisting the mounting shaft, pour lukewarm water into the cooled
pan and allow to soak for 5 Ð10 minutes. Remove the blade.
Always remove the blade and wash the pan with mild, liquid
detergent after each use.
Do not use other abrasive materials or otherwise, the pan may
be scratched.
These parts are not dishwasher safe.
Kneader mounting shaft
Lid
1. Be sure that the unit and the bread pan have dried completely before storing.
2. On the interior of the body some discolouration may occur with use.
Temperature
sensor
Body
How to clean
-12-
Steps Notes
Press TIMER to set the required time.
(Between 15 to 70 minutes.)
The TIMER cannot be used to delay the
start of baking.
Time indication starts from 30
minutes and moves up to
1 hour 10 minutes in 1 minute
increment.
Press START / STOP.
4
5
6
When checking with a skewer,
take utmost care not to burn
yourself as the oven cavity will
be extremely hot.
TIMER
START
STOP
Follow the same steps 11-15 on P. 9 to complete baking.
Note:
Upon completion of baking, you may check the consistency
of the baked product by piercing the centre with a skewer.
If the baking is still insufficient, you may additionally bake
by repeating above steps3&4.
The additional baking time may be set within the time span
left from the initial baking.
You may repeat additional baking as long as the total
accumulated baking time does not exceed 70 minutes.
Page 14
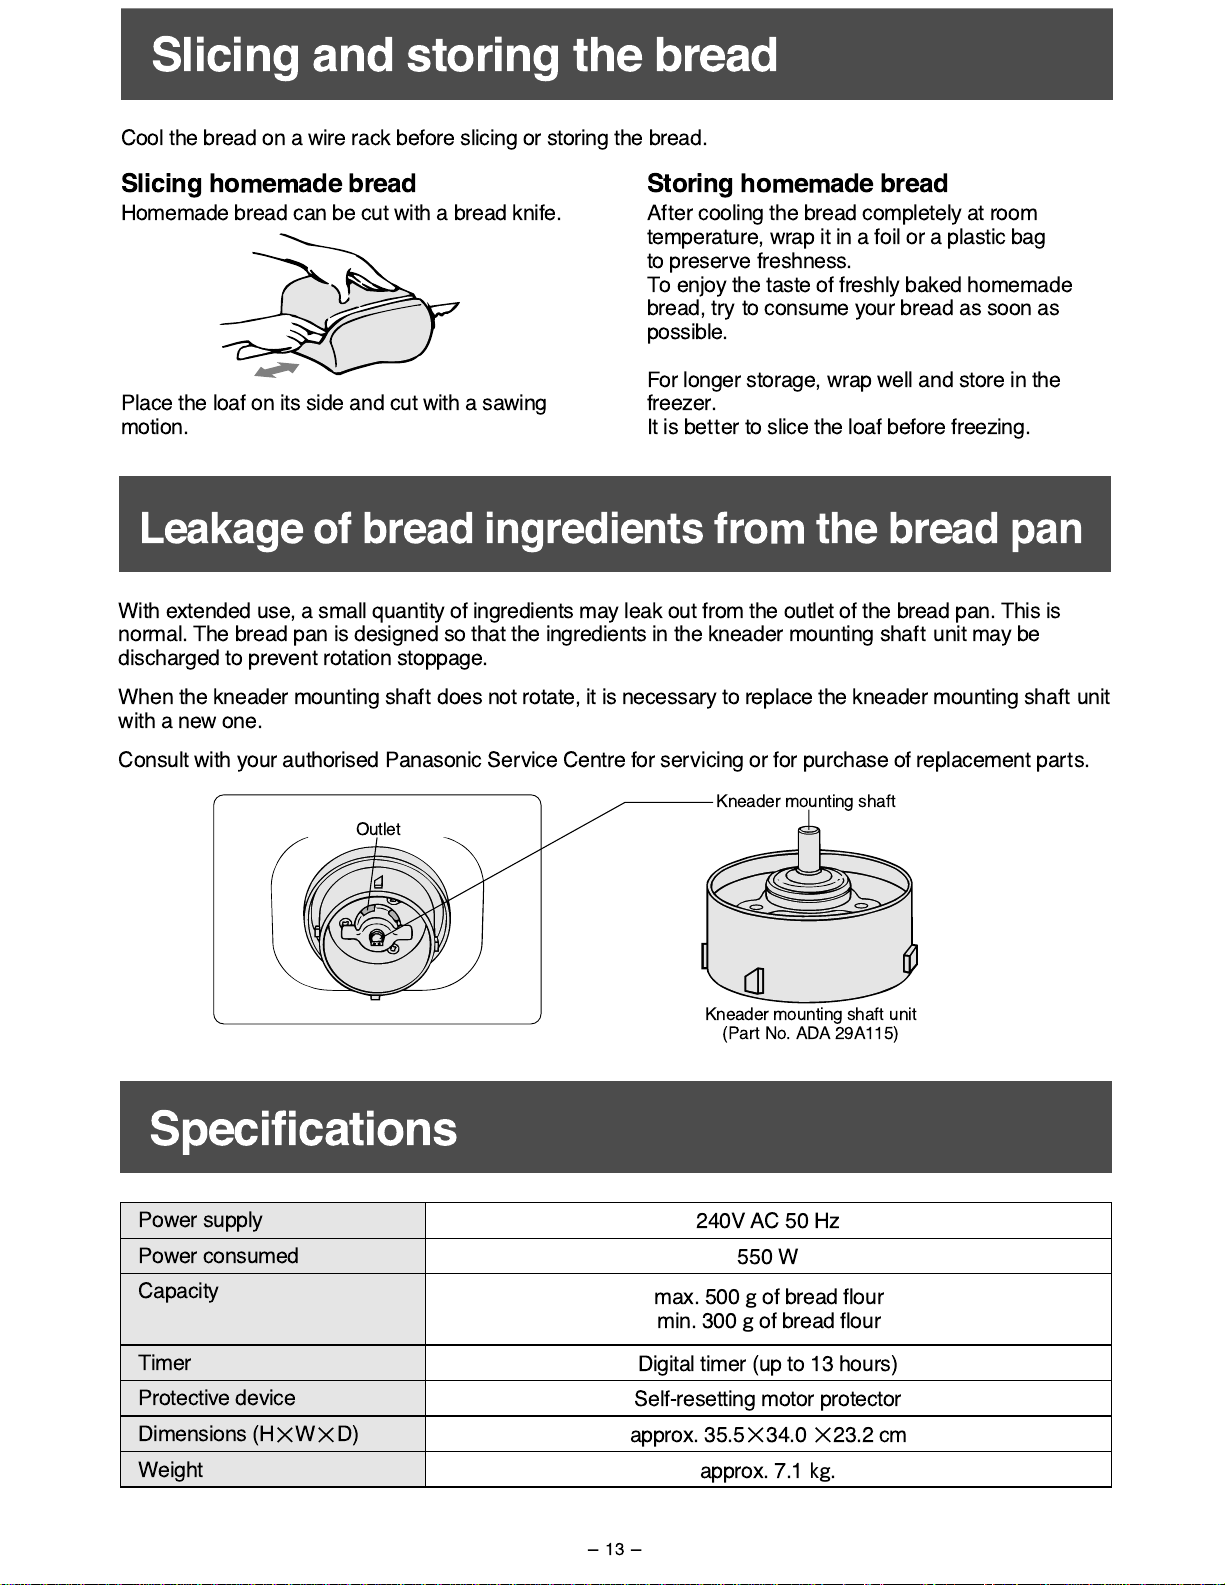
With extended use, a small quantity of ingredients may leak out from the outlet of the bread pan. This is
normal. The bread pan is designed so that the ingredients in the kneader mounting shaft unit may be
discharged to prevent rotation stoppage.
When the kneader mounting shaft does not rotate, it is necessary to replace the kneader mounting shaft unit
with a new one.
Consult with your authorised Panasonic Service Centre for servicing or for purchase of replacement parts.
Outlet
Kneader mounting shaft
Kneader mounting shaft unit
(Part No. ADA 29A115)
Leakage of bread ingredients from the bread pan
Power supply
Power consumed
Capacity
Timer
Protective device
Dimensions (H W D)
Weight
approx. 35.5 34.0 23.2 cm
240V AC 50 Hz
550 W
Digital timer (up to 13 hours)
Self-resetting motor protector
approx. 7.1O.
max. 500Nof bread flour
min. 300Nof bread flour
Specifications
-13-
Cool the bread on a wire rack before slicing or storing the bread.
Slicing homemade bread
Homemade bread can be cut with a bread knife.
Place the loaf on its side and cut with a sawing
motion.
Storing homemade bread
After cooling the bread completely at room
temperature, wrap it in a foil or a plastic bag
to preserve freshness.
To enjoy the taste of freshly baked homemade
bread, try to consume your bread as soon as
possible.
For longer storage, wrap well and store in the
freezer.
It is better to slice the loaf before freezing.
Slicing and storing the bread
Page 15

TEMP
ALERT
Reason/Cause
Condition
Motor protection device
Remedy 2
There has been a 20-minute or
less power cut. (The power plug
has been inadvertently pulled out or
the breaker has activated.)
How to reset/restart
If the interruption in the power supply is
momentary, the operation will not be affected.
If the power is restored within 20 minutes, the
bread maker will operate again. However, the
bread may not turn out well.
Remove the dough and start again using all
new ingredients.
Not baked at all, although
the operation appears to
have proceeded.
Check to see if the kneader mounting shaft can
rotate.
Motor protection device has activated.
This only happens when the unit is
overloaded and an excessive force
is applied to the motor.
After about 30 minutes, the motor
automatically starts running again.
If the unit is overloaded and an excessive force is applied to the motor, the protection device will
stop the motor. After approximately 30 minutes, the motor will automatically start running again. It is
recommended to restart with fresh ingredients.
If the kneading blade is restricted by hard dough, take out the dough. The
unit will restart 30 minutes later.
Check to see if the kneader mounting shaft of the bread pan can rotate.
If it can rotate, restart the bread maker after 30 minutes. If it cannot rotate,
service will be required.
Make sure you did not use
too much or too hard/heavy
ingredients, then start again
using all new ingredients.
Service will
be required.
is on
display.
is on
display.
appears
on
display.
There has been more than 20
minutes power cut. (power failure,
unplugging of the power cord, or a
malfunctioning of household fuse or
breaker).
Leave the unit as it is.
When the unit has cooled to below 40ûC/105ûF,
will disappear from the display window
and the red indicating light will go out.
This indicates that the unit is now ready to use.
The unit is hot (above 40ûC/105ûF).
This may occur during repetitive use.
You must allow the unit to cool down
before reusing.
ALERT
TEMP
TEMP
Display Indications for Abnormal Conditions
Yes
No
-14-
Remedy 1
Page 16

Before calling for service
Please check the following:
BAKING RESULTS:
Neither the
indicating
light nor
the display
light up.
Smoke
emitted
from steam
vent.
Burning
smell.
Sides of
bread
collapse
and bottom
is damp.
Bread
rises
too
much.
OPERATIONAL ERRORS
INGREDIENT PROBLEMS
Unplugged.
Ingredient spilled on heater element.
Power interruption (display ).
START/STOP pad was pressed after starting.
Top lid was open during operation.
Mode selection was wrong (DOUGH mode was
chosen).
Bread left in bread pan too long after baking.
Bread sliced just after baking (Steam was not
allowed to escape).
Water added after kneading flour.
Kneading blade not installed properly in pan.
MEASUREMENT ERRORS
Flour
Yeast
Water
No sweetening agents
Not enough
Not enough
Not enough
Too much
Too much
Too much
No yeast
Ingredients used other than prescribed.
Flour
Yeast
Old flour used.
Wrong type of flour used.
Yeast not placed in pan first, or liquids
touched yeast before kneading.
Old yeast used.
Wrong type of yeast used.
Temperature of water was either too hot or too cold.
(Not within optimum temperature range of 20 5ûC.)
0:00
-15-
Page 17

Collapsed
after
over-rising.
Bread
doesn't
rise
enough.
Unleavened or not leavened enough
Top of
bread
floured.
Under-
browned
and sticky.
Browned and
floured sides,
center sticky
and raw.
Sides
brown but
flour coated
bottom.
Not baked. Slices
unevenly
and is
sticky.
-16-
Page 18
Since the bread program on your Automatic is
completely computerised, the success of your loaf depends on the quantity
and quality of the ingredients
Flour:
Wheat flour provides the bulk and
structure of bread. Flour is classified
into two types, strong flours which are
milled from hard wheat and weak
flours which are milled from soft
wheat. The difference in the two types
of wheat is the content of proteins that form gluten
(ÒglutenÓ is the important constituent of bread which
provides its structure and its stretchy, chewy texture.
Gas which is released during fermentation is trapped
within the elastic network of gluten, thus making the
dough rise. Gluten development mostly takes place
during dough kneading).
Strong flours
contain a high content of proteins
necessary for the development of gluten. ÒBread flourÓ
and ÒBakers flourÓ are the major product within this
category. Most of the recipes in this book call for this
flour.
Weak flours
such as cake flour and pastry flour, are
less in protein content and are suitable for products
which have a light, crumbly texture and do not require
much gluten development.
Self raising flour
is a white flour to which baking
powder and sometimes salt has been added. Weak
flours and self raising flour
alone may not
be
substituted for bread flour in the included recipes.
Unbleached plain flour
is white wheat flour which has
not been bleached to whiten it. Most plain flours have
a gluten content of approximately 4-5%. For successful
results when baking bread, 8-9% is required. Plain
flour may be used if supplemented with gluten flour or
bread improver.
Continental flour
is a flour similar to bakers or bread
flour but is ground very fine. This produces a very
smooth even loaf.
Gluten (Gluten Flour or Wheat Gluten)
is a flour
extremely high in gluten content. Use approximately
1
/4 cup (35N) to flours with a low gluten content to
improve suitability for use.
Rye flour
contains some proteins but these do not
form sufficient gluten. Therefore, bread baked with
rye flour will be dense and heavy.
Ingredients
¨
Whole wheat flour or wholemeal wheat flour
is
made by grinding the entire wheat kernel, including the
bran and germ. 100% whole wheat bread or breads
containing a high percentage of whole wheat flour will
be lower in height and heavier in texture than bread
baked with flour. If you are not pleased with the height
and the texture of the whole wheat bread, you could
strengthen the bread by increasing the proportion of
white bread flour. (You must reduce the same
proportion of whole wheat flour so that the total amount
of wheat flour would remain the same.) The life of whloe
wheat flour and its baked products is shorter than
white bread flour and its baked products, because the
included germ is high in fat, which can become rancid.
Other flour:
Products milled from other grains are
occasionally used in bread. i.e. corn meal, rice, millet,
soy, oat, buckwheat and barley flours. These do not
contain protein that form sufficient gluten and
therefore they should not be substituted for bread
flour in the following recipes.
Sugars:
Sugars or sweetening agents
have the following purposes in
bread making:
¥ They add sweetness and flavour.
¥ They add softness and fineness to
the texture.
¥ They give crust colour.
¥ They contribute to keeping
qualities by retaining moisture.
¥ They provide food for yeast.
Besides granulated sugar or caster sugar, brown
sugar, honey and molasses can be substituted in the
recipes. Recipes including fruit generally require less
added sugar due to the high sugar content of the fruit.
Fats:
The major purpose of fats in bread
baking are:
¥ They tenderize the bread.
¥ They add flavour and richness.
¥ They contribute to keeping qualities
by retaining moisture.
Any fat can be used, however, we
recommend butter for the best flavour
and texture.
-17-
Page 19

Milk and milk products:
Their main purposes are:
¥ They enhance flavour.
¥ They increase the nutritional value
of bread.
¥ Milk solids include protein, lactose
(milk sugar), and minerals.
Most recipes call for the use of milk powder.
NEVER use fresh milk on the overnight program.
Otherwise it may sour during the rest time, spoiling
the final flavour.
Salt:
Salt has the following functions in
bread baking.
¥ It strengthens gluten structure and
makes it more stretchable.
¥ It inhibits yeast growth.
¥ It enhances the flavour.
Therefore, too much salt will inhibit fermentation
whereas too little will result in weak gluten structure.
Both will result in a bread with low volume and poor
texture. Use ordinary table salt.
Liquid:
Cold tap water should be used.
(For the BASIC BAKE RAPID mode,
however, lukewarm water should be
used, especially during the very cold
winter months.)
Cold fresh milk can be substituted to
improve the keeping quality and nutritional value of
the loaf, which will have a softer browner crust.
NEVER use fresh milk on the overnight program.
Always measure the liquid stated in the recipe
carefully, using the measuring cup provided.
TOO MUCH LIQUID will cause the dough to
collapse, giving a poor appearance.
Ingredients
¨
-18-
Yeast:
Yeast is a living organism, a
microscopic plant which works as
a leavening agent in bread baking.
It acts on sugars and changes them
into carbon dioxide gas and alcohol.
This gas production causes the leavening or the ÒriseÓ
of yeast dough.
The alcohol evaporates during baking.
Yeast is available in two forms: fresh and dry. Dry
yeast is available in two types; the type that requires
preliminary fermentation and the type that is used dry
and may be mixed with other ingredients.
For , use the latter type.
Do not use
fresh yeast or dry yeast that requires preliminary
fermentation.
Always use instant yeast that may be
added and mixed with other ingredients. Do not
dissolve yeast in water before use. It is placed dry in
the bread pan first, before all other ingredients.
As there is an optimum temperature for yeast to
activate, your incorporates a heat
sensor to keep the dough at the correct temperature
during the rising process.
We recommend brands ÒAlliedÓ, ÒKitchen CollectionÓ
and ÒFermipan,Ó however, several brands are
available in supermarkets. These yeasts are available
in sachets or large air tight packages and once
opened the sachets should be resealed and used
within 48 hrs or stored in air tight container in the
refrigerator or used according to manufacturerÕs
instructions.
Note:
Some brands of yeast have bread improver
included.
Please alter quantity when using these products.
¨
Page 20

Timer loaves
Do not use eggs and ÒfreshÓ ingredients i.e. fruit/vegetables on timer loaves, as these ingredients may stale
during the rest time, thus spoiling the loaf.
Egg:
These are sometimes added to
nutritionally enrich the dough, they
also improve the keeping properties
and colour of the baked product.
Fruits:
Dried fruits are used in some of the
following recipes. Total weight of
dried fruits used should not exceed
75g(
1
/4 cup)g100g(3/4 cup) for
raisinsh.
When using fresh fruit, use only as directed in the
following recipes, as the water content of the fruit will
affect the loaf volume.
Bran:
Approx 60 ml (4 tbsp) can be added
to boost the fibre content. (Do not use
more than this recommended amount
as it will affect the volume of the loaf).
Wheatgerm:
Approx 60 ml (4 tbsp) can be added
to give a nuttier flavour.
Other Ingredients Used for Flavoured Loaves
-19-
Vitamin C (Bread Improver):
Vitamin C is a Òbread improverÓ
i.e. it helps improve the volume of
the loaf. We recommend adding
1
/2 ~ 1 tsp vitamin C powder to
certain loaves to improve the rise.
Nuts:
Nuts may be used, but chop them
finely. Use no more than 75 g (1/4 cup).
The height of bread when nuts are
used, may be low because the
chopped nuts will cut the gluten
structure.
When adding nuts as well as dried fruit, their total
weight should not exceed 125 g
(1/2 cup)
. Remember
to chop them finely as these interfere with mixing.
Spices:
Spices are used to add
flavour to the bread. Only
small amounts (1 teaspoon
to 2 teaspoon) are required.
Page 21

The result of breads, such as whole wheat breads
and multigrain breads, are affected greatly by the
quality of ingredients, especially the flour. The flour
quality is affected by the keeping methods, the
temperature, humidity, etc. Another important factor
about the flour is that its quality also differs from year
to year, season to season due to the quality of the
wheat crop affected by the weather.
Sometimes due to bad weather conditions, the crop
may not grow with as much gluten forming properties
as it would require to produce flour for making
excellent breads.
When the quality of flour is poor, the bread may not
rise, or collapse after rising due to weak gluten.
In such cases, take the following measures to obtain
better results.
Tips for baking wholewheat & multigrain breads
-20-
1. Use vitamin C bread improver.
and/ or
2. At least 150Nof the flour should be white bread
flour, rather then whole wheat flour.
and/ or
3. Reduce 15 mRto 30 mRof water from the
regular amount.
If the above still does/do not solve problems,
4. Reduce the amount of dry yeast to half the
quantity required.
The loaf produced by above methods may be low
or small.
Baking results differ according to several factors including environmental conditions, electricity fluctuation,
choice of ingredients, their brands, measurements and quality. To avoid poor baking results the following
should be remembered.
Temperature is one of the most important factors in bread baking. Although the is
designed to sense the temperature and automatically control the heating system during the entire
process of baking, it works best in a room temperature between 20¡C (68¡F) to 25¡C (77¡F), a slight
difference in volume may be noticed when the BAKE RAPID mode is used or during winter months
when an overnight programme is used.
1. Bake at optimum temperature.
The incorporates a 20 minute memory which means the bread machine will automatically
restart should the electricity supply be interrupted for a maximum of 20 minutes.
2. Electricity Fluctuations will affect the height, the texture and the colour of bread.
Accurate measurement is essential in achieving good baking results.
Liquids should be measured in the measuring cup and yeast, salt, sugar and milk powder using the
measuring spoon.
Flour must be weighed accurately either using the metric (grams). Do not exceed the stated weight of flour
as this could damage your machine.
For measuring fat (butter) the 15Ð23Nrecommended in the recipes is a guideline for the quantity to use.
The yeast should be measured carefully using the teaspoon. Always use standardised Australian measuring
utensils.
3. Measure the ingredients accurately.
Always place yeast first, then all other dry ingredients into the bread pan, followed by the liquid so that
the yeast is at the bottom and not in contact with the liquid. N.B. Never let the yeast touch liquid before
kneading.
4. Order of Ingredients.
Check the date on the flour packet before purchase and use the flour before it is out of date. After
opening the packet reseal and store in a cool dry place in an airtight container.
5. Always use fresh ingredients.
Do not attempt to increase the quantities in the recipes given as overloading may damage your
machine.
7. Maximum Load.
Take care to follow the guidelines when adding additional ingredients, as if added in excess, these
affect the final loaf volume. For loaves with poor volume, extra sugar e.g. for white loaves extra
1
/2-1 tbsp should be added, as this helps the rise for poorer quality strong white flours.
Additional water eg 10-20 mRwill give a lighter textured loaf.
6. Experimenting.
Differences in Baking Results
¨
¨
Page 22

Basic White
Cheese & Garlic Loaf
Basic White Rapid
Large Medium Small
Large Medium Small
Dry yeast
Bread flour
Salt
Dry milk
Butter
Sugar
Water
Bread improver,
optional
tsp=teaspoon Tbsp=tablespoon
11/2 tsp
500
N
2 tsp
1
1
/2 Tbsp
23
N
1 Tbsp
400 m
R
1 tsp
1
1
/4 tsp
420
N
1 tsp
2 tsp
15
N
2
1
/2 tsp
350 m
R
1 tsp
1
1
/4 tsp
300
N
1 tsp
2 tsp
15
N
2
1
/2 tsp
210 m
R
1
/2 tsp
Dry yeast
Bread flour
Dry milk
Sugar
Romano cheese
Crushed garlic
Water
Bread improver,
optional
1
1
/2 tsp
500
N
1
1
/2 Tbsp
1 Tbsp
1
/4cup (25N)
1 Tbsp
390 m
R
1 tsp
1
1
/4 tsp
420
N
2 tsp
2
1
/2 tsp
2Tbsp (15N)
2 tsp
340 m
R
1 tsp
1
1
/4 tsp
300
N
2 tsp
2
1
/2 tsp
1Tbsp (10N)
1 tsp
200 m
R
1
/2 tsp
Hot & Spicy Loaf
Large Medium Small
Dry yeast
Bread flour
Salt
Dry milk
Butter
Sugar
Chilli powder
Cracked black pepper
Crushed garlic
Water
Bread improver,
optional
1
1
/2 tsp
500
N
2 tsp
1
1
/2 Tbsp
23
N
1 Tbsp
1 Tbsp
1 Tbsp
1 clove
400 m
R
1 tsp
1
1
/4 tsp
420
N
1 tsp
2 tsp
15
N
2
1
/2 tsp
1 Tbsp
2 tsp
1
/2 clove
350 m
R
1 tsp
1
1
/4 tsp
300
N
1 tsp
2 tsp
15
N
2
1
/2 tsp
2 tsp
1 tsp
1
/4 clove
210 m
R
1
/2 tsp
Curry & Onion Loaf
Large Medium Small
Dry yeast
Bread flour
Salt
Dry milk
Butter
Sugar
Curry powder
Onion flakes
Water
Bread improver,
optional
1
1
/2 tsp
500
N
2 tsp
1
1
/2 Tbsp
23
N
1 Tbsp
1 Tbsp
1 Tbsp
400 m
R
1 tsp
1
1
/4 tsp
420
N
1 tsp
2 tsp
15
N
2
1
/2 tsp
2 tsp
2 tsp
350 m
R
1 tsp
1
1
/4 tsp
300
N
1 tsp
2 tsp
15
N
2
1
/2 tsp
1 tsp
1 tsp
210 m
R
1
/2 tsp
Basic Sandwich Bread
(one size only)
Large Medium Small
Dry yeast
Bread flour
Salt
Dry milk
Butter
Sugar
Water
Bread improver,
optional
Dry yeast
Bread flour
Salt
Dry milk
Butter
Sugar
Water
Bread improver, optional
2 tsp
500
N
2 tsp
1
1
/2 Tbsp
23
N
2 Tbsp
400 m
R
1 tsp
1
3
/4 tsp
420
N
1 tsp
2 tsp
15
N
2
1
/2 tsp
350 m
R
1 tsp
1
1
/4 tsp
420
N
1
1
/4 tsp
2 tsp
15
N
2
1
/2 tsp
315 m
R
1 tsp
1
3
/4 tsp
300
N
1 tsp
2 tsp
15
N
2
1
/2 tsp
210 m
R
1
/2 tsp
-21-
Basic
Page 23

Large Medium Small
Large Medium Small
tsp=teaspoon Tbsp=tablespoon
Large Medium Small
Large Medium Small
Large Medium Small
Large Medium Small
-22-
Basic
Chilli Loaf
Dry yeast
Bread flour
Salt
Dry milk
Butter
Sugar
Chilli flakes
Cracked black papper
Water
Bread improver,
optional
1
1
/2 tsp
500
N
2 tsp
1
1
/2 Tbsp
23
N
1 Tbsp
1 Tbsp
1 Tbsp
400 m
R
1 tsp
1
1
/4 tsp
420
N
1 tsp
2 tsp
15
N
2
1
/2 tsp
2 tsp
2 tsp
350 m
R
1 tsp
1
1
/4 tsp
300
N
1 tsp
2 tsp
15
N
2
1
/2 tsp
1 tsp
1 tsp
210 m
R
1
/2 tsp
Spiced Ginger Loaf
Dry yeast
Bread flour
Salt
Dry milk
Butter
Sugar
Ground ginger
Cinnamon
Water
Bread improver,
optional
1
1
/2 tsp
500
N
2 tsp
1
1
/2 Tbsp
23
N
1 Tbsp
1 Tbsp
1 Tbsp
400 m
R
1 tsp
1
1
/4 tsp
420
N
1 tsp
2 tsp
15
N
2
1
/2 tsp
2 tsp
2 tsp
350 m
R
1 tsp
1
1
/4 tsp
300
N
1 tsp
2 tsp
15
N
2
1
/2 tsp
1 tsp
1 tsp
210 m
R
1
/2 tsp
Tri-Herb Loaf
Dry yeast
Bread flour
Salt
Dry milk
Butter
Sugar
Rosemary
Thyme
Oregano
Water
Bread improver,
optional
1
1
/2 tsp
500
N
2 tsp
1
1
/2 Tbsp
23
N
1 Tbsp
1 Tbsp
1 Tbsp
1 Tbsp
400 m
R
1 tsp
1
1
/4 tsp
420
N
1 tsp
2 tsp
15
N
2
1
/2 tsp
2 tsp
2 tsp
2 tsp
350 m
R
1 tsp
1
1
/4 tsp
300
N
1 tsp
2 tsp
15
N
2
1
/2 tsp
1 tsp
1 tsp
1 tsp
210 m
R
1
/2 tsp
Lemongrass & Chilli Loaf
Dry yeast
Bread flour
Salt
Dry milk
Butter
Sugar
Lemongrass &
chilli seasoning
Water
Bread improver,
optional
1
1
/2 tsp
500
N
2 tsp
1
1
/2 Tbsp
23
N
1 Tbsp
1 Tbsp
400 m
R
1 tsp
1
1
/4 tsp
420
N
1 tsp
2 tsp
15
N
2
1
/2 tsp
2 tsp
350 m
R
1 tsp
1
1
/4 tsp
300
N
1 tsp
2 tsp
15
N
2
1
/2 tsp
1 tsp
210 m
R
1
/2 tsp
Potato Loaf
Dry yeast
Bread flour
Salt
Dry milk
Butter
Sugar
Dehydrated
potato flakes
Water
Bread improver,
optional
1
1
/2 tsp
500
N
2 tsp
1
1
/2 Tbsp
23
N
1 Tbsp
1
/4 cup
400 m
R
1 tsp
1
1
/4 tsp
420
N
1 tsp
2 tsp
15
N
2
1
/2 tsp
2 Tbsp
350 m
R
1 tsp
1
1
/4 tsp
300
N
1 tsp
2 tsp
15
N
2
1
/2 tsp
1 Tbsp
210 m
R
1
/2 tsp
Rosemary & Pinenut Loaf
Dry yeast
Bread flour
Salt
Dry milk
Butter
Sugar
Pinenuts
Rosemary
Water
Bread improver,
optional
1
1
/2 tsp
500
N
2 tsp
1
1
/2 Tbsp
23
N
1 Tbsp
3 Tbsp
2 Tbsp
400 m
R
1 tsp
1
1
/4 tsp
420
N
1 tsp
2 tsp
15
N
2
1
/2 tsp
2 Tbsp
1 Tbsp
350 m
R
1 tsp
1
1
/4 tsp
300
N
1 tsp
2 tsp
15
N
2
1
/2 tsp
1 Tbsp
2 tsp
210 m
R
1
/2 tsp
Page 24

Pumpkin Loaf
Indian Loaf
Cheese & Mustard Loaf
Large Medium Small
Large Medium Small
Dry yeast
Bread flour
Salt
Dry milk
Butter
Sugar
Mashed pumpkin
All spice
Nutmeg
Water
Bread improver,
optional
tsp=teaspoon Tbsp=tablespoon
11/2 tsp
500
N
2 tsp
1
1
/2 Tbsp
23
N
1 Tbsp
1
/3 cup
2 tsp (75N)
1 Tbsp
330 m
R
1 tsp
1
1
/4 tsp
420
N
1 tsp
2 tsp
15
N
21/2 tsp
1
/4 cup
1 tsp (60N)
2 tsp
290 m
R
1 tsp
1
1
/4 tsp
300
N
1 tsp
2 tsp
15
N
21/2 tsp
2 Tbsp
1
/2tsp(40N)
2 tsp
170 m
R
1
/2 tsp
Dry yeast
Bread flour
Salt
Dry milk
Sugar
Curry paste
Onion, chopped
Sour cream
Cardamon
Coriander
Turmeric
Water
Bread improver,
optional
1
1
/2 tsp
500
N
2 tsp
1
1
/2 Tbsp
1 Tbsp
2 tsp
1
/4 (N)
2 Tbsp
2 tsp
2 tsp
1 tsp
330 m
R
1 tsp
1
1
/4 tsp
420
N
1 tsp
2 tsp
2
1
/2 tsp
1 tsp
2 Tbsp
1 Tbsp
1 tsp
1 tsp
1
/2 tsp
290 m
R
1 tsp
1
1
/4 tsp
300
N
1 tsp
2 tsp
2
1
/2 tsp
1 tsp
2 Tbsp
2 tsp
1
/2 tsp
1
/2 tsp
1
/4 tsp
170 m
R
1
/2 tsp
Orange Sunflower Loaf
Large Medium Small
Dry yeast
Bread flour
Salt
Dry milk
Butter
Sugar
Sunflower seeds
Orange rind
Water
Bread improver,
optional
1
1
/2 tsp
500
N
2 tsp
1
1
/2 Tbsp
23
N
1 Tbsp
1
/4 cup
2 Tbsp
400 m
R
1 tsp
1
1
/4 tsp
420
N
1 tsp
2 tsp
15
N
21/2 tsp
2 Tbsp
1 Tbsp
350 m
R
1 tsp
1
1
/4 tsp
300
N
1 tsp
2 tsp
15
N
21/2 tsp
1 Tbsp
2 tsp
210 m
R
1
/2 tsp
Peppercorn Loaf
Large Medium Small
Dry yeast
Bread flour
Salt
Dry milk
Butter
Sugar
Green peppercorns
Water
Bread improver,
optional
1
1
/2 tsp
500
N
2 tsp
1
1
/2 Tbsp
23
N
1 Tbsp
2 Tbsp
400 m
R
1 tsp
11/4 tsp
420
N
1 tsp
2 tsp
15
N
21/2 tsp
1 Tbsp
350 m
R
1 tsp
11/4 tsp
300
N
1 tsp
2 tsp
15
N
21/2 tsp
2 tsp
210 m
R
1
/2 tsp
Poppyseed & Lemon Loaf
Large Medium Small
Dry yeast
Bread flour
Salt
Dry milk
Butter
Sugar
Mustard powder
Pepper
Cheese
Worcestershire sauce
Water
Bread improver,
optional
1
1
/2 tsp
500
N
2 tsp
1
1
/2 Tbsp
23
N
1 Tbsp
2 tsp
2 tsp
1
/2 cup
2 Tbsp
350 m
R
1 tsp
1
1
/4 tsp
420
N
1 tsp
2 tsp
15
N
21/2 tsp
1 tsp
1 tsp
1
/4 cup
1 Tbsp
300 m
R
1 tsp
1
1
/4 tsp
300
N
1 tsp
2 tsp
15
N
21/2 tsp
1
/2 tsp
1
/2 tsp
2 Tbsp
2 tsp
210 m
R
1
/2 tsp
Large Medium Small
Dry yeast
Bread flour
Salt
Dry milk
Butter
Sugar
Poppy seeds
Lemon rind
Water
Bread improver,
optional
1
1
/2 tsp
500
N
2 tsp
1
1
/2 Tbsp
23
N
1 Tbsp
1
/4 cup
2 Tbsp
400 m
R
1 tsp
1
1
/4 tsp
420
N
1 tsp
2 tsp
15
N
21/2 tsp
2 Tbsp
1 Tbsp
350 m
R
1 tsp
1
1
/4 tsp
300
N
1 tsp
2 tsp
15
N
21/2 tsp
1 Tbsp
2 tsp
210 m
R
1
/2 tsp
-23-
Basic
Page 25

Large Medium Small
Large Medium Small
tsp=teaspoon Tbsp=tablespoon
Large Medium Small
Large Medium Small
Large Medium Small
Large Medium Small
-24-
Basic
Bacon & Cheese Loaf
Dry yeast
Bread flour
Dry milk
Sugar
Bacon bits*
Romano cheese*
Water
Bread improver,
optional
1
1
/2 tsp
500
N
1
1
/2 Tbsp
1 Tbsp
*
1
/4 cup
*
1
/4 cup
400 m
R
1 tsp
1
1
/4 tsp
420
N
2 tsp
2
1
/2 tsp
*2 Tbsp
*2 Tbsp
350 m
R
1 tsp
1
1
/4 tsp
300
N
2 tsp
2
1
/2 tsp
*1 Tbsp
*1 Tbsp
210 m
R
1
/2 tsp
Olive & Onion Loaf
Dry yeast
Bread flour
Dry milk
Sugar
Olive oil
Onion flakes
Sliced black olives*
Water
Bread improver,
optional
1
1
/2 tsp
500
N
1
1
/2 Tbsp
1 Tbsp
1 Tbsp
1 Tbsp
*
1
/4 cup
400 m
R
1 tsp
1
1
/4 tsp
420
N
2 tsp
2
1
/2 tsp
2 tsp
2 tsp
*2 Tbsp
350 m
R
1 tsp
1
1
/4 tsp
300
N
2 tsp
2
1
/2 tsp
1 tsp
1 tsp
*1 Tbsp
210 m
R
1
/2 tsp
Salami & Parmesan Loaf
Dry yeast
Bread flour
Dry milk
Sugar
Chopped salami*
Parmesan cheese
Water
Bread improver,
optional
1
1
/2 tsp
500
N
1
1
/2 Tbsp
1 Tbsp
*1 cup
2 Tbsp
400 m
R
1 tsp
1
1
/4 tsp
420
N
2 tsp
2
1
/2 tsp
*
1
/2 cup
1 Tbsp
350 m
R
1 tsp
1
1
/4 tsp
300
N
2 tsp
2
1
/2 tsp
*
1
/4 cup
1 Tbsp
210 m
R
1
/2 tsp
Tomato & Basil Loaf
Dry yeast
Bread flour
Salt
Dry milk
Butter
Sugar
Chopped tomato
Fresh chooped
basil
*
Water
Bread improver,
optional
1
1
/2 tsp
500
N
2 tsp
1
1
/2 Tbsp
23
N
1 Tbsp
1
/2cup(80N)
*2 Tbsp
320 m
R
1 tsp
1
1
/4 tsp
420
N
1 tsp
2 tsp
15
N
2
1
/2 tsp
1
/4cup(40N)
*1 Tbsp
310 m
R
1 tsp
1
1
/4 tsp
300
N
1 tsp
2 tsp
15
N
2
1
/2 tsp
2Tbsp (20N)
*2 tsp
190 m
R
1
/2 tsp
Muesli Loaf
Dry yeast
Bread flour
Salt
Dry milk
Butter
Sugar
Toasted muesli*
Water
Bread improver,
optional
1
1
/2 tsp
500
N
2 tsp
1
1
/2 Tbsp
23
N
1 Tbsp
*
1
/4 cup
400 m
R
1 tsp
1
1
/4 tsp
420
N
1 tsp
2 tsp
15
N
2
1
/2 tsp
*2 Tbsp
350 m
R
1 tsp
1
1
/4 tsp
300
N
1 tsp
2 tsp
15
N
2
1
/2 tsp
*1 Tbsp
210 m
R
1
/2 tsp
Banana Cinnamon Loaf
Dry yeast
Bread flour
Salt
Dry milk
Butter
Banana chips,
chopped*
Cinnamon
Honey
Water
Bread improver,
optional
1
1
/2 tsp
500
N
2 tsp
1
1
/2 Tbsp
23
N
*
1
/4 cup
1 tsp
1 Tbsp
400 m
R
1 tsp
1
1
/4 tsp
420
N
1 tsp
2 tsp
15
N
*2 Tbsp
1
/2 tsp
2 tsp
350 m
R
1 tsp
1
1
/4 tsp
300
N
1 tsp
2 tsp
15
N
*1 Tbsp
1
/4 tsp
1 tsp
210 m
R
1
/2 tsp
Basic Raisin Beep Recipes
ingredinents with * should be added on the beep.
Page 26

Pistachio Loaf
Large Medium Small
Dry yeast
Bread flour
Salt
Dry milk
Butter
Sugar
Pistachios, chopped
*
Water
Bread improver,
optional
1
1
/2 tsp
500
N
2 tsp
1
1
/2 Tbsp
23
N
1 Tbsp
*
1
/4 cup
400 m
R
1 tsp
1
1
/4 tsp
420
N
1 tsp
2 tsp
15
N
2
1
/2 tsp
*2 Tbsp
350 m
R
1 tsp
1
1
/4 tsp
300
N
1 tsp
2 tsp
15
N
2
1
/2 tsp
*1 Tbsp
210 m
R
1
/2 tsp
Sundried Tomato & Basil Loaf
Raisin Loaf
Large Medium Small
Large Medium Small
Dry yeast
Bread flour
Dry milk
Sugar
Olive oile
Chopped sundried
tomato*
Dried basil
Water
Bread improver,
optional
tsp=teaspoon Tbsp=tablespoon
11/2 tsp
500
N
1
1
/2 Tbsp
1 Tbsp
1 Tbsp
*
1
/4 cup
1 Tbsp
400 m
R
1 tsp
1
1
/4 tsp
420
N
2 tsp
2
1
/2 tsp
2 tsp
*2 Tbsp
2 tsp
350 m
R
1 tsp
1
1
/4 tsp
300
N
2 tsp
2
1
/2 tsp
1 tsp
*1 Tbsp
1 tsp
210 m
R
1
/2 tsp
Dry yeast
Bread flour
Salt
Dry milk
Butter
Sugar
Raisins*
Cinnamon
Water
Bread improver,
optional
1
1
/2 tsp
500
N
2 tsp
1
1
/2 Tbsp
23
N
1 Tbsp
*
3
/4 cup
1 Tbsp
400 m
R
1 tsp
1
1
/4 tsp
420
N
1 tsp
2 tsp
15
N
2
1
/2 tsp
*
1
/2 cup
2 tsp
350 m
R
1 tsp
1
1
/4 tsp
300
N
1 tsp
2 tsp
15
N
2
1
/2 tsp
*
1
/4 cup
1 tsp
210 m
R
1
/2 tsp
Mixed Seed Loaf
Large Medium Small
Dry yeast
Bread flour
Salt
Dry milk
Butter
Sugar
Pumpkin seeds*
Sunflower seeds*
Poppy seeds*
Water
Bread improver,
optional
1
1
/2 tsp
500
N
2 tsp
1
1
/2 Tbsp
23
N
1 Tbsp
*2 Tbsp
*2 Tbsp
*2 Tbsp
400 m
R
1 tsp
1
1
/4 tsp
420
N
1 tsp
2 tsp
15
N
2
1
/2 tsp
*1 Tbsp
*1 Tbsp
*1 Tbsp
350 m
R
1 tsp
1
1
/4 tsp
300
N
1 tsp
2 tsp
15
N
2
1
/2 tsp
*2 tsp
*2 tsp
*2 tsp
210 m
R
1
/2 tsp
-25-
Basic
Page 27

Large Medium Small
Large Medium Small
tsp=teaspoon Tbsp=tablespoon
Large Medium Small
Large Medium Small
Large Medium Small
-26-
Basic
Mixed Fruit Loaf
Dry yeast
Bread flour
Salt
Dry milk
Butter
Sugar
Mixed dried fruit,
diced*
All spice
Water
Bread improver,
optional
1
1
/2 tsp
500
N
2 tsp
1
1
/2 Tbsp
23
N
1 Tbsp
*
1
/2 cup
2 tsp
400 m
R
1 tsp
1
1
/4 tsp
420
N
1 tsp
2 tsp
15
N
2
1
/2 tsp
*
1
/4 cup
1 tsp
350 m
R
1 tsp
1
1
/4 tsp
300
N
1 tsp
2 tsp
15
N
2
1
/2 tsp
*2 Tbsp
1
/2 tsp
210 m
R
1
/2 tsp
Mango & Macadamia Bread
Dry yeast
Bread flour
Salt
Dry milk
Butter
Dried chopped
mango*
Chopped
macadamia nuts*
Water
Bread improver,
optional
1
1
/2 tsp
500
N
2 tsp
1
1
/2 Tbsp
23
N
*
1
/4 cup
*
1
/4 cup
400 m
R
1 tsp
1
1
/4 tsp
420
N
1 tsp
2 tsp
15
N
*2 Tbsp
*2 Tbsp
350 m
R
1 tsp
1
1
/4 tsp
300
N
1 tsp
2 tsp
15
N
*1 Tbsp
*1 Tbsp
210 m
R
1
/2 tsp
Chocolate Nut Bread
Dry yeast
Bread flour
Salt
Dry milk
Choc bits*
Mixed chopped
nuts*
Cocoa
Water
Bread improver,
optional
1
1
/2 tsp
500
N
2 tsp
1
1
/2 Tbsp
*
1
/4 cup
*
1
/4 cup
2 tsp
400 m
R
1 tsp
1
1
/4 tsp
420
N
1 tsp
2 tsp
*2 Tbsp
*2 Tbsp
1 tsp
350 m
R
1 tsp
1
1
/4 tsp
300
N
1 tsp
2 tsp
*1 Tbsp
*1 Tbsp
1
/2 tsp
210 m
R
1
/2 tsp
Apricot & Sunflower Seed Loaf
Dry yeast
Bread flour
Salt
Dry milk
Butter
Sunflower seeds*
Diced dried apricots*
Water
Bread improver,
optional
1
1
/2 tsp
500
N
2 tsp
1
1
/2 Tbsp
23
N
*
1
/4 cup
*
1
/4 cup
400 m
R
1 tsp
1
1
/4 tsp
420
N
1 tsp
2 tsp
15
N
*2 Tbsp
*2 Tbsp
350 m
R
1 tsp
1
1
/4 tsp
300
N
1 tsp
2 tsp
15
N
*1 Tbsp
*1 Tbsp
210 m
R
1
/2 tsp
Banana Pecan Loaf
Dry yeast
Bread flour
Salt
Dry milk
Butter
Sugar
Pecans*
Mashed banana
Water
Bread improver,
optional
1
1
/2 tsp
500
N
2 tsp
1
1
/2 Tbsp
23
N
1 Tbsp
*
1
/3 cup
1 (90N)
330 m
R
1 tsp
1
1
/4 tsp
420
N
1 tsp
2 tsp
15
N
2
1
/2 tsp
*
1
/4 cup
1
/2 (45N)
320 m
R
1 tsp
1
1
/4 tsp
300
N
1 tsp
2 tsp
15
N
2
1
/2 tsp
*2 Tbsp
1
/4 (20N)
200 m
R
1
/2 tsp
Sweet Breads
Page 28

Basic Wholemeal
Peanut & Sesame Loaf
Whole Wheat Rapid
Large Medium Small
Large Medium Small
Dry yeast
Whole wheat flour
Bread flour
Salt
Dry milk
Butter
Sugar
Water
Bread improver,
optional
tsp=teaspoon Tbsp=tablespoon
11/2 tsp
400
N
100
N
2 tsp
1
1
/2 Tbsp
23
N
1 Tbsp
400 m
R
1 tsp
1
1
/4 tsp
320
N
100
N
1 tsp
2 tsp
15
N
2
1
/2 tsp
350 m
R
1 tsp
1
1
/4 tsp
240
N
60
N
1 tsp
2 tsp
15
N
2
1
/2 tsp
210 m
R
1
/2 tsp
Dry yeast
Whole wheat flour
Bread flour
Salt
Dry milk
Sugar
Peanut butter
Sesame seeds
Water
Bread improver,
optional
1
1
/2 tsp
400
N
100
N
2 tsp
1
1
/2 Tbsp
1 Tbsp
1
/4 cup
2 Tbsp
400 m
R
1 tsp
1
1
/4 tsp
320
N
100
N
1 tsp
2 tsp
2
1
/2 tsp
2 Tbsp
1 Tbsp
350 m
R
1 tsp
1
1
/4 tsp
240
N
60
N
1 tsp
2 tsp
2
1
/2 tsp
1 Tbsp
2 tsp
210 m
R
1
/2 tsp
Sesame & Bran Loaf
Large Medium Small
Dry yeast
Whole wheat flour
Bread flour
Salt
Dry milk
Butter
Sugar
Unprocessed bran
Sesame seeds
Golden syrup
Water
Bread improver,
optional
1
1
/2 tsp
400
N
100
N
2 tsp
1
1
/2 Tbsp
23
N
1 Tbsp
1
/4 cup
2 Tbsp
1 Tbsp
400 m
R
1 tsp
1
1
/4 tsp
320
N
100
N
1 tsp
2 tsp
15
N
2
1
/2 tsp
2 Tbsp
1 Tbsp
2 tsp
350 m
R
1 tsp
1
1
/4 tsp
240
N
60
N
1 tsp
2 tsp
15
N
2
1
/2 tsp
1 Tbsp
2 tsp
2 tsp
210 m
R
1
/2 tsp
Whole Wheat Spice Loaf
Large Medium Small
Dry yeast
Whole wheat flour
Bread flour
Salt
Dry milk
Butter
Raw sugar
Cinnamon
Nutmeg
Water
Bread improver,
optional
1
1
/2 tsp
400
N
100
N
2 tsp
1
1
/2 Tbsp
23
N
1 Tbsp
1 Tbsp
2 tsp
400 m
R
1 tsp
1
1
/4 tsp
320
N
100
N
1 tsp
2 tsp
15
N
2 tsp
2 tsp
1 tsp
350 m
R
1 tsp
1
1
/4 tsp
240
N
60
N
1 tsp
2 tsp
15
N
1 tsp
1 tsp
1
/2 tsp
210 m
R
1
/2 tsp
Whole Wheat Sandwich Bread
(one size only)
Large Medium Small
Dry yeast
Whole wheat flour
Bread flour
Salt
Dry milk
Butter
Sugar
Water
Bread improver,
optional
2 tsp
400
N
100
N
2 tsp
1
1
/2 Tbsp
23
N
2 Tbsp
400 m
R
1 tsp
1
3
/4 tsp
320
N
100
N
1 tsp
2 tsp
15
N
2
1
/2 tsp
350 m
R
1 tsp
1
3
/4 tsp
200
N
100
N
1 tsp
2 tsp
15
N
2
1
/2 tsp
250 m
R
1
/2 tsp
Dry yeast
Whole wheat flour
Bread flour
Salt
Dry milk
Butter
Sugar
Water
Bread improver, optional
1
1
/4 tsp
320
N
100
N
1
1
/4 tsp
2 tsp
15
N
2
1
/2 tsp
315 m
R
1 tsp
-27-
Whole wheat
Page 29
Dry yeast
Whole wheat flour
Bread flour
Salt
Dry milk
Butter
Sugar
Unprocessed bran
Sesame seeds
Golden syrup
Water
Bread improver,
optional
1
1
/2 tsp
400
N
100
N
2 tsp
1
1
/2 Tbsp
23
N
1 Tbsp
1
/4 cup
2 Tbsp
1 Tbsp
400 m
R
1 tsp
1
1
/4 tsp
320
N
100
N
1 tsp
2 tsp
15
N
2
1
/2 tsp
2 Tbsp
1 Tbsp
2 tsp
350 m
R
1 tsp
1
1
/4 tsp
240
N
60
N
1 tsp
2 tsp
15
N
2
1
/2 tsp
1 Tbsp
2 tsp
2 tsp
210 m
R
1
/2 tsp
Large Medium Small
Large Medium Small
tsp=teaspoon Tbsp=tablespoon
Large Medium Small
Large Medium Small
Large Medium Small
Large Medium Small
-28-
Whole wheat
Rosemary & Thyme Loaf
Dry yeast
Whole wheat flour
Bread flour
Salt
Dry milk
Butter
Sugar
Rosemary
Thyme
Water
Bread improver,
optional
1
1
/2 tsp
400
N
100
N
2 tsp
1
1
/2 Tbsp
23
N
1 Tbsp
2 Tbsp
2 Tbsp
400 m
R
1 tsp
1
1
/4 tsp
320
N
100
N
1 tsp
2 tsp
15
N
2
1
/2 tsp
1 Tbsp
1 Tbsp
350 m
R
1 tsp
1
1
/4 tsp
240
N
60
N
1 tsp
2 tsp
15
N
2
1
/2 tsp
2 tsp
2 tsp
210 m
R
1
/2 tsp
Cheese & Chive Loaf
Dry yeast
Whole wheat flour
Bread flour
Salt
Dry milk
Butter
Sugar
Grated romano
cheese
Chives
Water
Bread improver,
optional
1
1
/2 tsp
400
N
100
N
2 tsp
1
1
/2 Tbsp
23
N
1 Tbsp
1
/4 cup
(25N)
2 Tbsp
390 m
R
1 tsp
1
1
/4 tsp
320
N
100
N
1 tsp
2 tsp
15
N
2
1
/2 tsp
2 Tbsp
(15N)
1 Tbsp
340 m
R
1 tsp
1
1
/4 tsp
240
N
60
N
1 tsp
2 tsp
15
N
2
1
/2 tsp
1 Tbsp
(10N)
2 tsp
200 m
R
1
/2 tsp
Hi-Fibre Loaf
Dry yeast
Whole wheat flour
Bread flour
Salt
Dry milk
Butter
Sugar
Water
Bread improver,
optional
1
1
/2 tsp
400
N
100
N
2 tsp
1
1
/2 Tbsp
23
N
1 Tbsp
400 m
R
1 tsp
1
1
/4 tsp
320
N
100
N
1 tsp
2 tsp
15
N
2
1
/2 tsp
350 m
R
1 tsp
1
1
/4 tsp
240
N
60
N
1 tsp
2 tsp
15
N
2
1
/2 tsp
210 m
R
1
/2 tsp
Bran & Sesame Loaf
Cracked Wheat Bread
Dry yeast
Whole wheat flour
Bread flour
Salt
Dry milk
Butter
Sugar
Cracked wheat
Water
Bread improver,
optional
1
1
/2 tsp
400
N
100
N
2 tsp
1
1
/2 Tbsp
23
N
1 Tbsp
1
/4 cup
400 m
R
1 tsp
1
1
/4 tsp
320
N
100
N
1 tsp
2 tsp
15
N
2
1
/2 tsp
2 Tbsp
350 m
R
1 tsp
1
1
/4 tsp
240
N
60
N
1 tsp
2 tsp
15
N
2
1
/2 tsp
1 Tbsp
210 m
R
1
/2 tsp
Orange Poppyseed Loaf
Dry yeast
Whole wheat flour
Bread flour
Salt
Dry milk
Butter
Sugar
Poppy seeds
Orange rind
Water
Bread improver,
optional
1
1
/2 tsp
400
N
100
N
2 tsp
1
1
/2 Tbsp
23
N
1 Tbsp
1
/4 cup
2 Tbsp
400 m
R
1 tsp
1
1
/4 tsp
320
N
100
N
1 tsp
2 tsp
15
N
2
1
/2 tsp
2 Tbsp
1 Tbsp
350 m
R
1 tsp
1
1
/4 tsp
240
N
60
N
1 tsp
2 tsp
15
N
2
1
/2 tsp
1 Tbsp
2 tsp
210 m
R
1
/2 tsp
Page 30

Walnut & Honey Loaf
Walnut & Sunflower Loaf
Raisin Loaf
Large Medium Small
Large Medium Small
Dry yeast
Whole wheat flour
Bread flour
Salt
Dry milk
Butter
Honey
Chopped walnuts*
Water
Bread improver,
optional
tsp=teaspoon Tbsp=tablespoon
11/2 tsp
500
N
100
N
2 tsp
1
1
/2 Tbsp
23
N
1 Tbsp
*
1
/3 cup
400 m
R
1 tsp
1
1
/4 tsp
420
N
100
N
1 tsp
2 tsp
15
N
2 tsp
*
1
/4 cup
350 m
R
1 tsp
1
1
/4 tsp
300
N
60
N
1 tsp
2 tsp
15
N
1 tsp
*2 Tbsp
210 m
R
1
/2 tsp
Dry yeast
Whole wheat flour
Bread flour
Salt
Dry milk
Butter
Chopped walnuts*
Sunflower seeds*
Water
Bread improver,
optional
1
1
/2 tsp
500
N
100
N
2 tsp
1
1
/2 Tbsp
23
N
*
1
/4 cup
*
1
/4 cup
400 m
R
1 tsp
1
1
/4 tsp
420
N
100
N
1 tsp
2 tsp
15
N
*2 Tbsp
*1 Tbsp
350 m
R
1 tsp
1
1
/4 tsp
300
N
60
N
1 tsp
2 tsp
15
N
*1 Tbsp
*2 tsp
210 m
R
1
/2 tsp
Date & Nut Loaf
Large Medium Small
Dry yeast
Whole wheat flour
Bread flour
Salt
Dry milk
Butter
Chopped pecans*
Chopped dates*
Water
Bread improver,
optional
1
1
/2 tsp
500
N
100
N
2 tsp
1
1
/2 Tbsp
23
N
*
1
/3 cup
*
1
/2 cup
400 m
R
1 tsp
1
1
/4 tsp
420
N
100
N
1 tsp
2 tsp
15
N
*
1
/4 cup
*
1
/4 cup
350 m
R
1 tsp
1
1
/4 tsp
300
N
60
N
1 tsp
2 tsp
15
N
*2 Tbsp
*2 Tbsp
210 m
R
1
/2 tsp
Cinnamon & Nut Loaf
Large Medium Small
Dry yeast
Whole wheat flour
Bread flour
Salt
Dry milk
Butter
Sugar
Raisins*
Cinnamon
Water
Bread improver,
optional
1
1
/2 tsp
500
N
100
N
2 tsp
1
1
/2 Tbsp
23
N
1 Tbsp
*
3
/4 cup
1 Tbsp
400 m
R
1 tsp
1
1
/4 tsp
420
N
100
N
1 tsp
2 tsp
15
N
2
1
/2 tsp
*
1
/2 cup
2 tsp
350 m
R
1 tsp
1
1
/4 tsp
300
N
60
N
1 tsp
2 tsp
15
N
2
1
/2 tsp
*
1
/4 cup
1 tsp
210 m
R
1
/2 tsp
Large Medium Small
Dry yeast
Whole wheat flour
Bread flour
Salt
Dry milk
Butter
Chopped mixed
nuts*
Honey
Cinnamon
Water
Bread improver,
optional
1
1
/2 tsp
500
N
100
N
2 tsp
1 Tbsp
23
N
*
1
/4 cup
1 Tbsp
1 Tbsp
400 m
R
1 tsp
1
1
/4 tsp
420
N
100
N
1 tsp
2
1
/2 tsp
15
N
*2 Tbsp
2 tsp
2 tsp
350 m
R
1 tsp
1
1
/4 tsp
300
N
60
N
1 tsp
2
1
/2 tsp
15
N
*1 Tbsp
1 tsp
1 tsp
210 m
R
1
/2 tsp
-29-
Whole wheat
Whole Wheat Raisin Beep Recipes
ingredinents with * should be added on the beep.
Page 31

tsp=teaspoon Tbsp=tablespoon
-30-
Multigrain
Rye Flake Loaf
Dry yeast
Bread flour
Whole wheat flour
Salt
Dry milk
Butter
Sugar
Whole grain rye flakes
Water
Bread improver, optional
1
1
/2 tsp
100
N
400
N
2 tsp
1
1
/2 Tbsp
23
N
1 Tbsp
1
/4 cup
400 m
R
1 tsp
Linseed & Soy Loaf
Dry yeast
Bread flour
Whole wheat flour
Salt
Dry milk
Butter
Sugar
Linseeds
Soy grits
Water
Bread improver, optional
1
1
/2 tsp
100
N
400
N
2 tsp
1
1
/2 Tbsp
23
N
1 Tbsp
1
/4 cup
1
/4 cup
400 m
R
1 tsp
Five Flakes Loaf
Dry yeast
Bread flour
Whole wheat flour
Salt
Dry milk
Butter
Sugar
Five flakes
Water
Bread improver, optional
1
1
/2 tsp
100
N
400
N
2 tsp
1
1
/2 Tbsp
23
N
1 Tbsp
1
/2 cup
400 m
R
1 tsp
Wheatgerm & Rosemary Loaf
Dry yeast
Bread flour
Whole wheat flour
Salt
Dry milk
Butter
Sugar
Wheatgerm
Rosemary
Water
Bread improver, optional
1
1
/2 tsp
100
N
400
N
2 tsp
1
1
/2 Tbsp
23
N
1 Tbsp
1
/4 cup
1 Tbsp
400 m
R
1 tsp
Buckwheat & Apricot Loaf
Dry yeast
Bread flour
Whole wheat flour
Salt
Dry milk
Butter
Sugar
Buckwheat
Diced dried apricots
Water
Bread improver, optional
1
1
/2 tsp
100
N
400
N
2 tsp
1
1
/2 Tbsp
23
N
1 Tbsp
1
/4 cup
1
/4 cup
400 m
R
1 tsp
Basic Multigrain Loaf
Dry yeast
Bread flour
Whole wheat flour
Salt
Dry milk
Butter
Sugar
Multigrain cereals
Water
Bread improver, optional
1
1
/4 tsp
100
N
350
N
2 tsp
1
1
/2 Tbsp
23
N
1 Tbsp
1
/4 cup (approx. 70N)
350 m
R
1 tsp
Page 32

tsp=teaspoon Tbsp=tablespoon
-31-
Multigrain
Buckwheat Loaf
Dry yeast
Bread flour
Whole wheat flour
Salt
Dry milk
Butter
Sesame seeds
Buckwheat
Oat bran
Brown sugar
Water
Bread improver, optional
1
1
/2 tsp
100
N
400
N
2 tsp
1
1
/2 Tbsp
23
N
3 Tbsp
3 Tbsp
2 Tbsp
2 Tbsp
400 m
R
1 tsp
Oat Groat & Thyme Loaf
Dry yeast
Bread flour
Whole wheat flour
Salt
Dry milk
Butter
Sugar
Organic oat groats
Thyme
Water
Bread improver, optional
1
1
/2 tsp
100
N
400
N
2 tsp
1
1
/2 Tbsp
23
N
1 Tbsp
1
/4 cup
1 Tbsp
400 m
R
1 tsp
Millet & Pepita Loaf
Dry yeast
Bread flour
Whole wheat flour
Salt
Dry milk
Butter
Sugar
Rolled millet
Pepitas
Water
Bread improver, optional
1
1
/2 tsp
100
N
400
N
2 tsp
1
1
/2 Tbsp
23
N
1 Tbsp
1
/4 cup
1
/4 cup
400 m
R
1 tsp
Oatmeal & Sultana Loaf
Dry yeast
Bread flour
Whole wheat flour
Salt
Dry milk
Butter
Sugar
Rolled oats
Sultanas
Water
Bread improver, optional
1
1
/2 tsp
100
N
400
N
2 tsp
1
1
/2 Tbsp
23
N
1 Tbsp
1
/4 cup
2 Tbsp
400 m
R
1 tsp
Bran Loaf
Dry yeast
Bread flour
Whole wheat flour
Salt
Dry milk
Butter
Sugar
Unprocessed bran
Water
Bread improver, optional
1
1
/2 tsp
100
N
350
N
2 tsp
1
1
/2 Tbsp
23
N
1 Tbsp
1
/4 cup
400 m
R
1 tsp
Page 33

Large Medium Small
tsp=teaspoon Tbsp=tablespoon
Large Medium Small
-32-
French
Tarragon & Thyme Loaf
Dry yeast
Bread flour
Salt
Butter
Tarragon
Thyme
Water
Bread improver, optional
1
1
/2 tsp
500
N
1 tsp
5
N
1 Tbsp
1 Tbsp
300 m
R
1 tsp
Whole Wheat Bread
(Use the WHOLE WHEAT BAKE mode)
Dry yeast
Flour mix
Water
2 tsp
600
N
450 m
R
11/2 tsp
500
N
400 m
R
11/2 tsp
400
N
300 m
R
White Bread
(Use the BASIC BAKE mode)
Kitchen Collection Breadmix
Dry yeast
Flour mix
Water
2 tsp
600
N
420 m
R
11/2 tsp
500
N
380 m
R
11/2 tsp
400
N
300 m
R
Large Medium Small
Multigrain Bread
(Use the MULTIGRAIN BAKE mode)
Dry yeast
Flour mix
Water
2 tsp
600
N
420 m
R
11/2 tsp
500
N
350 m
R
11/2 tsp
400
N
280 m
R
Large Medium Small
Large Medium Small
Whole Wheat Bread
(Use the WHOLE WHEAT BAKE mode)
Dry yeast
Flour mix
Water
2 tsp
600
N
410 m
R
11/2 tsp
500
N
350 m
R
11/2 tsp
400
N
280 m
R
White Bread
(Use the BASIC BAKE mode)
Defiance Breadmix
Dry yeast
Flour mix
Water
2 tsp
600
N
410 m
R
11/2 tsp
500
N
350 m
R
11/2 tsp
400
N
280 m
R
Large Medium Small
Multigrain Bread
(Use the MULTIGRAIN BAKE mode)
Dry yeast
Flour mix
Water
2 tsp
600
N
410 m
R
11/2 tsp
500
N
350 m
R
11/2 tsp
400
N
280 m
R
French Bread
Dry yeast
Bread flour
Salt
Butter
Water
Bread improver, optional
1
1
/2 tsp
500
N
1 tsp
5
N
300 m
R
1 tsp
When baking with bread mixes, the following formulas should be followed.
tsp=teaspoon Tbsp=tablespoon
Bread Mixes
Page 34

2 tsp
400
N
13/4 Tbsp
2 tsp
3 Tbsp
45
N
350 m
R
1
/2 tsp
1 egg, beaten for brushing on top
2 Tablespoon poppy seeds, optional for
sprinkling on top
2 Tablespoon sesame seeds, optional for
sprinkling on top
(1 cup bread flour, extra for kneading)
Dinner Rolls
(Use BASIC DOUGH Mode)
Ingredients: Makes 18
Method:
Make the dough according to instructions
1on page 11.
Knead dough on a lightly floured surface
2 until it becomes elastic and springs back
when touched.
Divide the dough
3 into 18 equal
portions. Roll each
portion into a ball.
Cover with a slightly
damp cloth and rest in
a warm place for 20
minutes until almost
doubled in size.
Roll one end of
4 the ball on a
lightly floured surface
to make a cone.
Roll each cone
5 into a wedge
shape, approximately
1
/2 cm thick, using a
rolling pin.
Starting with the
6 wider end, roll up
the wedge loosely
towards the narrower
end.
Place seam side
7 down on a
greased baking tray.
Cover and let rise
8 in a warm place
for 30 Ð 40 minutes
until almost doubled
in size.
Brush rolls with
9 beaten egg,
sprinkle with poppy
seeds or sesame
seeds if desired. Bake in
a preheated 160¡C oven
for 25-30 minutes or
until golden brown.
Remove from oven
and cool on a wire rack.
dry yeast
bread flour
sugar
salt
dry milk powder
butter
water
bread improver, optional
-33-
Dough
Page 35

2 tsp
475
N
1
/4 cup
3 Tbsp
2 tsp
30
N
350 m
R
1 tsp
250Nbutter, chilled for folding in the dough
1 egg, beaten for brushing on top
Croissants
(Use BASIC DOUGH Mode)
Ingredients: Makes 18
Fold the
6 remaining third
on top. Seal edges.
Rest the dough in
the refrigerator for
20 to 30 minutes.
Place the dough at
7 right angles to the
previous position in
#5. Roll out into
30 cm square. Fold
into thirds. Wrap and
place into refrigerator
for 20 to 30 minutes.
Roll and fold twice
more. Wrap and chill
after each folding. After
the final folding, chill
several hours or
overnight.
Spread the dough
8 for the final time
into 30 cm square.
Cut dough into 9 equal
squares. Cut each
square diagonally to
form two triangles.
Roll up each
9 triangle loosely,
starting from the
side opposite the
point. Curve ends.
Place seam
10 side down on
a greased baking
pan. Cover and place
in warm area for 30 Ð
50 minutes or until
almost doubled in
size.
Brush with beaten egg. Bake in a preheated
11 200¡C oven for 15 to 20 minutes or until
golden brown.
Method:
Make the dough according to instructions
1 on page 11.
Roll 250Nof
2 chilled butter
between two sheets
of plastic wrap into a
17 25 cm rectangle.
Chill at least 1 hour.
Turn the dough into a greased bowl. Place in
3 the refrigerator for 30 minutes.
Roll out the
4 dough on a
lightly floured
surface into a
30cm square.
Place the rolled
5 out butter over
two-thirds of the
dough.
Fold the third
without butter over
the centre third.
dry yeast
bread flour
sugar
dry milk
salt
butter
water
bread improver, optional
-34-
Dough
Page 36

3 tsp
475
N
4 Tbsp
4 Tbsp
2 tsp
125
N
3
200 m
R
1 tsp
1 egg, beaten for brushing on top
12 brioche moulds or muffing pans
(1 cup bread flour, extra for kneading)
yeast
bread flour
milk powder
sugar
salt
butter
eggs
water
bread improver, optional
Brioche
(Use BASIC DOUGH Mode)
Chicken Buns
(Use BASIC DOUGH Mode)
Ingredients: Makes 12
Method:
Make the dough according to instructions on
1page 11.
Place the dough in a greased bowl. Cover
2with a plastic wrap and rest the dough in the
refrigerator for 30 minutes.
Knead dough on a lightly floured surface until
3it becomes elastic and springs back
when touched.
Divide dough into 12 balls.
4Divide each ball into 1 large and 1 small ball.
Place each large
5ball in a greased
brioche (muffin) cup.
With floured fingers,
make an indentation
in each large ball.
Place the small ball in
each indentation.
Cover and let rise in
a warm place for 30
-
40 minutes or until
almost doubled in size.
Brush rolls with the beaten egg.
6Bake in a preheated 200¡C oven for
10-15 minutes or until golden brown.
Use the Dinner Roll Dough ingredients for
chicken buns.
Filling:
300
N
1
2 Tbsp
1 tsp
1 tsp
1 egg, beaten for brushing on top
chicken mince
l
arge onion finely chopped
sour cream
cracked black pepper
thyme
Method:
Make the dough according to instructions on
1 page 11.
Knead dough on a lightly floured surface until
2 it becomes elastic and springs back when
touched.
Divide the dough into 12 equal portions. Roll
3 each portion into a ball. Cover and let rest in a
warm place for 10 minutes.
Combine all filling ingredients.
4
Flatten each dough portion into a circle. Place
5 a tablespoon of the filling onto dough.
Twist edges together to enclose filling.
Neaten shape of bun.
Place seam side down on a greased baking
6 tray. Cover and let rise in a warm place for
30-40 minutes until almost doubled in size.
Brush buns with beaten egg.
7Bake in a preheated 200¡C oven for 15
-
20
minutes or until golden brown.
Serve warm.
-35-
Dough
Page 37

Ingredients: Makes 12
Method:
Make dough according to instructions on
1page 11.
Knead dough on a lightly floured surface until
2it becomes elastic and springs back when
touched. Divide dough into 12.
Cover and let rest in a warm place for
330 mimnutes.
Shape each ball into 10cm long ovals.
4
Cover and place in a warm place for 20 minutes
5until almost doubled in size.
Brush dough with beaten egg. Bake in a
6preheated 180¡C oven for 15 Ð 20 minutes or
until golden brown.
Icing:
mix all ingredients until smooth.
7Spread over rolls when cooled.
Method:
Make the dough according to instructions on
1page 11.
On a lightly floured board, roll out dough into
2 two 30 x 20cm rectangles.
Beat extra butter and brown sugar in a small bowl.
3Spread butter and sugar all over the dough.
Top with fruit and spice.
Roll dough up Swiss-roll style, beginning with the
4long side.
Slice each roll into 10 pieces. Place rolls cut side
5up, in a greased ring tin. Cover and place in a
warm place for 20 Ð 25 minutes until almost doubled
size.
Brush rolls with milk. Bake in a preheated 200¡C
6oven for 25 Ð 30 minutes.
Icing:
mix all ingredients until smooth. Spread
7over rolls when cooled.
2 tsp
450
N
1
/4 cup
1
/2 tsp
1
/3 cup
50
N
1
/2 cup
3
/4 cup
1 egg, beaten for brushing on top
Icing:
1 cup
15
N
2Ð3 Tbsp
pink food colouring
(1 cup plain flour, extra for kneading)
dry yeast
plain flour
milk powder
salt
sugar
butter
sultanas*
water
icing sugar
butter
water
2 tsp
400
N
125
N
1 Tbsp
1
/2 tsp
1 tsp
1 egg, beaten for brushing on top
Filling:
60
N
1
/4 cup
1 cup
1
/2 tsp
Icing:
1
/2 cup
1Ð2 Tbsp
(1 cup plain flour, extra for kneading)
dry yeast
plain flour
butter
sugar
mixed spice
grated lemon rind
butter, extra
brown sugar
mixed dried fruit
mixed spice
icing sugar
milk
Finger Buns
(Use BASIC RAISIN DOUGH Mode)
Sweet Rolls
(Use BASIC DOUGH Mode)
Ingredients: Makes 1 large
-36-
Dough
* add at the beep
Page 38

Dough
Method:
Make dough according to instructions on page
1 11.
Knead dough on a lightly floured surface until
2 it becomes elastic and springs back when
touched. Divide dough into two balls.
Place dough into two greased 20 x 10cm
3 baking tins. Cover and let rise in a warm place
for 30Ð40 minutes.
Brush with beaten egg.
4 Bake in a preheated 200¡C oven for 20Ð25
minutes or until golden brown.
Pull-a-Part Bread
(Use BASIC RAISIN DOUGH Mode)
Ingredients: Makes 2
2 tsp
500
N
1 Tbsp
2 tsp
1
1
/2 Tbsp
23
N
360 m
R
1
/2 tsp
1
/2 cup
1
/2 cup
1
/4 cup
1
/4 cup
1 egg, beaten for brushing on top
(1 cup bread flour, extra for kneading)
dry yeast
bread flour
sugar
salt
dry milk
butter
water
bread improver, optional
sun-dried tomatoes*
cubed cheese*
ripped basil*
halved olives*
-37-
Method:
Make the dough according to instructions on
1 page 11.
Knead dough on a lightly floured surface until
2 it becomes elastic and springs back when
touched.
Divide the dough into 15 equal portions. Roll
3 each portion into a ball. Cover and let rest in a
warm place for 30 minutes until almost doubled
in size.
To Make Crosses:
4 Mix together 1 cup flour with approximately
150mRwater until smooth. Pipe crosses over risen
buns.
Bake in a preheated 200¡C oven for
5 20
–
25 minutes.
To Make Glaze:
6 Place 1 teaspoon of gelatine, 2 tablespoons
water and 1 tablespoon sugar into a 1 cup jug.
Heat in a microwave oven on MEDIUM power
for 1 to 2 minutes.
Brush glaze onto hot buns. Serve hot or cold.
2 tsp
475
N
3 Tbsp
13/4 Tbsp
2 tsp
2 tsp
2 tsp
1 cup
45
N
350 m
R
1 tsp
(1 cup bread flour, extra for kneading)
Hot Cross Buns
(Use BASIC RAISIN DOUGH Mode)
Ingredients: Makes 12
dry yeast
bread flour
milk powder
sugar
salt
cinnamon
mixed spice
mixed dried fruit*
butter
water
bread improver, optional
* add at the beep
* add at the beep
Page 39

Method:
Make the dough according to instructions on
1 page 11.
Knead dough on a lightly floured surface until
2 it becomes elastic and springs back when
touched.
Shape into a flat circle, place on a baking tray,
3 make holes with the end of a wooden spoon
5 cm apart over the surface of the dough.
Cover and let rest in a warm place for 20-25
4 minutes until almost doubled in size.
Brush surface with olive oil, sprinkle with sea
5 salt, oregano and basil.
Bake in a preheated 210¡C oven for 26-30
6 minutes.
Focaccia
(Use PIZZA DOUGH Mode)
Ingredients: Makes 1 large
2 tsp
475
N
2 Tbsp
2 Tbsp
2 tsp
2 Tbsp
330 m
R
1 tsp
Topping:
1
/4 cup
1 Tbs
2 tsp
2 tsp
(1 cup bread flour, extra for kneading)
dry yeast
bread flour
milk powder
sugar
salt
olive oil
water
bread improver, optional
olive oil
fine sea salt
dried oregano
dried basil
Dough
-38-
Method:
Make the dough according to instructions on
1 page 11.
Knead dough on a lightly floured surface until
2 it becomes elastic and springs back when
touched.
Divide into 6 balls or 2 large balls, and place
3 in warm area for 10 minutes.
Shape each ball into a flat circle. Place the
4 circles on a baking tray and prick with a fork.
Let rest for 15 minutes at room
5 temperature.
Brush each circle with 2 tablespoons tomato
6 paste. Sprinkle with Mozzarella cheese.
Top with your favourite topping, such as sliced
onions, pepperoni, cooked sausage, capsicum
or olives.
Bake in a preheated 210¡C oven for 15-20
7 minutes.
1 tsp
475
N
1
13/4 Tbsp
1 tsp
20
N
350 m
R
2
/3 cup tomato paste, for brushing on top
3 cups Mozzarella cheese, for sprinkling on top
dry yeast
bread flour
milk powder
sugar
salt
butter
water
Pizza
(Use PIZZA DOUGH Mode)
Ingredients: Makes 6 small or 2 large
Page 40

Method:
Make the dough according to instructions on
1 page 11.
Let the dough rest in a greased bowl for
2 20
-
30 minutes.
Knead dough on a lightly floured surface until
3 it becomes elastic and springs back when
touched.
Divide the dough into 2 balls. Cover and let
4 rest in a warm place for 20 minutes.
Shape each ball into a flat rectangle. Roll up
5 tightly from long side; seal well. Taper ends.
Place on a greased baking tray. With a sharp
6 knife, make 3 or 4 diagonal cuts about
1
/2 cm
deep across top of the loaves. Cover and let rise
in a warm place for 30Ð40 minutes until almost
doubled in size.
Brush with beaten egg white, sprinkle with
7 poppy seeds.
Bake in a preheated 200¡C oven for 25-30
8 minutes or until golden brown.
French Bread
(Use FRENCH DOUGH Mode)
Ingredients: Makes 2
2 tsp
475
N
2
1
/2 Tbsp
2 tsp
2 tsp
10
N
350 m
R
1 egg white, beaten for brushing on top
Poppy seeds for sprinkling on top
(1 cup bread flour, extra for kneading)
dry yeast
bread flour
gluten flour
sugar
salt
butter
water
Dough
-39-
Method:
Make the dough according to instructions on
1 page 11.
Place the dough in a greased bowl. Cover
2 with a plastic wrap and rest the dough in the
refrigerator for 20 Ð 30 minutes.
Knead dough on a lightly floured surface until
3 it becomes elastic and springs back when
touched.
Divide the dough into 2 balls. Cover and
4 let rest in a warm place for 20 minutes.
Roll out dough in two 20 x 30cm rectangles.
5 Place filling in centre of dough, roll up dough,
like a Swiss-roll, beginning with the long end.
Place on a greased baking tray, seam side
6 down. Cover and let rise in a warm place for
30 minutes until almost doubled in size.
Brush with egg. Bake in a preheated 200¡C
7 oven for 25
-
30 minutes or until golden
brown.
Pepperoni Bread Stick
(Use FRENCH DOUGH Mode)
1 tsp
400
N
1 tsp
5
N
300 m
R
1
/2 tsp
1 egg, beaten for brushing on top
Filling:
1
2
1 tsp
1 cup
(1 cup bread flour, extra for kneading)
dry yeast
bread flour
salt
butter
water
bread improver, optional
pepperoni/cabanossi,
chopped
roasted capsicum
garlic powder
cheese
Ingredients: Makes 2
Page 41

Method:
Make the dough according to instructions on
1page 11.
Divide the dough into 16 equal portions.
2Shape each portion into a roll.
(Follow instructions on Dinner Rolls, P.33.)
Place on a greased baking tray. Cover and
3let rise in a warm place for 30
-
35 minutes
until almost doubled in size.
Brush rolls with beaten egg, garnish with
4sliced almonds and sugar, if desired.
Bake in a preheated 190¡C oven for 15-20
5minutes.
11/4 tsp
400
N
2 tsp
11/3 Tbsp
20
N
1
/4 cup +1 tsp
1
/3 cup
1 Tbsp
370 m
R
1 egg, beaten to brushing on top
(1 cup wholemeal bread flour, extra for kneading)
dry yeast
wholemeal bread flour
salt
milk powder
butter
gluten flour
raisins*
cinnamon
water
Ingredients: Makes 16
Ingredients: makes 1 large
Method:
Make dough according to Dinner Roll instructions
1 on page 11.
Knead dough on a lightly floured surface until
2it becomes elastic and springs back when touched.
Cover and let rest in a warm place for 20 minutes.
3
Roll out dough into a 20cm square. Roll up and
4place on a greased baking tray with the seam side
down.
Cover and let rise in a warm place for 40 minutes
5until almost doubled in size.
Brush with combined milk and malt.
6Bake in a preheated 180¡C oven for 40 minutes
or until golden brown.
2 tsp
450
N
50
N
2 tsp
1 tsp
1 tsp
30
N
1 Tbsp
1 Tbsp
1 Tbsp
125 m
R
Glaze:
1 Tbsp
1
/2 tsp
(1 cup plain wholemeal flour, extra for kneading)
dry yeast
plain wholemeal flour
bread flour
ground cinnamon
milk powder
sugar
raisins*
butter
treacle
liquid malt
water
warm milk
liquid malt
Malt Bread
(Use WHOLE WHEAT RAISIN DOUGH Mode)
Whole Wheat Raisin Rolls
(Use WHOLE WHEAT RAISIN DOUGH Mode)
Dough
-40-
* add at the beep
* add at the beep
Page 42

Method:
Make the dough according to instructions on
1page 11. Divide the dough into 2 equal
portions.
Divide each dough into 3 equal portions. Roll
2each portion into a smooth rope.
Pinch ropes together at top, braid loosely and
3pinch ends to seal, tucking them underneath.
Method:
Make the dough according to instructions on
1page 11.
Divide the dough into 12 equal portions. Working
2 with one portion at a time, wrap raisins with
each dough.
Shape into a smooth ball by gently rolling
3 between your palms.
Place on a greased baking tray. Cover and
4 let rise in a warm place for 30
-
35 minutes
until almost doubled in size.
Brush with beaten egg.
5
Bake in a preheated 180¡C oven for 15-20
6 minutes or until golden brown.
Place on a greased baking tray. Cover and
4let rise in a warm place for 30
-
35 minutes
until almost doubled in size.
Brush with beaten egg.
5
Bake in a preheated 180¡C oven for 15-20
6minutes or until golden brown.
11/4 tsp
475
N
2 tsp
13/4 Tbsp
20
N
21/2 Tbs
1
/2 cup
350 m
R
1
/2 tsp
1 egg, beaten for brushing on top
dry yeast
bread flour
salt
milk powder
butter
sugar
five flakes
water
bread improver, optional
1 tsp
390
N
1
/4 cup
2 tsp
13/4 Tbsp
15
N
1 Tbsp
2 Tbsp
350 m
R
1
/2 tsp
1 egg, beaten for brushing on top
dry yeast
wholemeal flour
gluten flour
salt
milk powder
butter
sugar
unprocessed bran
water
bread improver, optional
Braided bread
(Use MULTIGRAIN DOUGH mode)
Multigrain buns
(Use MULTIGRAIN DOUGH mode)
Ingredients: Makes 2
Ingredients: Makes 12
-41-
Dough
Page 43
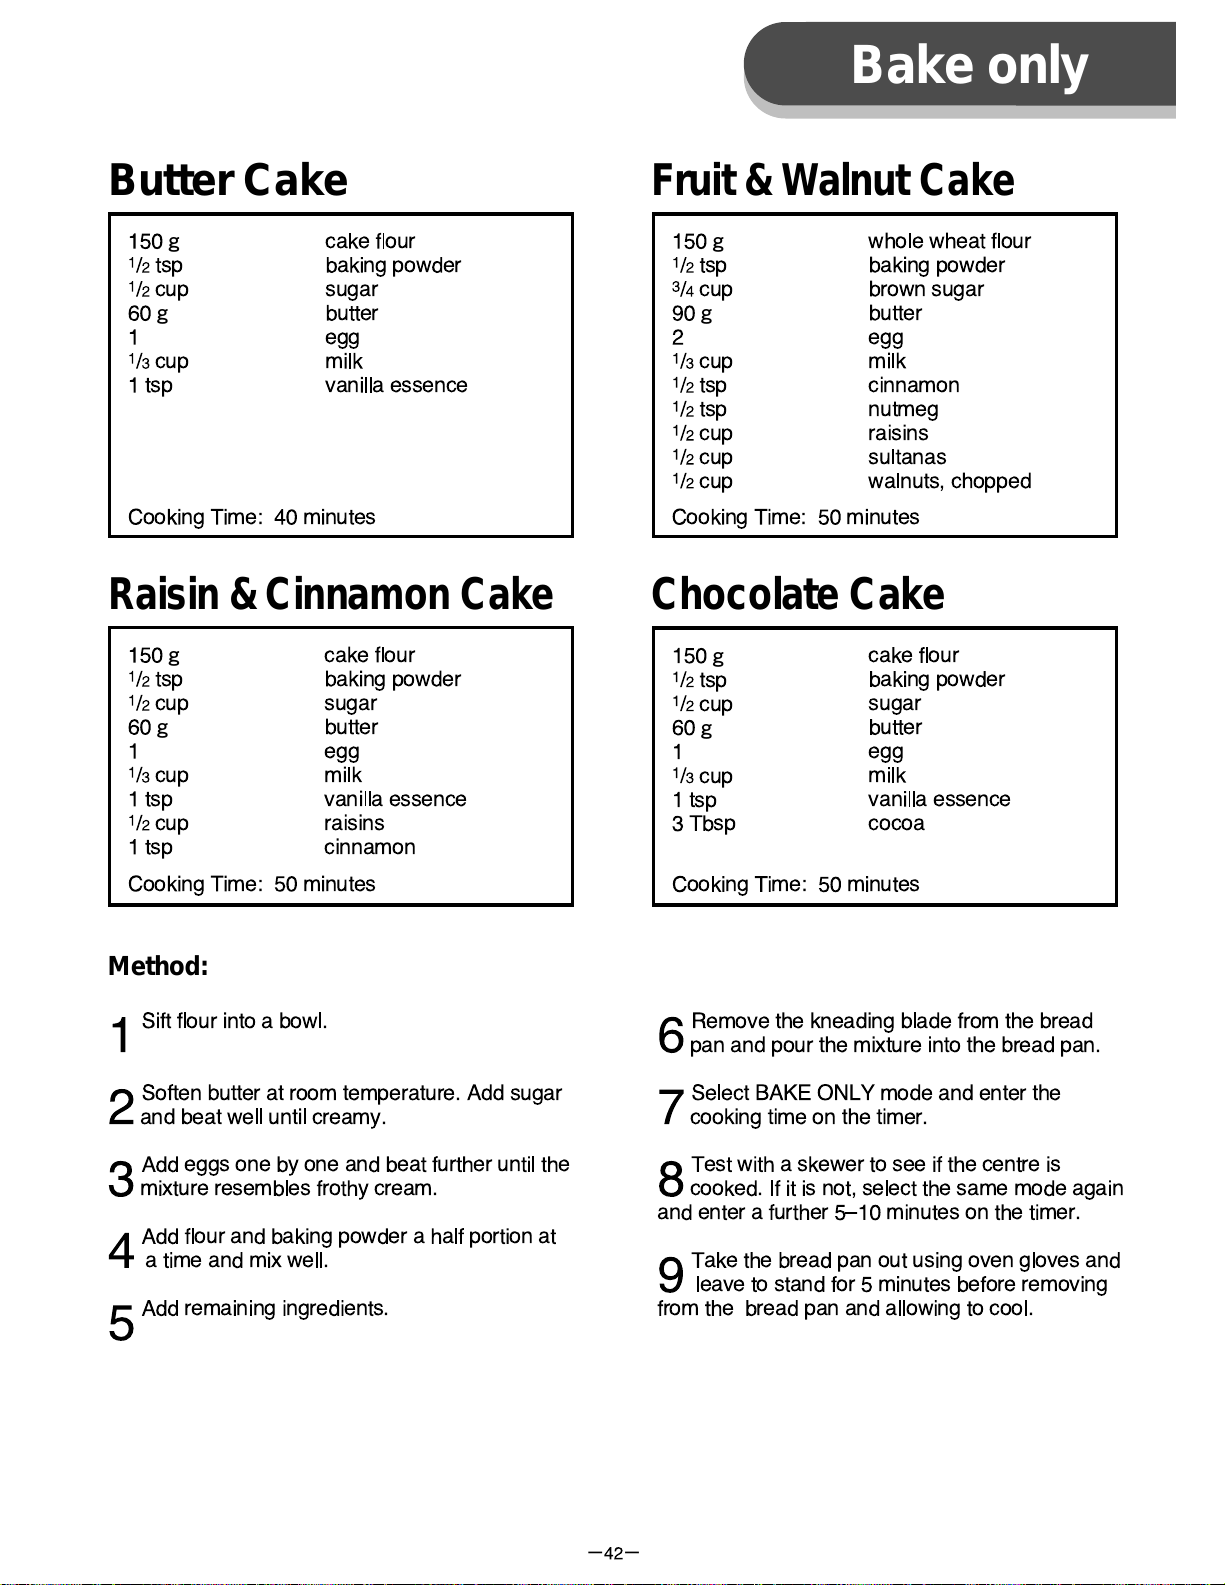
whole wheat flour
baking powder
brown sugar
butter
egg
milk
cinnamon
nutmeg
raisins
sultanas
walnuts, chopped
Fruit & Walnut Cake
Method:
Sift flour into a bowl.
1
Soften butter at room temperature. Add sugar
2and beat well until creamy.
Add eggs one by one and beat further until the
3mixture resembles frothy cream.
Add flour and baking powder a half portion at
4 a time and mix well.
Add remaining ingredients.
5
Remove the kneading blade from the bread
6pan and pour the mixture into the bread pan.
Select BAKE ONLY mode and enter the
7cooking time on the timer.
Test with a skewer to see if the centre is
8cooked. If it is not, select the same mode again
and enter a further 5Ð10 minutes on the timer.
Take the bread pan out using oven gloves and
9 leave to stand for 5 minutes before removing
from the bread pan and allowing to cool.
150
N
1
/2 tsp
1
/2 cup
60
N
1
1
/3 cup
1 tsp
150
N
1
/2 tsp
3
/4 cup
90
N
2
1
/3 cup
1
/2 tsp
1
/2 tsp
1
/2 cup
1
/2 cup
1
/2 cup
Cooking Time: 40 minutes Cooking Time: 50 minutes
cake flour
baking powder
sugar
butter
egg
milk
vanilla essence
raisins
cinnamon
150
N
1
/2 tsp
1
/2 cup
60
N
1
1
/3 cup
1 tsp
1
/2 cup
1 tsp
Cooking Time: 50 minutes
cake flour
baking powder
sugar
butter
egg
milk
vanilla essence
Butter Cake
Chocolate Cake
cake flour
baking powder
sugar
butter
egg
milk
vanilla essence
cocoa
150
N
1
/2 tsp
1
/2 cup
60
N
1
1
/3 cup
1 tsp
3 Tbsp
Cooking Time: 50 minutes
Raisin & Cinnamon Cake
Bake only
-42-
Page 44

DZ50R139
M0898-10998 Printed in Japan
 Loading...