

Page 1
EG
EB
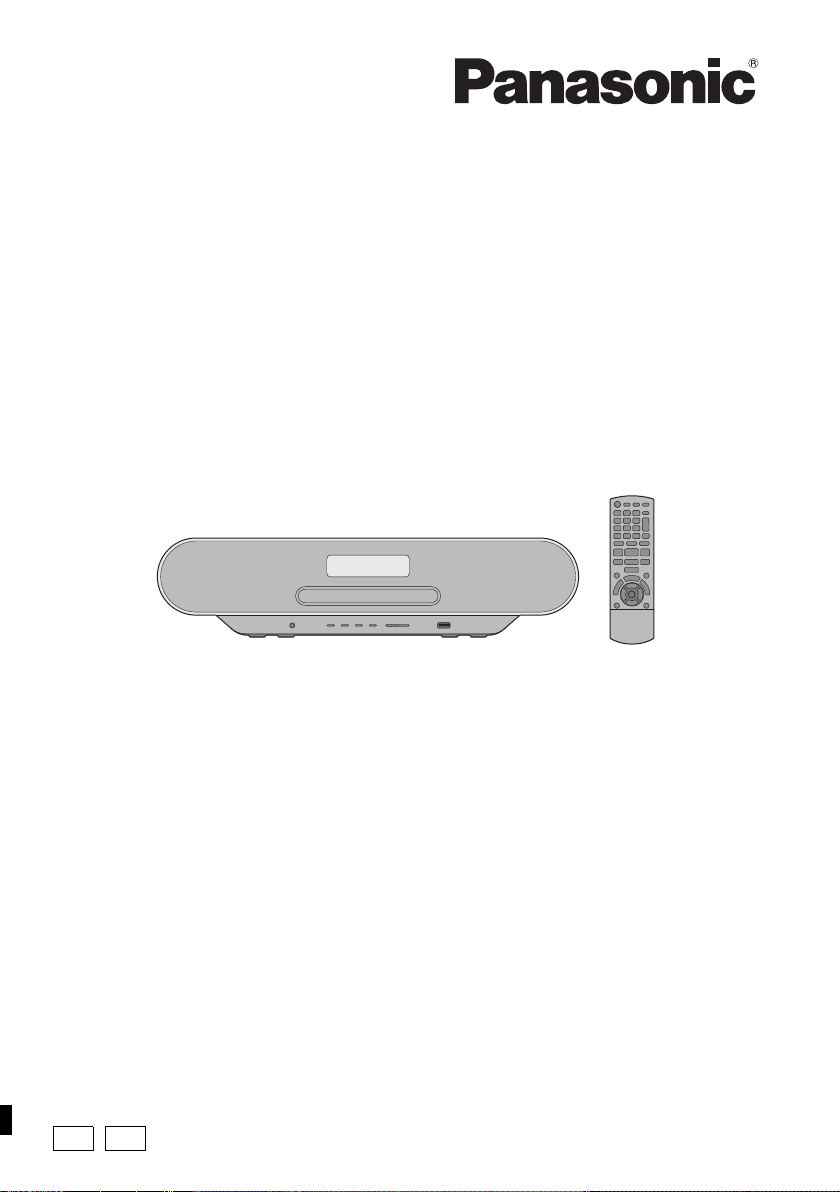
Operating Instructions
Compact Stereo System
Thank you for purchasing this product.
Please read these instructions carefully before using this product,
and save this manual for future use.
Model No. SC-RS32
SC-RS30
Model number suffix “EB” denotes UK model.
TQBJ2039
Page 2

Caution for AC Mains Lead
Figure A Figure B
Fuse cover
Figure A
Fuse
(5 ampere)
Figure B
Fuse
(5 ampere)
(For the AC mains plug of three pins)
For your safety, please read the following text carefully.
This appliance is supplied with a moulded three pin
mains plug for your safety and convenience.
A 5-ampere fuse is fitted in this plug.
Should the fuse need to be replaced please ensure
that the replacement fuse has a rating of 5-ampere and
that it is approved by ASTA or BSI to BS1362.
Check for the ASTA mark Ï or the BSI mark Ì on the
body of the fuse.
If the plug contains a removable fuse cover you must
ensure that it is refitted when the fuse is replaced.
If you lose the fuse cover the plug must not be used
until a replacement cover is obtained.
A replacement fuse cover can be purchased from your
local dealer.
Before use
Remove the connector cover.
How to replace the fuse
The location of the fuse differ according to the type of
AC mains plug (figures A and B). Confirm the AC
mains plug fitted and follow the instructions below.
Illustrations may differ from actual AC mains plug.
1. Open the fuse cover with a screwdriver.
2. Replace the fuse and close or attach the fuse cover.
Safety precautions
WARNING
Unit
≥ To reduce the risk of fire, electric shock or product damage,
– Do not expose this unit to rain, moisture, dripping or
splashing.
– Do not place objects filled with liquids, such as vases, on
this unit.
– Use only the recommended accessories.
– Do not remove covers.
– Do not repair this unit by yourself. Refer servicing to
qualified service personnel.
– Do not let metal objects fall inside this unit.
– Do not place heavy items on this unit.
AC mains lead
≥ To reduce the risk of fire, electric shock or product damage,
– Ensure that the power supply voltage corresponds to the
voltage printed on this unit.
– Insert the mains plug fully into the socket outlet.
– Do not pull, bend, or place heavy items on the lead.
– Do not handle the plug with wet hands.
– Hold onto the mains plug body when disconnecting the
plug.
– Do not use a damaged mains plug or socket outlet.
≥ The mains plug is the disconnecting device.
Install this unit so that the mains plug can be unplugged from
the socket outlet immediately.
CAUTION
Unit
≥ This unit utilizes a laser. Use of controls or adjustments or
performance of procedures other than those specified herein
may result in hazardous radiation exposure.
≥ Do not place sources of naked flames, such as lighted
candles, on this unit.
≥ This unit may receive radio interference caused by mobile
telephones during use. If such interference occurs, please
increase separation between this unit and the mobile
telephone.
≥ This unit is intended for use in moderate climates.
Placement
≥ Place this unit on an even surface.
≥ To reduce the risk of fire, electric shock or product damage,
– Do not install or place this unit in a bookcase, built-in
cabinet or in another confined space. Ensure this unit is
well ventilated.
– Do not obstruct this unit’s ventilation openings with
newspapers, tablecloths, curtains, and similar items.
– Do not expose this unit to direct sunlight, high
temperatures, high humidity, and excessive vibration.
2
TQBJ2039
Page 3
Battery
≥ Danger of explosion if battery is incorrectly replaced.
Replace only with the type recommended by the
manufacturer.
≥ Mishandling of batteries can cause electrolyte leakage and
may cause a fire.
– Remove the battery if you do not intend to use the remote
control for a long period of time. Store in a cool, dark
place.
– Do not heat or expose to flame.
– Do not leave the battery(ies) in a car exposed to direct
sunlight for a long period of time with doors and windows
closed.
– Do not take apart or short circuit.
– Do not recharge alkaline or manganese batteries.
– Do not use batteries if the covering has been peeled off.
≥ When disposing of the batteries, please contact your local
authorities or dealer and ask for the correct method of
disposal.
Product Identification Marking is located on the bottom of the
unit.
About descriptions in these operating
instructions
≥ Pages to be referred to are indicated as “l ±±”.
≥ Unless otherwise indicated, operations are described using
the remote control. You can also use the controls on this
unit if they are the same.
≥ These operating instructions are applicable to models
SC-RS32 and SC-RS30. Unless otherwise indicated,
illustrations in these operating instructions are of
SC-RS32.
[RS32]: indicates features applicable to SC-RS32 only.
[RS30]: indicates features applicable to SC-RS30 only.
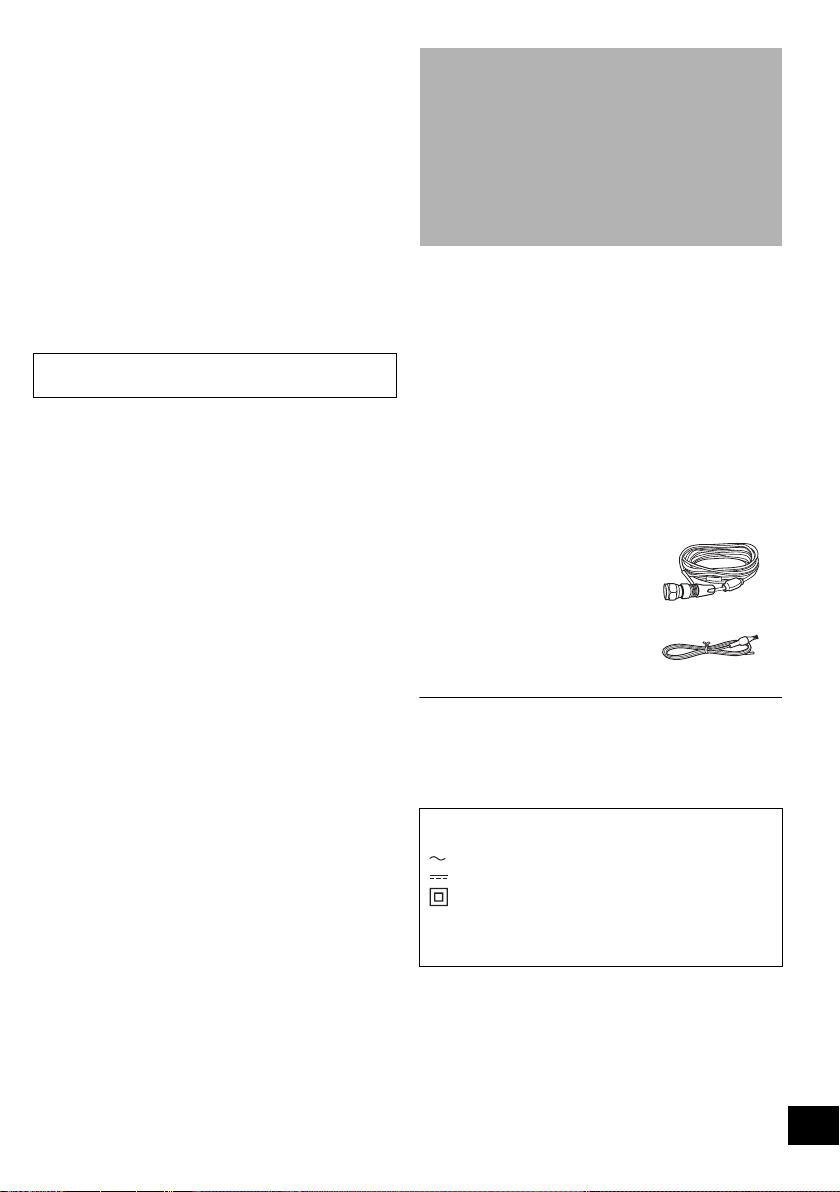
Accessories
Check the supplied accessories before using this unit.
∏ 1 Remote control
(N2QAYB001144)
∏ 1 Battery for remote control
Table of contents
Caution for AC Mains Lead .............................. 2
Safety precautions............................................ 2
Accessories....................................................... 3
Control reference guide ................................... 4
Using the remote control ................................. 5
Licenses ............................................................ 5
Connections ...................................................... 5
Inserting media .................................................6
Bluetooth
About Bluetooth
Media playback controls .................................. 8
[RS32] Listening to DAB/DAB+ ....................... 10
Listening to FM radio ..................................... 12
Sound adjustment .......................................... 13
Clock and Timer .............................................. 14
Others .............................................................. 15
Playable media................................................ 16
Unit and media care........................................ 16
Troubleshooting.............................................. 17
Specifications..................................................19
®
operations ...................................... 7
®
.............................................. 8
∏ 1 AC mains lead
For the United Kingdom and Ireland:
(K2CT2YY00089)
For Continental Europe:
(K2CQ2YY00107)
∏ [RS32]
1 DAB indoor antenna
(N1CYYYY00022)
∏ [RS30]
1 FM indoor antenna
(RSAX0002)
≥ Do not use AC mains lead with other equipment.
≥ Product numbers provided in these operating instructions are
correct as of December 2016. These may be subject to
change.
The symbols on this product (including the
accessories) represent the following:
AC
DC
Class II equipment (The construction of the
product is double-insulated.)
IOn
Í Standby
3
TQBJ2039
Page 4

Control reference guide
5 576
12
891011
1232
4
Top view
1 Standby/on switch [Í], [Í/I]
Press to switch the unit from on to standby mode or vice
versa. In standby mode, the unit is still consuming a small
amount of power.
2 Select the audio source
On this unit:
[ -PAIRING]: “BLUETOOTH”
≥ Press and hold to enter pairing mode (l 7) or
disconnect a Bluetooth
[CD/USB]: “CD” ,. “USB”
[RADIO]: “DAB+” ([RS32]) ,. “FM”
On the remote control:
[ ]: “BLUETOOTH”
[CD/USB]: “CD” ,. “USB”
[RADIO]: “DAB+” ([RS32]) ,. “FM”
3 FAVOURITE buttons for storing or selecting radio
®
device (l 7).
station ([1] to [5]) (l 10, 12)
4 Open or close the disc tray
5 Speakers
≥ These speakers do not have magnetic shielding. Do not
place them near a TV, personal computer or other
magnetic devices.
6 Display
7 Disc tray
≥ Do not put any object in front of the disc tray.
8 Headphones jack ( )
≥ Plug type: 3.5 mm stereo (not supplied)
≥ Avoid listening for prolonged periods of time to prevent
hearing damage.
≥ Excessive sound pressure from earphones and
headphones can cause hearing loss.
≥ Listening at full volume for long periods may damage
4
TQBJ2039
the user’s ears.
9 Basic playback control
10 Adjust the volume (0 (min) to 50 (max))
11 USB port (l 6)
12 Remote control signal sensor
Distance: Within approx. 7 m directly in front
Angle: Approx. 30o left and right
13 Select number
≥ To select a 2-digit number
Example: 16: [S10]
≥ To select a 3-digit number
Example: 124: [S10]
14 Delete a programmed track
15 Enter sound menu
16 Select D.BASS
17 Set the play menu item
18 Change the displayed information
19 Clock and timer operation
20 Set the programme function
21 Mute the sound
Press again to cancel. “MUTE” is also cancelled when the
volume is adjusted or the unit is turned off.
22 Select preset EQ
23 Enter setup menu
24 Set the radio menu item
25 Selection/OK
26 Dim the display panel
Press again to cancel.
1
3
13
14
2
9
15
16
17
18
> [1] > [6]
> [S10] >[1] > [2]> [4]
19
20
10
21
22
23
24
25
26
Page 5

Using the remote control
R6/LR6, AA
(Alkaline or manganese
battery)
12
Adhesive tape (not supplied)
DAB indoor antenna
(supplied)
Be sure to tighten
the nut fully.
Adhesive tape (not supplied)
FM indoor antenna (supplied)
To a mains socket
AC mains lead (supplied)
Insert the battery so the terminals (i and j) match
those in the remote control.
Connections
Connect the AC mains lead after all other
connections are completed.
Point it at the remote control signal sensor on this unit.
≥ To avoid interference, please do not put any objects in front
of signal sensor.
Licenses
The Bluetooth® word mark and logos are registered trademarks
owned by Bluetooth SIG, Inc. and any use of such marks by
Panasonic Corporation is under license.
Other trademarks and trade names are those of their respective
owners.
MPEG Layer-3 audio coding technology licensed from
Fraunhofer IIS and Thomson.
1 Connect the antenna.
≥ Tape the antenna to a wall or column in a position with
the least amount of interference.
≥ If radio reception is poor, use an outdoor antenna (not
supplied).
[RS32]
This unit can receive DAB/DAB+ and FM stations
with the DAB antenna.
[RS30]
2 Connect the AC mains lead.
This unit consumes a small amount of AC power
(l 19) even when turned off.
≥ In the interest of energy conservation, if you will not be using
this unit for an extended period of time, unplug it from the
mains socket.
≥ Some settings will be lost after you disconnect the system.
You have to set them again.
TQBJ2039
5
Page 6
Inserting media
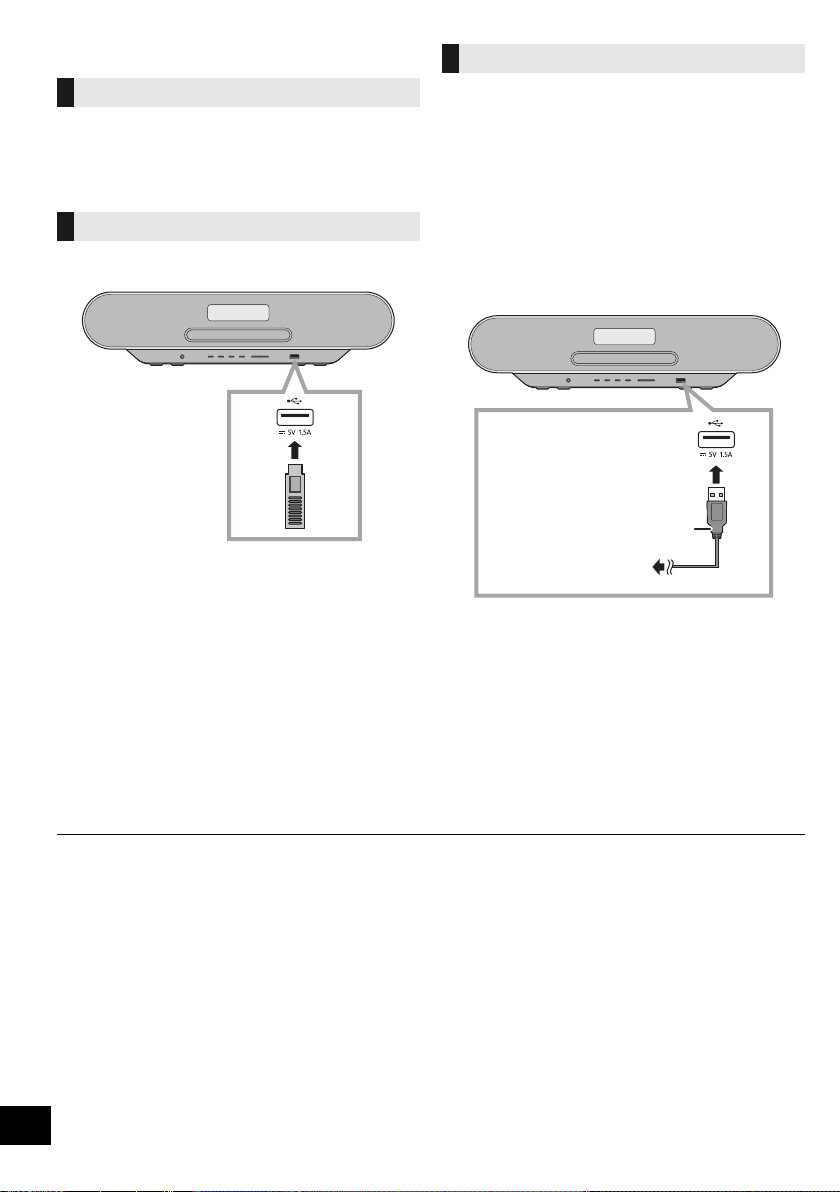
USB cable
(not supplied)
To the compatible device
Inserting a disc
1 Press [<] on this unit to open the disc tray.
2 Put in a disc with the label facing up.
3 Press [<] again to close the disc tray.
Connecting a USB device
Insert the USB device directly. Do not use any USB
extension cable.
≥ Please disconnect the USB device if you finish using.
≥ Before removing the USB device, select a source other than
“USB”.
Charging a device
Charging starts when a device (rated value: DC 5 V/
1.5 A) is connected to the USB port of this unit.
1 Turn the unit on.
2 Select a source other than “USB”.
3 Connect a device.
≥ Confirm from the screen of the connected device, etc. to
make sure charging has started.
≥ After the device has started charging, you can turn the
unit to standby mode.
– When charging a depleted device, do not turn the unit
to standby mode until the device becomes
operational.
≥ A cable compatible with your device is required. Use the
cable that comes with your device.
≥ Even if you connect a cable compatible with the USB port of
this unit, your device may not be charged. In that case, use
the charger that comes with the device.
≥ Depending on your device, using other chargers may not
work. Check the operating instructions of your device before
use.
≥ Do not connect a device with a rated value higher than 5 V/
1.5 A to this unit.
≥ To check if charging is complete, look at the screen of the
connected device, etc.
≥ Once fully charged, remove the USB cable from the USB
port.
≥ When moving this unit, be sure to remove all media and turn this unit to standby mode.
6
TQBJ2039
Page 7

Bluetooth® operations
You can listen to the sound from the Bluetooth® audio
device from this unit wirelessly.
≥ Refer to the operating instructions of the Bluetooth®
device for details.
Connecting via Bluetooth® menu
Preparation
≥ Turn on the Bluetooth® feature of the device and
place the device near this unit.
∫ Pairing with Bluetooth® devices
1 Press [ ] to select “BLUETOOTH”.
≥ If “PAIRING” is indicated on the display, go to step 3.
2 Press [PLAY MENU] to select “PAIRING” and then
press [OK].
≥
Alternatively, press and hold [ -PAIRING] on the unit.
3 Select “SC-RS32” or “SC-RS30” from the
Bluetooth® device’s Bluetooth® menu.
≥ The MAC address (e.g., 6C:5A:B5:B3:1D:0F) may be
displayed before “SC-RS32” or “SC-RS30” is displayed.
≥ The name of the connected device is indicated on the
display for a few seconds.
4 Start playback on the Bluetooth
®
device.
∫ Connecting a paired Bluetooth® device
1 Press [ ] to select “BLUETOOTH”.
≥ “READY” is indicated on the display.
2 Select “SC-RS32” or “SC-RS30” from the
Bluetooth® device’s Bluetooth® menu.
≥ The name of the connected device is indicated on the
display for a few seconds.
3 Start playback on the Bluetooth
≥ If prompted for the passkey, input “0000”.
≥ You can register up to 8 devices with this unit. If a 9th device
is paired, the device that has not been used the longest will
be replaced.
≥ This unit can only be connected to one device at a time.
≥ When “BLUETOOTH” is selected as the source, this unit will
automatically try and connect to the last connected
®
Bluetooth
during this process.) If the connection attempt fails, try to
establish a connection again.
device. (“LINKING” is indicated on the display
®
device.
Bluetooth® transmission mode
You can change the transmission mode to prioritise
transmission quality or sound quality.
Preparation
≥ Press [ ] to select “BLUETOOTH”.
≥ If a Bluetooth® device is already connected,
disconnect it.
1 Press [PLAY MENU] repeatedly to select
“LINK MODE”.
2 Press [2, 1] to select the mode and then press
[OK].
MODE 1: Emphasis on connectivity
MODE 2: Emphasis on sound quality
≥ Select “MODE 1” if the sound is interrupted.
≥ When enjoying video contents with this function, the video
and audio output may not be synchronised. In this case,
select “MODE 1”.
≥ The factory default is “MODE 2”.
Bluetooth® input level
If the sound input level from the Bluetooth® device is
too low, change the input level setting.
Preparation
≥ Connect a Bluetooth® device.
1 Press [PLAY MENU] repeatedly to select “INPUT
LEVEL”.
2 Press [2, 1] to select the level and then press
[OK].
“LEVEL 0” ,. “LEVEL i1” ,. “LEVEL i2”
^---------------------------------------------------------J
≥ Select “LEVEL 0” if the sound is distorted.
≥ The factory default is “LEVEL 0”.
Disconnecting a Bluetooth® device
1 While a Bluetooth
Press [PLAY MENU] repeatedly to select
“DISCONNECT?”.
®
device is connected:
2 Press [2, 1] to select “OK? YES” and then press
[OK].
≥ You can also disconnect the Bluetooth® device by pressing
and holding [ -PAIRING] on the unit.
≥ The Bluetooth
audio source (e.g., “CD”) is selected.
®
device will be disconnected if a different
7
TQBJ2039
Page 8
About Bluetooth
Panasonic bears no responsibility for data and/or
information that is compromised during a
wireless transmission.
®
∫ Frequency band used
≥ This system uses the 2.4 GHz frequency band.
∫ Certification of this device
≥ This system conforms to frequency restrictions and
has received certification based on frequency laws.
Thus, a wireless permit is not necessary.
≥ The actions below are punishable by law in some
countries:
– Taking apart or modifying the system.
– Removing specification indications.
∫ Restrictions of use
≥ Wireless transmission and/or usage with all
Bluetooth® equipped devices is not guaranteed.
≥ All devices must conform to standards set by
Bluetooth SIG, Inc.
≥ Depending on the specifications and settings of a
device, it can fail to connect or some operations can
be different.
≥ This system supports Bluetooth® security features.
But depending on the operating environment and/or
settings, this security is possibly not sufficient.
Transmit data wirelessly to this system with caution.
≥ This system cannot transmit data to a Bluetooth®
device.
∫ Range of use
≥ Use this device at a maximum range of 10 m. The
range can decrease depending on the environment,
obstacles or interference.
∫ Interference from other devices
≥ This system may not function properly and troubles
such as noise and sound jumps may arise due to
radio wave interference if this system is located too
close to other Bluetooth
use the 2.4 GHz band.
≥ This system may not function properly if radio waves
from a nearby broadcasting station, etc. is too
strong.
®
devices or the devices that
∫ Intended usage
≥ This system is for normal, general use only.
≥ Do not use this system near an equipment or in an
environment that is sensitive to radio frequency
interference (example: airports, hospitals,
laboratories, etc).
Media playback controls
The following marks indicate the availability of the
feature.
[CD]: CD audio in CD-DA format or a CD that
[USB]: USB devices containing MP3 files (l 16)
[BLUETOOTH]: Connected Bluetooth® device (l 7)
contains MP3 files (l 16)
Basic play
[CD], [USB], [BLUETOOTH])
(
Preparation
≥ Turn the unit on.
≥ Insert the media or connect the Bluetooth® device.
(l 6, 7)
1 Select the audio source.
For disc:
Press [CD/USB] repeatedly to select “CD”.
For USB device:
Press [CD/USB] repeatedly to select “USB”.
For Bluetooth® device:
Press [ ] to select “BLUETOOTH”.
2 Press [1/;] to start playback.
Basic controls
Stop Press [∫].
Pause Press [1/;].
Skip Press [:] or [9] to skip track.
Search During play or pause, press and hold
∫ To display information
([CD], [USB], [BLUETOOTH])
You can display the track, artist, album name, file type,
bit rate, and other information. (The information varies
depending on the audio source.)
Press [DISPLAY] repeatedly.
e.g. [USB] (MP3)
“A”: Album number
“T”: Track number
(“ ” stands for a number.)
“ ”: Album “ ”: Track
≥ [USB]: The position is memorised and
“RESUME” is displayed.
≥ [USB]: Press [∫] twice to stop the
playback fully.
Press again to continue playback.
(This unit: [:/6] or [5/9])
[CD] (MP3), [USB]
Press [3] or [4] to skip the album.
[6] or [5].
(This unit: [:/6] or [5/9])
8
TQBJ2039
Page 9
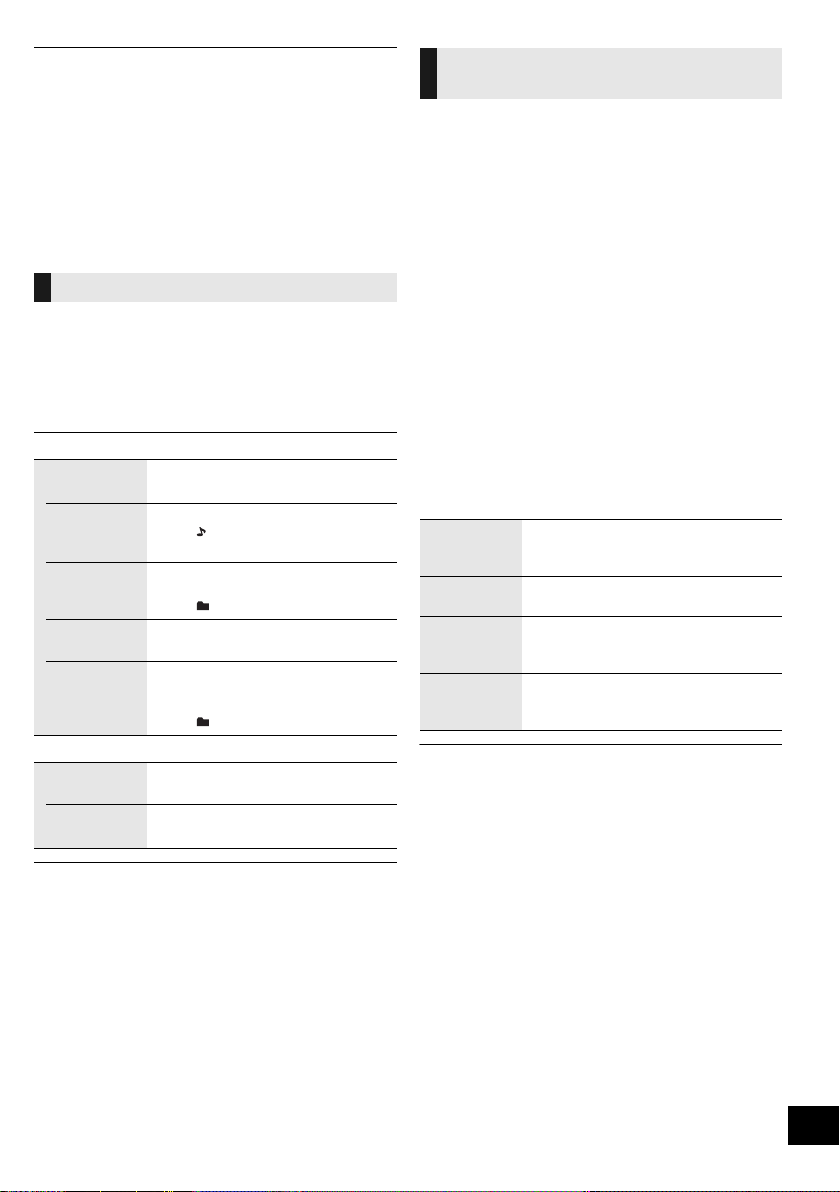
≥ To use this unit’s remote control with a Bluetooth® device, the
≥ [CD], [USB]:Tracks can be selected by pressing the numeric
≥ Maximum number of displayable characters:
≥ This system supports ver. 1 and 2 ID3 tags.
≥ Text data that is not supported will not be displayed or will be
Select the playback mode.
®
Bluetooth
Remote Control Profile).
Depending on the status of the device, some controls may
not work.
buttons.
Approx. 32
shown differently.
device must support AVRCP (Audio Video
Playback modes ([CD], [USB])
1 Press [PLAY MENU] repeatedly to select
“PLAYMODE” or “REPEAT”.
2 Press [2, 1] to select the setting and then press
[OK].
PLAYMODE
OFF
PLAYMODE
1-TRACK Only plays the selected track.
1-ALBUM Only plays the selected album.
RANDOM Plays the contents randomly.
1-ALBUM
RANDOM
REPEAT
ON REPEAT Turns on repeat mode.
OFF
REPEAT
Cancels the play mode setting.
≥ “1”, “ ” is displayed.
(Skip to the desired track.)
≥ Press [3] or [4] to select the album.
≥ “1”, “ ” is displayed.
≥ “RND” is displayed.
Plays the tracks in the selected
album randomly.
≥ Press [3] or [4] to select the album.
≥ “1”, “ ”, “RND” is displayed.
≥ “`” is displayed.
Turns off repeat mode.
Programme play
([CD], [USB])
This function allows you to programme up to 24 tracks.
[CD] (CD-DA)
1 Press [PROGRAM] in the stop mode.
≥ “PROGRAM” is shown for a few seconds.
2 Press the numeric buttons to select the desired
track.
≥ Do this step again to programme other tracks.
3 Press [1/;] to start playback.
[CD] (MP3), [USB]
1 Press [PROGRAM] in the stop mode.
≥ “PROGRAM” is shown for a few seconds.
2 Press [3, 4] to select the desired album.
3 Press [9] and then press the numeric buttons to
select the desired track.
4 Press [OK].
≥ Do steps 2 through 4 again to programme other tracks.
5 Press [1/;] to start playback.
Check
programme
contents
Clear the last
track
Cancel
programme
mode
Clear all
programmed
tracks
≥ The programme memory is cleared when you open the disc
tray or remove the USB device.
Press [:] or [9] in the stop
mode.
Press [DEL] in the stop mode.
Press [PROGRAM] in the stop mode.
≥ “PGM OFF” is shown for a few seconds.
Press [∫] in the stop mode. “CLEAR
ALL” is shown. Within 5 seconds,
press [∫] again.
≥ During random playback, you cannot skip to tracks which
have been played or press the numeric buttons.
≥ Playmode function does not work with “Programme play”.
≥ The mode is cancelled when you open the disc tray or
remove the USB device.
9
TQBJ2039
Page 10
[RS32]
Listening to DAB/DAB+
Preparation
≥ Make sure that the DAB antenna is connected. (l 5)
≥ Turn the unit on.
≥ Press [RADIO] repeatedly to select “DAB+”.
Memorising stations
To listen to DAB/DAB+ broadcasts, the available
stations need to be memorised in this unit.
≥ This unit will automatically start the “DAB AUTO
SCAN” and memorise the stations that are available
in your region if you select “DAB+” for the first time.
Changing the stations stored under
(FAVOURITE) [1] to [5]
You can change the stations stored under
(FAVOURITE) [1] to [5] easily.
While listening to a DAB/DAB+ broadcast
Press and hold one of [1] to [5] until “P ” appears on
the display.
(“ ” stands for a number.)
≥ When you change the stations stored under (FAVOURITE)
[1] to [5], channel 1 to 5 are also changed to the same
corresponding stations.
≥ “SCAN FAILED” is displayed when the auto scan is
unsuccessful. Locate the position with the best reception
(l 11, “To verify or improve the signal reception quality”) and
then re-scan DAB/DAB+ stations.
∫ To re-scan DAB/DAB+ stations
When new stations are added or when the antenna
has been moved, reperform the auto scan.
1 Press [RADIO MENU] to select “AUTOSCAN” and
then press [OK].
2 While “START?” is flashing,
Press [OK].
≥ When updating the station memory with the auto scan,
preset stations will be erased. Preset them again (l below).
Listening to the memorised stations
Press [6] or [5] to select a station.
≥ Alternatively, press [:/6] or [5/9] on this unit
when “STATION” is selected as the tune mode*
Presetting DAB/DAB+ stations
You can preset up to 20 DAB/DAB+ channels.
Channel 1 to 5 will be set as the favourite stations
under (FAVOURITE) [1] to [5]. (l right, “Changing the
stations stored under (FAVOURITE) [1] to [5]”)
1
.
1 While listening to a DAB/DAB+ broadcast
Press [PROGRAM].
2
Press the numeric buttons to select a preset number.
≥ You cannot preset stations when the station is not
broadcasting or when the secondary service is selected.
≥ The station occupying a channel is erased if another station
is preset in that channel.
Listening to preset DAB/DAB+
stations
Press the numeric buttons, [:] or [9] to select
the preset station.
≥ Alternatively, press [:/6] or [5/9] on this unit
when “PRESET” is selected as the tune mode*
≥ You can select channel 1 to 5 by pressing one of
(FAVOURITE) [1] to [5] on this unit.
*1: To change the tune mode
1 Press [RADIO MENU] repeatedly to select “TUNE
MODE”.
2Press [2, 1] to select “STATION” or “PRESET”, and
then press [OK].
1
.
≥ To select by preset, make sure that stations have already
been preset manually.
≥ To add additional preset stations, select the station using the
method mentioned in “Listening to the memorised stations”
(l left).
Listening to the secondary service
Some DAB/DAB+ stations provide a secondary service
as well as the primary service. If the station you are
listening to is providing secondary service, “ ” will be
displayed.
1 While “ ” is displayed
Press [RADIO MENU] repeatedly to select
“DAB SECONDARY”.
2 Press [2, 1] to select the secondary service and
press [OK].
≥ The setting will go back to primary service when changes are
made (e.g. the station is changed).
10
TQBJ2039
Page 11
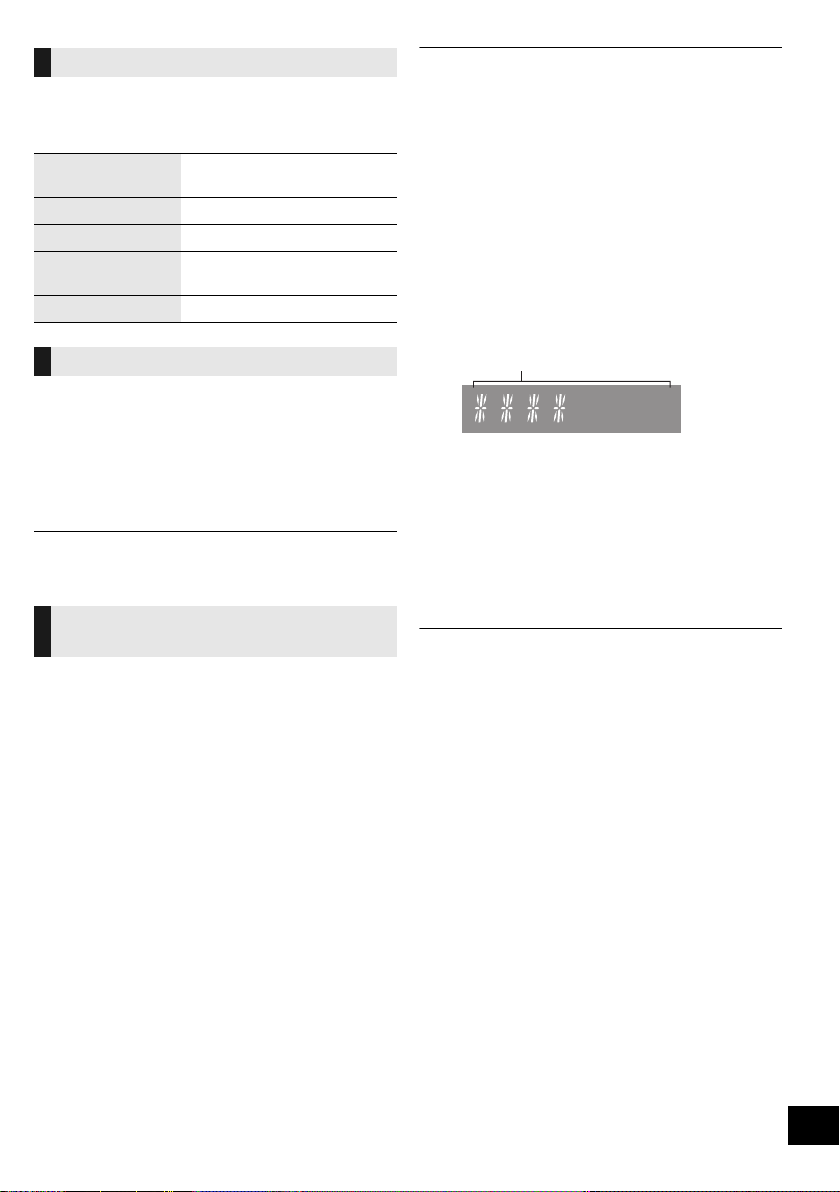
Display
Reception quality
0 (poor) – 8 (excellent)
Press [DISPLAY] to change the display.
The information will scroll through the display.
Each time you press the button:
Dynamic label: Information about the
broadcast
PTY display: Programme type
Ensemble label: The name of the ensemble
Frequency display: The frequency block and
frequency is displayed.
Time display: Current time
Automatic clock adjustment
If the DAB/DAB+ broadcast includes time information,
this unit’s clock will be automatically updated.
≥ If broadcasting stations are memorised, proceed to
“To re-scan DAB/DAB+ stations” to memorise stations on
other frequency blocks. (l 10)
≥ If “SCAN FAILED” is still displayed, repeat steps 1 to 3 until a
station is memorised. If the situation does not improve, try
using an outdoor DAB antenna or consult your dealer.
∫ Checking the DAB/DAB+ signal
reception quality
1 While listening to the DAB/DAB+ broadcast:
Press [RADIO MENU] repeatedly to select
“SIGNAL QUALITY” and then press [OK].
≥ The current frequency block is displayed and
then the reception quality is indicated.
1 Press [RADIO MENU] repeatedly to select “AUTO
CLOCK ADJ”.
2 Press [2, 1] to select “ON ADJUST” and then
press [OK].
≥ Select “OFF ADJUST” to turn the automatic clock adjustment
function off.
To verify or improve the signal
reception quality
To check the signal reception quality, at least 1
frequency block needs to be successfully memorised.
≥ If “SCAN FAILED” is displayed after “DAB+” is
selected or after an auto scan, proceed to “Manually
tuning 1 frequency block” (l below)
≥ If stations have already been memorised to this unit,
proceed to “Checking the DAB/DAB+ signal
reception quality” (l right)
∫ Manually tuning 1 frequency block
Use this function to scan 1 frequency block after
adjusting the position of the DAB antenna.
Preparation
Note down a frequency block that can be received in
your region (e.g., 12B 225.648 MHz).
1 While “SCAN FAILED” is displayed.
Adjust the position of the DAB antenna.
2 Press [RADIO MENU] repeatedly to select
“MANUAL SCAN”.
3 Press [2, 1] to select the frequency block that is
receivable in your region and then press [OK].
2 If the signal reception quality is poor, move the
antenna to a position where the reception quality
improves.
3 To continue checking the quality of other frequency
blocks:
Press [2, 1] again and select the desired
frequency.
4 Press [OK] to exit.
≥ If the antenna has been adjusted, perform auto scanning and
update the station memory. (l 10)
TQBJ2039
11
Page 12

Listening to FM radio
You can preset up to 30 channels.
Channel 1 to 5 will be set as the favourite stations
under (FAVOURITE) [1] to [5]. (l right, “Changing the
stations stored under (FAVOURITE) [1] to [5]”)
Preparation
≥ Make sure that the antenna is connected. (l 5)
≥ Turn the unit on.
≥ Press [RADIO] repeatedly to select “FM”.
Presetting stations automatically
1 Press [RADIO MENU] to select “A.PRESET”.
2 Press [2, 1] to select “LOWEST” or “CURRENT”
and then press [OK].
LOWEST:
To begin auto preset with the lowest frequency
(“FM 87.50”).
CURRENT:
To begin auto preset with the current frequency.*
≥ The tuner starts to preset all the stations it can receive
into the channels in ascending order.
*1: To change the frequency, refer to “Manual tuning”.
Listening to a preset channel
Press the numeric buttons, [:] or [9] to select
the preset station.
≥ Alternatively, press [:/6] or [5/9] on this unit
when “PRESET” is selected as the tune mode*
≥ You can select channel 1 to 5 by pressing one of
(FAVOURITE) [1] to [5] on this unit.
∫ Manual tuning
Press [6] or [5] to tune in to the station.
≥ Alternatively, press [:/6] or [5/9] on this unit
when “MANUAL” is selected as the tune mode*
To tune automatically, press and hold the button until the
frequency starts changing quickly.
*2: To change the tune mode
1 Press [RADIO MENU] repeatedly to select “TUNE
MODE”.
2 Press [2, 1] to select “MANUAL” or “PRESET”, and
then press [OK].
2
.
2
.
Presetting stations manually
1 While listening to the radio broadcast
Press [PROGRAM].
2 Press the numeric buttons to select a preset
number.
≥ Do steps 1 through 2 again to preset more stations.
≥ A station previously stored is overwritten when another
station is stored in the same channel preset.
Changing the stations stored under
(FAVOURITE) [1] to [5]
You can change the stations stored under
(FAVOURITE) [1] to [5] easily.
While listening to the radio broadcast
Press and hold one of [1] to [5] until “P ” appears on
the display.
1
(“ ” stands for a number.)
≥ When you change the stations stored under (FAVOURITE)
[1] to [5], channel 1 to 5 are also changed to the same
corresponding stations.
∫ To display the current FM signal status
For Continental Europe:
Press [DISPLAY] repeatedly to select “FM STATUS”.
For others:
Press [DISPLAY].
“FM ST”: FM stereo broadcast is being received.
“FM - - - -”: No broadcast is received or FM
“FM MONO”: You have set the “FM MODE” to
≥ “STEREO” is displayed when this unit tunes to a stereo
broadcast.
∫ To display RDS text data
(For Continental Europe only)
This system can show the text data transmitted by the
radio data system (RDS) available in some areas.
Press [DISPLAY] repeatedly.
“PS”: Programme service
“PTY”: Programme type
“FREQ”: Frequency
broadcast received is weak or in
monaural.
“MONO”. (l 17, “If noise is excessive
during FM reception.”)
12
TQBJ2039
≥ RDS is available only when stereo works in reception.
≥ RDS may not be available if reception is poor.
Page 13

Sound adjustment
The following sound effects can be added to the audio
output.
1 Press [SOUND] repeatedly to select the effect.
2 Press [2, 1] to select the setting and then press
[OK].
“MY SOUND”
(My sound)
“BASS” (Bass) or
“TREBLE” (Treble)
“SURROUND”
(Surround)
“CLEAR-MODE
DIALOG”
(Clear-mode
Dialogue)
≥ You may experience a reduction in sound quality when these
effects are used with some sources. If this occurs, turn the
sound effects off.
“SOUND 1”, “SOUND 2”, or
“SOUND 3”.
(l below, “Saving the sound
settings”)
Adjust the level (j4 to i4).
“ON SURROUND” or
“OFF SURROUND”.
“ON CLEAR-MODE DIALOG” or
“OFF CLEAR-MODE DIALOG”.
Saving the sound settings
You can save your desired sound settings to
“SOUND 1”, “SOUND 2” or “SOUND 3” as
“MY SOUND”.
1 Adjust your desired sound effects. (l above)
2 Press [SETUP] to select “SAVE MY SOUND”.
3 Press [2, 1] to select a setting number and then
press [OK].
≥ “SAVED” is displayed.
≥ The sound settings previously saved will be replaced
when you save new settings to the same setting
number.
D.Bass
Press [D.BASS] to select “ON D.BASS” or
“OFF D.BASS”.
Preset EQ
Press [PRESET EQ] repeatedly to select “HEAVY”
(heavy), “SOFT” (soft), “CLEAR” (clear), “VOCAL”
(vocal) or “FLAT” (flat/off).
Recalling the sound settings you have
saved
1 Press [SOUND] to select “MY SOUND”.
2 Press [2, 1] to select the desired sound setting
number and then press [OK].
13
TQBJ2039
Page 14

Clock and Timer
Setting the clock
This is a 24-hour clock.
1 Press [CLOCK/TIMER] to select “CLOCK”.
2 Press [3, 4] to set the time and then press [OK].
∫ To check the time
Press [CLOCK/TIMER].
≥ The clock is reset when there is a power failure or when the
AC mains lead is removed.
≥ Reset the clock regularly to maintain accuracy.
Sleep timer
The sleep timer can turn the unit off after a set time.
Press [SLEEP] repeatedly to select the setting
(in minutes).
“SLEEP 30” -. “SLEEP 60” -. “SLEEP 90” -. “SLEEP 120”
^------------------- “OFF” (Cancel) ("""""""}
≥ The remaining time is indicated on the unit’s display at every
minute except when other operations are performed.
“SLEEP 1” is always shown when only 1 minute remains.
≥ The play timer and sleep timer can be used together. The
sleep timer is always the main timer on the unit.
Play timer
You can set the timer so this unit turns on at a certain
time every day.
Preparation
Set the clock.
1 Press [CLOCK/TIMER] repeatedly to select
“TIMER ADJ”.
2 Press [3, 4] to set the starting time (“ON TIME”)
and then press [OK].
3 Press [3, 4] to set the finishing time
(“OFF TIME”) and then press [OK].
4 Press [3, 4] to select the music source*
press [OK].
and then
Turning the timer on
1 Prepare the selected music source and set the
desired volume.
2 Press [F, PLAY].
≥ “F” is shown.
To cancel, press [F, PLAY] again.
3 Press [Í] to turn the unit to standby mode.
∫ To check the settings
Press [CLOCK/TIMER] repeatedly to select
“TIMER ADJ”.
(During standby, press [CLOCK/TIMER] twice.)
≥ The timer starts at a low volume and increases gradually to
the preset level.
≥ The timer comes on at the set time every day if the timer is
on.
≥ If you turn off the unit and turn it on again while a timer is in
operation, the timer will not stop at the end time.
* “CD”, “USB”, “DAB+” ([RS32]) and “FM” can be set as the
music source.
14
TQBJ2039
Page 15

Others
Auto off function
As a factory default, this unit will turn to standby mode
automatically if there is no sound and it is not being
used for approximately 20 minutes.
To cancel this function
1 Press [SETUP] repeatedly to select “AUTO OFF”.
2 Press [2, 1] to select “OFF” and then press [OK].
≥ To turn the function on, select “ON” in step 2.
≥ This setting cannot be selected when radio is the source.
≥ When connected to a Bluetooth
not work.
Bluetooth® standby
When “SC-RS32” or “SC-RS30” is selected from a
paired Bluetooth® device’s Bluetooth® menu, this unit
will turn on automatically from standby mode and
establish a Bluetooth® connection.
®
device, the function does
1 Press [SETUP] repeatedly to select “BLUETOOTH
STANDBY”.
2 Press [2, 1] to select “ON” and then press [OK].
Changing the unit and remote
control code
When other Panasonic equipment responds to the
supplied remote control, change the remote control
code.
1 Press [CD/USB] repeatedly to select “CD”.
2 Press and hold [∫] on the unit and [2] on the
remote control until the unit’s display shows
“REMOTE 2”.
3 Press and hold [OK] and [2] on the remote control
for at least 4 seconds.
≥ To change the mode back to “REMOTE 1”, repeat the steps
above but replace [2] with [1].
Software update
Occasionally, Panasonic may release updated
software for this system that may add or improve the
way a feature operates. These updates are available
free of charge.
For more details, refer to the following website.
http://panasonic.jp/support/global/cs/
(This site is in English only.)
≥ To turn the function off, select “OFF” in step 2.
≥ The factory default is “OFF”. If this function is set to “ON”, the
standby power consumption will increase.
Checking the software version
Press [SETUP] repeatedly to select “SW VER.” and
then press [OK].
The version of the installed software is displayed.
≥ Press [OK] to exit.
15
TQBJ2039
Page 16
Playable media
Compatible CD
≥ A disc with the CD Logo.
≥ This unit can play back discs that conform to the CD-DA
format.
≥ This system can play back CD-R/RW with CD-DA or MP3
format content.
≥ The unit may not be able to play some discs due to the
condition of the recording.
≥ Before playback, finalise the disc on the device it was
recorded on.
≥ If the disc includes both MP3 and normal audio data
(CD-DA), the unit plays the type recorded in the inner part of
the disc.
≥ This unit cannot play files recorded using packet write.
≥ Disc must conform to ISO9660 level 1 or 2 (except for
extended formats).
≥ Some CD-R/RW cannot be played because of the condition
of the recording.
≥ MP3 files are defined as tracks and folders are defined as
albums.
≥ This system can access up to:
– CD-DA: 99 tracks
– MP3: 999 tracks, 255 albums (including root folder)
≥ Recordings will not necessarily be played in the order you
recorded them.
Compatible USB devices
≥ This unit does not guarantee connection with all USB
devices.
≥ FAT12, FAT16 and FAT32 file systems are supported.
≥ This unit supports USB 2.0 High Speed.
≥ USB devices with storage capacity of more than 32 GB
cannot work in some conditions.
≥ Supported format: Files with the extension “.mp3” or “.MP3”.
≥ Depending on how you create the files, they may not play in
the order you numbered them or may not play at all.
≥ Files are defined as tracks and folders are defined as
albums.
≥ This system can access up to:
– 800 albums (including root folder)
– 8000 tracks
– 999 tracks in one album
Unit and media care
Pull out the AC mains lead from the outlet before
maintenance.
∫ Clean this unit with a soft, dry cloth
≥ When dirt is heavy, wring a wet cloth tightly to wipe the dirt,
and then wipe it with a dry cloth.
≥ When cleaning the speaker covers, use a fine cloth.
Do not use tissues or other materials that can fall apart.
Small pieces may get stuck inside the speaker cover.
≥ Never use alcohol, paint thinner or benzine to clean this unit.
≥ Before using chemically treated cloth, carefully read the
cloth’s instructions.
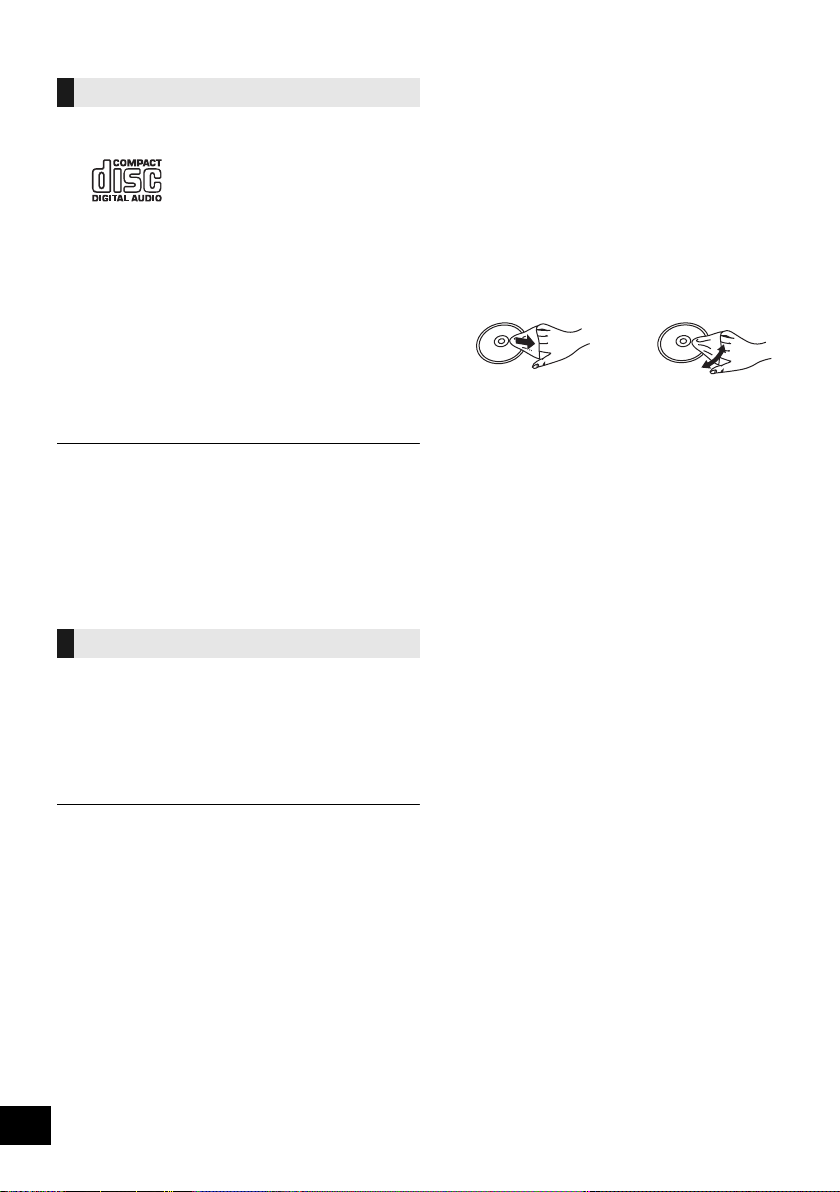
∫ Clean discs
DO DO NOT
Wipe with a damp cloth and then wipe dry.
∫ Disc handling precautions
≥ Handle discs by the edges to avoid inadvertent scratches or
fingerprints on the disc.
≥ Do not attach labels or stickers to discs.
≥ Do not use record cleaning sprays, benzine, thinner, static
electricity prevention liquids or any other solvent.
≥ Do not use the following discs:
– Discs with exposed adhesive from removed stickers or
labels (rented discs etc.).
– Discs that are badly warped or cracked.
– Irregularly shaped discs, such as heart shapes.
∫ To dispose or transfer this unit
The unit may keep the user settings information in the
unit. If you discard this unit either by disposal or
transfer, then follow the procedure to return all the
settings to the factory defaults to delete the user
settings.
(l 17, “To return all settings to the factory defaults”)
16
TQBJ2039
Page 17
Troubleshooting
Before requesting service, make the following checks.
If you are uncertain about some of the check points, or
if the solutions indicated in the following guide does not
resolve the issue, then consult your dealer for
instructions.
To return all settings to the factory defaults
Perform this procedure when the following situations occur:
≥ There is no response when buttons are pressed.
≥ You want to clear and reset the settings.
1 Disconnect the AC mains lead. (Wait for at least
1 minute before proceeding to step 2.)
2 While pressing and holding down [Í/I] on the
unit, reconnect the AC mains lead.
≥ Keep holding down [Í/I] until “---------” appears on the
display.
3 Release [Í/I].
≥ All the settings are returned to the factory defaults. You will
need to make the settings again.
General
Cannot turn on the unit.
≥ After connecting the AC mains lead, wait about 10 seconds before
turning on the unit.
Humming heard during playback.
≥ If an AC mains lead or fluorescent lights are near the cords, then
keep other appliances and cords away from the cables.
The unit does not work.
≥ One of the unit’s safety devices may have been activated.
1 Press [Í/I] on the unit to switch the unit to standby.
≥ If the unit does not switch to standby, disconnect the AC
mains lead, wait for at least 1 minute, then reconnect it.
2 Press [Í/I] on the unit to switch it on. If the unit still cannot be
operated, consult the dealer.
Charging does not start.
≥ Select a source other than “USB”.
≥ If charging does not start during standby mode:
Turn the unit on. Check the charging has started, and then turn
the unit to standby mode. (l 6)
Noise is heard or the sound is interrupted.
≥ Make sure not to place any device which uses radio frequency
(e.g. mobile phone, etc.) on top of this unit.
Remote control
The remote control does not work properly.
≥ The battery is depleted or inserted incorrectly. (l 5)
Disc
Incorrect display or play does not start.
≥ Make sure that the disc is compatible with this unit. (l 16)
≥ There is moisture on the lens. Wait for about an hour and then try
again.
USB
No response when [1/;] is pressed.
≥ Disconnect the USB device and then reconnect it. Alternatively,
turn the unit off and on again.
The USB drive or its contents cannot be read.
≥ The USB drive format or its contents is/are not compatible with the
unit (l 16).
≥ The USB host function of this product may not work with some
USB devices.
Slow operation of the USB flash drive.
≥ Large file size or high memory USB flash drive takes longer time
to read.
The elapsed time displayed is different from the
actual play time.
≥ Copy the data to another USB device or backup the data and
reformat the USB device.
Radio
[RS32]
DAB/DAB+ reception is poor.
≥ Keep the antenna away from computers, televisions, other cables
and cords.
≥ Use an outdoor antenna.
If noise is excessive during FM reception.
≥ Change the audio to be output as monaural.
1 Press [RADIO MENU] repeatedly to select “FM MODE”.
2 Press [2, 1] to select “MONO” and then press [OK].
The sound becomes monaural.
≥ To cancel, select “STEREO” or change the frequency.
In normal circumstances, select “STEREO”.
Static or noisy reception is heard while listening to
a radio broadcast.
≥ Confirm the antenna is properly connected. (l 5)
≥ Adjust the position of the antenna.
≥ Try to keep a certain amount of distance between the antenna and
AC mains lead.
≥ Try using an outdoor antenna if there are buildings or mountains
nearby.
≥ Turn the TV or other audio players off or separate it from this unit.
≥ Keep this unit away from mobile phones if there is interference.
17
TQBJ2039
Page 18
Bluetooth
Pairing cannot be completed.
≥ Check the Bluetooth® device condition.
The device cannot be connected.
≥ The pairing of the device was unsuccessful or the registration has
been replaced. Try re-pairing the device. (l 7)
≥ This unit might be connected to a different device. Disconnect the
other device and try re-pairing the device. (l 7)
≥ If “MODE 2” is selected in “LINK MODE”, select “MODE 1”. (l 7)
≥ If the problem persists, turn the unit off and on, then try again.
®
The device is connected, but audio cannot be
heard through this unit.
≥ For some built-in Bluetooth® devices, you have to set the audio
output to “SC-RS32” or “SC-RS30” manually. Read the operating
instructions for the device for details.
The sound is interrupted.
≥ The device is out of the 10 m communication range. Place the
≥ Remove any interference between this unit and the device.
≥ Other devices that use the 2.4 GHz frequency band, such as
≥ Select “MODE 1” for stable communication. (l 7)
®
Bluetooth
device closer to this unit.
wireless routers, microwaves, cordless phones, etc. are
interfering. Place the Bluetooth® device closer to this unit and
distance it from the other devices.
Messages
The following messages or service numbers may
appear on the unit’s display.
“--:--”
≥ You plugged the AC mains lead in for the first time or there was a
power failure recently. Set the time (l 14).
“ADJUST CLOCK”
≥ Clock is not set. Adjust the clock accordingly.
“ADJUST TIMER”
≥ Play timer is not set. Adjust the play timer accordingly.
“AUTO OFF”
≥ The unit has been left unused for about 20 minutes and will shut
down within a minute. Press any button to cancel it.
“ERROR”
≥ Incorrect operation is performed. Read the instructions and try
again.
“F” / “F” (“ ” stands for a number.)
≥ There is a problem with this unit.
Write down the displayed number, disconnect the AC mains lead
and consult your dealer.
“LINKING”
≥ This system is trying to connect to the last connected Bluetooth®
device when “BLUETOOTH” is selected.
“NO DEVICE”
≥ The USB device is not inserted correctly. Read the instructions
and try again (l 6).
“NO DISC”
≥ Insert the disc to be played (l 6).
“NO PLAY”
≥ Examine the content. You can only play supported format. (l 16)
≥ The files in the USB device can be corrupted. Format the USB
device and try again.
≥ The unit may have a problem. Turn the unit off and then on again.
[RS32]
“NO PRESET”
≥ There are no preset DAB/DAB+ stations to select. Preset some
channels. (l 10)
[RS32]
“NO SIGNAL”
≥ This station cannot be received. Check your antenna (l 5).
“NOT SUPPORTED”
≥ You have connected an unsupported USB device.
≥ If you have connected a device for charging, select a source other
than “USB”.
“PGM FULL”
≥ The number of programmed tracks is more than 24.
“PLAYERROR”
≥ You played an unsupported file. The system will skip that track
and play the next one.
“READING”
≥ The unit is checking the “CD”/“USB” information. After this display
has disappeared, start operating.
“REMOTE ” (“ ” stands for a number.)
≥ The remote control and this unit are using different codes. Change
the code on the remote control.
– When “REMOTE 1” is displayed, press and hold [OK] and [1]
for at least 4 seconds.
– When “REMOTE 2” is displayed, press and hold [OK] and [2]
for at least 4 seconds.
[RS32]
“SCAN FAILED”
≥ Stations are not receivable. Check your antenna and try Auto
scanning (l 10).
If “SCAN FAILED” is still displayed find the best signal reception
with the “MANUAL SCAN” tuning function. (l 11 )
“SOUND NOT SET” (“ ” stands for a number.)
≥ There is no saved setting under the selected sound setting
number. Save the sound settings. (l 13)
“USB OVER CURRENT ERROR”
≥ The USB device is drawing too much power. Select a source other
than “USB”, remove the USB and turn the unit off.
“VBR”
≥ The system cannot show the remaining play time for variable bit
rate (VBR) tracks.
18
TQBJ2039
Page 19

Specifications
∫ GENERAL
Power consumption 24 W
Power consumption in standby mode
(When “BLUETOOTH STANDBY” is “OFF”)*
(When “BLUETOOTH STANDBY” is “ON”)*
Power supply AC 220 V to 240 V, 50 Hz
Dimensions (WkHkD)
[RS32]
450 mmk107 mmk250 mm
[RS30]
450 mmk107 mmk245 mm
Mass Approx. 3.1 kg
Operating temperature range 0 oC to r40 oC
Operating humidity range
35% to 80% RH (no condensation)
∫ AMPLIFIER SECTION
Output power
RMS Output Power
Front Ch (both ch driven)
20 W per channel (8 ≠), 1 kHz, 10% THD
Total RMS power 40 W
∫ TUNER SECTION
Preset Memory FM 30 stations
Frequency Modulation (FM)
Frequency range
87.50 MHz to 108.00 MHz (50 kHz step)
Antenna terminals 75 ≠ (unbalanced)
[RS32]
∫
DAB SECTION
DAB memories 20 channels
Frequency Band (Wavelength)
Band III 5A to 13F
(174.928 MHz to 239.200 MHz)
Sensitivity *BER 4x10
-4
Min Requirement s98 dBm
DAB External Antenna
Ter mina l F - Connector (75 ≠)
∫ DISC SECTION
Disc played (8 cm or 12 cm)
Pick up
Wavelength 790 nm (CD)
NORSK (NORWAY)
Bølgelengde 790 nm (CD)
Laserstyrke Ingen farlig stråling sendes ut
CD, CD-R/RW (CD-DA, MP3*
1
Approx. 0.3 W
1
Approx. 0.35 W
∫ SPEAKER SECTION
Speaker unit(s)
Full Range
6.5 cm Cone typek2
∫ TERMINAL SECTION
USB Port
USB port power DC 5V1.5A
USB Standard USB 2.0 High Speed
Media file format support MP3*2 (¢.mp3)
Audio Support format
2
MP3*
Sampling frequency 32/44.1/48 kHz
Audio word size 16 bits
Channel count 2ch
USB device file system FAT12, FAT16, FAT3 2
Headphones Stereo, 3.5 mm jack
∫ Bluetooth® SECTION
Versi on Bluetooth® Ver.2.1+EDR
Class Class 2
Supported Profiles A2DP, AVRCP
Frequency Band 2.4 GHz band FH-SS
Operation Distance 10 m Line of Sight
Supported Codec SBC
≥ Specifications are subject to change without notice.
≥ Mass and dimensions are approximate.
≥ Total harmonic distortion is measured by a digital spectrum
analyser.
*1: No device is connected to the USB port before turning to
standby mode.
*2: MPEG-1 Layer 3, MPEG-2 Layer 3
2
)
19
TQBJ2039
Page 20
Disposal of Old Equipment and Batteries
Only for European Union and countries with
recycling systems
These symbols on the products,
packaging, and/or accompanying
documents mean that used electrical
and electronic products and batteries
must not be mixed with general
household waste.
For proper treatment, recovery and
recycling of old products and used
batteries, please take them to
applicable collection points in
accordance with your national
legislation.
By disposing of them correctly, you will help to save
valuable resources and prevent any potential
negative effects on human health and the
environment.
For more information about collection and recycling,
please contact your local municipality.
Penalties may be applicable for incorrect disposal of
this waste, in accordance with national legislation.
Note for the battery symbol
(bottom symbol):
This symbol might be used in
combination with a chemical symbol.
In this case it complies with the
requirement set by the Directive for
the chemical involved.
Safety information for customers in Norway
NORSK
ADVARSEL
Produkt
≥ For å redusere faren for brann, elektrisk støt eller skade på
apparatet:
– Utsett ikke produktet for regn, fukt, drypping eller sprut.
– Ikke plasser objekter som er fylt med væske, som vaser,
på apparatet.
– Bruk kun anbefalt tilbehør.
– Fjern ikke deksler.
– Reparer ikke denne enheten selv, overlat service til
kvalifisert servicepersonell.
Vekselstrømnett
≥ Nettstøpselet er trukket ut fra denne enheten.
Installer denne enheten slik at nettstøpselet umiddelbart kan
trekkes fra stikkontakten.
FORSIKTIG
Produkt
≥ Dette produktet anvender en laser. Betjening av kontroller
eller justering eller andre inngrep enn de beskrevet i denne
bruksanvisning kan føre til farlig bestråling.
≥ Plasser ikke åpen ild, slik som levende lys, oppå apparatet.
≥
Dette apparatet er beregnet for bruk under moderate klimaforhold.
Plassering
≥ For å redusere faren for brann, elektrisk støt eller skade på
apparatet:
– Ikke plasser apparatet i en bokhylle, et innebygget
kabinett eller et annet lukket sted. Pass på at produktet er
godt ventilert.
– Apparatets ventilasjonsåpninger må ikke dekkes til med
aviser, duker, gardiner eller lignende.
20
TQBJ2039
Page 21
English
Declaration of Conformity (DoC)
Hereby, “Panasonic Corporation” declares that this product is in
compliance with the essential requirements and other relevant
provisions of Directive 1999/5/EC.
Customers can download a copy of the original DoC to our R&TTE
products from our DoC server:
http://www.doc.panasonic.de
Contact to Authorised Representative: Panasonic Marketing Europe
GmbH,
Panasonic Testing Centre, Winsbergring 15, 22525 Hamburg,
Germany
Ελληνικά
Δήλωση συμμόρφωσης (DoC)
Με την παρούσ α, η “Panasonic Corporation” δηλώνει ότι το προϊόν
αυτό είναι σύμφωνο με τις βασικές απαιτήσεις και άλλες σχετικές
διατάξεις της οδηγίας 1999/5/ΕC.
Οι πελάτες μπορούν να κατεβάσουν ένα αντίγραφο του πρωτοτύπου
DoC για τα R&TTE προϊόντα μας από τον DoC server μας:
http://www.doc.panasonic.de
Στοι χεία επικοινωνίας Eξουσιοδοτημένου Aντιπροσώπου: Panasonic
Marketing Europe GmbH,
Panasonic Testing Centre, Winsbergring 15, 22525 Hamburg,
Γερμανία
Português
Declaração de Conformidade (DoC)
Com o presente documento, a “Panasonic Corporation” declara que
este produto é conforme os requisitos específicos e demais
especificações referentes à Directriz 1999/5/EC.
Os clientes podem baixar uma cópia da declaração de conformidade
(DoC) para nossos produtos R&TTE do Server DoC:
http://www.doc.panasonic.de
Contacte o representante autorizado: Panasonic Marketing Europe
GmbH,
Panasonic Testing Centre, Winsbergring 15, 22525 Hamburg,
Alemanha
Hrvatski
Deklaracija o podobnosti (DoC)
Ovime, “Panasonic Corporation” izjavljuje da je ovaj proizvod
udovoljava osnovnim zahtjevima i ostalim relevantnim uvjetima
Smjernice 1999/5/EC.
Kupci mogu preuzeti kopiju originalne DoC za naše R&TTE
proizvode s našeg DoC poslužitelja:
http://www.doc.panasonic.de
Adresa ovlaštenog predstavništva: Panasonic Marketing Europe
GmbH,
Panasonic Testing Centre, Winsbergring 15, 22525 Hamburg,
Njemačka
Lietuviškai
Atitikties deklaracija (AD)
Bendrovė “Panasonic Corporation” patvirtina, kad šis gaminys
tenkina direktyvos 1999/5/EB esminius reikalavimus ir kitas
taikytinas nuostatas.
Mūsų R&TTE gaminių originalios atitikties deklaracijos kopiją klientai
gali atsisiųsti iš mūsų AD serverio:
http://www.doc.panasonic.de
Įgaliotojo atstovo adresas: “Panasonic Marketing Europe GmbH”,
Panasonic Testing Centre, Winsbergring 15, 22525 Hamburg,
Vokietija.
Slovensko
Izjava o skladnosti (DoC)
S pričujočo izjavo podjetje “Panasonic Corporation” izjavlja, da so
svoji izdelki skladni s poglavitnimi zahtevami in drugimi
odgovarjajočimi predpisi direktive 1999/5/ES.
Stranka lahko naloži izvod izvirnega DoC o naših izdelkih R&TTE s
strežnika DoC:
http://www.doc.panasonic.de
Pooblaščeni zastopnik: Panasonic Marketing Europe GmbH,
Panasonic Testing Centre, Winsbergring 15, 22525 Hamburg,
Nemčija
Slovensky
Vyhlásenie o zhode (DoC)
“Panasonic Corporation” týmto prehlasuje, že tento výrobok je v
zhode so základnými požiadavkami a ďalšími príslušnými
ustanoveniami smernice 1999/5/ES.
Zákazníci si môžu stiahnuť kópiu pôvodného DoC na naše R&TTE
výrobky z nášho servera DoC:
http://www.doc.panasonic.de
Kontakt na splnomocneného zástupcu: Panasonic Marketing Europe
GmbH,
Panasonic Testing Centre, Winsbergring 15, 22525 Hamburg,
Nemecko
Norsk
Samsvarserklæring (DoC)
“Panasonic Corporation” erklærer at utstyret er i samsvar med de
grunnleggende krav og øvrige relevante krav i direktiv 1999/5/EF.
Kundene kan laste ned en kopi av den originale
samsvarserklæringen (DoC) for vårt R&TTE utstyr fra vår DoC
server:
http://www.doc.panasonic.de
Kontakt vår autoriserte representant: Panasonic Marketing Europe
GmbH,
Panasonic Testing Centre, Winsbergring 15, 22525 Hamburg,
Tyskland
21
TQBJ2039
Page 22

Eesti keel
Vastavusdeklaratsioon (DoC)
“Panasonic Corporation” kinnitab käesolevaga, et see toode on
vastavuses põhiliste nõuete ja muude direktiivi 1999/5/EÜ
asjakohaste sätetega.
Kliendid saavad koopia meie R&TTE toodetele kehtiva
originaalvastavusdeklaratsiooni koopia alla laadida meie
DoC-serverist:
http://www.doc.panasonic.de
Võtke ühendust volitatud esindajaga: Panasonic Marketing
Europe GmbH,
Panasonic Testing Centre, Winsbergring 15, 22525 Hamburg,
Saksamaa
Latviski
Atbilstības deklarācija (DoC)
Kompānija “Panasonic Corporation” ar šo paziņo, ka šis
izstrādājums atbilst būtiskām prasībām un citām saistošām
Direktīvas 1999/5/EK prasībām.
Pircēji var lejupielādēt oriģinālo DoC kopiju mūsu R&TTE
izstrādājumos no mūsu DoC servera:
http://www.doc.panasonic.de
Lūdzam sazināties ar pilnvaroto parstāvi Panasonic
Marketing Europe GmbH,
Panasonic Testing Centre, Winsbergring 15, 22525
Hamburg, Vācijā
Български
Декларация за съответствие (DoC)
“Panasonic Corporation” декларира, че този продукт съответства
на съществените изисквания и другите приложими разпоредби
на Директива 1999/5/EC.
Потребителите могат да свалят копие от оригиналните DoC към
нашите продуктите от типа R&TTE от сървъра, на който се
съхраняват DoC:
http://www.doc.panasonic.de
За контакт с оторизиран представител: Panasonic Marketing
Europe GmbH,
Panasonic Testing Centre, Winsbergring 15, 22525 Hamburg,
Герма ни я
Român
Declaraţie de Conformitate (DoC)
Prin prezenta, societatea “Panasonic Corporation” declară că
produsul este conform cu cerinţele esenţiale şi cu alte norme
corespunzătoare Directivei 1999/5/EC.
Clienţii pot descărca o copie a DoC-ului original al produselor
noastre R&TTE de la adressa noastră DoC din Internet:
http://www.doc.panasonic.de
Contact la Reprezentanţa autorizată: Panasonic Marketing Europe
GmbH,
Panasonic Testing Centre, Winsbergring 15, 22525 Hamburg,
Germania
Magyar
Megfelelőségi Nyilatkozat (DoC)
Ezennel a , “Panasonic Corporation” kijelenti, hogy a jelen termék
kielégíti az 1999/5/EK Irányelv létfontosságú követelményeit és más
vonatkozó rendelkezéseit.
A vásárlók letölthetik az R&TTE termékek eredeti DoC másolatát a
DoC szerverünkről:
http://www.doc.panasonic.de
Forduljon a hivatalos márkaképviselethez: Panasonic Marketing
Europe GmbH,
Panasonic Testing Centre, Winsbergring 15, 22525 Hamburg,
Németország
Türkçe
Uygunluk Beyanı (DoC)
“Panasonic Corporation” işbu belge ile bu ürünün 1999/5/EC sayılı
Direktif'in temel gereklerine ve diğer ilgili hükümlerine uygun
olduğunu beyan etmektedir.
Müşterilerimiz R&TTE ürünlerimizle ilgili orijinal DoC belgesinin bir
kopyasını DoC sunucumuzdan indirebilir:
http://www.doc.panasonic.de
Yetkili Temsilci ile temasa geçin:
Panasonic Marketing Europe GmbH, Panasonic Testing Centre,
Winsbergring 15, 22525 Hamburg, Almanya
22
TQBJ2039
Page 23

23
TQBJ2039
Page 24
For the United Kingdom and Ireland customers
(Bottom of product)
EU
Sales and Support Information
Customer Communications Centre
≥ For customers within the UK: 0344 844 3899
≥ For customers within Ireland: 01 289 8333
≥ Monday–Friday 9:00 am - 5:00 pm
(Excluding public holidays).
≥ For further support on your product, please visit our website: www.panasonic.co.uk
Direct Sales at Panasonic UK
≥ Order accessory and consumable items for your product with ease and confidence by phoning our
Customer Communications Centre
Monday–Friday 9:00 am - 5:00 pm
(Excluding public holidays).
≥ Or go on line through our Internet Accessory ordering application at www.pas-europe.com.
≥ Most major credit and debit cards accepted.
≥ All enquiries transactions and distribution facilities are provided directly by Panasonic UK.
≥ It couldn’t be simpler!
≥ Also available through our Internet is direct shopping for a wide range of finished products. Take a
browse on our website for further details.
Manufactured by:
Importer for Europe:
Panasonic Corporation
Kadoma, Osaka, Japan
Panasonic Marketing Europe GmbH
Panasonic Testing Centre
Winsbergring 15, 22525 Hamburg, Germany
Panasonic Corporation
Web Site: http://www.panasonic.com
C Panasonic Corporation 2016
p
TQBJ2039
F1216YM1017
 Loading...