

Page 1
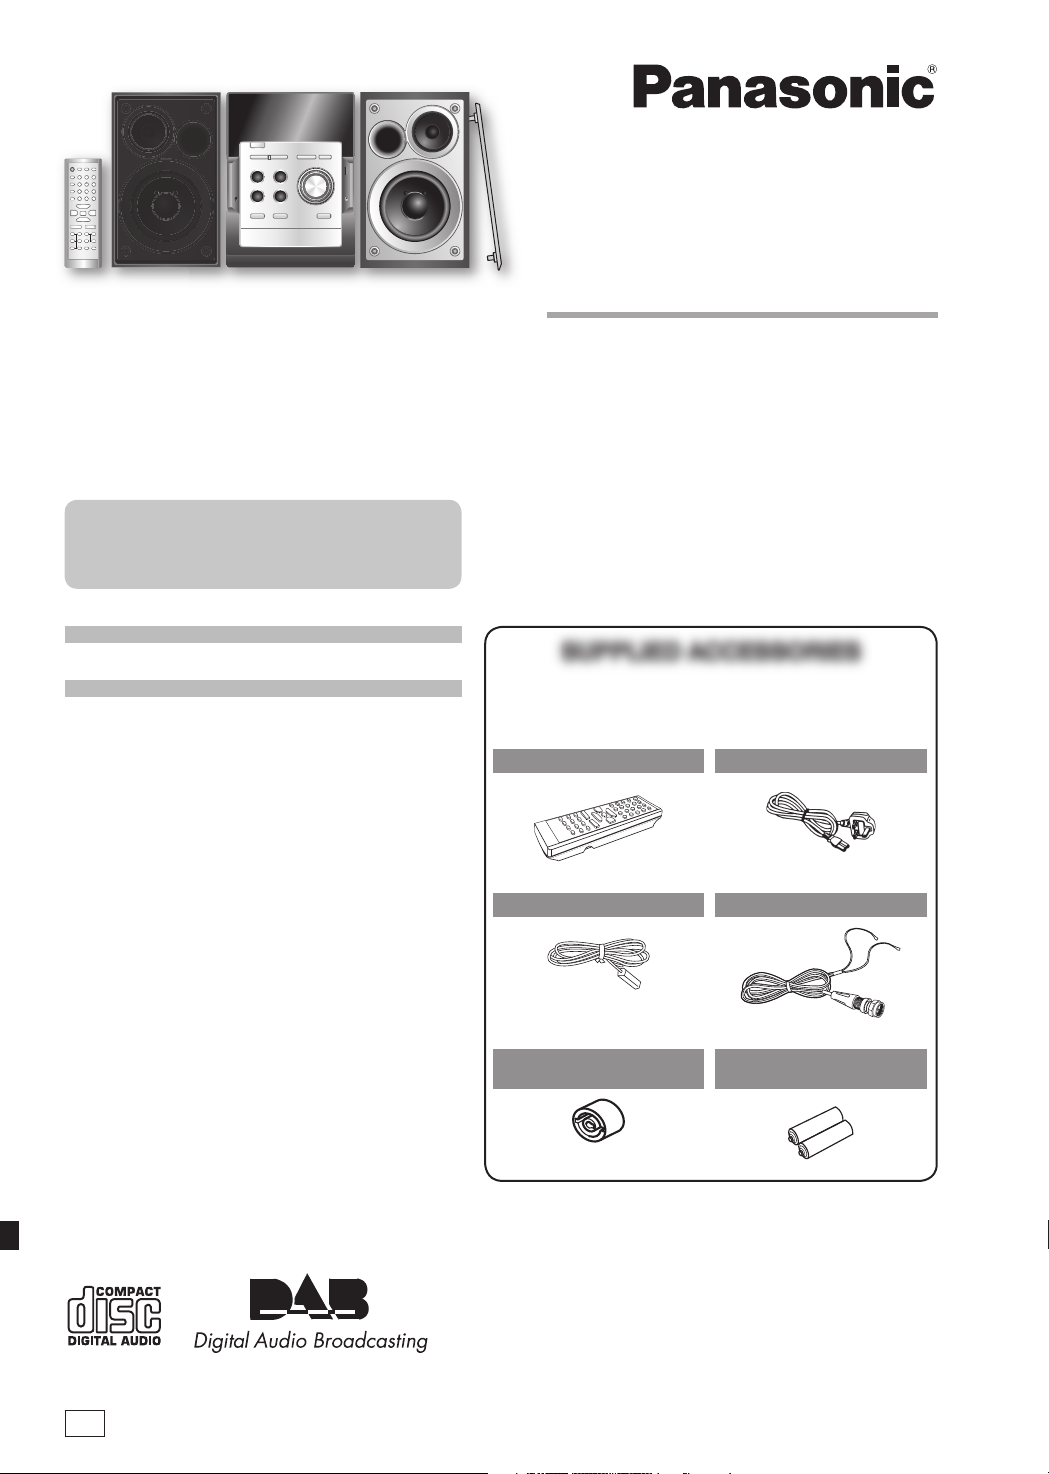
Operating Instructions
CD Stereo System
Before connecting, operating or adjusting this product,
please read the instructions completely.
Please keep this manual for future reference.
Note:
"EB" on the packaging indicates the United Kingdom.
Operations in these instructions are described using
remote control, but you can do the operations with the
main unit if the controls are the same.
Your unit may not look exactly as illustrated.
Table of contents
Safety precautions ................................ 2
Caution for AC mains lead .................... 3
Placement of speakers .......................... 3
Getting started ....................................... 4
Getting started ....................................... 6
Overview of controls ............................. 7
Discs ....................................................... 9
FM radio .................................................. 10
DAB ......................................................... 11
Timer ....................................................... 15
Sound adjustment ................................. 16
External unit ........................................... 17
Troubleshooting guide .......................... 18
Specifi cations ........................................ 19
Maintenance ........................................... 19
Model No. SC-PM45DB
SUPPLIED ACCESSORIESSUPPLIED ACCESSORIES
Please check and identify the supplied accessories.
Use numbers indicated in parentheses when asking for
replacement parts. (As of January 2007)
1 x Remote control
(N2QAYB000079)
1 x FM indoor antenna
(RSA0007-L1)
1 x Antenna plug
adaptor
1 x AC mains lead
(K2CT3CA00004)
1 x DAB “T” antenna
(N1EADY000001)
2 x Remote control
batteries
EB
(K1YZ02000013)
RQTV0179-2B
Page 2
Dear customer
Thank you for purchasing this product.
For optimum performance and safety, please read these
instructions carefully.
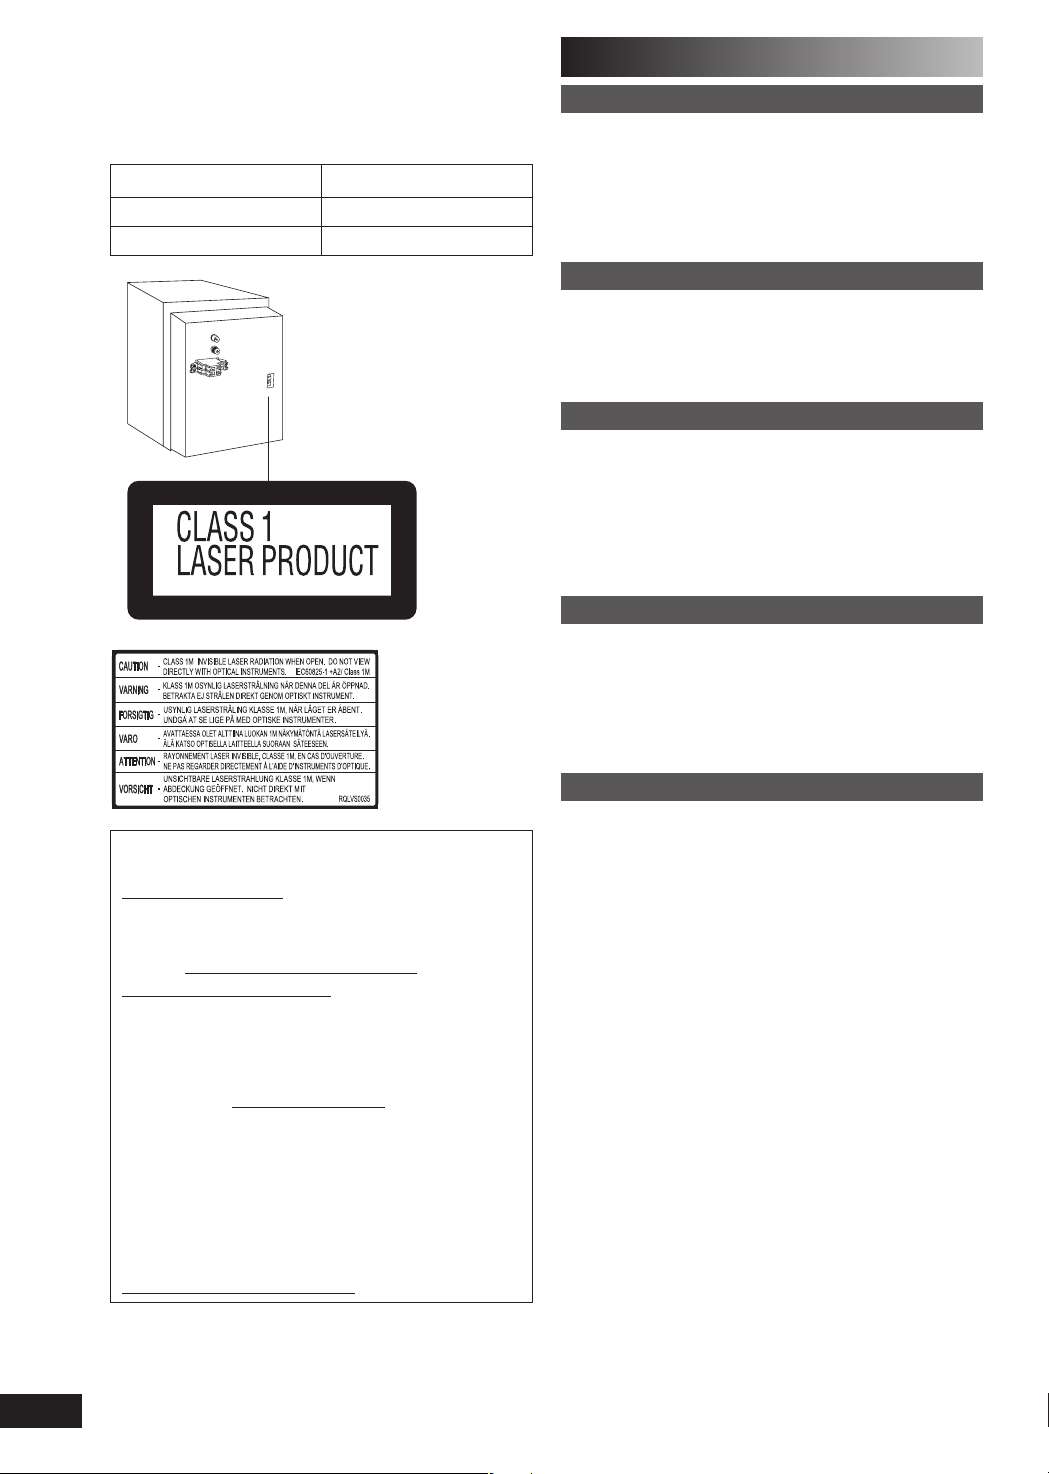
These operating instructions are applicable to the following
system.
System SC-PM45DB
Main unit SA-PM45DB
Speakers SB-PM45
Back of product
Safety precautions
Placement
Set the unit up on an even surface away from direct
sunlight, high temperatures, high humidity, and excessive
vibration. These conditions can damage the cabinet and
other components, thereby shortening the unit’s service life.
Place it at least 15 cm away from wall surfaces to avoid
distortion and unwanted acoustical effects.
Do not place heavy items on the unit.
Voltage
Do not use high voltage power sources. This can overload
the unit and cause a fi re.
Do not use a DC power source. Check the source carefully
when setting the unit up on a ship or other place where DC
is used.
AC mains lead protection
Ensure the AC mains lead is connected correctly and not
damaged. Poor connection and lead damage can cause fi re
or electric shock. Do not pull, bend, or place heavy items on
the lead.
Grasp the plug fi rmly when unplugging the lead. Pulling the
AC mains lead can cause electric shock.
Do not handle the plug with wet hands. This can cause
electric shock.
Foreign matter
Do not let metal objects fall inside the unit. This can cause
electric shock or malfunction.
Do not let liquids get into the unit. This can cause electric
shock or malfunction. If this occurs, immediately disconnect
the unit from the power supply and contact your dealer.
Do not spray insecticides onto or into the unit. They contain
fl ammable gases which can ignite if sprayed into the unit.
Inside of product
■ Sales and Support Information
(For the United Kingdom and Republic of Ireland)
Customer Care Centre
• For UK customers: 08705 357357
• For Republic of Ireland customers: 01 289 8333
• Visit our website for product information
• E-mail: [email protected]
Direct Sales at Panasonic UK
• Order accessory and consumable items for your product
with ease and confi dence by phoning our Customer
Care Centre Monday-Friday 9:00am-5:30pm. (Excluding
public holidays)
• Or go on line through our Internet Accessory ordering
application at www.panasonic.co.uk
• Most major credit and debit cards accepted.
• All enquiries transactions and distribution facilities are
provided directly by Panasonic UK Ltd.
• It couldn’t be simpler!
• Also available through our Internet is direct shopping for
a wide range of fi nished products, take a browse on our
website for further details.
Interested in purchasing an extended guarantee?
Please call 0870 240 6284 or visit our website
www.panasonic.co.uk/guarantee.
Service
Do not attempt to repair this unit by yourself. If sound is
interrupted, indicators fail to light, smoke appears, or any
other problem that is not covered in these instructions occurs,
disconnect the AC mains lead and contact your dealer or
an authorized service center. Electric shock or damage to
the unit can occur if the unit is repaired, disassembled or
reconstructed by unqualifi ed persons.
Extend operating life by disconnecting the unit from the
power source if it is not to be used for a long time.
RQTV0179
2
Page 3
Caution for AC mains lead
(For United Kingdom)
– If you see this symbol –
Information on Disposal for Users of Waste Electrical &
Electronic Equipment (private households)
(“EB” area code model only)
For your safety, please read the following text carefully.
This appliance is supplied with a moulded three pin mains plug for your
safety and convenience.
A 5-ampere fuse is fi tted in this plug.
Should the fuse need to be replaced please ensure that the replacement
fuse has a rating of 5-ampere and that it is approved by ASTA or BSI
to BS1362.
Check for the ASTA mark m or the BSI mark o on the body of the
fuse.
If the plug contains a removable fuse cover you must ensure that it is
refi tted when the fuse is replaced.
If you lose the fuse cover the plug must not be used until a replacement
cover is obtained.
A replacement fuse cover can be purchased from your local dealer.
CAUTION!
IF THE FITTED MOULDED PLUG IS UNSUI T ABLE FOR THE SOCKET
OUTLET IN YOUR HOME THEN THE FUSE SHOULD BE RE MOVED
AND THE PLUG CUT OFF AND DIS POSED OF SAFELY.
THERE IS A DANGER OF SEVERE ELECTRI CAL SHOCK IF THE
CUT OFF PLUG IS IN SERTED INTO ANY 13-AMPERE SOCKET.
If a new plug is to be fi tted please observe the wiring code as stated
below.
If in any doubt please consult a qualifi ed electrician.
IMPORTANT
The wires in this mains lead are coloured in accor dance with the
following code:
Blue: Neutral, Brown: Live.
As these colours may not correspond with the coloured markings
identifying the terminals in your plug, proceed as follows:
The wire which is coloured Blue must be connected to the terminal which
is marked with the letter N or col oured Black or Blue.
The wire which is coloured Brown must be connected to the terminal
which is marked with the letter L or coloured Brown or Red.
WARNING: DO NOT CONNECT EITHER WIRE TO THE EARTH
TERMINAL WHICH IS MARKED WITH THE LETTER E, BY THE EARTH
SYMBOL n OR COLOURED GREEN OR GREEN/YELLOW.
For proper treatment, recovery and recycling, please take
these products to designated collection points, where they
will be accepted on a free of charge basis. Alternatively, in
some countries you may be able to return your products
to your local retailer upon the purchase of an equivalent
new product.
Disposing of this product correctly will help to save valuable
resources and prevent any potential negative effects on
human health and the environment which could otherwise
arise from inappropriate waste handling. Please contact
your local authority for further details of your nearest
designated collection point.
Penalties may be applicable for incorrect disposal of this
waste, in accordance with national legislation.
For business users in the European Union
If you wish to discard electrical and electronic equipment,
please contact your dealer or supplier for further
information.
Information on Disposal in other Countries outside the
European Union
This symbol is only valid in the European Union.
If you wish to discard this product, please contact your
local authorities or dealer and ask for the correct method
of disposal.
Placement of speakers
This symbol on the products and/or
accompanying documents means that used
electrical and electronic products should not be
mixed with general household waste.
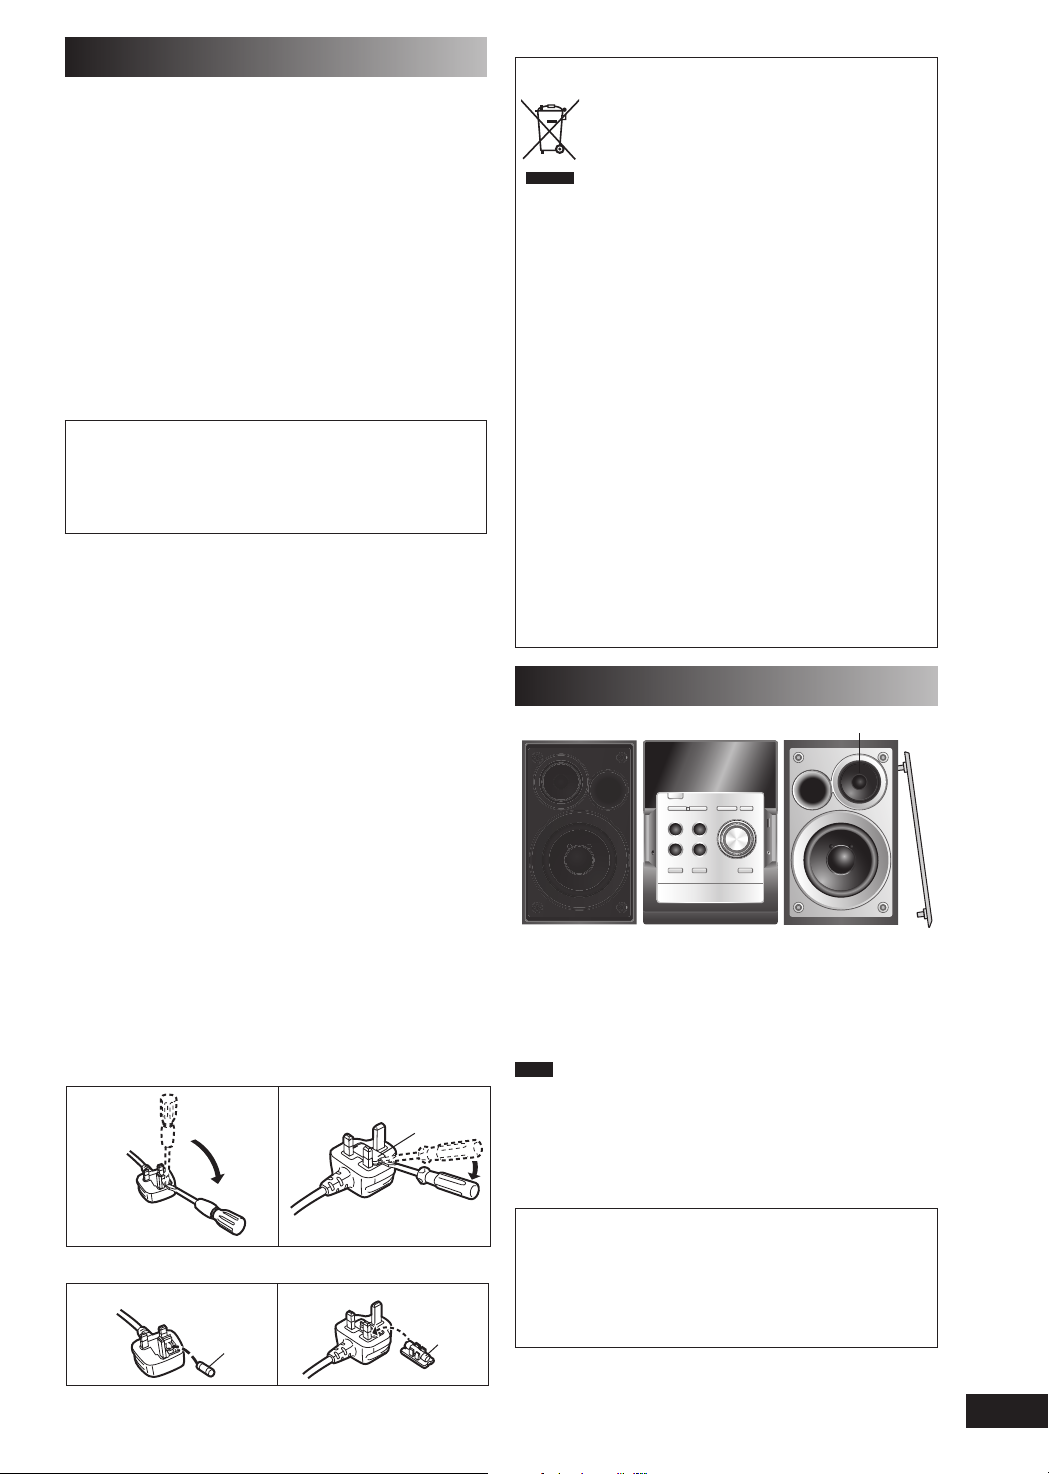
Tweeter
THIS PLUG IS NOT WATERPROOF—KEEP DRY.
Before use
Remove the connector cover.
How to replace the fuse
The location of the fuse differ according to the type of AC mains plug
(fi gures A and B). Confi rm the AC mains plug fi tted and follow the
instructions below.
Illustrations may differ from actual AC mains plug.
1. Open the fuse cover with a screwdriver.
Figure A Figure B
Fuse cover
2. Replace the fuse and close or attach the fuse cover.
Figure A Figure B
Fuse
(5 ampere)
Fuse
(5 ampere)
Place the speakers so that the tweeter is on the outside.
Use only the supplied speakers.
The combination of the main unit and speakers provide the
best sound. Using other speakers can damage the unit and
sound quality will be negatively affected.
Note
• Keep your speakers at least 10 mm away from the system for
proper ventilation.
• These speakers do not have magnetic shielding. Do not place
them near televisions, personal computers or other devices easily
infl uenced by magnetism.
• To avoid damage to the speakers, do not touch the speaker cones
if you have taken the nets off.
Caution
• Use the speakers only with the recommended
system. Failure to do so can damage the amplifi er
and speakers, and can cause fi re. Consult a qualifi ed
service person if damage occurs or if a sudden
change in performance is apparent.
• Do not attach these speakers to walls or ceilings.
RQTV0179
3
Page 4
Getting started
Step 1Step 1
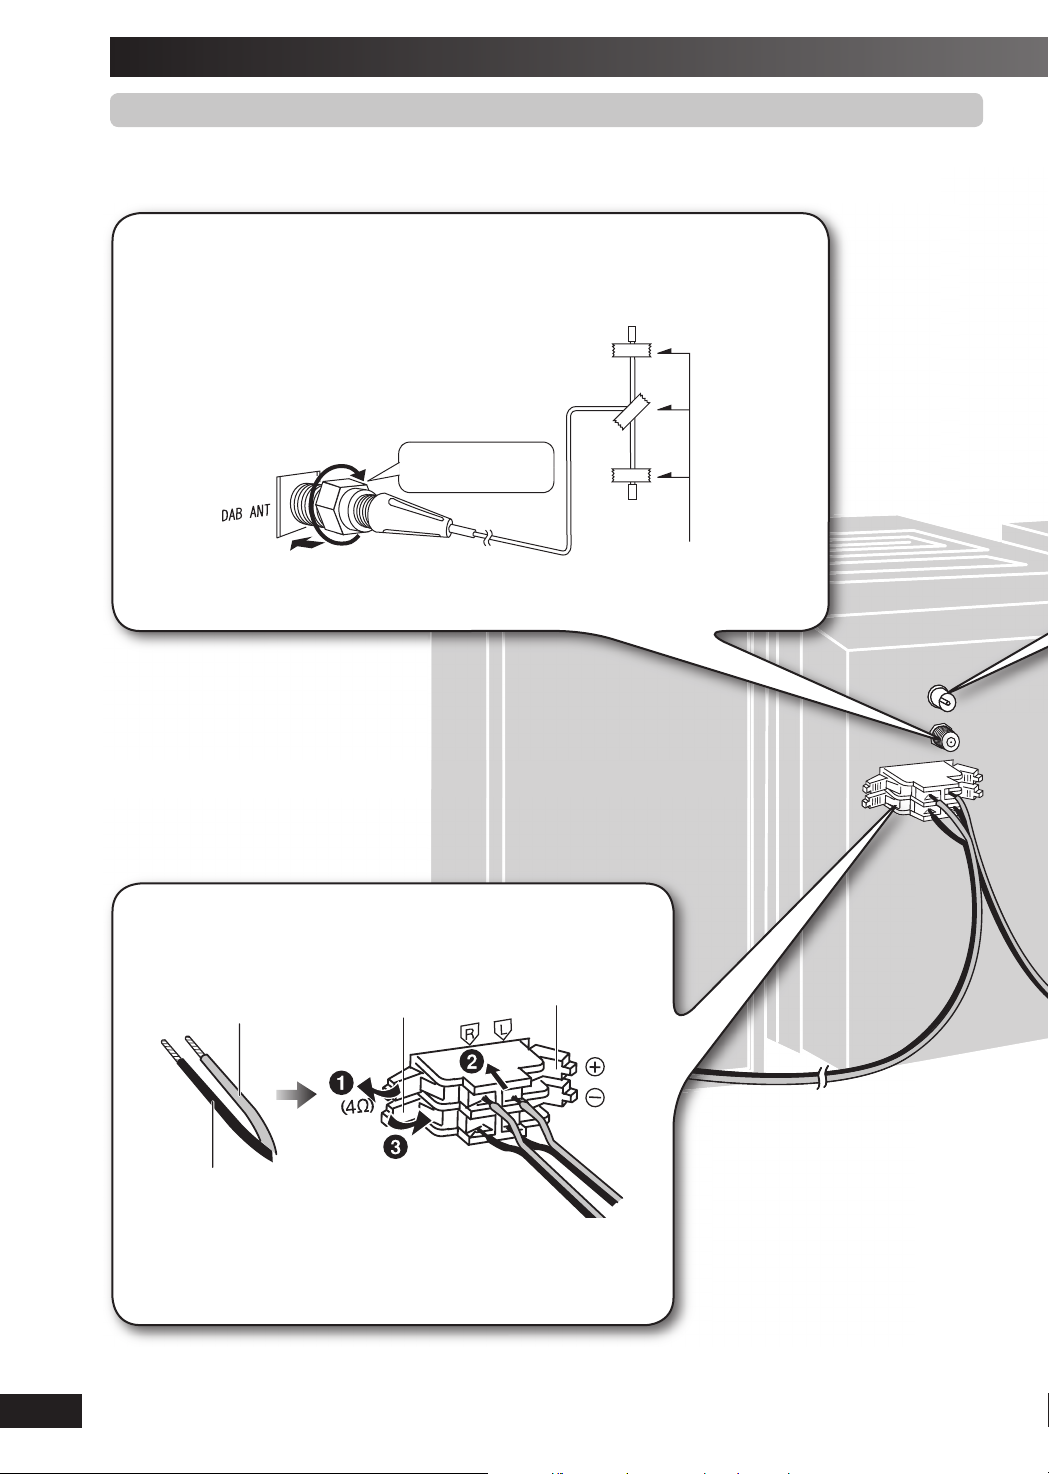
Connect the AC mains lead only after all other connections have been made.
1
The cross bar of the T should be kept fi rmly stretched.
Find a position with good reception.
There is a function on the unit to check signal quality.
For best reception
A DAB outdoor antenna is recommended (➡ page 6).
- Making the connections - Making the connections
Connect the DAB “T” antenna
Be sure to fully
tighten the screw.
Adhesive tape
RQTV0179
4
3
Connect the speaker cables.
Red (ª)
Black (·)
Incorrect connection can damage the unit.
Black (·)
Red (ª)
Page 5
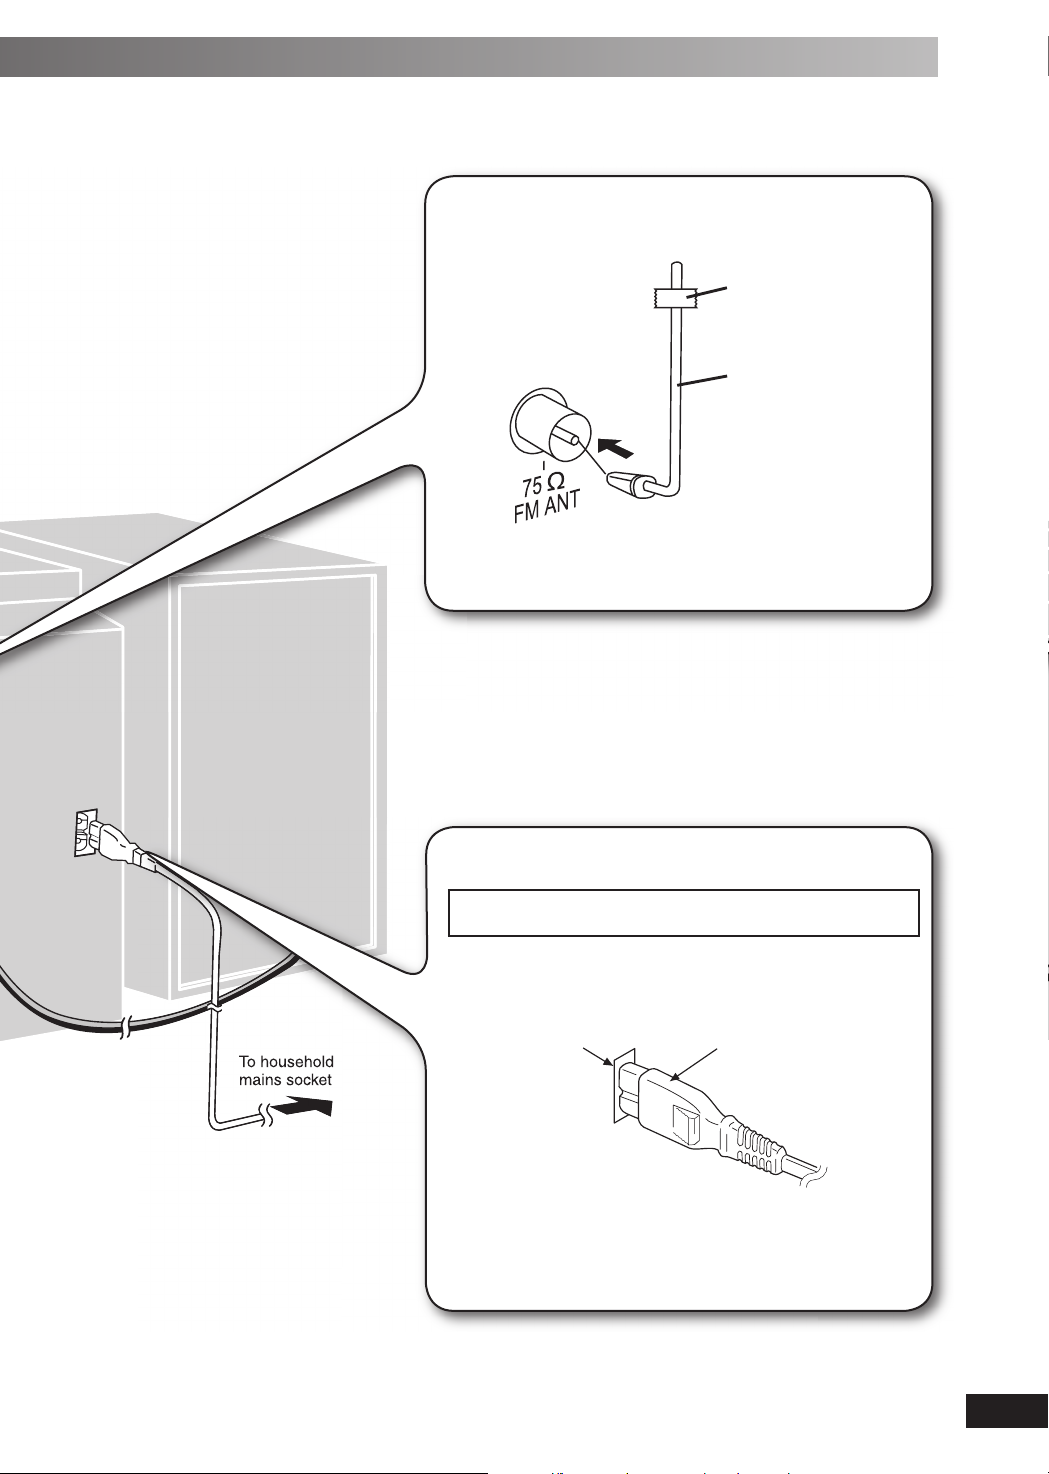
2
Connect the FM indoor antenna.
Adhesive
tape
FM indoor
antenna
Tape the antenna to a wall or column, in a position with least
amount of interference.
To household
mains socket
4
Connect the AC mains lead.
READ THE CAUTION FOR THE AC MAINS LEAD ON PAGE 3
BEFORE CONNECTION.
The included AC mains lead is for use with this unit only. Do not
use it with other equipment.
Insertion of connector
Appliance inlet
Even when the connector is perfectly inserted, depending on
the type of inlet used, the front part of the connector may jut out
as shown in the drawing. However there is no problem using
the unit.
Connector
RQTV0179
5
Page 6
Getting started
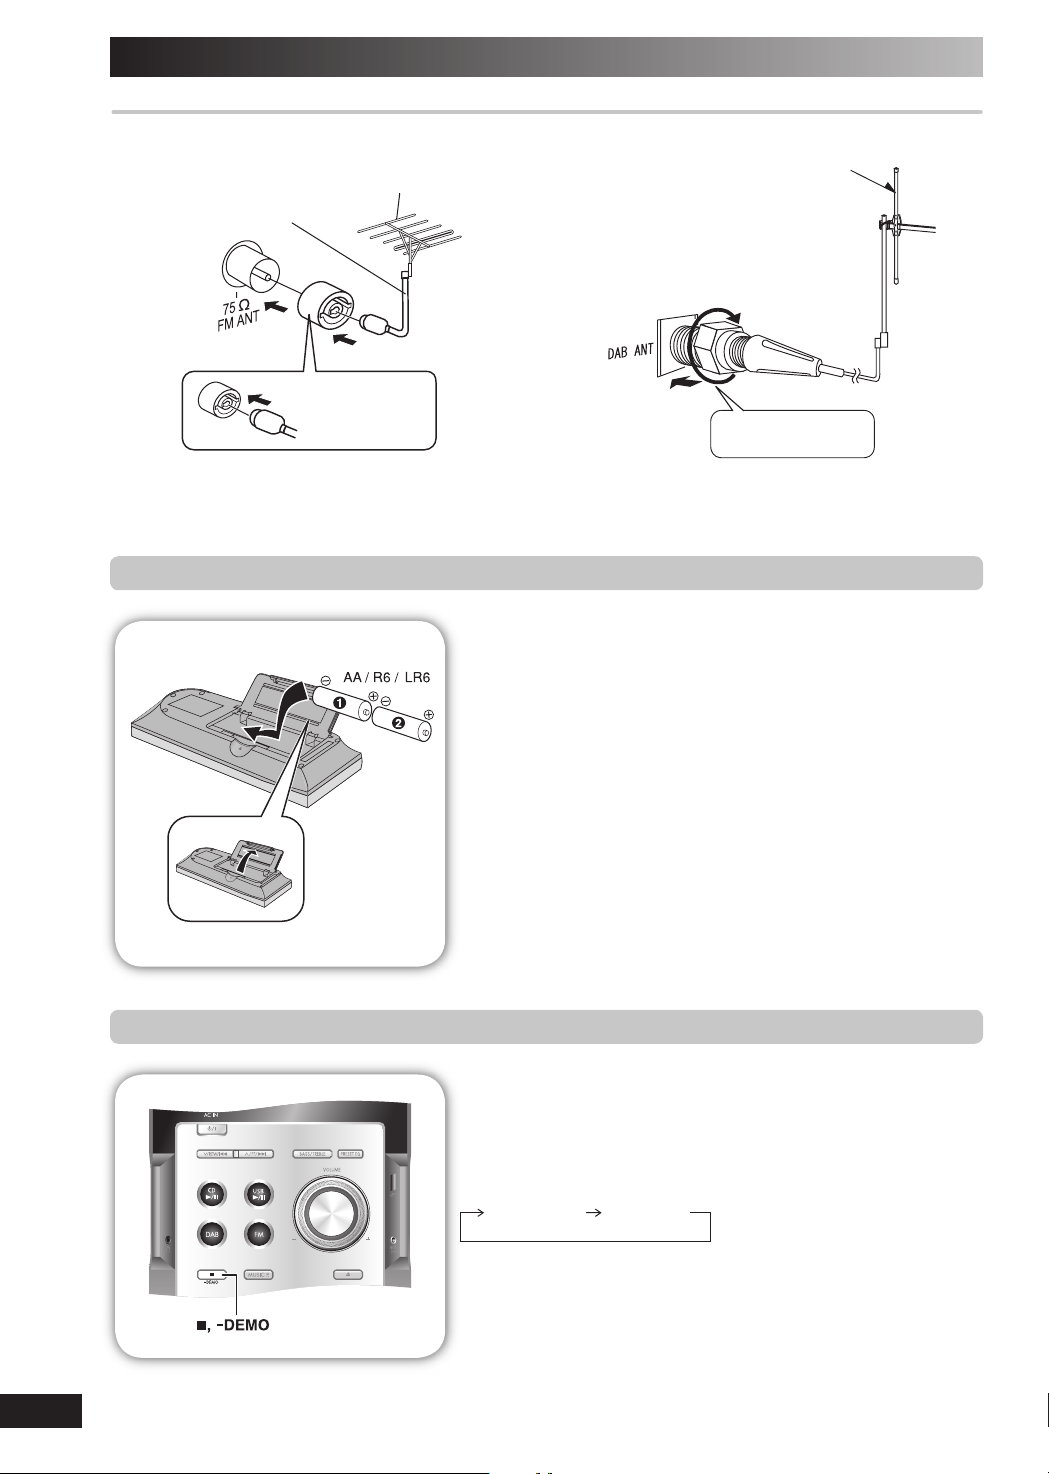
Optional antenna connectionsOptional antenna connections
FM outdoor antenna DAB outdoor antenna
FM outdoor antenna
75 Ω coaxial cable
(not included)
• Never use an outdoor antenna during a lightning storm.
• You can connect the FM outdoor antenna for better reception. Please consult your dealer for installation.
• Disconnect the FM indoor antenna if an FM outdoor antenna is installed.
(not included)
5SETHEANTENNA
PLUGADAPTOR
INCLUDED
DAB outdoor antenna
(not included)
Be sure to fully
tighten the screw.
Step 2Step 2
Step 3Step 3
- Inserting batteries into the remote control - Inserting batteries into the remote control
- DEMO function - DEMO function
■ Batteries
• Insert so the poles (+ and –) match those in the remote control.
• Remove if the remote control is not going to be used for a long period of
time. Store in a cool, dark place.
• Do not use rechargeable type batteries.
• Mishandling of batteries in the remote control can cause electrolyte
leakage, which may cause a fi re.
Do not:
• mix old and new batteries;
• use different types of batteries at the same time;
• heat or expose to fl ame;
• take apart or short-circuit;
• attempt to recharge alkaline or manganese batteries;
• use batteries if their covering has been peeled off.
■ Use
Aim at the remote control sensor, avoiding obstacles, at a maximum
range of 7
Refer to page 7 for remote control signal sensor position.
When the unit is fi rst plugged in, a demonstration of its functions may be
shown on the display.
If the demo setting is off, you can show a demonstration by selecting
“DEMO ON”.
Press and hold [7, –DEMO].
The display changes each time the button is held down.
m directly in front of the unit.
$%-//&& $%-//.
RQTV0179
6
While in standby mode, select “DEMO OFF” to reduce power
consumption.
Page 7
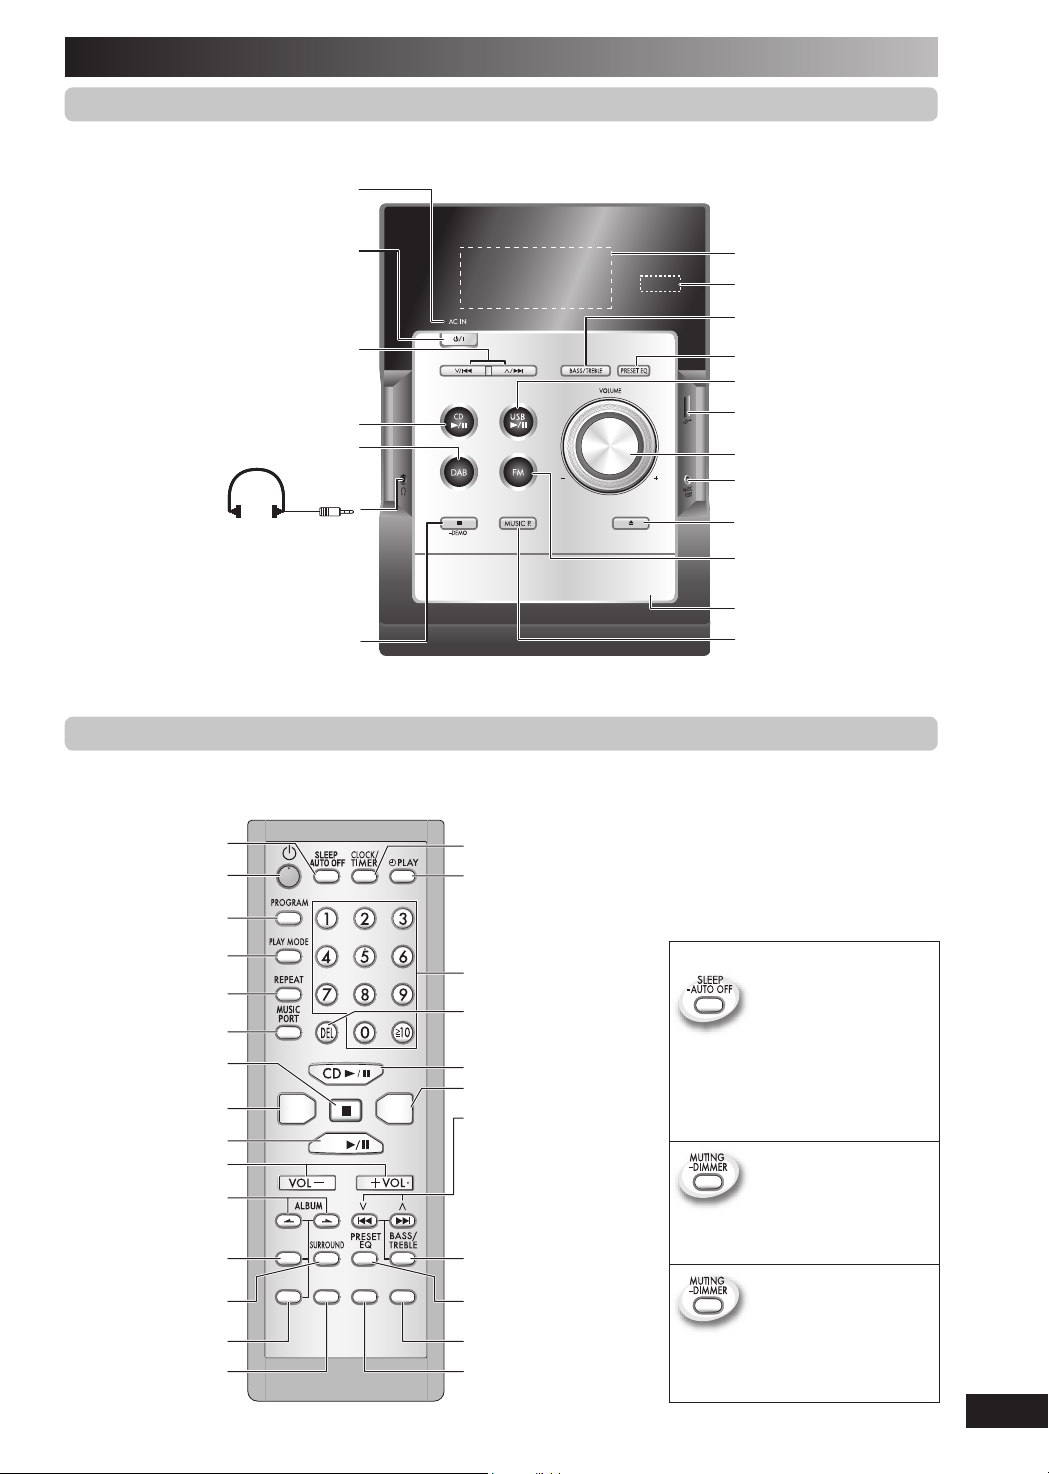
Overview of controls
Main unitMain unit
Refer to the numbers in parentheses for page reference.
AC supply indicator (AC IN)
This indicator lights when the unit is
connected to the AC mains supply.
Press to switch the unit from on to standby mode
1 Standby/on switch (y/l) (8, 15)
or vice versa. In standby mode, the unit is still
consuming a small amount of power.
Track skip/search, tune/preset channel
selection, time adjustment,
bass/treble adjustment
2 Disc play/pause (8, 9)
3 DAB selection (12)
Avoid listening for prolonged periods of
time to prevent hearing damage.
Headphone jack (
Plug type: 3.5 mm stereo
(not included)
l)
Stop/Demo (6, 8, 9, 17)
Remote controlRemote control
Buttons such as 1 function the same as the controls on the main unit.
Display panel
Remote control sensor
4 Bass/Treble selection (16)
5 Preset EQ (16)
6 USB play/pause (17)
USB jack (17)
7 Volume control
Music port jack (17)
Disc tray open/close (8)
8 FM radio selection (10)
Disc tray
9 Music port selection (17)
Sleep (15)/Auto Off
1
Program (9, 10, 12)
Play mode (8, 10, 12, 13)
Repeat (9)
9
Stop/Clear (8, 9, 17)
3
6
7
Album selection
(8, 9, 13, 14, 17)
Enter (9, 13, 14, 17)
Surround (16)
DAB menu (13, 14)
DAB secondary (13)
DAB
ENTER
DAB
MENU
USB
DAB
SECONDARY
CLEAR
MUTING
-DIMMER
FM
DISPLAY
Clock/Timer (15)
Play timer (15)
This function allows you to
Numeric (8, 9, 10, 12, 13, 17)
turn off the unit in disc or
USB mode only after left
Delete (9)
unused for 10 minutes.
The setting is maintained
2
8
Track skip/search,
tune/preset channel
• Press and hold the button until “A. OFF”
is displayed.
• Press and hold again to cancel.
“A. OFF” is cleared.
even if the unit is turned off.
selection, time adjustment,
bass/treble adjustment
(8, 9, 10, 12, 13, 15, 16, 17)
Mutes the sound.
• Press the button to activate.
4
5
Display (8, 13, 17)
Mutting/Dimmer
• Press again to cancel.
Dims the display panel.
• Press and hold the button to dims the
display panel.
• To cancel, press and hold again.
RQTV0179
7
Page 8
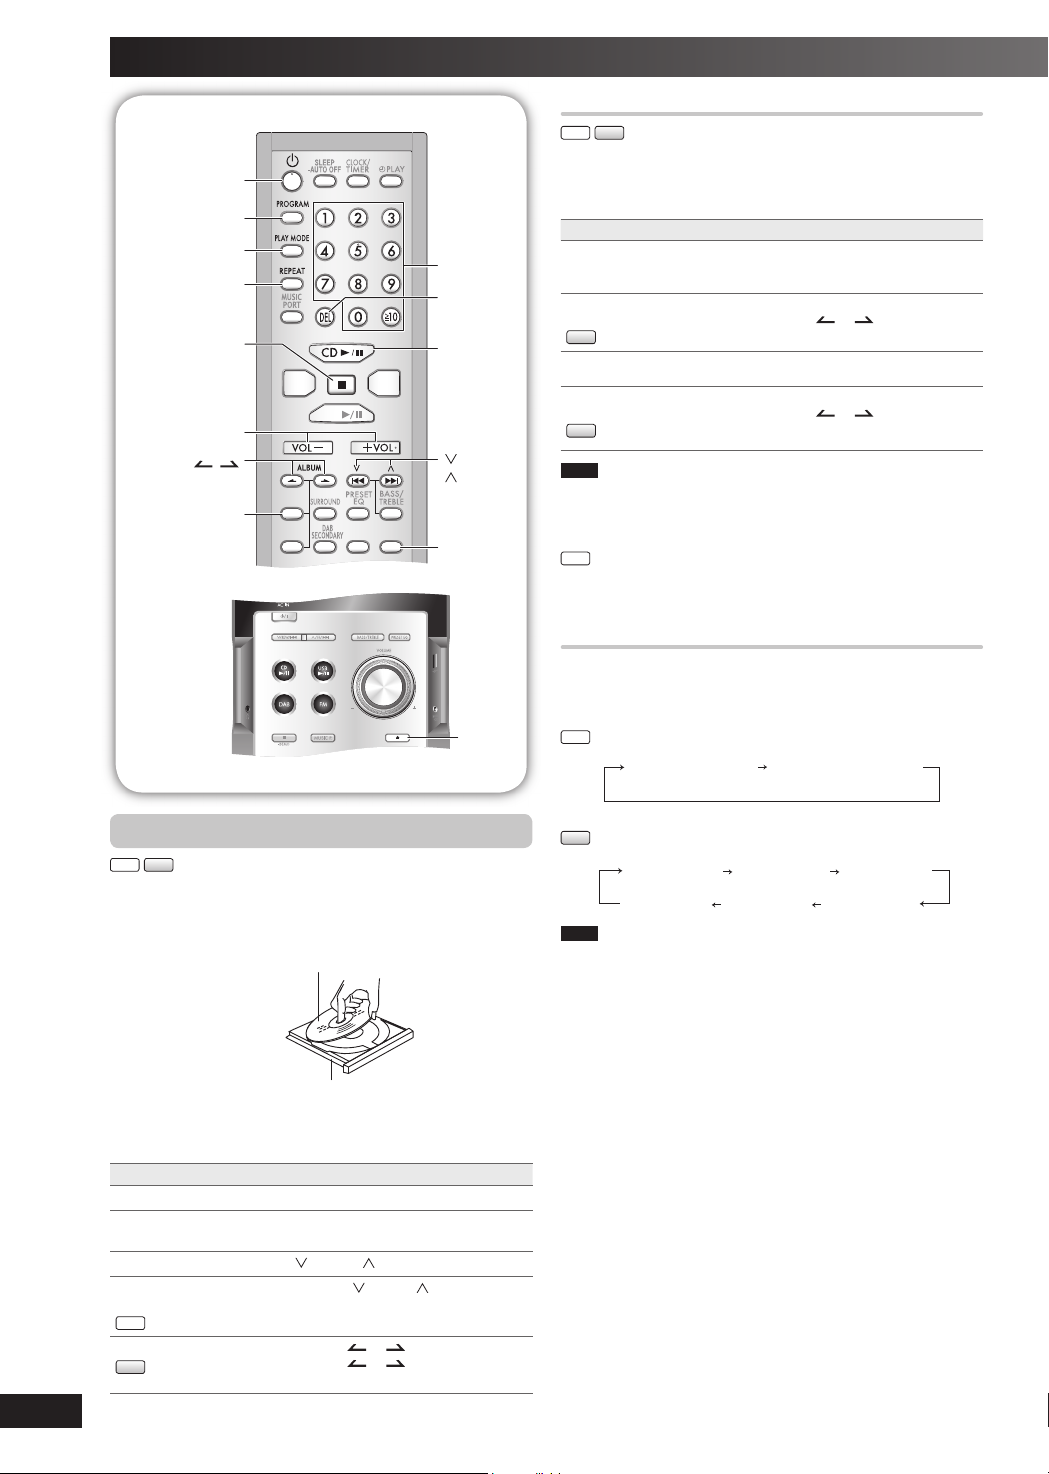
Discs
MUTING
-DIMMER
DAB
MENU
ENTER
DISPLAY
USB
CLEAR
DAB
FM
PROGRAM
PLAY MODE
ALBUM ,
REPEAT
CLEAR 7
VOL +, –
ENTER
Play Mode functionPlay Mode function
MP3
CD
Press [CD 6].
y
Numeric
buttons
DEL
CD 6
/4,
/¢
DISPLAY
1
Press [PLAY MODE] to select the desired mode.
2
Mode To play
1-TRACK
1TR
1-ALBUM
1ALBUM
MP3
RANDOM
RND
1-ALBUM RANDOM
1ALBUM RND
MP3
Note
• During RANDOM or 1-ALBUM RANDOM play, you cannot skip to
tracks that have been played.
• The current play mode is cleared when you change a disc or open
the disc tray.
CD
• During RANDOM play, you can search backward or forward only
within the current track.
one selected track on the disc.
Press the numeric buttons to select the
track.
one selected album on the disc.
Press [ALBUM
album.
a disc randomly.
all tracks in one selected album randomly.
Press [ALBUM
album.
or ] to select the
or ] to select the
Display functionDisplay function
This function allows you to display the information of the
current track.
Press [DISPLAY] repeatedly during play or pause mode.
0
CD
Elapsed play time Remaining play time
Basic playBasic play
MP3
CD
Press [y] to turn the unit on.
1
Press [0] to open the disc tray and then load the
2
disc. Press [0] again to close the tray.
Press [CD 6] to start play.
3
Adjust the volume.
4
To Action
stop the disc Press [CLEAR 7].
pause play Press [CD 6].
skip tracks Press
search through
tracks
CD
skip album
MP3
RQTV0179
8
Label must face upward
Disc tray
Press again to resume play.
[ /4] or [ /¢].
Press and hold [ /4] or[ /¢] during
play or pause.
Press [ALBUM or ] in the play mode.
Press [ALBUM
numeric buttons in the stop mode.
or ] once and then the
MP3
Elapsed time Album name Track name
ID3 (Artist)
Note
• Maximum number of displayable characters: approximately 30
• This unit supports ver. 1.0 & 1.1 ID3 tags. Text data that is not
supported will not be displayed.
• ID3 is a tag embedded in MP3 tracks to provide information about
the track.
ID3 (Track) ID3 (Album)
Page 9
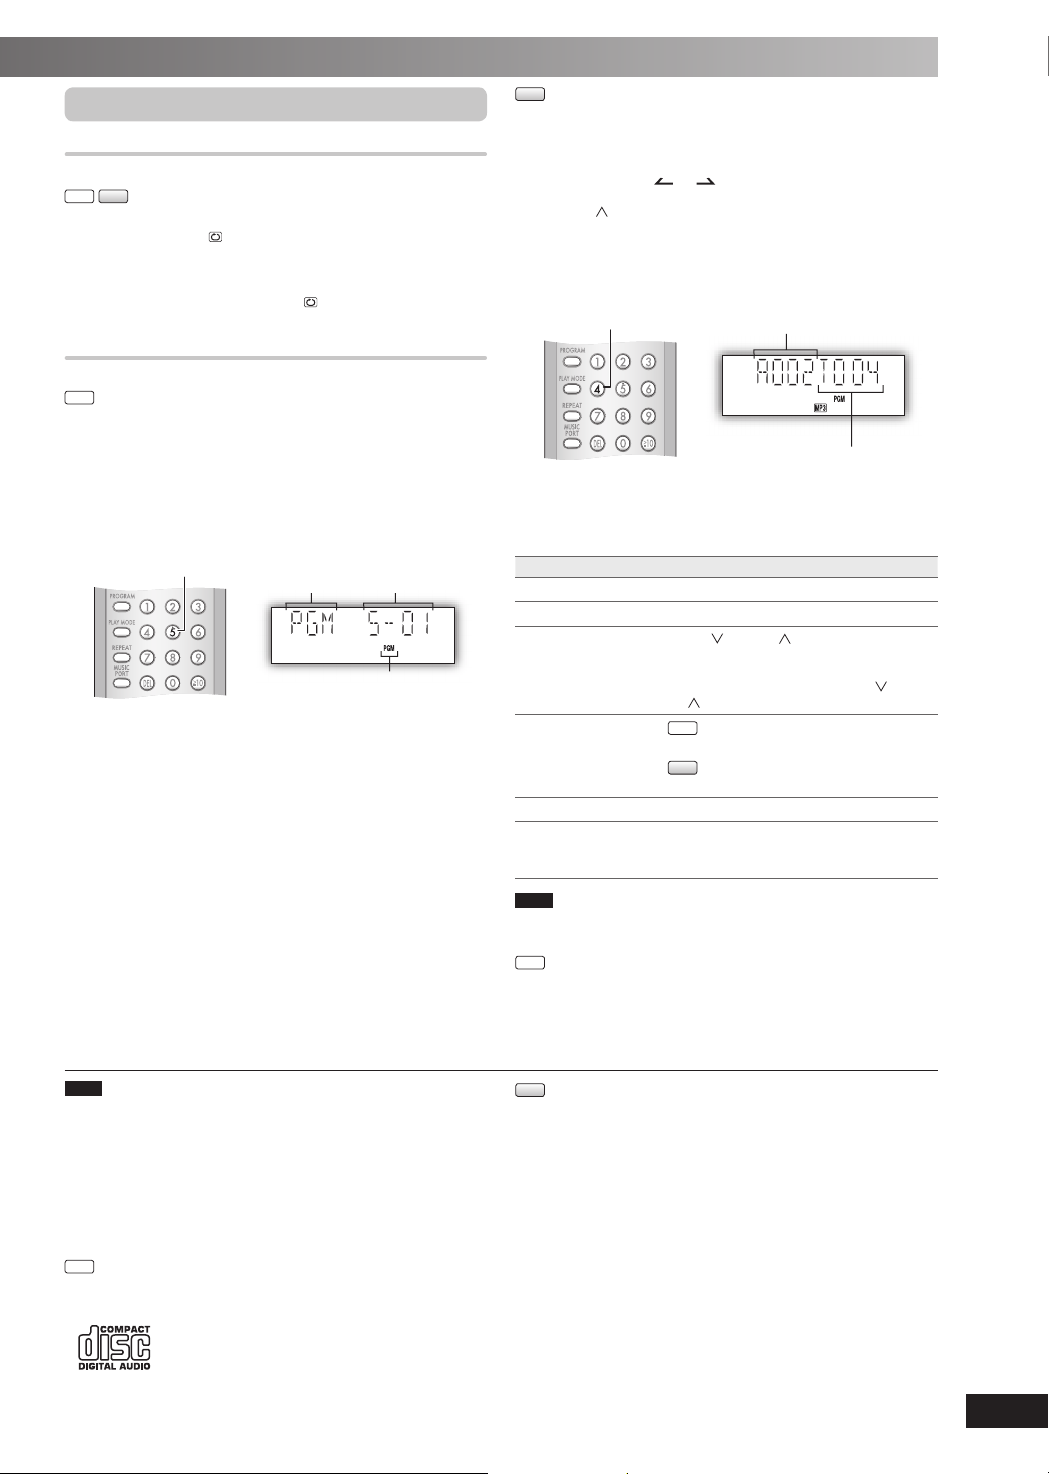
Advanced playAdvanced play
Repeat playRepeat play
You can repeat program play or other selected play mode.
MP3
CD
Press [REPEAT] before or during play.
“REPEAT ON” and “
To cancel
Press [REPEAT] again.
“REPEAT OFF” is displayed and “
Program playProgram play
This function allows you to program up to 24 tracks.
1
2
3
4
” are displayed.
” is cleared.
CD
Press [CD 6] and then [CLEAR 7].
Press [PROGRAM].
Press the numeric buttons to select your desired
track.
Repeat this step to program other tracks.
Example:
5
Track number Program number
Program indicator
Press [CD 6] to start play.
MP3
Press [CD 6] and then [CLEAR 7].
1
Press [PROGRAM].
2
Press [ALBUM or ] to select your desired album.
3
Press [ /¢] once and then the numeric buttons to
4
select your desired track.
Press [ENTER].
5
Repeat steps 3 to 5 to program other tracks.
Example:
4
Press [CD 6] to start play.
6
Album number
Track number
For two-digit track, press [h10] once then the two digit.
For three-digit track, press [h10] twice then the three digit.
To Action
cancel program mode Press [PROGRAM] in the stop mode.
replay the program Press [PROGRAM] then [CD 6].
check program
contents
add to the program
clear the last track Press [DEL] in the stop mode.
clear all programmed
tracks
Note
•
When you try to program more than 24 tracks “PGM FULL” appears.
• The program memory is cleared when you open the disc tray.
CD
• During program play, you can search backward or forward only
within the current track.
[ /4] or [ /¢] when “PGM” is
Press
displayed in the stop mode.To check while
programming, press [PROGRAM] twice
after “PGM” appears, then press
or [ /¢].
CD
Repeat step 3 in the stop mode.
MP3
Repeat steps 3 to 5 in the stop mode.
Press [CLEAR 7] in the stop mode.
“CLR ALL” is displayed. Within 5 seconds,
press the button again to clear all track.
[ /4]
Note
• This unit can play MP3 fi les and CD-DA format audio CD-R/RW that
have been fi nalized.
• It may not be able to play some CD-R/RW depending on the
condition of the recording.
• Do not use irregularly shaped discs.
• Do not use discs with labels and stickers that are coming off or with
adhesive exuding from under labels and stickers.
• Do not attach extra labels or stickers on the disc.
• Do not write anything on the disc.
CD
• This unit can access up to 99 tracks.
• Choose a CD with this mark:
Using DualDiscs
The “CD” sides of DualDiscs do not meet the CD-DA standard so it
may not be possible to play them on this unit.
MP3
• Files are treated as tracks and folders are treated as albums.
• This unit can access up to 999 tracks, 255 albums and 20
sessions.
• Files must have the extension: “.MP3” or “.mp3”
• Disc must conform to ISO9660 level 1 or 2 (except for extended
formats).
• To play in a certain order, prefi x the folder and fi le names with the
3-digit numbers in the order you want to play them.
RQTV0179
9
Page 10
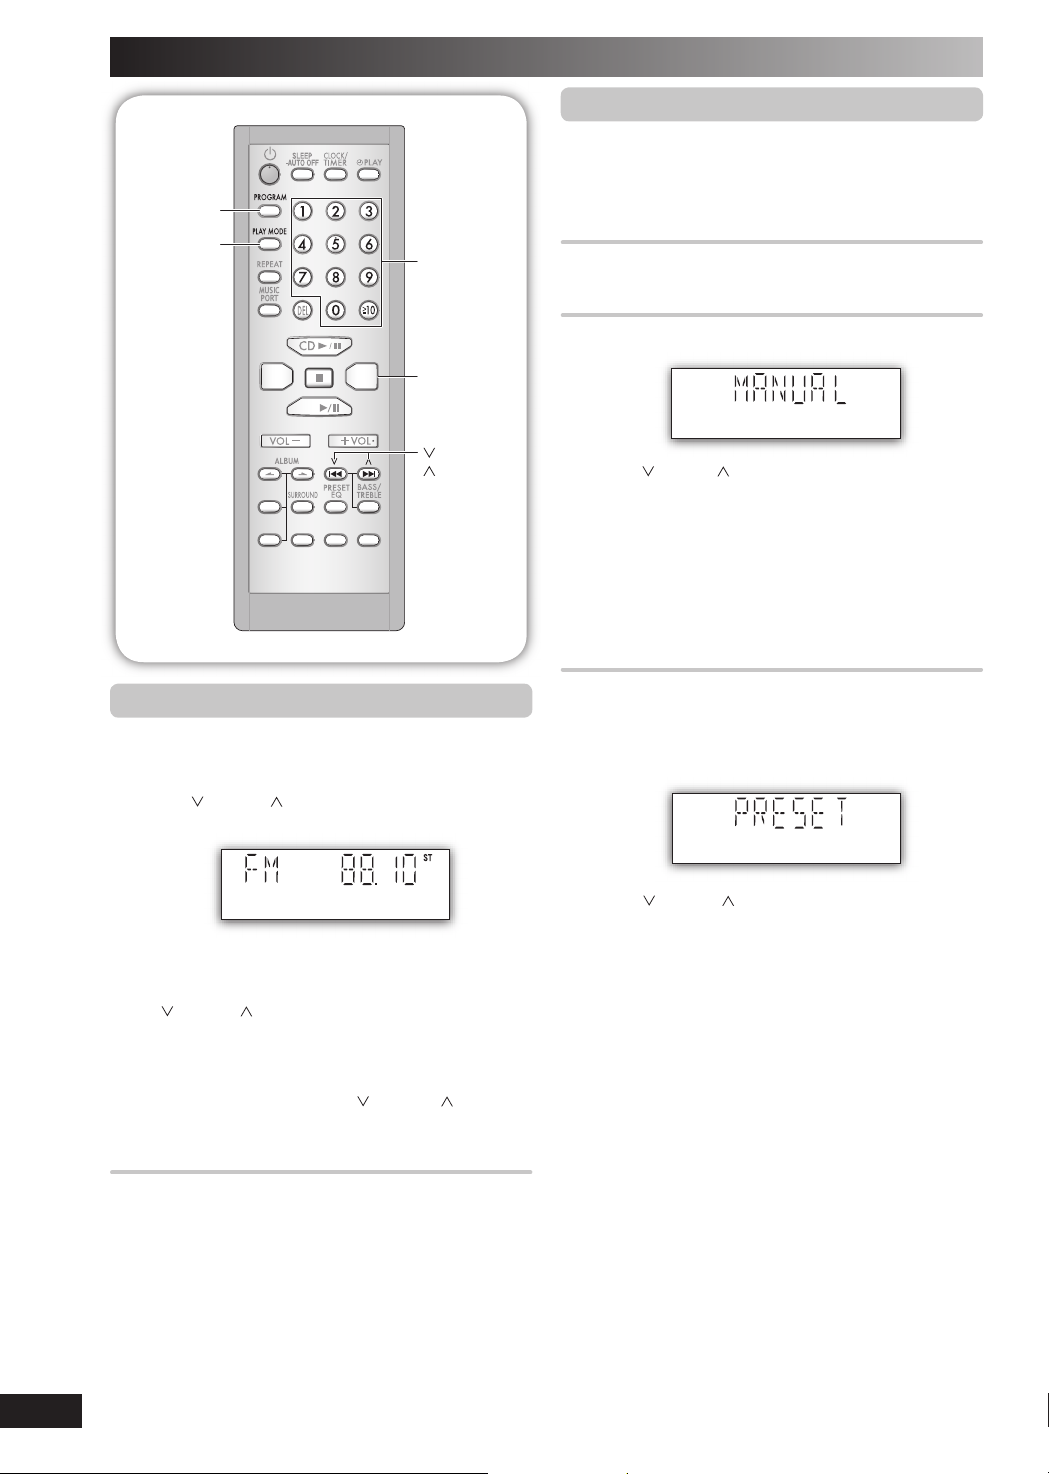
FM radio
MUTING
-DIMMER
DAB
MENU
ENTER
DISPLAY
DAB
SECONDARY
USB
CLEAR
DAB
FM
PROGRAM
PLAY MODE
Numeric
buttons
FM
/4,
/¢
Memory presetMemory preset
Up to 20 stations can be set in the FM band.
Preparation
Press [FM].
Automatic presettingAutomatic presetting
Press and hold [PROGRAM] to start presetting.
Manual presettingManual presetting
Press [PLAY MODE] to select “MANUAL”.
1
Press [ /¢] or [ /¢] to tune to the required
2
station.
Press [PROGRAM].
3
Press numeric buttons to select a channel.
4
The station occupying a channel is erased if another
station is preset in that channel.
Repeat steps 2 to 4 to preset more stations.
5
Manual tuningManual tuning
Press [FM].
1
Press [PLAY MODE] to select “MANUAL”.
2
Press [ /4] or [ /¢] to select the frequency of
3
the required station.
“
ST ”
is displayed when a stereo FM broadcast is being
received.
To tune automatically
Press
[ /4] or [ /¢] for a moment until the frequency
starts changing rapidly. The unit begins auto tuning, stopping
when it fi nds a station.
• Auto tuning may not function when there is excessive
interference.
• To cancel auto tuning, press [ /4] or [ /¢] once
again.
To improve FM sound qualityTo improve FM sound quality
Press and hold [PLAY MODE] to display “MONO”.
To cancel
Press and hold [PLAY MODE] again until “MONO”
disappears.
• MONO is also cancelled if the frequency is changed.
• Turn off “MONO” for normal listening.
Selecting a preset stationSelecting a preset station
Press numeric buttons to select the channel.
For two-digit channel, press [h10], then the two digits.
OR
Press [PLAY MODE] to select “PRESET”.
1
Press [ /¢] or [ /¢] to select the channel.
2
10
RQTV0179
Page 11
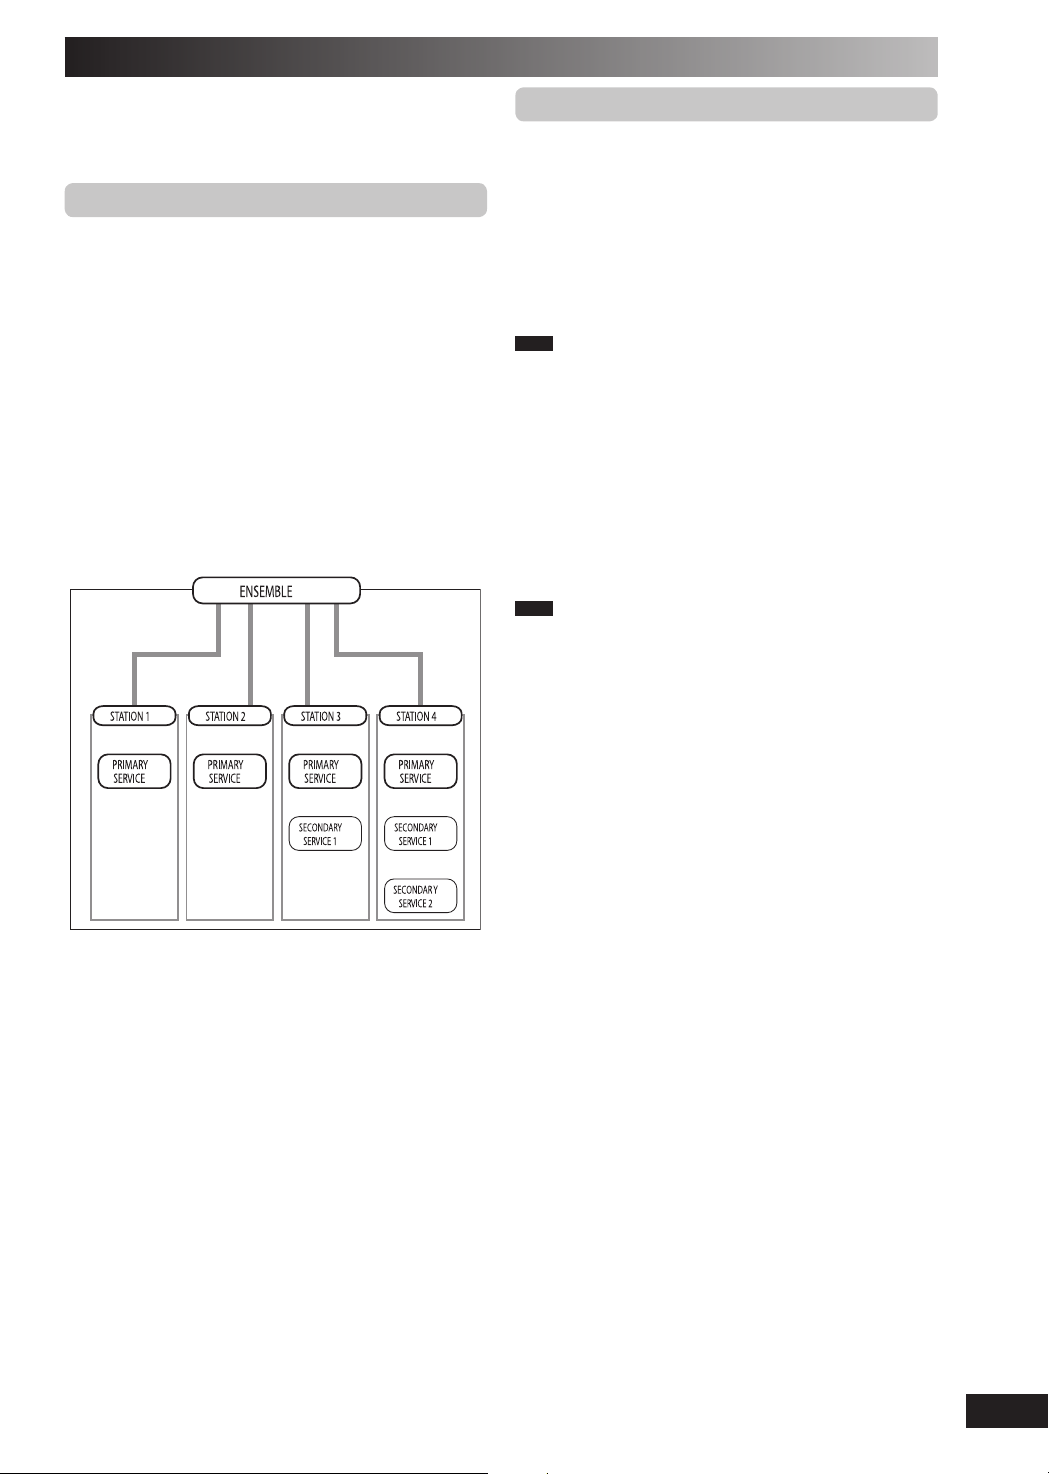
DAB
DAB stands for digital audio broadcasting. It is a new form
of radio that is broadcast digitally. Unlike regular analogue
broadcasting, digital radio deteriorates less, and is thus able
to provide quality sound close to that of a disc.
DAB structureDAB structure
Bands
There are two types of DAB bands, “BAND III” (Receivable
in this unit) and “L BAND”(Not broadcast in the United
Kingdom, and not receivable on this unit).
Frequencies
There are 41 frequencies on BAND III. Among those
frequencies, 7 are used in the United Kingdom (current as
of January, 2007).
Ensemble, station and service
The number of stations that make up one frequency differ
between DAB and analogue radio. Analogue stations all
broadcast on different frequencies, even if it is the same
company doing the broadcasting. With DAB however, it is
possible to broadcast a number of stations on the same
frequency.
In DAB terminology, a group of stations on the same frequency
is called an ensemble.
DAB reception method on this unitDAB reception method on this unit
Depending on the region there is a difference between
broadcast frequency and stations broadcast along the same
frequency. For this reason, a memory of receivable stations
should fi rst be created and then select from those memorized
stations as the reception method.
DAB Auto Scan
This function searches for currently receivable stations and
inputs them into unit memory.
When DAB is selected for the fi rst time, this function starts
automatically.
Note
Even if the station is stored into memory, some stations
may not broadcast depending on the time of day etc. If this
occurs,“NO SERVICE” is displayed.
Station Memory Updating
When there is a station name change, or a new station
begins broadcasting, the unit memory is automatically
updated when:
• The previous station name is displayed by selecting
“STATION TUNE”.
• One of the stations already broadcasting on the same
frequency with the new station is displayed by selecting
“STATION TUNE”.
Note
• Deleting stations that are no longer broadcasting is not automatic. If
you want to delete a station, perform Auto scan again and the new
memory is created.
• When a new frequency begins broadcasting, stations on that new
frequency are not automatically added to memory. Perform Auto
scan to add them to memory. Also, you may need to change the
Auto scan range if the new frequency is outside the factory set Auto
scan range (
STATION TUNE
You can select stations from the memory created as shown
above in alphanumeric order. You can easily select your
favorite stations by using presets (➡ page 12).
page 14).
➡
As shown in the diagram, an ensemble consists of a group
of stations which have primary services, they can also
have secondary services. This means, for example, that
commentary on sports events from different areas can all be
broadcast at once.
RQTV0179
11
Page 12
DAB (continued)
MUTING
-DIMMER
DAB
MENU
ENTER
DISPLAY
DAB
SECONDARY
USB
CLEAR
DAB
FM
PROGRAM
PLAY MODE
CLEAR 7
DAB
ALBUM
SECONDARY
,
ENTER
DAB MENU
DAB
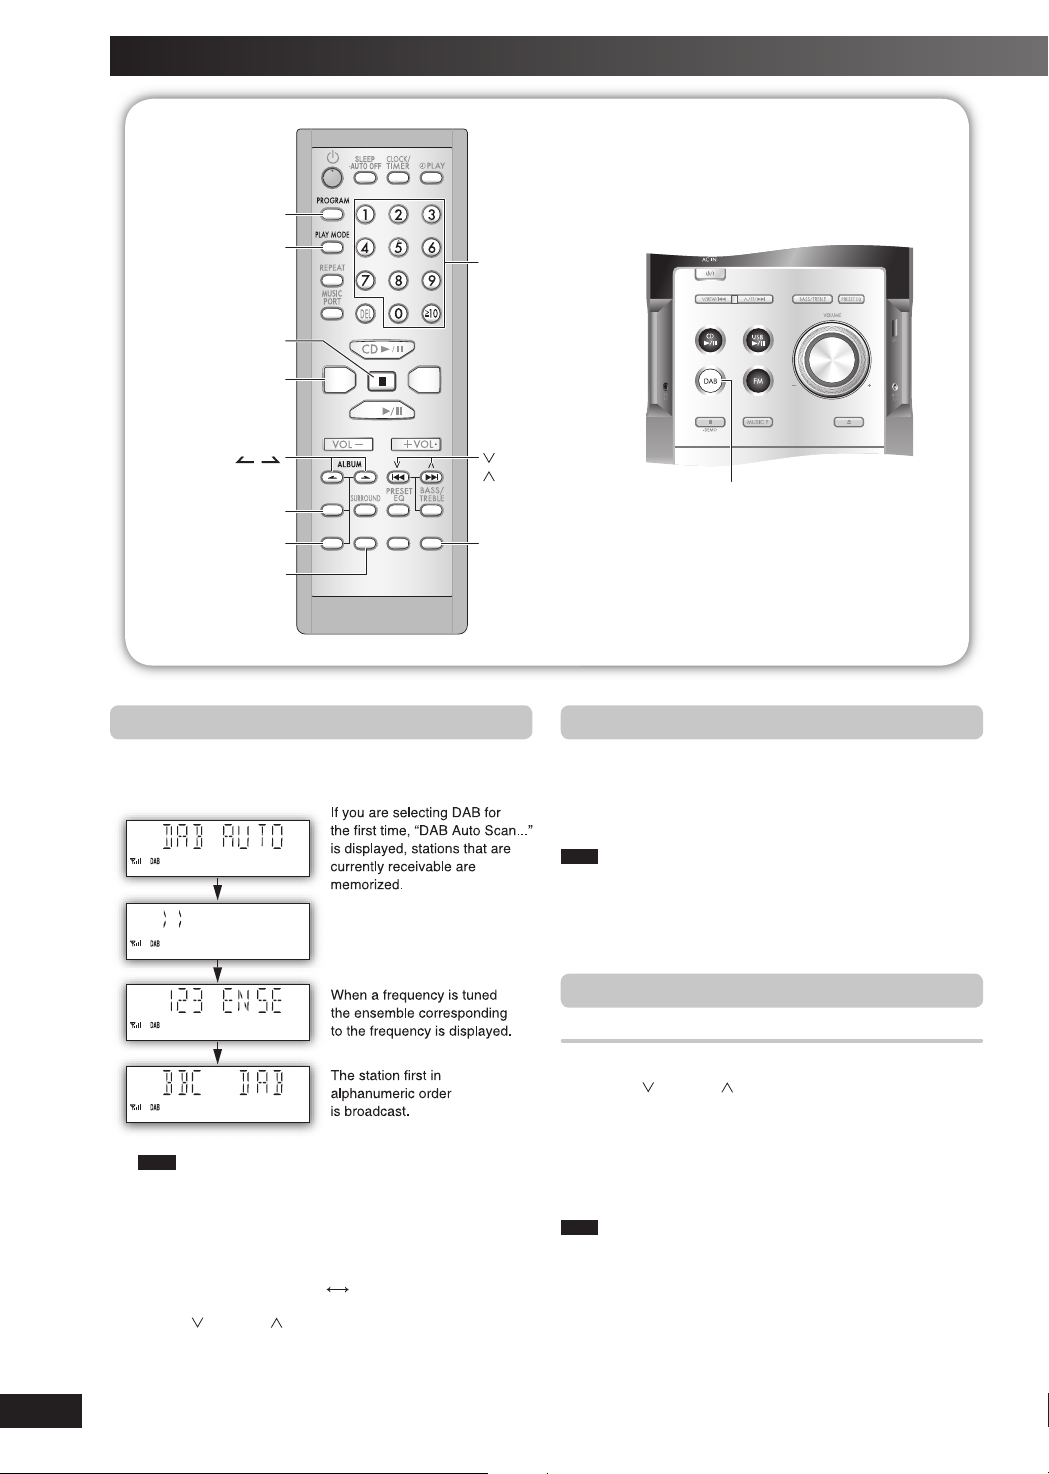
DAB operationDAB operation
Press [DAB] to enter DAB mode.
1
The unit comes on.
Numeric
buttons
/4,
/¢
DISPLAY
DAB
DAB Auto ScanDAB Auto Scan
Press and hold [PLAY MODE] until “DAB Auto Scan”
appears.
When a frequency is tuned by Auto scanning on this unit,
the ensemble corresponding to the frequency is displayed
for approximately 2 seconds.
Note
• When updating memory with Auto scan, preset stations are not
erased or changed.
• When a frequency cannot be received, the previous memory is
restored.
• Total stations received is displayed for approximately 2 seconds.
12
RQTV0179
Note
“Scan Failed.” appears if no stations are memorized. If this occurs,
adjust the antenna and try Auto scanning or change the Auto scan
frequency range. (➡ page 14)
Press [PLAY MODE] to select “STATION TUNE”.
2
Each time you press the button:
“STATION TUNE”
Press [ /4] or [ /¢] to select a station.
3
The station name changes in alphanumeric order.
“PRESET TUNE”
PresettingPresetting
Presetting channel
Up to 20 channels can be set.
Press [ /4] or [ /¢] to select a station.
1
Press [PROGRAM].
2
Press the numeric buttons to select a channel.
3
To preset more stations, press [PLAY MODE] to
4
select “STATION TUNE” and then repeat steps 1 to 3.
Note
You cannot preset stations when the station is not broadcasting or
when you are selecting a secondary service.
Page 13
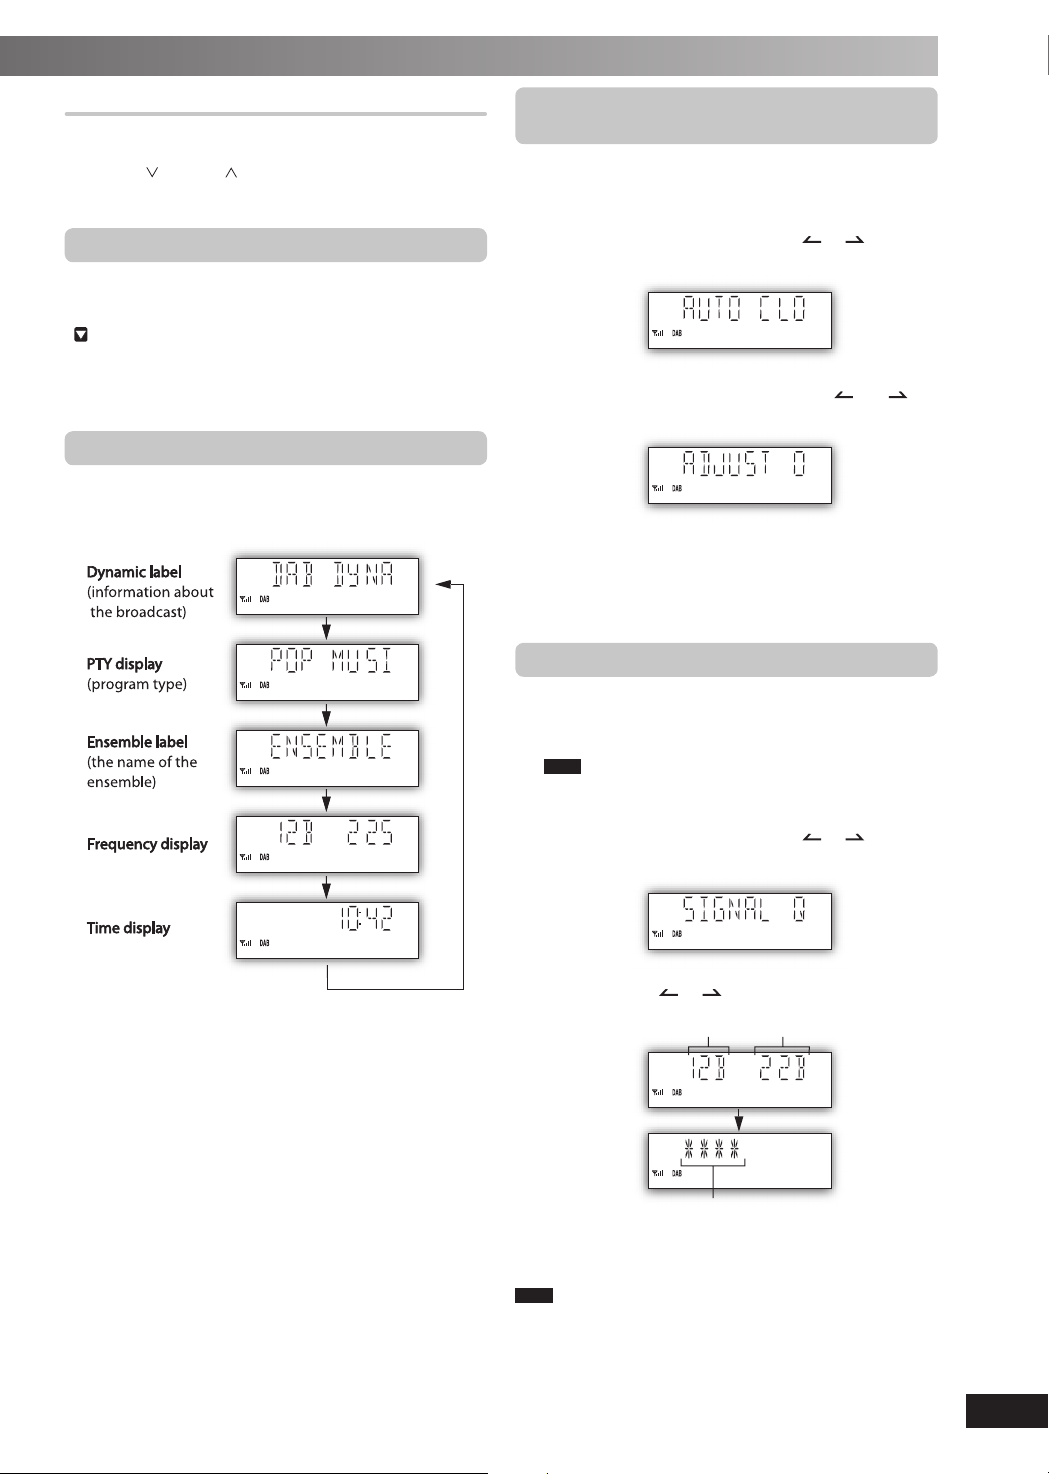
Selecting a preset channel
Press [PLAY MODE] to select “PRESET TUNE”.
1
Press [ /4] or [ /¢] or numeric buttons to
2
select a channel.
Listening to the secondary serviceListening to the secondary service
Press the [DAB SECONDARY] to select the secondary
service.
“
” is displayed if there is a secondary service broadcast.
The secondary services are selected each time the button
is pressed. The primary service is returned to after the last
secondary service.
DisplayDisplay
Press [DISPLAY] to select the display.
The information scroll through the display.
Each time you press the button:
Turning automatic clock adjustment Turning automatic clock adjustment
function on function on
To adjust the time information during DAB broadcasting and
automatic time adjustment.
Press [DAB MENU] to enter menu mode.
1
Within 10 seconds, press [ALBUM or ] to select
2
“AUTO CLOCK ADJ.” and then press [ENTER].
Within 10 seconds, press [ALBUM or ] to
3
select “ADJUST ON” and then press [ENTER].
Select “ADJUST OFF” to turn the automatic clock adjustment
function off.
To exit
Press [DAB MENU] again.
Checking the DAB signal qualityChecking the DAB signal quality
To improve reception by adjusting the antenna while
monitoring signal quality on the display.
Press [DAB MENU] to enter menu mode.
1
Note
“Scan Failed.” appears if no stations are memorized. If this
occurs, adjust the antenna and try Auto scanning or change
the Auto scan frequency range. (➡ page 14)
Within 10 seconds, press [ALBUM or ] to select
2
“SIGNAL QUALITY” and then press [ENTER].
Press [ALBUM or ] to select the frequency.
3
Frequency block
Reception quality
0 (poor) − 8 (excellent)
To exit
Press [DAB MENU] again.
Note
In order to enjoy the new stations after adjusting the antenna, it is
necessary to perform Auto scanning to update the station memory.
Frequency
RQTV0179
13
Page 14
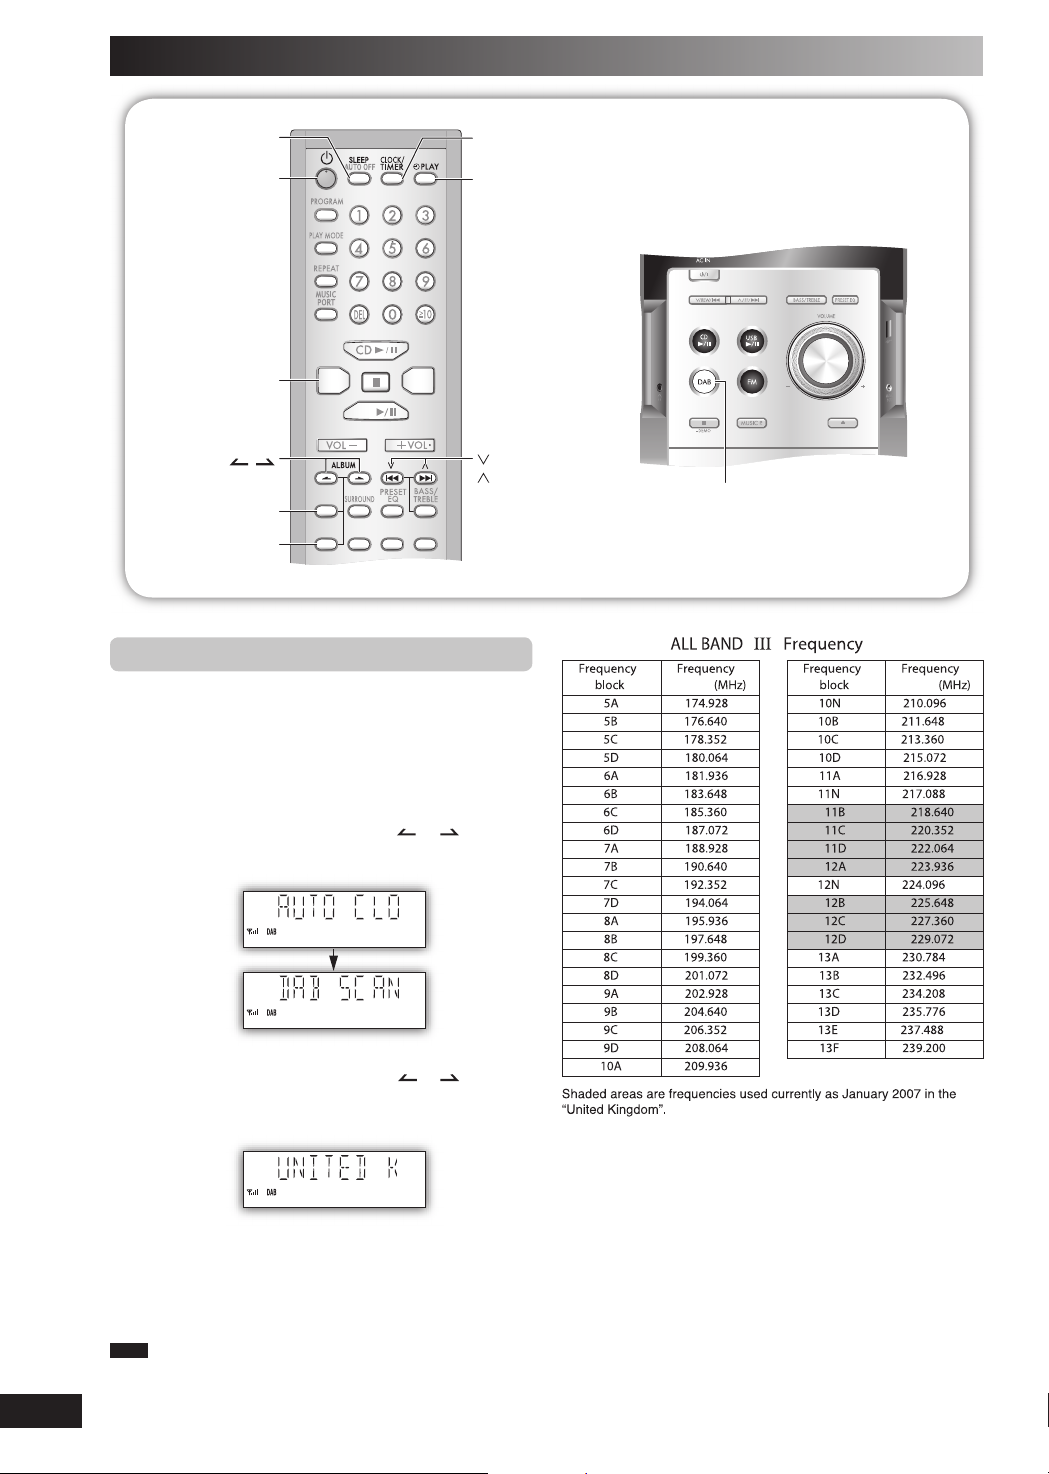
DAB (continued)
MUTING
-DIMMER
DAB
MENU
ENTER
DISPLAY
DAB
SECONDARY
USB
CLEAR
DAB
FM
DAB
CLOCK/TIMERSLEEP
y
y
PLAY
ALBUM
DAB MENU
,
ENTER
/4,
/¢
Changing the Auto scan frequency rangeChanging the Auto scan frequency range
Only the frequencies currently used in the UK as of January
2007 on BAND III are Auto scanned (“United Kingdom”,
factory setting).
Select “ALL BAND III” when you want to store stations on
other frequencies to memory.
Press [DAB MENU] to enter menu mode.
1
Within 10 seconds, press [ALBUM or ] to select
2
“DAB SCAN MODE” and then press [ENTER].
DAB
14
Within 10 seconds, press [ALBUM or ] to select
3
“UNITED KINGDOM” or “ALL BAND III” and then
press [ENTER].
Auto scan begins automatically after the change has been
made.
To exit
Press [DAB MENU] again
Note
When the “DAB SCAN MODE” is changed, the DAB preset channels
RQTV0179
are erased and if the DAB play timer has been set the timer switches
to off.
Page 15
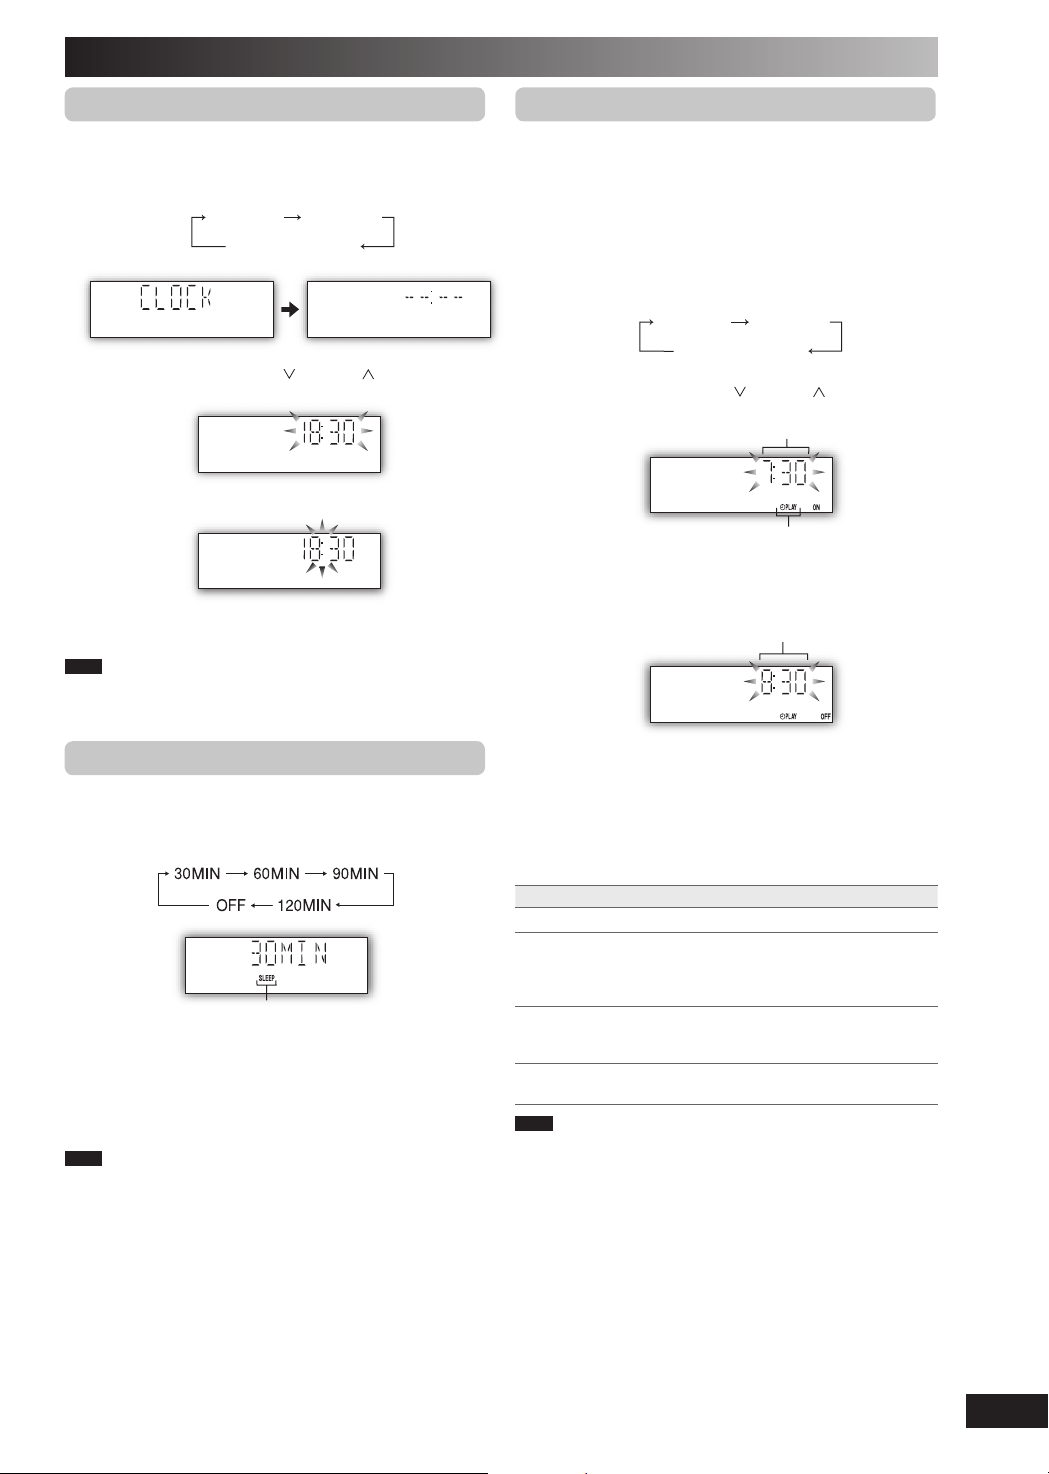
Timer
Setting the clockSetting the clock
This is a 24-hour clock.
Press [CLOCK/TIMER] to select “CLOCK”.
1
Each time you press the button:
CLOCK
Original display
Within 5 seconds, press
2
time.
Press [CLOCK/TIMER] again to confirm.
3
Displaying the clock
Press [CLOCK/TIMER] to display the clock for few seconds.
Note
The clock may lose or gain minutes over a period of time. Readjust
as necessary.
˚ PLAY
[ /4] or [ /¢]
to set the
Using the play timerUsing the play timer
You can set the play timer to come on at a certain time to
wake you up.
Preparation
Turn the unit on and set the clock.
Prepare the music source you want to listen to; disc, radio,
USB or music port source, and set the volume.
Press [CLOCK/TIMER] repeatedly to select play
1
timer.
CLOCK
Original display
Within 5 seconds, press
2
starting time.
Press [CLOCK/TIMER] to confirm.
3
Repeat steps 2 and 3 to set the finishing time.
4
˚ PLAY
[ /4] or [ /¢]
Start time
Play timer indicator
Finish time
to set the
Using the sleep timerUsing the sleep timer
This function enables you to turn off the unit automatically
after the set time.
Press [SLEEP] repeatedly to select your desired time.
Sleep timer indicator
To cancel
Press [SLEEP] to select “OFF”.
Changing the remaining time
Press [SLEEP] to show the remaining time, and press
[SLEEP] again to select your desired time.
Note
• The play and sleep timer can be used together.
• The sleep timer always has priority. Be sure not to overlap timer
settings.
To activate the timer
Press [˚PLAY] to turn on the timer.
5
“˚PLAY” is displayed.
Press [y] to turn off the unit.
6
The unit must be off for the timer to operate.
To Action
change the settings Repeat steps 1 to 4 and 6.
change the source
or volume
check the settings
(when the unit is on
or in standby mode)
cancel Press [˚PLAY] to clear the timer indicator
Note
• The play timer will start at the preset time, with the volume
increasing gradually to the preset level.
• The timer comes on at the set time every day if the timer is on.
• The unit must be in the standby mode for the timer to function.
• If you turn the unit off and on again while a timer is functioning, the
fi nish time setting will not be activated.
• If MUSIC PORT is selected as the source when the timer comes
on, the system turns on and engages MUSIC PORT as the source.
If you wish to playback from the portable audio equipment, activate
the equipment’s play mode and increase the volume. (See the
portable audio equipment’s instruction manual.)
˚PLAY] to clear the timer
1) Press [
indicator from the display.
2) Make changes to the source or volume.
3) Perform steps 5 and 6.
Press [CLOCK/TIMER] repeatedly to select
˚PLAY.
from the display.
RQTV0179
15
Page 16
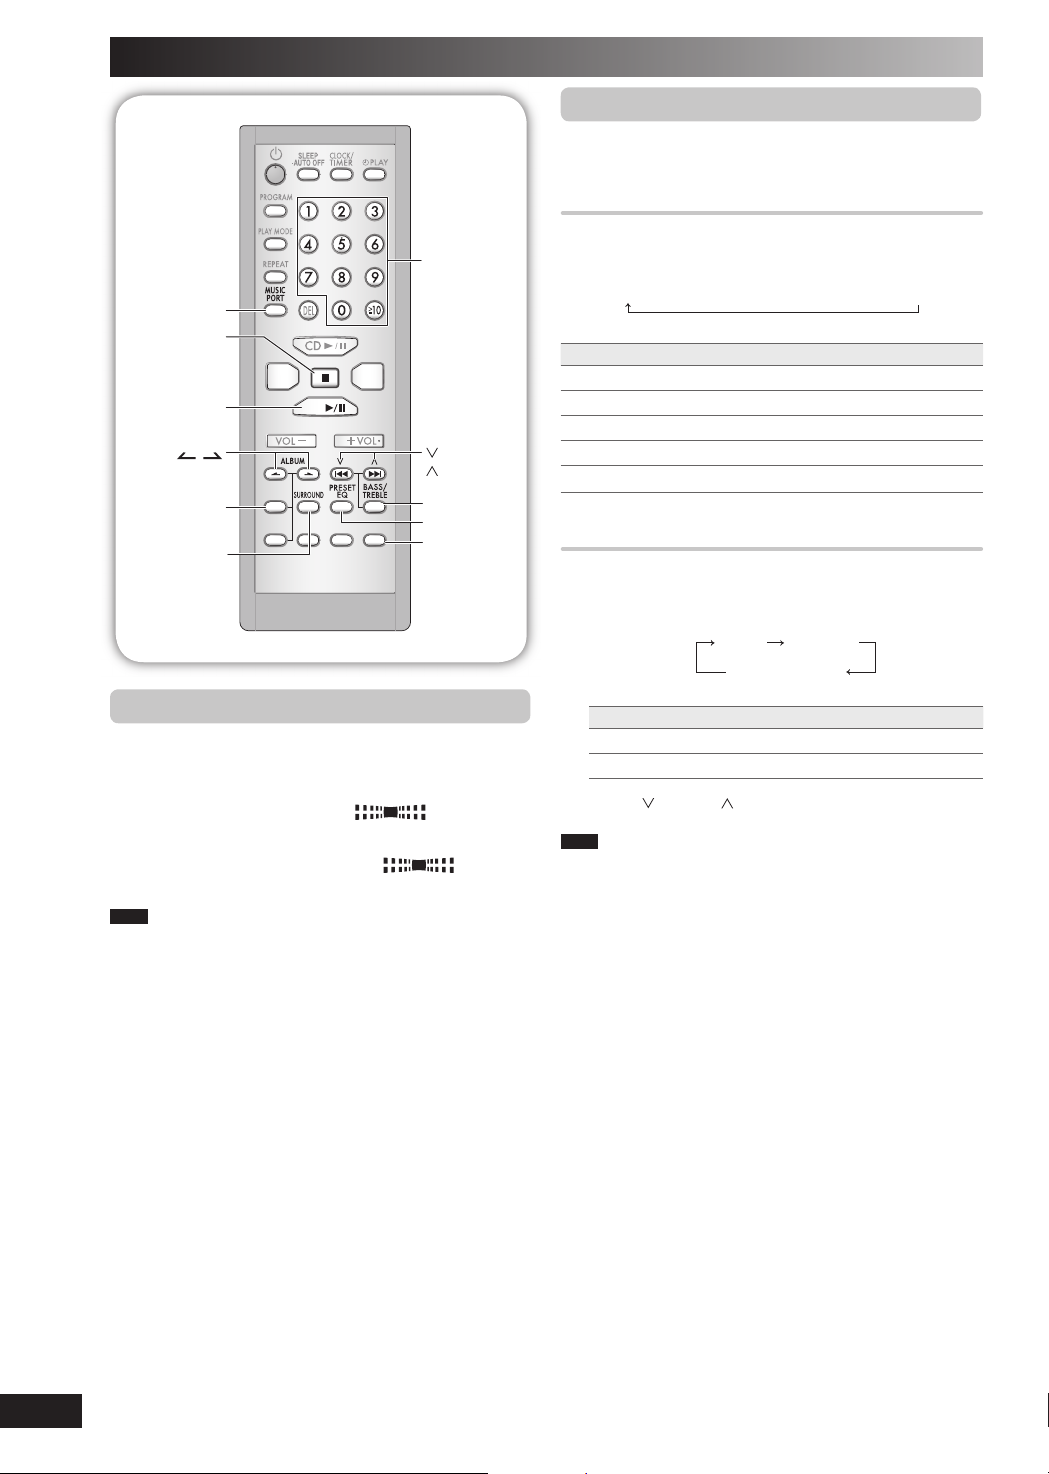
Sound adjustment
MUTING
-DIMMER
DAB
MENU
ENTER
DISPLAY
DAB
SECONDARY
USB
CLEAR
DAB
FM
MUSIC PORT
CLEAR 7
USB 6
ALBUM
,
ENTER
SURROUND
Numeric
buttons
/4,
/¢
BASS/TREBLE
PRESET EQ
DISPLAY
Selecting sound effectsSelecting sound effects
You can change the sound effect by selecting Preset EQ or
adjusting the bass or treble effect.
Preset EQPreset EQ
Press [PRESET EQ] repeatedly to select your desired
setting.
→
HEAVY
Setting Effect
HEAVY Adds punch to rock
CLEAR Clarifi es higher frequencies
SOFT For background music
VOCAL Adds gloss to vocal
EQ-OFF No effect
Bass or trebleBass or treble
Enable you to enjoy the lower or higher pitch sound.
Press [BASS/TREBLE] repeatedly to select your
1
desired setting.
CLEAR → SOFT → VOCAL → EQ-OFF
BASS TREBLE
original display
Enjoying surround soundEnjoying surround sound
Enable you to add natural width and depth to the stereo
sound.
To activate
Press [SURROUND] to display “ ” indicator.
To cancel
Press [SURROUND] again to clear “
indicator.
Note
• Surround sound is less discernible when listening through
headphones.
• If interference in FM stereo reception increases, cancel the surround
sound effect.
Setting Effect
BASS For lower pitch sound
TREBLE For higher pitch sound
Press [ /4] or [ /¢] to adjust the level.
2
Note
”
The tone level can be varied within -4 to +4.
16
RQTV0179
Page 17
External unit
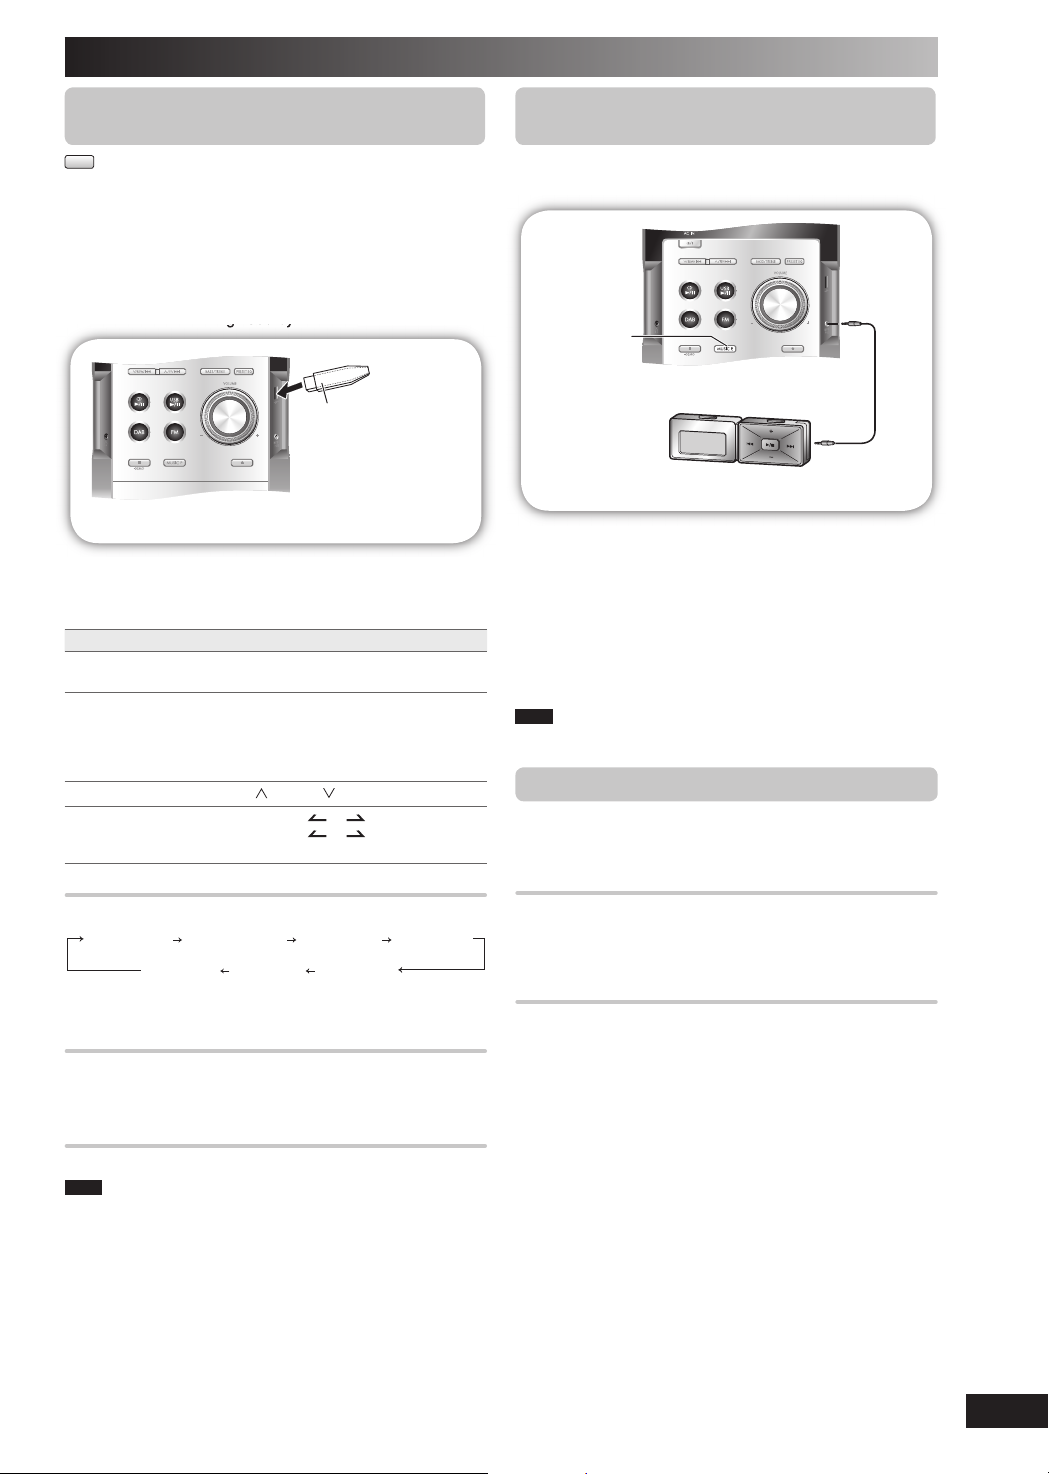
Connecting and playing a USB mass Connecting and playing a USB mass
storage class device storage class device
MP3
The USB connectivity enables you to connect and play MP3
tracks from USB mass storage class. Typically, USB memory
devices. (Bulk only transfer)
Preparation
Before connecting any USB mass storage device to the unit,
ensure that the data stored therein has been backed up.
It is not recommended to use a USB extension cable. The
USB device is not recognised by this unit.
USB enabled device
(not included)
It is not recommended
to use a USB extension
cable. The device
connected via the cable
will not be recognised by
this unit.
Reduce the volume and connect the USB mass
1
storage device.
Press [USB 6] to start play.
2
To Action
pause play Press [USB 6].
stop play Press [CLEAR 7].
skip track Press [ /¢] or [ /4].
skip album Press [ALBUM
Display functionDisplay function
Press [DISPLAY] repeatedly during play or pause mode.
Elapsed time Remaining time Album name Track name
ID3 (Artist) ID3 (Track) ID3 (Album)
For other operating functions, they are similar as those
described in “Discs” (➡ page 8 and 9).
Compatible devicesCompatible devices
Devices which are defi ned as USB mass storage class:
• USB devices that support bulk only transfer.
• USB devices that support USB 2.0 full speed.
Supported FormatSupported Format
Files must have the extension “.mp3” or “.MP3”.
Note
• CBI (Control/Bulk/Interrupt) is not suppor ted.
• A device using NTFS fi le system is not supported [Only FAT 16/32
(File Allocation Table 16/32) fi le system is supported].
• Depending on the sector size, some fi les may not work.
• This unit can access up to 255 albums (including blank folders) and
2500 tracks.
• The maximum number of tracks in a folder are 999 tracks.
• Only one memory card will be selected when connecting a multiport
USB card reader. Typically the fi rst memory card inserted.
• Do not unplug the USB device during reading or playback.
Disconnect the USB card reader from the unit when you remove the
•
memory card. Failure to do so may cause malfunction to the device.
• When you connect a compatible digital audio player to the USB
jack, charging maybe activated. It will not charge when the unit is
switch to standby mode.
Press again to resume play.
“RESUME” is displayed. The position is
memorized.
Press [USB 6] to resume.
Press [CLEAR 7] again to clear the position.
or ] in the play mode.
Press [ALBUM
the numeric buttons in the stop mode.
or ] once and then
Connecting and playing a portable audio Connecting and playing a portable audio
equipment equipment
This feature enables you to enjoy music from portable audio
equipment.
MUSIC P.
Audio cord (not included)
Portable audio equipment
(not included)
Switch off the equalizer function (if there is any) of the
portable audio equipment before you plug into the MUSIC
PORT jack. Otherwise, sound from the speaker may be
distorted.
Plug the audio cord into the MUSIC PORT jack and
1
press [MUSIC PORT].
Play the portable audio equipment. (See the
2
portable audio equipment’s instruction manual.)
Note
All peripheral components and cables are sold separately.
Changing the remote control codeChanging the remote control code
Change the code if you fi nd the remote control unintentionally
also controls other equipments.
Change the main unit’s code Change the main unit’s code
Press and hold [MUSIC P.] on the main unit and then
press and hold [2] (or [1]) on the remote control.
“REMOTE 2” is displayed.
Change the remote control’s codeChange the remote control’s code
Press and hold [ENTER] and [2] (or [1]) on the remote
control for at least 2 second.
If the remote control and main unit are using different codes,
a message appears on the main unit’s display showing the
main unit’s current code. Follow the above step to change
the remote control’s code to match it.
RQTV0179
17
Page 18
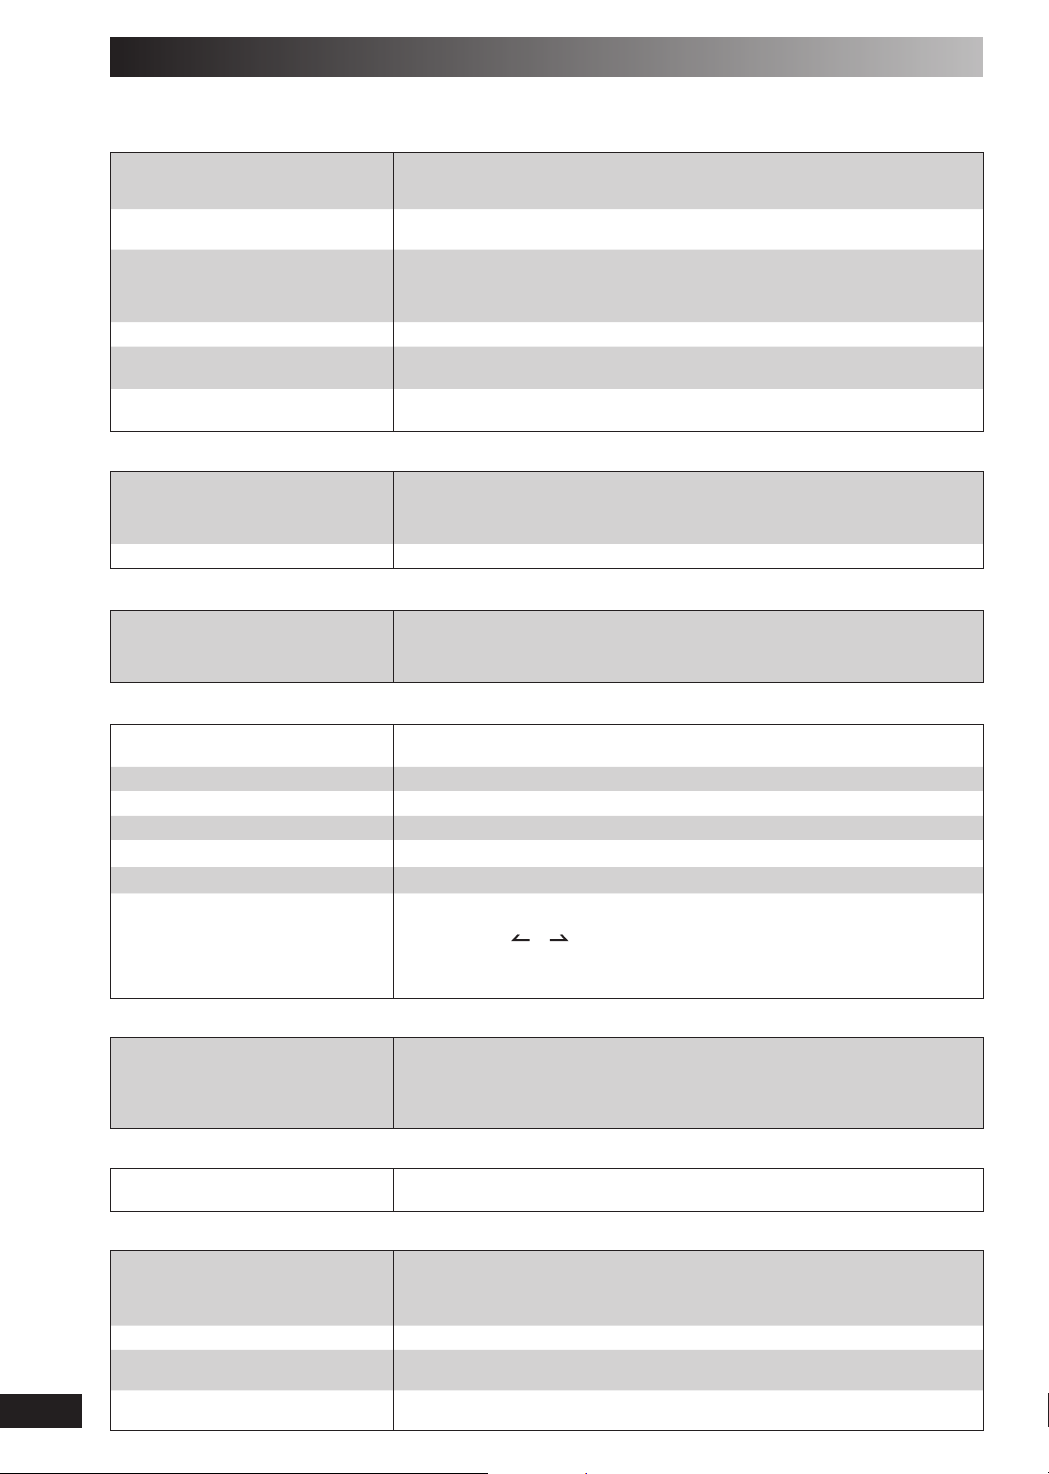
Troubleshooting guide
Before requesting service, make the below checks. If you can’t fi x the system as described below, or if something not listed
here occurs, refer to the enclosed directory to locate an Authorized Service Center convenient to you or contact your dealer.
Common problems
No sound.
Sounds unfi xed, reversed or come from
one speaker only.
Humming heard during play.
“ERROR” is displayed.
“- -:- -” appears on the display.
“F76” is displayed.
Listening to the radio
Noise is heard.
The stereo indicator fl ickers or doesn’t
light.
Sound is distorted.
A beat sound is heard.
When there is a television set nearby
The picture on the TV
disappears or stripes appear
on the screen.
Turn the volume up.
The speaker cords may not be connected properly. Turn the unit off, check and correct the
connections and turn the unit on (
Check the speaker connections (
An AC mains lead or fl uorescent light is near the cables. Keep other appliances and leads
away from this unit’s cables.
If possible in your area, turn the AC mains lead’s plug or connector over to reverse the lead’s
polarity.
Incorrect operation performed. Read the instructions and try again.
You plugged the AC mains lead in for the fi rst time or there was a power failure recently.
Set the time (
Check and correct the speaker cord connections (➡ page 4).
If this does not fi x the problem, there is a power supply problem. Consult the dealer.
Use an outdoor antenna (
Turn the TV off or separate it from the unit.
The location and direction of the antenna are incorrect. If you are using an indoor antenna,
change to an outdoor antenna (
The TV antenna wire is too close to the unit. Separate the antenna wire of the TV set from
the unit.
page 11).
➡
➡
➡
➡
page 6).
page 6).
➡
page 4).
page 4).
18
Listening to DAB
DAB reception is poor
DATA
SCRAMBLED
NO SERVICE
NO SIGNAL
Scan Failed
STATION FULL
Playing discs
The display is wrong or play
won’t start.
The remote control
Remote control doesn’t work.
USB
The USB drive or its contents cannot
be read.
Slow operation of the USB fl ash drive.
“USB OVER CURRENT ERROR”
RQTV0179
“NO PLAY”
Keep the antenna away from computers, televisions, other cables and cords.
Use an outdoor antennas (
Data broadcast being received over the DAB broadcast signal. Cannot be used on this unit.
The broadcast station being received cannot be accessed.
The station is currently not broadcasting.
This station cannot be received. Check your antenna (
Stations are not receivable. Check your antenna and try Auto scanning (
DAB station memory is full. Use the following method to clear station memory.
1. Press [DAB MENU].
2. Press [ALBUM
3. Press [ENTER].“OK? Push ENTER” is displayed.
4. Press [ENTER].
Station memory is erased and the unit automatically begins Auto scanning.
The disc may be upside down (
Wipe the disc.
Replace the disc if it is scratched, warped, or non-standard.
Condensation may have formed inside the unit due to a sudden change in temperature. Wait
about an hour for it to clear and try again.
Check that the batteries are inserted correctly (
Replace the batteries if they are worn.
The USB drive format or its contents is/are not compatible with the system (
The USB host function of this product may not work with some USB devices.
USB devices with storage capacity of more than 8 gigabytes may not work in some
instances.
Large fi le size or high memory USB fl ash drive takes longer time to read.
The USB mass storage device rating exceeds 500mA. Disconnect the USB device. Turn the
unit off and then back on.
Check the content.
Only MP3 format fi les can be played.
page 6).
➡
➡
or ] to select “STATION CLEAR”.
page 8).
➡
page 6).
➡
page 6).
page 6 and 12).
➡
page 17).
➡
Page 19
Specifi cations
AMPLIFIER SECTION
RMS OUTPUT POWER both channel driven
simultaneously
10 % Total harmonic distortion
20 W per channel (4 Ω)
Input impedance
MUSIC PORT 250 mV 12 kΩ
Output impedance
HEADPHONE 16 to 32 Ω
Phone jack
Terminal Stereo, 3.5 mm
Music Port jack
Terminal Stereo, 3.5 mm
FM TUNER SECTION
Frequency range 87.50 to 108.00 MHz (50 kHz step)
Sensitivity 0.10 dBµV (IHF)
S/N 30 dB 1.20 µV
Antenna terminal(s) 75 Ω (unbalanced)
Preset station FM 20 stations
DAB SECTION
Frequency Band (Wavelength)
Band III (UK Only)
Band III (Europe)
Intermediate frequency
Sensitivity *BER 4x10
MAX. input power 0 dBm
Min requirement -98 dBm
Selectivity
Adjacent channel (Band III) 33 dB
Far-Off channel (Band III) 45 dB
DAB memories 20 channels
11B to 12D (218.640 MHz to 229.072 MHz)
5A to 13F (174.928 MHz to 239.200 MHz)
1st : 38.912MHz, 2nd : 2.048 MHz
-4
CD SECTION
Disc played [8 cm or 12 cm]
(1) CD-Audio (CD-DA)
(2) CD-R/RW (CD-DA, MP3)
(3) MP3
Sampling frequency
CD 44.1 kHz
MP3 32 kHz, 44.1 kHz, 48 kHz
Bit rate
MP3 32 kbps to 384 kbps
Decoding 16/20/24 bit linear
Pickup
Wavelength 785 nm
Laser power CLASS 1
Audio output (Disc)
Number of channels 2 channel
Frequency response 20 Hz to 20 kHz (+1, -2 dB)
Wow and fl utter Below measurable limit
Digital fi lter 8 fs
D/A converter MASH (1 bit DAC)
USB SECTION
Playable USB Storage Media
(1) HDD
(2) USB MP3 player/Digital audio player
(3) USB thumbdrives
Supported audio fi le format
MP3
USB memory port
Maximum current 500 mA
Bit rate
MP3 32 kbps to 320 kbps
Audio output (MP3)
Number of channels 2 channel
Frequency response (MP3) 20 Hz to 20 kHz
SPEAKER SECTION
Type 2 way, 2 speaker system
Speaker(s)
WOOFER 10 cm CONE type 4 Ω
TWEETER 6 cm CONE type 4 Ω
Impedance 4 Ω
Input power (IEC) 20 W (MAX)
Output sound pressure 76.56 dB/W (1.0 m)
Cross over frequency 4.3 kHz
Frequency range 43 Hz to 42 kHz (-16 dB)
52 Hz to 22 kHz (-10 dB)
Dimensions (W x H x D) 138 mm x 227 mm x 141 mm
Mass 1.4 kg
GENERAL
Power supply AC 230 to 240V, 50 Hz
Power consumption 67 W
Dimensions (W x H x D) 164 mm x 227 mm x 314 mm
Mass 3.0 kg
Operating temperature range +5˚C to +35˚C
Operating humidity range
5% to 90% RH (no condensation)
Power consumption in standby mode 0.4 W (approx.)
Note
1. Specifi cations are subject to change without notice.
Mass and dimensions are approximate.
2. Total harmonic distortion is measured by the digital spectrum
analyzer.
Maintenance
If the surfaces are dirtyIf the surfaces are dirty
To clean this unit, wipe with a soft, dry cloth.
• Never use alcohol, paint thinner or benzine to clean this unit.
• Before using chemically treated cloth, read the instructions that came with the cloth carefully.
RQTV0179
19
Page 20
This product may receive radio interference caused by
mobile telephones during use. If such interference is
apparent, please increase separation between the product
and the mobile telephone.
The socket outlet shall be installed near the equipment and
easily accessible.
The mains plug of the power supply cord shall remain
readily operable.
To completely disconnect this apparatus from the AC
Mains, disconnect the power supply cord plug from AC
receptacle.
THIS UNIT IS INTENDED FOR USE IN MODERATE
CLIMATES.
WARNING:
TO REDUCE THE RISK OF FIRE, ELECTRIC SHOCK
OR PRODUCT DAMAGE,
• DO NOT EXPOSE THIS APPARATUS TO RAIN,
MOISTURE, DRIPPING OR SPLASHING AND THAT
NO OBJECTS FILLED WITH LIQUIDS, SUCH AS
VASES, SHALL BE PLACED ON THE APPARATUS.
• USE ONLY THE RECOMMENDED ACCESSORIES.
• DO NOT REMOVE THE COVER (OR BACK); THERE
ARE NO USER SERVICEABLE PARTS INSIDE.
REFER SERVICING TO QUALIFIED SERVICE
PERSONNEL.
CAUTION!
THIS PRODUCT UTILIZES A LASER.
USE OF CONTROLS OR ADJUSTMENTS OR
PERFORMANCE OF PROCEDURES OTHER THAN
THOSE SPECIFIED HEREIN MAY RESULT IN
HAZARDOUS RADIATION EXPOSURE.
DO NOT OPEN COVERS AND DO NOT REPAIR
YOURSELF. REFER SERVICING TO QUALIFIED
PERSONNEL.
CAUTION!
• DO NOT INSTALL OR PLACE THIS UNIT IN A
BOOK CASE, BUILT-IN CABINET OR IN ANOTHER
CONFINED SPACE. ENSURE THE UNIT IS
WELL VENTILATED. TO PREVENT RISK OF
ELECTRIC SHOCK OR FIRE HAZARD DUE TO
OVERHEATING, ENSURE THAT CURTAINS AND
ANY OTHER MATERIALS DO NOT OBSTRUCT
THE VENTILATION VENTS.
• DO NOT OBSTRUCT THE UNIT’S VENTILATION
OPENINGS WITH NEWSPAPERS, TABLECLOTHS,
CURTAINS, AND SIMILAR ITEMS.
• DO NOT PLACE SOURCES OF NAKED FLAMES,
SUCH AS LIGHTED CANDLES, ON THE UNIT.
• DISPOSE OF BATTERIES IN AN
ENVIRONMENTALLY FRIENDLY MANNER.
Matsushita Electric Industrial Co., Ltd.
Web Site: http://panasonic.net
En
RQTV0179-2B
L0207CH2037
 Loading...