

Page 1
As an ENERGY STAR® Partner,
Panasonic has determined that this
product meets the ENERGY STAR®
guidelines for energy effi ciency.
Operating Instructions
CD Stereo System
Model No. SC-PM321
Table of contents
IMPORTANT SAFETY INSTRUCTIONS 3
Placement of speakers .......................... 3
Getting started ....................................... 4
Overview of controls ............................. 6
Discs ....................................................... 7
FM/AM Radio .......................................... 9
®
XM
Satellite Radio ................................ 10
Timer ....................................................... 12
Sound adjustment ................................. 13
External unit ........................................... 13
Troubleshooting guide .......................... 14
Specifi cations ........................................ 15
Limited Warranty ................................... 16
Product Service ..................................... 17
Maintenance ........................................... 17
Listening caution ................................... 17
EspañolEspañol
Preparativos iniciales ............................ 18
Colocación de los altavoces ................ 18
Controles ................................................ 19
Discos ..................................................... 20
FM/AM Radio .......................................... 21
®
Radio satelital XM
Temporizador ......................................... 23
................................ 22
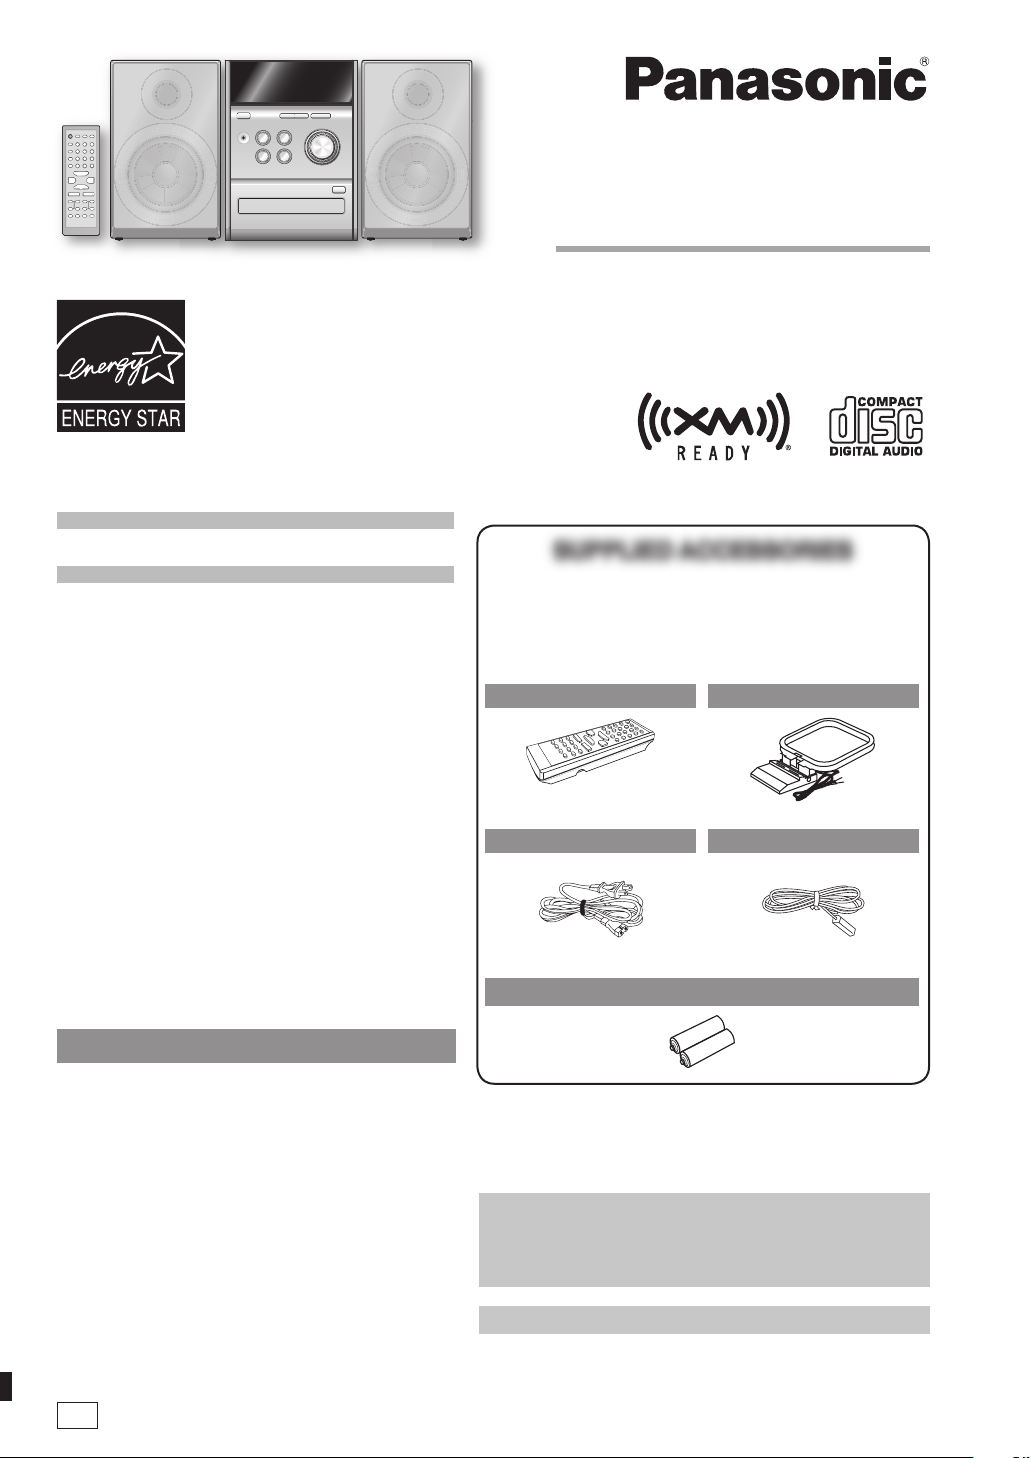
SUPPLIED ACCESSORIESSUPPLIED ACCESSORIES
Please check and identify the supplied accessories.
Use numbers indicated in parentheses when asking for
replacement parts. (As of July 2006)
To order accessories, refer to “Accessory Purchases” on
page 16.
1 x Remote control
(N2QAYB000051)
1 x AC power supply cord
(K2CB2CB00018)
2 x Remote control batteries
Before connecting, operating or adjusting this product, please
read the instructions completely.
Please keep this manual for future reference.
Operations in these instructions are described using remote
control, but you can do the operations with the main unit if the
controls are the same.
Your unit may not look exactly as illustrated.
1 x AM loop antenna
(N1DAAAA00001)
1 x FM indoor antenna
(RSA0007-L)
P
La guía rápida en español se encuentra en la página 18 - 23.
RQTV0160-1P
Page 2
Dear customer
Thank you for purchasing this product.
For optimum performance and safety, please read these
instructions carefully.
These operating instructions are applicable to the following
system.
System
Main unit SA-PM321
Speakers SB-PM3
The model number and serial number of this product can
be found on either the back or the bottom of the unit.
Please note them in the space provided below and keep
for future reference.
MODEL NUMBER
SERIAL NUMBER
User memo:
DATE OF PURCHASE
DEALER NAME
DEALER ADDRESS
SC-PM321
CAUTION: TO REDUCE THE RISK OF ELECTRIC
SHOCK, DO NOT REMOVE SCREWS.
NO USER-SERVICEABLE PARTS
INSIDE.
REFER SERVICING TO QUALIFIED
SERVICE PERSONNEL.
The lightning flash with arrowhead symbol,
within an equilateral triangle, is intended to
alert the user to the presence of uninsulated
dangerous voltage within the product s
enclosure that may be of sufficient
magnitude to constitute a risk of electric
shock to persons.
The exclamation point within an equilateral
triangle is intended to alert the user to the
presence of important operating and
maintenance (servicing) instructions in the
literature accompanying the appliance.
TELEPHONE NUMBER
WARNING:
TO REDUCE THE RISK OF FIRE, ELECTRIC
SHOCK OR PRODUCT DAMAGE, DO NOT
EXPOSE THIS APPARATUS TO RAIN,
MOISTURE, DRIPPING OR SPLASHING AND
THAT NO OBJECTS FILLED WITH LIQUIDS,
SUCH AS VASES, SHALL BE PLACED ON THE
APPARATUS.
CAUTION!
THIS PRODUCT UTILIZES A LASER.
USE OF CONTROLS OR ADJUSTMENTS OR
PERFORMANCE OF PROCEDURES OTHER
THAN THOSE SPECIFIED HEREIN MAY RESULT
IN HAZARDOUS RADIATION EXPOSURE.
DO NOT OPEN COVERS AND DO NOT REPAIR
YOURSELF. REFER SERVICING TO QUALIFIED
PERSONNEL.
CAUTION!
DO NOT INSTALL OR PLACE THIS UNIT IN
A BOOKCASE, BUILT-IN CABINET OR IN
ANOTHER CONFINED SPACE. ENSURE THE
UNIT IS WELL VENTILATED. TO PREVENT RISK
OF ELECTRIC SHOCK OR FIRE HAZARD DUE TO
OVERHEATING, ENSURE THAT CURTAINS AND
ANY OTHER MATERIALS DO NOT OBSTRUCT
THE VENTILATION VENTS.
FCC Note:
This equipment has been tested and found to comply
with the limits for a Class B digital device, pursuant to
Part 15 of the FCC Rules.
These limits are designed to provide reasonable
protection against harmful interference in a residential
installation. This equipment generates, uses and can
radiate radio frequency energy and, if not installed and
used in accordance with the instructions, may cause
harmful interference to radio communications. However,
there is no guarantee that interference will not occur in
a particular installation. If this equipment does cause
harmful interference to radio or television reception,
which can be determined by turning the equipment off
and on, the user is encouraged to try to correct the
interference by one or more of the following measures:
• Reorient or relocate the receiving antenna.
• Increase the separation between the equipment and
receiver.
• Connect the equipment into an outlet on a circuit
different from that to which the receiver is connected.
• Consult the dealer or an experienced radio/TV
technician for help.
Any unauthorized changes or modifications to this
equipment would void the user’s authority to operate
this device.
This device complies with Part 15 of the FCC Rules.
Operation is subject to the following two conditions:
(1) This device may not cause harmful interference, and
(2) this device must accept any interference received,
including interference that may cause undesired
operation.
The socket outlet shall be installed near the equipment
and easily accessible. The mains plug of the power supply
cord shall remain readily operable.
To completely disconnect this apparatus from the AC
Mains, disconnect the power supply cord plug from AC
receptacle.
RQTV0160
2
Responsible Party:
Panasonic Corporation of North America
One Panasonic Way
Secaucus, NJ 07094
Telephone No.: 1-800-211-7262
Page 3

IMPORTANT SAFETY INSTRUCTIONS
Read these operating instructions carefully before using the unit. Follow the safety instructions on the unit and the
applicable safety instructions listed below. Keep these operating instructions handy for future reference.
1) Read these instructions.
2) Keep these instructions.
3) Heed all warnings.
4) Follow all instructions.
5) Do not use this apparatus near water.
6) Clean only with dry cloth.
7) Do not block any ventilation openings. Install in
accordance with the manufacturer’s instructions.
8) Do not install near any heat sources such as radiators,
heat registers, stoves, or other apparatus (including
amplifiers) that produce heat.
9) Do not defeat the safety purpose of the polarized or
grounding-type plug. A polarized plug has two blades
with one wider than the other. A grounding-type plug
has two blades and a third grounding prong. The wide
blade or the third prong are provided for your safety. If
the provided plug does not fit into your outlet, consult
an electrician for replacement of the obsolete outlet.
-If you see this symbol-
Information on Disposal in other Countries outside the
European Union
This symbol is only valid in the European Union.
If you wish to discard this product, please contact
your local authorities or dealer and ask for the
correct method of disposal.
10) Protect the power cord from being walked on or
pinched particularly at plugs, convenience receptacles,
and the point where they exit from the apparatus.
11) Only use attachments/accessories specified by the
manufacturer.
12) Use only with the cart, stand, tripod,
bracket, or table specified by the
manufacturer, or sold with the
apparatus. When a cart is used, use
caution when moving the cart/apparatus
combination to avoid injury from tipover.
13) Unplug this apparatus during lightning storms or when
unused for long periods of time.
14) Refer all servicing to qualified service personnel.
Servicing is required when the apparatus has been
damaged in any way, such as power-supply cord or
plug is damaged, liquid has been spilled or objects
have fallen into the apparatus, the apparatus has
been exposed to rain or moisture, does not operate
normally, or has been dropped.
Placement of speakers
Speakers are designed identically so that no left or right
channel orientation is necessary.
Use only the supplied speakers.
The combination of the main unit and speakers provide the
best sound. Using other speakers can damage the unit and
sound quality will be negatively affected.
Note
• Keep your speakers at least 10 mm (13/32˝) away from the system
for proper ventilation.
• These speakers do not have magnetic shielding. Do not place
them near televisions, personal computers or other devices easily
infl uenced by magnetism.
• You cannot take the front net off the speakers.
Caution
• Use the speakers only with the recommended
system. Failure to do so can damage the amplifi er
and speakers, and can cause fi re. Consult a qualifi ed
service person if damage occurs or if a sudden
change in performance is apparent.
• Do not attach these speakers to walls or ceilings.
RQTV0160
3
Page 4
Getting started
Step 1Step 1
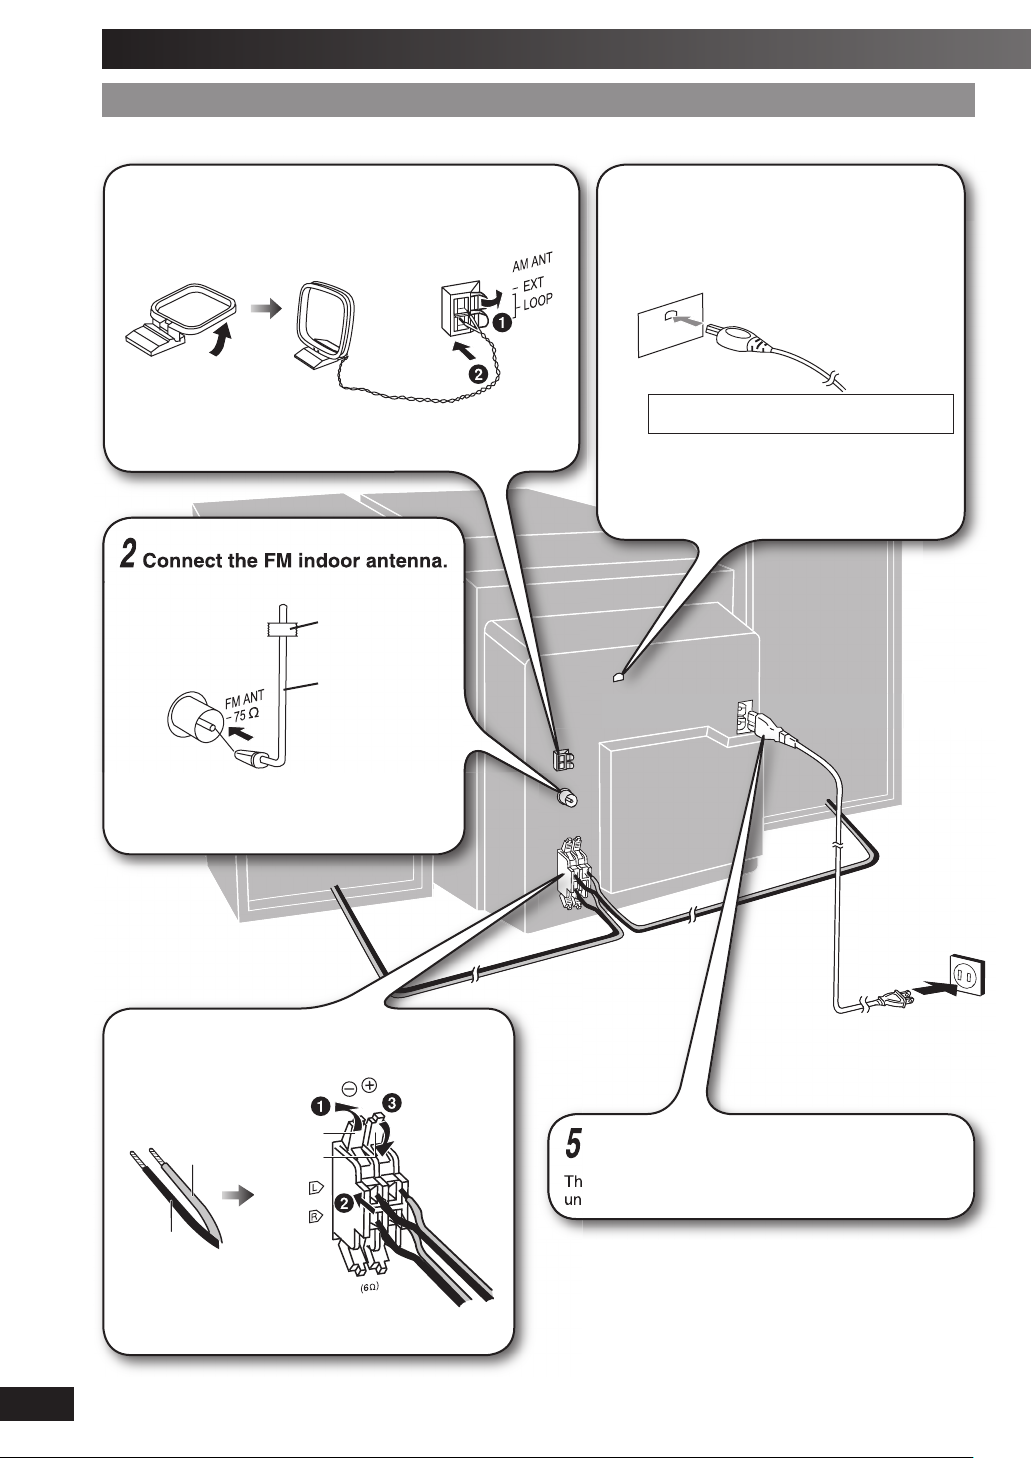
Connect the AC power supply cord only after all other connections have been made.
1
Stand the antenna up on its base. Keep the loose antenna cord
away from other wires and cords.
2
- Making the connections - Making the connections
Connect the AM loop antenna.
AM loop antenna
Connect the FM indoor antenna.
Adhesive
tape
FM indoor
antenna
4
Connect the XM Connect & Play
antenna, or XM Mini-Tuner and
Home Dock (includes home
antenna). (sold separately)
XM Connect & Play antenna, or XM Mini-Tuner
and Home Dock (includes home antenna)
To prevent interference with wireless equipment,
place the antenna away from other equipment
that emits radio waves (such as radio equipment
and microwave ovens).
Refer to page 10 for optimizing the reception.
Tape the antenna to a wall or column, in a
position with least amount of interference.
3
Connect the speaker cables.
Black (·)
Red (ª)
Black (·)
Incorrect connection can damage the unit.
RQTV0160
Red (ª)
5
Connect the AC power supply cord.
The included AC power supply cord is for use with this
unit only. Do not use it with other equipment.
4
Page 5
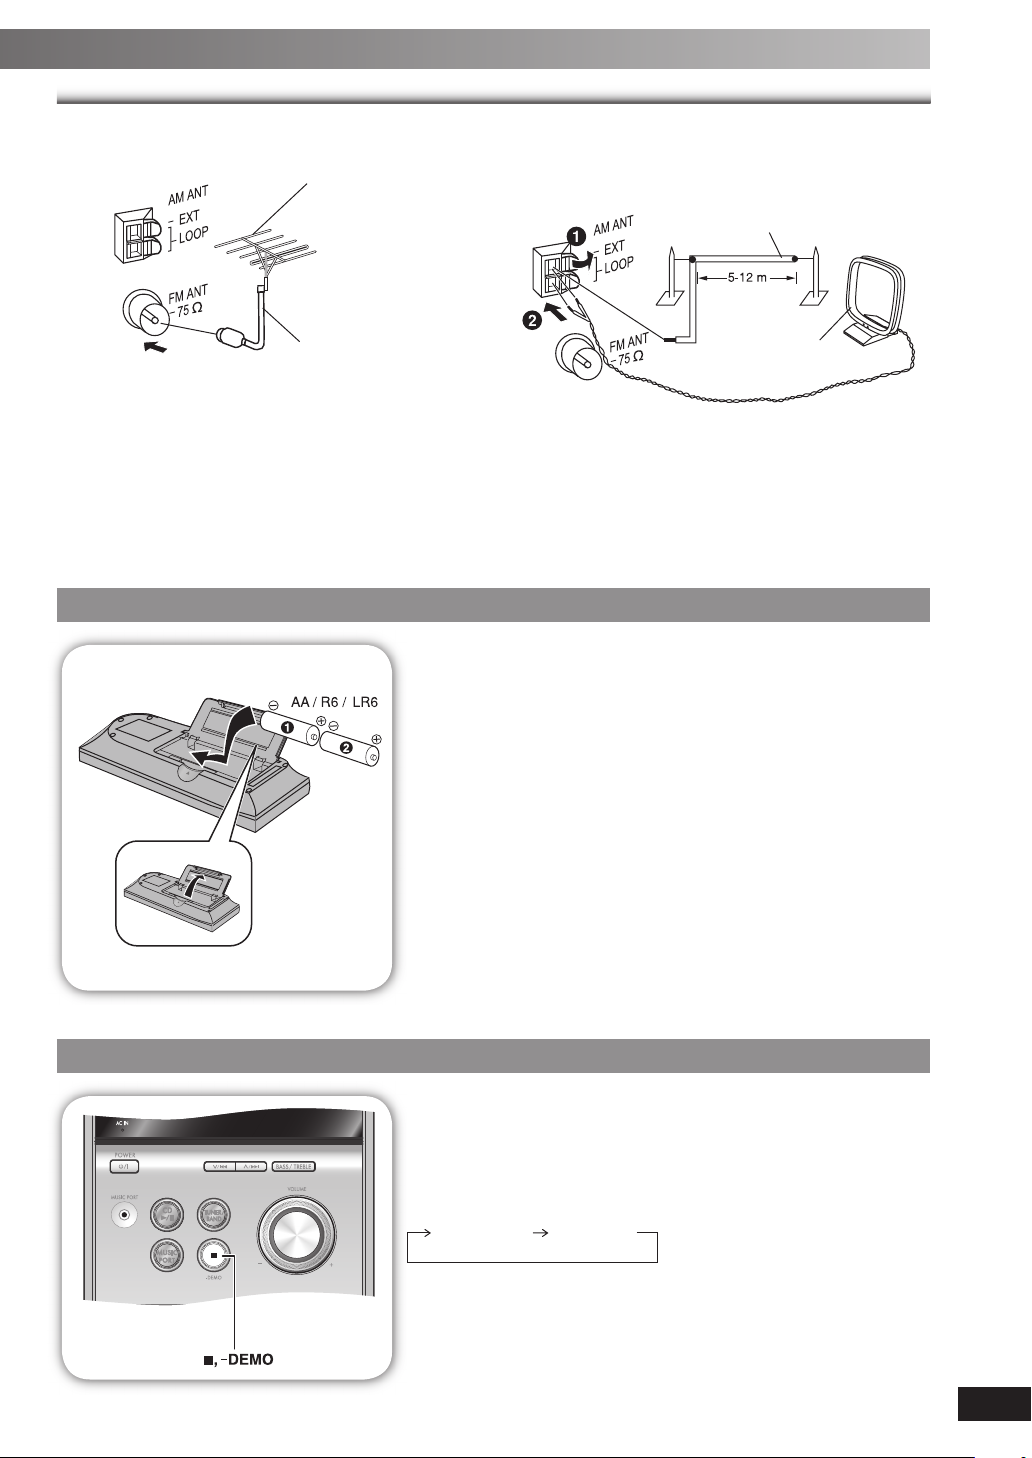
Optional antenna connectionsOptional antenna connections
FM outdoor antenna AM outdoor antenna
FM outdoor antenna
(not included)
AM outdoor antenna
(not included)
(16-40 ft.)
75
Ω coaxial cable
(not included)
• Never use an outdoor antenna during a lightning storm.
• You can connect the FM outdoor antenna for better reception. Please consult your dealer for installation.
• Disconnect the FM indoor antenna if an FM outdoor antenna is installed.
• Connect the AM outdoor antenna without removing the AM loop antenna. Run 5 to 12 m (16 to 40 feet) of vinyl-covered
wire horizontally along a window or other convenient location.
Step 2Step 2
- Inserting batteries into the remote control - Inserting batteries into the remote control
■ Batteries
• Insert so the poles (+ and –) match those in the remote control.
• Remove if the remote control is not going to be used for a long period of
time. Store in a cool, dark place.
• Do not use rechargeable type batteries.
• Do not heat or expose to fl ame.
• Mishandling of batteries in the remote control can cause electrolyte
leakage, which may cause a fi re.
Do not:
• mix old and new batteries;
• use different types of batteries at the same time;
• take apart or short-circuit;
• attempt to recharge alkaline or manganese batteries;
• use batteries if their covering has been peeled off.
AM loop antenna
(included)
Step 3Step 3
- DEMO function - DEMO function
■ Use
Aim at the remote control sensor, avoiding obstacles, at a maximum
range of 7
Refer to page 6 for remote control signal sensor position.
When the unit is fi rst plugged in, a demonstration of its functions may be
shown on the display.
If the demo setting is off, you can show a demonstration by selecting
“DEMO ON”.
Press and hold [7, –DEMO].
The display changes each time the button is held down.
While in standby mode, select “DEMO OFF” to reduce power
consumption.
m (23 feet) directly in front of the unit.
$%-//&& $%-//.
RQTV0160
5
Page 6
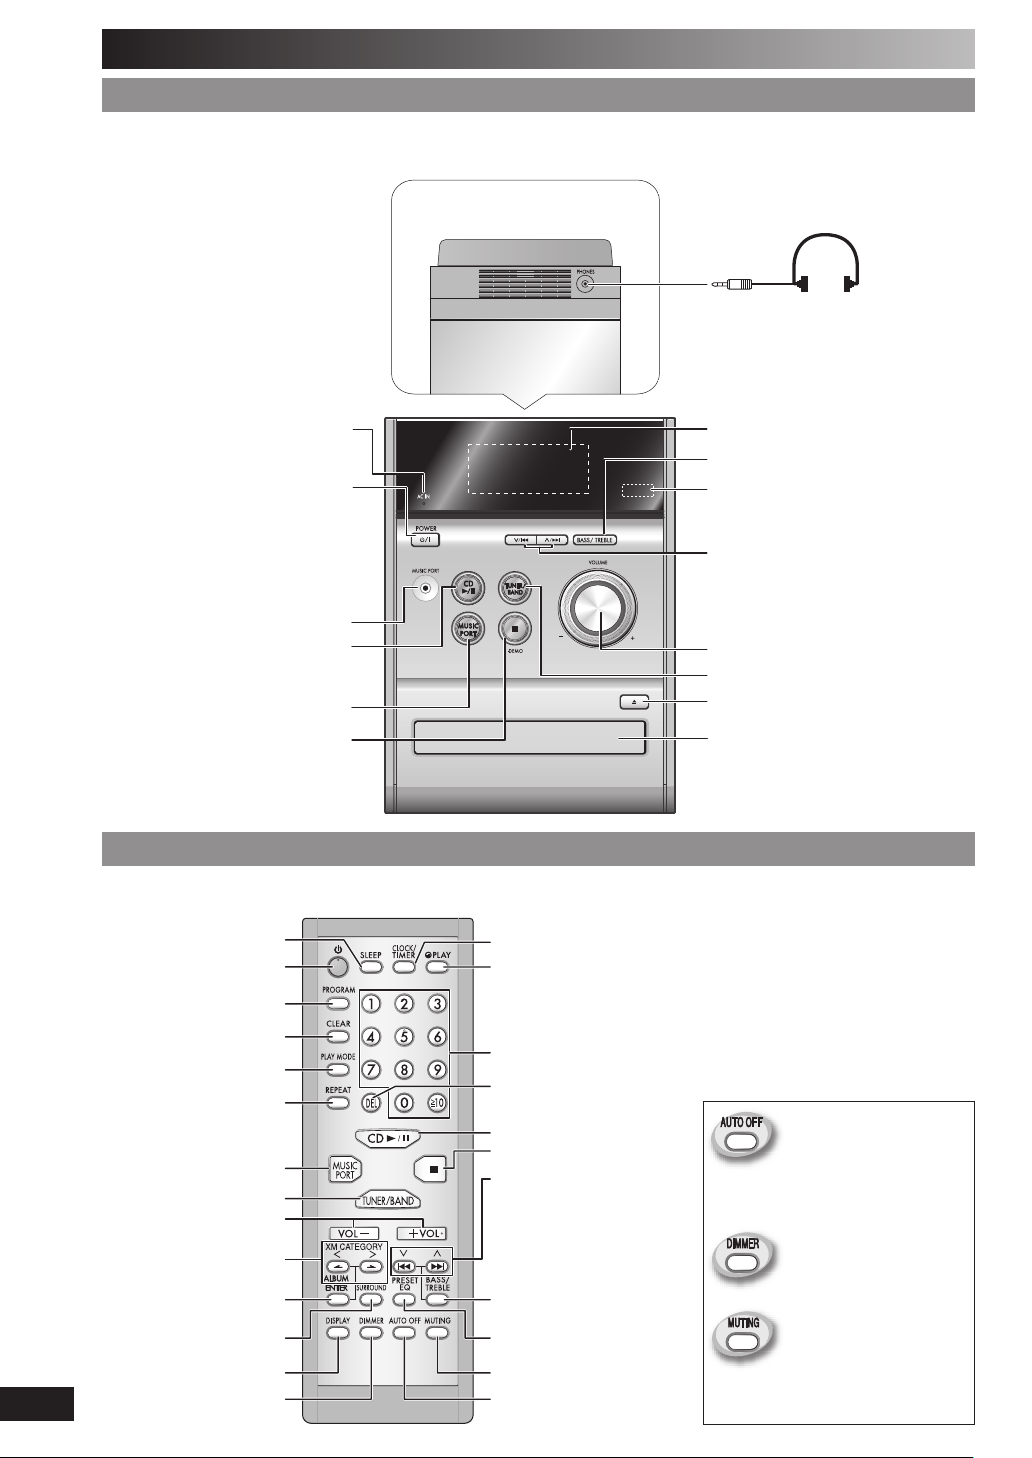
Overview of controls
Main unitMain unit
Refer to the numbers in parentheses for page reference.
Top of unit
Headphone jack (PHONES)
Avoid listening for prolonged
periods of time to prevent
hearing damage.
Plug type: Ø3.5
(not included)
mm (1/8˝) stereo
AC supply indicator (AC IN)
This indicator lights when the unit is
connected to the AC power supply.
1 Standby/on switch (
Press to switch the unit from on to
standby mode or vice versa. In standby
mode, the unit is still consuming a small
2 Disc play/pause (7, 8)
3 Music port selection (13)
y/l, POWER)
(7, 12)
amount of power.
Music port jack (13)
Stop/Demo (5, 7, 8)
Remote controlRemote control
Buttons such as 1 function the same as the controls on the main unit.
Sleep timer (12)
1
Program (8, 9, 11)
Clear (8)
Play mode (7, 9, 11)
Repeat (8)
3
6
5
XM radio category selection
and scan, disc album
selection (7, 8, 11)
Enter (8, 11)
Clock/Timer (12)
Play timer (12)
Numeric (7, 8, 9, 10)
Delete (8)
2
Stop (7, 8)
Disc skip/search, tune/preset
channel selection, XM radio
channel search/scan, time
adjustment, bass/treble
adjustment (7 to 13)
4
Display panel
4 Bass/Treble selection (13)
Remote control sensor
Disc skip/search, tune/preset
channel selection, XM radio channel
search/scan, time adjustment, bass/
treble adjustment
5 Volume control
6 Tuner/Band selection (9, 10, 11)
Disc tray open/close (7)
Disc tray
This function allows you to
turn off the unit in disc mode
only after left unused for 10
minutes.
The setting is maintained
even if the unit is turned off.
Dims the display panel.
RQTV0160
6
Surround (13)
Display (7, 11)
Dimmer
Preset EQ (13)
Muting
Auto off
Mutes the sound.
• Press the button to activate.
• Press again to cancel.
Page 7
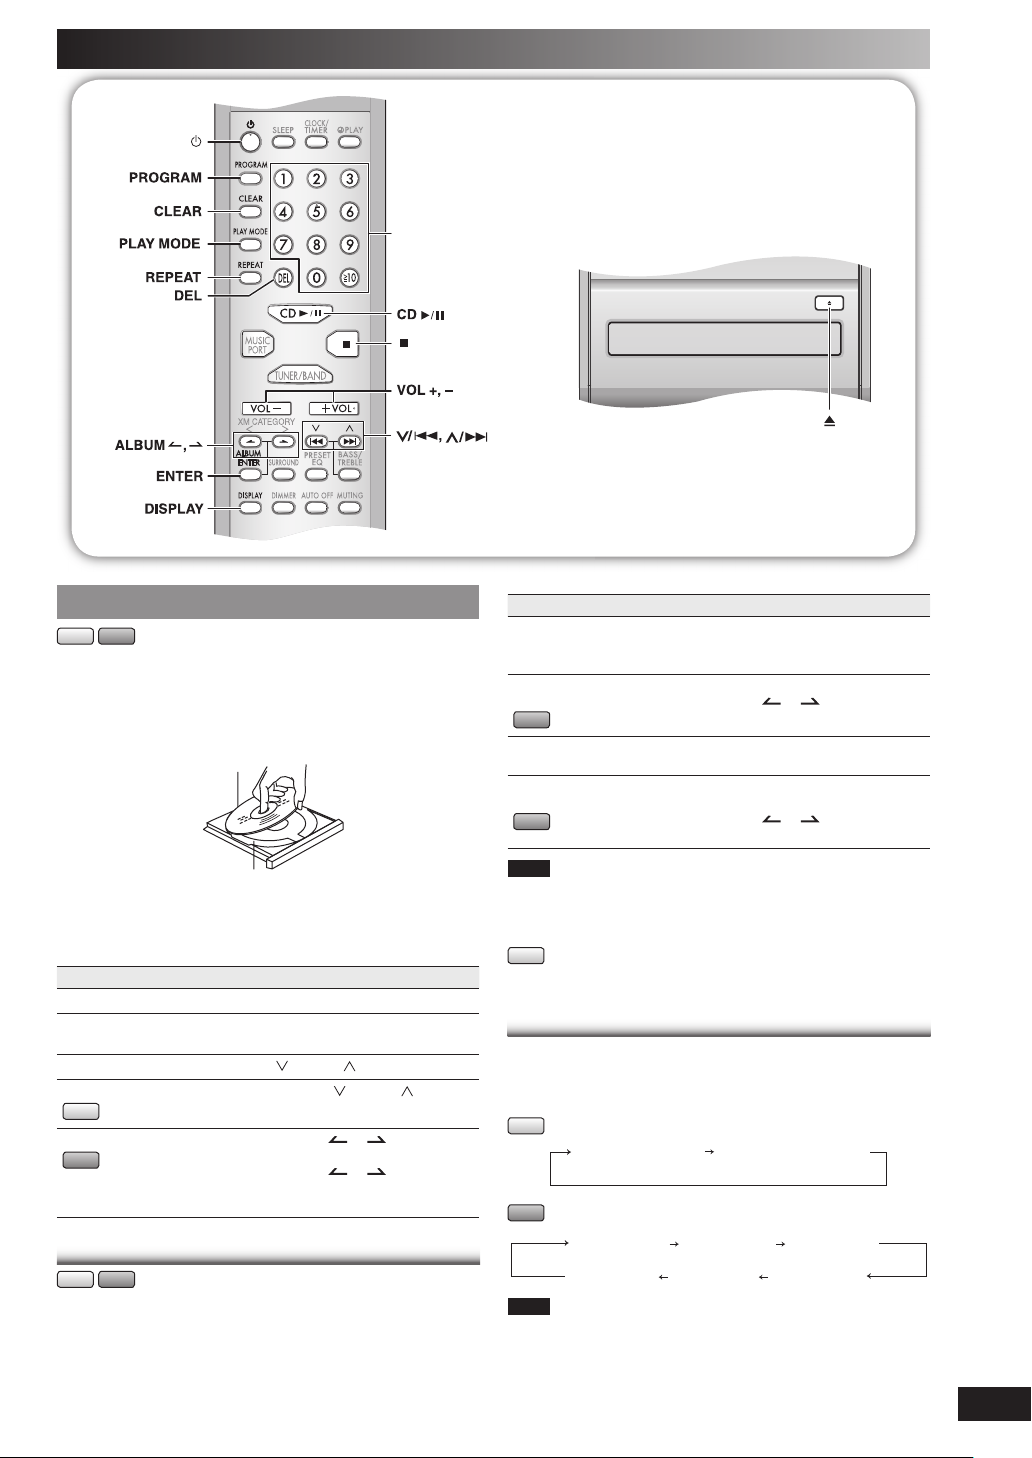
Discs
Numeric
buttons
Basic playBasic play
CD MP3
1
2
3
4
To Action
stop the disc Press [ 7 ].
pause play Press [CD 6]. Press again to
skip tracks
search through tracks
CD
skip album
MP3
Play Mode functionPlay Mode function
CD MP3
1
2
Press [y] to turn the unit on.
Press [0] to open the disc tray and then load the
disc. Press [0] again to close the tray.
Label must face upward
Disc tray
Press [CD 6] to start play.
Adjust the volume.
resume play.
[ /4] or [ /¢].
Press
Press and hold [ /4] or [ /¢]
during play or pause.
Press [ALBUM or ] in the play
mode.
Press [ALBUM
then the numeric buttons in the stop
mode.
or ] once and
Press [CD 6].
Press [PLAY MODE] to select the desired mode.
Mode To play
1-TRACK
1TR
1-ALBUM
1ALBUM
MP3
RANDOM
RND
1-ALBUM RANDOM
1ALBUM RND
MP3
Note
• During RANDOM or 1-ALBUM RANDOM play, you cannot skip to
tracks that have been played.
• The current play mode is cleared when you change a disc or open
the disc tray.
CD
• During RANDOM play, you can search backward or forward only
within the current track.
one selected track on the disc.
Press the numeric buttons to select the
track.
one selected album on the disc.
Press [ALBUM
album.
a disc randomly.
all tracks in one selected album
randomly.
Press [ALBUM
album.
or ] to select the
or ] to select the
Display functionDisplay function
This function allows you to display the information of the
current track.
Press [DISPLAY] repeatedly during play or pause mode.
CD
Elapsed play time Remaining play time
MP3
Elapsed time Album name Track name
ID3 (Artist)
Note
• Maximum number of displayable characters: approximately 30
• This unit supports ver. 1.0 & 1.1 ID3 tags. Text data that is not
supported will not be displayed.
• ID3 is a tag embedded in MP3 tracks to provide information about
the track.
ID3 (Track) ID3 (Album)
RQTV0160
7
Page 8
Discs (continued)
Advanced playAdvanced play
Direct access playDirect access play
This function allows you to start play from a specifi c track.
CD
Press the numeric buttons to select and play your
desired track.
MP3
Press [ALBUM or ] to select the album.
1
Press [ /¢] once and then the numeric buttons to
2
select and play your desired track.
For two-digit track, press [h10] once, and then the two digits.
For three-digit track, press [h
Note
This function does not work during any random/program mode.
Repeat playRepeat play
You can repeat program play or other selected play mode.
CD MP3
Press [REPEAT] before or during play.
“REPEAT ON” and “
To cancel
Press [REPEAT] again.
“REPEAT OFF” is displayed and “
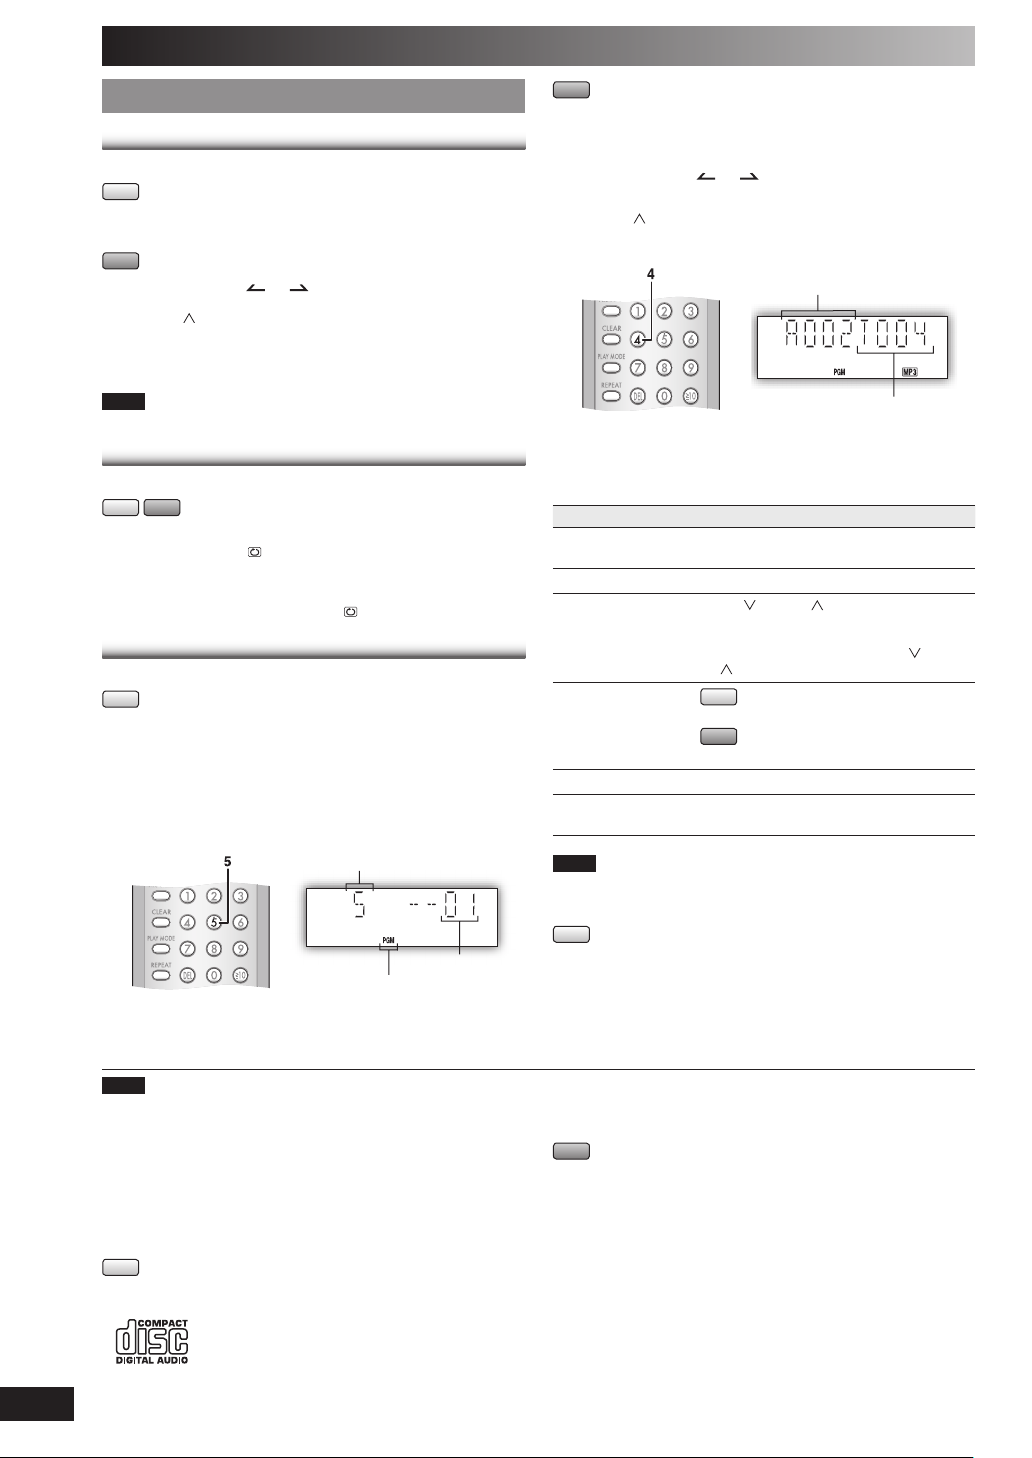
Program playProgram play
This function allows you to program up to 24 tracks.
CD
Press [CD 6] and then [ 7 ].
1
Press [PROGRAM].
2
Press the numeric buttons to select your desired
3
track.
Repeat this step to program other tracks.
Example:
Press [CD 6] to start play.
4
10]
twice, and then the three digits.
” are displayed.
” is cleared.
Track number
Program indicator
Program number
MP3
Press [CD 6] and then [ 7 ].
1
Press [PROGRAM].
2
Press [ALBUM or ] to select your desired
3
album.
Press [ /¢] once and then the numeric buttons to
4
select your desired track.
Example:
Album number
Track number
Press [ENTER].
5
Repeat steps 3 to 5 to program other tracks.
Press [CD 6] to start play.
6
To Action
cancel program
mode
replay the program Press [PROGRAM] then [CD 6].
check program
contents
add to the program
clear the last track Press [DEL] in the stop mode.
clear all
programmed tracks
Note
• When you try to program more than 24 tracks “PGM FULL”
appears.
• The program memory is cleared when you open the disc tray.
CD
• During program play, you can search backward or forward only
within the current track.
Press [PROGRAM] in the stop mode.
[ /4] or [ /¢] when “PGM” is
Press
displayed in the stop mode.To check while
programming, press [PROGRAM] twice
after “PGM” appears, then press
or [ /¢] .
CD
Repeat step 3 in the stop mode.
MP3
Repeat steps 3 to 5 in the stop mode.
Press [CLEAR] in the stop mode.
“CLR ALL” is displayed.
[ /4]
Note
• This unit can play MP3 fi les and CD-DA format audio CD-R/RW
that have been fi nalized.
• It may not be able to play some CD-R/RW depending on the
condition of the recording.
• Do not use irregularly shaped discs.
• Do not use discs with labels and stickers that are coming off or with
adhesive exuding from under labels and stickers.
• Do not attach extra labels or stickers on the disc.
• Do not write anything on the disc.
CD
• This unit can access up to 99 tracks.
• Choose a CD with this mark:
RQTV0160
8
Using DualDiscs
The “CD” sides of DualDiscs do not meet the CD-DA standard so it
may not be possible to play them on this unit.
MP3
• Files are treated as tracks and folders are treated as albums.
This unit can access up to 999 tracks, 255 albums and 20 sessions.
•
• Disc must conform to ISO9660 level 1 or 2 (except for extended
formats).
• To play in a certain order, prefi x the folder and fi le names with the
3-digit numbers in the order you want to play them.
Page 9
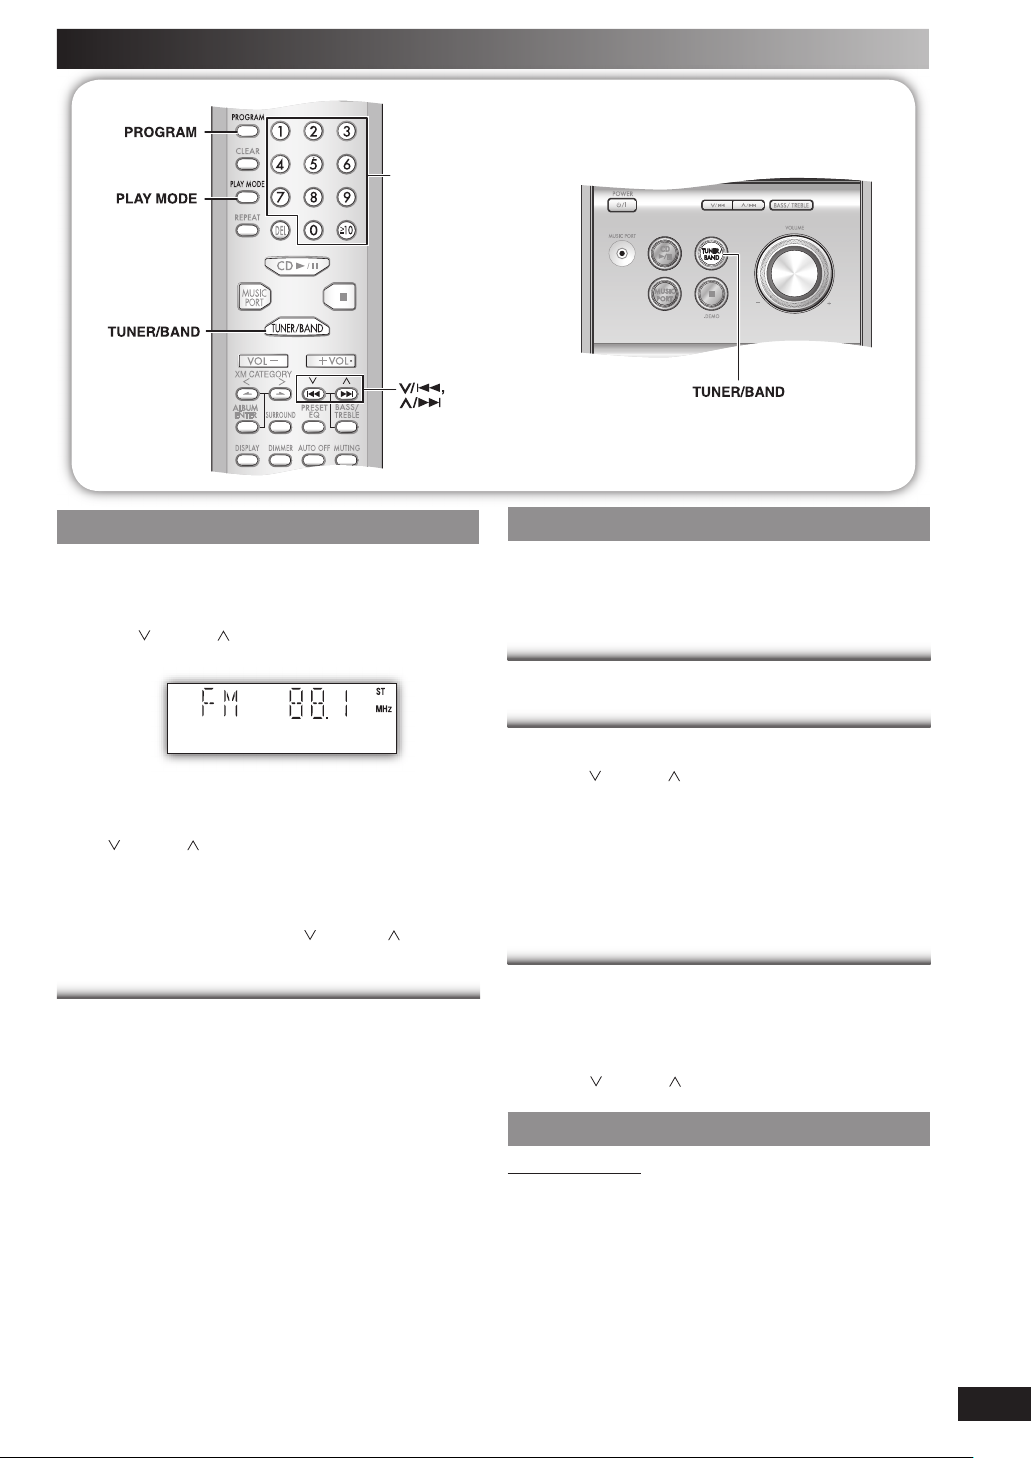
FM/AM Radio
Numeric
buttons
Manual tuningManual tuning
Press [TUNER/BAND] to select “FM” or “AM”.
1
Press [PLAY MODE] to select “MANUAL”.
2
Press [ /4] or [ /¢] to select the frequency of
3
the required station.
“
ST ”
is displayed when a stereo FM broadcast is being
received.
To tune automatically
Press
[ /4] or [ /¢] for a moment until the frequency
starts changing rapidly. The unit begins auto tuning, stopping
when it fi nds a station.
• Auto tuning may not function when there is excessive
interference.
• To cancel auto tuning, press [ /4] or [ /¢] once
again.
To improve FM sound qualityTo improve FM sound quality
Press and hold [PLAY MODE] to display “MONO”.
To cancel
Press and hold [PLAY MODE] again until “MONO”
disappears.
• MONO is also canceled if the frequency is changed.
• Turn off “MONO” for normal listening.
Memory presetMemory preset
Up to 15 stations can be set in both the FM and AM bands.
Preparation
Press [TUNER/BAND] to select “FM” or “AM”.
Automatic presettingAutomatic presetting
Press and hold [PROGRAM] to start presetting.
Manual presettingManual presetting
Press [PLAY MODE] to select “MANUAL”.
1
Press [ /4] or [ /¢] to tune to the required
2
station.
Press [PROGRAM].
3
Press the numeric buttons to select a channel.
4
The station occupying a channel is erased if another
station is preset in that channel.
Repeat steps 2 to 4 to preset more stations.
5
Selecting a preset stationSelecting a preset station
Press the numeric buttons to select the channel.
For channels 10 to 15 press [h10], then the two digits.
OR
Press [PLAY MODE] to select “PRESET”.
1
Press [ /4] or [ /¢] to select the channel.
2
FM allocation settingFM allocation setting
By main unit only
This system can also receive FM broadcasts allocated in
0.1 MHz steps.
To change the step to 0.1 MHz
Press [TUNER/BAND] to select “FM”.
1
Press and hold [TUNER/BAND].
2
After a few seconds the display changes to a fl ashing
display of the current minimum frequency.
Continue to hold down [TUNER/BAND].
3
•
When the minimum frequency changes, release the button.
To return to the original step, repeat the above steps.
•
After the setting is changed, any previously preset
frequency will be cleared.
RQTV0160
9
Page 10
XM® Satellite Radio
Numeric
buttons
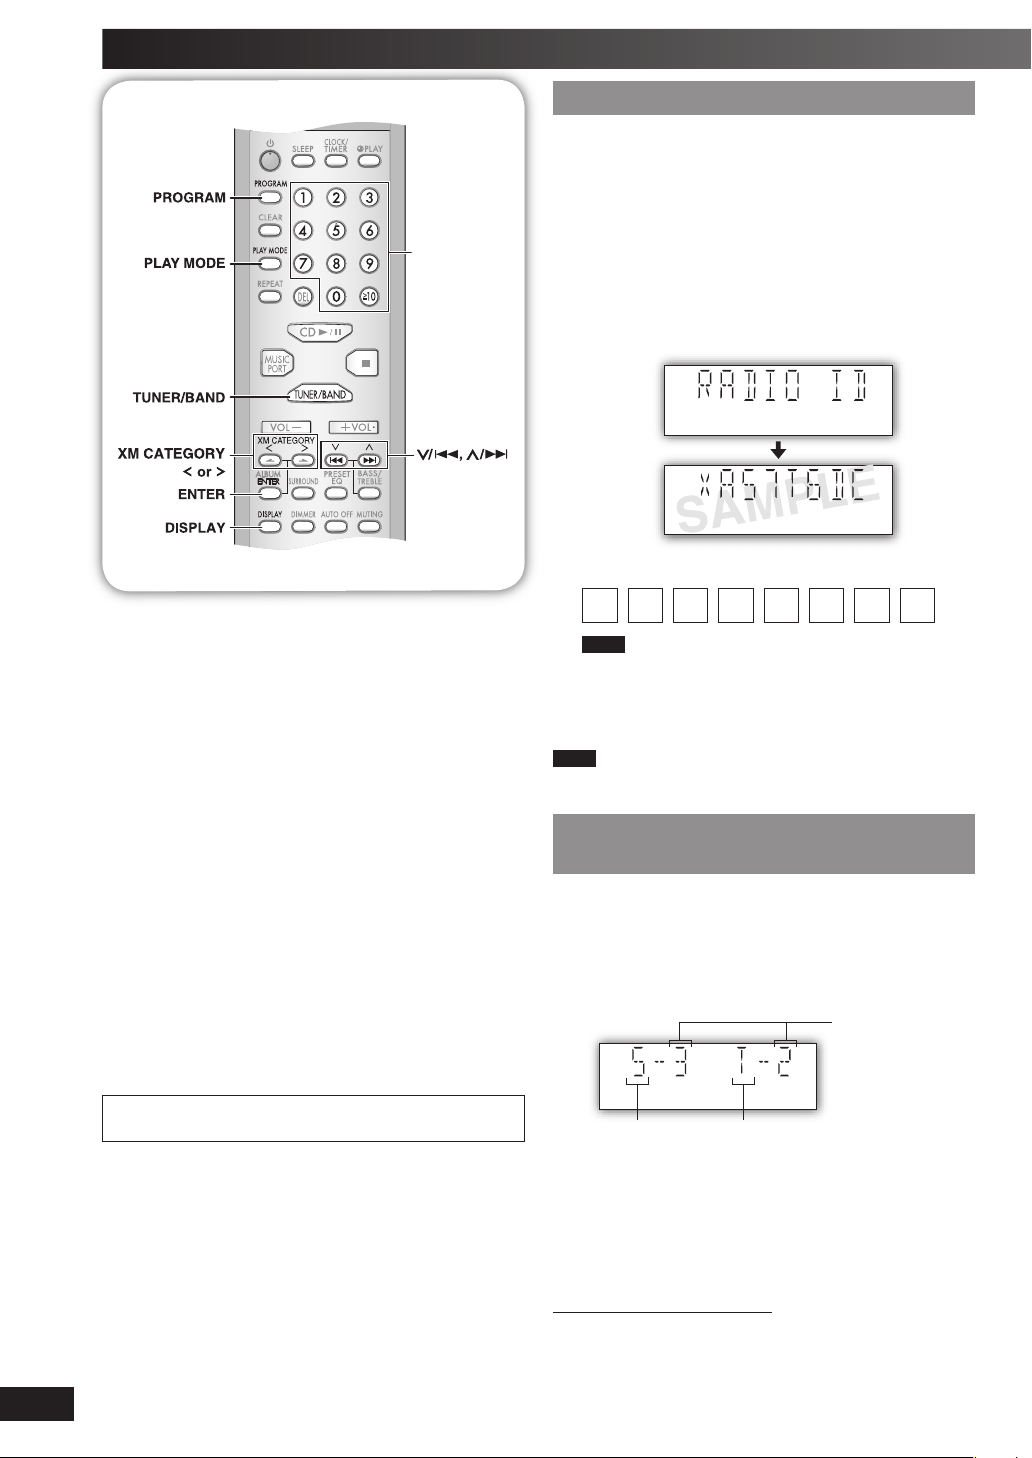
Displaying the XM Satellite Radio IDDisplaying the XM Satellite Radio ID
You can confi rm your XM Satellite Radio ID necessary for
activating XM Satellite Radio as follows.
Connect the XM Connect & Play antenna, or XM
1
Mini-Tuner and Home Dock. (
Press [TUNER/BAND] repeatedly to select “XM”.
2
“ANTENNA” blinks on the display if no XM antenna is
detected.
Press [0] to select channel “0” to display the Radio
3
ID.
“RADIO ID” is indicated in the display briefl y, followed by
an 8-digit alphanumeric ID.
Record your XM Satellite Radio ID here for reference:
4
page 4)
➡
Introducing XM Satellite Radio
XM Satellite Radio is the provider of satellite radio with more
than 6 million subscribers. XM offers more than 170 digital
radio channels with music, talk, news, sports, comedy, traffi c
and weather reports.
For more information, visit XM on the Web at www.xmradio.com.
How to Subscribe
XM monthly service subscription sold separately. XM
Connect & Play antenna, or XM Mini-Tuner and Home
Dock (includes home antenna) required to receive XM
service (sold separately). Installation costs and other fees
and taxes, including a one-time activation fee may apply.
Subscription fee is consumer only. All fees and programming
subject to change. Channels with frequent explicit language
are indicated with an XL. Channel blocking is available for
XM radio receivers by calling 1-800-XMRADIO (1-800967-2346). Subscriptions subject to Customer Agreement
available at xmradio.com. XM service only available in the
48 contiguous United States. XM Ready is a trademark of
XM Satellite Radio Inc. © 2006 XM Satellite Radio Inc. All
rights reserved.
• To subscribe, visit XM on the Web at www.xmradio.com or
call XM’s Listener Care at 1-800-XMRADIO (1-800-967-
2346). You should have your Radio ID ready; the Radio ID
can be found by selecting channel 0 on the radio.
The XM name and related logos are registered trademarks
of XM Satellite Radio Inc. All rights reserved.
Note
•
To avoid ambiguity, the letters I, O, S and F are not used in the ID.
• There is no sound output when “RADIO ID” is displayed.
XM channel 0 is for “RADIO ID” and channel 1 is for
“PREVIEW”.
Note
You can still listen to the preview channels XM1, XM174 and XM247
without activating the XM services.
Positioning the XM Connect & Play antenna, or XM Positioning the XM Connect & Play antenna, or XM
Mini-Tuner and Home Dock for optimal receptionMini-Tuner and Home Dock for optimal reception
The main unit has a signal strength indicator function that
allows you to optimize the XM signal reception.
Press [TUNER/BAND] repeatedly to select “XM”.
1
Ensure the antenna is connected. (➡ page 4)
Press and hold [DISPLAY] until the XM signal
2
status is displayed.
Signal strength:
4 (strong)
3 (good)
2 (marginal)
1 (weak)
Satellite signal Terrestrial signal
Position the antenna for the best possible satellite
3
signal reception.
As you position the antenna, the display changes
depending on the signal strength.
If the satellite signal is weak or not available, you can
optimize for the terrestrial signal (where available).
Press [DISPLAY] to return to the previous display.
4
0 (no signal)
10
RQTV0160
Tips for optimizing reception
• To prevent interference with wireless equipment, place the antenna
away from other equipment that emits radio waves (such as radio
equipment and microwave ovens).
• Place the antenna near a south-facing window with an unobstructed
view of the sky for the best satellite signal reception.
• Refer also to the operating instructions of your XM Connect & Play
or XM Mini-Tuner and Home Dock.
antenna,
Page 11
Manual TuningManual Tuning
Press [TUNER/BAND] repeatedly to select “XM”.
1
Press [PLAY MODE] to select “MANUAL”.
2
Each time you press the button:
MANUAL
Press [ /4] or [ /¢] to select a channel.
3
Press and hold [ /4] or [ /¢] to scan through
quickly.
OR
Press the numeric buttons for direct access to an
XM channel.
For two-digit channel, press [
two digits.
For three-digit channel, press [h10] twice, and then the
three digits.
Note
• You can enter a channel number between 0 to 255.
• If you enter a number that is not valid or selected an unauthorized
channel “XM
selected.
• If you change the playmode for XM, FM and AM playmodes are
also set to the newly select playmode, vice versa.
– –
–” is displayed and the previous channel is
PRESET
h
10] once, and then the
Selecting XM channels by categorySelecting XM channels by category
Memory presetMemory preset
Channel presettingChannel presetting
Channel presets allow you to quickly and conveniently select
your favorite XM channels. Up to 15 XM channels can be
stored as channel presets.
Press [PLAY MODE] to select “MANUAL”.
1
Press [ /4] or [ /¢] or numeric buttons to
2
select a channel.
Press [PROGRAM].
3
Press the numeric buttons to select a channel.
4
The station occupying a channel is erased if another
station is preset in that channel.
Repeat steps 2 to 4 to preset more stations.
5
Note
• You can only preset XM stations which you can receive.
• XM channel 0 (RADIO ID) cannot be stored as a channel preset.
Selecting a preset stationSelecting a preset station
Press [PLAY MODE] to select “PRESET”.
1
Press [ /4] or [ /¢] or numeric buttons to
2
select a channel.
XM channels are organized into categories such as Rock,
Classical, Country and Dance to make browsing and
selecting broadcast content easier.
Press [PLAY MODE] to select “MANUAL”.
1
Press [XM CATEGORY < or >] to select a category.
2
“CAT ON” (CATEGORY ON) is displayed briefl y, and
then the category of the current XM channel fl ashes on
the display.
Press and hold [XM CATEGORY < or >] to scan through
quickly.
Press [ /4] or [ /¢] to select a channel within
3
the category.
Press and hold [ /4] or [ /¢] to scan through
quickly.
Press [ENTER] to exit category mode.
4
“CAT OFF” (CATEGORY OFF) is displayed briefl y on
the display.
Note
• Category mode will cancel automatically after approximately 15
seconds if there is no user input.
• XM channel selection by category enables you to narrow down
your choices to channels belonging to a broadcasting category of
your choice and then to select a favorite channel from the chosen
category. Available categories vary according to broadcasting
hours. The unit does not display categories with no broadcasting
XM channel.
• Each XM channel may belong to two categories (Category 1 and
Category 2). Both categories are used for channel selection by
category.
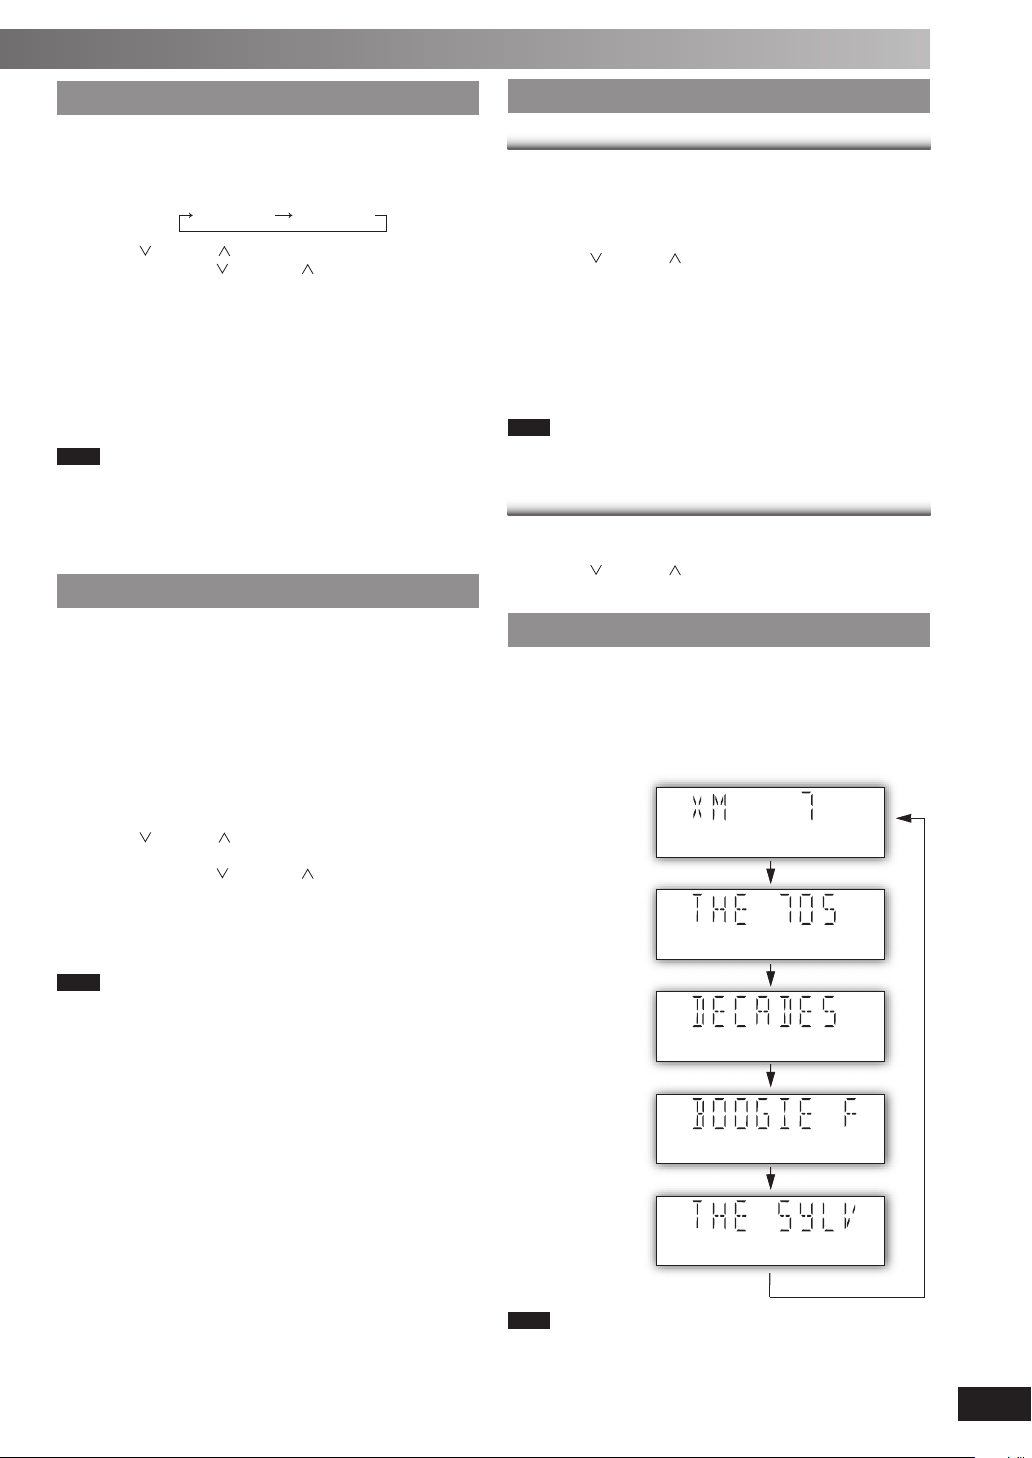
Displaying the XM channel informationDisplaying the XM channel information
The display mode setting can be changed to display
information about the broadcast content such as the
category, song title or artist’s name.
Press [DISPLAY] repeatedly to display:
%XAMPLE
#HANNELNUMBER
#HANNELNAME
#ATEGORYNAME
4ITLE
!RTIST
Note
• If there is no text information for the current XM broadcast, “– – –” is
displayed.
• For text information more than 8 characters long (Title or Artist
only), after the text has scrolled, press [DISPLAY] to scroll the text
again. Press [DISPLAY] while the text is scrolling to change the
display mode.
RQTV0160
11
Page 12
Timer
Using the play timerUsing the play timer
You can set the play timer to come on at a certain time to
wake you up.
Preparation
Turn the unit on and set the clock.
Prepare the music source you want to listen to; disc, radio or
music port source, and set the volume.
Press [CLOCK/TIMER] repeatedly to select play
1
timer.
CLOCK ˚ PLAY Original display
12
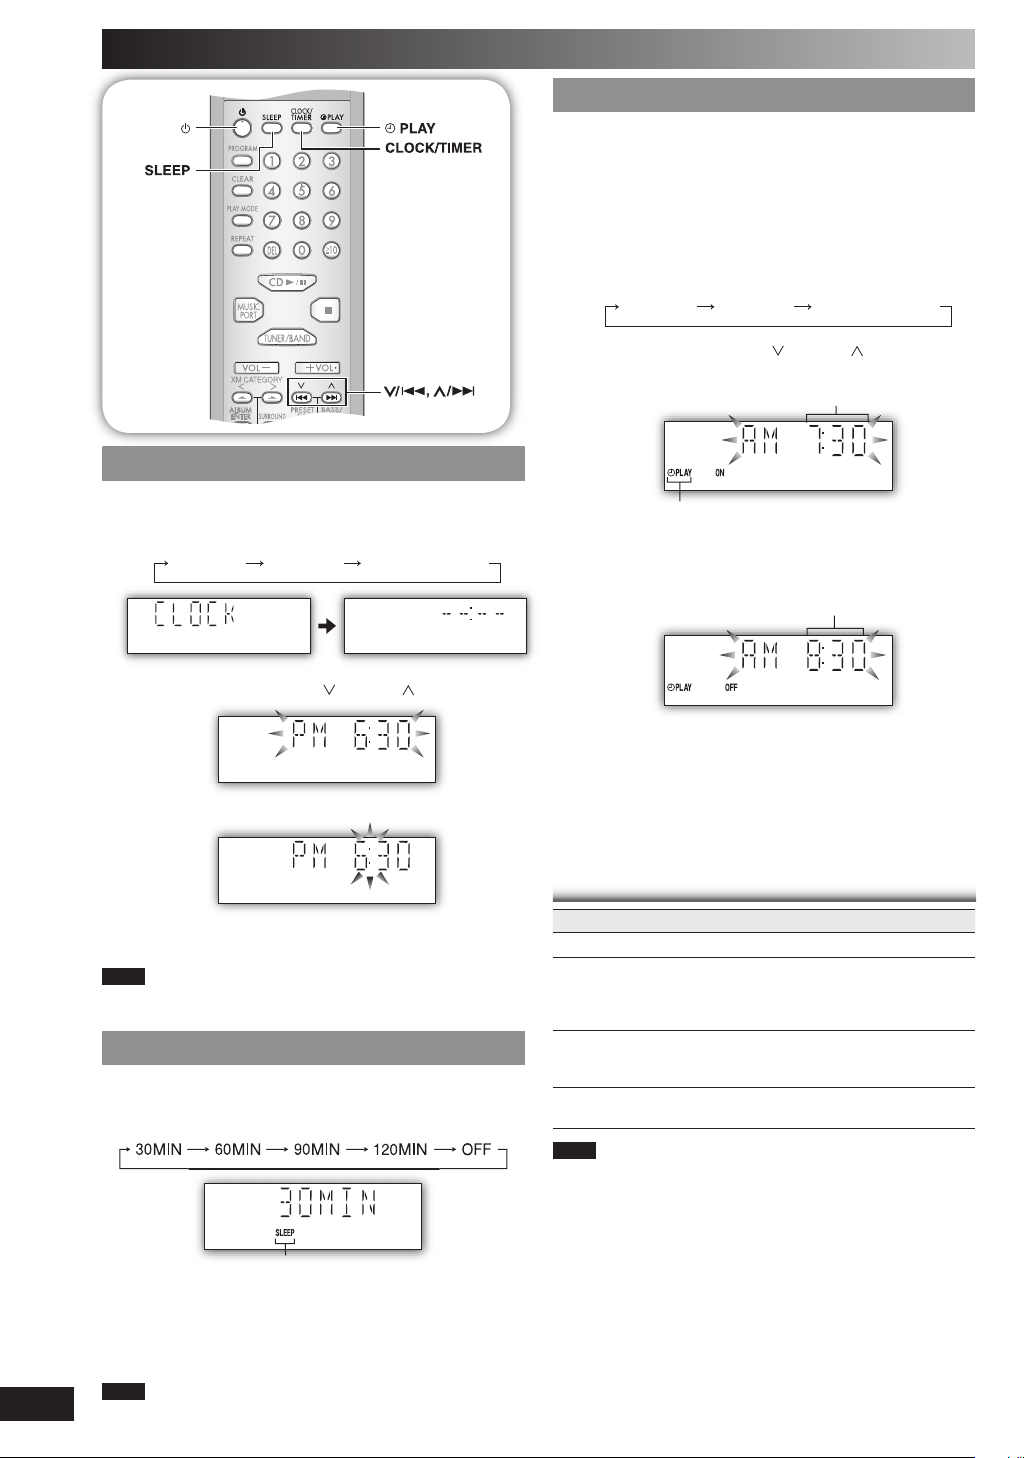
Setting the clockSetting the clock
This is a 12-hour clock.
Press [CLOCK/TIMER] to select “CLOCK”.
1
Each time you press the button:
CLOCK
Within 5 seconds, press [ /4] or [ /¢] to set
2
the time.
Press [CLOCK/TIMER] again to confirm.
3
Displaying the clock
Press [CLOCK/TIMER] to display the clock for few seconds.
Note
The clock may lose or gain minutes over a period of time. Readjust
as necessary.
˚ PLAY Original display
Using the sleep timerUsing the sleep timer
This function enables you to turn off the unit automatically
after the set time.
Press [SLEEP] repeatedly to select your desired time.
Sleep timer indicator
To cancel
Press [SLEEP] to select “OFF”.
Changing the remaining time
Press [SLEEP] to show the remaining time, and press
[SLEEP] again to select your desired time.
RQTV0160
Note
•
The play and sleep timer can be used together.
•
The sleep timer always has priority. Be sure not to overlap timer settings.
Within 5 seconds, press
2
starting time.
Play timer indicator
Press [CLOCK/TIMER] to confirm.
3
Repeat steps 2 and 3 to set the finishing time.
4
To activate the timer
Press [˚PLAY] to turn on the timer.
5
“˚PLAY” is displayed.
Press [y] to turn off the unit.
6
The unit must be off for the timer to operate.
[ /4] or [ /¢]
Start time
Finish time
to set the
Other basic operationsOther basic operations
To Action
change the settings Repeat steps 1 to 4 and 6.
change the source
or volume
check the settings
(when the unit is on
or in standby mode)
cancel Press [˚PLAY] to clear the timer indicator
Note
• The timer will start at the preset time, with the volume increasing
gradually to the preset level.
• The timer comes on at the set time every day if the timer is on.
• The unit must be in the standby mode for the timer to function.
• If you turn the unit off and on again while a timer is functioning, the
fi nish time setting will not be activated.
• If MUSIC PORT is selected as the source when the timer comes
on, the system turns on and engages MUSIC PORT as the source.
If you wish to playback from the portable audio equipment, activate
the equipment’s play mode and increase the volume. (See the
portable audio equipment’s instruction manual.)
1) Press [
2) Make changes to the source or volume.
3) Perform steps 5 and 6.
Press [CLOCK/TIMER] repeatedly to select
˚PLAY.
from the display.
˚PLAY] to clear the ˚PLAY
indicator from the display.
Page 13
Sound adjustment
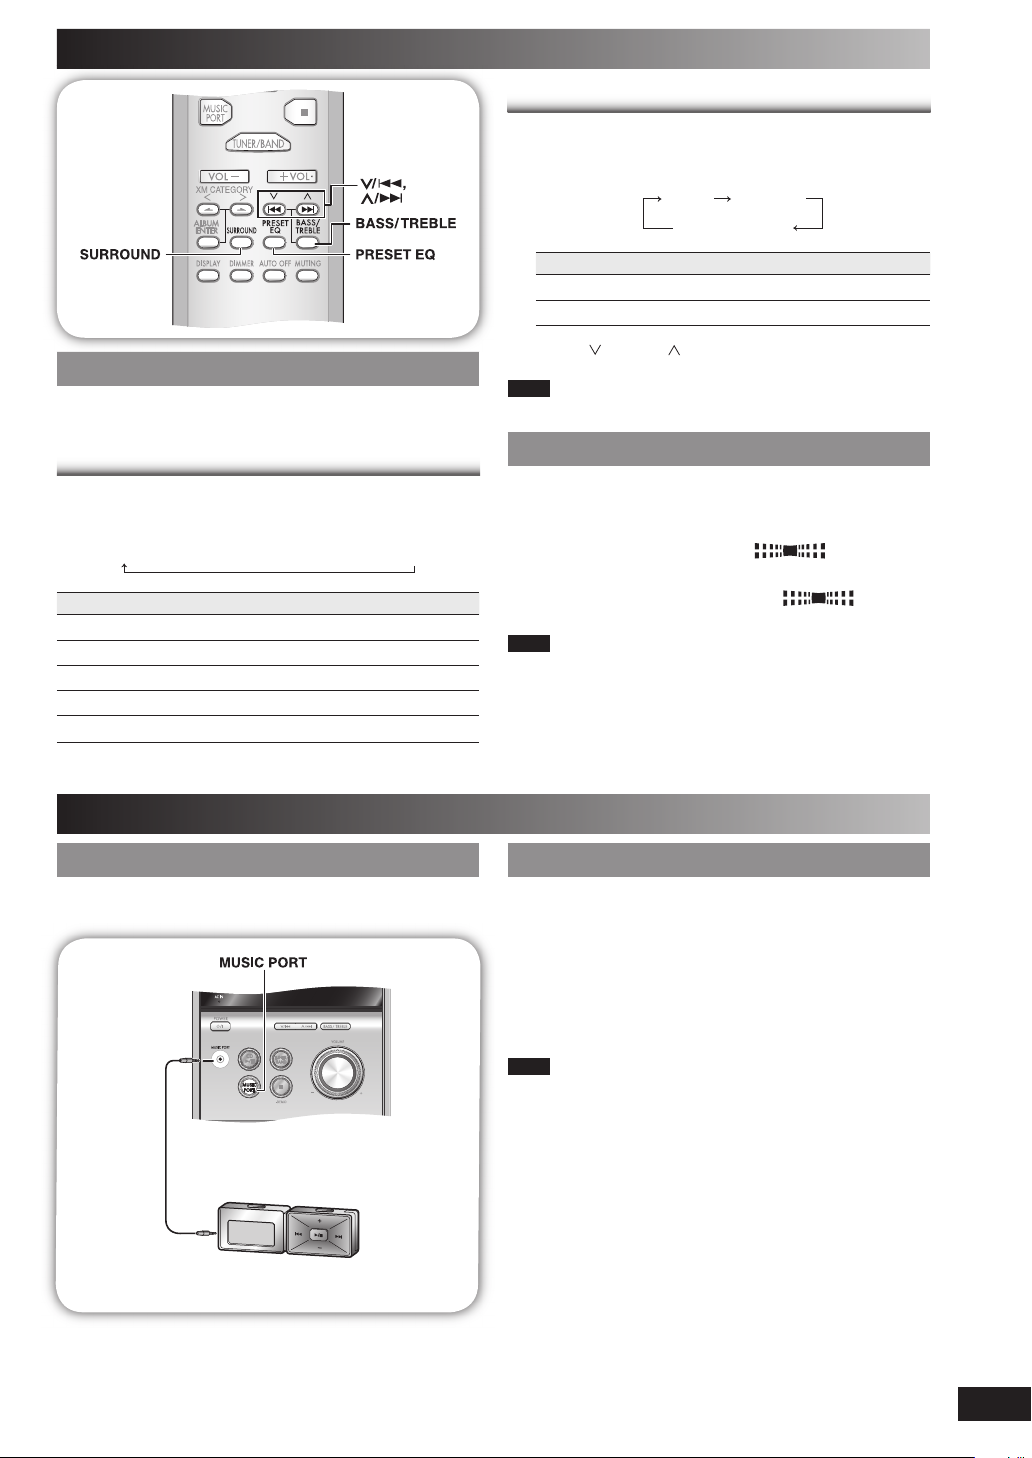
Selecting sound effectsSelecting sound effects
You can change the sound effect by selecting Preset EQ or
adjusting the bass or treble effect.
Preset EQPreset EQ
Press [PRESET EQ] repeatedly to select your desired
setting.
HEAVY
→
CLEAR → SOFT → VOCAL → EQ-OFF
Setting Effect
HEAVY Adds punch to rock
CLEAR Clarifi es higher frequencies
SOFT For background music
VOCAL Adds gloss to vocal
EQ-OFF No effect
Bass or trebleBass or treble
Enable you to enjoy the lower or higher pitch sound.
Press [BASS/TREBLE] repeatedly to select your
1
desired setting.
BASS TREBLE
original display
Setting Effect
BASS For lower pitch sound
TREBLE For higher pitch sound
Press [ /4] or [ /¢] to adjust the level.
2
Note
The tone level can be varied within -4 to +4.
Enjoying surround soundEnjoying surround sound
Enable you to add natural width and depth to the stereo
sound.
To activate
Press [SURROUND] to display “
To cancel
Press [SURROUND] again to clear “
indicator.
Note
• Surround sound is less discernible when listening through
headphones.
• If interference in FM stereo reception increases, cancel the
surround sound effect.
” indicator.
”
External unit
Connecting to a portable audio equipmentConnecting to a portable audio equipment
This feature enables you to enjoy music from portable audio
equipment.
Audio cord (not included)
Portable audio equipment
(not included)
Playing from portable audio equipmentPlaying from portable audio equipment
Switch off the equalizer function (if there is any) of the
portable audio equipment before you plug into the MUSIC
PORT jack. Otherwise, sound from the speaker may be
distorted.
Plug the audio cord into the MUSIC PORT jack and
1
press [MUSIC PORT].
Play the portable audio equipment. (See the
2
portable audio equipment’s instruction manual.)
Note
All peripheral components and cables are sold separately.
RQTV0160
13
Page 14
Troubleshooting guide
Before requesting service, make the following checks. If you are in doubt about some of the check points, or if the
remedies indicated in the chart do not solve the problem, refer to the “Customer Services Directory” on page 16.
Common problems
No sound.
Sounds unfi xed, reversed or
come from one speaker only.
Humming heard during
play.
“ERROR” is displayed.
“- -:- -” appears on the
display.
“F76” is displayed.
Listening to the radio
Noise is heard.
The stereo indicator fl ickers
or doesn’t light.
Sound is distorted.
A beat sound is heard.
A low hum is heard during
AM broadcast.
XM Satellite Radio advisory messages
“ANTENNA” is fl ashing.
“UPDATING” is fl ashing.
“NO SIGNL” is fl ashing.
“LOADING” is fl ashing.
“OFF AIR” is fl ashing.
–
–” is displayed.
“XM –
“XM RADIO” is displayed.
–
–” is displayed.
“–
You can receive only
promotional XM channels.
Turn the volume up.
The speaker cords may not be connected properly. Turn the unit off, check and correct the connections
and turn the unit on (➡ page 4).
Check the speaker connections (➡ page 4).
An AC power supply cord or fl uorescent light is near the cables. Keep other appliances and leads away
from this unit’s cables.
Incorrect operation performed. Read the instructions and try again.
You plugged the AC power supply cord in for the fi rst time or there was a power failure recently.
Set the time (➡ page 12).
Check and correct the speaker cord connections (➡ page 4).
If this does not fi x the problem, there is a power supply problem. Consult the dealer.
Use an outdoor antenna (➡ page 5).
Turn the TV off or separate it from the unit.
Separate the antenna from other cables and cords.
The XM Connect & Play antenna, or XM Mini-Tuner and Home Dock is not properly connected.
Check the connection and make sure the antenna cable not damaged (➡ page 4).
The XM Connect & Play
encryption code.
Wait a few seconds for the update to complete.
You may have selected an XM channel that has been blocked, or is no longer available with your
subscription package.
If you want to inquire about receiving the channel, call XM’s Listener Care at 1-800-XMRADIO
(1-800-967-2346).
The XM signal is too weak.
Reorient the XM Connect & Play antenna, or XM Mini-Tuner and Home Dock for better reception.
The XM Connect & Play antenna, or XM Mini-Tuner and Home Dock is receiving and decoding the
broadcast information.
Wait a few seconds for loading to complete.
The selected XM channel is not currently broadcasting.
Select a different channel.
The selected XM channel is not available. Select a different channel.
It takes a short time for the XM radio to power up after turning on the main unit, during which time “XM
RADIO” is displayed (only when the selected source is XM).
Wait a few seconds for this process to complete.
Supplemental text information, such as the song title or artist’s name is not available for that particular broadcast.
You can change the type of XM channel information that is displayed by pressing [DISPLAY].
Your XM Connect & Play antenna, or XM Mini-Tuner and Home Dock has not been activated, or your
subscription has expired.
To activate your XM Connect & Play antenna, or XM Mini-Tuner and Home Dock, or to renew your
subscription, visit XM on the Web at www.xmradio.com or call XM’s Listener Care at 1-800-XMRADIO
(1-800-967-2346). You should have your Radio ID ready.
antenna,
or XM Mini-Tuner and Home Dock is being updated with the latest
14
When there is a television set nearby
The picture on the TV
disappears or stripes appear
on the screen.
The location and direction of the antenna are incorrect. If you are using an indoor antenna, change to an
outdoor antenna (➡ page 5).
The TV antenna wire is too close to the unit. Separate the antenna wire of the TV set from the unit.
Playing discs
The display is wrong or play
won’t start.
RQTV0160
The remote control
Remote control doesn’t
work.
The disc may be upside down (➡ page 7).
Wipe the disc.
Replace the disc if it is scratched, warped, or non-standard.
Condensation may have formed inside the unit due to a sudden change in temperature. Wait about an
hour for it to clear and try again.
Check that the batteries are inserted correctly (➡ page 5).
Replace the batteries if they are worn.
Page 15
Specifi cations
AMPLIFIER SECTION
FTC OUTPUT POWER both channel driven
simultaneously
10 % Total harmonic distortion (THD)
60 Hz to 20 kHz 4.3 W per channel (6 Ω)
RMS OUTPUT POWER both channel driven
simultaneously
10 % Total harmonic distortion (THD)
5 W per channel (6 Ω)
Output impedance
HEADPHONE 16 to 32 Ω
MUSIC PORT 12 kΩ
Phone jack
Terminal Stereo, 3.5 mm
Music Port jack
Terminal Stereo, 3.5 mm
XM Ready XM Mini-Tuner and Home Dock
FM TUNER SECTION
Frequency range 87.90 to 107.9 MHz (200 kHz steps)
87.50 to 108.0 MHz (100 kHz steps)
Sensitivity 1.50 µV (IHF)
S/N 26 dB 1.20 µV
Antenna terminal(s) 75 Ω (unbalanced)
Preset station FM 15 stations
AM 15 stations
AM TUNER SECTION
Frequency range 520 to 1710 kHz (10 kHz steps)
Sensitivity
S/N 20 dB (at 1000 kHz) 447 µV/m
CD SECTION
Disc played [8 cm or 12 cm]
(1) CD-Audio (CD-DA)
(2) CD-R/RW (CD-DA, MP3 formatted disc)
(3) MP3
Sampling frequency
CD 44.1 kHz
MP3 32 kHz, 44.1 kHz, 48 kHz
Bit rate
MP3 32 kbps to 384 kbps
Decoding 16/20/24 bit linear
Pickup
Beam source Semiconductor laser
Wavelength 785 nm
Laser power CLASS 1
Audio output (Disc)
Number of channels 2 channel
Frequency response 20 Hz to 20 kHz (+1, -2 dB)
Wow and fl utter Below measurable limit
Digital fi lter 8 fs
D/A converter MASH (1 bit DAC)
SPEAKER SECTION
Type 1 way, 1 speaker system
Speaker(s)
FULL RANGE 10 cm (4˝) cone type 6 Ω
Impedance 6 Ω
Input power (IEC) 5 W (MAX)
Output sound pressure 83 dB/W (1.0 m)
Frequency range 61 Hz to 17 kHz (-16 dB)
95 Hz to 15 kHz (-10 dB)
Dimensions (W x H x D) 139 x 227 x 136 mm
(515/32˝ x 815/16˝ x 511/32˝)
Mass 1.3 kg (2.9 lb.)
GENERAL
Power supply AC 120 V, 60 Hz
Power consumption 30 W
Dimensions (W x H x D) 165 x 227 x 327 mm
(61/2˝ x 815/16˝ x 127/8˝)
Mass 2.7 kg (6 lb.)
Operating temperature range
+5 to +35˚C (+41˚F to +95˚F)
Operating humidity range
5 to 90 % RH (no condensation)
Power consumption in standby mode 0.6 W (approx.)
Note
1. Specifi cations are subject to change without notice.
Mass and dimensions are approximate.
2. Total harmonic distortion is measured by the digital spectrum
analyzer.
RQTV0160
15
Page 16
Limited Warranty
Panasonic Consumer Electronics Company,
Division of Panasonic Corporation of North America
One Panasonic Way Secaucus, New Jersey 07094
Panasonic Audio Products
Limited Warranty
Limited Warranty Coverage
If your product does not work properly because of a defect in materials or
workmanship, Panasonic Consumer Electronics Company or Panasonic
Puerto Rico, Inc. (collectively referred to as “the warrantor”) will, for the
length of the period indicated on the chart below, which starts with the
date of original purchase (“warranty period”), at its option either (a) repair
your product with new or refurbished parts, or (b) replace it with a new or
a refurbished product. The decision to repair or replace will be made by
the warrantor.
Product or Part Name Parts Labor
Audio Products (except items listed
below)
USB Reader-Writer, Personal
Computer Card Adapters
(in exchange for defective item)
Accessories: Headphones,
Cartridges, Microphones, Adapters
Rechargeable Batteries,
DVD-R/-RAM Discs (in exchange
for defective item)
SD Memory Cards, Rechargeable
Battery Packs (in exchange for
defective item)
During the “Labor” warranty period there will be no charge for labor. During
the “Parts” warranty period, there will be no charge for parts. You must carryin or mail-in your product during the warranty period. If non-rechargeable
batteries are included, they are not warranted. This warranty only applies
to products purchased and serviced in the United States or Puerto Rico.
This warranty is extended only to the original purchaser of a new product
which was not sold “as is”. A purchase receipt or other proof of the original
purchase date is required for warranty service.
One (1) year One (1) year
One (1) year Not Applicable
Ninety (90)
days
Ten (10) days Not Applicable
Ninety (90)
days
Ninety (90)
days
Not Applicable
Panasonic Puerto Rico, Inc.
Ave. 65 de Infantería, Km. 9.5
San Gabriel Industrial Park, Carolina, Puerto Rico 00985
Carry-In or Mail-In Service
For Carry-In or Mail-In Service in the United States call 1-800-211-PANA
(1-800-211-7262) or visit Panasonic web site: http://www.panasonic.com
For assistance in Puerto Rico call Panasonic Puerto Rico, Inc. (787)-7504300 or fax (787)-768-2910.
Limited Warranty Limits And Exclusions
This warranty ONLY COVERS failures due to defects in materials or
workmanship, and DOES NOT COVER normal wear and tear or cosmetic
damage. The warranty ALSO DOES NOT COVER damages which occurred
in shipment, or failures which are caused by products not supplied by
the warrantor, or failures which result from accidents, misuse, abuse,
neglect, mishandling, misapplication, alteration, faulty installation, set-up
adjustments, misadjustment of consumer controls, improper maintenance,
power line surge, lightning damage, modifi cation, or commercial use (such
as in a hotel, offi ce, restaurant, or other business), rental use of the product,
service by anyone other than a Factory Servicenter or other Authorized
Servicer, or damage that is attributable to acts of God.
THERE ARE NO EXPRESS WARRANTIES EXCEPT AS LISTED UNDER
“LIMITED WARRANTY COVERAGE”. THE WARRANTOR IS NOT LIABLE
FOR INCIDENTAL OR CONSEQUENTIAL DAMAGES RESULTING FROM
THE USE OF THIS PRODUCT, OR ARISING OUT OF ANY BREACH OF
THIS WARRANTY. (As examples, this excludes damages for lost time,
travel to and from the servicer, loss of media or images, data or other
memory content. The items listed are not exclusive, but are for illustration
only.) ALL EXPRESS AND IMPLIED WARRANTIES, INCLUDING THE
WARRANTY OF MERCHANTABILITY, ARE LIMITED TO THE PERIOD
OF THE LIMITED WARRANTY.
Some states do not allow the exclusion or limitation of incidental or
consequential damages, or limitations on how long an implied warranty lasts,
so the exclusions may not apply to you.
This warranty gives you specifi c legal rights and you may also have
other rights which vary from state to state. If a problem with this product
develops during or after the warranty period, you may contact your dealer
or Servicenter. If the problem is not handled to your satisfaction, then write
to the warrantor’s Consumer Affairs Department at the addresses listed
for the warrantor.
PARTS AND SERVICE WHICH ARE NOT COVERED BY THIS LIMITED
WARRANTY ARE YOUR RESPONSIBILITY.
16
Customer Services DirectoryCustomer Services Directory
Obtain Product Information and Operating Assistance; locate your nearest Dealer or Servicenter; purchase Parts and
Accessories; or make Customer Service and Literature requests by visiting our Web Site at:
http://www.panasonic.com/consumersupport
or, contact us via the web at:
http://www.panasonic.com/contactinfo
You may also contact us directly at:
1-800-211-PANA (7262),
Monday-Friday 9 am-9 pm; Saturday-Sunday 10 am-7 pm, EST.
For hearing or speech impaired TTY users, TTY: 1-877-833-8855
Accessory PurchasesAccessory Purchases
Purchase Parts, Accessories and Instruction Books online for all Panasonic Products by visiting our Web Site at:
http://www.pasc.panasonic.com
or, send your request by E-mail to:
You may also contact us directly at:
1-800-332-5368 (Phone) 1-800-237-9080 (Fax Only) (Monday-Friday 9 am to 8 pm, EST.)
Panasonic Services Company
20421 84th Avenue South, Kent, WA 98032
(We Accept Visa, MasterCard, Discover Card, American Express, and Personal Checks)
For hearing or speech impaired TTY users, TTY: 1-866-605-1277
Service in Puerto RicoService in Puerto Rico
RQTV0160
Panasonic Puerto Rico, Inc.
Ave. 65 de Infantería, Km. 9.5, San Gabriel Industrial Park, Carolina, Puerto Rico 00985
Phone (787)750-4300, Fax (787)768-2910
Page 17
Product Service
1. Damage requiring service − The unit should be serviced by qualifi ed service personnel if:
(a) The AC power supply cord or the plug has been damaged; or
(b) Objects or liquids have gotten into the unit; or
(c) The unit has been exposed to rain; or
(d) The unit does not operate normally or exhibits a marked change in performance; or
(e) The unit has been dropped or the cabinet damaged.
2. Servicing − Do not attempt to service the unit beyond that described in these operating instructions. Refer all other
servicing to authorized servicing personnel.
3. Replacement parts
that have the same characteristics as the original parts. Unauthorized substitutes may result in fi re, electric shock, or
other hazards.
4. Safety check − After repairs or service, ask the servicer to perform safety checks to confi rm that the unit is in proper
working condition.
The servicer will require all components to service your system.
Therefore, should service ever be necessary, be sure to bring the entire system.
Product information
For product information or assistance with product operation:
Refer to “Customer Services Directory” on page 16.
− When parts need replacing ensure the servicer uses parts specifi ed by the manufacturer or parts
Maintenance
If the surfaces are dirtyIf the surfaces are dirty
To clean this unit, wipe with a soft, dry cloth.
• Never use alcohol, paint thinner or benzine to clean this unit.
• Before using chemically treated cloth, read the instructions that came with the cloth carefully.
Listening caution
%34
Selecting fi ne audio equipment such as the unit you’ve just purchased is only the start of your musical enjoyment. Now it’s
time to consider how you can maximize the fun and excitement your equipment offers. This manufacturer and the Electronic
Industries Association’s Consumer Electronics Group want you to get the most out of your equipment by playing it at a safe
level. One that lets the sound come through loud and clear without annoying blaring or distortion—and, most importantly,
without affecting your sensitive hearing.
We recommend that you avoid prolonged exposure to excessive noise.
Sound can be deceiving. Over time your hearing “comfort level” adapts to higher volumes of sound. So what sounds “normal”
can actually be loud and harmful to your hearing.
Guard against this by setting your equipment at a safe level BEFORE your hearing adapts.
To establish a safe level:
• Start your volume control at a low setting.
• Slowly increase the sound until you can hear it comfortably and clearly, and without distortion.
Once you have established a comfortable sound level:
• Set the dial and leave it there.
Taking a minute to do this now will help to prevent hearing damage or loss in the future. After all, we want you listening for
a lifetime.
RQTV0160
17
Page 18
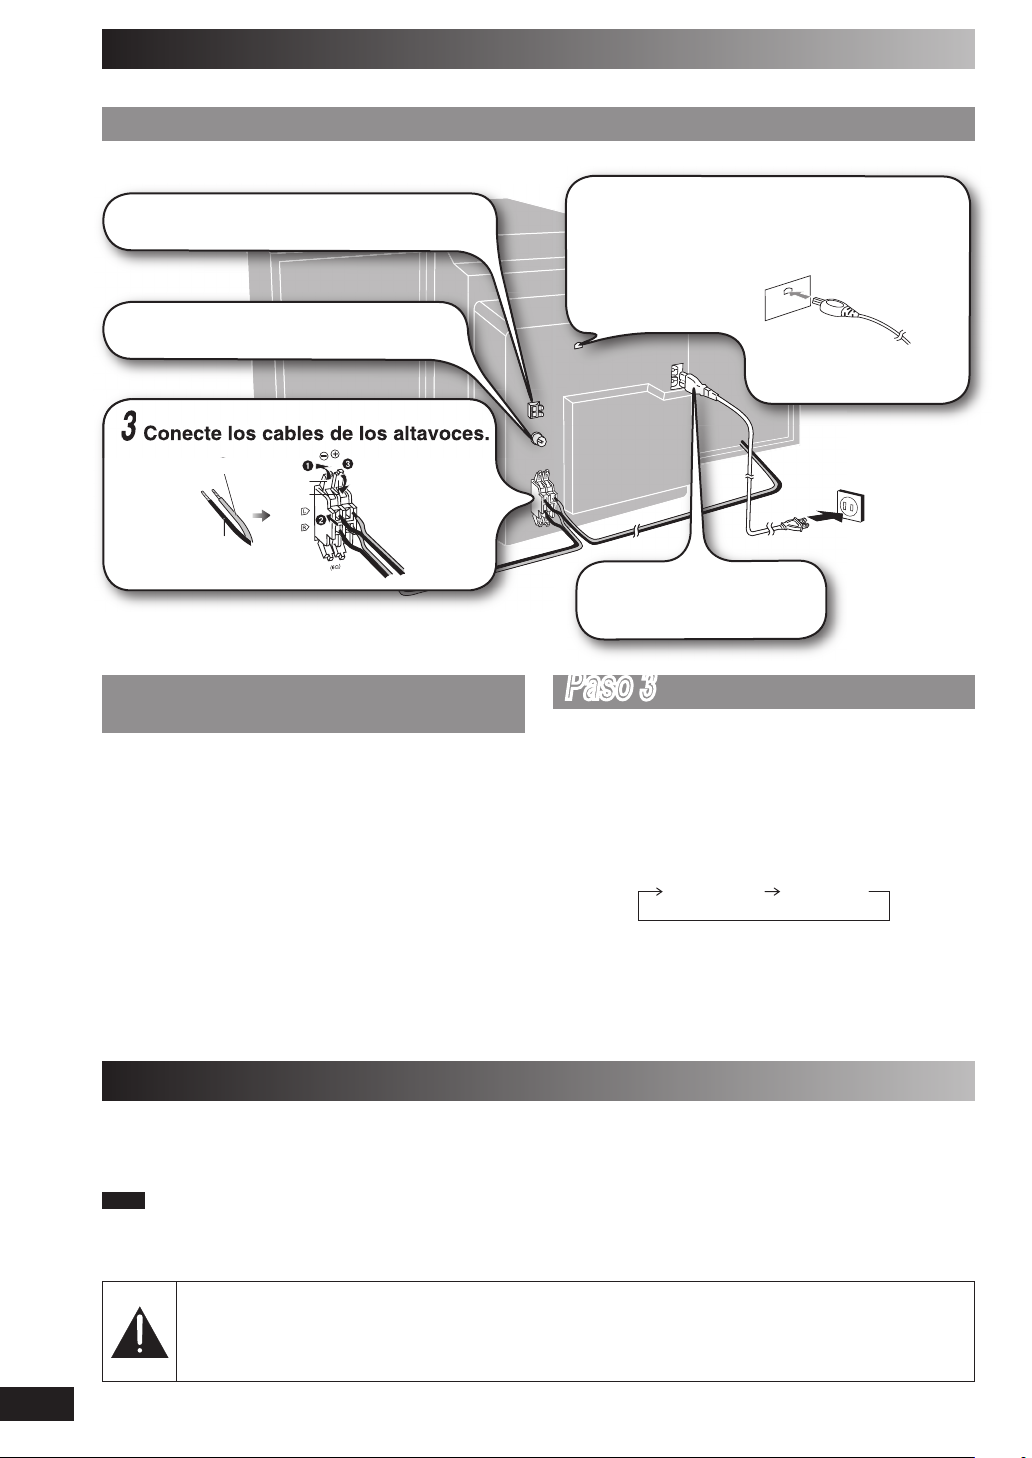
Preparativos iniciales
Referirse a las páginas 4 y 5 para las ilustraciones.
PasoPaso 11
Conecte el cable de alimentación de CA sólo después de haber hecho todas las demás conexiones.
1
- Conexiones - Conexiones
Conecte la antena de cuadro de AM.
4
Conecte la antena de XM Connect &
Play o el XM Mini-Tuner y Home Dock
(incluye antena doméstica). (Vendido
por separado)
2
Conecte la antena interior de FM.
Antena de XM Connect & Play
o XM Mini-Tuner y Home Dock
(incluye antena doméstica)
3
Conecte los cables de los altavoces.
Rojo (ª)
Negro (·)
Negro (·)
Rojo (ª)
5
Conecte el cable de
alimentación de CA.
PasoPaso 2 2
■ Pilas
• Inserte los polos (+ y –) de la forma que se indica en el
mando a distancia.
• Retire las pilas si no va a utilizar el mando a distancia
durante un periodo de tiempo largo. Guárdelas en un
lugar fresco y oscuro.
• No utilice baterías recargables.
•
Un mal manejo de pilas en el control remoto puede
provocar fugas electrolíticas, que pueden provocar fuego.
■ Utilización
Diríjalo al sensor del mando a distancia, evitando los
obstáculos, desde una distancia máxima de 7 m (23 pies)
directamente delante del aparato.
Consulte la página 19 para ver la posición del sensor de
la señal del mando a distancia.
- Introducción de pilas en el - Introducción de pilas en el
mando a distanciamando a distancia
Paso 3
Cuando el aparato se enchufe por primera vez puede
aparecer en el visualizador una demostración de sus
funciones.
Si el ajuste de demostración está desactivado, usted podrá
activarlo seleccionando “DEMO ON”.
Mantenga pulsado [7, −DEMO].
La visualización cambia cada vez que se pulsa el botón.
Durante el modo de espera, seleccione “DEMO OFF” para
reducir el consumo de energía.
- Función de demostración - Función de demostración
$%-//&& $%-//.
(desactivación) (activación)
18
Colocación de los altavoces
Los altavoces han sido diseñados idénticamente por lo que no es necesario orientar el canal derecho o izquierdo.
Utilice solamente los altavoces suministrados.
La combinación de la unidad principal y los altavoces proporcionan el mejor sonido. Utilizando otros altavoces se puede
estropear la unidad y el sonido quedará afectado negativamente.
Nota
• Mantenga sus altavoces alejados un mínimo de 10 mm (13/32˝ ) del sistema para tener una ventilación apropiada.
• Estos altavoces no disponen de blindaje magnético. No los ponga cerca de televisores, ordenadores personales u otros dispositivos a los
que afecte fácilmente el magnetismo.
• No quite la rejilla frontal de los altavoces.
Precaución
• Use los altavoces sólo con el sistema recomendado. De lo contrario, se podrían dañar el amplifi cador
y los altavoces, y se podría ocasionar un incendio. Consulte a un técnico de servicio especializado si
se ha producido algún daño o si se ha producido un cambio repentino en su funcionamiento.
RQTV0160
• No instale estos altavoces en paredes ni techos.
Page 19
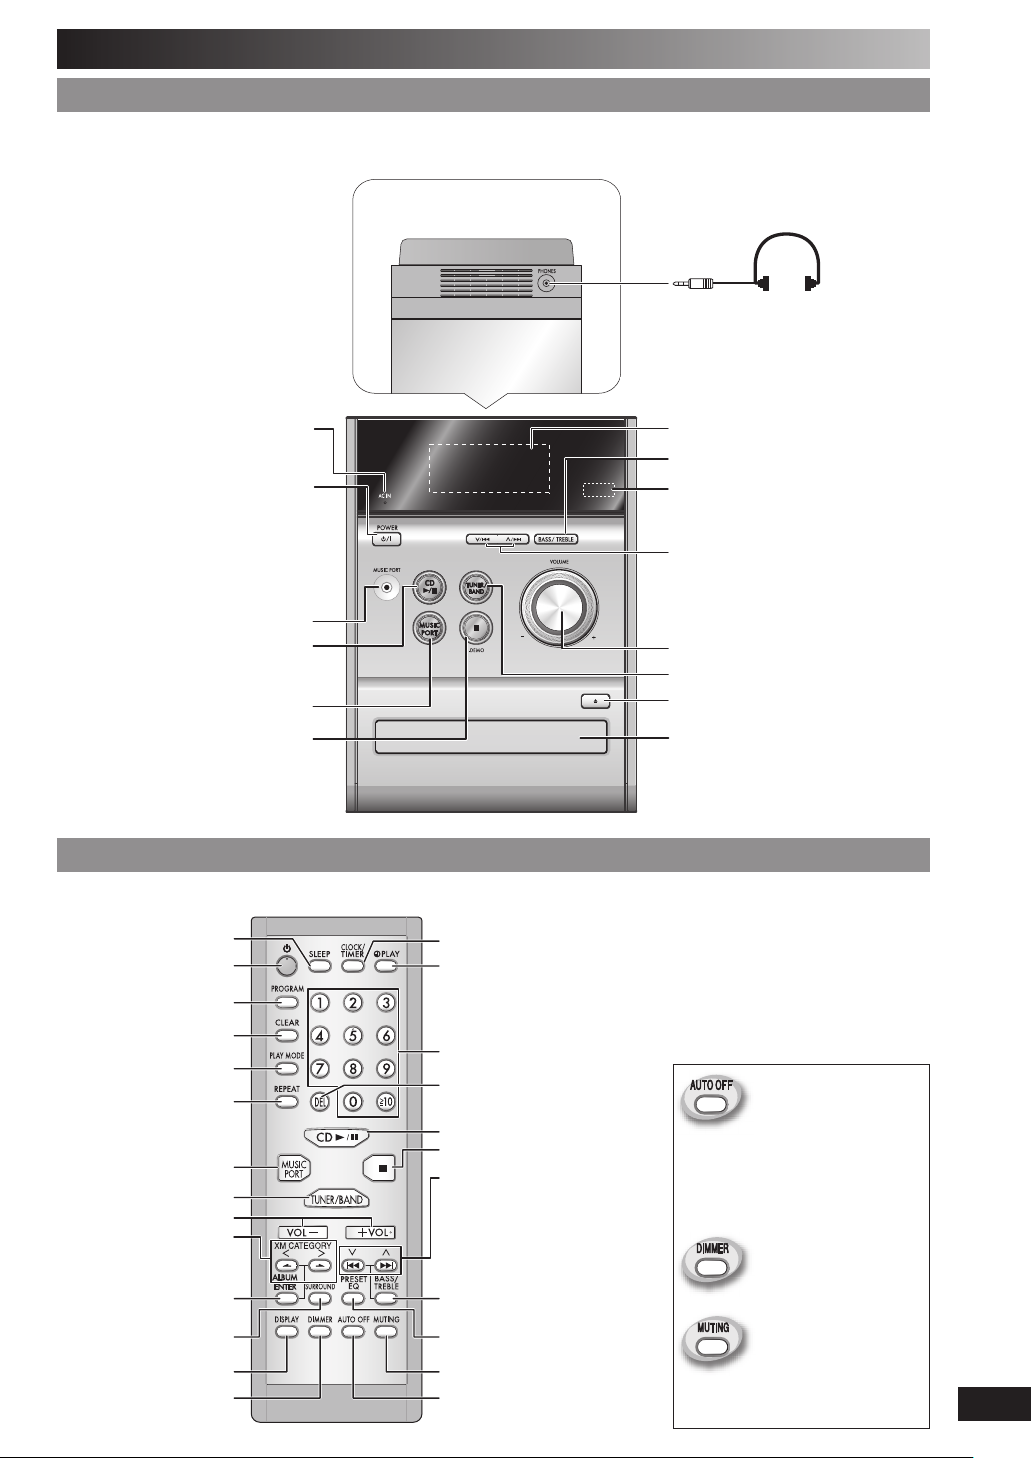
Controles
Aparato principalAparato principal
Los números entre paréntesis indican la página de referencia.
Parte superior del aparato
Indicador de alimentación de CA (AC IN)
Este indicador se encenderá cuando el
aparato esté conectado a la red de CA.
1 Interruptor de alimentación en
espera/conectada (y/l, POWER) (20, 23)
Pulse este interruptor para cambiar del
modo de alimentación conectada al modo
de alimentación en espera o viceversa. En el
modo de alimentación en espera el aparato
consume una pequeña cantidad de corriente.
Conector de puerto de música (13)
2 Reproducción/pausa de disco (8, 20)
3 Selección de puerto de música (13)
Paro/demostración (8, 18, 20)
Toma de auriculares (PHONES)
Procure evitar utilizarlos durante
un periodo de tiempo prolongado
con el fi n de evitar lesiones
auditivas.
Tipo de clavija: Estéreo
de 3,5 mm (
(no suministrada)
Visualizador
4 Selección de graves/agudos (13)
Sensor de señal del mando a distancia
Omitir/buscar disco, sintonizar/
selección de canal presintonizado,
buscar/exploración de canales de
radio XM, ajuste de tiempo, ajuste de
graves/agudos
5 Control de volumen
6 Selector de sintonizador/banda (21, 22)
Abrir/cerrar bandeja de disco (21)
Bandeja de disco (21)
1
/8˝) de diámetro
Mando a distanciaMando a distancia
Los botones como el 1 funcionan del mismo modo que los botones del aparato principal.
Temporizador para
dormir (11)
1
Programas (8, 21)
Cancelación de
programas (8)
Selector del modo de
reproducción (20, 21, 22)
Selección y exploración
de categoría de radio XM,
Sonido envolvente (13)
Repetición (8)
3
6
5
selección de álbum de
disco (8, 20, 22)
Introducir (8)
Visualizador (7, 11)
Reducción de la
iluminación del
visualizador
Reloj/temporizador (23)
Temporizador de
reproducción (23)
Numerados (20 ~ 23)
Borrado (8)
2
Parada (8, 20)
Omitir/buscar disco,
sintonizar/selección de canal
presintonizado, buscar/
exploración de canales de radio
XM, ajuste de tiempo, ajuste de
graves/agudos (20 ~ 23)
4
Ecualizador preajustado (13)
Silenciamiento
Apagado automático
Esta función de apagado
automático le permite
apagar el aparato
en modo disco, sólo
después de 10 minutos
sin utilizarlo.
El ajuste se mantiene
aunque el aparato esté
apagado.
Para reducir la iluminación
del visualizador.
Para silenciar el sonido.
• Pulse el botón para activarlo.
• Vuélvalo a pulsar para cancelar.
RQTV0160
19
Page 20
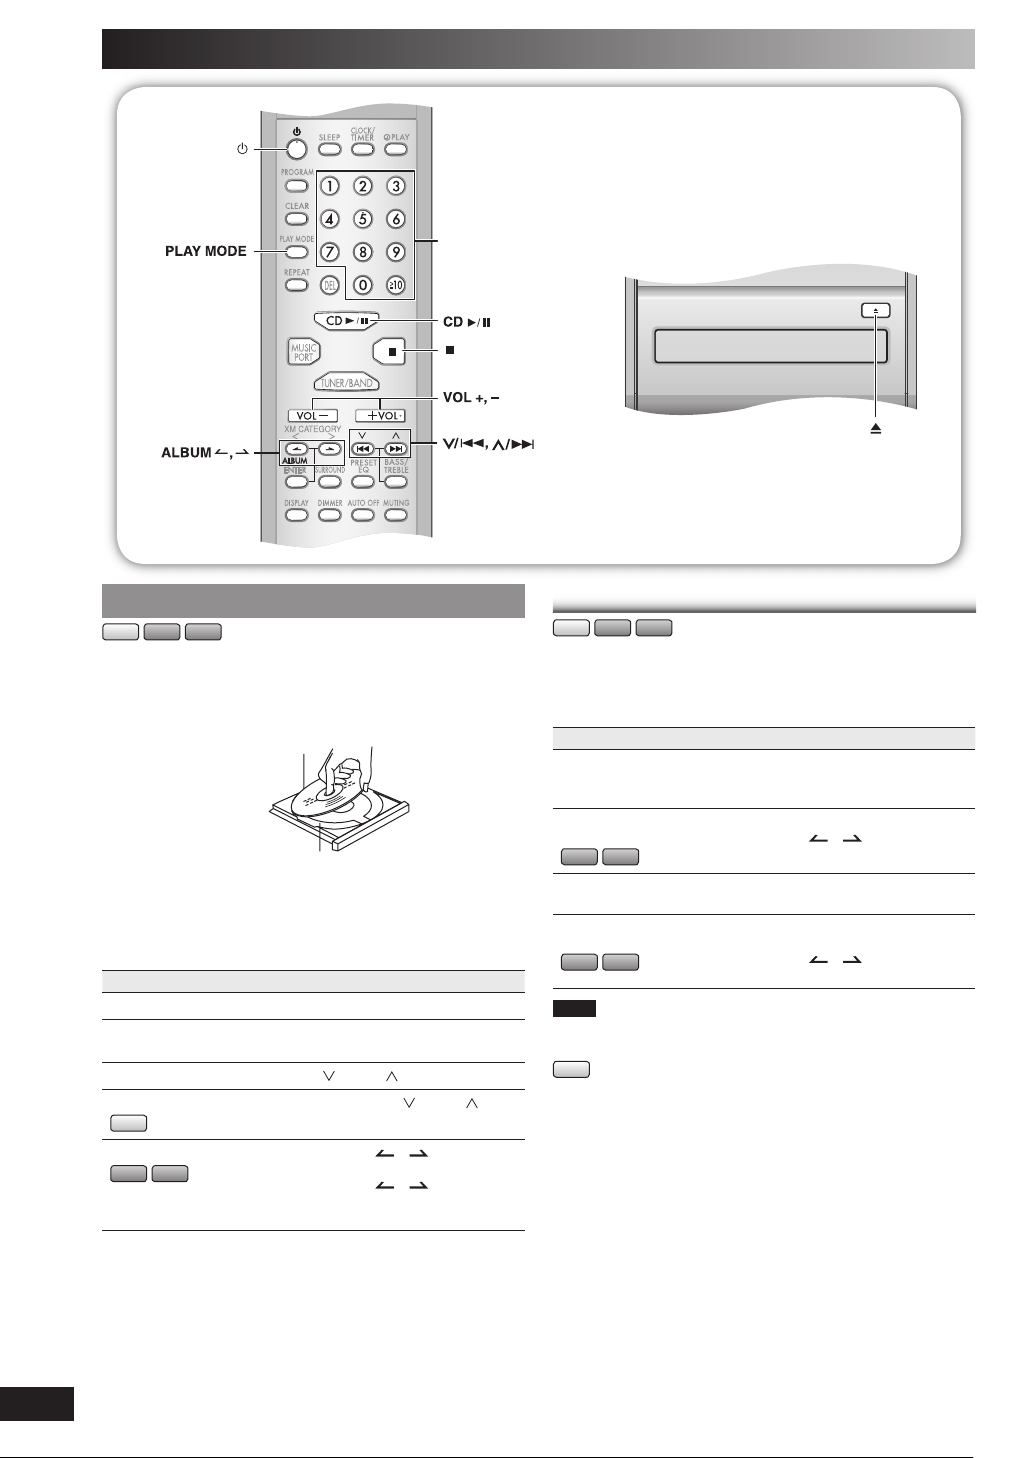
Discos
Botones
numéricos
Reproducción básicaReproducción básica
CD MP3 WMA
Pulse [y] para encender el aparato.
1
Pulse [0] para abrir la tapa del disco e inserte el
2
disco. Cierre la tapa.
Tapa del disco
La etiqueta tiene que
estar hacia arriba
Pulse [CD 6] para iniciar la reproducción.
3
Ajuste el volumen.
4
Para Acción
detener el disco Pulse [ 7 ].
interrumpir la
reproducción
saltar pistas Pulse
buscar por pistas
CD
saltar álbum
MP3 WMA
Pulse [CD 6]. Vuelva a pulsar para
reanudar la reproducción.
[ /4] o [ /¢].
Mantenga pulsado [ /4] o [ /¢]
durante la reproducción o la pausa.
Pulse [ALBUM o ] en el modo
de reproducción.
Pulse [ALBUM
los botones numéricos en el modo
de parada.
o ] una vez y
Función de modo de reproducciónFunción de modo de reproducción
CD MP3 WMA
Pulse [CD 6].
1
Pulse [PLAY MODE] para seleccionar el modo
2
deseado.
Modo Para reproducir
1-TRACK
1TR
1-ALBUM
1ALBUM
MP3 WMA
RANDOM
RND
1-ALBUM RANDOM
1ALBUM RND
MP3 WMA
Nota
• Durante la reproducción RANDOM o 1-ALBUM RANDOM, no
puede saltar pistas que ya han sido reproducidas.
CD
• Durante la reproducción RANDOM, podrá buscar hacia delante o
hacia atrás dentro de la pista actual solamente.
una melodía seleccionada del disco.
Pulse las teclas numéricas para
seleccionar la pista.
un álbum seleccionado del disco.
Pulse [ALBUM
el álbum.
un disco aleatoriamente.
todas las pistas de un álbum
seleccionado aleatoriamente.
Pulse [ALBUM
el álbum.
o ] para seleccionar
o ] para seleccionar
20
RQTV0160
Page 21
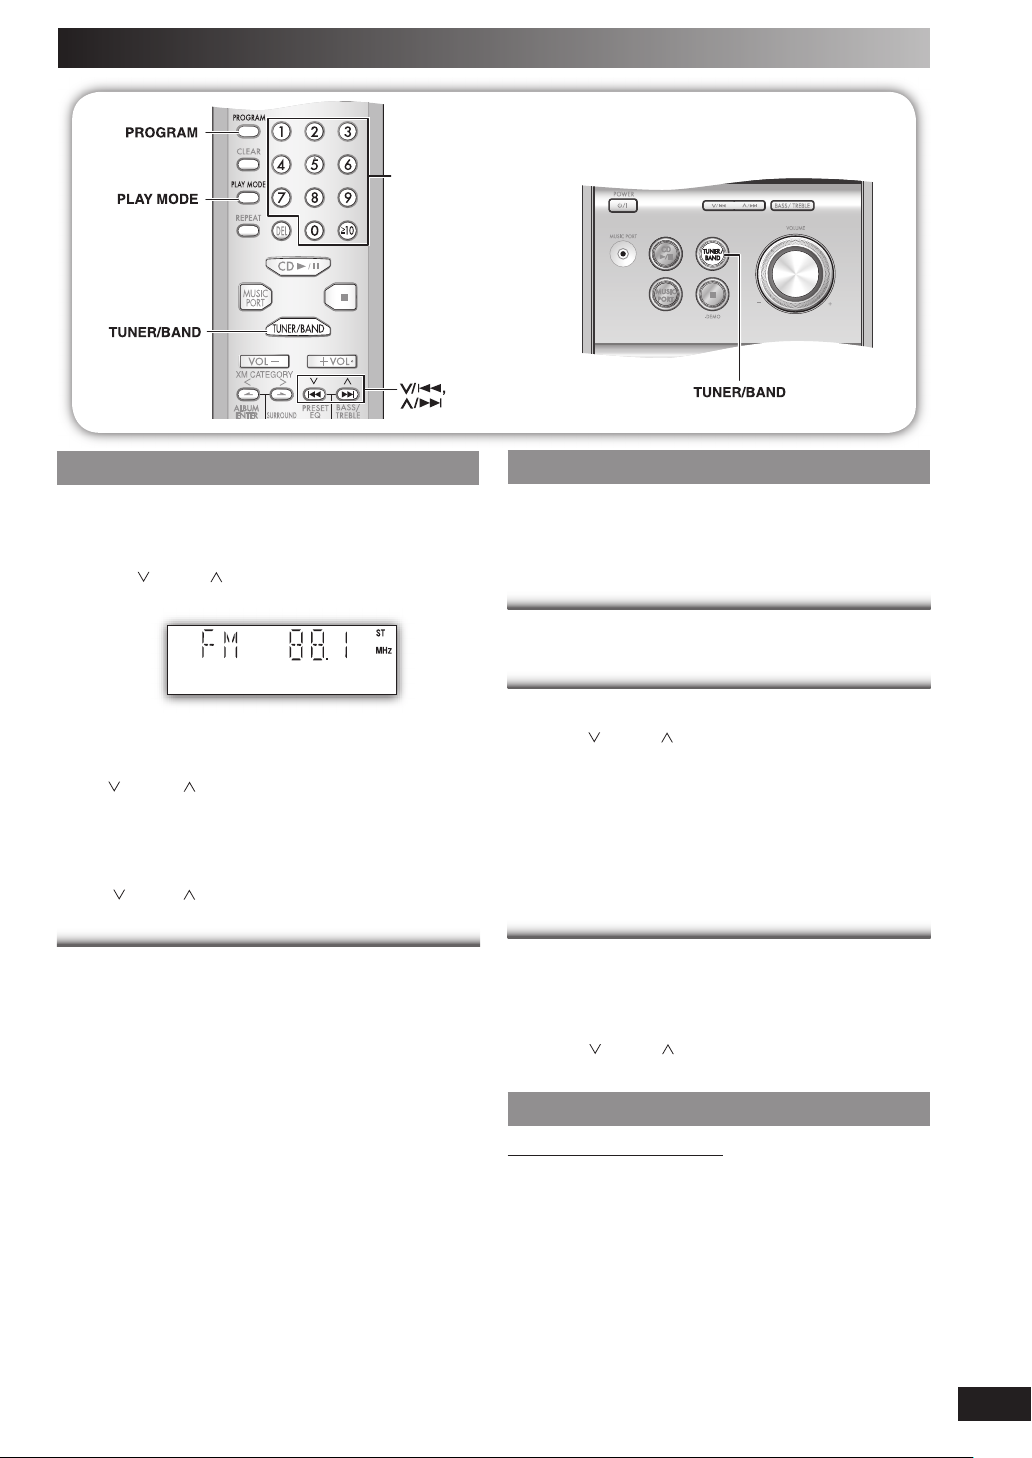
FM/AM Radio
Botones
numéricos
Sintonización manualSintonización manual
Pulse [TUNER/BAND] para seleccionar “FM” o
1
“AM”.
Pulse [PLAY MODE] para seleccionar “MANUAL”.
2
Pulse [ /4] o [ /¢] para seleccionar la
3
frecuencia de la emisora requerida.
Se visualizará “
emisora estéreo por FM.
Para sintonizar automáticamente
[ /4] o [ /¢] hasta que la frecuencia empiece
Pulse
a cambiar rápidamente. El aparato inicia la sintonización
automática y se detendrá cuando encuentre una emisora.
• La sintonización automática tal vez se interrumpa cuando
las interferencias sean excesivas.
• Para cancelar la sintonización automática, pulse una vez
más [ /4] o [ /¢].
Para mejorar la calidad del sonido de FMPara mejorar la calidad del sonido de FM
Mantenga pulsado [PLAY MODE] para visualizar
“MONO”.
Para cancelar
Mantenga pulsado [PLAY MODE] otra vez hasta que
“MONO” desaparezca.
• MONO también se cancelará si se cambia la frecuencia.
• Deje “MONO” apagado para la escucha normal.
ST ”
cuando esté siendo recibida una
Grabación de emisoras en memoriaGrabación de emisoras en memoria
Se puede presintonizar un máximo de 15 emisoras en cada
banda, FM y AM.
Preparación
Pulse [TUNER/BAND] para seleccionar “FM” o “AM”.
Presintonización automáticaPresintonización automática
Mantenga pulsado [PROGRAM] para iniciar la
presintonización.
Presintonización manualPresintonización manual
Pulse [PLAY MODE] para seleccionar “MANUAL”.
1
Pulse [ /4] o [ /¢] para seleccionar la emisora
2
deseada.
Pulse [PROGRAM].
3
Pulse los botones numéricos para seleccionar el canal.
4
La emisora que ocupa un canal se borrará si se
presintoniza otra emisora en ese canal.
Repita los pasos del 2 al 4 para preestablecer más
5
emisoras.
Selección de una emisora presintonizadaSelección de una emisora presintonizada
Pulse los botónes numéricos para seleccionar el canal.
Para los canales 10 a 15 pulse [h10] y después los dos dígitos.
O
Pulse [PLAY MODE] para seleccionar “PRESET”.
1
Pulse [ /4] o [ /¢] para seleccionar
2
el canal.
Ajuste de la asignación de FMAjuste de la asignación de FM
Aparato principal solamente
Este sistema le permite recibir emisiones de FM asignadas
en pasos de 0,1 MHz.
Para cambiar el paso a 0,1 MHz
Pulse [TUNER/BAND] para seleccionar “FM”.
1
Mantenga pulsado [TUNER/BAND].
2
Después de unos segundos, la visualización cambiará a una
visualización parpadeante de la frecuencia mínima actual.
Continúe pulsando [TUNER/BAND].
3
• Si la frecuencia mínima cambia, suelte el botón. Para
volver al paso original, repita los pasos anteriores.
• Después de cambiar el ajuste de “asignación”, las
frecuencias previamente preajustadas en la memoria
se borrarán.
RQTV0160
21
Page 22
Radio satelital XM
®
Sintonización manualSintonización manual
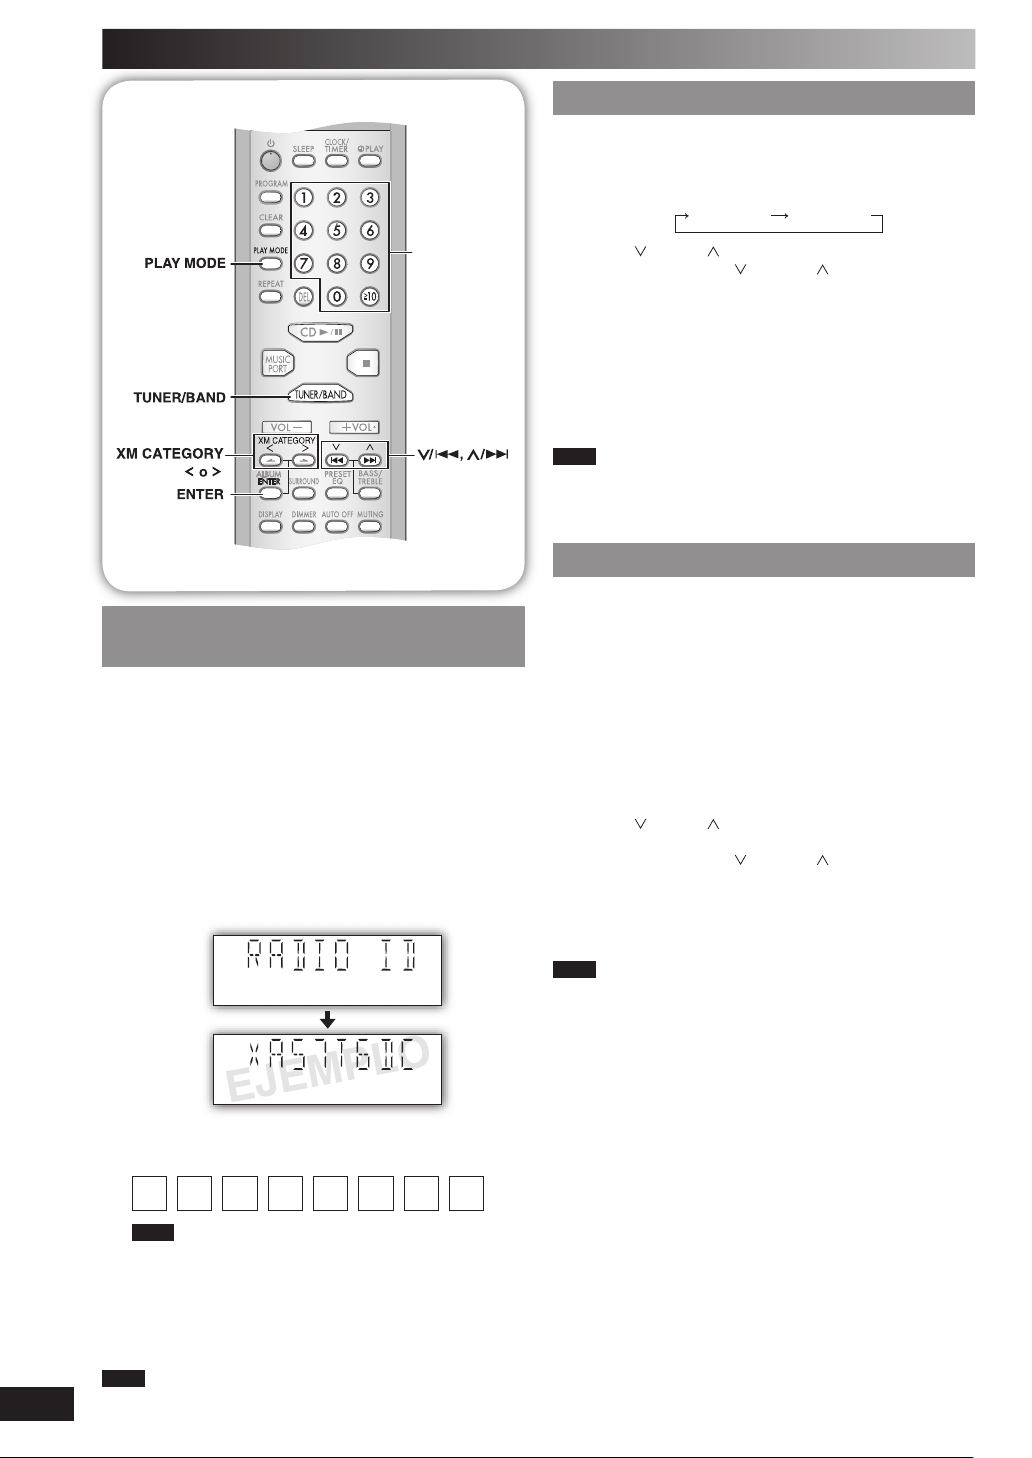
Pulse [TUNER/BAND] repetidamente para
1
seleccionar “XM”.
Pulse [PLAY MODE] para seleccionar “MANUAL”.
2
Cada vez que pulse el botón:
MANUAL
PRESET
Numeric
buttons
Visualizar la identifi cación (ID) de su Visualizar la identifi cación (ID) de su
radio satelital XM radio satelital XM
Puede confi rmar la ID de su radio satelital XM, necesaria
para activar la radio satelital XM, de la siguiente manera.
Conecte la antena de XM Connect & Play o el XM
1
Mini-Tuner y Home Dock.
Pulse [TUNER/BAND] repetidamente para
2
seleccionar “XM”.
“ANTENNA” parpadea sobre la pantalla si ninguna
antena XM es detectada.
Pulse [0] para seleccionar canal “0” para mostrar la
3
ID de radio.
“RADIO ID” aparece brevemente en pantalla, seguido
por la ID alfanumérica de 8 dígitos.
Pulse [ /4] o [ /¢] para seleccionar un canal.
3
Mantenga pulsado [ /4] o [ /¢] para explorar
rápidamente.
O
Pulse los botones numéricos para el acceso directo
a un canal de XM.
Para canales de dos dígitos, presione [> 10] una vez, y
luego los dos dígitos
Para canales de tres dígitos, presione [> 10] dos veces,
y luego los tres dígitos.
Nota
• Puede ingresar un número de canal entre 0 y 255.
• Si ingresa un número que no es válido o seleccionó un canal no
autorizado, aparecerá “XM –
anterior.
–
–” en pantalla y seleccionará el canal
Seleccionar canales XM por categoríaSeleccionar canales XM por categoría
Los canales XM están organizados en categorías como
Rock, Clásico, Country y Dance para buscar y seleccionar
el contenido de difusión con mayor facilidad.
Pulse [PLAY MODE] para seleccionar “MANUAL”.
1
Pulse [XM CATEGORY < o >] para seleccionar una
2
categoría.
“CAT ON” (CATEGORÍA ACTIVADA) aparece
brevemente en pantalla, y luego la categoría del canal
XM actual se visualiza en pantalla.
Mantenga pulsado [XM CATEGORY < o >] para explorar
rápidamente.
Pulse [ /4] o [ /¢] para seleccionar un canal
3
entre las categorías.
Mantenga pulsado [ /4] o [ /¢] para explorar
rápidamente.
Pulse [ENTER] para salir del modo de categoría.
4
“CAT OFF” (CATEGORÍA DESACTIVADA) aparece
brevemente en pantalla.
Nota
• El modo de categoría se cancelará automáticamente después de
unos 15 segundos si el usuario no introduce datos.
• La selección de canales XM por categoría le permite limitar sus
opciones a canales que pertenecen a una categoría de emisoras
de su opción y luego seleccionar un canal favorito de la categoría
escogida. Categorías disponibles según los horarios de emisión.
La unidad no muestra categorías que no contengan canales XM.
22
Registre la ID (identificación) de su radio satelital XM
4
aquí para la referencia:
Nota
• Para evitar la ambigüedad, las letras I, la O, la S y la F no son
utilizadas en la ID.
• No hay salida de sonido cuando se visualiza “RADIO ID” en la
pantalla.
El canal 0 de XM es para “RADIO ID” (ID DE RADIO) y el
canal 1 es para “PREVIEW” (ANTICIPO).
RQTV0160
Nota
Puede escuchar el anticipo (preview) de los canales XM1, XM174 y
XM247 sin activar los servicios XM.
Page 23
Temporizador
Puesta en horaPuesta en hora
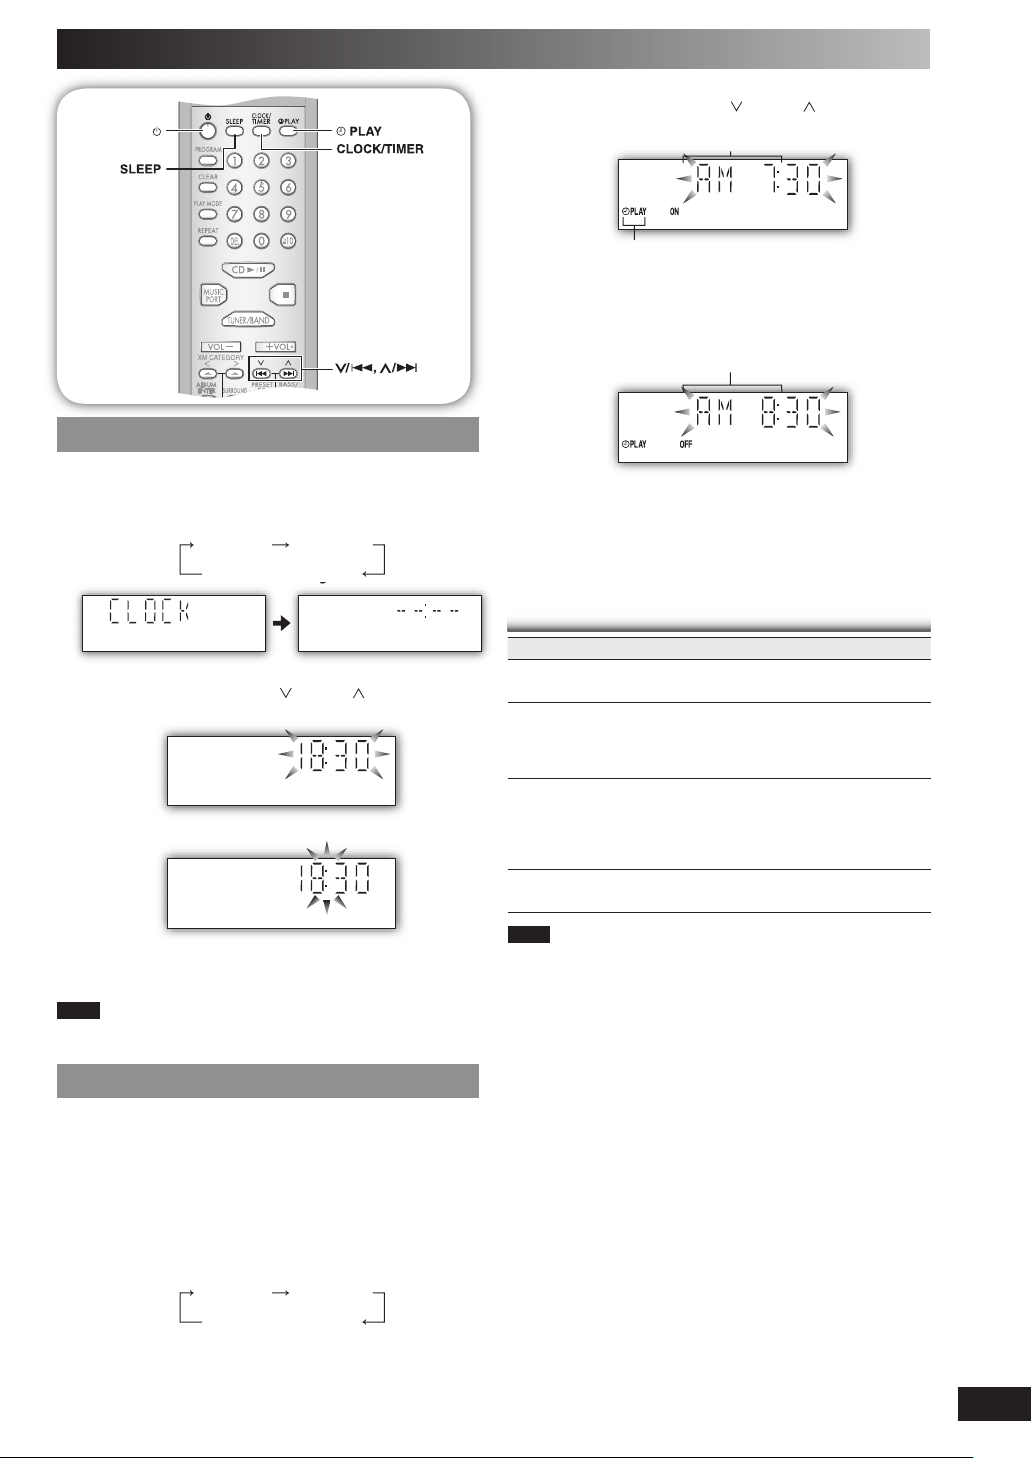
Entre 5 segundos, pulse [ /4] o [ /¢] para
2
ajustar la hora de inicio.
Indicador del temporizador
de reproducción
Pulse [CLOCK/TIMER] para confirmar.
3
Repita los pasos 2 y 3 para ajustar la hora de
4
finalización.
Hora de inicio
Hora de fi nalización
Éste es un reloj de sistema de 12 horas.
Pulse [CLOCK/TIMER] para seleccionar “CLOCK”.
1
Cada vez que pulse el botón:
CLOCK
Visulización original
Entre 5 segundos, pulse [ /4] o [ /¢] para
2
ajustar la hora.
Pulse [CLOCK/TIMER] para terminar de poner la
3
hora.
Visualización del reloj
Pulse [CLOCK/TIMER] para visualizar el reloj durante unos
segundos.
Nota
El reloj puede atrasarse o adelantarse en un plazo de tiempo. Si es
necesario vuelva a ponerlo en hora.
˚ PLAY
Utilización del temporizador de reproducciónUtilización del temporizador de reproducción
Puede ajustar el temporizador para que se encienda a una
hora determinada para despertarle.
Preparación
Encienda el aparato y ponga en hora el reloj.
Prepare la fuente musical que desea escuchar: disco, radio
o fuente de puerto de musica y ajuste el volumen.
Pulse [CLOCK/TIMER] repetidamente para seleccionar
1
el temporizador de reproducción.
CLOCK ˚ PLAY
Visulización original
Para activar el temporizador
Pulse [˚PLAY] para conectar el temporizador.
5
“˚PLAY” se muestra en pantalla.
Pulse [y] para apagar el aparato.
6
El aparato debe estar apagado para que funcionen los
temporizadores.
Otras operaciones básicasOtras operaciones básicas
Para Acción
cambiar la
confi guración
cambiar la fuente o
el volumen
compruebe la
confi guración
(si el aparato está
encendido o está en
modo de espera)
cancelar
Nota
• El temporizador se pondrá en marcha a la hora programada y el
volumen aumentará gradualmente hasta el nivel seleccionado.
• Si el temporizador está activo, se encenderá todos los días a la
hora fi jada.
• El aparato debe estar en modo de espera para que el temporizador
funcione.
• Si apaga el aparato y lo vuelve a encender mientras esté
funcionando un temporizador, no se activará el ajuste de tiempo de
terminación.
• Si se selecciona el puerto música (MUSIC PORT) como fuente
cuando el temporizador avance, el sistema se enciende y se
utilice el puerto de música (MUSIC PORT) como fuente. Si desea
reproducir o grabar desde el equipo reproductor portátil de audio,
sólo ha de activar el modo reproducir del equipo reproductor
y aumente el volumen. (Ver el manual de instrucciones del
reproductor portátil de audio.)
Repetir los pasos de 1 a 4 y 6.
1) Pulse [˚PLAY] para cancelar el ˚PLAY
indicador del visualizador.
2) Cambie la fuente o el volumen.
3) Realice los pasos 5 y 6.
Pulse [CLOCK/TIMER] repetidamente
seleccione
Pulse [
temporizador indicadores del visualizador.
˚PLAY.
˚PLAY] para cancelar el
RQTV0160
23
Page 24

Panasonic Consumer Electronics
Company, Division of Panasonic
Corporation of North America
One Panasonic Way Secaucus,
New Jersey 07094
http://www.panasonic.com
© 2006 Matsushita Electric Industrial Co., Ltd.
Printed in Malaysia
Panasonic Puerto Rico, Inc.
Ave. 65 de Infantería, Km. 9.5
San Gabriel Industrial Park, Carolina,
Puerto Rico 00985
En Sp
RQTV0160-1P
L0706CH1076
 Loading...