

Page 1
Operating Instructions
Instrucciones de funcionamiento
Compact Stereo System
Sistema estéreo compacto
Model No./Nº de Modelo SC-HC4
Dear customer
Thank you for purchasing this product.
Before connecting, operating or adjusting this product, please read the
instructions completely.
Please keep this manual for future reference.
Operations in these instructions are described using remote control, but you
can do the operations with the main unit if the controls are the same.
Your unit may not look exactly as illustrated.
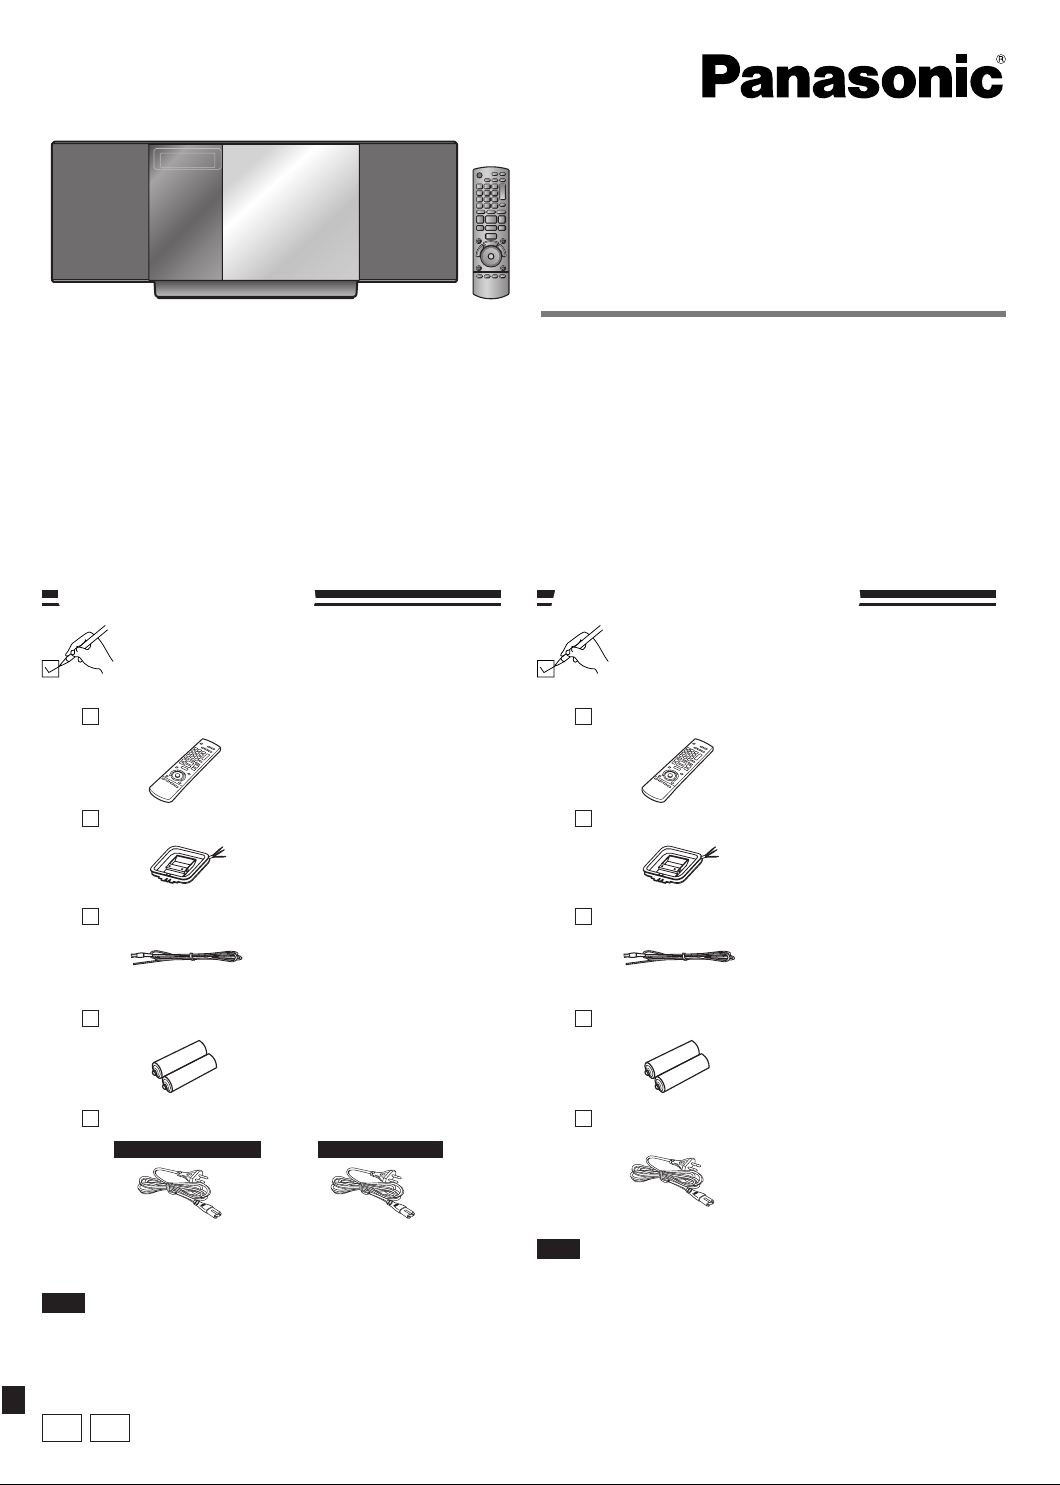
Supplied accessories
Please check and identify the supplied
accessories.
1 Remote control
(N2QAYB000429)
1 AM loop antenna
1 FM indoor antenna
Estimado cliente
Muchísimas gracias por haber adquirido este aparato.
Antes de conectar, utilizar o ajustar este producto, lea con detenimiento
estas instrucciones.
Guarde este manual para consultarlo en el futuro.
Las operaciones de estas instrucciones se describen principalmente
usando el mando a distancia, pero puede realizar las mismas operaciones
en la unidad principal si los controles son los mismos.
Es posible que su unidad no se parezca exactamente a la que se muestra.
Accesorios suministrados
Marque e identifique los accesorios
suministrados.
1 Mando a distancia
(N2QAYB000429)
1 Antena de cuadro de AM
1 Antena interior de FM
2 Batteries
1 AC mains lead
For Continental Europe
(K2CQ2CA00007)
Note
The included AC mains lead is for use with this unit only. Do
•
not use it with other equipment.
Do not use an AC mains lead from other equipment.
•
GA
EP
For Southeast Asia
(K2CQ2CA00007)
(K2CP2CA00001)*
* For Thailand only
2 Pilas
1 Cable de alimentación de CA
Nota
El cable de alimentación de CA suministrado está diseñado
•
para su uso con esta unidad solamente. No lo utilice con
ningún otro equipo.
No utilice con esta unidad el cable de alimentación de CA de
•
ningún otro equipo.
RQTX0257-2B
Page 2

RQTX0257
ENGLISH
2
Table of contents
Supplied accessories Cover
Safety precautions 2
Connections 4
Preparing the remote control 5
Demo function 5
Control guide 6
Disc operations 8
Radio operations 9
RDS broadcasts 10
Timer 10
Sound adjustment 11
External unit 12
Troubleshooting guide 14
Specifications 15
Maintenance 15
Safety precautions
Placement
Set the unit up on an even surface away from direct sunlight,
high temperature, high humidity, and excessive vibration. These
conditions can damage the cabinet and other components,
thereby shortening the unit’s service life.
Place it at least 15 cm away from wall surfaces to avoid
distortion and unwanted acoustical effects.
Do not place heavy items on the unit.
Voltage
Do not use high voltage power sources. This can overload the
unit and cause a fire.
Do not use a DC power source. Check the source carefully when
setting the unit up on a ship or other place where DC is used.
AC mains lead protection
Ensure the AC mains lead is connected correctly and not
damaged. Poor connection and lead damage can cause fire or
electric shock. Do not pull, bend, or place heavy items on the lead.
Grasp the plug firmly when unplugging the lead. Pulling the
AC mains lead can cause electric shock.
Do not handle the plug with wet hands. This can cause
electric shock.
Foreign matter
Do not let metal objects fall inside the unit. This can cause
electric shock or malfunction.
Do not let liquids get into the unit. This can cause electric
shock or malfunction. If this occurs, immediately disconnect the
unit from the power supply and contact your dealer.
Do not spray insecticides onto or into the unit. They contain
flammable gases which can ignite if sprayed into the unit.
2
Service
Do not attempt to repair this unit by yourself. If sound is
interrupted, indicators fail to light, smoke appears, or any other
problem that is not covered in these instructions occurs, disconnect
the AC mains lead and contact your dealer or an authorized service
center. Electric shock or damage to the unit can occur if the unit is
repaired, disassembled or reconstructed by unqualified persons.
Extend operating life by disconnecting the unit from the power
source if it is not to be used for a long time.
Page 3
RQTX0257
ENGLISH
3
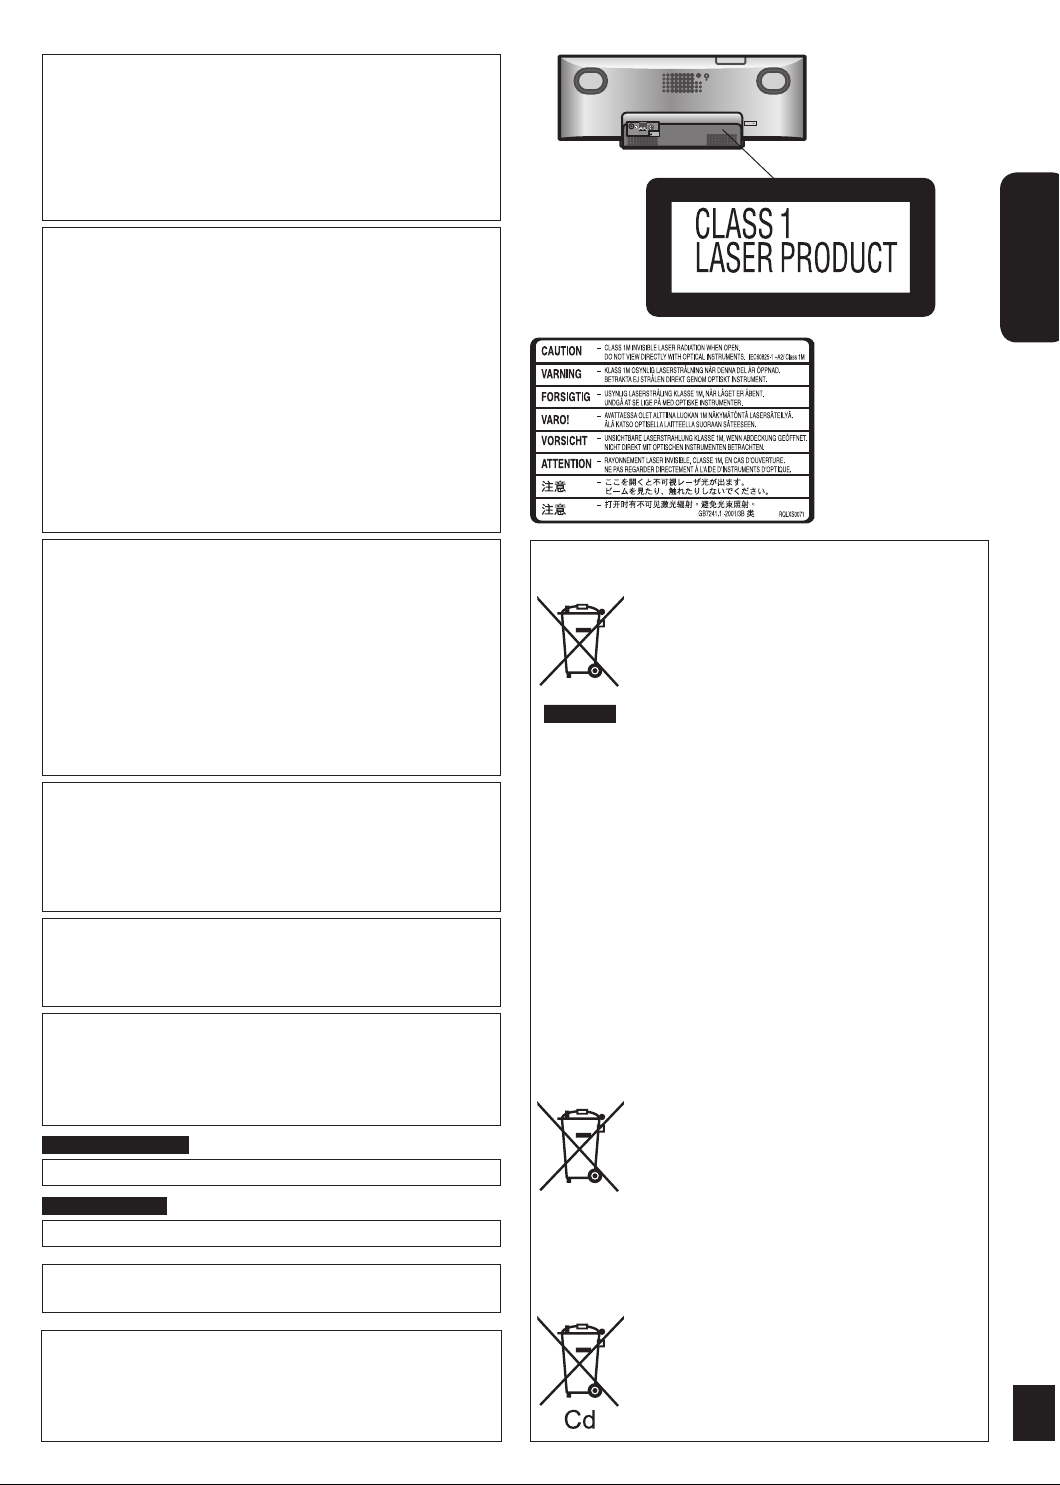
CAUTION!
AUX
EXT
75
Ω
LOOP
AM AN
TFM ANT
LOOP ANT
GROUND
AC IN
THIS PRODUCT UTILIZES A LASER.
USE OF CONTROLS OR ADJUSTMENTS OR
PERFORMANCE OF PROCEDURES OTHER THAN THOSE
SPECIFIED HEREIN MAY RESULT IN HAZARDOUS
RADIATION EXPOSURE.
DO NOT OPEN COVERS AND DO NOT REPAIR YOURSELF.
REFER SERVICING TO QUALIFIED PERSONNEL.
CAUTION!
DO NOT INSTALL OR PLACE THIS UNIT IN A
•
BOOKCASE, BUILT-IN CABINET OR IN ANOTHER
CONFINED SPACE. ENSURE THE UNIT IS WELL
VENTILATED. TO PREVENT RISK OF ELECTRIC SHOCK
OR FIRE HAZARD DUE TO OVERHEATING, ENSURE
THAT CURTAINS AND ANY OTHER MATERIALS DO
NOT OBSTRUCT THE VENTILATION VENTS.
DO NOT OBSTRUCT THE UNIT’S VENTILATION
•
OPENINGS WITH NEWSPAPERS, TABLECLOTHS,
CURTAINS, AND SIMILAR ITEMS.
DO NOT PLACE SOURCES OF NAKED FLAMES, SUCH
•
AS LIGHTED CANDLES, ON THE UNIT.
DISPOSE OF BATTERIES IN AN ENVIRONMENTALLY
•
FRIENDLY MANNER.
Inside of product
WARNING:
TO REDUCE THE RISK OF FIRE, ELECTRIC SHOCK OR
PRODUCT DAMAGE,
DO NOT EXPOSE THIS APPARATUS TO RAIN,
•
MOISTURE, DRIPPING OR SPLASHING AND THAT NO
OBJECTS FILLED WITH LIQUIDS, SUCH AS VASES,
SHALL BE PLACED ON THE APPARATUS.
USE ONLY THE RECOMMENDED ACCESSORIES.
•
DO NOT REMOVE THE COVER (OR BACK); THERE
•
ARE NO USER SERVICEABLE PARTS INSIDE. REFER
SERVICING TO QUALIFIED SERVICE PERSONNEL.
The socket outlet shall be installed near the equipment and
easily accessible.
The mains plug of the power supply cord shall remain readily
operable.
To completely disconnect this apparatus from the AC Mains,
disconnect the power supply cord plug from AC receptable.
This product may receive radio interference caused by mobile
telephones during use. If such interference is apparent, please
increase separation between the product and the mobile
telephone.
CAUTION
Danger of explosion if battery is incorrectly replaced.
Replace only with the same or equivalent type
recommended by the manufacturer. Dispose of used
batteries according to the manufacturer’s instructions.
For Continental Europe
THIS UNIT IS INTENDED FOR USE IN MODERATE CLIMATES.
For Southeast Asia
THIS UNIT IS INTENDED FOR USE IN TROPICAL CLIMATES.
iPod is a trademark of Apple Inc., registered in the U.S. and
other countries.
EU
Pursuant to at the directive 2004/108/EC, article 9(2)
Panasonic Testing Centre
Panasonic Marketing Europe GmbH
Winsbergring 15, 22525 Hamburg, Germany
Information for Users on Collection and Disposal of Old
Equipment and used Batteries
These symbols on the products, packaging, and/
or accompanying documents mean that used
electrical and electronic products and batteries
should not be mixed with general household
waste.
For proper treatment, recovery and recycling
of old products and used batteries, please
take them to applicable collection points, in
accordance with your national legislation and
the Directives 2002/96/EC and 2006/66/EC.
By disposing of these products and batteries
correctly, you will help to save valuable
resources and prevent any potential negative
effects on human health and the environment
which could otherwise arise from inappropriate
waste handling.
For more information about collection and
recycling of old products and batteries, please
contact your local municipality, your waste
disposal service or the point of sale where you
purchased the items.
Penalties may be applicable for incorrect
disposal of this waste, in accordance with
national legislation.
For business users in the European Union
If you wish to discard electrical and electronic
equipment, please contact your dealer or
supplier for further information.
[Information on Disposal in other Countries
outside the European Union]
These symbols are only valid in the European
Union. If you wish to discard these items, please
contact your local authorities or dealer and ask
for the correct method of disposal.
Note for the battery symbol (bottom two
symbol examples):
This symbol might be used in combination with
a chemical symbol. In this case it complies with
the requirement set by the Directive for the
chemical involved.
3
Page 4
RQTX0257
ENGLISH
4
AUX
EXT
75Ω
LOOP
AM ANTFM ANT
LOOP ANT
GROUND
132
AC IN
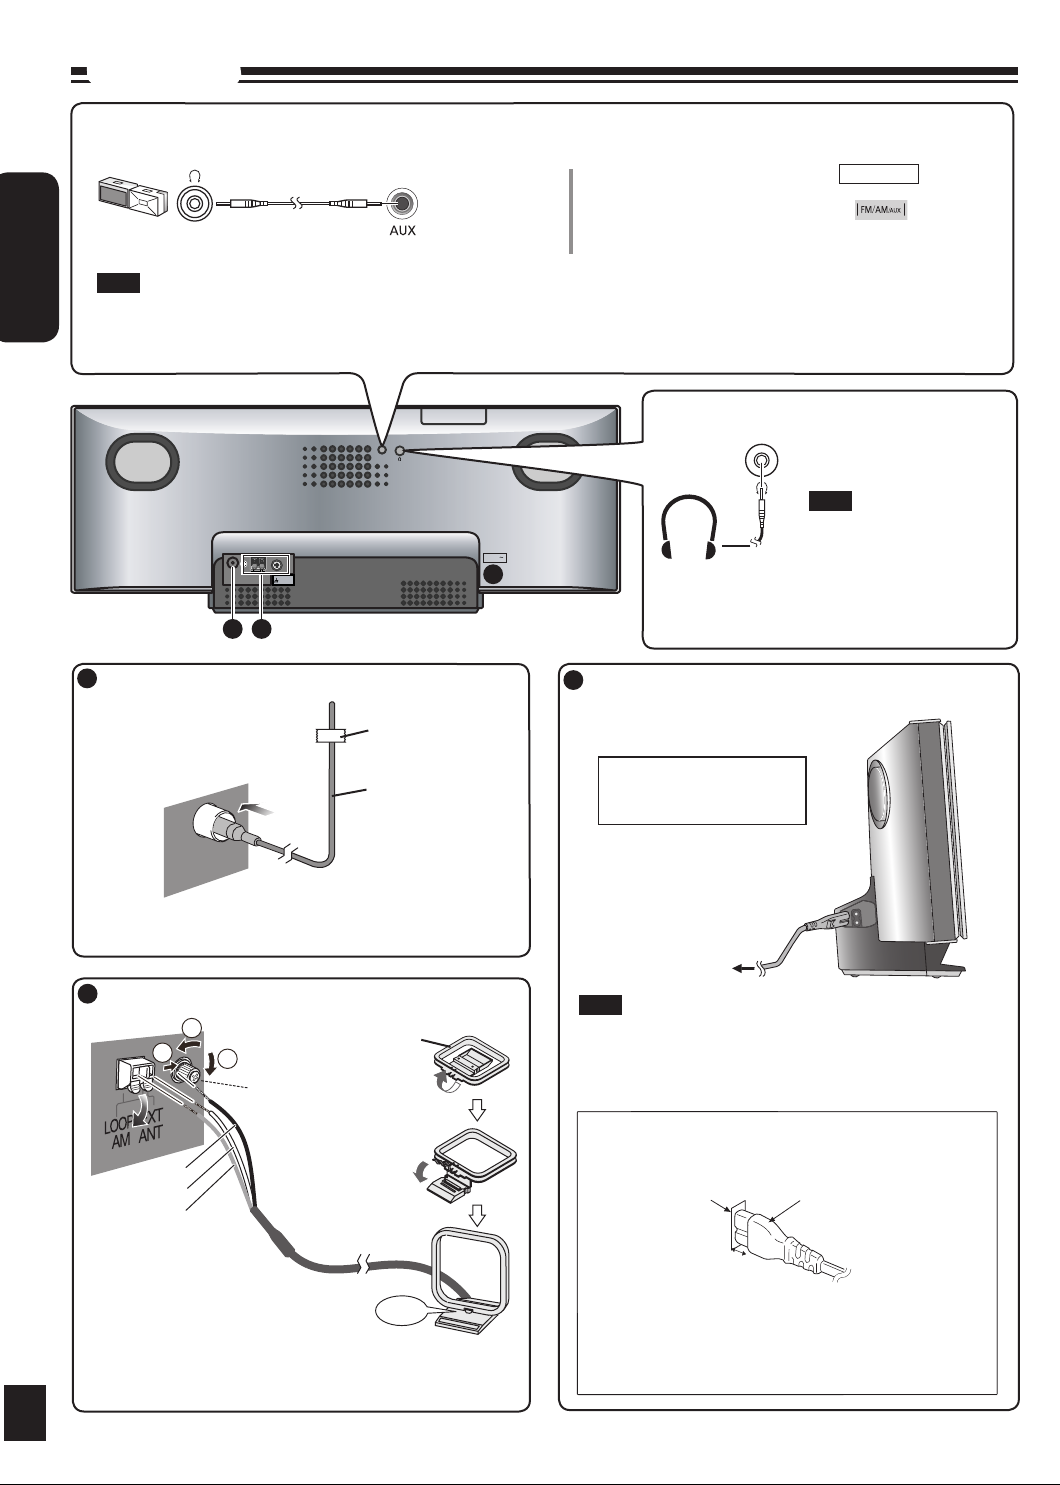
Connections
T
N
A
M
F
Ω
5
7
1
2
3
Portable audio equipment (Cords and equipment not included)
Portable audio player
Note
Adjust the volume and sound quality of this unit and the other equipment. Reduce the level of input signal (for example, by switching
•
off the equalizer or reducing the volume) of the other equipment before connection. High levels of input signal will distort the sound.
For details, refer to the instruction manual of the other equipment.
•
1
Connect the FM indoor antenna.
Plug type:
Ø3.5 mm stereo
Adhesive tape
Start playback from the
portable audio source.
Headphones (not included)
Connect the AC mains lead.
3
MAIN UNIT
➡
Reduce the volume level and
connect the headphones.
Plug type: Ø3.5 mm stereo.
Note
Avoid listening for prolonged
•
periods of time to prevent
hearing damage.
Excessive sound pressure
•
from earphones and
headphones can cause
hearing loss.
4
FM indoor antenna
Tape the antenna to a wall or column, in a position with the least
amount of interference.
Connect the AM loop antenna.
2
AM indoor antenna
Use a Phillips-head
screwdriver, etc.
Black
White
Red
Stand the antenna
up on its base.
Click!
Keep the loose antenna cord away from other wires and cords.
Do not screw too tightly. Otherwise, the screwdriver goes around
in circle and cannot be fixed.
Connect the AC mains lead
after all other connections
are complete.
To household AC
mains socket
Note
To save power when the unit is not to be used for a long time,
unplug it from the household AC mains socket. You will need to
reset some memory items after plugging in the unit.
Insertion of connector
Appliance inlet
Approx. 6 mm
Even when the connector is perfectly inserted, depending on
the type of inlet used, the front part of the connector may jut
out as shown in the drawing. However there is no problem
using the unit.
Connector
Page 5
RQTX0257
ENGLISH
5
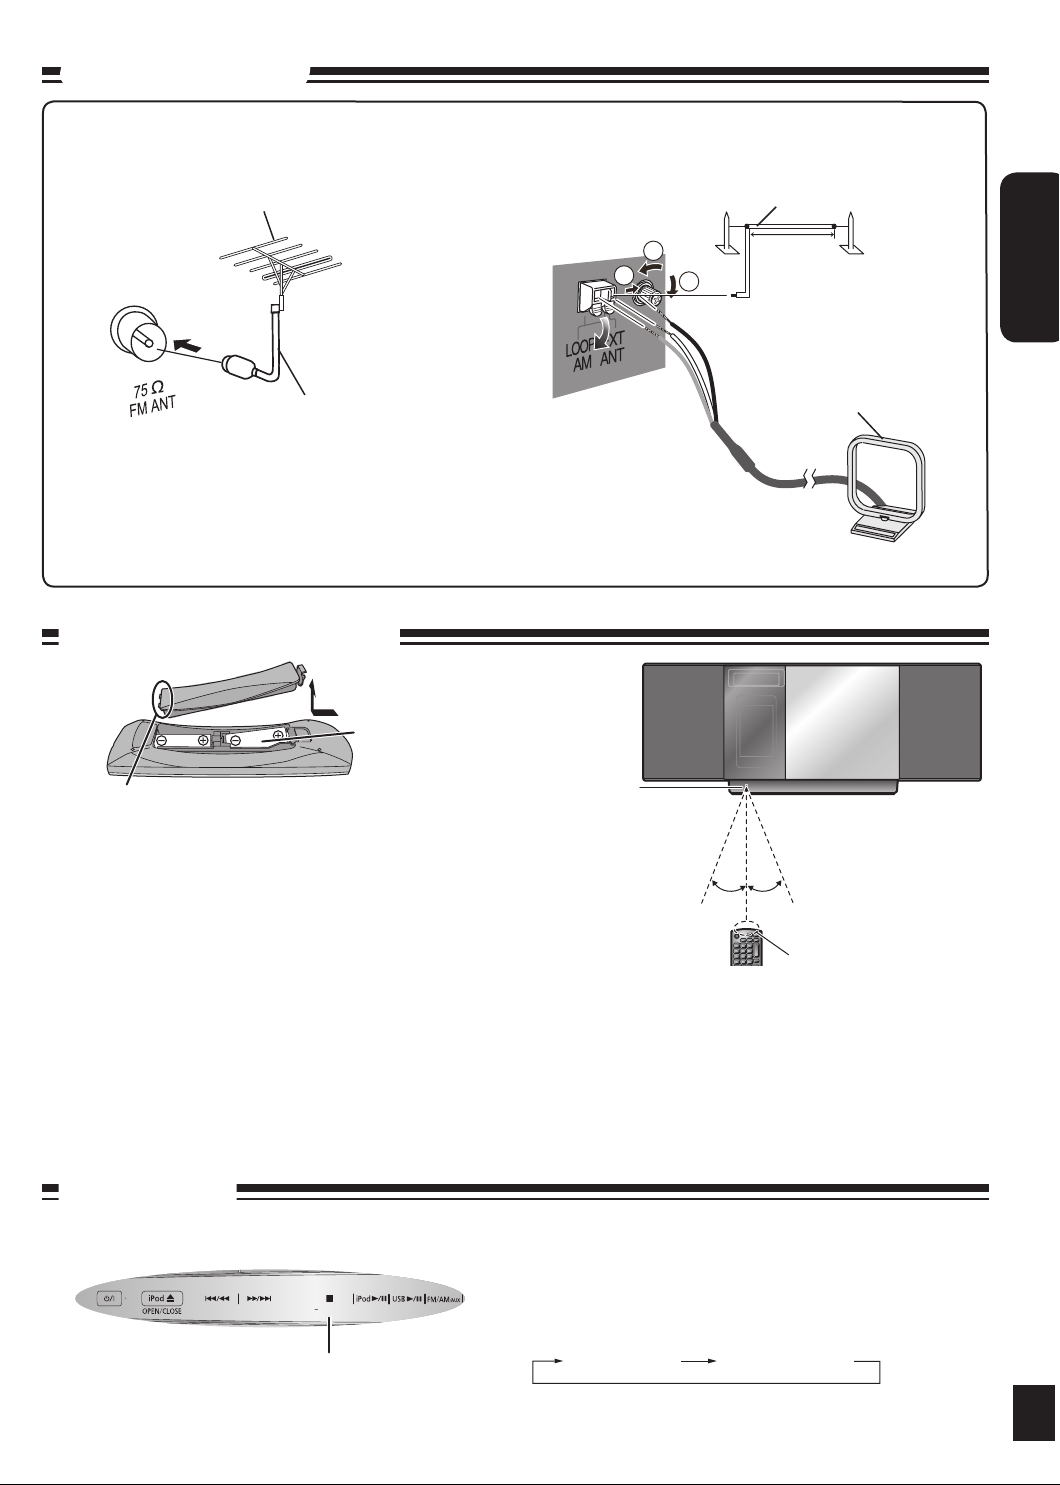
Connections (continued)
30°30°
DEMO
1
2
3
Optional antenna connections
FM outdoor antenna
FM outdoor antenna (not included)
75 Ω coaxial cable
(not included)
Never use an outdoor antenna during a lightning storm.
•
You can connect the FM outdoor antenna for better reception. Please consult your dealer for installation.
•
Disconnect the FM indoor antenna if an FM outdoor antenna is installed.
•
Connect the AM outdoor antenna without removing the AM loop antenna. Run 5 to 12 m of vinyl-covered
•
wire horizontally along a window or other convenient location.
AM outdoor antenna
Preparing the remote control
R6/LR6, AA
AM outdoor antenna
(not included)
5 to 12 m
AM loop antenna
(included)
Place this side in before the other side
■ Batteries
Use a manganese dry battery or an alkaline dry battery.
•
Insert so the poles (+ and – ) match those in the remote control.
•
Remove if the remote control is not going to be used for a long period
•
of time.
Store in a cool, dark place.
•
Do not heat or expose to flame.
•
Do not leave the batteries in an automobile exposed to direct sunlight
•
for a long period of time with doors and windows closed.
Mishandling of batteries in the remote control can cause electrolyte
•
leakage, which may cause a fire.
Do not:
mix old and new batteries;
•
use different types of batteries at the same time;
•
take apart or short-circuit;
•
attempt to recharge alkaline or manganese batteries;
•
use batteries if their covering has been peeled off.
•
Demo function
Top View (Top Panel)
[g, –DEMO]
Remote control
signal sensor
Transmission window
■ Use
Aim at the sensor, avoiding obstacles, at a maximum range of 7 m
•
directly in front of the unit (Exact distance depends on angles).
Operation can be affected by strong light sources, such as direct
•
sunlight, and the glass doors on cabinets.
When the unit is first plugged in, a demonstration of its functions may be
shown on the display.
If the demo setting is off, you can show a demonstration by selecting
“DEMO ON”.
Press and hold [g, –DEMO].
The display changes each time the button is held down.
DEMO OFF DEMO ON
While in standby mode, select “DEMO OFF” to reduce power
consumption.
5
Page 6
RQTX0257
ENGLISH
6
Control guide
MP3
INFO
2
3
4
5
6
7
8
9
10
11
12
13
14
15
1
16
17
18
19
20
21
22
23
24
25
26
27
28
29
30
32
31
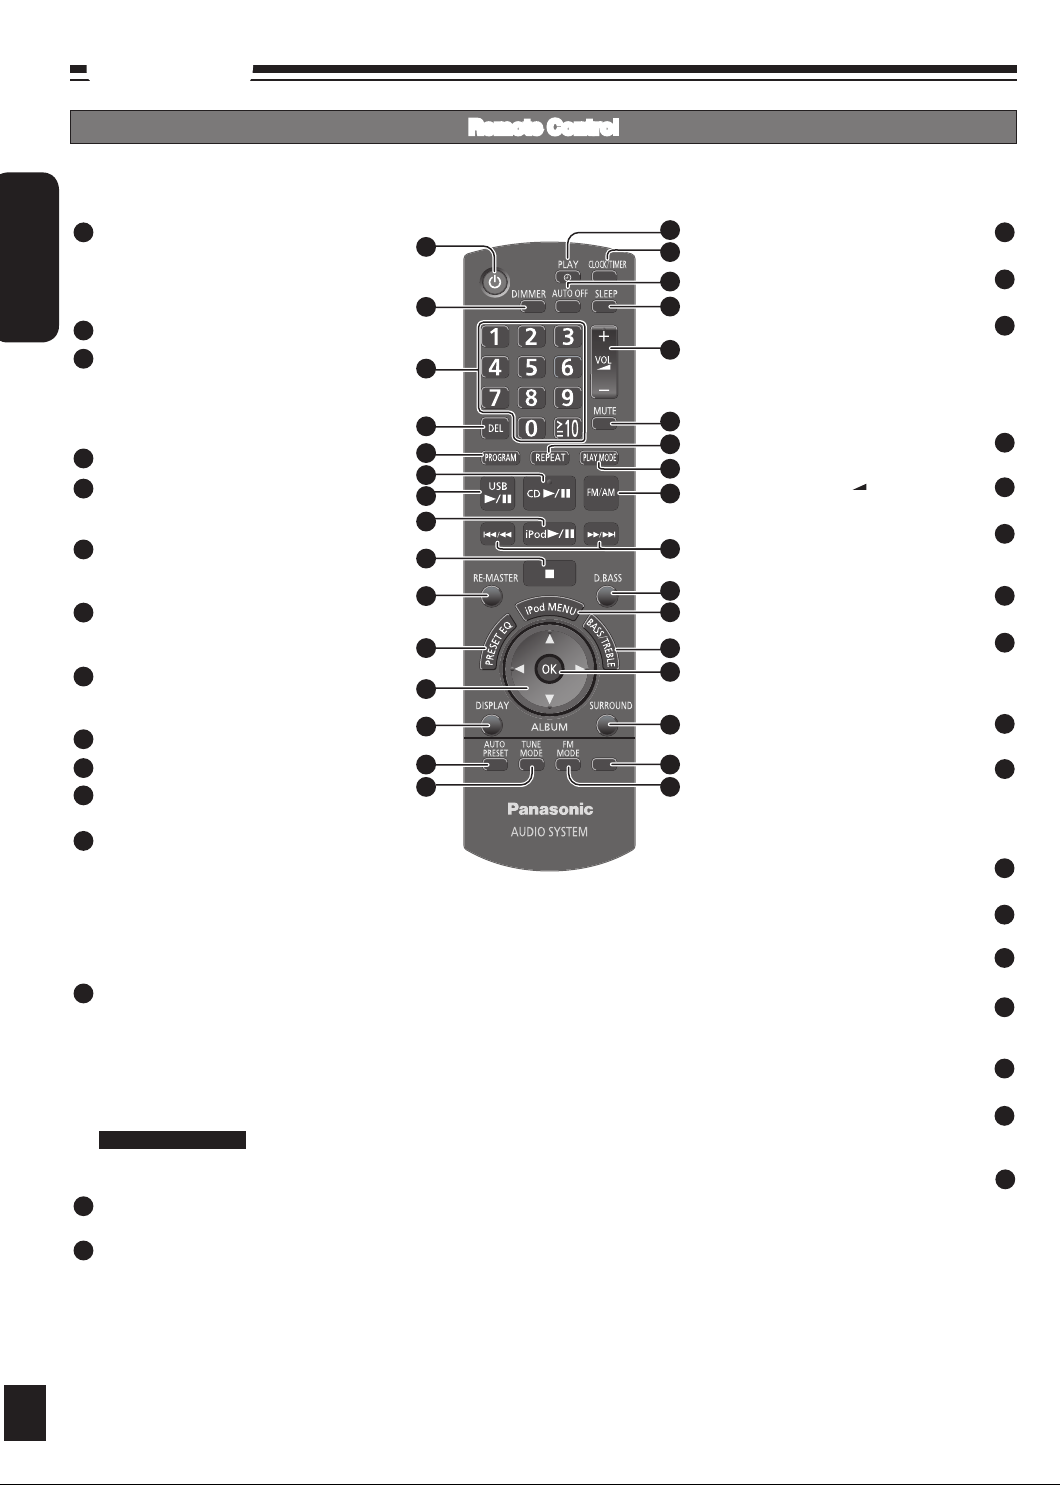
Remote Control
Refer to the numbers in parentheses for page reference.
•
[u/t] and [y/i] described in the operations have the same controls as [w] and [q] respectively.
•
6
1
Standby/on switch [^], [8] (8, 10)
Press to switch the unit from on to standby
mode or vice versa.
In standby mode, the unit is still consuming a
small amount of power.
2
[DIMMER] Dims the display panel
3
Numeric buttons [1-9, 0, ≧10] (8, 9, 13)
To select a 2-digit number
e.g. 16: [≧10] [1] [6]
To select a 3-digit number
e.g. 226: [≧10] [≧10] [2] [2] [6]
4
[DEL] Delete last programmed track (8)
[PROGRAM] (8, 9)
5
CD/MP3 Program
Tuner Preset (Manual)
6
[CD q/h] (8)
Selector switch to CD
Direct CD Play/CD Pause
7
[USB q/h] (13)
Selector Switch to USB
Direct USB Play/USB Pause
8
[iPod q/h] (12)
Selector switch to iPod
Direct iPod Play/iPod Pause
9
[g] Stop button (8, 12, 13)
10
[RE-MASTER] Re-master on/off (11)
11
[PRESET EQ] (11)
Preset EQ mode selector
12
[e, r, ALBUM] (8, 12, 13)
Album/track selection
iPod menu browsing
[w, q]
Track skip/search
Tune/preset channel selection
Time adjustment
Bass/treble adjustment
13
[DISPLAY] (8, 10, 13)
CD: CD Display (Elapsed play time/
Remaining play time)
MP3: MP3 Display (Elapsed play time/Album
name/Track name)
USB: USB Display (Elapsed play time/
Remaining play time/Album name/Track
name)
For Continental Europe
RDS: RDS Display (Station Name/Program
Type/Frequency)
[AUTO PRESET] (9)
14
Tuner Preset (Auto)
15
[TUNE MODE] (9)
Tune mode on/off
Selector switch to Manual/Preset
(10) [z, PLAY]
Play timer on/off
(10) [CLOCK/TIMER]
Clock and Timer setting
This function allows you to turn off the unit in
disc mode or USB mode only after the unit
is left unused for 10 minutes. The setting is
maintained even if the unit is turned off.
Press again to cancel this function.
(8, 10, 12, 13) [VOL +, –], [–VOLUME+]
Press again to cancel muting
(8, 9, 11) [PLAY MODE]
Tuner: Lowest/Current
Adjusting level in AUX mode to Normal/High
(8, 9, 10, 11, 12, 13) [
Tune/preset channel selection
Bass/treble adjustment
MP3: MP3 Display [ID3 (Album)/ID3 (Track)/
ID3 (Artist)/Elapsed play time]
Selector switch to Mono/Stereo
[AUTO OFF]
(11) [SLEEP]
Sleep timer setting
To adjust the volume
[MUTE]
Mutes the sound
(9) [REPEAT]
Repeat on/off
Play mode button
(9) [FM/AM]
FM/AM selection
u/t], [y/i]
Track skip/search
Time adjustment
(11) [D.BASS]
D.BASS on/off
(12) [iPod MENU]
To display iPod menu
(11) [BASS/TREBLE]
Bass/Treble selection
(8, 12, 13) [OK]
Disc play
Confirm selection
(11) [SURROUND]
Surround mode on/off
(8, 13) [MP3 INFO]
(9) [FM MODE]
FM mode on/off
16
17
18
19
20
21
22
23
24
25
26
27
28
29
30
31
32
Page 7

RQTX0257
ENGLISH
7
Control guide (continued)
DEMO
VOLUME
1 33 25 34 8 7 6 2035 26
36
37
Main Unit
Buttons such as function the same as the remote control.•
1
Front View
Top View (Top Panel)
Display
Remote control signal sensor
[iPod ;, OPEN/CLOSE] (12)
33
Open and close sliding door for
iPod operation.
[g, –DEMO] (5)
34
Stop/Demo
35
[FM/AM/AUX] (4, 9, 13)
FM/AM selection
Connecting to other external units
36
[CD ;, OPEN/CLOSE] (8)
Open and close sliding door for
CD operation.
USB port (13)
37
Sliding door Operation
36
To operate CD
Press to open sliding door.
Press again to close sliding door after
setting the CD in place. (Refer to
page 8 for inserting the CD.)
33
To operate iPod
Press to open sliding door.
Press again to close sliding door after
iPod is inserted into the dock properly.
(Refer to page 12 for inserting the
iPod.)
Docking switch
7
Page 8
RQTX0257
ENGLISH
8
Disc operations
MP3
INFO
Basic play Play Mode function
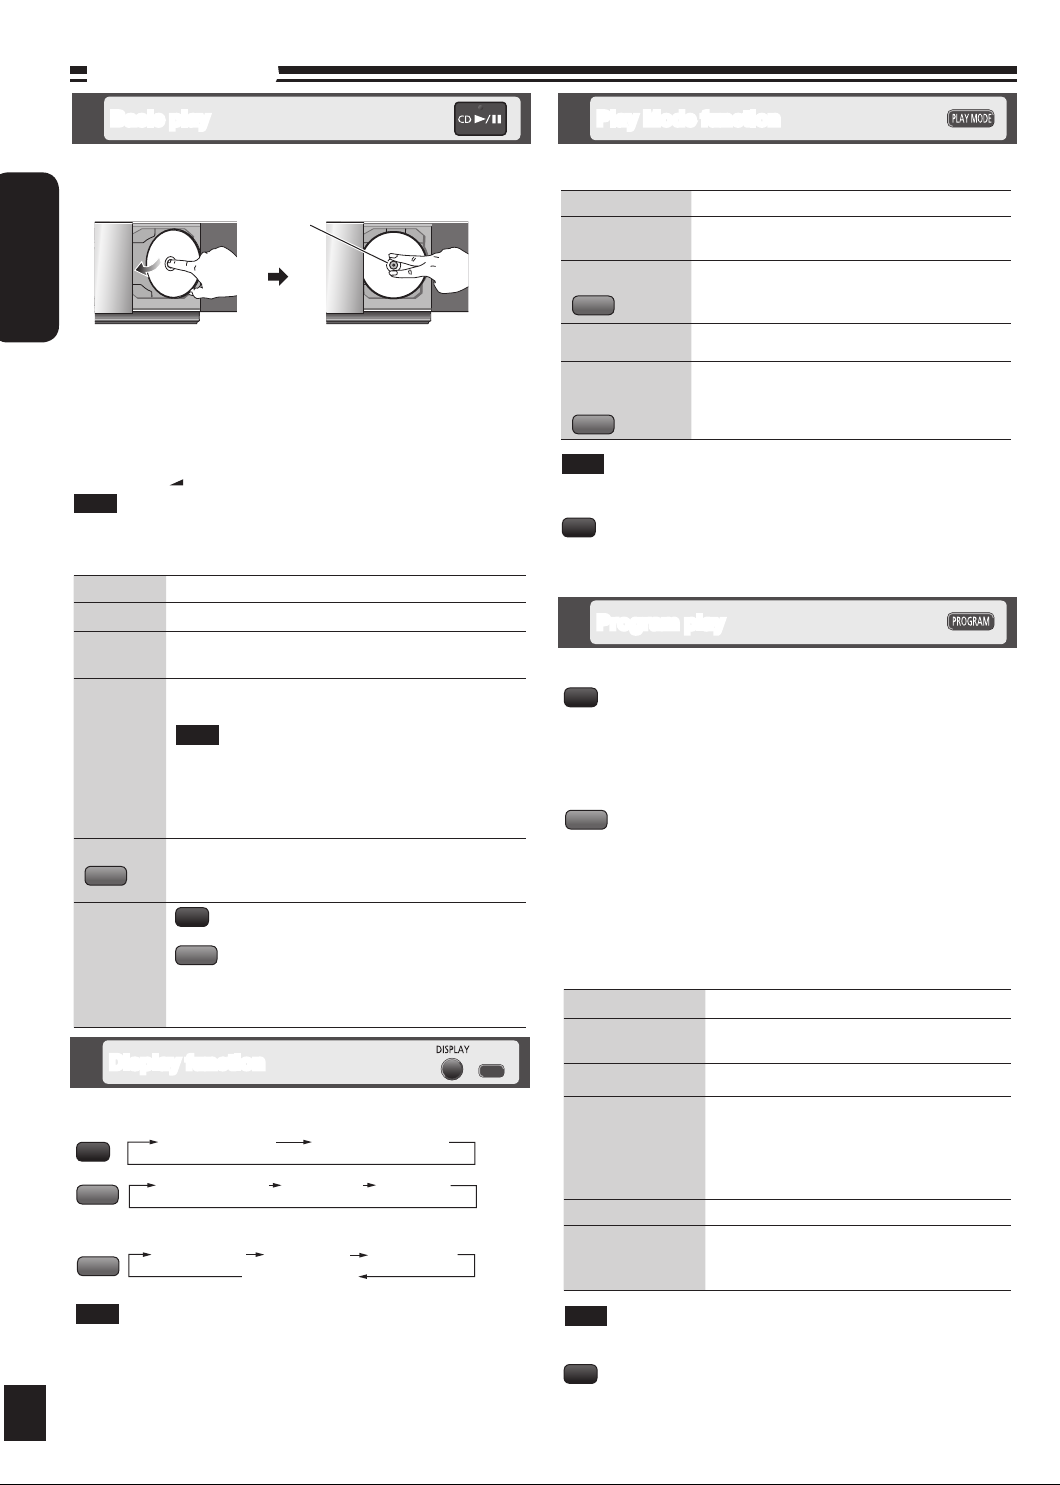
Press [^] to turn the unit on.
Press [CD ;, OPEN/CLOSE] to open the sliding door and then
set the CD in place.
Center part
Tilt the CD to the left
• Label must face outward.
and slide it in place.
Press [CD ;, OPEN/CLOSE] again to close the sliding door.
Keep fingers away from the sliding door when it is closing to avoid
possible minor injuries.
Press [CD q/h] or [OK] to start play.
Press [VOL +, –] to adjust the volume.
Note
Be sure to press the [CD ;, OPEN/CLOSE] button to open and close
•
the sliding door. Damage may occur if the sliding door is forced closed.
Be careful of CD hitting the sliding door while being removed.
•
To Action
stop
pause
skip/search
skip album
MP3
direct
access play
(Play starts
with the
track you
select.)
Press [g].
Press [CD q/h].
Press again to resume play.
Press [u/t] or [y/i] to skip.
Press and hold [u/t] or [y/i] to search.
Note
You can search during play or while paused.
•
You cannot search through MP3 files.
•
You can only search within the current track during
•
program play, one track repeat, and random play.
Press [e,r, ALBUM] in the play mode.
Press [e,r, ALBUM] once and then the numeric
buttons in the stop mode.
Press the numeric buttons to select the desired
CD
track.
MP3
Press [e,r, ALBUM] to select the album.
Press [y/i] once and then press the numeric
buttons to select the desired track.
Display function
This function allows you to display the information of the current track.
Press [DISPLAY] repeatedly during play or pause.
CD
MP3
Press [MP3 INFO] repeatedly during play or pause.
MP3
Elapsed play time Remaining play time
Elapsed play time Album name Track name
Elapsed play time
•
Press until you hear it
clicks into place.
ID3 (Artist)ID3 (Track)ID3 (Album)
Press [CD q/h].
Press [PLAY MODE] to select the desired mode.
Mode To play
1-TRACK
1TR
1-ALBUM
1ALBUM
MP3
RANDOM
RND
1-ALBUM
RANDOM
1ALBUM RND
MP3
Note
During random play, you cannot skip to previous track.
•
The current play mode is cleared when you open the sliding door.
•
CD
During RANDOM play, you can search backward or forward only
•
within the current track.
one selected track on the disc.
Press the numeric buttons to select the track.
one selected album on the disc.
Press [e,r, ALBUM] to select the album.
a disc randomly.
all tracks in one selected album randomly.
Press [e,r, ALBUM] to select the album.
Program play
The function allows you to program up to 24 tracks.
CD
Press [CD q/h] and then [g].
Press [PROGRAM].
Press the numeric buttons to select tracks.
Repeat this step to program other tracks.
Press [CD q/h] or [OK] to start play.
MP3
Press [CD q/h] and then [g].
Press [PROGRAM].
Press [e,r, ALBUM] to select your desired album.
Press [y/i] once and then press the numeric buttons to
select tracks.
Press [OK].
Repeat step 3 to 5 to program other tracks.
Press [CD q/h] to start play.
To Action
cancel program
mode
replay the program
check program
contents
clear the last track Press [DEL] in the stop mode.
clear all
programmed tracks
Press [PROGRAM] in the stop mode to clear
“PGM” indicator from the display.
Press [PROGRAM] then [CD q/h].
Press [u/t] or [y/i] when “PGM” is
displayed in the stop mode. To check while
programming, press [PROGRAM] twice after
“PGM” appears, then press [u/t] or
[y/i].
Press [g] in the stop mode.
“CLR ALL” is displayed. Within 5 seconds,
press the button again to clear all tracks.
Note
Maximum number of displayable characters: approximately 30.
•
This unit supports ver. 1.0 & 1.1 ID3 tags. Text data that is not
•
supported will not be displayed.
ID3 is a tag embedded in MP3 tracks to provide information about
•
8
the track.
Note
When you try to program more than 24 tracks “PGM FULL” appears.
•
The program memory is cleared when you open the sliding door.
•
CD
During program play, you can search backward or forward only within
•
the current track.
Page 9
RQTX0257
ENGLISH
9
Disc operations (continued)
Radio operations
Repeat play
You can repeat program play or other selected play mode.
Press [REPEAT] before or during play.
“ON REPEAT” and “ ” are displayed.
To cancel
Press [REPEAT] again.
“OFF REPEAT” is displayed and “ ” is cleared.
Note on CD-R and CD-RW
This unit can play CD-R and CD-RW recorded with CD-DA or MP3.
Use an audio recording disc for CD-DA and finalize* it when you finish
recording.
The unit may not be able to play some discs due to the condition of
the recording.
* A process performed after recording that enables CD-R/CD-RW
players to play audio CD-R and CD-RW.
Caution
Do not:
use irregularly shaped CDs.
•
attach extra labels and stickers.
•
use CDs with labels and stickers that are coming off or with
•
adhesive exuding from under labels and stickers.
attach scratch-proof covers or any other kind of accessories.
•
write anything on the CD.
•
clean CDs with liquids (Wipe with a soft, dry cloth).
•
Note about using a DualDisc
The digital audio content side of a DualDisc does not meet the
technical specifications of the Compact Disc Digital Audio (CD-DA)
format so playback may not be possible.
MP3
The unit can play MP3, a method of compressing audio without
hurting audio quality.
When creating MP3 files to play on this unit
Maximum number of tracks and albums: 999 tracks and 256
•
albums.
Compatible compression rate:
•
Between 64 kbps and 320 kbps (stereo).
128 kbps (stereo) is recommended.
•
Disc formats: ISO9660 level 1 and level 2 (except for extended
formats).
The time for reading TOC depends on the number of the tracks, the
•
folders or folder structures.
Limitations on MP3
This unit is compatible with multi-sessions but if there are a lot of
•
sessions it takes more time for play to start. Keep the number of
sessions to a minimum to avoid this.
This unit cannot play files recorded using packet write.
•
If the disc includes both MP3 and normal audio data (CD-DA), the
•
unit plays the type recorded in the inner part of the disc.
If the disc includes both MP3 and other types of audio data (e.g.
WMA or WAV), the unit plays only the MP3.
Depending on how you create MP3 files, they may not play in the
•
order you numbered them or may not play at all.
&
&
Manual tuning
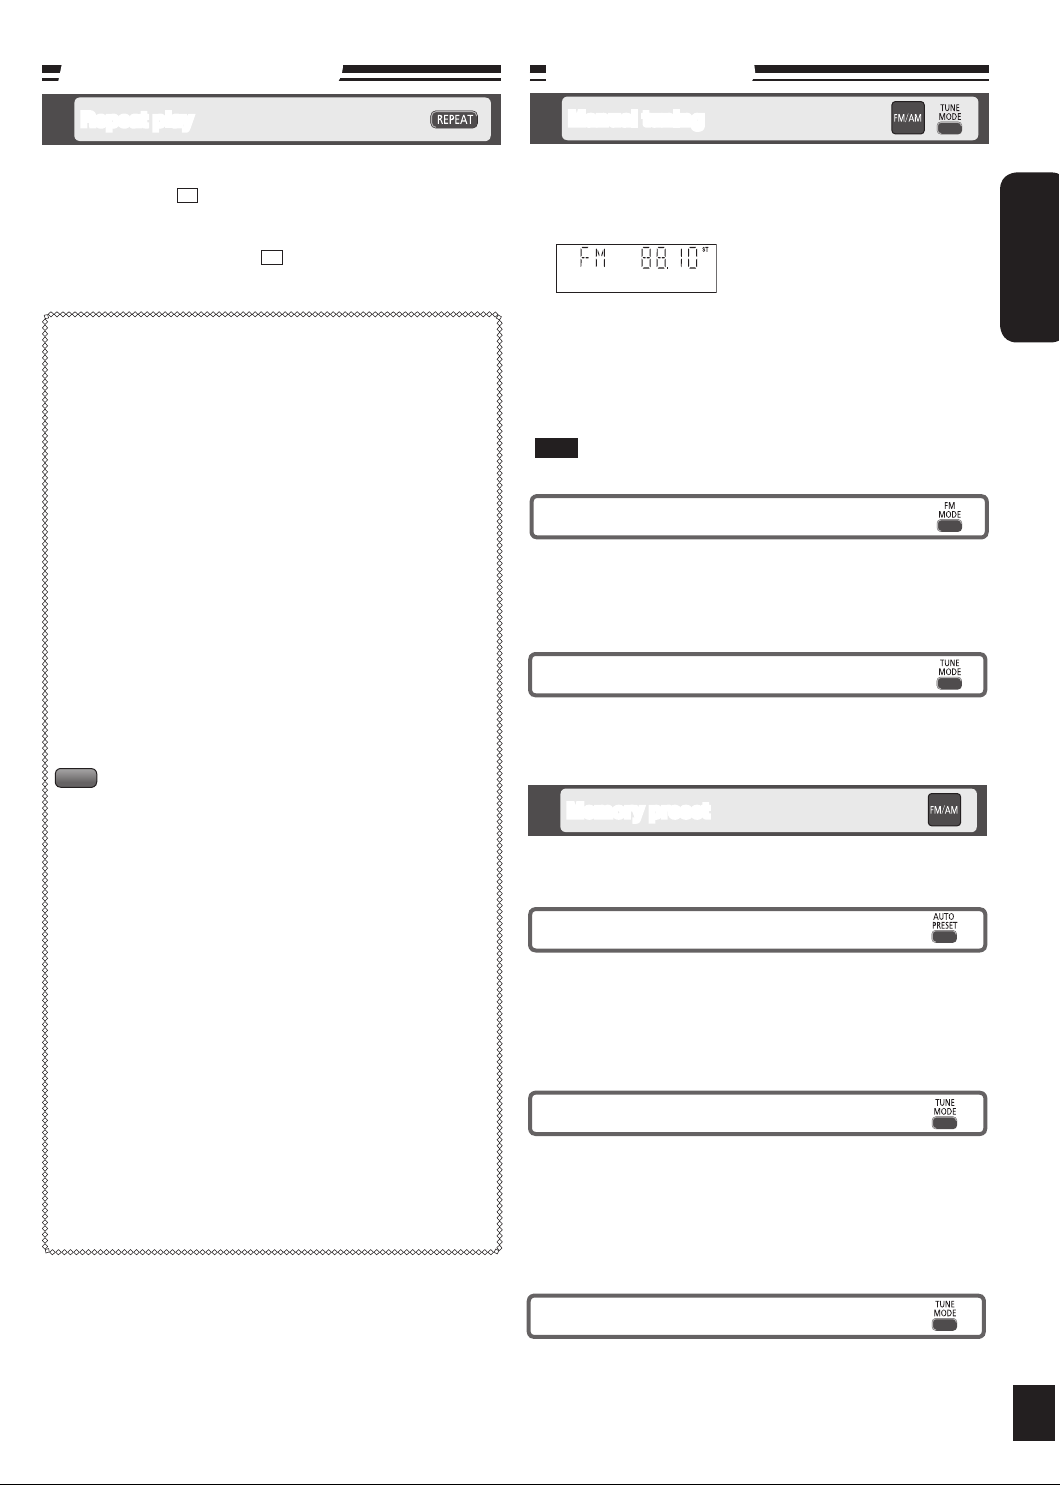
Press [FM/AM] to select “FM” or “AM”.
Press [TUNE MODE] to select “MANUAL”.
Press [u/t] or [y/i] to select the frequency of the
required station.
“ST” is displayed when a stereo FM
broadcast is being received.
To tune automatically
Press [FM/AM] to select “FM” or “AM”.
Press [TUNE MODE] to select “MANUAL”.
Press and hold [u/t] or [y/i] until the frequency starts
changing rapidly.
Auto tuning stops when it finds a station.
•
To cancel auto tuning, press [u/t] or [y/i] once again.
•
Note
Auto tuning may not function when there is excessive interference.
To improve FM sound quality
Press [FM MODE] to display “MONO” indicator.
To cancel
Press [FM MODE] again until “MONO” indicator disappears.
“MONO” is also canceled if the frequency is changed.
•
Turn off “MONO” for normal listening.
•
To improve AM sound quality
Press [FM/AM] to select “AM”.
Press and hold [TUNE MODE] repeatedly to change beat proof
setting (“BP1”, “BP2”, “BP3” or “BP4”).
Memory preset
You can preset up to 30 FM channels and up to 15 AM channels.
Preparation: Press [FM/AM] to select “FM” or “AM”.
Automatic presetting
Press [PLAY MODE] to switch between “LOWEST” or
“CURRENT” frequency.
Press [AUTO PRESET] to start presetting.
The tuner presets all the stations it can receive into the channels in
ascending order. When finished, the last station memorised is tuned
in.
Manual presetting
Press [TUNE MODE] to select “MANUAL”.
Press [u/t] or [y/i] to tune to the required station.
Press [PROGRAM].
Press the numeric buttons to select a channel.
The station occupying a channel is erased if another station is preset
in that channel.
Repeat steps 2 to 4 to preset more stations.
Selecting a preset station
Press the numeric buttons to select the channel.
For channels 10 to 30 press [≧10], then the two digits.
OR
Press [TUNE MODE] to select “PRESET”.
Press [u/t] or [y/i] to select the channel.
9
Page 10
RQTX0257
ENGLISH
10
RDS broadcasts
For Continental Europe
Enable you to display the name of a broadcasting station or a program
type.
“RDS” lights while RDS signals are being received.
Press [DISPLAY] to display.
Station Name (PS) Program Type (PTY)
Frequency display
Note
RDS displays may not be available if reception is poor.
Program type displays
NEWS VARIED FINANCE COUNTRY
AFFAIRS POP M CHILDREN NATIONAL
INFO ROCK M SOCIAL A OLDIES
SPORT M-O-R- M* RELIGION FOLK M
EDUCATE LIGHT M PHONE IN DOCUMENT
DRAMA CLASSICS TRAVEL TEST
CULTURE OTHER M LEISURE ALARM
SCIENCE WEATHER JAZZ
* M-O-R- M = Middle-of-the-Road music
Timer
Setting the clock
This is a 24-hour clock.
Press [CLOCK/TIMER] to set the clock.
Press [u/t] or [y/i] to select the time within 5 seconds.
(Press and hold to change the time faster.)
Press [CLOCK/TIMER] again.
g To display the clock for few
seconds when the unit is on or in
standby mode
Note
Reset the clock regularly to maintain accuracy.
Play timer
You can set the timer to come on at a certain time to wake you up.
This unit offers 3 optional play timers.
Preparation:
Turn the unit on and set the clock. (➡ see above)
•
Prepare the music source (disc, radio, iPod, AUX or USB) and set
•
the volume.
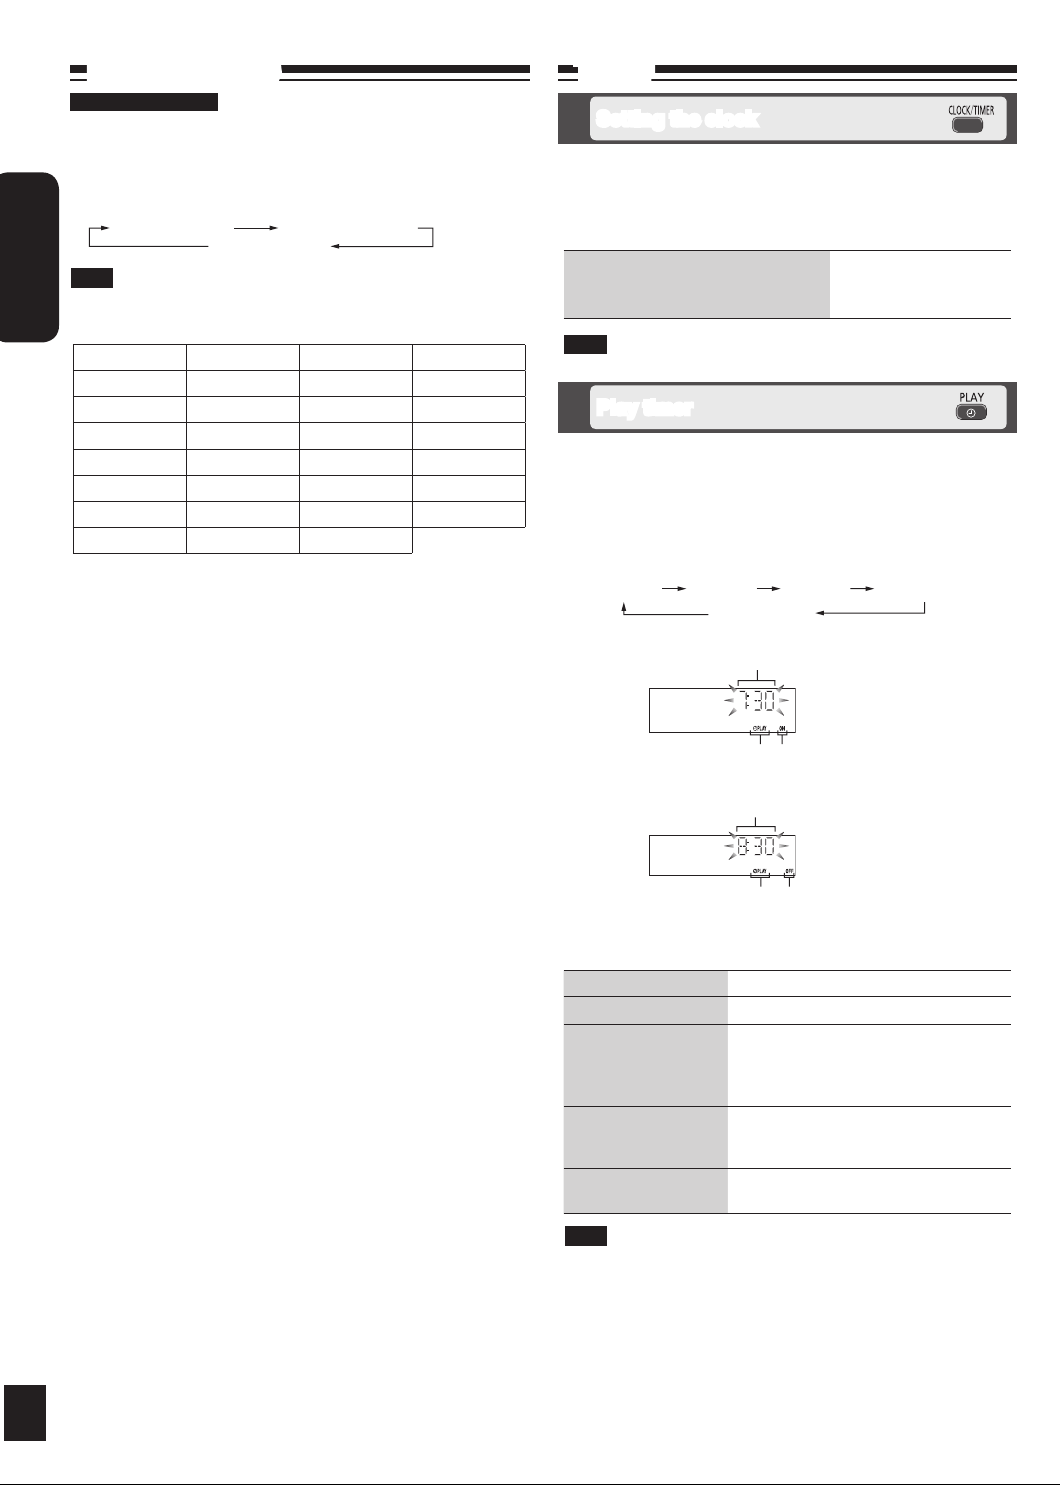
Press [CLOCK/TIMER] repeatedly to select play timer.
CLOCK
Within 5 seconds, press [u/t] or [y/i] to set the starting
time.
zPLAY 1 zPLAY 2 zPLAY 3
Original display
Start time
Press [CLOCK/TIMER]
10
Press [CLOCK/TIMER] to confirm.
Repeat steps 2 and 3 to set the finishing time.
To activate the timer
Press [z, PLAY] repeatedly to turn on your desired play timer.
Press [^] to turn off the unit.
To Action
change the settings Repeat steps 1 to 4 and 6.
change the source or
volume
check the settings
(when the unit is on or
in standby mode)
cancel
Note
The timer will start at the preset time, with the volume increasing
•
gradually to the preset level.
The timer comes on at the set time every day if the timer is on.
•
The unit must be in the standby mode for the timer to function.
•
If you turn the unit off and on again while the timer is functioning, the
•
finish time setting will not be activated.
When external unit is selected as the source when the timer comes
•
on, the system turns on and engages external unit as the source. If
you wish to playback from the portable audio equipment, activate the
equipment’s play mode and increase the volume. (See the portable
audio equipment’s instruction manual.)
Play timer indicator
Play timer indicator
“ON” is displayed
Finish time
“OFF” is displayed
Press [z, PLAY] to clear zPLAY
indicator from the display.
Make changes to the source or volume.
Perform steps 5 and 6.
Press [CLOCK/TIMER] repeatedly to
select zPLAY 1, zPLAY 2 or zPLAY 3.
Press [z, PLAY] to clear the timer
indicator from the display.
Page 11

RQTX0257
ENGLISH
11
ON D.BASS OFF D.BASS
ON RE-MASTER OFF RE-MASTER
HIGH NORMAL
30MIN 60MIN 90MIN 120MIN
Timer (continued)
Sound adjustment (continued)
Sleep timer
The SLEEP timer can turn the unit off after a set time.
Press [SLEEP] to turn the SLEEP function on/off.
Each time you press the button:
•
OFF (Canceled)
Sleep timer indicator
g To check the remaining time
Note
The play timer and sleep timer can be used together. The sleep timer
always has priority. Be sure not to overlap timer settings.
Press [SLEEP] once
Sound adjustment
Selecting sound effects
You can change the sound effect by selecting Preset EQ or adjusting the
bass or treble effect.
Enjoying surround sound
Enables you to add natural width and depth to the stereo sound.
To activate
Press [SURROUND] to display “ ” indicator.
To cancel
Press [SURROUND] again to clear “ ” indicator.
Note
Surround sound is less discernible when listening through headphones.
•
If interference in FM stereo reception increases, cancel the surround
•
sound effect.
Enhancing the bass
Enables you to enjoy the powerful bass effect.
Press [D.BASS] during play to select “ON D.BASS”.
Each time you press the button:
•
Note
The actual effect depends on the music source.
Re-master–Enjoying more natural sound
Preset EQ
Press [PRESET EQ] repeatedly to select your desired setting.
HEAVY
Setting Effect
HEAVY Adds punch to rock
CLEAR Clarifies higher frequencies
SOFT For background music
VOCAL Adds gloss to vocals
FLAT No effect
CLEAR SOFT
VOCAL
FLAT
Bass or treble
Enables you to enjoy lower or higher pitch sound.
Press [BASS/TREBLE] repeatedly to select your desired setting.
BASS TREBLE
Original Display
Setting Effect
BASS For lower pitch sound
TREBLE For higher pitch sound
MP3
Digital remaster is effective on CD (MP3) and USB
Analog remaster is effective on iPod and AUX
This feature reproduces the frequencies lost during recording to give
you a sound closer to the original.
Press [RE-MASTER] during play to select “ON RE-MASTER”.
Each time you press the button:•
Level adjustment (during AUX mode)
You can select the sound input level of your portable audio equipment.
Press [FM/AM/AUX] on the main unit to enter AUX
mode.
Press [PLAY MODE] repeatedly to select your
desired setting.
Note
Select “NORMAL” if the sound is distorted when level “HIGH” is
activated.
Press [u/t] or [y/i] to adjust the level.
Note
The tone level can be varied within -4 to +4.
11
Page 12

RQTX0257
ENGLISH
12
External unit
Push [;]
Click
Enjoying audio from iPod
g Inserting the iPod
Press [iPod ;, OPEN/CLOSE] to open the sliding door.
Push [;] to open the docking switch.
Adjust the docking switch and insert the suitable dock adapter for
Insert your iPod into the dock.
Push back the docking switch.
Press [iPod ;, OPEN/CLOSE] again to close the sliding door.
•
•
g Charging the iPod
•
•
•
•
Docking switch
your iPod.
Dock adapter
(not included)
iPod
(not included)
Recharging starts when the iPod dock is properly locked.
•
Keep fingers away from the sliding door when it is closing to avoid
possible minor injuries.
Note
It is recommended to use the dock adapter from Apple.
Be sure to push [;] to open and adjust the docking switch when
removing the iPod. Push back the docking switch after iPod being
removed.
iPod will start recharging regardless of whether this unit is in ON or
Standby condition.
“IPOD ” will be shown on the main unit’s display during iPod charging
in main unit standby mode.
Check iPod to see if the battery is fully recharged.
If you are not using iPod for an extended period of time after
recharging has completed, disconnect it from main unit, as the battery
will be depleted naturally. (Once fully recharged, additional recharging
will not occur.)
g Playing the iPod
Preparation:
Reduce the volume of the main unit to minimum before connecting/
•
disconnecting the iPod.
Confirm the iPod connection. (➡ left)
•
Press [iPod q/h] to play the iPod.
Adjust the volume of the main unit.
To Remote control Main unit
display iPod menu/
return previous menu
(During play/pause)
select contents from
iPod menu
(During play/pause)
pause track
skip a track
(During play/pause)
search the current track
(During play/pause)
Press [iPod MENU].
Press
[e,r, ALBUM]
followed by [OK].
Press [iPod q/h]
or [g].
Press [u/t] or
[y/i].
Press and hold
[u/t] or
[y/i].
3
3
Press [iPod q/h]
or [g].
Press [u/t] or
[y/i].
Press and hold
[u/t] or
[y/i].
■ Compatible iPod
Name Memory size
iPod touch 2nd generation 8 GB, 16 GB, 32 GB
iPod nano 4th generation (video) 8 GB, 16 GB
iPod classic 120 GB
iPod touch 1st generation 8 GB, 16 GB, 32 GB
iPod nano 3rd generation (video) 4 GB, 8 GB
iPod classic 80 GB, 160 GB
iPod nano 2nd generation (aluminum) 2 GB, 4 GB, 8 GB
iPod 5th generation (video) 60 GB, 80 GB
iPod 5th generation (video) 30 GB
iPod nano 1st generation 1 GB, 2 GB, 4 GB
iPod 4th generation (colour display) 40 GB, 60 GB
iPod 4th generation (colour display) 20 GB, 30 GB
iPod 4th generation 40 GB
iPod 4th generation 20 GB
iPod mini 4 GB, 6 GB
Compatibility depends on the software version of your iPod.•
12
Page 13

RQTX0257
ENGLISH
13
External unit (continued)
DEMO
VOLUME
MP3
INFO
USB operations
MP3
The USB connectivity enables you to connect and play MP3 tracks from
USB mass storage class. Typically, USB memory devices (Bulk only
transfer).
Preparation:
Before connecting any USB mass storage device to the unit, ensure that
the data stored therein has been backed up.
It is not recommended to use a USB extension cable. The device
connected via the cable will not be recognised by this unit.
Reduce the volume and connect the USB mass storage device.
USB enabled device (not included)
Press [USB q/h] or [OK] to start play.
To Action
pause play
stop play
skip track
skip album
direct access play
(Play starts with the
track you select.)
Display function
Press [DISPLAY] repeatedly during play or pause.
Elapsed play
time
Press [MP3 INFO] repeatedly during play or pause.
MP3
For other operating functions, they are similar as those described in “Disc
operations” (➡ page 8 and 9).
To remove the USB mass storage device
Select a source other than “USB”.
Removing the USB mass storage device with it selected as a source can
damage the data stored in the device.
Press [USB q/h].
Press again to resume play.
Press [g].
“RESUME” is displayed. The position is
memorized.
Press [USB q/h] to resume play.
OR
Press [g] again to clear the position.
Press [u/t] or [y/i].
Press [e, r, ALBUM] in the play mode.
Press [e, r, ALBUM] once and then the
numeric buttons in the stop mode.
Press [e, r, ALBUM] to select the album.
Press [y/i] once and then press the
numeric buttons to select the desired track.
Remaining play
time
Elapsed play time
Album name Track name
ID3 (Artist)ID3 (Track)ID3 (Album)
Compatible devices
Devices which are defined as USB mass storage class:
USB devices that support bulk only transfer.
•
USB devices that support USB 2.0 full speed.
•
Supported format
Files must have the extension “.mp3” or “.MP3”.
Note
CBI (Control/Bulk/Interrupt) is not supported.
•
A device using NTFS file system is not supported
•
[Only FAT 12/16/32 (File Allocation Table 12/16/32) file system is
supported].
Depending on the sector size, some files may not work.
•
This unit can access up to 255 albums and 2500 tracks.
•
The maximum number of tracks in a folder are 999 tracks.
•
Only one memory card will be selected when connecting a
•
multiport USB card reader. Typically the first memory card inserted.
Disconnect the USB card reader from the unit when you remove
•
the memory card. Failure to do so may cause malfunction to the
device.
When you connect your digital audio player to the USB port, it
•
charges all the time when the unit is on.
Changing the main unit and remote
control mode
The remote control and main unit are factory-set to “REMOTE 1” mode.
If you find the remote control unintentionally also controls other
equipment, you can switch to operate in “REMOTE 2” mode.
To switch to “REMOTE 2” mode
Press [FM/AM/AUX] to enter AUX mode.
(While pressing [FM/AM/AUX] on the main unit)
Press and hold [2] until “REMOTE 2” appears on the main unit
display.
Press and hold [OK] followed by [2] for at least 2 seconds.
The main unit and remote control are now set to operate in
“REMOTE 2” mode.
To return to “REMOTE 1” mode
Perform steps 1 to 3 but use [1] instead of [2] for steps 2 and 3.
(“REMOTE 1” appears on the main unit during step 2.)
The remote control cannot work with the main unit if their modes
are different.
“REMOTE 1” or “REMOTE 2” appears on the main unit when you
operate the remote control.*
* If “REMOTE 1” appears (The main unit is in “REMOTE 1” mode.)
Press and hold [OK] followed by [1] on the remote control for at least
2 seconds.
If “REMOTE 2” appears (The main unit is in “REMOTE 2” mode.)
Press and hold [OK] followed by [2] on the remote control for at least
2 seconds.
13
Page 14

RQTX0257
ENGLISH
14
Troubleshooting guide
Before requesting service, make the following checks. If you are in doubt about any of the check points, or if the solutions indicated in the
chart do not solve the problem, consult your dealer for instructions.
Common problems
You have not inserted the disc correctly; insert it correctly.
Incorrect display or play will not
start.
MP3 cannot be read.
Noise is heard or no sound.
Humming heard during play.
A beat sound or noise is heard
while receiving a radio broadcast.
A low hum or noise is heard
during AM broadcasts.
The picture on the television near
the unit disappears or stripes
appear on the screen.
No response when remote control
buttons are pressed.
•
The disc is scratched or dirty. (Tracks skipped.)
•
There is moisture on the lens. Wait for about an hour and then try again.
•
You may not be able to play MP3 if you have copied a multi-session disc that has no data between
•
sessions.
When creating a multi-session disc, it is necessary to close the session.
•
The amount of data on the disc is too small. Set the amount of data to greater than approximately 5 MB.
•
Noise may occur when playing MP3 if recording quality is poor.
•
Keep this unit away from mobile telephones if the interference is apparent.
•
Turn the volume up.
•
Switch the unit off, check and correct the connection, then switch the unit on. Causes include straining of
•
the speakers through excessive volume or power, and using the unit in a hot environment.
An AC mains lead or fluorescent light is near the cords. Keep other appliances and cords away from this
•
unit’s cables.
Switch the television or other audio player off or separate it from the unit.
•
Switch off the portable audio player if connected to “AUX” port.
•
Keep the antenna away from other cables and cords.
•
Keep the AM antenna away from the unit.
•
The location and orientation of the antenna are incorrect.
•
The television antenna wire is too close to the unit. Separate the antenna wire of the television from the unit.
•
Check that the batteries are inserted correctly. (➡ page 5)•
Display
“--:--”
“ADJUST CLOCK” Clock not set. Adjust the clock accordingly.•
“ADJUST TIMER” Play timer not set. Adjust the play timer accordingly.•
“PGM FULL” The number of programmed tracks is limited to 24. No further tracks can be programmed.•
“NO PLAY” A CD-ROM disc that is not CD-DA or MP3 format is inserted. It cannot be played.•
“ERROR” Incorrect operation performed. Read the instructions and try again.•
“F61” or “F76” There is a power supply problem. Consult the dealer.•
“UNLOCKED” Make sure the docking switch is pushed back properly.•
“ILLEGAL OPEN” Sliding door is not in correct position. Turn the unit off and on again.•
“IPOD NO DEV”
iPod
iPod does not turn on.
No sound is coming from the
speakers.
Distorted sound or the sound
level is too low.
Cannot control the iPod using
remote control or main unit.
iPod does not charge.
14
You plugged the AC mains lead in for the first time and there was a power failure recently. Set the time.
•
(➡ page 10)
The iPod device is not inserted correctly. Read the instructions and try again. (➡ page 12)•
Verify that the iPod battery is not depleted before connecting it to the unit.
•
Before inserting your iPod into the dock, turn off both the unit and iPod. Turn power back on and select the
•
appropriate source.
The iPod is not correctly inserted into the dock. Turn off the iPod, remove it from the dock connector.
•
Reinsert it and turn it on again.
Make sure that iPod is actually playing something.
•
Adjust the volume.
•
Make sure the equalizer function of your iPod is turned off.•
Make sure the iPod is inserted properly into the dock.
•
Check the dock connection and make sure that iPod is selected as the source of music. (➡ page 12)
•
Check all connections. (➡ page 4, 12)•
Page 15

RQTX0257
ENGLISH
15
Troubleshooting guide(continued)
USB
No response when [USB q/h]
button is pressed.
The USB drive or it’s contents
cannot be read.
Slow operation of the USB flash
drive.
“USB OVER CURRENT ERROR”
“NO PLAY”
“NO DEV” The USB device is not inserted. Check the connection.•
Disconnect the USB device and then reconnect it back. Alternatively, turn the unit off and then back on.•
The USB drive format or it’s contents is/are not compatible with the system. (➡ page 13)
•
The USB host function of this product may not work with some USB devices.
•
USB devices with storage capacity of more than 8 gigabytes may not work in some instances.
•
Large file size or high memory USB flash drive takes longer time to read.•
The USB mass storage device rating exceeds 500 mA. Disconnect the USB device. Turn the unit off and
•
then back on.
Check the content.
•
Only MP3 format files can be played.
•
Specifications
g AMPLIFIER SECTION
RMS Output Power Stereo mode
Front Ch (both ch driven)
20 W per channel (6 Ω), 1 kHz, 10 % THD
PMPO Output power
For Southeast Asia
450 W
Phone jack
Terminal Stereo, 3.5 mm jack
Output level (CD, 1 kHz, -20 dB)
max. 1.18 mW +1.18 mW, 32
Aux (Rear)
Sensitivity
Normal level 630 mV, 12.4 kΩ
High level 100 mV, 12.4 kΩ
Terminal Stereo, 3.5 mm jack
g TUNER SECTION
Preset Memory FM 30 stations
AM 15 stations
Frequency Modulation (FM)
Frequency range
87.50 MHz to 108.00 MHz (50 kHz step)
Antenna terminals 75 Ω (unbalanced)
Amplitude Modulation (AM)
Frequency range
522 kHz to 1629 kHz (9 kHz step)
g DISC SECTION
Disc played [8 cm or 12 cm]
(1) CD-Audio (CD-DA)
(2) CD-R/RW (CD-DA, MP3)
(3) MP3*
* MPEG-1 Layer 3, MPEG-2 Layer 3
Pick up (CD)
Wavelength 795 nm
Laser power CLASS 1
Audio Output (Disc)
Ω
Number of channels FL, FR, 2 channel
Audio performance (CD-Audio)
Frequency response 4 Hz to 20 kHz
S/N ratio 95 dB
Dynamic range 93 dB
Total harmonic distortion 0.005 %
g USB PORT
Media file format support MP3 (*.mp3)
USB device file system FAT12/16/32
USB port power Max 500 mA
g SPEAKER SECTION
Type 1 way, 1 speaker system (Bass reflex)
Speaker unit(s)
Full range 6.5 cm Cone type
Impedance 6 Ω
Input power (IEC) 30 W (Max)
Output sound pressure 79 dB/W (1.0m)
Frequency range
55 Hz to 25 kHz (-16 dB)
90 Hz to 22 kHz (-10 dB)
g GENERAL
Power supply
For Continental Europe
AC 220 to 240 V, 50 Hz
For Southeast Asia
AC 220 to 240 V, 50/60 Hz
Power consumption 33 W
Dimensions (W x H x D)
500 mm x 195 mm x 102.5 mm
(D = 69 mm minimum)
Mass Approx. 3 kg
Operating temperature range
0 °C to +35 °C
Operating humidity range
35 % to 80 % RH (no condensation)
Power consumption in standby mode:
0.2 W (approx.)
Note
Specifications are subject to change without
•
notice.
Total harmonic distortion is measured by the
•
digital spectrum analyzer.
Maintenance
■ If the surfaces are dirty
To clean this unit, wipe with a soft, dry cloth.
Never use alcohol, paint thinner or benzine to clean this unit.
•
Before using chemically treated cloth, read the instructions that came
•
with the cloth carefully.
■ Care of the CD lens
Clean the lens regularly to prevent malfunctions. Use a blower to
•
remove dust and a cotton swab if it is extremely dirty.
Do not use the lens cleaner of the CD type.
•
15
Page 16

RQTX0257
16
ESPAÑOL
Índice
Accesorios suministrados Tapa
Precauciones de seguridad 2
Conexiones 4
Preparando el mando a distancia 5
Función de demostración 5
Guía de control 6
Operaciones con discos 8
Funcionamiento de la radio 9
Emisiones RDS 10
Temporizador 10
Ajuste del sonido 11
Unidad externa 12
Guía para la solución de problemas 14
Especificaciones 15
Mantenimiento 15
Precauciones de seguridad
Instalación
Coloque la unidad sobre una superficie lisa lejos de la luz
directa del sol, de zonas de temperatura y humedad elevadas
y una vibración excesiva. Estas condiciones pueden dañar la
caja y otros componentes, y por lo tanto acortar la vida útil de la
unidad.
Coloque el aparato a una distancia de al menos 15 cm de la
pared para evitar distorsiones y efectos acústicos no deseados.
No coloque objetos pesados encima del aparato.
Voltaje
No utilice fuentes de alimentación de alto voltaje. Esto puede
sobrecargar la unidad y causar un incendio.
No use una fuente de alimentación de CC. Verifique
cuidadosamente la fuente cuando coloque la unidad en una
embarcación u otro lugar donde se utilice CC.
Protección del cable de alimentación de CA
Asegúrese de que el cable de alimentación de CA está bien
conectado y que no está dañado. Una mala conexión y un cable
dañado pueden ser la causa de un incendio o una descarga
eléctrica. No tire del cable de alimentación, ni lo doble, ni
coloque objetos pesados encima de él.
Agarre el enchufe firmemente cuando desenchufe el cable.
Si tira del cable de corriente puede provocar una descarga
eléctrica.
No manipule el enchufe con las manos mojadas. Esto puede
provocar una descarga eléctrica.
Materias extrañas
No permita que ningún objeto de metal caiga en el interior
del aparato. Esto puede causar una descarga eléctrica o una
avería.
No permita la entrada de líquidos en la unidad. Esto
puede causar una descarga eléctrica o una avería. Si esto
ocurre, desconecte inmediatamente la unidad de la fuente de
alimentación y póngase en contacto con su distribuidor.
No rocíe insecticidas sobre o dentro del aparato. Contienen
gases inflamables que pueden arder al ser rociados dentro de
la unidad.
Servicio
No intente reparar el aparato usted mismo. Si el sonido se
interrumpe, los indicadores no se iluminan, sale humo o sucede
cualquier otro problema que no se indica en estas instrucciones,
desconecte el adaptador de la CA y póngase en contacto con
su distribuidor o centro de servicio autorizado. Si el aparato
es reparado, desarmado o reconstruido por personas no
cualificadas podrían producirse descargas eléctricas o daños.
Prolongará la vida útil de la unidad si desconecta la fuente de
alimentación cuando no vaya a utilizarlo durante mucho tiempo.
2
Page 17

RQTX0257
17
ESPAÑOL
AUX
EXT
75
Ω
LOOP
AM AN
TFM ANT
LOOP ANT
GROUND
AC IN
¡ADVERTENCIA!
ESTE APARATO UTILIZA UN LÁSER.
EL USAR LOS CONTROLES, HACER LOS REGLAJES O
LOS PASOS REQUERIDOS EN FORMA DIVERSA DE LA
AQUÍ EXPUESTA PUEDE REDUNDAR EN EXPOSICIÓN
PELIGROSA A LA RADIACIÓN.
NO ABRA LAS TAPAS NI HAGA REPARACIONES USTED
MISMO. EN CASO DE PRODUCIRSE ANOMALÍAS
SOLICITE AYUDA DE PERSONAL CUALIFICADO.
¡ADVERTENCIA!
PARA MANTENER BIEN VENTILADA ESTA UNIDAD,
•
NO LA INSTALE NI PONGA EN UN ESTANTE DE
LIBROS, MUEBLE EMPOTRADO U OTRO ESPACIO
DE DIMENSIONES REDUCIDAS. ASEGÚRESE QUE
CORTINAS Y OTROS MATERIALES NO OBSTRUYAN
LAS CONDICIONES DE VENTILACIÓN PARA
PREVENIR EL RIESGO DE SACUDIDAS ELÉCTRICAS O
INCENDIOS DEBIDOS AL RECALENTAMIENTO.
NO OBSTRUYA LAS ABERTURAS DE VENTILACIÓN
•
DE LA UNIDAD CON PERIÓDICOS, MANTELES,
CORTINAS U OBJETOS SIMILARES.
NO COLOQUE OBJETOS CON LLAMA DESCUBIERTA,
•
UNA VELA POR EJEMPLO, ENCIMA DE LA UNIDAD.
TIRE LAS PILAS DE FORMA QUE NO CONTAMINE EL
•
MEDIO AMBIENTE.
ADVERTENCIA:
PARA REDUCIR EL RIESGO DE INCENDIOS,
DESCARGAS ELÉCTRICAS O DAÑOS EN EL PRODUCTO,
NO EXPONGA ESTE APARATO A LA LLUVIA,
•
HUMEDAD, GOTEO O SALPICADURAS, Y NO
COLOQUE ENCIMA DEL MISMO OBJETOS CON
LÍQUIDOS COMO, POR EJEMPLO, FLOREROS.
UTILICE SOLAMENTE LOS ACCESORIOS
•
RECOMENDADOS.
NO QUITE LA CUBIERTA (O EL PANEL TRASERO); EN
•
EL INTERIOR NO HAY PIEZAS QUE PUEDA REPARAR
EL USUARIO. SOLICITE LAS REPARACIONES AL
PERSONAL DE SERVICIO CUALIFICADO.
La toma de corriente deberá estar instalada cerca del equipo
y donde se pueda acceder a ella fácilmente.
El enchufe del cable de la alimentación deberá estar siempre
listo para ser utilizado.
Para desconectar completamente este aparato de la red de
CA, desconecte el enchufe del cable de alimentación del
receptáculo de CA.
Este producto puede tener interferencias causadas por
teléfonos móviles durante su utilización. Si tales interferencias
resultan evidentes, aumente la separación entre el producto y
el teléfono móvil.
CUIDADO
Hay peligro de explosión por si se sustituye
incorrectamente la batería. Sólo sustituya con el mismo
tipo recomendado por el fabricante o que sea equivalente.
Deseche las baterías usadas según instruye el fabricante.
ESTA UNIDAD HA SIDO DISEÑADA PARA SER UTILIZADA
EN CLIMAS MODERADOS.
iPod es una marca de Apple Inc., registrada en EUA y otros países.
EU
Pursuant to at the directive 2004/108/EC, article 9(2)
Panasonic Testing Centre
Panasonic Marketing Europe GmbH
Winsbergring 15, 22525 Hamburg, Germany
Parte interior del aparato
Información para Usuarios sobre la Recolección y
Eliminación de aparatos viejos y baterías usadas
Estos símbolos en los productos, embalajes
y/o documentos adjuntos, significan que los
aparatos eléctricos y electrónicos y las baterías
no deberían ser mezclados con los desechos
domésticos.
Para el tratamiento apropiado, la recuperación y
el reciclado de aparatos viejos y baterías usadas,
por favor, observe las normas de recolección
aplicables, de acuerdo a su legislación nacional y
a las Directivas
2002/96/CE y 2006/66/CE.
Al desechar estos aparatos y baterías
correctamente, Usted estará ayudando a
preservar recursos valiosos y a prevenir
cualquier potencial efecto negativo sobre la salud
de la humanidad y el medio ambiente que, de lo
contrario, podría surgir de un manejo inapropiado
de los residuos.
Para mayor información sobre la recolección y
el reciclado de aparatos y baterías viejos, por
favor, contacte a su comunidad local, su servicio
de eliminación de residuos o al comercio donde
adquirió estos aparatos.
Podrán aplicarse penas por la eliminación
incorrecta de estos residuos, de acuerdo a la
legislación nacional.
Para usuarios empresariales en la Unión
Europea
Si usted desea descartar aparatos eléctricos y
electrónicos, por favor contacte a su distribuidor
o proveedor a fin de obtener mayor información.
[Informacion sobre la Eliminación en otros
Países fuera de la Unión Europea]
Estos símbolos sólo son válidos dentro de
la Unión Europea. Si desea desechar estos
objetos, por favor contacte con sus autoridades
locales o distribuidor y consulte por el método
correcto de eliminación.
Nota sobre el símbolo de la bateria (abajo,
dos ejemplos de símbolos):
Este símbolo puede ser usado en combinación
con un símbolo químico. En este caso, el mismo
cumple con los requerimientos establecidos por
la Directiva para los químicos involucrados.
3
Page 18

RQTX0257
18
ESPAÑOL
AUX
EXT
75Ω
LOOP
AM ANTFM ANT
LOOP ANT
GROUND
132
AC IN
Conexiones
T
N
A
M
F
Ω
5
7
1
2
3
Equipo de audio portátil (Cables y equipos no incluidos)
Reproductor de audio portátil
Nota
Ajuste el volumen y la calidad del sonido de esta unidad y del otro equipo. Reduzca el nivel de la señal de entrada (por ejemplo,
•
desconectando el ecualizador o reduciendo el volumen) del otro equipo antes de la conexión. Los niveles elevados de señal de
entrada distorsionarán el sonido.
Para conocer detalles, consulte el manual de instrucciones del otro equipo.
•
1
Conecte la antena interior de FM.
Tipo de clavija:
estéreo de
Ø3,5 mm
Cinta adhesiva
Inicie la reproducción
desde la fuente de
audio portátil.
➡
UNIDAD
PRINCIPAL
Auriculares (no suministrados)
Reduzca el nivel del volumen
y conecte los auriculares.
Tipo de clavija: estéreo de
Ø3,5 mm.
Nota
Intente no usarlos durante
•
mucho tiempo seguido para
evitar lesiones auditivas.
Una presión sonora excesiva
•
en los auriculares puede
producir una pérdida de
audición.
Conecte el cable de alimentación de CA.
3
Antena interior de FM
Fije la antena en una pared o columna en una posición en que la
señal de radio se reciba con las menores interferencias.
Conecte la antena de cuadro de AM.
2
Antena interior de AM
Utilice un destornillador
Phillips, etc.
Negro
Rojo
Blanco
Coloque la antena
en posición vertical
sobre su base.
¡Clic!
Mantenga el cable de la antena alejado de otros cables. No apriete
demasiado. De lo contrario, el destornillador gira sin parar en círculos
y no es posible arreglarlo.
4
Conecte el cable de alimentación
de CA una vez terminado el resto
de las conexiones.
A la toma de
corriente de casa
Nota
Para ahorrar energía cuando no se vaya a utilizar el aparato
durante un período largo de tiempo, desenchúfelo para mantenerlo
alejado de la toma de corriente. Después de enchufar el aparato
tendrá que restablecer algunos elementos de la memoria.
Inserción del conector
Toma del aparato
6 mm aproximadamente
Incluso cuando el conector está bien insertado, dependiendo
del tipo de toma usada, la parte delantera del conector puede
sobresalir como se muestra en la figura. Sin embargo, no
habrá problemas para usar el aparato.
Conector
Page 19

RQTX0257
19
ESPAÑOL
Conexiones (continuación)
DEMO
1
2
3
30°30°
Conexiones de antenas opcionales
Antena exterior de FM
Antena exterior de FM (no incluida)
Cable coaxial de 75 Ω
(no incluido)
Nunca utilice una antena exterior durante una tormenta eléctrica.
•
Puede conectar la antena exterior de FM para conseguir una mejor recepción. Consulte con su distribuidor
•
para la instalación.
Desconecte la antena interior de FM si se encuentra instalada una antena exterior de FM.
•
Conecte la antena exterior de AM sin quitar la antena de cuadro de AM. Pase horizontalmente de 5 a 12 m
•
de conductor cubierto de vinilo a lo largo de una ventana o de otro lugar conveniente.
Antena exterior de AM
Preparando el mando a distancia
R6/LR6, AA
Antena exterior de AM
(no incluida)
5 a 12 m
Antena de cuadro
de AM (incluida)
Introduzca este lado antes que el otro
■ Pilas
Utilice pilas secas de manganeso o una pila seca alcalina.
•
Introduzca las pilas de forma que los polos (+ y –) coincidan con los
•
del mando a distancia.
Retire las pilas si no va a utilizar el mando a distancia durante un
•
periodo de tiempo largo.
Guárdelas en un lugar fresco y oscuro.
•
No las caliente ni exponga a las llamas.
•
No deje las baterías en un automóvil directamente al sol durante un
•
periodo de tiempo prolongado con las puertas y ventanillas cerradas.
Un mal manejo de pilas en el mando a distancia puede provocar fugas
•
electrolíticas, que pueden provocar fuego.
No:
mezcle pilas viejas y nuevas;
•
utilice pilas de diferentes tipos a la vez;
•
desmonte las pilas ni las cortocircuite;
•
intente recargar pilas alcalinas o de manganeso;
•
utilice pilas cuya cubierta protectora esté levantada.
•
Función de demostración
Vista superior (Panel superior)
[g, –DEMO]
Sensor de señal del
mando a distancia
Ventana de transmisión
■ Utilización
Apunte el mando a distancia al sensor, evitando obstáculos, dentro de
•
una distancia máxima de 7 m directamente enfrente del aparato (La
distancia exacta depende de los ángulos).
El funcionamiento puede verse afectado por fuentes de luz intensa,
•
como la luz solar directa, y las puertas de cristal de los muebles donde
se coloca el aparato.
Cuando el equipo se conecta por primera vez, puede aparecer una
demostración de sus funciones en el visualizador.
Si la función de demostración está desactivada, podrá ver una
demostración si selecciona “DEMO ON”.
Mantenga pulsado [g, –DEMO].
La pantalla cambia cada vez que se mantiene pulsado el botón.
DEMO OFF (desactivación) DEMO ON (activación)
Cuando esté en modo de espera, seleccione “DEMO OFF” para reducir el
consumo de electricidad.
5
Page 20

RQTX0257
20
ESPAÑOL
Guía de control
MP3
INFO
2
3
4
5
6
7
8
9
10
11
12
13
14
15
1
16
17
18
19
20
21
22
23
24
25
26
27
28
29
30
32
31
Mando a distancia
Los números entre paréntesis indican la página de referencia.
•
[u/t] y [y/i] descritos en las operaciones tienen los mismos controles que [w] y [q] respectivamente.
•
6
Interruptor de alimentación en espera/
1
conectada [^], [8] (8, 10)
Pulse este interruptor para cambiar del modo de
alimentación conectada al modo de alimentación
en espera o viceversa. En el modo de
alimentación en espera, el aparato consume una
pequeña cantidad de corriente.
2
[DIMMER] Reduce la iluminación del visualizador
Botones numéricos [1-9, 0, ≧10] (8, 9, 13)
3
Para seleccionar un número de 2 dígitos
Por ejemplo, 16: [≧10] [1] [6]
Para seleccionar un número de 3 dígitos
Por ejemplo, 226: [≧10] [≧10] [2] [2] [6]
4
[DEL] Borrar última pista programada (8)
[PROGRAM] (8, 9)
5
Programa CD/MP3
Presintonía del sintornizador (Manual)
[CD q/h] (8)
6
Cambiar selector a CD
Reproducción directa CD/Pausa CD
[USB q/h] (13)
7
Interruptor selector a USB
Reproducción directa USB/Pausa USB
[iPod q/h] (12)
8
Cambiar selector a iPod
Reproducción directa iPod/Pausa iPod
9
[g] Botón de parada (8, 12, 13)
[RE-MASTER] Activación/desactivación de
10
remasterización (11)
[PRESET EQ] (11)
11
Selector de modo Preset EQ
[e, r, ALBUM] (8, 12, 13)
12
Selección de Álbum/pista
Navegación por menú iPod
[w, q]
Saltar/buscar pista
Sintonización/selección de canal presintonizado
Ajuste de hora
Ajuste de bajos/agudos
[DISPLAY] (8, 10, 13)
13
CD: Pantalla CD (Tiempo de reproducción
transcurrido/Tiempo de reproducción restante)
MP3: Pantalla MP3 (Tiempo de reproducción
transcurrido/Nombre del álbum/Nombre de la
pista)
USB: Pantalla USB (Tiempo de reproducción
transcurrido/Tiempo de reproducción restante/
Nombre del álbum/Nombre de la pista)
RDS:Pantalla RDS (Nombre de la emisora/Tipo
de programa/Frecuencias)
[AUTO PRESET] (9)
14
Presintonía del sintornizador (Automática)
[TUNE MODE] (9)
15
Activación/Desactivación del modo sintonizador
Interruptor selector en Manual/Presintonía
Conexión/Desconexión del temporizador de
(10) [z, PLAY]
reproducción
(10) [CLOCK/TIMER]
Ajuste de la hora y del temporizador
[AUTO OFF]
Esta función le permite apagar la unidad
en modo disco o USB sólo después de 10
minutos de inactividad. El ajuste se mantiene
aunque el aparato esté apagado.
Vuélvalo a pulsar para cancelar la función.
(11) [SLEEP]
Ajuste del temporizador de desconexión
automática
(8, 10, 12, 13) [VOL +, –], [–VOLUME+]
Para ajustar el volumen
[MUTE]
Silencia el sonido
Vuélvalo a pulsar para cancelar.
(9) [REPEAT]
Conexión/Desconexión de Repetición
(8, 9, 11) [PLAY MODE]
Botón del modo de reproducción
Sintonizador: Inferior/Actual
Ajuste de nivel en modo AUX a Normal/Alto
(9) [FM/AM]
Selección FM/AM
(8, 9, 10, 11, 12, 13) [u/t], [y/i]
Saltar/buscar pista
Sintonización/selección de canal
presintonizado
Ajuste de hora
Ajuste de bajos/agudos
(11) [D.BASS]
Con/desc. D. BASS
(12) [iPod MENU]
Para visualizar el menú del iPod
(11) [BASS/TREBLE]
Selección de graves/agudos
(8, 12, 13) [OK]
Reproducción del disco
Confirmar selección
(11) [SURROUND]
Conexión/Desconexión del modo sonido
envolvente
(8, 13) [MP3 INFO]
MP3: Pantalla MP3 [ID3 (Álbum)/ID3 (Pista)/
ID3 (Artista)/Tiempo de reproducción
transcurrido]
(9) [FM MODE]
Conexión/Desconexión del modo FM
Interruptor selector en Mono/Estéreo
16
17
18
19
20
21
22
23
24
25
26
27
28
29
30
31
32
Page 21

RQTX0257
21
ESPAÑOL
Guía de control (continuación)
DEMO
VOLUME
1 33 25 34 8 7 6 2035 26
36
37
Unidad principal
Los botones como funcionan de igual forma que el mando a distancia.•
1
Vista frontal
Vista superior (Panel superior)
Visualizador
Sensor de señal del mando a distancia
[iPod ;, OPEN/CLOSE] (12)
33
Abra y cierre la puerta deslizante
para usar el iPod.
34
[g, –DEMO] (5)
Parar/Demostración
[FM/AM/AUX] (4, 9, 13)
35
Selección FM/AM
Conexión a otras unidades
externas
[CD ;, OPEN/CLOSE] (8)
36
Abra y cierre la puerta deslizante
para usar el CD.
37
Puerto USB (13)
Funcionamiento de la puerta deslizante
36
Para usar el CD
Pulsar para abrir la puerta
deslizante.
Púlsela de nuevo para cerrar la
puerta deslizante tras colocar en su
lugar el CD. (Consulte la página 8
para ver las instrucciones de cómo
insertar el CD.)
33
Para usar el iPod
Pulsar para abrir la puerta
deslizante.
Púlselo de nuevo para cerrar la
puerta deslizante tras insertar
adecuadamente el iPod en la base.
(Consulte la página 12 para ver las
Interruptor de la base
instrucciones de cómo insertar el
iPod.)
7
Page 22

RQTX0257
22
ESPAÑOL
Operaciones con discos
MP3
INFO
Reproducción básica Función de modo de reproducción
8
Pulse [^] para activar la unidad.
Pulse [CD ;, OPEN/CLOSE] para abrir la puerta deslizante y
luego coloque el CD en posición.
Parte
central
Incline el CD a la
• Etiqueta hacia afuera.
izquierda y colóquelo
en posición.
Pulse de nuevo [CD ;, OPEN/CLOSE] para cerrar la puerta
deslizante.
Para evitar sufrir heridas leves, mantenga los dedos alejados de la
puerta deslizante cuando la cierre.
Pulse [CD q/h] o [OK] para iniciar la reproducción.
Pulse [VOL +, –] para ajustar el volumen.
Nota
Asegúrese de pulsar el botón the [CD ;, OPEN/CLOSE] para abrir
•
y cerrar la puerta deslizante. Si la puerta deslizante se cierra a la
fuerza pueden producirse daños.
Tenga cuidado de que el CD no golpee la puerta deslizante al retirarlo.
•
Para Acción
parada
pausa
salto/búsqueda
salto de álbum
MP3
reproducción de
acceso directo
(La reproducción
empieza
con la pista
seleccionada.)
Pulse [g].
Pulse [CD q/h].
Pulse de nuevo para reanudar la reproducción.
Pulse [u/t] o [y/i] para saltar.
Pulse y mantenga pulsado [u/t] o [y/i]
para buscar.
Nota
Puede realizar la búsqueda durante la
•
reproducción o la pausa.
No puede buscar por los archivos MP3.
•
Durante la reproducción programada, la repetición
•
de una pista o la reproducción aleatoria sólo
puede buscar dentro de la pista actual.
Pulse [e,r, ALBUM] en el modo de reproducción.
Pulse [e,r, ALBUM] una vez y luego los botones
numerados en el modo de parada.
CD
Pulse las teclas numéricas para seleccionar la
pista que desee.
MP3
Pulse [e,r, ALBUM] para seleccionar el álbum.
Pulse [y/i] una vez y después los botones
numéricos para seleccionar la pista deseada.
•
Presione hasta que se
coloque en su lugar
haciendo un ruido seco.
Función de visualización
Esta función le permite visualizar la información de la pista actual.
Pulse [DISPLAY] repetidamente durante la reproducción o la pausa.
CD
Tiempo de reproducción
transcurrido
MP3
Tiempo de reproducción
transcurrido
Pulse [MP3 INFO] repetidamente durante la reproducción o la pausa.
MP3
Nota
Número máximo de caracteres que pueden visualizarse:
•
aproximadamente 30.
Esta unidad admite etiquetas ID3 versión 1.0 y 1.1. Los datos de
•
texto no compatibles no se pueden visualizar.
ID3 es una etiqueta incluida en las pistas MP3 para proporcionar
•
información acerca de las propias pistas.
Tiempo de reproducción
Tiempo de reproducción
Nombre del
álbum
transcurrido
restante
Nombre de
la pista
ID3 (Artista)ID3 (Pista)ID3 (Álbum)
Pulse [CD q/h].
Pulse [PLAY MODE] para seleccionar el modo deseado.
Modo Para reproducir
1-TRACK
1TR
1-ALBUM
1ALBUM
MP3
RANDOM
RND
1-ALBUM
RANDOM
1ALBUM RND
MP3
Nota
Durante la reproducción aleatoria no puede saltar a la pista anterior.
•
El modo actual de reproducción se borra cuando abre la puerta
•
deslizante.
CD
Durante la reproducción RANDOM, podrá buscar hacia delante o
•
hacia atrás dentro de la pista actual solamente.
una pista seleccionada del disco.
Pulse las teclas numéricas para seleccionar la
pista.
un álbum seleccionado del disco.
Pulse [e,r, ALBUM] para seleccionar el álbum.
un disco aleatoriamente.
todas las pistas de un álbum seleccionado
aleatoriamente.
Pulse [e,r, ALBUM] para seleccionar el álbum.
Reproducción programada
Esta función le permite programar un máximo de 24 pistas.
CD
Pulse [CD q/h] y luego [g].
Pulse [PROGRAM].
Pulse los botones numéricos para seleccionar las pistas.
Repita este paso para programar otras pistas.
Pulse [CD q/h] o [OK] para iniciar la reproducción.
MP3
Pulse [CD q/h] y luego [g].
Pulse [PROGRAM].
Pulse [e,r, ALBUM] para seleccionar el álbum que desee.
Pulse [y/i] una vez y pulse los botones numerados para
seleccionar las pistas.
Pulse [OK].
Repita los pasos 3 a 5 para programar otras pistas.
Pulse [CD q/h] para comenzar la reproducción.
Para Acción
cancelar el modo
de programación
reproducir el
programa otra vez
verificar el
contenido del
programa
cancelar la última
pista
cancelar todas las
pistas programadas
Nota
Si intenta programar más de 24 pistas, aparecerá “PGM FULL”.
•
La memoria del programa se borra cuando se abre la puerta
•
deslizante.
CD
Durante la reproducción programada, podrá buscar hacia delante o
•
hacia atrás dentro de la pista actual solamente.
Pulse [PROGRAM] en el modo de parada
para borrar el indicador “PGM” de la pantalla.
Pulse [PROGRAM] luego [CD q/h].
Pulse [u/t] o [y/i] cuando se
muestre “PGM” en el modo de parada. Para
comprobar mientras se programa, pulse
[PROGRAM] dos veces después de que
aparezca “PGM”, luego pulse [u/t] o
[y/i].
Pulse [DEL] en el modo de parada.
Pulse [g] en el modo de parada.
Se visualizará “CLR ALL”. Pulse el botón
antes de que pasen 5 segundos para cancelar
todas las pistas.
Page 23

RQTX0257
23
ESPAÑOL
Operaciones con discos (continuación)
Funcionamiento de la radio
Repetición de reproducción
Puede repetir una reproducción programada u otro modo de
reproducción que haya seleccionado.
Pulse [REPEAT] antes o durante la reproducción.
Se visualizarán “ON REPEAT” y “ ”.
Para cancelar
Pulse otra vez [REPEAT].
Se visualizará “OFF REPEAT” y “ ” se borrará de la pantalla.
Nota acerca de los discos CD-R y CD-RW
Esta unidad puede reproducir discos CD-R y CD-RW grabados con
CD-DA o MP3. Utilice un disco de grabación de audio para CD-DA y
finalícelo* cuando termine la grabación.
La unidad tal vez no pueda reproducir algunos discos debido a la
condición de la grabación.
* Un proceso realizado después de la grabación que permite a los
reproductores CD-R/CD-RW reproducir el audio de los discos CD-R
y CD-RW.
Precaución
No:
utilice CDs de formas irregulares.
•
coloque etiquetas ni pegatinas extra.
•
utilice CDs que tengan etiquetas y pegatinas que estén
•
despegadas o por debajo de las cuales salga el adhesivo de las
mismas.
ponga cubiertas a prueba de rayas o ningún otro tipo de accesorio.
•
escriba nada en el CD.
•
limpie los CDs con líquidos (pase un paño blando y seco).
•
Nota acerca del uso de un DualDisc
El lado del contenido de audio digital de un DualDisc no cumple las
especificaciones técnicas del formato de Disco Compacto Digital de
Audio (CD-DA), por ello no es posible su reproducción.
MP3
Esta unidad puede reproducir MP3, un método de compresión de
audio que no afecta abiertamente a la calidad del audio.
Cuando cree archivos MP3 para reproducir en este
aparato
Máximo número de pistas y álbumes: 999 pistas y 256 álbumes.
•
Velocidad de compresión compatible:
•
Entre 64 kbps y 320 kbps (estéreo).
Se recomienda 128 kbps (estéreo).
Formatos de discos: ISO9660 nivel 1 y nivel 2 (excepto para los
•
formatos extendidos).
El tiempo que se tarda el leer el índice depende del número de
•
pistas, carpetas o estructuras de carpetas.
Limitaciones de MP3
Esta unidad es compatible con los discos multisesión, pero si éstas
•
son muchas, la reproducción tarda más en empezar. Mantenga el
número de sesiones al mínimo para evitar esto.
Esta unidad no puede reproducir archivos grabados utilizando
•
escritura de paquete.
Si el disco incluye MP3 y datos de audio normales (CD-DA), el
•
aparato reproduce el tipo grabado en la parte interior del disco.
Si el disco incluye tanto MP3 como otros tipos de datos de audio
(por ejemplo WMA o WAV), la unidad sólo reproduce los MP3.
Dependiendo de cómo se crearan los archivos MP3, éstos puede
•
que no se reproduzcan en el orden en el que se los numeró o no
se reproduzcan en absoluto.
&
&
Sintonización manual
Pulse [FM/AM] para seleccionar la banda de “FM” o “AM”.
Pulse [TUNE MODE] para seleccionar “MANUAL”.
Pulse [u/t] o [y/i] para seleccionar la frecuencia de la
emisora que desee.
Cuando se esté recibiendo una emisión
en estéreo FM se visualizará “ST” .
Para sintonizar automáticamente
Pulse [FM/AM] para seleccionar la banda de “FM” o “AM”.
Pulse [TUNE MODE] para seleccionar “MANUAL”.
Pulse y mantenga pulsado [u/t] o [y/i] hasta que la
frecuencia comience a cambiar rápidamente.
La sintonización automática se detiene cuando encuentra una emisora.
•
Para cancelar la sintonización automática, pulse [u/t] o
•
[y/i] una vez más.
Nota
La sintonización automática puede no funcionar cuando la interferencia
es excesiva.
Para mejorar la calidad del sonido de FM
Pulse [FM MODE] para visualizar el indicador “MONO”.
Para cancelar
Pulse [FM MODE] de nuevo hasta que desaparezca el indicador “MONO”.
“MONO” también se cancelará si se cambia la frecuencia.
•
Deje “MONO” apagado para la escucha normal.
•
Para mejorar la calidad del sonido en AM
Pulse [FM/AM] para seleccionar “AM”.
Pulse y mantenga pulsada [TUNE MODE] varias veces para
cambiar el ajuste de prueba del ritmo (“BP1”, “BP2”, “BP3” o
“BP4”).
Grabación de emisoras en memoria
Puede presintonizar un máximo de 30 canales de FM y un máximo de
15 canales de AM.
Preparación: Pulse [FM/AM] para seleccionar la banda de “FM” o
“AM”.
Presintonización automática
Pulse [PLAY MODE] para cambiar entre las frecuencias
“LOWEST” (MÁS BAJA) o “CURRENT” (ACTUAL).
Pulse [AUTO PRESET] para iniciar la presintonización.
El sintonizador presintoniza todas las emisoras que puede recibir
en los canales, en orden ascendente. Cuando finaliza, se activa la
última emisora sintonizada.
Presintonización manual
Pulse [TUNE MODE] para seleccionar “MANUAL”.
Pulse [u/t] o [y/i] para sintonizar la emisora que desee.
Pulse [PROGRAM].
Pulse los botones numéricos para seleccionar un canal.
La emisora que ocupa un canal se borrará si se presintoniza otra
emisora en ese canal.
Repita los pasos 2 a 4 para presintonizar más emisoras.
Selección de una emisora presintonizada
Pulse los botones numéricos para seleccionar el canal.
Para los canales del 10 al 30 pulse [≧ 10], luego los dos dígitos.
O BIEN
Pulse [TUNE MODE] para seleccionar “PRESET”.
Pulse [u/t] o [y/i] para seleccionar el canal.
9
Page 24

RQTX0257
24
ESPAÑOL
Emisiones RDS
Le permite visualizar el nombre de una emisora o un tipo de programa.
Mientras se reciben señales RDS la palabra “RDS” aparece en pantalla.
Pulse [DISPLAY] para visualizarlo.
Nombre de la emisora (PS) Tipo de programa (PTY)
Pantalla de frecuencias
Nota
Las visualizaciones RDS tal vez no se encuentren disponibles si la
recepción no es adecuada.
Visualización de tipos de programas
NEWS Noticias
AFFAIRS Temas de actualidad
INFO Información
SPORT Deportes
EDUCATE Educación
DRAMA Teatro
CULTURE Cultura
SCIENCE Ciencia
VARIED Varios
POP M Música Pop
ROCK M Música Rock
M-O-R- M Música para viajar
LIGHT M Clásicos ligeros
CLASSICS Clásica seria
OTHER M Otra música
WEATHER Información meteorológica
FINANCE Finanzas
CHILDREN Infantil
SOCIAL A Temas sociales
RELIGION Religión
PHONE IN Programas en los que participa
TRAVEL Viajes
LEISURE Tiempo libre
JAZZ Música Jazz
COUNTRY Música Country
NATIONAL Música nacional
OLDIES Viejos éxitos
FOLK M Música Folk
DOCUMENT Documentales
TEST Emisión de prueba
ALARM Anuncios de emergencias
10
el público
Temporizador
Ajuste del reloj
El reloj de la unidad es del tipo de 24 horas.
Pulse [CLOCK/TIMER] para ajustar el reloj.
Pulse [u/t] o [y/i] para seleccionar la hora antes de
5 segundos.
(Mantenga pulsado para cambiar la hora más rápidamente.)
Pulse [CLOCK/TIMER] de nuevo.
g Para mostrar el reloj cuando la unidad
está encendido o en modo de espera
Nota
Reinicie regularmente el reloj para mantener su precisión.
Temporizador de reproducción
Puede ajustar el temporizador para que se encienda a una hora
determinada para despertarle.
Esta unidad ofrece tres temporizadores de reproducción opcionales.
Preparación:
Encienda la unidad y ponga en hora el reloj. (➡ anterior)
•
Prepare la fuente musical que desee escuchar (disco, radio, iPod,
•
AUX o USB) y ajuste el volumen.
Pulse [CLOCK/TIMER] varias veces para seleccionar el
temporizador de reproducción.
CLOCK
Antes de 5 segundos, pulse [u/t] o [y/i] para ajustar la
hora de inicio.
Indicador del temporizador de
reproducción
Pulse [CLOCK/TIMER] para confirmar.
Repita los pasos 2 y 3 para ajustar la hora de finalización.
Indicador del temporizador de
reproducción
Para activar el temporizador
Pulse [z, PLAY] varias veces para activar el temporizador de
reproducción que desee.
Pulse [^] para apagar la unidad.
Para Acción
cambiar los ajustes Repita los pasos 1 a 4 y 6.
cambiar la fuente o el
volumen
comprobar los ajustes
(cuando la unidad está
encendida o en modo
de espera)
cancelar
Nota
El temporizador se pondrá en marcha a la hora programada y el
•
volumen aumentará gradualmente hasta el nivel seleccionado.
Si el temporizador está activo, se encenderá todos los días a la hora
•
fijada.
La unidad debe estar en modo de espera para que el temporizador
•
funcione.
Si apaga y enciende la unidad mientras el temporizador está
•
funcionando, el ajuste de la hora de finalización no se activará.
Cuando se selecciona la unidad externa como fuente cuando el
•
temporizador se activa, el sistema se conecta y activa la unidad
externa como fuente. Si desea reproducir o grabar desde el
equipo reproductor portátil de audio, sólo ha de activar el modo de
reproducción del equipo reproductor y aumentar el volumen. (Ver el
manual de instrucciones del reproductor portátil de audio.)
zPLAY 1 zPLAY 2 zPLAY 3
Pantalla original
Hora de inicio
“ON” aparece en pantalla
Hora de finalización
“OFF” aparece en pantalla
Pulse [z, PLAY] para borrar el
indicador zPLAY de la pantalla.
Realice cambios a la fuente o el volumen.
Realice los pasos 5 y 6.
Pulse [CLOCK/TIMER] varias veces
para seleccionar zPLAY 1, zPLAY 2 o
zPLAY 3.
Pulse [z, PLAY] para borrar el indicador
del temporizador de la pantalla.
Pulse [CLOCK/TIMER]
Page 25

RQTX0257
25
ESPAÑOL
30MIN 60MIN 90MIN 120MIN
ON RE-MASTER OFF RE-MASTER
ON D.BASS OFF D.BASS
HIGH NORMAL
Temporizador (continuación)
Ajuste del sonido (continuación)
Temporizador de desconexión
El temporizador de desconexión (SLEEP) puede apagar el aparato
después de transcurrir un tiempo establecido.
Pulse [SLEEP] para encender/apagar la función SLEEP.
Cada vez que pulse el botón:
•
OFF (Cancelado)
Indicador del temporizador
de desconexión
g Para comprobar el tiempo restante
Nota
El temporizador de reproducción y el temporizador de desconexión
automática pueden utilizarse juntos. El temporizador de desconexión
automática siempre tiene prioridad. Asegúrese de no solapar la
configuración de la desconexión automática.
Pulse [SLEEP] una vez
Ajuste del sonido
Selección de efectos de sonido
Puede modificar el efecto de sonido seleccionando Preselección de
ecualización (Preset EQ) o ajustando el efecto de los graves o los
agudos.
Preselección de ecualización (Preset EQ)
Pulse [PRESET EQ] repetidamente para seleccionar el ajuste
HEAVY
CLEAR SOFT
VOCAL
deseado.
FLAT
Sonido envolvente (SURROUND)
Le permite añadir amplitud y profundidad naturales al sonido estéreo.
Para activar
Pulse [SURROUND] para mostrar el indicador “ ”.
Para cancelar
Pulse [SURROUND] de nuevo para borrar el indicador “ ”.
Nota
El sonido envolvente se percibe menos cuando se escucha mediante
•
auriculares.
Si aumentan las interferencias con la recepción estéreo de FM,
•
cancele el efecto de sonido envolvente.
Mejora de los bajos
Le permite disfrutar del potente efecto de los bajos.
Pulse [D.BASS] durante la reproducción para seleccionar
“ON D.BASS”.
Cada vez que pulse el botón:
•
Nota
El efecto real depende de la fuente de música.
Remasterización — Para disfrutar un
sonido más natural
MP3
La remasterización digital se aplica a los CD (MP3) y USB
La remasterización analógica es eficaz en iPod y AUX
Esta función reproduce las frecuencias perdidas durante la grabación
para reproducir un sonido más próximo al original.
Pulse [RE-MASTER] durante la reproducción para seleccionar
“ON RE-MASTER”.
Ajuste Efecto
HEAVY Añade potencia al rock
CLEAR Aporta nitidez a las frecuencias superiores
SOFT Para música de fondo
VOCAL Añade brillo a las voces
FLAT Sin efecto
Graves o agudos
Le permite disfrutar de un tono de sonido superior o inferior.
Pulse [BASS/TREBLE] repetidamente para seleccionar el ajuste
deseado.
BASS TREBLE
Pantalla original
Ajuste Efecto
BASS Para un tono de sonido más bajo
TREBLE Para un tono de sonido más alto
Pulse [u/t] o [y/i] para ajustar el nivel.
Nota
El nivel del tono se puede cambiar dentro de un margen de -4 a +4.
Cada vez que pulse el botón:•
Ajuste de nivel (durante el modo AUX)
Puede seleccionar el nivel de entrada del sonido de su equipo de audio
portátil.
Pulse [FM/AM/AUX] en la unidad principal para
entrar en el modo AUX.
Pulse [PLAY MODE] varias veces para seleccionar el ajuste que
desee.
Nota
Seleccione “NORMAL” si el sonido se distorsiona cuando se activa el
nivel “HIGH”.
11
Page 26

RQTX0257
26
ESPAÑOL
Presione [;]
Unidad externa
Clic
Disfrute del sonido desde
su iPod
g Inserción del iPod
Pulse [iPod ;, OPEN/CLOSE] para abrir la puerta deslizante.
Presione [;] para abrir el interruptor de la base.
Interruptor de la base
Ajuste el interruptor de la base e inserte el adaptador de base
adecuado para su modelo de iPod.
Adaptador base
(no incluido)
Inserte el iPod en la base.
iPod
(no incluido)
Tire del interruptor de la base.
La recarga comienza cuando la base del iPod queda debidamente
•
bloqueada.
Pulse de nuevo [iPod ;, OPEN/CLOSE] para cerrar la puerta
deslizante.
Para evitar sufrir heridas leves, mantenga los dedos alejados de la
puerta deslizante cuando la cierre.
Nota
Se recomienda usar el adaptador para la base de Apple.
•
Asegúrese de presionar [;] para abrir y ajustar el interruptor de la
•
base al retirar el iPod. Devuelva a su posición el interruptor de la base
una vez retirado el iPod.
g Carga del iPod
El iPod comenzará a cargarse aunque esta unidad se encuentre en
•
modo On o En espera.
Aparecerá “IPOD ” en la pantalla de la unidad principal mientras se
•
carga el iPod y la unidad se encuentra en modo En espera.
Compruebe el iPod para ver si la batería se ha recargado por
•
completo.
Si no va a utilizar el iPod durante un periodo prolongado tras finalizar
•
la recarga, desconéctelo de la unidad principal, ya que la batería se
agotará de forma natural. (Una vez recargada por completo, no se
producirán recargas adicionales).
g Reproducción desde el iPod
Preparación:
Baje el volumen de la unidad principal hasta el nivel mínimo antes de
•
conectar/desconectar el iPod.
Confirme la conexión del iPod. (➡ izquierda)
•
Pulse [iPod q/h] para reproducir el iPod.
Ajuste el volumen de la unidad principal.
Para Mando a distancia Unidad principal
visualizar el menú del
iPod/volver al menú
anterior
(Durante la
reproducción/pausa)
seleccionar los
contenidos del menú
iPod
(Durante la
reproducción/pausa)
realizar una pausa de
la pista
saltar una pista
(Durante la
reproducción/pausa)
buscar la pista actual
(Durante la
reproducción/pausa)
Pulse [iPod MENU].
Pulse
[e,r, ALBUM]
seguido de [OK].
Pulse [iPod q/h]
o [g].
Pulse [u/t] o
[y/i].
Pulse y mantenga
pulsado [u/t] o
[y/i].
3
3
Pulse [iPod q/h]
o [g].
Pulse [u/t] o
[y/i].
Pulse y mantenga
pulsado [u/t] o
[y/i].
■ iPod compatible
Nombre Tamaño de la memoria
iPod touch 2ª generación 8 GB, 16 GB, 32 GB
iPod nano 4ª generación (vídeo) 8 GB, 16 GB
iPod classic 120 GB
iPod touch 1ª generación 8 GB, 16 GB, 32 GB
iPod nano 3ª generación (vídeo) 4 GB, 8 GB
iPod classic 80 GB, 160 GB
iPod nano 2ª generación (aluminio) 2 GB, 4 GB, 8 GB
iPod 5ª generación (vídeo) 60 GB, 80 GB
iPod 5ª generación (vídeo) 30 GB
iPod nano 1ª generación 1 GB, 2 GB, 4 GB
iPod 4ª generación (pantalla en color) 40 GB, 60 GB
iPod 4ª generación (pantalla en color) 20 GB, 30 GB
iPod 4ª generación 40 GB
iPod 4ª generación 20 GB
iPod mini 4 GB, 6 GB
La compatibilidad depende de la versión del software de su iPod.•
12
Page 27

RQTX0257
27
ESPAÑOL
Unidad externa (continuación)
DEMO
VOLUME
MP3
INFO
Uso del USB
MP3
La conectividad USB le permite conectarse y reproducir pistas MP3
desde un dispositivo de almacenamiento masivo USB. Normalmente
serán dispositivos de memoria USB (sólo transferencia de datos).
Preparación:
Antes de conectar un dispositivo de almacenamiento masivo USB a la
unidad, asegúrese de que dispone de copia de seguridad de los datos
almacenados en la misma.
No se recomienda usar un cable de extensión USB. El dispositivo
conectado a través del cable no será reconocido por esta unidad.
Reduzca el volumen y conecte el dispositivo de almacenamiento
masivo USB.
Dispositivo compatible USB (no incluido)
Pulse [USB q/h] o [OK] para iniciar la reproducción.
Para Acción
Para dejar en pausa
la reproducción
Para detener la
reproducción
Para saltar pista
Para saltar el álbum
Reproducción de
acceso directo
(La reproducción
empieza con la
pista seleccionada.)
Función de visualización
Pulse [DISPLAY] repetidamente durante la reproducción o la pausa.
Tiempo de
reproducción
transcurrido
Pulse [MP3 INFO] repetidamente durante la reproducción o la pausa.
MP3
Para otras funciones existentes, son parecidas a las descritas en
“Operaciones con discos” (➡ página 8 y 9).
Para retirar el dispositivo de almacenamiento masivo USB
Seleccione una fuente diferente de “USB“.
Si retira el dispositivo de almacenamiento masivo USB mientras se
encuentra seleccionado como origen los datos almacenados pueden
resultar dañados.
Pulse [USB q/h].
Pulse de nuevo para reanudar la reproducción.
Pulse [g].
Se visualizará “RESUME“. La posición se
memorizará.
Pulse [USB q/h] para reanudar la
reproducción.
O
Pulse de nuevo [g] para borrar la posición.
Pulse [u/t] o [y/i].
Pulse [e, r, ALBUM] en el modo de
reproducción.
Pulse [e, r, ALBUM] una vez y luego los
botones numéricos en el modo de parada.
Pulse [e, r, ALBUM] para seleccionar el
álbum.
Pulse [y/i] una vez y luego los botones
numéricos para seleccionar la pista que
desee.
Tiempo de
reproducción
restante
Tiempo de reproducción
Nombre del
álbum
ID3 (Artista)ID3 (Pista)ID3 (Álbum)
transcurrido
Nombre
de la pista
Dispositivo compatible
Dispositivos que se incluyen dentro del grupo de almacenamientos
masivos USB:
Dispositivos USB que admiten sólo transferencia en masa.
•
Dispositivos USB que admiten velocidad total USB 2.0.
•
Formatos admitidos
Los archivos deben tener la extensión “.mp3“ o “.MP3“.
Nota
CBI (en inglés, Control/Bulk/Interrupt) no es admitido.
•
No se admiten dispositivos que utilizan el sistema de archivos
•
NFTS [Sólo se admiten sistemas de archivos FAT 12/16/32 (Tabla
de asignación de archivos 12/16/32)].
Dependido del tamaño del sector, algunos archivos no
•
funcionarán.
Esta unidad puede acceder hasta 255 álbumes y 2500 pistas.
•
El número máximo de pistas de una carpeta es de 999.
•
Sólo podrá seleccionarse una tarjeta de memoria cuando conecte
•
un lector de tarjeta USB de puertos múltiples. Generalmente la
primera tarjeta de memoria insertada.
Desconecte el lector de tarjetas USB de la unidad cuando quite la
•
tarjeta de memoria. No hacerlo puede provocar que funcione mal
el dispositivo.
Al conectar el reproductor de audio digital a la toma USB, se carga
•
en siempre que la unidad se encuentre activada.
Cambiar la unidad principal y el mando a
distancia
El mando a distancia y la unidad principal vienen con el preajuste de
fábrica en el modo “REMOTE 1“.
Si descubre que el mando a distancia controla también otros equipos,
puede cambiar para trabajar en modo “REMOTE 2”.
Para cambiar al modo “REMOTE 2“
Pulse [FM/AM/AUX] para entrar en el modo AUX.
(Mientras presiona [FM/AM/AUX] en la unidad principal)
Mantenga pulsado [2] hasta que aparezca “REMOTE 2“ en la
pantalla de la unidad principal.
Mantenga pulsado [OK] seguido de [2] durante por lo menos 2
segundos.
La unidad principal y el mando a distancia están ajustados ahora
para funcionar en modo “REMOTE 2“.
Para volver al modo “REMOTE 1“
Realice los pasos 1 a 3 anteriores, pero use [1] en vez de [2] para
ambos pasos. (“REMOTE 1” aparece en la unidad principal durante el
paso 2.)
El mando a distancia no puede funcionar con la unidad principal si
sus modos son diferentes.
“REMOTE 1“ o “REMOTE 2“ aparece en la pantalla de la unidad
principal cuando se utiliza el mando a distancia.*
* Si aparece “REMOTE 1“ (la unidad principal está en el modo
“REMOTE 1“.)
Mantenga pulsado [OK] seguido de [1] en el mando a distancia
durante al menos 2 segundos.
Si aparece “REMOTE 2“ (la unidad principal está en el modo
“REMOTE 2“.)
Mantenga pulsado [OK] seguido de [2] en el mando a distancia
durante al menos 2 segundos.
13
Page 28

RQTX0257
28
ESPAÑOL
Guía para la solución de problemas
Realice las siguientes verificaciones antes de solicitar la ayuda del servicio técnico. Si tiene dudas acerca de algunos de los puntos de
comprobación, o si los remedios indicados en la tabla no solucionan el problema, consulte a su concesionario para recibir las instrucciones
oportunas.
Problemas comunes
No ha introducido el disco correctamente; insértelo correctamente.
Pantalla incorrecta o la
reproducción no se iniciará.
No se pueden leer los datos de
MP3.
Se oye ruido o no existe sonido.
Se oye ruido de zumbido durante
la reproducción.
Se oye un sonido de batido
o ruido mientras se reciben
emisiones de radio.
Se oye un zumbido o ruido bajo
durante las emisiones de AM.
La imagen del televisor próximo
al equipo desaparece o aparecen
franjas en la pantalla.
Al pulsar los botones del mando
a distancia no se obtiene ninguna
respuesta.
•
El disco está rayado o sucio. (Se saltan pistas.)
•
Hay humedad en la lente. Espere una hora aproximadamente y luego inténtelo de nuevo.
•
Tal vez no pueda reproducir MP3 si ha copiado un disco de múltiples sesiones que no tiene datos entre ellas.
•
Cuando cree un disco de múltiples sesiones será necesario cerrarlas.
•
La cantidad de datos del disco es demasiado pequeña. Establezca una cantidad de datos superior a 5 MB
•
aproximadamente.
Al reproducir MP3 pueden producirse ruidos si la calidad de la grabación es mala.
•
Mantenga alejada esta unidad de los teléfonos móviles. si detecta interferencias.
•
Suba el volumen.
•
Apague la unidad, compruebe y corrija la conexión y luego vuelva a conectar la unidad. Las causas
•
incluyen esfuerzos de los altavoces debido a un volumen o una potencia excesivos, y la utilización del
aparato en un ambiente caluroso.
Cerca de los cables está el cable de alimentación de CA o una luz fluorescente. Mantenga otros aparatos y
•
sus cables alejados de los cables de esta unidad.
Apague el televisor u otro reproductor de audio o sepárelo de la unidad.
•
Apague el reproductor de audio portátil si estuviera conectado al puerto “AUX” .
•
Mantenga la antena alejada de otros cables.
•
Mantenga la antena de AM alejada de la unidad.
•
La ubicación y orientación de la antena son incorrectas.
•
El cable de la antena del televisor está demasiado cerca del aparato. Aleje el cable de la antena del
•
televisor de la unidad.
Compruebe que la pila esté bien introducida. (➡ página 5)•
Visualizador
“—:—”
“ADJUST CLOCK” Reloj no ajustado. Ajuste el reloj debidamente.•
“ADJUST TIMER” Temporizador de reproducción no ajustado. Ajuste el temporizador de reproducción debidamente.•
“PGM FULL” El número de pistas programadas se limita a 24. No se pueden programar más pistas.•
“NO PLAY” Se ha introducido un disco que no es CD-DA ni MP3 CD-ROM. No se puede reproducir.•
“ERROR” Se ha realizado una operación incorrecta. Lea las instrucciones e inténtelo de nuevo.•
“F61” o “F76” Hay un problema con el suministro de alimentación. Consulte a su distribuidor.•
“UNLOCKED” Asegúrese de que el interruptor de la base queda presionado hacia atrás debidamente.•
“ILLEGAL OPEN” La puerta corredera no se encuentra en posición correcta. Apague el aparato y vuelva a encenderlo.•
“IPOD NO DEV”
iPod
El iPod no se activa.
No se escucha nada por los
altavoces.
Sonido distorsionado o el nivel
de sonido es demasiado bajo.
No puede controlar el iPod con
el mando a distancia ni la unidad
principal.
14
El iPod no carga.
Ud conectó el enchufe de corriente por primera vez y recientemente hubo un fallo de alimentación de la
•
corriente eléctrica. Ajuste la hora. (➡ página 10)
El iPod no está debidamente insertado. Lea las instrucciones e inténtelo de nuevo. (➡ página 12)•
Compruebe que la batería del iPod tiene carga antes de conectarlo a la unidad.
•
Apague la unidad y el iPod antes de insertarlo en la base. Encienda de nuevo la unidad y seleccione la
•
fuente adecuada.
El iPod no está bien asentado en la base. Desconecte el iPod, retírelo del conector de la base. Vuelva a
•
colocarlo en la base y actívelo de nuevo.
Asegúrese de que el iPod realmente reproduce algo.
•
Ajuste el volumen.
•
Asegúrese de que la función del ecualizador del iPod está desactivada.•
Asegúrese de que el iPod está bien asentado en la base.
•
Compruebe la conexión de la base y asegúrese de que se selecciona el iPod como fuente de música.
•
(➡ página 12)
Compruebe todas las conexiones. (➡ página 4, 12)•
Page 29

RQTX0257
29
ESPAÑOL
Guía para la solución de problemas (continuación)
USB
No hay respuesta al pulsar el
botón [USB q/h].
No puede leerse la unidad USB o
su contenido.
Bajo rendimiento de la unidad
flash USB.
“USB OVER CURRENT ERROR”
“NO PLAY”
“NO DEV” El dispositivo USB no está debidamente insertado. Compruebe la conexión.•
Desconecte el dispositivo USB y vuelva a conectarlo de nuevo. También puede desconectar el equipo y
•
volver a conectarlo.
El formato de la unidad USB o su contenido no son compatibles con el sistema. (➡ página 13)
•
La función de almacenamiento USB de este producto puede no funcionar con algunos dispositivos USB.
•
Los dispositivos USB con una capacidad de almacenamiento de más de 8 gigabytes pueden no funcionar
•
en algunas ocasiones.
La lectura de archivos de gran tamaño o unidad flash USB de gran capacidad tarda mucho.•
La clasificación del dispositivo de almacenamiento masivo USB sobrepasa los 500 mA. Desconecte el
•
dispositivo USB. Apague la unidad y vuélvala a encender.
Compruebe el contenido.
•
Sólo se pueden reproducir archivos en formato MP3.
•
Especificaciones
g SECCIÓN DEL AMPLIFICADOR
Potencia de salida RMS en el modo estéreo
Canal delantero (ambos canales activos)
20 W por canal (6 Ω), 1 kHz, 10 % THD
Toma de auriculares
Terminal clavija estéreo de 3,5 mm
Nivel de salida (CD, 1 kHz, -20 dB)
máx. 1,18 mW +1,18 mW, 32 Ω
Aux (Trasera)
Sensibilidad
Nivel normal 630 mV, 12,4 kΩ
Nivel Alto 100 mV, 12,4 kΩ
Terminal Clavija estéreo de 3,5 mm
g SECCIÓN DEL SINTONIZADOR
Memoria de presintonías 30 emisoras de FM
15 emisoras de AM
Modulación de frecuencia (FM)
Gama de frecuencias
87,50 MHz a 108,00 MHz
(incrementos de 50 kHz)
Terminal(es) de antena
75 Ω (desequilibrada)
Modulación AM (AM)
Gama de frecuencias
522 kHz a 1629 kHz
(incrementos de 9 kHz)
g SECCIÓN DE DISCOS
Discos reproducidos [8 cm o 12 cm]
(1) CD-Audio (CD-DA)
(2) CD-R/RW (CD-DA, MP3)
(3) MP3*
* MPEG-1 Layer 3, MPEG-2 Layer 3
Lector (CD)
Longitud de onda 795 nm
Potencia del láser CLASS 1
Salida de audio (Disco)
Número de canales FL, FR, 2 canales
Rendimiento de audio (CD-Audio)
Frecuencia de respuestas 4 Hz a 20 kHz
Relación señal a ruido 95 dB
Margen dinámico 93 dB
Distorsión armónica total 0,005 %
g PUERTO USB
Admisión de formato de archivos
Sistema de archivos del dispositivo USB
Potencia máxima del puerto Máx. 500 mA
g SECCIÓN DE ALTAVOCES
Tipo Sistema de 1 altavoces de 1 vías
(reflejo de graves)
Unidades de altavoz
Gama completa Tipo cónico de 6,5 cm
Impedancia 6 Ω
Potencia de entrada (IEC) 30 W (Máx.)
Nivel de presión acústica de salida
Gama de frecuencias
90 Hz a 22 kHz (-10 dB)
MP3 (*.mp3)
FAT12/16/32
79 dB/W (1,0m)
55 Hz a 25 kHz (-16 db)
g GENERALIDADES
Alimentación
Consumo 33 W
Dimensiones (An x Al x Prf)
Peso Aprox. 3 kg
Rango de temperatura operativa
Rango de humedades de funcionamiento
Consumo en el modo de espera:
Nota
•
•
35 % a 80 % RH (sin condensación)
Las especificaciones están sujetas a
cambios sin previo aviso.
La distorsión armónica total se mide
mediante el analizador de espectro digital.
CA 220 a 240 V, 50 Hz
500 mm x 195 mm x 102,5 mm
(Prf = 69 mm minimum)
0 °C a +35 °C
0,2 W (aprox.)
Mantenimiento
■ Si las superficies están sucias
Utilice un paño suave y seco para limpiar esta unidad.
No utilice nunca alcohol, diluyente de pintura ni bencina para limpiar
•
la unidad.
Antes de utilizar un paño impregnado químicamente, lea con atención
•
las instrucciones, suministradas con él.
■ Cuidados de la lente CD
Limpie con frecuencia la lente para impedir fallos en el funcionamiento.
•
Utilice un soplador para quitar el polvo y un palillo con algodón en su
extremo si está demasiado sucia.
No utilice un limpiador de lentes tipo CD.
•
15
Page 30

RQTX0257
30
ESPAÑOL
16
Page 31

RQTX0257
31
ESPAÑOL
17
Page 32

EU
Panasonic Corporation
Web Site: http://panasonic.net
Sp
En
RQTX0257-2B
H0309VC2049
 Loading...