

Page 1
A
A
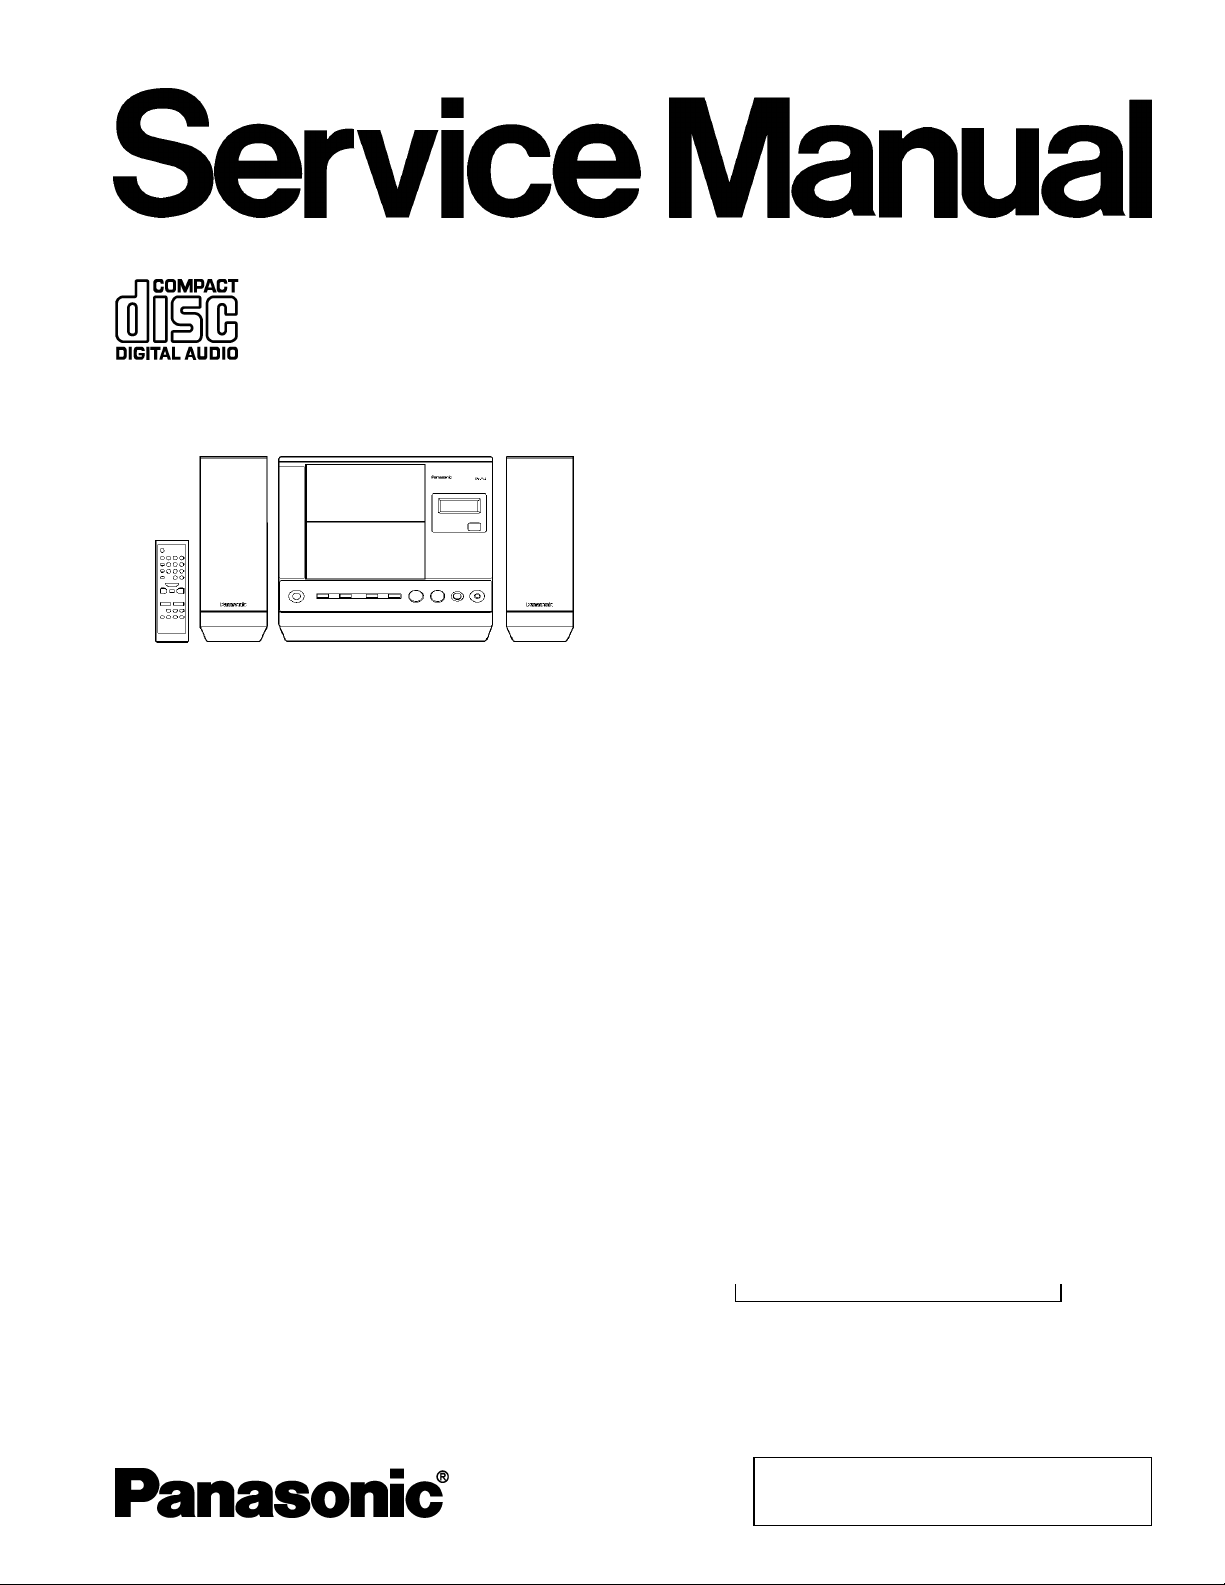
CD Stereo System
SC-EN25P
SC-EN26P
SC-EN27PC
Colour
(S)............Silver Type
System
SC-EN25P
Main Unit: SA-EN25P
Speakers: SB-EN25P
SC-EN26P
Main Unit: SA-EN26P
Speakers: SB-EN26P
SC-EN27PC
Main Unit: SA-EN27PC
Speakers: SB-EN25P
ORDER NO.AD0603021CE
A6
Specifications
MAIN UNIT
RADIO
Frequency range:
FM; 87.9 - 107.9 MHz (200kHz steps)
87.5 - 108.0 MHz (100kHz steps)
M; 520 to 1710 kHz (10kHz steps)
Intermediate Frequency:
FM; 10.7MHz
M; 450kHz
CD PLAYER
Sampling frequency: 44.1kHz
Decoding: 16 bit linear
Beam source: Semiconductor laser (wavelength
795nm)
Number of channels: 2 channel, stereo
Wow and flutter: Less than possible measurement
data
D/A converter: MASH(1 bit DAC)
Terminals
Input: MUSIC PORT; 3.5mm stereo
(33kΩ)
Output: PHONES: 3.5mm stereo (32Ω)
GENERAL
Power supply: AC120V, 60Hz
Power consumption: 16W
Dimensions (W×H×D): 241×206×206mm
(9-1/2”×8-1/8”×8-1/8”)
Mass: 3.1kg (6lb. 13oz.) with speakers
1.8kg (3lb. 15oz.) without speakers
SPEAKERS
Full range: 8cm (3-1/8”), 6Ω×2
Dimensions (W×H×D): 91mm×206mm×176mm
(3-19/32”×8-1/8”×6-15/16”)
Power consumption in standby mode: 2.0W
Note:
© 2006 Matsushita Electric Industrial Co., Ltd. All
rights reserved. Unauthorized copying and
distribution is a violation of law.
Page 2
SC-EN25P / SC-EN26P / SC-EN27PC
Specifications are subject to change without notice.
Mass and dimensions are approximate.
MPEG Layer-3 audio decording technology
licenced from Fraunhofer IIS and Thomson multimedia.
CONTENTS
Page Page
1 Accessories 3
2 Location of Control
3 Safety Precaution
4 Protection Circuitry
5 Handling Precautions For Traverse Deck (Optical Pickup)
6 Precaution of Laser Diode
7 Prevention of Electro Static Discharge (ESD) To
Electrostatically (ES) Devices
8 Handling the Lead-free Solder
8.1. About lead free solder (PbF)
9 Operation Checks and Component Replacement
9.1. Main Unit
9.2. Speaker
10 Self Diagnostic Function
10.1. Setting of self diagnostic Function
11 Description of Error Code
11.1. Error detection for CD Mechanism block
12 Schematic Diagram
12.1. Schematic Diagram Notes
15
17
17
18
18
19
19
3
4
5
5
6
7
7
7
8
8
12.2. Schematic Diagram 21
12.3. Voltage Value
13 Printed Circuit Board
14 Block Diagram
15 Wiring Connection Diagram
16 Measurements and Adjustments
16.1. Tuner Adjustment
16.2. Adjustment Point
17 Terminal Functions of ICs
18 Replacement Parts List
18.1. SA-EN25P,SA-EN26P and SA-EN27PC
18.2. SB-EN25P
18.3. SB-EN26P
19 Cabinet Parts Location
19.1. Main Unit
19.2. Speaker(SB-EN25)
19.3. Speaker(SB-EN26)
20 Packaging
25
27
31
35
37
37
38
39
40
40
45
45
46
46
48
49
50
2
Page 3

1 Accessories
· Remote control........................................................1pc.
(N2QAGB000037): SC-EN25/26
(N2QAGB000038): SC-EN27
· AC power supply cord (RJA0065-1D).......................1pc.
·
2 Location of Control
SC-EN25P / SC-EN26P / SC-EN27PC
Batteries.........................................................................2pc
s.
· FM/AM loop antenna (N1DADYY00003)...................1pc.
Note:
· The included AC power supply cord is for use with this unit
only. Do not use it with other equipment.
3
Page 4
SC-EN25P / SC-EN26P / SC- EN27PC
3 Safety Precaution
(This “Safety Precaution” is applied only in U.S.A.)
1. Before servicing, unplug the power cord to prevent an electric shock.
2. When replacing parts, use only manufacturer’s recommended components for safety.
3. Check the condition of the power cord. Replace if wear or damage is evident.
4. After servicing, be sure to restore the lead dress, insulation barriers, insulation papers, shields, etc.
5. Before returning the serviced equipment to the customer, be sure to make the following insulation resistance test to prevent the
customer from being exposed to a shock hazard.
Insulation Resistance Test
1. Unplug the power cord and short the two prongs of the plug with a jumper wire.
2. Turn on the power switch.
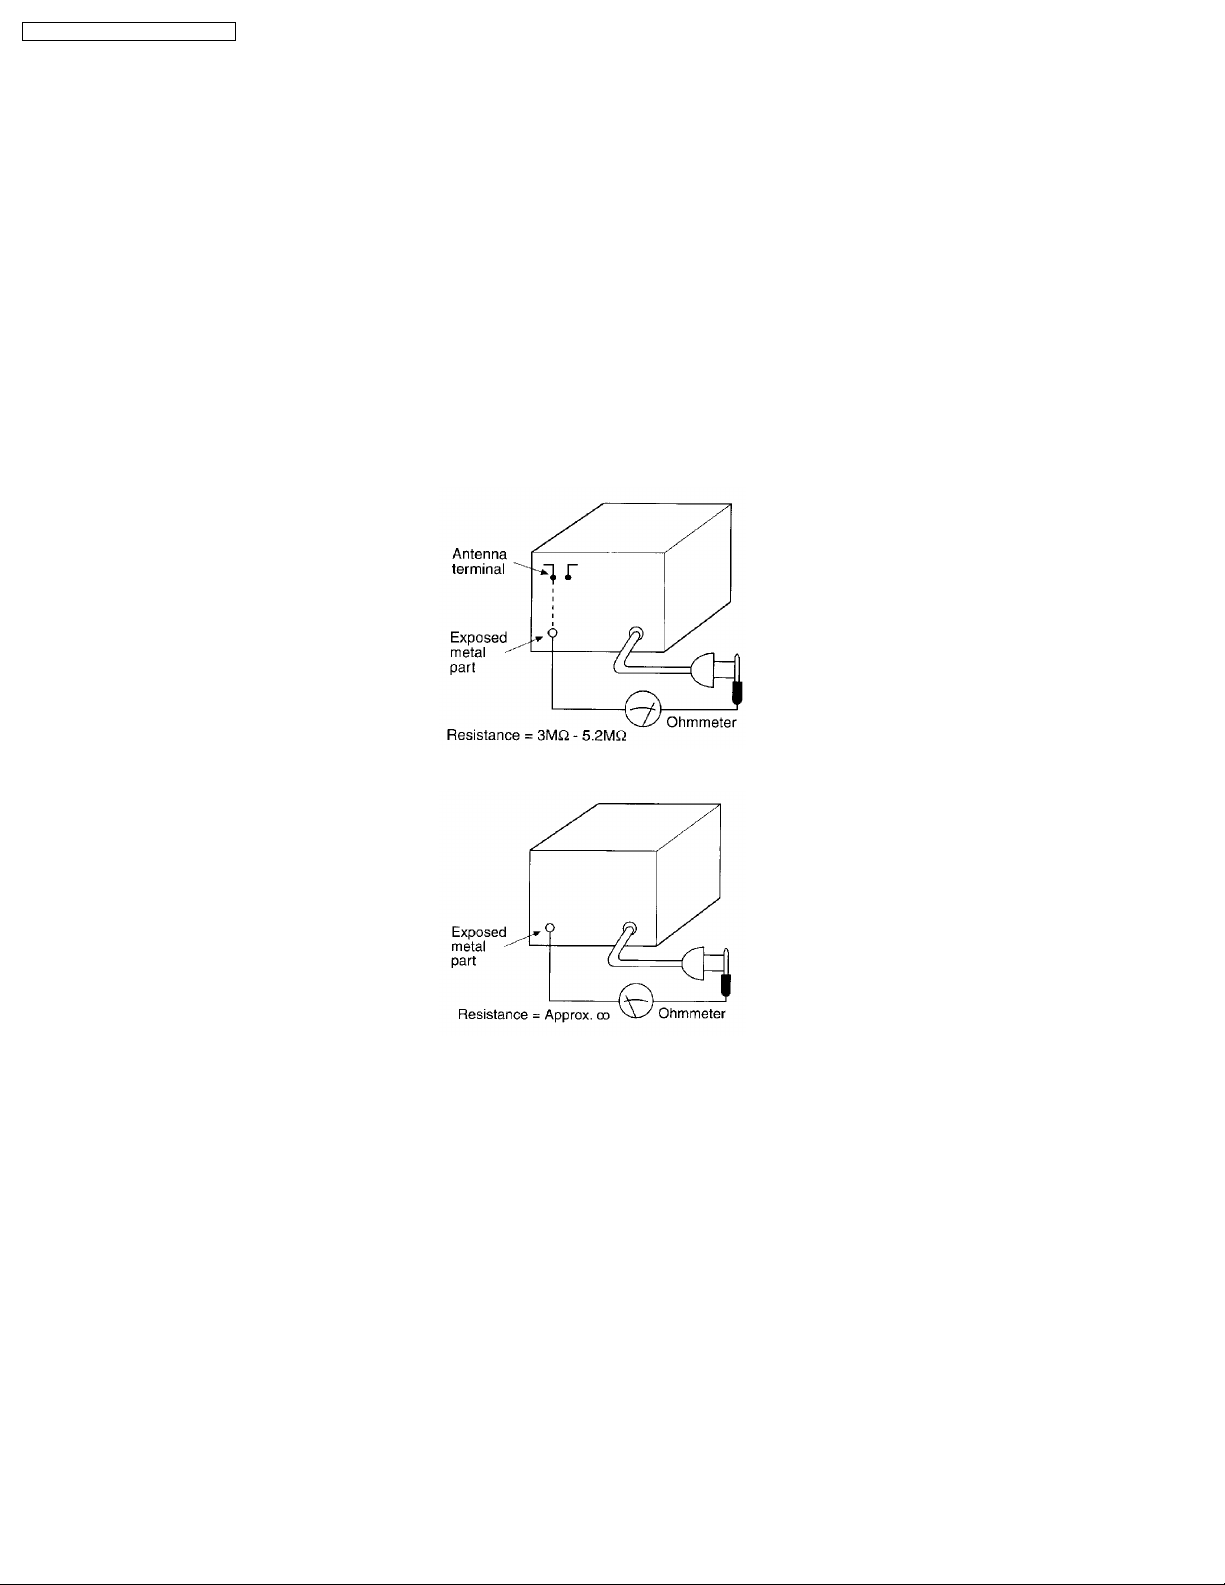
3. Measure the resistance value with ohmmeter between the jumper AC plug and each exposed metal cabinet part, such as screw
heads, control shafts, handle brackets, etc. Equipment with antenna terminals should read between 3MΩ and 5.2MΩ to
allexposedparts. (Fig.A) Equipment without antenn a terminals should read approximately infinity to all exposed parts. (Fig.B)
*Note: Some exposed partsmay beisolated from the chassis by design. These will read infinity.
(Fig.A)
(Fig.B)
4. If the measurement is outside the specified limits, there is a possibility of a shock hazard. The equipment should be repaired
and rechecked before it is returned to the customer.
4
Page 5

SC-EN25P / SC-EN26P / SC- EN27PC
4 Protection Circuitry
The protection circuitry may have operated if either of the following conditions are noticed:
· No sound is heard when the power is turned on.
· Stop during a performance.
The function of this circuitry is to prevent circuitry damage if, for example, the positive and negative speaker connection wires
are “shorted”, or if speaker with an impedance less than the indicated rated impedance of the amplifier are used.
If this occurs, follow the procedure outline below:
1. Turn off the power.
2. Determine the cause of the problem and correct it.
3. Turn on the power once again after one minute.
Note:
When the protection circuitry functions, the unit will not operate unless the power is first turned off and then on again.
5 Handling Precautions For Traverse Deck (Optical
Pickup)
The laser diode in the traverse deck (optical pickup) may break down due to potential caused by static electricity of clothes or
human body. So, be careful of electrostatic breakdown during repair of the traverse deck (optical pickup).
· Handling of traverse deck (optical pickup)
1. Do not subject the traverse deck (optical pickup) to static electricity as it is extremely sensitive to electrical shock.
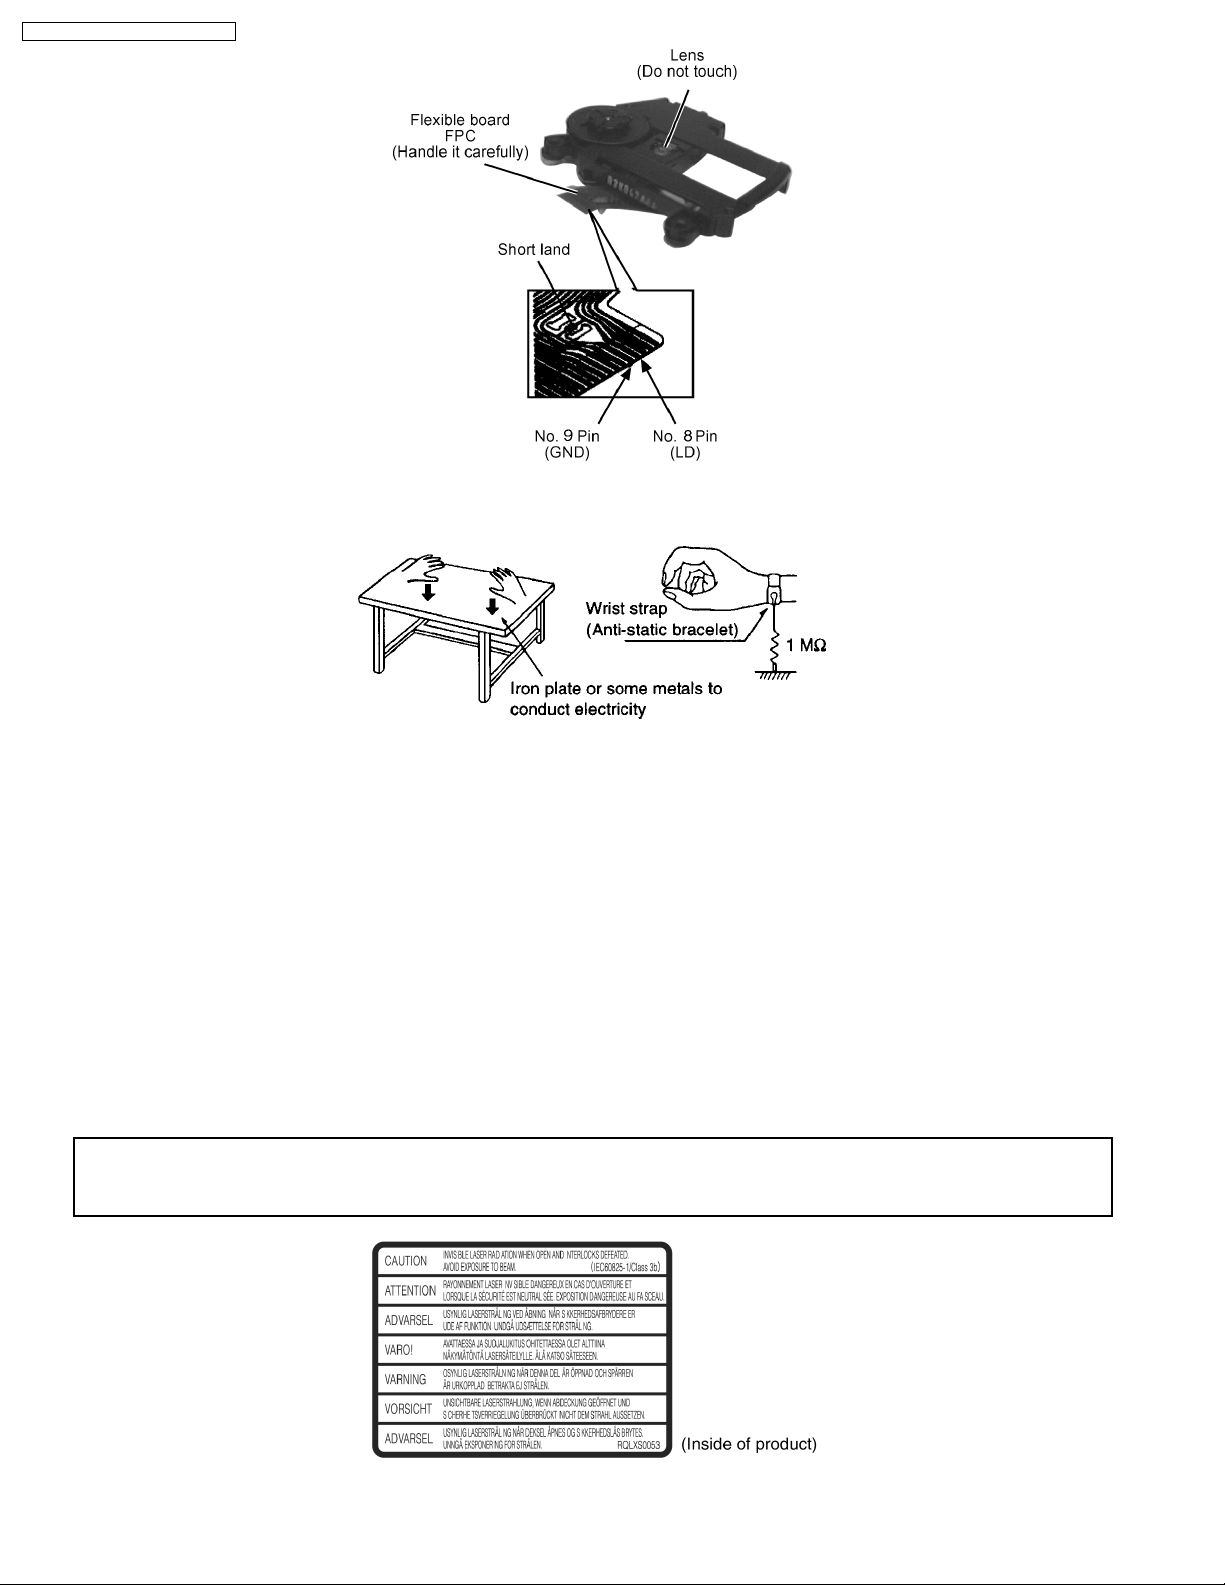
2. To prevent the breakdown of the laser diode, an antistatic shorting pin is inserted into flexible board (FFC board).(Fig.1)
3. Take care not to apply excessive stress to the flexible board (FFC board). When removing or connecting the short pin, finish
the job in as short time as possible.
4. Do not turn the variable resistor (laser power adjustment). It has already been adjusted.
· Grounding for electrostatic breakdown prevention
1. Human body grounding (Fig.2)
Use the anti-static wrist strap to discharge the static electricity from your body.
2. Work table grounding (Fig.2)
Put a conduc tive material (sheet) or steel sheet on the area where the traverse deck (optical pickup) is place, and ground
the sheet.
Caution:
The static electricity of your clothes will not be grounded through the wrist strap. So, take care not to let your clothes touch
the traverse deck (optical pickup).
Caution when replacing the Traverse Deck
The traverse deck has a short point shorted with solder to protect the laser diode against electrostatics breakdown. Be sure
to remove the solder from the short point before making connections.
5
Page 6
SC-EN25P / SC-EN26P / SC- EN27PC
(Fig.1)
(Fig.2)
6 Precaution of Laser Diode
Caution:
This unit utilizes a class 1 laser. Invisible laser radiation is emitted from the optical pickup lens. When the unit is turned on:
1. Do not look directly into the pickup lens.
2. Do not use optical instruments to look at the pickup lens.
3. Do not adjust the preset variable resister on the pickup lens.
4. Do not disassemble the optical pickup unit.
5. If the optical pickup is replaced, use the manufacturer’s specified replacement pickup only.
6. Use of control or adjustments or performance of procedures other than those specified herein may result in hazardous radiation
exposure.
CAUTION!
THIS PRODUCT UTILIZES A LASER.
USE OF CONTROLS OR ADJUSTMENTS OR PERFORMANCE OF PROCEDURES OTHER THAN THOSE SPECIFIED HEREIN MAY RESULT
IN HAZARDOUS RADIATION EXPOSURE.
6
Page 7

SC-EN25P / SC-EN26P / SC- EN27PC
7 Prevention of Electro Static Discharge (ESD) To
Electrostatically (ES) Devices
Some semiconductor (solid state) devices can be damaged easily by static electricity. Such components commonly are called
Electrostatically Sensitive (ES) Devices. Examples of typical ES Devices are integrated circuits and some field-effect transistors
and semiconductor “chip” components. The following techniques should be used to help reduce the incidence of component
damage caused by electro static discharge (ESD).
1. Immediately before handlin g any semiconductor component or semiconductor-equipped assembly, drain off any ESD on your
body by touching a known earth ground. Alternatively, obtain and wear a commercially available discharging ESD wrist strap,
Which should be removed for potential shock resons prior to applying power to the unit under test.
2. After removing an electrical assembly equipped with ES devices, place the assembly on a conductive surface such as alminum
foil, to prevent electrostatic charge buildup or exposure of the assembly.
3. Use only a grounded-tip soldering iron to solder or unsolder ES devices.
4. Use only an anti-static solder removal devices. Some solder removal devices not classified as “anti-static (ESD protected)” can
generate electrical charge sufficient to damage ES devices.
5. Do not use freon-propelled chemicals. These can generate electrical charges sufficie nt to damage ES devices.
6. Do not remove a replacement ES device from its protective package until immediately before you are ready to install it. (Most
replacement ES devices are packaged with leads electrically shorted together by conductive foam, alminum foil or comparable
conductive material).
7. Immediately before removing the protective material from the leads of a replacement ES device, touch the protective material
to the chassis or circuit assembly into which the device will be installed.
Caution
Be sure no power is applied to the chassis or circuit, and observe all other safety precautions.
8. Minimize bodily motions when handling unpackaged replacement ES devices.(Otherwise harmless motion such as the brushing
together of your clothes fabric or the lifting of your foot from a carpeted floor can generate static electricity (ESD) sufficient to
damage an ES device).
8 Handling the Lead-free Solder
8.1. About lead free solder (PbF)
Distinction of PbF P.C.B.:
P.C.B.s (manufactured) using lead free solder will have a PbF stamp on the P.C.B.
Caution
· Pb free solder has a higher melting point than standard solder; Typically the melting point is 50-70°F (30 - 40°C)
higher.Please use a high temperature soldering iron. In case of the soldering iron with temperature control, please set it to
700± 20 °F (370 ± 10°C).
· Pb free solder will tent to splash when heated too high (about 1100°F/600°C).
· W hen soldering or unsoldering, please completely remove all of the solder on the pins and solder area, and be sure to heat
the soldering points with the Pb free solder until it melts enough.
7
Page 8
SC-EN25P / SC-EN26P / SC- EN27PC
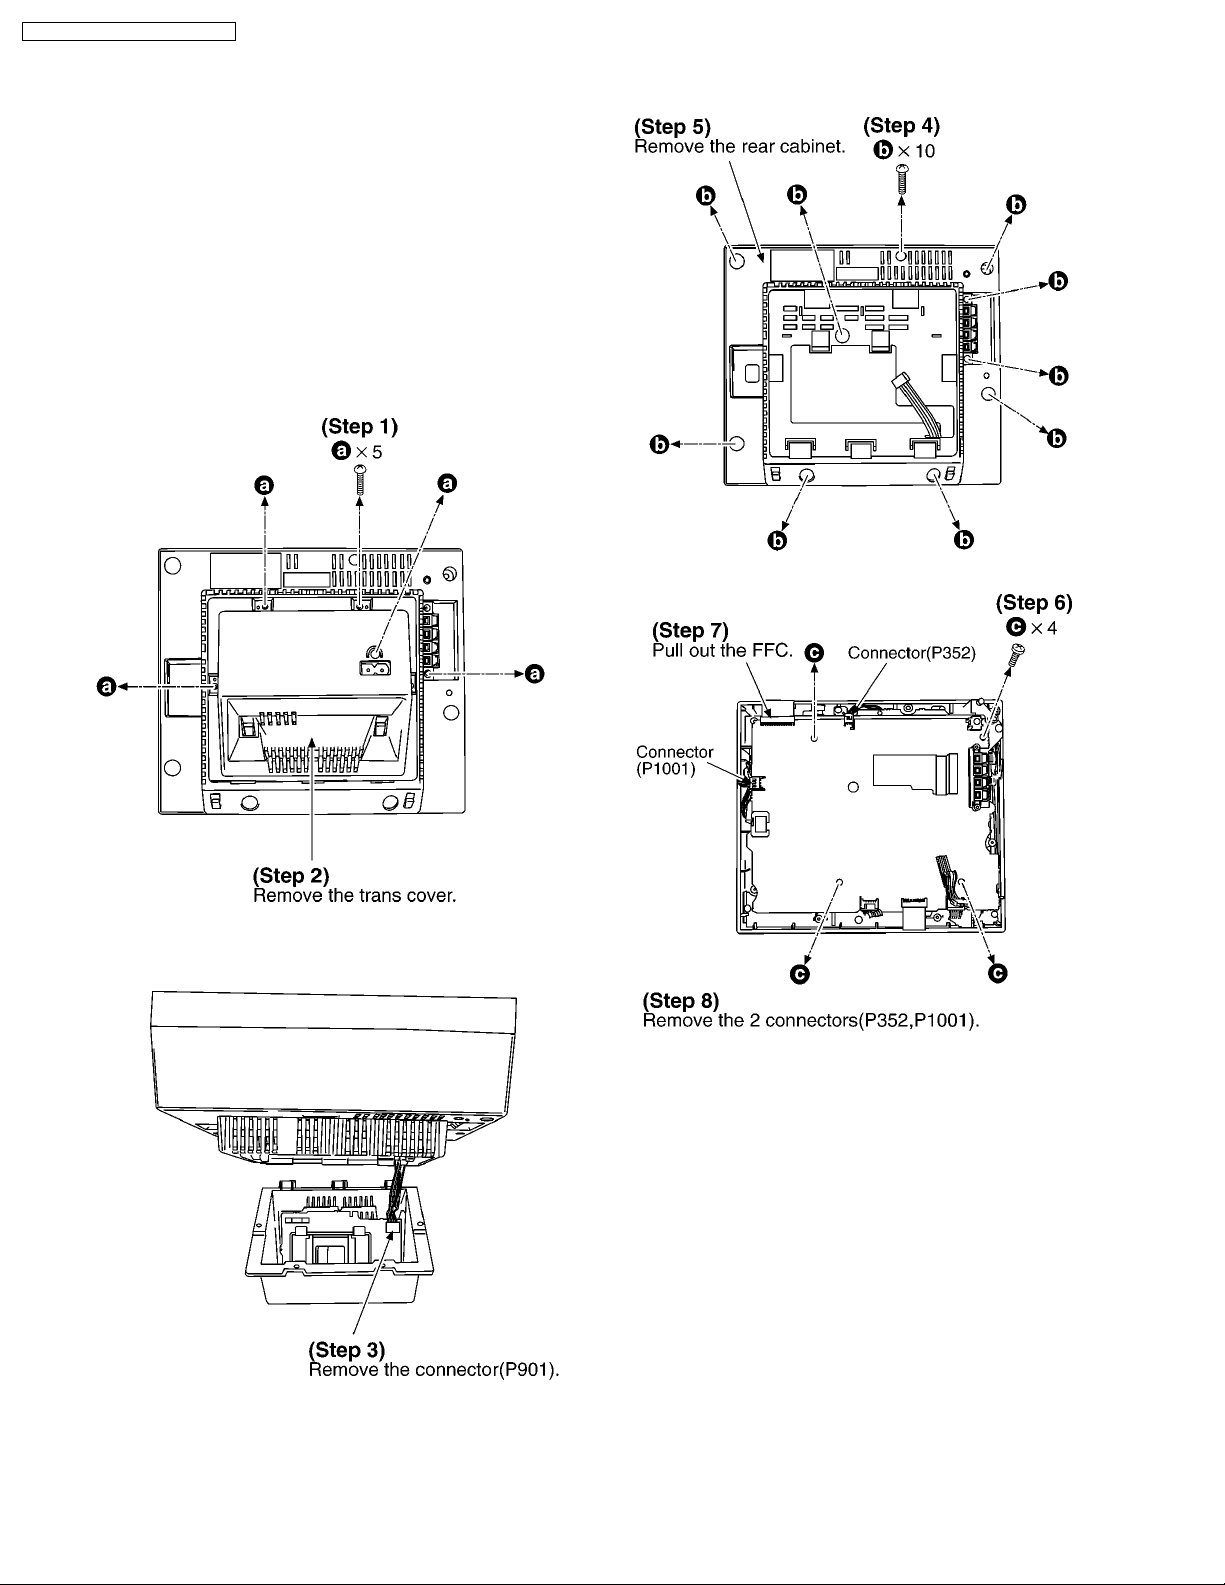
9 Operation Checks and Component Replacement
· This section desceibes procedures for checking the
operation of the major printed circuit boards and replacing
the main components.
· For reassembly after operation checks or replacement,
reverse the respective procedures. Specia l reassembly
procedures are described only when required.
9.1. Main Unit
9.1.1. Checking for the main P.C.B., CD
servo P.C.B. and loading motor
P.C.B.
8
Page 9
SC-EN25P / SC-EN26P / SC- EN27PC
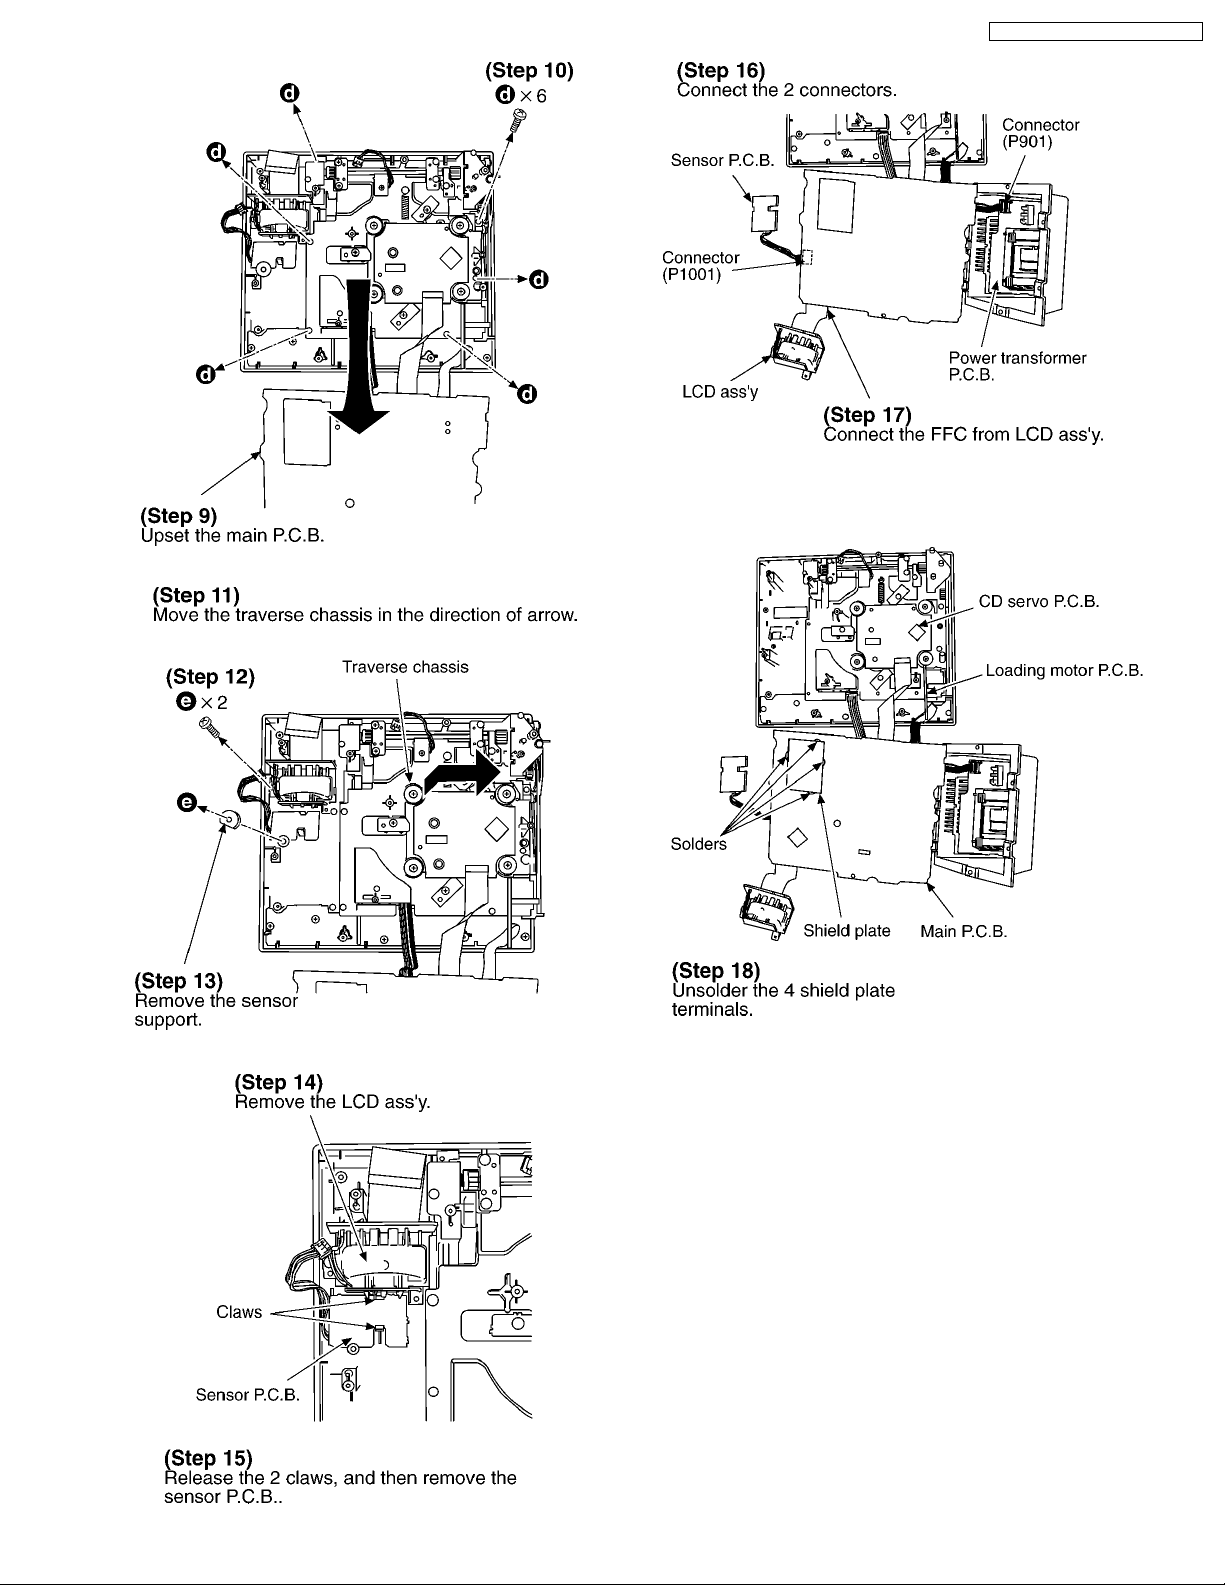
· Check the main P.C.B., CD servo P.C.B. and loading motor
P.C.B. as shown below.
9.1.2. Replacement for the traverse deck
ass’y
· Follow the (Step1) - (Step9) of item 9.1.1.
9
Page 10
SC-EN25P / SC-EN26P / SC- EN27PC
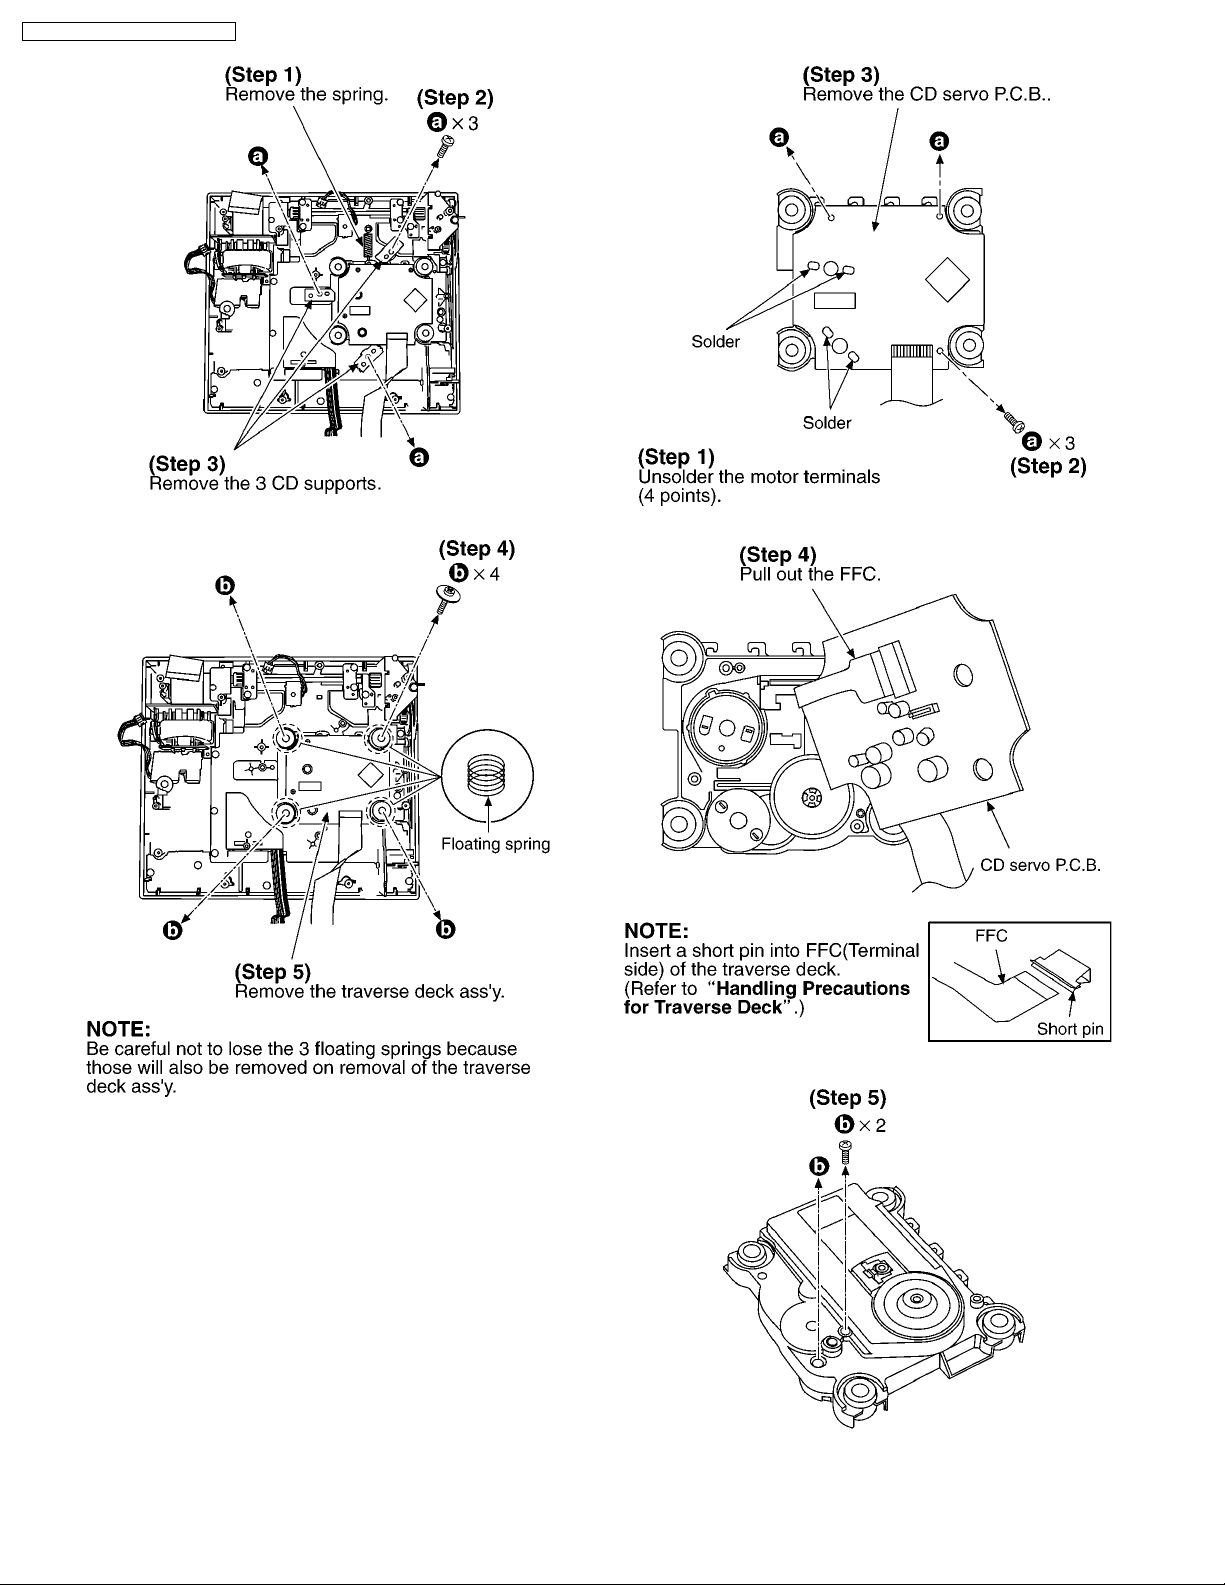
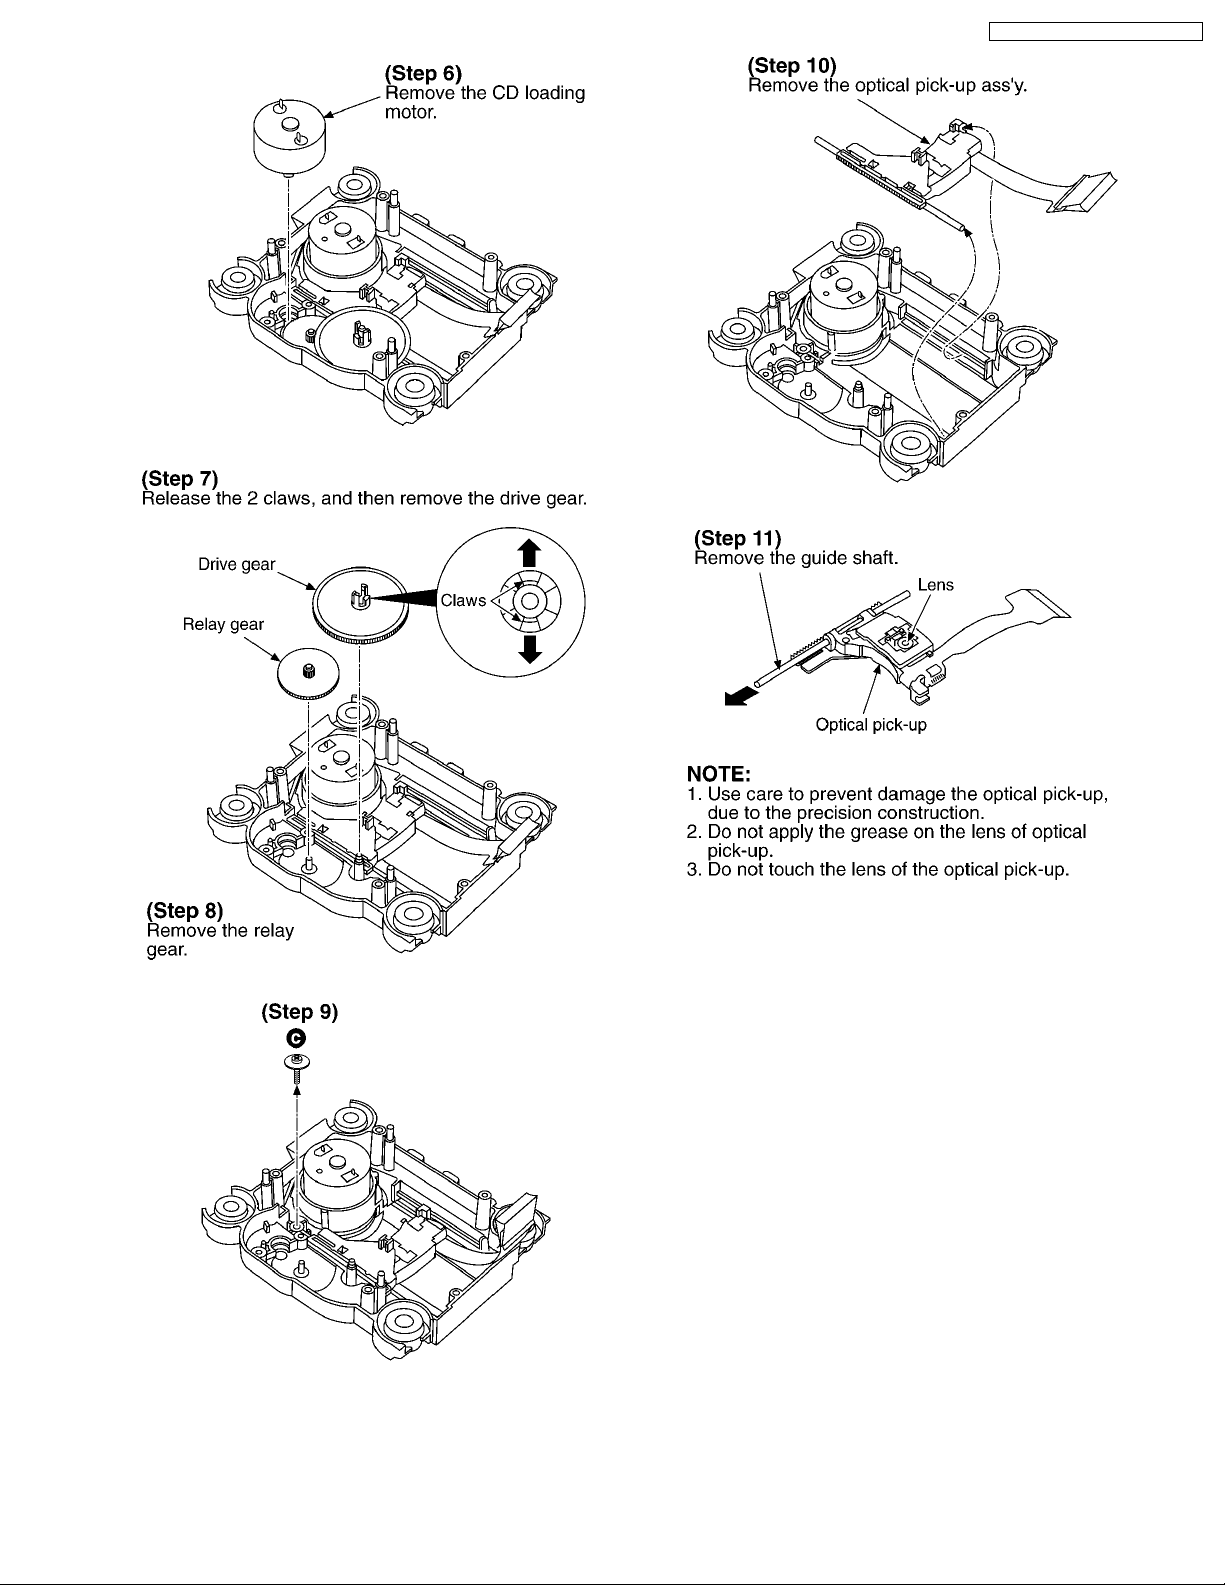
9.1.3. Replacement for the CD loading
motor and optical pick-up
· Follow the (Step1) - (Step9) of item 9.1.1.
· Follow the (Step1) - (Step5) of item 9.1.2.
10
Page 11
SC-EN25P / SC-EN26P / SC- EN27PC
11
Page 12
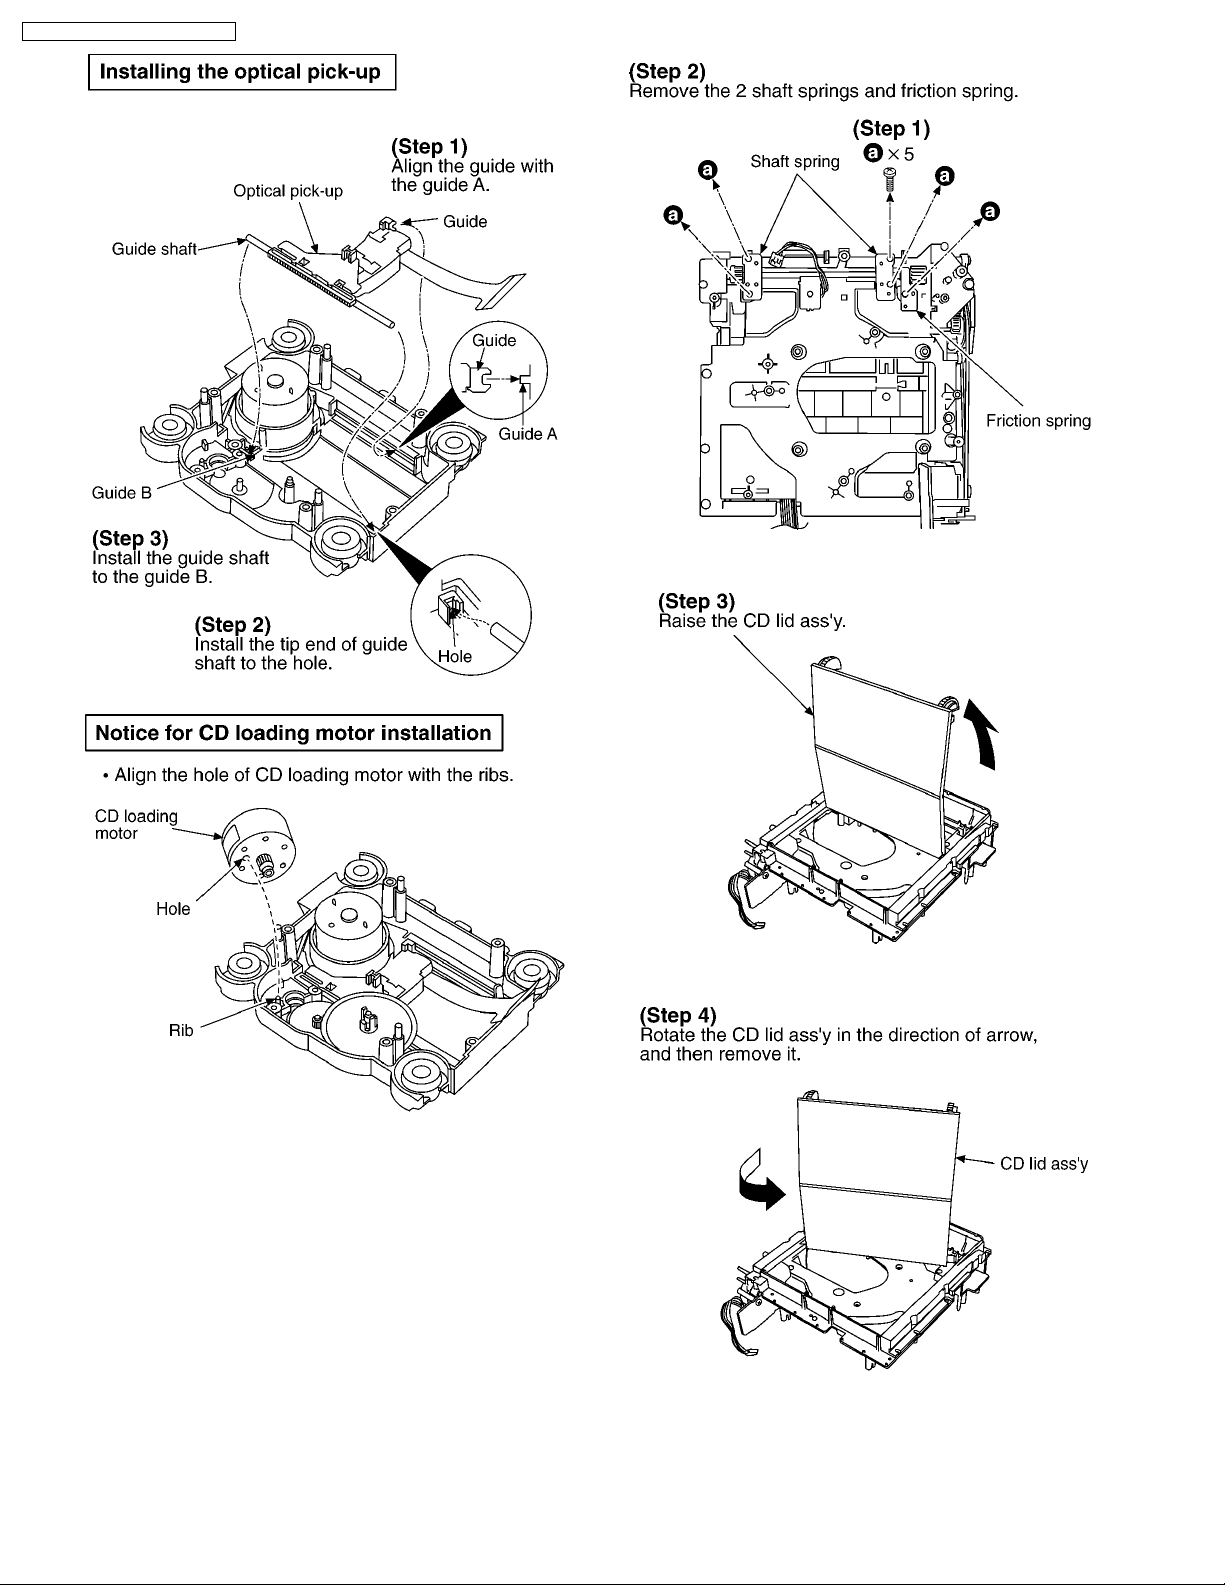
SC-EN25P / SC-EN26P / SC- EN27PC
9.1.4. Replacement for the CD lid ass’y
and gear CH R
· Follow the (Step1) - (Step11) of item 9.1.1.
· Follow the (Step1) - (Step5) of item 9.1.2.
12
Page 13
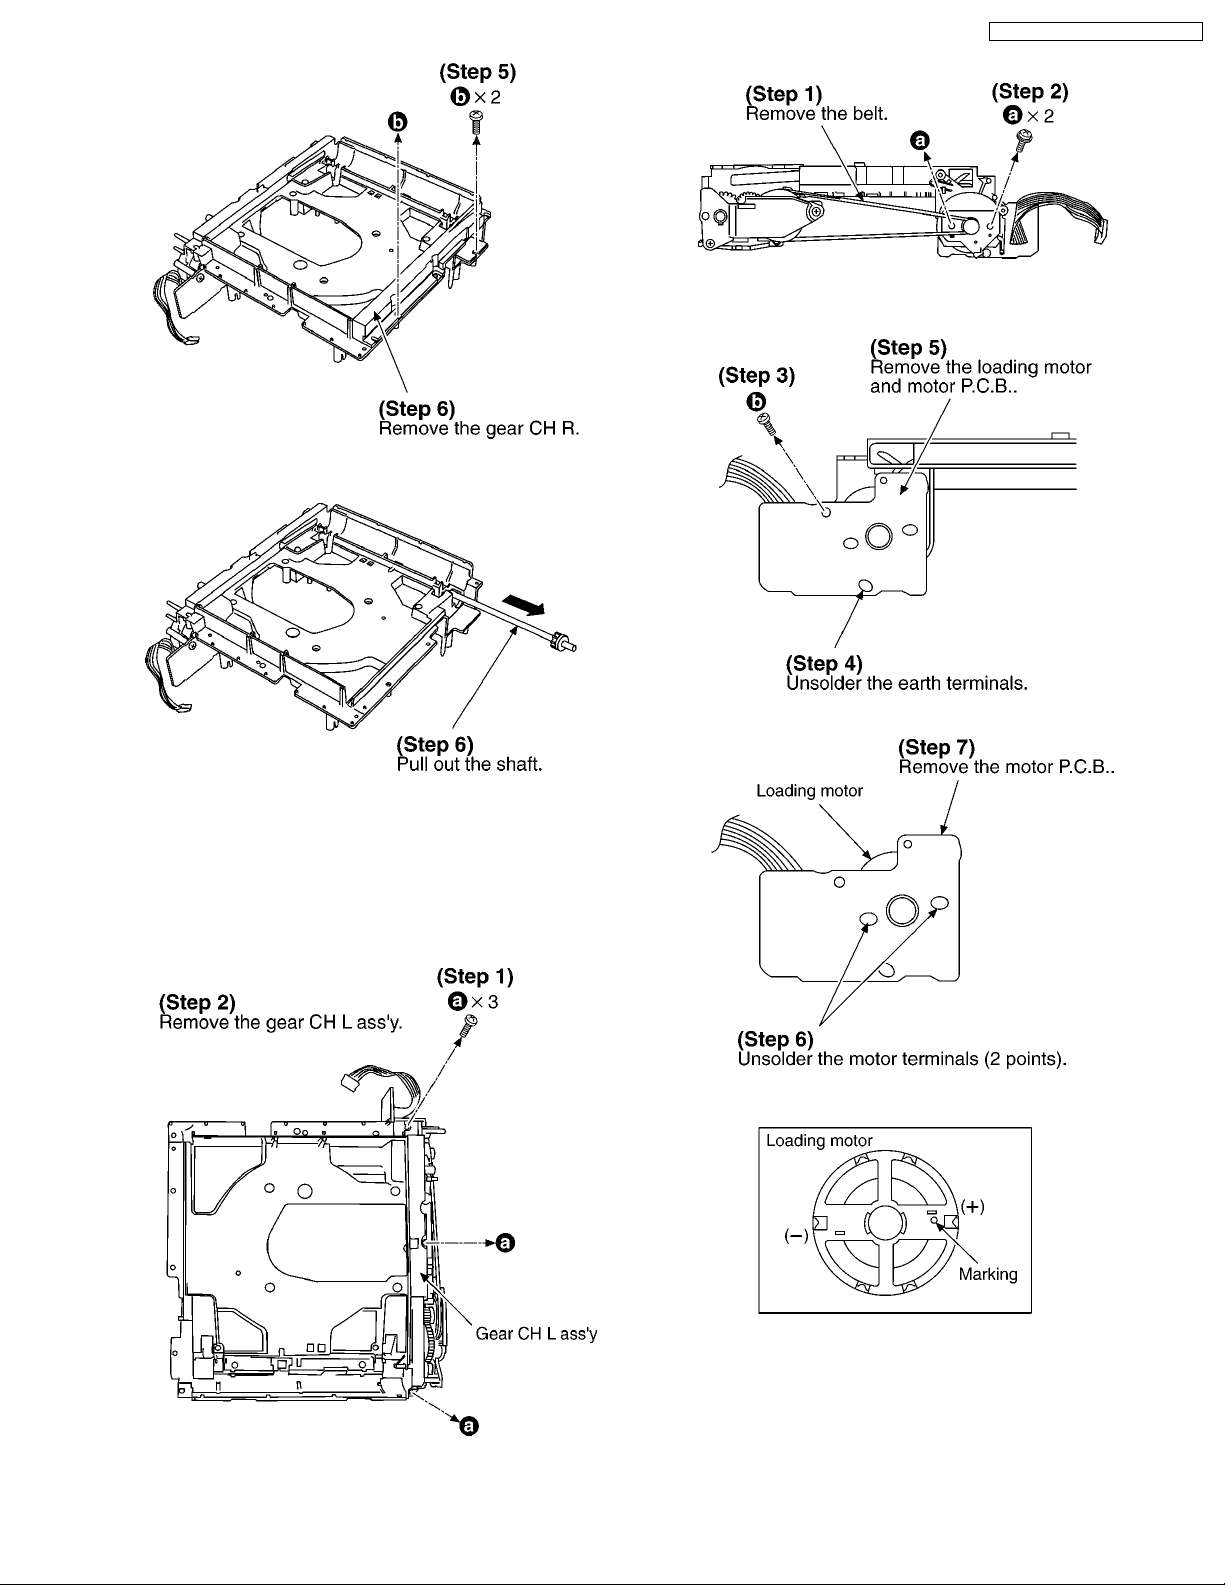
SC-EN25P / SC-EN26P / SC- EN27PC
9.1.5. Replacement for the loading motor
· Follow the (Step1) - (Step11) of item 9.1.1.
· Follow the (Step1) - (Step5) of item 9.1.2.
· Follow the (Step1) - (Step6) of item 9.1.4.
9.1.6. Replacement for the pulley gear,
2nd gear, drive gear L, timing gear
and lid kicker
· Follow the (Step1) - (Step11) of item 9.1.1.
· Follow the (Step1) - (Step5) of item 9.1.2.
· Follow the (Step1) - (Step6) of item 9.1.4.
13
Page 14
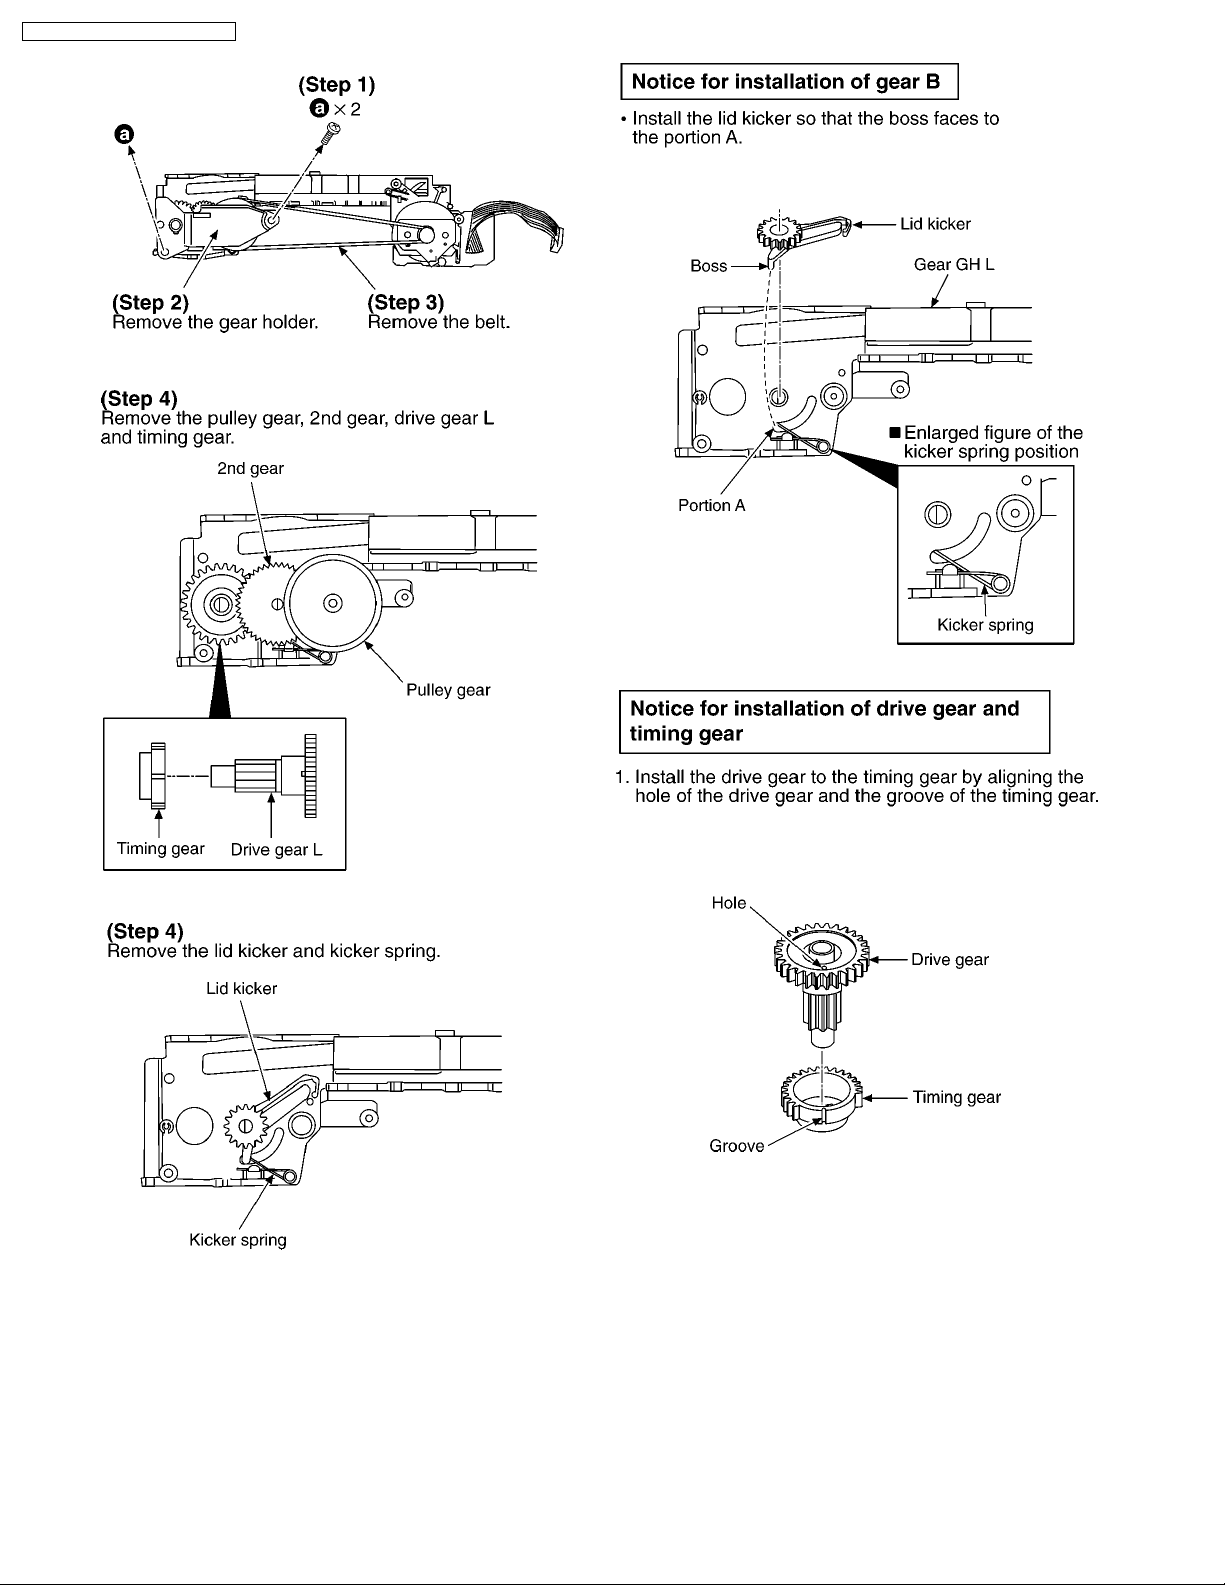
SC-EN25P / SC-EN26P / SC- EN27PC
14
Page 15
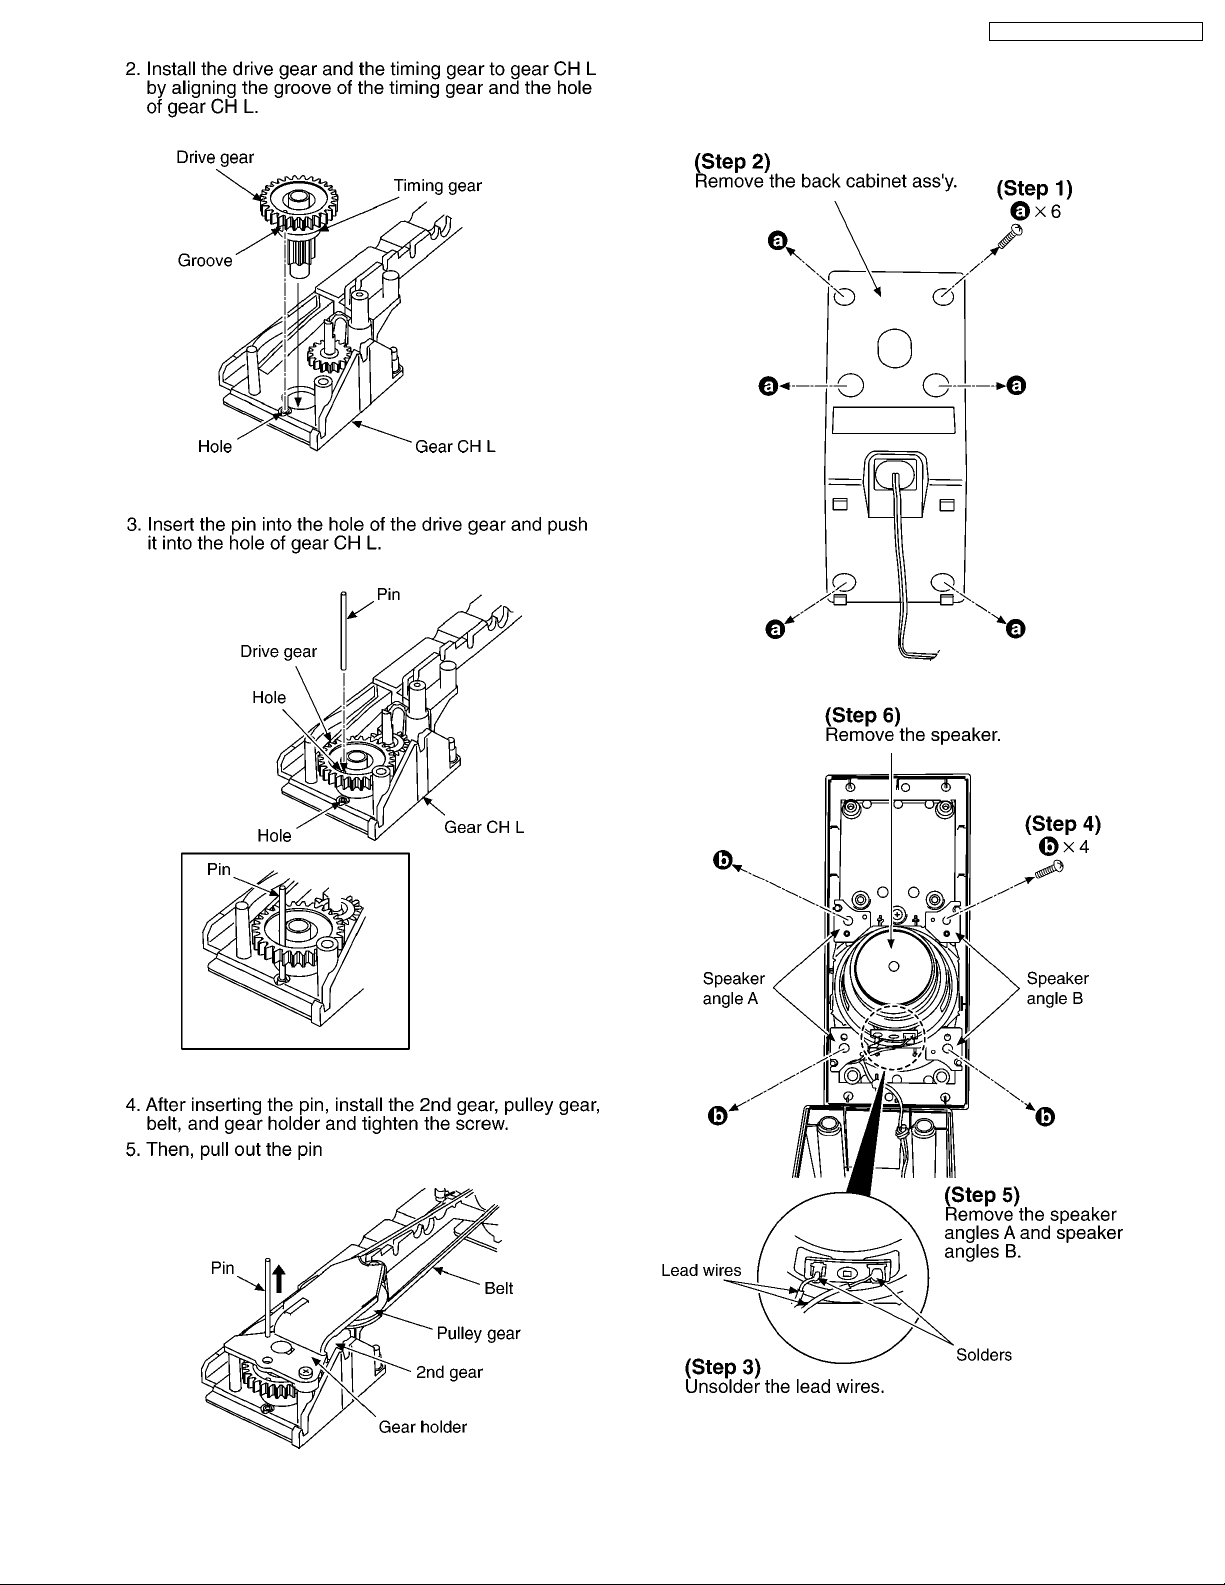
SC-EN25P / SC-EN26P / SC- EN27PC
9.2. Speaker
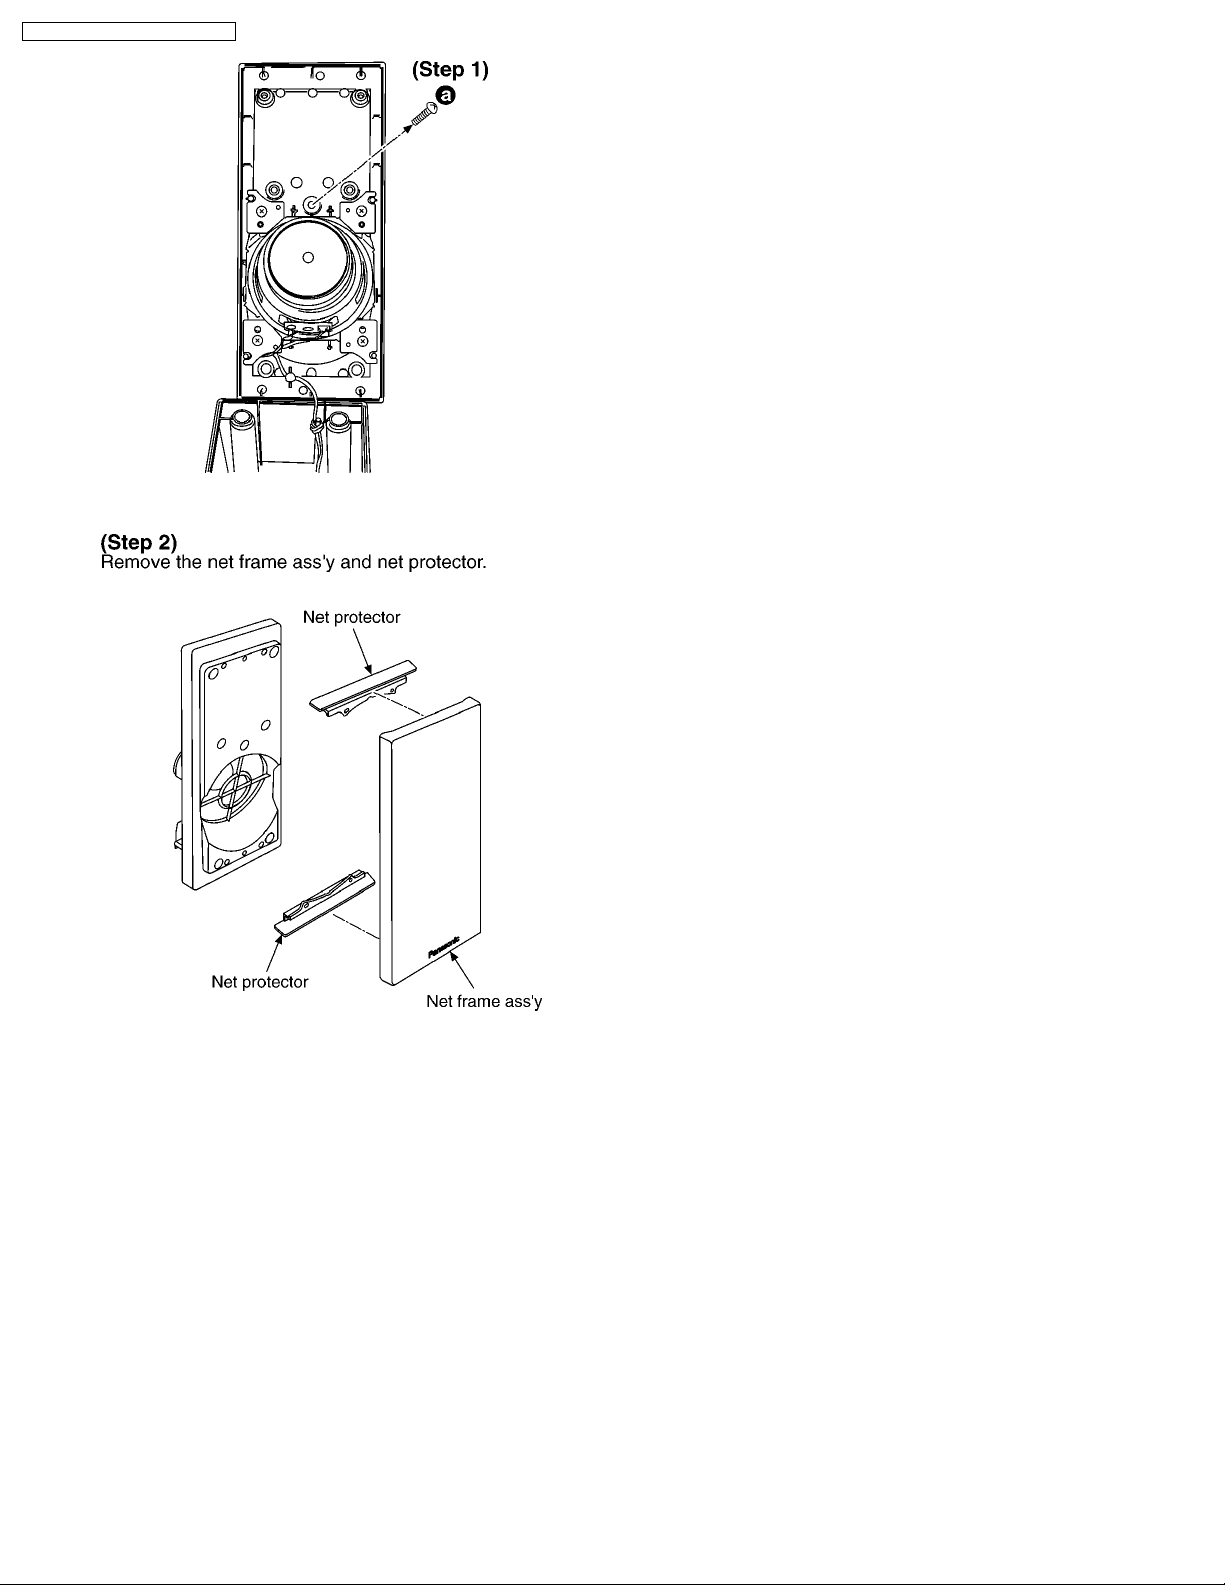
9.2.1. Removal of the speaker
9.2.2. Removal of the net frame ass’y
and net protector (SB-EN25)
· Follow the (Step1), (Step2) of item 9.2.1.
15
Page 16
SC-EN25P / SC-EN26P / SC- EN27PC
16
Page 17
10 Self Diagnostic Function
10.1. Setting of self diagnostic Function
10.1.1. Setting of self diagnostic mode
1. To enter into self-diagnostic mode:
· Press & hold + key,followed by VOL+ key for more than 2 second s.
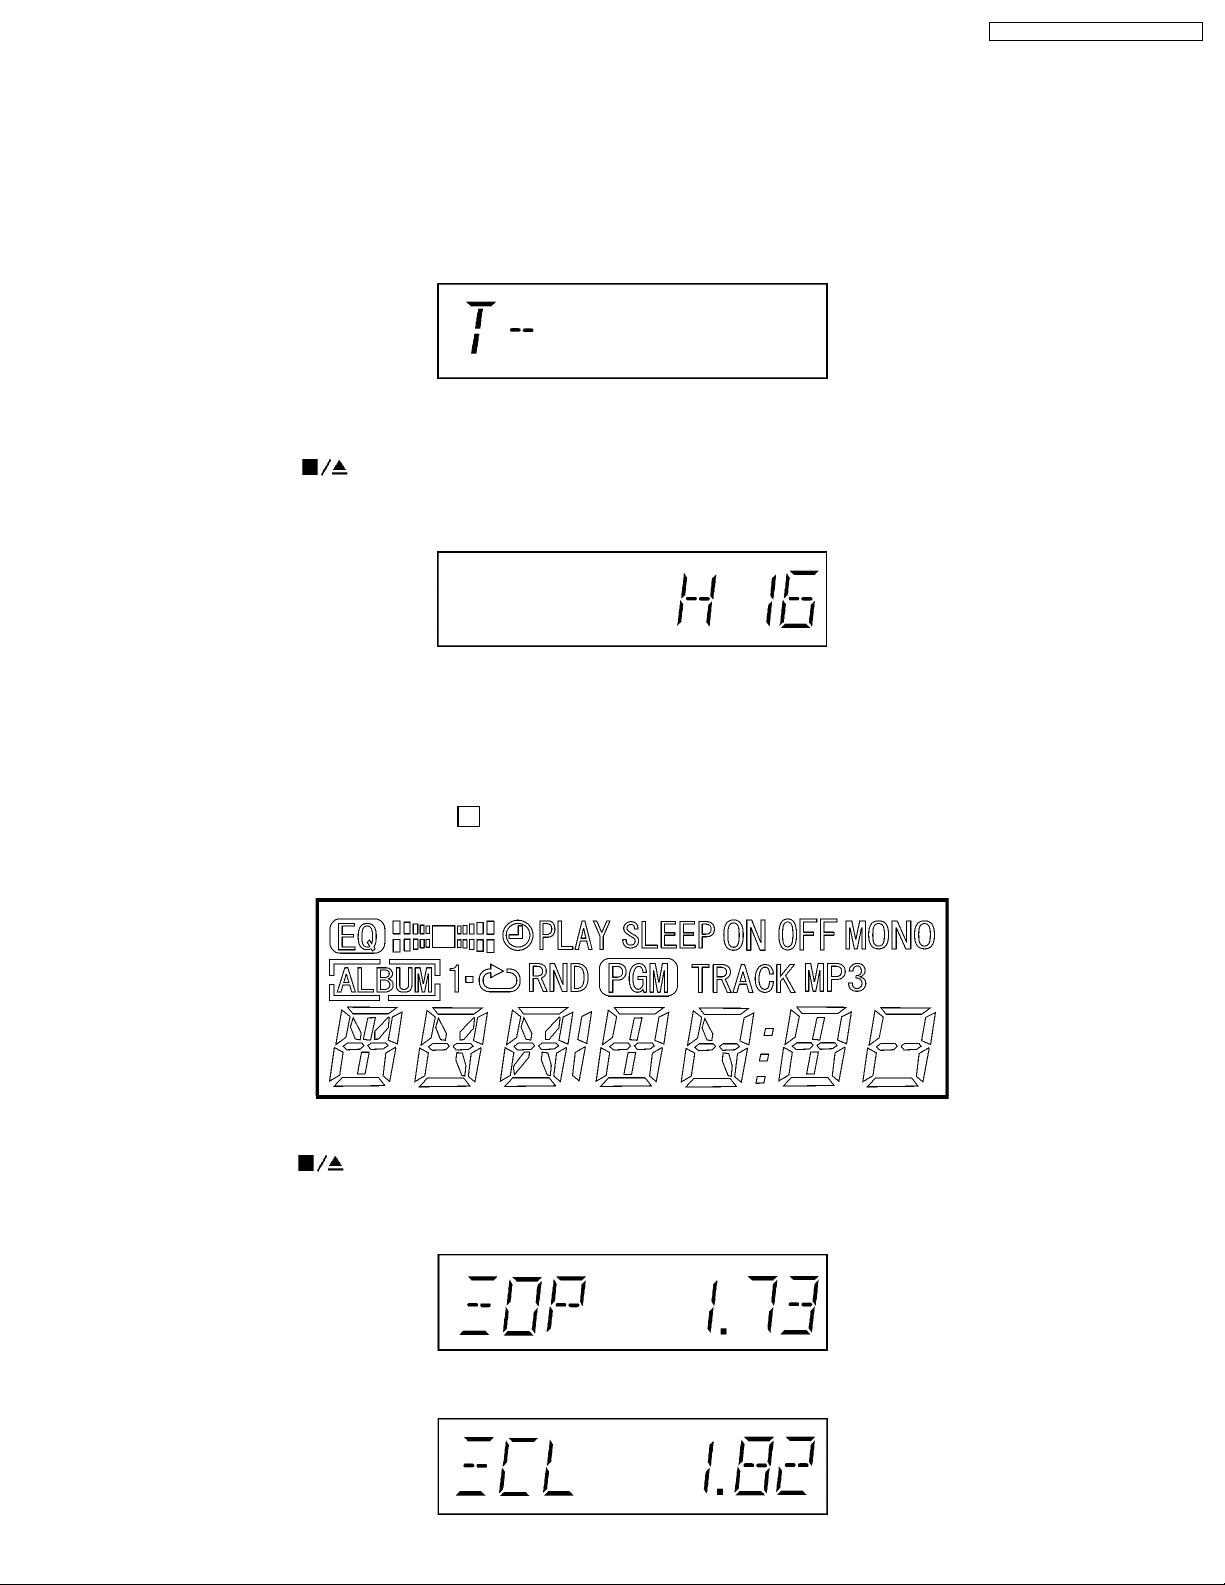
2. LCD will show the following display as below:
(LCD Display)
3. Error during Test:
· Press & hold
displayed.
Example:
key (> 2sec) will show blinking error code. If abnormality occurs during test, error code will be
SC-EN25P / SC-EN26P / SC- EN27PC
NOTE: Refer to error code table 11.1.
10.1.2. Test Mode Checking
1. Operation keys and all segment display check mode:
· Activate the Self Diagnosis mode before performing the following steps
· Press & hold REMORT CONTROL 2
· W hen the keys of the main set is pressed, the various corresponding key functions shall light up and display that particular
function. After all the main set keys were pressed, the LCD shows the following (Including CD LED):
2. CD lid OPEN/CLOSE aging test mode:
· Press & hold
· This mode counts the number of times the CD lid open/close (MAX is 65535).
−
− <OPEN>:
− −
key (>5 sec) will enter this mode.
key (>2 sec) will enter this mode.
−
− <CLOSE>:
− −
17
Page 18
SC-EN25P / SC-EN26P / SC- EN27PC
3. CD unit (250Z) and CD lid reliability test mode (Combination )
· Press & hold REMOTE CONTROL
· This test is the combination of CD lid operation and the inner and outer disc access operation aging test.Th e testing process
is as follow: CD lid OPEN→Wait for 1sec. open state→CD lid CLOSE→TOC read → Play all tracks → Increment counter
(Repeat the whole process).
→1→0key (>2 sec) will enter into this test mode.
10.1.3. Exiting from self-diagnostic mode
1. Press the POWER ON/OFF button eihter on the remote controller or main set to exit from Self-Diagnostic mode.
2. The content of abnormalities (error code) are kept as long as the microcontroller memory is backup.
3. If there is an error detected in RAM check at Reset, the content in the RAM shall be initialised and all the contents of
abnormalities shall be cleared.
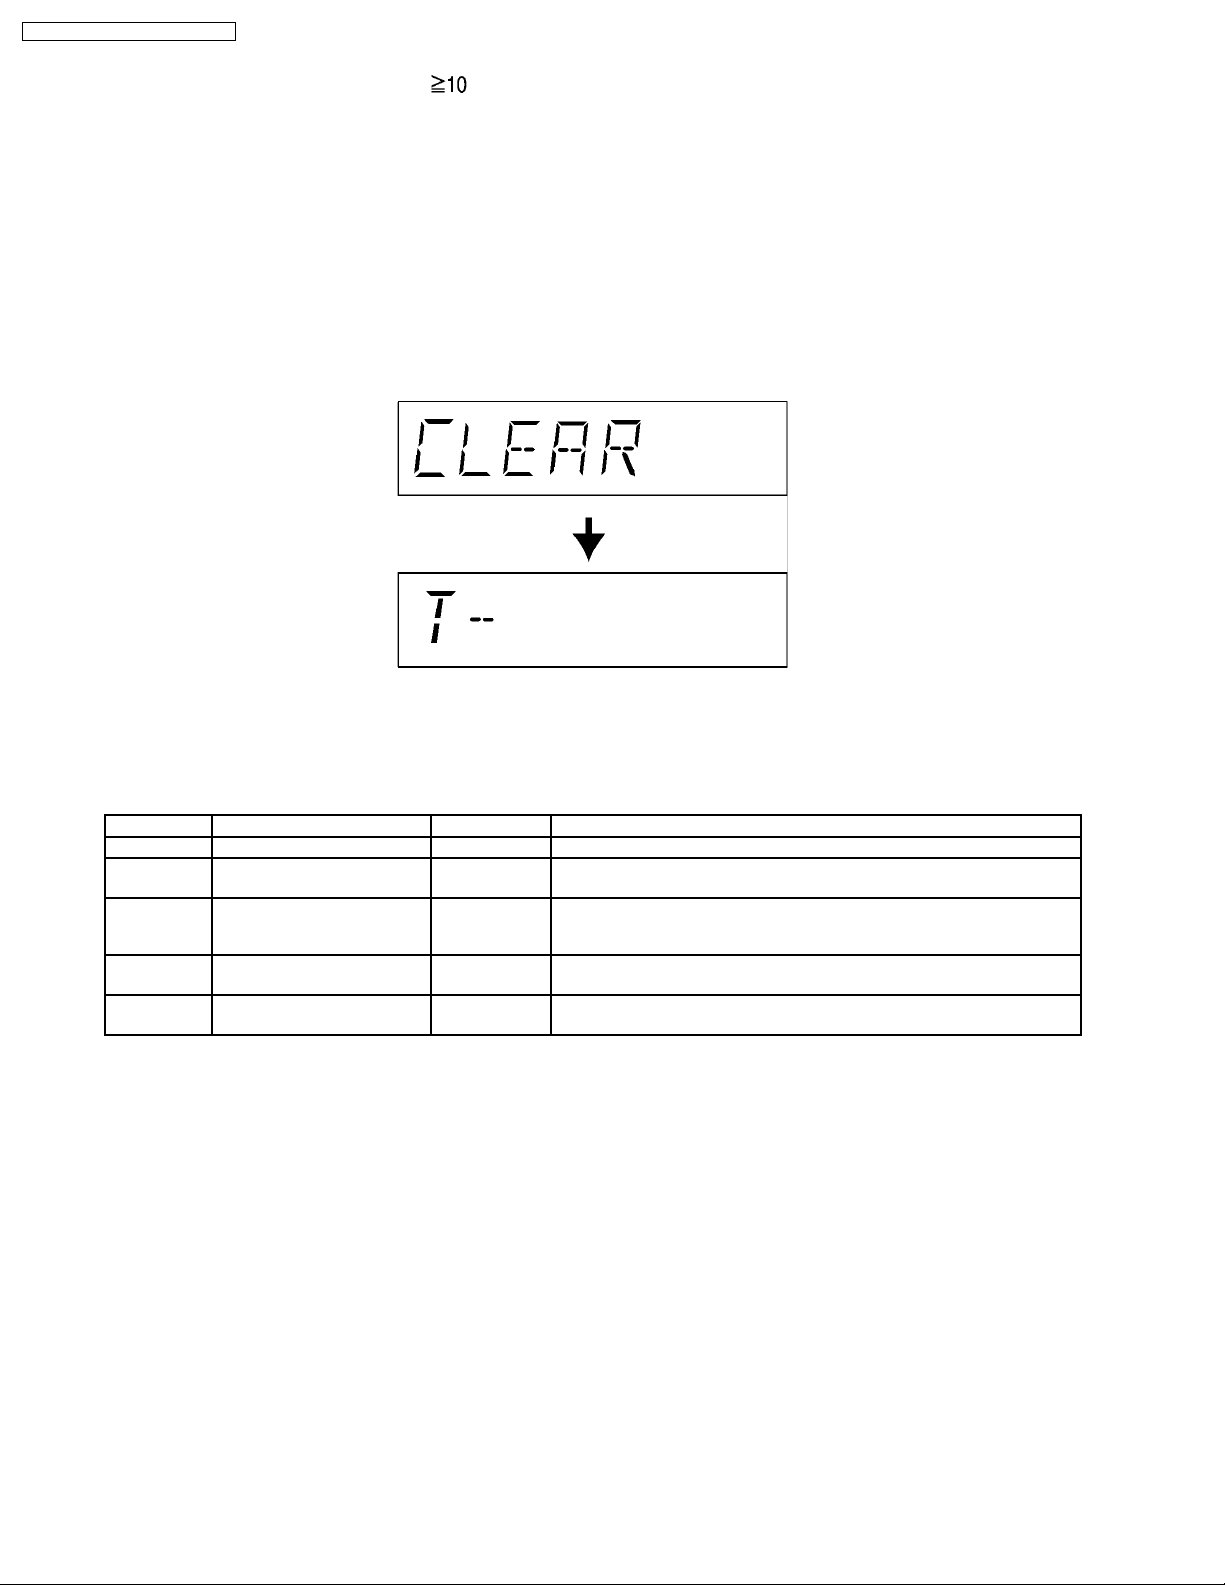
4. For force clearance, press “STOP” key while in self diagnostic mode.
“CLEAR” is displayed in upper row of LCD for one second followe d by “T” is.
11 Description of Error Code
11.1. Error detection for CD Mechanism block
No. Error Error Display Problem condition
1 CD Open Switch Error H15 Detect error during opening operation and memorised it as an error.
2 CD Close Switch (Bottom Sw)
Error
3 CD Rest Switch Error F15 Under normal operation (Self-Diagnostic Mode inclusive), this error occurs
4 Communication between CD
LSI and Micro-P
5 Power Supply Error F76 This error occurs when PDET (Input for detecting over/under voltage of
H16 Detect error during closing operation and memorised it as an error.
when the Rest_SW ON is not detected within the specified time (10 s) and
shall be memrised.
F26 This error occurs when communication between CD LSI and Micro-P is
abnormal.
power supply) voltage level is not in the range between 1.72V and 2.80V.
18
Page 19
12 Schematic Diagram
12.1. Schematic Diagram Notes
(All schematic diagrams may be modified at any time with the
development of new technology.)
Notes:
S351: CD TOP DETECTIO N Switch in “OFF”
position.
S352: CD BOTTOM DETECTION Switch in “OFF”
position.
S700: REST Switch in “OFF” position.
S801: CD switch
S802: TUNER switch
S803: VOL + switch.
S804: VOL - switch
S805: FWD- Skip Switch ( )
S806: REV- Skip Switch ( )
S807: CD OPEN/CLOSE Switch
S808: POWER OFF/TAPE Switch
· The voltage value and waveforms are the reference voltage
of this unit measured by DC electronic voltmeter (high
impedance) and oscilloscope on the basis of chassis.
Accordingly, there may arise some error in voltage values
and waveforms depending upon the internal impedance of
the tester or the measuring unit.
SC-EN25P / SC-EN26P / SC- EN27PC
foil.
· Put a conductive mat on the work table.
· Ground the soldering iron.
· Do not touch the pins of IC, LSI or VLSI with fingers
directly.
· Indicated voltage values are the standard values for the unit
measured by the DC electronic circuit tester (highimpedance) with the chassis taken as standard. Therefore,
there may exist some errors in the voltage values,
depending on theinternalimpedanceof the DC circuit tester.
· No mark: All VR is set as a center position.
Important safety notice:
Components identified by
mark have special
characteristics important for safety.
Furthermore, special parts which have purpose of fireretardant (resistors), high-quality sound (capacitors), lownoise (resistors), etc. are used. When replacing any of
components, be sure to use only manufacture´s specified
parts showninthepa rts list.
Caution!
· IC and LSI are sensitive to static electricity.
· Secondary trouble can be prevented by taking care
during repair.
· Cover the parts boxes made of plastics with
aluminum foil.
· Ground the soldering iron.
· Put a conductive mat on the work table.
· Do not touch the legs of IC or LSI with the fingers
directly.
· Battery Curent
Vol min.: 120mA (CD)
103mA (FM)
102mA (AM)
Vol max.: 118mA (CD)
102mA (FM)
100mA (AM)
−
− Measurement instruction
− −
CD: 1kHz, 0dB
FM: 60dB, 30% Mod.
AM: 74dB/m, 30% Mod.
· Importance safety notice:
Components identified by
mark have special
characteristics important for safety. Furthermore, special
parts which have purposes of fire-retardant (resistors), highquality sound (capacitors), low-noise (resistors), etc. are
used. When replacing any of components, be sure to use
only manufacturer’s specified parts shown in the parts list.
Caution!
IC, LSI and VLSI are sensitive to static electricity.
Secondary trouble can be prevented by taking care during
repair.
· Cover the parts boxes made of plastics with aluminium
19
Page 20

SC-EN25P / SC-EN26P / SC- EN27PC
20
Page 21
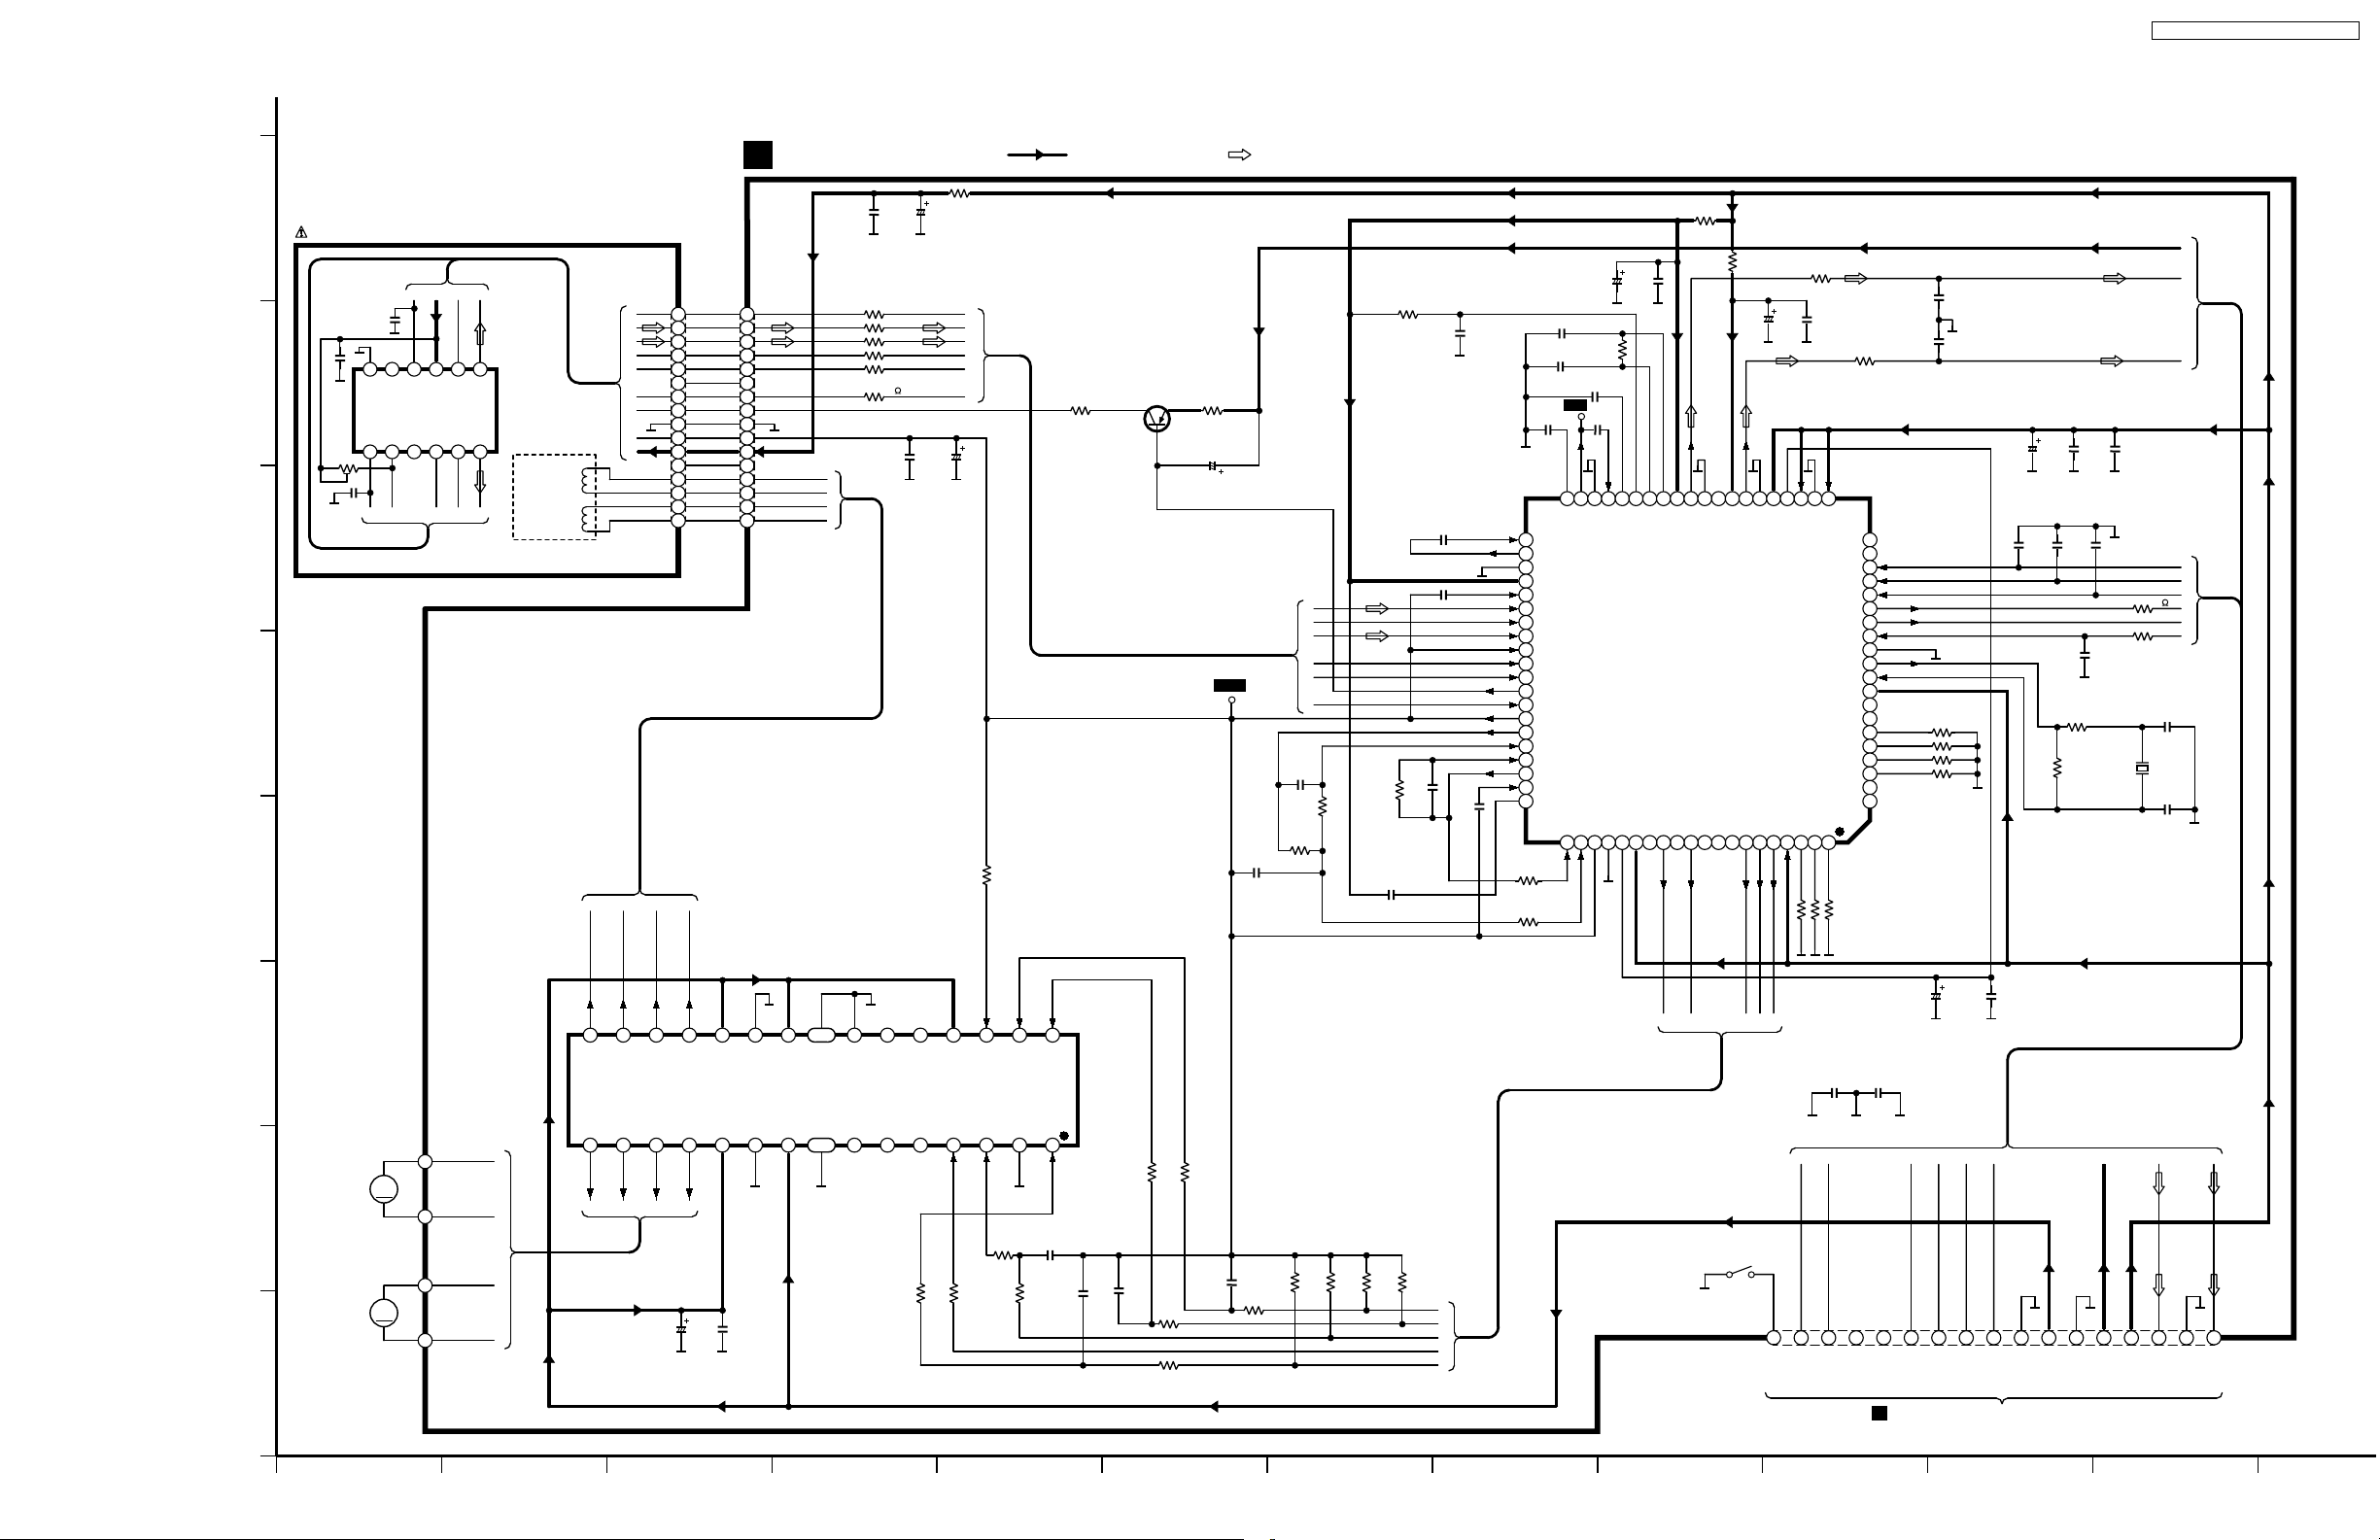
12.2. Schematic Diagram
SCHEMATIC DIAGRAM-1
SC-EN25P / SC-EN26P / SC- EN27PC
NOTE:
The number which noted at the connectors on the schematic diagram
as "SCHEMATICDIAGRAM-1" or "SCHEMATICDIAGRAM-2"indicates
the schematic diagram serial number located on the left corner in the
schematic diagram.
H
OPTICAL PICK-UP
AB
HI
I
0.22
0.22
G
1
VS
NC
GND
LD
MPD
NC
1 2 3 4 5 6
CD EFG
Vcc
VC
789101112
VB
VE
VF
VA
TRACKING
COIL
FOCUS
COIL
H
G
F
E
D
C
B
A
F
E
D
DCBA
R721
4.7
C720
6.3V33
VREF
:CD PLAYBACK SIGNALLINE:POSITIVE VOLTAGELINE
C721
4700P
C726
470P
R724
3.3K
C
E
B
D
A
F
R727
39K
R725
C754
0.039
27K
R731
82K
0.1
C732
C724
0.1
C723 0.1
C722
820P
(2.1V)1.7V
(1.4V)0V
(1.6V)0.7V
(2V)1.7V
(2V)1.7V
(2V)1.7V
(2V)1.7V
(2V)1.7V
(2.3V)2.8V
(3.1V)3.4V
C727
0.047
3.4V
1.6V
1.6V
1.6V
1.6V
1.6V
1.6V
1.6V
1.6V
R733
5.6
0.1
C734
C735
6.3V100
C736 0.082
820
C733 1000P
C729
0.1
40
RF IN
39
RFOUT
38
RESERVE
37
RFV
36
DCDET
35
A
34
C
33
B
32
D
31
F
30
E
29
LD
28
PD
27
VREF
26
TEOUT
25
TEN
24
FEN
23
FEOUT
22
RFENV
21
CEA
R726
1K
R723
1K
R732
C731
0.022
RF
C730
820P
0V(1.7V)
0V(1.4V)
1.7V(1.6V)
1.7V(1.6V)
0.8V
1V(1.8V)
1V(1.8V)
3.4V
41
42 4344 45 46 47 4849 50 51 52 53 54 55 56 57 58 59 60
2
SS
ARF
DSLF
AV
CAGC
ARF IN
DD
1
1
DD
SS
ADPVCC
TEIN
FEIN
DV
DV
1.5V
1.6V
1.6V
1.6V
1.5V
2
DD
IREF
PLLE
OUTL
PLLF0
AV
IC701
MN6627953HB
SERVOAMP/SERVO PROCESSOR/
DIGITALSIGNAL PROCESSOR/
DIGITALFILTER/
D/A CONVERTER
3
DD
TRP
TRM
FOP
FOM
IOV
1.6V
1.6V
3.5V
1
SS
AV
TRVM2
R734
AVREF
TRVP2
100
3.1V
1
DD
AV
TRVM
1.5V
OUTR
TRVP
1.6V
C738
6.3V220
2
SS
DV
SPPOL
(0V)3.4V
3.5V
1
DD
IOV
SPOUT
1.6V
0.1
C739
1.5V
3.5V
2
DD
DV
PWMSEL
0V
3.5V
R735 68K
R737
LON
EXT2
0V
R736 68K
1K
3.5V
NTEST
IOMODE
FLAG
MCLK
MDATA
BLKCK
NRST
DV
IOV
DQSY
TXTD
TXTCK
GOUT0
GOUT1
EXT0
EXT1
1234567891011121314151617181920
0V
R739 68K
MLD
STAT
GID0
GID1
GID2
G
I
C741
1000P
R738
1K
TX
SS
3
X2
X1
DD
2
61
62
63
64
65
66
67
68
69
70
71
72
73
74
75
76
77
78
79
80
3.3V
3.3V(3V)
3.3V
0V(1.6V)
0V
3.3V
1.5V(1.4V)
1.5V(1.4V)
3.5V
0V
R747 68K
R748 68K
0V
R749 68K
0V
R750 68K
0V
C742
1000P
C744
C743
220P
6.3V330
C748
R740
0.1
C747
220P
0.01
C750
R741
100
1M
(16.9344MHz)
C749
220P
X700
0.01
C740
R744 0
R742 1K
C746
22P
C745
22P
H
F
E
D
B
C
A
CD SERVO CIRCUIT
A
R704
C709
0.1
6.3V100
C753
6.3V100
5.6
A
B
C
D
E
F
R710
100
R718
5.6
Q700
2SB0709A0L
LASER POWER
DRIVE
(2.1V)
3.4V
1.2V
2.8V
(2.3V)
0.1
C707
CN701
VE
VB
VA
VF
VC
NC
MPD
LD
GND
VREF
Vcc
NC
TR+
TR
FO+
FO
1
2
3
4
5
6
7
8
9
10
11
12
13
14
15
16
IC700
BA5948FPE2
FOCUS COIL/
TRACKING COIL/
TRAVERSEMOTOR/
SPINDLE MOTOR DRIVE
1
2
3
4
5
6
7
8
9
10
11
12
13
14
15
16
R705 5.6K
R706 8.2K
R707 8.2K
R708 5.6K
R711 8.2K
R751 0
A
B
C
D
C756
C
B
A
M701
TRAVERSE
MOTOR
M702
SPINDLE
MOTOR
M
M
0.1
C757
C762
6.3V10
0.1
G
HI
11 12 13 14 15 16
+5.5V
D.GND
LD SW
+3.3V
Rch OUT
A.GND
17
Lch OUT
SQCK
C
BLKCK
D
E
F
109876
MLD
MCLK
P.GND
MDATA
C
S700
(REST)
CN702
E
DABC
1
REST SW
C751
C752
470P
AB
2 3 4 5
/RST
STAT
SUBQ
2.5V 2.5V 2.5V 2.5V 5.8V 5.8V 1.6V
15 16 17 18 19 20 21
VO3+
VO3-
VO2+
14 13 12 11 10 9 8
A
B
C
D
2.5V 2.5V 2.9V
AB DC
VO2-
VO4-
VO1+
(2.4V)
C704
5.8V 1.6V 1.6V
VO4+
VO1-
(3.3V)
6.3V330
2.9V
C705
PVcc2
PVcc1
5.8V
0.1
PGND2
PGND1
NC
NC
5.8V
23 24 25 26 27 28
22
NC
GND
GND
NC
NC
7
NC
NC
NC
6 5 4 3 2 1
6.8K
R713
R712
100
Vcc
MUTE1
(0V)
BIAS
VIN1
R715
1K
R716
3.3K
VIN4
MUTE2
C717
0.15
VIN3
VIN2
1.6V1.6V3.4V
C716
0.033
C718
2700P
5.6K
5.6K
R717
R720
R719
68K
R714 22K
C719
3300P
R722
56K
R728
5.6K
R729
5.6K
R730
5.6K
R743
1K
B
C
D
E
A
To MAIN CIRCUIT(CS701)
SA-EN25/26/27 CD SERVO CIRCUIT DIAGRAM
121110987654321
21
Page 22
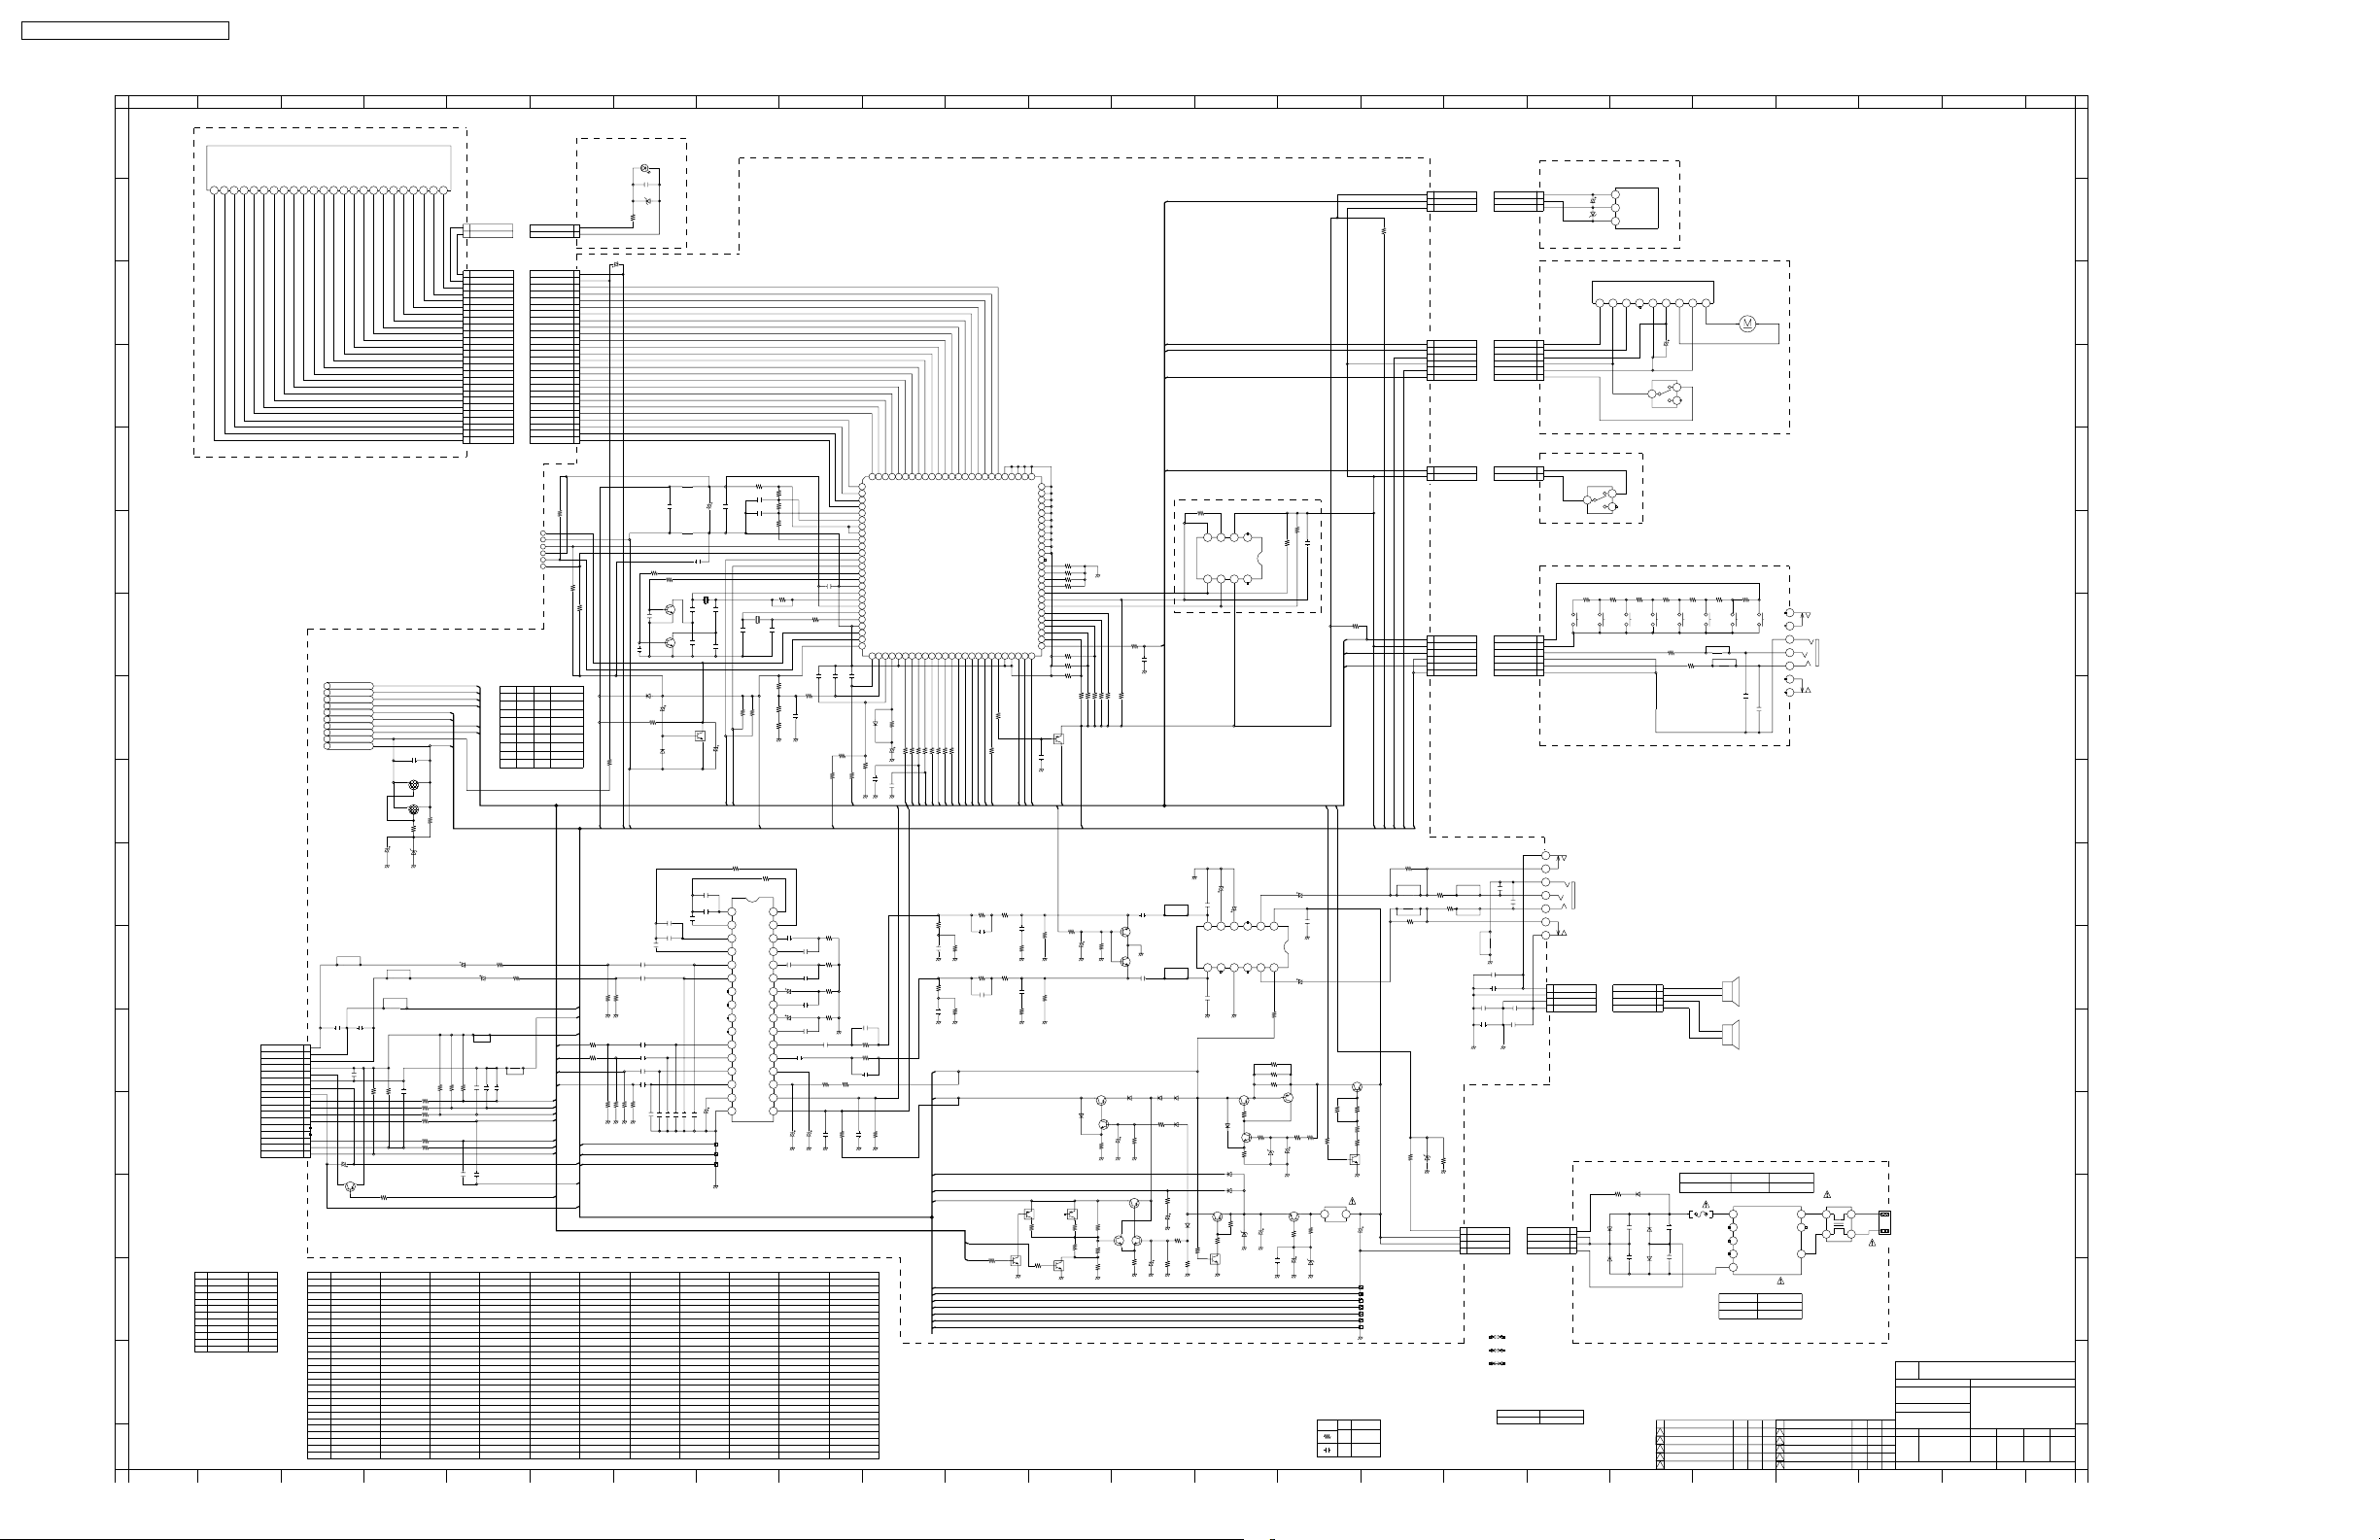
SC-EN25P / SC-EN26P / SC- EN27PC
1
2
3
K1KA03BA0055
P351
1
2
3
4
5
CD_BOTTOM_SW
6
K1KA06BA0061
1
1
CD_TOP_SW
2
2
K1KA02BA0055
1
2
3
4
5
6
K1KA06BA0061
R403
2
270
1
2
R604
MAZ40510MF
RJB3119#A
P1001
STBY3.3V
REM_IN
VREF-
CD_OPEN
CD_CLOSE
M5.5V
VREF-
M_GND
P352
VREF-
P601
KEY_SW
VREFAUX_LCH
AUX_GND
AUX_RCH
AUX_GND
1
R503
2
270
1
2
27K
Q
JW1001
STBY3.3V
REM_IN
VREF-
REX1229
R
1
1
2
2
C1001
3
3
D1001
RJB3119#H
JW351
1
CD_OPEN
1
2
CD_CLOSE
2
3
M5.5V
3
4
VREF-
4
5
M_GND
5
6
CD_BOTTOM_SW
6
REX1227
RJB3119#E
JW352
CD_TOP_SW
1
1
VREF-
2
2
REX1228
JW601
KEY_SW
VREFAUX_LCH
AUX_GND
AUX_RCH
AUX_GND
REX1231
RJB3119#F
1
1
2
2
3
3
4
4
5
5
6
6
STOP
CD_OP/CL
1
$[K0L1BB000005]
R852
1
2
15K[DI]
12
S808
EVQ21405R
RJB3119#B
JK601
K2HC103A0031
67
*
1
2
C404
( )
*
2
L602
( )
1
( )
1
2
( )
1
2
C621
1
2
*
C622
( )
1
2
*
K1
*
1
2
K2
*
1
2
K3
*
1
2
Q
1354 2
1 764 235
*
1
2
C504
( )
*
1
1
2
2
3
3
C505
4
4
( )
1
2
*
C506
1
2
*
P901
ACDET
VCCH
VCCH
GND
K1KA04BA0055
EN25P,EN26P
EN27PC
EN27E,EB,EG,GCS,GD,GK,GN
ZA601 $[RMYX0082]
ZA602 $[RMY0362]
JK602
Lch
Lch_GND
Rch
Rch_GND
K4AC04B00008
1
2
3
4
R
1
2
3
4
RJB3119#C
*
L401
( )
1
2
L501
( )( )
1
2
1
*
C405 *
C406
( )
( )
JW901
1
ACDET
1
2
VCCH
2
3
VCCH
3
4
4
GND
REX1226
NO
OPTIONAL_EEPROM
R7001
( )
1
2
$(4.7K)
756
8
6 75
NC
DO
GND
EDATA
IC7001
NC
VCC
ECLK
ECS
$[C3EBDG000052]
24 381
1
243
HEAT SINK
ZA602
RMYX0362
2
C601
1
16V47[KA]
50V
1
470P
2
2
C403
C602
1
2
*
2
*
2
2
2
1
D610B0AACK000004
1
2
R628
C503
KTA2014GRRTK
(RVD1SS133TA)
1
2
1K
R631
1
2
1K
L_IN
R_IN
HEAT SINK
ZA602
RMYX0082
16V10[KA]
8 10 11 12967
NC
P.PPRE_GND
FILTER
RIPPLE
NC
NC
45 13 2
5 3121
50V
1
2
470P
$[B1BCCG000002]
(2SB1565E)
Q605
3
1
1
2
R615
2
2SD1819ARL
1
3
1
(RVD1SS133TA)
Q607
D605 B0AACK000004
2
1
2
R616
D612
1
2
B0AAEF000001
D613
1
2
B0AAEF000001
(1SS291TA)
Q613
2
3
1
1
2
10K
R633
1
2
D614
1
2
R632
4.7K
3
1
2
QR614
UNR521F00L
4.7K/10K
11897 10
R_OUT L_OUT
246
R620 2.2
R621 1[DI]
R622 1[DI]
2
1
R617
1
2
100
470[DI]
(1SS291TA)
1
2
C612
MAZ40620MF
R601
D608
6V100[KA]
R7006
( )
(BR93L56F-WE2)
10V1000[M]
VCC
(LA4627N-E)
STBY
10V1000[M]
1
2
8.2K[DI]
1
2
1
2
1
2
1
1
1
C609
2
MAZ40910LF
B1BAAJ000003
Q615
2
R634
1
2
C613
C615
( )
$(1000P)
1
2
R7005
( )
$(100K)
1
2
C7001
$(100K)
C407
2
1
C603
IC601
C0AAAA000036
C507
2
1
2
3
Q606
KTA2014GRRTK
R619
R618
1
2
680
2
25V10[KA]
3
1
1
R635
2
100
1
2
D615
16V100[KA]
1
2
( )
$(220P)
50V
1
2
1000P
(2SA1576A106R)
1
2
680
R605
2
K5G251A00008
1
2
2.2K
1
2
MAZ40470MF
PCONT
2
R624
1
2
1K
4.7K/10K
0.25A
IP602
ACDET
B1ACND000003
(2SB1240RTV2)
1
2
deftype
R840
KEY_SW
AUX_LCH
AUX_RCH
3
470[DI]
1
1
1
CR[18]
P
1
2
3
1
820
2
R841
1
2
3
4
5
6
1
2
15K
Q608
2
1
1
2
R623
470[DI]
1
2
R625
120[DI]
1
2
R626
120[DI]
3
2
QR609
1
2
C616
CDDGND
1
CDPGND
1
TUGND
1
LEDGND
1
VREFGND
1
ASPGND
1
MGND
1
VALUE
[18]
VREF-
UNR521400L
25V3300
M_GND
M5.5V
LED_GND
( )
( )
1
L502 *
1
R504 *
( )
1
2
3
4
5
6
AUX_GND
R404
1
2
*
L402
2
*
2
1
2
1
2
D601
100K
R603
NOMP
1
1
1
2
2
2
R839 100K
R838 100K
R859 $(100K)
1
2
33K
R608
Q603
2
3
1
Q604
2SD1819ARL
3
1
(RVD1SS133TA)
2
1
2
R614
150[DI]
10K/10K
1
2
2.2K
Q617
R636
1
2
5.6K
R642
2SD1819ARL
1
2
680
R637
1
1
2
2
R833 100K
1
3
3
1
D602
1
B0EAKM000118
1
2
C608
25V10[KA]
B1ACND000003
3
1
2
M
R829
PCONT
1
2
1K
50V
1
2
C821
1000P
C402
10V
1
2
0.22
2
Q401
B1ABGD000021
Q501 B1ABGD000021
2
C502
10V
1
2
0.22
D603
1
2
B0EAKM000118
R612
2.2K
B0AACK000004
1
(RVD1SS133TA)
2
22K
R613
Q611
2
3
1
Q612
2SD1819ARL
3
1
2
1
1
2
R627
2
C610
220[DI]
25V10[KA]
REM_IN
CD_OPEN
CD_CLOSE
CD_BOTTOM_SW
CD_TOP_SW
L403
( )
1
L503
( )
1
D604
1
2
B0EAKM000118
D611
1
1
2
1
2
220
R630
1
2
C611
6V4700
R629
1K
1
2
27K
R643
A
1
2
3
4
5
6
7
8
9
BDC
LCD PANEL
7861092453 12141618202224232119171513111
1113579108642 12
Z801
L5ACAEC00028
PLL_CE
PLL_DI
PLL_CLK
PLL_DO
TU_GND
D3.3V
TUN_RCH
TUN_LCH
TU_5V
D9V
(KTC3199-GR-AT/P)
(KTC3199-GR-AT/P)
C315
1
2
1000P
B1AACF000117
2
Q303
B1AACF000117
2
Q302
6V100[KA]
C359
R322
D301
50V
1
2
3
1
3
1
1
47
2
1
2
MAZ40560MF
C113 15 17 19 21 C020181614 C2
RJB3119#G
1
2
330
R323
D1002
LNG4A4CN4E
1
2
C1002
16V
1
2
16V1u
D1003
1
2
MAZ40620MF
1
JW8011
1
LED_VCC
1
2
LED_GND
2
26
LED_GND
26
LED_VCC
25
25
24
SEG19
24
23
SEG18
23
22
SEG17
22
21
SEG16
21
20
SEG15
20
19
SEG14
19
18
SEG13
18
17
SEG12
17
16
SEG11
16
15
SEG10
15
SEG9
14
14
SEG8
13
13
12
SEG7
12
11
SEG6
11
SEG5
10
10
SEG4
9
9
8
SEG3
8
7
SEG2
7
6
6
SEG0
5
5
4
COM0
4
3
COM1
3
COM2
2
2
COM3
1
1
FFC801
REE1363
SEG1
FLASH_WRITER
/RST
GND
SBD
VDD
DMOD
SBT
0
15.9K
39.1K
12K
27K
1
JW801
LED_VCC
LED_GND
RWJ9002070SS
LED_GND
LED_VCC
SEG19
SEG18
SEG17
SEG16
SEG15
SEG14
SEG13
SEG12
SEG11
SEG10
SEG9
SEG8
SEG7
SEG6
SEG5
SEG4
SEG3
SEG2
SEG1
SEG0
COM0
COM1
COM2
COM3
FP801
K1MN26B00010
1
11 1
1
1
R826 DESTINATIONR R825
1
P_W/O_MP3
3.9K
P_WITH_MP3
12K
G_WITH_MP3
1
1
2
2
26
26
25
25
24
24
23
23
22
22
21
21
20
20
19
19
18
18
17
17
16
16
15
15
14
14
13
13
12
12
11
11
10
10
9
9
8
8
7
7
6
6
5
5
4
4
3
3
2
2
1
1
1
2
R835 10K
1
2
R836 10K
R837 10K
2
R1003
68[DI]
RJB3119#D
10V330C827
1
2
G0C2R2JA0019
50V
1
2
1000P
C803
G0C2R2JA0019
R808 3.3K
1
2
1
2
3.3KR807
82
LED_GND
C809 1000P
B0AAEF000001
(1SS291TA)
VREF-
1000PC806
50V
1
2
D803
50V
1
2
2SD1819ARL
1
2
R811
2
47K
1
Q801
2SD1819ARL
1
Q802
1
2
C814
1
1
D801
2
3
2
3
2
50V2R2[KA]
UNR521300L
B0AACK000004
(RVD1SS133TA)
1
2
1
2
R862
BUP3.3V
10
C222
16V
1
2
0.047
C210
0.068C209
16V
16V
1
2
0.1
1
C116
L101
( )
1
11
12
13
CD_Lch
AGND
CD_Rch
D3.3V
LDSW
DGND
5.5V
PGND
MCLK
MDATA
MLD
BLKCK
(SQCK)
(SUBQ)
STAT
/RST
RESET_SW
FP701
K1MN17B00032
14
Modify Category
Variation Type
1
EN25P A
2
EN27PC B
3
15
4
5
6
7
8
9
10
11
EN27P C
EN27E D
EN27EB E
EN27EG F
EN27GCS G
EN27GD H
EN27GK J
EN26P K
PCB Z
16
17
2
17
17
16
16
15
15
14
14
13
13
12
12
11
11
10
10
9
9
8
8
7
7
6
6
5
5
4
4
3
3
2
2
1
1
VariationCategory
C404
C405
C406
C408
C504
C505
C506
C508
C621
C622
JK901
K1
K2
K3
L401
L402
L403
L404
L501
L502
L503
L504
L602
R404
R504
R825
R826
$[RLL500050T-Y]
C101
$(0.001)
L201
( )
1
2
$[RLL500050T-Y]
L301
( )
1
2
$[RLL500050T-Y]
C201
( )( )
1
2
1
2
$(0.001)
50V
1
2
C301
C358
2
10V1000[M]
3
EN25P EN27P EN27EB EN27GCS EN27GK EN26PEN27GDEN27EGEN27EEN27PC
K2AB2B000007 K2AB2B000007 K2AB2B000007 K2AA2B000015 K2AA2B000015 K2AA2B000015 K2AA2B000015 K2AA2B000015 K2AA2B000015 K2AB2B000007 K2AB2B000007
RWDJ05-050 $ $ $ $ $ $ $ $ RWDJ05-050 RWDJ05-050
50V
1
1
1
2
R305
1000P
1
KTA2014GRRTK
2
(2SA1576A106R)
1
Q301
ABCDE F GHJ KZ
$ $ $ $ $ $ $ $ $ $ 0.01
$ $ $ 0.01 0.01 0.01 0.01 0.01 0.01 $ 0.01
$ $ $ 1000P 1000P 1000P 1000P 1000P 1000P $ 1000P
$ $ $ $ $ $ $ $ $ $ 0.01
$ $ $ $ $ $ $ $ $ $ 0.01
$ $ $ 0.01 0.01 0.01 0.01 0.01 0.01 $ 0.01
$ $ $ 1000P 1000P 1000P 1000P 1000P 1000P $ 1000P
$ $ $ $ $ $ $ $ $ $ 0.01
$ $ $ $ $ $ $ $ $ $ 0.01
$ $ $ $ $ $ $ $ $ $ 1000P
$ RWDJ05-050 RWDJ05-050 $ $ $ $ $ $ $ RWDJ05-050
$ $ $ RWDJ05-050 RWDJ05-050 RWDJ05-050 RWDJ05-050 RWDJ05-050 RWDJ05-050 $ RWDJ05-050
$ $ $ $ $ $ $ $ $ $ J0JBC0000032
$ $ $ J0JKB0000020 J0JKB0000020 J0JKB0000020 J0JKB0000020 J0JKB0000020 J0JKB0000020 $ J0JKB0000020
$ $ $ $ $ $ $ $ $ $ J0JBC0000032
$ $ $ $ $ $ $ $ $ $ J0JBC0000032
$ $ $ $ $ $ $ $ $ $ J0JBC0000032
$ $ $ J0JKB0000020 J0JKB0000020 J0JKB0000020 J0JKB0000020 J0JKB0000020 J0JKB0000020 $ J0JKB0000020
$ $ $ $ $ $ $ $ $ $ J0JBC0000032
$ $ $ $ $ $ $ $ $ $ J0JBC0000032
$ $ $ $ $ $ $ $ $ $ J0JBC0000032
$ $ $ 10[36] 10[36] 10[36] 10[36] 10[36] 10[36] $ 10[36]
$ $ $ 10[36] 10[36] 10[36] 10[36] 10[36] 10[36] $ 10[36]
1 12K 12K 27K 27K 27K 27K 27K 27K 1 1
1 3.9K 3.9K 12K 12K 12K 12K 12K 12K 1 1
R303 22K
2
2
10K
22K
R304
220P
C356
R306 1K
R307 1K
1
2
R308 1K
1
2
R309 1K
1
2
1
2
R312 1K
R313 1K
1
2
1
2
R325
1
2
1.5K
DBC
2
1
50V1u[KA]
$[RLL500050T-Y]
$(220P)
1
1
1
2
2
2
R301 22K
R302 22K
50V
1
2
220P
C357
R101
1
2
47K
C216
R201
2
1
1
2
50V1u[KA]
47K
L302
( )
1
2
L303
( )
1
2
$[RLL500050T-Y]
1
1
1
2
2
2
( )
( )
( )
C303
C302 $(220P)
C304 $(220P)
50V
1
2
220P
C305
CD_BOTTOM_SW
EA F
CD_RESET
REST_SW
CD_AGND
CD_DGND
D3.3V
R103 47K
1
2
TUN_LCH
R203
47K
1
2
TUN_RCH
AUX_LCH
AUX_RCH
MCLK
MDATA
MLD
BLKCK
STATUS
AUX_GND
ASP_GND
CD_AGND
M5.5V
VREF-
CD_PGND
2
C103 0.1
16V
1
2
C203 0.1
16V
1
2
5.6KR102
5.6KR202
1
1
2
2
C104 0.1
16V
1
2
C204 0.1
16V
1
2
C105 0.1
16V
1
2
C205 0.1
16V
1
2
5.6KR104
5.6KR105
5.6KR205
5.6KR204
1
1
1
1
2
2
2
2
1000PC107
1000PC108
1000PC207
1000PC208
50V
50V
50V
1
1
1
2
2
2
GH
L801
1
L802
1
QR803
47K/47K
1000PC206
50V
1
2
2
2
H2A800400011
C807
C810
0.068C109
1000PC106
50V
1
2
1
2
C801
10V100[KA]
C830
50V
1
2
1000P
1
2
X802
50V
1
2
56P
C808
50V
1
2
39P
C811
3
1
2
1
C815
C122
16V
1
2
0.047
C110
16V
16V
1
2
0.1
1
2
1
50V
2
1
2
C309
10V47[KA]
1
1
1
HFEG
R801 100K
1
2
C802
50V
25V
1
2
25V0.01
1
2
C805
1000P
C804
25V
25V0.01
1
2
R806 $(470)
50V
1
H0A327200097
2
56P
1
2
X801
50V
1
2
18P
C813
C812
50V
1
2
56P
1
1
R825
2
2
R831 100K
R830 100K
R826
2
50V1u[KA]
CD_TOP_SW
CD_BOTTOM_SW
STBY3.3V
R206
R106
1
2
6.8K[DI]
1
2
6.8K[DI]
IC301
C1BB00000732
VIN1
REC1
1
REC2
SEL1
MNF1
VIN2
MOUT1
SEL2
4
MNF2
A1
MOUT2
A2
BNF1
B1
8 7 5616 15 10 91314 1112 3 12
BOUT1
B2
BNF2
C1
910 2468 753121416 15 13 11
C2
BOUT2
OUT1
D1
D2
OUT2
E1
CAP
VCC
E2
SI
FILTER
GND SC
AUXGND
ASPGND
CDGND
R802
R803
R804
( )
50V
1
2
18P
R832
*
*
32
30 3231
29
2625 27 2817 18 20 22 24232119
50VR22[KA]
50VR22[KA]
18 20 22 24 26 28 30 3129272523211917
1
2
1
2
1
2
2
1
2
1
2
1
2
25V0.01
25V0.01
100K
100K
100K
1
R809 220K
15K
1
2
C823
( )
C111
25V
1
2
C112
25V0.015
C211
25V
1
2
C212
25V0.015
C113
2
1
0.047
C213
2
1
0.047
C215
1
2
16V1u
1
2
C310
10V100[KA]
1
2
3
4
5
6
7
8
9
10
11
12
13
14
15
C826
16
17
50V
1000P
1
2
18
19
20
21
22
1
2
23
24
25
50V
50V
50V
1
1
1
2
2
2
C819
C817
C818
1000P
1000P
1000P
R827
1
2
4.7K
$(1000P)
R818
1
2
10K
1
1
18K
2
2
R817
R819
4.7K
KEY_SW
D9V
R107
1
2
22K
25V
1
2
R207
1
2
22K
25V
1
2
R108
1
2
3.3K
C114
16V
1
2
R208
1
2
3.3K
C214
16V
1
2
C115
R109 10K
16V
1
2
16V1u
R209 10K
16V
R319
R318
1
2
1
2
33[DI]
33[DI]
1
50V
1
1
2
2
2
330K
C311
220P
R316
C312
C313
50VR33[KA]
PCB
IKLJ
JILK
100 899193959799 98 96 94 92 90
100
99
95 949697 9091 8993 9298
COM0
1
SEG4
SEG5
SEG3
SEG2
2
COM1
[99]SEG1
COM2
3
[100]SEG0
COM3
4
5
VLC3
6
VLC2
7
VLC1
C2
8
LCD_GND
9
PC1
10
PC2
11
12
CD_BOTTOM_SW
CD_TOP_SW
14
MBP1
15
MBP2
VSS
16
17
OSC1(IN)
18
OSC2(OUT)
19
VDD
20
XIN
21
XOUT
[24]DMOD(VDD)
22
NMOD(GND)
[25]VREF+
23
NRESET
CD_OPEN
NC
P.DET
REGION
CR.TIMER
KEY_SW
26
28 30
2927
2
1
2
1
R824
220K
(RVD1SS133TA)
D802 B0AACK000004
1KR864
1
2
C820
25V10[KA]
1
2
10K
R820
50V
1
2
50V
2200P
C828
1
2
2200P
C829
CD_OPEN
AG_CLK
AG_DATA
C117
50V
1
2
6800P
1
2
1
2
C217
50V
1
2
6800P
50V
1
1
2
2
330K
220P
R317
31 33 35 37 39 41 43 45 47 49 50484644424038363432
1KR865
1
2
CD_CLOSE
SEG6
SEG7
FOR_PR:
FOR_PMP:
FOR_MP:
AG_DATA
CD_CLOSE
1KR822
1
2
AG_DATA
1KR823
1
2
AG_CLK
AG_CLK
SEG8
PLL_DO
1KR813
1
2
PLL_DO
SEG10
SEG11PLL_CLK
SEG9
IC801
MN101CF74GXW
MNBCF74GAD1
MN101C74FAD
PLL_DI
1KR815
1KR816
1KR814
1
1
1
2
2
2
PLL_CLK
PLL_DI
PLL_CE
1
2
R110
3.9K
16V
1
2
0.033
C118
1
2
R210
3.9K
16V
1
2
0.033
C218
D9V
D3.3V
STBY3.3V
BUP3.3V
M5.5V
CD_DGND
CD_PGND
TU_GND
LED_GND
VREFASP_GND
M_GND
R111
R211
SEG12
PLL_CE
1
2
SEG13
MCLK
MDATA
MDATA
MCLK
1
2
33K
1
2
33K
OPEN=5.8V
CLOSE=5.0V
SEG14
SEG15
SEG16
[50]BLKCK
[49]ACDET
MLD
STATUS
4124393733 353429 302726 28 3231 36 382540 42 441346
MLD
STATUS
R112
6.8K
C119
25V0.015
R212
6.8K
C219
25V0.015
CD_OPEN
CD_CLOSE
SEG17
REST_SW
43
REST_SW
1
2
25V
1
2
1
2
25V
1
2
R641
82848688 87 85 8366788081 79
8182 80868788 84 8385
SEG18
SEG19
[73]SEG25
[74]SEG26
CD_RESET
MUTE_A
45
1KR828
1
2
1KR812
1
2
CD_RESET
R113
4.7K
R213
4.7K
1
2
1K
QR619
UNR521F00L
4.7K/10K
79
SEG20
SEG22
SEG21
NC(AUX_DET)
NC
(STBY_LED)
NC(JOG2)
NC(JOG1)
NC(TEST2)
NC(TEST1)
TAPE_L(N.C)
REC_H(N.C)
NC(EX_BASS)
NC
REM_IN
REM_IN
1
2
C401
R401
1
2
C501
R501
3
1
777076
77 7678
SEG23
SEG27
SEG28
SEG29
SEG30
SEG31
E-CLK
E-DATA
CD_SET3
CD_SET2
CD_SET1
P.CONT
4947 48 50
ACDET
1
2
1
2
( )( ) ( ) ( )
1
2
1
2
1
2
SEG24
NC
NC
NC
E-CS
BLKCK
$(0.068)
$(1.8K)
$(0.068)
$(1.8K)
3
R640
R639
UNR521F00L
4.7K/10K
C822
2
1
2
1K
75
75
74
74
73
73
72
72
71
71
70
69
69
68
68
67
67
66
65
65
64
64
63
63
62
62
61
61
60
60
59
59
58
58
57
57
56
56
55
55
54
54
53
53
52
52
51
51
1
2
R402
R502
QR621
UNR511100L
15K
1
2
50V
1000P
1
2
1
2
10K/10K
QR618
R874 100K
R875 100K
R861 100K
R860 100K
R878 0
R877 0
R876 0
1
3
MUTE_B
MUTE_B
1K
1K
3
1
2
R607
2.2K
2
1
2
1
2
1
2
1
2
1
2
1
2
1
2
QR804
UNR511100L
1
2
1
3
R638
R644
R857 $(100K)
STBY3.3V
1
C604
2
1
D607
2
QR620
1
2
15K
1
2
5.6K
$(100K)
1
2
R858
2
25V10[KA]
B1ACND000003
(2SB1240RTV2)
B0AACK000004
UNR511100L
1
2
2
1
S351
CD
16V10[KA]
231
MAZ40820MF
R851
8.2K
12
S807
1K[DI]
2
1
D901
1
2
D902
S
21 3
Z1001
B3RAD0000074
(RPM7473-H8)
IC351
C0GAE0000007
(BA6218)
2
46897531
1
2
C353
10V220
S352
1
$[K0L1BB000005]
3 2
R850
R849
1
2
1
2
1
2
5.6K
3.9K
12
12
S805
S806
TUNER
FWD_SKIP
EVQ21405R
EVQ21405R
EVQ21405R
R409
1
2
33K[DI]
2
L601
1
RLQZP101KT-Y
Lch 1
Lch_GND 2
Rch
3
Rch_GND
4
D906
R901
1
2
1
2
B0AACK000004
50V
50V
1
1
1
2
2
C904
C901
0.01
2
D904
B0EAKM000118
B0EAKM000118
50V
50V
1
1
2
2
2
C903
C902
0.01
1
D903
B0EAKM000118
B0EAKM000118
NO NAMEDATE CHECK
SEMKO_CE_SAFETY_APPRICATION
1
2
3
4
5
S
8465213 7 9
M351
$[L6AAFDFE0002]
+
21
3 2
R848
R847
R846
1
2
1
2
1
S804
EVQ21405R
L404
1
2
F901
I T E M
2.2K
12
VOL+
S803
( )
1
L504
( )
1
ZA901
K3GE1ZA00011
VOL-
EVQ21405R
2
1
2
*
2 4531
P/PC
EG/E/EB/GCS
GD
2
1.5K
12
S802
EVQ21405R
*
*
1
2
C408
( )
F901
1.6A 125V
250V T1.6AL
231 54
11/22
12
S801
POWER
1
*
2
C508
( )
K5D162BK0005
T901
G4C4ABD00011
G4C4ABK00008
G4C4ABG00001
2.7K
12
REV_SKIP
R509
33K[DI]
P/PC
EG/E/EB/GCS/GD
1
ZA902
0.01
K3GE1ZA00011
0.01
TU
6 7
EVQ21405R
13
1 764 235
5 42
JK603
K2HC103A0032
K5D162AQ0004
NO
6
7
8
9
10
L901
ELF15N035AN
423
796
79 6
1
2431
V
2
1
*
JK901
NAME
BOARDCIRCUIT
RJB3119A/RJB3119B
NODRAWING
KR9A0149
NAMEDATE CHECKI T E M
NWBG
PD3
REVISED DATE : Rule ID : Factory :
V
WXTU
MAIN
MODELNO NO
SC-EN25
SC-EN26
SC-EN27
Y.TAWAS.NINOMIYA Y.TAWA
M_DRS M2005.08.24
W X
DRAWNCHECKEDAPPR0VED DESIGNEDSECTIONDATE
K.MASUDA
1
2
3
4
5
6
7
8
9
10
11
12
13
14
15
16
17
A
0
22
Page 23
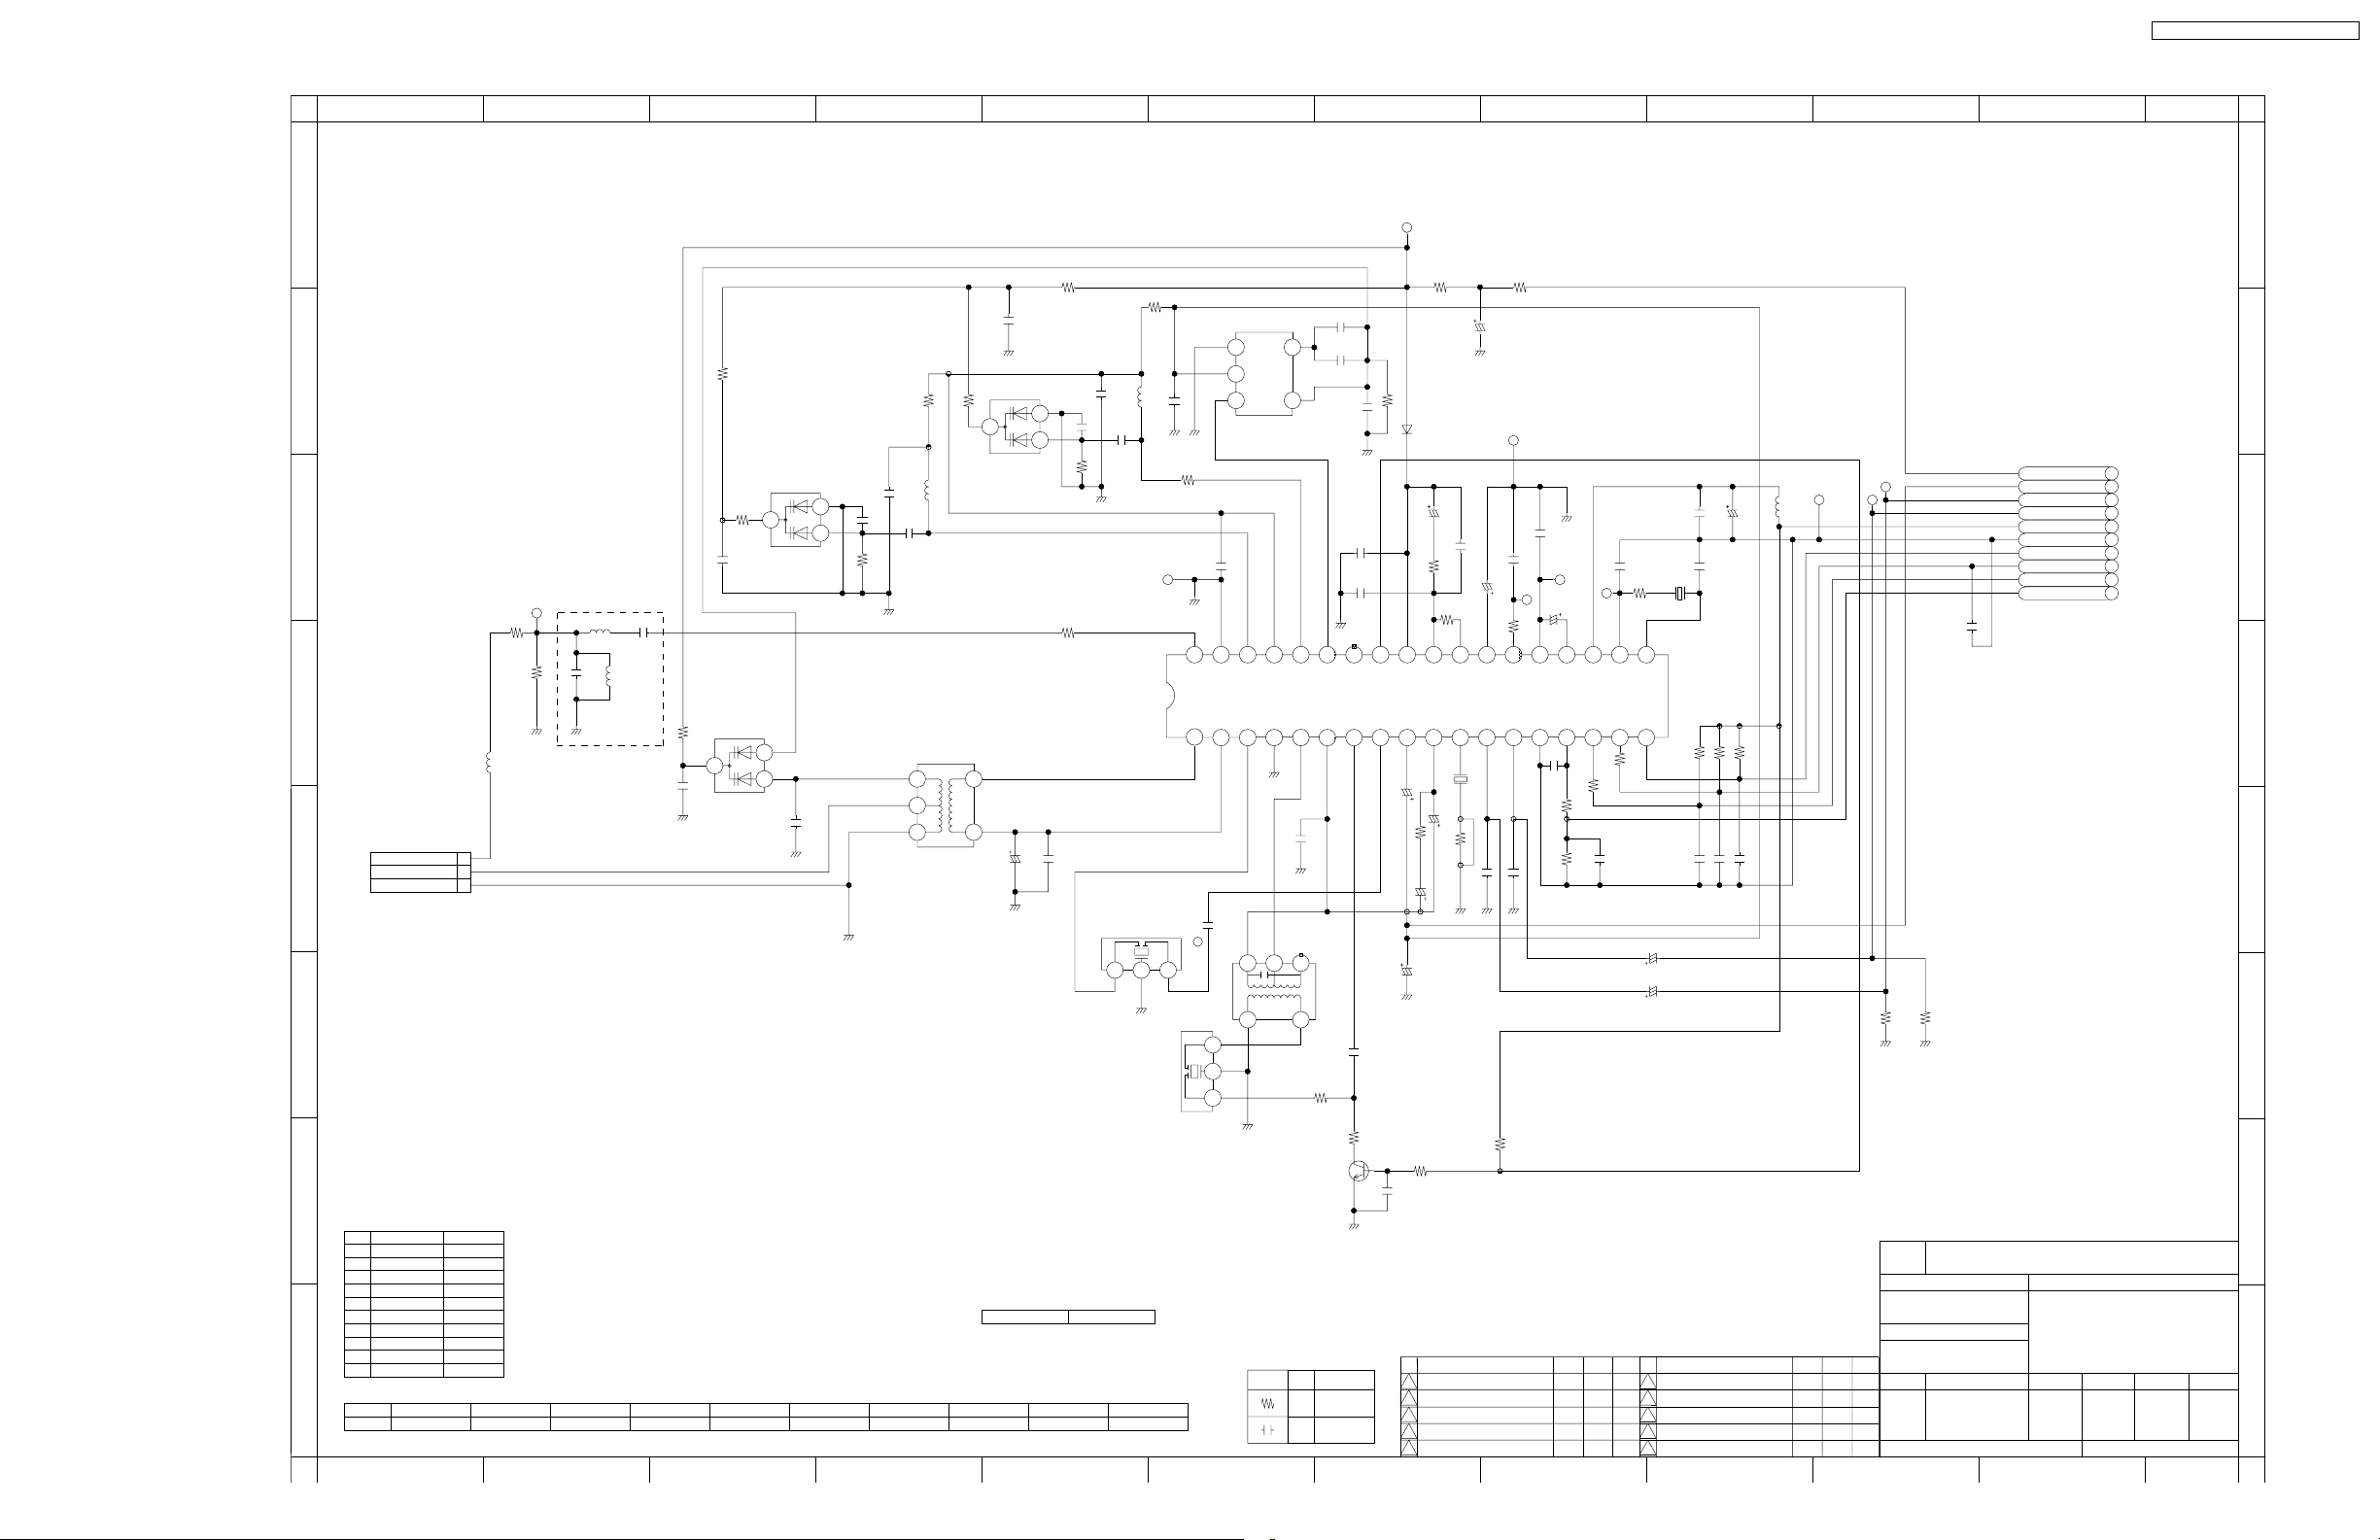
SC-EN25P / SC-EN26P / SC- EN27PC
1
2
3
4
5
6
7
8
R31
25V
1
C9
2
25V0.01
15P
1000P
100K
J0B1075A0101
C11
R9
1
2
0
2
L6
C43
1
PRINT_COIL
50V
1
2
1
TP2
IC1
C1BB00001120
LV23002M-M-TLM-E
CF1
312
231
CF2
RLFCFA450L4B
1
2
4.7K
16V
1
2
C44
16V0.022
1
2
R6
100K
25V
1
2
C10
25V0.01
50V
2
1
C7
2
C8
7P
1
R4
50V
1
2
1000P
1
2
100K
G2A390C00001
3
3
2
2
1
1
3
3
B0CDAB000019
D2
(SVC236-TB-E)
2
2
1
1
50V
1
2
C51
2
1
7P
R3
1
2
3.3K
50V
1
C6
2
1000P
TP1
1
R32
1
2
*
1
C1
2
R28
100K
2
L1
1
RLQY30S1W-F
P1
FM_ANT
AM_ANT
AM_ANT_GND
K1KA03AA0186
AM_LOOP&FM_ANT
Modify Category
Variation Type
EN25P A
1
EN27PC B
2
EN27P C
3
EN27E D
4
EN27EB E
5
EN27EG F
6
EN27GCS G
7
EN27GD H
8
EN27GK J
9
EN27GN K
10
VariationCategory1
R323333330000000
A
3
3
2
2
1
1
ABCDEF GHJ K
BDC
L3
1
2
RLQY30S1W-F
50V
1
2
2
47P
L2
1
PRINT_COIL
C2
50V
1
2
10P
1
2
R1
10K
3
3
16V
1
C3
2
0.033
B0CDAD000010
D1
(SVC383T-TL-E)
1
0
2
R2
2
L5
1
G0ZZ00002174
L51
1
2
R8
4
6
10K
2
3
3
1
B0CDAB000019
D3
(SVC236-TB-E)
4
6
1
C5
C4
2
16V10[KA]
ZA1 $[RSC0733]
50V
2
1
2
C13
1
1
2
R7
R5
1
2
68
16V
1
2
0.047
FGACEDB IH
TP6
1
R13
1
2
L7
G2BPC0000017
3
2
16V
1
1
2
0.047
R37
1
2
0
16V
1
2
C12
36
FM
GND2
RF-IN
REG
RF-IN
AM
21 16141291110 13 15 1767453 8
1
50V
1
2
10P
C47
A
312
231
3
2
1
0.047
FM
FM-MIX
1
6
6
VCC2
RF-OUT
GND1
2
4
6
deftype
4
6
FM-OSC
AM-OSC
AM-MIX
16V
1
2
C15
0.047
3
312
4
4
R33
2
4.7K
2SD1819ARL
CR[18]
C42
( )
1
2
$(150P)
C14
( )
1
2
$(470P)
15PC16
C45
( )
1
2
$(1000P)
C18
25V
1
2
25V0.01
30323435 33 31 29 27 25 23 21 19
B02
AM
IF-IN
VCC1
T1
G2BAC0000053
50V
1
2
C48
1000P
1
1
2
R34
1.8K
Q1
3
1
2
VALUE
[18]
3.3K
50V
1
2
1
2
R10 100K
2
D4
1
(RVD1SS133TA)
B0AACK000004
1
C17
2
50V3R3[KA]
C46
1
2
R12
1.5K
R14
1
2
4.7K
B01
A-OUT
FM
PDET
PCOMP A-IN
IF-IN
1024689753 1214161817151311
50V1[KA]
2
X1
1
C22
50VR47[KA]
2
C19
1
1
2
R11 3.3K
R15 $
50V1[KA]
2
1
C21
1
C20
2
10V100[KA]
R36
1
2
4.7K
50V
1
2
C52
1000P
ADJUST_AM_AUTO_STOP_SENS.
NO NAMEDATE CHECK
1
2
3
4
5
GEF
1
C23
2
50V
1
2200P
2
1
C24
PD
AGC
FMDET
LOUT
1
2
J0B1075A0121
1
2
( )
C25 16V0.018
R35
I T E M
R29
1
2
1K
10V100[KA]
TP8
1
25V
1
2
C26
25V0.01
2
1
10V22[KA]
TP9
1
2
10K
R16
AM
LOW-CUT
ROUT
16V
16V
1
1
2
2
C27 16V0.018
1
2
4.7K
50V
1
2
C28
50V4R7[KA]
C32
2
DET-OUT
VSS
C29
1000P
1000P
TP10
1
1
CE MPX-IN
50V
1
2
R20
1
2
10K
R17
1
2
C33
22K
R18
AUTOSTOP_H
H
TP7
DI VDD
1
2
10K
50V
1
2
50V
27P
1
2
C34
R30
1
39K
2022242628
2028 2324 2227 252632 3135 3436 33 2930 21
XOUTCL
1
2
10K
R22
100P[KC]
50V1[KA]
50V1[KA]
X2
1
2
H0A750200020
19
DO XIN
18
C30
1
2
C31
1
2
NO
6
7
8
9
10
C39
C36
1
2
100P[KC]
C35
R23 22K
50V
1
1000P
2
50V
22P
1
2
1
2
R24 22K
50V
1
2
C37 100P[KC]
C40
2
1
1
2
50V
1
2
I
10V100[KA]
1
2
R25 22K
$(100P)C38
1
2
( )
2
L8
RLQZP101KT-Y
1
TP3
J
KL
1
2
TP4
TP5
1
1
1
50V
1
330P
2
C41
D9V
TU_5V
TUN_LCH
TUN_RCH
D3.3V
TU_GND
PLL_DO
PLL_CLK
PLL_DI
PLL_CE
3
4
5
1
1
$
$
2
2
R21
R19
( )
( )
6
7
NAME
BOARDCIRCUIT
RJB3119A/RJB3119B
NODRAWING
NAMEDATE CHECKI T E M
KR7A0063
NWBG
PD3
REVISED DATE : Rule ID : Factory :
J K
TUNER
MODELNO NO
SC-EN25
SC-EN26
SC-EN27
8
DRAWNCHECKEDAPPR0VED DESIGNEDSECTIONDATE
K.MASUDA
Y.TAWAS.NINOMIYA Y.TAWA
M_DRS M2005.08.18
A
2
L
23
Page 24

SC-EN25P / SC-EN26P / SC- EN27PC
24
Page 25
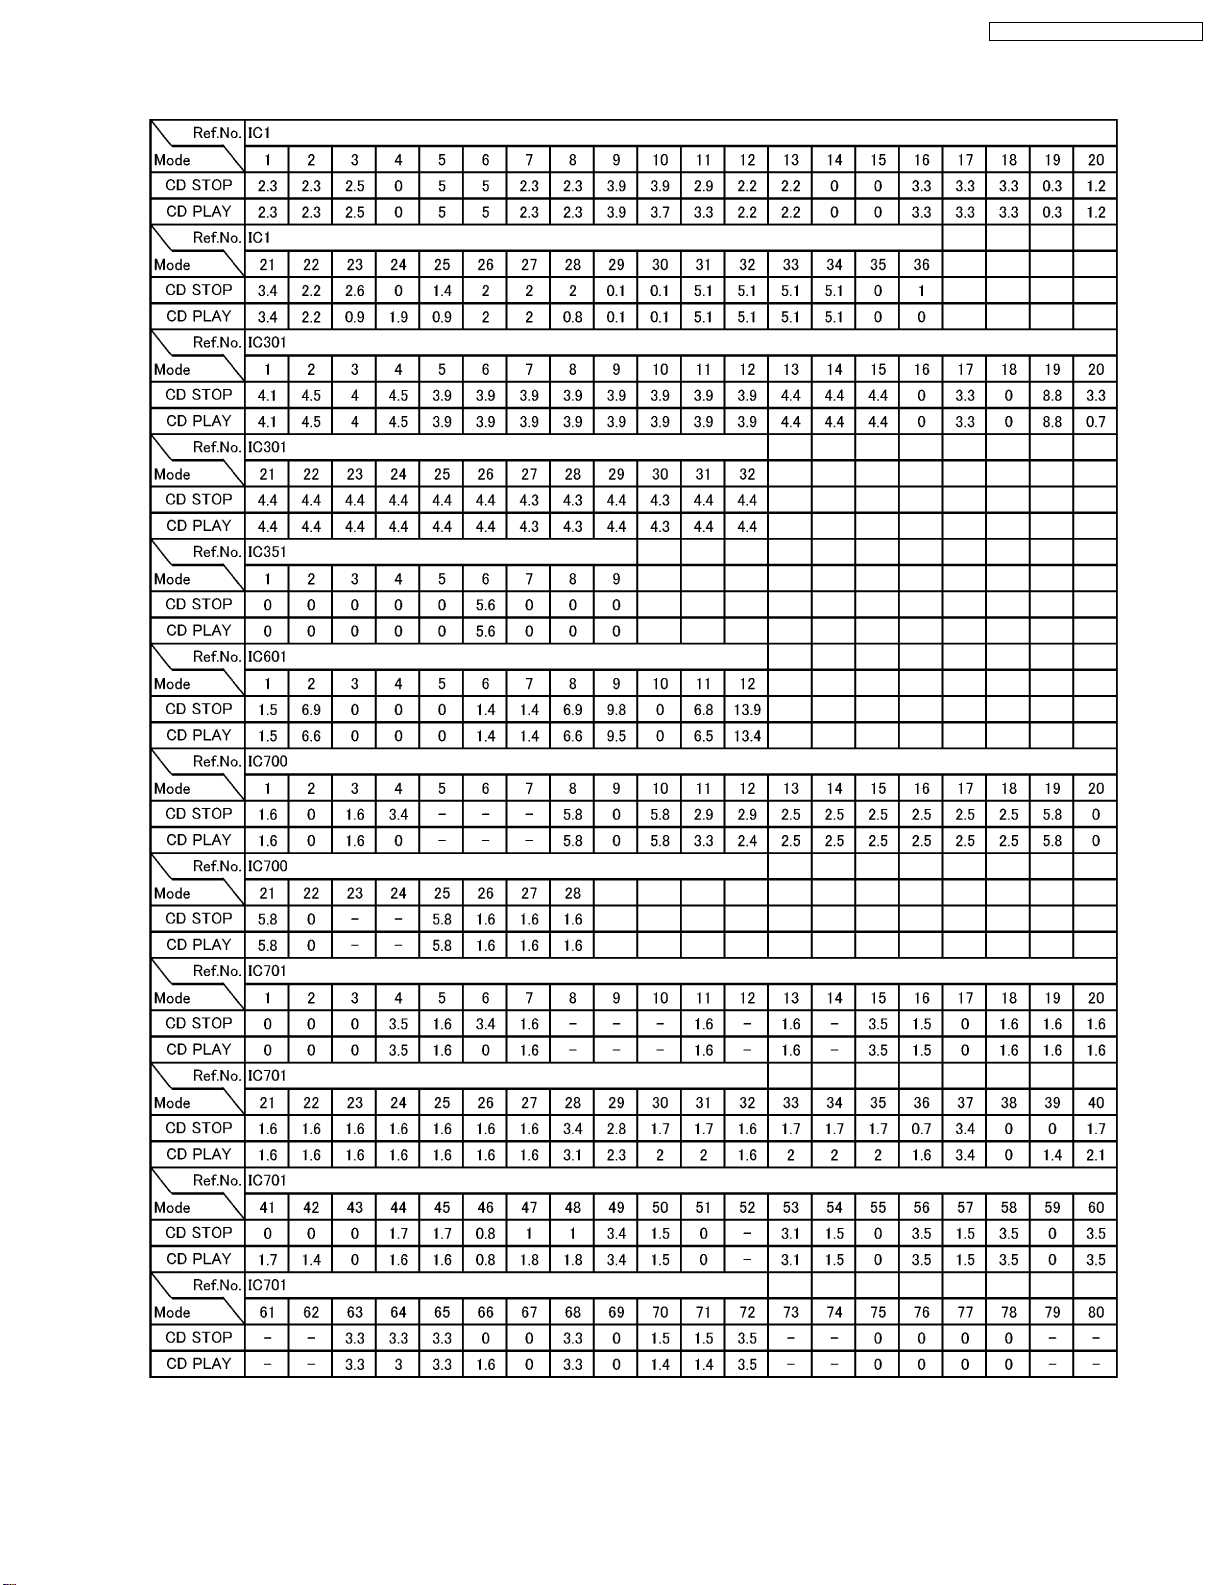
12.3. Voltage Value
SC-EN25P / SC-EN26P / SC- EN27PC
25
Page 26
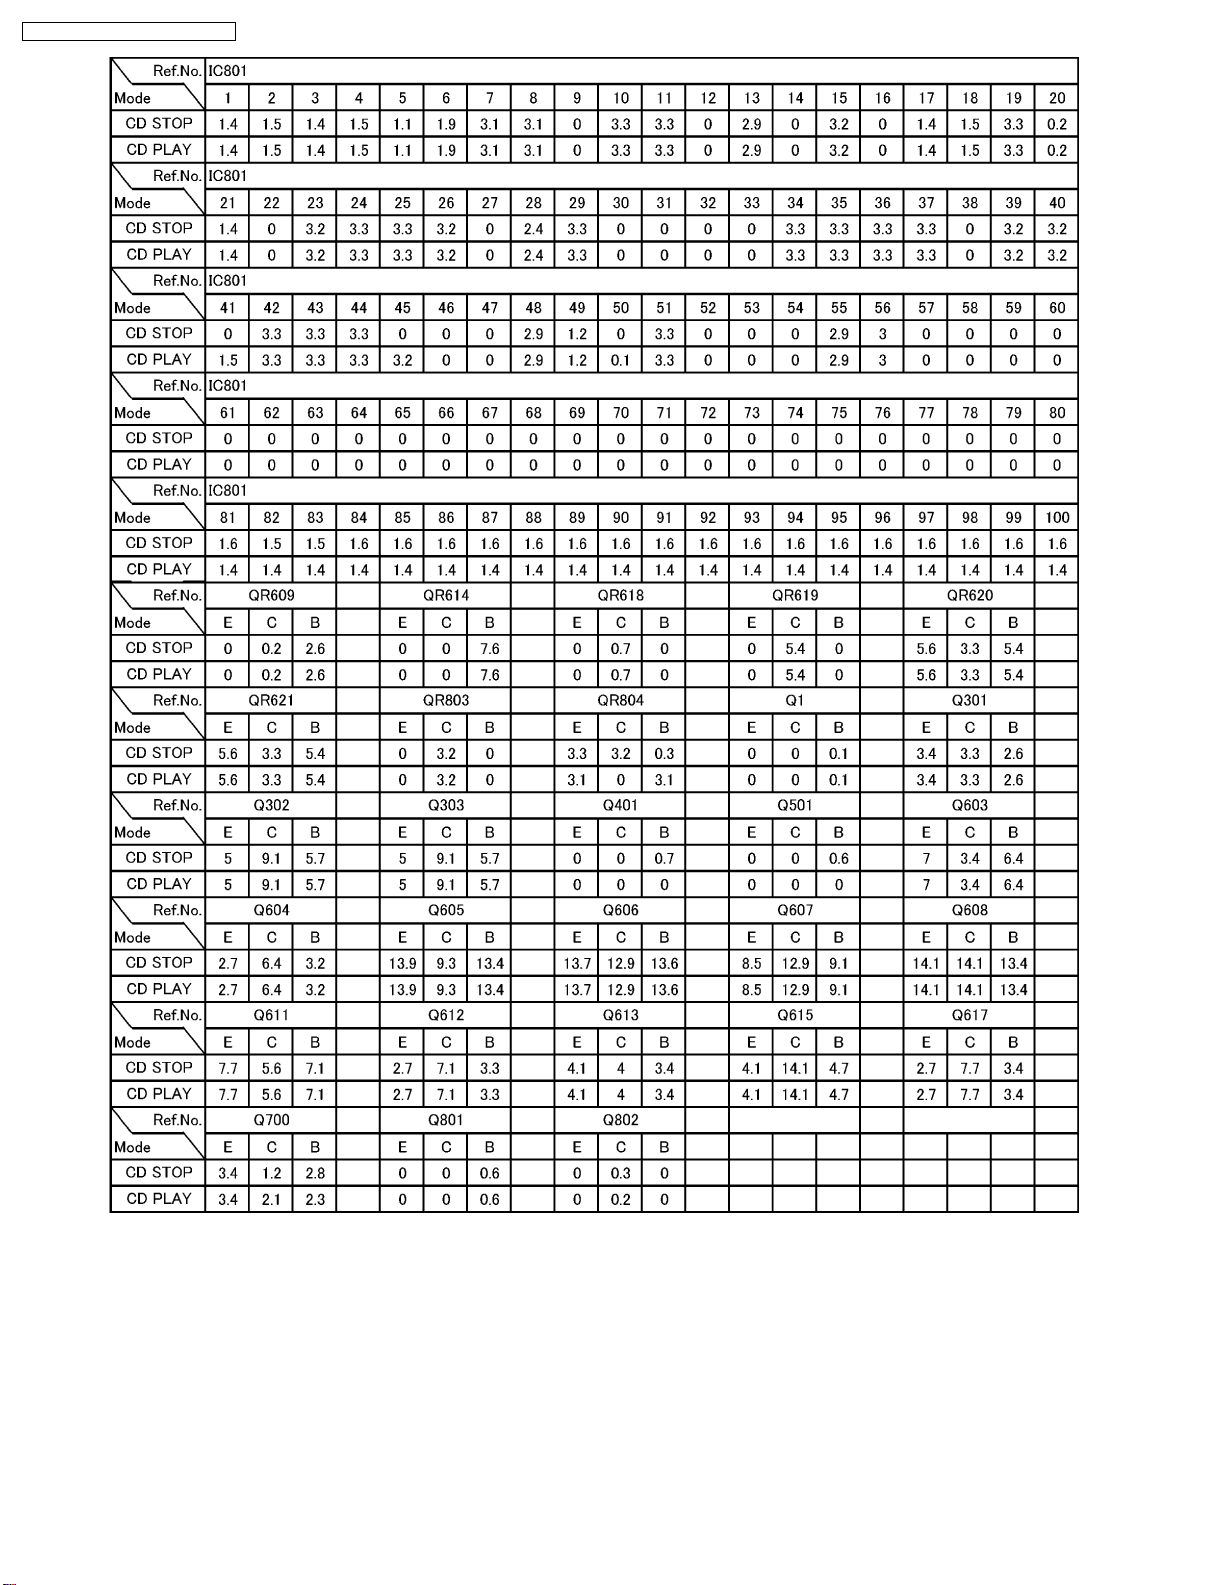
SC-EN25P / SC-EN26P / SC- EN27PC
26
Page 27
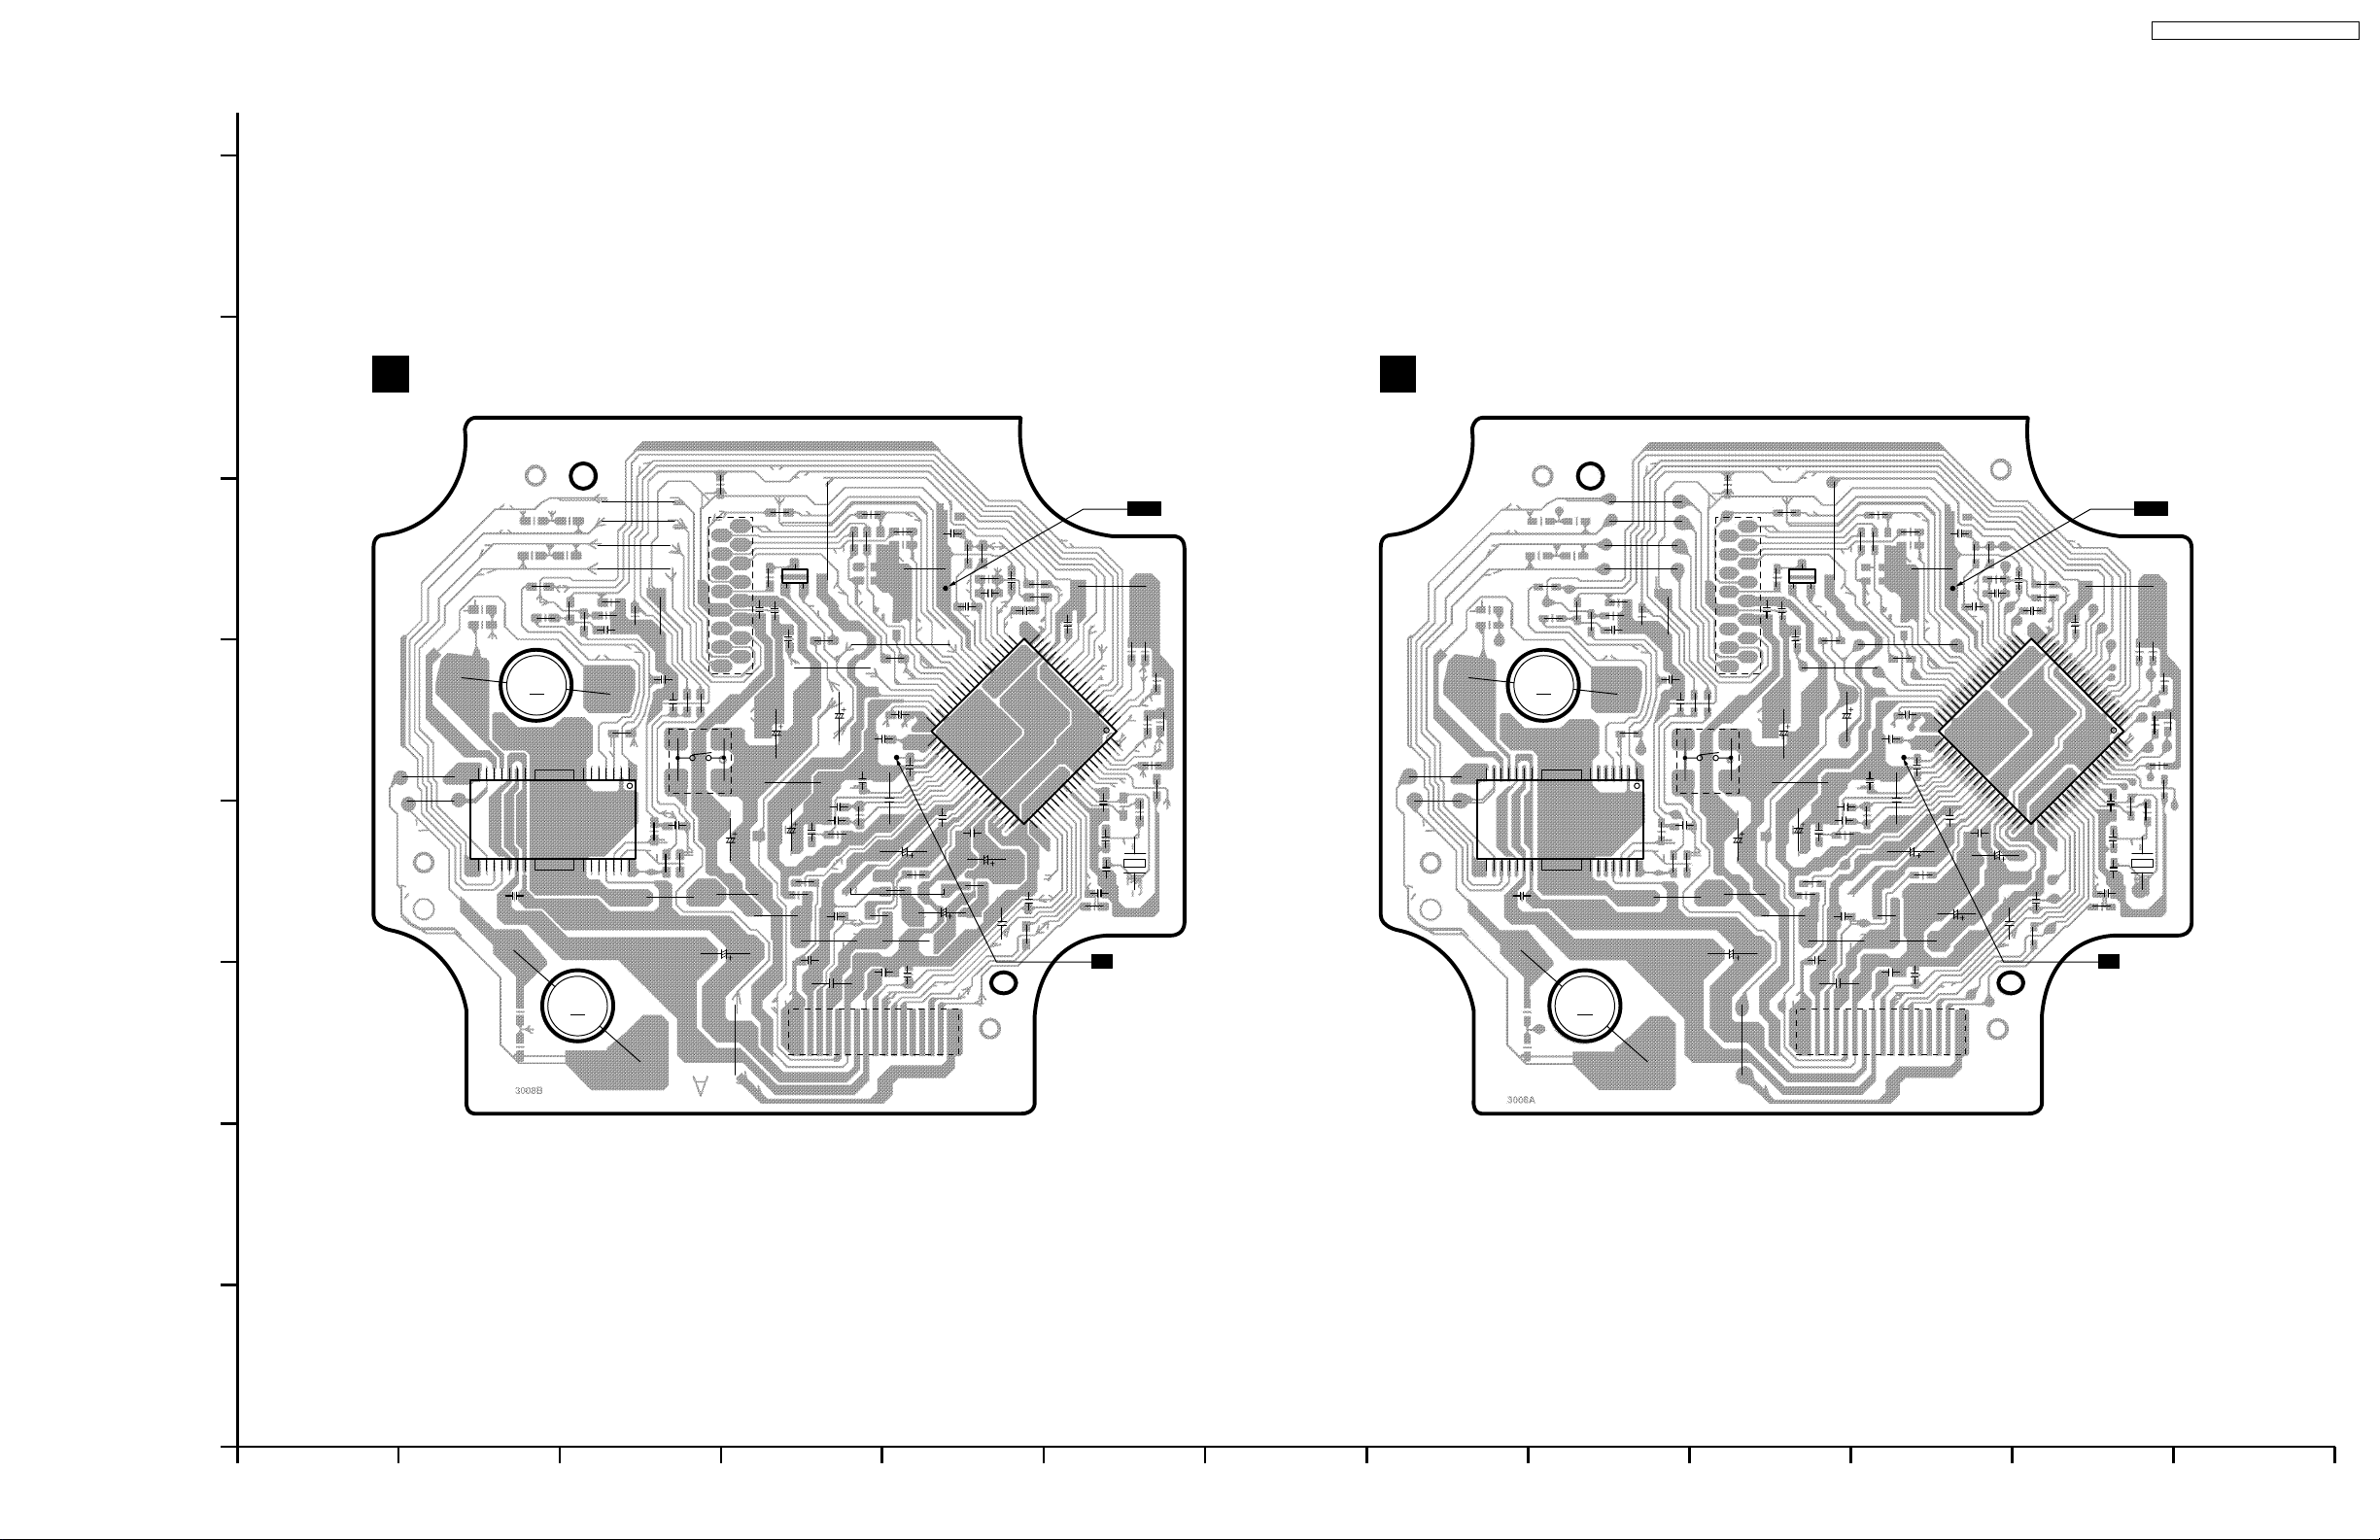
SC-EN25P / SC-EN26P / SC- EN27PC
13 Printed Circuit Board
Note: This printed circuit board diagram may be modified at any time with the development of new technology.
H
CD SERVO P.C.B. : For SA-EN25/26 (P) areas.
A
CD SERVO P.C.B. : For SA-EN27(PC) area.
A
G
C718
R719
S700(REST)
C719
717
R720
R
J
R722
R730
CN701
2
4
6
8
10
12
14
16
C709
C704
R751
1
3
Q700
C
5
7
R718
B
9
11
C756
13
C707
C723
15
C753
J
C735
R737
R733
J
R704
C741
J
17 7
E
C732
R721
C736
J
J
R731
C742
J
C751
C720
C733
707
R
R705
C731
R706
C729
R732
R734
C752
CN702
R711
C734
R752
R708
J
C724
C738
R738
J
J
C744
68910111213141516
40
41
J
C730
35
45
C737
C721
C739
VREF
R727
R724
R725
C726
30
50
C747
R753
C722
25
55
C743
21
60
C749
C754
IC701
R723
C727
R726
C748
R744
20
61
J
C757
15
10
70
65
C750
R742
5
75
C740
C746
C745
1
80
X700
R735
R736
R748
R741
R750
R739
R749
R747
J
J
15 2021 22 25 28
RF
12345
R712
R713
M702
(SPINDLE MOTOR)
M
IC700
C705
(TRAVERSE MOTOR)
R714
M
J
J
J
F
R712
R713
R714
M702
(SPINDLE MOTOR)
716
R
R728
R729
C716
J
R743
J
C717
M
E
J
J
IC700
D
15 2021 22 25 28
C705
(TRAVERSE MOTOR)
7
M701
R715
1581014
0
R71
M
C
R716
7
M701
R728
R729
C716
R715
J
J
1581014
J
J
R743
J
C717
710
R
C718
R719
S700(REST)
C719
R720
R717
J
R722
R730
CN701
2
4
6
8
10
12
14
16
C709
C704
R751
1
3
Q700
C
5
7
R718
B
9
11
C756
13
C707
C723
15
C753
J
C735
R737
R733
J
R704
C741
J
17 7
E
C736
C732
R721
J
J
C733
R731
C742
J
C751
C720
R707
C731
R705
R706
R732
R734
CN702
C729
C752
R711
C734
R708
J
C724
C738
R738
J
C744
68910111213141516
40
41
J
C730
45
C721
35
C739
C743
VREF
R727
R724
R725
C726
30
50
C747
25
55
C762
C722
21
60
C749
C754
IC701
R744
R723
C727
R726
C748
20
61
65
C757
15
70
C750
10
R742
5
75
C740
C746
C745
J
R736
R735
R739
1
R749
R750
80
R748
R747
R740
R741
X700
RF
12345
(REP3876B)
(REP3875B)
B
A
SA-EN25/26/27(P,PC) CD SERVO P.C.B.
123456789101112
13
27
Page 28
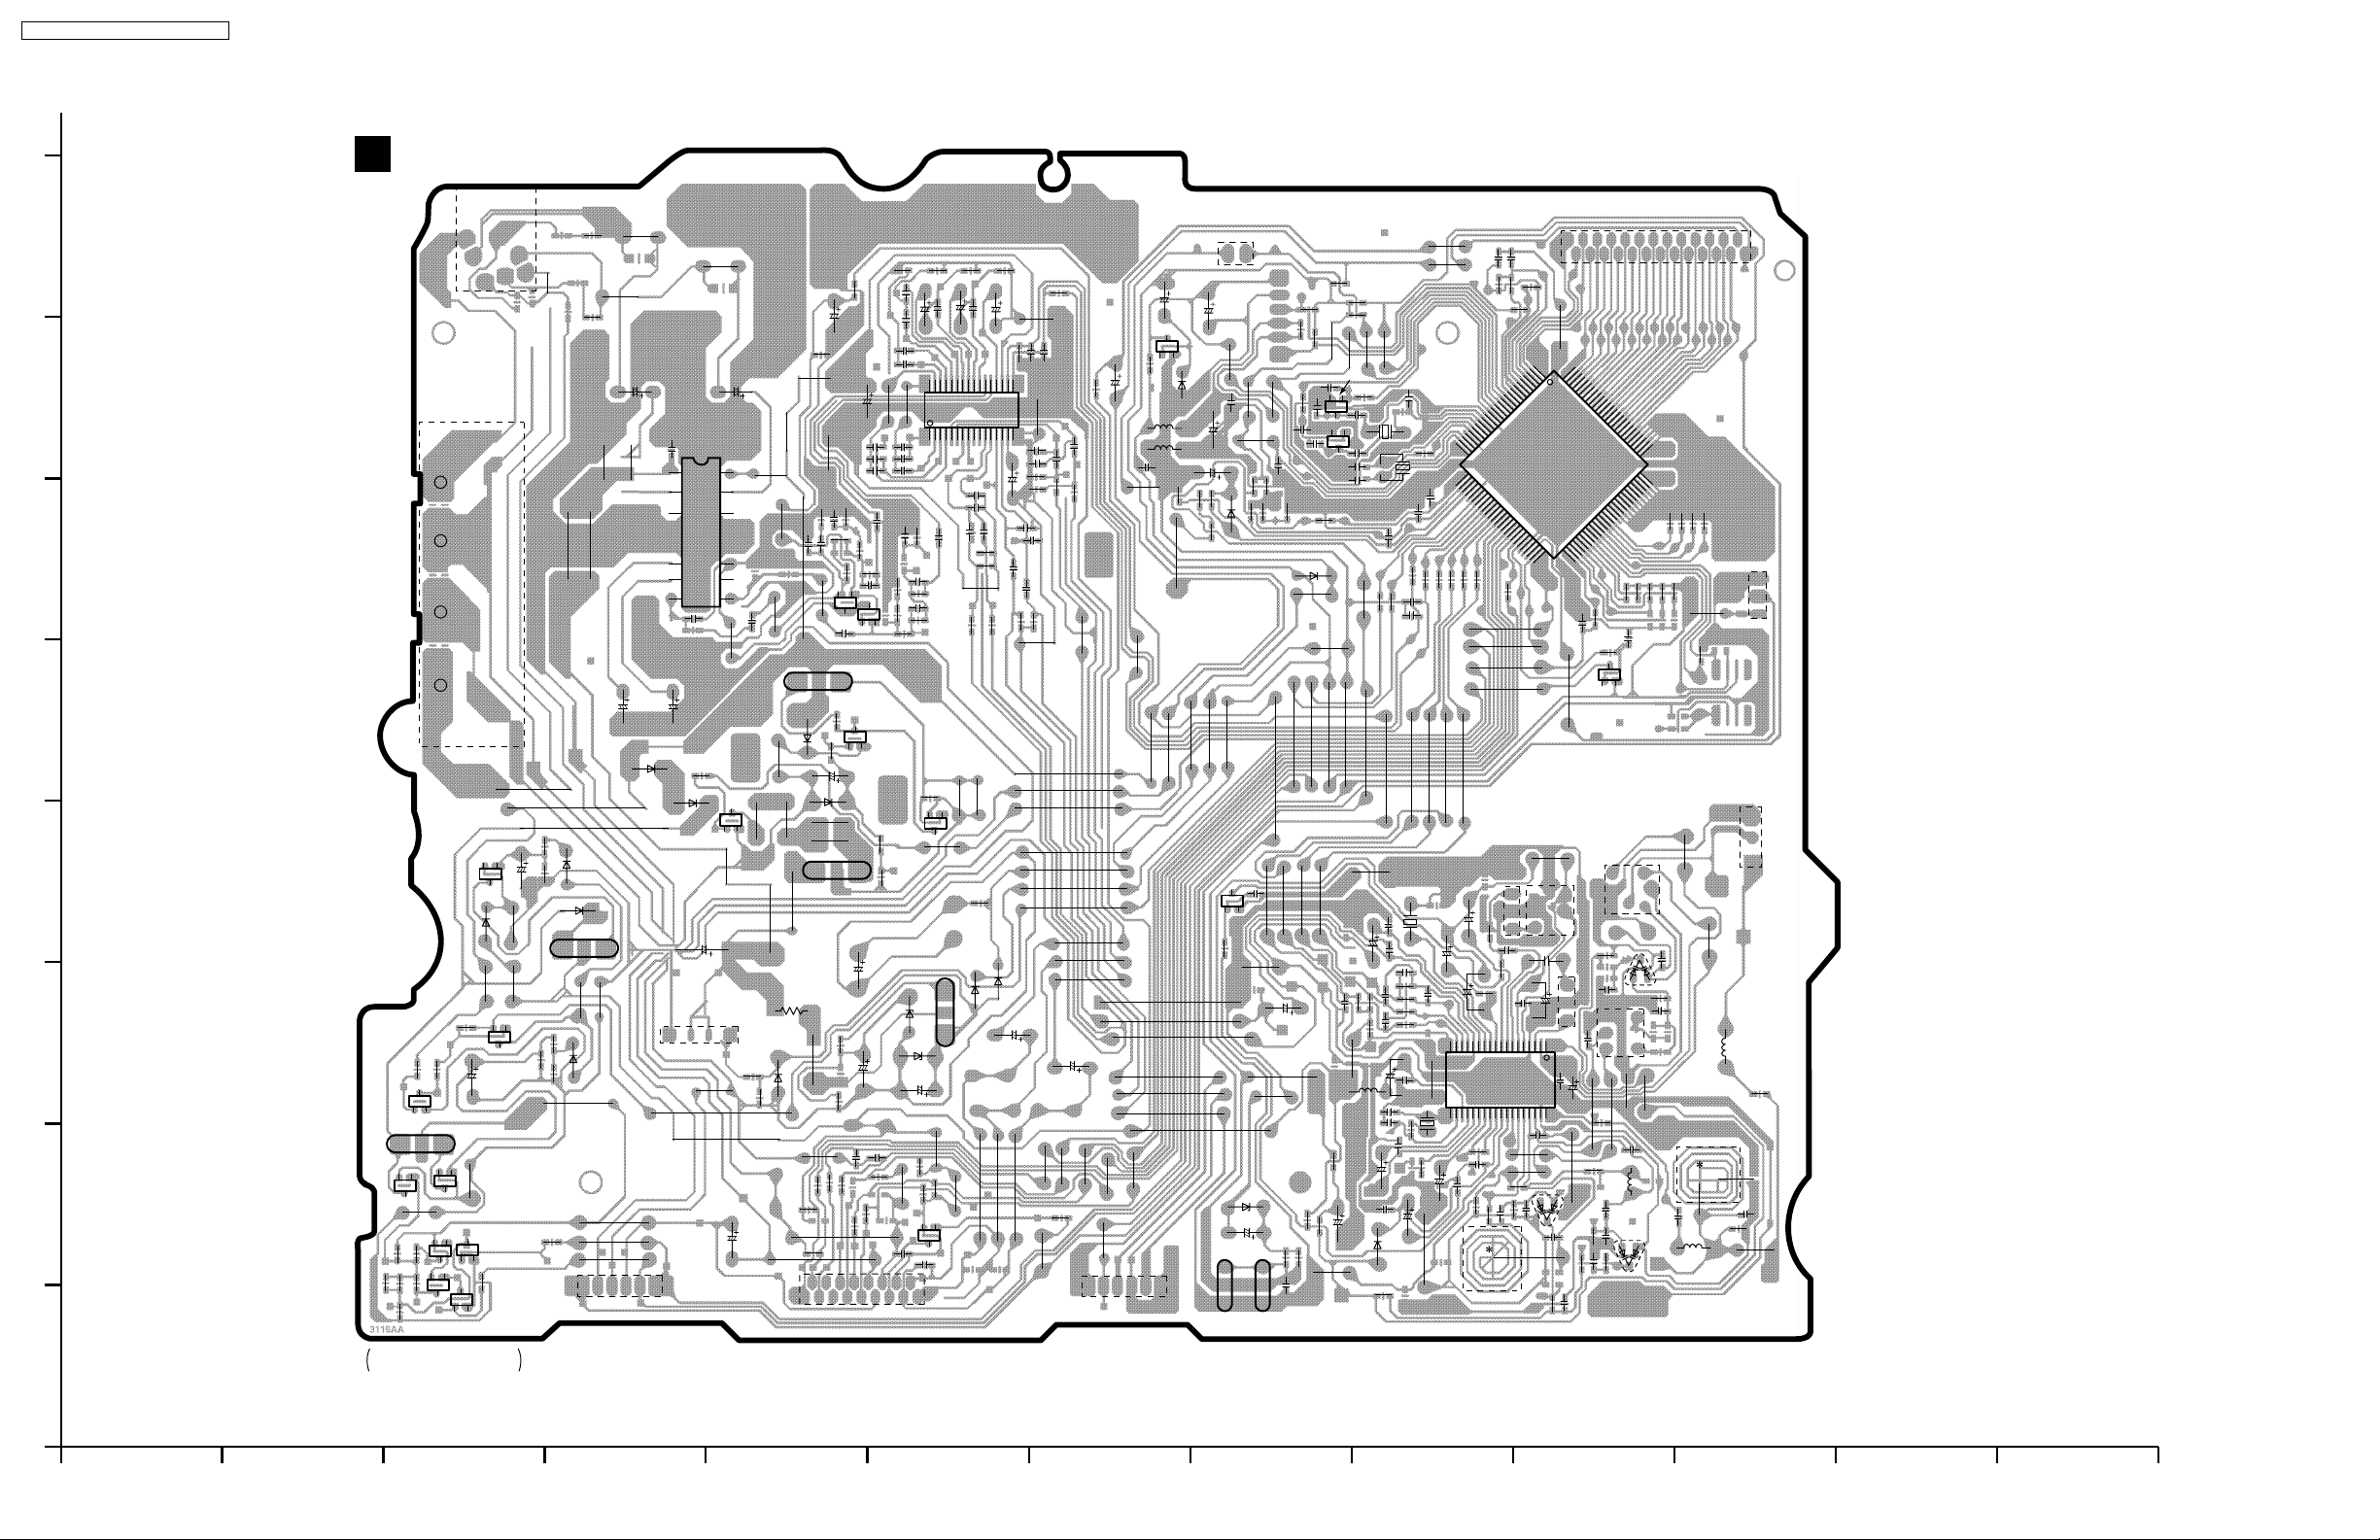
SC-EN25P / SC-EN26P / SC- EN27PC
MAIN/TUNER P.C.B.
B
95
60
55
R828
B
QR804
R1
C3
3
2
1
J
R5
R2
R4
C6
7
90
R829
C
4
1
J
R3
FP801
17 2122232425
2018
26
85
80
76
75
70
65
R875
R874
R861
R860
P1001
3
J
R833
2
1
P1
3
2
1
J
L1
R32
L2
J
C1
R28
J
R878
R838
R839
R877
R876
C822
E
J
L51
6
2
3
C51
D1
R10
L7
C16
4
6
J
J
C10
L5
C7
C8
J
C2
L3
D2
R403
R503
J
CBE
J
J
J
C604
R608
C402
R601
R319
R318
J
J
R402
C503
R112
C119
J
E
J
J
Q401
C502
C407
J
J
12
10
C603
C507
1
IC601
5
67
C403
J
Q605
C209
C210
C222
C118
C
R111
R113
R607
R110
B
B
C310
C115
R109
C
Q501
C111
C117
E
R107
C112
R206
C110
R213
C212C211
R502
R106
C122
C109
C218
R210
C113
1
R211
R207
C217
R209
C219
R212
C215
3032
C114
C207
C107
C213
IC301
5
R108 R208
C311
C214
20 17
25
10
C204
C104
R204
R104
J
R103
R203
15
C309
R317
16
C106
C105
R202
R102
C205
R105
C206
R205
J
J
C313
J
C108
R316
C208
C312
C203
R201
J
C103
R101
R862
C827
C803
J
J
B
R811
814
C
L801
L802
C
CEB
C602
C601
D604
R605
D603
J
J
J
J
J
123456
P351
C616
JW901
B
QR609
J
J
J
C
1234
J
C358
E
R603
R626
R604
R616
R625
J
J
IP602
D601
C
R615
C609
D608
R624
R623
J
R313
J
R617
Q608
CBE
R312
J
B
R634
R635
R309
C611
C615
C357
R307
FP701
E
C305
R308
R306
Q607
R618
R619
D605
J
R305
R304
12345689101112131415
C356
D615
J
D614
C612
16
177
R620
E
R303
R301
Q301
E
C
C301
C
Q615
J
R302
J
B
B
C
E
B
Q606
R621
J
R622
R630
D612
J
D613
J
C116
J
J
J
J
J
J
J
J
J
J
C216
J
J
J
J
R325
J
123456
J
J
J
J
P601
H
JK601
(PHONES)
G
JK602
(SPEAKERS)
1
2
J
J
F
3
4
E
J
J
Q604
E
D
R633
C
D607
J
E
C
R632
R631
C610
C
QR614
B
E
Q611
CBE
Q612
Q617
E
B
B
E
R644
C
R636
R642R637
B
QR621
A
REP4044A-M
REP4044B-M
J
QR620
E
R638
E
R640
C
B
B
C
B
C
B
QR619
.....
SA-EN25/26(P)
.....
SA-EN27(PC)
C
R627
C
E
QR618
E
R641
Q613
C
R612R613
B
C608
R614
J
B
R643
R639
R629
R628
D611
D602
Q603
J
D610
J
J
J
J
J
J
E
D801
R820
J
J
J
C815
QR803
C820
R818
J
J
C801
R824
R817
J
Q303
P352
12
J
C804
D802
J
C
B
Q1
R36
B
C
E
E
D301
C315
J
J
R840
R827
C52
Q302
J
C830
R832
R825
J
JJJ
J
C30
J
B
C
E
C811
R826
J
R322
C359
R836
C809
Q802
J
R323
R835
R808
D803
R35
J
J
R837
C806
C810
R819
J
R13
E
R841
C
E
J
J
J
C
C812
C813
R29
C23
J
R830
R831
J
Q801
B
B
J
C41
J
R807
R24
J
C807
C808
J
J
J
C31
R23
R25
L8
C36
C34
D4
X802
R864
C35
C32
C26
R31
J
C819
J
C27
C40
R865
C25
C33
C37
C28
R18
R17
R20
R22
C826
R809
C818
R822
J
X1
C39
R30
C17
J
J
15
20
25
X801
C817
26
30
35
R816
R815
R814
R813
R823
C829
C828
J
J
J
C19
C21
R11
C22
C29
15
J
19201825 30 35
R14
X2
C46
R16
C24
C18
R12
J
R33
R37
C802
R803
10
40
10
IC1
L6
R804
R801
5
45
R812
J
J
J
J
CF2
1
2
34
C48
R34
C15
C12
R9
C11
R7
123456891011121314151619
C805
R802
J
1
100
IC801
51
50
C821
J
J
T1
1
6
2
3
C47
CF1
3
2
C20
1
15
C43
C5
C4
36
J
J
J
D3
C13
C9
J
R6
R8
C44
SA-EN25/26/27(P,PC) MAIN P.C.B.
123456789101112
28
13
Page 29
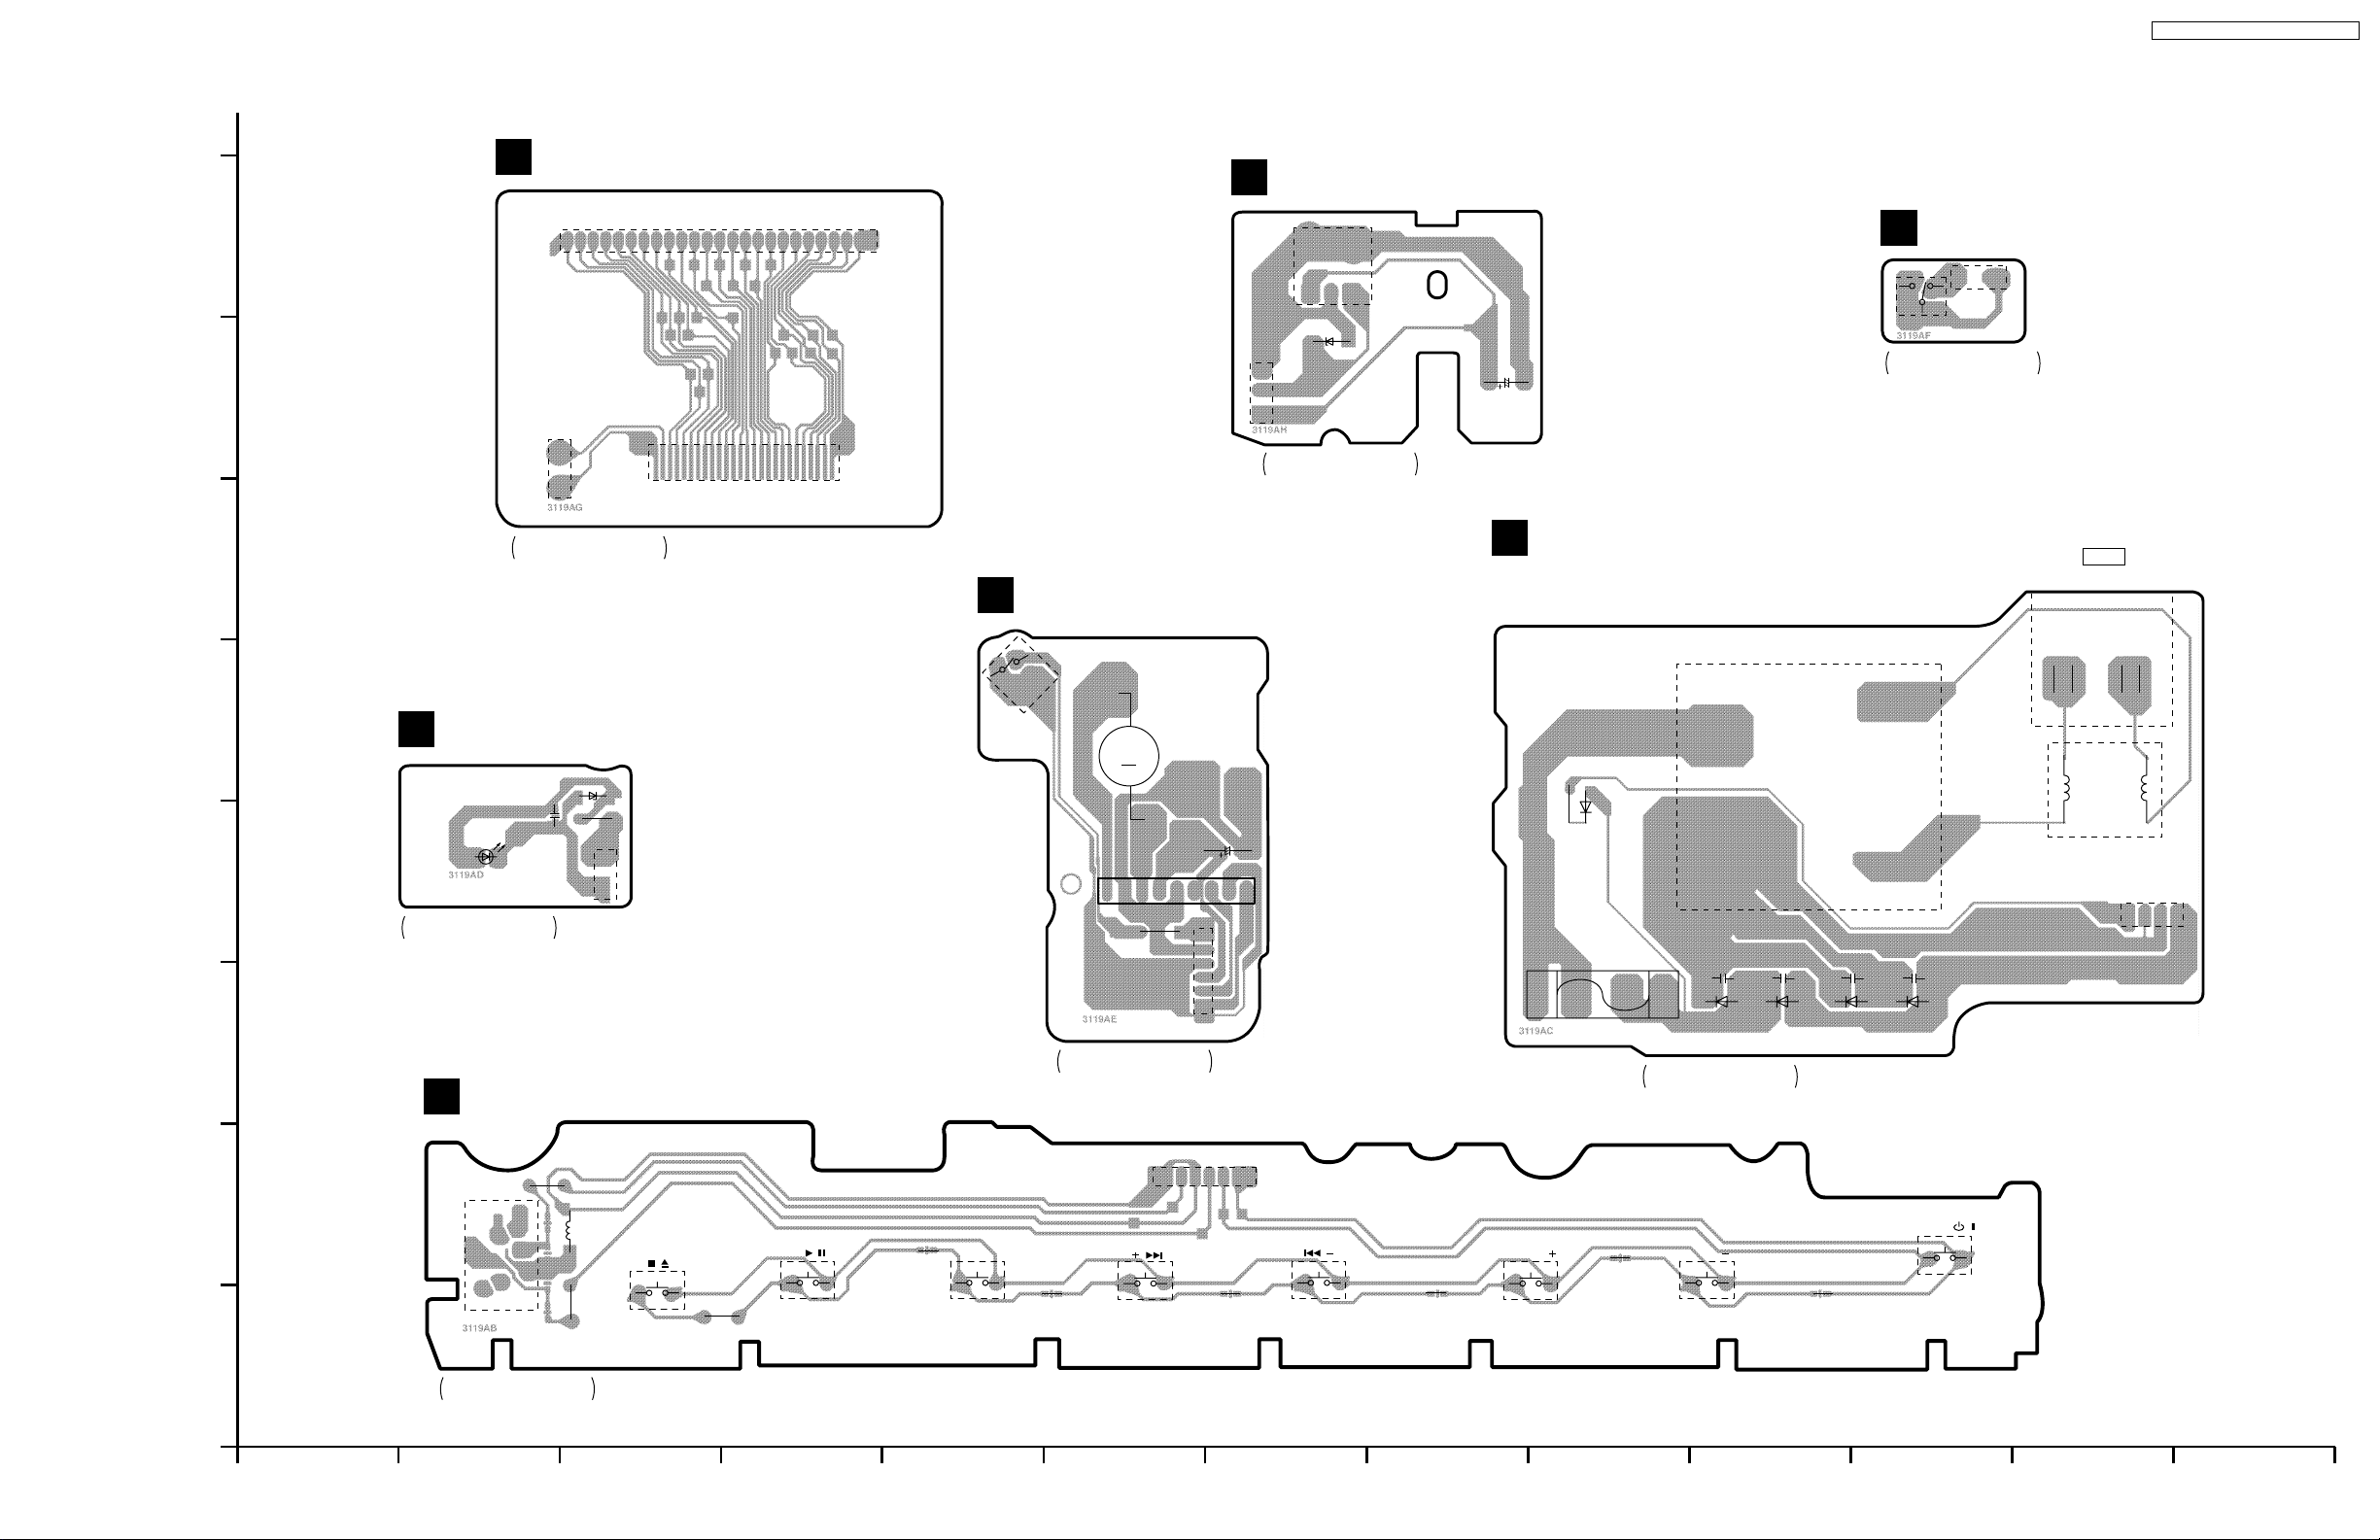
LCD P.C.B.
C
SENSOR P.C.B.
E
SC-EN25P / SC-EN26P / SC- EN27PC
H
G
JW8011
2
1
.....
REP4044A-M
F
E
LCD BACK-LIGHT P.C.B.
D
REP4044B-M
D1002
D
.....
REP4044A-M
REP4044B-M
SA-EN25/26(P)
.....
SA-EN27(PC)
C1002
SA-EN25/26(P)
.....
SA-EN27(PC)
D1003
R1003
JW801
2
1
Z801
2
1
REP4044A-M
REP4044B-M
Z1001
(REMOTE
SENSOR)
1
233
D1001
.....
.....
SA-EN25/26(P)
SA-EN27(PC)
C1001
POWER TRANSFORMER P.C.B .
I
(POWER TRANSFORMER)
R901
D906
F901
1.6A
ZA901 ZA902
C901
D901
C904
D904
T901
C902
D902
1510152024
JW1001
FFC801
26
1510152025
MOTOR P.C.B.
F
S352
(CD BOTTOM DET.)
M351
(LOADING MOTOR)
M
C353
IC351
159
J
6
5
4
JW351
3
2
1
SW P.C.B.
G
S351
REP4044A-M
REP4044B-M
C903
D903
1
JW352
.....
SA-EN25/26(P)
.....
SA-EN27(PC)
2
JK901
L901
J
AC IN
(120V 60Hz)
J
J
J
P901
1234
C
OPERATION P.C.B.
H
R509
JK603
B
A
(AUX)
REP4044A-M
REP4044B-M
.....
SA-EN25/26(P)
.....
SA-EN27(PC)
L601
R409
S808
( / )
R852
S807
(CD / )
R851
(TUNER/ BAND)
S806
REP4044A-M
REP4044B-M
123456789101112
.....
SA-EN25/26(P)
.....
SA-EN27(PC)
S805
( / )
JW601
REP4044A-M
REP4044B-M
123456
S804
( / )
R849R850
R848
S803
(VOLUME )
R847
.....
SA-EN25/26(P)
.....
SA-EN27(PC)
S801
S802
(VOLUME )
R846
SA-EN25/26/27(P,PC) LCD, LCD BACK-LIGHT, MOTOR, SENSOR, SW, OPERATION,POWER TRANSFORMER P.C.B.
(POWER / )
13
29
Page 30

SC-EN25P / SC-EN26P / SC- EN27PC
30
Page 31
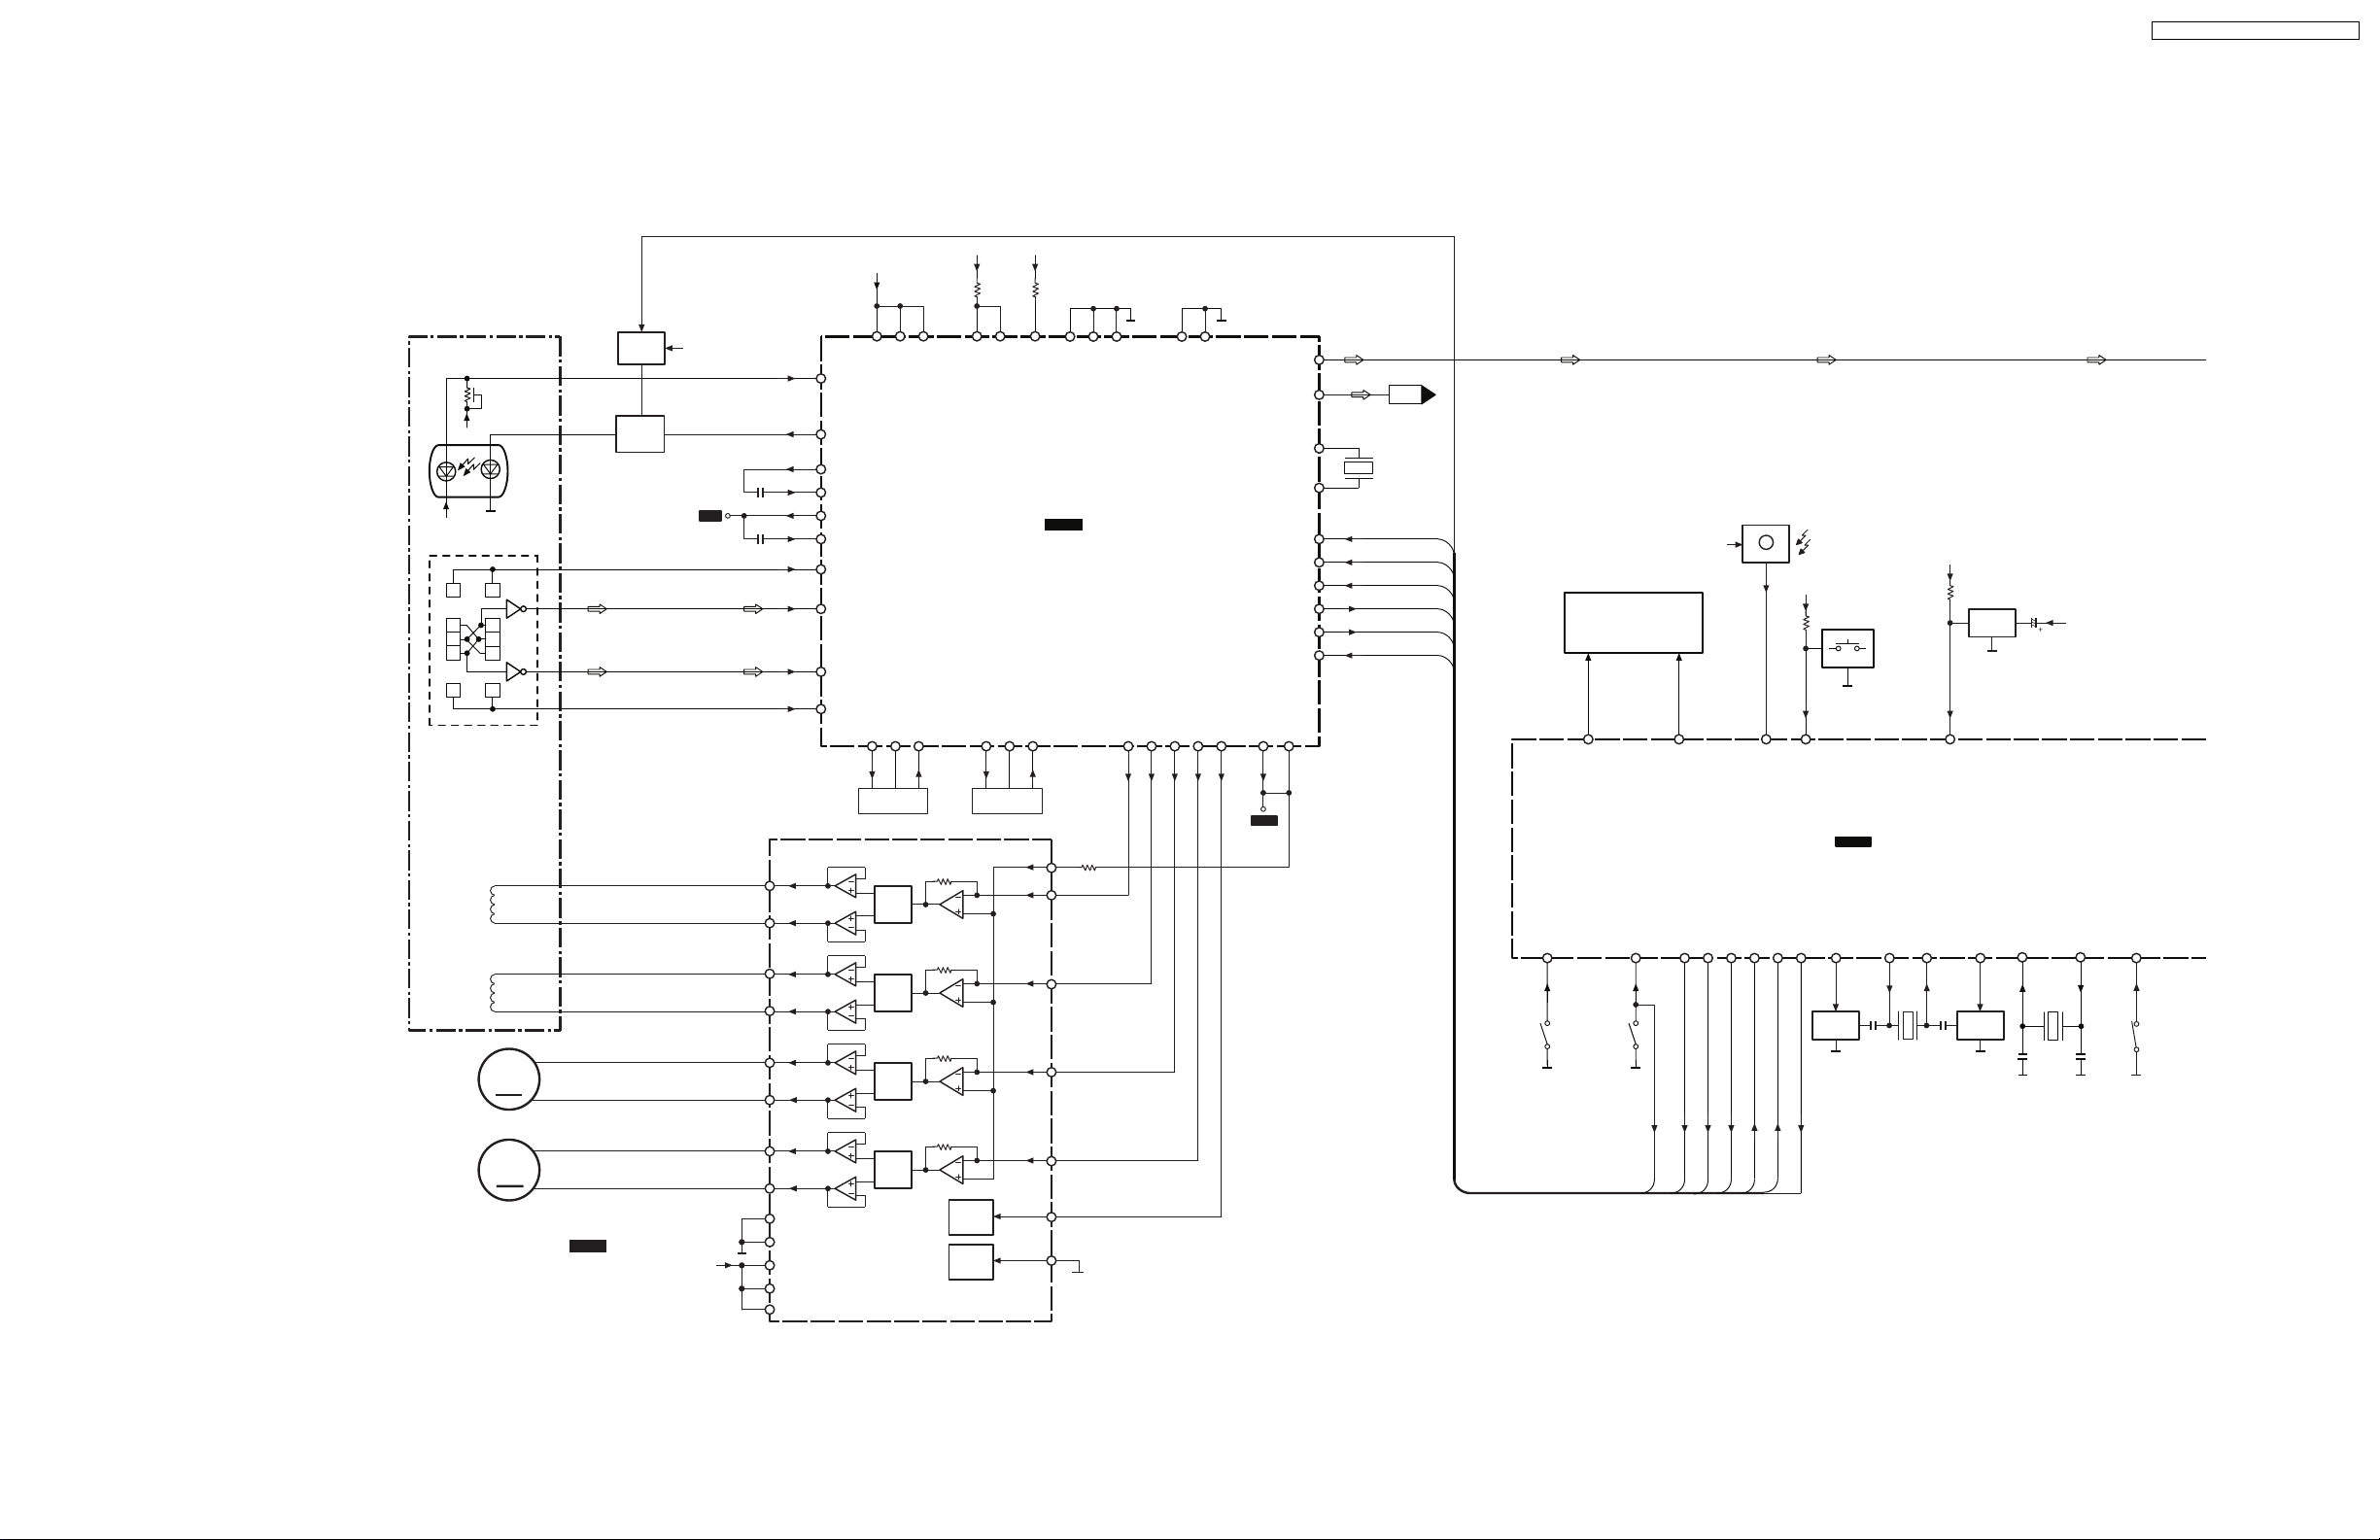
14 Block Diagram
OPTICAL PICK-UP
LASER
D3.3V
D3.3V
PHOTODETECTOR
EE
D
C
A
B
D
C
F F
TRACKING COIL
FOCUS COIL
TRAVERSE
MOTOR
T-
T+
F-
F+
M
Q301
Q700
POWER
CD BOTOOM SW
LASER
POWER
DRIVE
LASER
DRIVE
D3.3V
SC-EN25P / SC-EN26P / SC- EN27PC
D3.3V
D3.3V
15
56
28
29
39
40
RF
42
44
30
35
33
31
VO3-
15
[CH3]
VO3+
16
VO4-
17
[CH4]
VO4+
18
VO2+
14
[CH2]
VO2-
13
PD
LD
RFOUT
RFIN
ARF
ARF IN
E
A
B
F
IOVDD3
TEOUT
26 25 19
CR NET.
LEVEL
SHIFT
LEVEL
SHIFT
LEVEL
SHIFT
IOVDD1
TEN
37
72
IOVDD2
TEIN
D3.3V
53
17
55
IC701
DSP
26
28
27
1
69
DVSS2
DVSS1
49
AVDD1
AVDD2
RFVDD
MN6627552CB: SA-EN25/EN26
MN6627953HB: SA-EN27
FEOUT
FEN
FEIN
23 24 20
CR NET.
BIAS
VIN3
VIN4
VIN2
DVSS3
11
TRP13FOP
7
43
51
AVSS2
TRVP
5
AVSS1
SPOUT6SPPOL
27
VREF
VREF
18
OUTL
OUTR
MCLK
MDATA
MLD
BLKCK
STAT
NRST
ADPVCC
50
54
70
X2
71
X1
63
64
65
67
66
68
Rch
X700
(16.9344MHz)
MCLK
MDATA
MLD
BLKCK
STATUS
CDRESET
S351
(CD TOP DET.)
13
Z801
CD TOP SW
S352
(CD BOTTOM
DET.)
COM0~3
12
LCD
81~1001~4
CD BOTTOM SW
39
(REMOTE
SENSOR)
STBY3.3V
SEG0~19
MCLK
MDATA
MLD
40 42 50 41 44
Z1001
STBY3.3V
KEY SW
26
48
REM IN
KEY SW
MN101C74FAB1
SYSTEM CONTROL / LCDDRIVE
BLKCK
STATUS
IC801
CD RESET
MBP2
OSC2
15 18 17 14
Q801
SWITCH-
ING
X802
(8MHz)
BUP3.3V
23
OSC1
Q802
Q803
RESET
NRESET
SWITCH-
ING
MBP1
20 21
XIN
X801
(32.7kHz)
STBY3.3V
XOUT
(REST)
REST SW
43
S700
SPINDLE
MOTOR
M
BA5948FPE2
IC700
FOCUS COIL/ TRACKING
COIL / TRAVERSE MOTOR /
SPINDLE MOTORDRIVE
M5.5V
VO1+
12
[CH1]
VO1-
11
9
PGND1
20
PGND2
10
PVcc1
19
PVcc2
25
Vcc
LEVEL
SHIFT
MUTE
[CH1]
MUTE
[CH2]
VIN1
MUTE1
MUTE2
3
4
2
CD BOTTOM SW
MCLK
MLD
STATUS
BLKCK
MDATA
CD RESET
SA-EN25/EN26/EN27(P,PC)BLOCK DIAGRAM
31
Page 32
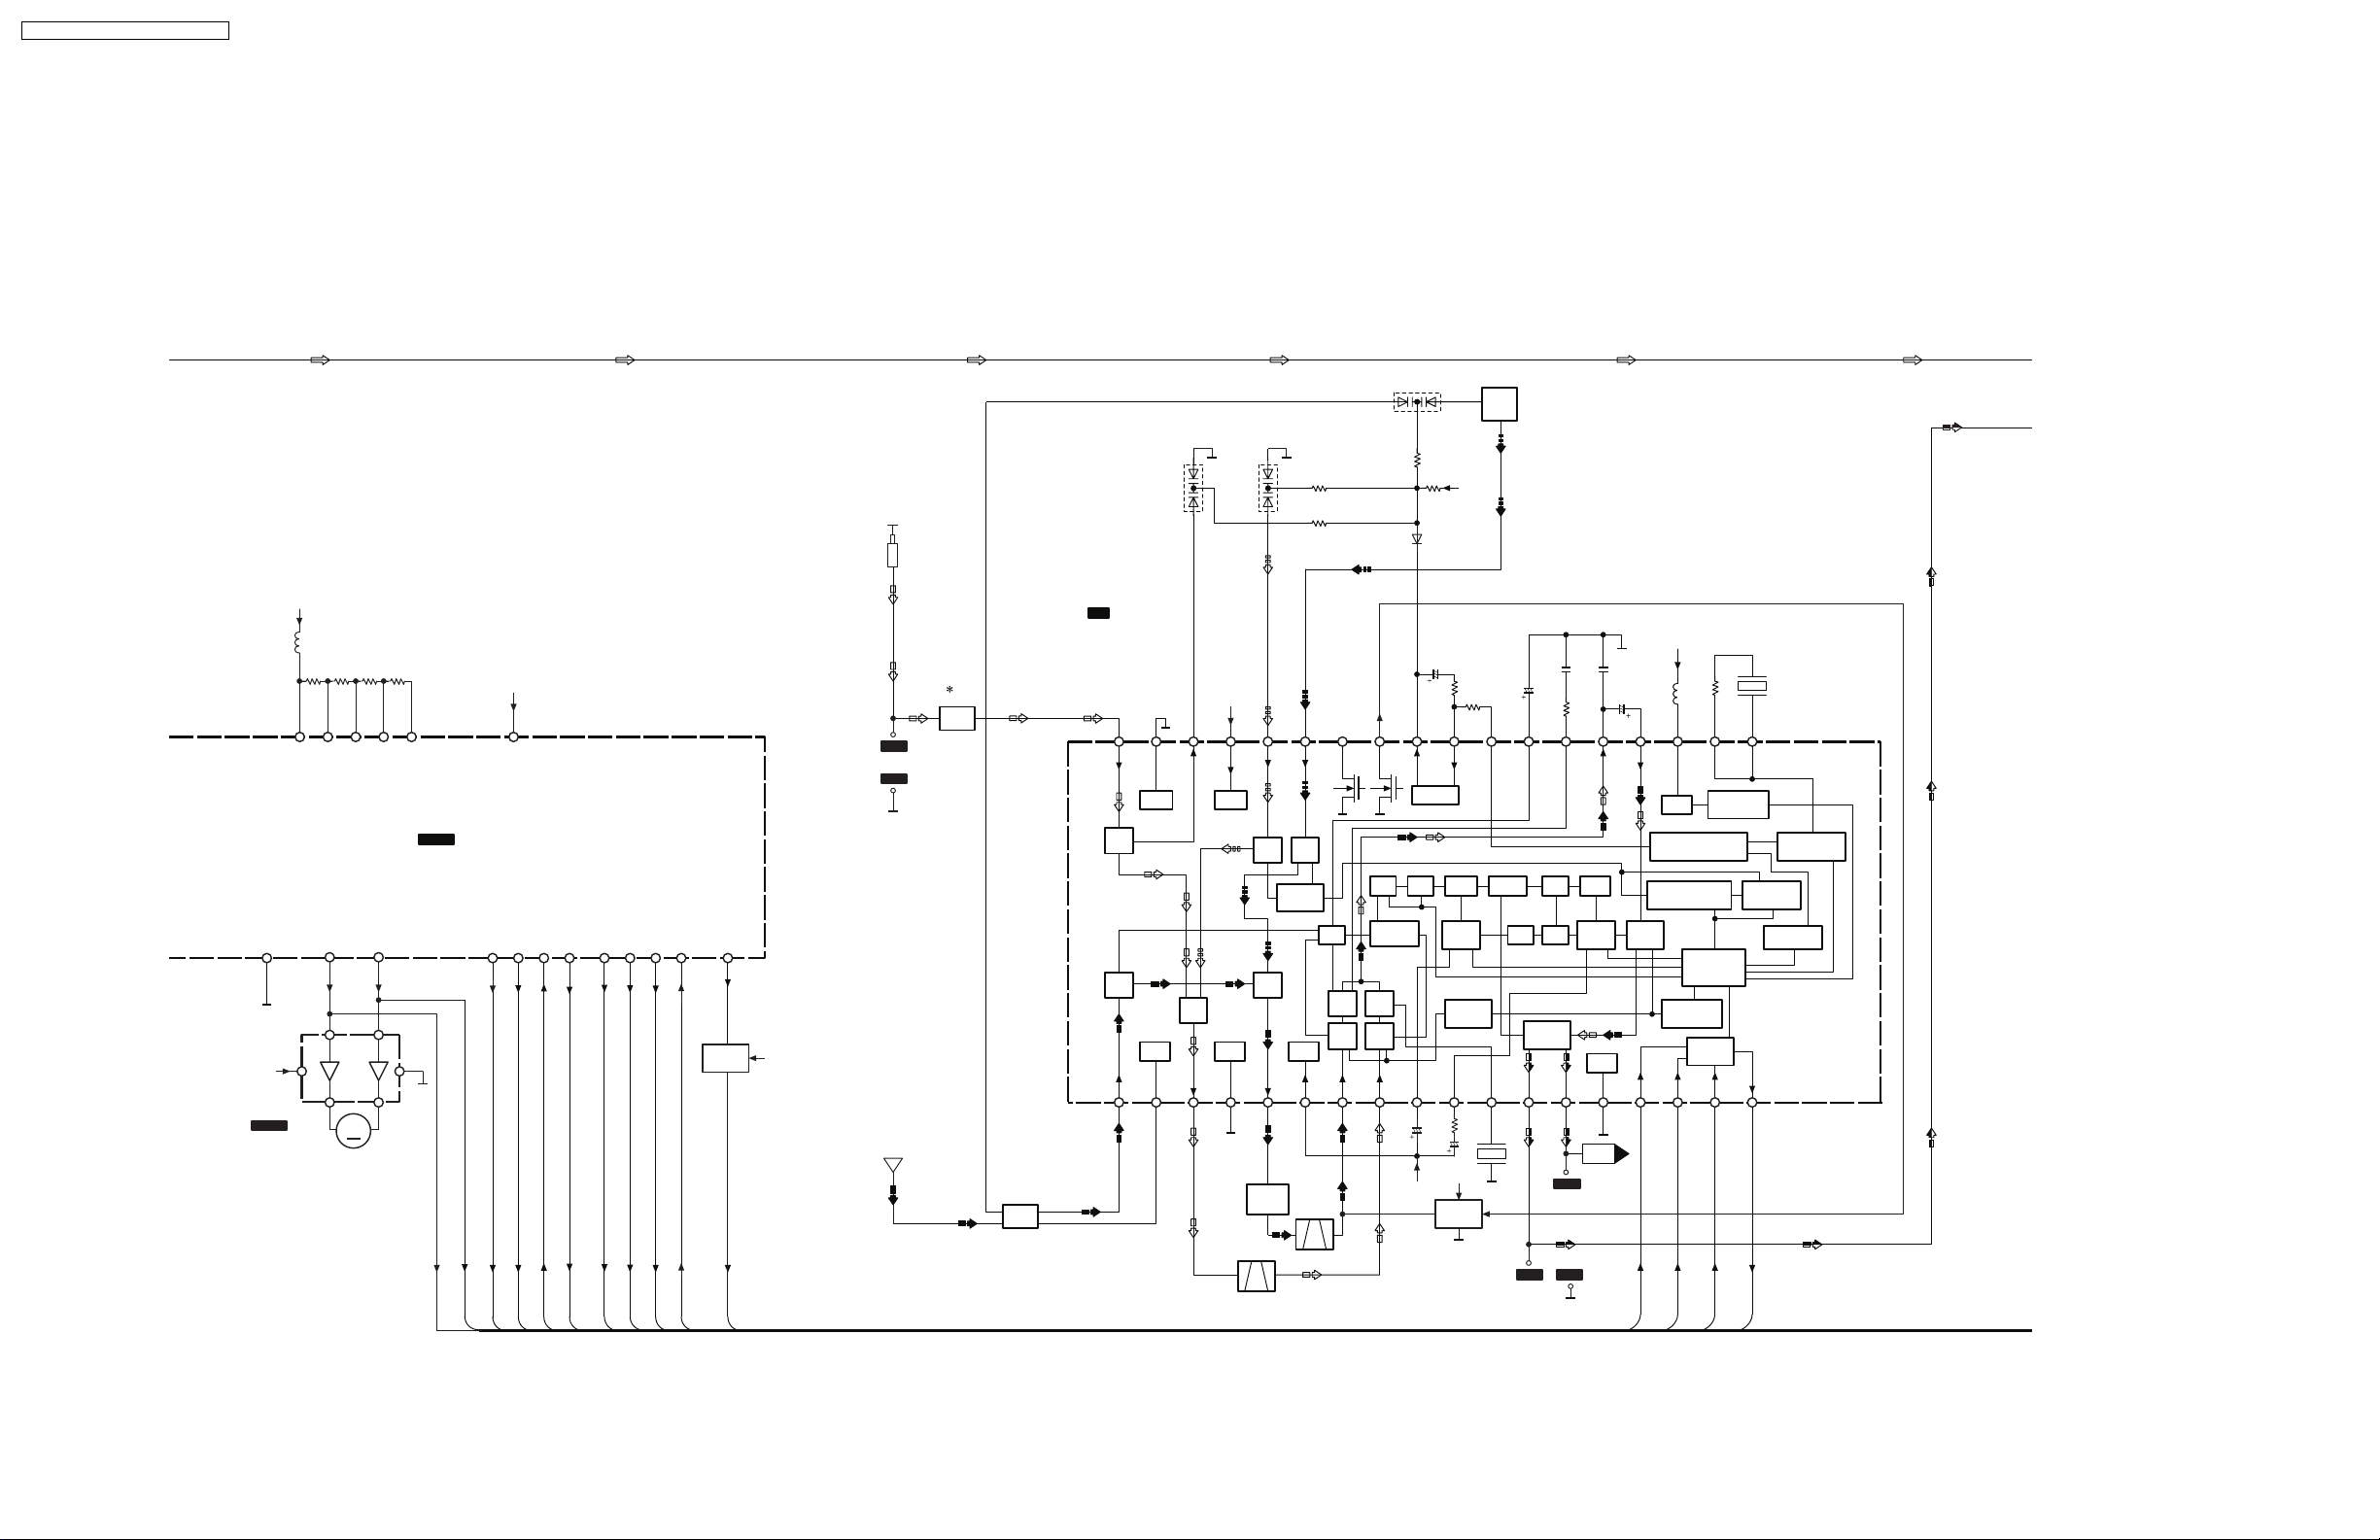
SC-EN25P / SC-EN26P / SC- EN27PC
BUP3.3V
L801
19
VSS
16
6
M5.5V
C0GAE0000007
IC351
MOTORDRIVE
9567
VDD
VLC1
VLC2
VLC3
LCD GND
MN101C74FAB1
SYSTEM CONTROL / LCDDRIVE
CD OPEN
IC801
CD CLOSE
3231
31
2,5,8
97
M
M351
(LOADING MOTOR)
CD OPEN
CD CLOSE
STBY3.3V
25
VREF+
PLL CLK
PLL DI
PLL CLK
TELESCOPIC
ANTENNA
D1
D2
D3
D9V
L7
AM
OSC
COIL
D4
C1BB00001120
IC1
FM/AM IFAMP,
DET/AM OSC,
MIX/FM MPX
C1,2
L2,
L3
FM
B.P.F .
TP1
TP2
36 35 34 33 32 31 30 29 28 27 26 25 24 23 22 21 20 19
GND2
FM RF-IN
GND2 VCC2
FM
IF
ACDET
P.CONT
AG DATA
PLL DI
PLL DO
AG CLK
PLL CE
49
38353637
513334
QR804
MUTING
45
CONT.
MUTE A
AM
IF
STBY3.3V
REG GND1
REG
AM RF-IN
FM RF-OUT
FM
MIX
FM-MIX
TU5V
CC2
V
GND1
FM-OSC
FM
OSCAMOSC
OSC
BUFFER
AM
MIX
VCC1
AM-MIX
AM-OSC
CC1
V
B01
B02
SB ST TRIG SF SW
S-METER
AM
DETFMDET
AMIFFM
IF
AM IF-IN
FM IF-IN
FM
AGC
A-OUT
P DET
LPF
A-IN
PILOT
DET
IF
BUFFER
P COMP
PD
FM DET
AGC
DE-
CODER
LOUT
DET-OUT
AM LOW-CUT
FF
VCO
PHASE
FFFF
COMP.
VSS
SS
V
ROUT
D3.3V
DD
V
MPX-IN
THD
PHASE DETECTOR
CHARGE MPX
PROGRAMMER-
BLE DIVIDER
MUTE
UNIVERSAL
COUNTER
DI
CE
XOUT
POWER ON
RESET
DATA SHIFT
REGISTER
LATCH
CCB
I/F
CL
(75kHz)
REFERENCE
SWALLOW
COUNTER
UNLOCK
DETECTOR
DO XIN
X2
DEVIDER
1 2 3 4 5 6 7 8 9 10 11 12 13 14 15 16 17 18
AM ANT
L51
AM
RF
T1
AM IFT
CF2
TU5V
D3.3V
SWITCH-
ING
X1
Q1
Rch
TP5
CF1
TP4 TP3
P.CONT
AG DATA
AG CLK
PLL CE
PLL DO
AC DET
MUTE B
PLLCE
PLLDI
PLLCLK
PLLDO
32
SA-EN17(P,PC)BLOCK DIAGRAM
Page 33
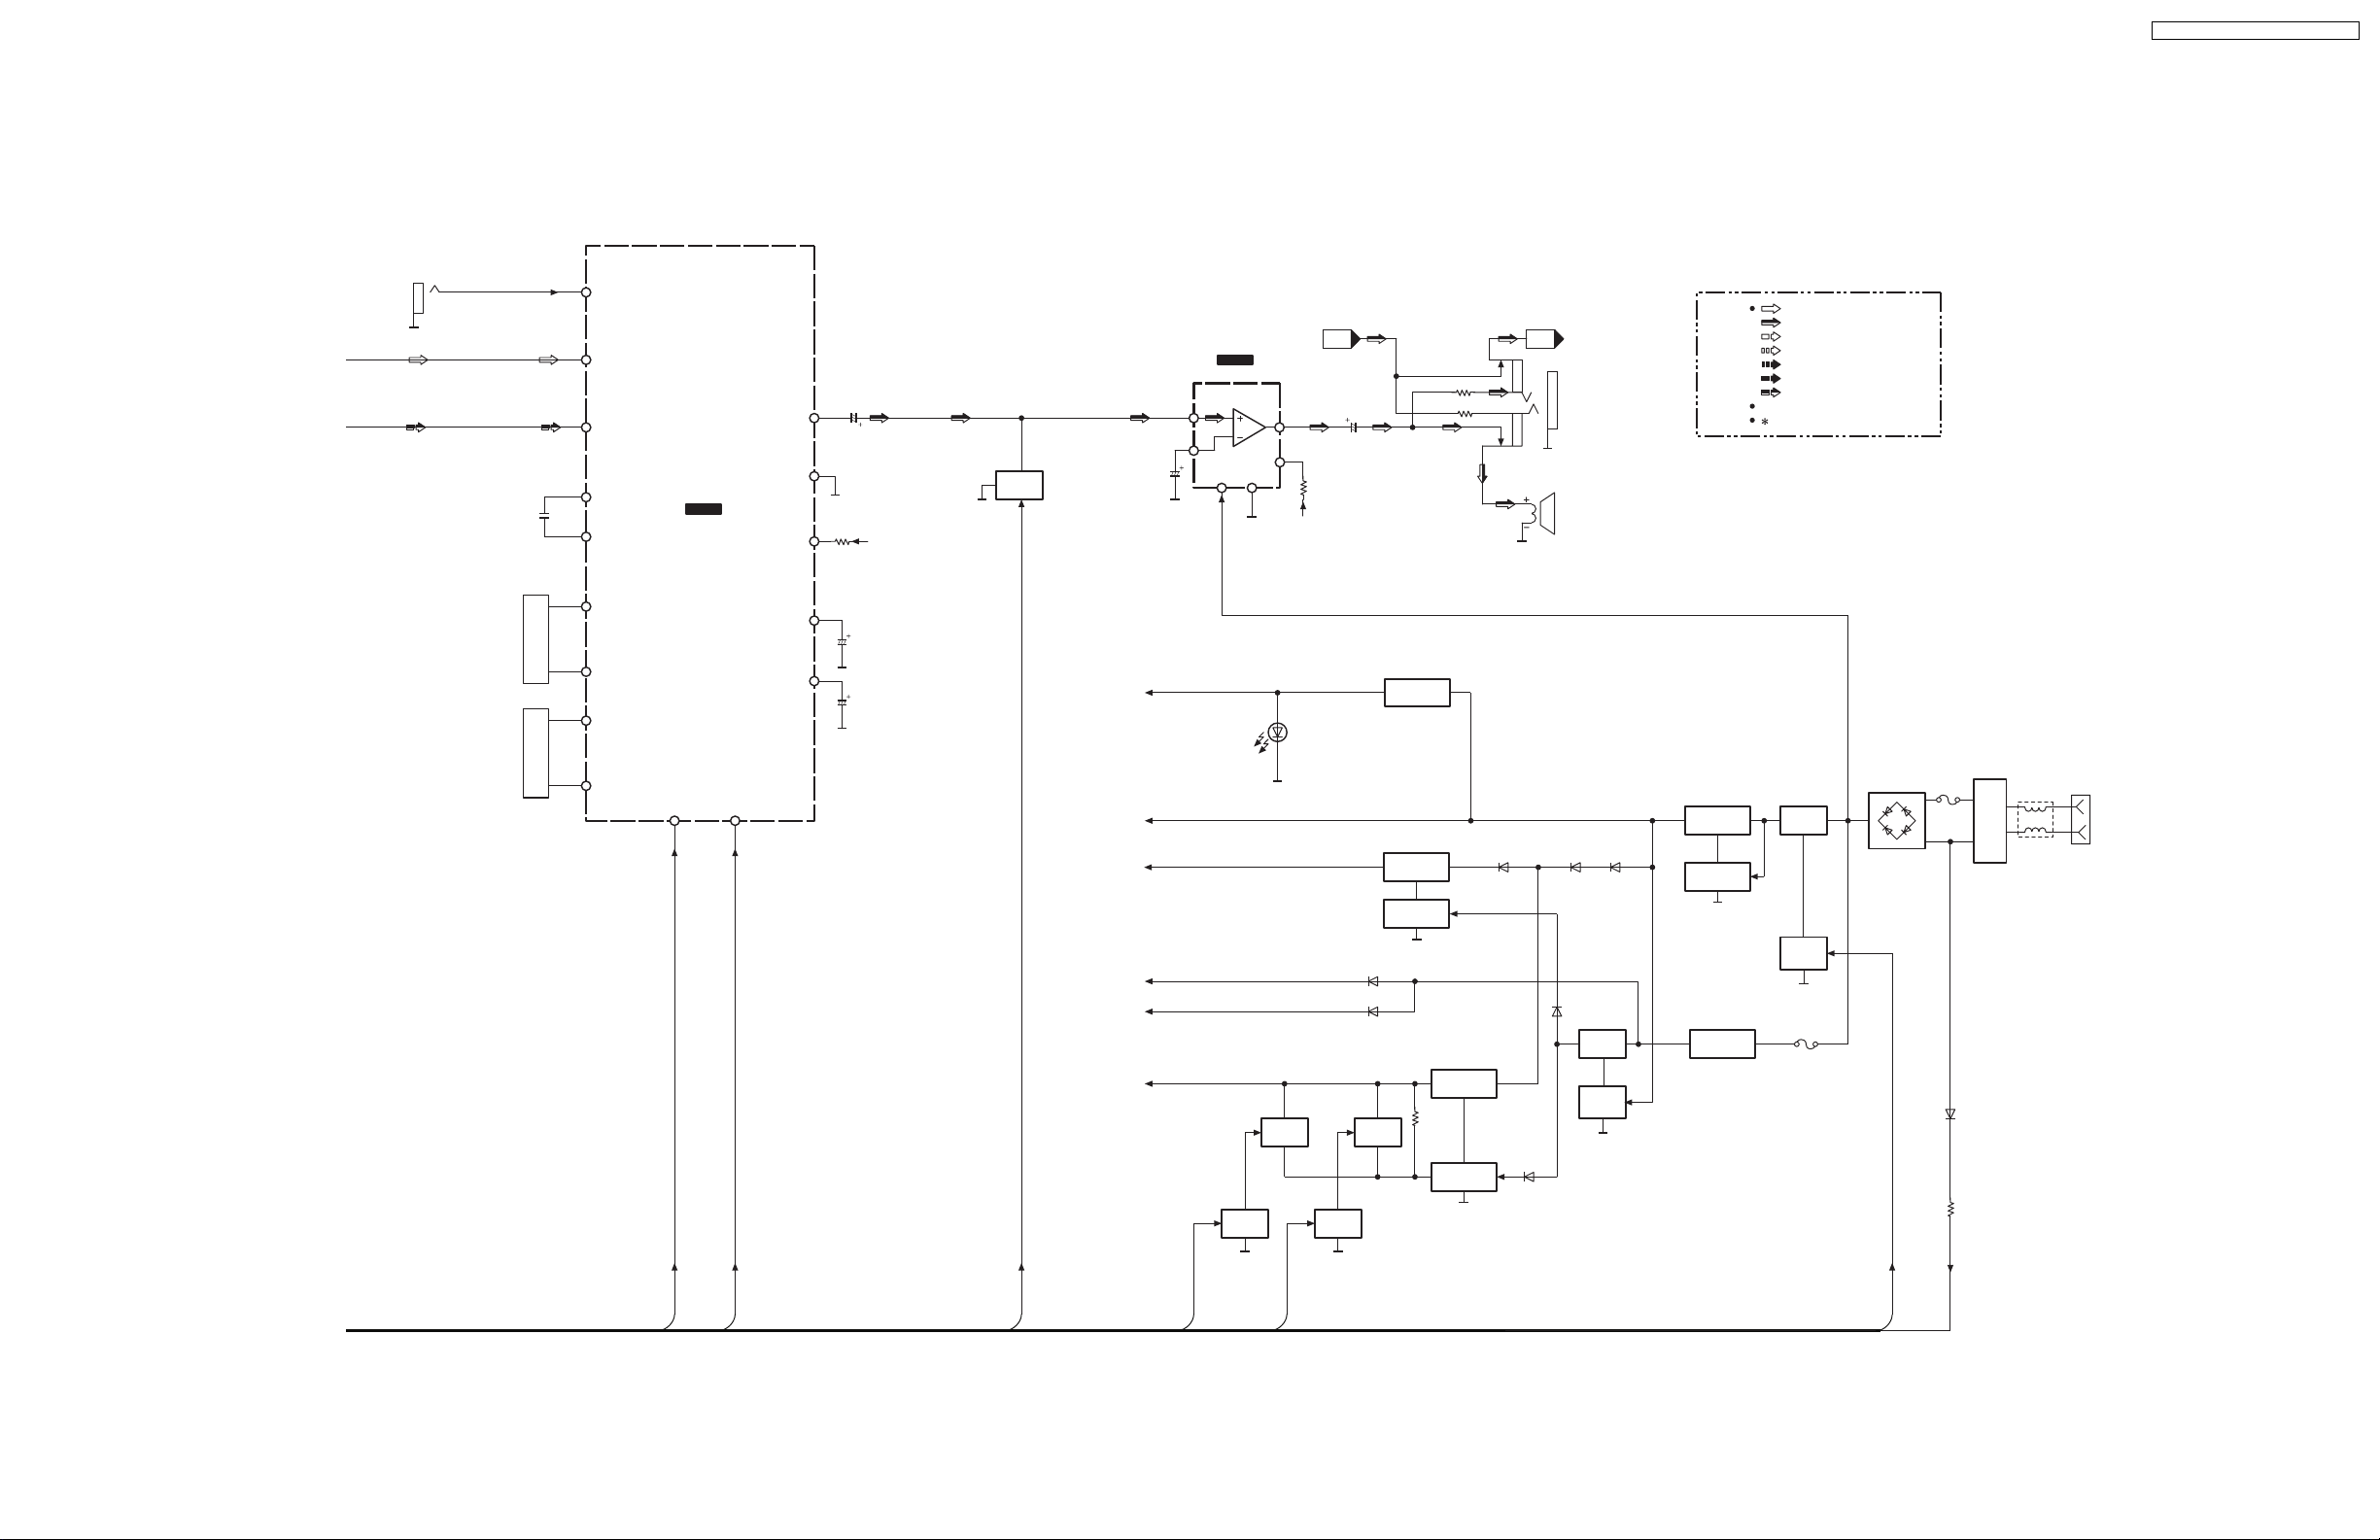
AUX
SC-EN25P / SC-EN26P / SC- EN27PC
13
(14)
E1
(E2)
D610
RchRch
PHONES
SPEAKER
D604D603D602
D611
Q613
POWER
SUPPLY
Q614
POWER
SUPPLY
CONT.
5
(6)
A1
(A2)
11
(12)
D1
(D2)
2
(4)
SEL1
(SEL2)
1
(3)
VIN1
(VIN2)
25
(23)
BOUT1
(BOUT2)
26
CR NET.
(24)
BNF1
(BNF2)
29
(27)
MOUT1
(MOUT2)
30
CR NET.
(28)
MNF1
(MNF2)
C1BB00000732
IC301
AUDIO SOUND
SI
18
CONTROL
SC
17
OUT1
(OUT2)
GND
VCC
CAP
FILTER
22
(21)
Q401
16
19
D9V
20
15
(Q501)
MUTING
TU5V
D9V
D3.3V
STBY3.3V
BUP3.3V
M5.5V
C0AAAA000035
IC601
POWER AMP
7
(6)
8
Vcc GND
SWITCH-
ING
412
QR621
SWITCH-
QR619
11
(2)
1
D9V
D1002
(BACK LIGHT)
ING
QR618
SWITCH-
ING
QR620
SWITCH-
D612
D613
ING
Q302,303
REGULATOR
Q603
REGULATOR
Q604
STABILIZER
Q611
REGULATOR
Q612,617
STABILIZER
NOTE : CDPLAYBACKSIGNAL LINE
Q605,606
REGULATOR
Q607
STABILIZER
Q615
REGULATOR
: MAIN SIGNAL LINE
: FM SIGNAL LINE
: FM OSC SIGNAL LINE
: AM OSC SIGNAL LINE
: AM SIGNAL LINE
: FM/AM OSC SIGNAL LINE
( ) indicates pin No. Right channel.
L2: Print coil
Q608
POWER
SUPPLY
Q609
POWER
SUPPLY
CONT.
IP602
D901~904
D906
F901
T901
POWER
TRANSFORMER
L901
AC IN
AG DATA
AG CLK
MUTE B
CD CLOSE
CD OPEN
PCONT
AC DET
SA-EN25/EN26/EN27(P,PC)BLOCK DIAGRAM
33
Page 34

SC-EN25P / SC-EN26P / SC- EN27PC
34
Page 35
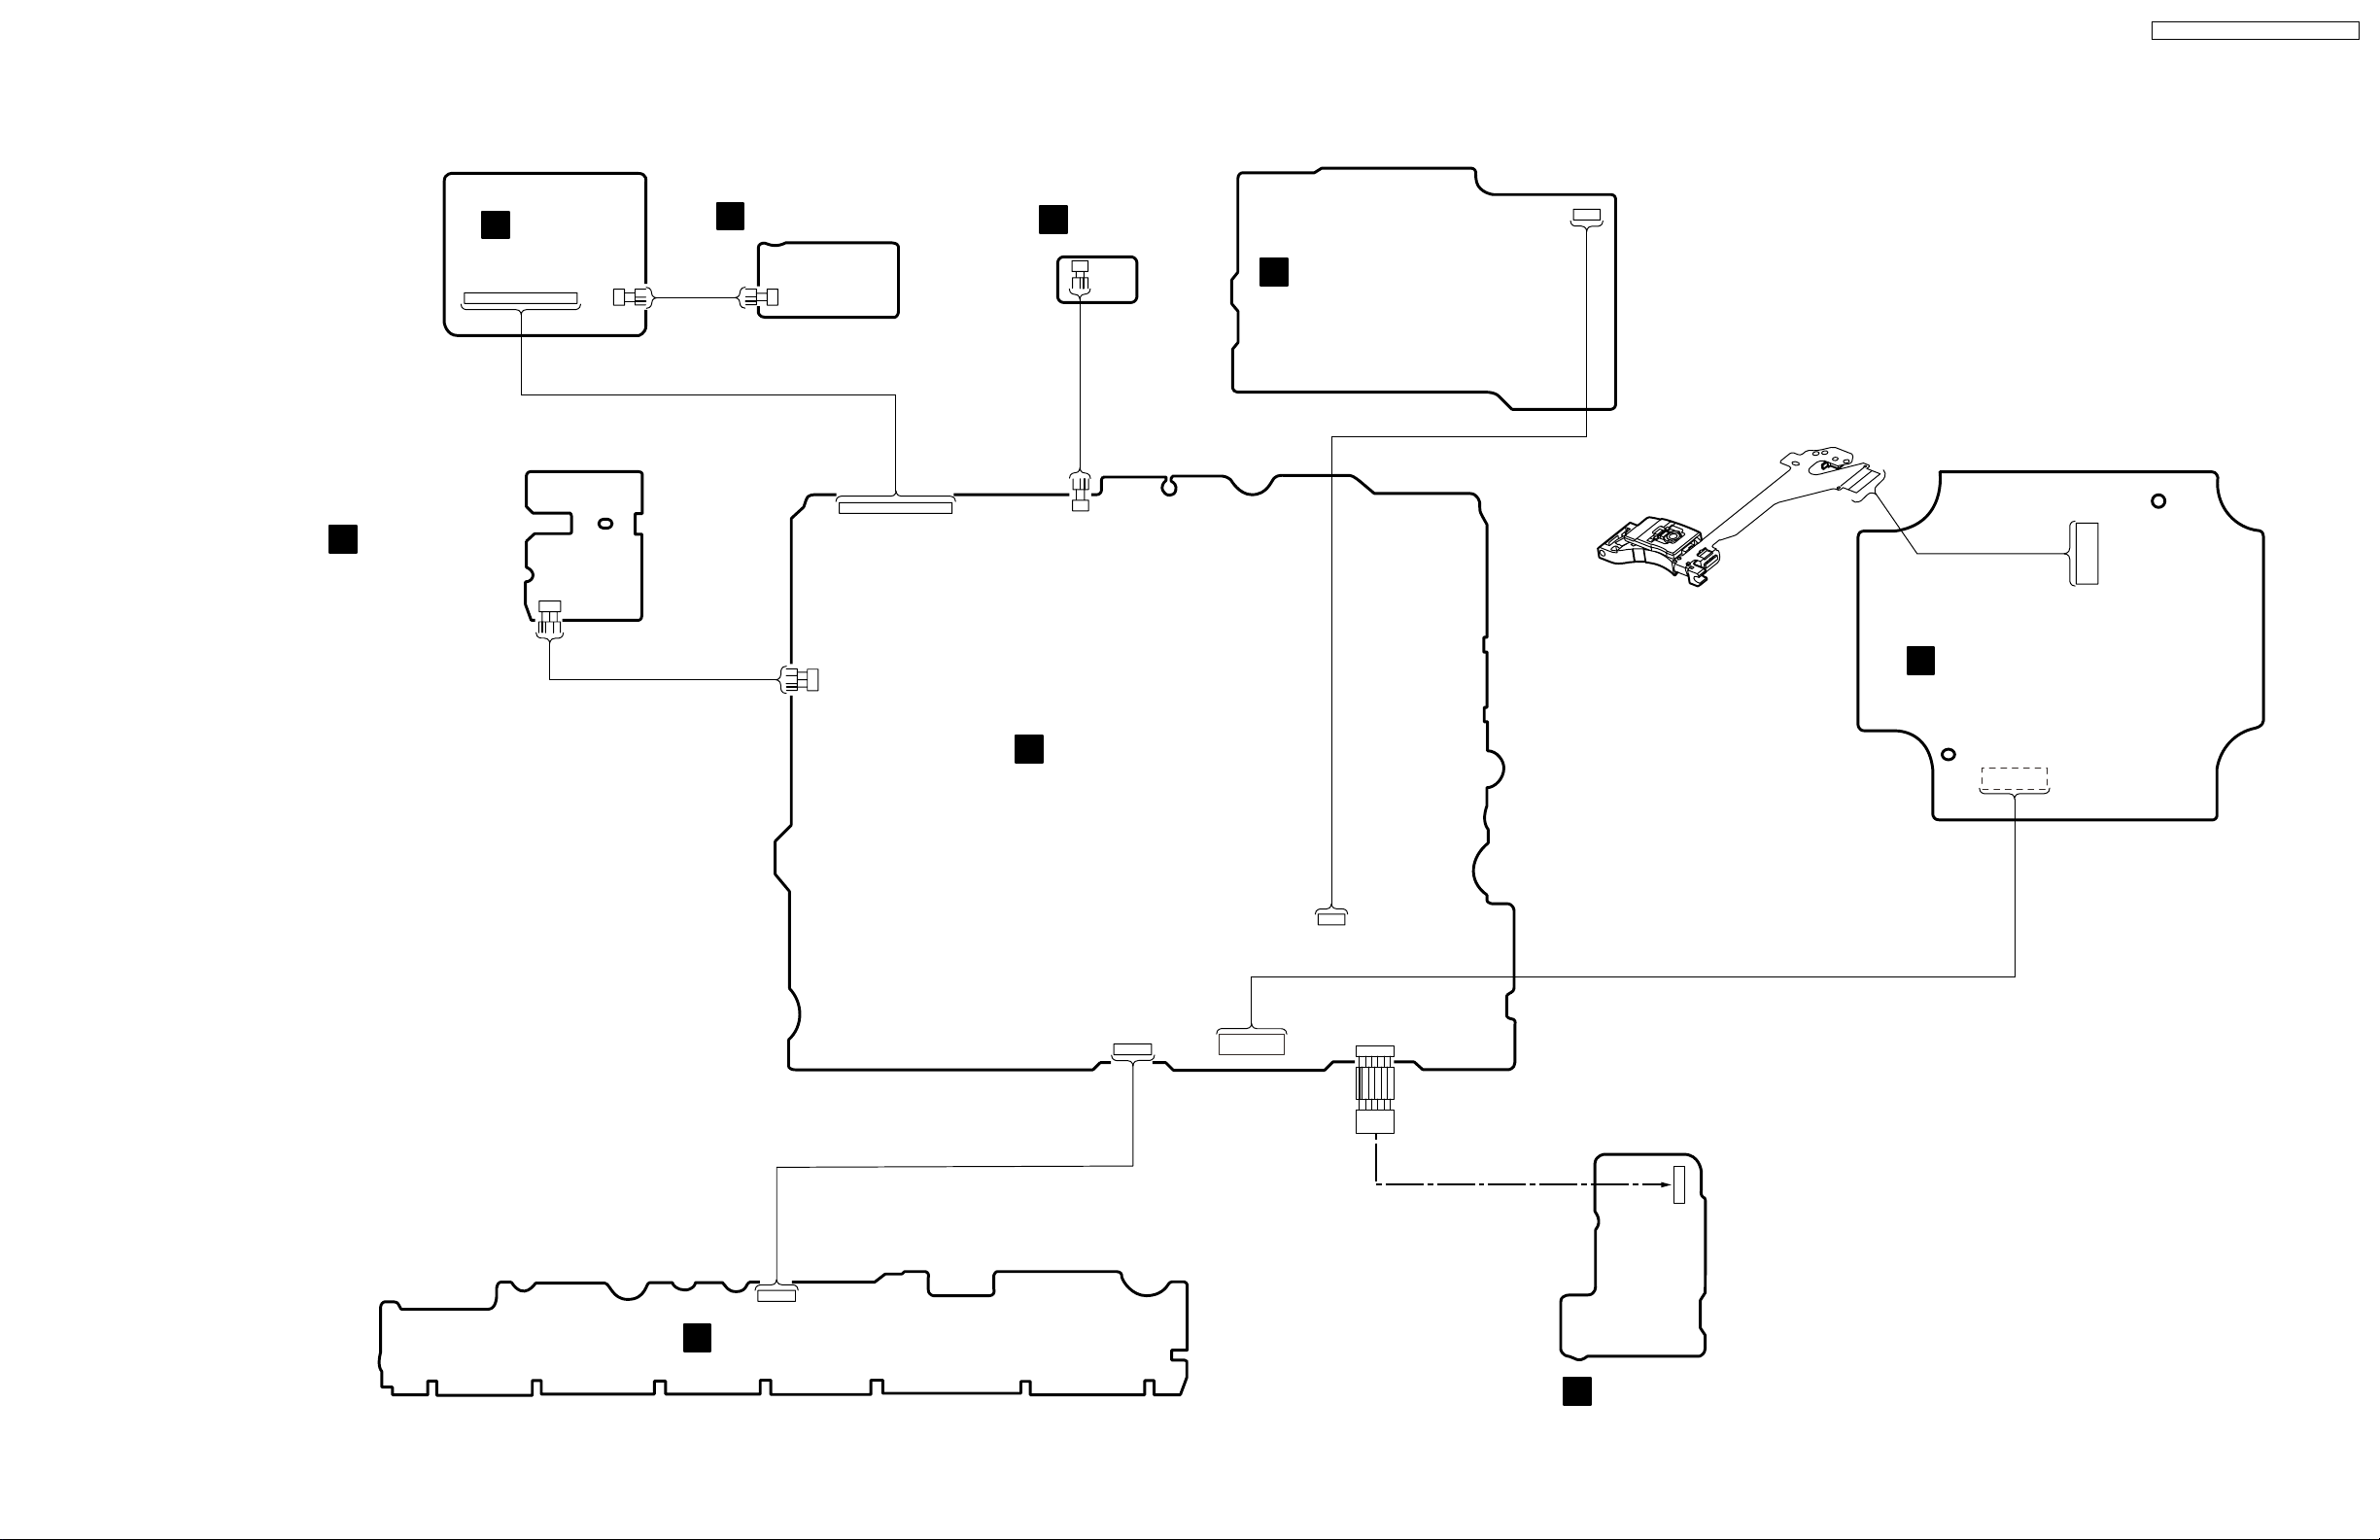
15 Wiring Connection Diagram
LCD BACK-LIGHT P.C.B.
C
1. . . . . . .
FFC801
. . . . . . . . . . . . . . . . .
LCD P.C.B.
26
JW8011
2
1
D
JW352
2
1
SW P.C.B.
G
2 1
JW352
POWER TRANSFORMER P.C.B.
I
P901
1 . . 4
SC-EN25P / SC-EN26P / SC- EN27PC
SENSOR P.C.B.
E
JW1001
1 . 3
3
.
1
P1001
26. . . . . . .
. . . . . . . . . . . . . . . . .
FP801
1
2 1
P352
MAIN P.C.B.
B
P601
6 . . . . 1
. . . . . . .
16
. . . . . . . .
17
FP701
1 . . 4
JW901
2
1
P351
1 . . . . 6
OPTICAL PICK-UP
CD SERVO P.C.B.
A
CN702
. . . . . . . .
1
2 . . . . . . .
CN701
2
1
.
.
.
.
.
.
.
.
.
.
.
.
16
15
17
16
1 . . . . 6
JW801
OPEARATION P.C.B.
H
35
1 . . . . 6
MOTOR P.C.B.
F
1
.
.
.
.
6
JW351
Page 36

SC-EN25P / SC-EN26P / SC- EN27PC
36
Page 37

16 Measurements and Adjustments
16.1. Tuner Adjustment
16.1.1. Required tools and equipment
· Signal generator
· AM loop antenna
· Oscilloscope or electrical voltage meter
· Headphone jig
16.1.2. Preparations for Adjustment
· Apply under [9. Operation Checks and Component Replacement].
· Connect to the power supply (AC120V).
· Maximize the volume.
16.1.3. AM RF Adjustment
1. Input AM signal generator output from the AM loop antenna.
2. Connect a measuring instrument to the headphone jack.
3. Tune to the signal (SG 603kHz).
4. Adjust L51 so that the output reaches maximum.(Fig.01)
SC-EN25P / SC-EN26P / SC- EN27PC
16.1.4. AM IF Adjustment
1. Follow the steps 1 and 2 of AM RF Adjustment.
2. Tune to the signal (SG 450kHz).
3. Revolve the T1 core and adjust that the output waveforms reaches maximum. (Fig.02)
16.1.5. AM VCO Adjustment
1. Input AM single generator output from the AM loop antenna.
2. Set the electrical voltage meter to TP1 - TP3.
3. Tune to the signal (SG 520kHz).
4. Adjust L51 so that the output reaches DC 1.4±0.3V.
16.1.6. FM RF Adjustment
1. Set the frequency of FM signal generator to 87.9MHz.
2. Input to TP1(RF I/P) - TP2(RF O/P) through FM dummy antenna.
3. Adjust L7 so that the output reaches maximum. (Fig.01)
4. Take measurement at point 1, point 2 and point 3 (GND). Range from 2.15 ± 0.5 V
37
Page 38
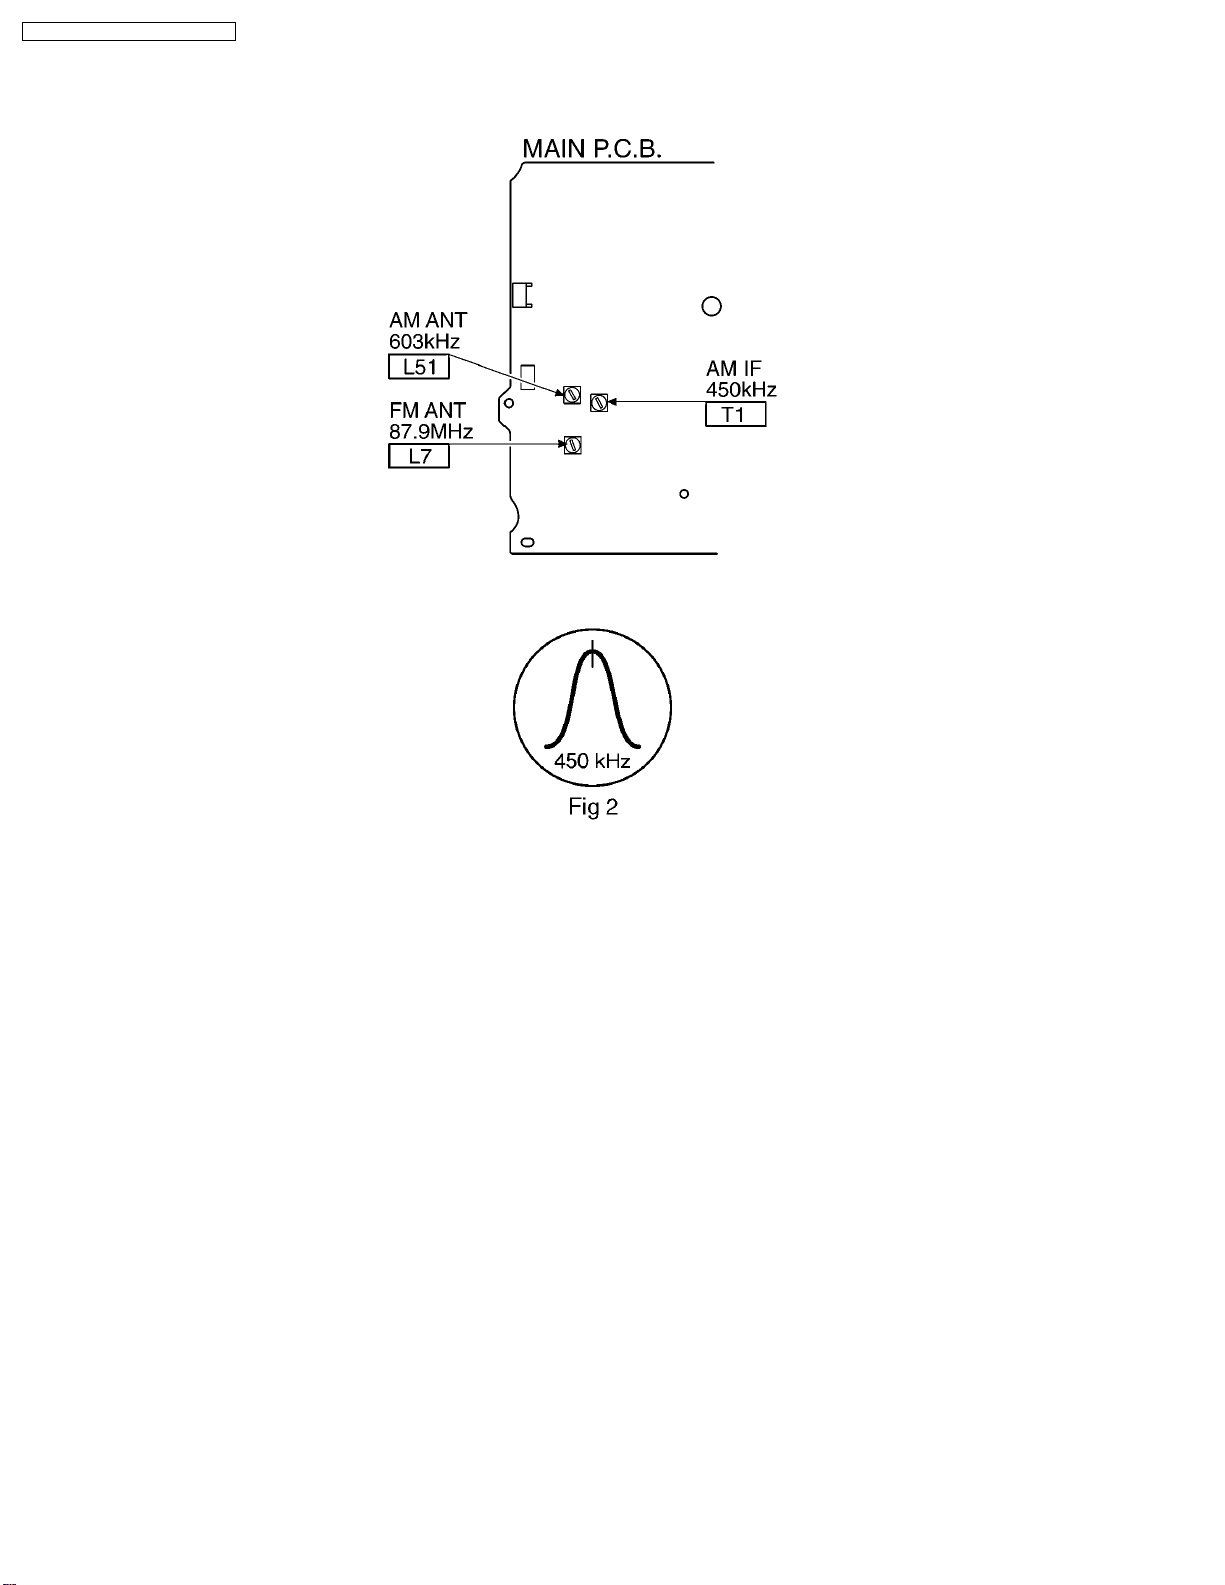
SC-EN25P / SC-EN26P / SC- EN27PC
16.2. Adjustment Point
(Fig.01)
(Fig.02)
38
Page 39
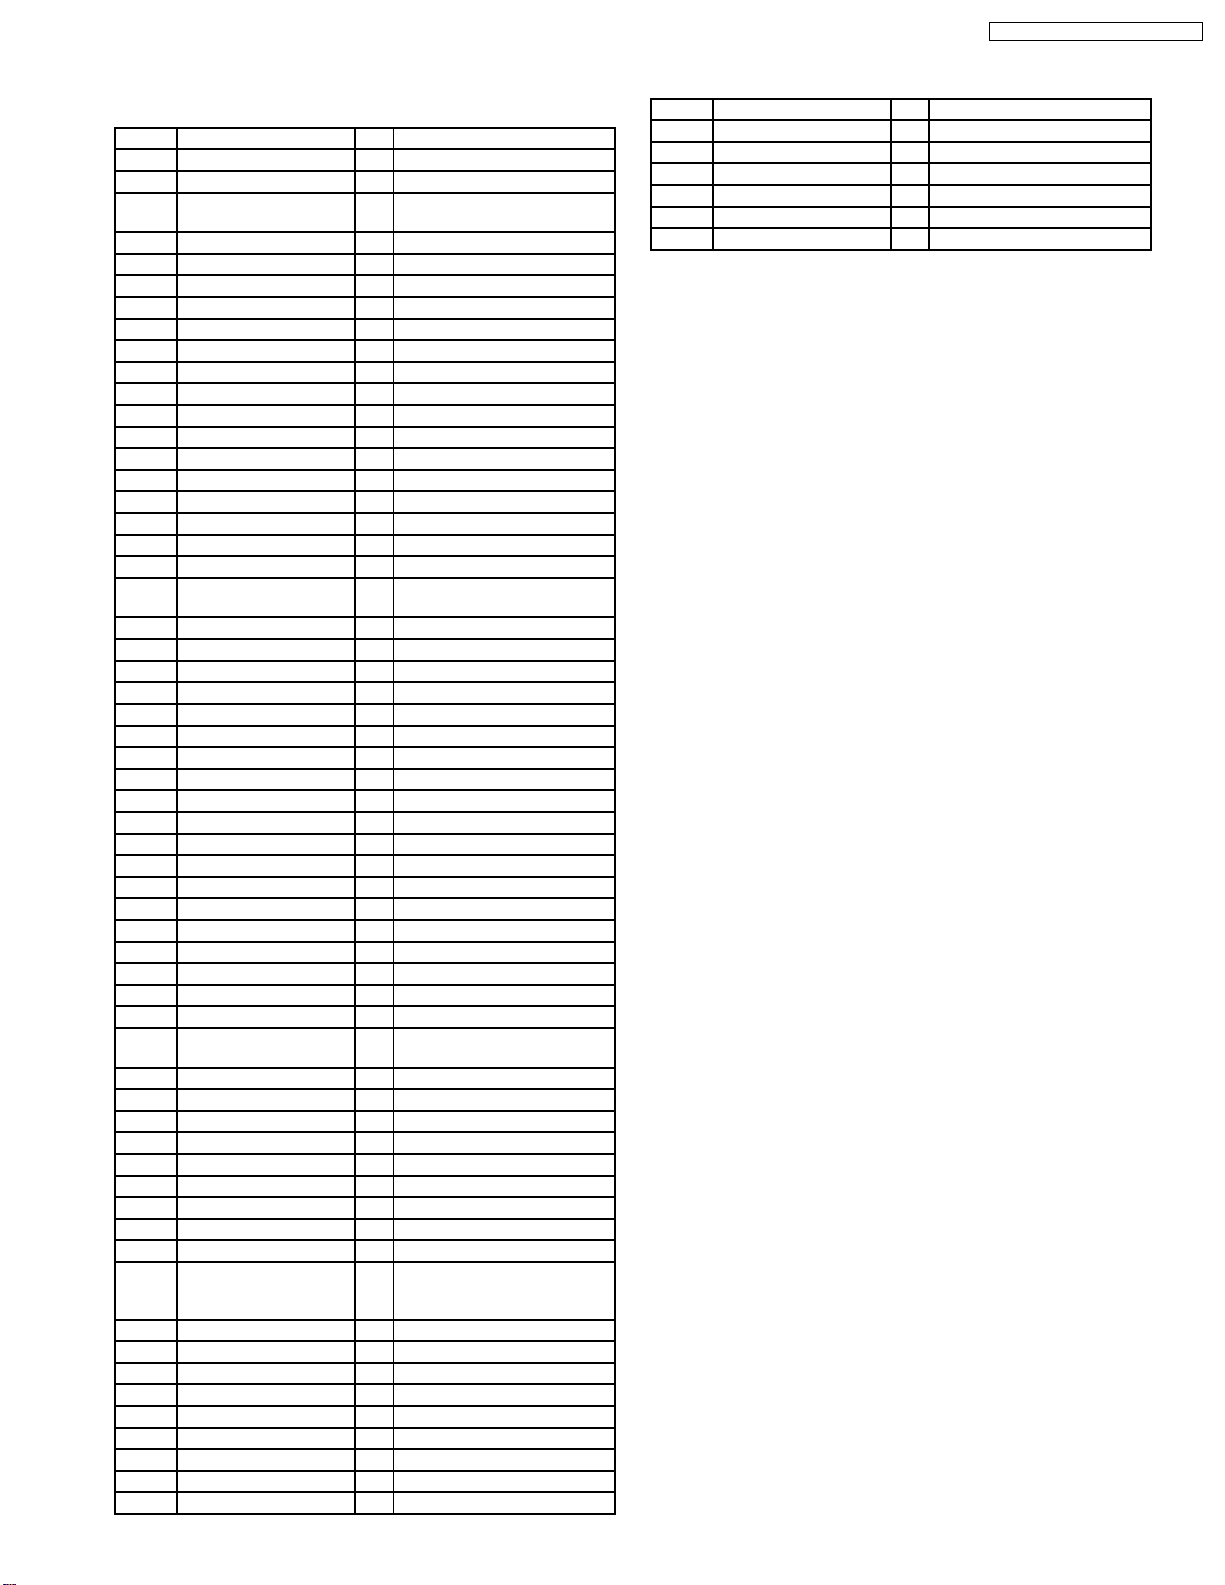
17 Terminal Functions of ICs
SC-EN25P / SC-EN26P / SC- EN27PC
· IC801 (MN101C74FAD) Microprocessor
Pin No. Mark I/O Function
1-4 COM0 - COM4 O LCD common output
5-7 VLC3 -VLC1 - LCD power supply
8 C2 - Capacitor terminal for
pressure
9 LCD_GND O/I LCD GND
10 PC1 I Writing data
11 PC2 I/O Writing clock
12 CD_BOTTOM_SW I/O CD bottom switch
13 CD_TOP_SW I/O CD top switch
14 MBP1 O Beet proof 1
15 MBP2 O Beet proof 2
16 VSS - GND
17 OSC1 I Main oscillator input (8MHz)
18 OSC2 O Main oscillator output (8MHz)
19 VDD - VDD +3.3V
20 XI I Sub oscillator input (32kHz)
21 XO O Sub oscillator output (32kHz)
22 NMOD I CD Memory mode select
23 NRESET I Reset
24 DMOD I Silial writing mode
25 VREF+ - A/D converter reference
voltage
26 KEYSW A/D Key input
27 REGION A/D Aria/Model select
28 PDET A/D Main voltage check
29 CRT A/D CR timer
30 NC I N.C.
31 CD_OPEN O CD open switch function
32 CS_CLOSE O CD close switch function
33 AG_DATA O ASP data output
34 AG_CLK O ASP clock output
35 PLL_D0 I/O PLL data input
36 PLL_D1 O/I PLL data output
37 PLL_CLK O/I PLL CLK
38 PLL_CE O/I PLL chip select output
39 MCLK O/I CD LSI command clock
40 MDATA O/I CD LSI command data
41 STATUS I/O CD status
42 MLD O/I CD LSI command load
43 REST_SW I/O CD travers limit switch
44 CD_RESET O CD reset switch
45 MUTE_A I/O Audio Mute Output (L: MUTE
ON)
46 NC(EX_BASS) I N.C.
47 NC I N.C.
48 REM_IN I Remocon input
49 ACDET I Ac detection
50 BLKCK I/O CD subcode block clock input
51 PCONT O Power control output
52 CD_SET1 I CD setting 1
53 CD _SET2 I CD setting 2
54 CD_SET3 I CD setting 3
55 NC(REC_H) I Not used. Connected with
GND exterminally through
resistance.
56 NC(TAPE_L) I N.C.
57 E_CS O EEPROM chip select
58 E_DATA I/O EEPROM DATA
59 E_CLK O EEPROM CLOCK
60 NC(TEST1) I TEST 1 terminal
61 NC(TEST2) I TEST 2 terminal
62 NC(JOG1) I Not used
63 NC(JOG2) I Not used
64 STBY_LED O Standby_LED
Pin No. Mark I/O Function
65 NC(AUX_DET) I Not used
66 NC I Not used
67 NC I Not used
68 NC I Not used
69-80 NC I Not used
81-100 SEG19-SEG0 O LCD Segment Output
39
Page 40
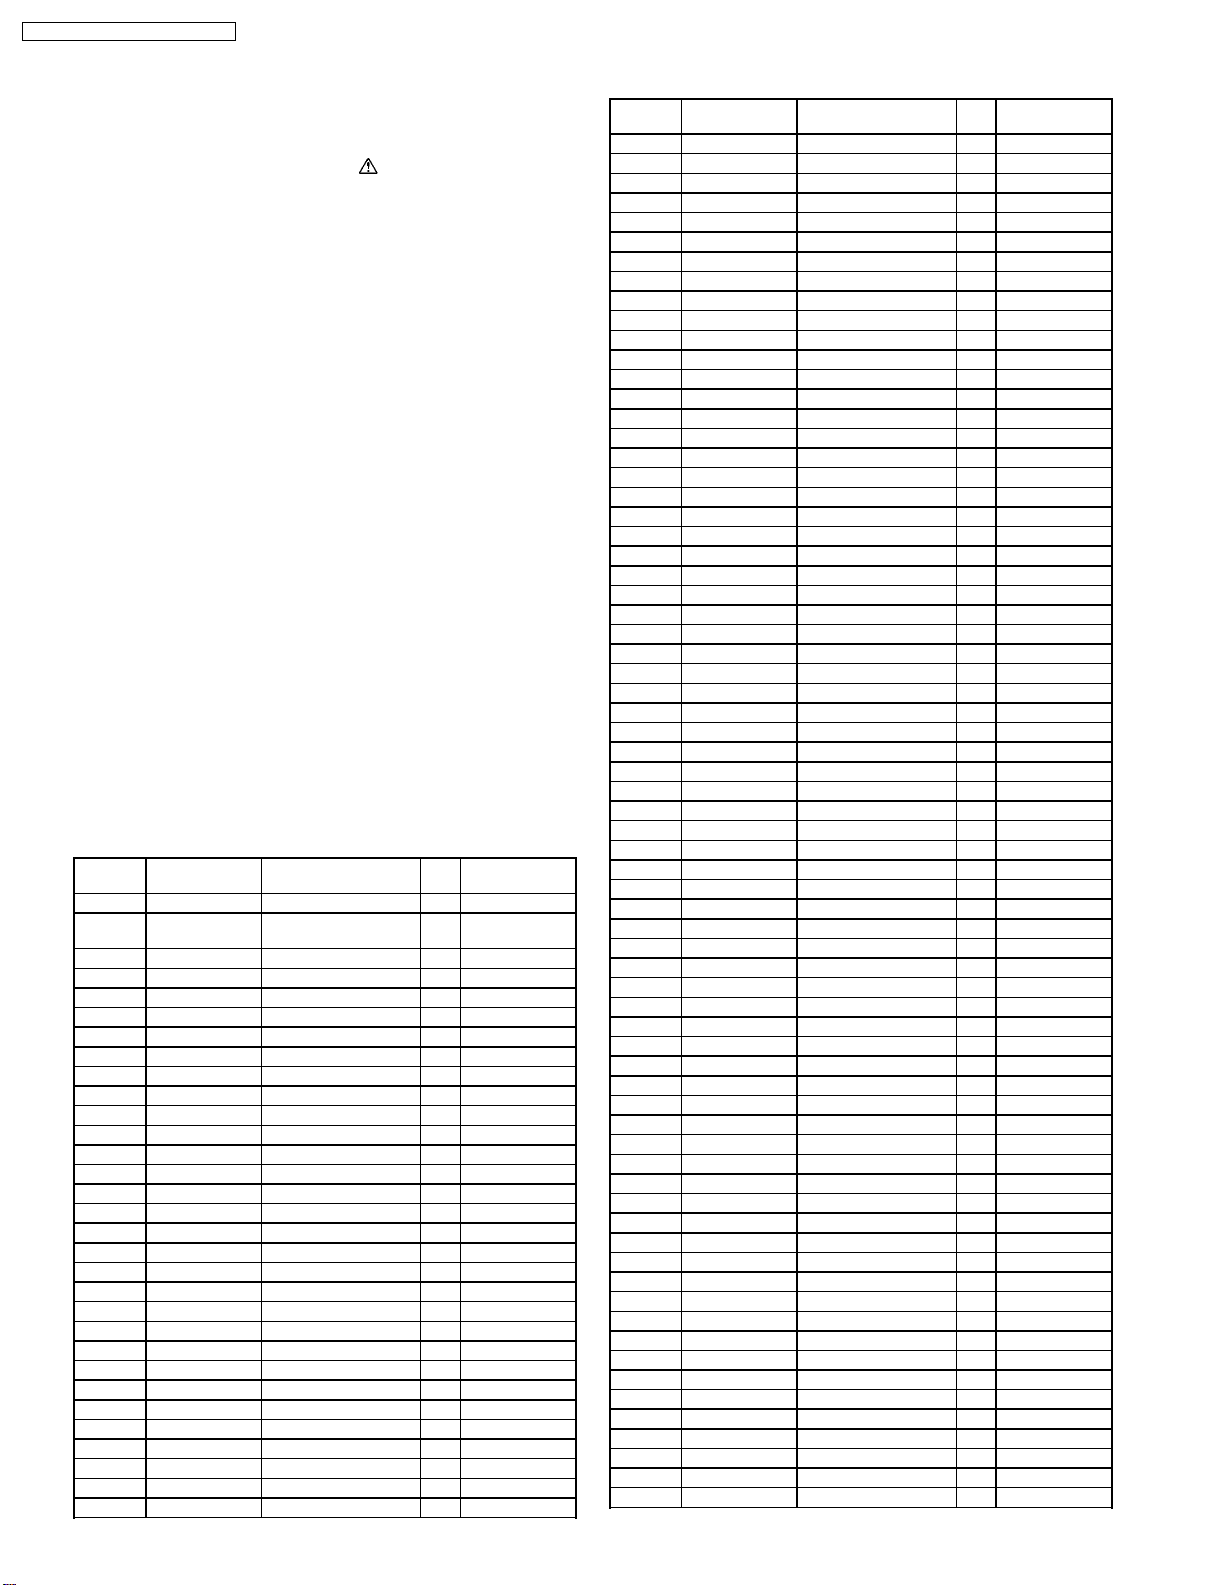
SC-EN25P / SC-EN26P / SC- EN27PC
18 Replacement Parts List
Notes:
· Important safety notice:
Components identified by
mark have special
characteristics important for safety.
Furthermore, special parts which have purposes of fireretardant (resistors), high-quality sound (capacitors), lownoise (resistors), etc. are used.
When replacing any of these components, be sure to use
only manufacturers’s specified parts shown in the parts list.
· Warning: This product uses a laser diode. Refer to caution
statements on “Precaution of Laser Diode”
· Capacitor values are in microfarad (µF) unless specified
otherwise, P=Pico -farads(pF); Farads.
· Resistance values are in ohms, unless specified otherwise,
1K=1,000(ohms).
· The marking (RTL) indicates the Retention Time is limited
for this item. After the discontinuation of this assembly in
production, it will no longer be available.
· All parts are supplied by ASPC.
· The parenthesized indications in the Remarks column
specify the areas. (Refer to the cover page for area.)
Parts without these indications can be used for all areas.
−
− (25P): SA-EN25P
− −
−
− (26P): SA-EN26P
− −
−
− (27PC): SA-EN27PC
− −
18.1. SA-EN25P,SA-EN26P and SAEN27PC
Ref.
No.
C704 ECEA0JKA331B 6.3V 330U 1
C705 F1H1C104A042 16V 0.1U 1
C707 F1H1C104A042 16V 0.1U 1
C709 ECEA0JKA101B 6.3V 100U 1
C716 ECUV1C333KBV 16V 0.033U 1
C717 ECUVNC154KBV 16V 0.15U 1
C718 ECUV1H272KBV 50V 2700P 1
C719 ECUV1H332KBV 50V 3300P 1
C720 ECEA0JKA330B 6.3V 33U 1
C721 ECUV1H472KBV 50V 4700P 1
C722 ECUV1H821JCV 50V 820P 1
C723 F1H1C104A042 16V 0.1U 1
C724 F1H1C104A042 16V 0.1U 1
C726 ECUV1H471JCV 50V 470P 1
C727 ECUV1C473KBV 16V 0.047U 1
C729 F1H1C104A042 16V 0.1U 1
C730 ECUV1H821KBV 50V 820P 1
C731 ECUV1C223KBV 16V 0.022U 1
C732 F1H1C104A042 16V 0.1U 1
C733 ECUV1H102KBV 50V 1000P 1
C734 ECBT1H104KB5 50V 0.1U 1
C735 ECEA0JKA101B 6.3V 100U 1
C736 ECUV1C823KBV 16V 0.082U 1
C737 ECEA0JKA101B 6.3V 100U 1 (25P)(26P)
C738 ECEA0JKA221B 6.3V 220U 1
C739 F1H1C104A042 16V 0.1U 1
C740 ECUV1E103KBN 25V 0.01U 1
Part No. Part Name &
REP3876B CD P.C.B. ASS’Y (RTL) (25P)
REP3875B CD P.C.B. ASS’Y (RTL)(27PC)
Description
Pcs Remarks
(26P)
Ref.
No.
C741 ECUV1H102KBV 50V 1000P 1
C742 ECUV1H102KBV 50V 1000P 1
C743 ECEA0JKA331B 6.3V 330U 1
C744 ECUV1H221KBV 50V 220P 1
C745 ECUV1H220JCV 50V 22P 1
C746 ECUV1H220JCV 50V 22P 1
C747 F1H1C104A042 16V 0.1U 1
C748 ECUV1H221KBV 50V 220P 1
C749 F1D1H221A012 50V 220P 1
C750 ECUV1E103KBV 25V 0.01U 1
C751 F1D1H471A012 50V 470P 1
C752 F1H1C104A042 16V 0.1U 1
C753 ECEA0JKA101B 6.3V 100U 1
C754 ECUV1C393KBV 16V 0.039U 1
C756 F1H1C104A042 16V 0.1U 1
C757 F1H1C104A042 16V 0.1U 1
C762 ECEA0JKA100B 6.3V 10U 1 (27PC)
CN701 K1MN16B00154 CONNECTOR 1
CN702 REE1362 CD SERVO FFC 1
IC700 BA5948FPE2 IC 1
IC701 MN6627552CB IC 1 (25P)(26P)
IC701 MN6627953HB IC 1 (27PC)
Q700 2SB0709A0L TRANSISTOR 1
R704 ERDS2TJ5R6T 1/4W 5.6 1
R705 ERJ3GEYJ562V 1/10W 5.6K 1
R706 ERJ3GEYJ822V 1/10W 8.2K 1
R707 ERJ3GEYJ822V 1/10W 8.2K 1
R708 ERJ3GEYJ562V 1/10W 5.6K 1
R710 ERJ3GEYJ101V 1/10W 100 1
R711 ERJ3GEYJ822V 1/10W 8.2K 1
R712 ERJ3GEYJ101V 1/10W 100 1
R713 ERJ3GEYJ682V 1/10W 6.8K 1
R714 ERJ3GEYJ223V 1/10W 22K 1
R715 ERJ3GEYJ102V 1/10W 1K 1
R716 ERJ3GEYJ332V 1/10W 3.3K 1
R717 ERJ3GEYJ562V 1/10W 5.6K 1
R718 ERJ3GEYJ5R6V 1/10W 5.6 1
R719 ERJ3GEYJ683V 1/10W 68K 1
R720 ERJ3GEYJ562V 1/10W 5.6K 1
R721 ERJ3GEYJ4R7V 1/10W 4.7 1
R722 ERJ3GEYJ563V 1/10W 56K 1
R723 ERJ3GEYJ102V 1/10W 1K 1
R724 ERJ3GEYJ332V 1/10W 3.3K 1
R725 ERJ3GEYJ273V 1/10W 27K 1
R726 ERJ3GEYJ102V 1/10W 1K 1
R727 ERJ3GEYJ393V 1/10W 39K 1
R728 ERJ3GEYJ562V 1/10W 5.6K 1
R729 ERJ3GEYJ562V 1/10W 5.6K 1
R730 ERJ3GEYJ562V 1/10W 5.6K 1
R731 ERJ3GEYJ823V 1/10W 82K 1
R732 ERJ3GEYJ821V 1/10W 820 1
R733 ERJ3GEYJ5R6V 1/10W 5.6 1
R734 ERJ3GEYJ101V 1/10W 100 1
R735 ERJ3GEYJ683V 1/10W 68K 1
R736 ERJ3GEYJ683V 1/10W 68K 1
R737 ERJ3GEYJ102V 1/10W 1K 1
R738 ERJ3GEYJ102V 1/10W 1K 1
R739 ERJ3GEYJ683V 1/10W 68K 1
R740 ERJ3GEYJ105V 1/10W 1M 1 (27PC)
R741 ERJ3GEYJ101V 1/10W 100 1
R742 ERJ3GEYJ102V 1/10W 1K 1
R743 ERJ3GEYJ102V 1/10W 1K 1
R744 ERJ3GEY0R00V 1/10W 0 1
R747 ERJ3GEYJ683V 1/10W 68K 1
R748 ERJ3GEYJ683V 1/10W 68K 1
R749 ERJ3GEYJ683V 1/10W 68K 1
Part No. Part Name &
Description
Pcs Remarks
40
Page 41
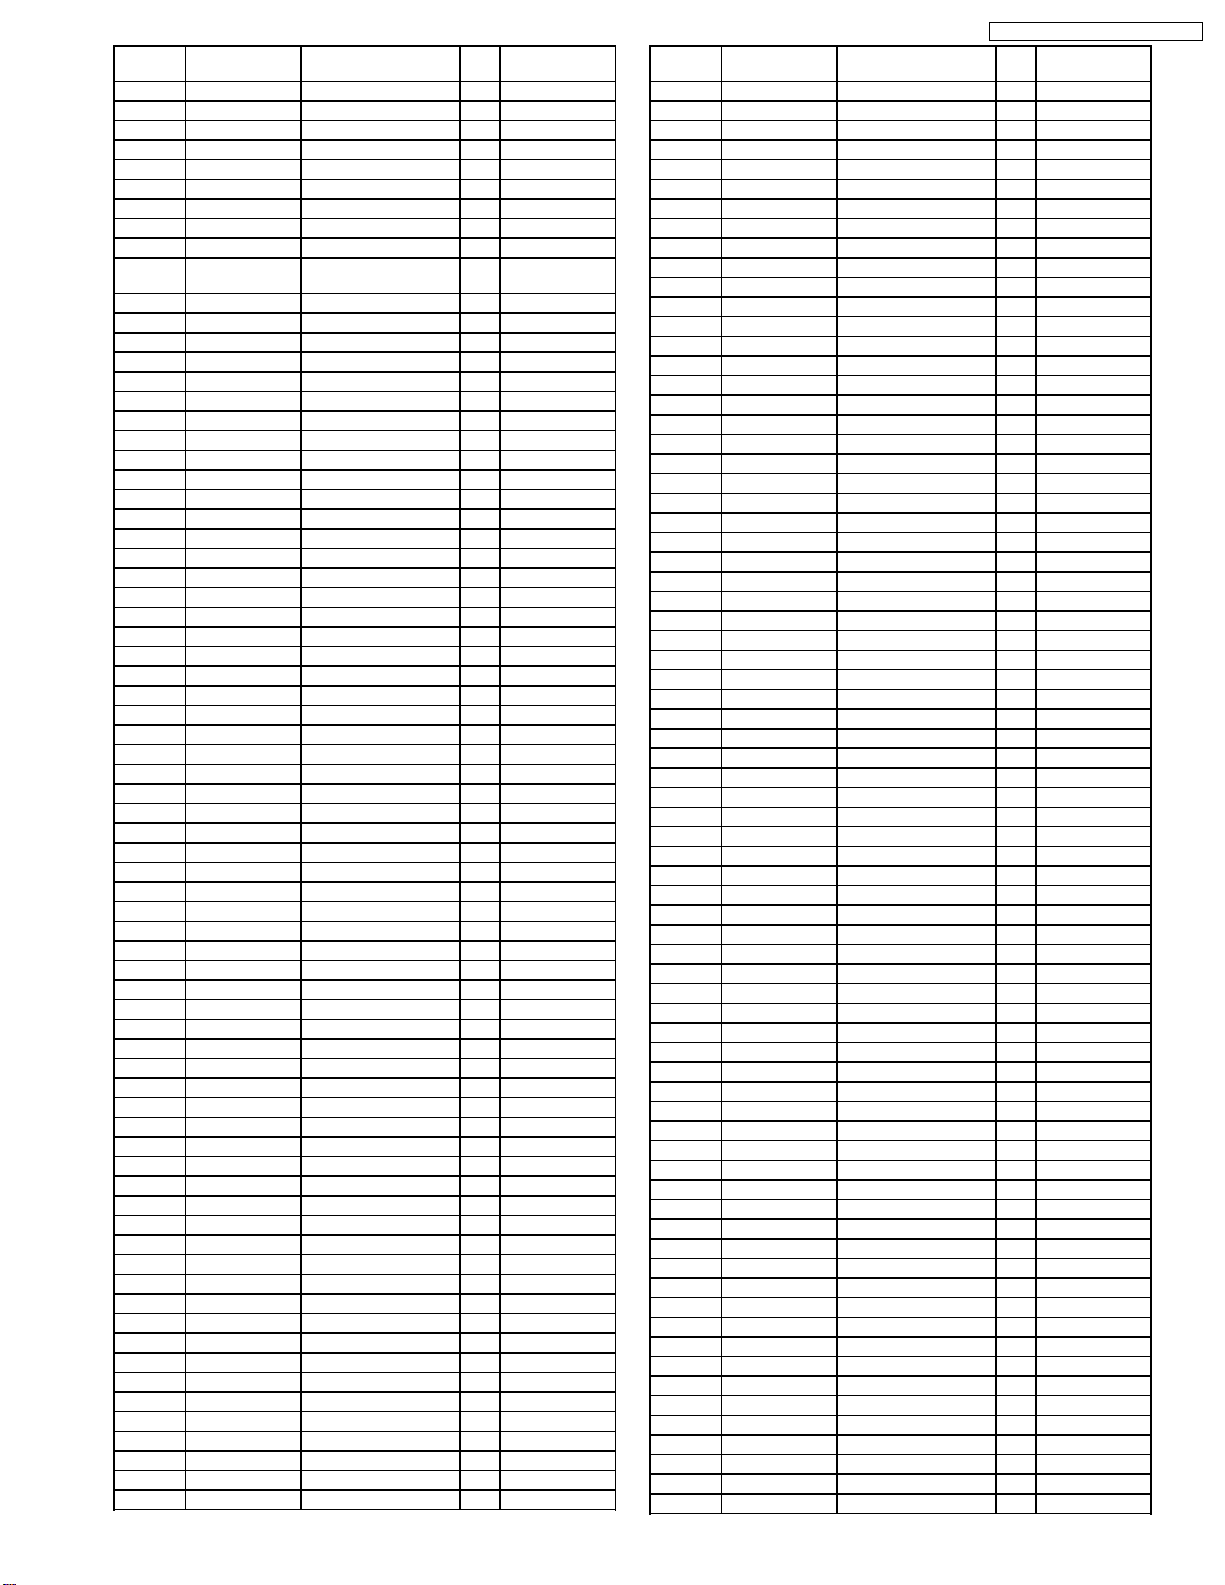
Ref.
No.
R750 ERJ3GEYJ683V 1/10W 68K 1
R751 ERJ3GEY0R00V 1/10W 0 1
R752 ERJ6GEY0R00V 1/8W 0 1 (25P)(26P)
R753 ERJ3GEY0R00V 1/10W 0 1 (25P)(26P)
S700 K0L1BA000109 SW 1
X700 H2A169500008 CRYSTAL OSC. 1
C1 ECJ1VC1H470J 50V 47P 1
C2 ECJ1VC1H100D 50V 10P 1
C3 ECJ1VB1C333K 16V 0.033U 1
C4 ECEA1CKA100B 16V 10U 1
C5 ECJ1VB1C473K 16V 0.047U 1
C6 ECJ1VB1H102K 50V 1000P 1
C7 ECJ1VB1H102K 50V 1000P 1
C8 ECJ1VC1H070D 50V 7P 1
C9 ECJ1VB1E103K 25V 0.01U 1
C10 ECJ1VB1E103K 25V 0.01U 1
C11 ECJ1VB1H102K 50V 1000P 1
C12 ECJ1VB1C473K 16V 0.047U 1
C13 ECJ1VC1H150J 50V 15P 1
C15 ECJ1VB1C473K 16V 0.047U 1
C16 ECJ1VC1H150J 50V 15P 1
C17 ECEA1HKA3R3B 50V 3.3U 1
C18 ECJ1VB1E103K 25V 0.01U 1
C19 ECEA1HKA010B 50V 1U 1
C20 ECEA1AKA101B 10V 100U 1
C21 ECEA1HKA010B 50V 1U 1
C22 ECEA1HKAR47B 50V 0.47U 1
C23 ECEA1AKA101B 10V 100U 1
C24 ECEA1AKA220B 10V 22U 1
C25 ECJ1VB1C183K 16V 0.018U 1
C26 ECJ1VB1E103K 25V 0.01U 1
C27 ECJ1VB1C183K 16V 0.018U 1
C28 ECJ1VB1H102K 50V 1000P 1
C29 ECJ1VB1H102K 50V 1000P 1
C30 ECEA1HKA010B 50V 1U 1
C31 ECEA1HKA010B 50V 1U 1
C32 ECEA1HKA4R7B 50V 4.7U 1
C33 ECJ1VC1H101K 50V 100P 1
C34 ECJ1VC1H270J 50V 27P 1
C35 ECJ1VC1H101K 50V 100P 1
C36 ECJ1VC1H220J 50V 22P 1
C37 ECJ1VC1H101K 50V 100P 1
C39 ECJ1VB1H102K 50V 1000P 1
C40 ECEA1CKA101B 16V 100U 1
C41 ECJ1VB1H331K 50V 330P 1
C43 ECJ1VB1C473K 16V 0.047U 1
C44 ECJ1VB1C223K 16V 0.023U 1
C46 ECJ1VB1H222K 50V 2200P 1
C47 F1D1H100A015 50V 10U 1
C48 ECJ1VB1H102K 50V 1000P 1
C51 ECJ1VC1H070D 50V 7P 1
C52 ECJ1VB1H102K 50V 1000P 1
C103 F1H1C104A042 16V 0.1U 1
C104 F1H1C104A042 16V 0.1U 1
C105 F1H1C104A042 16V 0.1U 1
C106 ECJ1VB1H102K 50V 1000P 1
C107 ECJ1VB1H102K 50V 1000P 1
C108 ECJ1VB1H102K 50V 1000P 1
C109 ECJ1VB1C683K 16V 0.068U 1
C110 F1H1C104A042 16V 0.1U 1
C111 ECJ1VB1E103K 25V 0.01U 1
C112 ECJ1VB1E153K 25V 0.015U 1
C113 ECEA1HKAR22B 50V 0.22U 1
C114 ECJ1VB1C473K 16V 0.047U 1
C115 ECJ1VB1C105K 16V 1U 1
C116 ECEA1HKA010B 50V 1U 1
Part No. Part Name &
REP4044A MAIN P.C.B. ASS’Y (RTL) (25P)
REP4044B MAIN P.C.B. ASS’Y (RTL)(27PC)
Description
Pcs Remarks
(26P)
SC-EN25P / SC-EN26P / SC- EN27PC
Ref.
No.
C117 ECUV1H682KBV 50V 6800P 1
C118 ECJ1VB1C333K 16V 0.033U 1
C119 ECJ1VB1E153K 25V 0.015U 1
C122 ECJ1VB1C473K 16V 0.047U 1
C203 F1H1C104A042 16V 0.1U 1
C204 F1H1C104A042 16V 0.1U 1
C205 F1H1C104A042 16V 0.1U 1
C206 ECJ1VB1H102K 50V 1000P 1
C207 ECJ1VB1H102K 50V 1000P 1
C208 ECJ1VB1H102K 50V 1000P 1
C209 ECJ1VB1C683K 16V 0.068U 1
C210 F1H1C104A042 16V 0.1U 1
C211 ECJ1VB1E103K 25V 0.01U 1
C212 ECJ1VB1E153K 25V 0.015U 1
C213 ECEA1HKAR22B 50V 0.22U 1
C214 ECJ1VB1C473K 16V 0.047U 1
C215 ECJ1VB1C105K 16V 1U 1
C216 ECEA1HKA010B 50V 1U 1
C217 ECUV1H682KBV 50V 6800P 1
C218 ECJ1VB1C333K 16V 0.033U 1
C219 ECJ1VB1E153K 25V 0.015U 1
C222 ECJ1VB1C473K 16V 0.047U 1
C301 ECJ1VB1H102K 50V 1000P 1
C305 ECJ1VB1H221K 50V 220P 1
C309 ECEA1AKA470B 10V 47U 1
C310 ECEA1AKA101B 10V 100U 1
C311 ECEA1HKAR33B 50V 0.33U 1
C312 ECJ1VB1H221K 50V 220P 1
C313 ECJ1VB1H221K 50V 220P 1
C315 ECEA0JKA101B 6.3V 100U 1
C353 ECA1AM221B 10V 220U 1
C356 ECJ1VB1H221K 50V 220P 1
C357 ECJ1VB1H221K 50V 220P 1
C358 ECA1AM102B 10V 1000U 1
C359 ECJ1VB1H102K 50V 1000P 1
C402 ECUV1C224KBV 16V 0.22U 1
C403 ECJ1VB1H471K 50V 470P 1
C407 ECA1AM102B 10V 1000U 1
C502 ECUV1C224KBV 16V 0.22U 1
C503 ECJ1VB1H471K 50V 470P 1
C507 ECA1AM102B 10V 1000U 1
C601 ECEA1CKA470B 16V 47U 1
C602 ECEA1CKA100B 16V 10U 1
C603 ECJ1VB1H102K 50V 1000P 1
C604 ECEA1EKA100B 25V 10U 1
C608 ECEA1EKA100B 25V 10U 1
C609 ECEA1EKA100B 25V 10U 1
C610 ECEA1EKA100B 25V 10U 1
C611 ECA0JM472E 6.3V 4700U 1
C612 ECEA0JKA101B 6.3V 100U 1
C615 ECEA1CKA101B 16V 100U 1
C616 ECA1EM332E 25V 3300U 1
C801 ECEA1AKA101B 10V 100U 1
C802 ECJ1VB1E103K 25V 0.01U 1
C803 ECJ1VB1H102K 50V 1000P 1
C804 ECJ1VB1H102K 50V 1000P 1
C805 ECJ1VB1E103K 25V 0.01U 1
C806 ECJ1VB1H102K 50V 1000P 1
C807 ECJ1VC1H560J 50V 56P 1
C808 ECJ1VC1H560J 50V 56P 1
C809 ECJ1VB1H102K 50V 1000P 1
C810 ECJ1VC1H390J 50V 39P 1
C811 ECJ1VC1H560J 50V 56P 1
C812 ECUV1H180JCV 50V 18P 1
C813 ECUV1H180JCV 50V 18P 1
C814 ECEA1HKA2R2B 50V 2.2U 1
C815 ECEA1HKA010B 50V 1U 1
C817 ECJ1VB1H102K 50V 1000P 1
C818 ECJ1VB1H102K 50V 1000P 1
C819 ECJ1VB1H102K 50V 1000P 1
C820 ECEA1EKA100B 25V 10U 1
C821 ECJ1VB1H102K 50V 1000P 1
C822 ECJ1VB1H102K 50V 1000P 1
Part No. Part Name &
Description
Pcs Remarks
41
Page 42
SC-EN25P / SC-EN26P / SC- EN27PC
Ref.
No.
C826 ECJ1VB1H102K 50V 1000P 1
C827 ECA1AM331B 10V 330U 1
C828 ECJ1VB1H222K 50V 2200P 1
C829 ECJ1VB1H222K 50V 2200P 1
C830 ECJ1VB1H102K 50V 1000P 1
C901 ECBT1H103KB5 50V 0.01U 1
C902 ECBT1H103KB5 50V 0.01U 1
C903 ECBT1H103KB5 50V 0.01U 1
C904 ECBT1H103KB5 50V 0.01U 1
C1001 ECEA1CKA100B 16V 10U 1
C1002 ECJ1VB1C105K 16V 1U 1
CF1 J0B1075A0101 FM CERAMIC FILTER 1
CF2 RLFCFA450L4B AM FILTER 1
Part No. Part Name &
Description
Pcs Remarks
Ref.
No.
L7 G2BPC0000017 COIL 1
L8 RLQZP101KT-Y AXIAL COIL 1
L51 G2A390C00001 AM RF COIL 1
L601 RLQZP101KT-Y AXIAL COIL 1
L801 G0C2R2JA0019 FIXED INDUCTOR 1
L802 G0C2R2JA0019 FIXED INDUCTOR 1
L901 ELF15N035AN POWER COIL 1
P1 K1KA03AA0186 CONNECTOR(3P) 1
P351 K1KA06BA0061 CONNECTOR 1
P352 K1KA02BA0055 CONNECTOR 1
P601 K1KA06BA0061 CONNECTOR 1
P901 K1KA04BA0055 CONNECTOR 1
P1001 K1KA03BA0055 CONNECTOR 1
Part No. Part Name &
Description
Pcs Remarks
D1 B0CDAD000010 DIODE 1
D2 B0CDAB000019 DIODE 1
D3 B0CDAB000019 DIODE 1
D4 B0AACK000004 DIODE 1
D301 MAZ40560MF DIODE 1
D601 MAZ40510MF DIODE 1
D602 B0EAKM000118 DIODE 1
D603 B0EAKM000118 DIODE 1
D604 B0EAKM000118 DIODE 1
D605 B0AACK000004 DIODE 1
D607 B0AACK000004 DIODE 1
D608 MAZ40910LF DIODE 1
D610 B0AACK000004 DIODE 1
D611 B0AACK000004 DIODE 1
D612 B0AAEF000001 DIODE 1
D613 B0AAEF000001 DIODE 1
D614 MAZ40620MF DIODE 1
D615 MAZ40470MF DIODE 1
D801 B0AACK000004 DIODE 1
D802 B0AACK000004 DIODE 1
D803 B0AAEF000001 DIODE 1
D901 B0EAKM000118 DIODE 1
D902 B0EAKM000118 DIODE 1
D903 B0EAKM000118 DIODE 1
D904 B0EAKM000118 DIODE 1
D906 B0AACK000004 DIODE 1
D1001 MAZ40820MF DIODE 1
D1002 LNG4A4CN4E LED 1
D1003 MAZ40620MF DIODE 1
FFC801 REE1363 LCD FFC 1
FP701 K1MN17B00032 CONNECTOR 1
FP801 K1MN26B00010 CONNECTOR 1
IC1 C1BB00001120 TUNER IC 1
IC301 C1BB00000732 IC 1
IC351 C0GAE0000007 MOTOR DRIVER IC 1
IC601 C0AAAA000036 POWER IC 1
IC801 MN101C74FAD MICON IC 1
IP602 K5G251A00008 FUSE PROTECTOR 1
JK601 K2HC103A0031 JACK 1
JK602 K4AC04B00008 TERMINAL 1
JK603 K2HC1YYA0002 JACK 1
JK901 K2AB2B000007 AC INTEL 1
JW351 REX1227 MOTER TO MAIN WIRE 1
JW352 REX1228 SW TO MAIN WIRE 1
JW601 REX1227 SW TO MAIN WIRE 1
JW801 RWJ9002070SS LEAF SW WIRE 1
JW1001 REX1229 SENSOR TO MAIN
L1 RLQY30S1W-F COIL 1
L3 RLQY30S1W-F COIL 1
L5 G0ZZ00002174 FM COIL 1
WIRE
Q1 2SD1819ARL TRANSISTOR 1
Q301 KTA2014GRRTK TRANSISTOR 1
Q302 B1AACF000117 TRANSISTOR 1
Q303 B1AACF000117 TRANSISTOR 1
Q401 B1ABGD000021 TRANSISTOR 1
Q501 B1ABGD000021 TRANSISTOR 1
Q603 B1ACND000003 TRANSISTOR 1
Q604 2SD1819ARL TRANSISTOR 1
Q605 B1BCCG000002 P TRANSISTOR 1
Q606 KTA2014GRRTK TRANSISTOR 1
Q607 2SD1819ARL TRANSISTOR 1
Q608 B1ACND000003 TRANSISTOR 1
Q611 B1ACND000003 TRANSISTOR 1
Q612 2SD1819ARL TRANSISTOR 1
Q613 KTA2014GRRTK TRANSISTOR 1
Q615 B1BAAJ000003 TRANSISTOR 1
Q617 2SD1819ARL TRANSISTOR 1
Q801 2SD1819ARL TRANSISTOR 1
Q802 2SD1819ARL TRANSISTOR 1
QR609 UNR521400L TRANSISTOR 1
QR614 UNR521F00L TRANSISTOR 1
QR618 UNR521F00L TRANSISTOR 1
QR619 UNR521F00L TRANSISTOR 1
QR620 UNR511100L TRANSISTOR 1
QR621 UNR511100L TRANSISTOR 1
QR803 UNR521300L TRANSISTOR 1
QR804 UNR511100L TRANSISTOR 1
R1 ERJ3GEYJ103V 1/10W 10K 1
R2 ERJ3GEY0R00V 1/10W 0 1
R3 ERJ3GEYJ332V 1/10W 3.3K 1
R4 ERJ3GEYJ104V 1/10W 100K 1
R5 ERJ3GEYJ680V 1/10W 68 1
R6 ERJ3GEYJ104V 1/10W 100K 1
R7 ERJ3GEYJ104V 1/10W 100K 1
R8 ERJ3GEYJ103V 1/10W 10K 1
R9 ERJ3GEY0R00V 1/10W 0 1
R10 ERJ3GEYJ104V 1/10W 100K 1
R11 ERJ3GEYJ332V 1/10W 3.3K 1
R12 ERJ3GEYJ152V 1/10W 1.5K 1
R13 ERJ3GEYJ332V 1/10W 3.3K 1
R14 ERJ3GEYJ472V 1/10W 4.7K 1
R16 ERJ3GEYJ103V 1/10W 10K 1
R17 ERJ3GEYJ103V 1/10W 10K 1
R18 ERJ3GEYJ223V 1/10W 22K 1
R20 ERJ3GEYJ103V 1/10W 10K 1
R22 ERJ3GEYJ103V 1/10W 10K 1
R23 ERJ3GEYJ223V 1/10W 22K 1
R24 ERJ3GEYJ223V 1/10W 22K 1
R25 ERJ3GEYJ223V 1/10W 22K 1
1
R28 ERJ3GEYJ104V 1/10W 100K 1
R29 ERJ3GEYJ102V 1/10W 1K 1
R30 ERJ3GEYJ393V 1/10W 39K 1
R31 ERJ3GEYJ472V 1/10W 4.7K 1
R32 ERJ3GEYJ330V 1/10W 33 1
R33 ERJ3GEYJ472V 1/10W 4.7K 1
R34 ERJ3GEYJ182V 1/10W 1.8K 1
42
Page 43
Ref.
No.
R35 ERJ3GEYJ472V 1/10W 4.7K 1
R36 ERJ3GEYJ472V 1/10W 4.7K 1
R37 ERJ3GEY0R00V 1/10W 0 1
R101 ERJ3GEYJ473V 1/10W 47K 1
R102 ERJ3GEYJ562V 1/10W 5.6K 1
R103 ERJ3GEYJ473V 1/10W 47K 1
R104 ERJ3GEYJ562V 1/10W 5.6K 1
R105 ERJ3GEYJ562V 1/10W 5.6K 1
R106 ERDS2TJ682T 1/4W 6.8K 1
R107 ERJ3GEYJ223V 1/10W 22K 1
R108 ERJ3GEYJ332V 1/10W 3.3K 1
R109 ERJ3GEYJ103V 1/10W 10K 1
R110 ERJ3GEYJ392V 1/10W 3.9K 1
R111 ERJ3GEYJ333V 1/10W 33K 1
R112 ERJ3GEYJ682V 1/10W 6.8K 1
R113 ERJ3GEYJ472V 1/10W 4.7K 1
R201 ERJ3GEYJ473V 1/10W 47K 1
R202 ERJ3GEYJ562V 1/10W 5.6K 1
R203 ERJ3GEYJ473V 1/10W 47K 1
R204 ERJ3GEYJ562V 1/10W 5.6K 1
R205 ERJ3GEYJ562V 1/10W 5.6K 1
R206 ERDS2TJ682T 1/4W 6.8K 1
R207 ERJ3GEYJ223V 1/10W 22K 1
R208 ERJ3GEYJ332V 1/10W 3.3K 1
R209 ERJ3GEYJ103V 1/10W 10K 1
R210 ERJ3GEYJ392V 1/10W 3.9K 1
R211 ERJ3GEYJ333V 1/10W 33K 1
R212 ERJ3GEYJ682V 1/10W 6.8K 1
R213 ERJ3GEYJ472V 1/10W 4.7K 1
R301 ERJ3GEYJ223V 1/10W 22K 1
R302 ERJ3GEYJ223V 1/10W 22K 1
R303 ERJ3GEYJ223V 1/10W 22K 1
R304 ERJ3GEYJ223V 1/10W 22K 1
R305 ERJ3GEYJ103V 1/10W 10K 1
R306 ERJ3GEYJ102V 1/10W 1K 1
R307 ERJ3GEYJ102V 1/10W 1K 1
R308 ERJ3GEYJ102V 1/10W 1K 1
R309 ERJ3GEYJ102V 1/10W 1K 1
R312 ERJ3GEYJ102V 1/10W 1K 1
R313 ERJ3GEYJ102V 1/10W 1K 1
R316 ERJ3GEYJ334V 1/10W 330K 1
R317 ERJ3GEYJ334V 1/10W 330K 1
R318 ERDS2TJ330T 1/4W 33 1
R319 ERDS2TJ330T 1/4W 33 1
R322 ERJ3GEYJ470V 1/10W 47 1
R323 ERJ3GEYJ331V 1/10W 330 1
R325 ERJ3GEYJ152V 1/10W 1.5K 1
R402 ERJ3GEYJ102V 1/10W 1K 1
R403 ERJ3GEYJ271V 1/10W 270 1
R409 ERDS2TJ333T 1/4W 33K 1
R502 ERJ3GEYJ102V 1/10W 1K 1
R503 ERJ3GEYJ271V 1/10W 270 1
R509 ERDS2TJ333T 1/4W 33K 1
R601 ERDS2TJ822T 1/4W 8.2K 1
R603 ERJ3GEYJ104V 1/10W 100K 1
R604 ERJ3GEYJ273V 1/10W 27K 1
R605 ERJ3GEYJ102V 1/10W 1K 1
R607 ERJ3GEYJ222V 1/10W 2.2K 1
R608 ERJ3GEYJ333V 1/10W 33K 1
R612 ERJ3GEYJ222V 1/10W 2.2K 1
R613 ERJ3GEYJ223V 1/10W 22K 1
R614 ERDS2TJ151T 1/4W 150 1
R615 ERJ3GEYJ1R0V 1/10W 1 1
R616 ERDS2TJ471T 1/4W 470 1
R617 ERJ3GEYJ101V 1/10W 100 1
R618 ERJ3GEYJ681V 1/10W 680 1
R619 ERJ3GEYJ681V 1/10W 680 1
R620 ERJ3GEYJ2R2V 1/10W 2.2 1
R621 ERDS2TJ1R0T 1/4W 1 1
R622 ERDS2TJ1R0T 1/4W 1 1
R623 ERDS2TJ471T 1/4W 470 1
R624 ERDS2TJ471T 1/4W 470 1
R625 ERDS2TJ121T 1/4W 120 1
Part No. Part Name &
Description
Pcs Remarks
SC-EN25P / SC-EN26P / SC- EN27PC
Ref.
No.
R626 ERDS2TJ121T 1/4W 120 1
R627 ERDS2TJ221T 1/4W 220 1
R628 ERJ3GEYJ102V 1/10W 1K 1
R629 ERJ3GEYJ102V 1/10W 1K 1
R630 ERJ3GEYJ221V 1/10W 220 1
R631 ERJ3GEYJ102V 1/10W 1K 1
R632 ERJ3GEYJ472V 1/10W 4.7K 1
R633 ERJ3GEYJ103V 1/10W 10K 1
R634 ERJ3GEYJ101V 1/10W 100 1
R635 ERJ3GEYJ222V 1/10W 2.2K 1
R636 ERJ3GEYJ222V 1/10W 2.2K 1
R637 ERJ3GEYJ681V 1/10W 680 1
R638 ERJ3GEYJ153V 1/10W 15K 1
R639 ERJ3GEYJ102V 1/10W 1K 1
R640 ERJ3GEYJ153V 1/10W 15K 1
R641 ERJ3GEYJ102V 1/10W 1K 1
R642 ERJ3GEYJ562V 1/10W 5.6K 1
R643 ERJ3GEYJ273V 1/10W 27K 1
R644 ERJ3GEYJ562V 1/10W 5.6K 1
R801 ERJ3GEYJ123V 1/10W 12K 1
R802 ERJ3GEYJ104V 1/10W 100K 1
R803 ERJ3GEYJ104V 1/10W 100K 1
R804 ERJ3GEYJ104V 1/10W 100K 1
R807 ERJ3GEYJ332V 1/10W 3.3K 1
R808 ERJ3GEYJ332V 1/10W 3.3K 1
R809 ERJ3GEYJ224V 1/10W 220K 1
R811 ERJ3GEYJ473V 1/10W 47K 1
R812 ERJ3GEYJ102V 1/10W 1K 1
R813 ERJ3GEYJ102V 1/10W 1K 1
R814 ERJ3GEYJ102V 1/10W 1K 1
R815 ERJ3GEYJ102V 1/10W 1K 1
R816 ERJ3GEYJ102V 1/10W 1K 1
R817 ERJ3GEYJ183V 1/10W 18K 1
R818 ERJ3GEYJ103V 1/10W 10K 1
R819 ERJ3GEYJ472V 1/10W 4.7K 1
R820 ERJ3GEYJ103V 1/10W 10K 1
R822 ERJ3GEYJ102V 1/10W 1K 1
R823 ERJ3GEYJ102V 1/10W 1K 1
R824 ERJ3GEYJ224V 1/10W 220K 1
R825 ERJ3GEYJ123V 1/10W 12K 1 (27PC)
R825 ERJ3GEYJ1R0V 1/10W 1 1 (25P)(26P)
R826 ERJ3GEYJ1R0V 1/10W 1 1 (25P)(26P)
R826 ERJ3GEYJ392V 1/10W 3.9K 1 (27PC)
R827 ERJ3GEYJ472V 1/10W 4.7K 1
R828 ERJ3GEYJ102V 1/10W 1K 1
R829 ERJ3GEYJ102V 1/10W 1K 1
R830 ERJ3GEYJ104V 1/10W 100K 1
R831 ERJ3GEYJ104V 1/10W 100K 1
R832 ERJ3GEYJ153V 1/10W 15K 1
R833 ERJ3GEYJ104V 1/10W 100K 1
R835 ERJ3GEYJ103V 1/10W 10K 1
R836 ERJ3GEYJ103V 1/10W 10K 1
R837 ERJ3GEYJ103V 1/10W 10K 1
R838 ERJ3GEYJ104V 1/10W 100K 1
R839 ERJ3GEYJ104V 1/10W 100K 1
R840 ERJ3GEYJ153V 1/10W 15K 1
R841 ERJ3GEYJ821V 1/10W 820 1
R846 ERJ3GEYJ152V 1/10W 1.5K 1
R847 ERJ3GEYJ222V 1/10W 2.2K 1
R848 ERJ3GEYJ272V 1/10W 2.7K 1
R849 ERJ3GEYJ392V 1/10W 3.9K 1
R850 ERJ3GEYJ562V 1/10W 5.6K 1
R851 ERJ3GEYJ822V 1/10W 8.2K 1
R852 ERDS2TJ153T 1/4W 15K 1
R860 ERJ3GEYJ104V 1/10W 100K 1
R861 ERJ3GEYJ104V 1/10W 100K 1
R862 ERJ3GEYJ820V 1/10W 82 1
R864 ERJ3GEYJ102V 1/10W 1K 1
R865 ERJ3GEYJ102V 1/10W 1K 1
R874 ERJ3GEYJ104V 1/10W 100K 1
R875 ERJ3GEYJ104V 1/10W 100K 1
R876 ERJ3GEY0R00V 1/10W 0 1
R877 ERJ3GEY0R00V 1/10W 0 1
Part No. Part Name &
Description
Pcs Remarks
43
Page 44
SC-EN25P / SC-EN26P / SC- EN27PC
Ref.
No.
R878 ERJ3GEY0R00V 1/10W 0 1
R901 ERDS2TJ102T 1/4W 1K 1
R1003 ERDS2TJ680T 1/4W 68 1
S351 K0L1BB000005 SW 1
S352 K0L1BB000005 SW 1
S801 EVQ21405R SW 1
S802 EVQ21405R SW 1
S803 EVQ21405R SW 1
S804 EVQ21405R SW 1
S805 EVQ21405R SW 1
S806 EVQ21405R SW 1
S807 EVQ21405R SW 1
S808 EVQ21405R SW 1
T1 G2BAC0000053 IFT 1
X1 J0B1075A0121 DISCRIMINATOR 1
X2 H0A750200020 CRYSTAL OSCILLATOR 1
X801 H0A327200097 CRYSTAL OSCILLATOR 1
X802 H2A800400011 CERAMIC OSCILLATOR 1
Z801 L5ACAEC00028 LCD 1
Z1001 B3RAD0000074 SENSOR 1
ZA901 K3GE1ZA00011 FUSE HOLDER 1
ZA902 K3GE1ZA00011 FUSE HOLDER 1
1 RAE0250Z-1X TRAVERSE ASS’Y 1
1-1 RAF0250A-8X PICK-UP 1
1-2 RDG0593 RELAY GEAR 1
1-3 RDG0592 DRIVE GEAR 1
1-5 RMS0849 GUIDE SHAFT 1
1-6 RXQ1225 TRV MOTOR ASS’Y 1
1-7 XQN2+C3FJ SCREW 1
1-8 XQN2+C3FJ SCREW 1
2 RMG0649-A FLOATING RUBBER B 1
3 RMG0649-A FLOATING RUBBER B 1
4 RMG0649-A FLOATING RUBBER B 1
5 RMG0649-A FLOATING RUBBER B 1
6 XTN2+6GFJ SCREW 1
7 XTN2+6GFJ SCREW 1
8 XTN2+6GFJ SCREW 1
10 RMN0837 LCD HOLDER 1
11 RMN0838 LED HOLDER 1
12 RMN0839 ANT HOLDER 1
13 RMN0840 LCD FIX PIECE 1
14 RMN0840 LCD FIX PIECE 1
15 RMX0353 LCD SPACE SHEET 1
16 XTV3+6FFJ SCREW 1
17 RDG0612 PULLEY GEAR 1
18 RDG0613 2ND GEAR 1
19 RDG0614 DRIVE GEAR L 1
20 RDG0615 DRIVE GEAR R 1
21 RDG0616 TIMING GEAR 1
22 RDG0617 LID KICKER 1
23 RDG0618 LID GEAR L 1
24 RDG0619 LID GEAR R 1
25 RDP0118 LID ROLLER 1
26 RDP0118 LID ROLLER 1
27 RDV0076 BELT 1
28 RGU2449-S1 FUNCTION BUTTON 1
29 RHD14136 SCREW 1
30 RHD14136 SCREW 1
32 RHD26044-1 SCREW 1
33 RHD26044-1 SCREW 1
34 RHD26044-1 SCREW 1
35 RHD26044-1 SCREW 1
36 RHD26047 SCREW 1
37 RHD26047 SCREW 1
38 RHD26047 SCREW 1
Part No. Part Name &
Description
CABINET PARTS
Pcs Remarks
Ref.
No.
39 RHD26047 SCREW 1
40 RHD26047 SCREW 1
41 RHD26047 SCREW 1
42 RHD26047 SCREW 1
43 RHD26047 SCREW 1
44 RHD26047 SCREW 1
45 RHD26047 SCREW 1
46 RHD26047 SCREW 1
47 RHD26047 SCREW 1
48 RHD26047 SCREW 1
49 RHD26047 SCREW 1
50 RHD26047 SCREW 1
51 RHD26047 SCREW 1
52 RHD26047 SCREW 1
53 RHD26047 SCREW 1
54 RHD26047 SCREW 1
55 RHD26047 SCREW 1
56 RHD26047 SCREW 1
57 RHD26047 SCREW 1
58 RHD26047 SCREW 1
59 RHD26047 SCREW 1
60 RHD26047 SCREW 1
61 RHD26047 SCREW 1
62 RHD26047 SCREW 1
64 RHD26051 SCREW 1
65 RHD26051 SCREW 1
66 RHD26051 SCREW 1
67 RHD26051 SCREW 1
68 RHD26051 SCREW 1
69 RHD26051 SCREW 1
70 RKA0162-K LEG RUBBER 1
71 RKA0162-K LEG RUBBER 1
72 RKA0162-K LEG RUBBER 1
73 RKA0162-K LEG RUBBER 1
74 RKQ0274-K CD BASE 1 (25P)(26P)
74 RKQ0274A-K CD BASE 1 (27PC)
75 RKS0423-H BACK CAB 1 (25P)(26P)
75 RKS0423A-H BACK CAB 1 (27PC)
76 RMB0819 CD SPRING 1
77 RMB0845 KICKER SPRING 1
78 RMB0846 SW SPRING 1
79 RMC0671 FRICTION SPRING 1
80 RMC0683 SHAFT FIXER 1
81 RMC0683 SHAFT FIXER 1
82 RMET0025-1 CD FLOATING SPRING 1
83 RMET0025-1 CD FLOATING SPRING 1
84 RMET0025-1 CD FLOATING SPRING 1
85 RMET0025-1 CD FLOATING SPRING 1
86 RMG0699-K LID CUSHON 1
87 RMG0699-K LID CUSHON 1
91 RMK0657 GEAR CH L 1
92 RMK0658 GEAR CH R 1
93 RML0710 SW LEVER 1
94 RMQ1494-1 GEAR FIXTRURE 1
95 RMS0876 LID BEARING L 1
96 RMS0877 LID BEARING R 1
97 RMS0878 SHAFT BEARING 1
98 RMS0879 ROLLER BEARING L 1
99 RMS0880 ROLLER BEARING R 1
100 RMS0881 SHAFT 1
102 RMS0885 SHAFT BEARING2 1
103 RSC0732 EARTH PLATE 1
104 RSC0733 TUNER SHIELD 1
105 RYK1477-S FRONT CAB UNIT 1 (25P)
105 RYK1477A-S FRONT CAB UNIT 1 (27PC)
105 RYK1477C-S FRONT CAB UNIT 1 (26P)
106 XTN2+6GFJ SCREW 1
107 XTN2+6GFJ SCREW 1
108 XTN2+6GFJ SCREW 1
109 XTN2+6GFJ SCREW 1
110 XTN2+6GFJ SCREW 1
111 XTN2+6GFJ SCREW 1
112 XTN2+6GFJ SCREW 1
Part No. Part Name &
Description
Pcs Remarks
44
Page 45
Ref.
No.
113 XTN2+6GFJ SCREW 1
114 XTN2+6GFJ SCREW 1
115 XTV3+12GFJ SCREW 1
116 XTV3+12GFJ SCREW 1
117 XTV3+12GFJ SCREW 1
118 XTV3+12GFJK SCREW 1
119 XTV3+12GFJK SCREW 1
120 XTV3+12GFJK SCREW 1
121 XTV3+12GFJK SCREW 1
122 XTV3+12GFJK SCREW 1
123 XTV3+12GFJK SCREW 1
124 XTV3+12GFJK SCREW 1
125 XTV3+12GFJK SCREW 1
126 XTV3+12GFJK SCREW 1
127 XTV3+12GFJK SCREW 1
128 XTV3+12GFJK SCREW 1
129 XTV3+12GFJK SCREW 1
130 XTV3+12GFJK SCREW 1
131 XTV3+12GFJK SCREW 1
132 XTV3+12GFJK SCREW 1
133 XTV3+6FFJ SCREW 1
134 XTV3+6FFJ SCREW 1
135 XYN26+C6FJ SCREW 1
136 XYN26+C6FJ SCREW 1
137 RFKPAEN25PS SMALL DC MOTOR
138 RFKNAEN25PS CD LID ASS’Y 1
139 RGN2875-K NAME PLATE 1 (27PC)
139 RGN2875E-K NAME PLATE 1 (26P)
140 RQLXS0053 LASER CAUTIONLABEL 1 (27PC)
141 RKU0086-H TRANS COVER 1 (25P)(26P)
141 RKU0086A-H TRANS COVER 1 (27PC)
F901 K5D162AQ0004 FUSE 1
JW901 REX1226 WIRE 1
PCB1 REP3876B CD SERVO PCB ASS’Y 1 (25P)(26P)
PCB1 REP3875B CD SERVO PCB ASS’Y 1 (27PC)
PCB2 REP4044A MAIN PCB ASS’Y 1 (25P)(26P)
PCB2 REP4044B MAIN PCB ASS’Y 1 (27PC)
T901 G4C4ABD00011 POWER TRANSFORMERS 1
A1 N1DADYY00003 LINEAR ANTENNAS 1
A2 N2QAGB000037 REMOTE CONTROL
A2 N2QAGB000038 REMOTE CONTROL
A3 RJA0065-1D AC CORD 1
A4 RQT8520-P O/I BOOK 1
A4 RQT8521-C O/I BOOK 1 (27PC)
P1 RPG7815 PACKING CASE 1 (25P)
P1 RPG7959 PACKING CASE 1 (26P)
P1 RPG7816 PACKING CASE 1 (27PC)
P2 RPN1850 CUSHION 1
P3 RPF0417 BAG A 1
P4 RPFW0009 MIRAMAT SHEET 1
P5 RPFW0009 MIRAMAT SHEET 1
Part No. Part Name &
Description
ASS’Y
ACCESSORY AND
PACKAGING
UNITS
UNITS
Pcs Remarks
1
1 (25P)(26P)
1 (27PC)
SC-EN25P / SC-EN26P / SC- EN27PC
18.2. SB-EN25P
Ref.
No.
201 EAS8P198A SPEAKER 1
202 RGK1970-S NET PROTECTOR 1
203 RGK1970-S NET PROTECTOR 1
204 RKP0067-K SP FRONT CAB 1
205 RMA1981 SP ANGLE A 1
206 RMA1981 SP ANGLE A 1
207 RMA1982 SP ANGLE B 1
208 RMA1982 SP ANGLE B 1
209 RFKHBEN25PS SP BACKCAB ASS’Y 1
209-1 RKAX0011-K LEG FELT 4
209-2 RKAX0011-K LEG FELT 1
209-3 RKAX0011-K LEG FELT 1
209-4 RKAX0011-K LEG FELT 1
210 RFKNBEN25PS SP NET FRAME ASS’Y 1
211 XTV3+14GFJ SCREW 1
212 XTV3+14GFJ SCREW 1
213 XTV3+14GFJ SCREW 1
214 XTV3+14GFJ SCREW 1
215 XTV3+14GFJ SCREW 1
216 XTV3+14GFJ SCREW 1
217 XTV3+14GFJ SCREW 1
218 XTV3+14GFJ SCREW 1
219 XTV3+14GFJ SCREW 1
220 XTV3+14GFJ SCREW 1
221 XTV3+14GFJ SCREW 1
222 RQLA1030 SP CAUTION LABEL 1
Part No. Part Name &
Description
18.3. SB-EN26P
Ref.
No.
301 EAS8P198A SPEAKER 1
302 RMA1981 SP ANGLE A 1
303 RMA1981 SP ANGLE A 1
304 RMA1982 SP ANGLE B 1
305 RMA1982 SP ANGLE B 1
306 RFKHBEN25PS SP BACK CAB ASS’Y 1
306-1 RKAX0011-K LEG FELT 1
306-2 RKAX0011-K LEG FELT 1
306-3 RKAX0011-K LEG FELT 1
306-4 RKAX0011-K LEG FELT 1
307 RFKGBEN26PS SP FRONT CAB ASS’Y 1
308 XTV3+14GFJ SCREW 1
309 XTV3+14GFJ SCREW 1
310 XTV3+14GFJ SCREW 1
311 XTV3+14GFJ SCREW 1
312 XTV3+14GFJ SCREW 1
313 XTV3+14GFJ SCREW 1
314 XTV3+14GFJ SCREW 1
315 XTV3+14GFJ SCREW 1
316 XTV3+14GFJ SCREW 1
317 XTV3+14GFJ SCREW 1
318 RQLA1030 SP CAUTION LABEL 1
319 RGN2908-K SP NAME PLATE 1
Part No. Part Name &
Description
Pcs Remarks
Pcs Remarks
45
Page 46
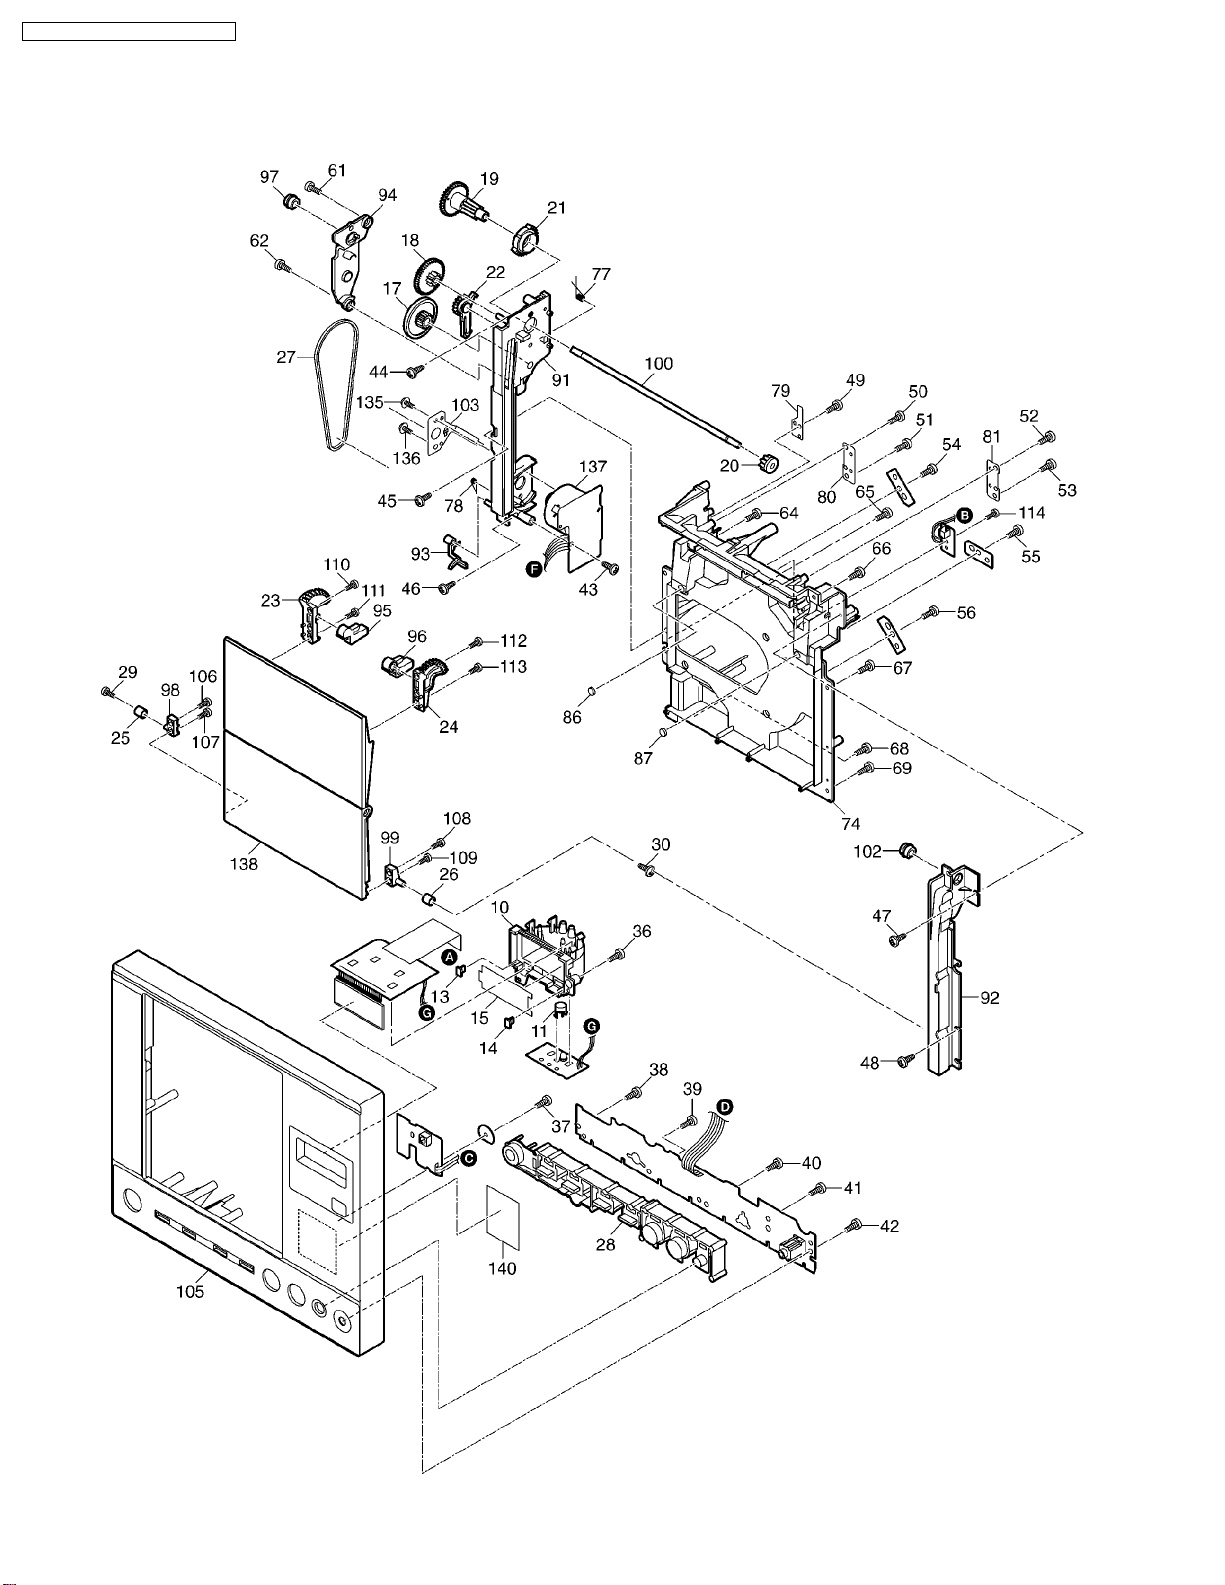
SC-EN25P / SC-EN26P / SC- EN27PC
19 Cabinet Parts Location
19.1. Main Unit
46
Page 47
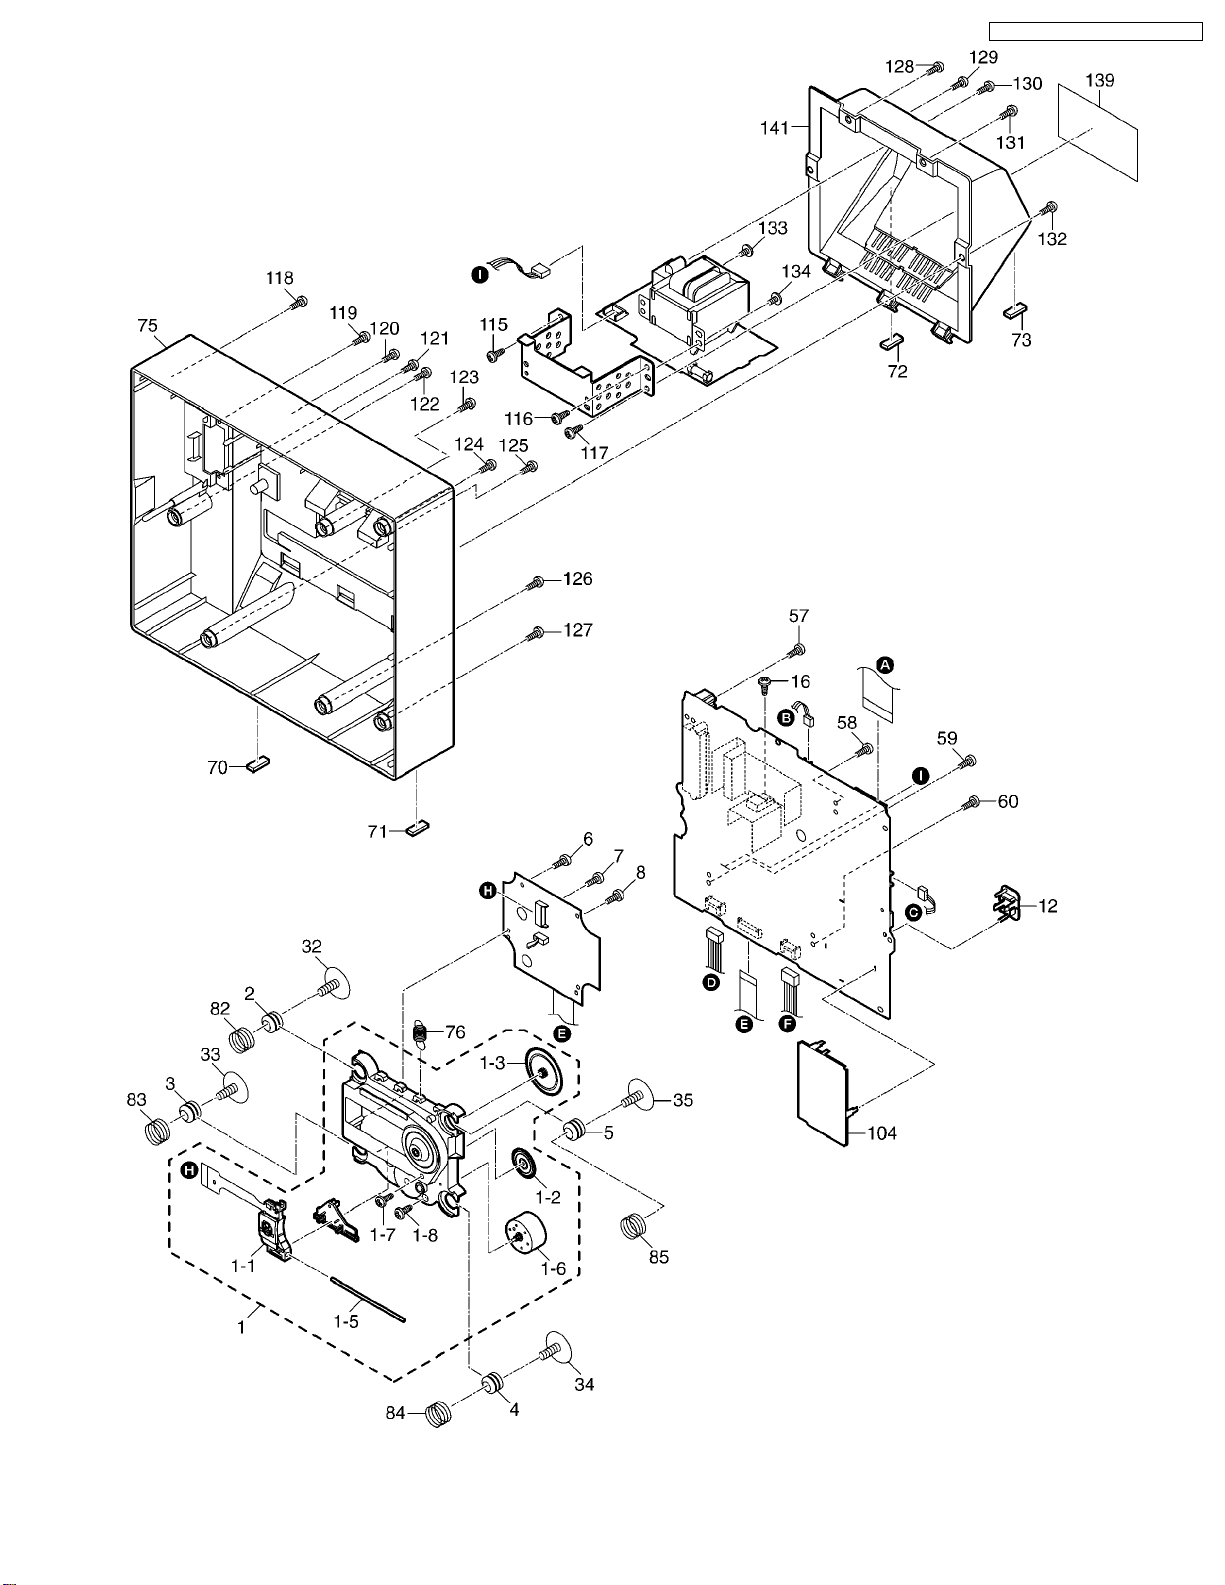
SC-EN25P / SC-EN26P / SC- EN27PC
47
Page 48
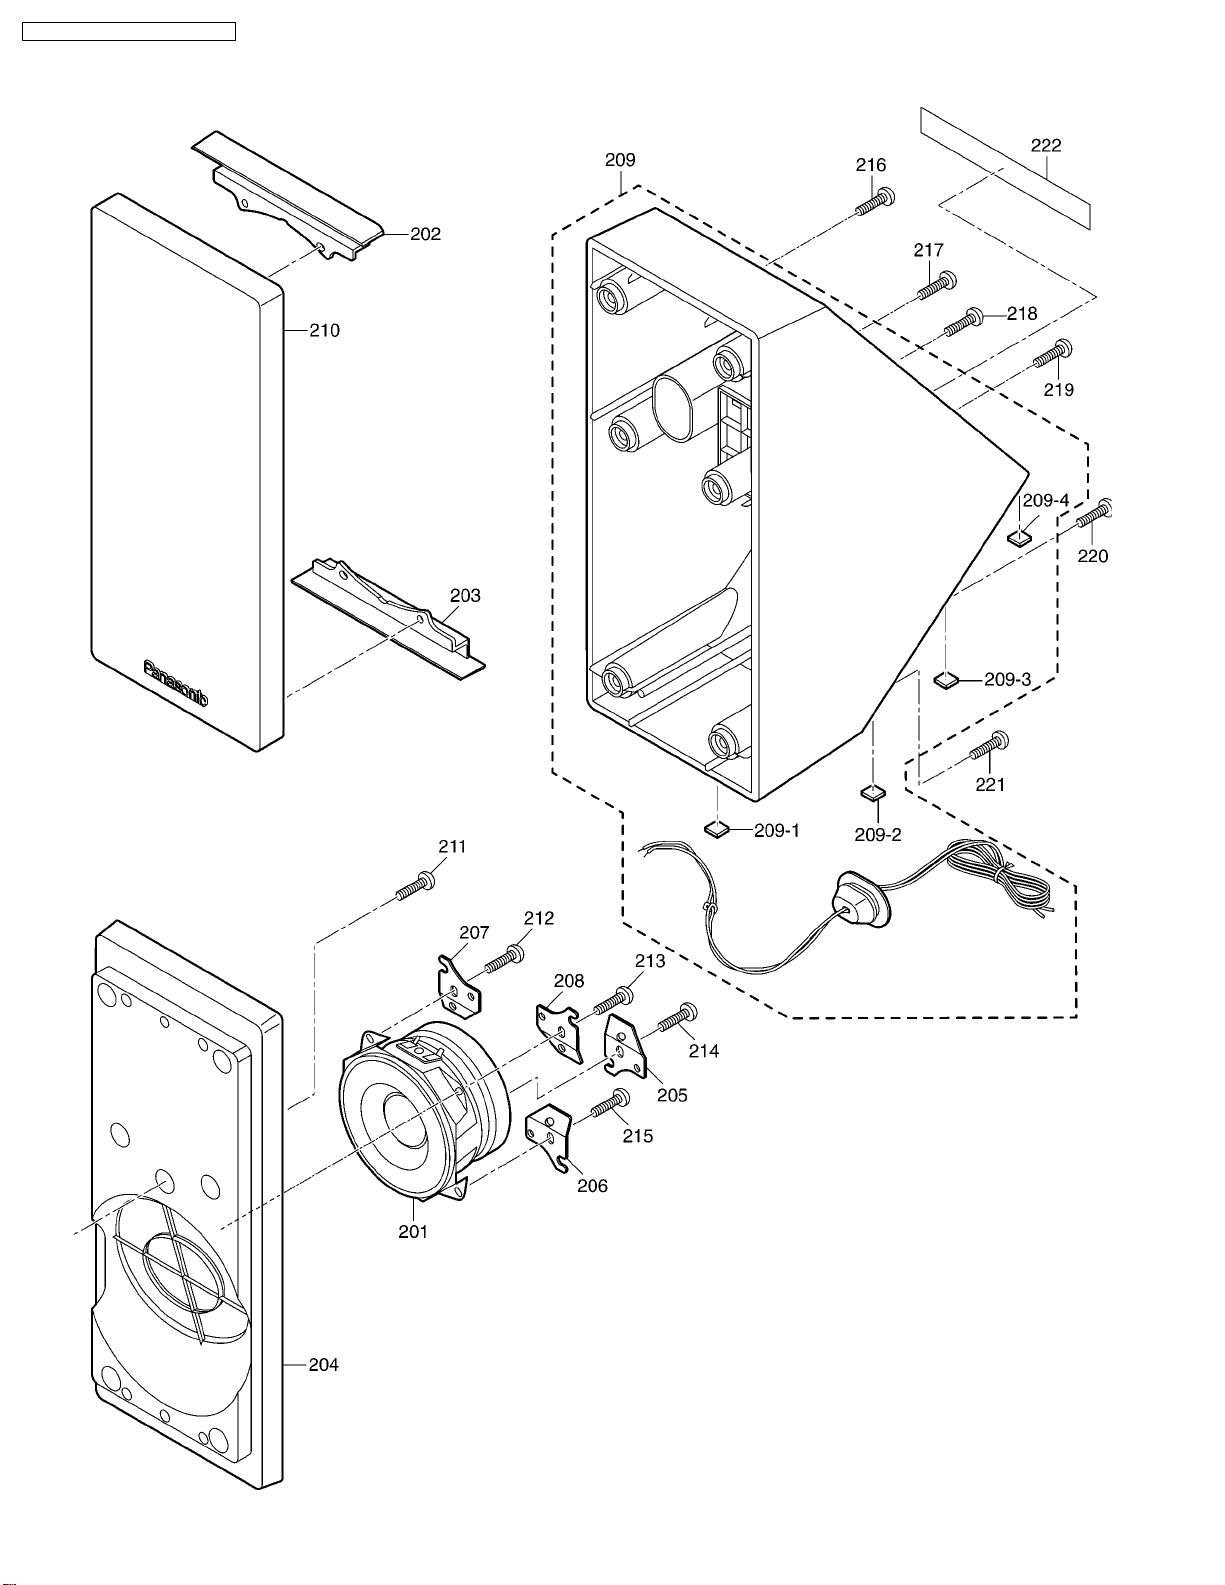
SC-EN25P / SC-EN26P / SC- EN27PC
19.2. Speaker(SB-EN25)
48
Page 49
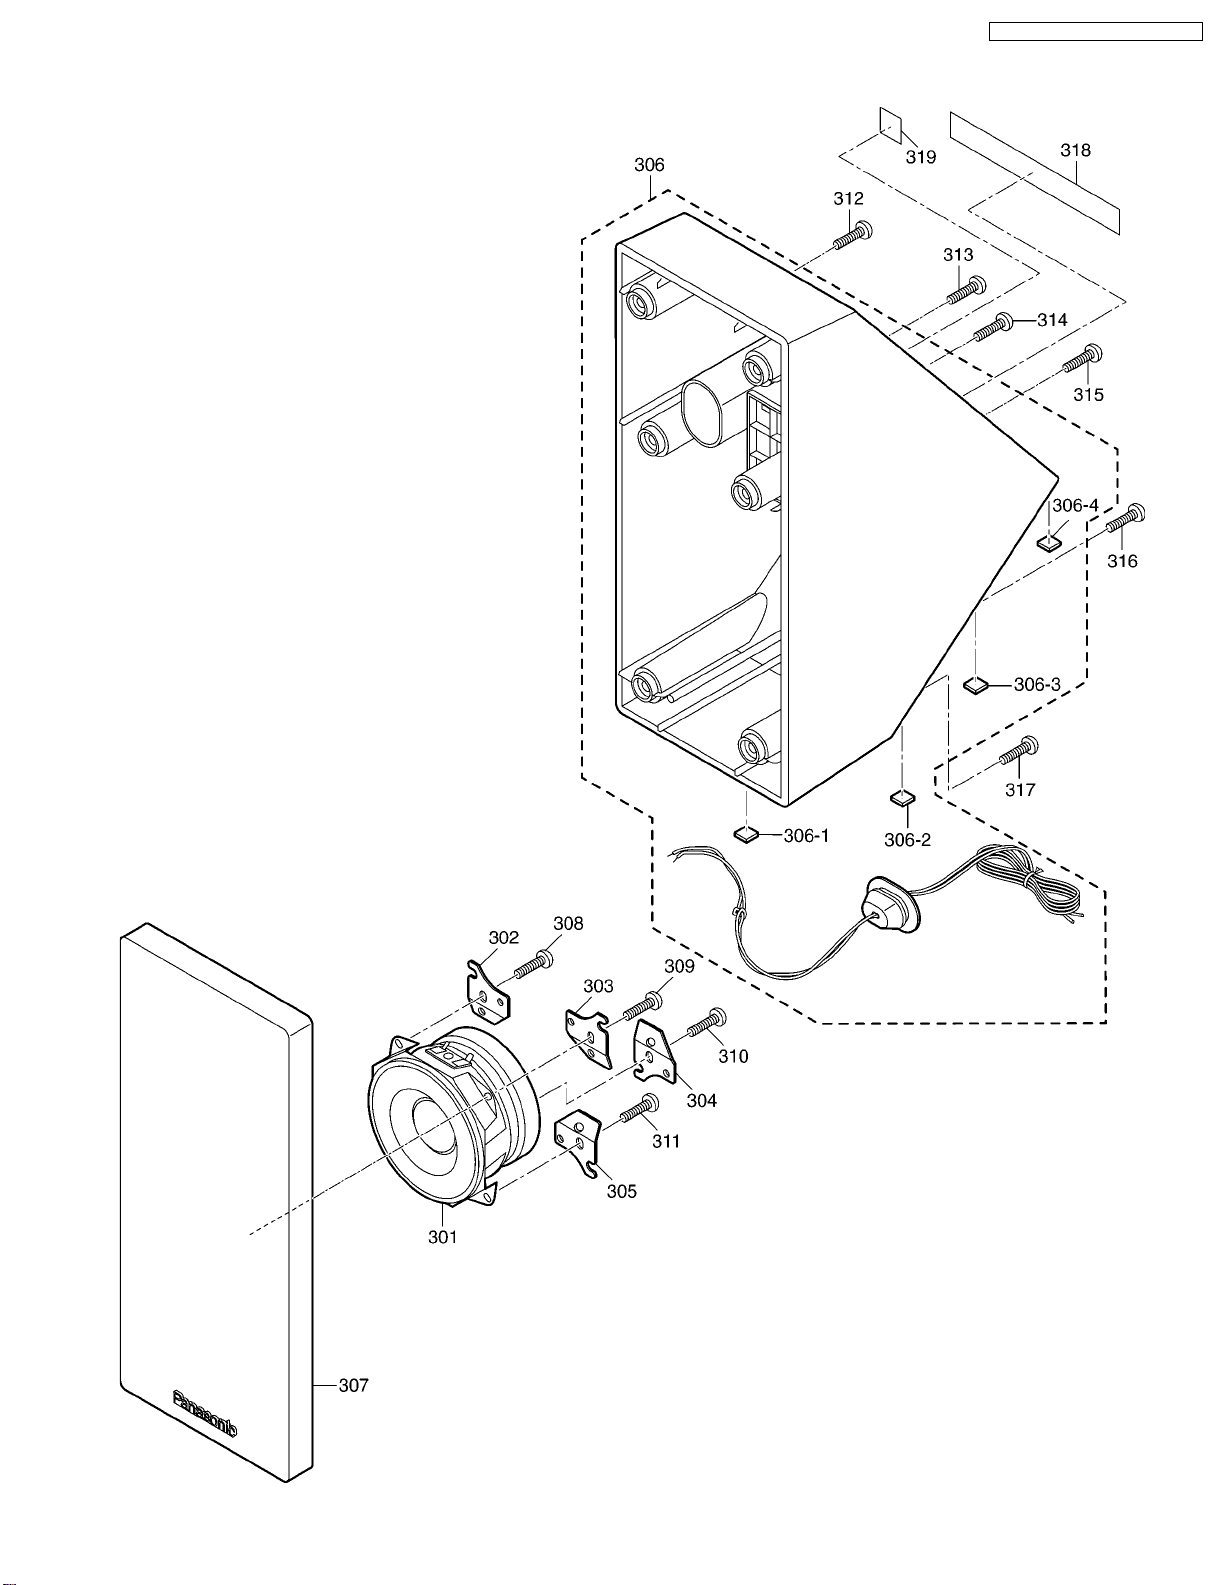
19.3. Speaker(SB-EN26)
SC-EN25P / SC-EN26P / SC- EN27PC
49
Page 50
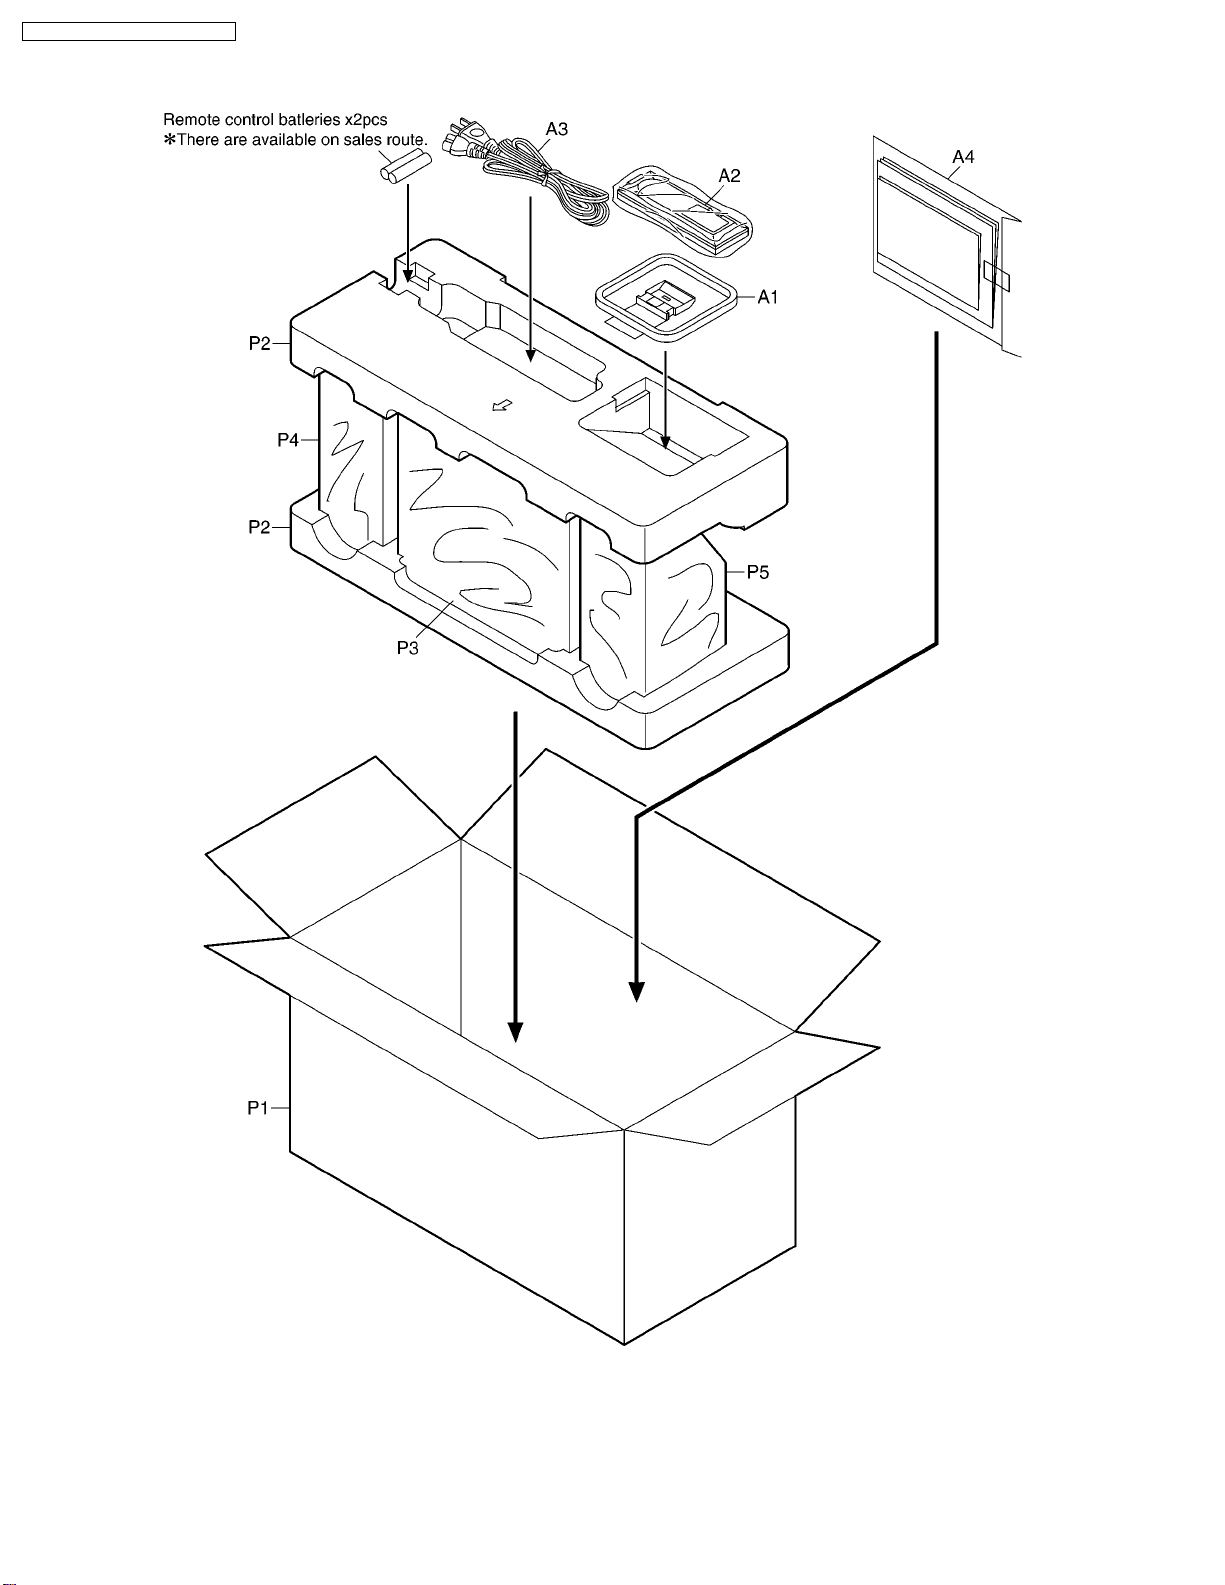
SC-EN25P / SC-EN26P / SC- EN27PC
20 Packaging
50
K0603HH/YH
 Loading...