

Page 1

Panasonic’
CD Stereo System
SC-CH75
SC-CH74
Operating Instructions
The illustration shows SC-CH74.
t'
; Note: ^
|: The “EB” indication shown on the outside packing case indicates
United Kingdom.
& Before connecting, operating or adjusting this product, please read
W
these instructions completely. Please save this manual.
EB GN
COMPACT
DIGITAL AUDIO
RQT3309-1B
Page 2

Dear Customer
Thank you for purchasing this system.
For optimum performance and safety, please read these instructions
carefully.
These operating instructions are applicable to the following systems.
System
Main unit
SC-CH75
SA-CH75
SC-CH74
SA-CH74
CAUTION!
THIS PRODUCT UTILIZES A LASER.
USE OF CONTROLS OR ADJUSTMENTS OR PERFORM
ANCE OF PROCEDURES OTHER THAN THOSE SPECI
FIED HEREIN MAY RESULT IN HAZARDOUS RADIATION
EXPOSURE.
DO NOT OPEN COVERS AND DO NOT REPAIR
YOURSELF. REFER SERVICING TO QUALIFIED
PERSONNEL.
(For United
Speaker system
SB-CH75
Kingdom)
SB-CH74
(For others)
SB-CH430
CAUTION!
DO NOT INSTALL OR PLACE THIS UNIT IN A
BOOKCASE, BUILT IN CABINET OR IN ANOTHER CON
FINED SPACE IN ORDER TO KEEP WELL VENTILATED
CONDITION. ENSURE THAT CURTAINS AND ANY
OTHER MATERIALS DO NOT OBSTRUCT THE
Back of product
VENTILATION HOLES TO PREVENT RISK OF ELECTRIC
SHOCK OR FIRE HAZARD DUE TO OVERHEATING.
N VISIBLE LASER RADIATION WHE.N OPEN
DANGER
AVOID direct E>!FOSlWErO BEAM
:jSiNLIGL;SEPSIP4..NGVEDiBNINC.NABSIM(:RHEDyEeP'C;=i
ADWRSEL
fB .JC: AF FI.INK'ION LiNDGAUCSinELSE FOE jEFIALINS.
AVAIIAEsSAjA EuüJALUKITUSOWTETTAESSAOLETALmiNi
V.ARO!
NAKYWATONTALASERSArEILVLLE. ÄLAKAISOSA TEE SEEN.
OSVNLIG LASEflSrRALNIW fJAR DENNA DEL ARflPPftADCCH
VARNING
SPARREN AR UfiKOPPLAD. ВЕТЯАКТА tj STRAFEN
usynlis lasötsiraling nab DEKsa ARNES cg SIKKEBHEDSLAS
ADVARSEL
BBYTES UNNGAEKSPCNERINGEDRSTRALEN
LNSICHIBARE LAS[RSrB.AHLUNG. №NN ABCECKUNG GECf FNE’
VORSICHT
NICHT DEM STRAHL AUSSETZEN
(Inside of product)
(Indersiden at apparate!)
(Tjotteen sisaNa)
(Apparaterts insida)
(Produktets innside)
(Im Inneren des Gerätes)
THIS MUSIC SYSTEM IS CAPABLE OF RECEIVING THE NEW AM STEREO BROADCASTS FROM THE AM BAND
RADIO STATIONS. HOWEVER LIKE MANY MUSIC SYSTEM CURRENTLY AVAILABLE ON THE MARKET IT WILL
REPRODUCE THIS AM STEREO SIGNAL ONLY IN AM MONO, WHICH, IN EFFECT, IS OF NO LESSER QUALITY
THAN YOUR EXISTING AM MONO MUSIC SYSTEM.
Suggestions for safety
Placement Power cord protection
Avoid placing the unit in areas of:
•direct sunlight
•high temperature
• high humidity
•excessive vibration
•uneven surfaces (Place the unit on a flat level surface.)
Such conditions might damage the cabinet and/or other component parts and
thereby shorten the unit s service life.
To protect the unit against sound distortion and acoustical effects, please place
the unit at least 15 cm away from wall surfaces etc.
Ventilation
Place the unit in a well-ventilated position at least 10 cm away from wall
surfaces etc.
Ensure that curtains and similar materials do not obstruct the ventilation holes.
Stacking
Never place heavy items on top of the unit or the power cord.
Voltage
• ft is very dangerous to use an AC power source of high voltage such as for an
air conditioner.
A fire might be caused by such a connection.
•A DC power source can not be used. * *
Be sure to check the power source carefully, especially if on a ship or other
pface where DC is used.
• Avoid cuts, scratches or poor connection of the AC main cord, as this may
result in fire or electric shock.
Excessive bending, pulling or slicing of the cord should also be avoided.
•Do not pull on the cord when you are disconnecting the power, as this could
cause an electric shock. Grasp the plug firmly when you disconnect the power
supply.
•Never touch the plug with wet hands or a serious electric shock could result.
Foreign materials
• Ensure that no foreign objects, such as needles, coins, screwdrivers etc.,
accidentally fail into the unit or through the ventilation holes.
Otherwise, a serious electric shock or malfunction could occur.
• Be extremely careful about spilling water or liquid on/into the unit, as a fire or
electric shock could occur.
(Disconnect the power plug and contact your dealer immediately if this oc
curs.)
• Avoid spraying insecticides onto the unit as they contain flammable gases
which can be ignited.
• Insecticides, alcohol, paint thinner and similar chemicals should never be
used to clean the unit as they can cause flaking or cloudiness to the cabinet
finish.
Service
• Never attempt to repair, disassemble or reconstruct the unit if there seems to
be a probiem.
A serious electric shock could result if you ignore this precautionary measure,
• If a problem occurs during operation (the sound is interrupted, indicators fail to
light up, smoke is detected, etc.) contact your dealer or Authorized Service
Center immediately.
• Disconnect the power supply if the unit will not be used for a long time.
Otherwise the operation life could be shortened.
Page 3
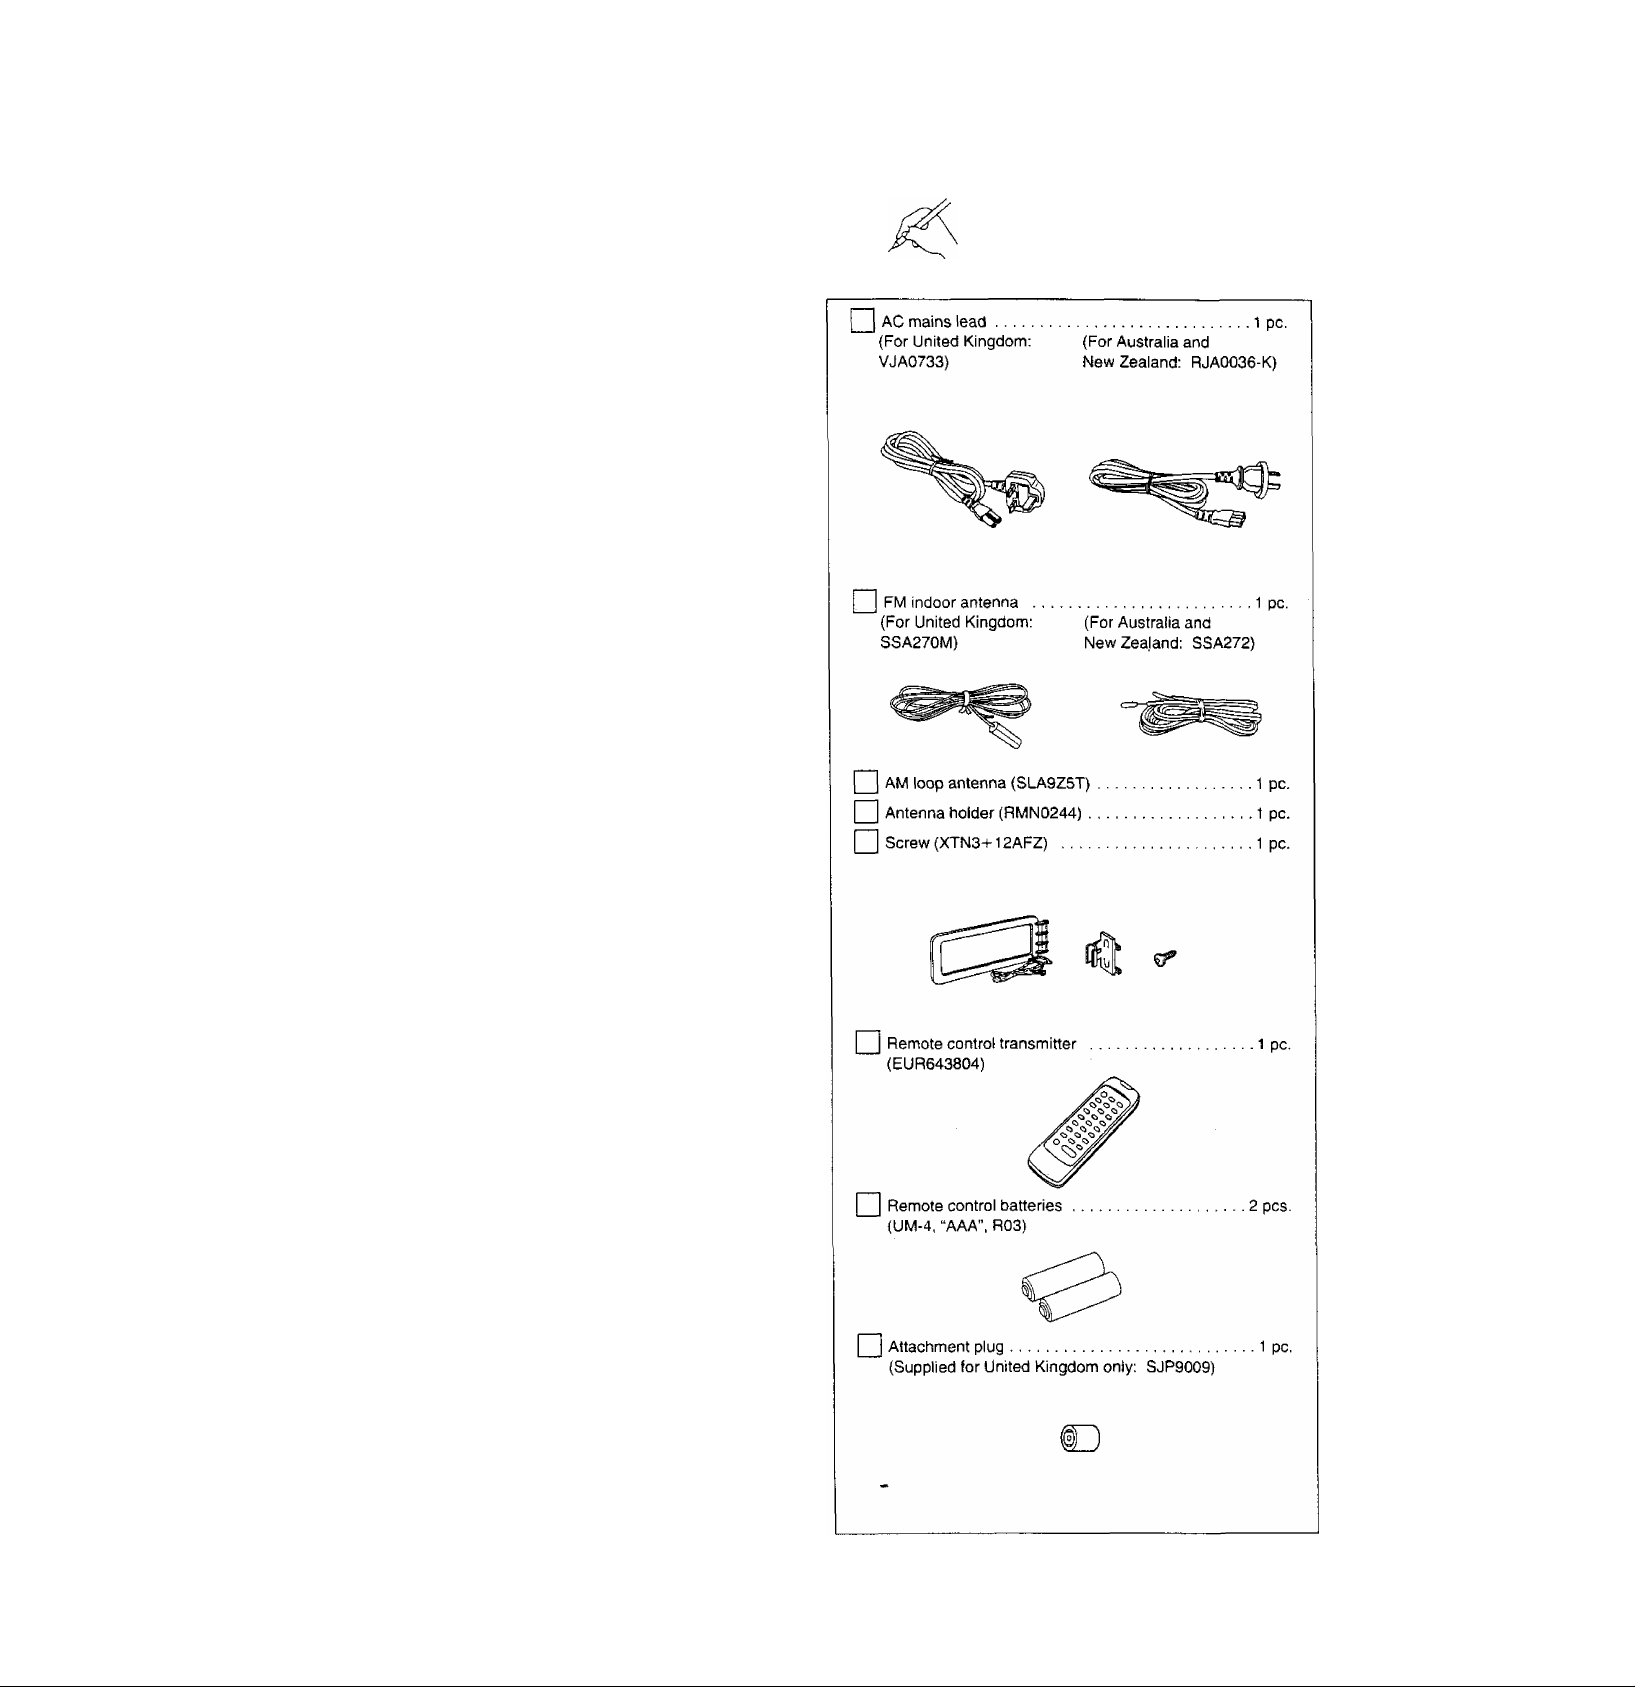
Table of contents Supplied accessories
Please check and identify the supplied ac
Before use
cessories.
Supplied accessories............................................... 3
Caution for AC mains lead
..........
...........................
Preparations
Concerning the remote control .............................. 5
Installation................................................................. 5
Connections.............................................................. 6
Front panel controls................................................. 8
Setting the time......................................................... 9
Memory presetting .................................................10
Operations
Listening to radio broadcasts
Listening to compact discs
Listening to tapes
Changing sound quality and field
Convenient functions
..................................................
.............................................
..............................
..................................
........................
11
12
16
18
19
Recording operations
Before recording.....................................................19
Recording from radio broadcasts........................20
Recording from compact discs
Tape to tape recording
...........................................
..........................
.21
25
0
4
Timer operations
Using the play timer ... '
Using the record timer
Using the sleep timer
To use two timers together ...................................30
........................................
.........................................
...........................................
26
28
30
ijSxternal unit operations
iinging along with karaoke
pJsing an external unit
rOther functions......................................................32
.................................
...........................................
31
32
leference
Quick reference of remote control
operations ..........................................................33
^Concerning compact discs .................................36
^Concerning cassette tapes..................................36
laintenance........................................^
^Troubleshooting guide.........................................38
^Technical specifications.......................Back cover
These operating instructions fundamentally explain the
operation of system SC-CH74.
.................
37
Page 4
1*^
GmHon /or AC mains lead
(For United Kingdom)
(“EB” area code model only)
For your safety, please read the following text carefully.
This appliance is supplied with a moulded three pin mains plug for
your safety and convenience.
A 5*ampere fuse is fitted in this plug.
Should the fuse need to be replaced please ensure that the replace
ment fuse has a rating of 5-ampere and that it is approved by ASTA
or BSIto BS1362.
Check for the ASTA mark ^ or the BSI mark ^ on the body of the
fuse.
If the plug contains a removable fuse cover you must ensure that it is
refitted when the fuse is replaced.
If you lose the fuse cover the plug must not be used until a replace
ment cover is obtained.
A replacement fuse cover can be purchased from your local dealer.
CAUTION!
IF THE FITTED MOULDED PLUG IS UNSUITABLE FOR
THE SOCKET OUTLET IN YOUR HOME THEN THE FUSE
SHOULD BE REMOVED AND THE PLUG CUT OFF AND
DISPOSED OF SAFELY.
THERE IS A DANGER OF SEVERE ELECTRICAL SHOCK
IF THE CUT OFF PLUG IS INSERTED INTO ANY 13AMPERE SOCKET.
If a new plug is to be fitted please observe the wiring code as shown
below.
If in any doubt please consult a qualified electrician.
The wire which is coloured BROWN must be connected to the
terminal in the plug which is marked with the letter L or coloured
RED.
Under no circumstances should either of these wires be connected to
the earth terminal of the three pin plug, marked with the letter E or the
Earth Symbol i.
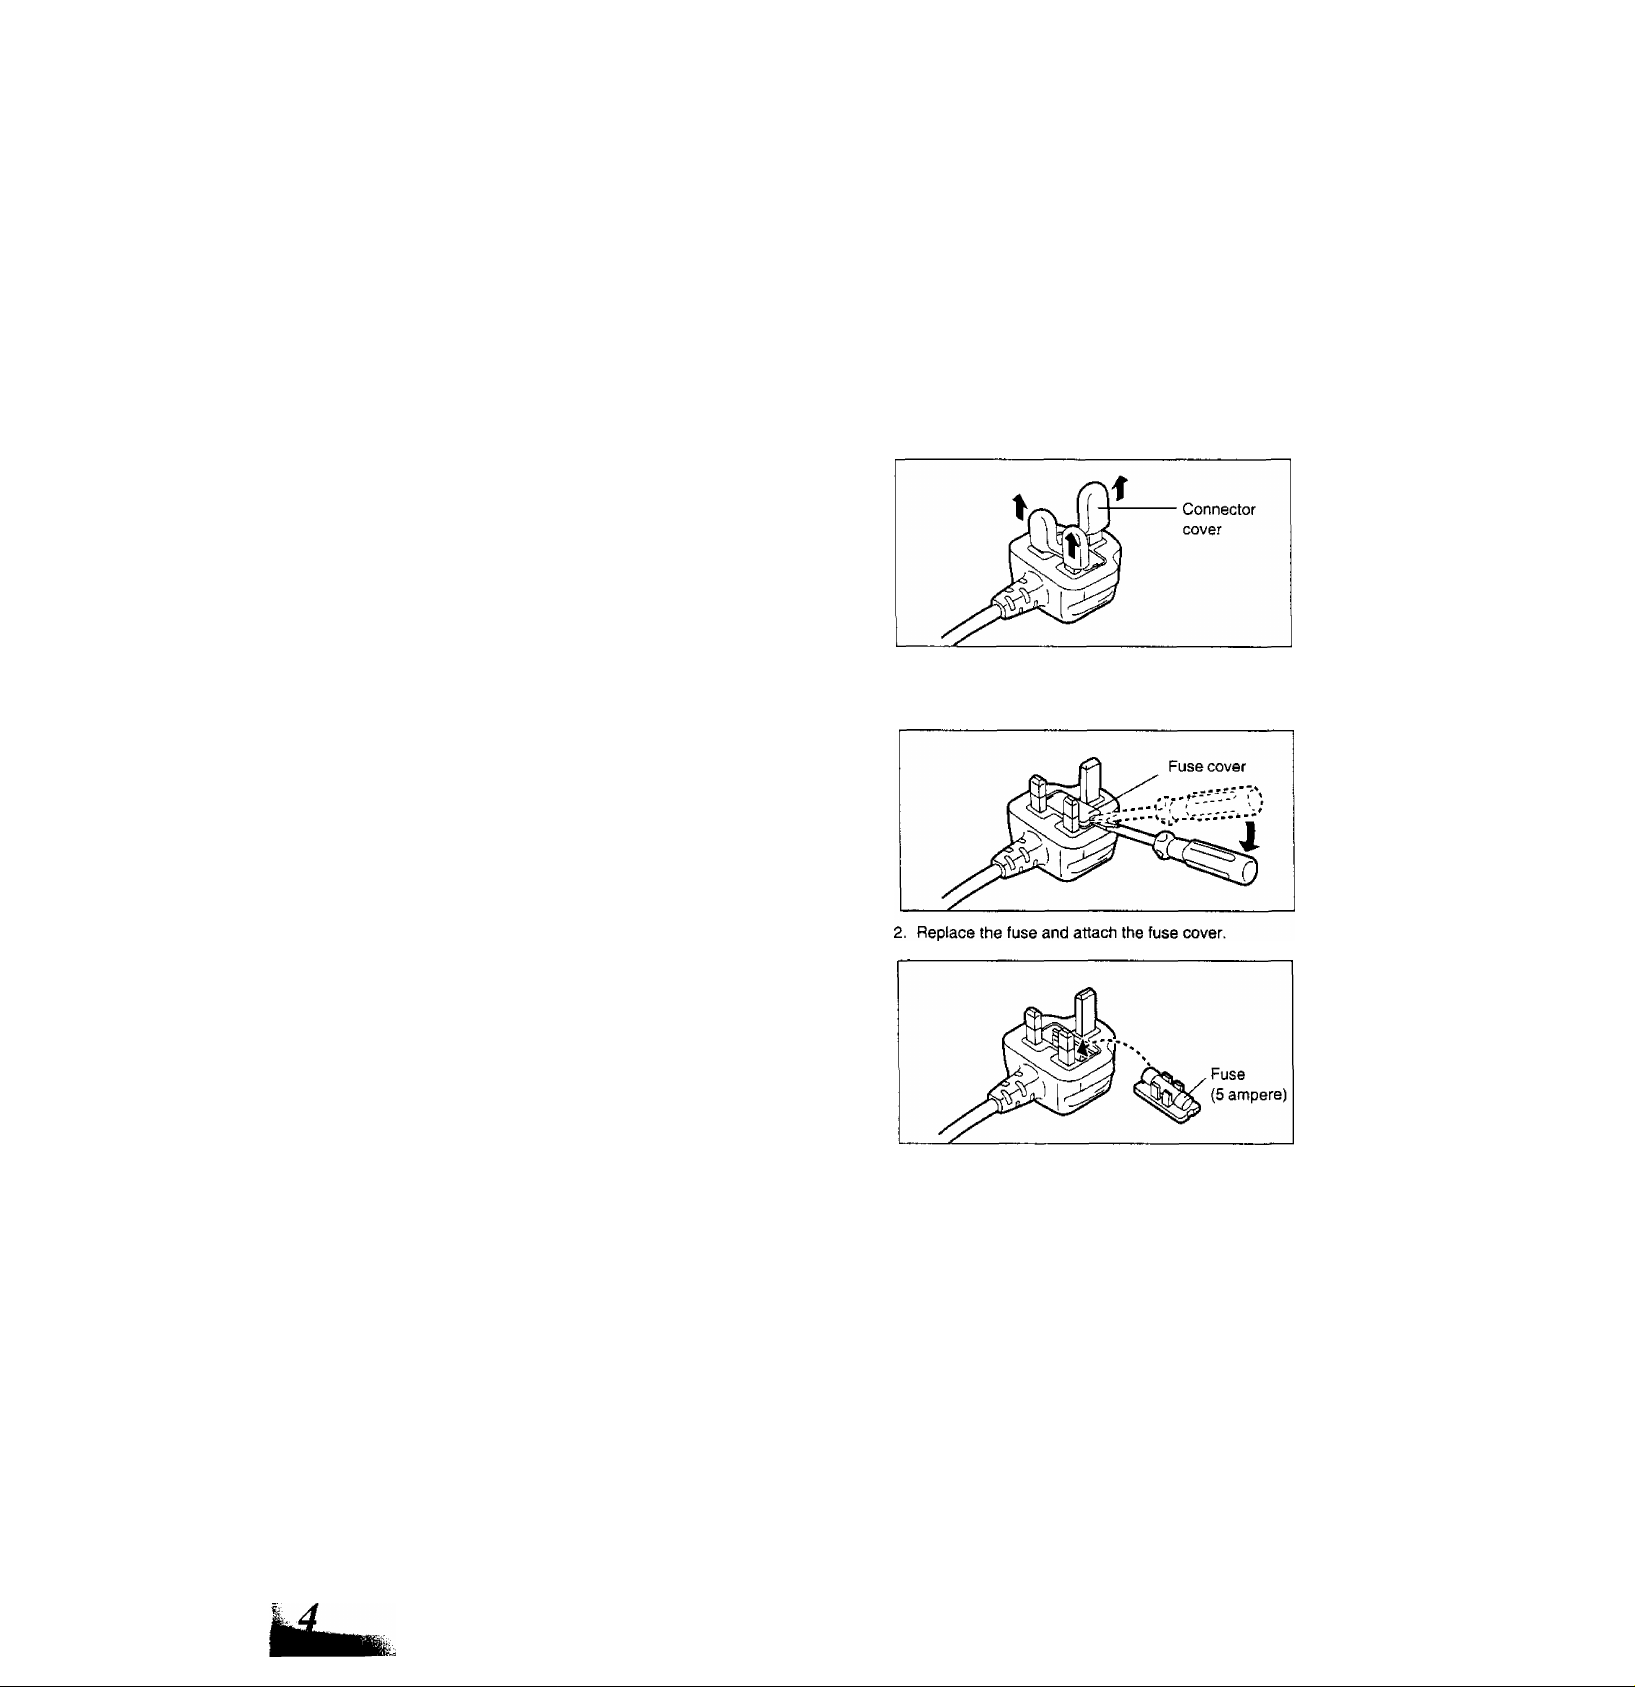
Before use
Remove the connector cover as follows.
How to replace the fuse
1. Remove the fuse cover with a screwdriver.
IMPORTANT
The wires in this mains lead are coloured in accordance with the
following code:
Slue: Neutral
Brown: Live
As the colours of the wires in the mains lead of this appliance may not
correspond with the coloured markings identifying the terminals in
your plug, proceed as follows:
The wire which is coloured BLUE must be connected to the terminal
in the plug which is marked with the letter N or coloured BLACK.
Page 5
Il
Concerning the remote
^ control
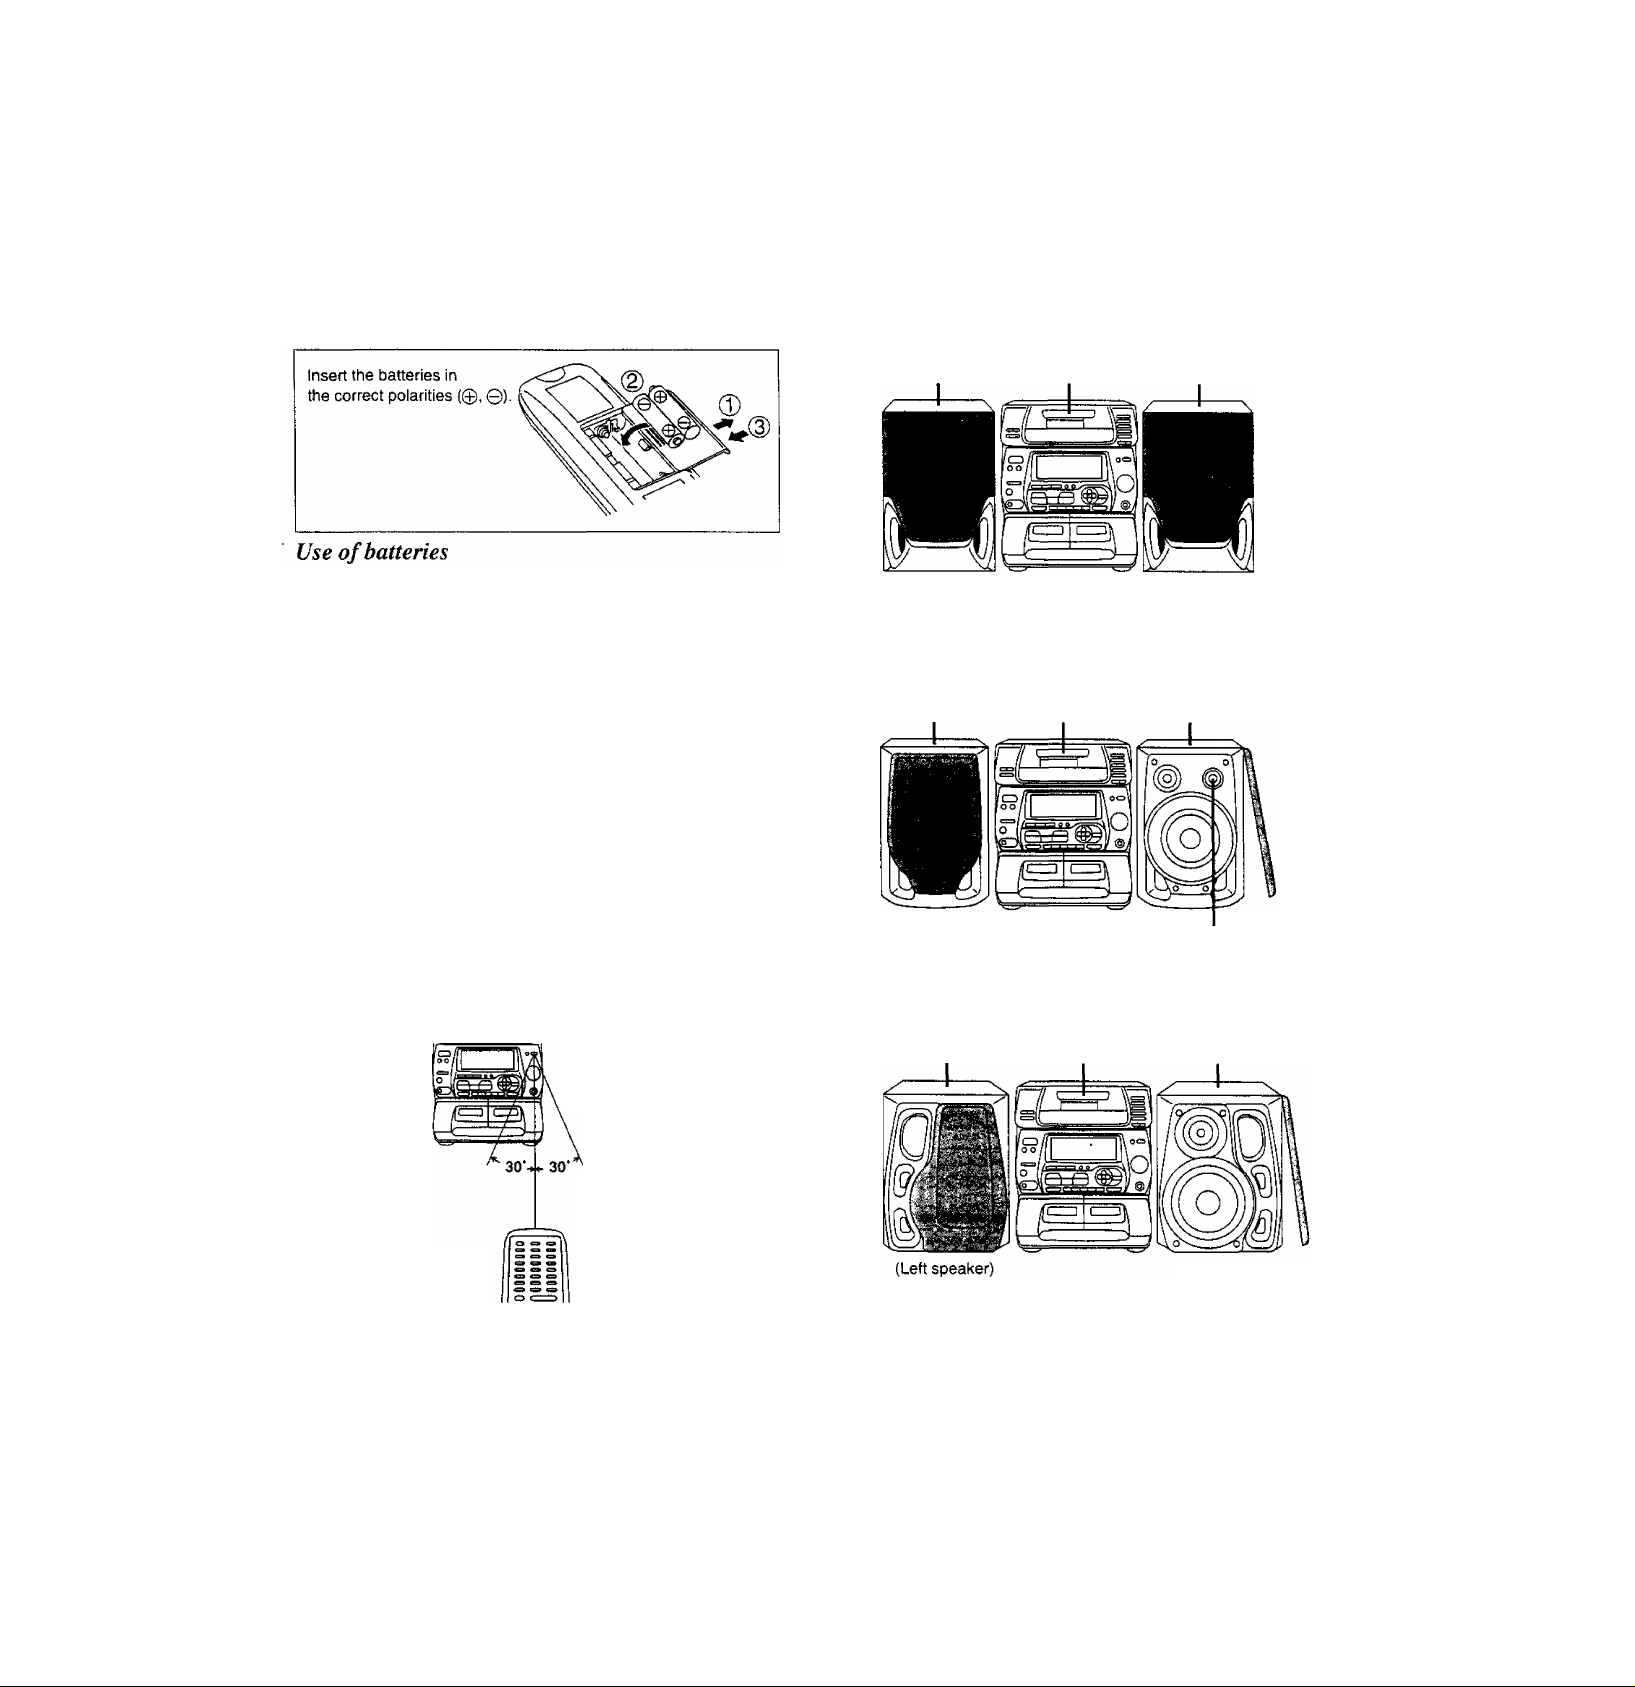
Installation
Placement of speakers
Battery installation
Insert the batteries with this unit as shown below.
Use two UM-4 “AAA”, lEC R03 (1,5 V) or equivalent batteries.
• Do not mix old and new batteries, or batteries of different types
(manganese and alkaline, etc.).
• Never subject batteries to excessive heat or flame; do not attempt
to disassemble them; and be sure they are not short-circuited.
• If the remote control is not to be used for a long period of time,
remove the batteries and store them in a cool, dark place.
• Do not attempt to recharge alkaline or manganese batteries.
Battery life
The battery life is about one year.
The batteries should be replaced if commands from the remote
control transmitter do not operate the unit even when the transmitter
is held close to the front panel.
To produce a better stereo sound, install both speakers away from
the system.
1
(For United Kingdom)
SB-CH74 SA-CH74
Speakers are symmetrically the same on the inside, so you don’t
have to orient them in a certain one or another.
(For Australia and New Zealand)
SB-CH430 SA-CH74 SB-CH430
SB-CH74
When you need to replace these batteries
Use two UM-4, “AAA”, lEC R03 (1.5 V) or equivalent batteries.
Correct method of use
Remote control
sensor
About 7 meters in front of
the signal sensor (The
Transmission
window
Operations notes
•Aim the remote control’s transmission window toward the unit’s
sensor. Avoid any obstacles.
•Be sure the transmission window and the unit’s sensor are free
from dust. Excessive dust might affect its performance.
'•The operation may not be correct if direct sunlight or other strong
light source strikes the receiving sensor of this unit. If there is a
problem, place the unit away from the light source.
'•if this system Is installed in a rack with glass doors, the glass doors’
thickness or color might make it necessary to use the remote
control a shorter distance from the system.
• Never place heavy items.
• Do not disassemble or reconstruct,
• Do not spill water or other liquids.
actual range will depend
on the angle at which the
remote control is used.)
Set the speakers so that the tweeter with the silver cap is on the
outside.
(For Australia and New Zealand)
SB-CH75 SA-CH75 SB-CH75
(Right speaker)
For your reference
For your listening pleasure, keep your speakers from touching the
stereo.
Page 6
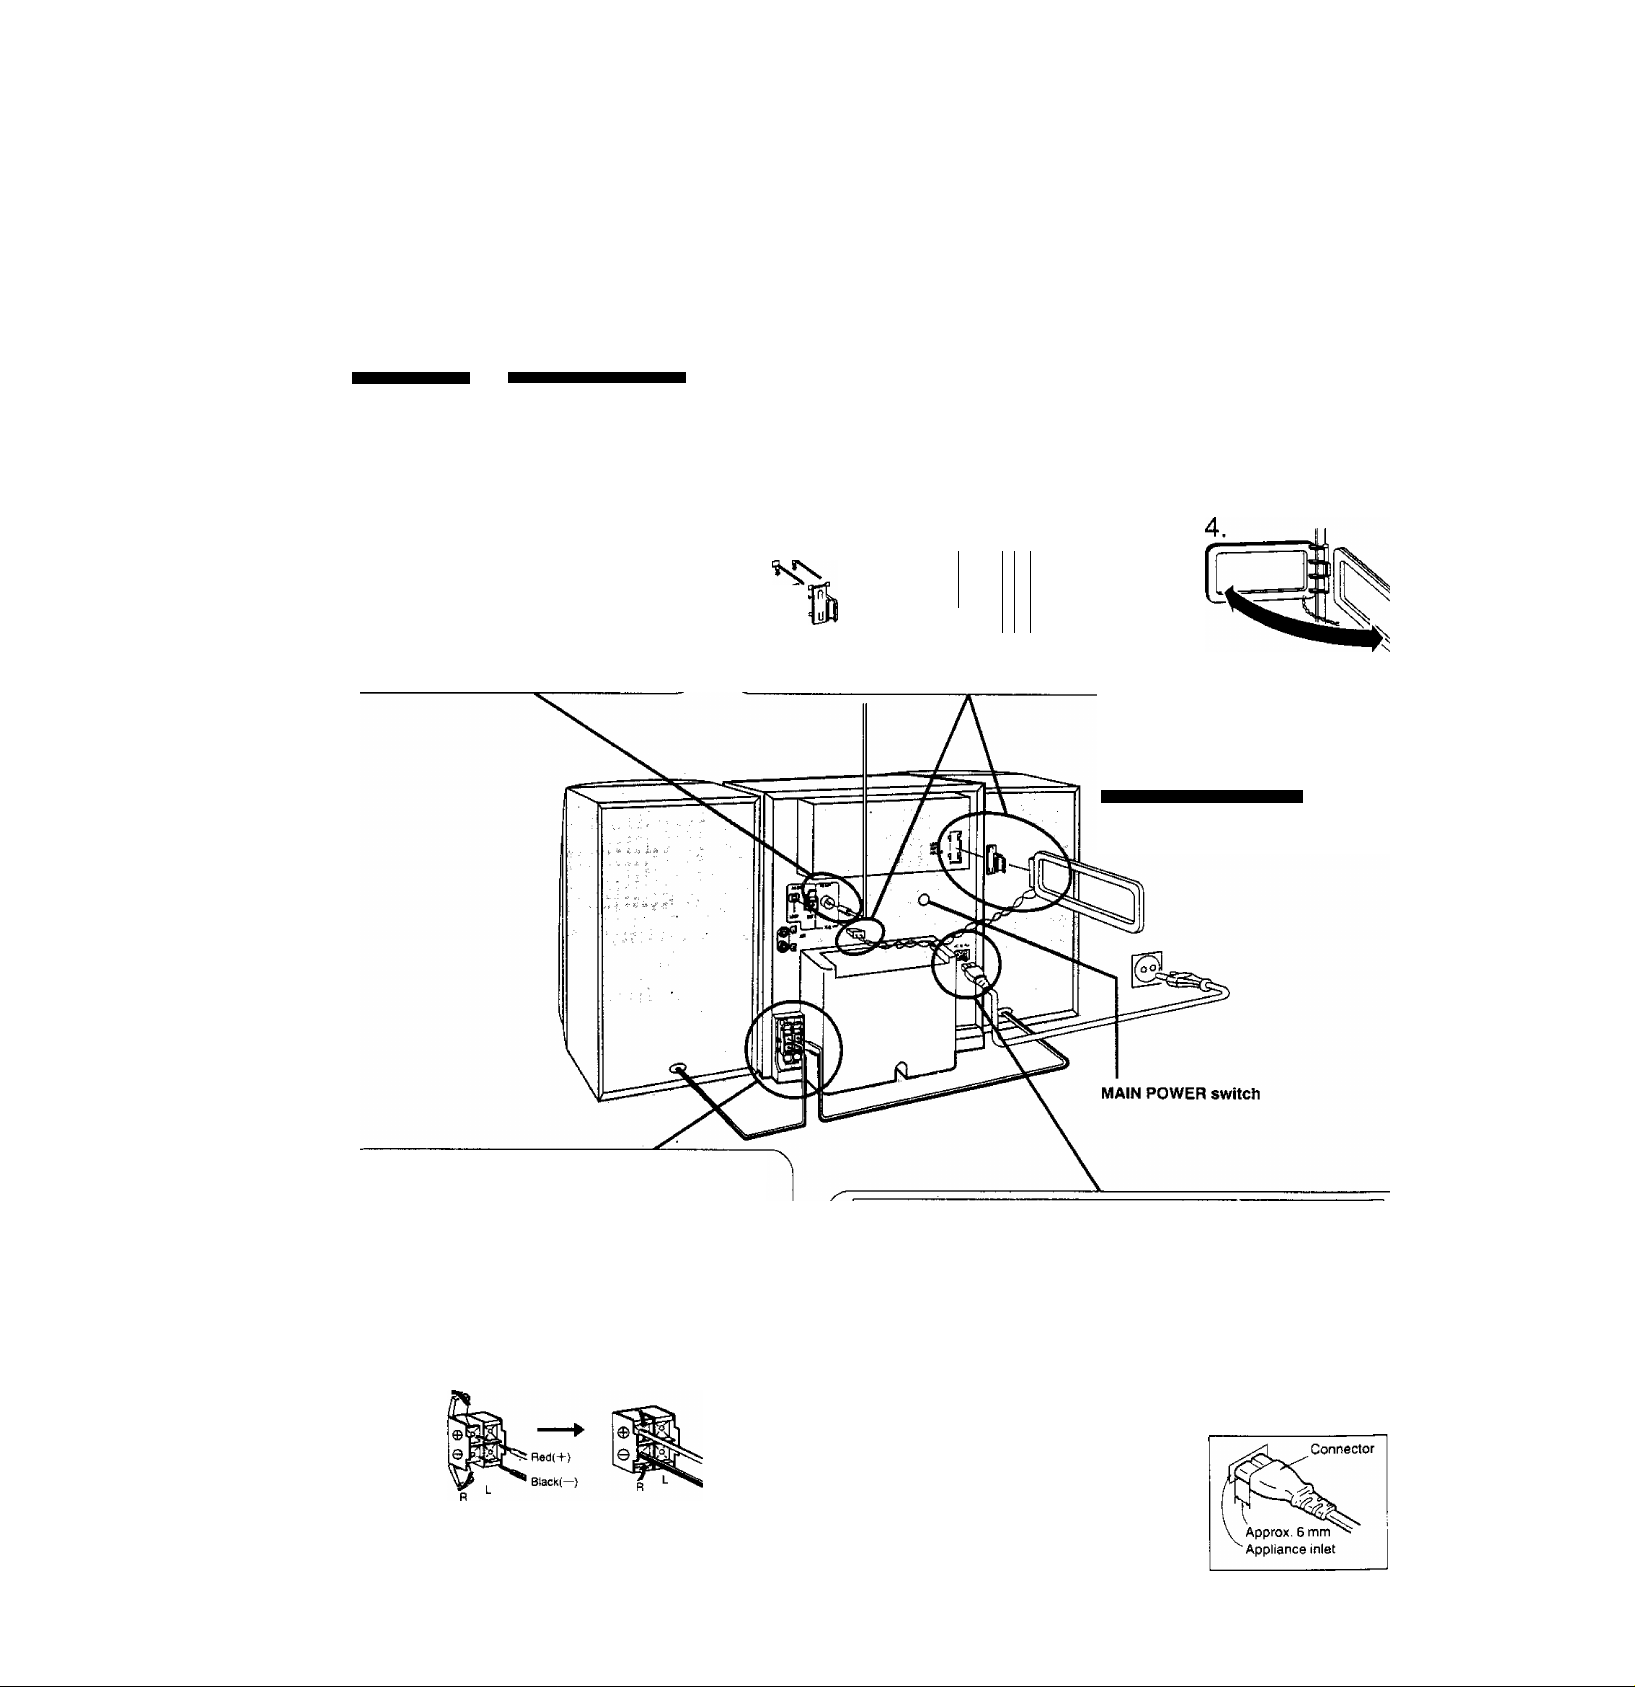
Commèàams
Basic connections (for supplied accessories)
FM indoor antenna
Twist
For United Kingdom
Adhesive tape E!I!
FM ANT
(75Q)
Attach to a wall {using tape) facing in the
direction of best reception.
For best reception sound quality:
An FM outdoor antenna is recommended.
Disconnect the FM indoor antenna if an FM
outdoor antenna is installed.
For Australia and New Zealand
FM ANT
(750)
AM loop antenna
1. Attach the anten
na holder to the
rear panel. Press
the antenna hold
er hard enough
to get it fixed
firmly in place,
with a click.
1.-®
1.-(
2. Clamp the anten
na to the antenna
holder.
2.
%
3. Connect the an
tenna terminal to
the rear panel of
the unit.
4.
While listening to
an AM broad
cast, position the
loop antenna for
the best recep
tion.
3.
For Australia and New Zealand
The configutation of AC mains lead and I
antenna terminal are different.
%j Speaker cords
® Strip off the outer covering, and twist the center con
ductor.
o
X
' Match the cords to the terminals by color and con
nect.
To prevent damage to circuitry, never short-circuit posi
tive (-F) and negative (-) speaker wires.
For United Kingdom:
BE SURE TO READ THE CAUTION FOR AC MAINS
LEAD ON PAGE 4 BEFORE PROCEEDING TO
STEP 4.
AC mains lead
Plug the cord into an outlet only after all other connections have been
made.
For United Kingdom;
insertion of Connector
Even when the connector is perfectly in
serted, depending on the type of inlet
used, the front part of the connector may
jut out as shown in the drawing.
However there is no problem using the
unit.
Page 7
a -:. Í
-r ;
SC-CH75
For Australia and New Zealand
After you have connected all other cables:
Press MAIN POWER switch at the rear panel to
ON position.
The primary circuit is always “live” as long as this
switch is set to ON position.
Note:
If you do not plan to use the system for a long
time, press the MAIN POWER switch to OFF
position or disconnected the AC power supply
cord.
Caution
Use this speaker only with the recommended system.
Failure to do so may lead to damage to the amplifier
and/or the speaker, and may result in the risk of fire.
Consuit a qualified service person if damage has oc*
curred or if you experience a sudden change in perfor
mance.
External unit connection
• For details, refer to the instruction manual of the units which are to
be connected.
•When units other than those described beiow are to be connected,
please consult with your audio dealer.
Optional antenna connections
You may need an outdoor antenna if you use this system in a
mountainous region or inside a reinforced-concrete building, etc.
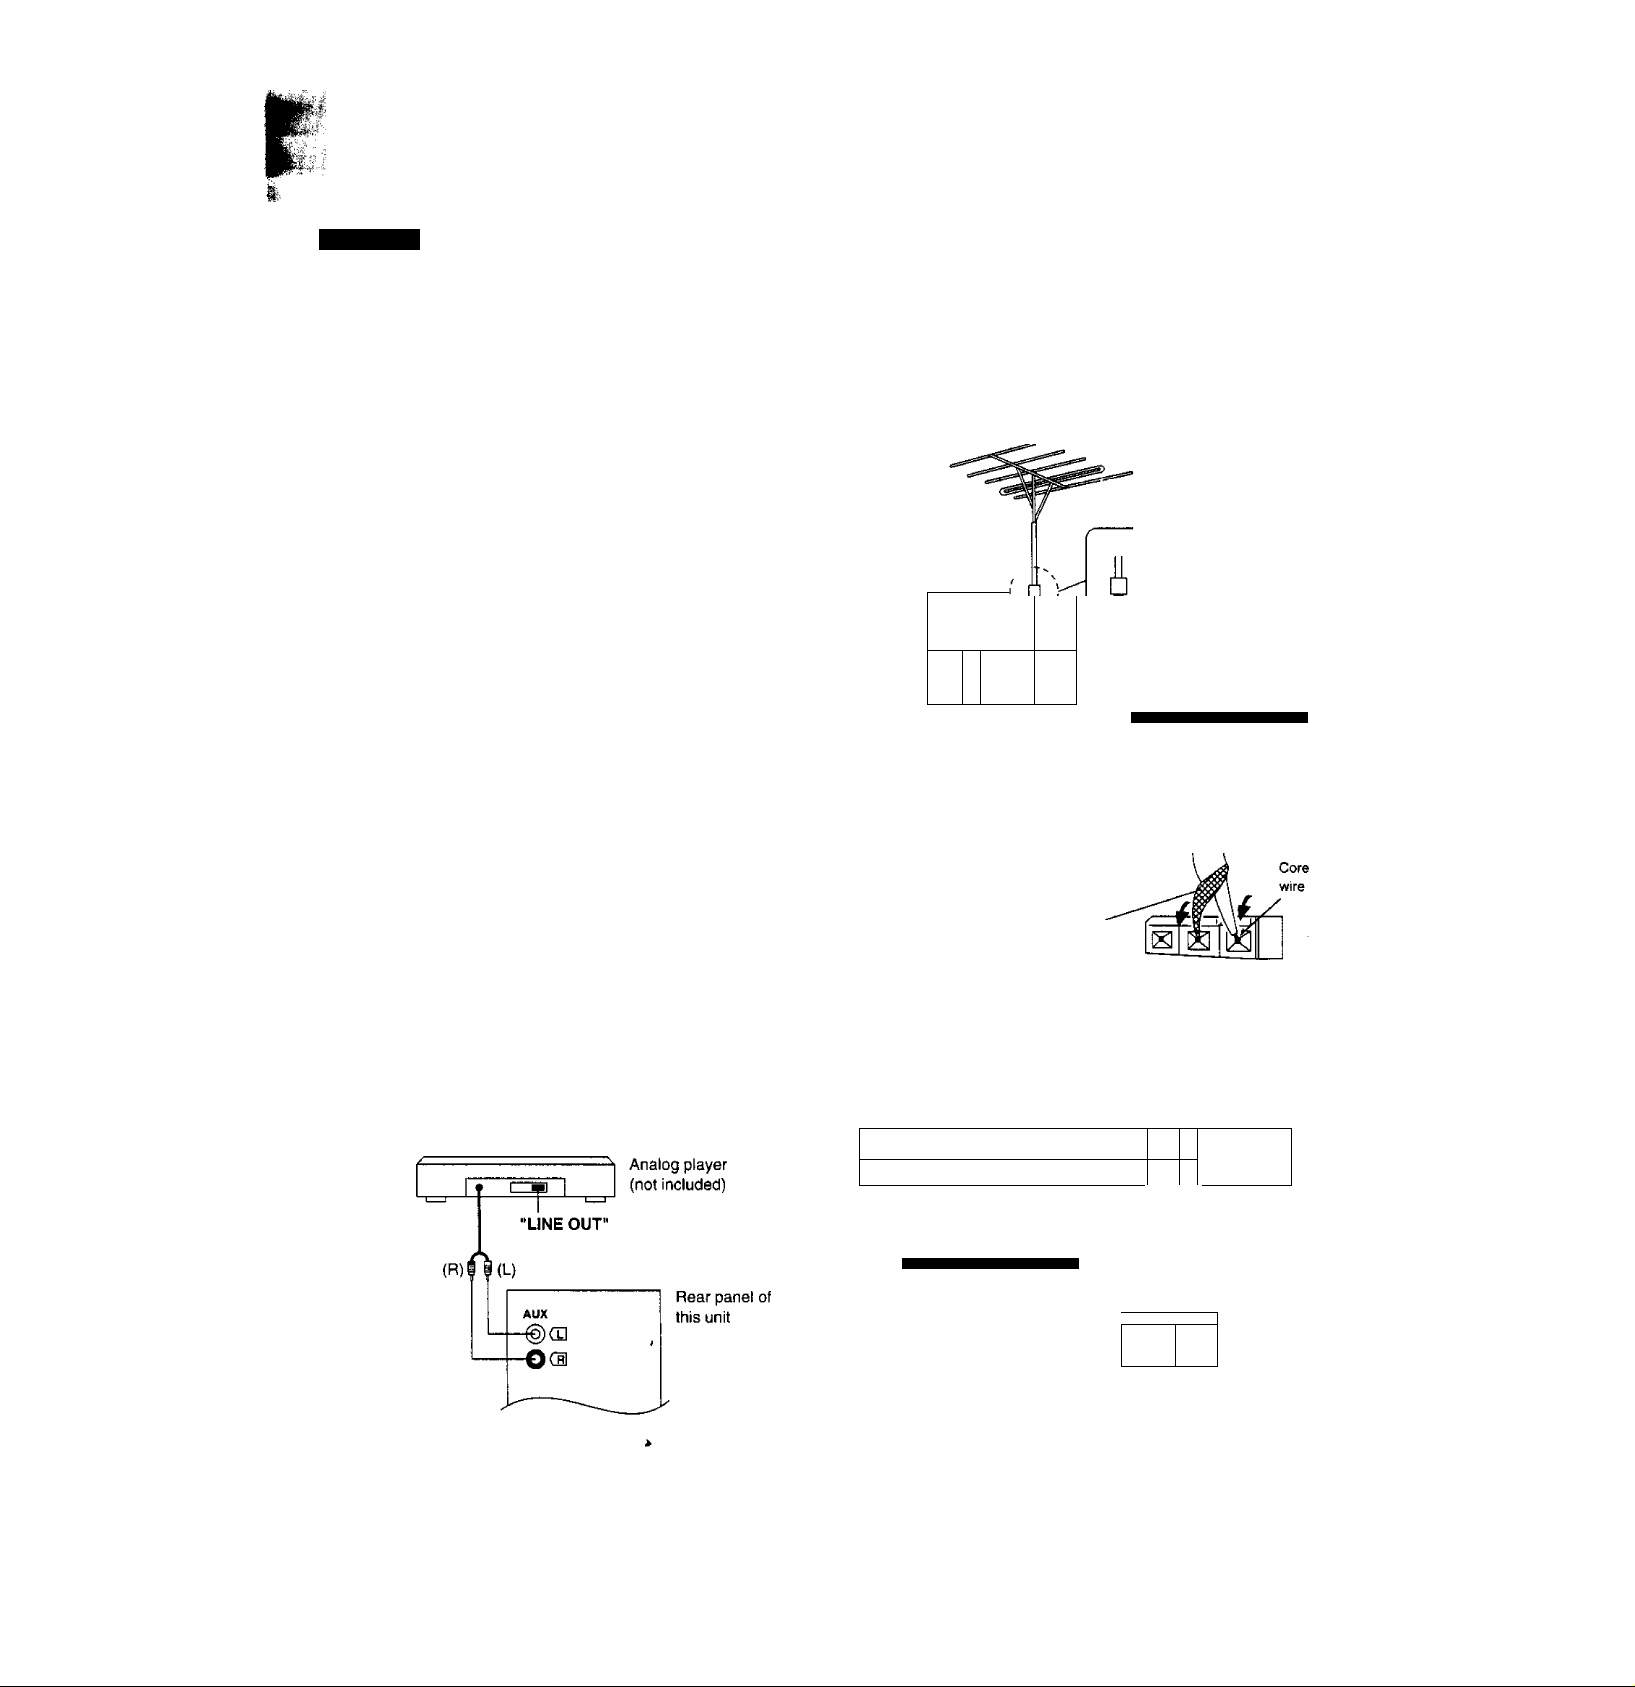
FM outdoor antenna
An outdoor antenna should be installed by a competent technician
only.
FM outdoor antenna
(not included)
75Q coaxial
cable
(not included) ,
(T) Remove a piece of the outer vinyl
insulator.
(D Twist the shield braid to expose
the core wire.
@ Connect the shield braid and the
core wire as shown at the left.
7“
\
FM ANT
(750)
_
For United
Kingdom only:
Use the
¿^attachment
plug (included)
For Australta and New Zealand
30 mm (iVis")
15 mm {'%/)«
Analog player
Only an analog player with a built-in phono equalizer can be con
nected.
This example shows how to connect the analog player with the
PHONO OUT/LINE OUT switch.
Set the switch to the “LINE OUT" position at the back of the analog
player.
Shield braid
GND FM ANT
AM outdoor antenna (not included)
Connect the outdoor antenna without removing the AM loop antenna.
Run 5 to 12 m of vinyl-covered wire horizontally along a window or
other convenient location.
AM outdoor antenna
(not included)
1
-------
5-12m
-----------------------
For Ausiralia and New Zealand
When the unit is not in use, disconnect the outdoor antenna to
prevent possible damage that may be caused by lightning. Never use
an outdoor antenna during an electrical storm.
1
AM ANT
EXT
y
1____
----
AM ANT
EXT
____
(S)
L
Page 8
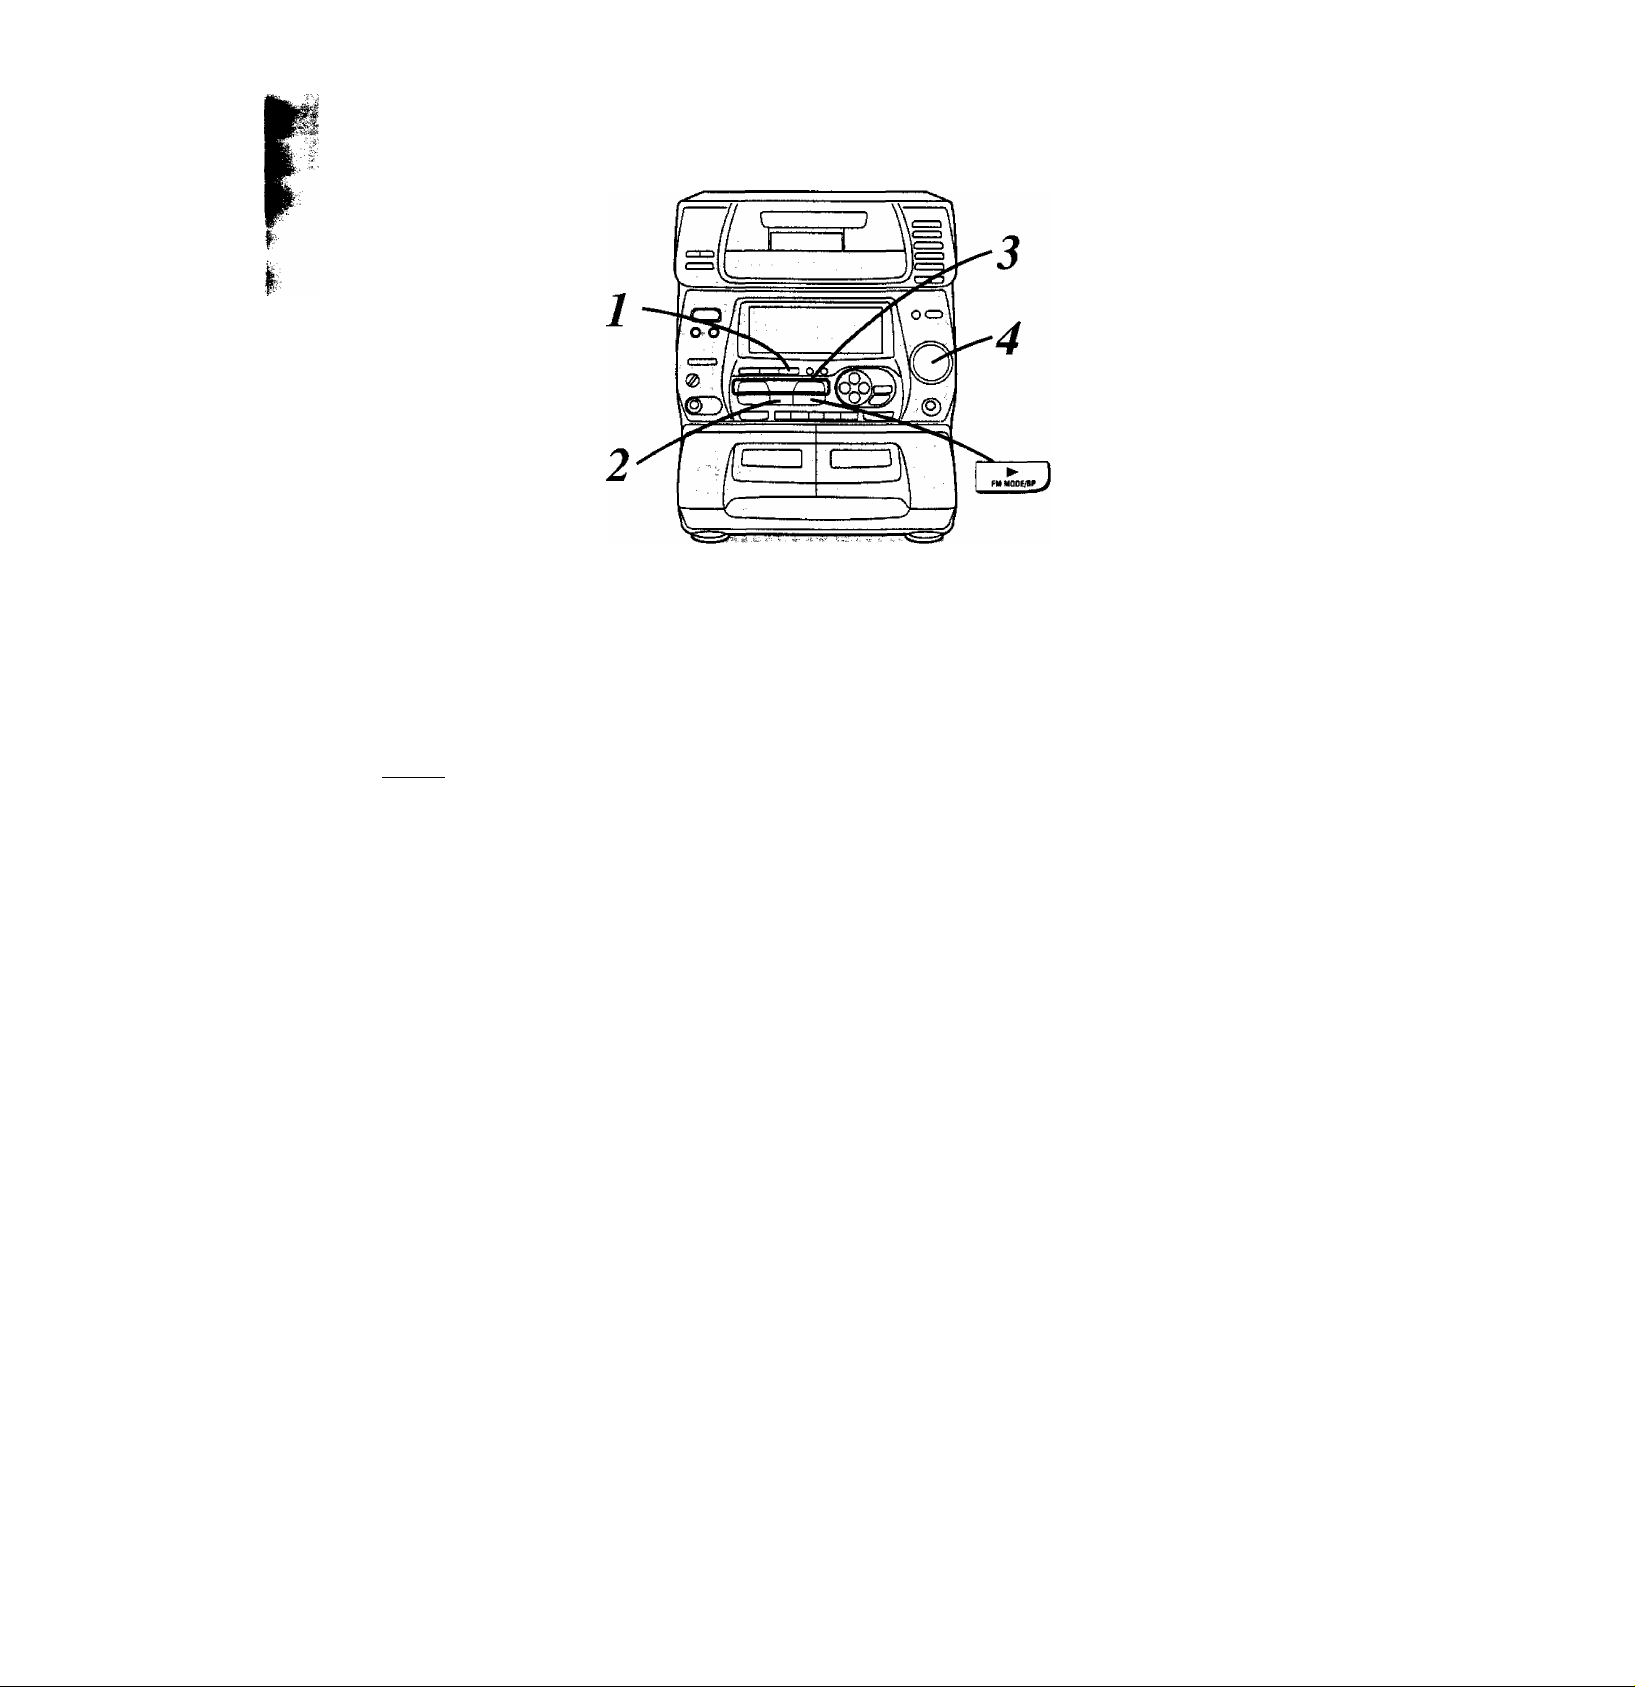
®c
t= =^.J
—*
____1__
{
No,
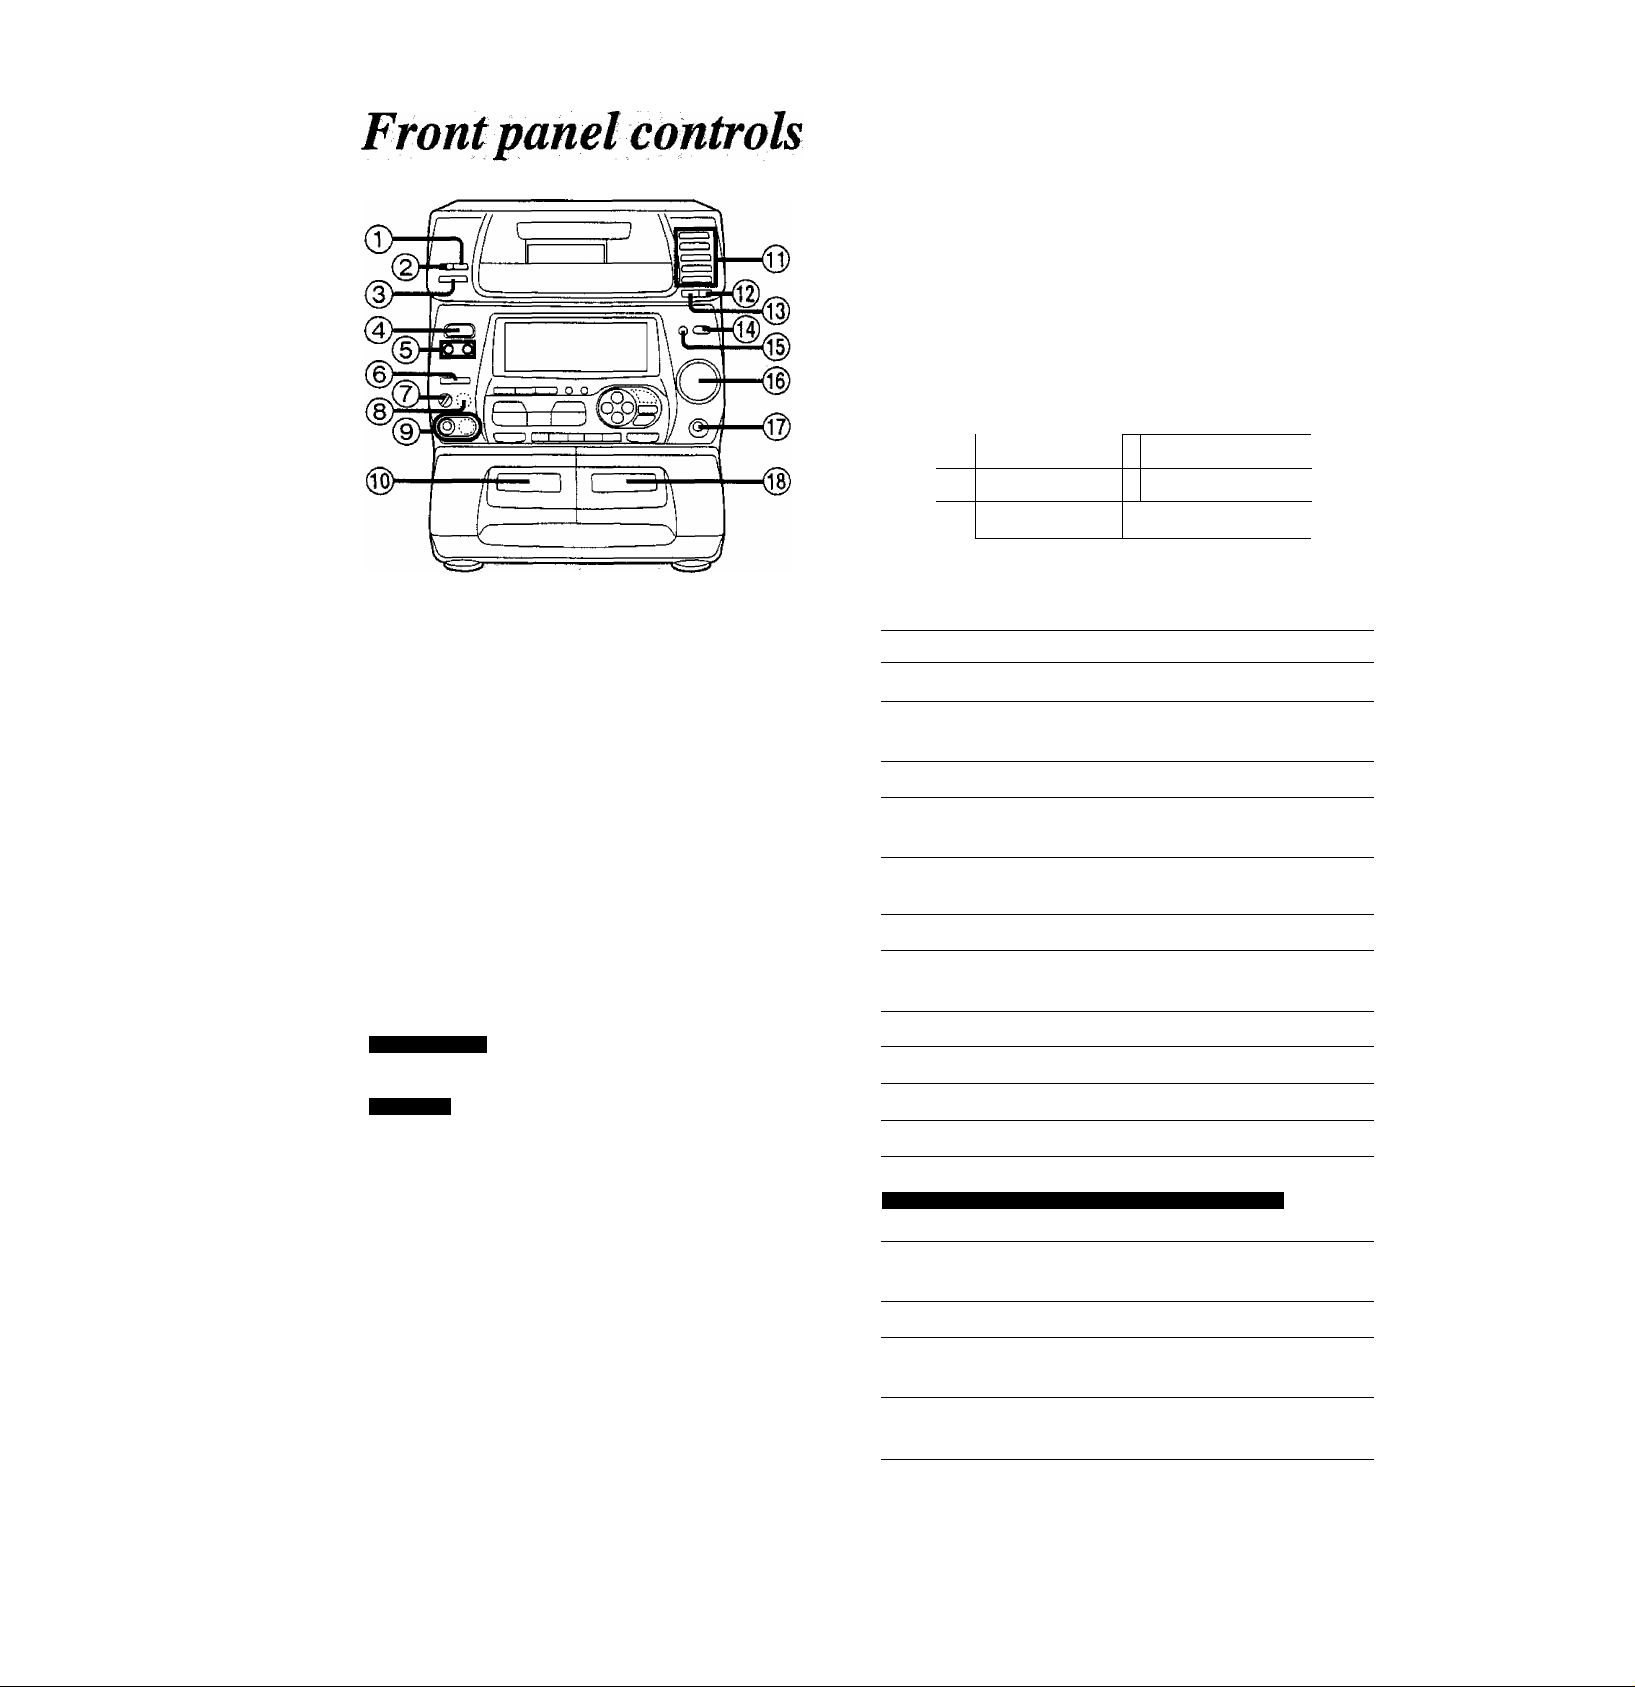
Name Ref. page
© Repeat button (REPEAT)
(D Random play button (RANDOM)
© CD edit button (EASY EDIT)
@ Power “STANDBY 6/ON” switch
(POWER, STANDBY (l)/ON) 9
Press to switch the unit from on to standby mode or vice versa. In
standby mode, the unit is still consuming a small amount of
power.
Record timer/play timer button
(E REC, E PLAY)
(6) Karaoke button (KARAOKE)
0 Microphone volume control (MIC)
SC-CH75 only
Echo volume control (ECHO)
SC-CH75
Microphone jacks (MIC 1 -2)
Microphone jack (MIC)
© Deck 1 cassette holder
0 Disc select buttons (DISC 1-5)
0 Disc check button (CHECK-NEXT/-AUTO)
0 Disc tray open/close button
(A OPEN/CLOSE)
©Remote control signal sensor
0 Display select/demonstratlon button
(-DISPLAY/-DEMO)
27,29
13
14
23
31
31
31
31
31
16
14
12
12
32
No. Name
0 Disc tray
Ref. page
12
©Tuner, band select button
(TUNER, BAND)
©CD button (CD)
10
13
©Tape, deck select button
(TAPE, DECK 1/2)
16
© Basic operating buttons
Buttons change according to the source.
© Deck 1 open button (DECK 1, ^ OPEN)
11,13,16
16
©Tape edit buttons
(TAPE EDIT NORMAL, HIGH)
©Disc indicators (DISC 1-5)
25
13
© Display
© AUX button (AUX)
32
© Clock/timer button (CLOCK/TIMER) 9
© Sound quality buttons
18
Graphic equalizer button (G. EQ) 18
© Deck 2 cassette open button
(DECK 2, ^ OPEN)
20
© Reverse mode select button (REV MODE) 16
© Dolby noise reduction button
5
(DOLBY NR)
16
© Recording start/stop button
(REC. START/STOP)
20
©Volume control (VOLUME)
0 Headphones jack (PHONES)
0 Deck 2 cassette holder
11
32
20
Page 9
t ■
/is.
. V-
OISPLAY/-DEMO
O
•The built-in demo function will run automatically shortly after
you plug in the system (see page 32).
•The demo function in the power standby mode will be
cancelled automatically by setting the time.
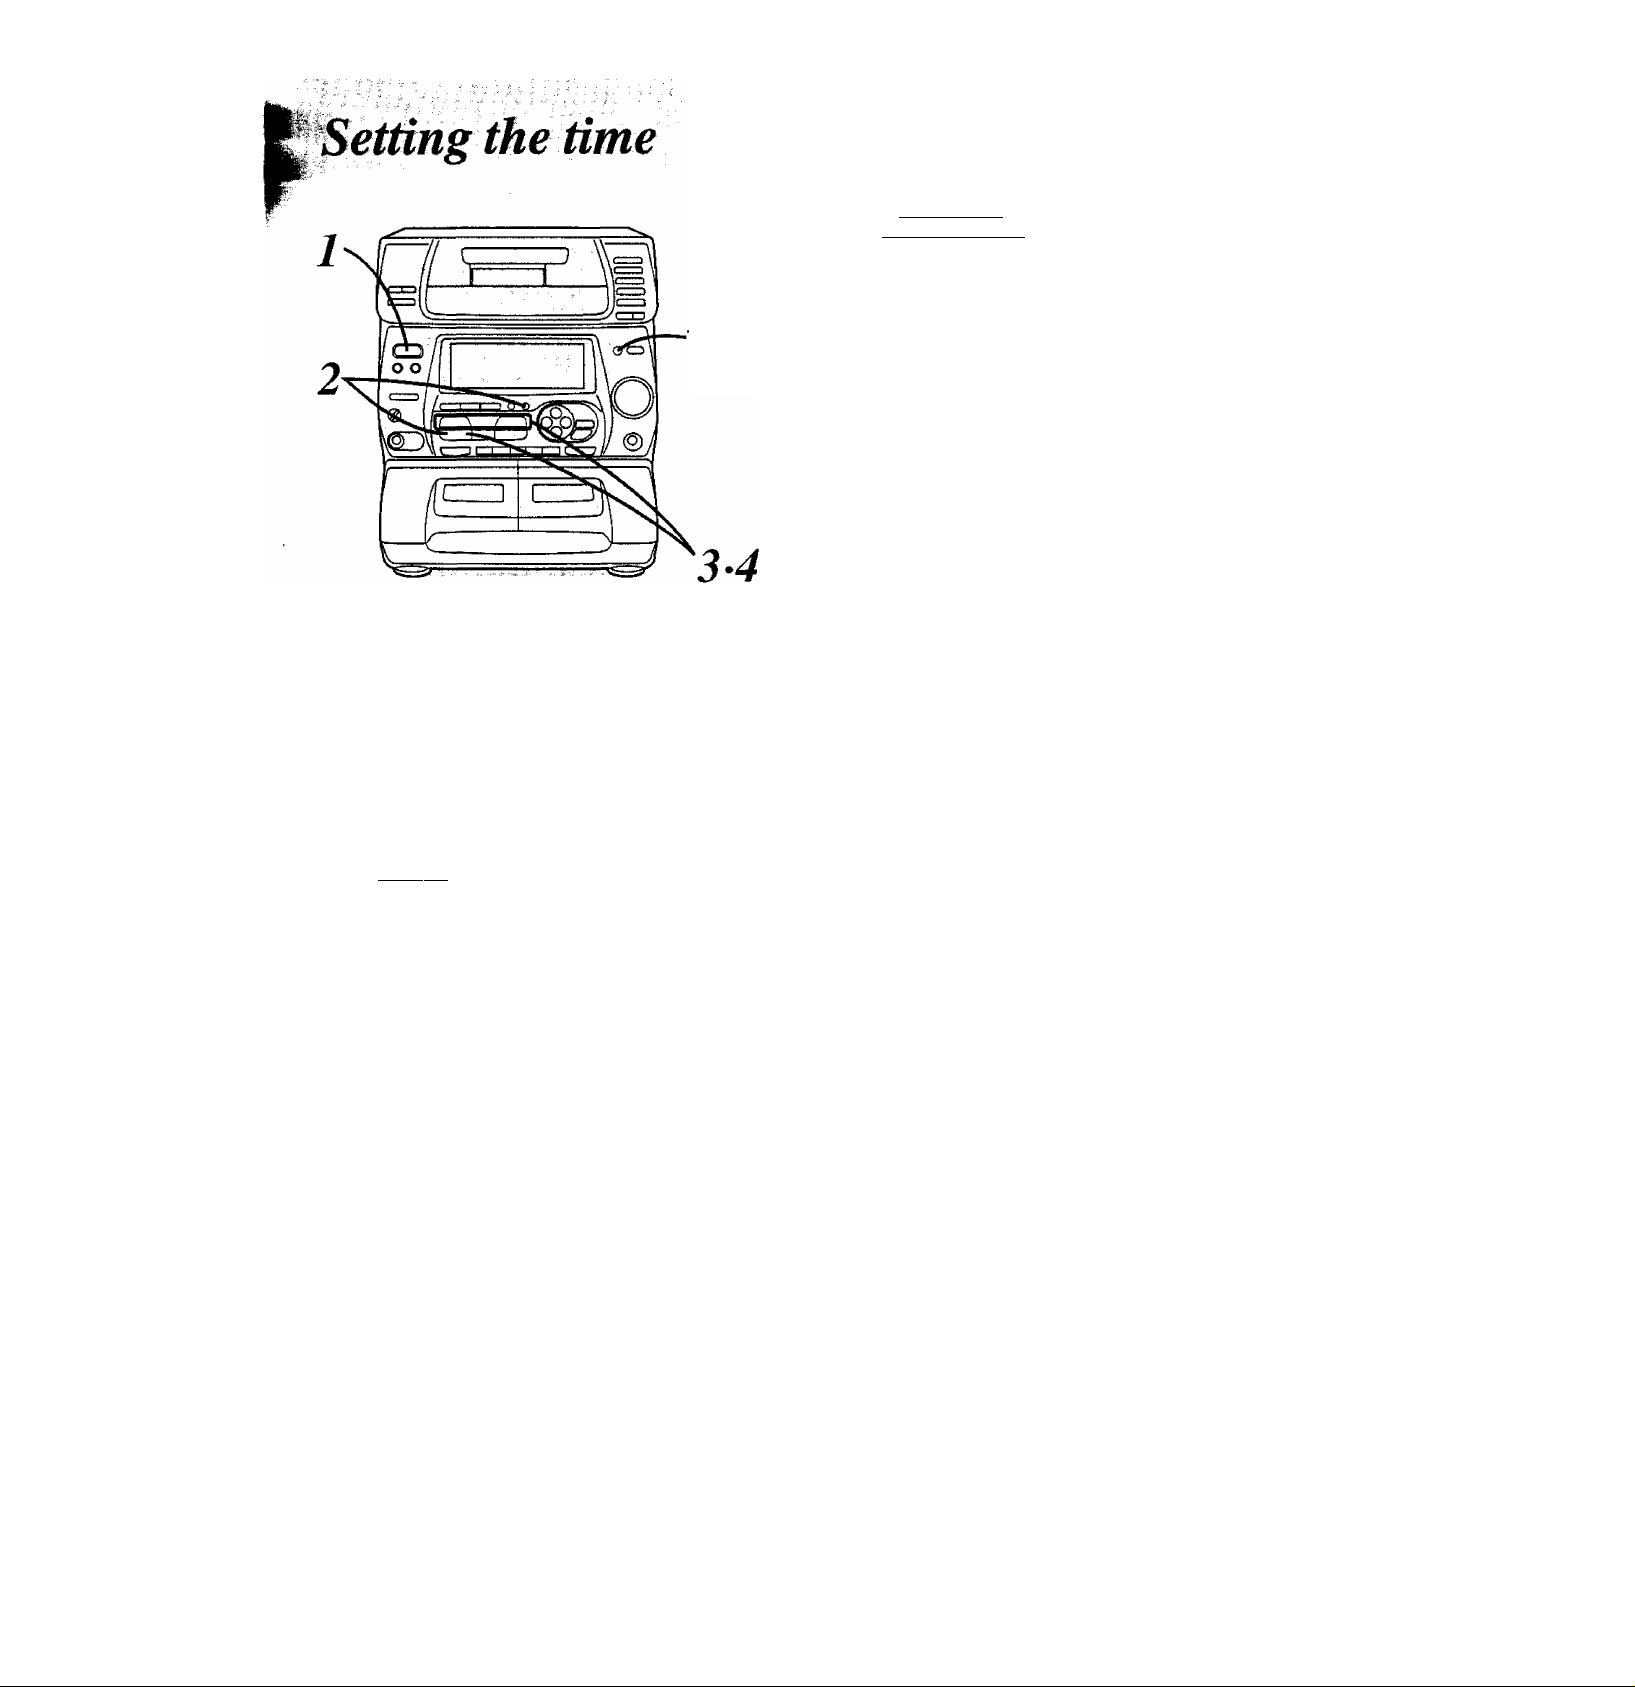
This is a 24-hour display clock.
This example in the figure shows how to set the time for 16:25
(4:25 p.m.).
POWER
STANDBYc!)/ON
Switch on the power.
^
__
© Press V or A to select the
f ^ hour.
b
"■ f D'U u ■ —
n
Press MEMORY/SET.
VMenwBY^gTXS^
© Press V or A to select the
minutes.
b
©Press MEMORY/SET to fin
ish setting the time.
The clock now starts.
The display will return to the previous
display after few seconds.
When “0:00” flashes or the demo function is run
ning:
This happens when you connect the AC power supply cord for the
first time or if there has been a power failure.
In this case, reset the time.
CLO CK /TIMEft
©Press CLOCK/TIMER once
to show “CLOCK”.
Within 7 seconds:
(2)
Press MEMORY/SET.
If the minutes setting has gone wrong:
1. Press CLOCK/TIMER.
2. Press MEMORY/SET twice.
3. Press V or A to set the minutes, and then press MEMORY/SET.
To display the clock again:
Press CLOCK/TIMER.
The display will return to the previous display after about 5 seconds.
For your reference
The hour indication will not change when the minutes pass from “59’’
to “00".
Demo function while the power is on;
When the input source is set to "CD" or “TAPE”, the demo
function will run automatically after about 2 minutes or more in
the stop mode.
You can cancel the demo function by pressing and holding
-DISPLAY/-DEMO for about 2 seconds or more.
Page 10
Memory presetting
• If broadcast frequencies are preset in the memory, you can easily
tune in any of these frequencies from the system or remote control
unit.
• Up to 12 stations can each be set in the FM, LW and MW {For the
Australia and New Zealand: AM) bands with the automatic or man
ual memory presetting.
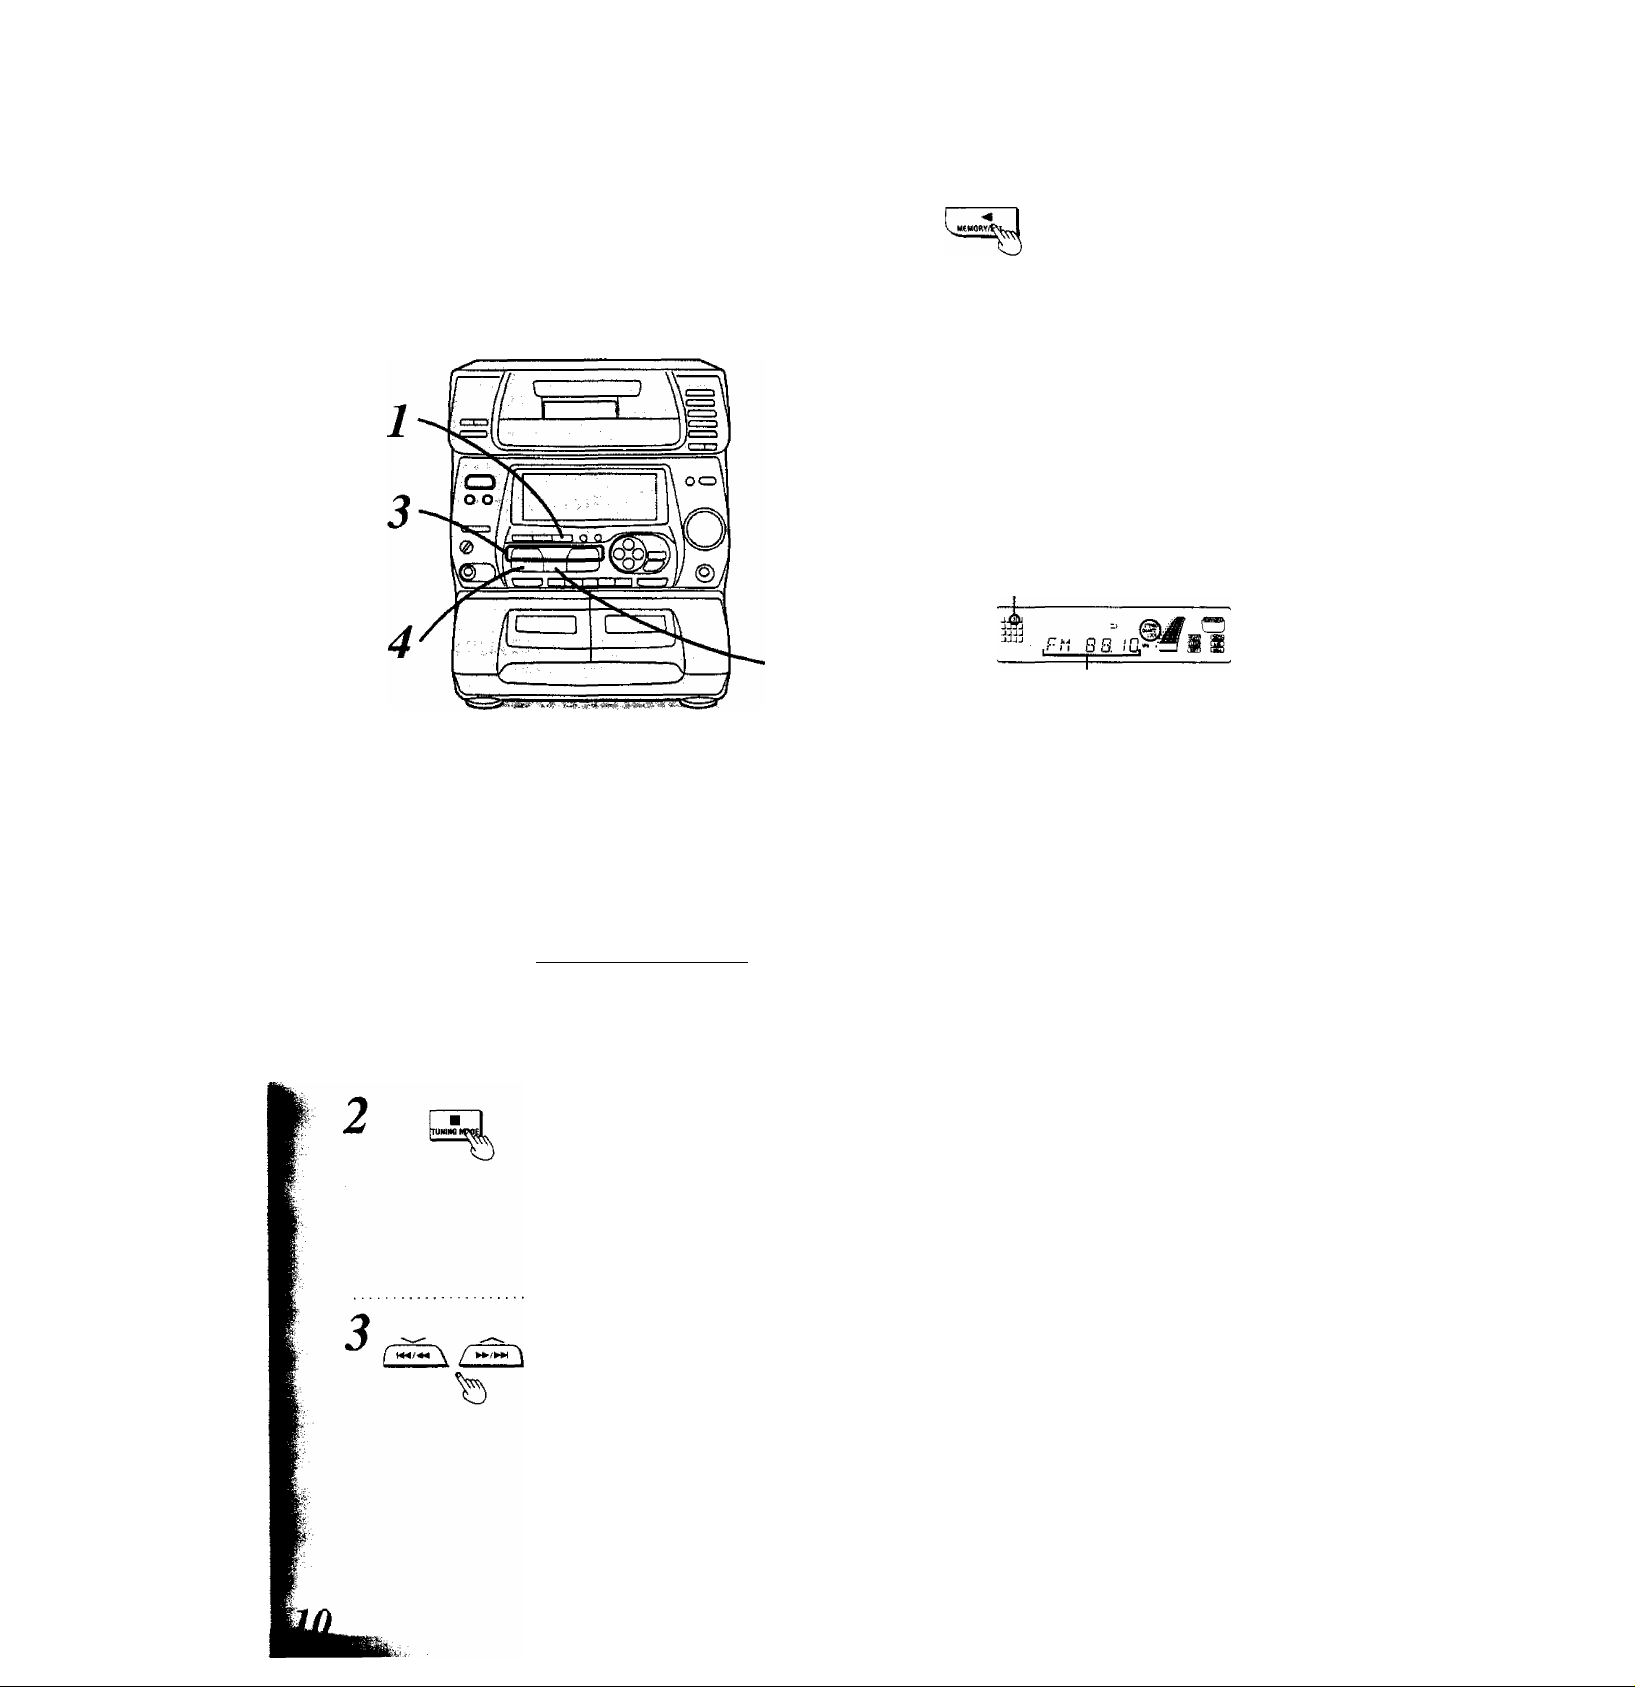
Automatic memory presetting
II
Press and hold MEMORY/SET.
Release the button when the frequency
display begins to change.
The unit v/ill automatically memorize the
received broadcast frequencies in se
quence.
The moment the frequency is mem
orized
The station and channel will be displayed
for about 1 second.
When auto memorization is complete
The last station to be memorized will be
left on the display.
To confirm the preset stations:
1. Press TUNING MODE to select "PRESET,
2. Press V or A,
Preset channel
Station
Auto memory presetting does not work when radio waves from the
broadcasting station are too strong or too weak.
In such case, carry out presetting manually, (See below.)
This example in the figure shows how to preset stations in the FM
band.
Press TUNER, BAND to select
“FM”, “MW” or “LW”.
I
For Australia and New Zealandl
Note that for Australia and New
Zealand, there are two bands of “FM”,
“AM” instead of “FM”, “MW", “LW”.
The power will come on automatically,
even if the system is on standby.
Press TUNING MODE to select
“MANUAL”.
Each time you press the button,
“MANUAL" and “PRESET will appear al
ternately.
JJJJ
JJJJ
JJJJ
JJJJ
.M o
^ H HE
Press V or A until the display
shows the^ frequency from
which you want to begin auto
matic memory presetting.
Holding the button down will scroll the
frequency. Repeatedly tapping on it will
change the frequency one step with
every touch.
White scrolling, if the radio picks up a
station, it will automatically tune it in (auto
tuning).
Manual memory presetting
(After step 2)
1. Press V or A to select the desired frequency, and press
"MEMORY/SET’. (“PROGRAM" flashes.)
2. Press V or A to select the preset channel, and then press
“MEMORY/SET’ during “PROGRAM" flashes,
“PROGRAM" indicator goes off.
Memory retention
The contents of the memory will continue to be stored for approxi
mately 2 weeks, even if the power supply cord is disconnected.
Page 11
Listeningia radio broadcasts
Preset tuning
Be sure you’ve completed the steps in “Memory presetting” on page
10.
I This example in the figure shows how to listen to FM preset channel
' 3.
BAND
( nJHEIKi
I I
Press TUNER, BAND to select
"FM”, “MW” or “LW*
I For Australia and New Zealand {
Note that for Australia and New
Zealand, there are two bands of "FM”,
"AM” instead of “FM”, “MW”, "LW”.
The power will come on automatically,
even if the system is on standby.
Press TUNING MODE to select “PRESET”.
Each time you .press the button,
“MANUAL” and "PRESET" will appear al
ternately.
Press V or A to select the pre
set channel.
"STEREO” lights when an FM stereo
broadcast is being received. “QUARTZ
LOCK" lights when you precisely tune in
a broadcast station.
Preset channel
О
FM 8 8.
Turn VOLUME>to adjust the volume as you like.
Manual tuning
If the frequency is not known, use the tuning buttons for searching.
Press TUNER, BAND to select band,
Press TUNING MODE to select "MANUAL”.
Each time you press the button, “MANUAL” and “PRESET' will
appear alternately.
3.
Press V or A to tune in the desired broadcast.
Repeatedly tapping on the button will change the frequency one
step with every touch. Holding it down will scroll the frequency.
While scrolling, if the radio picks up a station, it will automatically
tune it in (auto tuning).
4. Turn VOLUME to adjust the volume as you like.
Tuning may stop automatically if any jamming is encountered.
Switching the mode from stereo to monaurai
while iistening to an FM station:
Press FM MODeBP.
The sound reception mode switches to “MONO” (monaural)
and “MONO” lights.
When “MONO” indicator lights up:
Use this setting when listening to or recording in monaural. All
sound reception including stereo sound, is in monaural.
When “MONO” indicator goes off:
Use this setting for normal listening. Both stereo and monau
ral sounds can be heard as they are.
For your reference:
If too much noise is produced in the FM stereo mode, press
FM MODE/BP and check “MONO" lights up.
The sound will then be heard in monaural. If the broadcast
signal is weak, or if there is a large amount of interference, you
will get a clearer sound in “MONO" mode.
IZBSi
You cannot memorize the stations in the "MONO" mode.
/'TTn t
о
•I'S
11
Page 12
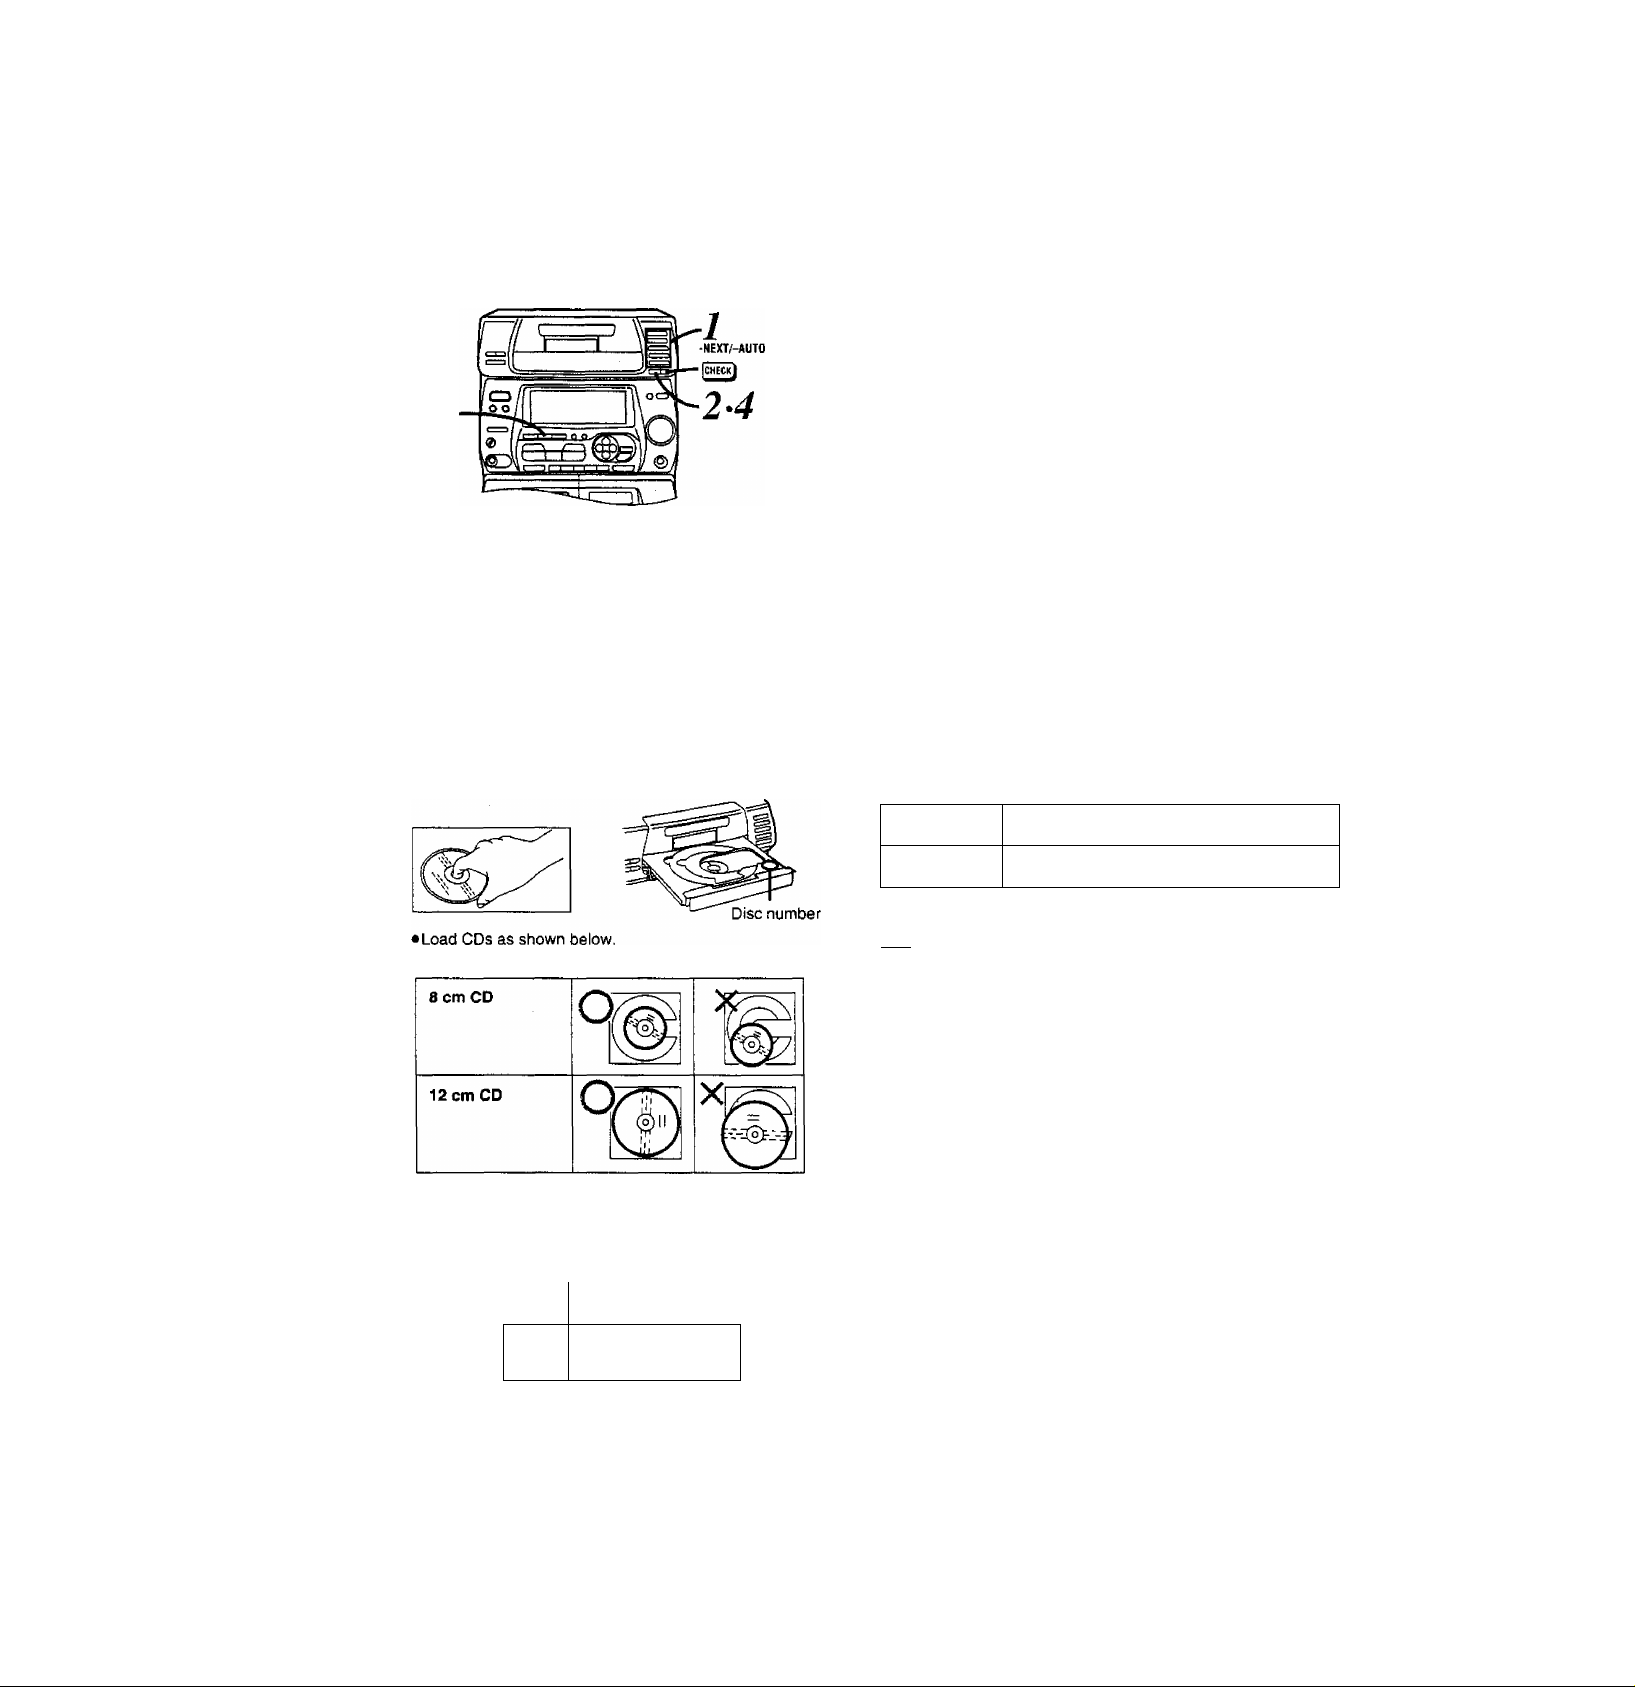
Listening to compact discs
- Loading and checking CDs
Always stop the changer before loading or changing CDs. You
cannot change CDs while a disc is playing.
---------------------
How to load CDs
Press DISC 1-5, whichever you want to
1
open.
Within about 5 seconds:
2
Press A OPEN/CLOSE.
Set the CD in the tray.
3
• How to hold CDs
How to check which trays have discs
“CHECK” is a convenient way to know what discs you have in
your changer and where.
Press CHECK (-NEXT).
• Every time you press the button, the next tray opens.
•You can change the CD while the tray is open.
• To close the tray, press A OPEN/CLOSE,
Press and hold CHECK (-AUTO).
The trays will open (and close) automatically one after another.
The first one to open will be the next tray after the disc number
shown on the display. This way, you can check all trays in a row.
• To stop the auto check in course, press ■.
Do not attempt to change CDs while trays are opening and
closing in the auto check.
Disc indicators
When you open or close a tray with the A OPEN/CLOSE button,
the changer automatically detects whether there is a CD in the
tray or not. The indicator will act as follows.
Press ^ OPEN/CLOSE.
The open tray will close.
Number of tracks
Total playing time
USUH
iISJS
Disc number
' // m
G 'nSGI?’ U i 1
• (red) There's a CD in the tray.
light off
While the CD is playing, its indicator is green.
ffwa
In the following cases, CD detection is OFF. The indicators will be
red whether there Is a disc in the tray or not.
Assuming that the tray is already opened.
• When the tray is closed with CHECK
• When the tray is closed with DISC 1 -5
•When an input mode (TUNER/TAPE/AUX) other than CD is
selected and the tray is closed with A OPEN/CLOSE.
There isn’t a CD in the tray.
For your reference;
While the CD changer is changing discs, the disc indicators will
flash.
^ To load other CDs, repeat steps 1 through
For your reference:
If the tray you want to open is already shown on the display, you
obviously do not need to perform step 1,
Page 13

Sequential play
What is meant by “final disc”?:
For example, if play starts from disc 4, disc 3 will be the “final disc".
Order of progression:
Disc 4-»5-»1-»2-»-3
When “NO DISC” display appears:
It indicates that the disc tray now shown on the display is empty.
For your reference:
If you press ► instead of ^ OPEN/CLOSE after inserting a CD, the
tray will close and play will start directly from the track 1.
Skip function
Press either or ►►/►w.
To Skip forward
You can skip as many tracks as the number of times you press the
button.
To skip backward
You can skip to the beginning of the track being played. If you press
the button again quickly, you can skip to the beginning of the previ
ous track.
1
The power will come on automatically,
even if the system is on standby.
Insert CDs in the trays.
Press CD.
{For details, see page 12.)
When there are 16 or more tracks on the
CD," will appear.
ГДЯ
The total playing time displayed when a
disc is loaded includes intervals between
tracks. This is why sometimes the dis
the CD.
|To stop the disc play:
Press ■.
played time is longer than that listed on
Press ►.
Track number
Elapsed play time
*n- V
T IS ^
U-L
1 ^
The changer will automatically play all
tracks on all discs. It will start from the
first track on the disc shown on the dis
play, and will continue until playing the
last track of the final disc (see below).
J 1 Ш Ж
Adjust the volume level as you tike.
For your reference:
• In random play mode (See page 14), you cannot skip to the previ
ous track.
• In program play mode (See page 15), you can skip only the pro
grammed tracks.
Search function
While in ptay mode, press and hold either or
Release the button when you have reached the desired point.
►►/►►i: To search forward
To search backward
For your reference:
During random play and program play, search will take place within
the track being played. (See pages 14 and 15.)
Repeat function
This function repeats the play of all tracks.
Press REPEAT before or during play.
“ " will light.
To cancel repeat play;
Press REPEAT once again.
“ CD " will go out.
For your reference:
In program play mode (See page 15), the CD changer will repeat only
the programmed tracks. You can enjoy the same track over and over
by programming only one track.
iBUfi J
is^ii N—^
IG 4Q;S(? \
|To temporarily stop the disc play:
>ress
■play again, press ►.
13
Page 14

Listening^to tampact discs
Direct access play
by remote control only
Direct access allows you to start sequential play from a specific track
to the last track on the final disc.
1
2
■/CD
DISC
_n_ ■/CD
o o o
Press H/CD.
Press DISC.
Jillil
sviiia » *
7Y
AJ
^ n
(within 10 seconds or so)
Press DISC 1-5, whichever
disc you want.
If wanting to listen to the disc from the
first track, there is no need to perform
step 4.
Random play
In random play, the changer randomly selects the tracks. It will play
each track once until all tracks on all the loaded discs have been
played, and will then stop automatically.
RANDO M
Press RANDOM.
RANDO M
“RANDOM” will light, and then random play will start.
Play will stop automatically when all tracks on all of the discs finish
playing randomly.
To cancel random play:
Press RANDOM once again,
“RANDOM” will go out. The CD changer resumes the sequential play
mode.
For your reference:
In the program play mode {See page 15), the programmed tracks will
be played randomly.
JJJJ
JJJJ
JJJ ■
‘t^p RNH Gtl
CD ntci 0lM 2
JJJJ ^ ( I f A-
—11 I \ \ —
3-
Press or ^ to select the
a
desired track number.
Play wilt start with the track you select.
JJ4J#
jjia* -j
0 D-0 I i
/y
si 1 1
What is meant by “final disc”?;
For example, if play starts from disc 4, disc 3 will be the ‘1inal disc"
Order of progression:
Disc 4^5-*1^2-*3
Page 15

Program play
by remote control only
This function allows you to program up to 24 tracks.
This example shows how to program track 8 from disc 2 and track 3
from disc 5.
Press B/CD.
1
Press PROGRAM.
“PROGRAM" will light.
4
JJJ
JJJJ
JJJJ
2
PROGRAM
Repeat steps 3 through 5 untii
you have programmed aii the
tracks you want.
Press ►.
Play will start in the programmed se
quence.
When all the programmed tracks have
been played, the changer will stop auto
matically.
"P" of the program play mode will appear
on the display.
To cancel program play;
press ■. (Press ■ twice during program play).
To check programmed tracks:
Press or when “P" appears on the display.
Track number and the programmed order will appear on the display.
To add a programmed track:
Repeat steps 3 through 5 when “P” appears on the display.
To cfear a programmed track one by one:
Press CANCEL when “P" appears on the display.
Each time you press the button, the last programmed track will be
cancelled.
When “CD FULL” appears;
The number of programmed tracks is limited to 24. No further tracks
can be programmed.
DISC
Press DISC.
JJ4J
jjJj
JJJJ » «
JJJJ <AlJr n
(within 10 seconds or so)
Press Disc 1-5, whichever
disc you want.
JJJJ
CD WC> C(K2
oo
0 Press or, ^ to select
the desired track number.
PRotRAM^ ® (within 10 seconds or so)
Press PROGRAM.
Programmed track ilumber
Programmed order
JJJJ
™ ^
G ■■ -
O
o
// O
For your reference
The program will remain stored in memory for approximately two
weeks even after the unit is switched off.
lyiwa
If you enter non-existing disc(s) or track(s), the corresponding indica
tor illuminates and the entry is included in the count. In the play
mode, the changer will cancel the non-existing entry.
15
Page 16

Listening to tapes
■ ■ . ■ c*,
Press REV MODE to select the
reverse mode.
Each time you press REV MODE, one of
the indicators will light up.
The deck plays one side only, and
then stops automatically.
The deck plays both sides, and
then stops automatically.
The deck plays both sides 8 times,
and then stops automatically.
When you load tapes into both
decks; series piayback will be se
lected. (See page 17.)
Press ◄ or ► to start play-
I I
Ъ
back.
►: The forward side (front side) will play.
◄ : The reverse side will play.
• You can use either deck 1 or deck 2 for tape playback.
•This page shows an example using deck 1.
DECK1/2 Press TAPE, DECK 1/2.
1
0ECK1
2
The power will come on automatically,
even if the system is on standby.
Press ^ OPEN on deck 1, and
then insert the tape.
Insert the tape with the exposed tape fac
ing down.
Close the holder.
Front side
Press DOLBY NR if the cas
sette you want to play was
recorded using Dolby noise re
duction mode.
If the tape was not recorded using Dolby
NR, press DOLBY NR again so that the
Dolby NR indicator will go off.
JJJJ
JJJJ
7 a
/ ДК
Л CBS im>
VOLUME _ Adjust the volume level as you
like.
To stop tape playback:
Press
To change the deck to be used:
Press TAPE, DECK 1/2 to select the deck you want to use when you
load cassettes into both decks.
DECK 1 or DECK 2 indicator will illuminate to show
which deck you can operate.
^JJJ
JJJJ
JJJJ
Playback is interrupted white playing back tapes, if you open the
other deck.
О
For your reference:
The tape will automatically stop when a different source mode is
selected during its operation.
About priority of the deck:
When you load cassettes in both decks, the DECK 1 or 2 indicator
will light to show which deck you loaded last.
The system automatically selects “DECK 2" when you turn on the
power or whenever you switch to another source and then back to
the tape deck.
Type of tape which can be piayed correctly:
The unit automatically identifies the type of tape.
NORMAL Р031Т10МЛ^РЕ I
HIGH POSITION/TYPE 11
METAL POSITION^YPE IV
0
0
О
Page 17

To fast-forward or rewind the tape
Press or ►►/►►I while the tape is in the
stop mode.
If the forward side (►) of the tape is seiected:
►►/►w: The tape will be fast forwarded.
The tape wili be rewound.
Series playback
Press A OPEN on decks 1 and 2, and then insert the tapes.
Insert the tape in deck 1 with the side that you wish to listen to first
facing you.
2.
Press DOLBY NR if the cassettes you want to play were recorded
using Dolby noise reduction mode.
Press REV MODE to select “c;^y mode.
Press TAPE, DECK 1/2 to select deck 1.
“DECK 1" will light up.
5.
Press ►.
© Forward side of tape in deck 1 <
i
(2) Reverse side of tape in deck 1
Forward side of tape in deck 2
I
@ Reverse side of tape in deck 2-
• After repeating above operation 8 times, the tape will automatically
stop.
• You can also start playback from a position other than the forward
side in deck 1 (©). In this case, too, the deck counts 1 time after
finishes playback of the reverse side of tape in deck 2 (©).
To stop tape playback:
Press ■.
---------
To find the beginning of a program
(TPS: Tape Program Sensor)
Press V«/« or ►►/►w whiie the tape is play
ing.
If the forward side (►) is piaying;
►►/►w: The tape will piay from the beginning of the next tune.
The tape wiil rewind to the beginning of the present tune.
Then the tune will piay again.
If the reverse side (◄) of the tape is playing:
The reverse operation should take place.
*S is a function that searches for the silent passage in a tape
program. So, it may sometimes fail to operate correctly in the follow-
:',ing situations.
'•When there is no blank space between tape programs (for exam
ple, a tape recorded from a microphone)
•When the interval between programs is less than 4 seconds
•When there is a particular low-level passage in a program (for
. example, classical music)
. eWhen the program is less than 10 seconds, or when it is less than
10 seconds from the beginning of the progranj to the beginning of
' the next program
•When a tape is recorded with fade-ins or fade-outs
For your reference:
You cannot select Dolby NR for one deck but not the other. We
recommend you use tapes of the same type (Dolby noise reduction).
About Dolby Noise Reduction system
Using Dolby NR reduces tape hiss in the high-frequency range. It
boosts the level of the high-frequency during recording, and lowers it
by the same amount during playback, simultaneously reducing high-
frequency interference incurred during the recording process.
Noise is reduced to about one-third.
Use this system when playing back tapes recorded by the Dolby-B
noise-reduction system, such as prerecorded music tapes, etc.
Dolby noise reduction manufactured under license from Dolby
Laboratories Licensing Corporation.
“DOLBY" and the double-D symbol DO are trademarks of
Dolby Laboratories Licensing Corporation.
17
Page 18

Selecting sound quality and field
Base your selection on the type of music and how you want to listen
to it.
Press EQ SPACE.
a
Press ◄ or ► or ▼ or
select the desired mode.
I HEAVY 1-
►
DISCO
▲ to
Adjusting sound quality
SC-CH75 only
Press G.EQ.
Press or ^ to select the de
0®®
sired frequency.
Flashing parts are adjustable frequen
0^
cies.
1
■2
ClEAR
SOFT
HEAVY: Use to add “punch” to rock and other music.
CLEAR; Use to clarify the treble range of jazz, etc.
SOFT: Use to listen to background music, etc.
DISCO:
LIVE:
HALL:
Use to reproduce a long reverberating sounjd like that
heard in discotheques.
Use primarily for vocal pieces to add gloss to the vocals.
Use to impart a deep bass and spread which will make you
feel as if you were in a large concert hall.
I
To cancel the mode:
Press EQ SPACE to select “FLAT’.
For your reference:
You can record with the desired mode. First select the desired mode,
and then start recording.
To playback such recordings, press EQ SPACE to select “FLAT',
Adding bass
for playback only
Press V. BASS.
Middle frequency
Low frequency
High frequency
Press T or A to adjust the fre
quency level.
1
Sample of frequency level “up"
Repeat steps 2 through 3 until
4
you have adjusted the desired
frequency.
To cancel the mode:
Press G. EQ to select “FLAT.
For your reference:
You can record with the desired mode. First select the desired mode,
and then start recording.
To playback such recordings, press G. EQ to select “FLAT".
Press the button again to cancel.
“V. BASS” goes out.
Page 19

Canvenient
DECK 2 only
Type of tape which can be recorded
correctly
The unit automatically identifies the type of tape.
Easy play
When you load a CD or cassette in advance, you can start play
directly from standby by pressing the appropriate button.
Listening to tapes
0ЕС К1Д
TAB
Listening to compact discs
Listening to radio broadcasts
BAN D
ОШ
Listening to external units
Press TAPE, DECK 1/2.
• if both decks are loaded with tapes,
playback starts from deck 2.
•The reverse mode stores the previously
selected mode in memory.
Press CD.
• Play will begin from the disc that you
last heard.
• When the tracks has been program
med, the play will start in the program
med sequence.
Press TUNER, BAND.
You can receive the station last tuned in.
NORMAL POSITION/TYPE I
HIGHPOSmON/TYPE II
METAL POSITIONЯYPE IV
Recording may not turn out as you want it to when using metal tapes.
0
О
X
How to advance the leader tape
Wind the leader tape fonward so that recording can start as soon as
you press the button. But, this is not necessary if edit-recording from
CDs.
The leader tape is the first few revolutions that you cannot record on.
Magnetic section
(on which sound can be recorded)
Leader tape
(on which sound cannot be recorded)
Concerning the volume level while
recording
The deck automatically sets the recording level. If you change the
volume level while recording, it does not affect the recording volume
level.
Press AUX.
The system will turn on and the unit con
nected to the “AUX" terminals will be se
lected as the input source.
To mute the volume
This feature is convenient when you have a telephone call, etc.
by remote control only
Press MUTING.
JJJJ
JJJJ
JJJJ
JJJJ
Press the button aggin to cancel.
“MUTING" goes out.
Muting can also be canceled by lowering the volume all the way
(—dB).
When the system is turned off, the muting operation will be automati
cally canceled.
да ir дет 09«
^ \ 1 ^
_ kd i t T r * < Г"
M U 1 J, M и
/j о
■ /
Дп Дш
Concerning the sound quality and field
while recording
To record the sound as it is:
Press EQ SPACE to select “FLAT", and then start recording.
To record with the desired sound quality:
Select the desired sound quality, and then start recording.
•You cannot open the deck while recording with it.
• You cannot fast-forward or rewind one deck while recording with
the other.
To erase a recorded sound
1. Unplug the microphone if connected.
2. Press TAPE, DECK 1/2.
3. Insert the recorded tape into deck 2.
4. Press DOLBY NR so that the Dolby NR indicator goes off.
5. Press REV MODE to select reverse mode.
6. Press REC START/STOP,
19
Page 20

Recording frain radio broadcasts
Advance the leader tape a few revolutions.
1
DECK 2
Press ^ OPEN on deck 2, and
then insert the tape.
Close the holder.
When making a Dolby NR re
2
cording, press DOLBY NR so
that the Dolby NR indicator
lights.
Fif eaco-sil
6
“FM”, "MW” or “LW”.
fpor Australia and New Zealand |
Note that for Australia and New
Zealand, there are two bands of “FM”,
“AM” instead of “FM”, “MW”, “LW".
Press TUNING MODE to select
"PRESET".
Press TUNER, BAND to select
You can also select the desired broad*
cast station by tuning manually.
(See page 11.)
Press V or A to select the pre-
8
STOPSTAHT/STOP
set chsnnel.
Press REC START/STOP to
start recording.
ranm iSinetw
JJJJ
JJJJ
CM Q Q I ■;
r I I o U. I u .
To stop recording
Press REC START/STOP again.
Recording can also be stopped by pressing ■.
To cut an unnecessary part while recording
1. Press REC STAHT/STOP when hearing a unnecessary part.
The cassette deck will go into the stop mode.
2. Press REC START/STOP when wanting resume recording again.
Recording will continue in the same direction as before.
DECK1/2
^ 1 1 WMCV J
I I I ^ J
'4'
b
Press REV MODE to select the
reverse mode.
T—One side will record, and then the
tape will stop automatically at the
tape end.
Zly. Both sides will record (forward
side—»-reverse side), and then the
tape will stop automatically at the
tape end.
cZy>‘- Same as above. (When you press
REC START/STOP, “cr::)’’ will be
automatically switched over to
Press TAPE, DECK 1/2 to select “DECK 2”.
Press or immediately fol
lowed by ■.
This selects which direction the tape runs
in. ^
► : Recording from forward side
Recording onto reverse side
To reduce the noise while LW/MW
recording (Beatproof function)
While in the recording mode of LW/MW (For Australia and New
Zealand: AM) band;
Press FM MODE/BP while re
cording.
Each time you press the button, BP 1, BP 2 and BP 3 will be dis
played alternately. (For Australia and New Zealand: BP 1 and BP 2
will be displayed alternately and “AM" display appears instead of
“MW".)
Select the position where there is less noise.
Your attention is drawn to the fact that recording pre-recorded
tapes or discs or other published or broadcast material may
infringe copyright laws.
Page 21

There are 2 ways to record from compact discs, normal recording
and one-touch editing.
One-touch editing
Normal recording
• Tracks are recorded in the order in which they are found on the CD.
• Tracks are cut in the middle when the end of the tape is reached.
• You can record from any point on the tape.
(py When you load one disc:
Breaks
I Side A |[TrVck1
Side В I
Remaining part of track 5
¿1
)
•Tracks are recorded in the order in which they are found on the CD.
•Tracks are cut in the middle when the end of the tape is reached,
but recording is resumed on side B.
• Recording always starts from the beginning of the tape. (Tapes are
automatically rewound.)
When you load one disc:
Breaks
Side A |j Trackf
Side В
I
Recording resumes here.
П1
О
'(PJJJJJ When recording from more than one CD:
-CDO-
SideA || Trackt
Side В I
T
CDO
I^or your reference;
i»The recorded tape should be long enough to record the desired
tracks.
rracii
-CD0-
2
•CD0-
Trackt
i_l
)
(P////J When recording from more than one CD:
-CDO-
Side A 11 Trackt'
■'9^
I
2|
■CD0-
The link function automatically turns on between CDs to keep on
recording.
2 T racki
•CD0-
5
P
21
Page 22

Recording from compact discs
Normal recording
i ^ ]
I FMWOOtiP _J
Press < or ►, immediately fol
lowed by B.
This selects which direction the tape runs
in,
► : Recording from forward side
<\ Recording onto reverse side
Advance the leader tape a few revolutions.
1
DECK 2
Press ^ OPEN on deck 2, and
then insert the tape.
Close the holder.
When making a Dolby NR re
2
cording, press DOLBY NR so
that the Dolby NR indicator
lights.
jjjj
jjjj
JJJJ
JJJJ
Press REV MODE to select the
reverse mode.
T"*: One side wilt record, and then the
tape will stop automatically at the
tape end.
Both sides will record (forward
side-»reverse side), and then the
tape will stop automaticaily at the
tape end.
Same as above. (When you press
REC START/STOP, “cX^” will be
automatically switched over to
3
2
6
( CD
Press CD.
Insert CDs in the trays.
7
Recording will begin from the first track of
the disc shown on the display. For exam
ple, if disc 4 is displayed, recording will
begin from the first track on disc 4, and
will continue in progressive order.
Order of progression:
Disc 4^5—»1 —*2—»3
8
STABT/STDP
Press REC START/STOP
start recording.
O
to
i i
To stop recording
To Stop recording after a 4 second silent interval
Press ■.
To Stop recording without a silent intervai
Press REC START/STOP.
The CD will stop automatically too.
To record programmed tracks
© Perform steps 1-7, and then press PROGRAM on the remote
control.
d) Press DISC on the remote control.
@ Select the disc from the remote control.
© Select the track number from the remote control, and then press
PROGRAM.
® Repeat steps C|)-@ until programming all tracks (max. 24 tracks).
® Press REC START/STOP to start recording.
Press TAPE, DECK 1/2 to se
lect “DECK 2”.
Page 23

One-touch editing
•You don’t have to advance the leader tape.
• "^d” of the reverse mode will be automatically selected.
1
2
3
DECK 2
1
2
Press ^ OPEN on deck 2, and
then insert the tape.
Close the holder.
When making a Doiby NR re
cording, press DOLBY NR so
that the Dolby NR indicator
iights.
Press CD.
EASY EDIT
cording.
The deck starts rewinding the tape.
It takes a little while after the button is
pressed for the recording to actually start.
To stop editing
Press EASY EDIT to start re
Press ■.
The CO changer section also stops.
One-touch editing operation
1. The cassette deck will rewind the tape, and then advance the tape
beyond the leader tape while making the non-recorded passage
of about 10 seconds.
2. The recording from forward side starts.
3. If the last track on forward side has not yet finished recording,
that trad; will automatically be recorded again from the begin
ning of reverse side.
4. Depending on the length of the tape, the last track on reverse side
may be cut off in the middle.
When one-touch editing finishes
•The disc and track numbers last recorded will remain on the dis
play.
• If there is another CD to record, “LINK" will flash on the display and
the stereo will automatically start recording the next CD.
• If there isn’t another CD to record, "LINK" will still flash on the
display, but the stereo will go on standby. To continue recording,
insert a disc and press ►. (If you want to link the tracks, do not
■press ■.)
To quit linking, press ■.
insert CDs in the trays.
Recording will begin from the first track of
the disc shown on the display.
Specify the disc (DiSC 1-5)
you want to start recording
from. Then, press ■.
Of course, if the number of the disc you
wanted is already displayed, you do not
have to select it. *
To record programmed tracks
© Perform steps 1-4, and then press PROGRAM on the remote
control.
(D Press DISC on the remote control.
© Select the disc from the remote control.
© Select the track number from the remote control, and then press
PROGRAM,
(D Repeat steps ©-© until programming all tracks (max. 24 tracks).
(6) Press EASY EDIT to start recording.
23
Page 24

Recording from compcictdism
Recording onto left over space on tapes
(LINK)
You can link up another CD when “LINK" flashes after editing a CD.
£3ir -iJii
/ OPEN/CLOSE
Press A OPEN/CLOSE to re
place the CD with another one.
Press ►.
2
► 1
Linking will start.
To continue linking tracks:
Repeat steps 1 and 2.
As long as there is space on the tape to record, when the recording
finishing, the tape deck will put linking on standby.
To cancel the LINK function:
Press ■.
Linking programmed tracks
® Perform step 1 above, and then press PROGRAM on the remote
control.
@ Press DISC on the remote control. '
@ Select the disc from the remote control.
(4) Select the track number from the remote control, and then press
PROGRAM.
® Repeat steps until programming all tracks (max. 24 tracks).
(D Press ►. Linking will begin. *
Page 25

The recording level and the Dolby effect will be recorded as they are
on the tape being played back.
Advance the leader tape a few revolutions.
DECK1/Z
DECK 1 DECK 2
Press TAPE, DECK 1/2.
Press A OPEN on both decks, and then insert the tapes.
For playback: Into deck 1
For recording: into deck 2
Close each deck's holder.
Press REV MODE to select the reverse mode.
Single-sided recording
Two-side recording
:y.
(forward side~>reverse side)
Same as above (When you press
NORMAL or HIGH, “c:^^ will be
automatically switched over to
THPS
O
Press or immediately fol
lowed by ■.
This selects which direction the tape runs
tn.
► ; Recording from forward side
◄ : Recording onto reverse side
Set both deck 1 and 2 to run in the same
direction, side A.
To switch over between decks 1 and 2
Press TAPE, DECK 1/2.
To record onto side B, set deck 2 to run in
the ◄ direction.
TAPE EDIT
I
I
I
Press NORMAL or HIGH of TAPE EDIT to start recording.
NORMAL: Normal speed recording
HIGH: High speed (about 2 times
norma! speed) recording.
Recording starts at the selected speed.
Tape travel direction indicator
The tape travel direction indicator shows
the tape travel direction of the tape for
recording.
After recording has finished, both decks
will stop.
To stop recording
Press ■.
Both decks will stop.
•While making a high-speed recording, move visual units such as TV
further away from this unit. It prevents noises from being recorded.
• You cannot record acoustical effects such as bass or changes in
sound quality and field.
25
Page 26

timer
• Make sure that you have completed “Setting the time” on page 9.
• Select this timer when you want to use the timer as an alarm clock.
You can wake up with listening to music (CD, tuner, tape or aux) at
a desired volume level and time.
EPLAV
0
5
1
I Preparations | Switch on the power.
The following example in the figure shows how to set the play timer
for playing a CD from 6:30 a.m. to 7:40 a.m.
CLOCK/TIMER
©Press CLOCK/TIMER three
times to show “Q PLAY”.
JJJJ
JJJJ
^
CfPLfTg) .'1
Within 12 seconds:
/ sjB
J ^ cSD
© Press MEMORY/SET.
7 O
J M M
“ON" time setting
jdjj <ËPuÿ~ ^
.... •-
© Press V or A to select the
starting hour.
JJJJ
JJJJ
JJJJ
7 C
J ¡SB
Press MEMORY/SET.
JJJJ
jjjj
jjjj
JJJJ
__
n n_ ■
&
uu *-
^ X ^
o
@ Press MEMORY/SET.
LJtoo I
‘OFF" time setting
© Press V or A to select the
b
I
b
Press V or A to select the
starting minutes.
JJJJ
JJJJ
JJJJ
JJJJ
ending hour.
JJJJ
JJJJ
jjjj
JJJJ
- d Ï 1
Press MEMORY/SET.
JJJJ
JJJJ
dddd
i^ü-d i 1
©Press V or A to select the
ending minutes.
j3jj
jjjj
, V-^ /7 O
© Press MEMORY/SET.
1
JJJJ
JJJJ
dddd
(■ MI
U I
1 s
Page 27

HPLAY
Select the desired source and then prepare the stereo for play.
When you play CD(s):
Press CD and insert CD(s).
Stop the CD(s) after playback.
When you play tape(s):
Press TAPE, DECK 1/2 and insert
tape(s).
Stop the tape deck after you select the
direction of the tape.
When you play the radio:
Press TUNER, BAND and tune in the
desired station.
When you play a unit connected to the
"AUX” terminals:
Press AUX.
Set the playback volume.
Press S PLAY.
The unit will be switched to the power
standby condition.
The timer play will start at the preset time
with volume increasing gradually up to
the volume level you preset.
To switch the timer OFF
Press Q PLAY and check “Q PLAY” goes out.
The settings made with the preceding procedure will however be kept
in memory.
To check settings (only while power is ON)
Press CLOCK/TIMER 3 times and check “E] PLAY" is displayed.
(T) Play start time
@ Play over time
@ Play source and playback volume
To change settings (only while power is ON)
© Press □ PLAY and check “[g PLAY" goes out.
d) Reprogram from step 1.
Using the timer at the same time setting continu
ously
{You can accomplish this even if your stereo is on standby.)
The settings made with the preceding procedure will however be kept
in memory.
Press eg PLAY and check “[g PLAY" is displayed.
To enjoy the desired source after the timer setting
is completed
1. After finishing step 6, switch on the power and, start playing the
desired source.
Even if you change the volume level or music source, the timer
play will start with the preset condition.
2. Press POWER to standby mode after enjoying the play, and
confirm CD(s) ortape{s) has (have) been inserted.
• if the power is on, the timer will not function. The system must be in
the standby mode.
•The ON time and OFF time cannot be the same setting.
• If you switch the power to the standby mode while the play timer is
functioning, the OFF time setting will not be activated,
• The lowest possible volume with the timer is -60 dB. If you set it
lower than this, it will automatically be played back at -60 dB just
the same.
• Record timer cannot be used in combination with the play timer.
For your reference
• External sources must be connected to the “AUX" terminal. How
ever, time settings apply only to this stereo. For more information,
see the instruction manual of the connected unit.
• As long as "Cg PLAY" is displayed, the timer will work every day at
the same time.
• When you insert cassettes in both deck 1 and 2, deck 2 has priority.
27
Page 28

-..'tí.a. i-;:-.
• Make sure that you have completed "Setting the time” on page 9.
• Select this timer when you want to use the timer to record a
midnight program or while you are out.
i: :IÍ
■V
i PrepafationsI Switch on the power.
The following example in the figure shows how to set the record timer
for recording FM broadcasts from 18:30 {6:30 p.m.) to 20:00 (8:00
p.m.)
©Press CLOCK/TIMER two
CLOCK/riMER
times to show “H REC”.
o
Within 12 seconds:
©Press MEMORY/SET.
yjpu ■-
ON” time setting
© Press V or A to select the
starting hour.
M /7 0
-JB'CD UM^
Press MEMORY/SET.
Í \ f
I I
“OFF” time setting
© Press V or A to select the
starting minutes.
Úi-ii
W-/
©Press MEMORY/SET.
-ÍB^ UM 1
© Press V or A to select the
ending hour.
JJJJ
jjjj
JJJJ
I'hVfqn
o
Press MEMORY/SET.
p TT •
C U Du „
'
I ^
© Press V or A to select the
ending minutes.
ha * ro'nV,.-'-
__________-
p n-rtrt_ .*
C. u jjLt^ •-
©Press MEMORY/SET.
Page 29

□flEC
Select the desired source and
then prepare for recording.
When you record from the radio:
Press TUNER, BAND to select band and
tune in the desired station.
When you record from a unit con
nected to the “AUX” terminals:
Press AUX.
Prepare for recording.
1. Insert a tape into deck 2 with the for*
ward side facing you.
2. Select the appropriate Dolby noisereduction system.
3. Select the reverse mode.
Press □ REC.
The unit will be switched to the power
standby condition.
• Recording will start roughly 30 seconds
prior to the set time.
• Recording sound will be automatically
muted.
To switch the timer OFF
Press [E REC and check "0 REC” goes out.
The settings made with the preceding procedure will however be kept
in memory.
To check settings (only while power is ON)
Press CLOCK/TIMER 2 times and check "0 REC” is displayed.
Two seconds later, the display will change in the following order.
(D Recording start time
@ Recording overtime
@ Recording source
To change settings (only while power is ON)
(T) Press 0 REC and check “0 REC" goes out.
(D Reprogram from step 1.
Using the timer at the same time setting continuousiy
(You can accomplish this even if your stereo is on standby.)
The settings made with the preceding procedure will however be kept
in memory.
Press 0 REC and check “0 REC” is displayed.
To enjoy the desired source after the timer setting is completed
1. After finishing step 6, switch on the power, and start playing the
desired source.
When listening to a cassette tape, use deck 1.
Even if you change the music source, the timer recording will start
with the preset condition.
2. Press POWER to set the stereo on standby after enjoying play,
and confirm a tape is inserted in deck 2.
rriTBl
• If the power is on, the timer will not function.
•The ON time and OFF time cannot be the same setting.
• If you switch the power to the standby mode while the record timer
is functioning, the OFF time setting wili not be activated.
• Play timer cannot be used in combination with a record timer.
For your reference
• Set recording to start roughly two minutes ahead of time.
• External sources must be connected to the “AUX" terminal. How
ever, time settings apply only to this stereo. For more information,
see the instruction manual of the connected unit.
• As long as “0 REC” is displayed, the timer will work everyday at the
same time.
29
Page 30

Using the sleep
To use two timers
timer
by remote control only
The system has a sleep timer so that you can fall asleep with the
music on and have the system stop by itself. When the set time
elapses, the system goes into the power standby mode. You have up
to 2 hours time available for listening and you can set the timer in
30 minute increments.
The following example in the figure shows how to set the system to
standby mode after 30 minutes.
While enjoying the desired source:
SLEEP
Press SLEEP to select the de
sired time.
0:30^1 ;00->1:30->2;00^OFF
{The display changes each time the but
ton is pressed.)
Time setting
JJlfJ ^
¿3 ®
I ri- n
u-
J
D^U
ss// O
-----------
i 1
together
The sleep timer can be used in conjunction with the play timer or
record timer.
Record timer and sleep timer
To go to sleep listening to a compact disc, and then to make a timer
recording from a radio broadcast,
© Program the record timer.
@ Switch on the power.
@ Start CD playback and adjust the desired volume.
@ Set the sleep timer.
Be sure to set the sleep timer to off before the timer recording
begins.
Play timer and sleep timer
To go to sleep listening to an FM broadcast, and wake up the next
morning listening to a compact disc,
© Program a CD for play timer.
(2) Switch on the power.
(3) Tune in the desired band and station, and adjust the volume.
@ Set the sleep timer.
Timer priority
The sleep timer always has priority.
Be sure not to overlap timer settings.
For your reference
• The play timer cannot be used in combination with the record timer.
•The volume of the play timer does not change if the volume of the
sleep timer is changed.
Check “SLEEP" is displayed.
The system is turned off after the set time has elapsed.
To cancel the steep timer
Press SLEEP to select "OFF”.
“SLEEP" goes out.
To confirm the remaining time
(only while power is ON)
Press SLEEP.
The remaining time will be displayed.
To change the time remaining during operation:
Press SLEEP to show the remaining time then press SLEEP to select
the desired time. ,
The sleep timer turns OFF automatically the moment you attempt to
edit-record a CD.
Page 31

Singing along with karaoke
This unit lets you enjoy the karaoke fun with audio CDs and audio
tapes.
MIC
First, lower volume with MIC.
Then, connect the micro
phone.
Plug type: M3 monaural type
SC-CH75 only
You can connect two microphones.
About V • MUTE function
You need software recorded in stereo sound if wanting to use the
voice mute function. Voice and/or static may be reproduced with the
following types of software.
• Software recorded monaural
•Classic music, or works performed by a limited number of instru
ments
• Chorus works or duets
Start the source (CD, etc.).
3
4
VOLUME
MIC
MIK MAX
To cancel the karaoke
Press KARAOKE to select “{OFF)" mode.
SC-CH75 only
To activate the echo effect
Turn ECHO to adjust the level.
Adjust volume with VOLUME
and MIC, and sing along.
KARAOKE
Voice mode selection
If you want to play with the karaoke function, check first whether or
not your software is formatted for karaoke and then select the voice
mode as indicated below.
): Appropriate
y. For practice, etc.
Software Karaoke
Voice
modes \
(OFF)
V.MUTE
voice mode.
Each time the button is pressed, the dis
play will change in the following order:
V-MUTE
t
____
Sound
multiplex
•
(Background
music-f Voice)
—
MONO-L^MONO.R
—(OFF).
---------------
Stereo
o
V
1
Non
karaoke
•
(For singing
along)
O
O
Press KARAOKE to select the
MONO'L
MONO'R
(Background
music)
• (Voice) —
—
—
• If strange noise (squealing or howling) is emitted during use, move
the microphone far away from the speakers, or turn down the
microphone volume.
• When you are not using the microphone, disconnect it from the MIC
jack, and turn down the microphone volume level to MIN.
• Sound field cannot be used with karaoke nor can the radio.
To record your “KARAOKE” performance
1. Connect the microphone to the MIC jack.
2. Press ^ OPEN on deck 2, and then insert a tape. (Close the
holder.)
3. Press KARAOKE to select a mode.
4. Start recording.
When singing off CDs
Press CD and then REC START/STOP.
When singing off tapes
Follow steps 1 -5 on page 25. (In step 5, select NORMAL.)
5. Start "KARAOKE” performance.
•To playback the recorded tape, be sure to press KARAOKE to
select the “(OFF)” mode.
• You cannot record sound field or bass effect with karaoke, or radiobacked karaoke.
To record your voice
1. Connect the microphone to the MIC jack.
2. Press ± OPEN on deck 2, and then insert a tape, (Close the
holder.)
3. Press TAPE, DECK 1/2.
4. Press REC START/STOP to start recording.
5. Speak through the microphone and adjust volume with VOLUME
and MIC.
bar is indicated in the above table when the voice mode is least
|,effective. It is better to avoid using the mode in such cases.
nwfi
When you record your voice, select “FLAT' with EQ SPACE button.
31
Page 32

Using an external
unit
START/STOP
HEC
Listening to an external source
(See page 7 for external unit connection)
DISPLAVZ-OEMO
O
Changing the output level display
The output level display will change in 3 steps. Select the desired
display.
Press DISPLAY/DEMO.
Each time the button is pressed, the display will change as follows,
M Aurora mode
1. Press AUX.
JJJJ
JJJJ
JJJJ u
The power wilt come on automatically, even if the stereo is on
standby.
2. Start playback from the external source. (For details, refer to the
owner’s manual of the equipment.)
to
// o
_/11
Recording from an external source
1. Follow steps 1 -5 on page 20.
2. Press AUX,
3. Press REC START/STOP (recording starts).
4. Start playback from the external source. (For details, refer to the
owner’s manual of the equipment.)
To stop recording
1. Press REC START/STOP.
2. Stop the source.
Listening with headphones
Before connecting, reduce the volume.
Connect the headphones to the headphones jack.
Plug type: M3 stereo type
Normal mode
c
Peak-holding mode
1 ^ [sm
m 11
Demo function
This system comes with a “demo" function. The default setting is for
the demo function to be ON.
Switching the demo function on or off;
Press and hold -DISPLAY/-DEMO for about 2 seconds or more. .
When the demo function is set to on;
• When the power is ON
When the input source is set to “CD" or “TAPE”, the demo function
will run automatically after about 2 minutes or more pass in the stop
mode.
•When the system is in the power standby mode
When you do not set the time, the demo function runs automati
cally.
Avoid listening for prolonged periods of time to prevent hearing
damage.
Page 33

вгепсе pages indicated in black circles.
Common operation
starting play directly from the power
standby condition
Switching the system on and to the
power satandby mode
Selecting the input source
Adjusting the volume
Muting the volume temporarily
Tiiner/timer/sound quality operation
DISCS
► TUNERBAKO M AUX
0,0,00,0
POWER
о
TUNE№BA>iO m/C D AUX '
0,0,0
DISCS
- VOLUME +
C 1 )
MUTING
О
Ф
©
Ф 0 ^
Ф
0
ZZJ
9L££.. AUX
о oo
ТШЯЫМ s/PRESET
ooo
ртодум CANCEL REPEAT
OtSC ^»4
OOO
^ II V/CD
OOO
DECK 1/г ^ ^
0 0„P
V.6ASS QWFU7 WOQ€
hNJTING • VOLLME +
0<^D
Selecting band
Listening to radio broadcasts
(Preset Tuning)
Operating/releasing the sleep timer
Switching sound quality or field to on or
off
Switching between sound quality and
fields ^
Switching V. BASS on or off
niNER/BANO
■ о
TUNEWBANO 4^ PRESET
О “► О О
SLEEP
О
OWFLAT
О
MODE
О
V.BASS
О
ф
ф
0
ф
ф
ф
33
Page 34

Compact disc section
SLEEP AUK
Qoo
TUWIWWO s/PRESET^
ooo
PflOGflAM CANCEL REPEAT
о
__ __
OOO
DECK1«
m/ca
9>-i?9
Q 9.9
V.EASS OwrV.AT MOPE
OOO
MUTINQ -VOLUMES
OCLD
starting play
Temporarily stopping play
Stopping play
Skipping forward/backward
Searching forward/backward
Repeating play
[>t3C3
(During playback)
OSC4
tl
O
0I$C5
■/CD
O
Tap on the buttons repeatedly.
0ISC1 DISCS
oo
Press and hold during playback or
pause.
DISCI DISCS
MH
oo
(Before or during playback)
REPEAT
o
0
Ф
0
0
0
0
IZJ
SLEEP AUK
Ooo
TWeMAI« V PRESET Л
ooo
PROGRAM CANCEL REPEAT
о„<рф
OBC
> II mfCD
OOO
DECKIft ^
Q-OO
о 99
V.BA5S ONRLAT MODE
OOO
WUTiNa - VOLUME +
OOZ)
Starting play from a particular track
Playing a particular track you
programmed
/
Cancelling a particular track you
programmed
>
Cancelling all of programmed tracks at
one time
iKSCi O O
■/CD DISC <»SC3 nsci WC9
(--\ —► (--\ —► ► " "/CD
^ ^ OOO
wscs
C~~^ C ^
■/CO PROGRAM OtSC
IR- PROGRAM MH
otsc3 disci discs
DISCI DtSei ^ DWCl
0^0^0 0
CANCEL
o
(While playing, press twice.)
uses
■/CD
o
HSC1 nsca
MCI DISCS
0ISC1 DISCS
l<^ MH
0
oo
0
0
0
Page 35

Tape section
Switching between deck 1 and deck 2
Starting playback
Fast-forwarding or rewinding the tape
Finding the beginning of a track
Stopping playback and recording
{In the stop mode)
(During playback)
DECK 1«
o o
MM
OO
MM
o O
o
(D
■
O
<D
35
Page 36

Concerning compact discs
Concerning cassette tapes
With this changer, you can only play compact
discs having this mark.
COMPACT
DIGITAL AUDIO
Handling precautions
To open the compact disc case, gently press the sides of the top and
pull up.
To remove the disc from the case, press the center holder and lift the
disc, holding by the edges.
To return the disc to the case, insert the disc with the label facing up
and press downward at the center.
Hold compact discs by the edges so as not to soil the surface with
fingerprints. Fingerprints, dirt and scratches can cause skipping and
distortion.
(Correct)
(Incorrect)
Selection of cassette tapes
Cassette tapes exceeding 100 minutes
These tapes are handy for their long playback and recording time but
be careful about repeatedly stopping and starting, rewinding and fast
forwarding these tapes in short intervals as they are thin, tend to
stretch and may become entangled in the deck mechanism.
Endless-tapes
Failure to operate these tapes correctly may cause the tape to wind
around the revolving parts.
For this unit, it is recommended to use the tape which is appropriate
to the auto reverse mechanism.
Fe-Cr tapes (TYPE lU)
The high frequency range will be emphasized, and it will not be
possible to obtain a flat frequency response.
Tape slack
Tape slack may cause the tape to break.
Do not use record cleaning sprays, benzine, thinner, static electricity
prevention liquids or any other solvent on a disc.
If the surface is soiled, wipe gently with a soft, damp (water only)
cloth.
Always move the cloth directly outward from the center of the disc,
not in a circular motion as with standard phonograph records.
(Incorrect)
If you are taking the disc from a cold to a warm environment,
moisture may form on the disc. Wipe this off with a soft, dry, lint-free
cloth before using the disc.
Do not write on the label side with a ball-point pen or other writing
instrument.
Do not use the cleaning disc.
Storage precautions
Erasure prevention
Remove the tab(s).
To re-record on a protected cassette
Cover the slot with adhesive tape.
Be sure to store discs in their cases to protect them from dust,
scratches, and warping. ^
Do not place or store discs in the following places:
1 ) Locations exposed to direct sunlight
2) Humid or dusty locations
3) Locations directly exposed to a heat vent or heating appliance
4) In the glove compartment or on the rear deck of an automobile
Tape storage
Tapes can be damaged if stored in places such as those described
below.
•Where the temperature is high (35°C or higher) or where the humid
ity is high (80% or higher)
•Where there is a strong magnetic field (near a speaker, on top of a
TV, etc.). Recording may become erased.
Page 37

Maintenance
Maintenance of external surfaces
To clean this unit, use a soft, dry cloth.
If the surfaces are extremely dirty, use a soft cloth dipped in a
soap-and-water solution or a weak detergent solution.
Wring the cloth well before wiping the unit.
Wipe once again with a soft, dry cloth.
Never use alcohol, paint thinner, benzine, or chemically treated
cloths to clean this unit. Such chemicals may damage the finish of
your system.
Tape head care
To assure sound quality for recording and playback, be sure to clean
the tape heads after approximately every 10 hours of use.
1. Press ^ OPEN to open the cassette holder.
2. Press POWER to put your system on standby.
3. Clean the heads, pinch roller and the capstan shaft with a cotton
swab (or with a soft, lint-free cloth) slightly moistened with isopro
pyl alcohol.
Do not use any solution other than alcohol for head cleaning.
37
Page 38

Troubleshooting guide
Before requesting service for this unit, check the chart below for a possible cause of the problem you are experiencing. Some simple checks or a
minor adjustment on your part may eliminate the problem and restore proper operation.
If you are in doubt about some of the check points, or if the remedies indicated in the chart do not solve the problem, refer to the directory of
Authorized Service Centers {enclosed with this unit) to locate a convenient service center, or consult your dealer for instructions.
Problem
Problems common to all systems
The location of the various
musical instruments is not
well defined.
The left and right sounds
are reversed.
Humming is heard while
playing.
Only one speaker is
emitting sound.
There is no sound when a
source is being played.
“ERROR” message appears
on the display.
The {+) and (-) connections to one of the
speakers are reversed.
The left and right connections to the
speaker are reversed.
A power cord or fluorescent lamp is located
in the vicinity of cables.
One of the wires of the speaker cord is
disconnected.
The (+) and {-) wire of the speaker cords
are shorted.
Wrong operation has been done.
White listening to FM broadcasts
There is a “rushing noise”
during a stereo broadcast
which is not audible during
a monaural broadcast.
You hear excessive noise
during a stereo broadcast,
and occasionally the sound
disappears.
The stereo indicator
flickers and does not light
completely.
The sound during a stereo
broadcast is highly
distorted.
The transmitting station is a long distance
away.
The installation location and orientation of
the antenna are unsuitable.
The transmitting station is a long distance
away.
The power of the TV set or VCR is ON.
There is a building or mountain nearby.
[Distortion is caused by interference
between the signal from the transmitting
station (direct wave) and the signal
reflected from the building or mountain
{reflected wave),]
Probable cause(s)
Suggested remedy
Connect the speaker cord correctly.
Connect the speaker cords correctly.
Keep electric appliances away from the
stereo. Try plugging the cord in, the other
way.
Connect the speaker cord correctly.
Switch the system to the standby mode,
and reconnect the speaker cords so that
they are not shorted. Then switch on the
power.
Operate the unit correctly by following the
operating instructions.
• If you are using an indoor antenna,
change to an outdoor antenna.
• If you are using a high-grade outdoor
antenna, try changing the installation
location, height, and orientation.
Try switching off the TV set or VCR.
Use a high-grade outdoor antenna, and
install it in a good location, height, and
orientation for reception.
Reference
page(s)
6
6
6
6
7
7
While listening to LW/MW (AM) broadcasts
You hear an unusual beat
sound.
You hear a low-frequency
hum.
You are using the system at the same time
you are playing a TV set.
The antenna wire is near the power cord.
When there is a television set nearby
The picture on the TV
disappears or stripes,
appear on the screen.
The Iqpation and orientation of the antenna
are incorrect.
The wiring at the back of the system is
unsuitable.
Switch off the TV set, or use the system
further away from it.
Separate the antenna wire from the power
cord.
If you are using an indoor antenna, change
to an, outdoor antenna.
Separate the antenna wire of the TV set
from the system.
6
7
Page 39

Problem Probable cause(s)
Suggested remedy
Reference
page(s)
While listening to ta
Sound is low, intermittent,
or poor quality, noisy,
scratchy, or unsteady.
The deck does not enter the
recording mode.
pes
Heads are dirty. Clean the heads. 17
Dolby noise reductions is set in the wrong
position.
The erase-prevention tabs are removed
from the cassette.
While listening to compact discs
The display will not show
the correct indication. Disc
play does not start when
you press the play button.
The disc is not positioned correctly in the
disc tray.
The disc is loaded upside down.
The disc is dirty.
The disc is scratched.
The disc is badiy warped.
The disc is a nonstandard one.
There is condensation inside the CD
changer.
While using the remote control
The system cannot be
operated with the remote
control.
The batteries are installed in the reverse
polarity.
The batteries are worn.
Set it to match the Dolby NR recording
mode.
Attach tape to cover the space left by
removal of the erase-prevention tabs.
Load the disc on the tray correctly.
Reload the disc.
Wipe the disc with a soft doth.
Replace the disc with a new one.
Replace the disc with a different one.
Switch the power ON, and then wait for
60 minutes before using the CD changer
section.
Reinsert the batteries in the correct polarity.
Replace the batteries with new batteries.
37
12
36
5
5
The servicer will require all components to service your system. Therefore, should service ever be necessary,
be sure to bring the entire system.
Before moving or shipping this system:
Prepare the system as described below to prevent damage to the mechanism.
1. Remove all CDs.
2. Press CD,
3. Hold down stop button (■) for 2 seconds and then without releasing it, hold down both it and DISC 5 for 2 more seconds. (This will turn
OFF the power and set the so-called “shipping mode”.)
4. Unplug the system.
Avoid strong vibrations or impact while moving the equipment. The shipping mode will turn OFF automatically when you turn the power ON
the next time.
39
Page 40

AMPLIFIER SECTION
1 kHz continuous power output
both channel driven
[SA-CH75] 2x60 W (THD 1%, 4Q)
[SA-CH74] 2x35 W (THD 1%, 4fi)
RMS
[SA-CH75] 2X90 W (THD 10%, 4Q)
[SA-CH74] 2X50 W (THD 10%, 40)
Total harmonic distortion
Half power at 1 kHz 0.06% (40)
Frequency response
AUX 60 Hz-20 kHz (-3 dB)
Input sensitivity
AUX 250 mV
MIC 0,6 mV
Input impedance
AUX 28 kO
MIC 6800
Tone controls 6-EQ SPACE modes
HEAVY, CLEAR, SOFT
DISCO, LIVE, HALL
V.BASS
(Volume at —30 dB) 63 Hz, 7 dB
Load impedance 40
FM TUNER SECTION
Frequency range 87.50-108.00 MHz
Sensitivity 23.3 dBf
Total harmonic distortion
MONO 0.3%
STEREO 0.5%
S/N
MONO 60 dB
Antenna terminai(s) 750 (unbalanced)
Frequency response
NORMAL
35 Hz-14 kHz (+3dB, -6dB)
HIGH 35 Hz-14 kHz (+3dB, -6 dB)
S/N (HIGH POSITION)
Dolby NR off 50 dB (A weighted)
Dolby NR on 60 dB (CCIR)
Wow and flutter 0.18% (WRMS)
Fast forward and rewind times
Approx. 120 seconds
with C-60 cassette tape
CD SECTION
Sampling frequency 44.1 kHz
Decoding 16 bit linear
Beam source/wave length
Semiconductor laser/780 nm
Number of channels Stereo
Frequency response
20 Hz-20 kHz (+1 dB, -2 dB)
S/N
CD UNIT OUT 95 dB (JIS.A)
Wow and flutter Below measurable limit
Digital filter 8 fs
D/A converter MASH (1 bit DAC)
GENERAL
Power consumption [SA-CH75] 230 W
[SA-CH74] 150W
Power supply AC 50 Hz, 230-240 V
Dimensions (WXHxD)
270x331.5x331 mm
Weight [SA-CH75] 8.9 kg
[SA-CH74] 7.6 kg
SPEAKER SECTION
ISB-CH430I
Type
Speaker(s)
Woofer
Midrange
Tweeter
Impedance
Input power
Output sound pressure level
Cross over frequency 1.5 kHz, 10 kHz
Frequency range 45 Hz-22 kHz (-16 dB)
Dimensions (WxHxD)
Weight 3.2 kg
SB-CH75
Type
Speaker(s)
Woofer
Midrange
Tweeter
Impedance
Input power
Output sound pressure level
Cross over frequency 1.5 kHz, 10 kHz
Frequency range 40 Hz-22 kHz ( -16 dB)
Dimensions (WxHxO)
Weight 3.6 kg
3 way 3 speaker, Bass-Ref
14 cm cone type
6 cm cone type
Piezo type
40
80 W (MUSIC)
40 W (DIN)
87 dB/W (1.0 m)
230x330x252 mm
3 way 3 speaker, Bass-Ref
17 cm cone type
6 cm cone type
Piezo type
40
1 SOW (MUSIC)
80 W (DIN)
87 dB/W (1.0 m)
270x330x266 mm
AM TUNER SECTION
Frequency range
(For United Kingdom)
MW
LW
(For others)
AM
Sensitivity (for 500 mW)
(For United Kingdom)
MW (at 999 kHz)
LW (at 252 kHz)
(For others)
AM (at 999 kHz)
522-1611 kHz
144-288 kHz
522-1611 kHz
250 liV/m
500 pV/m
250 pV/m
CASSETTE DECK SECTION
Track system 4 track, 2 channel
Heads
Record/playback Solid permalloy head
Erasure Double gap ferrite head
Motor DC servo motor
Recording system AC bias 100 kl-le
Erasing system AC erase 100 kHz
Tape speed 4.8 cm/s
(Rotaly head)
SPEAKER SECTION
rsa-CH741
Type
Speaker(s)
Woofer
Midrange
Tweeter
Impedance
input power
Output sound pressure level
Cross over frequency 1.5 kHz, 10 kHz
Frequency range 45 Hz-22 kHz (-16 dB)
Dimensions (WXHXD)
Weight 3.4 kg
3 way 3 speaker, Bass-Ref
14 cm cone type
6 cm cone type
Piezo type
4Q
80 W (MUSIC)
40 W (DIN)
86 dB/W(1.0m)
230x330x251 mm
Notes:
1, Specifications are subject to change
without notice.
Weight and dimensions are approximate.
2. Total harmonic distortion is measured
by the digital spectrum analyzer.
MASH is a trademark of NTT.
Matsushita Electric Industrial Co., Ltd.
Central P.O. Box 288, Osaka 530-91, Japan
Printed in Singapore
RQT3309-1B
F1295B0(D)
 Loading...