

Page 1
Panasonic‘S
CD Stereo System
SC-CH52
Operating Instructions
Before connecting, operating or adjusting this product,
please read these Instructions completely.
ɧ(§
DIGITAL AUDIO
RQT 3049-1L
Page 2
Dear Customer
Thank you for purchasing this product.
For optimum performance and safety, please read these operating
instructions carefully.
These operating instructions are applicable to the following systems.
System
Main unit
Speakers
SC-CH52
SA-CH52
SB-CH52
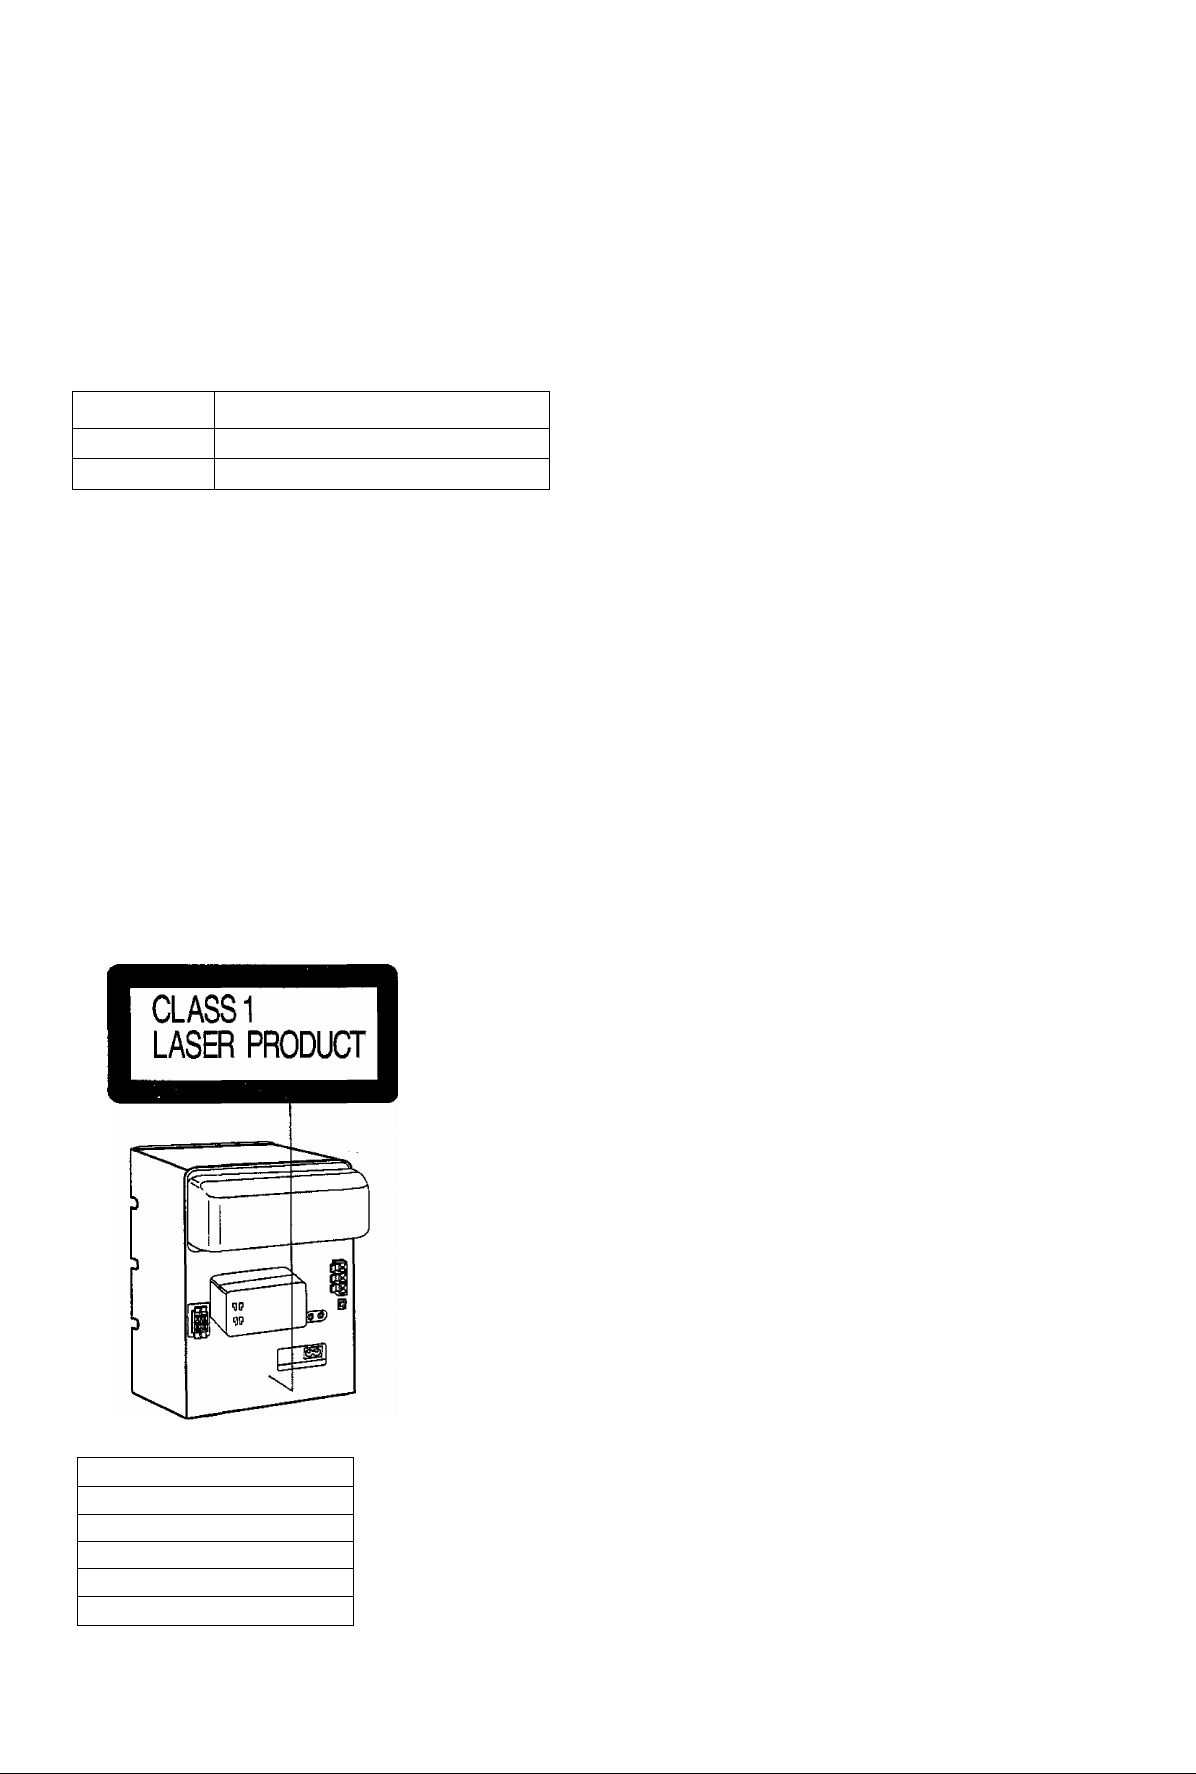
CAUTION!
THIS PRODUCT UTILIZES A LASER.
USE OF CONTROLS OR ADJUSTMENTS OR PER
FORMANCE OF PROCEDURES OTHER THAN
THOSE SPEaFIED HEREIN MAY RESULT IN HAZ
ARDOUS RADIATION EXPOSURE.
DO NOT OPEN COVERS AND DO NOT REPAIR YOUR
SELF. REFER SERVICING TO QUAURED PERSONNEL
THIS MUSIC SYSTEM IS CAPABLE OF RECEIVING
THE NEW AM STEREO BROADCASTS FROM THE
AM BAND RADIO STATIONS. HOWEVER LIKE
MANY MUSIC SYSTEM CURRENTLY AVAILABLE
ON THE MARKET IT WILL REPRODUCE THIS AM
STEREO SIGNAL ONLY IN AM MONO, WHICH, IN
EFFECT, IS OF NO LESSER QUALITY THAN YOUR
EXISTING AM MONO MUSIC SYSTEM.
Before use
Supplied Accessories.................................................
Suggestions tor Safety...............................................3
Preparation
Connections............................................................ 4
Location of Controls
Concerning the Remote Control..
...
........................................... ..6
.............................
Memory Presetting................................................... 9
Radio operations
Listening to Preset Stations (Preset Tuning).... 10
Compact disc operations
Listening to Compact Disc
.....................................
11
Tape deck operations
Listening to Tape.................................................... 15
Convenient functions
Convenient Functions..............................................17
3
8
INVISIBLE LASER RADIATION WHEN OPEN.
DANGER
AVOID DIRECT EXPOSJRE TO BEAM
USVMLIG USEflSTflULING VEDASIINGl W (l aKKflHEDSAtBRiDfRE
AOVARSEL
EBUDE AF FUNKTION. UNBGfl UDSiTTELS! fOi STRiLIItG .
AVATTAESSA JA SUCUALUKITUS DHIIEITAES5A OLET ALTHIN A
VARO!
NÄKYMÄTONIÄ LASERSATEILmE. ALÄ KATSO SATEESEEH.
0
VARNING
ADVARSEL
VORSICHT
SVHÜG LASEHSTRALNING NÄR DENNA DEL AR ÖPPNAD OCH
SPÄRREHAHLfflKOPPLAD. BETRAXTA EJ STfti«.ErJ
USTNIIG lASERSTRALHG NAROEKSEI APNESOG SKKERtlEDSLAS
BflITES. ilNNCAEKSPOHERIIIGEQRSTMlEH,
UNSICHTBAflELASEflSIim.UNG.MNFIABOE™NGGEDFFKET.
mCtfTDEHSTRAHLAUSSET7EN.
(Inside of product)
(Indersiden at apparatet)
(Tuotteen sisäitä)
(Apparatens Insida)
(Pfoduktats innside)
(Im inneren des Gerätes)
Recording operations
For Your Recording................................................ 17
Recording from Radio Broadcasts
Recording from Compact Disc
Tape to Tape Recording
..........................................
........................
...............................
External unit operations
Using an External Unit
..........................................
21
Changing the Tone
Changing the Tone................................................. 22
Reference
Quick Reference of Remote Control
Operations........................................................... 22
Concerning Compact Disc
Concerning Cassette Tape......................................25
Maintenance...............................................
Troubleshooting Guide.......................................... 26
Technical Specifications
....
..............................
..........................
24
...........
...25
Back Cover
18
19
20
Page 3
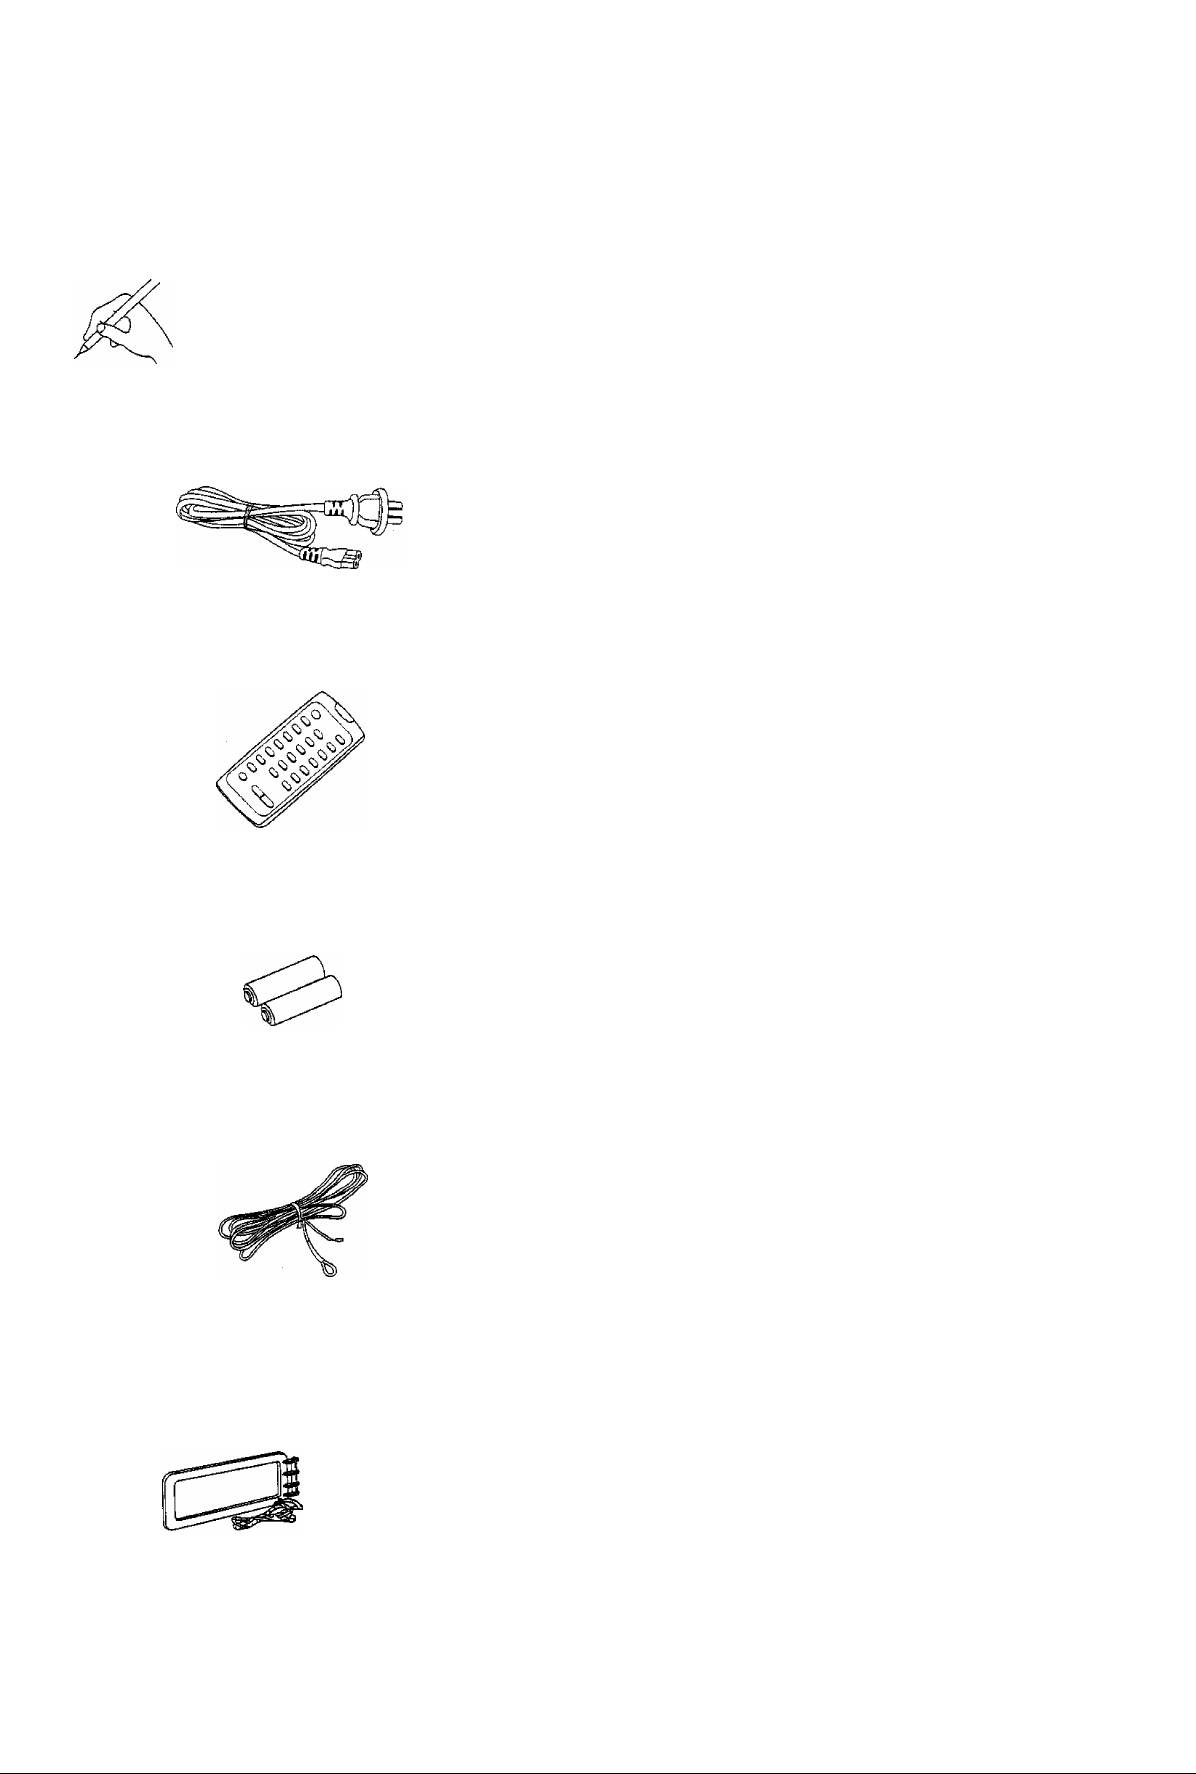
Supplied Accessories Suggestions for Safety
Please check and identify the supplied acces
sories.
0
□ AC power supply cord.........................................................1 pc.
□ Remote control transmitter
{EUR643802)
□ Remote control batteries
(UM-4, “AAA" R03)
1 pc.
2 pcs.
B Use a standard AC wall outlet
1. Use from an AC power source of high voltage, such as that
used for an air conditioner, is very dangerous.
A fire might be caused by such a connection.
2. A DC power source cannot be used.
Be sure to check the power source carefully, especially on a
ship or other place where DC is used.
B Grasp the plug when disconnecting the power supply
cord
1. Wet hands are dangerous.
A dangerous electric shock may result if the plug is touched by
wet hands.
2. Never place heavy Items on top of the power supply cord,
nor force it to bend sharply.
B Place the unit where it will be well ventilated
Place this unit at least 10 cm (4") away from wall surfaces, etc.
Be careful that curtains and similar materials do not obstruct the
ventilation holes.
B Avoid places such as the following:
In direct sunlight or in other places where the temperature is
high.
In places where there is excessive vibration or humidity.
Such conditions might damage the cabinet and/or other component
parts and thereby shorten the unit’s service life.
B Be sure to place the unit on a flat, level surface
If the surface is incline, a malfunction may result.
B Never attempt to repair nor reconstruct this unit
A serious electric shock might occur if this unit is repaired,
disassembled or reconstructed by unauthorized persons, or if the
internal parts are accidentally touched.
□ FM indoor antenna
□ AM loop antenna
□ Antenna holder...................................................................1 pc.
□ Screw
.................................................................................
..............................................................
................................................................
1 pc.
1 pc.
1 pc.
B Take particular care if children are present
Never permit children to put anything, especially metal, inside this
unit. A serious electric shock or malfunction could occur if articles
such as coins, needles, screwdrivers, etc. are inserted through the
ventilation holes, etc. of this unit.
B If water is spilled on the unit
Be extremely careful if water is spilled on the unit, because a fire or
serious electric shock might occur. Immediately disconnect the power
cord plug, and consult with your dealer.
B Avoid spray-type insecticides
insecticides might cause cracks or “cloudiness" in the cabinet and
plastic parts of this unit. The gas used in such sprays might,
moreover, be ignited suddenly.
B Never use alcohol or paint thinner
These and similar chemicals should never be used, because they
might cause flaking or cloudiness of the cabinet finish.
B Disconnect the power supply cord if the unit will not
be used for a long time
If the unit is left for a long time with the power ON, this not only will
shorten its useful operation life, but also may cause other trouble,
B If trouble occurs
If, during operation, the sound is interrupted or indicators no longer
illuminate, or if an abnormal odour or smoke is detected, immediately
disconnect the power cord plug, and contact with your dealer or an
Authorized Service Center.
Page 4
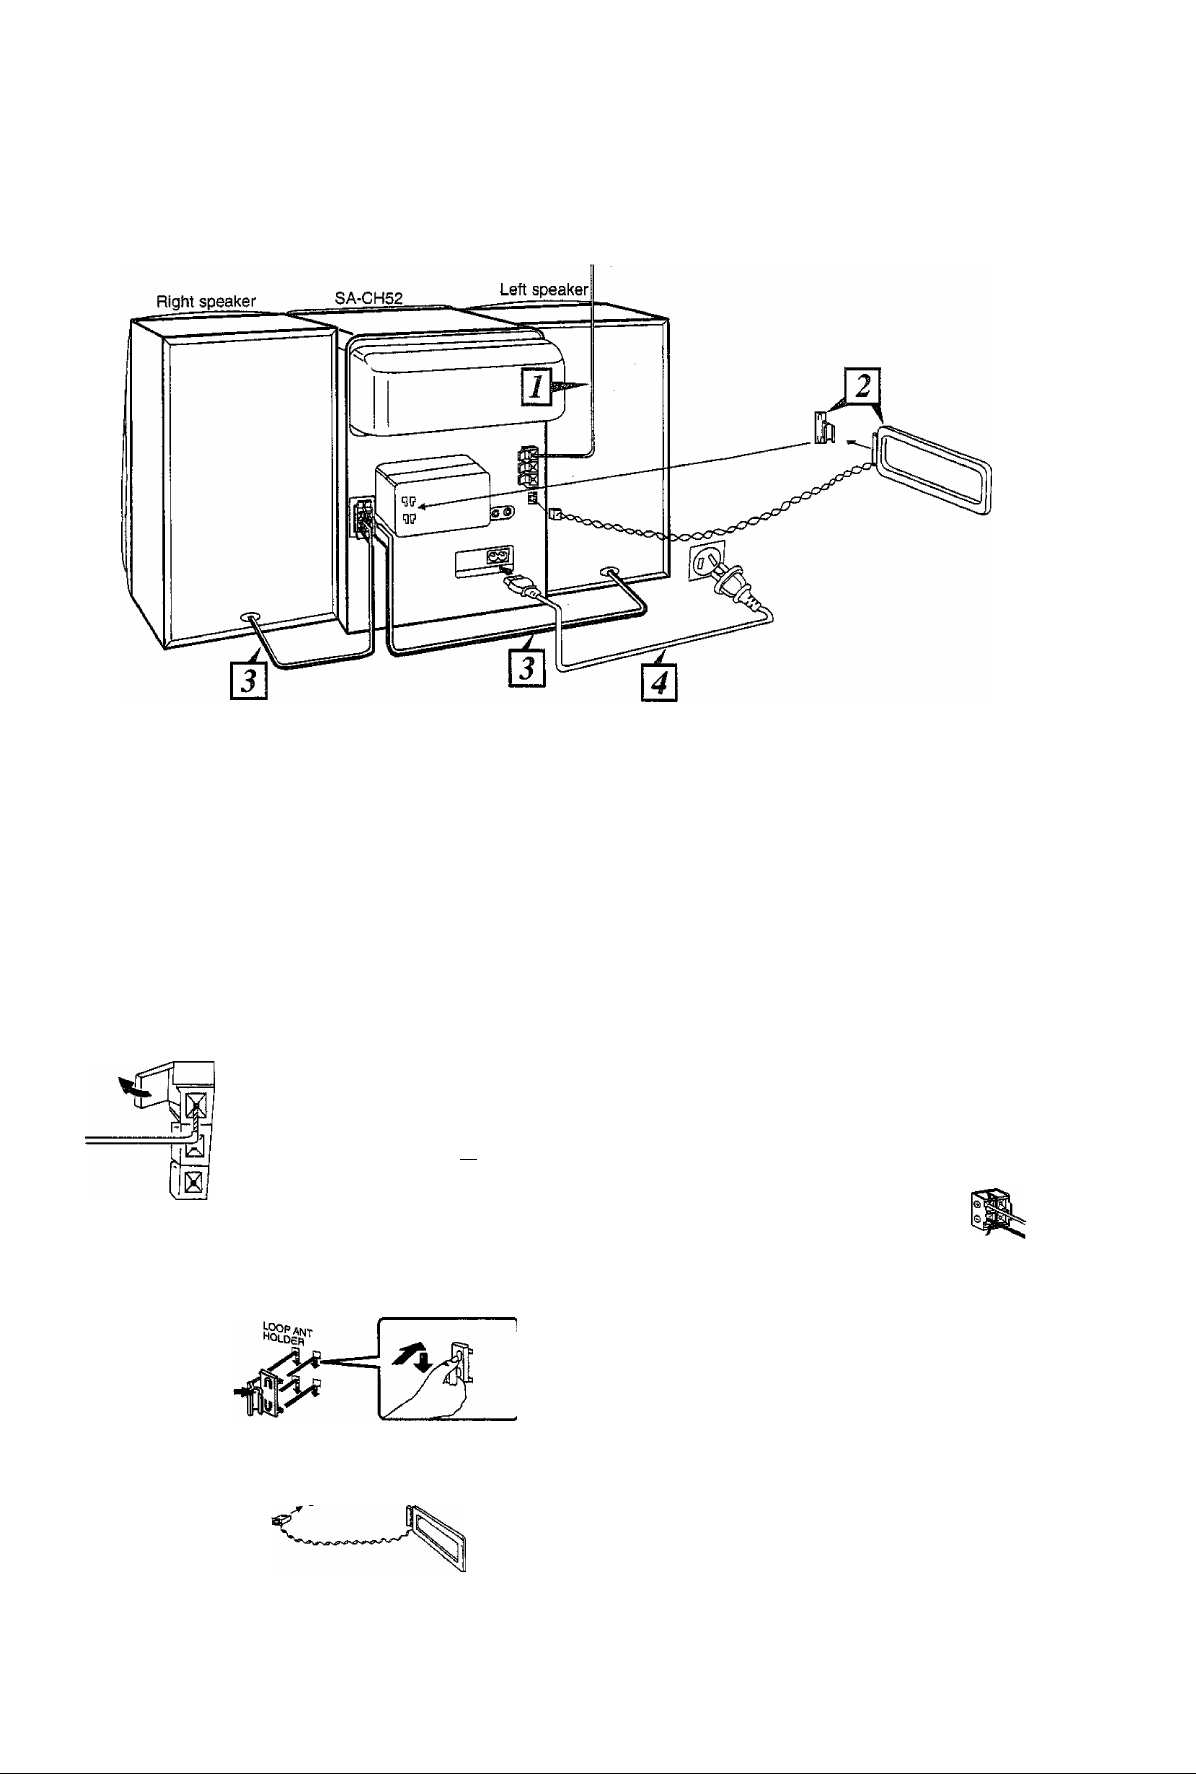
Connections
Connect the AC power supply cord after you have connected all
other cables.
j Connect the FM indoor antenna.
À. Install the antenna on a wall at a height and in a direction
which result in the best reception.
The tip of the internal antenna wire should not come into
contact with any metal objects.
When you cannot get a good reception with this FM indoor
antenna, we recommend you to install an FM outdoor antenna
(not included).
15mm
FM ANT
(75fi>
Adhesive
tape
1
FM ANT
(750)
'ft
]\\à
Connect the AM loop antenna
1. Attach the antenna holder to the rear panel. Press the
antenna holder hard enough to get it fixed firmly in place,
with a click.
Antenna
holder
2. Clamp the antenna to the antenna holder.
3. Connect the antenna terminal to the rear panel of the unit.
You may attach the antenna holder to a rack
or other structure. Use a screw (included) to
attach as shown in the figure.
4
Connect the right (R) and left (L) speaker cables.
• Be sure to connect speaker cables before connecting the
AC power supply cord.
• The load impedance of any speaker used with this unit
must be ACl.
Connection of speaker cables:
1. Strip off the outer covering, and twist the center
conductor.
Make sure the bare ends of the wires are not unraveled.
(If they are, twist
them tight again.)
2. Insert the wire to the
rear panel of the unit,
and close the lever.
Red {+)
Black (-)
• To prevent damage to circuitry, nevershort-circuit positive
(+) and negative (-) speaker wires.
• Be sure to connect only positive (+) wires to positive (+)
terminals and negative (-) wires to negative {-) terminals.
Caution
Use this speaker only with the recommended system.
Failure to do so may lead to damage to the amplifier and/
or the speaker, and may result in the risk of fire.
Consult a qualified service person if damage has occurred
or if you experience a sudden change in performance.
(After you have connected all cables)
4. While listening to a AM broadcast, position the loop
antenna for the best reception.
Connect the AC power supply cord after you have connected ail other cables and cords.
Page 5

Optional antenna connections
You may need an outdoor antenna if you use this system in a
mountainous region or inside a reinforced-concrete building, etc.
FM outdoor antenna (not included)
An outdoor antenna should be installed by a competent technician
only.
FM outdoor antenna (not included)
FM Atir
(75Ì1)
GND
How to connect a 75-ohm coaxial cable:
(FM outdoor antenna)
1. Remove a piece of the
outer vinyl sheath from
the end.
2. Bundle the shield braid,
and remove a piece of
the inner vinyl sheath
covering the core wire,
3. Connect the core wire
and the shield braid.
Core wire
30 mm
15 mm
AM outdoor antenna (not included)
Connect the outdoor antenna without removing the AM loop antenna.
Run 5 to 12 m of vinyl-covered wire horizontally along a window or
other convenient location.
External unit connections
• For details, refer to the Operating instructions of the units which
are to be connected.
• When units other than those described below are to be connected,
please consult with your audio dealer.
Analog player
Only an analog player with built-in phono equalizer can be
connected.
This example shows how to connect the analog player with the
PHONO OUT/LINE OUT switch.
Set ttie LINE OUT position at the back of the analog player.
Shield braid
1—^
“LINE OUT” position
|(L)
(R)|
M
>
>
AUX
H
D
Analog player
(not included)
Rear Panel of
this unit
Page 6
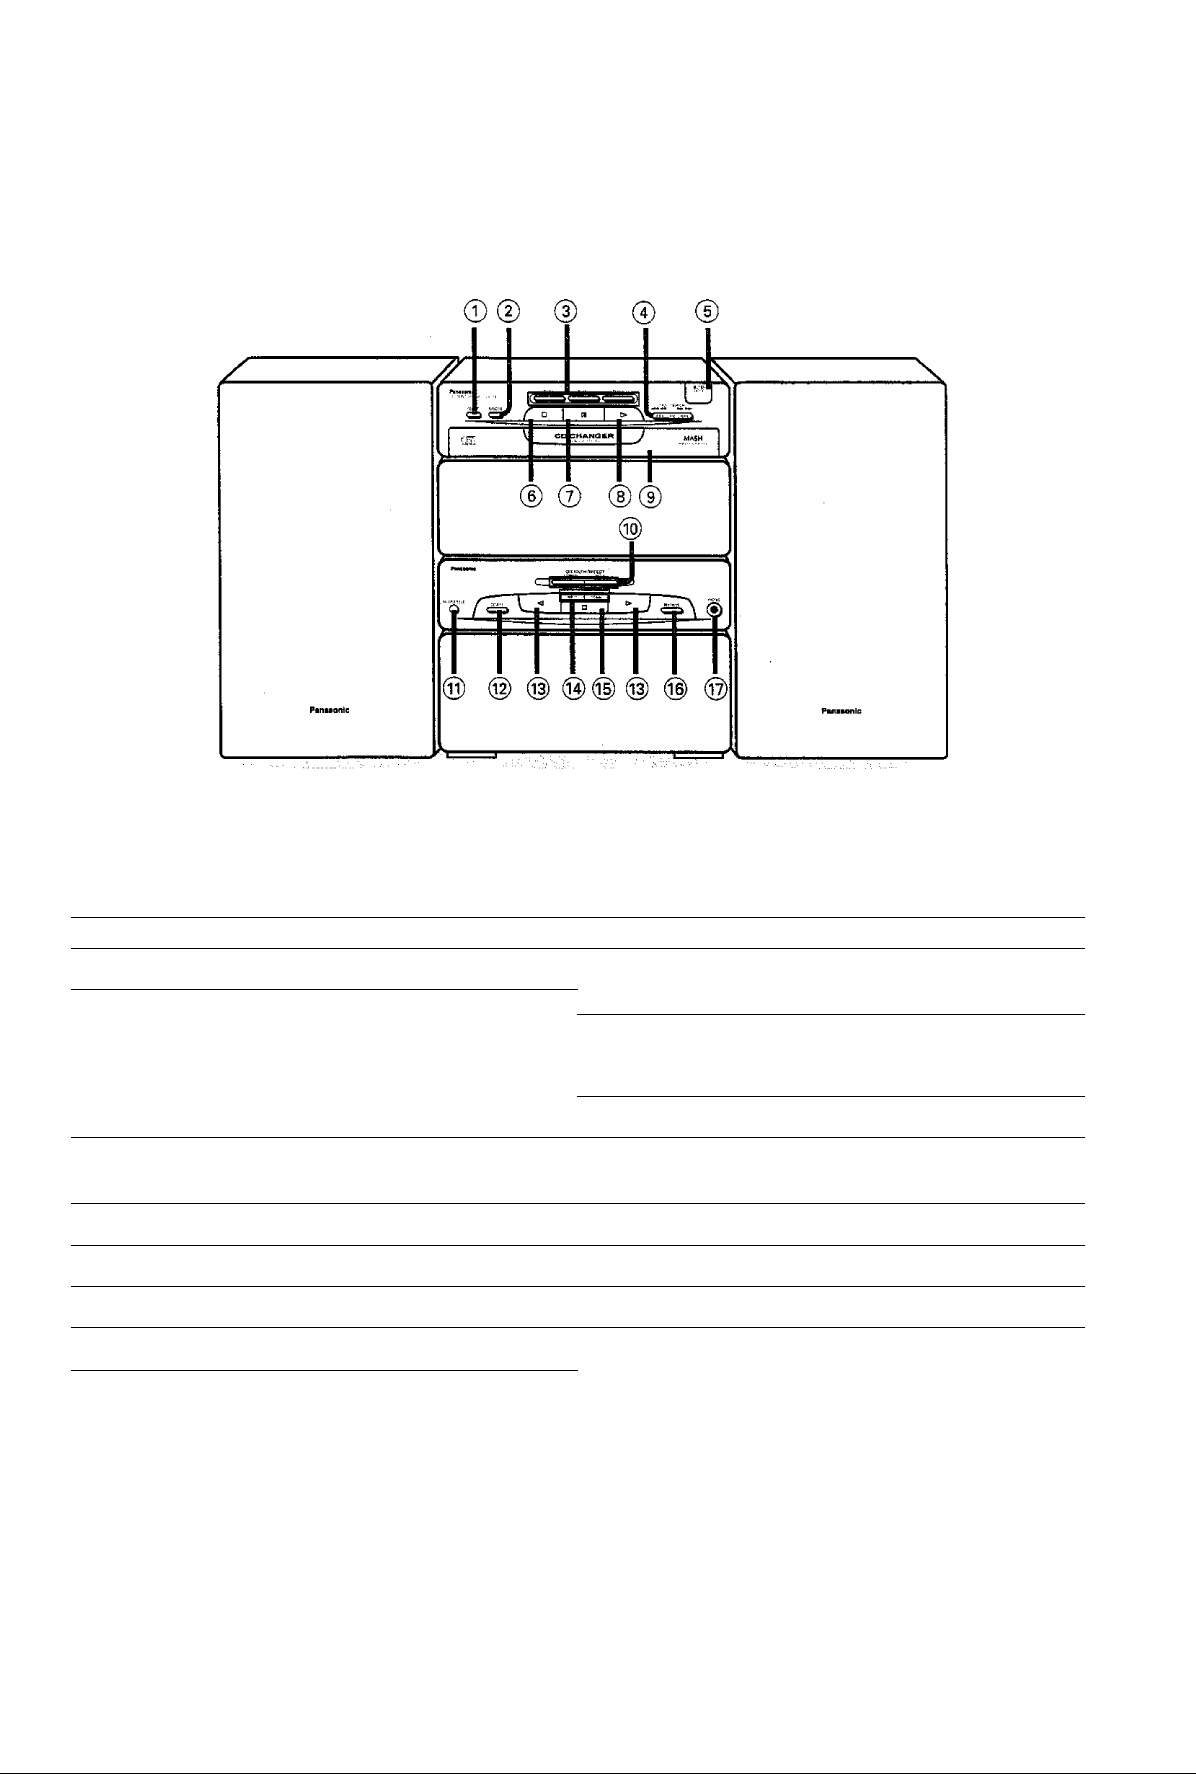
Location of Controls
No. Name Ref. page
® Repeat button (REPEAT)
@ Random play button (RANDOM)
® Disc buttons (DISC 1, DISC 2, DISC 3)
® Skip/search buttons
(!◄◄/◄◄, ►►/►►!)
® Disc tray open/close button
(A OPEN/CLOSE)
® Stop button (□)
® Pause button (DO)
® Play button (►)
® Loading drawer
No. Name Ref. page
12
14
12
12
11
11
11 ® Record pause button (REC PAUSE) 18
11 ® Headphones jack (PHONES)
11
® One-touch tape edit buttons
(NORMAL, HIGH)
® Reverse mode button (REVERSE MODE)
@ Deck 1/deck 2 select button (DECK 1/2)
@ Playback buttons (’^j ►)
® Fast forward/rewind/tape program
sensor buttons (◄◄ n'PS)j (TPS) ►►) 16
® Stop button (□) 15
20
15
15
15
22
Page 7
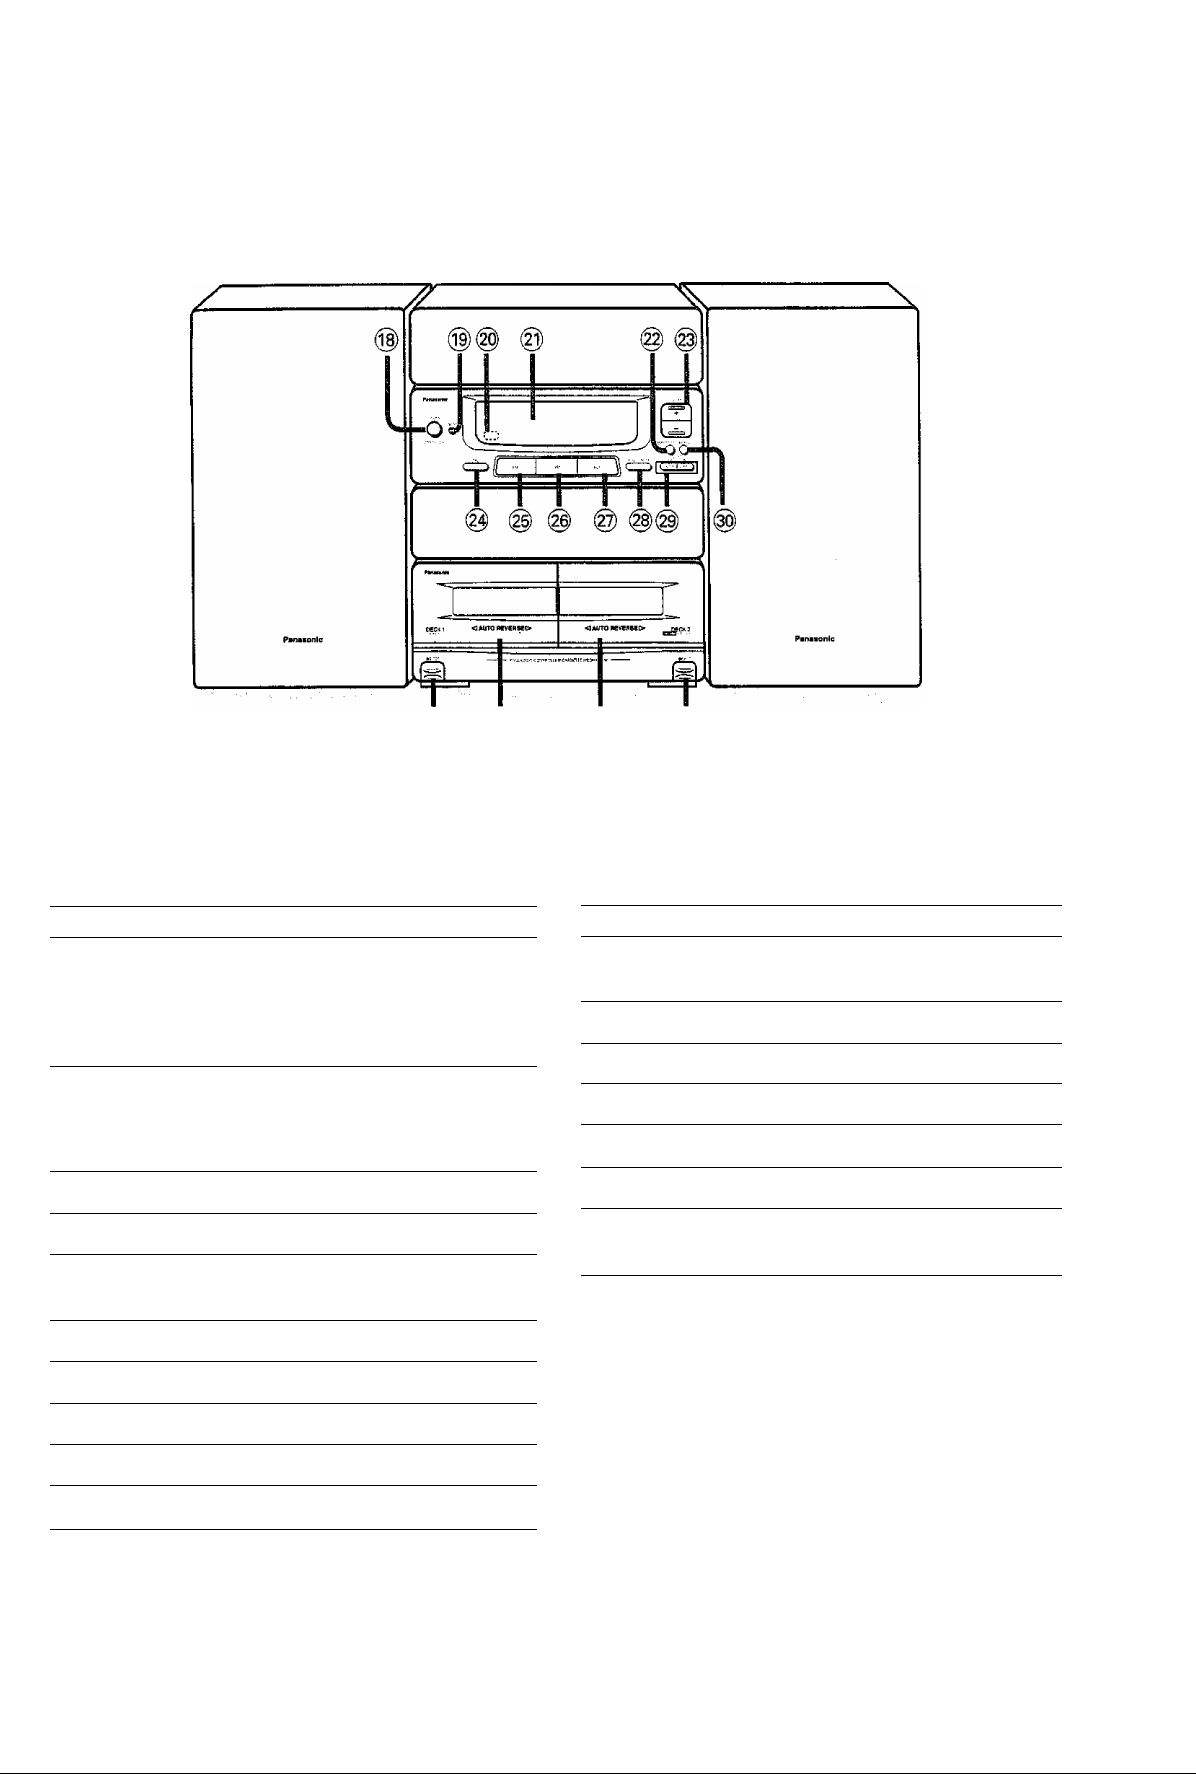
No, Name
Ref. page
No. Name Ref. page
@ Power “STANDBY O/ON” switch
(POWER, STANDBY CD/ON)
Press to switch the unit from on to standby mode
or vice versa. In standby mode, the unit is still
consuming a small amount of power.
® Standby indicator (STANDBY)
When the unit is connected to the AC mains
suppiy, this indicator iights up in standby mode
• and goes out when the unit is turned on.
Remote control signal sensor
@ Display section
@ FM mode/beat proof button
(FM MODE/BP)
@ Voiume control button (VOLUME)
@ V. BASS button (V. BASS)
(§) FM button (FM)
(g) AM button (AM)
@ AUX button (AUX)
11
10, 18
10
22
21
(g) Tuning mode seiect button
(TUNING MODE)
(g) Tuning buttons (V TUNING A) 9
(g) Memory button (MEMORY)
(g) Deck 1 holder open button (^ EJECT) 15
(g) Deck 1 cassette holder
8
-
(g) Deck 2 cassette holder
(g) Deck 2 holder open button
EJECT)
18,19, 20
18,19, 20
9
9
15
9
9
Page 8
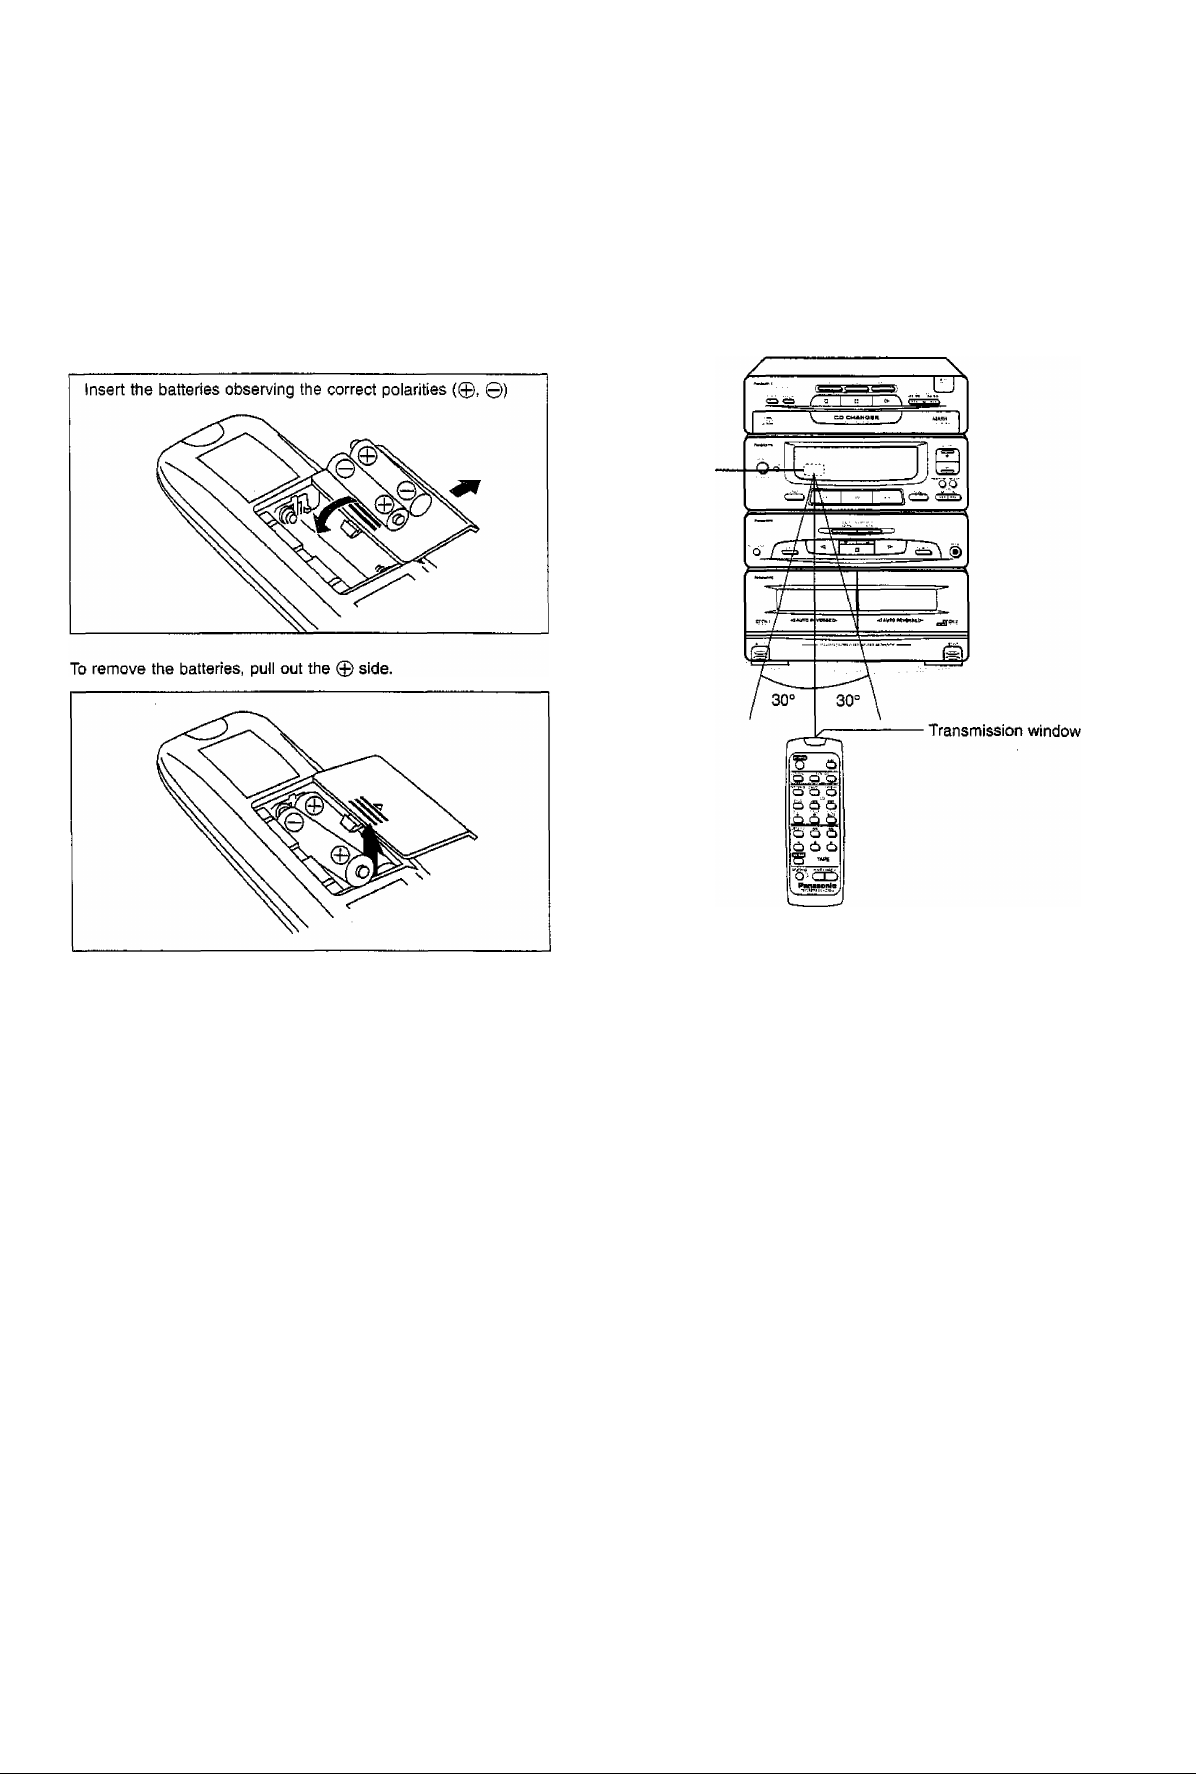
Concerning the Remote Control
Battery installation
Insert two UM-4 “AAA”, (1.5 V) or equivalent batteries.
Correct method of use
Remote control
signal sensor
Use of batteries
• Do not mix old and new batteries, or batteries of different types
(manganese and alkaline, etc.).
• Never subject batteries to excessive heat or flame ; do not attempt
to disassemble them; and be sure they are not short-circuited.
• If the remote control Is not to be used for a long period of time,
remove the batteries and store them in a cool, dark place.
• Do not attempt to recharge alkaline or manganese batteries.
Battery life
The battery life is about one year.
The batteries should be replaced if commands from the remote
control transmitter do not operate the unit even when the transmitter
is held close to the front panel.
Face about 7 meters in
front of the sensor.
Operation notes
• Aim the remote control’s transmission window toward the unit’s
sensor. Avoid any obstacles.
• Be sure the transmission window and the unit’s sensor are free
from dust. Excessive dust might affect its performance.
• The operation may not be correct if direct sunlight or other strong
light source strikes the receiving sensor of this unit. If there is a
problem, place the unit away from the light source.
• If this system is installed in a rack with glass doors, the glass
doors’ thickness or color might make it necessary to use the
remote control a shorter distance from the system.
• Never place heavy items.
• Do not disassemble or reconstruct.
• Do not spill water or other liquids.
8
Page 9
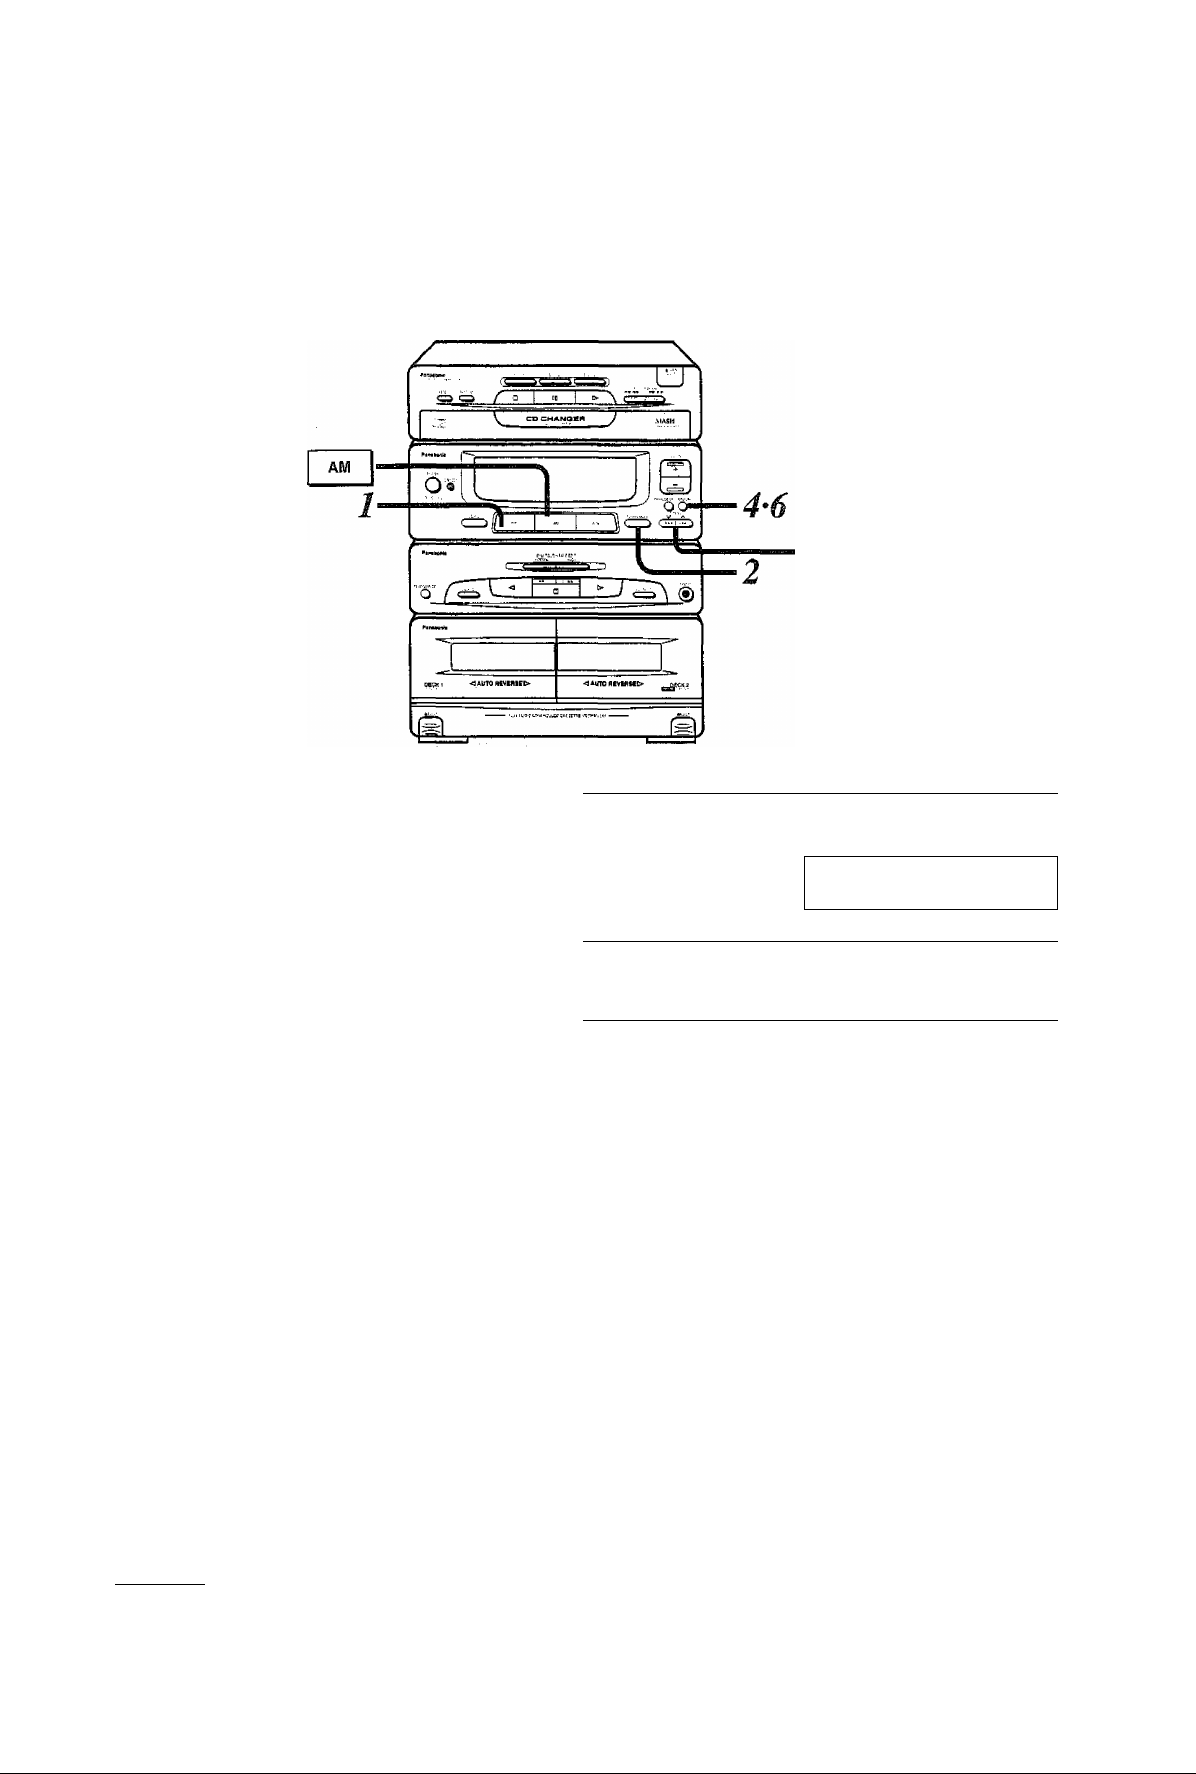
Memory Presetting
• If broadcast frequencies are preset in the memory, you can easily • Up to 10 stations can each be set in the FM and AM bands with
tune in any these of frequencies from the system or remote the memory presetting,
control unit.
3*5
This example in the figure shows how to preset stations in the FM
band. (FM 88.1 MH2 in preset channel 3)
Press FM,
The power will be automatically on.
Press TUNING MODE to select “MANUAL”.
Each time you press the button,
“MANUAL” and “PRESET will appear
alternately.
Press V or A to select the desired frequency.
FM stations can be selected auto
matically (see right).
1 r
FM
TUNING MODE
C " "
TUNING
V A
(T77JT^
MEMORY
6
While PROGRAM Is flashing,
Press MEMORY.
o
-
Repeat steps 3 to 6 to preset
7
To preset stations in the AM band:
1. Press AM
2. Perform steps 2-7.
Selecting FM stations automatically;
Keep pressing v or a until the frequency display starts to change.
A station with good reception is automatically selected and the
selection process then stops.
the other stations.
4
MEMORY
o
TUNING
V A
C--- I --O
Press MEMORY.
— PHOSKW/
Flashes
Press V or A to select the preset channel.
— pflOGfww « V t *“t
Preset Channel
Page 10

Listening to Preset Stations (Preset Tuning)
Be sure you’ve completed the steps of “Memory presetting" on
page 9.
This example in the figure shows how to listen to FM preset channel
3;
FM
TUNING MODE
C
TUNING
V A
Press FM.
The power will be automatically on.
Press TUNING MODE to select “PRESET”.
Each time you press the button,
“MANUAL” and “PRESET’ will appear
alternately.
DDlCIlT
Press V or A to seiect the preset channei.
“STEREO" lights when an FM stereo
broadcast is being received. “QUARTZ
LOCK" lights when you precisely tune
in a broadcast station.
STEREO
Manual tuning (When stations have not been
preset):
1. Press FM or AM.
2. Press TUNING MODE to select “MANUAL”
Each time you press the button, .“MANUAL” and “PRESET’ will
appear alternately.
3. Press V or A to tune in the desired broadcast.
4. Press VOLUME to adjust the volume as you like.
Switching the mode from stereo to monaural
while listening to an FM station:
Press FM MODE/BP.
MONO
----------
FM MODE/BP
^^i,
; ; / t a ; j
O
The sound reception mode switches to “MONO” (monaural)
when the FM MODE/BP button is pressed.
When “MONO” indicator goes off;
Use this setting for normal listening. Both stereo and monaural
sounds can be heard as they are.
When “MONO” indicator lights up:
Use this setting when listening to or our recording in monaural.
Ail sound reception including stereo sound, is in monaural.
10
4
VOLUME
Preset Channel QUARTZ LOCK
Press VOLUME to adjust the
volume as you like.
For your reference:
if too much noise is produced in the FM stereo mode, press
FM MODE/BP and check “MONO" lights up.
The sound will then be heard in monaural. If the broadcast
signal is weak, or if there is a large amount of interference,
you will get a clearer sound in “MONO" mode.
You cannot memorize the stations in “MONO” mode.
Page 11

Listening to Compact Disc
Sequential play
POWER
O
STANDBYcWON
A OPEN/
2
CLOSE
3
Label must face up.
A OPEN/
4
5
CLOSE
A
Switch on the power.
Press A OPEN/CLOSE to open the loading drawer.
Load the CD on each disc tray with label facing upward.
Do not load 8 cm and 12 cm disc on
the same disc tray.
Place a CD as shown in the figure.
Press A OPEN/CLOSE to close the loading drawer.
Press ►.
Disc play begins from the first track on
the first disc.
Play stops automatically when the last
track on the last disc finishes playing.
To stop the disc play:
Press □.
To temporarily stop the disc play:
Press DO,
To p!ay again, press ►.
When “ ^ ” appears on the display:
it indicates there are 11 or more tracks on the disc at the playing
position.
When “NO DISC” appears on the display:
it indicates there are no disc loaded on the disc tray.
Concerning the total playing time on the display;
The total play time including the gaps between the tracks is indicated.
This is why the time may be several seconds longer than the figure
given in the liner notes, etc.
For your reference:
If you press ► instead of ^ OPEN/CLOSE after inserting disc(s),
the loading drawer will close and play will start directly.
Avoid the following things to prevent the malfunction or incorrect
operation.
• Do not push the loading drawer to close.
• Do not cover the hole or slits.
• Do not turn the tray forcibly by hand because it may fail to operate
normally.
• Do not move this changer with a compact disc inside the unit, if a
disc comes off the disc tray, it might be scratched or the changer
might become incapable of playing.
VOLUME .
+
Press VOLUME to adjust the
volume level as you tike.
-;CO< 5
^ CTigBaciSBBS
11
Page 12

Listening to Compact Disc
To change discs during play
While a disc is playing, you can change disc.
1. Press ^ OPEN/CLOSE during playing.
The loading drawer will open at half position.
2. Change the discs.
3. Press ^ OPEN/CLOSE again to close the loading drawer.
• Do not insert another disc onto tray placed at (D. Although the
tray is partially showing, its disc is in the play position.
• To open fully, follow the procedure below.
1. Press □.
2. Press ^ OPEN/CLOSE to close the loading drawer.
3. Press A OPEN/CLOSE again to open the drawer.
For your reference:
If you play a disc with the loading drawer open, the changer will
automatically stop when the last track on the current disc finishes
playing.
To select the desired disc
Press DISC 1, DISC 2 or DISC 3 to select the disc
which you want to play.
The play will automatically start from the first track of the disc you
select.
-SK1P/-SEARCH
REPEAT
Skip function
Press either or ►►/►►! until you reach
the desired track.
►►/►W: To skip forward
You can skip as many tracks as the number of times you press the
button.
To skip backward
You can skip to the beginning of the track being played. If you
press this button again quickly, you can skip to the beginning of the
previous track.
Note that in a backward skip, the current track is included in the
count.
Repeat function
This function repeats the play of ail tracks on the loaded disc.
Press REPEAT before or during play.
REPEAT
C
To repeat the same track over and over/
To repeat the programmed tracks
1. Select the desired track using the program play procedure on
page 13.
2. Press REPEAT to display “ CJ
3. Press ►.
o; ; (•
<9300 Q B El [3
12
For your reference;
In program play mode, you can skip only the programmed tracks.
(See page 13.)
in random play mode, you cannot skip to the previous track.
(See page 14.)
Search function
You can rapidly search forward or backward on the disc for specific
sections.
While in play mode, press and hold either
or ►►/1^. Release the button when you have
reached the desired point.
►►/►►i: To search forward
l/-<^; To search backward
For your reference:
During program play and random play, search will take place within
the track being played.
Page 13

Program play
This iunction allows you to program up to 24 tracks from the loaded disc(s) in any order you choose.
5
1
■4
From the remote control
This example shows how to program track 8 of disc 2.
DISCS
a/CD
PROGRAM
^DISC^
4
DISC 1 DISC 2 DISC 3
► II a/CD
Press a/CD.
DSC pmQMM
iO
i >
< 5
Press PROGRAM.
Press DISC.
Press one of the disc buttons (DISC 1-3) to select the disc.
BSC PROGRAM
i >
CO
c ?
Press or to select the track you want to play.
DlSCPnOGAB^
C >
C35
< >
Press PROGRAM.
Track number Programmed order
use PROGRAM
i >
tai
< >
a
i
(
-
6
PROGRAM
CD
Repeat steps 3-6 until you
7
DISC1
8
-
►
CD
have completed the program.
Press IK to start play.
Play will stop automatically when the
last program track finishes playing.
^ 1^/
When you do not press DISC before
pressing these buttons, these buttons
are used as ► (play), ii (pause), and
a/CD (stop/CD selector) buttons.
To cancel program play:
Press PROGRAM.
The compact disc changer resumes sequential piay mode.
13
Page 14

Listening to Compact Disc
RANDOM
CDCD
From the main unit
1. Press MEMORY.
2. Press one of the disc button (DISC 1-3) to select the disc.
3. Press HW or to select the track.
4. Press MEMORY.
5. Repeat steps 2-4 until you have connpleted the program.
6. Press ►.
Play will stop automatically when the last program track finishes
playing.
When “CD FULL” appears:
This indicates that an attempt has been made to program more
than 24 tracks. No more than 24 tracks can be programmed.
To add an entry:
1. Press DISC.
2. Press one of the disc buttons (DISC 1-3).
3. Press or to select the track to be added.
4. Press PROGRAM.
To clear a programmed track one by one:
(Available only from the remote control)
1. Press CANCEL “CANCEL” lights.
2. Press one of the disc buttons (DISC 1-3).
3. Press or repeatedly until the display shows the track
number you want to cancel.
4. (Within 10 seconds)
Press CANCEL.
5. Repeat steps 2 to 4 to finish cancelling track.
6. Press CANCEL.
“CANCEL” will go off.
Random play
The changer will randomly choose a track from a randomly selected
disc.
Press RANDOM.
Random play will start.
RANDOM
The changer will stop automatically when all tracks on all the loaded
discs have been played.
To cancel random play, press RANDOM once again.
The compact disc changer resumes the sequential play mode.
For your reference:
In the program play mode, the programmed tracks wiil be played
randomly. (See page 13.)
RANDOM
nsc I
^ "f / / i f / ;
►<2>— M/"**
/ I \ Q Q-CHH) (B IS □ (9 S D >
To clear all tracks:
Press B/CD once in the stop mode or twice in the play mode.
In random play mode, you cannot add or clear a track.
14
Page 15

Listening to Tape
Playback
• You can use normal, chrome and metal tapes.
• You can use either deck 1 or deck 2 for tape playback.
• This page shows an example using deck 1.
POWER
o
STANDBYO/ON
A EJECT
REVERSE MODE
o
Switch on the power.
Press A EJECT on deck 1, and then insert the tape.
Insert the tape with the exposed tape
facing down.
Close the cassette holder.
Front side
Press REVERSE MODE to
seiect the reverse mode.
Each time you press REVERSE MODE,
one of the indicators will light up.
: The deck plays one side only,
and then stop automatically.
■^y- The deck plays both sides, and
then stops automatically.
The deck plays both sides 8
times, and then stop automati
cally.
When you load tapes into both
decks; sequential playback will
be made. {See page 16)
Press M or ►.
► : The forward side (front side ) will
play.
M : The reverse side will play.
@0
Tape travel direction
VOLUME
To stop tape playback:
Press □.
When tapes are inserted in both decks:
Before proceeding step 4, press DECK 1/2 to select the deck you
want to play.
For your reference:
The deck automatically identifies the type of tape loaded.
Press VOLUME to adjust the volume level as you like.
Usable deck
[5i^ ll'
15
Page 16

Listening to Tape
■|-«(TPS)||(TPS)I
7
□
To find the beginning of a program
(TPS: Tape Program Sensor)
Press or while the tape is playing.
If the forward side {►) is playing;
The tape will play from the beginning of the next tune.
The tape will rewind to the beginning of the present tune.
Then the tune will play again.
If the reverse side (-^) of the tape is playing:
The reverse operation should take place.
TPS is the function that searches for the silent passage in a tape
program. So, it may sometimes fail to operate correctly in the
following situations;
• When there is no blank space between tape programs (for
example, a tape recorded from a microphone)
• When the interval between programs is less than 4 seconds
• When there is a particular low-level passage in a program (for
example, classical music)
• When the program Is less than 10 seconds, or when it is less
than 10 seconds from the beginning of the program to the
beginning of the next program
• When a tape recorded with fade-ins or fade-outs
To fast forward or rewind the tape
Press « or» white the tape is in the stop mode.
The tape will be fast forwarded.
«: The tape will be rewound.
Sequential playback among 2 tapes:
1. Press ^ EJECT on decks 1 and 2, and then insert the tapes,
insert with the side that you wish to listen to first facing in you
deck 1.
2. Press REVERSE MODE to select mode.
3. Press DECK 1/2 to select deck 1.
“DECK 1” will tight up.
4. Press ►.
Forward side of tape in deck 1 *-
Reverse side of tape in deck 1
Forward side of tape in deck 2
Reverse side of tape in deck 2
After repeating above operation 8 times, the tape will automatically
stop.
To stop tape playback:
Press □.
For your reference:
You can also start playback from a position other than the forward
side in deck 1.
About “DECK 1/2” indicator
When you load tapes in both decks, deck 1 or 2 indicator will light
to show which deck you loaded last.
When you switch on the power when two tapes are loaded in both
decks, “DECK 1" will light.
16
For your reference:
You can fast forward or rewind the tape while you are playing a
tape in another deck. Press DECK 1/2 to switch to the non playing
deck, and then press or ►►. After above operation, be sure
to press DECK 1/2 to select the deck in which you are playing a
tape.
Page 17

Convenient Functions For Your Recording
Concerning cassette tapes:
You can use normal and chrome tapes for recording. The deck
automatically identifies the kind of tape loaded, and set the bias
(for recording), recording level, equalization accordingly.
To take up the leader tape:
The leader tape is the first few revolutions that you cannot record
on.
Magnetic section
(on which sound can be recorded)
Leader tape
(on which sound cannot be recorded)
Concerning the volume level while recording:
The deck automatically sets the recording ievel. If you change the
volume level while recording, it does not affect the recording volume
level.
To erase a recorded sound:
1. Press □ button on the cassette deck section to select ‘TAPE".
2. Insert the recorded tape into deck 2.
3. Press REVERSE MODE to select reverse mode.
Easy play
(Also available from the remote control)
4. Press REG PAUSE.
5. Press or ► corresponding to the tape side you want to
erase.
From the power standby condition, you can start play directly.
Listening to compact disc
Press
The play will start from the first track.
Listening to radio broadcasts
Press FM or AM.
You can receive the station last tuned in.
Listening to tape
Press ◄ or ►.
When tapes have been loaded in both decks, deck 1 has priority.
To mute the volume
(Only available from the remote control)
Press MUTING.
“MUTING" will light.
This feature is convenient when you have a telephone call, etc.
To cancel, press MUTING once again.
•v.
! ! a L.
.
\ \ /■
— WLiTlNG —
'' 1 r
MUTING
17
Page 18

Recording from Radio Broadcasts
• You can use normal and chrome tapes.
• Check that the tape’s tabs (see page 25) are intact.
• The leader tape must be wound up before-hand, (See page 17)
A EJECT
Press ^ EJECT on deck 2,
and then Insert the tape.
Close the holder.
REVERSE MODE
Press REVERSE MODE to
select the reverse mode.
О
REC PAUSE
C-——
: One side will record, and then
the tape will stop automatically
at the tape end.
: Both sides will record (forward
side “»■ reverse side), and then
the tape will stop automatically
at the tape end.
c;:o ; Same as above. (When you
press REC PAUSE, “ c;::?" will
be automatically switched over
to “ Z3".)
Press REC PAUSE to put the
cassette deck Into the re
cording standby mode.
"fRE^" will light.
Press FM or AM to select the
band.
L.
FM
AM
TUNING
V Л
Press V or Л to select the
preset channel.
Press or ► to start re
J
cording.
►; When recording on either the
forward side or both sides.
When recording only the reverse
side.
To stop recording:
Press □.
To cut an unnecessary part while recording:
1. Press REC PAUSE,
The cassette deck will go into the recording standby state.
2. To resume recording, press or ► corresponding to the direction
in which recording is taking place.
To reduce the noise while AM recording (Beat proof function)
While in the recording standby mode of AM band;
Press FM MODE/BP.
Each time you press the button, BP 1 and BP 2 will be displayed
alternately.
Select the position where there is less noise.
^
........
ЙМ Ppp
1
НП H r 1
t
____
->
18
TUNING MODE
C ^
Press TUNING MODE to
select “PRESET”.
You can also tune in using “MANUAL"
mode.
Page 19

Recording from Compact Discs
L_" J ^
<Aino nmiuto <AUTOuvenu>
• You can use normal and chrome tapes.
• The leader tape must be wound up before-hand. (See page 17)
A EJECT
/■
--------
'
REVERSE MODE
Press ^ EJECT on deck 2, and then insert a tape.
Close the holder.
Press REVERSE MODE to
select the reverse mode.
o
^OPE№
CLOSE
Z : One side will record, and then
the tape will stop automatically
at the end.
Z> : Both sides will record (forward
side reverse side), then the
tape will stop automatically at
the tape end.
CZ3 : Same as above (When you
press REC PAUSE. “cZ3" will
be automatically switched over
to “ Z5”)-
Press ^ OPEN/CLOSE to load a CD.
When you record from one disc;
Load a CD on the disc tray 1.
When you record from two or three
disc:
Load a disc from which you want to
record first on the disc tray 1, and in
order 2, 3.
Press ^ OPEN/CLOSE again to close
the tray.
A REC PAUSE
4 C_—.._3
Press REC PAUSE to put the
cassette deck into the record
ing standby mode.
“[RKTI" will light
Press
5
The recording will automatically start in
the (forward side) direction.
When CD play finishes, the cassette
deck enters the recording standby
condition.
After the compact disc play finishes:
When one disc is loaded:
The cassette deck will create a non-recorded passage of about 4
seconds, and then go into the recording standby state.
When two or three disc are loaded:
When there is a blank portion on the tape, the deck will automatically
start recording from the next compact disc.
To specify the tracks to be recorded:
(Steps 2-7 are from the remote control)
1. Follow steps 1 to 4,
2. Press PROGRAM.
3. Press DISC.
4. Press one of the disc buttons (DISC 1-3) to select the disc.
5. Press \« or to select the track to be edited.
6. Press PROGRAM.
7. Repeat steps 3-6 to program discs and tracks such that the
total playing time is less than the length of the tape (up to 24
tracks),
8. Press ► on the CD changer to start recording.
The recording will automatically start.
19
Page 20

Tape to Tape Recording
• You can use normal and chrome tapes.
• The recording level and the noise reduction effect of the original (playback) tape will be recorded on the new tape.
• The leader tape must be wound up beforehand. (See page 17.)
REJECT ¿EJECT
-----
f 'x
/S\
REVERSE MODE
o
Press □ to select “TAPE’
Press A EJECT on both
decks, and then insert the
tapes.
For playback: Into deck 1
For recording: Into deck 2
Close each deck’s holder.
Press REVERSE MODE to select the reverse mode.
t : Single-sided recording
: Two-sided recording
(forward side reverse side)
cT:? : Same as above (When you
press NORMAL or HIGH, “ c:;:?"
will be automatically switched
over to “ ::;:3”).
1«CK| [U
ONE TOUCH TAPE EDIT
NORMAL HIGH
To stop recording:
Press □.
Both decks will stop.
Press NORMAL or HIGH of
ONE TOUCH TAPE EDIT to
start recording.
NORMAL: Normal speed recording
HIGH: High speed (about 2 times
The recording will start from the forward
side automatically. The tape travel
direction indicator shows the tape travel
direction of the tape for recording.
After recording has finished, both decks
will stop.
Both "DECK 1" and “DECK 2” indicator
light.
When the tape length in deck 2 is longer
than a tape in deck 1, the deck enters
the recording standby state.
normal speed) recording
loSKirnm
*■
20
While making a high-speed recording, install the visual unit such as
a TV further away from this unit. It prevents noises from being
recorded.
Page 21

Using an External Unit
□ H >
CD CHANQSn
O *
■q- » J S'
----
Listening to an external source
(See page 5 for external unit connection)
AUX
Press AUX.
Operate the unit which is con
nected to the system.
See the instruction manual of the unit
concerned for the operation.
Recording from an external source
1
2
3
REC PAUSE
AUX ^
Press REC PAUSE.
Press AUX.
Press or ► to start re
cording.
►: Recording will Start from the forward
side
<: Recording will start from the reverse
side
■2
3
Start playing the source to be recorded.
See the instruction manual of the unit
concerned for the operation,
To stop recording:
Press □ on the cassette deck section.
To briefly interrupt recording:
Press REC PAUSE.
The cassette deck will go into the recording standby mode.
To resume recording, press ► or corresponding to the direction
in which recording is taking place.
21
Page 22

Using an External Unit
Changing the Tone
и
In
To use headphones
Connect the headphones (not included) to the headphones jack.
Before connecting, reduce the volume level.
• Avoid listening for prolonged periods of time to prevent hearing
damage.
• Plug type: Stereo mini
TU
'--^Q
I
V. BASS
------o' ^ ®
■ —
cKKi
I .
/ "I" Ч
■■■"
CO «HANOiH
AZIZ.
To listen with augmented bass (V. BASS)
Press V. BASS.
“V. BASS" will light.
To cancel the V. BASS effect:
Press V. BASS once again.
“V. BASS" will go off.
DISC ;
iO i ; *
<^3> П) Q S3 0) S
t ttt
!f 1
Y-BAES -
V. BASS
AUX
TWtMWO V PRESET Л
,Q Q Q
PROGRAM CAWEL REPEAT
Q Q О
DISC
О Q О
EM8C 1 DISC 2 [}]SC a
► II Ш/СО
Q Q Q
О
CD
►►
' О О
ООО
TAPE
muting -volume +
O“ гт^
Panasonic,
. CD STEREO SYSTEM /
You cannot record with the V. BASS effect. V, BASS is effective
only to the playback sound.
Common Operation
Switching the system on and power standby mode
О
Starting play directly from the power standby condition
TUNER/BAND P- ^ ^
DISC 1 TAPE
О О О О
Selecting the input source DISC 3
TUN^VBAND Я/CD ■
ООО
Selecting the external source
AUX
о
Adjusting the volume
- VOLUME +
CO
Muting the volume temporarily
MUTING
22
(У
Page 23

Quick Reference of Remote Control Operations
starting play
Temporarily stopping play
Stopping play
Skipping tracks
Compact disc section
DISC 1
O
DISC 2
il
o
DISCS
■/CD
CD
o o
, _ V PRESET A
.Q Q Q
PROGRAM CANCEL REPEAT
Q O Q
DISC
o Q o
ùmc^ [MSC3 Deca
[Q Q Q
oiou/a
Q Q Q
Q Q CD
MUTING -VOIUME +
O's CD
CD
>■ u m/CD
^ «
TAPE
Panasonic
CO STEREO SYSTEM
Repeating tracks
Playing the particular track you programmed
Cancelling the particular track you programmed
1 Tape operation
Switching between deck 1 and deck 2
Starting playback
Finding the beginning of a track
REPEAT
o
DISC 3 DISC 1 DISC 2 DISC 3
■/CD PROGRAM DISC H K/CD
0-0-0-00
DISC1
► PROGRAM ►W
Q
O-O-OO-I
DISC 1 DISC 2 use 3
CANCEL DISC ► ii B/CD
0-0-000
0-0-0
DECK 1/2
0
*J
O
o o
During playback ^ ^
O O
Fast forwarding or rewinding the tape
Stopping playback and recording
Recording
Listening to radio broadcasts
In the stop condition ^ ^
O O
■
o
o
Tuner operation
TUNEB/BM V PRESET A
,o-^o o
23
Page 24

Concerning Compact Disc
Only compact disc having this mark can be used
with this unit.
(Ни®
DIGITAL AUDIO
To remove a disc from its case
Press the center hoider and lift the disc holding by the edges.
To hold the disc
Hoid the disc by the edges so the surface is not soiled with
fingerprints.
Fingerprints, dirt and scratches can cause skipping and distortion.
If the disc is brought from a cold to
warm environment, moisture may form
on the disc
Wipe this moisture off with a soft, linMree cioth before using the
disc.
Improper disc storage:
You can damage disc if you store them in the following places:
• Areas exposed to direct sunlight
• Humid or dusty areas
• Areas directly exposed to a heat outlet or heating appliance
Handling precautions:
• Do not write on the label side with a ball-point pen or other
writing utensils.
• Do not use record cleaning sprays, benzene, thinner, static
electricity prevention liquids or any other solvent.
• Do not soil with fingerprints.
To store a disc in its case
Insert the disc with label facing upwards and press downward at
the center.
If the surface is soiled
Wipe gently with a soft, damp (water only) cloth.
24
Page 25

Concerning Cassette Tape
Maintenance
Selection of cassette tapes
You can use normal and chrome tapes for recording:
® The deck automatically identifies the kind of tape loaded, and
sets the bias (for recording) and equalization accordingly.
® The deck automatically sets the recording level.
Cassette tape exceeding 90 minutes:
These tapes are handy for their long playback and recording time
but be careful about repeatedly stopping, starting, rewinding and
fast forwarding these tapes in short intervals as they are thin, tend
to stretch and may become entangled in the deck mechanism.
Do not use Fe-Cr tapes (TYPE III) in this system:
If you use this tape, it is impossible to obtain the required flat
frequency response.
If the tape loosen, take up the slack
Tape siack may cause the tape to break.
Maintenance of external surfaces
To clean this unit, use a soft, dry cloth.
If the surfaces are extremely dirty, use a soft cloth dipped in a
soap-and'Water solution or a weak detergent solution.
Wiring the cloth well before wiping the unit.
Wipe once again with a soft, dry cloth.
Never use alcohol, paint thinner, benzine, or chemically treated
cloth to clean this unit. Such chemicals may damage the finish of
your system.
Tape head care
To assure sound quality for recording and playback, be sure to
clean the tape heads after approximately every 10 hours of use.
1 Press POWER to switch the system to the power
standby condition.
2 Press ^ EJECT to open the cassette hoider.
3 Ciean the tape heads, pinch rollers and the
capstan shafts with a cotton swab (or a soft,
lint-free cloth) slightly moistened with isopropyl
alcohol.
Do not use any solution other than alcohol for head cleaning
To prevent erasure of recorded sounds
Remove the tabs with a screwdriver or a similar object.
To re-record on a protected cassette, cover the slot with adhesive
tape.
Detection hole
Do not cover the detection holes on chrome tape.
Improper tape storage:
You can damages tapes if you store them in the following places:
• In high temperature (35“C or higher) or high humidity (00% or
higher) areas
• In a strong magnetic field (near a speaker, on top of a TV, etc.)
This can erase a recording.
• Areas exposed to direct sunlight
Adhesive tape
•
25
Page 26

Troubleshooting Guide
Before requesting service for this unit, check the chart below for a possible cause of the problem you are experiencing. Some simple checks
or a minor adjustment on your part may eliminate the problem and restore proper operation.
If you are in doubt about some of the check point, or if the remedies indicated in the chart do not solve the problem, refer to the directory of
Authorized Service Centers (enclosed with this unit) to locate a convenient service center, consult your dealer for instructions.
Problem
Problems common to all systems
There Is no sound when the
power is ON.
The location of the various
musical instruments is not
well defined.
The left and right sounds
are reversed.
When listening to the
external unit, the left and
right sounds are reversed.
A low-frequency hum is
heard during play
Only one speaker is
emitting sound.
There is no sound when a
source is being played
“ERROR" message
appears on the display.
Volume is set too low.
The (+) and (-) connections to one of the
speaker are reversed.
The left and right connections to the speakers
are reversed.
The left and right connections to the external
unit are reversed.
Power cord or fluorescent light is near a
connecting cord.
One of the wires of the speaker cord is
disconnected.
The (+) and (-) wire of the speaker cords are
shorted.
Wrong operation has been done.
Probable cause(s)
Suggested remedy
Adjust the volume level with the volume control
button.
Connect the speaker cord correctly.
Connect the speaker cords correctly.
Connect the externa! unit's cord correctly
Keep electrica! appliances well away from the
connecting cords. Try unplugging the power cable
and re-connecting it with its polarities reversed.
Connect the speaker cord correctly.
Switch the system to the standby mode, and
reconnect the speaker cords so that they are not
shorted. Then switch on the power.
Operate the unit correctly by following the operating
instructions.
While listening to FM broadcasts
There is a "rushing noise”
during a stereo broadcast
which is not audible during
a monaural broadcast.
You hear excessive noise
during a stereo broadcast,
and occasionally the sound
disappears.
“STEREO” indicator flickers
and does not light
completely.
The sound during a stereo
broadcast is highly
distorted.
The transmitting station is along distance away.
The installation location and orientation of the
antenna are unsuitable.
The transmitting station is a long distance away.
The power of the TV set or VCR is ON.
There is a building or mountain nearby.
[Distortion is caused by interference between
the signal from the transmitting station (direct
wave) and the signal reflected from the building
or mountain (reflected wave).]
While listening to AM broadcasts
You hear an unusual beat
sound.
You hear a iow-frequency
hum.
You are using the system at the same time you
are playing a TV set.
The antenna wire is near the power cord.
If you are using an indoor antenna, change to an
outdoor antenna.
Try switching off the TV set or VCR.
Use a high-grade outdoor antenna, and install it in a
good location, height, and orientation for reception.
Switch off the TV set, or use the system further
away from it.
Separate the antenna wire from the power cord.
26
Page 27

Problem Probable came(s)
When there is a television set nearby
The picture on the TV
disappears or stripes
appear on the screen.
The location and orientation of the antenna are
incorrect.
The wiring at the back of the system is
unsuitable.
Suggested remedy
If you are using an indoor antenna, change to an
outdoor antenna.
Separate the antenna wire of the TV set from the
system.
While listening to ta
Sound is tow, interinittent,
or poor quaiity, noisy,
scratchy, or unsteady.
The deck does not enter
the recording mode
pe
Heads are dirty.
Heads have become magnetized.
The tabs are removed from the cassette.
Whiie listening to compact disc
Loading drawer does not
close even when disc are
loaded and ^
OPEN/CLOSE button is
pressed.
The dispiay wiii not change.
Disc play does not start
when you press the play
(>-) button.
Certain parts of the disc do
not work.
Disc is not loaded property on the tray.
The disc is not positioned correctly in the disc
tray.
The disc is loaded upside down.
The disc is dirty.
The disc is scratched.
The disc is badly warped.
The disc is a nonstandard one.
There is condensation inside the compact disc
changer.
The disc is dirty.
Clean the heads.
Use a head degausser available from audio store
to demagnetize the heads.
Attach tape to cover the space left by removal of the
erase-prevention tabs.
Load the disc again.
Load the disc on the tray correctly.
Reload the disc.
Wipe the disc with a soft cloth.
Replace the disc with a new one.
Replace the disc with a different one.
Switch the power ON, and then wait for 60 minutes
before using the compact disc changer.
Wipe the disc with a soft cloth.
While using the remote control
The system cannot be | The batteries are installed in the reverse polarity. Re-insert the batteries observing the correct polarity.
operated with the remote ■ ¡■ ^0 batteries are worn out.
control. I
Replace the batteries with new batteries.
27
Page 28

Technical Specifications
AMPLIFIER SECTION
Rated minimum sine wave RMS power
output 70 Hz-20 kHz both channels
driven 10% total harmonic distortion
2x5 W (4ii)
Total harmonic distortion
Half power at 1 kHz 0.7% (4ii)
Input sensitivity
AUX 250 mV
Input impedance
AUX 92 kil
Load impedance 4Q
FM TUNER SECTION
Frequency range
87.5-108.0 MHz (100 kHz steps)
Sensivity 23.3 dBf (4.0^iV, iHF ’58)
Total harmonic distortion
MONO 0.4%
STEREO 0.5%
S/N
MONO 60dB (65dB, IHF)
Frequency response
40 Hz-15 kHz (+0.5 dB, -2dB)
Image rejection at 98MHz 47 dB
Stereo separation at 1 kHz 31 dB
Antenna terminal(s) 750 (unbalanced)
AM TUNER SECTION
Frequency range 522-1611kHz
(9 kHz steps)
Sensitivy
(for 50mW) 141p V/m
(S/N 20 dB) 446p V/m
Image rejection at 999 kHz 37 dB
CASSETTE DECK SECTION
Track system 4 track, 2 channel
Heads
Playback Solid permalloy head
Record/playback Solid permalloy head
Erasure Double gap ferrite head
Motor DC servo motor
Recording system AC bias 100kHz
Erasing system AC erase 100kHz
Tape speed 4.8 cm/sec (1Vs ips)
Frequency réponse
NORMAL 40 Hz-12 kHz (±3 dB)
Wow and flutter 0.1% (WRMS)
Fast forward and rewind times
Approx. 120 seconds
with C-60 cassette tape
CD SECTION
Sampling frequency 44.1kHz
Decoding 16 bit linear
Beam source/wave length
Semiconductor laser/780 nm
Number of channels 2 Ch, Stereo
Frequency response
20 Hz-20kHz (+1,-2 dB)
S/N 90 dB (JIS.A)
Wow and flutter Below measurable limit
Digital filter 4 time over sampling
D/A converter MASH (1 bit DAC)
SPEAKER SECTION
Type 1 way closed
Speaker(s)
Impedance 4Q
Input power 12 W (music)
Output sound pressure level
Frequency range
Dimensions (WxHxD)
Weight 2.75 kg (6 lb.)
Full range 12 cm cone type
6 W (DIN)
90dB/W(1.0m)
68 Hz-20 kHz (-16 dB)
201.5x345x192 mm
General
Power consumption 43 W
Power supply AC 230-240 V, 50 Hz
Dimensions (WxHxD)
Weight 6 kg (13.2 lb.)
Notes:
1. Specifications are subject to change
without notice
Weight and dimensions are approximate.
2. Total harmonic distortion is measured
by the digital spectrum analyzer.
MASH is trademark of NTT.
270x345x308.5 mm
Matsushita Electric Industrial Co., Ltd.
Central P.O. Box 288, Osaka 530-91, Japan
Printed in Singapore
RQT 3049-1L
L0295Y0
 Loading...