

Page 1
Troubleshooting
(Alkaline or
manganese battery)
Panasonic Corporation
Web Site: http://panasonic.net
C Panasonic Corporation 2014
p
SQT0470
F0914HA0
11
Before requesting service, make the following
checks. If you are uncertain about some of the check
points, or if the solutions indicated in the following
guide does not resolve the issue, then consult your
dealer for instructions.
To return all settings to the factory defaults
When the following situations occur, reset the memory:
≥ There is no response when buttons are pressed.
≥ You want to clear and reset the memory contents.
1 Turn this unit on.
2 Touch and hold [Í/I] on the unit.
3 While continuing to hold [Í/I] on the unit, touch and
hold [∫] on the unit for 5 seconds.
≥ Keep holding down [Í/I] and [∫] until “---------”
appears on the display.
4 Release [Í/I] and [∫].
≥ All the settings are returned to the factory defaults. You will
need to reset the memory items.
General
Humming heard during playback.
≥ If an AC mains lead or fluorescent lights are near
the cords, then keep other appliances and cords
away from the cables.
Charging does not start.
≥ Remove and re-insert the USB device.
≥ Try to change the audio source.
Charging does not start during standby mode.
≥ Turn the unit on. Check the charging has started.
Remote control
The remote control does not work properly.
≥ The battery is depleted or inserted incorrectly.
≥
It may be necessary to set the code of the remote control
again after changing the battery of the remote control.
(See “Changing the unit and remote control code”)
USB
No response when [1/;] is pressed.
≥ Disconnect the USB device and then reconnect it.
Alternatively, turn the unit off and on again.
The USB device or its contents cannot be read.
≥ The USB device format or its contents is/are not
compatible with the unit.
≥ The USB host function of this product may not work
with some USB devices.
≥ It may not be possible to insert a USB device
correctly, depending on its shape.
The performance of the USB device is slow.
≥ It may take time to read or play a USB device in the
following cases:
jThe USB device contains a large number of
folders or files.
jThe USB device contains large-size files.
jThe USB device is a large memory USB device.
The elapsed time displayed is different from the
actual play time.
≥ Copy the data to another USB device or backup the
data and reformat the USB device.
Bluetooth
®
Pairing cannot be completed.
®
≥ Check the Bluetooth
device condition.
The device cannot be connected.
≥ The pairing of the device was unsuccessful or the
registration has been replaced. Try re-pairing the
device.
≥ This unit might be connected to a different device.
Disconnect the other device and try re-pairing the
device.
≥ If the problem persists, turn the unit off and on, then
try again.
The device is connected, but audio cannot be
heard through this unit.
≥
For some built-in Bluetooth® devices, you have to
set the audio output to “SC-BMAX3” manually. Read
the operating instructions for the device for details.
≥ Try to operate the Bluetooth® device to connect to
this unit.
®
≥ Try to play the connected Bluetooth
device.
The sound is interrupted.
≥
The device is out of the 10 m communication range.
Place the Bluetooth
®
device closer to this unit.
≥ Remove any interference between this unit and the
device.
≥ Other devices that use the 2.4 GHz frequency
band, such as
wireless routers, microwaves,
cordless phones, etc. are interfering. Place the
®
Bluetooth
device closer to this unit and distance it
from the other devices.
Reference
13
About Bluetooth
®
Panasonic bears no responsibility for data
and/or information that is compromised
during a wireless transmission.
∫ Frequency band used
This system uses the 2.4 GHz frequency band.
∫ Certification of this device
≥ This system conforms to frequency restrictions and
has received certification based on frequency laws.
Thus, a wireless permit is not necessary.
≥ The actions below are punishable by law in some
countries:
jTaking apart or modifying the system.
jRemoving specification indications.
∫ Restrictions of use
≥ Wireless transmission and/or usage with all
Bluetooth
≥ All devices must conform to standards set by
Bluetooth SIG, Inc.
≥ Depending on the specifications and settings of a
device, it can fail to connect or some operations
can be different.
≥
This system supports Bluetooth® security features.
But depending on the operating environment and/or
settings, this security is possibly not sufficient.
Transmit data wirelessly to this system with caution.
≥ This system cannot transmit data to a Bluetooth®
device.
®
equipped devices is not guaranteed.
∫ Range of use
≥ Use this device at a maximum range of 10 m. The
range can decrease depending on the
environment, obstacles or interference.
∫ Interference from other devices
≥ This system may not function properly and troubles
such as noise and sound jumps may arise due to
radio wave interference if this system is located too
close to other Bluetooth
®
devices or the devices
that use the 2.4 GHz band.
≥
This system may not function properly if radio waves
from a nearby broadcasting station, etc. is too strong.
∫ Intended usage
≥ This system is for normal, general use only.
≥ Do not use this system near an equipment or in an
environment that is sensitive to radio frequency
interference (e.g.: airports, hospitals, laboratories,
etc).
Compatible USB devices
≥ FAT12, FAT16 and FAT32 file systems are
supported.
≥ This unit supports USB 2.0 full speed.
≥ This unit can support USB devices of up to 32 GB.
≥ This unit does not guarantee connection to all USB
devices.
Examples:
jConnection to a device with more than one
memory
jConnection to a USB device via a USB hub
jConnection to a smartphone, tablet or similar
device
Compatible MP3 files
≥ Supported format: Files with the extension “.mp3”
or “.MP3”.
≥ Compatible compression rate: Between 32 kbps
and 320 kbps (stereo).
≥ Depending on how you create the MP3 files, they
may not play in the order you numbered them or
may not play at all.
USB device
≥ A maximum of 255 albums (including root folder) or
2500 tracks can be read by this unit. The maximum
number of tracks in a folder that can be read by this
unit is 999 tracks. This unit is not guaranteed to
read files exceeding those numbers.
Licenses
MPEG Layer-3 audio coding technology licensed from Fraunhofer IIS
and Thomson.
The Bluetooth® word mark and logos are registered trademarks owned
by Bluetooth SIG, Inc. and any use of such marks by Panasonic
Corporation is under license.
Other trademarks and trade names are those of their respective
owners.
Safety precautions
∫ WARNING
Unit
≥ To reduce the risk of fire, electric shock or product damage,
j Do not expose this unit to rain, moisture, dripping or
splashing.
j Do not place objects filled with liquids, such as vases, on
this unit.
j Use only the recommended accessories.
j Do not remove covers.
j Do not repair this unit by yourself. Refer servicing to
qualified service personnel.
AC mains lead
≥ The mains plug is the disconnecting device.
Install this unit so that the mains plug can be unplugged
from the socket outlet immediately.
≥ To reduce the risk of fire, electric shock or product damage,
j Ensure that the power supply voltage corresponds to the
voltage printed on this unit.
j Insert the mains plug fully into the socket outlet.
j Do not pull, bend, or place heavy items on the lead.
j Do not handle the plug with wet hands.
j Hold onto the mains plug body when disconnecting the
plug.
j Do not use a damaged mains plug or socket outlet.
≥ Do not forcibly bend, pull or twist the AC mains lead.
∫ CAUTION
Unit
≥ To reduce the risk of fire, electric shock or product damage,
j Do not install or place this unit in a bookcase, built-in
cabinet or in another confined space. Ensure this unit is
well ventilated.
j Do not obstruct this unit’s ventilation openings with
newspapers, tablecloths, curtains, and similar items.
j Do not block the fan's ventilation holes on the rear of this
unit.
j Do not place this unit in such a way that it crushes the
female end of the AC mains lead and the connectors of
the connected cables.
j Do not place sources of naked flames, such as lighted
candles, on this unit.
j Do not expose this unit to direct sunlight, high
temperatures, high humidity, and excessive vibration.
≥ This unit is intended for use in moderate climates.
≥ This unit may receive radio interference caused by mobile
telephones during use. If such interference occurs, please
increase separation between this unit and the mobile
telephone.
≥ Product Identification Marking is located on the rear of the
unit.
≥ Do not allow children to climb on this unit.
≥ Do not stack anything on this unit.
≥ Place this unit on an even surface.
≥ Do not touch the speaker cone’s reverberating surfaces:
j This may damage the speaker cone.
j The speaker cone may be hot.
≥ Do not place your feet under the unit.
≥ Improper handling or transportation manner may cause the
unit to fall, etc., resulting in damage and/or personal injury.
≥ Be careful when babies or children are near.
≥ Do not carry this unit as shown below.
Battery
≥ Danger of explosion if battery is incorrectly replaced.
Replace only with the type recommended by the
manufacturer.
≥ When disposing of the batteries, please contact your local
authorities or dealer and ask for the correct method of
disposal.
≥ Do not heat or expose to flame.
≥ Do not leave the battery(ies) in a car exposed to direct
sunlight for a long period of time with doors and windows
closed.
≥ Do not take apart or short circuit.
≥ Do not recharge alkaline or manganese batteries.
≥ Do not use the battery if the cover has peeled off.
≥ Remove the battery if you do not use the remote control for
a long period of time. Keep in a cool, dark area.
Operating Instructions
Active Speaker System
Model No. SC-BMAX3
Thank you for purchasing this product.
Please read these instructions carefully before using this product,
and save this manual for future use.
GN
YOM200165-1001
Messages
12
The following messages or service numbers may
appear on the unit’s display.
“--:--”
≥ You plugged the AC mains lead in for the first time
or there was a power failure recently. Set the time.
“ADJUST CLOCK”
≥ Clock is not set. Adjust the clock accordingly.
“ADJUST TIMER”
≥ Play timer is not set. Adjust the play timer
accordingly.
“AUTO OFF”
≥ The unit has been left unused for about 20 minutes
and will shut down within a minute. Press any
button to cancel it.
“CANNOT SET”
≥ Select an audio source other than “BLUETOOTH”.
“CONNECTED”
≥ The Bluetooth
®
connection has been completed.
“ERROR”
≥ Incorrect operation is performed. Read the
instructions and try again.
“F” (“ ” stands for a number.)
≥ There is a problem with this unit.
Write down the displayed number, disconnect the
AC mains lead and consult your dealer.
“LINKING”
≥ This unit tries and connects to the last connected
®
Bluetooth
device.
“NODEVICE”
≥ The USB device is not inserted correctly. Read the
instructions and try again.
“NO PLAY”
≥ Examine the content. You can only play supported format.
≥ The files in the USB device can be corrupted. Format the
USB device and try again.
≥ The unit may have a problem. Turn the unit off and then on
again.
“NOT SUPPORTED”
≥ The playback function of this unit does not support
that of the connected USB device. Try another USB
device.
“READING”
≥ The unit is checking the USB information. After this
display has disappeared, start operating.
“READY”
®
≥ Connect this unit to the paired Bluetooth
(See “Connecting a paired Bluetooth
device.
®
device”)
“REMOTE ” (“ ” stands for a number.)
≥ The remote control and this unit are using different
codes. Change the code on the remote control.
(See “Changing the unit and remote control code”)
“USB OVER CURRENT ERROR”
≥ The USB device is drawing too much power.
Remove the USB device and turn the unit off.
Specifications
14
∫ GENERAL
Power consumption 80 W
Power consumption in standby mode
Approx. 1.0 W
Power supply AC 220 V to 240 V, 50 Hz
Dimensions (WkHkD)
For Vertical setting
Dimensions (WkHkD)
Mass Approx. 14.4 kg
Operating temperature range 0oC to r40oC
Operating humidity range
Approx. 756 mmk292 mmk408 mm
Approx. 288 mmk756 mmk410 mm
20 % to 80 % RH (no condensation)
∫ AMPLIFIER SECTION
RMS Output Power
Total RMS output power (1channel drive) 550 W
∫ USB SECTION
USB Standard USB 2.0 full speed
Media file format support MP3 (¢.mp3)
USB device file system FAT12, FAT16, FAT32
Playable USB storage USB Thumbdrives
USB port power max 1 A
Sampling frequency 32 kHz, 44.1 kHz, 48 kHz
Bit rate 32 kbps to 320 kbps
Audio output 2ch
∫ TERMINAL SECTION
AUX
Jack Type Stereo, 3.5 mm
Audio Output
Jack Type Stereo, 3.5 mm
∫ BLUETOOTH SECTION
Bluetooth system specification
Wireless equipment classification
Supported Profiles A2DP, AVRCP
Supported codec
Frequency band 2.4 GHz band FH-SS
Operating distance Approx. 10 m Line of sight
Bluetooth® Ver. 3.0
Class 2 (2.5 mW)
SBC
∫ SPEAKER SECTION
Speaker (L/R)
Typ e 2 way 2 speaker system (Bass reflex type)
Woofer Unit(s) 2 speakers
Size(Type) 20 cm (Cone type)
Tweeter Unit(s) 2 speakers
Size(Type) 5cm(Conetype)
≥ Specifications are subject to change without notice.
≥ Mass and dimensions are approximate.
≥ Total harmonic distortion is measured by a digital spectrum
analyzer.
Unit care
∫ To prevent speaker damage
≥ When you play at high levels for a long period, it can cause damage to the speakers and decrease the life of
the speakers.
≥ Decrease the volume in these conditions to prevent damage:
j When the sound is distorted.
j When you adjust the sound quality.
∫ Clean this unit with a soft, dry cloth
Pull out the AC mains lead from the outlet before maintenance.
≥ When dirt is heavy, wring a wet cloth tightly to wipe the dirt, and then wipe it with a dry cloth.
≥ Do not use solvents including benzine, thinner, alcohol, kitchen detergent, a chemical wiper, etc. This might
cause the exterior case to be deformed or the coating to come off.
∫ To dispose or transfer this unit
The unit may keep the user settings information in the unit. If you discard this unit either by disposal or transfer,
then follow the procedure to return all the settings to the factory defaults to delete the user settings.
(See “To return all settings to the factory defaults”)
≥ The operation history may be recorded in the memory of this unit.
Accessories
Check the supplied accessories before using this unit.
∏ 1 Remote control (N2QAYB001000)
∏ 1 Battery for remote control
≥ Product numbers provided in these operating instructions are correct as of September 2014. These may be
subject to change.
∫ Using the remote control
Insert the battery so the terminals (i and j) match
those in the remote control.
Point it at the remote control signal sensor on this
unit.
To avoid interference, please do not put any objects
in front of signal sensor.
About descriptions in these operating instructions
≥ Unless otherwise indicated, operations are described using the remote control.
-If you see this symbol-
Information on Disposal in other Countries outside the European Union
This symbol is only valid in the European Union.
If you wish to discard this product, please contact your local authorities or dealer and ask for the
correct method of disposal.
Limited Warranty (ONLY FOR AUSTRALIA)
Panasonic Warranty
1. The product is warranted for 12 months from the date of purchase. Subject to the conditions of this warranty Panasonic or its
Authorised Service Centre will perform necessary service on the product without charge for parts or labour, if in the opinion of
Panasonic, the product is found to be faulty within the warranty period.
2. This warranty only applies to Panasonic products purchased in Australia and sold by Panasonic Australia or its Authorised
Distributors or Dealers and only where the products are used and serviced within Australia or it's territories. Warranty cover only
applies to service carried out by a Panasonic Authorised Service Centre and only if valid proof of purchase is presented when
warranty service is requested.
3. This warranty only applies if the product has been installed and used in accordance with the manufacturer’s recommendations (as
noted in the operating instructions) under normal use and reasonable care (in the opinion of Panasonic). The warranty covers normal
domestic use only and does not cover damage, malfunction or failure resulting from use of incorrect voltages, incorrect installation,
accident, misuse, neglect, build-up of dirt or dust, abuse, maladjustment of customer controls, mains supply problems, thunderstorm
activity, infestation by insects or vermin, tampering or repair by unauthorised persons (including unauthorised alterations),
introduction of sand, humidity or liquids, commercial use such as hotel, office, restaurant, or other business or rental use of the
product, exposure to abnormally corrosive conditions or any foreign object or matter having entered the product.
4. This warranty does not cover the following items unless the fault or defect existed at the time of purchase:
(a) Cabinet Part(s) (e) DVD, Blu-ray or Recordable Discs
(b) Video or Audio Tapes (f) Video / Audio Heads from wear and tear in normal use
(c) SD cards or USB devices (g) Information stored on Hard Disk Drive, USB stick or SD card
(d) User replaceable Batteries (h) DTV reception issues caused by TV Aerial / Cabling / Wall socket(s)
etc
5. Some products may be supplied with Ethernet connection hardware. The warranty is limited on such products and will not cover
(a) Internet and or DLNA connection / setup related problems
(b) Access fees and or charges incurred for internet connection
(c) The use of incompatible software or software not specifically stipulated in the product operations manual;
and
(d) Any indirect or consequential costs associated with the incorrect use or misuse of the hardware, its connection to the internet or
any other device.
6. To claim warranty service, when required, you should:
Telephone Panasonic’s Customer Care Centre on 132600 or visit our website referred to below and use the Service Centre
Locator for the name/address of the nearest Authorised Service Centre.
Send or take the product to a Panasonic Authorised Service Centre together with your proof of purchase receipt as a proof of
purchase date. Please note that freight and insurance to and / or from your nearest Authorised Service Centre must be arranged
by you.
Note that home or pick-up/delivery service is available for the following products in the major metropolitan areas of Australia or the
normal operating areas of the nearest Authorised Service Centres:
Plasma/LCD televisions / displays (screen size greater than 103 cm)
7. The warranties hereby conferred do not extend to, and exclude, any costs associated with the installation, de-installation or
re-installation of a product, including costs related to the mounting, de-mounting or remounting of any screen, (and any other
ancillary activities), delivery, handling, freighting, transportation or insurance of the product or any part thereof or replacement of and
do not extend to, and exclude, any damage or loss occurring by reason of, during, associated with, or related to such installation,
de-installation, re-installation or transit.
Panasonic Authorised Service Centres are located in major metropolitan areas and most regional centres of Australia, however,
coverage will vary dependant on product. For advice on exact Authorised Service Centre locations for your product, please telephone
our Customer Care Centre on 132600 or visit our website and use the Service Centre Locator.
In addition to your rights under this warranty, Panasonic products come with consumer guarantees that cannot be excluded under the
Australian Consumer Law. If there is a major failure with the product, you can reject the product and elect to have a refund or to have
the product replaced or if you wish you may elect to keep the goods and be compensated for the drop in value of the goods. You are
also entitled to have the product repaired or replaced if the product fails to be of acceptable quality and the failure does not amount to a
major failure.
If there is a major failure in regard to the product which cannot be remedied then you must notify us within a reasonable period by
contacting the Panasonic Customer Care Centre. If the failure in the product is not a major failure then Panasonic may choose to repair
or replace the product and will do so in a reasonable period of time from receiving notice from you.
THIS WARRANTY CARD AND THE PURCHASE DOCKET (OR SIMILAR PROOF OF PURCHASE)
If you require assistance regarding warranty conditions or any other enquiries, please visit the
PRO-031-F11 Issue: 4.0 01-01-2011
SHOULD BE RETAINED BY THE CUSTOMER AT ALL TIMES
website www.panasonic.com.au or contact by phone on 132 600
If phoning in, please ensure you have your operating instructions available.
Panasonic Australia
Panasonic Australia Pty. Limited
ACN 001 592 187 ABN 83 001 592 187
1 Innovation Road, Macquarie Park NSW 2113
Page 2
6
9
3
2
1
4
5
7
8
10
11
12
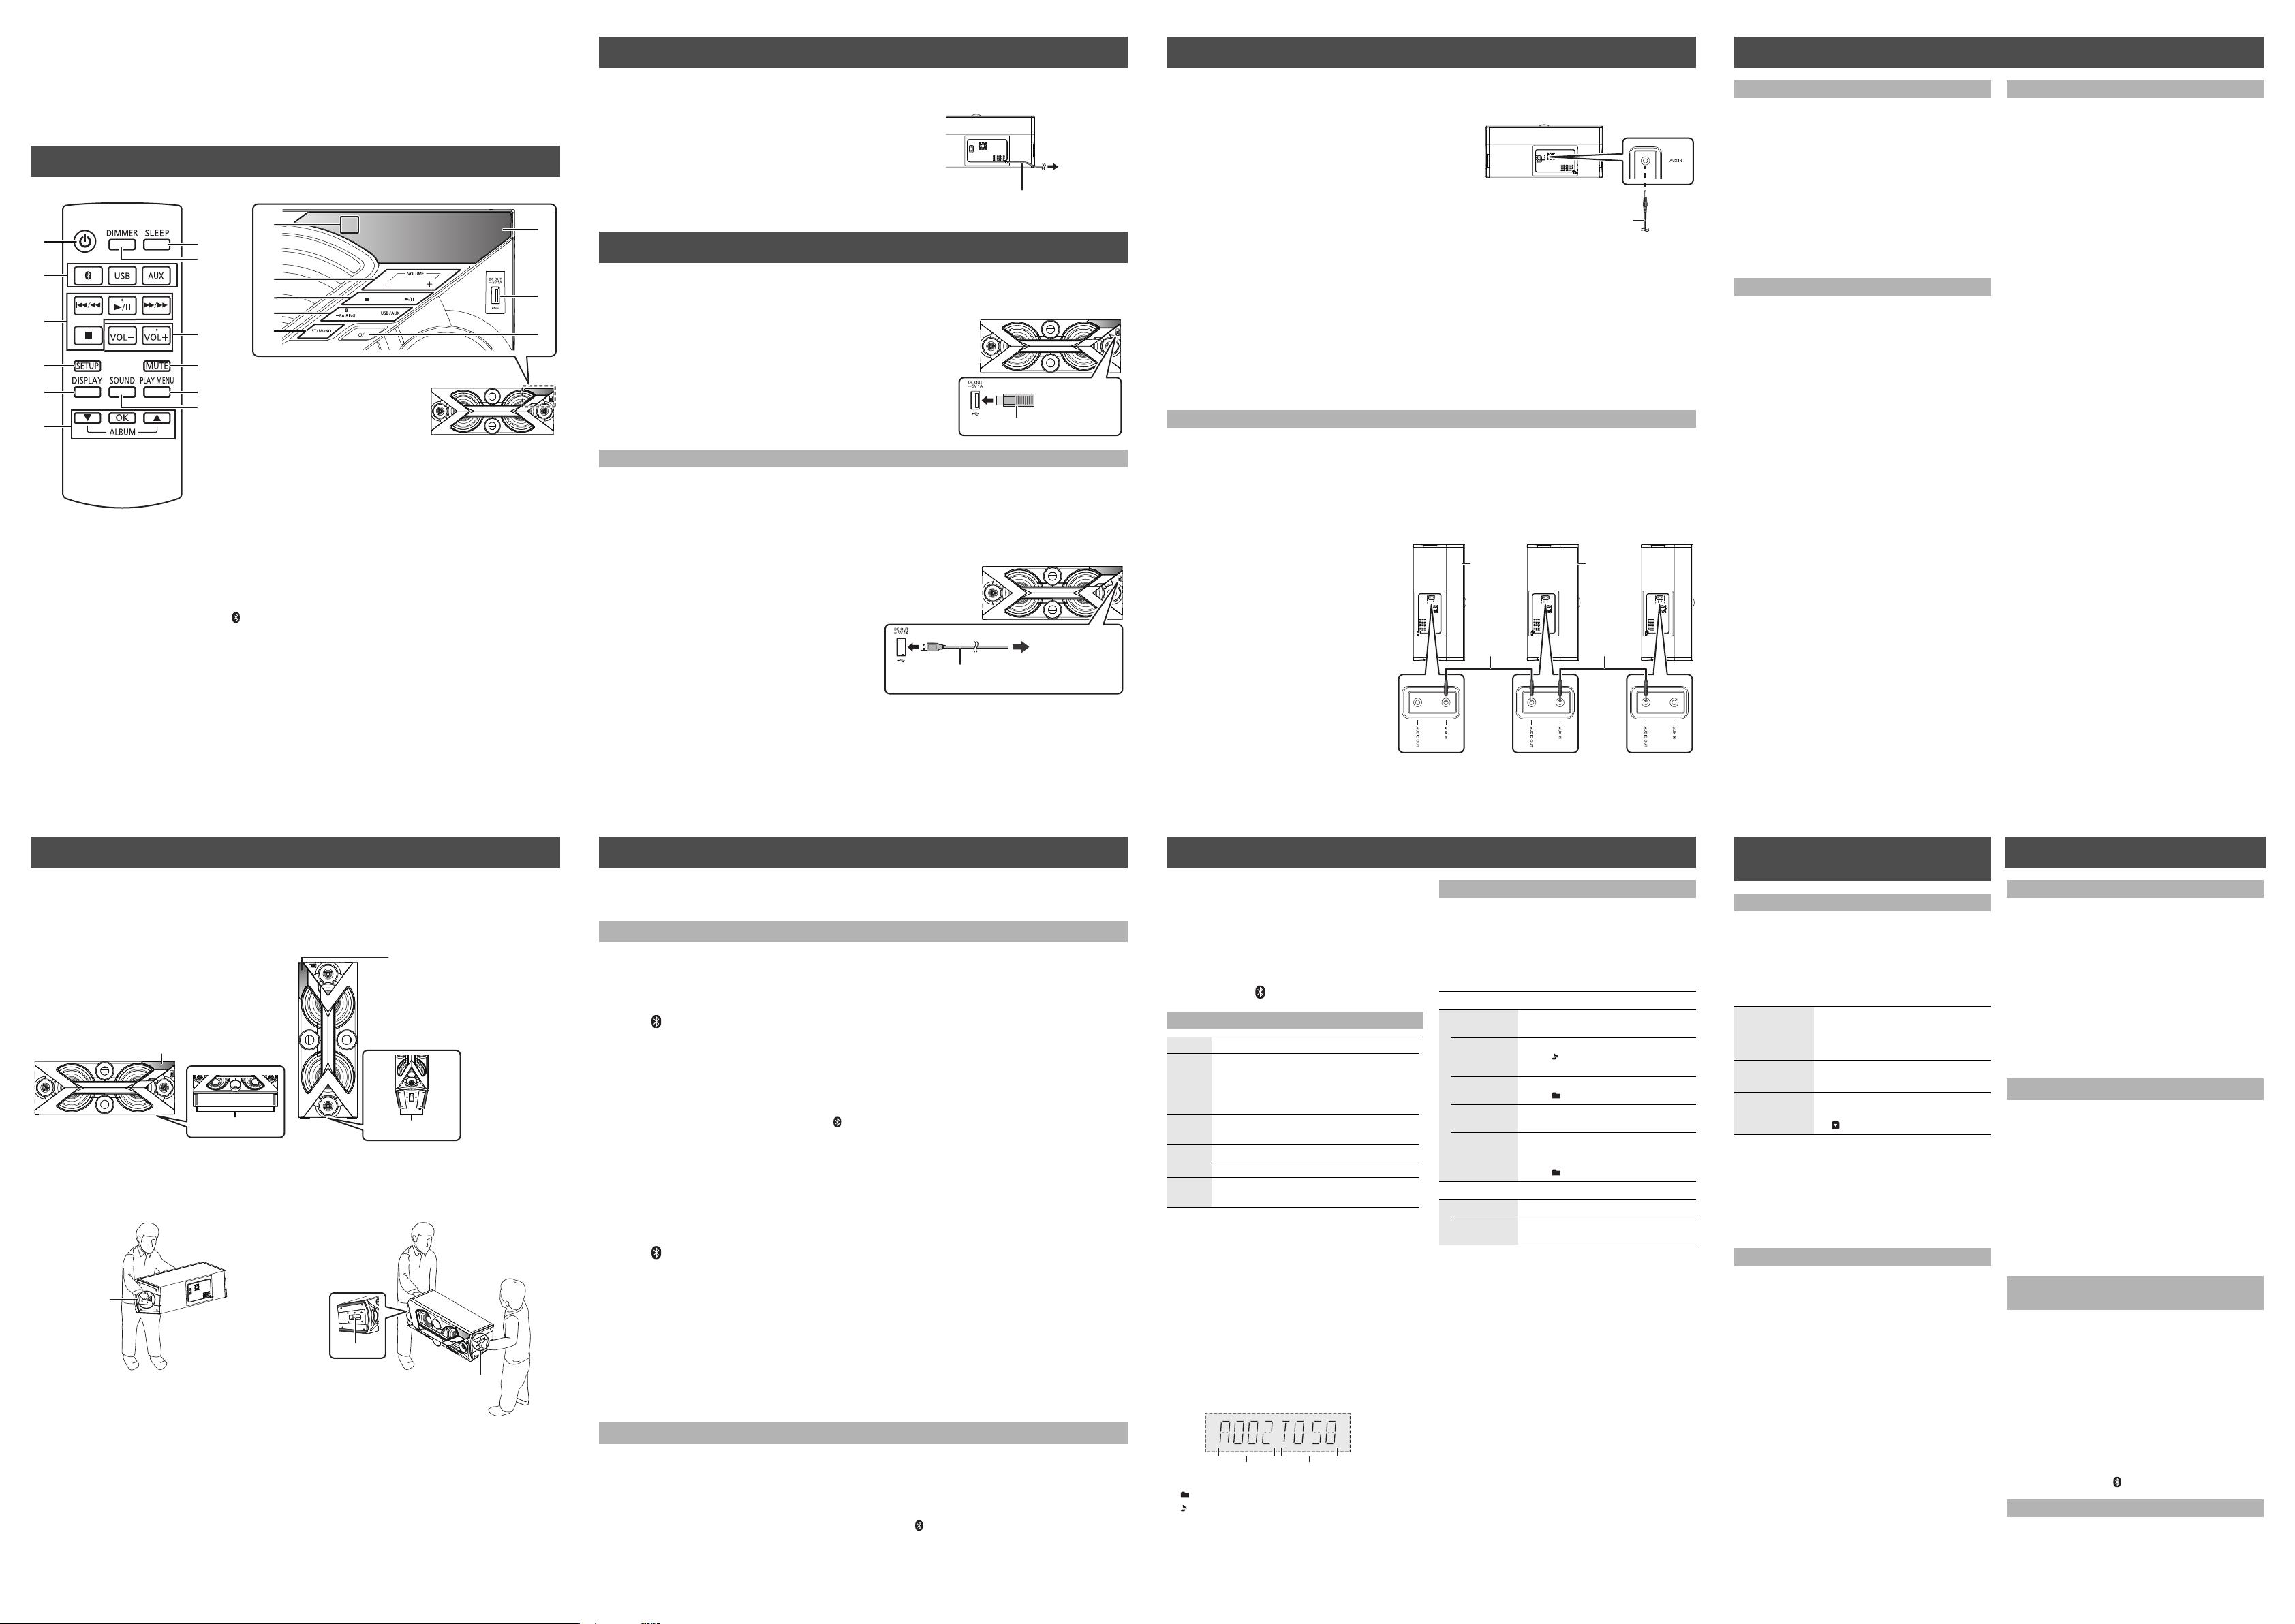
Remote control
The unit (Front view)
Speaker feet
Display panel
Horizontal Layout
Speaker feet
Display panel
Vertical Layout
Handle
One person
Handle
Handle
Two people
Connecting the AC mains lead
Rear view
To a
household
mains socket
AC mains lead
USB device (not supplied)
Front view
To the compatible
device
USB cable
(not supplied)
Front view
Audio cable
(not supplied)
Rear view
Additional
SC-BMAX3
(rear)
Audio cable
(not supplied)
Rear view
Audio cable
(not supplied)
Additional
SC-BMAX3
(rear)
Track number*
e.g.
Album number*
3
Connecting an external device
6
Clock and timers
8
Control reference guide
1
1 Standby/on switch [Í], [Í/I]
Press to switch the unit from on to standby mode or vice
versa. In standby mode, the unit is still consuming a
small amount of power.
2 Select the audio source
On the unit:
To start Bluetooth
when you are in Bluetooth
(See “Connecting via Bluetooth
3 Basic playback control buttons
4 Enter setup menu
5 Change the displayed information
6 Selection/OK
7 Set the sleep timer
8 Dim the display panel
Press again to cancel.
®
pairing, press and hold [ -PAIRING]
®
®
menu”)
13
14*
Turn off all equipment before connection and read the appropriate operating instructions.
Connect the AC mains lead.
≥ Conserving power
This unit consumes a small amount of power (See “Specifications”) even in
standby mode. In the interest of power conservation, if you will not be using
this unit for a long time, unplug it from the household mains socket. Since
some settings will be lost when this unit is unplugged, you will need to apply
them again next time you use it.
15
Connecting a USB device
4
9*
3*
2*
16
1*
Preparation
Before you connect a USB device to this unit, make sure you do a backup of the data.
Decrease the volume and connect the USB device to the
USB terminal.
Hold this unit when connecting or disconnecting the USB device.
≥ Do not use a USB extension cable.
This unit cannot recognise USB device connected through a cable.
Charging a device
Charging starts when a device (rated value: 5 V/1 A) is connected to the USB terminal of this unit.
≥
9 Adjust the volume (0 (min) to 50 (max))
10 Mute the sound
Press again to cancel. “MUTE” is also cancelled when
the volume is adjusted or the unit is turned off.
11 Set the play menu item
12 Enter sound menu
13 Remote control signal sensor
For both horizontal and vertical layouts:
Distance: Within approx. 7 m directly in front
Angle: Approximately 20° up and down, 30° left and right
14 Switch the sound to stereo or monaural
15 Display panel
16 USB terminal
*
These switches work just by touching the marks.
Although some devices can be charged when this unit is in USB mode, it is recommend to charge such devices
when this unit is in Bluetooth
≥ When charging a device for more than approximately 20 minutes, set the Auto off function to "OFF".
(See “Auto off function”)
Preparation
Turn the unit on.
Connect a device.
Confirm from the screen of the connected device, etc. to
make sure charging has started.
≥ A cable compatible with your device is required. Use the cable
that comes with your device.
≥ Even if you connect a cable compatible with the USB terminal of this unit, your device may not be charged. In that case, use
the charger that comes with the device.
≥ Depending on your device, using other chargers may not work. Check the operating instructions of your device before use.
≥
If your device cannot be charged when this unit is in USB mode, charge the device when this unit is in Bluetooth® mode or AUX mode.
≥ Do not connect a device with a rated value higher than 5 V/1 A to this unit.
≥ To check if charging is complete, look at the screen of the connected device, etc.
≥ Once fully charged, remove the USB cable from the USB terminal.
®
mode or AUX mode.
Preparation
Turn the unit on.
1 Connect an external device using an audio cable (not
supplied).
≥ Plug type: ‰ 3.5 mm stereo
2 Press [AUX] to select “AUX” and start playback on the
connected device.
∫ To select the sound input level of the external
device
1 While in AUX mode, press [PLAY MENU] repeatedly to select “INPUT LEVEL”.
2 Press [3, 4] to select “NORMAL” or “HIGH” and then press [OK].
≥ The factory default is “NORMAL”.
≥ To improve sound distortion when “HIGH” is selected, select “NORMAL”.
≥ Switch the equalizer off or turn the volume of the external device down to reduce the input signal. High level of input signal
will distort the sound.
≥ For details, refer to the operating instructions of the device.
Connecting additional SC-BMAX3 units
You can connect to play sound from this unit to the additional SC-BMAX3 units.
≥ It is recommended to install all SC-BMAX3 units vertically.
Preparation
1 Set the sound input level of additional SC-BMAX3 units to “NORMAL”.
(See “To select the sound input level of the external device”)
2 Turn all the SC-BMAX3 units off.
1 Connect this unit and all the additional
SC-BMAX3 units with audio cables (not
supplied).
≥ Plug type: ‰ 3.5 mm stereo
2 Turn all the SC-BMAX3 units on.
3 On the additional SC-BMAX3 units:
Press [AUX] to select “AUX”.
≥ For all the SC-BMAX3 units:
It is recommended to select the “MONO”
sound effect. (See “Sound effects”)
4 On this unit:
Start your desired playback.
≥
You can connect this unit and up to two SC-BMAX3 units.
≥ The sound effect will be controlled separately by
each unit. Make the same sound settings on the
additional units if necessary.
≥ The illumination lights of the SC-BMAX3 units may flash at slightly different times.
Setting the clock
This is a 24-hour clock.
1 Press [SETUP] repeatedly to select “CLOCK”.
2 Press [3, 4] to set the time and then press
[OK].
≥ To display the clock, press [SETUP] repeatedly to select
“CLOCK” and then press [OK] once.
(During standby, press [DISPLAY] once.)
≥ The clock is reset when there is a power failure or when
the AC mains lead is removed.
≥ Reset the clock regularly to maintain accuracy.
Sleep timer
The sleep timer can turn the unit off after a set time.
Press [SLEEP] to set the time (in minutes).
“SLEEP 30” -. “SLEEP 60” -. “SLEEP 90” -. “SLEEP 120”
^------------------- “OFF” (Cancel) (------------------b
≥ The remaining time is indicated on the unit’s display except
when other operations are performed.
≥ The play timer and sleep timer can be used together. The
sleep timer is always the main timer on the unit.
Play timer
You can set the timer so this unit turns on at a certain
time every day.
Preparation
Set the clock. (See “Setting the clock”)
1 Press [SETUP] repeatedly to select “TIMER
ADJ”.
2 Press [3, 4] to set the starting time
(“ON TIME”) and then press [OK].
3 Press [3, 4] to set the finishing time
(“OFF TIME”) and then press [OK].
Turning the timer on
1 Select a music source* and set the desired
volume.
2 Press [SETUP] repeatedly to select “TIMER
SET”.
3 Press [3, 4] to select “SET” and then press
[OK].
≥ “F” is displayed.
≥ To turn the timer off, select “OFF”.
4 Press [Í] to turn the unit to standby mode.
≥ To display the timer settings, press [SETUP] repeatedly to
select “TIMER ADJ” and then press [OK] once.
The music source and volume will also be displayed if the
timer is turned on.
≥ During standby, if the timer is turned on, press [DISPLAY]
twice to display the settings.
≥ To change the music source, select “OFF” in step 3 of
“Turning the timer on” and then perform steps 1 to 4 of the
procedure.
≥ This unit can be used as normal after the timer is set,
however:
j Turn the unit to standby mode before the timer start time.
j Even if the music source or the volume is changed, the
timer will still use the music source and volume that was
set when the timer was turned on.
* “USB” and “AUX” can be set as the music source.
Installation
2
This unit can be installed either vertically or horizontally. Select the installation style based on your preferences.
Install this unit with the speaker feet side down as shown below.
≥ It is recommended to select the “MONO” sound effect when this unit is installed vertically.
(See “Sound effects”)
∫ Carrying this unit
This unit can be carried by either one or two people. To lift this unit, hold the side handles.
≥ Put this unit on a flat safe surface.
≥ Use caution when lifting this unit.
j Carry this unit with two people if necessary.
Bluetooth® connection
5
You can listen to the sound from the Bluetooth® audio device from this unit wirelessly.
≥ Refer to the operating instructions of the Bluetooth
®
device for details.
Connecting via Bluetooth® menu
Preparation
≥ Turn on the Bluetooth
∫ Pairing with Bluetooth® devices
®
feature of the device and place the device near this unit.
1 Press [ ] to select “BLUETOOTH”.
≥ If “PAIRING” is indicated on the display, go to step 4.
To enter pairing mode*
2 Press [PLAY MENU] to select “PAIRING”.
3 Press [3, 4] to select “OK? YES” and then press [OK].
* You can also enter pairing mode by pressing and holding [ -PAIRING] on the unit.
To pair with a device
®
device.
®
device’s Bluetooth® menu.
4 Select “SC-BMAX3” from the Bluetooth
5 Start playback on the Bluetooth
∫ Connecting a paired Bluetooth® device
1 Press [ ] to select “BLUETOOTH”.
≥ “READY” is indicated on the display.
≥ When “BLUETOOTH” is selected as the source, this unit will automatically try and connect to the last connected
2 Select “SC-BMAX3” from the Bluetooth
3 Start playback on the Bluetooth
≥ If prompted for the passkey, input “0000”.
≥ You can register up to 8 devices with this unit. If a 9th device is paired, the device that has not been used the longest will be
replaced.
≥ This unit can only be connected to one device at a time.
Bluetooth
®
device.
®
device.
®
device’s Bluetooth® menu.
Disconnecting a Bluetooth® device
1 While a Bluetooth
Press [PLAY MENU] repeatedly to select “DISCONNECT?”.
®
device is connected:
2 Press [3, 4] to select “OK? YES” and then press [OK].
≥ You can also disconnect the Bluetooth® device by pressing and holding [ -PAIRING] on the unit.
≥ The Bluetooth
®
device will be disconnected if a different audio source (e.g., “USB”) is selected.
Media playback controls
7
The following marks indicate the availability of the feature.
[USB]: USB devices containing MP3 files
(See “Compatible USB devices”)
[Bluetooth]: Connected Bluetooth
Preparation
≥ Turn the unit on.
≥
Insert the USB device or connect the Bluetooth® device.
≥ Press [USB] or [ ] to select the audio source.
®
device
Basic controls ([USB], [Bluetooth])
Play Press [1/;].
Stop Press [∫].
Pause Press [1/;].
Skip
Search During play or pause, press and hold
∫ To display information
Press [DISPLAY] repeatedly.
≥ To use this unit’s remote control with a Bluetooth® device,
≥ Maximum number of displayable characters: approx. 32
≥ This unit supports ver. 1 and 2 ID3 tags but priority is more
≥ The displayed remaining time of a track with a variable bit
≥ Album and track indication for MP3 files.
≥ This unit skips MP3 files (tracks) that are not supported.
≥ [USB]: The position is memorised and
“RESUME” is displayed.
j Press [1/;] to resume.
j Press [∫] again to clear the position.
Press again to restart play.
Press [:/6] or [5/9] to skip track.
[USB]: Press [3] or [4] to skip the MP3 album.
[:/6] or [5/9].
the Bluetooth
Remote Control Profile).
Depending on the status of the device, some controls may
not work.
to ver. 2. Text data that is not supported will not be
displayed or will be shown differently.
rate (VBR) may differ from its actual remaining time.
“ ”: This indication is also used to refer to an album.
“ ”: This indication is also used to refer to a track.
* Those numbers are displayed as “A _ _ _” (album
number) or “T _ _ _” (track number) when the number of
albums or tracks stored in the connected USB device
exceeds the maximum number of albums or tracks that
can be read by this unit.
®
device must support AVRCP (Audio Video
Playback modes ([USB])
Select the playback mode.
1 Press [PLAY MENU] to select “PLAYMODE” or
“REPEAT”.
2 Press [3, 4] to select the setting and then
press [OK].
PLAYMODE
OFF
PLAYMODE
1-TRACK Only plays the selected track.
1-ALBUM Only plays the selected MP3 album.
RANDOM Plays the contents randomly.
1-ALBUM
RANDOM
REPEAT
OFF REPEAT Turns off repeat mode.
ON REPEAT Turns on repeat mode.
≥ During random play, you cannot skip to the previous track.
≥
In “RANDOM” or “1-ALBUM RANDOM” mode, tracks are played
endlessly even when “REPEAT” is set to “OFF REPEAT”.
≥ “`” is displayed depending on the REPEAT mode
setting.
≥ In “RANDOM” or “1-ALBUM RANDOM” mode, tracks may
be played more than once.
Cancels the play mode setting.
≥ “1”, “ ” is displayed.
(Skip to the desired track.)
≥ “1”, “ ” is displayed.
≥ “RND” is displayed.
Plays the tracks in the selected MP3
album randomly.
≥
Press [3] or [4] to select the MP3 album.
≥ “1”, “ ”, “RND” is displayed.
≥ “`” is displayed.
Sound and illumination
9
effects
Sound effects
The following sound effects can be added to the
audio output.
1 Press [SOUND] repeatedly to select the effect.
2 Press [3, 4] to select the setting and then
press [OK].
“PRESET EQ”
(Preset
Equalizer)
“D.BASS”
(Dynamic Bass)
“ST/MONO”
(STEREO/
MONO)
≥ You may experience a reduction in sound quality when
these effects are used with some sources. If this occurs,
turn the sound effects off.
≥ When “AUX” is selected as the source, you can select
“INPUT LEVEL” to adjust the sound input level of the
external device.
(See “To select the sound input level of the external
device”)
“HEAVY” (heavy), “SOFT” (soft),
“CLEAR” (clear), “VOCAL” (vocal) or
“FLAT” (flat/off).
≥ The factory default is “HEAVY”.
“ON D.BASS” or “OFF D.BASS”.
≥ The factory default is “ON D.BASS”.
“STEREO” or “MONO”.
≥ The factory default is “STEREO”.
≥
“ ” is displayed when “MONO” is selected .
Illumination setting
You can change the illumination setting.
1 Press [SETUP] repeatedly to select
“ILLUMINATION”.
2 Press [3, 4] to select a setting and then
press [OK].
“SPECTRUM” ,--------. “NEON” ,--------. “SWING”
^----. “OFF ILLUMINATION” (Cancel) (----J
To cancel, select “OFF ILLUMINATION”.
≥ The factory default is “SPECTRUM”.
≥ Depending on the track, the flashing pattern of the
set illumination light differs, and it may flash with
one state (on or off) lasting longer than the other.
Advanced operations
10
Auto off function
As a factory default, this unit will turn to standby
mode automatically if there is no sound and it is not
being used for approximately 20 minutes.
To cancel this function
1
Press [SETUP] repeatedly to select “AUTO OFF”.
2
Press [3,4] to select “OFF” and then press [OK].
≥ To turn the function on, select “ON” in step 2.
≥ This function does not work in the following cases:
j When this unit is in USB mode and the connected device
is playing or paused.
j When this unit is connected to a Bluetooth
®
device
Bluetooth® standby
When “SC-BMAX3” is selected from a paired
Bluetooth
turn on automatically from power standby mode and
establish a Bluetooth
®
device’s Bluetooth® menu, this unit will
®
connection.
1 Press [PLAY MENU] repeatedly to select
“STANDBY MODE”.
2 Press [3, 4] to select “ON STANDBY MODE”
and then press [OK].
≥ The factory default is “OFF STANDBY MODE”.
≥
To turn the function off, select “OFF STANDBY MODE” in step 2.
Changing the unit and remote
control code
When other Panasonic equipment responds to the
supplied remote control, change the remote control code.
1 Press [USB/AUX] on the unit to select “USB”.
2
While pressing and holding [ST/MONO] on the
unit, press and hold [USB] on the remote control
until the unit’s display shows “REMOTE 2”.
3 Press and hold [OK] and [USB] on the remote
control for at least 4 seconds.
≥
To change the mode back to “REMOTE 1”, press [USB/AUX]
on the unit to select “USB” and then repeat the step 2 and 3
but replace [USB] with [ ].
Checking the software version
The version of the installed software is displayed.
Press [SETUP] repeatedly to select “SW VER.”
and then press [OK].
≥ Press [OK] to exit.
 Loading...