

Page 1
Sistema estéreo con
reproductor de discos
compactos
Las ilustraciones muestran el SC-AK331 PL .
: Para zonas donde se utilizan fuentes de alimentación
PL
de 120 V.
: Para zonas donde se utilizan fuentes de alimentación
GCP
de 110-127/220-240 V.
Antes de conectar, operar o ajustar este producto, sírvase leer estas
instrucciones completamente.
Guarde este manual para su consulta en el futuro.
Instrucciones de funcionamiento
Modelo SC-AK331
Índice
INSTRUCCIONES IMPORTANTES DE SEGURIDAD ........... 3
Accesorios suministrados ................................................... 3
El mando a distancia ............................................................ 3
Preparación ........................................................................... 4
Apagado y encendido de la función de demostración...... 4
Controles del panel delantero ............................................. 5
Información de los discos ................................................... 6
Discos.................................................................................... 6
Reproducción básica ........................................................... 6
Reproducción con salto de álbum ....................................... 7
Visualización de discos compactos ..................................... 7
Para escuchar discos compactos y pistas específicos
(Función del modo de reproducción) ............................... 7
Reproducción programada .................................................. 8
Repetición de reproducción ................................................. 8
Marcación de una pista ....................................................... 8
Función INTRO (Exploración de álbumes) .......................... 9
Función de búsqueda de títulos .......................................... 9
Radio ................................................................................... 10
Casetes ................................................................................ 11
Mezcla de micrófono .......................................................... 12
Puesta de la hora................................................................ 12
Temporizadores .................................................................. 13
Calidad de sonido/campo de sonido ................................ 13
Otras funciones .................................................................. 14
Conexión de un aparato exterior ....................................... 14
Utilización de un aparato exterior ...................................... 14
Utilización de los auriculares (no suministrados) ............... 14
Función de desconexión automática de la
alimentación ................................................................... 14
Funciones convenientes .................................................... 14
Guía para la localización de las fallas .............................. 15
Especificaciones técnicas ................................................. 16
Mantenimiento .................................................................... 16
GCPPL
EnSp
RQT7799-4M
G1004HS4055
Page 2
Estimado cliente
GCP solamente
Muchísimas gracias por haber adquirido este aparato.
Lea con atención estas instrucciones para obtener las máximas
prestaciones y seguridad.
Estas instrucciones de funcionamiento son para el sistema siquiente.
A menos que se indique lo contrario, las ilustraciones de
estas instrucciones de funcionamiento corresponden al modelo
SC-AK331: PL.
Sistema SC-AK331
Aparato principal SA-AK331
Altavoces SB-AK330
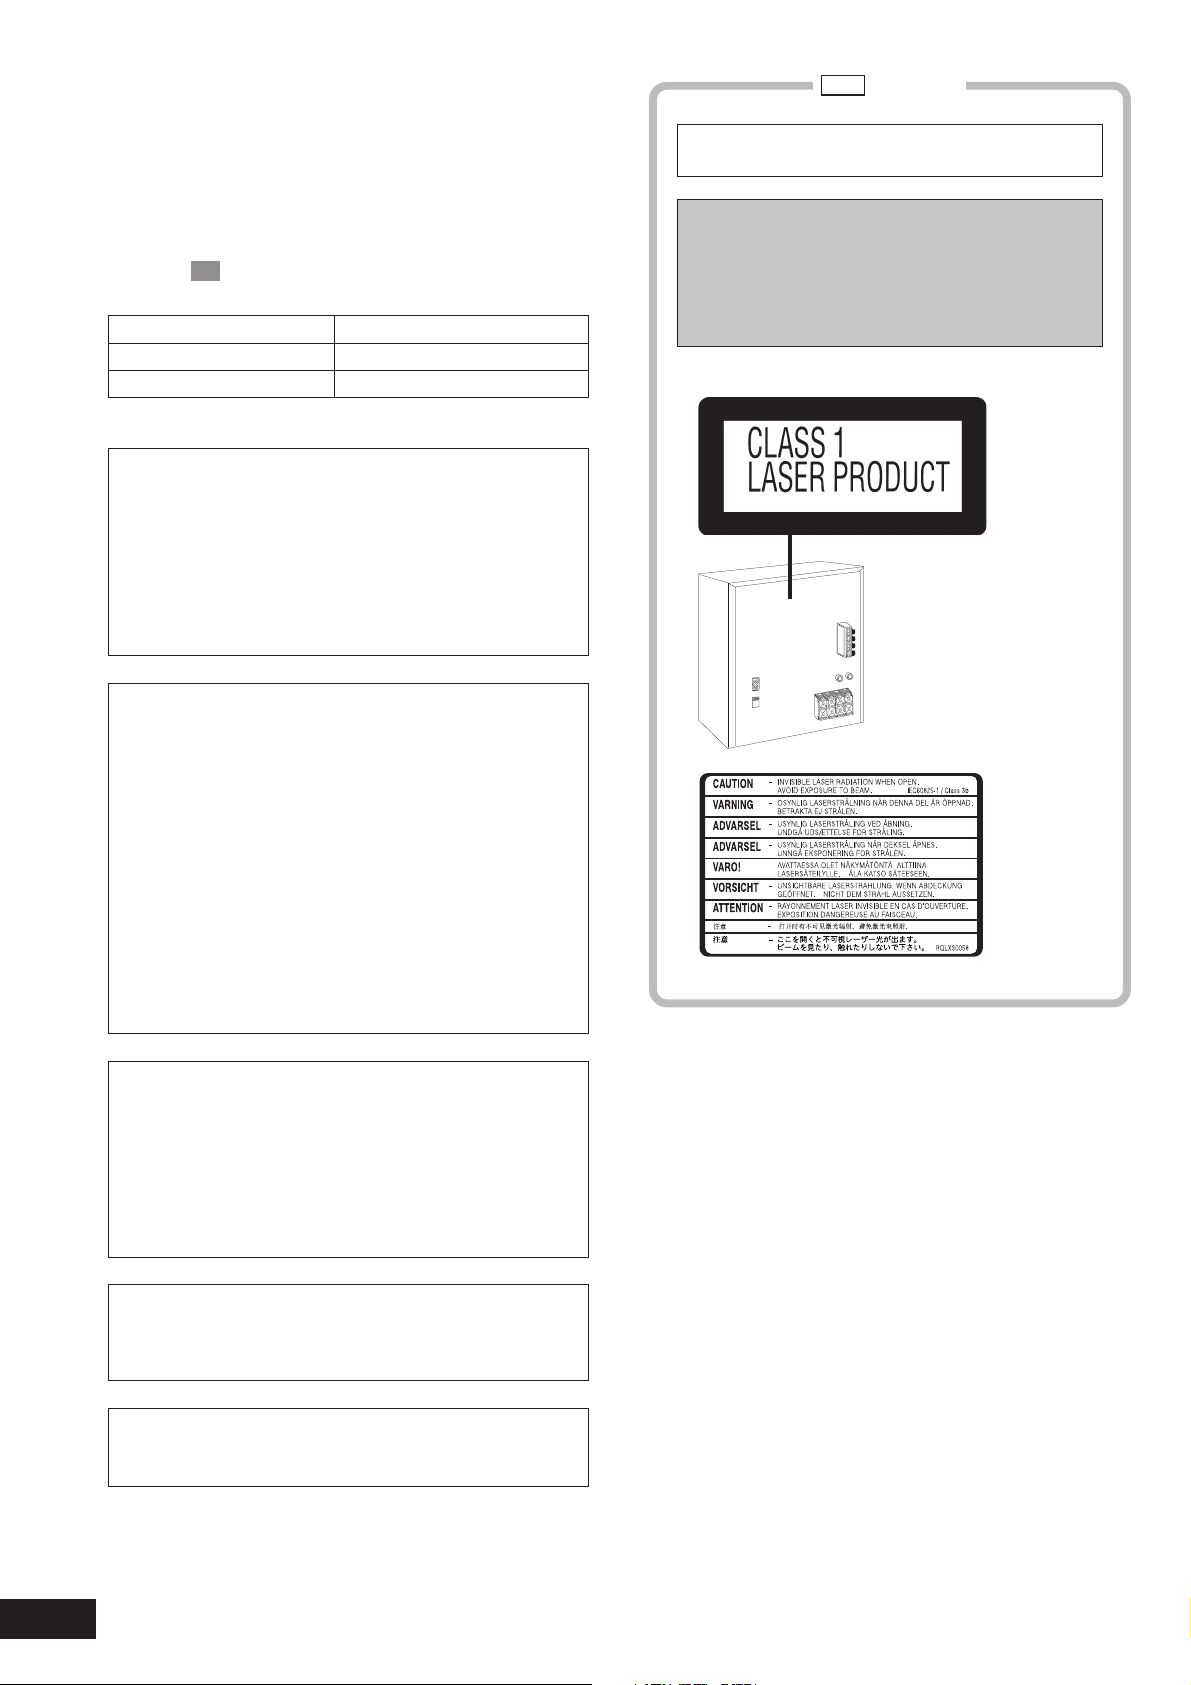
¡ADVERTENCIA!
ESTE APARATO UTILIZA UN LÁSER.
EL USAR LOS CONTROLES, HACER LOS REGLAJES O
LOS PASOS REQUERIDOS EN FORMA DIVERSA DE LA
AQUÍ EXPUESTA PUEDE REDUNDAR EN EXPOSICIÓN
PELIGROSA A LA RADIACIÓN.
NO ABRA LAS TAPAS NI HAGA REPARACIONES USTED
MISMO. EN CASO DE PRODUCIRSE ANOMALÍAS SOLICITE
AYUDA DE PERSONAL CUALIFICADO.
ESTA UNIDAD HA SIDO DISEÑADA PARA SER
UTILIZADA EN CLIMAS TROPICALES.
ADVERTENCIA:
Cambie el ajuste del voltaje según el voltaje de CA
empleado en su área. Consulte la página 4.
Tenga en cuenta que el aparato se estropeará
seriamente o no funcionará de la forma apropiada si
no se hace este ajuste correctamente.
¡ADVERTENCIA!
PARA MANTENER BIEN VENTILADA ESTA UNIDAD, NO LA
•
INSTALE NI PONGA EN UN ESTANTE DE LIBROS, MUEBLE
EMPOTRADO U OTRO ESPACIO DE DIMENSIONES
REDUCIDAS. ASEGÚRESE QUE CORTINAS Y OTROS
MATERIALES NO OBSTRUYAN LAS CONDICIONES DE
VENTILACIÓN PARA PREVENIR EL RIESGO DE SACUDIDAS
ELÉCTRICAS O INCENDIOS DEBIDOS AL
RECALENTAMIENTO.
NO OBSTRUYA LAS ABERTURAS DE VENTILACIÓN DE LA
•
UNIDAD CON PERIÓDICOS, MANTELES, CORTINAS U
OBJETOS SIMILARES.
NO COLOQUE OBJETOS CON LLAMA DESCUBIERTA, UNA
•
VELA POR EJEMPLO, ENCIMA DE LA UNIDAD.
TIRE LAS PILAS DE FORMA QUE NO CONTAMINE EL MEDIO
•
AMBIENTE.
AVISO:
PARA REDUCIR EL RIESGO DE INCENDIOS,
DESCARGAS ELÉCTRICAS O DAÑOS EN ESTE
APARATO, NO LO EXPONGA A LA LLUVIA,
HUMEDAD, GOTEO NI SALPICADURAS, Y NO
COLOQUE ENCIMA DE ÉL OBJETOS QUE
CONTENGAN LÍQUIDOS COMO, POR EJEMPLO,
FLOREROS.
Parte interior del aparato
2
RQT7799
Este producto puede tener interferencias causadas por teléfonos
móviles durante su utilización. Si tales interferencias resultan
evidentes, aumente la separación entre el producto y el teléfono
móvil.
El equipo deberá colocarse cerca de la toma de CA, y a la clavija
del cable de alimentación deberá poder accederse fácilmente en
el caso de que se produzca un problema.
Page 3
INSTRUCCIONES IMPORTANTES DE
SEGURIDAD
Lea las siguientes instrucciones de funcionamiento cuidadosamente
antes de usar la unidad. Siga las instrucciones de seguridad de la
unidad y aplique las instrucciones de seguridad listadas abajo.
Mantenga a la mano estas instrucciones de funcionamiento para futuras
referencias.
1) Lea estas instrucciones.
2) Guarde estas instrucciones.
3) Atienda todas las advertencias.
4) Siga todas las instrucciones.
5) No use esta unidad cerca del agua.
6) Limpie la unidad sólo con una tela seca.
7) No obstruya ninguna ranura de ventilación. Instálela de acuerdo
con las instrucciones del fabricante.
8) No la instale cerca de fuentes de calor como radiadores, estufas
u otros aparatos (incluyendo amplificadores) que produzcan calor.
9)
PL
solamente
Respete el propósito de seguridad de la clavija polarizada o
conectada a tierra. La clavija polarizada tiene dos cuchillas, una
más ancha que la otra. La clavija conectada a tierra tiene las dos
Accesorios suministrados
Marque e identifique los accesorios
suministrados.
Cable de alimentación de CA ................................... 1
PL
GCP
cuchillas y una tercera punta conectada a tierra. La cuchilla ancha
y la tercera punta fueron provistas para su seguridad. Si la clavija
suministrada no se ajusta a su tomacorriente, consulte a un
electricista para reemplazar el tomacorriente obsoleto.
10) Cuide que el cordón de alimentación no se pise o pellizque
particularmente la clavija, el tomacorriente y los puntos donde
está la salida de los aparatos.
11) Utilice solamente elementos/accesorios especificados por el
fabricante.
12) Utilícese solamente con el carro, base, trípode,
soporte o mesa especificada por el fabricante o
vendida con el aparato. Cuando se utilice un
carro, tenga cuidado al mover la combinación
carro/aparato para evitar lesiones resultantes de
un vuelco.
13) Desconecte esta unidad durante tormentas eléctricas y durante
largos periodos sin uso.
14) Todo servicio debe realizarlo un personal de servicio cualificado.
El servicio es requerido cuando la unidad sufra cualquier daño,
como por ejemplo: el cable o clavilla de alimentación fue
estropeado, se ha derramado líquido sobre la unidad, se ha
caído un objeto dentro de la unidad, la unidad no funciona como
es debido, o se cayó.
GCP
Pilas para el mando a
distancia .....................
2
solamente
Adaptador para la
clavija de
alimentación...............
1
Antena interior
de FM..........................
Antena de cuadro
1
de AM .........................1
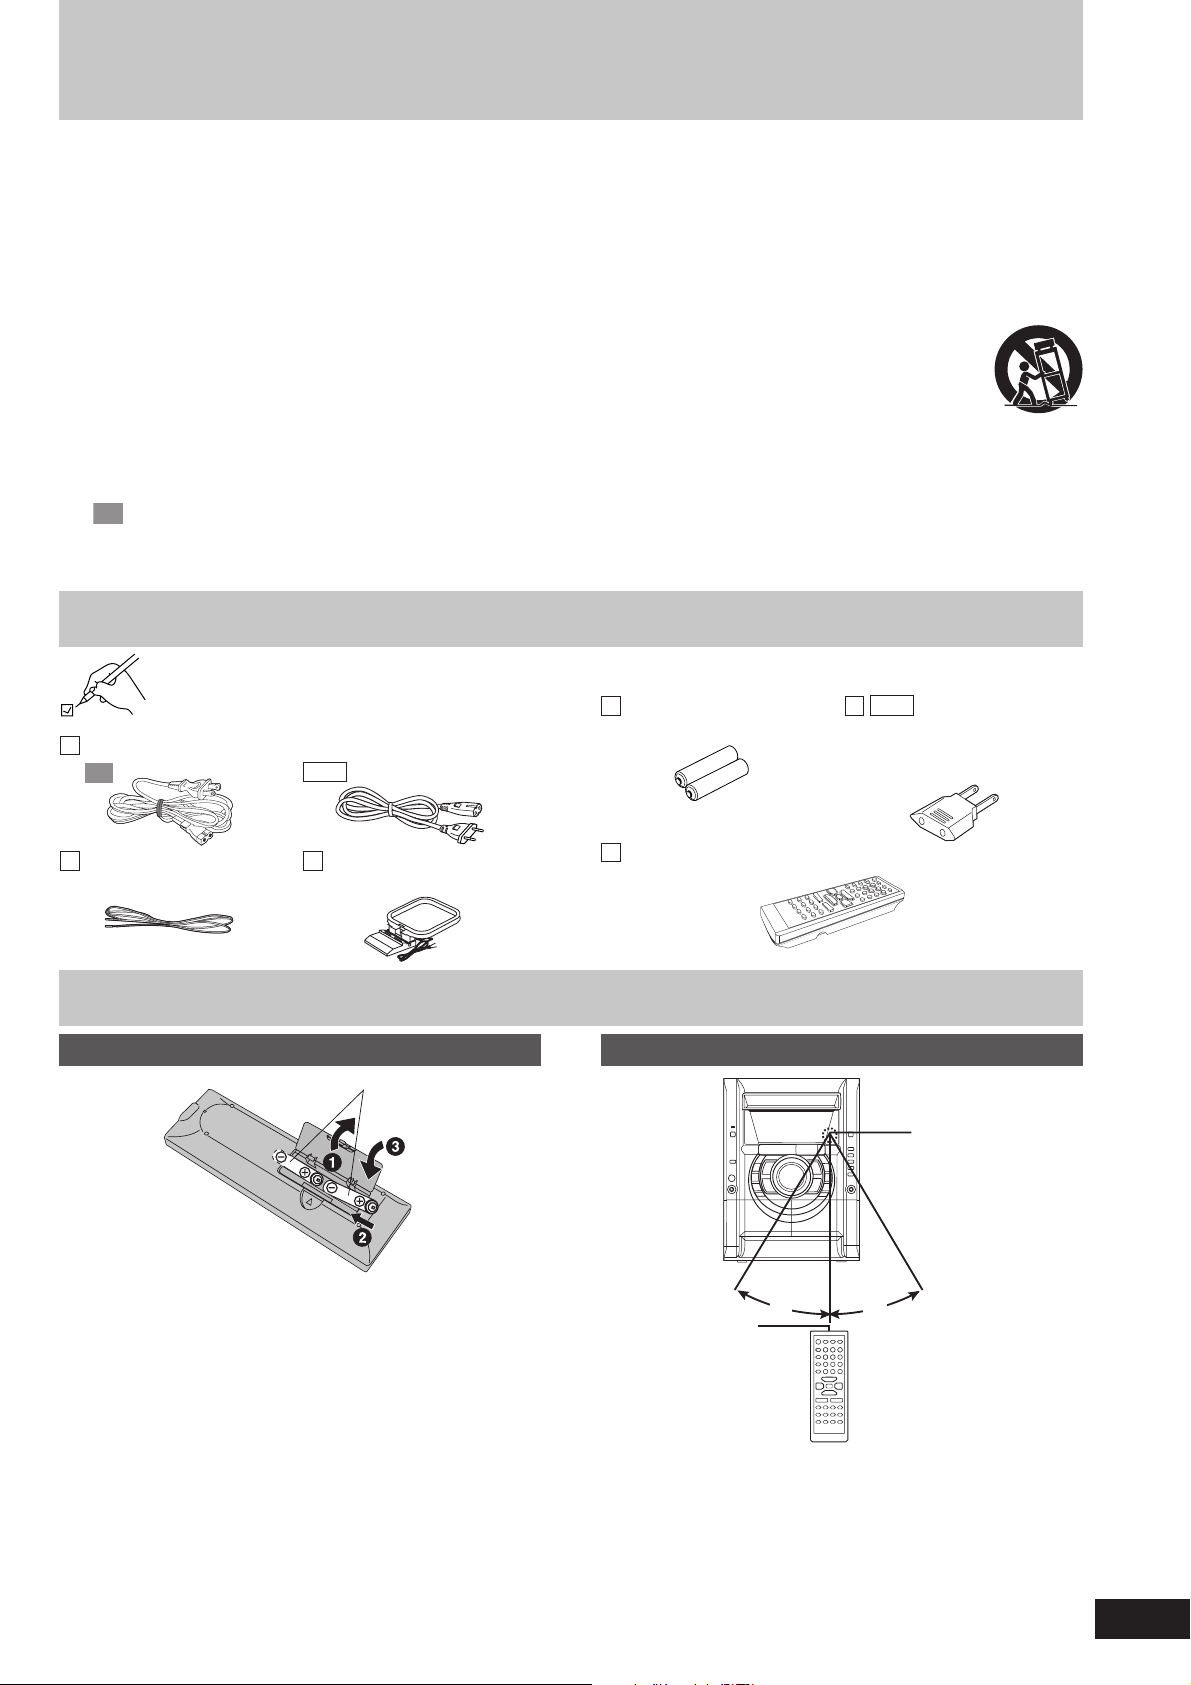
El mando a distancia
Pilas
R6/LR6, AA, UM-3
Inserte las pilas de forma que los polos (+ y –) queden en las
•
posiciones indicadas en el mando a distancia.
No utilice baterías recargables.
•
No:
Mezcle pilas viejas y nuevas.
•
Utilice tipos diferentes al mismo tiempo.
•
Las caliente ni exponga a las llamas.
•
Las desmonte ni cortocircuite.
•
Intente cargar las pilas alcalinas o de manganeso.
•
Utilice pilas si sus cubiertas se han despegado.
•
Las guarde junto con objetos metálicos como, por ejemplo, collares.
•
Manejar mal las pilas puede causar fugas de electrólito, lo que a su
vez estropeará lo que toque el fluido y podrá causarse un incendio.
Si las pilas tienen fugas de electrólito, consulte a su distribuidor.
Si el electrólito entra en contacto con cualquier parte de su cuerpo,
lave la parte afectada con agua abundante.
Retire las pilas si el mando a distancia no va a ser utilizado durante un
periodo largo de tiempo. Guárdelas en un lugar fresco y oscuro.
Reemplace las pilas si el aparato no responde al mando a distancia a
pesar de utilizarlo cerca del panel delantero.
Mando a distancia ..................................................... 1
(N2QAHB000052)
Utilización
Sensor de señales
del mando a
distancia
30
Ventanilla de
transmisión
Apunte al sensor, evitando los obstáculos, a una distancia máxima de
7 metros directamente enfrente del aparato.
Mantenga la ventanilla de transmisión y el sensor del aparato limpios
•
de polvo.
El funcionamiento puede ser afectado por fuentes de luz intensas
•
como, por ejemplo, la luz solar directa, y también por puertas de
cristal de muebles.
˚
No:
Ponga objetos pesados encima del mando a distancia.
•
Desarme el mando a distancia.
•
Derrame líquidos sobre el mando a distancia.
•
30
˚
7 metros aproximadamente
por delante del sensor de
señales
3
RQT7799
Page 4
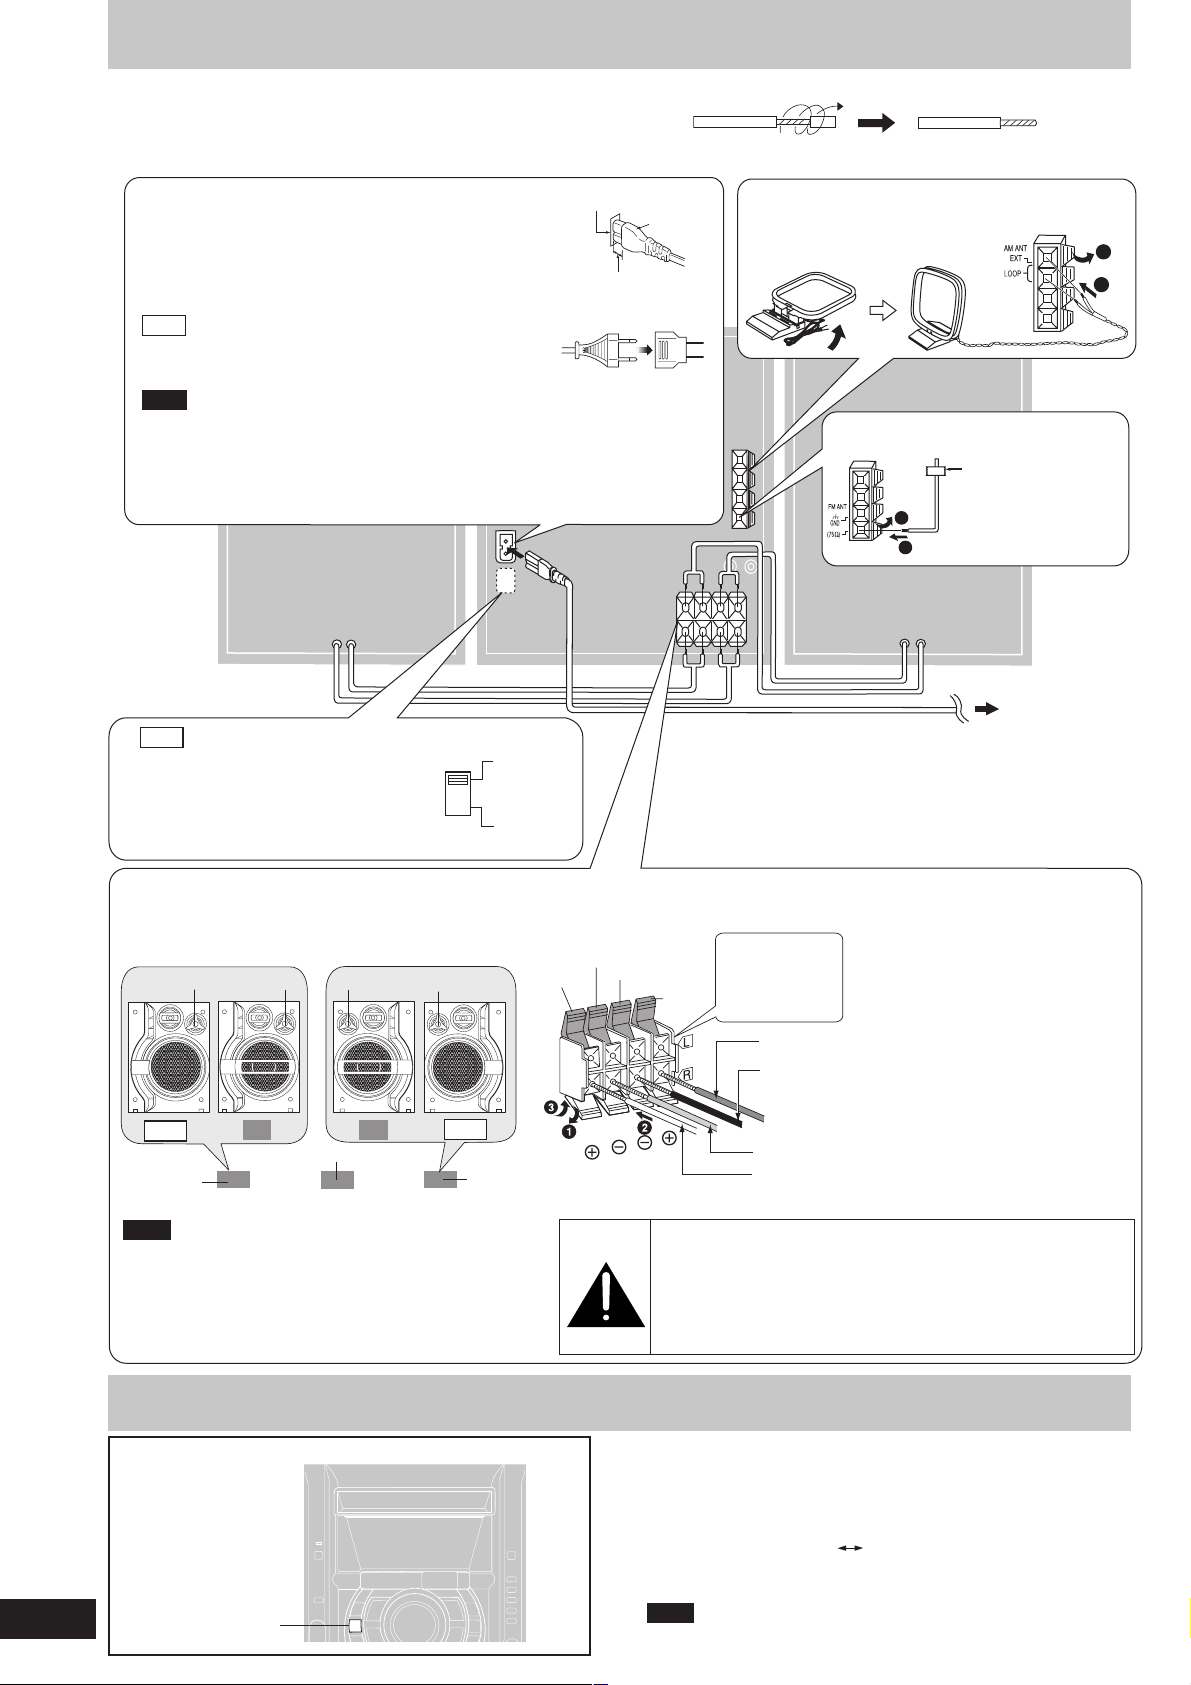
Preparación
Conecte el cable de alimentación de CA sólo después de haber hecho todas las demás conexiones.
Conexiones de antenas opcionales (A página 11)
Preparación
Retuerza y tire de la punta de vinilo de los cables de la antena y de los altavoces.
O BIEN
Si los cables del altavoz no tienen la cubierta de vinilo, conéctelas directamente a los terminales.
5 Cable de alimentación de CA
Inserción del conector
Incluso cuando el conector está bien insertado,
dependiendo del tipo de toma usada, la parte delantera
del conector puede sobresalir como se muestra en la
figura.
Sin embargo, no habrá problemas para usar el aparato.
GCP
solamente
Si la clavija de alimentación no se puede conectar en la
toma de corriente, utilice el adaptador de clavija de
alimentación (suministrado).
Nota
El cable de alimentación de CA suministrado es para ser usado con este aparato
solamente. No lo utilice con otro equipo.
Para su referencia
Para ahorrar energia cuando no utilizar el aparato durante mucho tiempo,
desenchúfelo de la toma de CA. Después de enchufar el aparato tendrá que
reponer algunos elementos de la memoria.
Toma del aparato
Aproximadamente
6 mm
(R)
GCP
4
solamente
Selector del voltaje
Utilice un destornillador de punta plana
para poner el selector de tensión del panel
trasero en la posición apropiada, hacia
arriba o hacia abajo, deacuerdo al área
en la que vaya a utilizarse este sistema.
VOLT ADJ
220–240
V
110–127
V
Conector
2 Antena de cuadro de AM
Ponga la antena en posición vertical sobre su base.
1 Antena interior de FM
Cinta adhesiva
1
2
(L)
Fije la antena donde
la recepción sea mejor.
A la toma
de corriente de CA
1
2
4
RQT7799
3 Altavoces
Colocación
Coloque los altavoces delanteros de forma que el
altavoz de superagudos quede en la parte interior.
Altavoz de superagudos
GCP
Altavoz
delantero
(izquierdo)
Nota
Mantenga sus altavoces separados a un mínimo de 10 mm
•
del sistema para disponer de una ventilación apropiada.
Estos altavoces no disponen de blindaje magnético. No
•
los ponga cerca de televisores, ordenadores personales y
otros dispositivos a los que afecte fácilmente el
magnetismo.
No puede retirar la red delantera de los altavoces.
•
PL
Aparato principal
Altavoz de superagudos
PL
GCP
Altavoz
delantero
(derecho)
Conexiones
Azul
Gris
Negro
Conecte el
lado izquierdo
(L) de la misma
Rojo
manera.
Rojo (+)
Negro (–)
Azul (–)
Gris (+)
Precaución
Use estos altavoces sólo con el sistema recomendado. De
•
lo contrario, se podría dañar el amplificador y/o los
altavoces, y se podría ocasionar un incendio. Consulte a un
técnico de servicio especializado si ha ocurrido un problema
o si se advierte un cambio repentino en el rendimiento.
No instale estos altavoces en paredes ni techos.
•
Apagado y encendido de la función de demostración
Cuando el aparato se enchufe por primera vez puede que se muestre
en el visualizador una demostración de sus funciones.
Si el ajuste de demostración está desactivado, usted podrá activarlo
seleccionando “DEMO ON”.
Mantenga pulsado [DISP, –DEMO].
La visualización cambia cada vez que se pulsa el botón.
NO DEMO (desactivación)
Durante el modo de espera, seleccione “NO DEMO” para reducir el
consumo de energía.
DISP, –DEMO
Nota
La función DEMO no se puede activar cuando la función DIMMER
está activada.
Use solamente los altavoces
suministrados.
La combinación de la unidad principal
y los altavoces suministrados suministra
el mejor sonido. Usando otros altavoces
se puede dañar la unidad y la calidad
de sonido será afectada negativamente.
Notas acerca de la utilización de los
altavoces
Si reproduce el sonido con niveles
•
altos durante largos periodos de
tiempo podrá dañar los altavoces y
reducir su duración.
Reduzca el volumen para evitar
•
daños en los casos siguientes.
– Cuando reproduzca sonido
distorsionado.
– Cuando ajuste la calidad del
sonido.
DEMO ON (activación)
Page 5
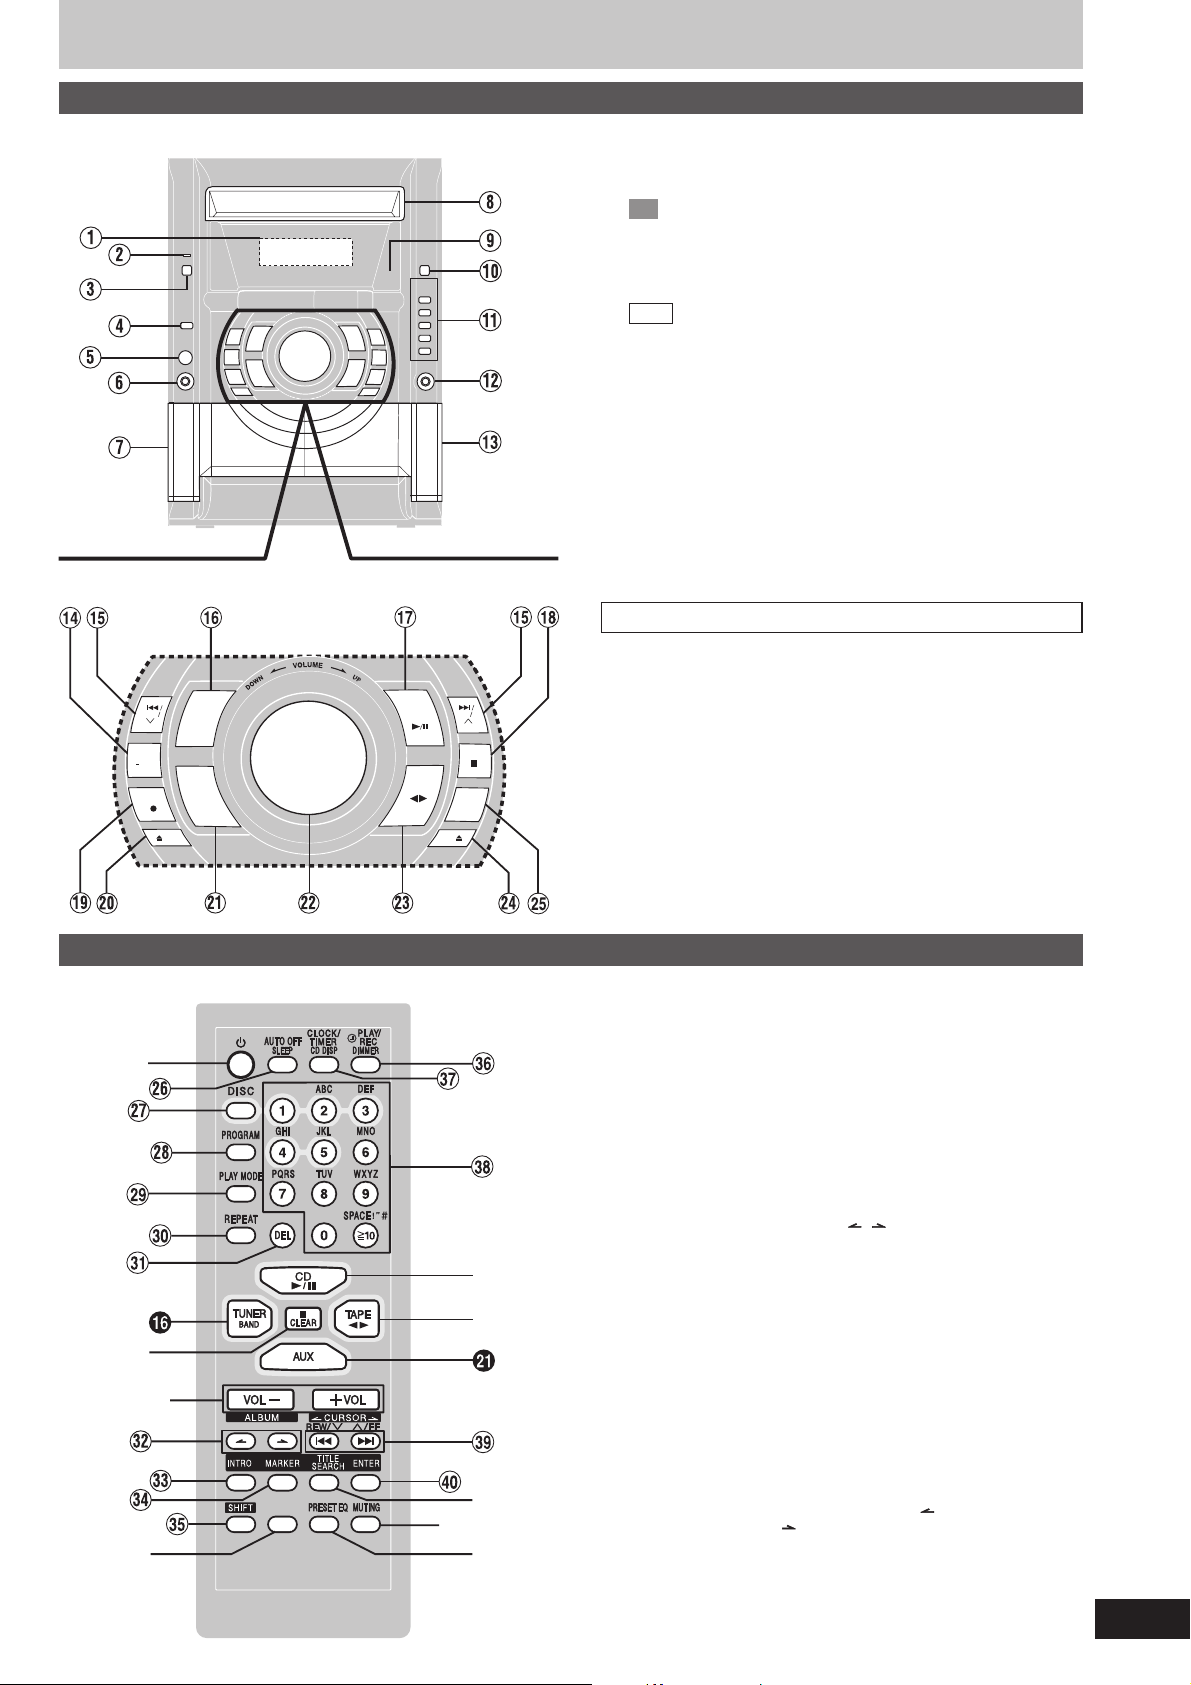
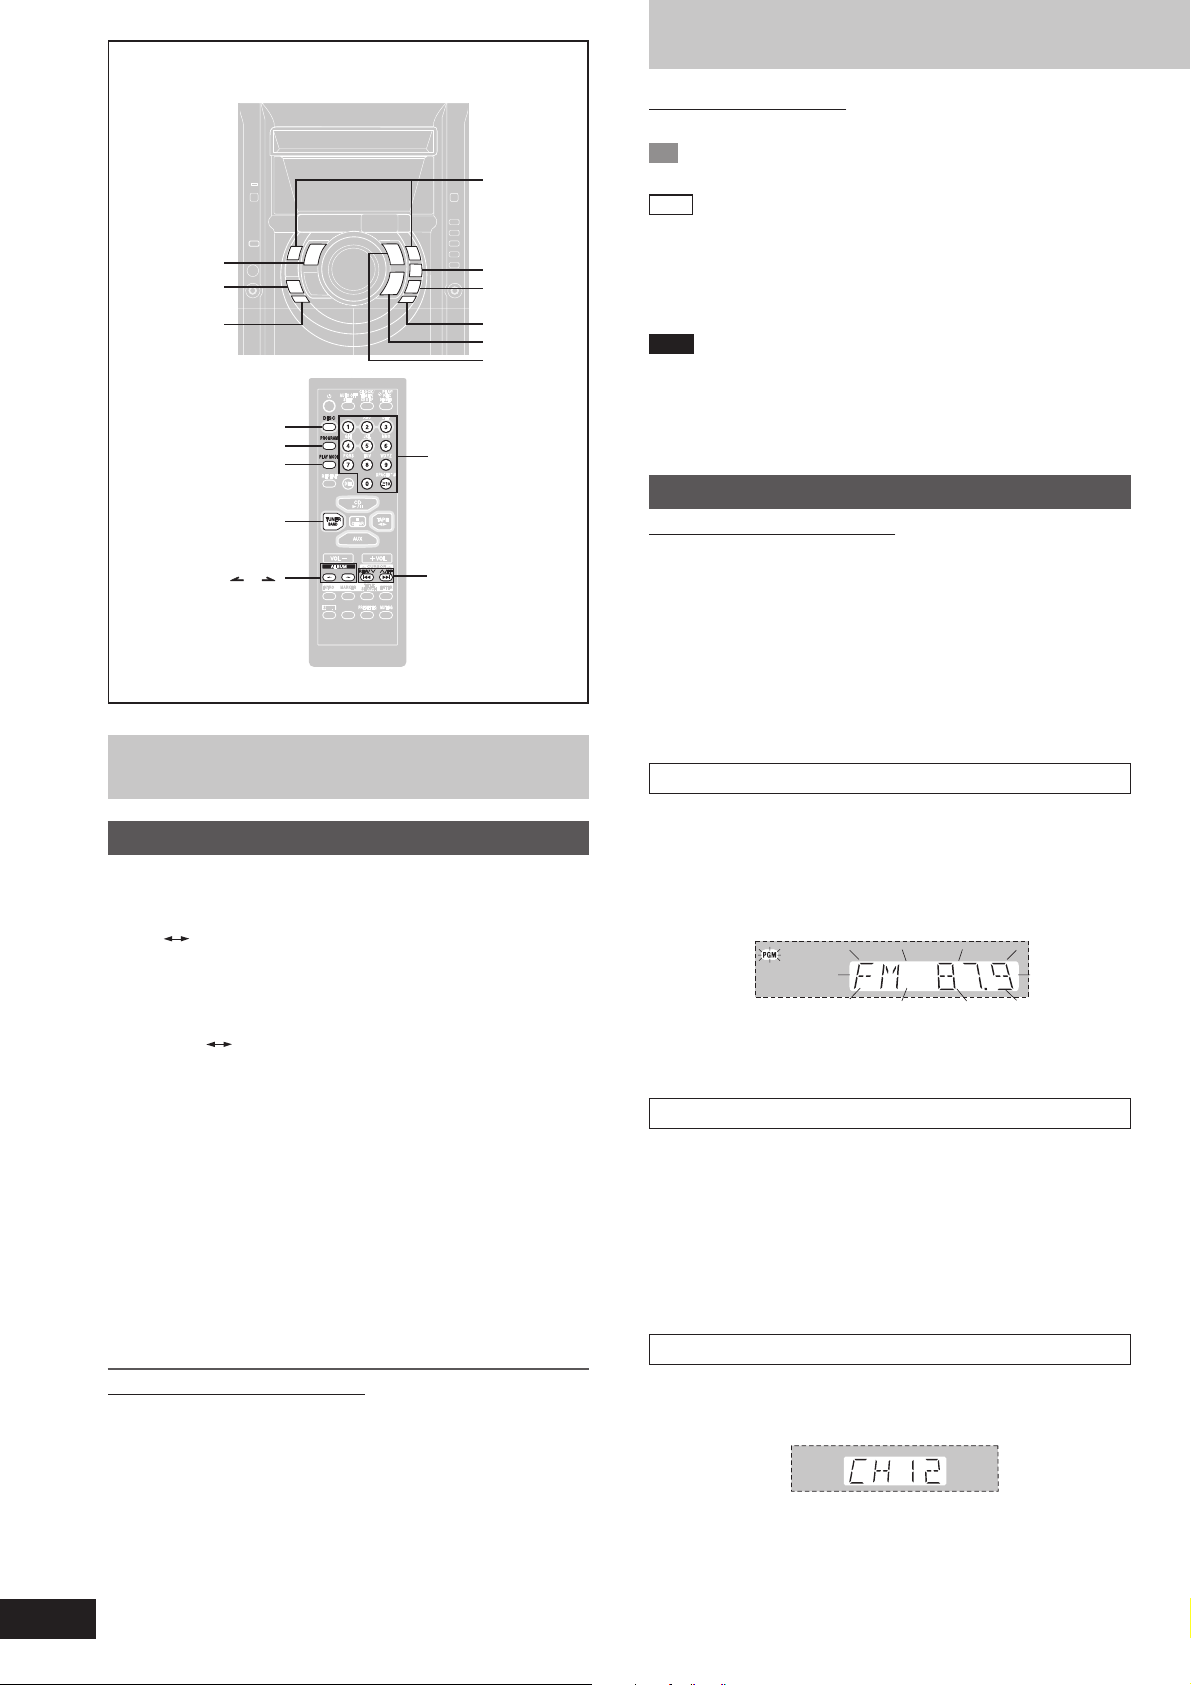
Controles del panel delantero
H.BASS
Aparato principal
DISP
DEMO
REW
REC
DECK1
TUNER
BAND
AUX
CD
TAPE
DECK2
FF
DECK
1/2
STOP
1 Visualizador
22
2 Indicador de alimentación de CA [AC IN]
22
Este indicador se encenderá cuando el aparato esté conectado a la
alimentación de CA.
33
3
33
PL
Interruptor de alimentación en espera/conectada [
ff
f/I, POWER]
ff
Pulse este interruptor para cambiar el aparato del modo de alimentación
conectada al modo de alimentación en espera o viceversa. En el modo
de alimentación en espera, el aparato consume una pequeña cantidad
de corriente.
GCP
Interruptor de alimentación en espera/conectada [
Pulse este interruptor para cambiar el aparato del modo de alimentación
conectada al modo de alimentación en espera o viceversa. En el modo
de alimentación en espera, el aparato consume una pequeña cantidad
de corriente.
4 Botón H.BASS [H.BASS] ..............................................................13
5 Control de volumen del micrófono [MIC VOL] ........................... 12
6 Toma de micrófono [MIC] ............................................................ 12
7 Portacasete de la platina 1 ........................................................... 11
8 Bandeja de discos
9 Sensor de señal del mando a distancia ........................................ 3
! Botón de apertura/cierre de la bandeja de CD [c, OPEN/CLOSE] ... 6
! Botones de reproducción directa de CD [1 ~ 5] ........................... 6
@ Toma de auricular [PHONES] ...................................................... 14
# Portacasete de la platina 2 ........................................................... 11
ff
f/I]
ff
Consola central
$ Botón de visualización, demostración [DISP, –DEMO] .......... 4, 14
% Botones de salto/búsqueda de CD, avance rápido/rebobinado de
cinta, sintonización/selección de canales presintonizados y ajuste
de la hora [g/REW/3, f/FF/4] ................................ 6, 10, 11
^ Botón selector de sintonizador/banda [TUNER, BAND] ............ 10
& Botón de reproducción/pausa de CD [ :/J, CD] .......................... 6
* Botón de parada/cancelación de programas
[L, STOP] .......................................................................... 6, 8, 9, 11
( Botón de grabación [
) Botón de apertura de la platina 1 [c DECK1] ............................ 11
- Botón del equipo auxiliar [AUX] .................................................. 14
= Control de volumen [VOLUME DOWN, UP] ................................ 12
[ Botón para la dirección y reproducción de la cinta [;:, TAPE] .... 11
] Botón de apertura de la platina 2 [DECK2
\ Botón selector de platina [DECK 1/2] ......................................... 11
aa
a, REC] ...................................................... 11
aa
cc
c] ............................ 11
cc
Mando a distancia
3
~
.
4
H.BASS
2
)
/
1
3
Los botones como el 3 funcionan exactamente igual que los botones
del aparato principal.
< Botón del temporizador para dormir + apagado automático
[SLEEP, AUTO OFF] ............................................................... 13, 14
= Botón de disco [DISC] .................................................................... 7
> Botón de programas [PROGRAM] ........................................... 8, 10
? Botón selector del modo de reproducción
[PLAY MODE] ...................................................................... 7, 10, 11
Utilícelo para seleccionar el modo de reproducción de CD, el modo de
sintonización, el modo de FM, el modo de la inversión de cinta y la
platina.
@ Botón de repetición [REPEAT] ...................................................... 8
[ Botón de borrado [DEL] .............................................................8, 9
\ Botones de salto de álbumes [ , , ALBUM] ........................... 7
] Botón de introducción [INTRO] ..................................................... 9
^ Botón para la marcación de memoria/recuperación
[MARKER] .......................................................................................8
_ Botón de cambio [SHIFT]
Para utilizar las funciones etiquetadas en color anaranjado\:
Mientras pulsa [SHIFT], pulse el botón correspondiente.
\
Para los botones [AUTO OFF], [CLOCK/TIMER] y [rPLAY/REC]
{ Botón de reducción de la iluminación del visualizador + temporizador
de reproducción/grabación [DIMMER, rPLAY/REC] ................ 13, 14
| Botón de visualización de CD + reloj/temporizador
[CD DISP, CLOCK/TIMER] ........................................................7, 12
} Botones numerados y botones de caracteres
[X10, 1–9, 0, A-Z, SPACE!”#] .....................................................7-10
V Botones de salto/búsqueda de CD, avance rápido/rebobinado
de cinta, sintonización/selección de canales presintonizados,
ajuste de la hora y cursor [g, REW/3, CURSOR,
f, 4/FF, CURSOR ] .......................................................... 8-12
0 Botón de introducción [ENTER] ................................................8, 9
1 Botón selector del modo de búsqueda de títulos
[TITLE SEARCH] ............................................................................. 9
2 Botón de silenciamiento [MUTING] ............................................. 14
3 Botón selector de efectos del ecualizador preajustado
[PRESET EQ] ................................................................................. 13
5
RQT7799
Page 6
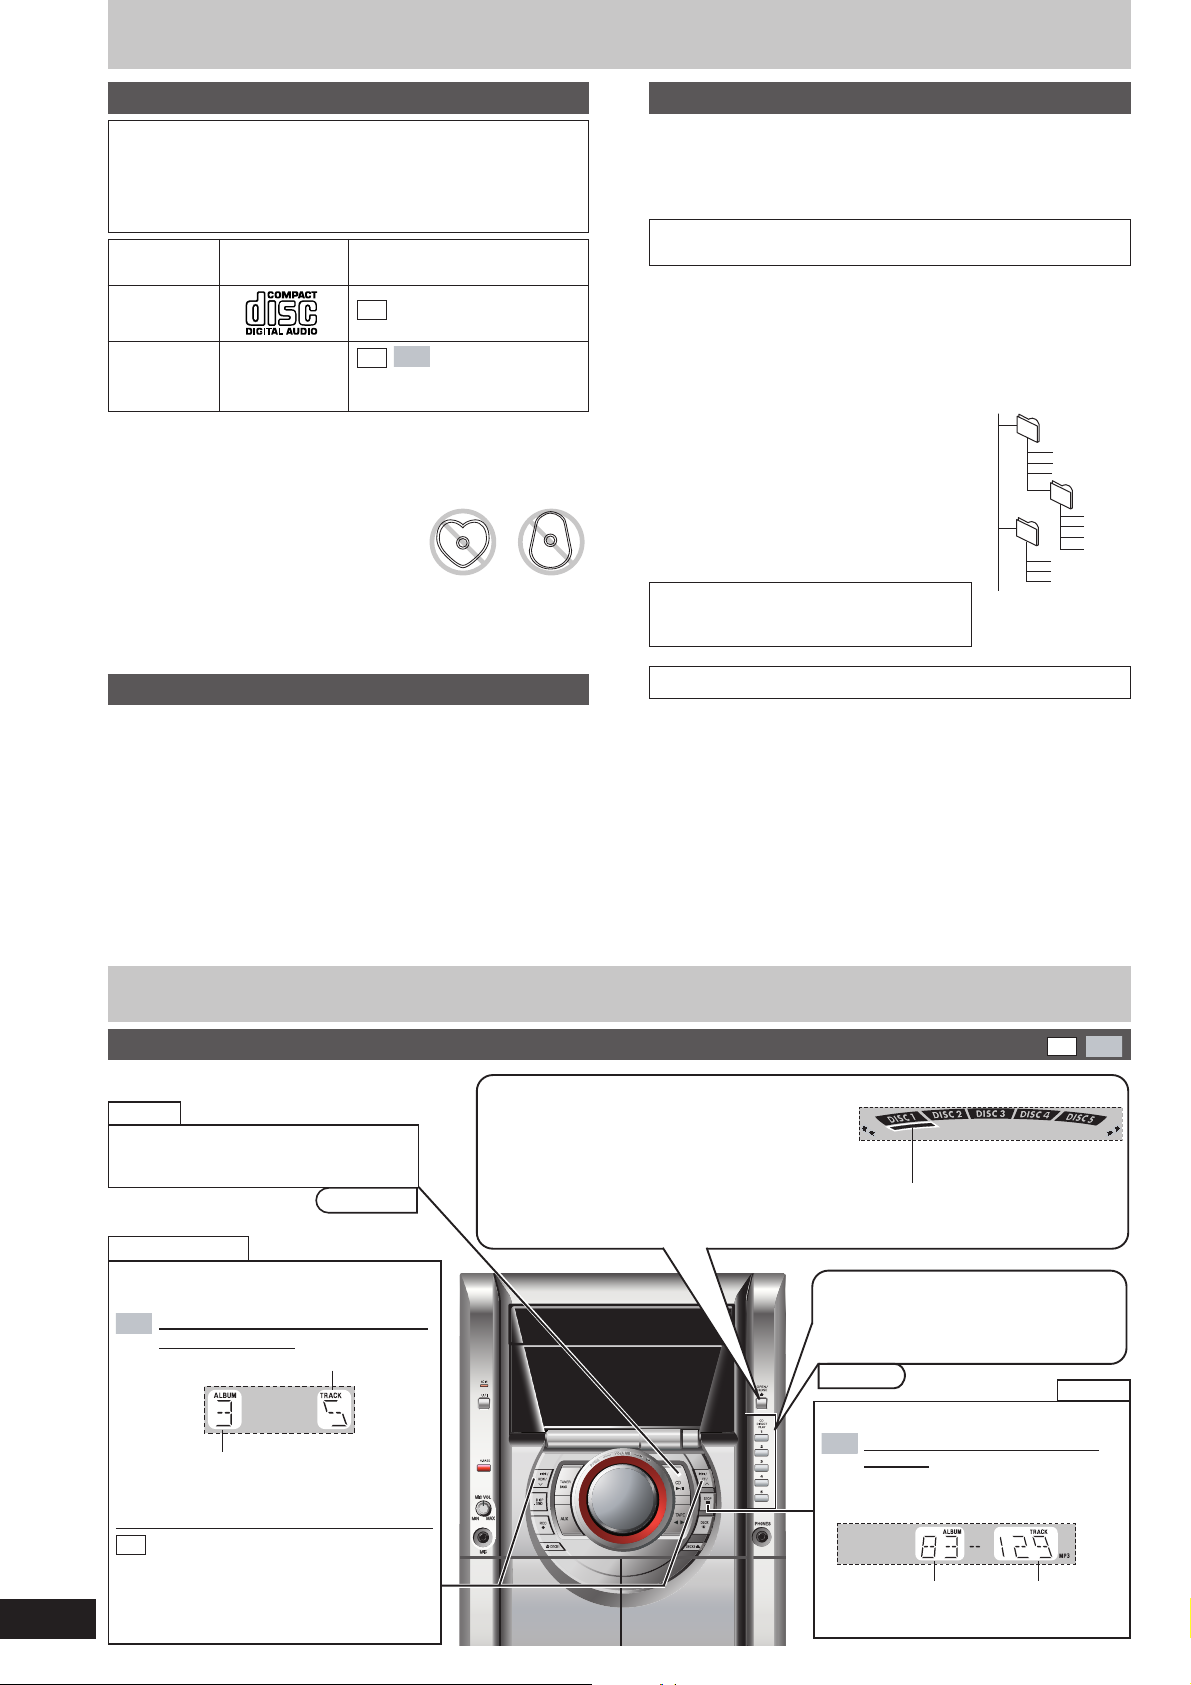
Información de los discos
Selección de disco Información sobre MP3
Este aparato puede reproducir discos CD-R y CD-RW de audio del
formato MP3 y CD-DA (audio digital) que hayan sido finalizados (un
proceso que permite a los reproductores CD-R/CD-RW reproducir
discos CD-R y CD-RW) tras finalizar la grabación.
Algunos CD-R y CD-RW tal vez no puedan ser reproducidos debido
a la condición de la grabación.
Tipo de
disco
Logotipo
Audio CD
CD-R/RW —
Indicaciones utilizadas
en las instrucciones
CD
MP3
CD
(Dependiendo del formato de
grabación A consulte más arriba)
Nota acerca de la utilización de un DualDisc
La cara con el contenido de audio digital de un DualDisc no cumple con
las especificaciones técnicas del formato de audio digital de disco compacto
(CD-DA), por lo que la reproducción podría resultar imposible.
No:
Utilice discos de forma irregular.
•
Coloque etiquetas y pegatinas extra.
•
Utilice discos con etiquetas y pegatinas
•
despegadas o que tengan adhesivo que sale
por debajo de ellas.
Ponga cubiertas para impedir las rayaduras ni alguna otra clase de accesorio.
•
Escriba nada en los discos.
•
Limpie los discos con líquidos. (Límpielos pasando un paño blando y seco.)
•
Utilice discos impresos con impresoras de etiquetas de venta en el
•
comercio.
XXXX XXXX XXXXX XXXX XX
XXXX XXXX XXXXX
XXXX XXXX XXXXX
XXXX XXXX
x
x
x
x
x
x
x
x
x
x
x
x
x
x
x
x
x
x
x
x
x
x
x
x
x
x
x
x
x
x
x
x
x
x
x
x
x
x
x
x
x
x
x
x
x
x
x
x
x
x
x
x
x
x
Para evitar daños
Tenga siempre en cuenta los puntos siguientes:
Cargue solamente 1 disco compacto en la bandeja.
•
Pare siempre el cambiador antes de introducir o cambiar discos compactos.
•
No cambie los discos compactos mientras se reproduzca un disco.
Ponga el sistema sobre una superficie plana y nivelada.
•
Antes de mover el sistema, descargue siempre todos los discos compactos.
•
No:
Coloque el aparato encima de revistas, superficies inclinadas, etc.
•
Mueva el aparato mientras se abre/cierra una bandeja, ni cuando tenga
•
discos en su interior.
Ponga nada que no sean discos en las bandejas.
•
Utilice discos de limpieza ni discos que estén deformados o agrietados.
•
Desconecte el cable de alimentación de CA de la toma de CA durante
•
la operación de cambio de un disco.
Este aparato puede reproducir archivos MP3 grabados en
CD-R/RW con un ordenador.
Los archivos son tratados como pistas y las carpetas como álbumes.
Este aparato puede tener acceso a un máximo de 999 pistas, 255
álbumes y 20 sesiones.
Cuando se hagan archivos MP3 para reproducirlos
en esta unidad
Formato de disco
Los discos deben cumplir con la norma ISO9660 nivel 1 ó 2 (excepto
para los formatos extendidos).
Formato de archivo
Los archivos MP3 deben tener la extensión “.MP3” o “.mp3”.
Para reproducir en cierto orden
Prefije los nombres de las carpetas y los
archivos con números de 3 dígitos en el orden
en que quiera reproducirlos.
Los archivos pueden no grabarse en el orden
numerado si los prefijos tienen números de
dígitos diferentes. Por ejemplo: 1track.mp3,
2track.mp3, 10track.mp3.
Sin embargo, algunos software de escritura
puede que también hagan que la grabación
se realice en orden diferente.
MPEG La tecnología de decodificación de
audio Layer-3 autorizada por Fraunhofer IIS
y Thomson multimedia.
Limitaciones de la reproducción MP3
Este aparato no es compatible con el formato de escritura de paquete.
•
Cuando se graben datos MP3 y CD-DA en el disco durante cierto
•
número de sesiones:
Si la primera sesión contiene grabaciones MP3, el aparato
•
reproducirá desde el MP3 hecho en esa sesión hasta la sesión
anterior a las primeras grabaciones CD-DA.
Si la primera sesión contiene grabaciones CD-DA, el aparato
•
reproducirá solamente las grabaciones hechas en esa sesión. Las
sesiones posteriores se ignorarán.
Algunos MP3 puede que no se reproduzcan debido a la condición del
•
disco o la grabación.
Las grabaciones no se reproducirán necesariamente en el orden en
•
que usted las grabó.
Las letras minúsculas se visualizarán como mayúsculas.
•
Ejemplo:
raíz
001
003
001.mp3
002.mp3
003.mp3
002
001.mp3
002.mp3
003.mp3
001.mp3
002.mp3
003.mp3
004.mp3
6
RQT7799
Discos
Reproducción básica
Pausa
Pulse [:/J, CD] durante la reproducción.
Púlselo de nuevo para reanudar la
reproducción.
[:/J, CD]
Salto/Búsqueda
Pulse
[g/REW/3 ] o [f/FF/4]
para saltar.
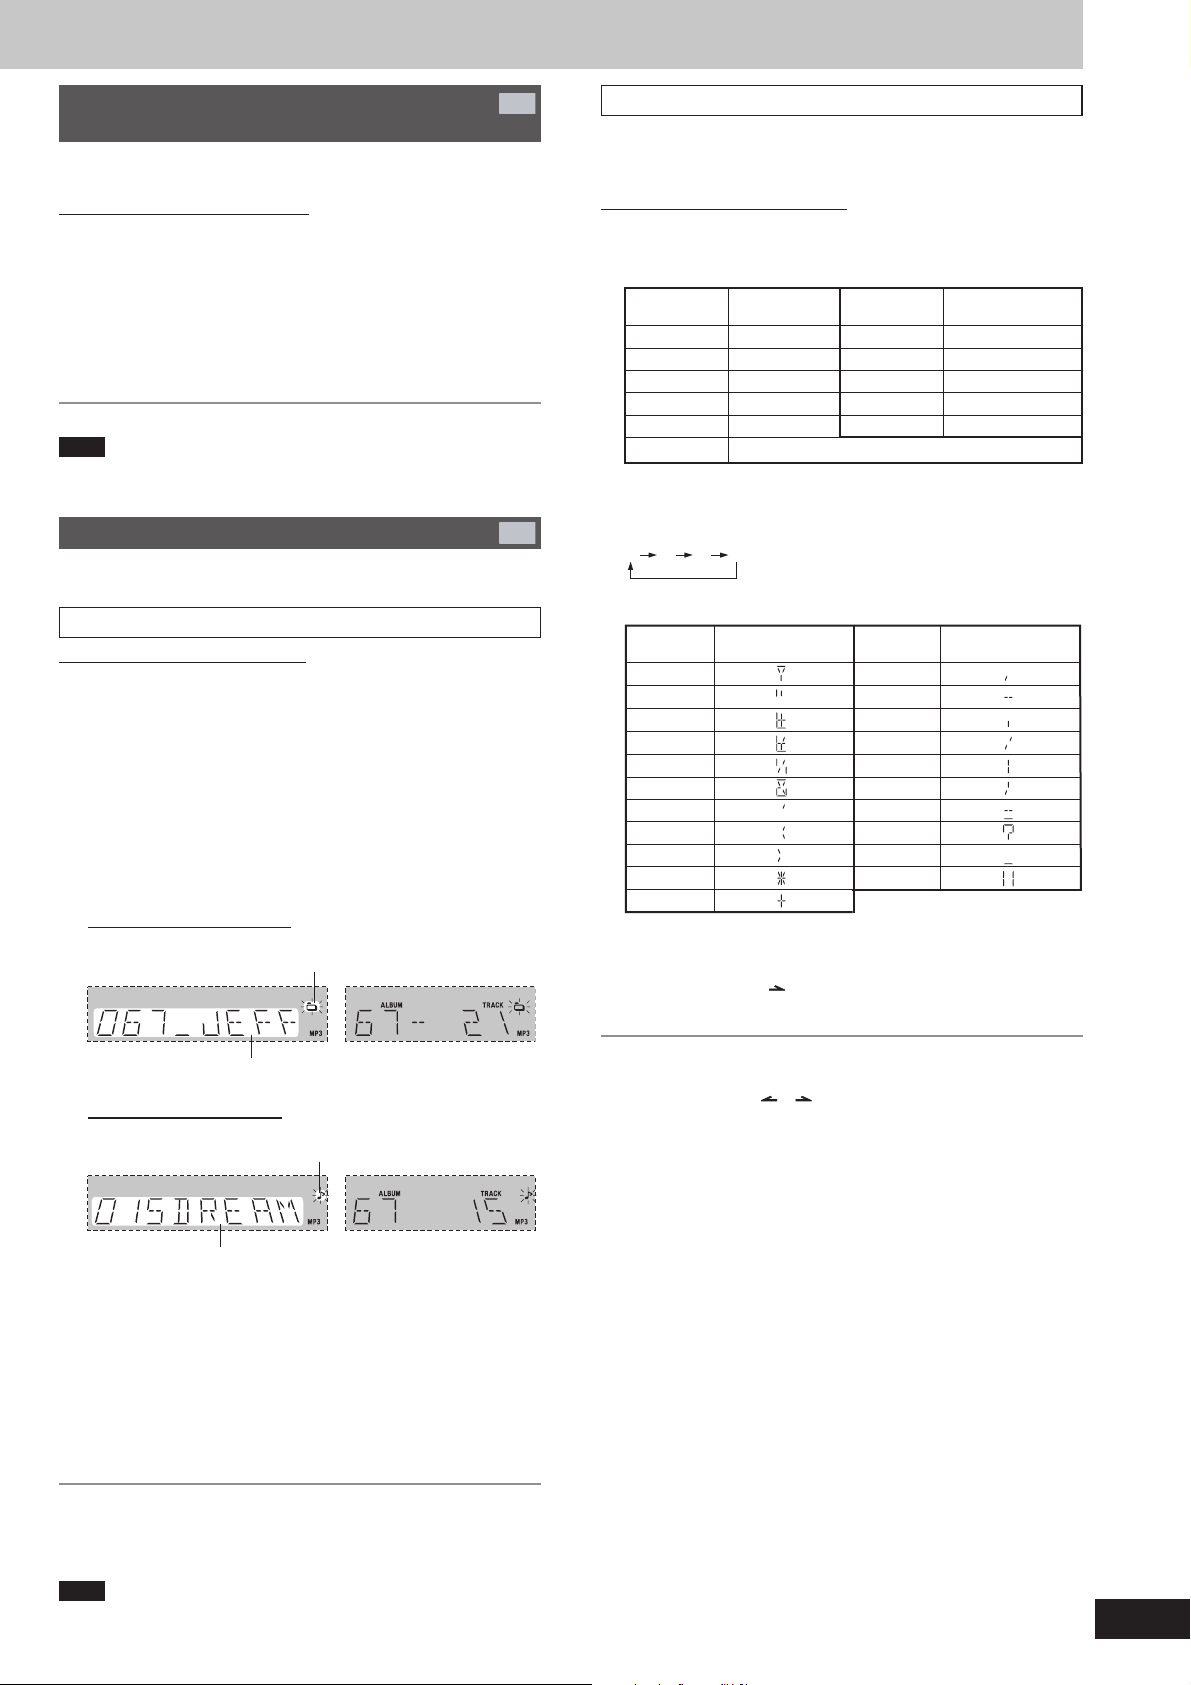
Visualización durante el salto en el modo
MP3
de parada (ejemplo):
Álbum actual
Durante la reproducción aleatoria
•
(A página 7)
que ya han sido reproducidas.
Manténgalo pulsado durante la
CD
reproducción o la pausa para buscar.
Durante la reproducción programada
•
(A página 8),
(A página 7),
de la pista.
Pista actual
no se puede saltar a pistas
o la reproducción aleatoria
usted sólo puede buscar dentro
1 Pulse [c, OPEN/CLOSE] para abrir la
bandeja.
El aparato se enciende.
Cargue los discos con la etiqueta hacia arriba.
Para cargar discos en otras bandejas, pulse
[1]–[5]
para seleccionar la bandeja, y
luego pulse
[c, OPEN/CLOSE].
2 Pulse [c, OPEN/CLOSE] para cerrar la bandeja.
3 Pulse [1]–[5] para reproducir el
disco.
También puede pulsar [:/ J, CD] si el
disco actual es el CD que quiere
reproducir.
POWER
[1]–[5]
Pulse [L, STOP] durante la reproducción.
MP3
“MP3”: Indica que el disco contiene archivos
CD
Indicador del disco actual
Parada
Visualización en el modo de parada
(ejemplo):
MP3.
Número total
de álbumes
Número total
de pistas
MP3
Page 7
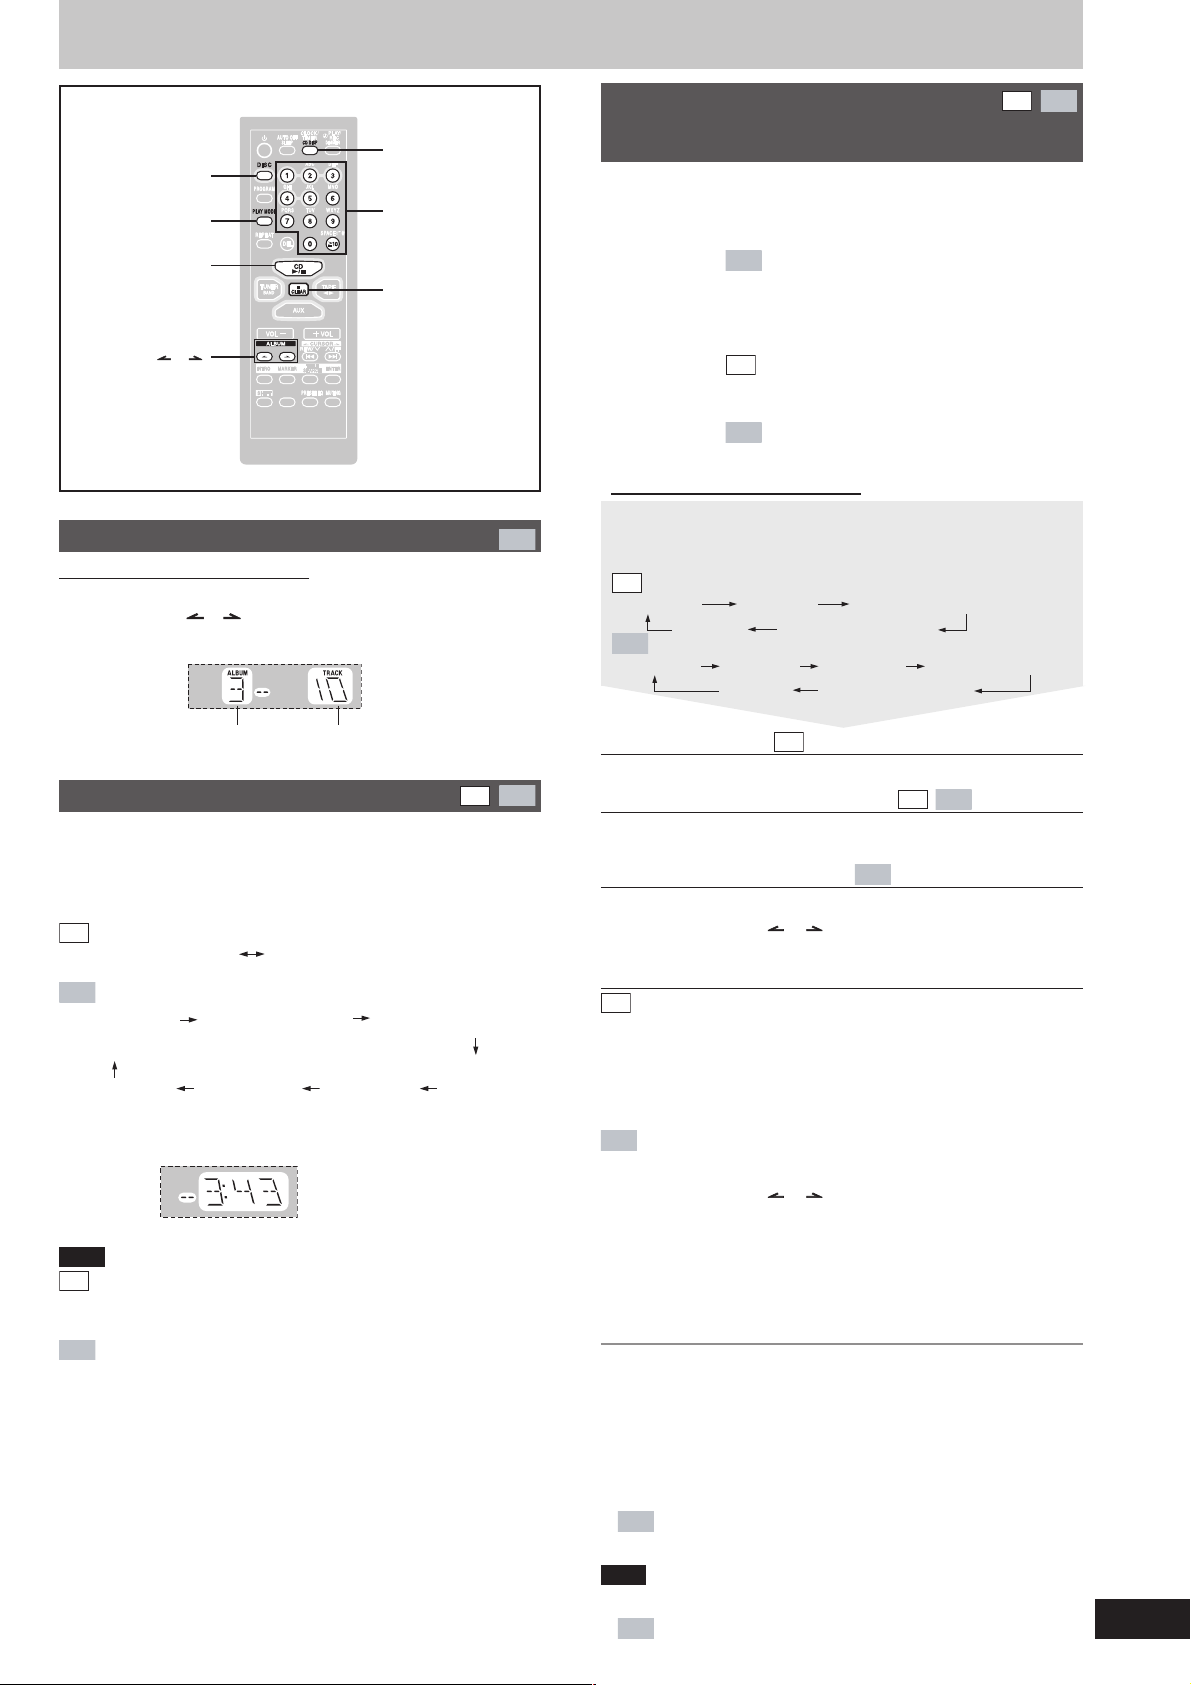
H.BASS
Discos
CD DISP
DISC
PLAY MODE
:/J, CD
ALBUM ( o )
H.BASS
Reproducción con salto de álbum
Mando a distancia solamente
Durante la reproducción o la parada
Pulse [ALBUM ( o )] para seleccionar el álbum deseado.
Cuando seleccione en el modo de parada (ejemplo):
Botones
numerados
L, CLEAR
MP3
CD
Para escuchar discos compactos
MP3
y pistas específicos (Función del
modo de reproducción)
a ALL-DISC: Se reproducen en orden consecutivo todos los
b 1-SONG: Se reproduce una pista seleccionada del disco
c 1-ALBUM:
d 1-DISC
RANDOM: Se reproduce en orden aleatorio un disco
e ALL-DISC
RANDOM:
f 1-DISC: Se reproduce un disco seleccionado.
g 1-ALBUM
RANDOM:
Mando a distancia solamente
Preparación: Pulse [:/ J, CD] y luego [L, CLEAR].
Pulse [PLAY MODE] para seleccionar el modo deseado.
Cada vez que pulse el botón:
CD
a ALL-DISC b 1-SONG
MP3
a ALL-DISC c 1-ALBUMb 1-SONG
discos cargados, desde el disco seleccionado hasta
el disco final\.
seleccionado.
Se reproduce un álbum seleccionado del
MP3
disco seleccionado.
seleccionado.
CD
Se reproducen en orden aleatorio todos los
discos cargados.
MP3
Se reproduce un álbum seleccionado en
orden aleatorio.
d 1-DISC RANDOM
f 1-DISC
f 1-DISC
e ALL-DISC RANDOM
d 1-DISC RANDOM
g 1-ALBUM RANDOM
Álbum actual
Visualización de discos compactosCD
Puede seleccionar el modo de visualización de discos compactos
deseado.
Durante la reproducción o la pausa
Número de pistas del álbum actual
MP3
Pulse [CD DISP] en el mando a distancia.
Cada vez que pulse el botón:
CD
Tiempo de reproducción
restante transcurrido
MP3
a Tiempo de b Título de álbum
reproducción
restante
g Tiempo de f Nombre e Nombre d Nombre
reproducción de artista de título de álbum
transcurrido ID3 ID3 ID3
Ejemplo: a Tiempo de reproducción restante
Nota
CD
Cuando se reproduce la pista número 25 u otra de número superior,
•
la visualización del tiempo de reproducción restante mostrará
“– –:– –”.
MP3
Cuando un título tenga más de 8 caracteres, éste se desplazará de un
•
lado a otro del visualizador. Si selecciona un modo de b - f (consulte
más arriba), el desplazamiento empezará de nuevo cada 3 segundos.
Si no se han introducido títulos con etiquetas ID3 se visualiza “NO
•
ID3”.
Número máximo de caracteres visualizables:
•
Títulos de álbumes/pistas: 31
Nombre de álbum/título/artista ID3: 30
(ID3 es una etiqueta incluida en las pistas MP3 para proporcionar
información acerca de las pistas.)
Este aparato puede visualizar títulos de álbumes y de pistas que
•
tengan etiquetas ID3 (versión 1.0 y 1.1). Los títulos que contienen
datos de texto no compatibles con este aparato no se pueden visualizar.
Los títulos introducidos con el código de 2 bytes no se pueden
•
visualizar correctamente en esta unidad.
Tiempo de reproducción
c Título de pista
ALL-DISC RANDOM
CD
Pulse [:/J, CD] para iniciar la reproducción.
ALL-DISC/1-DISC/1-DISC RANDOM CD
MP3
Pulse [DISC] y luego [1]–[5] para seleccionar el disco.
Empieza la reproducción.
1-ALBUM/1-ALBUM RANDOM
MP3
1 Pulse [DISC] y luego [1]–[5] para seleccionar el disco.
2 Pulse [ALBUM ( o )] para seleccionar el álbum.
La reproducción empieza desde el álbum seleccionado.
1-SONG
CD
1 Pulse [DISC] y luego [1]–[5] para seleccionar el disco.
2 Pulse los botones numerados para seleccionar la pista
en el disco actual.
Para seleccionar una pista de 2 dígitos, pulse una vez [>10] y
luego los dos dígitos.
La reproducción empieza desde la pista seleccionada.
MP3
1 Pulse [DISC] y luego [1]-[5] para seleccionar el disco.
2 Pulse [ALBUM ( o )] para seleccionar el álbum.
3 Pulse los botones numerados para seleccionar la pista
en el álbum actual.
Para seleccionar una pista de 2 dígitos, pulse una vez [>10] y
luego los dos dígitos.
Para seleccionar una pista de 3 dígitos, pulse dos veces [>10] y
luego los tres dígitos.
La reproducción empieza desde la pista seleccionada.
Para detener la reproducción
Pulse [L, CLEAR].
Cuando termine la reproducción
El modo de reproducción actual se retendrá en la memoria, aunque
se apague el aparato, hasta que se cambie.
\
Disco final
Por ejemplo, si la reproducción empieza desde el disco 4, el disco 3
será el “disco final”.
Orden de progresión: Disco 4z5z1z2z3
MP3
L
Cuando aparezca “NOT MP3/ERROR1” en el visualizador
Se está reproduciendo un formato MP3 incompatible. El aparato
omitirá esa pista y reproducirá la siguiente.
Nota
Usted no puede utilizar el modo de programa con la función del
•
modo de reproducción.
MP3
Durante el modo 1-ALBUM, el salto de pista sólo puede
•
realizarse dentro del álbum actual.
7
RQT7799
Page 8
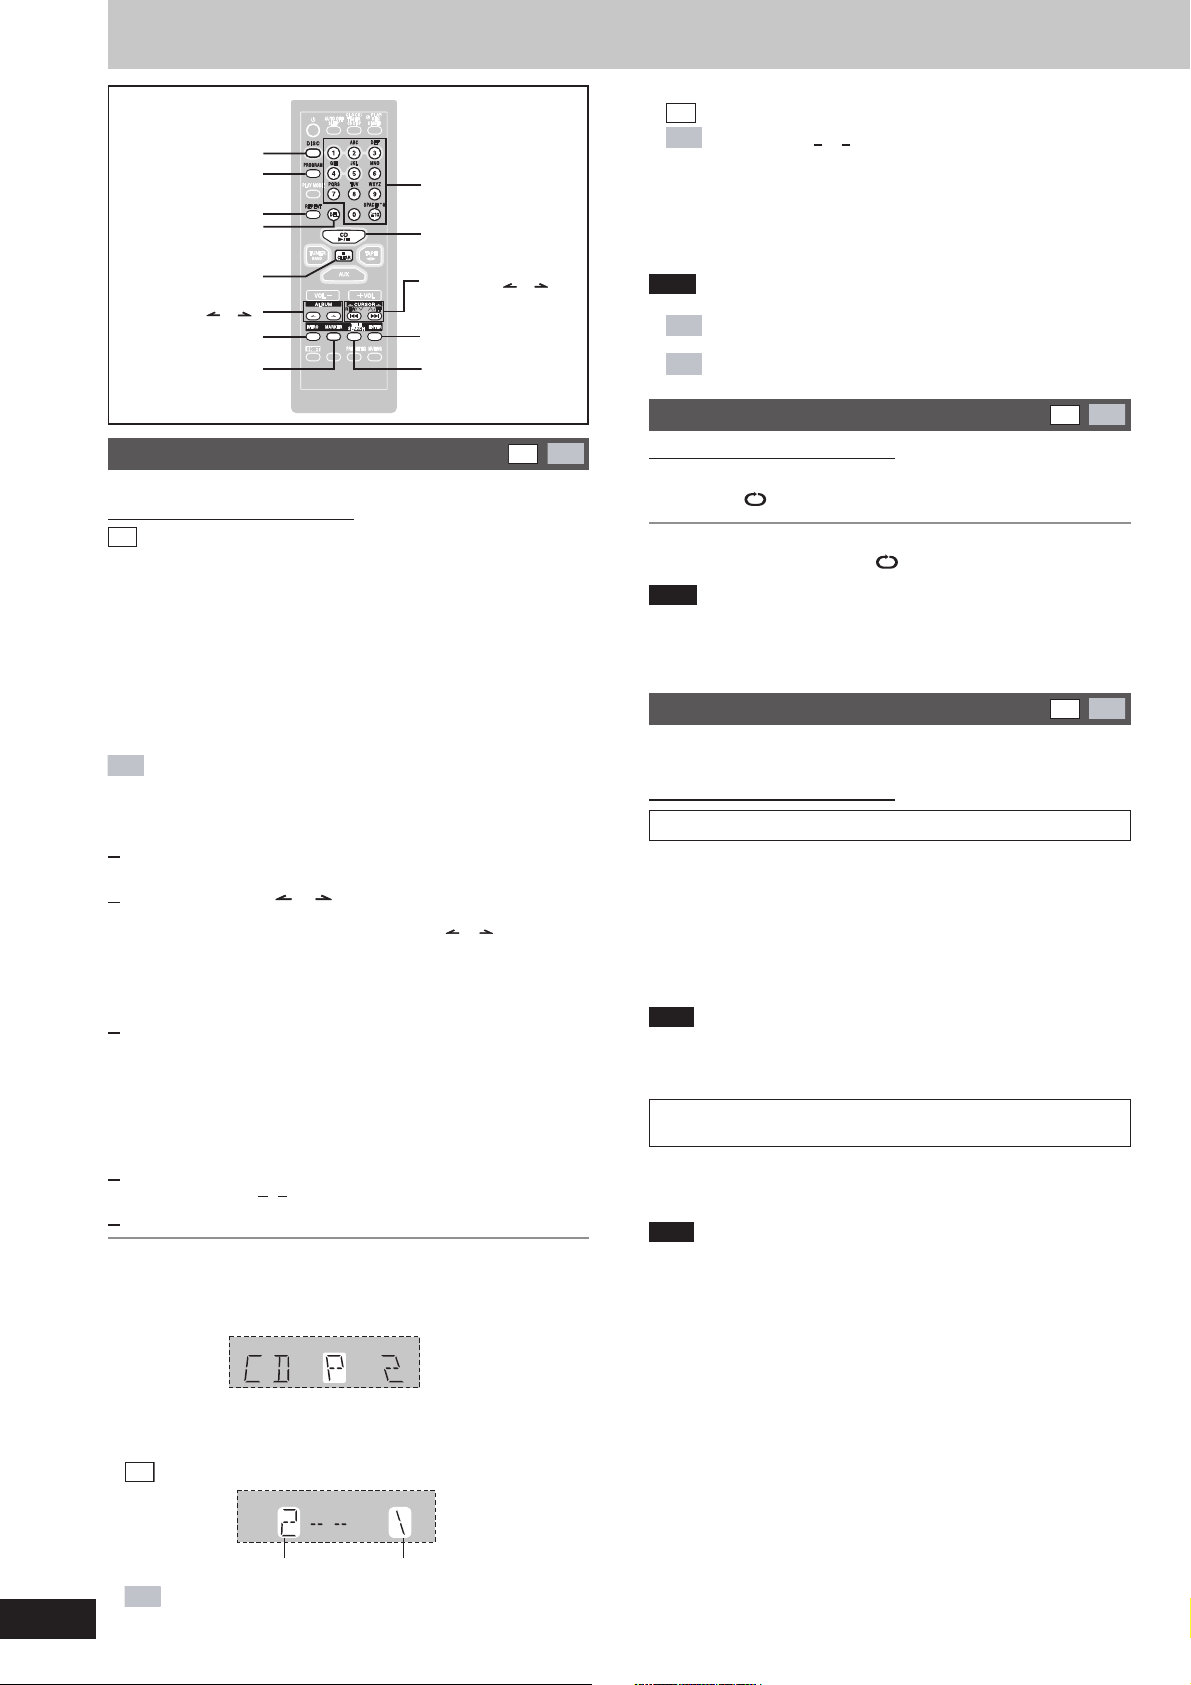
Discos
H.BASS
PROGRAM
REPEAT
L, CLEAR
ALBUM ( o )
MARKER
DISC
DEL
INTRO
H.BASS
Botones
numerados
:/J, CD
CURSOR ( o ),
g
, REW/3,
f
, 4/FF
ENTER
TITLE SEARCH
Para añadir una pista al programa
•
CD
Siga los pasos 2 y 3.
Siga los pasos 2 ~ 4.
MP3
Para cancelar la última pista
•
Pulse [DEL].
Para cancelar todas las pistas
•
Pulse [L, CLEAR].
Mientras parpadea “CLEAR ALL”, pulse de nuevo el botón para
cancelar todas las pistas.
Nota
No puede programar CD-DA junto con pistas MP3.
•
MP3
La memoria del programa se cancela cuando usted cambia
•
de disco o abre la bandeja de disco.
No puede programar más de un disco para MP3.
MP3
•
Repetición de reproducción
CD
MP3
CD
Reproducción programada
Puede programar un máximo de 24 pistas.
MP3
Mando a distancia solamente
CD
::
Preparación: Pulse [
JJ
:/
J, CD] y luego [L, CLEAR].
::
JJ
1 Pulse [PROGRAM].
Aparece “PGM”.
2 Pulse [DISC] y luego [1]–[5] para seleccionar el disco.
3 Seleccione las pistas con los botones numerados.
Para seleccionar una pista de 2 dígitos, pulse una vez [>10] y
luego los dos dígitos.
Repita los pasos 2 y 3 para programar otras pistas.
4 Pulse [:/J, CD] para iniciar la reproducción.
MP3
Preparación:
1. Pulse [DISC] y luego [1]–[5] para seleccionar el disco.
2. Pulse [L, CLEAR].
1 Pulse [PROGRAM].
Aparece “PGM”.
2 Pulse [ALBUM ( o )] para seleccionar el álbum.
Para seleccionar un álbum directamente, pulse los botones
numerados después de pulsar [ALBUM ( o )].
Para seleccionar un álbum de 2 dígitos, pulse una vez [>10] y
luego los dos dígitos.
Para seleccionar un álbum de 3 dígitos, pulse dos veces [>10] y
luego los tres dígitos.
3 Pulse [
g, REW/3] o [f, 4/FF] para seleccionar la
pista.
Para seleccionar directamente una pista, pulse los botones
numerados después de pulsar [ g, REW/3] o [f, 4/FF].
Para seleccionar una pista de 2 dígitos, pulse una vez [>10] y
luego los dos dígitos.
Para seleccionar una pista de 3 dígitos, pulse dos veces [>10] y
luego los tres dígitos.
4 Pulse [ENTER].
Repita los pasos 2~4 para programar otras pistas.
5 Pulse [:/J, CD] para iniciar la reproducción.
Para salir del modo de programación
Pulse [PROGRAM] en el modo de parada. (Puede reproducir su
programa pulsando [PROGRAM] y luego [:/J, CD].)
Mientras se visualiza “P”, usted puede hacer lo siguiente
Mando a distancia solamente
Pulse [REPEAT] durante la reproducción.
Se visualiza “ ” .
Para cancelar la repetición de reproducción
Pulse [REPEAT] para cancelar “ ” .
Nota
Puede utilizar el modo de repetición con la reproducción programada
(A
consulte la columna de la izquierda) y con el modo de reproducción
(A página 7).
CD
Marcación de una pista
Usted puede marcar una pista de cada disco cargado para poder
iniciar la reproducción desde ella más adelante.
MP3
Mando a distancia solamente
Para marcar una pista
1 Durante la reproducción o la parada
Seleccione la pista deseada.
(A página 6, “Reproducción básica – Salto/Búsqueda”)
2 Mantenga pulsado [MARKER] hasta que “STORING”
parpadee en el visualizador.
La pista seleccionada se almacena en el marcador del disco
actual.
Nota
Si ya hay una pista almacenada en el marcador, ésta será reemplazada
la próxima vez que usted guarde una pista nueva en el mismo
marcador.
Para recuperar un número de pista marcada en el
disco actual
Durante la reproducción o la parada
Pulse [MARKER] para recuperar la pista marcada.
La reproducción empieza desde la pista recuperada.
Nota
“NO MARKER” indica que el marcador del disco actual está vacío.
•
La memoria del marcador se borra cuando usted abre la bandeja
•
del disco.
No puede utilizar esta función durante la reproducción programada
•
ni la reproducción aleatoria.
8
RQT7799
Para comprobar el contenido del programa
•
Pulse [g, REW/3] o [f, 4/FF].
Cada vez que pulse el botón:
CD
Se visualiza el número de la pista y el orden del programa:
Número de pista Orden del programa
MP3
Se visualiza el orden del programa, y luego el número del
álbum y el número de la pista.
Page 9
Función INTRO
MP3
(Exploración de álbumes)
Puede encontrar un álbum escuchando durante 10 segundos la primera
pista de todos los álbumes del disco actual.
Mando a distancia solamente
Preparación: Pulse [:/ J, CD] y luego [ L, CLEAR].
1 Pulse [INTRO].
Empieza la función INTRO.
(La función INTRO se cancela después de reproducir la primera
pista del último álbum del disco actual.)
2 Mientras se reproduce su álbum deseado, pulse
::
[
:/J, CD].
::
La reproducción continúa desde la primera pista del álbum.
Para detener el proceso, pulse [INTRO] o [L, CLEAR].
Nota
No puede utilizar esta función durante la reproducción programada ni
la reproducción aleatoria.
Función de búsqueda de títulos
Puede buscar su álbum/pista deseado con su palabra clave (parte del
título).
Búsqueda del título del álbum/pista
Mando a distancia solamente
Preparación: Pulse [:/ J, CD] y luego [ L, CLEAR].
1 Para buscar un título de álbum
Pulse una vez [TITLE SEARCH].
Para buscar un título de pista
Pulse dos veces [TITLE SEARCH].
2 Introduzca los caracteres de la palabra clave del título.
(A consulte la columna derecha: “Introducción de caracteres”)
3 Pulse [ENTER].
La búsqueda de título empieza.
El título que corresponde se visualiza.
Búsqueda de título de álbum
Parpadea para indicar el modo de
búsqueda del título del álbum
\
MP3
Introducción de caracteres
Usted puede introducir una palabra clave que tenga un máximo de 8
caracteres para buscar títulos de álbumes/pistas. Sólo puede introducir
mayúsculas, pero el aparato también busca minúsculas.
Mando a distancia solamente
11
1 Pulse el botón numerado para seleccionar el carácter
11
requerido.
Caracteres asignados a los botones numerados:
Botones Caracteres Botones Caracteres
numerados numerados
1 1 6 M N O 6
2 A B C 2 7 P Q R S 7
3 D E F 3 8 T U V 8
4 G H I 4 9 W X Y Z 9
5 J K L 5 0 0
>10
Puede buscar “ < ” o “ > ” introduciendo “ ( ” o “ ) ”.
Los caracteres cambian cada vez que se pulsa un botón numerado.
Por ejemplo, cada vez que usted pulsa [2]:
A B C 2
Los caracteres especiales se visualizarán como se indica abajo:
Caracteres Caracteres
!
”–
#.
$/
%:
&;
’ =
(?
)_
∗ `
+
Algunos caracteres no se visualizarán correctamente debido al
formato de grabación/software utilizado.
22
2 Pulse [CURSOR ] para introducir el carácter.
22
Repita los pasos 1~2 para completar la palabra clave.
espacio
!”#$ %&’ ()∗ +,– ./:;=?_ `
Visualización de la
unidad principal
Visualización de la
,
unidad principal
Título de álbum correspondiente
Búsqueda de título de pista
Parpadea para indicar el modo de
búsqueda del título de la pista
\
Título de pista correspondiente
Para volver a mostrar el título que corresponde
Pulse [ENTER].
Para mostrar el resultado de la búsqueda siguiente/anterior
Pulse [f, 4/FF] (siguiente) o [ g, REW/3]
Pulse [:/J, CD] para empezar a reproducir desde el álbum/
pista encontrado.
Para buscar un álbum, la reproducción empieza desde la
primera pista del álbum.
(El modo de búsqueda se cancela.)
Para cancelar la búsqueda durante el proceso
Pulse [L, CLEAR].
Cuando no haya una palabra clave idéntica a la buscada, el
visualizador mostrará “NOT FOUND”.
Nota
No puede utilizar la función de búsqueda de títulos durante la
reproducción programada o durante la reproducción aleatoria.
(anterior)
.
L Edición de palabras claves
Para mover el cursor
Pulse [CURSOR ( o )].
Para borrar un carácter
1. Mueva el cursor para ponerlo encima del carácter que va a
borrar.
2. Pulse [DEL].
Edición de un carácter
1. Mueva el cursor y póngalo encima del carácter que va a
editar.
2. Introduzca el carácter correcto.
9
RQT7799
Page 10
H.BASS
TUNER, BAND
a, REC
c DECK1
PROGRAM
PLAY MODE
TUNER, BAND
ALBUM ( o )
DISC
H.BASS
g
f
L, STOP
DECK 1/2
DECK2 c
;:, TAPE
:/J, CD
Botones
numerados
g
, REW/3,
f
, 4/FF
/REW/3,
/FF/4
Radio
Ajuste de la asignación
Aparato principal solamente
: Ajustando la asignación, usted podrá hacer que la radio reciba
PL
GCP
Mantenga pulsado [TUNER, BAND]. La visualización cambia en unos
pocos segundos para mostrar la frecuencia mínima actual. Continúe
pulsando el botón hasta que se cambie la frecuencia mínima. El paso
cambia. Repita el procedimiento de arriba para volver al paso anterior.
Nota
•
•
emisiones de FM asignadas en pasos de 0,1 MHz.
: Ajustando la asignación, usted podrá hacer que la radio reciba
emisiones de AM asignadas en pasos de 10 kHz.
Después de cambiar el ajuste de “asignación”, las frecuencias
previamente preajustadas en la memoria se borrarán.
El sonido se interrumpirá momentáneamente si se introducen/
extraen cintas mientras se está escuchando una emisión por
AM.
Presintonización de emisoras
Mando a distancia solamente
Hay dos formas de presintonizar emisoras.
Presintonización automática: Se presintonizan todas las emisoras
Presintonización manual: Usted puede seleccionar las emisoras
Se puede presintonizar un máximo de 15 emisoras en cada banda,
FM y AM.
Preparación:
Pulse [TUNER, BAND] para seleccionar “FM” o “AM”.
que la radio puede recibir.
a presintonizar y el orden en que
quiera presintonizarlas.
Radio
Sintonización manual
1 Pulse [TUNER, BAND] para seleccionar la banda.
El aparato se enciende.
Cada vez que pulse el botón:
FM
AM
2 Pulse [PLAY MODE] en el mando a distancia para
seleccionar “MANUAL”.
Cada vez que pulse el botón:
MANUAL
3 Mantenga pulsado [g/REW/3] o [ f/FF/4] durante
un momento para buscar una emisora.
La frecuencia se detiene cuando se encuentra una emisora que
se recibe más claramente.
Para detener el proceso, pulse [g/REW/3] o [ f/FF/4].
Cuando la interferencia sea excesiva tal vez no se pueda encontrar
una emisora.
Pulse repetidamente [g/REW/3] o [f/FF/4] para sintonizar
paso a paso.
Se visualizará “TUNED” cuando se sintonice con precisión una
emisora de radiodifusión.
Se visualizará “ST” cuando esté siendo recibida una radiodifusión
estéreo por FM.
Si hay demasiado ruido en FM
Mando a distancia solamente
Mantenga pulsado [PLAY MODE] para visualizar “MONO”.
Se selecciona el sonido monoaural y el ruido se reduce cuando la
recepción es débil.
Mantenga pulsado de nuevo [PLAY MODE] para cancelar el modo.
“MONO” también se cancela si se cambia la frecuencia.
PRESET
Presintonización automática
Haga lo siguiente una vez para cada banda de FM y AM.
Preparación: Sintonice la frecuencia desde la que quiere comenzar
a presintonizar.
Mantenga pulsado [PROGRAM] hasta que se cambie la
frecuencia.
La radio presintonizará en los canales, en orden ascendente, todas
las emisoras que pueda recibir. Cuando termine, se sintonizará la
última emisora memorizada.
Presintonización manual
Presintonice las emisoras una a una.
1 Pulse [PROGRAM] y luego pulse [g, REW/3 ] o
[f, 4/FF] para sintonizar la emisora deseada.
2 Pulse [PROGRAM] y luego pulse [g, REW/3 ] o
[f, 4/FF] para seleccionar un canal.
3 Pulse [PROGRAM].
La emisora que ocupa un canal se borrará si se presintoniza otra
emisora en ese canal.
Selección de canales
Pulse los botones numerados para seleccionar el canal.
Para introducir un canal de 2 dígitos, pulse [X10] y luego los dos
dígitos.
O
1 Pulse [PLAY MODE] para seleccionar “PRESET”.
2 Pulse [ g, REW/3] o [ f, 4/FF] para seleccionar
el canal.
10
RQT7799
Page 11

Conexiones de antenas opcionales
Utilice una antena exterior si la recepción de la radio no es adecuada.
Nota
Desconecte la antena exterior cuando no utilice el aparato. No utilice la antena exterior durante una tormenta eléctrica.
Antena exterior de FM
Antena exterior de FM
(no suministrada)
Cable coaxial de 75 Ω
(no suministrado)
Panel
posterior
del aparato
Desconecte la antena interior de FM.
•
La antena deberá ser instalada por un técnico competente.
•
1
2
1
2
3
30 mm
Cuchilla de blindaje
15 mm
Cable central
Casetes
Reproducción
Para reproducir cintas podrá utilizar la platina 1 o la 2.
Use cintas de posición normal.
Las cintas de posición alta y de posición metal pueden reproducirse, pero el
aparato no podrá reproducir perfectamente las características de estas cintas.
1 Pulse [;:, TAPE].
El aparato se enciende. Si ya se introdujo un casete, la reproducción
empezará automáticamente (Reproducción de un toque).
2 Pulse [c DECK1] o [DECK2 c] y luego inserte la cinta.
Inserte con el lado que va a reproducirse
hacia usted y con la cinta expuesta hacia
abajo. Cierre el portacasete con la mano.
3 Mantenga pulsado [PLAY MODE] en el mando a distancia
para seleccionar el modo de inversión.
Cada vez que mantiene pulsado el botón:
: Se reproduce una cara.
: Se reproducen ambas caras.
: Se reproducirán repetidamente ambos lados hasta que se
pulse [L, STOP].
Para escuchar 2 cintas consecutivamente
Introduzca una cinta en cada platina y seleccione “ ”. Se reproducirán
repetidamente ambas cintas hasta que se pulse [L, STOP].
Lado
delantero
Antena exterior de AM
Antena exterior de AM (no suministrada)
5 -12 m
Panel
posterior
del aparato
Coloque horizontalmente una parte del cable cubierto de vinilo a lo
largo de una ventana u otro lugar conveniente.
Deje conectada la antena de cuadro.
4 Pulse [;:, TAPE] para empezar la reproducción.
Cada vez que pulse el botón: / R
F - : Se reproducirá el lado delantero (lado frontal).
/ R: Se reproducirá el lado trasero.
Para detener la reproducción de una cinta
Pulse [L, STOP].
Para avanzar rápidamente o rebobinar
Pulse [g/REW/3] (rebobinado) o [f/FF/4] (avance rápido).
Para seleccionar entre platinas cargadas
Pulse [DECK 1/2] (mando a distancia: [PLAY MODE]).
Nota
La reproducción de la cinta se interrumpe momentáneamente si usted
•
abre la otra platina.
Las cintas de más de 100 minutos son finas y pueden romperse o
•
atascarse en el mecanismo.
Las cintas flojas pueden quedar atrapadas en el mecanismo, por lo
•
que deberán tensarse antes de ser reproducidas.
Las cintas sin fin pueden quedar atrapadas en las partes móviles de la
•
platina si no se utilizan correctamente. Utilice cintas apropiadas para el
mecanismo de inversión automática de este aparato.
1
2
F -
Antena de
cuadro de AM
(suministrada)
Grabación
Selección de cintas para la grabación
Use cintas de posición normal.
Pueden usarse cintas de posición alta y de metal, pero este aparato no las
grabará ni las borrará correctamente.
Preparación:
Rebobine la parte inicial de la cinta para que la grabación pueda comenzar
de inmediato.
Pulse [;:, TAPE] y luego [L, STOP] para seleccionar la cinta como
fuente.
1 Pulse [DECK2 c] e inserte el casete en el que se va a
grabar.
El sentido de movimiento de la cinta se ajusta automáticamente a
“F :”.
Para grabar en el lado opuesto
Pulse dos veces [;:, TAPE], y luego pulse [ L, STOP]
2 Mantenga pulsado [PLAY MODE] en el mando a distancia
para seleccionar el modo de inversión.
Cada vez que mantiene pulsado el botón:
: Grabación de una sola cara.
y : Grabación de ambas caras (directa
“ ” cambia automáticamente a “ ” cuando se pulsa [[, REC].
inversa).
3 Seleccione la fuente que va a grabar.
Grabación de la radio:
Sintonice la emisora. (A página 10)
Grabación de disco:
1 Inserte el(los) disco(s) que desee grabar.
Pulse [:/ J, CD] y luego [ L, STOP].
2 Prepare el modo de grabación del disco deseado.
Mando a distancia solamente
Para grabar pistas programadas
•
En la página 8, “Reproducción programada”, haga los siguientes
pasos.
CD
1 ~ 3
1 ~ 4
MP3
Para grabar discos/pistas específicos
•
1. Pulse [PLAY MODE] para seleccionar el modo deseado.
(A página 7)
2. Pulse [DISC] y luego [1]–[5] para seleccionar el disco.
Asegúrese de que el disco esté parado.
MP3
3.
Para el modo 1-ALBUM y el modo 1-SONG: Pulse
[ALBUM ( o )] para seleccionar el álbum.
4. Para el modo 1-SONG: Pulse [g, REW/3] o
[f, 4/FF] para seleccionar la pista.
Grabación de cinta a cinta:
1 Pulse [;:, TAPE] y luego [L, STOP].
2 Pulse [c DECK1] e inserte la cinta que desee grabar.
4 Pulse [a, REC] para empezar la grabación.
(Continúa en la siguiente página)
11
RQT7799
Page 12

Mezcla de micrófono
H.BASS
Para disfrutar de la mezcla de micrófono
Puede disfrutar de la mezcla de micrófono con fuentes de audio
(cinta/disco/radio/fuentes auxiliares)
H.BASS
MIC VOL
MIC
Micrófono
(no suministrado)
[, REC
SLEEP
SHIFT
H.BASS
L, STOP
;
:, TAPE
VOLUME
rPLAY/REC
CLOCK/TIMER
g
, REW/3,
f
, 4/FF
PRESET EQ
1 Primero baje el volumen con [MIC VOL], luego conecte
el micrófono (no incluido).
Tipo de clavija: 3,5 mm monoaural
2 Inicie la reproducción de la fuente (CD, etc.).
3 Ajuste el volumen con [VOLUME] y [MIC VOL] y luego
cante.
Nota
Si un sonido extraño (ruido) es emitido durante su uso, retire el
•
micrófono de los altavoces, o baje el volumen del micrófono.
Cuando no use el micrófono, desconéctelo de la toma (MIC) y
•
coloque el volumen del micrófono en MIN.
La calidad del sonido puede ajustarse cuando esté usando mezcla
•
de micrófono pero la grabación no será afectada.
Grabación de la mezcla de micrófono
Preparaciones:
Siga los pasos 1 y 2 de la página 11: “Grabación”.
•
Siga los pasos 1 más arriba: “Para disfrutar de la mezcla de
•
micrófono”.
Cuando cante con el acompañamiento de disco
•
Introduzca los discos deseados (A página 6).
Cuando cante con el acompañamiento de cintas
•
Introduzca la cinta deseada en la platina 1 (A página 11).
Cuando cante con el acompañamiento de la radio
•
Seleccione la emisora deseada (A página 10).
Cuando cante con el acompañamiento de una fuente externa
•
Conecte y prepare la fuente (A página 14).
Pulse [a, REC] y comience la mezcla de micrófono.
12
RQT7799
Casetes
Grabación
Para detener la grabación
Pulse [L, STOP].
Si la cinta termina antes que el disco
El disco sigue reproduciéndose. Pulse [L, STOP] para pararlo.
Nota
Los cambios en el volumen y en la calidad del sonido/campo no afectan
•
a la grabación.
No podrá abrir la platina 1 durante la grabación.
•
No podrá avanzar rápidamente ni rebobinar en una platina mientras
•
graba con la otra.
Cuando grabe una radiodifusión de AM, el sonido se interrumpirá
•
momentáneamente cuando inicie y pare la grabación.
Protección contra borrado
Utilice un destornillador
o herramienta
similar para romper
la lengüeta.
Para volver a grabar en un casete protegido
Tape el agujero con cinta adhesiva.
Para borrar una cinta
1. Desconecte el micrófono.
2. Pulse [;:, TAPE] y luego [ L, STOP].
3. Inserte la cinta grabada en la platina 2.
Asegúrese de que no haya una cinta en la platina 1.
4. Mantenga presionado [PLAY MODE] en el mando a distancia para
seleccionar el modo de inversión.
5. Pulse [[, REC].
Lado A
Lengüeta del
lado B
Lengüeta del
lado A
Cinta
adhesiva
Para detener la grabación
Pulse [L, STOP].
Para grabar su voz
Preparación: Siga los pasos 1 y 2 de la página 11: “Grabación”.
1. Primero baje el volumen con [MIC VOL], luego conecte el micrófono.
2. Pulse [a, REC] para iniciar la grabación.
3. Hable a través del micrófono y ajuste el volumen con [VOLUME] y
[MIC VOL].
Asegúrese de que no haya una cinta en la platina 1.
Puesta de la hora
Mando a distancia solamente
: Reloj de 12 horas.
PL
: Reloj de 24 horas.
GCP
1 Conecte la alimentación.
2 Pulse [SHIFT] + [CLOCK/TIMER] para seleccionar
“CLOCK”.
Cada vez que pulse el botón:
CLOCK
Visualización
previa
3 (Antes de que pasen unos 7 segundos)
Pulse [g, REW/3] o [f, 4/FF] para poner la hora.
4 Pulse [SHIFT] + [CLOCK/TIMER] para terminar de poner
la hora.
La visualización volverá a ser la que estaba siendo visualizada
antes de poner la hora.
Para visualizar la hora
Pulse una vez [SHIFT] + [CLOCK/TIMER] cuando el aparato esté
encendido o en el modo de espera.
La hora se muestra durante 5 segundos aproximadamente.
Nota
Vuelva a poner en hora el reloj con frecuencia para mantener su
precisión.
RECPLAY
Page 13

Temporizadores
Utilización del temporizador de
reproducción/grabación
Mando a distancia solamente
Puede ajustar el temporizador para que se encienda a cierta hora y
que le despierte (temporizador de reproducción) o para grabar una
emisora de radio o una fuente auxiliar (temporizador de grabación).
Los temporizadores de reproducción y grabación no se pueden utilizar
juntos.
Preparativos:
Encienda el aparato y ajuste el reloj (A página 12).
•
Para el temporizador de reproducción, prepare la fuente de
•
música deseada (cinta/disco/radio/auxiliar) y ajuste el volumen.
Para el temporizador de grabación, verifique que el casete tenga
•
las lengüetas de prevención de borrado (A página 12) e inserte la
cinta en la platina 2 (A página 11). Sintonice la emisora de radio
(A página 10) o seleccione la fuente auxiliar (A página 14).
1 Pulse [SHIFT] + [CLOCK/TIMER] para seleccionar la
función del temporizador.
Cada vez que pulse el botón:
CLOCK
Visualización
previa
rPLAY : para ajustar el temporizador de reproducción
rREC : para ajustar el temporizador de grabación
(Vaya al paso siguiente antes de que pasen 8 segundos)
2 Ajuste de la hora de encendido (ON)
1 Pulse [g, REW/3] o [f, 4/FF] para poner en
hora el reloj.
2 Pulse [SHIFT] + [CLOCK/TIMER].
Ajuste de la hora de apagado (OFF)
Repita los pasos 1 y 2.
3 Pulse [SHIFT] + [rPLAY/REC] para visualizar el
indicador del temporizador.
Cada vez que pulse el botón:
(apagado)
rPLAY : para encender el temporizador de reproducción
rREC : para encender el temporizador de grabación
(El indicador no aparece si no se han programado las horas de
encendido (ON) y apagado (OFF) o no está puesto en hora el
reloj.)
4 Pulse [
Para cancelar el temporizador
Pulse [SHIFT] + [rPLAY/REC] para eliminar del visor el indicador del
temporizador.
(El temporizador entra en funcionamiento a la hora programada todos
los días si está encendido.)
Para cambiar los ajustes (cuando el aparato está
encendido)
Para cambiar las horas de reproducción/grabación
Siga los pasos 1, 2 y 4.
Para cambiar la fuente o el volumen
1. Pulse [SHIFT] + [rPLAY/REC] para eliminar del visor el indicador
del temporizador.
2. Haga cambios en la fuente o en el volumen.
3. Siga los pasos 3 y 4.
Para comprobar ajustes
Pulse [SHIFT] + [CLOCK/TIMER] mientras el aparato está encendido
para seleccionar “rPLAY” o “rREC”.
Los ajustes se muestran en el orden siguiente:
Temporizador de reproducción:
Hora de encendido→hora de apagado → fuente → volumen
Temporizador de grabación:
Hora de encendido→hora de apagado → fuente
Para comprobar los ajustes mientras el aparato está apagado, pulse
[SHIFT] + [CLOCK/TIMER] dos veces.
ff
f] para apagar el aparato.
ff
El aparato deberá estar apagado para que funcionen los
temporizadores.
Temporizador de reproducción:
•
La reproducción empieza con la condición establecida y a la
hora puesta, con el volumen aumentando poco a poco hasta
alcanzar el nivel establecido.
Temporizador de grabación:
•
El aparato se enciende 30 segundos antes de la hora puesta,
con el sonido silenciado.
RECPLAY
RECPLAY
Si utiliza el aparato después de haber ajustado los temporizadores
Tras la utilización del aparato, compruebe que la cinta/disco correcto
esté introducido antes de apagar el aparato.
Nota
Si apaga y enciende el aparato de nuevo mientras está funcionando
•
un temporizador, el ajuste de la hora apagado (OFF) no se activará.
La unidad se enciende y se activa “AUX” como fuente. Si desea
•
reproducir o grabar desde una unidad conectada, ajuste el
temporizador de dicha unidad en la misma hora. (Véase el manual
de instrucciones de la unidad conectada.)
Utilización del temporizador para dormir
Mando a distancia solamente
Este temporizador apaga el aparato después de transcurrir un
tiempo establecido.
Mientras disfruta de la fuente deseada:
Pulse [SLEEP] para seleccionar el tiempo (minutos).
Cada vez que pulse el botón:
SLEEP 90 SLEEP 120SLEEP 60SLEEP 30
Para cancelar el temporizador para dormir
Pulse [SLEEP] para seleccionar “SLEEP OFF”.
Para confirmar el tiempo restante
Pulse [SLEEP] una vez.
El tiempo restante se muestra durante 5 segundos aproximadamente.
Para cambiar el ajuste
Pulse [SLEEP] para seleccionar el nuevo ajuste.
Puede utilizar el temporizador para dormir en combinación con el
temporizador de reproducción/grabación. Asegúrese de que el aparato
esté apagado antes de llegar la hora de inicio del temporizador de
reproducción/grabación.
Nota
El temporizador para dormir se apagará cuando usted comience a
grabar.
SLEEP OFF
Calidad de sonido/campo de sonido
Utilización de los ajustes de calidad
de sonido/campo de sonido incorporados
Mando a distancia solamente
Pulse [PRESET EQ] para seleccionar un ajuste.
Cada vez que pulse el botón:
HEAVY SOFT CLEAR
(cancelado)
HEAVY (calidad de sonido) : Agrega fuerza a la música rock
SOFT (calidad de sonido) : Para música de fondo
CLEAR (calidad de sonido) : Clarifica los sonidos más altos
DISCO (campo de sonido) : Produce un sonido con la misma clase
LIVE (campo de sonido) : Da más vida a las voces
HALL (campo de sonido) :Añade expansibilidad al sonido para
Nota
No puede utilizar juntos PRESET EQ y H.BASS.
Mejoramiento de los sonidos graves
Puede mejorar el sonido de baja frecuencia para que los sonidos
graves profundos puedan oírse claramente, aunque las características
acústicas de su sala no sean óptimas.
Pulse [H.BASS].
La luz del botón se enciende.
Pulse ota vez el botón para cancelar.
La luz del botón se apaga.
DISCO LIVE HALL
EQ-OFF
de reverberación extendida que la que
se oye en las discotecas
crear la atmósfera de una sala de
conciertos grande
13
RQT7799
Page 14

Otras funciones
H.BASS
DISP, –DEMO
a, REC
AUX
Auriculares
(no suministrados)
PHONES
VOLUME
Función de desconexión automática de
la alimentación
Mando a distancia solamente
Cuando se seleccione como fuente de sonido un disco compacto o
una cinta
Para ahorrar energía, el aparato se apaga si se deja sin utilizar durante
10 minutos.
Esta función no se activa si la fuente de sonido es la radio o AUX.
Pulse [SHIFT] + [AUTO OFF].
“AUTO OFF” se muestra en el visualizador.
El ajuste se mantiene incluso si se apaga el aparato.
Si selecciona la radio o AUX como la fuente, “AUTO OFF” se apagará.
Se encenderá de nuevo cuando usted seleccione disco o cinta.
Para cancelar
Pulse [SHIFT] + [AUTO OFF] otra vez.
AUTO OFF
SHIFT
H.BASS
DIMMER
MUTING
Conexión de un aparato exterior
Panel posterior
del aparato
Sólo podrá conectarse un reproductor analógico con ecualizador
•
fonográfico incorporado.
Para conocer detalles, consulte el manual de instrucciones de los
•
aparatos que van a ser conectados.
Consulte a su concesionario de productos de audio cuando vaya a
•
conectar otros aparatos que no sean los descritos anteriormente.
RL
(R)
(L)
Reproductor
analógico
(no suministrado)
Funciones convenientes
Para oscurecer el panel de visualización
Mando a distancia solamente
Pulse [DIMMER].
El visualizador se oscurece y el indicador se apaga.
(El indicador de alimentación de CA permanece encendido.)
Pulse de nuevo [DIMMER] para restaurar la visualización.
Cambio de visualizaciones
Pulse [DISP, –DEMO] para seleccionar el modo de
visualización deseado.
Cada vez que pulse el botón:
Normal
Para silenciar el volumen
Mando a distancia solamente
Pulse [MUTING].
Pulse de nuevo el botón para cancelar.
“MUTING” se apagará.
Para cancelar desde el aparato, gire [VOLUME] hasta el mínimo
(--dB), y luego súbalo hasta el nivel requerido.
El silenciamiento también se cancela cuando se apaga el aparato.
Retención de pico
(desactivada)
Reflexión
14
RQT7799
Utilización de un aparato exterior
(Consulte más arriba para hacer la conexión de un aparato exterior.)
1. Pulse [AUX].
El aparato se enciende.
2. Para escuchar: Vaya al paso 3.
Para grabar: Pulse [a, REC] (la grabación empieza).
3. Empiece a reproducir en la fuente exterior. (Para conocer detalles,
consulte el manual de instrucciones del aparato exterior.)
Utilización de los auriculares
(no suministrados)
Reduzca el nivel del volumen y conecte los auriculares.
Tipo de clavija: estéreo de 3,5 mm
Nota
Se recomienda no escuchar el aparato durante largo tiempo para no
alterar sus facultades auditivas.
Page 15

Guía para la localización de las fallas
Antes de solicitar el servicio de reparaciones, haga las comprobaciones de la tabla siguiente. Si no puede solucionar el problema como se
describe a continuación, o si se produce algo que no se indica en la tabla, consulte el directorio adjunto para localizar el Centro de Servicio
Autorizado más conveniente o póngase en contacto con su concesionario.
Las páginas de referencia se muestran mediante números en el interior de un círculo negro como, por ejemplo, el 4.
Problemas comunes
Aunque la unidad está en el modo
de espera, la visualización se
enciende y cambia
continuamente.
No hay sonido.
El sonido se apaga.
Sonido malo, invertido o sólo sale
de un altavoz.
Se oye ruido de zumbido durante
la reproducción.
Se visualiza “ERROR”.
“– –:– –” aparece en el
visualizador en el modo de
espera.
Se visualiza “F61”.
Escucha de la radio
Se oye ruido.
El indicador de estéreo parpadea
o no se enciende.
El sonido está distorsionado.
Se oye un ruido de batido.
Se oye un leve zumbido durante
las emisiones en AM.
Cuando haya un televisor cerca
La imagen del televisor
desaparece o aparecen franjas en
la pantalla.
Desactive la función de demostración. 4
Si pone en hora el reloj, la función de demostración se apagará automáticamente. @
Suba el volumen.
Apague el aparato, determine y corrija la causa, y luego encienda el aparato. Entre las causas se
encuentran los cortocircuitos de los cables positivos y negativos de los altavoces, el esfuerzo de los
altavoces debido a una potencia o a un volumen excesivos, y la utilización del aparato en un
ambiente donde hace calor.
Compruebe las conexiones de los altavoces. 4
Cerca de los cables se encuentra un cable de alimentación de CA o luces flourescentes. Mantenga
otros aparatos y cables alejados de los cables de este aparato.
Se ha realizado una operación incorrecta. Lea las instrucciones e inténtelo de nuevo.
Conectó el cable de alimentación de CA por primera vez o se produjo un fallo recientemente en la
alimentación. Ponga la hora. @
Compruebe y corrija la conexión de los cables de los altavoces. 4
Si esto no resuelve el problema, habrá un problema con la fuente de alimentación. Consulte a su
concesionario.
Utilice una antena exterior. !
Apague el televisor o sepárelo del aparato.
Separe la antena de otros cables.
La ubicación y orientación de la antena no son correctas. Si está utilizando una antena interior,
cambie a una antena exterior.
El cable de antena de TV está demasiado cerca del aparato. Separe el cable de antena del televisor
del aparato.
Utilización de la platima de casete
Deficiente calidad de sonido.
No se puede grabar.
Reproducción de discos compactos
La visualización es errónea o no
empieza la reproducción.
No se puede realizar la
reproducción aleatoria de todos
los discos.
El número total de pistas
visualizado es diferente cada vez
que se introduce el mismo disco.
Se oye un sonido extraño.
No se puede leer el disco CD-RW.
Se visualiza “VBR–” en lugar del
tiempo de reproducción restante.
“TAKE OUT/DISC” aparece en el
visualizador.
Mando a distancia
El mando a distancia no funciona.
Limpie las cabezas. ^
Si se han quitado las lengüetas para impedir el borrado, cubra los orificios con cinta adhesiva. @
El disco está al revés. 6
Limpie el disco.
Sustituya el disco si está rayado, deformado o no es un disco convencional.
Puede haberse formado condensación en el interior del aparato debido a un cambio repentino de
temperatura. Espere una hora aproximadamente hasta que desaparezca la condensación e
inténtelo de nuevo.
El modo de reproducción aleatoria de todos los discos no se puede utilizar con los discos MP3.
Cambie el disco o seleccione otro modo de reproducción. 7
El disco puede estar rayado o sus datos pueden estar defectuosos. Cambie el disco.
El disco no fue formateado completamente. Utilice el equipo de grabación para formatear
completamente el disco antes de grabar.
El aparato no puede visualizar el tiempo de reproducción restante para las pistas con velocidad de
bits variable (VBR).
Hay un problema con el mecanismo del disco. (Es posible que se haya producido un corte de corriente.)
La bandeja se abrirá automáticamente. Retire el disco de la bandeja y después de asegurarse de
que no hay ningún disco en la bandeja, ciérrela. El aparato hará durante unos momentos los ruidos
de cambio de disco y a continuación funcionará normalmente.
Compruebe las pilas e insértelas correctamente. 3
Sustituya las pilas si están agotadas.
Restablecer memoria (Inicialización)
Cuando ocurre la siguiente situación, consulte las instrucciones de abajo para restablecer la memoria.
Los botones no funcionan.
•
Usted desea borrar y restablecer el contenido de la memoria.
•
Para restablecer memoria
1 Desconecte el cable de alimentación de CA. (Espere al menos durante 3 minutos antes de proseguir al paso 2)
2 Mientras mantenga pulsado [
Aparecerá la indicación “– – – – – – – – –” en el visualizador.
3 Suelte [
ff
f/7, POWER] (PL) o [
ff
Todos los ajustes se reponen a los preajustados en fábrica.
Usted necesitará restablecer los elementos de la memoria.
ff
f/7, POWER] (PL) o [
ff
ff
f/7] (
ff
GCP
).
ff
f/7] (
ff
) en la unidad principal, vuelva a conectar el cable de alimentación de CA.
GCP
15
RQT7799
Page 16

Especificaciones técnicas
SECCIÓN DEL AMPLIFICADOR
PMPO 3300 W
Potencia de salida FTC
Distorsión armónica total 10%,
ambos canales excitados
100 Hz – 3 kHz
(Canal bajo) 64 W por canal (5 Ω)
3 kHz – 10 kHz
(Canal alto) 60 W por canal (5 Ω)
Potencia total del sistema
biamplificador 248 W
Potencia de salida RMS
Distorsión armónica total 10%,
ambos canales excitados
1 kHz (Canal bajo) 90 W por canal (5 Ω)
10 kHz (Canal alto) 90 W por canal (5 Ω)
Potencia total del sistema
biamplificador 360 W
SECCIÓN DEL AMPLIFICADOR
Potencia de salida RMS
Distorsión armónica total 10%,
ambos canales excitados
1 kHz (Canal bajo) 90 W por canal (5 Ω)
10 kHz (Canal alto) 90 W por canal (5 Ω)
Potencia total del sistema
biamplificador 360 W
PL
GCP
SECCIÓN DE SINTONIZADOR DE
FM/AM, TERMINALES
Emisoras presintonizadas
Modulación de frecuencia (FM)
Gama de frecuencias
PL
87,9 – 107,9 MHz (pasos de 200 kHz)
87,5 – 108,0 MHz (pasos de 100 kHz)
GCP
87,50 – 108,00 MHz (pasos de 50 kHz)
Sensibilidad 2,5 ØV (IHF)
Relación señal a ruido de 26 dB 2,2 ØV
Terminal(es) de antena
Modulación de amplitud (AM)
Gama de frecuencias
PL
520 – 1710 kHz (pasos de 10 kHz)
GCP
522 – 1629 kHz (en pasos de 9 kHz)
520 – 1630 kHz (en pasos de 10 kHz)
Sensibilidad
PL
Relación señal a ruido de 20 dB
(en 1000 kHz) 560 ØV/m
GCP
Relación señal a ruido de 20 dB
(en 999 kHz) 560 ØV/m
15 emisoras de FM
15 emisoras de AM
75 Ω (desequilibrado)
Rendimiento de audio (Amplificador)
Sensibilidad de entrada/
Impedancia de entrada
AUX 250 mV, 14,7 kΩ
Toma de auriculares
Terminal Estéreo, toma de 3,5 mm
Toma de micrófono
Sensibilidad 0,7 mV, 680 Ω
Terminal Mono, toma de 3,5 mm
SECCIÓN DE LA PLATINA DE CASETE
Sistema de pistas 4 pistas, 2 canales
Cabezas
Grabación/Reproducción
Cabeza de permalloy sólida
Borrado
Cabeza de ferrita de doble entrehierro
Motor Servomotor de CC
Sistema de grabación
Polarización de CA 100 kHz
Sistema de borrado
Borrado de CA 100 kHz
Velocidad de cinta 4,8 cm/s
Respuesta de frecuencias
(+3 dB, –6 dB en DECK OUT)
NORMAL 35 Hz – 14 kHz
Relación señal a ruido
50 dB (A ponderada)
Fluctuación y trémolo
0,18% (WRMS)
Tiempo de avance rápido y rebobinado
120 segundos aproximadamente con
cinta de casete C-60
SECCIÓN DE DISCOS COMPACTOS
Discos reproducidos [8 cm ó 12 cm]
(1) CD-Audio (CD-DA)
(2) CD-R/RW (CD-DA, disco formateado
con MP3)
(3) MP3
Velocidad de transferencia de bits
MP3 32 kbps – 320 kbps
Frecuencia de muestreo
MP3 32 kHz, 44,1 kHz, 48 kHz
CD 44,1 kHz
Descodificación Lineal de 16 bits
Filtro digital 8 fs
Convertidor D/A MASH (1 bit DAC)
Pickup
Longitud de onda 780 nm
Fuente de rayo láser
Láser de semiconductor
Salida de audio (Disco)
Número de canales 2 (Estéreo) (FL, FR)
SECCIÓN DE ALTAVOCES
Tipo Sistema de 3 altavoces de 3 vías
Altavoces
Altavoz para graves
Altavoz para agudos
Altavoz para superagudos
Impedancia
ALTA 5 Ω
BAJA 5 Ω
Potencia de entrada (IEC)
ALTA 90 W (Máx.)
BAJA 90 W (Máx.)
Nivel de presión acústica de salida
Frecuencia de cruce 2,6 kHz, 10 kHz
Gama de frecuencias
Dimensiones (AnxAlxPrf)
PL
GCP
Peso 3,2 kg
(Reflejo de graves)
Tipo cónico de 16 cm
Tipo cónico de 6 cm
Tipo piezoeléctrico
83 dB/W (1,0 m)
37 Hz–23 kHz (–16 dB)
44 Hz–22 kHz (–10 dB)
240 x 330 x 230 mm
240 x 330 x 229 mm
GENERALIDADES
Alimentación
PL
120 V CA, 60 Hz
GCP
Consumo
Dimensiones (AnxAlxPrf)
Peso 7,1 kg
Gama de temperaturas de
Gama de humedades de
Nota:
1. Las especificaciones están sujetas a
2. La distorsión armónica total se mide con
3. Las etiquetas “HIGH” y “LOW” de la parte
110–127/220–240 V CA, 50/60 Hz
PL
GCP
250 x 330 x 341 mm
funcionamiento +5 a +35 °C
funcionamiento 5 a 90 % humedad
Consumo en el modo de espera
PL
GCP
cambios sin previo aviso.
Los pesos y las dimensiones son
aproximados.
el analizador de espectro digital.
trasera de los altavoces se refieren a la
frecuencia alta y baja.
relativa (sin condensación)
238 W
255 W
0,38 W
0,85 W
16
RQT7799
Mantenimiento
Si las superficies están sucias
Utilice un paño suave y seco para limpiar este aparato.
No utilice nunca alcohol, diluyente de pintura ni bencina para limpiar
•
este aparato.
Antes de utilizar un paño tratado químicamente, lea cuidadosamente
•
las instrucciones que se entregan con el paño.
Matsushita Electric Industrial Co., Ltd.
Web Site: http://www.panasonic.co.jp/global/
Para obtener un sonido más claro
Limpie con regularidad las cabezas para asegurar una buena calidad de
reproducción y grabación.
Utilice una cinta de limpieza (no suministrada).
Page 17

The illustrations show SC-AK331 PL .
: For areas using power supply of 120 V.
PL
: For areas using power supply of 110-127/220-240 V.
GCP
Before connecting, operating or adjusting this product, please read the
instructions completely.
Please keep this manual for future reference.
CD Stereo System
Operating Instructions
Model No. SC-AK331
Table of contents
IMPORTANT SAFETY INSTRUCTIONS ................................ 3
Supplied accessories ........................................................... 3
The remote control ............................................................... 3
Set-up .................................................................................... 4
Turning the demo function on/off ....................................... 4
Front panel controls ............................................................. 5
Disc information ................................................................... 6
Discs ...................................................................................... 6
Basic play ............................................................................ 6
Album skip play ................................................................... 7
CD display ........................................................................... 7
To listen to specific discs and tracks
(Play Mode function) ........................................................ 7
Program play ....................................................................... 8
Repeat play ......................................................................... 8
Marking a track ................................................................... 8
INTRO function (Album scan) ............................................. 9
Title search function ............................................................ 9
Radio ................................................................................... 10
Cassettes ............................................................................. 11
Microphone mixing ............................................................. 12
Setting the time .................................................................. 12
Timers .................................................................................. 13
Sound quality/sound field .................................................. 13
Other functions ................................................................... 14
External unit connections .................................................. 14
Using an external unit ....................................................... 14
Using headphones (not included) ...................................... 14
Auto-off function ................................................................ 14
Convenient functions ......................................................... 14
Troubleshooting guide ....................................................... 15
Specifications ..................................................................... 16
Maintenance ........................................................................ 16
GCPPL
En Sp
RQT7799-4M
G1004HS4055
Page 18

Dear customer
GCP only
Thank you for purchasing this product.
For optimum performance and safety, please read these instructions
carefully.
These operating instructions are applicable to the following systems.
Unless otherwise indicated, illustrations in these operating instructions
are of SC-AK331: PL.
System SC-AK331
Main unit SA-AK331
Speakers SB-AK330
CAUTION!
THIS PRODUCT UTILIZES A LASER.
USE OF CONTROLS OR ADJUSTMENTS OR PERFORMANCE OF PROCEDURES OTHER THAN THOSE SPECIFIED HEREIN MAY RESULT IN HAZARDOUS RADIATION
EXPOSURE.
DO NOT OPEN COVERS AND DO NOT REPAIR YOURSELF. REFER SERVICING TO QUALIFIED PERSONNEL.
CAUTION!
DO NOT INSTALL OR PLACE THIS UNIT IN A
•
BOOKCASE, BUILT-IN CABINET OR IN ANOTHER
CONFINED SPACE. ENSURE THE UNIT IS WELL
VENTILATED. TO PREVENT RISK OF ELECTRIC
SHOCK OR FIRE HAZARD DUE TO OVERHEATING,
ENSURE THAT CURTAINS AND ANY OTHER
MATERIALS DO NOT OBSTRUCT THE VENTILATION
VENTS.
DO NOT OBSTRUCT THE UNIT’S VENTILATION
•
OPENINGS WITH NEWSPAPERS, TABLECLOTHS,
CURTAINS, AND SIMILAR ITEMS.
DO NOT PLACE SOURCES OF NAKED FLAMES, SUCH
•
AS LIGHTED CANDLES, ON THE UNIT.
DISPOSE OF BATTERIES IN AN ENVIRONMENTALLY
•
FRIENDLY MANNER.
THIS UNIT IS INTENDED FOR USE IN TROPICAL
CLIMATES.
CAUTION:
Change the voltage setting to suit the AC voltage in
your area. See page 4.
Note that the unit will be seriously damaged or fail to
operate correctly if this setting is not made correctly.
Inside of product
2
RQT7799
WARNING:
TO REDUCE THE RISK OF FIRE, ELECTRIC SHOCK
OR PRODUCT DAMAGE, DO NOT EXPOSE THIS
APPARATUS TO RAIN, MOISTURE, DRIPPING OR
SPLASHING AND THAT NO OBJECTS FILLED WITH
LIQUIDS, SUCH AS VASES, SHALL BE PLACED
ON THE APPARATUS.
This product may receive radio interference caused by mobile
telephones during use. If such interference is apparent, please
increase separation between the product and the mobile
telephone.
The socket outlet shall be installed near the equipment and
easily accessible or the mains plug or an appliance coupler
shall remain readily operable.
Page 19

IMPORTANT SAFETY INSTRUCTIONS
Read these operating instructions carefully before using the unit. Follow
the safety instructions on the unit and the applicable safety instructions
listed below. Keep these operating instructions handy for future
reference.
1) Read these instructions.
2) Keep these instructions.
3) Heed all warnings.
4) Follow all instructions.
5) Do not use this apparatus near water.
6) Clean only with dry cloth.
7) Do not block any ventilation openings. Install in accordance with
the manufacturer’s instructions.
8) Do not install near any heat sources such as radiators, heat
registers, stoves, or other apparatus (including amplifiers) that
produce heat.
9)
PL
only
Do not defeat the safety purpose of the polarized or groundingtype plug. A polarized plug has two blades with one wider than the
Supplied accessories
Please check and identify the supplied
accessories.
AC power supply cord ........................................ 1 pc.
PL
GCP
other. A grounding-type plug has two blades and a third grounding
prong. The wide blade or the third prong are provided for your
safety. If the provided plug does not fit into your outlet, consult an
electrician for replacement of the obsolete outlet.
10) Protect the power cord from being walked on or pinched
particularly at plugs, convenience receptacles, and the point where
they exit from the apparatus.
11) Only use attachments/accessories specified by the manufacturer.
12) Use only with the cart, stand, tripod, bracket, or
table specified by the manufacturer, or sold with
the apparatus. When a cart is used, use caution
when moving the cart/apparatus combination to
avoid injury from tip-over.
13) Unplug this apparatus during lightning storms or when unused
for long periods of time.
14) Refer all servicing to qualified service personnel. Servicing is
required when the apparatus has been damaged in any way,
such as power-supply cord or plug is damaged, liquid has been
spilled or objects have fallen into the apparatus, the apparatus
has been exposed to rain or moisture, does not operate normally,
or has been dropped.
GCP
Batteries for
remote control .. 2 pcs.
only
Power plug
adaptor ................ 1 pc.
FM indoor
antenna ................ 1 pc.
AM loop
antenna ................ 1 pc.
The remote control
Batteries
R6/LR6, AA, UM-3
Insert so the poles (+ and –) match those in the remote control.
•
Do not use rechargeable type batteries.
•
Do not:
mix old and new batteries.
•
use different types at the same time.
•
heat or expose to flame.
•
take apart or short-circuit.
•
attempt to recharge alkaline or manganese batteries.
•
use batteries if the covering has been peeled off.
•
keep together with metallic objects such as necklaces.
•
Mishandling of batteries can cause electrolyte leakage which can
damage items the fluid contacts and may cause a fire.
If electrolyte leaks from the batteries, consult your dealer.
Wash thoroughly with water if electrolyte comes in contact with any
part of your body.
Remove if the remote control is not going to be used for a long period
of time. Store in a cool, dark place.
Replace if the unit does not respond to the remote control even when
held close to the front panel.
Remote control transmitter ................................. 1 pc.
(N2QAHB000052)
Use
Remote control
signal sensor
30
Transmission
window
Aim at the sensor, avoiding obstacles, at a maximum range of 7
meters directly in front of the unit.
Keep the transmission window and the unit’s sensor free from dust.
•
Operation can be affected by strong light sources, such as direct
•
sunlight, and the glass doors on cabinets.
˚
Do not:
put heavy objects on the remote control.
•
take the remote control apart.
•
spill liquids onto the remote control.
•
30
˚
About 7 meters in front of
the signal sensor
3
RQT7799
Page 20

Set-up
Connect the AC power supply cord only after all other connections have been made.
Optional antenna connections (A page 11)
Preparation
Twist and pull off the vinyl tip of the antenna wires and speaker cords.
OR
If the speaker cords do not have vinyl tips, directly connect them to the terminals.
5 AC power supply cord
Insertion of connector
Even when the connector is perfectly inserted, depending
on the type of inlet used, the front part of the connector
may jut out as shown in the drawing.
However there is no problem using the unit.
GCP
only
If the power plug does not fit your socket, use the power
plug adaptor (included).
Note
The included AC power supply cord is for use with this unit only. Do not use it with
other equipment.
For your reference
To save power when the unit is not to be used for
a long time, unplug it from the household AC outlet. You will need to reset some
memory items after plugging in the unit.
Appliance inlet
Connector
Approx. 6 mm
2 AM loop antenna
Stand the antenna up on its base.
1 FM Indoor antenna
1
2
1
2
Adhensive tape
Affix where
reception is best.
(R)
GCP
4
only
Voltage selector
Use a flat-head screwdriver to set the
voltage selector on the rear panel to the
appropriate position for the area in which
this system is used.
VOLT ADJ
3 Speakers
Placement
Place the front speakers so that the super tweeter is
on the inside.
Super tweeter
GCP
Front
speaker
(left)
Note
Keep your speakers at least 10 mm away from the system
•
for proper ventilation.
These speakers do not have magnetic shielding. Do not
•
place them near televisions, personal computers or other
devices easily influenced by magnetism.
You cannot take the front net off the speakers.
•
PL
Super tweeter
Main unit
PL
GCP
Front
speaker
(right)
220–240
V
110–127
V
Connection
Blue
Gray
(L)
To household
AC outlet
Use only the supplied speakers.
The combination of the main unit
Black
Red
Caution
Use the speakers only with the recommended system.
•
Failure to do so may lead to damage to the amplifier and/
or the speakers, and may result in the risk of fire. Consult
a qualified service person if damage has occurred or if
you experience a sudden change in performance.
Do not attach these speakers to walls or ceilings.
•
Connect the
left (L) side in
the same way.
Red (+)
Black (–)
Blue (–)
Gray (+)
and speakers provide the best
sound. Using other speakers can
damage the unit and sound quality
will be negatively affected.
Notes on speaker use
You can damage your speakers
•
and shorten their useful life if
you play sound at high levels
over extended periods.
Reduce the volume in the
•
following cases to avoid
damage.
– When playing distorted sound.
– When adjusting the sound
quality.
4
RQT7799
Turning the demo function on/off
DISP, –DEMO
When the unit is first plugged in, a demonstration of its functions may
be shown on the display.
If the demo setting is off, you can show a demonstration by selecting
“DEMO ON”.
Press and hold [DISP, –DEMO].
The display changes each time the button is held down.
NO DEMO (off)
While in the standby mode, select “NO DEMO” to reduce power
consumption.
Note
DEMO function cannot be turned on when Dimmer is on.
DEMO ON (on)
Page 21

Front panel controls
H.BASS
Main unit
REW
TUNER
BAND
DISP
DEMO
AUX
REC
DECK1
CD
TAPE
DECK2
FF
DECK
1/2
STOP
1 Display
22
2 AC supply indicator [AC IN]
22
This indicator lights when the unit is connected to the AC mains
supply.
33
3
33
PL
Standby/on switch [
ff
f/I, POWER]
ff
Press to switch the unit from on to standby mode or vice versa. In
standby mode, the unit is still consuming a small amount of power.
GCP
Standby/on switch [
Press to switch the unit from on to standby mode or vice versa. In
standby mode, the unit is still consuming a small amount of power.
4 H.BASS button [H.BASS] ....................................................... 13
5 Microphone volume control [MIC VOL] ............................... 12
6 Microphone jack [MIC] ...........................................................12
7 Deck 1 cassette holder ......................................................... 11
8 Disc tray
9 Remote control signal sensor ................................................ 3
! CD tray open/close button [c, OPEN/CLOSE] .......................... 6
! CD direct play buttons [1 ~ 5] ................................................ 6
@ Headphone jack [PHONES] .................................................. 14
# Deck 2 cassette holder ......................................................... 11
ff
f/I]
ff
Center console
$ Display, demonstration button [DISP, –DEMO] .............. 4, 14
% CD skip/search, tape fast-forward/rewind, tune/preset channel
select, time adjust buttons
[g/REW/3, f/FF/4] ........................................... 6, 10, 11
^ Tuner/band select button [TUNER, BAND] .......................... 10
& CD play/pause button [:/ J, CD] ............................................ 6
* Stop/program clear button [L, STOP] ..................... 6, 8, 9, 11
( Record button [
) Deck 1 open button [c DECK1] ............................................ 11
- AUX button [AUX] .................................................................. 14
= Volume control [VOLUME DOWN, UP] .................................12
[ Tape play/direction button [;:, TAPE] ................................ 11
] Deck 2 open button [DECK2
\ Deck select button [DECK 1/2] .............................................. 11
aa
a, REC] ......................................................... 11
aa
cc
c] ............................................11
cc
Remote control
3
~
.
4
H.BASS
2
)
/
1
3
Buttons such as 3 function in exactly the same way as the
buttons on the main unit.
< Sleep timer + Auto off button [SLEEP, AUTO OFF] ...... 13, 14
= Disc button [DISC] .................................................................. 7
> Program button [PROGRAM] ........................................... 8, 10
? Play mode select button [PLAY MODE] ...................... 7, 10, 11
Use this for selecting CD play mode, tune mode, FM mode, tape
reverse mode and deck select.
@ Repeat button [REPEAT] ........................................................ 8
[ Delete button [DEL] ............................................................. 8, 9
\ Album skip buttons [
, , ALBUM] .................................... 7
] Intro button [INTRO] ............................................................... 9
^ Marker memory/recall button [MARKER] .............................. 8
_ Shift button [SHIFT]
To use functions labeled in orange\:
While pressing [SHIFT], press the corresponding button.
\
For buttons [AUTO OFF], [CLOCK/TIMER] and [rPLAY/REC]
{ Dimmer + Play timer/record timer button
[DIMMER, rPLAY/REC] ................................................... 13, 14
| CD display + Clock/timer button
[CD DISP, CLOCK/TIMER] ................................................ 7, 12
} Numbered, character buttons
[X10, 1–9, 0, A-Z, SPACE!”#] ............................................. 7-10
V CD skip/search, tape fast-forward/rewind,
tune/preset channel select, time adjust, cursor buttons
[g, REW/3, CURSOR,
f, 4/FF, CURSOR ] .................................................. 8-12
0 Enter button [ENTER] ......................................................... 8, 9
1 Title search mode select button [TITLE SEARCH] ............... 9
2 Muting button [MUTING] ....................................................... 14
3 Preset EQ select button [PRESET EQ] .................................13
5
RQT7799
Page 22

Disc information
Disc selection MP3 information
This unit can play MP3 and CD-DA (digital audio) format audio
CD-R and CD-RW that have been finalized (a process that enables
CD-R/CD-RW players to play audio CD-R and CD-RW) upon
completion of recording.
It may not be able to play some CD-R or CD-RW due to the
condition of the recording.
Disc type
Logo
Audio CD
CD-R/RW —
CD
CD
MP3
Indication used
in instructions
(Depending on the
recording format A see above)
Note about using a DualDisc
The digital audio content side of a DualDisc does not meet the technical
specifications of the Compact Disc Digital Audio (CD-DA) format so
play may not be possible.
Do not:
use irregularly shaped discs.
•
attach extra labels and stickers.
•
use discs with labels and stickers that are
•
coming off or with adhesive exuding from
XXXX XXXX XXXXX XXXX XX
XXXX XXXX XXXXX
XXXX XXXX XXXXX
XXXX XXXX
x
x
x
x
x
x
x
x
x
x
x
x
x
x
x
x
x
x
x
x
x
x
x
x
x
x
x
x
x
x
x
x
x
x
x
x
x
x
x
x
x
x
x
x
x
x
x
x
x
x
x
x
x
x
under labels and stickers.
attach scratch proof covers or any other kind of accessory.
•
write anything on the disc.
•
clean discs with liquids. (Wipe with a soft, dry cloth.)
•
use discs printed with label printers available on the market.
•
To prevent damage
Always observe the following points:
Load only 1 disc on the tray.
•
Always stop the changer before loading or changing discs. Do not
•
change discs while a disc is playing.
Set the system on a flat, level surface.
•
Always unload all discs before moving the unit.
•
Do not:
set the unit on top of magazines, inclined surfaces, etc.
•
move the unit while a tray is opening/closing, or when loaded.
•
put anything except a disc in the tray.
•
use cleaning discs or discs which are badly warped or cracked.
•
disconnect the AC power supply cord from the household AC outlet
•
during disc changing operation.
This unit can play MP3 files recorded on CD-R/RW with a computer.
Files are treated as tracks and folders are treated as albums.
This unit can access up to 999 tracks, 255 albums and 20 sessions.
When making MP3 files to play on this unit
Disc format
Discs must conform to ISO9660 level 1 or 2 (except for extended
formats).
File format
MP3 files must have the extension “.MP3” or “.mp3”.
To play in a certain order
Prefix the folder and file names with 3-digit
numbers in the order you want to play them.
Files may not be recorded in numbered order if
the prefixes have different numbers of digits.
For example: 1track.mp3, 2track.mp3,
10track.mp3.
However, some writing software may also
cause recording to occur in a different order.
MPEG Layer-3 audio decoding technology
licensed from Fraunhofer IIS and Thomson
multimedia.
Limitations on MP3 play
This unit is not compatible with packet-write format.
•
When both MP3 and CD-DA data is recorded on the disc over a
•
number of sessions:
If the first session contains MP3 recordings, the unit will play
•
from the MP3 made in that session till the session before the first
CD-DA recordings.
If the first session contains CD-DA recordings, the unit will play
•
only the recordings made in that session. The subsequent
sessions will be ignored.
Some MP3 may not be played due to the condition of the disc or
•
recording.
Recordings will not necessarily be played in the order you recorded
•
them.
Lower case letters will be displayed as upper case.
•
Example:
root
001
003
001.mp3
002.mp3
003.mp3
002
001.mp3
002.mp3
003.mp3
001.mp3
002.mp3
003.mp3
004.mp3
6
RQT7799
Discs
Basic play
Pause
Press [:/J, CD] during play.
Press again to resume play.
[:/J, CD]
Skip/Search
Press
[g/REW/3] or [f/FF/4]
to skip.
Display when skipping in stop mode
MP3
(example):
Current track
Current album
During random play (A page 7), you
•
cannot skip to tracks already played.
Hold down during play or pause
CD
to search.
During program play (A page 8), or
•
random play (A page 7), you can search
only within the track.
1 Press [c, OPEN/CLOSE] to open
the tray.
The unit comes on.
Load discs with label facing up.
To load discs in other trays, press [1]–[5]
to select the tray, then press [c, OPEN/CLOSE].
2 Press [c, OPEN/CLOSE] to close the tray.
3 Press [1]–[5] to play the disc.
POWER
[1]–[5]
Press [L, STOP] during play.
MP3
“MP3”: Indicates the disc contains MP3
CD
MP3
Current disc indicator
You can also press [:/J, CD] if the
current disc is your desired disc.
Stop
Display when in the stop mode
(example):
files
Total number
of albums
Total number
of tracks
Page 23

H.BASS
Discs
CD DISP
DISC
PLAY MODE
:/J, CD
ALBUM ( or )
H.BASS
Album skip play
Remote control only
During play or stop
Press [ALBUM ( or )] to select the desired album.
When selecting in the stop mode (example):
Current album
Number of tracks in current album
CD display
You can select a desired CD display mode.
During play or pause
Press [CD DISP] on the remote control.
Every time you press the button:
CD
Remaining play time
MP3
a Remaining b Album title
play time
g Elapsed f ID3 artist e ID3 title d ID3 album
play time name name name
Example: a Remaining play time
Note
CD
When track number 25 or greater is playing, remaining play time
•
display shows “– –:– –”.
MP3
When a title is longer than 8 characters, it will scroll across the
•
display. If you selected a mode from b - f (see above), the
scrolling will start again after every 3 seconds.
“NO ID3” is displayed if titles with ID3 tags haven’t been entered.
•
Maximum number of displayable characters:
•
Album/track title: 31
ID3 album/title/artist name: 30
(ID3 is a tag embedded in MP3 track to provide information about
the track.)
This unit can display album and track titles with ID3 tags (version
•
1.0 and 1.1). Titles containing text data that the unit doesn’t support
cannot be displayed.
Titles entered with 2-byte code cannot be displayed correctly on
•
this unit.
Elapsed play time
Numbered
buttons
L, CLEAR
CD
c Track title
MP3
MP3
CD
To listen to specific discs and
MP3
tracks (Play Mode function)
a ALL-DISC: Plays all loaded discs in succession from the
b 1-SONG: Plays one selected track on the selected disc.
c 1-ALBUM:
d 1-DISC
RANDOM: Plays one selected disc in random order.
e ALL-DISC
RANDOM:
f 1-DISC: Plays one selected disc.
g 1-ALBUM
RANDOM:
Remote control only
Preparation: Press [:/J, CD] and then [ L, CLEAR].
Press [PLAY MODE] to select the desired mode.
Every time you press the button:
CD
a ALL-DISC b 1-SONG
MP3
a ALL-DISC c 1-ALBUMb 1-SONG
ALL-DISC RANDOM
Press [:/J, CD] to start play.
ALL-DISC/1-DISC/1-DISC RANDOM CD
Press [DISC] and then [1]–[5] to select the disc.
Play starts.
1-ALBUM/1-ALBUM RANDOM
1 Press [DISC] and then [1]–[5] to select the disc.
2 Press [ALBUM ( or )] to select the album.
Play starts from the selected album.
1-SONG
CD
1 Press [DISC] and then [1]–[5] to select the disc.
2 Press the numbered buttons to select the track in the
current disc.
To select a 2-digit track, press [>10] once then the two digits.
Play starts from the selected track.
MP3
1 Press [DISC] and then [1]–[5] to select the disc.
2 Press [ALBUM ( or )] to select the album.
3 Press the numbered buttons to select the track in the
current album.
To select a 2-digit track, press [>10] once then the two digits.
To select a 3-digit track, press [>10] twice then the three digits.
Play starts from the selected track.
To stop play
Press [L, CLEAR].
When playback ends
The current play mode will be retained in memory until it is changed
even if the unit is turned off.
\
Final disc
For example, if play starts from disc 4, disc 3 will be the “final disc”.
Order of progression: Disc 4z5z1z2z3
MP3
L
When “NOT MP3/ERROR1” appears on the display
An unsupported MP3 format is being played. The unit will skip that
track and play the next one.
Note
You cannot use program mode together with Play Mode function.
•
During 1-ALBUM mode, track skipping can only be done
MP3
•
within the current album.
selected disc to the final disc \.
Plays one selected album on the selected
MP3
disc.
CD
Plays all loaded discs in random order.
MP3
Plays one selected album in random order.
f 1-DISC
f 1-DISC
e ALL-DISC RANDOM
g 1-ALBUM RANDOM
CD
d 1-DISC RANDOM
d 1-DISC RANDOM
MP3
MP3
7
RQT7799
Page 24

Discs
H.BASS
PROGRAM
REPEAT
L, CLEAR
ALBUM ( or )
INTRO
MARKER
DISC
DEL
H.BASS
Numbered
buttons
:/J, CD
CURSOR ( or ),
g
, REW/3,
f
, 4/FF
ENTER
TITLE SEARCH
To add to the program
•
CD
Do steps 2 and 3.
Do steps 2 ~ 4.
MP3
To clear the last track
•
Press [DEL].
To clear all tracks
•
Press [L, CLEAR].
While “CLEAR ALL” is blinking, press the button again to clear all
tracks.
Note
You cannot program CD-DA together with MP3 tracks.
•
The program memory is cleared when you change a disc or
MP3
•
open the disc tray.
You cannot program more than one disc for MP3.
MP3
•
Repeat play
CD
MP3
CD
Program play
You can program up to 24 tracks.
MP3
Remote control only
CD
::
Preparation: Press [
JJ
:/
J, CD] and then [L, CLEAR].
::
JJ
1 Press [PROGRAM].
“PGM” appears.
2 Press [DISC] and then [1]–[5] to select the disc.
3 Select the tracks with the numbered buttons.
To select a 2-digit track, press [>10] once then the two digits.
Repeat steps 2 and 3 to program other tracks.
4 Press [:/J, CD] to start play.
MP3
Preparation:
1. Press [DISC] and then [1]–[5] to select the disc.
2. Press [L, CLEAR].
1 Press [PROGRAM].
“PGM” appears.
2 Press [ALBUM ( or )] to select the album.
To select an album directly, press the numbered buttons
after pressing [ALBUM ( or )].
To select a 2-digit album, press [>10] once then the two digits.
To select a 3-digit album, press [>10] twice then the three digits.
3 Press [
g, REW/3] or [f, 4/FF] to select the track.
To select a track directly, press the numbered buttons after
pressing [ g, REW/3] or [f, 4/FF].
To select a 2-digit track, press [>10] once then the two digits.
To select a 3-digit track, press [>10] twice then the three digits.
4 Press [ENTER].
Repeat steps 2 ~ 4 to program other tracks.
5 Press [:/J, CD] to start play.
To exit program mode
Press [PROGRAM] in the stop mode. (You can replay your program
by pressing [PROGRAM] then [:/J, CD].)
You can do the following while “P” is displayed
Remote control only
Press [REPEAT] during play.
“ ” is displayed.
To cancel repeat play
Press [REPEAT] to clear “ ” .
Note
You can use repeat mode with program play (A see left) and Play
Mode (A page 7) functions.
CD
Marking a track
You can mark one track each on the discs loaded so that you can
start play from them later.
MP3
Remote control only
To mark a track
1 During play or stop
Select your desired track.
(A page 6, “Basic play – Skip/Search”)
2 Hold down [MARKER] until “STORING” blinks on the
display.
The selected track is stored in the marker of the current disc.
Note
If a track is already stored in the marker, it will be replaced next time
you store a new track in the same marker.
To recall a marked track number in the current disc
During play or stop
Press [MARKER] to recall a marker.
Play starts from the track recalled.
Note
“NO MARKER” indicates that the marker in the current disc is
•
empty.
The marker memory is cleared when you open the disc tray.
•
You cannot use this function during program play or random play.
•
8
RQT7799
To check program contents
•
Press [g, REW/3] or [f, 4/FF].
Every time you press the button:
CD
The track number and program order are displayed:
Track number Program order
MP3
Program order is displayed, then album number and track
number.
Page 25

INTRO function (Album scan)
You can find an album by listening to the first track of all albums in the
current disc for 10 seconds each.
MP3
Remote control only
Preparation: Press [:/J, CD] and then [ L, CLEAR].
1 Press [INTRO].
INTRO function starts.
(INTRO function is cancelled after playing the first track in the
last album on the current disc.)
2 While your desired album is playing, press [
Play continues from the first track of the album.
To stop during the process, press [INTRO] or [L, CLEAR].
Note
You cannot use this function during program play or random play.
Title search function
You can search for your desired album/track with its keyword (part of
the title).
::
:/J, CD].
::
MP3
Album/track title search
Remote control only
Preparation: Press [:/J, CD] and then [L, CLEAR].
1 For album title search
Press [TITLE SEARCH] once.
For track title search
Press [TITLE SEARCH] twice.
2 Enter the characters of the keyword for the title.
(A see right: “Entering characters”)
3 Press [ENTER].
Title search starts.
The matched title is displayed.
Album title search
Blinks to indicate album title search mode
\
Matched album title
Entering characters
You can enter a keyword of up to 8 characters for album/track title
search. You can only enter upper case letters but the unit also searches
for lower case.
Remote control only
11
1 Press the numbered button to select the required
11
character.
Characters allocated to the numbered buttons:
Numbered Characters Numbered Characters
buttons buttons
1 1 6 M N O 6
2 A B C 2 7 P Q R S 7
3 D E F 3 8 T U V 8
4 G H I 4 9 W X Y Z 9
5 J K L 5 0 0
>10
You can search for “ < ” or “ > ” by entering “ ( ” or “ ) ”.
The characters change each time a numbered button is pressed.
For example, every time you press [2]:
A B C 2
The special characters will be displayed as below:
Characters Main unit display Characters Main unit display
!
”–
#.
$/
%:
&;
’ =
(?
)_
∗ `
+
Some characters may not be displayed correctly due to the
recording format/software used.
22
2 Press [CURSOR ] to enter the character.
22
Repeat steps 1~2 to complete the keyword.
space
!”#$ %&’ ()∗ +,– ./:;=?_ `
,
Track title search
Blinks to indicate track title search mode
\
Matched track title
To show the matched title again
Press [ENTER].
To show the next/previous search result
Pulse [f, 4/FF] (next) or [ g, REW/3]
Press [:/J, CD] to start play from the album/track found.
For album search, play starts from the first track of the album.
(Search mode is cancelled.)
To cancel partway through
Press [L, CLEAR].
When there is no match for the searched keyword, the display shows
“NOT FOUND”.
Note
You cannot use title search function in program play or random play.
(previous).
L Editing keywords
To move the cursor
Press [CURSOR ( or )].
Deleting a character
1. Move the cursor over the character to be deleted.
2. Press [DEL].
Editing a character
1. Move the cursor over the character to be edited.
2. Enter the correct character.
9
RQT7799
Page 26

H.BASS
TUNER, BAND
a, REC
c DECK1
PROGRAM
PLAY MODE
TUNER, BAND
ALBUM ( or )
DISC
H.BASS
g
f
L, STOP
DECK 1/2
DECK2 c
;:, TAPE
:/J, CD
Numbered
buttons
g
, REW/3,
f
, 4/FF
/REW/3,
/FF/4
Radio
Allocation setting
Main unit only
: By adjusting the allocation, you can enable this tuner to receive
PL
GCP
Hold down [TUNER, BAND]. The display changes in a few seconds to
show the current minimum frequency. Continue to hold down the
button until the minimum frequency changes. The step is changed.
Repeat the above to change the step back.
Note
•
•
FM broadcasts allocated in 0.1MHz steps.
: By adjusting the allocation, you can enable this tuner to receive
AM broadcasts allocated in 10 kHz steps.
After changing the “allocation” setting, the frequencies you previously
preset in the memory will be cleared.
Sound is momentarily interrupted if you load/unload tapes while
listening to an AM broadcast.
Preset tuning
Remote control only
There are two methods of pre-setting stations.
Automatic presetting : All the stations the tuner can receive are
Manual presetting : You can select the stations to preset and
Up to 15 stations each can be set in the FM and AM bands.
Preparation:
Press [TUNER, BAND] to select “FM” or “AM”.
preset.
the order they are preset in.
Radio
Manual tuning
1 Press [TUNER, BAND] to select band.
The unit comes on.
Every time you press the button:
FM
AM
2 Press [PLAY MODE] on the remote control to select
“MANUAL”.
Every time you press the button:
MANUAL
3 Hold down [g/REW/3] or [f/FF/4] for a moment
to search for a station.
The frequency stops when it finds a clear station.
To stop during the process, press [g/REW/3] or [f/FF/4].
Under excessive interference, a station may not be found.
Press [ g/REW/3] or [f/FF/4] repeatedly to tune step-bystep.
“TUNED” is displayed when a radio station is tuned.
“ST” is displayed when a stereo FM broadcast is being received.
If noise is excessive in FM
Remote control only
Hold down [PLAY MODE] to display “MONO”.
Monaural sound is selected and noise reduces when reception is
weak.
Hold down [PLAY MODE] again to cancel the mode.
“MONO” is also cancelled if the frequency is changed.
PRESET
Automatic presetting
Do the following once each for FM and AM.
Preparation: Tune to the frequency where pre-setting is to begin.
Hold down [PROGRAM] until the frequency changes.
The tuner presets all the stations it can receive into the channels in
ascending order. When finished, the last station memorized is tuned
in.
Manual presetting
Pre-set the stations one at a time.
1 Press [PROGRAM] then press [g, REW/3 ] or
[f, 4/FF] to tune to the desired station.
2 Press [PROGRAM] then press [g, REW/3 ] or
[f, 4/FF] to select a channel.
3 Press [PROGRAM].
The station occupying a channel is erased if another station is preset
in that channel.
Selecting channels
Press the numbered buttons to select the channel.
To enter a 2-digit channel, press [X10], then the two digits.
OR
1 Press [PLAY MODE] to select “PRESET”.
2 Press [ g, REW/3] or [ f, 4/FF] to select the
channel.
10
RQT7799
Page 27

Optional antenna connections
Use outdoor antenna if radio reception is poor.
Note
Disconnect the outdoor antenna when the unit is not in use. Do not use the outdoor antenna during an electrical storm.
FM outdoor antenna
FM outdoor antenna
(not included)
75 Ω coaxial cable
(not included)
Rear panel
of this unit
Disconnect the FM indoor antenna.
•
The antenna should be installed by a competent technician.
•
1
2
1
2
3
30 mm
Shield braid
15 mm
Core wire
Cassettes
Playback
You can use either deck 1 or deck 2 for tape playback.
Use normal position tapes.
High position and metal position tapes can be played, but the unit will
not be able to do full justice to the characteristics of these tapes.
1 Press [;:, TAPE].
The unit comes on. If a cassette was loaded, play starts
automatically (One touch play).
2 Press [c DECK1] or [DECK2 c] and insert the cassette.
Insert with the side to be played facing
towards you and the exposed tape
facing down. Close the holder by hand.
3 Press and hold [PLAY MODE] on the remote control to
select the reverse mode.
Every time you press and hold the button:
: One side is played.
: Both sides are played.
: Both sides are played repeatedly until [L, STOP] is pressed.
To listen to 2 tapes consecutively
Load a tape into each deck and select “ ”. Both tapes will be
played repeatedly until [L, STOP] is pressed.
Front side
AM outdoor antenna
AM outdoor antenna (not included)
5 -12 m
1
Rear panel
of this unit
Run a piece of vinyl wire horizontally across a window or other
convenient location.
Leave the loop antenna connected.
4 Press [;:, TAPE] to start playback.
Every time you press the button: / R
F - : The forward side (front side) will play.
/ R: The reverse side will play.
To stop tape playback
Press [L, STOP].
To fast-forward or rewind
Press [g/REW/3] (rewind) or [f/FF/4] (fast-forward).
To select between loaded decks
Press [DECK 1/2] (remote control: [PLAY MODE]).
Note
Tape playback is momentarily interrupted if you open the other
•
deck.
Tapes exceeding 100 minutes are thin and can break or get caught
•
in the mechanism.
Tape slack can get caught up in the mechanism and should be
•
taken up before the tape is played.
Endless tapes can get caught up in the deck’s moving parts if used
•
incorrectly. Use tapes appropriate to this unit’s auto-reverse
mechanism.
2
AM loop
antenna
(included)
F -
Recording
Selection of tapes for recording
Use normal position tapes.
High position and metal position tapes can be used, but this unit will
not be able to record or erase them correctly.
Preparation:
Wind up the leader tape so recording can begin immediately.
Press [;:, TAPE] then [L, STOP] to select tape as the source.
1 Press [DECK2 c] and insert the cassette to be
recorded.
The tape direction is automatically set to “F :”.
To record on the reverse side
Press [;:, TAPE] twice, then press [L, STOP]
2 Press and hold [PLAY MODE] on the remote control to
select the reverse mode.
Every time you press and hold the button:
: One side only records.
, : Both sides record (forward
“ ” automatically changes to “ ” when [[, REC] is pressed.
reverse).
3 Select the source to be recorded.
Radio recording:
Tune in the station. (A page 10)
Disc recording:
1 Insert the disc(s) you want to record.
Press [:/J, CD] and then [ L, STOP].
2 Prepare the desired disc recording mode.
Remote control only
To record programmed tracks
•
On page 8, “Program play”, do steps:
CD
1 ~ 3
1 ~ 4
MP3
To record specific discs/tracks
•
1. Press [PLAY MODE] to select the desired mode.
(A page 7)
2. Press [DISC] and then [1]–[5] to select the disc.
Ensure disc is stopped.
MP3
3.
For 1-ALBUM mode and 1-SONG mode: Press
[ALBUM ( or )] to select the album.
4. For 1-SONG mode: Press [g, REW/3 ] or
[f, 4/FF] to select the track.
Tape-to-tape recording:
1 Press [ ;:, TAPE] and then [L, STOP].
2 Press [c DECK1] and insert the cassette you want to record.
4 Press [a, REC] to start recording.
(Continued on next page)
11
RQT7799
Page 28

Microphone mixing
H.BASS
Enjoying the microphone mixing
You can enjoy mircophone mixing with audio sources (tape/disc/radio/
aux).
H.BASS
MIC VOL
Microphone
(not included)
[, REC
MIC
SLEEP
SHIFT
H.BASS
L, STOP
;
:, TAPE
VOLUME
rPLAY/REC
CLOCK/TIMER
g
, REW/3,
f
, 4/FF
PRESET EQ
1 First, lower volume with [MIC VOL], then connect the
microphone (not included).
Plug type: 3.5 mm monaural
2 Start the source (CD, etc.).
3 Adjust volume with [VOLUME] and [MIC VOL] and sing
along.
Note
If strange noise (squealing or howling) is emitted during use, move
•
the microphone further away from the speakers, or turn down the
microphone volume.
When you are not using the microphone, disconnect it from the MIC
•
jack, and turn down the microphone volume level to MIN.
Sound quality can be adjusted when using microphone mixing but
•
recording will not be affected.
Microphone mixing recording
Preparations:
Do steps 1 and 2 on page 11: “Recording”.
•
Do step 1 on above “Enjoying the microphone mixing”.
•
When singing along with disc
•
Insert the desired discs (A page 6).
When singing along with tape
•
Insert the desired tape into deck 1 (A page 11).
When singing along with radio
•
Select your desired station (A page 10).
When singing along from an external source
•
Connect and prepare the source (A page 14).
Press [a, REC] and start microphone mixing.
12
RQT7799
Cassettes
Recording
To stop recording
Press [L, STOP].
If the tape finishes before the disc
The disc continues playing. Press [L, STOP] to stop it.
Note
Changes to volume and sound/field quality do not affect recording.
•
You cannot open deck 1 while recording.
•
You cannot fast-forward or rewind one deck while recording with
•
the other.
When recording an AM broadcast, sound is momentarily interrupted
•
when you start and stop the recording.
Erasure prevention
Use a screwdriver or
similar object to break
out the tab.
To re-record on a protected cassette
Cover the hole with adhesive tape.
To erase a tape
1. Disconnect the microphone.
2. Press [;:, TAPE] and then [ L, STOP].
3. Insert the recorded tape into deck 2.
Ensure there is no tape in deck 1.
4. Press and hold [PLAY MODE] on the remote control to select
reverse mode.
5. Press [[, REC].
Side A
Tab for side B
Tab for side A
Adhesive
tape
To stop recording
Press [L, STOP].
To record your voice
Preparation: Do steps 1 and 2 on page 11: “Recording”.
1. First, lower volume with [MIC VOL], then connect the microphone.
2. Press [a, REC] to start recording.
3. Speak through the microphone and adjust volume with [VOLUME]
and [MIC VOL].
Ensure there is no tape in deck 1.
Setting the time
Remote control only
: This is a 12-hour clock.
PL
: This is a 24-hour clock.
GCP
1 Switch on the power.
2 Press [SHIFT] + [CLOCK/TIMER] to select “CLOCK”.
Every time you press the button:
CLOCK
Previous dispaly
3 (Within 7 seconds or so)
Press [g, REW/3] or [f, 4/FF] to set the time.
4 Press [SHIFT] + [CLOCK/TIMER] to finish setting the
time.
The display will return to whatever was displayed before you set
the time.
To display the time
Press [SHIFT] + [CLOCK/TIMER] once when the unit is on or at
standby mode.
The time is shown for about 5 seconds.
Note
Reset the clock regularly to maintain accuracy.
RECPLAY
Page 29

Timers
Using the play/record timer
Remote control only
You can set the timer to come on at a certain time to wake you up (play
timer) or to record a radio station or from the aux source (record timer).
The play and record timers cannot be used together.
Preparations:
Turn the unit on and set the clock (A page 12).
•
For the play timer, prepare the desired music source (tape/disc/
•
radio/aux), and set the volume.
For the record timer, check the cassette’s erasure prevention tabs
•
(A page 12) and insert the tape in deck 2 (A page 11). Tune to
the radio station (A page 10) or select the aux source (A page
14).
1 Press [SHIFT] + [CLOCK/TIMER] to select the timer
function.
Every time you press the button:
CLOCK
Previous dispaly
rPLAY : to set the play timer
rREC : to set the record timer
(Proceed to the next step within 8 seconds)
2 ON time setting
1 Press [g, REW/3] or [f, 4/FF] to set the
time.
2 Press [SHIFT] + [CLOCK/TIMER].
OFF time setting
Repeat steps 1 and 2.
3 Press [SHIFT] + [rPLAY/REC] to display the timer
indicator.
Every time you press the button:
RECPLAY
(off)
rPLAY : to turn the play timer on
rREC : to turn the record timer on
(The indicator doesn’t appear if the ON and OFF times or the
clock hasn’t been set.)
4 Press [
To cancel the timer
Press [SHIFT] + [rPLAY/REC] to clear the timer indicator from the
display.
(The timer comes on at the set time everyday if the timer is on.)
To change the settings (when the unit is on)
To change the play/record times
Do steps 1, 2 and 4.
To change the source or volume
1. Press [SHIFT] + [rPLAY/REC] to clear the timer indicator from the
display.
2. Make changes to the source or volume.
3. Do steps 3 to 4.
To check the settings
Press [SHIFT] + [CLOCK/TIMER] while the unit is on to select “rPLAY”
or “rREC”.
The settings are shown in the following order:
Play timer: on time→off time→source→ volume
Record timer: on time→ off time→source
To check the settings while the unit is off, press [SHIFT] + [CLOCK/
TIMER] twice.
ff
f] to turn the unit off.
ff
The unit must be off for the timers to operate.
Play timer: Play will start in the set condition at the set time
•
with volume increasing gradually to the set level.
Record timer: The unit comes on 30 seconds before the set
•
time with the volume muted.
RECPLAY
If you use the unit after the timers are set
After using, check that the correct tape/disc are loaded before turning
the unit off.
Note
If you turn the unit off and on again while a timer is functioning, the
•
OFF time setting will not be activated.
If you selected AUX as the source, when the timer comes on, the
•
unit turns on and engages “AUX” as the source. If you want to
playback or record from a connected unit, set that unit’s timer to the
same time. (See the connected unit’s instruction manual.)
Using the sleep timer
Remote control only
This timer turns the unit off after a set time.
While enjoying the desired source:
Press [SLEEP] to select the time (minutes).
Every time you press the button:
SLEEP 90 SLEEP 120SLEEP 60SLEEP 30
To cancel the sleep timer
Press [SLEEP] to select “SLEEP OFF”.
To confirm the remaining time
Press [SLEEP] once.
The remaining time is shown for about 5 seconds.
To change the setting
Press [SLEEP] to select the new setting.
You can use the sleep timer in combination with the play/record timer.
Make sure the unit is off before the play/record timer’s start time.
Note
The sleep timer will be turned off when you start recording.
SLEEP OFF
Sound quality/sound field
Using the built-in sound quality/sound
field settings
Remote control only
Press [PRESET EQ] to select a setting.
Every time you press the button:
HEAVY SOFT CLEAR
(cancelled)
HEAVY (sound quality) : Adds punch to rock
SOFT (sound quality) : For background music
CLEAR (sound quality): Clarifies higher sounds
DISCO (sound field) : Produces sound with the same kind of
lengthy reverberations heard at a disco
LIVE (sound field) : Makes vocals more alive
HALL (sound field) : Adds an expansiveness to the sound to
produce the atmosphere of a great concert
hall
Note
You cannot use PRESET EQ together with H.BASS.
Enhancing the bass sound
You can enhance low-frequency sound so that heavy bass sound can
be heard clearly, even if the acoustics of your room are not optimal.
Press [H.BASS].
The button light comes on.
Press the button again to cancel.
The button light goes out.
DISCO LIVE HALL
EQ-OFF
13
RQT7799
Page 30

Other functions
H.BASS
Headphones
(not included)
Auto-off function
Remote control only
When disc or tape is selected as the source
To save power, the unit turns off if it is left unused for ten minutes.
This function does not work if the source is tuner or AUX.
Press [SHIFT] + [AUTO OFF].
“AUTO OFF” is shown on the display.
DISP, –DEMO
a, REC
AUX
AUTO OFF
SHIFT
H.BASS
External unit connections
Rear panel of
this unit
RL
(R)
(L)
DIMMER
MUTING
PHONES
VOLUME
The setting is maintained even if the unit is turned off.
If you select tuner or AUX as the source, “AUTO OFF” goes out. It
comes on again when you select disc or tape.
To cancel
Press [SHIFT] + [AUTO OFF] again.
Convenient functions
To dim the display panel
Remote control only
Press [DIMMER].
The display is dimmed and the indicator is turned off.
(The AC supply indicator remains on.)
Press [DIMMER] again to restore the display.
Switching displays
Press [DISP, –DEMO] to select the desired display mode.
Every time you press the button:
Normal
Peak hold
(off)
To mute the volume
Remote control only
Press [MUTING].
Press the button again to cancel.
“MUTING” goes out.
To cancel from the unit, turn [VOLUME] to minimum (--dB), then raise
it to the required level.
Muting is also cancelled when the unit is turned off.
Reflection
Analog player
(not included)
An analog player with a built-in phono equalizer can be connected.
•
For details, refer to the instruction manual of the units which are to
•
be connected.
When units other than those described above are to be connected,
•
please consult your audio dealer.
Using an external unit
(See above for external unit connection.)
1. Press [AUX].
The unit comes on.
2. For listening: Proceed to step 3.
For recording: Press [a, REC] (recording starts).
3. Start playback from the external source. (For details, refer to the
external unit’s instruction manual.)
Using headphones (not included)
Reduce the volume level and connect the headphones.
Plug type: 3.5 mm stereo
Note
Avoid listening for prolonged periods of time to prevent hearing damage.
14
RQT7799
Page 31

Troubleshooting guide
Before requesting service, make the checks below. If you can’t fix the system as described below, or if something not listed here occurs, refer to the
enclosed directory to locate an Authorized Service Center convenient to you or contact your dealer.
Reference pages are shown as black circled numbers 4.
Common Problems
Although the unit is in standby
mode, the display lights up and
changes continuously.
Turn off the demo function. 4
If you set the clock, demo function will be turned off automatically. @
No sound.
Sound stops.
Sound is unfixed, reversed or
comes from one speaker only.
Humming heard during play.
“ERROR” is displayed.
“– –:– –” appears on the display
at standby mode.
“F61” is displayed.
Listening to the radio
Noise is heard.
The stereo indicator flickers or
doesn’t light.
Sound is distorted.
A beat sound is heard.
A low hum is heard during AM
broadcasts.
When there is a television set nearby
The picture on the TV disappears
or stripes appear on the screen.
Turn the volume up.
Switch off the unit, determine and correct the cause, then switch the unit on. Causes include shorting
of the positive and negative speaker wires, straining of the speakers through excessive volume or
power, and using the unit in a hot environment.
Check the speaker connections. 4
An AC power supply cord or fluorescent light is near the cables. Keep other appliances and cords
away from this unit’s cables.
Incorrect operation performed. Read the instructions and try again.
You plugged the AC power supply cord in for the first time or there was a power failure recently. Set
the time. @
Check and correct the speaker cords connection. 4
If this does not fix the problem, there is a power supply problem. Consult the dealer.
Use an outdoor antenna. !
Turn the TV off or separate it from the unit.
Separate the antenna from other cables and cords.
The location and orientation of the antenna are incorrect. If you are using an indoor antenna, change
to an outdoor antenna.
The TV antenna wire is too close to the unit. Separate the antenna wire of the TV set from the unit.
Using the cassette deck
Poor quality sound.
Recording is not possible.
Playing discs
The display is wrong or play
won’t start.
Cannot perform all-disc
random play.
The total number of tracks
displayed differs each time the
same disc is inserted. Unusual
sound is heard.
CD-RW cannot be read.
“VBR–” is displayed instead of
the remaining play time.
“TAKE OUT/DISC” appears on the
display.
Remote control
Remote control doesn’t work.
Clean the heads. ^
If the erasure prevention tabs have been removed, cover the holes with adhesive tape. @
The disc may be upside down. 6
Wipe the disc.
Replace the disc if it is scratched, warped, or non-standard.
Condensation may have formed inside the unit due to a sudden change in temperature. Wait for
about an hour for it to clear and try again.
All-disc random mode cannot be used for MP3 discs. Change the disc or select another play
mode. 7
The disc may be scratched, or its data may be defective. Replace the disc.
The disc was incompletely formatted. Use the recording equipment to fully format the disc before
recording.
The unit cannot display the remaining play time for variable bit rate (VBR) tracks.
There is a problem with the disc mechanism. (A power failure may have occurred.)
The tray will open automatically. Remove the disc from the tray, and after ensuring there is no disc in
the tray, close it. The unit will make the disc changing noises for a few moments and then it should
operate normally.
Check that the batteries are inserted correctly. 3
Replace the batteries if they are worn.
Memory reset (Initialization)
When the following situations occur, refer to the instructions below to reset the memory:
There is no response when buttons are pressed.
•
You want to clear and reset the memory contents.
•
To reset memory
1 Disconnect the AC power supply cord. (Wait at least 3 minutes before proceeding to step 2)
2 While pressing and holding down [
“– – – – – – – – –” appears on the display.
3 Release [
All the settings are returned to the factory preset.
You will need to reset the memory items.
ff
f/7, POWER] (PL) or [
ff
ff
f/7, POWER] (PL) or [
ff
ff
f/7] (
ff
GCP
).
ff
f/7] (
ff
) on the main unit, reconnect the AC power supply cord.
GCP
15
RQT7799
Page 32

Specifications
AMPLIFIER SECTION
PMPO 3300 W
FTC output power
THD 10%, both channels driven
100 Hz – 3 kHz
(Low channel) 64 W per channel (5 Ω)
3 kHz–10 kHz
(High channel) 60 W per channel (5 Ω)
Total Bi-Amp power 248 W
RMS output power
THD 10%, both channels driven
1 kHz
(Low channel) 90 W per channel (5 Ω)
10 kHz
(High channel) 90 W per channel (5 Ω)
Total Bi-Amp power 360 W
AMPLIFIER SECTION
RMS output power
THD 10%, both channels driven
1 kHz
(Low channel) 90 W per channel (5 Ω)
10 kHz
(High channel) 90 W per channel (5 Ω)
Total Bi-Amp power 360 W
PL
GCP
FM/AM TUNER, TERMINALS SECTION
Preset station FM 15 stations
Frequency Modulation (FM)
Frequency range
PL
87.9 – 107.9 MHz (200 kHz steps)
87.5 – 108.0 MHz (100 kHz steps)
GCP
87.50 – 108.00 MHz (50 kHz steps)
Sensitivity 2.5 ØV (IHF)
S/N 26 dB 2.2 ØV
Antenna terminal(s) 75 Ω (unbalanced)
Amplitude Modulation (AM)
Frequency range
PL
Sensitivity
S/N 20 dB (at 1000 kHz) 560 ØV/m
S/N 20 dB (at 999 kHz) 560 ØV/m
Audio performance (Amplifier)
Input sensitivity/Input impedance
Aux 250 mV, 14.7 kΩ
Phone jack
Terminal Stereo, 3.5 mm jack
Mic jack
Sensitivity 0.7 mV, 680 Ω
Terminal Mono, 3.5 mm jack
520 – 1710 kHz (10 kHz steps)
GCP
522 – 1629 kHz (9 kHz steps)
520 – 1630 kHz (10 kHz steps)
PL
GCP
AM 15 stations
CASSETTE DECK SECTION
Track system 4 track, 2 channel
Heads
Record/playback Solid permalloy head
Erasure Double gap ferrite head
Motor DC servo motor
Recording system AC bias 100 kHz
Erasing system AC erase 100 kHz
Tape speed 4.8 cm/s
Overall frequency response
(+3 dB, –6 dB at DECK OUT)
NORMAL 35 Hz – 14 kHz
S/N 50 dB (A weighted)
Wow and flutter 0.18% (WRMS)
Fast forward and rewind time
Approx. 120 seconds with
C-60 cassette tape
DISC SECTION
Discs played [8 cm or 12 cm]
(1) CD-Audio (CD-DA)
(2) CD-R/RW (CD-DA, MP3 formatted
disc)
(3) MP3
Bit rate
MP3 32 kbps – 320 kbps
Sampling frequency
MP3 32 kHz, 44.1 kHz, 48 kHz
CD 44.1 kHz
Decoding 16 bit linear
Digital filter 8 fs
D/A converter MASH (1 bit DAC)
Pickup
Wavelength 780 nm
Beam Source Semiconductor laser
Audio output (Disc)
Number of channels 2 (Stereo) (FL, FR)
SPEAKER SECTION
Type
3 way, 3 speaker system (Bass reflex)
Speaker(s)
Woofer 16 cm cone type
Tweeter 6 cm cone type
Super tweeter Piezo type
Impedance
HIGH 5 Ω
LOW 5 Ω
Input power (IEC)
HIGH 90 W (Max)
LOW 90 W (Max)
Output sound pressure level
Cross over frequency 2.6 kHz, 10 kHz
Frequency range
Dimensions (WxHxD)
PL
GCP
Mass 3.2 kg
83 dB/W (1.0 m)
37 Hz–23 kHz (–16 dB)
44 Hz–22 kHz (–10 dB)
240 x 330 x 230 mm
240 x 330 x 229 mm
GENERAL
Power supply
PL
AC 110–127/220–240 V, 50/60 Hz
GCP
Power consumption
PL
GCP
Dimensions (WxHxD)
Mass 7.1 kg
Operating temperature range
Operating humidity range
Power consumption in standby mode
Note:
1. Specifications are subject to change without
notice.
Mass and dimensions are approximate.
2. Total harmonic distortion is measured by
the digital spectrum analyzer.
3. The labels “HIGH” and “LOW” on the rear
of the speakers refer to High frequency
and Low frequency.
5 to 90 % RH (no condensation)
PL
GCP
AC 120 V, 60 Hz
238 W
255 W
250 x 330 x 341 mm
+5 to +35 °C
0.38 W
0.85 W
16
RQT7799
Maintenance
If the surfaces are dirty
To clean this unit, wipe with a soft, dry cloth.
Never use alcohol, paint thinner or benzine to clean this unit.
•
Before using a chemically treated cloth, read the instructions that
•
came with the cloth carefully.
Matsushita Electric Industrial Co., Ltd.
Web Site: http://www.panasonic.co.jp/global/
For a cleaner, crisper sound
Clean the heads regularly to assure good quality playback and recording.
Use a cleaning tape (not included).
 Loading...