

Panasonic SC-AK28 User Manual
CD Stereo System
Operating Instructions
Modal No. SC~AK28
SC-AK18
>... • /\'.-
V.- •’ ;•
. .f: - A
7v.,r,7.v
."V ':i> •:■. - "-•-i
• ■.:Jy: f.S.'J
:V;-,•'■ •;i-.'V-::;i;.A'"■ '■ :■:{■ •:• -•-:.:•V ^''.
•..' iiefor&.cérFtécti^^ .iw.aifiJrtftfl' iifa' pnj^. •' V: '.i ;.
,^ì::™flflkkeep*lé.'riiwùé*1oFfutuV
liSsàuéilprii .'eorripteiaiy; • .' r
bATCr>ftK_H Q

■
Dear customer
Thark you tei pli(chask^g this product.
For opftnim pertofiriarks end safety, piesas reed these Instructions
cerefitiy.
These operating Inslructlcns are appllcehle to the feltowing system.
These operating irieErixtione, however, fundBrnentalty expfaln the
operation of system 5C-AK2S.
Syst^ S&AKZe
Ma^ unit SA-AK26 SA-AKIti
$B-AK2«A
^»akere
(For AuetreJk) and
New Zeeland:
SB-AK28)
SC-AK18
SB-AKtQA
(For Australia and
New Zea^id:
SB-AKie}
Supplied accessories
Pleaae check and identify the
supplied accressoiies.
i I AC main« lead
Fur Urtited Kingdom
(RJAW44-1C)
\ О RenKrti control tran^lttar...................
SC-AKZat (RAK-SC957WK)
ЭС-АК18; {EUR648200)
..........................
Fgr Australia and New
Zealand
{RJA0035-XJ
3
.......................
.... 1 pc.
1pc.
(Beck of product)
ricai US FKM И Ml №
0i№3l
f,'n[WD»4'Q£lll
WH£U(^n«.CClJ<kW.dl^.t{nRnSC
aifLjfRMH LMeLUETT3EPI3lLJl
nr.l£U il, аш им Oirpi X se 1ТБ 4Л№
rtRCH
ItIftlUVilUlJAUliVim iU,l,UniUl£ffl
:rwj итанШжкНкшхщаткк.
MBItflLMIMi. inUcV.MSnIJF'i
£ш inarUi« rti ran File samejiU
Ю/fifiS.
^TiTK. iMfitswHKrne.a
'JMWr ь«шниа «¡moK Siam
UtlRStCkT
JS£I£iiStUSa_
_____________
(indli cr РГ9<МС|)
(IndinUBn M sopvslet)
IJgcewtlseiS)
[.Af(«re,te4 uiMt)
iProdukimiiTBUB)
IlmitHWMVdH OaritQ^
CAUTIONI
TTIB PRODUCT UTIUZeS a laser.
USE OF COtfTROLS OR ADJUSTMENTS OR PERFORMANCE
OP PROCEDURES OTHER THAN TW9E SPECIFED HERBN
MAY RESULT IN HAZARDOUS RADIATION E>U>OSURE.
DO NCrr OPEN COVERS AND DO NOT REPMR YOURSELF.
REFER SERVICINQ TO QUAUFIED PEFESONNELh
Q Baderlea for remote control
PU Irxloor antenna..
FitrUruted Wngdom
(RSA0007)
□ АИ loop antenna (RSA0CI29)
Q Antenna plufl ad^Nor (SJP9009).
(United KIngdcrti oNy}
............................... 2pcs.
...................................... 1 pc.
...................
Ю
Fcr Auafroia and New
Zealand
(RSAOQOM
...
........ 1 pc.
1pc.
CAUTION!
DO NOT NSTALL OH PLACE THE UNIT IN A BOOKCASE
BUILT IN CABINET OR IN ANOTHER CONRNED SPACE.
ENSURE THE UNIT B VkELL VENnLATED ENSURE THAT CUR^
TAINS AND ANY OTHER MATERIALS DO NOT OBSTRUCT THE
VENTLATION tO PREVENT RISK OP ELECmC SHOCK OR
FIRE HAZARD DUE TO OVERHEATTNC
Ltee nijinbem intfcated ir> parentheees 44ieri a^<ng tor repiacament
parte.

Before using
Placement
SuppUad aecMsortM
Sof^ precauUDns..........................................
Caution for AC Mains Lead
..............
..................................................................................
...
......................-................
..................
..........................................................................
...
..............................
—-
CnnoArriing ttiA htìmrrt» mMitrnl ....................................................................................
Battery inetsilailon .................................................................................................
..
rVirTRnt mflthivl nf MRB .............................................
Placement Of speakers.......................................
Conrtectlons.....
....................
.........................................................................................................
Basic ccdnactlons (for supplied accessorlea.)
.. .........
.............................
...
CT[iJinnRl artfsrwift I'rtrirttiirfinrtc ........................................................................................
External urrt connection
Front panel controls.
............
...................................
............................................................................
...
Turning the demo function off ...........................
ECO moda
AutCKjff function
Setting the tima
Convantent functions ........................................................................................................
.......
.............................................................................-
.............
.......................................................................................................
............
.......................................................................
................
...
...
..............................
..
..
Radio Operations
Pi milting radia broocteaeti
LIstMingta ridio broadeaete
.............................
..................
.......................
Compact disc opcrotioos
(ТогоегпГпд compatii diMi« ........................... .
UiMnln9 to iiompact dica
Direct acccea play
Repeat play .....................
............................................................................................................................................ 16
......
......................................... .
......................................................................
........................14
FtandcfTi play
Pro^m play
To Itslan to apociaJ CDs and tracks (CD Маладег function) .,,,.16
Cassette deck operations
.....................................
.
....................................
.....................................
............
......................
.....................................
..
.
....................................
.....................................6
.
................ 7
..
..................................ID
ааиааш^ь^4ра, ^0
.
................................10
16
.
12
..16
13
.17
Set ifie system 141 cn an even surface away from diraci aunlfght,
high temperatures, high hurridity, and encesstvs utbratkin. These
4
5
5
,5
6
conditicine can dantaga fha cabinet and d№ar components, iharaby
shortening Ihe unifs service life.
Place It et least 15 ctn ayray Ircm wall aurfacae to avoid diatonlcn
and unwanted Rustical affaciB.
Do not place heavy items on the unit
6
Voilage
Do not use high voltage power aouroea. This can overload ths unit
and oauaeafire.
Do not uea B DC power souiCB. Check the source carefully vrtian
setting the unit up on a ship or other place where DC is used.
AC mains lead protection
Ensureltia AC meins teed Is connected correctly and not-damaged.
Poor connecb'on and lead damage car cause fira or electrfe ahoch.
Do not pull, bend, or pleme heavy llarte on the lead.
Grasp the plug lirmly whan unplugging the leed. Pulling the AC
mains lead can cause etecMc sliock.
Do not hendle the plug with wet hands. Thia can caues electric
shock.
Foroiqn matter
Do not let metal objects fall Inside the unit This can l^'J=^l.^вg electilc
16
shock or metfunetkin.
Do not let liquids get into the unit This oan cause otoctric shock or
malfunction. If this occurs. immsdiatBly disconnect the unit from the
power aupply end contact your dealer.
Do not spray in^ectlcrdes onto or into the unit They contain
flammable gasee ntijch can IgnAe if sprayed into the unit.
Llafaning to tapM
Oorweniing casaatte tafias
......... .
...................................
.........................
.
.
........................-..ao
Recording oporotions
Btforc ncarctlng (Dock 2 only}
Tapa^tipo mcoftSng
.....
Ascordlng from radfo broecicaats.......................-—
Recording from compapt discs
To [^ord special CDs and tracks (CO Manager function)
Sound quolit//sound field operotiona
Using Itia hullt-ln sound quilfey^ound flald saltings.........—... 25
Boosting №u super woofer gjiQuyy............................
Adding bau
Veryhg tbs sound quality wKh the menud squaHzsr......
Varying tha sound quality with the eeousttc imags
(Al) squellsar
...
...............................
Timer operations
Using the Umar . .................
Using the play/record timar.
Uaing №e sdaap timer....
Reference
Using on externil unit
TtiMüeahocrttng guhk_____
Ualntenance.........................
Techrloal speeirrcations
ttK.'
.....
............................
.................................................
.
.
.............
...
........................................
............. 25
.......................................................26
_______
.
.............
...................................
........
...............
.
.............„29
............30
...............................31
BaoK Cover
...21
...21
....22
-
....23
..-..26
27
Service
O0 not attempi to tepeir thie unlt by youraoif. |f sound is irrtemrptad,
ìncAcators fall te aghi, emoke appeara, or eny enhar ргоЫегл that te net
cQvared in ttwse Instrudione occurs, diaooraiect thè AC maina tead
and contact уС1д dealer or an authcitcad ssivloe cantar. Electric shock
or damage lo thè irnit oan oocur tf thè unlt le rapeàad, dlaassamtJad
or reconstructed by unqualiriad parsone.
24
Extend operatrig ife bydiscennading the uni from the power edurca
It Is not Ip bo used for a long lime.
26
27
26

(Far UnitPd Kinnrlnm^ warning: do not connect e™
(For United Kingdom)
\ru\ U\llieu r\ll lyuoilij THE EARTH TERMINAL WHICH IS W
(“EB” area code moctal only)
For voiir salety, please read Ihe following tart carefully*
This appliance is supplied with a moulded three pin
mains plug for your safety and convenience.
A 5-ampere fuse is fitted in this plug.
Should tfie fuse need to be replaced please ensure that
the replacement fuse has a rating of 5-ampere and that
It Is approved by ASIA or BSI to BSI382.
Check for the ASIA made or the BSI mode ^ on the
body of the fuse.
if the plug contains a removabte fuse cover you must
ensure that it Is refitted when the fuse is replaced.
If you lose the fuse oover the plug must not be used
until a replacement cover is obtained.
A replacement fuse cover can be purchased from your
local dealer.
WARNING: DO NOT CONNECT EfTHBR WIRE TO
THE EARTH TERMINAL WHICH IS MARKED WfTH
THE LETTER B, BY THE EARTH SYMBOL ^ OR
COLOURED GREEN OR GREEWYELLOW,
THIS PLUG IS NOT WATERPROOF—KEEP DRY.
Before use
Remove the connector cover.
How to replace the fuse
The locatior of the fuse differ according lo the type of
AC mains plug (figures A and B). Confirm №e AC mains
plug fitted ar>d follow the Instructions below.
INustralions may differ from actual AC mains plug.
CAUTION!
IF THE FITTED MOULDED PLUG iS UNSUITABLE
FOR THE SOCKET OUTLET IN YOUR HOME THEN
THE FUSE SHOULD BE REMOVED AND THE PLUG
CUT OFF AND DISPOSED OF SAFELY.
THERE IS A DANGER OF SEVERE ELECTRICAL
SHOCK IF THE CUT OFF PLUG 13 INSERTED INTO
ANY 13-AMPERE SOCKET.
if a new plug is to be fitted please observe №e vnring
code as stated belcw.
If in any doubt please cor^sult a qualified electrician.
IMPORTAm'
The wires in this mains lead are coloured in accordance
with the following code:
Blue: Neutral, Brown: Live.
As these colours may not correapend with the coloured
markings Identifying the terminals in your plug, proceed
as fc)k>ws:
The wire which is coloured Blue must be connected to
the terminal which is marked with the letter N or coloured
Black or Blue.
The wire which f$ coloured Brown must be connected to
the terminal which Is mailced with the letter L or coloured
Brown or Red.
2. Fteplaos the fuse and close or attach the fuse cover.
Battery- rnstaJIatian
Um gf bctn«n«»
« Align (he poles (+ end -) properly when Insertfng Eho batterlse.
e Do not mlK old and new batteries or different tvvee of bslterlss.
• Do not recharge ordinary dr>'cell batteries.
• Do not heat or disassefrible the bsttohes. Do not allcw them lo
contact Usme or iiva№.
e RsiTiove ihe bsUsneB If the unit is net io be used ter a Icng tims.
• Do not ks^ (ogettisr with metallic ebjeds such as nsoklacBs.
e Do not use rechargeatte tvps b^hea.
Mishandling of batteries car cause elocljoiyte leakage Vftdch can
domage Items the fluid comads end may cause a firs.
If eladrotyte lea^ Irom the batteries, oonaidt your dealer.
Wash thofOLighly with ivater If sleotrolyte comsis ai contact with any
pertd your body.
Trangmlasla
wlr*dow
About 7 meters In frciit of
ihe Bi^eJ sensor
Corrcr<t method ol vse
13
Operation note»
• Oo not place ebstades between the remote oontroi signal sensor
and remote oonird unit
• Do not expose Ihe remote control signal sareca- to direct aunflghr
or to the bright light of a fluorescent light
• Take care to keep the remote cortirol signal sensor and end of the
remote control urit Ires trcvn dust.
e If this system la installed In e rack with glass doers, Ihe gfaea
dcojs' iMekneea or oolotv might make It necsesaiy to useths remde
. conlrd a shorter distbroe froiri the system.
To prevent damage
Never placa hservy Items on tup of the unit.
Do not ebaassembte or rsconstruetthe uniL
Do not spi water or other liquida Into the ixilt.
speakers so that ths super woofer is cn the oulside.
'■!^4. . .. Jl .11
orienlallon Is necessary.
re designed Msnlice3)y so that no Islt 'or lighl channel
• Keep your epeakers al isest lOmrrt away frem the system fgr
proper venill^on.
• These spesAers do not have ma^iel» ehieltSng. Do not place
them rear telavisicr>e, personal computers or odier devfcse aeelty
Ihlusnced by magnetism.
• To avoid damage 10 the speaksijs, de not touch the speaker cones
if you harre takart ths nets off.
Basic connections (for supplied occessorios)
Plug the AC mains laed Into a household mains socket only after
all other oonnectlons haua been cnaOe.
To pregiare ti>e antenna wires and speaker corde, twist the vinyl
covert and pull off.
Foi' Aitr;ljn?i<i unti >Jei.v Zerifonc,!
-i' <• •„
The oonfigurattorv of the FM and AM antenna termlnela are different.
Conrtactihe FM Indoor antenna.
Tape the antenna to a wall or column, In e poeflini wtiere radP
aignels are received with the least amount of intar^rence.
n
TÌi-MÌMfì^^ '^¡^■iniiiï'^^^É^-rBiiiii'iiV'^--^—’ ■ ■.
X
For AustnEla and Hsw Zealand For United Kingdom
Adheehre tap«^
FM indoor antenna •
For Australia and New Zealand Far Un№d Kingdom
»“r
AMkic^ antenna
SC-flK7J5
— Red(+>
---
tS!
CP
For best reception sound qualtty;
Ar> FM Duldcor anteme ts reccmmanded. (See page 7.)
Conned th* AM loop antenna.
After atlachiig the antenna, turn on the system artd tuna in a
broadcast atelion. Then, turn the aniema to the angle ol beet
reception artd Isset IrrterfererKO.
Connect the speaker ceblea.
B
Conrtact each end of the speaker cables to the teimlnal lever of
the same ccfour.
Uaa only the supplied apeakers.
The oombcnation of the maih isiit and speakers provide the
beet sound. UsInQ ether speahets can tbmage the unit and
Sound quality wHI be negetwety affected.
To prshrenf damage to dicuitiy, never shcrt^drcuitpoeitn^ ^.4.}
and negative (-) epeakar wires.
Caution
* Use the epeaksrs onl^ with the recommended
ayetem.
Failure to do eo mey lead to damage to the
ampllller antVor the epealosrB, and may result hi
theHskof flm,
Consult a qudiflad service person If damage has
occurred or If you expartonce a sudden change
In perfonnatiee.
* Do not otlBci] these epeakera to walla or osSInga.
Connect the AC maina laed.
<3rey (+)
sc-AKia
□
9 ^
Appliance inlet
Approji, 6jrim
Black H
Bli^ H
Rad (+)
Blactc (-]
Connector
(FOR UNITED KINGDOM ONLY)
BE BURE TO READ THE CALTRON FOH THE
AC MAINS LEAD ON PAGE 4 BEFORE
CONNECTION.
Insertion ol connMdor
Even when the ccnnocror Is perlsctly inserted, depending on
the type of Inlet used, the front part of the connector may }ut out
as shown In the drawmg.
However them Is no preblsm using the unit.
The Induded AC mains lead Is for usa with Ihs unt c^ily. Do
net use it wtth oinsr equipment

Optional antenne connections
Yc^u may need ar outdoor antenra IF you uae ttils systsm In a
mountalnoua regiori or Inside a relnforc^d^ncrsts tailing, eto.
FM outdoor ontanng О
Disconnect the FU Indoor antenna ll sc FM oiitdoor anienna is in-
staled,
0 Ftemqve a olece of the outer XifTryl irfidlator.
® Twist the ehiald braid,
0 Expose the core wire.
An ouldoof antenna should Os inetadled by a quelifiad technician coty.
AM outdoor dnieitna Ш
Conrrect ttia ouldoor antenre wllhout removing the AM loop antenna.
Run 5 10 I2ni of vwiyl-ccvered vrire hortzontslly along e wmdow or
other corhreniarrt locailcn.
When the unit ie net in use, dsconnect №e outdoor anterma to prevent
poeslbde damage that may be caused by llghtring. Never uaa wi
outdoorantsnna during an aledrical atofni.
External unit cannectfon
• Make sure that the power supply tor al cemponents has been
turned off before making any donnections.
« For de^ls, referto Ihe operating inelructicna of the unit which are
td be cerneded.
« Afl peripheral components and cables sold e^emlety.
ConnectBtg amdog oquipment В
An analog player vrtth a buM-ln phono equalizer can be conoecaed.
When units other then fheea described an to be coitnacledr pease
.consult your aui& ds^r.
Connecting digital oquipmont to the optical
fibar out torniTnal D
(For United Kingdomi modal SC-AK28 oniyi
Remove the duet-proteefon cap and ccrnect an optical niter ceble
(not included) to the opdcai Inpul terminal of Ihs receiver or minimise
recorder.
Whan this termkiel is not being used, attach the cap.
■ ■ ^ '^''''’ i ''■''^ ■• '• •• '•'?''• ? *'.^-• iy •;i]''?■•'],■•''"r V' • •
Main imh Q
Mix
Ebo button (MOD€}.
CD
Staniftiv/on switch (O/l, POWER).
Msma
r Id4d ■ ■ •■ ■ ■ ■ ■ ■ Maaaaa||444 r
a M aaaaa444aTPaaaaaaaa*ra
Rtit. pas*
10
10
For Uiiilcd KinfjfJon
Standbyibrt switch (Ort).................................................................*.10
Press to Switch Iha unll fn?m cn to standby mod« or vJco verea.
In $tani±iy mode, (he unit Is stil oonsuming a small amount of
power.
AC supply Irxllpator (AC IN)
This indicelor Ughts wheri the unit Is cornectad to Che AC mains
si^pty.
Play timsrfrecord timar buttort end Indicator
(SPLAY/SREC)
ClockAiinar button
(CLOCK/TTMER)
Display
®-
Deck 1 oe&settfl holder aaaaaaa aaaaaaa*4+4 ^badadbaaraaaaaaaaaMa*a*4M 19
Disc droct play, opwi/closa buttons and sidlcators
(CD1 ** ) aaaaaa*«aaaaaaqq4^baaaaaaaH*aaaaaaaa^bllbabaa*«aaaaaaa 15
CD manapar button
(CD MANAGER) ........................................................................18,24
Random play button (RANDOM)
Disc iray
Display sslect/dantonsirstlon button
(■DiSPH3EHO)
..............................................................................
............
....................................................1i, 27, 28
....................................................
................................................................... 10.11
27
16
Super woofw on/off button
(S. WOOFER)
BS3EI
V.fiAS$ ontoH tMinon (V.BASS)
Volume control (VOLUME)
OD Al EO button (3D Al EG)
Headphone jack (PHONES)
Deck 2 CBSsetts holder
Center console Q
Tapefdeck eelact button {TAPE, DECK 1 (2)
CD button (CO)
IP
Tuner/band esiect button (TUNER, BAND)
®
AUX button (AUX)
Dack 1 open button (^ DECK 1 OPEN)
Oaalc opevattng buttons
Furtedons iihangs aoogrdlng to iTis source.
Tape edit button (TAPE EDIT)
Recording etarVetop button (• REC/STOP)
©
Reverse mods select button (REV MODE)
Deck 2 open button («b DECK 2 OPEN)
Sound equalizer control (SOUND EG)
...............................
...................
14« a a a a a a a *« a a a a a a a a p • 111
a auaaqq44ebblbaaaarvaaa
iAaaaaqq||4,nad«aaaa
...................
bbbdM44r*vaaa
^25
25
13
26
_... 29
19
19
18
12
.29
19
21
22
19
19
25
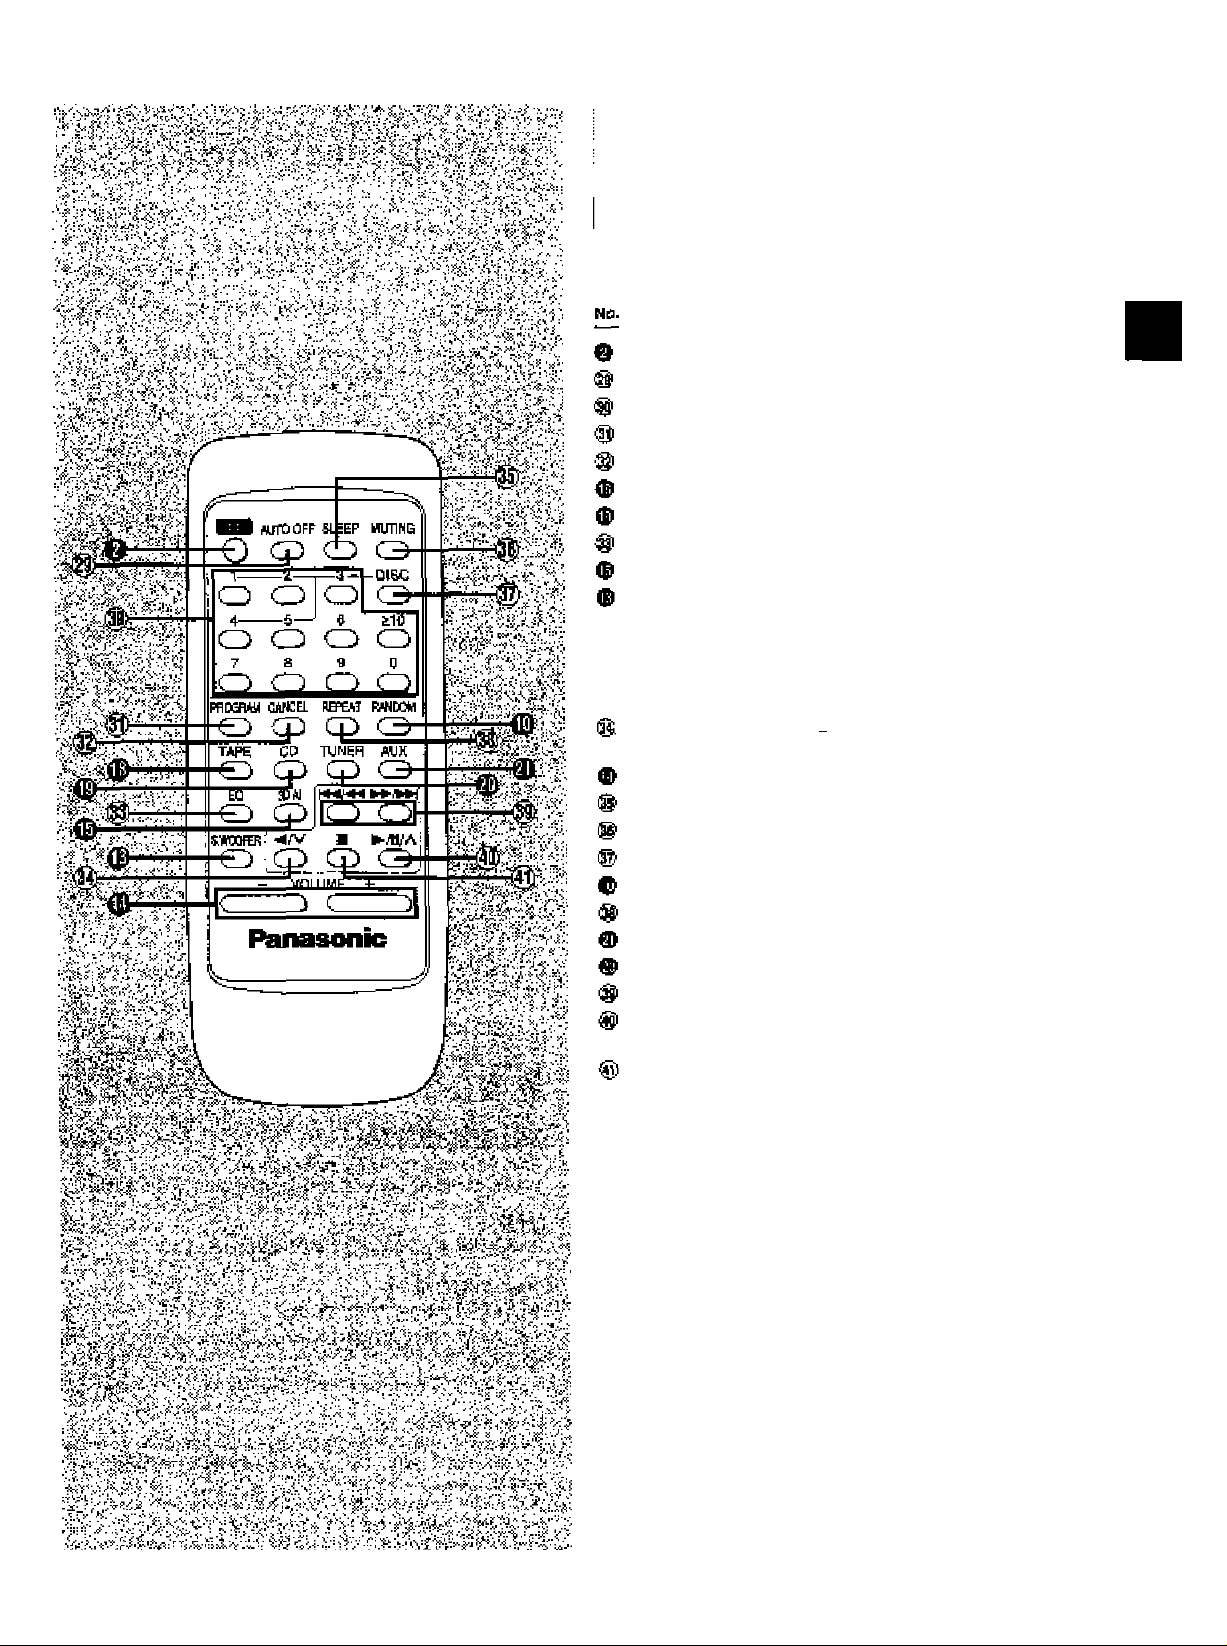
conimi
Bc,Jtton9 such BA @ fundions tn axadJy ti^ same way as liie buttons
onttiemalr unit,
riiiM Ret, page
standbyten button (ili).....
Auto off button (AUTO OFF)
Numeric buttoru ^10,1-4}
Program button (PROGRAM)
Cancel button (CANCEL)
Tape/dock select button (TAPE)
CO button (CD)
EO select button ^0)
aaaaaaaaaMaaqaqqaqqqq^pp•111b11dd4d + r« aaaaaaa
.............
-
abaaaaq^a^^+aa
aaaaa«aaaaaaaa*abaaaaq||q^4 b4+daaaaaa««a
10
10
13,16
„ 17
-.17
... 19
-.10
2S
3D Al EQ select button <3D Al)
Super woofer onAoff button
(S.WOOFER)
V.BASS on/off button (V.BASS)..............
...........-.........
......
...........
.25
.......... 25
Reverse aide playbeohi^reset channel
eelSGt button {^)
Volume buttons (- VOLUME +)
..............................-......................
.......... ...............—..........
-13,15
13
Sleep button (SLEEP) ^bei*bl*be+llll+Sei-abldaaaaaaaanaaaaaaa*«»«aaa 20
Muting button (MUTING)
Disc button (DISOmm-,
..................-.......................
..................................
............
......
.......
„11
,15
Random button (RANDOM) « a a a a w« a a a a a a a a a a a M « a a a a a a a a ^ ^ ^ b b I d 15
Repeat button (REPEAT)
AUX button (AUX)
Tuner/band aelect button (TUNER)
Sklr^seerch buttons
...........................—..........—.......
.....
................................
..........
.....
...................
..................
......
.....
- IS, 20
15
25
12
Play/pauee/presel channel
eelect button (^Al/A) ■dll+4 bbbdlaavaaaaaddv^Taiaaaaaaaaa 13,15,19
Stop button (■)
.....................-......-.........
......
.........
».,..15,19
■Ì- • .«•-•v/t^.v^':?-'.i5V'.!V •v^^-'Vv.-f^
.Ì1..V.V1- ..i..i!":. '1 i T-.'i'-' -ì'-ìì .ì-' t.'.'ii'.v
■
II Ihe dock hae not beer sat, a dsmonslraliort of itig depley is stKwn
vit*a thè is swttctiad ^ stsmdby.
Tlìts functlon ie to on arttie 4m« o( purcriaea.
Turn VM funcilc?i off (0 ge( thd most from 1^a seo mode (see belc^f.
Pnss and hold f-l»SPM)EMO] unttl *‘N0 DEMO’’ ia dlaplayed.
The dsplay charges each (Ime (he bunon Is hs(d d№n.
NO DEMO (ipft) DEMO (ori)
Wher Itile mode ia uaad, (he display remains bUrik wr>en ttie imit
ie switched IO standby moda and thè powaf consumed Is retbjced
to 0.4 W from a maximum of liWTTis moda la esl to on at thè Unta of purchase.
~‘''''''-,.^ondii»3n Ir sardtty
ECO mode
off
or
To got the most Irciri this mods, (urn ths demo fundian otf or set tha
dock.
Turning EGO er and off
Prdftd [ОЛ] to turn the unit on.
Press [MODE).
The cunsm ECO mods is displave(l< Press again to diengs ths mods.
The diEflay diengss each Hme Ehs button q pressed.
NORMAL (Qif) ECO (on)
The SCO mode car be tumed on if the unit Is In stanAy hut ft cannd
be turned off.
Display
olcct;
blark
Power 00 nsumption
12W
Q.4-W
ftv 1>'11чИг cu'Hio only
Wher CD or tape la aslsoted ss the source
To save power, the unit turns off If It la lait unused for four minutes.
This function does not work If the sourca is tuiar or AUX.
Press lAUTO OFFl,
“AUTO OFF’ Q shown or the dsplay.
T01:aiii»t
Press [AUTO OFF] again lo dear “AUTO OFF from the dsplay.
For your reference
The setting 1$ maintained ever if tha unit is turned of. When ihe lintt is
tumad on again, 'AUTO OFF is displayed and the unit frinctlona as
described above.
“AUTO OFF cSsappsars from the dfsplay if either tuner or AUX is
aaiacted as the sourca but contiruiss to function normally.
“AUTO OFF remaine dsplayed if CD orlape laaaiacted as the source.
 Loading...