

Panasonic SBTP100 User Manual [en, ru, de, es, fr, it, cs, pl]
Note:
“EB” on the packaging indicates the United Kingdom.
Operating Instructions
Instrucciones de funcionamiento
Mode d’emploi/Gebruiksaanwijzing
Bedienungsanleitung
Istruzioni per l’uso
Bruksanvisning
Betjeningsvejledning
Návod k obsluze/Instrukcja obsługi
Инструкция по эксплуатации
Інструкції з експлуатації
Speaker System
Cajas acústicas
Enceinte acoustique
Luidsprekersysteem
ENGLISHESPAÑOLFRANÇAIS
NEDERLANDS
Before connecting, operating or adjusting this product, please read
these instructions completely.
Please keep this manual for future reference.
Antes de conectar, operar o ajustar este producto, sírvase leer estas instrucciones completamente.
Guarde este manual.
Avant de raccorder, faire fonctionner ou régler l’appareil, lire attentivement tout ce mode d’emploi.
Conserver ce manuel.
Gelieve deze gebruiksaanwijzing volledig door te lezen alvorens dit
product aan te sluiten, te bedienen of af te stellen.
Bewaar deze gebruiksaanwijzing.
Bitte lesen Sie diese Bedienungsanleitung vor dem Anschließen,
Inbetriebnehmen oder Einstellen dieses Gerätes vollständig durch.
Diese Anleitung bitte aufbewahren.
Prima di collegare, far funzionare o regolare l’appa recchio, leggere
completamente queste istruzioni.
Conservare questo manuale.
Läs denna bruksanvisning helt innan du ansluter, använder eller
justerar denna produkt.
Spara denna bruksanvisning.
Læs venligst hele denne betjeningsvejledning, før du tilslutter,
betjener eller indstiller dette apparat.
Gem vejledningen til senere brug.
Dříve než začnete jakékoli zapojování, operace nebo nastavování
tohoto výrobku, prostudujte si prosím celý tento návod.
Uschovejte si prosím tento návod k obsluze.
Przed podłączeniem uruchomieniem, lub regulacją sprzętu prosimy
o dokładne zapoznanie się z treścią niniejszej instrukcji.
Pro simy o zachowanie niniejszej instrukcji obsługi.
Niniejsza instrukcja została opracowana na pod stawie oryginalnej
publikacji fi rmy MATSUSHITA ELECTRIC INDUSTRIAL CO., LTD.
Перед подключением, работой или регулировкой данного
аппарата прочтите, пожалуйста, эту инструкцию полностью.
Сохраните, пожалуйста, эту инструкцию.
Перед тим, як підключати, використовувати або налаштовувати
цей пристрій, будь ласка, повністю прочитайте ці інструкції.
Збережіть цей документ для використання в майбутньому.
Lautsprecheranlage
Cassa acustica
Högtalarsystem
Højttalersystem
Reprosoustava
Zestaw głośników
Акустическая система
Акустична система
Model No. SB-TP100
ENGLISH See the pages 2–4, 6, 8–20 and 62.
ESPAÑOL Véase las páginas 2, 4, 6, 8–20 y 62.
FRANÇAIS Voir les pages 2, 5, 7–19, 21 et 62.
NEDERLANDS
DEUTSCH Siehe Seite 22–23, 26, 28–40 und 63.
ITALIANO Vedere alle pagg. 22–23, 26, 28–40 e 63.
SVENSKA Se sidorna 22, 24–25, 27–39, 41 och 63.
DANSK Se side 22, 24, 27–39, 41 og 63.
ČESKY Viz str. 42–43, 46, 48–60, a zadní strana obalu.
POLSKI Patrz strony 42–43, 45–46, 48–60 i okładka ty-
РУССКИЙ ЯЗЫК
УКРАЇНСЬКА
Zie bladzijden 2, 5, 7–19, 21 en 62.
lna.
Cм. стр. 42, 44–45, 47–59, 61 и обратную
сторону обложки.
Див. сторінки 42, 44–45, 47–59, 61 а також на
задньому боці обкладинки.
DEUTSCHITALIANOSVENSKADANSK
ČESKY
POLSKI
ЯЗЫК
РУССКИЙ
EB GNE
УКРАЇНСЬКА
RQT8573-1E
ENGLISHESPAÑOLFRANÇAIS
NEDERLANDS
2
RQT8573
Dear customer
Thank you for purchasing this product.
For optimum performance and safety, please read these instructions carefully.
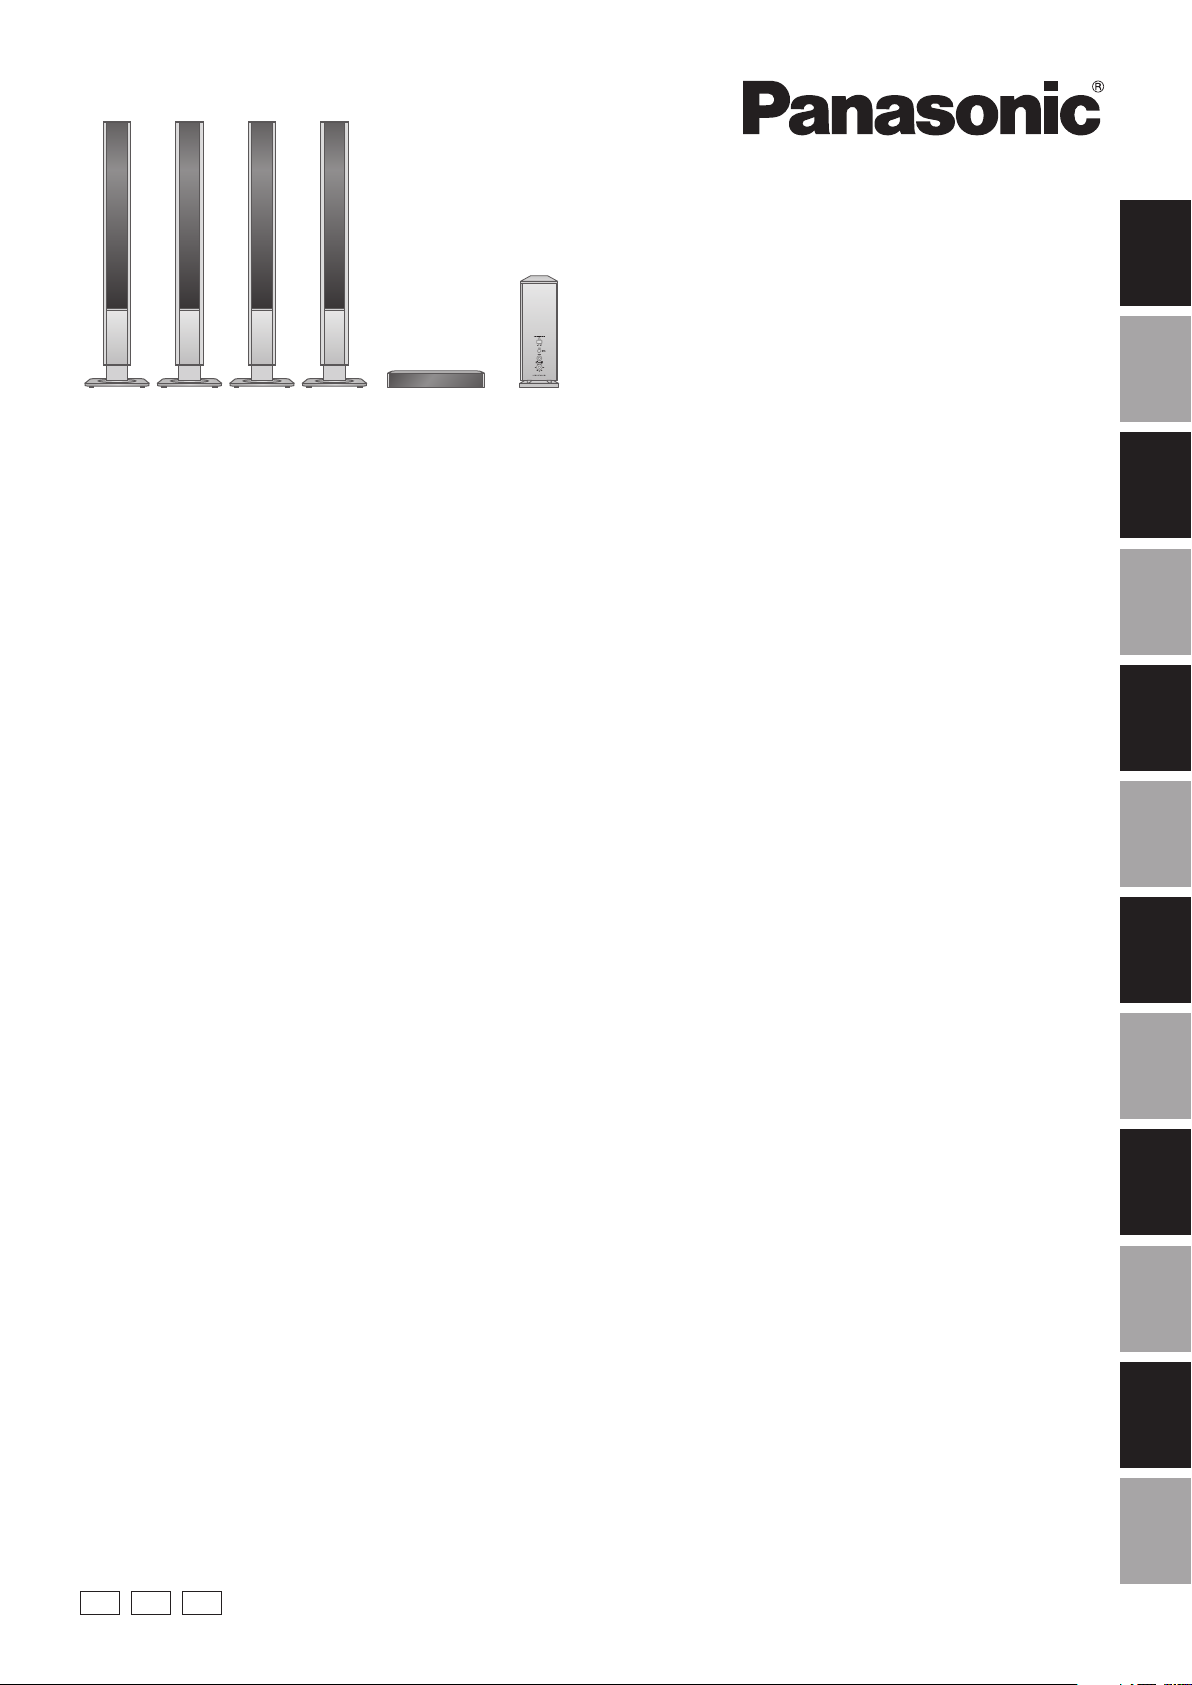
Speaker system Speaker
SB-FS100 Front, Surround SB-FS100 X 4
SB-CW100
Contents
Supplied accessories. . . . . . . . . . . . . . . . . . . . . . . . . . . . . . . . . . . . . . . . . . 2
Caution for AC Mains Lead . . . . . . . . . . . . . . . . . . . . . . . . . . . . . . . . . . . . . 3
Safety precautions . . . . . . . . . . . . . . . . . . . . . . . . . . . . . . . . . . . . . . . . . . . . 6
Location. . . . . . . . . . . . . . . . . . . . . . . . . . . . . . . . . . . . . . . . . . . . . . . . . . . . . 8
Assembly and Installation . . . . . . . . . . . . . . . . . . . . . . . . . . . . . . . . . . . . . 10
Assembling the front and surround speakers
(SB-FS100) as stand types . . . . . . . . . . . . . . . . . . . . . . . . . . . . . . . . . . 10
Wall-mounting the front and surround speakers
(SB-FS100). . . . . . . . . . . . . . . . . . . . . . . . . . . . . . . . . . . . . . . . . . . . . . . 12
Setup the center speaker (SB-PC100) . . . . . . . . . . . . . . . . . . . . . . . . . . 14
Settings for connecting the recommended amplifi er to the active
subwoofer . . . . . . . . . . . . . . . . . . . . . . . . . . . . . . . . . . . . . . . . . . . . . . . . 14
Connections . . . . . . . . . . . . . . . . . . . . . . . . . . . . . . . . . . . . . . . . . . . . . . . . 16
Subwoofer operation (SB-WA101) . . . . . . . . . . . . . . . . . . . . . . . . . . . . . . 18
Notes . . . . . . . . . . . . . . . . . . . . . . . . . . . . . . . . . . . . . . . . . . . . . . . . . . . . . . 20
Maintenance . . . . . . . . . . . . . . . . . . . . . . . . . . . . . . . . . . . . . . . . . . . . . . . . 20
Specifi cations . . . . . . . . . . . . . . . . . . . . . . . . . . . . . . . . . . . . . . . . . . . . . . . 62
Estimado cliente
Muchísimas gracias por haber adquirido este aparato.
Lea con atención estas instrucciones para obtener las máximas prestaciones
y seguridad.
Cajas acústicas Altavoces
SB-FS100
SB-CW100
Índice
Accessorios suministrados . . . . . . . . . . . . . . . . . . . . . . . . . . . . . . . . . . . . 2
Precauciones de seguridad. . . . . . . . . . . . . . . . . . . . . . . . . . . . . . . . . . . . . 6
Ubicación . . . . . . . . . . . . . . . . . . . . . . . . . . . . . . . . . . . . . . . . . . . . . . . . . . . 8
Ensamblaje e instalación. . . . . . . . . . . . . . . . . . . . . . . . . . . . . . . . . . . . . . 10
Ensamblaje de los altavoces delanteros y de sonido ambiental
(SB-FS100) como altavoces tipo independiente . . . . . . . . . . . . . . . . . . 10
Montaje en pared de los altavoces delanteros y de sonido ambiental
(SB-FS100). . . . . . . . . . . . . . . . . . . . . . . . . . . . . . . . . . . . . . . . . . . . . . . 12
Instalación del altavoz central (SB-PC100) . . . . . . . . . . . . . . . . . . . . . . 14
Ajustes para conectar el amplifi cador recomendado al altavoz de sub-
graves activo . . . . . . . . . . . . . . . . . . . . . . . . . . . . . . . . . . . . . . . . . . . . . 14
Conexiones . . . . . . . . . . . . . . . . . . . . . . . . . . . . . . . . . . . . . . . . . . . . . . . . . 16
Operación del altavoz de subgraves (SB-WA101). . . . . . . . . . . . . . . . . . 18
Notas . . . . . . . . . . . . . . . . . . . . . . . . . . . . . . . . . . . . . . . . . . . . . . . . . . . . . . 20
Mantenimiento . . . . . . . . . . . . . . . . . . . . . . . . . . . . . . . . . . . . . . . . . . . . . . 20
Especifi caciones técnicas. . . . . . . . . . . . . . . . . . . . . . . . . . . . . . . . . . . . . 62
Center SB-PC100 X 1
Active Subwoofer SB-WA101 X 1
Delanteros, sonido ambiental
Central
Altavoz de extra-graves amplifi cado SB-WA101 X 1
SB-FS100 X 4
SB-PC100 X 1
Cher client
Nous vous remercions pour votre achat de cet appareil.
Pour en obtenir des performances idéales et pour votre sécurité, veuillez lire
attentivement le présent manuel.
Enceinte acoustique Enceintes
SB-FS100
SB-CW100
Tables des matières
Accessoires fournis . . . . . . . . . . . . . . . . . . . . . . . . . . . . . . . . . . . . . . . . . . . 2
Précautions de sécurité. . . . . . . . . . . . . . . . . . . . . . . . . . . . . . . . . . . . . . . . 7
Positionnement. . . . . . . . . . . . . . . . . . . . . . . . . . . . . . . . . . . . . . . . . . . . . . 9
Montage et installation. . . . . . . . . . . . . . . . . . . . . . . . . . . . . . . . . . . . . . . 11
Montage des enceintes avant et surround (SB-FS100) sur pied . . . . . . 11
Montage au mur des enceintes avant et surround (SB-FS100) . . . . . . . 13
Installation de l’enceinte centrale (SB-PC100) . . . . . . . . . . . . . . . . . . . . 15
Réglages nécessaires au raccordement de l’amplifi cateur recommandé
sur le caisson de graves actif. . . . . . . . . . . . . . . . . . . . . . . . . . . . . . . . . 15
Raccordements . . . . . . . . . . . . . . . . . . . . . . . . . . . . . . . . . . . . . . . . . . . . 17
Utilisation du caisson de graves (SB-WA101). . . . . . . . . . . . . . . . . . . . . 19
Remarques . . . . . . . . . . . . . . . . . . . . . . . . . . . . . . . . . . . . . . . . . . . . . . . . . 21
Entretien . . . . . . . . . . . . . . . . . . . . . . . . . . . . . . . . . . . . . . . . . . . . . . . . . . . 21
Données techniques . . . . . . . . . . . . . . . . . . . . . . . . . . . . . . . . . . . . . . . . . 62
Avant, Surround
Centrale
Enceinte d’extrêmes-graves avec amplifi cateur
SB-FS100 X 4
SB-PC100 X 1
SB-WA101 X 1
Geachte klant
Hartelijk dank voor de aankoop van dit product.
Gelieve deze gebruiksaanwijzing aandachtig door le lezen voor een optimale
prestatie en een veilig gebruik van het systeem.
Luidsprekersysteem
SB-FS100
SB-CW100
Inhoud
Bijgeleverde accessoires . . . . . . . . . . . . . . . . . . . . . . . . . . . . . . . . . . . . . . 2
Veiligheidsmaatregelen . . . . . . . . . . . . . . . . . . . . . . . . . . . . . . . . . . . . . . . 7
Opstelling . . . . . . . . . . . . . . . . . . . . . . . . . . . . . . . . . . . . . . . . . . . . . . . . . . . 9
Montage en installatie . . . . . . . . . . . . . . . . . . . . . . . . . . . . . . . . . . . . . . . . .11
Montage van de voor- en surroundluidsprekers (SB-FS100) als
vrijstaande luidsprekers . . . . . . . . . . . . . . . . . . . . . . . . . . . . . . . . . . . . . .11
De voor- en surroundluidsprekers (SB-FS100) aan een muur
bevestigen . . . . . . . . . . . . . . . . . . . . . . . . . . . . . . . . . . . . . . . . . . . . . . . 13
De middenluidspreker (SB-PC100) opstellen. . . . . . . . . . . . . . . . . . . . . 15
Instellingen voor aansluiting van de aanbevolen versterker op de
actieve subwoofer. . . . . . . . . . . . . . . . . . . . . . . . . . . . . . . . . . . . . . . . . . 15
Aansluitingen . . . . . . . . . . . . . . . . . . . . . . . . . . . . . . . . . . . . . . . . . . . . . . . 17
Gebruik van de subwoofer (SB-WA101). . . . . . . . . . . . . . . . . . . . . . . . . . 19
Opmerkingen . . . . . . . . . . . . . . . . . . . . . . . . . . . . . . . . . . . . . . . . . . . . . . . 21
Onderhoud . . . . . . . . . . . . . . . . . . . . . . . . . . . . . . . . . . . . . . . . . . . . . . . . . 21
Technische gegevens . . . . . . . . . . . . . . . . . . . . . . . . . . . . . . . . . . . . . . . . 62
Voor, Surround
Midden
Actieve subwoofer SB-WA101 X 1
Luidsprekers
SB-FS100 X 4
SB-PC100 X 1
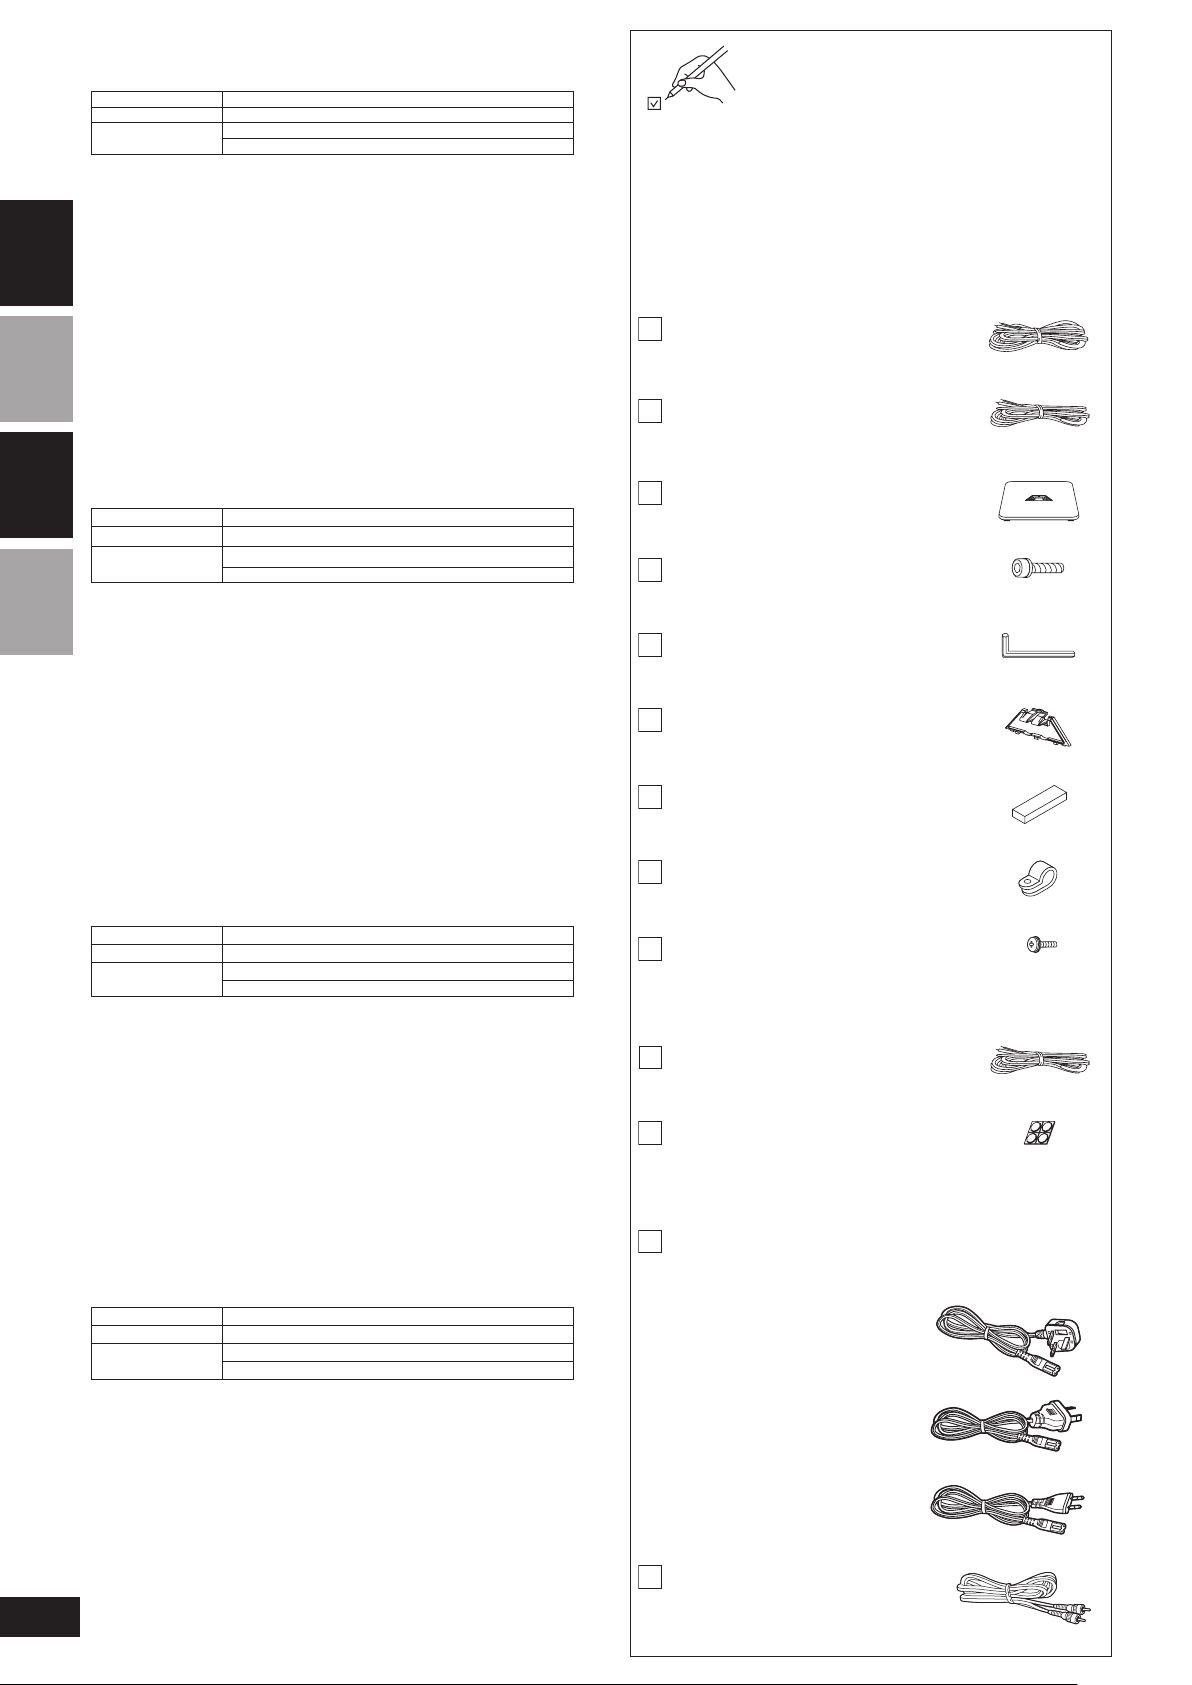
Supplied accessories
Accessorios suministrados
Accessoires fournis
Bijgeleverde accessoires
Please check and identify the supplied accessories.
For the United Kingdom
Use numbers indicated in parentheses when asking for replacement
parts. “As of January 2006”
Verifi que e identifi que los accessorios suministrados.
Cocher les accessoires pour vérifier qu’ils sont bien tous dans
l’emballage.
Controleer de bijgeleverde accessoires en markeer in de vierkantjes.
SB-FS100
Speaker cables (long: 10 m) . . . . . . . .2
Cables de altavoces (largos: 10 m) . . .2
Câbles d’enceinte (longs : 10 m) . . . . .2
Luidsprekerkabels (lang: 10 m) . . . . . .2
Speaker cables (short: 4 m). . . . . . . . .2
Cables de altavoces (cortos: 4 m) . . . .2
Câbles d’enceinte (courts : 4 m) . . . . .2
Luidsprekerkabels (kort: 4 m). . . . . . . .2
Stand base. . . . . . . . . . . . . . . . . . . . . .4
Base de soporte. . . . . . . . . . . . . . . . . .4
Base du socle. . . . . . . . . . . . . . . . . . . .4
Voetstuk . . . . . . . . . . . . . . . . . . . . . . . .4
Bolt for stand base . . . . . . . . . . . . . . .16
Perno para la base de soporte. . . . . .16
Boulon pour la base du socle. . . . . . .16
Bevestigingsbout voor voetstuk . . . . .16
Hexagonal wrench . . . . . . . . . . . . . . . .1
Llave hexagonal. . . . . . . . . . . . . . . . . .1
Clé hexagonale . . . . . . . . . . . . . . . . . .1
Inbussleutel . . . . . . . . . . . . . . . . . . . . .1
Bottom cover . . . . . . . . . . . . . . . . . . . .4
Cubierta inferior . . . . . . . . . . . . . . . . . .4
Cache inférieur. . . . . . . . . . . . . . . . . . .4
Bodemafdekplaat . . . . . . . . . . . . . . . . .4
Spacer . . . . . . . . . . . . . . . . . . . . . . . . .8
Espaciador . . . . . . . . . . . . . . . . . . . . . .8
Entretoise. . . . . . . . . . . . . . . . . . . . . . .8
Opvulstuk . . . . . . . . . . . . . . . . . . . . . . .8
Nylon clamp . . . . . . . . . . . . . . . . . . . . .4
Abrazadera de nailon. . . . . . . . . . . . . .4
Collier de serrage en nylon . . . . . . . . .4
Nylonklem . . . . . . . . . . . . . . . . . . . . . .4
Screw for nylon clamp . . . . . . . . . . . . .4
Tornillo para abrazadera de nailon. . . .4
Vis du collier de serrage en nylon . . . .4
Schroef voor nylonklem . . . . . . . . . . . .4
SB-PC100
Speaker cables (short: 4 m). . . . . . . . .1
Cables de altavoces (cortos: 4 m) . . . .1
Câbles d’enceinte (courts : 4 m) . . . . .1
Luidsprekerkabels (korte: 4 m). . . . . . .1
Speaker feet. . . . . . . . . 1 sheet (4 feet)
Patas de altavoces. . . . 1 hoja (4 patas)
Pieds d’enceinte. . . . . 1 feuille (4 pieds)
Luidsprekervoetjes . . .1 vel (4 voetjes)
SB-WA101
AC mains lead . . . . . . . . . . . . . . . . . . .1
Cable de alimentación de CA. . . . . . . .1
Cordon d’alimentation . . . . . . . . . . . . .1
Netsnoer. . . . . . . . . . . . . . . . . . . . . . . .1
For the United Kingdom
Para el Reino Unido
Pour le Royaume-Uni
Voor het Verenigd Koninkrijk
For Australia and New Zealand
Para Australia y Nueva Zelanda
Pour l’Australie et la Nouvelle-Zélande
Voor Australië en Nieuw-Zeeland
For others
Para otros países
Pour les autres pays
Voor overige landen
Monaural connection cable (5 m). . . . .1
Cable de conexión monofónico (5 m)
. . .1
Câble de connexion monaural (5 m) . . .1
Monokabel (5 m) . . . . . . . . . . . . . . . . .1
(REE1247C)
(REE1247A)
(RYQ0596-S)
(RHD40028)
(RHQ0091-K)
(RGK1982-S)
(RKA0182-H)
(RMR1503-W)
(XTW3+10JFN)
(REE1247A)
(RFA1388A)
(K2CT3CA00004)
(K2CJ2DA00010)
(K2CQ2CA00002)
(RJL1P015B50)
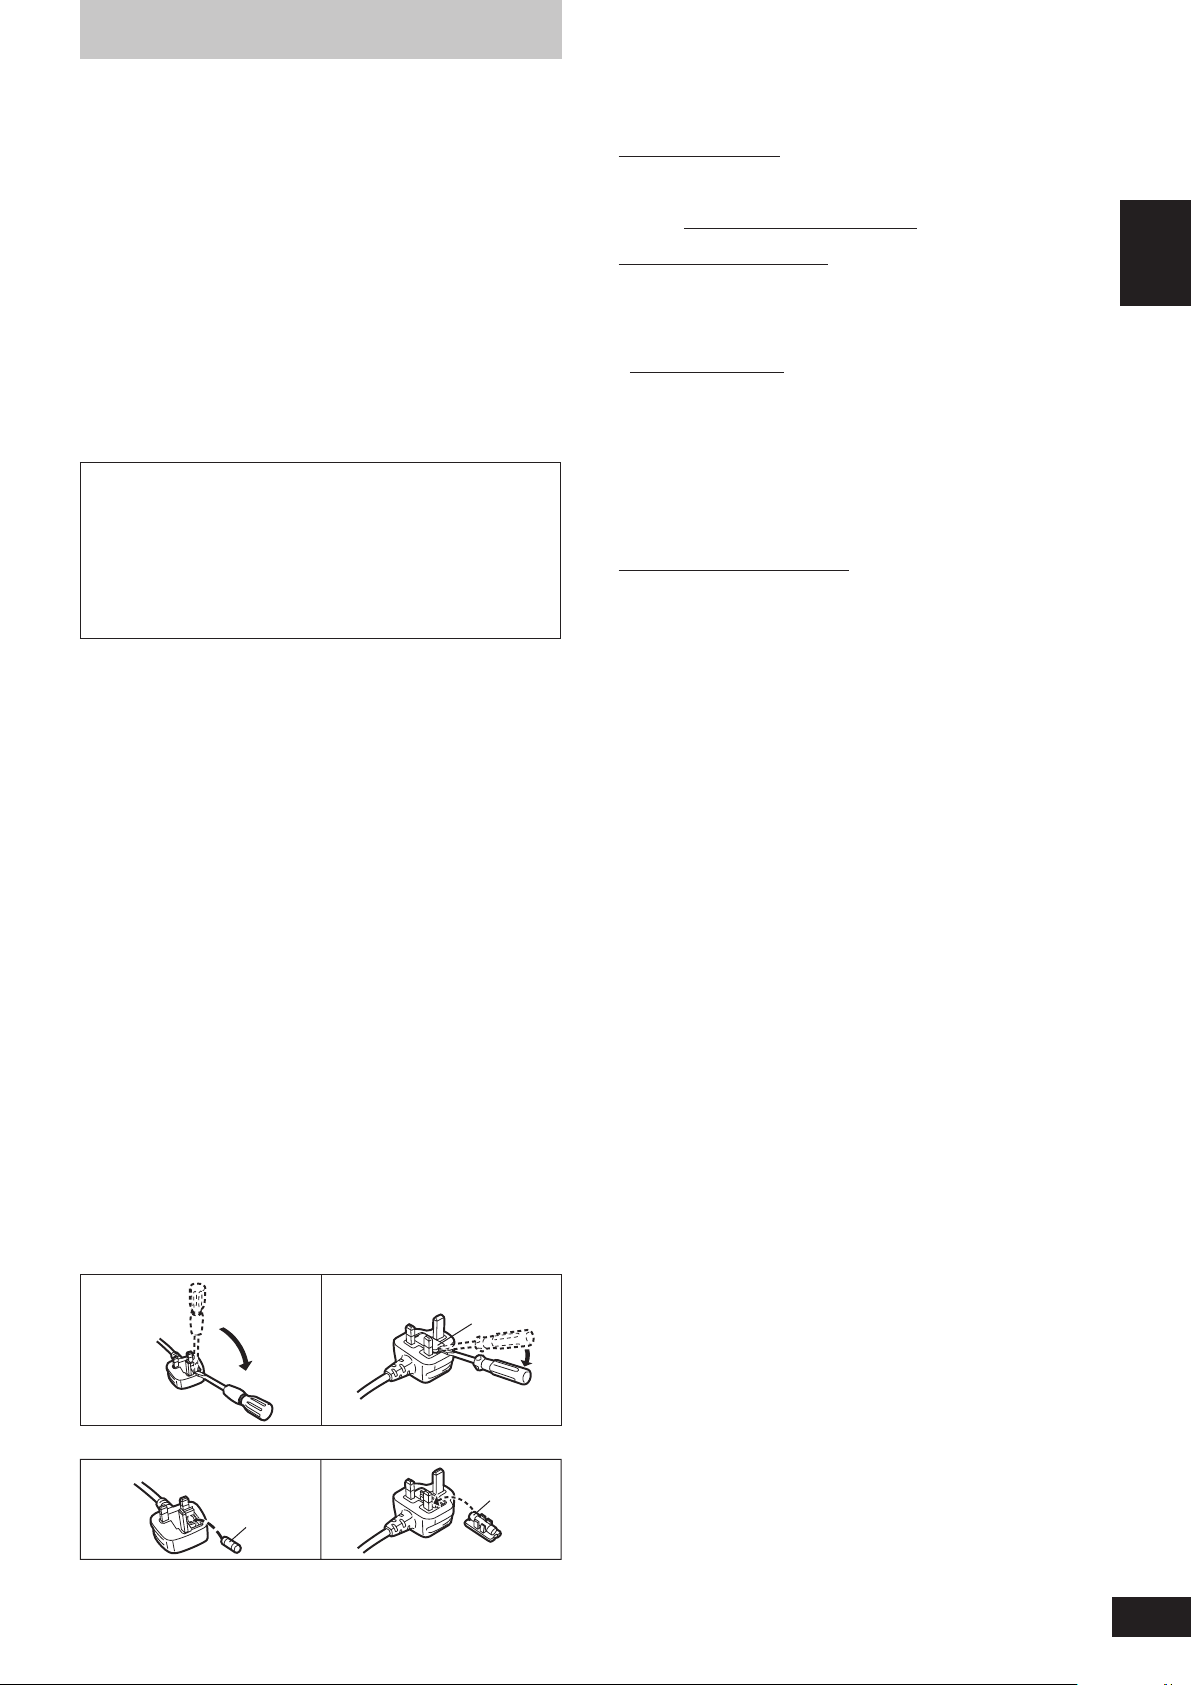
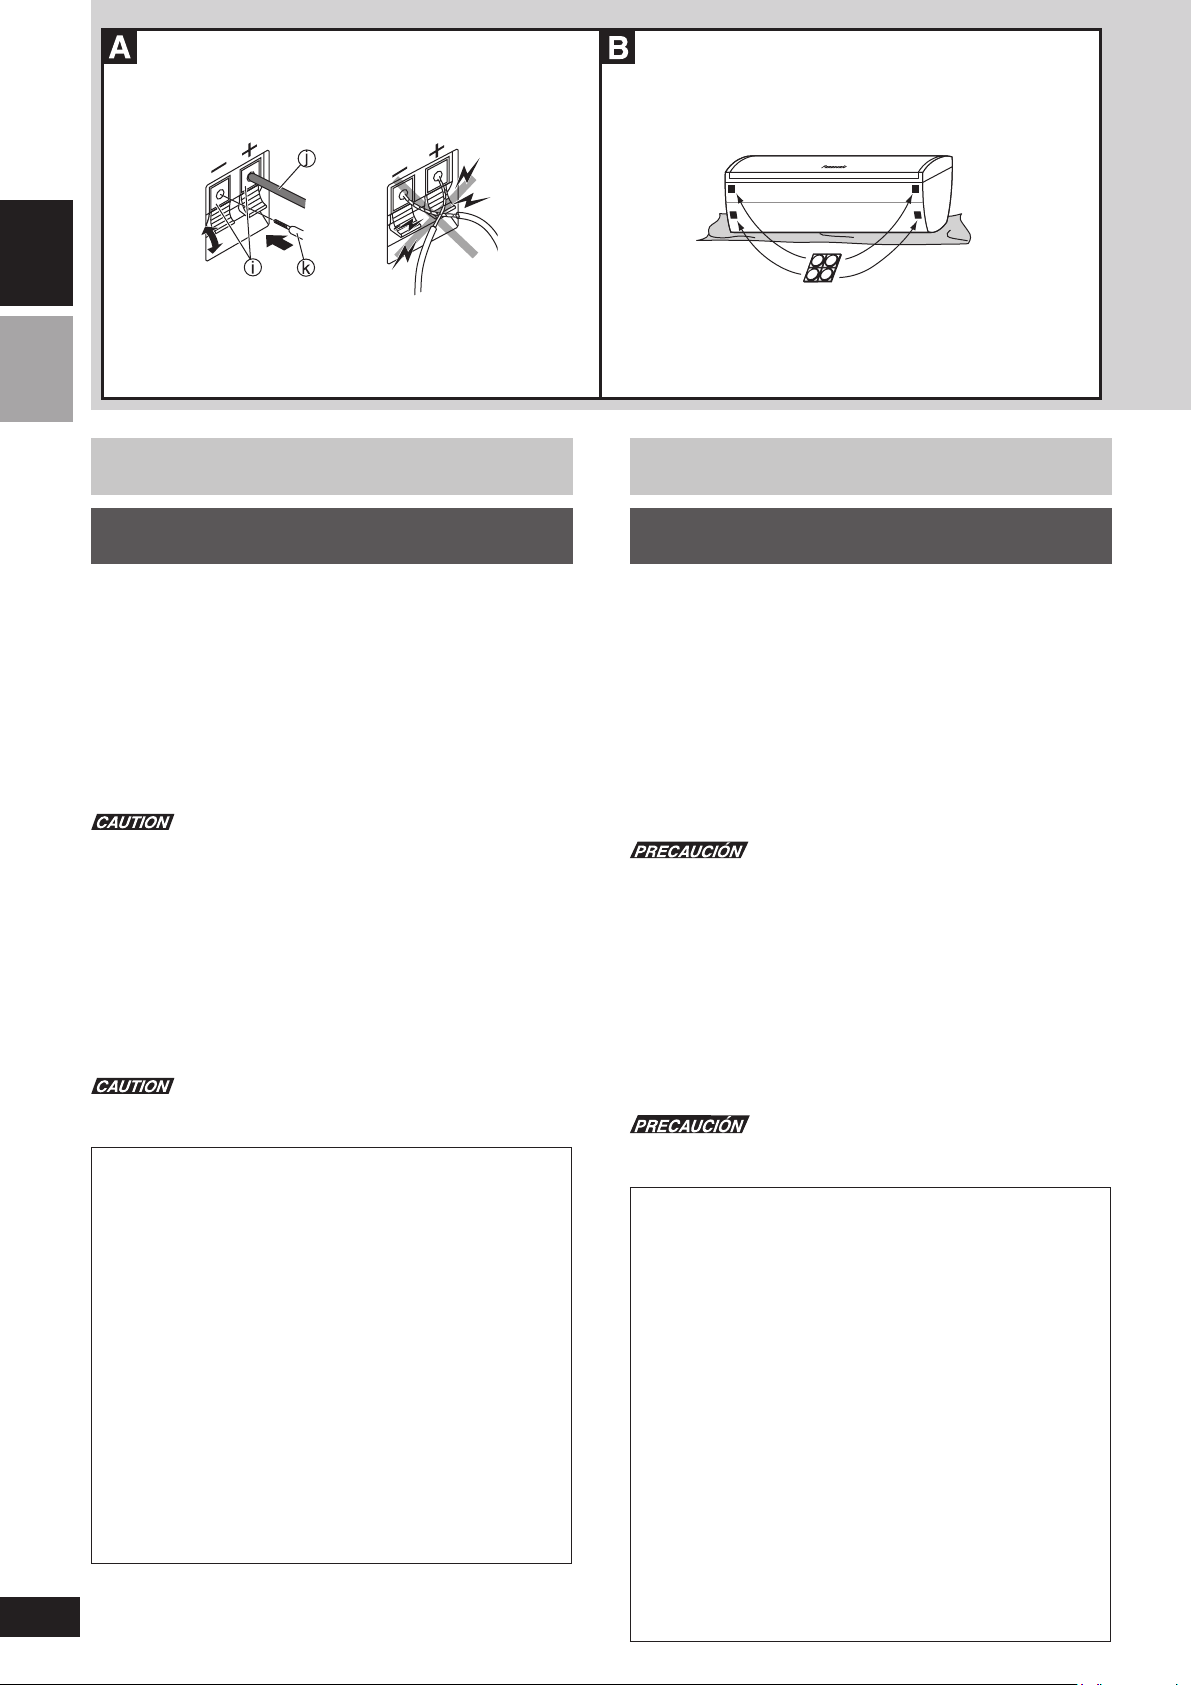
Caution for AC Mains Lead
Fuse cover
Figure A
Figure B
Fuse
(5 ampere)
Fuse
(5 ampere)
Figure A
Figure B
(For United Kingdom)
(“EB” area code model only)
For your safety, please read the following text carefully.
This appliance is supplied with a moulded three pin mains plug for
your safety and convenience.
A 5-ampere fuse is fi tted in this plug.
Should the fuse need to be replaced please ensure that the replacement fuse has a rating of 5-ampere and that it is approved by ASTA
or BSI to BS1362.
Check for the ASTA mark m or the BSI mark o on the body of the fuse.
If the plug contains a removable fuse cover you must ensure that it is
refi tted when the fuse is replaced.
If you lose the fuse cover the plug must not be used until a replacement cover is obtained.
A replacement fuse cover can be purchased from your local dealer.
CAUTION!
IF THE FITTED MOULDED PLUG IS UNSUI T ABLE FOR THE
SOCKET OUTLET IN YOUR HOME THEN THE FUSE SHOULD
BE RE MOVED AND THE PLUG CUT OFF AND DIS POSED
OF SAFELY.
THERE IS A DANGER OF SEVERE ELECTRI CAL SHOCK IF
THE CUT OFF PLUG IS IN SERTED INTO ANY 13-AMPERE
SOCKET.
Sales and Support Information
(For United Kingdom and Republic of Ireland)
Customer Care Centre
• For customers within the UK: 08705 357357
• For customers within the Republic of Ireland: 01 289 8333
• Visit our website for product information
• E-mail: customer.care@panasonic.co.uk
Direct Sales at Panasonic UK
• Order accessory and consumable items for your product with ease
and confi dence by phoning our Customer Care Centre Monday
- Thursday 9:00am – 5:30pm, Friday 9:30am – 5:30pm (Excluding
public holidays).
• Or go on line through our Internet Accessory ordering application at
www.panasonic.co.uk.
• Most major credit and debit cards accepted.
• All enquiries transactions and distribution facilities are provided
directly by Panasonic UK Ltd.
• It couldn’t be simpler!
• Also available through our Internet is direct shopping for a wide
range of fi nished products, take a browse on our website for further
details.
Interested in purchasing an extended guarantee?
Please call 0870 240 6284 or visit our website
www.panasonic.co.uk/guarantee.
ENGLISH
If a new plug is to be fi tted please observe the wiring code as stated
below.
If in any doubt please consult a qualifi ed electrician.
IMPORTANT
The wires in this mains lead are coloured in accor dance with the
following code:
Blue: Neutral, Brown: Live.
As these colours may not correspond with the coloured markings
identifying the terminals in your plug, proceed as follows:
The wire which is coloured Blue must be connected to the terminal
which is marked with the letter N or col oured Black or Blue.
The wire which is coloured Brown must be connected to the terminal
which is marked with the letter L or coloured Brown or Red.
WARNING: DO NOT CONNECT EITHER WIRE TO THE
EARTH TERMINAL WHICH IS MARKED WITH THE LETTER
E, BY THE EARTH SYMBOL n OR COLOURED GREEN
OR GREEN/YELLOW.
THIS PLUG IS NOT WATERPROOF—KEEP DRY.
Before use
Remove the connector cover.
How to replace the fuse
The location of the fuse differ according to the type of AC mains plug
(fi gures A and B). Confi rm the AC mains plug fi tted and follow the
instructions below.
Illustrations may differ from actual AC mains plug.
1. Open the fuse cover with a screwdriver.
2. Replace the fuse and close or attach the fuse cover.
3
RQT8573
WARNING:
TO REDUCE THE RISK OF FIRE, ELECTRIC SHOCK OR PRODUCT
DAMAGE, DO NOT EXPOSE THIS APPARATUS TO RAIN,
MOISTURE, DRIPPING OR SPLASHING AND THAT NO OBJECTS
FILLED WITH LIQUIDS, SUCH AS VASES, SHALL BE PLACED ON
THE APPARATUS.
AVISO:
PARA REDUCIR EL RIESGO DE INCENDIOS, DESCARGAS
ELÉCTRICAS O DAÑOS EN ESTE APARATO, NO
LO EXPONGA A LA LLUVIA, HUMEDAD, GOTEO NI
SALPICADURAS, Y NO COLOQUE ENCIMA DE ÉL
OBJETOS QUE CONTENGAN LÍQUIDOS COMO, POR
EJEMPLO, FLOREROS.
CAUTION!
• DO NOT INSTALL OR PLACE THIS UNIT IN A BOOKCASE, BUILTIN CABINET OR IN ANOTHER CONFINED SPACE. ENSURE THE
UNIT IS WELL VENTILATED. TO PREVENT RISK OF ELECTRIC
SHOCK OR FIRE HAZARD DUE TO OVERHEATING, ENSURE
ENGLISHESPAÑOL
THAT CURTAINS AND ANY OTHER MATERIALS DO NOT
OBSTRUCT THE VENTILATION VENTS.
• DO NOT OBSTRUCT THE UNIT’S VENTILATION OPENINGS
WITH NEWSPAPERS, TABLECLOTHS, CURTAINS, AND SIMILAR
ITEMS.
• DO NOT PLACE SOURCES OF NAKED FLAMES, SUCH AS
LIGHTED CANDLES, ON THE UNIT.
• DISPOSE OF BATTERIES IN AN ENVIRONMENTALLY FRIENDLY
MANNER.
THIS UNIT IS INTENDED FOR USE IN MODERATE CLIMATES.
This product may receive radio interference caused by mobile
telephones during use. If such interference is apparent, please increase
separation between the product and the mobile telephone.
The socket outlet shall be installed near the equipment and easily
accessible or the mains plug or an appliance coupler shall remain
readily operable.
Although the AC power switch is in the “OFF” position, the unit is not
completely disconnected from the mains. Remove the plug from the
main electrical outlet if you will not be using the unit for an extended
period of time. Place the unit so the plug can be easily removed.
-If you see this symbol-
Information on Disposal for Users of Waste Electrical & Electronic
Equipment (private households)
¡ADVERTENCIA!
•
PARA MANTENER BIEN VENTILADA ESTA UNIDAD,
NO LA INSTALE NI PONGA EN UN ESTANTE DE
LIBROS, MUEBLE EMPOTRADO U OTRO ESPACIO DE
DIMENSIONES REDUCIDAS. ASEGÚRESE QUE
CORTINAS Y OTROS MATERIALES NO OBSTRUYAN LAS
CONDICIONES DE VENTILACIÓN PARA PREVENIR EL RIESGO
DE SACUDIDAS ELÉCTRICAS O INCENDIOS DEBIDOS AL
RECALENTAMIENTO.
NO OBSTRUYA LAS ABERTURAS DE VENTILACIÓN DE LA
•
UNIDAD CON PERIÓDICOS, MANTELES, CORTINAS U OBJETOS
SIMILARES.
NO COLOQUE OBJETOS CON LLAMA DESCUBIERTA, UNA VELA
•
POR EJEMPLO, ENCIMA DE LA UNIDAD.
• TIRE LAS PILAS DE FORMA QUE NO CONTAMINE EL MEDIO
AMBIENTE.
ESTA UNIDAD HA SIDO DISEÑADA PARA SER UTILIZADA EN CLIMAS MODERADOS.
Este producto puede tener interferencias causadas por teléfonos
móviles durante su utilización. Si tales interferencias resultan evidentes,
aumente la separación entre el producto y el teléfono móvil.
El equipo deberá colocarse cerca de la toma de CA, y a la
clavija del cable de alimentación deberá poder accederse
fácilmente en el caso de que se produzca un problema.
La unidad no quedará completamente desconectada de la
red eléctrica aunque el interruptor de la alimentación de CA
se ponga en “OFF” (desconectado). Desenchufe la clavija de
alimentación de la toma de corriente si no va a utilizar la unidad
durante mucho tiempo. Coloque la unidad en lugar donde la clavija de
alimentación pueda desenchufarse fácilmente.
This symbol on the products and/or accompanying documents
means that used electrical and electronic products should not
be mixed with general household waste.
For proper treatment, recovery and recycling, please take these
products to designated collection points, where they will be accepted on
a free of charge basis. Alternatively, in some countries you may be able
to return your products to your local retailer upon the purchase of an
equivalent new product.
Disposing of this product correctly will help to save valuable resources
and prevent any potential negative effects on human health and the
environment which could otherwise arise from inappropriate waste
handling. Please contact your local authority for further details of your
nearest designated collection point.
Penalties may be applicable for incorrect disposal of this waste, in
accordance with national legislation.
For business users in the European Union
If you wish to discard electrical and electronic equipment, please contact
your dealer or supplier for further information.
Information on Disposal in other Countries outside the European
Union
This symbol is only valid in the European Union.
If you wish to discard this product, please contact your local authorities
or dealer and ask for the correct method of disposal.
-Si ve este símbolo-
Información sobre la eliminación para los usuarios de equipos
eléctricos y electrónicos usados (particulares)
La aparición de este símbolo en un producto y/o en la
documentación adjunta indica que los productos eléctricos
y electrónicos usados no deben mezclarse con la basura
doméstica general.
Para que estos productos se sometan a un proceso adecuado de
tratamiento, recuperación y reciclaje, llévelos a los puntos de recogida
designados, donde los admitirán sin coste alguno. En algunos países
existe también la posibilidad de devolver los productos a su minorista
local al comprar un producto nuevo equivalente.
Si desecha el producto correctamente, estará contribuyendo a preservar
valiosos recursos y a evitar cualquier posible efecto negativo en la salud
de las personas y en el medio ambiente que pudiera producirse debido
al tratamiento inadecuado de desechos. Póngase en contacto con su
autoridad local para que le informen detalladamente sobre el punto de
recogida designado más cercano.
De acuerdo con la legislación nacional, podrían aplicarse multas por la
eliminación incorrecta de estos desechos.
Para empresas de la Unión Europea
Si desea desechar equipos eléctricos y electrónicos, póngase
en contacto con su distribuidor o proveedor para que le informe
detalladamente.
Información sobre la eliminación en otros países no pertenecientes
a la Unión Europea
Este símbolo sólo es válido en la Unión Europea.
Si desea desechar este producto, póngase en contacto con las
autoridades locales o con su distribuidor para que le informen sobre el
método correcto de eliminación.
4
RQT8573
AVERTISSEMENT:
POUR RÉDUIRE LES RISQUES D’INCENDIE,
D’ÉLECTROCUTION OU DE DOMMAGES AU PRODUIT,
N’EXPOSEZ PAS CET APPAREIL À LA PLUIE, L’HUMIDITÉ,
L’ÉGOUTTEMENT OU L’ÉCLABOUSSEMENT ET NE PLACEZ PAS
D’OBJETS REMPLIS DE LIQUIDES TELS QUE VASES DESSUS.
WAARSCHUWING:
TENEINDE HET GEVAAR VOOR BRAND, ELEKTRISCHE SCHOK
OF PRODUCTBESCHADIGING TE VERMINDEREN, MAG DIT
APPARAAT NIET WORDEN BLOOTGESTELD AAN REGEN, VOCHT,
EN DRUPPELEND OF SPATTEND WATER, EN MOGEN ER GEEN
VOORWERPEN MET WATER OF ANDERE VLOEISTOFFEN ERIN,
ZOALS BLOEMENVAZEN, OP HET APPARAAT WORDEN GEZET.
AVERTISSEMENT!
•
NE PAS INSTALLER NI PLACER L’APPAREIL DANS
UNE BIBLIOTHÈQUE, UN PLACARD RENFERMÉ NI
AUCUN AUTRE ESPACE RÉDUIT DE FAÇON À ASSURER
UNE BONNE VENTILATION. VÉRIFIER QU’AUCUN
RIDEAU NI AUCUN AUTRE MATÉRIAU NE BLOQUE LA
VENTILATION DE FAÇON À ÉVITER TOUT RISQUE
DE CHOC ÉLECTRIQUE OU DE FEU DÛ À UNE
SURCHAUFFE.
NE BOUCHEZ PAS LES OUVERTURES D’AÉRATION DE
•
L’APPAREIL AVEC DES JOURNAUX, NAPPES, RIDEAUX OU
OBJETS SIMILAIRES.
NE PLACEZ PAS DE SOURCES DE FLAMMES VIVES TELLES
•
QUE BOUGIES ALLUMÉES SUR L’APPAREIL.
JETEZ LES PILES D’UNE MANIÈRE COMPATIBLE AVEC
•
L’ENVIRONNEMENT.
CET APPAREIL EST DESTINÉ AUX CLIMATS TEMPÉRÉS.
Ce produit peut être perturbé par les ondes des téléphones
mobiles pendant l’utilisation. Si vous constatez une telle
interférence, éloignez le téléphone mobile du produit.
L’appareil doit être placé près de la prise secteur, et la fi che du cordon
doit être facilement accessible en cas de problème.
Bien que l’interrupteur d’alimentation soit en position “OFF” (arrêt),
l’appareil n’est pas complètement débranché du secteur. Retirez de la
prise secteur la fi che du cordon d’alimentation si vous prévoyez laisser
l’appareil inutilisé pour une période prolongée. Placez l’appareil de sorte
qu’il soit facile de débrancher la fi che du cordon d’alimentation.
- Si vous voyez ce symbole -
Informations relatives à l’évacuation des déchets, destinées aux
utilisateurs d’appareils électriques et électroniques (appareils
ménagers domestiques)
Lorsque ce symbole fi gure sur les produits et/ou les
documents qui les accompagnent, cela signifi e que les
appareils électriques et électroniques ne doivent pas être
jetés avec les ordures ménagères.
Pour que ces produits subissent un traitement, une récupération et un
recyclage appropriés, envoyez-les dans les points de collecte désignés,
où ils peuvent être déposés gratuitement. Dans certains pays, il est
possible de renvoyer les produits au revendeur local en cas d’achat
d’un produit équivalent.
En éliminant correctement ce produit, vous contribuerez à la
conservation des ressources vitales et à la prévention des éventuels
effets négatifs sur l’environnement et la santé humaine qui pourraient
survenir dans le cas contraire. Afi n de connaître le point de collecte le
plus proche, veuillez contacter vos autorités locales.
Des sanctions peuvent être appliquées en cas d’élimination incorrecte
de ces déchets, conformément à la législation nationale.
Utilisateurs professionnels de l’Union européenne
Pour en savoir plus sur l’élimination des appareils électriques et
électroniques, contactez votre revendeur ou fournisseur.
Informations sur l’évacuation des déchets dans les pays ne faisant
pas partie de l’Union européenne
Ce symbole n’est reconnu que dans l’Union européenne.
Pour vous débarrasser de ce produit, veuillez contacter les autorités
locales ou votre revendeur afi n de connaître la procédure d’élimination
à suivre.
WAARSCHUWING!
•
OM EEN GOEDE VENTILATIE TE VERZEKEREN, DIT
APPARAAT NIET IN EEN BOEKENKAST, EEN
INGEBOUWDE KAST OF EEN ANDERE GESLOTEN RUIMTE
INSTALLEREN OF GEBRUIKEN. ZORG ERVOOR DAT DE
VENTILATIEWEGEN NIET DOOR GORDIJNEN OF ANDERE
MATERIALEN WORDEN AFGESLOTEN, OM GEVAAR VOOR
ELEKTRISCHE SCHOK OF BRAND TEN GEVOLGE VAN
OVERVERHITTING TE VOORKOMEN.
ZORG DAT DE VENTILATIE-OPENINGEN VAN HET
•
APPARAAT NIET GEBLOKKEERD WORDEN DOOR KRANTEN,
TAFELKLEEDJES, GORDIJNEN, OF IETS DERGELIJKS.
ZET GEEN OPEN VUUR, ZOALS BRANDENDE KAARSEN, OP
•
HET APPARAAT.
DOE LEGE BATTERIJEN WEG OP EEN
•
MILIEUVRIENDELIJKE MANIER.
DIT APPARAAT IS BESTEMD VOOR GEBRUIK IN EEN GEMATIGD
KLIMAAT.
Tijdens het gebruik is dit product vatbaar voor radiostoring
veroorzaakt door een mobiele telefoon. Wanneer dergelijke
storing optreedt, moet u dit product en de mobiele telefoon verder van
elkaar vandaan gebruiken.
De apparatuur dient dicht bij een stopcontact te worden
geïnstalleerd en de netstekker dient zodanig te worden geplaatst dat hij
gemakkelijk bereikbaar is in geval van problemen.
Ook wanneer de spanningsschakelaar op “OFF” staat, wordt er
nog stroom geleverd naar het apparaat. Trek daarom de stekker
van het netsnoer uit het stopcontact wanneer u het apparaat
voor langere tijd niet gaat gebruiken. Installeer het apparaat
zodanig dat de stekker gemakkelijk uit het stopcontact kan
worden verwijderd.
-Als u dit symbool ziet-
Informatie over het weggooien van elektrische en elektronische
apparatuur (particulieren)
Dit symbool betekent in Europa dat gebruikte elektrische en
elektronische producten niet bij het normale huishoudelijke
afval mogen.
Lever deze producten in bij de aangewezen inzamelingspunten, waar
ze gratis worden geaccepteerd en op de juiste manier worden verwerkt,
teruggewonnen en hergebruikt. In Nederland kunt u uw producten bij uw
winkelier inleveren bij de aanschaf van een vergelijkbaar nieuw product.
Wanneer u dit product op de juiste manier als afval inlevert, spaart u
waardevolle hulpbronnen en voorkomt u potentiële negatieve gevolgen
voor de volksgezondheid en het milieu, die anders kunnen ontstaan
door een onjuiste verwerking van afval. Neem contact op met uw
gemeente voor meer informatie over het dichtstbijzijnde inzamelingspunt
of raadpleeg www.nvmp.nl, www.ictoffi ce.nl of www.stibat.nl.
Voor zakelijke gebruikers in de Europese Unie
Neem voor het weggooien van elektrische en elektronische apparatuur
contact op met uw leverancier voor verdere informatie.
Informatie over verwijdering van afval in landen buiten de
Europese Unie
Dit symbool is alleen geldig in de Europese Unie.
Neem wanneer u dit product wilt weggooien, contact op met de lokale
overheid of uw leverancier en vraag wat de juiste verwijderingsmethode
is.
FRANÇAIS
NEDERLANDS
5
RQT8573
Safety precautions
Connector
Approx. 6 mm
Appliance inlet
Connector
Approx. 6 mm
Appliance inlet
Precauciones de seguridad
Placement
Set the unit up on an even surface away from direct sunlight, high
temperatures, high humidity, and excessive vibration. These conditions
can damage the cabinet and other components, thereby shortening
the unit’s service life.
Voltage
ENGLISHESPAÑOL
Do not use high voltage power sources. This can overload the unit
and cause a fi re.
Do not use a DC power source. Check the source carefully when
setting the unit up on a ship or other place where DC is used.
AC mains lead protection
Ensure the AC mains lead is connected correctly and not damaged.
Poor connection and lead damage can cause fi re or electric shock.
Do not pull, bend, or place heavy items on the lead.
Grasp the plug fi rmly when unplugging the lead. Pulling the AC
mains lead can cause electric shock.
Do not handle the plug with wet hands. This can cause electric
shock.
Foreign matter
Do not let metal objects fall inside the unit. This can cause electric
shock or malfunction.
Do not let liquids get into the unit. This can cause electric shock or
malfunction. If this occurs, immediately disconnect the unit from the
power supply and contact your dealer.
Do not spray insecticides onto or into the unit. They contain fl am-
mable gases which can ignite if sprayed into the unit.
Service
Do not attempt to repair this unit by yourself. If sound is interrupted,
indicators fail to light, smoke appears, or any other problem that is
not covered in these operating instructions occurs, disconnect the AC
mains lead and contact your dealer or an authorized service center.
Electric shock or damage to the unit can occur if the unit is repaired,
disassembled or reconstructed by unqualifi ed persons.
Extend operating life by disconnecting the unit from the power
source if it is not to be used for a long time.
Insertion of connector
Even when the connector is perfectly inserted, depending on the
type of inlet used, the front part
of the connector may jut out as
shown in the drawing.
However there is no problem
using the unit.
Ubicación
Coloque la unidad en una superfi cie plana lejos de la luz directa
del sol, temperatura y humedad altas, y vibración excesiva. Estas
condiciones pueden dañar el gabinete y otros componentes, y por lo
tanto acortar la vida útil de la unidad.
Voltaje
No use fuentes de alimentación de alto voltaje. Esto puede sobrecargar la unidad y causar un incendio.
No use una fuente de alimentación de CC. Verifi que cuidadosa-
mente la fuente cuando coloque la unidad en una embarcación u otro
lugar donde CC sea usada.
Protección del cordón de alimentación
Asegúrese que el cordón de alimentación esté conectado correctamente y no dañado. Una mala conexión y daño en el cordón pueden
causar un incendio o un choque eléctrico. No jale, doble el cordón ni
coloque objetos pesados sobre él.
Coja el enchufe fi rmemente cuando desenchufe el cordón. El jalar
el cordón puede causar choque eléctrico.
No maneje el enchufe con manos mojadas. Esto puede causar
choque eléctrico.
Objetos extraños
No permita que objetos de metal caigan dentro de la unidad. Esto
puede causar choque eléctrico o fallas.
No permita que líquidos penetren en la unidad. Esto puede causar
choque eléctrico o fallas. Si esto ocurre, desconecte inmediatamente
la unidad de su alimentación y póngase en contacto con su distribuidor.
No rocíe insecticidas sobre o dentro de la unidad. Contienen gases
infl amables que pueden encenderse si son rociados dentro de la
unidad.
Servicio
No intente reparar esta unidad por sí mismo. Si el sonido se interrumpe, los indicadores no se iluminan, sale humo o sucede cualquier
problema que no está tratado en estas instrucciones, desconecte el
cordón de alimentación y póngase en contacto con su distribuidor
o con un centro de servicio autorizado. Puede ocurrir un choque
eléctrico o daño a la unidad si esta unidad es reparada, desarmada
o reconstruida por personas no califi cadas.
Extienda la vida útil de la unidad desconectándola de la fuente de
alimentación si no va a ser usada por largo tiempo.
Inserción del conector
Incluso cuando el conector está
bien insertado, dependiendo
del tipo de toma usada, la parte
delantera del conector puede
sobresalir como se muestra en
la fi gura.
Sin embargo, no habrá problemas para usar la unidad.
Aprox. 6 mm
Toma del aparato
Conector
6
RQT8573

Précautions de sécurité
Connector
Approx. 6 mm
Appliance inlet
Connector
Approx. 6 mm
Appliance inlet
Veiligheidsmaatregelen
Placement
Placer l’appareil sur une surface plane éloignée de la lumière
directe du soleil, de hautes températures, de haute humidité et de vibrations excessives. Ces conditions peuvent endommager le coffret et
les autres composants, raccourcissant la durée de vie de l’appareil.
Tension
Ne pas utiliser de sources d’alimentation à haute tension. Cela
peut surcharger l’appareil et provoquer un incendie.
Ne pas utiliser de source d’alimentation à courant continu. Vérifi er
soigneusement la source lors de l’installation de cet appareil sur un
navire ou tout endroit où le courant continu est utilisé.
Protection du cordon d’alimentation
S’assurer que le cordon est correctement branché et qu’il n’est pas
endommagé. Un mauvais raccordement et un cordon endommagé
peuvent provoquer un incendie et des décharges électriques. Ne pas
tirer, plier ou placer des objets lourds sur le cordon.
Saisir fermement la fi che pour débrancher le cordon. Tirer le cordon
peut provoquer des décharges électriques.
Ne pas manipuler la fi che avec les mains mouillées. Cela peut
provoquer des décharges électriques.
Corps étranger
Opstelling
Plaats het apparaat op een horizontale ondergrond waar het
niet blootgesteld staat aan direct zonlicht, hoge temperaturen, hoge
vochtigheid of sterke trillingen. Dit om beschadiging van de behuizing
en de inwendige onderdelen te voorkomen, en een lange levensduur
van het apparaat te waarborgen.
Bedrijfsspanning
Gebruik het apparaat niet op een hoogspanningsbron. Dit kan
resulteren in overbelasting en zelfs brand.
Gebruik het apparaat ook niet op gelijkstroom. Controleer zorgvuldig de stroomvoorziening wanneer u het apparaat op een boot of
andere plaats wilt gebruiken waar wellicht gelijkstroom is.
Behandeling van het netsnoer
Zorg dat het netsnoer juist is aangesloten en niet beschadigd is.
Verkeerde aansluiting of beschadiging van het netsnoer kan resulteren
in brand of in een elektrische schok. Trek niet aan het snoer, buig het
niet te sterk en zet er geen zware voorwerpen op.
Pak altijd de stekker vast wanneer u het netsnoer wilt losmaken
uit het stopcontact. Trek niet aan het snoer, want dit kan resulteren
in een elektrische schok.
Pak de stekker nooit met natte handen vast, anders kunt u een
elektrische schok krijgen.
FRANÇAIS
NEDERLANDS
Ne pas laisser d’objets métalliques tomber dans l’appareil. Cela
peut provoquer des décharges électriques ou un mauvais fonctionnement.
Ne pas laisser de liquides pénétrer dans l’appareil. Cela peut provoquer des décharges électriques ou un mauvais fonctionnement. Si
cela se produit, débrancher immédiatement l’alimentation et contacter
le revendeur.
Ne pas vaporiser d’insecticides sur ou dans l’appareil. Ils contiennent des gaz infl ammables qui peuvent s’enfl ammer s’ils sont
vaporisés dans l’appareil.
Réparation
Ne pas tenter de réparer cet appareil soi-même. Si le son est interrompu, si les témoins ne s’allument pas, si de la fumée apparaît ou
si tout autre problème qui n’est pas couvert par ce mode d’emploi se
produit, débrancher le cordon et contacter le revendeur ou un centre
de réparation agréé. Des décharges électriques ou l’endommagement
de l’appareil peuvent se produire si l’appareil est réparé, démonté ou
remonté par des personnes qui ne sont pas qualifi ées.
Augmenter sa durée de vie en débranchant l’appareil de sa
source d’alimentation s’il doit ne pas être utilisé pendant une longue
période.
Insertion du connecteur
Même si le connecteur est bien
inséré à fond, la partie avant
de la fiche peut éventuellement dépas ser selon le type de
prise utilisé, comme montré sur
l’illustration.
Quoi qu’il en soit, il n’y a aucun
problème d’utilisation.
Environ 6 mm
Entrée de câble
Connecteur
Vreemde bestanddelen
Zorg dat geen metalen voorwerpen in het apparaat terechtkomen.
Dit kan resulteren in een elektrische schok of een defect.
Pas tevens op dat geen vloeistoffen in het apparaat terechtkomen.
Ook dit kan resulteren in een elektrische schok of een defect. Mocht
het toch gebeuren, trek dan onmiddellijk de stekker uit het stopcontact
en neem contact op met uw handelaar.
Spuit geen insectensprays op of in de buurt van het apparaat.
Deze sprays bevatten gassen die ontvlammen kunnen wanneer zij
in de buurt van het apparaat worden gebruikt.
Reparaties
Probeer nooit zelf reparaties aan het apparaat uit te voeren. Als het
geluid wegvalt, de indicators niet oplichten, het apparaat rook uitstoot
of er een andere storing optreedt die niet in deze gebruiksaanwijzing
is beschreven neem dan contact op met uw handelaar of een offi cieel
servicecentrum. Reparatie, demontage e.d. door niet bevoegde personen kan resulteren in een elektrische schok of beschadiging van
het apparaat.
Voor een lange levensduur verdient het aanbeveling de stekker
uit het stopcontact te trekken wanneer u het apparaat langere tijd niet
denkt te gebruiken.
Insteken van de stekker
Ook als de stekker volledig wordt
ingestoken, is het mogelijk dat afhankelijk van de gebruikte soort
stekkeringang, de voorzijde van
de stekker uitsteekt, zoals aangegeven in de tekening.
Bij gebruik van dit apparaat vormt
dit echter geen probleem.
Ongeveer 6 mm
Stekkeringang van
het apparaat
Stekker
7
RQT8573
ENGLISHESPAÑOL
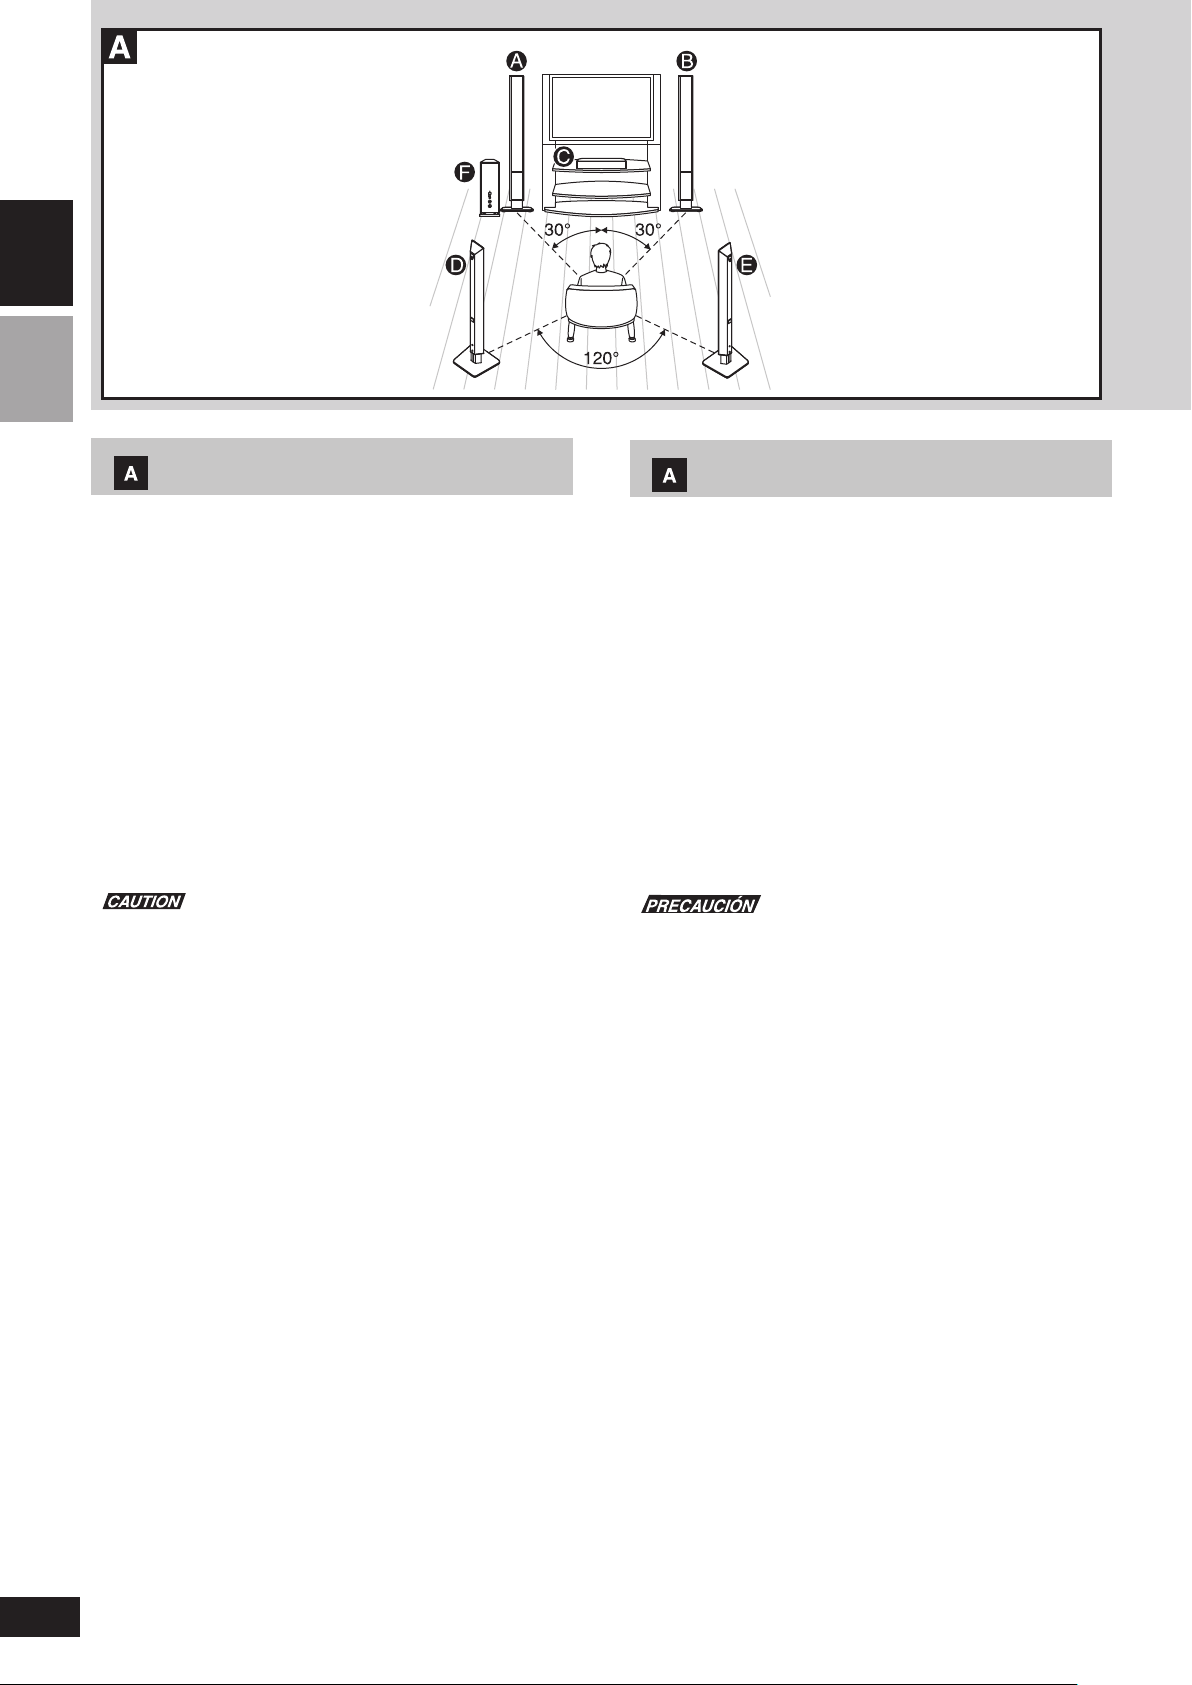
Location
The front, center, and surround speakers should be placed at approximately the same distance from the listening position. The angles in
the diagram are approximate.
Front speakers ( A left, B right: SB-FS100)
• Put the front speakers on either side of the television.
Center speaker (C: SB-PC100)
• Put above or below the center of the television, on a shelf or rack or
attach to the wall. Placing it directly on the television can cause the
picture to be distorted.
Surround speakers (D left, E right: SB-FS100)
• Put the surround speakers to the side of or slightly behind the seating
area.
Active subwoofer (F: SB-WA101)
• Place it at least 5 cm from the wall as it has a bass refl ex port in the
rear.
• Depending on speaker location, the low-range frequency characteristics will vary. When placed in the corner of the room, the volume
will increase accordingly.
Do not attach the subwoofer to walls or ceilings.
How you set up your speakers can affect the bass and the sound fi eld.
Note the following points.
• Place them on a fl at, level secure surface.
Use spacers or similar items to stop them from rocking.
• Placing speakers too close to walls, and corners can result in excessive bass.
• Cover walls and windows with a thick curtain.
• You can enjoy clearer sound by angling the front speakers toward
the listening chair.
• Do not place anything on top of the subwoofer.
ı
Installing one or more surround back speakers G (not included)
• Surround speakers (D left, E right: SB-FS100)
Install these speakers on the left and right sides of the listening
position.
• Surround back speaker(s) (G: SB-PC70A) (not included)
For one speaker: Install the speaker directly behind the listening
position, about one meter above the fl oor.
When installing two speakers: Install the speakers 30° to the rear of
the listening position, about one meter above the fl oor.
Ubicación
Los altavoces delanteros, central y de sonido ambiental deberán colocarse aproximadamente a la misma altura de la posición de escucha.
Los ángulos del diagrama son aproximados.
Altavoz delantero (A izquierdo, B derecho: SB-FS100)
• Ponga los altavoces delanteros a ambos lados del televisor.
Altavoz central (C: SB-PC100)
• Póngalo por encima o por debajo del centro del televisor, en un
estante o bastidor o instalado en la pared. Colocarlo directamente
encima del televisor puede causar distorsiones en la imagen.
Altavoz de sonido ambiental (D izquierdo, E derecho: SB-FS100)
• Ponga los altavoces de sonido ambiental a los lados o un poco por
detrás del área de escucha.
Altavoz de extra-graves amplifi cado
• Sepárelo un mínimo de 5 cm de la pared porque tiene en la parte
trasera un orifi cio para el refl ejo de los graves.
• Dependiendo de la ubicación del altavoz, las características de baja
frecuencia cambiarán. Cuando se coloque en la esquina de una
habitación, el volumen aumentará de la forma correspondiente.
No instale este altavoz en paredes o techos.
La forma en que instala sus altavoces puede afectar a los graves y al
campo de sonido. Tenga en cuenta los puntos siguientes.
• Colóquelos en bases planas, niveladas y seguras.
Utilice espaciadores o cosas similares para impedir que se mue-
van.
• La colocación de los altavoces muy cerca de las paredes o esquinas
puede crear un sonido grave excesivo.
• Tape las paredes y las ventanas con cortinas gruesas.
• Orientando los altavoces delanteros hacia la silla donde usted se
sienta podrá disfrutar de un sonido más claro.
• No ponga nada encima del altavoz de subgraves.
ı Instalación de uno o más altavoces de sonido ambiental tra-
seros G (no suministrados)
• Altavoces de sonido ambiental (D izquierdo, E derecho: SB-
FS100)
Instale estos altavoces a la izquierda y a la derecha de la posición
de escucha.
• Altavoz (o altavoces) de sonido ambiental trasero (traseros)
(G: SB-PC70A) (no suministrados)
Para un altavoz: Instale el altavoz directamente detrás de la posición
de escucha, a un metro aproximadamente por encima del suelo.
Cuando instale dos altavoces: Instale los altavoces a 30° por detrás de la posición de escucha, a un metro aproximadamente por
encima del suelo.
(F: SB-WA101)
8
RQT8573
Positionnement
Opstelling
Les enceintes avant, centrale et surround doivent être placées environ
à une même distance de la position d’écoute. Les angles indiqués sur
le diagramme sont approximatifs.
Enceintes avant (A gauche, B droite : SB-FS100)
• Placez les enceintes avant de chaque côté du téléviseur.
Enceinte centrale (C : SB-PC100)
• Placez-la au-dessus ou en dessous du téléviseur, centrée par rapport
à ce dernier, posée sur une tablette ou une étagère, ou bien fi xée au
mur. Pour éviter toute distorsion de l’image, évitez de placer cette
enceinte directement sur le téléviseur.
Enceintes surround (D gauche, E droite : SB-FS100)
• Placez les enceintes surround de chaque côté de la position d’écoute
ou légèrement en retrait.
Enceinte d’extremes-graves avec amplifi cateur (F : SB-WA101)
• Le caisson étant doté d’un orifi ce bass-refl ex à l’arrière, il doit être
placé à au moins 5 cm du mur.
• Les caractéristiques des fréquences de faible gamme dépendent de
l’emplacement de l’enceinte. Si l’enceinte est placée dans le coin
d’une pièce, le volume augmentera en conséquence.
Ne pas fi xer le caisson de graves au mur ni au plafond.
La façon dont vous disposez les enceintes peut affecter le rendu
des graves et la qualité du champ sonore. Veuillez noter les points
suivants.
• Placez-les sur des bases planes, de niveau et stables.
Utilisez des entretoises ou objets similaires pour les empêcher de
balancer.
• Si vous placez les enceintes trop près des murs et des coins, les
graves risquent d’être trop prononcées.
• Recouvrez les murs et fenêtres de rideaux épais.
• Vous pouvez écouter un son plus clair en orientant les enceintes
avant vers la position d’écoute.
• Evitez de placer quoi que ce soit sur le caisson de graves.
Installation d’une ou plusieurs enceintes surround arrière G
ı
(non fournie)
• Enceintes surround (D gauche, E droite : SB-FS100)
Installez ces enceintes sur les côtés gauche et droit par rapport à
la position d’écoute.
• Enceinte(s) surround arrière (G : SB-PC70A) (non fournie)
Pour une enceinte : Installez l’enceinte directement derrière la position d’écoute, à environ un mètre au-dessus du sol.
Lors de l’installation de deux enceintes : Installez l’enceinte 30° derrière la position d’écoute, à environ un mètre au-dessus du sol.
De voorluidsprekers, middenluidspreker en surroundluidsprekers
moeten op ongeveer gelijke afstand van de luisterpositie worden geplaatst. De hoeken op het schema zijn bij benadering aangegeven.
Voorluidspreker (A links, B rechts: SB-FS100)
• Plaats de voorluidsprekers aan beide zijden van het tv-toestel.
Middenluidspreker (C: SB-PC100)
• Plaats deze luidspreker op een plank of rack, of bevestig hem aan
een muur, iets hoger of lager dan het midden van het tv-toestel.
Plaats deze luidspreker niet direct op het tv-toestel, aangezien dit
beeldstoring kan veroorzaken.
Surroundluidspreker (D links, E rechts: SB-FS100)
• Plaats de surroundluidsprekers vlak naast of ietwat achter de luisterplaats.
Actieve subwoofer (F: SB-WA101)
• Plaats hem tenminste 5 cm van de muur vandaan, aangezien hij
een basrefl expoort heeft op de achterzijde.
• De lage-frequentiebereik kan afhankelijk van de luidsprekeropstelling variëren. Bij een opstelling in een hoek van de kamer zal de
geluidssterkte dienovereenkomstig toenemen.
Bevestig deze luidspreker niet aan een muur of plafond.
De manier waarop u de luidsprekers installeert kan invloed hebben op
de basweergave en het geluidsveld. Let op de volgende punten.
• Plaats de luidsprekers op een effen, horizontaal en stevig oppervlak.
Gebruik vulstukken of iets dergelijks om te voorkomen dat de luid-
sprekers wiegelen.
• Als u de luidsprekers te dicht bij muren en hoeken plaatst, kan de
basweergave te sterk zijn.
• Hang een dik gordijn voor muren en ramen.
• U krijgt een helderder geluid als u de voorluidsprekers naar de
luisterpositie richt.
• Plaats niets bovenop de subwoofer.
ı Opstelling van een of meerdere surround-achterluidsprekers
G (niet bijgeleverd)
• Surroundluidsprekers (D links, E rechts: SB-FS100)
Plaats deze luidsprekers links en rechts naast de luisterpositie.
• Surround-achterluidspreker(s) (G: SB-PC70A) (niet bijgeleverd)
Bij een enkele luidspreker: Plaats de luidspreker vlak achter de
luisterpositie, ongeveer een meter boven de vloer.
Opstelling van twee luidsprekers: Plaats de luidsprekers onder een
hoek van 30° achter de luisterpositie, ongeveer een meter boven
de vloer.
FRANÇAIS
NEDERLANDS
9
RQT8573
ENGLISHESPAÑOL
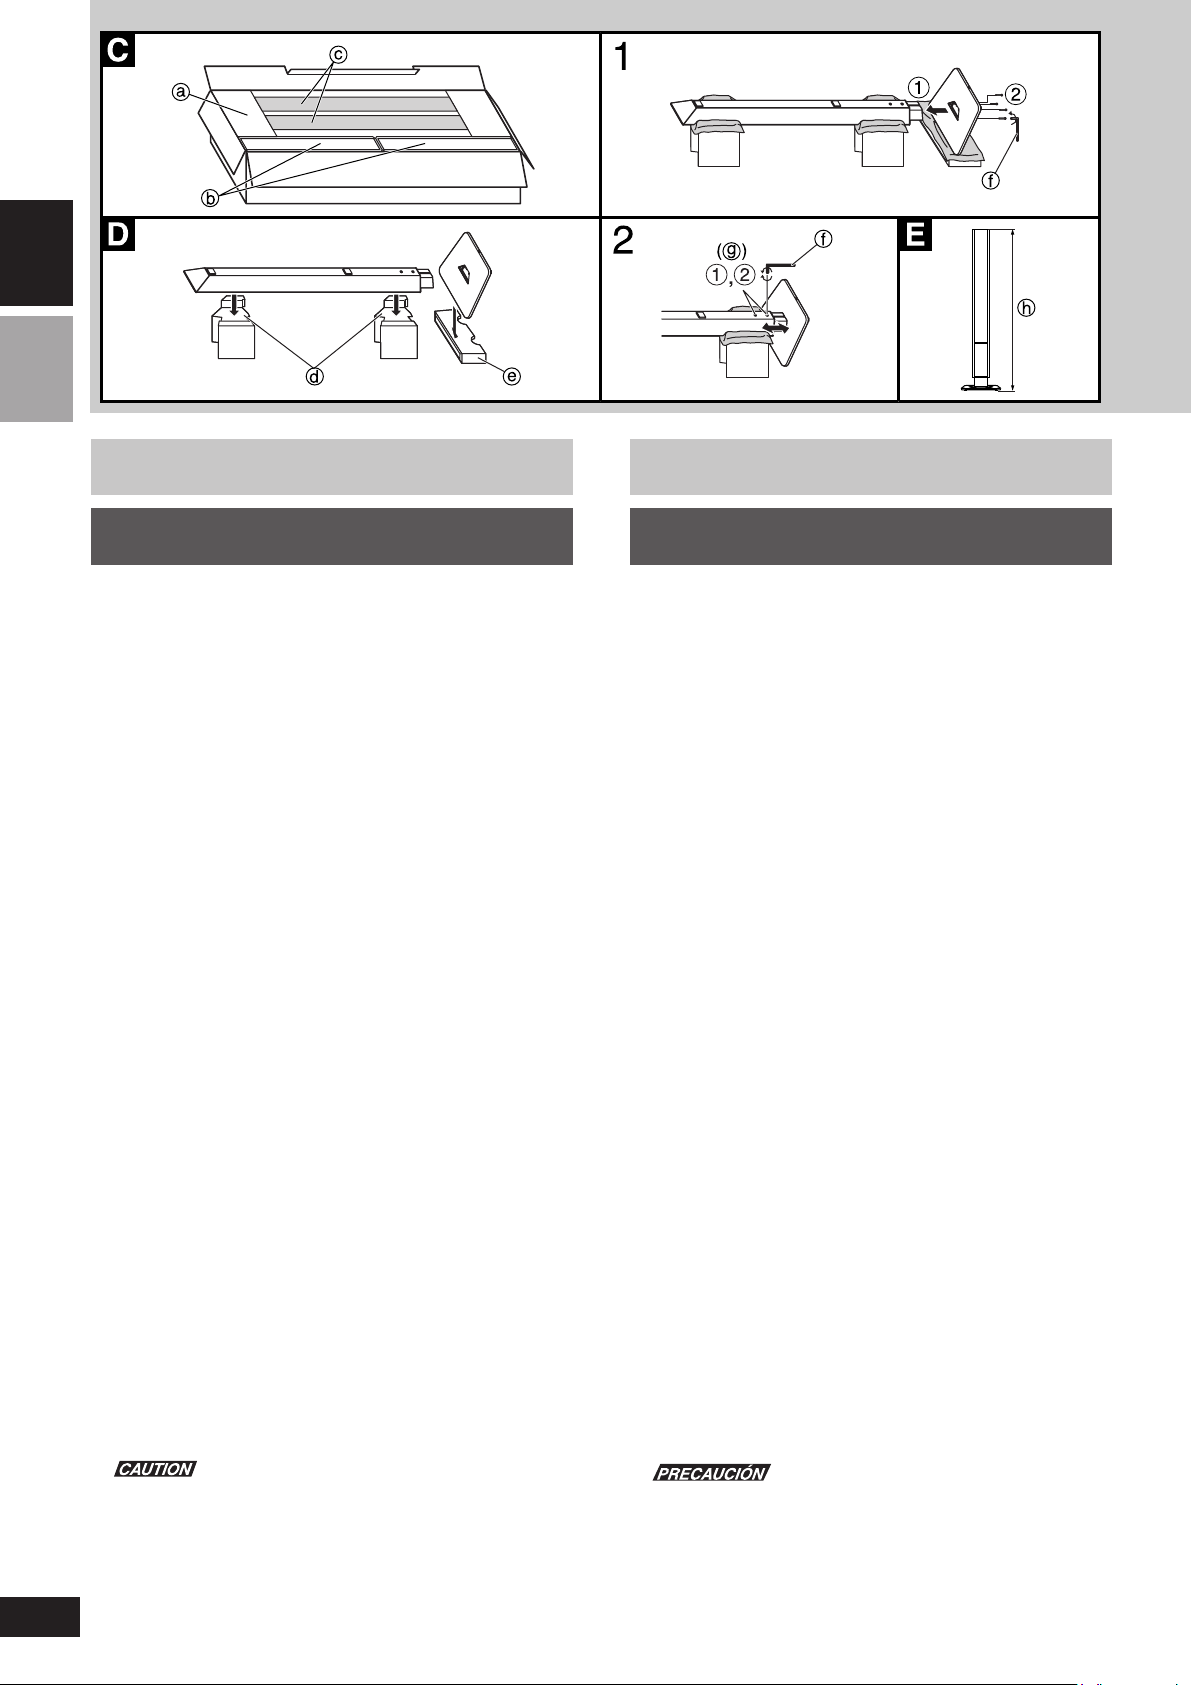
Assembly and Installation
Assembling the front and surround
speakers (SB-FS100) as stand types
• Do not apply an unreasonable force to the net at the front of the
speaker unit. You cannot remove the front net.
• You can carry out assembly work stably by placing the cushions in
the packing case beneath the speaker. Place the speaker with the
net side face downward.
Ç Cushions used
a Two left cushions (upper and lower) for the speaker units
b One stand base cushion (left or right or top and bottom)
c Speaker units
Î Method of setting cushions
d Left cushions for speaker unit
e Cushion for stand base
Be sure to spread a cloth, for example, on the fl oor to protect it
from damage.
• After each task, tighten the screws securely.
Tighten the stand base mounting bolts and the height adjusting bolts
using the hexagonal wrench f provided.
1. Install the stand base (provided) on the speaker
unit.
1 Fit the stand base onto the stand of the speaker unit.
2 Install the stand base using the four stand base mounting
bolts (provided).
• Tighten the screws alternately, and finally tighten
them hard.
2. Determine the height of the speaker, and tighten
the two height adjusting bolts.
The height of each speaker is set to MIN at the factory.
Adjust the height as shown in the fi gure above.
1 Adjust the height.
Loosen the two height adjusting bolts g, and move the stand
base.
• You can obtain a better sound effect by adjusting the height of the
speaker to suit the height of the plasma television, for example.
‰
Height adjustment range: 1,183 mm (MIN) - 1,428 mm (MAX)
h Height
2 Tighten the height adjusting bolts g alternately, and fi nally
tighten them hard.
3. Connect the speaker cable (provided) to the
terminals i.
Be sure to connect only positive (copper) wire j to positive (+)
terminal and negative (silver) wire k to negative (–) terminal.
• Speaker cable (short, 4 m): For the front speaker
Speaker cable (long, 10 m): For the surround speaker
Turn the thumb nut in the loosening direction until the hole in
the terminal becomes visible, then insert the conductor from
the top of the terminal and re-tighten the thumb nut.
• Slightly bend the tip of the conductor before inserting it. l
• Tighten the thumb nut when the conductor is protruding from the
hole in the terminal.
Ensamblaje e instalación
Ensamblaje de los altavoces delanteros y de sonido
ambiental (SB-FS100) como altavoces tipo independiente
• No aplique una fuerza excesiva a la red de la parte delantera del
altavoz. La red delantera no puede desmontarse.
• Puede realizar el trabajo de ensamblaje de manera estable colocando los cojines de la caja de embalaje debajo del altavoz. Coloque
el altavoz con la cara de la red hacia abajo.
Ç Cojines utilizados
a
Dos cojinetes izquierdos (superior e inferior) para los altavoces
b Un cojín de base de soporte (izquierdo o derecho o superior e
inferior)
c Altavoces
Î Método de colocación de los cojines
d Cojines izquierdos para altavoz
e Cojín para base de soporte
Asegúrese de poner un paño, por ejemplo, sobre el suelo para
protegerlo contra los daños.
• Apriete fi rmemente los tornillos después de cada tarea.
Apriete los pernos de montaje de la base de soporte y los pernos de
ajuste de altura utilizando la llave hexagonal f suministrada.
1.
Instale la base de soporte (suministrada) en el altavoz.
1 Coloque la base de soporte sobre la base del altavoz.
2 Instale la base de soporte utilizando los cuatro pernos de
montaje de la base de soporte (suministrados).
• Apriete los tornillos de forma alterna y fi nalmente apriételos
fi rmemente.
2. Determine la altura del altavoz y apriete los dos pernos
de ajuste de altura.
La altura de cada altavoz ha sido establecida al mínimo en
la fábrica.
Ajuste la altura como se muestra en la fi gura de arriba.
1 Ajuste la altura.
Afl oje los dos pernos de ajuste de altura g y mueva la base
de soporte.
• Puede obtener un mejor efecto de sonido ajustando la altura del
altavoz para adaptarla a la altura del televisor con pantalla de
plasma, por ejemplo.
‰ Margen de ajuste de altura: 1.183 mm (mínimo) - 1.428 mm
(máximo)
h Altura
2 Apriete los pernos de ajuste de altura g de forma alterna y
fi nalmente apriételos fi rmemente.
3. Conecte el cable de altavoz (suministrado) a los
terminales
Asegúrese de conectar solamente el cable positivo (cobre) j
al terminal positivo (+) y el cable negativo (plata) k al terminal
negativo (–).
• Cable de altavoz (corto, 4 m): Para altavoz delantero
Cable de altavoz (largo, 10 m): Para altavoz de sonido ambiental
Gire la tuerca de apriete manual en el sentido en que se afl oja
hasta que se pueda ver el agujero del terminal, y luego inserte
el conductor desde la parte superior del terminal y apriete de
nuevo la tuerca de apriete manual.
•
Doble ligeramente la punta del conductor antes de insertarla.
• Apriete la tuerca de apriete manual cuando el conductor sobre-
salga del agujero del terminal.
i.
l
10
RQT8573
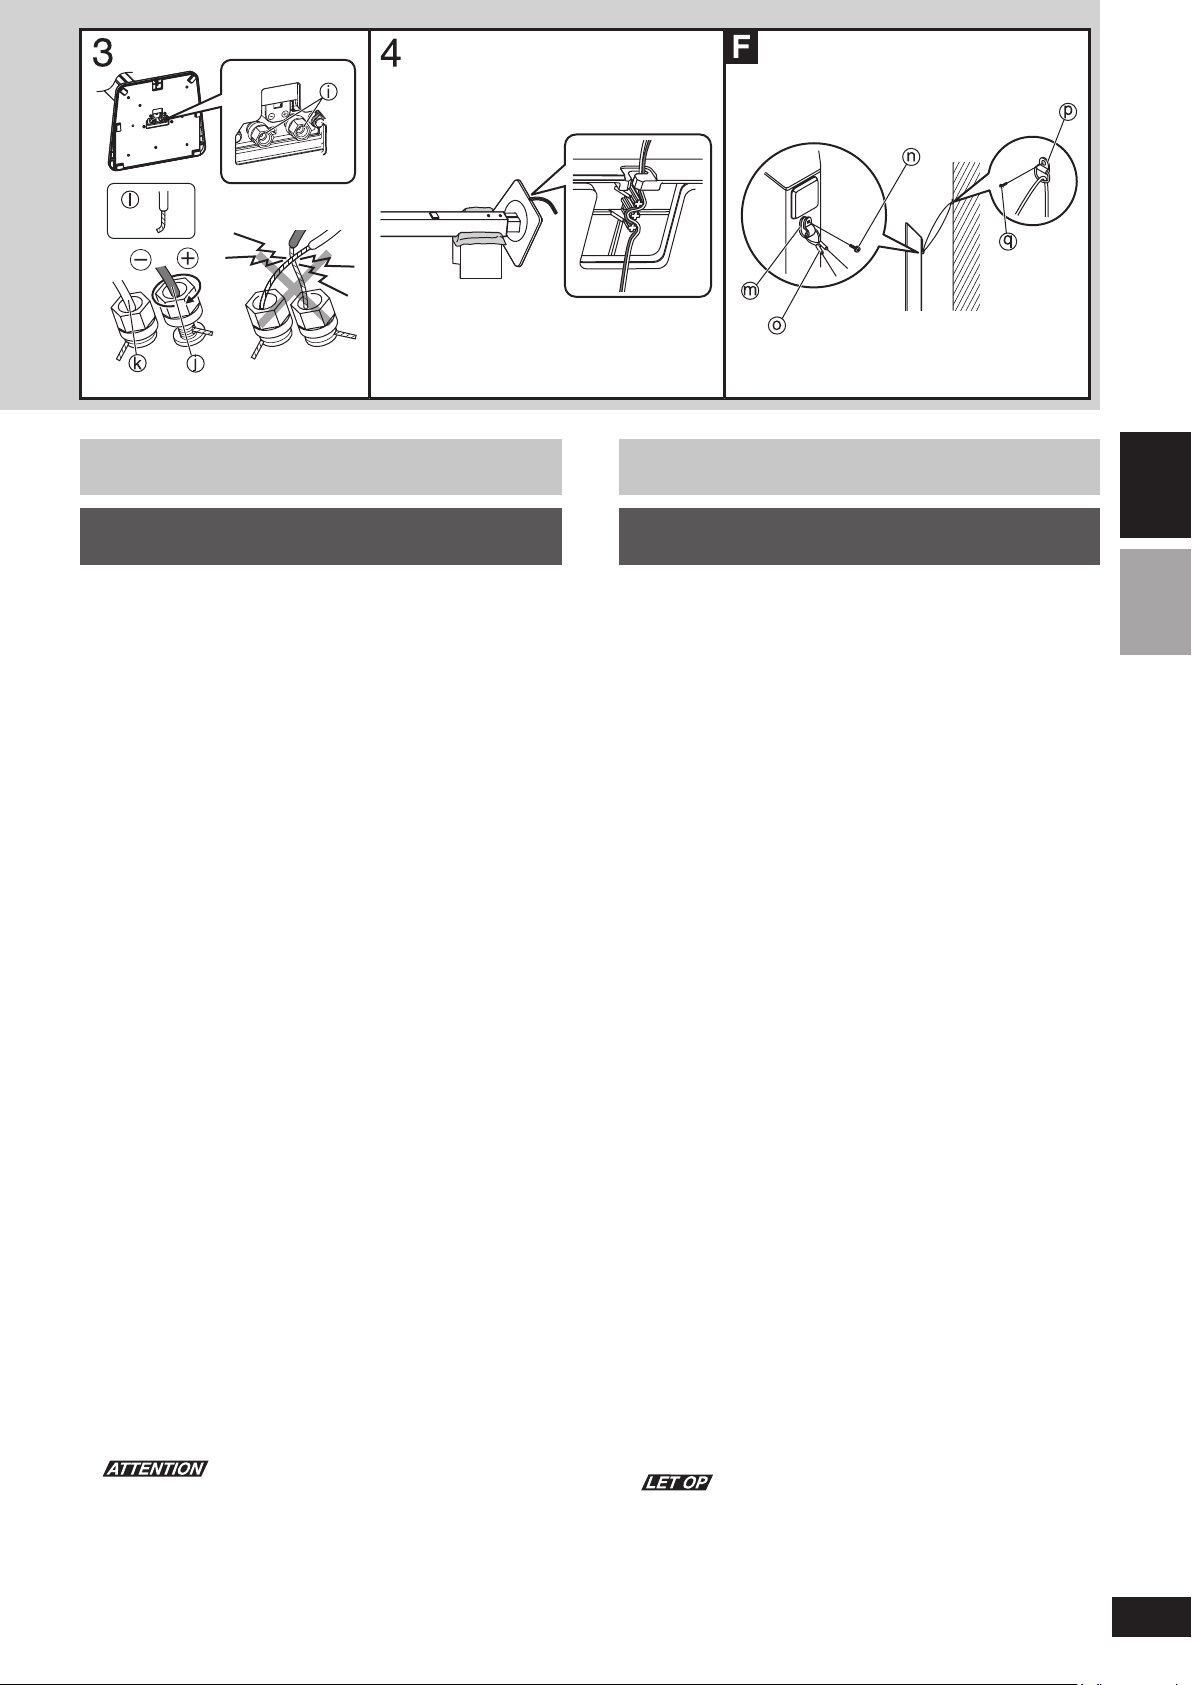
Never short-circuit positive (+) and negative (–) speaker
wires.
4. Fix the cable to the bottom of the stand base.
Ï Attaching a stabilizing wire
Example
Screw q the wood screw into a thick and hard part of the wall.
The surface must be able to support over 45 kg.
m Nylon clamp n Screw for nylon clamp
o Wire (not included) p Ring (not included)
q Screw (not included)
No cortocircuite nunca los cables positivos (+) y negativos
(–) de los altavoces.
4.
Fije el cable a la parte inferior de la base de soporte.
Ï Colocación de un alambre estabilizador
Ejemplo
m
Abrazadera de nailon
o
Alambre (no suministrado)pAnillo (no suministrado)
q
Tornillo (no suministrado)
Atornille el tornillo de madera q en una parte gruesa y dura de la pared.
La superfi cie deberá poder soportar un peso de más de 45 kg.
Tornillo para abrazadera de nailon
n
Montage et installation
Montage en installatie
Montage des enceintes avant et
surround (SB-FS100) sur pied
• N’exercez pas une force excessive sur le fi let sur le devant de
l’enceinte. Il est impossible de retirer le fi let avant.
• Vous pouvez procéder à un montage stable en plaçant les coussinets
dans la caisse sous l’enceinte. Positionnez l’enceinte avec le fi let
tourné vers le bas.
Ç Coussinets utilisés
a Deux coussinets gauches (supérieur et inférieur) pour les en-
ceintes
b Un coussinet pour la base du socle (gauche ou droit ou haut et
bas)
c Enceintes
Î Méthode pour placer les coussinets
d Coussinets gauches pour l’enceinte
e Coussinet pour la base du socle
Pensez à étendre un tissu ou autre sur le sol pour le protéger.
• Après chaque tâche, serrez bien les vis.
Serrez les boulons de fi xation de la base du socle et les boulons de
réglage de la hauteur avec la clé hexagonale f fournie.
1. Installez la base du socle (fournie) sur
l’enceinte.
1 Montez la base du socle sur le socle de l’enceinte.
2 Installez la base du socle avec les quatre boulons de fi xation
de la base du socle (fournis).
• Serrez les vis l’une après l’autre, puis serrez les solidement.
2. Déterminez la hauteur de l’enceinte et serrez les
deux boulons de réglage de la hauteur.
La hauteur de chaque enceinte est réglée sur MIN en usine.
Ajustez la hauteur comme illustré sur le schéma ci-dessus.
1 Ajustez la hauteur.
Desserrez les deux boulons de réglage de la hauteur g et
déplacez la base du socle.
• Vous obtiendrez un meilleur effet en ajustant la hauteur de
l’enceinte pour qu’elle corresponde par exemple à la hauteur du
téléviseur plasma.
‰ Plage du réglage de la hauteur : 1.183 mm (MIN) - 1.428 mm
(MAX)
h Hauteur
2 Serrez les boulons de réglage de la hauteur g l’un après
l’autre, puis serrez-les solidement.
3. Branchez le câble de l’enceinte (fourni) sur les
bornes i.
Assurez-vous de brancher uniquement un fi l positif (cuivre) j à la
borne positive (+) et un fi l négatif (argent) k à la borne négative (–).
• Câble d’enceinte (court, 4 m) : Pour l’enceinte avant
Câble d’enceinte (long, 10 m) : Pour l’enceinte surround
Desserrez l’écrou à oreilles jusqu’à ce que l’orifi ce dans la
borne soit visible, puis insérez le conducteur à partir du haut
de la borne et resserrez l’écrou à oreilles.
• Pliez légèrement l’extrémité du conducteur avant de l’insérer.
l
• Serrez l’écrou à oreilles lorsque le conducteur sort de l’orifi ce
de la borne.
Prenez bien garde de court-circuiter les fi ls d’enceinte positifs
(+) et négatifs (–).
4. Attachez le câble au bas de la base du socle.
Ï Fixation d’un câble stabilisateur
Exemple
Vissez la vis à bois q dans une partie épaisse et solide du mur.
La surface doit pouvoir supporter plus de 45 kg.
m
Collier de serrage en nylon
o
Fil (non fourni)
q
Vis (non fournie)
Vis du collier de serrage en nylon
n
Anneau (non fourni)
p
Montage van de voor- en surroundluidsprekers
(SB-FS100) als vrijstaande luidsprekers
• Oefen geen overmatige druk uit op de voorgrilles van de luidspreker.
U kunt de voorgrilles niet verwijderen.
• Door de kussens uit de verpakking onder de luidspreker te plaatsen
kunt u de montagewerkzaamheden veilig uitvoeren. Plaats de luidspreker met zijn voorzijde naar beneden gericht.
Ç Te gebruiken kussens
a
Twee linker kussens (bovenste en onderste) voor de luidsprekers
b Een kussen voor het voetstuk (links of rechts of boven en
onder)
c Luidsprekers
Î Plaatsing van de kussens
d Linker kussens voor de luidspreker
e Kussen voor het voetstuk
Leg iets op de grond, bijvoorbeeld een doek, om beschadiging te
voorkomen.
• Draai de schroeven na iedere stap goed aan.
Draai de voetstuk-bevestingsbouten en de hoogte-afstelbouten met
behulp van de bijgeleverde inbussleutel f aan.
1. Monteer het voetstuk (bijgeleverd) op de luidspreker.
1 Plaats het voetstuk op de voet van de luidspreker.
2 Bevestig het voetstuk met behulp van de vier voetstuk-beves-
tingsbouten (bijgeleverd).
• Draai de schroeven beurtelings aan en draai ze tenslotte stevig
vast.
2. Bepaal de luidsprekerhoogte en draai de twee hoogteafstelbouten vast.
De hoogte van elke luidspreker is in de fabriek ingesteld op
MIN.
In bovenstaande tekening is weergegeven hoe u de hoogte
kunt veranderen.
1 De hoogte veranderen.
Draai de twee hoogte-afstelbouten los g en verschuif het
voetstuk.
• U kunt bijvoorbeeld een beter geluidseffect verkrijgen als u
de hoogte van de luidspreker aanpast aan de hoogte van het
plasmascherm.
‰ Instelbereik: 1 183 mm (MIN) - 1 428 mm (MAX)
h Hoogte
2 Draai de schroeven beurtelings aan en draai ze tenslotte stevig
vast.
3. Sluit de luidsprekerkabel (bijgeleverd) aan op de
luidsprekeraansluitingen i.
Zorg ervoor dat u de positieve (koper) draden j op positieve (+)
aansluitingen en de negatieve (zilver) draden k op negatieve (–)
aansluitingen aansluit.
• Luidsprekerkabel (kort, 4 m): Voor de voorluidspreker
Luidsprekerkabel (lang, 10 m): Voor de surroundluidspreker
Draai de vingermoer los totdat de opening in de aansluiting
zichtbaar is, steek daarna de draadkern boven in de aansluiting en draai tenslotte de vingermoer weer vast.
• Voordat u het erin uiteinde van de draadkern steekt moet u het
iets ombuigen. l
• Draai de vingermoer vast als de draadkern uit de opening in de
aansluiting tevoorschijn komt.
Pas op dat u de positieve (+) en negatieve (–) luidsprekerdraden niet kortsluit.
4. Bevestig de kabel aan de onderkant van het voetstuk.
Ï Bevestigen van een stabiliseringsdraad
Voorbeeld
Draai de houtschroef q in een dik en hard gedeelte van de muur.
Het muuroppervlak moet een gewicht van meer dan 45 kg kunnen dragen.
m
Nylonklem
o
Draad (niet bijgeleverd)
q
Schroef (niet bijgeleverd)
Schroef voor nylonklem
n
Ring (niet bijgeleverd)
p
11
RQT8573
FRANÇAIS
NEDERLANDS
ENGLISHESPAÑOL
12
RQT8573
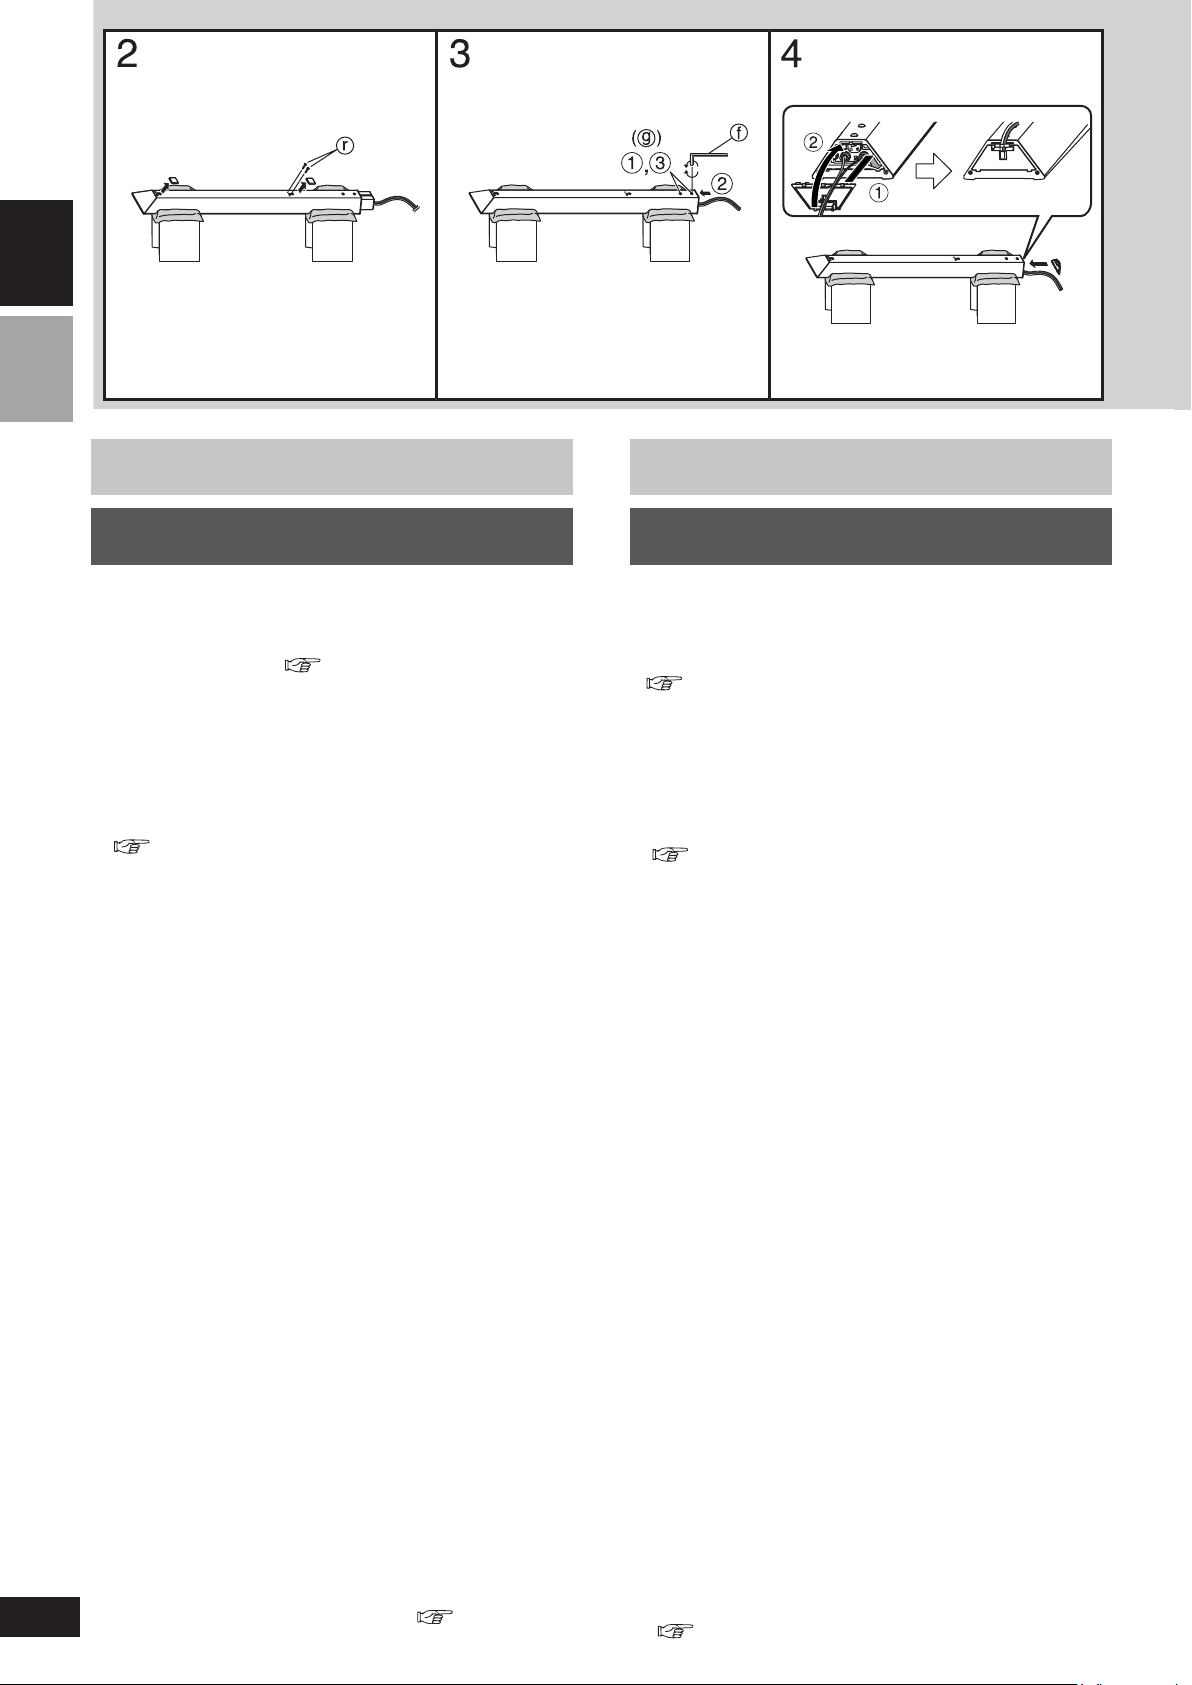
Assembly and Installation
Wall-mounting the front and surround
speakers (SB-FS100)
• Do not apply an unreasonable force to the net at the front of the
speaker unit. You cannot remove the front net.
• You can carry out assembly work stably by placing the cushions in
the packing case beneath each speaker. Place the speaker with the
net side face downward. ( page 10)
Be sure to spread a cloth, for example, on the fl oor to protect it
from damage.
• After each task, tighten the screws securely.
Tighten the height adjusting bolts using the hexagonal wrench f
provided.
• Keep the removed parts carefully aside.
1. Connect the speaker cable (provided) to the ter-
minals i.
Refer to step 3 on page 10.
• Speaker cable (short, 4 m): For the front speaker
Speaker cable (long, 10 m): For the surround speaker
2. Remove the upper and lower covers from the back
of the speaker unit, and remove the two stopper
screws r from the lower cover.
• Unless wall-mounting the speaker, do not remove the stopper
screws.These screws determine the minimum height of the
speaker unit.
3. Fit the stand onto the speaker unit, and fi x it in
place.
1 Loosen the two height adjusting bolts g.
2 Push the stand to the rear of the bottom part of the speaker
unit.
3 Tighten the two height adjusting bolts g.
• Tighten the screws alternately and fi nally tighten them hard.
4. Fit the bottom cover (provided) into the lower end
of the speaker unit.
1 Bring the cable out from the side of the bottom cover, and then
insert the bottom cover.
2 Fit the bottom cover into the speaker unit.
5. Apply the spacers (provided), and mount the
speaker on the wall.
• Apply the spacers to the two points beneath the cover as shown
in the illustration.
s When the screws are in this position, the speaker may drop
off.
t Fit the speaker securely so the screws are in this position.
q Screw (not included)
Screw q the wood screw into a thick and hard part of the wall.
The surface must be able to support over 25 kg.
Assembling a wall-mounted speaker system as a stand
type
1 Return the speaker to the original condition by carrying out
the opposite procedure to the above.
• Insert the stopper screws r of step 2 above into the holes in the
speaker unit.
2 Assemble the speaker as a stand type. ( page 10)
Ensamblaje e instalación
Montaje en pared de los altavoces delanteros y
de sonido ambiental (SB-FS100)
• No aplique una fuerza excesiva a la red de la parte delantera del
altavoz. La red delantera no puede desmontarse.
• Puede realizar el trabajo de ensamblaje de manera estable
colocando los cojines de la caja de embalaje debajo de cada
altavoz. Coloque el altavoz con la cara de la red hacia abajo.
( página 10)
Asegúrese de poner un paño, por ejemplo, sobre el suelo para
protegerlo contra los daños.
• Apriete fi rmemente los tornillos después de cada tarea.
Apriete los pernos de ajuste de altura con la llave hexagonal f
suministrada.
• Ponga cuidadosamente a un lado las piezas desmontadas.
1. Conecte el cable de altavoz (suministrado) a los
terminales i.
Consulte el paso 3 de la página 10.
• Cable de altavoz (corto, 4 m): Para altavoz delantero
Cable de altavoz (largo, 10 m): Para altavoz de sonido ambiental
2. Quite las cubiertas superior e inferior de la parte
posterior del altavoz, y quite los dos tornillos del
tope r de la cubierta inferior.
• No quite los tornillos del tope excepto cuando monte el altavoz en
una pared. Este tope determina la altura mínima del altavoz.
3. Coloque la base en el altavoz y fíjela en su
lugar.
1 Afl oje los dos pernos de ajuste de altura g.
2 Empuje el soporte hacia la parte trasera de la parte inferior
del altavoz.
3 Apriete los dos pernos de ajuste de altura g.
• Apriete los tornillos de forma alterna y fi nalmente apriételos
fi rmemente.
4. Coloque la cubierta inferior (suministrada) en el
extremo inferior del altavoz.
1 Saque el cable desde el lado de la cubierta inferior y luego
inserte la cubierta inferior.
2 Coloque la cubierta inferior en el altavoz.
5. Coloque los espaciadores (suministrados) y
monte el altavoz en la pared.
• Coloque los espaciadores en los dos puntos situados debajo de
la cubierta como se muestra en la fi gura.
s En esta posición puede que se caiga el altavoz.
t Coloque fi rmemente el altavoz en esta posición.
q Tornillo (no suministrado)
Atornille el tornillo de madera q en una parte gruesa y dura de
la pared.
La superfi cie deberá poder soportar un peso de más de 25 kg.
Ensamblaje de un altavoz montado en pared como altavoz
tipo independiente
1 Vuelva a poner el altavoz en la condición original realizando
a la inversa el procedimiento descrito más arriba.
• Inserte los tornillos del tope r del paso 2 de más arriba en los
agujeros del altavoz.
2 Ensamblaje del altavoz como altavoz tipo independiente.
( página 10)

Montage et installation
Montage en installatie
Montage au mur des enceintes avant et
surround (SB-FS100)
• N’exercez pas une force excessive sur le fi let sur le devant de
l’enceinte. Il est impossible de retirer le fi let avant.
• Vous pouvez procéder à un montage stable en plaçant les coussinets
dans la caisse sous chaque enceinte. Positionnez l’enceinte avec le
fi let tourné vers le bas. ( page 11)
Pensez à étendre un tissu ou autre sur le sol pour le protéger.
• Après chaque tâche, serrez bien les vis.
Insérez les boulons de réglage de la hauteur avec la clé hexagonale
f fournie.
• Mettez soigneusement de côté les pièces déposées.
1. Branchez le câble de l’enceinte (fourni) sur les
bornes i.
Reportez-vous à l’étape 3 à la page 11.
• Câble d’enceinte (court, 4 m) : Pour l’enceinte avant
Câble d’enceinte (long, 10 m) : Pour l’enceinte surround
2. Déposez les caches supérieur et inférieur du dos
de l’enceinte et retirez les deux vis de butée r du
cache inférieur.
• Hormis pour le montage au mur de l’enceinte, ne retirez jamais
les vis de butée. Cette butée détermine la hauteur minimum de
l’enceinte.
3. Posez le socle sur l’enceinte et fi xez-le en place.
1 Desserrez les deux boulons de réglage de la hauteur g.
2 Poussez le socle vers l’arrière de la partie inférieure de
l’enceinte.
3 Serrez les deux boulons de réglage de la hauteur g.
• Serrez les vis l’une après l’autre, puis serrez les solidement.
4. Posez le cache inférieur (fourni) dans la partie
inférieure de l’enceinte.
1 Faites sortir le câble par le côté du cache inférieur, puis insérez
le cache.
2 Posez le cache inférieur sur l’enceinte.
5. Appliquez les entretoises (fournies) et montez
l’enceinte au mur.
• Appliquez les entretoises aux deux points sous le cache comme
illustré.
s Dans cette position, l’enceinte peut tomber.
t Fixez solidement l’enceinte dans cette position.
q Vis (non fournie)
Vissez la vis à bois q dans une partie épaisse et solide du mur.
La surface doit pouvoir supporter plus de 25 kg.
Installation sur pied d’un système d’enceintes monté au
mur
1 Ramenez l’enceinte à la condition à laquelle vous l’avez ache-
tée en procédant à l’opposé des étapes ci-dessus.
• Insérez les vis de butée r de l’étape 2 ci-dessus dans les orifi ces
de l’enceinte.
2 Montez les enceintes sur pied. ( page 11)
De voor- en surroundluidsprekers (SBFS100) aan een muur bevestigen
• Oefen geen overmatige druk uit op de voorgrilles van de luidspreker.
U kunt de voorgrilles niet verwijderen.
• Door de kussens uit de verpakking onder de luidspreker te plaatsen
kunt u de montagewerkzaamheden veilig uitvoeren. Plaats de luid-
spreker met de voorzijde naar beneden gericht. ( blz. 11)
Leg iets op de grond, bijvoorbeeld een doek, om beschadiging te
voorkomen.
• Draai de schroeven na iedere stap goed aan.
Plaats de hoogte-afstelbouten met behulp van de bijgeleverde
inbussleutel f.
• Bewaar de verwijderde onderdelen zorgvuldig.
1. Sluit de luidsprekerkabel (bijgeleverd) aan op de
luidsprekeraansluitingen i.
Zie stap 3 op blz. 11.
• Luidsprekerkabel (kort, 4 m): Voor de voorluidspreker
Luidsprekerkabel (lang, 10 m): Voor de surroundluidspreker
2. Verwijder de bovenste en onderste afdekplaatjes
aan de achterkant van de luidspreker en verwijder
de twee aanslagschroeven r uit het onderste
afdekplaatje.
• Deze aanslagschroeven mogen niet verwijderd worden, behalve
bij bevestiging van de luidspreker aan de muur. De minimale
hoogte van de luidspreker wordt door deze aanslag bepaald.
3. Plaats het voetstuk op de luidspreker en bevestig
het.
1 Maak de twee hoogte-afstelbouten g los.
2 Duw het voetstuk aan de onderzijde van de luidspreker naar
achteren.
3 Draai de twee hoogte-afstelbouten g vast.
• Draai de schroeven beurtelings aan en draai ze tenslotte stevig
vast.
4. Plaats de bodemafdekplaat (bijgeleverd) op de
onderkant van de luidspreker.
1 Haal de kabel door de opening van de bodemafdekplaat en
maak het op deze plaat vast.
2 Bevestig de bodemafdekplaat op de luidspreker.
5. Plaats de opvulstukken (bijgeleverd) en bevestig
de luidspreker aan de muur.
• Plaats de opvulstukken op de twee plaatsen onder de afdekplaat.
Zie illustratie.
s In deze positie is het mogelijk dat de luidspreker eraf valt.
t Bevestig de luidspreker stevig in deze positie.
q Schroef (niet bijgeleverd)
Draai de houtschroef q in een dik en hard gedeelte van de
muur.
Het muuroppervlak moet een gewicht van meer dan 25 kg kunnen dragen.
Een aan een muur bevestigde luidspreker ombouwen tot
een vrijstaande luidspreker
1 Breng de luidspreker terug in de originele staat ten tijde van
aankoop door bovenstaand stappenplan omgekeerd uit te
voeren.
• Plaats de aanslagschroeven r van bovengenoemde stap 2 in
de gaten van de luidspreker.
2 Monteer de luidspreker als een vrijstaande luidspreker.
( blz. 11)
FRANÇAIS
NEDERLANDS
13
RQT8573
ENGLISHESPAÑOL
14
RQT8573
Assembly and Installation
Setup the center speaker
(SB-PC100)
• Do not apply an unreasonable force to the net at the front of the
speaker unit. You cannot remove the front net.
• Lay the speakers on a fl at surface over a soft cloth when working
on them.
• Tighten the screws fi rmly.
Å
Connect the speaker cable (provided) to the terminals i.
Be sure to connect only positive (copper) wire j to positive (+) terminal
and negative (silver) wire k to negative (–) terminal.
Press the spring lever to open the wire inlet, then insert the lead
before releasing the spring lever.
Never short-circuit positive (+) and negative (–) speaker wires.
ı Attaching the rubber feet when placing on a surface
Attach the rubber feet to the base of the speaker to prevent vibration
from causing the speaker to move or fall over.
Ç Attaching to a wall
Attach four rubber feet to the rear of the speaker.
q Screw (not included)
Screw the wood screw q into a thick and hard part of the wall.
The surface must be able to support over 10 kg.
Do not attach this speaker to walls or ceilings using methods other
than those described here.
Settings for connecting the recommended amplifi er
to the active subwoofer
When using our SA-XR57 AV control receiver (not included)
First make the following settings.
• Refer to “Setting the Amplifi er” in the instruction manual for the
SA-XR57 AV control receiver.
Setting the speaker (YES/NO) and its size
Speaker to be set
SUBW (subwoofer)
LR (Front)
C (Center)
S (Surround)
SB (Surround back)
• When connecting one surround back speaker
Connect it to the “left” surround back terminal on the amplifi er.
• When connecting two surround back speakers
Connect them to the “left” and “right” surround back terminals
on the amplifi er.
Setting the lower region fi lter
Selection frequency: 100 (Frequencies of 100 Hz and below
are output to the subwoofer.)
Setting item
YES (Connected)
SMALL
SMALL
SMALL
NONE (Not connected)
1-SPK (When one is connected)
2-SPK (When two are connected)
Ensamblaje e instalación
Instalación del altavoz central
(SB-PC100)
• No aplique una fuerza excesiva a la red de la parte delantera del
altavoz. La red delantera no puede desmontarse.
• Coloque los altavoces en una superfi cie plana y encima de un paño
blando cuando tenga que hacer algo con ellos.
• Apriete fi rmemente los tornillos.
Å
Conecte el cable de altavoz (suministrado) a los terminales
i.
Asegúrese de conectar solamente el cable positivo (cobre) j al terminal positivo (+) y el cable negativo (plata) k al terminal negativo
(–).
Presione la palanca de resorte para abrir el orifi cio de entrada
del cable y luego inserte el conductor antes de soltar la palanca
de resorte.
No cortocircuite nunca los cables positivos (+) y negativos (–) de los
altavoces.
ı Colocación de las patas de goma cuando los altavoces
se ponen encima de una superfi cie
Coloque las patas de goma en la base del altavoz para impedir que
las vibraciones desplacen el altavoz o hagan que éste se caiga.
Ç Colocación en una pared
Coloque las cuatro patas de goma en la parte trasera del altavoz.
q Tornillo (no suministrado)
Atornille el tornillo q de madera en una parte gruesa y dura de la
pared.
La superfi cie deberá poder servir de apoyo a más de 10 kg.
No coloque este altavoz en una pared o techo utilizando métodos
diferentes de los descritos en este manual.
Ajustes para conectar el amplifi cador recomendado
al altavoz de subgraves activo
Cuando utilice nuestro receptor de control AV modelo SA-XR57
(no suministrado)
Haga primero los ajustes siguientes.
• Consulte “Ajuste del amplifi cador” en el manual de instrucciones
del receptor de control AV modelo SA-XR57.
Ajuste del altavoz (YES/NO) y su tamaño
Altavoz que va a ser
ajustado
SUBW (subgraves)
LR (Delantero)
C (Central)
S (Ambiental)
SB (Ambiental trasero)
• Cuando conecte un altavoz de sonido ambiental trasero
Conéctelo al terminal de altavoz de sonido ambiental trasero
“izquierdo” del amplifi cador.
• Cuando conecte dos altavoces de sonido ambiental traseros
Conéctelos a los terminales de altavoces de sonido ambiental
traseros “izquierdos” y “derechos” del amplifi cador.
Ajuste del fi ltro pasabajos
Selección de frecuencia: 100 (Las frecuencias de 100 Hz y
menos salen al altavoz de subgraves.)
Elemento de ajuste
YES (Conectado)
SMALL
SMALL
SMALL
NONE (No conectado)
1-SPK (Cuando está conectado uno)
2-SPK (Cuando están conectados dos)
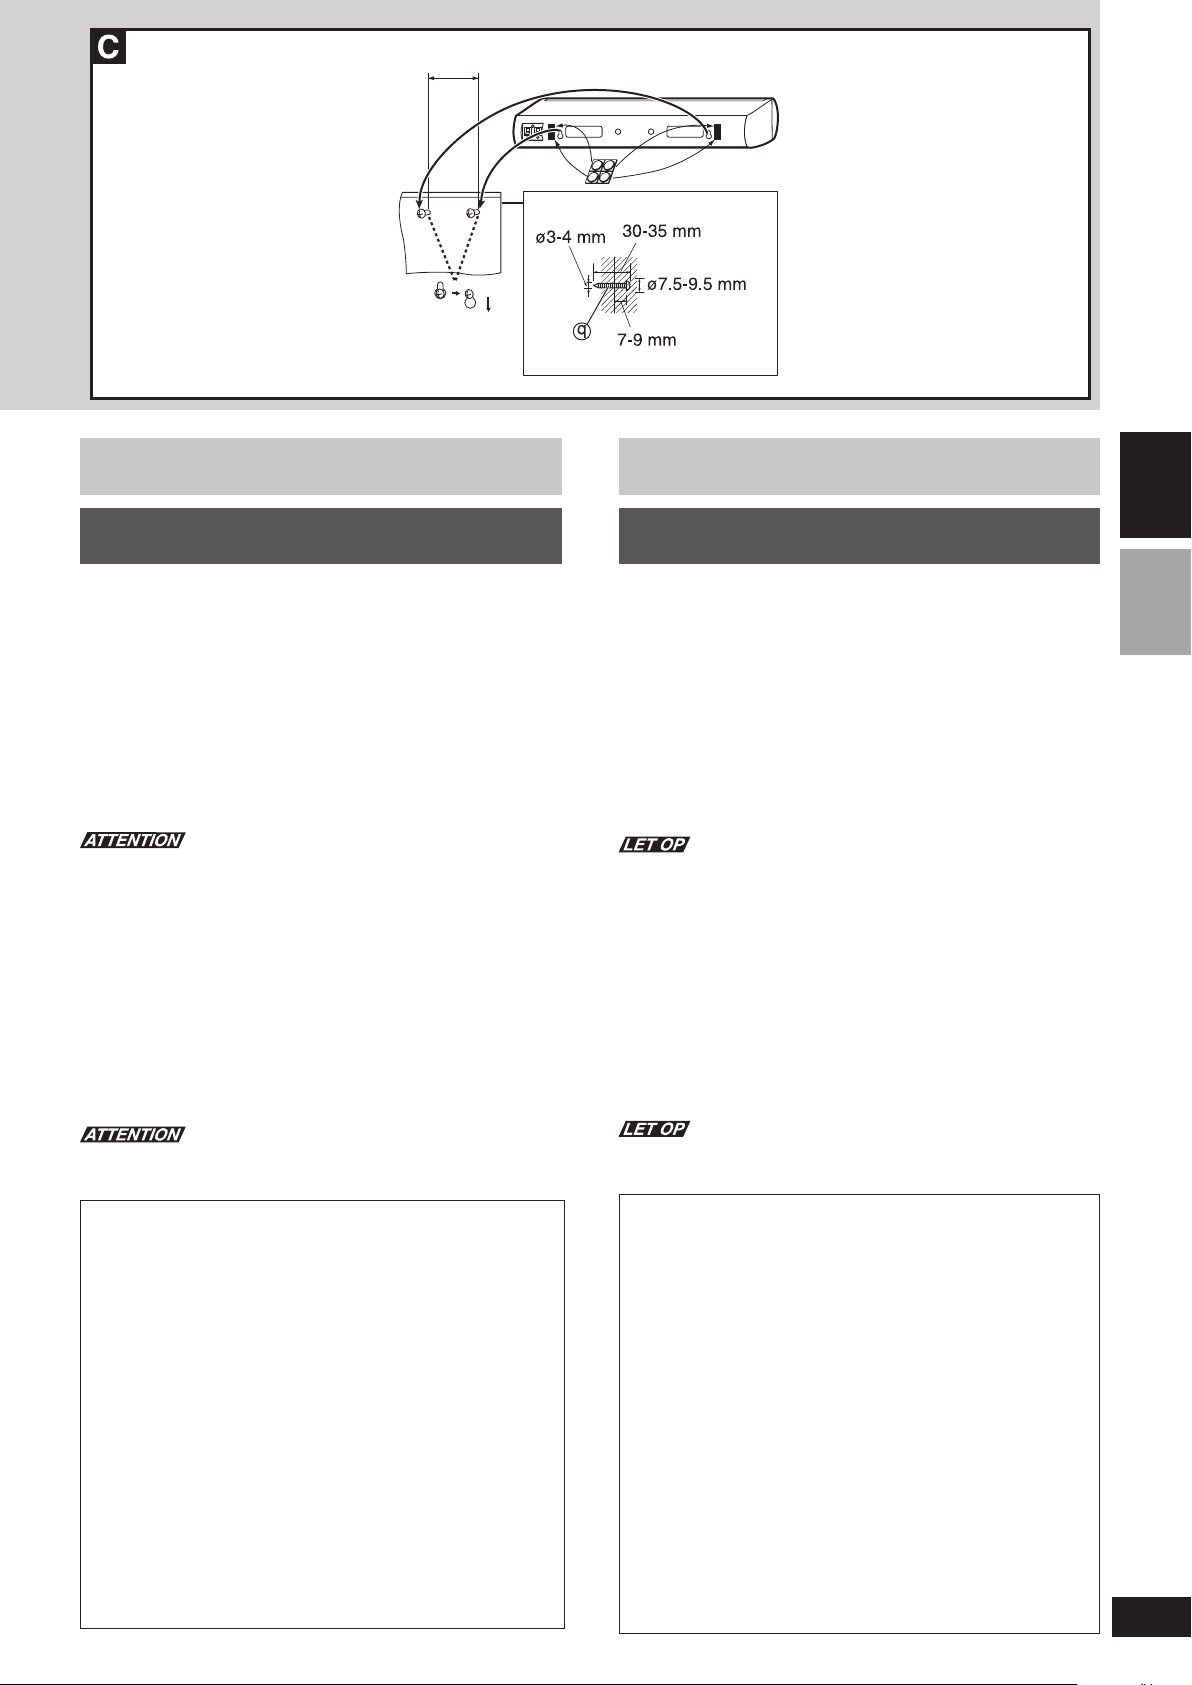
270 mm
Montage et installation
Installation de l’enceinte centrale
(SB-PC100)
• N’exercez pas une force excessive sur le fi let sur le devant de
l’enceinte. Il est impossible de retirer le fi let avant.
• Pour effectuer tout travail sur les enceintes, celles-ci doivent être
placées sur un chiffon doux posé sur une surface plane.
• Serrez les vis fermement.
Å
Branchez le câble de l’enceinte (fourni) sur les bornes
i.
Assurez-vous de brancher uniquement un fi l positif (cuivre) j à la
borne positive (+) et un fi l négatif (argent) k à la borne négative
(–).
Appuyez sur le taquet pour ouvrir l’entrée du fi l, puis insérez le
fi l avant de relâcher le taquet.
Prenez bien garde de court-circuiter les fi ls d’enceinte positifs (+) et
négatifs (–).
ı Fixation des pieds de caoutchouc lorsque l’enceinte
est placée sur une surface horizontale
Fixez les pieds de caoutchouc à la base de l’enceinte pour éviter
que les vibrations ne provoquent le déplacement ou le renversement
l’enceinte.
Ç Fixation à un mur
Fixez quatre pieds de caoutchouc sur la face arrière de l’enceinte.
q Vis (non fournie)
Vissez la vis à bois q dans une partie épaisse et solide du mur.
La surface doit pouvoir supporter plus de 10 kg.
Montage en installatie
De middenluidspreker (SB-PC100)
opstellen
• Oefen geen overmatige druk uit op de voorgrilles van de luidspreker.
U kunt de voorgrilles niet verwijderen.
• Plaats de luidsprekers op een zachte doek op een effen oppervlak
wanneer u eraan werkt.
• Trek de schroeven goed aan.
Å
Sluit de luidsprekerkabel (bijgeleverd) aan op de luidsprekeraansluitingen i.
Zorg ervoor dat u de positieve (koper) draden j op positieve (+)
aansluitingen en de negatieve (zilver) draden k op negatieve (–)
aansluitingen aansluit.
Houd de veerknop ingedrukt om de kabelopening te openen, steek
vervolgens hierin het ontblote draadeinde, en laat de veerknop
tenslotte los.
Pas op dat u de positieve (+) en negatieve (–) luidsprekerdraden
niet kortsluit.
ı De rubbervoetjes bevestigen wanneer u de luidspreker
op een oppervlak installeert
Bevestig de rubbervoetjes aan de luidsprekerbasis om te voorkomen
dat de luidspreker ten gevolge van trilling beweegt of omvalt.
Ç Bevestigen aan een muur
Bevestig vier rubbervoetjes op de achterzijde van de luidspreker.
q Schroef (niet meegeleverd)
Draai de houtschroef q in een dik en hard gedeelte van de muur.
Het muuroppervlak moet een gewicht van meer dan 10 kg kunnen
dragen.
FRANÇAIS
NEDERLANDS
Pour fi xer cette enceinte à un mur ou au plafond, n’utilisez aucune
autre méthode que celle décrite ici.
Réglages nécessaires au raccordement de l’amplifi cateur
recommandé sur le caisson de graves actif
Lors de l’utilisation de l’ampli-tuner AV SA-XR57 (non compris)
Commencez par procéder aux réglages suivants.
• Reportez-vous à “Réglage de l
d’emploi de l’ampli-tuner AV SA-XR57.
Réglage de l’enceinte (YES/NO) et de sa taille
Enceinte à régler
SUBW (caisson de graves)
LR (Avant)
C (Centrale)
S (Surround)
SB (Surround arrière)
• Lors du raccordement d’une enceinte surround arrière
Branchez-la sur la borne surround arrière “gauche” de
l’amplifi cateur.
• Lors du raccordement de deux enceintes surround arrière
Branchez-les sur les bornes surround arrière “gauche” et “droite”
de l’amplifi cateur.
Réglage du fi ltre passe-bas
Fréquence sélectionnée : 100 (Les fréquences de 100 Hz et
inférieures sont émises vers le caisson de graves.)
Elément à régler
YES (Raccordée)
SMALL
SMALL
SMALL
NONE (Non raccordée)
1-SPK (Si une enceinte est raccordée)
2-SPK (Si deux enceintes sont raccordées)
’amplifi cateur
” dans le mode
Gebruik geen andere dan de hieronder beschreven methode om
deze luidspreker aan een muur of zoldering te bevestigen.
Instellingen voor aansluiting van de aanbevolen versterker op de actieve subwoofer
Bij gebruik van onze SA-XR57 AV-regelontvanger (niet bijgeleverd)
Voltooi eerst de volgende instellingen.
• Zie “De versterker instellen” in de gebruiksaanwijzing van de
SA-XR57 AV-regelontvanger.
Instellen van de luidspreker (YES/NO) en grootte ervan
In te stellen luidspreker
SUBW (subwoofer)
LR (voor)
C (midden)
S (surround)
SB (surround-achter)
• Bij aansluiting van een surround-achterluidspreker
Sluit deze aan op de linker (“left”) surround-achteraansluiting
op de versterker.
• Bij aansluiting van twee surround-achterluidsprekers
Sluit deze aan op de linker (“left”) en rechter (“right”) surroundachteraansluiting op de versterker.
Instellen van het fi lter voor het lager bereik
Keuzefrequentie: 100 (Frequenties van 100 Hz en lager wor-
den weergegeven via de subwoofer.)
Instelling
Ja (“YES”) (Aangesloten)
Klein (“SMALL”)
Klein (“SMALL”)
Klein (“SMALL”)
Geen (“NONE”) (Niet aangesloten)
1-SPK (Bij aansluiting van een luidspreker)
2-SPK (Bij aansluiting van twee luidsprekers)
15
RQT8573
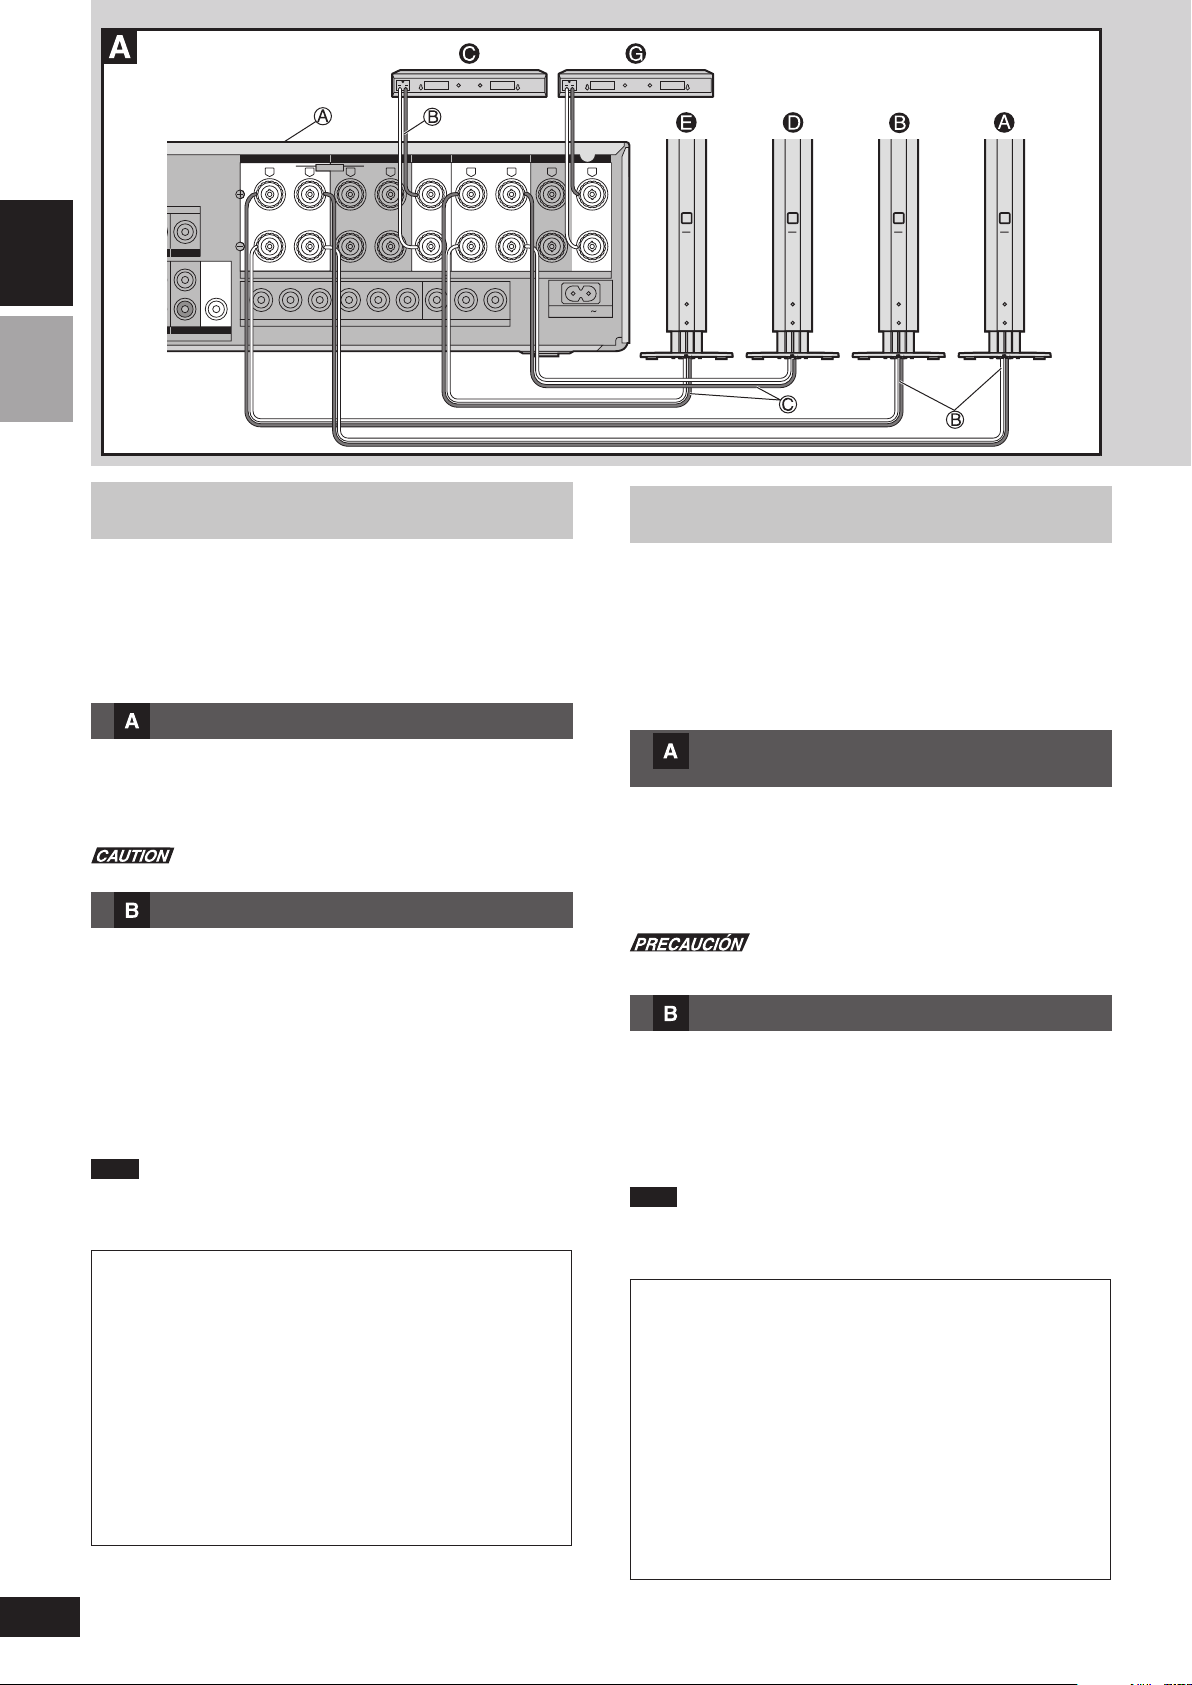
ENGLISHESPAÑOL
IN
TV/STB
IN OUT
TV/STB
FRONTA FRONTB
LF HF
BI-WIRE
RLRL RLRL
YPB PR YYPB PR PB PR
SUBWOOFER
TV MONITOROUT
DVDRECORDERIN TV/STBIN
COMPONENTVIDEO
CENTER SURROUND
SPEAKERS (4 16½)
SURROUNDBACK
AC IN
Connections
Connect to a receiver or amplifi er A with 6-Ω impedance for the front,
center, and surround speakers, and a pin-type output terminal for an
active subwoofer. You cannot connect these speakers to any equipment other than this amplifi er.
Before connection
Turn off the other equipment.
Do not connect the AC mains lead until all other cables and cords
are connected.
Front, center, and surround speakers
Connect the front A, B and center speakers C with the 4-meter
cables B and the surround speakers D, E with the 10-meter cables
C, and the surround back speaker G (not included).
Be sure to connect only positive (copper) wires to positive (+) terminals
and negative (silver) wires to negative (–) terminals.
Never short-circuit positive (+) and negative (–) speaker wires.
Subwoofer
1. Connect using the included monaural connection cable
D to the receiver or amplifi er’s subwoofer output ter-
minal.
For the United Kingdom:
BE SURE TO READ THE CAUTION FOR THE AC MAINS LEAD
ON PAGE 3 BEFORE CONNECTION.
2. Connect the AC mains lead E to the household AC
outlet F.
The included AC mains lead is for use with this unit only.
Do not use it with other equipment.
Note
• Do not move the speaker while the speaker cables are connected.
This may cause a short circuit.
• Make sure to bundle the speaker cable with a string etc. when re-
locating the speaker cables.
Protection circuitry (SB-WA101)
This circuitry prevents damage if the unit is used in an exceptionally
hot place or something abnormal is detected internally. In such
cases, output may be automatically interrupted.
It could take approximately an hour for the protection circuitry
to reset.
If sound is interrupted during play...
1. Reduce the volume level from the receiver or amplifi er.
2. Press [POWER] to turn the unit off.
3. Check the temperature and connections for problems.
4. Remove the cause of any problems discovered. Press
[POWER] to turn the unit on.
Should the unit still not function properly...
Pull out the plug and consult your dealer.
Conexiones
Haga las conexiones a un receptor o amplifi cador A con impedancia
de 6-Ω para los altavoces delanteros, central y de sonido ambiental,
y emplee un terminal de salida tipo contactos para un altavoz de
subgraves activo. No puede conectar estos altavoces a ningún otro
equipo que no sea este amplifi cador.
Antes de hacer la conexión
Apague el otro equipo.
No conecte el cable de alimentación de CA hasta después de haber
conectado todos los demás cables.
Altavoces delanteros, central y de
sonido ambiental
Conecte los altavoces delanteros A y B y el altavoz central C con
los cables de 4 metros B, y los altavoces de sonido ambiental D y
E y el altavoz de sonido ambiental trasero G (no suministrados) con
los cables de 10 metros C.
Asegúrese de conectar solamente los cables positivos (cobre) a los
terminales positivos (+) y los cables negativos (plata) a los terminales
negativos (–).
No cortocircuite nunca los cables positivos (+) y negativos (–) de los
altavoces.
Altavoz de subgraves
1. Conéctelo con el cable de conexión monofónico suministrado D al terminal de salida de altavoz de subgraves
del receptor o amplifi cador.
2. Conecte el cable de alimentación de CA E a la toma de
CA del hogar F.
El cable de alimentación de CA suministrado es para ser utilizado
con esta unidad solamente. No lo utilice con otros aparatos.
Nota
• No mueva el altavoz mientras están conectados sus cables. Esto
podría causar un cortocircuito.
• Asegúrese de juntar los cables de los altavoces con una cuerda,
etc. cuando cambie la posición de los mismos.
Circuitos de protección (SB-WA101)
Estos circuitos impiden que se produzcan daños si la unidad es
utilizado en un lugar excepcionalmente caliente o si se detecta
alguna anomalía interna. En tales casos, la salida de sonido
puede interrumpirse automáticamente.
Puede transcurrir aproximadamente una hora hasta que se
restablezcan los circuitos de protección.
Si el sonido se interrumpe durante la reproducción…
1. Reduzca el nivel del volumen del receptor o amplifi cador.
2. Pulse [POWER] para apagar la unidad.
3. Compruebe la temperatura y las conexiones por si hubiera
algún problema.
4. Elimine la causa de cualquier problema que se descubra. Pulse
[POWER] para encender la unidad.
Si la unidad no funciona correctamente…
Desenchúfela y consulte a su distribuidor.
16
RQT8573
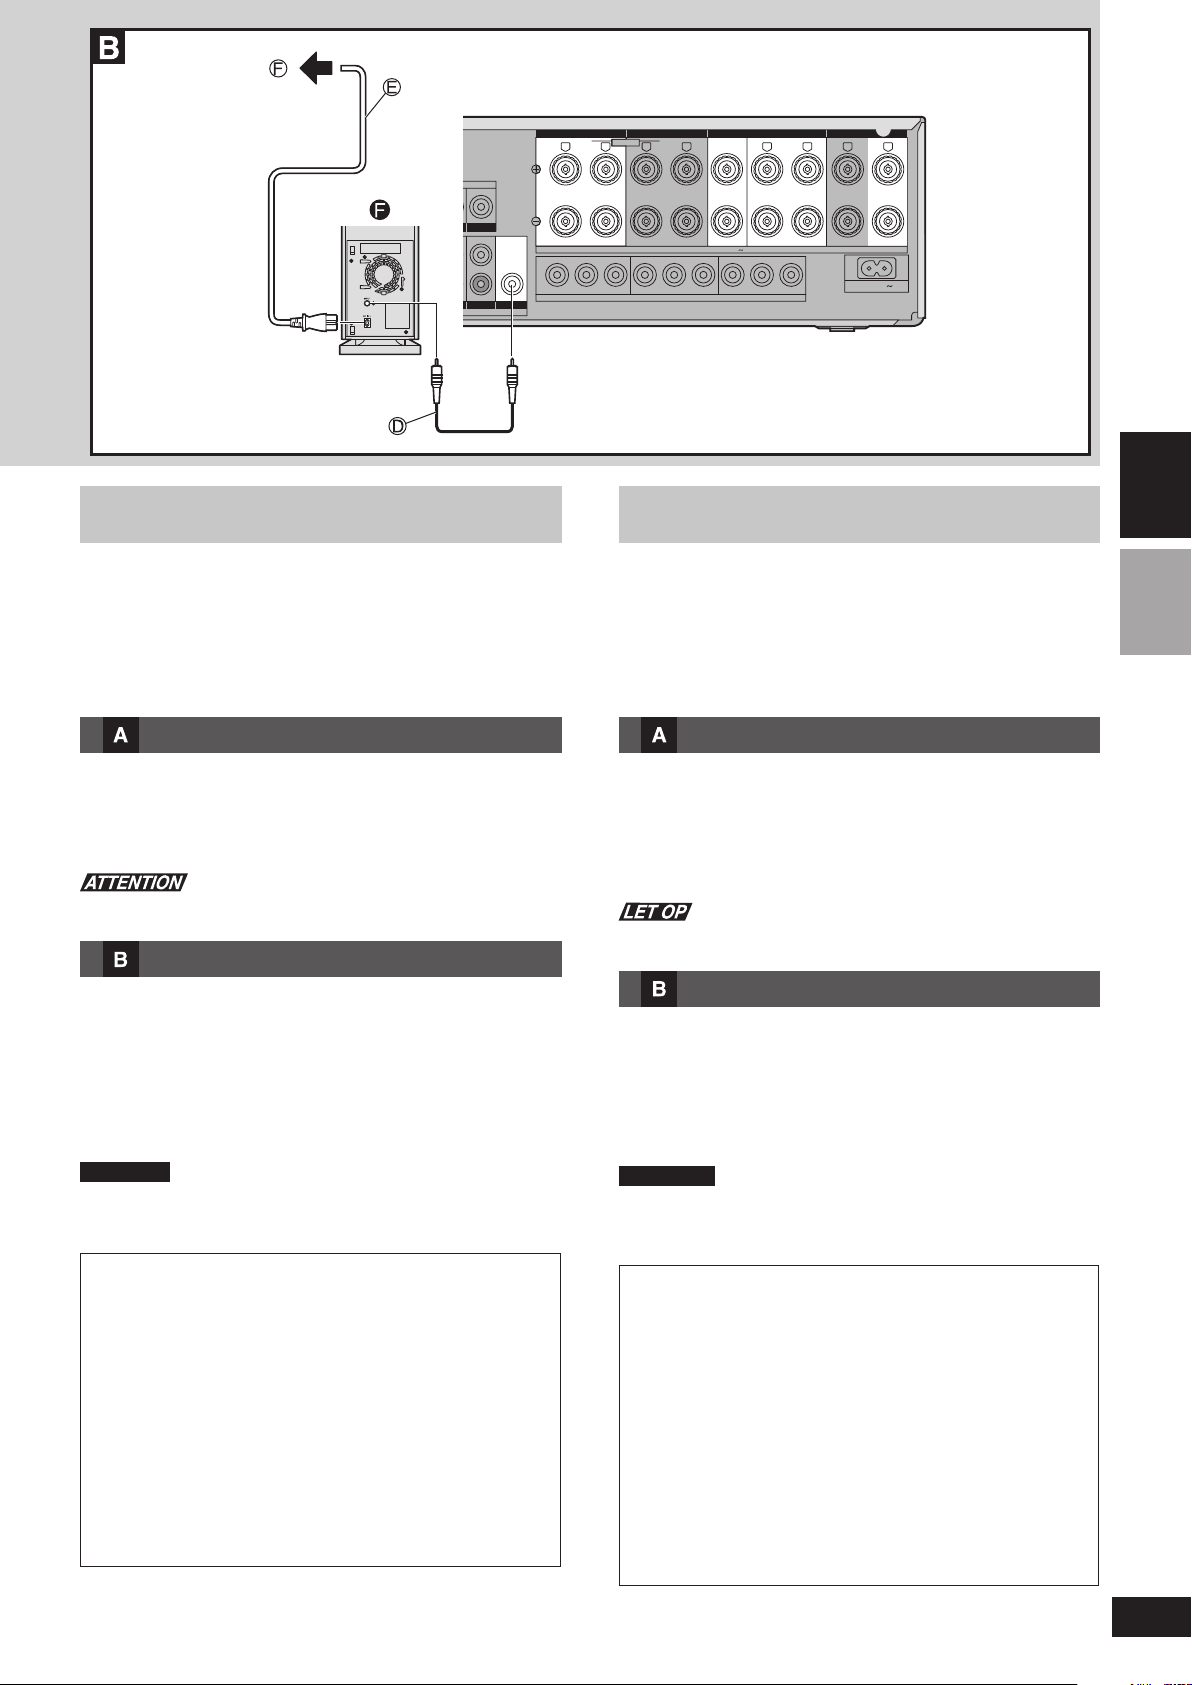
IN
TV/STB
IN OUT
TV/STB
FRONTA FRONTB
LF HF
BI-WIRE
RLRL RLRL
YPB PR YYPB PR PB PR
SUBWOOFER
TV MONITOROUT
DVDRECORDERIN TV/STBIN
COMPONENTVIDEO
CENTER SURROUND
SPEAKERS (4 16½)
SURROUNDBACK
AC IN
Raccordements
Raccordez les enceintes avant, centrale et surround à un amplituner ou amplifi cateur A d’une impédance de 6-Ω et le caisson de
graves actif à une borne de sortie à broche. Il est impossible de
connecter ces enceintes à un appareil autre que cet amplifi cateur.
Avant de brancher l’appareil
Eteignez tous les autres appareils.
Ne branchez le cordon d’alimentation qu’après avoir raccordé tous
les autres câbles et cordons.
Enceintes avant, centrales et surround
Raccordez les enceintes avant A, B et centrale C avec les câbles
de 4 mètres B, et les enceintes surround D, E, avec les câbles de
10 mètres C et l’enceinte surround arrière G (non fournie).
Assurez-vous d’avoir raccordé les fi ls positifs (cuivre) aux bornes posi-
tives (+) et les fi ls négatifs (argent) aux bornes négatives (–).
Prenez bien garde de court-circuiter les fi ls d’enceinte positifs (+) et
négatifs (–).
Caisson de graves
1. Raccordez-le avec le câble de connexion monaural
fourni D à la borne de sortie de caisson de graves sur
l’ampli-tuner ou l’amplifi cateur.
2. Branchez le cordon d’alimentation
F.
Le cordon d’alimentation fourni ne doit être utilisé qu’avec ce pack
d’enceintes.
Evitez de l’utiliser avec tout autre appareil.
Remarque
• Ne déplacez pas l’enceinte alors que les câbles d’enceinte sont
raccordés. Cela risquerait de causer un court-circuit.
• Vous devez regrouper les câbles d’enceinte avec une fi celle, etc.,
après avoir modifi é leur emplacement.
Circuits de protection (SB-WA101)
Ces circuits évitent des dommages si l’appareil est utilisé dans
un endroit exceptionnellement chaud ou si une anomalie est
détectée a l’intérieur. Dans ce cas, la sortie du son peut être
automatiquement interrompue.
La réinitialisation des circuits de protection peut prendre environ
une heure.
Si le son est interrompu pendant la lecture...
1. Réduisez le niveau de volume de l’ampli-tuner ou de
l’amplifi cateur.
2. Appuyez sur [POWER] pour éteindre l’appareil.
3. Vérifi ez la température et les connexions pour identifi er le
problème.
4. Eliminez la cause du problème identifi é. Appuyez sur [POWER]
pour allumer l’appareil.
Si l’appareil ne fonctionne toujours pas correctement...
Débranchez la fi che et consultez votre distributeur.
E à une prise secteur
Aansluitingen
Sluit aan op een ontvanger of versterker A met een 6-Ω impedantie
voor de voor-, midden-, en surroundluidsprekers, en een pentype uitgangsaansluiting voor een actieve subwoofer. U kunt deze luidsprekers
op geen andere apparatuur aansluiten dan deze versterker.
Alvorens aan te sluiten
Schakel alle andere apparatuur uit.
Sluit het netsnoer pas aan nadat alle andere kabels en snoeren zijn
aangesloten.
Voor-, midden-, en surroundluidsprekers
Gebruik de 4-meter kabels B om de voorluidsprekers A, B en de
middenluidspreker C aan te sluiten, en gebruik de 10-meter kabels
C om de surroundluidsprekers D, E aan te sluiten en sluit de
surround-achterluidspreker G (niet bijgeleverd) aan.
Zorg ervoor dat u de positieve (koper) draden op positieve (+) aansluitingen en de negatieve (zilver) draden op negatieve (–) aansluitingen
aansluit.
Pas op dat u de positieve (+) en negatieve (–) luidsprekerdraden
niet kortsluit.
Subwoofer
1. Gebruik de bijgeleverde monokabel D om de subwoofer
aan te sluiten op de subwoofer-uitgangsaansluiting van
de ontvanger of versterker.
2. Sluit het netsnoer E aan op een stopcontact F.
Het bijgeleverde netsnoer is uitsluitend bestemd voor gebruik met
dit systeem. Gebruik het niet voor andere apparatuur.
Opmerking
• Verplaats de luidsprekers niet terwijl de luidsprekerkabels zijn aan-
gesloten. Dit kan namelijk kortsluiting veroorzaken.
• Bundel de luidsprekerkabels samen door middel van een touwtje
e.d. wanneer u de luidsprekerkabels wilt verplaatsen.
Beveiligingscircuit (SB-WA101)
Dit circuit voorkomt mogelijke beschadiging wanneer het
systeem in een uiterst warme plaats wordt gebruikt of wanneer
iets abnormaals in het systeem wordt waargenomen. In zulke
gevallen wordt de geluidsweergave mogelijk automatisch
onderbroken.
Het kan ongeveer een uur duren voordat de beveiligingsschakeling
wordt teruggesteld.
Indien de geluidsweergave wordt onderbroken…
1. Verminder het volumeniveau op de ontvanger of versterker.
2. Druk op [POWER] om het apparaat uit te schakelen.
3. Controleer de temperatuur en of de aansluitingen juist zijn.
4. Elimineer de oorzaak van het probleem. Druk op [POWER]
om het apparaat weer in te schakelen.
Indien het apparaat nog steeds niet juist werkt…
Trek de stekker uit het stopcontact en raadpleeg uw handelaar.
FRANÇAIS
NEDERLANDS
17
RQT8573
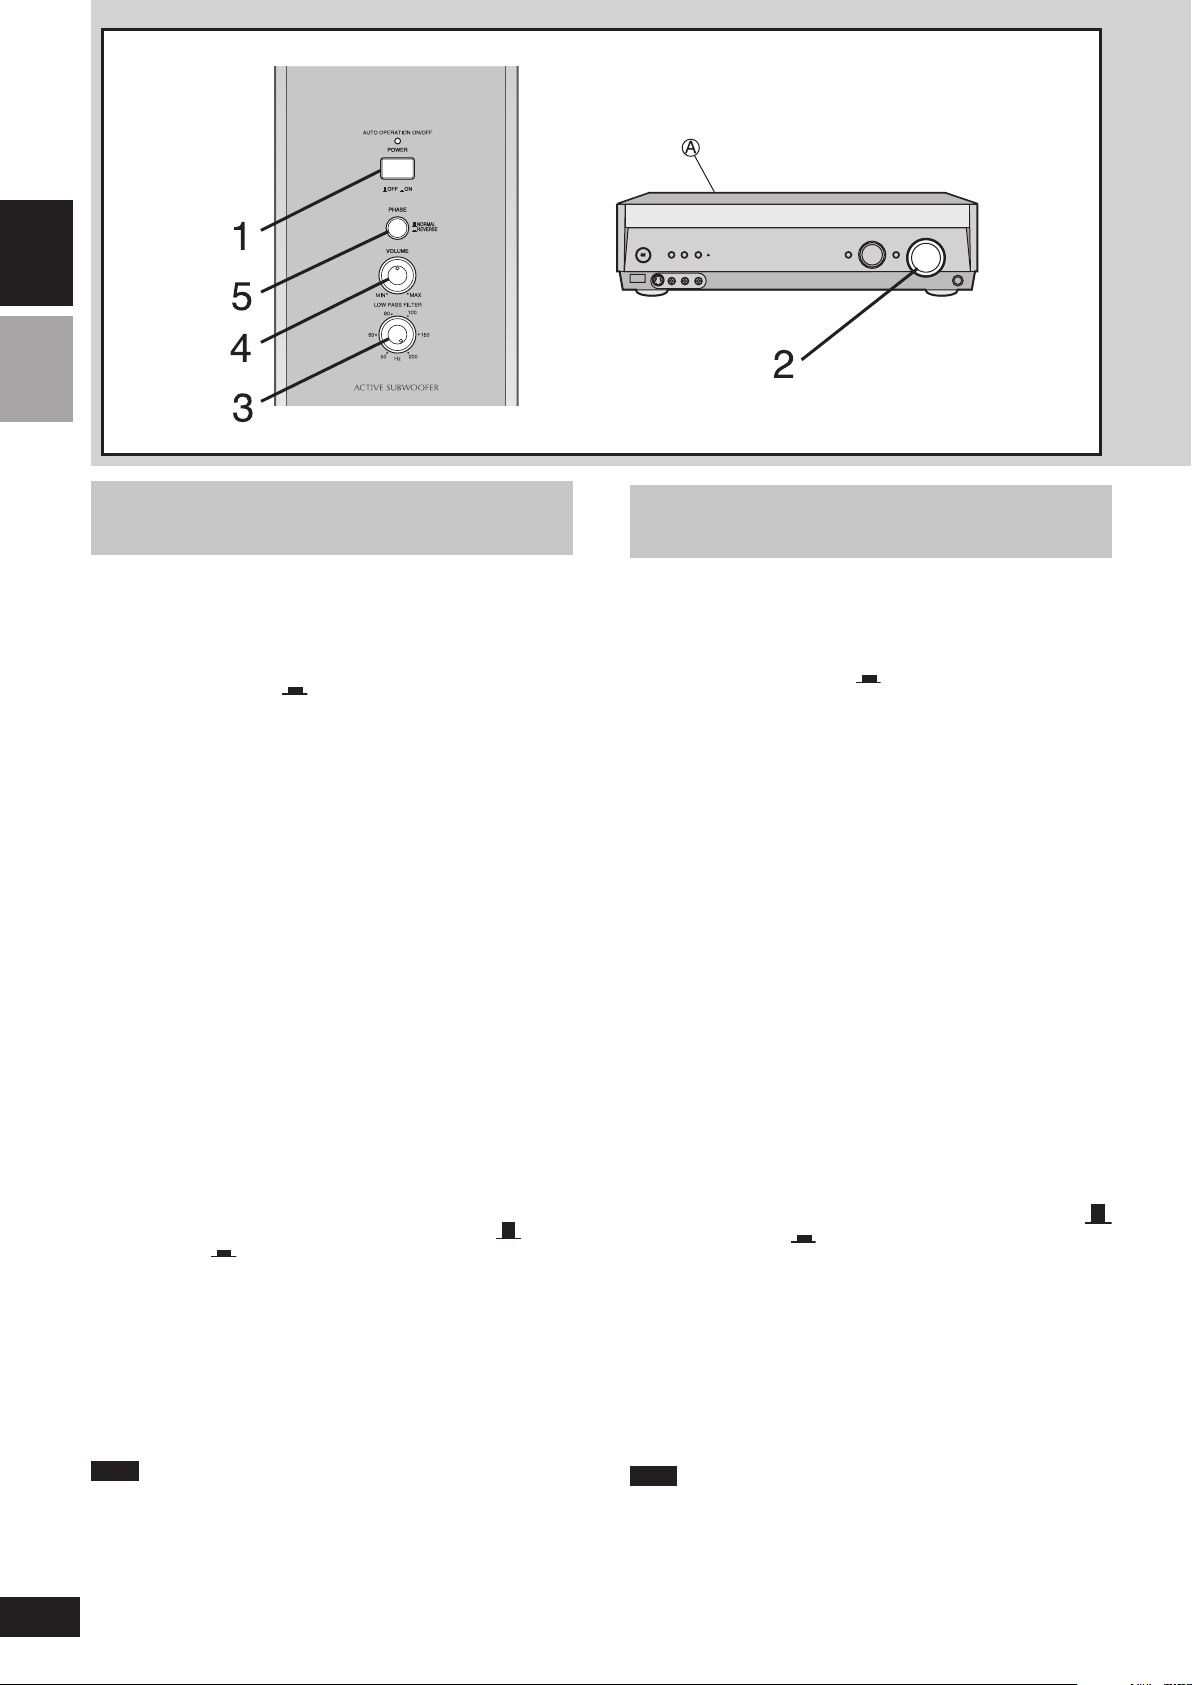
ENGLISHESPAÑOL
18
RQT8573
Subwoofer operation
(SB-WA101)
The active subwoofer reproduces very low frequency sound monaurally, making use of the fact that the human ear does not sense
direction in the low frequency region.
You can emphasize low frequencies by combining the active subwoofer
with the speaker system.
1. Set [POWER] to “ ON”.
The indicator turns green.
2. Output sound from the receiver or amplifi er A
and adjust the volume to a suitable level.
See the operating instructions for the other equipment for details.
• Do not adjust the bass as this can cause distortion.
• If the volume control on the amplifi er is left in the minimum position
or there is no signal from the amplifi er for more than 8 minutes,
the active subwoofer will automatically switch to standby and the
power lamp will turn red. If you turn up the volume control on the
amplifi er or if a signal enters the subwoofer from the amplifi er,
the subwoofer will automatically switch to the operation mode
and the power lamp will turn green.
Note, however, that the subwoofer may sometimes fail to switch
to standby due to noise emitted by the amplifi er to which it is
connected.
3. Set [LOW PASS FILTER].
• Refer to “Frequency response by LOW PASS FILTER setting”
G.
• When you adjust the frequency domain of subwoofer with your
receiver or amplifi er, set [LOW PASS FILTER] to 200 Hz.
4. Adjust [VOLUME] to a suitable level.
• Gradually turn up the volume control from the minimum position
and set it in a position where the output from the subwoofer is
balanced with the front speakers and also there is no distortion
in the low frequency region.
• Refer to “Level change according to volume control setting” H.
5. Play something, then set [PHASE] to “ NORMAL” or “ REVERSE” so the sound is normal.
The subwoofer and speakers cancel each other out (causing unusual, muffl ed sound) if the phase setting is incorrect.
When you wish to reproduce 2-channel stereo music
The output in the low range sometimes may be excessively high depending on the setting of the amplifi er and the active subwoofer when
you are reproducing a multi-channel movie source.
Reduce the subwoofer level at the amplifi er side.
Also, note that you may be able to obtain more natural sound quality by
reducing the frequency of the “low-pass fi lter” on the active subwoofer.
Note
If the volume output is too loud, this unit’s amplifi er can be clipped,
causing output to sound unusual. Reduce the volume of the receiver
or amplifi er or the volume of this unit if this occurs.
When settings are complete
The only operation you should have to perform daily is press [POWER]
to turn the unit ON/OFF.
If you reposition the system and the acoustics change, reset the unit
as necessary.
Operación del altavoz de
subgraves (SB-WA101)
El altavoz de subgraves activo reproduce monofónicamente el
sonido de frecuencias muy bajas, aprovechando el hecho de que el
oído humano no siente la dirección en la zona de frecuencias bajas.
Usted puede realzar las frecuencias bajas combinando el altavoz de
subgraves activo con el sistema de altavoces.
1. Ponga [POWER] en “ ON”.
El indicador se pone verde.
2. Dé salida al sonido del receptor o amplifi cador A
y ajuste el volumen a un nivel apropiado.
Consulte las instrucciones de funcionamiento del otro equipo para
conocer detalles.
• No ajuste los graves porque esto puede causar distorsión.
• Si el control de volumen del amplifi cador se deja en la posición
del mínimo o no hay señal procedente del amplifi cador durante
más de 8 minutos, el altavoz de subgraves activo se pondrá automáticamente en el modo de espera y la luz de la alimentación
se pondrá roja. Si sube el volumen en el amplifi cador o entra una
señal en el altavoz de subgraves procedente del amplifi cador, el
altavoz de subgraves se pondrá automáticamente en el modo de
funcionamiento y la luz de la alimentación se pondrá verde.
Note, sin embargo, que el altavoz de subgraves podrá no ponerse
algunas veces en el modo de espera debido al ruido emitido por
el amplifi cador al que está conectado.
3. Ajuste [LOW PASS FILTER].
• Consulte “Respuesta de frecuencia del ajuste LOW PASS
FILTER” G.
• Cuando ajuste el dominio frecuencial del altavoz de subgraves con
su receptor o amplifi cador, ponga [LOW PASS FILTER] en 200 Hz.
4. Ajuste [VOLUME] a un nivel apropiado.
• Gire poco a poco el control de volumen desde la posición del
mínimo y póngalo en una posición donde la salida del altavoz
de subgraves quede equilibrada con los altavoces delanteros y
no haya tampoco distorsión en la zona de frecuencias bajas.
• Consulte “Cambio de nivel según el ajuste del control de volumen”
H.
5. Reproduzca algo y luego ajuste [PHASE] a “
NORMAL” o “ REVERSE” para que el sonido
sea normal.
Si la fase no es correcta el altavoz de subgraves y los demás
altavoces se anularán entre sí (causando un sonido extraño y
apagado).
Cuando quiera reproducir música estéreo de 2 canales
La salida en la gama baja puede ser algunas veces excesivamente alta
dependiendo del ajuste del amplifi cador y el altavoz de subgraves activo
cuando usted está reproduciendo películas de múltiples canales.
Reduzca el nivel del altavoz de subgraves en el amplifi cador.
Tenga también en cuenta que tal vez pueda obtener una calidad de
sonido más natural reduciendo la frecuencia del “fi ltro pasabajos” en
el altavoz de subgraves activo.
Nota
Si la salida del sonido está demasiado alta, el amplifi cador de esta
unidad podrá bloquearse, haciendo que la salida suene mal. Si
ocurre esto, reduzca el volumen del receptor, el del amplifi cador o
el de esta unidad.
Cuando los ajustes están completos
La única operación que Ud. deberá realizar diariamente es presionar
[POWER] para encender y apagar la unidad.
Si Ud. reubica el sistema y la acústica cambia, reajuste la unidad
como fuera necesario.
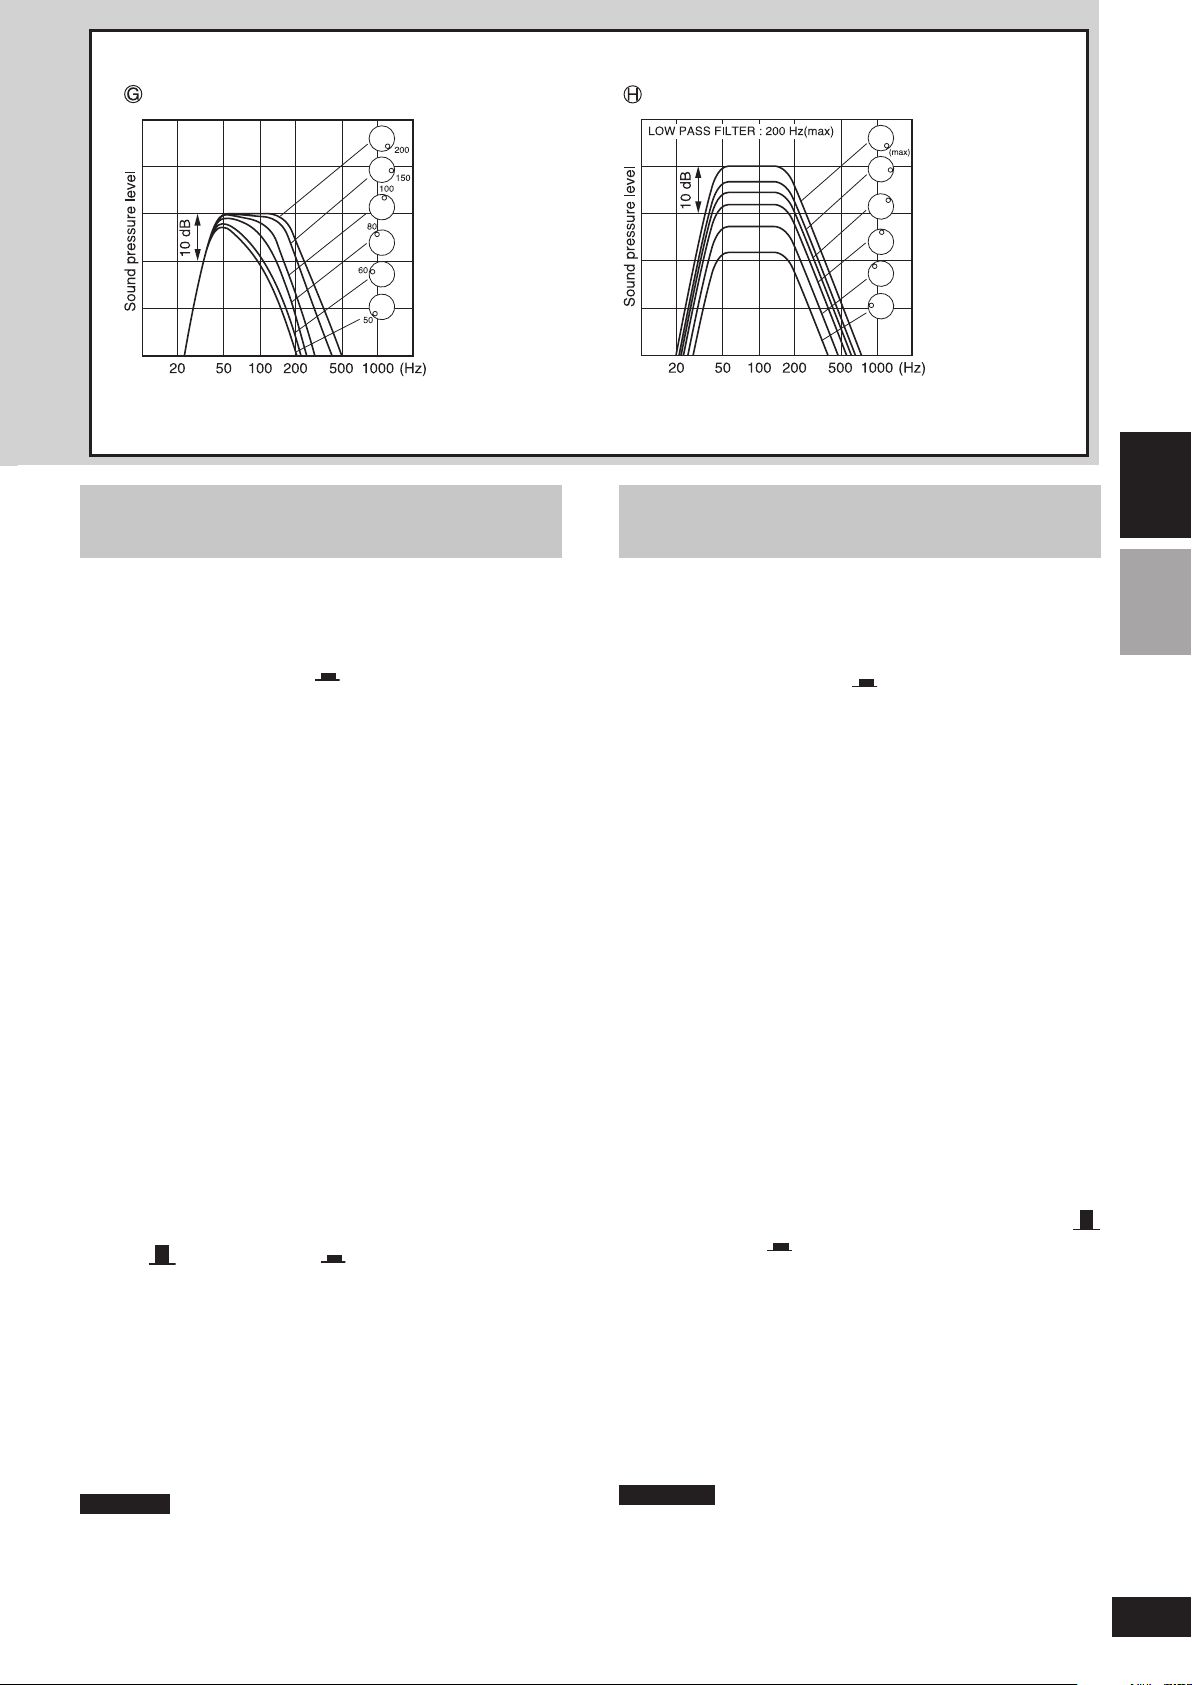
(approximate values)
(valores aproximados)
(valeurs approximatives)
(
approximatieve waarden
)
(approximate values)
(valores aproximados)
(valeurs approximatives)
(
approximatieve waarden
)
Utilisation du caisson de
graves (SB-WA101)
Le caisson de graves actif reproduit un son monaural à basse
fréquence, en mettant à profi t le fait que l’oreille humaine ne perçoive
pas la direction dans la région basses fréquences.
Vous pouvez accentuer les basses fréquences en associant le caisson
de graves actif avec le système d’enceintes.
1. Mettez [POWER] sur “ ON”.
Le témoin devient vert.
2.
Emettez le son depuis l’ampli-tuner ou l’amplifi cateur
A
et réglez le volume sur le niveau désiré.
Pour plus de détails sur l’autre appareil, consultez son mode
d’emploi.
• Ne réglez pas les graves, cela risquerait de causer de la distorsion.
•
Si le bouton du volume sur l’amplifi cateur est laissé sur la position
minimum ou qu’il n’y a pas de signal provenant de l’amplifi cateur
pendant plus de 8 minutes, le caisson de graves actif passera automatiquement en mode d’attente et le témoin d’alimentation deviendra rouge. Si vous augmentez le volume sur l’amplifi cateur ou si un
signal est entré dans le caisson de graves à partir de l’amplifi cateur,
le caisson de graves passera automatiquement en mode de fonctionnement et le témoin d’alimentation deviendra vert.
Notez, cependant, que le caisson de graves peut quelquefois
ne pas passer en mode d’attente en raison du bruit généré par
l’amplifi cateur auquel il est raccordé.
3. Réglez [LOW PASS FILTER].
• Reportez-vous à “Réponse en fréquence suivant le réglage de
LOW PASS FILTER” G.
• Lorsque vous ajustez le domaine fréquentiel du caisson de graves
avec votre ampli-tuner ou amplifi cateur, réglez [LOW PASS FIL-
TER] sur 200 Hz.
4. Réglez [VOLUME] sur le niveau désiré.
• Augmentez progressivement le volume à partir de sa position
minimum et réglez-le sur une position où la sortie du caisson de
graves est équilibrée par les enceintes avant et là où il n’y a pas
de distorsion dans la région basses fréquences.
• Reportez-vous à “Changement de niveau d’après le réglage du
volume” H.
5. Faites la lecture d’un morceau puis réglez [PHASE]
sur “ NORMAL” ou “ REVERSE” pour que le
son soit normal.
Si la mauvais réglage de phase est sélectionné, le caisson de
grave et les enceintes s’annulent réciproquement (ce qui résulte
en un son anormal, assourdi).
Lorsque vous souhaitez reproduire un son stéréo à 2 canaux
La sortie dans la gamme sub-audio peut quelquefois être excessivement élevée selon le réglage de l’amplifi cateur et du caisson de graves
actif lorsque vous reproduisez une source fi lm multi-canal.
Diminuez le niveau du caisson de graves du côté de
l’amplifi cateur.
En outre, notez que vous pourrez obtenir une qualité de son plus
naturel en diminuant la fréquence sur “fi ltre passe-bas” sur le caisson
de graves actif.
Remarque
Si le volume de sortie est trop élevé, l’amplifi cateur de l’appareil peut être
écrêté, ce qui rendra la sortie de son anormale. Réduisez soit le volume
de l’ampli-tuner, de l’amplifi cateur ou de cet appareil si cela se produit.
Lorsque les réglages sont terminés
Désormais, il n’y a plus qu’à appuyer sur [POWER] pour mettre
l’appareil sous/hors tension.
Si l’on transporte l’appareil et que l’acoustique a changé, il faudra
recommencer les réglages.
Gebruik van de subwoofer
(SB-WA101)
De actieve subwoofer geeft de zeer lage frequenties in mono weer en
maakt hierbij gebruik van het gegeven dat het menselijke gehoor niet
in staat is om de richting van de lage frequenties te ontdekken.
De weergave van de lage frequenties kunnen versterkt worden door
de actieve subwoofer te combineren met het luidsprekersysteem.
1. Druk [POWER] in de “ ON” stand.
De indicator brandt groen.
2. Geef geluid weer op de ontvanger of versterker
A en stel het volume in op een geschikt niveau.
Voor bijzonderheden, zie de gebruiksaanwijzing van de ontvanger
of versterker.
• Stel de lage tonen niet in, aangezien dit geluidsvervorming kan
veroorzaken.
• Als het versterkervolume langer dan 8 minuten in de laagste stand
blijft staan of als geen signaal van de versterker wordt ontvangen,
zal de actieve subwoofer automatisch stand-by worden gezet en
zal de indicator rood gaan branden. Wanneer het volume op de
versterker wordt verhoogd of als de subwoofer een signaal van
de versterker ontvangt, zal de subwoofer automatisch worden
ingeschakeld en zal de indicator groen gaan branden.
Het kan echter gebeuren dat de subwoofer niet stand-by wordt
gezet vanwege ruis die door de aangesloten versterker wordt
voortgebracht.
3. Stel [LOW PASS FILTER] in.
• Zie hiervoor “Frequen tiekarakteris tiek door instelling van LOW
PASS FILTER” G.
• Om het toonbereik van de subwoofer met behulp van de ontvan-
ger of versterker te veranderen moet u het [LOW PASS FILTER]
instellen op 200 Hz.
4. Stel [VOLUME] in op een geschikt niveau.
• Draai de volumeknop vanaf de laagste stand geleidelijk naar
rechts tot de stand waarbij de weergave van de subwoofer en
de voorluidsprekers in balans zijn en er geen vervorming in het
lage frequentiebereik aanwezig is.
• Raadpleeg “Niveauverandering overeenkomstig de instelling van
volumeregelaar” H.
5.
Geef wat muziek weer en stel [PHASE] in op “
NORMAL” of “ REVERSE” zodat het geluid normaal
klinkt.
Indien de fase niet juist is, zullen de subwoofer en de andere
luidsprekers elkaar tegenwerken (hetgeen resulteert in abnormaal
of gedempt geluid).
Als u 2-kanaals stereomuziek wilt weergeven
Tijdens het weergeven van meerkanaals filmgeluid kan het
volumeniveau van het lage frequentiebereik soms erg hoog zijn,
afhankelijk van de instelling van de versterker en de subwoofer.
In dat geval moet u het volumeniveau van de subwoofer op de
versterker verlagen.
Merk bovendien op dat u een natuurlijkere geluidskwaliteit kunt verkrijgen door de frequentie van het “laagdoorlaatfi lter” op de actieve
subwoofer te verlagen.
Opmerking
Indien het uitgangsvolume te hoog is, zal de versterker van dit apparaat
soms worden begrensd zodat het uitgangsgeluid abnormaal zal klinken.
In dat geval moet u het volumeniveau op de ontvanger of versterker,
of op dit apparaat verlagen.
Wanneer de instellingen zijn voltooid
U hoeft nu dagelijks niets anders te doen dan [POWER] in te drukken
om het apparaat IN/UIT te schakelen.
Indien u het systeem verplaatst en de akoestiek daardoor verandert,
dient u het apparaat opnieuw in te stellen.
FRANÇAIS
NEDERLANDS
19
RQT8573

Notes
Notas
Speaker impedance and allowed input
Impedancia del altavoz y potencia
de entrada
SB-FS100 / SB-PC100 Impedance 6 Ω
Input power 100 W (RATED)
The only receivers or amplifi ers you should connect to these speakers
ENGLISHESPAÑOL
are those whose rated output does not exceed the above fi gures.
Using a receiver or amplifi er with higher ratings than listed above can
cause abnormal sounds to occur because of excessive input, damage
to the receiver or speakers, and fi re. If equipment is damaged in any
way or unexpected trouble occurs during playback, unplug the system
from its outlet and call a serviceman for help.
Protection circuitry
(SB-FS100 / SB-PC100)
SB-FS100 / SB-PC100 Impedancia 6 Ω
Los únicos receptores o amplifi cadores que deberá conectar a estos
altavoces son aquellos que cuya salida nominal no exceda las cifras
de arriba.
Al usar un receptor o un amplifi cador con características nominales
superiores a las indicadas arriba se pueden producir ruidos anormales
debido a la entrada excesiva, el receptor o los altavoces se pueden
estropear, y además se puede producir un incendio. Si el equipo es
dañado de alguna manera o un problema inesperado ocurre durante
la reproducción, desenchufe el sistema y llame a su distribuidor para
que envíen una persona que le ayude.
Circuito de protección (SB-FS100 / SB-PC100)
These units incorporate protection circuitry to protect them from damage caused by excessive input or abnormal signals; when excess input
is detected, input is automatically interrupted.
If sound is interrupted...
1. Reduce the volume of the receiver (or amplifi er).
2. Check the sound source and connections for any problems.
If there is no problem, the protection circuitry will reset in a few
minutes.
After the protection circuit is reset...
Take care not to increase the receiver’s volume too high.
Excessive input
You can damage your speakers and shorten their life span
if you keep the volume high over extended periods.
Reduce the volume in the following cases to avoid damage :
• When playing distorted sound.
• When the speakers are receiving howling from a microphone or
record player, noise from FM broadcasts, or continuous signals from
an oscillator, test disc, or electronic instrument.
• When adjusting the sound quality.
• When turning the amplifi er on or off.
Estas unidades incorporan un circuito de protección para protegerlos
de daños causados por una entrada excesiva o señales anormales;
cuando una entrada excesiva es detectada, la entrada es automáticamente interrumpida.
Si el sonido se interrumpe...
1. Reduzca el volumen del receptor (o amplifi cador).
2. Verifi que si hay problemas en la fuente de sonido y las conexiones.
Si no hay problemas, el circuito de protección se reajustará en unos
pocos minutos.
Después de que el circuito de protección sea reajustado...
Cuídese de no incrementar demasiado el volumen del receptor.
Entrada excesiva
Si reproduce el sonido con niveles altos durante períodos
de tiempo prolongados podrá estropear sus altavoces y
reducir su duración.
Para evitar daños, reduzca el volumen en los casos
siguientes:
• Cuando reproduzca sonido distorsionado.
• Cuando los altavoces reciban aullido procedente de un micrófono
o giradiscos, ruido de emisiones de FM o señales continuas procedentes de un oscilador, disco de prueba o instrumento electrónico.
• Cuando ajuste la calidad del sonido.
• Cuando encienda o apague el amplifi cador.
Potencia de entrada 100 W (RATED)
20
RQT8573
Other notes
If irregular coloring occurs on your television :
These speakers are designed to be used close to a television, but
the picture may be affected with some televisions and set-up combinations.
If this occurs, turn the television off for about 30 minutes.
The television’s demagnetizing function should correct the problem. If
it persists, move the speakers further away from the television.
The active subwoofer (SB-WA101) is not magnetically
shielded.
Do not place it near a television set, PC, or other device that
is affected by magnetic fi elds.
Keep magnetized items away.
Magnetized cards, bank cards, commuter passes, etc., can be damaged if placed too closed to the speaker magnets. Clocks may also
be affected.
Avoid locations such as described below :
• In direct sunlight
• Near heating appliances or other sources of heat
• Where the humidity is high
Maintenance
Clean these units with a soft, clean, dry cloth.
• Never use alcohol, paint thinner, or benzine to clean these units.
• Before using chemically treated cloth, read the instructions that came
with the cloth carefully.
Otras notas
Si se producen colores irregulares en su televisor:
Estos altavoces han sido diseñados para ser utilizados cerca de un
televisor, sin embargo, con algunos televisores y combinaciones de
instalación es posible que la imagen se distorsione.
Si ocurre esto, apague el televisor durante unos 30 minutos.
La función de desmagnetización del televisor deberá corregir el
problema. Si persiste el problema, separe más los altavoces del
televisor.
El altavoz de subgraves activo (SB-WA101) no está protegido magnéticamente.
No lo coloque cerca de un televisor, PC u otro dispositivo que sea
afectado por los campos magnéticos.
Aleje los objetos magnetizados.
Las tarjetas magnetizadas, las tarjetas de bancos, los pases de viajeros, etc., pueden estropearse si se dejan demasiado cerca de los
imanes de los altavoces. Los relojes también pueden ser afectados.
Evite ubicaciones como las indicadas a continuación:
• Expuestas a los rayos solares directos
• Próximas a dispositivos de calefacción u otras fuentes de calor
• Donde la humedad sea excesiva
Mantenimiento
Limpie estas unidades con un paño blando, limpio y seco.
• No utilice nunca alcohol, diluyente de pintura ni bencina para limpiar
estas unidades.
• Antes de utilizar un paño impregnado químicamente, lea con atención las instrucciones suministradas con la unidad.
 Loading...