

Page 1
Operating Instructions
使用说明书
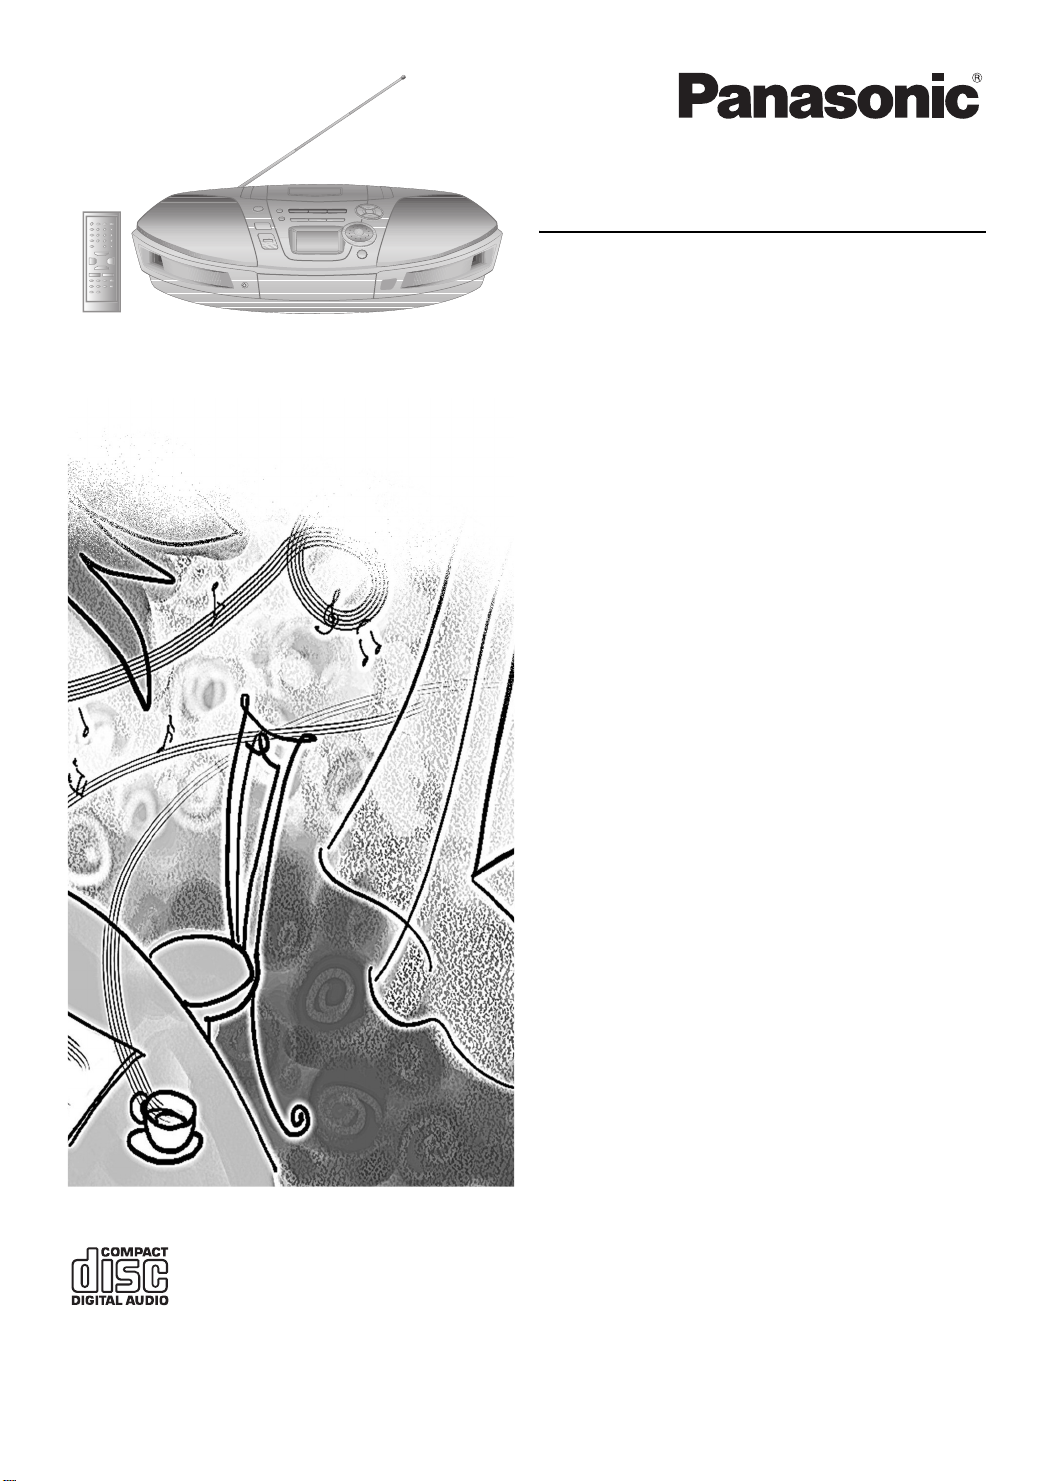
Portable Stereo CD System
便携式立体声 CD 系统
Model No. RX-ES29
RX-ES23
Table of Contents
Supplied Accessories ........................................... 2
Precautions .......................................................... 2
Maintenance......................................................... 3
CD Selection ........................................................ 3
Location of Controls ............................................. 4
Use of Batteries.................................................... 6
Power Sources ..................................................... 6
Memory Batteries ................................................. 6
The Radio............................................................. 7
CDs and MP3 ....................................................... 8
Cassette Tape Play............................................. 10
Cassette Tape Recording ................................... 10
Setting the Clock ................................................ 12
The Play and Record Timer ............................... 12
The Sleep Timer................................................. 13
Sound Quality..................................................... 14
3-D Sound with the Sound Virtualizer ................ 14
Troubleshooting .................................................. 15
Specifications ..................................................... 15
[GC] [GS]
Before connecting, operating or adjusting this product, please
read these instructions completely. Please keep this manual for
future reference.
在连接、操作或调整本产品之前,请完整阅读本说明书。
请妥善保管本手册,以备日后参考。
RQT7914-2G
Page 2
Dear Customer
Thank you for purchasing this product.
For optimum performance and safety, please read these
instructions carefully.
Supplied Accessories
Please check and identify the supplied accessories.
Use numbers indicated in parentheses when asking for
replacement parts.
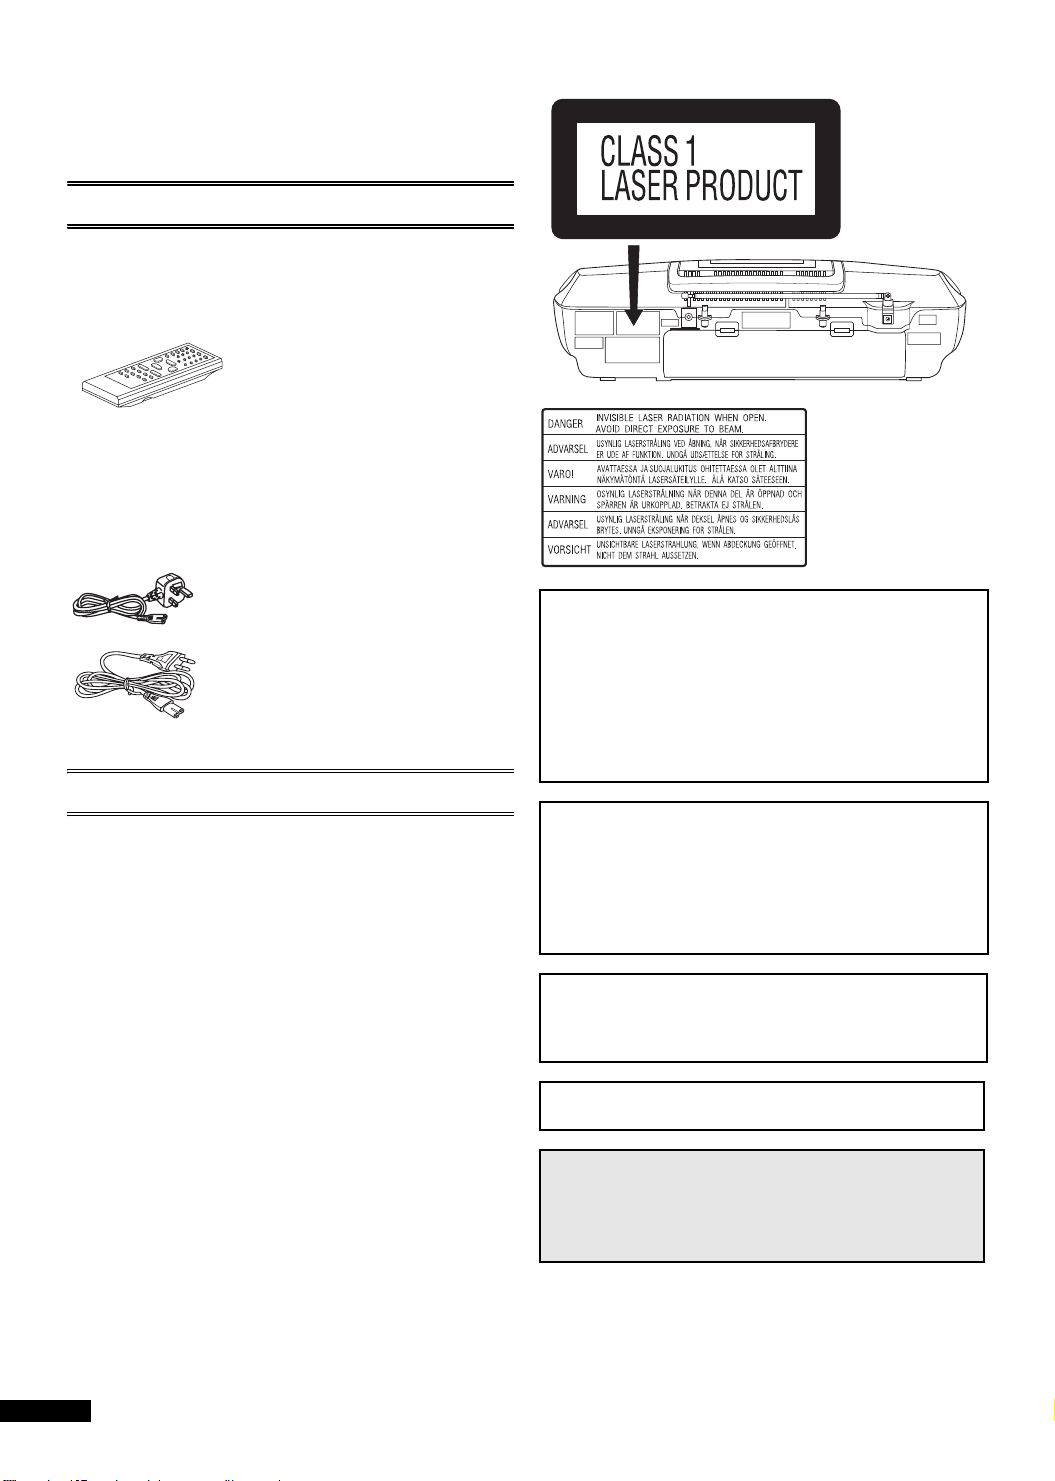
Remote control transmitter (N2QAHB000048)............... 1 pc.
AC power supply cord ....................................................1 pc.
Note:
≥ The included AC power supply cord is for use with this unit
only.
Do not use it with other equipment.
For Saudi Arabia and Kuwait
For others
Precautions
≥ Avoid using or placing this unit near sources of heat. Do not
leave it in an automobile exposed to direct sunlight for long
time with the doors and windows closed as this may deform
the cabinet.
≥ Avoid cuts, scratches, or poor connections in the AC power
supply cord, as they may result in possible fire or electric
shock hazard. Also, excessive bending, pulling or splicing of
the cord should be avoided.
≥ Do not unplug the AC power supply cord by pulling on the
cord. To do so may cause premature failure or shock hazard.
≥ Do not operate this unit on AC outlet in a bathroom, as a
potential shock hazard may result.
≥ When not in use, disconnect the AC power supply cord from
the household AC outlet.
RQLS0218
Inside of product
CAUTION!
THIS PRODUCT UTILIZES A LASER.
USE OF CONTROLS OR ADJUSTMENTS OR
PERFORMANCE OF PROCEDURES OTHER THAN
THOSE SPECIFIED HEREIN MAY RESULT IN
HAZARDOUS RADIATION EXPOSURE.
DO NOT OPEN COVERS AND DO NOT REPAIR
YOURSELF. REFER SERVICING TO QUALIFIED
PERSONNEL.
WARNING:
TO REDUCE THE RISK OF FIRE, ELECTRIC SHOCK OR
PRODUCT DAMAGE, DO NOT EXPOSE THIS
APPARATUS TO RAIN, MOISTURE, DRIPPING OR
SPLASHING AND THAT NO OBJECTS FILLED WITH
LIQUIDS, SUCH AS VASES, SHALL BE PLACED ON
THE APPARATUS.
This product may receive radio interference caused by
mobile telephones during use. If such interference is
apparent, please increase separation between the product
and the mobile telephone.
THIS UNIT IS INTENDED FOR USE IN TROPICAL
CLIMATES.
2
RQT7914
CAUTION:
Change the voltage setting to suit the AC voltage in
your area. See page 6. Note that the unit will be
seriously damaged or fail to operate correctly if this
setting is not made correctly.
Page 3

CAUTION!
≥ DO NOT INSTALL OR PLACE THIS UNIT IN A
BOOKCASE, BUILT-IN CABINET OR IN ANOTHER
CONFINED SPACE. ENSURE THE UNIT IS WELL
VENTILATED. TO PREVENT RISK OF ELECTRIC
SHOCK OR FIRE HAZARD DUE TO OVERHEATING,
ENSURE THAT CURTAINS AND ANY OTHER
MATERIALS DO NOT OBSTRUCT THE VENTILATION
VENTS.
≥ DO NOT OBSTRUCT THE UNIT’S VENTILATION
OPENINGS WITH NEWSPAPERS, TABLECLOTHS,
CURTAINS, AND SIMILAR ITEMS.
≥ DO NOT PLACE SOURCES OF NAKED FLAMES,
SUCH AS LIGHTED CANDLES, ON THE UNIT.
≥ DISPOSE OF BATTERIES IN AN ENVIRONMENTALLY
FRIENDLY MANNER.
The socket outlet shall be installed near the equipment
and easily accessible or the mains plug or an appliance
coupler shall remain readily operable.
Maintenance
If the surfaces are dirty
To clean this unit, wipe with a soft, dry cloth.
≥ Never use alcohol, paint thinner or benzine to clean this unit.
≥ Before using chemically treated cloth, read the instructions
that comes with the cloth carefully.
For a cleaner crisper sound
Clean the heads after every 10 hours of use to assure good
quality playback and recording.
Use a cleaning tape (not included).
Cassette tape care
≥ Tapes exceeding 100 minutes are thin and can break or get
caught in the mechanism.
≥ Tape slack can get caught up in the mechanism and should
be taken up before the tape is played.
≥ Endless tapes can get caught up in the deck’s moving parts if
used incorrectly.
ENGLISH
Note on AC power supply cord
(For Saudi Arabia and Kuwait only)
Before use
Remove the connector cover.
How to replace the fuse
The location of the fuse differ according to the type of AC
mains plug (figures A and B). Confirm the AC mains plug
fitted and follow the instructions below. Illustrations may
differ from actual AC mains plug.
1. Open the fuse cover with a screwdriver.
Figure A Figure B
Fuse cover
2. Replace the fuse and close or attach the fuse cover.
Figure BFigure A
Fuse
(5 ampere)
Fuse
(5 ampere)
CD Selection
Choose CDs with this mark: (A).
This unit can play CD-DA (digital audio)
format audio CD-R and CD-RW that have
been finalized (a process that enables
CD-R/CD-RW players to play audio CD-R
and CD-RW) upon completion of recording. It may not be able
to play some CD-R or CD-RW due to the condition of the
recording.
Do not
≥ use CDs in irregular shape.
≥ use CDs with labels and stickers that are coming off or with
adhesive exuding from under labels and stickers.
≥ attach scratch-proof covers or any other kind of accessory.
≥ write anything on the CD.
≥ clean CDs with liquids. (Wipe with a soft, dry cloth.)
≥ use CDs printed with label printers available on the market.
A
3
RQT7914
Page 4
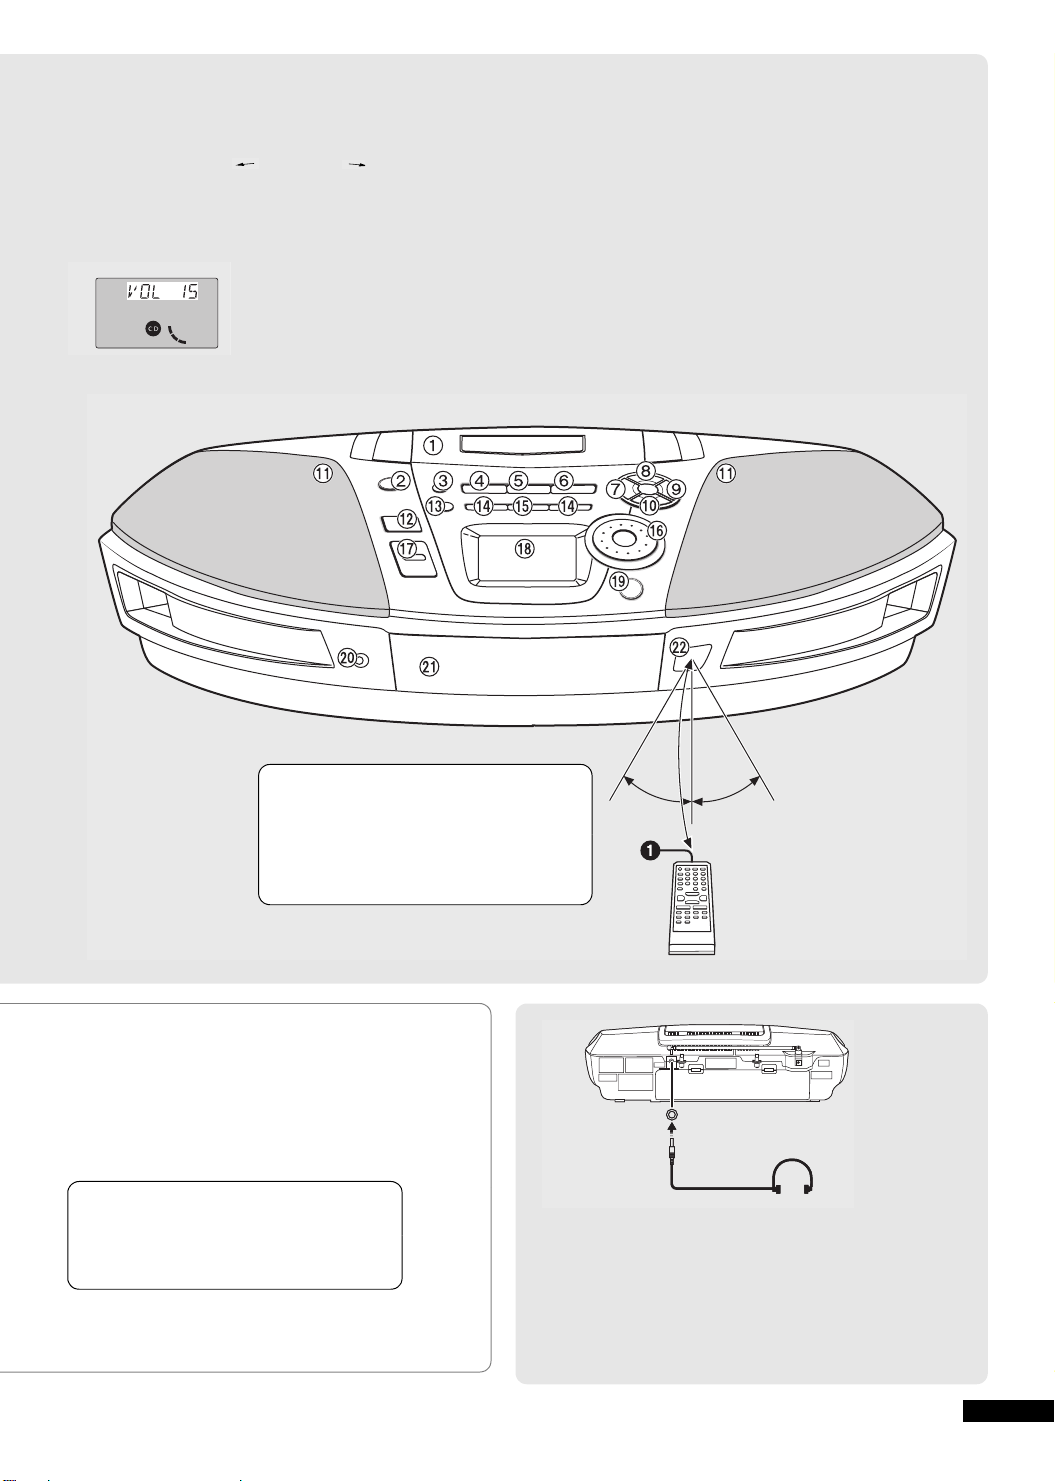
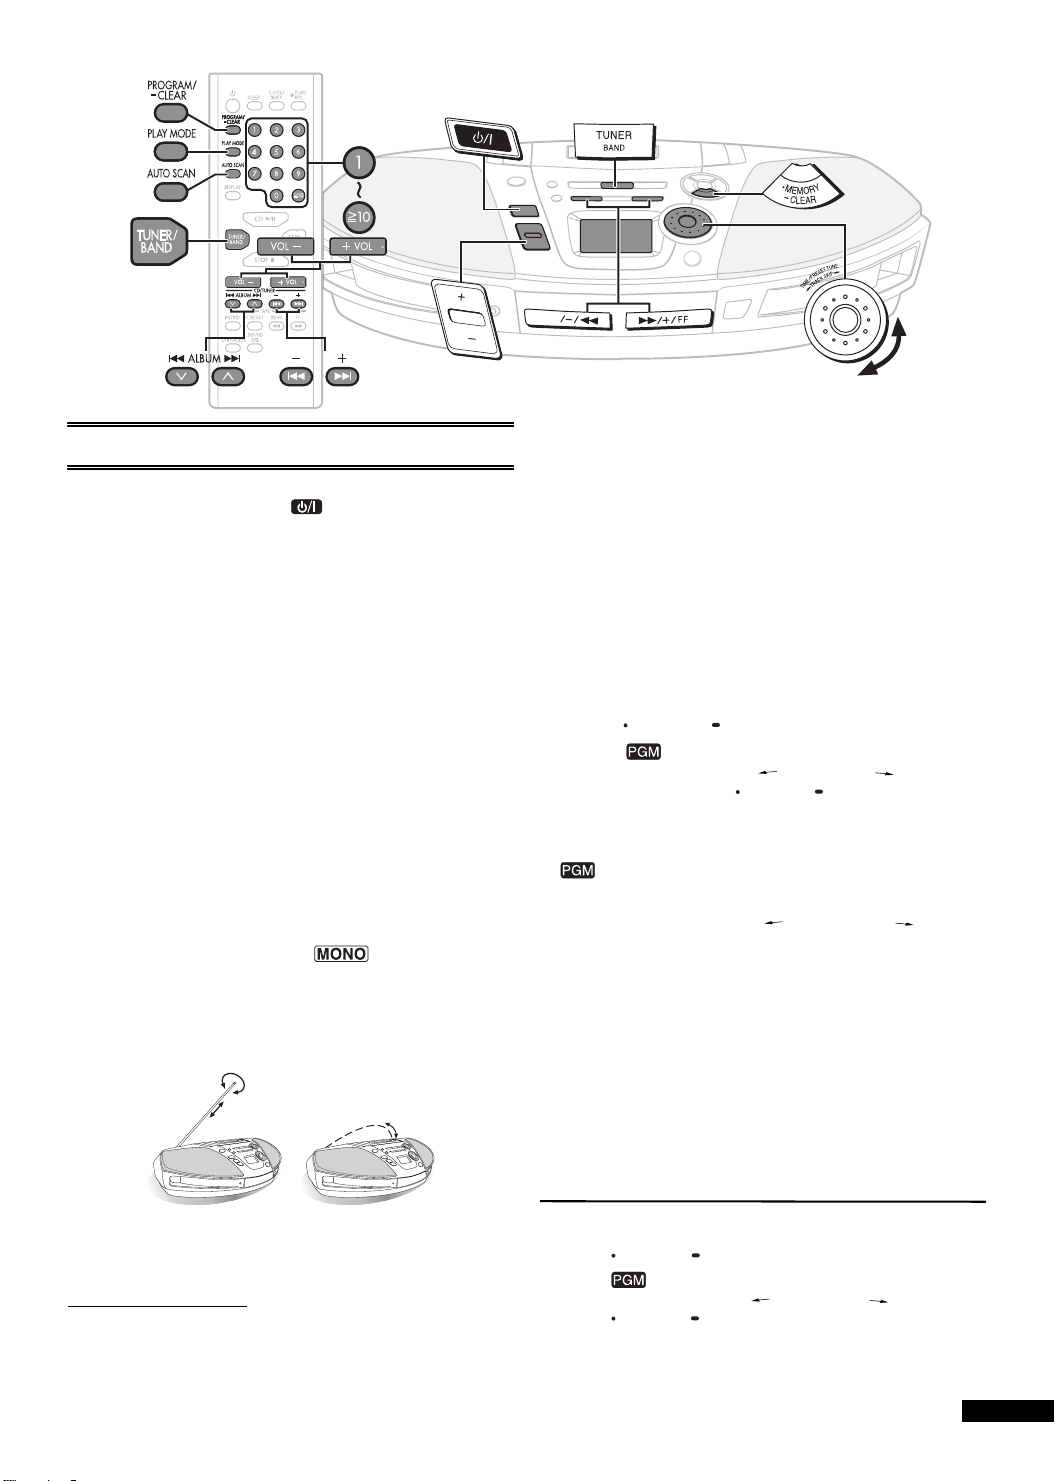
Location of Controls
Main Unit
1
Deck
2 Deck eject button (< DECK) .................................(l 10)
• Press [< DECK] to open the deck.
(The unit comes on.)
Then, load a cassette and close the deck by hand.
3 Record/record pause button (¥/;) ................(l 10, 11)
4 Cassette play button (1TAPE).............................. (l 10)
• Press [1TAPE] to start play.
5 Band button (TUNER BAND) ...................................(l 7)
• Press [TUNER BAND] to select “FM” or “AM”.
6 CD play/pause button (CD 1/;)......................... (l 8, 9)
• Press [CD 1/;] to start play.
Plays to the end of the CD and stops.
• Press [CD 1/;] to pause halfway during play.
Press again to resume play.
7 CD recording mode button (CD REC MODE)....... (l 11)
8 Play timer/record timer button ( PLAY/REC) .... (l 13)
9 Clock/timer button (CLOCK/TIMER) ............... (l 12, 13)
: CD program/clear, tuner preset button
( MEMORY CLEAR) ........................................... (l 7, 9)
; Speaker
Note:
• These speakers do not have magnetic shielding.
Do not place them near televisions, personal computers
or other devices easily influenced by magnetism.
< Standby/on switch ()
Press to switch the unit from on to standby mode or vice
versa. In standby mode, the unit is still consuming a small
amount of power.
= Sound equalizer button (SOUND EQ)................... (l 14)
> Tuning/CD search, Rewind/fast-forward, Album skip
buttons (REW/–/6, 5/+/FF)..................... (l 7, 8, 10)
Remote Control
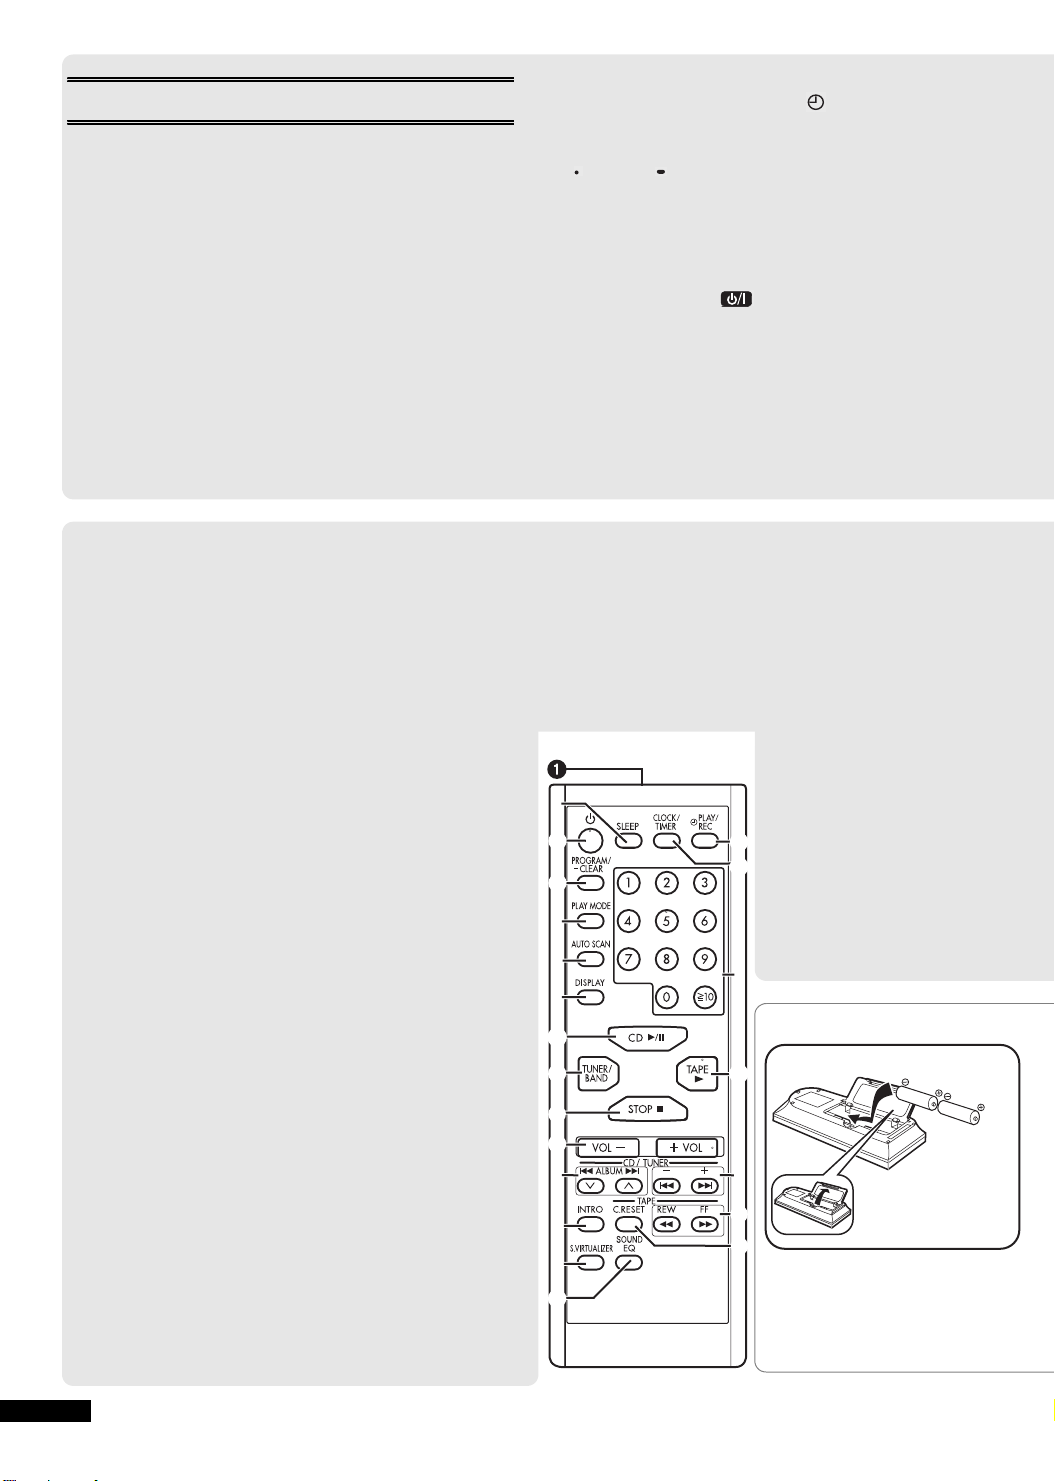
1 Transmission window
Aim at the sensor, avoiding obstacles, at a maximum range
of 7 meters directly in front of the unit.
2 Sleep timer button (SLEEP)................................... (l 13)
3 Numeric buttons............................................... (l 7, 8, 9)
4 CD/MP3 play mode/FM mode button
(PLAY MODE).............................................. (l 7, 8, 9, 11)
5 Auto scan button (AUTO SCAN).............................. (l 7)
6 Display select button (DISPLAY)..................... (l 10, 12)
• Press [DISPLAY] to display the clock on the Display
panel B.
7 Preset channel select/album skip buttons
(C/: ALBUM, ALBUM9/D) ....................... (l 7, 8)
8 Tuning/CD skip, search/MP3 track skip/clock/timer
adjust buttons (–/:, 9/+)................... (l 7, 8, 9, 12)
9 MP3 intro play button (INTRO) ................................(l 9)
: Tape counter reset button (C.RESET) .................. (l 10)
• Press [C.RESET] to reset the tape counter.
The counter resets to “000”.
; Tape rewind/fast-forward buttons
(6/REW, 5/FF )................................................ (l 10)
< Sound virtualizer button (S.VIRTUALIZER).......... (l 14)
When the unit is supplied with AC Power, the button such as 4
function in the same way as the controls on the main unit. To
save power, the unit cannot be turned on from the remote
control when batteries are used.
2
<
8
9
:
4
5
3
6
6
5
?
4
R6, AA, UM-3
(not included)
1
2
A
7
8
4
RQT7914
9
<
=
;
:
Page 5
? Tape/CD mode select/stop button
(∫ TAPE/CD) .............................................(l 8, 9, 10, 11)
• Press [∫ TAPE/CD] to stop play.
@ Time adjust, Preset channel select/CD track select dial
(TIME/PRESET TUNE TRACK SKIP )........(l7, 8, 9, 11, 12)
A Volume control buttons (+, – VOLUME)........ (l 7, 8, 10)
• Press [+, – VOLUME] to adjust to the desired volume
for CD, Tuner or Cassette.
B Display panel
e.g. CD
C CD tray open/close button (< CD) ................... (l 8, 11)
• Press [< CD] to open the tray.
(The unit comes on.)
Load a CD and press [< CD] to close the tray.
D Standby indicator (Í) (RX-ES29)
When the unit is connected to the AC mains supply, this
indicator lights up in standby mode and goes out when the
unit is turned on.
Standby/on indicator (Í/I) (RX-ES23)
The indicator lights green when the unit is turned on.
When the AC power supply is used, it functions as an AC
connection indicator. (The indicator colour changes to red
when the unit is turned off.)
E CD tray
F Remote control signal sensor (SENSOR)
Use
≥ Keep the transmission window and the
unit’s sensor free from dust.
≥ Operation can be affected by strong light
sources, such as direct sunlight, and the
glass doors of cabinets.
Batteries
Insert so the poles (+ and –) match those in the remote
control.
Remove if the remote control is not going to be used for a
long period of time. Store in a cool, dark place.
Replace if the unit does not respond to the remote control
even when held close to the front panel.
Do not
≥ put heavy objects on the remote control.
≥ take the remote control apart.
≥ spill liquids onto the remote control.
7 m
30° 30°
PHONESPHONES
To Use Headphones (not included)
Reduce volume before connection.
Plug type: 3.5 mm stereo
Note:
≥ Avoid listening for prolonged periods of time to prevent
hearing damage.
5
RQT7914
Page 6

Use of Batteries
≥ If this unit is not used for a long period of time or is used
only from an AC power source, remove all the batteries
to prevent potential damage due to possible battery
leakage.
≥ Align the poles (+ and –) correctly when inserting the
batteries.
≥ Do not mix old and new batteries or different types of
batteries.
≥ Do not recharge ordinary dry cell batteries.
≥ Do not heat or disassemble the batteries. Keep them away
from flame or water.
≥ Do not keep together with metallic objects such as
necklaces.
≥ Do not use rechargeable type batteries.
≥ Do not use batteries if the covering has peeled off.
Mishandling of batteries can damage other items, cause
damage to the unit, and may cause a fire through
short-circuiting or electrolyte leakage.
If electrolyte leaks from the batteries, consult your dealer.
Wash thoroughly with water if electrolyte comes in contact with
any part of your body.
Power Sources
To replace the batteries
≥ The memory batteries last for about 1 year.
≥ Connect the unit to AC power before replacing the batteries.
≥ Extend the memory battery life by always pressing [] to
(3)
turn the unit off before disconnecting the unit from the AC
power source or replacing the power batteries.
To remove the batteries
(4)
Lift the negative end of the number 4 battery to remove
batteries.
(1)
3
VOLT ADJ
110
OFF
–
127V
220
240V
VOLT ADJ
110
–
127V
OFF
–
220
240V
VOLT ADJ
110
–
127V
OFF
–
OFF 110-127 V 220-240 V
220
240V
AC IN
1
–
2
To operate the unit on AC power
(1)
[1] Use a flat head screwdriver to turn [VOLT ADJ] to
the voltage setting for your area.
[2] Connect the AC power supply cord. For areas
except Saudi Arabia and Kuwait:
Use the plug adaptor (not included) if necessary
.
(1)
2: Household AC outlet
3: AC power supply cord (included)
To use batteries (not included)
(2)
Disconnect the AC power supply cord from unit to operate on
battery power.
The remote control cannot turn the unit on when batteries are
used.
To remove the batteries [A]
Open the battery cover, insert a finger into the hole at the
bottom of the unit and push the batteries out.
Battery life
“ ” flashes on the display when the batteries are
running down.
Then, the unit turns itself off and displays “U01”.
Replace all the batteries with new ones.
Memory Batteries
Memory batteries retain memory (clock/timer/CD/radio
settings) during power supply interruption.
These batteries do not power the unit.
§
Memory batteries are not included.
(3)
(R6/LR6, AA, UM-3)
2
1
3
4
(2)
(R20/LR20, D, UM-1)
12
7
43
6
8
inner
row
5
outer
row
[A]
(4)
1
2
3
4
6
RQT7914
Page 7
VO
LUME
The Radio
Preparation:
≥ When using batteries, press [].
≥ Press [TUNER BAND] to select “FM” or “AM”.
Manual tuning
[1]
Press [REW/–/6] or [5 /+/FF] to select a station.
To tune automatically
Press and hold [REW/–/6] or [5/+/FF] until the
frequency starts changing rapidly.
≥ Auto tuning may be interrupted when there is excessive
interference.
≥ To cancel auto tuning, press [REW/–/6] or [5/+/FF]
once again.
[2] Press [+, – VOLUME] to adjust volume.
To use auto scan
You can search for a station by listening to all tuned-in stations
for 8 seconds each.
[1] Press [AUTO SCAN].
Press [AUTO SCAN] when you find the desired station.
[2]
Auto scan ends when it reaches the original frequency again.
To stop during the process, press [AUTO SCAN].
To improve FM sound quality
Press [PLAY MODE] to display “ ”.
Monaural sound is selected and noise reduces when reception is weak.
Press [PLAY MODE] again to cancel the mode.
≥ To improve reception
FM : Change the length and direction of the antenna.
AM : Change the facing of the unit.
AMFM
≥
AM reception is briefly interrupted if [< DECK] is pressed.
≥ To improve reception when using the unit in a building or
vehicle, place it near a window.
AM allocation setting
Only from the main unit
Before receiving AM broadcasts, be sure to select the correct
allocation setting (either 9 kHz or 10 kHz) for your area.
1 Press [TUNER BAND] to select FM.
REW
2
Press and hold [TUNER BAND] for approximately 5 seconds.
The frequency display will be returned to the minimum frequency
of the AM band and the display will begin to flash. Keep holding
for approximately 5 more seconds.
3 When the display stops flashing and indicates a
different frequency number, release [TUNER BAND].
To return to the original frequency, repeat steps 1 to 3 above.
Note:
≥ After changing the “allocation” setting, the frequencies you
previously preset into the memory will be cleared.
Preset tuning
Up to 16 stations can be set in the FM and AM band.
[1] Press [REW/–/6] or [5/+/ FF] to tune to the
required station.
[2] Press [ MEMORY CLEAR].
[3] While “ ” is flashing
Turn [TIME/PRESET TUNE TRACK SKIP ] to select
the channel and press [ MEMORY CLEAR] or on remote
control, press the numeric buttons to select channels.
≥ For channels 1 to 9, press the corresponding number.
≥ For channels 10 to 16, press [S10], then the two digits.
If “ ” goes off during presetting, return to step [1].
To select channels
Turn [TIME/PRESET TUNE TRACK SKIP ] to
select the channel or on remote control, press the
numeric buttons to select channels.
To use preset scan
You can search for a station by listening to all preset channels
for 8 seconds each.
[1] Press and hold [C/: ALBUM] or [ALBUM 9/
D] until “PS” appears on the display.
[2] Press [C/: ALBUM] or [ALBUM 9/D] when
you find the desired channel.
Preset scan ends after searching through each preset channel
once. To stop during the process, press [C/: ALBUM] or
[ALBUM 9/D].
To skip the preset channel,
1 Select the desired station.
2 Press [MEMORY CLEAR].
3 While “ ” is flashing
Turn
[TIME/PRESET TUNE TRACK SKIP ]
4 Press [ MEMORY CLEAR].
To select the skipped channel,
Press the numeric buttons.
to display “– –”.
7
RQT7914
Page 8
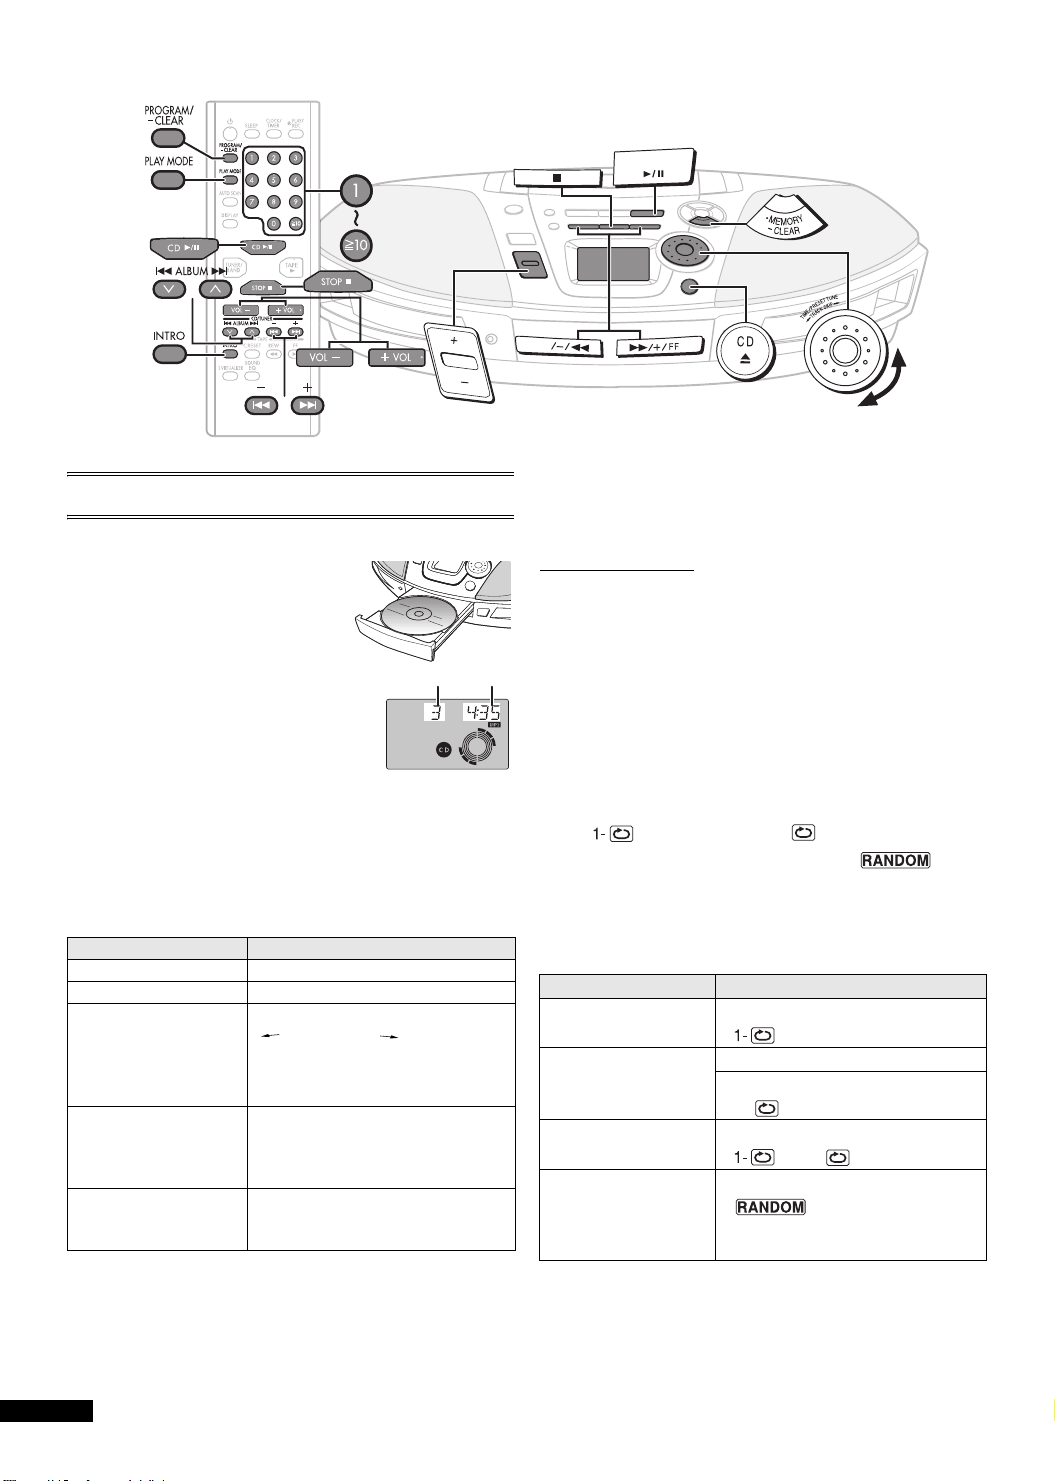
TAPE ⁄ CD
CD
VO
LUME
CDs and MP3
To play a disc [CD-DA]
[1] Press [< CD] to open the
tray.
(The unit comes on.)
≥ Label must face upward
(l right).
≥ Load a CD and press [< CD]
to close the tray.
[2] Press [CD 1/;] to start play.
Plays to the end of the CD and stops.
When playing MP3, “MP3” is
displayed.
A: Track number
B: Elapsed play time
[3] Press [+, – VOLUME] to adjust volume.
One touch play (when using AC power)
When a CD is loaded, press [CD 1/;].
To Operations
stop play Press [∫ TAPE/CD].
pause play Press [CD 1/;] during play.
skip tracks §
search through tracks
[CD-DA]
skip album [MP3]
§
For skip tracks and skip album,
Press [CD 1/;] to start play if in the stop mode.
Note:
≥ Keep this unit away from radios and televisions if interference
occurs.
[MP3]
AB
e.g. MP3
Turn [TIME/PRESET TUNE
TRACK SKIP ] clockwise
(forward) or counter-clockwise
(backward). On remote control,
press [–/:] or [9/+].
Press and hold [REW/–/6] or
[5/+/FF] during play.
On remote control, press and hold
§
[–/:] or [9/+] during play.
Press
[REW/–/6]
On remote control, press
ALBUM] or [ALBUM 9 /D]
or [5
[C/
/+/FF]
:
.
.
REW
Advanced CD and MP3 Functions
Preparation:
Press [∫ TAPE/CD] to switch to CD mode.
Remote control only
Direct access play [CD-DA] [MP3]
≥ Starts play from a selected track.
≥ Press the numeric buttons to select and play your desired
track.
For 2-digits number: press [S10] once, then the 2 digits.
For 3-digits number: press [S10] twice, then the 3 digits.
Repeat play and Random play [CD-DA]
≥ Repeat : plays a track or all tracks repeatedly.
≥ Random : plays each track once in the random order.
Press [PLAY MODE] to select the desired mode.
,
n
]
≥ Press [CD 1/;] to start play if in the stop mode.
≥ Random can only be selected in the stop mode.
≥ The play mode is also cancelled if the CD tray is opened.
To Operations
repeat the desired
track
repeat programmed
tracks
cancel repeat play Press [PLAY MODE] until
cancel random play Press [PLAY MODE] to clear
Notes: (For Random Play)
≥ Random play cannot be used together with program play.
≥ Search can only be done during the current playing tracks.
≥ During play you cannot select tracks with the numeric buttons
and skip to tracks which have already been played.
: (1 track- repeat)
===
(No display)
Press [PLAY MODE] to select
“”.
1 Start program play. (l 9)
2 Press [PLAY MODE] to select
“ ” and “ ” are cleared.
“”.
If cancelled during play, play
continues to the end of the CD.
: (All-track repeat)
#
(===
“”.
,
]
n
8
RQT7914
Page 9
Repeat play and Album play [MP3]
You can play ( ) or repeat play ( ) tracks
only in the selected album.
Press [PLAY MODE] before or during playback to
select the desired mode.
,
OFF (no indication)
≥ ( ): play all tracks in the selected album one time.
≥ ( )
≥ You can select another album with album skip.
≥ You cannot use random play with MP3.
: play all tracks in the selected album repeatedly.
###
(====
MP3 Intro play
Intro functions allow you to start playing the 1st track of all
albums for 10 seconds each in the stop mode.
Press [INTRO] to start intro play.
Intro function is cancelled after playing the 1st track of last
album in the disc. To stop during the process, press [INTRO]
or [∫ TAPE/CD].
This unit can play MP3, a method of compressing audio
without affecting audio quality.
ª When creating MP3 files to play on this unit
Disc format: ISO9660 level 1 and level 2 (except for
extended formats)
Title names and album names are not displayable on
this unit.
ª Limitation on MP3
≥ This unit is compatible with multi-session but if there
are a lot of sessions it takes more time for play to
start. Keep the number of sessions to a minimum to
avoid this.
≥ This unit cannot play files recorded using packet
write.
≥ If a CD-ROM format CD contains MP3 and files other
than MP3, only the MP3 files will be playable.
≥ Depending on how you create MP3 files, they may
not play in the order you numbered them or may not
play at all.
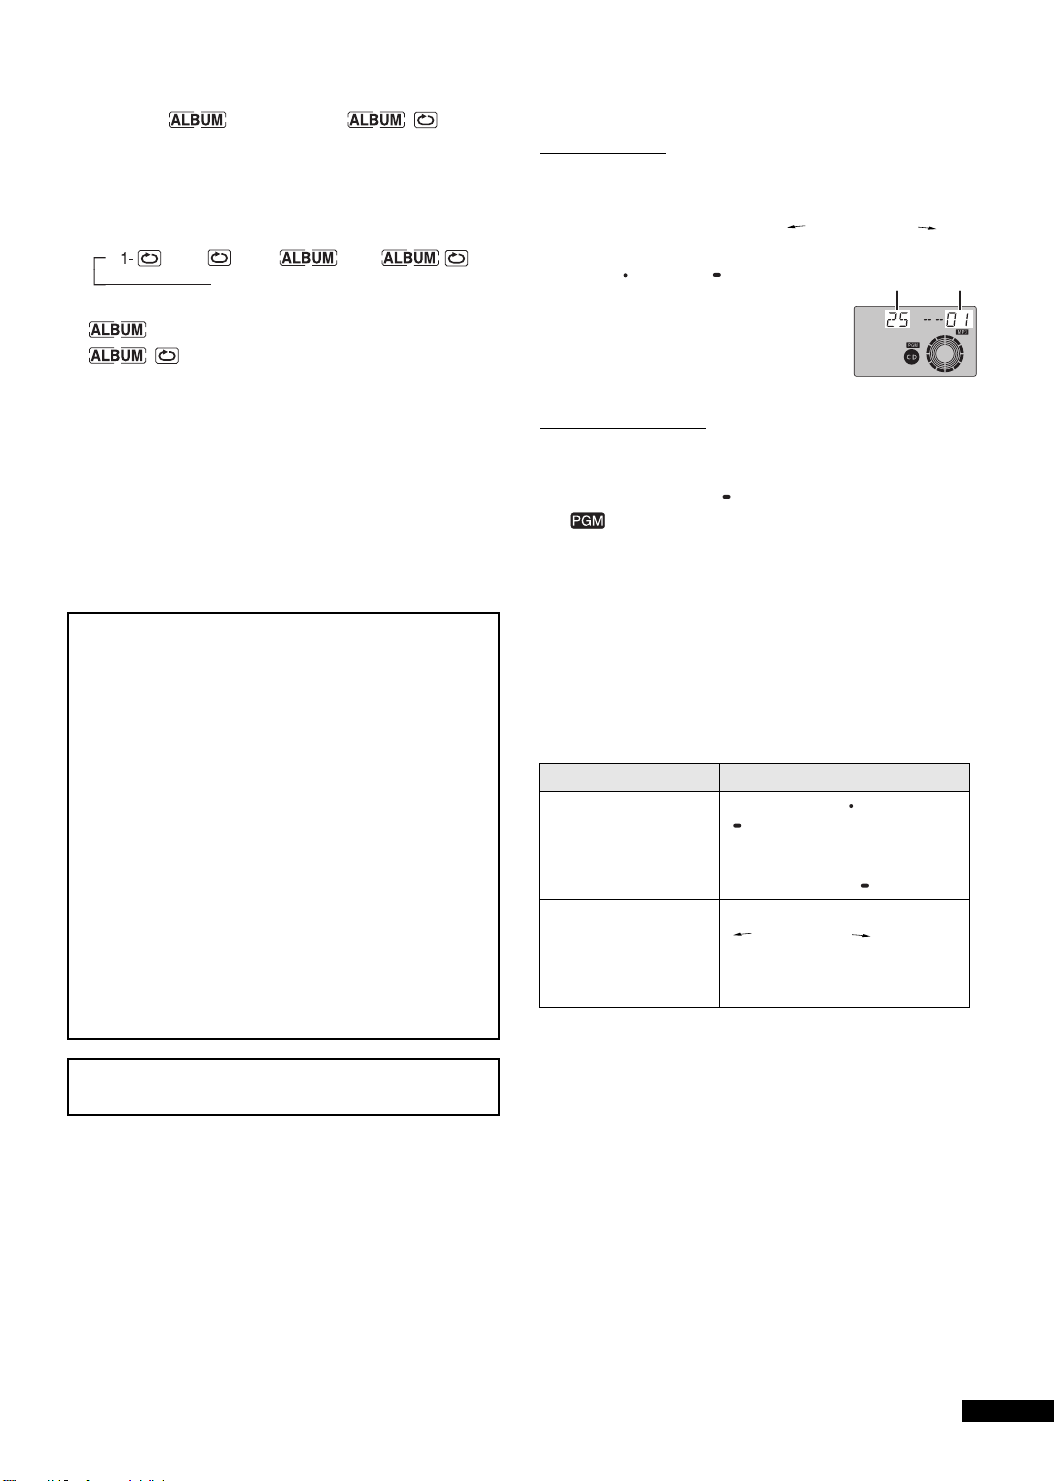
Program play [CD-DA] [MP3]
You can program up to 24 tracks.
On the main unit
Preparation:
Press [∫ TAPE/CD] to switch to CD stop mode.
[1] Turn [TIME/PRESET TUNE TRACK SKIP ] to
]
n
select the track.
[2] Press [ MEMORY CLEAR].
C: Programmed track
D: Play sequence
[3] Repeat step [1] and [2] to
program other tracks.
[4] Press [CD 1/;] to start play.
On the remote control
Preparation:
Press [STOP ∫] to switch to CD stop mode.
[1] Press [PROGRAM/ CLEAR].
appears on the display.
“”
[2] Press the numeric button(s) to select the desired
track.
For 2-digits number: press [S10] once, then the 2 digits.
For 3-digits number: press [S10] twice, then the 3 digits.
Repeat this step to program other tracks.
[3] Press [CD 1/;] to start play.
The program remains intact even if play is stopped or the unit is
turned off. “Cd-P” for [CD-DA] or “P” for [MP3] appears when play
is stopped to indicate the contents are in the memory.
To Operations
§
cancel
check the program
contents (while
“Cd-P” for [CD-DA] or
“P” for [MP3] is
displayed)
§
The mode is also cancelled if the CD tray is opened.
Press and hold [ MEMORY
CLEAR] in the CD stop mode
until “CLEAR” is displayed.
On remote control, press and
hold [PROGRAM/ CLEAR].
Turn [TIME/PRESET TUNE
TRACK SKIP ].
On remote control, press
[–/:] or [9/+].
C D
e.g. MP3
MPEG Layer-3 audio decoding technology licensed
from Fraunhofer IIS and Thomson multimedia.
Notes:
≥ “FULL” is displayed
If 24 tracks have already been programmed.
≥ You can still program and play tracks if the total elapsed play
time of the program exceeds 200 minutes.
“– –:– –” is displayed [CD-DA].
9
RQT7914
Page 10

Cassette Tape Play
[1] Press [< DECK] to open the deck.
(The unit comes on.)
Load a cassette and close the
deck by hand.
A: Side to be played back facing
up.
B: Insert the cassette with the
exposed tape facing you.
[2] Press [1TAPE] to start play.
[3] Press [+, – VOLUME] to adjust volume.
A
B
TAPE ⁄ CD
VO
LUM
REW
E
Volume and sound quality in recording
≥ Recording level is set automatically.
≥ Recordings are unaffected by changes to sound quality.
To display the tape counter while recording
Press [DISPLAY].
Each time you press the button in the CD or radio mode:
,
n
Present state Present time Tape counter
]
=====
To reset the tape counter
Press [C.RESET].
The counter resets to “000”.
==========
##
]
n
To Operations
stop play Press [∫ TAPE/CD].
§
start one touch play
fast-forward Press [5/+/FF]. On remote
rewind Press [REW/–/6].
§
when using AC power.
Press [1TAPE] when a cassette is
loaded.
control, press [5/FF].
On remote control, press
[6/REW].
Cassette Tape Recording
Before Recording
Notes:
≥ Use household AC power or new batteries when recording to
avoid poor recordings caused by the batteries running down.
≥ Televisions can cause interference to recordings made on
this unit if they are too close to each other.
Selection of tapes
Use normal position tapes.
High position and metal position tapes can be played, but the
unit will not be able to record or erase correctly.
Erasure prevention
The illustration shows how to remove the tabs to prevent
recording. To record on the tape again, cover as shown.
A Side A
A
BC
A
B Tab for side “B”
C Tab for side “A”
D Adhesive tape
D
To erase recordings
1 Press [< DECK] to open the deck and insert the cassette
with the side to be erased facing up.
2 Press [∫ TAPE/CD] to switch to TAPE mode.
3 Press [¥/;].
Recording CDs
Normal recording
Preparation:
Wind on the leader tape.
[1] Press [< DECK] to open the deck.
[2] Press [∫ TAPE/CD] to switch to CD mode.
[3] Press [¥/;] to start recording.
CD play and recording start at the same time.
The cassette stops when the CD finishes.
10
RQT7914
Page 11

To Operations
stop recording Press [∫ TAPE/CD].
pause recording Press [¥/;].
continue recording
from another CD on
the same cassette
during pause or stop.
record selected tracks 1 Do step [1] and [2], then
skip unwanted tracks 1 Press [¥/;] to pause
1 Press [< CD] and replace
the CD.
2 Press [¥/;].
Press again to resume
recording.
program the tracks. (l 9)
2 Press [¥/;].
recording. (The CD also
pauses.)
2 Turn [TIME/PRESET TUNE
TRACK SKIP ] so the
next track you want to record is
displayed.
3 Press [¥/;] to resume
recording.
ALL-REC [CD-DA]
Records the whole CD or selected tracks. When the tape
finishes before CD, recording and CD pauses for you to resume
recording on the opposite side.
[1] Press [∫ TAPE/CD] to switch to CD mode.
[2] Press [CD REC MODE] to display “ALL-REC”.
Each time you press the button:
,
n
ALL-REC 1-REC OFF
]
=====
The display shows the tape length needed.
“C – – – –” indicates the tape needed exceeds 100 minutes.
You can still record, but some tracks may not be recorded if
the tape is not long enough.
##
=====
[3] Press [< DECK] to open the deck and load a
cassette with the side for recording facing up.
[4] Press [¥/;] to start recording.
The unit rewinds the tape, records 10 seconds of silence,
and then starts recording.
To stop recording, press [∫ TAPE/CD]. The CD also stops.
If a track is interrupted at the end of the side facing up,
Recording and CD pauses.
To Operations
record the track again
on the opposite side
§
The unit records 10 seconds of silence, and resumes
recording from the beginning of the cut-off track.
Note:
≥ Random play and repeat play cannot be used with
“ALL-REC”.
1 Press [< DECK], flip the
cassette, and insert it.
2 Press [¥/;].
]
n
§
1-REC [CD-DA] [MP3]
Records a selected track from the CD and stops.
Preparation:
Wind on the tape to where you want to start recording.
[1] Press [∫ TAPE/CD] to switch to CD mode.
[2] Press [CD REC MODE] to display “1-REC”.
[3] Tur n [TIME/PRESET TUNE TRACK SKIP ] to
select the track you want to record.
[4] Press [¥/;] to start recording.
CD play and recording start at the same time.
To Operations
stop recording Press [∫ TAPE/CD].
(The CD also stops.)
continue recording
from another CD
record a track in play 1 Press [CD REC MODE] to
Note:
≥ Recording and CD will stop when the tape reaches its end,
even if the track has not finished.
1 Press [< CD] and replace the
CD.
2 Do steps [3] and [4].
display “1-REC”.
2 Press [¥/;].
Recording starts from the
beginning of the track and stops
when the track finishes.
Recording the Radio
Preparation:
To record from the beginning of the tape;
Wind on the leader tape.
To record from part or half way through the tape;
Wind on the tape to where you want to start recording.
[1] Load a cassette with the side for recording
facing up.
[2] Tune to the station.
[3] Press [¥/;] to start recording.
To Operations
stop recording Press [∫ TAPE/ CD ].
pause recording Press [¥/;].
To reduce noise when recording AM (Beat Proof function)
Remote control only
1 Press [PLAY MODE] while recording.
Each time you press the button:
bP1 ,-. bP2
Choose the setting with the least noise.
Press again to resume recording.
11
RQT7914
Page 12

VOLUME
TAPE ⁄ CD
Setting the Clock
This is a 24-hour clock.
[1] Press [ ] to turn the unit on.
[2] Press [CLOCK/TIMER] to select “CLOCK”.
Each time you press the button:
,
n
CLOCK
]
Original display
ON PLAY
#
OFF REC
[3] Within 10 seconds
Turn [TIME/PRESET TUNE TRACK SKIP ] to
set the time or on remote control, press [–/:]
or [9/+].
[4] Press [CLOCK/TIMER] to start the clock.
The original display is restored shortly after.
Note:
≥ The clock may lose or gain some time over a period.
Readjust if necessary.
To display the clock
Remote control only
Press [DISPLAY].
OFF PLAY
#
ON REC
##
(
The Play and Record Timer
You can set the timer to come on at a certain time to wake you
up (play timer) or to record a radio station (record timer).
Preparations:
Turn the unit on and set the clock.
For play timer, prepare the music source (tape/CD/radio) for
listening, and set the volume.
For record timer, check the cassette’s erasure prevention tab
]
(l 10) and load the cassette with the side for recording facing
n
up. Tune to the radio station (l 7), and set the volume.
To set the start and finish times
[1] Press [CLOCK/TIMER] to select the desired timer
function.
ON PLAY: to set the play timer
ON REC : to set the record timer
Proceed to step [2] before these indicators stop flashing
(about 10 seconds).
[2] Turn [TIME/PRESET TUNE TRACK SKIP ] to
set the start time and then press [CLOCK/TIMER].
[3] Turn [TIME/PRESET TUNE TRACK SKIP ] to
set the finish time and then press [CLOCK/
TIMER].
The start and finish times are now set.
12
RQT7914
Page 13

To turn the timer on
[4] Press [ PLAY/REC] to display the timer
indicator.
Each time you press the button:
,
n
PLAY REC
]
=====
PLAY: to turn the play timer on
REC: to turn the record timer on
(The indicator does not appear if the start and finish times
have not been set.)
“E” appears if the clock has not been set.
===========
[5] Press [ ] to turn the unit off.
The unit must be off for timer to operate.
The record timer comes on about 30 seconds earlier than
the set time.
To Operations
cancel the timer
check the settings
Press [ PLAY/REC]. (l A)
§
Press [CLOCK/TIMER]. (l B)
A : When the unit is on to clear the timer indicators from
the display. (The timer comes on at the set time
everyday if the timer is on.)
B : The settings are shown in the following order:
Start time > Finish time > Music source > Vo l u m e
> Original display
§
While the unit is in standby mode and connected to the
household mains socket.
To change the settings (when unit is on)
No display (OFF)
##
The Sleep Timer
Remote control only
You can set the unit to turn off after certain time. (e.g. when you
want to fall asleep while listening to music.)
]
n
Press [SLEEP] to select the time (minutes).
Each time you press the button:
,
n
]
===
To Operations
cancel
check the remaining
time
change the setting
Notes:
≥ You can use sleep timer in combination with play and record
timer.
≥ Make sure the unit is off before the play and record timer’s
start time.
≥ Sleep-off time shall have higher priority than timer-off time.
#
Press
“SLEEP OFF”.
Press
The remaining time is shown for
about 5 seconds.
Press
time.
SLEEP 90SLEEP 60SLEEP 30
##
SLEEP 120SLEEP OFF
]
n
===
,
[SLEEP] to select
[SLEEP] once.
[SLEEP] to select the new
To Operations
change the times Do steps [1], [2], [3] and [5].
change the source or
volume
You can enjoy your desired source after you have set the
timer.
Turn the unit off before the timer’s start time.
Note:
≥ The play and record timers cannot be used together.
1 Press [ PLAY/REC] to clear
the timer indicator.
2 Make changes to the source or
volume.
3 Do steps [4] and [5].
13
RQT7914
Page 14

SOUND EQ
Sound Quality
You can choose one of four types of sound quality.
1 Heavy: Adds punch to rock
2 Clear: Clarifies higher sounds
3 Soft: For background music
4 Vocal: Adds gloss to vocals
Press [SOUND EQ] to select a setting.
Each time you press the button:
1 Heavy > 2 Clear
e v
l 3 Soft
l v
l 4 Vocal
l v
EQ-OFF (cancelled)
Note:
≥ Changes to sound
quality do not affect
recordings.
1
2
3
3-D Sound
with the Sound Virtualizer
Remote control only
You can create a three-dimensional sound field when listening
to stereo sound.
Press [S.VIRTUALIZER].
Press again to cancel.
,
n
]
=====
Notes:
≥ This feature does not affect recordings.
≥ The actual effect depends on the source played.
ON: OFF
#
=====
=====
]
n
14
RQT7914
4
Page 15

Troubleshooting
Before requesting for service, make the following checks. If you cannot fix the unit as described below, or if something not listed
here occurs, refer to the enclosed directory to locate an Authorized Service Center convenient to you or contact your dealer.
Reference pages are shown as an example (l 3).
Common problems
“E” is displayed. Indicates incorrect operation. Read the instructions.
“U01” is displayed. Replace the batteries or use household AC power. (l 6)
“U02” is displayed.
CD
CD will not play or CD display is
incorrect.
Certain sections are not played
properly.
Cassette deck
Recording is not possible. If the cassette’s tabs have removed, cover the holes with adhesive tape. (l 10)
Poor sound quality. Clean the heads. (l 3)
Radio
A lot of noise or tuning difficulty.
Remote Control
The remote control does not work.
The unit cannot be turned on from
the remote control.
Power batteries have not been inserted. Insert them or use household AC power.
(l 6)
Place the CD with label facing up. (l 8)
Wait for 1 hour for condensation to dry and try again.
Clean the CD. (l 3)
Replace the CD if it is scratched, warped, or nonstandard.
Interference may be caused by other equipment or the use of its remote control.
Turn the other equipment off or keep this unit away from them.
Check to ensure the batteries are inserted correctly. (l 4)
Replace the batteries if they are worn. (l 4)
Turn the unit on from the main unit if you are using batteries to power the unit.
(l 4, 6)
Specifications
Radio
Frequency range
FM 87.50s108.00 MHz (50 kHz steps)
AM 522s1629 kHz (9 kHz steps)
520s1630 kHz (10 kHz steps)
CD player
Disc played
CD/MP3/CD-R/RW 8 cm/12 cm
Bit rate
MP3 32 kbpss320 kbps
Sampling frequency
CD 44.1 kHz
MP3 32 kHz, 44.1 kHz, 48 kHz
Decoding 16 bit linear
Beam source Semiconductor laser (wavelength 780 nm)
No. of channels 2-channel, stereo
Wow and flutter Below measurable limit
D/A converter MASH (1 bit DAC)
Tape recorder
Track system Stereo
Monitor system Variable sound monitor
Recording system AC bias
Erasing system Multi Pole magnet
Frequency range
Normal position 50s14000 Hz
General
Speakers (RX-ES29) 8 cm 5.4 ™ k 2
(RX-ES23) 8 cm 2.7 ™ k 2
Jacks
Output PHONES: 3.5 mm stereo (16s32 ™)
Power requirement
AC 110s127 V/220s240 V, 50/60 Hz
Power consumption: (RX-ES29) 33 W
(RX-ES23) 20 W
Battery 12 V [Eight R20/LR20 (D, UM-1) batteries]
≥ Do not use rechargeable type batteries.
Memory back-up for computer/clock
6 V [Four R6/LR6 (AA, UM-3) batteries]
≥ Do not use rechargeable type batteries.
Dimensions 529 mm (W) k 144 mm (H) k 276 mm (D)
Mass (RX-ES29) 4.4 kg without batteries
(RX-ES23) 3.9 kg without batteries
Power consumption in standby mode
(RX-ES29) 3.0 W (117 V)
3.5 W (240 V)
(RX-ES23) 3.0 W (117 V)
3.5 W (240 V)
y
Notes:
≥ Specifications are subject to change without notice.
≥ Mass and dimensions are approximate.
15
RQT7914
Page 16

亲爱的顾客
感谢您购买本产品。
有关本机器的最佳性能和安全性,请仔细阅读本说明书。
目录
随附的附件 ................................ 17
预防措施 .................................. 17
保养 ...................................... 17
CD 选择 ................................... 17
控件的位置 ................................ 18
使用电池 .................................. 20
电源 ...................................... 20
记忆电池 .................................. 20
收音机 .................................... 21
CD 和 MP3 ................................. 22
盒式磁带播放 .............................. 24
录制盒式磁带 .............................. 24
设置时钟 .................................. 26
播放和录制计时器 .......................... 26
睡眠计时器 ................................ 27
音质 ...................................... 28
带有声音虚拟器的 3-D 音效 ................. 28
故障排除 ................................ 封底
规格 .................................... 封底
注意 !
本产品使用激光射线。
控制器的使用、调整及操作等如不遵照此处的说明进行,很
可能会受到激光辐射的危害。
勿拆开机壳自行修理。有问题请交给专业维修人员。
RQLS0218
产品内部
注意:
请变换电压的设定以配合您居住地区的 AC 电压详情
可参阅第 20 页
应注意如果电压的设定不正确本机会受到严重的损坏
或不能正确地操作
警告:
为了减少火灾、触电或产品损坏的危险,请勿让本机遭受雨
淋、受潮、滴上或溅上水,也不要将诸如花瓶等盛水之物置
于本机上。
本产品在使用过程中,可能会受到移动电话的无线电波干扰
如果这种干扰明显的话,请将本产品远离移动电话使用。
本机供在热带气候地区使用。
注意 !
≥ 为了确保良好的通风条件,请勿将本机安装或置于书柜、
内藏式机柜或其它密闭的空间里。勿让窗帘或任何其它物
体堵塞通风孔,以免因过热而造成触电或火灾危险。
≥ 切勿让报纸、桌布、窗帘等物品堵塞住本机的通风孔。
≥ 切勿将诸如点然的蜡烛等明火火源置于本机上。
≥ 废弃处理电池时要尽量采取不破坏环境的方式。
设备应放在交流电源输出插孔附近,电源插头应放在出现故
障时能够便于插拔之处。
16
RQT7914
。
Page 17

随附的附件
请检查和核对随附的附件。
需要更换零件时,请使用括号中标明的编号。
遥控器 (N2QAHB000048) .......................... 1 个
AC 电源线 ...................................... 1 条
注:
≥ 随附的 AC 电源线仅用于本设备。
请勿将其用于其它设备。
用于沙特阿拉伯和科威特
用于其它地区
保养
如果表面附有灰尘
要清洁本设备,请使用柔软、干燥的布擦拭。
≥ 切勿使用酒精、涂料稀释剂或汽油清洁本设备。
≥ 在使用以化学方式处理过的布前,请仔细阅读布料附带
的说明书。
对于更加清晰的声音
每使用 10 个小时后清洁一次磁头,以确保良好的回放和
录制质量。
使用清洁磁带 (未随附)。
盒式磁带的保养
≥ 超过 100 分钟的磁带很薄,可能会在设备中断裂或卡住。
≥ 磁带松弛会导致在设备中卡带,应在播放磁带之前将其解
决。
≥ 如果使用不当,则环形磁带可能会卡在卡座部件中。
CD 选择
预防措施
≥ 避免在热源附近使用或放置本设备。请勿将其长时间搁置在门
窗紧闭、阳光直接照射的汽车内,否则可能会造成机壳变形。
≥ 避免使用切割、有划痕或接触不好的 AC 电源线,否则可能会
导致火灾或引起电击的危险。此外,还要避免电源线过度弯
曲、牵引或重叠。
≥ 请勿通过拉出电线的方式拔掉 AC 电源线,否则可能会导致老
化故障或电击的危险。
≥ 请勿在浴室内的 AC 插座上使用本产品,否则可能会引起电击
的危险。
≥ 不使用本设备时,请从家中的 AC 插座中拔出 AC 导线。
选择带有此标记的 CD:(A)。
本设备可以播放 CD-DA (数码音频)格式的
音频 CD-R 和最终已完成录制的 CD-RW
(使 CD-R/CD-RW 播放机可以播放音频 CD-R
和 CD-RW 的过程)。由于录制条件的不同,
某些 CD-R 或 CD-RW 可能无法播放。
请勿
≥ 使用形状不规则的 CD。
≥ 使用标签和贴条快要脱落或粘胶已从标签或贴条下流出
的CD。
≥ 贴上防刮擦的封面或任何其它类型的附件。
≥ 涂写 CD。
≥ 使用液体清洗 CD。(使用柔软、干燥的布擦拭。)
≥ 使用市售的标签打印机印刷的 CD。
A
17
RQT7914
Page 18

控件的位置
主机
1 卡座
2 卡座弹出按钮 (< DECK) ..................... (l 24)
• 按下 [< DECK] 以打开卡座。
(设备打开。)
然后,放入盒式磁带并手动关闭卡座。
3 录制 / 暂停录制按钮 (¥/;) ............... (l 24, 25)
4 盒式磁带播放按钮 (1TAPE) .................. (l 24)
• 按下 [1TAPE] 以开始播放。
5 波段按钮 (TUNER BAND) .................... (l 21)
• 按下 [TUNER BAND] 以选择 「FM」或 「AM」。
6 CD 播放 / 暂停按钮 (CD 1/;) ............ (l 22, 23)
• 按下 [CD 1/;] 以开始播放。
播放至 CD 末端并停止。
• 按下 [CD 1/;] 以在播放中途暂停。
再次按下继续播放。
7 CD 录制模式按钮 (CD REC MODE) ............ (l 25)
8 播放定时器 / 录制计时器按钮 ( PLAY/REC) ... (l 27)
9 时钟 / 计时器按钮 (CLOCK/TIMER) ........ (l 26, 27)
: CD 节目 / 清除、调频预置按钮
(MEMORY CLEAR).................... (l 21, 23)
; 扬声器
注:
• 扬声器不具备磁屏蔽功能。
请勿将它们放置在易受磁性干扰的电视机、个人计算机或
其它设备附近。
< 待机 / 开机开关 ()
按下此键可将设备从开机模式切换到待机模式,反之亦然。
在待机模式下,设备仍会消耗少量电能。
= 声音均衡器按钮 (SOUND EQ) .................(l 28)
> 调谐 /CD 搜索、快退 / 快进、唱片集跳过按钮
(REW/–/6, 5/+/FF) .............. (l 21, 22, 24)
遥控器
1 发射窗
对准传感器,避开障碍,设备前方最长的直线距离
为7米。
2 睡眠定时器按钮 (SLEEP) ..................... (l 27)
3 数字键 .............................. (l 21, 22, 23)
4 CD/MP3 播放模式 /FM 模式按钮
(PLAY MODE)................... (l 21, 22, 23, 25)
5 自动寻台按钮 (AUTO SCAN) .................. (l 21)
6 显示屏选择按钮 (DISPLAY) ............... (l 24, 26)
• 按下 [DISPLAY] 以在显示屏面板 B 上显示时钟。
7 预置频道选择 / 唱片集跳过按钮
(C/:ALBUM, ALBUM9/D) ........ (l 21, 22)
8 调谐 /CD 跳过、搜索 /MP3 曲目跳过 / 时钟 / 计时器调节按钮
(–/:, 9/+) .................. (l 21, 22, 23, 26)
9 MP3 试听播放按钮 (INTRO) ................... (l 23)
: 磁带计数器重置按钮 (C.RESET) ............... (l 24)
• 按下 [C.RESET] 以重置磁带计数器。
计数器重置为「000」。
; 磁带快退 / 快进按钮
(6/REW, 5/FF) ......................... (l 24)
< 声音虚拟器按钮 (S.VIRTUALIZER) ............. (l 28)
使用 AC 电源向本设备供电时,按钮
控件相同。要节省电量,当电池耗尽时无法通过遥控器打开设
备。
4 等的功能与主机上的
2
<
8
9
:
4
5
3
6
6
5
?
4
R6, AA, UM-3
( )
1
2
A
7
8
18
RQT7914
9
<
=
;
:
Page 19

? 磁带 /CD 模式选择 / 停止按钮
(∫ TAPE/CD) ................... (l 22, 23, 24, 25)
• 按下 [∫ TAPE/CD] 以停止播放。
@ 时间调节、预置频道选择 /CD 曲目选择盘 (TIME/PRESET
TUNE TRACK SKIP ) .... (l 21, 22, 23, 25, 26)
A 音量控制按扭 (+, – VOLUME) ......... (l 21, 22, 24)
• 按下 [+, – VOLUME] 以将 CD、调谐器或盒式磁带调节至
所需的音量。
B 显示屏面板
例如 CD
C CD 托盘打开 / 关闭按钮 (< CD) ........... (l 22, 25)
• 按下 [< CD] 以打开托盘。
(设备打开。)
放入 CD,然后按下 [< CD] 以关闭托盘。
D 待机指示灯 (Í) (RX-ES29)
当设备连接至 AC 电源时,该指示灯在待机模式下亮起,并
在设备打开时熄灭。
待机 / 开机指示灯 (Í/I) (RX-ES23)
当设备打开时,指示灯呈绿色亮起。
使用 AC 电源时,其作用与 AC 连接指示灯相同。
(设备关闭时,指示灯颜色更改为红色。)
E CD 托盘
F 遥控器信号传感器 (SENSOR)
使用
≥ 保持发射窗和设备传感器的清洁。
≥ 操作会受到强光源的影响,例如直射的阳
光和机壳的玻璃门。
电池
插入电池,使电极(+ 和 –)与遥控器中的电极匹配。
如果长时间不使用遥控器,请取出电池。存放在凉爽
的暗处。
如果在遥控器靠近前面板执行操作时设备也没有任何反应,
请更换电池。
请勿
≥ 在遥控器上放置重物。
≥ 拆解遥控器。
≥ 将液体泼溅到遥控器上。
7 m
30° 30°
PHONESPHONES
使用耳机(未随附)
连接前降低音量。
插头类型:3.5 毫米立体声
注:
≥ 避免长时间聆听,防止听力受损。
19
RQT7914
Page 20

使用电池
≥ 如果长时间不使用本设备或仅使用 AC 电源,请取出所有的电
池,以防止可能由于漏电而造成潜在的损坏。
≥ 插入电池时,正确对准电极(+ 和 –)。
≥ 请勿混用新旧电池或不同类型的电池。
≥ 请勿为普通的干电池充电。
≥ 请勿加热或拆解电池。远离烟火或水。
≥ 请勿与金属物件共同放置,例如项链。
≥ 切勿使用充电型电池。
≥ 请勿使用外壳已剥落的电池。
错误使用电池会对其它零件和本设备造成损坏,并可能由于短
路或电解液泄漏而引发火灾。
如果电池漏液,请与经销商联系。如果身体沾染了漏液,请彻
底用水清洗。
电源
通过 AC 电源操作设备
[1] 使用平头螺丝起子将 [VOLT ADJ] 转至您所在地区的
电压设置。
[2] 连接 AC 电源线。适用于沙特阿拉伯和科威特以外的
地区:
如有必要,请使用插头转接器(未随附)(1)。
2:家庭 AC 插座
3:AC 电源线 (随附)
(1)
(1)
VOLT ADJ
110
–
127V
OFF
OFF 110-127 V 220-240 V
220
240V
VOLT ADJ
110
–
127V
220
240V
OFF
–
OFF
–
VOLT ADJ
–
127V
110
220
240V
3
AC IN
2
1
–
使用电池(未随附)(2)
从设备上断开 AC 电源线,将电池用作电源。
使用电池时,无法使用遥控器打开设备。
取出电池 [A]
打开电池盖,将一个手指插入设备底部的小洞中,然后推出电
池。
电池寿命
电池耗尽时,显示屏上的 「」闪烁。
然后,设备自动关闭,并显示 「U01」。
用新电池更换所有电池。
记忆电池
在电源中断的过程中,记忆电池保留记忆 (时钟 / 计时器 /CD/
收音机设置)。
电池不会向设备供电。
§
不包括记忆电源。
更换电池 (3)
≥ 记忆电池可持续使用约 1 年。
≥ 在更换电池之前,将设备连接至 AC 电源。
≥ 在断开 AC 电源或更换电池前始终按住 [] 关闭设备,可
以延长记忆电池的寿命。
取出电池 (4)
抬起电池 4 的负极端以取出电池。
(4)
1
3
4
2
20
RQT7914
Page 21

VO
LUME
收音机
准备工作:
≥ 使用电池时,按下 []。
≥ 按下 [TUNER BAND] 以选择「FM」或「AM」。
手动调频
[1] 按下 [REW/–/6] 或 [5/+/FF] 以选择电台。
自动调频
按住
[REW/–/6] 或 [5/+/FF] 直至频率开始快速更
改。
≥ 有过多干扰时,自动调频可能会中断。
≥ 要取消自动调频,再次按下 [REW/–/6] 或
[5/+/FF]。
[2] 按下 [+, – VOLUME] 以调节音量。
使用自动寻台
通过每次聆听所有已调频的电台 8 秒钟,可以搜索电台。
[1] 按下 [AUTO SCAN]。
[2] 找到所需的电台时,按下 [AUTO SCAN]。
再次到达原频率时,自动寻台结束。要在此过程中停止,
按下 [AUTO SCAN]。
提高 FM 的音质
按下 [PLAY MODE] 以显示 「」。
接收信号较弱时,将选择单声道且干扰会减少。
再次按下 [PLAY MODE] 以取消模式。
≥ 增强接收信号
FM :更改天线的长度和方向。
AM :更改设备的朝向。
AMFM
REW
接收 AM 广播之前,请确保选择您所在地区正确的分配设置(9
kHz 或 10 kHz)。
1 按下 [TUNER BAND] 以选择 FM。
2 按住 [TUNER BAND] 约 5 秒钟。
频率显示屏将返回至 AM 波段的最低频率,并且显示屏开始
闪烁。按住约 5 秒钟以上。
3
显示屏停止闪烁并显示不同的频率时,释放
要返回至原频率,重复上述步骤 1 至 3。
注:
≥ 更改“分配”设置后,以前写入内存的频率将被清除。
[TUNER BAND]
。
预置调频
在 FM 和 AM 波段,最多可以设定 16 个电台。
[1] 按下 [REW/–/6] 或 [5/+/FF] 以调至所需的电
台。
[2] 按下 [ MEMORY CLEAR]。
[3] 当
「」闪烁时
旋转 [TIME/PRESET TUNE TRACK SKIP ] 以选择频
道,然后按下 [MEMORY CLEAR] 或按下遥控器上数字
键以选择频道。
≥ 对于频道 1 至 9,按下相应的数字。
≥ 对于频道 10 至 16,按下 [S10],然后再按下两位数。
如果在预置过程中 「」消失,请返回步骤 [1]。
选择频道
旋转 [TIME/PRESET TUNE TRACK SKIP ] 以选择频道,
或者按下遥控器上的数字键来选择频道。
使用预置寻台
通过每次聆听所有预置的电台 8 秒钟,可以搜索电台。
[1] 按住 [C/: ALBUM] 或 [ALBUM 9/D] 直至
显示屏显示「PS」。
[2] 找到所需的频道时,按下 [C/: ALBUM] 或
[ALBUM 9/D]。
搜索每个预置的频道后,预置寻台结束。要在此过程中停止,
按下 [C/: ALBUM] 或 [ALBUM 9/D]。
≥ 如果按下 [< DECK],则 AM 接收信号会短时中断。
≥ 要在建筑物或汽车内使用本设备时增强接收信号,请将其
放置在窗户附近。
AM 分配设置
仅从主设备进行设置
跳过预置的频道,
1 选择所需的电台。
2 按下 [MEMORY CLEAR]。
3 当「」闪烁时
旋转 [TIME/PRESET TUNE TRACK SKIP ]
以显示「– –」。
4 按下 [MEMORY CLEAR]。
选择跳过的频道,
按下数字键。
21
RQT7914
Page 22

TAPE ⁄ CD
CD
CD 和 MP3
播放光盘
[1] 按下 [< CD] 以打开托盘。
(设备打开。)
≥ 标签必须面朝上
≥ 放入 CD,然后按下 [< CD]
[2] 按下 [CD 1/;] 以开始播放。
播放至 CD 末端并停止。播放 MP3
时,显示屏显示「MP3」。
A:曲目编号
B:已播放的时间
[3] 按下 [+, – VOLUME] 以调节音
量。
单键播放(使用 AC 电源时)
放入 CD 时,按下 [CD 1/;]。
设备打开,播放开始。
目的 操作
停止播放 按下 [∫ TAPE/CD]。
暂停播放 播放过程中按下 [CD 1/;]。
跳过曲目§
搜索曲目 [CD-DA] 在播放过程中,按住
跳过唱片集 [MP3] §
§
对于跳过曲目和唱片集,
如果在停止模式下,请按下 [CD 1/;] 以开始播放。
注:
≥ 如果出现干扰,请使本设备远离收音机和电视机。
[CD-DA] [MP3]
(l 右侧)。
以关闭托盘。
AB
例如 MP3
顺时针 (前进)或逆时针
(后退)旋转 [TIME/PRESET
TUNE TRACK SKIP ]。按下
遥控器上的 [–/:] 或
[9/+]。
[REW/–/6] 或 [5/+/FF]。
在播放过程中,按住遥控器上的
[–/:] 或 [9/+]。
按下 [REW/–/6] 或 [5/+/
FF]。按下遥控器上的 [C/:
ALBUM] 或 [ALBUM 9/D]。
VO
LUME
REW
高级 CD 和 MP3 功能
准备工作:
按下 [∫ TAPE/CD] 以切换至 CD 模式。
仅适用于遥控器
直接存取播放
≥ 从选定的曲目开始播放。
≥ 按下数字键以选择并播放所需的曲目。
对于 2 位数:按一下 [S10],然后按下 2 位数。
对于 3 位数:按两下 [S10],然后按下 3 位数。
重复播放和随机播放
≥ 重复:重复播放一首曲目或全部曲目。
≥ 随机:按随机顺序播放每首曲目一次。
按下 [PLAY MODE] 以选择所需的模式。
,
n
]
===
≥ 如果在停止模式下,请按下 [CD 1/;] 以开始播放。
≥ 在停止模式下仅可选择随机播放。
≥ 如果打开 CD 托盘,也可以取消播放模式。
目的 操作
重复所需的曲目 按下 [PLAY MODE] 以选择
重复编制的曲目 1 开始播放节目。(l 23)
取消重复播放 按下 [PLAY MODE] 直至
取消随机播放 按下 [PLAY MODE] 以取消
注:(适用于随机播放)
≥ 随机播放不能与节目播放同时使用。
≥ 在当前播放曲目的过程中,可以执行搜索操作。
≥ 在播放过程中,无法使用数字键选择曲目和跳至已播放的曲
目。
[CD-DA] [MP3]
[CD-DA]
#
(===
「」。
2 按下 [PLAY MODE] 以选择
「」。
「」和 「」取消。
「」。
如果在播放过程中取消,则播放会
持续到 CD 结束。
,==
]
n
22
RQT7914
Page 23

重复播放和唱片集播放
仅可播放 ( ) 或重复播放 ( ) 选定唱片集
中的曲目。
[MP3]
在回放前或回放过程中,按下 [PLAY MODE] 以选择所
需的模式。
,
n
]
=====
≥ ( ):播放一次选定唱片集中的所有曲目。
≥ ( ):
≥ 使用唱片集跳过按钮,可以选择另一个唱片集。
≥ 无法对 MP3 使用随机播放功能。
反复播放选定唱片集中的所有曲目。
###
(====
]
n
编程播放
最多可以编制 24 首曲目。
在主机上
准备工作:
按下 [∫ TAPE/ CD ] 以切换至 CD 停止模式。
[CD-DA] [MP3]
[1] 旋转 [TIME/PRESET TUNE TRACK SKIP ] 以
选择曲目。
[2] 按下 [ MEMORY CLEAR]。
C:已编程的曲目
D:播放顺序
C D
[3] 重复步骤 [1] 和 [2] 以编制其它
曲目。
[4] 按下 [CD 1/;] 以开始播放。
例如 MP3
MP3 试听播放
在停止模式下,试听功能允许播放全部唱片集的第一首曲目,
每首曲目播放 10 秒钟。
按下 [INTRO] 以开始试听播放。
光盘中最后唱片集中的第一首曲目播放结束后,试听功能取消。
要在操作过程中停止,按下 [INTRO] 或 [∫ TAPE/CD]。
本设备可以播放 MP3,它是一种不影响音质的音频压缩
方法。
ª 创建 MP3 文件以在本设备上播放时
光盘格式:ISO9660 级别 1 和级别 2 (除扩展格式以
外)
标题名称和唱片集名称不可在本设备上显示。
ª 有关 MP3 的限制
≥ 本设备适用于多区段功能,但是如果区段过多,则开
始播放需要更多时间。请尽量减少区段数,以避免出
现这种情况。
≥ 本设备无法播放使用包写入录制的文件。
≥ 如果 CD-ROM 格式的 CD 中包含 MP3 和非 MP3 文
件,则仅可以播放 MP3 文件。
≥ 根据创建 MP3 文件的方式,可能无法按您编排的顺序
播放或根本无法播放。
MPEG 第 3 层音频解码技术,经 Fraunhofer IIS 和
Thomson multimedia 许可。
在遥控器上
准备工作:
按下 [STOP ∫] 以切换至 CD 停止模式。
[1] 按下 [PROGRAM/ CLEAR]。
显示屏显示「」。
[2] 按下数字键以选择所需的曲目。
对于 2 位数:按一下 [S10],然后按下 2 位数。
对于 3 位数:按两下 [S10],然后按下 3 位数。
重复此步骤以对编制其它曲目。
[3] 按下 [CD 1/;] 以开始播放。
即使播放停止或设备关闭,编程也会保持不变。表示 [CD-DA]
的 「Cd-P」或表示 [MP3] 的 「P」在播放停止时显示,以说明
内容在内存中。
目的 操作
§
取消
检查编程内容 (当表
示 [CD-DA] 的
「Cd-P」 或表示 [MP3]
的 「P」 显示时)
§
如果 CD 托盘打开,此模式也会取消。
注:
≥ 显示屏显示「FULL」
如果已编制 24 首曲目。
≥ 如果节目的已播放时间总计超过 200 分钟,则仍然可以编制
并播放曲目。
「– –:– –」显示 [CD-DA]。
在 CD 停止模式下,按住
[ MEMORY CLEAR] 直至显
示屏显示 「CLEAR」。
按住遥控器上的 [PROGRAM/
CLEAR]。
旋转 [TIME/PRESET TUNE
TRACK SKIP ]。
按下遥控器上的
[–/:] 或 [9/+]。
23
RQT7914
Page 24

TAPE ⁄ CD
VO
LUM
REW
E
盒式磁带播放
[1] 按下 [< DECK] 以打开卡座。
(设备打开。)
放入盒式磁带,然后手动关闭
卡座。
A:要回放的一面朝上。
B:将露出的磁带面向您插入盒
式磁带。
[2] 按下 [1TAPE] 以开始播放。
A
B
[3] 按下 [+, – VOLUME] 以调节音量。
目的 操作
停止播放 按下 [∫ TAPE/CD]。
开始单键播放
快进 按下 [5/+/FF]。按下遥控器上的
快退 按下 [REW/–/6]。
§
使用 AC 电源时。
§
放入盒式磁带后,按下 [1TAPE]。
[5/FF]。
按下遥控器上的 [6/REW]。
录制盒式磁带
录制前
注:
≥ 请在录制时使用家庭 AC 电源或新电池,以避免由于电池耗尽
而导致录制效果不佳。
≥ 如果电视机和本设备相距太近,则录制时会产生干扰。
选择磁带
使用标准位置的磁带。
本设备可以播放高位置和金属位置的磁带,但无法正常地录制
或删除。
录制时的音量和音质
≥ 录制音量自动设定。
≥ 改变音质不会影响录制。
录制时显示磁带计数器
按下 [DISPLAY]。
每次在 CD 或收音机模式下按下按钮:
重置磁带计数器
按下 [C.RESET]。
计数器重置为 「000」。
防擦除
图例显示如何除去标签以防止录制。要再次在磁带上录制,如
下所示。
A A 面
A
BC
A
B「B」面突出部件
C「A」面突出部件
D 粘胶带
D
删除录制内容
1 按下 [< DECK] 以打开卡座,然后插入磁带,使要删除的一
面向上。
2 按下 [∫ TAPE/CD] 以切换为 TAPE 模式。
3 按下 [¥/;]。
录制 CD 内容
正常录制
准备工作:
卷上引导带。
[1] 按下 [< DECK] 以打开卡座。
[2] 按下 [∫ TAPE/CD] 以切换为 CD 模式。
[3] 按下 [¥/;] 以开始录制。
CD 播放和录制同时开始。
CD 结束时,盒式磁带停止。
24
RQT7914
Page 25

目的 操作
停止录制 按下 [∫ TAPE/CD]。
暂停录制 按下 [¥/;]。
在暂停或停止过程中,
继续在同一磁带上从
另一张 CD 录制。
录制选定的曲目 1 执行步骤 [1] 和 [2],然后编制
跳过不想要的曲目 1 按下 [¥/;] 以暂停录制。
1 按下 [< CD] ,然后更换 CD。
2 按下 [¥/;]。
再次按下以继续录制。
曲目。(l 23)
2 按下 [¥/;]。
(CD 也暂停。)
2 旋转 [TIME/PRESET TUNE
TRACK SKIP ] 以显示要
录制的下一首曲目。
3 按下 [¥/;] 以继续录制。
ALL-REC [CD-DA]
录制整张 CD 或选定的曲目。如果磁带在 CD 前用完,则录制和
CD 会暂停以便在另一面继续录制。
[1] 按下 [∫ TAPE/CD] 以切换为 CD 模式。
[2] 按下 [CD REC MODE] 以显示「ALL-REC」。
每次按下按钮:
,
n
ALL-REC 1-REC OFF
]
=====
##
=====
]
n
1-REC
录制 CD 中选定的曲目,然后停止。
准备工作:
将磁带卷到要开始录制的位置。
[CD-DA] [MP3]
[1] 按下 [∫ TAPE/CD] 以切换为 CD 模式。
[2] 按下 [CD REC MODE] 以显示「1-REC」。
[3] 旋转 [TIME/PRESET TUNE TRACK SKIP ]
以选择要录制的曲目。
[4] 按下 [¥/;] 以开始录制。
CD 播放和录制同时开始。
目的 操作
停止录制 按下 [∫ TAPE/CD]。
(CD 也停止。)
继续从另一张 CD
录制
录制播放的曲目 1 按下 [CD REC MODE] 以显示
注:
≥ 当磁带到达其末端时,即使曲目尚未结束,录制和 CD 也会
停止。
1 按下 [< CD],然后更换 CD。
2 执行步骤 [3] 和 [4]。
「1-REC」。
2 按下 [¥/;]。
录制从曲目起始处开始,并在曲目
结束时停止。
显示屏显示所需的磁带长度。
「C – – – –」表示所需的磁带超过 100 分钟。您仍然可以录
制,但如果磁带不够长,则某些曲目可能无法录制。
[3] 按下 [< DECK] 以打开卡座,然后插入磁带,使要
录制的一面向上。
[4] 按下 [¥/;] 以开始录制。
设备倒带,录制 10 秒钟的静音,然后开始录制。
要停止录制,按下 [∫ TAPE/CD]。CD 也停止。
如果曲目在朝上的一面末端中断,则录制和 CD 暂停。
目的 操作
在另一面再次录制曲目1 按下 [< DECK],翻转盒式磁
带,然后将其插入。
2 按下 [¥/;]。
§
设备录制 10 秒钟的静音,然后继续从定点曲目起始处录制。
注:
≥ 随机播放和反复播放无法通过「ALL-REC」使用。
§
录制无线电内容
准备工作:
从磁带起始处录制 ;
卷上引导带。
从磁带中间部分录制 ;
将磁带卷到要开始录制的位置。
[1] 放入盒式磁带,使要录制的一面向上。
[2] 调谐至电台。
[3] 按下 [¥/;] 以开始录制。
目的 操作
停止录制 按下 [∫ TAPE/CD]。
暂停录制 按下 [¥/;]。
再次按下以继续录制。
录制 AM 时减少干扰 (防震功能)
仅适用于遥控器
1 在录制时按下 [PLAY MODE]。
每次按下按钮:
bP1 ,-. bP2
选择干扰最小的设置。
25
RQT7914
Page 26

VOLUME
TAPE ⁄ CD
设置时钟
这是 24 小时制时钟。
[1] 按下 [] 以打开设备。
[2] 按下
[CLOCK/TIMER] 以选择「CLOCK」。
每次按下按钮:
,
n
]
[3] 在 10 秒钟内
旋转 [TIME/PRESET TUNE TRACK SKIP ]
以设置计时器,或者按下遥控器上的 [–/:] 或
[9/+]。
[4] 按下 [CLOCK/TIMER] 以启动时钟。
原显示稍后立即恢复。
注:
≥ 在一段时间以后,时钟可能会变慢或变快。
如有必要,请重新调整。
显示时钟
仅适用于遥控器
按下 [DISPLAY]。
##
##
(
播放和录制计时器
您可以设置计时器在特定的时刻启动,以将您唤醒 (播放计时
器)或录制无线电电台 (录制计时器)。
准备工作:
打开设备,然后设置时钟。
对于播放计时器,请准备聆听的音频源 (磁带 /CD/ 收音机),
然后设置音量。
]
对于录制计时器,请检查盒式磁带的防擦除突出部件 (l 24),
n
然后放入盒式磁带,使要录制的一面向上。调谐至无线电电台
(l 21),然后设置音量。
设置开始和结束时间
[1] 按下 [CLOCK/TIMER] 以选择所需的计时器功能。
ON PLAY :设置播放计时器
ON REC :设置录制计时器
在这些指示停止闪烁(约 10 秒钟)之前,执行步骤 [2]。
[2] 旋转 [TIME/PRESET TUNE TRACK SKIP ] 以
设置开始时间,然后按下 [CLOCK/TIMER]。
[3] 旋转 [TIME/PRESET TUNE TRACK SKIP ] 以
设置结束时间,然后按下 [CLOCK/TIMER]。
开始和结束时间现已设置。
26
RQT7914
Page 27

打开计时器
[4] 按下 [ PLAY/REC] 以显示计时器指示。
每次按下按钮:
,
n
]
=====
PLAY :打开播放计时器
REC :打开录制计时器
(如果未设置开始和结束时间,则指示不会显示)。
如果未设置时钟,则显示屏显示「E」。
[5] 按下 [] 以关闭设备。
设备必须关闭才可操作计时器。
录制计时器比设置的时间约早 30 秒钟显示。
目的 操作
取消计时器
检查设置
A : 当设备打开以从显示屏上清除计时器指示时。(如果计
B : 设置按以下顺序显示:
§
当本设备处于待机模式并连接至家庭电源插座时。
更改设置 (设备打开时)
§
时器打开,则它每天会在设置的时间显示。)
开始时间 > 结束时间 > 音频源 > 音量 > 原显示
==========
##
按下 [PLAY/REC]。(l A)
按下 [CLOCK/TIMER]。(l B)
睡眠计时器
仅适用于遥控器
]
n
可以将设备设置为在特定时刻后关闭。(例如,当您想在听音乐
的时候睡觉。)
按下 [SLEEP] 以选择时间(分钟)。
每次按下按钮:
,
n
]
===
目的 操作
取消
检查剩余时间 按一下 [SLEEP]。
更改设置
注:
≥ 可以与播放和录制计时器组合使用睡眠计时器。
≥ 请确保在播放和录制计时器的开始时间之前设备已关闭。
≥ 睡眠结束时间比计时器结束时间具有更高的优先级。
#
按下 [SLEEP]
「SLEEP OFF」。
剩余时间显示约 5 秒钟。
按下 [SLEEP]
SLEEP 90SLEEP 60SLEEP 30
##
SLEEP 120SLEEP OFF
以选择
以选择新的时间。
]
n
===
,
目的 操作
更改时间 执行步骤 [1]、 [2]、 [3] 和 [5]。
更改音频源或音量
在设置计时器之后,您可以欣赏所需的音频源。
在计时器的开始时间之前关闭设备。
注:
≥ 播放和录制计时器无法同时使用。
1 按下 [PLAY/REC] 以清除
计时器指示。
2 更改音频源或音量。
3 执行步骤 [4] 和 [5]。
27
RQT7914
Page 28

SOUND EQ
音质
您可以选择四种音质中的一种。
1 重音: 将冲击音加入摇滚
2 清晰: 使较高的声音更清晰
3 轻柔: 用于背景音乐
4 和音: 将渲染效果加入和音
按下 [SOUND EQ] 以选择一种设置。
每次按下按钮:
重音 > 2
1
e v
l
l v
4
l
l v
EQ-OFF(被取消)
注:
≥ 更改为不影响
录制的音质。
3
清晰
轻柔
和音
1
2
3
带有声音虚拟器的
3-D 音效
仅适用于遥控器
在聆听立体声声音时,您可以创建三维空间声音区域。
按下 [S.VIRTUALIZER]。
再次按下可取消。
,
n
]
=====
注:
≥ 此功能不会影响录制。
≥ 实际的效果视播放的声音而定。
ON: OFF
#
=====
=====
]
n
28
RQT7914
4
Page 29

故障排除
在要求维修之前,请执行下列检查。如果按以下说明无法修复设备,或者出现了此处未列出的故障,请参阅随附的地址名录以找到
您便于与经销商联系的授权维修中心。
参考页面作为示例显示 (l 3)。
一般问题
显示屏显示 「E」。 表示操作错误。请阅读说明。
显示屏显示 「U01」。 更换电池或使用家庭 AC 电源。(l 20)
显示屏显示 「U02」。
CD
CD 不播放或 CD 显示不正确。 放置 CD,使其标签向上。(l 22)
特定部分无法正常播放。 清洁 CD。(l 17)
盒式磁带卡座
无法录制。 如果移除了盒式磁带的突出部件,请用粘胶带盖住小孔。(l 24)
音质较差。 清洁磁头。(l 17)
收音机
干扰很大或难以调频。 干扰可能由其它设备或使用其遥控器导致。关闭其它设备,或者使它们远离本设备。
遥控器
遥控器不工作。
无法通过遥控器打开本设备。 如果使用电池向设备供电,请从主机上打开本设备。(l 18, 20)
未插入电源电池。请插入它们或使用家庭 AC 电源。(l 20)
等待 1 小时使水汽蒸发,然后再试一次。
如果 CD 被刮伤、弯曲或不是标准格式,请更换。
检查以确保电池是否已正确插入。(l 18)
如果电池已损耗,请更换。(l 18)
规格
收音机
频率范围
FM 87.50s108.00 MHz(50 kHz 幅度)
AM 522s1629 kHz(9 kHz 幅度)
520s1630 kHz(10 kHz 幅度)
CD 播放机
播放 CD
CD/MP3/CD-R/RW 8 cm/12 cm
比特率
MP3 32 kbpss320 kbps
采样频率
CD 44.1 kHz
MP3 32 kHz, 44.1 kHz, 48 kHz
解码 16 位线性
无线电波源 半导体激光(波长 780 nm)
声道数 2 声道,立体声
抖晃度 低于可测量限定值
D/A 转换器 MASH(1 位 DAC)
磁带录音机
曲目系统 立体声
监视器系统 可变音监视器
录音系统 AC 偏磁
消磁系统 多极消磁
频率范围
标准位置 50s14000 Hz
一般信息
扬声器 (RX-ES29) 8 cm 5.4 ™ k 2
插孔
输出 PHONES:3.5 毫米立体声 (16s32 ™)
电源要求
AC 110-127 V/220-240 V,50/60 Hz
电池 12 V [ 八粒 R20/LR20 (D, UM-1) 电池 ]
用于计算机 / 时钟的记忆备份
6 V [ 四粒 R6/LR6 (AA, UM-3) 电池 ]
尺寸 529 mm (W) k 144 mm (H) k 276 mm (D)
重量 (RX-ES29) 4.4 k
待机模式下的功耗
注:
≥ 规格如有更改,恕不另行通知。
≥ 重量和尺寸为近似值。
(RX-ES23) 8 cm 2.7 ™ k 2
功耗:(RX-ES29)
(RX-ES23) 20 W
≥ 切勿使用充电型电池。
≥ 切勿使用充电型电池。
(RX-ES23) 3.9 k
(RX-ES29) 3.0 W (117 V)
(RX-ES23) 3.0 W (117 V)
g 不包含电池
g 不包含电池
3.5 W (240 V)
3.5 W (240 V)
33
W
Matsushita Electric Industrial Co., Ltd.
Web Site: http://www.panasonic.co.jp/global/
(En) (Cn)
RQT7914-2G
F0105Ks2035
 Loading...