

Page 1
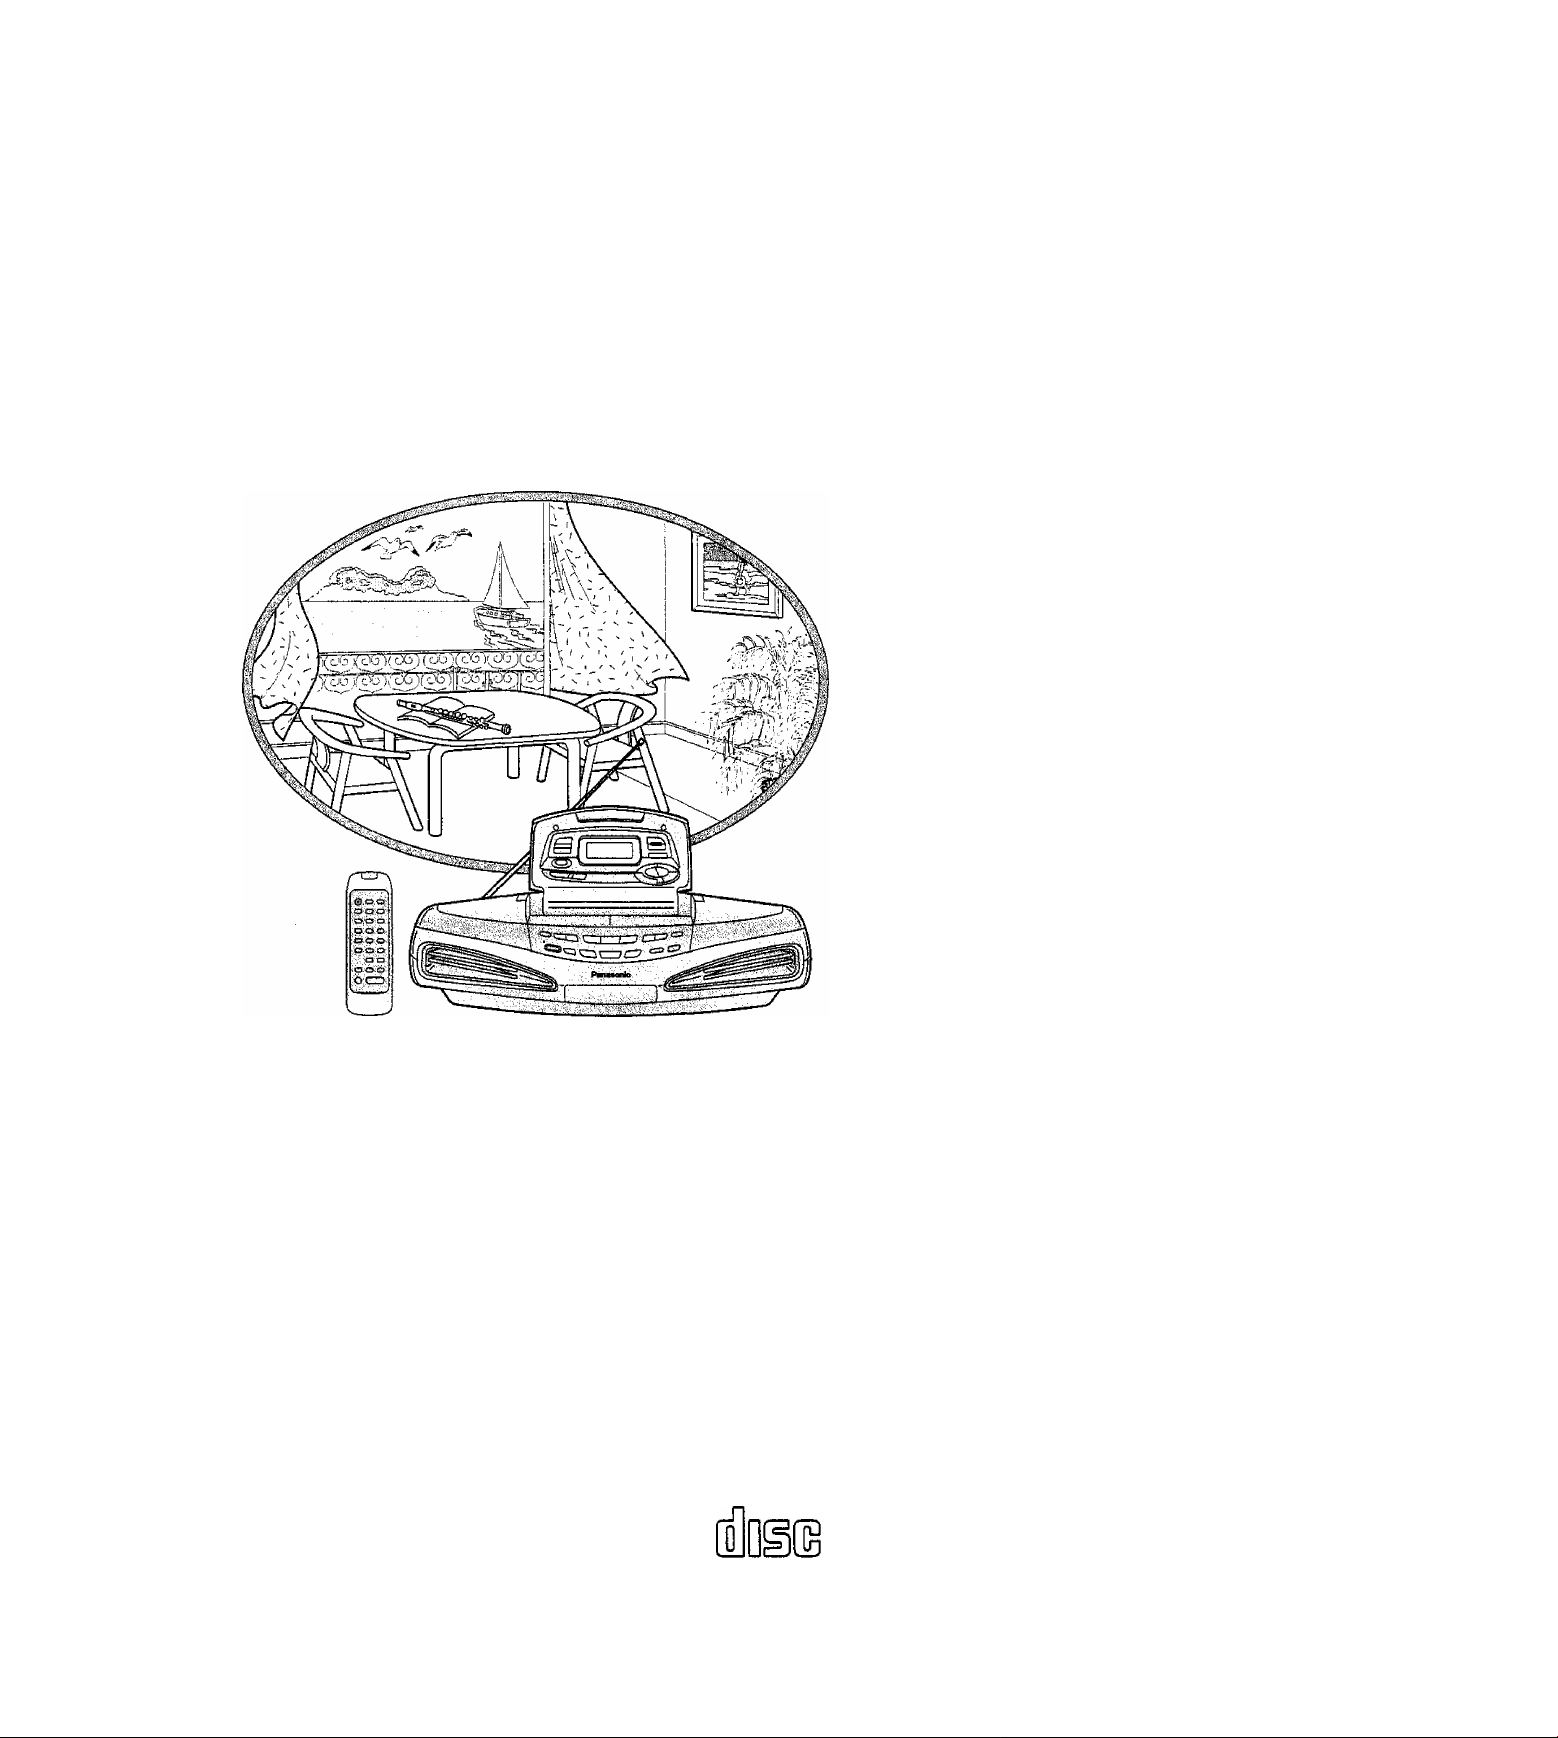
Portable Stereo CD System
RX-ED77
Operating Instructions
Pana so nk f
EB GC GN
RQT3628-3B
COMPACT
DIGITAL AUDIO
Note:'
The "'EB'' indication shown on the packmg case indi
cates United Kingdom.
Before connecting, operating or adjusting this prod
uct, please read these instructions completely.
Please save this manual.
Page 2
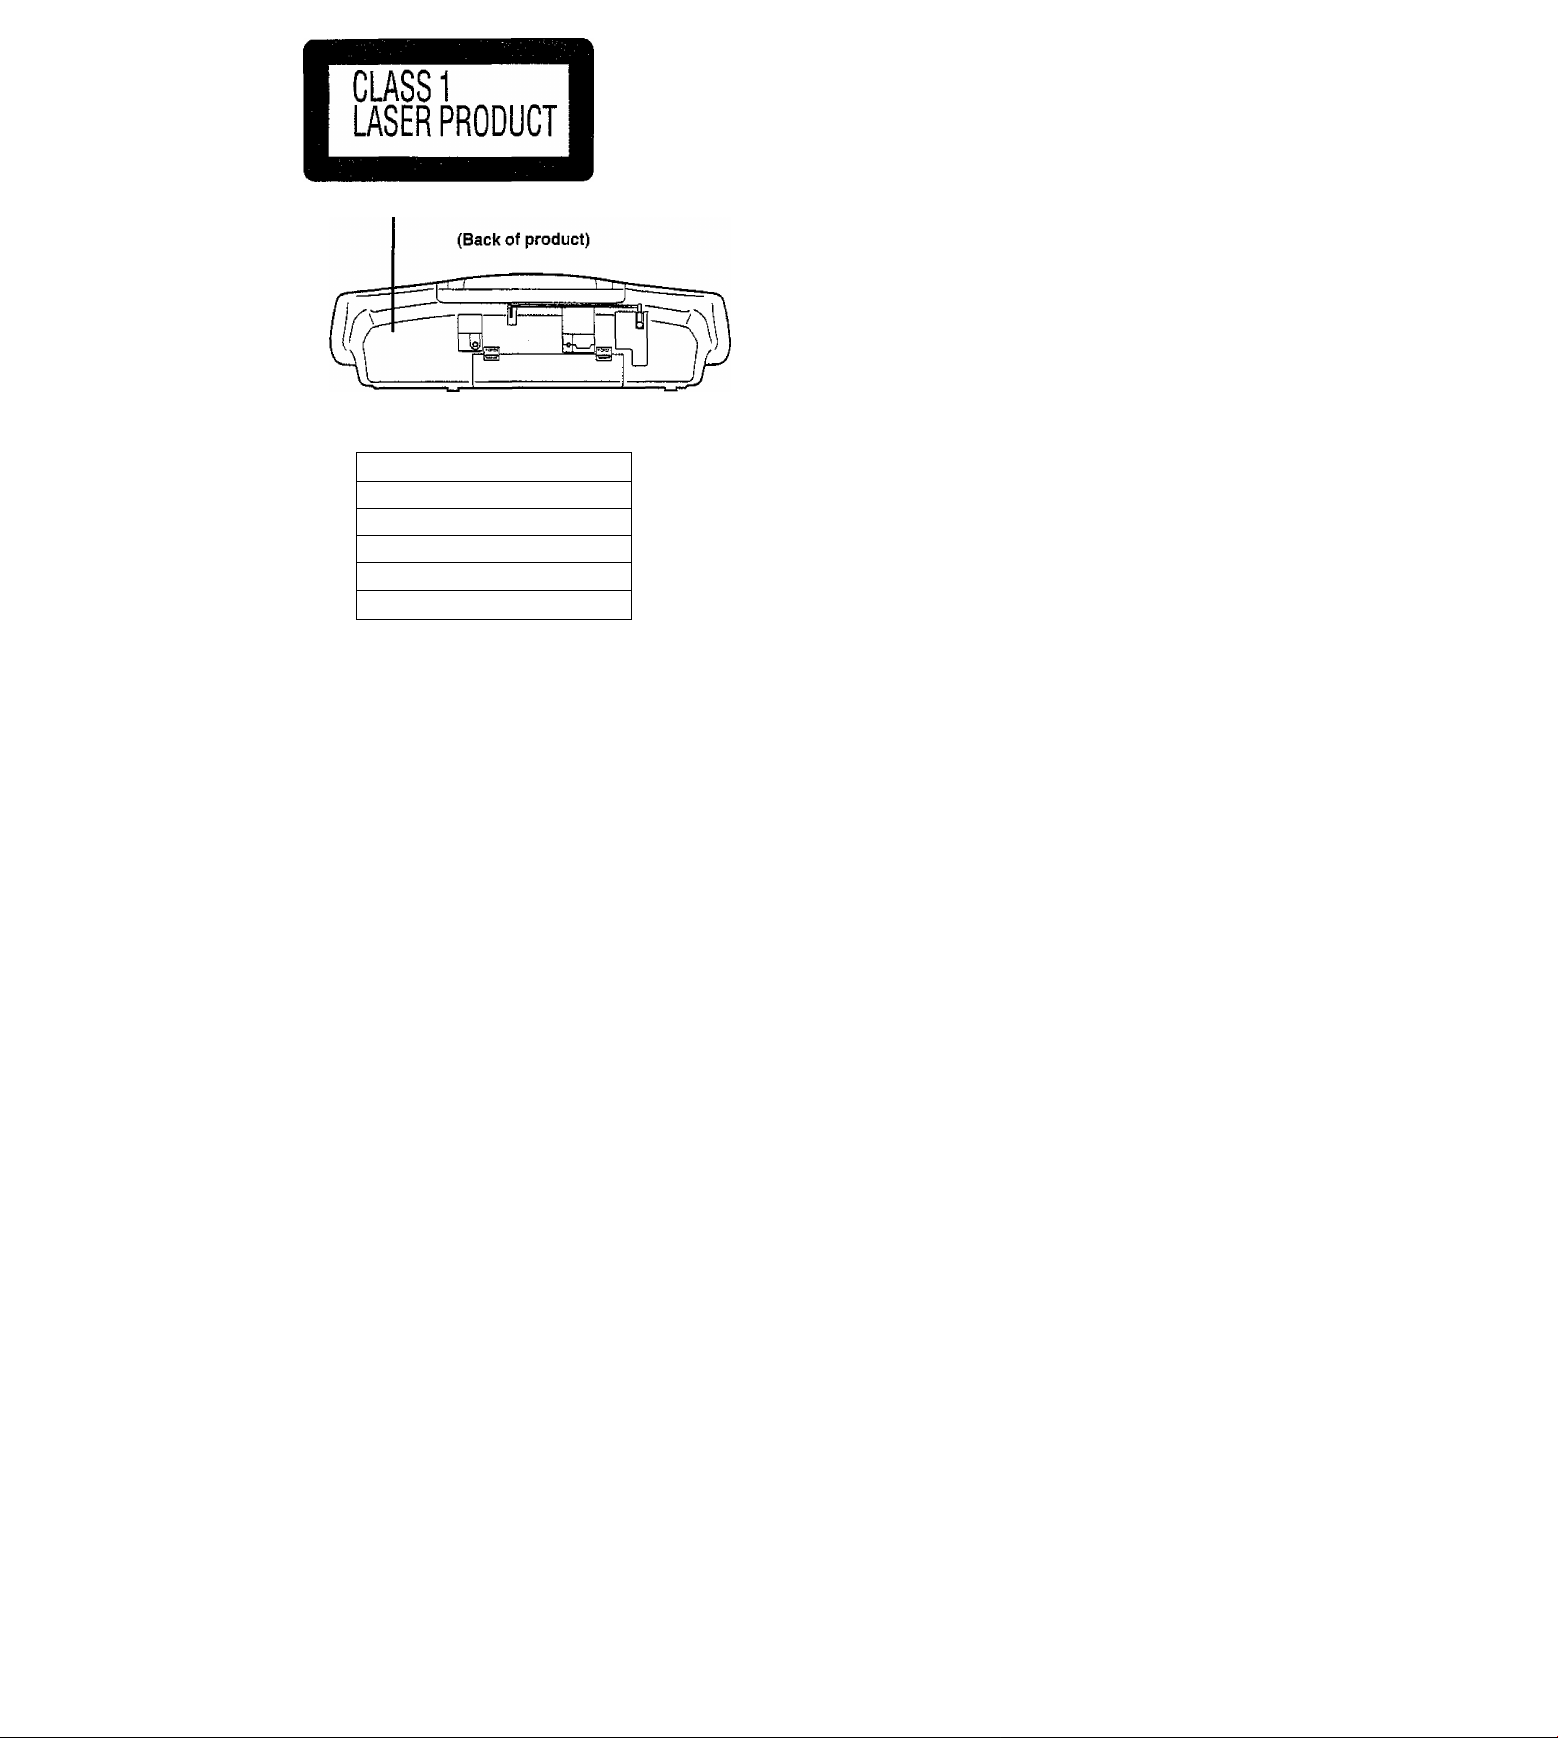
INVISIBLE LASEfI HADlATiON WHEN OPEN.
DAKGER
AVOID DIRECT EXPOSURE TO BEAM.
DStNLIG uaEflSTBAUttG'iO iEtUNG. Ш SIKKffiHEDSAFBRTDEflE
AOVARSEL
ШЖЛРЕВШЮН. DNDGAtIDSfItELSEFORSrnALING.
AVATTAESSA JA SUdJALUKlIUS OHITETTAESSAOIETAITTIW
VARO!
HAKVMATflHTA LASEflSATEILVLI.E AURATSO SA7EESEEH.
OSYMUG LASERSIFAENIMG МАЯ DENNA Da АЯ OPPWAO OCH
VARNING
SPARRfflAfltlRKOPPUO. BFRAKrAEJSTRiLEN.
USYHLIG LASEftSMLINGtiAR DEKSEL APNES OG SIKKEFHEOStAS
ADVARSEL
ВРШ. UNNGAEKa>tWfflNGFORSniAL£rt.
JNSICHTBARELASERSTRAHUNG, WENN ABDECKUHG GEOmiEI.
VORSICHT
rCHTOEMStflAKLAiliSEliEN.
For areas except United Kingdom, Australia and New Zealand:
(Inside of product)
(Indersiden at apparate!)
(Tuotteen sisällä)
(Apparatens insida)
(Produktets innside)
Orn Inneren dee Gerätes)
CAUTION;
The AC voltage is different according to the area.
Be sure to set the proper voltage in your area before use.
(For details, please refer to the page 5.)
Dear customer
Thank you for purchasing this product.
For optimum performance and safety, please read these operating
instructions carefully.
Table of Contents
Before use
Caution for AC Mains Lead ....
Precautions
Supplied Accessories
Power Sources..............................
Location of Controls
Concerning the Remote Control
Opening/Closing the Top Panel
Using Headphones
Setting Clock ...............................
Selecting the Display
Listening to Cassettes ...
Listening to the Radio
Listening to CDs
Changing the Sound Quality
Preparation for Recording ...
Recording Radio Programs
Recording from CD
Recording Tape to Tape ..
...................................
Listening
Recording
..................
....................
.....................
..................
____
................
.............
.
10
12
14
.17
.18
19
20
23
CAUTION!
THIS PRODUCT UTILIZES A LASER.
USE OF CONTROLS OR ADJUSTMENTS OR PERFORM
ANCE OF PROCEDURES OTHER THAN THOSE SPECI
FIED HEREIN MAY RESULT IN HAZARDOUS RADIATION
EXPOSURE.
DO NOT OPEN COVERS AND DO NOT REPAIR
YOURSELF, REFER SERVICING TO QUALIFIED
PERSONNEL.
CAUTION!
DO NOT INSTALL OR PLACE THIS UNIT IN A
BOOKCASE, BUILT IN CABINET OR IN ANOTHER CON
FINED SPACE IN ORDER TO KEEP WELL VENTILATED
CONDITION. ENSURE THAT CURTAINS AND ANY
OTHER MATERIALS DO NOT OBSTRUCT THE
VENTILATION CONDITION TO PREVENT RISK OF ELEC
TRIC SHOCK OR FIRE HAZARD DUE TO OVERHEATING.
WARNING:
TO REDUCE THE RISK OF FIRE, ELECTRIC SHOCK OR
PRODUCT DAMAGE, DO NOT EXPOSE THIS APPLIANCE
TO RAIN, SPLASHING, DRIPPING OR MOISTURE.
Timer
Using Play Timer
Using Recording Timer
Using the Sleep Timer .
............
General information
Using an External Unit...........................................
Concerning Compact Discs....................................
Concerning Cassette Tapes
Quick Reference of Remote Control Operations
Maintenance of external surface
Troubleshooting Guide
Teclmical Specifications ......................................
...................................
............................
.........................................
.24
.26
.28
.29
.30
.31
.32
.33
.34
.35
Page 3
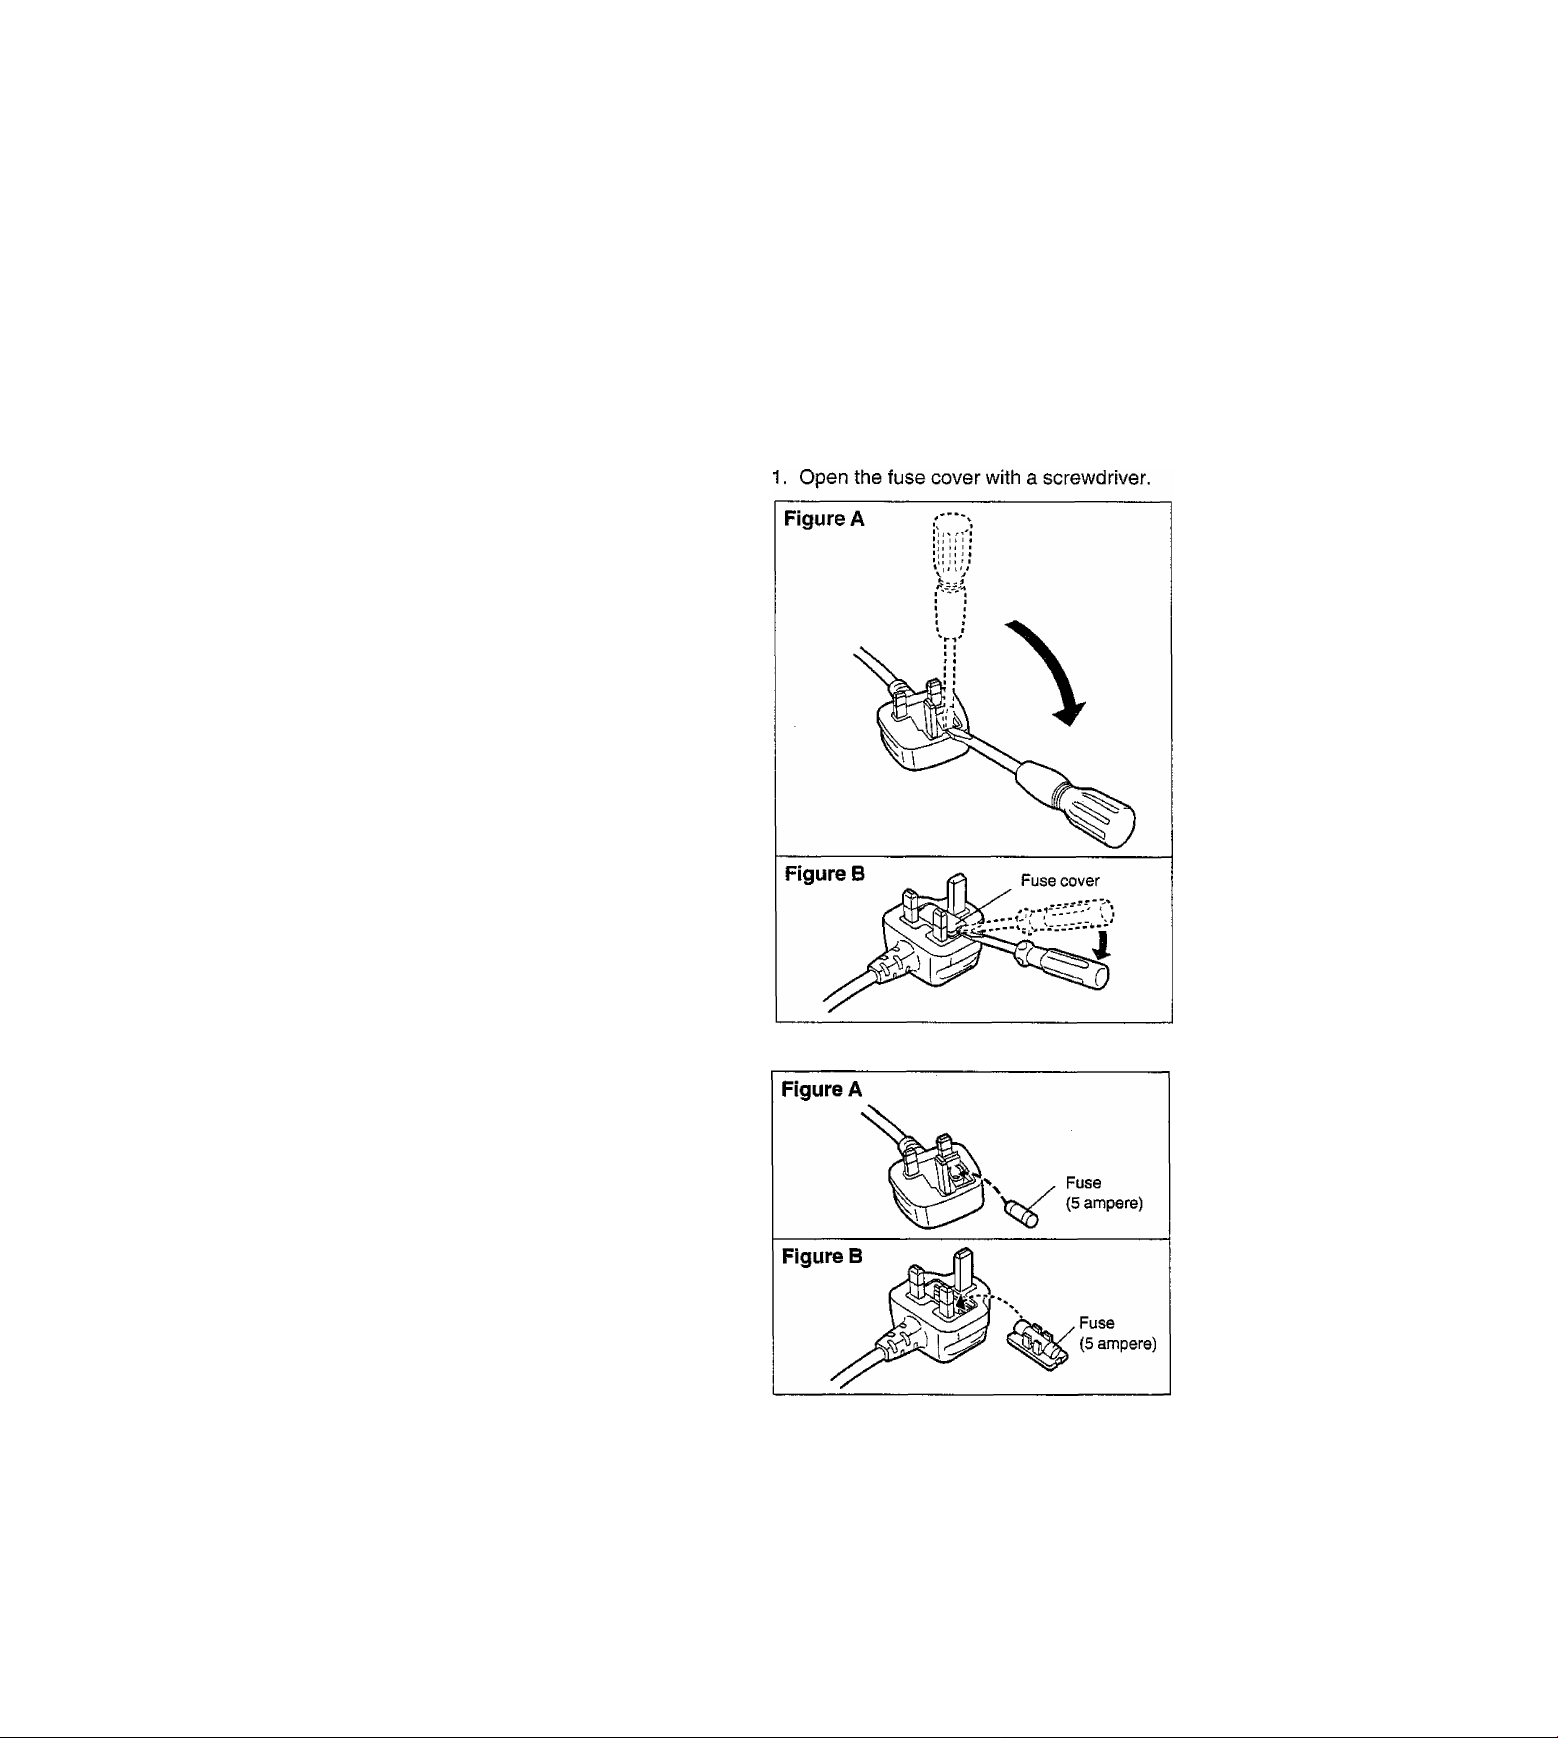
Caution for AC Mains Lead
(For United Kingdom)
{“EB" area code model only)
For your safety, please read the following text carefully.
This appliance is supplied with a moulded three pin mains plug for
your safety and con\'enience.
A 5-ampere fuse is fitted in this plug.
Should the fuse need to be replaced please ensure that the replace
ment fuse has a rating of 5-ampere and that it is approved by ASIA
or BSI to BS1362.
Check for the ASIA mark or the BSI mark ^ on the body of the
fuse.
If the plug contains a removable fuse cover you must ensure that it is
refitted when the fuse is replaced.
If you lose the fuse cover the plug must not be used until a replace
ment cover is obtained.
A replacement fuse cover can be purchased from your local dealer.
CAUTION!
IF THE FITTED MOULDED PLUG IS UNSUIT
ABLE FOR THE SOCKET OUTLET IN YOUR
HOME THEN THE FUSE SHOULD BE RE
MOVED AND THE PLUG CUT OFF AND DIS
POSED OF SAFELY.
THERE IS A DANGER OF SEVERE ELECTRI
CAL SHOCK IF THE CUT OFF PLUG IS IN
SERTED INTO ANY 13-AMPERE SOCKET.
WARNING; DO NOT CONNECT EITHER WIRE TO THE
EARTH TERMINAL WHICH IS MARKED WITH THE LET
TER E, BY THE EARTH SYMBOL ^ OR COLOURED
GREEN OR GREEN/YELLOW.
THIS PLUG IS NOT WATERPROOF—KEEP DRY.
Before use
Remove the connector co\'er.
How to replace the fuse
The location of the fuse differ according to the type of AC mains plug
(figures A and B), Confirm the AC mains plug fitted and follovi the
instructions below.
Illustrations may differ from actual AC mains plug.
If a new plug is to be fitted please observe the wiring code as shown
below.
If in any doubt please consult a qualified electrician.
IMPORTANT
The wires in this mains lead are coloured in accordance with the
following code:
Blue; Neutral, Brown: Live.
As these colours may not correspond with the coloured markings
identifying the terminals in your plug, proceed as follows:
The wire which is coloured Blue must be connected to the terminal
which is marked with the letter N or coloured Black or Blue.
The wire which is coloured Brown must be connected to the terminal
which is marked with the letter L or coloured Brown or Red.
2. Replace the fuse and close or attach the fuse cover.
Page 4

Precautions m
•If this unit Is not used for a long period of time or is used only
from an AC mains, remove all the batteries to prevent potential
damage due to possible battery leakage.
•Avoid using or placing this unit near sources of heat. Do not leave
it in an automobile exposed to direct sunlight for a long time with
the doors and windo^vs dosed as this may deform the cabinet.
• Avoid cuts, scratches, or poor connections in the AC mains lead, as
the)^ may result in possible fire or electric shock hazard, Also,
excessive bending, pulling or splicing of the cord should be
avoided.
• Do not unplug the AC mains lead by pulling on the cord. To do so
may cause premature failure or shock hazard.
• Do not operate this unit on AC mains in a bathroom, as a potential
shock hazard may result.
• When not in use, disconnect the AC mains lead from the household
AC outlet.
Use: of batteries'
• Do not use rechargeable type batteries.
• Do not mix old and new batteries, or batteries of the different types
(manganese and alkaline, etc.).
• Always remove old, weak or worn-out batteries promptly and dis
pose of them properly.
• Never subject batteries to excessive heat or flame; do not attempt to
disassemble them, and be sure they are not short-circuited.
• If this unit is not to be used for a long period of time or is used only
from an AC power source, remove the batteries and store them in a
cool, dark place.
• If a battery leaks, remove all batteries and dispose them properly.
•Throughly dean the battery compartment before inserting new bat
teries.
• If the electrolyte comes into contact with skin or dothes, flush with
water immidiately.
•Keep batteries out of reach of children.
• Do not attempt to recharge alkaline or manganese batteries.
• Batteries installed with incorrect polarities may leak and damage
the unit.
In these operating instructions, "unit off" defined as the
following mode.
"Standby" when AC power is used.
"Battery power off" when batteries are used.
Supplied JUcessories
Please Check and identify the supplied accessories. E
® Remote control transmitter (EUR643826) ...................................Ipc
AC power cord
(¿) For United Kingdom: (RJA0038-U)
© For Australia and New Zealand: (RJA0035-A) ............................Ipc.
© For areas except for United Kingdom, Australia and
New Zealand: (RJA0019-1U) ....................................................Ipc.
® AC plug adaptor (Except for United Kingdom, Australia and
New Zealand)
© Batteries for remote control (Except for United Kingdom,
Australia and New Zealand)
Use numbers indicated in parentheses when asking replacement
parts.
..............................................................................
...........................................
.....................................................
Ipc.
Ipc.
2pcs.
Page 5
VOLTAGE,
SELECTOR
110127V
llJ b
110-127V
200*
22QV
200-220V
\ 230-
250V
230-250V
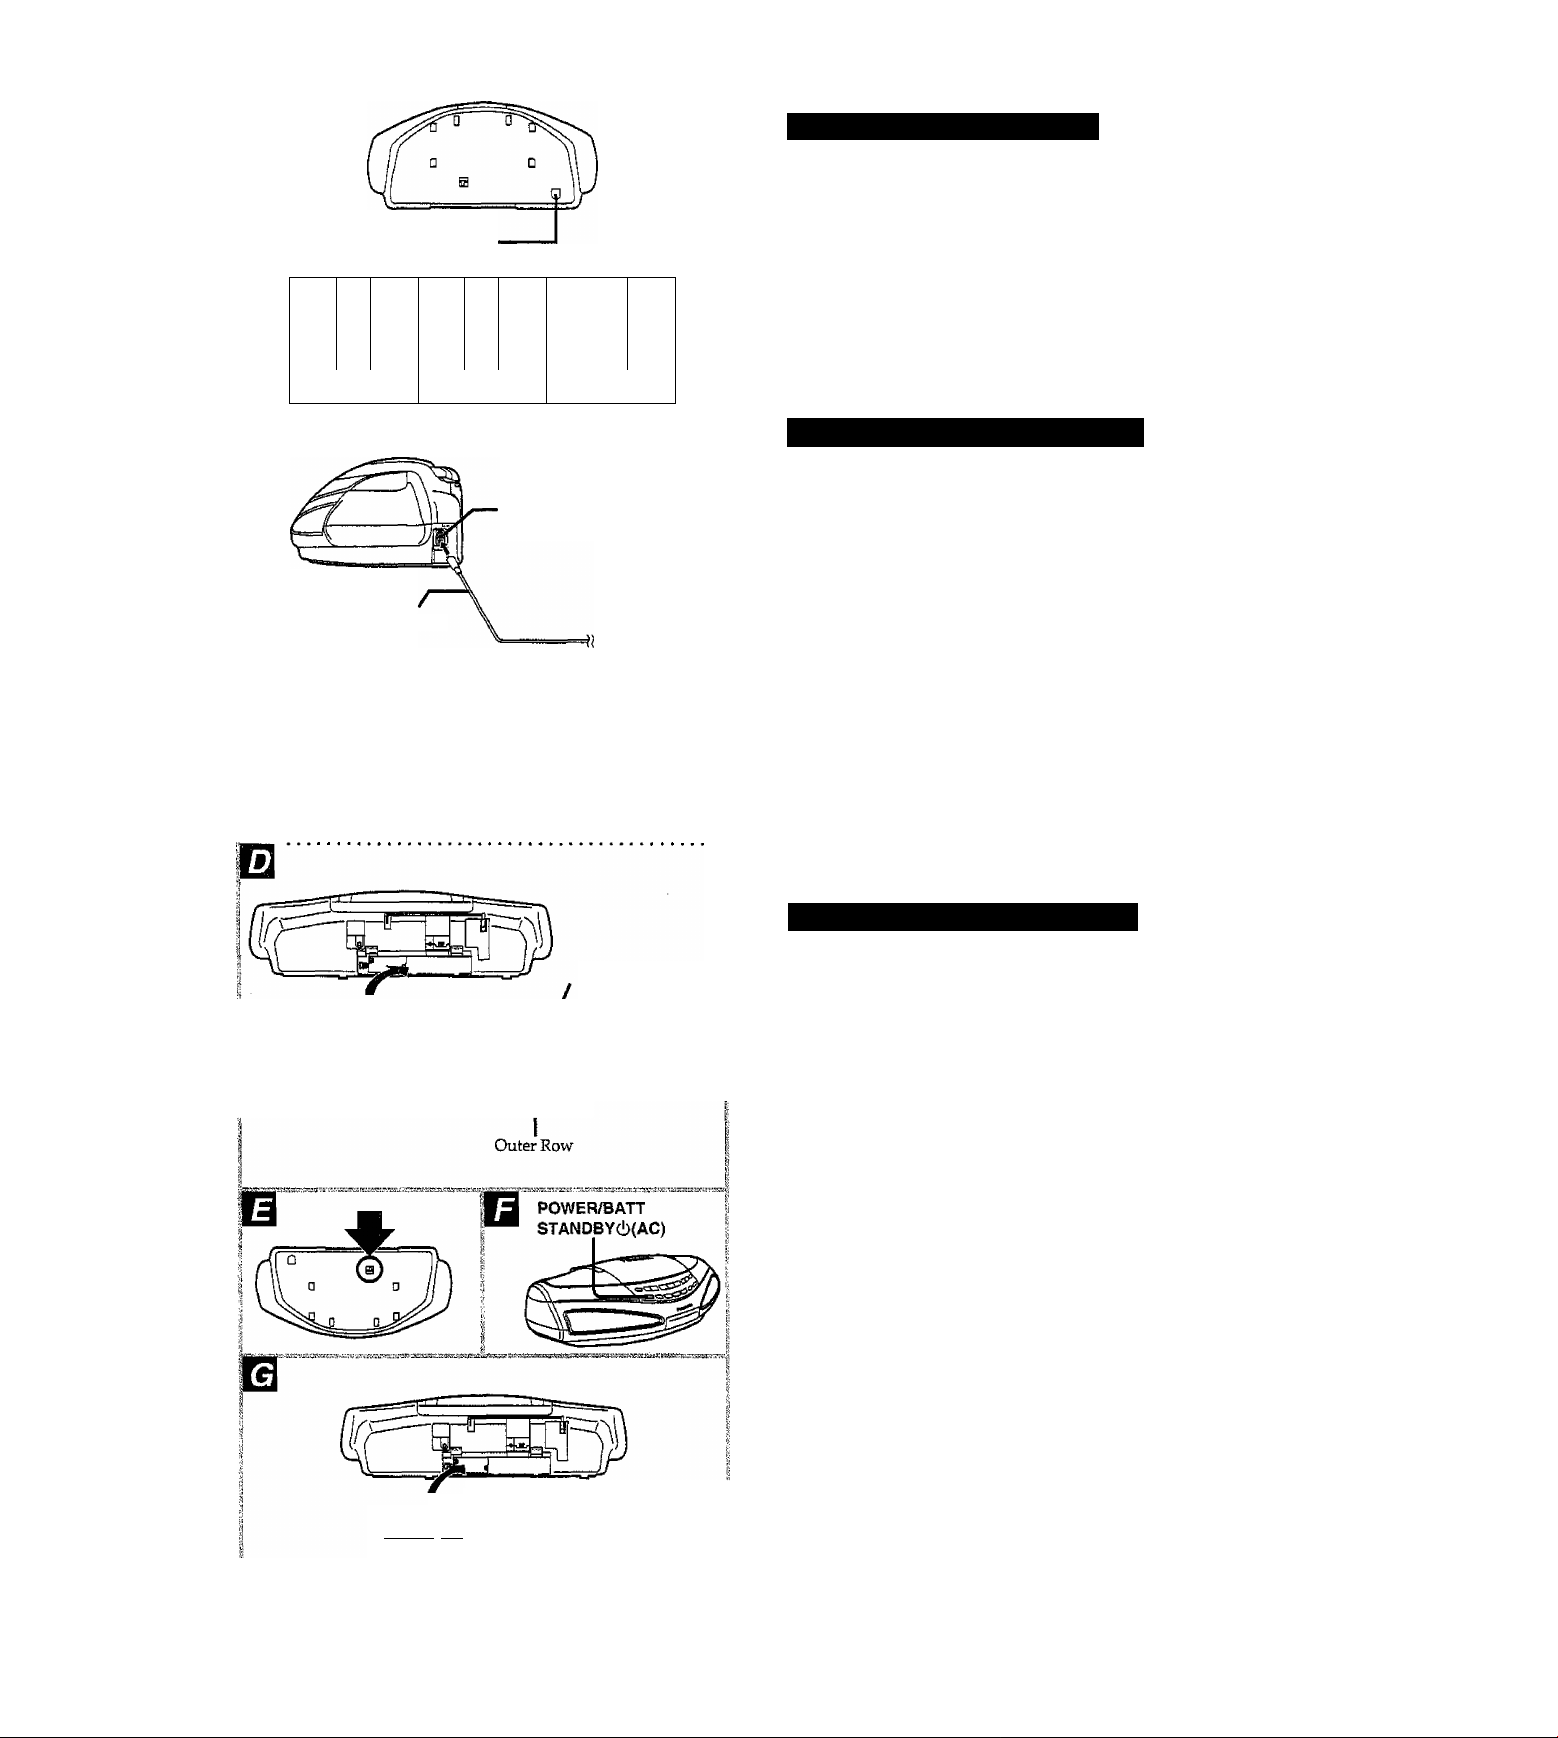
Power Sources
operating: un№ on ÀC power
For areas except United Kingdom, Australia and New Zealand:
Set the voltage. Use a flat-head screwdriver to turn the voltage selec
tor on the rear to the voltage settmg for the area in ivhich you udll be
using the system. 0
Connect the included AC power cable to the AC IN socket of the unit
and your household AC outlet. E
If the power plug will not fit your socket, use the power plug adaptor
(included) as illustrated, 0
M
Power Cable (Included)
R20/LR20 (D, UM-1)
3 4 5 2
ACIN-
To household^
AC outlet I
Inner Row
Opéràltînjgtù^^
Install memory batteries first.
Battery installation ond removal 0
Place unit on a soft cloth when installing and removing batteries to
avoid damaging the front panel,
(T) Open the battery cover on the rear panel.
Install batteries in the order indicated in the diagram.
Remove batteries by inserting finger into hole on the bottom of the
unit and pushing out. B
Battery life E
When the power/battery check/standby indicator goes off (or dims)
during play, replace all the batteries with new ones.
Mempry bdttiei;pes {iSlot^ ihcluded)
What is memory?
Memory is the information wltich can be programmed into the unit
such as:
•Time
•Timer programmiirg
•CD programming
• Radiostations
R6/LR6 (AA, UM-3)
0O~rO(n30
© 0ZjZD 0HIZD ©
If memory batteries are not used, the memory is cancelled at the
following times.
•In electric failures
•When the cable plug is removed from the AC outlet
•When, using batteries as the power source, cable is inserted into the
emit while disconnected from the AC outlet
Battery installation and removal 0
Press the negative end of the number 4 battery to remove batteries.
Replacing batteries
•The service life of these batteries is approximately one year.
To preser\'e the memory contents, connect the power cable to the
household AC outlet before replacing all the memory batteries with
new ones.
•When disconnecting the power cable, first turn the unit off by
pressing POWER.
The service life of the memory back-up batteries is reduced if the
power cable is disconnected from the household AC outlet with the
power still supplied.
Page 6
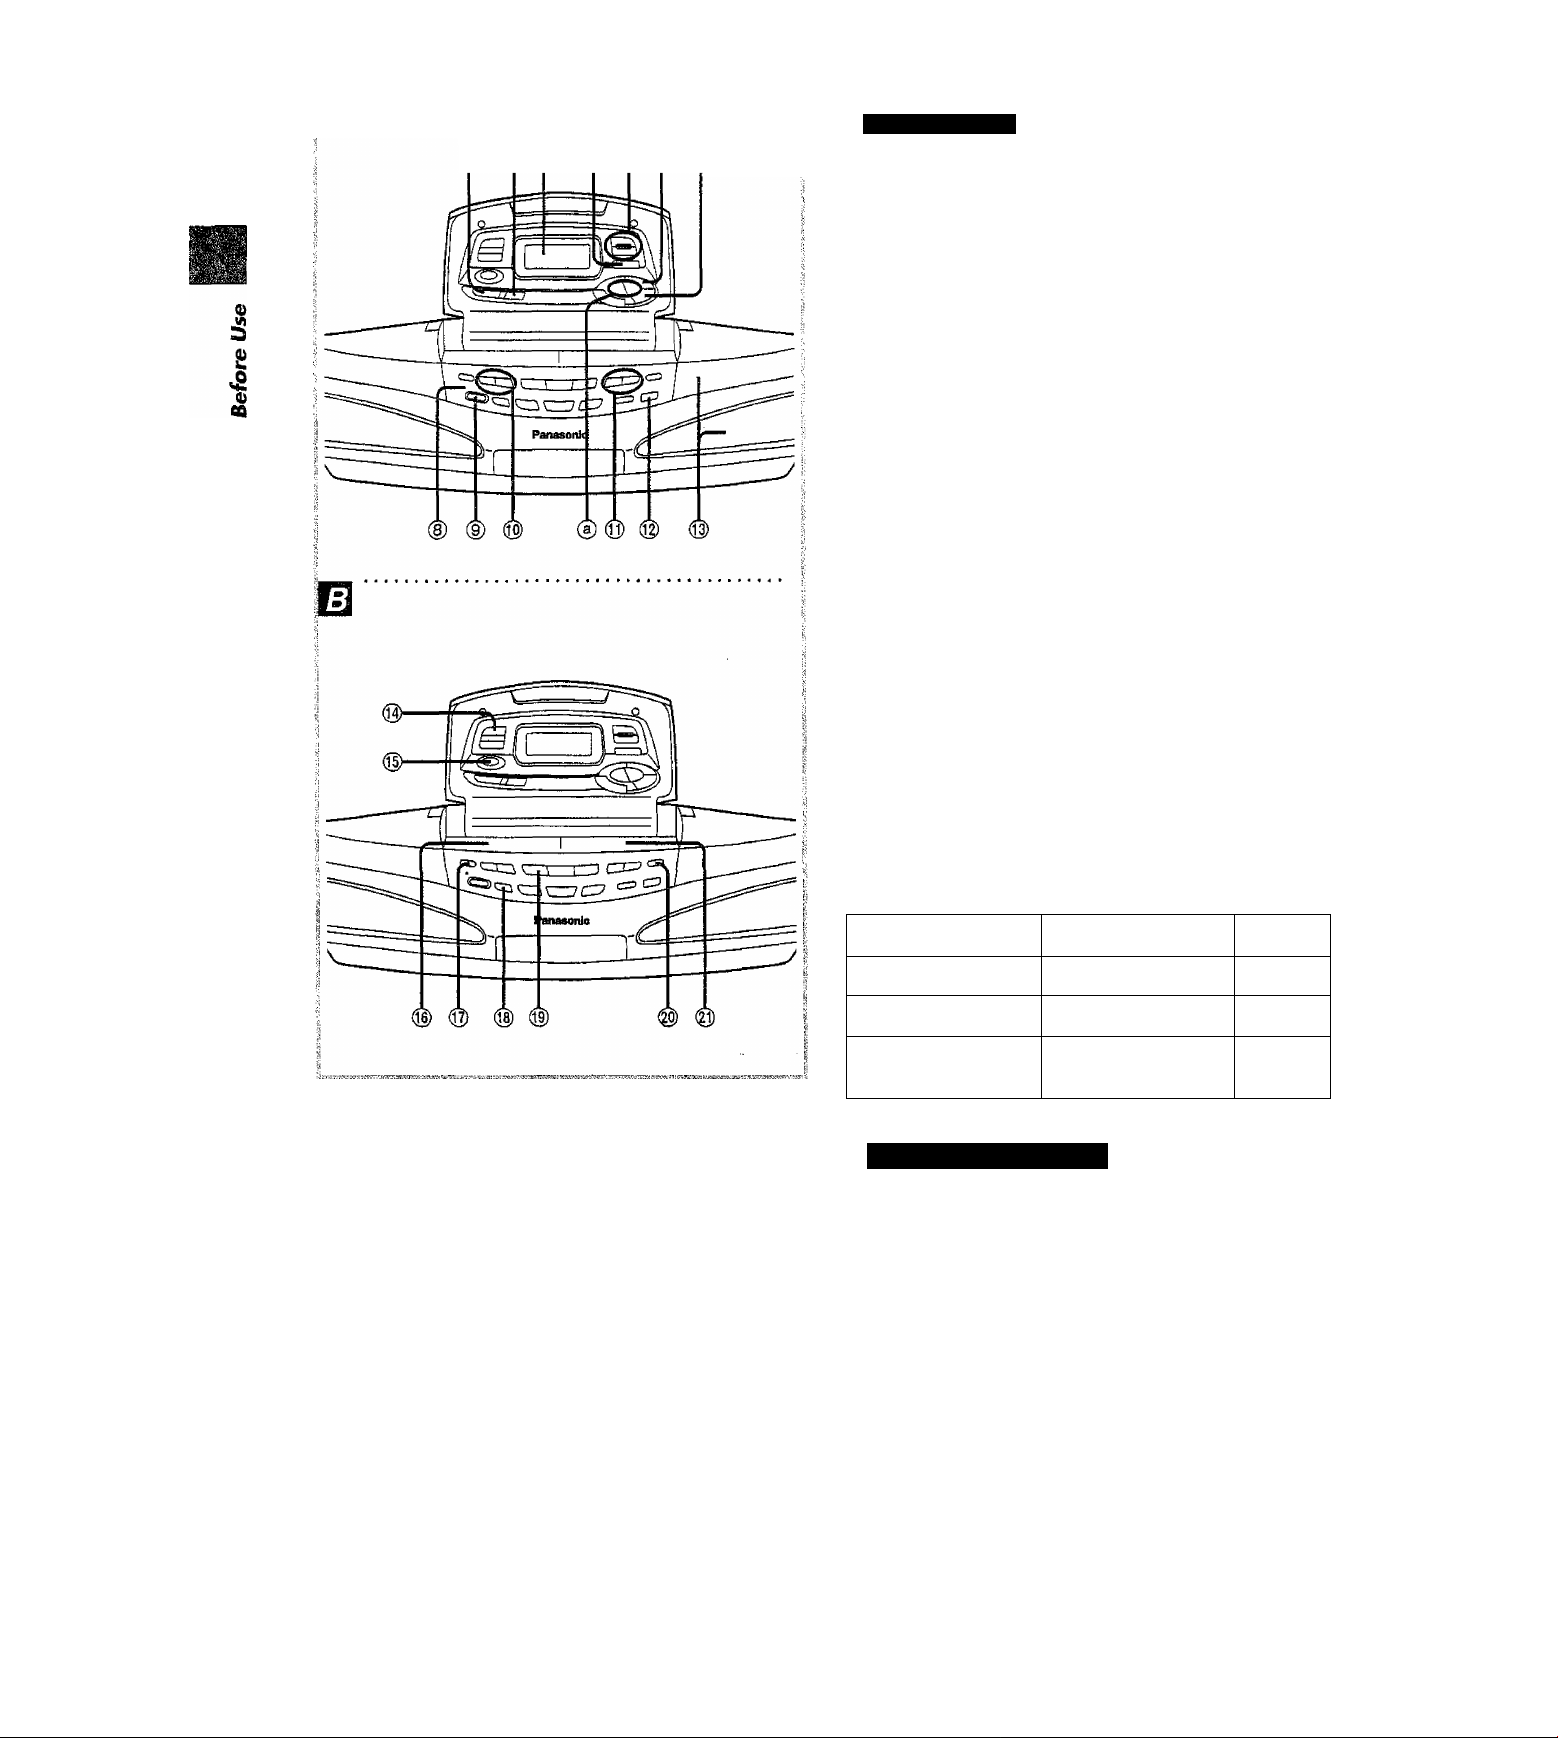
Location of Controls
m
© (2) (3) (4) (5) (6) ©
Number Designation Reference Page
(D Sound virtualizer button {S.VIRTUALiZER}
d) Preset equalizer button {PRESET EQ)
...........
............
17
(D Display panel
0 Recording timer programming button
(REC TIMER) ................................................... 26
0 Play timer programming button
(PLAY TIMER A, B).......................................... 24
0 Timer time adjustment button
(TIMER ADJUST)............................................24, 26
0 Clock time adjustment button
(CLOCK ADJUST)................................................9
0 Power/battery life check/standby indicator
[POWER/BATT, STANDBY <b (AC)]
The indicator lights green when the unit is turned on.
When the AC power supply is used, it functions as an AC connec
tion indicator. (The indicator colour changes to red when the unit
is turned off.)
When the unit is operated on batteries, it functions as a battery
check indicator. (See page 5.)
.................
.5
0 Power “STANDBY c!)” switch
[POWER/BATT, STAND BY (!) (AC)]
Press to switch the unit from on to standby mode or vice versa. In
standby mode, the unit is still consuming a small amount of
power.
® Volume control buttons (VOLUME +, —)
O Top panel open/close buttons
(TOP PANEL OPEN A, CLOSE ▼).....................8
® Remote control signal sensor (SENSOR)
® Speaker
..........
8
..............17
Button ® (—/ , +/►►!) functions change according to
the operation mode when pressed.
Mode
Time adjustnrent Setting time
Radio
CD
Function
Selecting station
Selecting tracks for
programming
Cassétte: d controls
Page
9
12
16
m
Number Designation Reference Page
® Tape edit button (TAPE EDIT)
...........................
23
® Record/record pause button
(•/• 11 REC/REC PAUSE)
...............................
19-23
© Deck 1
0 Deck 1 eject button (A DECK 1)
@ Deck1/2 select button (DECK 1/2)
....................
10
© Cassette play/direction button (*4 ► PLAY/DIR)... 10
0 Deck 2 eject button (A DECK 2)
........................
.10
@ Deck 2
Page 7
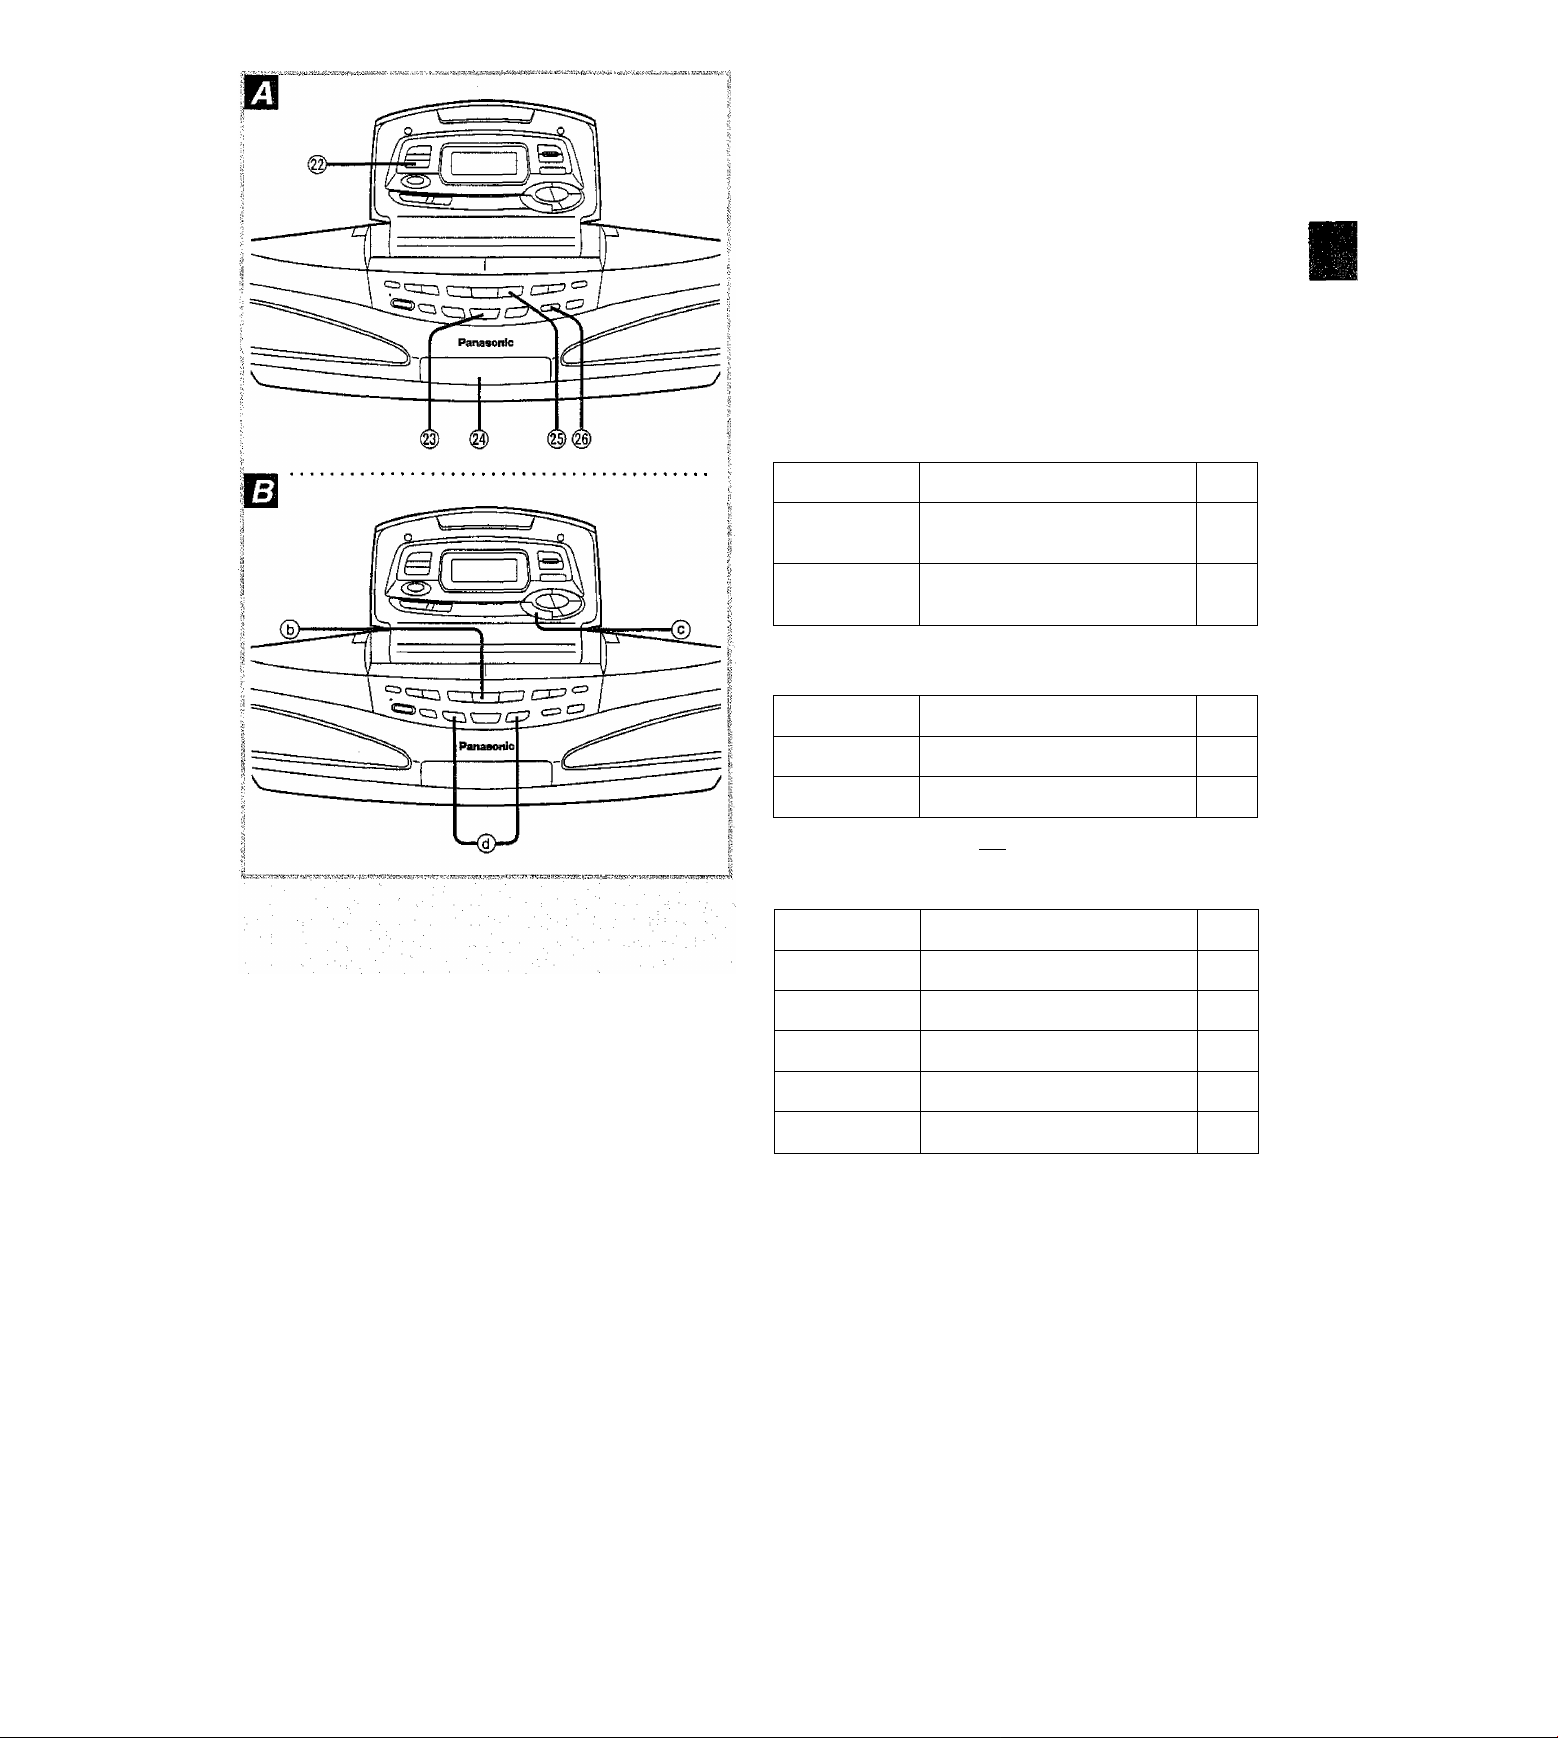
Location of Controls
Number
Designation
Reference Page
® CD recording mode button (CD REC MODE)... 21, 22
® Band button (BAND)
@ CD tray
..............................................................
@ CD play/pause button (►/H PLAY/PAUSE)
......................
...................
......
12
14
14
@ ^ CD tray open/ciose button
(A CD OPEN/CLOSE)
.........................................
14
m
Button (b) (■ STOP) functions change according to the
operation mode when pressed.
Mode Function
Tape play/
CD play
Tape stop/
CD stop
Stop play
Selects between CD and cassette
(each time it's pressed)
Button 0 («MEMORY/«CLEAR) functions change ac
cording to the way the buttons are pressed.
Press Function
Once
Program 16
Page
10
14
10
14
Page
Q)
to
£
Q)
Continuously
Cancel programming
16
Button ®(v/K^ REW rf^/CD. a/^N FF |Te1]/CD)func
tions change according to the operation mode when
pressed.
Mode Function
Tape stop
Tape play Retunr to the beginiung of the track
Radio
CD stop
CD play
Fast forward, rewind
Select preset station 13
Select track
Skip track, fast forward, rewind 14
Page
11
11
14
Page 8
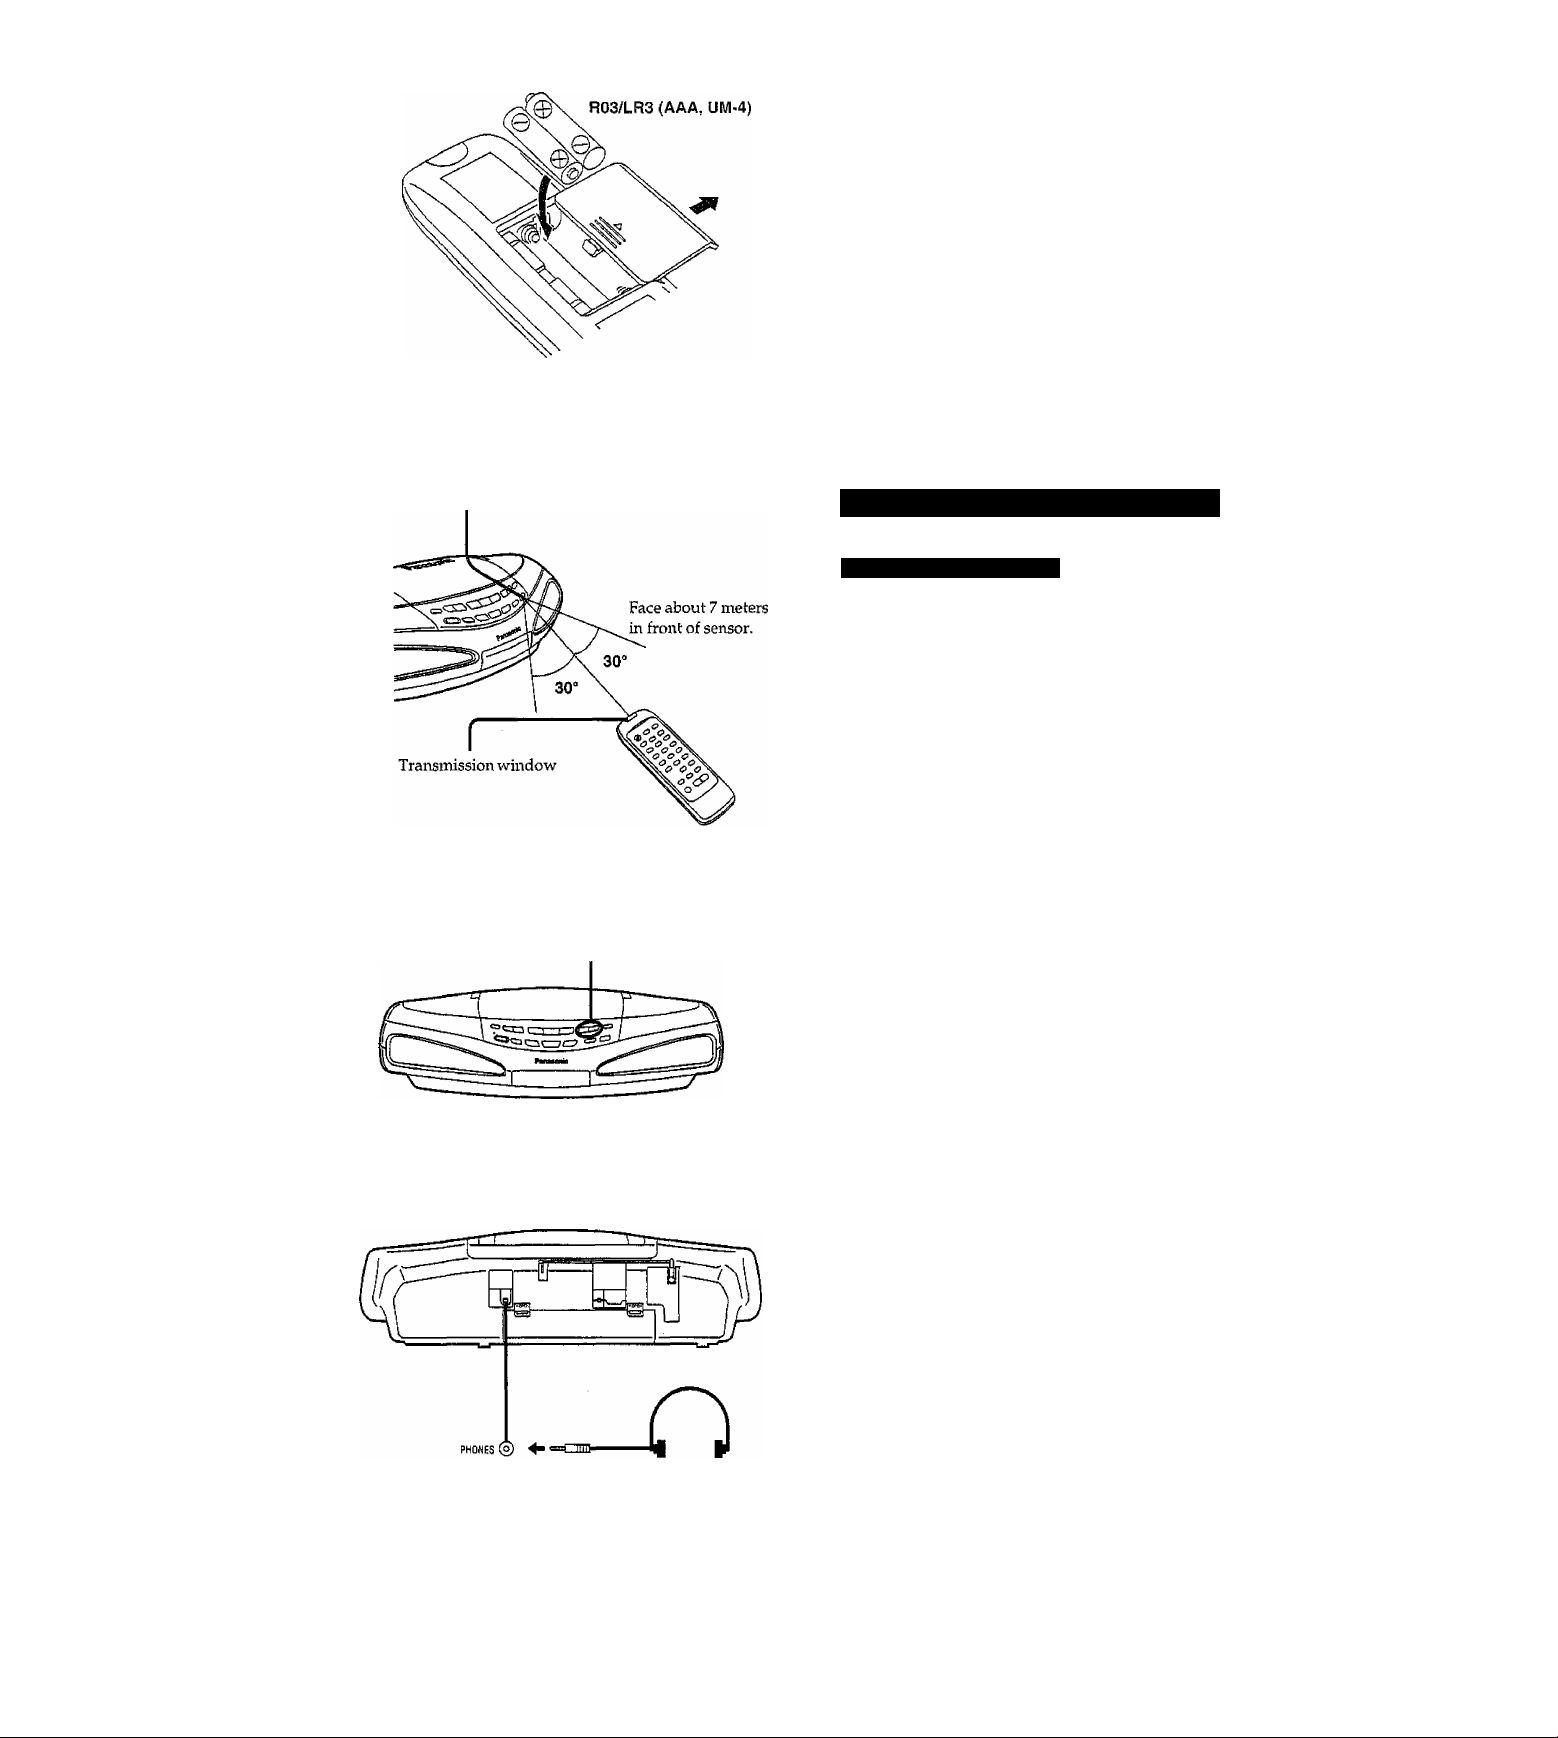
Concerning the Remote Control
Remove the batteries (included for areas except United Kingdom,
Australia and New Zealand) by pulling the positi\^e side of the bat
tery up.
4)
3
£
Q)
GQ
Remote control sigiral sensor (SENSOR)
CLOSET, OPEN A
Tire battery life is about one year.
Although the battery life ^’aries depending on how often the device is
used, the batteries should be replaced about once every year on the
average.
The batteries should be replaced if commands from the remote con
trol transmitter do not operate the uirit even when transmitter is held
close to the front panel.
í¿í;'(-ÍSarrí?cl^.nriethaaííoF'-üse%'i'":^^^^
• Do not expose the remote control signal sensor to direct sunlight or
bright fluorescent lighting.
• Keep the remote control signal sensor and end of the remote control
free from dust.
m
Opening/Closihg the Top Panel q
Press TOP PANEL OPEN A to open panel.
Press TOP PANEL CLOSE T to close the panel.
When this unit operated on battery power, the panel cannot be
opened or closed by pressing OPEN or CLOSE on the remote control
in the vmit off mode. Turn the unit on first by pressing POWER on the
main unit before opening or closing the panel.
Do not put cmy object on the top panel to prevent it would fail
inside the unit. It might be cause of fire or trouble.
Using Headphones m
Lower the volume and connect the headphones (not in
cluded).
Plug type: 3.5 mm stereo
Avoid listening for prolonged periods of time to prevent hearing
damage.
Page 9
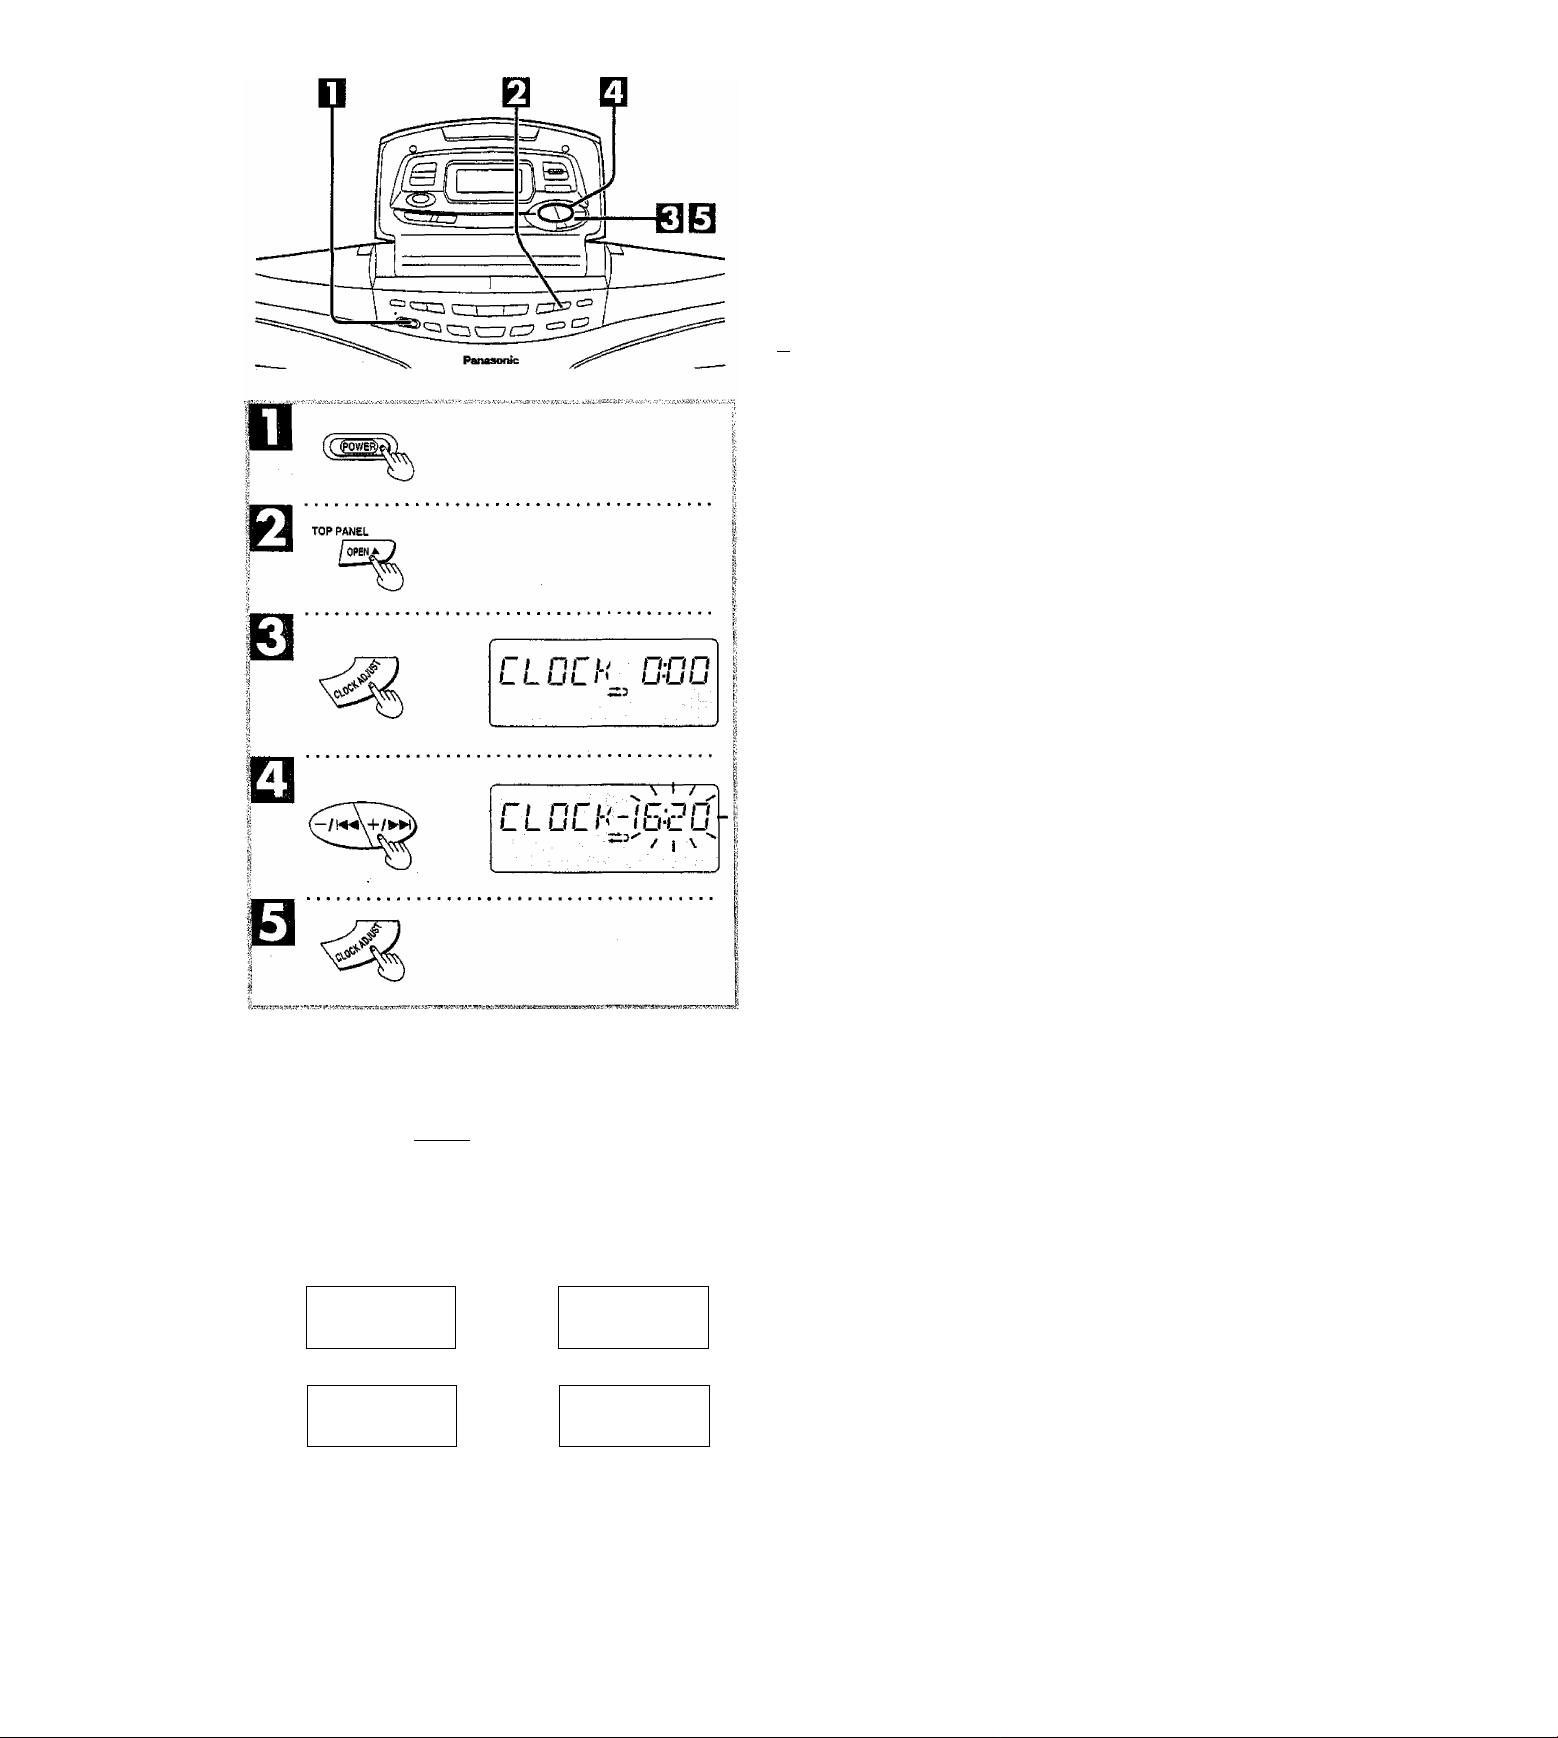
Setting the Clock
The clock has a 24-hour display.
Example; Setting the clock to 16:20;
Press POWER.
(This turns the unit on.)
Q Press TOP PANEL OPEN A to open top panel. E] Press CLOCK ADJUST.
"CLOCK" is displayed.
d Press +/>-H or —f\« to show desired time.
The time display can be changed in one minute units by tapping
the buttons, and quickly by holding down the buttons.
O While the time display is flashing;
Press CLOCK ADJUST.
The clock now starts operating, and the display returns to its
original status.
To display the clock (When the unit is on): Q
(Available only from the remote control)
Press DISPLAY when the unit is on.
Selecting the PIsplay B
(Only from the remote control)
Press DISPLAY when the unit is on.
The display changes each time the button is pressed.
•When using the cassette
® Tapecounter
(¿) Present time
I
0)
£
0
BQ
©
THPE IBP"
©
L O 3 i-U J
t
TZIT
0 O C3-
o o o
o o o
o o o
o o o
irr-^
■DISPLAY
©
TRPE IB-EO
I"“ -J
L O
®
TRPE iB'-i
¡¡¡a ■
IB^ED
• When using the radio or CD
© Frequency/play status
(^ Present time
® Tapecounter
"
------------
has not been inserted.
" appears on the tape counter display when a cassette
Page 10
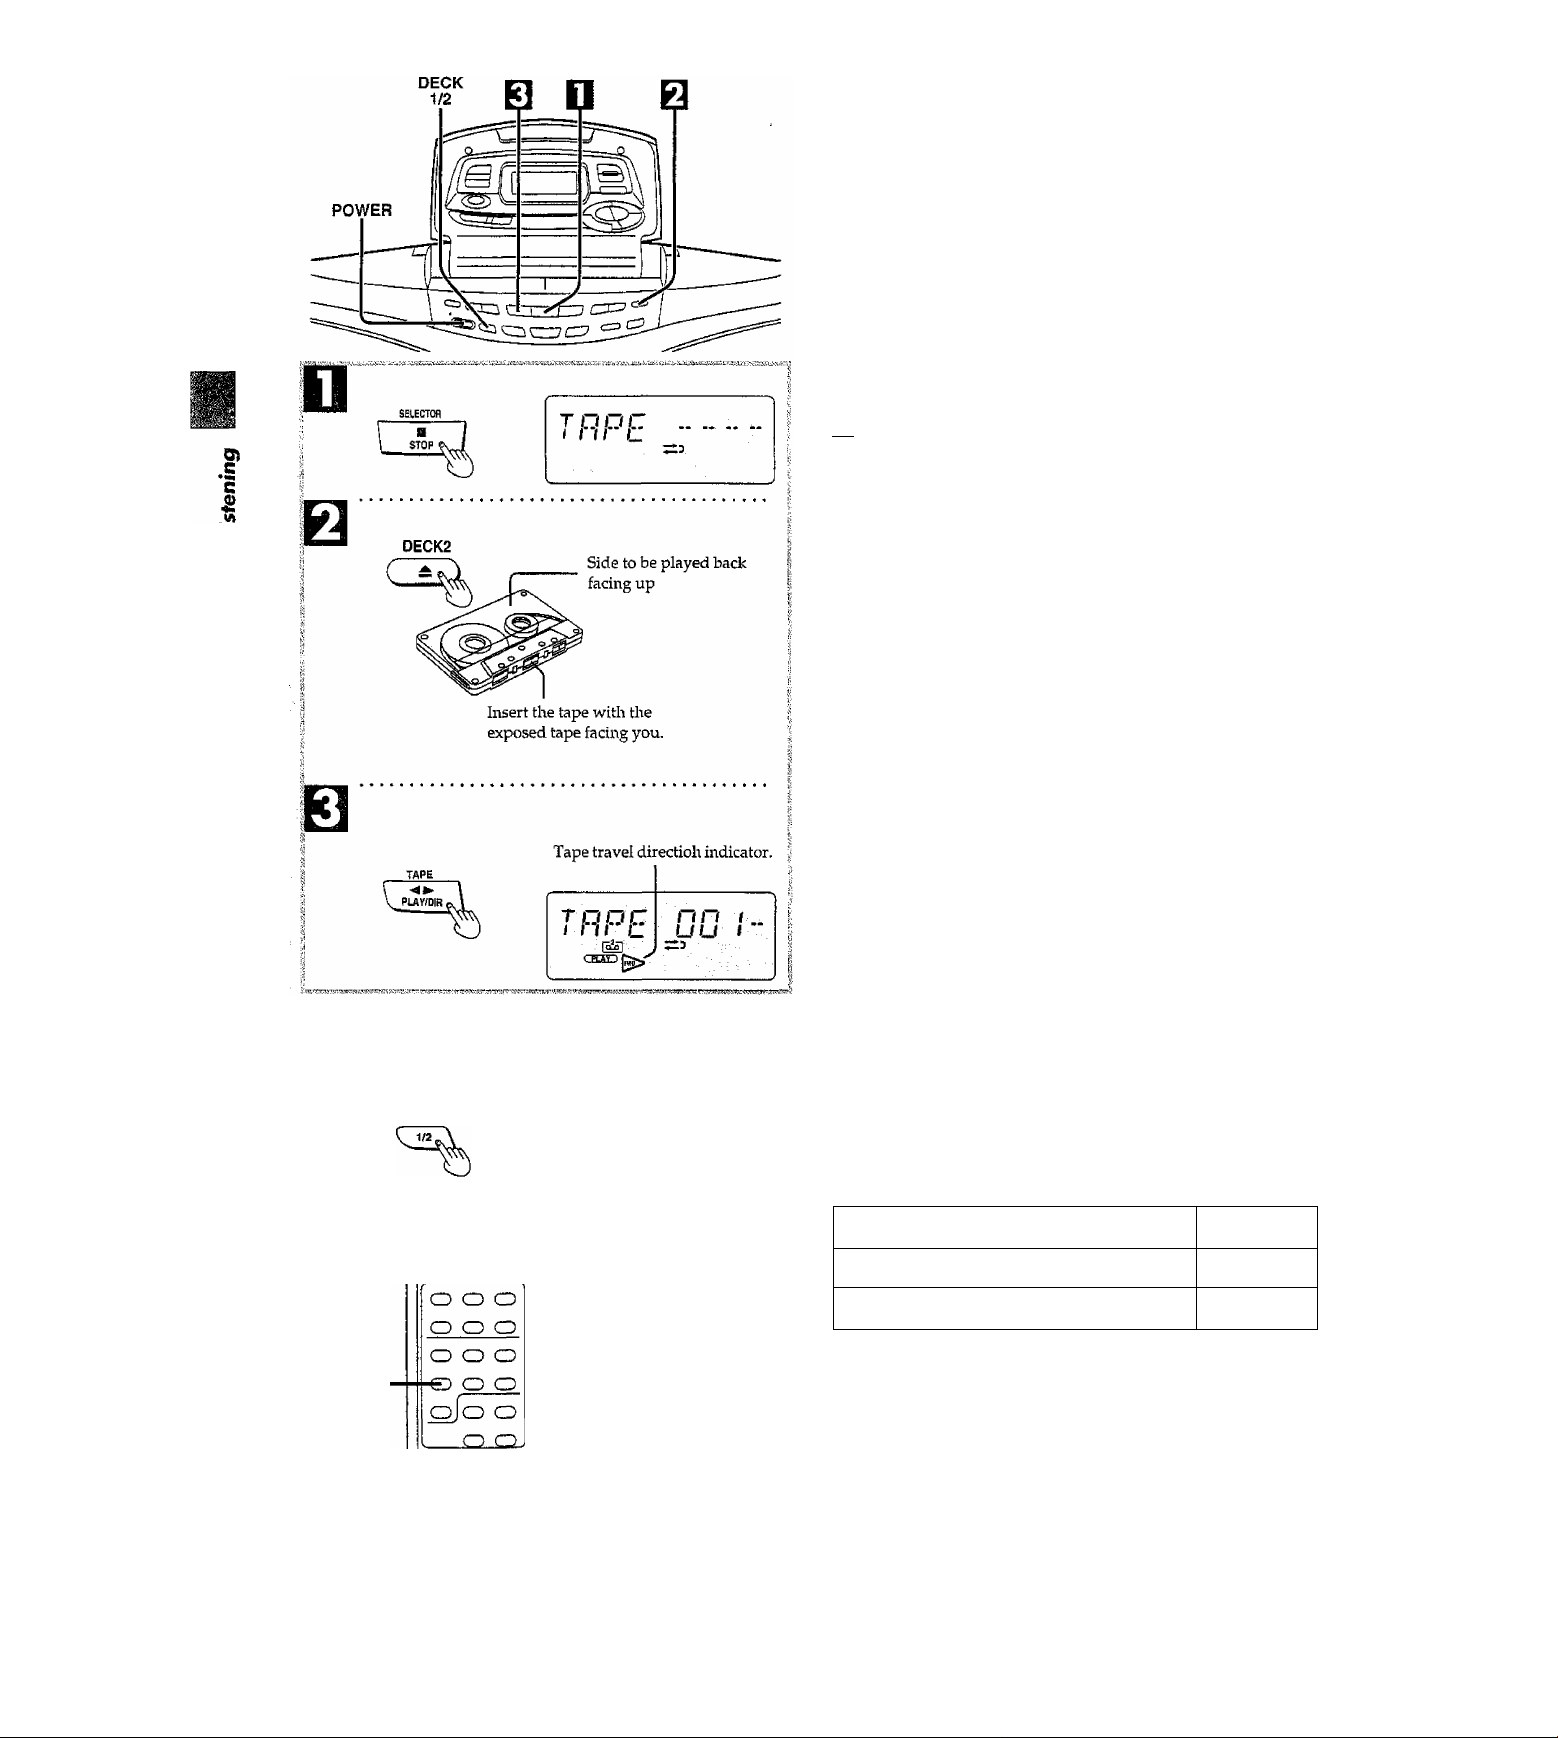
Listening to Cassettes
Tapes can be played back either deck 1 or deck 2,
Normal, high position and metal tapes can be used.
Press POWER.
(Only when the batteries are used for the poi\-er supply)
Press ■ STOP to select the cassette mode.
CD^TAFE
(The display changes each time the button is pressed.)
Q Press DECK 1 ^ or DECK 2 A, load the tape
and close the lid.
The direction is automatically set to play the top side {is
displayed).
|cl Press ◄ ►.
"FWD" is displayed and play begins. ("REV" is displayed when
play begins while is displayed.)
j^; Tlie side which is facing up is played back.
<3: The reverse side is playback.
To stop play:
Press B.
* •
The deck corresponding to the lighted
deck indicator (1 or 2) can be operated.
T О О C П П n
I n I L. UUU.
To listen to the other side of the tape:
Press ► during playback.
Pressing M ► automatically turns the unit on, and if a tape is in
serted, begins play (only when AC power is supplied).
Changin9 the operation deck
The deck loaded last is automatically selected.
Press DECK 1/2 to select deck 1 or 2. E!
• When one deck is fast forwarding or rewinding and tlie other is
selected and play begun by pressing -4 ►, fast forwarding or
rewinding stops.
• When one deck is playing and the other is selected and a/ ►>! or
v/ K4 pressed, play stops.
To reset the tope counter to "000"
(Available only from the remote control)
Press C-RESET. E
Types of tapes which can be played on this unit:
The unit automatically identifies type of tape.
C-RESET-
C-RESET
%
трас
till и
i' j: i
“3
П П П
и и LJ _
Normal posiHon/TYPE I
High position/TYPE II
Metal position/TYPE IV
0
о
о
Page 11
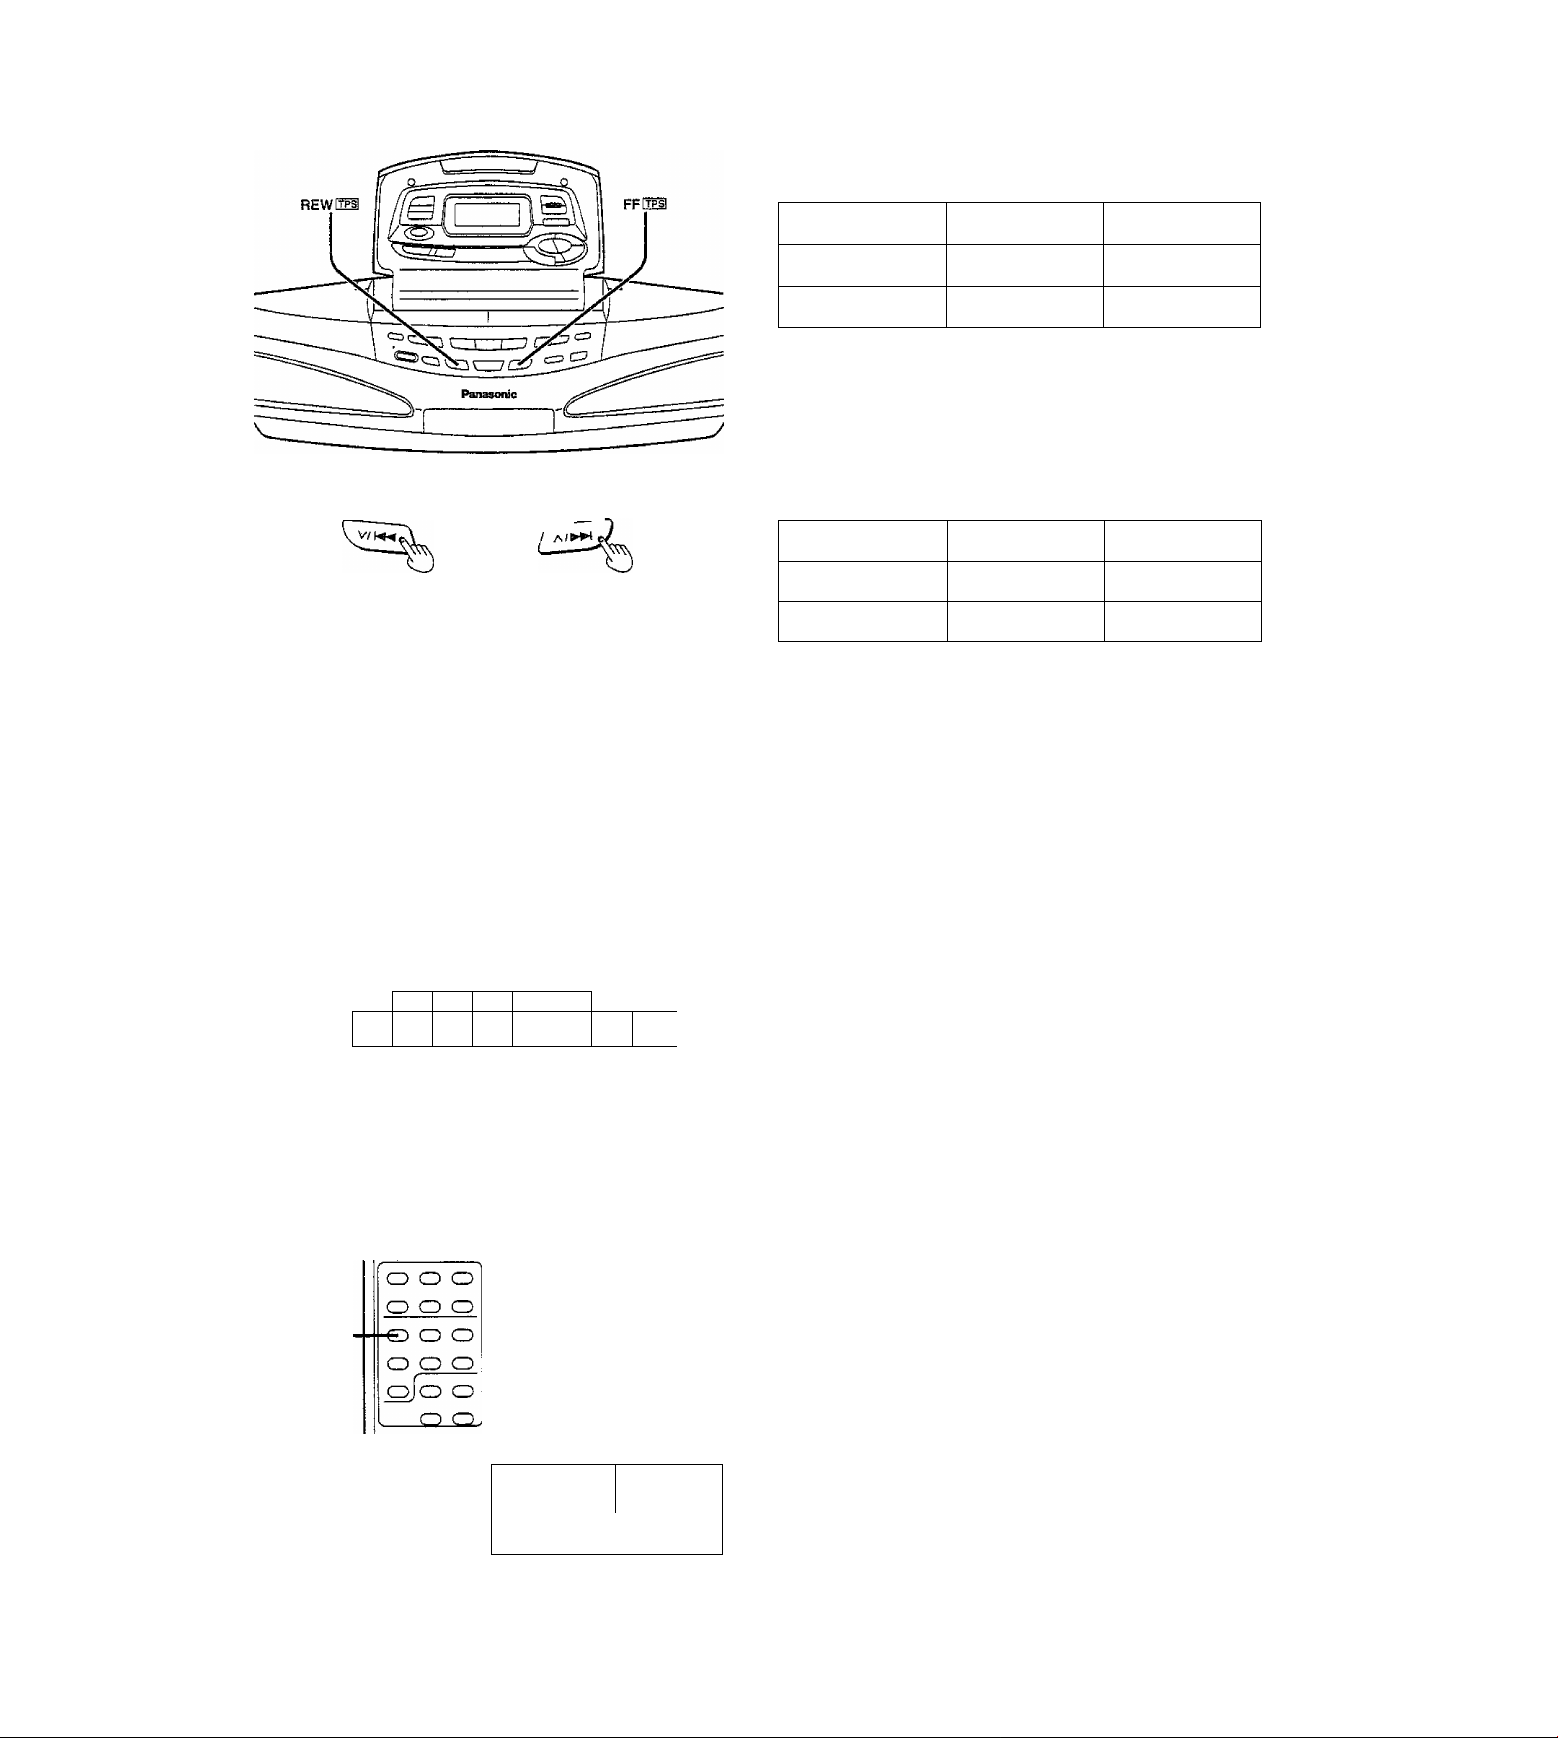
Ustening to Cassettes
Fast forwarding and rewinding a cassette
Press FF
mode.
or REW [TPS] when cassette is in stop
REWI^/CD
1 2 3 4 a
I Play from this point
Current track
3 2 1
Main unit
Remote control
Rewind
v/
REW [TPi
Fast foriv ard
a/^W
FF iTPlI
Finding the beginning of a track (TPS: Tape Program Sensor) B
Press the button once for each track to be skipped (up to
9 tracks).
Press during play mode.
Backward Forward
Main unit v/ ]-^-4
Remote control REW [TPi FF [TPi
►Since the blank spaces between tracks are used for locating the
begining of each track, the TPS function may not operated in the
following cases:
When the blank spaces aré 4 seconds or less.
When there are no blank spaces on the tape (such as when the
recording has been made from a microphone, etc.).
When there are parts of a track which have been recorded at a
particularly low level or which have not been recorded at all (such
as with classical music).
When 10 or fewer seconds untÜ elapsed since the begining of a track
or when there are 10 or fewer seconds until begining of the next
track.
Number of times the
button is pressed
2 3
-
7
«
When a tape is recorded with fade-ins or fade-outs.
►When you press ► to start playback on one deck during fast
forwarding or rewinding on another deck, fast forwarding or re
winding will be stopped.
Selecting the reverse mode
(Available only from the remote control)
a/^H
0}
c
I
-Wt
P'
REV MODE-
flEVMODE
d) c:^:> zZ Ì
t
___________
Reverse mode
rpor
Í 1 fi i_
n n n
uuu^
I Ì
Press REV MODE to select the mode, m
Tlte display changes each time the button is pressed. ©
The tape plays from the side facing up to reverse side, and
then it stops automatically.
The tape plays repeatedly until ■ (STOP) is pressed.
(When cassettes are inserted into both decks, both play contin
uously.)
Only one side of the tape is played, and then the tape stops
automatically.
To listen continuously to two tapes in succession:
1. Load tapes into deck 1 and deck 2.
2. Select the reverse mode iC^D)-
3. Select which deck is to start tape by pressing DECK 1 /2.
•
4. Press ► to start the tape play.
The tape plays from repeatedly until ■ (STOP) is pressed.
Page 12

TUNER
BAND
(a) LW MW FM
i
__________
listening to the Radio
Press POWER.
(Only wheiT the batteries are used for the power supply)
For United Kingdom:
Press BAND to display “LW”, "MW” or “FM”.
The display changes each time the button is pressed. 0
For areas except United Kingdom:
Press BAND to display “AM” or “FM”.
The display changes each time the button is pressed, 0
Q Press +■/►>] or “/ to select the station.
+ / : The frequency is increased.
— / ; The frequency is reduced.
Adjust the frequency until is displayed on the panel
(the display blinks or does not light when reception is weak).
Automatic tuning:
Keep + / or — / 1-^-^ depressed until the frequenc}'- display
starts to change. A station with good reception is automatically
I
selected and the selection process then stops.
To stop automatic timing, press + / or — / 1-4^ again.
® AM -- FM
C iwi
1 J (
C (tw
I I »
O ~iC n
D l-tu
QO in
OQ lU
*3
• Pressing BAND will automatically turn the unit on and receive the
broadcasts which is previously tuned (only AC power is supplied).
•The automatic tuning may stop without a station having been tuned
in when interference is encountered on neighboring airwaves. In
such a case, tune in a station by tapping + / or — / K4.
Adjusting tfie antenna
For FM reception: E3
Adjust the length and direction of the whip antenna.
For AM (LW/MW) reception; B
Adjust the direction in which the main unit is pointed.
For your reference:
Radio broadcasts may be hard to receive in a moving vehicle or
building because their signals are weak. In such cases, use the unit
near by a window.
For areas except United Kingdom:
AM allocation setting
Before receiving the AM broadcasts, be sure to select the correct
allocation setting (either 9 kHz or 10 kHz) according to your area.
\ ^ ✓
n t ( - b j (
JQ K'i
n M _3 3U
0 Press BAND to select FM. (g) Press and hold BAND for approximately 5 seconds.
The frequency display will be returned to the minimum fre
quency of the AM band and the display wtU begin to flash. Keep
holding for approximately 5 more seconds.
(3) When the display stops flashing and Indicates a differ
E
ent frequency number, release BAND. E
To return to the original frequency, repeat steps 1 to 3 above.
Page 13

o o o
o o o
oj^
-CHDJ
o o o
O OD
smwNO/BP
Listening to the Radio
When interference of FM stereo reception
o
ST/MONO/BP
c
i
,
lui
1 1
^3 gjlUH« 1 MBNfl 1
QO
DO.iniU
___
.
occurs fS\
(Available only from the remote control)
Set the sound to the monaural mode to reduce the noise.
Press ST/MONO/BP.
The i MONO I display appears.
The monairral sound is set but noises are reduced and sound become
dear.
To return to stereo sound, press ST/MONO/BP agaiir to turn off the
I ft/iONO I display.
Keep the I MONO I display off m usual and FKI stereo programs can
be heard as stereo sound.
Pres«t tuning
Once broadcast stations have been programmed, they can eas
ily be turned in.
Up to ten PM, AM (LW/MW) stations each can be programmed.
0)
.S
c
£
,J2
TUNER
Programming broadcast stations
(Available only from the main unit)
Preset radio stations on the FM, AM (LW/MW) band.
For United Kingdom:
Press BAND to display “LW”, “MW” or “FM”.
For areas except United Kingdom:
Press BAND to display “AM” or “FM”.
Q Press +/^ or —I to select the station, in Press »MEMORY once.
flashes.
Q While is flashing,
Press +/»| or -/«d to display the preset channel to be programmed.
Q While tdmt is flashing,
Press»MEMORY.
If the indicator goes during programming, return to
step 3.
Q Repeat steps 2 to 5 to program Other stations.
Selecting the preset channel
C
r t t
ÌM3
d
Blinijil
. C
O' "
Q O D n
u.t. u
For United Kingdom:
Press BAND to display “LW”, “MW” or “FM*
For areas except United Kingdom:
Press BAND to display “AM”or “FM”.
Q Select the preset channel. 0]
Down
Main unit
Remote control
v/M4
V
Up
A
Page 14

Listening to CDs
Press POWER.
{When using batteries for the po^'.-er supply)
Press ■ STOP to select the CD mode.
CD^ TAPE
(The display changes each time the button is pressed.)
0 Press ^ CD OPEN/CLOSE, insert a CD and
press the A again.
Insert the CD with the label facing up.
Q Press ►/! B PLAY/PAUSE.
Plays to the last track and automatically stops.
To Stop playing:
Press B STOP.
C
£
SELECTOn
m
ST0P<
Press to pause play.
Press ► /11 to return to play mode.
iJBffll
• If interference occurs to radios or televisions, place the unit as far as
possible from this equipment.
• Do not use irregular shape CDs (heart-shape, octagonal, etc.). Bl
I Indicates no CD has been
a inserted.
i
!
CDOPEWaOSE
d
%
Total number of tracks
It in
1 uu
r ,J ( ^
Í-0 »(_
Tl
lor
±1
rpu
. Label
Total play time
UC'H o
nffin
Pressing ►/! Í automatically turns the unit on, and if a CD is in
serted, begins play (only when AC power is supplied).
Skipping tracks
Press the button once for each track to be skipped.
Main unit
Remote control
Backward
v/K^
Forward
Fast forwarding and rewinding
Keep the button pressed during play or pause mode.
Backward Forward
Main unit
Remote control
a/^H
►►1
Track number in play ■
Elapsed the time of track in play
n*n I
i_ o
u-u I
Page 15

REPEAT-
® I 1-0 I — I ALL-C31
t
___________
REPEAT
© O O
o o o
■e o o
o o o
( ) ( ) CD
olo o
Listening to CDs
(Only from the remote control)
Press REPEAT.
The display changes each time the button is pressed. 0
To repeat only one track:
Press REPEAT to display 1 1-C3 I, |3
To repeat all tracks on the CD:
Press REPEAT to display I ALL-CJI. B
To repeat programmed tracks:
© Program desired tracks (steps 1 to 4 on page 16).
© Press REPEAT to display i ALL-OI.
0 Press ► /11 to begin play.
To clear the repeat function:
Press REPEAT to cancel I 1-03 I or I ALL-O I.
0)
-S
I
REPEAT
■/CLEAR
%
r J * * Hi
Lu (/-
tjc-n D
_"iU‘UL
nSUTcjl
RdndibtTt
(Only from the remote control)
Press H/CLEAR to select the CD mode.
0 Press RANDOM when CD is in stop mode.
mANDOMI is not displayed if pressed when CD is in play mode.
Press ^/11.
All tracks play at random, and play automatically stops.
To cancel random play:
Press RANDOM to clear I RANDOM! display.
• If cancelled durmg random play, the CD plays from the track in
play to the end of the CD, and automatically stops.
•Random play cannot be used in combination with program play.
• Skipping to tracks which have already been played is not possible.
•Searching forward and backward are possible only within the track
in play.
RANDOM
►/II
r J I o UO-n ~i
UQ ic tO’Uil
r „1
(_ o
c:
o
IBAricOMI
;:C3
n-n /
u-u i
Page 16

.S
£
O)
s
m
Listening to CDs
B
(pirbgram play];
Up to 36 tracks can be programmed.
(Only from the main unit)
|f| Press ■ STOP to select the CD mode.
When IRANDOMI is displayed, press RANDOM on the remote
control to clear the display.
Q Press -!-/►►! or —/!◄◄ to select desired track.
Q Press »MEMORY to record the selection.
PI Continue programming by repeating steps 2
and 3.
g Press ►/BI PLAY/PAUSE.
Selected tracks play in tlie programmed sequence, and play
automatically stops.
To cancel program play:
(From the main unit)
Keep the »MEMORY/ »CLEAR pressed when CD is in stop mode
until "CLEAR" is displayed.
(From the remote control)
Press ■/CLEAR when CD is in stop mode to display "CLEAR".
Program play can also be cleared by pressing ^ CD OPEN/CLOSE.
Total play time of programmed track
When “
Total play time of the programmed tracks exceeds 120 minutes.
When “FULL” Is displayed:
36 tracks have already been programmed. No further tracks can be
programmed.
To check programming;
Press A / ►>{ or V /when CD is in stop mode.
The track number and its play sequence can be checked eadr time
these buttons are pressed.
Memory retention of programmed tracks:
Track programming is retained even if play is stopped or the unit is
turned off.
A displayed "P" indicates that programming is retained in the mem
ory. H
----:-----
” is displayed:
Page 17

Changing the Sound Quaiity
Four types of sound quaiity can be selected.
Press PRESET EQ to select desired sound quality.
The displayed image of a sound qualih" effect changes each time the
button is pressed,
0 Gi\^es added punch to rock and other music (XBS)
© Lightens pop and other music (CLEAR)
© Aílo^v^s BGM enjoyment (SOFT)
© Enhances vocals (VOCAL)
© No sound quality effects used.
E£l
The “live” effect allows enjoyment of the 3-D feeling of listening
to live music. Compared with earlier surround sound systems,
the sound virtualizer leaves middle-range sounds such as vo
cals clear and gives natural width and depth to music.
Sound virtualizer is effective with stereo sound.
Press S.VIRTUALIZER to displayS.VIRTUALIZER
To cancel:
Press S.VIRTUALIZER to clear the
«When listening through headphones
The effect is less discemable than through tire unit speakers.
• When high sounds are felt to be too strong
High-range sounds are difficult to listen to with some kinds of
music. lit this case, adjust the music using the preset equalizer until
music reaches a pleasant range.
•When excessive interference In the FM stereo reception
occurs
If interference increases, cancel the sound virtualizer effect.
S.VIRTUALIZER'
indicator.
Page 18

Preparation for Recording
Type of tape which can be used for recording
Automatically identifies the type of tapes.
i l
J
1
1
t
REV MODE ■
Side to be recorded
faciiig up.
Insert the tape ivith the
exposed tape facing you.
Leader tape (on which nothing
can be recorded)
Reverse mode
Normal position/TYPE I
High position/TYPE II
Metal position/TYPE W
This unit can not make a recording or erase correctly, if metal position
tapes are used.
load the tape in deck 2 with the side to be recorded first facing up. El
The automatically selected when the cassette with the side to he
recorded facing up.
•When recording from the begining of a cassette
Wind the leader tape out, B
•When recording from the middie of a cassette
Stop the cassette at the position where recording is to begin.
" 1
i i
S 1
1
? !
Press REV MODE on the remote control to
select the mode. Q
'^0 CXD: Records from the side facing up to the opposite side and
automatically stops.
Records only one side of the cassette and automatically stops.
•You cannot operate deck 1 during recording,
"E" is displayed when you attempt to operate deck 1.
• Any change made to the volume or sound quality during recording
will not affect the recording.
• In order to prevent trouble caused by flat batteries, it is recom
mended that you either supply power to the unit from the house
hold AC outlet or replace all the batteries with new ones' when you
are recording something which is important to you.
• The recording level is set automatically.
Your attention is drawir to the fact that recording pre-recorded tapes
or discs or other published or broadcast material may infringe copy
right laws.
0
0
X
L
REV MODE
TDD C
1 nr c
:
nnn
uuu^
*3
Page 19

Recording Radio Programs
(Only Deck 2)
Insert cassette into deck 2 with the side to be recorded facing up.
Select desired radio station.
(Refer to pages 12 to 13)
Select the mode with REV MODE on the remote control.
Q Press •/•II REC/REC PAUSE.
"FWD REC" is displayed and recording begins. "REV REC" is
displayed when recording begins rvhile <53 is displayed.
To stop recording:
Press ■.
To stop recording temporarily:
Press •/• IB REC/REC PAUSE.
To resume recording, press •/• 11 REC/REC PAUSE.
REV MODE
Recording direction indicator
Light (Flashing during pause)
When there is too much interference during
AM (LW/MW) recording E]
{Available only from the remote control)
For United Kingdom:
Press ST/MONO/BP.
Select "bPl", "bP2" or "bP3" whichever yields less noise.
bP3 is available only for LW.
For areas except United Kingdom:
Press ST/MONO/BP.
Select "bPl" or "bP2" wliichever yields less noise.
0>
c
Page 20

.1
■g
8
Q}
Qfi
P'n
B □
V/h« A/>>H
CD OPEN/CLOSE
© O O
O O O
O O O
B
■e) o o
o o o
o o o
Recording from CD (Only Deck 2)
Recording and CD play automatically begin simultaneously.
Getting ready; insert the CD.
Open the cassette cover on deck 2 and insert the cassette with the side to be recorded facing up.
Tape length must be longer than the CD play time.
E Select the mode with REV MODE on the remote
control.
Q Press ■ STOP to select the CD mode.
CD^TAPE
(The display changes each time the button is pressed.)
^ Press 11 REC/REC PAUSE.
"FWD REC" is displayed and recording and CD play begin
simultaneously, "REV REC" is displayed when recordirig be
gins wlnile is displayed.
To stop recording:
Press ■ STOP.
To pause recording;
Press •/• 11 {CD will also pause).
To begin recording again, press •/• 11.
REV MODE
c
STOP
Recording direction indicator
Cd
1 n-n 1
f ^ U'U f
>
After recording
When CD play is finished, the cassette simultaneously stops.
To continue recording a different CD on the same cas
sette:
® Press ét CD OPEN/CLOSE and replace the CD.
(3) Press •/•Bl.
Recording favorite tracks
Program desired tracks (refer to steps 1 to 4 on page 16) after
step 3.
To skip tracks not to be recorded
I (T) Press •/• II during recording.
I CD wiU also pause.
I (§) Press A / or V / to display the number of the next track
I to be recorded.
I @ Press •/• 11 to begin recording again.
To change cassette direction during recording
Press ◄ ► when is displayed.
When is displayed, press •/• 11 to pause, then press ► and
•/• 11 agam.
Light (Flasliing during pause)
Page 21

Recording from CD
:^Sy CDf : i^
Records all tracks or programmed tracks of a CD in pro
grammed order.
• It is not necessary to rewind the cassette. Recording always begins
from the beginning of the side facing up.
• If the side ends m the middle of a track, the track which was cut off
is recorded on the opposite side from the beginning.
Getting ready; insert the CD.
Press ■ STOP to select the CD mode.
Press CD REC MODE to display “AUTO”.
B
Tire display changes each time the button is pressed. @
The necessary tape length wiU be displayed. (Example: Tape of
47 minutes or more necessary to record all tracks.)
When “C----------” is displayed:
Auto-CD recording is not possible.
Follow the steps on page 20.
SELECTOR
DECK!
® AUTO—‘1-REC—OFF |
t
____________
--
---1------------------
' lALTfi) '
p C M _
/ f (_ I'tf
©
4< . 1
V. j
Insert a cassette which is longer than that dis
played in step 2.
Insert with the side to be recorded first up.
Press •/• 11 REC/REC PAUSE.
d
Automatically rewinds, and recording from the first track be
gins after a 10 second interval of silence.
I
Reverse mode is displayed as
(T) Rewinding tape
Recording 10 second interval of silence
(§) Recording begun
•f
I
Qt
To Stop recording (CD will also stop):
Press H STOP,
To record favorite tracks:
Program desired tracks (refer to steps 1 to 4 on page 16) after step 1.
Auto CD recording cannot be used in combination with random play
(refer to page 15).
■
narfm
- PPE-REC-
"%> '
i'ji'tliOi
r -J f
L O 1 U*U 1
(^
n*n /
Page 22

PLAY/PAUSE Ц
^/11 jrm
Recording from CD
Onelrdck recbf^in^li TRACK}
Records one track from the CD and stops. Convenient for re
cording one track each from many CDs.
Recording can begin from any place on the tape.
Getting ready: insert a CD.
П Open the cassette cover on deck 2 and insert
cassette with the side to be recorded facing up.
Recording direction is automatically set to begin from the side
facing up (the indicator is displayed).
Find the position on the tape where recording is to begin.
El Press Ш STOP to select the CD mode.
Q Press CD REC MODE to display “1-REC”.
The display changes each time the button is pressed. ©
Q Press or w/\M< to select the track to be
recorded.
Omit this step when recording the first track on the CD.
CDflSC
CD OPEN/CLOSE
4EF
® AUTO —1-REC ^ OFF I
1
_____________
!ГЙМ1
г tp uc-no
i_o fc lo'uc:
I I
Q Press •/• 11 REC/REC PAUSE.
CD play and recording begin simultaneously. Records only one
track and stops.
Reverse mode is displayed as
• If the track is interrupted when the end of the cassette is
reached, recording automatically begins again from the begin
ning of the track on the opposite side (if recording was begun
on the opposite side, recording stops at the end of the present
side).
To continue recording with another CD:
Press 4b CD OPEN/CLOSE, insert a CD and follow steps 4 and 5.
To stop recording (CD will also stop):
Press ■ STOP.
nnwi
Try listening to the track to check the type of song it is before record
ing, Press CD REC MODE to display "1-REC," then ► /11 to play the
CD.
Press #/# II to record a song you like during CD play. The track is
recorded from the beginning.
V/
ЛЛ
1ГЯЕ7Г1
Cd £?
m
П-П 1
U-U 1
Page 23

REC/REC PAUSE Q Q
Recording Tape to Tape
n Press ■ STOP to select the cassette mode.
“ CD^TAPE
(The display changes each time the button is pressed.)
Insert the playback cassette into deck 1 and the recording cassette into deck 2.
Q Press REV MODE on the remote control to se
lect the mode.
gj Press TAPE EDIT.
Play on deck 1 and recording on deck 2 begin simultaneously.
To stop recording:
Press ■.
To temporarily stop recording:
Press •/• 11 REC/REC PAUSE.
To resume recording, press TAPE EDIT.
■
0)
.S
SELECTOR
DECK1
DECK2^-^
REVMODE
/t^eedit /
1
I
Deck 2 recording direction indicator
nn i
TR PE
Light (Flashing during pause)
uLs tf
«3
Page 24

□□ Q
Start
-ON- OFF
li; n-nn
OM \ / OFF
u-uu u-uu
^3
n-n n
f-uu
n-n n
L.(-L.f U
Finish
m
Using the Play Timer
The clock has a 24-hour display.
Timers A and B can be set and used separately for the play
start/finish times.
Example: Setting CD play from 7:00 to 8:30 on play timer A.
Setting the start and finish times
Press POWER to turn the unit on.
Q ^ess TIMER ADJUST to set “ON or “ON
[|]” flashing.
P^ON [^-»OFF [^^ON IT^OFF [f]
I—Original Display ^OFF I REG I <—ON I REG I <
{The display changes each time the button is pressed.)
Q © Press +/►►! or when “ON [^” or “ON
[¥]” is flashing to set the start time.
© Press TIMER ADJUST.
Finish time flashes.
FI ® Press +/►►! or —to set the finish time.
©Press TIMER ADJUST.
Display returns to original mode.
When “E” is displayed:
Check whether start and finish are set for the same time.
Programming play
--------------------------
--------
,
1
l-nn _ Q-Dn
l‘U U OO LJ
r i“i uc-n3
U it. 7U-Ui-
c
OFF \ CO ^ ^
=:> / , N
CS]
^3
El Get the music source ready.
Listening to cassettes: refer to pages 10 to 11.
•When used in combination with the recording timer
Always insert the cassette to be played into deck 1 and display
the {ol^ indicator.
Listening to the radio: refer to pages 12 to 13.
Listening to CDs: refer to pages 14 to 16.
Press VOLUME to adjust volume for time of play.
Setting the timer function
Press PLAY TIMER A (or B) to display “PLAY”.
When “E” is displayed:
Check whether the clock has been set {page 9).
Press POWER to turn the unit off.
□
Programming can be checked when the unit is off (page 27).
1
[3
3:3-u c
Flashes at programmed time
r ,J t fT-n t
t-O ( LJ-U I
■cs-
Page 25

Using the Play Timer
To clear the timer function;
Press PLAY TIMER A (or B) when the unit is on to clear the or [|^
display.
To play music after programming: (after step 7)
(T) Begin play of the desired music source.
Programmed play timer information is retained in the memorv^
even if the volume or music source is changed when music is
plaved.
(2) After playing music, turn the unit off.
• Cassette deck and direction displayed wdren the unit is turned off
are activated in the play timer. After playing music, check the play
timer deck and direction before turning the unit off.
•When using the play timer with a CD, check the setting of the
random, repeat or programmed plav mode before turning the unit
off.
Always turn the unit off before the programmed start time. The timer
does not activate when the unit is turned on.
To change the source or volume of the timer function;
Press PLAY TIMER A or B to clear the ® or [b] indicator and follow
steps 5 to 8,
To use the timer at the same time daily:
Check that or [§ is displayed and turn the unit off.
Example: Listening to CDs from 7:00 on weekdays and FM
® Program play timer A for CD play.
(2) Program play timer B for radio programing.
broadcasting from 9:00 on weekends. O
Display H on weekdays and [b] on weekends (steps 7 on
page 24).
and cannot be displayed simultaneously.
Page 26

Start
n-n n
u-uu
Finish
JfBEgl-
n-n'n
u-u u
Using the Recording Timer
The ciock has a 24-hour display.
Radio broadcasts can be recorded at a programmed time.
Exampie: Recording radio broadcasting from 13:00 to 14:30
Setting the start and finish times
Press POWER.
□
Q Press TIMER ADJUST to set “ON CHE0” flash
ing.
p>ON [X^OFFX^ON T^OFF [§"----------------------------.
I—Original display«—OFF I REG i «-ON iRECI
(The display changes each time the button is pressed.)
Q ©Press +/►►! or -/Kd while “ON [MS” is
flashing to set the start time.
©PressTIMER ADJUST.
Finish time flashes.
FI © Press +/►» or —/ to set the finish time.
© Press TIMER ADJUST.
Display returns to original mode.
When “E” is displayed:
Check whether start and finish are set for the same time.
Programming recording
----------------
'
' «1 ^ ^ J OfF ~ iBgEI
i q-nn n*fin
J J-UU U‘UU
^ / t \ ^ -3
on OFR. ^
iq-nn
f \J‘UU
- iu-qn1
J (O uJ
/ 1 v"
-
■
C M
1 if
rasi
aiEEi
q q u n
UC, TU
Get the music source ready.
® Select radio station.
(§) Insert cassette into deck 2.
(§) Press REV MODE on the remote control to select the mode.
•Reduce the volume when listening during recording is not
desired.
• If there is excessive interference when recording an AM
(LW/MW) station, press ST/MONO/BP to switch to reduced
static.
Setting the timer function
Q Press REC TIMER to display “REC”.
When “E” is displayed:
Check whether the clock has been set (page 9),
Press POWER to turn the unit off.
B
Programming can be checked when the unit is off (page 27).
The unit turns on approximately 30 seconds before the set start
time and recording begins.
To clear the timer function:
Press REC TIMER when the unit is on to clear the indicator.
qo D
O-DC
nreei
Flashes when recording begins i
4.-
hyf
c
I I
^3 miraM
-fffici-
q D u'n
oc. lU
Page 27

OH OfP 5]
©
T o o c
I ni C
ia!j “3
Timer A or B indicator J;
—
~i*n n
t-uu 0*1/ u
Q‘~t n
Using the Recording Timer
To play music after programming: (after step 6)
0 Begin play of desired music source.
Programming for the recording time remains in the memory e\^en
i
if the volume or source is changed during play,
@ After playiiig music, turn the unit off.
Direction displayed when tmit is turned off is activated in the
recording timer. After plaving music, check the direction ( ^ or
<S3) of the cassette to be recorded before turning the unit off.
To change the radio station to be recorded:
Press REC TIMER to clear the IRËCI indicator and follow steps 5 to 7,
To use the timer at the same time daily:
Check that IRÊC i is displayed and turn the unit off.
Always turn the unit off before the programmed start time. The timer
does not activate if unit is on.
to che|cic programming:
Play and recording timer programming can be checked.
Sot activated
PLAY TIMER
■■■ m
“Í n-c n
0
!!!ítttSl'í?'i5?^Tr5tlT>.'«!!ï1W^rVí:SэJWУ'í:5r«IУJt5ГtTOÏÏ!flaW^‘^^
i: u-iJi u
0^0
--
---------
^
Start recording
.■.L,.;..;.....: '.T-.:. ' ■■.■’ '- L.
Press TIMER ADJUST when unit is off.
The display automatically changes in the following order.
Display example: Play tape from 7:00 to 8:30 on play timer A. 0
I
J
© Programmed time
@ Programmed music source
[q^dI (f^> and (<^) are not displayed when batteries are
used as the power source,
© Timer volume
@ Original display
Uisihg the pld^ and recbrding timers in combination
Example: Waking up to a cassette in the morning and record
ing radio programing while away IS
© Program play timer (A or B) for cassette play (page 24).
© Program recording timer for radio recording and insert recording
cassette into deck 2 (page 26).
• Insert the playback cassette into deck 1 and the recording cassette
into deck 2. In this case, the play timer operates only on deck 1.
When programmed times overlap
•When recording is programmed to begin during play timer
operation B
Cancels play and begins recording.
• When play is programmed to begin during recording timer
operation Q
Continues recording. Tlie play timer is not activated.
•>'.1
r
Not activated
Continue recording
PLAY TIMER
Page 28

Using the Sleep Timer
■CD"
© cb o
SLEEP
o o o]
o o o
o o o
■•1 Jt'Il'ü LaijíTi ÍÍÍSSiíJ^T-J Jíí-
® 0:30 - 1:00 1:30 - 2:00 - SLEEP OFF
t
_________________________________
SLEEP
"SLEEP" display
(A^'ailable only from the remote control)
The unit off time can be set up to two hours ahead of the present
time.
Press SLEEP to select the desired time.
The displa}f changes each time the button is pressed. ©
The unit is turned off after the time set has elapsed.
To release the timer function:
!
Press SLEEP to select "SLEEP OFF".
To check the time remaining during operation:
Press SLEEP.
To change the time remaining during operation:
Press SLEEP to show the remaining time then SLEEP to select the
desired time.
Pressing SLEEP can turn the unit on (only AC power is supplied).
Using the sleep and play timers in combination
Example; Falling asleep listening to FM programing and waking
up the next morning listening to a CD. El
© Program the play timer (A or B) for CD play (page 24).
© Select the desired radio station and set the sleep timer.
Plays the CD at the volume programmed in a in the morning even
if it is reduced the night before.
Not activated
;SKí<7TW.Ti3iiniwarft.-'í?nTiry«K;T;?'%x«^^
;^5WiiíiiU55AV¿W^
éÉm
PLAY TIMER
C]j:00-2:00]]>
0^0
•When programmed times overlap U1
When play is programmed to begin before the sleep timer turns the
unit off, the play timer is not activated. The unit turns off after the
programmed sleep timer is completed.
Always set the sleep timer so that the unit turns off by the time the
play timer is programmed to begin.
Using the sleep and recording timers in
cómbination
Example: Falling asleep listening to a cassette and recording
FM programming during the night Q
© Program the recording timer to record the FM programming and
insert recording cassette into deck 2 (page 26),
© Insert the playback cassette into deck 1 and set the sleep tinier.
•When programmed times overlap B
When recording is programmed to begin before the sleep timer
turns the unit off, the recording timer is not activated.
The unit turns off after the programmed sleep timer is completed.
Always set the sleep timer so that the unit turns off by the time the
recording timer is programmed to begin.
Not activated
REC TIMER
Page 29

Karaoke
1. Lo'iver the volume and connect the microphone (not included),
2. Start playing a CD or tape, or turn on the radio.
3. Start karaoke singing and adjust the \'olume.
Recording karaoke sound with accompaniment from a CD
1. Lower the volume and connect the microphone.
2. Insert the CD and program desired track. (See page 16.)
3. Load the tape in deck 2.
4. Select the mode using REV MODE on the remote control.
5. Press«/«aiREC/RECPAUSE.
Play and recording start.
REV MODE-
TAPE EDIT STOP
© o o
o o o
o o o
■€D O O
O O O
OjO O
O CDJ
Recording karaoke sound with accompaniment from a tape
1. Lower the volume and connect the microphone,
2. Load the karaoke tape in deck 1 and the recording tape in deck 2.
3. Select the mode using REV MODE on the remote control.
4. Press ■.
5. Press TAPE EDIT.
Playback and recording start
'' Recb'rdm th'e-'
1. Lower the volmne and connect the microphone.
2. Press
3. Load the tape in deck 2.
4. Select the mode using REV MODE on the remote control.
5. Press •/• 11 REC/REC PAUSE.
Recording starts.
When karaoke singing with accompaniment from a CD, sound is
heard only while the CD is playing. No sound is heard in the stop or
pause mode.
Page 30

Concerning Compact Discs
_n COMPACT
(ÍDglS
DIGITAL AUDIO
Only compact discs having this mark can he used with this unit.
However, do not use irregular shape CDs {heart-shape, octagonal,
etc.). CDs of the sort can damage the unit. E
To remove a disc from its case EE
Press the center holder and lift the disc holding bv the edges.
To hold the disc B
Hold the disc by the edge so the surface is r\ot soiled with finger
prints.
Fingerprints, dirt and scratches can cause skipping and distortion.
To store a disc in its cose B
Insert the disc with label facing upwards and press downward at the
center.
If the surface is soiled El
Wipe gently with a soft, damp (water only) doth.
If the disc is brought from a cold to a warm environment, mois
ture may form on the disc.
Wipe this moisture off with a soft,dry,iint-free cloth before using the
disc.
•i
Ì
O
C
0
1
Q>
C
9
Improper disc storage:
You can damage discs if you store them in the following places;
• Areas exposed to direct sunlight
• Humid or dusty areas
• Areas directly exposed to a heat outlet or heating appliance
Handling precautions;
• Do not write on the label side with a ball-point pen or other writing
utensils.
• Do not use record cleaning sprays, benzine, thimier, static electricity
prevention liquids or any other solvent,
•Do not use CDs with poorly attached labels or stickers.
Adhesive protruding from underneath stickers or left over from
peeled off stickers can cause your stereo to mulfunction.
o
(Correct)
Page 31

Concerning Cassette Tapes
Selection of cassette tapes
Cassette tapes exceeding 100 minutes:
These tapes are handy for their long playback and recording time but
be careful about repeatedly stopping and starting, rewinding and fast
forwarding these tapes in short intervals as they are thin, tend to
stretch and ma\^ become entangled in the deck mechanism.
Endless tapes:
Failure to operate these tapes correctly may cause the tape to rvmd
around the revolving parts.
For this unit, it is recomnrended to use the tape which is appropriate
to the auto reverse mechanism.
If ihe tape loosens, take up the slack E]
Tape slack may cause the tape break.
To prevent erasure of recorded sounds B
To re-record on a protected cassette, cover the slot with adhesive
tape. B
Do not cover the detection holes on high position tapes.
Improper tape storage:
You can damage tapes if you store them in the following places;
• In high temperature (35°C or higher) or high humidity {80% or
higher) areas
• In a strong magnetic field (near a speaker, on top of TV, etc.)
This can erase a recording.
• Areas exposed to direct sunlight
To erase sound previously recorded on a tape:
Disconnect the microphone.
1. Load the tape in deck 2.
2. Press* *.
3. Press#/#IIREC/RECPAUSE.
;Tci p'é;--, li|éa'q.^ctìr,é;
To assure sound quality for recording Eind playback, be sure to clean
the tape heads after approximately every 10 hours of use,
1, Open the cassette cover by pressing DECK 1 A and DECK 2
2. Clean the portions which contact the tape (the shaded portions in
the figure) with a cotton swab.
Do not use any solution other than alcohol for head cleaning.
Gl
j
Ì
e
le
o
u
c
Page 32

Quick Reference of Remote Control Operations
Common operations
SLEEP DISPLAY
© О О
RANDOM KM
О О О
REPEAT B/CLEAR ►/!!
CD
О О О
REVMOOE НЕ1ЛГШ1 FF
ООО
C-RESET
CD C3 CZ)
DECK 10 1тШ0Н0/ВР ВАШ
ООО
VPRESrTUNEA
TUNER
PRESET£0 CLOSET OPEN*
TOP PWIEL
О О О
S.VIHIUAUESI -VOLUME-к
О схз
Panasonic
Turning the unit on and off
(Unit cannot be turned on by remote control
when batteries are used as poTver source.) ©
To open the top panel
ШЫ
TOP PANEL
OPENA
О
To close the top panel
TOP PANEL
CLOSET
О
Selecting the equalizer effect
PRESETEQ
О
To turn on sound-space effects
S.VIfmjAUZER
о
Adjusting the volume
- VOLUME +
c:zz
Selecting the display
DISPLAY
О
One touch play
BAND ►/!!
О О О
с
•£
0
1
■§
0
1
о
ю
SLEEP DISPLAY
О О
©
RANDM КМ РМ
ООО
REPEAT i^LEAR
REV MODE
О
t>RESET ~Ш
ООО
DECK 10 ^ЛШКШР BAND
О О о
TUNER
PRESET £Q aOSET ОРЕМА
ООО
SVIHTUALEER -VOLUME +
О о©
CD
TOPPANil
Panasonic
Setting/releasing the sleep timer
Cassette deck operations
Starting playback/Changing the direction
Rewinding/Fast forwarding
Finding the begining of a track (TPS)
Stopping the tape
Selecting the reverse mode
Resetting the tape counter to "000"
Selecting deck 1 /2
SLEEP
О
o
In the stop mode
REWlSi FF
O O
During playback
REWSi FF
o o
■
o
REV MODE
O
C^REKT
O
DECK 1/2
o
Page 33

Tuner/CD operations
«SLEEP DISPLAY
® О О
f RANDOM /"ИМ ►W'4’
О vo^ oj
REPEAT e/CLEAR WH
О О О
REV MODE REWll^ FF
o o o
CflESET
o o o
DECK 1/2 ^TMNO/SP BA№)
О О о
/v PRESET TUNE л\
TUNEFI
-.- lerar
PRESET EQ CLOSET OPENA
О О О
S.VIRTUAUZER -VOLUME ■
О схз
Panasonic
Listening to a programmed radio station
Selecting reception iiT stereo or mono
Reducing noise during the recording of AM
(LW/MW) programs
Starting play/
Temporarily stopping play
Stopping play/
To clear program play
To skip tracks
To search forward or backward
Listening to track(s) repeatedly
V PRESETTUNE A
o o
STiWHogp
o
ST/HONO/BP
o
►/II
o
■/CLEAR
O
o o
Keep pressing
O O
REPEAT
O
ListenitTg to track at random
RANDOM
O
Main^nonce of external surfaces
To clean this unit, use a soft or dry doth.
If the surfaces extremely dirty, use a soft cloth dipped in a soap and water solution or a weak detergent solution.
Wring the doth well before wiping the unit.
Wipe once again with a soft or dry cloth.
Never use alchol, paint tliinner, benzine, or chemically treated clothes to clean this unit. Such chemicals may damage the finish of your unit.
C
■I
J
s
4)
c
s
Page 34

Troubleshooting Guide
Before requesting service for this unit, check the chart beiow for a possible cause of the problem you are experiencing. Some simple checks or a
minor adjushnent on your part may elinrinate the problem and restore proper operation.
If you are in doubt about some of the check points, or if the remedies indicated in the chart do not solve the problem, refer to the directorv of
Authorized Sendee Centers {enclosed ivith this unit) to locate a convenient service center, or consult vour dealer for instructions.
Problem
Common problems
“E” appears.
“U01” appears.
Have you made a mistake i:i Read the operating instructions and
operation?
The batteries are flat.
The power is not supplied the unit.
While listening to CDs
Play does not start. No display of
track numbers, etc. down?
Certain sections are not played
properly.
Has the CD been installed upside
Has there been a sudden change in
temperature?
For instance, was the unit brought
straight from a cold place into a
warm location?
Is the CD soiled?
Is the CD scratched?
Probable cause (s) Suggested remedy
try again.
Replace them with new ones.
Alternatively, use a household AC
outlet as the power source.
Install the batteries or connect the
power cable.
Install the CD with the label side
facing up.
Condensation may have formed on
the lens unit.
Leave it for about an hour before
attempting operation again.
Wipe with a soft cloth.
Replace with a new CD.
Page
5
14
30
O
C
D
E
im
s
a>
0
While listening to tapes
No recording.
Sound is low, intermittent, or poor
quality, noisy, scratchy, or
unsteady.
Have the tape's accidental erasure
prevention tabs been broken out?
Are the head soiled?
Cover the holes with adhesive tape.
Clean them.
While listening to the radio
Stations cannot be tuned in well.
Noise heard during AM (LW/MW)
reception.
Has the antenna been adjusted
properly?
Are you using a remote control of
other appliances near the unit?
Are you operating the unit and a TV Place tlie unit at a distance from the
set at the same time? TV. Alternatively, turn the TV off.
Try changiitg its direction. 12
Use the remote control at a distance.
While using the timer
No timer operation at the Is the unit turned on (when the play Turn the unit off upon completion of
programmed time.
timer and the recording timer are
being used)?
Has the programmed timer indicator Operate again so that the display 24
fREcI or SLEEP) lighted?
the settings. 26
lights up.
31
31
24
26
28
Page 35

Technical specifications
Radio
Frequency range
(United Kingdom)
FM 87.^0-108.00 MHz (50 kHz steps)
LW
MW
(Except United Kingdom)
FM
AM 531 -1602 kHz (9 kHz steps)
CD player
Sampling frequency 44.1 kHz
Decoding 16 bit litrear
Beam source Semiconductor laser (wavelength 780 nm)
No. of channels
Wow and flutter
D/A converter
Less than possible measurement data
Tape recorder
Track system 4 track, 2 channel, stereo
Monitor system Variable sound monitor
Recording system
Erasing system
Frequency range
Normal position
High position
144-288 kHz (9 kHz steps)
522-1611 kHz (9 kHz steps)
87,50-108,00 MHz (50 kHz steps)
530-1600 kHz (10 kHz steps)
2 channel, stereo
MASH (1 bit DAO
AC bias
AC erase
30-16000 Hz
30-17000 Hz
General
Speakers
Jacks
Output
Input
Power requirement
AC
(United Kingdom, Australia and New Zealand)
(Except United Kingdom, Australia and New Zealand)
PHONES; 3,5 mm stereo (16-32^)
MIX MIC 3.5mm(200-600n)
110-127 V/200-220 V/230-250 V, 50/60 Hz
Power consumption: 44 W
Battery 15 V (Ten R20/LR20 D size, UM-1 batteries)
•Do not use rechargeable type batteries.
Memory back-up for computer/clock
6 V [Four R6/LR6 (AA, UM-3) batteries]
•Do not use rechargeable type batteries.
Dimensions (WXHXD) 630x178x296 mm
Weight 5.6 kg
Specifications are subject to change without notice.
Weight and dimensions are approximate.
MASH is a trademark of NTT.
10cm2.7ax2
230-240 V, 50 Hz
(Top panel dosed)
without batteries
Page 36

Matsushita Electric industrial Co., Ltd.
Central P.O. Box 288, Osaka 530-91, Japan
RQT3628-3B
F1196Z1027 (D)
 Loading...