

Panasonic RX-D11 User Manual
Portable Stereo CD System
Operating Instructions
Model No. RX-D11
RX-D10
The illustrations show RX-D11.
EB GN
Note:
The “EB” indication shown on the packing case
indicates United Kingdom.
Before connecting, operating or adjusting this product, please read these instructions completely.
Please keep this manual for future reference.
RQT5210-B

Dear customer
Thank you for purchasing this product.
For optimum performance and safety, please read these instructions
carefully.
Table of Contents
Before use
CAUTION!
THIS PRODUCT UTILIZES A LASER. USE OF CONTROLS OR
ADJUSTMENTS OR PERFORMANCE OF PROCEDURES
OTHER THAN THOSE SPECIFIED HEREIN MAY RESULT IN
HAZARDOUS RADIATION EXPOSURE.
DO NOT OPEN COVERS AND DO NOT REPAIR YOURSELF.
REFER SERVICING TO QUALIFIED PERSONNEL.
CAUTION!
DO NOT INSTALL OR PLACE THIS UNIT IN A BOOKCASE,
BUILT IN CABINET OR IN ANOTHER CONFINED SPACE.
ENSURE THE UNIT IS WELL VENTILATED. ENSURE THAT
CURTAINS AND ANY OTHER MATERIALS DO NOT OBSTRUCT
THE VENTILATION TO PREVENT RISK OF ELECTRIC SHOCK
OR FIRE HAZARD DUE TO OVERHEATING.
WARNING:
TO REDUCE THE RISK OF FIRE, ELECTRIC SHOCK OR
PRODUCT DAMAGE, DO NOT EXPOSE THIS APPLIANCE TO
RAIN, SPLASHING, DRIPPING OR MOISTURE.
In these operating instructions, “unit off” defines the following
modes.
“Standby” when AC power is used.
“Battery power off” when batteries are used.
(Back of product)
Before use
Supplied accessories ......................................................... 2
Caution for AC Mains Lead ................................................ 3
Precautions ........................................................................ 4
Power sources ................................................................... 4
Location of controls ............................................................ 5
Concerning the remote control (RX-D11 only) ................... 6
To listen through headphones ........................................... 6
Listening
Presetting radio broadcasts ............................................... 7
Listening to radio broadcasts......................................... 8
Listening to CDs............................................................. 10
Listening to tapes .......................................................... 12
Changing the sound quality ............................................. 12
Recording
Before recording............................................................... 13
Recording from radio broadcasts ................................ 13
Recording from CDs ...................................................... 13
Reference
Concerning CDs............................................................... 14
Concerning cassette tapes .............................................. 14
Troubleshooting guide ..................................................... 15
Maintenance..................................................................... 15
Technical specifications ......................................Back cover
Supplied accessories
Please check and identify the supplied
accessories.
Use numbers indicated in parentheses when
asking for replacement parts.
RQT5210
AC mains lead ....................................................................1 pc.
(For United Kingdom: (For Australia and New Zealand:
RJA0053-2X) RJA0035-X)
Note
The included AC mains lead is for use with this unit only. Do not
use it with other equipment.
RX-D11 only
Remote control transmitter (EUR646553) .......................... 1 pc.
2
Caution for AC Mains Lead
(For United Kingdom)
(“EB” area code model only)
For your safety, please read the following text carefully.
This appliance is supplied with a moulded three pin
mains plug for your safety and convenience.
A 5-ampere fuse is fitted in this plug.
Should the fuse need to be replaced please ensure that
the replacement fuse has a rating of 5-ampere and that
it is approved by ASTA or BSI to BS1362.
Check for the ASTA mark or the BSI mark on the
body of the fuse.
If the plug contains a removable fuse cover you must
ensure that it is refitted when the fuse is replaced.
If you lose the fuse cover the plug must not be used
until a replacement cover is obtained.
A replacement fuse cover can be purchased from your
local dealer.
CAUTION!
IF THE FITTED MOULDED PLUG IS UNSUITABLE
FOR THE SOCKET OUTLET IN YOUR HOME THEN
THE FUSE SHOULD BE REMOVED AND THE
PLUG CUT OFF AND DISPOSED OF SAFELY.
THERE IS A DANGER OF SEVERE ELECTRICAL
SHOCK IF THE CUT OFF PLUG IS INSERTED INTO
ANY 13-AMPERE SOCKET.
WARNING: DO NOT CONNECT EITHER WIRE TO
THE EARTH TERMINAL WHICH IS MARKED WITH
THE LETTER E, BY THE EARTH SYMBOL
COLOURED GREEN OR GREEN/YELLOW.
THIS PLUG IS NOT WATERPROOF—KEEP DRY.
i
OR
Before use
Remove the connector cover.
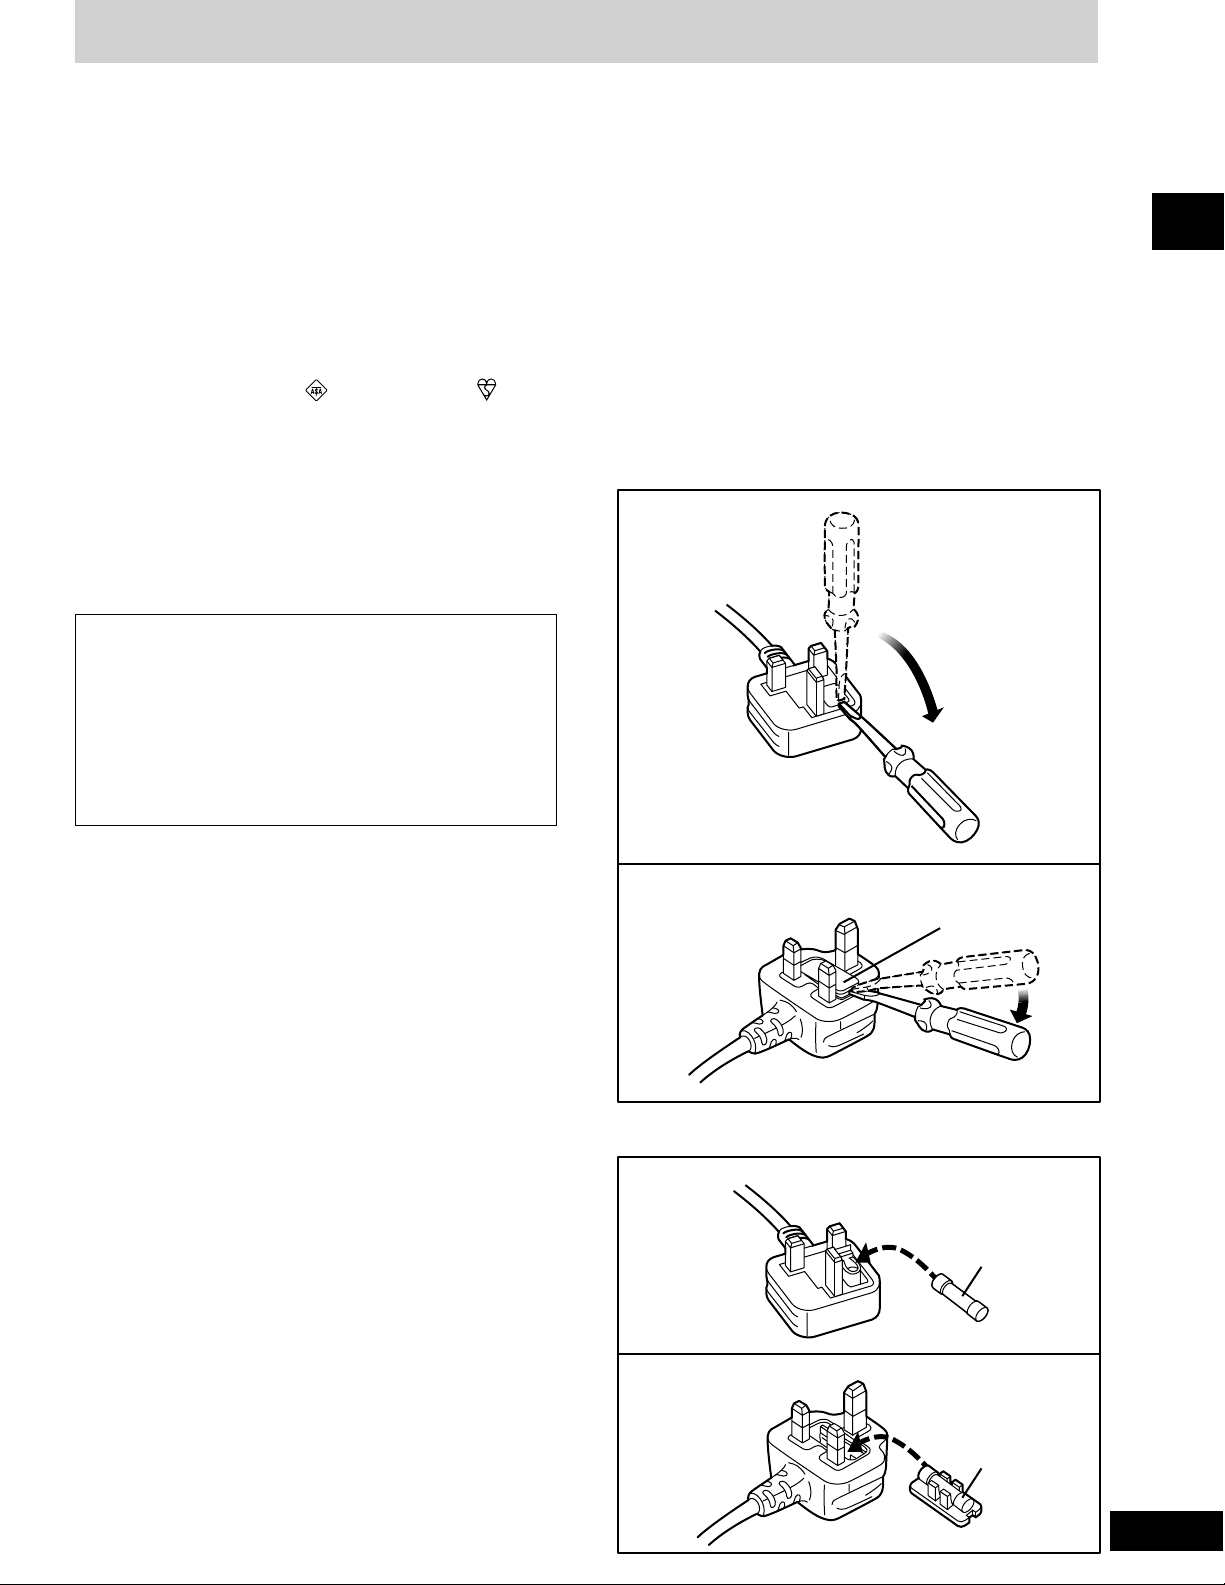
How to replace the fuse
The location of the fuse differ according to the type of
AC mains plug (figures A and B). Confirm the AC mains
plug fitted and follow the instructions below.
Illustrations may differ from actual AC mains plug.
1. Open the fuse cover with a screwdriver.
Figure A
Before use
If a new plug is to be fitted please observe the wiring
code as stated below.
If in any doubt please consult a qualified electrician.
IMPORTANT
The wires in this mains lead are coloured in accordance
with the following code:
Blue: Neutral, Brown: Live.
As these colours may not correspond with the coloured
markings identifying the terminals in your plug, proceed
as follows:
The wire which is coloured Blue must be connected to
the terminal which is marked with the letter N or coloured
Black or Blue.
The wire which is coloured Brown must be connected to
the terminal which is marked with the letter L or coloured
Brown or Red.
Figure B
Fuse cover
2. Replace the fuse and close or attach the fuse cover.
Figure A
Fuse
(5 ampere)
Figure B
Fuse
(5 ampere)
3
RQT5210
Precautions
A
A
Before use
B
C
Max. 40°C
AC IN ~
AC mains lead
(included)
To
household
mains
socket
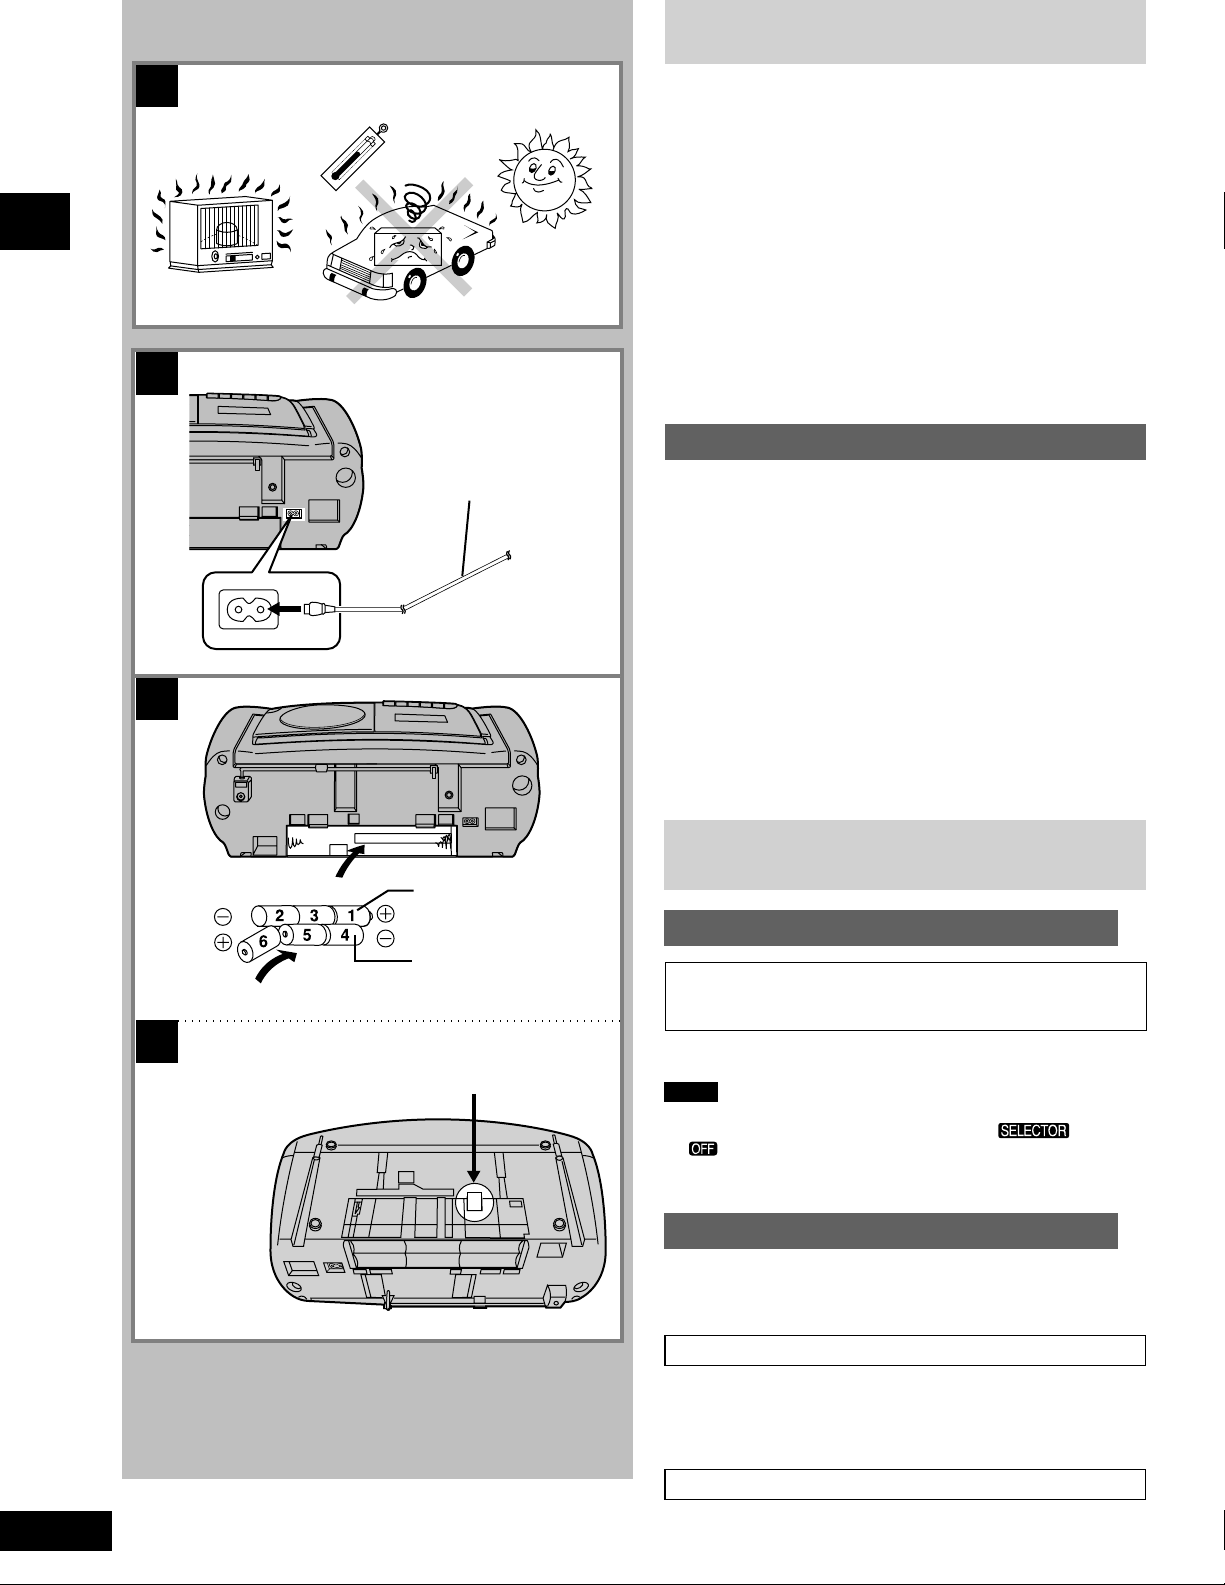
If this unit is not used for a long period of time or is used
•
only from an AC power source, remove all the batteries to
prevent potential damage due to possible battery leakage.
Avoid using or placing this unit near sources of heat. Do not
•
leave it in an automobile exposed to direct sunlight for a long
time with the doors and windows closed as this may deform the
cabinet.
Avoid cuts, scratches, or poor connections in the AC mains lead,
•
as they may result in possible fire or electric shock hazard. Also,
excessive bending, pulling or splicing of the cord should be
avoided.
Do not unplug the AC mains lead by pulling on the lead. To do so
•
may cause premature failure or shock hazard.
Do not operate this unit on AC power in a bathroom, as a potential
•
shock hazard may result.
When not in use, disconnect the AC mains lead from the household
•
mains socket.
Use of batteries
Align the poles (+ and –) properly when inserting the batteries.
•
Do not mix old and new batteries or different types of batteries.
•
Do not recharge ordinary dry cell batteries.
•
Do not heat or disassemble the batteries. Do not allow them to
•
contact flame or water.
If the unit is not going to be used for a long time or if the unit is to
•
be powered exclusively by AC power, remove the batteries and
store them in a cool dark place.
Do not keep together with metallic objects such as necklaces.
•
Do not use rechargeable type batteries.
•
Do not use batteries if the covering has been peeled off.
•
Mishandling of batteries can damage other items, cause damage to
the unit, and may cause a fire through short-circuiting or electrolyte
leakage.
If electrolyte leaks from the batteries, consult your dealer.
Wash thoroughly with water if electrolyte comes in contact with any
part of your body.
(R20/LR20, D, UM-1)
D
Insert your finger into the opening and push out.
Bottom of the unit
Inner row
Outer row
Power sources
Using a household mains socket
FOR UNITED KINGDOM ONLY
BE SURE TO READ THE CAUTION FOR THE AC MAINS LEAD
ON PAGE 3 BEFORE CONNECTION.
Connect the included AC mains lead to the [AC IN ~] socket of the
unit and your household mains socket.
Notes
Before connecting or disconnecting the AC mains lead to the unit,
•
make sure the unit is switched off by setting [ ] to “TAPE/
”. (If the tape is travelling, press [L/c STOP/EJECT] as well.)
If the unit is not going to be used for a prolonged period of time,
•
disconnect the AC mains lead to conserve power.
Using batteries (not included)
Disconnect the AC mains lead from the [AC IN ~] socket of the unit,
and insert six R20/LR20 (D, UM-1, not included) batteries in the
illustrated order.
When to replace the batteries
Replace all batteries with new ones if the sound is distorted or the unit
fails to operate properly. When the batteries start to wear out, it may
not be possible to play CDs properly even when there is nothing
wrong with the radio and tape operations.
B
C
RQT5210
How to remove the batteries D
4
Remove batteries by inserting your finger into opening on the bottom
of the unit and pushing out.
Power sources
A
B
(R6/LR6, AA, UM-3)
3
5
1
2 6
Y
A
L
P
C
E
R
4
REW/REV
7
E
S
AU
P
T
C
E
J
E
/
P
O
T
S
E
U
C
/
F
F
10 11 12 13 14 15
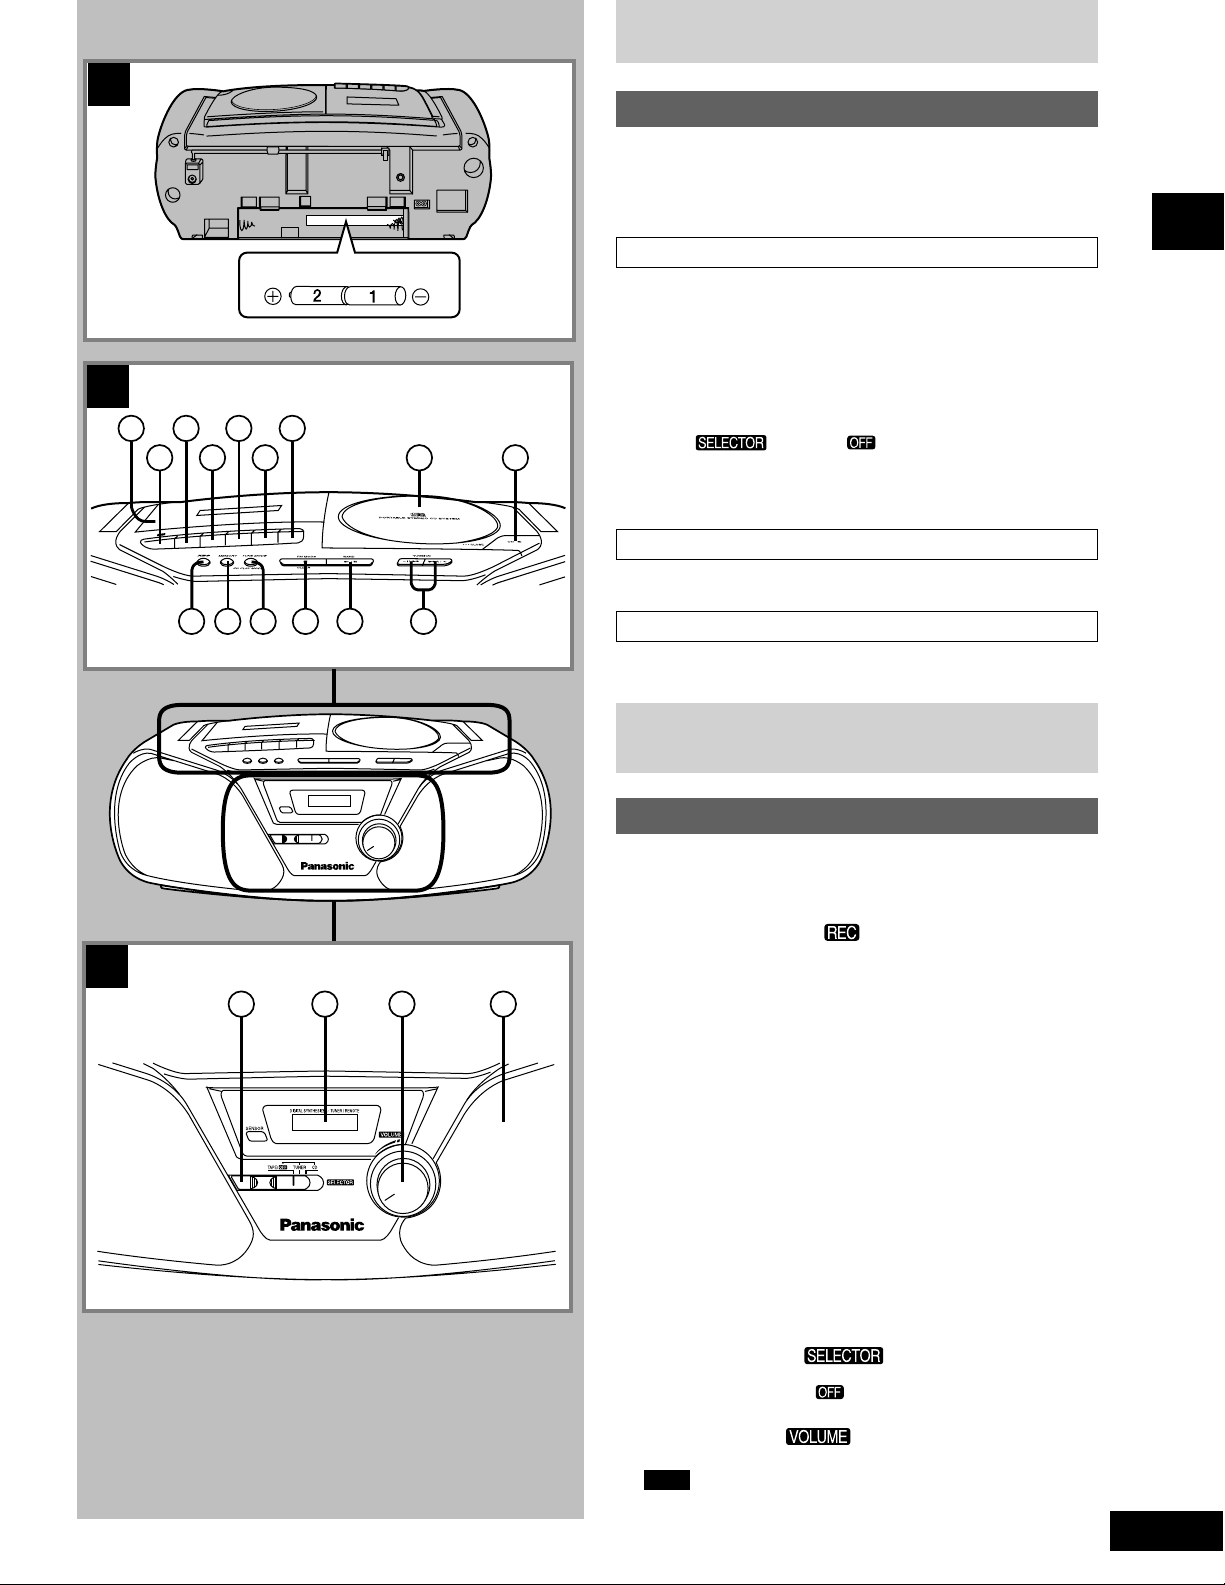
Memory back-up batteries (not included)
In the event of a power failure, or if the AC mains lead is disconnected
from the household mains socket (during AC operation), or should the
batteries fail, the memory back-up batteries will preserve the preset
memory of this unit.
Battery installation A
Insert two R6/LR6 (AA, UM-3, not included) batteries into the battery
compartment, making sure that the batteries are installed in the
designated numerical order and that the proper polarities are
maintained.
The life of the memory back-up batteries can be prolonged by
•
keeping the AC mains lead plugged in the household mains socket
at all times.
When disconnecting the AC mains lead, switch off the unit first by
•
98
setting [ ] to “TAPE/ ”. (If the tape is travelling, press
[L/c STOP/EJECT] as well.) The life of the memory back-up
batteries is reduced if the AC mains lead is disconnected from a
household mains socket with the power still supplied.
Battery removal
Press the negative end of the number 2 battery to remove batteries.
Battery life
The life of the memory back-up batteries is about one year.
Before use
C
17 1916 18
Location of controls
Main unit
B
Number Designation Reference page
1 Deck (Recording/playback)
aa
2 Recording button (
3 Playback button (
- -
- PLAY).........................................12
- -
4 Rewind/review button (
5 Fast forward/cue button (
6 Stop/eject button (
7 Pause button (
LL
L/
LL
J J
J PAUSE) ............................................12
J J
8 CD lid
9 CD lid open button (CD
! XBS button (XBS) .......................................................12
" CD program, tuner preset button (MEMORY) ...... 7, 11
# Tuning mode, CD play mode select button
(TUNE MODE, CD PLAY MODE) ........................... 8, 10
$ CD stop/program clear, stereo/monaural button
(L CLEAR, FM MODE) ............................................ 9-11
% CD play/pause, band select button
--
JJ
(
-/
J, BAND) ........................................................... 7, 10
--
JJ
& Tuning/CD skip, search buttons
gg
ff
(–/
g,
gg
+ TUNE/CD) ...................................... 7, 10
f/
ff
C
( Function selector (
The function selector switch does not separate entire unit from
mains even if in “TAPE/ ” position.
) Display panel
~ Volume control (
+ Speaker
Note
These speakers do not have magnetic shielding. Do not place
them near televisions, personal computers or other devices easily
influenced by magnetism.
) .........................................13
a
aa
;; ;;
;; REW/REV) ..................... 12
;; ;;
:: ::
:: FF/CUE) ..................... 12
:: ::
c c
c STOP/EJECT) ...................... 12
c c
cc
c).........................................10
cc
) ......................... 7, 10, 12
)............................................ 8
5
RQT5210
 Loading...