

Panasonic RX-CT60, RX-CT65 User Manual

Portable Stereo Component System
Operating Instructions
RX-CT65
Dear customer
Thank you for purchasing this product.
Before connecting, operating or adjusting this product, please read
these instructions completely.
Please keep this manual for future reference.
Table of contents
Model No. RX-CT65
RX-CT60
Control guide.................................................................................3
Speaker connection
Power supply
The radio
Tapes
Recording the radio
Recording tape to tape
Other functions
Troubleshooting guide
Maintenance
Specifications
.........................................................................................6
................................................................................................7
................................................................Back cover
.....................................................................4
.................................................................................5
.....................................................................8
................................................................9
...........................................................................10
.............................................................11
.............................................................Back cover
Supplied accessories
Check the packaging for these accessories.
1 AC power supply cord
Note
The included AC power supply cord is for use with this unit only.
Do not use it with other equipment.
GC
GU GS
RQT7611-G
These operating instructions are applicable to models RXCT65 and RX-CT60, however, are intended primarily for
model RX-CT65.
CAUTION:
Change the voltage setting to suit the AC voltage in your
area. See page 5. Note that the unit will be seriously damaged
or fail to operate correctly if this setting is not made
correctly.
CAUTION!
• DO NOT INSTALL, OR PLACE THIS UNIT IN A BOOKCASE,
BUILT-IN CABINET OR IN ANOTHER CONFINED SPACE.
ENSURE THE UNIT IS WELL VENTILATED. TO PREVENT
RISK OF ELECTRIC SHOCK OR FIRE HAZARD DUE TO
OVERHEATING, ENSURE THAT CURTAINS AND ANY
OTHER MATERIALS DO NOT OBSTRUCT THE
VENTILATION VENTS.
• DO NOT OBSTRUCT THE UNIT’S VENTILATION OPENINGS
WITH NEWSPAPERS, TABLECLOTHS, CURTAINS, AND
SIMILAR ITEMS.
• DO NOT PLACE SOURCES OF NAKED FLAMES, SUCH AS
LIGHTED CANDLES, ON THE UNIT.
• DISPOSE OF BATTERIES IN AN ENVIRONMENTALLY
FRIENDLY MANNER.
WARNING:
TO REDUCE THE RISK OF FIRE, ELECTRIC SHOCK OR
PRODUCT DAMAGE, DO NOT EXPOSE THIS APPARATUS TO
RAIN, MOISTURE, DRIPPING OR SPLASHING AND THAT NO
OBJECTS FILLED WITH LIQUIDS, SUCH AS VASES, SHALL
BE PLACED ON THE APPARATUS.
This product may receive radio interference caused by mobile
telephones during use. If such interference is apparent, please
increase separation between the product and the mobile
telephone.
THIS UNIT IS INTENDED FOR USE IN TROPICAL CLIMATES.
The speakers do not have magnetic shielding. Do not place the
unit near televisions, personal computers or other devices easily
influenced by magnetism.
The socket outlet shall be installed near the equipment and easily
accessible or the mains plug or an appliance coupler shall remain
readily operable.
2
RQT7611
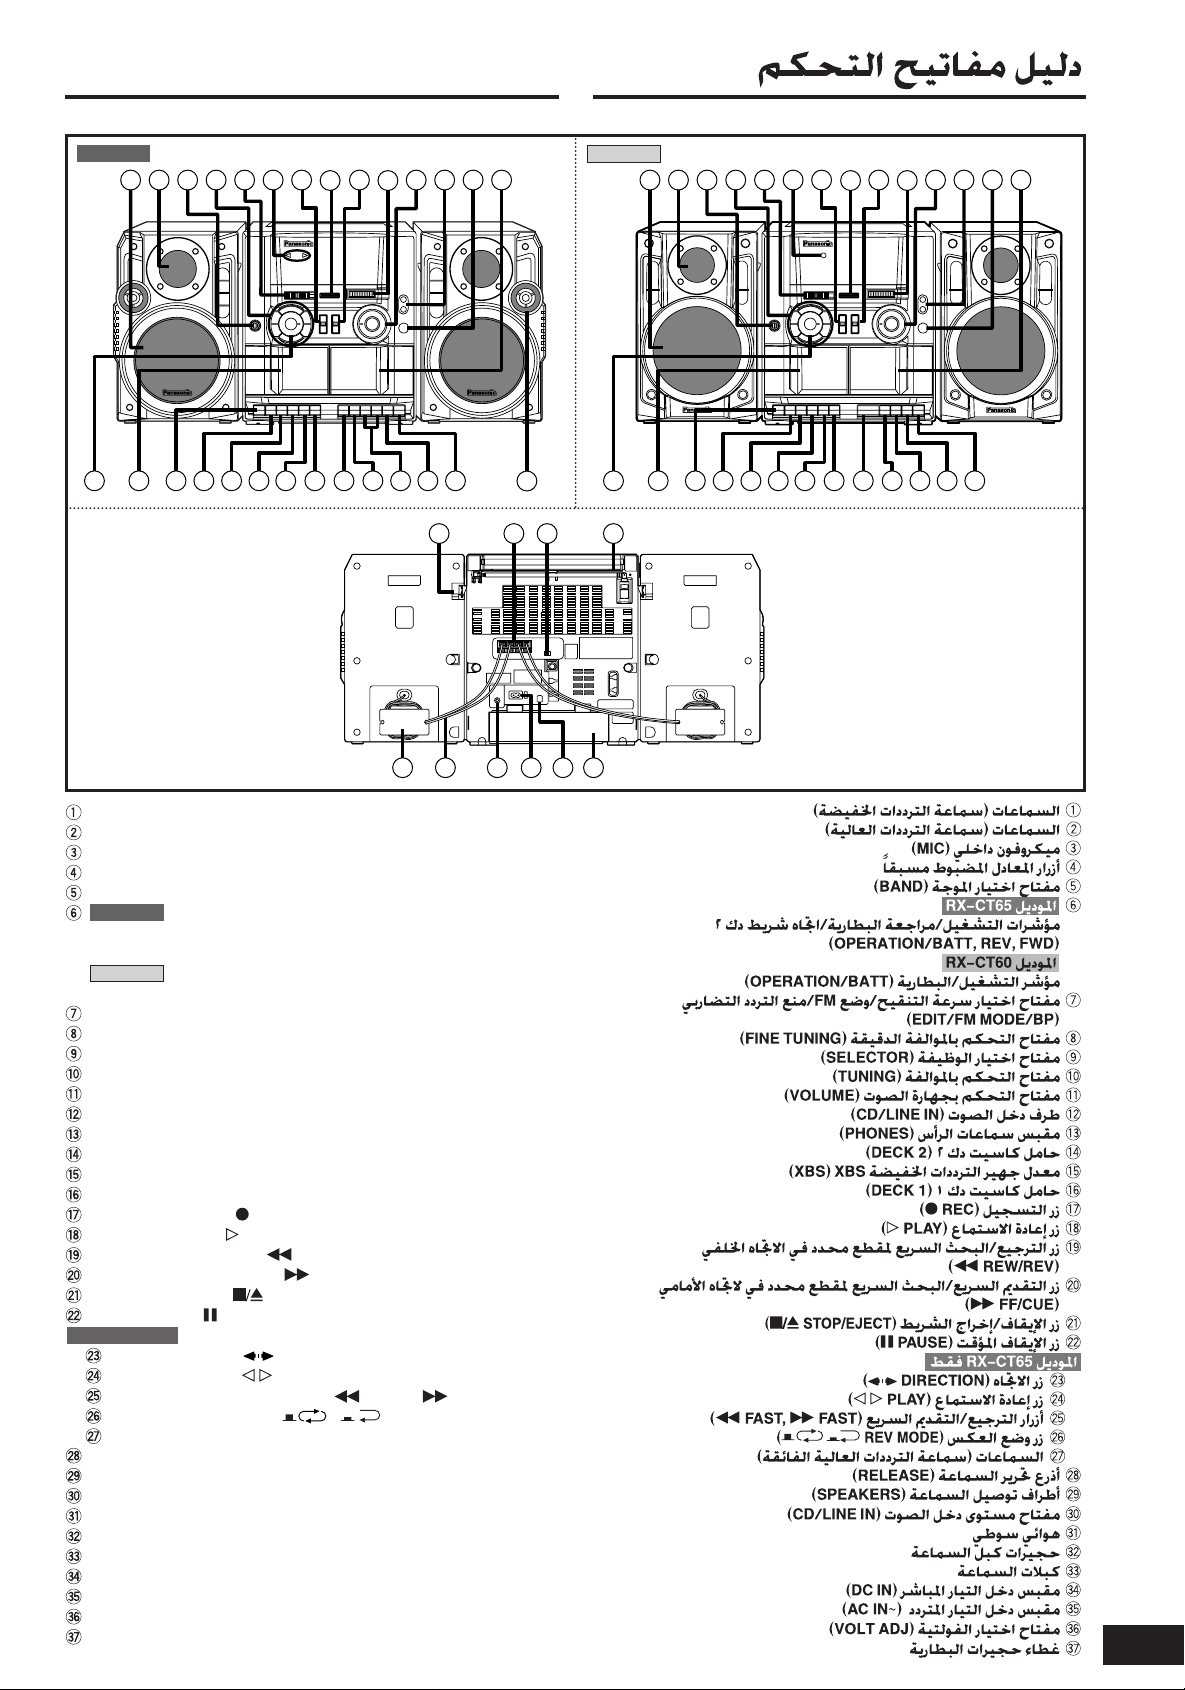
Control guide
RX-CT65 RX-CT60
43
2
1
5 6
7
9
111213
10
8
14
2
1
43
5 6
7
9
111213
10
8
14
17
15
16
Speakers (woofer)
Speakers (tweeter)
Built-in microphone (MIC)
Preset equalizer buttons
Band selector (BAND)
RX-CT65
Operation/battery check/deck 2 tape direction indicators
(OPERATION/BATT, REV, FWD)
RX-CT60
Operation/battery indicator
Editing speed/FM mode/beat proof selector (EDIT/FM MODE/BP)
Fine tuning control (FINE TUNING)
Function selector (SELECTOR)
Tuning control (TUNING)
Volume control (VOLUME)
Audio input terminal (CD/LINE IN)
Headphones jack (PHONES)
Deck 2 cassette holder (DECK 2)
XBS adjustor (XBS)
Deck 1 cassette holder (DECK 1)
Recording button ( REC)
Playback button ( PLAY)
Rewind/review button ( REW/REV)
Fast forward/cue button ( FF/CUE)
Stop/eject button ( STOP/EJECT)
Pause button ( PAUSE)
RX-CT65 only
Direction button ( DIRECTION)
Playback button ( PLAY)
Rewind/fast forward buttons ( FAST, FAST)
Reverse mode button ( REV MODE)
Speakers (super tweeter)
Speaker release levers (RELEASE)
Speaker terminals (SPEAKERS)
Audio input level switch (CD/LINE IN)
Whip antenna
Speaker cord compartments
Speaker cords
DC input jack (DC IN)
AC socket (AC IN~)
Voltage selector (VOLT ADJ)
Battery compartment cover
19
18 20
23
21 21
22
24 25 26
(OPERATION/BATT)
27
28 29 3130
3332 36 373534
15
16 18 20
17 19
21 21 2222 20
18
19
3
RQT7611
OPR OFF
OPR OFF
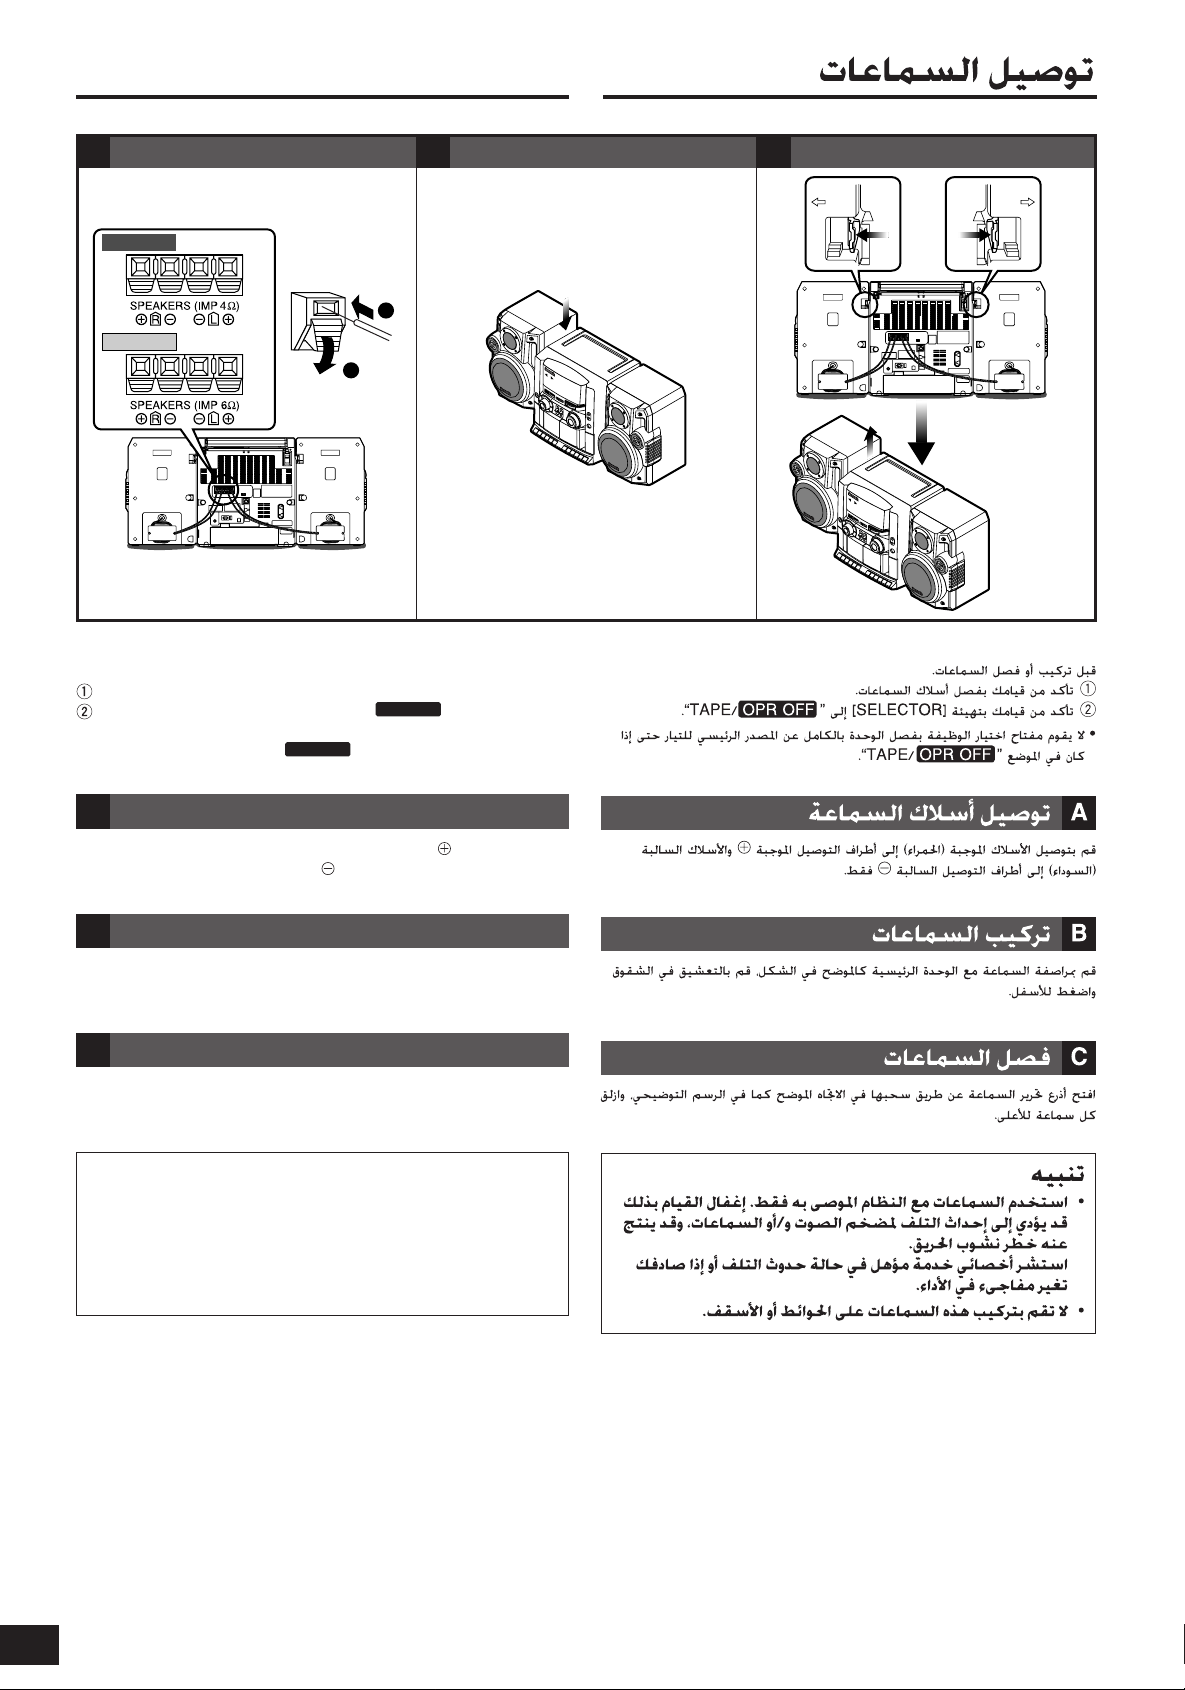
Speaker connection
RELEASE RELEASE
Connect the speaker cordsAAttaching the speakers
RX-CT65
RX-CT60
1
Before attaching or detaching the speakers,
Be sure to disconnect the speaker cords.
Be sure to set [SELECTOR] to “TAPE/ ”.
• The function selector switch does not separate entire unit from
mains even if in “TAPE/ ” position.
B
2
C
Detaching the speakers
A
Connect the speaker cords
Connect only positive (red) wires to positive terminals and
negative (black) wires to negative terminals.
B
Attaching the speakers
Align the speaker with the main unit as shown in the figure, interlock
the grooves and press down.
C
Detaching the speakers
Unlock the speaker release levers by pulling them in direction shown
as illustrated, and slide each speaker up.
Caution
• Use the speakers only with the recommended system.
Failure to do so may lead to damage to the amplifier and/or
the speakers, and may result in the risk of fire.
Consult a qualified service person if damage has occurred
or if you experience a sudden change in performance.
• Do not attach these speakers to walls or ceilings.
4
RQT7611
 Loading...