

Page 1
Infrared Cordless
Stereo Headphones System
RP-WH20
Operating Instioctions
Panasonic
Dear customer
Thar* you lor ptMfmno ffM pfoduei
For portormanoo and aalavy.
features
—Can ba uMd lo approB 7 meeeri *acSy m
irora ol t«a iranamaiar (Tha ^ac»or< io fta
aanamAar and tw oondaon ol tta bananaa
ahonan fw dUmoa )
—Opanair typa haadpNmaa. maiong t aaaior io
uaa twm lor a longar ima Haa «Mda. 40 mflh
molai diamaiaf unno, arwbftng playback ol
powartui daap baaa aounda
~Tha kanammar la poaiarad by №a mokidad AC
adipiar Tha haadpbonaa uaa two A03/t.S03
(AAA. UM-4) bananaa
—Can ba oonnactad to aitbar tha haadphonaa
\àck or ttìa ima output lamimala on audio-viaual
aquipmant uamg tho auppiiad adaptor cord.
Before connecting, operating or ad|ustmg Via
product pteasa read these instruciof» complalaly. Please save this marHjai.
Panaaor>(c Consumer Eieoboràcs Comparty. Olvlelon of
Matsushita Electric Corporation of Amarlca
Panasonic Sales Company, OHnaion of MatauaNla PaclPc of
Puarto RÌC& Inc. rPSC*l
Awe e5daMaravia.Km.9.5Sv>Gabn«in«aaai
P.unDHoeOt3Se6
CE
(g)
RQT4669-P
HxaeRxo)
Page 2

Connections
Connect the audio-visual equip
ment.
There are two ways to connect the unit to
audio-visual equipment: El or
□
fagailjiteGaæOHfe
Use the input plug to connect the unit to the
headphones jack on your audio-visual equip
ment.
© Portable CD player, headphone stereo, radio/
tape players, personal computer, etc.
m
GDCaîSïîfiïj37 03
GirÎÎ?œOGSiïïïft^
Use the supplied adaptor cord to connect the unit
to the line output terminals on your audio-visual
equipment.
® Amplifier, TV set, video deck, cassette deck,
laser disc player, etc.
Connect the power supply to the
transmitter.
The unit is in the standby condition when the AC
adaptor is connected. The primary circuit is
always "live” as long as the AC adaptor is con
nected to an electrical outlet.
Page 3
Operation
Preparation:
Turn on the equipment that you have connected.
If you have connected the transmitter to the
headphones jack on the equipment, turn the vol
ume up as far as possible without causing distor
tion.
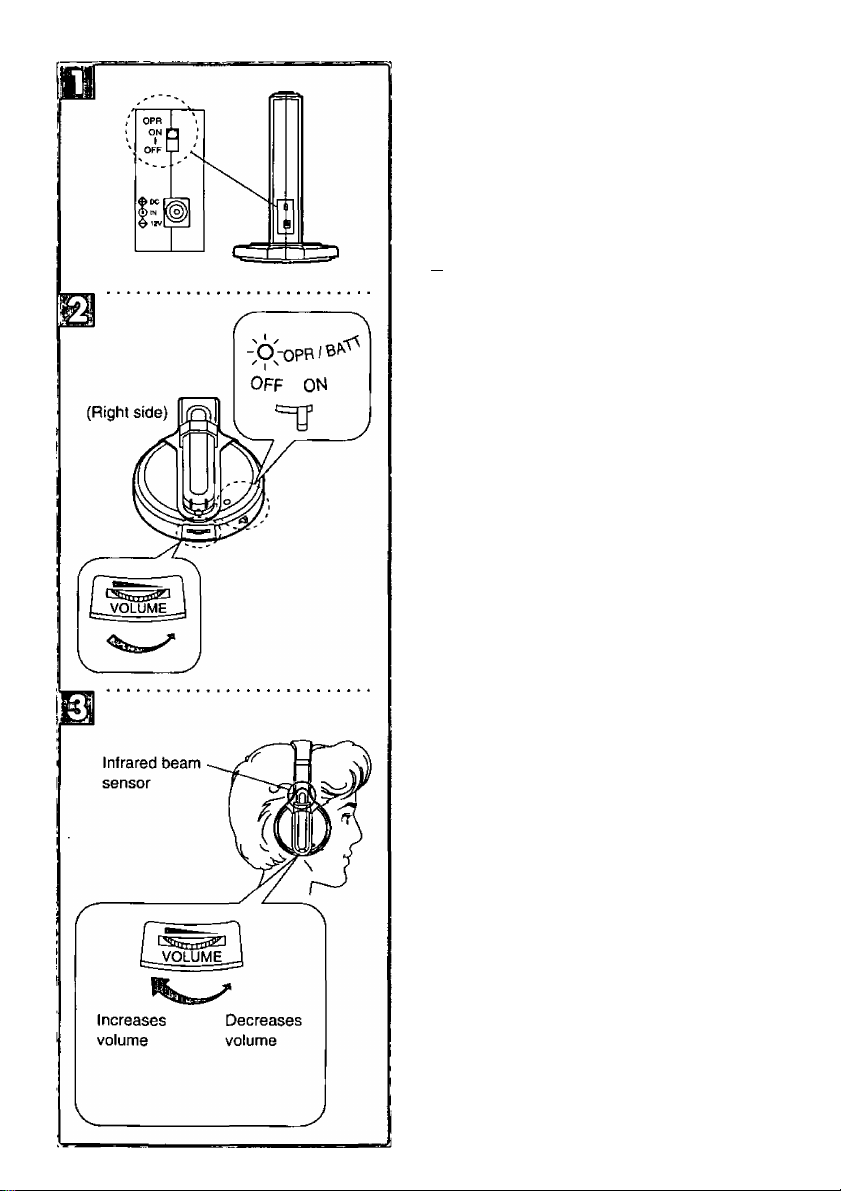
n Switch the transmitter on with
the OPR switch.
Turn the volume on the head
phones all the way down, then
switch them on with the OPR
switch.
The OPR/BATT indicator lights up.
Put the headphones on and ad
just the volume.
Since this unit utilizes an infrared beam, in pro
portion to the range from the infrared beam trans
mitter, hiss may increase. Interception of the
infrared beam causes noise or a break in
sound.
These phenomena are not an indication that the
unit is out of order.
• Use the headphones within the range described
in “Installation”.
• Obstructions decrease the effectiveness of the
sensor. Keep your hands away from the sen
sors.
«This unit uses infrared beams, so do not use
the headphones in direct sunlight.
After use:
«Switch off the headphones, transmitter, and
audio-visual equipment.
«Store the headphones on the transmitter.
Page 4

Product Service
Specifications
Do not attempt to remove the cover(s) or repair
the unit yourself. Refer servicing to qualified
personnel only.
Product information
For product service, product information or
assistance with product operation, refer to the
servicenter directory.
User memo:
DATE OF PURCHASE
DEALER NAME
DEALER ADDRESS _
TELEPHONE NUMBER
______
■ General
Wavelength of infrared beam 860 nm
Modulation system Frequency modulation
Carrier frequency 2.3 MHz for left channel
2.8 MHz for right channel
Transmitting distance
Approx. 7 meters {in front)
Frequency response 19-22,000 Hz
Distortion ratio Less than 1.0% (at 1 kHz)
■ Infrared Beam Transmitter (beam emitter)
RP-WH20T
Power supply DC 12 V, 150 mA
(using AC adaptor, included)
Power consumption 4 W
Dimensions (WXHxD) 125x205x90 mm
Weight Approx. 200 g (including cord)
Audio input terminals
Stereo mini plug or pin plug x2
(using the supplied adaptor cord)
Cord length Approx. 2 m
■ Headphones (beam sensor)
RP-WH20H
Type Open-air dynamic stereo headphones
Unit 40 mm diameter
Power supply Two R03/LR03, AAA, UMr4
batteries
Weight Approx. 240 g (including batteries)
Battery operation time
Batteries
used
Battery
operation
time
■ Accessories
Use numbers indicated in parentheses when
asking for replacement parts.
—AC adaptor (DC 12 V, 150 mA) (RFX1813)
—Adaptor cord (stereo mini jack—pin plug x2)
(RFX1645)
Note:
Specifications are subject to change without
notice.
Weight and dimensions are approximate.
To order accessories contact 1-800-332-5368
or web site (
2 Manganese
batteries
Approx.
20 hours
http://www.panasonic.com).
2 Alkaline
batteries
Approx.
40 hours
Page 5

Troubleshooting guide
Before requesting service for this unit, check the chart below for a possible cause of the problem you
are experiencing. Some simple checks or a minor adjustment on your part may eliminate the problem
and restore proper operation.
If you are in doubt about some of the check points, or if the remedies indicated in the chart do not solve
the problem, refer to the directory of Authorized Service Centers (enclosed with this unit) to locate a
convenient service center, or consult your dealer for instructions.
Problem Probable cause(s) Suggested remedy
No sound.
Distorted sound.
Too much noise.
Is power being supplied to
audio-visual equipment?
Have the transmitter and
audio-visual equipment been
connected properly?
Is the volume on the
headphones down too far?
Is the volume on the audio
visual equipment down too
far?
Is the input level of the audio
signal too high?
• Does the infrared beam
reach the headphones?
• Is the path between the
transmitter and headphones
obstructed by something?
Turn on the power.
Read the section on "Connections” and
connect the units properly. Ensure that
the plugs are properly inserted.
Turn the volume up.
If the transmitter is connected to the
headphones jack, turn the volume up
as far as possible without causing
distortion.
When the transmitter has been
connected to the headphones jack on
audio-visual equipment, turn down the
volume of the connected unit.
Use the headphones nearer the
transmitter.
Make sure that the infrared beam
sensor (on the headphones) is not
covered by your hand, etc.
Change the transmitter’s position and
direction.
Is the input level of the audio
signal too low?
No sound, distorted
sound or too much
noise.
For detailed instructions, contact an authorized servicenter 1-800-211-7262 or web site
(http://www.panasonic.com).
Is the OPR/BATT indicator
dim or out completely?
When the transmitter has been
connected to the headphones jack on
audio-visual equipment, turn up the
volume of the connected unit.
The batteries have run down and need
to be replaced.
Page 6

Installation
These headphones use an infrared beam. The
approximate area in which the infrared beam
from the transmitter (beam emitter) can reach the
headphones (beam sensor) is shown in the fig
ure. Install the infrared beam transmitter inside
the area indicated,
.Notes.
•The infrared beam does not pass through walls
or window panes. The headphones must be
used where the infrared beam transmitter is di
rectly visible without any obstructions.
•Do not expose the headphones to direct sun
light or to the bright light of an invertor fluores
cent light.
Maintenance
To clean this unit, wipe with a soft, dry cloth.
If the surfaces are extremely dirty, use a soft
cloth dipped in a soap-and-water solution or a
weak detergent solution.
• Never use alcohol, paint thinner or benzine to
clean this unit.
•Before using chemically impregnated cloth,
read the instructions that came with the doth
carefully.
Page 7

Battery installation
The headphones are powered by two R03/LR03
(AAA, UM-4, not included) batteries. Insert one
battery each into the battery compartments on
the headphones.
Inserting the batteries:
Push up on the triangle and open the battery compartment lid.
Insert the battery observing po
larity.
Put the lid back on the compart
ment.
How to tell when to change the batteries;
The OPR/BATT indicator on the right hand side
headphone lights up when the headphones are
switched on with the OPR switch. When the bat
teries run down, the indicator dims or fails to light
up. Noise and interference also increase.
Change the batteries if any of these occur.
If rechargeable batteries are to be used,
rechargeable batteries manufactured by
Panasonic are recommended.
Page 8

GSGíflaii
Do not play your headphones or earphones at a
high volume. Hearing experts advise against
continuous extended play.
If you experience a ringing in your ears, reduce
volume or discontinue use.
Handle the AC adaptor carefully. Improper han
dling is dangerous.
©Do not touch it with wet hands.
©Do not place heavy objects on top of it.
©Do not forcibly bend it.
Be sure to connect only the AC adaptor provided
with the unit.
Disconnect the AC adaptor from the power outlet
if the unit is not going to be used for a long time.
You should use extreme caution or temporarily
discontinue use in potentially hazardous situa
tions.
Even if your headphones or earphones is an
open-air type designed to let you hear outside
sounds, don’t turn up the volume so high that you
can’t hear what’s around you.
Sound can be deceiving. Over time your hearing
“comfort level” adapts to higher volumes of
sound. So what sounds “normal” can actually be
loud and harmful to your hearing.
Guard against this by setting your equipment at a
safe level BEFORE your hearing adapts.
To establish a safe level:
©Start your volume control at a low setting,
©Slowly increase the sound until you can hear it
comfortably and clearly, and without distortion.
Once you have established a comfortable sound
level:
©Set the dial and leave it there.
The serial number of this product can be
found on the label under the right ear pad.
Please note them in the space provided
below and keep as a permanent record of
your purchase to aid identification in the
event of theft.
0!Ш
No altering or remodeling
This can cause malfunctioning.
No dropping or strong impacts
This may damage the unit.
Locations to be avoided
Avoid using the unit in the following locations
since they can cause malfunctioning.
1. Bathrooms and other moisture-prone places
2. Warehouses and other dusty places
3. Very hot places near heating appliances, etc.
Do not leave the unit exposed to direct sun-
light for long periods of time.
This may deform or discolor the cabinet and may
also cause malfunctioning.
To avoid product damage, do not expose this
product to rain, water or other liquids.
MODEL NUMBER RP-WH20
SERIAL NUMBER_____________________
 Loading...