

Page 1

Operating Instructions
Digital Wireless Stereo Headphones
Model No. RP-HTX80B
Thank you for purchasing this product.
Please read these instructions carefully before using this product, and save this manual for future use.
E
TQBM0155
Page 2

Safety precautions
∫Unit
WAR NING:
To reduce the risk of fire, electric shock or product damage,
• Do not expose this unit to rain, moisture, dripping or splashing.
• Do not place objects filled with liquids, such as vases, on this unit.
• Use the recommended accessories.
• Do not remove covers.
• Do not repair this unit by yourself. Refer servicing to qualified service personnel.
• Avoid using or placing this unit near sources of heat.
• Do not listen with this unit at high volume in places where you need to hear sounds from the surrounding
environment for safety, such as at railroad crossings, and construction sites.
• Wide band characteristic voltage equal or larger than 75 mV.
• Certification information can be found on the right side of the headphones. Remove the right earpad to see it.
∫Allergies
• Discontinue use if you experience discomfort with the earpads or any other parts that directly contact your
skin.
• Continued use may cause rashes or other allergic reactions.
∫Precautions for listening with the Headphones
• Excessive sound pressure from earphones and headphones can cause hearing loss.
• Do not use your headphones at a high volume. Hearing experts advise against continuous extended play.
• If you experience a ringing in your ears, reduce volume or discontinue use.
• Do not use while operating a motorised vehicle. It may create a traffic hazard and is illegal in many areas.
• You should use extreme caution or temporarily discontinue use in potentially hazardous situations.
This unit may receive radio interference caused by mobile telephones during use. If such interference occurs,
please increase separation between this unit and the mobile telephone.
This unit is intended for use in moderate and tropical climates.
2
Page 3

About Bluetooth
Panasonic bears no responsibility for data and/or information that is compromised during a wireless
transmission.
®
∫Frequency band used
This unit uses the 2.4 GHz frequency band.
∫Certification of this unit
• This unit conforms to frequency restrictions and has received certification based on frequency laws. Thus, a
wireless permit is not necessary.
• The actions below are punishable by law in some countries:
– Taking apart/modifying this unit.
– Removing specification indications.
∫Restrictions of use
• Wireless transmission and/or usage with all Bluetooth® equipped devices is not guaranteed.
• All devices must conform to standards set by Bluetooth SIG, Inc.
• Depending on the specifications and settings of a device, it can fail to connect or some operations can be
different.
• This unit supports Bluetooth
this security may not be sufficient. Transmit data wirelessly to this unit with caution.
• This unit cannot transmit data to a Bluetooth
®
security features. But depending on the operating environment and/or settings,
®
device.
∫Range of use
Use this unit at a maximum range of 10 m.
The range can decrease depending on the environment, obstacles or interference.
∫Interference from other devices
• This unit may not function properly and troubles such as noise and sound jumps may arise due to radio wave
interference if this unit is located too close to other Bluetooth
band.
• This unit may not function properly if radio waves from a nearby broadcasting station, etc. is too strong.
®
devices or the devices that use the 2.4 GHz
∫Intended usage
• This unit is for normal, general use only.
• Do not use this system near an equipment or in an environment that is sensitive to radio frequency
interference (example: airports, hospitals, laboratories, etc).
3
Page 4

Table of contents
Safety precautions ...................................................................................................................................... 2
About Bluetooth
Before use
Accessories................................................................................................................................................. 5
Maintenance................................................................................................................................................ 5
Part names.................................................................................................................................................. 6
Preparation
Charging...................................................................................................................................................... 7
Turning the power on/off ............................................................................................................................. 7
Connecting a Bluetooth
• Pairing (Registration) this unit with the Bluetooth
• Connecting a paired Bluetooth
Operation
Listening to music ..................................................................................................................................... 10
• Remote controlling.............................................................................................................................. 10
Making a phone call ...................................................................................................................................11
Useful functions......................................................................................................................................... 12
• Activating a voice control function...................................................................................................... 12
• Resetting the unit ............................................................................................................................... 12
• Auto power off .................................................................................................................................... 12
• Battery level notification...................................................................................................................... 12
Other
Restoring to the factory settings................................................................................................................ 13
Copyright, etc............................................................................................................................................ 13
Troubleshooting......................................................................................................................................... 14
• General............................................................................................................................................... 14
• Power supply and charging ................................................................................................................ 14
• Bluetooth
• Sound and audio volume.................................................................................................................... 14
• Phone Calls ........................................................................................................................................ 15
Specifications ............................................................................................................................................ 16
To remove the battery when disposing of this unit .................................................................................... 17
®
......................................................................................................................................... 3
®
device.................................................................................................................. 8
®
device ................................................................................................ 9
®
device connection .............................................................................................................14
®
device for connection ............................................ 8
4
Page 5

Before use
Expressions used in this document
• Pages to be referred to are indicated as “l ±±”.
• The product illustrations may differ from the actual product.
Accessories
Please check and identify the supplied accessories.
∏ 1 x USB charging cord
Maintenance
Clean this unit with a dry and soft cloth.
• Do not use solvents including benzine, thinner, alcohol, kitchen detergent, a chemical wiper, etc. This might cause the
exterior case to be deformed or the coating to come off.
5
Page 6
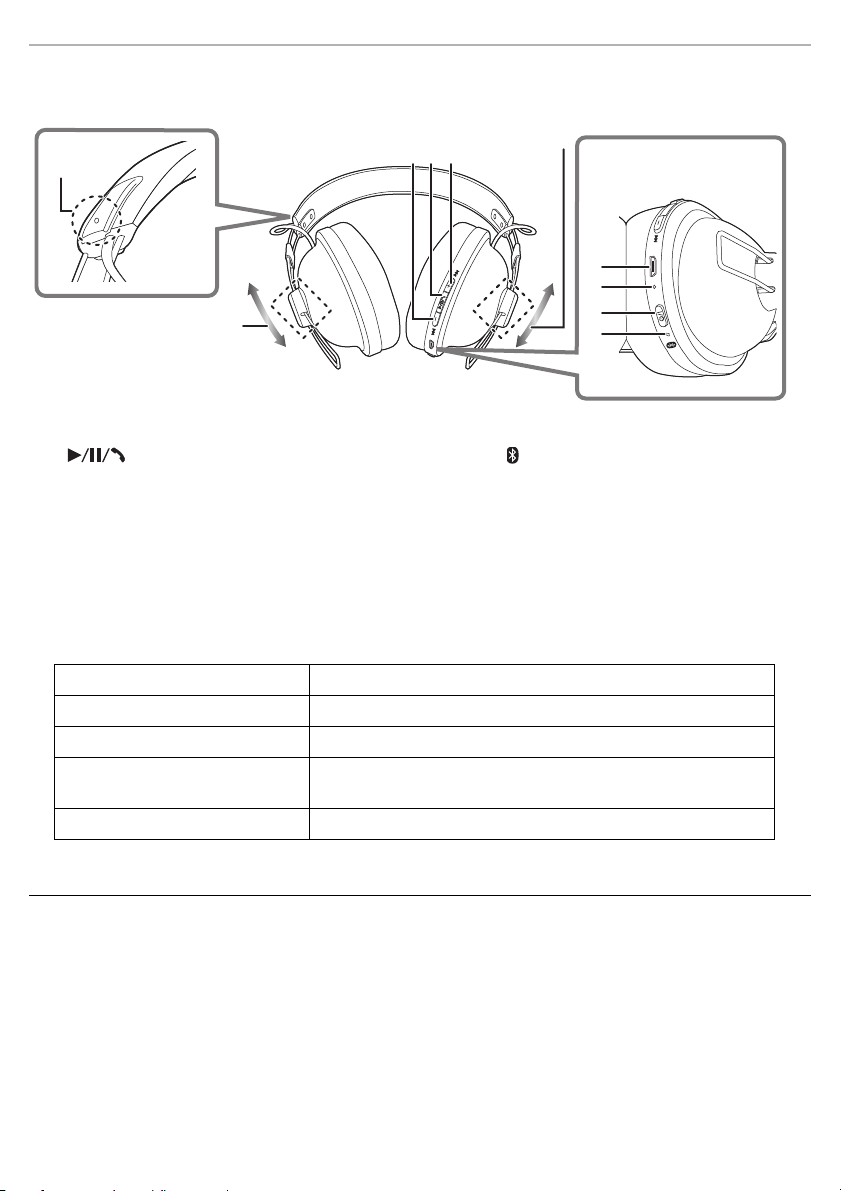
Part names
321
4
5
6
7
Right (R) side
Before use
1[–(:)] button
2 [ ] button
3[+(9)] button
5 Microphone
6[Í/I ( )] button
7 LED indicator light
*1
*2*3
4 Charging terminal (DC IN)
• Connect the USB charging cord (supplied) to this
terminal when charging. (
l 7)
A Raised dot indicating the left side
B This allows you to adjust the housing position of
the headphones.
*1 Í/I: Standby/ON
*2 Hereafter referred to as “LED”
*3 Examples of lighting/blinking patterns
Lighting (red): Charging is in progress
®
Blinking alternately in blue and red: Bluetooth
*4
Blinking slowly (blue)
Blinking twice about every 2 seconds
*4
:
(blue)
Blinking (blue)
*4 The battery is low when it is blinking in red. (
:Bluetooth
A Bluetooth
progress
*4
: A call is being received
pairing (registration) standby
®
connection standby
®
pairing (registration) has been established or a call is in
l 12, “Battery level notification”)
Note
• Do not use any other USB charging cords except the supplied one.
• When using the unit, do not cover the right speaker with the palm of your hand. The Bluetooth
blocked.
®
connection may be
6
Page 7

Preparation
A
B
C
LED
[Í/I ( )]
Charging
The rechargeable battery (installed in the unit) is not charged initially. Charge the battery before using the unit.
Connect this unit to a computer using the
USB charging cord.
A
:LED
B
: USB charging cord (supplied)
• Check the direction of the terminals and plug in/out
straight holding onto the plug. (It may result in
malfunction by the deforming of the terminal if it is
plugged in obliquely or in wrong direction.)
C
: Computer
• The LED lights in red when charging is in progress.
When charging is completed, the LED will go out.
• Charging will take approximately 3.5 hours from
empty state to fully charged.
Note
• The Bluetooth® feature cannot be used when this unit is connected to a computer using the USB charging cord.
• Charge in a room temperature between 10 oC and 35 oC. Outside of this temperature range, charging may stop and
the LED may go out.
• The power cannot be turned on while charging.
• Do not use any other USB charging cords except the supplied one.
Caution: Use only the supplied USB charging cord when connecting to a computer.
Turning the power on/off
In the power-off state, press and hold [Í/I ( )] of this unit for
approx. 3 seconds until the LED (blue) blinks.
• A beep will sound, and the LED (blue) will blink slowly.
∫ To turn the power off
Press and hold [Í/I ( )] for approximately 3 seconds. A beep will sound
and the power will be turned off.
Note
• When the unit is not operated for approximately 5 minutes, the power will automatically turn off. (l 12, “Auto power
off”)
7
Page 8

Preparation
Device
e.g.
Select
Connecting a Bluetooth® device
Preparation
• Place the Bluetooth
• Check the device operation using its operation instructions as required.
®
device within approx. 1 m from the unit.
Pairing (Registration) this unit with the Bluetooth® device for connection
1 In the power-off state, press and hold [Í/I ( )] of this unit until the LED blinks.
When pairing a device for the first time: approx. 3 seconds
When pairing a second or subsequent devices: approx. 5 seconds
• The unit starts to search for the Bluetooth® device for connection, and the LED will blink in blue and red
alternately.
2 Turn on the power of the Bluetooth
3 Select “RP-HTX80B” from the Bluetooth
• A MAC address (an alphanumeric character string that is displayed by
and unique to the device) may be displayed before “RP-HTX80B” is
displayed.
• If prompted for a passkey, input the passkey “0000 (four zeros)” of this
unit.
4 Check the connection with the Bluetooth
unit.
• The LED will blink in blue and red alternately until the connection with the device is completed. When the LED
(blue) blinks twice every approx. 2 seconds, pairing (registration) is completed. (Connection established)
Note
• If connection to a device is not established within approximately 5 minutes, the unit will be turned off. Perform pairing
again.
• You can pair up to 8 Bluetooth
will be replaced. To use it, perform pairing again.
®
devices with this unit. If a 9th device is paired, the device with the oldest connection
®
unit, and enable the Bluetooth® function.
®
device’s menu.
Bluetooth
Bluetooth ON
RP-HTX80B
®
device on the
8
Page 9

Preparation
Connecting a paired Bluetooth® device
1 Turn on this unit.
• Press and hold [Í/I ( )] of this unit for approx. 3 seconds until the LED (blue) blinks.
• A beep will sound, and the LED (blue) will blink slowly.
2 Perform steps 2 and 3 of “Pairing (Registration) this unit with the Bluetooth
connection”. (
• When the LED (blue) blinks twice every approx. 2 seconds, pairing (registration) is completed. (Connection
established)
Note
• This unit remembers the device lastly connected. Connection may be automatically established after step 1 (see
above).
• If connection to a device is not established within approximately 5 minutes, the unit will be turned off. Turn on the unit
again.
l 8)
®
device for
9
Page 10

Operation
Listening to music
If the Bluetooth® compatible device supports the “A2DP” and “AVRCP” Bluetooth® profiles, music can be
played back with remote control operations on the unit.
• A2DP (Advanced Audio Distribution Profile): Transmits audio to the unit.
• AVRCP (Audio/Video Remote Control Profile): Allows remote control of the device using the unit.
1 Connect the Bluetooth
2 Select and play the music on the Bluetooth
• The selected music is output to the speakers of the unit.
• Operating time:
The maximum playback time is approximately 6 hours. (It may become shorter depending on the usage
conditions.)
∫ Attention
• The unit might leak sound depending on the volume level.
• When the volume is increased to near maximum level, music may sound distorted. Decrease the volume until the
distortion is cleared.
Remote controlling
You can control the Bluetooth® device using the unit.
• Depending on the Bluetooth® device or the app, even if you press buttons on the unit, some functions may not
respond or may operate differently from the descriptions below.
(Operation example)
®
device and the unit. (l 8, “Connecting a Bluetooth® device”)
®
device.
Function Operation
Play / Pause Press [ ].
Increase the volume Press [+ (9)].
Decrease the volume Press [– (:)].
Forward to the start of next
track
Return to the start of current
track
Press and hold [+ (9)] for approximately
2 seconds.
Press and hold [– (:)] for approximately
2 seconds.
Note
• The volume can be adjusted in 16 levels. When the maximum or minimum volume is reached, a beep will sound.
10
Page 11

Operation
[]
Making a phone call
With Bluetooth® enabled phones (cell phones or smartphones) that support the “HSP” or “HFP” Bluetooth®
profile, you can use the unit for phone calls.
• HSP (Headset Profile):
This profile can be used to receive monaural sounds and establish two-way communication using the
microphone on the unit.
• HFP (Hands-Free Profile):
In addition to the HSP functions, this profile has the incoming and outgoing calls function.
(This unit does not have a function that allows you to make phone calls independently of a Bluetooth
phone.)
1 Connect the Bluetooth
®
device and the unit. (l 8, “Connecting a Bluetooth® device”)
2 Press [ ] on the unit and answer the incoming call.
• During an incoming call, ringtone will sound from the speaker and the LED
will blink.
• (HFP only) To reject the incoming call, press [ ] twice quickly.
3 Start talking.
• The LED will repeatedly blink 2 times during a call.
• The volume can be adjusted during a phone call. For setting instructions, see page 10.
4 Press [ ] to end the phone call.
• A beep will sound.
®
enabled
Note
• There may be instances when hands free setting needs to be done on the Bluetooth® enabled phone.
• Depending on the Bluetooth
the unit.
• (HFP only) The calling device will be switched between the Bluetooth
on the unit twice quickly to switch.)
• You can have the Bluetooth
Bluetooth
®
enabled phone. (l 12, “Activating a voice control function”)
®
enabled phone, you may hear incoming and outgoing call ringtones of the phone from
®
enabled phone and the unit. (Press [ ]
®
enabled phone make phone calls by using the microphone of the unit and an app of the
11
Page 12

Operation
Useful functions
Activating a voice control function
You can activate the voice control function of your Bluetooth® device (smartphone, etc.) and control the device
by speaking to the microphone of the unit.
1 Connect the Bluetooth
®
device and the unit. (l 8, “Connecting a Bluetooth® device”)
2 Press and hold [ ] of this unit for approx. 3 seconds.
• The voice control app on the Bluetooth® device will be activated.
Note
• For details about voice control commands, refer to the operating instructions for the Bluetooth® device.
• Depending on the device, a voice control function may not be available.
Resetting the unit
This unit can be reset when all operations are rejected. To reset the unit, press and hold [Í/I ( )] for
10 seconds or more. All the previous operations will be cancelled. (The pairing device information will not be
deleted.)
Auto power off
®
If the unit is not connected to a Bluetooth
5 minutes after you have stopped using it.
Battery level notification
When the battery level is low during use of the unit, the blue blinking LED will change to red. A beep will sound
every 1 minute. When the battery runs out, the power will turn off.
device, the unit will beep and turn off automatically approximately
12
Page 13

Other
Restoring to the factory settings
When you want to delete all pairing device information, etc., you can restore the unit to the factory settings
(original settings upon purchase). Charge the battery before restoring the unit.
1 While the unit is turned off, press and hold [Í/I ( )] for at least 5 seconds until the LED
starts blinking alternately in blue and red.
2 While the LED is blinking alternately in blue and red, press and hold [+ (9)] and
[– (:)] at the same time for at least 5 seconds.
• The default settings will be restored after the LED (blue) blinks fast and the unit turns off.
∫ Attention
• When pairing a device again, delete the registering information (Device: “RP-HTX80B”) from the Bluetooth® device’s
menu, and register this unit with the Bluetooth
®
device again. (l 8)
Copyright, etc.
The Bluetooth® word mark and logos are registered trademarks owned by the Bluetooth SIG, Inc. and any
use of such marks by Panasonic Corporation is under license.
Other trademarks and trade names are those of their respective owners.
Other system names and product names appearing in this document are in general the registered
trademarks or trademarks of the respective developer companies.
Note that the
TM
mark and ® mark do not appear in this document.
13
Page 14

Other
Troubleshooting
Before requesting service, make the following checks. If you are in doubt about some of the check points, or if
the remedies indicated do not solve the problem, consult your dealer for instructions.
General
The unit does not respond.
• This unit can be reset when all operations are rejected. To reset the unit, press and hold [Í/I ( )] for 10 seconds or
l 12)
more. (
Power supply and charging
Cannot charge the unit.
• Make sure the computer is turned on and is not on standby or sleep mode.
• Is the USB port you are currently using working properly? If your computer has other USB ports, unplug the connector
from its current port and plug it into one of the other ports.
• If the measures mentioned above are not applicable, unplug the USB charging cord and plug it in again.
• If the charge time and operating time become shortened, the battery may have run down. (Number of charging times
of the installed battery: Approximately 300.)
LED does not light during charging. / Charging takes longer.
• Is the USB charging cord (supplied) connected firmly to the USB terminal of the computer? (l 7)
• Make sure to charge in a room temperature between 10 oC and 35 oC.
The power does not turn on.
• Is the unit being charged? The power cannot be turned ON during charging. (l 7)
Bluetooth® device connection
The device cannot be connected.
• Delete the pairing information for this unit from the Bluetooth® device, then pair them again. (l 8)
Sound and audio volume
No sound.
• Make sure that the unit and the Bluetooth® device are connected correctly. (l 8)
• Check if music is playing on the Bluetooth
• Make sure that the unit is turned on and the volume is not set too low.
• Pair and connect the Bluetooth
• Check if the Bluetooth
l 10). Also refer to the operating manual for the Bluetooth
(
®
®
device and the unit again. (l 8)
compatible device supports “A2DP” profile. For details on profiles, see “Listening to music”
®
device.
®
compatible device.
Low volume.
• Increase the volume of the unit. (l 10)
• Increase the volume on the Bluetooth
®
device.
14
Page 15

Other
Sound from the device is cut off. / Sound quality is bad.
• Sound may be disrupted if signals are blocked. Do not fully cover this unit with the palm of your hand, etc.
• The device may be out of the 10 m communication range. Move the device closer to this unit.
• Remove any obstacle between this unit and the device.
• Switch off any wireless LAN device when not in use.
• A communication problem may arise if the battery is not fully charged. Charge the unit. (
l 7)
Phone Calls
You cannot hear the other person.
• Make sure that the unit and the Bluetooth® enabled phone are turned on.
• Check if the unit and the Bluetooth
• Check the audio settings of the Bluetooth
Bluetooth
• If the volume of the other person’s voice is too low, increase the volume of both the unit and the Bluetooth
phone.
®
enabled phone. (l 8)
Cannot make a phone call.
• Check if the Bluetooth® compatible device supports “HSP” or “HFP” profile. For details on profiles, see “Listening to
l 10) and “Making a phone call” (l 11). Also refer to the operating manual for the Bluetooth
music” (
phone.
®
enabled phone are connected. (l 8)
®
enabled phone. Switch the calling device to the unit if it is set to the
®
®
enabled
enabled
15
Page 16

Specifications
∫ General
Other
Power supply DC 5 V, 330 mA
Operating time
Charging time
Charging temperature range 10 oC to 35 oC
Operating temperature range 0 oC to 40 oC
Operating humidity range 35%RH to 80%RH (no condensation)
Mass Approx. 190 g
*1 It may be shorter depending on the operating conditions.
*2 Time taken to recharge from empty to full.
*1
*2
(25 oC) Approx. 3.5 hours
(Internal battery: 3.7 V (Li-polymer 430 mAh))
Approx. 24 hours
∫ Bluetooth® section
Bluetooth
Wireless equipment classification Class 2 (2.5 mW)
Frequency band 2402 MHz to 2480 MHz
Max RF power 4dBm
Supported profiles A2DP, AVRCP, HSP, HFP
Supported codec SBC
Operating distance Up to 10 m
®
system specification Ver. 4. 1
∫ Speaker section
Driver units 40 mm
∫ Terminal section
DC IN DC 5 V, 330 mA
∫ Microphone section
Typ e Mono
∫ Accessory section
USB charging cord 0.5 m
• Specifications are subject to change without notice.
16
Page 17

Other
To remove the battery when disposing of this unit
The following instructions are not intended for repairing purposes but for the disposal of this unit.
This unit is not restorable once disassembled.
• When disposing of this unit, take out the battery installed in this unit and recycle it.
• Disassemble after the battery runs out.
• Keep disassembled parts out of reach of children.
Regarding the handling of used batteries
• Insulate the terminals with adhesive tape or similar material.
• Do not disassemble.
∫ Batteries
• Do not heat or expose to flame.
• Do not leave the battery(ies) in a car exposed to direct sunlight for a long period of time with doors and
windows closed.
• Battery mishandling can cause electrolyte leakage which can damage items the leaked fluid comes into
contact with. If electrolyte leaks from the battery, consult your dealer. Wash thoroughly with water if electrolyte
comes in contact with any part of your body.
• When disposing of the batteries, please contact your local authorities or dealer and ask for the correct method
of disposal.
12
3
1 Remove the left ear pad.
2 Remove the 4 screws, and lift and flip the part A.
3 Cut off the wires one by one with scissors, and remove the battery.
17
Page 18

Other
Declaration of Conformity (DoC)
Hereby, “Panasonic Corporation” declares that this product is in compliance with the essential requirements and
other relevant provisions of
Directive 2014/53/EU.
Customers can download a copy of the original DoC to our RE products from our DoC server:
http://www.ptc.panasonic.eu
Contact to Authorised Representative:
Panasonic Marketing Europe GmbH,
Panasonic Testing Centre, Winsbergring 15, 22525 Hamburg, Germany
Type of wireless Frequency band Maximum power
Bluetooth
®
2402 - 2480 MHz 4 dBm
Disposal of Old Equipment and Batteries
Only for European Union and countries with recycling systems
These symbols on the products, packaging, and/or accompanying documents mean that used
electrical and electronic products and batteries must not be mixed with general household waste.
For proper treatment, recovery and recycling of old products and used batteries, please take them to
applicable collection points in accordance with your national legislation.
By disposing of them correctly, you will help to save valuable resources and prevent any potential
negative effects on human health and the environment.
For more information about collection and recycling, please contact your local municipality.
Penalties may be applicable for incorrect disposal of this waste, in accordance with national
legislation.
Note for the battery symbol (bottom symbol):
This symbol might be used in combination with a chemical symbol. In this case it complies with the
requirement set by the Directive for the chemical involved.
For Thailand only
This telecommunication equipment conforms to NTC/NBTC technical requirement.
18
Page 19

Sales and Support Information
TQBM0155
F1017HA0
Customer Communications Centre
• For customers within the UK: 0344 844 3899
• For customers within Ireland: 01 289 8333
• Monday–Friday 9:00 am–5:00 pm (Excluding public holidays).
• For further support on your product, please visit our website:
www.panasonic.co.uk
Direct Sales at Panasonic UK
• Order accessory and consumable items for your product with ease and confidence by phoning our Customer Communications
Centre Monday–Friday 9:00 am–5:00 pm (Excluding public holidays).
• Or go on line through our Internet Accessory ordering application at www.pas-europe.com
• Most major credit and debit cards accepted.
• All enquiries transactions and distribution facilities are provided directly by Panasonic UK.
• It couldn’t be simpler!
• Also available through our Internet is direct shopping for a wide range of finished products. Take a browse on our website for
further details.
.
Manufactured by: Panasonic Corporation
Kadoma, Osaka, Japan
Importer for Europe: Panasonic Marketing Europe GmbH
Panasonic Testing Centre
Winsbergring 15, 22525 Hamburg, Germany
Panasonic Corporation
http://www.panasonic.com
Panasonic Corporation 2017
EU
 Loading...