

Page 1
Operating Instructions
printing
DAB-FM Radio
Model No. RF-D10
Thank you for purchasing this product.
For optimum performance and safety, please read these instructions carefully.
Please keep this manual for future reference.
Panasonic Corporation
Web Site: http://panasonic.net
© Panasonic Corporation 2014
En
GN
RQTN0174
L0114CH0
Page 2
Safety precautions
printing
WARNING!
Unit
• To reduce the risk of fire, electric shock or product
damage,
– Do not expose this unit to rain, moisture, dripping
or splashing.
– Do not place objects filled with liquids, such as
vases, on this unit.
– Use only the recommended accessories.
– Do not remove covers.
– Do not repair this unit by yourself. Refer servicing
to qualified service personnel.
AC mains lead
• The mains plug is the disconnecting device. Install
this unit so that the mains plug can be unplugged
from the socket outlet immediately.
CAUTION!
Unit
• This unit may receive radio interference caused by
mobile telephones during use. If such interference
occurs, please increase separation between this
unit and the mobile telephone.
Battery
• Danger of explosion if battery is incorrectly
replaced. Replace only with the type recommended
by the manufacturer.
• When disposing the batteries, please contact your
local authorities or dealer and ask for the correct
method of disposal.
• Do not heat or expose to flame.
• Do not leave the battery(ies) in a car exposed to
direct sunlight for a long period of time with doors
and windows closed.
• Do not break open or short-circuit the battery.
• Do not charge the alkaline or manganese battery.
• Do not use the battery if the cover has peeled off.
• Remove the battery if you do not use the unit for a
long period of time or if the unit is to be powered
exclusively by AC power. Keep in a cool, dark area.
Small objects
• The knobs (e.g., [VOLUME] knob) can come off
when pulled hard. To prevent children from
swallowing the knob, do not pull it off.
This product incorporates the following software:
(1) The software developed independently by or for
Panasonic Corporation,
(2) The software owned by third party and licensed
to Panasonic Corporation, and/or
(3) Open source software
The software categorized as (3) is distributed in the
hope that it will be useful, but WITHOUT ANY
WARRANTY, without even the implied warranty of
MERCHANTABILITY or FITNESS FOR A
PARTICULAR PURPOSE. Please refer to the
detailed terms and conditions thereof shown below.
This software is copyright 2008 Simon Tatham.
Permission is hereby granted, free of charge, to any
person obtaining a copy of this software and
associated documentation files (the “Software”), to
deal in the Software without restriction, including
without limitation the rights to use, copy, modify,
merge, publish, distribute, sublicense, and/or sell
copies of the Software, and to permit persons to
whom the Software is furnished to do so, subject to
the following conditions:
The above copyright notice and this permission
notice shall be included in all copies or substantial
portions of the Software.
THE SOFTWARE IS PROVIDED “AS IS”, WITHOUT
WARRANTY OF ANY KIND, EXPRESS OR
IMPLIED, INCLUDING BUT NOT LIMITED TO THE
WARRANTIES OF MERCHANTABILITY, FITNESS
FOR A PARTICULAR PURPOSE AND
NONINFRINGEMENT. IN NO EVENT SHALL THE
COPYRIGHT HOLDERS BE LIABLE FOR ANY
CLAIM, DAMAGES OR OTHER LIABILITY,
WHETHER IN AN ACTION OF CONTRACT, TORT
OR OTHERWISE, ARISING FROM, OUT OF OR IN
CONNECTION WITH THE SOFTWARE OR THE
USE OR OTHER DEALINGS IN THE SOFTWARE.
Supplied accessories
Check and identify the supplied accessories.
1 AC mains lead
RQTN0174
2
- If you see this symbol -
Information on Disposal in other Countries
outside the European Union
This symbol is only valid in the European
Union.
If you wish to discard this product,
please contact your local authorities or
dealer and ask for the correct method of
disposal.
Page 3

Troubleshooting
printing
Specifications
General
Sound is distorted or no sound.
• Adjust the volume.
• Check and adjust the antenna.
• Move the unit to another location and do a full scan
again.
• An AC mains lead or fluorescent light is near the
cables. Keep other appliances and cords away from
the cables of this unit.
Reception is poor or beat sound is heard.
• Keep the antenna away from computers, TVs, other
cables and cords. Move mobile telephones away
from the unit if the interference is apparent.
Messages
“Service not available”
• No DAB reception.
“No DAB station”
• No DAB station available.
• Check the antenna.
• Move the unit to another location and do a full scan
again.
“Time Not saved”
• The changes made to the time was not saved, the
changes will be lost.
“Alarm Not saved”
• The changes made to the alarm was not saved, the
changes will be lost.
Power supply
AC AC 230 V to 240 V, 50 Hz
Battery DC 6 V (4 x R14/LR14, C)
Power consumption 7 W
Frequency range
FM 87.50 MHz to 108.00 MHz (50 kHz steps)
DAB/DAB+ BAND III
Terminal
Headphones Stereo, 3.5 mm jack (16 Ω)
Speaker
Full range 10 cm (4 Ω)
Output power 2 W (RMS 10% THD)
Battery life
Power
source
FM Approx. 9 H Approx. 30 H
DAB/DAB+ Approx. 12 H Approx. 40 H
Dimensions (W x H x D) 251 mm x 138 mm x 91 mm
Mass
With batteries 1.3 kg
Without batteries 1.0 kg
Operating temperature range 0°C to +40°C
Operating humidity range
Power consumption in standby mode
Note:
Specifications are subject to change without notice. Mass
and dimensions are approximate.
5A to 13F (174.928 MHz to 239.200 MHz)
Manganese
R14 battery
35% to 80% RH (no condensation)
Alkaline
LR14 battery
0.6 W (approximate)
RQTN0174
3
Page 4

Limited Warranty
Panasonic Australia Pty. Limited
ACN 001 592 187 ABN 83 001 592 187
1 Innovation Road, Macquarie Park NSW 2113
PRO-031-F11 Issue: 4.0 01-01-2011
If you require assistance regarding warranty conditions or any other enquiries, please visit the
Panasonic Australia website
www.panasonic.com.au or contact by phone on 132 600
If phoning in, please ensure you have your operating instructions available.
THIS WARRANTY CARD AND THE PURCHASE DOCKET (OR SIMILAR PROOF OF PURCHASE)
SHOULD BE RETAINED BY THE CUSTOMER AT ALL TIMES
Panasonic Authorised Service Centres are located in major metropolitan areas and most regional centres of Australia, however,
coverage will vary dependant on product. For advice on exact Authorised Service Centre locations for your product, please telephone
our Customer Care Centre on 132600 or visit our website and use the Service Centre Locator.
In addition to your rights under this warranty, Panasonic products come with consumer guarantees that cannot be excluded under the
Australian Consumer Law. If there is a major failure with the product, you can reject the product and elect to have a refund or to have
the product replaced or if you wish you may elect to keep the goods and be compensated for the drop in value of the goods. You are
also entitled to have the product repaired or replaced if the product fails to be of acceptable quality and the failure does not amount to
a major failure.
If there is a major failure in regard to the product which cannot be remedied then you must notify us within a reasonable period by
contacting the Panasonic Customer Care Centre. If the failure in the product is not a major failure then Panasonic may choose to repair
or replace the product and will do so in a reasonable period of time from receiving notice from you.
The product is warranted for 12 months from the date of purchase. Subject to the conditions of this warranty Panasonic or its
Authorised Service Centre will perform necessary service on the product without charge for parts or labour, if in the opinion of
Panasonic, the product is found to be faulty within the warranty period.
This warranty only applies to Panasonic products purchased in Australia and sold by Panasonic Australia or its Authorised
Distributors or Dealers and only where the products are used and serviced within Australia or it's territories. Warranty cover only
applies to service carried out by a Panasonic Authorised Service Centre and only if valid proof of purchase is presented when
warranty service is requested.
This warranty only applies if the product has been installed and used in accordance with the manufacturer’s recommendations (as
noted in the operating instructions) under normal use and reasonable care (in the opinion of Panasonic). The warranty covers
normal domestic use only and does not cover damage, malfunction or failure resulting from use of incorrect voltages, incorrect
installation, accident, misuse, neglect, build-up of dirt or dust, abuse, maladjustment of customer controls, mains supply problems,
thunderstorm activity, infestation by insects or vermin, tampering or repair by unauthorised persons (including unauthorised
alterations), introduction of sand, humidity or liquids, commercial use such as hotel, office, restaurant, or other business or rental
use of the product, exposure to abnormally corrosive conditions or any foreign object or matter having entered the product.
This warranty does not cover the following items unless the fault or defect existed at the time of purchase:
(a) Cabinet Part(s) (e) DVD, Blu-ray or Recordable Discs
(b) Video or Audio Tapes (
f
) Video / Audio Heads from wear and tear in normal use
(c) SD cards or USB devices (g) Information stored on Hard Disk Drive, USB stick or SD card
(d) User replaceable Batteries (h) DTV reception issues caused by TV Aerial / Cabling / Wall socket(s) etc
Some products may be supplied with Ethernet connection hardware. The warranty is limited on such products and will not cover
(a) Internet and or DLNA connection / setup related problems
(b) Access fees and or charges incurred for internet connection
(c) The use of incompatible software or software not specifically stipulated in the product operations manual; and
(d) Any indirect or consequential costs associated with the incorrect use or misuse of the hardware, its connection to the internet or
any other device.
To claim warranty service, when required, you should:
• Telephone Panasonic’s Customer Care Centre on 132600 or visit our website referred to below and use the Service Centre
Locator for the name/address of the nearest Authorised Service Centre.
• Send or take the product to a Panasonic Authorised Service Centre together with your proof of purchase receipt as a proof of
purchase date. Please note that freight and insurance to and / or from your nearest Authorised Service Centre must be
arranged by you.
• Note that home or pick-up/delivery service is available for the following products in the major metropolitan areas of Australia or
the normal operating areas of the nearest Authorised Service Centres:
- Plasma/LCD televisions / displays (screen size greater than 103 cm)
The warranties hereby conferred do not extend to, and exclude, any costs associated with the installation, de-installation or
re-installation of a product, including costs related to the mounting, de-mounting or remounting of any screen, (and any other
ancillary activities), delivery, handling, freighting, transportation or insurance of the product or any part thereof or replacement of and
do not extend to, and exclude, any damage or loss occurring by reason of, during, associated with, or related to such installation,
de-installation, re-installation or transit.
1.
2.
3.
4.
5.
6.
7.
Panasonic Warranty
printing
RQTN0174
4
Page 5

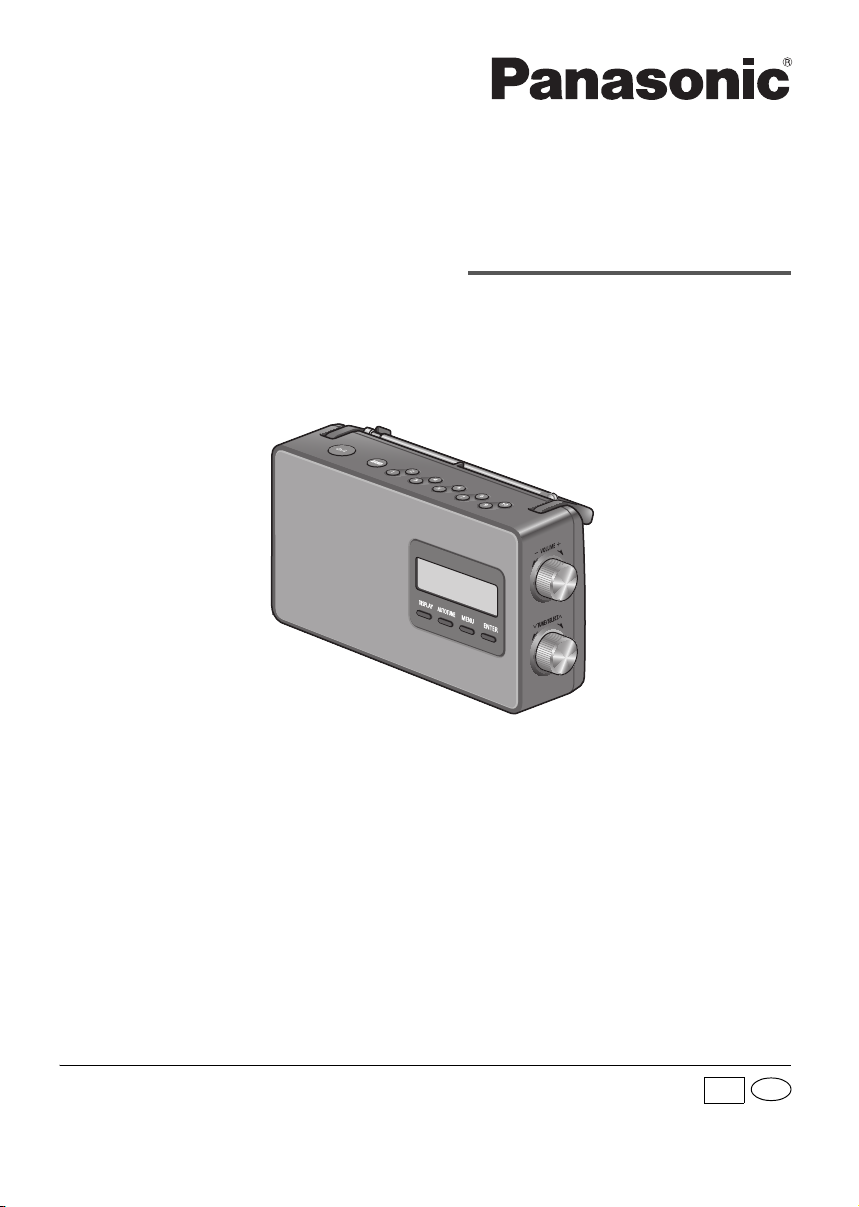
Overview of controls
L
M
P
N
O
1
2
3
4
5
6
7
8
9
J
K
Front view
Rear view
Weak Strong
Signal strength indicator
(blinking)
printing
A Standby/on switch [1]
Press to switch the unit from on to standby mode
or vice versa. In standby mode, the unit is still
consuming a small amount of power.
B Select FM or DAB radio
C Direct preset buttons
D Adjust the volume
E Select desired frequency in manual tuning
View available options
F Confirm an option
G View available menu
H Auto tuning for FM stations
I View available information
J Display panel
K Speaker (monaural)
The speaker does not have magnetic shielding. Do
not put this unit near TVs, PCs or other equipment
easily influenced by magnetism.
L Antenna
Extend the antenna, adjust the
length, angle and direction for
best reception.
M Handle
N Headphones jack
Plug type: Ø 3.5 mm stereo (not supplied)
– Excessive sound pressure from earphones and
headphones can cause hearing loss.
– Listening at full volume for long periods may
damage the user’s ears.
O AC IN terminal
P Battery compartment
RQTN0174
5
Page 6

Power sources
To household
mains socket
1
2
3
4
R14/LR14, C
Press towards while
inserting the battery.
Number of stations found
printing
Getting started
Using the household mains socket
Connect the AC mains lead firmly to the unit and the
household mains socket.
Note:
• Do not use an AC mains lead from other equipment.
• This unit consumes a small amount of power when it is
in standby mode. Disconnect the power supply if you
do not use the unit.
Using the batteries (not supplied)
1 Extend the antenna.
2 Press [1] to switch on the unit.
The first time you switch on the unit, it will enter DAB
mode and automatically scan for stations. It sets the
time and date (if data is available) and starts playing
the first station it finds.
Note:
In standby mode, the unit shows the time and date (only
when the unit is powered by AC).
DAB
DAB (Digital Audio Broadcasting) is a procedure of
broadcasting the radio digitally. It gives less
interference and better sound quality.
This unit supports DAB in “BAND III” bands.
DAB operation
The first time you enter DAB mode, or if the station list
is empty, the unit will start the full scan and memorise
the stations.
You can perform the full scan procedure when there is
a new station or a station becomes available.
1 Press [BAND] to select “DAB”.
2 Press [MENU] to select “Full scan” and then
press [ENTER] to start full scan.
To cancel, press [MENU].
Use alkaline or manganese batteries.
Install the batteries so that the poles (+ and –) align
with those in the unit.
This unit will use the batteries as the power source
when you disconnect the AC mains lead. The battery
indicator will light up.
The battery indicator shows the battery levels.
Note:
• The unit switches on after you insert the batteries.
• When the battery indicator “ ” begins flashing,
replace all 4 of the batteries.
• After the battery indicator flashes for 10 seconds, the
unit will switch off automatically.
RQTN0174
6
█ Remove unavailable listed stations
This unit indicates those stations that are closed or no
longer available with a question mark in front of the
station name. You can remove these stations from the
station list.
1 Press [MENU] and then turn
[ TUNE/SELECT ] to select “Prune”.
2 Press [ENTER].
3 Turn [ TUNE/SELECT ] to select “Yes” and
then press [ENTER].
To cancel, select “No”.
Page 7

Listening to a station
threshold indicator
printing
1 Turn [ TUNE/SELECT ] to select a station
from the station list.
2 Press [ENTER] to tune to the selected station.
Note:
“ ” indicates a secondary service station. Secondary
service stations are always listed next to their primary
station in the station list.
Viewing available information
You can view various information about the DAB
broadcast such as dynamic label information (if
available), signal strength, program type, ensemble
name, channel number, bit rate, DAB variant and date.
Press [DISPLAY] to view available information.
Press and hold [DISPLAY] to show the default display.
Presetting stations
You can preset up to 10 stations into the direct preset
buttons.
1 While listening to a station, press and hold the
desired direct preset button ([1] to [10]).
Example: press and hold [2] to store current station
into preset 2.
2 Press [ENTER] to preset the station.
█ Listening to a preset station
Press the direct preset button ([1] to [10]) to listen
to the preset station.
Manual tuning
You can perform manual tuning to a particular channel
or frequency. This can be useful when you are
adjusting the antenna to achieve the best possible
reception and scanning a particular channel to update
the station list.
1 Press [MENU].
2 Turn [ TUNE/SELECT ] to select “Manual
tune” and then press [ENTER].
3 Turn [ TUNE/SELECT ] to select a
frequency or channel and then press [ENTER].
The display shows the received signal strength of
the selected frequency. Adjust the antenna to
achieve the best reception.
Adjust the antenna so that the received signal
strength (solid rectangles) exceeds the threshold
indicator.
FM radio
1 Press [BAND] to select “FM”.
2 Press [AUTOTUNE] to tune to a station.
The unit stops tuning when it finds a station.
Press [AUTOTUNE] again to tune to the next
station.
Manual tuning
Turn [ TUNE/SELECT ] to tune to the required
station.
Presetting stations
You can preset up to 10 stations into the direct preset
buttons.
The first five stations are preset with a default
frequency for your convenience.
1 While listening to a station, press and hold the
desired direct preset button ([1] to [10]).
2 Press [ENTER] to preset the station.
█ Listening to a preset station
Press the direct preset button ([1] to [10]) to listen
to the preset station.
Viewing available information
You can view the information of the radio station such
as frequency and date.
Press [DISPLAY].
RQTN0174
7
Page 8

System settings
Indicates current setting
printing
█ To view the System menu
When in DAB mode
1 Press [MENU].
2 Turn [ TUNE/SELECT ] to select “System” and then press [ENTER].
When in FM mode
Press [MENU].
█ To navigate around the menu
Turn [ TUNE/SELECT ] to select an item or option. Press [ENTER] to confirm.
Example: Backlight setting displays
Alarm The Alarm Wizard is shown.
Sleep The sleep timer switches off the unit after the set time (in minutes).
Equaliser Flat, Heavy, Soft, Clear, Vocal
Time The time and date information are updated automatically with the DAB/RDS broadcast
Backlight • 10 sec: The backlight switches off after 10 seconds of inactivity.
Language You can change the language for the display panel.
Factory Reset Yes, No
RQTN0174
• Alarm: On, Off
Select “On” to switch on the alarm.
• On time: Set the hours and minutes of start time.
• Source: Buzzer, DAB, FM
Set the audio source.
If FM or DAB is set, select the last station you tuned in to (“Last listened”) or a preset
station as the audio source.
• Set the volume
The alarm starts at a low volume and increases gradually to the preset level.
“ ” is shown after you set the alarm.
Note:
• The alarm does not work when the unit is powered by batteries.
• Check that the date and time are set correctly, or else the alarm may not work as desired.
• The alarm will come on at the set time every day for a duration of 90 minutes. Press any button or
turn any knob to stop the alarm.
• You need to set the alarm again every time you disconnect and connect the AC power, or after
you replace the batteries.
Sleep Off, 30 minutes, 60 minutes, 90 minutes, 120 minutes
“ ” is shown.
“ ” is shown.
(if available).
You can also set the time and date manually with the Time menu.
This is a 24 hour clock.
• Set time: Set the hours and minutes.
• Set date: Set the day, month and year.
• On: The backlight is always on.
English, Italiano, Deutsch, Français
Select “Yes” to reset the unit to factory default setting.
8
 Loading...