

Page 1
S-VHS-C Movie Camera
Istruzioni per l’uso
NV-VS4EG/E
Operating Instructions
Instrucciones de funcionamiento
Bruksanvisning
Model No. NV-VS4EG/E
Before use, please read these instructions completely.
VQT8460
Page 2

ITALIANO ENGLISH
Queste informazioni sono per la Vostra
sicurezza
ATTENZIONE
Per ridurre il rischio di incendio, di scariche elettriche
o di sgradite interferenze, utilizzate solo gli accessori
consigliati e non esponete questo apparecchio a
pioggia o a umidità eccessiva. Non aprite
l’apparecchio: all’interno non vi sono parti che
possiate riparare. Rivolgetevi sempre a un centro
assistenza autorizzato.
Video Movie
La piastrina di identificazione si trova sul lato
inferiore dell’apparecchio.
Alimentatore CA
La piastrina di identificazione si trova sul lato
inferiore dell’alimentatore CA.
Questo apparecchio ha la tendenza a scaldarsi
durante l’uso. Adoperatelo sempre in un luogo ben
ventilato; quando lo utilizzate, non mettetelo in un
contenitore chiuso, come potrebbe essere una
borsa.
∫∫
∫ Leggete con attenzione questo Manuale di
∫∫
Istruzioni e utilizzate correttamente la movie.
Lesioni o danni materiali, derivanti da un utilizzo
dell’apparecchio non conforme alle procedure descritte in
questo manuale di istruzioni, verranno ritenuti di
esclusiva responsabilità dell’utente.
Vi preghiamo di notare che l’aspetto effettivo di controlli,
componenti, voci del menu, ecc. della vostra movie,
potrebbe essere leggermente diverso da quello mostrato
nelle illustrazioni di questo manuale di istruzioni.
∫∫
∫ Prova della movie.
∫∫
Non effettuate la vostra prima vera registrazione senza
aver sperimentato tutte le versatili funzioni di questa
movie, potrete sfruttare al meglio le eccezionali possibilità
che vi offre.
∫∫
∫ Il produttore non è in alcun modo responsabile
∫∫
della perdita di materiale registrato.
Il produttore non si riterrà in alcun caso responsabile
della perdita di informazioni registrate, dovute a un
funzionamento difettoso o a un guasto della movie, degli
accessori o delle videocassette.
∫∫
∫ Rispettate le leggi sul diritto di autore.
∫∫
Vi ricordiamo che la registrazione di nastri pre-registrati,
dischi o altro materiale pubblicato o trasmesso via etere
può infrangere le leggi che proteggono il diritto di autore.
La registrazione di determinato materiale può essere
proibita anche per uso esclusivamente privato.
Information for Your Safety
WARNING
To reduce the risk of fire or shock hazard and
annoying interference, use only the recommended
accessories and do not expose this equipment to
rain or moisture.
Do not remove the cover (or back); there are no user
serviceable parts inside. Refer servicing to qualified
service personnel.
Movie Camera
The rating plate is on the underside of the Movie
Camera.
AC Adaptor
The rating plate is on the underside of the AC
Adaptor.
As this equipment gets hot during use, operate it in
a well ventilated place; do not install this equipment
in a confined space such as a book case or similar
unit.
∫∫
∫ Read the Operating Instructions and use the
∫∫
Movie Camera correctly.
Injury or material damage resulting from any kind of use
that is not in accordance with the operating procedures
explained in these Operating Instructions are the sole
responsibility of the user.
Please note that the actual controls and components,
menu items, etc. of your Movie Camera may look
somewhat different from those shown in the illustrations
in these Operating Instructions.
∫∫
∫ Try out the Movie Camera.
∫∫
Be sure to try out the Movie Camera before recording your
first important event and check that it records properly
and functions correctly.
∫∫
∫ The manufacturer is not liable for loss of
∫∫
recorded contents.
The manufacturer shall in no event be liable for the loss of
recordings due to malfunction or defect of this Movie
Camera, its accessories or cassettes.
∫∫
∫ Observe copyright laws.
∫∫
Recording of pre-recorded tapes or discs or other
published or broadcast material for purposes other than
your own private use may infringe copyright laws. Even
for the purpose of private use, recording of certain
material may be restricted.
∫∫
∫ EMC Electric and magnetic compatibility
∫∫
This symbol (CE) is located on the rating plate.
∫∫
∫ Conforme alle norme elettromagnetiche
∫∫
Il simbolo (CE) è sulla piastrina di identificazione.
2
Page 3

SVENSKAESPAÑOL
Información para su seguridad
ADVERTENCIA
Para evitar los riesgos de un incendio, descarga
eléctrica o interferencias molestas, utilice sólo los
accesorios recomendados y no exponga este equipo
a la lluvia o humedad. No abra la cubierta (o
respaldo) ya que no hay piezas en el interior que
pueda reparar por sí mismo. Acuda al personal de
servicio cualificado para cualquier reparación o
servicio.
Videocámara
La placa de especificaciones está debajo de la
videocámara.
Adaptador de CA
La placa de especificaciones está debajo del
adaptador de CA.
Como el equipo se calienta durante su uso, hágalo
funcionar en un lugar bien ventilado; no instale este
equipo en un lugar cerrado por ejemplo en un
estante de libros o mueble similar.
∫∫
∫ Lea cuidadosamente las instrucciones de
∫∫
funcionamiento y utilice correctamente la
videocámara.
Cualquier herida o daños materiales derivados del uso
por no seguir los procedimientos de uso de este manual
de instrucciones son exclusiva responsabilidad del
usuario.
För säkerhets skull
VARNING
Använd bara de rekommenderade tillbehören och
utsätt inte utrustningen för regn eller fukt för att
minska risken för brand, elektriska stötar eller
irriterande störningar.
Ta inte av höljet (eller bakstycket); det finns inga
delar inuti som du kan reparera själv. Överlåt allt
reparationsarbete till kvalificerad servicepersonal.
Videokameran
Märkplattan sitter på videokamerans undersida.
Nätadaptern
Märkplattan sitter på nätadapterns undersida.
Använd utrustningen på en plats med god ventilation eftersom den blir varm när den används.
Installera inte utrustningen i ett slutet utrymme,
som t.ex. en bokhylla eller liknande.
∫∫
∫ Läs noggrant igenom bruksanvisningen och
∫∫
använd videokameran på rätt sätt.
Eventuella personskador eller materiella skador till följd
av annat handhavande eller annan användning än vad
som beskrivs i denna bruksanvisning är helt på
användarens ansvar.
Observera att de faktiska kontrollerna, komponenterna,
menypunkterna osv. på själva videokameran kan se något
annorlunda ut än i figurerna i denna bruksanvisning.
Tenga en cuenta que los controles y equipos, puntos en el
menú, etc. pueden verse en la práctica en su videocámara
un poco diferentes de los que aparecen en las figuras de
este manual de instrucciones.
∫∫
∫ Pruebe la videocámara.
∫∫
Pruebe la videocámara antes de grabar su primer
acontecimiento importante y verifique que graba y
funciona correctamente.
∫∫
∫ El fabricante no se hace responsable por la
∫∫
pérdida de una grabación.
El fabricante no se responsabiliza bajo ninguna
circunstancia por la pérdida de grabaciones debido a un
mal funcionamiento o defecto de la videocámara, sus
accesorios o cassettes.
∫∫
∫ Respete los derechos de autor.
∫∫
La grabación de cintas grabadas comercialmente o de
discos u otro material publicado o transmitido para otro
propósito que no sea su uso en privado puede infringir
las leyes de derechos de autor. Incluso aunque sea para
uso privado, puede estar prohibida la grabación de
algunos materiales.
∫∫
∫ Tolerancia eléctrica y magnética TEM
∫∫
Este símbolo (CE) está colocado en la placa de
especificaciones.
∫∫
∫ Prova videokameran.
∫∫
Glöm inte att prova videokameran innan du börjar spela in
dina första viktiga händelser. Kontrollera att den fungerar
ordentligt och spelar in som den ska.
∫∫
∫ Tillverkaren påtar sig inget ansvar för
∫∫
inspelningsinnehåll som gått förlorat.
Under inga omständigheter kan tillverkaren hållas
ansvaring för inspelningar som gått förlorade på grund av
fel på videokameran, dess tillbehör eller kassetter.
∫∫
∫ Följ upphovsrättslagstiftningen noggrant.
∫∫
Inspelning av förinspelade band eller skivor eller annat
publicerat eller utsänt material för annat än ditt eget
privata bruk kan strida mot upphovsrätts-lag-stiftningen.
Även för privat bruk kan det finnas begränsningar i rätten
att spela in visst material.
∫∫
∫ EMT Elektrisk och magnetisk tolerans
∫∫
Symbolen (CE) finns på märkplattan.
3
Page 4

ITALIANO ENGLISH
Indice
Se volete utilizzare immediatamente la movie, è necessario
che leggiate almeno le pagine contrassegnate con ♠.
Preparazione
Controllo degli accessori in dotazione .............. 10
Parti e comandi ..................................................... 12
♠ Alimentazione
(3 diversi modi di alimentare la movie) ..............18
≥Uso dell’alimentatore CA ................................................ 18
≥Ricarica della batteria .....................................................20
≥Come inserire una batteria carica .................................. 24
Uso del Monitor LCD ............................................28
Uso dei menu ........................................................30
Funzioni del Menu ................................................32
Regolazione del monitor LCD e del mirino:
luminosità e colore...............................................40
♠ Inserimento della cassetta .................................. 42
≥Come impostare la Lunghezza della cassetta ............... 44
≥Come controllare la Durata del nastro rimanente .......... 46
≥I formati VHS ...................................................................48
Regolazione del mirino ........................................50
Regolazione della cinghietta ...............................50
Copri-obiettivo ......................................................50
Inserimento della tracolla ....................................52
Pila del telecomando (inserimento) .................... 54
Programmazione di Ora e Data ...........................56
≥Ripresa con la sovrimpressione
di Ora e/o Data ................................................................ 58
Operazioni Base
Contents
If you want to start using the Movie Camera immediately, be
sure to read at least the pages marked with ♠.
Preparations
Standard Accessories......................................... 10
Controls and Components ................................. 12
♠ The 3 Types of Power Supplies .......................... 18
≥Using the AC Adaptor as Power Supply Unit ................ 18
≥Charging the Battery ...................................................... 20
≥Attaching the Charged Battery ...................................... 24
Using the LCD Monitor........................................ 28
Using the Menus .................................................. 30
Menu Functions ................................................... 32
Adjusting the Brightness and Colour
Level of the LCD Monitor/Finder ........................ 40
♠ Inserting the Cassette ......................................... 42
≥Selecting the Correct Tape Length ................................ 44
≥Confirming the Remaining Tape Time ........................... 46
≥About the VHS Formats ................................................. 48
Adjusting the Finder ........................................... 50
Adjusting the Grip Belt ....................................... 50
Handling the Lens Cap ....................................... 50
Attaching the Shoulder Strap ............................. 52
Inserting the Button-type Battery ...................... 54
Setting the Date and Time ................................... 56
≥Recording with the Time and/or Date
Superimposed in the Picture ......................................... 58
♠ Ripresa con il modo Full Auto ............................ 60
Come controllare la fine della scena
precedente
(Funzione di controllo della ripresa) ................. 64
≥Come cercare a metà nastro una scena
registrata (Ricerca nella Telecamera) ............................ 64
Uso dello zoom .................................................... 66
≥Zoom Vocale ................................................................... 66
≥Uso della funzione di MACRO (primissimo piano) ........ 68
♠ Riproduzione.........................................................70
≥Per rivedere le riprese nella movie ................................ 70
¡Funzione TBC (Time Base Corrector) ........................... 72
¡Per vedere le immagini sul Monitor LCD,
tenendo la movie appoggiata su di un piano
orizzontale ...................................................................... 74
≥Per rivedere le riprese su un televisore ......................... 76
≥Come rivedere le riprese in un videoregistratore
(Utilizzando l’adattatore di cassette in dotazione) ............ 78
≥Riavvolgimento ad Alta velocità ..................................... 80
≥Come eliminare le distorsioni nelle immagini
(Regolazione manuale del tracking) .............................. 80
≥Ricerca veloce in avanti (Cue) ....................................... 82
≥Ricerca veloce all’indietro (Review) ............................... 82
≥Fermoimmagine ............................................................. 82
Al termine ............................................................. 84
≥Pulizia del mirino............................................................ 84
¡Pulizia del Monitor LCD ................................................. 84
≥Pulizia del corpo della movie ......................................... 84
≥Pulizia dell’obiettivo ....................................................... 84
Basic Operations
♠ Recording in the Full Auto Mode ....................... 60
Checking the End of a Recorded Scene
(Recording Check Function) .............................. 64
≥Searching for a Tape Position Before the End
of the Last Recording
(Camera Search Function) ............................................ 64
Zooming In/Out .................................................... 66
≥Voice Zoom .................................................................... 66
≥Using the Macro Close-up Function .............................. 68
♠ Playback ............................................................... 70
≥Watching Playback on the Movie Camera ..................... 70
≥TBC (Time Base Corrector) Function ............................ 72
¡Watching Playback on the LCD Monitor with
the Movie Camera Placed on a Table ............................ 74
≥Watching Playback on a TV ........................................... 76
≥Playing Back on a VCR
(Using the Supplied Cassette Adaptor) ......................... 78
≥High-Speed Rewinding .................................................. 80
≥Eliminating Picture Distortions
(Manual Tracking Adjustment) ....................................... 80
≥Cue Playback ................................................................. 82
≥Review Playback ............................................................ 82
≥Still Playback .................................................................. 82
After Use .............................................................. 84
≥Cleaning the Finder ........................................................ 84
¡Cleaning the LCD Monitor ............................................. 84
≥Cleaning the Movie Camera Body ................................. 84
≥Cleaning the Lens .......................................................... 84
4
Page 5

SVENSKAESPAÑOL
Indice
Para utilizar la videocámara inmediatamente, lea por lo menos
las páginas marcadas con ♠.
Preparativos
Accesorios estándar ........................................... 11
Controles y componentes .................................. 13
♠ Las 3 alimentaciones .......................................... 19
≥Adaptador de CA como alimentación
eléctrica .......................................................................... 19
≥Carga de la batería ........................................................ 21
≥Instalación de una batería con carga ............................ 25
Utilización del monitor de cristal líquido ............. 29
Uso de los menús ................................................ 31
Funciones de menú ............................................. 33
Ajuste del brillo y nivel de color del monitor/
visor de cristal líquido ........................................ 41
♠ Colocación del cassette ..................................... 43
≥Selección de la longitud de cinta correcta .................... 45
≥Confirmación del tiempo de cinta remanente ............... 47
≥Sobre los formatos VHS ................................................. 49
Ajuste del visor .................................................... 51
Ajuste de la correa de la empuñadura .............. 51
Uso de la tapa de objetivo .................................. 51
Instalación de la correa al hombro .................... 53
Colocación de la pila tipo botón ........................ 55
Ajuste de la fecha y hora .................................... 57
≥Grabación con la hora y/o fecha superpuesta
en la imagen .................................................................. 59
Operaciones básicas
♠ Grabación totalmente automática ...................... 61
Revisión del final de una escena grabada
(Revisión de grabaciones) ...................................65
≥Búsqueda de un punto en la cinta anterior a la
última grabación (Búsqueda en la cámara) ................... 65
Acercamiento/Alejamiento con
zoom ...................................................................... 67
≥Zoom de voz.................................................................... 67
≥Función de acercamiento macro ....................................69
♠ Reproducción ....................................................... 71
≥Reproducción de imagen en la videocámara .................71
¡Función TBC (Corrector de base de tiempo) .................73
¡Reproducción en el monitor de cristal líquido
con la videocámara apoyada en una mesa.................... 75
≥Reproducción de imagen en un aparato de TV .............. 77
≥Reproducción en un VCR
(con el adaptador de cassette incluido) ......................... 79
≥Rebobinado a alta velocidad ..........................................81
≥Eliminación de las distorsiones de imagen
(Ajuste manual de seguimiento) ..................................... 81
≥Localización progresiva .................................................. 83
≥Localización regresiva .................................................... 83
≥Reproducción de imagen fija .......................................... 83
Al terminar de usar ............................................... 85
≥Limpieza del visor ........................................................... 85
¡Limpieza del monitor de cristal líquido ...........................85
≥Limpieza del cuer po de la videocámara .........................85
≥Limpieza del objetivo ...................................................... 85
Innehåll
Om du vill börja använda videokameran med en gång så var
noga med att läsa igenom åtminstone sidorna som är
markerade med ♠ först.
Förberedelser
Standardtillbehör ................................................. 11
Kontroller och delar............................................. 13
♠ De 3 olika strömkällorna ..................................... 19
≥Hur man driver videokameran
med nätadaptern ............................................................ 19
≥Uppladdning av batteriet ................................................ 21
≥Hur man sätter på ett uppladdat batteri ......................... 25
Hur man använder LCD-skärmen....................... 29
Hur man använder menyerna ............................. 31
Funktioner på menyerna..................................... 33
Justering av LCD-skärmens/sökarens
ljusstyrka och färgmättnad ................................ 41
♠ Hur man sätter i en kassett ................................ 43
≥Inställning av rätt bandlängd .......................................... 45
≥Kontroll av hur lång tid det är kvar på bandet................ 47
≥ Angående VHS-format ................................................... 49
Justering av sökaren........................................... 51
Justering av handremmen.................................. 51
Hantering av linsskyddet .................................... 51
Hur man sätter fast axelremmen........................ 53
Hur man sätter i knapptypsbatteriet .................. 55
Inställning av datum och klockslag ................... 57
≥Inspelning med klockan och/eller datumet
pålagt i bilden ................................................................. 59
Grundläggande användningssätt
♠ Inspelning med helautomatiska
inställningar ..........................................................61
Kontroll av slutet på en inspelad scen
(inspelningskontrollfunktionen)..........................65
≥Sökning efter ett ställe på bandet innan slutet på
den sista inspelningen (kamerasökfunktionen) ..............65
In/utzoomning .......................................................67
≥Röstzoom ........................................................................ 67
≥Närbilder med makrofunktionen ..................................... 69
♠ Uppspelning .......................................................... 71
≥Uppspelning av bilden på videokameran ....................... 71
¡TBC-funktionen (tidsbaskorrigering) ............................... 73
¡Uppspelning på LCD-skärmen med
videokameran ställd på ett bord ..................................... 75
≥Uppspelning på en TV .................................................... 77
≥Uppspelning på en videobandspelare
(med hjälp av den medföljande
kassettadaptern) ............................................................. 79
≥Snabbåterspolning ..........................................................81
≥Eliminering av bildstörningar
(Manuell spårningsinställning) ........................................ 81
≥Snabbspolning framåt med bild ...................................... 83
≥Snabbspolning bakåt med bild ....................................... 83
≥Uppspelning av stillbilder ................................................ 83
Efter användningen ..............................................85
≥Rengöring av sökaren ..................................................... 85
¡Rengöring av LCD-skärmen ........................................... 85
≥Rengöring av videokamerahuset ....................................85
≥Rengöring av objektivet .................................................. 85
5
Page 6

ITALIANO ENGLISH
Operazioni avanzate
Dissolvenze di immagine e suono .................................... 86
Riprese con effetti speciali (Effetti Digitali) ....................... 88
≥Selezione di un effetto digitale........................................ 88
≥Effetti Digitali 1 [EFFECT1].............................................90
≥Effetti Digitali 2 [EFFECT2].............................................92
≥Uso del Super Stabilizzatore di Immagine ..................... 94
≥Uso dello Zoom Digitale .................................................. 96
≥Dissolvenza digitale ........................................................98
Registrazione a Sensore di Movimento .......................... 100
Riprese in ambienti scuri senza illuminazione
(Visione notturna 0 Lux) ..................................................104
≥Uso della Visione Notturna 0 Lux assieme alla
Ripresa con Sensore di Movimento
(in ambienti bui privi di illuminazione) .......................... 106
Soggetti e condizioni di ripresa in cui è meglio
ricorrere al modo Manuale .............................................. 108
Riprese con Bilanciamento del bianco manuale ............. 110
≥Temperatura del colore e Bilanciamento
del bianco ......................................................................112
Riprese con Messa a fuoco manuale .............................114
Riprese in condizioni diverse
(Programmi di Esposizione Automatica) ......................... 116
Come riprendere un soggetto in controluce
(Modo Controluce)........................................................... 120
Advanced Operations
Fading In/Out .....................................................................86
Using Special Effects (Digital Effects) .............................. 88
≥Selecting a Desired Digital Effect ................................... 88
≥Digital Effects 1 [EFFECT1] ............................................ 90
≥Digital Effects 2 [EFFECT2] ............................................ 92
≥Using the Super Image Stabilizer Function .................... 94
≥Using the Digital Zoom Function .................................... 96
≥Digital Fade .....................................................................98
Motion-Sensor-Controlled Recording.............................. 100
Recording in Dark Places Without Any
Illumination (0 Lux Night View Function)......................... 104
≥Using the 0 Lux Night View Function together
with the Motion-Sensor-Controlled Recording
Function in Dark Places without Any
Illumination .................................................................... 106
Subjects and Recording Conditions for Which
the Manual Mode Is More Suitable ................................. 108
Recording with Manual White Balance
Adjustment....................................................................... 110
≥Colour Temperature and White Balance
Adjustment .................................................................... 112
Recording with Manual Focus Adjustment ..................... 114
Recording in Special Situations
(Programme AE) .............................................................. 116
Recording Backlit Scenes (Backlight Mode)...................120
6
Page 7

SVENSKAESPAÑOL
Operaciones avanzadas
Esfumado .......................................................................... 87
Utilización de los efectos especiales
(efectos digitales) .............................................................. 89
≥Selección del efecto digital deseado ..............................89
≥Efectos digitales 1 [EFFECT1] ....................................... 91
≥Efectos digitales 2 [EFFECT2] ....................................... 93
≥Función del súper estabilizador de imagen ....................95
≥Función del zoom digital .................................................97
≥Esfumado digital ............................................................. 99
Grabación controlada por el sensor
de movimiento ................................................................. 101
Grabación en lugares oscuros sin ninguna iluminación
(Función de visión nocturna con 0 lux) ........................... 105
≥Función de visión nocturna con 0 lux junto con
la función de grabación controlada por sensor
de movimiento en lugares oscuros sin
iluminación ....................................................................107
Objetos y condiciones de grabación para los
que es conveniente usar el modo manual .......................109
Grabación con ajuste del balance del
blanco manual ................................................................. 111
≥Temperatura de color y ajuste del balance
del blanco ......................................................................113
Grabación con el ajuste de enfoque manual ..................115
Grabación en condiciones especiales
(EA programada) ............................................................. 117
Grabación de escenas a contraluz
(Modo de contraluz) ........................................................ 121
Avancerade funktioner
In/uttoning ..........................................................................87
Inspelning med specialeffekter
(digitala effekter) ................................................................89
≥Hur man väljer önskad digital effekt ............................... 89
≥Digital effektgrupp 1 [EFFECT1]..................................... 91
≥Digital effektgrupp 2 [EFFECT2]..................................... 93
≥Hur man använder superbildstabilisatorn .......................95
≥Hur man använder den digitala
zoomfunktionen............................................................... 97
≥Digital in/uttoning ............................................................ 99
Rörelsesensorstyrd inspelning ........................................ 101
Inspelning på mörka platser utan belysning
(0-lux nattsynsfunktionen) ...............................................105
≥Hur man använder 0-lux nattsynsfunktionen
tillsammans med funktionen för
rörelsesensorstyrd inspelning för att spela in på
mörka platser utan belysning .......................................107
Motiv och inspelningsförhållanden för vilka
det är bättre att använda manuella
inställningar ..................................................................... 109
Inspelning med manuell vitbalansinställning .................. 111
≥Färgtemperatur och vitbalansinställning ....................... 113
Inspelning med manuell skärpeinställning ......................115
Inspelning under speciella förhållanden
(AE-program) ...................................................................117
Inspelning i motljus (motljusläget)................................... 121
7
Page 8

ITALIANO ENGLISH
Operazioni avanzate
Telecomando ................................................................... 122
¡Inserimento delle batterie nel telecomando ................. 124
Autoregistrazione con Monitor LCD
ruotato in avanti ...............................................................126
Riprese con sovrimpressione di titoli .............................. 130
≥Selezione della lingua desiderata .................................130
≥Scelta di uno dei titoli standard .................................... 132
≥Scelta del colore per i titoli standard ............................ 132
≥Come selezionare la dimensione dei titoli
standard ........................................................................134
Come creare titoli personalizzati e aggiungerli in
fase di ripresa (Sovrimpressione Digitale) ......................136
≥Memorizzazione di un titolo personalizzato ................. 136
≥Scelta del colore per un titolo
personalizzato ...............................................................138
≥Inserimento di un titolo personalizzato all’inizio
della ripresa .................................................................. 140
≥Inserimento di un titolo personalizzato durante
la ripresa ....................................................................... 140
Indicazioni del contanastro ............................................. 142
≥Controllo del Tempo trascorso: .....................................142
≥Memoria di arresto: .......................................................146
Duplicazione (Copia) .......................................... 148
Collegamento della movie a un computer .......150
Precauzioni e informazioni tecniche
Precauzioni ......................................................................160
≥Precauzioni nell’uso della movie .................................. 160
≥Precauzioni nell’uso dell’alimentatore CA ....................160
≥Precauzioni per l’uso della batteria .............................. 162
≥Precauzioni nell’uso della cassetta .............................. 162
≥Condensa: cause della sua formazione
e rimedi ......................................................................... 164
≥Testine video sporche: come intervenire ......................164
Come funziona il Bilanciamento del bianco
(Dominanti cromatiche) ................................................... 166
Come funziona la Messa a fuoco ................................... 168
Indicazioni........................................................................ 172
Modo Demo ..........................................................178
Accessori opzionali ......................................................... 180
Caratteristiche ................................................................. 182
Prima di rivolgervi al centro assistenza
(Problemi e soluzioni)...................................................... 184
Advanced Operations
Using the Remote Controller ........................................... 122
¡Inserting the Batteries into the Remote
Controller....................................................................... 124
Recording Yourself with the LCD Monitor Facing
Forward ............................................................................ 126
Recording with Pre-programmed Titles Inserted
in the Picture ................................................................... 130
≥Selecting the Desired Language ..................................130
≥Selecting the Desired Pre-programmed
Title ............................................................................... 132
≥Selecting the Desired Colour of the
Pre-programmed Title ................................................... 132
≥Selecting the Size of the Pre-programmed
Title ............................................................................... 134
Creating Your Own Titles and Inserting Them
During Recording
(Digital Superimposer Function) ..................................... 136
≥Storing Your Own Title in the Digital Image
Memory ......................................................................... 136
≥Selecting the Desired Colour of Your Own
Title ............................................................................... 138
≥Inserting Your Own Title at the Beginning of a
Recording ...................................................................... 140
≥Inserting Your Own Title During Recording ...................140
Using the Tape Counter Indication .................................. 142
≥Checking the Elapsed Tape Time ................................. 142
≥Using the Memory Stop Function ................................. 146
Dubbing (Copying) .............................................148
Using the Movie Camera with a Computer ...... 150
Precautions, Technical Information, etc.
Precautions...................................................................... 160
≥Precautions for the Movie Camera ...............................160
≥Precautions for the AC Adaptor.................................... 160
≥Precautions for the Battery ........................................... 162
≥Precautions for the Cassette ........................................ 162
≥Causes of Condensation and Remedy ......................... 164
≥Video Head Clogging and Remedy .............................. 164
How the White Balance (Tint)
Adjustment Works ........................................................... 166
How the Focus Adjustment Works ..................................168
Indications ....................................................................... 172
Demonstration Mode ............................................178
Optional Accessories ...................................................... 180
Specifications .................................................................. 182
Before Requesting Service
(Problems & Solutions) ................................................... 185
8
Page 9

SVENSKAESPAÑOL
Operaciones avanzadas
Mando a distancia ........................................................... 123
¡
Inserción
a
Autograbación con el monitor de cristal líquido
hacia adelante ................................................................. 127
Grabación con los títulos pre-programados en
la imagen ......................................................................... 131
≥Selección del idioma deseado ......................................131
≥Selección del título pre-programado
deseado ........................................................................ 133
≥Selección del color del título pre-programado
deseado ........................................................................ 133
≥Selección del tamaño del título
pre-programado ............................................................135
Creación de sus propios títulos y su colocación
durante la grabación
(función de superposición digital) ................................... 137
≥Memorización de su título en la memoria de
imagen digital ................................................................137
≥Selección del color deseado para su propio
título .............................................................................. 139
≥Colocación de su propio título al principio de la
grabación ...................................................................... 141
≥Colocación de su propio título durante la
grabación ...................................................................... 141
Contador de cinta ............................................................143
≥Verificación de tiempo transcurrido
en la cinta ......................................................................143
≥Función de parada de memoria .................................... 147
de las pilas en el mando
distancia .....................................................................
Doblaje (copiado) ............................................... 149
Utilización de la videocámara con
un ordenador ...................................................... 151
Precauciones, información técnica, etc.
Precauciones ...................................................................161
≥Precauciones con la videocámara ............................... 161
≥Precauciones con el adaptador de CA .........................161
≥Precauciones con la batería ......................................... 163
≥Precauciones con el cassette ....................................... 163
≥Causas de condensación y solución ............................165
≥Obstrucción del cabezales de video y su solución ...... 165
Principios del ajuste del balance
del blanco (tinte) ..............................................................167
Principios del ajuste de enfoque .....................................169
Indicaciones .................................................................... 173
Modo de demostración .........................................179
Accesorios opcionales .................................................... 181
Especificaciones ............................................................. 183
Antes de acudir al servicio técnico
(Problemas y Soluciones) ............................................... 186
125
Avancerade funktioner
Hur man använder fjärrkontrollen.................................... 123
¡Hur man sätter i batterier i fjärrkontrollen ..................... 125
Hur man spelar in sig själv med LCD-skärmen
vänd framåt ...................................................................... 127
Inspelning med förprogrammerad text pålagd i
bilden ............................................................................... 131
≥Val av språk ...................................................................131
≥Val av förprogrammerad bildtext ................................... 133
≥Val av färg på den förprogrammerade
bildtexten ....................................................................... 133
≥Val av storlek på den förprogrammerade
bildtexten ....................................................................... 135
Hur du gör dina egna bildtexter och lägger på
dem i bilden under inspelningen
(den digitala bildpåläggsfunktionen) ............................... 137
≥Hur du lagrar din egen bildtext i det digitala
bildminnet ...................................................................... 137
≥Val av färg på din egen bildtext.....................................139
≥Hur du lägger på din egen bildtext i början av
en inspelning ................................................................. 141
≥Hur du lägger på din egen bildtext under
inspelningens gång .......................................................141
Hur man använder räkneverket ....................................... 143
≥Kontroll av hur lång tid som gått på bandet .................. 143
≥Hur man använder minnesstoppfunktionen .................. 147
Kopiering .............................................................149
Hur man använder videokameran
tillsammans med en dator .................................151
Försiktighetsåtgärder, tekniska data, mm
Försiktighetsåtgärder ...................................................... 161
≥Att tänka på när du använder videokameran ............... 161
≥Att tänka på angående nätadaptern ............................. 161
≥Att tänka på angående batteriet ................................... 163
≥Att tänka på angående kassetten .................................163
≥Orsaker till imbildning och motåtgärder ........................165
≥Smutsiga videohuvuden och motåtgärder .................... 165
Hur vitbalansinställning (färgjustering) fungerar ............. 167
Hur skärpeinställning fungerar ........................................ 169
Indikeringar ...................................................................... 173
Demonstrationsläget ............................................179
Extra tillbehör .................................................................. 181
Tekniska data ...................................................................183
Innan du ringer till reparatören
(problem & lösningar) ...................................................... 187
9
Page 10
1. 2. 3.
(VSK0541) (VJA0664)
4.
7.
(EUR646570) (AAA, UM-4, R03)
ITALIANO ENGLISH
(VJA1128) (CGR-V610) (VXQ0368) (AA, UM-3, R6)
5.
(VFC3299) (VFA0039)
8.
(CR2025)
Preparazione
Questo capitolo descrive le operazioni da compiere per
preparare e controllare la movie.
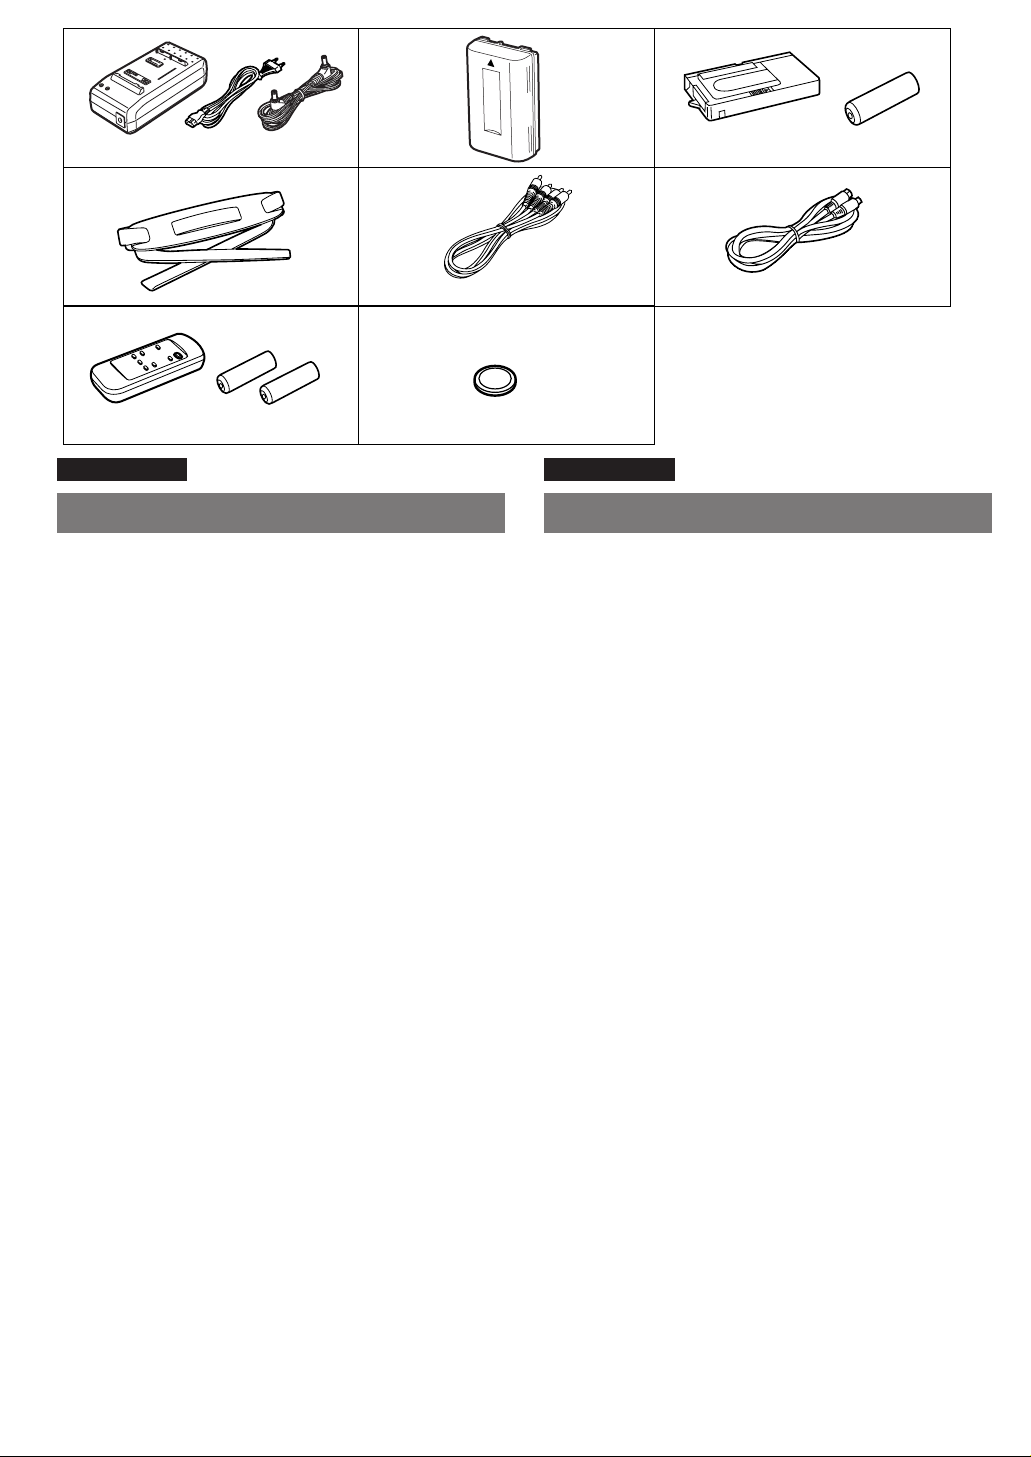
Controllo degli accessori in dotazione
1. Alimentatore CA (m 18, 20, 160)
Per alimentare la movie con corrente alternata o per
caricare le batterie.
Cavo CC e Cavo di Rete (l 18, 20)
Per il collegamento dell’alimentatore CA e alimentare la
movie dalla presa di rete.
2. Batteria ricaricabile (m 20, 24, 162)
Per alimentare la movie.
3. Adattatore di cassette e batteria (l 78)
4. Tracolla (l 52)
5. Cavo AV (m 76, 148, 150)
Per collegare la movie agli ingressi audio e video di un TV
o di un videoregistratore.
6. Cavo S-Video (l 76, 148, 150)
7. Telecomando e pile per telecomando
(m 122, 124)
8. Pila a pastiglia (m 54)
Per alimentare l’orologio interno della movie.
This chapter explains the necessary steps before you can
start using the Movie Camera.
Standard Accessories
1. AC Adaptor (m 18, 20, 160)
To supply power to the Movie Camera and to charge the
Battery.
DC Input Lead and AC Mains Lead (l 18, 20)
To connect the AC Adaptor to the Movie Camera and to an
AC mains socket.
2. Battery (m 20, 24, 162)
To supply power to the Movie Camera.
3. Cassette Adaptor and Battery (l 78)
4. Shoulder Strap (l 52)
5. AV Cable (m 76, 148, 150)
To connect the Movie Camera to the video input and audio
input sockets on a TV or a VCR.
6. S-Video Cable (m 76, 148, 150)
7. Remote Controller and Batteries for Remote Controller
(m 122, 124)
8. Button-Type Battery (m 54)
To supply power to the Movie Camera’s built-in clock.
6.
(VJA0658)
Preparations
10
Page 11

SVENSKAESPAÑOL
Preparativos
Describe los procedimientos a realizar antes de utilizar la
videocámara por primera vez.
Accesorios estándar
1. Adaptador de CA (m 19, 21, 161)
Para el suministro de corriente a la videocámara y para
cargar la batería.
Cable de entrada de CC y cable eléctrico de CA
(l 19, 21)
Para conectar el adaptador de CA a la videocámara y a un
tomacorriente de CA.
2. Batería (l 21, 25, 163)
Para suministrar corriente a la videocámara.
3. Adaptador de cassette y pila (l 79)
4. Correa al hombro (l 53)
5. Cable AV (m 77, 149, 151)
Para conectar la videocámara a las tomas de entrada de
video y de audio en su TV o VCR.
6. Cable S-Video (l 77, 149, 151)
7. Mando a distancia y pilas para el mando a distancia
(l 123, 125)
8. Pila tipo botón (l 55)
Para suministrar corriente al reloj incorporado en la
videocámara.
Förberedelser
I detta kapitel förklaras några saker du måste veta innan du
kan börja använda videokameran.
Standardtillbehör
1. Nätadapter (l 19, 21, 161)
För att driva videokameran och för uppladdning av
batteriet.
Likströmskabel och nätkabel (l 19, 21)
För att ansluta av nätadaptern till videokameran och till ett
vägguttag.
2. Batteri (l 21, 25, 163)
För att driva videokameran.
3. Kassettadapter och batteri (l 79)
4. Axelrem (l 53)
5. A/V-kabel (l 77, 149, 151)
För att ansluta videokameran till video- och
audioingångarna på en TV eller videobandspelare.
6. S-videokabel (l 77, 149, 151)
7. Fjärrkontroll och batterier till fjärrkontrollen
(l 123, 125)
8. Knapptypsbatteri (l 55)
För att driva videokamerans inbyggda klocka.
11
Page 12
1234
A
5
6, 7, 8
CAMERA
V C R
INFO-
WINDOW
18
10
11
12
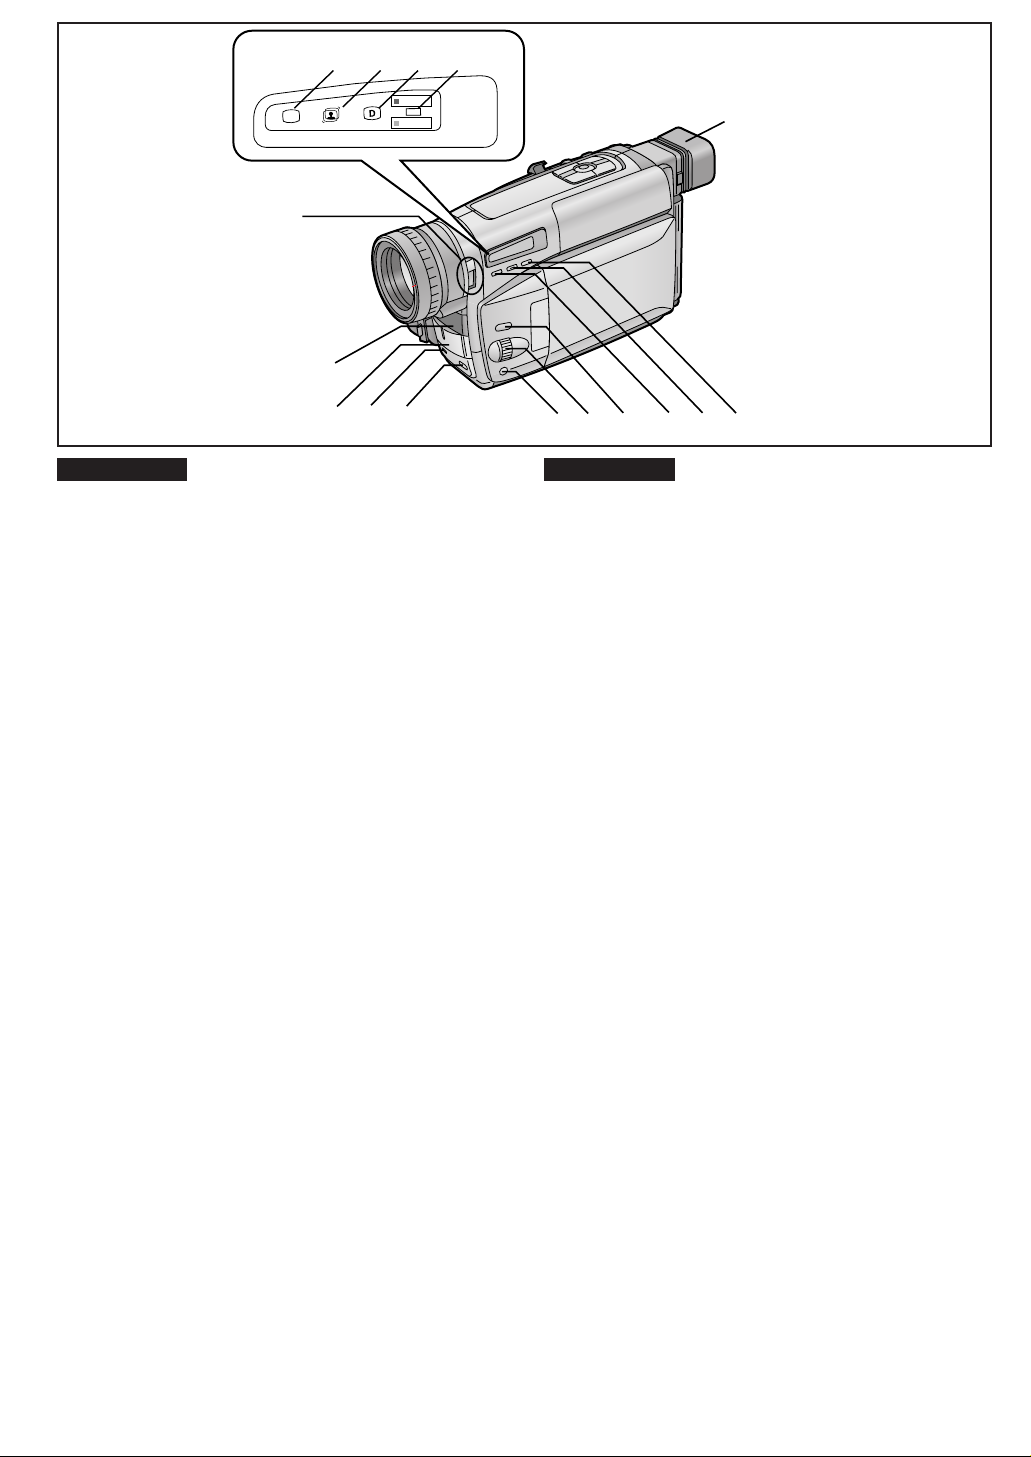
Controls and Components
1 Auto Mode Indication Lamp [ƒ] (m 60)
2 Super Image Stabilizer Indication Lamp [[]
(m 88, 94)
3 Digital Effect Indication Lamp [´] (m 88, 96, 98)
4 Camera Mode Lamp [CAMERA] (m 60)
VCR Mode Lamp [VCR] (m 70, 76)
Camera Mode: The lamp lights red.
VCR Mode: The lamp lights green.
5 0-Lux Recording Switch [0 LUX OFF/ON] (m 104)
6 White Balance Sensor (m 166)
7 Remote Control Sensor (m 122)
8 Built-in Infra-red Beam Emitters (m 104)
9 Microphone
10 Tally Lamp (m 62)
11 Fade Button [FADE] (m 86, 98)
12 Focus Button [FOCUS] (m 114)
Item Set Button [SET] (m 30)
Tracking Button (m 80)
13 Multi-Function Dial [
(m 30, 80, 114)
14 Menu Button [MENU] (m 30)
15 Auto Exposure Selector Button [PROG. AE]
(m 60, 110, 114, 116)
16 Digital Image Store Button [STORE]
Digital Image Superimpose Button [OFF/ON]
(m 136, 138, 140)
17 Colour Selector Button for Digital Image [COLOUR]
(m 138)
18 Eyecup
9
ITALIANO ENGLISH
Parti e comandi
11 Spia del modo Auto [ƒ] (m 60)
12 Spia del Super Stabilizzatore di Immagine [[]
(m 88, 94)
13 Spia degli Effetti Digitali [´] (m 88, 96, 98)
14 Spia del modo Camera [CAMERA] (m 60)
Spia del modo VCR [VCR] (m 70, 76)
Modo Camera: La spia diventa rossa.
Modo VCR: La spia diventa verde.
15 Selettore per riprese 0 lux [0 LUX OFF/ON] (m 104)
16 Sensore del Bilanciamento del bianco (l 166)
17 Sensore del telecomando (l 122)
18 Dispositivo di emissione di raggi infrarossi incorporato
(m 104)
19 Microfono
10 Spia di registrazione (m 62)
11 Tasto per dissolvenza [FADE] (m 86, 98)
12 Tasto per Messa a fuoco [FOCUS] (m 114)
Tasto per Conferma delle funzioni [SET] (m 30)
Tasto del tracking (m 80)
13 Selettore Multifunzione [
(m 30, 80, 114)
14 Tasto menu [MENU] (m 30)
15 Selettore per Programmi di Esposizione Automatica
[PROG. AE] (m 60, 110, 114, 116)
16 Tasto per la Memoria di immagine [STORE] (l 136)
Tasto per la sovrimpressione dei titoli digitalizzati
[OFF/ON]
17 Tasto per selezionare il colore dei titoli digitalizzati
[COLOUR]
18 Oculare
(m 136, 138, 140)
(m 138)
3434
34/MF/TRACKING]
3434
1413
15 16 17
3434
34/MF/TRACKING]
3434
(l 136)
12
Page 13

SVENSKAESPAÑOL
Controles y componentes
1 Luz indicadora del modo automático [ƒ] (m 61)
2 Luz indicadora del super-estabilizador de imagen [[]
(m 89, 95)
3 Luz indicadora de efecto digital [´] (m 89, 97, 99)
4 Luz del modo de cámara [CAMERA]
Luz de modo de vídeo [VCR]
Modo de cámara: La luz se enciende en rojo.
Modo VCR: La luz se enciende en verde.
5 Interruptor de grabación con 0 lux
[0 LUX OFF/ON] (m 105)
6 Sensor de balance del blanco (l 167)
7 Sensor del mando a distancia (l 123)
8 Emisores de rayos infrarrojos integrados (m 105)
9 Micrófono
10 Luz piloto (l 63)
11 Botón de esfumado [FADE] (m 87, 99)
12 Botón de enfoque [FOCUS] (m 115)
Botón de ajuste de ítem [SET] (m 31)
Botón de seguimiento (m 81)
13 Dial multifuncional [
(m 31, 81, 115)
14 Botón de menú [MENU] (m 31)
15 Botón de selección de exposición automática
[PROG. AE] (m 61, 111, 115, 117)
16 Botón de memorización de imagen digital [STORE]
(l 137)
Botón de superposición de imagen digital [OFF/ON]
(m 137, 139, 141)
17 Botón de selección de color para la imagen digital
[COLOUR]
18 Ocular
(m 139)
3434
34/MF/TRACKING]
3434
(m 61)
(m 71, 77)
Kontroller och delar
1 Indikatorlampa för det helautomatiska läget [ƒ]
(m 61)
2 Indikatorlampa för superbildstabilisatorn [[]
(m 89, 95)
3 Indikatorlampa för digitala effekter [´] (m 89, 97, 99)
4 Lampa för kameraläget [CAMERA] (m 61)
Lampa för videobandspelarläget [VCR] (m 71, 77)
Kameraläget: Lampan lyser rött.
Videobandspelarläget: Lampan lyser grönt.
5 Omkopplare för 0-luxinspelning [0 LUX OFF/ON]
(m 105)
6 Vitbalanssensor (l 167)
7 Fjärrkontrollsensor (l 123)
8 Inbyggda infraröda strålkastare (m 105)
9 Mikrofon
10 Inspelningslampa (l 63)
11 Knapp för in/uttoning [FADE] (m 87, 99)
12 Knapp för manuell skärpeinställning [FOCUS]
(l 115)
Inställningsinmatningsknapp [SET] (m 31)
Knapp för spårningsinställning (l 81)
13 Multifunktionsratt [
(m 31, 81, 115)
14 Menyknapp [MENU] (m 31)
15 Knapp för val av automatiska exponeringsprogram
[PROG. AE] (m 61, 111, 115, 117)
16 Knapp för lagring av en bild i det digitala bildminnet
[STORE] (l 137)
Knapp för pålägg av bilden i det digitala bildminnet
[OFF/ON]
17 Färgväljarknapp för bilden i det digitala bildminnet
[COLOUR]
18 Okular
(m 137, 139, 141)
(m 139)
3434
34/MF/TRACKING]
3434
13
Page 14
19
20
s SEARCH SEARCH r
S
65
;W.B
∫
BLC
21
1
22
TBC
23
24 25
27 28
26
ITALIANO ENGLISH
19 Tasto per Ricerca all’indietro [sSEARCH] (l 64)
Tasto per Riavvolgimento/Ricerca veloce all’indietro/
Riavvolgimento ad alta velocità [C] (m 70, 80, 82)
Tasto per Controllo della registrazione [S] (l 64)
20 Tasto di arresto [
∫∫
∫] (l 70)
∫∫
21 Tasto per Ricerca in avanti [SEARCHr] (l 64)
Tasto per Avvolgimento veloce/Ricerca veloce in avanti
[5] (m 82)
22 Tasto per Bilanciamento del bianco [W.B] (m 110)
Tasto per Pausa [;] (l 82)
23 Tasto per Riproduzione [
11
1] (l 70)
11
Tasto per compensazione al controluce [BLC] (m 120)
Tasto TBC (Correttore della Base dei Tempi) [TBC]
(l 72)
24 Leva di apertura del Monitor LCD [LOPEN] (m 28)
25 Monitor LCD
(m 28, 40, 84)
La presenza sul monitor LCD di punti scuri o di
punti luminosi è dovuta ai limiti della tecnologia a
cristalli liquidi. Non è indice di un funzionamento
difettoso e non ha alcuna influenza sulla registrazione
delle immagini.
26
Finestrella del vano cassetta
27 Tasto di chiusura del vano cassetta [LOCK] (m 42)
28
Vano batteria (m 24)
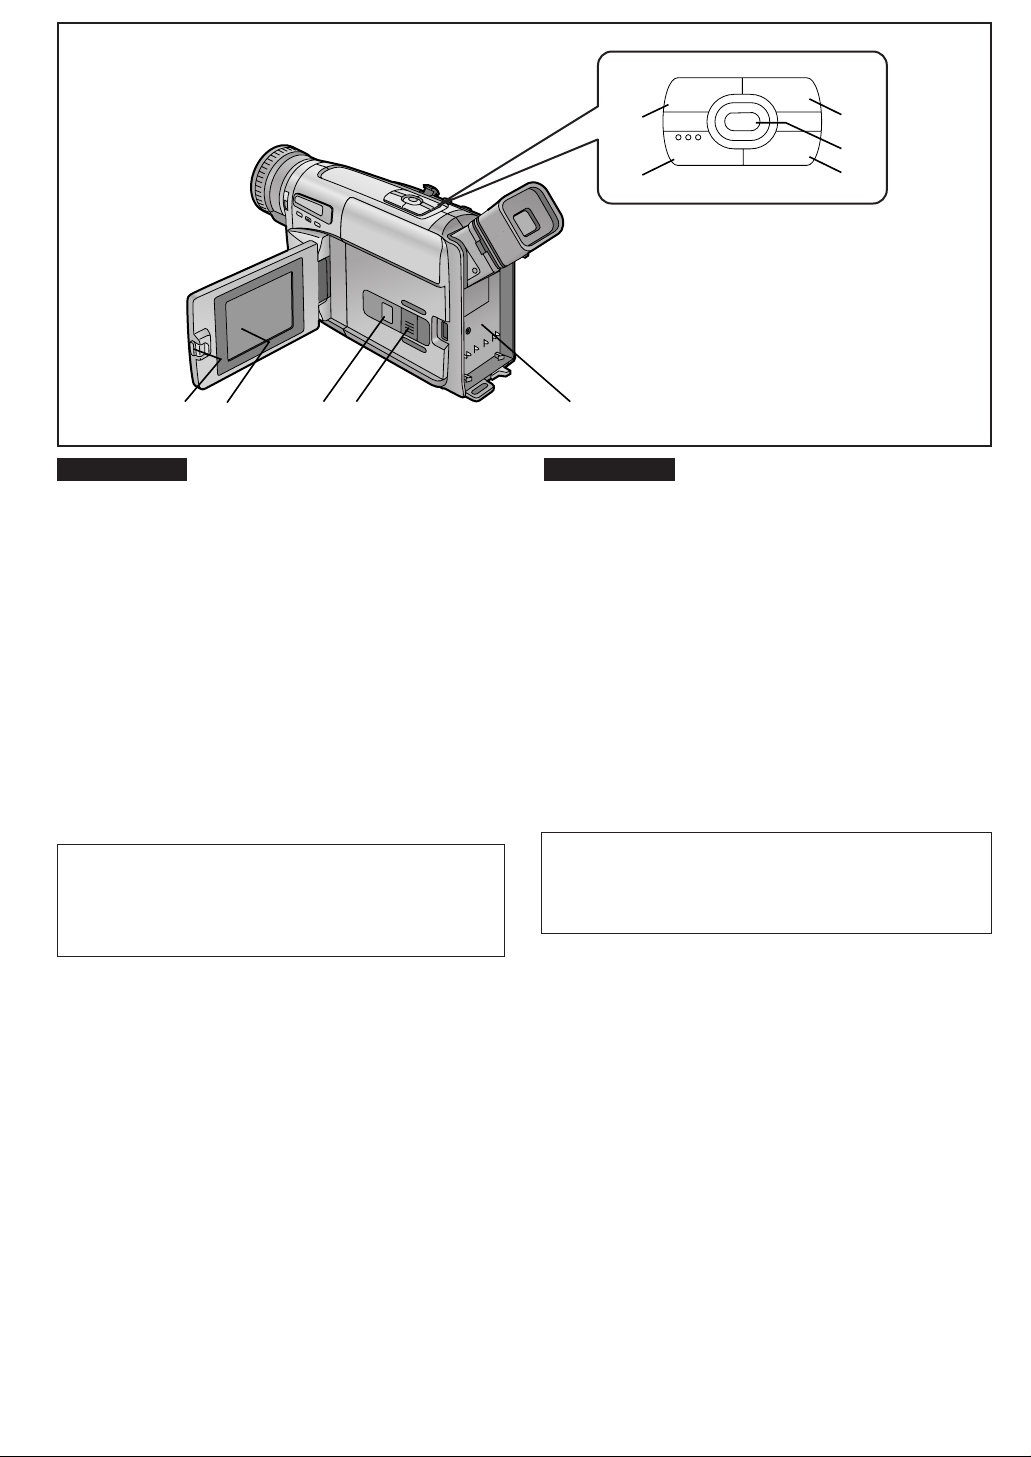
19 Reverse Search Button [
Rewind/Review/High-Speed Rewind Button [C]
(m 70, 80, 82)
Recording Check Button [S] (
20 Stop Button [∫] (m 70)
21 Forward Search Button [SEARCH
Fast Forward/Cue Button [D] (m 82)
22 White Balance Button [
Pause Button [;] (m 82)
23 Playback Button [
Backlight Button [BLC] (m 120)
TBC Button [TBC] (l 72)
24 LCD Monitor Open Lever [LOPEN] (m 28)
25 LCD Monitor ( m 28, 40, 84)
Due to limitations in LCD production technology, there
may be some tiny bright or dark spots on the LCD
Monitor screen. However, this is not a malfunction and
does not affect the recorded picture.
26 Cassette Compartment Window
27 Cassette Compartment Lock Button [LOCK] (m 42)
28 Battery Holder ( m 24)
sSEARCH
W.B
11
1] (m 70)
11
l 64
rr
r] (m 64)
rr
] (m 110)
] (
l 64
)
)
14
Page 15

19 Botón de búsqueda hacia atrás [sSEARCH] (l 65)
Botón de rebobinado/localización regresiva/
rebobinado a alta velocidad [C] (m 71, 81, 83)
Botón de verificación de la grabación [S] (m 65)
20 Botón de parada [
21 Botón de búsqueda hacia adelante [SEARCHr] (m 65)
Botón de avance rápido/localización progresiva
(m 83)
22 Botón de balance del blanco [W.B] (m 111)
Botón de pausa [;] (l 83)
23 Botón de reproducción [
Botón de contraluz [BLC] (l 121)
Botón del corrector de base de tiempo [TBC] (l 73)
24 Palanca de apertura del monitor de cristal líquido
[LOPEN] (m 29)
25 Monitor de cristal líquido
Debido a limitaciones en la tecnología de fabricación de
pantallas de cristal líquido, puede haber puntos brillantes u
oscuros en el monitor de cristal líquido. Esto no es una
avería y no afecta la imagen grabada.
26
Ventana del compartimiento de cassette
27 Botón del seguro del compartimiento del cassette
[LOCK] (m 43)
28
Soporte de batería
∫∫
∫] (l 71)
∫∫
11
1] (l 71)
11
(m 29, 41, 85)
(m 25)
[ 5 ]
SVENSKAESPAÑOL
19 Knapp för sökning bakåt [sSEARCH] (l 65)
Knapp för snabbspolning bakåt/snabbåterspolning
[6]
(m 71, 81, 83)
Inspelningskontrollknapp [S] (l 65)
20 Stoppknapp [
21 Knapp för sökning framåt [SEARCHr] (l 65)
Knapp för snabbspolning framåt med/utan bild [5]
(m 83)
22 Vitbalansknapp [W.B] (m 111)
Pausknapp [;] (l 83)
23 Uppspelningsknapp [
Knapp för inspelning i motljus [BLC] (l 121)
Tidsbaskorrigeringsknapp [TBC] (l 73)
24 Öppningsknapp för LCD-skärmen [LOPEN] (m 29)
25 LCD-skärm
Det kan förekomma små ljusa eller svarta prickar
på LCD-skärmen på grund av begränsningar i den teknik
som används vid tillverkningen.
Detta innebär dock inget funktionsfel och har ingen
inverkan på bilden som spelas in.
26
Kassettfacksfönster
27 Låsknapp för kassettfacket [LOCK] (m 43)
28
Batterihållare
∫∫
∫] (l 71)
∫∫
11
1] (l 71)
11
(m 29, 41, 85)
(m 25)
15
Page 16
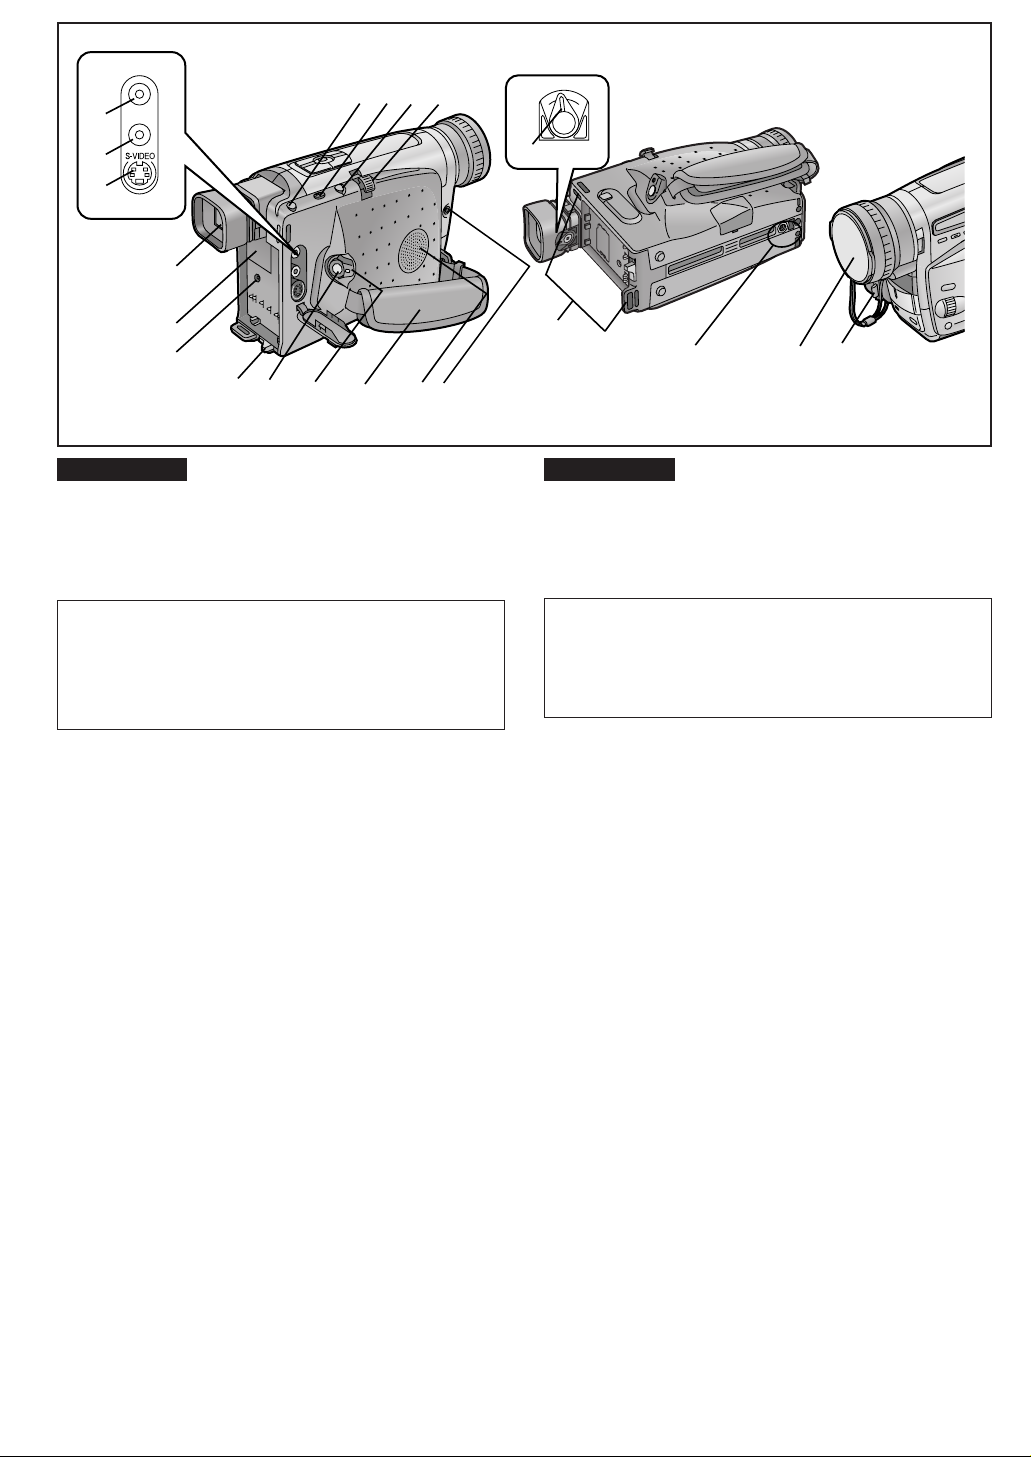
29
V
A
41 42 36
43
30
44
31
32
33
45
34
35
36
37
ITALIANO ENGLISH
29 Uscita video [V] (m 76, 148, 150)
30 Uscita audio [A] (m 76, 148, 150)
31 Terminale di uscita S-Video [S-VIDEO] (l 76, 148, 150)
32 Mirino (l 40, 50, 84)
La tecnologia a cristalli liquidi ha alcuni limiti. A questi è
dovuta la possibile presenza sullo schermo del mirino di
piccolissimi punti scuri o luminosi, di una tonalità
cromatica dominante e di un lieve sfarfallio. In ogni
caso, questo non indica un funzionamento difettoso e
non ha alcuna influenza sulle immagini registrate.
33 Coperchio del vano della pila a pastiglia
[BACKUP BATTERY] (l 54)
34 Ingresso alimentazione CC [DC IN] (l 18)
35 Leva di sgancio della batteria [
(l 24)
36 Tasti di Avvio/Arresto registrazione (l 58, 60)
Possono essere utilizzati entrambi, in base all’angolazione
della ripresa.
37 Selettore di Accensione / Modo [CAMERA/OFF/VCR]
(l 24, 60, 70, 84)
38 Cinghietta (l 50)
39 Altoparlante (l 70)
40 Terminale Digital Still Picture
[DIGITAL STILL PICTURE] (l 150)
41 Tasto per espulsione cassetta [< EJECT] (l 42)
42 Tasto per Ora e Data/Titolo [DATE/TITLE]
43 Leva Zoom [W/T] (l 66, 96)
Leva regolazione volume [∂VOLµ] (m 70)
44 Leva di correzione diottrica (l 50)
45 Passanti per tracolla (l 52)
46 Attacco per treppiede
47 Copri-obiettivo (m 50, 110)
48 Supporto del copri-obiettivo (l 50)
38
""
"BATTERY EJECT]
""
40
39
(m 58, 134)
29 Video Output Socket [V] (m 76, 148, 150)
30 Audio Output Socket [A] (m 76, 148, 150)
31 S-Video Output Socket [S-VIDEO] (l 76, 148, 150)
32 Finder (l 40, 50, 84)
Due to limitations in LCD production technology, there
may be some tiny bright or dark spots on the Finder
screen, the whole screen may have a slight colour cast,
and flickering may occur. However, this is not a
malfunction and does not affect the recorded picture.
33 Cover of the Button-type Battery’s Compartment
[BACKUP BATTERY] (l 54)
34 DC Input Socket [DC IN] (l 18)
35 Battery Eject Lever [
36 Recording Start/Stop Buttons (l 58, 60)
Use either of these buttons depending on the recording
angle.
37 Off/On Mode Selector Switch [CAMERA/OFF/VCR]
(l 24, 60, 70, 84)
38 Grip Belt (l 50)
39 Speaker ( m 70)
40 Digital Still Picture Terminal
[DIGITAL STILL PICTURE] (l 150)
41 Cassette Eject Button [< EJECT] (l 42)
42 Date/Time/Title Button [DATE/TITLE] (m 58, 134)
43 Zoom Lever [W/T] (l 66, 96)
Volume Adjustment Lever [
44 Eyepiece Corrector Lever (l 50)
45 Shoulder Strap Holders (l 52)
46 Tripod Receptacle
47 Lens Cap (l 50, 110)
48 Lens Cap Holder ( l 50)
46
47 48
""
"BATTERY EJECT] (l 24)
""
ss
sVOL
ss
rr
r] (l 70)
rr
16
Page 17

29 Toma de salida de video [V] (m 77, 149, 151)
30 Toma de salida de audio [A] (m 77, 149, 151)
31 Toma de salida S-Video [S-VIDEO] (l 77, 149, 151)
32 Visor (l 41, 51, 85)
Debido a limitaciones en la tecnología de fabricación de
pantallas de cristal líquido, puede haber algunos puntos
brillantes u oscuros en la pantalla del visor, toda la
pantalla puede tener un ligero esfumado de color o
puede producirse un parpadeo. Sin embargo, esto no
es una avería y no afecta la imagen grabada.
33 Cubierta del compartimiento de la pila tipo botón
[BACKUP BATTERY] (l 55)
34 Toma de entrada de CC [DC IN] (l 19)
35 Palanca de expulsión de la batería
""
[
"BATTERY EJECT] (l 25)
""
36 Botones de inicio/parada de grabación (l 59, 61)
Utilice uno de estos botones según el ángulo de grabación.
37 Interruptor de selección de desconexión/conexión y
modo [CAMERA/OFF/VCR] (l 25, 61, 71, 85)
38 Empuñadura (l 51)
39 Altavoz (l 71)
40 Terminal de imagen fija digital
[DIGITAL STILL PICTURE] (l 151)
41 Botón de expulsión de cassette [< EJECT] (l 43)
42 Botón de la fecha/hora/título [DATE/TITLE]
(m 59, 135)
43 Palanca del zoom [W/T] (l 67, 97)
Palanca de ajuste de volumen [∂VOL µ] (m 71)
44 Palanca del corrector del ocular (l 51)
45 Argollas de la correa al hombro (l 53)
46 Rosca para trípode
47 Tapa del objetivo (l 51, 111)
48 Soporte de la tapa del objetivo (m 51)
SVENSKAESPAÑOL
29 Videoutgång [V] (m77, 149, 151)
30 Ljudutgång [A] (m 77, 149, 151)
31 S-videoutgång [S-VIDEO] (l 77, 149, 151)
32 Sökare (l 41, 51, 85)
Beroende på begränsningar i den teknik som används
vid tillverkningen av flytande kristallskärmar kan det
förekomma små ljusa eller mörka prickar på
sökarskärmen, hela skärmen kan ha ett svagt färgstick,
och det kan hända att den flimrar. Detta är dock inget
fel och har ingen inverkan på bilden som spelas in.
33 Lock till knapptypsbatterifacket [BACKUP BATTERY]
(l 55)
34 Likströmsingång [DC IN] (l 19)
35 Batteriavtagningsknapp [
36 Inspelningsstart/stoppknappar (l 59, 61)
Använd vilken som helst av dessa knappar beroende på
tagningsvinkeln.
37 Strömbrytare/lägesomkopplare [CAMERA/OFF/VCR]
(l 25, 61, 71, 85)
38 Handrem (l 51)
39 Högtalare (l 71)
40 Digital stillbildsutgång
[DIGITAL STILL PICTURE] (l 151)
41 Kassettutmatningsknapp [< EJECT] (l 43)
42 Knapp för visning/inspelning av datum/klocka/text
[DATE/TITLE] (m 59, 135)
43 Zoomknapp [W/T] (l 67, 97)
Volymjusteringsknapp [∂VOLµ] (m 71)
44 Okularinställningsspak (l 51)
45 Axelremshållare (l 53)
46 Stativfäste
47 Linsskydd (m 51, 111)
48 Linsskyddshållare (m 51)
""
"BATTERY EJECT] (l 25)
""
17
Page 18
3
1
1
ITALIANO ENGLISH
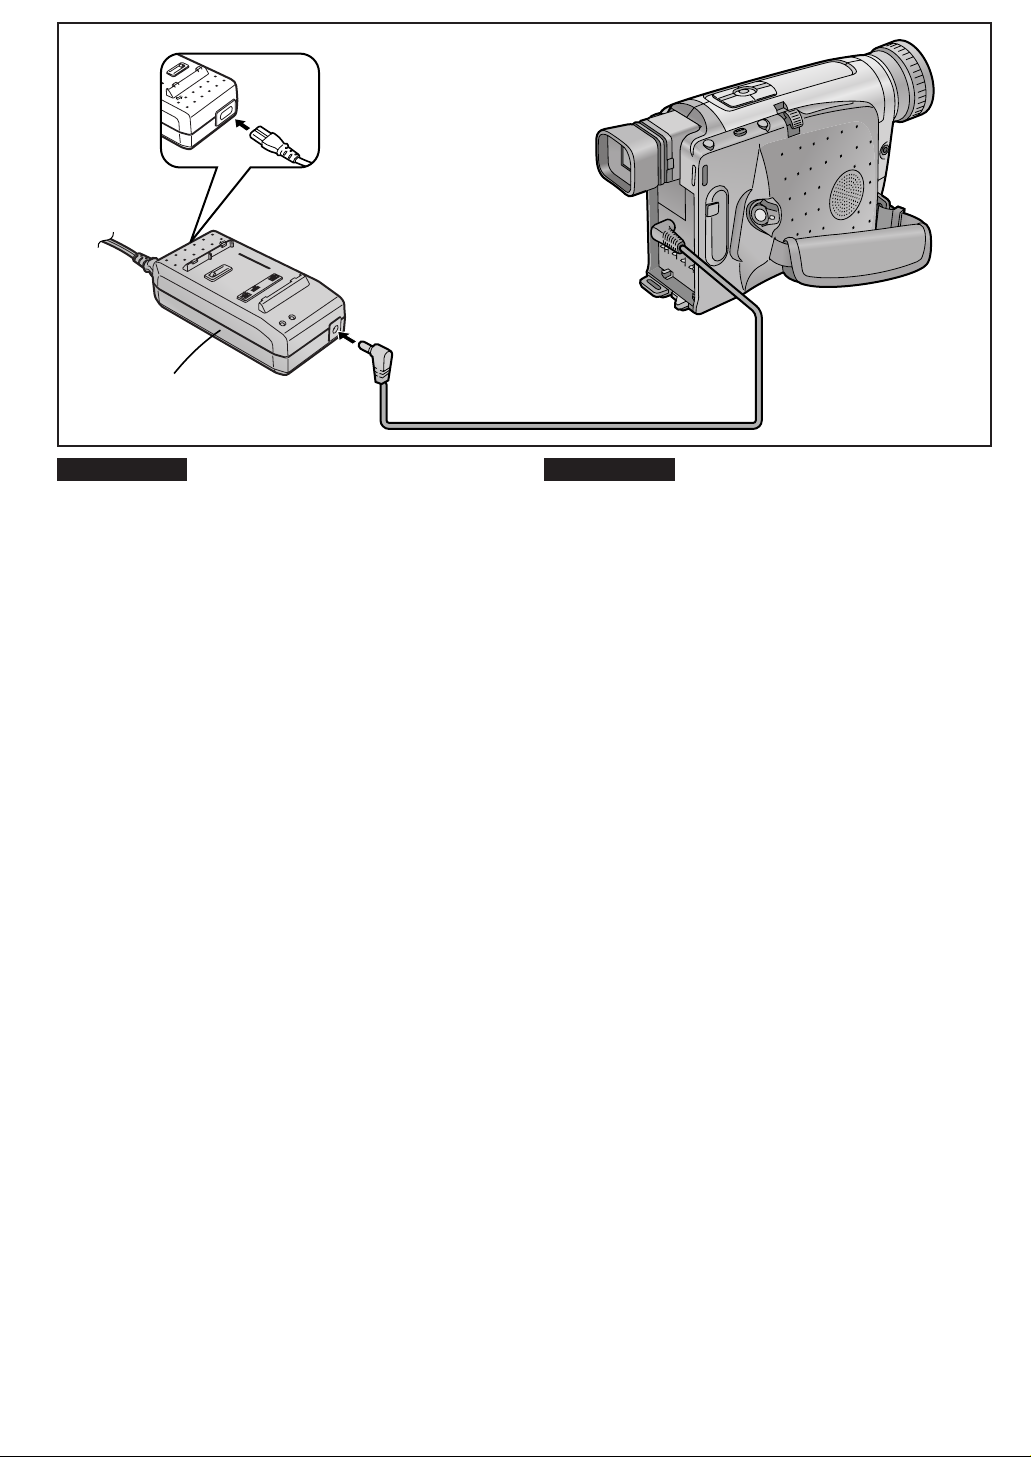
Alimentazione
(3 diversi modi di alimentare la movie)
Se vi trovate all’interno di uno stabile vi consigliamo di
utilizzare l’alimentatore CA 1.
1. Alimentatore CA (in dotazione)
≥Per utilizzare la movie in interni.
≥Per caricare le batterie. (l 20)
2. Batteria (in dotazione)
≥Per utilizzare la movie in esterni o dove non vi sia una
presa di corrente nelle vicinanze. (l 20)
3. Caricabatterie per auto (opzionale)
≥Per utilizzare la movie in auto.
Uso dell’alimentatore CA
1 Collegate il cavo CC alla presa [DC IN] sulla
movie.
2 Collegate l’altro capo del cavo alla presa
[DC OUT] sull’alimentatore CA.
2
The 3 Types of Power Supplies
To try out the Movie Camera at home, we recommend that you
use the AC Adaptor 1.
1. AC Adaptor (supplied)
≥To use the Movie Camera indoors.
≥To charge the Battery. (l 20)
2. Battery (supplied)
≥To use the Movie Camera outdoors, and also indoors
3. Car Battery Charger (optional)
≥To use the Movie Camera in a car.
Using the AC Adaptor as Power Supply Unit
1 Connect the DC Input Lead to the
2 Connect the other end of the cable to the
3 Connect the AC Mains Lead to the AC Adaptor
3 Collegate l’apposito cavo CA all’alimentatore e
alla presa di rete.
L’alimentatore CA è dotato di regolazione automatica
universale della tensione (AC 100–240 V, 50/60 Hz).
Recandovi all’estero, non dovrete effettuare alcuna
regolazione manuale.
The AC Adaptor features automatic universal voltage
adjustment (AC 100–240 V, 50/60 Hz), therefore, there is no
need for any manual voltage adjustment for use in other
countries.
when there is no AC mains socket nearby. (l 20)
[DC IN] Socket on the Movie Camera.
[DC OUT] Socket on the AC Adaptor.
and to an AC mains socket.
18
Page 19

SVENSKAESPAÑOL
Las 3 alimentaciones
Hay tres diferentes alimentaciones para la videocámara.
En el hogar utilice el adaptador de CA 1.
1. Adaptador de CA (incluido)
≥Para utilizar la videocámara en interiores.
≥Para cargar la batería. (l 21)
2. Batería (incluida)
≥Para utilizar en exteriores e interiores cuando no hay un
tomacorriente cerca. (l 21)
3. Cargador de la batería de coche (opcional)
≥Para utilizar la videocámara en el coche.
Adaptador de CA como alimentación eléctrica
1 Conecte el cable CC en la toma
[DC IN] de la videocámara.
2 Conecte el otro lado del cable en la toma
[DC OUT] del adaptador de CA.
3 Conecte el cable eléctrico en el adaptador de
CA y en un tomacorriente de CA.
El adaptador de CA tiene un ajuste automático de voltaje
universal (CA de 100–240 V, 50/60 Hz); no es necesario
ajustar el voltaje manualmente para usarlo en otro país.
De 3 olika strömkällorna
När du använder videokameran där hemma rekommenderar vi
att du använder nätadaptern 1.
1. Nätadaptern (medföljer)
≥När videokameran används inomhus.
≥För att ladda upp batteriet. (l 21)
2. Batteriet (medföljer)
≥När videokameran används utomhus, eller inomhus på
platser där det inte finns något vägguttag i närheten.
(l 21)
3. Bilbatteriladdare (säljs separat)
≥När videokameran används i bilen.
Hur man driver videokameran med nätadaptern
1 Sätt i likströmskabeln i [DC IN]-uttaget på
videokameran.
2 Sätt i kabelns andra ände i [DC OUT]-uttaget på
nätadaptern.
3 Sätt i nätkabeln i nätadaptern och i ett
vägguttag.
Nätadaptern är försedd med en automatisk
universalspänningsomkopplare (100–240 V växelström,
50/60 Hz), så du behöver inte ställa om spänningen för hand
för att kunna använda videokameran utomlands.
19
Page 20
2 3
1
1
ITALIANO ENGLISH
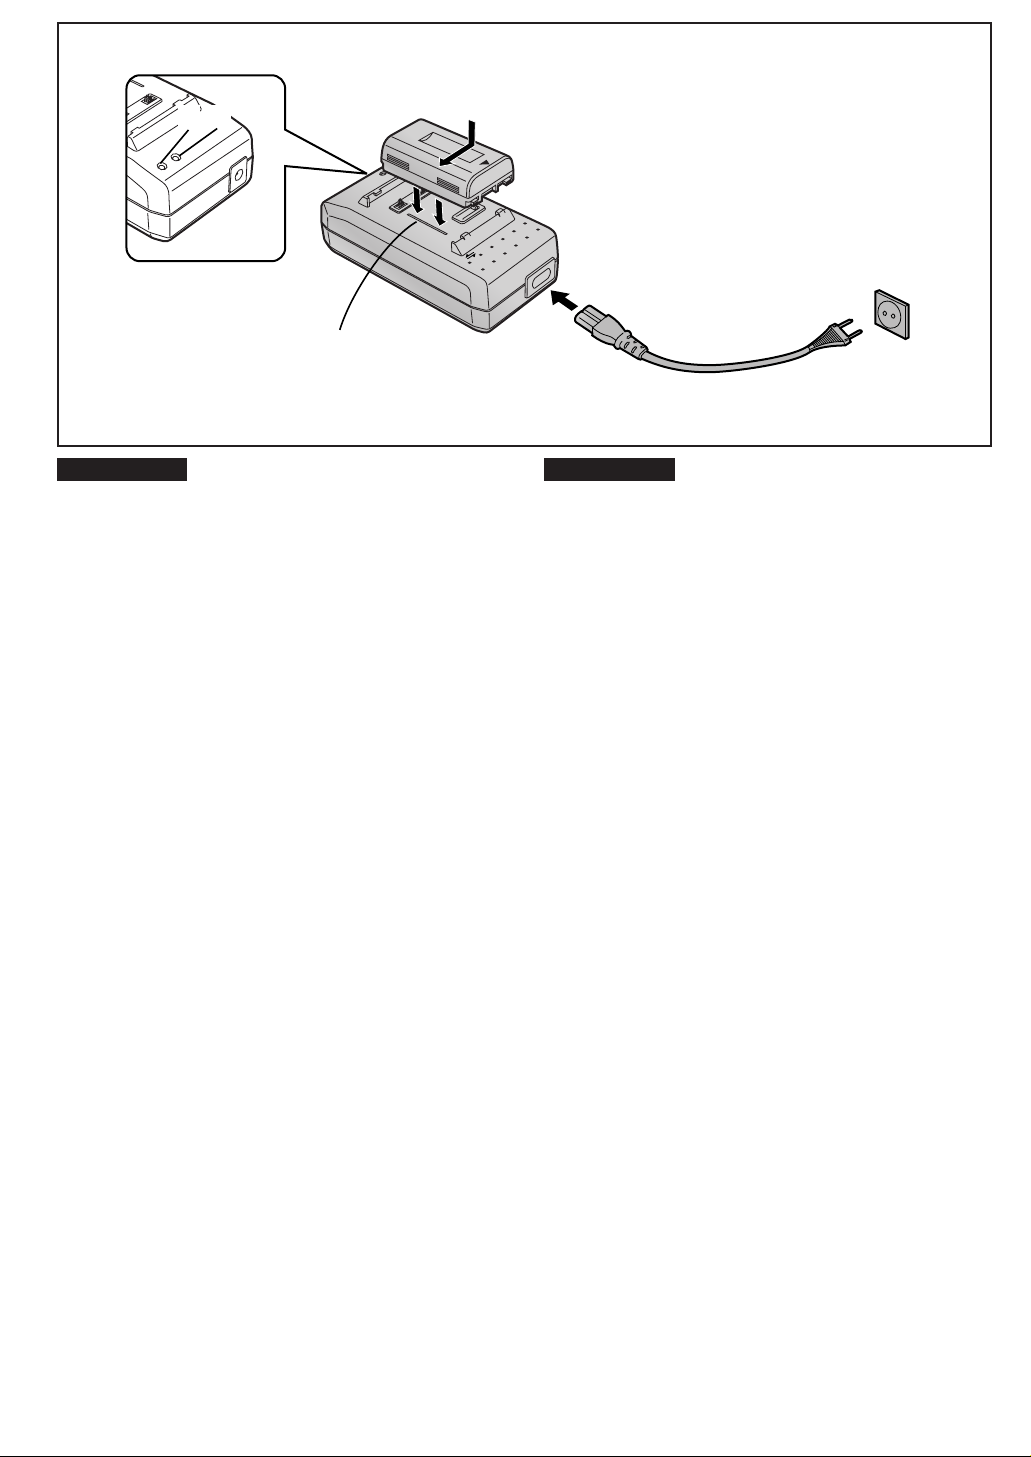
Ricarica della batteria
Prima di essere utilizzata, la batteria deve essere ricaricata.
1 Inserite la batteria.
≥Allineate la batteria con la linea 1 e, tenendola
premuta verso il basso, fatela scorrere nella direzione
indicata dalla freccia.
Charging the Battery
Charge the Battery before using it.
1 Attach the Battery.
2 Securely connect the AC Mains Lead to the AC
2 Collegate saldamente il cavo di alimentazione
CA all’alimentatore CA e alla presa di rete.
≥Si accenderà la spia [POWER] 2, lampeggerà la spia
[CHARGE] 3 e inizierà la ricarica della batteria.
≥Se la spia [CHARGE] 3 non lampeggia, nonostante la
batteria sia stata inserita, togliete la batteria e inseritela
nuovamente.
∫∫
∫ Charging Lamp [CHARGE]
∫∫
∫ Spia di carica [CHARGE]
∫∫
Lampeggia: La ricarica è in corso.
Rimane accesa: La batteria può essere già
utilizzata per usare la movie, ma
non è completamente ricaricata.
(30 minuti circa di carica).
Rimane spenta: La batteria è completamente
ricaricata.
∫∫
∫ Rimozione della batteria
∫∫
Fatela scorrere nella direzione opposta a quella indicata al
punto 1.
≥La carica delle batterie deve essere effettuata a una
temperatura ambientale compresa tra i 10xC e i 30xC.
≥Durante la ricarica, non collegate il cavo CC all’alimentatore
CA.
≥Durante le riprese o le ricariche, la batteria potrebbe
scaldarsi. E’ un fenomeno normale.
≥Se mettete in carica una batteria che non è completamente
scarica, potrebbe capitare che la spia [CHARGE] 3
lampeggi brevemente e quindi si spenga. Questo indica che
la batteria è completamente ricaricata e non è segno di un
funzionamento difettoso.
∫∫
Flashing: During charging
Lit: The Battery can already be used to
Off: The Battery is fully charged.
∫∫
∫ Removing the Battery
∫∫
Slide it in the opposite direction of that indicated in step 1
above.
≥Charge the Battery at a room temperature between 10xC and
30xC.
≥When charging, do not connect the DC Input Lead to the AC
Adaptor.
≥During recording or charging, the Battery becomes warm.
However, this is normal.
≥If you charge the Battery when it is not yet discharged, the
[CHARGE] Lamp 3 may flash briefly and then go out. This
indicates that the Battery is fully charged. Therefore, this is
not an indication of a malfunction.
2
≥Align the Battery with line 1 and push it in the direction
of the arrow while holding it down.
Adaptor and an AC Mains Socket.
≥The [POWER] Lamp 2 lights and then the [CHARGE]
Lamp 3 flashes and charging starts.
≥If the [CHARGE] Lamp 3 does not flash even though
the Battery is attached, remove the Battery and then
re-attach it.
operate the Movie Camera but it is not
yet fully charged.
(Approx. 30-minute battery charge)
20
Page 21

Carga de la batería
Cargue la batería antes de usarla.
1 Instale la batería.
≥Alinee la batería con la línea 1 y empuje en el sentido
de la flecha y hacia abajo.
2 Conecte firmemente el cable de CA en el
adaptador de CA y en el tomacorriente de CA.
≥La luz [POWER] 2 se enciende y la luz [CHARGE] 3
destella y empieza la carga.
≥Si la luz [CHARGE] 3 no destella aunque se ha
instalado la batería, desmonte la batería y vuelva a
instalar.
SVENSKAESPAÑOL
Uppladdning av batteriet
Ladda upp batteriet innan du använder det.
1 Sätt på batteriet.
≥Håll batteriet längs linjen 1 och tryck in det i pilens
riktning, samtidigt som du håller det nedtryckt.
2 Sätt i nätkabeln ordentligt i nätadaptern och i ett
vägguttag.
≥[POWER]-lampan 2 tänds. Därefter börjar [CHARGE]-
lampan 3 blinka och uppladdningen startar.
≥Om [CHARGE]-lampan 3 inte börjar blinka trots att
batteriet är påsatt, så ta av batteriet och sätt på det
igen.
∫∫
∫ Luz de carga [CHARGE]
∫∫
Destella: Durante la carga.
Encendida: La batería ya se ha utilizado la batería
para hacer funcionar la cámara y no
está todavía cargada totalmente.
(La carga de batería demora unos
30 minutos)
Apagada: La batería está completamente cargada
∫∫
∫ Desmontaje de la batería
∫∫
Deslice en el sentido opuesto al indicado en el paso 1
anterior.
≥Cargue la batería a una temperatura ambiente de entre 10xC
y 30xC.
≥Mientras se hace la carga, no conecte el cable de entrada de
CC en el adaptador de CA.
≥Durante la grabación o carga, la batería se calienta. Esto es
algo normal.
≥Si carga la batería cuando todavía no se ha descargado, la
luz [CHARGE] 3 puede destellar brevemente y apagarse.
Esto indica que la batería está totalmente cargada. Esto no
es una indicación de avería.
∫∫
∫ Laddningslampan [CHARGE]
∫∫
Blinkar: Under uppladdning
Tänd: Batteriet går att använda för att driva
videokameran, men är ännu inte fullt
uppladdat. (Ca. 30 minuters laddning.)
Släckt: Batteriet är fullt uppladdat.
∫∫
∫ Hur man tar av batteriet
∫∫
Skjut det i motsatt riktning mot i steg 1 ovan.
≥Ladda upp batteriet vid en rumstemperatur på mellan 10 och
30xC.
≥Sätt inte i likströmskabeln i nätadaptern under
uppladdningen.
≥Under inspelning eller uppladdning blir batteriet varmt, men
det är normalt.
≥Om du börjar ladda upp batteriet innan det är urladdat kan
det hända att [CHARGE]-lampan 3 blinkar en kort stund
och sedan släcks igen. Det betyder att batteriet är fullt
uppladdat, och tyder inte på något fel.
21
Page 22
ITALIANO ENGLISH
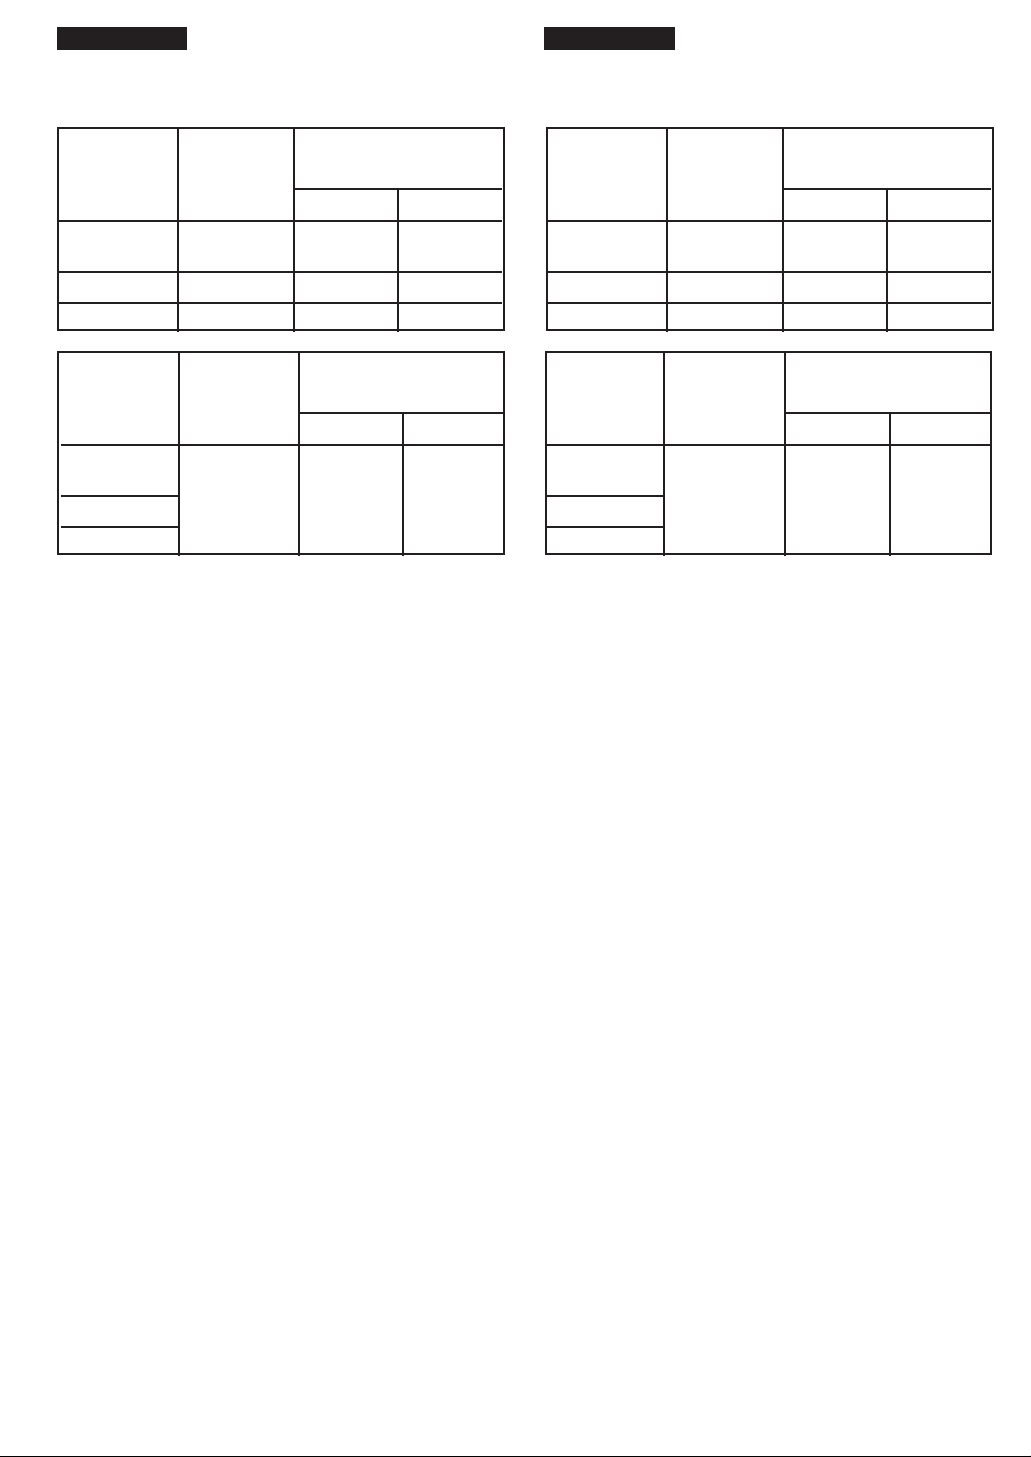
∫ Tempi di ricarica e massima autonomia di
ripresa in registrazione con modalità Manuale
Tipo di
batteria
CGR-V610
(In
dotazione
CGR-V620
CGR-V816
Tipo di
batteria
CGR-V610
(In
dotazione
CGR-V620
CGR-V816
Ricarica
completa
(tempo
necessario)
80 min. 85 min.
)
145 min.
310 min.
30 minuti di
ricarica
(approssimativa)
)
30 min.
Max. Autonomia
di Ripresa
A
175 min.
350 min.
Max. Autonomia
di Ripresa
B
120 min.
250 min.
500 min.
AB
40 min.
50 min.
1: Uso del LCD Monitor 2: Uso del mirino
(I tempi indicati nella tabella sono approssimativi.)
Per Massima Autonomia di Ripresa si intende la durata di una
registrazione senza interruzioni, effettuata con una
temperatura ambientale di 25oC e un’umidità relativa del 60%.
Va ricordato che, durante le riprese effettive, l’uso dello zoom
e di altre funzioni aumenta il consumo, mentre una maggiore o
minore temperatura ambientale riduce la capacità della
batteria di generare corrente elettrica. L’autonomia effettiva
della batteria, perciò, può essere minore del 30%–50%
rispetto a quanto indicato.
∫ Charging Time and Maximum Continuous
Recording Time in the Manual Recording Mode
Battery
Model No.
CGR-V610
(Supplied)
CGR-V620
CGR-V816
Battery
Model No.
CGR-V610
(Supplied)
CGR-V620
CGR-V816
Charging Time
for a Full
Charge
80 min. 85 min.
145 min.
310 min.
Approx.
30-Minute
Charge
30 min.
Max. Continuous
Recording Time
A
175 min.
350 min.
Max. Continuous
Recording Time
A
40 min.
B
120 min.
250 min.
500 min.
B
50 min.
1: Using LCD Monitor 2: Using Finder
(The times shown in the above charts are approximations.)
Maximum Continuous Recording Time means the duration of
continuous recording performed at an ambient temperature of
25oC and 60% relative humidity. In actual recording, however,
the use of the zoom and other functions increases the power
consumption, and higher or lower temperatures reduce the
Battery’s ability to generate electricity. Therefore, the actual
recording time per Battery may be approximately 30%–50%
shorter than listed above.
22
Page 23
SVENSKAESPAÑOL
∫ Tiempo de carga y máximo tiempo de grabación
continua en el modo de grabación manual
Código de
batería
CGR-V610
(Suministrado)
CGR-V620
CGR-V816
Código de
batería
CGR-V610
(Suministrado)
CGR-V620
CGR-V816
Tiempo de
carga para
carga máxima
80 min. 85 min.
145 min.
310 min.
Aprox. 30
minutos de
carga
30 min.
Máximo tiempo de
grabación continua
A
120 min.
175 min.
350 min.
Máximo tiempo de
grabación continua
250 min.
500 min.
A
40 min.
50 min.
B
B
1: Uso del monitor de cristal líquido 2: Uso del visor
(Los tiempos de los cuadros anteriores son aproximados.)
Por máximo tiempo de grabación continua se entiende una
grabación continua a una temperatura ambiente de 25oC y
humedad relativa del 60%.
En la práctica se utilizará el zoom y otras funciones que
requieren más electricidad y una temperatura ambiente mayor
o menor reduce la capacidad de la batería de generar
electricidad. El tiempo por batería puede ser un 30%–50%
más corto que el indicado.
∫ Uppladdningstid och maximal kontinuerlig
inspelningstid i det manuella inspelningsläget
Max. kontinuerlig
inspelningstid
A
175 min.
350 min.
Max. kontinuerlig
inspelningstid
A
40 min.
B
120 min.
250 min.
500 min.
B
50 min.
Batteri nr.
CGR-V610
(Medföljande)
CGR-V620
CGR-V816
Batteri nr.
CGR-V610
(Medföljande)
CGR-V620
CGR-V816
Laddningstid
för full
uppladdning
80 min. 85 min.
145 min.
310 min.
Ca. 30
minuters
uppladdning
30 min.
1: Mha LCD-skärmen 2:Mha sökaren
(Tiderna i ovanstående tabeller är ungefärliga.)
Maximal kontinuerlig inspelningstid betyder varaktigheten för
en kontinuerlig inspelning som utförs vid en
omgivningstemperatur på 25oC och en relativ luftfuktighet på
60%.
När man faktiskt spelar in ökar dock strömförbrukningen när
zoomen och de andra funktionerna används, och batteriets
förmåga att alstra elektricitet sjunker vid högre eller lägre
temperatur. Det innebär att den faktiska inspelningstiden per
batteri kan bli cirka 30–50% kortare än vad som anges i
ovanstående tabell.
23
Page 24
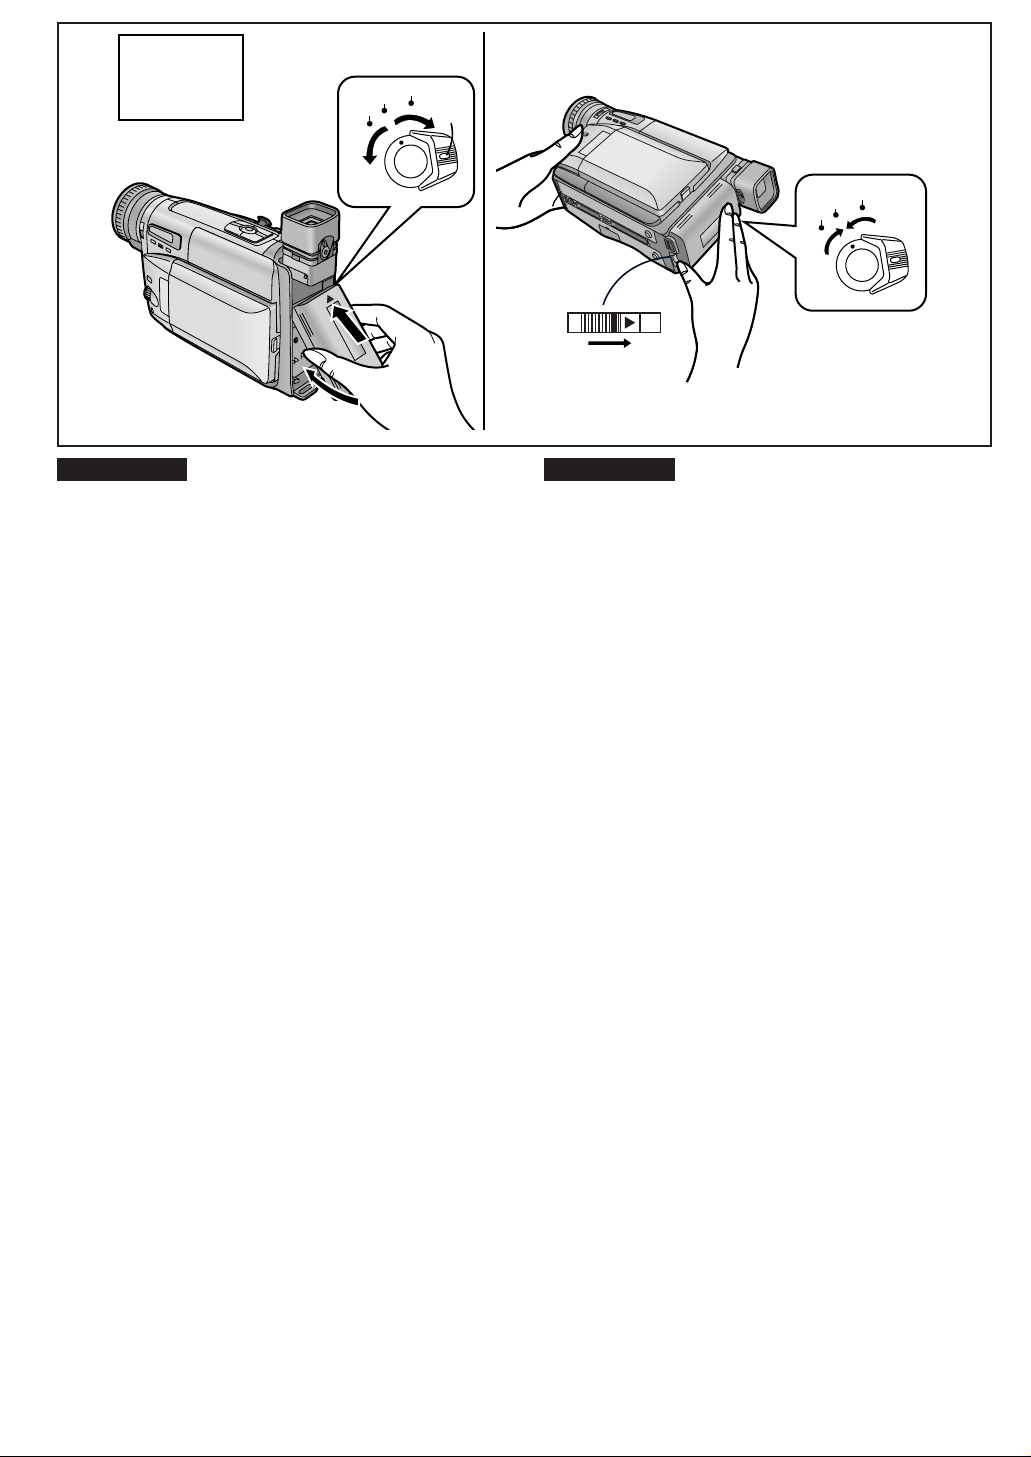
u
VCR
CAMERA
OFF
1
3
1
5
2
ITALIANO ENGLISH
Come inserire una batteria carica
1 Fissate la batteria di modo che la sua parte
superiore (quella con la freccia verso l’alto)
venga a trovarsi nella parte superiore
dell’alloggiamento.
2 Premete la parte inferiore della batteria verso la
movie fino a che uno scatto non segnala che si
è agganciata correttamente.
Attaching the Charged Battery
1 Insert the Battery with its top (so that the arrow
2 Press the bottom of the Battery toward the
3 Set the [CAMERA/OFF/VCR] Switch to
3 Impostate l’interruttore [CAMERA/OFF/VCR] su
[CAMERA] o [VCR].
¡Per far ruotare l’interruttore tenete premuto il tasto
centrale 1.
¡L’Autonomia rimanente della batteria può essere
controllata nel mirino e nel monitor LCD.
≥Per garantire una indicazione più precisa della Carica
Rimanente nella batteria, inserite una batteria
completamente ricaricata.
≥Troverete maggiori informazioni sulle indicazioni di
Autonomia e Carica rimanenti nella Batteria al paragrafo
“Controllo della Carica Rimanente nella batteria”. (l 26)
∫∫
∫ Rimozione della batteria
∫∫
∫∫
∫ Removing the Battery
∫∫
4 Set the [CAMERA/OFF/VCR] Switch to [OFF].
5 Hold the Battery firmly to prevent it from
4 Impostate l’interruttore [CAMERA/OFF/VCR] su
[OFF].
5 Fate scorrere la leva [
direzione della freccia e togliete la batteria,
tenendola saldamente ed evitando di farla
cadere accidentalmente.
""
"BATTERY EJECT] in
""
CAMERA
OFF
VCR
points upward) into the top Battery Holder.
Movie Camera until it locks with a click.
[CAMERA] or [VCR].
¡Turn the switch while pressing the button 1.
¡The Remaining Battery Operation Time can be
confirmed both in the Finder and on the LCD Monitor.
≥To ensure more precise indication of the remaining
battery power, attach a fully charged Battery.
≥For details about the Remaining Battery Power
Indication, read “Checking the Remaining Battery
Power”. (l 26)
dropping and pull it off while sliding the
""
[
"BATTERY EJECT] Lever in the direction of
""
the arrow.
4
24
Page 25

Instalación de una batería con carga
1 Instale la batería con su lado de arriba (para
que la flecha apunte hacia arriba) en el soporte
superior de la batería.
2 Presione el lado de abajo de la batería hacia la
videocámara hasta que se trabe.
3 Mueva el interruptor [CAMERA/OFF/VCR] a
[CAMERA] o [VCR].
¡Conecte el interruptor mientras presiona el botón 1.
¡El tiempo de funcionamiento remanente de la batería
puede confimarse tanto en el visor como en el monitor
de cristal líquido.
≥Para garantizar una indicación más precisa de la carga
remanente, instale una batería totalmente cargada.
≥Para más detalles sobre las indicaciones de carga
remanente de batería y de tiempo de funcionamiento,
lea la “Verificación de la carga remanente de la batería”
(l 27).
∫∫
∫ Desmontaje de la batería
∫∫
4 Mueva el interruptor [CAMERA/OFF/VCR] a
[OFF].
5 Sujete firmemente la batería para que no se
caiga y saque deslizando la palanca
""
[
"BATTERY EJECT] en el sentido de la flecha.
""
SVENSKAESPAÑOL
Hur man sätter på ett uppladdat batteri
1 Stick in batteriets övre ände (med pilen vänd
uppåt) i den övre batterhållaren.
2 Tryck in batteriets undre del mot videokameran
tills det klickar till.
3 Ställ strömbrytaren [CAMERA/OFF/VCR] på
[CAMERA] eller [VCR].
¡Håll knapp 1 intr yckt medan du flyttar strömbrytaren.
¡Det går att kontrollera batteriets återstående brukstid
både i sökaren och på LCD-skärmen.
≥Sätt på ett fullt uppladdat batteri för att indikeringen för
återstående batteriström ska bli så exakt som möjligt.
≥Läs igenom “Kontroll av hur mycket ström det är kvar i
batteriet” (l 27) för närmare detaljer om indikeringen
för återstående batteriström.
∫∫
∫ Hur man tar av batteriet
∫∫
4 Ställ strömbrytaren [CAMERA/OFF/VCR] på
[OFF].
5 Håll ordentligt i batteriet så att du inte tappar
det och dra av det samtidigt som du skjuter
""
[
"BATTERY EJECT]-knappen i pilens riktning.
""
25
Page 26
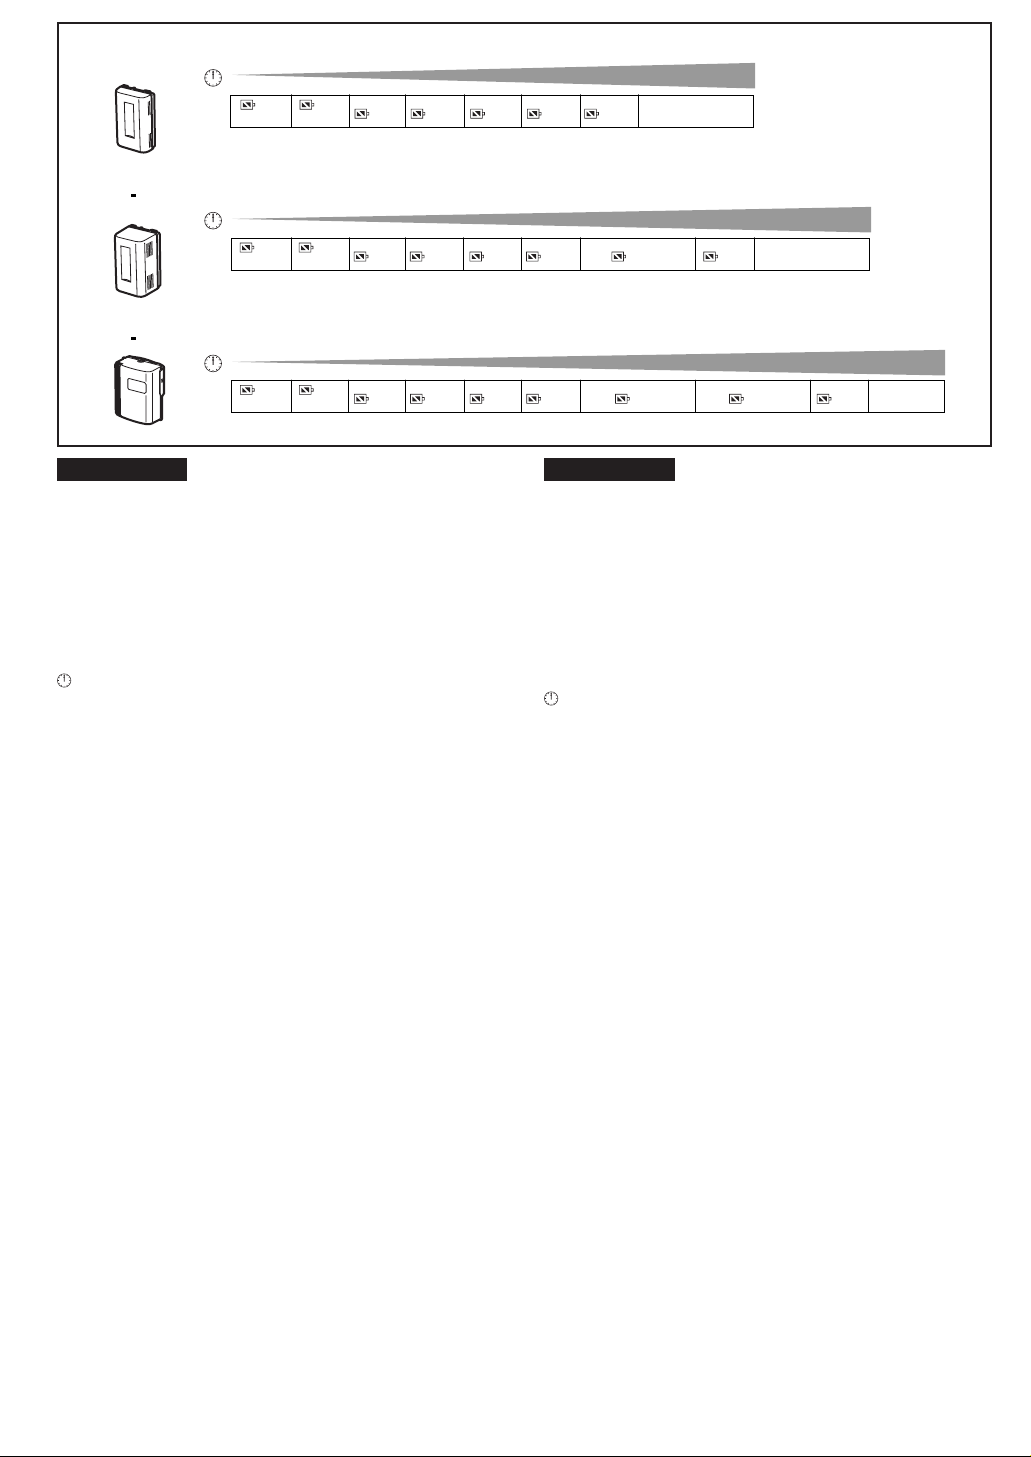
CGR-V610
00 11 33 55 1010 2020 4040 6060
0:00 0:01
ÿ
A
ÿ
ÿ
ÿ
ÿ
6
ÿ
ÿ
ÿ
ÿ
ÿ
ÿ
ÿ
ÿ
ÿ
ÿ
ÿ
ÿ
ÿ
ÿ
0:03 0:05 0:10 0:20 0:40
ÿ
6
ÿ
ÿ
ÿ
ÿ
CGR-V620
00 11 33 55 1010 2020 4040 6060 8080 120120
0:00 0:01
ÿ
A
ÿ
ÿ
ÿ
ÿ
6
ÿ
ÿ
ÿ
ÿ
ÿ
ÿ
ÿ
ÿ
ÿ
ÿ
ÿ
ÿ
ÿ
ÿ
0:03 0:05 0:10 0:20 0:40
ÿ
6
ÿ
ÿ
ÿ
ÿ
CGR-V816
11 33 55 1010 2020 4040 6060 8080 120120 160160 24024000
0:00 0:01
ÿ
ÿ
ÿ
A
ÿ
ÿ
6
ÿ
ÿ
ITALIANO ENGLISH
»»
» Controllo della Carica Rimanente nella batteria
»»
Nel mirino e sul Monitor LCD è possibile controllare la carica
rimanente nella batteria. L’indicazione mostra anche
approssimativamente l’autonomia in registrazione fornita dalla
batteria che avete inserito. Come è possibile vedere dalla
figura, le indicazioni non sono precise al minuto. La figura
mette in relazione tra loro le indicazioni di Autonomia
rimanente e di Carica Rimanente nella batteria (in ore/minuti).
: Autonomia rimanente.
A: Carica Rimanente nella batteria (in ore/minuti).
(Questa indicazione non appare quando si riprende con il
Modo “a specchio”) (m 128)
Indicazione di Carica Rimanente nella batteria
(in ore/minuti)
L’indicazione mostra l’autonomia disponibile per una ripresa
senza interruzioni a una temperatura ambientale di 25°C,
inserendo una batteria completamente ricaricata. Nei casi che
seguono, l’autonomia effettiva della batteria è differente da
quella indicata sopra:
Quando la registrazione viene effettuata a tratti.
Nella maggior parte dei casi, la registrazione viene avviata e
interrotta di frequente, la movie viene spenta e accesa,
vengono utilizzati zoom e altre funzioni che consumano
energia. Questo fa sì che l’autonomia effettiva della batteria
sia ridotta del 30–50% rispetto al valore indicato. (m 22)
Quando la temperatura ambientale è eccessivamente
elevata o ridotta.
Le prestazioni della batteria cambiano a seconda della
temperatura ambientale. A temperature estremamente basse,
l’autonomia di ripresa può diventare estremamente ridotta.
L’indicazione di Carica Rimanente nella batteria (in ore/minuti)
diminuirà più velocemente che non a una temperatura
ambientale di 25°C: (A temperature più elevate le indicazioni
hanno la tendenza a ridursi più lentamente).
Quando la batteria è giunta al termine della sua vita utile.
Se l’autonomia delle batteria è insufficiente per un uso normale,
anche dopo una ricarica completa, significa che la batteria è
giunta al termine della sua vita utile. (m 162)
ÿ
ÿ
ÿ
ÿ
ÿ
ÿ
ÿ
ÿ
ÿ
ÿ
ÿ
ÿ
0:03 0:05 0:10 0:20 0:40 1:20
ÿ
6
ÿ
ÿ
ÿ
ÿ
»»
» Checking the Remaining Battery Power
»»
You can confirm the remaining charge in the attached Battery
in the Finder or on the LCD Monitor. This also shows you
approximately how much more continuous recording time you
can get from the attached Battery. The indicated time does not
change in 1-minute steps.
The above illustrations show how the Remaining Battery
Operation Time Indication changes according to the remaining
operation time.
: Actual remaining battery operation time
A: Remaining Batter y Operation Time Indication
Remaining Battery Operation Time Indication
This Indication shows the remaining duration of continuous
recording at an ambient temperature of 25°C when a fully
charged Battery was attached. Therefore, in the following
cases, the actual available recording time is different from the
times shown above:
When Recording Is Not Performed Continuously
In most cases, you will frequently start and stop recording,
turn the Movie Camera on and off, use the zoom and other
functions, all of which consume power. Therefore, the actual
available recording time from the Battery is approximately
30–50% shorter than listed. (m 22)
When the Ambient Temperature Is Extremely Low or
Extremely High
The characteristics of the Battery vary according to the
ambient temperature, and at a very low temperature, the
possible recording time becomes extremely short.
In addition, the Remaining Battery Operation Time Indication
on the Movie Camera decreases a little faster than at an
ambient temperature of 25°C. (At a higher temperature, it
tends to decrease more slowly.)
When the Service Life of the Battery Has Reached Its End
When the operation time even after full charging is too short
for normal use, the service life of the Battery has reached its
end. (m 162)
u
1:20
u
2:40
u
(This indication does not appear when recording in
the Mirror Mode.) (m 128)
26
Page 27

»»
» Verificación de la carga remanente de la batería
»»
Se puede confirmar la carga remanente de la batería instalada
mediante el visor o el monitor de cristal líquido. Muestra
aproximadamente el tiempo de grabación continua que
todavía le queda en la batería instalada. El tiempo indicado no
cambia en intervalos de 1 minuto. Las figuras anteriores
muestran la forma de cambiar la indicación del tiempo de
funcionamiento remanente de la batería de acuerdo al tiempo
de funcionamiento remanente.
: Tiempo de funcionamiento remanente real
A: Indicación de tiempo de funcionamiento remanente
de la batería (Esta indicación no aparece cuando
graba en el modo de espejo.) (m 129)
Indicación del tiempo de funcionamiento remanente de la
batería
Esta indicación muestra la duración remanente de grabación
continua a temperatura ambiente de 25°C cuando se instala
una batería completamente cargada. Por lo tanto, en los
siguientes casos, el tiempo de grabación disponible real es
diferente de los tiempos mostrados anteriormente:
Cuando la grabación no se hace continuamente
En la mayoría de los casos se iniciará y parará la grabación,
conectará y desconectará la videocámara y utilizará el zoom y
otras funciones, todo lo cual consume electricidad adicional. Por lo
tanto el tiempo de grabación disponible en la práctica para la
batería es aproximadamente 30–50% más corto que el de la lista.
(m 23)
Cuando hay una temperatura ambiente demasiado baja o
demasiado alta
Las características de la batería varían de acuerdo a la
temperatura ambiente y a muy bajas temperatura es posible
que el tiempo de grabación se vuelva muy corto. Además, l a
indicación de tiempo de funcionamiento remanente de la
batería en la videocámara disminuye un poco más rápido que
a la temperatura ambiente de 25°C. (A temperaturas más
altas, tiende a disminuir más lentamente.)
Cuando la vida de servicio de la batería ha llegado a su fin
Cuando el tiempo de funcionamiento después de una carga
completa se vuelve más corto para el uso normal, la vida de
servicio de la batería ha llegado a su fin. (m 163)
SVENSKAESPAÑOL
»»
» Kontroll av hur mycket ström det är kvar i
»»
batteriet
Det går att kontrollera hur mycket ström det är kvar i det
påsatta batteriet antingen i sökaren eller på LCD-skärmen.
Där visas även ungefär hur länge till det går att spela in med
det påsatta batteriet. Tiden ändras inte varje minut. I
ovanstående figurer visas hur indikeringen för återstående
batteribrukstid ändras i förhållande till den återstående
brukstiden.
: Faktisk återstående brukstid
A: Indikering för återstående batteribrukstid
(Denna indikering visas inte under inspelning i
spegelläget.) (m 129)
Indikeringarna för återstående batteriström och brukstid
Indikeringen för återstående batteribrukstid
Denna indikering visar den återstående tidslängden för
oavbruten inspelning vid en omgivningstemperatur på 25°C
när ett fullt uppladdat var påsatt. Den verkliga återstående
inspelningstiden kan därför skilja sig från ovanstående tider i
följande fall:
När inspelningen inte görs oavbrutet
I de flesta fall brukar man ganska ofta starta och stanna
inspelningen, slå på videokameran och stänga av den, och
använda zoomen och andra funktioner, och allt detta drar
ström. Det medför att den tid det faktiskt går att spela in med
batteriet blir ungefär 30–50% kortare än vad som anges i
tabellerna. (m 23)
När det är väldigt kallt eller väldigt varmt
Batteriets egenskaper varierar med omgivningstemperaturen,
och när det är väldigt kallt blir den möjliga inspelningstiden
ytterst kort. Dessutom sjunker indikeringen för återstående
batteribrukstid på videokameran något fortare än vid en
omgivningstemperatur på 25°C. (Vid högre temperatur
tenderar indikeringen att sjunka något långsammare.)
När batteriet är utslitet
Om batteriets brukstid blir för kort för nor mal användning trots
att det är fullt uppladdat, betyder det att batteriet är utslitet.
(m 163)
27
Page 28
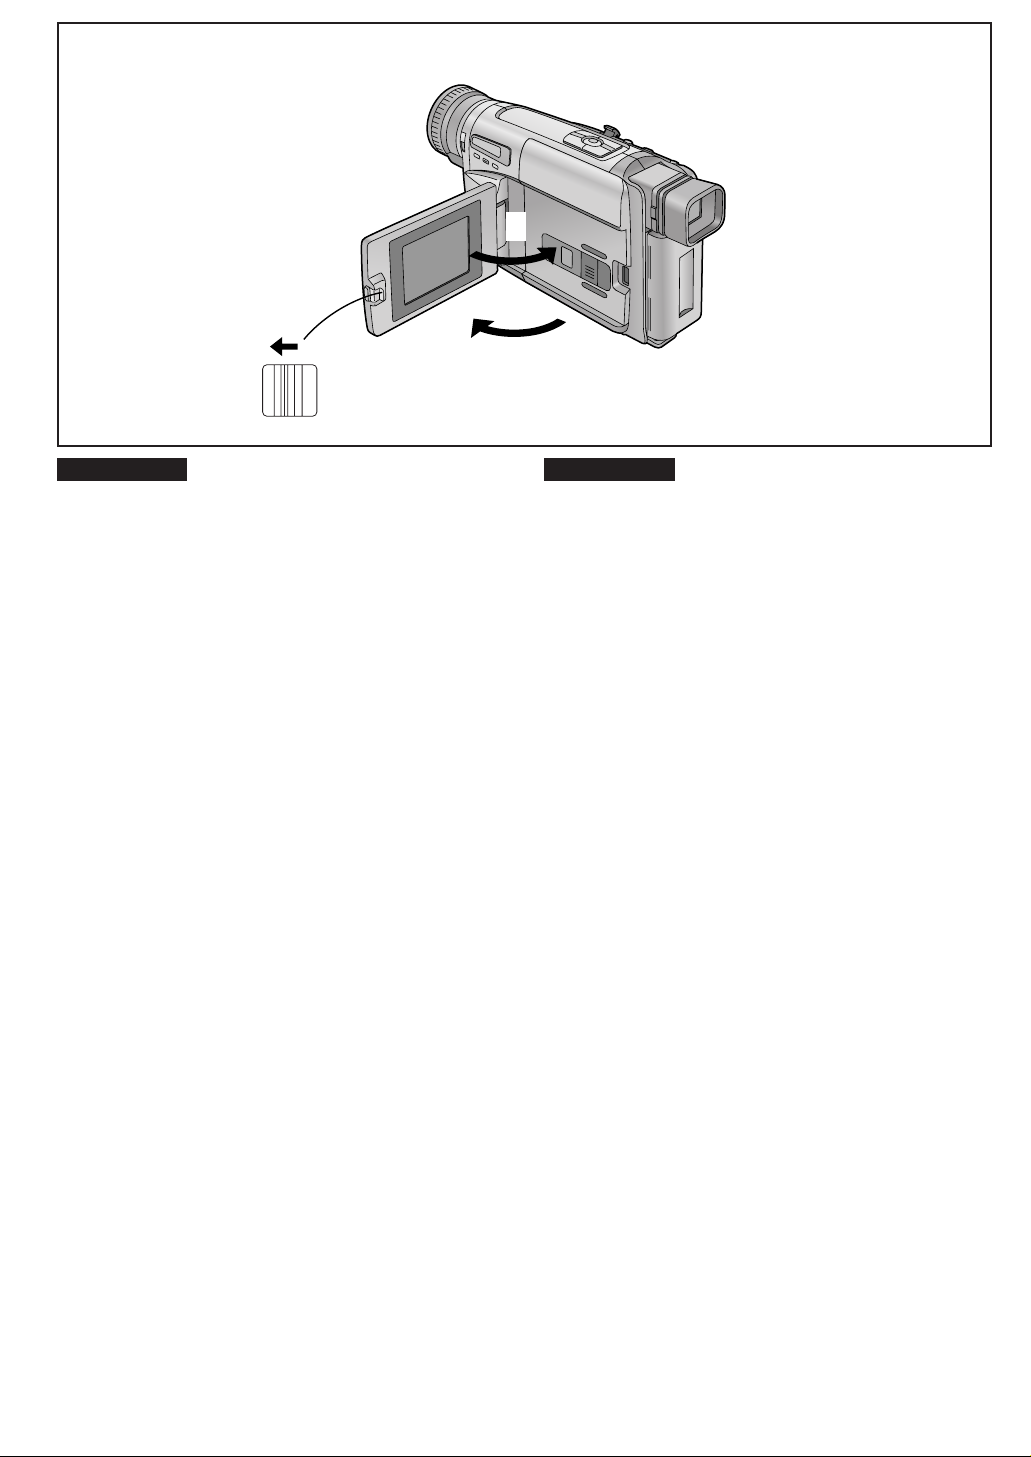
2
1
1
ITALIANO ENGLISH
OPEN
3
Uso del Monitor LCD
Il nuovo sistema di retroilluminazione del pannello a cristalli
liquidi rende le immagini molto più luminose. Lo speciale
rivestimento antiriflesso della superficie del Monitor LCD,
inoltre, mantiene vivi i colori delle immagini e le rende più facili
da vedere
»»
» Apertura del Monitor LCD
»»
1 Fate scorrere verso sinistra la leva [LOPEN] e
contemporaneamente aprite il Monitor LCD, in
direzione della freccia, di circa 90°.
»»
» Per chiudere il Monitor LCD
»»
2 Ruotate il Monitor LCD verso il corpo della
movie, fino a che non si blocca con uno scatto.
¡L’immagine visualizzata dal Monitor LCD apparirà
leggermente allungata in senso verticale. Questo non ha
alcuna influenza sulle immagini effettivamente registrate, che
saranno assolutamente corrette.
¡Prima di chiudere il Monitor LCD, riportatelo in posizione
verticale e accertatevi che il vano cassetta sia ben chiuso.
¡L’apertura del Monitor LCD spegne automaticamente il
mirino. Il mirino si riaccende se il Monitor LCD viene girato in
avanti.
¡Il Monitor LCD è stato costruito con tecnologie di altissima
precisione. Come risultato si sono ottenuti più del 99,99% di
pixel attivi, con meno dello 0,01% di pixel inattivi o sempre
accesi. La presenza di eventuali pixel inattivi o sempre
accesi non è indice di funzionamento difettoso e non
influenza in alcun modo le immagini registrate.
¡Se, al momento dell’accensione, la movie è particolarmente
fredda, le immagini sul Monitor LCD sono più scure del
normale. Tuttavia, non appena viene raggiunta la temperatura
normale, il Monitor LCD torna alla normale luminosità.
¡Per togliere eventuali impronte digitali, pulite il Monitor LCD
con un panno morbido.
¡Non esponete il Monitor LCD alla luce solare diretta: il
riflesso potrebbe rendere difficile la visione delle immagini.
¡Evitate che il Monitor LCD subisca urti e che la sua
superficie venga compressa in alcun modo.
¡Prima di trasportare la movie, accertatevi che il Monitor LCD
sia ben chiuso.
Using the LCD Monitor
Improved LCD backlight transmission makes the picture extra
bright. In addition, special coating of the LCD’s surface diffuses
the light from outside to minimize light reflection, so the picture
has vivid colours and is easy to see.
»»
» Opening the LCD Monitor
»»
1
Slide the [LOPEN] Lever to the left and
simultaneously open the LCD Monitor in the
direction of the arrow approximately 90
»»
» Closing the LCD Monitor
»»
uu
u.
uu
2 Turn the LCD Monitor back toward the Movie
Camera body until it locks with a click.
¡The picture seen on the LCD Monitor looks slightly stretched
vertically, however, the actually recorded picture remains
unaffected by this.
¡Return the LCD Monitor to its vertical position before closing
it. Also, make sure that the Cassette Compartment is
securely closed before closing the LCD Monitor.
¡Opening the LCD Monitor automatically turns the Finder off.
However, when you turn the LCD Monitor so that is faces
forward, the Finder turns on again.
¡Extremely high precision technology is employed in
producing the LCD Monitor. The result is more than 99.99%
effective pixels with a mere 0.01% of the pixels inactive or
always lit. However, this is not a malfunction and does not
affect the recorded picture.
¡When the Movie Camera is very cold when turning it on, the
picture on the LCD Monitor is darker than normally. However,
as it reaches normal temperature, it regains its normal
brightness.
¡To remove fingerprints, wipe the LCD Monitor with a soft
cloth.
¡Do not expose the LCD Monitor to direct sunlight. When
sunlight falls onto the LCD Monitor, it may be difficult to view
the picture.
¡Do not apply any pressure to the surface of the LCD Monitor
or subject it to strong shocks.
¡Before transporting the Movie Camera, securely close the
LCD Monitor.
28
Page 29

SVENSKAESPAÑOL
Utilización del monitor de cristal
líquido
Este monitor de cristal líquido tiene una mayor transmisión de
la luz de fondo para que las imágenes se vean más brillantes.
para reducir los reflejos, tiene un revestimiento especial en la
superficie que dispersa la luz ambiente para que los colores
sean más fuertes y fáciles de ver.
»»
» Apertura del monitor de cristal líquido
»»
1 Deslice la palanca [LOPEN] a la izquierda y
abra simultáneamente el monitor de cristal
líquido en el sentido de la flecha, en
aproximadamente 90°.
»»
» Cierre del monitor de cristal líquido
»»
2 Vuelva el monitor de cristal líquido hacia el
cuerpo de la videocámara hasta que se cierre
con un chasquido.
¡La imagen que se ve en el monitor de cristal líquido está
ligeramente estirada verticalmente, sin embargo, la imagen
grabada actualmente no se ve afectada.
¡Vuelva el monitor de cristal líquido a su posición vertical
antes de cerrarlo. También compruebe que el
compartimiento del casete está bien cerrado antes de cerrar
el monitor de cristal líquido.
¡Al abrir el monitor de cristal líquido se apaga
automáticamente el visor. Sin embargo, cuando se gira el
monitor de cristal líquido hacia adelante, se vuelve a
encender el visor.
¡El monitor de cristal líquido fue creado con una tecnología
de gran precisión. Tiene pixeles efectivos al 99,99% con sólo
un 0,01% de los pixeles inactivos o permanentemente
encendidos.
¡Cuando la videocámara esta muy fría en el momento de
conectarla, la imagen en el monitor de cristal líquido se ve
más oscura de lo normal. Cuando alcance su temperatura
normal, volverá a tener el brillo normal.
¡Para limpiar las huellas dactilares, frote el monitor de cristal
líquido con un paño suave.
¡No exponga el monitor de cristal líquido directamente sobre
a los rayos del sol. Cuando los rayos solares inciden
directamente sobre el monitor de cristal líquido, puede no
verse bien la imagen.
¡No presione sobre la superficie del monitor de cristal líquido
o exponga a golpes fuertes.
¡Cierre firmemente el monitor de cristal líquido antes de
transportar la videocámara.
Hur man använder LCD-skärmen
Förbättrad bakbelysningsöverföring i flytande kristall-skärmen
gör bilden extra ljusstark. Dessutom är skärmytan täckt med
ett speciellt skikt som sprider ljus utifrån för att minimera
ljusreflexerna, vilket gör att färgerna blir livliga och bilden blir
lätt att se.
»»
» Hur man öppnar LCD-skärmen
»»
1 Skjut [LOPEN]-knappen åt vänster och fäll
samtidigt ut LCD-skärmen ca. 90° i pilens
riktning.
»»
» Hur man stänger LCD-skärmen
»»
2 Fäll in LCD-skärmen mot videokamerahuset tills
den låses fast med ett klick.
¡Bilden som visas på LCD-skärmen blir en aning utdragen i
höjdled, men bilden som faktiskt spelas in påverkas inte
därav.
¡Återför LCD-skärmen till vertikalt läge innan du fäller in den.
Kontrollera även att kassettfacket är ordentligt stängt innan
du stänger LCD-skärmen.
¡När LCD-skärmen öppnas stängs sökaren automatiskt av,
men om du vrider LCD-skärmen så att den är vänd framåt
tänds sökaren igen.
¡LCD-skärmen är tillverkad med hjälp av teknologi med
extremt hög precision. Resultatet är mer än 99,99% effektiva
pixels, med bara 0,01% som är inaktiva eller alltid lyser.
Detta är dock inget fel och har ingen inverkan på bilden som
spelas in.
¡Om videokameran är mycket kall när den slås på blir bilden
på LCD-skärmen först något mörkare än vanligt, men
efterhand som temperaturen stiger återfår den sin normala
ljusstyrka.
¡Torka bort eventuella fingeravtryck från LCD-skärmen med
en mjuk torkduk.
¡Utsätt inte LCD-skärmen för direkt solljus. Om solen lyser
rakt på LCD-skärmen kan bilden vara svår att se.
¡Tryck inte på LCD-skärmens yta och utsätt den inte för
stötar.
¡Stäng LCD-skärmen ordentligt innan du transporterar
videokameran.
29
Page 30
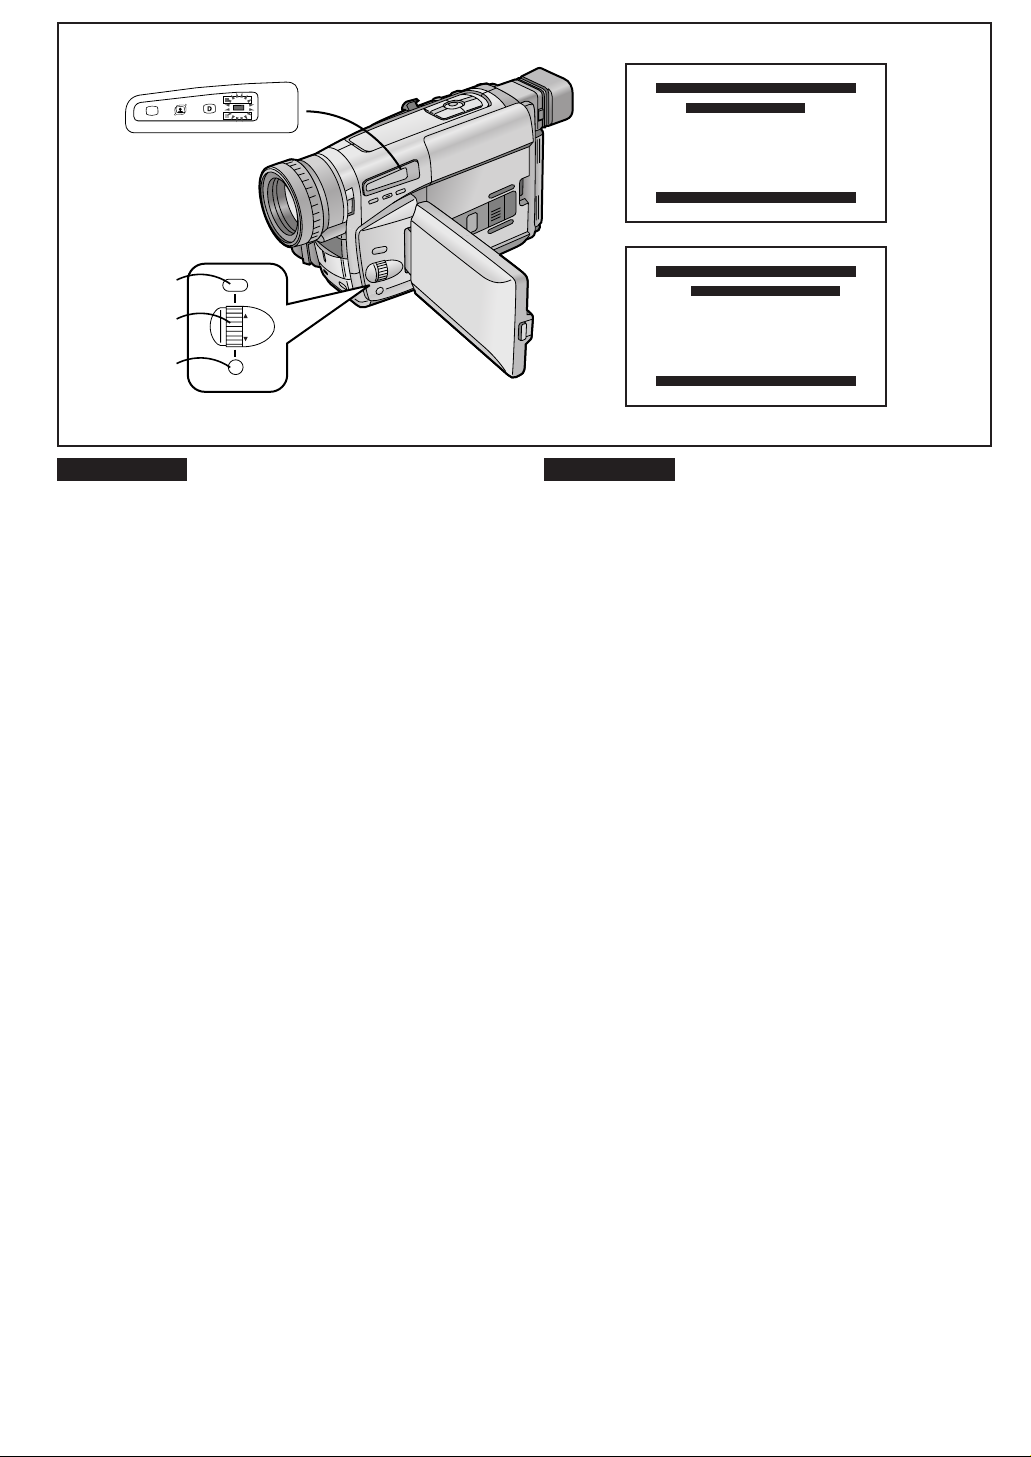
1
CAMERA
A
V C R
INFO-
WINDOW
CAMERA FUNCTIONS
1.
CAMERA SETUP
2.
DIGITAL EFFECT
3.
TITLE SETUP
4.
DATE/TIME SETUP
5.
OTHER FUNCTIONS
6.
LCD/EVF SETUP
PRESS MENU TO EXIT
1
MENU
MF/
2,4
3,5
ITALIANO ENGLISH
Uso dei menu
I menu permettono di impostare con grande facilità le
numerose funzioni della movie.
TRACKING
FOCUS / SET
Using the Menus
This Movie Camera displays the settings of various functions
in menus to make it easy to select the desired functions and
settings.
1 Premete il tasto [MENU].
Se il tasto viene premuto mentre la spia [CAMERA] è
illuminata in rosso, apparirà il menu del modo Camera
1, se il tasto viene premuto mentre la spia [VCR] è
illuminata in verde, apparirà il menu del modo VCR 2.
2 Ruotate il selettore [
3434
34] per selezionare il
3434
sottomenu che vi interessa.
La rotazione del selettore [34] modifica la voce
evidenziata.
3 Premete il tasto [SET] per visualizzare il
sottomenu desiderato.
4 Ruotate il selettore [
funzione da impostare.
3434
34] per selezionare la
3434
1 Press the [MENU] Button.
2 Turn the [
3 Press the [SET] Button to display the selected
4 Turn the [
5 Press the [SET] Button to set the selected item
5 Premete il tasto [SET] per impostare la funzione
sul valore desiderato.
Per uscire dal menu.
Premente nuovamente il tasto [MENU].
≥La procedura per impostare le funzioni sul sottomenu
[DATE/TIME SETUP] (l 56) e sul sottomenu
[LCD/EVF SETUP] (l 40) differiscono leggermente da
quelle degli altri sottomenu.
≥E’ possibile visualizzare il menu durante la riproduzione, ma
non in ripresa. E’ possibile avviare la riproduzione mentre il
menu è visualizzato, ma, se iniziate a riprendere, il menu
scomparirà. (Quando il Terminale Digital Still Picture della
movie è collegato a un personal computer, tramite il Kit di
collegamento a personal computer (opzionale) (l 150), non
è possibile visualizzare il menu durante la riproduzione.)
≥Le impostazioni programmate dal menu vengono mantenute
in memoria anche quando spegnete la movie. Se, però,
scollegate l’alimentazione (batteria, alimentatore CA) prima
di aver spento la movie, le impostazioni che avete effettuato
non saranno memorizzate.
Exiting the Menu
Press the [MENU] Button again.
≥The method for making settings on the [DATE/TIME SETUP]
Sub-Menu (l 56) and [LCD/EVF SETUP] Sub-Menu (l 40)
differs slightly from that of other Sub-Menus.
≥You can display the menu during playback, but not during
recording. Also, it is possible to start playback while the
menu is displayed, but if you start recording, the displayed
menu disappears. (When the Movie Camera’s Digital Still
Picture Terminal is connected to a computer by using the
Personal Computer Connection Kit (optional) (l 150), it is
not possible to display the menu during playback.)
≥The settings that you have selected on the menus are
maintained when you turn the Movie Camera off. However, if
you disconnect the power supply unit (Battery or AC
Adaptor) from the Movie Camera before turning it off, the
selected settings may not be maintained.
2
When you press this button while the [CAMERA] Lamp is
lit in red, the Camera Mode Menu 1 appears. When you
press this button while the [VCR] Lamp is lit in green, the
VCR Mode Menu 2 appears.
VCR FUNCTIONS
1.
OTHER FUNCTIONS
2.
LCD/EVF SETUP
PRESS MENU TO EXIT
3434
34] Dial to select the desired
3434
sub-menu.
Turning the [34] Dial changes the highlighted item.
sub-menu.
3434
34] Dial to select the item to be set.
3434
to the desired mode.
30
Page 31

SVENSKAESPAÑOL
Uso de los menús
Esta videocámara muestra los ajustes de las distintas
funciones en los menús para facilitar la selección de las
funciones y ajustes deseados.
1 Oprima el botón [MENU].
Cuando oprima este botón con la luz [CAMERA]
encendida en rojo, aparece el menú de modo de cámara
1. Cuando oprima este botón con la luz [VCR]
encendida, aparece el menú de modo de videograbadora
2.
2 Gire el dial [
deseado.
Al girar el dial [34] cambia el punto resaltado.
3434
34] para seleccionar el submenú
3434
3 Oprima el botón [SET] para que aparezca el
sub-menú seleccionado.
4 Gire el dial [
desea ajustar.
3434
34] para seleccionar el punto que
3434
5 Oprima el botón [SET] para ajustar el punto
seleccionado al modo deseado.
Salida del menú
Oprima otra vez el botón [MENU].
≥El método para realizar los ajustes en el sub-menú
[DATE/TIME SETUP] (l 57) y el sub-menú
[LCD/EVF SETUP] (l 41) difieren ligeramente de los otros
sub-menúes.
≥Puede aparecer el menú durante la reproducción, pero no
durante la grabación. También, es posible iniciar la
reproducción mientras aparece el menú, pero si inicia la
grabación desaparece el menú. (Cuando el terminal de
imagen fija digital de la videocámara está conectado a un
ordenador utilizando el kit de conexión de ordenador
personal (opcional) (l 151) no es posible mostrar el menú
durante la reproducción.)
≥Los ajustes seleccionados en el menú se mantienen aunque
desconecte la videocámara. Pero si se desconecta la fuente
de alimentación (batería o adaptador de CA) de la
videocámara antes de desconectarla, no se conservarán
estos ajustes.
Hur man använder menyerna
På denna videokamera visas inställningarna för olika
funktioner på menyer för att göra det lättare att välja önskade
funktioner och inställningar.
1 Tryck på [MENU]-knappen.
Om du trycker på denna knapp medan [CAMERA]lampan lyser rött tänds kameralägesmenyn 1. Om du
trycker på knappen medan [VCR]-lampan lyser grönt
tänds videobandspelarlägesmenyn 2.
2 Vrid på [
undermeny.
När man vrider på [34]-ratten flyttas markeringen med
omvänd färg.
3434
34]-ratten för att välja önskad
3434
3 Tryck på [SET]-knappen för att tända vald
undermeny.
4 Vrid på [
inställningsrad du vill ställa in.
3434
34]-ratten för att välja den
3434
5 Tryck på [SET]-knappen för att ställa in vald
inställningsrad på önskat läge.
Hur man lämnar menyn
Tryck en gång till på [MENU]-knappen.
≥Sättet att göra inställningar på undermenyn
[DATE/TIME SETUP] (l 57) och undermenyn
[LCD/EVF SETUP] (l 41) är något annorlunda än på de
andra undermenyerna.
≥Det går att tända menyerna under uppspelning, men inte
under inspelning. Det går även att starta uppspelning medan
en meny är tänd, men om du börjar spela in släcks menyn.
(När videokamerans digitala stillbildsutgång är ansluten till
en dator med hjälp av en PC-anslutningssats (säljs separat)
(l 151) går det inte att tända menyn under uppspelning.)
≥De inställningar du gjort på menyn hålls kvar i minnet när du
stänger av videokameran. Om du kopplar bort strömkällan
(batteriet eller nätadaptern) från videokameran innan du
stänger av den kan det dock hända att inställningarna
försvinner.
31
Page 32

1
CAMERA FUNCTIONS
1.
CAMERA SETUP
2.
DIGITAL EFFECT
3.
TITLE SETUP
4.
DATE/TIME SETUP
5.
OTHER FUNCTIONS
6.
LCD/EVF SETUP
PRESS MENU TO EXIT
ITALIANO ENGLISH
Funzioni del Menu
Le figure dei menu hanno esclusivamente lo scopo di illustrare
le funzioni: i menu reali possono essere leggermente differenti.
Menu principale della modalità telecamera
[CAMERA FUNCTIONS]
1. CAMERA SETUP
2. DIGITAL EFFECT
3. TITLE SETUP
4. DATE/TIME SETUP
5. OTHER FUNCTIONS
6. LCD/EVF SETUP
Sottomenu [CAMERA SETUP] 1
1 Ripresa con Sensore di Movimento [M.SENSOR]
(l 100)
1
2
3
4
M.SENSOR OFF ON
D.ZOOM
TALLY LAMP
RETURN ---- YES
Menu Functions
The illustrations of the menus are for explanation purposes
only and the actual menus may be somewhat different.
Camera Mode Main-Menu
[CAMERA FUNCTIONS]
1. CAMERA SETUP
2. DIGITAL EFFECT
3. TITLE SETUP
4. DATE/TIME SETUP
5. OTHER FUNCTIONS
6. LCD/EVF SETUP
[CAMERA SETUP] Sub-Menu 1
1 Motion-Sensor-Controlled Recording [M.SENSOR]
(l 100)
CAMERA SETUP
40X 100X 220X
OFF ON
PRESS MENU TO EXIT
2 Zoom Digitale [D.ZOOM] (l 96)
3 Spia di registrazione [TALLY LAMP] (l 62)
4 Per tornare al Menu principale [RETURN]
Impostando su [YES] la funzione [RETURN], si passerà al
Menu principale.
2 Digital Zoom [D.ZOOM] (l 96)
3 Recording Lamp [TALLY LAMP] (l 62)
4 Returning to the Main-Menu [RETURN]
If you set [RETURN] to [YES], the menu changes back to
the Main-Menu.
32
Page 33

SVENSKAESPAÑOL
Funciones de menú
Las figuras que describen los menú son sólo para fines
explicativos; en la práctica los menú pueden aparecer
diferentes.
Menú principal del modo de cámara
[CAMERA FUNCTIONS]
1. CAMERA SETUP
2. DIGITAL EFFECT
3. TITLE SETUP
4. DATE/TIME SETUP
5. OTHER FUNCTIONS
6. LCD/EVF SETUP
Submenú [CAMERA SETUP] 1
1Grabación controlada por sensor de movimiento
[M.SENSOR] (l 101)
2Zoom digital [D.ZOOM] (l 97)
3Piloto de grabación [TALLY LAMP] (l 63)
4Retorno al menú principal [RETURN]
Si ajusta [RETURN] a [YES], el menú cambia nuevamente
al menú principal.
Funktioner på menyerna
Figurerna över menyerna är endast avsedda för
förklaringsändamål. De verkliga menyerna kan se något
annorlunda ut.
Huvudmenyn för kameraläget
[CAMERA FUNCTIONS]
1. CAMERA SETUP
2. DIGITAL EFFECT
3. TITLE SETUP
4. DATE/TIME SETUP
5. OTHER FUNCTIONS
6. LCD/EVF SETUP
Undermenyn [CAMERA SETUP] 1
1 Rörelsesensorstyrd inspelning [M.SENSOR]
(l 101)
2 Digital zoom [D.ZOOM] (l 97)
3 Inspelningslampan [TALLY LAMP] (l 63)
4 Gå tillbaka till huvudmenyn [RETURN]
Ställ in [RETURN] på [YES] för att återvända till
huvudmenyn.
33
Page 34

23
DIGITAL EFFECT
EFFECT1 OFF SIS D.ZOOM
5
EFFECT2 OFF NEGA SOLARI
6
RETURN ---- YES
7
ITALIANO ENGLISH
SIS+D.ZOOM MOSAIC
STRETCH
SEPIA B/W D.FADE1
D.FADE2 D.FADE3
PRESS MENU TO EXIT
Menu principale della modalità telecamera
[CAMERA FUNCTIONS] (continua)
Sottomenu [DIGITAL EFFECT] 2
5 Effetti digitali 1 [EFFECT1] (l 88, 90)
6 Effetti digitali 2 [EFFECT2] (l 88, 92)
7 Per tornare al Menu principale [RETURN]
8
DATE/TITLE
9
TITLE
LANGUAGE
:
FOR TITLE
SIZE
;
<
RETURN ---- YES
=
Camera Mode Main-Menu
[CAMERA FUNCTIONS] (Continued)
[DIGITAL EFFECT] Sub-Menu 2
5 Digital Effects 1 [EFFECT1] (l 88, 90)
6 Digital Effects 2 [EFFECT2] (l 88, 92)
7 Returning to the Main-Menu [RETURN]
TITLE SETUP
DATE TIME TITLE
HAPPY BIRTHDAY
ENGLISH
NORMAL LARGE
YELLOWCOLOUR
PRESS MENU TO EXIT
Sottomenu [TITLE SETUP] 3
8 Visualizzazione di Data/Ora/Titolo [DATE/TITLE]
(l 58)
9 Titolo [TITLE] (l 132)
: Lingua del titolo [LANGUAGE FOR TITLE]
(l 130)
; Dimensione del titolo [SIZE] (l 134)
< Colore della visualizzazione [COLOUR] (l 132)
= Per tornare al Menu principale [RETURN]
[TITLE SETUP] Sub-Menu 3
8 Date/Time/Title Indication [DATE/TITLE] (l 58)
9 Title [TITLE] (l 132)
: Language of the Title [LANGUAGE FOR TITLE](l 130)
; Size of the Title [SIZE] (l 134)
< Colour of the Date/Time/Title Indication [COLOUR]
(l 132)
= Returning to the Main-Menu [RETURN]
34
Page 35

SVENSKAESPAÑOL
Menú principal del modo de cámara
[CAMERA FUNCTIONS] (continua)
Submenú [DIGITAL EFFECT] 2
5 Efectos digitales 1 [EFFECT1] (l 89, 91)
6 Efectos digitales 2 [EFFECT2] (l 89, 93)
7Retorno al menú principal [RETURN]
Submenú [TITLE SETUP] 3
8 Indicación de la fecha/hora/titulo [DATE/TITLE]
(l 59)
9Título [TITLE] (l 133)
:Idioma del título [LANGUAGE FOR TITLE]
(l 131)
; Tamaño del título [SIZE] (l 135)
<Color de la indicación de fecha/hora/título [COLOUR]
(l 133)
=Retorno al menú principal [RETURN]
Huvudmenyn för kameraläget
[CAMERA FUNCTIONS] (forts.)
Undermenyn [DIGITAL EFFECT] 2
5 Digitala effekter 1 [EFFECT1] (l 89, 91)
6 Digitala effekter 2 [EFFECT2] (l 89, 93)
7 Gå tillbaka till huvudmenyn [RETURN]
Undermenyn [TITLE SETUP] 3
8 Datum/klock/textindikering [DATE/TITLE] (l 59)
9 Text [TITLE] (l 133)
: Språk för bildtexten [LANGUAGE FOR TITLE]
(l 131)
; Storlek på bildtexten [SIZE] (l 135)
< Färg på datum/klock/textindikeringen [COLOUR]
(l 133)
= Gå tillbaka till huvudmenyn [RETURN]
35
Page 36

45
DATE/TIME SETUP
YEAR 2000
MONTH 10
DATE 15
HOUR 14
MIN. 30
>
?
@
A
B
PRESS MENU TO RETURN
6
LCD/EVF SETUP
LCD BRIGHTNESS
LCD COLOUR
EVF BRIGHTNESS
ITALIANO ENGLISH
[-]||||----[+]
[-]||||----[+]
[-]||||----[+]
PRESS MENU TO RETURN
C
D
E
OTHER FUNCTIONS
REC SPEED SP LP
TAPE 30 45 60
SELF SHOOT NOR. MIR.
S-VHS ET OFF ON
VOICE ZOOM OFF ON
DISPLAY ALL MEMORY
PARTIAL OFF
C.RESET ---- YES
DEMO MODE OFF ON
RETURN ---- YES
PRESS MENU TO EXIT
Menu principale della modalità telecamera
[CAMERA FUNCTIONS] (continua)
Sottomenu [DATE/TIME SETUP] 4 (l 56)
Sottomenu [OTHER FUNCTIONS] 5
> Lunghezza del nastro [TAPE2] (l 44)
? Auto Registrazione [SELF SHOOT] (m 126)
@ Modo S-VHS ET [S-VHS ET] (l 48)
≥Quando viene inserita nella movie una cassetta
S-VHS-C, al posto dell’indicazione [S-VHS ET] viene
visualizzata l’indicazione [S-VHS]. Potrete attivare [ON] o
disattivare [OFF] questa funzione per selezionare o
annullare la registrazione S-VHS.
≥Se viene inserita una cassetta a cui è stata rimossa la
linguetta che protegge da cancellazioni accidentali, al
posto di [S-VHS] verrà indicato [S-VHS ET]. Questo non
è un indice di funzionamento difettoso. Per effettuare la
registrazione, in ogni caso, è necessario utilizzare una
cassetta che abbia la linguetta di protezione intatta.
(l 46)
A Zoom vocale [VOICE ZOOM] (l 66)
B Tipo di contanastro [DISPLAY] (l 144)
C Azzeramento contanastro [C.RESET] (l 142)
D Modo Demo [DEMO MODE] (l 178)
E Per tornare al Menu principale [RETURN]
Sottomenu [LCD/EVF SETUP] 6 (l 40)
Camera Mode Main-Menu
[CAMERA FUNCTIONS] (Continued)
[DATE/TIME SETUP] Sub-Menu 4 (l 56)
[OTHER FUNCTIONS] Sub-Menu 5
> Tape Length [TAPE2] (l 44)
? Self-Recording [SELF SHOOT] (l 126)
@ S-VHS ET Mode [S-VHS ET] (l 48)
≥When an S-VHS-C cassette is inserted in the Movie
Camera, [S-VHS] is indicated instead of [S-VHS ET] and
you can set this item to [ON] or [OFF] to select or cancel
the S-VHS recording format.
≥If you insert an S-VHS-C cassette with a broken out
erasure prevention tab, [S-VHS ET] is indicated instead
of [S-VHS], however, this is not a malfunction. If you want
to perform recording, use a cassette with an intact tab.
(l 46)
A Voice Zoom [VOICE ZOOM] (l 66)
B Counter Display Mode [DISPLAY] (l 142)
C Counter Reset [C.RESET] (l 144)
D Demonstration Mode [DEMO MODE] (l 178)
E Returning to the Main-Menu [RETURN]
[LCD/EVF SETUP] Sub-Menu 6 (l 40)
36
Page 37

SVENSKAESPAÑOL
Menú principal del modo de cámara
[CAMERA FUNCTIONS] (continua)
Submenú [DATE/TIME SETUP] 4 (l 57)
Submenú [OTHER FUNCTIONS] 5
>Longitud de la cinta [TAPE2] (l 45)
? Autograbación [SELF SHOOT] (m 127)
@ Modo S-VHS ET [S-VHS ET] (l 49)
≥Cuando se inserta un cassette S-VHS-C en la
videocámara, aparece [S-VHS] en lugar de [S-VHS ET] y
puede ajustar este punto a [ON] u [OFF] para seleccionar
o cancelar el formato de grabación S-VHS.
≥Si coloca un cassette S-VHS-C con la lengüeta para
evitar el borrado rota, se indica [S-VHS ET] en lugar de
[S-VHS], sin embargo esto no es un malfuncionamiento.
Si desea grabar, utilice un cassette que tenga la lengüeta
intacta. (l 47)
A Zoom de voz [VOICE ZOOM] (l 67)
B Modo de visualización del contador [DISPLAY]
(l 143)
C Vuelta a cero del contador [C.RESET] (l 145)
Huvudmenyn för kameraläget
[CAMERA FUNCTIONS] (forts.)
Undermenyn [DATE/TIME SETUP] 4 (l 57)
Undermenyn [OTHER FUNCTIONS] 5
> Bandlängd [TAPE2] (l 45)
? Självinspelning [SELF SHOOT] (m 127)
@ S-VHS ET-läge [S-VHS ET] (l 49)
≥När en S-VHS-C-kassett är isatt i videokameran visas [S-
VHS] i stället för [S-VHS ET] och det går att ställa in
denna rad på [ON] eller [OFF] för att slå på respektive
stänga av S-VHS-inspelningsformatet.
≥Om du sätter i en S-VHS-C-kassett med bortbruten
raderingsskyddstapp visas [S-VHS ET] i stället för
[S-VHS], men det är inget fel. Använd en kassett med hel
raderingsskyddstapp om du vill spela in. (l 47)
A Röstzoom [VOICE ZOOM] (l 67)
B Räkneverkets visningssätt [DISPLAY] (l 143)
C Nollställning av räkneverket [C.RESET] (l 145)
D Demonstrationsläget [DEMO MODE] (l 179)
DModo de demostración [DEMO MODE] (l 179)
ERetorno al menú principal [RETURN]
Submenú [LCD/EVF SETUP] 6 (l 41)
E Gå tillbaka till huvudmenyn [RETURN]
Undermenyn [LCD/EVF SETUP] 6 (l 41)
37
Page 38

VCR FUNCTIONS
1.
OTHER FUNCTIONS
2.
LCD/EVF SETUP
PRESS MENU TO EXIT
12
OTHER FUNCTIONS
TAPE 30 45 60
DISPLAY ALL MEMORY
OFF
C.RESET ---- YES
RETURN ---- YES
PRESS MENU TO EXIT
LCD BRIGHTNESS
LCD COLOUR
EVF BRIGHTNESS
PRESS MENU TO RETURN
ITALIANO ENGLISH
Menu principale del modo videoregistratore
[VCR FUNCTIONS]
1. OTHER FUNCTIONS
2. LCD/EVF SETUP
Sottomenu [OTHER FUNCTIONS] 1
Il sottomenu [OTHER FUNCTIONS] ha le stesse funzioni del
sottomenu [OTHER FUNCTIONS] sul menu principale
[CAMERA FUNCTIONS].
VCR Mode Main-Menu
[VCR FUNCTIONS]
1. OTHER FUNCTIONS
2. LCD/EVF SETUP
[OTHER FUNCTIONS] Sub-Menu 1
All items on the [OTHER FUNCTIONS] Sub-Menu are the
same as those on the [OTHER FUNCTIONS] Sub-Menu of the
[CAMERA FUNCTIONS] Main-Menu.
Sottomenu [LCD/EVF SETUP] 2 (l 40)
[LCD/EVF SETUP] Sub-Menu 2 (l 40)
LCD/EVF SETUP
[-]||||----[+]
[-]||||----[+]
[-]||||----[+]
38
Page 39

SVENSKAESPAÑOL
Menú principal de modo VCR [VCR FUNCTIONS]
1. OTHER FUNCTIONS
2. LCD/EVF SETUP
Submenú [OTHER FUNCTIONS]
Todos los puntos del submenú [OTHER FUNCTIONS] son los
mismos que los submenú [OTHER FUNCTIONS] del menú
principal [CAMERA FUNCTIONS].
Submenú [LCD/EVF SETUP] 2 (l 41)
11
1
11
Huvudmenyn för videobandspelarläget
[VCR FUNCTIONS]
1. OTHER FUNCTIONS
2. LCD/EVF SETUP
Undermenyn [OTHER FUNCTIONS] 1
Alla inställningsrader på undermenyn [OTHER FUNCTIONS]
är desamma som på undermenyn [OTHER FUNCTIONS]
under huvudmenyn [CAMERA FUNCTIONS] för kameraläget.
Undermenyn [LCD/EVF SETUP] 2 (l 41)
39
Page 40

LCD/EVF SETUP
LCD BRIGHTNESS
[-]||||----[+]
LCD COLOUR
[-]||||----[+]
EVF BRIGHTNESS
[-]||||----[+]
PRESS MENU TO RETURN
MENU
MF/
2
TRACKING
A
180 u
B
1
ITALIANO ENGLISH
Regolazione del monitor LCD e del
mirino: luminosità e colore
Selezionando il sottomenu [LCD/EVF SETUP], dai Menu
principali [VCR FUNCTIONS] e [CAMERA FUNCTIONS],
appariranno le seguenti funzioni.
Luminosità del Monitor LCD [LCD BRIGHTNESS]
Per regolare la luminosità delle immagini sullo schermo del
Monitor LCD.
Regolazione del colore sul Monitor LCD
[LCD COLOUR]
Per regolare la saturazione dei colori sullo schermo del
Monitor LCD.
Luminosità del mirino [EVF BRIGHTNESS]
Per regolare la luminosità delle immagini sul mirino.
FOCUS / SET
Adjusting the Brightness and Colour
Level of the LCD Monitor/Finder
If you select the [LCD/EVF SETUP] Sub-Menu of the [VCR
FUNCTIONS] or the [CAMERA FUNCTIONS] Main-Menu, the
following items are displayed.
LCD Brightness [LCD BRIGHTNESS]
To adjust the brightness of the picture on the LCD screen.
LCD Colour Level [LCD COLOUR]
To adjust the colour saturation of the picture on the LCD
screen.
Finder Brightness [EVF BRIGHTNESS]
To adjust the brightness of the picture in the Finder.
1 Press the [SET] Button to select the item that
1 Premete il tasto [SET] per selezionare la
funzione che volete impostare.
2 Ruotate il selettore [
3434
34] per aumentare o
3434
diminuire il numero di barre verticali sulla linea.
L’indicazione è costituita da 8 barre verticali. Più barre
vengono visualizzate, maggiore è la luminosità o la
saturazione del colore.
Per uscire dal menu
Premete due volte il tasto [MENU].
≥Queste regolazioni non hanno alcun influsso sulle immagini
effettivamente registrate.
»»
» Angolazione del Monitor LCD
»»
Rispetto alla normale posizione verticale, il Monitor LCD può
essere ruotato verso l’alto di un massimo di 180° A e verso il
basso di un massimo di 90° B. Se forzate il monitor per
cercare di ruotarlo ulteriormente, potreste danneggiare
seriamente la movie.
2 Turn the [
Exiting the Menu
Press the [MENU] Button twice.
≥These adjustments have no influence on the actual picture
recorded.
»»
» Adjusting the Angle of the LCD Monitor
»»
The LCD Monitor rotates upward a maximum of 180ª A and
downward a maximum of 90ª B from its normal vertical
position. Trying to forcefully rotate it beyond this range could
seriously damage the Movie Camera.
90 u
you want to adjust.
3434
34] Dial to increase or decrease the
3434
vertical bars of the Bar Indication.
The Bar Indication is divided into 8 steps. The more
vertical bars are shown, the stronger the brightness or
colour saturation is.
40
Page 41

SVENSKAESPAÑOL
Ajuste del brillo y nivel de color del
monitor/visor de cristal líquido
Si selecciona el sub-menú [LCD/EVF SETUP] del menú
principal [VCR FUNCTIONS] o [CAMERA FUNCTIONS],
aparecen los siguientes puntos.
Brillo del cristal líquido [LCD BRIGHTNESS]
Para ajustar el brillo de la imagen en la pantalla de cristal
líquido.
Nivel de color de la pantalla de cristal líquido
[LCD COLOUR]
Para ajustar la saturación del color de la imagen en la pantalla
de cristal líquido.
Brillo del visor [EVF BRIGHTNESS]
Para ajustar el brillo de la imagen en el visor.
1 Oprima el botón [SET] para seleccionar el
punto que desea ajustar.
2 Gire el dial [
número de barras verticales en la indicación de
barras.
La indicación de barras está dividida en 8 niveles. A
mayor cantidad de barras verticales más fuerte es el
brillo o saturación de color.
Salida del menú
Oprima el botón [MENU] dos veces.
≥Estos ajustes no influyen sobre la imagen grabada en sí.
»»
» Ajuste del ángulo del monitor de la pantalla de
»»
cristal líquido
El monitor de la pantalla de cristal líquido gira hacia arriba un
máximo de 180ª A y hacia abajo un máximo de 90ª B de su
posición vertical normal. Si se trata de girar a la fuerza más
allá de esta gama se puede dañar seriamente la videocámara.
3434
34] y aumente o disminuya el
3434
Justering av LCD-skärmens/sökarens
ljusstyrka och färgmättnad
Om du väljer undermenyn [LCD/EVF SETUP] under någon av
huvudmenyerna [VCR FUNCTIONS] eller [CAMERA
FUNCTIONS] visas följande inställningsrader.
LCD-skärmens ljusstyrka [LCD BRIGHTNESS]
Används för att justera ljusstyrkan för bilden på LCD-skärmen.
LCD-skärmens färgmättnad [LCD COLOUR]
Används för att justera färgmättnaden för bilden på LCDskärmen.
Sökarens ljusstyrka [EVF BRIGHTNESS]
Används för att justera ljusstyrkan för bilden i sökaren.
1 Tryck på [SET]-knappen för att välja den
inställningsrad som du vill ändra.
2 Vrid på [
antalet vertikala streck i indikeringen.
Streckindikeringen är indelad i 8 streck. Ju fler vertikala
streck som visas, desto starkare ljusstyrka eller
färgmättnad.
För att lämna menyn
Tryck två gånger på [MENU]-knappen.
≥Dessa justeringar har ingen inverkan på bilden som faktiskt
spelas in.
»»
» Justering av LCD-skärmens vinkel
»»
LCD-skärmen går att vrida maximalt 180° uppåt A och
maximalt 90° nedåt B från det normala vertikala läget. Försök
aldrig vrida LCD-skärmen längre med våld; det kan orsaka
allvarliga skador på videokameran.
3434
34]-ratten för att öka eller minska
3434
41
Page 42

2
6
1
<
EJECT
4
5
LOCK
OPEN
3
3
ITALIANO ENGLISH
Inserimento della cassetta
1 Collegate l’alimentatore CA o inserite una
batteria carica. (m
18, 24)
2 Tendete il nastro utilizzando la rotella dentellata
1.
Inserting the Cassette
1 Connect the AC Adaptor or attach a charged
2 Turn the cog wheel 1 to tighten the tape.
3 Slide the [LOPEN] Lever to the left and
3 Fate scorrere verso sinistra la leva [LOPEN] e
contemporaneamente aprite il Monitor LCD, in
direzione della freccia, di circa 90°.
¡Controllate che il Monitor LCD rimanga in posizione
verticale, per non interferire con l'apertura del coperchio
del vano cassetta.
4 Premete il tasto [f EJECT].
4 Push the [f EJECT] Button.
5 Insert the cassette with the cassette window 2
5 Inserite la cassetta con la finestrella 2 rivolta
verso l’esterno e premete a fondo.
6 Close the Cassette Compartment by pressing
6 Chiudete il vano cassetta premendo il tasto
[LOCK] .
≥Se è inserita la batteria o è collegato l’alimentatore CA è
possibile inserire ed estrarre le cassette senza dover
accendere la movie.
≥Durante la registrazione non è possibile estrarre la cassetta.
≥Evitate di estrarre e inserire ripetutamente la cassetta, il
nastro potrebbe allentarsi o danneggiarsi.
≥Se viene inserita una cassetta priva della linguetta di
protezione contro le registrazioni accidentali, lampeggerà
l’indicazione [Y].
Espulsione della cassetta
Premete il tasto [
Chiudete il vano cassetta premendo il tasto [LOCK].
f f
f EJECT] e estraete la cassetta.
f f
≥If the AC Adaptor or Battery is used to supply power, it is
possible to insert or eject the cassette without turning on the
Movie Camera.
≥It is not possible to take out the cassette during recording.
≥Do not insert and take out the cassette repeatedly. This could
cause the tape to become loose or damaged.
≥If a cassette with broken out erasure prevention tab is
inserted, the [Y] Indication flashes.
Ejecting the Cassette
Push the [
Close the Cassette Compartment by pressing the [LOCK]
Button.
2
Battery. (m
simultaneously open the LCD Monitor in the
direction of the arrow approximately 90
¡Be sure to keep the LCD Monitor in its vertical position,
so that the Cassette Compartment Cover, when it
opens, does not hit the LCD Monitor.
facing outward and push it all the way in.
the [LOCK] Button.
18, 24)
f f
f EJECT] Button and pull out the cassette.
f f
1
uu
u.
uu
42
Page 43

SVENSKAESPAÑOL
Colocación del cassette
1 Conecte el adaptador de CA o instale una
batería cargada. (m
19, 25)
2 Gire la rueda dentada 1 para tensar la cinta.
3 Deslice la palanca [LOPEN] a la izquierda y
abra simultáneamente el monitor de cristal
líquido en el sentido de la flecha, en
aproximadamente 90°.
¡Confirme que el monitor de cristal líquido está en su
posición vertical, para que, cuando se abra la cubierta
del casetero, no golpee contra el monitor de cristal
líquido.
4 Empuje el botón [f EJECT].
5 Empuje el cassette con la ventanilla 2 hacia
afuera, hasta el tope.
6 Cierre el compartimiento del cassette
oprimiendo el botón [LOCK].
≥Si se utiliza el adaptador de CA o la batería para alimentar la
electricidad puede colocar o expulsar el cassette sin
necesidad de conectar la videocámara.
≥No se puede expulsar el cassette en el medio de la
grabación.
≥No coloque y saque el cassette repetidamente. Esto puede
hacer que la cinta quede floja o se dañe.
≥Si se coloca un cassette con la lengüeta para evitar el
borrado rota, destella la indicación [Y].
Expulsión del cassette
Empuje el botón [
Cierre el porta-cassette oprimiendo el botón [LOCK].
f f
f EJECT] y saque el cassette.
f f
Hur man sätter i en kassett
1 Koppla in nätadaptern eller sätt på ett uppladdat
batteri. (m
19, 25)
2 Spänn bandet genom att vrida på kugghjulet 1.
3 Skjut [LOPEN]-knappen åt vänster och fäll
samtidigt ut LCD-skärmen ca. 90° i pilens
riktning.
¡Var noga med att hålla LCD-skärmen i vertikalt läge så
att inte kassettfackslocket slår i LCD-skärmen när det
öppnas.
4 Tryck på [f EJECT]-knappen.
5 Sätt i kassetten med kassettfönstret 2 vänt
utåt och tryck in den helt.
6 Stäng kassettfacket genom att trycka på
[LOCK]-knappen .
≥Om nätadaptern är inkopplad eller ett batteri påsatt går det
att sätta i eller ta ut kassetter även utan att slå på
videokameran.
≥Det går inte att ta ut kassetten under inspelningens gång.
≥Ta inte ut kassetten och sätt i den igen upprepade gånger.
Det kan leda till att bandet blir slakt eller skadat på annat
sätt.
≥Om en kassett vars skyddstapp är bortbruten sätts i, blinkar
indikeringen [Y].
Hur man tar ut kassetten
Tryck på [
Stäng kassettfacket genom att trycka på [LOCK]-knappen.
f f
f EJECT]-knappen och ta ut kassetten.
f f
43
Page 44

1
OTHER FUNCTIONS
TAPE 30 45 60
SELF SHOOT NOR.
S-VHS ET OFF
VOICE ZOOM OFF
DISPLAY ALL
C.RESET ---DEMO MODE OFF
RETURN ----
PRESS MENU TO EXIT
2
1,5
MENU
MF/
2,3
2,4
ITALIANO ENGLISH
Come impostare la Lunghezza della cassetta
La movie, in registrazione e riproduzione, visualizza nel mirino
la Durata del nastro rimanente. Perché questa indicazione
possa essere corretta è necessario selezionare la lunghezza
della cassetta che avete inserito.
TRACKING
FOCUS / SET
TAPE 30 45 60
DISPLAY ALL
C.RESET ----
RETURN ----
Selecting the Correct Tape Length
To ensure that the Remaining Tape Time Indication displayed
during recording and playback is correct, you need to set the
tape length that matches that of the inserted cassette.
1 Press the [MENU] Button.
1 Premete il tasto [MENU].
≥Apparirà il Menu principale.
2 Ruotate il selettore [
3434
34] per selezionare
3434
[OTHER FUNCTIONS], quindi premete il tasto
[SET].
3 Ruotate il selettore [
3434
34] per selezionare
3434
[TAPE2].
2 Turn the [
3 Turn the [
4 Press the [SET] Button to select the correct
4 Premete il tasto [SET] per selezionare la
lunghezza della cassetta.
≥La lunghezza che avete scelto sarà indicata dal segno
[1].
≥Le indicazioni di lunghezza della cassetta si modificano
nel seguente ordine:
5 Press the [MENU] Button to exit the menu.
OTHER FUNCTIONS
PRESS MENU TO EXIT
≥The Main-Menu appears.
3434
34] Dial to select [OTHER
3434
FUNCTIONS] and then press the [SET] Button.
3434
34] Dial to select [TAPE2].
3434
tape length.
≥The selected tape length is marked with the [1] Mark.
≥The Tape Length Indications change in the following
order:
[30] [45] [60]
[230] [245] [260]
[30] [45] [60]
[230] [245] [260]
5 Premete il tasto [MENU] per uscire dal menu.
1: Modo Camera
2: Modo VCR
1: Camera Mode
2: VCR Mode
44
Page 45

Selección de la longitud de cinta correcta
Para mostrar la indicación de tiempo de cinta remanente
correcto durante la grabación y reproducción se debe ajustar
la longitud de cinta a la del cassette colocado.
1 Oprima el botón [MENU].
≥Aparece el menú principal.
2 Gire el dial [
FUNCTIONS] y oprima el botón [SET].
3 Gire el dial [
3434
34] para seleccionar [OTHER
3434
3434
34] para seleccionar [TAPE2].
3434
4 Oprima el botón [SET] para seleccionar el
modo correcto.
≥La longitud de cinta seleccionada aparece con la marca
[1].
≥Las indicaciones de longitud de cinta cambian en el
siguiente orden:
[30] [45] [60]
[230] [245] [260]
SVENSKAESPAÑOL
Inställning av rätt bandlängd
För att den återstående bandtiden som visas under inspelning
och uppspelning ska bli korrekt måste man ställa in
bandlängden så att den motsvarar den isatta kassetten.
1 Tryck på [MENU]-knappen.
≥Huvudmenyn tänds.
2 Vrid på [
FUNCTIONS] och tryck sedan på [SET]knappen.
3 Vrid på [
3434
34]-ratten för att välja [OTHER
3434
3434
34]-ratten för att välja [TAPE2].
3434
4 Tryck på [SET]-knappen för att ställa in rätt
bandlängd.
≥Den inställda bandlängden är markerad med märket
[1].
≥Bandlängdsindikeringen ändras i följande ordning:
[30] [45] [60]
[230] [245] [260]
5 Oprima el botón [MENU] para salir del menú.
1: Modo de cámara
2: Modo de videograbadora
5 Tryck på [MENU]-knappen för att lämna menyn.
1: Kameraläge
2: Videobandspelarläge
45
Page 46

30
ITALIANO ENGLISH
Come controllare la Durata del nastro
rimanente
Sia in registrazione che in riproduzione, viene
automaticamente visualizzata l’indicazione di Durata del
nastro rimanente 1. In questo modo saprete sempre quanto
nastro vi resta sulla cassetta. Per un funzionamento corretto
della funzione è necessario che abbiate impostato in
precedenza la Lunghezza della cassetta che avete inserito.
(l 44)
≥Quando si avvia la registrazione o la riproduzione,
l’indicazione di Lunghezza della cassetta scompare e, al suo
posto, lampeggia l’indicazione [R] 1 per tutto il tempo
necessario a calcolare la durata del nastro che rimane. Dopo
alcuni secondi apparirà l’Indicazione di Durata del nastro
rimanente. ([R] sta per Rimanente.)
≥Quando la durata del nastro che rimane nella cassetta
scende al di sotto dei 2 minuti, l’indicazione [R] e
l’indicazione di Durata del nastro rimanente iniziano a
lampeggiare.
1
R 0:30
Confirming the Remaining Tape Time
During recording and playback, the Remaining Tape Time
Indication 1 is automatically displayed, so you always know
how much time you have left on the cassette. However, to
ensure correct display of the remaining tape time, the tape
length of the cassette being used must be set correctly on the
Movie Camera. (l 44)
≥When recording or playback starts, the Tape Length
Indication disappears, and in its place the [R] Indication 1
flashes while the remaining tape time is being calculated. A
few seconds later, the Remaining Tape Time Indication
appears. ([R] means Remaining.)
≥When the remaining tape time is less than 2 minutes, the [R]
Indication and the Remaining Tape Time Indication start to
flash.
When you use a cassette bearing the [P] mark 2 or other
special types of cassettes, the Remaining Tape Time
Indication may not be very precise.
2
3
P
P
4
Se utilizzate una cassetta con il segno [P] 2 o altre cassette
di tipo speciale, l’indicazione di duranta del nastro rimanente
potrà non essere molto precisa.
∫ Protezione dalle registrazioni accidentali
≥Ogni registrazione su nastro cancella le immagini e i suoni
che vi erano registrati in precedenza.
≥Per proteggere registrazioni che giudicate di particolare
importanza, rompete la linguetta anti-cancellazione della
cassetta 3, servendovi di un attrezzo a punta, come un
piccolo cacciavite. (Alcune cassette al posto della linguetta
hanno un cursore scorrevole).
≥Per registrare nuovamente una cassetta protetta, basterà
chiudere la finestrella lasciata dalla linguetta, con un doppio
strato di nastro adesivo 4.
∫ Preventing Accidental Erasure of Recordings
≥Recording on a previously recorded cassette erases the
existing scenes and sound.
≥To protect important recordings against accidental erasure,
use a screwdriver to break out the tab 3 on the cassette
(some cassettes have sliding-type tabs).
≥To be able to record again on a protected cassette, firmly
cover the hole where the tab was with two layers of adhesive
tape 4.
46
Page 47

Confirmación del tiempo de cinta remanente
Durante la grabación y reproducción, la indicación del tiempo
de cinta remanente 1 aparecerá automáticamente para que
sepa el tiempo de cinta que queda en el cassette. Para que
aparezca correctamente el tiempo de cinta remanente, deberá
seleccionar la longitud correcta del cassette colocado en la
videocámara. (l 45)
SVENSKAESPAÑOL
Kontroll av hur lång tid det är kvar på bandet
Under inspelning och uppspelning visas automatiskt
indikeringen för återstående bandtid 1 så att du alltid vet hur
lång tid det är kvar på kassetten. För att den återstående
bandtiden ska kunna visas på rätt sätt måste dock
bandlängden för den isatta kassetten vara rätt inställd på
videokameran. (l 45)
≥Cuando empiece la grabación o reproducción desaparece la
indicación de longitud de la cinta, y en su lugar destella la
indicación [R] 1 mientras que se está calculando el tiempo
de cinta remanente. Unos segundos después aparece la
indicación de tiempo de cinta remanente. ([R] es remanente.)
≥Cuando hay menos de 2 minutos de cinta remanente, la
indicación [R] y el tiempo de cinta remanente empiezan a
destellar.
Cuando utilice cassettes con la marca [P] 2 u otros
cassettes especiales, la indicación de cinta remanente puede
no ser muy precisa.
∫ Prevención del borrado accidental de una
grabación
≥Si se graba en una cinta ya grabada, la imagen y sonido
actuales se borran.
≥Para proteger una grabación importante, rompa la lengüeta
3 del cassette con un destornillador (algunos cassettes
tienen lengüetas deslizantes).
≥Para volver a grabar en un cassette protegido, cubra el
orificio donde estaba la lengüeta, con dos capas de cinta
adhesiva 4.
≥När inspelningen eller uppspelningen startar släcks
bandlängdsindikeringen, och i stället blinkar indikeringen [R]
1 medan videokameran håller på att räkna ut den
återstående bandtiden. Ett par sekunder senare tänds
indikeringen för återstående bandtid. ([R] är en förkortning av
Remaining, som betyder återstående.)
≥När det är mindre än 2 minuter kvar på bandet börjar [R]-
indikeringen och indikeringen för den återstående bandtiden
att blinka.
Om du använder en kassett som är märkt med ett [P] 2 eller
andra speciella sorters kassetter kan det hända att
indikeringen för återstående bandtid inte blir alldeles exakt.
∫ Skydd mot oavsiktlig radering av inspelningar
≥När du spelar in på ett redan inspelat band raderas de gamla
scenerna och det gamla ljudet.
≥Det går att skydda viktiga inspelningar från att bli raderade
av misstag genom att bryta av skyddstappen 3 på
kassetten med hjälp av en skruvmejsel (en del kassetter har
skyddstappar av skjuttyp).
≥Om du vill kunna spela in på en inspelningskyddad kassett
igen så täck över hålet efter den avbrutna skyddstappen med
två lager vanlig tejp 4.
47
Page 48

ITALIANO ENGLISH
I formati VHS
Con questa movie potete scegliere fra tre diversi formati di
registrazione:
1. VHS: detto anche formato “VHS normale” o
“convenzionale”
2. S-VHS (Super-VHS): uno sviluppo del formato VHS,
caratterizzato da una risoluzione e una qualità di
immagine più elevate
(Apparirà l’indicazione [ ].)
3. S-VHS ET (Super-VHS Expansion Technology):
E’ una funzione che permette la registrazione e la
riproduzione con qualità S-VHS utilizzando normali
cassette VHS-C.
(Apparirà l’indicazione [S-VHS ET].)
≥Se inserite una cassetta VHS-C:
Se avete impostato su [ON] la funzione [S-VHS ET] del
sottomenu [OTHER FUNCTIONS], la registrazione verrà
effettuata nel formato S-VHS ET. Se la funzione [S-VHS ET]
è stata impostata su [OFF], la registrazione verrà effettuata
nel formato VHS. (l 30)
≥Se inserite una cassetta S-VHS-C:
Se avete impostato su [ON] la funzione [S-VHS] del
sottomenu [OTHER FUNCTIONS], la registrazione verrà
effettuata nel formato S-VHS. Se la funzione [S-VHS] è stata
impostata su [OFF], la registrazione verrà effettuata nel
formato VHS. (l 30)
∫∫
∫ Registrazione e Riproduzione
∫∫
Prima di iniziare la ripresa, decidete in quale formato volete
che la registrazione venga effettuata.
Cassetta
VHS-C
S-VHS-C
≥Una cassetta registrata nel formato S-VHS o S-VHS ET può
essere riprodotta anche da un altro apparecchio video in
grado di leggere i formati S-VHS, S-VHS ET o SQPB
(S-VHS Quasi Playback). (Con alcuni apparecchi, la
riproduzione potrebbe non essere possibile. In questo caso,
collegate la movie direttamente al TV. (l 76))
≥Per riprendere e rivedere con la migliore qualità di immagine
possibile, oppure per conservare a lungo la cassetta, vi
raccomandiamo di utilizzare videocassette S-VHS-C e di
riprendere nel formato S-VHS.
≥Se effettuate le riprese nel formato S-VHS ET, con alcuni tipi
di cassetta, la qualità di immagine potrebbe non essere
molto buona. Per evitare sorprese negative, ci
raccomandiamo di effettuare delle riprese di prova e di
controllare preventivamente se la qualità delle riprese vi
soddisfa.
(Per avere la certezza di una qualità ottimale, vi
raccomandiamo di utilizzare cassette di tipo HG (High
Grade).)
Formato di
registrazione
VHS
S-VHS ET
VHS
S-VHS
Dispositivi di
riproduzione
compatibili
VHS, S-VHS,
S-VHS ET, SQPB
S-VHS,
S-VHS ET, SQPB
VHS, S-VHS,
S-VHS ET, SQPB
S-VHS,
S-VHS ET, SQPB
About the VHS Formats
With this Movie Camera, you can choose one of the following
3 different formats for recording:
1. VHS: also called “normal” or “conventional VHS”
format
2. S-VHS (Super-VHS): developed based on the VHS
format but featuring higher resolution and picture
quality
(The [ ] Indication appears.)
3. S-VHS ET (Super-VHS Expansion Technology):
This function allows recording and playback in S-VHS
quality picture on a normal VHS-C cassette
(The [S-VHS ET] Indication appears.)
≥When you insert a VHS-C cassette:
If you set [S-VHS ET] on the [OTHER FUNCTIONS] SubMenu to [ON], recording is performed in the S-VHS ET
format, and if you set [S-VHS ET] to [OFF], recording is
performed in the VHS format. (l 30)
≥When you insert an S-VHS-C cassette:
If you set [S-VHS] on the [OTHER FUNCTIONS] Sub-Menu
to [ON], recording is performed in the S-VHS format, and if
you set [S-VHS] to [OFF], recording is performed in the VHS
format. (l 30)
∫∫
∫ Recording and Playback
∫∫
Before starting to record, decide in which VHS format you
want to record.
Cassette
VHS-C
S-VHS-C
≥A cassette that was recorded in the S-VHS or S-VHS ET
format can also be played back on other S-VHS, S-VHS ET,
or SQPB (S-VHS Quasi Playback) video equipment.
(However, with some equipment, playback may not be
possible. In that case, connect this Movie Camera directly to
the TV. (l 76))
≥If you want to record and play back with highest possible
picture quality or store the cassettes for a long time, we
recommend that you use S-VHS-C cassettes and record in
the S-VHS format.
≥If you record in the S-VHS ET format, the picture quality may
not be very good with certain types of cassettes. To avoid
negative surprises, we recommend that you make a trial
recording and confirm that the quality of the recorded picture
is satisfactory.
(To ensure optimum picture quality, we recommend the use
of HG (high-grade) type cassettes.)
Recording
Format
VHS
S-VHS ET
VHS
S-VHS
48
Compatible
Playback
Equipment
VHS, S-VHS,
S-VHS ET, SQPB
S-VHS,
S-VHS ET, SQPB
VHS, S-VHS,
S-VHS ET, SQPB
S-VHS,
S-VHS ET, SQPB
Page 49

SVENSKAESPAÑOL
Sobre los formatos VHS
Con esta videocámara puede elegir uno de los siguientes 3
formatos diferentes para grabar:
1. VHS: también llamado formato “VHS convencional” o
“normal”
2. S-VHS (Super-VHS): desarrollado sobre la base del
formato VHS pero con mayor resolución y calidad de
imagen
(Aparece la indicación [ ].)
3. S-VHS ET (Tecnología de expansión Super-VHS):
Esta función permite grabar y reproducir en la imagen
de calidad S-VHS en un cassette VHS-C normal.
(Aparece la indicación [S-VHS ET].)
≥Cuando inserta un cassette VHS-C:
Si ajusta [S-VHS ET] en el sub-menú [OTHER FUNCTIONS]
a [ON], la grabación se realiza en el formato S-VHS ET y
debe ajustar [S-VHS ET] a [OFF], la grabación se hace en el
formato VHS. (l 31)
≥Cuando inserte un cassette S-VHS-C;
Si ajusta [S-VHS] en el sub-menú [OTHER FUNCTIONS] a
[ON], la grabación se hace en el formato S-VHS y cuando
mueva [S-VHS] a [OFF] la grabación se hace en el formato
VHS. (l 31)
∫∫
∫ Grabación y reproducción
∫∫
Antes de empezar a grabar, decida el formato VHS en el que
desea grabar.
Cassette
VHS-C
S-VHS-C
≥Un cassette grabado en el formato S-VHS o S-VHS ET
también puede reproducirse en otros equipos de vídeo SVHS, S-VHS ET o SQPB (Reproducción casi S-VHS).
(Sin embargo, con algunos equipos, la reproducción puede
no ser posible. En ese caso, conecte esta videocámara
directamente al televisor. (l 77))
≥Si desea grabar y reproducir con la máxima calidad de
imagen posible o guardar los cassettes durante mucho
tiempo, se recomienda utilizar cassettes S-VHS-C y grabar
en el formato S-VHS.
≥Si se graba en el formato S-VHS ET la calidad de imagen
puede no ser demasiado buena con algunos tipos de
cassettes. Para evitar sorpresas negativas, se recomienda
hacer una grabación de ensayo y confirmar que la calidad de
la imagen grabada es satisfactoria.
(Para garantizar una óptima calidad de imagen, se
recomienda utilizar cassettes de tipo HG (alta calidad).)
Formato de
grabación
VHS
S-VHS ET
VHS
S-VHS
Equipos de
reproducción
compatibles
VHS, S-VHS,
S-VHS ET, SQPB
S-VHS,
S-VHS ET, SQPB
VHS, S-VHS,
S-VHS ET, SQPB
S-VHS,
S-VHS ET, SQPB
Angående VHS-format
På denna videokamera går det att spela in i följande 3 olika
format:
1. VHS: även kallat “vanligt”, “normalt” eller
“konventionellt” VHS-format
2. S-VHS (Super-VHS): utvecklat från VHS-formatet men
med högre upplösning och bildkvalitet
(Indikeringen [ ] tänds.)
3. S-VHS ET (Super-VHS Expansion Technology):
Med denna funktion går det att spela in och spela upp
bilder med S-VHS-kvalitet på en vanlig VHS-C-kassett.
(Indikeringen [S-VHS ET] tänds.)
≥När du sätter i en VHS-C-kassett:
Om du ställer in raden [S-VHS ET] på undermenyn [OTHER
FUNCTIONS] på [ON] utförs inspelningen i S-VHS ETformat, och om du ställer in [S-VHS ET] på [OFF] utförs
inspelningen i VHS-format. (l 31)
≥När du sätter i en S-VHS-C-kassett:
Om du ställer in raden [S-VHS] på undermenyn [OTHER
FUNCTIONS] på [ON] utförs inspelningen i S-VHS-format,
och om du ställer in [S-VHS] på [OFF] utförs inspelningen i
VHS-format. (l 31)
∫∫
∫ Inspelning och uppspelning
∫∫
Bestäm vilket VHS-format du vill spela in i innan du börjar
spela in.
Kassett
VHS-C
S-VHS-C
≥En kassett som är inspelad i S-VHS- eller S-VHS ET-format
går även att spela upp på andra videoapparater avsedda för
S-VHS, S-VHS ET eller SQPB (S-VHS Quasi Playback).
(Det kan dock hända att detta inte fungerar på vissa
apparater. Anslut i så fall denna videokamera direkt till TV-n.
(l 77))
≥Om du vill spela in och spela upp med högsta möjliga
bildkvalitet, eller tänker spara kassetterna länge,
rekommenderar vi att du använder S-VHS-C-kassetter och
spelar in i S-VHS-format.
≥Om du spelar in i S-VHS ET-format kan det hända att
bildkvaliteten inte blir särskilt bra för vissa sorters kassetter.
För att undvika att bli obehagligt överraskad rekommenderar
vi att du gör en provinspelning och kontrollerar att kvaliteten
på den inspelade bilden blir tillräckligt bra.
(För bästa möjliga bildkvalitet rekommenderar vi att du
använder kassetter av HG-typ (High Grade).)
Inspelningsformat
VHS
S-VHS ET
VHS
S-VHS
Kompatibel
uppspelningsutrustning
VHS, S-VHS,
S-VHS ET, SQPB
S-VHS,
S-VHS ET, SQPB
VHS, S-VHS,
S-VHS ET, SQPB
S-VHS,
S-VHS ET, SQPB
49
Page 50

0:00.00
0:00.00
45
6
7
2
3
4
2
VCR
CAMERA
OFF
3
1
ITALIANO ENGLISH
Regolazione del mirino
Prima di utilizzare il mirino, adattatelo alla vostra vista, di
modo che le indicazioni al suo interno siano nitide e facilmente
leggibili.
Adjusting the Finder
Before using the Finder, adjust it to your eyesight so that the
indications in the Finder are clear and easy to read.
1 Connect the AC Adaptor or attach a charged
1 Collegate l’alimentatore CA o inserite una
batteria carica.
2 Set the [CAMERA/OFF/VCR] Switch to
2 Impostate l’interruttore [CAMERA/OFF/VCR] su
[CAMERA] o [VCR].
¡Per far ruotare l’interruttore tenete premuto il tasto
centrale 1.
3 If necessary, adjust the angle of the Finder by
3 Se necessario, estraete il mirino tirandolo verso
l’alto e regolate la sua angolazione.
¡Il mirino può essere inclinato verso l’alto di un massimo
di 90u.
4 Ruotate la leva 2 per regolare la correzione
diottrica.
4 Adjust by turning the Eyepiece Corrector Lever
Never aim the Movie Camera with its Finder or Lens directly at
the sun; this could damage internal parts of the unit. 3
1
8
Battery.
[CAMERA] or [VCR].
¡Turn the switch while pressing the button 1.
tilting it upward.
¡The Finder can be tilted upward up to 90u.
2.
Non puntate mai direttamente verso il sole il mirino o l’obiettivo
della movie; le parti interne dell’apparecchio potrebbero
danneggiarsi. 3
Se il mirino viene colpito dalla luce del sole o da un’altra forte
sorgente di luce, sullo schermo del mirino potrebbero prodursi
degli scintillii 4. Il fenomeno scompare in pochi minuti se
viene mascherata la sorgente di luce e, comunque, non ha
influenza sulle immagini registrate.
Se sul mirino viene visualizzato un soggetto con forte
contrasto o un menu, potrebbe prodursi temporaneamente un
effetto “ghost” (doppia immagine o ombra). 5 Non si tratta,
tuttavia, di un difetto di funzionamento e non influisce
assolutamente sull’immagine registrata.
Regolazione della cinghietta
Regolate la cinghietta in modo da poter premere agevolmente
il tasto di Avvio/Arresto 6 con il pollice e la leva Zoom [W/T]
7 con l’indice o il medio.
Copri-obiettivo
Togliete il copri-obiettivo dal paraluce e agganciatelo
all’apposito supporto sulla cinghietta 8.
If sunlight or other strong light enters the Finder, sparkling
noise occurs on the Finder screen. 4 If you block off the light,
this phenomenon disappears after a few minutes and does not
affect the recorded picture.
If a subject with strong contrast or a menu is displayed in the
Finder, a ghost image may remain temporarily. 5 However,
this is not a malfunction and does not affect the recorded
picture.
Adjusting the Grip Belt
Adjust the length of the Grip Belt so that you can easily press
the Recording Start/Stop Button 6 with your thumb and push
the [W/T] Zoom Lever 7 with your index or middle finger.
Handling the Lens Cap
Remove the Lens Cap from the Lens Hood and attach it to the
Lens Cap Holder on the Grip Belt 8.
50
Page 51

SVENSKAESPAÑOL
Ajuste del visor
Antes de utilizar el visor, ajústelo a su vista para que pueda
ver y leer claramente las indicaciones del visor.
1 Conecte el adaptador de CA o instale una
batería cargada.
2 Mueva el interruptor [CAMERA/OFF/VCR] a
[CAMERA] o [VCR].
¡Conecte el interruptor mientras presiona el botón 1.
3 Si fuera necesario, ajuste el ángulo del visor
inclinándolo hacia arriba.
¡El visor puede inclinarse hacia arriba hasta 90u.
4 Ajuste girando la palanca del corrector del
ocular
2.
No se debe apuntar el visor o el objetivo de la videocámara
directamente hacia el sol, esto puede dañar las piezas en el
interior de la videocámara. 3
Si entra la luz del sol u otra luz fuerte en el visor, puede
producirse centelleo en la pantalla del visor. 4 Bloquee esta
luz y desaparecerá este fenómeno después de unos minutos
y no afecta la imagen grabada.
Si aparece un objeto de gran contraste o un menú en el visor,
puede quedar una imagen fantasma temporalmente. 5 Sin
embargo, esto no es un mal funcionamiento y no afecta la
imagen grabada.
Justering av sökaren
Justera sökaren efter din syn innan du använder den så att
sökarindikeringarna syns klart och tydligt.
1 Koppla in nätadaptern eller sätt på ett uppladdat
batteri.
2 Ställ strömbrytaren [CAMERA/OFF/VCR] på
[CAMERA] eller [VCR].
¡Håll knapp 1 intryckt medan du flyttar strömbrytaren.
3 Justera vid behov sökarens vinkel genom att
luta den uppåt.
¡Det går att vrida sökaren upp till 90u uppåt.
4 Justera genom att vrida på
okularinställningsspaken
Rikta aldrig videokamerans objektiv eller sökare rakt mot
solen, eftersom det kan leda till skador inuti videokameran 3.
Om det kommer in solljus eller annat starkt ljus i sökaren
uppstår det glittrande störningar på sökarskärmen 4. Om du
blockerar ljuset försvinner detta fenomen igen efter ett par
minuter, och bilden som faktiskt spelas in påverkas inte.
Om ett motiv med stark kontrast eller en meny visas i sökaren
kan det hända att en spökbild dröjer kvar en kort stund. 5
Detta är dock inget fel och påverkar inte bilden som faktiskt
spelas in.
2.
Ajuste de la correa de la empuñadura
Ajuste la longitud de la correa de forma que pueda oprimir
fácilmente el botón de inicio/parada de grabación 6 con el
pulgar y presionar la palanca del zoom [W/T] 7 con el índice
o dedo mayor.
Uso de la tapa de objetivo
Saque la tapa de objetivo de la visera del objetivo y enganche
en el sujetador de tapa en la correa de la empuñadura 8.
Justering av handremmen
Justera längden på handremmen så att du lätt kan trycka på
inspelningsstart/stoppknappen 6 med tummen och sköta
[W/T]-zoomknappen 7 med pekfingret eller långfingret.
Hantering av linsskyddet
Ta av linsskyddet från linskåpan och sätt fast det i
linsskyddshållaren på handremmen 8.
51
Page 52

1
1
2
2
ITALIANO ENGLISH
3
3
Inserimento della tracolla
1 Fate scorrere un’estremità della tracolla
attraverso l’apposito supporto.
1
2 Agganciate saldamente l’estremità della tracolla
(
2 Più di 2 cm).
3 Eseguite le stesse operazioni per agganciare
l’altra estremità della tracolla nell’altro supporto
3 sulla movie.
Attaching the Shoulder Strap
1 Pull one end of the Shoulder Strap through the
Shoulder Strap Holder
1.
2 Fasten this end of the Shoulder Strap securely
(
2 more than 2 cm).
3 Perform the above steps to attach the other end
of the Shoulder Strap to the other Shoulder
Strap Holder
3 on the Movie Camera.
52
Page 53

SVENSKAESPAÑOL
Instalación de la correa al hombro
1 Tire una punta de la correa al hombro por la
argolla de la correa al hombro
1.
2 Apriete firmemente esta punta de la correa al
hombro (
2 más de 2 cm).
3 Realice los pasos anteriores para instalar la
otra punta de la correa al hombro en la otra
argolla de la correa al hombro
videocámara.
3 de la
Hur man sätter fast axelremmen
1 Trä axelremmens ena ände genom
axelremshållaren
1.
2 Fäst den axelremsänden ordentligt (med minst
2 cm
2).
3 Gör på samma sätt för att fästa axelremmens
andra ände i den andra axelremshållaren
videokameran.
3 på
53
Page 54

1
3
ITALIANO ENGLISH
2
_
Pila del telecomando
Prima di regolare ora e data, inserite la pila a pastiglia (in
dotazione).
(inserimento)
1 Aprite il coperchio [BACKUP BATTERY].
2 Inserite la pila di modo che il lato
contrassegnato con (r) sia visibile.
3 Chiudete il coperchio [BACKUP BATTERY].
≥Prima di inserire o togliere la pila a pastiglia, controllate che
l’interruttore [CAMERA/OFF/VCR] sia sulla posizione [OFF].
≥Quando la pila a pastiglia si scarica, lampeggia l’indicazione
[0]. In questo caso sostituite la pila con una nuova pila
modello CR2025.
(La vita utile della batteria è di circa 3 anni.)
≥Per aiutarvi nella sostituzione della pila, potete utilizzare un
oggetto a punta.
≥Nel togliere la pila, fate attenzione a non farla cadere.
¡Tenete la pila a pastiglia lontano dalla portata dei
bambini.
¡Controllate di aver inserito la pila rispettando le polarità.
≥L’orologio interno rimane in funzione anche quando la movie
è spenta. Per fare questo, consuma l’energia della pila.
Inserting the Button-type Battery
Before setting the date and time, insert the button-type battery
(supplied).
1 Open the [BACKUP BATTERY] Cover.
2 Insert the button-type battery so that its (r) side
is visible.
3 Close the [BACKUP BATTERY] Cover.
≥Before inserting or removing the button-type battery, be sure
to set the [CAMERA/OFF/VCR] Switch to [OFF].
≥When the button-type battery is exhausted, the [0]
Indication flashes. In this case, replace it with a new CR2025
battery.
(The life of the battery is about 3 years.)
≥To make it easier to remove the button-type battery, use a
pointed object.
≥When you remove the button-type battery, be careful not to
drop it.
≥Keep the button-type battery out of the reach of children.
≥Make sure you insert the battery with its poles correctly
aligned.
≥The internal clock works even when the Movie Camera is
turned off, and it consumes power from the button-type
battery.
ATTENZIONE
Una sostituzione non corretta della pila espone al
rischio di esplosione. Sostituite la pila esclusivamente
con una di tipo identico o equivalente a quello
raccomandato dal produttore. Per lo smaltimento delle
pile esaurite, osservate le norme vigenti.
CAUTION
Danger of explosion if battery is incorrectly replaced.
Replace only with the same or equivalent type
recommended by the equipment manufacturer. Discard
used batteries according to manufacturer’s instructions.
54
Page 55

SVENSKAESPAÑOL
Colocación de la pila tipo botón
Antes de ajustar la fecha y la hora, coloque la pila tipo botón
(suministrada).
1 Abra la tapa [BACKUP BATTERY].
2 Coloque la pila tipo botón para que el símbolo
(r) pueda verse.
3 Cierre la tapa [BACKUP BATTERY].
≥Antes de colocar o sacar la pila de tipo botón, asegúrese de
mover el interruptor [CAMERA/OFF/VCR] a [OFF].
≥Cuando se acaba la pila de tipo botón, destella la indicación
[0]. En este caso, cambie por una nueva pila CR2025.
(La vida útil de la pila es de aproximadamente 3 años.)
≥Para desmontar fácilmente la pila tipo botón, utilice un objeto
puntiagudo.
≥Cuando desmonte la pila tipo botón, tenga cuidado de no
dejarlo caer.
¡No deje la pila tipo botón al alcance de los niños.
¡Coloque las pilas con los polos correctamente orientados.
≥El reloj interno funciona incluso con la videocámara
desconectada y consume la carga de la pila tipo botón.
Hur man sätter i knapptypsbatteriet
Sätt i det medföljande knapptypsbatteriet innan du ställer in
datumet och ställer klockan.
1 Öppna locket till batterifacket
[BACKUP BATTERY].
2 Sätt i knapptypsbatteriet så att dess (r) -sida
syns.
3 Stäng locket till batterifacket
[BACKUP BATTERY] igen.
≥Glöm inte att ställa [CAMERA/OFF/VCR]-omkopplaren på
[OFF] innan du sätter i eller tar ut knapptypsbatteriet.
≥När knapptypsbatteriet är urladdat blinkar indikeringen [0].
Byt i så fall ut det mot ett nytt CR2025-batteri.
(Batteriets livslägd är ungefär 3 år.)
≥Det går lättare att ta ut knapptypsbatteriet om man använder
något spetsigt föremål.
≥Var försiktig så att du inte tappar knapptypsbatteriet när du
tar ut det.
¡Förvara knapptypsbatterier utom räckhåll för barn.
¡Var noga med att sätta i batteriet med polerna vända åt rätt
håll.
≥Den inbyggda klockan fortsätter att gå även när
videokameran är avstängd, och drar då ström från
knapptypsbatteriet.
PRECAUCION
El aparato puede explotar si se coloca una pila con
especificaciones incorrectas. Coloque sólo las pilas
recomendadas por el fabricante u otras con las mismas
especificaciones. Siga las instrucciones del fabricante
de las pilas y los reglamentos locales para el desecho
de las pilas.
VARNING
Explosionsfara vid felaktigt batteribyte.
Använd samma batterityp eller en likvärdig typ som
rekommenderas av apparattillverkaren.
Ta hand om använda batterier enligt tillverkarens
anvisningar.
55
Page 56

CAMERA FUNCTIONS
1.
CAMERA SETUP
2.
DIGITAL EFFECT
3.
TITLE SETUP
4.
DATE/TIME SETUP
5.
OTHER FUNCTIONS
6.
LCD/EVF SETUP
PRESS MENU TO EXIT
10
MENU
MF/
1,3,5,7,9
2,4,6,8
ITALIANO ENGLISH
Programmazione di Ora e Data
Selezionando il sottomenu [DATE/TIME SETUP] sul menu
principale [VCR FUNCTIONS] o sul menu principale
[CAMERA FUNCTIONS], apparirà il menu indicato sopra.
Esempio: per programmare l’orologio su
15 Ottobre 2000, ore 14:30.
1 Ruotate il selettore [
[2000].
L’indicazione dell’anno si modifica nel seguente ordine:
...1990...1991... 2000...2089...1990...
2 Premete il tasto [SET] per selezionare
[MONTH].
3 Ruotate il selettore [
4 Premete il tasto [SET] per selezionare [DATE].
5 Ruotate il selettore [
6 Premete il tasto [SET] per selezionare [HOUR].
7 Ruotate il selettore [
8 Premete il tasto [SET] per selezionare [MIN.].
9 Ruotate il selettore [
TRACKING
FOCUS / SET
3434
34] per impostare
3434
3434
34] per impostare [10].
3434
3434
34] per impostare [15].
3434
3434
34] per impostare [14].
3434
3434
34] per impostare [30].
3434
Setting the Date and Time
If you select the [DATE/TIME SETUP] Sub-Menu of the [VCR
FUNCTIONS] or the [CAMERA FUNCTIONS] Main-Menu,
the menu shown above appears.
For example: To set the clock to 15th October
1 Turn the [
2 Press the [SET] Button to select [MONTH].
3 Turn the [
4 Press the [SET] Button to select [DATE].
5 Turn the [
6 Press the [SET] Button to select [HOUR].
7 Turn the [
8 Press the [SET] Button to select [MIN.].
9 Turn the [
10 Press the [MENU] Button to finish the date
10 Premete il tasto [MENU] per confermare la
regolazione di ora e data.
Inizierà il conteggio dei secondi a partire da [00].
Premendo nuovamente il tasto, il menu verrà
cancellato.
≥Quando selezionate il sottomenu [DATE/TIME SETUP], se la
pila a pastiglia non è inserita nella movie o è scarica,
scomparirà il Menu principale e al suo posto lampeggerà
l’indicazione [0]. Inserite una nuova pila a pastiglia (l 54)
e regolate nuovamente ora e data.
≥Dato che l’orologio interno della movie è soggetto a lievi
imprecisioni, controllate bene l’ora prima di effettuare una
ripresa.
≥L’orologio interno utilizza un sistema a 24 ore.
≥If you select the [DATE/TIME SETUP] Sub-Menu when the
button-type battery is not inserted into the Movie Camera or
is exhausted, the Main-Menu disappears and the [0]
Indication flashes instead. Insert a new button-type battery
(l 54) and then set the date and time again.
≥As the Movie Camera’s built-in clock is subject to slight
imprecision, be sure to check the indicated time before
recording.
≥The clock employs the 24-hour system.
DATE/TIME SETUP
YEAR 2000
MONTH 10
DATE 15
HOUR 14
MIN. 30
PRESS MENU TO RETURN
2000, 14:30.
3434
34] Dial to set to [2000].
The years change in the following order:
...1990...1991... 2000...2089 ...1990 ...
and time setting.
The operation of the clock starts from [00] seconds.
Pressing the button one more time makes
the menu disappear.
3434
3434
34] Dial to set to [10].
3434
3434
34] Dial to set to [15].
3434
3434
34] Dial to set to [14].
3434
3434
34] Dial to set to [30].
3434
56
Page 57

SVENSKAESPAÑOL
Ajuste de la fecha y hora
Si selecciona el sub-menú [DATE/TIME SETUP] del menú
principal [VCR FUNCTIONS] o [CAMERA FUNCTIONS]
aparece el menú de arriba.
Por ejemplo: Para ajustar el reloj al 15 de octubre
de 2000, 14:30.
1 Gire el dial [
Los años cambian en el siguiente orden:
...1990...1991... 2000...2089...1990...
3434
34] y ajuste a [2000].
3434
2 Oprima el botón [SET] para seleccionar
[MONTH].
3 Gire el dial [
3434
34] y ajuste a [10].
3434
4 Oprima el botón [SET] para seleccionar
[DATE].
5 Gire el dial [
3434
34] y ajuste a [15].
3434
6 Oprima el botón [SET] para seleccionar
[HOUR].
7 Gire el dial [
3434
34] y ajuste a [14].
3434
8 Oprima el botón [SET] para seleccionar [MIN.].
9 Gire el dial [
3434
34] y ajuste a [30].
3434
10 Oprima el botón [MENU] para terminar el
ajuste de la fecha y hora.
El reloj empieza a funcionar desde [00] segundos.
Oprima el botón una vez más para que desaparezca el
menú.
≥Si selecciona el sub-menú [DATE/TIME SETUP] cuando no
se coloca la pila tipo botón en la videocámara o está
agotada, desaparece el menú principal y en su lugar la
indicación [0] destella. Coloque una nueva pila tipo botón
(l 55) y ajuste la fecha y hora nuevamente.
≥Debido a que el reloj incorporado en la videocámara está
sujeto a ligeras impresiciones, asegúrese que la hora que
aparece sea la correcta, antes de grabar.
≥El reloj funciona con un sistema de 24 horas.
Inställning av datum och klockslag
Om du väljer undermenyn [DATE/TIME SETUP] under någon
av huvudmenyerna [VCR FUNCTIONS] eller [CAMERA
FUNCTIONS] tänds ovanstående meny.
Exempel: För att ställa klockan på 14:30, den
15 oktober 2000.
1 Vrid på [
Årtalet ändras i följande ordning:
...1990...1991... 2000...2089 ...1990 ...
3434
34]-ratten för att ställa in [2000].
3434
2 Tryck på [SET]-knappen för att välja [MONTH].
3 Vrid på [34]-ratten för att ställa in [10].
4 Tryck på [SET]-knappen för att välja [DATE].
5 Vrid på [34]-ratten för att ställa in [15].
6 Tryck på [SET]-knappen för att välja [HOUR].
7 Vrid på [34]-ratten för att ställa in [14].
8 Tryck på [SET]-knappen för att välja [MIN.].
9 Vrid på [34]-ratten för att ställa in [30].
10 Tryck på [MENU]-knappen för att avsluta
datum- och klockinställningen.
Klockan börjar gå från [00] sekunder.
När man trycker en gång till på knappen släcks
menyn.
≥Om du väljer undermenyn [DATE/TIME SETUP] när det inte
finns något knapptypsbatteri isatt i videokameran eller när
knapptypsbatteriet är slut, släcks huvudmenyn och i stället
börjar indikeringen [0] blinka. Sätt i ett nytt
knapptypsbatteri (l 55) och ställ sedan in datumet och ställ
klockan igen.
≥Videokamerans inbyggda klocka är inte alldeles exakt så
glöm inte att kontrollera att den går rätt innan du börjar spela
in.
≥Klockan använder 24-timmarsvisning.
57
Page 58

DATE/TITLE
TITLE
LANGUAGE
FOR TITLE
SIZE
RETURN ----
TITLE SETUP
DATE TIME
HOLIDAY
ENGLISH
NORMAL
WHITECOLOUR
PRESS MENU TO EXIT
DATE/
TITLE
3
1
2
MENU
MF/
TRACKING
FOCUS / SET
1
2
12:30
15.10.2000
4
5
HOLIDAY
15.10.2000
5
4
ITALIANO ENGLISH
Ripresa con la sovrimpressione di Ora e/o Data
Recording with the Time and/or Date
Superimposed in the Picture
Dopo aver visualizzato il sottomenu [TITLE SETUP]...
(l 30)
1 Ruotate il selettore [
[DATE/TITLE].
3434
34] per selezionare
3434
After displaying the [TITLE SETUP] Sub-Menu... (l 30)
1 Turn the [
2 Press the [SET] Button to select the desired
2 Premete il tasto [SET] per selezionare
l’indicazione desiderata.
≥Le indicazioni si modificano nell’ordine da 1 a 6.
1 Ora e Data _>2 Data _>
3 Ora e Data, Titolo _> 4 Data e Titolo _>
5 Titolo _>6 Ora (con i secondi) e Data _>
≥Se la pila a pastiglia che fornisce energia all’orologio
interno non è stata inserita nella movie o è scarica,
verrà visualizzato solo il titolo. (l 54)
3 Press the [MENU] Button to exit the menu.
3 Premete il tasto [MENU] per uscire dal menu.
≥Apparira l’indicazione di Ora/Data/Titolo che è stata
selezionata.
4 Premete il tasto di Avvio/Arresto per iniziare la
ripresa.
∫ Cancellazione dell’indicazione di Ora/Data/Titolo
4 Press the Recording Start/Stop Button to start
∫ Deleting the Date/Time/Title Indication
5 During recording or when the Movie Camera is
5 Durante la ripresa, o mentre la movie si trova in
Pausa di Ripresa, premete il tasto [DATE/TITLE]
fino a che l’indicazione di Ora/Data/Titolo non
scompare.
≥Se la movie viene spenta e accesa nuovamente,
l’Indicazione di Ora/Data/Titolo non sarà più visibile. Per farla
apparire di nuovo, premete una volta il tasto [DATE/TITLE].
≥Ricordatevi di spegnere la movie prima di togliere la batteria
o di staccare l’alimentatore CA. Scollegare l’alimentazione,
mentre la movie è accesa, provoca la cancellazione
dell’indicazione di Ora/Data/Titolo (l 130) conservata in
memoria.
≥After turning the Movie Camera off and then on again, the
previously selected Date/Time/Title Indication is no longer
displayed. To make it appear again, press the [DATE/TITLE]
Button once.
≥Be sure to turn the Movie Camera off before removing the
Battery or disconnecting the AC Adaptor. Disconnecting the
power supply while the Movie Camera is on erases the Date/
Time/Title Indication (l 130) stored in memory.
15.10.2000
3
HOLIDAY
12:30
15.10.2000
3434
34] Dial to select [DATE/TITLE].
3434
6
HOLIDAY
12:30:15
15.10.2000
indication.
≥The indications change in the order 1 to 6.
1 Date and Time _>2 Date _>
3 Date, Time and Title _>4 Date and Title _>
5 Title _>6 Date and Time with seconds _>
≥If the button-type battery for the built-in clock is not
inserted into the Movie Camera or is exhausted, only
the title is displayed. (l 54)
≥The selected Date/Time/Title Indication appears.
recording.
in the Recording Pause Mode, press the
[DATE/TITLE] Button to make the Date/Time/
Title Indication disappear.
58
Page 59

Grabación con la hora y/o fecha superpuesta en
la imagen
SVENSKAESPAÑOL
Inspelning med klockan och/eller datumet
pålagt i bilden
Después de que aparezca el sub-menú [TITLE SETUP]…
(l 31)
1
Gire el dial [
[DATE/TITLE].
2
Oprima el botón [SET] para seleccionar la
indicación deseada.
≥Las indicaciones cambian en el orden 1 a 6.
3434
34] para seleccionar
3434
1 Fecha y hora _>2 Fecha _>
3 Fecha, Hora y Título _>
4 Fecha y Título _>5 Título _>
6 Fecha y Hora con segundos _>
≥La pila tipo botón para el reloj incorporado no está
colocada en la videocámara o está agotada, sólo
aparece el título. (l 55)
3
Oprima el botón [MENU] para salir del menú.
≥Aparece la indicación de la fecha/hora/título
seleccionado.
4
Oprima el botón de inicio/parada de grabación
para empezar a grabar.
∫
Borrado de la indicación de la fecha/hora/título
5
Durante la grabación o con la videocámara en
la pausa de grabación, oprima el botón
[DATE/TITLE] para que desaparezca la
indicación de la fecha/hora/título.
≥Cuando desconecta y vuelve a conectar la videocámara,
desaparece la indicación de la fecha/hora/título. Oprima una
vez el botón [DATE/TITLE] para que vuelva a aparecer.
≥Asegúrese de que la videocámara está desconectada antes
de sacar la batería o desenchufar el adaptador de CA. Si
desenchufara la alimentación eléctrica con la videocámara
conectada, se borrará la indicación de la fecha/hora/título
(l 131) de la memoria.
Tänd först undermenyn [TITLE SETUP]... (l 31)
1 Vrid på [
3434
34]-ratten för att välja [DATE/TITLE].
3434
2 Tryck på [SET]-knappen för att välja önskad
indikering.
≥Indikeringarna ändras i ordningen 1 till 6.
1 Datum och klocka _>2 Datum _>
3 Datum, klocka och text _>
4 Datum och text _>5 Text _>
6 Datum och klocka med sekunder _>
≥Om det inte finns något knapptypsbatteri isatt i
videokameran för att driva den inbyggda klockan, eller
om knapptypsbatteriet är slut, visas bara bildtexten.
(l 55)
3 Tryck på [MENU]-knappen för att lämna menyn.
≥Den valda datum/klock/textindikeringen tänds.
4 Tryck på inspelningsstart/stoppknappen för att
börja spela in.
∫ Hur man släcker datum/klock/textindikeringen
5 Tryck på [DATE/TITLE]-knappen under
inspelning eller när videokameran är i
inspelningspausläge så att datum/klock/
textindikeringen släcks.
≥Om du stänger av videokameran och sedan slår på den igen
släcks den senast inställda datum/klock/textindikeringen.
Tryck en gång på [DATE/TITLE]-knappen så tänds den igen.
≥Var noga med att stänga av videokameran innan du tar av
batteriet eller kopplar loss nätadaptern. Om
strömförsörjningen bryts medan videokameran är påslagen
raderas den lagrade datum/klock/textindikeringen (l 131)
ur minnet.
59
Page 60

REC
5
RECORD
42
CAMERA
A
PROG. AE STORE COLOUR
OFF/ON
V C R
INFO-
WINDOW
PAUSE
AUTO
6
3
1
3,4
VCR
VCR
CAMERA
OFF
CAMERA
OFF
1
2
ITALIANO ENGLISH
Operazioni Base
Ripresa con il modo Full Auto
Il modo Full Auto provvede a regolare automaticamente il
Bilanciamento del bianco e la Messa a fuoco. Queste due
funzioni, volendo, possono essere regolate in modo manuale,
insieme o separatamente. (m 110, 114)
Se le riprese vengono effettuate in un ambiente poco
illuminato, l’immagine può presentare disturbied essere poco
nitida. Per evitare questi inconvenienti vi consigliamo di
utilizzare ad esempio l’Illuminatore video/IR (opzionale).
Recording in the Full Auto Mode
The Full Auto Mode adjusts the white balance and focus
automatically. However, if you want, you can also adjust
either one or both of them manually (l 110, 114).
When recording in a dimly lit location, the picture may become
noisy and less sharp, so we recommend that you use the IR/
Video DC Light (optional), etc. to brighten up the scene.
1 Set the [CAMERA/OFF/VCR] Switch to
1 Impostate l’interruttore [CAMERA/OFF/VCR] su
[CAMERA].
≥Per far ruotare l’interruttore tenete premuto il tasto
centrale 1.
¡Si accenderà la spia [CAMERA] 2.
2 Confirm that the [AUTO] Indication 3 is
2 Controllate che sia visualizzata l’indicazione
[AUTO]
≥Si accenderà la spia [ƒ] 4.
¡L’impostazione iniziale è [AUTO].
¡Se è visualizzata una delle altre impostazioni [MNL],
3.
[5], [7], [4], [ ] o [ ] premete più volte il tasto
[PROG. AE] fino a visualizzare l’indicazione [AUTO].
3 Press the Recording Start/Stop Button to start
3 Premete il tasto di Avvio/Arresto per iniziare la
ripresa.
¡Inizierà la ripresa e appariranno le indicazioni [◊◊] e
[REC] 5. Per tutto il tempo della registrazione, sul lato
anteriore della movie, rimarrà accesa la spia di
registrazione (m 62).
([REC] sta per Recording = Registrazione.)
4 Per interrompere momentaneamente la ripresa:
Premete nuovamente il tasto di Avvio/Arresto.
Apparirà l’indicazione [PAUSE]. 6
5 Per terminare la ripresa:
Spegnete la movie tramite l’interruttore di
Accensione [CAMERA/OFF/VCR].
4 To pause recording:
5 To finish recording:
≥If you use an E55 type cassette for recording, the picture
may contain some distortion when you play it back.
However, this is not a malfunction of the Movie Camera.
CAMERA
OFF
VCR
5
Basic Operations
[CAMERA].
¡Turn the switch while pressing the button 1.
¡The [CAMERA] Lamp 2 lights.
displayed.
≥The [ƒ] Lamp 4 lights.
¡The initial setting is [AUTO].
¡If the [MNL], [5], [7], [4], [ ] or [ ] Indication
is displayed, press the [PROG.AE] Button repeatedly
until the [AUTO] Indication appears.
recording.
¡Recording starts and the [◊◊] Indication and the [REC]
Indication 5 appear. The Tally Lamp (m 62) on the
front of the Movie Camera remains lit during recording.
([REC] means Recording.)
Press the Start/Stop Button again.
The [PAUSE] Indication appears. 6
Set the [CAMERA/OFF/VCR] Switch to [OFF].
≥Se effettuate le riprese utilizzando cassette del tipo E55,
durante la riproduzione le immagini potrebbero contenere
delle distorsioni. Questo non è dovuto a un difetto di
funzionamento della movie.
60
Page 61

SVENSKAESPAÑOL
Operaciones básicas
Grabación totalmente automática
El modo automático total ajusta automáticamente el balance
del blanco y el enfoque. También puede ajustar uno o ambos
manualmente (m 111, 115).
Cuando se graba en un lugar poco iluminado, la imagen
puede contener ruidos y ser menos nítida. Para evitar esto
se recomienda utilizar la luz CC de vídeo/IR (opcional), etc.
para que la escena esté más iluminada.
1 Mueva el interruptor [CAMERA/OFF/VCR] a
[CAMERA].
≥Conecte el interruptor mientras presiona el botón 1.
¡Se enciende la luz [CAMERA] 2.
2 Confirme que aparece la indicación [AUTO] 3.
¡La luz [ƒ] 4 se enciende.
¡El ajuste inicial es [AUTO].
¡Si aparece la indicación [MNL], [5], [7], [4], [ ] o
[ ] oprima repetidamente el botón [PROG. AE] hasta
que aparezca la indicación [AUTO].
3 Oprima el botón de inicio/parada de grabación
para grabar.
¡Empieza a grabar y aparecen las indicaciones [◊◊] y
[REC] 5. La luz piloto (m 63) en el frente de la
videocámara se enciende mientras graba.
([REC] es la abreviatura en inglés de Grabación.)
4 Para hacer una pausa en la grabación:
Oprima otra vez el botón de inicio/parada.
Aparece la indicación [PAUSE]. 6
5 Para terminar de grabar:
Mueva el interruptor [CAMERA/OFF/VCR] a
[OFF].
Grundläggande användningssätt
Inspelning med helautomatiska
inställningar
I det helautomatiska läget ställs vitbalansen och skärpan in
automatiskt, men om du vill kan du också göra en av eller
båda dessa inställningar för hand (m 111, 115).
Vid inspelning på en dåligt upplyst plats kan det hända att det
uppstår störningar i bilden eller att bilden blir oskarp. För att
förhindra detta rekommenderar vi att du lyser upp scenen
men en IR-likströmsvideolampa (säljs separat).
1 Ställ strömbrytaren [CAMERA/OFF/VCR] på
[CAMERA].
≥Håll knapp 1 intr yckt medan du flyttar strömbrytaren.
¡[CAMERA]-lampan 2 tänds.
2 Kontrollera att [AUTO]-indikeringen 3 visas.
¡[ƒ]-lampan 4 tänds.
¡[AUTO] är begynnelseinställningen.
¡Om någon av indikeringarna [MNL], [5], [7], [4],
[ ] eller [ ] visas, så tryck upprepade gånger på
[PROG. AE]-knappen tills [AUTO]-indikeringen tänds.
3 Tryck på inspelningsstart/stoppknappen för att
börja spela in.
¡Inspelningen startar och bandgångsindikeringen [◊◊]
och indikeringen [REC] 5 tänds. Inspelningslampan
(m 63) framtill på videokameran lyser under hela
inspelningen.
([REC] är en förkortning av Recording som betyder
inspelning.)
4 För att göra en paus i inspelningen:
Tryck en gång till på start/stoppknappen.
Indikeringen [PAUSE] tänds 6.
≥Si utiliza un cassette de tipo E55 para grabar, la imagen
puede tener algunas distorsiones cuando la reproduce. Sin
embargo esto no es una avería de la videocámara.
5 För att avsluta inspelningen:
Ställ strömbrytaren [CAMERA/OFF/VCR] på
[OFF].
≥Om du spelar in på en kassett av E55-typ kan det hända att
det förekommer störningar i bilden vid uppspelningen, men
det beror inte på något fel på videokameran.
61
Page 62

ITALIANO ENGLISH
Spia di registrazione 1
Se non volete che la spia di registrazione si accenda durante
la ripresa, impostate su [OFF] la funzione [TALLY LAMP] del
sottomenu [CAMERA SETUP].
¡Durante la registrazione, non è possibile modificare la
modalità di registrazione ([MNL], [5], [7], [4], [ ],
[ ]), anche premendo il tasto [PROG. AE]. (m 116)
¡Se la movie viene lasciata in Pausa di ripresa per oltre
6 minuti si spegne automaticamente, per proteggere il
nastro e risparmiare l’energia della batteria. Per
riprendere la ripresa da questa condizione, impostate
l’interruttore [CAMERA/OFF/VCR] prima su [OFF], quindi
nuovamente su [CAMERA].
Tally Lamp 1
If you don’t want the Tally Lamp to light during recording, set
[TALLY LAMP] on the [CAMERA SETUP] Sub-Menu to [OFF].
¡During recording, it is not possible to change the recording
mode ([MNL], [5], [7], [4], [ ], [ ]), even if you
press the [PROG.AE] Button. (m 116)
¡If you leave the Movie Camera in the Recording Pause
Mode for more than 6 minutes, it automatically switches
off to protect the tape and to conserve battery power. To
resume recording from this condition, set the [CAMERA/
OFF/VCR] Switch to [OFF] and then to [CAMERA] again.
1
62
Page 63

Piloto de grabación 1
Si no desea que se encienda el piloto durante la grabación,
ajuste [TALLY LAMP] del sub-menú [CAMERA SETUP] a
[OFF].
SVENSKAESPAÑOL
Inspelningslampan 1
Om du inte vill att inspelningslampan ska tändas under
inspelning så ställ in [TALLY LAMP] på undermenyn [CAMERA
SETUP] på [OFF].
¡No se puede cambiar el modo de grabación en el medio de
la grabación ([MNL], [5], [7], [4], [ ], [ ]), aunque
oprima el botón [PROG. AE]. (m 117)
¡Si deja la videocámara en la pausa de grabación durante
más de 6 minutos, se desconecta automáticamente para
proteger la cinta y el ahorro de la batería. Para seguir
grabando, mueva una vez el interruptor [CAMERA/OFF/
VCR] a [OFF] y después a [CAMERA].
¡Det går inte att byta inspelningsläge ([MNL], [5], [7],
[4], [ ], [ ]) medan inspelningen pågår, även om du
trycker på [PROG. AE]-knappen. (m 117)
¡Om du lämnar kvar videokameran i
inspelningspausläget i mer än 6 minuter stängs den
automatiskt av för att skydda bandet och för att spara
batteriström. Om du vill fortsätta spela in från det läget
så ställ först strömbrytaren [CAMERA/OFF/VCR] på
[OFF], och därefter på [CAMERA] igen.
63
Page 64

CHK
1
2
3
ITALIANO ENGLISH
s SEARCH
S
6
1, 2
SEARCH r
5
2
Come controllare la fine della scena
precedente
(Funzione di controllo della ripresa)
Questa funzione riproduce automaticamente gli ultimi
2 secondi della scena che avete appena ripreso, per
controllare se la registrazione vi sembra soddisfacente.
Quando iniziate una nuova ripresa, la scena sarà collegata
alla precedente, senza disturbi o distorsioni di immagine. Vi
consigliamo di utilizzare di tanto in tanto questa funzione
quando filmate eventi che rivestono una particolare
importanza.
1 Mentre vi trovate in Pausa di ripresa, premete
brevemente il tasto [S].
≥Apparirà l’indicazione [CHK] 1 e potrete rivedere gli
ultimi 2 secondi circa della registrazione precedente.
Quindi la movie tornerà in Pausa di Ripresa e sarà
pronta per registrare nuovamente. ([CHK] sta per Check
= controllo.)
Come cercare a metà nastro una scena
registrata (Ricerca nella Telecamera)
Questa funzione semplifica la ricerca sul nastro di un punto
preciso da cui continuare le riprese. In più garantisce una
transizione senza disturbi dalla vecchia ripresa alla nuova.
2 In Pausa di ripresa, tenete premuto il tasto
[sSEARCH] o il tasto [SEARCHr].
2: Ricerca all’indietro
3: Ricerca in avanti
Checking the End of a Recorded Scene
(Recording Check Function)
By automatically playing back the final 2 seconds
(approximate) of the last recorded scene, this function lets
you check if a just finished scene has been recorded
correctly. When you then start recording the next scene, it is
automatically joined with a smooth transition free from picture
distortion. For especially important scenes, use this function
from time to time for confirmation.
1 Press the [S] Button briefly in the Recording
Pause Mode.
¡The [CHK] Indication 1 appears and the final
approximately 2 seconds of the last recorded scene are
played back.
After that, the Movie Camera returns to the Recording
Pause Mode and is ready for recording the next scene.
([CHK] means Check.)
Searching for a Tape Position Before the End of
the Last Recording
(Camera Search Function)
This function makes it easy to search for a point in a
previously recorded scene or cassette from which you want to
start recording a new scene. In addition, it ensures smooth
scene-to-scene transitions free from picture distortion.
2 Keep the [
[SEARCH
Pause Mode.
2: Reverse Search
3: Forward Search
HH
HSEARCH] Button (or the
HH
GG
G] Button) pressed in the Recording
GG
64
Page 65

SVENSKAESPAÑOL
Revisión del final de una escena
grabada
Reproduce automáticamente los 2 segundos finales de la
última grabación para verificar que está bien. Cuando empiece
a grabar la siguiente escena, se une con una transición suave
sin distorsión de imagen. Cuando se ha grabado una escena
importante, aproveche esta función de vez en cuando para
confirmar que todo está bien.
(Revisión de grabaciones)
1 Oprima brevemente el botón [S] en el modo de
pausa de grabación.
≥Aparece la indicación [CHK] 1 y se reproducen
automáticamente los 2 segundos finales de la última
grabación.
A continuación, la videocámara vuelve a la pausa de
grabación y está lista para grabar la siguiente escena.
([CHK] es verificación en inglés. )
Búsqueda de un punto en la cinta anterior a la
última grabación
(Búsqueda en la cámara)
Facilita la búsqueda de un punto en una escena anterior o del
cassette desde donde desea grabar la nueva escena.
Además, se produce una transición suave de una escena a la
siguiente, sin distorsión de imagen.
2 Mantenga oprimido el botón [sSEARCH] (o el
[SEARCHr]) en el modo de pausa de
grabación.
2:Búsqueda hacia atrás
3:Búsqueda hacia adelante
Kontroll av slutet på en inspelad scen
(inspelningskontrollfunktionen)
Denna funktion spelar automatiskt upp de sista ca. 2
sekunderna av den sist inspelade scenen, vilket gör det lätt att
kontrollera om en nyss färdiginspelad scen blivit rätt inspelad.
När du sedan börjar spela in nästa scen fogas den automatiskt
in med en mjuk övergång utan bildstörningar. Använd denna
funktion då och då medan du spelar in speciellt viktiga scener
för att kontrollera att inspelningen blir som den ska.
1 Tryck en kort stund på [S]-knappen i
inspelningspausläge.
≥Indikeringen [CHK] 1 tänds i sökaren och de sista ca.
2 sekunderna av den sist inspelade scenen spelas upp.
Därefter återgår videokameran till inspelningspausläget
och är reda att börja spela in nästa scen.
([CHK] är en förkortning av Check, som betyder
kontroll.)
Sökning efter ett ställe på bandet innan slutet på
den sista inspelningen (kamerasökfunktionen)
Denna funktion gör det lätt att hitta ett visst ställe mitt i en
tidigare inspelad scen eller mitt på en tidigare inspelad kassett
från vilket du vill börja spela in en ny scen. Funktionen
garanterar dessutom mjuka scenövergångar utan
bildstörningar.
2 Håll [sSEARCH]-knappen (eller [SEARCHr]-
knappen) intryckt i inspelningspausläge.
2:Sökning bakåt
3:Sökning framåt
65
Page 66

1
V.ZOOM
4
[W]
3
V.ZOOM
20
2
5
s
VOL
r
21
WT
1
ITALIANO ENGLISH
Uso dello zoom
∫ Zoomata in avvicinamento 1
La zoomata in avvicinamento permette di riprendere in primo
piano soggetti distanti.
1 Premete la leva Zoom [W/T] verso la posizione
[T]
Zooming In/Out
∫ Zooming in 1
Zooming in lets you record close-ups of distant subjects.
1 Push the [W/T] Zoom Lever toward [T].
[T].
≥Apparirà l’indicazione del numero di ingrandimenti dello
zoom 2.
∫ Zoomata in allontanamento 3
La zoomata in allontanamento permette di riprendere la scena
con un angolo visuale più ampio.
2 Premete la leva Zoom [W/T] verso la posizione
[W].
≥Apparirà l’indicazione del numero di ingrandimenti dello
zoom 4.
≥E’ possibile zoomare dalla posizione di grandangolo
(Ingrandimento [1t]) a quella di telefoto (Ingrandimento
[20t]).
≥Quanto più spostate la leva verso le posizioni [W] o [T], tanto
più veloce è l’effetto di zoom.
≥Al massimo della telefoto, cioè al massimo
dell’ingrandimento, è possibile mettere a fuoco solo soggetti
che siano a più di 1,8 m dall’obiettivo.
Un uso eccessivo dello zoom durante le registrazioni dà alle
scene un aspetto poco professionale.
Zoom Vocale
E’ una funzione che permette di registrare leggermente più
forte e più nitidamente le voci di persone distanti. La funzione
enfatizza la gamma di frequenza della voce umana, in base
all’ingrandimento zoom dell’obiettivo ottico. Per attivare la
funzione di Zoom Vocale, impostate su [ON] la funzione
[VOICE ZOOM] sul sottomenu [OTHER FUNCTIONS] del
menu principale [CAMERA FUNCTIONS]. (l 30)
≥Apparirà l’indicazione [V.ZOOM] 5.
≥La funzione di Zoom Vocale lavora entro un ingrandimento
pari a 14k. Al di là di questo punto, l’effetto rimane identico.
≥La funzione di Zoom Vocale dipende dalla distanza della
persona (o delle persone) e dal rumore circostante. In
alcuni casi potrebbe non avere un effetto rilevante.
∫ Zooming out 3
Zooming out lets you record wider views.
2 Push the [W/T] Zoom Lever toward [W].
≥Zooming is possible between wide-angle (Zoom
Magnification Indication [1t]) and telephoto (Zoom
Magnification Indication [20t]).
≥The farther you push the [W/T] Zoom Lever toward [W] or [T],
the faster the zooming speed becomes.
≥In the maximum telephoto setting (when you have zoomed
in), precise focusing is only possible for subjects that are
more than 1.8 m from the lens.
Avoid too much zooming during recording as it gives videos an
unprofessional look.
Voice Zoom
This function makes it possible to record the voices of distant
persons slightly louder and more clearly, by emphasizing the
frequency range of human voices according to the zoom
position of the Movie Camera’s lens. To activate the Voice
Zoom Function, set [VOICE ZOOM] on the [OTHER
FUNCTIONS] Sub-Menu of the [CAMERA FUNCTIONS]
Main-Menu to [ON]. (l 30)
≥The [V.ZOOM] Indication 5 appears.
≥The Voice Zoom Function works within the zoom range up
to 14k: above that point, its effect remains unchanged.
≥Depending on the distance of the person(s) and the
surrounding sounds, the Voice Zoom Function may not
have much effect.
66
≥The Zoom Magnification Indication 2 appears.
≥The Zoom Magnification Indication 4 appears.
Page 67

SVENSKAESPAÑOL
Acercamiento/Alejamiento con zoom
∫ Acercamiento con zoom 1
El acercamiento con zoom permite grabar primeros planos de
objetos a la distancia.
1 Oprima la palanca del zoom [W/T] hacia el [T].
≥Aparece la indicación de cambio del zoom 2.
∫ Alejamiento con zoom 3
El alejamiento con zoom permite grabar una vista panorámica.
2 Oprima la palanca del zoom [W/T] hacia el [W].
≥Aparece la indicación de cambio del zoom 4.
≥Se puede cambiar el zoom entre el gran angular (indicación
de cambio del zoom [1t]) y el teleobjetivo (indicación de
cambio del zoom [20t]).
≥La velocidad del zoom es variable. Oprima [W] o [T] de la
palanca del zoom [W/T] hacia la punta y cambiará
rápidamente.
≥En el máximo teleobjetivo (acercamiento), sólo puede
enfocar de forma precisa a más de 1,8 m del objetivo.
No utilice frecuentemente el zoom en la grabación; se verá
poco profesional.
Zoom de voz
Esta función permite grabar las voces de personas lejanas
un poco más fuerte y nítidamente poniendo énfasis en la
gama de frecuencia de las voces humanas, de acuerdo con
la posición del zoom del objetivo de la videocámara. Para
activar la función de zoom de voz, mueva [VOICE ZOOM] en
el sub-menú [OTHER FUNCTIONS] del menú principal
[CAMERA FUNCTIONS] a [ON]. (l 31)
≥Aparece la indicación [V.ZOOM] 5.
≥La función de zoom de voz funciona dentro de la gama de
zoom de hasta 14k: por encima de este punto, su efecto
permanece incambiado.
≥Según la distancia de la(s) persona(s) y los ruidos en el
ambiente, la función el zoom de voz puede no tener mucho
efecto práctico.
In/utzoomning
∫ Inzoomning 1
Genom att zooma in kan du spela in närbilder på avl ägsna
motiv.
1 Tryck [W/T]-knappen mot [T].
≥Zoomförstoringsgraden 2 tänds.
∫ Utzoomning 3
Genom att zooma ut får du med mer i bilden.
2 Tryck [W/T]-knappen mot [W].
≥Zoomförstoringsgraden 4 tänds.
≥Det går att zooma mellan vidvinkel (zoomförstoringsgraden
[1t]) och tele (zoomförstoringsgraden [20t]).
≥Ju längre du trycker [W/T]-zoomknappen mot [W] eller [T],
desto snabbare går zoomningen.
≥I det maximala teleläget (när du har zoomat in) måste
motivet befinna sig minst 1,8 m från objektivet för att det ska
gå att ställa in skärpan exakt.
Undvik att zooma för mycket under själva inspelningen,
eftersom det lätt gör att filmen ser amatörmässig ut.
Röstzoom
Denna funktion gör det möjligt att spela in avlägsna röster på
lite högre volym och lite tydligare genom att framhäva det
frekvensområde där den mänskliga rösten ligger i förhållande
till zoomläget för videokamerans objektiv. Ställ in [VOICE
ZOOM] på [ON] på undermenyn [OTHER FUNCTIONS]
under huvudmenyn [CAMERA FUNCTIONS] för att aktivera
röstzoomfunktionen. (l 31)
≥Indikeringen [V.ZOOM] 5 tänds.
≥Röstzoomfunktionen fungerar inom zoomområdet upp till
14k: däröver ändras inte effekten.
≥Beroende på hur långt bort personen (personerna) befinner
sig och ljuden runtomkring kan det hända att
röstzoomfunktionen inte har någon större effekt.
67
Page 68

2
ITALIANO ENGLISH
Uso della funzione di MACRO
(primissimo piano)
E’ una funzione che permette di riprendere soggetti molto
piccoli, come ad esempio insetti.
Using the Macro Close-up Function
This function lets you record very small subjects such as
insects.
1 Keep the [W/T] Zoom Lever pushed toward [W]
1 Tenete premuta la leva Zoom [W/T] verso la
posizione [W], per allargare l’inquadratura fino al
massimo del grandangolo (Ingrandimento [1t]).
2 Approach the subject with the Movie Camera
s
VOL
r
1
WT
to zoom to the maximum wide-angle setting
(Zoom Magnification Indication [1t]).
until it reaches the desired size in the picture.
2 Avvicinatevi al soggetto fino a che, all’interno
dell’inquadratura, non ha le dimensioni richieste.
≥Al massimo del grandangolo, la movie è in grado di mettere
a fuoco automaticamente soggetti che si trovino a una
distanza dall’obiettivo compresa tra 5 mm e infinito.
≥Nelle riprese macro è facile che vi siano oscillazioni nelle
immagini. Vi consigliamo pertanto l’uso di un treppiede
(opzionale).
≥Se state utilizzando la funzione di Macro (primissimo piano)
e siete estremamente vicini al soggetto, nelle riprese 0 lux
(Visione notturna) il raggio a infrarossi emesso dalla movie
potrebbe non raggiungere il soggetto.
≥With the lens in the maximum wide-angle setting, the Movie
Camera can automatically focus on subjects from infinity to a
minimum distance of only 5 mm between lens and subject.
≥To prevent unstable pictures, use a tripod (optional) for
macro close-up recording.
≥If you use the Macro close-up Function and approach
extremely close to the subject when recording in the
0 Lux Night View Function, the infra-red beam from the
Movie Camera’s built-in Infra-red Beam Emitters may not
reach the subject.
68
Page 69

Función de acercamiento macro
Permite grabar objetos tan pequeños como un insecto.
1 Mantenga oprimida la palanca del zoom [W/T] a
[W] hasta el máximo gran angular (indicación
de cambio del zoom [1t]).
2 Acérquese al objeto con la videocámara hasta
que tenga la imagen en el tamaño deseado.
≥En el máximo gran angular, la videocámara puede enfocar
automáticamente objetos en el infinito o a tan sólo 5 mm del
objetivo.
≥Para que la imagen no se mueva, utilice un trípode (de venta
por separado) en la grabación de acercamiento macro.
≥Si se usa la función de acercamiento macro y se acerca
mucho al objeto durante la grabación con la función de
visión nocturna con 0 lux, el rayo de infrarrojos de los
emisores de rayos infrarrojos integrados a la videocámara
puede no iluminar el objeto.
SVENSKAESPAÑOL
Närbilder med makrofunktionen
Med denna funktion kan du spela in mycket små motiv som
t.ex. insekter.
1 Håll [W/T]-zoomknappen tryckt mot [W] för att
zooma ut till det maximala vidvinkelläget
(zoomförstoringsgraden [1t]).
2 Närma dig motivet med videokameran tills det
blir lagom stort i bilden.
≥När objektivet är i det maximala vidvinkelläget kan
videokameran automatiskt ställa in skärpan för motiv från
oändligt avstånd till ett minimiavstånd på bara 5 mm mellan
objektivet och motivet.
≥Använd ett stativ (säljs separat) för att undvika
skakningsoskärpa vid makroinspelning.
≥Om du använder makrofunktionen för att spela in ett motiv
på extremt nära håll med 0-lux nattsynsfunktionen kan det
hända att de infraröda strålarna från videokamerans
inbyggda infraröda strålkastare inte når fram till motivet.
69
Page 70

VOLUME
TBC
VCR
3
2
4 3
CAMERA
OFF
1
s SEARCH SEARCH r
S
65
;W.B
∫
TBC
BLC
1
TBC
2
CAMERA
A
V C R
INFO-
WINDOW
5
4
1
CAMERA
OFF
VCR
6
ITALIANO ENGLISH
Riproduzione
Per rivedere le riprese nella movie
E’ possibile rivedere le scene appena riprese.
1 Impostate l’interruttore [CAMERA/OFF/VCR] su
[VCR].
¡Per far ruotare l’interruttore tenete premuto il tasto
centrale 1.
¡Si accenderà la spia [VCR] 2.
Playback
Watching Playback on the Movie Camera
You can watch playback of the recorded scenes.
1 Set the [CAMERA/OFF/VCR] Switch to [VCR].
2 Press the [C] Button.
2 Premete il tasto [C].
¡Il nastro comincerà a riavvolgersi. Giunto all’inizio, il
riavvolgimento si interromperà automaticamente.
3 Premete il tasto [
¡Avrà inizio la riproduzione e apparirà l’indicazione [◊]
11
1].
11
3. Quando il nastro giungerà alla fine, verrà
automaticamente riavvolto fino all’inizio.
»»
» Per interrompere la riproduzione
»»
4 Premete il tasto [
¡La riproduzione si arresterà e la movie passerà nel
modo Stop.
∫∫
∫].
∫∫
5 Togliete la cassetta. (m 42)
6 Impostate l’interruttore [CAMERA/OFF/VCR] su
[OFF].
7 Scollegate l’alimentatore CA o togliete la
batteria.
»»
» Regolazione del volume del suono
»»
Premete la leva [HVOLG] 4 verso il segno [G] per
aumentare il volume, oppure premetela verso il segno
[H] per diminuirlo. Apparirà l’indicazione [VOLUME] e il
numero delle barre che la costituiscono aumenterà o
diminuirà. L’indicazione scompare non appena viene lasciata
la leva.
Il volume può essere regolato anche tramite telecomando. Per
aumentare il volume potete premere il tasto [T], per diminuirlo
potete premere il tasto [W].
Questa regolazione è possibile solo in fase di riproduzione.
¡Non coprite il diffusore 5 durante la riproduzione.
¡Il diffusore contiene un magnete. Non mettetegli vicino
una videocassetta: il contenuto della registrazione
potrebbe venire alterato.
3 Press the [
»»
» Stopping Playback
»»
4 Press the [
5 Take out the cassette. (m 42)
6 Set the [CAMERA/OFF/VCR] Switch to [OFF].
7 Disconnect the AC Adaptor or remove the
»»
» Adjusting the Sound Volume
»»
Push the [HVOLG] Lever 4 toward [G] to increase the
volume or push it toward [H] to decrease the volume. The
[VOLUME] Indication appears and the number of bars
increases or decreases. When you release the Lever, this
indication disappears.
You can also adjust the volume with the Remote Controller.
Increase the volume by pressing the [T] Button, or decrease it
by pressing the [W] Button.
This adjustment is only possible during playback.
¡Do not cover the Speaker 5 during playback.
¡Because the speaker contains a magnet, do not bring a
cassette near the speaker. It could adversely influence the
recorded content.
5
7
¡Turn the switch while pressig the button 1.
¡The [VCR] Lamp 2 lights.
¡The tape starts to rewind. When the tape reaches the
beginning, the rewinding automatically stops.
11
1] Button.
11
¡Playback starts and the [◊] Indication 3 appears.
When the tape reaches the end, it automatically rewinds
to the beginning.
∫∫
∫] Button.
¡Playback stops and the Movie Camera changes over to
the Stop Mode.
Battery.
∫∫
70
Page 71

SVENSKAESPAÑOL
Reproducción
Reproducción de imagen en la videocámara
Las escenas grabadas se pueden reproducir.
1 Mueva el interruptor [CAMERA/OFF/VCR] a
[VCR].
¡Conecte el interruptor mientras presiona el botón 1.
¡Se enciende la luz [VCR] 2.
2 Oprima el botón [C].
¡Se rebobina la cinta. Se para automáticamente al llegar
al principio de la cinta.
3 Oprima el botón [
¡Empieza a reproducir y aparece la indicación [◊] 3.
Cuando la cinta llega al final se rebobinará
automáticamente al principio.
»»
» Parada de la reproducción
»»
4 Oprima el botón [
¡Se detiene la reproducción y la videocámara se
conmuta al modo de parada.
11
1].
11
∫∫
∫].
∫∫
5 Saque el cassette. (m 43)
6 Mueva el interruptor [CAMERA/OFF/VCR] a
[OFF].
7 Desconecte el adaptador de CA o saque la
batería.
»»
» Ajuste del volumen del sonido
»»
Empuje la palanca [HVOLG] 4 hacia [G] para aumentar el
volumen u oprima hacia [H] para disminuir el volumen. La
indicación [VOLUME] aparece y el número de barras aumenta
o disminuye. Cuando suelte la palanca, desaparece esta
indicación.
También puede ajustar el volumen con el mando a distancia.
Aumente el volumen oprimiendo el botón [T] o baje
oprimiendo el botón [W]. Este ajuste sólo es posible durante la
reproducción.
¡No cubra el altavoz 5 durante la reproducción.
¡Debido a que el altavoz contiene un imán, no acerque
un videocasete cerca del altavoz. Pueden producirse
perturbaciones en la grabación.
Uppspelning
Uppspelning av bilden på videokameran
Det går att spela upp de inspelade scenerna.
1 Ställ strömbrytaren [CAMERA/OFF/VCR] på
[VCR].
¡Håll knapp 1 intr yckt medan du flyttar strömbrytaren.
¡[VCR]-lampan 2 tänds.
2 Tryck på [C]-knappen.
¡Bandet börjar spolas tillbaka. När det kommit till början
på bandet avbryts återspolningen automatiskt.
3 Tryck på [
¡Bandet börjar spelas upp och indikeringen [◊] 3
tänds. När bandet tar slut spolas det automatiskt tillbaka
till början.
»»
» Hur man avbryter uppspelningen
»»
4 Tryck på [
¡Uppspelningen avbryts och videokameran går över i
stoppläge.
11
1]-knappen.
11
∫∫
∫]-knappen.
∫∫
5 Ta ut kassetten. (m 43)
6 Ställ strömbrytaren [CAMERA/OFF/VCR] på
[OFF].
7 Koppla loss nätadaptern eller ta av batteriet.
»»
» Justering av volymen
»»
Tryck [HVOLG] -knappen 4 mot [G] för att höja volymen eller
mot [H] för att sänka volymen. [VOLUME]-indikeringen tänds
och antalet streck ökar respektive minskar. När du släpper
volymknappen släcks denna indikering igen.
Det går även att justera volymen med fjärrkontrollen. Tryck på
[T]-knappen för att höja volymen eller på [W]-knappen för att
sänka den. Det går bara att justera volymen under
uppspelning.
¡Täck inte över högtalaren 5 medan uppspelningen
pågår.
¡Undvik att placera videokassetter i närheten av
högtalaren, eftersom den innehåller en magnet. Det
kan skada inspelningsinnehållet.
71
Page 72

TBC
ITALIANO ENGLISH
BLC
TBC
1
Funzione TBC (Time Base Corrector)
Nella riproduzione di alcune cassette si possono verificare
leggere oscillazioni orizzontali dell’immagine o distorsioni di
altro tipo. Per minimizzare questo tipo di problemi e garantire
una riproduzione stabile delle immagini, questa movie è dotata
di TBC (Correttore della Base dei Tempi). E’ una funzione che
si attiva automaticamente alcuni secondi dopo l’inizio della
riproduzione e viene segnalata dall’apparire dell’indicazione
[TBC].
Disattivazione della funzione TBC
Con alcuni tipi di cassette, la funzione TBC potrebbe
provocare leggere oscillazioni verticali o distorsioni di altro
tipo sull’immagine in riproduzione.
In questo caso, cercate come prima cosa di regolare il
tracking (l 80). Se questo non basta a migliorare le
immagini, disattivate la funzione TBC tenendo premuto il tasto
[TBC] fino a che l’indicazione [TBC] non è scomparsa.
Per attivare nuovamente la funzione TBC, tenete premuto per
alcuni secondi il tasto [TBC], fino a che l’indicazione [TBC]
non appare nuovamente.
Anche se è stata disattivata, la funzione TBC si attiva
automaticamente quando la movie passa dalla modalità
Camera alla modalità VCR.
∫ Nei casi che seguono la funzione TBC non è
attiva:
≥Nella Ricerca veloce in avanti (Cue), all’indietro (Review) e
in Fermoimmagine
≥Mentre utilizzate la funzione di Ricerca nella Telecamera o
di Controllo della ripresa
≥Durante la regolazione del tracking
≥Quando viene riprodotta una parte di nastro non registrata
Se viene riprodotta una cassetta il cui nastro è deformato,
strappato o danneggiato in altro modo, la funzione TBC non
opera correttamente (potrebbe attivarsi e disattivarsi
ripetutamente). In questo caso è consigliabile disattivarla
manualmente.
TBC (Time Base Corrector) Function
Playback of certain cassettes can cause slight horizontal
shaking of the picture or other distortion. To minimise such
distortion and ensure a stable playback picture, this Movie
Camera is equipped with the TBC Function. This function is
automatically activated within a few seconds after playback
has started, and the [TBC] Indication appears.
Cancelling the TBC Function
With certain cassettes, however, the TBC Function could
cause slight vertical shaking or other distortion in the
playback picture.
In this case, first try to adjust the tracking (l 80). If this does
not improve the picture, cancel the TBC Function by keeping
the [TBC] Button pressed until the [TBC] Indication
disappears.
If you want to turn the TBC Function on again, press the
[TBC] Button for a few seconds until the [TBC] Indication
reappears.
Even if you cancel the TBC Function, it is automatically
turned back on when you switch the Movie Camera from the
Camera Mode to the VCR Mode.
∫ In the Following Cases, the TBC Function Does
Not Work:
≥In the Cue, Review or Still Playback Mode
≥When using the Camera Search or Recording Check
Function
≥When adjusting the tracking
≥When playing back an unrecorded part on the tape
When you play back a cassette with stretched, shrunk or
otherwise damaged tape, the TBC Function does not work
correctly (it may repeatedly turn on and off). In this case,
cancel the TBC Function.
72
Page 73

SVENSKAESPAÑOL
Función TBC (Corrector de base de tiempo)
La reproducción de algunas cintas puede provocar una
pequeña vibración horizontal de la imagen u otra distorsión.
Para reducir esta distorsión y para que la reproducción de la
imagen sea más estable, esta videocámara tiene una función
TBC. Esta función se activa automáticamente unos
segundos después de que empieza la reproducción y
cuando aparece la indicación [TBC].
Cancelación de la función TBC
Sin embargo, en algunas cintas, la función TBC puede
provocar una ligera vibración vertical u otra distorsión en la
imagen reproducida.
En este caso, trate de ajustar primero el seguimiento (l 81).
Si esto no mejora la imagen, cancele la función TBC
manteniendo oprimido el botón [TBC] hasta que desaparezca
la indicación [TBC].
Si desea volver a activar la función TBC, oprima el botón
[TBC] durante unos segundos hasta que vuelva a aparecer
la indicación [TBC].
Aunque cancele la función TBC, se vuelve a activar
automáticamente al conmutar la videocámara del modo de
cámara al modo de videograbadora.
∫ En los siguientes casos no se activa la función
TBC:
≥En el modo de localización, progresiva, regresiva o
reproducción de imagen fija
≥Cuando utilice la búsqueda de cámara o la función de
verificación de la grabación
≥Cuando se está ajustando el seguimiento
≥Cuando se reproduce una parte sin grabar de la cinta
Cuando se reproduce un cassette con cinta estirada,
encogida o dañada de alguna otra forma, la función TBC no
funcionará correctamente (puede conectarse y
desconectarse repetidamente). En este caso, cancele la
función TBC.
TBC-funktionen (tidsbaskorrigering)
När vissa kassetter spelas upp kan det hända att bilden
skakar en aning i sidled eller att det uppstår andra
bildstörningar. För att minimera sådana störningar och
garantera att bilden blir stabil vid uppspelningen är denna
videokamera utrustad med en TBC-funktion. Denna funktion
aktiveras automatiskt inom ett par sekunder efter
uppspelningsstarten, varvid indikeringen [TBC]-tänds.
Avstängning av TBC-funktionen
För vissa sorters kassetter kan dock TBC-funktionen göra
att bilden skakar en aning i höjdled i stället eller att det
uppstår andra bildstörningar vid uppspelningen.
Prova i så fall först att ställa in spårningen (l 81). Om det
inte hjälper så stäng av TBC-funktionen genom att hålla TBCknappen intryckt tills [TBC]-indikeringen försvinner.
Om du vill slå på TBC-funktionen igen så håll TBC-knappen
intryckt i ett par sekunder tills [TBC]-indikeringen tänds igen.
Även om du stänger av TBC-funktionen slås den automatiskt
på igen när du ställer om videokameran från kameraläget till
videobandspelarläget.
∫ TBC-funktionen fungerar inte i följande fall:
≥Vid snabbspolning framåt/bakåt med bild eller uppspelning
av stillbilder
≥När kamerasökfunktionen eller
inspelningskontrollfunktionen används
≥Under spårningsinställning
≥Vid uppspelning av oinspelade avsnitt på bandet
Vid uppspelning av en kassett i vilket bandet har blivit uttänjt,
krympt eller skadat på något annat sätt, fungerar inte TBCfunktionen som den ska (det kan hända att funktionen slås
på och stängs av gång på: gång). Stäng i så fall av TBCfunktionen.
73
Page 74

123
OPEN
3
ITALIANO ENGLISH
Per vedere le immagini sul Monitor LCD,
tenendo la movie appoggiata su di un piano
orizzontale
Watching Playback on the LCD Monitor with
the Movie Camera Placed on a Table
1 Slide the [LOPEN] Lever to the left and
1 Fate scorrere verso sinistra la leva [LOPEN] e
contemporaneamente aprite il Monitor LCD, in
direzione della freccia, di circa 90°.
2 Turn the LCD Monitor so that it faces forward
2 Ruotate il Monitor LCD e rivolgetelo verso
l’esterno (circa 180
3 Chiudete il Monitor LCD.
uu
u).
uu
3 Close the LCD Monitor.
4 Place the Movie Camera on a flat, stable surface
4 Sistemate la movie su una superficie piana e
stabile e date avvio alla riproduzione.
¡Quando utilizzate il telecomando, tenetelo ad una distanza di
circa 1 metro dalla movie.
¡Durante le riprese nel modo “a specchio” (l
possibile inserire nell’immagine l’indicazione di Ora/Data e/o
Titoli. Di conseguenza, non potranno apparire nemmeno
nelle immagini in riproduzione.
128) non è
¡If you use the Remote Controller to operate the Movie
Camera, use it within approximately 1 metre from the Movie
Camera.
¡When recording in the Mirror Mode (l
and/or Title Indications cannot be inserted in the picture.
Therefore, they are also not included in the playback picture.
simultaneously open the LCD Monitor in the
direction of the arrow approximately 90
approximately 180
for playback.
uu
u.
uu
128), the Date, Time
uu
u.
uu
74
Page 75

Reproducción en el monitor de cristal líquido
con la videocámara apoyada en una mesa
1 Mueva la palanca [LOPEN] hacia arriba y abra
simultáneamente el monitor de cristal líquido
en el sentido de la flecha, en aproximadamente
uu
90
u.
uu
2 Gire el monitor de cristal líquido hasta el tope
(aprox. 180
uu
u)
uu
3 Cierre el monitor de cristal líquido.
4 Instale la videocámara en una superficie plana
y estable para reproducir.
¡Si se utiliza la videocámara con el mando a distancia,
acciónela desde una distancia de menos de 1 metro de la
videocámara.
¡Cuando se graba en el modo de espejo (l
colocarse la fecha, hora y/o título en la imagen.
Por lo tanto tampoco se incluyen en la imagen reproducida.
129), no pueden
SVENSKAESPAÑOL
Uppspelning på LCD-skärmen med
videokameran ställd på ett bord
1 Skjut [LOPEN]-knappen åt vänster och fäll
samtidigt ut LCD-skärmen ca. 90° i pilens
riktning.
2 Vrid LCD-skärmen tills den är vänd framåt
(ca. 180°).
3 Fäll in LCD-skärmen.
4 Ställ videokameran på en flat, stabil yta vid
uppspelningen.
¡Om du styr videokameran med fjärrkontrollen så använd den
inom ca. 1 meters avstånd från videokameran.
¡Vid inspelning i spegelläget (l
datumet, klockan eller textindikeringen i bilden.
Det betyder att de inte visas under uppspelningen heller.
129) går det inte att lägga på
75
Page 76

BLC
4
1
TBC
VCR
CAMERA
OFF
3
2
CAMERA
A
V C R
INFO-
WINDOW
2
VIDEO OUT
ITALIANO ENGLISH
Per rivedere le riprese su un televisore
Collegando la movie a un televisore, potrete rivedere sullo
schermo le scene che avete ripreso.
Prima del collegamento, per maggiore sicurezza, spegnete
sia la movie che il televisore.
1 Utilizzate il cavo AV (in dotazione) per collegare
la movie al televisore.
Movie TV (Presa di ingresso AV)
VIDEO OUT _> VIDEO IN
AUDIO OUT _> AUDIO IN
Se il vostro televisore è dotato di terminale S-Video,
collegate anche il cavo S-Video 1 (in dotazione).
2 Sul televisore, selezionate il canale che
corrisponde agli ingressi audio/video utilizzati
per il collegamento.
(Consultate le istruzioni del televisore.)
Watching Playback on a TV
By connecting the Movie Camera to a TV, you can watch
playback of the recorded scenes on the TV screen.
Before connecting, turn off both the Movie Camera and the TV
for safety’s sake.
1 Use the AV Cable (supplied) to connect the
2 Select the channel on the TV which corresponds
(Refer to the operating instructions of your TV).
VIDEO IN
S-VIDEO IN
AUDIO IN
V
AUDIO
A
1
OUT
S-VIDEO OUT
Movie Camera with the TV.
Movie Camera TV (AV Input Sockets)
VIDEO OUT _> VIDEO IN
AUDIO OUT _> AUDIO IN
If your TV is equipped with an S-Video Socket, also
connect the S-Video Cable 1 (Supplied).
to the video/audio input sockets used for
connecting.
1
3 Impostate l’interruttore [CAMERA/OFF/VCR] su
[VCR].
≥Si accenderà la spia [VCR] 2.
4 Avviate la riproduzione dalla movie. (l 70)
3 Set the [CAMERA/OFF/VCR] Switch to [VCR].
≥The [VCR] Lamp 2 lights.
4 Start playback on the Movie Camera. (l 70)
76
Page 77

Reproducción de imagen en un aparato de TV
Conecte la videocámara a la TV para reproducir las escenas
grabadas en su TV.
Para su seguridad, desconecte la videocámara y la TV antes
de hacer la conexión.
SVENSKAESPAÑOL
Uppspelning på en TV
Genom att koppla videokameran till en TV kan du spela upp
de inspelade scenerna på TV-skärmen.
Stäng av både videokameran och TV-n för säkerhets skull
innan du kopplar in videokameran.
1 Use el cable AV (incluido) para conectar la
videocámara al TV.
Videocámara TV (tomas de entrada AV)
VIDEO OUT _> ENTRADA DE VIDEO
AUDIO OUT _> ENTRADA DE AUDIO
Si su televisor tiene una toma S-Video puede conectar el
cable S-Video 1 (incluido).
2 Seleccione el canal en el TV, correspondiente a
las tomas de entrada de vídeo/audio utilizadas
para la conexión.
(Lea el manual de instrucciones de su TV.)
3 Mueva el interruptor [CAMERA/OFF/VCR] a
[VCR].
≥Se enciende la luz [VCR] 2.
4 Reproduzca la cinta en la videocámara.
(l
71)
1 Koppla in videokameran i TV-n med hjälp av den
medföljande A/V-kabeln.
Videokamera TV (A/V-ingångar)
VIDEO OUT _> VIDEO IN
AUDIO OUT _> AUDIO IN
Om TV-n är försedd med en S-videoingång så koppla
även in den medföljande S-videokabeln 1.
2 Ställ in den kanal på TV-n som motsvarar de
video- och audioingångar som videokameran är
ansluten till.
(Se TV-ns bruksanvisning.)
3 Ställ strömbrytaren [CAMERA/OFF/VCR] på
[VCR].
≥[VCR]-lampan 2 tänds.
4 Sätt igång uppspelningen på videokameran
(l
71).
77
Page 78

1 2
34
ITALIANO ENGLISH
Come rivedere le riprese in un
videoregistratore (Utilizzando l’adattatore di
cassette in dotazione)
L’adattatore per cassette in dotazione permette di riprodurre
nel vostro videoregistratore le cassette compatte come
fossero una normale cassetta standard.
Playing Back on a VCR
(Using the Supplied Cassette Adaptor)
By using the supplied Cassette Adaptor, you can play back
compact cassettes in your VCR in the same way as full-size
cassettes.
1 Push the Battery Compartment Cover upward
1 Spingete verso l’alto il coperchio del vano
batteria e toglietelo.
2 Insert the supplied battery and then re-attach
2 Inserite la batteria (in dotazione) e rimettete il
coperchio del vano batteria.
3 Slide the Open Lever in the direction of the
3 Fate scorrere la levetta di apertura in direzione
della freccia.
4 Insert the recorded cassette and close the Top
4 Inserite la videocassetta registrata e chiudete il
coperchio.
5 Inserite l’adattatore di cassette nel
videoregistratore.
6 Avviate la riproduzione sul videoregistratore.
5 Insert the Cassette Adaptor into the VCR.
6 Start playback on the VCR.
After use, take out the cassette from the Cassette Adaptor.
6
5
and remove it.
the Battery Compartment Cover.
arrow.
Cover.
Dopo l’uso, togliete la cassetta dall’adattatore.
78
Page 79

Reproducción en un VCR
(con el adaptador de cassette incluido)
El adaptador de cassette incluido reproduce los cassettes
compactos en su VCR como si fueran cassettes grandes.
1 Abra el portapila y desmonte la tapa.
2 Coloque la pila incluida e instale la tapa del
portapilas.
3 Mueva la palanca de apertura hacia la flecha.
4 Coloque el cassette grabado y cierre la
cubierta.
5 Coloque el adaptador de cassette en el VCR.
6 Empiece a reproducir en el VCR.
Saque el cassette del adaptador cuando haya terminado.
SVENSKAESPAÑOL
Uppspelning på en videobandspelare (med
hjälp av den medföljande kassettadaptern)
Med hjälp av den medföljande kassettadaptern kan du spela
upp kompaktkassetter på din videobandspelare på samma
sätt som kassetter i fullt format.
1 Tryck batterifacklocket uppåt och ta av det.
2 Sätt i det medföljande batteriet och sätt sedan
på batterifacklocket igen.
3 Skjut öppningsknappen i pilens riktning.
4 Sätt i den inspelade kassetten och stäng locket
på ovansidan.
5 Sätt i kassettadaptern i videobandspelaren.
6 Sätt igång uppspelningen på
videobandspelaren.
Ta ut kassetten ur kassettadaptern efter användningen.
79
Page 80

s SEARCH
S
6
1
1
TRACK.TRACK.
2
TBC TBC
MENU
#
"
ITALIANO ENGLISH
Riavvolgimento ad Alta velocità
1 Mentre la movie si trova nel modo stop, tenete
MF/
TRACKING
FOCUS / SET
High-Speed Rewinding
1 Press the [6] Button for more than 1 second
premuto il tasto [6] per più di 1 secondo.
≥Apparirà l’indicazione [≈] 1.
≥Durante il Riavvolgimento ad Alta velocità, il rumore del
nastro che si avvolge è più forte.
≥Quando il nastro viene riavvolto sino all’inizio, in
prossimità del inizio del nastro, la movie passa
automaticamente dal Riavvolgimento ad Alta velocità, al
normale Riavvolgimento veloce. All’inizio del nastro, la
movie passa automaticamente nel modo Stop.
≥Premendo il tasto [∫] durante il Riavvolgimento ad Alta
velocità, noterete che occorrono alcuni secondi prima
che il nastro si arresti. E’ un accorgimento per
proteggere il nastro da possibili danni.
≥Se state utilizzando il telecomando, tenente premuto il
66
tasto [
6] per più di 3 secondi.
66
≥Se state controllando la movie da computer (l 150) non
sarà possibile utilizzare questa funzione.
≥Durante il Riavvolgimento ad Alta velocità, il contanastro
mostra l’indicazione [0:00.00].
Come eliminare le distorsioni nelle immagini
(Regolazione manuale del tracking)
La movie regola automaticamente l’allineamento (tracking).
Con alcune cassette, però, questa regolazione potrebbe non essere
precisa. In questo caso potete ricorrere alla regolazione manuale.
Eliminating Picture Distortions
(Manual Tracking Adjustment)
This Movie Camera adjusts the tracking automatically. With
certain cassettes, however, the tracking adjustment may not be
precise. In this case, adjust the tracking manually.
" Press the [FOCUS/SET] Button briefly during
" Durante la riproduzione, premete per un attimo
il tasto [FOCUS/SET].
≥Apparirà l’indicazione [TRACK.] 2.
# Regolate il tracking ruotando la manopola
[TRACKING].
≥La funzione di regolazione manuale del tracking viene
automaticamente terminata se la manopola [TRACKING]
non viene ruotata per 5 secondi.
≥Potrebbe non essere possibile rimuovere completamente le
barre che disturbano l’immagine.
≥Quando è visualizzato un menu non è possibile regolare il
tracking.
≥La regolazione del tracking viene annullata quando viene
estratta la cassetta.
Per tornare alla regolazione automatica del tracking.
In riproduzione, tenete premuto il tasto [FOCUS/SET] per più
di 2 secondi.
# Turn the [TRACKING] Dial to adjust the tracking.
≥The Tracking Adjustment Function is automatically cancelled
when the [TRACKING] Dial is not turned for 5 seconds.
≥It may not be possible to remove the noise bars completely.
≥It is not possible to adjust the tracking when a menu is
displayed.
≥If you eject the cassette after adjusting the tracking, the
adjusted setting is cancelled.
Returning to the Auto Tracking Mode
Press [FOCUS/SET] Button for more than 2 seconds during
playback.
80
in the Stop Mode.
≥The [≈] Indication 1 appears.
≥During High-Speed Rewinding, the tape winding sound
is louder.
≥When rewinding the tape to the beginning, the Movie
Camera automatically changes over from the
High-Speed Rewinding Mode to the Rewinding Mode
near the beginning of the tape, and it switches over to
the Stop Mode at the beginning of the tape.
≥If you press the [∫] Button during High-Speed
Rewinding, it takes several seconds before the tape is
stopped, in order to protect the tape from damage.
≥When using the Remote Controller, press the [
Button for more than 3 seconds.
≥If you operate this Movie Camera from a computer
(l 150), it is not possible to use this function.
≥During High-Speed Rewinding, the Tape Counter shows
[0:00.00].
66
6]
66
playback.
≥The [TRACK.] Indication 2 appears.
Page 81

Rebobinado a alta velocidad
1 Oprima el botón [6] durante más de 1
segundo en el modo de parada.
≥Aparece la indicación [≈] 1.
≥Durante el rebobinado a alta velocidad, el sonido de
bobinado de la cinta es más fuerte.
≥Cuando rebobine la cinta al principio, la videocámara
cambia automáticamente del modo de rebobinado a alta
velocidad al modo de rebobinado cerca del principio de
la cinta y se conmuta al modo de parada al principio de
la cinta.
≥Si presiona el botón [∫] durante el rebobinado a alta
velocidad, demora varios segundos antes de que se
pare la cinta, para proteger la cinta contra daños.
≥Cuando utilice el mando a distancia, oprima el botón
66
[
6] durante más de 3 segundos.
66
≥Si hace funcionar esta videocámara desde un
ordenador (l 151) no es posible utilizar esta función.
≥Durante el rebobinado a alta velocidad, el contador de
cinta muestra [0:00.00].
Eliminación de distorsiones de imagen
(Ajuste manual de seguimiento)
Esta videocámara ajusta automáticamente el seguimiento. Sin
embargo, con algunos cassettes, el ajuste de seguimiento
puede no ser preciso. En este caso, ajuste manualmente el
seguimiento.
" Oprima brevemente el botón [FOCUS/SET]
durante la reproducción.
≥Aparece la indicación [TRACK.] 2.
# Gire el dial [TRACKING] para ajustar el
seguimiento.
≥Se cancela automáticamente la función de ajuste cuando no
se gira el dial [TRACKING] durante 5 segundos.
≥Puede no ser posible eliminar completamente las barras de
ruido.
≥No es posible ajustar el seguimiento cuando aparece un
menú.
≥Si expulsa el cassette después de ajustar el seguimiento, se
cancela el ajuste realizado.
Retorno al modo de seguimiento automático
Oprima el botón [FOCUS/SET] durante más de 2 segundos de
la reproducción.
SVENSKAESPAÑOL
Snabbåterspolning
1 Håll [6]-knappen intryckt i mer än 1 sekund i
stoppläge.
≥Indikeringen [≈] 1 tänds.
≥Under snabbåterspolning låter bandspolningen högre.
≥När bandet spolas tillbaka till början går videokameran
automatiskt över från snabbåterspolningsläget till läget
för vanlig snabbspolning bakåt strax innan bandet når
början, och går sedan över i stoppläge när bandet ar
helt återspolat.
≥Om du trycker på [∫]-knappen under snabbåterspolning
tar det ett par sekunder innan bandet stannar. Detta är
för att skydda bandet från att bli skadat.
≥Om du använder fjärrkontrollen så håll [
intryckt i mer än 3 sekunder.
≥Om du styr videokameran från en dator (l 151) går det
inte att använda denna funktion.
≥Under snabbåterspolning visar räkneverket [0:00.00].
66
6]-knappen
66
Eliminering av bildstörningar
(Manuell spårningsinställning)
På denna videokamera ställs spårningen in automatiskt. För
vissa kassetter kan det dock hända att spårningsinställningen
inte blir exakt. Justera i så fall spårningen för hand.
" Tryck på [FOCUS/SET]-knappen en kort stund
under uppspelning.
≥Indikeringen [TRACK.] 2 tänds.
# Vrid på [TRACKING]-ratten för att justera
spårningen.
≥Spårningsinställningsfunktionen stängs automatiskt av om
du inte vrider på [TRACKING]-ratten inom 5 sekunder.
≥Det kan hända att det inte går att få bort störningsränderna
helt.
≥Det går inte att justera spårningen medan en meny visas på
skärmen.
≥Om du matar ut kassetten efter att ha justerat spårningen
upphör den justerade spårningsinställningen.
Återgång till automatisk spårningsinställning
Håll [FOCUS/SET]-knappen intryckt i mer än 2 sekunder
under uppspelning.
81
Page 82

1
ITALIANO ENGLISH
Ricerca veloce in avanti (Cue)
1 Durante la normale riproduzione, tenete
premuto il tasto [D].
Cue Playback
1 Keep the [D] Button pressed during normal
playback.
2
s SEARCH SEARCH r
S
65
;W.B
∫
BLC
1
1
TBC
3
Per tornare alla riproduzione normale
Lasciate il tasto [D].
Ricerca veloce all’indietro (Review)
2 Durante la normale riproduzione, tenete
premuto il tasto [C].
Per tornare alla riproduzione normale.
Lasciate il tasto [C].
Blocco della ricerca
Se prevedete che la ricerca possa essere più lunga del
normale, premete solo per un attimo i tasti di Ricerca veloce
[5] o [6].
La funzione rimarrà bloccata e non avrete bisogno di
mantenere il tasto premuto.
≥Per tornare alla normale visione delle immagini, premete il
tasto di Riproduzione [1].
Fermoimmagine
3 Durante la normale riproduzione, premete il
tasto [;].
Per tornare alla riproduzione normale
Premete nuovamente il tasto [;].
≥Nei modi di Fermoimmagine e di Ricerca Veloce in Avanti e
all’indietro, le immagini potranno essere disturbate da
striature orizzontali 1, oppure potranno apparire in bianco e
nero o distorte.
≥L'immagine in riproduzione sul Monitor LCD è meno
disturbata di quella sul mirino. Guardando le immagini su uno
schermo TV, però, avrete gli stessi disturbi del mirino.
≥Durante la ricerca veloce in avanti e all’indietro (Cue e
Review) non viene visualizzata alcuna indicazione.
≥Dopo essere rimasta per più di 6 minuti in Fermoimmagine,
la movie tornerà automaticamente al modo Stop. Dopo altri
6 minuti, se è alimentata dalla batteria, la movie si spegnerà
completamente.
Resuming Normal Playback
Release the [D] Button.
Review Playback
2 Keep the [C] Button pressed during normal
playback.
Resuming Normal Playback
Release the [C] Button.
Search Lock Function
For longer Cue or Review Playback, press the Cue Button
[5] or the Review Button [6] only briefly.
As this locks the search function, you do not need to keep the
button pressed for a long time.
≥To resume normal playback, press the Play Button [1].
Still Playback
3 Press the [;] Button during normal playback.
Resuming Normal Playback
Press the [;] Button again.
≥In the Cue, Review and Still Playback Modes, horizontal
noise bars 1 appear in the picture, or the picture may
become black and white or distorted.
≥The picture reproduced on the LCD Monitor contains less
noise than the picture in the Finder. During playback on a
TV, however, the picture noise is the same as in the Finder.
≥During Cue or Review Playback, no indications are displayed
on the LCD Monitor.
≥If you leave the Movie Camera in the Still Playback Mode for
about 6 minutes, it automatically switches over to the Stop
Mode. And, if the Movie Camera is being powered by the
Battery, it switches off completely after a further 6 minutes.
82
Page 83

Localización progresiva
1 Mantenga oprimido el botón [D] durante la
reproducción normal.
SVENSKAESPAÑOL
Snabbspolning framåt med bild
1 Håll [D]-knappen intryckt under normal
uppspelning.
Continuación de la reproducción normal
Suelte el botón [D].
Localización regresiva
2 Mantenga oprimido el botón [C] durante la
reproducción normal.
Continuación de la reproducción normal
Suelte el botón [C].
Función de bloqueo de la búsqueda
Para una localización progresiva o regresiva más larga oprima
el botón de localización progresiva [5] o el botón de
localización regresiva [6] sólo brevemente.
Esto bloquea la función de búsqueda y no es necesario
mantener el botón oprimido durante largo tiempo.
≥Para seguir reproduciendo normalmente, oprima el botón de
reproducción [1].
Reproducción de imagen fija
3 Oprima el botón [;] durante la reproducción
normal.
Continuación de la reproducción normal
Oprima otra vez el botón [;].
≥En los modos de localización progresiva y regresiva y
reproducción de imagen fija aparecen algunas barras de
ruido horizontales 1 en la imagen o la imagen puede verse
en blanco y negro o distorsionada.
≥La imagen que se reproduce en el monitor de cristal líquido
contiene menos ruido que la imagen en el visor. Sin
embargo, durante la reproducción en el televisor, los ruidos
de imagen que se ven son como los del visor.
≥Durante la localización progresiva o regresiva no aparecen
indicaciones.
≥Si deja la videocámara en el modo de reproducción de
imagen fija durante unos 6 minutos, se conmuta
automáticamente al modo de parada. Si la videocámara está
funcionando con la corriente de la batería, se desconecta
completamente después de otros 6 minutos.
Återgång till normal uppspelning
Släpp [D]-knappen.
Snabbspolning bakåt med bild
2 Håll [C]-knappen intryckt under normal
uppspelning.
Återgång till normal uppspelning
Släpp [C]-knappen.
Sökningslåsfunktionen
Om du vill snabbspola framåt eller bakåt med bild en längre
stund så tryck bara kvickt på knappen för snabbspolning
framåt med bild [5] eller knappen för snabbspolning bakåt
med bild [6].
Då låses sökningsfunktionen så att du inte behöver hålla
knappen intryckt hela tiden.
≥Tryck på uppspelningsknappen [1] för att återgå till normal
uppspelning.
Uppspelning av stillbilder
3 Tryck på [;]-knappen under normal
uppspelning.
Återgång till normal uppspelning
Tryck en gång till på [;]-knappen.
≥I samband med snabbspolning framåt/bakåt med bild eller
uppspelning av stillbilder kan det hända att det uppstår
horisontella störningsränder 1 i bilden eller att den blir
svartvit eller förvrängd.
≥Bilden på LCD-skärmen innehåller färre störningar än bilden i
sökaren. Vid uppspelning på en TV blir dock bildstörningarna
desamma som i sökaren.
≥Inga indikeringar visas under snabbspolning framåt/bakåt
med bild.
≥Om du lämnar kvar videokameran i
stillbildsuppspelningsläget i ca. 6 minuter går den
automatiskt över i stoppläge. Om videokameran drivs på
batteri stängs den av helt efter ytterligare 6 minuter.
83
Page 84

1
CAMERA
VCR
OFF
2
3
ITALIANO ENGLISH
4
6
5
Al termine
1 Togliete la cassetta. (m 42)
2 Impostate l’interruttore [CAMERA/OFF/VCR] su
[OFF].
3 Scollegate l’alimentatore CA o togliete la
batteria.
Pulizia del mirino
Se nel mirino dovesse introdursi della polvere…
4 Premete i due tasti a lato del mirino e toglietelo,
estraendolo in direzione della freccia.
5 Eliminate la polvere con uno spazzolino a
soffietto (non in dotazione).
¡Se utilizzate un bastoncino cotonato, o qualcosa di
simile, per pulire l’interno del mirino, fate molta
attenzione a non graffiare lo schermo interno.
6 Per inserire nuovamente il mirino, spingetelo
all’interno della sua sede, fino a che non si
blocca con uno scatto.
Pulizia del Monitor LCD
Pulite il Monitor LCD utilizzando un panno morbido o uno
spazzolino a soffietto.
Pulizia del corpo della movie
Pulite il corpo della movie con un panno morbido.
Pulizia dell’obiettivo
Pulite l’obiettivo con un panno morbido oppure con uno
spazzolino a soffietto.
After Use
1 Take out the cassette. (m 42)
2 Set the [CAMERA/OFF/VCR] Switch to [OFF].
3 Disconnect the AC Adaptor or remove the
Battery.
Cleaning the Finder
If dust has entered the Finder…
4 Push the Buttons on both sides of the Finder
and remove it in the direction of the arrow.
5 Remove dust with a blower brush (not
supplied).
¡If you use a cotton swab or similar to clean the inside of
the Finder, use it very carefully to prevent scratching the
screen inside the Finder.
6 To re-attach the Finder, push it forward onto the
Finder Tube until it locks with a click.
Cleaning the LCD Monitor
Clean the LCD Monitor with a soft cloth or a blower brush.
Cleaning the Movie Camera Body
Wipe it with a soft cloth.
Cleaning the Lens
Clean the lens with a soft cloth or a blower brush.
84
Page 85

SVENSKAESPAÑOL
Al terminar de usar
1 Saque el cassette. (m 43)
2 Mueva el interruptor [CAMERA/OFF/VCR] a
[OFF].
3 Desconecte el adaptador de CA o saque la
batería.
Limpieza del visor
Si entró polvo en el visor…
4 Oprima los botones a ambos lados del visor y
desmóntelo en el sentido de la flecha.
5 Limpie el polvo con un cepillo con soplador (no
incluido entre los accesorios).
¡Si se utiliza un algodón en un palillo o similar para
limpiar el interior del visor, hágalo muy cuidadosamente
para no rayar la pantalla dentro del visor.
6 Para volver a instalar el visor, empuje hacia
adelante en el tubo del visor hasta que quede
fijado con un chasquido.
Limpieza del monitor de cristal líquido
Limpie el monitor de cristal líquido con un paño suave o un
cepillo con soplador.
Limpieza del cuerpo de la videocámara
Limpie con un paño suave.
Limpieza del objetivo
Limpie el objetivo con un paño suave o cepillo con soplador.
Efter användningen
1 Ta ut kassetten. (m 43)
2 Ställ strömbrytaren [CAMERA/OFF/VCR] på
[OFF].
3 Koppla loss nätadaptern eller ta av batteriet.
Rengöring av sökaren
Om det kommit in damm i sökaren…
4 Tryck in knapparna på båda sidorna om sökaren
och dra av den i pilens riktning.
5 Avlägsna dammet med en blåsborste
(medföljer ej).
¡Var ytterst försiktig om du använder en bomullstuss eller
liknande för att göra rent inuti sökaren, så att inte
skärmen inuti sökaren blir repad.
6 Sätt tillbaka sökaren genom att trycka den
framåt på sökartuben tills den låses fast med
ett klick.
Rengöring av LCD-skärmen
Rengör LCD-skärmen med en mjuk duk eller en blåsborste.
Rengöring av videokamerahuset
Torka rent det med en mjuk duk.
Rengöring av objektivet
Rengör objektivet med en mjuk duk eller en blåsborste.
85
Page 86

2
1
2, 4, 5, 7
FADE
ITALIANO ENGLISH
3, 6
VCR
CAMERA
OFF
Operazioni avanzate
Dissolvenze di immagine e suono
∫ Dissolvenza in apertura (Fade In) 1
Usando la dissolvenza in apertura (Fade-in), immagini e suoni
appariranno gradualmente all’inizio della registrazione.
1 Mentre la movie si trova in Pausa di Ripresa,
inquadrate la scena che intendete riprendere.
2 Mantenete premuto il tasto [FADE].
3 Quando l’immagine sarà scomparsa, premete il
tasto di Avvio/Arresto. Inizierà la registrazione.
4 Dopo 3-4 secondi circa, lasciate il tasto [FADE].
∫ Dissolvenza in chiusura (Fade Out)
Usando la dissolvenza in chiusura (Fade-out), immagini e
suoni spariranno gradualmente al termine della scena. La
dissolvenza in chiusura di una scena, seguita dalla
dissolvenza in apertura della scena successiva, crea una
transizione di grande effetto.
2
5 Durante la ripresa, nel punto in cui volete che
termini la scena, tenete premuto il tasto [FADE].
6 Dopo che l’immagine sarà scomparsa, premete
il tasto di Avvio/Arresto per interrompere la
registrazione.
7 Lasciate il tasto [FADE].
Advanced Operations
Fading In/Out
∫ Fading In 1
Fading in lets you make the picture (and sound) appear
gradually at the beginning of a recording.
1 With the Movie Camera in the Recording Pause
Mode, aim it at the scene that you want to
record.
2 Press the [FADE] Button and keep it pressed.
3 When the picture has completely disappeared,
press the Recording Start/Stop Button to start
recording.
4 Approximately 3-4 seconds later, release the
[FADE] Button.
∫ Fading Out
Fading out lets you make the picture (and sound) disappear
gradually at the end of a recording. By fading out a scene and
fading in the following one, you can produce smooth scene-toscene transitions.
2
5 During recording, press the [FADE] Button at
the point where you want to fade out, and keep
it pressed.
6 After the picture has completely disappeared,
press the Recording Start/Stop Button to stop
recording.
7 Release the [FADE] Button.
86
Page 87

SVENSKAESPAÑOL
Operaciones avanzadas
Esfumado
∫ Esfumado de aparición 1
El esfumado de aparición hace aparecer la imagen (y sonido)
gradualmente al principio de la grabación.
1 En la pausa de grabación, apunte hacia la
escena que desea grabar.
2 Mantenga oprimido el botón [FADE].
3 Cuando la imagen desaparece completamente,
oprima el botón de inicio/parada de grabación
para grabar.
4 Aproximadamente 3-4 segundos después,
suelte el botón [FADE].
∫ Esfumado de desaparición
El esfumado de desaparición hace desaparecer la imagen (y
sonido) gradualmente al final de la grabación. Combine ambos
esfumados para producir una transición suave entre escenas.
2
5 Durante la grabación, mantenga oprimido el
botón [FADE] y apunte hacia la última imagen
con la que esfumará.
6 Cuando la imagen desaparece completamente,
oprima el botón de inicio/parada de grabación
para dejar de grabar.
7 Suelte el botón [FADE].
Avancerade funktioner
In/uttoning
∫ Intoning 1
Vid intoning framträder bilden (och ljudet) gradvis i början av
en scen.
1 Se till att videokameran är i
inspelningspausläge och rikta den mot scenen
som du vill spela in.
2 Tryck in [FADE]-knappen och håll den intryckt.
3 Vänta tills bilden försvunnit helt och tryck
sedan på inspelningsstart/stoppknappen för att
börja spela in.
4 Släpp [FADE]-knappen efter ca. 3-4 sekunder.
∫ Uttoning
Vid uttoning försvinner bilden (och ljudet) gradvis i slutet av en
scen. Genom att tona ut en scen och tona in nästa går det att
skapa en mjuk övergång mellan två scener.
2
5 Tryck in [FADE]-knappen på det ställe i
inspelningen där du vill börja tona ut och håll
knappen intryckt.
6 Vänta tills bilden försvunnit helt och tryck
sedan på inspelningsstart/stoppknappen för att
avbryta inspelningen.
7 Släpp [FADE]-knappen.
87
Page 88

2
1
CAMERA
A
V C R
INFO-
WINDOW
CAMERA FUNCTIONS
1.
CAMERA SETUP
2.
DIGITAL EFFECT
3.
TITLE SETUP
4.
DATE/TIME SETUP
5.
OTHER FUNCTIONS
6.
LCD/EVF SETUP
PRESS MENU TO EXIT
1,5
MENU
MF/
2,3
2,4
ITALIANO ENGLISH
Riprese con effetti speciali
(Effetti Digitali)
Oltre al Super Stabilizzatore di Immagine e allo Zoom Digitale,
questa movie vi mette a disposizione numerosi e differenti
effetti digitali, che permettono di arricchire le vostre riprese in
modo semplice e creativo.
Selezione di un effetto digitale
1 Premete il tasto [MENU].
Apparirà il menu principale [CAMERA FUNCTIONS].
2 Ruotate il selettore [
[DIGITAL EFFECT], quindi premete il tasto
[SET].
Apparirà il sottomenu [DIGITAL EFFECT].
3 Ruotate il selettore [
TRACKING
FOCUS / SET
3434
34] per selezionare
3434
3434
34] per selezionare
3434
Using Special Effects
In addition to the Super Image Stabilizer and Digital Zoom, this
Movie Camera offers you various digital effect modes to make
it easy to enhance your scenes in many creative ways.
Selecting a Desired Digital Effect
1 Press the [MENU] Button.
2 Turn the [
3 Turn the [
4 Press the [SET] Button to select the desired
[EFFECT1] o [EFFECT2].
4 Premete il tasto [SET] per selezionare l’effetto
digitale che desiderate.
≥Selezionando il Super Stabilizzatore di Immagine, si
accenderà la spia [[] 1. Selezionando un qualsiasi
altro effetto digitale, si accenderà la spia [©] 2.
5 Premete il tasto [MENU] per uscire dal menu.
≥Se il selettore [CAMERA/OFF/VCR] viene messo sulla
posizione [OFF] e quindi nuovamente sulla posizione
[CAMERA], lampeggerà per alcuni secondi l’indicazione
dell’effetto digitale selezionato, per informarvi della selezione
attiva.
≥Se avete impostato su [B/W] o su [SEPIA] la funzione
[EFFECT2] del sottomenu [DIGITAL EFFECT], non sarà
possibile modificare la modalità di bilanciamento del bianco
selezionata. (l 110)
5 Press the [MENU] Button to exit the menu.
≥If you set the [CAMERA/OFF/VCR] Switch to [OFF] and then
set it to [CAMERA] again, the indication of the selected
digital effect flashes for a few seconds to inform you of the
selected setting.
≥If you have set [EFFECT2] on the [DIGITAL EFFECT] Sub-
Menu to [B/W] or [SEPIA], changing the selected white
balance mode is not possible. (l 110)
Cancelling the Digital Effect
Set [EFFECT1] or [EFFECT2] on the [DIGITAL EFFECT] SubMenu to [OFF].
DIGITAL EFFECT
EFFECT1 OFF SIS D.ZOOM
EFFECT2 OFF
RETURN ----
SIS+D.ZOOM MOSAIC
STRETCH
PRESS MENU TO EXIT
(Digital Effects)
The [CAMERA FUNCTIONS] Main-Menu appears.
3434
34] Dial to select [DIGITAL EFFECT]
3434
and then press the [SET] Button.
The [DIGITAL EFFECT] Sub-Menu appears.
3434
34] Dial to select [EFFECT1] or
3434
[EFFECT2].
digital effect.
≥When you select the Super Image Stabilizer Mode, the
[[] Lamp 1 lights. When you select any other digital
effect, the [©] Lamp 2 lights.
Disattivazione degli effetti digitali
Nel sottomenu [DIGITAL EFFECT], impostate su [OFF] la
funzione [EFFECT1] o [EFFECT2].
88
Page 89

Utilización de los efectos especiales
(efectos digitales)
Además del súper estabilizador de imagen y del zoom digital,
esta videocámara le ofrece distintos modos de efecto digital
para que pueda dar realce a sus escenas de muchas formas
creativas.
Selección del efecto digital deseado
SVENSKAESPAÑOL
Inspelning med specialeffekter
(digitala effekter)
Förutom superbildstabilisatorn och den digitala zoomen finns
det ett antal olika effektlägen på denna videokamera som gör
det lätt att göra de scener du spelar in ännu mer spännande
på olika kreativa sätt.
Hur man väljer önskad digital effekt
1 Oprima el botón [MENU].
Aparece el menú principal [CAMERA FUNCTIONS].
2 Gire el dial [
EFFECT] y oprima el botón [SET].
Aparece el sub-menú [DIGITAL EFFECT].
3 Gire el dial [
[EFFECT2].
3434
34] para seleccionar [DIGITAL
3434
3434
34] para seleccionar [EFFECT1] o
3434
4 Oprima el botón [SET] para seleccionar el
efecto digital deseado.
≥Cuando seleccione el modo de súper estabilizador de
imagen, la luz [[] 1 se enciende. Cuando seleccione
algún otro efecto digital, la luz [©] 2 se enciende.
5 Oprima el botón [MENU] para salir del menú.
≥Si conmuta el interruptor [CAMERA/OFF/VCR] a [OFF] y
conmuta a [CAMERA] nuevamente, la indicación del efecto
digital seleccionado destella durante unos pocos segundos
para informarle del ajuste seleccionado.
≥Si se ajusta [EFFECT2] en el submenú [DIGITAL EFFECT] a
[B/W] o [SEPIA], no es posible seleccionar el modo de
balance del blanco. (l 111)
Cancelación del efecto digital
Ajuste [EFFECT1] o [EFFECT2] del submenú [DIGITAL
EFFECT] a [OFF].
1 Tryck på [MENU]-knappen.
Huvudmenyn [CAMERA FUNCTIONS] tänds.
2 Vrid på [
EFFECT] och tryck sedan på [SET]-knappen.
Undermenyn [DIGITAL EFFECT] tänds.
3 Vrid på [
[EFFECT2].
3434
34]-ratten för att välja [DIGITAL
3434
3434
34]-ratten för att välja [EFFECT1] eller
3434
4 Tryck på [SET]-knappen för att välja önskad
digital effekt.
≥Om du väljer superbildstabilisatorn tänds [[]-lampan
1. Om du väljer någon annan digital effekt tänds
[©]-lampan 2.
5 Tryck på [MENU]-knappen för att lämna menyn.
≥Om du ställer [CAMERA/OFF/VCR]-omkopplaren på [OFF]
och sedan ställer tillbaka den på [CAMERA], blinkar
indikeringen för vald digital effekt i ett par sekunder för att
informera dig om vad som är inställt.
≥Om du har ställt in [EFFECT2] på undermenyn [DIGITAL
EFFECT] på [B/W] eller [SEPIA] går det inte att ändra den
valda vitbalansinställningen. (l 111)
Avstängning av de digitala effekterna
Ställ in [EFFECT1] respektive [EFFECT2] på undermenyn
[DIGITAL EFFECT] på [OFF].
89
Page 90

12 3
220
220
D.ZOOM
4
MOSAIC
ITALIANO ENGLISH
Effetti Digitali 1 [EFFECT1]
1 Super Stabilizzatore di Immagine [[] (l 94)
Assicura immagini stabili, anche durante le riprese con il
teleobiettivo o da un veicolo in movimento.
2 Zoom Digitale [D.ZOOM] (l 96)
Per ottenere un ingrandimento del soggetto che sia
superiore a quello dello zoom ottico.
3 Super Stabilizzatore di Immagine e Zoom Digitale
[[/D.ZOOM]
Un modo combinato che consente di registrare con un
elevato fattore di ingrandimento senza oscillazioni nelle
immagini.
4 Effetto Mosaico [MOSAIC]
Per dare all’immagine un aspetto “mosaico”.
5 Effetto Stretch [STRETCH]
L’immagine viene allungata in senso orizzontale, mentre la
sua altezza rimane immutata.
5
STRETCH
Digital Effects 1 [EFFECT1]
1 Super Image Stabilizer Mode [[] (l 94)
This prevents shaky pictures when recording in the tele
range or from a moving vehicle.
2 Digital Zoom Mode [D.ZOOM] (l 96)
It enlarges the subject beyond the optical zooming range.
3 Super Image Stabilizer and Digital Zoom Mode
[[/D.ZOOM]
This combination mode allows recording in the extreme tele
range and prevents shaky pictures.
4 Mosaic Mode [MOSAIC]
The picture becomes mosaic-like.
5 Stretch Mode [STRETCH]
The picture is stretched horizontally while its height
remains unchanged.
D.ZOOM
90
Page 91

Efectos digitales 1 [EFFECT1]
1Modo del súper estabilizador de imagen [[] (l 95)
Esto evita que vibren las imágenes cuando grabe con
teleobjetivo de un vehículo en movimiento.
2Modo de zoom digital [D.ZOOM] (l 97)
Amplía el objeto más allá de la gama del zoom óptico.
3Modo del súper estabilizador de imagen y zoom digital
[[/D.ZOOM]
Este modo combinado permite grabar en la gama de
teleobjetivo máximo y evita que las imágenes vibre.
4Modo de mosaico [MOSAIC]
La imagen adquiere la forma de un mosaico.
5Modo de estiramiento [STRETCH]
La imagen se estira horizontalmente, manteniendo
constante la altura.
SVENSKAESPAÑOL
Digital effektgrupp 1 [EFFECT1]
1 Superbildstabilisatorläget [[] (l 95)
Förhindrar att bilden blir skakig vid inspelning i teleläget
eller från ett fordon i rörelse.
2 Det digitala zoomläget [D.ZOOM] (l 97)
Används för att förstora motivet mer än vad som är möjligt i
det optiska zoomläget.
3 Superbildstabilisator- och digitalzoomläget
[[/D.ZOOM]
Denna kombination gör det möjligt att spela in med extremt
hög förstoring utan att bilden blir skakig.
4 Mosaikläget [MOSAIC]
Bilden blir mosaikliknande.
5 Stretch-läget [STRETCH]
Bilden dras ut i sidled, men förblir oförändrad i höjdled.
91
Page 92

1234
NEGA
SOLARI
SEPIA
567
D.FADE1
ITALIANO ENGLISH
D.FADE2
Effetti Digitali 2 [EFFECT2]
1 Effetto Negativo [NEGA]
Le riprese hanno i colori alterati con un effetto simile al
negativo fotografico.
2 Effetto Solarizzazione [SOLARI]
L’immagine acquista un effetto pittorico.
D.FADE3
Digital Effects 2 [EFFECT2]
1 Negative Mode [NEGA]
The picture has reversed colours similar to photographic
negatives.
2 Solarisation Mode [SOLARI]
The picture has an effect similar to a painting.
B/W
3 Effetto Virato Seppia [SEPIA]
Le scene assumono una colorazione tendente al marrone,
simile a quella delle fotografie di altri tempi.
≥Quando viene utilizzato l’Effetto Seppia, non è possibile
regolare manualmente il Bilanciamento del bianco, né
annullare le regolazioni di Bilanciamento del bianco
effettuate manualmente.
4 Effetto Bianco e Nero [B/W]
Le immagini sono in bianco e nero.
≥Quando viene utilizzato l’Effetto Bianco e Nero, non è
possibile regolare manualmente il Bilanciamento del
bianco, né annullare le regolazioni di Bilanciamento del
bianco effettuate manualmente.
5 Dissolvenza digitale 1 [D.FADE1] (l 98)
Nella dissolvenza in apertura, l’immagine appare partendo
dal centro ed espandendosi fino a occupare tutto lo
schermo. Nella dissolvenza in chiusura si ha l’effetto
co ntrario.
6 Dissolvenza digitale 2 [D.FADE2] (l 98)
L’immagine appare gradualmente da uno sfondo bianco
(dissolvenza in apertura) e svanisce scomponendosi in
piccoli punti bianchi simili a un effetto di neve che turbina o
cade (dissolvenza in chiusura).
3 Sepia Mode [SEPIA]
Scenes have a brown tint similar to the colour of old
photographs.
≥When the Sepia Mode is used, it is not possible to
manually adjust the white balance or to cancel the
manually adjusted white balance setting.
4 Black & White Mode [B/W]
The picture is in black and white.
≥When the Black & White Mode is used, it is not possible
to manually adjust the white balance or to cancel the
manually adjusted white balance setting.
5 Digital Fade 1 Mode [D.FADE1] (l 98)
The picture fades in starting at the centre and extending
toward the edges and fades out in reverse direction.
6 Digital Fade 2 Mode [D.FADE2] (l 98)
The picture fades in from a white screen and fades out to
white in small dots similar to snow melting or falling.
7 Digital Fade 3 Mode [D.FADE3] (l 98)
The picture fades in with a wipe effect from a black screen
and fades out to black.
7 Dissolvenza digitale 3 [D.FADE3] (l 98)
L’immagine appare da uno schermo nero, con un effetto
tendina (dissolvenza in apertura). La dissolvenza in
chiusura ha l’effetto contrario.
92
Page 93

Efectos digitales 2 [EFFECT2]
SVENSKAESPAÑOL
Digital effektgrupp 2 [EFFECT2]
1Modo negativo [NEGA]
La imagen tiene colores invertidos como si fuera un
negativo fotográfico.
2Modo de solarización [SOLARI]
La imagen tiene un efecto similar a una pintura.
3Modo de sepia [SEPIA]
Las escenas tienen un tono marrón como el de las
fotografías viejas.
≥Cuando se usa el modo de sepia, no puede ajustar
manualmente el balance del blanco o cancelar el balance
de blanco ajustado manualmente.
4Modo de blanco y negro [B/W]
La imagen está en blanco y negro.
≥Cuando se usa el modo de blanco y negro, no puede
ajustar manualmente el balance del blanco o cancelar el
balance de blanco ajustado manualmente.
5Modo de esfumado digital 1 [D.FADE1] (l 99)
La imagen aparece de un esfumado empezando por el
centro y se va ampliando hacia los bordes y se esfuma en
el sentido opuesto.
6Modo de esfumado digital 2 [D.FADE2] (l 99)
La imagen aparece de un esfumado empezando por una
pantalla blanca y se esfuma hacia el blanco con puntos
pequeños como la nieve que se derrite o va cayendo.
7Modo de esfumado digital 3 [D.FADE3] (l 99)
La imagen aparece con un efecto de cortinilla de una
pantalla negra y se esfuma hacia el negro.
1 Negativläget [NEGA]
Färgerna i bilden blir omvända som på ett negativ.
2 Solariseringsläget [SOLARI]
Bilden ser ut som en målning.
3 Sepialäget [SEPIA]
Bilden får en brun färgton som på gamla fotografier.
≥När sepialäget används går det inte att ställa in
vitbalansen för hand eller att stänga av den manuellt
inställda vitbalansinställningen.
4 Svartvitläget [B/W]
Bilden blir svartvit.
≥När svartvitläget används går det inte att ställa in
vitbalansen för hand eller att stänga av den manuellt
inställda vitbalansinställningen.
5 Digital in/uttoning 1 [D.FADE1] (l 99)
Bilden tonas in med början från mitten och ut mot kanterna,
och tonas ut åt andra hållet.
6 Digital in/uttoning 2 [D.FADE2] (l 99)
Bilden tonas in prickvis från en vit bakgrund som när snö
smälter, och tonas ut till en vit bakgrund som när det snöar.
7 Digital in/uttoning 3 [D.FADE3] (l 99)
Bilden tonas in från en svart bakgrund som när man drar
ifrån ett draperi, och tonas ut på samma sätt till en svart
bakgrund.
93
Page 94

A
DIGITAL EFFECT
EFFECT1 OFF SIS D.ZOOM
EFFECT2 OFF
SIS+D.ZOOM MOSAIC
STRETCH
3
1
RETURN ----
PRESS MENU TO EXIT
ITALIANO ENGLISH
Uso del Super Stabilizzatore di Immagine
Vi consigliamo di utilizzare questa funzione se prevedete che
l’immagine possa oscillare, come quando riprendete un
soggetto distante con lo zoom oppure effettuate una ripresa
camminando.
≥In caso di forti oscillazioni della movie, potrebbe non essere
possibile stabilizzare l’immagine.
Dopo aver visualizzato il sottomenu
[DIGITAL EFFECT]...(l 88)
1 Ruotate il selettore [
[EFFECT1].
3434
34] per selezionare
3434
2
Using the Super Image Stabilizer Function
In recording situations where shaking of the Movie Camera is
likely to happen, for example when you have zoomed in on a
distant subject or when you record while walking, you can use
this function to stabilize the image.
≥In case of very strong camera shake, it may not be possible
to stabilize the picture.
After displaying the [DIGITAL EFFECT] Sub-Menu...
(l 88)
1 Turn the [
2 Press the [SET] Button to select [SIS] or
2 Premete il tasto [SET] per selezionare [SIS] o
[SISrD.ZOOM].
≥Si accenderanno le spie [[] e/o [©].
3 Press the [MENU] Button to exit the menu.
3 Premete il tasto [MENU] per uscire dal menu.
≥Appariranno le indicazioni [[] e/o [D.ZOOM].
≥Quando utilizzate questa funzione, la velocità
dell’otturatore viene impostata automaticamente tra 1/125
e 1/50 in base alla luminosità della scena.
Disattivazione del Super Stabilizzatore di Immagine
Impostate su [OFF] la funzione [EFFECT1] del sottomenu
[DIGITAL EFFECT].
≥La disattivazione del Super Stabilizzatore di Immagine
riporta la velocità dell’otturatore a 1/50 di secondo. Se sono
stati selezionati il Modo Sport o il Modo Ritratto, la
disattivazione del Super Stabilizzatore di Immagine non
riporterà la velocità dell’otturatore a 1/50 di sec.
∫ In particolari condizioni di ripresa, l’effetto di
stabilizzazione potrebbe non essere efficace:
≥Soggetti con strisce orizzontali o verticali.
≥Soggetti piatti.
¡Un soggetto scuro (In questo caso vedrete lampeggiare
l’indicazione [[]. Cercate di aumentare l’illuminazione della
scena.)
≥Soggetti illuminati da lampade fluorescenti.
≥Soggetti che si muovono velocemente.
≥Soggetti con uno sfondo piatto
∫
Quando si utilizza il Super Stabilizzatore di
Immagine, l’immagine subisce le seguenti modifiche
≥Si ha una leggera perdita di qualità dell’immagine.
≥Se la scena è illuminata da lampade a fluorescenza, la
luminosità dell’immagine potrebbe non essere costante e i
colori non essere naturali.
Cancelling the Super Image Stabilizer Function
Set [EFFECT1] on the [DIGITAL EFFECT] Sub-Menu to
[OFF].
≥Cancelling the Super Image Stabilizer Function also resets
the shutter speed to 1/50 s. However, after selecting the
Sports Mode or the Portrait Mode, cancelling the Super
Image Stabilizer Function does not reset the shutter speed to
1/50 s.
∫ In the Following Recording Conditions, the
Picture Stabilizing Effect May Not Be Sufficient:
≥Subjects with horizontal or vertical stripes
≥Flat subjects
¡Dark subjects (In this case, the [[] Indication flashes.
Increase the amount of light.)
≥Subjects under many fluorescent lamps
≥Fast-moving subjects
≥Subjects with a flat background
∫ When Using the Super Image Stabilizer Function,
the Picture Changes as Follows:
≥The picture quality deteriorates slightly.
≥Under fluorescent lamps, the picture brightness may
fluctuate and the colours may be unnatural.
94
CAMERA
INFO-
WINDOW
V C R
MENU
MF/
TRACKING
FOCUS / SET
3434
34] Dial to select [EFFECT1].
3434
[SISrD.ZOOM].
≥The [[] and/or [©] Lamp lights.
≥The [[] and/or [D.ZOOM] Indication appear.
≥When you use this function, the shutter speed is
automatically adjusted between 1/125 s and
1/50 s according to the brightness of the scene.
Page 95

Función del súper estabilizador de imagen
En condiciones de grabación donde el movimiento de la
cámara es probable, por ejemplo cuando se ha acercado un
objeto distante con el zoom o cuando graba mientras camina,
permite estabilizar la imagen.
≥Si la cámara se mueve mucho puede no ser posible
estabilizar la imagen.
Después de aparecer el sub-menú [DIGITAL EFFECT]...
(l 89)
1 Gire el dial [
3434
34] para seleccionar [EFFECT1].
3434
2 Oprima el botón [SET] para seleccionar [SIS] o
[SISrD.ZOOM].
≥La luz [[] y/o [©] se enciende.
3 Oprima el botón [MENU] y salga del menú.
≥Aparece la indicación [[] y/o [D.ZOOM].
≥Cuando use esta función, se ajusta automáticamente la
velocidad de obturación entre 1/125 y 1/50 de seg.
según la iluminación de la escena.
Cancelación de la función del súper estabilizador de
imagen
Ajuste [EFFECT1] en el submenú [DIGITAL EFFECT] a
[OFF].
≥La cancelación de la función del súper estabilizador de
imagen también repone la velocidad de obturación a 1/50
seg. Sin embargo, si se ha seleccionado el modo deportivo o
el modo de retrato, la cancelación de la función del súper
estabilizador de imagen no repone la velocidad de
obturación a 1/50 de seg.
∫ El efecto de estabilización de la imagen puede no
ser suficiente en las siguientes condiciones de
grabación:
≥
Objetos con rayas horizontales o verticales
≥
Objetos planos
¡
Un objeto oscuro (Si destella la indicación
iluminación.)
≥
Objetos bajo muchas luces fluorescentes
≥
Objetos que se mueven rápidamente
≥
Objetos con un fondo plano
∫ Cuando use la función del súper estabilizador de
imagen, la imagen cambia de la siguiente forma:
≥La calidad de la imagen se deteriora ligeramente.
≥Con luces fluorescentes, el brillo de la imagen puede fluctuar
y los colores aparecen distorsionados.
[[]
, aumente la
SVENSKAESPAÑOL
Hur man använder superbildstabilisatorn
Vid inspelningssituationer där det finns risk att videokameran
skakar, t.ex. när du har zoomat in ett avlägset motiv eller när
du går omkring och spelar in med kameran i handen, går det
att använda denna funktion för att stabilisera bilden.
≥Om kameraskakningarna är alltför kraftiga kan det hända att
det inte går att få bilden helt stabil.
Tänd först undermenyn [DIGITAL EFFECT]... (l 89)
1 Vrid på [
3434
34]-ratten för att välja [EFFECT1].
3434
2 Tryck på [SET]-knappen för att välja [SIS] eller
[SISrD.ZOOM].
≥[[]-lampan och/eller [©]-lampan tänds.
3 Tryck på [MENU]-knappen för att lämna menyn.
≥Indikeringen [[] och/eller [D.ZOOM] tänds.
≥När superbildstabilisatorn används ställs slutartiden
automatiskt in på mellan 1/125 s och 1/50 s, beroende
på scenens ljusstyrka.
Avstängning av superbildstabilisatorn
Ställ in [EFFECT1] på undermenyn [DIGITAL EFFECT] på
[OFF].
≥När superbildstabilisatorn stängs av återställs även
slutartiden till 1/50 s. Om sportläget eller porträttläget är
inställt återställs dock inte slutartiden till 1/50 s när
superbildstabilisatorn stängs av.
∫ Under följande inspelningsförhållanden kan det
hända att bildstabiliseringseffekten inte blir
tillräckligt stark:
≥Motiv med horisontella eller vertikala ränder
≥Flata motiv
¡Mörka motiv (I detta fall blinkar [[]-indikeringen.
Öka belysningen.)
≥Motiv som är upplysta av flera lysrör
≥Motiv som rör sig snabbt
≥Motiv mot en flat bakgrund
∫ När superbildstabilisatorn används ändras bilden
på följande sätt:
≥Bildkvaliteten sjunker en aning.
≥I lysrörsbelysning kan det hända att bildens ljusstyrka
varierar och att färgerna blir onaturliga.
95
Page 96

20 25
D.ZOOM
DIGITAL EFFECT
EFFECT1 OFF SIS D.ZOOM
EFFECT2 OFF
SIS+D.ZOOM MOSAIC
STRETCH
25
s
VOL
r
77
WT
CAMERA
A
V C R
INFO-
WINDOW
6
MENU
MF/
CAMERA SETUP
M.SENSOR OFF
D.ZOOM
TALLY LAMP
40X 100X 220X
OFF
1,3,4
2,3
TRACKING
FOCUS / SET
4,5
ITALIANO ENGLISH
Uso dello Zoom Digitale
Lo Zoom Digitale è una funzione molto utile quando volete
riprendere un soggetto distante e intendete ingrandirlo più di
quanto lo zoom normale (ottico) non riesca a fare.
Dopo aver visualizzato il sottomenu
[DIGITAL EFFECT]...(l 88)
1 Ruotate il selettore [
[EFFECT1].
3434
34] per selezionare
3434
Using the Digital Zoom Function
This function is convenient, when you record a very distant
subject and want to enlarge it even further than is possible
with the normal (optical) zoom function.
After displaying the [DIGITAL EFFECT] Sub-Menu...
(l 88)
1 Turn the [
2 Press the [SET] Button to select [D.ZOOM] or
2 Premete il tasto [SET] per selezionare [D.ZOOM]
o [SIS+D.ZOOM].
≥Si accenderanno le spie [©] e/o [[].
3 Ruotate il selettore [
3434
34] per selezionare
3434
[RETURN] e quindi premete il tasto [SET] per
selezionare [YES].
≥Apparirà il Menu principale [CAMERA FUNCTIONS].
4 Selezionate la funzione [D.ZOOM] sul
sottomenu [CAMERA SETUP]. (l
30)
3 Turn the [
4 Select [D.ZOOM] on the [CAMERA SETUP] Sub-
5 Press [SET] Button to select the desired digital
5 Premete il tasto [SET] per selezionare la gamma
di ingrandimenti desiderata (fino a 40t, fino a
100t, fino a 220t).
6 Premete il tasto [MENU] per uscire dal menu.
≥Appariranno le indicazioni [D.ZOOM] e/o [ [] .
6 Press the [MENU] Button to exit the menu.
7 Push the [W/T] Zoom Lever toward [T] or [W] to
7 Per avvicinarvi o allontanarvi dal soggetto,
premete la leva Zoom [W/T] verso [T] o verso
[W].
≥Quando la funzione di Zoom Digitale è attivata, è
possibile un effetto ottico da 1t (grandangolo) a 20t, e
un effetto digitale tra 21t e 220t.
Il passaggio da zoom ottico a effetto digitale è
automatico.
≥Utilizzando lo Zoom Digitale si ha una certa perdita di
qualità dell’immagine.
≥Nella gamma di ingrandimento dello zoom digitale
(21t–220t) non è possibile regolare manualmente il
Bilanciamento del bianco o disattivare le impostazioni di
Bilanciamento del bianco effettuate manualmente.
Cancelling the Digital Zoom Function
Set [EFFECT1] on the [DIGITAL EFFECT] Sub-Menu to [OFF].
3434
34] Dial to select [EFFECT1].
3434
ii
[SIS
iD.ZOOM].
ii
≥The [©] and/or [[] Lamp lights.
3434
34] Dial to select [RETURN] and then
3434
press the [SET] Button to select [YES].
≥The [CAMERA FUNCTOINS] Main-Menu appears.
Menu. (l
30)
zoom range (up to 40t, up to 100t or up to
220t).
≥The [D.ZOOM] and/or [[] Indication appear.
zoom in or out as desired.
≥With the Digital Zoom Function activated, you can
optically zoom between 1t (wide-angle) and 20t and
digitally between 21t and 220t.
The changeover between optical and digital zooming is
automatic.
≥When using the Digital Zoom Function, the picture
quality is somewhat reduced.
≥Within the digital zoom range (21t–220t), it is not
possible to adjust the white balance manually or to
cancel the manually adjusted white balance setting.
Per disattivare la funzione di Zoom Digitale
Impostate su [OFF] la funzione [EFFECT1] del sottomenu
[DIGITAL EFFECT].
96
Page 97

Función del zoom digital
Esta función es conveniente para grabar objetos que están a
gran distancia y desea ampliarlos más de lo que sería posible
con la función del zoom normal (óptico).
Después de aparecer el sub-menú [DIGITAL EFFECT]...
(l 89)
1 Gire el dial [
3434
34] para seleccionar [EFFECT1].
3434
2 Oprima el botón [SET] para seleccionar
[D.ZOOM] o [SIS+D.ZOOM].
≥La luz [©] y/o [[] se enciende.
3 Gire el dial [
oprima el botón [SET] para seleccionar [YES].
≥Aparece el menú principal [CAMERA FUNCTIONS].
3434
34] para seleccionar [RETURN] y
3434
4 Seleccione [D.ZOOM] en el sub-menú [CAMERA
SETUP]. (l
31)
5 Oprima el botón [SET] para seleccionar la gama
de zoom digital deseada (hasta 40t, hasta
100t o hasta 220t).
6 Oprima el botón [MENU] para salir del menú.
≥Aparece la indicación [D.ZOOM] y/o [[].
7 Mueva la palanca del zoom [W/T] hacia [T] o [W]
para acercarse o alejarse según se desea.
≥Con la función del zoom digital activada, funciona el
zoom óptico entre 1t (gran angular) y 20t y
digitalmente entre 21t y 220t.
La conmutación óptica/digital es automática.
≥Cuando utilice la función del zoom digital, la calidad de
la imagen será ligeramente más pobre.
≥Dentro de la gama de zoom digital (21t–220t), no es
posible ajustar manualmente el balance del blanco o
cancelar el balance del blanco ajustado manualmente.
Cancelación de la función de zoom digital
Ajuste [EFFECT1] en el submenú [DIGITAL EFFECT] a [OFF].
SVENSKAESPAÑOL
Hur man använder den digitala
zoomfunktionen
Denna funktion är praktisk när man spelar in ett mycket
avlägset motiv och vill förstora det ännu mer än vad som är
möjligt med den vanliga (optiska) zoomfunktionen.
Tänd först undermenyn [DIGITAL EFFECT]... (l 89)
1 Vrid på [
3434
34]-ratten för att välja [EFFECT1].
3434
2 Tryck på [SET]-knappen för att välja [D.ZOOM]
eller [SIS+D.ZOOM].
≥[©]-lampan och/eller [[]-lampan tänds.
3 Vrid på [
tryck sedan på [SET]-knappen för att välja
[YES].
≥Huvudmenyn [CAMERA FUNCTIONS] tänds.
3434
34]-ratten för att välja [RETURN] och
3434
4 Välj [D.ZOOM] på undermenyn [CAMERA
SETUP] (l
31)
5 Tryck på [SET]-knappen för att välja önskat
digitalzoomområde (upp till 40t, upp till 100t,
eller upp till 220t).
6 Tryck på [MENU]-knappen för att lämna menyn.
≥Indikeringen [D.ZOOM] och/eller [[] tänds.
7 Tryck [W/T]-zoomknappen mot [T] eller [W] för
att zooma in eller ut på önskat sätt.
≥När den digitala zoomfunktionen är aktiverad sker
zoomningen optiskt mellan 1t (vidvinkel) och 20t, och
digitalt mellan 21t och 220t.
Övergången mellan optisk och digital zoomning sker
automatiskt.
≥När den digitala zoomfunktionen används sjunker
bildkvaliteten något.
≥I det digitala zoomområdet (21t–220t) går det inte att
ställa in vitbalansen för hand eller att stänga av den
manuellt inställda vitbalansinställningen.
Avstängning av den digitala zoomfunktionen
Ställ in [EFFECT1] på undermenyn [DIGITAL EFFECT] på
[OFF].
97
Page 98

1
A
D.FADE1
CAMERA
V C R
2, 4
2
D.FADE2
3
D.FADE3
ITALIANO ENGLISH
Dissolvenza digitale
Sono disponibili 3 tipi di dissolvenza digitale.
1 Dissolvenza digitale 1 [D.FADE1]
2 Dissolvenza digitale 2 [D.FADE2]
3 Dissolvenza digitale 3 [D.FADE3]
1 Impostate la funzione [EFFECT2] del sottomenu
[DIGITAL EFFECT] su [D.FADE1], [D.FADE2] o
[D.FADE3].
¡Si accenderà la spia [´].
∫ Dissolvenza in apertura (Fade In)
5, 7
FADE
Digital Fade
There are 3 Digital Fade Modes available.
1 Digital Fade 1 [D.FADE1]
2 Digital Fade 2 [D.FADE2]
3 Digital Fade 3 [D.FADE3]
1 Set [EFFECT2] on the [DIGITAL EFFECT] Sub-
∫ Fading In
2 With the Movie Camera in the Recording Pause
2 Mentre la movie si trova in Pausa di Ripresa,
tenete premuto il tasto [FADE].
≥L’immagine scomparirà lentamente con l’effetto digitale
selezionato.
3 When the picture has completely disappeared,
3 Quando l’immagine sarà scomparsa, premete il
tasto di Avvio/Arresto. Inizierà la registrazione.
4 Dopo 3-4 secondi circa, lasciate il tasto [FADE].
∫ Dissolvenza in chiusura (Fade Out)
5 Durante la ripresa, nel punto in cui volete che
termini la scena, tenete premuto il tasto [FADE].
4 Approximately 3–4 seconds later, release the
∫ Fading Out
5 During recording, press the [FADE] Button at
6 Dopo che l’immagine sarà scomparsa, premete
il tasto di Avvio/Arresto per interrompere la
registrazione.
≥La movie, ora, si troverà in Pausa di Ripresa.
6 After the picture has completely disappeared,
7 Lasciate il tasto [FADE].
Per disattivare la funzione di dissolvenza digitale
selezionata.
Impostate su [OFF] la funzione [EFFECT2] del sottomenu
[DIGITAL EFFECT].
7 Release the [FADE] Button.
Cancelling the Selected Digital Fade Function
Set [EFFECT2] on the [DIGITAL EFFECT] Sub-Menu to [OFF].
INFO-
WINDOW
CAMERA
OFF
VCR
MENU
1
MF/
TRACKING
FOCUS / SET
Menu to [D.FADE1], [D.FADE2] or [D.FADE3].
¡The [´] Lamp lights.
Mode, keep the [FADE] Button pressed.
≥The picture disappears gradually with the selected
digital fade effect.
press the Recording Start/Stop Button to start
recording.
[FADE] Button.
the point where you want to fade out, and keep
it pressed.
press the Recording Start/Stop Button to stop
recording.
≥The Movie Camera is now in the Recording Pause
Mode.
3, 6
98
Page 99

Esfumado digital
Hay 3 modos de esfumado digital que puede utilizar.
1 Esfumado digital 1 [D.FADE1]
2Esfumado digital 2 [D.FADE2]
3Esfumado digital 3 [D.FADE3]
1 Ajuste [EFFECT2] en el sub-menú [DIGITAL
EFFECT] a [D.FADE1], [D.FADE2] o [D.FADE3].
¡La luz [´] se enciende.
∫ Esfumado de aparición
2 Con la videocámara en el modo de pausa de
grabación, mantenga oprimido el botón [FADE].
≥La imagen desaparece gradulamente con el efecto de
esfumado digital seleccionado.
3 Cuando la imagen desaparece completamente,
oprima el botón de inicio/parada de grabación
para grabar.
4 Aproximadamente 3-4 segundos después,
suelte el botón [FADE].
∫ Esfumado de desaparición
5 Durante la grabación, mantenga oprimido el
botón [FADE] y apunte hacia la última imagen
con la que esfumará.
6 Cuando la imagen desaparece completamente,
oprima el botón de inicio/parada de grabación
para dejar de grabar.
≥La videocámara está ahora en el modo de pausa de
grabación.
7 Suelte el botón [FADE].
Cancelación de la función de esfumado digital
seleccionada
Ajuste [EFFECT2] en el submenú [DIGITAL EFFECT] a
[OFF].
SVENSKAESPAÑOL
Digital in/uttoning
Det finns 3 olika digitala in/uttoningslägen att välja mellan.
1 Digital in/uttoning 1 [D.FADE1]
2 Digital in/uttoning 2 [D.FADE2]
3 Digital in/uttoning 3 [D.FADE3]
1 Ställ in [EFFECT2] på undermenyn [DIGITAL
EFFECT] på [D.FADE1], [D.FADE2] eller
[D.FADE3].
¡[´]-lampan tänds.
∫∫
∫ Intoning
∫∫
2 Tryck in [FADE]-knappen när videokameran är i
inspelningspausläge och håll den intryckt.
≥Bilden försvinner gradvis med vald digital
uttoningseffekt.
3 Vänta tills bilden försvunnit helt och tryck
sedan på inspelningsstart/stoppknappen för att
börja spela in.
4 Släpp [FADE]-knappen efter ca. 3-4 sekunder.
∫ Uttoning
5 Tryck in [FADE]-knappen på det ställe i
inspelningen där du vill börja tona ut och håll
knappen intryckt.
6 Vänta tills bilden försvunnit helt och tryck
sedan på inspelningsstart/stoppknappen för att
avbryta inspelningen.
≥Videokameran är nu i inspelningspausläge.
7 Släpp [FADE]-knappen.
Avstängning av vald digital in/uttoningsfunktion
Ställ in [EFFECT2] på undermenyn [DIGITAL EFFECT] på
[OFF].
99
Page 100

STDBY
MOTION SENSOR
MOTION SENSOR
REC
CAMERA FUNCTIONS
1.
CAMERA SETUP
2.
DIGITAL EFFECT
3.
TITLE SETUP
4.
DATE/TIME SETUP
5.
OTHER FUNCTIONS
6.
LCD/EVF SETUP
PRESS MENU TO EXIT
1,5
MENU
MF/
2,3
2,4
ITALIANO ENGLISH
Registrazione a Sensore di Movimento
E’ una modalità molto particolare: la registrazione inizia
automaticamente non appena l’apposito sensore incorporato
individua un movimento nell’immagine.
TRACKING
FOCUS / SET
Motion-Sensor-Controlled Recording
In this mode, recording automatically starts when the built-in
Motion Sensor detects some movement in the picture.
1 Press the [MENU] Button.
1 Premete il tasto [MENU].
≥Apparirà il Menu principale [CAMERA FUNCTIONS].
2 Ruotate la manopola [
3434
34] per selezionare la
3434
funzione [CAMERA SETUP], quindi premete il
tasto [SET].
≥Apparirà il sottomenu [CAMERA SETUP].
3 Ruotate la manopola [
3434
34] per selezionare
3434
[M.SENSOR].
2 Turn the [
3 Turn the [
4 Press the [SET] Button to select [ON].
5 Press the [MENU] Button to exit the menu.
4 Premete il tasto [SET] per selezionare [ON].
5 Premete il tasto [MENU] per uscire dal menu.
≥Apparirà l’indicazione di standby di Registrazione a
Sensore di Movimento [STDBY].
≥La registrazione inizia automaticamente,
approssimativamente 1 secondo dopo che il sensore della
movie ha rilevato un movimento nell’immagine. La
registrazione si interromperà automaticamente dopo circa 10
secondi dal momento in cui sarà cessato qualsiasi
movimento nell’immagine. La movie tornerà in standby di
Registrazione a Sensore di Movimento.
≥Se la movie rimane in stand-by di Registrazione a Sensore di
Movimento per più di 6 minuti, per risparmiare energia, si
spengono automaticamente il mirino, (o il Monitor LCD) e la
spia
[ƒ]
.Non appena il sensore rileva nuovamente un
movimento nell’immagine, la ripresa riparte automaticamente
dopo 4 secondi e si accendono il mirino (o il Monitor LCD) e
la spia
[ƒ]
.
≥Approximately 1 second after the Movie Camera’s Motion
Sensor has detected movement in the picture, recording
automatically starts. Approximately 10 seconds after
movement in the picture has stopped, recording
automatically stops and the Movie Camera is in the Motion
Sensor Stand-by Mode.
≥
When the Movie Camera remains in the Motion Sensor Stand-
by Mode for more than 6 minutes, the Finder or LCD Monitor
turns off, and the [ƒ] Lamp goes out to conserve power.
When the Motion Sensor again detects movement in the
picture, recording automatically restarts after approximately
4 seconds, and the Finder or LCD Monitor turns on, and the
[ƒ] Lamp lights.
Cancelling the Motion Sensor Function During Stand-by
Set [M.SENSOR] on the [CAMERA SETUP] Sub-Menu to
[OFF].
CAMERA SETUP
M.SENSOR OFF ON
D.ZOOM
TALLY LAMP
RETURN ----
PRESS MENU TO EXIT
≥The [CAMERA FUNCTIONS] Main-Menu appears.
3434
34] Dial to select [CAMERA SETUP]
3434
40X
OFF
and then press the [SET] Button.
≥The [CAMERA SETUP] Sub-Menu appears.
3434
34] Dial to select [M.SENSOR].
3434
≥The Motion Sensor Function Stand-by [STDBY]
Indication appears.
Disattivazione della funzione di Sensore di Movimento
durante lo Stand-by
Impostate su [OFF] la funzione [M.SENSOR] del sottomenu
[CAMERA SETUP].
Disattivazione della funzione di Sensore di Movimento
durante la registrazione
Tenete premuto per 2 secondi il tasto di Avvio/Arresto.
Cancelling the Motion Sensor Function During Recording
Press the Recording Start/Stop Button for 2 seconds.
100
 Loading...