

Panasonic NV-GS320 Operating Instructions [pl]
Operating Instructions
Instrukcja obsługi
Digital Video Camera
Model No. NV-GS320
EP
Before use, please read these instructions completely.
Przed pierwszym włączeniem kamery prosimy o dokładne przeczytanie
instrukcji obsługi.
VQT1A45

Information for your safety
WARNING:
TO REDUCE THE RISK OF FIRE, ELECTRIC
SHOCK OR PRODUCT DAMAGE,
≥ DO NOT EXPOSE THIS APPARATUS TO RAIN,
MOISTURE, DRIPPING OR SPLASHING AND
THAT NO OBJECTS FILLED WITH LIQUIDS,
SUCH AS VASES, SHALL BE PLACED ON THE
APPARATUS.
≥ USE ONLY THE RECOMMENDED
ACCESSORIES.
≥ DO NOT REMOVE THE COVER (OR BACK);
THERE ARE NO USER SERVICEABLE PARTS
INSIDE. REFER SERVICING TO QUALIFIED
SERVICE PERSONNEL.
CAUTION!
≥ DO NOT INSTALL OR PLACE THIS UNIT IN A
BOOKCASE, BUILT-IN CABINET OR IN
ANOTHER CONFINED SPACE. ENSURE THE
UNIT IS WELL VENTILATED. TO PREVENT RISK
OF ELECTRIC SHOCK OR FIRE HAZARD DUE
TO OVERHEATING, ENSURE THAT CURTAINS
AND ANY OTHER MATERIALS DO NOT
OBSTRUCT THE VENTILATION VENTS.
≥ DO NOT OBSTRUCT THE UNIT’S VENTILATION
OPENINGS WITH NEWSPAPERS,
TABLECLOTHS, CURTAINS, AND SIMILAR
ITEMS.
≥ DO NOT PLACE SOURCES OF NAKED
FLAMES, SUCH AS LIGHTED CANDLES, ON
THE UNIT.
≥ DISPOSE OF BATTERIES IN AN
ENVIRONMENTALLY FRIENDLY MANNER.
The socket outlet shall be installed near the
equipment and easily accessible.
The mains plug of the power supply cord shall
remain readily operable.
To completely disconnect this apparatus from
the AC Mains, disconnect the power supply
cord plug from AC receptacle.
Product Identification Marking is located on the
bottom of units.
ª Carefully read the Operating
Instructions and use the Movie
Camera correctly.
≥Injury or material damage resulting from any
kind of use that is not in accordance with the
operating procedures explained in these
Operating Instructions are the sole
responsibility of the user.
Try out the Movie Camera.
Be sure to try out the Movie Camera before
recording your first important event and check
that it records properly and functions correctly.
The manufacturer is not liable for loss of
recorded contents.
The manufacturer shall in no event be liable for
the loss of recordings due to malfunction or defect
of this Movie Camera, its accessories or
cassettes.
Carefully observe copyright laws.
Recording of pre-recorded tapes or discs or other
published or broadcast material for purposes
other than your own private use may infringe
copyright laws. Even for the purpose of private
use, recording of certain material may be
restricted.
≥The Movie Camera uses copyright-protected
technologies and is protected by the patented
technologies and intellectual properties of
Japan and the U.S. To use these copyrightprotected technologies, authorization of the
Macrovision Company is required. It is
prohibited to disassemble or modify the Movie
Camera.
≥SDHC Logo is a trademark.
≥miniSD Logo is a trademark.
≥Leica is a registered trademark of Leica
microsystems IR GmbH and Dicomar is a
registered trademark of Leica Camera AG.
≥All other company and product names in the
operating instructions are trademarks or
registered trademarks of their respective
corporations.
Files recorded on SD Memory Card
It may not be possible to play back the files on
this Movie Camera recorded on and created by
other equipment or vice versa. For this reason,
check the compatibility of the equipment in
advance.
2
VQT1A45

Pages for reference
Pages for reference are indicated by dashes
either side of a number, for example:
The menu operation flow is indicated by >> in the
description.
-00-
ª EMC Electric and magnetic
compatibility
This symbol (CE) is located on the rating
plate.
Use only the recommended accessories.
≥Do not use any other Multi cables and USB
cables except the supplied one.
≥When you use the cable which are sold
separately, please make sure to use the one
whose length is less than 3 meters.
ENGLISH
Information on Disposal for Users of
Waste Electrical & Electronic Equipment
(private households)
This symbol on the
products and/or
accompanying
documents means
that used electrical
and electronic
products should not
be mixed with
general household
waste.
For proper
treatment, recovery
and recycling, please take these products to
designated collection points, where they will
be accepted on a free of charge basis.
Alternatively, in some countries you may be
able to return your products to your local
retailer upon the purchase of an equivalent
new product.
Disposing of this product correctly will help to
save valuable resources and prevent any
potential negative effects on human health
and the environment which could otherwise
arise from inappropriate waste handling.
Please contact your local authority for further
details of your nearest designated collection
point.
Penalties may be applicable for incorrect
disposal of this waste, in accordance with
national legislation.
For business users in the European
Union
If you wish to discard electrical and
electronic equipment, please contact your
dealer or supplier for further information.
Information on Disposal in other
Countries outside the European Union
This symbol is only valid in the European
Union.
If you wish to discard this product, please
contact your local authorities or dealer and
ask for the correct method of disposal.
3
VQT1A45

Before opening the CD-ROM package, please read the following.
End User License Agreement (for USB Driver, SweetMovieLife
and MotionDV STUDIO)
You (“Licensee”) are granted a license for the Software defined in this End User Soft Agreement
(“Agreement”) on condition that you agree to the terms and conditions of this Agreement. If Licensee
does not agree to the terms and conditions of this Agreement, promptly return the Software to
Matsushita Electric Industrial Co., Ltd. (“Matsushita”), its distributors or dealers from which you made
the purchase.
Article 1 License
Licensee is granted the right to use the software, including the information recorded or described on the
CD-ROM, instruction manuals, and any other media provided to Licensee (collectively “Software”), but
all applicable rights to patents, copyrights, trademarks and trade secrets in the Software are not
transferred to Licensee.
Article 2 Use by a Third Party
Licensee may not use, copy, modify, transfer or allow any third party, whether free of charge or not, to
use, copy or modify the Software, except as expressly provided for in this Agreement.
Article 3 Restrictions on Copying the Software
Licensee may make a single copy of the Software in whole or a part solely for back-up purpose.
Article 4 Computer
Licensee may use the Software only on one computer, and may not use it on more than one computer.
Article 5 Reverse Engineering, Decompiling or Disassembly
Licensee may not reverse engineer, decompile, or disassemble the Software, except to the extent either
of them is permitted under law or regulation of the country where Licensee resides. Matsushita, or its
distributors will not be responsible for any defects in the Software or damage to Licensee caused by
Licensee’s reverse engineering, decompiling, or disassembly of the Software.
Article 6 Indemnification
The Software is provided “AS-IS” without warranty of any kind, either expressed or implied, including,
but not limited to, warranties of non-infringement, merchantability and/or fitness for a particular
purpose. Further, Matsushita does not warrant that the operation of the Software will be uninterrupted
or error free. Matsushita or any of its distributors will not be liable for any damage suffered by Licensee
arising from or in connection with Licensee’s use of the Software.
Article 7 Export Control
Licensee agrees not to export or re-export to any country the Software in any form without the
appropriate export licenses under regulations of the country where Licensee resides, if necessary.
Article 8 Termination of License
The right granted to Licensee hereunder will be automatically terminated if Licensee contravenes of any
of the terms and conditions of this Agreement. In the event, Licensee must destroy the Software and
related documentation together with all the copies thereof at Licensee’s own expense.
4
VQT1A45

Contents
Information for your safety ................................... 2
Before using
Accessories.......................................................... 6
Optional................................................................ 6
Parts identification and handling .......................... 6
Fitting the lens cap............................................... 8
The grip belt......................................................... 9
Power supply ....................................................... 9
Charging time and recordable time .................... 11
Turning the camera on....................................... 11
Setting date and time ......................................... 12
Using the LCD monitor....................................... 13
Using the viewfinder........................................... 13
Quick Start ......................................................... 14
Inserting/removing a cassette............................ 15
Inserting/removing a card .................................. 16
Selecting a mode ............................................... 17
How to use the joystick ...................................... 17
Help mode.......................................................... 19
Switching the language ...................................... 19
Using the menu screen ...................................... 19
Adjusting LCD monitor/viewfinder ...................... 21
Using the remote control.................................... 22
Record mode
Check before recording...................................... 24
Recording on a tape........................................... 25
Recording check ................................................ 26
Blank search function......................................... 26
Recording still pictures on a card
while recording image onto a tape .................. 27
Recording still pictures onto a card
(Photoshot)...................................................... 27
Zoom in/out function .......................................... 29
Recording yourself ............................................. 30
Backlight compensation function ....................... 30
Colour night view function.................................. 31
Soft skin mode ................................................... 31
Tele macro function ........................................... 32
Fade in/fade out function ................................... 32
Wind noise reduction function............................ 33
Anti-Ground-Shooting (AGS) ............................. 33
Self-timer recording............................................ 34
Wide/4:3 Function .............................................. 34
Image stabilizer function .................................... 35
Guideline function .............................................. 35
Recording in various situations
(Scene mode).................................................. 36
Recording in natural colours
(White balance)............................................... 37
Manual focus adjustment ................................... 38
Manual shutter speed/aperture adjustment ....... 38
Playback mode
Playing back tape............................................... 40
Slow-motion playback/
frame-by-frame playback................................. 41
Variable-speed search function.......................... 41
Playback on TV .................................................. 42
Playing back card............................................... 43
Deleting files recorded on a card ....................... 44
Formatting a card............................................... 44
Protecting files on a card.................................... 45
Writing the printing data on a card
(DPOF setting) ................................................ 45
Edit mode
Recording from a tape onto a card..................... 46
Copying onto a DVD recorder or a VCR
(Dubbing)......................................................... 46
Using the DV Cable for Recording
(Digital Dubbing).............................................. 47
Audio dubbing .................................................... 48
Printing pictures by directly connecting to
the printer (PictBridge) .................................... 49
With a PC
Before Use......................................................... 51
Install/Connection............................................... 54
Software............................................................. 57
Others............................................................ 59
Menu
Menu list............................................................. 62
Menus related to taking pictures ........................ 64
Menus related to playback ................................. 64
Other menus ...................................................... 65
Others
Indications.......................................................... 66
Warning/alarm indications.................................. 67
Functions cannot be used simultaneously ......... 68
Before requesting repair
(Problems and solutions)................................. 69
Cautions for Use ................................................ 73
Explanation of terms .......................................... 77
Specifications
Specifications ..................................................... 79
5
VQT1A45
Before using
(5)(6)
Before using
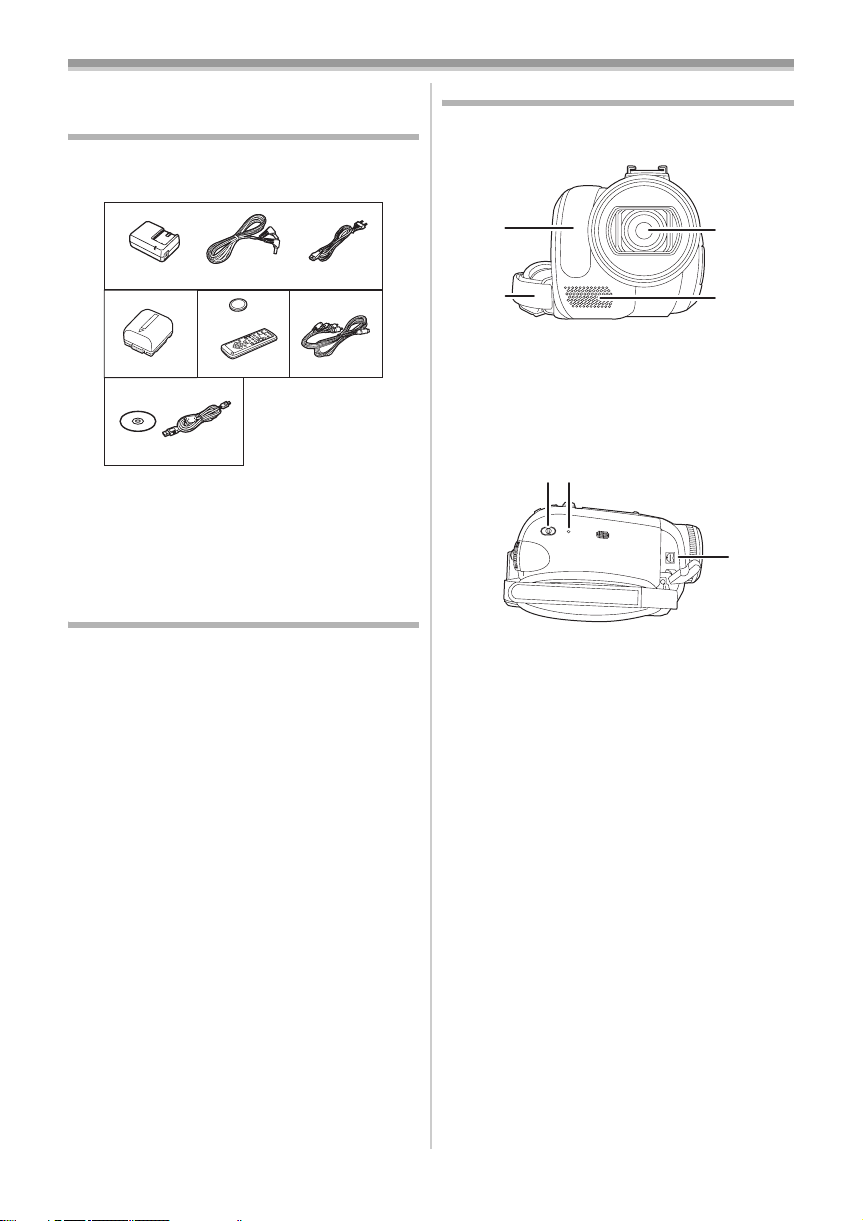
Accessories
The followings are the accessories supplied with
this product.
1)
VSK0651B
2)
5)
K2GJ2DC00011
3)
CR2025
N2QAEC000021
K1HA05CD0010
1) AC adaptor, DC input lead, AC mains lead
-10-
2) Battery pack -9-
3) Remote control, button-type battery -22-
4) Multi cable -46-
5) USB cable and CD-ROM -49-, -51-
Optional
1) AC adaptor (VW-AD11E)
2) Battery pack (lithium/CGR-DU06/640 mAh)
3) Battery pack (lithium/CGA-DU07/680 mAh)
4) Battery pack (lithium/CGA-DU12/1150 mAh)
5) Battery pack (lithium/CGA-DU14/1360 mAh)
6) Battery pack (lithium/CGA-DU21/2040 mAh)
7) Wide conversion lens (VW-LW3707M3E)
8) Tele conversion lens (VW-LT3714ME)
9) Filter kit (VW-LF37WE)
10) Video DC light (VW-LDC10E)
11) Light bulb for video DC light (VZ-LL10E)
12) Tripod (VW-CT45E)
13) DV cable (VW-CD1E)
≥Some optional accessories may not be
available in some countries.
K2CQ2CA00006
4)
K2KZ9CB00001
Parts identification and handling
ª Camera
(1)
(2)
(1) White balance sensor -37-
Remote control sensor -23-
Grip belt -9-
(2)
Lens (LEICA DICOMAR)
(3)
(4) Microphone (built-in, stereo) -29-, -33-
Mode select switch [AUTO/MANUAL/
(5)
FOCUS]
(6)
Reset button [RESET] -72-
Audio-video/S-Video output terminal
(7)
[A/V]
-24-, -36-, -37-, -38-
-46-
≥Use the supplied Multi cable only, otherwise
audio may not be played back normally.
(3)
(4)
(7)
6
VQT1A45
(8)
(9)
(10)
(11)
(12)
(13)
(8) Viewfinder -13-, -77-
Due to limitations in LCD production
technology, there may be some tiny bright or
dark spots on the Viewfinder screen.
However, this is not a malfunction and does
not affect the recorded picture.
(9)
USB terminal [ ] -49-, -57-
DC input terminal [DC/C.C.IN] -10-
(10)
(11)
DV output terminal [DV] -47-
Battery holder -10-
(12)
Battery release lever [BATTERY] -10-
(13)
Power switch [OFF/ON] -11-
(14)
Status indicator -11-
(15)
Menu button [MENU] -1 9-
(16)
(17)
Joystick -17-
Mode dial -17-
(18)
Recording start/stop button -25-
(19)
Before using
(14)
(15)
(16)
(17)
(18)
(19)
(20)
(21)
(23)
(20) LCD monitor -13-, -77-
(24)
(25)
Due to limitations in LCD production
technology, there may be some tiny bright or
dark spots on the LCD monitor screen.
However, this is not a malfunction and does
not affect the recorded picture.
(21) LCD monitor open part -13-
Speaker -40-
(22)
Card access lamp -16-
(23)
Card slot -16-
(24)
Card slot cover -16-
(25)
(22)
(28)
(29)
(26)
(27)
Cassette holder -15-
(26)
Accessory shoe
(27)
(30)
(31)
≥Accessories, such as a video DC light
(VW-LDC10E; optional), are attached here.
(28) Cassette eject lever [OPEN/EJECT] -15-
Cassette cover -15-
(29)
Zoom lever [W/T] -29-
(30)
Volume lever [s /VOLr] -40-
(31)
Photoshot button [ ] -27-
VQT1A45
7
Before using
(32)
(32) Tripod receptacle
This is a hole for attaching the camera to optional
tripod/VW-CT45E. (Please carefully read the
operating instructions for how to attach the tripod
to the camera.)
≥You cannot open the card slot cover when the
tripod is used. Insert the card first and then
attach the tripod.
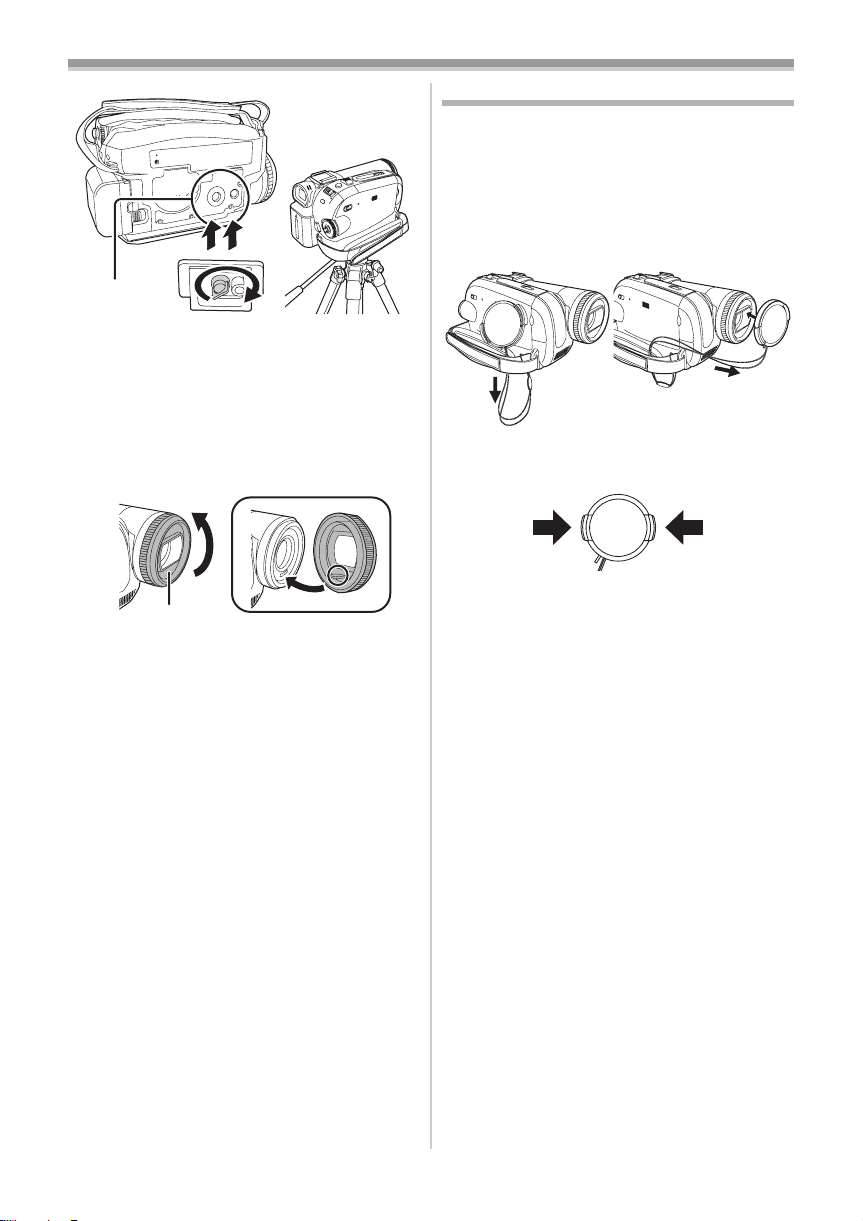
Fitting the lens cap
Fit the lens cap to protect the surface of the lens.
≥The lens cap and the lens cap cord come
pre-attached to the grip belt.
≥When not using the lens cap, pull the lens cap
cord in the direction of the arrow. 1
≥When you are not recording, be sure to cover
the lens with the lens cap for protection.
1
≥When you remove the lens cap, press the knobs
firmly.
2
2
1
(33)
(33) Lens hood
2
In order to remove the lens hood, rotate it
counterclockwise 1. In order to fit it, put into slot
2, and then rotate it clockwise.
≥Fit the MC protector or the ND filter of the Filter
Kit (VW-LF37WE; optional) in front of the lens
hood. Do not fit the other accessories on the
hood. (Except for the lens cap)
(Refer to the operating instructions for the Filter
Kit.)
≥When fitting the tele conversion lens
(VW-LT3714ME; optional) or the wide
conversion lens (VW-LW3707M3E; optional),
first remove the lens hood.
(Refer to the operating instructions for the tele
conversion lens or the wide conversion lens.)
≥When 2 lens accessories, such as the ND filter
and tele conversion lens, are fitted and the
[W/T] lever is pressed toward the [W] side, the 4
corners of an image will be darkened.
(Vignetting)
8
VQT1A45
Before using
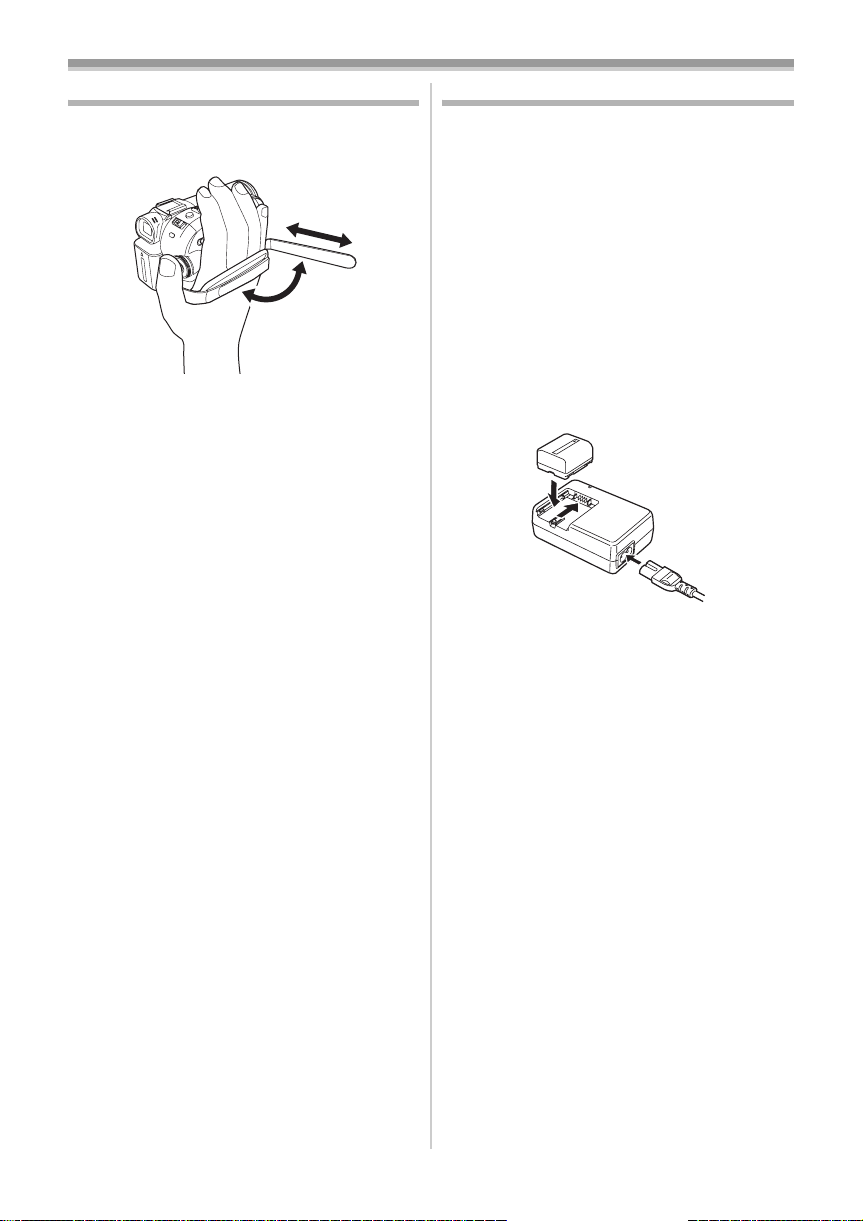
The grip belt
Adjust the belt length so it fits your hand.
1 Adjust the belt length and the pad position.
2
1
3
1 Flip the belt.
2 Adjust the length.
3 Fix the belt.
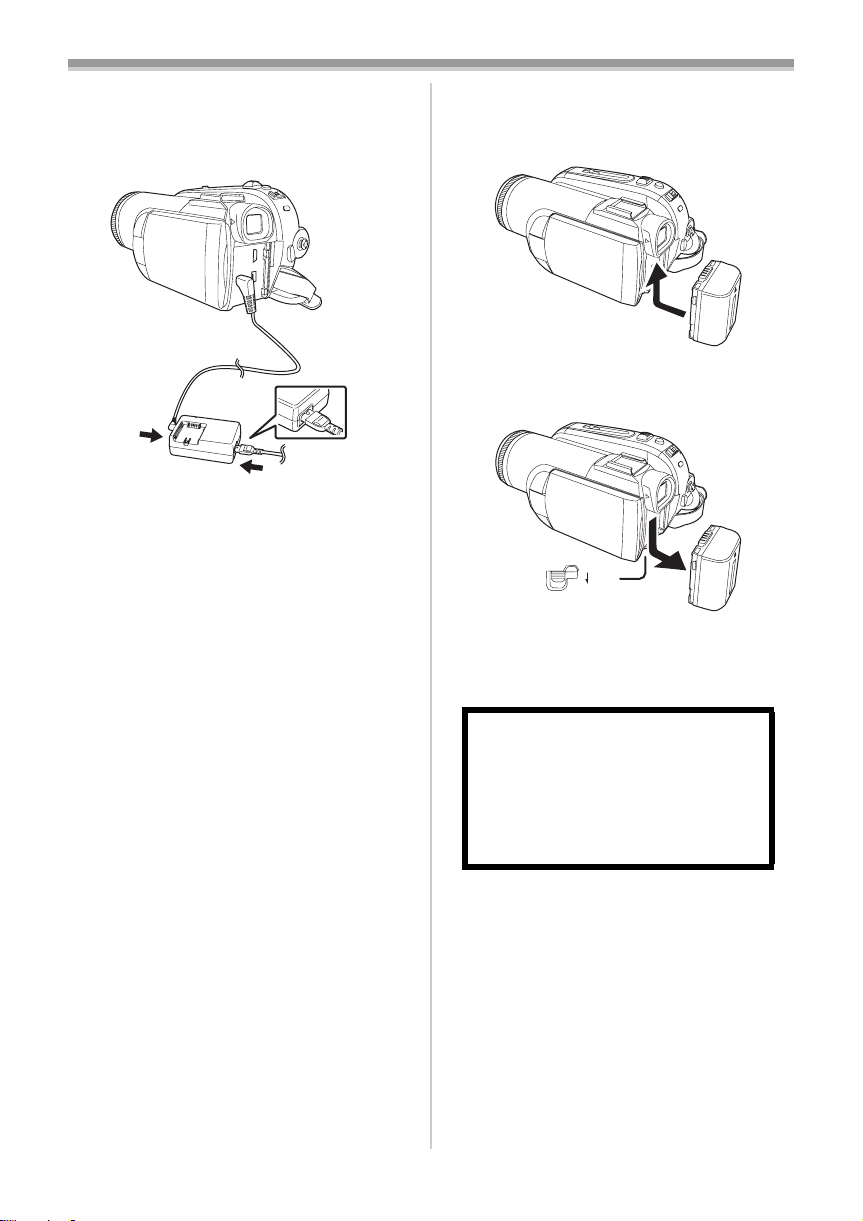
Power supply
ª Charging the battery
When this product is purchased, the battery is not
charged. Charge the battery before using this
product.
≥Battery charging time (
≥We recommend using Panasonic batteries. (
≥If you use other batteries, we cannot guarantee
the quality of this product.
≥If the DC input lead is connected to the AC
adaptor, then the battery will not get charged.
Remove the DC input lead from the AC adaptor.
1 Connect the AC mains lead to the AC
adaptor and the AC mains socket.
2 Put the battery on the battery mount by
aligning the mark, and then securely plug it
in.
Charging lamp
ª
Lights up:Charging
Goes off: Charging completed
Flashing: The battery is over discharged
(discharged excessively). In a while,
the lamp will light up and normal
charging will start.
When the battery temperature is
excessively high or low, the [CHARGE]
lamp flashes and the charging time will
be longer than normal.
-11-)
-6-)
9
VQT1A45
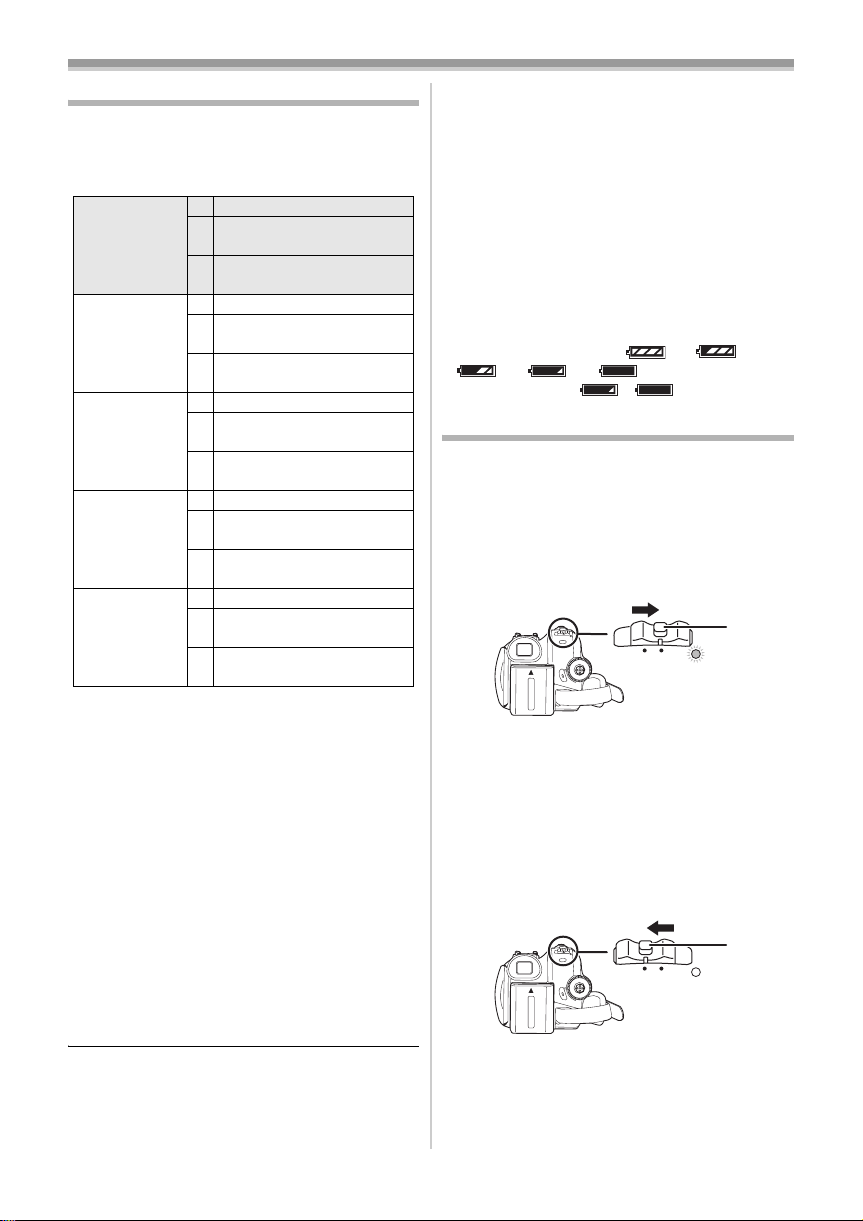
Before using
ª Connecting to the AC outlet
The unit is in the standby condition when the AC
adaptor is connected. The primary circuit is
always “live” as long as the AC adaptor is
connected to an electrical outlet.
1
1 Connect the AC mains lead to the AC
adaptor and the AC mains socket.
2 Connect the DC input lead to the AC
adaptor.
3 Connect the DC input lead to this product.
≥The output plug of the AC mains lead is not
completely connected to the AC adaptor
socket. As shown in 1, there is a gap.
≥Do not use the power cord for other
equipment since the power cord is exclusively
designed for the movie camera. Or do not use
the power cord of other equipment for the
movie camera.
Fitting the battery
ª
Push the battery against the battery holder and
slide it until it clicks.
ª
Removing the battery
While sliding the [BATTERY] lever, slide the
battery to remove it.
BATTERY
≥Hold the battery with your hand so it does not
fall.
≥Before removing the battery, be sure to set the
[OFF/ON] switch to [OFF].
CAUTION
Danger of explosion if battery is
incorrectly replaced. Replace only with
the same or equivalent type
recommended by the manufacturer.
Dispose of used batteries according to
the manufacturer’s instructions.
10
VQT1A45
Before using
Charging time and recordable time
The times shown in the tables below are for when
the temperature is 25 oC and the humidity is 60%.
If the temperature is higher or lower than 25 oC,
the charging time will become longer.
Supplied
battery/
CGR-DU06
(7.2 V/
640 mAh)
CGA-DU12
(7.2 V/
1150 mAh)
CGA-DU14
(7.2 V/
1360 mAh)
CGA-DU21
(7.2 V/
2040 mAh)
CGA-DU07
(7.2 V/
680 mAh)
A Charging time
B Maximum continuously recordable time
C Actual recordable time
(The actual recordable time refers to the
recordable time on a tape when repeatedly
starting/stopping recording, turning the unit on/off,
moving the zoom lever, etc.)
“1 h 10 min” indicates 1 hour 10 minutes.
≥The battery CGR-DU06 is supplied.
≥The charging time and recordable time shown in
the table are approximations. The times indicate
the recordable times when the viewfinder is
used. The times in parentheses indicate the
recordable times when the LCD monitor is used.
≥We recommend the Battery Pack CGA-DU12,
CGA-DU14 and CGA-DU21 for long time
recording (2 hours or more for continuous
recording, 1 hour or more for actual recording).
A 1 h 40 min
B 1 h 15 min
(1 h 10 min)
C 30 min
(30 min)
A 2 h 25 min
B 2 h 15 min
(2 h 5 min)
C 1 h
(55 min)
A 2 h 45 min
B 2 h 40 min
(2 h 30 min)
C 1 h 10 min
(1 h)
A 3 h 55 min
B 4 h
(3 h 45 min)
C 1 h 45 min
(1 h 30 min)
A 1 h 30 min
B 1 h 20 min
(1 h 15 min)
C 35 min
(30 min)
≥The actual time may become shorter than this.
The recordable time shown in the table are
approximations. The recordable time will
become shorter in the following cases:
≥When you use both the viewfinder and the
LCD monitor simultaneously while rotating
the LCD monitor frontward to record yourself,
etc.
≥When you use this camera with the LCD
monitor lit up with the [POWER LCD] setting.
≥The batteries heat up after use or charging. The
main unit of the movie camera being used will
also heat up. This is normal.
≥Along with the reduction of the battery capacity,
the display will change: # #
# # . If the battery
discharges, then ( ) will flash.
Turning the camera on
When the camera is turned on with the lens cap
fitted, the automatic white balance adjustment
-77-) may not function properly. Please turn the
(
camera on after removing the lens cap.
How to turn on the power
ª
While pressing the button 1, set the
1
[OFF/ON] switch to [ON].
1
ON
OFF
≥The Status indicator lights red and the power
turns on.
≥In Tape Recording Mode or Card Recording
Mode, if the [OFF/ON] switch is set to [ON]
while the LCD monitor is closed and the
viewfinder is retracted, the power turns off.
How to turn off the power
ª
1 While pressing the button 1, set the
[OFF/ON] switch to [OFF].
1
ON
OFF
≥Set the [OFF/ON] switch to [OFF] when not
using the camera.
≥The status indicator goes off when the power
turns off.
11
VQT1A45
Before using
ª How to turn the power on and off with
the LCD monitor/viewfinder
When the power switch is set to [ON], the power
can be turned on and off with the LCD monitor
and the viewfinder when the unit is in Tape
Recording Mode or Card Recording Mode.
ON
OFF
1 Open the LCD monitor out or extend the
viewfinder to use. (
≥The LCD monitor or viewfinder will be
activated.
-13-)
2 Close the LCD monitor and retract the
viewfinder.
F
OF
ON
≥The power will not turn off unless the LCD
monitor is closed and the viewfinder is
retracted.
≥The Status indicator automatically goes off
and the power turns off. (If quick start is set to
-14-), the unit goes into quick start
[ON] (
standby mode and the Status indicator lights
green.)
≥The power does not turn off even if the
LCD monitor is closed and the viewfinder
is retracted while recording on a tape.
3 Open the LCD monitor or extend the
viewfinder to turn the power on and use the
movie camera again.
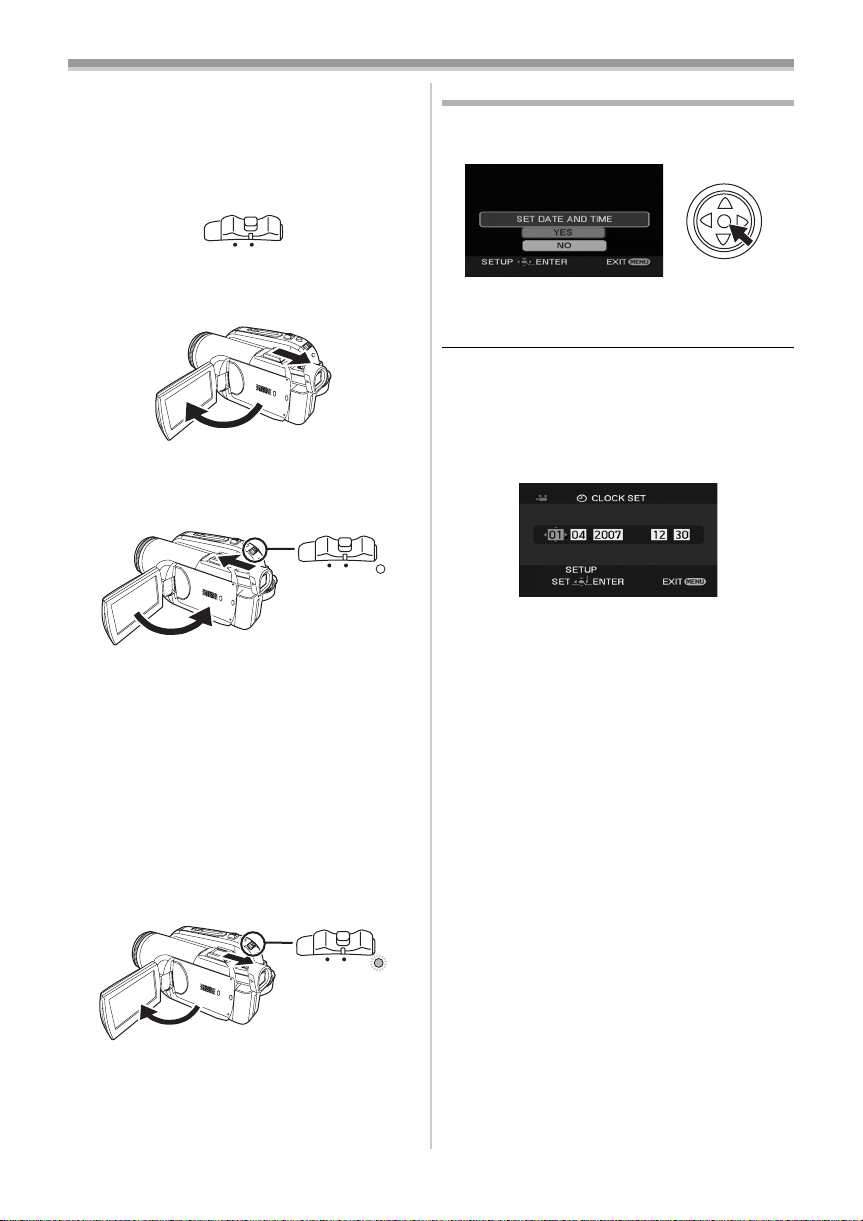
Setting date and time
When the movie camera is turned on for the first
time, [SET DATE AND TIME] will appear.
≥Select [YES] and press the centre of the
joystick. Do steps 2 and 3 below to set the date/
time.
If the screen shows the incorrect date/time, then
adjust it.
≥Set to Tape Recording Mode or Card
Recording Mode.
1 Set [BASIC] >> [CLOCK SET] >> [YES].
-19-)
(
2 Move the joystick left or right in order to
select the item to be set. Then move the
joystick up or down to set the desired value.
≥The year will change as follows:
2000, 2001, ..., 2089, 2000, ...
≥The 24-hour clock is used.
3 Press the joystick to determine the setting.
≥The clock function starts at [00] seconds.
About date/time
ª
≥The date and time function are driven by a built-
in lithium battery.
≥Make sure to check the time before recording
because the built-in clock is not very accurate.
ON
OFF
≥The status indicator lights red and the power
turns on.
12
VQT1A45
Before using
ª Recharging the built-in lithium battery
≥If [0] or [--] is appears when the camera is
turned on, then the built-in lithium battery has
run down. Use the steps below to charge the
battery. When turn on the power for the first time
after charging, [SET DATE AND TIME] will
appear. Select [YES] and set the date and time.
Connect the AC adaptor to the camera or attach
the battery to the camera, and the built-in lithium
battery will be recharged. Leave the camera as
is for approx. 24 hours, and the battery will drive
the date and time for approx. 6 months. (Even if
the [OFF/ON] switch is set to [OFF], the battery
is still being recharged.)
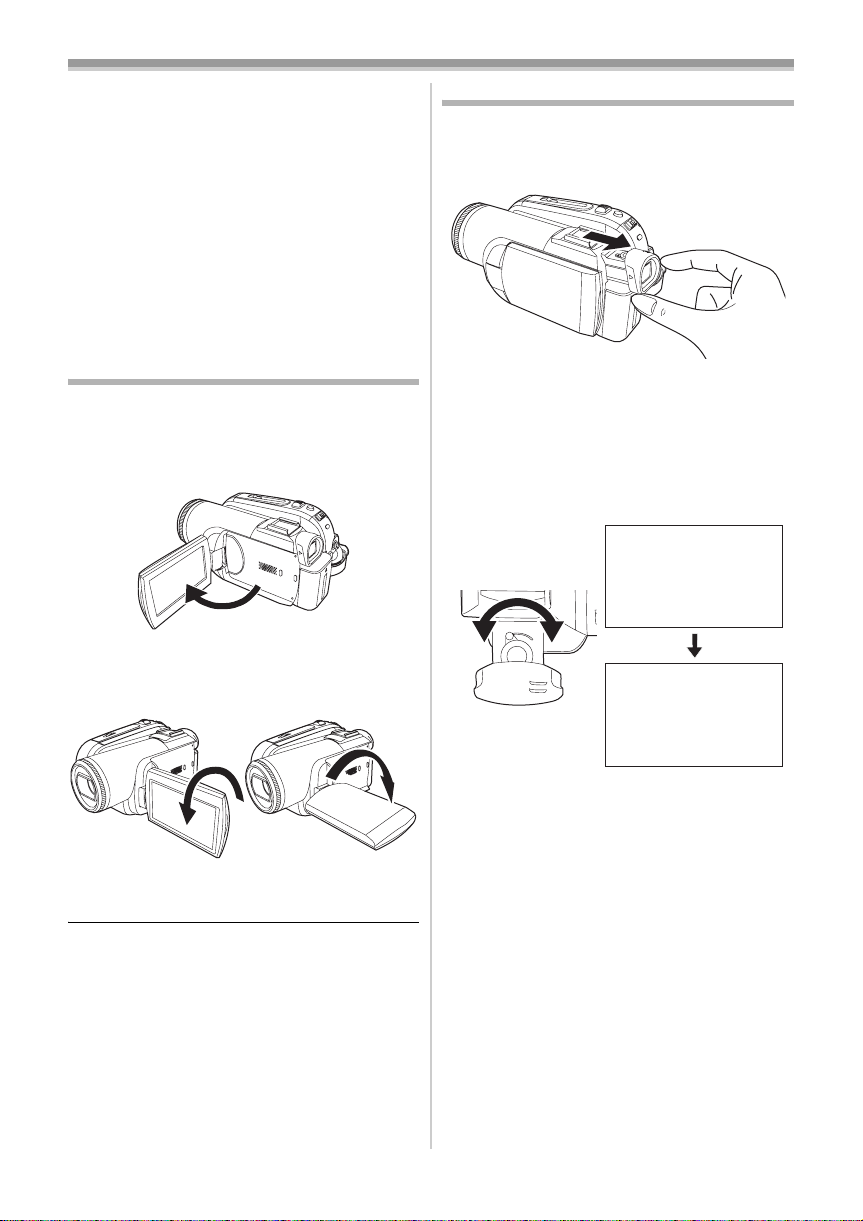
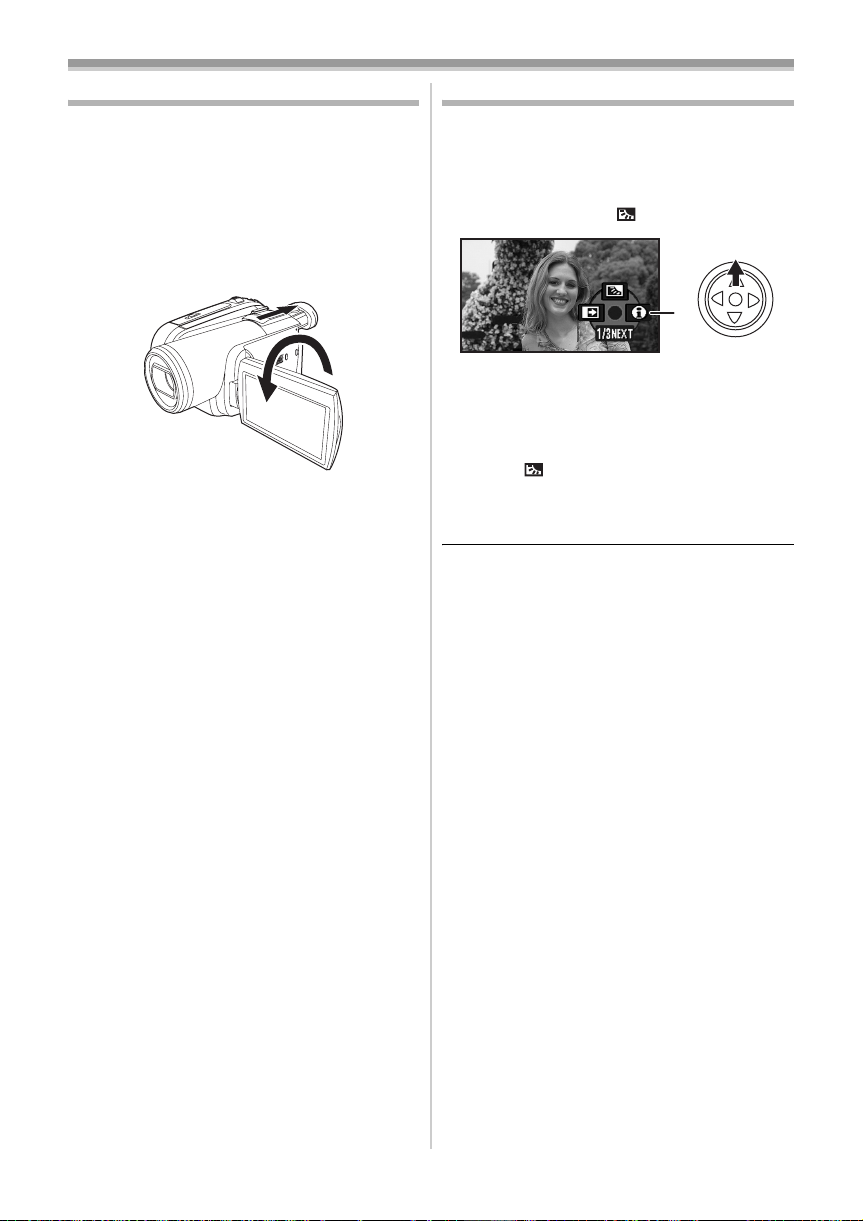
Using the LCD monitor
You can record the image while viewing it on the
opened LCD monitor.
1 Put a finger on the LCD monitor open part
and pull the LCD monitor out in the
direction of the arrow.
≥It can open up to 90o.
2 Adjust the angle of the LCD monitor
according to your preference.
Using the viewfinder
ª Extending the viewfinder
1 Pull out the viewfinder and extend it by
pinching the extension knob.
≥The viewfinder will be activated. (If the LCD
monitor is opened, the viewfinder will be
deactivated.)
Adjusting the field of view
ª
1 Adjust the focus by sliding the eyepiece
corrector knob.
12:30:4512:30:4512:30:45
15.10. 200715.10. 200715.10. 2007
1 180o 2 90o
≥It can rotate up to 180o 1 towards the lens or
90o 2 towards the viewfinder.
≥The brightness and colour level of the LCD
monitor can be adjusted from the menu.
≥If it is forcibly opened or rotated, the camera
may be damaged or fail.
≥If the LCD monitor is rotated by 180o towards
the lens and the viewfinder is extended (when
recording yourself), the LCD monitor and the
viewfinder simultaneously light.
12:30:45
15.10. 2007
≥You can adjust the brightness of the viewfinder
from the menu.
13
VQT1A45
Before using
Quick Start
When quick start is ON the battery power is still
being consumed, even when the LCD monitor
and the viewfinder are closed.
The movie camera will resume recording/pause
mode about 1.7 seconds after the LCD monitor or
the viewfinder is reopended.
≥Please note in quick start mode approximately
half the pause recording power is being
consumed. Using quick start mode will reduce
the battery recording/playback time.
≥This is only activated in the following cases.
≥While using the battery
A tape or a card is inserted, while the Tape
Recording Mode is set.
A card is inserted, while the Card Recording
Mode is set.
≥While using the AC adaptor
quick start can be used even if a tape/card
is not inserted.
≥Set to Tape/Card Recording Mode.
1 Set [SETUP] >> [QUICK START] >> [ON].
-19-)
(
2 While the [OFF/ON] switch is still set to
[ON], close the LCD monitor and retract the
viewfinder.
ON
OFF
≥The Status indicator lights green and the unit
goes into quick start standby mode.
≥The movie camera will not go into quick start
standby unless the LCD monitor is closed and
the viewfinder is retracted.
3 Open the LCD monitor or extend the
Viewfinder.
To cancel Quick Start
ª
1 Set [SETUP] >> [QUICK START] >> [OFF].
-19-)
(
≥If the [OFF/ON] switch is set to [OFF] while the
unit is in quick start standby, the power turns off.
≥If the standby continues for approx. 30 minutes,
then the status indicator will go off and the
camera will be completely turned off.
≥In the following cases, quick start is cancelled
and the power turns off.
≥When the Mode dial is moved.
≥When the battery or AC adaptor is removed.
≥When both the tape and card are removed
while using the battery in Tape Recording
Mode.
≥When the card is removed while using the
battery in Card Recording Mode.
≥When the camera is quick-started with the white
balance on automatic, it may take some time
until the white balance is adjusted if the scene
being recorded has a light source different from
the scene last recorded. (When the colour night
view function is used, however, the white
balance of the scene last recorded is retained.)
≥If the power is turned on in quick start standby,
the zoom magnification becomes 1k and the
picture size may differ from what it was before
quick start standby.
≥If [POWER SAVE] (
and the unit automatically goes into quick start
standby mode, set the [OFF/ON] switch to
[OFF], then to [ON] again. Also, close the LCD
monitor and retract the viewfinder and then
open the LCD monitor or extend the viewfinder
again.
-64-) is set to [5 MINUTES]
OFF
≥The Status indicator lights red and the
camera is put into recording pause approx.
1.7 seconds after it is turned on.
14
VQT1A45
ON
Before using
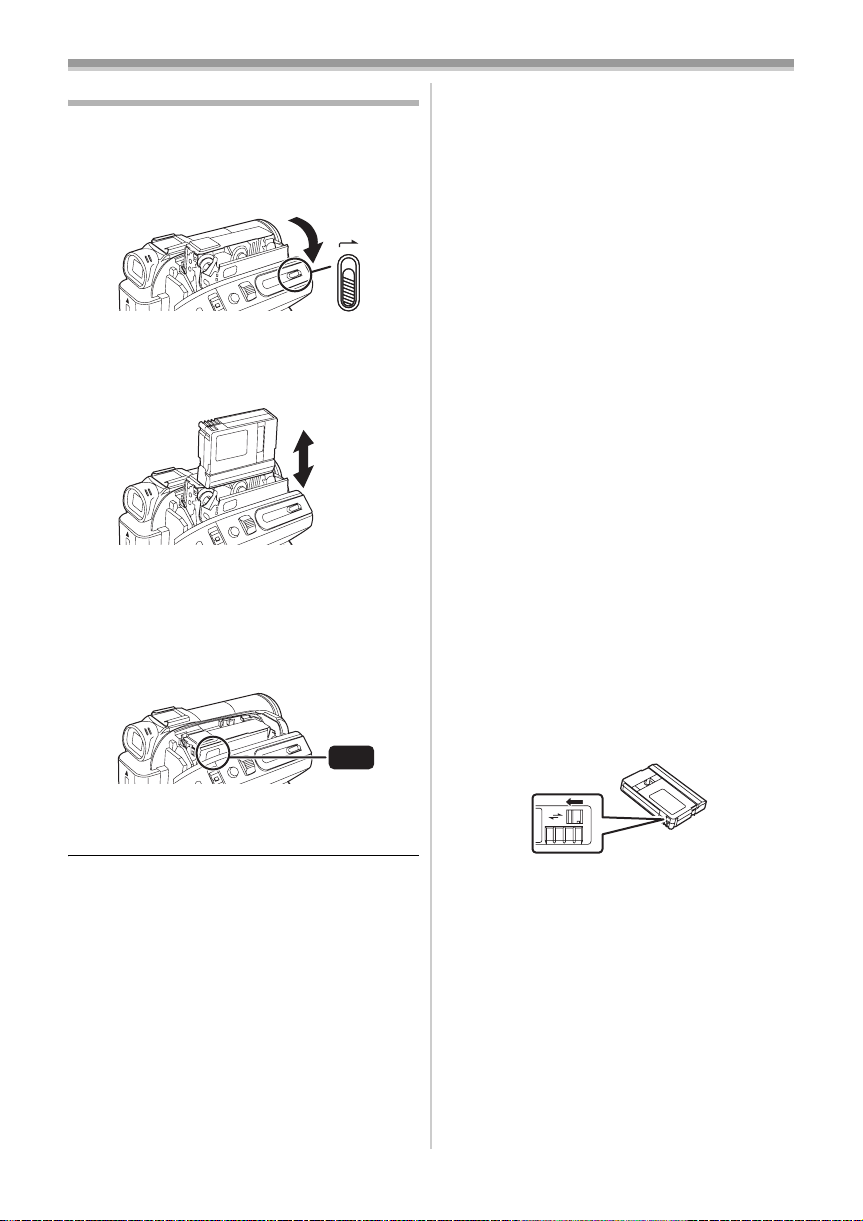
Inserting/removing a cassette
1 Fit the AC adaptor or the battery and turn on
the power.
2 Slide the [OPEN/EJECT] lever and open the
cassette cover.
OPEN/
EJECT
≥When the cover is fully opened, the cassette
holder will come out.
3 After the cassette holder is opened, insert/
remove the cassette.
≥When inserting a cassette, orient it as shown
in the figure, and then securely insert it as far
as it goes.
≥When removing, pull it straight out.
4 Push the [PUSH] mark 1 in order to close
the cassette holder.
1
PUSH
≥The cassette holder is housed.
5 Only after the cassette holder is completely
housed, close the cassette cover tightly.
≥When inserting a previously recorded cassette,
use the blank search function to find the position
where you want to continue recording. If you are
overwriting a previously recorded cassette, be
sure to find the position where you want to
continue recording.
≥When closing the cassette cover, do not get
anything, such as a cable, caught in the cover.
≥After use, be sure to rewind the cassette
completely, remove it and put it in a case. Store
the case in an upright position. (
-76-)
≥If the indicator of the condensation does not
display on the LCD monitor and/or viewfinder
and you notice condensation on the lens or the
main unit, do not open the cassette cover
otherwise condensation may be formed on the
heads or the cassette tape. (
When the cassette holder does not
ª
-73-)
come out
≥Close the cassette cover completely, and then
open it again completely.
≥Check if the battery has run down.
When the cassette holder cannot be
ª
housed
≥Set the [OFF/ON] switch to [OFF], then to [ON]
again.
≥Check if the battery has run down.
Accidental erasure prevention
ª
If the accidental erasure prevention slider 1 of a
cassette is opened (slide in the direction of the
[SAVE] arrow), the cassette cannot be recorded.
When recording, close the accidental erasure
prevention slider of the cassette (slide in the
direction of the [REC] arrow).
1
R E C
SAVE
15
VQT1A45
Before using
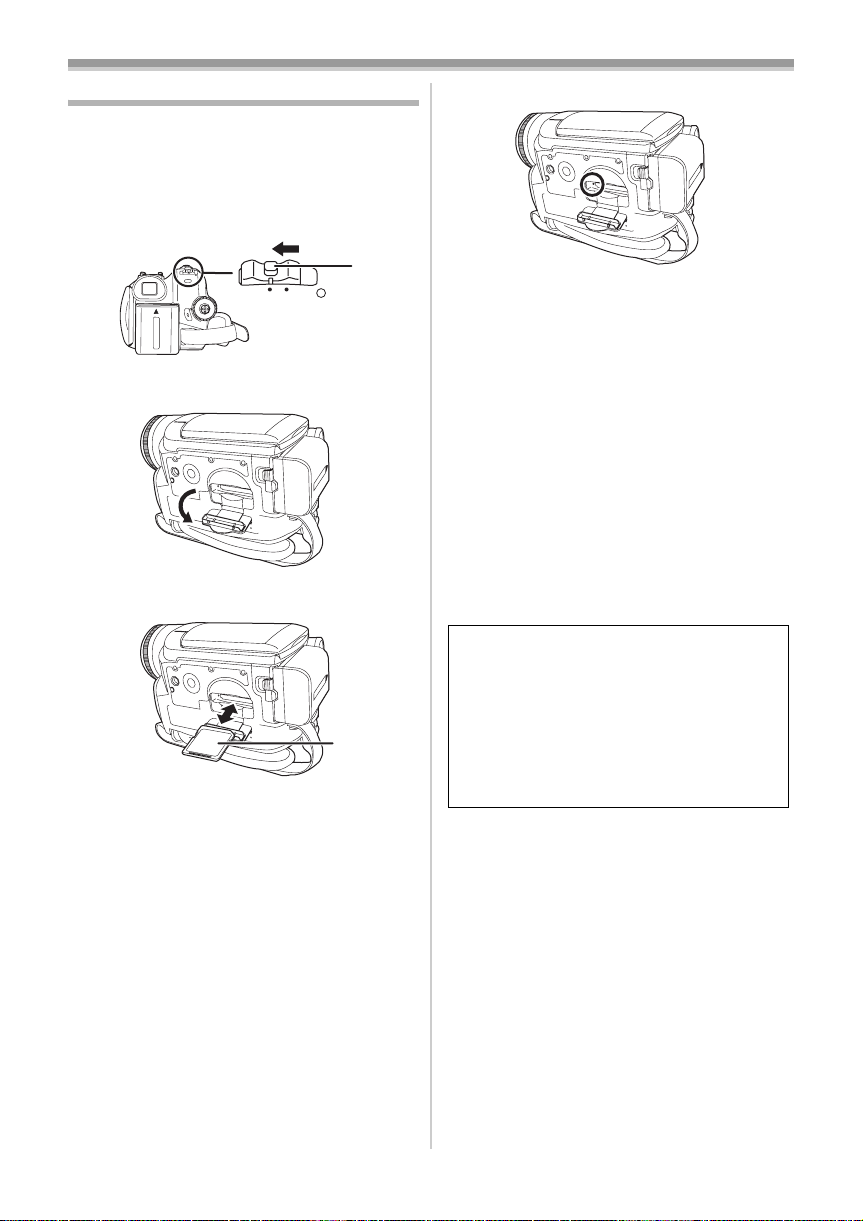
Inserting/removing a card
Before inserting/removing a card, set the
[OFF/ON] switch to [OFF].
≥If the card is inserted or removed with the power
turned on, this camera may malfunction or the
data recorded on the card may be lost.
1 Turn off the power 1.
Card access lamp
ª
1
ON
OFF
≥Check that the Status indicator has gone off.
2 Open the card slot cover.
3 Insert/remove the card into/from the card
slot.
1
≥When inserting a card, face the label side 1
towards you and push it straight in with one
stroke as far as it goes.
≥When removing the card, press the centre of
the card and then pull it straight out.
4 Securely close the card slot cover.
Concerning the card
ª
≥Do not format the card with another movie
camera or any personal computer. This
operation may make the card unusable.
≥4 GB Memory Cards must be SDHC Memory
Cards.
≥Memory Cards greater than 4 GB without the
SDHC Logo are not compliant with the SD
specifications.
≥When the camera accesses the card (reading,
recording, playback, erasing, etc.), the access
lamp lights up.
≥If the following operations are performed when
the access lamp is lit, then the card or the
recorded data may be damaged or the camera
may malfunction.
≥Inserting or removing the card.
≥Operating the [OFF/ON] switch or the mode
dial.
≥Removing the battery or AC adaptor.
SD Card
ª
≥The memory capacity indicated on the SD Card
label corresponds to the total amount of
capacity to protect and manage the copyright
and the capacity available as conventional
memory for a movie camera, personal computer
or other equipment.
This unit is compatible with both SD Memory
cards and SDHC Memory cards. You can only
use SDHC Memory cards on devices that are
compatible with them. You cannot use SDHC
Memory cards on devices that are only
compatible with SD Memory cards.
(When using a SDHC Memory card on
another device, be sure to read the operating
instructions for that device.)
Concerning the write protection
ª
switch on the SD Card
≥The SD Card has a write protection switch on it.
If the switch is moved to [LOCK], you cannot
write to the card, erase the data on it, or format
it. If it is moved back, you can.
16
VQT1A45
Before using
3
2
4
1
5
Selecting a mode
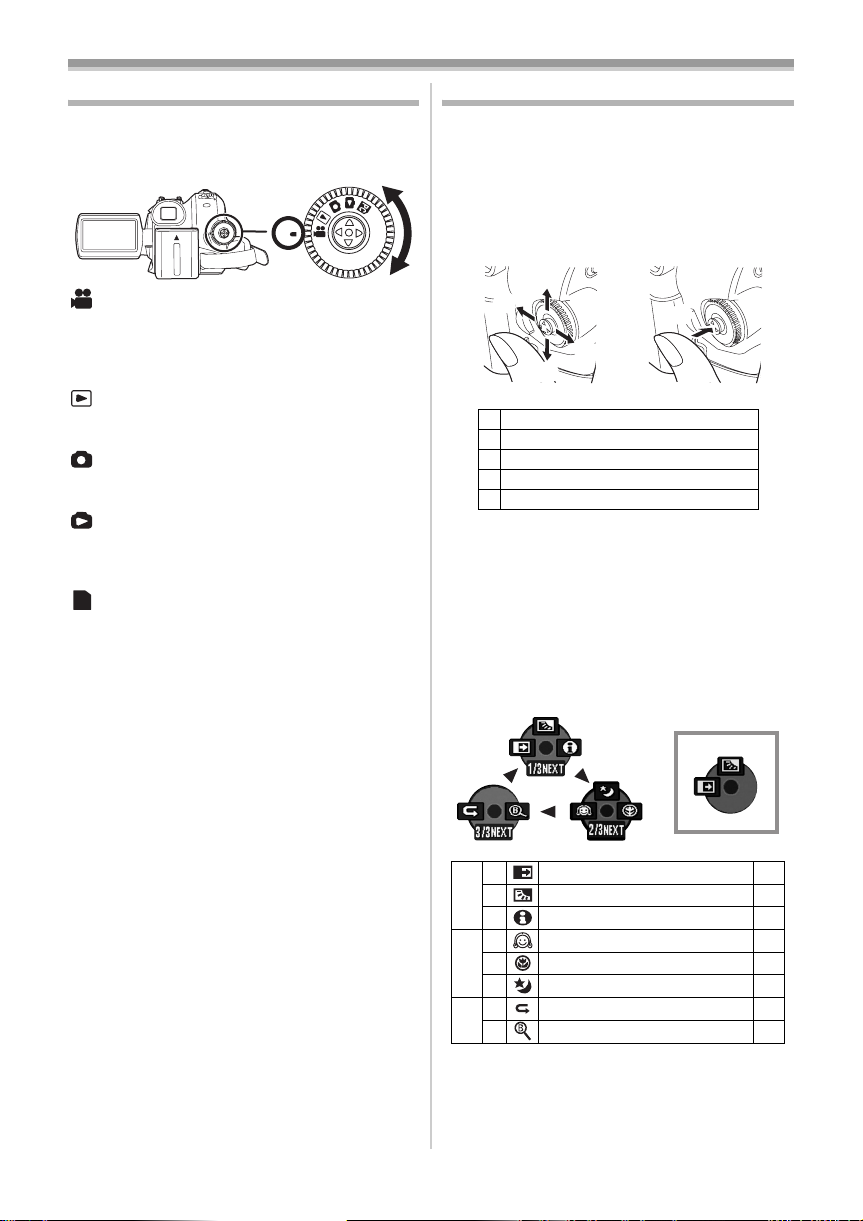
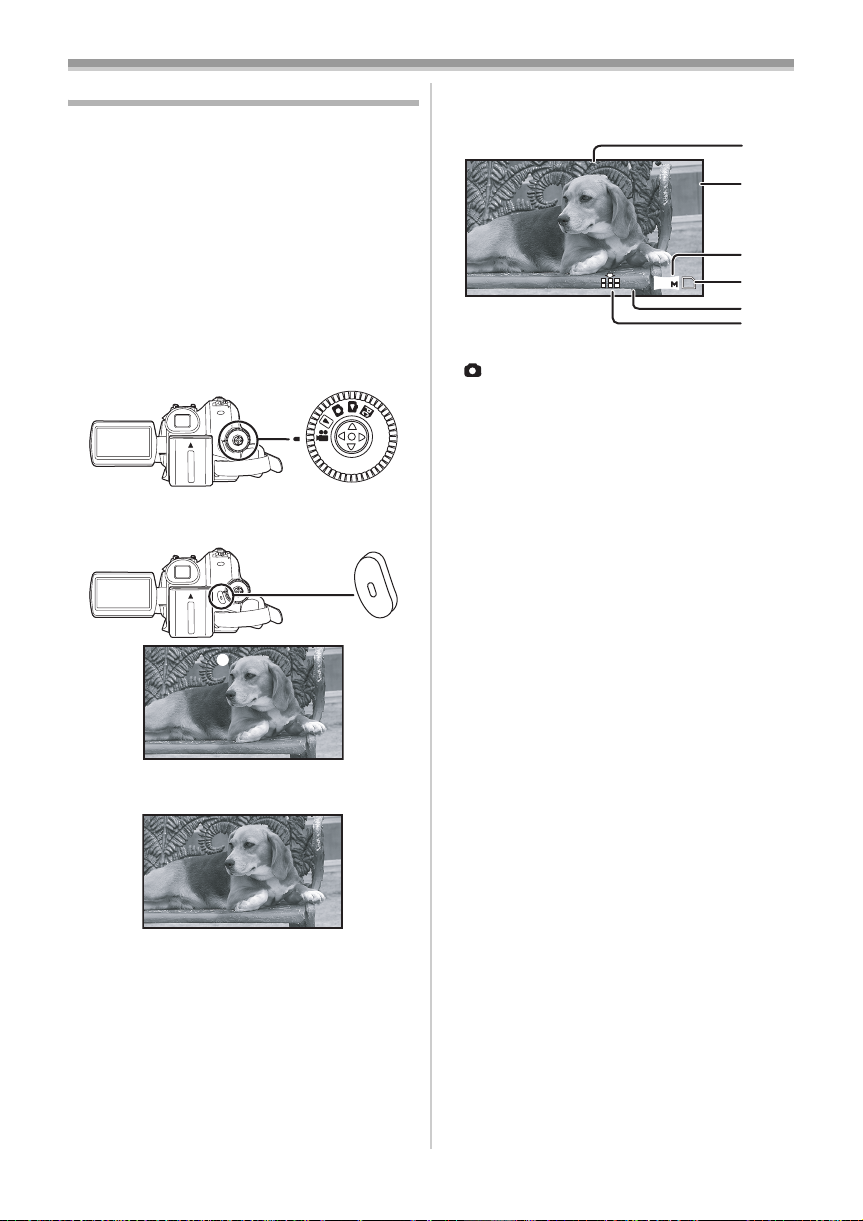
Rotate the mode dial to select the desired mode.
1 Rotate the mode dial.
≥Set your desired mode to 1.
1
: TAPE RECORDING MODE
Use this when you record the image on a tape.
(Also, you can simultaneously record still pictures
on a card while recording images on a tape.)
: TAPE PLAYBACK MODE
Use this to play back a tape.
: CARD RECORDING MODE
Use this to record still pictures on a card.
: CARD PLAYBACK MODE
Use this to play back the still pictures recorded on
a card.
: PC CONNECTION MODE
PC
You can view or edit the images recorded on a
card on your personal computer.
-51-
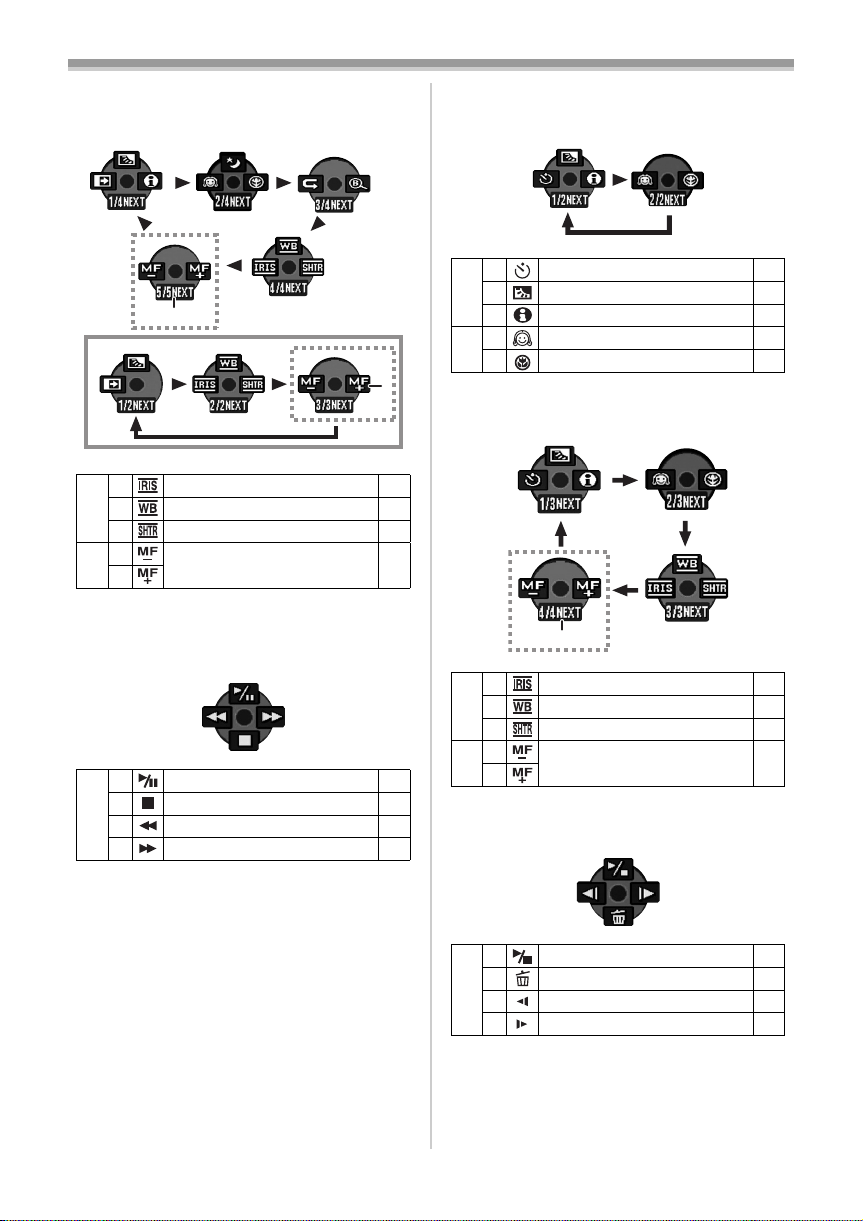
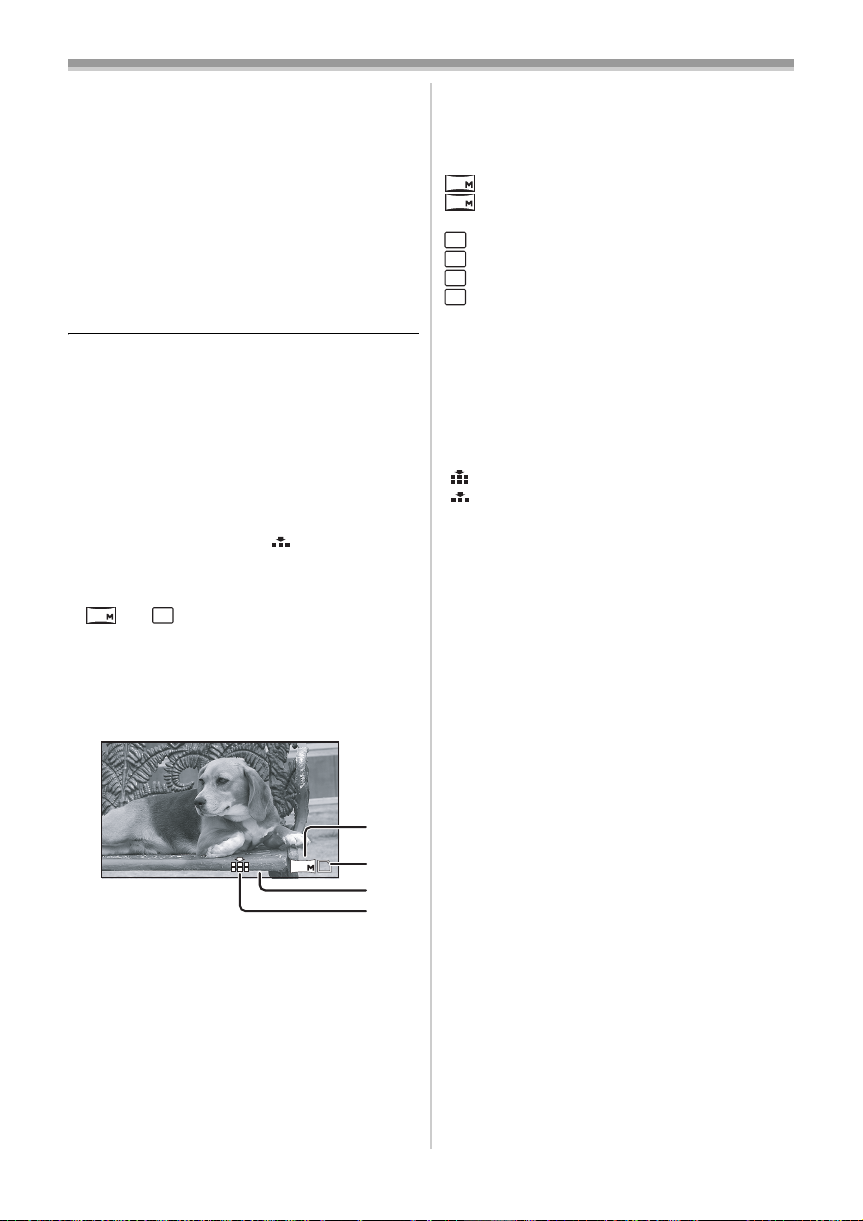
How to use the joystick
ª Basic joystick operations
Operations on the menu screen and selection
of files to be played back on the multi-image
display
Move the joystick up, down, left, or right to select
an item or file, and then push in the centre to set
it.
1 Select by moving up.
2 Select by moving down.
3 Select by moving left.
4 Select by moving right.
5 Determine by pushing the centre.
Joystick and screen display
ª
Push the centre of the joystick, and icons will be
displayed on the screen. Each time the joystick is
moved down, the indication changes.
(In the Tape playback mode or the Card Playback
Mode, the icons will be automatically displayed on
the screen.)
1) Tape recording mode
([AUTO/MANUAL/FOCUS] switch is set to
[AUTO])
1
2 Fade
3 Backlight compensation -30-
1/3
1 Help mode -19-
2 Soft skin mode
1 Tele macro -32-
2/3
3 Colour night view
2 Recording check
3/3
1 Blank search -26-
≥1 is displayed while recording on a tape.
-32-
-31-
-31-
-26-
17
VQT1A45
Before using
2) Tape recording mode
([AUTO/MANUAL/FOCUS] switch is set to
[MANUAL])
2
1
2 Iris or gain value
3 White balance -37-
4/4
1 Shutter speed -38-
2
5/5
Manual focus adjustment -38-
1
≥1 is displayed while recording on a tape.
≥2 is displayed only when the [AUTO/
MANUAL/FOCUS] switch is set to [FOCUS].
3) Tape playback mode
3 Playback/pause
4 Stop -40-
2 Rewind (review playback) -40-
1 Fast forward (cue playback) -40-
2
4) Card recording mode
([AUTO/MANUAL/FOCUS] switch is set to
[AUTO])
2 Self-timer recording
3 Backlight compensation -30-
1/2
1 Help mode -19-
2 Soft skin mode
2/2
1 Tele macro -32-
5) Card recording mode
([AUTO/MANUAL/FOCUS] switch is set to
[MANUAL])
-38-
2 Iris or gain value
3 White balance -37-
3/3
1 Shutter speed -38-
2
4/4
-40-
1
≥1 is displayed only when the [AUTO/
MANUAL/FOCUS] switch is set to [FOCUS].
6) Card Playback Mode
-34-
-31-
1
-38-
Manual focus adjustment -38-
18
VQT1A45
3 Slide show start/pause
4 Delete -44-
2 Playback the previous picture -43-
1 Playback the next picture -43-
-43-
Before using
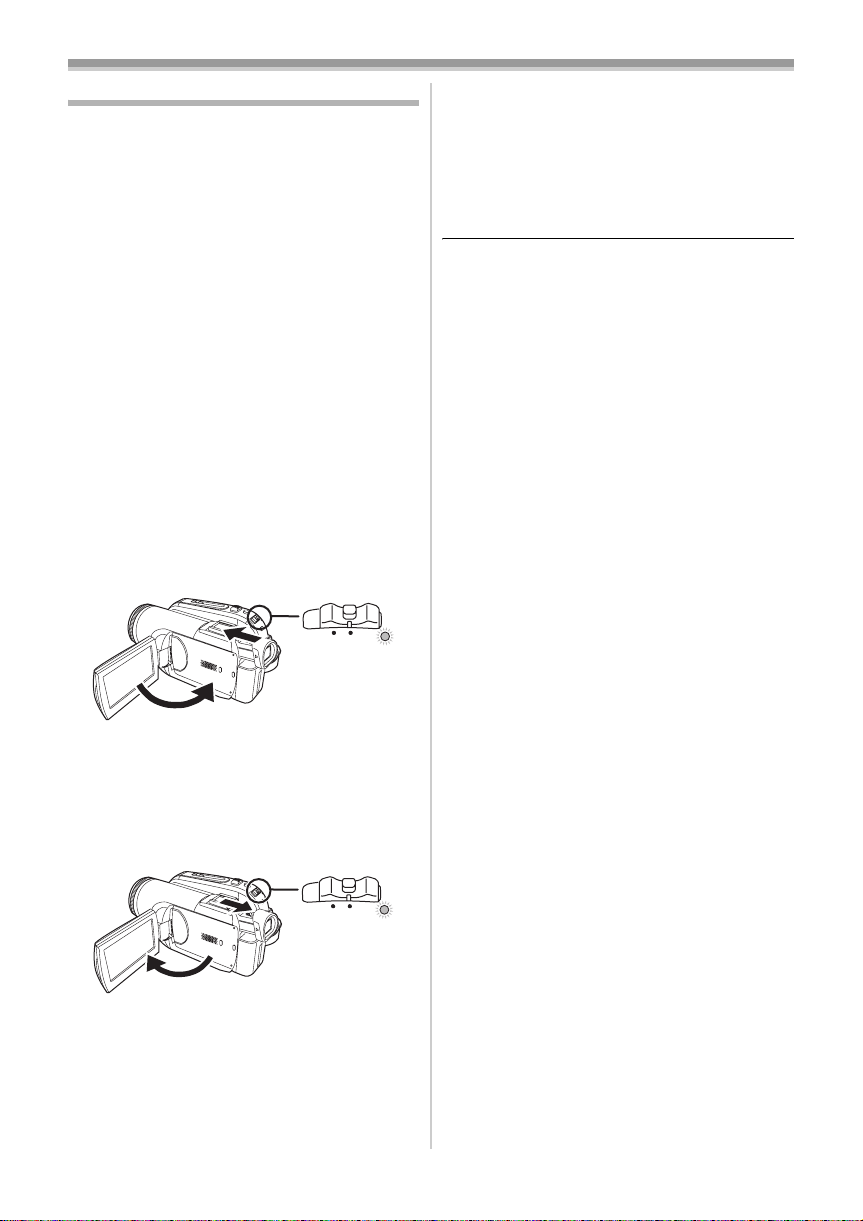
Help mode
Select an icon for an explanation of the function.
≥Set to Tape/Card Recording Mode.
1 Press the joystick to display the icon during
the recording pause. Move the joystick
down until icon 1 appears.
1
2 Move the joystick right to select the Help
mode icon [ ].
≥The help mode explains the operation icons
displayed when the [AUTO/MANUAL/
FOCUS] switch is set to [AUTO] in Tape/Card
Recording Mode.
3 Move the joystick up, left, or right to select
the desired icon.
Switching the language
You can switch the language on the screen
display or the menu screen.
1 Set [LANGUAGE] >> select the desired
language.
Using the menu screen
For each individual menu, please refer to -62-.
1 Press the [MENU] button.
MENU
≥The menu corresponding to the mode
selected by the mode dial is displayed.
≥Do not switch the mode dial when the menu is
displayed.
2 Move the joystick up or down in order to
select the top menu.
≥An explanation of the selected icon is
displayed on the screen.
≥Each time the joystick is moved down, the
indication changes.
To exit the Help mode
ª
Select [EXIT] icon or press the [MENU] button.
≥When the Help mode is used, it is not possible
to record or set the functions.
3 Move the joystick right or press it to set the
selection.
4 Move the joystick up or down in order to
select the sub-menu.
19
VQT1A45
Before using
5 Move the joystick right or press it to set the
selection.
6 Move the joystick up or down in order to
select the item to be set.
7 Press the joystick to determine the setting.
ª
To exit the menu screen
Press the [MENU] button.
To get back to the previous screen
ª
Move the joystick left.
≥Use the direction buttons (3, 2, 1, 4) and
[ENTER] button in place of the joystick on the
main unit.
3 Press the [MENU] button to exit the menu
screen.
About the menu setting
ª
≥The menu is not displayed while recording on a
tape or a card. Also, you cannot record on a
tape or a card while the menu is displayed.
Operating with remote control
ª
The menu screen transition is the same as when
the buttons on the main unit are used.
1 Press the [MENU] button.
2 Select a menu item.
20
VQT1A45

Before using
Adjusting LCD monitor/viewfinder
ª Adjusting the brightness and colour
level
Set [SETUP] >> [LCD SET] or [EVF SET] >>
1
[YES].
2 Move the joystick up or down in order to
select the item to be adjusted.
[LCD SET]
:Brightness of the LCD monitor
:Colour level of the LCD monitor
[EVF SET]
:Brightness of the viewfinder
3 Move the joystick left or right to move the
bar indication representing the brightness.
4 Press the [MENU] button or the joystick to
complete the settings.
≥When the LCD monitor is rotated by 180°
towards the lens, the brightness of the LCD
monitor cannot be adjusted.
≥To adjust the brightness of the viewfinder, close
the LCD monitor and extend the viewfinder to
activate it.
≥These settings will not affect the images actually
recorded.
In order to increase the brightness of
ª
the entire LCD monitor
Set [SETUP] >> [POWER LCD] >> [ON].
1
≥The [ ] indication appears on the LCD
monitor.
≥If the [POWER LCD] is set to [ON], the entire
LCD monitor will become approx. twice as
bright as the normal.
≥To cancel the [POWER LCD] function, set
[SETUP] >> [POWER LCD] >> [OFF].
≥This will not affect the images to be recorded.
≥If you turn on the camera when the AC adaptor
is used, the [POWER LCD] function will
automatically be activated.
≥You cannot use this function in PC Connection
Mode.
21
VQT1A45

Before using
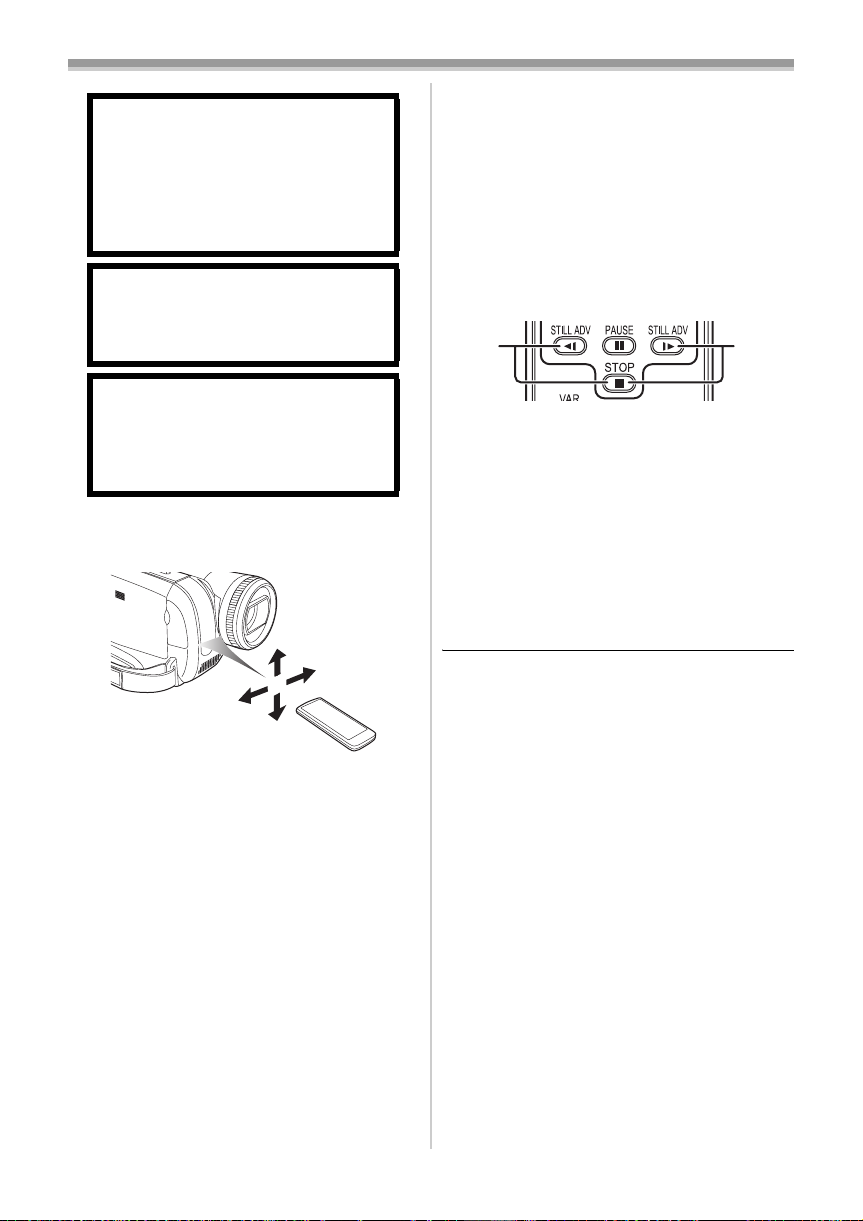
Using the remote control
ª Remote control
Using the remote control supplied will enable
controlling almost all the functions of this camera
to be controlled.
(1)
(2)
(1) On-screen display button [EXT DISPLAY]
-42-
Date/time button [DATE/TIME] -64-
(2)
(3)
Audio dubbing button [AUDIO DUB] -48-
Record button [¥REC] (not operable)
(4)
(5) Direction buttons [3, 2, 1, 4] -20-
(3)
(4)
(5)
(7)
(10)
(11)
(12)
(13)
Photoshot button [PHOTO SHOT] ¢
(10)
(11) Rewind/review button [6]
(12) Pause button [;]
(13) Stop button [∫]
(14) Recording start/stop button
(14)
(15)
(16)
(17)
[START/STOP] ¢
(15) Playback button [PLAY 1]
(16) Fast forward/cue button [5]
(17) Enter button [ENTER] -20-
¢ means that these buttons function in the same
manner as the corresponding buttons on the
movie camera.
Install a button-type battery
ª
Install the button-type battery supplied in the
remote control before using it.
1 While pressing the stopper 1, pull out the
battery holder.
(6)
(8)
(9)
(6)
Slow/frame-by-frame forward button
[E, D] (E: reverse, D: forward)
Zoom/volume button [ZOOM/VOL] ¢
(7)
(8) Search button [VAR SEARCH] -41-
(9)
Menu button [MENU] ¢ -20-
22
VQT1A45
1
2 Set the button-type battery with its (i) mark
facing upward and get the battery holder
back in place.
-41-
CAUTION
Danger of explosion if battery is
incorrectly replaced. Replace only with
the same or equivalent type
recommended by the manufacturer.
Dispose of used batteries according to
the manufacturer’s instructions.
Warning
Risk of fire, explosion and burns. Do not
recharge, disassemble, heat above
60 xC or incinerate.
Warning
Keep the Button-Type battery out of the
reach of children. Never put ButtonType battery in mouth. If swallowed call
your doctor.
ª Remote control usable range
Before using
Selecting the remote control mode
ª
If 2 cameras are used simultaneously, set the
mode for one pair of movie camera and remote
control to [VCR1] and that of the other pair to
[VCR2]. This will prevent interference between
the 2 pairs. (The default setting is [VCR1]. When
the button-type battery is replaced, the setting will
revert to the default [VCR1].)
1 Setting on the camera:
Set [SETUP] >> [REMOTE] >> [VCR1] or
[VCR2].
2 Setting on the remote control:
2 1
[VCR1]:
Press [D] and [∫] simultaneously. 1
[VCR2]:
Press [E] and [∫] simultaneously. 2
Concerning the button-type battery
ª
≥When the button-type battery runs down,
replace it with a new battery (part number:
CR2025). The battery is normally expected to
last about 1 year, but it depends on operation
frequency.
≥Keep the button-type battery out of the reach of
children.
≥The distance between the remote control and
the camera: Within approx. 5 m
Angle: Approx. 10o up and 15o down, left, and
right
≥If the remote control mode of the camera and
that of the remote control do not match with
each other, “REMOTE” will appear. When the
remote control is operated for the first time after
the camera is turned on, “CHECK REMOTE
MODE” (
impossible. Set the same remote control mode.
≥The remote control is intended for indoor
operation. Outdoors or under strong light, the
movie camera may not operate properly even
within the usable ranges.
-67-) will appear and operation is
VQT1A45
23

Record mode
Record mode
Check before recording
Check the following before recording important
events such as weddings or when the movie
camera has not been used for a long time.
Conduct a test recording to make sure that the image
recording and the audio recording work properly.
ª Basic camera holding
1)
2)
4)
3)
5)
1) Hold the camera with both hands.
2) Run your hand through the grip belt.
3) Do not cover the microphones or sensors with
your hands.
4) Keep your arms near your body.
5) Slightly open your legs.
≥When you are in the open air, record pictures
with the sunlight as far in the background as
possible. If the subject is backlit, it will become
dark in the recording.
Check points
ª
≥Remove the lens cap. (-8-)
(When the camera is turned on with the lens cap
fitted, the automatic white balance adjustment
may not function properly. Please turn the
camera on after removing the lens cap.)
≥Grip belt adjustment (
≥Open the LCD monitor or extend the viewfinder.
(Recording cannot start while the LCD monitor
and viewfinder are closed. Even if the LCD
monitor and viewfinder are closed during
recording, the power will not turn off until
recording stops.)
≥Adjusting LCD monitor/viewfinder (
24
VQT1A45
-9-)
-21-)
≥Power supply (
≥Insert a cassette/card (
≥Setting date/time (
≥Getting the remote control ready (
≥Setting SP/LP mode (
About auto mode
ª
≥Set the [AUTO/MANUAL/FOCUS] switch to
[AUTO], and colour balance (white balance) and
focusing will be adjusted automatically.
≥Auto white balance:
≥Auto focusing: -78-
≥Depending on the brightness of the subject etc.,
the aperture and shutter speed are
automatically adjusted for an optimum
brightness. (When set to the Tape recording
mode: The shutter speed is adjusted to a
maximum of 1/250.)
≥Colour balance and focus may not be adjusted
depending on light sources or scenes. If so,
manually adjust the white balance and focus.
≥Scene mode setting (
≥White balance setting (
≥Shutter speed setting (
≥Iris/gain value setting (
≥Focus setting (
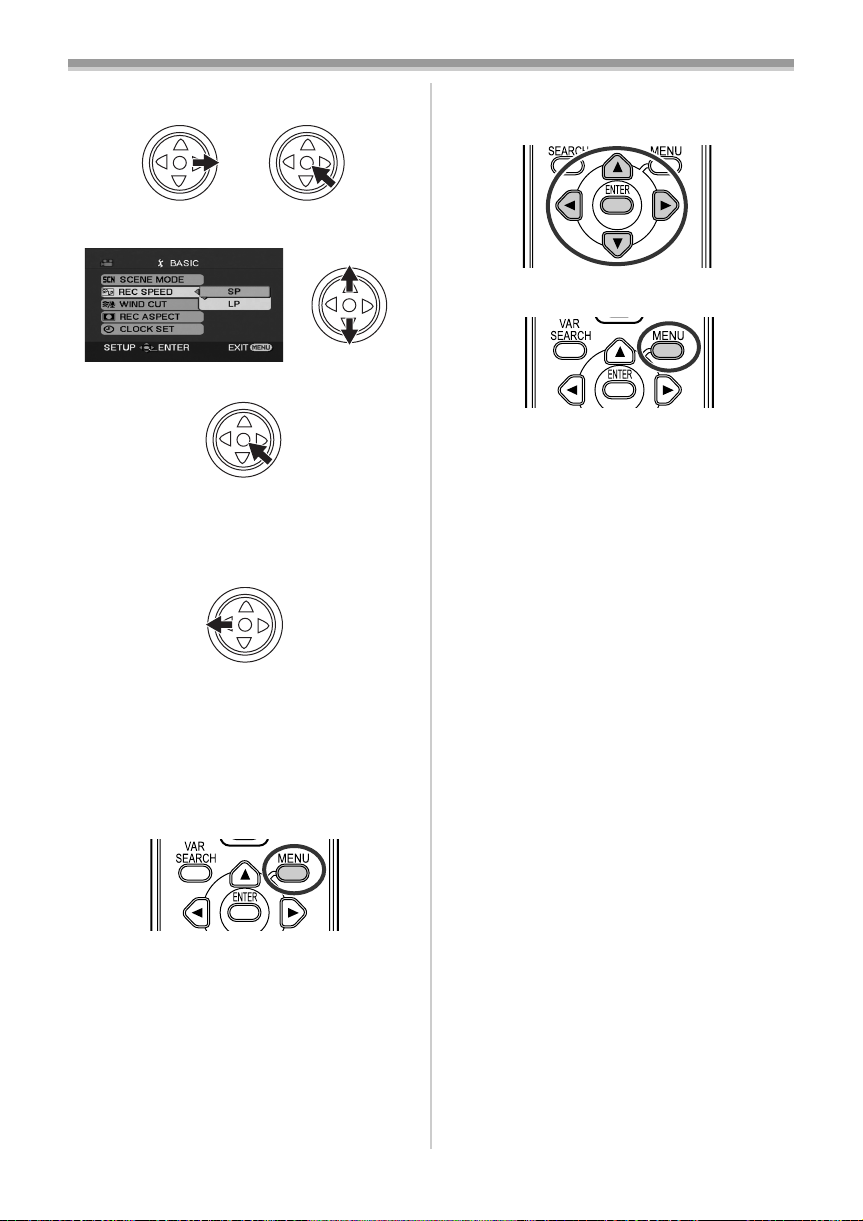
Recording mode
ª
You can switch the tape recording mode.
≥Set to Tape Recording Mode.
-9-)
-15-, -16-)
-12-)
-22-)
-24-)
-77-
-36-)
-37-)
-38-)
-38-)
-38-)
1 Set [BASIC] >> [REC SPEED] >> [SP] or
[LP].
If the LP mode is selected, the recording time will
be 1.5 times the SP mode, but some functions will
be disabled.
≥We recommend using the SP mode for
important recording.
≥In order to fully exhibit the performances of the
LP mode, we recommend using Panasonic
cassettes marked LP mode.
≥It is not possible to dub audio onto image
recorded in the LP mode. (
≥In the LP mode, the picture quality will not be
degraded in comparison with the SP mode, but
mosaic noise may appear on the playback
image or some functions may be disabled.
≥Playback on other digital video equipment
or on digital video equipment without the LP
mode.
≥Playback of the image on other digital video
equipment recorded in the LP mode.
≥Slow/frame-by-frame playback.
-48-)
Record mode
100
Recording on a tape
Remove the lens cap. (-8-)
(When the camera is turned on with the lens
cap fitted, the automatic white balance
adjustment may not function properly. Please
turn the camera on after removing the lens
cap.)
When this unit is purchased, the aspect ratio is
set to [16:9] for recording images compatible with
a wide-screen TV. To make this unit compatible
with regular TVs (4:3), change the
[REC ASPECT] setting before recording the
images (
when watching them on the connected TV (
≥Set to Tape Recording Mode.
1 Press the recording start/stop button to
2 Press the recording start/stop button again
-34-) or change the [TV ASPECT] setting
-42-).
start recording.
to pause recording.
;
ª
On-screen display in the tape
recording mode
1)
0h00m10s00f
100
R0:30
0.2
2)
3)¢
4)¢
5)¢
6)¢
¢These are only displayed when you press the
[ ] button half way while a card is inserted.
These are not displayed when using the remote
control.
1) Recording time elapse
2) Remaining tape indication
3) Still picture size
4) Card indication (
-66-)
5) Number of recordable still pictures
(When no picture can be recorded, this
indication will flash in red.)
6) Quality of still pictures
Concerning the remaining tape time
ª
indication on the screen
≥The remaining tape time is indicated in minutes.
(When it reaches less than 3 minutes, the
indication starts flashing.)
≥During a 15-second or shorter recording, the
remaining tape time indication may not be
displayed or the remaining tape time may not be
displayed correctly.
≥In some cases, the remaining tape time
indication may display remaining tape time that
is 2 to 3 minutes shorter than the actual
remaining tape time.
≥For the recording time on a tape, refer to
≥Carry out a recording check (
-26-) to verify that
-11-.
the image is recorded properly.
≥In order to find the unrecorded section, carry out
the blank search (
-26-).
≥If you want to preserve the original sound
recorded when audio dubbing (
-48-), set
[ADVANCED] >> [AUDIO REC] >> [12bit] to
take pictures.
25
VQT1A45
Record mode
Recording check
The last image recorded is played back for 2 to
3 seconds. After checking, the camera will be set
to a recording pause.
≥Set to Tape Recording Mode.
1 Press the joystick to display the icon during
the recording pause. Move the joystick
down until icon 1 appears.
2 Move the joystick left to select the
recording check icon [ ].
1
≥The [RECORDING CHECK STARTED]
indication appears on the screen of the movie
camera.
Blank search function
Searches for the last part of the image recorded
(unused part of the tape). After the search is
finished, the blank search function is cancelled
and the camera is put into recording pause.
≥Set to Tape Recording Mode.
1 Press the joystick to display the icon during
the recording pause. Move the joystick
down until icon 1 appears.
2 Move the joystick right to select the blank
search icon [ ].
1
3 When the confirmation message appears,
select [YES] and press the centre of the
joystick.
Stopping blank search midway
ª
through
Move the joystick down to select the [∫] icon.
26
VQT1A45
≥If the cassette tape has no blank part, then the
camera will stop at the end of the tape.
≥The camera stops at a point approx. 1 second
before the end of the last image recorded.
When you start recording at that point, the
image can be recorded seamlessly from the last
image.
Record mode
Recording still pictures on a card
while recording image onto a tape
You can record still pictures while recording
image onto a tape.
≥Set to Tape Recording Mode.
1 Press the [ ] button fully while recording
image onto a tape.
≥For the number of still pictures to be recorded
on a card, refer to
≥When recording pictures onto a card, the
recording start/stop button is disabled.
≥You can select a picture quality for still pictures
to be recorded. (
≥In order to record still pictures with higher
quality, we recommend using the Card
recording mode.
≥When recording still pictures, hold the movie
camera firmly with your hands and keep your
arms stationary at your side so as not to shake
the movie camera.
Select the size of still pictures to be
ª
recorded on a card in Tape Recording
Mode
Set [ADVANCED] >> [PICTURE SIZE] >>
1
select the desired picture size.
REC ASPECT [16:9]:
: 1280t720
1
: 640t360
0.2
REC ASPECT [4:3]:
: 1280t960
1
M
: 640t480
0.3
M
-80-.
-28-)
Recording still pictures onto a card
(Photoshot)
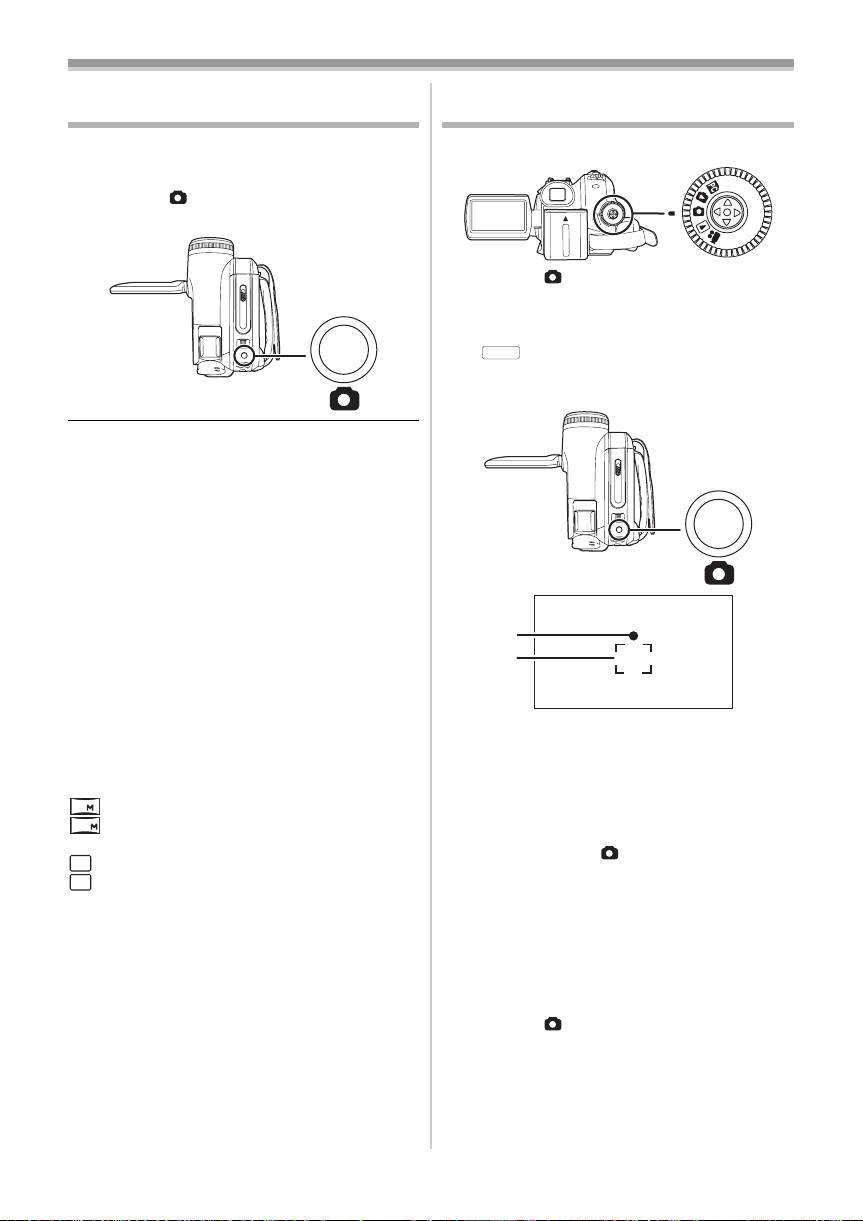
≥Set to Card Recording Mode.
1 Press the [ ] button halfway in order to
adjust focusing. (For auto focusing only)
≥If you set [O.I.S.] to [ON], then the image
stabilizer function will be more effective.
MEGA
([ (MEGA OIS)] will be indicated.)
≥The iris/gain value is fixed and this camera
focuses on the subject automatically.
1
2
1 Shutter chance mark
± (The white lamp flashes.):
¥ (The green lamp lights up.):
No mark: When focusing is unsuccessful
≥The shutter chance mark is indicated as
follows when the [ ] button is not pressed
halfway. Please use it as a guide for
recording.
¥ (The green lamp lights up.):
± (The white lamp lights up.):
2 Focus area
2 Press the [ ] button fully.
Focusing
When in focus
When in focus and a good
picture can be recorded
Almost in focus
27
VQT1A45
Record mode
100
ª To record still pictures clearly
≥When zooming in on the subject with a
magnification of 4k or higher, it is difficult to
reduce the slight shaking from holding the
movie camera by hand. We recommend
decreasing the zoom magnification and
approaching the subject when recording.
≥When recording still pictures, hold the movie
camera firmly with your hands and keep your
arms stationary at your side so as not to shake
the movie camera.
≥You can record stable pictures without shaking
by using a tripod and the remote control.
≥For the number of still pictures to be recorded
on a card, refer to
-80-.
≥The moving picture and sound cannot be
recorded.
≥While data are recorded on a card, do not
operate the mode dial.
≥When the access lamp is lit, do not insert or
remove a card.
≥Another product may degrade or not play back
data recorded on this camera.
≥If set [PICT.QUALITY] >> [ ], mosaic-pattern
noise may appear on a playback image
depending on the picture content.
≥When the [PICTURE SIZE] is set to other than
[ ] or [ ], the mega pixel recording mode
0.2
0.3
M
is set.
≥It is not possible to press the [PHOTO SHOT]
button on the remote control halfway.
On-screen display in the card
ª
recording mode
1)
100
2.4
1) Still picture size
2) Card indication (
-66-)
3) Number of recordable still pictures
(When no picture can be recorded, this
indication will flash in red.)
4) Quality of still pictures
2)
3)
4)
Select the size of still pictures to be
ª
recorded on a card
Set [BASIC] >> [PICTURE SIZE] >> select
1
the desired picture size.
REC ASPECT [16:9]:
: 2048t1152
2.4
: 640t360
0.2
REC ASPECT [4:3]:
: 2048t1512
3.1
M
: 1600t1200
2
M
: 1280t960
1
M
: 640t480
0.3
M
≥When you purchase this unit, [REC ASPECT] is
set to [16:9]. The sides of pictures recorded
when [16:9] is set may be cut at printing. Check
before printing.
Select the picture quality for
ª
photoshot images
Set [BASIC] >> [PICT.QUALITY] >> select
1
the desired picture quality.
[ ]: High picture quality
[ ]: Normal picture quality
≥You can also change the picture quality on
[ADVANCED] >> [PICT.QUALITY] in the tape
recording mode.
Recording with a shutter operation
ª
effect
You can add a shutter operation simulating
sound.
1 Set [ADVANCED] >> [SHTR EFFECT] >>
[ON].
About the shutter chance mark
ª
≥The shutter chance mark does not appear in
manual focus mode.
≥When the subject is not easily focused, focus on
the subject manually.
≥You can record still pictures on the card even if
the shutter chance mark does not appear, but
pictures may be recorded without being
focused.
≥The shutter chance mark does not appear or
becomes difficult to be displayed in the following
cases.
≥When the zoom magnification is high.
≥When the movie camera is shaken.
≥When the subject is moving.
≥When the subject stands against the light
source.
≥When close subjects and far subjects are
included in the same scene.
≥When the scene is dark.
≥When there is a bright part in the scene.
≥When the scene is filled with only horizontal
lines.
28
VQT1A45

Record mode
1t t W
T
5t t W
T
t W
T
t W
T
≥When the scene lacks contrast.
≥When recording on tape.
Concerning the focusing area
ª
≥When there is a contrasting object ahead or
behind the subject in the focus area, the subject
may not be focused. If so, move the contrasting
object out of the focus area.
≥Even when it is still difficult to focus, adjust the
focus manually.
Zoom in/out function
You can zoom in up to 10t optically.
≥Set to Tape/Card Recording Mode.
1 Wide-angle recording (zoom out):
Push the [W/T] lever towards [W].
Close-up recording (zoom in):
Push the [W/T] lever towards [T].
VOL
1010t
≥When zooming in and taking a picture while
holding the movie camera by hand, we
recommend using the image stabilizer function.
≥When you are zooming on a faraway subject, a
sharper focus is achieved if the recording
subject is 1.0 metres or further from the movie
camera.
≥When the zoom speed is high, the subject may
not be focused easily.
≥When the zoom magnification is 1t, the movie
camera can focus on a subject approx. 4.0 cm
distant from the lens.
≥Be aware that a mechanical sound may be
recorded when the [W/T] lever is released while
zooming. Gently move the zoom lever back to
it's original possition before releasing it.
Digital zoom function
ª
If the zoom magnification exceeds 10 times, then
the digital zoom function will be activated. The
digital zoom function allows you to select a
magnification from 25t to 700t.
≥Set to Tape Recording Mode.
1 Set [ADVANCED] >> [D.ZOOM] >> [25t] or
[700t].
5050t
[OFF]: Optical zoom only (Up to 10t)
[25t]: Digital zoom (Up to 25t)
[700t]: Digital zoom (Up to 700t)
≥The larger the digital zoom magnification, the
more the image quality is degraded.
≥When the Card Recording mode is used, the
digital zoom function cannot be used.
About the variable speed zoom
ª
function
≥The zoom speed varies according to the amount
of movement of the [W/T] lever.
≥The variable speed zoom function cannot be
used with the remote control.
To use the zoom microphone function
ª
Interlocked with the zooming operation, the
microphone will collect sounds clearly far away
with the tele-shot or those in the vicinity with the
wide-angle shot.
≥Set to Tape Recording Mode.
1 Set [ADVANCED] >> [ZOOM MIC] >> [ON].
ZOOM
29
VQT1A45
Record mode
ª
Recording yourself
You can record yourself while viewing the LCD
monitor. You can record persons in front of the
camera while presenting them the image. The
image is horizontally flipped as if you see a mirror
image. (However the image to be recorded is not
altered.)
≥Extend the viewfinder to see the picture
while recording.
1
Rotate the LCD monitor towards the lens side.
≥
When the Wide function is set, a vertically oriented
display appears on the viewfinder screen, this is
normal and not indicative of any trouble.
≥When the LCD monitor is rotated towards the
lens side, the icon will not be displayed even if
you push the centre of the joystick.
Backlight compensation function
This protects a backlit subject from being darkened.
≥Set to Tape/Card Recording Mode.
1 Press the joystick to display the icon. Move
the joystick down until icon 1 appears.
2 Move the joystick up to select the backlight
compensation icon [ ].
1
≥The [BACKLIGHT COMPENSATION ON]
indication appears on the screen of the movie
camera.
The image on the screen will become brighter.
≥
ª To return to normal recording
Select the [ ] icon again.
≥The [BACKLIGHT COMPENSATION OFF]
indication appears on the screen of the movie
camera.
≥The backlight compensation function is
cancelled when you turn off the power or
operate the mode dial.
≥The backlight compensation is cancelled when
you activate the colour night view function.
30
VQT1A45
 Loading...