

Page 1
Operating Instructions
Microwave Oven
Model NN-GX35
This manual contains Safety Instructions, Operating Instructions and Maintenance of the oven.
Before operating this oven, please read these instructions completely.
Antes de operar este producto, lea este instructivo en su totalidad.
El manual de instrucciones en español puede ser encontrada en la páginas 21-29
(Spanish Operating Instructions can be found on pages 21-29)
Panasonic Consumer Electronics Panasonic Sales Company, Division
Company, Division of Matsushita of Matsushita Electric of Puerto Rico,
Electric Corporation of America Inc. (“PSC”)
One Panasonic Way Ave. 65 de Infanteria, Km. 9.5
Secaucus, New Jersey 07094 San Gabriel Industrial Park,
Carolina, Puerto Rico 00985
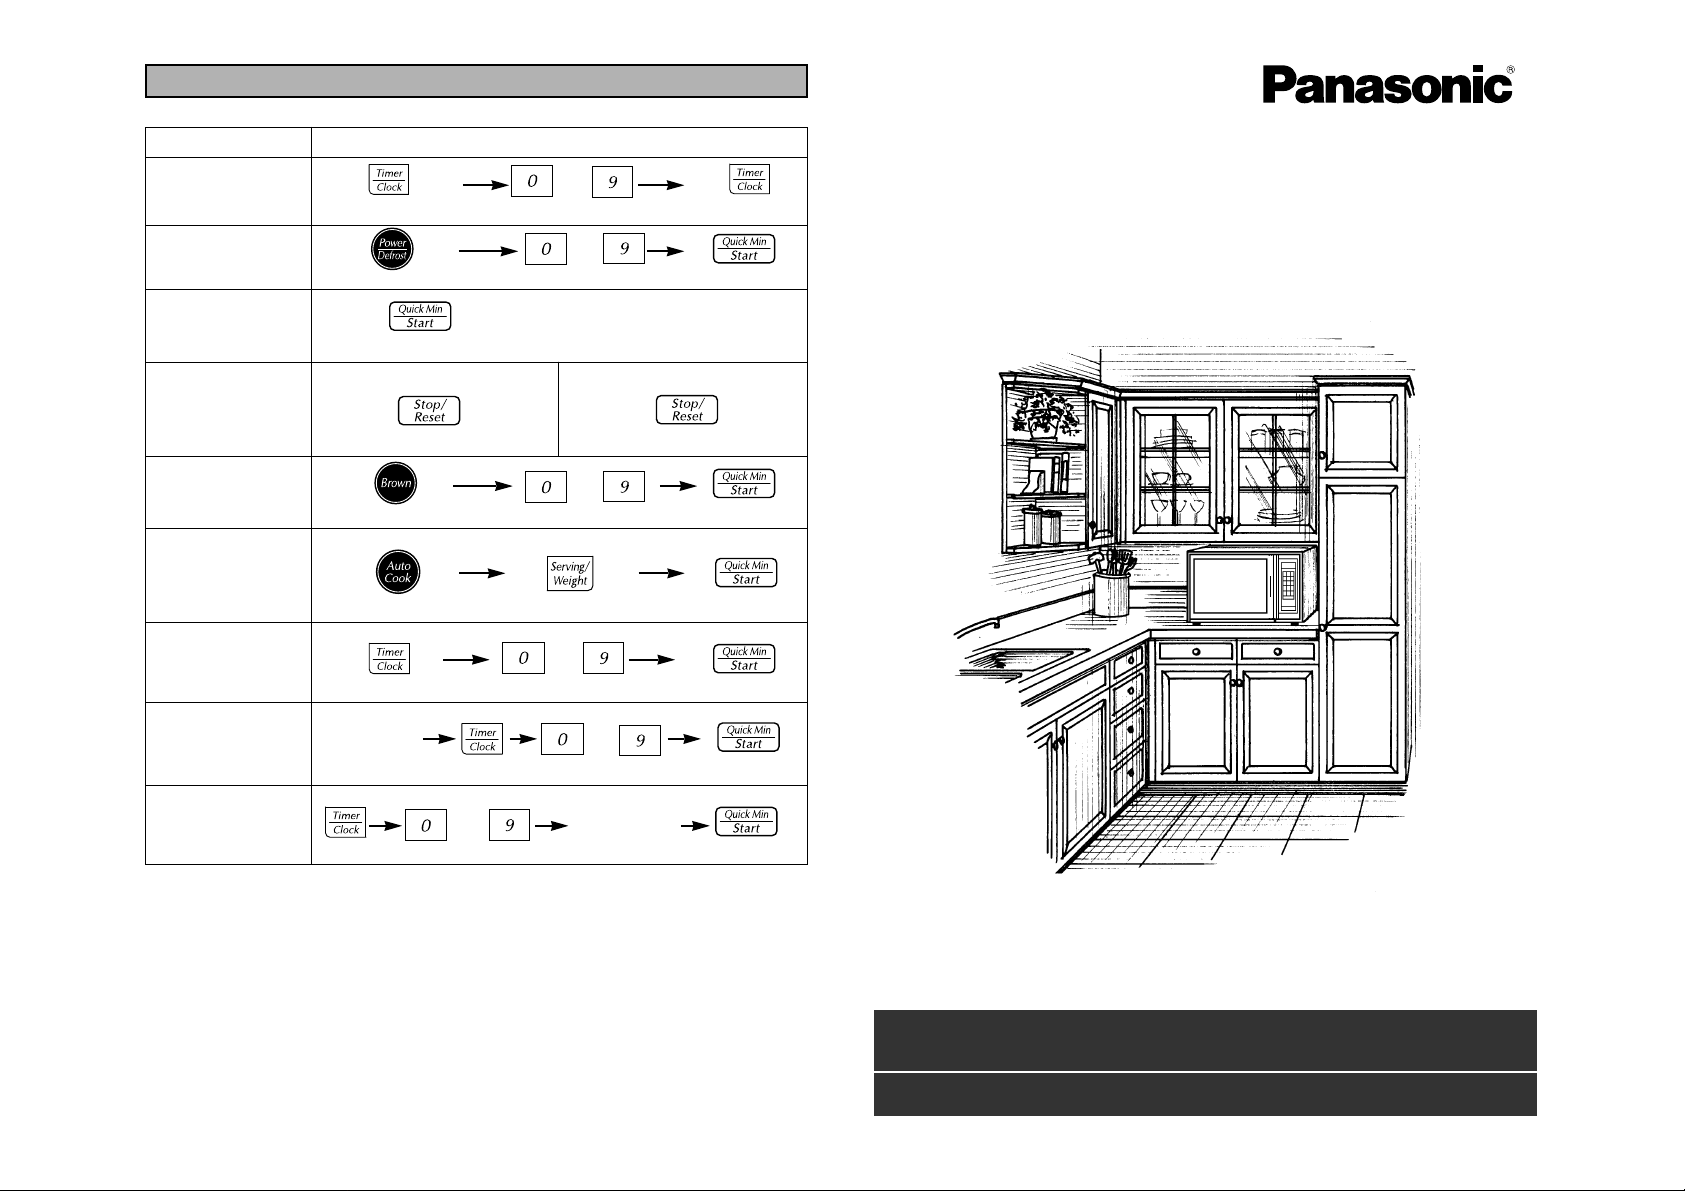
Feature How to Operate
To Set Clock
(☛page 8)
To Set
Power and Time
(☛ page 8)
To Cook using
Quick Min Pad
(☛ page 9)
To Use as
a Kitchen Timer
(☛page 14)
To Set Stand Time
(☛page 14)
To Set Delay Start
(☛page 14)
Enter time of day.
Press twice.
Press.
Press.Press to select Power Level
(up to 10 min.)
Press.
Press.
Input up to 4-
stage cooking
programs.
(
)
Input up to 4-
stage cooking
programs.
(
)
Press.
Press.
Press.
Press.
To Cook using
Auto Cook Pad
(☛page 11-13)
Thru
Set cooking time.
QUICK GUIDE TO OPERATION
F00035G60AP
FLE 0702-0
Printed in China
Thru
Thru
Thru
Thru
To Set Brown Pad
(☛ page 9)
Press.
Thru
Press.
Select serving/weight.
Select category.
Press.
For assistance, please call :1-800-211-PANA(7262)
or send e-mail to :consumerproducts@panasonic.com
or visit us at www.panasonic.com (U.S.A)
For assistance, please call : 787-750-4300
or visit us at
www.panasonicpr.com (Puerto Rico)
To Use Child
Safety Lock
(☛page 9)
Press 3 times
To Set:
Press 3 times
To Cancel:
Page 2
Thank you for purchasing a Panasonic Microwave Oven.
PRECAUTIONS TO AVOID
POSSIBLE EXPOSURE TO
EXCESSIVE MICROW AVE ENERGY
(a) Do not attempt to operate this oven with the door open since open-door
operation can result in harmful exposure to microwave energy. It is
important not to defeat or tamper with the safety interlocks. Under normal conditions oven will not operate with door open.
(b) Do not place any object between the oven front face and the door or
allow soil or cleaner residue to accumulate on sealing surfaces.
(c) Do not operate the oven if it is damaged. It is particularly important that
the oven door closes properly and that there is no damage to the:
(1) door (bent),
(2) hinges and latches (broken or loosened),
(3) door seals and sealing surfaces.
(d) The oven should not be adjusted or repaired by anyone except properly
qualified service personnel.
© Copyrighted by Matsushita Electric Industrial Co., Ltd. 2002.
The serial number of this product may be
found on the back side of the oven. You
should note the model number and the
serial number of this oven in the space
provided and retain this book as a permanent record of your purchase for future reference.
Model No. _________________________
Serial No. _________________________
Date of Purchase ___________________
Technical Specifications
*IEC Test procedure Specifications subject to change without notice.
Power Source: 120V, 60Hz
Power Consumption: 10.5 Amps, 1,230 W
Output: Microwave* 800W
Grill 1,100 W
Outside Dimensions 11
1
/8" x 19" x 14"
(H x W x D): (282 x 484 x 357mm)
Oven Cavity Dimensions 8
9
/16" x 123/4" x 13"
(H x W x D): (191 x 325 x 330 mm)
Operating Frequency: 2,450 MHz
Uncrated Weight: Approx. 34 lbs. (15.5 kg)
29
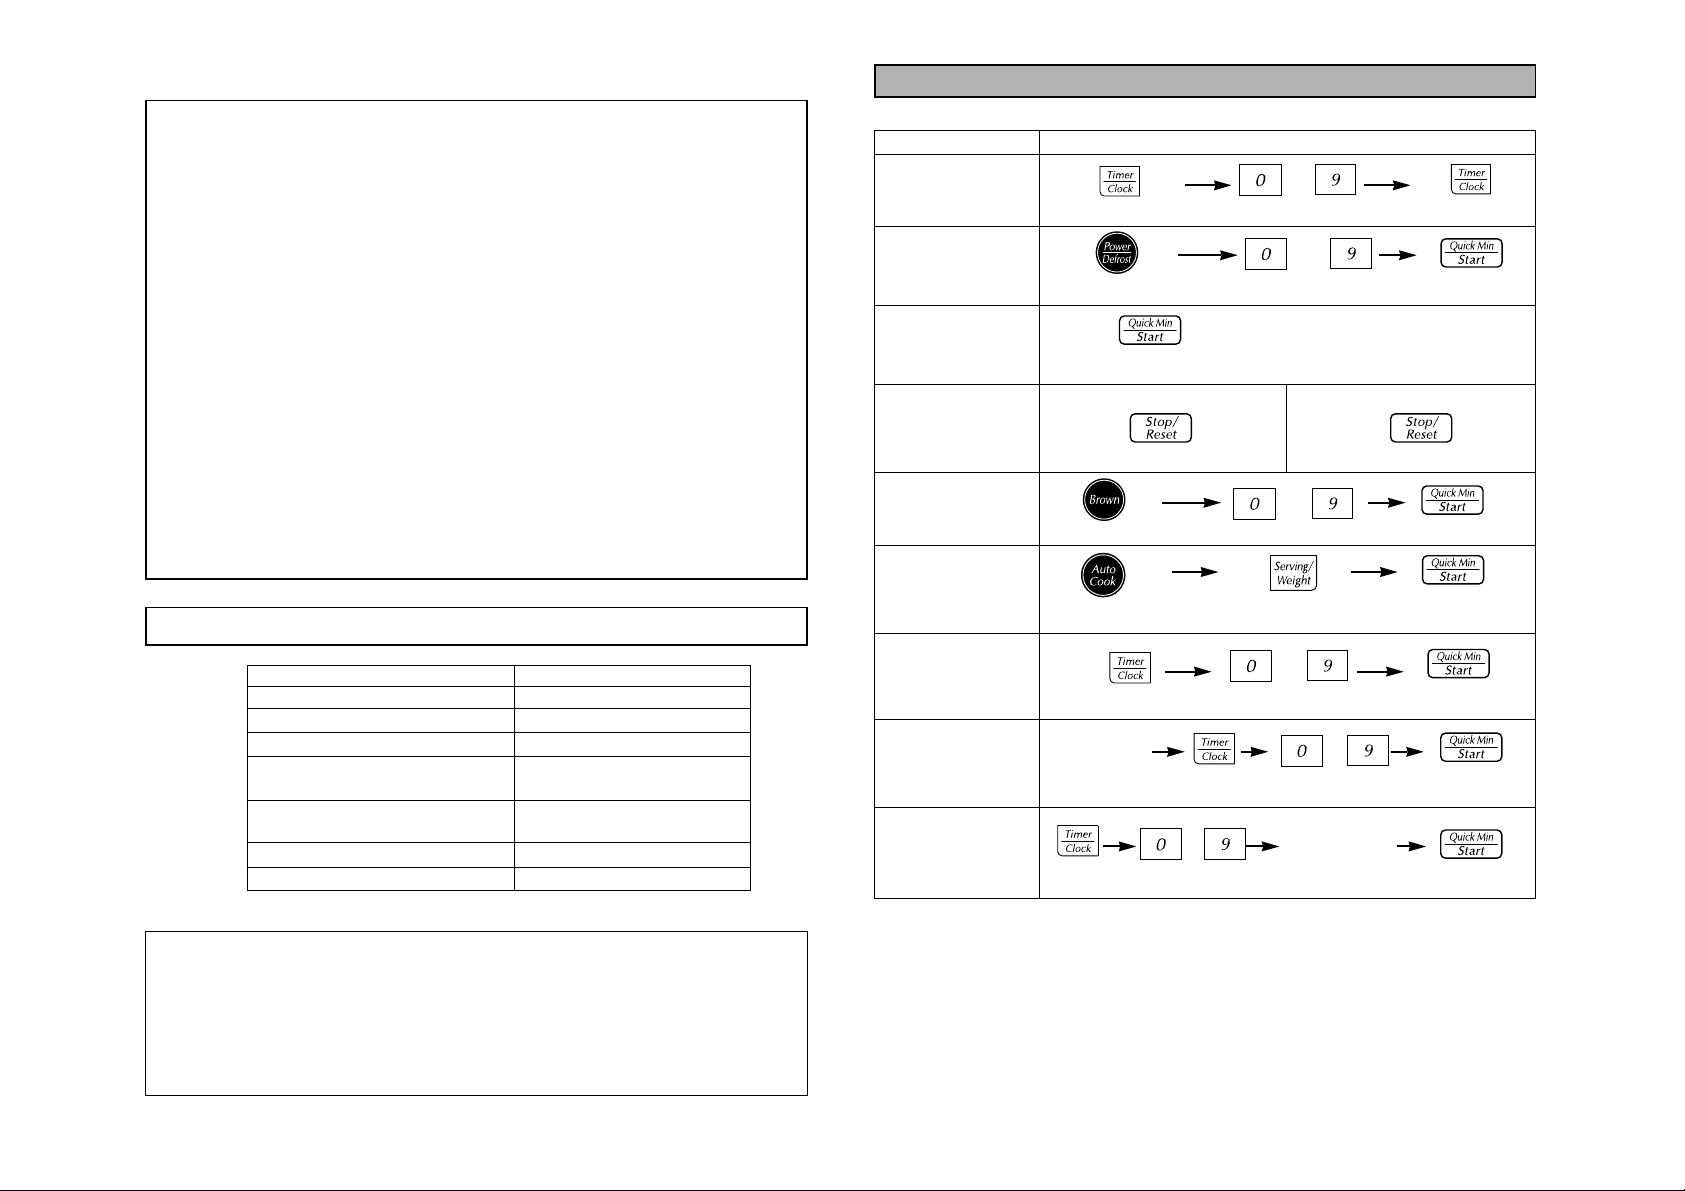
Para Poner el Reloj en
la Hora
Para Ajuste de
Potencia y Tiempo
Minuto Automático
Para Usar como en
temporizador de
cocina
Para Establecar el
tiempo de
Permanencia
Para Establecer Inicio
de Efecto Retardado
Registre la hora o dia.
Presione des veces.
Presione.
Presione.
Seleccione potencia.
(hasta a 10)
Presione.
Presione.
Presione.
Presione.
Presione.
Presione.
Para Cocinar usando
el Pulsador Auto
Cocción
To set Brown Pad
Establezca el tiempo de cocción.
GUIA RAPIDA DE OPERACIÓN
Caracteristica Como Operala
Registre el
programa de
Cocción
deseado.
(
)
Registre el
programa de
Cocción
deseado.
(
)
a
a
a
a
a
Presione.
Seleccione porciones/peso.
Seleccione la categoria.
Seguro Para Niños
Presione tres veces
Para Activar
Presione tres veces
Para Desactiver
Presione.
a
Presione.
Page 3

3.
Opcional
1
CONTENTS
Before Operating
Precautions...............................................................................................Inside Front Cover
Important Safety Instructions ..........................................................................................2-3
Installation and Grounding Instructions............................................................................4
Safety Precautions.................................................................................................................5
Cookware and Utensil Guide.................................................................................................6
Feature Diagram....................................................................................................................7
Control Panel .........................................................................................................................7
Operation & Hints
Let's Start to Use Your Oven .................................................................................................8
To Set Clock ...........................................................................................................................8
To Use Child Safety Lock.......................................................................................................9
To Use Brown Function..........................................................................................................9
To Use Popcorn Function .....................................................................................................11
Additional Method for Cooking Popcorn...............................................................................11
To Reheat using Power & Time Setting............................................................................8
Reheat Function ..................................................................................12
To Defrost using Power & Time Setting............................................................................8
Defrost Pad......................................................................................8, 10
To Cook using Power & Time Setting............................................................................8
Auto Cook Pad ...............................................................................12-13
Quick Min...............................................................................................9
To Set Timer (Stand Time / Delay Start)..............................................................................14
Microwave Shortcuts............................................................................................................15
Food Characteristics............................................................................................................16
Cooking Techniques........................................................................................................16-17
Quick Guide to Operation...................................................................................Back Cover
Maintenance
Technical Specifications.............................................................................Inside Front Cover
To Order Accessories, Book, etc..........................................................................................18
Care of Your Microwave Oven.............................................................................................18
Before Requesting Service ..................................................................................................19
Limited Warranty & Customer Services Directory................................................................20
Manual de instrucciones (Spanish Operating Instructions)
Precauciónes......................................................................................................................21
Instrucciones de Seguridad.........................................................................................22-23
Instrucciones para Conexión a Tierra..............................................................................23
Instrucciones de Instalación.............................................................................................24
Sugerencias Utiles...............................................................................................................25
Panel de Control ..................................................................................................................26
Procedimientos de Operación ........................................................................................26-28
Guia Rapida de Operación ..................................................................................................29
28
For assistance, PLEASE CALL 1-800-211-PANA (7262)
Palomitas de maíz
Para usar con bolsas de palomitas de maíz
para horno de microondas:
Ejemplo: Para cocinar un paquete de 99 g
de palomitas de maíz .
NOTAS:
1. Los paquetes de palomitas de maíz
deberían estar a temperatura ambiente.
2. Colocar la bolsa de acuerdo con las instrucciones del fabricante.
3. Cocinar las bolsa una a una.
4. To obtain best cooking results, fold in the four
corners of the bag, so that bag turns freely.
5. Una vez que las palomitas estén ya cocinadas, permitir que la bolsa se enfríe. Abrir
cuidadosamente la bolsa, manteniéndola
apartada de la cara y del cuerpo, ya que las
palomitas y el vapor están extremedamente
calientes.
6. NUNCA deje el horno sin atención cuando
prepare palomitas de maíz.
7. No recalentar nunca granos que no se
hayan convertido en palomitas ni
reutilizar la bolsa. Para el horno de
microondas cuandolas palomitas de maíz
brinquen a Lentaments de 2 a 3
segundos si se sobrecocinan. Puede
quemarse.
REMARK:
1. Popcorn bags of various weight may have the
same cooking time.
2. Cooking time for popcorn may vary with power
line voltage.
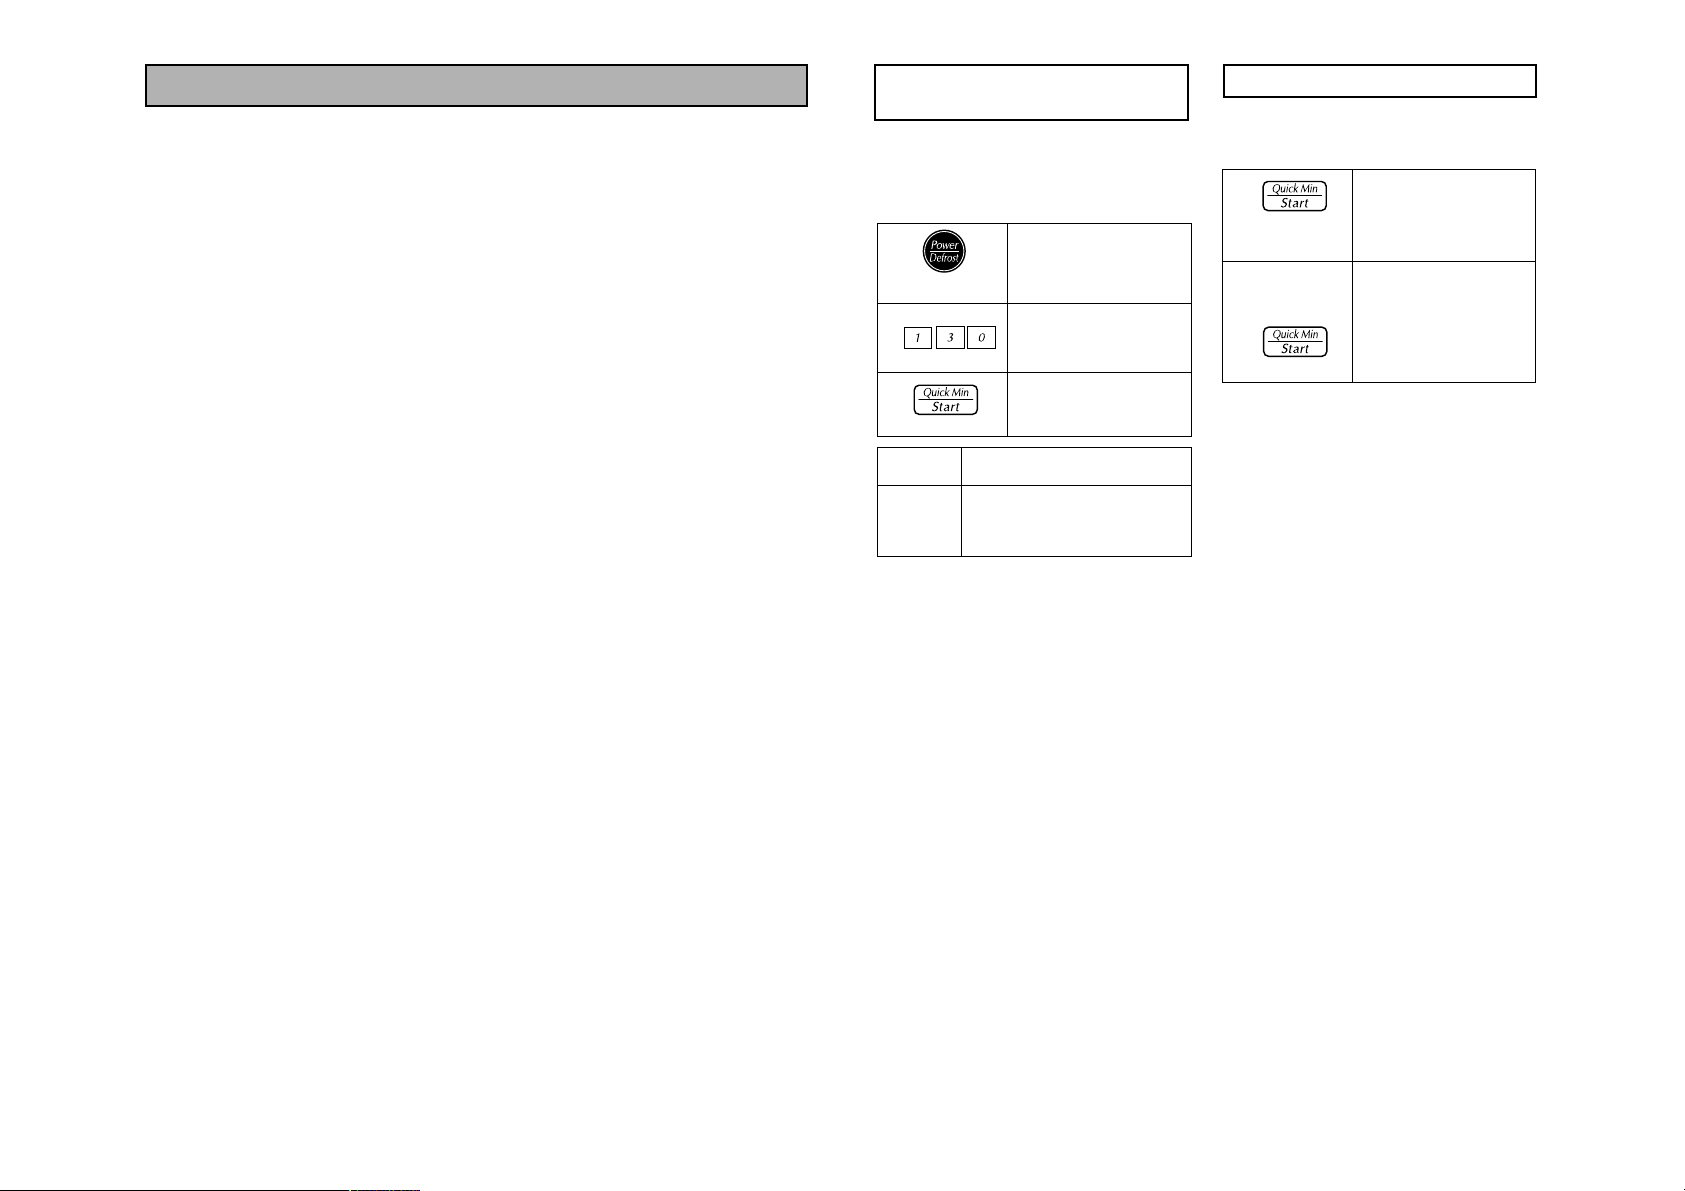
Método adicional para
preparar palomitas
Al utilizar el botón para palomitas de maíz,
el peso real puede no ser el indicado. Con
los botones 1o 0, se pueden ajustar los
programas para preparar alimentos de un
peso mayor o menor.
Pulsar 1o 0antes de pulsar Encender.
1. • Presione des veces.
2.
Presione una vez
4. • Presione
ENCENDER (START).
➤
Tras varios segundos,
se muestra el tiempo
de preparación en el
Visor y comienza a
transcurrir el tiempo.
Presione
o
3,5 oz (99 g)
3,0 oz (85 g)
una vez
dos veces
Presione
Para el control con 1o 0:
Presione
1 pulsación = Más
+
2 pulsaciones = Más
++
1 pulsación = Menos
-
2 pulsaciones = Menos
--
Page 4
2
IMPORTANT SAFETY INSTRUCTIONS
27
W ARNING
—To reduce the risk of
burns, electric shock, fire, injury to persons, or
exposure to excessive microwave energy:
1. Read all instructions before using the
appliance.
2. Read and follow the specific “PRECAU-
TIONS TO AVOID POSSIBLE EXPOSURE TO EXCESSIVE MICROWAVE
ENERGY,” found inside of the front cover.
3. This appliance must be grounded.
Connect only to properly grounded outlet.
See “GROUNDING INSTRUCTIONS”
found on page 4.
4. Install or locate this appliance only in
accordance with the installation instructions found on page 4.
5. Do not cover or block any openings on
this appliance.
6. Do not store or use this appliance outdoors.
Do not use this product near water—for
example, near a kitchen sink, in a wet
basement, or near a swimming pool, and
the like.
7. Use this appliance only for its intended
use as described in this manual. Do not
use corrosive chemicals, vapors, or nonfood products in this appliance. This type
of oven is specifically designed to heat, or
cook food. It is not designed for industrial
or laboratory use. The use of corrosive
chemicals in heating or cleaning will damage the appliance and may result in radiation leaks.
8. When cleaning surfaces of door and oven
that come together on closing the door,
use only mild, non-abrasive soaps or
detergents applied with a sponge or soft
cloth.
9. Do not allow children to use this appliance, unless closely supervised by an
adult.
10. Do not operate this appliance if it has a
damaged cord or plug, if it is not working
properly, or if it has been damaged or
dropped.
11. Do not immerse cord or plug in water.
12. Keep cord away from heated surfaces.
13. Do not let cord hang over edge of table or
counter.
14. This appliance should be serviced only by
qualified service personnel. Contact the
nearest authorized service facility for
examination, repair or adjustment.
15. Some products such as whole eggs, narrow neck bottles and sealed containers—
for example, closed glass jars—may
explode and should not be heated in this
oven.
16. To reduce the risk of fire in the oven cavity:
(a) Do not overcook food. Carefully attend
appliance if paper, plastic, or other combustible materials are placed inside the
oven to facilitate cooking.
(b) Remove wire twist-ties from paper or
plastic bags before placing bag in oven.
(c) If materials inside the oven should
ignite, keep oven door closed, turn
oven off, and disconnect the power
cord, or shut off power at the fuse or
circuit breaker panel.
(d) Do not use the cavity for storage pur-
poses. Do not leave paper products,
cooking utensils, or food in the cavity
when not in use.
17. Liquids, such as water, coffee, or tea are
able to be overheated beyond the boiling
point without appearing to be boiling due
to surface tension of the liquid. Visible
bubbling or boiling when the container is
removed from the microwave oven is not
always present. THIS COULD RESULT
IN VERY HOT LIQUIDS SUDDENLY
BOILING OVER WHEN DISTURBED
OR ASPOON OR OTHER UTENSIL IS
INSERTED INTO THE LIQUID.
To reduce the risk of injury to persons:
(a) Do not overheat the liquid.
(b) Stir the liquid both before and halfway
through heating it.
(c) Do not use straight-sided containers
with narrow necks.
(d) After heating, allow the container to
stand in the microwave oven for a
short time before removing the container.
(e) Use extreme care when inserting a
spoon or other utensil into the container.
SAVE THESE INSTRUCTIONS
For proper use of your oven read remaining safety cautions and operating instructions.
Y
our microwave oven is a cooking device and you should use as much care as you use
with a stove or any other cooking device. When using this electric appliance, basic safety precautions should be followed, including the following:
Operación Manual
(Ajuste de Potencia y Tiempo)
1. • Seleccione el nivel de
potencia.
2. • Seleccione el tiempo de
cocción.
3. • El tiempo de cocción
aparece y empieza la
cuenta regresiva.
Esta función le permite ajustar manualmente la
potencia y tiempo para la cocción del
microondas.
Ejemplo: Para cocinar en MEDIO durante 1
minuto 30 segundos.
Presione cinco
veces
Presione
NOTAS:
1. Para la cocción de más de una etapa, repetir los pasos, 1 y 2 para cada etapa de
cocción antes de presionar la tecla Start
(Encender). El número máximo de etapas es
de 5. Cuando selecciona Alto.
2. Cuando se selecciona la potencia ALTO
para la primera etapa, podrá empezar en el
paso 2.
3. Sonarán dos zumbidos entre cada etapa de
la programmación. Sonarán cinco zumbidos
al final de toda la secuencia.
4. Cuando se selecciona la potencia ALTO el
tiempo máximo es de 30 minutos.
5. Para el recalentamiento, utilizar ALTO para
líquidos, MEDIO para la mayoría de los
alimentos y MEDIO para los alimentos
densos.
6. Para decongelar use Decongelatión.
7. When setting cooking stage, HIGH power
can not be set continuously for 2 stages.
Pulsar Nivel
Nivel de Potencia
de Potencia
una vez ALTO
dos veces Decongelatión
3 veces MEDIO
4 veces ALTO
Minuto Automatico
Esta función le permite ajustar y/o añadir
tiempos de cocción fácilmente en múltiplos de
un minuto.
Para Ajustar el Tiempo de Cocción:
NOTAS:
1.
Después de un minuto de cerrar la puerta,
usted puede pulsar minuto rápido, de otro
modo, el horno hará 2 bips.
2. Para utilizar con otros niveles de potencia,
presionar Nivel de Potencia, a continuación
minuto Rápido.
3. Si utiliza minuto automático, no podrá utilizar pulsador de números o vice versa.
1. • Presione.
➤Para cocinar inmedi-
atamente por un minuto con nivel de potencia Alto.
2. Para agregar • Pulsar minuto automático
más tiempo de para añadir más tiempo
cocción. durante la cocción. Para
verificar el tiempo de
cocción adicional, com
probar la Ventana de
Visualización.
Page 5
326
Panel de Control
IMPORTANT SAFETY INSTRUCTIONS
General Use
1. DO NOT tamper with
or make any adjustments or repairs to
door, Control Panel
housing, safety interlock switches or any
other part of the oven.
DO NOT remove outer
panel from oven. Repairs must only be done
by a qualified service person.
2. DO NOT operate the
oven empty. The
microwave energy will
reflect continuously
throughout the oven
causing overheating if
food or water is not
present to absorb
energy. This could damage the oven and
result in the risk of a fire.
3. DO NOT dry clothes, newspapers or other
materials in oven, or use newspapers or
paper bags for cooking. Fire could result.
4. DO NOT use recycled paper products unless
the paper product is labeled as safe for
microwave oven use. Recycled paper products may contain impurities which may cause
sparks, and result in fires when used.
5. DO NOT hit or strike Control Panel. Damage
to controls may occur. Fire could result.
6. POT HOLDERS should always be used
when removing items from the oven. Heat is
transferred from the HOT food to the cooking
container and from the cooking container to
the Glass Tray. The Glass Tray can be very
HOT after removing cooking container from
oven. The wire rack can also be very HOT
after use of the oven.
7. DO NOT store flammable materials next to,
on top of, or in the oven. These could be fire
hazards.
8. DO NOT allow grease accumulation or food
to touch heating elements.
Glass Tray
1. DO NOT operate the oven without Roller Ring
and Glass Tray in place.
2. DO NOT operate the oven without the Glass
Tray fully engaged on the drive hub. Improper
cooking or damage to the oven could result.
Verify that the Glass Tray is properly engaged
and rotating by observing its rotation when
you press Start.
3. Only use the Glass Tray specifically designed
for this oven. Do not substitute any other glass
tray.
4. If the Glass Tray is hot, allow to cool before
cleaning or placing in water.
5. DO NOT cook directly on the Glass Tray.
Always place food in a microwave-safe dish,
or on a rack set in a microwave-safe dish.
6. If food or utensil on Glass Tray touches oven
walls, causing the tray to stop moving, the tray
will automatically rotate in the opposite direction. This is normal.
7. Glass Tray can turn in either direction.
Roller Ring
1. Roller Ring and oven floor should be cleaned
frequently to prevent excessive noise.
2. Roller Ring must always be used for cooking
along with Glass Tray.
3. Always replace Roller Ring and Glass Tray in
their proper positions.
Practical Hints:
1. Before using Brown function for the first time,
wipe excessive oil off in oven cavity. Operate
the oven without food and accessories on
Brown, for 20 minutes. This will allow the oil
that is used for rust protection to be burned
off.
2. Exterior oven surfaces, including air vents on
the cabinet and the oven door will get hot during Brown. Use care when opening or closing
door and when inserting or removing food and
accessories.
¡Vamos a empezar a
usar su horno!
1. Enchufe en una toma eléctrica
debidaments conectada a tierra.
Ventana de
Visualización
Enel horno aparecera el
peso en "oz"
2. Si decea usar gr:
Presione Start (Encender)
Verifique su
seleccion en la Ventana
de Visualización.
3. Dos puntos
apareceran
Presione
en la Ventana
de Visualización
Ahora, disfrute cocinando con su microondas
Panasonic.
Seguro Para Niños
Esta función evita la operacion del horno
hasta que se cancela. No asegura la puerta.
Para Activar • La palabra "Child"
aparecera en la
Ventana de
Visualización.
➤"Child" Se mantendra
hasta que se cancela.
Si los pulsadores son
presionados el horno
no trabajara.
Para Desactiver • La Ventana de
Visualización regre-
sa a los dos puntos o
la hora.
Presione tres
veces
Presione tres
veces
(1) Pantalla indicadora
(Ventana de Visualización)
(2) Auto Cook Pad
(3) Power/Defrost Pad
(4) Brown Pad
(5) Pulsadores de numéricos
(6) Pulsador de tiempo/reloj
(7) Pulsador de porción / peso
(8) Pulsador de rapido en
minutos/Para Comenzar
(9) Pulsador Para/Cancelar
(1)
(2)
(3)
(6)
(9)
(4)
(7)
(8)
(5)
Page 6

25
Sugerencias Utiles
IMPORTANTE
La cocción adecuada depende de la potencia, tiempo
designado y cantidad de comida. Si usa una porción
menor a la recomendada y cocina por el tiempo para la
opción recomendada, puede resultar en un incendio.
1) ENLATADO CASERO/ALIMENTOS DESHIDRA TADOS/ PEQUEÑAS CANTIDADES DE ALIMENTO
• No use su horno para el enlatado casero o para calentar
cualquier frasco cerrado. La presión aumentará y el frasco
puede explotar. Su horno no puede mantener los alimentos a la temperatura apropiada de enlatado.
• Pequeñas cantidades de alimento o alimentos con bajo
contenido de humedad se pueden secar, quemar o incendiarse.
• No seque alimentos, hierbas, frutas o vegetales en su
horno.
3) FREIR CON MUCHA GRASA
• NO trate de freir con mucha grasa en su horno de
microondas. Cocinar aceites puede estallar en flamas y
puede causar daño al horno y quiza acabar en quemaduras. Los utensilios de microondas pueden no ser
utiles para soportar la temperatura del aceite caliente, y
podrían romperse o derretirse.
4) ALIMENTOS CON PIELES NO POROSAS
• Papas, manzanas, yemas de huevo, calabazas com-
pletas y salchichas son ejemplos de alimentos con
pieles no porosa. Estos tipos de alimentos deben ser
perforados antes de cocinarlos con Microondas para evitar que estallen.
• Use papas frescas para hornear y cocinelas hasta que
esten listas. Use los pesos recomendados o puede ocurrir
un incendio. Cocinar demasiado causar deshidratación y
puede resultar en un incendio.
5) BANDEJA DE CRISTAL / UTENSILIOS DE
COCINA / PAPEL DE ALUMINIO
• Los utensilios para cocinar se calientan durante la cocción
en microondas. El calor es transferido de la comida
CALIENTE al recipiente y la Bandeja de Cristal. Use
manoplas para tomar ollas cuando saque los utensilios del
horno o cuando quite tapas o cubiertas de envoltura de
plástico de los utensilios de cocina para evitar quemaduras.
• La Bandeja de Cristal se calentará durante la cocción.
Debe permitir que se enfríe antes antes de manejarla o
antes de colocar productos de papel, tales como platos de
papel o bolsas de palomitas de maíz para microondas,
para cocinar.
• Cuando use papel de aluminio, brochetas, rejillas para
calentar o utensilios hechos de metal en el horno, deje por
lo menos 1 pulgada (2,5 cm) de espacio entre el material
de metal y las paredes interiores del horno. Si ocurren
arcos (chispeos), retire el material de metal (brochetas
etc.) y/o transfieralo a un contenedor no metálico.
• Platos con adornos metálicos no deberán ser usados, ya
que pueden producirse arcos eléctricos.
• Si se calienta una entrada en una bandeja de aluminio,
mantenga al menos un espacio de 1 pulgada (2.5 cm)
desde la pared del horno.
6) TOALLAS DE PAPEL / TELAS
• NO use toallas de papel o telas que contengan fibras
sintéticas en su tejido. La fibra sintética puede causar que
la toallla se incendie. Use toallas de papel bajo supervisión
7) BANDEJA DORADOR / BOLSAS PARACOCINAR
• Las bandejas doradoras o rejillas están diseñadas para
cocinar en microondas solamente. Siempre siga las
instrucciones dadas por el fabricante. NO precaliente la
bandeja doradora más de 6 minutos.
• Si usa una bolsa para cocinar en el microondas, prepare
de acuerdo a las instrucciones del paquete. NO use sujetadores de alambre para cerrar la bolsa, en vez de eso
use cordones plásticos, hilos de algodón o un pedazo cortado de la esquina libre de la bolsa
8) TERMÓMETROS
• NO use termómetros convencionales para alimentos en
su horno. Pueden producir un arco. Termómetros a prueba de microondas están disponibles para carne y pasteles
9) P APILLAS / COMIDAS PARA BEBÉ
• NO caliente papillas o alimentos para bebés en el
microondas. Los jarros de cristal o superficies de la comida pueden parecer no muy calientes mientras que en el
interior pueden estar tan calientes como para quemar la
boca y esófago de un infante.
10) RECALENT AMIENT O DE PASTAS
• Cuando recaliente pastas, verifique la temperatura de todo
el contenido antes de comer. Algunas comidas tienen
lugares que se calientan mucho más rápido que otros y
pueden estar extremadamente calientes, mientras que la
superficie restante continua tibia al tacto (por ej. Roscas
de Gelatina).
11) GUÍADE USO GENERAL DEL HORNO
• NO use el horno por cualquier razón que no sea la
preparación de alimento
• NO deje el horno desatendido mientras esté en uso.
Siga estas Precauciones de Seguridad Cuando Cocine en Su Horno.
2) PALOMITAS DE MAIZ
Las palomitas de maíz deben prepararse en un recipiente para palomitas de maíz adecuado para horno de
microondas. Las palomitas de maíz para horno de
microondas que se preparan en su propio paquete
también están disponibles. Siga las intrucciones del fabricante de palomitas de maíz y use una marca adecuada para la potencia de su horno de microondas.
PRECAUCIÓN: Cuando use palomitas de maíz para
microondas previamente empacadas siga las
instrucciones recomendas en el paquete. Revise el
peso del paquete antes de usar el pulsador
Palomitas del Maíz (vea la sección del Pulsador
Palomitas de Maíz). Ajuste el horno para el peso del
paquete de palomitas de maíz. Si no se siguen las
instrucciones, las palomitas de maíz pueden no
reventar adecuadamente o pueden encenderse y
causar un incendio. Nunca deje desatendido el
horno cuando prepare palomitas de maíz. Deje
enfriar el paquete de palomitas de maíz antes de
abrir, y siempre abra el paquete lejos de su cara y
cuerpo para prevenir quemaduras por vapor.
INSTALLA TION AND GROUNDING INSTRUCTIONS
Examine Your Oven
Unpack oven, remove all packing material, and examine the oven for any damages such as dents, broken door latches
or cracks in the door. Notify dealer immediately if oven is damaged. DO NOT
install if oven is damaged.
Placement of Oven
1. Oven must be placed on a flat, stable
surface. For proper operation, the oven
must have sufficient air flow. Allow 3inches (7.6 cm) of space on both sides
of the oven and 1-inch (2.5 cm) of
space of space on top of oven.
a. DO NOT block air vents.
If they are blocked during operation,
the oven may be overheated and
damaged.
When using any cloth over the oven,
the air intake and exhaust should not
be blocked. Also should allow space
on back and both sides of oven properly.
b. DO NOT place oven near a hot
damp surface such as a gas or electric range, or dishwasher.
c. DO NOT operate oven when room
humidity is too high.
2. This oven was manufactured for
household use only, on the countertop
above 3Ft (916 mm).
Grounding
Instructions
This appliance must be grounded. In
the event of an electrical short circuit,
grounding reduces the risk of electric
shock by providing an escape wire for the
electric current. This appliance is
equipped with a cord having a grounding
wire with a grounding plug. The plug must
be plugged into an outlet that is properly
installed and grounded.
WARNING—Improper use of
the grounding plug can result in a risk
of electric shock.
Consult a qualified electrician or service
person if the grounding instructions are
not completely understood, or if doubt
exists as to whether the appliance is properly grounded. If it is necessary to use an
extension cord, use only a three wire
extension cord that has a three blade
grounding plug, and a three slot receptacle that will accept the plug on the appliance. The marked rating of the extension
cord should be equal to or
greater than the electrical
rating of the appliance.
Power Supply
1. Ashort power-supply cord is provided
to reduce the risks resulting from
becoming entangled in or tripping over
a longer cord.
2. Longer cord sets or extension cords are
available and may be used if care is
exercised in their use.
3. If a long cord or extension cord is used,
(1) the marked electrical rating of the
cord set or extension cord should be at
least as great as the electrical rating of
the appliance, (2) the extension cord
must be a grounding-type 3-wire cord,
and (3) the longer cord should be
arranged so that it will not drape over
the counter top or tabletop where it can
be pulled on by children or tripped over
accidentally.
Wiring Requirements
1. The oven must be operated on a SEPARATE CIRCUIT. No other appliance
should share the circuit with the
microwave oven. If it does, the branch
circuit fuse may blow, the circuit breaker may trip, or the food may cook slower than the times recommended in this
manual.
2. The VOLTAGE used must be the same
as specified on this microwave oven
(120 V, 60 Hz). Using a higher voltage
is dangerous and may result in a fire or
another incident causing oven damage.
Using a lower voltage will cause slow
cooking. Panasonic is NOT responsible
for any damages resulting from the use
of the oven with any voltage other than
specified.
3. The oven must be plugged into at least
a 15 AMP, 120 VOLT, 60 Hz GROUND ED OUTLET. Where a standard twoprong outlet is encountered, it is the
personal responsibility and obligation of
the consumer to have it replaced with a
properly grounded three-prong outlet.
TV / Radio Interference
1. Operation of the microwave oven may
cause interference to your radio, TV or
similar equipment.
2. When there is interference, it may be
reduced or eliminated by taking the following measures:
a. Clean door and sealing surfaces of
the oven. (See Care of Your
Microwave Oven)
b. Place the radio, TV, etc. away from
the microwave oven as far as possible.
c. Use a properly installed antenna to
obtain stronger signal reception.
4
Page 7

5
Examine Su Horno
Desempaque el horno, quite todo el material
de empaque y examine que su horno no
tenga ningún daño, tales como abolladuras,
seguros de la puerta rotos o resquebrajaduras en la puerta. Notifique inmediatamente a su distribuidor si el horno está
dañado.
Ubicación del Horno
1. El horno debe ser colocado en una superficie plana y estable. Para su operación
apropiada, el horno debe tener suficiente
corriente de aire. Deje 8 cm de espacio de
ambos lados del horno y 2.5 cm de espacio en la parte superior del horno.
a.NO bloquear la ventilación del aire.
Si es bloqueada la ventilación del aire
durante la operación, el horno puede
sobrecalentarse y quemarse.
Cuando use algún trapo, franela o funda
para cubrir el horno, las tomas y salidas
del aire no deberán ser bloqueadas.
También debe tener un espacio apropiado para la parte trasera y los costados.
b.NO coloque el horno cerca de una
superficie húmeda caliente, tal como un
registro de gas o eléctrico.
c.NO opere el horno cuando la humedad
del cuarto sea muy alta.
2. Este horno ha sido fabricado para uso en
el hogar solamente.
Instrucciones
para Conexión a
Tierra
Este aparato debe ser conectado a tierra. En
el caso de un corto circuito, la conexión a
tierra reduce el riesgo de una descarga
eléctrica mediante un cable de escape para
la corriente eléctrica. Este aparato está
equipado con un cable y enchufe para
conexión a tierra. El enchufe debe ser conectado en un toma de corriente que esté adecuadamente instalada y conectada a tierra.
PRECAUCIÓN
—El uso
inapropiado del enchufe para la conexión
a tierra puede resultar en riesgo de
descarga eléctrica.
Consulte a un electricista o a una persona
del servicio calificados si las intrucciones
para conectar a tierra no son comprendidas
completamente o si existe duda de si el
aparato está
correctamente
conectado a tierra
o no.
Suministro Eléctrico
1. Se provee un cable de suministro eléctrico
corto para reducir los riesgos resultantes
de enredarse o tropezarse con un cable
más largo.
2. Juegos de cable más largos o extensiones
están disponibles y pueden utilizarse si se
usan con cuidado.
3. Si se usa un cable más largo o extensión,
(1) el calibre eléctrico marcado en el juego
de cordón o extensión debe ser al menos
tan grande como el calibre eléctrico del
aparato, (2) el cable de extensión debe ser
de tres hilos del tipo de conexión a tierra,
y (3) el cordón más largo debe ser
arreglado de tal forma que no caiga sobre
la cubierta del mostrador o de la mesa
donde pueda ser jalado por niños o
tropezarse accidentalmente.
Requerimientos de cableado
1. El horno debe estar en un circuito separado. Ningún otro aparato debe compartir el
circuito con el horno. Si lo hace el fusible
del circuito puede estallar, el bloqueador
del circuito trabarse o la comida cocinarse
más lento que en los tiempos recomendados en este manual.
2. El voltaje usado debe ser el mismo al
especificado en el horno de microondas
(120 V.). Usar un voltaje más alto es peligroso y puede resultar en fuego u otro
accidente causando daño al horno. Usar
un bajo voltaje dará como resultado un
cocinado más lento. Panasonic NO es
responsable por cualquier daño que haya
resultado del uso del horno con un voltaje
distinto al especificado.
3. El horno debe ser conectado en un
enchufe a tierra de al menos 15 amp 120
volt, 60 Hz. Donde se encuentre un
enchufe estándar de 2 entradas es
responsabilidad y obligación del consumidor reemplazarlo por un enchufe a tierra
de 3 entradas.
Interferencia de Radio
1. La operación de su horno de microondas
puede causar interferencia en su radio, TV
o equipo similar.
2. Cuando hay interferencia, se puede
reducir o eliminar tomando las siguientes
medidas:
a.Limpie la puerta y las superficies sell-
adoras del horno.
b.Ponga el radio, TV, etc. lo más lejos
posible del horno de microondas.
c.Use una antena instalada adecuada-
mente para obtener una recepción de
señal más fuerte.
INSTRUCCIONES DE INSTALACION Safety Precautions
IMPORT ANT
Proper cooking depends upon the power, the
time set and quantity of food. If you use a
smaller portion than recommended and cook at
the time for the recommended portion, fire
could result.
1) HOME CANNING / DRYING FOODS / SMALL
QUANTITIES OF FOODS
•
Do not use your oven for home canning, your
oven cannot maintain the food at the proper canning temperature. Improperly canned food may
spoil and be dangerous to consume.
•
Do not dry meats, herbs, fruits or vegetables in
your oven. Small quantities of food or foods with
low moisture content can dry out, scorch or catch
on fire if overheated.
2) POPCORN
3) DEEP FAT FRYING
•
Do not attempt to deep fat fry in your microwave
oven. Cooking oils may burst into flames and may
cause damage to the oven and perhaps result in
burns. Microwave utensils may not be able to
withstand the temperature of the hot oil, and could
shatter or melt.
4) FOODS WITH NONPOROUS SKINS
•
Potatoes, apples, egg yolks, whole eggs,
whole squash and sausages are examples of
foods with nonporous skins. These types of
foods must be pierced before microwave cooking
to prevent their bursting.
•
Use fresh potatoes for baking and cook until just
done. Use recommended weights for pro
-
grammed cooking. Overcooking causes dehydra
-
tion and may result in a fire.
5) GLASS TRAY / COOKING UTENSILS / FOIL
•
Cooking utensils get hot during microwaving. Heat
is transferred from the HOT food to the container
and the Glass Tray. Use potholders when removing utensils from the oven or when removing lids
or plastic wrap covers from cooking utensils, to
avoid burns.
•
The glass tray will get hot during cooking. It
should be allowed to cool before handling or
before paper products, such as paper plates or
microwave popcorn bags, are placed in the oven
for microwave cooking.
•
When using foil, skewers, warming rack or utensils made of metal in the oven, allow at least 1inch (2.5 cm) of space between metal material
and interior oven walls. If arcing occurs (sparking),
remove metal material (skewers etc.) and/or transfer to a non-metallic container.
•
Dishes with metallic trim should not be used, as
arcing may occur.
•
If an entree is heated in a foil tray, maintain at
least 1-inch (2.5 cm) spacing from the oven walls.
6) PAPER TOWELS / CLOTHS
•
DO NOT use paper towels or cloths which contain
a synthetic fiber woven into them. The synthetic
fiber may cause the towel to ignite. Use paper
toweling under supervision.
7) BROWNING DISHES / OVEN COOKING
BAGS
•
Browning dishes or grills are designed for
microwave cooking only. Always follow instructions provided by the manufacturer. DO NOT preheat browning dish more than 6 minutes.
•
If an oven cooking bag is used for microwave
cooking, prepare according to package directions.
DO NOT use a wire twist-tie to close bag, instead
use plastic ties, cotton string or a strip cut from the
open end of the bag.
8) THERMOMETERS
•
DO NOT use a conventional meat thermometer in
your oven. Arcing may occur. Microwave-safe
thermometers are available for both meat and
candy.
9) BABY FORMULA / FOOD
• DO NOT heat baby formula or food in the
microwave oven. The glass jar or surface of the
food may appear warm while the interior can be
so hot as to burn the infant’s mouth and esophagus.
10) REHEATING PASTRY PRODUCTS
• When reheating pastry products, check tempera-
tures of any fillings before eating. Some foods
have fillings which heat faster and can be
extremely hot, while the surface remains warm to
the touch (ex. Jelly Donuts).
11) GENERALOVEN USAGE GUIDELINES
•
DO NOT use the oven for any reason other than
the preparation of food.
•
DO NOT leave oven unattended while in use.
Follow These Safety Precautions When Cooking in Your Oven
Popcorn may be popped in a microwave oven
corn popper. Microwave popcorn which pops in
its own package is also available. Follow popcorn
manufacturers’ directions and use a brand suitable for the wattage of your microwave oven.
CAUTION: When using pre-packaged
microwave popcorn, follow recommended
package instructions. Check package weight
before using the Popcorn pad (see Popcorn
Pad section). Set the oven for the weight of
the popcorn package.
If these instructions are not followed, the popcorn may not pop adequately or may ignite
and cause a fire. Never leave oven unattended
when popping popcorn. Allow the popcorn bag to
cool before opening, always open the bag away
from your face and body to prevent steam burns.
24
Page 8

6 23
Uso General
1.NO altere o haga
ningún ajuste o
reparación a la puerta, el alojamiento del
Panel de Control,
interruptores entrecruzados de seguridad o cualquier otra parte del horno.
NO quite el panel exterior del horno.
Las reparaciones deben ser hechas
solamente por personal de servicio calificado.
2.NO opere el horno
vacío. La energía de
microondas se reflejará continuamente a
través del horno si
los alimentos o agua
no están presentes
para absorber energía. Esto puede
dañar el horno y resultar en riesgos de
un incendio.
3.NO dseque telas, periódicos u otros
materiales en el horno, ni use bolsas de
periódicos o papel para cocinar. Puede
resultar en un incendio.
4.NO use productos de papel reciclado a
menos que el papel este etiquetado
como apto para uso con horno de
microondas. El papel reciclado puede
contener impurezas que pueden causar
chispas, y resultar en incendios cuando
sean utilizados.
5.NO pegue o golpee el Panel de Control.
Puede causar daños en los controles.
Puede resultar en un incendio.
6.LAS MANOPLAS PARA TOMAR
OLLAS deben ser utilizadas cuando se
retiren artículos del horno. El calor se
transfiere de los alimentos CALIENTES
a los recipientes y de los recipientes a
la Bandeja de Cristal. La Bandeja de
Cristal puede estar muy CALIENTE
despues de sacar los recipientes para
cocinar del horno.
7.NO almacene materiales inflamables
cerca, arriba o dentro del horno. Puede
haber riesgos de incendio.
8.NO almacene materiales flamables
cerca, arriba, o dentro del horno.
Pueden ser riesgos de incendio.
Bandeja de Cristal
1.NO utilice el horno sin el Aro de Rodillo
ni la Bandeja de Cristal en su lugar.
2.NO utilice el horno sin la Bandeja de
Cristal completamente enganchada en
el cubo de volante. Puede resultar en
cocciones inapropiadas o daños en el
horno. Verifique que la Bandeja de
Cristal esté adecuadamente encajada y
rotando al observar su rotación cuando
se presiona Encender.
3.Sólo utilice la Bandeja de Cristal
específicamete diseñada para este
horno. No substituya por cualquier otra
bandeja de cristal.
4.If the Glass Tray is hot, allow to cool
before cleaning or placing in water.
5.NO cocine directamente en la Bandeja
de Cristal. Siempre coloque la comida
en una plato a prueba de microondas, o
sobre una rejilla en un plato a prueba
de microondas.
6. Si la comida o utensilios en la Bandeja
de Cristal tocan las paredes del horno,
causando que la bandeja deje de
moverse, la bandeja rotara automáticamente en la dirección contraria. Esto es
normal. La Bandeja de Cristal puede
rotar en ambas direcciones. Aún cuando este funcionando el modo "Plato
Giratorio apagado", coloque el Aro de
Rodillo y la Bandeja de Cristal correctamente.
7. Glass Tray can turn in either direction.
ARO DE RODILLO
1.El Aro de Rodillo y el piso del horno
deben ser limpiados frecuentemente
para prevenir ruidos excesivos.
2.El Aro de Rodillo debe ser siempre
usado para cocinar con la Bandeja de
Cristal.
3.Siempre vuelva a colocar el Aro de
Rodillo y la Bandeja de Cristal en sus
posiciones apropiadas.
Practical Hints:
1. Before using Brown function for the first
time, wipe excessive oil off in oven cavity. Operate the oven without food and
accessories on Brown, for 20 minutes.
This will allow the oil that is used for
rust protection to be burned off.
2. Exterior oven surfaces, including air
vents on the cabinet and the oven door
will get hot during Brown. Use care
when opening or closing door and
when inserting or removing food and
accessories.
INSTRUCCIONES DE SEGURIDAD
Cookware and Utensil Guide
ITEM MICROWAVE COMMENTS
Yes for Small strips of foil can be molded around thin parts of
Aluminum Foil Shielding meat or poultry to prevent overcooking. Arcing can occur
only if foil is too close to oven wall or if too much foil is used.
Browning Dish Yes
Browning dishes are designed for microwave cooking
only. Check browning dish information for instructions
and heating chart. Do not preheat for more than 6 minutes.
Brown paper bags No May cause a fire in the oven.
Dinnerware Check manufacturers' use and care directions for use in
Labelled Yes microwave heating. Some dinnerware may state on the
“Microwave-Safe” back of the dish, “Oven-Microwave Safe”.
Other Dinnerware ? Use CONTAINER TESTbelow.
Disposable polyester
Yes
Some frozen foods are packaged in these dishes. Can be
Paperboard Dishes purchased in grocery stores.
Fast Food Carton
No Metal handle may cause arcing
.
with Metal Handle
Frozen Dinner Tray Frozen dinners may be heated in foil tray, if tray is less than
Metal Yes
3
/4
in.(2 cm) high. Place foil tray in center of oven. Leave at
least 1 in. (2.5 cm) space between foil tray and oven walls.
Microwave-safe Yes Heat only 1 foil tray in the oven at time. For containers more
than
3
/4
inch (2 cm) deep,remove food and place in a similar
size microwave-safe container.
Glass Jars
Yes, Remove lid. Heat food until just warm, not HOT. Most glass
use caution jars are not heat resistant. Do not use for cooking.
Glassware
Heat Resistant Oven
Yes
Ideal for microwave cooking and browning.
Glassware & Ceramics (See CONTAINER TEST below)
Metal Bakeware No Not recommended for use in microwave ovens.
Metal Twist-Ties No May cause arcing which could cause a fire in the oven.
Follow manufacturers' directions. Close bag with the nylon tie
Oven Cooking Bag Yes
provided, a strip cut from the end of the bag, or a piece of
cotton string. Do not close with metal twist-tie. Make six
1
/2
in. (1 cm) slits near the closure.
Paper Plates & Cups Yes
Use to warm cooked foods, and to cook foods that require
short cooking times such as hot dogs.
Paper Towels & Napkins Yes Use to warm rolls and sandwiches by microwave.
Parchment Paper Yes
Use as a cover to prevent spattering. Safe for use in
microwave, microwave/convection and conventional ovens.
Plastic
Microwave-Safe Yes Should be labeled, "Suitable for Microwave Heating." Check
Cookware manufacuters’ directions for recommended uses.
Reheat & Storage Yes, Some microwave-safe plastic dishes are not suitable for
use caution cooking foods with high fat or sugar content. The heat from
hot food may cause the plastic to warp.
Melamine No This material absorbs microwave energy. Dishes get HOT!
Plastic Foam Cups Yes
Plastic foam will melt if foods reach a high temperature. Use
to bring foods to a low serving temperature.
Use to cover food during cooking to retain moisture and
Plastic Wrap Yes prevent spattering. Should be labelled “Suitable for
Microwave Heating”. Check package directions.
Straw, Wicker, Wood Yes
Use only for short term reheating and to bring
food to a low serving temperature.
Thermometers
Microwave-safe, only Yes Use only microwave-safe meat and candy thermometers.
Conventional No
Not suitable for use in microwave oven, will cause sparks
and get hot.
Wax paper Yes Use as a cover to prevent spattering and to retain moisture.
CONTAINER TEST
TO TEST ACONTAINER FOR SAFE MICROW A VE OVEN USE:Fill a 1-cup glass measure with cool water
and place it in the microwave oven alongside the empty container to be tested; heat one (1) minute at P10
(HIGH). If the container is microwave oven-safe (transparent to microwave energy), the container should
remain comfortably cool, the water in glass measure should be hot. If the container is hot, it has absorbed
some microwave energy and should NOT be used. This test cannot be used for plastic containers.
Page 9

722
INSTRUCCIONES DE SEGURIDAD
ADVERTENCIA
—Para
reducir el riesgo de quemaduras,
electrocutaciones, fuegos, lesiones a
personas o exposición a una energía de
microondas:
1. Lea todas las instrucciones antes de usar
el aparato.
2. Lea y siga las “PRECAUCIÓNES PARA
EVITAR POSIBLE EXPOSICION EXCESIVAA ENERGIA DE MICROONDAS”
especificas, que se encuentran abajo.
3. Este aparato debe ser conectado a tierra.
Conecte solamente a la toma eléctrica
debidamente conectada a tierra. Vea las
“INSTRUCCIONES PARACONEXIÓN A
TIERRA” que se encuentran en la página
23.
4. Instale o ubique este aparato solamente
de acuerdo con las instrucciones de instalación que se encuentran en la página 24.
5. No cubra ni tape ninguna de las rendijas
de este aparato.
6. No almacene o use este aparato en exteriores. No use este aparato cerca del
agua - por ejemplo, cerca del fregadero
de la cocina, en una base mojada, o
cerca de una alberca, y similares.
7. Use este aparato sólo para los fines para
los que fué hecho, tal como se describen
en este manual. No use químicos o
vapores corrosivos en este aparato. Este
tipo de horno está específicamente
diseñado para calentar o cocinar alimentos. No fué diseñado para uso industrial o
de laboratorio.
8. Cuando limpie las superficies de la puerta
y el horno que vienen juntas al cerrar la
puerta, use solamente jabones no abrasivos o detergentes suaves aplicados con
una esponja o con tela suave.
9. No permita a los niños usar este aparato,
a menos que sean supervisados muy de
cerca por un adulto.
10. No use este aparato si tiene dañado el
cordón o la clavija, si no está trabajando
adecuadamente, o si ha sido dañado o se
ha dejado caer.
11. No sumergir en agua el cable o la clavija.
12. Mantenga el cordón lejos de superficies
calientes.
13. No deje el cordón colgando en el borde
de la mesa o mostrador.
14. Este aparato debe recibir mantenimiento
sólo de personal calificado. Contacte las
instalaciones de servicio autorizadas más
cercanas para revisión, reparación o
ajuste.
15. Algunos productos, tales como los huevos
completos y contenedores sellados - por
ejemplo frascos de vidrio cerrados pueden explotar y no deben ser calentados en este horno.
16. Para reducir el riesgo de incendio en la
cavidad del horno:
(a) No sobrecocine los alimentos. Preste
atención cuidadosamente al aparato. El
papel, plástico u otros materiales combustibles son colocados dentro del
horno para facilitar la cocción pero si no
se utilizan adecuadamente esto puede
producir incendio en su horno.
(b) Quite los sujetadores de alambre de las
bolsas de papel o plástico antes de
colocar la bolsa en el horno.
(c) Quite los sujetadores de alambre de las
bolsas de papel o plástico antes de
colocar la bolsa en el horno.
(d) No use la cavidad con propósitos de
almacenaje. No deje productos de
papel, utensillos de cocina o alimentos
en la cavidad cuando no esté en uso.
17. Líquidos, tales como agua, café, o té
pueden ser calentados por sobre el punto
de ebullición sin parecer estar ebullendo
debido a la tensión de superficie del
líquido. Aveces el burbujeo o ebullición
no son visibles cuando el recipiente es
removido del horno de microondas. ESTO
PUEDE RESULTAR EN UNA EBULLICIÓN REPENTINA DELLÍQUIDO MUY
CALIENTE CUANDO SE INTRODUZCA
UNA CUCHARAU OTRO UTENSILIO
DENTRO DEL LÍQUIDO. Para reducir el
riesgo de heridas a personas:
(a) No sobrecaliente el líquido.
(b) Revuelva el líquido antes y durante el
caletamiento.
(c) No utilize recipientes de lados rectos
con cuello angosto.
(d) Luego del calentamiento, deje estar el
recipiente dentro del horno de microondas por un corto tiempo antes de retirarlo.
(e) Sea muy cuidadoso cuando introduzca
cucharas u otros utensilios dentro del
recipiente.
Su horno de microondas es un articulo para cocinar y usted debe usarlo con tanto
cuidado como usa una estufa o cualquier otro articulo para cocinar.
Cuando utilice este aparato electrico, se deben sequir precauciones básicas de
seguridad, incluyendo las siguientes:
Guarde estas instrucciones
Para un uso apropiado de su horno lea las precauciones de seguridad e instrucciones de funcionamiento restantes.
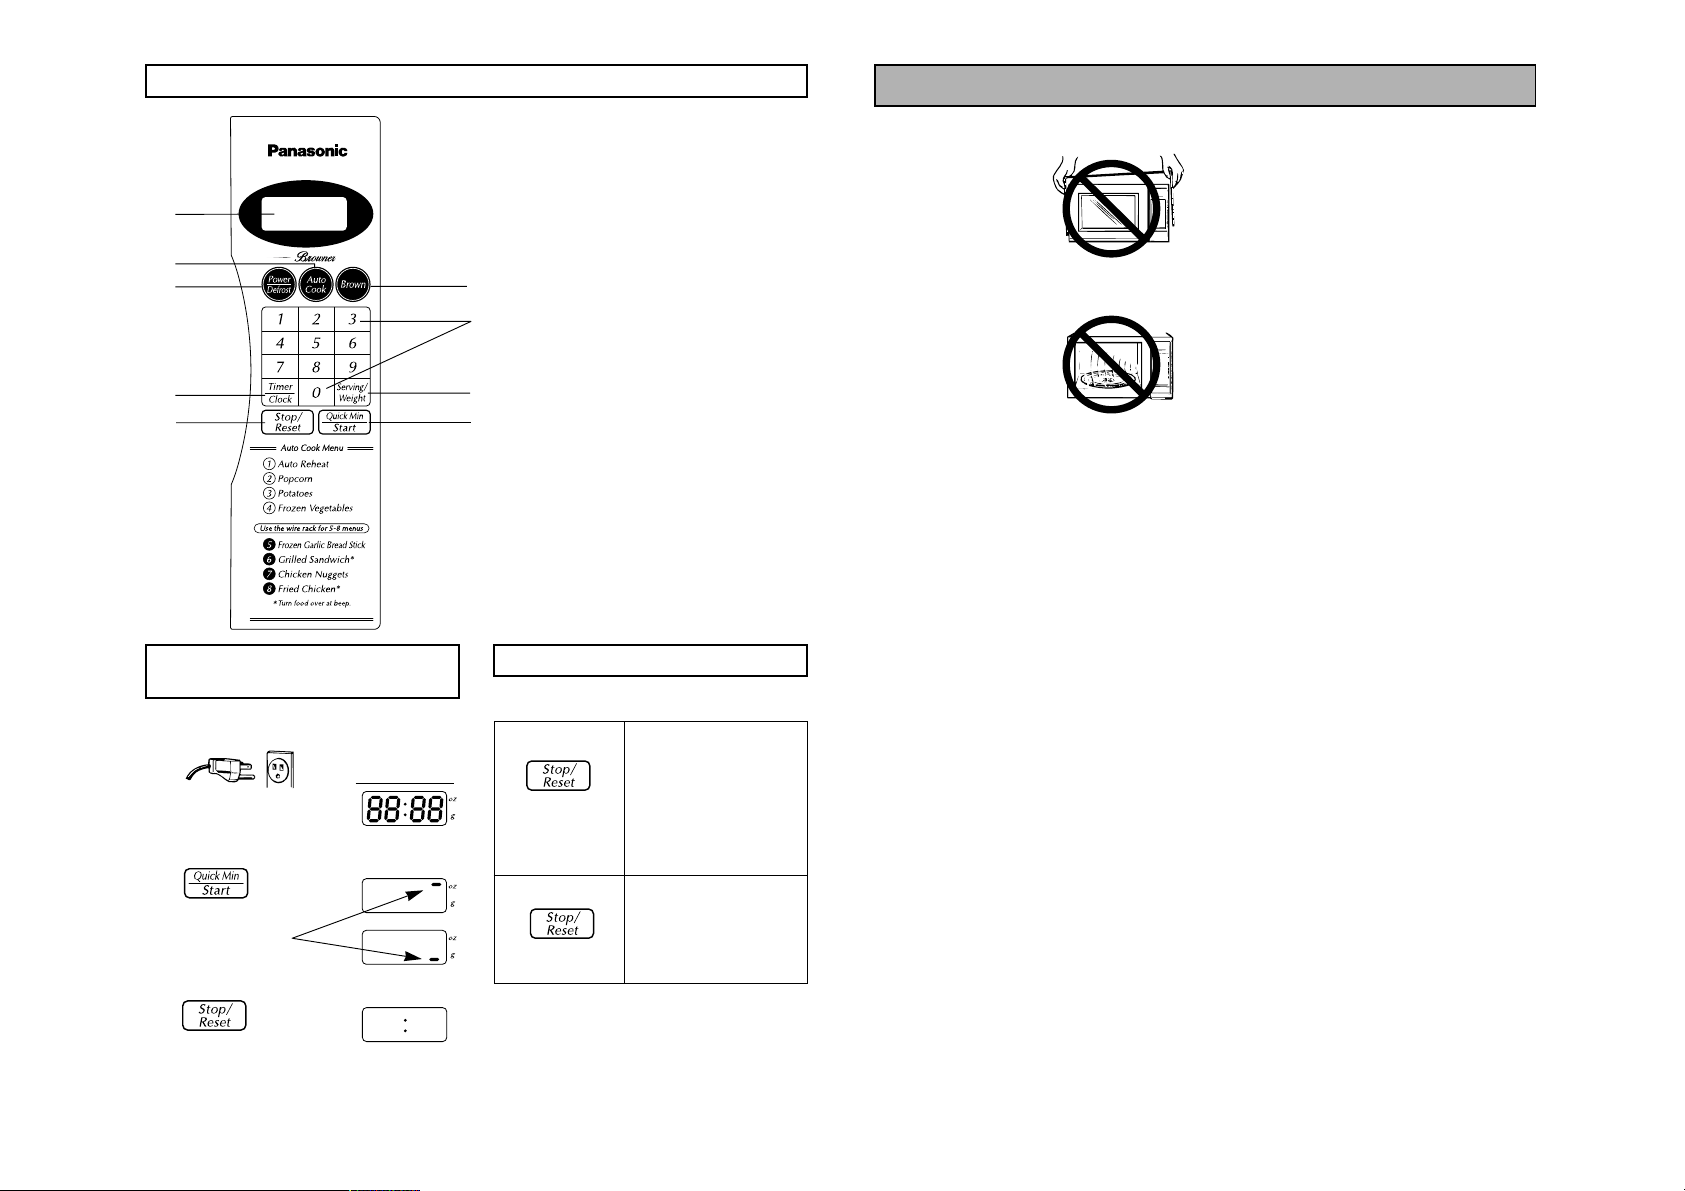
Feature Diagram
Control Panel
(1) Display Window
(2) Auto Cook Pad (☛page 12)
(3) Power/Defrost Pad (☛page 8)
(4) Brown Pad (☛page 9)
(5) Number Pads
(6) Timer /Clock Pad
(☛page 8,14)
(7) Serving/Weight Pad
(☛page 11-12)
(8) Quick Min/Start Pad
(☛page 9)
One tap allows oven to begin
cooking for one minute. If door
is opened or Stop/Reset Pad is
pressed once during oven operation, Start Pad must be
pressed again to restart oven.
(9) Stop/Reset Pad
Before cooking: One tap clears
your instruction.
During cooking: One tap temporarily stops the cooking
process. Another tap cancels all
your instructions and time of day
or colon appears on the
Display Window.
External Air Vents
Internal Air Vents
Door Safety Lock System
Exhaust Air Vents
Control Panel
Identification Plate
Glass Tray
Roller Ring
Heat/Vapor Barrier Film
(do not remove)
Cover (do not remove)
Wire Rack (for Browner cooking)
e
a
f
d
c
b
g
h
i
j
k
Beep Sound: When a pad is pressed correctly, a beep will be heard.
If a pad is pressed and no beep is heard, the unit did not or cannot accept the instruction.
The oven will beep twice between programmed stages. At the end of any complete
program, the oven will beep 5 times.
(1)
(2)
(3)
(6)
(9)
(4)
(7)
(8)
(5)
e
a b
d
h
gijf d
Oven Light:
Oven Light turns on while cooking and when oven door is opened.
c
k
Page 10

8 21
Clock Setting
The oven will operate without setting the clock.
Example: To set 11:25 a.m. or p.m.
Power & Time Setting
1. • Select Power Level.
(according to the chart
below)
2. • Set Cooking Time using
number pads.
3. • Press.
➤Cooking will start. The
time on the screen
will count down.
How do I program Power and Time?
Example: To cook at MEDIUM Power for 1
minute 30 seconds
Press 3 times.
NOTES:
1. For more than one stage cooking, repeat steps
1 and 2 for each stage of cooking before
pressing Start Pad.
2. When selecting HIGH power for the first stage,
you may begin at step 2.
3. Two beeps will sound between each stage of
programming. Five beeps will sound at the end
of the entire sequence.
4. When selecting HIGH power, the
maximum programmable time is 30 minutes.
For other power levels, the maximum time is
99 minutes and 99 seconds.
5. For reheating, use HIGH for liquids, MEDIUM
for most foods and MEDIUM for dense foods.
6. For defrosting, use DEFROST.
7. When setting cooking stage, HIGH power can
not be set continuously for 2 stages.
Press Power Level
once HIGH
twice DEFROST
3 times MEDIUM
4 times LOW
1.
• Press twice.
➤Colon flashes.
2.
• Enter time of day using
the number pads.
➤Time appears on the
Display Window;
colon continues blinking.
3.
• Press.
➤Colon stops flashing;
time of day is entered.
NOTES:
1.To reset the clock, repeat steps 1- 3.
2.The clock will keep the time of day as long as
the oven is plugged in and electricity is
supplied.
3.Clock is a 12 hour display.
4.Oven will not operate while colon is blinking.
Let's Start to Use Your Oven!
1. Plug into a properly grounded electrical
outlet.
Display Window
The oven automatically
displays weights in
imperial (oz).
2. If you wish to use metric (g):
Press Start to
convert to metric.
Verify your selection
on the Display Window.
3. Colon appears
on Display
Press
Window.
Now, enjoy cooking with your Panasonic
microwave.
Gracias por comprar un Horno de Microondas Panasonic.
PRECAUCIONES PARA EVIT AR
POSIBLE EXPOSICIÓN EXCESIVA A
ENERGÍA DE MICROONDAS
(a) No intente hacer funcionar este horno con la puerta abierta ya que esto
puede resultar en exposiciones perjudiciales de energía microondas. Es
importante no anular o forzar los mecanismos de seguridad. Bajo condiciones normales, el horno no operará con la puerta abierta.
(b) No coloque ningún objeto entre el panel frontal del horno y la puerta, ni
permita que se acumule basura o residuos de limpiadores en las superficies de sellado.
(c) No haga funcionar el horno si está dañado. Es en particular importante
que la puerta del horno cierre apropiadamente y que no haya ningún
daño en:
(1) la puerta (combada),
(2) bisagras y seguro de la puerta (rotos o sueltos),
(3) sellos de las puertas y superficies de sellado.
(d) El horno no deberá ser ajustado o reparado por ninguna persona,
excepto el personal de servicio debidamente calificado.
El número de serie de este producto
puede ser encontrado en el lado derecho
de la abertura de la puerta. Le recomendamos anotar el número de modelo y
serie en el espacio provisto y conservar
este manual como una documentación
permamente de su compra para consultas futuras.
Modelo No._______________________
Serie No. ________________________
Fecha de Compra _________________
Especificaciones Técnicas
*Determinado de acuerdo a procedimientos contemplados en la norma IEC
Las especificaciones están sujetas a cambios sin previo aviso.
Potencia de la Fuente de Poder: 120V, 60Hz
Potencia de Consumo: 10,5 Amps, 1 230 W
Potencia de Salida: Micro-ondas* 800W
Calor Emitido 1 100 W
Dimensiones Externas 282 x 484 x 357mm
(Alto x Ancho x Fondo): (11
1
/8
" x 19" x 14")
Dimensiones de la Cavidad del Horno 191 x 325 x 330 mm
(Alto x Ancho x Fondo): (8
9
/
16" x 12
3
/
4" x 13")
Frecuencia de Operación: 2 450 MHz
Peso sin Embalaje: Approx. 15.5 kg (34 lbs.)
© Copia registrada por Matsushita Electric Industrial Co., Ltd. 2002.
Page 11

920
Quick Min Function
This feature allows you to set and/or add cooking times easily in multiples of one minute.
NOTE:
1. Quick Min can be set only within one minute
after placing food into the microwave oven and
closing the door. Otherwise, the oven will beep
twice and you will need to open and close the
door again.
2. You can use other power levels. Select desired
power level before pressing Quick Min Pad.
3. After setting the time by Quick Min Pad, you
cannot use Number Pads, but after using
Number Pads, you can use Quick Min Pad to
add more cooking time.
To Set Cooking Time:
1. • Press.
➤Cooking for one
minute by HIGH power
will start immediately.
2. To add more • Press Quick Min Pad to
cooking time: add more time during
cooking. To verify the
additional cooking time,
check the Display
Window.
(up to 10 taps/minutes)
To Use Child Safety Lock
This feature prevents the electronic
operation of the oven until cancelled. It does
not lock the door.
To Set: • "Child" appears on
the Display Window.
➤
"Child" continues to
be displayed until
Child Lock is cancelled. Keypads may
be pressed but the
microwave will not
start.
To Cancel: • The Display Window
will return to colon or
time of day when
Child Lock has been
cancelled.
Press 3 times.
Press 3 times.
Brown Function
How do I program Brown and Time?
Directions for Browning
When Browning, heat is radiated from the two
elements at the top of the oven. The Browning
elements do not require preheating. Browning
is particularly useful for reheating crispy foods
such as fried chicken or chicken nuggets. It is
also suitable for hot sandwiches and au gratin
dishes.
Place food to be Browned on Wire Rack and
place Wire Rack on Glass Tray. Aheat-proof
dish can be placed underneath Wire Rack to
catch oil drippings from foods. Select Brown
setting, set the time and start the oven. The
food being Browned can be turned over after
half the Browning time. When the oven door is
opened the program is interrupted. Turn the
food over, place it back the oven, close the
door and restart oven. While Browning, the
oven door can be opened at any time to check
the food.
1. • Select Brown Pad.
2. • Set Cooking Time
using number pads.
3. • Press
➤
Cooking time will
appear on the Display
Window and begin to
count down
Press.
Limited Warranty & Customer Services Directory
Panasonic Microwave Oven Product
Limited Warranty
Limited Warranty Coverage
If your product does not work properly because of a defect in materials or workmanship, Panasonic Consumer
Electronics Company or Panasonic Sales Company (collectively referred to as “the warrantor”) will, for the
length of the period indicated on the chart below, which starts with the date of original purchase ("warranty
period"), at its option either (a) repair your product with new or refurbished parts, or (b) replace it with a new or
a refurbished product. The decision to repair or replace will be made by the warrantor.
PARTS LABOR
ALL P ARTS(EXCEPTMAGNETRON TUBE) 1 (ONE) YEAR 1 (ONE) YEAR
MAGNETRON TUBE 5 (FIVE) YEAR 1 (ONE) YEAR
During the "Labor" warranty period there will be no charge for labor. During the "Parts" warranty period, there
will be no charge for parts. You must carry-in or mail-in your product during the warranty period. This
warranty only applies to products purchased and serviced in the United States or Puerto Rico. This warranty is
extended only to the original purchaser of a new product which was not sold "as is". A purchase receipt or
other proof of the original purchase date is required for warranty service.
Carry-In or Mail-In Service
For Carry-In or Mail-In Service in the United States call 1-800-211-PANA(7262) or visit Panasonic Web Site:
http://www.panasonic.com
For assistance in Puerto Rico call Panasonic Sales Company (787)-750-4300 or fax (787)-768-2910.
Limited Warranty Limits And Exclusions
This warranty ONLYCOVERS failures due to defects in materials or workmanship, and DOES NOT COVER
glass, plastic parts, temperature probes(if included) and normal wear and tear or cosmetic damage. The
warranty ALSO DOES NOT COVER damages which occurred in shipment, or failures which are caused by
products not supplied by the warrantor, or failures which result from accidents, misuse, abuse, neglect,
mishandling, misapplication, alteration, faulty installation, set-up adjustments, misadjustment of consumer
controls, improper maintenance, power line surge, lightning damage, modification, or commercial use (such as
in a hotel, office, restaurant, or other business), rental use of the product, service by anyone other than a
Factory Servicenter or other Authorized Servicer, or damage that is attributable to acts of God.
THERE ARE NO EXPRESS WARRANTIES EXCEPT AS LISTED UNDER “LIMITED WARRANTY
COVERAGE". THE WARRANTOR IS NOT LIABLE FOR INCIDENTAL OR CONSEQUENTIAL DAMAGES
RESULTING FROM THE USE OF THIS PRODUCT, OR ARISING OUT OF ANY BREACH OF THIS
WARRANTY. (As examples, this excludes damages for lost time, cost of having someone remove or re-install
an installed unit if applicable, or travel to and from the servicer. The items listed are not exclusive, but are for
illustration only.) ALL EXPRESS AND IMPLIED WARRANTIES, INCLUDING THE WARRANTY OF
MERCHANTABILITY, ARE LIMITED TO THE PERIOD OF THE LIMITED WARRANTY.
Some states do not allow the exclusion or limitation of incidental or consequential damages, or limitations on
how long an implied warranty lasts, so the exclusions may not apply to you.
This warranty gives you specific legal rights and you may also have others rights which vary from state to
state. If a problem with this product develops during or after the warranty period, you may contact your dealer
or Servicenter. If the problem is not handled to your satisfaction, then write to the warrantor's Consumer Affairs
Department at the addresses listed for the warrantor.
PARTS AND SERVICE WHICH ARE NOT COVERED BY THIS LIMITED WARRANTY ARE YOUR
RESPONSIBILITY .
Customer Services Directory
PANASONIC CONSUMER ELECTRONICS COMPANY, PANASONIC SALES COMPANY,
DIVISION OF MATSUSHITA ELECTRIC DIVISION OF MATSUSHITA
CORPORATION OF AMERICA ELECTRIC OF PUERTO RICO, INC.,
One Panasonic Way Ave. 65 de Infanteria, Km. 9.5
Secaucus, New Jersey 07094 San Gabriel Industrial Park
Carolina, Puerto Rico 00985
For Product Information, Operating Assistance, Literature Request, Dealer Locations, and all
Customer Service inquiries please contact:
1-800-211-PANA (7262), Monday-Friday 9 am-9 pm; Saturday-Sunday 9 am-7 pm, EST.
Service in Puerto Rico
Matsushita Electric of Puerto Rico, Inc. Panasonic Sales Company/Factory Servicenter:
Ave. 65 de Infanteria, Km. 9.5, San Gabriel Industrial Park, Carolina, Puerto Rico 00985
Phone (787) 750-4300 Fax (787) 768-2910
Web Site: http://www.panasonic.com
you can purchase parts, accessories or locate your
nearest servicenter by visiting our Web Site.
Accessory Purchases:
1-800-332-5368 (Customer Orders Only)
Panasonic Services Company 20421 84th Avenue South, Kent, WA 98032
(6 am to 5 pm Monday-Friday; 6 am to 10:30 am Saturday; PST)
(Visa, MasterCard, Discover Card, American Express, Check)
Example: To brown for 3 minutes
Caution:
Food and accessories will be hot after browning. Use oven mitts when removing.
Wire Rack
Heat-proof dish Glass Tray
Page 12

10
19
Before Requesting Service
All these things are normal:
The oven causes Some radio and TV interference might occur when you cook with the
interference with microwave oven. This interference is similar to the interference caused
my TV. by small appliances such as mixers, vacuums, blow dryers, etc. It
does not indicate a problem with your oven.
The oven lights dim. When cooking with a power other than HIGH power, the oven
must cycle to obtain the lower power levels. The oven light will dim and
clicking noises can be heard when the oven cycles.
Steam accumulates During cooking, steam and warm air are given off from the food. Most
on the oven door and of the steam and warm air are removed from the oven by the air which
warm air comes from circulates in the oven cavity. However, some steam will condense on
the oven vents. cooler surfaces such as the oven door. This is normal.
I accidentally ran my Running the oven empty for a short time will not damage the oven.
microwave oven However, we do not recommend operating the microwave oven
without any food in it. without any food in it.
PROBLEM POSSIBLE CAUSE REMEDY
Oven will not turn on.
The oven is not plugged in Remove plug from outlet, wait
securely. 10 seconds and reinsert.
Circuit breaker or fuse is Reset circuit breaker or replace
tripped or blown. fuse.
There is a problem with the Plug another appliance into the
outlet. outlet to check if it is working.
Oven will not start
cooking.
The door is not closed completely. Close the oven door securely.
Another program is already Press Stop/Reset Pad to
entered into the oven. cancel the previous program
and enter new program.
Quick Min Function was pressed Open and close the oven door,
more than one minute after closing then press Quick Min
the oven door. Function again.
➔
➔
Start Pad was not pressed after Press Start Pad.
programming.
Stop/Reset Pad has been pressed Program oven again.
accidentally.
The program is not correct. Program again according to the
Operating Instructions.
The Roller Ring and oven bottom Clean these parts according to
are dirty. Care of Your Microwave Oven.
When the oven is
operating, there is
noise coming from
the glass tray.
➔
Defrosting Tips & Techniques
Before Freezing:
1. Freeze meats, poultry, and fish in packages with only 1 or 2 layers of food. Place wax paper between
layers.
2. Package in heavy-duty plastic wraps, bags (labeled “For Freezer”), or freezer paper.
3. Remove as much air as possible, i.e. create a vacuum.
4. Seal securely, date, and label.
To Defrost:
1. Remove wrapper. This helps moisture to evaporate. Juices from food can get hot and cook the food.
2. Set food on microwave safe roasting rack in an appropriately sized dish.
3. Place roasts fat-side down. Place whole poultry breast-side down.
4. Drain liquids during defrosting.
5. Turn over (invert) items during defrosting.
6. Shield edges and ends if needed. (See Cooking Techniques).
7. Select power and minimum time so that items will be under-defrosted.
After Defrosting:
1. Large items may be icy in the center. Defrosting will complete during STANDING TIME.
2. Let stand, covered with plastic wrap, in the refrigerator for time shown in the chart below.
3. See chart below for standing time and rinsing directions.
4. Items which have been layered should be rinsed separately or have a longer stand time.
RECOMMENDED
FOOD
DEFROST TIME
DURING DEFROSTING AFTER DEFROSTING
(min./lb.) Stand Time Rinse
Fish and Seafood
[up to 3 lbs. (1.4 kg)]
Crabmeat 6 Break apart/Rearrange
Fish Steaks 4 to 6 Turn over
YES
Fish Fillets 4 to 6 Turn over/Rearrange/Shield ends
5 min.
Sea Scallops 4 to 6 Break apart/Remove defrosted pieces
Whole fish 4 to 6 Turn over
Meat Turn over/Remove defrosted portion/
Ground Meat 6 to 7 Shield edges 10 min.
Roasts
4 to 8
Turn over/Shield ends and
30 min. in refrig.
[21/2-4 lbs. (1.1-1.8 kg)] defrosted surface
Chops/Steak 6 to 8 Turn over/Rearrange/Shield ends and
defrosted surface
Ribs/T-bone 6 to 8 Turn over/Rearrange/Shield ends and
defrosted surface
5 min.
NO
Stew Meat 4 to 8 Break apart/Rearrange/
Remove defrosted pieces
Liver (thin sliced) 4 to 6 Drain liquid/Turn over/
Separate pieces
Bacon (sliced) 4 Turn over - - - -
Poultry
Chicken, Whole 4 to 6 Turn over/Shield 20 min. in refrig.
[up to 3 lbs. (1.4 kg)]
Cutlets 4 to 6 Break apart/Turn over/
YES
Remove defrosted Pieces
5 min.
Pieces 4 to 6 Break apart/Turn over/Shield
Cornish Hens 6 to 8 Turn over/Shield
10 min.
Turkey Breast
6 Turn over/Shield 20 min. in refrig.
[5-6 lbs. (2.3-2.7 kg)]
The Glass Tray is not positioned Take out Glass Tray and Roller
properly on the Roller Ring or there Ring. Wipe with a damp cloth and
is food under the Roller Ring. reset Roller Ring and Glass Tray
properly.
The Glass Tray
wobbles.
➔
Page 13

1118
Care of Your Microwave Oven
ORDER FORM
DESCRIPTION PART NUMBER
Instruction / Operating Manual (this book) F00035G60AP
Glass Tray A06015G10XN
Roller Ring Assembly F290D5G10XN
For pricing quotes, call or write the Parts & Literature Department at the phone or address
listed below. Please have your credit card information readily available.
Shipping & handling are not included. Price & availability subject to change. Sorry, no COD’s.
PANASONIC SERVICES COMPANY
20421 84th Avenue South (800) 833-9626 - Phone
Kent, WA 98032 (800) 237-9080 - FAX
You can purchase parts, accessories or locate your
nearest servicenter by visiting our Web Site:
Web Site: http://www.Panasonic.com
BEFORE CLEANING:
Unplug at socket of the oven. If impossible,
leave oven door open to prevent oven from
accidentally turning on.
AFTER CLEANING:
Be sure to replace the Roller Ring and Glass
Tray in the proper position and press
Stop/Reset Pad to clear the Display Window.
Inside of the oven:
Wipe with a damp cloth. Mild
detergent may be used if the
oven gets very dirty. The use of
harsh detergent or abrasives is
not recommended.
Glass Tray:
Remove and wash in warm
soapy water or in a dishwasher.
Outside oven surfaces.
Clean with a damp cloth.
To prevent damage to the
operating parts inside the
oven, water should not be
allowed to seep into ventilation openings.
Oven Door:
Wipe with a soft cloth when steam
accumulates inside or around the
outside of the oven door. During
cooking, especially under high
humidity conditions, steam is given
off from the food. (Some steam will
condense on cooler surfaces, such
as the oven door.) This is normal.
Inside surface is covered with a
heat and vapour barrier film. Do not
remove.
Roller Ring and oven cavity
floor:
Wipe the bottom surface of the
oven with mild detergent water
or window cleaner and dry.
Roller Ring may be washed in
mild soapy water or dishwasher. These areas should be kept
clean to avoid excessive noise.
Control Panel:
* Covered with a removable pro-
tective film to prevent scratches
during shipping. Small bubbles
may appear under this film.
(Hint - To remove film, apply
masking or clear tape to an
exposed corner and pull gently.)
* If the control panel becomes
wet, clean it with a soft dry
cloth. Do not use harsh detergents or abrasives on the
Control Panel.
Do not remover cover.
Additional Method for
Cooking Popcorn
When using popcorn pad, the weight may
not be the same as offered. By using the
number pad 1or 0, the programs can be
adjusted to cook popcorn for a heavier or
lighter weight.
Press 1or 0pads before pressing Start.
NOTES ON POPCORN PAD:
1. Use prepackaged room temperature
microwave popcorn. Read manufacturers'
instructions.
2. Place bag in oven according to manufacturers'
directions.
3. Pop only one bag at a time.
4. To obtain best cooking results, fold in the four
corners of the bag, so that bag turns freely.
5. After popping, allow the contents of the bag to
cool for a few minutes before opening. Open
bag carefully away from face and body
because popcorn and steam are extremely hot.
6. Do not reheat unpopped kernels or reuse bag.
7. NEVER leave oven unattended when pop-
ping popcorn. Stop the oven when popping
slows to 2 to 3 seconds between pops.
Overcooking may cause scorching.
REMARK:
1. Popcorn bags of various weight may have the
same cooking time.
2. Cooking time for popcorn may vary with power
line voltage.
Popcorn Function
Example: To heat 3.5 oz. of Popcorn
4. • Press Start Pad.
➤
After several seconds,
cooking time appears
on the Display
Window and begins to
count down.
3.
1.
• Press twice.
2.
Press
To control by
1
or 0pad:
Press
or
Optional.
Press.
3.5 oz (99 g)
3.0 oz (85 g)
once
twice
Wire Rack
1 tap = More
+
2 taps = More
++
1 taps = Less
-
2 taps = Less
--
Page 14

12 17
Cooking Techniques Cooking Techniques
Shielding
Thin areas of meat and poultry cook more quickly
than meaty portions. To prevent overcooking,
these thin areas can be shielded with strips of
aluminum foil. Wooden toothpicks may be used to
hold the foil in place.
Timing
A range in cooking time is given in each recipe.
The time range compensates for the uncontrollable differences in food shapes, starting temperature, and regional preferences. Always cook
food for the minimum cooking time given in a
recipe and check for doneness. If the food is
undercooked, continue cooking. It is easier to add
time to an undercooked product. Once the food is
overcooked, nothing can be done.
Stirring
Stirring is usually necessary during microwave
cooking. We have noted when stirring is helpful,
using the words once, twice, frequently, or occasionally to describe the amount of stirring necessary. Always bring the cooked outside edges
toward the center and the less cooked center portions toward the outside of the dish.
Rearranging
Rearrange small items such as chicken pieces,
shrimp, hamburger patties, or pork chops.
Rearrange pieces from the edge to the center
and pieces from the center to the edge of the
dish.
Turning
It is not possible to stir some foods to redistribute
the heat. At times, microwave energy will concentrate in one area of a food. To help insure even
cooking, these foods need to be turned. Turn
over large foods, such as roasts or turkeys,
halfway through cooking.
Stand Time
Most foods will continue to cook by conduction
after the microwave oven is turned off. In meat
cookery, the internal temperature will rise 5°F to
15°F (3°C to 8°C), if allowed to stand, tented with
foil, for 10 to 15 minutes. Casseroles and
vegetables need a shorter amount of standing
time, but this standing time is necessary to allow
foods to complete cooking to the center without
overcooking on the edges.
Test for Doneness
The same tests for doneness used in conventional cooking may be used for microwave cooking.
Meat is done when fork-tender or splits at fibers.
Chicken is done when juices are clear yellow and
drumstick moves freely. Fish is done when it
flakes and is opaque. Cake is done when a toothpick or cake tester is inserted and comes out
clean. Candy is done when it reaches the proper
temperature for each stage of crystallization.
Spacing
Individual foods, such as baked potatoes, cupcakes and appetizers, will cook more evenly if
placed in the oven equal distances apart. When
possible, arrange foods in a circular pattern.
Covering
As with conventional cooking, moisture evaporates during microwave cooking. Casserole lids or
plastic wrap are used for a tighter seal. When
using plastic wrap, vent the plastic wrap by folding back part of the plastic wrap from the edge of
the dish to allow steam to escape. Loosen or
remove plastic wrap as recipe directs for stand
time. When removing plastic wrap covers, as well
as any glass lids, be careful to remove them
away from you to avoid steam burns. Various
degrees of moisture retention are also obtained
by using wax paper or paper towels. However,
unless specified, a recipe is cooked covered.
These are tested and pre-timed (based on the
power rating of this oven) for the quantity of food
listed in the chart on page 13. Locale, power fluctuations and personal tastes are not taken into
account. Should you prefer your food cooked differently, use power and time method shown on
page 8.
Auto Cook
Example: To cook 2 pieces of Potatoes
1. Press until desired
menu number appears
on Display Window.
2. •
Press until the desired
quantity appears on
the Display Window.
3. • Press.
➤Cooking time
appears on the
Display Window
and begins to
count down.
This feature allows you to reheat 1 to 4 servings of precooked room temperature and refrigerator temperature foods without setting power
and time.
Reheat Function
1. • Press once.
2. •
Press until the
desired number of
servings appears on
the Display Window.
3. • Press.
➤Cooking time
appears on the
Display Window
and begins to
count down.
Example: To Reheat 2 serving
NOTES: For best results, follow these recom-
mendations:
1.All foods must be previously cooked.
2.Foods should always be covered loosely
with plastic wrap, wax paper or casserole lid.
3.All foods should have a covered stand time
of 3 to 5 minutes.
4.DO NOT reheat bread and pastry products
using Reheat. Use manual power and time
instead.
5.DO NOT reheat beverages.
6.Times are based on an approximate serving
size of 4 oz.
7.A plate of food is normally 3-4 servings.
Press Auto Reheat
pad to indicate
number or servings
once
twice
three times
four times
4-6 oz.
8 oz.
12 oz.
16 oz.
Average
Serving
Size
Press 3 times.
Page 15

Category Serving/Weight Hints
1.
Auto Reheat
1, 2, 3, 4 servings see page12.
2.Popcorn 3.5, 3 oz see page11.
(99, 85 g)
3.Potatoes 1, 2, 3, 4 pcs Pierce each potato with a fork 6 times spacing
( 6-8 oz , each ) around surface. Place Potato or Potatoes around
( 170 - 225 g ) edge of paper-towel-lined Glass Tray (Turntable),
at least 1-inch (2.5 cm) apart. Do not cover. Let
stand 5 minutes to complete cooking.
4.Frozen 6, 10, 16 oz Follow manufacturers’ directions. Do not salt until
Vegetables ( 170, 300, 450 g ) after cooking. Not suitable for vegetables in butter
or sauce.
5.Frozen 1, 2, 3 sticks Place frozen garlic bread stick/s on wire rack. A
Garlic ( 1-2 oz , each ) microwave/ heat safe dish can be placed
Bread Stick ( 28 - 56 g ) underneath wire rack to catch oil drippings.
6.Grilled 1 sandwich Place fresh sandwich on wire rack. When
Sandwich Microwave oven beeps, turn sandwich over using
a spatula. Use oven mitts when touching wire rack.
7.Chicken 4, 6, 8, 10 pcs Place pre-cooked chicken nuggets on wire rack.
Nuggets A microwave/ heat safe dish can be placed
underneath wire rack to catch oil drippings.
8.Fried 4, 8, 12 oz Place pre-cooked fried chicken on wire rack. A
Chicken ( 110, 225, 340 g ) microwave/ heat safe dish can be placed
underneath wire rack to catch oil drippings. When
microwave oven beeps, turn chicken over using
tongs. Use oven mitts when touching wire rack or
dish.
16
13
Food Characteristics Cooking Techniques
Bone and Fat
Both bone and fat affect cooking. Bones may
cause irregular cooking. Meat next to the tips of
bones may overcook while meat positioned under
a large bone, such as a ham bone, may be
undercooked. Large amounts of fat absorb
microwave energy and the meat next to these
areas may overcook.
Density
Porous, airy foods such as breads, cakes or rolls
take less time to cook than heavy, dense foods
such as potatoes and roasts. When reheating
donuts or other foods with different centers be
very careful. Certain foods have centers made
with sugar, water, or fat and these centers attract
microwaves (For ex., jelly donuts). When a jelly
donut is heated, the jelly can become extremely
hot while the exterior remains warm to the touch.
This could result in a burn if the food is not
allowed to cool properly in the center.
Quantity
Two potatoes take longer to cook than one potato. As the quantity of the food increases so does
the cooking time. When cooking small amounts of
food such as one or two potatoes, do not leave
oven unattended. The moisture content in the
food may decrease and a fire could result.
Shape
Uniform sizes heat more evenly. The thin end of a
drumstick will cook more quickly than the meaty
end. To compensate for irregular shapes, place
thin parts toward the center of the dish and thick
pieces toward the edge.
Size
Thin pieces cook more quickly than thick pieces.
Starting Temperature
Foods that are room temperature take less time
to cook than if they are chilled, refrigerated, or
frozen.
Piercing
Foods with skins or membranes must be pierced
scored or have a strip of skin peeled before cooking to allow steam to escape. Pierce whole egg
yolks and whites, clams, oysters, chicken livers,
whole potatoes and whole vegetables. Whole
apples or new potatoes should have a 1-inch strip
of skin peeled before cooking. Score sausages
and frankfurters.
Browning
Foods will not have the same brown appearance
as conventionally cooked foods or those foods
which are cooked utilizing a browning feature.
Meats and poultry may be coated with browning
sauce, Worcestershire sauce, barbecue sauce or
shake-on browning sauce. To use, combine
browning sauce with melted butter or margarine;
brush on before cooking.
For quick breads or muffins, brown sugar can be
used in the recipe in place of granulated sugar, or
the surface can be sprinkled with dark spices
before baking.
Auto Cook
The following chart is the recommended serving/weights for Auto Cook.
* Category 1, 2, 3, 4
These menu items use microwave energy
only. Place food onto the glass tray.
* Category 5, 6, 7, 8
These menu items use energy from both the
microwave and the browner. Place food on
top of the wire rack.
Wire Rack
Heat-proof dish Glass Tray
Glass Tray
Page 16

14
15
Example: To stand for 5 mins. after cook-
ing (3 mins. at MEDIUM Power)
1. • Enter the desired cook-
ing program (see page
8 for directions).
2. • Press once.
3. • Set desired amount of
Stand Time using number pads. (up to 99 minutes and 99 seconds)
4. • Press.
➤Cooking will start.
After cooking, stand
time will count down
without oven operating.
1. • Press once.
2. • Set desired amount of
time using number pads.
(up to 99 minutes and
99 seconds).
3. • Press.
➤Time will count down
without oven
operating.
To Use as a Kitchen Timer:
To Set Stand Time:
Example: To start cooking 5 minutes later.
(3 mins. at MEDIUM Power).
To Set Delay Start:
This feature allows you to program a Standing
Time after cooking is completed and to program
the oven as a minute timer and/or to program a
delay start.
1. • Press once.
2. • Enter desired amount of
delayed time using
number pads.
(up to 99 minutes and
99 seconds)
3. • Enter the desired cook-
ing program (see page
8 for directions).
4. • Press.
➤Delayed time will
count down. Then
cooking will start.
Press 3 times
NOTES:
1. When each stage finishes, a two-beep signal
sounds. At the end of the program, the oven will
beep five times.
2. If oven door is opened during Stand Time or
Kitchen Timer, the time on the screen will continue to count down.
3. Stand time and Delay time cannot be programmed before any Auto Control Function.
This is to prevent the starting temperature of
food from rising before cooking begins. A
change in starting temperature could cause
inaccurate results.
Timer Setting
Example: To count 5 minutes
Press 3 times
TIME
FOOD POWER DIRECTIONS
(in mins.)
To separate Bacon, High 30 sec. Remove wrapper and place in microwave
1 pound (450 g) safe dish. After heating, use a plastic
spatula to separate slices.
To soften Brown Sugar High 20 - 30 sec. Place brown sugar in microwave safe dish
1 cup (250 mL) with a slice of bread. Cover with plastic wrap.
To soften Butter, LOW 1
1
/2
Remove wrapper and place butter in a
1 stick,
1
/4
pound (110 g) microwave-safe dish.
To melt Butter, MEDIUM 1
1
/2
- 2 Remove wrapper and place butter in a
1 stick
1
/4
pound (110 g) microwave-safe dish covered with
plastic wrap.
To melt Chocolate, High 1 -
1
1
/2
Remove wrapper and place chocolate
1 square, 1 oz. (28 g) in a microwave-safe dish. Stir before
To melt Chocolate, High 1 - 1
1
/2
adding more time. (Stir until completely
1
/2
cup (125 mL) chips melted.) Note: Chocolate holds its shape
even when softened.
To toast Coconut, High 1 Place in a microwave-safe dish.
1
/2
cup (125 mL) Stir every 30 seconds.
To soften Cream Cheese, LOW 1 - 2 Remove wrapper and place in a
8 oz. (250 g) microwave-safe bowl.
To brown Ground Beef, High 4 - 5 Crumble into a microwave-safe colander
1 pound (450 g) set into another dish. Stir twice.
Drain grease.
To steam Hand Towels - 4 High 20 - 30 sec. Soak in water, then wring out excess.
Place on a microwave-safe dish.
Heat. Present immediately.
To soften Ice Cream, LOW 1 - 1
1
/
2
Check often to prevent melting.
1
/2
gallon (2L)
Cup of liquid
boiling water, broth, etc. High
1 cup, 8 oz. (250 mL) 2
1
/3
- 3 Heated liquids can erupt if not stirred.
2 cups, 16 oz. (500 mL) 4 Do not heat liquids in microwave oven
to heat milk MEDIUM without stirring before and after heating.
1 cup, 8 oz. (250 mL) 2 - 3
1
/2
2 cups, 16 oz. (500 mL) 4 - 5
1
/2
To roast Nuts, High 4 - 5 Spread nuts into a 9-inch (230 mm)
1
1
/2
cups (375 mL) microwave-safe pie plate.
Stir occasionally.
To toast Sesame Seeds, High 3 - 5 Place in a small microwave-safe bowl.
1
/4
cup (50 mL) Stir twice.
To skin Tomatoes High 30 sec. Place tomato into a microwave-safe bowl
(one at a time) containing boiling water. Rinse and peel.
Repeat for each tomato.
To remove Cooking Odors High 5 Combine 1 to 1
1
/2 cups (250 - 375 mL)
water with the juice and peel of one
lemon in a small microwave-safe bowl.
After heating, wipe interior of oven with
a cloth.
Microwave Shortcuts
 Loading...