

Page 1
Operating Instructions
|ÉSÉɱÉxÉ ÊxÉnæù¶É
ﺎﻤﻨﻫﺍﺭ ﻪﭼﺮﺘﻓﺩ
ﻞﻴﻐﺸﺘﻟﺍ ﺕﺍﺩﺎﺷﺭﺇ
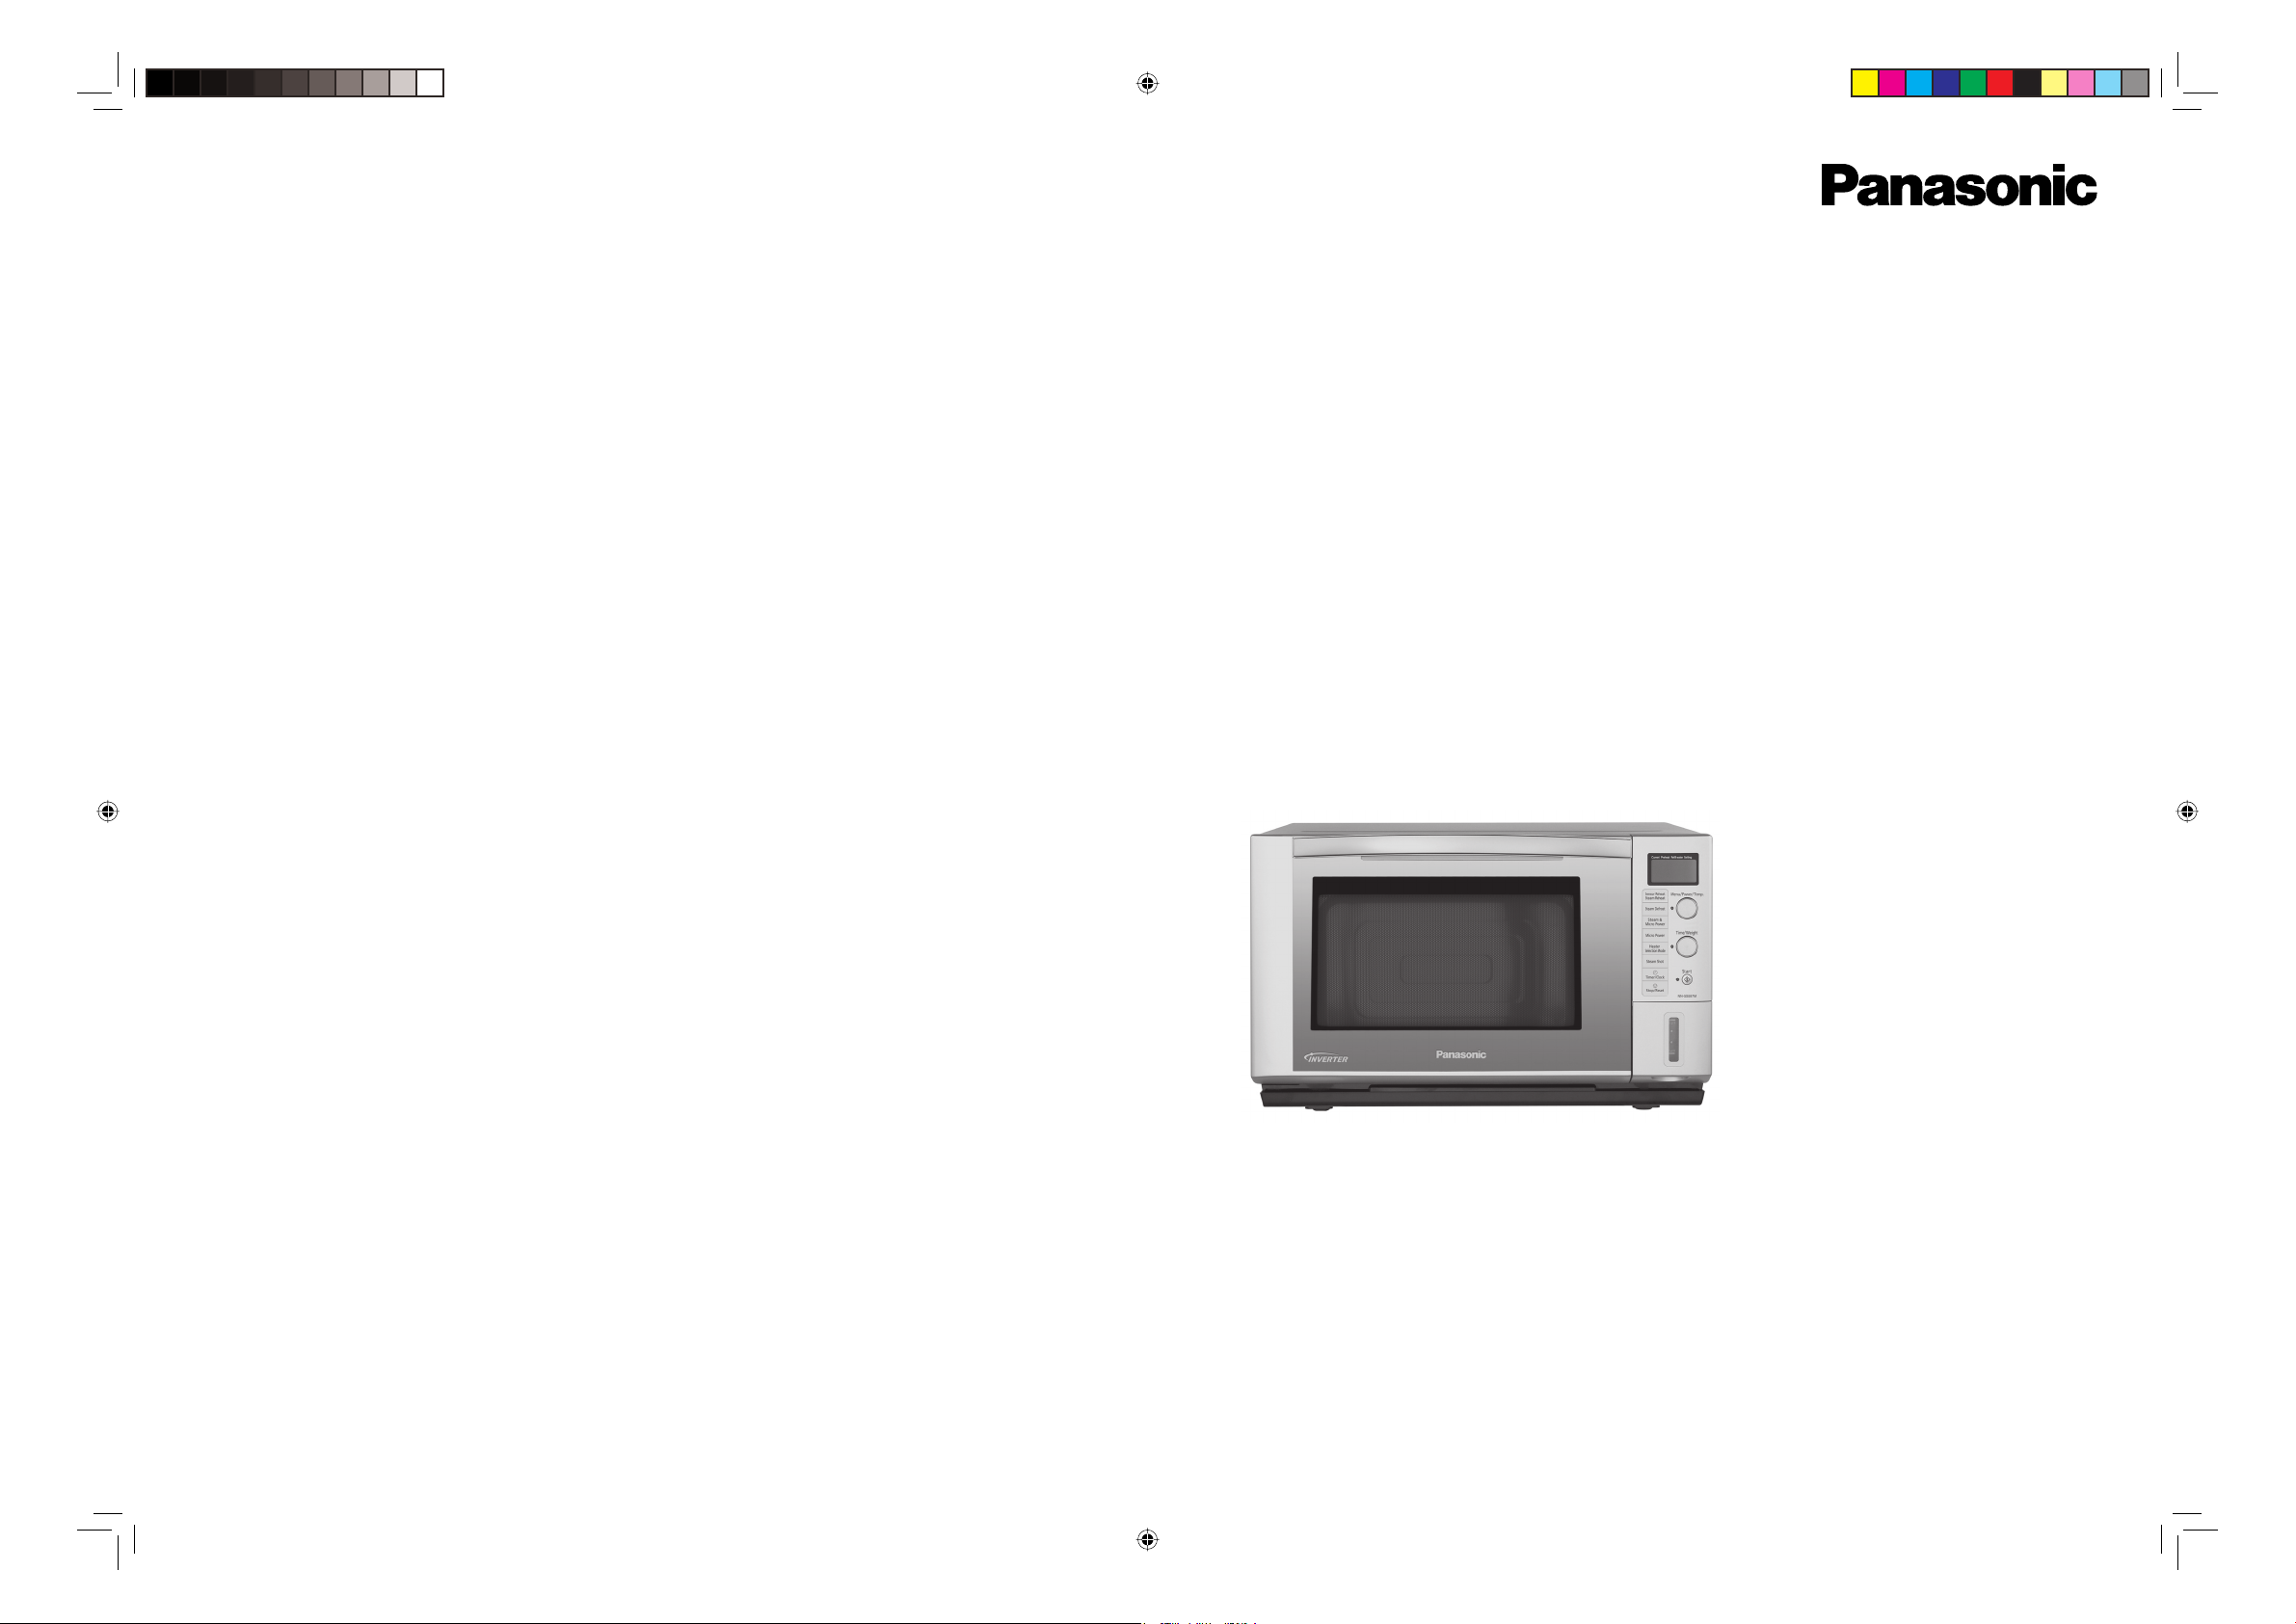
Steam Grill Microwave Oven
º]Ò¨É ÊOÉ±É ¨ÉÉ<GòÉä´Éä´É +´ÉxÉ
ﺭﺎﺨﺑ ﻦﮐ ﺥﺮﺳ ﻮﻳﻭﻭﺮﮑﻳﺎﻣ ﻕﺎﺟﺍ
ﺭﺎﺨﺒﻟﺎﺑ ﻱﻮﺸﻠﻟ ﻒﻳﻭﻭﺮﻜﻳﺎﻣ ﻥﺮﻓ
Read all instructions carefully before using the oven and please keep it importantly.
+´ÉxÉ EòÉ ={ɪÉÉäMÉ Eò®xÉä Eäò {ÉÚ´ÉÇ ºÉ¦ÉÒ ÊxÉnæ¶ÉÉå EòÉä vªÉÉxÉ{ÉÚ´ÉÇEò {Éfà ±Éå +Éè® <xÉ ÊxÉnæ¶ÉÉå EòÉä ÊEòºÉÒ ºÉÖ®ÊIÉiÉ ºlÉÉxÉ ¨Éå ºÉÆVÉÉäEò® ®JÉå*
.ﺪﻳﺭﺎﻤﺸﺑ ﻢﻬﻣ ﺍﺭ ﺎﻬﻧﺁ ﻭ ﺪﻴﻧﺍﻮﺨﺑ ﺖﻗﺩ ﻪﺑ ﺍﺭ ﺎﻬﻠﻤﻌﻟﺍﺭﻮﺘﺳﺩ ﺮﻓﻭﺮﮑﻳﺎﻣ ﺯﺍ ﻩﺩﺎﻔﺘﺳﺍ ﺯﺍ ﻞﺒﻗ ﺎﻔﻄﻟ
.ﺭﺎﺒﺘﻋﻻﺍ ﻲﻓ ﺎﻬﻌﺿﻭ ﻊﻣ ﻥﺮﻔﻟﺍ ﻡﺍﺪﺨﺘﺳﺍ ﻞﺒﻗ ﺕﺎﻤﻴﻠﻌﺘﻟﺍ ﺔﻓﺎﻛ ﺓءﺍﺮﻗ ءﺎﺟﺮﺑ
Model: NN-GS597M
F00038S82KP
iPress0808-2
Panasonic Corporation
Web Site: http://panasonic.net
IP2123_38S82KP_Cov_00_080806.indd 1IP2123_38S82KP_Cov_00_080806.indd 1 2008-8-6 Michael 2:42:462008-8-6 Michael 2:42:46
Page 2

Table of Contents
Quick Guide to Operation .................................................................................................................................... 2-3
Safety Instructions ...................................................................................................................................................4
Installation and General Instructions .......................................................................................................................5
Feature Diagram .....................................................................................................................................................6
Control Panel ...........................................................................................................................................................7
Display Window .......................................................................................................................................................8
Dial Feature .............................................................................................................................................................8
Clock Setting ...........................................................................................................................................................9
Child Safety Lock Setting ........................................................................................................................................9
Micro Power Setting ..............................................................................................................................................10
Cooking Time Adjustment Setting ......................................................................................................................... 11
Usage of Oven Accessories .................................................................................................................................. 11
Steam & Micro Power Setting ...............................................................................................................................12
Steam Shot Setting ...............................................................................................................................................12
Defrosting by Time Setting ....................................................................................................................................13
Defrosting by Steam Setting ..................................................................................................................................13
Defrosting Tips and Techniques ............................................................................................................................14
Steam Reheat Setting ...........................................................................................................................................15
Sensor Reheat Setting ..........................................................................................................................................16
English
Recommended Food Temperature ........................................................................................................................17
Heater Selection Mode Setting ........................................................................................................................ 18-20
Timer Setting .........................................................................................................................................................21
3-Stage Setting ......................................................................................................................................................22
Drain Setting ..........................................................................................................................................................22
Auto Cook Setting and Menus ......................................................................................................................... 23-25
Before Requesting Service .............................................................................................................................. 26-27
Care of your Microwave Oven ...............................................................................................................................28
Technical Specifications ........................................................................................................................................29
- Eng-1 -
IP1589_38S80KP_Eng_06_071227.indd 1IP1589_38S80KP_Eng_06_071227.indd 1 2007-12-27 Good Tom 15:50:072007-12-27 Good Tom 15:50:07
Page 3
Quick Guide to Operation
After plugging in, "WELCOME TO INVERTER COOKING" will appear in the display window, then you can start to operate.
Feature How to Operate
To Set Clock
English
To Set/Cancel Child Safety
Lock
To Set Micro Power
To Set Steam & Micro Power
Steam Shot Setting
(page 9)
(page 9)
(page 10)
(page 12)
(page 12)
Press twice To set time (12-hour) Press once
To Set: Display
Press 3 times
Cancel: Display
or
Press 3 times
Method 1:
Press once to 6 times to
set power
Set time Press once
Method 2:
(Default is Micro Power High)
Press once
Press once
During Oven or Grill
Set power Press onceSet time
Set time Press once
Press once to set 1
minute steam
Press once or twice in 5
seconds after step 2 to
add 1 or 2 minutes steam
( )
(If necessary)
To Use Steam Defrost
(page 13)
To Reheat using Steam
Reheat
(page 15)
To Reheat using Sensor
Reheat
(page 16)
Press once Set weight Press once
(If necessary)
( )
Press twice Set more or less Press once
Press once Set temperature Press once
- Eng-2 -
IP1589_38S80KP_Eng_06_071227.indd 2IP1589_38S80KP_Eng_06_071227.indd 2 2007-12-27 Good Tom 15:50:072007-12-27 Good Tom 15:50:07
Page 4
Quick Guide to Operation
Feature How to Operate
Without Preheating:
To Use Oven
(page 18)
Press once
With Preheating:
Press once
Set temperature Press onceSet time
Set temperature Press onceSet time
Press once
After preheat
Put the food into
the oven
English
To Use Grill
(page 19)
To Use Combination
(page 20)
To Use as a Kitchen Timer
(page 21)
To Set Stand Time
(page 21)
To Set Delay Start
(page 21)
Press twice
(Default is Grill High)
Press 3 times
(Default is Combination High)
Press once Set time Press once
Set cooking
power and time
Press once Press onceSet time
Set power Press onceSet time
Set power Press onceSet time
Press once Press onceSet time
Set cooking
power and time
Menu 1-7:
Select the menu Set serving/weight Press once
Menu 8:
After preheating
To Cook using Auto Cook
(page 23)
Select the menu
Set serving/weight Press once to
Press once to preheat
start cooking
Menu 9-10:
Select the cleaning
function
- Eng-3 -
IP1589_38S80KP_Eng_06_071227.indd 3IP1589_38S80KP_Eng_06_071227.indd 3 2007-12-27 Good Tom 15:50:082007-12-27 Good Tom 15:50:08
Press once
Page 5

Safety Instructions
Precautions to be taken when
using Microwave Ovens for Heating
Foodstuffs
Inspection for Damage:
A microwave oven should only be used if an inspection
confirms all of the following conditions:
1. The grille is not damaged or broken.
2. The door fits squarely and securely and opens and
English
closes smoothly.
3. The door hinges are in good condition.
4. The metal plates of a metal seal on the door are neither
buckled nor deformed.
5. The door seals are neither covered with food nor have
large burn marks.
Precautions:
Microwave radiation from microwave ovens can cause
harmful effects if the following precautions are not taken:
1. Never tamper with or deactivate the interlocking devices
on the door.
2. Never poke an object, particularly a metal object, through
a grille or between the door and the oven while the oven
is operating.
3. Never place saucepans, unopened cans or other heavy
metal objects in the oven.
4. Do not let other metallic articles, e.g. fast food foil
containers, touch the side of the oven.
5. Clean the oven cavity, the door and the seals with water
and a mild detergent at regular intervals. Never use
any form of abrasive cleaner that may scratch or scour
surfaces around the door.
6. Always use the oven with the cookware recommended
by the manufacturer.
7. Never operate the oven without a load (i.e. an absorbing
material such as food or water) in the oven cavity unless
specifically allowed in the manufacturer's literature.
8. For horizontally hinged doors, never rest heavy objects
such as food containers on the door while it is open.
9. Do not place sealed containers in the microwave
oven. Baby bottles fitted with a screw cap or a teat are
considered to be sealed containers.
10. The appliance is not intended for use by young children
or infirm persons without supervision.
11. Young children should be supervised to ensure that they
do not play with the appliance.
Important Instructions
WARNING—To reduce the risk of burns, electric shock, fire,
injury to persons or excessive microwave energy:
1. Read all instructions before using microwave oven.
2. Some products such as whole eggs and sealed
containers - (for example, closed glass jars and sealed
baby bottles with teat) may explode and should not be
heated in microwave oven. Refer to cookbook for more
details.
3. Use this microwave oven only for its intended use as
described in this manual.
4. As with any appliance, close supervision is necessary
when used by children.
5. Do not operate this microwave oven, if it is not working
properly, or if it has been damaged or dropped.
6. Do not store or use this appliance outdoors.
7. Do not immerse cord or plug in water.
8. Keep cord away from heated surfaces.
9. Do not let cord hang over edge of table or counter.
10. To reduce the risk of fire in the oven cavity:
(a) Do not overcook food. Carefully attend microwave
oven if paper, plastic, or other combustible materials
are placed inside the oven to facilitate cooking.
(b) Remove wire twist-ties from bags before placing bag
in oven.
(c) If materials inside the oven should ignite, keep oven
door closed, turn oven off at the wall switch, or shut
off power at the fuse or circuit breaker panel.
11. Do not remove outer panel from oven.
Earthing Instructions
This microwave oven must be earthed. In the event of an
electrical short circuit, earthing reduces the risk of electric
shock by providing an escape wire for the electric current.
This microwave oven is equipped with an earthing plug. The
plug must be plugged into an outlet that is properly installed
and earthed.
WARNING—Improper use of the earthing plug can result in
electric shock.
Fan Motor Operation after Cooking
After using this oven (such as Grill, Combination or Oven),
the fan may rotate to cool the electric components. This is
perfectly normal, and you can take out the food from the
oven while the fan operates.
Practical Hints:
Exterior oven surfaces, including air vents on the cabinet and
the oven door will get hot during COMBINATION, GRILL and
OVEN. Use care when opening or closing door and when
inserting or removing food and accessories.
Circuits
Your microwave ovens should be operated on a separate
circuit from other appliances. The voltage used must be the
same as specified on this microwave oven. Failure to do this
may cause the power board fuse to blow, and/or food to cook
slower.
Do not insert higher value fuse in the power board.
- Eng-4 -
IP1589_38S80KP_Eng_06_071227.indd 4IP1589_38S80KP_Eng_06_071227.indd 4 2007-12-27 Good Tom 15:50:082007-12-27 Good Tom 15:50:08
Page 6
Installation and General Instructions
General Use
1. In order to maintain high quality, do not operate the
oven when empty. The microwave energy will reflect
continuously throughout the oven if no food or water is
present to absorb energy.
2. If smoke is observed, press the Stop/Reset Pad and
leave door closed. Disconnect the power cord, or shut off
power at the fuse or circuit breaker panel.
3. Do not dry clothes, newspapers or other materials in
oven. They may catch on fire.
4. Do not use recycled paper products, as they may contain
impurities which may cause sparks and/or fires when
used.
5. Do not use newspapers or paper bags for cooking.
6. Do not hit or strike control panel. Damage to controls
may occur.
7. POT HOLDERS may be needed as heat from food
is transferred to the cooking container and from the
container to the glass tray. The glass tray can be very hot
after removing the cooking container from the oven.
8. Do not store flammable materials next to, on top of, or in
the oven. It could be a fire hazard.
9. Do not cook food directly on ceramic plate unless
indicated in recipes. (Food should be placed in a suitable
cooking utensil.)
10. DO NOT use this oven to heat chemicals or other
nonfood products. DO NOT clean this oven with any
product that is labeled as containing corrosive chemicals.
The heating of corrosive chemicals in this oven may
cause microwave radiation leaks.
11. If glass tray is hot, allow to cool before cleaning or
placing in water.
12. When using the COMBINATION mode, never place any
aluminum or metal container directly on the wire rack.
Always insert a heat-proof, glass plate or dish between
the wire rack and the aluminum container.
This will prevent sparking that may damage the oven.
13. It is recommended not to use the wire rack when cooking
in the MICROWAVE mode only.
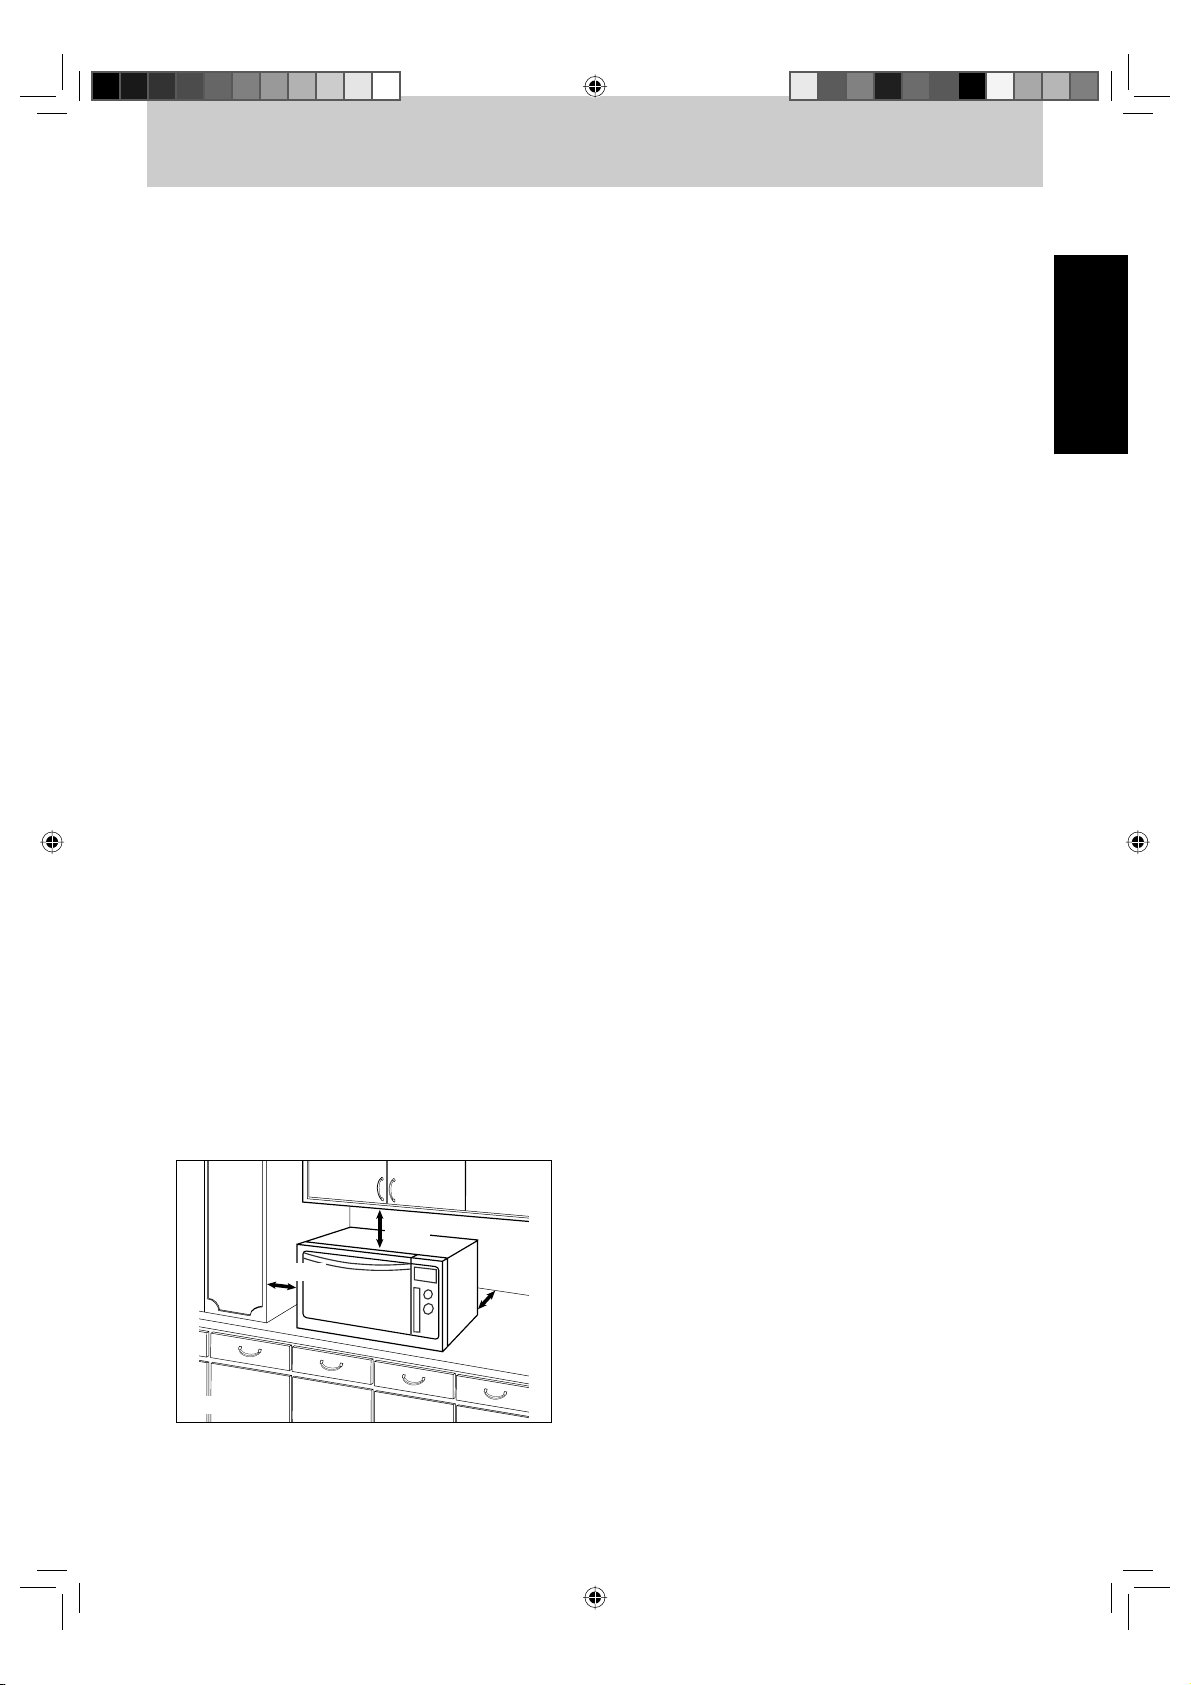
Placement of the Oven
1. The oven must be placed on a flat, stable surface and it
shall not be placed in a cabinet. For correct operation,
the oven must have sufficient air flow. Allow 25 cm of
space on the top of the oven, 10 cm at back and 10 cm
on left side. If one side of the oven is placed flush to a
wall, the other side or top must not be blocked. Do not
remove feet.
25 cm
10 cm
Counter-top
(a) Do not block air vents. If they are blocked during
operation, the oven may overheat. If the oven
overheats, a thermal safety device will turn the
oven off. The oven will remain inoperable until it has
cooled.
10 cm
- Eng-5 -
(b) Do not place oven near a hot or damp surface such
as a gas stove, electric range or sink etc.
(c) Do not operate oven when room humidity is too high.
2. This oven was manufactured for household use only.
English
Food
1. Do not use your oven for home canning or the heating
of any closed jar. Pressure will build up and the jar
may explode. In addition, the microwave oven cannot
maintain the food at the correct canning temperature.
Improperly canned food may spoil and be dangerous to
consume.
2. Do not attempt to deep fat fry in your microwave oven.
3. Do not boil eggs in their shell (unless otherwise stated
in cookbook). Pressure will build up and the eggs will
explode.
4. Potatoes, apples, egg yolks, whole squash and
sausages are examples of foods with nonporous skins.
This type of food must be pierced before cooking, to
prevent bursting.
5. When heating liquids, e.g. soup. sauces and beverages
in your microwave oven, overheating the liquid beyond
boiling point can occur without evidence of bubbling.
This could result in a sudden boil over the hot liquid.
To prevent this possibility the following steps should be
taken.
(a) Avoid using straight-sided containers with narrow
necks.
(b) Do not overheat.
(c) Stir the liquid before placing the container in the oven
and again halfway through cooking time.
(d) After heating, allow to stand in the oven for a short
time, stirring again before carefully removing the
container.
6. DO NOT USE A CONVENTIONAL MEAT
THERMOMETER IN THE MICROWAVE OVEN. To
check the degree of cooking of roasts and poultry
use a MICROWAVE THERMOMETER. Alternatively, a
conventional meat thermometer may be used after the
food is removed from the oven. If undercooked, return
meat or poultry to the oven and cook for a few more
minutes at the recommended power level. It is important
to ensure that meat and poultry are thoroughly cooked.
7. COOKING TIME given in the cookbook is
APPROXIMATE. Factors that may affect cooking time
are preferred degree of moisture content, starting
temperature, altitude, volume, size, shape of food and
utensils used. As you become familiar with the oven, you
will be able to adjust for these factors.
8. It is better to UNDERCOOK RATHER THAN
OVERCOOK foods. If food is undercooked, it can always
be returned to the oven for further cooking. If food is
overcooked, nothing can be done. Always start with
minimum cooking time recommended.
9. Extreme care should be taken when cooking popcorn
in a microwave oven. Cook for minimum time as
recommended by manufacturer. Use the directions
suitable for the wattage of your microwave oven. NEVER
leave oven unattended when popping popcorn.
10. When heating food in plastic or paper containers, check
the oven frequently due to the possibility of ignition.
11. The contents of feeding bottles and baby food jars are
to be stirred or shaken and the temperature is to be
checked before consumption, in order to avoid burns.
IP1589_38S80KP_Eng_06_071227.indd 5IP1589_38S80KP_Eng_06_071227.indd 5 2007-12-27 Good Tom 15:50:082007-12-27 Good Tom 15:50:08
Page 7
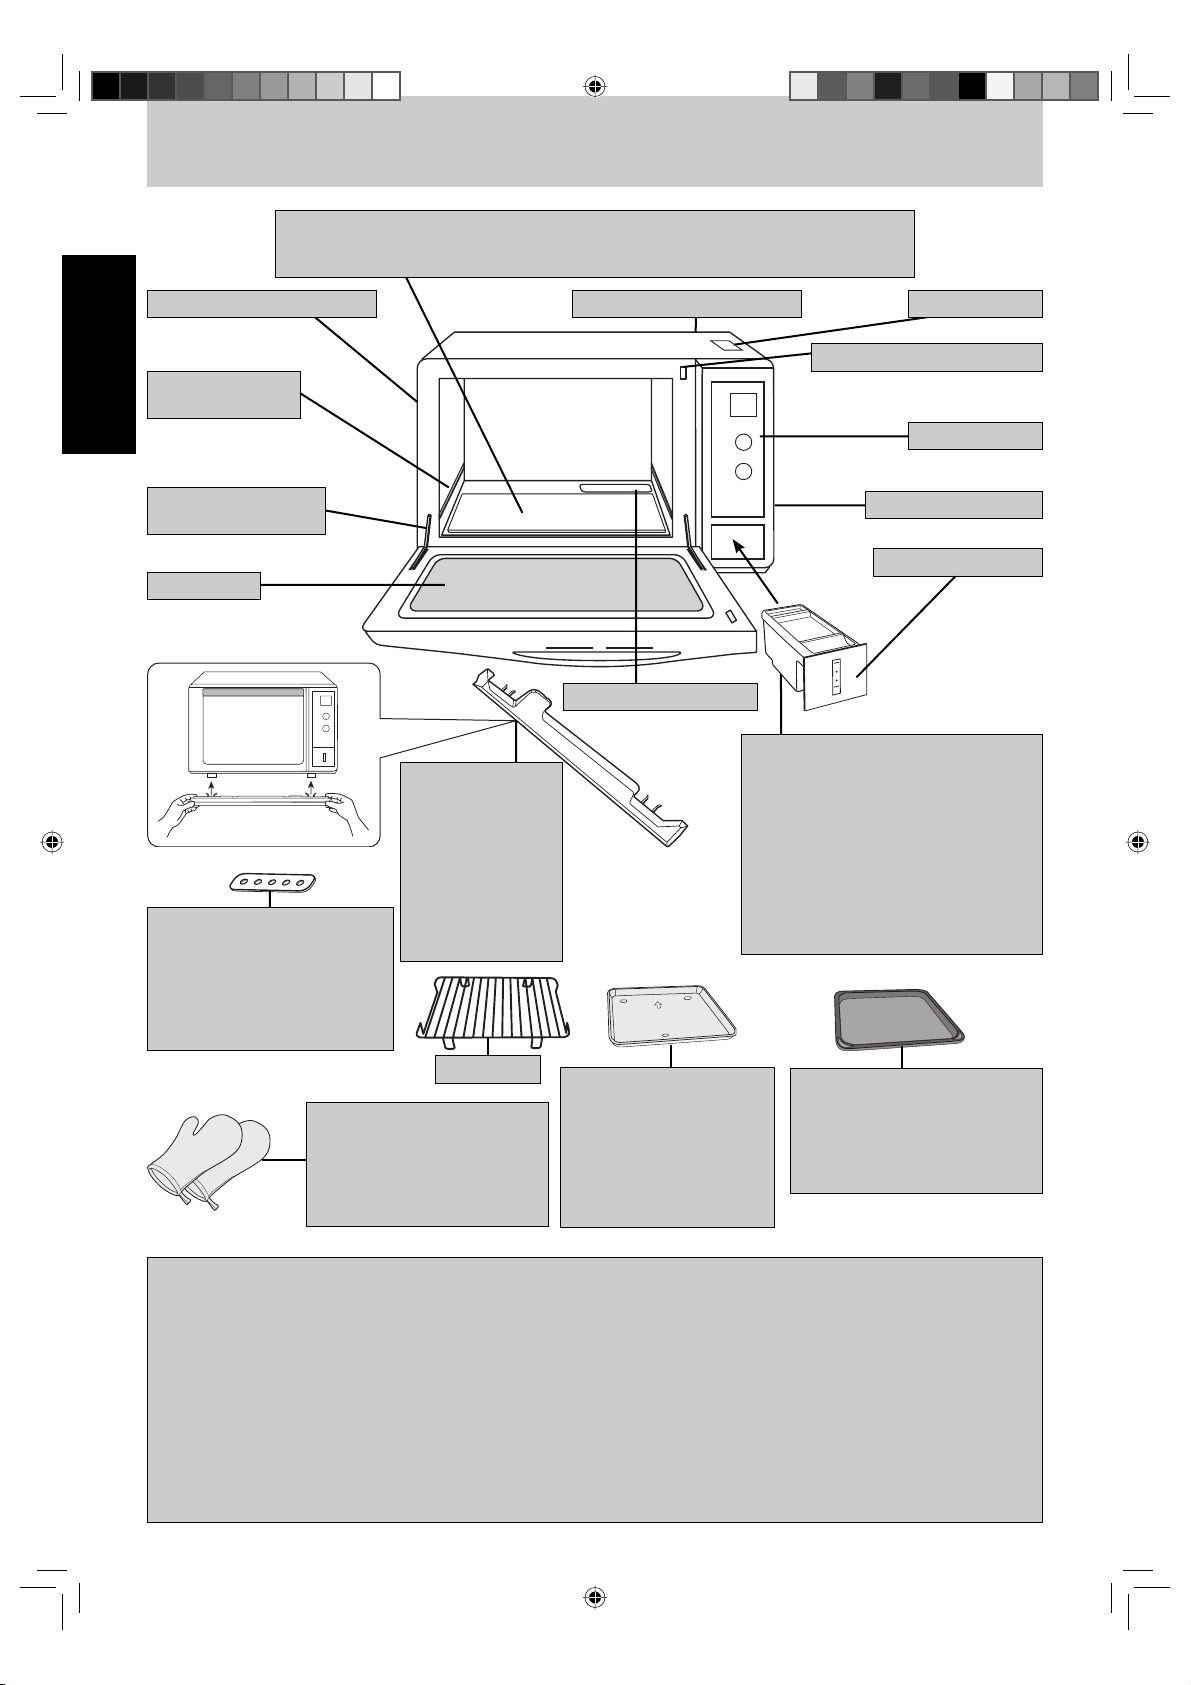
Feature Diagram
Ceramic Plate
1. If the ceramic plate is hot, allow cooling down before cleaning.
2. Do not cook directly on the ceramic plate. Always put the food in the container or rack.
External Oven Air Vents
Support Shelf
English
(only for crispy pan)
Door Hinge
Never put the finger in.
Oven Door
Ceramic Cover
1. Install over the evaporating
channel.
2. After using steam function, do
not touch the ceramic cover to
avoid scalding.
3. Clean after cooling down.
Drip Tray
1. Install the Drip
Tray at the rubber
feet before using.
2. Clean and wipe to
dry after using.
3. After cleaning,
re-install the plate
back to the rubber
feet.
External Oven Air Vents Caution Label
Door Safety Lock System
Control Panel
Identification Plate
Water Tank Cover
Evaporating Channel
Water Tank
1. Install the tank in the arrow direction.
2. Pour the water to full mark in the tank.
3. Incorrect installation may cause
leakage of water.
4. Clean the tank and sealed band
frequently.
5. Remove the sealed band may cause
dropping water.
6. Use distilled water or tap water.
Do not use mineral water.
Wire Rack
Mitten
After using grill or oven function,
the crispy pan become very hot,
please use the mitten to take it
out in order to avoid scalding.
Glass Tray
1. Place in the arrow
direction.
2. Drag the glass tray on the
oven window may cause
damage to the window.
3. Never shelve on support
shelf.
Crispy Pan
1. For oven or grill only.
2. Place directly on the support
shelf only.
3. After cooking, don't touch it by
hand directly to avoid scalding.
Warning
(a) The door seals and door seal areas should be cleaned with a damp cloth. The appliance should be inspected for
damage to the door seals and door seal areas and if these areas are damaged the appliance should not be operated
until it has been repaired by a service technician trained by the manufacturer.
(b) It is dangerous for anyone other than a service technician trained by the manufacturer to perform repair service.
(c) If the supply cord of this appliance is damaged, it must be replaced by the manufacturer or its service agent or a similarly
qualified person in order to avoid a hazard.
(d) Before use, the user should check that whether the utensils are suitable for use in microwave ovens.
(e) Liquids or other foods must not be heated in sealed containers since they are liable to explode, at the same time it
should avoid the boiling liquids splash.
(f) Only allow children to use the oven without supervision when adequate instructions have been given so that the child is
able to use the oven in a safe way and understands the hazards of improper use.
(g) Accessible parts may become hot when COMBINATION/GRILL/OVEN is in use. Children should be kept away.
- Eng-6 -
IP1589_38S80KP_Eng_06_071227.indd 6IP1589_38S80KP_Eng_06_071227.indd 6 2007-12-27 Good Tom 15:50:092007-12-27 Good Tom 15:50:09
Page 8
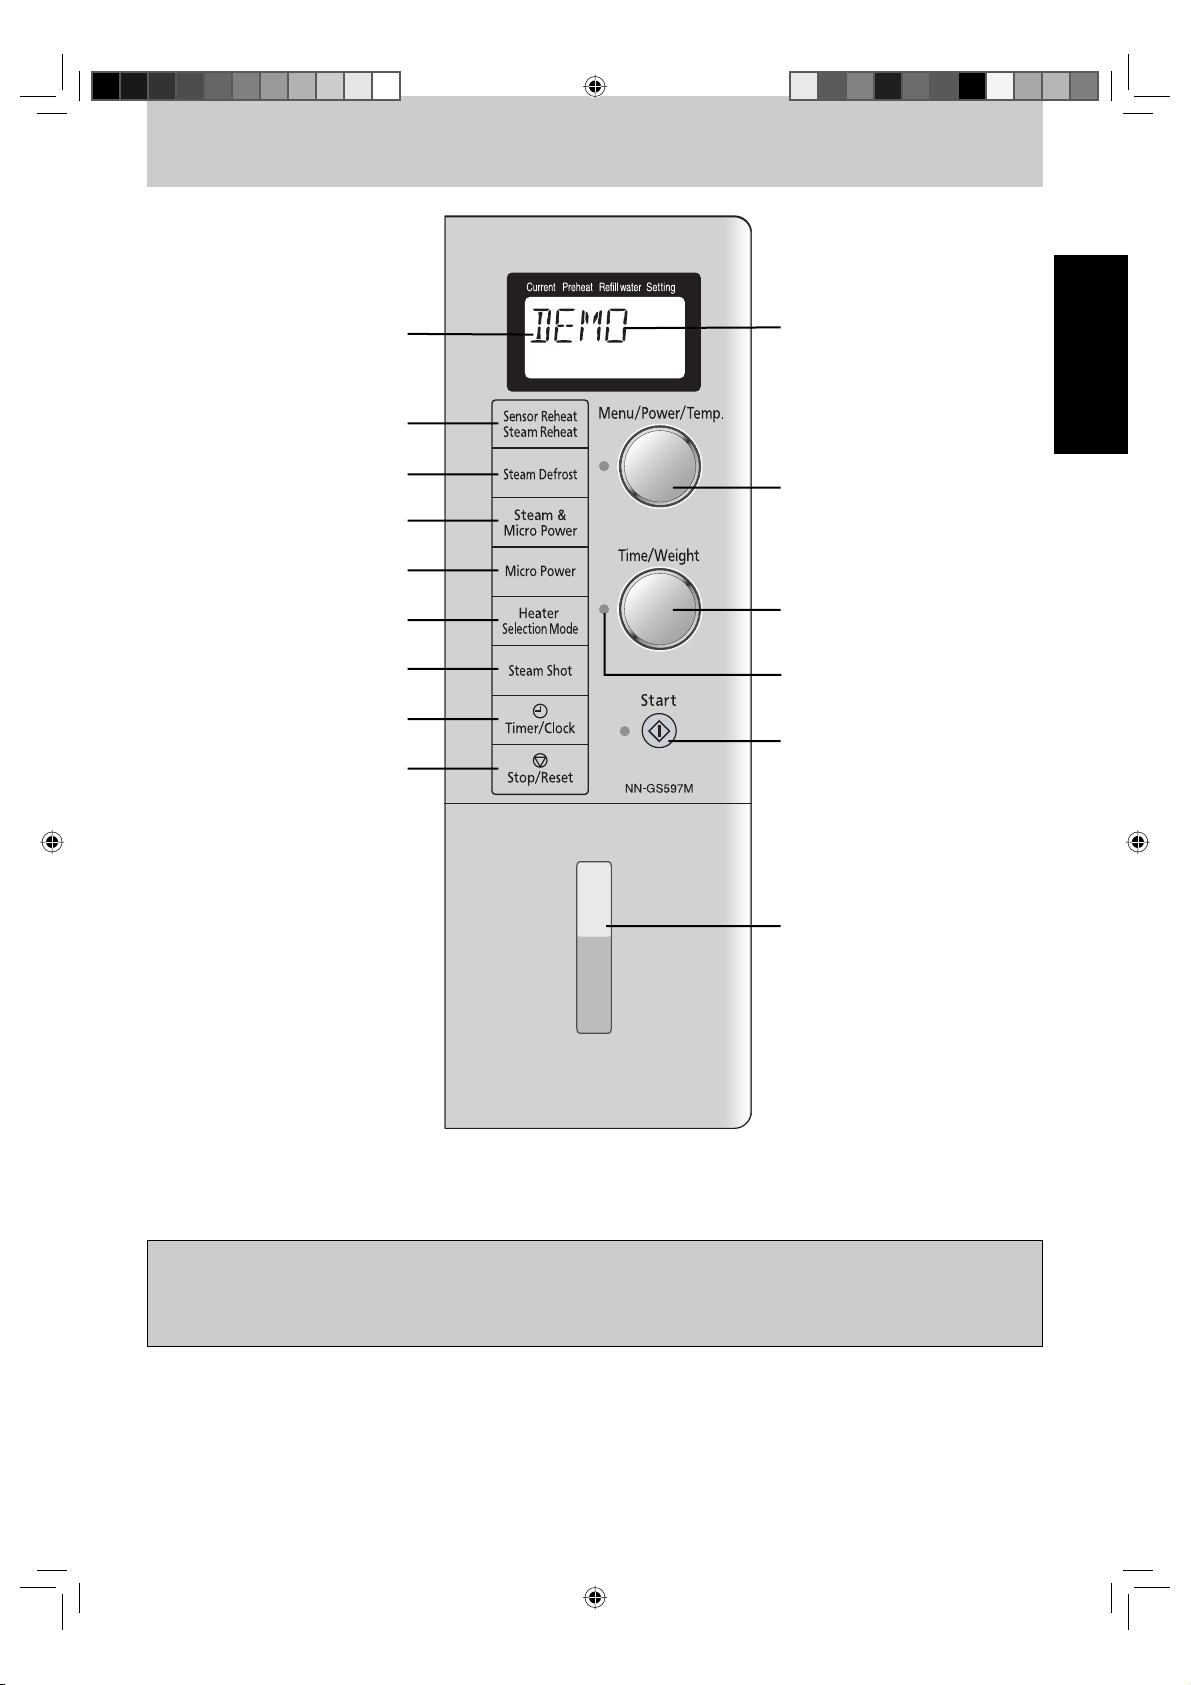
Control Panel
Display Window
Sensor Reheat/
Steam Reheat Pad
(page 15, 16)
Steam Defrost Pad
(page 13)
Steam & Micro Power Pad
(page 12)
Micro Power Pad
(page 10)
Heater Selection Mode
Pad (page 18)
Steam Shot Pad
(page 12)
Timer/Clock Pad
(page 9, 21)
Stop/Reset Pad
Before cooking: One tap
clears your instructions.
During cooking: One tap
temporarily stops the cooking
process. Another tap cancels
all your instructions and colon
or time of day appears in the
Display Window.
* When "DEMO MODE PRESS
English
ANY KEY" appears in the
display window, it means the
oven is under demonstration
mode, microwave doesn't
emit. To set or cancel this
mode, please refer to page 27.
Menu/Power/Temp. Dial*
* To be "More" or "Less" Dial
when using Steam Reheat.
Time/Weight Dial
Prompt Light
Twinkling to prompt next
operation.
Start Button
After setting, one tap allows
oven to begin functioning. If
door is opened or Stop/Reset
pad is pressed once during
oven operation, Start button
must again be pressed to
restart oven.
Water Tank
(for steam function)
Beep Sound:
When a pad is pressed correctly, a beep sound will be heard. If a pad is pressed and no beep is heard, the unit
did not or could not accept the instruction. The oven will beep twice between programmed stages. At the end
of any completed program, the oven will beep 5 times.
Note:
If no operation during program setting or cooking program pausing, 6 minutes later the oven will automatically
cancel this setting. The display will revert back to clock or colon mode.
- Eng-7 -
IP1589_38S80KP_Eng_06_071227.indd 7IP1589_38S80KP_Eng_06_071227.indd 7 2007-12-27 Good Tom 15:50:092007-12-27 Good Tom 15:50:09
Page 9
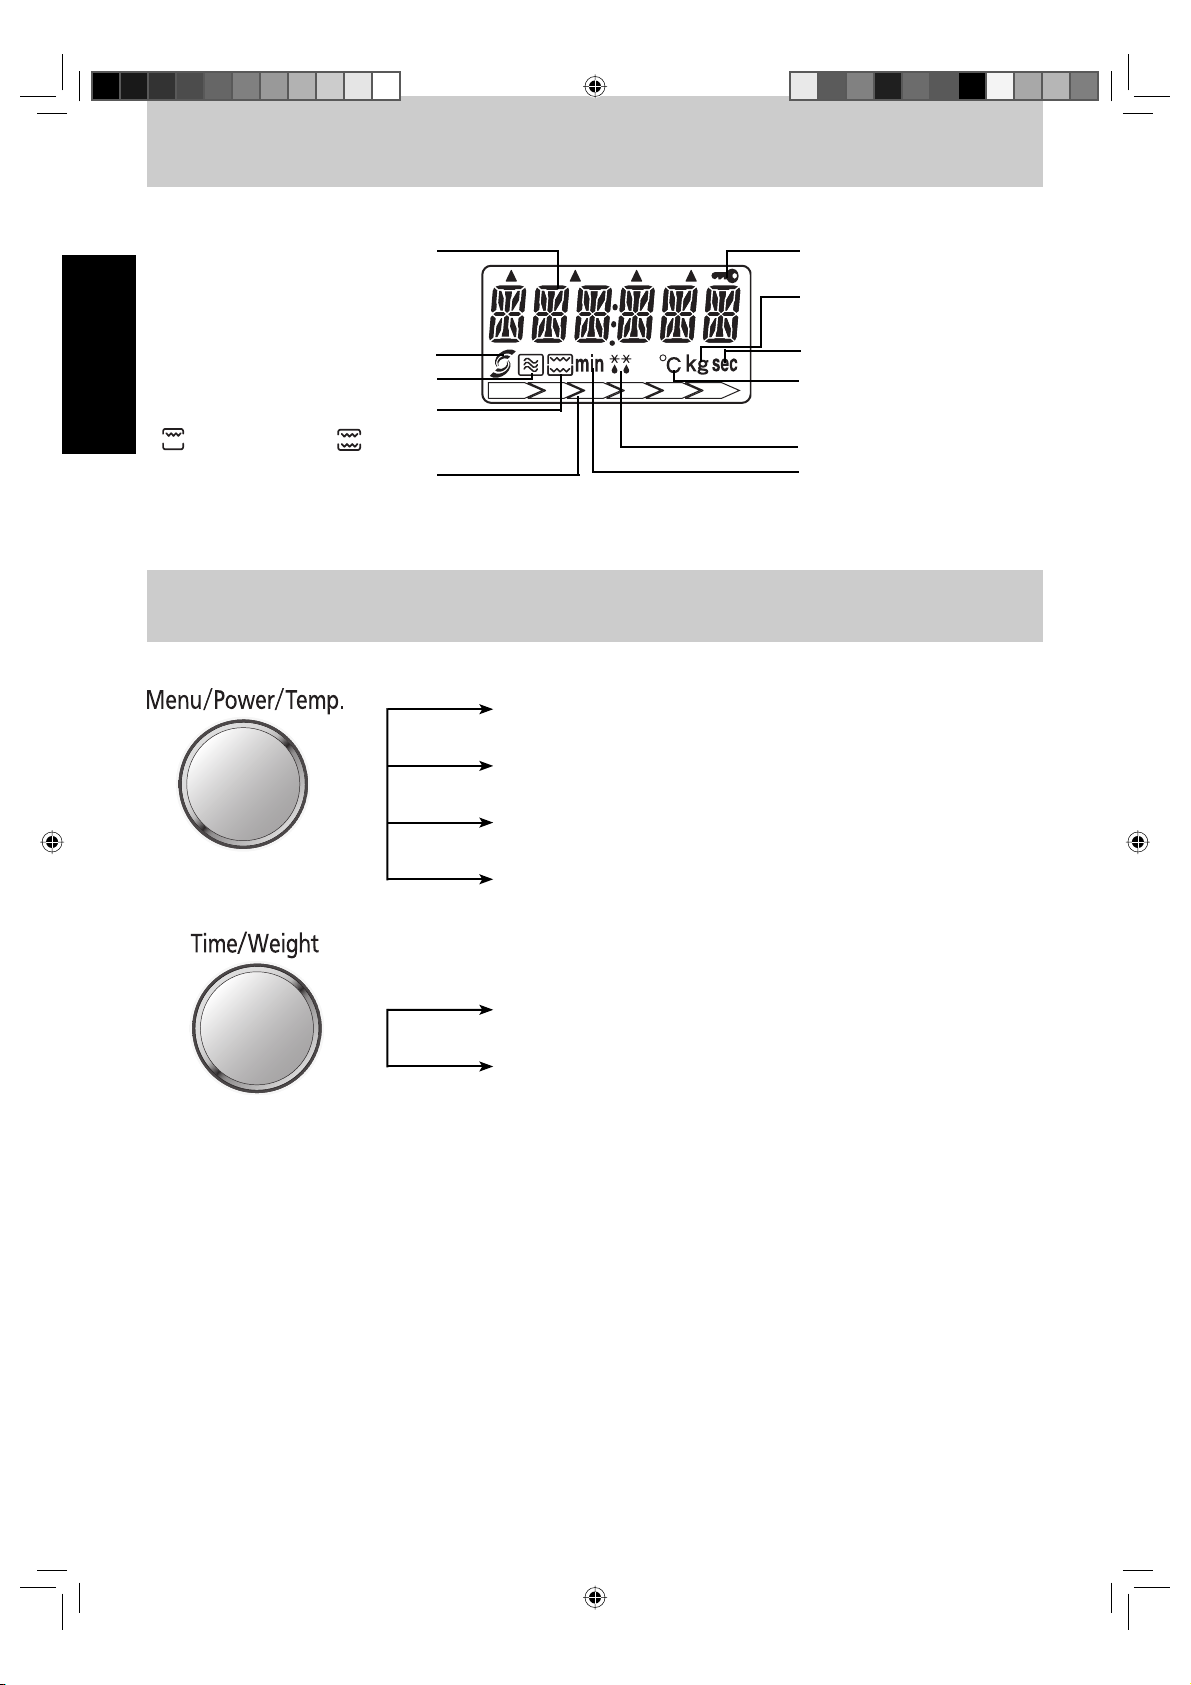
Display Window
To help you operate the oven conveniently, the present state will appear in the display window.
Number (Time/Weight)
Steam Feature
English
Microwave Power
Heater Feature
(" " is grill feature, " " is oven feature)
Power Level
Dial Feature
Child Safety Lock
Weight (kg/g)
Timer (second)
Temperature
Defrost Feature
Timer (minute)
Menu Setting Dial:
To choose desired menu among auto cook menus.
Power Level Setting Dial:
To set the power level of micro power, grill and combination.
Temperature Setting Dial:
To set the temperature of sensor reheat and oven.
"More" or "Less" Setting Dial:
To get higher or lower temperature when using steam reheat.
Time Setting Dial:
To set the time of cooking, countdown and clock.
Weight Setting Dial:
To set the weight of steam defrost and auto cook menus.
* Please set the Dial when it is poping-up. After setting, please replace the Dial to avoid false operation.
- Eng-8 -
IP1589_38S80KP_Eng_06_071227.indd 8IP1589_38S80KP_Eng_06_071227.indd 8 2007-12-27 Good Tom 15:50:092007-12-27 Good Tom 15:50:09
Page 10

Clock Setting
E.g.: 11:25
English
1. Press Timer/Clock pad
twice, colon will blink in
the Display Window.
Notes:
1. If you want to reset time, please repeat step 1 to 3.
2. The clock will keep the time of day as long as oven is plugged in and electricity is supplied.
3. Clock is a 12-hour display.
2. Enter time of day using the
Time/Weight dial.
Time appears in the display
window; colon is blinking.
Time counts up in minutes.
3. Press once.
Colon stops blinking; time of
day is entered and locked in
the display window.
Child Safety Lock Setting
This feature allows you to prevent operation of the oven by a young child; however, the door will open. This function can be
set when colon or time of day is displayed.
To set: To cancel:
Press Start button 3 times.
► " " and " " appears
in the display window.
Press 3 times Press 3 times
Press Stop/Reset pad 3 times.
► Colon or time of day appears in the display
window.
- Eng-9 -
IP1589_38S80KP_Eng_06_071227.indd 9IP1589_38S80KP_Eng_06_071227.indd 9 2007-12-27 Good Tom 15:50:102007-12-27 Good Tom 15:50:10
Page 11

Micro Power Setting
This feature allows you to set the desired power and time for cooking by yourself. Two ways are available for setting.
Method 1:
English
1. Select the desired power
you need.
Notes:
1. When selecting High Power at the first stage, you can omit press Micro Power pad and enter the cooking time you want
by using Time/Weight dial. Then press Start button.
2. Three stages can be set continuously. This function allows you to set only once for some different stages without taking
care during cooking. Please refer to page 22.
Press Power Level Wattage Example of Use
1
2. Enter the cooking time by using
the Time/Weight dial.
(High Power: up to 30 minutes)
(Other Powers: up to 90 minutes)
High 1000 W
Boil water, cook fresh fruit, fresh vegetables and confectionery,
and heat non-milk beverage.
3. Press Start button.
The cooking time appears
in the display window and
begins to count down.
2
3
4
5
6
Method 2:
1. Press once.
(Default Power Level
is High)
Medium-High 700 W Cook fish, shellfish, cakes, meats, poultry, eggs and cheese.
Medium 550 W Cook cake and casserole, melt butter and chocolate.
Medium-Low 400 W
Defrost 300 W Thaw.
Low 200 W
2. Set desired power level
by using Menu/Power/
Temp. dial.
Cook less tender cuts of meat, simmer soups and stews, and
soften butter and cream cheese.
Keep foods warm, proof yeast, soften ice cream, and make
yoghurt.
3. Enter the cooking time
by using the Time/
Weight dial.
4. Press Start button.
The cooking time appears
in the display window and
begins to count down.
- Eng-10 -
IP1589_38S80KP_Eng_06_071227.indd 10IP1589_38S80KP_Eng_06_071227.indd 10 2007-12-27 Good Tom 15:50:102007-12-27 Good Tom 15:50:10
Page 12

Cooking Time Adjustment Setting
This feature allows you to add or reduce the cooking time during micro power, combination, oven, grill and timer setting.
Turning the dial will count up in 1 minute.
E.g.: To cook at medium power for 5 minutes, add 3 more minutes when remain 4 minutes cooking time.
English
1. Press 3 times to select
medium power.
2. Enter cooking time by
using the Time/Weight
dial as 5 minutes.
3. Press Start button.
The cooking time appears
in the display window and
begins to count down.
Notes:
1. Do not over cook food while using this feature.
2. This feature is not available during Auto Cook and Micro Steam function.
3. The oven stops working when the reduced cooking time is less than the remaining time.
Usage of Oven Accessories
Oven Accessories
Glass Tray
Cooking Method
Wire Rack Crispy Pan
4. When remain 4 minutes,
turning the Time/Weight
dial clockwise to add 3
minutes.
(Maximum adding time is
10 minutes, you can also
reduce cooking time by
turning Time/Weight dial
anti-clockwise.)
Micro Power Yes No No
Grill Yes Yes Yes
Steam & Micro Power Yes No No
Steam Defrost Yes No No
Combination* Yes Yes No
Oven No Yes Yes
Note:
Always put Wire Rack on Glass Tray when combination cooking. To avoid causing arcing, do not put Wire Rack directly on
Ceramic Plate, and do not put any metal cookware directly on Wire Rack.
- Eng-11 -
IP1589_38S80KP_Eng_06_071227.indd 11IP1589_38S80KP_Eng_06_071227.indd 11 2007-12-27 Good Tom 15:50:102007-12-27 Good Tom 15:50:10
Page 13

Steam & Micro Power Setting
This feature combines the steam and microwave, and you only need setting the time.
1. Press once. 2. Set cooking time by
English
Notes:
1. Always pour the water into the tank before using.
2. If setting the function as the first stage, it needs one minute preheating.
3. The power of micro steam is as MEDIUM power.
4. No cover, lid or plastic wrap when using this feature.
5. The temperature of ceramic cover will be very high just after using micro steam, please do not touch it.
6. Always wipe the remaining water in the evaporating channel after cooling the cavity.
using the Time/Weight
dial. (up to 15 minutes)
3. Press Start button.
The cooking time appears
in the display window and
begins to count down.
Steam Shot Setting
This feature allows you add steam during oven or grill setting (up to 3 minutes).
E.g.: Add 1 minute during oven.
( )*
1. Oven proceeding. 2. Press once and 1 minute
will be added.
Notes:
1. Always pour the water into the tank before use.
2. The original setting is still counting down when setting steam shot.
3. The setting time can not exceed the remaining cooking time.
4. If grill heaters are working when setting steam shot function, the heaters have to be stopped a while to keep the steam
shot working normally.
*3. If you want to add 3 minutes,
press Steam Shot pad twice
again within 5 seconds after
step 2.
(up to 3 minutes)
- Eng-12 -
IP1589_38S80KP_Eng_06_071227.indd 12IP1589_38S80KP_Eng_06_071227.indd 12 2007-12-27 Good Tom 15:50:102007-12-27 Good Tom 15:50:10
Page 14

Defrosting by Time Setting
This feature allows you to defrost by setting time yourself.
English
1. Press 5 times. 2. Set the defrost time by using
the Time/Weight dial.
Notes:
1. Please use plastic wrap or lids when defrosting.
2. Opening the door and taking out the defrosted parts during the operating time is recommended. Turn over, stir or
rearrange the parts which are still in icy.
3. Press Start button.
The cooking time appears
in the display window and
begins to count down.
Defrosting by Steam Setting
This feature allows you to defrost meat, poultry and seafood automatically by just setting the weight. The serving/weight is 0.1
kg to 3.0 kg.
1. Press once. 2. Set the required weight by
using Time/Weight dial.
3. Press Start button.
The cooking time appears
in the display window and
begins to count down.
Notes:
1. Steam will explode during defrosting. Do not cover or wrap.
2. When the oven beep twice, open the door, remove the defrosted part, turn over or rearrange the remaining part.
3. "HOT" will appear and steam defrost function doesn't allow to use if the cavity is too hot. Use manual setting instead of
steam defrost.
- Eng-13 -
IP1589_38S80KP_Eng_06_071227.indd 13IP1589_38S80KP_Eng_06_071227.indd 13 2007-12-27 Good Tom 15:50:102007-12-27 Good Tom 15:50:10
Page 15

Defrosting Tips and Techniques
Preparation for Freezing
The quality of the cooked foods comes from the foods before freezing, freezing ways and defrosting tips and times. So it is
important to purchase fresh and high quality foods. And freeze them immediately. Thick plastic foil, package, freezing
wrap and the meat which has been sealed before selling are all able to be reserved in the refrigerator for some times.
Notes:
1. Please remove the aluminum foil if the package is made of aluminum to prevent arcing.
2. The foods in the refrigerator should be kept under 18˚C. ( At least 24 hours in freezer before defrosting.)
English
Steam Defrost
The Steam defrost function is operated based on the
weight of foods. Most cut foods such as chicken, meat and
fish can be defrosted by using this function easily. Set the
Time/Weight dial for weight based on the real weight of
foods, and the microwave oven will set the power and time
automatically. The display window will display the time of
defrost after setting. The foods listed in the below table
are the most suitable for using chaos defrost function. The
minimize weight is 0.1kg and the maximum is 3.0kg for
getting the best result.
Foods
Meat loaf, chicken, rib 2 kg
Beef, lamb, whole chicken 3 kg
Whole fish, shellfish, prawn and
fish fillet
Key to defrosting
The maximum
weight for the foods
1 kg
For evenly defrosting, turn over the foods or move the position of the foods in the
containers during the progress of defrosting.
Tips for steam defrost
Meat, which is with bones. For example, if the meat with
bones has the same weight as the pure meat, the meat in the
former one is lighter than the latter one. So, subtract 0.5 kg
for 2 kg meat with bones is better for defrosting and 0.2-0.3
kg for meat with bones which is less then 2 kg.
Two buzz beeps
Turn over the meat, chicken, fish and shellfish. Separate the
stewed meat, chicken pieces and meat loaf. Apart the meat
loaf from the hamburger. Shield the edge of chicken wings,
roast, fat or bones.
Remove the package of the
raw meat and place it on
the plate.
IP1589_38S80KP_Eng_06_071227.indd 14IP1589_38S80KP_Eng_06_071227.indd 14 2007-12-27 Good Tom 15:50:112007-12-27 Good Tom 15:50:11
Shield the front part of
the chicken drumsticks by
using aluminum foil.
Shield the head and tail
of the whole fish by using
aluminum foil.
- Eng-14 -
Remove the package of the
fish fillet and place it on the
plate.
Page 16

Steam Reheat Setting
This feature allows you to reheat rice, meal without setting power and time. The recommended weight is 200-600g.
( )*
1. Press twice until
the display window
appears "REHEAT
WITH STEAM".
* Optional step. Press Start button directly if satisfied with the default setting.
Reheat Rice
• Stir the rice and pour water into the tank before reheating.
• Do not cover or wrap.
• Stir again before serving.
Notes:
1. This feature is only suitable for cooked food.
2. It is not suitable for reheating liquids.
3. Frozen foods can be reheated, but thickness foods is not suitable.
4. If the temperature of the cavity is too high, steam reheat feature can not be used. Display window will appear "HOT".
Steam reheat feature can be used again until the "HOT" disappears.
2. Optional setting to get higher or
lower temperature according to
the actual and favor, the display
window appears "MORE+" or
"LESS-".
3. Press Start button.
Reheat Meal
• Stir the meal and pour water into the tank before
reheating.
• Do not cover or wrap.
• Stir again before serving.
English
- Eng-15 -
IP1589_38S80KP_Eng_06_071227.indd 15IP1589_38S80KP_Eng_06_071227.indd 15 2007-12-27 Good Tom 15:50:112007-12-27 Good Tom 15:50:11
Page 17

Sensor Reheat Setting
This feature can cook food without setting power and time, only according to the temperature as your require. The field is
-10~90°C. The recommended weight is 200-600g.
1. Press once. 2. Set the desired temperature
English
by using Menu/Power/Temp.
dial.
3. Press once.
After detecting for a period of time,
the approximate current temperature
will appear in the display window.
Notes:
1. The default setting is 70°C when plugging in. From the second time, the default setting will be changed to previous setting
if between 55~75°C.
2. After reheating, stir then serve.
3. The food must be put in the center of ceramic plate.
4. For the beverage, the reheat field is 1-4 cups (200ml/cup). After reheating, stir carefully. Arrange the containers as figure.
1 cup
3 cups
5. The plastic wrap should cover the food tightly, otherwise, the temperature of food may not be tested. If the plastic wrap is
overlapped, make sure the overlapped area is placed downwards.
2 cups
4 cups
oven door
position
Container
Plastic wrap
Food
6. Food less than 100g can not be detected. It may cause overcook.
7. If the temperature of the cavity is too high, sensor reheat feature can not be used. Display window will appear "HOT".
Sensor reheat feature can be used again until the "HOT" disappears.
8. The actual temperature maybe different from the required temperature. It depends on the cavity temperature, the food
density, the container, the placement of the food etc.
9. Avoid using straight-sided containers with narrow necks when using Sensor Reheat.
- Eng-16 -
IP1589_38S80KP_Eng_06_071227.indd 16IP1589_38S80KP_Eng_06_071227.indd 16 2007-12-27 Good Tom 15:50:112007-12-27 Good Tom 15:50:11
Page 18

Recommended Food Temperature
-10-5010203040505560708090oC
English
To soften ice cream:
• The recommended weight
is 200-600g.
• Please remove the cover
before softening.
To reheat baby food:
• The recommended weight is
100-150g.
• Do not reheat in baby bottles
or jars.
• Stir thoroughly and check the
temperature carefully before
serving.
To reheat bread:
• The recommended weight
is 100-200g.
To reheat casserole type foods:
• The recommended weight is 100-600g.
• After reheating, stir.
To reheat milk:
• The recommended weight is
1-4 cups (200ml/cup).
• Refer to the note No. 4 on
page 16.
To reheat meal (rice, soup etc):
• The recommended weight is 200600g.
• After reheating, stir then serve.
To melt butter:
• The recommended weight is 100-250g.
• Before melting, cut into small size cubes.
Note: Above is only the recommended temperature. Set the temperature as you desire.
- Eng-17 -
IP1589_38S80KP_Eng_06_071227.indd 17IP1589_38S80KP_Eng_06_071227.indd 17 2007-12-27 Good Tom 15:50:112007-12-27 Good Tom 15:50:11
Page 19

Heater Selection Mode Setting
This feature provides 3 modes to select.
Oven Setting
Oven can set temperature from 110 to 220 degree. Heat radiate from light-wave pipe on the top of cavity and quartz pipes
under the ceramic plate. It’s particularly for cake, pizza etc. Put the food on the crispy pan, set the proper temperature and
time, then start.
Without Preheating:
English
1. Press once. 3. Set the desired cooking
2. Set the desired
temperature by using
Menu/Power/Temp. dial.
time by using Time/
Weight dial.
(up to 90 minutes)
With Preheating:
After preheating,
put the food into oven
immediately
1. Press once. 4. Set the desired
E.g.: Frozen Pizza
Ingredient: Frozen Pizza 9 inches
2. Set the desired
temperature by using
Menu/Power/Temp.
dial.
(about 400 g)
3. Press Start button
to start preheating.
1. Take out the pizza from the
refrigerator and put on the crispy
pan without defrosting.
2. Press Heater Selection Mode pad
once.
3. Turn Menu/Power/Temp. dial
until 200°C appears in the display
window.
cooking time by using
Time/Weight dial.
(up to 90 minutes)
4. Press Start button to begin
preheating.
5. Open the door when the oven beep
3 times, put the crispy pan with
pizza on the support shelf quickly.
6. Set time for 10 to 12 minutes.
7 Press Start button to start cooking.
4. Press Start button.
The cooking time appears
in the display window and
begins to count down.
5. Press Start button.
The cooking time
appears in the display
window and begins to
count down.
- Eng-18 -
IP1589_38S80KP_Eng_06_071227.indd 18IP1589_38S80KP_Eng_06_071227.indd 18 2007-12-27 Good Tom 15:50:112007-12-27 Good Tom 15:50:11
Page 20

Heater Selection Mode Setting
Grill Setting
There are three power levels for grill. When grilling, heat is radiated from one light-wave pipe. It is especially suitable for thin
slices of meat and seafood as well as bread and meal. It is needn't to preheat the oven before grill. Place the sauced food on
the wire rack and select the program and time, then press Start button. At the half of the cooking time, please open the door
and turn over the foods carefully then continue cooking.
Power Level Display Suitable kinds of foods
English
Grill (High)
Grill (Medium)
Grill (Low) Slice of meat and chicken
1. Press twice.
(Default is Grill High)
2. Set the desired power level
by using Menu/Power/
Tem p. dial.
* Please omit this step if you
use the default power.
E.g.: Roast Chicken Wings
Wire Rack
Glass Tray
Ingredient: 4 chicken wings (about
250 - 300 g) and
seasonings
Thicker poultry or meat
Thin seafood, garlic flavor
bread and toast
1. Marinate the chicken wings for 1520 minutes in the seasonings.
2. Place the wings on the wire rack,
then place the rack on the glass
tray.
3. Press Heater Selection Mode pad
twice.
3. Set the desired cooking
time by using Time/
Weight dial.
(up to 90 minutes)
4. Input the cooking time: 22-25
minutes.
5. Press Start button.
6. Turning over the wings during half
of the total time is recommended; it
will make the food more evenly.
4. Press Start button.
The cooking time appears
in the display window and
begins to count down.
- Eng-19 -
IP1589_38S80KP_Eng_06_071227.indd 19IP1589_38S80KP_Eng_06_071227.indd 19 2007-12-27 Good Tom 15:50:122007-12-27 Good Tom 15:50:12
Page 21

Heater Selection Mode Setting
Combination Setting
There are three power levels for combination. It's a good way for roasting foods by combining microwave and grill effectively.
It's suitable for roasting poultry, meat and seafood. This function can ensure the foods even cooking and keep the crispness of
certain foods. Please open the door and turn over the foods when half of the cooking time, then continue cooking.
Power Level Display Suitable kinds of foods
Combination (High)
English
Combination (Medium)
Combination (Low)
1. Press 3 times.
(Default is
Combination High)
E.g.: Roast Chicken
Wire Rack
Ingredient: one whole chicken and
seasonings
2. Set the desired power level
by using Menu/Power/
Tem p. dial.
* Please omit this step if you
use the default power.
1. Marinate the chicken with sauce for
about 15-20 minutes and spread
the sauce on the chicken.
2. Weight the chicken and place it on
the wire rack. Then put it on the
glass tray.
3. Press Heater Selection Mode pad
Glass Tray
3 times. Turn Menu/Power/Temp.
dial to select Combination Medium
power.
Seafood and pudding
Poultry and potatoes
Thicker meat
3. Set the desired cooking
time by using Time/
Weight dial.
(up to 90 minutes)
4. Press Start button.
The cooking time appears
in the display window and
begins to count down.
4. Set the cooking time by using Time/
Weight dial. (More weight, more
time. Please refer to the below
chart for more information.)
5. Press Start button.
6. During the cooking time, turn
over the chicken for 2 or 3 times.
You can open the door during the
cooking time to prevent burning.
Weight (kg) 0.6 0.9 1.2
Time (mins) 20 22 26
- Eng-20 -
IP1589_38S80KP_Eng_06_071227.indd 20IP1589_38S80KP_Eng_06_071227.indd 20 2007-12-27 Good Tom 15:50:122007-12-27 Good Tom 15:50:12
Page 22

Timer Setting
This feature allows you to program the oven as a kitchen timer. It can be also used to program a stand time after cooking is
completed or to program a delay start.
To set Kitchen Timer:
1. Press once. 2. Set time as 5 minutes by
To set Stand Timer:
1. Press 3 times. 4. Set stand time as
2. Set the desired time
as 3 minutes by
using Time/Weight
dial.
To set Delay Start:
E.g.: To count down 5 minutes
using Time/Weight dial.
(up to 90 minutes)
3. Press Start button.
Time will count down
without oven operating.
E.g.: To cook at medium power for 3 minutes, with stand time of 5 minutes
3. Press once.
5 minutes by using
Time/Weight dial.
(up to 90 minutes)
E.g.: To delay the start of cooking for 5 minutes, and cook at Medium power
for 3 minutes
English
5. Press Start button.
Cooking will start. After
cooking, stand time will
count down without oven
operating.
1. Press once. 4. Set the desired time
2. Set delay time as
5 minutes by using
Time/Weight dial.
(up to 90 minutes)
3. Press 3 times.
as 3 minutes by
using Time/Weight
dial.
5. Press Start button.
Delay time will count
down. Then cooking will
start.
Notes:
1. If the oven door is opened during Kitchen Timer, Stand Time, Delay Start, the time in the display window will continue to
count down.
2. Stand Time and Delay Start can not be programmed together with automatic function. This is to prevent the starting
temperature of food from rising before defrosting or cooking begins. A change is starting temperature could cause
inaccurate results.
- Eng-21 -
IP1589_38S80KP_Eng_06_071227.indd 21IP1589_38S80KP_Eng_06_071227.indd 21 2007-12-27 Good Tom 15:50:122007-12-27 Good Tom 15:50:12
Page 23

3-Stage Setting
This feature allows you to program 3-stage continually.
E.g.: Continually set [Medium power] 2 minutes, [Combination High] 3 minutes and [Grill High] 2 minutes.
English
1. Press 3 times. 4. Set as 3 minutes
2. Set as 2 minutes
by using Time/
Weight dial.
3. Press twice to
select Combination
(high).
by using Time/
Weight dial.
5. Press once to select
Grill (high).
7. Press once.
The time will count down
at the first stage in the
display window.
6. Set as 2 minutes
by using Time/
Weight dial.
Notes:
1. When operating, two beeps will sound between each stage.
2. This feature is not available for Oven, Auto Cook, Steam Defrost and Reheat function.
3. Steam & Micro Power feature can only be used once and can not be set with Grill and Combination.
Drain Setting
This feature allows you to drain the water in the pipe away into the evaporating channel after using steam feature. Please dry it
up after the cavity cools down.
When Colon or time of day appears
in the display window, keep pressing
Steam Defrost pad for 2 seconds to
begin draining.
Notes:
1. This feature can be used up to 3 times in succession. For further use, please wait 10 minutes.
2. Ensure the tank is separated from the connection while using this feature. Otherwise, water in the tank will also be drained
into the evaporating channel.
- Eng-22 -
IP1589_38S80KP_Eng_06_071227.indd 22IP1589_38S80KP_Eng_06_071227.indd 22 2007-12-27 Good Tom 15:50:122007-12-27 Good Tom 15:50:12
Page 24

Auto Cook Setting and Menus
This feature allows you to set some ordinary menus with different weights. It will cook automatically without setting power and
time. Turn Menu/Power/Temp. dial and the corresponding number will appear in the display window.
For menus 1-7 please operate as follows:
English
1. Turn Menu/Power/Temp. dial to select
the desired menu number appears in the
display window.
* The green indicator lights up indicating
you to full the tank with water as the
steam feature is used.
For menus 8 please operate as follows:
1. Turn Menu/Power/Temp. dial
to select the desired menu
number appears in the display
window.
* The green indicator lights
up indicating you to full the
tank with water as the steam
feature is used.
2. Set desired serving/
weight by using Time/
Weight dial.
2. Set desired serving/weight
by using Time/Weight dial.
3. Press Start button to begin
preheating.
* Do not use crispy pan when
preheating.
* After preheating, please place
the crispy pan with food into the
support shelf within 2 minutes,
then close the oven door
immediately.
* The oven will produce a 30
seconds long reminding sound
after the door opening for 1
minute and 30 seconds and no
food is put in. If still no food put
in after the sound, the oven will
stop operating.
3. Press Start button.
The cooking time appears
in the display window and
begins to count down.
4. Press Start button.
After detecting for a
period of time, the
remain cooking time
will appear in the
display window.
For menus 9-10, please operate as follows:
1. Turn Menu/Power/Temp. dial
to select the desired menu
number appears in the display
window.
* The green indicator lights
up indicating you to full the
tank with water as the steam
feature is used.
IP1589_38S80KP_Eng_06_071227.indd 23IP1589_38S80KP_Eng_06_071227.indd 23 2007-12-27 Good Tom 15:50:132007-12-27 Good Tom 15:50:13
2. Press Start button.
The cleaning time appears in
the display window and begins
to count down.
- Eng-23 -
Page 25

Auto Cook Setting and Menus
Number Menus/Functions Serving/Weight Recommended Containers
1 Vegetables 120 g 180 g 250 g 370 g Casserole
2 Potatoes 250 g 370 g 500 g 900 g Casserole
3 Pasta 150 g 250 g 375 g 500 g Casserole
4 Steam Fish 120 g 250 g 370 g 500 g Dish
5 Steam Froz. Foods 100 g 150 g 200 g 250 g Dish
English
6 Roast Chicken 600 g 900 g 1200 g 1500 g Wire Rack and Glass Tray
7 Grill Meat Pieces 200 g 400 g 600 g 800 g Wire Rack and Glass Tray
8 Cake
8 inches
(20 cm)
- - - Crispy Pan
9 * Clean Cavity
10 *
Clean Evaporating
Channel
Clean Functions
Notes:
1. If the temperature of the cavity is high, auto cook feature can not be used. Display window will appear “HOT”. Auto
Cook feature can be used until the “HOT” disappear.
2. Cook according to the following cooking method.
*3. No. 9 and No. 10 are not cooking menus. They are cleaning functions.
1 Vegetables
It is suitable for cooking (steaming) vegetables, asparagus,
beans, broccoli, brussels sprouts, cabbage, cauliflower,
celery, corn, eggplant, mushrooms, peas, spinach, squash,
tomatoes, zucchini, etc. Arrange vegetables on a plate or
casserole dish, stem on outer ring of plate and leafy in the
center. Cover with a lid or microwave safe plastic wrap.
2 Potatoes
Potatoes should be trimmed or prepared and cut into
evenly sliced pieces. Add 1 tablespoon to
potatoes, if dehydrated or softer texture is desired. Place in a
appropriate size dish and cover with plastic wrap or well fitted
lid. Halfway through the cooking time, stir potatoes. This will
assist in even cooking.
1
/4 cup of water to
3 Pasta
Suitable for cooking dried pasta. Place pasta and water in
a large sized dish to prevent from boiling over. Use hot tap
water at a ratio of:
Pasta Water
150 g 4 cups
250 g 5 cups
375 g 6 cups
500 g 8 cups
Add 1 tablespoon of oil, if desired, before cooking to prevent
the pasta from sticking together. Cover with plastic wrap or
a fitted lid. When the cooking time is displayed, remove the
cover. Stand for 5 to 10 minutes at the completion of cooking
time.
- Eng-24 -
IP1589_38S80KP_Eng_06_071227.indd 24IP1589_38S80KP_Eng_06_071227.indd 24 2007-12-27 Good Tom 15:50:132007-12-27 Good Tom 15:50:13
Page 26

Auto Cook Setting and Menus
4 Steam Fish
Suitable for steaming different kinds of fish. Place the fish on
the microwave safety dish, add salt, ginger, green onion and
cooking wine for cooking. Do not wrap or cover. Pour water
into the tank before cooking. Place the dish on the center of
ceramic plate. Select the program and start.
5 Steam Froz. Foods
Suitable for steaming some dessert such as buns. It’s not
suitable for big size food. Food can be directly cooked by
microwave oven from the fridge. Spread some water on them
before cooking. Space between food must be left to prevent
swelling after cooking and becoming hard under stress. Do
not wrap or cover. Pour water into the tank before cooking.
Place the dish on the center of ceramic plate.
6 Roast Chicken
Clean the chicken and cut into pieces. Add salt, ginger,
green onion, cooking wine, mushroom and ham. Place the
chicken pieces loosely on the wire rack. Stir and rearrange
during cooking. Place the glass tray on the center of the
crystal glass and put the wire rack on the glass tray. Open
the door and turn the chicken over when hearing 2 beeps
during cooking time. Close the door and press Start button
to continue. Do not wrap or cover. Pour water into the tank.
Select the program and start.
8 Cake
Ingredients:
Egg 180g
Cake powder 90g
Sugar 90g
Add the beaten eggs and sugar into the container. Whisk
using low speed by the mixer till all melt. Change to high
speed and bubble the egg until the bubble is thick. Change
to low speed and mix the bubble to even. Pour the water
into the tank. Select the program and press Start button to
preheat. Gradually add the sifted cake powder and add into
the mixture. Mix the batter even with a wooden spoon from
bottom to top. Place the baking paper at the bottom of the
circular dish and pour in the batter. Put the dish on the crispy
pan. After preheating, three beeps will be heard. Place the
crispy pan on the support shelf quickly, close the door and
press Start button.
Notes:
1. Mix the batter affect the cooking result directly. After
adding the powder, do not mix excessively.
2. Set the cooking time according to the actual for different
size dish and different ingredients.
3. After preheating, place the crispy pan on the support shelf
immediately. The door is opened too long can affect the
cooking result.
4. Insert a toothpick in the center. Cake is cooked if the
toothpick comes out clean.
English
7 Grill Meat Pieces
It is suitable for grilling meat pieces, poultry pieces, seafood,
etc. Place prepared food on Wire Rack. Place the glass
tray on the center of the ceramic plate and put the wire rack
on the glass tray. Pour the water into the water. Select the
program and begin to cook. Open the door and turn the
meat pieces over when hearing 2 beeps during cooking time.
Close the door and press Start button to continue.
9* Clean Cavity
Pour water into the tank. Select the programme, then press
Start button, the auto cleaning programme will start. When
the oven beep 5 times, open the door and remove the
softened dirt by using damp cloth.
10* Clean Evaporating Channel
Pour water into the tank. Spray detergent on the evaporating
channel and then select this programme. After the oven beep
5 times, remove the dirt.
- Eng-25 -
IP1589_38S80KP_Eng_06_071227.indd 25IP1589_38S80KP_Eng_06_071227.indd 25 2007-12-27 Good Tom 15:50:132007-12-27 Good Tom 15:50:13
Page 27

Before Requesting Service
ALL THESE THINGS ARE NORMAL:
The oven causes interference with
my TV.
English
Steam accumulates on the oven
door and warm air comes from the
oven vents.
I accidentally operate my
microwave oven without any food
in it.
There are humming and clicking
noises from my oven when I cook
by Combination.
The oven has an odor and
generates smoke when using
Oven, Combination and Grill
function.
Noise comes from evaporating
channel.
Some radio and TV interference might occur when you cook with the
microwave oven. This interference is similar to the interference caused by
small appliances such as mixers, vacuums, hair dryers, etc. It does not
indicate a problem with your oven.
During cooking, steam and warm air are given off from the food. Most of the
steam and warm air are removed from the oven by the air which circulates in
the oven cavity. However, some steam will condense on cooler surfaces such
as the oven door. This is normal.
Operating the oven empty for a short time will not damage the oven.
However, we do not recommend this to be done.
These noise occur as the oven automatically switches from microwave power
to Grill, to create the Combination setting. This is normal.
It is essential that your oven is wiped out regularly particularly after cooking
by Oven, Combination or Grill. Any fat and grease that builds up on the roof
and walls of the oven will begin to smoke if not cleaned.
When using Steam Shot, Steam Defrost or some auto menus, steam will be
made from water tank, then transfer to evaporating channel. The water flow
and heated can make this noise.
The fan motor continues operating
after cooking is over.
This is perfectly normal, the fan motor is cooling the electric components.
- Eng-26 -
IP1589_38S80KP_Eng_06_071227.indd 26IP1589_38S80KP_Eng_06_071227.indd 26 2007-12-27 Good Tom 15:50:132007-12-27 Good Tom 15:50:13
Page 28

Before Requesting Service
PROBLEM POSSIBLE CAUSE REMEDY
Oven will not turn on.
Oven will not start cooking.
"HOT" appears in the display
window.
The oven is not plugged in securely.
Circuit Breaker or fuse is tripped or
blown.
There is a problem with the outlet.
The door is not closed completely. Close the oven door securely.
Start button was not pressed after
programming.
Another program has already been
entered into the oven.
The program has not been entered
correctly.
Stop/Reset pad has been pressed
accidentally.
The cavity is overheated. Operate again after it cools down.
Remove plug from outlet, wait 10 seconds
and re-insert.
Contact the specified service center.
Plug another appliance into the outlet to
check if the outlet is working.
Press Start button.
Press Stop/Reset pad to cancel the
previous program and program again.
Program again according to the Operating
Instructions.
Program oven again.
English
"U14" appears in the display
window.
"H00" or "H02" appears in
the display window.
"DEMO MODE PRESS ANY
KEY" appears in the display
window.
The " " and " "
appears in the display
window.
The oven stops cooking by
microwave and "H97" or
"H98" appears in the display
window.
If it seems there is a problem with the oven, contact an authorized Service Center.
The water tank is empty. Full it with water.
The oven is defected. Contact the specified service center.
The oven is under demonstration
mode.
The Child Lock was activated by
pressing Start button 3 times.
This displaying indicates a problem
with the microwave generation
system.
Press Timer/Clock pad 4 times to exit the
mode.
Deactivate Lock by pressing Stop/Reset
pad 3 times.
Please contact an authorised Service
Center.
- Eng-27 -
IP1589_38S80KP_Eng_06_071227.indd 27IP1589_38S80KP_Eng_06_071227.indd 27 2007-12-27 Good Tom 15:50:132007-12-27 Good Tom 15:50:13
Page 29

Care of your Microwave Oven
Turn the oven off and remove the power plug from the wall socket before cleaning.
The outside oven surfaces should be
cleaned with a damp cloth. To prevent
damage to the operating parts inside
the oven, water should not be allowed
to seep into the ventilation openings.
English
Clean the upper heater
after it is completely cold.
Wipe with a soft and
damp cloth carefully to
avoid breaking the heater
and hurting your fingers
by the broken heater.
If steam accumulates inside or around the outside of the oven door,
wipe with a soft cloth. This may occur when the microwave oven is
operated under high humidity conditions and in no way indicates
malfunction of the unit.
Always clean the Ceramic
Plate after cooling down with a
mild detergent and wipe to dry.
Keep the inside of the oven clean. When
food splatters or spilled liquids adhere to
oven walls, wipe with a damp cloth. Mild
detergent may be used if the oven gets
very dirty. The use of harsh detergent or
abrasives is not recommended.
Do not allow the Control Panel to become
wet. Clean with a soft, damp cloth.
Do not use detergents, abrasives or
spray-on cleaners on the Control Panel.
When cleaning the Control Panel, leave
oven door open to prevent oven from
accidentally turning on. After cleaning
press Stop/Reset pad to clear display
window.
Always clean the Ceramic Cover with a
mild detergent to avoid obstruction. Clean
the cover after the oven cools down. After
using the steam function and the oven
is cooling down, dry up the water in the
evaporating Channel.
After using, clean it with a
mild detergent or dishwasher.
After using the steam function, dry up the water in
Wire Rack Glass Tray Crispy Pan
the Drip Tray and clean, then re-install the plate
back to the rubber feet.
Notes:
1. When using the Oven, Grill or cooking in the Combination mode, some foods may inevitably splatter grease on to the oven
walls. If the oven is not cleaned, occasionally it may start to "smoke" during use. These marks will be more difficult to clean
later.
2. After Grill, Combination or Oven cooking the ceiling and walls of the oven should be cleaned with a soft cloth squeezed in
soapy water. Particular care should be taken to keep the window area clean particularly after cooking by Grill, Combination
or Oven. Stubborn spots inside the oven can be removed by using a small amount of microwave oven cleaner sprayed
onto a soft damp cloth. Wipe onto problem spots, leave for recommended time and then wipe off. This method can not be
used to clean the oven door.
DO NOT SPRAY DIRECTLY INSIDE THE OVEN.
A steam cleaner is not to be used for cleaning.
3. Failure to maintain the oven in a clean condition could lead to deterioration of the surface that could adversely affect the
life of the appliance and possibly result in a hazardous situation.
4. When it becomes necessary to replace the oven light, please consult the service center specified by Panasonic.
- Eng-28 -
IP1589_38S80KP_Eng_06_071227.indd 28IP1589_38S80KP_Eng_06_071227.indd 28 2007-12-27 Good Tom 15:50:142007-12-27 Good Tom 15:50:14
Page 30

Technical Specifications
Power Source: 220 V 50 Hz 230-240 V 50 Hz
Power Consumption: Microwave 4.7 A 950 W 4.4 A 950 W
Heater 7.4 A 1,600 W 6.8 A 1,600 W
Combination 8.0 A 1,700 W 7.5 A 1,700 W
Output Power: Microwave*
Up Heater
Low Heater
Outside Dimensions (except handle):
Oven Cavity Dimensions:
Cavity Volume:
Operating Frequency:
Net Weight:
* IEC Test Procedure
Specifications subject to change without notice.
As for the voltage requirement, the production date, manufactory and serial number, please refer to the identification plate on
the microwave oven.
320 mm (H) x 520 mm (W) x 445 mm (D)
205 mm (H) x 354 mm (W) x 341 mm (D)
1,000 W
1,000 W
600 W
25 L
2,450 MHz
14.5 kg
English
- Eng-29 -
IP1589_38S80KP_Eng_06_071227.indd 29IP1589_38S80KP_Eng_06_071227.indd 29 2007-12-27 Good Tom 15:50:142007-12-27 Good Tom 15:50:14
 Loading...