

Panasonic MC-CG463, MC-CG465, MC-CG461 User Manual
Model No. MC-CG467, MC-CG465
MC-CG463, MC-CG461
Operating Instructions
Vacuum Cleaner
ENGLISHESPAÑOL
操作説明書
真空吸塵器
中文
Instrucciones de Manejo
Aspiradora
Keep pages 3 and 10 open when reading this manual, to make easier identify the different parts of the
GB
product.
We would recommend that you carefully study these Operating Instructions before attempting to operate
the unit, and that you note the Important Safety Instructions ···································································
This product complies with the European directives 73/23/EEC and 89/336/EEC and with the Australian
Standards AS 3350.2.2 (1995) and Australian EMC requirements for the C-Tick Mark.
閲讀本手冊時,打開第3頁和第10頁,以便于識別本產品不同的零件。
中文
我們建議您在使用本裝置前,認真學習這些操作説明並注意重要的安全説明。 ·······································
本產品遵照歐洲73/23EEC以及89/336/EEC的指示並且具有澳洲AS3350.2.2(1995)基準以及澳洲EMC
求的C-Tick標章.
Mantenga las páginas 3 y 10 abiertas para una fácil identificación de las piezas cuando lea este
E
manual.
Antes de poner en marcha la aspiradora, le recomendamos que lea atentamente este Manual de
Instrucciones para el correcto funcionamiento del aparato. ·····································································
Este producto cumple con las directivas europeas 73/23/CEE y 89/336/CEE y con las normas australianas
AS 3350 2.0 (1995) y los requisitos EMS australianos la Marca C-Tick.
需
Page 4
頁
6
Página 8
2
A
B
C
B-1
C-1
B-2
C-2 C-3 C-4 C-5
B-3
B-4
B-5
C-6
C-7 C-8
3
ENGLISH
IMPORTANT SAFETY INSTRUCTIONS FOR THE USER
Before using the vacuum cleaner, please observe these basic precautions.
WARNING: To reduce the risk of fire, electric shock, or injury
• This appliance is not intended for use by young children or infirm person without supervision; young children should be
supervised to ensure that they do not play with the appliance.
• Do not use the appliance if the mains lead or plug is damaged or faulty.
• This appliance is provided with a mains lead and if this becomes damaged, it must be repaired by an Authorised Service Centre
or a qualified person in order to avoid any hazard.
• Unplug from the socket when not in use and before cleaning the appliance or undertaking maintenance operations.
• Turn off the appliance before removing the plug. Do not pull on the mains, always pull on the plug body itself.
• Do not handle plug or vacuum cleaner with wet hands.
• Do not use wet filters after wash, make sure they are completely dry to avoid damaging the cleaner.
• Do not vacuum flammable or combustible substances, neither use in areas where they may be present.
• Do not vacuum hot ash, embers or large and sharp objects.
• Do not vacuum water or other liquids.
• Keep the vacuum cleaner away from heat sources such as radiators, fires, direct sunlight, etc.
• This vacuum cleaner is fitted with a thermal cut-out device which automatically turns off the cleaner to prevent overheating of the
motor. When this happens, disconnect the cleaner from the mains socket and check the dust compartment and filters as they
may be full or clogged with fine dust. Check for any other obstructions in the hose or tube. After removing the obstruction, leave
the cleaner to cool down until the thermal cut-out resets after approximately 60 minutes.
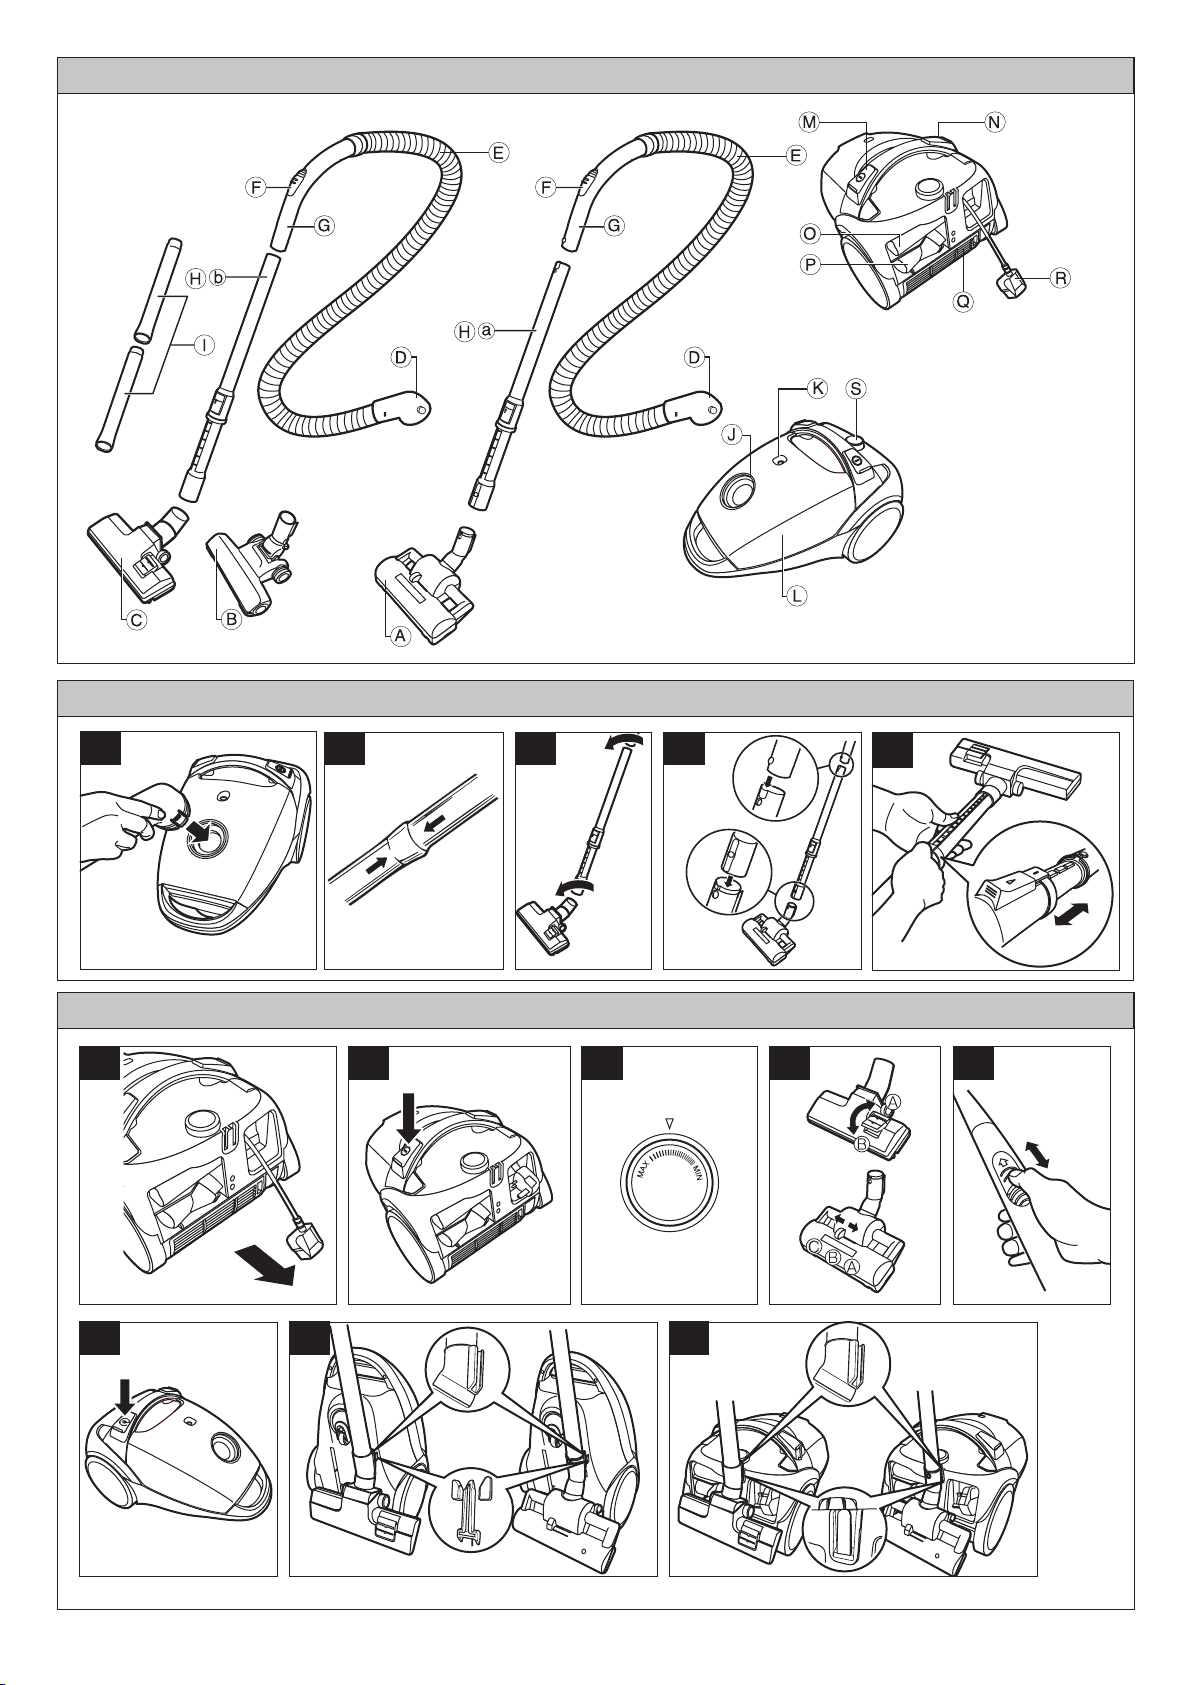
A- IDENTIFICATION OF MAIN PARTS
Turbine nozzle (
A)
Ionizer nozzle (Only MC-CG465)
B)
Floor nozzle
C)
Connection pipe
D)
Hose
E)
Suction regulator
F)
Curved wand
G)
H)
Telescopic wand (MC-CG467)
Extension wand (MC-CG461)
I )
Hose inlet
J)
Dust indicator
K)
Dust cover
L)
ON /OFF Switch pedal
M)
Cord rewind pedal
N)
Crevice nozzle
O)
Dusting brush
P)
Exhaust cover
Q)
Plug
R)
Variable power control button
S)
Only MC-CG467)
(MC-CG465, MC-CG463)
B - HOW TO ASSEMBLE YOUR CLEANER
B-1 Insert connection pipe into hose inlet until it locks. When
removing hose assembly, pull out connection pipe with
pushing down two connection buttons.
NOTE: Do not bend, pull and step on the hose or put
anything heavy on it.
B-2 Connect the two extension wands by inserting one into
the other and twisting together. (depending on model)
B-3 Insert the hose unit into the upper end of the connected
extension wand or telescopic wand and the floor nozzle
to the other end.
(depending on model ).
B-4 Insert the hose unit into the upper end of the telescopic
wand. Twist the telescopic wand so that the round hole
will fit into the tab on the hose unit. (When removing the
hose, push the tab down whilst pulling on the telescopic
wand)
Attach the Turbine Nozzle to the other end (depending
on model)( Removal as per reverse procedure)
B-5 You can adjust the length of telescopic wand by pushing
button. (depending on model)
C - HOW TO OPERATE YOUR CLEANER
C-1 Pull out the power cord and put the plug into the
wall socket.
C-2 Gently press at the centre of the switch pedal to turn
ON the vacuum cleaner.
Press the pedal again to turn it OFF.
C-3 Power control
To increase or decrease the power, turn the variable
power control button.
C-4 Switching between carpet and flooring
Flooring: Press lever A
Carpet: Press lever B
*Switching 3 positions for MC-CG467.
Flooring (PARQUET): Set position A
Carpet (short): Set position B
Carpet (long or hard to push): Set position C
C-5 The curved wand of the hose is attached with a manual
suction regulator, which allows you to briefly reduce the
suction level.
C-6 After you finish vacuuming, remove the plug from
the wall socket and press the cord rewind pedal.
When rewinding the power cord, press the cord rewind
pedal by holding the plug so that it does not become
damaged.
C-7 Storage position
Insert the wan d holder straight into the wand
supporter.
C-8 Park system
For short breaks during vacuuming, slide the hook
attached to the nozzle pipe into the slot on the rear side
of the cleaner.
NOTE: When you use park position, we suggest the
appliance is switched off.
4
 Loading...