


Panasonic Lumix DMC-GH2K, Lumix DMC-GH2H, Lumix DMC-GH2 Operating Instructions Manual
Operating Instructions
Digital Camera/
Lens Kit/Body
Model No. DMC-GH2H/DMC-GH2K
DMC-GH2
LUM|X TM
H__l Vt rALi_F_
Before connecting, operating or adjusting this product,
please read the instructions completely.
VQT3A36
Dear Customer,
Thank you for choosing Panasonic!
You have purchased one of the most sophisticated and reliable products on the market
today. Used properly, we're sure it will bring you and your family years of enjoyment.
Please take time to fill in the model and serial numbers in the space below. The serial
number is on the tag located on the underside of your Camera. Be sure to retain this
manual as your convenient Camera information source. Please note that the actual
controls and components, menu items, etc. of your Digital Camera may look somewhat
different from those shown in the illustrations in these Operating Instructions.
Carefully observe copyright laws.
• Recording of pre-recorded tapes or discs or other published or broadcast material for purposes
other than your own private use may infringecopyright laws. Even for the purpose of private
use, recording of certain material may be restricted.
Mode,No i1
Serial No.
WARNING:
TO REDUCE THE RISK OF FIRE, ELECTRIC SHOCK OR PRODUCT DAMAGE,
• DO NOT EXPOSE THIS APPARATUS TO RAIN, MOISTURE, DRIPPING OR
SPLASHING AND THAT NO OBJECTS FILLED WITH LIQUIDS, SUCH AS VASES,
SHALL BE PLACED ON THE APPARATUS.
• USE ONLY THE RECOMMENDED ACCESSORIES.
• DO NOT REMOVE THE COVER (OR BACK); THERE ARE NO USER SERVICEABLE
PARTS INSIDE. REFER SERVICING TO QUALIFIED SERVICE PERSONNEL.
THE SOCKET OUTLET SHALL BE INSTALLED NEAR THE EQUIPMENT AND SHALL
BE EASILY ACCESSIBLE.
Location
Bottom
Bottom
• Product identification marking
Product
Digital camera
Battery charger
2 VQT3A36
THE FOLLOWING APPLIES ONLY IN CANADA.
This Class B with Canadian ICES-003. ]
digital apparatus complies
THE FOLLOWING APPLIES ONLY IN THE U.S.A.
FCC Note:
This equipment has been tested and found to comply with the limits for a Class B digital
device, pursuant to Part 15 of the FCC Rules. These limits are designed to provide
reasonable protection against harmful interference in a residential installation. This
equipment generates, uses, and can radiate radio frequency energy and, if not installed
and used in accordance with the instructions, may cause harmful interference to radio
communications. However, there is no guarantee that interference will not occur in a
particular installation. If this equipment does cause harmful interference to radio or
television reception, which can be determined by turning the equipment off and on, the
user is encouraged to try to correct the interference by one or more of the following
measures:
• Reorient or relocate the receiving antenna.
• Increase the separation between the equipment and receiver.
• Connect the equipment into an outlet on a circuit different from that to which the receiver is
connected.
• Consult the dealer or an experienced radio/TV technician for help.
FCC Caution: To assure continued compliance, follow the attached installation
instructions and use only shielded interface cables with ferrite core when
connecting to computer or peripheral devices.
Any changes or modifications not expressly approved by the party responsible for
compliance could void the user's authority to operate this equipment.
Declaration of Conformity
Trade Name: Panasonic
Model No.: DMC-GH2
Responsible party: Panasonic Corporation of North America
One Panasonic Way, Secaucus, NJ 07094
Support Contact: Panasonic Consumer Electronics Company 1-800-211-PANA (7262)
This device complies with Part 15 of the FCC Rules. Operation is subject to the
following two conditions: (1) This device may not cause harmful interference, and (2)
this device must accept any interference received, including interference that may
cause undesired operation.
pa. so.ic ]
DMC-Gfl2
VQT3A36 3
• About the battery pack
CAUTION
Battery pack (Lithium ion battery pack)
• Use the specified unit to recharge the battery pack.
• Do not use the battery pack with equipment other than the specified unit.
• Do not get dirt, sand, liquids, or other foreign matter on the terminals.
• Do not touch the plug terminals (+ and ) with metal objects.
• Do not disassemble, remodel, heat or throw into fire.
If any electrolyte should come into contact with your hands or clothes, wash it off
thoroughly with water.
If any electrolyte should come into contact with your eyes, never rub the eyes. Rinse
eyes thoroughly with water, and then consult a doctor.
CAUTION
Danger of explosion if battery is incorrectly replaced. Replace only with the same or
equivalent type recommended by the manufacturer. Dispose of used batteries
according to the manufacturer's instructions.
• Do not heat or expose to flame.
• Do not leave the battery(ies) in an automobile exposed to direct sunlight for a long period of
time with doors and windows closed.
I arning I
Risk of fire, explosion and burns. Do not disassemble, heat above 60 °C (140 °F) or
incinerate.
• About the battery charger
CAUTION7
• DO NOT INSTALL OR PLACE THIS UNIT IN A BOOKCASE, BUILT-IN CABINET OR IN
ANOTHER CONFINED SPACE. ENSURE THE UNIT IS WELL VENTILATED. TO PREVENT
RISK OF ELECTRIC SHOCK OR FIRE HAZARD DUE TO OVERHEATING, ENSURE THAT
CURTAINS AND ANY OTHER MATERIALS DO NOT OBSTRUCT THE VENTILATION
VENTS.
• DO NOT OBSTRUCT THE UNIT'S VENTILATION OPENINGS WITH NEWSPAPERS,
TABLECLOTHS, CURTAINS, AND SIMILAR ITEMS.
• DO NOT PLACE SOURCES OF NAKED FLAMES, SUCH AS LIGHTED CANDLES, ON THE
UNIT.
• DISPOSE OF BATTERIES IN AN ENVIRONMENTALLY FRIENDLY MANNER.
Battery charger
This battery charger operates on AC between 110 V and 240 V.
But
• In the U.S.A. and Canada, the battery charger must be connected to a 120 V AC power
supply only.
• When connecting to an AC supply outside of the U.S.A. or Canada, use a plug adaptor to
suit the AC outlet configuration.
• The battery charger is in the standby condition when the AC power is supplied. The primary
circuit is always "live" as long as the battery charger is connected to an electrical outlet.
4 VQT3A36
• Care of the camera
• Do not strongly shake or bump the camera by dropping or hitting it. Do not subject to
strong pressure.
The camera may malfunction, recording pictures may become impossible, or the lens, the LCD
monitor or the external case may be damaged.
• Be particularly careful in the following places as they may cause this unit to
malfunction.
- Places with a lot of sand or dust.
- Places where water can come into contact with this unit such as when using it on a rainy day
or on a beach.
• Do not touch the lens or the sockets with dirty hands. Also, be careful not to allow
liquids, sand and other foreign matter to get into the space around the lens, buttons etc.
• This camera is not waterproof. If water or seawater splashes on the camera, use a dry
cloth to wipe the camera body carefully.
If the unit does not operate normally, please contact the dealer where you purchased the
camera or the repair service center.
• Do not place your hands inside the mount of the digital camera body. Since the sensor
unit is a precision apparatus, it may cause a malfunction or damage.
• About Condensation (When the lens, the viewfinder or LCD Monitor is fogged up)
• Condensation occurs when the ambient temperature or humidity changes. Be careful of
condensation since it causes lens and LCD monitor stains, fungus and camera malfunction.
• If condensation occurs, turn the camera off and leave it for about 2 hours. The fog will
disappear naturally when the temperature of the camera becomes close to the ambient
temperature.
• Read together with the "Cautions for Use". (P176)
-If you see this symbol-
Information on Disposal in other Countries outside the European Union
This symbol is only valid in the European Union. \ ,,_=._ j
If you wish to discard this product, please contact your local
authorities or dealer and ask for the correct method of disposal.
VQT3A36
Contents
Information for Your Safety ....................... 2
Before Use
Standard Accessories ............................... 9
Names and Functions of Components ... 11
About the Lens ....................................... 18
Preparation
Attaching/Detaching the Lens ................. 20
Attaching the Shoulder Strap .................. 22
Preparing the Battery .............................. 23
• Charging the Battery ........................ 23
• Inserting/Removing the Battery ........ 24
• Approximate operating time and
number of recordable pictures ......... 25
Preparing the Card (Optional) ................ 28
• Inserting/Removing the Card
(Optional) ......................................... 28
• About cards that can be used with
this unit ............................................. 29
• Approximate number of recordable
pictures and operating time .............. 30
Setting Date/Time (Clock Set) ................ 31
• Changing the clock setting ............... 31
Basic
Selecting the [REC] Mode ...................... 32
Taking a Still picture ............................... 34
• How to set focus when taking a still
picture (AFS/AFC) ............................ 34
• Taking Pictures with Your Favorite
Settings
(1_: Program AE Mode) ................... 35
• Taking pictures using the Touch
Shutter function ................................ 38
Playing Back Pictures ............................. 39
• Changing the information displayed
on the playback screen .................... 40
Recording Motion Picture ....................... 43
• How to set focus when recording a
motion picture (Continuous AF) ....... 43
• Recording Motion Picture ................. 44
Playing Back Motion Pictures ................. 46
Taking Pictures using the Automatic
Function (iI_: Intelligent Auto Mode) ....... 48
Deleting Pictures .................................... 52
Setting the Menu .................................... 54
• Setting menu items ........................... 55
Setting the Quick Menu .......................... 56
About the Setup Menu ............................ 58
Recording
Switching the Display of the LCD
Monitor/Viewfinder .................................. 63
• Switching the Information Displayed
on the recording screen ................... 63
Taking Pictures with the Zoom ............... 66
• Using the Optical Zoom/
Using the Extended Tele Conversion
(EX)/Using the Digital Zoom ............. 66
Taking Pictures using the Built-in
Flash ....................................................... 68
• Switching to the appropriate flash
setting ............................................... 68
• Adjust the flash output ...................... 73
Optical Image Stabilizer .......................... 73
Compensating the Exposure .................. 75
Taking Pictures using Burst Mode .......... 76
Taking Pictures using Auto Bracket ........ 78
Taking Pictures with the Self-timer ......... 80
Setting the Method used to Focus
(AF Mode) ............................................... 81
Taking Pictures with Manual Focus ........ 84
Fixing the Focus and the Exposure
(AF/AE Lock) .......................................... 86
Adjusting the White Balance ................... 87
Setting the Light Sensitivity .................... 90
Taking Pictures by Specifying
the Aperture/Shutter Speed .................... 92
• [[]] Aperture-priority AE ................... 92
• [_]] Shutter-priority AE ..................... 92
Taking Picture by Setting the Exposure
Manually ................................................. 93
6 VQT3A36
Confirm the Effects of Aperture and
Shutter Speed (Preview Mode) ............... 95
Taking Expressive Portraits and
Landscape Pictures
(Advanced Scene Mode) ........................ 96
• [_ [PORTRAIT] ............................... 96
• _ [SCENERY] ................................ 97
• _ [CLOSE-UP] ............................... 97
Taking Pictures that match the Scene
being recorded (_: Scene Mode) .......... 98
• _ [PERIPHERAL DEFOCUS] ........ 98
• _ [NIGHT PORTRAIT] ................... 99
• [] [NIGHT SCENERY] .................... 99
• _ [SUNSET] ................................... 99
• [] [PARTY] ................................... 100
• [] [SPORTS] ................................ 100
• [] [BABY1]/[] [BABY2] ............... 100
• [] [PET] ........................................ 101
Taking Pictures while Adjusting Color
([_j: My Color Mode) ............................. 102
Taking Pictures in Custom Mode .......... 104
Selecting the Mode and Recording
Motion Pictures
(_: Creative Motion Picture Mode) ...... 105
• _1 [MANUAL MOVIE MODE] ........ 105
• _ [24P CINEMA] .......................... 105
• _1 [VARIABLE MOVIE MODE] ..... 106
Recording still pictures while recording
motion pictures ...................................... 107
Taking a Picture with Face Recognition
Function ................................................ 108
Useful Functions at Travel
Destinations .......................................... 114
Entering Text ......................................... 116
Using the [REC] Mode Menu ................ 117
_IP [FILM MODE] ........................... 117
[] [ASPECT RATIO] ..................... 119
{-" [PICTURE SIZE] ...................... 119
--!-- [QUALITY] ................................ 120
,_:| [FACE RECOG.] ...................... 121
[METERING MODE] ................ 121
1(_))[STABILIZER] ........................... 121
[] [FLASH] .................................... 121
@,4 [RED-EYE REMOVAL] ............. 122
D [FLASH SYNCHRO] ................. 122
[] [FLASH ADJUST.] .................... 122
• I.R [I.RESOLUTION] ...................... 122
• i(_ [I.DYNAMIC] (Intelligent
dynamic range control) ............. 123
%lso[ISO LIMIT SET] ....................... 123
[] [LONG SHTR NR] .................... 123
[b'_ [EX. TELE CONV.] ................... 123
[DIGITAL ZOOM] ...................... 124
_j [BURST RATE] ......................... 124
_Jj [AUTO BRACKET] ................... 124
",-,_[ASPECT BRACKET] ............... 124
Q [SELF-TIMER] .......................... 124
[COLOR SPACE] ..................... 125
Using the [MOTION PICTURE]
Mode Menu ........................................... 126
E_tt [REC MODE] ............................ 126
_- [REC QUALITY] ....................... 126
4_M[EXPOSURE MODE] ................ 127
I_1 [PICTURE MODE] .................... 127
• IAF[CONTINUOUS AF] .................. 128
_/_ [WIND CUT] ............................. 128
L_ [MIC LEVEL DISP.] .................. 128
_'_ [MIC LEVEL ADJ.] .................... 128
"i,'- [REC HIGHLIGHT] ................... 128
Using the [CUSTOM] Menu .................. 129
Playback/Editing
Playing Back Burst Pictures .................. 136
Editing Burst Pictures ............................ 137
Creating Still Pictures from a Motion
Picture ................................................... 139
Using the [PLAYBACK] Mode Menu ..... 140
_ [2D/3D SETTINGS] .................. 140
_t [SLIDE SHOW] ......................... 140
oj [PLAYBACK MODE] ................. 142
_._ [TITLE EDIT] ............................ 143
[_ [TEXT STAMP] ......................... 144
Fi-] [VIDEO DIVIDE] ....................... 145
[RESIZE] Reducing the picture
size (number of pixels) ............. 146
• >_ [CROPPING] ............................ 147
• [] [ASPECT CONV.] ..................... 147
•I_'_[ROTATE]/
B_A[ROTATE DISP.] ....................... 148
• "it [FAVORITE] ............................. 149
• '_ [PRINT SET] ............................. 150
VQT3A36 7
• o.-. [PROTECT] .............................. 151
• ,_:_ [FACE REC EDIT] ................... 152
Connecting to other equipment
Enjoying 3D pictures ............................. 153
Playing Back Pictures on a TV
Screen .................................................. 156
Saving the Recorded Still Pictures and
Motion Pictures ..................................... 161
Connecting to a PC .............................. 163
Printing the Pictures ............................. 166
Others
Optional accessories ............................ 170
LCD Monitor Display/Viewfinder
Display .................................................. 173
Cautions for Use ................................... 176
Message Display .................................. 182
Troubleshooting .................................... 185
Specifications ....................................... 194
Digital Camera Accessory System ....... 198
Digital Camera Accessory Order Form
(For USA and Puerto Rico Customers).....200
Limited Warranty
(ONLY FOR U.S.A. AND PUERTO RICO)... 201
Index ..................................................... 204
Useful Information
(For Latin American Countries Only) .... 207
8 VQT3A36
Before Use
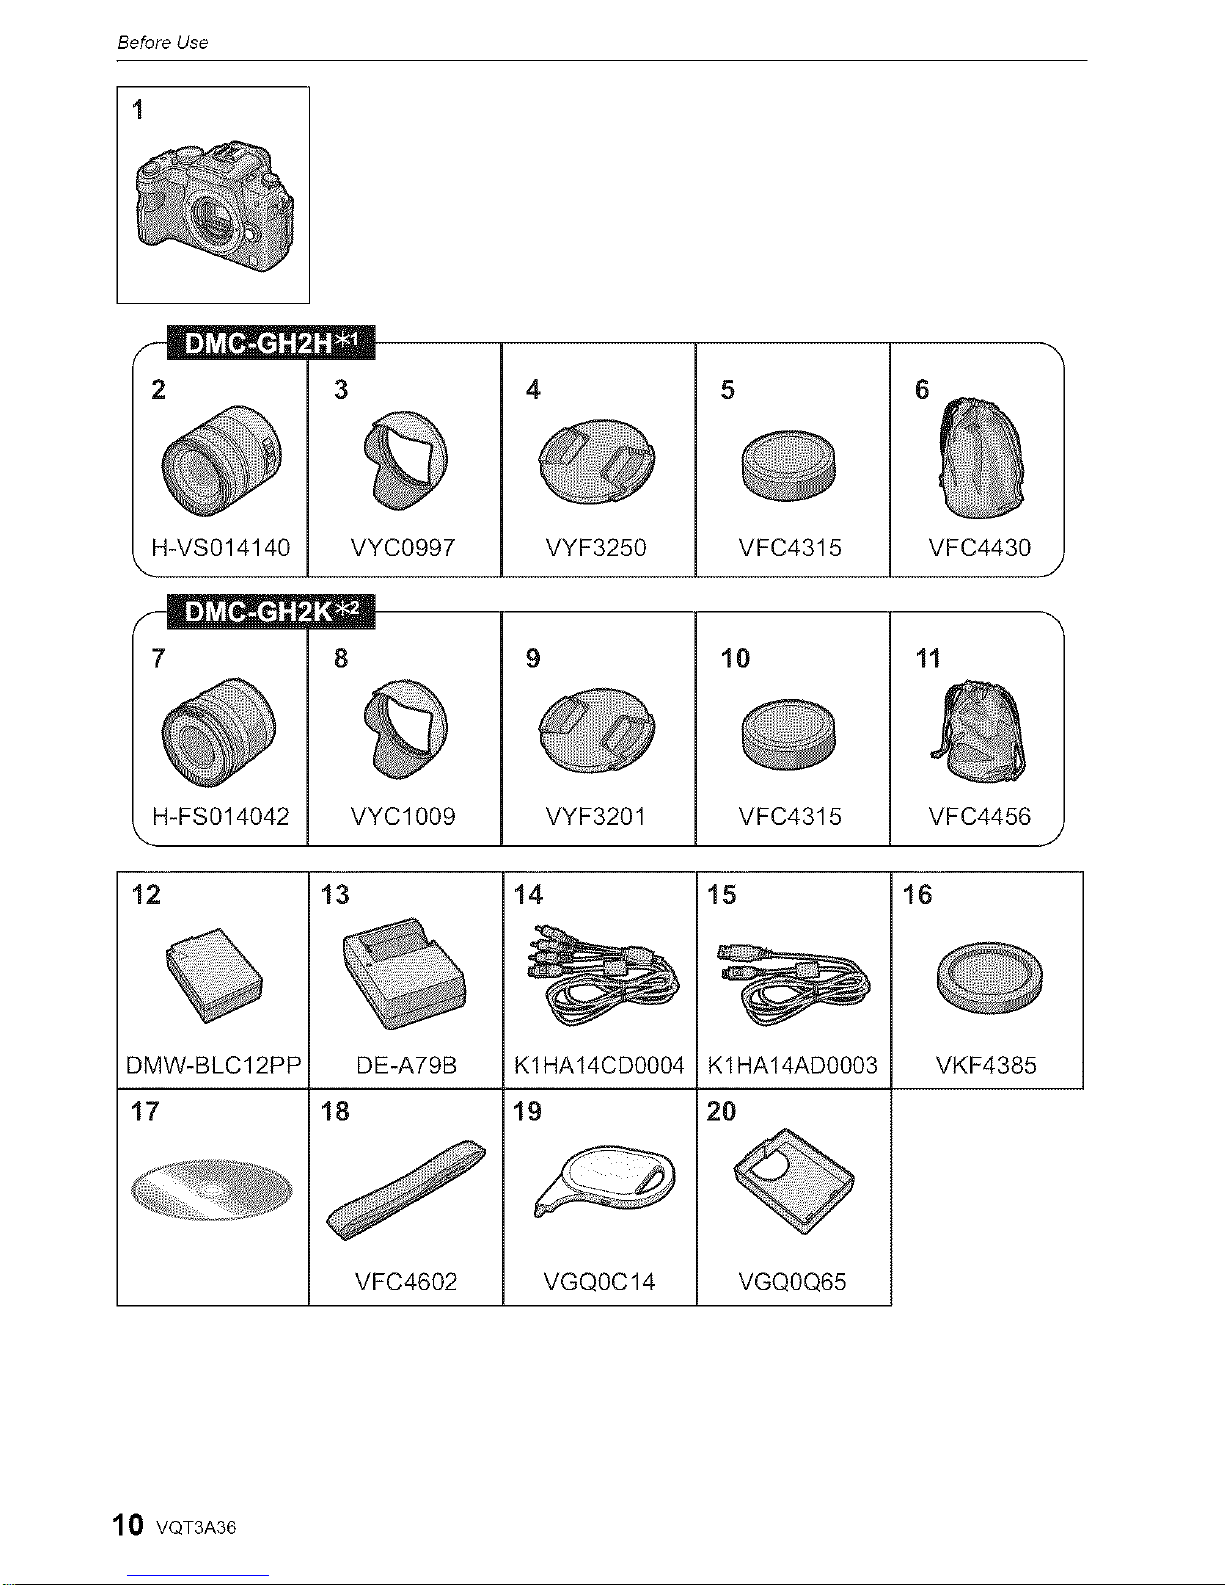
Check that all the accessories are supplied before using the camera.
Product numbers correct as of October 2010. These may be subject to change.
1 Digital Camera Body
(This is referred to as camera body in these operating instructions.)
2 Interchangeable Lens
"LUMIX G VARIO HD 14-140 mm/F4.0-5.8 ASPH./MEGA O.I.S."
(This is referred to as lens in these operating instructions.)
3 Lens Hood
4 Lens Cap
(This is attached to the interchangeable lens at the time of purchase.)
5 Lens Rear Cap
(This is attached to the interchangeable lens at the time of purchase.)
6 Lens Storage Bag
7 Interchangeable Lens
"LUMIX G VARIO 14-42 mm/F3.5-5.6 ASPH./MEGA O.I.S."
(This is referred to as lens in these operating instructions.)
8 Lens Hood
9 Lens Cap
(This is attached to the interchangeable lens at the time of purchase.)
10 Lens Rear Cap
(This is attached to the interchangeable lens at the time of purchase.)
11 Lens Storage Bag
12 Battery Pack
(Indicated as battery pack or battery in the text)
Charge the battery before use.
13 Battery Charger
(Indicated as battery charger or charger in the text)
14 AV Cable
15 USB Connection Cable
16 Body Cap
(This is attached to the camera body at the time of purchase.)
17 CD-ROM
• Software:
Use it to install the software to your PC.
18 Shoulder Strap
19 Stylus pen
20 Battery Case
41 Supplied in DMC-GH2H only
4<2Supplied in DMC-GH2K only
• SD Memory Card, SDHC Memory Card and SDXC Memory Card are indicated as card in the text.
"The card is optional.
• Description in these operating instructions is based on the 14-42 mm/F3.5-5.6 lens supplied
in DMC-GH2K.
• For information about optional accessories, refer to the "Digital Camera Accessory System".
(P198)
• If any accessories are lost, customers in the USA and Puerto Rico should contact Panasonic's
parts department at 1-800-833-9626 and customers in Canada should contact 1-800-99-LUMIX
(1-800-995-8649) for further information about obtaining replacement parts.
VQT3A36 9
Before Use
1
2
H-VS014140
H-FS014042
12
DMW-BLC12PP
17
3
VYC0997
8
VYC1009
VYF3250
VYF3201
VFC4315
10
VFC4315
13
18
DE-A79B
VFC4602
14
K1HA14CD0004
19
VGQOC14
15
K1HA14AD0003
20
VGQOQ65
11
VFC4430
16
VFC4456
VKF4385
1
1 0 VQT3A36
Before Use
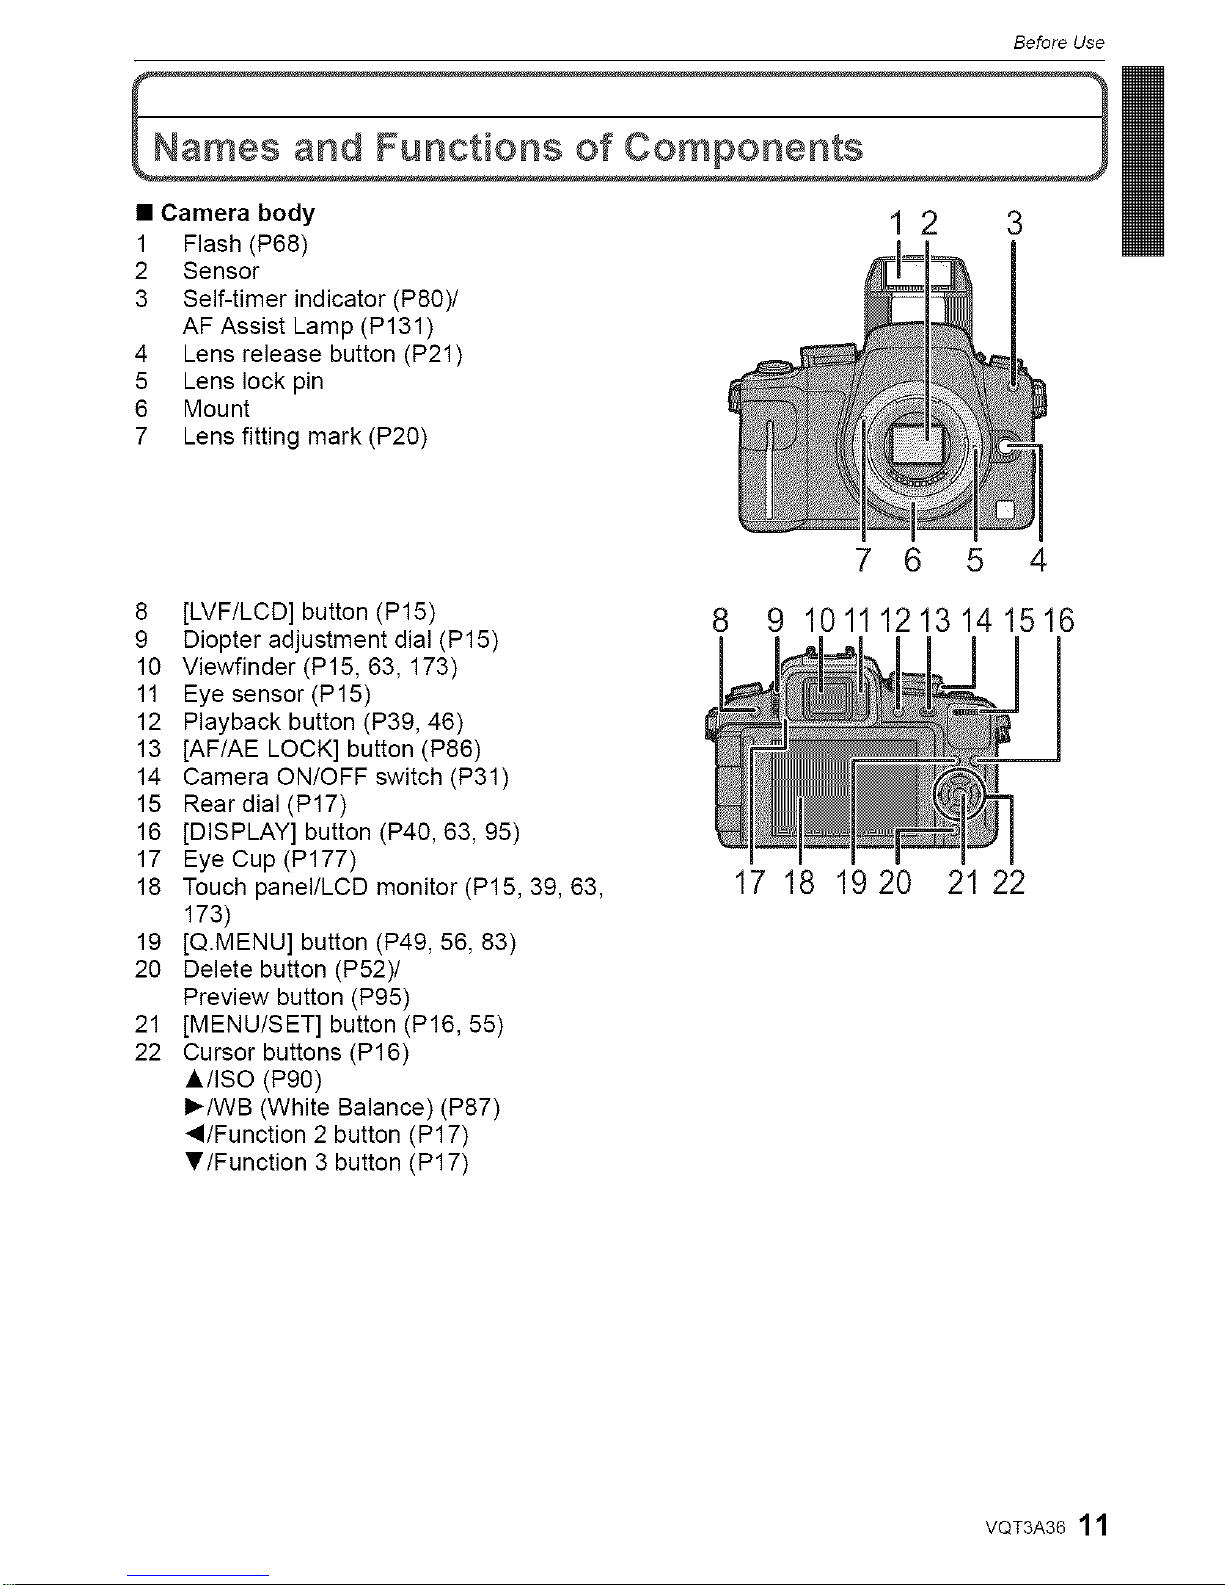
• Camera body 1 2 3
1 Flash (P68)
2 Sensor
3 Self-timer indicator (P80)/
AF Assist Lamp (P131)
4 Lens release button (P21)
5 Lens lock pin
6 Mount
7 Lens fitting mark (P20)
8 [LVF/LCD] button (P15)
9 Diopter adjustment dial (P15)
10 Viewfinder (P15, 63, 173)
11 Eye sensor (P15)
12 Playback button (P39, 46)
13 [AF/AE LOCK] button (P86)
14 Camera ON/OFF switch (P31)
15 Rear dial (P17)
16 [DISPLAY] button (P40, 63, 95)
17 Eye Cup (P177)
18 Touch panel/LCD monitor (P15, 39, 63,
173)
19 [Q.MENU] button (P49, 56, 83)
20 Delete button (P52)/
Preview button (P95)
21 [MENU/SET] button (P16, 55)
22 Cursor buttons (P16)
A/ISO (P90)
I_/WB (White Balance) (P87)
"_/Function 2 button (P17)
T/Function 3 button (P17)
7 6 5 4
10 11 12 13 14 15 16
17 18 19 20 21 22
VQT3A3611
Before Use
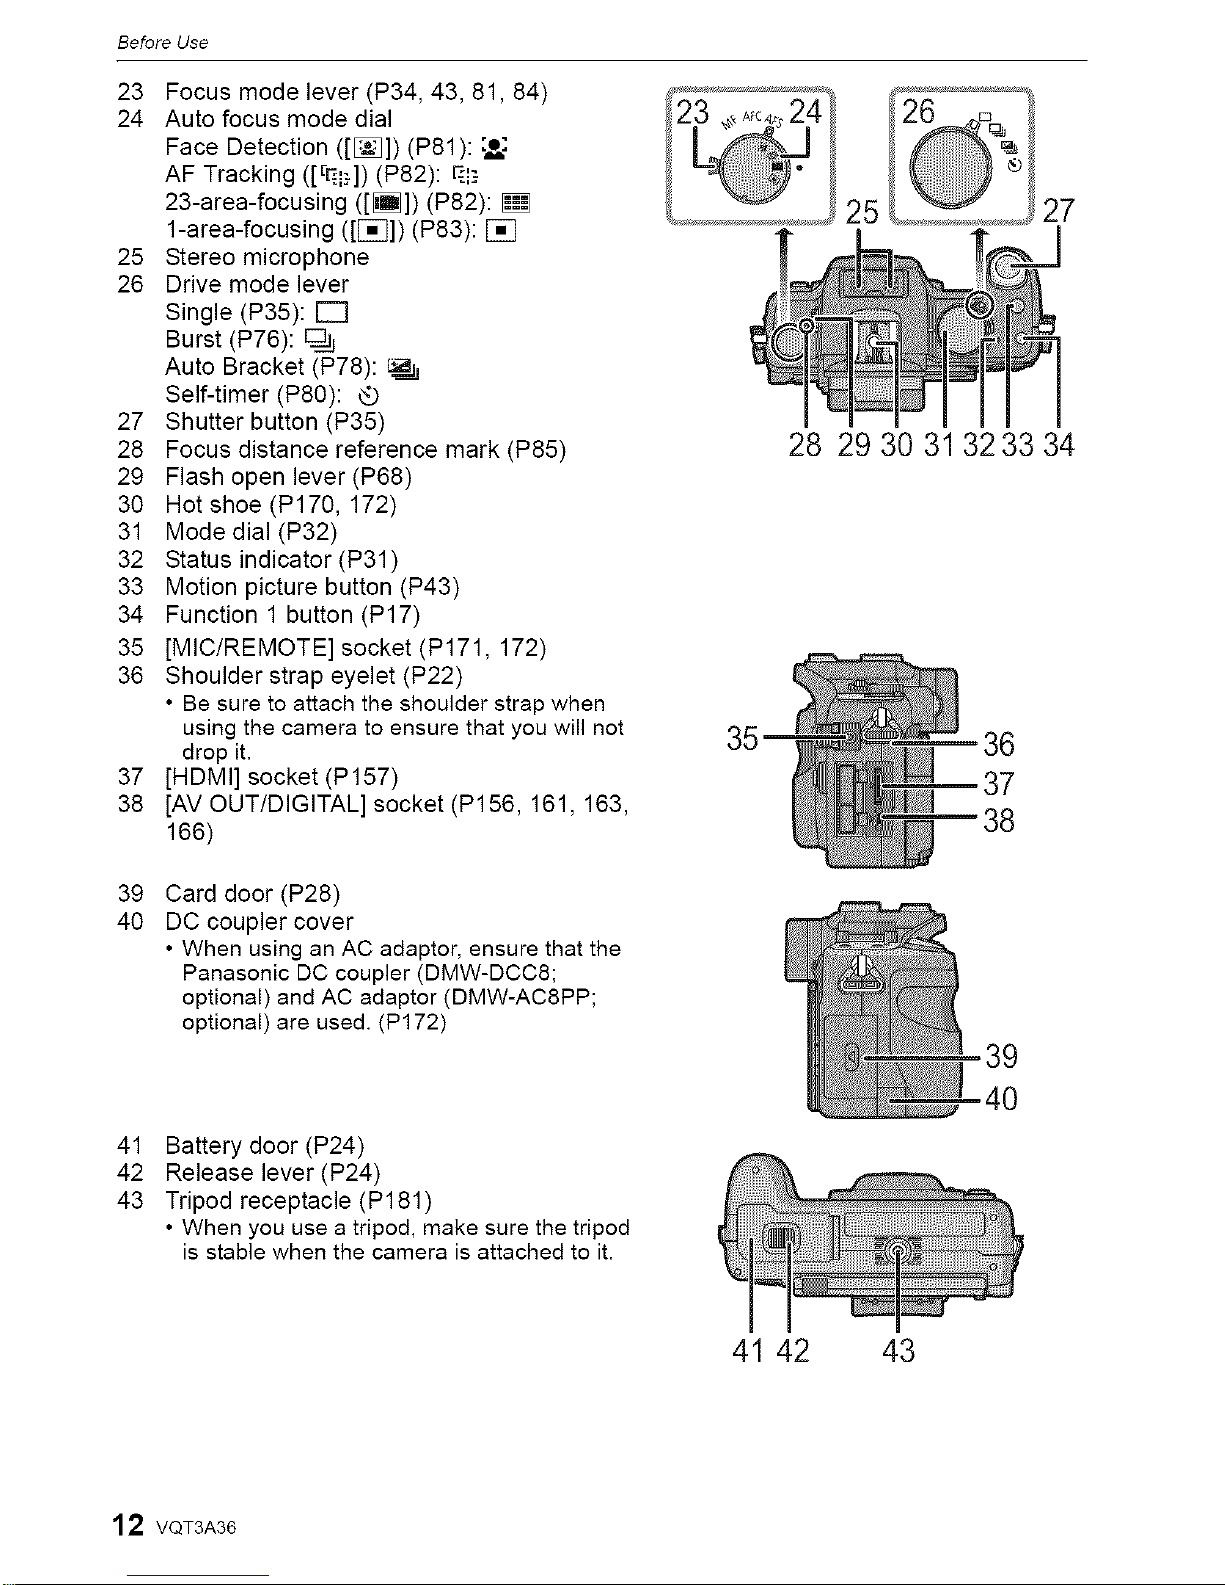
23 Focus mode lever (P34, 43, 81, 84)
24 Auto focus mode dial
Face Detection ([[]]) (P81): r_:
AF Tracking ([r_i}]) (P82): _i.'-
23-area-focusing ([[]]) (P82):
1-area-focusing (